


DVR 794HD
Wi-Fi Action Camcorder
User Manual
© 2009-2014 Sakar International, Inc. All rights reserved.
Windows and the Windows logo are registered trademarks of Microsoft Corporation. All other trademarks are the property of their respective companies.

CONTENTS |
|
Introduction .................................................................................................................................. |
2 |
What’s Included............................................................................................................................ |
3 |
Parts of the Camcorder ................................................................................................................ |
4 |
Initial Camcorder Setup................................................................................................................ |
5 |
Main Camcorder Modes ............................................................................................................... |
9 |
Camcorder Technical Specifications........................................................................................... |
10 |
Waterproof Case ......................................................................................................................... |
11 |
Powering On Your Camcorder.................................................................................................... |
12 |
LCD Display ............................................................................................................................... |
13 |
Changing Camcorder Mode ....................................................................................................... |
14 |
Video Capture Mode .................................................................................................................. |
16 |
Photo Capture Mode .................................................................................................................. |
17 |
Playback Mode........................................................................................................................... |
18 |
Remote Control .......................................................................................................................... |
22 |
Mobile Device Application .......................................................................................................... |
23 |
Computer System Requirements ............................................................................................... |
27 |
Installing the Software ................................................................................................................ |
28 |
Connecting the Camcorder to the Computer .............................................................................. |
29 |
Getting Videos from the Camcorder to the Computer ................................................................ |
30 |
Getting Started! .......................................................................................................................... |
31 |
Transferring Images Manually from the Camcorder to the Computer......................................... |
31 |
Camcorder Maintenance ............................................................................................................ |
33 |
Sakar Warranty Card.................................................................................................................. |
35 |
Technical Support....................................................................................................................... |
36 |
Troubleshooting.......................................................................................................................... |
36 |
1

Introduction
Thank you for purchasing the Vivitar DVR 794HD Full HS Wi-Fi Action Camcorder. Everything you need to take high definition digital videos and photos is included with your camcorder.
This unique, ultraportable camera design is adapted specifically for this camera and can be used to capture special moments in many different environments.
Vivitar makes capturing those special moments as easy as possible.
Please read this manual carefully first in order to get the most out of your digital camcorder.
NOTE:
Your digital action camcorder supports a Class 4 or higher Micro SD card with a capacity expansion up to 32GB.
In order to use your digital action camcorder normally, please insert the Micro SD Memory card before use. Please format the Micro SD Memory Card before first use.
Micro SD Memory cards are not included and need to be purchased separately.
This camcorder is a plug and play device. You can download the pictures and videos without the software by directly accessing the memory card from your computer. We would however recommend that you install the Vivitar Experience Image Manager software to enjoy the full Vivitar experience.
2

What’s Included
1. |
Wi-Fi Action Camcorder |
6. |
Remote Control |
2. |
USB Cable |
7. |
Bicycle Mount |
3. |
AC Adapter |
8. |
Helmet Mount & Strap |
4. |
Vivitar Experience Installation CD |
9. |
Lithium Battery |
5. |
Waterproof Casing |
|
|
NOTE: Micro SD Card not included.
3
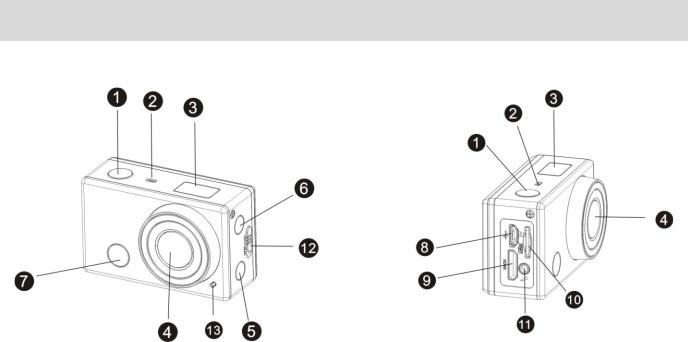
Parts of the Camcorder
1. |
Shutter Button |
8. |
Micro USB Port |
2. |
Microphone |
9. |
Mini HDMI Port |
3. |
LCD Display |
10. |
Micro SD Card Slot |
4. |
Lens |
11. |
AV Out |
5. |
Wi-Fi Button and Status Indicator (Red) |
12. |
Battery Cover Release lever |
6. |
Power / Mode Button |
13. |
LED Indicator Light |
7. |
Infrared Signal Reception Light |
|
|
4
Initial Camcorder Setup
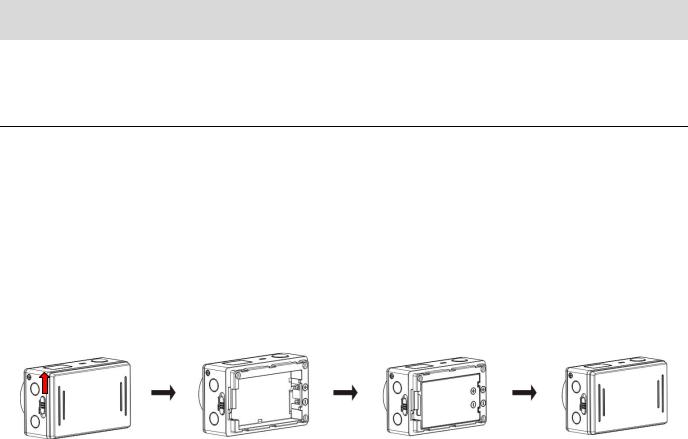
INSTALLING AND CHARGING THE BATTERY
To insert the lithium battery:
1.If the camera is inside the waterproof casing, please take it out of the casing.
2.Push the battery cover lever up, to the unlock/open position, and remove the battery cover. See Figure 1 and 2.
3.Insert the battery into the battery compartment as shown. Make sure to place the battery according to the correct polarity as shown inside the battery compartment. See Figure 3.
4.Close the battery cover. See Figure 4.
Figure 1 |
Figure 2 |
Figure 3 |
Figure 4 |
To charge the lithium battery:
1.Power off the camcorder.
2.Connect the included USB cable to the camcorder and connect the other end of the cable to a power source such as a computer or included AC Adapter.
3.During the time the camcorder is charging, the LED status indicator light (blue) is on. When the battery is fully charged the LED status indicator light turns off.
NOTE:
While the device is charging it cannot be used to capture images.
When the camcorder is on, connecting it to a computer will not charge the device. Make sure the camcorder is powered off when recharging.
5
Battery Indicator:
Battery Indicator Description
The battery level is full.
The battery level is half.
When this icon flashes, this indicates that the battery level is low and the camcorder will then automatically turn off. Please recharge your camcorder.
NOTE: When the battery capacity drops to a low level, the battery icon will flash on the display, indicating that the camcorder requires to be recharged. Please charge the battery. When the battery icon flickers, the camcorder will shut down automatically.
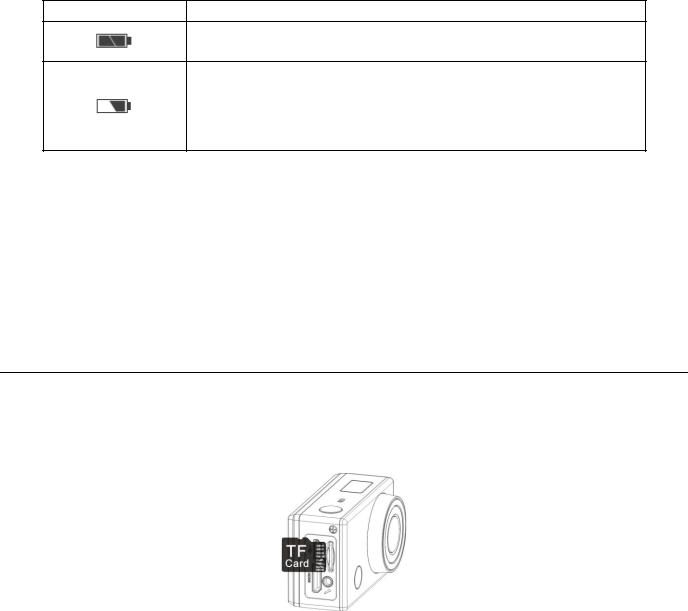
INSTALLING THE MICRO SD MEMORY CARD
Make sure a High Speed Class 4 or higher Micro SD Memory card has been properly inserted into your camcorder. A Micro SD Card must be inserted before use.
Micro SD Memory card not included.
Installing the Memory Card:
To properly insert the Micro SD Card, follow the instructions below:
1.Power off the camcorder.
2.Insert the Micro SD Card into the Micro SD Card slot in the direction as shown above.
3.Gently press the Micro SD Card until you hear a slight clicking sound. This indicates the memory card has been inserted correctly.
4.The display screen will show an SD card icon  , indicating that the SD card has been successfully installed.
5.To remove the card, gently press on the edge of the card to release it and pull the card out.
6
IMPORTANT:
Please power the camcorder off before plugging in or taking out the memory card.
If the card is inserted or removed while the camcorder's power is on, it may damage the card and/or any recorded data. Always confirm that the power is off before inserting the card into the camcorder.
Make sure there is room on the Micro SD Memory Card for additional images. If the Micro SD Memory Card is full, additional images will not be added to the memory card.
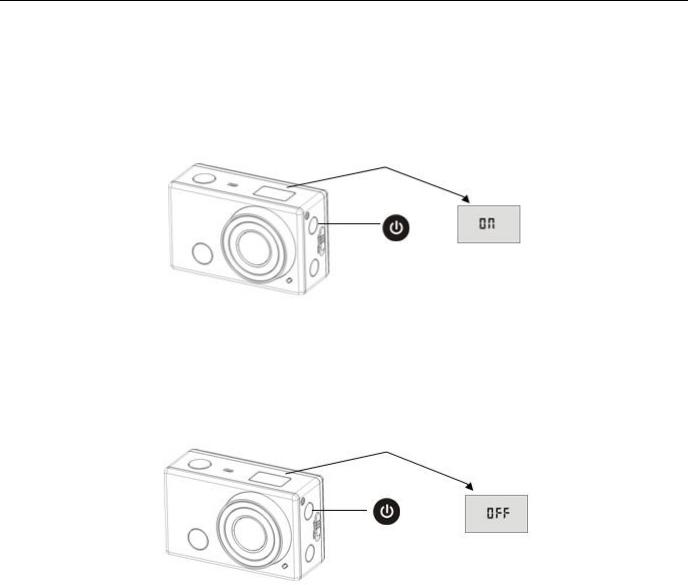
POWERING ON – OFF / ENERGY SAVE
To power on the camcorder:
1.Press and hold the  Power button for about 3 seconds.
2.The LCD displays “ON” and a beep can be heard from the camcorder’s buzzer.
To power off the camcorder:
1.Press and hold the  Power button for about 3 seconds.
2.The LCD displays “OFF” and a beep can be heard from the camcorder’s buzzer.
7
Energy Save:
In order to save the camcorder’s battery power, the camcorder automatically powers off after
sitting idle for 5 minutes.
USING THE CAMCORDER
8
Main Camcorder Modes
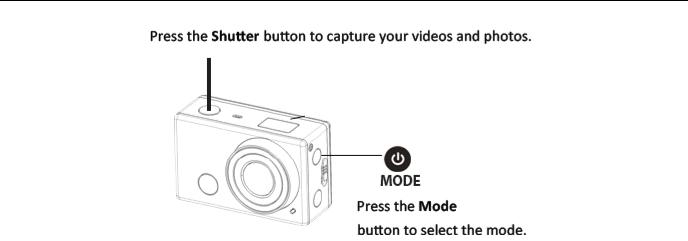
Press the  Power/Mode button to toggle between the Video and Photo Capture Modes.
Video Capture Mode
Use this mode to capture videos with your digital camcorder.
To record a video, please check that the DV is in Video mode. If the  video icon is not displayed on the LCD screen, press the Power/Mode button repeatedly until it appears. To start recording, press the Shutter button. Press the Shutter button again to stop recording.
The video is automatically saved to your camcorder’s memory card.
To select the video resolution press the Mode button. ‘HI’ indicates FHD 1080p@30fps,
‘LO’ indicates 720P (1280x720,30 fps) and ‘HILO’ indicates 720P (1280x720,60 fps).
Photo Capture Mode
Use this mode to capture pictures with your camcorder.
To take a photo, please check that the DV is in Photo mode. If the  photo icon is not displayed on the LCD screen, press the Power/Mode button repeatedly until it appears. Press the Shutter button to capture your photo. The picture is automatically saved to your camcorder’s memory card. To select the photo resolution, press the Mode button. ‘LO’ indicates 5M (2592 x 1944) resolution and ‘HI’ indicates 8M (3264 x 2448) resolution.
Playback (Photos & Videos)
Use this mode to view and manage the photos and videos on your camcorder. Your captured images can be viewed either on the computer or on your television.
Playback Mode on the Computer: After turning on your camcorder, connect it to your computer via the supplied USB cable to view the images on your computer.
Playback Mode on the HDTV: After turning on your camcorder and connecting it to an HDTV via an HDMI cable (purchased separately), it enters Playback Mode.
Mobile Device: After downloading the SYMAGIX app to your mobile device and connecting it via Wi-Fi to your camera, tap the Playback icon to view your photos.
9
Camcorder Technical Specifications
Image Sensor |
CMOS Sensor |
|
|
|
|
Video Resolution |
HI FHD (1920x1080,30 fps), LO 720P (1280x720,30 fps), |
|
|
||
|
HILO 720P (1280x720,60 fps) |
|
|
|
|
Photo Resolution |
HI 8MP (23264x2448 pixels), LO 5MP (2592x1944) |
|
|
|
|
File Format |
AVI (Video), JPEG (Photo) |
|
|
|
|
External Memory |
Class 4 Micro SD Memory card or higher, up to 32GB |
|
|
|
|
LCD Display |
Monochrome LCD Display |
|
|
|
|
Lens |
Fixed Focus F3.1 f=2.9mm |
|
|
|
|
|
Auto, Daylight, Cloudy, Florescent, Incandescent (only via |
|
White Balance (via App) |
|
|
|
the App on your mobile device) |
|
|
|
|
Frequency (via App) |
50Hz, 60Hz |
|
|
|
|
Continuous Shot (via App) |
Yes; 3 continuous photos (only via the App on your mobile |
|
device) |
||
|
||
|
Off, 2 seconds, 10 seconds (only via the App on your |
|
Self Timer (via App) |
|
|
|
mobile device) |
|
|
|
|
Auto Power Off |
5 minutes |
|
|
|
|
Language |
English |
|
|
|
|
Interface |
USB 2.0 |
|
|
|
|
System Requirements for |
WINDOWS XP (SP3), Vista (SP1), WINDOWS 7 or higher; |
|
Vivitar Experience |
MAC OSX v10.5.x and above |
|
|
|
|
Battery |
Removable 3.7V rechargeable Li-ion battery |
|
|
|
10
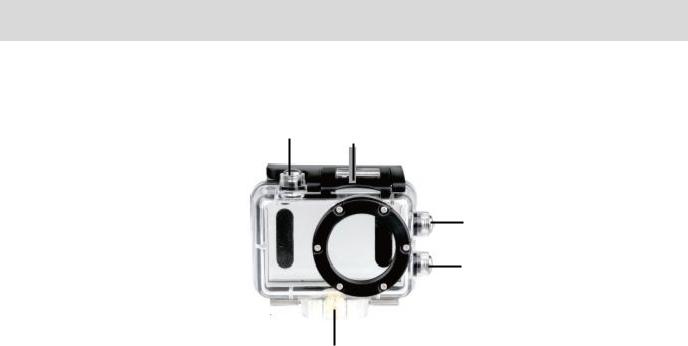
Waterproof Case
1 4
2
3
1. Shutter Release |
5 |
|
2.Power/Mode Button
3.Wi-Fi Button
4.Clamp (Securing Latch)
5.Tripod socket
Your action cam comes with a waterproof casing for underwater action and added durability. To assemble your camera to the case, follow the instructions below:
1.To open the case: Insert a finger at the half circle of the latch by prying the latch up - away from the case.
2.Insert the camera lens forward into the case.
3.Before sealing the waterproof case, make sure the camera housing’s rubber seal clean.
Close the door and secure the latch.
4.While the camcorder is in the waterproof casing, press the POWER/MODE button to select either Video or Photo Capture Mode. Press the Shutter button for recording your videos and capturing your photos.
11
 Loading...