


DVR 910HD
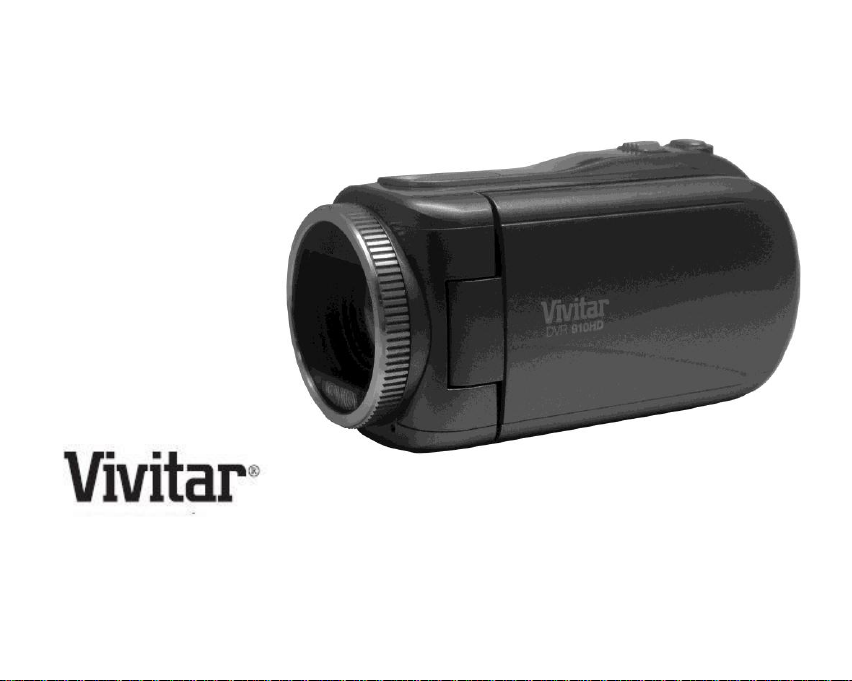
DVR 910HD Digital Video Camera
User Manual
© 2010 Sakar International, Inc. All rights reserved.
Windows and the Windows logo are registered trademarks of Microsoft Corporation.
All other trademarks are the property of their respective companies.

1
Contents
Introduction ..................................................................................................................................................... 2
What Your Camera Includes ............................................................................................................................ 2
Camera Technical Specifications ..................................................................................................................... 3
Computer System Requirements – Windows ................................................................................................... 4
Computer System Requirements – Macintosh ................................................................................................. 4
A Quick Look at your Digital Camera ............................................................................................................... 5
Initial Camera Setup ........................................................................................................................................ 6
Using Your Digital Camera .............................................................................................................................. 8
Changing Camera Mode ................................................................................................................................. 9
Navigating the Menus .................................................................................................................................... 10
Video Capture Mode ..................................................................................................................................... 11
Video Playback Mode .................................................................................................................................... 27
Photo Capture Mode ..................................................................................................................................... 33
Photo Playback Mode ................................................................................................................................... 54
TV Out Function to Connect the Camera to a TV ........................................................................................... 63
Installing the Software ................................................................................................................................... 64
Connecting the Camera to the Computer ...................................................................................................... 67
Getting Photos and Videos from Your Camera to Your Computer .................................................................. 67
Get started! ................................................................................................................................................... 68
Transfer media from my camera to my computer manually (Using Windows) ................................................ 69
Transfer media from my camera to my computer manually (Using Macintosh) .............................................. 70
Camera Maintenance .................................................................................................................................... 70
Sakar Warranty Card ..................................................................................................................................... 71
Technical Support .......................................................................................................................................... 72
Troubleshooting............................................................................................................................................. 73

2
Introduction
Thank you for purchasing this camera. Everything you need to take quality digital photos and videos is
included with your camera.
Vivitar makes capturing those special moments as easy as possible.
Note: Your camera needs an SD Memory card (up to 32GB) for normal use.
SD Memory cards are not included and need to be purchased separately.
Please read this manual carefully first in order to get the most out of your digital camera.
What Your Camera Includes
Digital Camera
Vivitar Experience Image Manager software Installation CD
USB cable
Easy Guide
Strap
Warranty Certificate

3
Camera Technical Specifications
Image Sensor
CMOS Sensor
Image Resolution
(3264x2448 (8M) / 3648x2048(7M-HD) / 2592x1944(5M) /
2048x1536(3M) / 1920x1080(2M-HD) / 640x480(VGA)
Video Resolution
1280X720 (HD), VGA 640X480, QVGA 320X240
File Format
JPEG/AVI
External Memory
SD Card (up to 32GB)
LCD Display
2.7 Inch TFT
Lens
f=7.45
Zoom
4X Digital Zoom
Exposure
-3.0EV ~ +3.0EV
White Balance
Auto, Daylight, Cloudy, Incandescent , Fluorescent
ISO
Auto / 100 / 200 / 400
Scene
Auto / Scenery / Portrait / Night Scenery / Night Portrait / High
Sensitivity / Sport / Beach / Party
Language
English / French / Spanish / Portuguese / German / Dutch / Italian /
Russian / Turkish
Flash
2 LED Flash lamps
Self-Timer
2 / 5 or 10 second delay
Anti-Shake
Yes
Print Photos
Yes
Face Detect
Yes
Smile Capture
Yes
Interface
USB 2.0
System Requirements
Windows XP and above / Mac OSX 10.5 and above
Battery
4 * AAA (1.5V) batteries
Working Temperature
0~40 ℃

4
Computer System Requirements – Windows
To be able to download photos and videos to your PC, you will need the following minimum configuration:
Pentium 4 processor or above with Windows XP service pack 2, Windows Vista or Windows 7
512 MB RAM, with 100MB of free disk space
1024 x 768 Recommended screen resolution
16-bit color or higher display adaptor
CD-ROM Drive
QuickTime 6 or higher
Microsoft Internet Explorer 7 or higher
Windows Media Player 10 or higher
Internet connection required
Computer System Requirements – Macintosh
Macintosh with Intel processor running Mac OS X v10.5 or later
256 MB RAM, 100 MB free disk space
Display: 1024 x 768 or higher-resolution monitor
QuickTime 6 or higher
Internet connection required
5
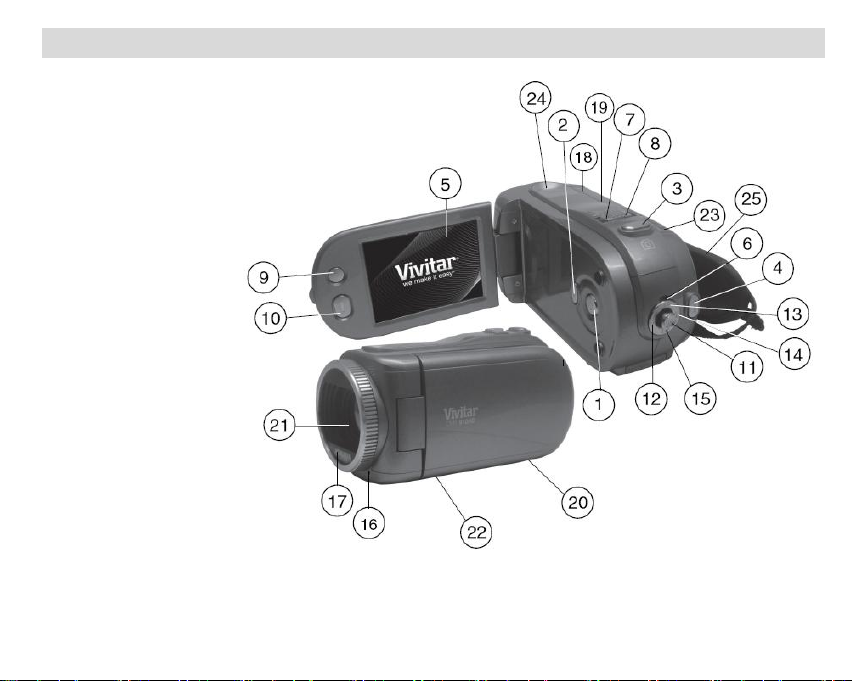
A Quick Look at your Digital Camera
1. Power button
2. ViviLink button
3. Photo Shutter Button
4. Video Shutter Button
5. LCD Screen
6. LED
7. W / Zoom Out / Vol -
8. T / Zoom In / Vol +
9. MODE Button
10. MENU Button
11. OK Button
12. Self-Timer / Left Button
13. EV+ / Up / Slideshow
14. Delete / Right Button
15. EV- / Down Button
16. Microphone
17. LED Flash Light
18. USB Slot
19. TV- Out Slot
20. Tripod Socket
21. Digital Lens
22. Battery Compartment
23. SD Memory Card slot
24. Speaker
25. Strap
6
Initial Camera Setup
Flip open the LCD screen. When powering the camera ON for the first time the camera will take you through
the initial camera setup.
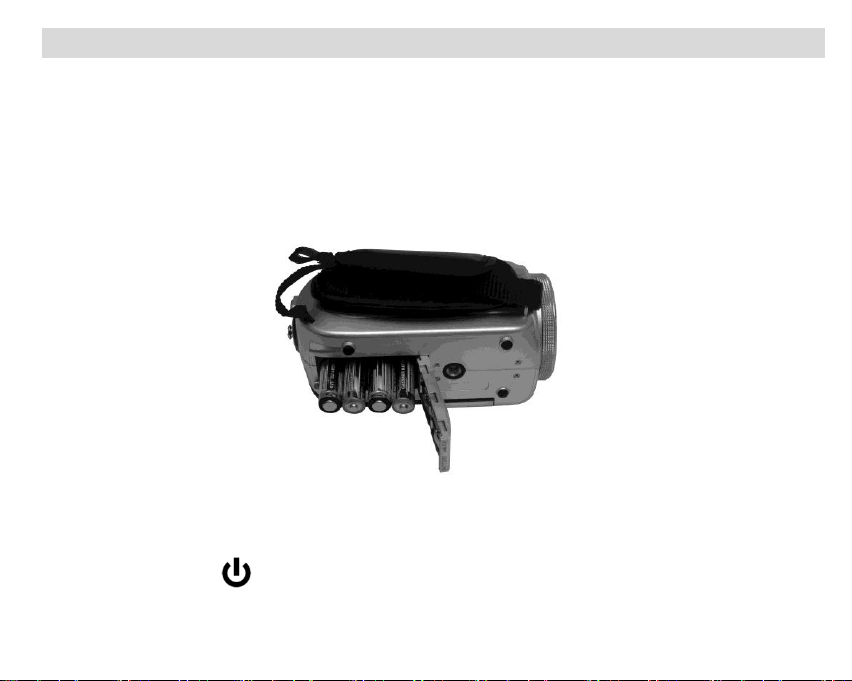
Powering the Camera ON
1) Make sure the batteries have been inserted properly into your digital camera.
2) Make sure an SD card has been inserted into your camera.
3) Press the POWER button to turn on the camera.
7
Setting the Camera Language
1) You will first be prompted to select a language for the camera. The Language selection menu will appear.
Select the language of your choice and press the SET button to confirm the selection.
2) After selecting a language, you will be asked if you would like to continue with the initial camera setup. A
message will appear: “Continue with Camera Setup?” Select “Yes” to continue or “No” to exit the setup.
Note: If you select “No” and decide to leave the camera setup, the camera will be set to its default settings.
These settings can be adjusted at any time manually through the menus in the camera.
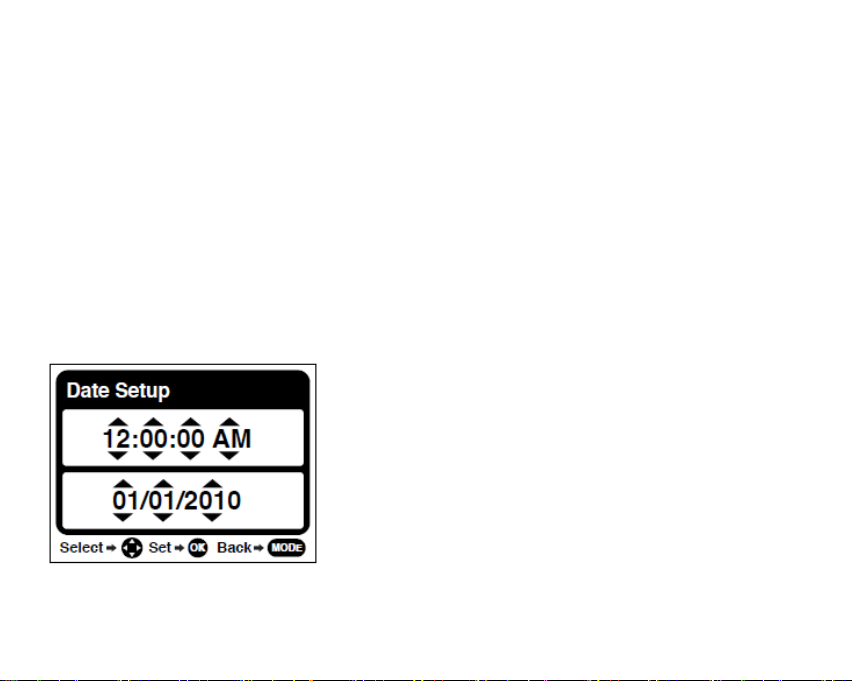
Setting the Date and Time
The next step in the initial camera setup is to set the date and time on the camera.
Set the Date and Time as Desired and press the SET button to confirm the selection and move to the next part
of the camera setup.

8
Setting the ViviLink Default Option
Once the Date and Time have been set, you will be asked to set the default ViviLink destination for photos and
videos taken with your camera.
The ViviLink technology allows you to quickly and easily upload your camera‟s photos and videos to the social
networks of your choice with the accompanying software application.
1) First you will be asked to choose the default ViviLink social network for Photos. Highlight the desired
default social network and press the SET button to confirm the selection.
2) Next you will be asked to choose the default ViviLink social network for Videos. Highlight the desired
default social network and press the SET button to confirm the selection.
3) After the ViviLink Video option is confirmed the camera is now ready to use.
Using Your Digital Camera
Make sure the batteries have been inserted properly into your digital camera.
Powering the camera ON
Press the Power button to turn your camera ON. The camera will be in Video Capture mode to start.
Powering the camera OFF

9
While the camera is on, you can press the Power button again at any point to turn your camera OFF.
You will see a “Goodbye” splash screen and then the camera will power off completely.
Note: your digital camera also has an Auto Power Off feature that will automatically turn off your camera after
a specific period of time that your camera is left idle. The Auto Power Off settings can be set from the Auto
Power Off settings menu.
Changing Camera Mode
Your camera has three main modes:
1) Video Capture Mode - Use this mode to capture videos with your camera.
2) Photo Capture Mode - Use this mode to capture photos with your camera.
3) Playback Mode (for photos and videos) - Use this mode to view the photos and videos you have
already taken with your camera.
When the camera is first powered ON, the Video Capture Mode will be active. The icons that appear on the
LCD screen are the best default settings so that you can begin to capture and enjoy clear quality photos.
To change the active camera mode, make sure the camera is powered ON and press the MODE button on top
left of the LCD Panel.

10
When in Video Capture Mode, this icon will display on the top-left corner of the LCD display
When in Photo Capture Mode, this icon will display on the top-left corner of the LCD display
When in Playback Mode, this icon will display on the top-left corner of the LCD display
Navigating the Menus
Each camera mode has a set of menus specific to that mode. Press the MENU button to open the menus for
the current mode.
1) Press the LEFT or RIGHT direction control buttons to scroll between the various menus for the current
mode.
2) Press the UP or DOWN direction control buttons to highlight the desired menu selection.
3) Press the OK button to confirm and select the highlighted menu option.

11
4) If the selection can be remembered by the camera, a selection icon will appear to the right of the
selected menu option. Changes made to these options will remain as is until you decide to change them
again at a later time.
5) Some menu options are single-use functions that are not remembered by the camera and do not display
this icon when selected.
6) At any time you can press the MODE button to exit the menus and return to the previous screen.
Video Capture Mode
The Video Capture Mode allows you to capture videos with your digital camera. When the camera is first
powered ON, the camera will be in Video Capture Mode.
Taking a Video
1) While in Video Capture Mode use the LCD display to direct the camera at the scene you would like to
capture.
2) Click the T/Zoom In and W/Zoom Out buttons to better set the camera display if desired.
Note: The actual shape of these buttons may vary per camera model.
3) Press the Video Shutter button on the right of the direction joystick to start the video capture.
12
4) You will see a red light at the top of the LCD indicating that the record is in progress.
5) To stop the video record, press the shutter button again.
6) The picture will automatically be saved to the camera‟s memory or SD card.
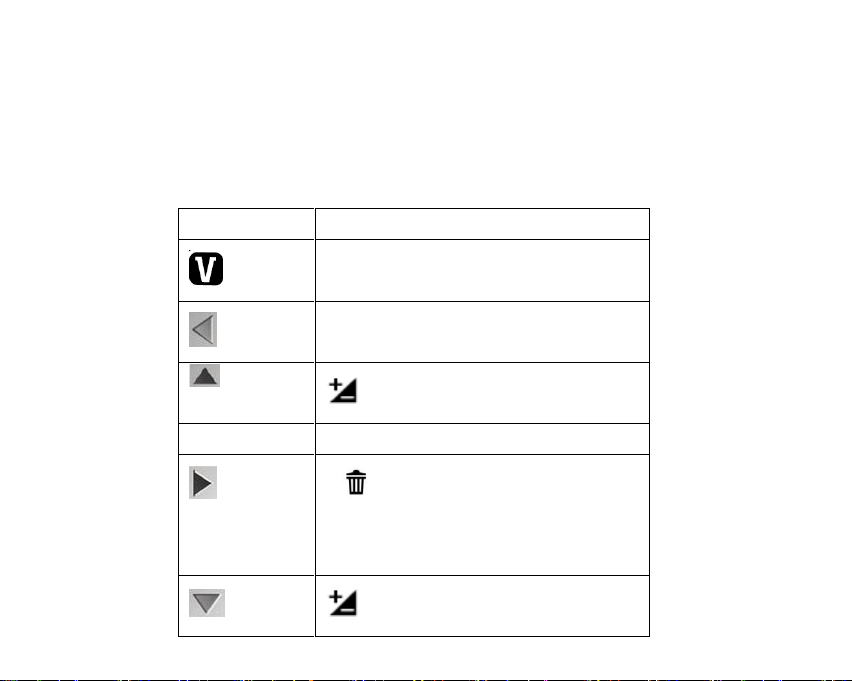
Video Capture Mode Quick Function Buttons
Your digital camera has a four-directional joystick that functions as Quick Function buttons.
Button
Icon appearing next to direction
ViviLink
Open the ViviLink menu
Left
No Function in Video Mode
Up
Opens the Light Exposure + menu
OK
Turns the LED Flash On / Off
Right
Open the Video Playback Delete
menu with the Delete Last Video option
highlighted
Down
Opens the Light Exposure - menu
13
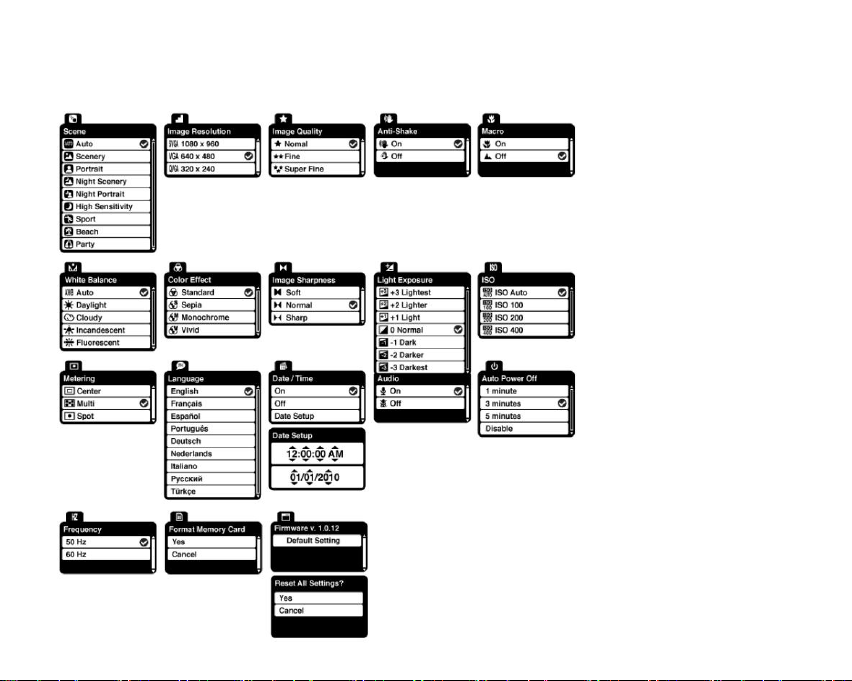
Video Capture Mode Menus
The following are the menus that appear in your camera‟s Video Capture Mode:

14
Scene Menu
The Scene Menu allows you to choose scene settings that allow your camera to adapt properly to your current
environment.
1) Press the UP or DOWN direction control buttons to scroll through the menu options.
2) Press the OK button to select the desired option.
3) A selected option icon will appear on the selected item
4) Press the MODE button to exit the menu and return to your previous mode.
5) An icon reflecting your selection will display on the LCD screen.
6) Remember that this setting will be remembered by your camera until you manually change the setting or
restore the camera‟s default factory settings.
Image Resolution Menu
The Image Resolution menu allows you to choose the desired size of the images taken by your camera. Keep
in mind that images with a higher resolution will also take up more of your camera‟s memory.
1) Press the UP or DOWN direction control buttons to scroll through the menu options.

15
2) Press the OK button to select the desired option.
3) A selected option icon will appear on the selected item
4) Press the MODE button to exit the menu and return to your previous mode.
5) An icon reflecting your selection will display on the LCD screen.
6) Remember that this setting will be remembered by your camera until you manually change the setting or
restore the camera‟s default factory settings.
Image Quality Menu
The Image Quality menu allows you to select the desired quality level of the images taken by your camera.
Keep in mind that images with a higher image quality level will also take up more memory on your camera.
1) Press the UP or DOWN direction control buttons to scroll through the menu options.
2) Press the OK button to select the desired option.
3) A selected option icon will appear on the selected item
4) Press the MODE button to exit the menu and return to your previous mode.
5) An icon reflecting your selection will display on the LCD screen.
6) Remember that this setting will be remembered by your camera until you manually change the setting or
restore the camera‟s default factory settings.

16
Anti-Shake Menu
The Anti-Shake feature reduces image corruption that can be caused by movement of the camera while
capturing the image.
1) Press the UP or DOWN direction control buttons to scroll through the menu options.
2) Press the OK button to select the desired option.
3) A selected option icon will appear on the selected item
4) Press the MODE button to exit the menu and return to your previous mode.
5) An icon reflecting your selection will display on the LCD screen.
6) Remember that this setting will be remembered by your camera until you manually change the setting or
restore the camera‟s default factory settings.
White Balance Menu
The White Balance feature allows your camera to adjust the coloring of the captured images depending on the
type of light source in the current environment.
Properly adjusting the White Balance setting to match your current environment will allow the camera to
properly balance the colors in the images that are taken with your camera.

17
1) Press the UP or DOWN direction control buttons to scroll through the menu options.
2) Press the OK button to select the desired option.
3) A selected option icon will appear on the selected item
4) Press the MODE button to exit the menu and return to your previous mode.
5) An icon reflecting your selection will display on the LCD screen
6) Remember that this setting will be remembered by your camera until you manually change the setting or
restore the camera‟s default factory settings.
Color Effect Menu
You can choose to add a color effect to the images taken with your camera.
1) Press the UP or DOWN direction control buttons to scroll through the menu options.
2) Press the OK button to select the desired option.
3) A selected option icon will appear on the selected item
4) Press the MODE button to exit the menu and return to your previous mode.
5) An icon reflecting your selection will display on the LCD screen

18
6) Remember that this setting will be remembered by your camera until you manually change the setting or
restore the camera‟s default factory settings.
Image Sharpness Menu
You can set the level of sharpness in the images taken with your camera. The sharpness level dictates if the
edges of objects in the image are more or less distinct.
1) Press the UP or DOWN direction control buttons to scroll through the menu options.
2) Press the OK button to select the desired option.
3) A selected option icon will appear on the selected item
4) Press the MODE button to exit the menu and return to your previous mode.
5) An icon reflecting your selection will display on the LCD screen
6) Remember that this setting will be remembered by your camera until you manually change the setting or
restore the camera‟s default factory settings.
Light Exposure Menu
The Light Exposure setting helps you control the amount of light that enters your camera‟s lens. This setting
should be adjusted when the environment is lighter or darker than normal.

19
When the environment has more light than is needed, reduce the exposure setting (by using the negative -
count) to reduce the amount of light allowed into the lens by your camera.
If the environment has less light (darker) than is needed, increase the exposure setting (by using the positive +
count) to increase the amount of light allowed into the lens by your camera
.
1) Press the UP or DOWN direction control buttons to scroll through the menu options.
2) Press the OK button to select the desired option.
3) A selected option icon will appear on the selected item
4) Press the MODE button to exit the menu and return to your previous mode.
5) An icon reflecting your selection will display on the LCD screen
6) Remember that this setting will be remembered by your camera until you manually change the setting or
restore the camera‟s default factory settings.
ISO Menu
The ISO menu allows you to set the level of sensitivity that your camera has to light in the surrounding
environment. When the ISO level is increased, the image sensor in your camera will be more sensitive to light

20
and allow you to capture images in lower-light situations. The higher sensitivity to light however, may reduce
the quality of the images that are taken.
When the ISO is reduced, the image sensor in your camera will be less sensitive to light and will optimize the
image quality in environments with bright lighting.
1) Press the UP or DOWN direction control buttons to scroll through the menu options.
2) Press the OK button to select the desired option.
3) A selected option icon will appear on the selected item
4) Press the MODE button to exit the menu and return to your previous mode.
5) An icon reflecting your selection will display on the LCD screen
6) Remember that this setting will be remembered by your camera until you manually change the setting or
restore the camera‟s default factory settings.
Metering Menu
The Metering setting will affect how your camera focuses when capturing an image. Depending on your
selection, the camera will be more sensitive to focusing on particular areas in the display and adjust the image
color and lighting accordingly.

21
Center – Averages the light metered from the entire frame, but giving greater weight to the subjectin the center
Multi – Used in standard conditions the camera divides and adjusts the settings of the image into several
zones for light metering such as complex light conditions, position of subject, brightness, background, direct
light and scenes
Spot – Meters the area within the spot point frame at the center of the LCD to set the exposure on the subject
in the center of the monitor.
1) Press the UP or DOWN direction control buttons to scroll through the menu options.
2) Press the OK button to select the desired option.
3) A selected option icon will appear on the selected item
4) Press the MODE button to exit the menu and return to your previous mode.
5) An icon reflecting your selection will display on the LCD screen
6) Remember that this setting will be remembered by your camera until you manually change the setting or
restore the camera‟s default factory settings.
Language Menu
You can select your camera‟s language setting by selecting the desired language from the Language menu.

22
1) Press the UP or DOWN direction control buttons to scroll through the menu options.
2) Press the OK button to select the desired option.
3) A selected option icon will appear on the selected item
4) Press the MODE button to exit the menu and return to your previous mode.
5) Remember that this setting will be remembered by your camera until you manually change the setting or
restore the camera‟s default factory settings.
Date/Time Menu
When you capture an image with your camera, the image will include a time stamp with the date and time that
the image was taken.
The Date/Time menu allows you to set your camera‟s date and time as desired. You can also disable the
timestamp for future images that will be taken with your camera.
On – The timestamp will appear on photos taken
Off – The date stamp will not appear on photos taken
To Enable/Disable the Timestamp:
1) Press the UP or DOWN direction control buttons to scroll through the menu options.
2) Press the OK button to select the desired option.
 Loading...