

Page 1

DVR16H3
EN
DIGITAL 16-CHANNEL H.264 RECORDER
NL
DIGITALE 16-KANAALS H.264 RECORDER
FR
ENREGISTREUR NUMÉRIQUE H.264 À 16 CANAUX
ES
VIDEOGRABADORA DIGITAL H.264 DE 16 CANALES
DE
DIGITALER 16-KANAL H.264 RECORDER
QUICK INSTALLATION GUIDE 3
BEKNOPTE HANDLEIDING 15
GUIDE D'INSTALLATION RAPIDE 28
GUÍA RÁPIDA 41
SCHNELLEINSTIEG 54
- HDMI®/VGA
- PUSH STATUS
- PUSH VIDEO
- EAGLEEYES
Page 2
DVR16H3
V. 01 – 25/09/2014 2 ©Velleman nv
EN
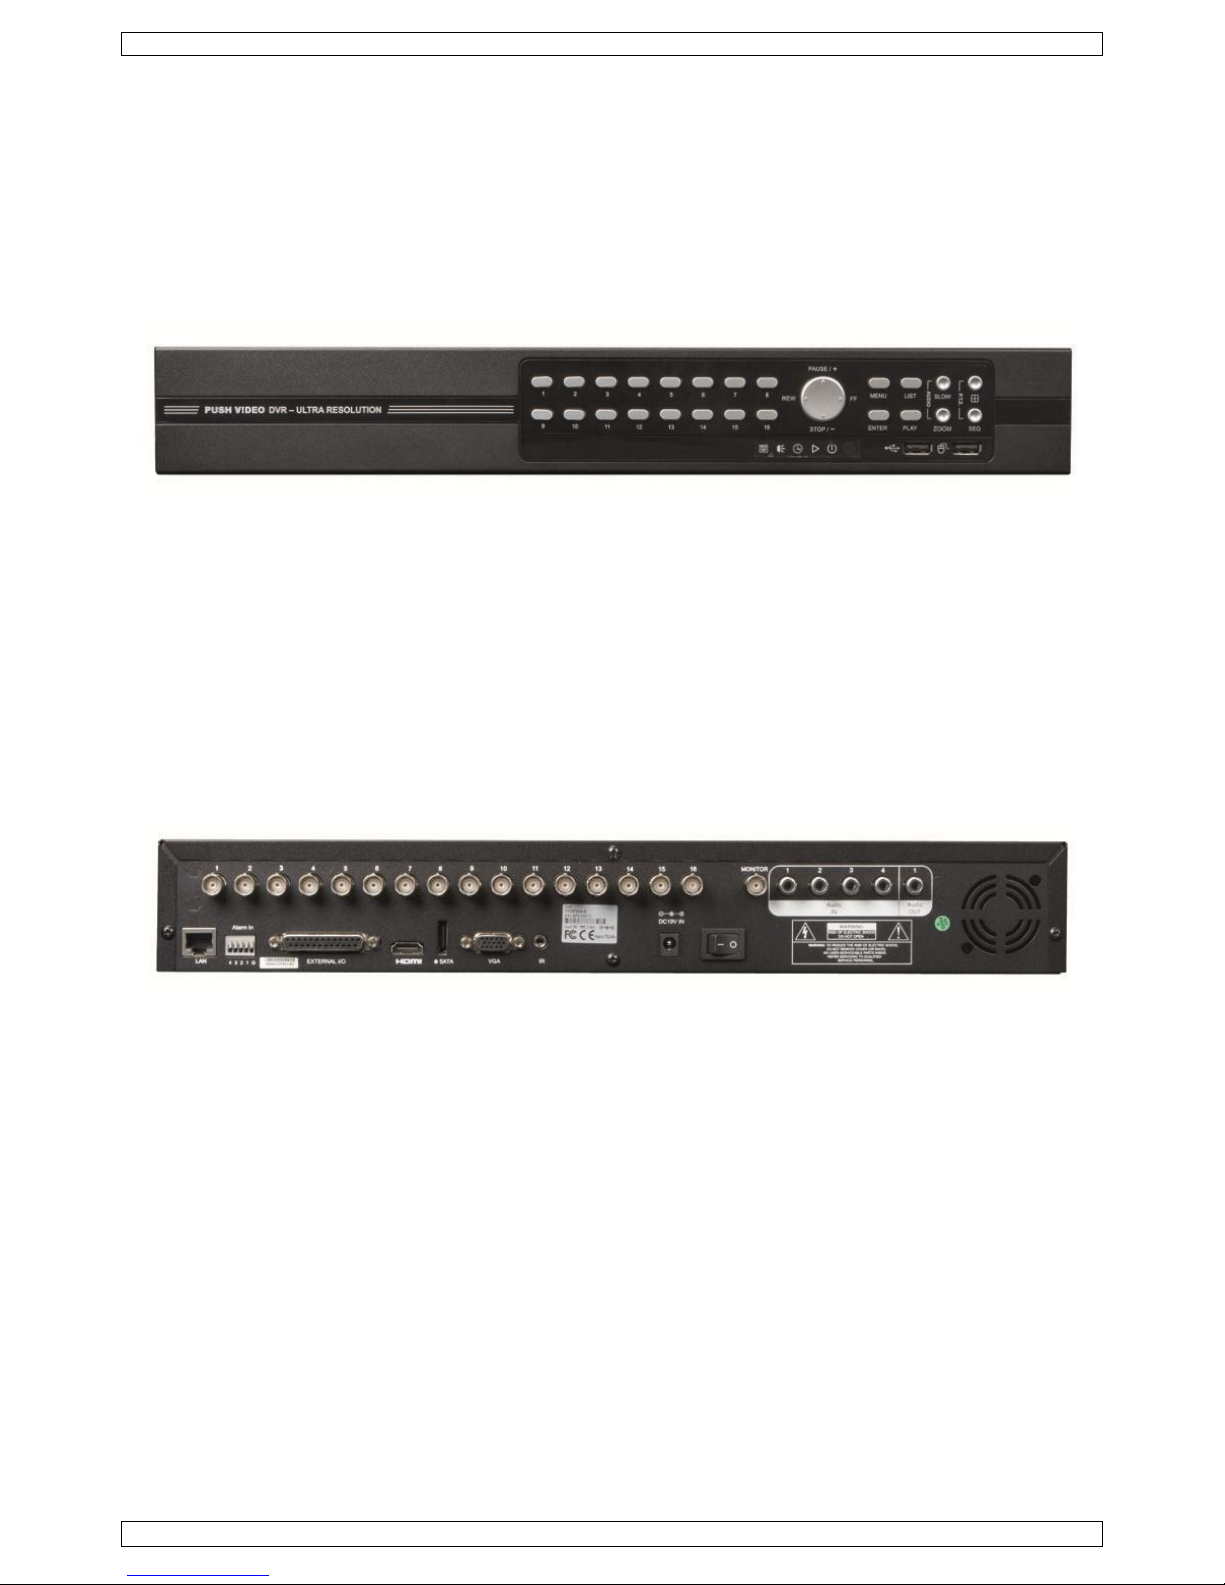
front view
NL
voorzijde
FR
vue frontale
ES
vista frontal
DE
Vorderansicht
EN
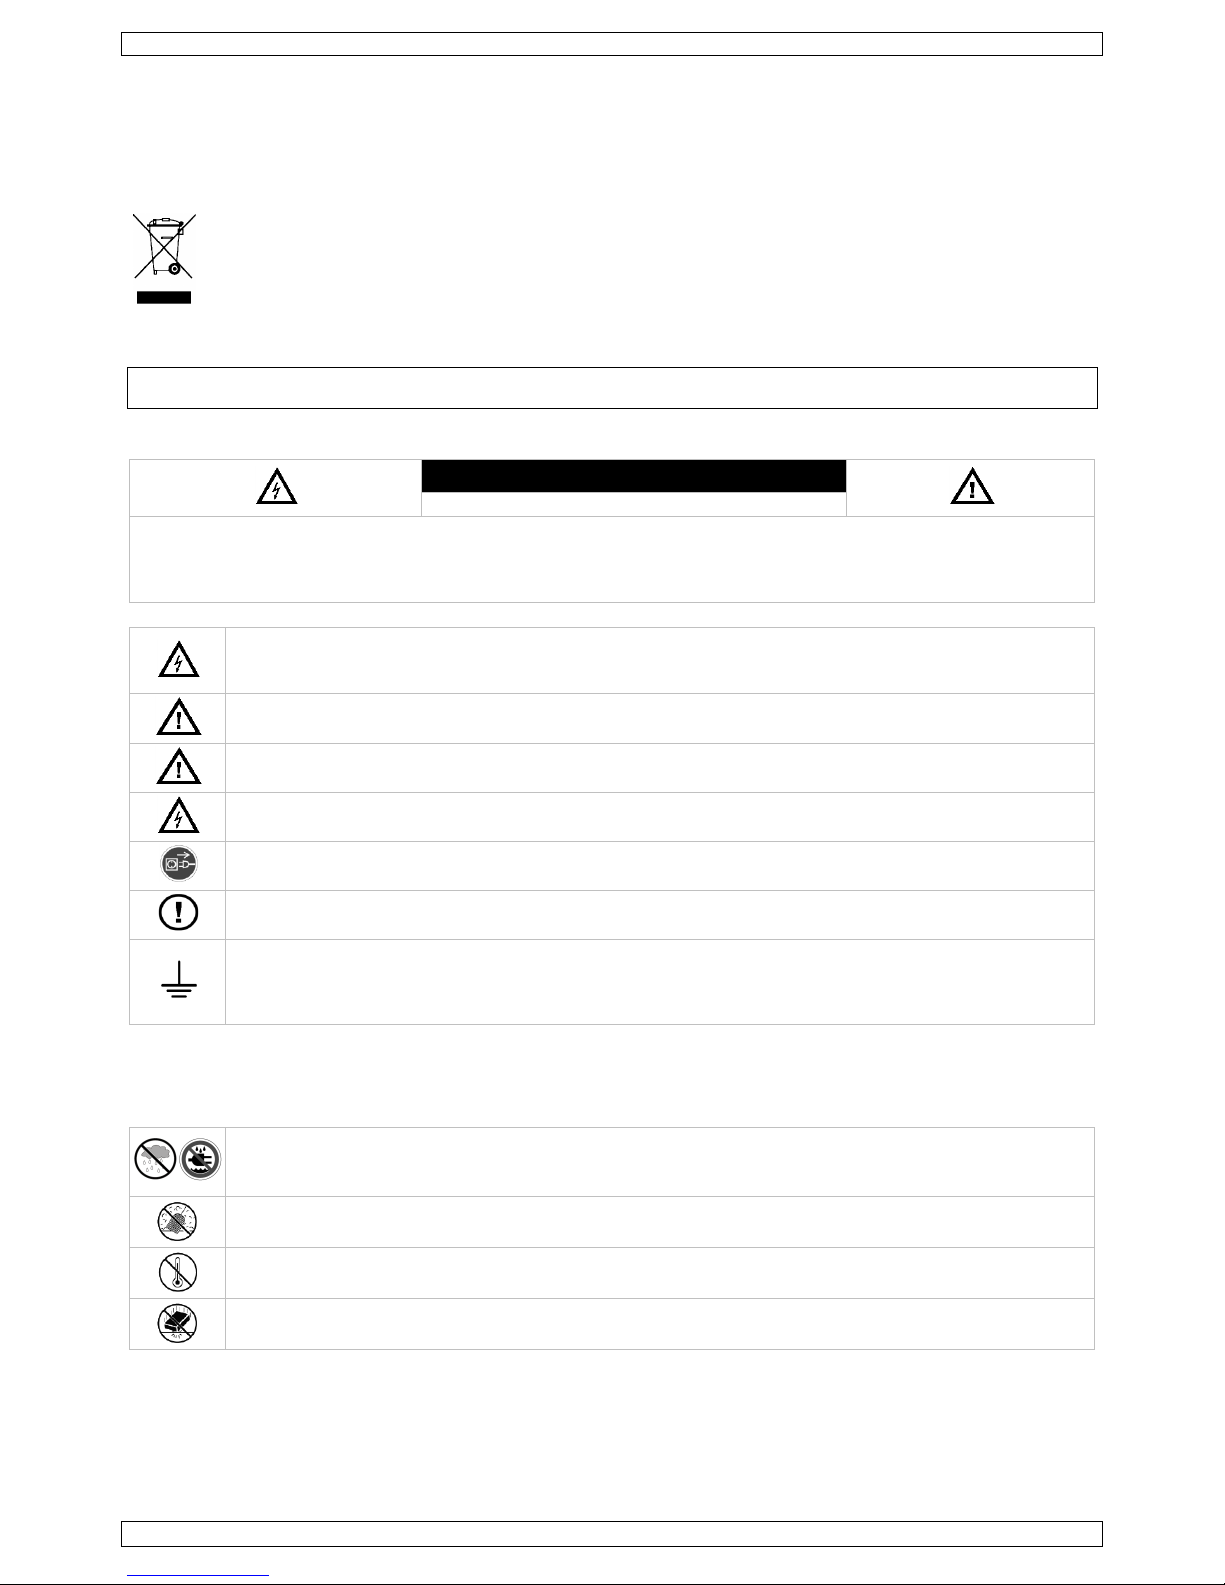
rear view
NL
achterzijde
FR
vue arrière
ES
vista posterior
DE
Hinteransicht
Page 3
DVR16H3
V. 01 – 25/09/2014 3 ©Velleman nv
QUICK INSTALLATION GUIDE
1. Introduction
To all residents of the European Union
Important environmental information about this product
This symbol on the device or the package indicates that disposal of the device after its lifecycle could harm the
environment. Do not dispose of the unit (or batteries) as unsorted municipal waste; it should be taken to a
specialized company for recycling. This device should be returned to your distributor or to a local recycling service.
Respect the local environmental rules.
If in doubt, contact your local waste disposal authorities.
Thank you for choosing Velleman! Please read the manual thoroughly before bringing this device into service. If the device
was damaged in transit, do not install or use it and contact your dealer.
NOTE: This document is a Quick installation guide. For more details, refer to the full user manual which can be found on the
included CD-ROM.
2. Safety Instructions
CAUTION
RISK OF ELECTRIC SHOCK
CAUTION:
To reduce the risk of electric shock, do not expose this apparatus to rain or moisture. Only operate this apparatus from the
type of power source indicated on the label. The company shall not be liable for any damages arising out of any improper
use, even if we have been advised of the possibility of such damages.
The lightning flash with arrowhead symbol, within an equilateral triangle, is intended to alert the user to the
presence of non-insulated “dangerous voltages” within the product’s enclosure that may be of sufficient
magnitude to constitute a risk of electric shock to persons.
This exclamation mark within an equilateral triangle is intended to alert the user to the presence of important
operating and maintenance (servicing) instructions in the literature accompanying the appliance.
Keep the device away from children and unauthorised users.
Risk of electroshock when opening the cover. Touching live wires can cause life-threatening electroshocks.
Have the device repaired by qualified personnel.
Always disconnect mains power when device not in use or when servicing or maintenance activities are
performed. Handle the power cord by the plug only.
DO NOT disassemble or open the cover unless otherwise indicated in this manual. There are no user-serviceable
parts inside the device. Refer to an authorized dealer for service and/or spare parts.
This is a Safety Class 1 Product (provided with a protective earthing ground incorporated in the power cord). The
mains plug shall only be inserted in a socket outlet provided with a protective earth contact. Any interruption of
the protective conductor inside or outside of the instrument is likely to make the instrument dangerous.
Intentional interruption is prohibited.
3. General Guidelines
Refer to the Velleman® Service and Quality Warranty on the last pages of this manual.
Indoor use only
Keep this device away from rain, moisture, splashing and dripping liquids. Never put objects filled with liquid on
top.
Keep this device away from dust.
Keep this device away from extreme heat. Make sure the ventilation openings are clear at all times. For sufficient
air circulation, leave at least 1" (± 2.5 cm) in front of the openings.
Protect this device from shocks and abuse. Avoid brute force when operating the device.
Familiarise yourself with the functions of the device before actually using it.
All modifications of the device are forbidden for safety reasons.
Only use the device for its intended purpose. Using the device in an unauthorised way will void the warranty.
Damage caused by disregard of certain guidelines in this manual is not covered by the warranty and the dealer will not
accept responsibility for any ensuing defects or problems.
Do not use this product to violate privacy laws or perform other illegal activities.
Page 4
DVR16H3
V. 01 – 25/09/2014 4 ©Velleman nv
4. Features
compression format: H.264 real-time
high resolution recording:
o full frame: 704 x 576 pixels
o 960H: 960 x 576 pixels with 700TVL cameras
multiplex: allows live display, recording, playback, backup and network operation
backup function: supports USB 2.0 flash drive and network backup
powerful mobile surveillance support on all major platforms including iPad®, iPhone®, BlackBerry®, Windows Mobile®,
Symbian® and Android® - Software: see www.eagleeyescctv.com
intelligent motion trigger recording:
o advanced motion detection
o scheduled motion detection recording (with 3 adjustable parameters)
automatic integrated Dynamic Domain Name Service (DDNS): free service
system auto recovery after power reconnected
supports daylight-saving function
supports manual / timer / motion / alarm recording functions
multi-language OSD: English, French, Dutch, German, Portuguese, Spanish, Czech, Hungarian, Greek, Chinese,
Vietnamese
user manual: English
quick start manual: English, Dutch, French, Spanish, German
USB mouse: incl.
optional hard disks (not incl.): HD500GB/S, HD1TB/S and HD2TB/S
IR remote control: DVRRC4 (incl.)
optional monitor (not incl.): MONSCA4N1
optional router (not incl.): EM4544, EM4571, PCRT1
5. Overview
Refer to the illustrations on page 2 of this manual.
Front panel
LED indications
HDD
Reading or recording activities on the hard disk.
ALARM
An alarm was triggered.
TIMER
Timed recording is enabled.
PLAY
The DVR is in playing mode.
POWER
DVR power is on.
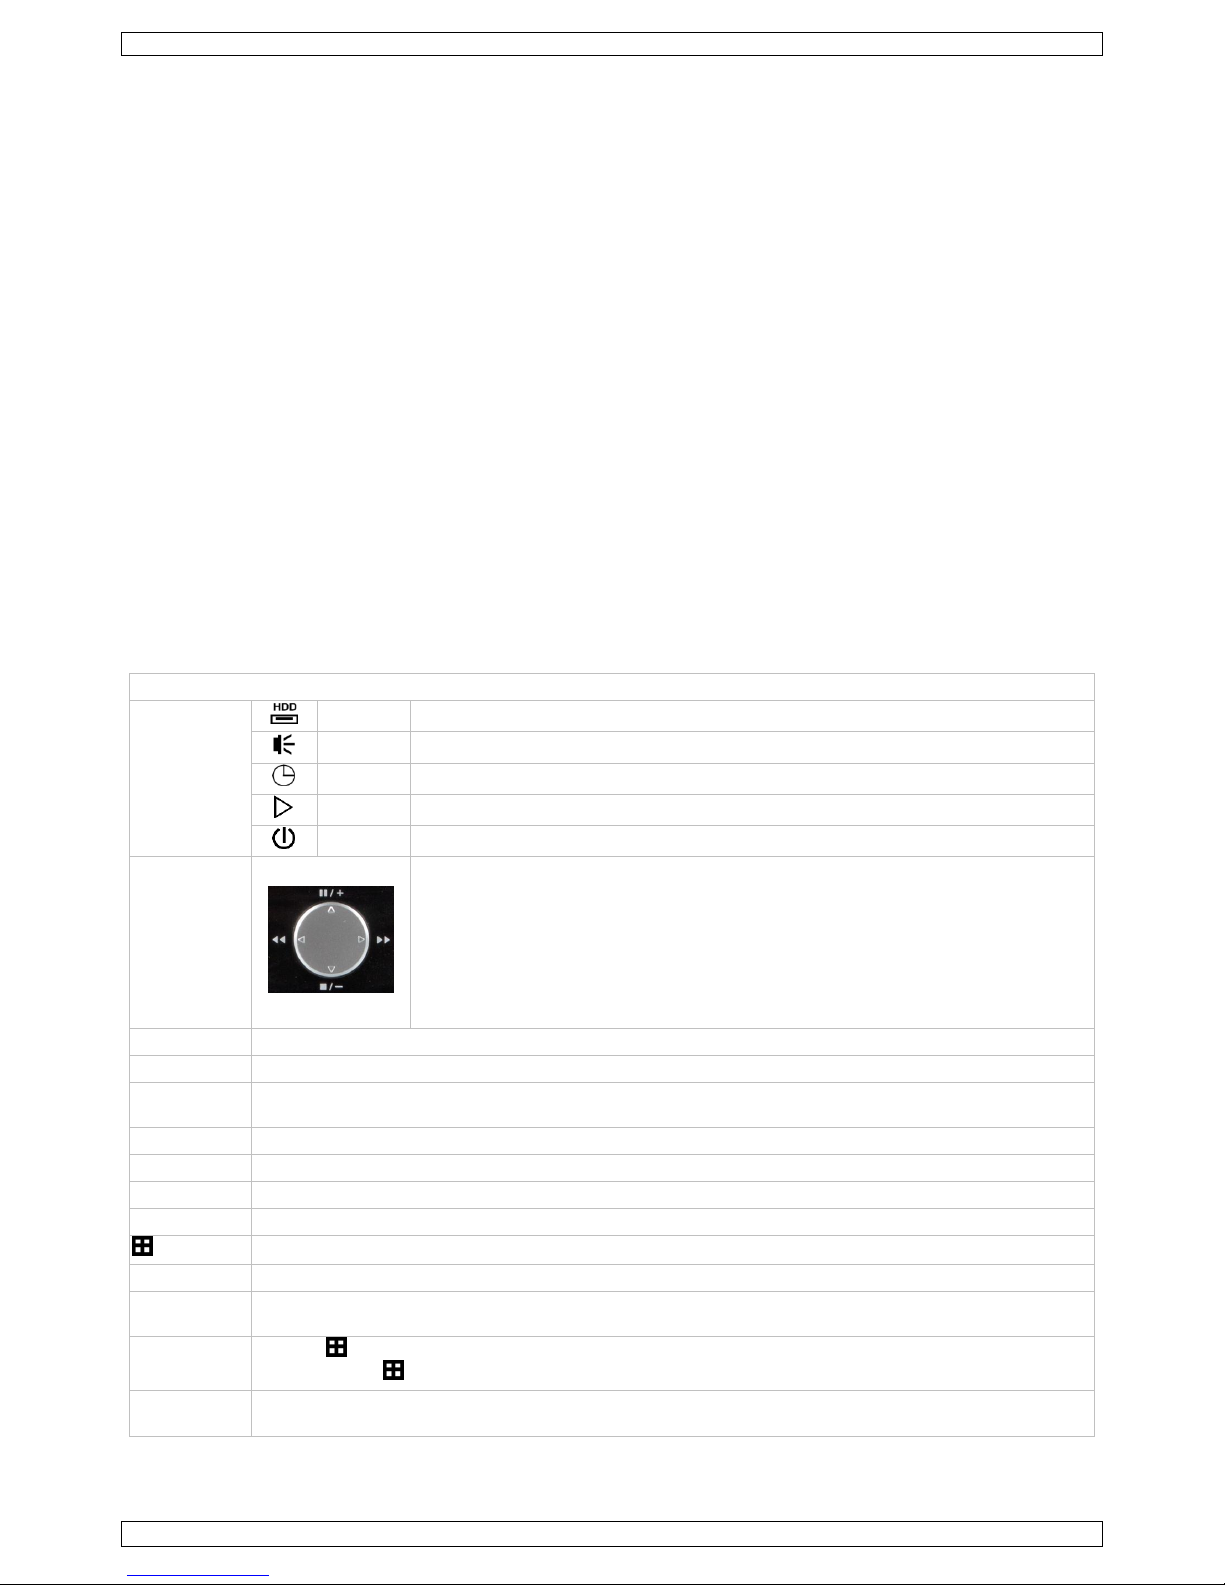
Navigation
button
In settings mode:
Press ▲ / ▼ / ◄ / ► to move the cursor accordingly.
When changing a setting, press + or – to increase or decrease the setting.
In playback mode:
Press to pause playback.
Press to stop playback.
Press to fast forward.
Press to fast rewind.
MENU
Press to enter the main menu.
ENTER
Press to confirm settings.
LIST
List the information of the recorded files.
QUICK SEARCH / RECORD / MOTION / ALARM / TIMER / FULL LIST
PLAY
Press to play the recorded video.
SLOW
In playback mode, press to play the recorded file slowly.
ZOOM
In live or playback mode, press to enlarge the image of the selected channel.
SEQ
Press to show all screens sequentially in full screen mode. Press again to quit.
Press to show the multiple display mode.
1–16
Press a button to select the corresponding channel.
AUDIO
= SLOW + ZOOM
Press SLOW and ZOOM simultaneously to select live or play-back sounds.
P.T.Z.
= SEQ +
Press SLOW and simultaneously to enter or exit PTZ control mode.
USB port (2 x)
Connect a USB flash drive for video backup to one USB port; connect a USB mouse to the other.
Note: do not connect two USB flash drives or USB mice at the same time.
Page 5
DVR16H3
V. 01 – 25/09/2014 5 ©Velleman nv
Rear panel
LAN port
Connect the DVR to a local network by plugging a network cable into this port.
VGA
Connector for video monitor (not included).
AUDIO IN
4 audio input channels to connect four external audio sources, e.g. from cameras with audio.
AUDIO OUT
1 audio output to connect to an audio device, e.g. a speaker (mono).
VIDEO IN
4 video input channels to connect 4 external video sources, e.g. cameras.
HDMI
1 video output channel to connect the DVR to the main monitor.
EXTERNAL I/O
Use a 9-pin DSUB connector to connect external signals, e.g. alarm, PTZ…
19V DC
Power supply input
MONITOR
eSATA
ALARM IN
Connectors for alarm sensors.
6. Installing a SATA hard disk
A SATA hard disk (not included) must be installed before the DVR is powered on.
Notes
We do not recommend using a green hard disk in this device. Refer to the manual on the cd for a list of compatible hard
disks.
We recommend clearing all data in the hard disk when the DVR is powered on and the date & time are set correctly to
ensure the recorded data are not mixed with other data previously saved in the same hard disk. Refer to the manual on
the cd for details.
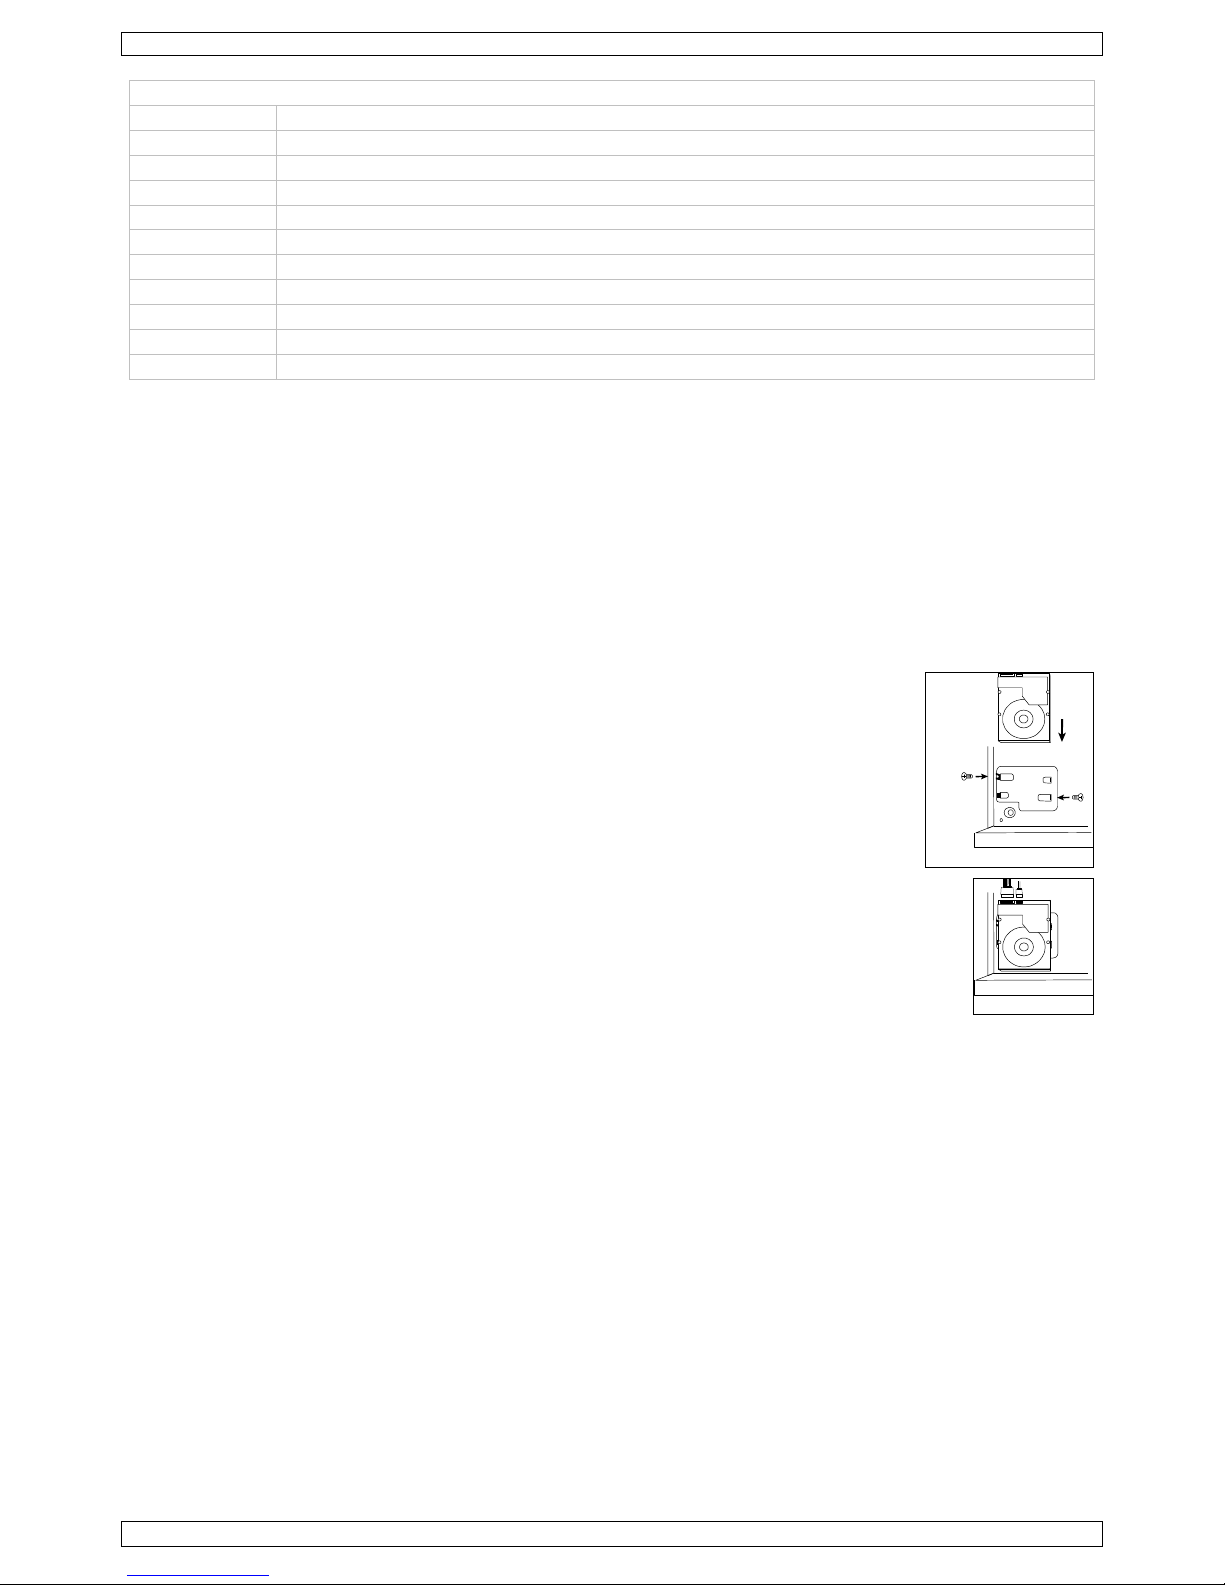
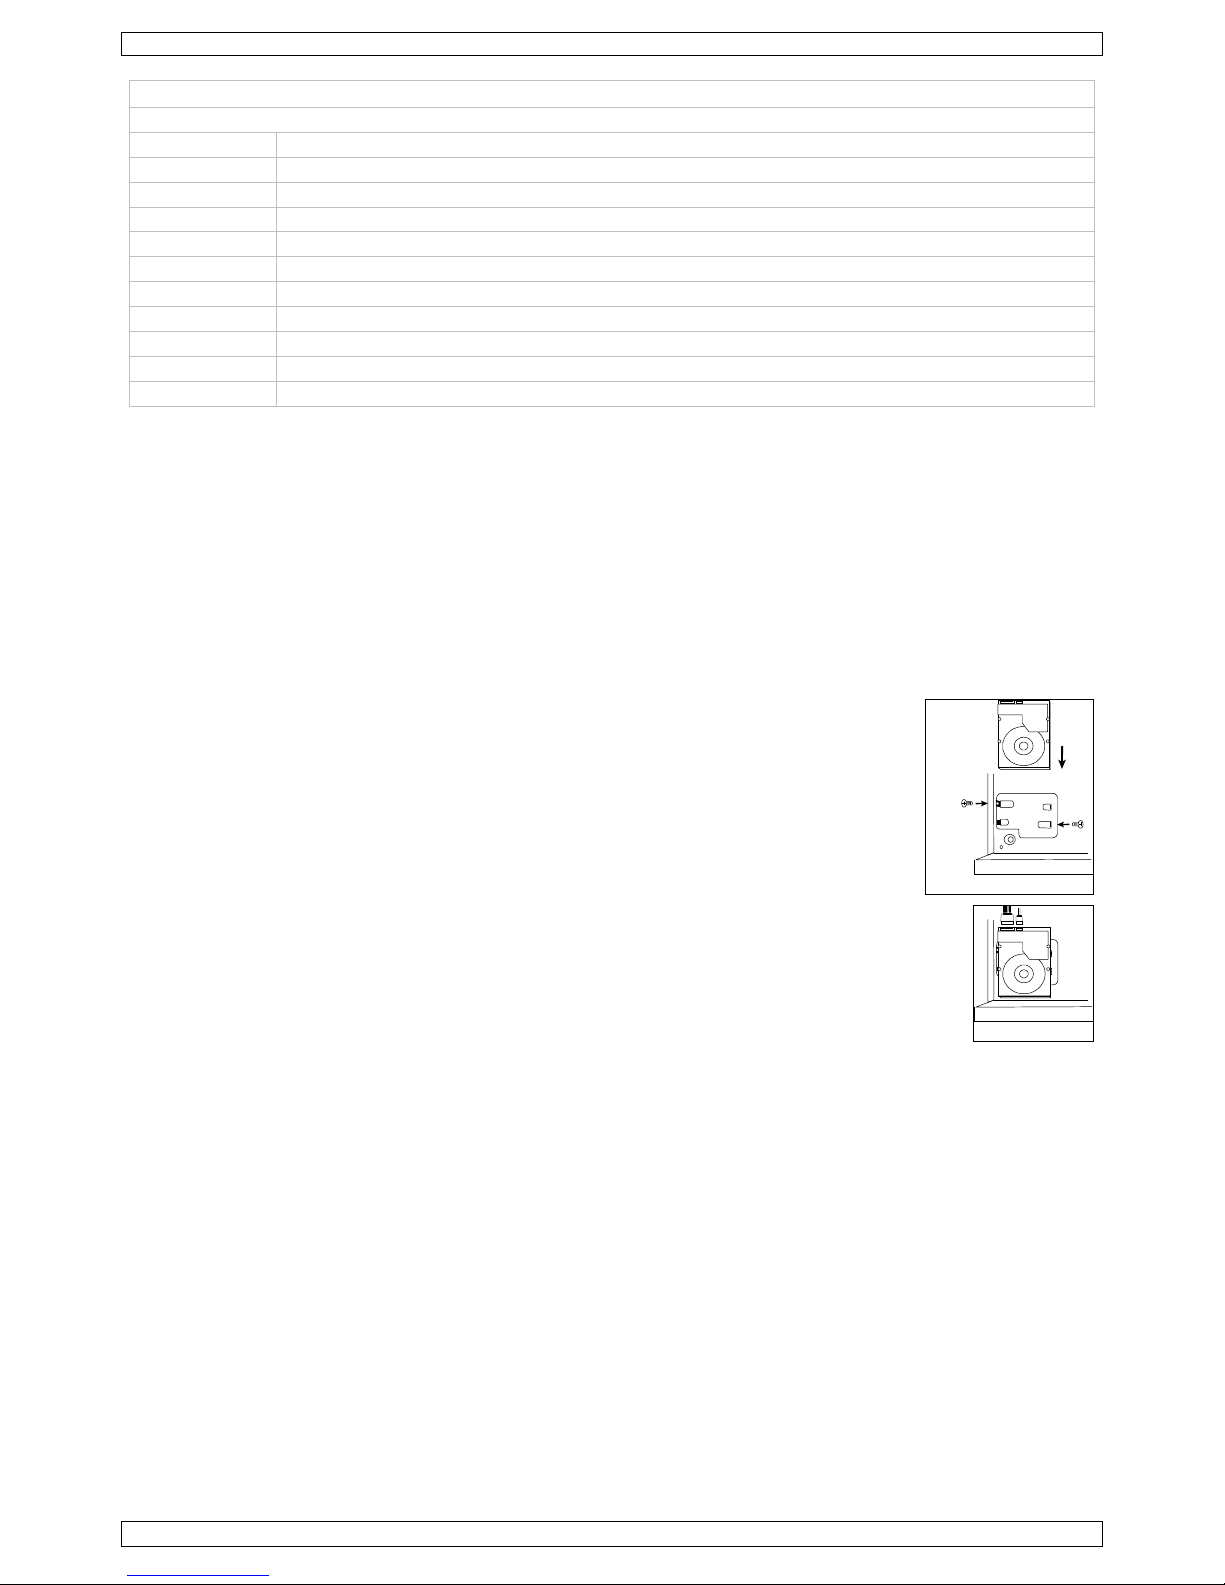
Installation
1
Loosen the screws on the upper cover and remove it from the DVR.
The cover is made of metal. Be careful not to hurt yourself to its edge.
2
Place the hard disk to the bracket, and fasten it with the supplied screws.
Make sure the PCB side of the hard disk is facing up
3
Connect the power and data bus cables to the hard disk.
4
Close the upper cover of the DVR and fasten the screws you loosened in step 1.
7. Hardware Setup
Refer to the illustrations on page 2 of this manual.
Connecting a Video Monitor
Obtain a suitable monitor (not included) and connect it to the HDMI or VGA video output port on the back of the DVR.
Connecting the Power Supply
1. Plug the DC output connector of the included power adaptor into the VDC power input at the back of the DVR.
WARNING: only use the included adaptor.
2. Plug the included power cable into the adaptor input connector and plug the other end into the mains. Do not switch the
DVR on yet.
Connecting a Camera
1. You can connect up to four suitable cameras. Each camera needs its own power supply.
2. Connect the video output of the camera to either video input at the back of the DVR. The number next to the input
connectors represents the channel number. Connector type is BNC.
Connecting Audio
1. The DVR supports four audio inputs. Connect the audio output of an audio source to an audio input of the DVR. Make
sure to connect the audio channel to the corresponding video channel. Connector type is BNC.
2. There is also an audio output connector. Connect an audio device, e.g. a speaker to this connector when desired.
Connector type is BNC.
Front Pan el
screw hole
Front Pan el
Page 6
DVR16H3
V. 01 – 25/09/2014 6 ©Velleman nv
Connecting Local Area Network (LAN)
Connect the DVR to a local network by plugging a network cable into the LAN port at the back of the DVR. Connector type is
8P8C (RJ45). To setup the network connection, press the Menu button and select . Refer to the full manual on the included
CD-ROM for details.
8. Getting Started
1. Make sure the connected cameras are powered on.
2. Set the power switch of the DVR at the back of the device to ON.
It takes about 15 to 30 seconds to start up.
Menu Overview
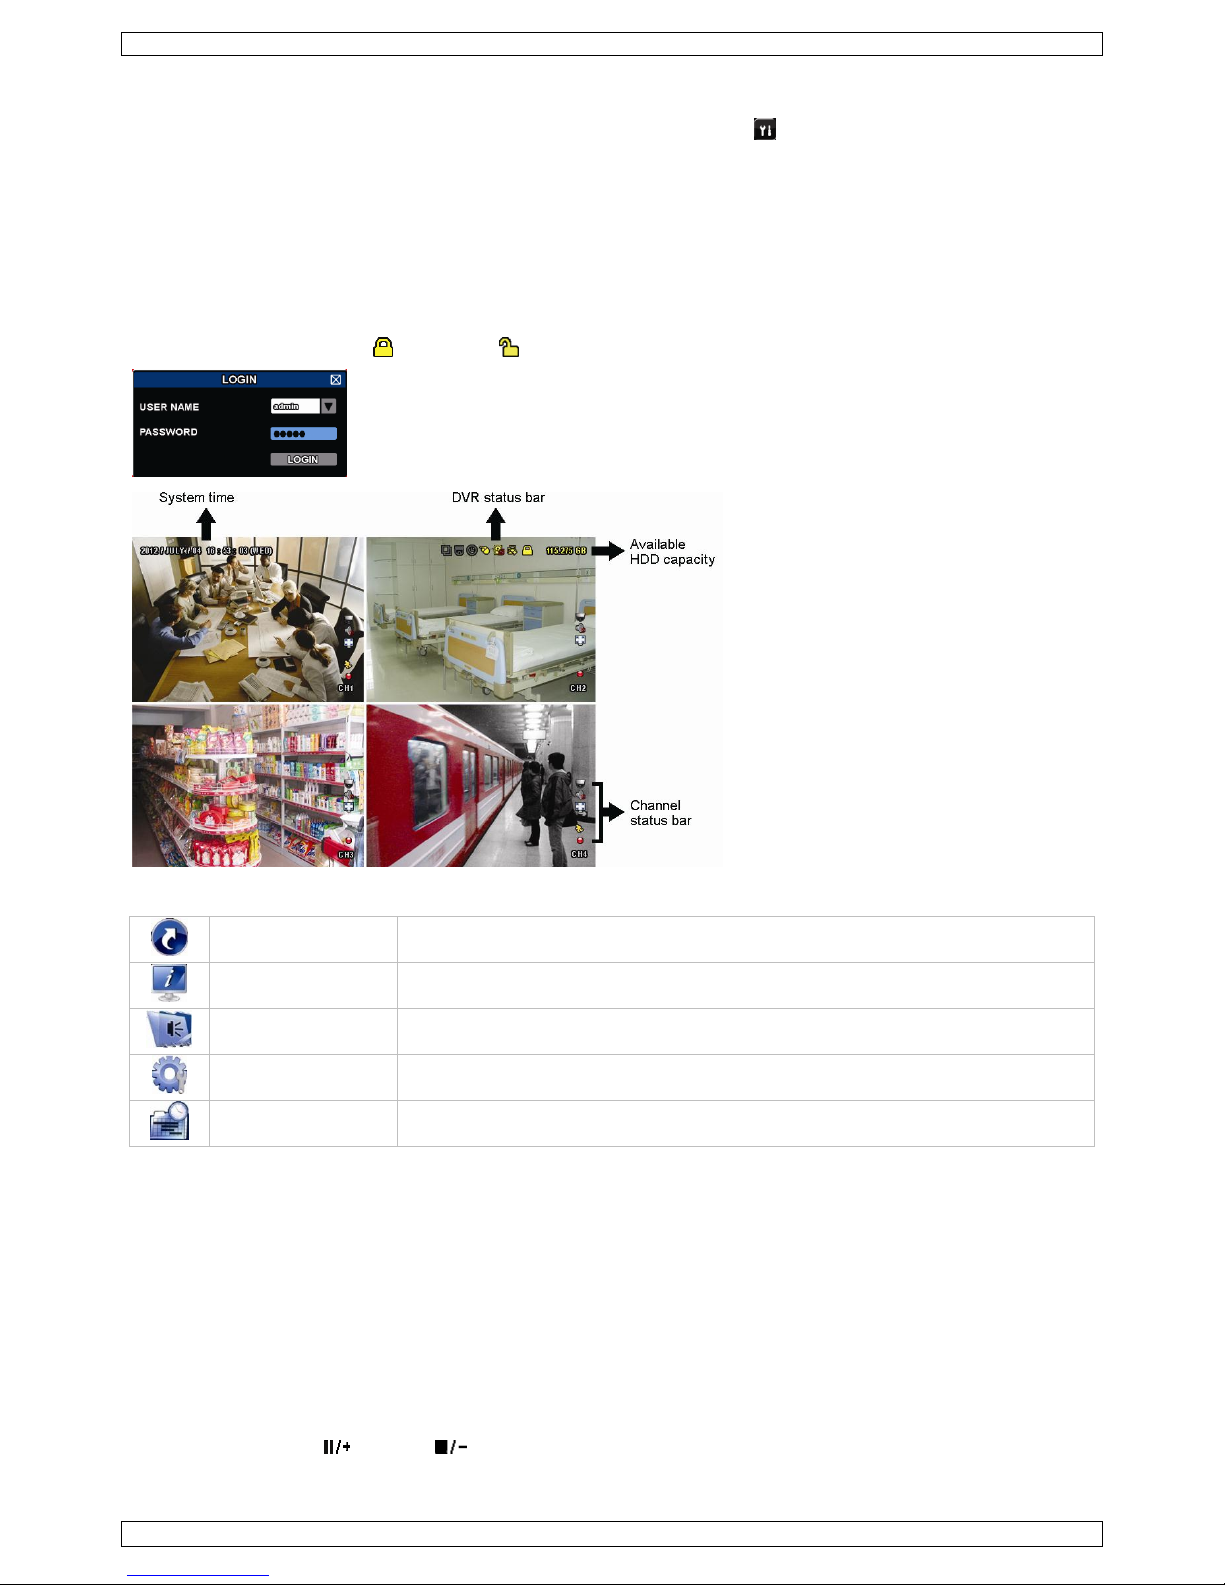
Move your mouse to enter the DVR password with the password keypad.
The default user name and password are both “admin”.
The status will change from (key lock) to (unlock).
Right-click anywhere on the screen to show the main menu, and right-click again to exit.
QUICK START
Click to set the status display, image settings, and date & time.
SYSTEM
Click to set the system configurations.
EVENT INFORMATION
Click to enter the event search menu.
ADVANCED CONFIG
Click to set CAMERA, DETECTION, ALERT, NETWORK, DISPLAY, RECORD, DEVICES &
NOTIFY.
SCHEDULE SETTINGS
Click to set record timer, detection timer & alarm timer.
Refer to the full user manual on the included CD-ROM for more details.
Setting Date and Time
Before using the DVR, the time and date shall be set to get a valid time stamp.
1. Right-click the screen and enter the admin password.
2. Click the QUICK START icon.
3. Select TIME SETUP to set date and time.
Note: once recording started, do not change date or time as this will make it very difficult to find back the recorded files.
Note: when using the DVR for the first time and the correct time is set, leave it on for at least 48 hours.
Password Setting
1. Right-click the screen and enter the admin password.
2. Click the SYSTEM icon.
3. Go to ACCOUNT. Select the password you want to set and click EDIT.
Note: an operator cannot access the main menu, only the quick menu bar (see below).
4. Press the cursor up ( ) or down ( ) button to select the value of the first number and press enter to save and go to
the next character, or use the mouse to select the desired value. Repeat this for all four password numbers.
Note: the default admin password is admin.
Page 7
DVR16H3
V. 01 – 25/09/2014 7 ©Velleman nv
Record Settings
1. Right-click the screen and enter the admin password.
2. Use the arrow button to select ADVANCED CONFIG.
3. Use the arrow button to select RECORD.
4. Select the record type you want to set (manual, event or timer).
5. In "CHANNEL", select "ALL" to apply the changes to all channels.
6. Alternatively, select "BY CHANNEL" to set the image size, image per second & image quality individually for each channel.
7. Use the arrow button to select GENERAL.
8. Set the image size, images per second (I.P.S.) and image quality.
9. Select APPLY.
Refer to the full user manual on the included CD-ROM for more details.
Audio Playback
Press the SLOW and ZOOM button simultaneously to select the desired audio channel or use the quick menu bar (see below).
The current audio channel is indicated in the status bar.
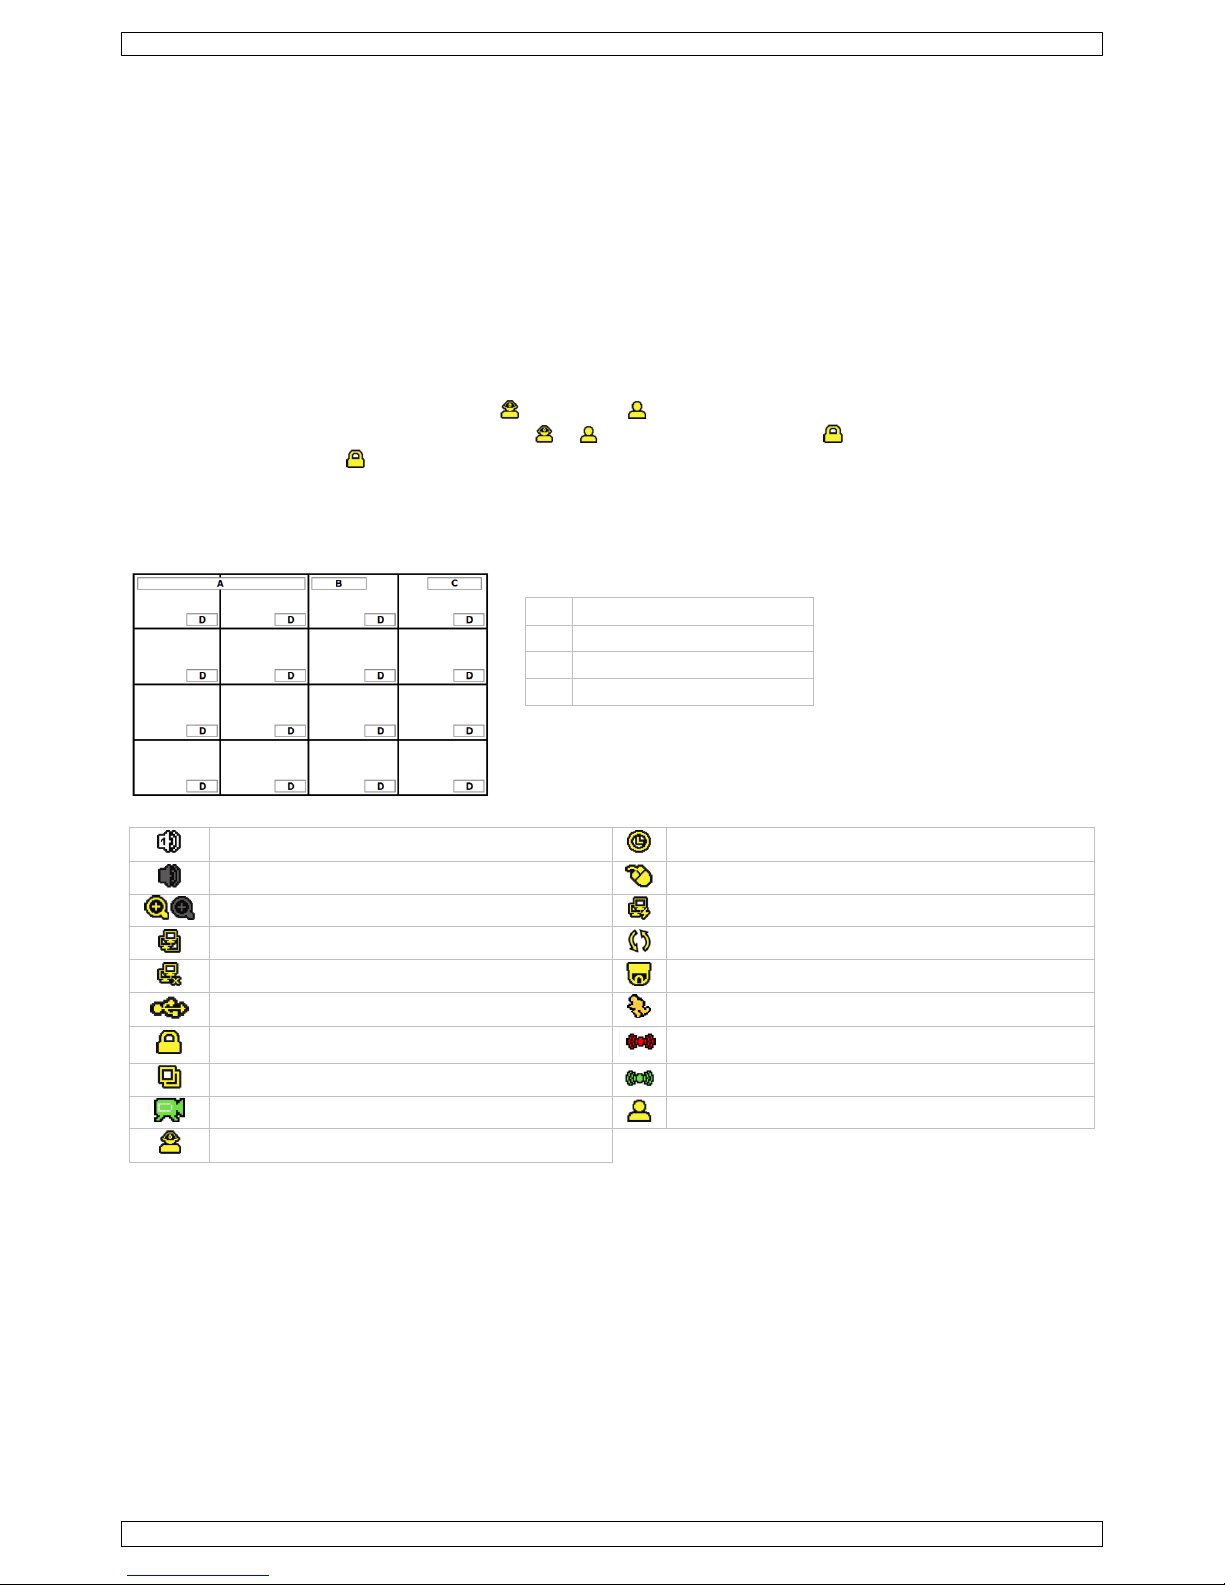
Switch Users
1. The DVR can be accessed as administrator ( ) or operator ( ), icons are indicated in the status bar.
2. To switch between users, click on the user icon ( or ) to lock the current session ( ).
3. Click the key lock icon ( ) and enter the password of the desired profile.
9. Operation
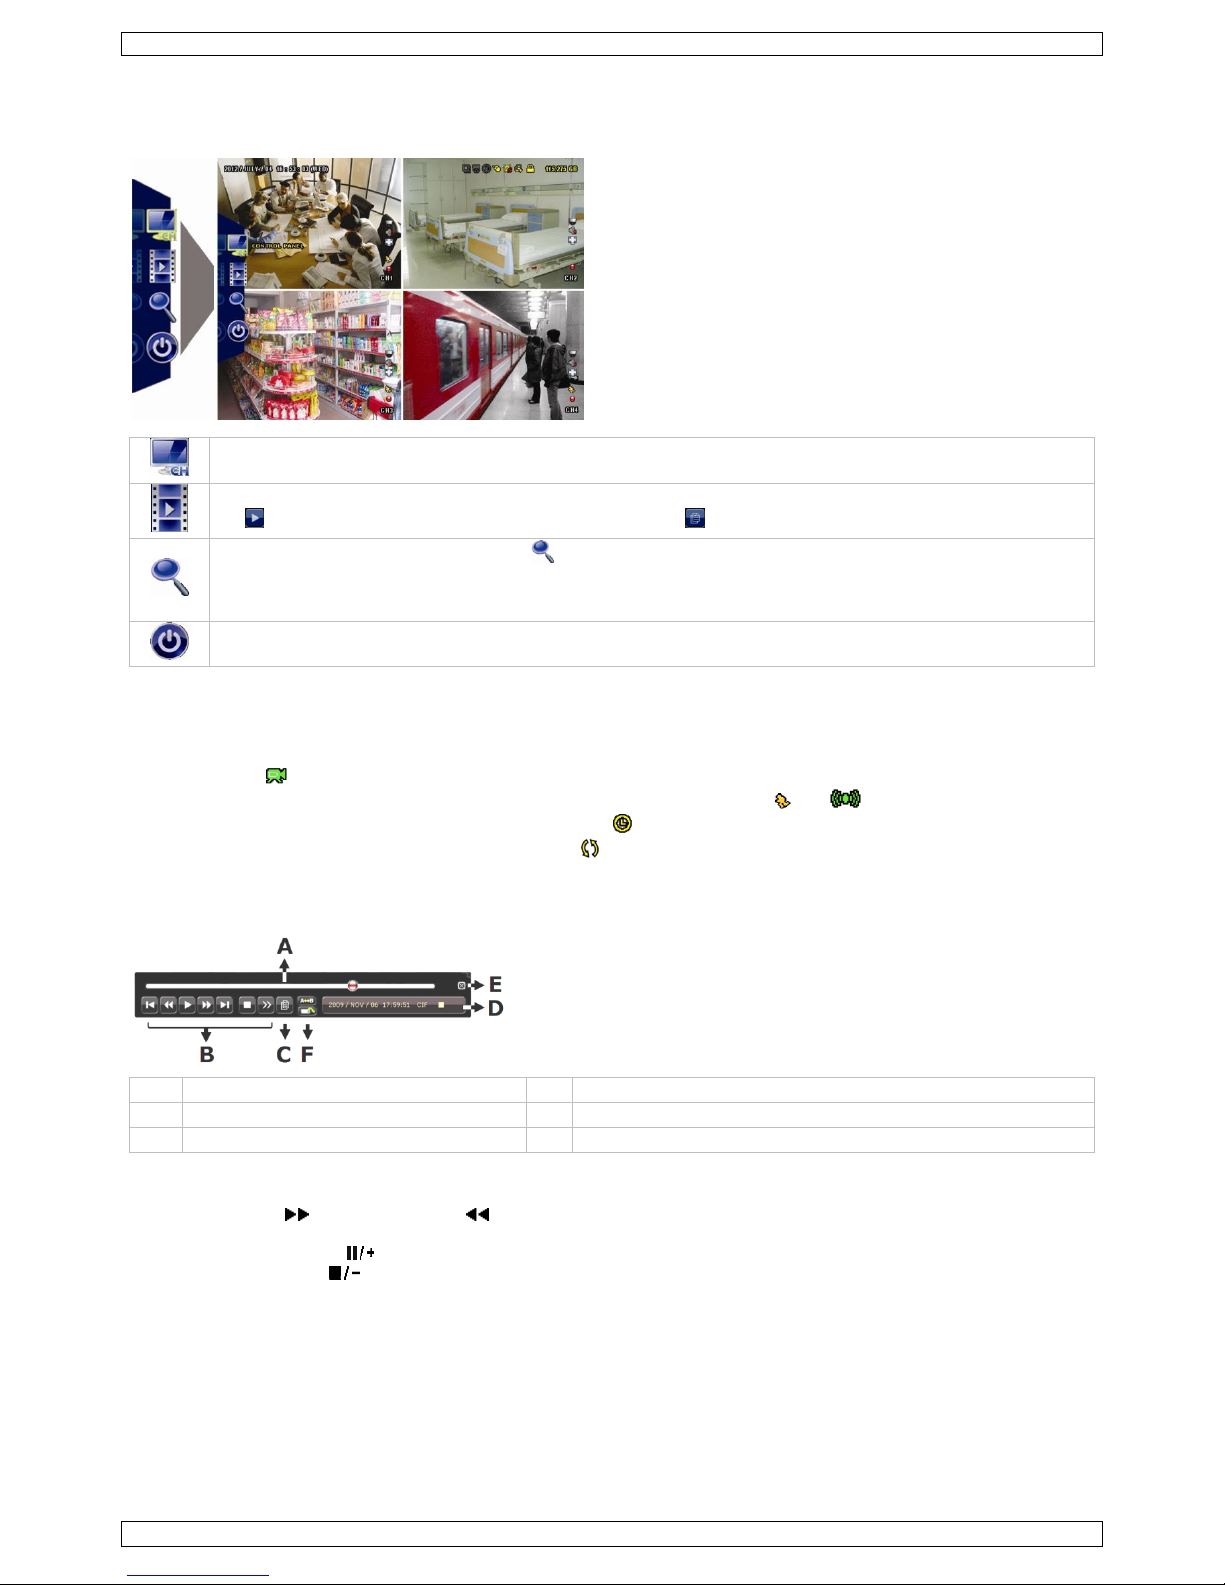
Display
The following image shows the screen layout.
A system date and time
B general system status
C available HDD capacity
D
channel status
live audio channel enabled
timer recording
audio channel disabled
USB mouse connected
digital zoom on (yellow) / off
internet connected
LAN connected
hard disk overwrite (default)
no network connection
PTZ mode
USB flash drive connected
motion mode
key lock on
alarm
sequence mode
alarm mode
recording mode
operator logged on
administrator logged on
Note that actual screen icons might differ slightly from the ones shown above.
Page 8

DVR16H3
V. 01 – 25/09/2014 8 ©Velleman nv
Quick Menu Bar
Note: the quick menu bar is only available when a USB mouse is connected.
Move the cursor to the arrow mark to open the quick menu bar. It contains the following icons:
Click to show the channel switch panel and select the channel you want.
Click to display the playback control panel.
Click to play the latest recorded video clip, or click to enter the search list.
Switch to the channel you want first, and click to enter the zoom-in mode.
In this mode, click and drag the red frame on the bottom left of the screen to move to the place you want to see.
To exit this mode, click .
Click to show the power-off panel to either stop or reboot the system.
Refer to the full user manual on the included CD-ROM for more details.
Recording
Check whether the camera or cameras are properly connected.
When the auto-recording and pre-alarm functions are enabled, the device will start recording images.
Default the recording icon ( ) is shown.
In case the motion or alarm detection is activated and a motion or alarm is detected, the motion ( ) resp. alarm ( )
icon is shown.
When timed recording is enabled, the timed recording icon ( ) is shown and the timed recording LED is on.
Default, the device is in HDD overwrite mode and the icon ( ) is shown.
Play-back
Make sure the control panel is not locked and press the PLAY button on the control panel or use the quick menu bar to open
the playback control panel:
A
progress bar
D
information
B
playback control
E
close
C
event search
F
set repeat function AB / open backup menu
Note: play-back needs at least 8192 recorded images to work properly (e.g. with images per second set to 30, the recording
must be at least 273 seconds long).
The fast forward ( ) and fast rewind ( ) buttons will increase resp. decrease the play-back speed. Repeatedly pressing
the button will increase/decrease speed to 4x, 8x, 16x, or 32x (max.).
Press the pause button ( ) to temporary suspend video play-back.
Press the stop button ( ) to return to live monitoring.
Press the SLOW button once to set play-back speed to 1/4
th
and twice for 1/8th.
Search
1. To search an event, press the LIST button on the front panel.
The system displays an overview of recorded file types.
2. You can search the recordings by file type. Available types are ALARM, MANUAL, MOTION, SYSTEM, and FULL LIST.
3. Select a list and recording from this list.
4. Press ENTER to start play-back.
Note: the recorded files can also be searched via the included Video Viewer software.
Page 9

DVR16H3
V. 01 – 25/09/2014 9 ©Velleman nv
10. Installing the EagleEyes App
Prerequisites
Before installing EagleEyes to your mobile phone for remote surveillance, make sure you have checked the following:
You have subscribed to and you can access mobile internet services for your mobile phone.
Note: You may be charged for internet access via wireless or 3G networks. For the internet access rate details, please
check with your local network operator or service provider.
You have noted down the IP address, port number, user name and password used to access your network camera from
the internet.
Where to Download
1. Connect to www.eagleeyescctv.com from your mobile device, and sign in.
Please do not try to download EagleEyes from your computer.
o For Android®, select the download link from the website to start downloading.
o For iPhone® and iPad®, two versions of EagleEyes are available: EagleEyesHD Plus (at a fee), and EagleEyesHD Lite
(free).
2. Select the version you want, and you will be directed to the App Store to download the application.
3. When the download is completed, EagleEyes will install automatically to the default location or any location you choose.
Note: For more details about configuring and operating EagleEyes, visit the website www.avtech.com.tw.
11. Push Status Configuration
If you have an iPhone®, iPad® or Android® mobile device, you can use the DVR's push status function: the DVR will send a
notification to your device when an alarm event occurs.
The alarm events are:
ALL
VIDEO LOSS
HDD FULL
POWER ON
HDD (CLEAR / NO HDD / OVER TEMPERATURE)
NET LOGIN
KEY UNLOCK
NETWORK
UPS
SYSTEM ABNORMAL.
To do so, you need to install the EagleEyes app on your mobile device (see: Installing the EagleEyes App below).
On the DVR:
1. Set "ACTION" to ON.
2. Select the system event or events you want to be notified about on your mobile device.
You will receive a text message whenever an event occurs.
11.1 Configuration
Before configuring push status, make sure that:
The DVR system is set up as described in point Connection and Setup in the full manual on the included CD-ROM.
The DVR is connected to the internet.
The EagleEyes app is installed on your mobile device (see: Installing the EagleEyes App above).
Steps
1. Open EagleEyes, and add this DVR to the EagleEyes address book.
For more details about EagleEyes operation, visit www.eagleeyescctv.com.
2. In the EagleEyes app, enable push status as described below.
3. Try triggering an alarm event to see if you get a push status message.
Page 10
DVR16H3
V. 01 – 25/09/2014 10 ©Velleman nv
12. Push Video Configuration
12.1 Pin Connection
This DVR can send notifications to your mobile devices, such as iPhone®, iPad® and Android® mobile devices, if an alarm
event occurs (push video). However, only certain alarm-in pins support this function.
There are several methods to connect alarm sensors for push video:
via the push video alarm-in terminal
via the external I/O port.
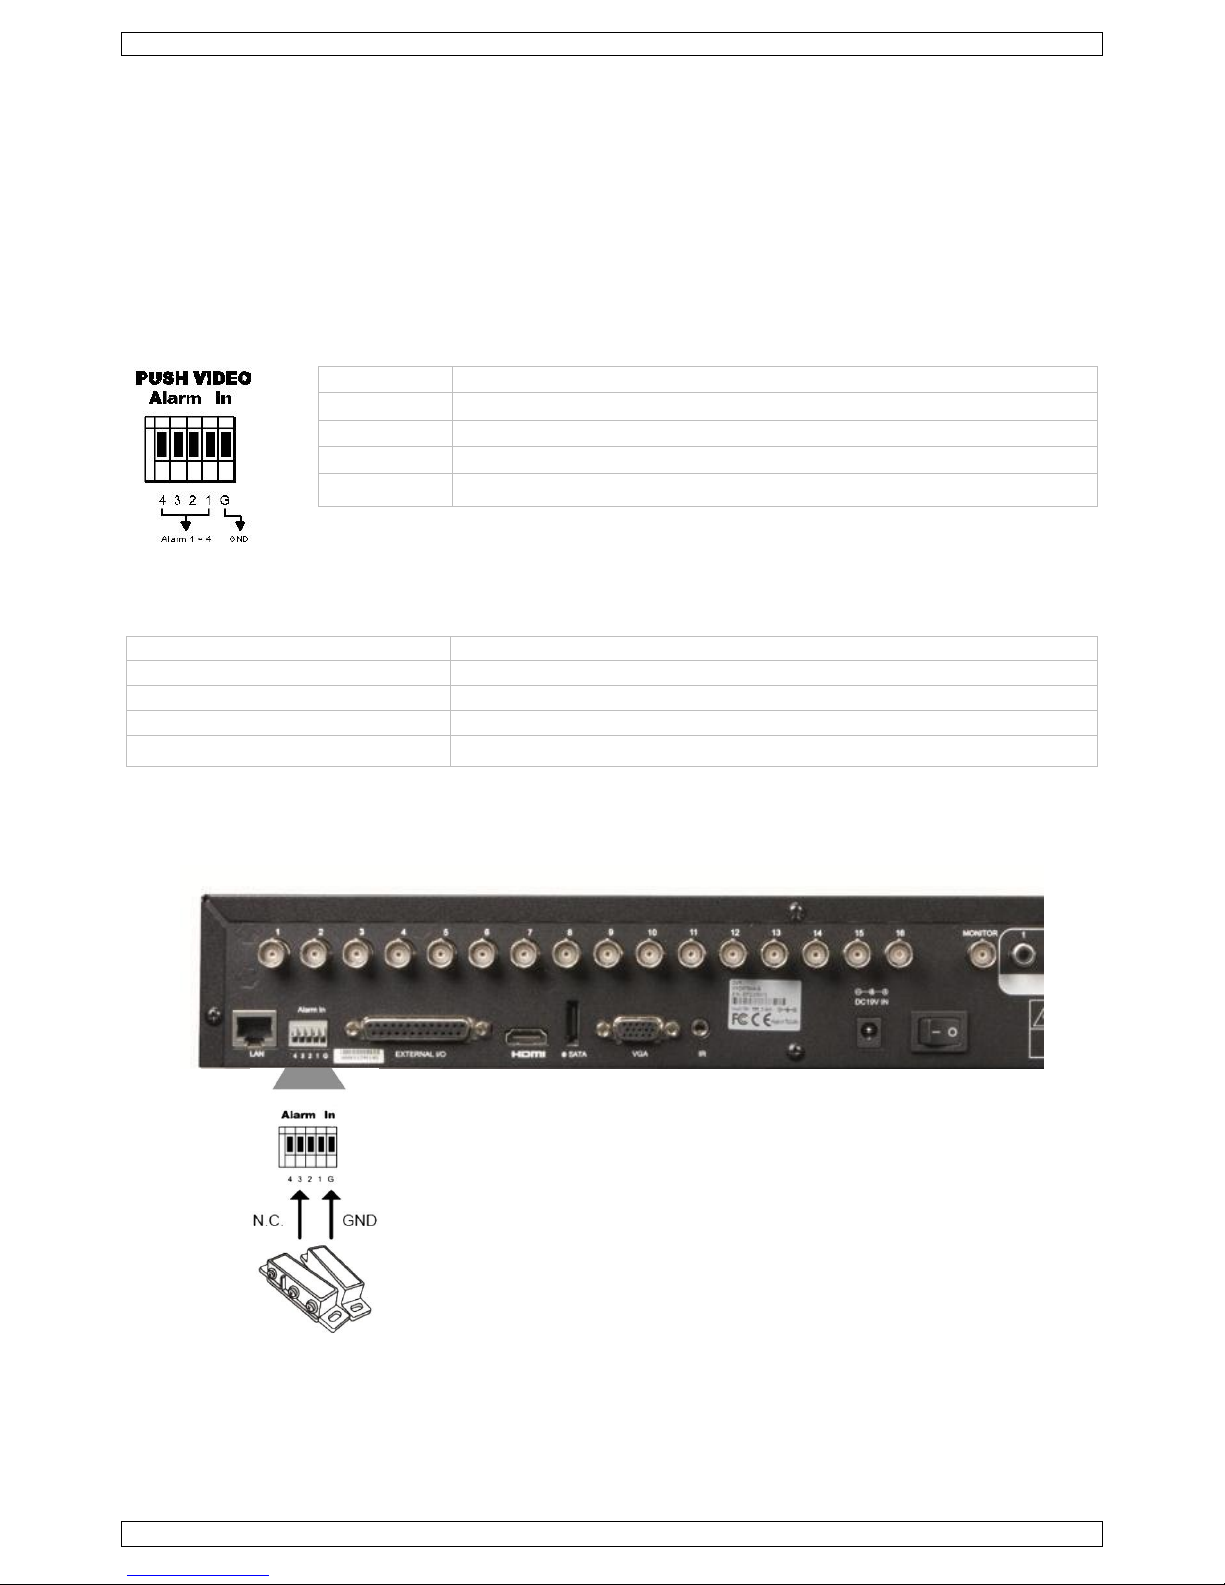
Push Video Alarm-In Terminal
A push video alarm-in terminal is provided on the DVR rear panel. Refer to the table below for the pin connections that
support push video and their corresponding video channels.
Alarm
Corresponding video channel
Alarm 1
CH1
Alarm 2
CH2
Alarm 3
CH3
Alarm 4
CH4
External I/O port
Refer to the table below for the pin connections that support push video and their corresponding video channels.
Pin
Corresponding video channel
Pin 2
CH1
Pin 15
CH2
Pin 3
CH3
Pin 16
CH4
Alarm sensor connection
Connect the alarm sensor, such as magnetic contacts, to the push video alarm-in terminal or I/O pins that support push video
on the DVR rear panel.
12.2 Configuration
Before configuring push video, make sure that:
The DVR system is set up as described in Connection and Setup.
The DVR is connected to internet.
You have installed the EagleEyes app on your iPhone®, iPad® or Android® mobile devices.
For details, please refer to Mobile Surveillance via EagleEyes.
Page 11
DVR16H3
V. 01 – 25/09/2014 11 ©Velleman nv
To configure push video:
1. Right-click to show the main menu and select (ADVANCED CONFIG) > NOTIFY.
2. Set GUARD to ON.
3. Configure your alarm sensor type (normal open or normal closed).
Careful! You have to select the opposite type for push video to work correctly.
If your alarm sensor is N.C. (normal closed, alarm goes off when the contact opens), then select ALARM N.O.
If your alarm sensor is N.O. (normal open, alarm goes off when the contact closes), then select ALARM N.C.
ADVANCED CONFIG
CAMERA
PUSH VIDEO
PUSH MESSAGE
MESSAGE MAIL
VIDEO MAIL
DETECTION
GUARD
ON ALERT
CH01
ALARM OFF / INTERNAL ALARM
CH1 NETWORK
CH02
ALARM OFF
CH2 DISPLAY
CH03
ALARM N.O.
office
RECORD
CH04
ALARM OFF
CH4 DEVICES
DCCS
IVS
NOTIFY
EXIT
4. Open EagleEyes and add this DVR to the EagleEyes address book.
Note: For more information on EagleEyes operation, please visit www.eagleeyescctv.com.
5. Enable push video.
6. Trigger the input alarm.
7. Receive an event notification and see video.
13. Mobile Surveillance via EagleEyes
EagleEyes is a powerful mobile surveillance program developed by AV TECH Corporation.
Note: For more operations details about EagleEyes, visit http://www.eagleeyescctv.com.
For any comment or question about this program, contact Velleman. Visit www.velleman.eu for contact details.
Page 12
DVR16H3
V. 01 – 25/09/2014 12 ©Velleman nv
13.1 Prerequisite
Before installing EagleEyes on your mobile phone for remote surveillance, make sure you have checked the following:
Your mobile platform is iPhone®, iPad®, BlackBerry® or Android®.
You have subscribed to mobile internet services on your phone; the service is available for use on your phone.
Note: You may be charged for internet access via wireless or 3G networks. For the internet access rates, contact your
local network operator or service provider.
You have noted down the IP address, port number, user name, and password used to access your network camera via
internet.
13.2 Downloading EagleEyes
1. Connect to www.eagleeyescctv.com from your mobile device.
Note: Do not download EagleEyes from your computer.
2. Select Products > Software > Mobile app to access the EagleEyes introduction page.
3. Select your platform (iOS, BlackBerry® or Android®) and download the program you need.
Note: This DVR is compatible only with iPhone®, iPad® BlackBerry® and Android® mobile devices.
4. Follow the on-screen instructions for downloading.
When the download is completed, EagleEyes is installed automatically on your mobile device.
Note: For more information about the configuration of this program, read the related instructions on the download page.
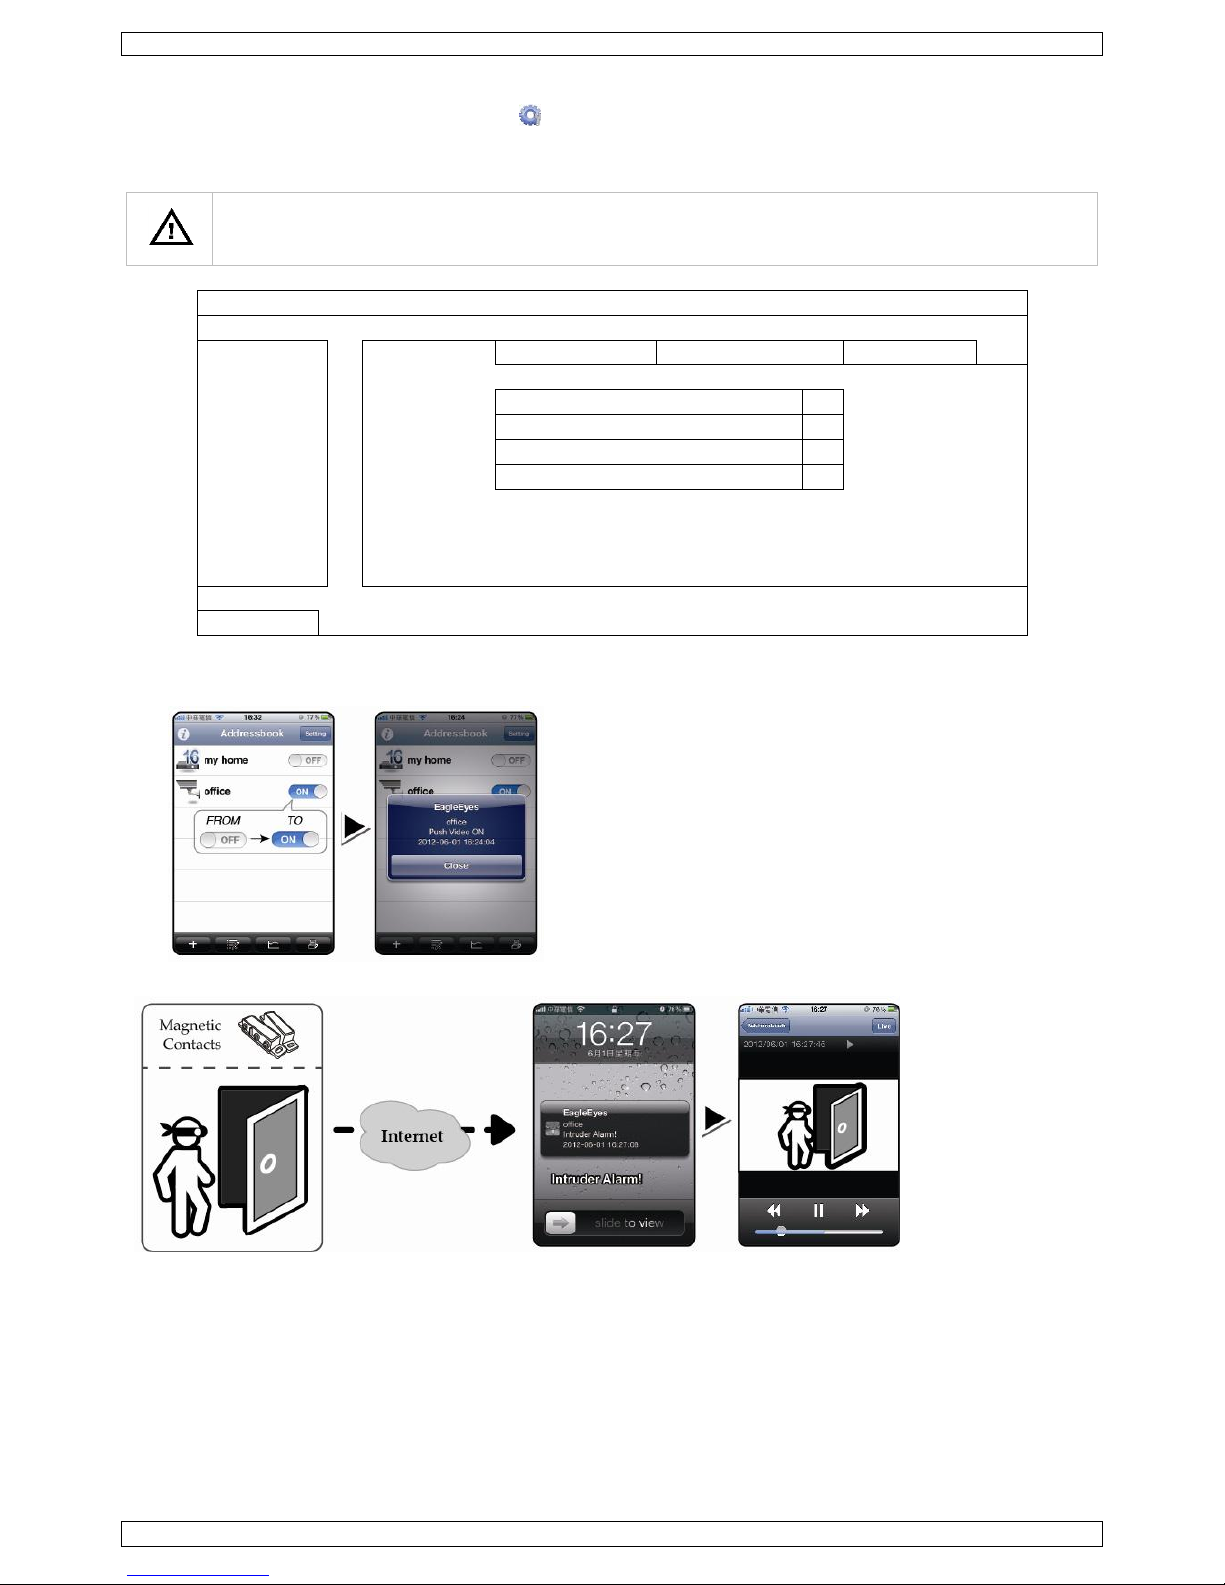
14. Setting Up Push Video
This DVR series supports instant event notifications to your iPhone, iPad, or Android mobile device with EagleEyes installed.
When a human is detected by a human detection camera or the external alarm device, the DVR will immediately receive
alarm signals and send them to your mobile device.
14.1 Prerequisite
Before setting up push video, make sure you have checked the following:
You have an iPhone®, iPad® or Android® mobile device with EagleEyes installed. For more details, see Downloading
EagleEyes.
A human detection camera is connected to CH1, or an external alarm device is connected to the push video alarm-in
terminal on the rear panel. To record alarm occurrences, make sure you also have a camera connected. Refer to Push
Video Configuration for details on video channels and alarm pins.
The event record function of your DVR is enabled.
The motion detection function of your DVR is enabled.
Your DVR is connected to internet. For details, refer to
http://www.surveillance-download.com/user/CMS.pdf.
14.2 Enabling Push Video
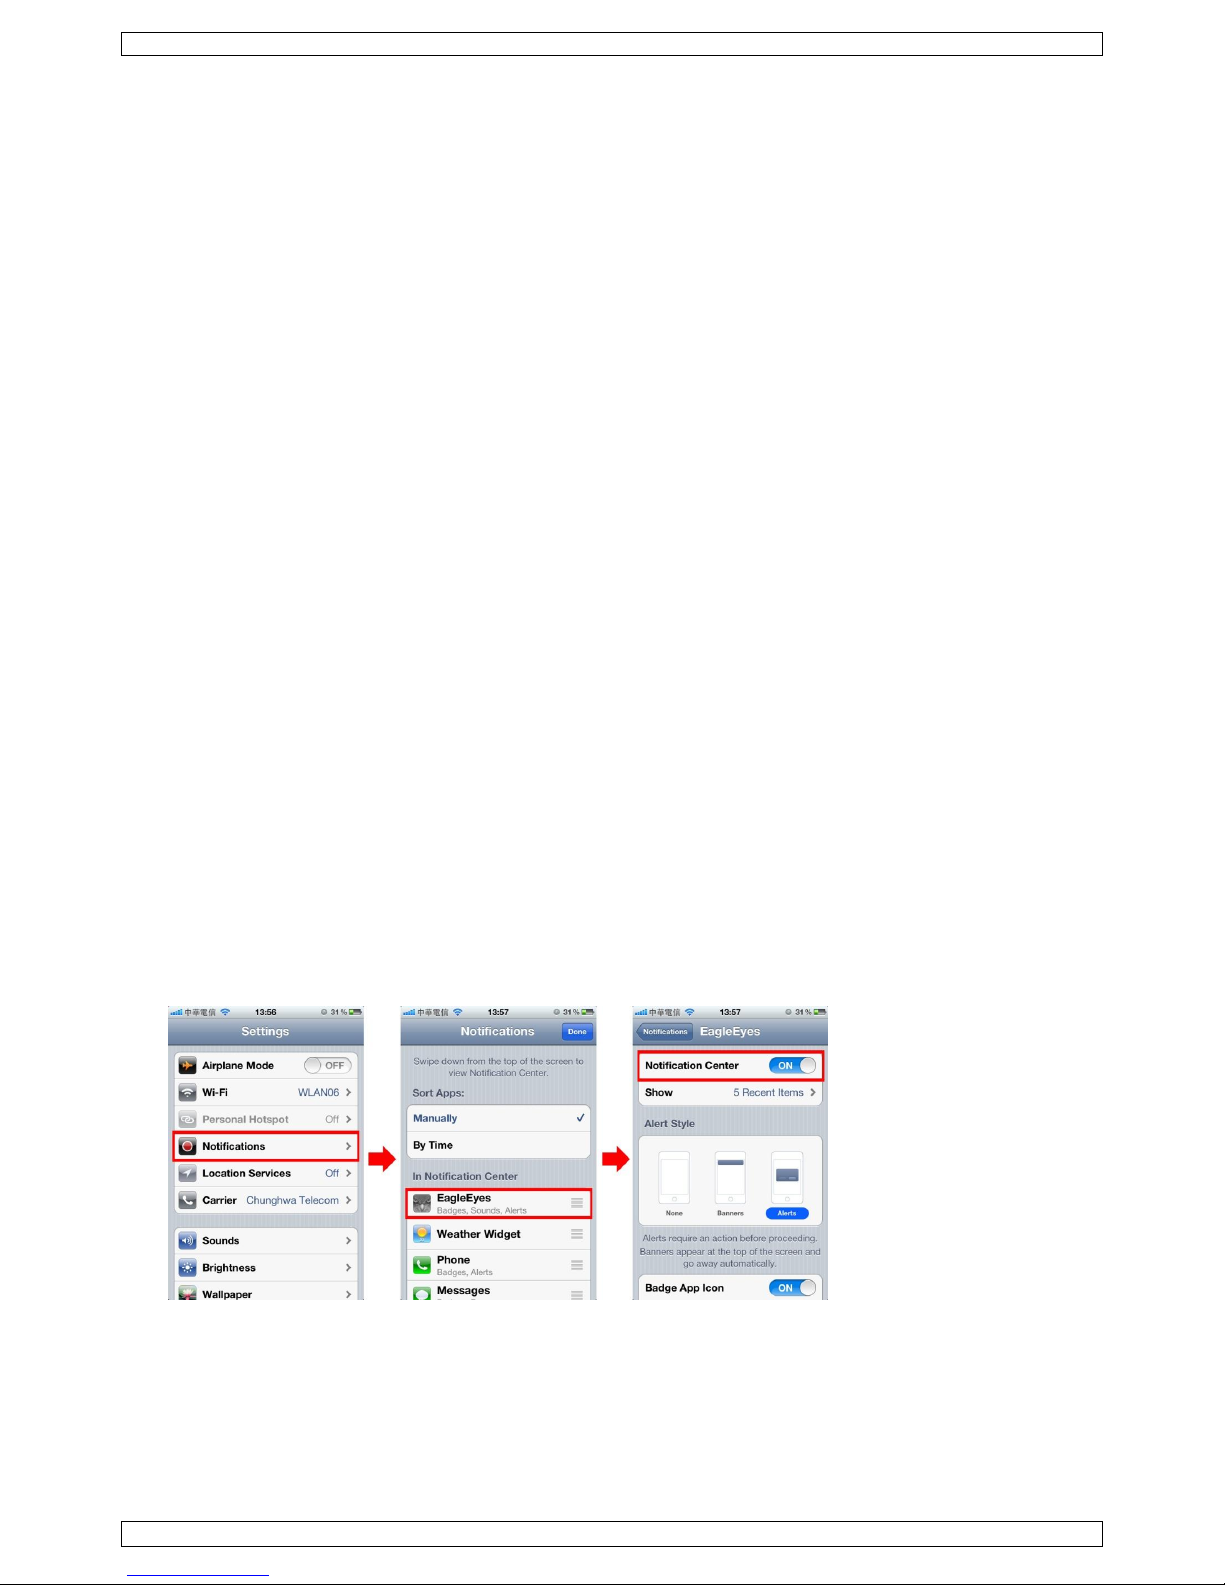
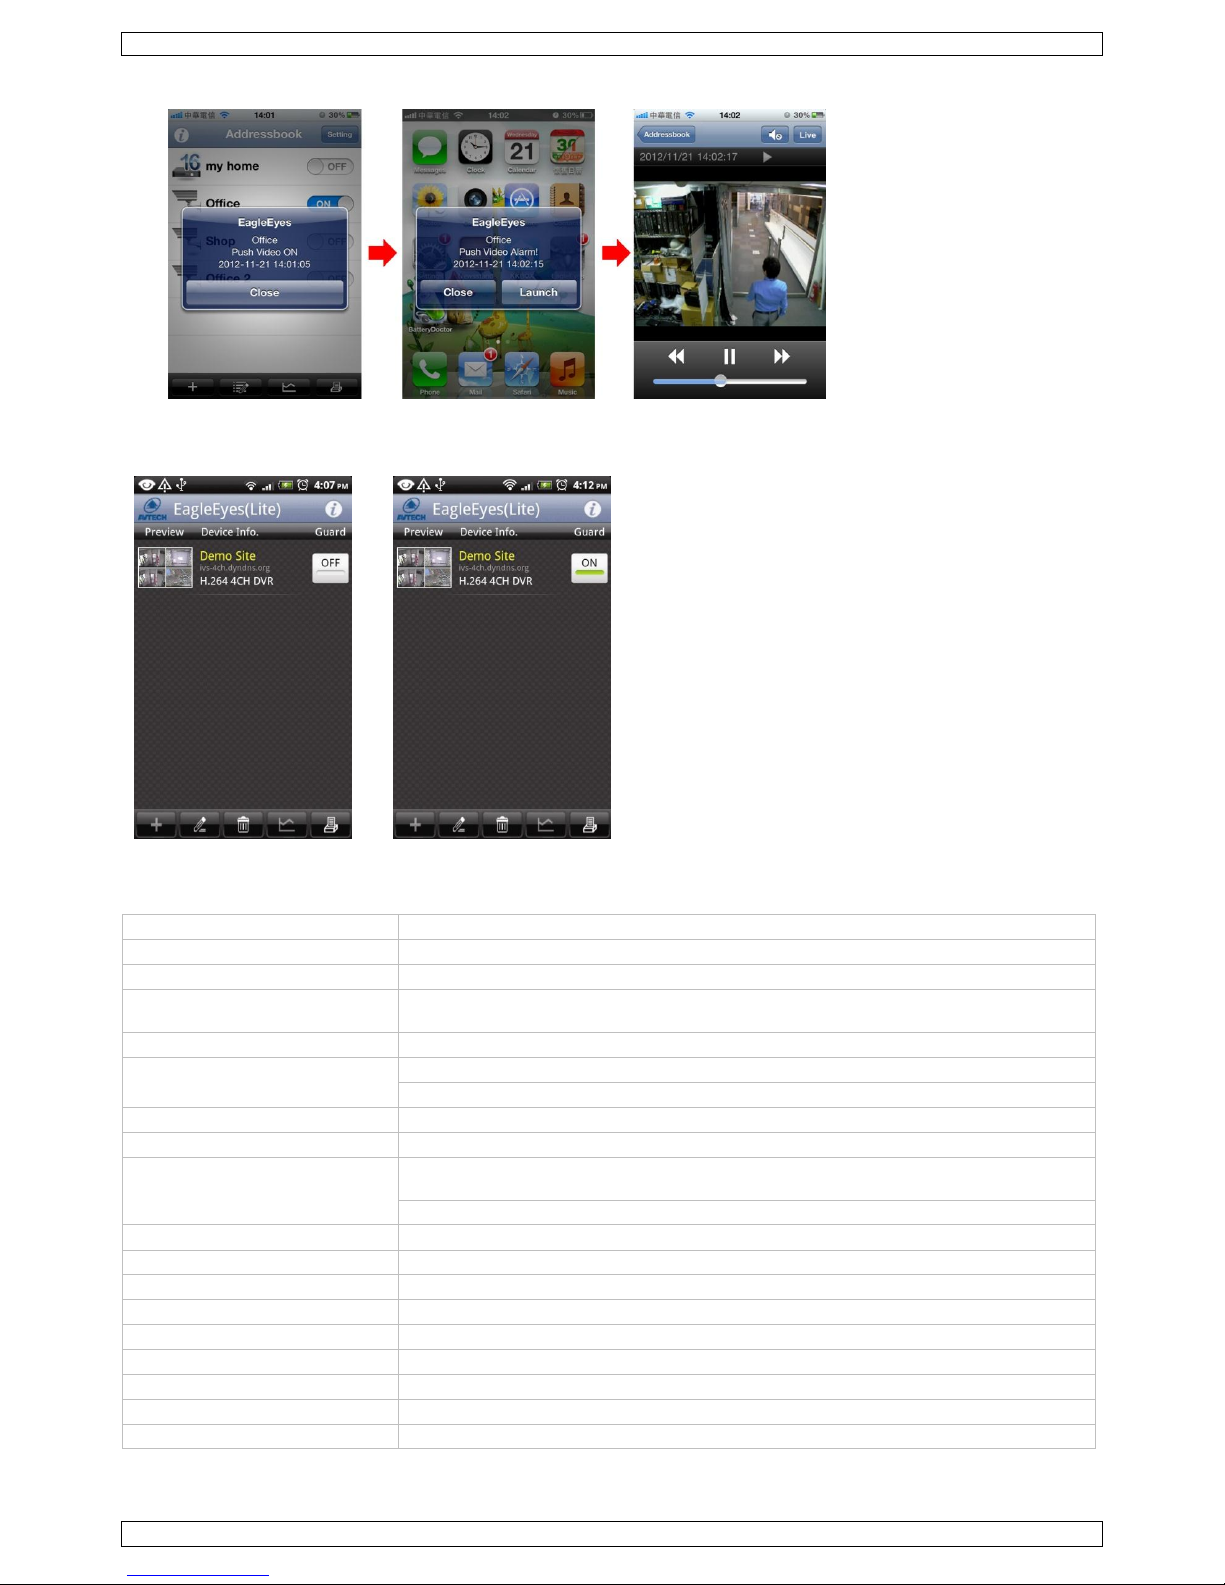
From iPhone or iPad
1. In the iPhone®/iPad® main menu, select Settings > Notifications.
2. Select EagleEyes and make sure Notification Center is set to ON.
3. Open EagleEyes and switch the Push Video button to ON. You will receive a message that push notification (push video)
is enabled.
4. Return to the main menu of your iPhone®/iPad®.
You will receive event notifications when there is a human detection or an alarm event. Select Launch to play the
Page 13
DVR16H3
V. 01 – 25/09/2014 13 ©Velleman nv
recorded clip immediately.
From Android Mobile Device
In the address book, switch Guard from OFF to ON.
15. Technical specifications
video format
PAL
video compression
H.264
video input
16 channels, composite video signal 1 Vpp / 75 ohm BNC
video output
HDMI® (1080p) & VGA (max. 1920 x 1080 pixels) & composite video signal 1 Vpp /
75 ohm BNC
video loop out
no
maximum recording rate (PAL)
960H: 960 x 576 pixels @ 400 fps (PAL)
frame: 704 × 576 pixels @ 400 fps (PAL)
adjustable recording speed
-
image quality setting
super best - best - high - normal
hard disk storage
built-in SATA type: supports 2 x HDD, supported HDD capacity over 2 TB (HDD not
incl.)
external eSATA: external hard disk or disk array (Linux system support)
HDD quick cleaning
quick clean-up of the "index system" of the recorded files. 1 TB in under 2 seconds
recording mode
manual / timer / motion / alarm / remote event
refresh rate
400 IPS for PAL
multiplex operation
live display, record, playback, backup and network
audio I/O
4 inputs / 1 output
motion detection area
16 × 12 grids per camera for all channels
motion detection sensitivity
3 parameters with adjustable sensitivity levels
pre-alarm recording
yes
backup device
USB 2.0 flash drive / network (for backup and firmware updates)
Page 14

DVR16H3
V. 01 – 25/09/2014 14 ©Velleman nv
mobile surveillance
EagleEyes software (www.eagleeyescctv.com)
smart phones
push status: on iPad®, iPod touch®, iPhone®, Android®
phone & tablet
remote login via all smart phone platforms (Apple®,
Android®, BlackBerry®, Nokia® Symbian® and Windows
Mobile®)
computer
CMS (Central Management System)
remote surveillance to monitor up to 10 different IP
addresses (Windows® & Mac OS®)
web browser: Internet Explorer®, Firefox®, Google Chrome®
and Safari® via Java, QuickTime or VLC plug-in
Ethernet
10/100BASE-T, supports remote control and LiveView via Ethernet
network connection
supports TCP/IP, PPPoE, DHCP and DDNS function
IR remote control
remote control DVR and PTZ (DVRRC4 incl.)
PTZ control
yes (via RS-485)
alarm I/O
16 inputs / 1 output
digital zoom
2 x (live & playback)
key lock
yes
video loss detection
yes
camera title
up to 6 characters
video adjustments
hue / colour / contrast / brightness
date display format
YY/MM/DD, DD/MM/YY, MM/DD/YY, and off
power source
19 VDC
power consumption
< 64 W
daylight saving
yes
operating temperature
10-40 °C
system recovery
system auto recovery after power reconnected
dimensions
430 x 65 x 338 mm
Options:
light barrier
PEM300D, PEM10D, PEM30DN
NO and NC magnetic contacts
HAA27
vibration sensor
HAA15
indoor PIR sensors
HAA52N, HAA55
security keypad
HAA2866, HAA2890, HAA9523S
Use this device with original accessories only. Velleman nv cannot be held responsible in the event of damage or
injury resulting from (incorrect) use of this device. For more info concerning this product and the latest version
of this manual, please visit our website www.velleman.eu. The information in this manual is subject to change
without prior notice.
All registered trademarks and trade names are properties of their respective owners and are used only for the clarification of
the compatibility of our products with the products of the different manufacturers. Windows, Windows XP, Windows 2000,
Windows Vista, Windows Aero, Windows 7, Windows 8, Windows Mobile, Windows Server are registered trademarks of
Microsoft Corporation in the United States and other countries.
iPad, iPod, iPod touch, iPhone, Mac, iMac, MacBook, PowerBook, Power Mac, Mac OS are trademarks of Apple Inc., registered
in the U.S. and other countries.
iOS is a trademark or registered trademark of Cisco in the U.S. and other countries and is used under license.
Android is a trademark of Google Inc.
The Trademark BlackBerry is owned by Research In Motion Limited and is registered in the United States and may be pending
or registered in other countries.
Symbian is a registered trademark of Symbian Software Ltd, Symbian Ltd.
© COPYRIGHT NOTICE – The copyright to this manual is owned by Velleman nv. All worldwide rights reserved.
No part of this manual may be copied, reproduced, translated or reduced to any electronic medium or otherwise without the
prior written consent of the copyright holder.
Page 15

DVR16H3
V. 01 – 25/09/2014 15 ©Velleman nv
BEKNOPTE HANDLEIDING
1. Inleiding
Aan alle burgers van de Europese Unie
Belangrijke milieu-informatie betreffende dit product
Dit symbool op het toestel of de verpakking geeft aan dat, als het toestel na zijn levenscyclus wordt weggeworpen,
dit toestel schade kan toebrengen aan het milieu. Gooi dit toestel (en eventuele batterijen) niet bij het gewone
huishoudelijke afval; het moet bij een gespecialiseerd bedrijf terechtkomen voor recyclage. U moet dit toestel naar
uw dealer of naar een lokaal recyclagepunt brengen. Respecteer de plaatselijke milieuwetgeving.
Hebt u vragen, contacteer dan de plaatselijke autoriteiten betreffende de verwijdering.
Dank u voor uw aankoop! Lees deze handleiding grondig door voor u het toestel in gebruik neemt. Werd het toestel
beschadigd tijdens het transport, installeer het dan niet en raadpleeg uw dealer.
OPMERKING: Dit document is een beknopte installatiehandleiding. Voor meer informatie, raadpleeg de volledige handleiding
die beschikbaar is op de meegeleverde cd-rom.
2. Veiligheidsinstructies
OPGELET
ELEKTROCUTIEGEVAAR
OPGELET:
Stel het toestel niet bloot aan regen of vocht, om het risico op elektrische schokken te voorkomen. Gebruik het toestel enkel
met de voedingsspanning zoals vermeld op het toestel. Het bedrijf is niet aansprakelijk voor schade bij verkeerd gebruik van
dit toestel.
De bliksemschicht met pijlpunt in een driehoek waarschuwt de gebruiker voor de aanwezigheid van nietgeïsoleerde gevaarlijke spanning in de behuizing van het systeem, die zo hoog kan zijn dat er een risico van
elektrische schokken bestaat.
Het uitroepteken in een driehoek, zoals afgebeeld op het systeem, is bedoeld om de gebruiker attent te maken
op belangrijke bedienings- en onderhoudsinstructies in deze gebruikershandleiding.
Houd dit toestel uit de buurt van kinderen en onbevoegden.
Elektrocutiegevaar bij het openen van het toestel. Raak geen kabels aan die onder stroom staan om dodelijke
elektrische schokken te vermijden. Laat het onderhoud van het toestel over aan een geschoolde vakman.
Trek de stekker uit het stopcontact voordat u het toestel reinigt of als u het niet gebruikt. Houd de voedingskabel
altijd vast bij de stekker en niet bij de kabel.
De behuizing mag NOOIT gedemonteerd of geopend worden tenzij anders vermeld in deze handleiding. Er zijn
geen onderdelen in het toestel die door de gebruiker gerepareerd kunnen worden. Voor onderhoud of
reserveonderdelen, contacteer uw dealer.
Dit toestel valt onder beschermingsklasse I (voorzien van een beschermende aarding ingebouwd in het
stroomsnoer). De stekker mag enkel aangesloten worden op een geaard stopcontact. Elke onderbreking van de
beschermende geleider, aan de binnenzijde of aan de buitenzijde van het toestel, is gevaarlijk. Opzettelijke
onderbreking is verboden.
3. Algemene richtlijnen
Raadpleeg de Velleman® service- en kwaliteitsgarantie achteraan deze handleiding.
Gebruik het toestel enkel binnenshuis
Bescherm dit toestel tegen regen, vochtigheid en opspattende vloeistoffen. Plaats nooit objecten gevuld met een
vloeistof op het toestel.
Bescherm dit toestel tegen stof.
Bescherm dit toestel tegen extreme hitte. Zorg ervoor dat de verluchtingsopeningen niet verstopt geraken. Voor
voldoende luchtcirculatie, voorzie een ruimte van minstens 2.5 cm tussen het toestel en elk ander object.
Bescherm het toestel tegen schokken. Vermijd brute kracht tijdens de bediening van het toestel.
Leer eerst de functies van het toestel kennen voor u het gaat gebruiken.
Om veiligheidsredenen mag u geen wijzigingen aanbrengen aan het toestel.
Gebruik het toestel enkel waarvoor het gemaakt is. De garantie vervalt automatisch bij ongeoorloofd gebruik.
De garantie geldt niet voor schade door het negeren van bepaalde richtlijnen in deze handleiding en uw dealer zal de
verantwoordelijkheid afwijzen voor defecten of problemen die hier rechtstreeks verband mee houden.
Installeer en gebruik dit toestel NIET voor illegale praktijken en respecteer ieders privacy.
Page 16

DVR16H3
V. 01 – 25/09/2014 16 ©Velleman nv
4. Eigenschappen
compressieformaat: H.264 realtime
opname in hoge resolutie:
o Full-Frame: 704 x 576 pixels
o 960H: 960 x 576 pixels met 700TVL-camera's
multiplex-functies: live weergave, opname, playback, back-up en bediening via netwerk
back-upfunctie: ondersteunt back-up via USB 2.0 flash drive en netwerk
bewaking op afstand via alle voornaamste platforms: iPad®, iPhone®, BlackBerry®, Windows Mobile®, Symbian® en
Android®: zie www.eagleeyescctv.com
opname door bewegingswaarneming:
o geavanceerde bewegingswaarneming
o opname door bewegingswaarneming met geprogrammeerde starttijd (3 instelbare parameters)
automatische geïntegreerde dynamische domeinnaamservice (DDNS): gratis dienst
automatisch systeemherstel na stroomonderbreking
ondersteunt de zomer- / wintertijd-functie
opnamemodi: manueel / timer / beweging / alarm
meertalige OSD: Engels, Frans, Nederlands, Duits, Portugees, Spaans, Tsjechisch, Hongaars, Grieks, Chinees en
Vietnamees
gebruikershandleiding: Engels
beknopte handleiding: Engels, Nederlands, Frans, Spaans, Duits
USB-muis: meegelev.
optionele harde schijven (niet meegeleverd.): HD500GB/S, HD1TB/S, HD2TB/S
IR-afstandsbediening: DVRRC4 (meegelev.)
optioneel scherm (niet meegelev.): MONSCA4N1
optionele router (niet meegelev.): EM4544, EM4571, PCRT1
5. Omschrijving
Raadpleeg de afbeeldingen op pagina 2 van deze handleiding.
Voorpaneel
LEDs
HDD
De harde schijf leest of neemt data op.
ALARM
Het alarm is ingeschakeld.
TIMER
De geprogrammeerde opnamefunctie is ingeschakeld.
PLAY
De DVR speelt de opname af.
POWER
De DVR is ingeschakeld.
Navigatieknop
In instelmodus:
Druk op ▲ / ▼ / ◄ / ► om de cursor naar boven/onder/links/rechts te verplaatsen.
Om een instelling te wijzigen, druk op + of – om de waarde te verhogen of te
verlagen.
In afspeelmodus:
Druk op om de opname te onderbreken.
Druk op om de opname te stoppen.
Druk op om vooruit te spoelen.
Druk op om terug te spoelen.
MENU
Druk op MENU om het hoofdmenu weer te geven.
ENTER
Druk op ENTER om te bevestigen.
LIST
Lijst van de opnamebestanden.
QUICK SEARCH / RECORD / MOTION / ALARM / TIMER / FULL LIST
PLAY
Druk op PLAY om de opname af te spelen.
SLOW
Langzaam afspelen.
ZOOM
In live-weergave of afspeelmodus, druk op ZOOM om het beeld van het geselecteerde kanaal te vergroten.
SEQ
Druk op SEQ om alle kanalen achtereenvolgens op het volledige scherm weer te geven. Druk nogmaals om
de functie te verlaten.
Indrukken om de multikanaalmodus weer te geven.
1–16
Druk op een knop om het desbetreffende kanaal te selecteren.
AUDIO
= SLOW + ZOOM
Druk gelijktijdig op SLOW en ZOOM, om live-geluid te selecteren of afspeeldgeluiden af te spelen.
P.T.Z.
= SEQ +
Druk op SLOW en gelijktijdig om de PTZ-bestuurmodus te openen of te sluiten.
USB-poort
(2 x)
Voor video-backups, verbind een USB-flashstation met een USB-poort; verbind een USB-muis met de andere
USB-poort.
Opmerking: sluit geen twee USB-flashstations of USB-muizen gelijktijdig aan.
Page 17
DVR16H3
V. 01 – 25/09/2014 17 ©Velleman nv
Voorpaneel
Achterpaneel
LAN-poort
Sluit de DVR via een netwerkkabel aan op een LAN-netwerk.
VGA
Aansluiting voor videomonitor (niet meegeleverd).
AUDIO IN
4 geluidsingangen voor het aansluiten van 4 externe geluidsbronnen (bijv. camera met geluid).
AUDIO OUT
1 audio-uitgang voor het aansluiten van een audiotoestel (bijv. mono-luidspreker).
VIDEO IN
4 video-ingangen voor het aansluiten van 4 externe videobronnen (bijv. camera's).
HDMI
1 video-uitgang voor het aansluiten van de DVR op de hoofdmonitor.
EXTERNAL I/O
Gebruik een 9-polige DSUB-stekker, om externe toestellen aan te sluiten (bijv. alarm, PTZ, enz.).
19V DC
Voedingsingang
MONITOR
eSATA
ALARM IN
Connectoren voor alarmsensoren.
6. Een SATA-harde schijf installeren
Installeer een SATA-harde schijf (niet meegelev.) voordat u de DVR inschakelt.
Opmerkingen
Wij raden het gebruik van een groene harde schijf in combinatie met dit apparaat af. Voor een lijst met compatibele harde
schijven, raadpleeg de gebruikershandleiding op de cd-rom.
Wis alle data van de harde schijf als u de DVR voor de eerste keer gebruikt, zodat de nieuwe opnames niet met oudere
data verwisseld kunnen worden. Voor meer informatie, raadpleeg de uitgebreide handleiding op de meegeleverde cd-rom.
Installatie
1
Schroef het bovendeksel van de DVR los en neem het weg.
Het deksel is vervaardigd uit metaal. Wees voorzichtig dat u zich niet verwondt
aan de rand.
2
Bevestig de harde schijf aan de beugel met de schroeven (meegelev.).
Plaats de harde schijf met de printplaat naar boven gericht.
3
Sluit de voedings- en datakabels aan op de harde schijf.
4
Sluit het bovendeksel van de DVR en draai de schroeven die u in stap 1 hebt
losgedraaid, opnieuw vast.
7. De hardware installeren
Raadpleeg de afbeeldingen op pagina 2 van deze handleiding.
Een monitor aansluiten
Sluit een geschikte monitor (niet meegelev.) aan op de HDMI- of VGA-uitgangspoort aan de achterkant van de DVR.
De voeding aansluiten
1. Sluit de DC-uitgangsstekker van de meegeleverde voedingsadapter aan op de VDC-ingang achteraan de DVR.
WAARSCHUWING: gebruik enkel de meegeleverde voedingsadapter.
2. Sluit het toestel via de meegeleverde stroomkabel aan op het lichtnet. Schakel de DVR nog niet in.
Een camera aansluiten
1. U kunt tot 4 geschikte camera's aansluiten. Elke aangesloten camera heeft een eigen voeding nodig.
2. Sluit de video-uitgang van de camera aan op een video-ingang aan de achterkant van de DVR. Het nummer naast de
ingangsaansluitingen duidt op het kanaalnummer. Gebruik een stekker van het type BNC.
Audio aansluiten
1. De DVR heeft vier geluidsingangen. Sluit de geluidsuitgang van een geluidsbron aan op de geluidsingang van de DVR.
Zorg ervoor dat u het geluidskanaal aansluit op het correcte videokanaal. Gebruik een stekker van het type BNC.
Front Pan el
screw hole
Front Pan el
Page 18

DVR16H3
V. 01 – 25/09/2014 18 ©Velleman nv
2. Er is ook een geluidsuitgang. Indien nodig, sluit een extern geluidstoestel (bijv. een luidspreker) aan. Gebruik een
stekker van het type BNC.
Een lokaal netwerk (LAN) aansluiten
Sluit de DVR via een netwerkkabel aan op een LAN-netwerk. Gebruik hiervoor een stekker van het type 8P8C (RJ45). Om de
netwerkverbinding in te stellen, druk op de MENU-knop en selecteer . Voor meer informatie, raadpleeg de uitgebreide
handleiding op de meegeleverde cd-rom.
8. Aan de slag
1. Zorg ervoor dat de aangesloten camera's ingeschakeld zijn.
2. Zet de voedingsschakelaar aan de achterkant van de DVR op ON.
Het opstarten duurt ongeveer 15 à 30 seconden.
Menu
Gebruik de muis om het wachtwoord van de DVR in te voeren met het toetsenbord.
De standaard gebruikersnaam en wachtwoord zijn “admin”.
De status zal wijzigen van (toetsvergrendeling) naar (ontgrendelen).
Klik met de rechtermuisknop op een willekeurige plaats op het scherm om het hoofdmenu te openen, en klik nogmaals om te
sluiten.
QUICK START
Klik om de statusweergave, de beelden, de datum en het uur in te stellen.
SYSTEM
Klik om de systeemconfiguratie in te stellen.
EVENT INFORMATION
Klik om naar het zoekmenu voor events te gaan.
ADVANCED CONFIG
Klik om CAMERA, DETECTION, ALERT, NETWORK, DISPLAY, RECORD, DEVICES & NOTIFY
in te stellen.
SCHEDULE SETTINGS
Klik om de opnametimer, detectietimer en alarmtimer in te stellen.
Voor meer details, raadpleeg de uitgebreide handleiding op de meegeleverde cd-rom.
Datum en tijd instellen
Stel voor het eerste gebruik de datum en het uur in.
1. Klik met de rechtermuisknop en geef het admin wachtwoord in.
2. Klik op het icoon QUICK START.
3. Selecteer TIME SETUP om de datum en het uur in te stellen.
Opmerking: Opmerking: Wijzig de ingestelde datum en het uur niet meer eenmaal een opname is gestart.
Opmerking: laat de DVR bij de eerste ingebruikname minstens 48 uur ingeschakeld, nadat u de datum en het uur hebt
ingesteld.
Het wachtwoord instellen
1. Klik met de rechtermuisknop en geef het admin wachtwoord in.
2. Klik op het icoon SYSTEM.
Page 19

DVR16H3
V. 01 – 25/09/2014 19 ©Velleman nv
3. Ga naar ACCOUNT. Selecteer het wachtwoord dat u wilt instellen en klik op EDIT.
Opmerking: een gewone gebruiker heeft geen toegang tot het hoofdmenu, enkel tot de menubalk (zie hieronder).
4. Scroll naar boven ( ) of naar onder ( ) om de waarde van het eerste nummer te selecteren en druk op ENTER om
op te slaan. Ga naar het volgende teken of gebruik de muis om de gewenste waarde te selecteren. Herhaal dit voor de
vier wachtwoordcijfers.
Opmerking: het standaard admin wachtwoord is admin.
Opname-instellingen
1. Klik met de rechtermuisknop en geef het admin wachtwoord in.
2. Gebruik de pijltjestoets om ADVANCED CONFIG te selecteren.
3. Gebruik de pijltjestoets om RECORD te selecteren.
4. Selecteer het opnametype dat u wilt instellen (manueel, event of timer).
5. In "CHANNEL", selecteer "ALL" om de wijzigingen op alle kanalen toe te passen.
6. Of selecteer "BY CHANNEL" om de beeldgrootte, beelden per seconde & beeldkwaliteit voor elk kanaal afzonderlijk in te
stellen.
7. Gebruik de pijltjestoets om GENERAL te selecteren.
8. Stel de beeldgrootte, beelden per seconden (I.P.S.) en beeldkwaliteit in.
9. Selecteer APPLY.
Voor meer details, raadpleeg de uitgebreide handleiding op de meegeleverde cd-rom.
Geluid afspelen
Druk gelijktijdig op SLOW en ZOOM om het gewenste geluidskanaal te selecteren of gebruik de menubalk (zie hieronder). Het
geselecteerde audiokanaal wordt in de statusbalk weergegeven.
Het gebruikerstype veranderen
1. U kunt als administrator ( ) of als gebruiker ( ) toegang tot de DVR hebben. De symbolen worden in de statusbalk
weergegeven.
2. Klik op het gewenste symbool ( of ) om als administrator of gebruiker in te loggen ).
3. . Druk op ( ) en geef het wachtwoord van het gewenste profiel in.
9. Gebruik
Display
De volgende afbeelding geeft de lay-out van de display weer.
A systeemdatum en -uur
B algemene systeemstatus
C beschikbare schijfruimte
D
kanaalstatus
live audiokanaal ingeschakeld
geprogrammeerde opname
geluidskanaal uitgeschakeld
USB-muis aangesloten
digitale zoom aan (geel) / uit
met internet verbonden
LAN-aansluiting
harde schijf overschrijven (standaard)
geen netwerkverbinding
PTZ-modus
USB-flashdrive aangesloten
beweging
toetsvergrendeling aan
alarm
sequentiefunctie
alarmmodus
opnamemodus
gebruiker ingelogd
administrator ingelogd
Deze symbolen kunnen lichtjes van de weergegeven symbolen afwijken.
Page 20
DVR16H3
V. 01 – 25/09/2014 20 ©Velleman nv
Snelmenubalk
Opmerking: Enkel zichtbaar wanneer een USB-muis aangesloten is.
Beweeg de cursor naar links, om de snelmenubalk weer te geven. Deze geeft de volgende pictogrammen weer:
Klik om het kanaalkeuzevenster weer te geven en het gewenste kanaal te selecteren.
Klik om het afspeelpaneel weer te geven.
Klik om de laatst opgenomen videoclip af te spelen, of klik om de zoeklijst te openen.
Stel eerst het gewenste kanaal in, en klik om de inzoommodus te openen.
Klik en sleep het rode kader (linksonder) om het gewenste bereik weer te geven.
Om opnieuw uit te zoomen, klik op .
Klik om het uitschakelmenu weer te geven en het apparaat uit te schakelen of opnieuw op te starten.
Voor meer details, raadpleeg de uitgebreide handleiding op de meegeleverde cd-rom.
Opname
Sluit de camera('s) en de harde schijf correct aan op het toestel.
Het toestel start de opname wanneer de opname- en de pre-alarmfunctie ingeschakeld zijn.
Het symbool ( ) verschijnt op de display.
Bij bewegingswaarneming of alarm (functie is ingeschakeld) wordt het symbool ( ) of ( ) weergegeven.
Bij een geprogrammeerde opname verschijnt het symbool ( ) en licht de opname-LED op.
Standaard staat de DVR in overschrijfmodus en wordt ( ) weergegeven.
Weergave
Zorg ervoor dat het controlepaneel niet vergrendeld is. Druk op PLAY in het controlepaneel of gebruik de snelmenubalk, om
het afspeelpaneel te openen:
A
statusbalk
D
informatie
B
bedieningstoetsen
E
sluiten
C
zoekfunctie
F
herhaalfunctie AB instellen / back-up menu openen
Opmerking: een bestand moet minstens 8192 beelden bevatten (vb. ips = 30, de opname moet minstens 273 seconden
lang zijn).
De snel vooruit ( )- en snel achteruit ( -knoppen) regelen de afspeelsnelheid. Druk meermaals op de knop om de
snelheid aan te passen: 4x, 8x, 16x of 32x (max.).
Druk op de pauze knop ( ) om de tijdelijk te onderbreken.
Druk op de stopknop ( ) om terug te keren naar live bewaking
Druk eenmaal op SLOW om de opname aan 1/4 afspeelsnelheid af te spelen, of druk tweemaal om de opname aan 1/8
afspeelsnelheid af te spelen.
Zoekfunctie
1. Om een event te zoeken, druk op LIST (frontpaneel).
Het systeem geeft een overzicht van de opgenomen bestanden weer.
2. U kunt volgens bestandstype zoeken. ALARM, MANUAL, MOTION, SYSTEM en FULL LIST.
3. Selecteer de gewenste lijst en opname.
4. Druk op ENTER om het bestand af te spelen.
Opmerking: U kunt de opgenomen bestanden ook met de Video Viewer-software zoeken.
Page 21

DVR16H3
V. 01 – 25/09/2014 21 ©Velleman nv
10. De EagleEyes-app installeren
Vereisten
Voordat u EagleEyes voor bewaking op afstand installeert op uw draagbaar toestel, controleer het volgende:
U heeft toegang tot mobiele internetdiensten via uw mobiele telefoon.
Opmerking: De kosten voor internettoegang via draadloze of 3G-netwerken kunnen mogelijk in rekening worden
gebracht. Voor meer informatie over internettoegang, neem contact op met uw lokale netwerk- of serviceprovider.
U hebt het IP-adres, poortnummer, gebruikersnaam en wachtwoord genoteerd om toegang te krijgen tot uw
netwerkcamera via het internet.
De software downloaden
1. Ga naar www.eagleeyescctv.com vanaf uw draagbaar toestel en log in.
Download EagleEyes niet vanaf uw computer.
o Voor Android ®, selecteer de downloadlink van de website om het downloaden te starten.
o Voor iPhone® en iPad® zijn er twee versies van EagleEyes beschikbaar: EagleEyesHD Plus (betalend) en EagleEyesHD
Lite (gratis).
2. Selecteer de gewenste versie en u wordt naar de App Store doorgestuurd om de applicatie te downloaden.
3. Na het downloaden wordt EagleEyes automatisch geïnstalleerd op de locatie waar alle toepassingen standaard in uw
telefoon zijn opgeslagen of op een door u opgegeven locatie.
Opmerking: Voor meer details over de configuratie en het gebruik van EagleEyes, raadpleeg de officiële website
www.avtech.com.tw.
11. Push status-configuratie
Hebt u een iPhone®, iPad® of Android®, dan kunt u de push status-functie van de DVR gebruiken: de DVR zal een bericht naar
uw mobiele toestel sturen wanneer een alarm geactiveerd wordt.
De alarmevents zijn:
ALL
BEELDVERLIES
HARDE SCHIJF VOL
AAN
HARDE SCHIJF (WISSEN / GEEN HARDE SCHIJF / TE
WARME TEMPERATUUR)
NETWERKTOEGANG
TOETSVERGRENDELING INACTIEF
NETWERK
UPS
SYSTEEMFOUT.
Daarvoor dient u de EagleEyes app op uw draagbaar toestel te installeren (zie: De EagleEyes App installeren onderaan).
Op de DVR:
1. Stel "ACTION" in op ON.
2. Selecteer de events waarvoor u een bericht wilt ontvangen.
U ontvangt een bericht telkens er zich een event voordoet.
11.1 Configuratie
Voor u push status configureert, zorg ervoor dat:
Het DVR-systeem is ingesteld zoals beschreven in het hoofdstuk Aansluiting en instelling van de volledige handleiding
op de meegeleverde cd-rom.
De DVR is aangesloten op het internet.
De EagleEyes app is geïnstalleerd op uw draagbaar toestel (zie: De EagleEyes App installeren bovenaan).
Page 22

DVR16H3
V. 01 – 25/09/2014 22 ©Velleman nv
Stappen
1. Open EagleEyes en voeg deze DVR toe aan het EagleEyes-adresboek.
Voor meer details over het gebruik van EagleEyes, raadpleeg de website www.eagleeyescctv.com.
2. In de EagleEyes-applicatie, schakel de push status-functie in.
3. Activeer het alarm om te controleren of u een bericht ontvangt.
12. Push Video-configuratie
12.1 Pinaansluiting
Met een iPhone®, iPad® of een Android® mobiel toestel kunt u de push video-functie gebruiken: de DVR stuurt een melding
van zodra een alarm zich voordoet (push video). Slechts bepaalde alarm-ingangspinnen ondersteunen deze functie.
Er bestaan verschillende manieren om alarmsensoren aan te sluiten voor push video:
via de push video alarmingang
via de externe I/O-poort.
Push Video Alarm-In Terminal
Een push video alarmingang bevindt zich aan de achterkant van de DVR. Raadpleeg de onderstaande tabel voor de
pinaansluitingen die push video en de overeenkomstige videokanalen ondersteunen.
Alarm
Overeenkomstig videokanaal
Alarm 1
CH1
Alarm 2
CH2
Alarm 3
CH3
Alarm 4
CH4
Externe I/O-poort
Raadpleeg de onderstaande tabel voor de pinaansluitingen die push video en de overeenkomstige videokanalen
ondersteunen.
Pin
Overeenkomstig videokanaal
Pin 2
CH1
Pin 15
CH2
Pin 3
CH3
Pin 16
CH4
Page 23

DVR16H3
V. 01 – 25/09/2014 23 ©Velleman nv
Aansluiting alarmsensor
Sluit de alarmsensor, zoals magneetcontacten, aan op de alarmingang of I/O-pinnen die push video ondersteunen.
12.2 Configuratie
Voor u push video programmeert, zorg ervoor dat:
Het DVR-systeem is ingesteld zoals beschreven in Aansluiting en instelling.
De DVR verbonden is met het internet.
U heeft de EagleEyes-app op uw iPhone®, iPad® of Android® geïnstalleerd.
Voor meer details, zie Mobiele bewaking via EagleEyes.
Push video configureren:
1. Klik rechts om het hoofdmenu weer te geven en selecteer (ADVANCED CONFIG) > NOTIFY.
2. Stel GUARD in op ON.
3. Configureer de alarmsensor (normaal open of normaal gesloten).
Opgelet! Selecteer het andere type, om correct te functioneren.
Indien uw alarmsensor N.C. aangeeft.(normaal gesloten, alarm gaat af wanneer het contact geopend is),
selecteer vervolgens ALARM N.O.
Indien uw alarmsensor N.O. aangeeft. (normaal open, alarm gaat af wanneer het contact gesloten is),
selecteer vervolgens ALARM N.C.
ADVANCED CONFIG
CAMERA
PUSH VIDEO
PUSH MESSAGE
MESSAGE MAIL
VIDEO MAIL
DETECTION
GUARD
ON ALERT
CH01
ALARM OFF / INTERNAL ALARM
CH1 NETWERK
CH02
ALARM OFF
CH2 DISPLAY
CH03
ALARM N.O.
office
RECORD
CH04
ALARM OFF
CH4
DEVICES
DCCS
IVS
NOTIFY
EXIT
4. Open EagleEyes, en voeg deze DVR toe aan het EagleEyes-adresboek.
Opmerking: Ga naar www.eagleeyescctv.com voor meer informatie over EagleEyes.
Page 24

DVR16H3
V. 01 – 25/09/2014 24 ©Velleman nv
5. Schakel de push video-functie in.
6. Schakel het alarm in.
7. U ontvangt een alarmmelding en video op uw mobiele toestel.
13. Mobiele bewaking via EagleEyes
EagleEyes is een krachtige bewakingssoftware ontworpen door AV TECH Corporation.
Opmerking: Raadpleeg http://www.eagleeyescctv.com voor meer informatie over EagleEyes.
Contacteer Velleman indien u vragen hebt over EagleEyes. Voor contactgegevens, ga naar www.velleman.eu.
13.1 Richtlijnen vooraf
Voordat u EagleEyes voor bewaking op afstand installeert op uw mobiele telefoon, zorg ervoor dat u het volgende hebt
gecontroleerd:
Uw mobiele platform is een iPhone®, iPad®, BlackBerry® of Android®.
U heeft zich geabonneerd voor mobiele netwerkdiensten op uw telefoon; de service is klaar voor gebruik op uw telefoon.
Opmerking: De kosten voor internettoegang via draadloze of 3G-netwerken kunnen mogelijk in rekening worden
gebracht. Voor details over de toegangstarieven tot het internet, neem contact op met uw lokale netwerk- of
serviceprovider.
U hebt het IP-adres, poortnummer, gebruikersnaam en wachtwoord genoteerd om toegang te krijgen tot uw DVR- of
netwerkcamera via het internet.
13.2 EagleEyes downloaden
1. Ga naar www.eagleeyescctv.com vanaf uw mobiele telefoon en log in.
Opmerking: Probeer niet om EagleEyes vanaf uw computer te downloaden.
2. Selecteer Products > Software > Mobile app om toegang te krijgen tot de startpagina van EagleEyes.
3. Selecteer uw platform (iOS, BlackBerry® of Android®) en download het gewenste programma.
Opmerking: De DVD is enkel compatibel met iPhone®, iPad®BlackBerry®en Android®.
4. Volg de aanwijzingen op het scherm voor het downloaden.
Na het downloaden wordt EagleEyes automatisch geïnstalleerd op uw mobiele toestel.
Opmerking: Voor meer informatie over de configuratie van dit programma, raadpleeg de betreffende instructies op de
downloadpagina.
14. Push Video-configuratie
Deze DVR ondersteunt de meldingsfunctie via uw iPhone, iPad of Android-smartphone met de EagleEyes-software. Na een
alarm, stuurt de DVR onmiddellijk een melding van de gebeurtenis naar uw mobiele toestel.
14.1 Richtlijnen vooraf
Voer eerst volgende handelingen uit alvorens push video in te stellen:
U heeft de EagleEyes-app op uw iPhone®, iPad® of Android® geïnstalleerd. Voor meer details, zie EagleEyes
downloaden.
Page 25

DVR16H3
V. 01 – 25/09/2014 25 ©Velleman nv
Sluit een camera met bewegingswaarneming aan op CH1, of sluit een extern alarm aan op de push video alarmingang op
het achterpaneel. Sluit een camera aan om alarmevents op te slaan. Voor meer details over videokanalen en
alarmpinnen, zie Push Video-configuratie.
Schakel de opnamefunctie in op de DVR.
Schakel de bewegingswaarneming in op de DVR.
Uw DVR is met het internet verbonden. Voor meer details, zie
http://www.surveillance-download.com/user/CMS.pdf.
14.2 De Push Video-functie inschakelen
Vanaf iPhone of iPad
1. In het iPhone®/iPad® -hoofdmenu, selecteer Settings > Notifications.
2. Kies EagleEyes en stel Notification Center in op ON.
3. Open EagleEyes en zet de Push Video knop op ON. U ontvangt een bericht dat push-berichten (push video)
ingeschakeld zijn.
4. Keer terug naar het hoofdmenu van de iPhone®/iPad®.
U ontvangt een melding wanneer er menselijke aanwezigheid wordt gedetecteerd of als er zich een alarm voordoet.
Selecteer Launch om de opgenomen video onmiddellijk af te spelen.
Vanaf een Android-smartphone
In het adresboek, stel Guard van OFF in op ON.
Page 26

DVR16H3
V. 01 – 25/09/2014 26 ©Velleman nv
15. Technische specificaties
videoformaat
PAL
videocompressie
H.264
video-ingang
16 kanalen, composiet videosignaal 1 Vpp / 75 ohm BNC
video-uitgang
HDMI® (1080p) & VGA (max. 1920 x 1080 pixels) & composiet videosignaal 1 Vpp /
75 ohm BNC
'loop' video-uitgang
nee
max. opnamefrequentie (PAL)
960H: 960 x 576 pixels @ 400 fps (PAL)
frame: 704 × 576 pixels @ 400 IPS (PAL)
instelbare opnamesnelheid
-
instelling beeldkwaliteit
Super best (superieur) - Best (best) - High (hoog) - Normal (normaal)
opslag op harde schijf
ingebouwd SATA-type: ondersteunt 2 x HDD, ondersteunt HDD van meer dan 2 TB
(harde schijf niet meegelev.)
externe eSATA: externe harde schijf of disk-array (ondersteunt Linux-systeem)
HDD snelwisfunctie
snel wissen van het "indexsysteem" van de opgenomen beelden. 1 TB in minder dan
2 seconden
opnamemodus
manueel / timer / beweging / alarm / inschakeling alarm op afstand
beeldfrequentie
400 beelden per seconde (PAL)
multiplex-werking
live-weergave, opname, afspelen, back-up en netwerk
audio I/O
4 ingangen, 1 uitgang
detectiebereik
16 × 12 triggerpunten per camera voor alle kanalen
detectiegevoeligheid
3 parameters met instelbare gevoeligheidsniveaus
opname pre-alarm
ja
back-uptoestel
USB 2.0 flash drive / netwerk (voor back-up en updates van firmware)
bewaking op afstand
EagleEyes-software (www.eagleeyescctv.com)
smartphones
push status: op iPad®, iPod touch®, iPhone®, Android®
phone & tablet
login op afstand vanaf alle smartphoneplatforms (Apple®,
Android®, BlackBerry®, Nokia® Symbian® en Windows
Mobile®)
computer
CMS (Central Management System)
bewaking op afstand tot 10 IP-adressen (Windows® & Mac
OS®)
webbrowser Internet Explorer®, Firefox®, Google Chrome®
en Safari® via Java, QuickTime of VLC plug-in
Ethernet
10/100BASE-T, ondersteunt bediening op afstand en LiveView via Ethernet
netwerkverbinding
ondersteunt TCP/IP, PPPoE, DHCP en DDNS
IR-afstandsbediening
bediening op afstand van de DVR en PTZ-functies (DVRRC4 meegelev.)
PTZ-besturing
ja (via RS-485)
alarm I/O
16 ingangen / 1 uitgang
digitale zoom
2x (live-weergave & afspelen)
toetsvergrendeling
ja
detectie beeldverlies
ja
cameranaam
tot 6 tekens
videoregelingen
tint / kleur / contrast / helderheid
formaat tijdsweergave
JJ/MM/DD, DD/MM/JJ, MM/DD/JJ en geen
voeding
19 VDC
verbruik
< 64 W
zomertijdregeling
ja
werktemperatuur
10-40 °C
systeemherstel
automatisch systeemherstel na stroomonderbreking
afmetingen
430 x 65 x 338 mm
Page 27

DVR16H3
V. 01 – 25/09/2014 27 ©Velleman nv
Opties:
lichtsluis
PEM300D, PEM10D, PEM30DN
magneetcontact normaal open &
gesloten
HAA27
trillingssensor
HAA15
PIR-sensoren voor binnen
HAA52N, HAA55
toegangscontrolepaneel
HAA2866, HAA2890, HAA9523S
Gebruik dit toestel enkel met originele accessoires. Velleman nv is niet aansprakelijk voor schade of kwetsuren
bij (verkeerd) gebruik van dit toestel. Voor meer informatie over dit product en de laatste versie van deze
handleiding, zie www.velleman.eu. De informatie in deze handleiding kan te allen tijde worden gewijzigd zonder
voorafgaande kennisgeving.
Alle geregistreerde handelsmerken en handelsnamen zijn eigendom van hun respectieve bezitters, en zijn enkel gebruikt als
voorbeeld van de compatibiliteit tussen onze producten en de producten van de verschillende fabrikanten. Windows, Windows
XP, Windows 2000, Windows Vista, Windows Aero, Windows 7, Windows 8, Windows Mobile, Windows Server zijn
geregistreerde handelsmerken van Microsoft Corporation in de Verenigde Staten en in andere landen.
iPad, iPod, iPod touch, iPhone, Mac, iMac, MacBook, PowerBook, Power Mac, Mac OS zijn handelsmerken van Apple Inc.,
geregistreerd in de VS en andere landen.
IOS is een handelsmerk of een geregistreerd handelsmerk van Cisco in de Verenigde Staten en andere landen en wordt
gebruikt onder licentie.
Android is een handelsmerk van Google Inc.
Het handelsmerk BlackBerry® is eigendom van Research In Motion Limited en is geregistreerd in de Verenigde Staten. In
andere landen kan dit een geregistreerd handelsmerk zijn of is de aanvraag mogelijk in behandeling.
Symbian is een geregistreerd handelsmerk van Symbian Software Ltd, Symbian Ltd.
© AUTEURSRECHT – Velleman nv heeft het auteursrecht voor deze handleiding. Alle wereldwijde rechten
voorbehouden. Het is niet toegestaan om deze handleiding of gedeelten ervan over te nemen, te kopiëren, te vertalen, te
bewerken en op te slaan op een elektronisch medium zonder voorafgaande schriftelijke toestemming van de rechthebbende.
Page 28

DVR16H3
V. 01 – 25/09/2014 28 ©Velleman nv
GUIDE D'INSTALLATION RAPIDE
1. Introduction
Aux résidents de l'Union européenne
Informations environnementales importantes concernant ce produit
Cette icône sur l'appareil ou l'emballage indique que l’élimination d’un appareil en fin de vie peut polluer
l'environnement. Ne pas jeter cet appareil (ni les piles) parmi les déchets municipaux non sujets au tri sélectif; une
déchetterie traitera l’appareil en question. Renvoyer l'appareil à votre fournisseur ou à un service de recyclage local.
Il convient de respecter la réglementation locale relative à la protection de l’environnement.
En cas de questions, contacter les autorités locales pour élimination.
Nous vous remercions de votre achat! Lire attentivement le présent mode d'emploi avant la mise en service de l’appareil. Si
l’appareil a été endommagé pendant le transport, ne pas l’installer et consulter votre revendeur.
REMARQUE : Ce document est un guide d'installation rapide. Pour plus d'informations, consulter le mode d'emploi complet sur
le CD-ROM inclus.
2. Consignes de sécurité
ATTENTION
RISQUE D'ÉLECTROCUTION
ATTENTION :
Afin d’éviter tout risque d’électrocution, ne pas exposer cet appareil à la pluie ou à l’humidité. N'utiliser cet appareil
seulement avec la source d'alimentation indiquée sur l'étiquette. L'entreprise ne sera aucunement responsable de dommages
ou lésions survenus à un usage (incorrect) de cet appareil.
Le triangle équilatéral contenant un éclair terminé par une flèche avertit l'utilisateur de la présence d'une tension
potentiellement dangereuse qui pourrait engendrer un risque d'électrocution.
Ce point d'exclamation dans un triangle équilatéral avertit l'utilisateur de la présence de remarques importantes
concernant l'emploi et/ou l'entretien de l'appareil.
Garder l'appareil hors de la portée de jeunes enfants et de personnes non qualifiées.
Risque d’électrocution lors de l’ouverture du boîtier. Toucher un câble sous tension peut causer des
électrochocs mortels. Confier la réparation de l'appareil à du personnel qualifié.
Toujours débrancher l’appareil s’il n’est pas utilisé ou avant le nettoyage ou l'entretien. Tirer sur la fiche pour
débrancher l'appareil; non pas sur le câble.
NE JAMAIS démonter ni ouvrir le boîtier sauf indication contraire dans ce mode d'emploi. Il n’y a aucune pièce
réparable par l’utilisateur dans l'appareil. Commander des pièces de rechange éventuelles chez votre revendeur.
Cet appareil ressort à la classe de protection I (fourni avec un contact de mise à la terre de protection incorporé
dans le cordon d’alimentation). La fiche doit être branchée sur une prise de terre. Toute interruption du
conducteur de protection dans ou en dehors de l'appareil crée un danger électrique potentiel. Toute interruption
intentionnelle est interdite.
3. Directives générales
Se référer à la garantie de service et de qualité Velleman® en fin de ce mode d'emploi.
Utiliser cet appareil uniquement à l'intérieur
Protéger de la pluie, de l’humidité et des projections d’eau. Ne jamais placer d’objet contenant un liquide sur
l’appareil.
Protéger cet appareil contre la poussière.
Protéger cet appareil contre la chaleur extrême. Veiller à ce que les fentes de ventilation ne soient pas bloquées.
Pour une circulation d'air suffisante, laisser une distance minimale de 2.5cm entre l’appareil et tout autre objet.
Protéger cet appareil des chocs. Traiter l'appareil avec circonspection pendant l’opération.
Se familiariser avec le fonctionnement de l’appareil avant de l’utiliser.
Toute modification est interdite pour des raisons de sécurité.
N’utiliser l'appareil qu’à sa fonction prévue. Un usage impropre annule d'office la garantie.
La garantie ne s’applique pas aux dommages survenus en négligeant certaines directives de cette notice et votre
revendeur déclinera toute responsabilité pour les problèmes et les défauts qui en résultent.
Installer et utiliser l'appareil en respectant la législation et la vie privée des tiers.
Page 29

DVR16H3
V. 01 – 25/09/2014 29 ©Velleman nv
4. Caractéristiques
format de compression : H.264 en temps réel
enregistrement haute résolution :
o Full Frame : 704 x 576 pixels
o 960H : 960 x 576 pixels avec caméras à 700 lignes TV
fonctions multiplex : lecture en direct, enregistrement, lecture, sauvegarde et utilisation par réseau
fonction de sauvegarde : supporte la sauvegarde par USB 2.0 flash drive et réseau
vidéosurveillance à distance depuis les systèmes principaux comprenant iPad®, iPhone®, BlackBerry®, Windows Mobile®,
Symbian® et Android®: voir www.eagleeyescctv.com
enregistrement par détection de mouvements :
o détection de mouvements avancée
o enregistrement par détection de mouvements programmé (3 paramètres réglables)
service de noms de domaine dynamiques (DDNS) : service gratuit
auto-rétablissement du système après la remise sous tension
fonction 'temps d'été / d'hiver'
mode d'enregistrement : enregistrement manuel / programmé / par détection de mouvements / alarme
OSD multilingue : anglais, français, néerlandais, allemand, portugais, espagnol, tchèque, hongrois, grec, chinois et
vietnamien
mode d'emploi : anglais
guide de démarrage rapide : anglais, néerlandais, français, espagnol, allemand
souris USB : incl.
disques durs optionnels (non incl.) : HD500GB/S, HD1TB/S et HD2TB/S
télécommande IR : DVRRC4 (incl.)
moniteur optionnel (non incl.) : MONSCA4N1
routeur optionnel (non incl.) : EM4544, EM4571, PCRT1
5. Description
Se référer aux illustrations en page 2 de ce mode d'emploi.
Panneau frontal
LEDs
HDD
Lecture ou enregistrement en cours.
ALARM
L'alarme s'est déclenchée.
TIMER
L'enregistrement programmé est activé.
PLAY
Lecture en cours.
POWER
Le DVR est allumé.
Bouton de
navigation
En mode de configuration :
Appuyer sur ▲ / ▼ / ◄ / ► pour déplacer le curseur vers le haut/bas/gauche/droite.
Pour modifier un réglage, appuyer sur + ou – pour augmenter ou diminuer la valeur.
En mode de lecture :
Appuyer sur pour interrompre la lecture.
Appuyer sur pour arrêter la lecture.
Appuyer sur pour avancer rapidement.
Appuyer sur pour reculer rapidement.
MENU
Appuyer pour accéder au menu principal.
ENTER
Appuyer pour confirmer les réglages.
LIST
Liste des fichiers enregistrés.
QUICK SEARCH / RECORD / MOTION / ALARM / TIMER / FULL LIST
PLAY
Appuyer pour lire la vidéo enregistrée.
SLOW
En mode de lecture, appuyer pour une lecture ralentie.
ZOOM
En mode de lecture en direct ou en mode d'enregistrement, appuyer pour agrandir l'image du canal
sélectionné.
SEQ
Appuyer pour un affichage séquentiel en plein écran de tous les écrans. Appuyer de nouveau pour quitter la
fonction.
Appuyer pour afficher le mode multicanaux.
1–16
Appuyer sur un bouton pour sélectionner le canal correspondant.
AUDIO
= SLOW + ZOOM
Appuyer simultanément sur SLOW et ZOOM pour sélectionner le mode audio.
P.T.Z.
= SEQ +
Appuyer simultanément sur SLOW pour entrer ou quitter le mode de contrôle PTZ
Port USB (2 x)
Connecter une clé USB vidéo à un port USB; connecter une souris USB à l'autre port.
Note: Ne pas connecter simultanément deux clés USB ou deux souris USB.
Page 30

DVR16H3
V. 01 – 25/09/2014 30 ©Velleman nv
Panneau arrière
port LAN
Connecter le DVR au réseau LAN avec un câble de réseau.
VGA
Connecteur pour moniteur de vidéo (non incl).
AUDIO IN
4 canaux d'entrée audio pour connecter 4 sources audio externes (p. ex. caméras avec audio).
AUDIO OUT
1 sortie audio pour connecter un appareil audio (p. ex. un haut-parleur, mono).
VIDEO IN
4 canaux d'entrée vidéo pour connecter 4 sources vidéo externes (p. ex. des caméras).
HDMI
1 canal de sortie vidéo pour connecter le DVR au moniteur principal.
EXTERNAL I/O
Connecter un signal externe, p. ex. une alarme, caméra PTZ, par un connecteur DSUB à 9 broches.
19V DC
Entrée d'alimentation
MONITEUR
eSATA
ALARM IN
Connecteurs pour capteurs d'alarme.
6. Installer un disque dur SATA
Installer un disque dur SATA (non incl.) avant d'allumer le DVR.
Notes
Il n'est pas recommandé d'utiliser un disque dur vert dans cet appareil. Consulter le mode d'emploi sur le CD pour une
liste de disques durs compatibles.
Supprimer toutes les données du disque dur avant d'utiliser le DVR pour la première fois pour ne pas confondre les
données enregistrées et les données enregistrées antérieurement sur le même disque dur. Pour plus d'informations,
consulter le mode d'emploi détaillé sur le CD.
Installation
1
Desserrer les vis et enlever le couvercle supérieur du DVR.
Le couvercle est fabriqué en métal. Faire attention à ne pas se blesser sur les
bords.
2
Fixer le disque dur au support avec les vis (incl.).
Installer le disque dur avec le circuit imprimé vers le haut
3
Connecter les câbles d'alimentation et de données au disque dur.
4
Remettre le couvercle supérieur du DVR et resserrer les vis desserrées à l'étape
1.
7. Installer le matériel
Se référer aux illustrations en page 2 de ce mode d'emploi.
Connecter un moniteur
Connecter un moniteur approprié (non incl.) au port de sortie vidéo HDMI ou VGA de la partie arrière du DVR.
Connecter l'alimentation
1. Connecter le connecteur CC de l'adaptateur secteur (incl.) à l'entrée d'alimentation à l'arrière du DVR.
AVERTISSEMENT : n'utiliser que l'adaptateur inclus.
2. Utiliser le câble d'alimentation (incl.) pour brancher l'appareil sur une prise électrique appropriée. Ne pas encore
allumer le DVR.
Connecter une caméra
1. Il est possible de connecter jusqu'à 4 caméras appropriées. Chaque caméra nécessite sa propre source d'alimentation.
2. Connecter la sortie vidéo de la caméra à l'entrée vidéo de la partie arrière du DVR. Le chiffre à côté des connecteurs
d'entrée est le numéro du canal. Le connecteur est du type BNC.
Connecter audio
1. Le DVR intègre 4 entrées audio. Connecter la sortie audio d'une source audio à l'entrée audio du DVR. Veiller à connecter
le canal audio au canal vidéo correspondant. Le connecteur est du type BNC.
Front Pan el
screw hole
Front Pan el
Page 31

DVR16H3
V. 01 – 25/09/2014 31 ©Velleman nv
2. L'enregistreur est également équipé d'un connecteur de sortie audio. Si nécessaire, connecter un appareil audio (p.ex.
haut-parleur) à ce connecteur. Le connecteur est du type BNC.
Connecter un réseau local (Local Area Network, LAN)
Connecter le DVR au réseau LAN avec un câble de réseau depuis le port LAN de la partie arrière du DVR. Le type de
connecteur est 8P8C (RJ45). Pour configurer la connexion réseau, appuyer sur le bouton MENU et sélectionner . Pour plus
d'informations, consulter le mode d'emploi détaillé sur le CD inclus.
8. Mise en service
1. S'assurer que les caméras connectées sont allumées.
2. Mettre l'interrupteur ON/OFF de la partie arrière du DVR sur ON.
Cela prend environ 15 à 30 secondes pour démarrer.
Menu
Utiliser la souris pour saisir le mot de passe du DVR avec le clavier du mot de passe .
Le nom d'utilisateur et mot de passe par défaut sont “admin”.
L'état passe de (verrouillage des touches) à (déverrouiller).
Cliquer avec le bouton droit de la souris sur une partie quelconque de l'écran pour ouvrir le menu principal et cliquer de
nouveau pour quitter.
QUICK START
Cliquer pour configurer l'affichage de l'état, les images, la date et l'heure.
SYSTEM
Cliquer pour régler la configuration du système.
EVENT INFORMATION
Cliquer pour accéder au menu de recherche d'événements.
ADVANCED CONFIG
Cliquer pour configurer CAMERA, DETECTION, ALERT, NETWORK, DISPLAY, RECORD,
DEVICES & NOTIFY.
SCHEDULE SETTINGS
Cliquer pour régler le minuteur d'enregistrement, le minuteur de détection et le minuteur
d'alarme.
Pour plus d'informations, consulter le mode d'emploi détaillé sur le CD inclus.
Régler la date et l'heure
Il est nécessaire de configurer l'heure et la data avant le premier emploi.
1. Cliquer avec le bouton droit de la souris et saisir le mot de passe admin.
2. Cliquer sur l'icône QUICK START.
3. Sélectionner TIME SETUP pour régler la date et l'heure.
Note: ne plus modifier l’heure et la date une fois l'enregistrement commencé.
Note: Laisser l’enregistreur allumé pendant 48 heures après la configuration de l’heure et de la date.
Configurer le mot de passe
1. Cliquer avec le bouton droit de la souris et saisir le mot de passe admin.
2. Cliquer sur l'icône SYSTEM.
Page 32

DVR16H3
V. 01 – 25/09/2014 32 ©Velleman nv
3. Aller à ACCOUNT. Sélectionner le mot de passe souhaité et cliquer sur EDIT.
Note: Un utilisateur autre que l’administrateur n’est pas autorisé à accéder au menu principal. Il n’aura accès qu’à la
barre menu (voir ci-dessous).
4. Modifier le premier digit avec les touches ou et confirmer avec la touche ENTER ou sélectionner le digit avec la
souris. Répéter cela pour les 4 chiffres du mot de passe.
Remarque : le mot de passe admin par défaut est admin.
Réglages d'enregistrement
1. Cliquer avec le bouton droit de la souris et saisir le mot de passe admin.
2. Utiliser le bouton de navigation pour sélectionner ADVANCED CONFIG.
3. Utiliser le bouton de navigation pour sélectionner RECORD.
4. Sélectionner le type d'enregistrement souhaité (manuel, événement ou minuteur).
5. Dans "CHANNEL", sélectionner "ALL" pour appliquer les changements à tous les canaux.
6. Ou, sélectionner "BY CHANNEL" pour régler la taille d'image, images par seconde & qualité d'image individuellement pour
chaque canal.
7. Utiliser le bouton de navigation pour sélectionner GENERAL.
8. Régler la taille d'image, images par seconde (I.P.S.) et qualité d'image.
9. Sélectionner APPLY.
Pour plus d'informations, consulter le mode d'emploi détaillé sur le CD inclus.
Lecture avec audio
Appuyer simultanément sur SLOW et ZOOM ou utiliser la barre de menu rapide pour sélectionner le canal audio souhaité (voir
ci-dessous). Le canal sélectionné est indiqué dans la barre d'état.
Sélectionner l'utilisateur
1. Il est possible d'accéder au DVR comme administrateur ( ) ou comme utilisateur ( ). L'icône correspondant s'affiche
dans la barre d'état.
2. Pour commuter d’un utilisateur à l’autre, sélectionner l’icône ( ou ) pour verrouiller la sélection actuelle. ).
3. Enfoncer l'icône ( ) et introduire le mot de passe du profil souhaité.
9. Emploi
Afficheur
L’illustration suivante représente la disposition d'affichage.
A date et heure du système
B état général du système
C espace disponible sur le disque
dur D
état du canal
compatible avec la fonction audio en direct
enregistrement programmé
audio désactivé
souris USB connectée
zoom numérique activé (jaune) / désactivé
connexion à l'internet
connexion LAN
écraser les données du disque dur (par défaut)
pas de connexion réseau
pilotage PTZ
clé USB connectée
détection de mouvements
clavier verrouillé
alarme
mode séquentiel
mode d'alarme
mode d'enregistrement
connexion comme utilisateur
connexion comme administrateur
Les icônes d'écran peuvent différer légèrement des icônes affichées ci-dessus.
Page 33

DVR16H3
V. 01 – 25/09/2014 33 ©Velleman nv
Menu rapide
Note: la barre de menu rapide est seulement disponible lorsqu'une souris USB est connectée.
Déplacer le pointeur de la souris vers la gauche pour ouvrir la barre de menu rapide. Celle-ci contient les icônes suivants :
Cliquer pour afficher la fenêtre de sélection de canaux et sélectionner le canal souhaité.
Cliquer pour afficher le panneau de lecture.
Cliquer pour activer la lecture du dernier enregistrement, ou cliquer pour accéder à la liste de recherche.
Sélectionner le canal souhaité et cliquer su pour agrandir l'image.
Cliquer et déplacer le cadre rouge de la partie inférieure gauche de l'écran pour se déplacer dans l'image.
Pour quitter ce mode, cliquer sur .
Cliquer pour afficher l'icône de désactivation et pour éteindre ou réinitialiser l'appareil.
Pour plus d'informations, consulter le mode d'emploi détaillé sur le CD inclus.
Enregistrement
S'assurer que les caméras et le disque dur sont connectés correctement.
L’appareil commence à enregistrer si les fonctions d'enregistrement automatique et de pré-alarme sont activées.
L'icône ( ) s'affiche automatiquement.
L'icône ( ) ou ( ) s'affiche après la détection de mouvements ou une alarme (si le mode en question est activé).
L'icône ( ) s'affiche et la LED s'allume dans le mode d'enregistrement programmé.
L'enregistrement se met automatiquement en mode d'écrasement. L'icône ( ) s'affiche.
Lire un enregistrement
S'assurer que le panneau de contrôle ne soit pas verrouillé. Enfoncer PLAY sur le panneau de contrôle et utiliser le menu
rapide pour ouvrir le panneau de contrôle de lecture :
A
barre de progression
D
information
B
touches de commande
E
fermer
C
fonction de recherche
F
régler la fonction de répétition AB / ouvrir le menu de sauvegarde
Note: le fichier doit contenir au moins 8192 images (p. ex. IPS = 30, l'enregistrement doit avoir une durée minimale de
273 secondes).
Avancer rapidement ( ) et reculer rapidement ( ) les boutons règlent la vitesse de lecture. Enfoncer plusieurs fois la
touche pour sélectionner la vitesse : 4x, 8x, 16x ou 32x (max.).
Appuyer sur le bouton de pause ( ) pour interrompre la lecture vidéo.
Appuyer sur le bouton d'arrêt ( ) pour retourner dans la fenêtre de visualisation en direct.
Enfoncer une fois le bouton SLOW pour lire l'enregistrement à 1/4 de la vitesse de lecture normale ; enfoncer le bouton
une deuxième fois pour lire l'enregistrement à 1/8 de la vitesse de lecture normale .
Fonction de recherche
1. Pour rechercher un événement, appuyer sur le bouton LIST du panneau frontal.
Le système affiche une liste de tous les fichiers enregistrés.
2. Il est possible de rechercher par type de fichier. Les types possibles sont ALARM, MANUAL, MOTION, SYSTEM et FULL
LIST.
3. Sélectionner le type d'enregistrement souhaité.
4. Appuyer sur ENTER pour démarrer la lecture.
Note: Il est également possible de rechercher les fichiers d'enregistrement avec le logiciel 'Video Viewer'.
Page 34

DVR16H3
V. 01 – 25/09/2014 34 ©Velleman nv
10. Installer l'application EagleEyes
Conditions préalables
Avant d'installer EagleEyes sur votre appareil mobile pour la vidéosurveillance à distance, s'assurer de vérifier si :
Vous êtes souscrit aux services internet et vous pouvez y accéder depuis votre appareil mobile.
Remarque : L’accès à Internet via le réseau Wi-Fi ou 3G est peut-être payant. Pour plus de détails sur les taux d'accès à
Internet, consulter votre opérateur de réseau local ou votre fournisseur de services.
Vous avez noté l'adresse IP, le numéro de port, le nom d'utilisateur et le mot de passe nécessaires pour accéder à votre
caméra de réseau depuis l'internet.
Où télécharger le logiciel
1. Se connecter à la page web www.eagleeyescctv.prom depuis votre appareil mobile et s'enregistrer.
Ne pas essayer de télécharger EagleEyes depuis votre ordinateur.
o Pour Android®, sélectionner le lien de téléchargement sur le site web pour lancer le téléchargement.
o Pour iPhone® et iPad®, il existe deux versions d'EaglesEyes: EagleEyesHD Plus (payant) et EagleEyesHD Lite (gratuit).
2. Sélectionner la version souhaitée et ouvrir App Store pour télécharger l'application.
3. Après le téléchargement, EagleEyes s'installera automatiquement à l'emplacement par défaut ou à l'emplacement
sélectionné.
Remarque : Pour plus d'informations sur la configuration et le fonctionnement d'EagleEyes, consulter le site web
www.avtech.com.tw.
11. Configurer la fonction "Push status"
Si vous possédez un iPhone®, iPad® ou Android® il est possible d'utiliser la fonction "push status" du DVR : le DVR enverra
une notification à votre appareil lorsque l'alarme est activée.
Les événements d'alarme sont :
ALL
PERTE D'IMAGE
DISQUE DUR PLEIN
ACTIVÉ
DISQUE DUR (SUPPRIMER / PAS DE DISQUE DUR /
TEMPÉRATURE EXCESSIVE)
ACCÈS AU RÉSEAU
CLAVIER DÉVERROUILLÉ
RÉSEAU
UPS
ERREUR DE SYSTÈME.
Installer l'app EagleEyes sur votre téléphone mobile (voir: Installer l'application EagleEyes ci-dessous).
Sur le DVR :
1. Régler "ACTION" sur ON.
2. Sélectionner les événements pour lesquels vous souhaitez recevoir une notification sur votre dispositif mobile.
Vous recevrez un message à chaque fois qu'un événement survient.
11.1 Configuration
Avant de configurer la fonction push status, s'assurer que :
Le système DVR soit configuré correctement comme décrit dans Connexion et Configuration dans le mode d'emploit
complet sur le CD-ROM.
Le DVR est connecté à l'Internet.
L'app EagleEyes soit installée sur votre téléphone mobile (se référer à Installer l'application EagleEyes ci-dessus).
Page 35

DVR16H3
V. 01 – 25/09/2014 35 ©Velleman nv
Etapes
1. Ouvrir EagleEyes et ajouter ce DVR au carnet d'adresses d'EagleEyes.
Pour plus d'informations sur le fonctionnement d'EagleEyes, consulter le site web www.eagleeyescctv.com.
2. Dans l'application EagleEyes, activer la fonction "push status" (voir ci-dessous).
3. Activer l'alarme pour voir si vous recevez un message d'alarme.
12. Configurer la fonction push video
12.1 Connexion PIN
Avec votre iPhone®, iPad® ou téléphone mobile Android ®, il est possible d'utiliser la fonction push video de l'enregistreur
DVR: le DVR enverra une notification à votre appareil dès qu'une alarme se déclenche (push video). Seulement certaines
broches d'entrées d'alarme supportent la fonction push video.
Il existe plusieurs méthodes pour connecter des capteurs d'alarme pour push video:
depuis l'entrée alarme push video
depuis le port I/O externe.
Borne d'entrée d'alarme push video
La partie arrière du DVR est équipée d'une connexion d'entrée d'alarme push video. Se référer à la table ci-dessous pour les
connexions pin supportant la fonction push video et les canaux de vidéo correspondants.
Alarme
Canal vidéo correspondant
Alarme 1
CH1
Alarme 2
CH2
Alarme 3
CH3
Alarme 4
CH4
Port I/O externe
Se référer à la table ci-dessous pour les connexions pin supportant la fonction push video et les canaux de vidéo
correspondants.
Pin
Canal vidéo correspondant
Pin 2
CH1
Pin 15
CH2
Pin 3
CH3
Pin 16
CH4
Page 36

DVR16H3
V. 01 – 25/09/2014 36 ©Velleman nv
Connexion pour capteur d'alarme
Connecter le capteur d'alarme comme des contacts magnétiques à la borne d'alarme ou aux broches I/O supportant push
video situées à l'arrière de l'enregistreur DVR.
12.2 Configuration
Avant de configurer la fonction push video, s'assurer que :
le système DVR soit configuré correctement comme décrit dans Connexion et Configuration.
l'enregistreur DVR soit connecté à l'internet.
L'application EagleEyes est installée sur votre iPhone®, iPad® ou Android®.
Se référer à Surveillance mobile via EagleEyes pour plus de détails.
Configurer la fonction push video :
1. Cliquer avec le bouton droit de la souris pour afficher le menu principal, et sélectionner (ADVANCED CONFIG) >
NOTIFY.
2. Régler GUARD sur ON.
3. Configurer le capteur d'alarme (contact normalement ouvert ou normalement fermé).
Attention ! Sélectionner le type de contact opposé pour que la fonction push video fonctionne
correctement.
Si votre capteur d'alarme est N.C. (normalement fermé, l'alarme se déclenche lorsque le contact s'ouvre),
sélectionner ALARM N.O.
Si votre capteur d'alarme est N.O. (normalement ouvert, l'alarme se déclenche lorsque le contact s'ouvre),
sélectionner ALARM N.C.
ADVANCED CONFIG
CAMERA
PUSH VIDEO
PUSH MESSAGE
MESSAGE MAIL
VIDEO MAIL
DETECTION
GUARD
ON ALERT
CH01
ALARM OFF / INTERNAL ALARM
CH1 RÉSEAU
CH02
ALARM OFF
CH2
DISPLAY
CH03
ALARM N.O.
office
RECORD
CH04
ALARM OFF
CH4 DEVICES
DCCS
IVS
NOTIFY
EXIT
4. Ouvrir EagleEyes, et ajouter ce DVR au carnet d'adresses d'EagleEyes.
Note: Pour plus d'informations sur le fonctionnement d'EagleEyes, visiter www.eagleeyescctv.com.
Page 37

DVR16H3
V. 01 – 25/09/2014 37 ©Velleman nv
5. Activer la fonction push video.
6. Faire déclencher l'alarme.
7. Recevoir une notification d'alarme et visualiser la vidéo.
13. Surveillance mobile via EagleEyes
EagleEyes est un logiciel de surveillance puissant développé par AV TECH Corporation. Consulter la page
http://www.eagleeyescctv.com pour plus de détails.
Note: Consulter la page http://www.eagleeyescctv.com pour plus de détails.
Contacter Velleman en cas de questions. Aller sur www.velleman.eu pour les coordonnées de contact.
13.1 Conditions préalables
Avant d'installer EagleEyes sur votre téléphone mobile pour la vidéosurveillance mobile, vérifier les points suivants :
La plateforme de votre téléphone mobile est iPhone®, iPad®, BlackBerry® ou Android®.
Les services Internet sont souscrits et disponibles sur votre téléphone mobile.
Note: L’accès à Internet via le réseau Wi-Fi ou 3G est peut-être payant. Consulter votre fournisseur d’accès pour tout
renseignement concernant les tarifs de connexion à l’internet.
Noter l'adresse IP, le numéro de port, le nom d'utilisateur et le mot de passe utilisés pour accéder à votre caméra de
réseau depuis l'internet.
13.2 Télécharger EagleEyes
1. Aller sur www.eagleeyescctv.prom depuis votre téléphone mobile, et s'identifier.
Note: Veuiller ne pas essayer de télécharger EagleEyes depuis votre ordinateur.
2. Sélectionner Products > Software > Mobile app pour accéder à la page d'introduction d'EagleEyes.
3. Sélectionner votre plateforme (iOS, BlackBerry® or Android®) et télécharger le programme souhaité.
Note: Cet enregistreur DVR n'est compatible qu'avec iPhone®, iPad®, BlackBerry® et smartphones Android®.
4. Suivre les instructions à l'écran pour télécharger le logiciel.
Après le téléchargement, EagleEyes est installé automatiquement sur votre téléphone mobile.
Note: Pour plus d'informations sur la configuration de ce programme, consulter les instructions correspondantes sur la
page de téléchargement.
14. Configurer la fonction push video
Cet enregistreur DVR supporte la fonction de notification via votre iPhone, iPad, ou Android smartphone avec le logiciel
EagleEyes. Le système envoie un message à votre téléphone mobile en cas d'alarme.
14.1 Conditions préalables
Avant de configurer la fonction push video, vérifier les points suivants :
Installer EagleEyes sur votre iPhone®, iPad® ou Android®. Pour plus de détails, voir Télécharger EagleEyes.
Connecter une caméra de détection humaine au CH1, ou connecter un dispositif d'alarme externe à la borne d'entrée
push video sur le panneau arrière. Connecter une caméra pour enregistrer des événements d'alarme. Consulter
Configurer la fonction push video pour plus de détails sur les canaux vidéo et broches d'alarme.
La fonction d'enregistrement d'événements du DVR est activée.
Page 38

DVR16H3
V. 01 – 25/09/2014 38 ©Velleman nv
La fonction de détection de mouvements du DVR est activée.
Votre DVR est connecté à l'Internet. Pour plus de détails, consulter
http://www.surveillance-download.com/user/CMS.pdf.
14.2 Activer la fonction push video
Depuis iPhone ou iPad
1. Depuis le menu principal de l'iPhone®/iPad®, sélectionner Settings > Notifications.
2. Sélectionner EagleEyes et s'assurer que Notification Center soit réglé sur ON.
3. Ouvrir EagleEyes et mettre le bouton Push Video sur ON. Un message est envoyé indiquant l'envoi de notifications
(push video) est activé.
4. Retourner au menu principal de votre iPhone®/iPad®.
Des notifications d'événements seront envoyées en cas de détection d'une présence humaine ou en cas d'alarme.
Sélectionner Launch pour lire la vidéo enregistrée immédiatement.
Depuis les appareils mobiles Android
Dans le carnet d'adresses, basculer Guard de OFF en ON.
Page 39

DVR16H3
V. 01 – 25/09/2014 39 ©Velleman nv
15. Spécifications techniques
système de vidéo
PAL
compression vidéo
H.264
entrée vidéo
16 canaux, signal vidéo composite 1 Vpp / 75 ohm BNC
sortie vidéo
HDMI® (1080p) & VGA (max. 1920 x 1080 & signal vidéo composite 1 Vpp /
75 ohm BNC
sortie 'loop' vidéo
non
fréquence max. d'enregistrement
(PAL)
960H : 960 × 576 pixels @ 400 IPS (PAL)
trame : 704 × 576 pixels @ 400 IPS (PAL)
vitesse d'enregistrement réglable
-
réglage de la qualité d'image
Super best (supérieur) - Best (meilleur) - High (haut) - Normal (normal)
capacité du disque dur
type SATA intégré : supporte 2 disques durs, supporte une capacité de disque dur de
plus de 2 To (disque dur non incl.)
eSATA externe : disque dur ou matrice externe pour disque dur (supporte Linux)
nettoyage rapide du HDD
nettoyage rapide du système d'indexation des fichiers enregistrés. 1 To en moins de
2 secondes
mode d'enregistrement
manuel / programmé / par détection de mouvement / alarme / déclenchement de
l'alarme à distance
taux de rafraîchissement
400 IPS pour PAL
fonctions multiplex
affichage en direct, enregistrement, repassage des images, copie de sauvegarde et
réseau
audio E/S
1 x convertisseur CC-CC haute performance pour le DVR et les caméras
zone de détection de
mouvements
16 x 12 grille par caméra pour tous les canaux
sensibilité de détection de
mouvements
3 paramètres avec des niveaux de sensibilité réglables
enregistrement pré-alarme
oui
système de sauvegarde
USB 2.0 flash drive / réseau (pour la sauvegarde et les mises à jour du micrologiciel)
surveillance mobile
logiciel EagleEyes (www.eagleeyescctv.com)
smartphones
push status : sur iPad®, iPod touch®, iPhone®, Android®
phone & tablet
gestion à distance depuis toutes les plateformes du
smartphone (Apple®, Android®, BlackBerry®, Nokia®
Symbian® et Windows Mobile®)
ordinateur
CMS (Central Management System)
surveillance à distance jusqu'à 10 adresses IP (Windows® &
Mac OS®)
navigateur web : Internet Explorer®, Firefox®, Google
Chrome® et Safari® via Java, QuickTime ou plug-in VLC
Ethernet
10/100BASE-T, supporte le contrôle à distance et LiveView via Ethernet
connexion réseau
supporte TCP/IP, PPPoE, DHCP et DDNS
télécommande IR
commande à distance de l'enregistreur et des fonctions PTZ (DVRRC4 incl.)
contrôle PTZ
oui (via RS-485)
alarme E/S
16 entrées / 1 sortie
zoom numérique
2 x (en direct & lecture)
le clavier est verrouillé
oui
détection de perte d'image
oui
titre de la caméra
jusqu'à 6 caractères
réglages d'image
teint / couleur / contraste / luminosité
format d'affichage de la date
AA/MM/JJ, JJ/MM/AA, MM/JJ/AA et OFF
alimentation
19 VCC
consommation
< 64 W
heure d'été
oui
température de service
10-40 °C
rétablissement du système
auto-rétablissement du système après la remise sous tension
dimensions
430 x 65 x 338 mm
Page 40

DVR16H3
V. 01 – 25/09/2014 40 ©Velleman nv
Options:
barrière lumineuse
PEM300D, PEM10D, PEM30DN
contacts magnétiques NO et NF
HAA27
capteur de vibrations
HAA15
capteurs PIR intérieurs
HAA52N, HAA55
clavier verrouillé
HAA2866, HAA2890, HAA9523S
N’employer cet appareil qu’avec des accessoires d’origine. La SA Velleman ne peut, dans la mesure conforme au
droit applicable être tenue responsable des dommages ou lésions (directs ou indirects) pouvant résulter de
l’utilisation de cet appareil. Pour plus d'informations concernant cet article et la dernière version de ce mode
d'emploi, consulter notre site www.velleman.eu. Toutes les informations présentées dans ce mode d'emploi
peuvent être modifiées sans notification préalable.
Les marques déposées et les raisons sociales sont la propriété de leurs détenteurs respectifs, et sont uniquement utilisées
dans le but de démontrer la compatibilité entre nos articles et les articles des fabricants. Windows, Windows XP, Windows
2000, Windows Vista, Windows Aero, Windows 7, Windows 8, Windows Mobile, Windows Server sont des marques
commerciales enregistrées de Microsoft Corporation aux Etats-Unis et d'autres pays.
iPad, iPod, iPod touch, iPhone, Mac, iMac, MacBook, PowerBook, Power Mac, Mac OS sont des marques de commerce d'Apple
Inc., enregistrées aux Etats-Unis et dans d'autres pays.
IOS est une marque commerciale ou une marque déposée de Cisco aux Etats-Unis et d'autres pays et est utilisée sous
licence.
Android est une marque de Google Inc.
La marque BlackBerry est la propriété de Research In Motion Limited et est enregistrée aux Etats-Unis et peut être en attente
d'enregistrement ou enregistrée dans d’autres pays.
Symbian est une marque déposée de Symbian Software Ltd, Symbian Ltd.
© DROITS D’AUTEUR – SA Velleman est l’ayant droit des droits d’auteur pour cette notice. Tous droits mondiaux
réservés. Toute reproduction, traduction, copie ou diffusion, intégrale ou partielle, du contenu de ce mode d'emploi par
quelque procédé ou sur tout support électronique que ce soit est interdite sans l’accord préalable écrit de l’ayant droit.
Page 41

DVR16H3
V. 01 – 25/09/2014 41 ©Velleman nv
GUÍA RÁPIDA
1. Introducción
A los ciudadanos de la Unión Europea
Importantes informaciones sobre el medio ambiente concerniente a este producto
Este símbolo en este aparato o el embalaje indica que, si tira las muestras inservibles, podrían dañar el medio
ambiente. No tire este aparato (ni las pilas, si las hubiera) en la basura doméstica; debe ir a una empresa
especializada en reciclaje. Devuelva este aparato a su distribuidor o a la unidad de reciclaje local. Respete las leyes
locales en relación con el medio ambiente.
Si tiene dudas, contacte con las autoridades locales para residuos.
¡Gracias por elegir Velleman! Lea atentamente las instrucciones del manual antes de usar el aparato. Si ha sufrido algún daño
en el transporte no lo instale y póngase en contacto con su distribuidor.
OBSERVACIÓN: Este documento es una guía rápida. Para más información, consulte el amplio manual del usuario en el CDROM (incl.).
2. Instrucciones de seguridad
ADVERTENCIA
RIESGO DE DESCARGA ELÉCTRICA
ADVERTENCIA:
Para reducir cualquier riesgo de descarga eléctrica, no exponga el aparato a lluvia ni humedad. Utilice este aparato sólo con
la fuente de alimentación indicada en la etiqueta. Velleman NV no será responsable de ningún daño o lesión debido a un uso
(inadecuado) de este aparato.
Este símbolo advierta al usuario de la presencia de una tensión potencialmente peligrosa que puede constituir un
riesgo de descarga eléctrica.
Este símbolo advierta al usuario de la presencia de observaciones importantes sobre el uso y/o el mantenimiento
del aparato.
Mantenga el aparato lejos del alcance de personas no capacitadas y niños.
Riesgo de descargas eléctricas al abrir la caja. Puede sufrir una peligrosa descarga eléctrica al tocar un cable
conectado a la red eléctrica. La reparación debe llevarla a cabo un técnico cualificado.
Desconecte siempre el aparato de la red eléctrica si no va a usarlo durante un largo período de tiempo y antes de
su limpieza o mantenimiento. Tire siempre del enchufe para desconectar el cable de red, nunca del propio cable.
NO desmonte ni abra la caja salvo mención en contra. El usuario no habrá de efectuar el mantenimiento de
ninguna pieza. Contacte con su distribuidor si necesita piezas de recambio.
Este aparato pertenece a la clase de protección I, por lo tanto, es esencial que el aparato esté puesto a tierra.
Conecte el aparato sólo a un enchufe puesto a tierra. Por seguridad no interrumpa nunca la toma de tierra.
Queda prohibida cualquier interrupción intencional.
3. Normas generales
Véase la Garantía de servicio y calidad Velleman® al final de este manual del usuario.
Utilice el aparato sólo en interiores
No exponga este equipo a lluvia, humedad ni a ningún tipo de salpicadura o goteo. Nunca ponga un objeto con
líquido en el aparato.
No exponga este equipo a polvo.
No exponga este equipo a temperaturas extremas. Asegúrese de que los orificios de ventilación no estén
bloqueados. Deje una distancia de mín. 2.5 cm entre el aparato y cualquier otro objeto para asegurar una
ventilación suficiente.
Proteja el aparato contra choques y golbes. Evite usar excesiva fuerza durante el manejo y la instalación.
Familiarícese con el funcionamiento del aparato antes de utilizarlo.
Por razones de seguridad, las modificaciones no autorizadas del aparato están prohibidas.
Utilice sólo el aparato para las aplicaciones descritas en este manual Su uso incorrecto anula la garantía completamente.
Los daños causados por descuido de las instrucciones de seguridad de este manual invalidarán su garantía y su
distribuidor no será responsable de ningún daño u otros problemas resultantes.
Instale y utilice la cámara al respetar la legislación et la vida privada de terceros.
Page 42

DVR16H3
V. 01 – 25/09/2014 42 ©Velleman nv
4. Características
formato de compresión H.264 en tiempo real
grabación de alta resolución:
o full frame: 704 x 576 píxeles
o 960H: 960 x 576 píxeles con cámaras de 700 líneas TV
funciones multiplex: reproducción en directo, grabación, reproducción, copia de seguridad y acceso por la red
función de copia de seguridad: soporta el back up por USB 2.0 flash drive y red
vigilancia con iPad®, iPhone®, BlackBerry®, Windows Mobile®, Symbian® y Android® software: consulte
www.eagleeyescctv.com
grabación por detección de movimientos:
o detección de movimientos avanzada
o grabación por detección de movimientos programada (3 parámetros ajustables)
Sistema Dinámico de Nombres de Dominio (DDNS): gratuito
restablecimiento automático del sistema después de haber activado la alimentación de nuevo
función 'tiempo de verano/invierno'
modos de grabación: manual / temporizador / por detección de movimientos / alarma
OSD multilingüe: inglés, francés, alemán, portugués, español, checo, húngaro, griego, chino y vietnamita
manual del usuario: inglés
guía rápida: inglés, neerlandés, francés, español, alemán
ratón USB: incl.
discos duros opcionales (no incl.): HD500GB/S, HD1TB/S y HD2TB/S
mando a distancia IR: DVRRC4 (incl.)
monitor opcional (no incl.): MONSCA4N1
router opcional (no incl.): EM4544, EM4571, PCRT1
5. Descripción
Véase las figuras en la página 2 de este manual del usuario.
Panel frontal
LEDs
HDD
El disco duro está leyendo o grabando.
ALARM
Se ha activado una alarma.
TIMER
La grabación programada está activada.
PLAY
El aparato está en el modo de reproducción.
POWER
El aparato está activado.
Teclas de
dirección
En el modo de ajuste:
Pulse ▲ / ▼ / ◄ / ► para desplazar el cursor en la dirección deseada.
Si quiere cambiar un ajuste, pulse + o – para aumentar o disminuir.
En el modo de reproducción:
Pulse para pausar la reproducción.
Pulse para parar la reproducción.
Pulse para avanzar rápidamente.
Pulse para retroceder rápidamente.
MENU
Pulse MENU para entrar en el menú principal.
ENTER
Pulse ENTER para confirmar el ajuste.
LIST
Lista con informaciones sobre los ficheros grabados.
QUICK SEARCH (búsqueda rápida) / RECORD (grabación) / MOTION (movimiento) / ALARM (alarma) /
TIMER (temporizador) / FULL LIST (lista completa)
PLAY
Pulse para reproducir el vídeo grabado.
SLOW
En el modo de reproducción, pulse para una reproducción lenta.
ZOOM
En el modo de reproducción en directo o en el modo de grabación, pulse para agrandar la imagen del canal
seleccionado.
SEQ
Pulse para visualizar cada canal en pantalla completa uno a uno. Vuelva a pulsar para salir de este modo.
Pulse para visualizar el modo de múltiples canales.
1–16
Pulse el botón para seleccionar el canal deseado.
AUDIO
= SLOW + ZOOM
Pulse SLOW y ZOOM simultáneamente para seleccionar el audio en directo o el audio de reproducción de los
canales de audio.
P.T.Z.
= SEQ +
Pulse SLOW y simultáneamente para entrar en o salir del modo de control PTZ
Puerto USB (2 x)
Para una copia de seguridad, conecte una unidad flash USB a un puerto USB;conecte un ratón USB a otro
puerto USB. Observación: No conecte dos ratones o dos unidades flash USB simultáneamente.
Page 43

DVR16H3
V. 01 – 25/09/2014 43 ©Velleman nv
Panel trasero
puerto LAN
Para conectar la DVR a una red local con un cable de red.
VGA
Conexión para monitor de vídeo (monitor no incl.).
AUDIO IN
4 canales de entrada de audio para conectar cuatro fuentes de audio externas (p.ej. cámaras con audio).
AUDIO OUT
1 salida de audio para conectar a un aparato de audio (p.ej. altavoz, mono).
VIDEO IN
4 canales de entrada de vídeo para conectar 4 fuentes de vídeo externos (p.ej. cámaras).
HDMI
1 canal de salida de vídeo para conectar el DVR al monitor principal.
EXTERNAL I/O
Utilice un conector DSUB de 9 polos para conectar un dispositivo externo (p.ej. alarma, PTZ, etc.).
19V DC
Entrada de alimentación
MONITOR
eSATA
ALARM IN
Conectores para los sensores de alarma.
6. Instalar un disco duro SATA.
Instale un disco duro SATA antes de activar la DVR.
Observaciones
No utilice un disco duro verde en este aparato. Para una lista de discos duros compatibles, consulte el manual del usuario
en el CD.
Borre todos los datos del disco duro después de haber activado la videograbadora. Introduzca la fecha y la hora correcta
para asegurarse de que los datos grabados no se mezclen con otros datos guardados anteriormente en el mismo disco
duro. Para más información, consulte el manual del usuario en el CD.
Instalación
1
Desatornille los tornillos de la tapa superior y quítela.
La tapa es de metal. Sea cuidadoso y no se haga daño con los bordes.
2
Ponga el disco duro en el soporte y fíjelo con los tornillos incluidos.
Instale el disco duro con el lado CI hacia arriba
3
Conecte el cable de alimentación y el cable del bus de datos al disco duro.
4
Cierre la tapa superior de la DVR y apriete los tornillos que dejó sueltos en el
paso 1.
7. Configurar el hardware
Véase las figuras en la página 2 de este manual del usuario.
Conectar un monitor
Conecte un monitor adecuado (no incl.) al puerto de salida HDMI o VGA de la parte trasera de la DVR.
Conectar la alimentación
1. Conecte el conector DC del adaptador de red (incl.) a la entrada de alimentación VDC de la parte trasera de la DVR.
ADVERTENCIA: utilice sólo el adaptador incluido.
2. Utilice el cable de alimentación (incl.) para enchufar el aparato en una toma eléctrica adecuada. Todavía no encienda
la DVR.
Conectar una cámara
1. Es posible conectar hasta 4 cámaras adecuadas. Cada cámara necesita su propia alimentación.
2. Conecte la salida de vídeo de la cámara a la entrada de vídeo de la parte trasera de la DVR. El número al lado de cada
conector de entrada es el número de canal. Tipo de conector: BNC.
Conectar audio
1. La DVR soporta cuatro entradas de audio. Conecte la salida de audio de una fuente de audio a la entrada de audio de la
DVR. Asegúrese de que conecte el canal de audio al canal de vídeo adecuado. Tipo de conector: BNC.
2. También, está equipado con un conector de salida de audio. Si fuera necesario, conecte un aparato de audio (p.ej.
altavoz) a este conector. Tipo de conector: BNC.
Front Pan el
screw hole
Front Pan el
Page 44

DVR16H3
V. 01 – 25/09/2014 44 ©Velleman nv
Conectar una red de área local (Local Area Network, LAN)
Conecte la DVR a una red local al introducir el cable de red en el puerto LAN de la parte trasera de la DVR. Tipo de conector:
8P8C (RJ45). Para configurar la conexión de red, pulse el botón del menú y seleccione . Para más información, consulte el
amplio manual del usuario en el CD (incl.).
8. Introducción
1. Asegúrese de que las cámaras conectadas estén activadas.
2. Ponga el interruptor ON/OFF de la parte trasera del DVR en la posición ON.
El aparato tarda entre 15 y 30 segundos en arrancar.
El menú
Utilice el ratón para introducir la contraseña de la DVR con el teclado de la contraseña.
El nombre de usuario y la contraseña por defecto son “admin”.
El estado cambia de (teclado bloqueado) a (teclado desbloqueado).
Haga clic con el botón derecho del ratón en cualquier lugar de la pantalla para visualizar el menú principal. Vuelva a hacer clic
con el botón derecho para salir.
QUICK START
Haga clic para ajustar la visualización del estado, las imágenes, la fecha & el tiempo.
SYSTEM
Haga clic para configurar los ajustes del sistema
EVENT INFORMATION
Haga clic para entrar en el menú de búsqueda de eventos.
ADVANCED CONFIG
Haga clic para ajustar CAMERA, DETECTION, ALERT, NETWORK, DISPLAY, RECORD,
DEVICES & NOTIFY.
SCHEDULE SETTINGS
Haga clic para ajustar el temporizador de grabación, el temporizador de detección y el
temporizador de alarma.
Para más información, consulte el amplio manual del usuario en el CD-ROM (incl.).
Ajustar la fecha y la hora
Primero, ajuste la fecha y la hora antes de utilizar la videograbadora.
1. Haga clic con el botón derecho del ratón en la pantalla e introduzca la contraseña del administrador.
2. Haga clic en el icono QUICK START.
3. Seleccione TIME SETUP para ajustar la fecha y la hora.
Observación: No modifique la fecha ni la hora después de haber activado la función de grabación. De lo contrario, los datos
grabados estarán desordenados y no podrá encontrar dichos archivos a través de la búsqueda por tiempo.
Observación: Si utiliza la DVR por primera vez, actívela durante al menos 48 horas ininterrumpidamente una vez que la
fecha y la hora hayan sido configuradas correctamente.
Configurar la contraseña
1. Haga clic con el botón derecho del ratón en la pantalla e introduzca la contraseña del administrador.
2. Haga clic en el icono SYSTEM.
3. Seleccione ACCOUNT. Seleccione la contraseña que quiere ajustar y haga clic en EDIT.
Observación: un operador no puede acceder al menú principal, sólo a la barra de menú rápido (véase abajo).
Page 45

DVR16H3
V. 01 – 25/09/2014 45 ©Velleman nv
4. Desplácese ’hacia arriba’ ( ) o hacia abajo ( ) para seleccionar el valor del primer número. Pulse ENTER para
guardar el número y para ir al siguiente o utilice el ratón para seleccionar el valor deseado. Repita esto para los cuatro
números de la contraseña.
Observación: la contraseña del administrador por defecto es admin.
Ajustes de grabación
1. Haga clic con el botón derecho del ratón en la pantalla e introduzca la contraseña del administrador.
2. Utilice las teclas de dirección para seleccionar ADVANCED CONFIG.
3. Utilice las teclas de dirección para seleccionar RECORD.
4. Seleccione el tipo de grabación deseado (manual, evento o temporizador).
5. En "CHANNEL", seleccione "ALL" para aplicar los cambios a todos los canales.
6. Seleccione "BY CHANNEL" para ajustar el tamaño de la imagen, el número de imágenes por segundo & la calidad de
imagen de cada canal por separado.
7. Utilice las teclas de dirección para seleccionar GENERAL.
8. Ajuste el tamaño de la imagen, el número de imágenes por segundo (IPS) y la calidad de imagen.
9. Seleccione APPLY.
Para más información, consulte el amplio manual del usuario en el CD-ROM (incl.).
Reproducción de sonido
Pulse SLOW y ZOOM simultáneamente para seleccionar el canal de audio deseado o utilice la barra de menú rápido (véase
abajo). El canal de audio actual se visualiza en la barra de estado.
Cambiar el tipo de usuario
1. Es posible acceder al sistema como administrador ( ) u operador ( ). Él símbolo correspondiente se visualiza en la
barra de estado.
2. Para conmutar entre los usuarios, haga clic en el símbolo de usuario ( ó ) para bloquear la sesión actual ( ).
3. ). Pulse el símbolo de teclado bloqueado ( ) e introduzca la contraseña del perfil deseado.
9. Funcionamiento
pantalla
La siguiente imagen visualiza la estructuración de la pantalla.
A fecha y hora del sistema
B estado general del sistema
C capacidad disponible en el
disco duro
D
estado de los canales
el canal de audio en directo está activado
grabación con temporizador
audio desactivado
ratón USB conectado
zoom digital activado (amarillo) / desactivado
conexión Internet
conexión LAN
sobreescribir el disco duro (ajuste por defecto)
No hay conexión de red
modo PTZ
dispositivo flash USB conectado
modo de movimiento
teclado bloqueado
alarm
modo de visualización secuencial
modo de alarma
modo de grabación
operador conectado
administrador conectado
Es posible que los símbolos difieran un poco de los visualizados arriba.
Page 46

DVR16H3
V. 01 – 25/09/2014 46 ©Velleman nv
Barra de menú rápido
Observación: La barra de menú rápido sólo está disponible si está conectado un ratón USB.
Mueva el cursor hacia la marca de la flecha para abrir la barra de menú rápido. Incluye los siguientes iconos:
Haga clic para visualizar la ventana de selección de canales y seleccione el canal deseado.
Haga clic para visualizar el panel de control de la reproducción.
Haga clic en para reproducir el último vídeo grabado o haga clic en para entrar en la lista de búsqueda.
Seleccione el canal deseado y haga clic en para entrar en el modo 'ampliar la imagen'.
Haga clic y desplace el cuadro rojo de la parte inferior izquierda de la pantalla para moverse hacia el lugar que
desee visualizar.
Haga clic en para salir de este modo.
Haga clic para visualizar el icono de desactivación y para desactivar o reiniciar el aparato.
Para más información, consulte el amplio manual del usuario en el CD-ROM (incl.).
Grabación
Controle si la cámara o las cámaras están conectadas correctamente.
El aparato empieza a grabar si la función de grabación automática y la función de prealarma están activadas.
El símbolo de grabación ( ) se visualiza (por defecto).
El símbolo de movimiento ( ) o el símbolo de alarma ( ) se visualiza en caso de detección de movimiento o alarma y
si esta función está activada.
El símbolo de grabación por temporizador ( ) se visualiza y el LED correspondiente se ilumina si está activada la
grabación por temporizador.
El símbolo de sobreescribir ( ) se visualiza en la pantalla si esta función está activada. (ajuste por defecto)
Reproducción
Asegúrese de que el panel de control no esté bloqueado. Pulse PLAY en el panel de control o utilice la barra de menú rápido
para abrir el panel de control de reproducción.
A
barra de progreso
D
información
B
control de la reproducción
E
cerrado
C
búsqueda de evento
F
ajustar la función AB / abrir el menú de copia de seguridad
Observación: Debe haber al menos 8192 imágenes de datos grabados para que la reproducción funcione correctamente.
(Por ejemplo: con 30 imágenes por segundo debe haber una duración de grabación de mín. 273 segundos).
los botones de avanzar rápidamente ( ) y retroceder rápidamente( ). Haga clic para avanzar/retroceder a una
velocidad de 4, 8, 16 ó 32 (máx.) veces más rápida de lo normal.
Pulse el botón de pausa ( ) para hacer una pausa.
Pulse el botón de parar ( ) para volver a la reproducción en directo.
Pulse el botón SLOW una vez para una reproducción a 1/4 de la velocidad normal. Pulse dos veces para una reproducción
a 1/8 de la velocidad normal.
Función de búsqueda
1. Para buscar un evento, pulse el botón LIST de la parte frontal.
El sistema visualiza un resumen de los ficheros grabados.
2. Es posible buscar por tipo de fichero. Tipos disponibles: ALARM, MANUAL, MOTION, SYSTEM y FULL LIST.
Page 47

DVR16H3
V. 01 – 25/09/2014 47 ©Velleman nv
3. Seleccione una lista y una grabación.
4. Pulse ENTER para iniciar la reproducción.
Observación: También es posible buscar los ficheros grabados con el software 'Video Viewer'.
10. Instalar « EagleEyes »
Prerrequisitos
Antes de instalar EagleEyes en el teléfono móvil para la vigilancia a distancia, asegúrese de que haya comprobado lo
siguiente:
Tiene suscritos y disponibles para utilizar servicios de Internet en su teléfono móvil.
Observación: Es posible que le cobren por acceder a Internet a través de las redes inalámbricas o las redes 3G. Para
más detalles sobre las tasas de acceso a internet, consulte a su operador de red local o a su proveedor de servicios.
Ha anotado la dirección IP, el número de puerto, el nombre de usuario y la contraseña utilizados para acceder a su
cámara de red desde el internet.
Dónde descargar el software
1. Conéctese a la página web www.eagleeyescctv.com desde su teléfono y regístrese.
No intente descargar EagleEyes desde su ordenador.
o Para Android, seleccione el enlace de descarga que puede encontrar en la página web para iniciar la descarga.
o Para iPhone y iPad, están disponibles dos versiones de la app EagleEyes:
EagleEyesHD Plus (versión de pago) und EagleEyesHD Lite (versión
gratuita).
2. Seleccione la versión que quiera y se abre la “App Store” para descargar la aplicación.
3. Cuando la descarga se haya completado, EagleEyes se instalará automáticamente en la ubicación por defecto en la que
se guardan todas las aplicaciones en su teléfono móvil, o bien donde usted especifique.
Observación: Para más informaciones sobre la configuración y el uso de EagleEyes, visite la página web oficial
www.avtech.com.tw.
11. Configurar ‘push status’
Utilice la función ‘push status’ de la DVR si tiene un iPhone®, iPad® o dispositivo Android®: la DVR enviará una notificación en
caso de una alarma.
Las alarmas posibles:
ALL
VIDEO LOSS
HDD FULL
POWER ON
HDD (CLEAR / NO HDD / OVER TEMPERATURE)
NET LOGIN
KEY UNLOCK
NETWORK
UPS
SYSTEM ABNORMAL.
Instale la app EagleEyes en el teléfono móvil si quiere utilizar esta función (consulte Instalar « EagleEyes »).
En la DVR:
1. Ponga "ACTION" en la posición ON.
2. Seleccione el evento del sistema para el que quiere recibir una notificación en el teléfono móvil.
Recibirá un mensaje en cuanto ocurra el evento seleccionado.
11.1 Configuración
Antes de configurar la función « push status », asegúrese de que:
Haya configurado el DVR de manera correcto (consulte 3. Conexión y Configuración del amplio manual del usuario en
el CD-ROM incluido).
El DVR esté conectado a internet.
La app EagleEyes esté instalado en el teléfono móvil (consulte Instalar « EagleEyes »arriba).
Page 48

DVR16H3
V. 01 – 25/09/2014 48 ©Velleman nv
Pasos
1. Abra EagleEyes y añada este DVR a la libreta de direcciones EagleEyes.
Para más informaciones sobre el uso de EagleEyes, visite www.eagleeyescctv.com.
2. En la app EagleEyes, active « Push Status » (véase abajo).
3. Provoque una alarma para controlar si recibe una notificación « Push Status ».
12. Configurar la función de notificación Push Video
12.1 Conexión pin
En caso de una alarma, esta DVR puede enviar notificaciones a sus dispositivos móviles (p.ej. iPhone®, iPad® y Android®)
(push video). Sin embargo, sólo algunos pins de entrada de alarma soportan esta función.
Existen diferentes métodos para conectar detectores de alarma para « Push Video »:
por la conexión de entrada de alarma 'Push Video'
por el puerto E/S externo.
La conexión de entrada de alarma 'Push Video'
La parte trasera de la DVR está equipada con una conexión de entrada de alarma « Push Video ». Consulte la siguiente lista
para las conexiones pin que soportan la función « Push Video » y los canales de vídeo correspondientes.
Alarma
Canal de vídeo correspondiente
Alarma 1
CH1
Alarma 2
CH2
Alarma 3
CH3
Alarma 4
CH4
Puerto E/S externo
Consulte la siguiente lista para las conexiones pin que soportan la función « Push Video » y los canales de vídeo
correspondientes.
Pin
Canal de vídeo correspondiente
Pin 2
CH1
Pin 15
CH2
Pin 3
CH3
Pin 16
CH4
Page 49

DVR16H3
V. 01 – 25/09/2014 49 ©Velleman nv
Conectar un detector de alarma
Conecte el detector de alarma (p.ej. contactos magnéticos) a la conexión de entrada de alarma « Push Video » o los pins E/S
que soportan la función « Push Video » de la parte trasera de la DVR.
12.2 Configuración
Antes de configurar la función 'Push Video', asegúrese de que:
haya configurado la DVR de manera correcta (consulte Conexión y Configuración).
la DVR esté conectada a internet.
Haya instalado la aplicación EagleEyes en el iPhone®, iPad® o dispositivo Android®.
Consulte Vigilancia a distancia por el dispositivo móvil con EagleEyes.
Configurar la notificación « Push Video »:
1. Haga clic con el botón derecho del ratón para visualizar el menú principal y seleccione (ADVANCED CONFIG) >
NOTIFY.
2. Ponga GUARD en la posición ON.
3. Configure el tipo de detector de alarma (normalmente abierto o normalmente cerrado).
¡Cuidado! Seleccione el tipo opuesto para que la función Push Video funcione correctamente.
Seleccione ALARM N.O. si el sensor de alarma está NC (normalmente cerrado, la alarma se activa si el
contacto se abre).
Seleccione ALARM N.C. si el sensor de alarma está NO (normalmente abierto, la alarma se activa si el
contacto se cierre).
ADVANCED CONFIG
CAMERA
PUSH VIDEO
PUSH MESSAGE
MESSAGE MAIL
VIDEO MAIL
DETECTION
GUARD
ON ALERT
CH01
ALARM OFF / INTERNAL ALARM
CH1 NETWORK
CH02
ALARM OFF
CH2
DISPLAY
CH03
ALARM N.O.
office
RECORD
CH04
ALARM OFF
CH4 DEVICES
DCCS
IVS
NOTIFY
EXIT
4. Abra EagleEyes y añada este DVR a la libreta de direcciones EagleEyes.
Observación: Consulte la página http://www.eagleeyescctv.com para más información.
Page 50

DVR16H3
V. 01 – 25/09/2014 50 ©Velleman nv
5. Active la función Push Video.
6. Active la alarma de entrada.
7. Reciba una notificación y mire el vídeo.
13. Vigilancia a distancia por el móvil con EagleEyes
EagleEyes es un potente software de vigilancia desarrollado por AV TECH Corporation.
Observación: Consulte la página http://www.eagleeyescctv.com para más información.
Contacte con Velleman si tiene preguntas. Visite www.velleman.eu para saber cómo contactarnos.
13.1 Prerrequisitos
Antes de instalar EagleEyes en el teléfono móvil para la vigilancia a distancia, asegúrese de que ha comprobado lo siguiente:
Su plataforma móvil es iPhone®, iPad®, BlackBerry® o un dispositivo Android®.
Tiene suscritos y disponibles los servicios de Internet para ser utilizados en su teléfono móvil.
Observación: Es posible que le cobren por acceder a Internet a través de las redes inalámbricas o las redes 3G. Para
más detalles sobre las tarifas de acceso a Internet, contacte con su operador de red local o su proveedor de servicios
Ha anotado la dirección IP, número de puerto, nombre de usuario y contraseña utilizados para acceder a su cámara de
red desde el internet.
13.2 Descargar EagleEyes
1. Conéctese a la página web www.eagleeyescctv.com desde su teléfono y regístrese.
Observación: No descargue EagleEyes desde su ordenador.
2. Seleccione Products > Software > Mobile app para acceder a la página de introducción de EagleEyes.
3. Seleccione su plataforma (iOS, BlackBerry® o Android®) y descargue el programa adecuado.
Observación: Esta DVR sólo es compatible con iPhone®, iPad® BlackBerry® y dispositivos móviles Android®.
4. Siga las instrucciones en la pantalla para descargar el software.
Cuando la descarga se haya completado, EagleEyes se instalará automáticamente en el teléfono móvil.
Observación: Lea las instrucciones de la página de descarga para más informaciones sobre la configuración de este
programa.
14. Configurar la notificación Push Video
Esta DVR puede enviar notificaciones inmediatas a su iPhone, iPad o Android si EagleEyes está instalado. La DVR recibe
inmediatamente una señal de alarma y envía una notificación a su dispositivo móvil si una cámara de detección humana o un
dispositivo de alarma externa detecta a una persona.
14.1 Prerrequisitos
Antes de configurar la función de notificación Push Video, asegúrese de que ha comprobado lo siguiente:
Tiene un iPhone®, iPad® o dispositivo Android® en el que ha instalado software EagleEyes. Véase Descargar EagleEyes
para más información.
Una cámara con detección humana está conectada a CH1 o una alarma externa está conectada a la entrada de alarma
'Push Video Alarm In' de la parte trasera. Para grabar los eventos de alarma, asegúrese de que también esté conectada
Page 51

DVR16H3
V. 01 – 25/09/2014 51 ©Velleman nv
una cámara. Véase Configurar la función de notificación Push Video para más información sobre los canales de
vídeo y los pines de alarma.
La función de grabación de eventos está activada.
La función de detección de movimiento está activada.
La DVR está conectada a Internet. Para más información, visite
http://www.surveillance-download.com/user/CMS.pdf.
14.2 Activar la función de notificación Push Video
Para el iPhone o iPad
1. En el menú principal de iPhone®/iPad®, seleccione Settings > Notifications.
2. Seleccione EagleEyes y asegúrese de que el Centro de notificaciones esté ACTIVADO.
3. Abra EagleEyes y ponga el botón Push Video en la posición ON. Recibirá un mensaje para confirmar que la función de
notificación (push video) está activada.
4. Vuelva al menú principal del iPhone®/iPad®.
Recibirá una notificación si hay una detección humana o un evento de alarma. Seleccione Launch (ejecutar) para
reproducir inmediatamente las imágenes grabadas.
Para dispositivos móviles Android
En la libreta de direcciones, ponga Guard en la posición ON.
Page 52

DVR16H3
V. 01 – 25/09/2014 52 ©Velleman nv
15. Especificaciones
sistema de vídeo
PAL
formato de compresión vídeo
H.264
entrada de vídeo
16 canales, señal de vídeo compuesto 1 Vpp / 75 ohm BNC
salida de vídeo
HDMI® (1080p), VGA (máx. 1920 x 1080 píxeles) & señal de vídeo compuesto 1 Vpp /
75 ohm BNC
salida 'loop' vídeo
no
frecuencia máx. de grabación
(PAL)
960H: 960 × 576 píxeles @ 400 ips (PAL)
frame: 704 × 576 píxeles @ 400 IPS (PAL)
velocidad de grabación regulable
-
ajuste de la calidad de imagen
Best (mejor) - High (alta) - Normal (normal) - Basic (básica)
capacidad disco duro
tipo SATA incluido: soporta 2 discos duros, soporta una capacidad de disco duro de más
de 2 TB (disco duro no incl.)
eSATA externo: disco duro externo o disk array (soporta el sistema Linux)
función HDD Quick Cleaning
limpiar rápidamente el "sistema índice" de los ficheros grabados, 1 TB en menos de 2
segundos
modo de grabación
manual / temporizador / movimiento / alarma / activación a distancia de la alarma
frecuencia de actualización de las
imágenes
400 IPS para PAL
funciones multiplex
reproducción en directo, grabación, reproducción, copia de seguridad y red
audio E/S
4 entradas / 1 salida
zona de detección de movimiento
16 x 12 blancos por cámara para todos los canales
sensibilidad de detección de
movimientos
3 parámetros con niveles de sensibilidad ajustables
grabación prealarma
sí
sistema de copia de seguridad
USB 2.0 flash drive / red (para la copia de seguridad y las actualizaciones del firmware)
vigilancia a distancia por el móvil
software EagleEyes (www.eagleeyescctv.com)
smartphones
push status: iPad®, iPod touch®, iPhone®, dispositivos
Android®
conexión a distancia por cualquier plataforma de
smartphone (Apple®, Android®, BlackBerry®, Nokia®
Symbian® y Windows Mobile®)
ordenador
CMS (Central Management System)
manejo central de hasta 10 direcciones IP (Windows® & Mac
OS®)
navegador Internet Explorer®, Firefox®, Google Chrome® y
Safari® mediante Java, QuickTime o VLC plug-in
Ethernet
10/100BASE-T, soporta el control a distancia y LiveView por Ethernet
conexión de red
soporta TCP/IP, PPPoE, DHCP y DDNS
mando a distancia IR
la videograbadora y las funciones PTZ se manejan a distancia (DVRRC4 incl.)
PTZ
sí (por RS-485)
alarma E/S
16 entradas / 1 salida
zoom digital
2 x (visualización en directo & reproducción)
teclado bloqueado
sí
detección de pérdida de la señal
sí
título de la cámara
máx. 6 caracteres
ajustes de vídeo
matiz / color / contraste / brillo
formato de visualización de la
fecha
AA/MM/DD, DD/MM/AA, MM/DD/AA y OFF
alimentación
19 VDC
consumo
< 64 W
horario de verano
sí
temperatura de funcionamiento
10-40 °C
restablecimiento
restablecimiento automático del sistema después de haber activado la alimentación de
nuevo
dimensiones
430 x 65 x 338 mm
Page 53

DVR16H3
V. 01 – 25/09/2014 53 ©Velleman nv
Opciones:
sensor fotoeléctrico
PEM300D, PEM10D, PEM30DN
contactos magnéticos
(normalmente abiertos &
cerrados)
HAA27
detector de vibraciones
HAA15
detectores PIR para uso en
interiores
HAA52N, HAA55
teclado de seguridad
HAA2866, HAA2890, HAA9523S
Utilice este aparato sólo con los accesorios originales. Velleman NV no será responsable de daños ni lesiones
causados por un uso (indebido) de este aparato. Para más información sobre este producto y la versión más
reciente de este manual del usuario, visite nuestra página www.velleman.eu. Se pueden modificar las
especificaciones y el contenido de este manual sin previo aviso.
Todas las marcas registradas y nombres comerciales son propiedad de sus respectivos dueños y se utilizan sólo para aclarar
la compatibilidad de nuestros productos con los de diferentes fabricantes. Windows, Windows XP, Windows 2000, Windows
Vista, Windows Aero, Windows 7, Windows 8, Windows Mobile, Windows Server son marcas registradas de Microsoft
Corporation en los Estados Unidos y otros países.
iPad, iPod, iPod touch, iPhone, Mac, iMac, MacBook, PowerBook, Power Mac, Mac OS son marcas comerciales de Apple Inc.,
registradas en EE.UU. y otros países.
IOS es una marca comercial o una marca comercial registrada de Cisco en los en los Estados Unidos y otros países y se utiliza
bajo licencia.
Android es una marca comercial de Google Inc.
El nombre BlackBerry® es propiedad de Research In Motion Limited y está registrada en EE.UU. y puede estar pendiente o
registrada en otros países.
Symbian está una marca registrada de Symbian Software Ltd, Symbian Ltd.
© DERECHOS DE AUTOR – Velleman NV dispone de los derechos de autor para este manual del usuario. Todos los
derechos mundiales reservados. Está estrictamente prohibido reproducir, traducir, copiar, editar y guardar este manual
del usuario o partes de ello sin previo permiso escrito del derecho habiente.
Page 54

DVR16H3
V. 01 – 25/09/2014 54 ©Velleman nv
SCHNELLEINSTIEG
1. Einführung
An alle Einwohner der Europäischen Union
Wichtige Umweltinformationen über dieses Produkt
Dieses Symbol auf dem Produkt oder der Verpackung zeigt an, dass die Entsorgung dieses Produktes nach seinem
Lebenszyklus der Umwelt Schaden zufügen kann. Entsorgen Sie die Einheit (oder verwendeten Batterien) nicht als
unsortiertes Hausmüll; die Einheit oder verwendeten Batterien müssen von einer spezialisierten Firma zwecks
Recycling entsorgt werden. Diese Einheit muss an den Händler oder ein örtliches Recycling-Unternehmen retourniert
werden. Respektieren Sie die örtlichen Umweltvorschriften.
Falls Zweifel bestehen, wenden Sie sich für Entsorgungsrichtlinien an Ihre örtliche Behörde.
Vielen Dank, dass Sie sich für Velleman entschieden haben! Lesen Sie diese Bedienungsanleitung vor Inbetriebnahme
sorgfältig durch. Überprüfen Sie, ob Transportschäden vorliegen. Sollte dies der Fall sein, verwenden Sie das Gerät nicht und
wenden Sie sich an Ihren Händler.
BEMERKUNG: Dies ist ein Schnelleinstieg. Mehr Informationen hierzu finden Sie in der ausführlichen Bedienungsanleitung auf
der mitgelieferten CD-ROM.
2. Sicherheitshinweise
ACHTUNG
STROMSCHLAGGEFAHR
ACHTUNG:
Um Stromschlaggefahr auf ein Minimum zu reduzieren, sollten Sie das Gerät vor Regen und Feuchtigkeit schützen.
Verwenden Sie das Gerät nur mit einem geeigneten Netzteil (siehe Gerät). Velleman NV übernimmt keine Haftung für
Schäden, verursacht durch falsche Anwendung des Gerätes.
Dieses Symbol weist auf das Vorhandensein von nicht-isolierten, möglicherweise gefährlichen stromführenden
Teilen im Gehäuse hin.
Dieses Symbol weist darauf hin, dass in der Bedienungsanleitung wichtige Hinweise zur Pflege bzw. Reparatur zu
finden sind.
Halten Sie Kinder und Unbefugte vom Gerät fern.
Stromschlaggefahr beim Öffnen des Gehäuses. Das Berühren von unter Spannung stehenden Leitungen könnte
zu lebensgefährlichen elektrischen Schlägen führen. Die Reparation darf nur von einer Fachkraft durchgeführt
werden.
Trennen Sie das Gerät bei Nichtbenutzung und vor jeder Reinigung vom Netz. Fassen Sie dazu den Netzstecker
an der Grifffläche an und ziehen Sie nie an der Netzleitung.
Öffnen oder desmontieren Sie das Gehäuse NICHT, wenn nicht anders angegeben in dieser
Bedienungsanleitung. Es gibt keine zu wartenden Teile. Bestellen Sie eventuelle Ersatzteile bei Ihrem
Fachhändler.
Der Aufbau des Gerätes entspricht der Schutzklasse I. Gemäß den Vorschriften muss das Gerät geerdet sein. Die
verwendete Steckdose muss geerdet sein (Schutzleiterkontakt). Jede Unterbrechung des Schutzleiters innerhalb
oder außerhalb des Gerätes ist gefährlich. Eine absichtliche Unterbrechung ist verboten.
3. Allgemeine Richtlinien
Siehe Velleman® Service- und Qualitätsgarantie am Ende dieser Bedienungsanleitung.
Verwenden Sie das Gerät nur im Innenbereich
Schützen Sie das Gerät vor Regen und Feuchte. Setzen Sie das Gerät keiner Flüssigkeit wie z.B. Tropf- oder
Spritzwasser, aus. Stellen Sie keine mit Flüssigkeit befüllten Gegenstände auf das Gerät.
Schützen Sie das Gerät vor Staub.
Schützen Sie das Gerät vor extremen Temperaturen. Beachten Sie, dass die Lüftungsschlitze nicht blockiert
werden. Beachten Sie eine minimale Entfernung von 2.5 cm zwischen dem Gerät und jedem anderen
Gegenstand.
Vermeiden Sie Erschütterungen. Vermeiden Sie rohe Gewalt während der Installation und Bedienung des
Gerätes.
Nehmen Sie das Gerät erst in Betrieb, nachdem Sie sich mit seinen Funktionen vertraut gemacht haben.
Eigenmächtige Veränderungen sind aus Sicherheitsgründen verboten.
Verwenden Sie das Gerät nur für Anwendungen beschrieben in dieser Bedienungsanleitung. sonst kann dies zu Schäden
am Produkt führen und erlischt der Garantieanspruch.
Page 55

DVR16H3
V. 01 – 25/09/2014 55 ©Velleman nv
Bei Schäden, die durch Nichtbeachtung der Bedienungsanleitung verursacht werden, erlischt der Garantieanspruch. Für
daraus resultierende Folgeschäden übernimmt der Hersteller keine Haftung.
Installieren und verwenden Sie das Gerät nicht für illegale Praktiken und beachten Sie die Intimsphäre aller.
4. Eigenschaften
Kompressionsformat H.264 Echtzeit
Aufnahme mit hoher Auflösung:
o full frame: 704 x 576 Pixel
o 960H: 960 x 576 Pixel mit Kameras mit 700 TV-Zeilen
Multiplex-Funktionen: erlaubt Liveanzeige, Aufnahme, Wiedergabe, Backup und Bedienung über das Netz
Back-up-Funktion: unterstützt Back-Up über USB 2.0 flash drive und Netz
Fernüberwachung über iiPad®, iPhone®, BlackBerry®, Windows Mobile®, Symbian® und Android® - Software:
www.eagleeyescctv.com
Aufnahme ausgelöst durch Bewegungsdetektion:
o fortgeschrittene Aufnahme durch Bewegungsdetektion
o Aufnahme durch Bewegungserfassung mit programmierter Startzeit (3 einstellbarer Parameter)
Dynamischer Domain-Name-System-Eintrag (DDNS): gratis
automatische Systemwiederherstellung nach Stromunterbrechung
unterstützt die Sommer-/Winterzeit-Funktion
Aufnahmemodi: manuell / Timer / Bewegung / Alarm
mehrsprachiges OSD: Englisch, Französisch, Deutsch, Portugiesisch, Spanisch, Tschechisch, Ungarisch, Griechisch,
Chinesisch und Vietnamesisch
Bedienungsanleitung: Englisch
Schnelleinstieg: Englisch, Niederländisch, Französisch, Spanisch, Deutsch
USB-Maus: mitgeliefert
optionale Festplatten (nicht mitgeliefert): HD500GB/S, HD1TB/S und HD2TB/S
IR-Fernbedienung: DVRRC4 (mitgeliefert)
optionaler Monitor (nicht mitgeliefert): MONSCA4N1
optionaler Router (nicht mitgeliefert): EM4544, EM4571, PCRT1
5. Beschreibung
Siehe Abbildungen, Seite 2 dieser Bedienungsanleitung.
Vorderseite
LEDs
Festplatte
Die Festplatte spielt Daten ab oder nimmt diese auf.
ALARM
Der Alarm wurde eingeschaltet.
TIMER
Die Timer-Aufnahme ist eingeschaltet.
PLAY
Das Gerät spielt Daten von der Festplatte ab.
POWER
Das Gerät ist eingeschaltet.
Navigationstasten
Im Konfigurationsmodus:
Drücken Sie ▲ / ▼ / ◄ / ► um den Cursor in die gewünschte Richtung zu bewegen.
Möchten Sie eine Einstellung ändern, so drücken Sie auf + oder –, um zu erhöhen
oder verringern.
Im Wiedergabe-Modus:
Drücken Sie um die Wiedergabe zu unterbrechen.
Drücken Sie um die Wiedergabe zu stoppen.
Drücken Sie für einen schnellen Vorlauf.
Drücken Sie für einen schnellen Rücklauf.
MENU
Drücken Sie diese Taste, um das Hauptmenü aufzurufen.
ENTER
Drücken Sie, um die Einstellungen zu bestätigen.
LIST
Liste mit Informationen über die aufgenommenen Dateien.
QUICK SEARCH / RECORD / MOTION / ALARM / TIMER / FULL LIST
PLAY
Drücken Sie PLAY, um die aufgenommene Datei abzuspielen.
SLOW
Drücken Sie SLOW, um die aufgenommene Datei langsam abzuspielen.
ZOOM
Im Live- oder Wiedergabe-Modus, drücken Sie ZOOM, um das Bild im ausgewählten Kanal zu vergrößern.
SEQ
Drücken Sie SEQ, um alle Kanäle nacheinander im ganzen Bildschirm anzuzeigen. Drücken Sie wieder, um
die Funktion zu verlassen.
Drücken Sie, um den Multikanal-Modus anzuzeigen.
1–16
Drücken Sie eine Taste, um den gewünschten Kanal zu wählen.
AUDIO
= SLOW + ZOOM
Drücken Sie gleichzeitig auf SLOW und ZOOM, um Live-Audio auszuwählen oder Audio von Audiokanal
wiederzugeben.
Page 56

DVR16H3
V. 01 – 25/09/2014 56 ©Velleman nv
Vorderseite
P.T.Z.
= SEQ +
Drücken Sie gleichzeitig auf SLOW und , um in den PTZ-Modus zu gelangen oder ihn zu verlassen.
USB-Port (2 x)
Schließen Sie ein USB-Laufwerk zur schnellen Datensicherung an den einen USB-Port an. Schließen Sie
eine USB-Maus an den anderen USB-Port an.
Bemerkung: Schließen Sie niemals zwei USB-Mäusen oder zwei USB Flash-Laufwerke gleichzeitig an.
Rückseite
LAN-Port
Schließen Sie ein LAN-Kabel für den Internetzugang an.
VGA
Anschluss für Monitor (nicht mitgeliefert).
AUDIO IN
4 Audio-Eingangskanäle, um vier externe Audioquellen (z.B. Kamera mit Audio) anzuschließen.
AUDIO OUT
1 Audio-Ausgang, um ein Audiogerät (z.B. Mono-Lautsprecher) anzuschließen.
VIDEO IN
4 Video Eingangskanäle, um 4 externe Videoquellen (z.B. Kamera) anzuschließen.
HDMI
1 Video-Ausgangskanal, um den DVR mit dem Hauptmonitor zu verbinden.
EXTERNAL I/O
Verwenden Sie den 9-pol. DSUB-Anschluss, um externe Geräte (z.B. Alarm, PTZ, usw.) anzuschließen.
19V DC
Stromversorgungseingang
MONITOR
eSATA
ALARM IN
Anschlüsse für die Alarmsensoren.
6. Eine SATA-Festplatte installieren
Installieren Sie eine SATA-Festplatte (nicht mitgeliefert), bevor Sie den DVR einschalten.
Bemerkungen
Verwenden Sie keine grüne Festplatte. Siehe die Bedienungsanleitung auf der CD für eine Liste mit kompatiblen
Festplatten
Löschen Sie beim Einschalten des DVR zuerst alle Daten auf einer neuen Festplatte. Geben Sie das Datum und die Uhrzeit
korrekt ein, um sicherzustellen, dass die neuen Aufnahmen nicht mit alten Daten vermischt werden. Mehr Informationen
hierzu finden Sie in der Bedienungsanleitung auf der mitgelieferten CD.
Installation
1
Lösen Sie die Schrauben an der oberen Abdeckung und entfernen Sie die
Abdeckung.
Die Abdeckung ist aus Metall. Seien Sie vorsichtig, damit Sie sich nicht an den
Kanten verletzen.
2
Befestigen Sie die Festplatte an der Fesplattenhalterung und schrauben Sie mit
den mitgelieferten Schrauben fest.
Achten Sie darauf, dass die PCB-Seite der Festplatte nach oben zeigt
3
Verbinden Sie die Netz- und Datenbuskabel mit der Festplatte.
4
Schließen Sie die obere Abdeckung des DVR und schrauben Sie die in Schritt 1
gelockerten Schrauben wieder fest.
Front Pan el
screw hole
Front Pan el
Page 57

DVR16H3
V. 01 – 25/09/2014 57 ©Velleman nv
7. Konfiguration der Hardware
Siehe Abbildungen, Seite 2 dieser Bedienungsanleitung.
Einen Monitor anschließen
Schließen Sie einen geeigneten Monitor (nicht mitgeliefert) an den HDMI- oder VGA-Videoport auf der Rückseite des DVR an.
Die Stromversorgung anschließen
1. Verbinden Sie den DC-Ausgangsstecker des mitgelieferten Netzteils mit dem VDC-Stromversorgungseingang auf der
Rückseite des DVR.
WARNUNG: Verwenden Sie nur das mitgelieferte Netzteil.
2. Verbinden Sie das Gerät über das mitgelieferte Stromkabel mit dem Netz. Schalten Sie den DVR noch nicht ein.
Eine Kamera anschließen
1. Es können bis zu 4 geeignete IP- Kameras angeschlossen werden. Jede Kamera braucht eine eigene Stromversorgung.
2. Verbinden Sie den Videoausgang der Kamera mit dem Videoeingang auf der Rückseite des DVR. Die Nummern neben den
Eingangsanschlüssen sind die Kanalnummer. Anschlusstyp: BNC.
Audio anschließen
1. Der DVR unterstützt vier Audio-Eingänge. Verbinden Sie den Audio-Ausgang einer Audioquelle mit dem Audio-Eingang
des DVR. Achten Sie darauf, dass Sie den Audiokanal mit dem entsprechenden Videokanal verbinden. Anschlusstyp: BNC.
2. Es gibt auch einen Audio-Ausgangsanschluss. Wenn nötig, schließen Sie einen Audiogerät (z.B. Lautsprecher) an diesen
Anschluss an. Anschlusstyp: BNC.
Ein lokales Netzwerk (LAN) anschließen
Verbinden Sie den DVR mit einem lokalen Netzwerk, indem Sie das Netzwerkkabel mit dem LAN-Port auf der Rückseite des
Gerätes verbinden. Anschlusstyp: 8P8C (RJ45). Um den Netzanschluss zu konfigurieren, drücken Sie die Menü-Taste und
wählen Sie . Mehr Informationen hierzu finden Sie in der ausführlichen Bedienungsanleitung auf der mitgelieferten CD.
8. Erste Schritte
1. Vergewissern Sie sich davon, dass die angeschlossenen Kameras eingeschaltet sind.
2. Stellen Sie den EIN/AUS-Schalter (Rückseite des DVR) auf ON.
Das Einschalten dauert etwa 15 bis 30 Sekunden.
Das Menü
Benutzen Sie die Maus, um das Kennwort mit der Kennwort-Tastatur einzugeben.
Der Standard-Benutzername und das Standard-Kennwort lauten “admin”.
Der Status wird von (Tastensperre) zu (Tasten entsperren) wechseln.
Drücken Sie die rechte Maustaste irgendwo auf dem Bildschirm, um das Hauptmenü anzuzeigen, und drücken Sie die rechte
Maustaste wieder, um das Menü zu verlassen.
QUICK START
Klicken Sie, um die Statusanzeige, die Bilder, das Datum & die Uhrzeit einzustellen.
SYSTEM
Klicken Sie, um die Systemkonfiguration einzustellen.
EVENT INFORMATION
Klicken Sie, um in das Ereignis-Suchmenü zu gelangen.
Page 58

DVR16H3
V. 01 – 25/09/2014 58 ©Velleman nv
ADVANCED CONFIG
Klicken Sie, um CAMERA, DETECTION, ALERT, NETWORK, DISPLAY, RECORD, DEVICES,
DCCS, IVS & NOTIFY einzustellen.
SCHEDULE SETTINGS
Klicken Sie, um den Aufnahme-Timer, den Erfassungs-Timer und den Alarm-Timer.
Mehr Informationen hierzu finden Sie in der ausführlichen Bedienungsanleitung auf der mitgelieferten CD-ROM.
Das Datum und die Uhrzeit einstellen
Bevor Sie den DVR verwenden, stellen Sie zuerst das Datum und die Uhrzeit ein.
1. Drücken Sie die rechte Maustaste und geben Sie das Administratorpasswort ein.
2. Klicken Sie auf das QUICK START-Symbol.
3. Wählen Sie TIME SETUP, um das Datum und die Uhrzeit einzustellen.
Bemerkung: Ändern Sie das Datum und die Uhrzeit nicht nachdem Sie die Aufnahmefunktion aktiviert haben. Sonst gerät
die Reihenfolge der aufgenommenen Daten durcheinander und werden Sie die aufgenommene Datei bei einer späteren ZeitSuche nicht wiederfinden können.
Bemerkung: Lassen Sie den DVR bei erster Inbetriebnahme mindestens 48 Stunden eingeschaltet, nachdem Sie das Datum
und die Uhrzeit korrekt eingestellt haben.
Das Kennwort einstellen
1. Drücken Sie die rechte Maustaste und geben Sie das Administratorpasswort ein.
2. Klicken Sie auf das SYSTEM-Symbol.
3. Gehen Sie zu ACCOUNT. Wählen Sie das Passwort, das Sie einstellen möchten, und klicken Sie auf EDIT.
Bemerkung: Ein Operator hat keinen Zugang zum Hauptmenü, nur zur Schnellmenüleiste (siehe unten).
4. Scrollen Sie nach oben ( ) oder nach unten ( ), um den Wert der ersten Nummer zu wählen und drücken Sie ENTER
zum Speichern. Gehen Sie zum nächsten Zeichen oder verwenden Sie die Maus, um den gewünschten Wert zu wählen.
Wiederholen Sie dies für die vier Kennwortnummern.
Bemerkung: das Standard-Administrator Passwort ist admin.
Aufnahme-Einstellungen
1. Drücken Sie die rechte Maustaste und geben Sie das Administratorpasswort ein.
2. Verwenden Sie die Navigationstasten, um ADVANCED CONFIG auszuwählen.
3. Verwenden Sie die Navigationstasten, um RECORD auszuwählen.
4. Wählen Sie den Wiedergabetyp aus (manual, Ereignis oder Timer).
5. In "CHANNEL", wählen Sie "ALL" aus, um die Änderungen auf alle Kanäle anzuwenden.
6. wählen Sie "BY CHANNEL", um die Bildgröße, die Anzahl Bilder pro Sekunden & die Bildqualität individuell für jeden Kanal
einzustellen.
7. Verwenden Sie die Navigationstasten, um GENERAL auszuwählen.
8. Stellen Sie die Bildgröße, die Anzahl Bilder pro Sekunden (IPS) und die Bildqualität ein.
9. Wählen Sie APPLY aus.
Mehr Informationen hierzu finden Sie in der ausführlichen Bedienungsanleitung auf der mitgelieferten CD-ROM.
Audiowiedergabe
Drücken Sie gleichzeitig auf SLOW und ZOOM, um den gewünschten Audiokanal auszuwählen oder verwenden Sie die
Schnellmenüleiste (siehe unten). Der aktuelle Audiokanal wird in der Statusleiste angezeigt.
Den Benutzertyp ändern
1. Sie können als Administrator ( ) oder als Operator ( ) Zugang zum DVR haben. Die Symbole werden in der
Statusleiste angezeigt.
2. Um zwischen den Benutzern zu schalten, klicken Sie auf das Benutzersymbol ( oder ) um die aktuelle Benutzung (
).
3. zu verriegeln. Drücken Sie auf das Symbol der Tastensperre ( ) und geben Sie dann das Passwort des gewünschten
Profils eins.
9. Anwendung
Display
Folgendes Bild zeigt die Bildschirmaufteilung.
A Systemdatum und -Zeit
B allgemeiner Systemstatus
C verfügbare HDD-Kapazität
D
Kanalstatus
Live-Audiokanal eingeschaltet
Timer-Aufnahme
Audiokanal ausgeschaltet
USB-Maus angeschlossen
Page 59

DVR16H3
V. 01 – 25/09/2014 59 ©Velleman nv
digitaler Zoom ein (Gelb) / aus
Internetanschluss
LAN-Anschluss
Festplatte überschreiben (Standard)
keine Netzwerkverbindung
PTZ-Modus
USB-Flashlaufwerk verbunden
Bewegung
Tastensperre ein
alarm
Sequenz-Modus
Alarmmodus
Aufnahmemodus
Operator eingeloggt
Administrator eingeloggt
Beachten Sie, dass die aktuellen Symbole geringfügig von den oben angezeigten Symbolen abweichen können.
Schnellmenüleiste
Bemerkung: die Schnellmenüleiste ist nur verfügbar wenn eine USB-Maus angeschlossen ist.
Bewegen Sie den Cursor zur Pfeilmarke, um die Schnellmenüleiste zu öffnen. Sie enthält folgende Symbole:
Klicken Sie, um das Kanalwechselfenster anzuzeigen und den gewünschten Kanal auszuwählen.
Klicken Sie, um das Bedienfeld für die Wiedergabe anzuzeigen.
Klicken Sie , um das neueste Video abzuspielen oder klicken Sie , um in die Suchliste zu gelangen.
Wählen Sie zuerst den gewünschten Kanal und klicken Sie dann auf um den Vergrößerungsmodus aufzurufen.
Klicken und ziehen Sie den roten Rahmen (links unten) um den gewünschten Bereich anzuzeigen.
Klicken Sie auf um diesen Modus zu verlassen.
Klicken Sie, um das Ausschaltmenü anzuzeigen und das Gerät auszuschalten oder neu zu starten.
Mehr Informationen hierzu finden Sie in der ausführlichen Bedienungsanleitung auf der mitgelieferten CD-ROM.
Aufnahme
Überprüfen Sie ob die Kamera(s) korrekt angeschlossen sind.
Sind die automatische Aufnahme- und die Voralarm-Funktion eingeschaltet, dann fängt das Gerät an, aufzunehmen.
Standard wird das Aufnahmesymbol ( ) angezeigt.
Ist die Bewegungserkennung aktiviert und tritt ein Ereignis auf, dann wird das Bewegungssymbol ( ) oder das
Alarmsymbol ( ) angezeigt.
Ist die Timer-Aufnahme aktiviert, so wird ( ) auf dem Bildschirm angezeigt und leuchtet die entsprechende LED.
Die Funktion ‚Festplatte überschreiben‘ ist Standard eingeschaltet und ( ) wird auf dem Bildschirm angezeigt.
Wiedergabe
Beachten Sie, dass das Bedienfeld nicht verriegelt ist. Drücken Sie PLAY im Bedienfeld oder verwenden Sie die
Schnellmenüleiste, um das Wiedergabefenster zu öffnen:
A
Fortschrittbalken
D
Information
B
Wiedergabesteuerung
E
geschlossen
C
Ereignissuche
F
Die Wiederholfunktion AB einstellen / das Backup-Menü öffnen
Page 60

DVR16H3
V. 01 – 25/09/2014 60 ©Velleman nv
Bemerkung: Damit die Wiedergabefunktion korrekt funktioniert, müssen mindestens 8192 Einzelbilder aufgenommen
worden sein (z.B. Wenn die Bildrate auf 30 Bilder pro Sekunde eingestellt ist, sollte die Aufnahmezeit mindestens
273 Sekunden betragen).
Mit den Tasten für schnellen Vorlauf ( ) und schnellen Rücklauf ( ) erhöhen oder verringern Sie die
Wiedergabegeschwindigkeit. Klicken Sie wiederholt, um die Geschwindigkeit zu erhöhen/verringern: 4-fach, 8-fach, 16fach oder 32-fach (max.).
Drücken Sie die Pause-Taste ( ), um die Wiedergabe anzuhalten.
Drücken Sie die Stop-Taste ( ), um wieder auf das Live-Bild zu wechseln.
Drücken Sie SLOW ein Mal für 1/4 der Wiedergabegeschwindigkeit 1/4. Drücken Sie zwei Mal für 1/8 der normalen
Geschwindigkeit.
Suchfunktion
1. Um ein Ereignis zu suchen, drücken Sie die LIST-Taste (Frontplatte).
Das System zeigt eine Übersicht der aufgenommenen Dateien an.
2. Sie können nach Dateityp suchen. Verfügbare Dateitype: ALARM, MANUAL, MOTION, SYSTEM und FULL LIST.
3. Wählen Sie eine Liste und Aufnahme aus.
4. Drücken Sie ENTER, um die Wiedergabe zu starten.
Bemerkung: Sie können die aufgenommenen Dateien auch mit der 'Video Viewer'-Software suchen.
10. Die EagleEyes-App installieren
Vorbedingungen
Vor der Installation von EagleEyes zur Fernüberwachung auf Ihrem Handy, überprüfen Sie folgendes:
Mobile Internetdienste sind abonniert und zur Nutzung auf Ihrem Handy verfügbar.
Bemerkung: Internetzugang über Drahtlos- oder 3G-Netzwerke wird möglicherweise berechnet. Für Einzelheiten zum
Internetzugang wenden Sie sich bitte an Ihren örtlichen Netzwerk- oder Dienstanbieter.
Sie haben IP-Adresse, Portnummer, Benutzername und Passwort zum Zugriff auf Netzwerkkamera vom Internet notiert.
Die Software herunterladen
1. Navigieren Sie auf Ihrem Handy zu www.eagleeyescctv.com und melden Sie sich an.
Laden Sie EagleEyes nicht auf Ihren Computer herunter.
o Für Android® wählen Sie den Download-Link auf der Website.
o Für iPhone® und iPad® sind zwei Versionen von EagleEyes verfügbar: EagleEyesHD Plus (kostenpflichtig) und
EagleEyesHD Lite (kostenlos).
2. Wählen Sie die gewünschte Version und Sie werden zum App Store zum Download der Anwendung geführt.
3. Nach dem Download wird EagleEyes automatisch an der Speicherstelle installiert, an der auf Ihrem Handy
standardgemäß alle Anwendungen gespeichert werden oder gemäß Ihren Spezifikationen.
Bemerkung: Für weitere Einzelheiten zur Konfiguration und Benutzung dieses Programms besuchen Sie bitte die offizielle
Website www.avtech.com.tw.
11. Push Status Konfiguration
Haben Sie ein iPhone®, iPad® oder Android®-Gerät, dann können Sie die Push Status-Funktion vom DVR verwenden: bei
Alarm wird der Videorecorder eine Nachricht an das Smartphone schicken.
Mögliche Alarmereignisse:
ALL
VIDEO LOSS
HDD FULL
POWER ON
HDD (CLEAR / NO HDD / OVER TEMPERATURE)
NET LOGIN
KEY UNLOCK
NETWORK
UPS
SYSTEM ABNORMAL.
Installieren Sie die EagleEyes-App auf Ihrem Mobiltelefon (siehe Die EagleEyes-App installieren).
Auf dem DVR:
1. Stellen Sie "ACTION" auf ON.
2. Wählen Sie die Ereignisse, wofür Sie eine Nachricht empfangen möchten, aus.
Sie empfangen eine Nachrichte wenn ein ausgewähltes Ereignis ausgelöst wird.
Page 61

DVR16H3
V. 01 – 25/09/2014 61 ©Velleman nv
11.1 Konfiguration
Bevor Sie Push Status programmieren, beachten Sie, dass:
Das DVR-System eingestellt ist, wie beschrieben in 3. Anschluss und Konfiguration in der ausführliche
Bedienungsanleitung auf der mitgelieferten CD-ROM.
Der DVR mit Internet verbunden ist.
Die EagleEyes-App auf Ihrem Handy installiert ist (siehe oben Die EagleEyes-App installieren).
Schritte
1. Öffnen Sie EagleEyes und fügen Sie der EagleEyes Adressbuch diesen NVR hinzu.
Für mehr Informationen über EagleEyes operation, besuchen Sie www.eagleeyescctv.com.
2. In der EagleEyes-App, schalten Sie Push Status ein (siehe unten).
3. Lösen Sie ein Ereignis aus, um zu überprüfen, ob Sie eine Push Status-Nachricht empfangen.
12. Push Video-Konfiguration
12.1 PIN-Belegung
Dieser DVR kann Meldungen an mobile Geräte (z.B. ®, iPad® und Android®) senden, wenn ein Alarm ausgelöst wird (Push
Video). Nur einige Alarm-In-Pins unterstützen diese Funktion aber.
Es gibt verschiedene Methoden, um Alarmsensoren für Push Video anzuschließen:
über den Push Video ALARM IN-Anschluss
über den externen I/O-Port.
Push Video ALARM IN-Anschluss
Es befindet sich einen Push Video ALARM IN-Anschluss auf der Rückseite des DVR. Siehe nachfolgende Liste für die PinBelegung, die Push Video und die entsprechenden Videokanäle unterstützt.
Alarm
Entsprechender Videokanal
Alarm 1
CH1
Alarm 2
CH2
Alarm 3
CH3
Alarm 4
CH4
Externer I/O-Port
Siehe nachfolgende Liste für die Pin-Belegung, die Push Video und die entsprechenden Videokanäle unterstützt.
Pin
Entsprechender Videokanal
Pin 2
CH1
Pin 15
CH2
Pin 3
CH3
Pin 16
CH4
Page 62

DVR16H3
V. 01 – 25/09/2014 62 ©Velleman nv
Einen Alarmsensor anschließen
Verbinden Sie den Alarmsensor (z.B. Magnetkontakte) mit dem Push Video ALARM IN-Anschluss oder den I/O-Pins, die Push
Video unterstützen (Rückseite des Gerätes).
12.2 Konfiguration
Bevor Sie Push Video programmieren, beachten Sie, dass:
das DVR-System eingestellt ist, wie beschrieben in Anschluss und Konfiguration.
der DVR mit Internet verbunden ist.
die EagleEyes-App auf Ihrem iPhone®, iPad® oder Android
®-Gerät
installiert ist.
Für weitere Einzelheiten, siehe Mobile Überwachung über EagleEyes.
Um Push Video zu konfigurieren:
1. Klicken Sie mit der rechten Maustaste, um das Hauptmenü anzuzeigen und wählen Sie (ADVANCED CONFIG) >
NOTIFY.
2. Stellen Sie GUARD auf ON.
3. Konfigurieren Sie den Alarmsensor (normal offen oder normal geschlossen).
Achtung! Um korrekt zu funktionieren, wählen Sie den anderen Typ.
Ist der Alarmsensor NC (normal geschlossen, Alarm ertönt wenn der Kontakt sich öffnet), wählen Sie dann
ALARM N.O.
Ist der Alarmsensor NO (normal offen, Alarm ertönt wenn der Kontakt sich schließt), wählen Sie dann
ALARM N.C.
ADVANCED CONFIG
CAMERA
PUSH VIDEO
PUSH MESSAGE
MESSAGE MAIL
VIDEO MAIL
DETECTION
GUARD
ON ALERT
CH01
ALARM OFF / INTERNAL ALARM
CH1 NETWORK
CH02
ALARM OFF
CH2 DISPLAY
CH03
ALARM N.O.
office
RECORD
CH04
ALARM OFF
CH4
DEVICES
DCCS
IVS
NOTIFY
EXIT
4. Öffnen Sie EagleEyes und fügen Sie der EagleEyes-Adressbuch diesen DVR hinzu.
Bemerkung: Für weitere Einzelheiten über EagleEyes, besuchen Sie www.eagleeyescctv.com.
Page 63

DVR16H3
V. 01 – 25/09/2014 63 ©Velleman nv
5. Schalten Sie die Push Video-Funktion ein.
6. Lösen Sie den Alarm aus.
7. Empfangen Sie eine Meldung und sehen Sie sich das Video an.
13. Fernüberwachung über EagleEyes
EagleEyes ist eine leistungsstarke Überwachungssoftware, entworfen durch AV TECH Corporation.
Bemerkung: Besuchen Sie http://www.eagleeyescctv.com für mehr Informationen über EagleEyes.
Für Kommentar oder Fragen über dieses Programm, setzen Sie sich mit Velleman in Verbindung. Siehe www.velleman.eu für
Kontaktdaten.
13.1 Voraussetzungen
Vor der Installation von EagleEyes zur Fernüberwachung auf Ihrem Handy, überprüfen Sie folgendes:
Ihre Mobilplattform ist iPhone®, iPad®, BlackBerry® oder Android®-Mobilgeräte.
Sie haben mobilen Internetdienste abonniert und diese stehen auf Ihrem Handy zur Verfügung.
Bemerkung: Internetzugang über Drahtlos- oder 3G-Netzwerke wird möglicherweise berechnet. Für Einzelheiten über
die Gebühren für den Internetzugang wenden Sie sich bitte an Ihren örtlichen Netzwerk- oder Serviceanbieter.
Sie haben IP-Adresse, Portnummer, Benutzername und Passwort zum Zugriff auf Netzwerkkamera aus dem Internet
notiert.
13.2 EagleEyes herunterladen
1. Navigieren Sie auf Ihrem Handy zu www.eagleeyescctv.com.
Bemerkung: Laden Sie EagleEyes nicht von Ihrem Computer aus herunter.
2. Wählen Sie Products > Software > Mobile app, um die EagleEyes-Einführungsseite aufzurufen.
3. Wählen Sie Ihre Plattform (iOS, BlackBerry oder Android) und laden Sie das geeignete Programm herunter.
Bemerkung: Der DVR ist nur mit iPhone®, iPad® BlackBerry® und Android®-Mobilgeräten kompatibel.
4. Befolgen Sie die Anweisungen im Bildschirm, um mit dem Download zu beginnen.
Nach dem Download wird EagleEyes automatisch auf Ihrem Handy installiert.
Bemerkung: Für weitere Einzelheiten zur Konfiguration und Benutzung dieses Programms lesen Sie bitte die Hinweise
auf der Download-Seite.
14. Push Video einstellen
Dieser DVR unterstützt sofortige Benachrichtigungen auf Ihr Mobilgerät (iPhone, iPad, Android) dank der EagleEyes-Software.
Entdeckt die Personenerkennungskamera oder das externen Alarmgerät eine Person, so empfängt der DVR sofort
Alarmsignale und sendet diese an Ihr Mobilgerät.
14.1 Voraussetzungen
Beachten Sie Folgendes, bevor Sie die Push Video-Meldefunktion einstellen:
Sie haben die EagleEyes-App auf Ihrem iPhone®, iPad® oder Android®-Mobilgerät installiert. Einzelheiten hierzu finden Sie
unter EagleEyes herunterladen.
Page 64

DVR16H3
V. 01 – 25/09/2014 64 ©Velleman nv
Eine Kamera mit Personenerkennung ist mit CH1 oder ein externes Alarmgerät ist mit dem 'Push Video Alarm In' auf der
Rückseite verbunden. Stellen Sie sicher, dass ebenfalls eine Kamera für die Aufnahme vom Alarmereignissen
angeschlossen ist. Siehe Push Video einstellen für Einzelheiten über die Videokanäle und Alarm-Pins.
Die Ereignisaufnahmefunktion Ihrem DVR ist eingeschaltet.
Die Bewegungserkennungsfunktion auf Ihrem DVR ist eingeschaltet.
Der DVR ist mit Internet verbunden. Mehr Einzelheiten hierzu finden Sie unter
http://www.surveillance-download.com/user/CMS.pdf.
14.2 Push Video einschalten
Auf dem iPhone oder iPad
1. Im Hauptmenü vom iiPhone®/iPad® , wählen Sie Settings > Notifications.
2. Wählen Sie EagleEyes und beachten Sie, dass das Benachrichtigungszentrum (Notification Center) auf ON steht.
3. Öffnen Sie EagleEyes und stellen Sie die Push Video-Taste auf ON. Sie empfangen eine Meldung, dass die Push-
Benachrichtigung (Push Video) eingeschaltet ist.
4. Kehren Sie zum Hauptmenü vom iPhone®/iPad®.
Sie empfangen eine Meldung bei Personenerkennung oder bei Alarmereignis. Wählen Sie Launch (starten), um den
aufgenommenen Clip sofort wiederzugeben.
Auf dem Android-Mobilgerät
Im Adressbuch, stellen Sie Guard von OFF auf ON.
Page 65

DVR16H3
V. 01 – 25/09/2014 65 ©Velleman nv
15. Technische Daten
Videosystem
PAL
Videokompressionsformat
H.264
Video-Eingang
16 Kanäle, Komposit-Videosignal 1 Vpp / 75 Ohm BNC
Video-Ausgang
HDMI® (1080p), VGA (max. 1920 x 1080 Pixel) & Komposit-Videosignal 1 Vpp /
75 Ohm BNC
Video Loop Out
nein
max. Aufnahmefrequenz (PAL)
960H: 960 x 576 Pixel @ 400 FPS (PAL)
Frame: 704 × 576 Pixel @ 400 FPS (PAL)
einstellbare
Aufnahmegeschwindigkeit
Regelung Bildqualität
Best, High, Normal, Basic
Festplattenspeicherplatz
SATA-Typ (eingebaut): unterstützt 2 x Festplatte, unterstützt HDD von über 2 TB
(Festplatte nicht mitgeliefert)
externe eSATA: externe Festplatte oder Disk Array (unterstützt Linux-System)
HDD-Schnelllöschen
Schnellfreigabe des Datei-Index" der aufgenommenen Dateien 1 TB in weniger als
2 Sekunden
Aufnahmemodus
manuell / Timer / Bewegung / Alarm/ Ferneinschaltung Alarm
Bildwiederholrate
400 IPS für PAL
Multiplex-Betrieb
Live-Ansicht, Aufnahme, Wiedergabe, Datensicherung und Netzwerk
Audio I/O
4 Eingänge / 1 Ausgang
Erfassungsbereich
16 x 12 Raster pro Kamera für alle Kanäle
Erfassungsempfindlichkeit
3 Parameter mit einstellbaren Empfindlichkeitspegeln
Pre-Alarm-Aufzeichnung
ja
Backup-Geräte
USB 2.0 Flash Drive / Netz (für Sicherungskopie und Aktualisierungen der Firmware)
Fernüberwachung über Handy
EagleEyes-Software (www.eagleeyescctv.com)
Smartphones
Push Status: iPad®, iPod touch®, iPhone®, Android®Smartphone & Tablet-PC
Login über alle Smartphone-Plattformen möglich (Apple®,
Android®, BlackBerry®, Nokia® Symbian® und Windows
Mobile®)
Rechner
CMS (Central Management System)
zentrale Verwaltung von bis zu 10 IP-Adressen (Windows® &
Mac OS®)
Webbrowser Internet Explorer®, Firefox®, Google Chrome®
und Safari® über Java, QuickTime oder VLC plug-in
Ethernet
10/100BASE-T. Unterstützt Fernbedienung und Livebild über Ethernet
Netzverbindung
unterstützt TCP/IP, PPPoE, DHCP und DDNS
IR-Fernbedienung
Fernbedienung des DVR und der PTZ-Funktionen (DVRRC4 mitgeliefert)
PTZ
ja (über RS-485)
Alarm I/O
16 Eingänge / 1 Ausgang
digitaler Zoom
2x (Live-Ansicht & Wiedergabe)
Tastensperre
ja
Detektion Bildverlust
ja
Kameratitel
bis zu 6 Zeichen
Videoregelungen
Farbton / Farbe / Kontrast / Helligkeit
Format der Datumsanzeige
JJ/MM/TT, TT/MM/JJ, MM/TT/JJ und Aus
Stromversorgung
19 VDC
Stromverbrauch
< 64 W
Sommerzeit
ja
Betriebstemperatur
10-40 °C
Systemwiederherstellung
automatische Systemwiederherstellung nach Stromunterbrechung
Abmessungen
430 x 65 x 338 mm
Page 66

DVR16H3
V. 01 – 25/09/2014 66 ©Velleman nv
Optionen:
IR-Lichtschranke
PEM300D, PEM10D, PEM30DN
Magnetkontakte (normal offen &
geschlossen)
HAA27
Erschütterungssensor
HAA15
PIR-Bewegungsmelder für den
Innenbereich
HAA52N, HAA55
Codeschloss
HAA2866, HAA2890, HAA9523S
Verwenden Sie dieses Gerät nur mit originellen Zubehörteilen. Velleman NV übernimmt keine Haftung für
Schaden oder Verletzungen bei (falscher) Anwendung dieses Gerätes. Mehr Informationen zu diesem Produkt
und die neueste Version dieser Bedienungsanleitung finden Sie hier: www.velleman.eu. Alle Änderungen ohne
vorherige Ankündigung vorbehalten.
Alle eingetragenen Warenzeichen und Handelsnamen sind Eigentum Ihrer jeweiligen Inhaber und dienen nur zur
Verdeutlichung der Kompatibilität unserer Produkte mit den Produkten verschiedener Hersteller. Windows, Windows XP,
Windows 2000, Windows Vista, Windows Aero, Windows 7, Windows 8, Windows Mobile, Windows Server sind eingetragene
Warenzeichen von Microsoft Corporation in den VS und anderen Ländern.
iPad, iPod, iPod touch, iPhone, Mac, iMac, MacBook, PowerBook, Power Mac, Mac OS sind Warenzeichen von Apple Inc.,
eingetragen in den USA und anderen Ländern.
iOS ist eine Marke oder eine eingetragene Marke von Cisco in den USA und anderen Ländern und wird unter Lizenz
verwendet.
Android ist ein eingetragenes Warenzeichen von Google Inc.
Der Name BlackBerry ist Eigentum von Research In Motion Limited und ist in den USA und in weiteren Ländern registriert
oder angemeldet.
Symbian ist eine eingetragene Marke von Symbian Software Ltd, Symbian Ltd.
© URHEBERRECHT – Velleman NV besitzt das Urheberrecht für diese Bedienungsanleitung. Alle weltweiten
Rechte vorbehalten. Ohne vorherige schriftliche Genehmigung des Urhebers ist es nicht gestattet, diese
Bedienungsanleitung ganz oder in Teilen zu reproduzieren, zu kopieren, zu übersetzen, zu bearbeiten oder zu speichern.
Page 67

Velleman® Service and Quality Warranty
Since its foundation in 1972, Velleman® acquired extensive
experience in the electronics world and currently distributes its
products in over 85 countries.
All our products fulfil strict quality requirements and legal stipulations
in the EU. In order to ensure the quality, our products regularly go
through an extra quality check, both by an internal quality
department and by specialized external organisations. If, all
precautionary measures notwithstanding, problems should occur,
please make appeal to our warranty (see guarantee conditions).
General Warranty Conditions Concerning Consumer Products
(for EU):
• All consumer products are subject to a 24-month warranty on
production flaws and defective material as from the original date of
purchase.
• Velleman® can decide to replace an article with an equivalent
article, or to refund the retail value totally or partially when the
complaint is valid and a free repair or replacement of the article is
impossible, or if the expenses are out of proportion.
You will be delivered a replacing article or a refund at the value of
100% of the purchase price in case of a flaw occurred in the first
year after the date of purchase and delivery, or a replacing article at
50% of the purchase price or a refund at the value of 50% of the
retail value in case of a flaw occurred in the second year after the
date of purchase and delivery.
• Not covered by warranty:
- all direct or indirect damage caused after delivery to the article
(e.g. by oxidation, shocks, falls, dust, dirt, humidity...), and by the
article, as well as its contents (e.g. data loss), compensation for loss
of profits;
- consumable goods, parts or accessories that are subject to an aging
process during normal use, such as batteries (rechargeable, nonrechargeable, built-in or replaceable), lamps, rubber parts, drive
belts... (unlimited list);
- flaws resulting from fire, water damage, lightning, accident, natural
disaster, etc.…;
- flaws caused deliberately, negligently or resulting from improper
handling, negligent maintenance, abusive use or use contrary to the
manufacturer’s instructions;
- damage caused by a commercial, professional or collective use of
the article (the warranty validity will be reduced to six (6) months
when the article is used professionally);
- damage resulting from an inappropriate packing and shipping of the
article;
- all damage caused by modification, repair or alteration performed
by a third party without written permission by Velleman®.
• Articles to be repaired must be delivered to your Velleman® dealer,
solidly packed (preferably in the original packaging), and be
completed with the original receipt of purchase and a clear flaw
description.
• Hint: In order to save on cost and time, please reread the manual
and check if the flaw is caused by obvious causes prior to presenting
the article for repair. Note that returning a non-defective article can
also involve handling costs.
• Repairs occurring after warranty expiration are subject to shipping
costs.
• The above conditions are without prejudice to all commercial
warranties.
The above enumeration is subject to modification according to
the article (see article’s manual).
Velleman® service- en kwaliteitsgarantie
Velleman® heeft sinds zijn oprichting in 1972 een ruime ervaring
opgebouwd in de elektronicawereld en verdeelt op dit moment
producten in meer dan 85 landen. Al onze producten beantwoorden
aan strikte kwaliteitseisen en aan de wettelijke bepalingen geldig in
de EU. Om de kwaliteit te waarborgen, ondergaan onze producten op
regelmatige tijdstippen een extra kwaliteitscontrole, zowel door onze
eigen kwaliteitsafdeling als door externe gespecialiseerde
organisaties. Mocht er ondanks deze voorzorgen toch een probleem
optreden, dan kunt u steeds een beroep doen op onze waarborg (zie
waarborgvoorwaarden).
Algemene waarborgvoorwaarden consumentengoederen
(voor Europese Unie):
• Op alle consumentengoederen geldt een garantieperiode van 24
maanden op productie- en materiaalfouten en dit vanaf de
oorspronkelijke aankoopdatum.
• Indien de klacht gegrond is en een gratis reparatie of vervanging
van een artikel onmogelijk is of indien de kosten hiervoor buiten
verhouding zijn, kan Velleman® beslissen het desbetreffende artikel
te vervangen door een gelijkwaardig artikel of de aankoopsom van
het artikel gedeeltelijk of volledig terug te betalen. In dat geval krijgt
u een vervangend product of terugbetaling ter waarde van 100% van
de aankoopsom bij ontdekking van een gebrek tot één jaar na
aankoop en levering, of een vervangend product tegen 50% van de
kostprijs of terugbetaling van 50 % bij ontdekking na één jaar tot 2
jaar.
• Valt niet onder waarborg:
- alle rechtstreekse of onrechtstreekse schade na de levering
veroorzaakt aan het toestel (bv. door oxidatie, schokken, val, stof,
vuil, vocht...), en door het toestel, alsook zijn inhoud (bv. verlies van
data), vergoeding voor eventuele winstderving.
- verbruiksgoederen, onderdelen of hulpstukken die onderhevig zijn
aan veroudering door normaal gebruik zoals bv. batterijen (zowel
oplaadbare als niet-oplaadbare, ingebouwd of vervangbaar), lampen,
rubberen onderdelen, aandrijfriemen... (onbeperkte lijst).
- defecten ten gevolge van brand, waterschade, bliksem, ongevallen,
natuurrampen, enz.
- defecten veroorzaakt door opzet, nalatigheid of door een
onoordeelkundige behandeling, slecht onderhoud of abnormaal
gebruik of gebruik van het toestel strijdig met de voorschriften van
de fabrikant.
- schade ten gevolge van een commercieel, professioneel of collectief
gebruik van het apparaat (bij professioneel gebruik wordt de
garantieperiode herleid tot 6 maand).
- schade veroorzaakt door onvoldoende bescherming bij transport
van het apparaat.
- alle schade door wijzigingen, reparaties of modificaties uitgevoerd
door derden zonder toestemming van Velleman®.
• Toestellen dienen ter reparatie aangeboden te worden bij uw
Velleman®-verdeler. Het toestel dient vergezeld te zijn van het
oorspronkelijke aankoopbewijs. Zorg voor een degelijke verpakking
(bij voorkeur de originele verpakking) en voeg een duidelijke
foutomschrijving bij.
• Tip: alvorens het toestel voor reparatie aan te bieden, kijk nog
eens na of er geen voor de hand liggende reden is waarom het
toestel niet naar behoren werkt (zie handleiding). Op deze wijze kunt
u kosten en tijd besparen. Denk eraan dat er ook voor niet-defecte
toestellen een kost voor controle aangerekend kan worden.
• Bij reparaties buiten de waarborgperiode zullen transportkosten
aangerekend worden.
• Elke commerciële garantie laat deze rechten onverminderd.
Bovenstaande opsomming kan eventueel aangepast worden
naargelang de aard van het product (zie handleiding van het
betreffende product).
Garantie de service et de qualité Velleman®
Depuis 1972, Velleman® a gagné une vaste expérience dans le
secteur de l’électronique et est actuellement distributeur dans plus de
85 pays.
Tous nos produits répondent à des exigences de qualité rigoureuses
et à des dispositions légales en vigueur dans l’UE. Afin de garantir la
qualité, nous soumettons régulièrement nos produits à des contrôles
de qualité supplémentaires, tant par notre propre service qualité que
par un service qualité externe. Dans le cas improbable d’un défaut
malgré toutes les précautions, il est possible d’invoquer notre
garantie (voir les conditions de garantie).
Conditions générales concernant la garantie sur les produits
grand public (pour l’UE) :
• tout produit grand public est garanti 24 mois contre tout vice de
production ou de matériaux à dater du jour d’acquisition effective ;
• si la plainte est justifiée et que la réparation ou le remplacement
d’un article est jugé impossible, ou lorsque les coûts s’avèrent
disproportionnés, Velleman® s’autorise à remplacer ledit article par
un article équivalent ou à rembourser la totalité ou une partie du prix
d’achat. Le cas échéant, il vous sera consenti un article de
remplacement ou le remboursement complet du prix d’achat lors
d’un défaut dans un délai de 1 an après l’achat et la livraison, ou un
article de remplacement moyennant 50% du prix d’achat ou le
remboursement de 50% du prix d’achat lors d’un défaut après 1 à 2
ans.
• sont par conséquent exclus :
- tout dommage direct ou indirect survenu à l’article après livraison
(p.ex. dommage lié à l’oxydation, choc, chute, poussière, sable,
impureté…) et provoqué par l’appareil, ainsi que son contenu (p.ex.
perte de données) et une indemnisation éventuelle pour perte de
revenus ;
- toute pièce ou accessoire nécessitant un remplacement causé par
un usage normal comme p.ex. piles (rechargeables comme non
rechargeables, intégrées ou remplaçables), ampoules, pièces en
caoutchouc, courroies… (liste illimitée) ;
- tout dommage qui résulte d’un incendie, de la foudre, d’un
accident, d’une catastrophe naturelle, etc. ;
- out dommage provoqué par une négligence, volontaire ou non, une
utilisation ou un entretien incorrect, ou une utilisation de l’appareil
contraire aux prescriptions du fabricant ;
- tout dommage à cause d’une utilisation commerciale,
professionnelle ou collective de l’appareil (la période de garantie sera
réduite à 6 mois lors d’une utilisation professionnelle) ;
- tout dommage à l’appareil qui résulte d’une utilisation incorrecte ou
différente que celle pour laquelle il a été initialement prévu comme
décrit dans la notice ;
- tout dommage engendré par un retour de l’appareil emballé dans
un conditionnement non ou insuffisamment protégé.
- toute réparation ou modification effectuée par une tierce personne
sans l’autorisation explicite de SA Velleman® ; - frais de transport de
et vers Velleman® si l’appareil n’est plus couvert sous la garantie.
• toute réparation sera fournie par l’endroit de l’achat. L’appareil doit
nécessairement être accompagné du bon d’achat d’origine et être
dûment conditionné (de préférence dans l’emballage d’origine avec
mention du défaut) ;
• tuyau : il est conseillé de consulter la notice et de contrôler câbles,
piles, etc. avant de retourner l’appareil. Un appareil retourné jugé
défectueux qui s’avère en bon état de marche pourra faire l’objet
d’une note de frais à charge du consommateur ;
• une réparation effectuée en-dehors de la période de garantie fera
l’objet de frais de transport ;
• toute garantie commerciale ne porte pas atteinte aux conditions
susmentionnées.
La liste susmentionnée peut être sujette à une
complémentation selon le type de l’article et être mentionnée
dans la notice d’emploi.
Page 68

Garantía de servicio y calidad Velleman®
Desde su fundación en 1972 Velleman® ha adquirido una amplia
experiencia como distribuidor en el sector de la electrónica en más de
85 países. Todos nuestros productos responden a normas de calidad
rigurosas y disposiciones legales vigentes en la UE. Para garantizar la
calidad, sometemos nuestros productos regularmente a controles de
calidad adicionales, tanto a través de nuestro propio servicio de
calidad como de un servicio de calidad externo. En el caso
improbable de que surgieran problemas a pesar de todas las
precauciones, es posible recurrir a nuestra garantía (véase las
condiciones de garantía).
Condiciones generales referentes a la garantía sobre
productos de venta al público (para la Unión Europea):
• Todos los productos de venta al público tienen un perìodo de
garantía de 24 meses contra errores de producción o errores en
materiales desde la adquisición original;
• Si la queja está fundada y si la reparación o sustitución de un
artículo no es posible, o si los gastos son desproporcionados,
Velleman® autoriza reemplazar el artículo por un artículo equivalente
o reembolsar la totalidad o una parte del precio de compra. En este
caso, usted recibirá un artículo de recambio o el reembolso completo
del precio de compra si encuentra algún fallo hasta un año después
de la compra y entrega, o un artículo de recambio al 50% del precio
de compra o el reembolso del 50% del precio de compra si encuentra
un fallo después de 1 año y hasta los 2 años después de la compra y
entrega.
Por consiguiente, están excluidos entre otras cosas:
- todos los daños causados directa o indirectamente al aparato (p.ej.
por oxidación, choques, caída,...) y a su contenido (p.ej. pérdida de
datos) después de la entrega y causados por el aparato, y cualquier
indemnización por posible pérdida de ganancias;
- partes o accesorios, que estén expuestos al desgaste causado por
un uso normal, como por ejemplo baterías (tanto recargables como
no recargables, incorporadas o reemplazables), bombillas, partes de
goma, etc. (lista ilimitada);
- defectos causados por un incendio, daños causados por el agua,
rayos, accidentes, catástrofes naturales, etc.;
- defectos causados a conciencia, descuido o por malos tratos, un
mantenimiento inapropiado o un uso anormal del aparato contrario a
las instrucciones del fabricante;
- daños causados por un uso comercial, profesional o colectivo del
aparato (el período de garantía se reducirá a 6 meses con uso
profesional);
- daños causados por un uso incorrecto o un uso ajeno al que está
previsto el producto inicialmente como está descrito en el manual del
usuario;
- daños causados por una protección insuficiente al transportar el
aparato.
- daños causados por reparaciones o modificaciones efectuadas por
una tercera persona sin la autorización explícita de Velleman®;
- se calcula gastos de transporte de y a Velleman® si el aparato ya
no está cubierto por la garantía.
• Cualquier artículo que tenga que ser reparado tendrá que ser
devuelto a su distribuidor Velleman®. Devuelva el aparato con la
factura de compra original y transpórtelo en un embalaje sólido
(preferentemente el embalaje original). Incluya también una buena
descripción del fallo;
• Consejo: Lea el manual del usuario y controle los cables, las pilas,
etc. antes de devolver el aparato. Si no se encuentra un defecto en el
artículo los gastos podrían correr a cargo del cliente;
• Los gastos de transporte correrán a carga del cliente para una
reparación efectuada fuera del período de garantía.
• Cualquier gesto comercial no disminuye estos derechos.
La lista previamente mencionada puede ser adaptada según el
tipo de artículo (véase el manual del usuario del artículo en
cuestión).
Velleman® Service- und Qualitätsgarantie
Seit der Gründung in 1972 hat Velleman® sehr viel Erfahrung als
Verteiler in der Elektronikwelt in über 85 Ländern aufgebaut.
Alle Produkte entsprechen den strengen Qualitätsforderungen und
gesetzlichen Anforderungen in der EU. Um die Qualität zu
gewährleisten werden unsere Produkte regelmäßig einer zusätzlichen
Qualitätskontrolle unterworfen, sowohl von unserer eigenen
Qualitätsabteilung als auch von externen spezialisierten
Organisationen. Sollten, trotz aller Vorsichtsmaßnahmen, Probleme
auftreten, nehmen Sie bitte die Garantie in Anspruch (siehe
Garantiebedingungen).
Allgemeine Garantiebedingungen in Bezug auf Konsumgüter
(für die Europäische Union):
• Alle Produkte haben für Material- oder Herstellungsfehler eine
Garantieperiode von 24 Monaten ab Verkaufsdatum.
• Wenn die Klage berechtigt ist und falls eine kostenlose Reparatur
oder ein Austausch des Gerätes unmöglich ist, oder wenn die Kosten
dafür unverhältnismäßig sind, kann Velleman® sich darüber
entscheiden, dieses Produkt durch ein gleiches Produkt zu ersetzen
oder die Kaufsumme ganz oder teilweise zurückzuzahlen. In diesem
Fall erhalten Sie ein Ersatzprodukt oder eine Rückzahlung im Werte
von 100% der Kaufsumme im Falle eines Defektes bis zu 1 Jahr nach
Kauf oder Lieferung, oder Sie bekommen ein Ersatzprodukt im Werte
von 50% der Kaufsumme oder eine Rückzahlung im Werte von 50 %
im Falle eines Defektes im zweiten Jahr.
• Von der Garantie ausgeschlossen sind:
- alle direkten oder indirekten Schäden, die nach Lieferung am Gerät
und durch das Gerät verursacht werden (z.B. Oxidation, Stöße, Fall,
Staub, Schmutz, Feuchtigkeit, ...), sowie auch der Inhalt (z.B.
Datenverlust), Entschädigung für eventuellen Gewinnausfall.
- Verbrauchsgüter, Teile oder Zubehörteile, die durch normalen
Gebrauch dem Verschleiß ausgesetzt sind, wie z.B. Batterien (nicht
nur aufladbare, sondern auch nicht aufladbare, eingebaute oder
ersetzbare), Lampen, Gummiteile, Treibriemen, usw. (unbeschränkte
Liste).
- Schäden verursacht durch Brandschaden, Wasserschaden, Blitz,
Unfälle, Naturkatastrophen, usw.
- Schäden verursacht durch absichtliche, nachlässige oder
unsachgemäße Anwendung, schlechte Wartung, zweckentfremdete
Anwendung oder Nichtbeachtung von Benutzerhinweisen in der
Bedienungsanleitung.
- Schäden infolge einer kommerziellen, professionellen oder
kollektiven Anwendung des Gerätes (bei gewerblicher Anwendung
wird die Garantieperiode auf 6 Monate zurückgeführt).
- Schäden verursacht durch eine unsachgemäße Verpackung und
unsachgemäßen Transport des Gerätes.
- alle Schäden verursacht durch unautorisierte Änderungen,
Reparaturen oder Modifikationen, die von einem Dritten ohne
Erlaubnis von Velleman® vorgenommen werden.
• Im Fall einer Reparatur, wenden Sie sich an Ihren Velleman®Verteiler. Legen Sie das Produkt ordnungsgemäß verpackt
(vorzugsweise die Originalverpackung) und mit dem OriginalKaufbeleg vor. Fügen Sie eine deutliche Fehlerbeschreibung hinzu.
• Hinweis: Um Kosten und Zeit zu sparen, lesen Sie die
Bedienungsanleitung nochmals und überprüfen Sie, ob es keinen auf
de Hand liegenden Grund gibt, ehe Sie das Gerät zur Reparatur
zurückschicken. Stellt sich bei der Überprüfung des Gerätes heraus,
dass kein Geräteschaden vorliegt, könnte dem Kunden eine
Untersuchungspauschale berechnet.
• Für Reparaturen nach Ablauf der Garantiefrist werden
Transportkosten berechnet.
• Jede kommerzielle Garantie lässt diese Rechte unberührt.
Die oben stehende Aufzählung kann eventuell angepasst
werden gemäß der Art des Produktes (siehe
Bedienungsanleitung des Gerätes).
Made in Taiwan
Imported by Velleman nv
Legen Heirweg 33, 9890 Gavere, Belgium
www.velleman.eu
 Loading...