

Page 1
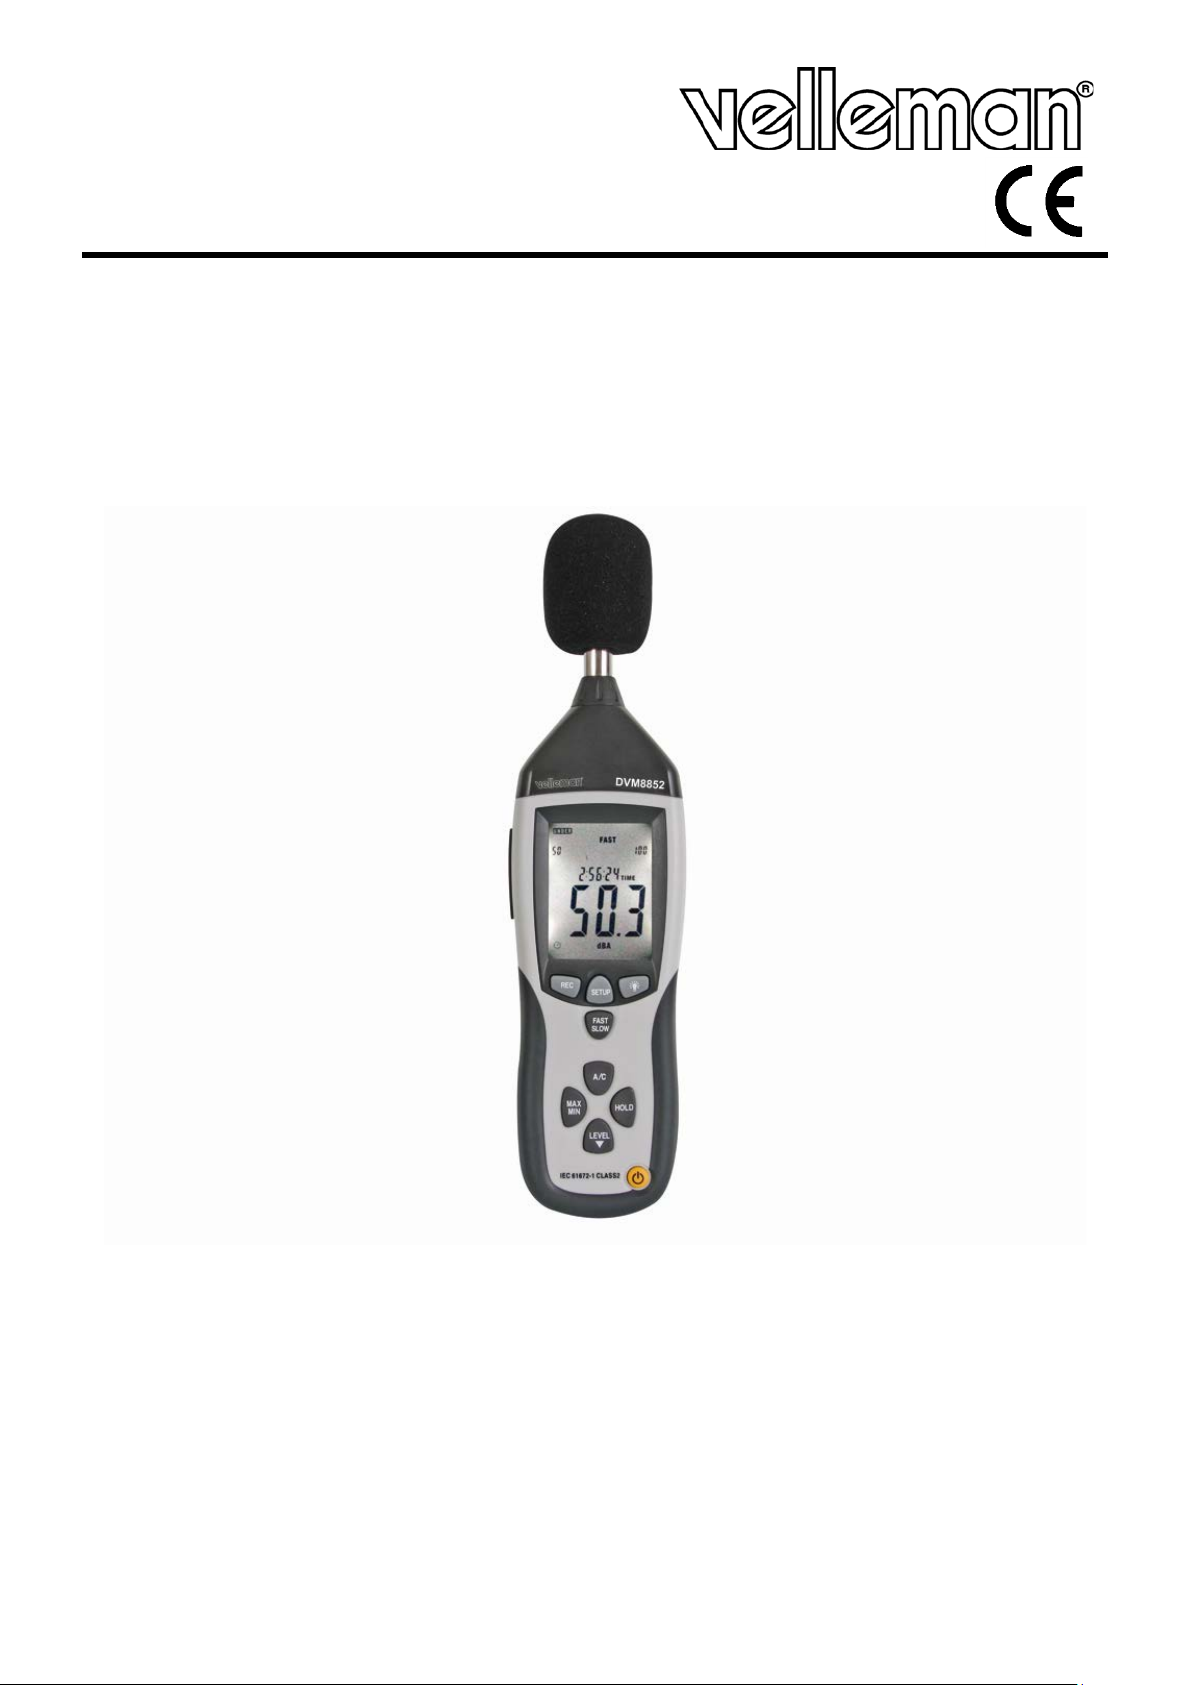
DVM8852
SOUND LEVEL METER - DATA LOGGER
GELUIDSDRUKMETER - DATALOGGER
SONOMÈTRE - ENREGISTREUR DE DONNÉES
SCHALLPEGELMESSGERÄT - DATENLOGGER
SONÓMETRO - DATA LOGGER
USER MANUAL 4
GEBRUIKERSHANDLEIDING 9
MODE D'EMPLOI 14
MANUAL DEL USUAR I O 19
BEDIENUNGSANLEITUNG 24
Page 2
DVM8852
Figure 2
Figure 3
Figure 1
02 (22/08/2013) Velleman
2
Page 3

DVM8852
Figure 4
Figure 5
02 (22/08/2013) Velleman
3
Page 4
DVM8852
User manual
1. Introduction
To all residents of the European Union
Important env i ronmental information about this product
This symbol on the device or the package indicates that disposal of the device after its
lifecycle could harm the environment. Do not dispose of the unit (or batteries) as
unsorted municipal waste; it should be taken to a specialized company for recycling. Th is
device should be returned to your distributor or to a local recycling service. Respect the
local en v ironmental ru le s.
If in doubt, conta ct y our local wa ste disposal aut hori t i es.
Thank you for choosing Velleman! Please read the manual thoroughly before bringing this device into
service. If the device was damaged in transit, do not install or use it and contact your dealer. Damage
caused by disregard of certain guidelines in this manual is not covered by the warranty and the
dealer will not accept responsibility for any ensuing defects or problems.
2. Safety Instructions
Keep the device away from children and unauthorised
users.
Keep the sound level meter away from rain, moisture,
splashing and dripping liquids.
Protected the meter against extreme heat and dust.
Do not use in area’s where altitude > 2,000m.
• Damage caused by disregard of certain guidelines in this manual is not covered by the warranty
and the dealer will not accept responsibility for any ensuin g defects or problems.
• Note that damage caused by user modifications to the device is not covered by the warranty.
3. General Guidelines
• Protect this de vi ce from shocks and abuse. Avoid brute force when operati ng the device.
• Familiarise your s elf wit h t he f unct i ons of t he device before actually using it.
• All modifications of the device are forbidden for safety reasons.
• Only use the device for its intended purpose. Using the device in an unauthorised way will void the
warranty.
• There are no user-serviceable parts inside. Refer to an authorized dealer for spare parts.
4. Features
• cannot b e used for officia l sound measurem en ts
• with Windows® softw are and Mac® / Linu x® USB drivers
• 32,700 records data logger
• bar graph indication
• max/min fun ction
• over and un der range displa y
• auto ranging: 30 - 130 dB
• clock display
• resolution: 0.1 dB
• level range display
• AC/DC signal output
• auto powe r of f
• fast & slow response
• AC/DC signal output for connection to analyser or X-Y recorder
02 (22/08/2013) Velleman
4
Page 5
DVM8852
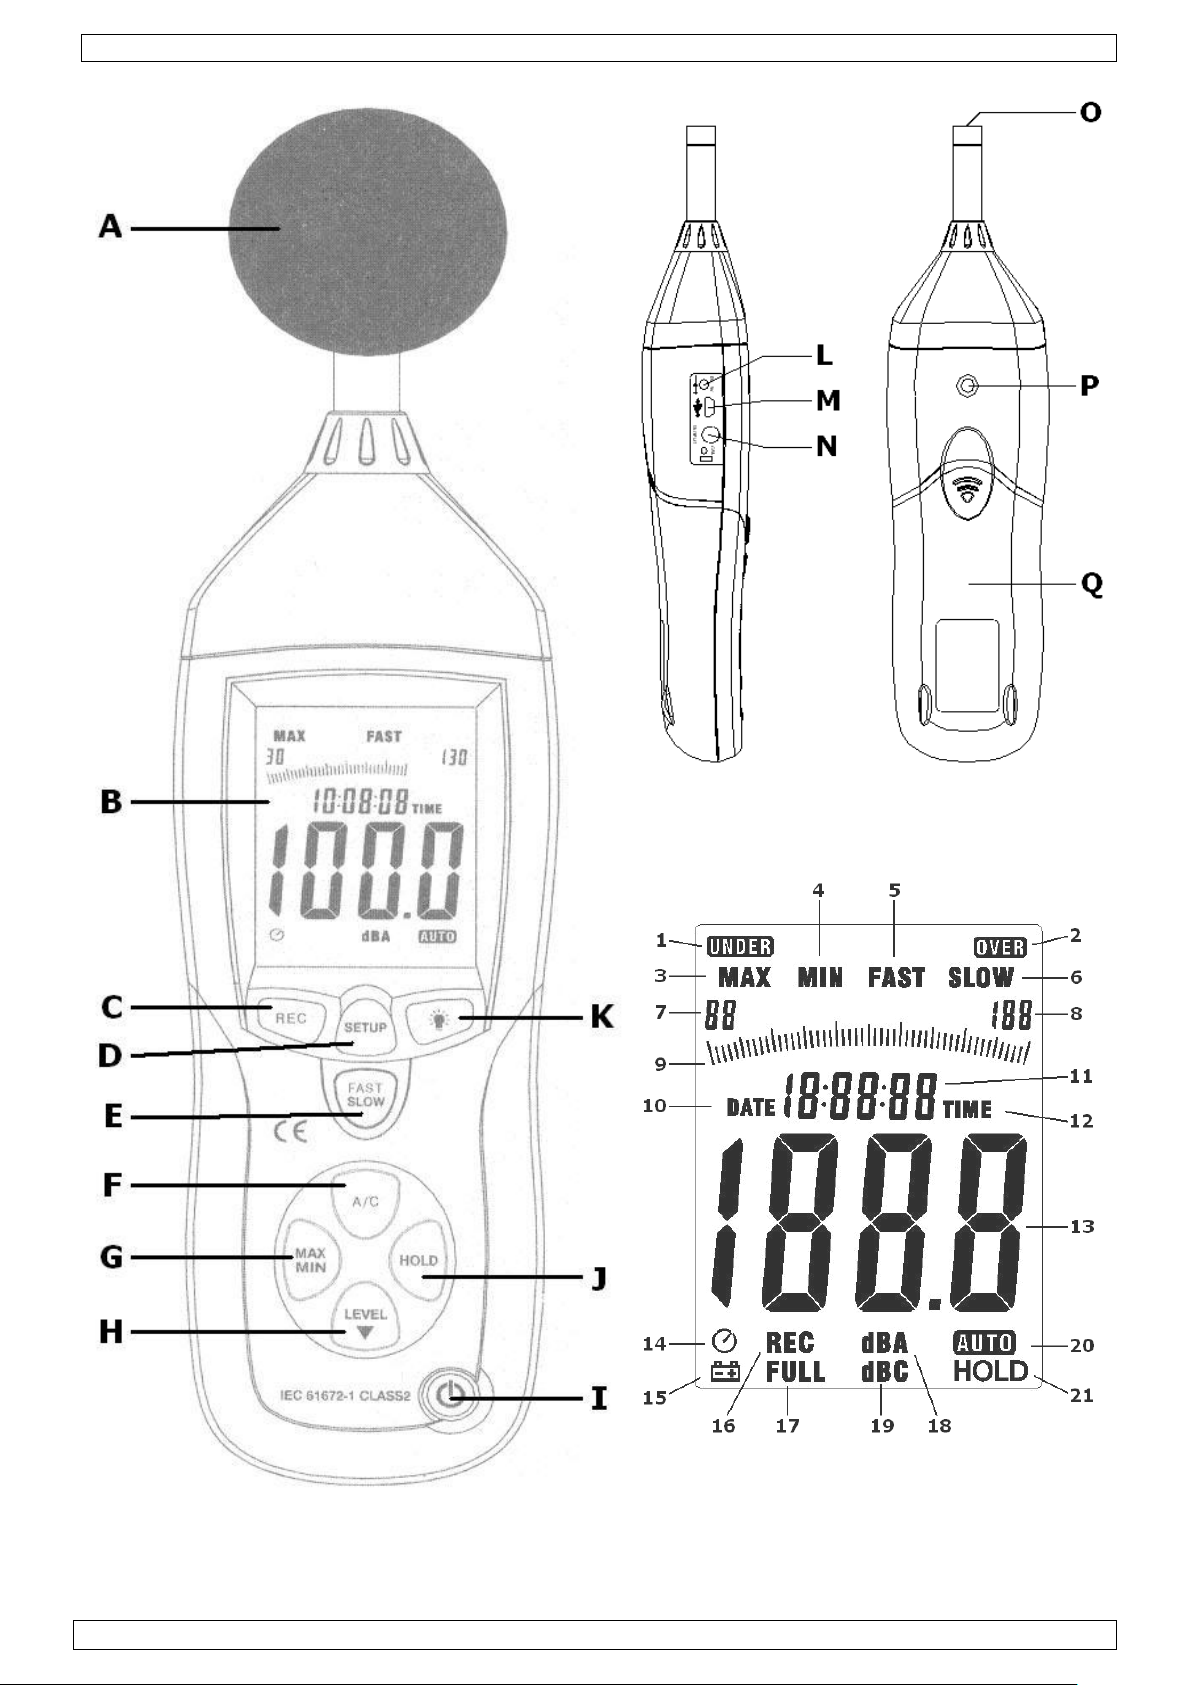
A
windscreen
J
hold button
C
record start/stop button
L
externa l 9VD C jack
D
setup bu tton
M
USB mini-B connector
E
mode select button
N
AC/DC output jack
F
signal weighing select button
O
pick-up element
G
max/min capture butto n
P
tripod mounting hole
H
range/level select button
Q
battery cover
I
power on/ off button
1
UNDER
the current measurement is below the selected range
2
OVER
the current measurement is above the selected range
3
MAX
the maximum noise level is being measured
4
MIN
the minimum noise level is being measured
5
FAST
fast measurement mode, measurement every 125ms
6
SLOW
slow measurement mode, measurement every 1s
7
88
range indicator, lower limit
8
188
range indicator, lower limit
9
bar graph
scale depends on selected range (low, medium, high, auto)
10
DATE
only displayed during setup
12
TIME
indicates time display
13
188.8
measured sound level
14
auto-power off mode enabled
15
16
REC
datalogger enabled, data is being stored
17
FULL
datalogger memory is full, connect meter to PC to save/clear memory
18
dBA
A-weighted mode
19
dBC
C-weighted mode
20
AUTO
automatic range selection
21
HOLD
hold mode, displayed value frozen
[7]
[8]
range
30
80
low
50
100
medium
80
130
high
30
130
auto range
5. Overview
General: refer to the Figure 1 and Figure 2 on page 2 of this manual.
B LCD display K backlight button
LCD-displa y : refer to Figure 3 on page 2 of this manual.
11 18:88:88 shows tim e during normal operation, shows set-up codes during set-up
low battery indication, replace battery
6. Operation
General
• Slide the windscreen [A] over the p ick-up element [O] to avoid erroneous measurements due to
strong winds.
• Switch the sound meter on by pressing the power on/off button [I].
• Select the sound pressure range with the range/level select button [H]. Ranges are indica ted on
the display [7], [8] and [20]. The bar graph [9] scale depends on th e selected range.
• When the UNDER [1] or OVER [2] indication appears, the measurement is outside the selected
range. Select an appropriate range.
02 (22/08/2013) Velleman
5
Page 6

DVM8852
voltage: 1Vrms/ range step
impedance: 100Ω
impedance: 1kΩ
Z
Ground
Press #
Display
minutes TIME
n n
h-A or h-P
A=ante meridiem (before n oon), P=post meridiem (after noon)
3
DATE –d- day
set the day of the month by pressing the range/level select button [H]
DATE –Hmonth
5
DATE –Y- year
set the year by pressing the range/level select button [H]
6
rSt
press the hold button [J] to reset date and time to factory default
• The meter h a s two operational modes, fast or slow. In fast mode, soun d is sampled every
125ms; in slow mode every second. Select fast or slow mode with the mode selec t bu t to n [E].
Selected mode is indicated in the display, [5] or [6]. Note t ha t t he d isplay i ts elf is updated 2
times per second.
• There are two weighing schemes available on the meter: A-weighted (dBA) and C-weighted
(dBC):
dBA: sound pressure adjus ted to w a r d s th e fr equenc y r a nge of human hearing
dBC: sound pressure adjusted towards t he lo w f re quency end of the spectrum
Select the desired scheme with the signal weighing select button [F], the scheme is indicated on
the display [18] or [19].
• Pr e ss th e ho ld b u tton [J] to freeze the curre nt measurem ent on the di s play. Hold mode is
indicated on the display [21]. Press the hold button [J] again to exit hold mode.
• Press the max/min capture button [G] to continuously display the maximum measured value,
displa y indica tes MAX [3]. Press the max/min capture button [G] again to continuously display
the minimum measured value, display indicates MIN [4]. Pressing the max/min capture button
[G] again will show the current noise pressure level again.
• Press the backlight button [K] to switch the backlight on and off.
• The auto-power off mode indication [14] is shown when auto-power off is en a b led. The meter
switches off after ±15 min utes of user inactivity. To disable the auto-p ow e r off function, press
the setup button [D].
• To switch off the mete r, press and hold the power on/off button [I] for about 3 seconds (display
shows countdown).
• The meter can be used ha ndheld or m o u nted on the in cluded tripod. S cre w t he tr ipo d into t he
mounting hole [P] on the back of the meter.
Note: the AC/DC output jack can be used to connect other devices e.g. frequency analyzer (not
incl.), p lo tter (not incl.) …
X AC output
Y DC output
voltage: 10mV/dB
Time/date setting
• If the meter is on, switch it off first.
• Press and hold the setup button [D] while switching on the meter wit h the power on/off button
[I]. Release the setup button [D] when TIME [12] is displayed. The disp la y now sho w s t he
date.
• Pres si ng t he se t up b u tton [D] to enter the setup menu. Press the setup button [D] to save the
setting and go to the next setup entry. Press the hold button [J] at any time to save the se tting
and exit setup mode.
1
2
4
hour TIME
set the minutes by pressing the range/level select button [H]
set the hour by pressing the range/level select b utton [H]
set the month by pressing the range/level select button [H]
Note: the day is not shown on the display during normal operation. It can only be shown by going
into setu p mode
Data logger function
• During m ea sure ment, press the record start/stop button [C] to start recording the
measurement. Press again to stop recording. Record ings ca n be tran sferred to a compu ter (see
§7 Analysis).
• To clear the memory, switch off the meter first. Press and hold the record start/stop button [C]
while switching the meter back on. Release the record start/stop button [C] when the wo r d CLR
appears on the display. Warning: all recorded data in the meter is lost. Consider uploading the
memory content to a computer prior to clearing the memory.
02 (22/08/2013) Velleman
6
Page 7
DVM8852
7. Analysis
• The meter can store 32,700 readings. To analyse the readings, the included software must be
installed.
Software setup
• Insert the included CD-ROM in to a personal computer. Open the CD directory and double click on
the file named setup.exe to start the installation. Follow the instructions on the screen of your
computer.
• Connec t the USB po r t [M] of the meter with a free USB port of the computer using the included
US B cable.
• Switch on the meter with the p ower on/off button [I].
• Press on the setup button [D] to start data transmission. The auto-power off icon [14] is no
longer displayed.
• When the computer doesn’t recognize the USB device, copy the CP2101WIN directory from the
CD to a local directory and let the computer look for the drivers on the local directory.
Data analysis
• Loc a te the 8852.exe icon ( ) and double clic k it to start the software. Select the right C OM
port in the ComPort(C) menu. The COM port depends on the setup of the computer and the
us ed USB port. When the right port is selected, connection is established immediately. Refer to
the
Figure 4 on page 3 of this ma nual for a screen shot.
• Use the Real Time(R) menu to run or stop real time sound monitorin g , set up or clear the
graph. Details are shown above the graph.
• Real-time mode must be stopped to set the sampling rate. Note that this is not the sampling rate
of the meter, but the rate with which the software reads the meter.
• Zoom in on the graph b y s el ecting an area with left click, d rag and release . To go b a ck to full
screen graph, cl ick on the UnDo Zoom button.
• When in zoom mode, click on the Graph(G) menu and select Histogram. Click anywhere in the
graph to change the appearance to a histogram. Go to the Graph(G) menu, select Line and
click anywhere in the graph to change the appearance back to line.
• Also in zoom mode , d ouble click left mouse button on a point of the graph will set a green mark
line. Double click left mouse button again to set a second mark line (blue). Data between the two
mark lines is analyzed (e.g. max. value, min. value, average…) and shown below the graph. To
remove the mark lines, click on the right mouse button or double click left mouse button on a
new point in the graph.
• To save the real-time data, stop real-time monitoring and start it again. At this point, the
software will ask to save the previous graph data. Data is saved as a text file.
• To analyze previously recorded meter data, select the DataLogger(D) menu. Note that this will
not work when the meter is in record mode. A new screen opens; refer to Figure 5 on page 3 of
this manual for a screen shot.
• The data is copied from the meter to the software memory and deleted from the meters’
memory. T o sa v e the data on the com p uter, use the Save Data(S) menu. If not, when
closing the application the data will be lost.
• Double click left mouse button on a file to see the data. The graph also has the zoom and mark
lines functions.
• It is po ssible to recall previously saved records with the Import Data (I) menu.
• To print the graph, use the Print Data (P) menu.
8. Battery replacement
• To replace the battery, switch off the meter first.
• Open the battery cover [Q]. Push gently on the mark ( ) and slide the cover ±1cm downwards
and lift.
• Remove the old battery and insert a new 9V battery. Respect the polarity.
• Place the cover on the back of the device and slide upwards. Make sure all keys are in place and
the battery cover is closed completely.
WARNING: A ma l function may o ccur if the power i s on when the ba tt ery is
replaced. Dispose of bat teries in acc ord a nce with local regulations. Keep the
battery away from children.
02 (22/08/2013) Velleman
7
Page 8
9. Technical spec ific at ions
Lo
30 – 80 dB
Med
50 – 100 dB
Hi
80 – 130 dB
accuracy
± 1.4dB (ref 94dB @ 1kHz)
freque ncy weighting
A, C
time weighting
fast ( 125 ms), slow (1 s)
dynamic range
50 dB
freque ncy range
31.5 Hz t o 8 kHz
microphone
1/2" electre t co n dense r microphone
auxiliary outputs
AC = 1Vrms and DC = 10mV/dB outputs
power supply
9V battery (incl.)
batte ry li fe
±30 hours (with alk aline b a t te r y)
dimensions
278 x 76 x 50 mm
weight
±350 g
auto powe r of f
±15 min
operation tempe rat ure
0 – 40 °C
opera tion hum idity
< 90 %
instructio n ma nual, tripod, battery, screwdriver,
windscreen, Windows software, USB cable
level range
DVM8852
included accessories
Use this device with original accessories only. Velleman nv cannot b e held responsib l e in
the event of damage or injury resulted from (incorrect) use of t his device.
For more info concerning this product, p lease visi t our w ebsite www . v el leman.eu.
The information in this manual i s subject to chang e without prior notice.
02 (22/08/2013) Velleman
8
Page 9

DVM8852
Gebruikershandleiding
1. Inleiding
Aan alle ingezet enen van de Europ ese Unie
Belangrijke milieu-informatie betreffende dit prod u ct
Dit symbool op het toestel of de verpakking geeft a an dat, als het na zijn lev en scyc l us
wordt weggeworpen, dit toestel schade kan toebrengen aan het milieu. Gooi dit toestel (en
eventuele batterijen) niet bij het gewone huishoudelijke afval; het moet bij een
gespecialiseerd bedrijf terechtkomen voor recyclage. U moet dit toestel naa r uw verdeler of
naar een lokaal recyclagepunt brengen. Respecteer de plaatselijke milieuwetgeving.
Hebt u vragen, contacteer dan de pla at selijke autori t eiten inzak e v erwijdering.
Dank u voor uw aankoop! Lees deze handleiding grondig voor u het toestel in gebruik neemt. Werd
het toestel beschadigd tijdens het transport, installeer het dan niet en raadpleeg uw dealer.
2. Veiligheidsinstructies
Houd dit toestel uit de buurt van kinderen en
onbevoegden.
Bescherm deze ge luidsme ter tegen regen, vochtigheid en
opspattende vloeistoffen.
Bescherm deze geluidsdrukmeter tegen stof en extreme
temperaturen. Deze geluidsdrukmeter is niet geschikt voor
gebruik > 2.000 m.
• De garantie geldt niet voor schade door het negeren van bepaalde richtlijnen in deze handleiding
en uw dealer zal de verantwoordelijkheid afwijzen voor defecten of problemen die hier
rechtstreeks verband mee houd en.
• Schade door wijzigingen die de gebruiker heeft aangebracht aan het toestel vallen niet onder de
garantie.
3. Algemene richtlijnen
• Bescherm dit toestel tegen schokken. Vermijd brute kracht tijdens de bediening van dit toestel.
• Leer eerst de functies van het toestel kennen voor u het gaat gebruiken.
• Om veiligheidsredenen mag de gebruiker geen wijzigingen aanbr eng en aan het toes te l.
• Gebruik het toestel enkel waarvoor het gem a akt is. Bij onoordeelkundig g ebruik vervalt d e
garantie.
4. Eigenschappen
• niet geschikt voor officiële geluidsmetingen
• Windows®-software en USB-drivers voor Macintosh®/Linux®
• data logger met geheugen voor 32.7 0 0 meti ngen
• bargraphaanduiding
• max-minfunctie
• weergave sterk e n zwak sig naa l
• automatische bereikinstelling: 30 - 130 dB
• klok
• resolutie: 0,1 dB
• weergave van het meetbereik
• signaaluitgang AC/DC
• automa tische ui ts c hakeling
• trage/snelle respons
• AC/DC-sign a a luitgang voor aa nsluitin g met an a lyser of X-Y-recorder
02 (22/08/2013) Velleman
9
Page 10

DVM8852
A
windscherm
J
holdtoets
C
start-stoptoets opname
L
extern e 9 VDC-aansluiting
D
insteltoets
M
mini USB-aansluiting
E
modustoets
N
AC/DC-uitgang
F
selectietoets signaalweging
O
opneemelement
G
max-mintoets
P
aansluiting statief
H
selectietoets bereik/niveau
Q
batterijvak
I
aan-uitschakelaar
1
UNDER
gemeten waarde is onder geselecteerde bereik
2
OVER
gemeten waarde is boven geselecteerde bereik
3
MAX
meting van de maximale geluidsdruk
4
MIN
meting van de minimale geluidsdruk
5
FAST
snelle meting (el ke 125 ms)
6
SLOW
trage meting (elke 1 s)
7
88
bereikaanduiding, lage drempel
8
188
bereikaanduiding, hoge drempel
9
bargraph
afhankelijk van geselecteerde bereik (laag, gemiddeld, hoog, automatisch)
10
DATE
datum (enkel tijdens instelling)
11
18:88:88
tijdsaandu iding tij d e n s no r ma al gebr uik, in stelco d e s tij d ens ins telling
12
TIME
tijdsaanduiding
13
188.8
gemeten waarde van de geluidsdruk
14
automa t ische uitscha ke l i ng ing e s chake ld
16
REC
datalogger ingeschakeld, data wordt bewaard
17
FULL
geheugen datalogger is vol, sluit meter aan op pc om data te bewaren/wissen
18
dBA
A-weging
19
dBC
C-weging
20
AUTO
automatische ber eikinstelling
21
HOLD
holdmodus, u itlezing word t v er g r e nd eld
[7]
[8]
bereik
30
80
laag
50
100
gemiddeld
80
130
hoog
30
130
automatisch
5. Omschrijving
Algemeen: Raadpleeg de figuur 1 en 2 op pagina 2 van deze handle iding.
B lcd-scherm K toets achtergrondverlichting
Lcd-scherm: Raadpleeg de figuur 3 op pagina 2 van dez e ha ndleiding.
15
aanduiding zwakke batterij (vervang batterij)
6. Gebruik
Algemeen
• Plaats het windscherm [A] over het opneemeelemen t [O] om deze te beschermen tegen de wind.
• Schakel de meter in met de aan-uitschakelaar [I].
• Selecteer het bereik met de selectietoets voor bereik/niveau [H]. De bereiken worden
weergegeven op de display [7][8][20]. De schaalverdeling van de bargraph [9] is afhankeleijk
van het geselecteerde bereik.
• Een meting buiten het ingestelde bereik wordt weergegeven door UNDER [1] of OVER [2].
Selecteer het gepaste bereik.
02 (22/08/2013) Velleman
10
Page 11

DVM8852
spanning: 1 V rms/stap
impedantie: 100 Ω
impedantie: 1 kΩ
Z
massa
druk #
display
minuten TIME
n n
h-A of h-P
A=voormiddag, P=namiddag
3
DATE -d- dag
stel de dag in met de seelctietoets voor bereik/niveau [H]
5
DATE -Y- jaar
stel het jaar in met de seelctietoets voor bereik/niveau [H]
te stellen
• Deze geluidsdrukmeter heeft twee meetfrequenties, nl. een trage en een snelle frequentie. In
trage meetmodus neemt de meter om de 125 ms een geluidsmonster op; in snelle meetmodus
gebeurt dit elke seconde. Selecteer een meetfrequentie met de modustoets [E]. De
geselecteerde modus wordt op de display [5][6] weergegeven. De uitlezing wordt om de twee
seconden geüpdatet.
• De geluidsmeter biedt ook twee weegfuncties, nl. de A-weging (dBA) en de C-weging (dBC):
dBA: de geluidsdruk wordt bijgestuurd naar het frequentiebereik van het menselijke gehoor
toe
dBC: de geluidsdruk wordt bijgestuurd naar de lage frequenties van spectrum toe.
Selecteer de gewenste functie met de selectietoets voor signaalweging [F]. De geselecteerde
functie wordt weergegeven op de display [18][19].
• Houd de holdtoets [J] ingedrukt om de uitlezing op de display te bevriezen. Deze functie wordt
op de display [21] weergegeven. Druk opnieuw om verder te gaan.
• Druk eenmaal op de max-mintoets [G] om de maximale waarde weer te geven (display geeft
MAX [3] weer), druk een tweede maal om de minimale waarde weer te geven (display geeft
MIN [4] weer), druk een derde maal om de huidige geluidsdruk weer te geven.
• Schakel de achtergrondverlichting in en uit met toets [K].
• De aanduiding voor de automatische uitschakelin g [14] geeft aan dat de functie is ingesc hakeld
[14]. De geluidsdrukmeter schakelt uit na ± 15 minuten. Schakel de functie in en uit met de
insteltoets [D].
• Houd de aan-uitschakelaar [I] gedurende 3 seconden ingedrukt om de meter uit te schakelen
(display telt af).
• U kunt de geluidsmeter ook op het statief pl aatsen. Schroef het meeg eleverde statief in de meter
[P].
Opmerking: Sluit een extern toestel, zoals een frequentieanalyzer (niet meegelev.), plotter (niet
meegelev.) , aan d e meter via de the AC/DC-uitgang [N].
X AC-uitgang
Y DC-uitgang
spanning: 10 mV/dB
Datum- en tijdsinstelling
• Schakel d e geluidsmeter uit.
• Houd de in steltoets [D] ingedrukt en druk nu op de aan-uitschakelaar [I]. Laat de insteltoets
[D] los van zodra TIME [12] en de datum worden weergegeven.
• Geef het instelmenu weer met de insteltoets [D]. Druk nu op dezelfde insteltoets [D] om de
instelling te bewaren en om naar het volgende instelniveau te gaan . Bewaar de inste llingen en
verlaat het instelmenu me t de h o ldtoet s [J].
1
2
uur TIME
stel de minuten in met de seelctietoets voor bereik/niveau [H]
stel de uren in met d e seelctietoets voor bereik/niveau [H]
4 DATE -H- maand stel d e maand in met de seelctietoets voor bereik/niveau [H]
6 rSt
houd de holdtoets [J] in gedru kt om de fabr iek s instel li ng en opnieuw in
Opmerking: De dag verschijnt niet op de display tijdens de normale schermweergave maar enkel
tijdens de instelprocedure.
Datalogger
• Druk tijden s het meten op de start -stoptoets [C] om de opname van de meting te starten/te
stoppen. De opnames kunnen naar een pc getransfereerd worden (zie §7 Analyse).
• Wissen van het geheugen: Schakel eerst de gelui dsmeter ui t. Houd daarna de start-stoptoets
[C] ingedrukt terwijl u de meter inschakelt. Laat vervolgens de start-stoptoets [C] los van zodra
CLR op de display verschijnt. Let op: alle geregistreede data in de meter wordt gewist.
Transfereer de inhoud van het geheugen naar een pc indien u de data verder wenst te
gebruiken.
02 (22/08/2013) Velleman
11
Page 12
DVM8852
7. Analyse
• De geluidsmeter heeft een geheugen voor 32.700 metingen. Om deze metingen te kunnen
analyseren, dient u eerst de meegeleverde software installeren.
Software-installatie
• Plaats de meegeleverde cd-rom in de cd-romdrive van de pc. Open de directory een dubbelk lik
op het bestand setup.exe om de in s tallatie te sta rten. Vo lg de instruct ie s op het scherm.
• Sluit de geluidsmeter aan de pc via de USB-poort [M] met behulp van de meegeleverde USB-
kabel.
• Schakel de gel uidsmet er in met de aan-uitschakelaar [I].
• Druk op de insteltoets [D] om de dataoverdracht te starten. De icoon voor de automatische
uitschakeling [14] verschijnt niet meer op de display.
• Herkent de pc de nieuwe randapparatuur niet, kopieer dan de CP2101WIN-directory va n de cdrom naar een locale directory en zoek de drivers in de locale directory via een automatisch
zoekopdracht.
Analyse van de data
• Dubbelkli k op het bestand 8852.exe ( ) om de software te starten. Selecteer de rechtse COM-
poort in het menu ComPort(C). Kies de COM-poort afhankelijk van uw pc en de gebruikte USBpoort. Bij het kiezen van de COM-poort gebeurt de aansluiting onmiddellijk. Raadpleeg de figuur
4 op pagina
• Start of stop de real-time monitoring , of wis de bargraph via het menu Real Time(R). Meer
details worden weergegeven boven de bargraph.
• Stop de real-time monitoring wanneer u de bemonsteringsfrequentie wenst in te stellen. Deze
bemonsteringsfrequentie is NIET de bemonsteringsfrequentie van de meter maar de freque ntie
aan dewelke de software de geluidsmeter leest.
• Inzoomen: Houd de linkermuisknop ingedrukt en sleep over het gewenste gebied. Laat de
linkermuisknop los.
Uitzoom en : Klik op UnDo Zoom.
• In zoommodus, klik op het menu Graph(G) en selecteer Histogram. Klik in de bargraph om
naat een histogram ove r te schakelen. Keer terug naar de bargraph door het menu Graph(G) te
openen, de optie Line te selecteren en in de histogram te klikken.
• In zoommodus, klik dubbel klik met de linkermuiskn op op een pu nt in de bargarph om een
beginpunt te bepalen (groene lijn). Dubbelklik opnieuw met de linkermuisknop op een punt in de
bargarph om een eindpunt te bepalen (blauwe lijn). De data tussen die tw e e lijne n wo r d t
geanalyseerd (bv. maximum- en minimumwaarde, gemiddelde…) en weergegeven onderaan de
bargraph. Verwijder de lijnen door een d ubbele klik met de linkermuisknop.
• Bewaar de real-time data door de real-time monitoring te stoppen en opnieuw te starten. De
meter vraagt of u de data als een tekstbestand wenst te bewaren.
• Analyseer eerdere metingen via het menu DataLogger(D). Dit lukt echter niet wa nn e er de
geluidsdrukmeter in opnamemodus staat. Er verschijnt een nieuw venster. Raadpleeg de figuur 5
op pagina
• De data wordt gekopieerd van de geluidsdrukmeter naar het geh eugen van de software en
gewist uit het geheugen van de geluidsdrukmeter. Bewaar de data op uw pc via het menu Save
Data(S). Doet u dit niet, dan wordt alle data bij uitschakeling gewist.
• Dubbelkli k m et de linkermuisknop op een bestand om de data weer te geven. De bargraph biedt
ook de zoomfunctie en de markeringen.
• Roep eerder bewaarde metingen op via het menu Impo rt Data ( I).
• Print de bargraph via het menu Print Data (P).
3 van deze handle iding voor een screenshot.
3 van deze handleiding voor een screenshot.
8. Vervangen van de batterij
• Schakel d e geluidsmeter uit.
• Open het batterijvak [Q]. Druk lichtjes op de markering ( ) en schuif de deksel ongeveer ± 1 cm
naar onder.
• Verwijder de oude batterij en plaats een nieuwe 9 V-batterij. Respecteer de polariteitsaanduiding.
• Plaats de deksel terug en schuif dic ht. Zorg ervoor dat alle ankers in de groeven zitten en d at het
batterijvak volledig gesloten is.
LET OP: Bij het vervangen va n d e batterij v a n een nog ingeschakelde
geluidsdrukm et er kunnen zich storingen voordoen. Herstart de
geluidsdruk meter. Houd de batterij uit de buurt v a n k i nderen.
02 (22/08/2013) Velleman
12
Page 13

9. Technische specificaties
Lo
30 - 80 dB
Med
50 - 100 dB
Hi
80 - 130 dB
nauwkeurigheid
± 1,4 dB (r ef 94 dB @ 1 kHz)
frequentieweging
A, C
tijdsweging
snel (125 ms), traag (1 s)
dynamisch bereik
50 dB
frequentiebereik
31,5 Hz - 8 kHz
microfoon
condensatormicrofoon met elektreet van 1/2"
extra uitgangen
AC = 1 V rms en DC = 10 mV/dB
voeding
9 V-batterij (meegelev.)
levensduur batterij
± 30 uur (met alkalinebatterij)
afmetingen
278 x 76 x 50 mm
gewicht
± 350 g
automa t ische uitscha ke l i ng
± 15 min
werktemperatuur
0 - 40°C
vochtigheidsgraad
< 90 %
handleiding, statief, batterij, schroevendraaier,
windscherm, Windows®-software , USB-kabel
meetbereik
DVM8852
meegeleverde accessoires
Gebruik dit t oest el enkel met ori ginele accessoire s. V el leman nv is niet a ansprakelijk voor
schade of kwetsuren bij (v erkeerd) gebruik v an dit toestel. Voor meer inform a t i e omtrent
dit product, zie www.velleman.eu
. De informatie in deze handleiding kan te allen tijde
worden gewijzigd zonder voorafgaande kennisgeving.
02 (22/08/2013) Velleman
13
Page 14

DVM8852
Mode d'emploi
1. Introduction
Aux résidents de l 'Union européenne
Des informations environnementales i m portantes concernant ce p rod uit
Ce symbole sur l'appareil ou l'emballage indique que l’élimination d’un appareil en fin de vie
peut polluer l'environnement. Ne pas jeter un appareil électrique ou électronique (et des
piles éventuelles) parmi les déc hets municipa ux non suj ets au tri séle c t if ; une déchèterie
traitera l’appareil en question. Renvoyer les équipements usagés à votre fournisseur ou à un
service de recyclage local. Il convient de respecter la réglementation locale relative à la pro tectio n
de l’environnement.
En cas de questions, contact er l es autorités locales pou r él imination.
Nous vous remercions de votre achat ! Lire la présente notice attentivement avant la mise en
service de l’appareil. Si l’appareil a été endommagé pendant le transpo r t, ne pas l’ i nstalle r et
consulter votre revendeur.
2. Prescriptions de sécurité
Garder le sonomètre hors de la portée de personnes non
qualifiées et de jeunes enfants.
Protég e r le sonom è tre contr e la plu ie, l’humid i té et les
projections de liquides.
Protég e r le sonom è tre contr e la pous s ière et les
températur es extrêmes. Ce sonomètre ne convient pas à
une utilisation à une altitude de plus de 2.000 m.
• La garantie ne s’applique pas aux dommages survenus en négligeant certaines directives de
cette notice et votre revendeur déclinera toute responsabilité pour les problèmes et les défauts
qui en résultent.
• Les domma ges occasionnés par des modific a tions à l’appareil par le client ne tombent pa s s ous
la garantie.
3. Directives générales
• Protéger le sonomètre contre les chocs et le traiter avec circonspection pendant l’installation et
l’opération.
• Se familiariser avec le fonctionnement du sonomètre avant de l’utiliser.
• Toute modification de l’appareil est interdite pour des raisons de sécurité.
• N’utiliser le thermomètre qu’à sa fonction prévue. Tout autre usage peut causer des courts-
circuits, des brûlures, des électrochocs, etc. Un usage impropre annule d'office la garantie.
4. Caractéristiques
• ne convient pas pour mesures sonores officielles
• logic iel pour Window s® et pilotes USB Macintosh®/Linux®
• capacité d’enregistrement avec mémoire pou r 3 2.7 0 0 mesures
• indication graphique
• fonctions max/min
• affichage hors gamme
• sélection automatique de gamme : 30 - 130 dB
• horloge
• résolution : 0,1 dB
• affichage de la gamme de mes ure
• connexion de sortie du signal CA/CC
• désactivation automatique
• délai de réponse lent/rapide
• sortie d e signal CA/CC pour connexion à un analyseur ou un enreg istreur X-Y
02 (22/08/2013) Velleman
14
Page 15

DVM8852
A
pare-vent
J
touche de gel d’affichage
C
marche/arrêt enregistr eme nt
L
prise externe 9 VCC
D
touche de paramétrage
M
connex ion mini USB
E
touche de s élection de mode
N
sortie CA/CC
F
touche de s élection de pondération
O
microphone
G
touche max/min
P
connexion pour pied
H
touche de sélection gamme/niveau
Q
compartiment de la pile
I
interrupteur marche/arr êt
1
UNDER
valeur mesurée hors gamme sélectionnée (va le u r trop basse )
2
OVER
valeur mesurée hors gamme sélectionnée (valeur trop élevée)
3
MAX
mesure du niveau sonore maxima l
4
MIN
mesure du niveau sonore minimal
5
FAST
fréquence d’échantillonnage rapide (chaque 125 ms)
6
SLOW
fréquence d’échantillonnage lente (chaque 1 s)
7
88
indication du seuil inférieur de la gamme
8
188
indication du seuil supérieur de la gamme
9
graphique
échelle en fonction de la gamme sélectionnée (bas, moyen, haut, automatique)
10
DATE
ne s’affiche que lors du paramétrage
12
TIME
affichage de l’heure
13
188.8
valeur du niveau sonore
14
fonction de désactivation automatique enclenchée
15
16
REC
enregistreur de données enclenché, données sauvegardées
17
FULL
mémoire pleine, raccorder le sonomètre à un PC pour sauvegarder /e ffa cer
18
dBA
mode de pondération A
19
dBC
mode de pondération C
20
AUTO
sélection automatique de la gamme
21
HOLD
mode de gel d’affichage
[7]
[8]
gamme
30
80
bas
50
100
moyen
80
130
haut
30
130
automatique
5. Description
Sonomètre : consulter les illustrations 1 et 2 à la page 2 de cette no tice.
B afficheur LCD K touche de rétro-éclairage
Afficheur LCD : consulter l’illustration 3 à la page 2 de cette notice.
11 18:88:88 affichage de l’heure en mode normal, affichage des codes lors du paramétrage
indication de pile faible, remplacer la pile
6. Emploi
En général
• Glisser le mousse pare-vent [A] sur la mem br ane du mi c ro p hone [O] afin d e réduire les
incidences du vent.
• Allumer le sonomètre en enfonçant l’interrupteur marche/arrêt [I].
• Sélectionner la gamme à l’aide de la touche de sélection gamme/niveau [H]. La gamme est
indiqu ée sur l’aff i cheur [7][8][20]. L’échelle du graphique [9] est tributaire de la gamme
sélectionnée.
• Une mesure hors de la gamme sélectionnée est indiquée par UNDER [1] ou OVER [2].
Sélectionner la gamme appropriée.
02 (22/08/2013) Velleman
15
Page 16

DVM8852
impédance : 100 Ω
tension : 10 mV/dB
impédance : 1 kΩ
Z
masse
Enfoncer #
Display
minutes TIME
n n
h-A ou h-P
A=avant-midi, P=après-midi
3
DATE -d- jour
réglage du jour avec la touche de sélection gamme/niveau [H]
4
DATE -H- mois
réglage du mois avec la touche de sélection gamme/niveau [H]
5
DATE -Y- année
réglage de l’année avec la touche de sélection gamme/niveau [H]
Maintenir enfoncé la touche de gel d’affichage [J] pour rétabl ir la
configuration d’origine
• Le sonomètre intègre deux fréquences d’échantillonnage : fréquence d’ échantillonnage rapide ou
lente. En mode rapide, le niveau sonore est échantillonné chaque 125 ms ; en mode lent, le niveau
sonore est échantillonné chaque 1 s. Sélectionner la fréquence à l’aide de la touche de sélection de
mode [E]. La sélection [5][6] est indiquée sur l’afficheur. L’afficheur est rafraîchi 2x/s.
• La pondération peut être réglée sur A (dBA) ou sur C (dBC) :
dBA : niveau pondéré en fonction des caractéristiques de l’oreille humaine ;
dBC : niveau pondéré vers les fréquences graves du spectre.
Sélectionner la pondération à l’aide de la touche de sélection [F]. La selection [18][19] est
indiquée sur l’afficheur.
• Maintenir enfoncé la touche de gel d’affichage [J] pour verrouiller/déverrouiller les valeurs sur
l’afficheur. La fonction est indiquée sur l’afficheur [21].
• En fo nc er la touche max/min [G] pour afficher la valeur du niveau sonore maximal (l’afficheur
indique MAX [3]). Ren f o ncer la to uche max/min [G] pour a fficher la valeur du niveau sonore
minimal ( l’affich eur indique MIN [4]). Renfoncer la to uche max/min [G] pour afficher la valeur
du niveau sonore actuel.
• Activer/désactiver le rétro-éclairage à l’aide de la touche [K].
• L’indication de la fonction de désactivation automatique [14] s’aff ic he lo rs que la fo nction e st
activée. Le sonomètre s’éteint après un délai de ± 15 minutes. Enfoncer la to uc he de
paramétrage [D] pour désactiver la fonction.
• Éteindre le sonomètre en maintenant l’interrupt eur marc he/ar rêt [I] pendant 3 seco ndes (un
compteur à rebours s’affiche).
• Le sonomètre peut être monté sur un trépied. Visser le trép ied dan s la connexion [P] à l’arrière
de l’appareil.
Remarque : Racco rd er un analyseur de fréquences (no n in cl. ) , u n tra c eur grap hique (non incl.) à la
sortie CA/CC.
X sortie CA
tension : 1 V RMS/cran
Y sortie CC
Paramétrage d e l’heure/de la date
• Éteind r e le sonomètre .
• Maintenir enfoncé la touche de paramétrage [D] et allumer le sonomètre à l’aide de
l’interrupteur marche/arrê t [I]. Relâcher la touc he de paramétrage [D] dès que l’indication
TIME [12] s’affiche. La date est affichée.
• Enfoncer la touche de paramét rage [D] pour accéder au menu de paramétrage ; renfoncer la
touche de paramétrage [D] pour sauvegarder les réglages et pour accéder au niveau suivant.
Maintenir enfoncé la touche de gel d’affichage [J] pour sauvegarder les réglages et pour quitter
le menu de paramétrage.
1
2
heure TIME
réglage des minutes avec la touche de sélection ga mme/niveau [H]
réglage des heures avec la touche de sélection gamme/niveau [H]
6 rSt
Remarque : Le jour ne s’affiche pas en mode normal mais ne s’affiche qu’en mode de paramétrage.
Enregistreur de données
• Pendant la mesure, enfoncer la touche d’e nreg istrem ent [C] pour enregistrer la mesure.
Renfoncer la touche pour arrêter l’enregistrement. Ces enregistrements peuvent être transférés
vers un ordinateur (voir §7 Analyse).
• Effacement de la mémoire : Éteindre le sonomètre. Maintenir enfoncé la touche d’enregistrement
[C] et rallumer le so nomètr e. Relâcher Release la touche d’enregistrement [C] dès que
l’indication CLR s’affiche. Attention ! Cette fonction efface irrémédiablement tou tes les données
enregistrées. Transférer ces données au préalable vers un ordinateur si néce ssaire.
02 (22/08/2013) Velleman
16
Page 17

DVM8852
7. Analyse
• Le sonomètre a une capacité de mémoire pour 32.700 mesures. L’analyse de ces mesures
nécessite l’installation du logiciel inclus sur un ordinateur.
Installation du logiciel
• Insérer le cédérom inclus dans le lecteur de l’ordinateur. Ouvrir le répertoire et cliquer double
sur le fichier setup.exe pour démarrer l’installation. Suivre les instructions.
• Raccorder le port USB [M] du sonomètre à un port USB libre de l’ordinateur à l’aide du câble
USB inclus.
• Allumer le sonomètre à l’aide de l’interrupteur marche/arrêt [I].
• Enfoncer la touche de paramétrage [D] pour lancer la transm ission des d o nnées. L’indication de
désactivation automatique [14] n’est plus affichée.
• Si l’ord i nateur ne re connaî t pas le pé rip hér ique, cop ier le répertoir e CP2101WIN du cédérom ver s
un répertoire local et rechercher les pilotes à l’aide d’une recherche automatique.
Analyse des données
• Cliquer double sur l’icône 8852.exe ( ) pour lancer le logiciel. Sélectionner le port COM droit
dans le menu ComPort(C) selon le paramétrage de votre ordinat eur et du port USB util isé. La
connexion s’établit dès que le port COM est sélectionné. Consulter l’illustration 4 à la page 3 pour
une capture d’écran.
• Lancer/arrêt er le monitorage e n temps réel et pa ramétrer/ e fface r le graph ique dep uis le menu
Real Time(R). Les données sont affichées au-dessus du graphique.
• Désactiver le monitorage en temps réel avant de régler le taux d’échantillonnage. Ce taux
d’échantil lo n na g e e st la v itesse à laq uelle le lo g i c iel analy s e le s o no m ètre.
• Agrandir le graphique en maintenant enfoncé le bouton gauche de la souris et en sélectionnant la
zone dans le graphique. Reven ir en arrière en cliquant sur la touche UnDo Zoom.
• En mode zoom, d é rouler le menu Graph(G) et séle ct ionner l’ optio n Histogram. Cliquer dans le
graphique pour le modifier en un histogramme. Pour réafficher le graphique, déro uler le menu
Graph(G), sélectio n ne r l’optio n Line et cliquer da ns l’histogramme.
• En mode zoom, cliquer double dans le graphique pour établir une ligne de démarcation de départ
(ligne verte). Recliquer d oub le dans le graphique pour établir la ligne de démarcation de fin
(ligne bleue). Les données entre ces deux lignes seront analysées (p.ex. valeur
maximale/minimale, moy e nn e… ) et affichées au bas du graphique. Effacer les lignes avec le
bouton dr oit de la souris ou en recliquant double dans le graphique.
• Sauvegarde des données en temps réel : Arrêter et redémarrer le monitorage en temps réel. Le
logiciel offre la possibilité de sauvegarder les données dans un fichier textuel.
• Analyse des données enregistrées : Cliquer l’option DataLogger(D) (cette fonction n’est pas
disponible en mode d’enregistrement). Une nouvelle fenêtre apparaît. Consulter l’illustration 5 à
la page
• Les données sont transférées du sonomètre vers la mémoire du logiciel et effacées de la
mémoire du sonomètre. Sauvegarder les données sur l’ordinateu r avec l’opti on Save
Data(S) afin de ne pas les perdre.
• Cliquer double sur un fichier pour visionner le contenu. Le graphique offre également les
fonctions zoom et lignes de démarcation.
• Afficher des données préalablement sauvegardées en cliquant sur l’option Import Data (I).
• Imprimer le graphique en cliquant sur la touche the Print Data (P).
3 de cette notice pour une capture d’écran.
8. Remplacement de la pile
• Éteind re le sonomètre .
• Ouvrir le compartiment de la pile [Q] en poussant légèrement sur le marquage et en glissant le
couvercle ± 1 cm vers le bas .
• Retirer la pile usagée et remplacer par une nouvelle pile 9 V en respectant la polarité.
• Bi en refermer le compartiment de la pile. Veiller à ce que chaque dent d u couvercl e soit dans les
guides.
ATTENTION : D es a ffichages erronés peuvent app a raître lorsque l e
remplaceme n t s’effectue t andis que le so nomètre est e ncore allumé. Le cas
échéant, réinit ialiser l e s onomètre. Tenir la pi l e à l’écart des enfants.
02 (22/08/2013) Velleman
17
Page 18

9. Spécifications techniques
Lo
30 - 80 dB
Med
50 - 100 dB
Hi
80 - 130 dB
précision
± 1,4 dB (réf. 94 dB @ 1 kHz)
pondération de fréquence
A, C
fréquence de mesure
rapide (125 ms), lente (1 s)
plage dynamique
50 dB
plage de fréquence
31,5 Hz - 8 kHz
microphone
microphone à électret de 1/2"
sorties supplémentaire
AC = 1 V R MS et CC = 10 mV/dB
alimentation
pile 9 V (incl.)
durée de vie de la pile
± 30 heures (avec pile alcaline)
dimensions
278 x 76 x 50 mm
poids
± 350 g
désactivation automatique
± 15 min
température de service
0 - 40°C
taux d’humidité
< 90 %
notice d'emploi, trépied, pile, tournevis, pare-vent,
logic iel pour Window s®, câble USB
plage de mesure
DVM8852
accessoires fournis
N’employe r cet a p pareil q u’a v ec d es access oi res d’origi ne. SA Velleman ne sera
aucunement resp onsable de dom mages ou l ésions survenus à un usage (incorrect) de cet
appareil. Pour plus d’in form ation concerna nt cet a rt i cle, visi tez not re site web
www.velleman.eu
. Toutes les informations présentées dans cette notice peuvent être
modifiées sans notification préalable.
02 (22/08/2013) Velleman
18
Page 19

DVM8852
MANUAL DEL USUARIO
1. Introducción
A los ciudadanos d e la Unión Eu rop ea
Importantes i nformaciones sobre el med io ambiente concernient e a este produ ct o
Este símbolo en este aparato o el embalaje indica que, si tira las muestras inservibles,
podrían dañar el medio ambiente. No tire este aparato (ni las pilas, si las hubiera) en la
basura dom éstica; debe ir a una empresa especializada en reciclaje. Devuelva este aparato
a su distribuidor o a la unidad de reciclaje local. Respete las leyes locales en relación con el
medio ambiente.
Si tiene dudas, contacte con l as a utoridades locales para resi d uos.
¡Graci as p or haber comprado el DVM8852! Lea atentamente las instrucciones del manual antes de
usarlo. Si el aparato ha sufrido algún daño en el transporte no lo instale y póngase en contacto con
su distribuidor.
2. Instrucc iones de seguridad
Mantenga el aparato lejos del alcance de personas no
capacitadas y ni ños.
No exponga este equipo a lluv ia, humedad ni a ningún
tipo de salpicadura o goteo.
No exponga este aparato a polv o ni temperatu ras
extremas. No es apto para un uso a una altura de más de
2.000m.
• Los daños causados por descuido de las instrucciones de seguridad de este manual invalidarán
su garantía y su distribuidor no será res p onsable de ningú n d a ño u otros problemas resultantes.
• Los daños causados por modificacione s no autorizad a s, no están cubiertos por la garantía.
3. Normas generales
• No agite el aparato. Evite usar excesiva fuerza durante el manejo y la instalación.
• Familiarícese con el funcionamiento del aparato antes de utilizarlo.
• Por razones de seguridad, las modificacione s no autorizadas del aparato están prohibidas.
• Utilice sólo el aparato para las aplicaciones descritas en este manual. Un uso desautorizado anula
la gara nt ía c o mp leta me n te .
4. Características
• no homolog a do para mediciones oficial es
• software para Windows® y driver USB Macintosh®/Linux®
• capacidad datalogging con memoria para 32.7000 mediciones
• indicación barra gráfica
• funció n m á x. / m ín.
• visualización sobre rango
• selecc ión auto mática del rango: 30 - 130 dB
• visual iz a ción de la ho ra
• resolución: 0,1 dB
• visualización del rango de mediciones
• conex ió n d e sa lid a de la se ñal AC/D C
• desactivación automática
• tiempo de respuesta lento/rápido
• salida de señal CA/CC para la conexión a un analizador o una grabadora X-Y
02 (22/08/2013) Velleman
19
Page 20

DVM8852
A
esponja p a ra suprimir los ruidos del vie nto
J
tecla de retención de lectura (data hold)
B
pantalla LCD
K
tecla de retroiluminación
C
interruptor ON/OFF grabación
L
conexión externa de 9VCC
D
tecla de ajuste
M
conexión mini USB
E
tecla de selección del modo
N
salida CA/CC
F
tecla de selección de la ponderación de la
señal
O
micrófono
H
tecla de selección rango/nivel
Q
compartimiento de pilas
I
interruptor ON/OFF
1
UNDER
bajo)
2
OVER
elevado)
3
MAX
medición del nivel sonoro máx.
4
MIN
medición del nivel sonoro mín.
5
FAST
modo de medición rápida (cada 125 ms)
6
SLOW
modo de medición lenta (cada 1 s)
7
88
indic a ción del rango, límite inferior
8
188
indicación del rango, límite superior
9
gráfico de
barras
el gráfico de barras depende del rango seleccionado (bajo, medio, elevado,
automático
10
DATE
la fecha sólo se visualiza durante el ajuste
12
TIME
visual iz a ción de la ho ra
13
188.8
valor del nivel sonoro
14
la función de desactivación automática está activada
16
REC
la grabación de datos está activada, datos guardados
17
FULL
memoria llena, conecte el sonómetro a un PC para guardar/borrar
18
dBA
modo de selección A
19
dBC
modo de selección C
20
AUTO
selección automática del rango
21
HOLD
modo de retención de lectura (data hold)
[7]
[8]
rango
30
80
bajo
50
100
medio
80
130
elevado
30
130
automática
5. Descripción
Sonómetro: Véase la figura 1 y 2 en la página 2 de este manual del usuario.
G tecla máx./mín. P conexión para trípode
Pantalla LCD: Véase la figura 3 en la página 2 de este manual del usuario.
valor med id o se encuentra fuera del rango s elecciona d o (va lor demasiado
valor med id o se encuentra fuera del rango s elecciona d o (va lor demasiado
11 18:88:88 visualización de la hora en el modo normal, visualización de los códigos
durante el ajuste
15
indicación de pila baja, re emplaz ar la pi la
6. Uso
En general
• Deslice la esponja [A] sob re la m embrana del micrófon o [O] para reducir los ruidos del viento.
• Active el sonómetro al pulsar el interruptor ON/OFF [I].
• Seleccione el rango con la tecla de selección rango/nivel [H]. El rango se indica en la pantalla
[7][8][20]. La escala del gráfico de barras [9] depende del rango seleccionado.
02 (22/08/2013) Velleman
20
Page 21

DVM8852
tensión: 1 V RMS/cran
impedancia: 100 Ω
impedancia: 1 kΩ
Z
masa
Pulse #
Display
TIME
n n
hora TIME
h-A o h-P
ajuste de las horas con la tecla de selección rango/nivel [H]
A= por la mañana, P= por la tarde
3
DATE -d- día
ajuste del día con la tecla de selección rango/nivel [H]
4
DATE -H- mes
ajuste del mes con la tecla de selección rango/nivel [H]
5
DATE -Y- año
ajuste del año con la tecla de selección rango/nivel [H]
Mantenga pulsada la tecla de retención de lectura (data hold) [J] para
restablecer los ajustes de fábrica
• Una medici ón fuera del ran g o seleccionad o se indica por UNDER [1] o OVER [2]. Sel eccione el
rango adecuado.
• El sonómetro incluye dos frecuencias de medición: frecuencia de medición rápida o lenta. En el
modo de medición rápida, el nivel sonoro se mid e cada12 5 ms; en el modo de medición lento, el
nivel sonoro se mide cada 1 s. Seleccione la frecuencia con la tecla de selección del modo [E]. La
selección [5][6] se indica en la pantalla. La pantalla se actualiza 2x/s.
• Es posible ofrece también dos funciones de ponderación: ponderación A (dBA) y ponderación C
(dBC):
dBA : el nivel se ajusta en función del rango de frecuencias del oído humano;
dBC : el nivel se ajusta en las frecuencias graves del espectro.
Seleccione la se l e cción co n la te cla de selecc ión [F]. La selección [18][19] se indica en la
pantalla.
• Mantenga pulsada la tecla de retención de lectura (data hold) [J] para bloquear/desbloquear los
valores en la pantalla. La función se indica en la pantalla [21].
• Pulse la tecla máx./mín. [G] para visualizar el valor del nivel sonoro máx. (la pantalla indica
MAX [3]). Vuelva a pulsar la tecla máx./mín. [G] par a visualizar el valor del nivel sonoro mín.
(la pantalla indica MIN [4]). Vuelva a pulsar la tecla máx./mín. [G] para visualizar el valor del
nivel sonoro actual .
• Act iv e/des a c tive la re t r o il umina c ión con la tecla [K].
• L a ind ic ación de la f u nción de de s activación automática [14] se visualiza si la función está
activada. El sonómetro se desactiva después de ± 15 minutos de inactividad. Pulse la tecla de
ajuste [D] p ara desactivar la función.
• Desactive el sonómetro al manten er pulsado el interruptor ON/OFF [I] durante 3 segundos (se
visualiza la cuenta atrás).
• Es po s ible in stalar e l so nómetr o e n u n tr íp o d e. Ator n il le e l tr ípode en la c o ne x ión [P] de la parte
trasera del aparato.
Nota: Conecte un analizador de frecuencias (no incl.), un bode plotter (no incl.) a la salida C A/CC .
X salida CA
Y salida CC
tensión: 10 mV/dB
Ajustar la hora/la fecha
• Desactive el sonómetro.
• Mantenga pulsada la tecla de ajuste [D] y active el sonómetr o con el interruptor ON/OFF [I].
Suelte la te cla de aj uste [D] en c ua n to la ind icación TIME [12] se visualice. La fecha se
visualiza.
• Pulse la tecla de ajuste [D] para entrar en el menú de ajuste; vuelva a pulsar la tecla de ajuste
[D] para guardar los ajustes y para entrar en el nivel siguiente. Mantenga pulsada la tecla de
retención de lectura (data hold) [J] para guardar los ajustes y para salir del menú de ajuste.
1
minutos
ajuste de lo s m i nutos co n la te cla de se le cció n r a ngo/nivel [H]
2
6 rSt
Nota: El día no se visualiza en el modo normal. Se visualiza sólo en el modo de ajuste .
Grabadora de datos
• Duran te la me dició n, p ul s e la te cla de gra b a ción [C] para grabar la medición. Vuelva a pulsar la
tecla para desactivar la grabación. Es posible transmitir estas grabaciones a un ordenador (véase
§7 Análisis).
• Borrar la memoria: Desactive el sonómetro. Mantenga pulsada la tecla de grabación [C] y vuelva
a activar el sonómetro. Suelte la tecla de grabación [C] en cua n to se visualice la indicac ión CLR.
¡Ojo! Esta función borra irremediablemente todos los datos grabados. Transmita estos datos a
un ordenador si fuera necesario.
02 (22/08/2013) Velleman
21
Page 22

DVM8852
7. Análisis
• El sonómetro tiene una capacidad de memoria para 32.700 mediciones. Para el análisis de estas
mediciones es necesario instalar el software incluido en un ordenador.
Instalar el software
• Introd uzca el CD-ROM (incl.) en el lector del ordenador. Abra el directorio y haga clic dos veces
en el fichero setup.exe para activar la instalación. Siga las instrucciones.
• Conecte el puerto USB [M] del sonómet ro a un puerto USB libre del ordena dor con el cable USB
incluido.
• Active el sonómetro con el interruptor ON/OFF [I].
• Pulse la tecla de ajuste [D] para activar la transmisión de datos. La indicación de desactivación
automática [14] ya no se visualiza.
• Si el ordenador no recon oce el aparato peri férico, copie el directorio CP2101WIN del CD-ROM a
un directorio local y busque los drivers con una búsqueda automática.
Analizar los datos
• Haga clic dos veces en el icono 8852.exe ( ) para ejecutar el software. Seleccione el puerto
COM de la parte derecha del menú ComPort(C) según el ajuste de su ordenador y el puerto
USB utilizado. La conexión se establece en cuanto se seleccione el puerto COM. Véase la figura 4
en la página
• Active/d esactive la monitorización en tiempo real y ajuste/borre el gráfico de barras por el menú
Real Time(R). Los datos se visualizan en la parte superior del gráfico de barras.
• Desactive la monitorización en tiempo real antes de ajustar la frecuencia de muestreo. Esta
frecuencia de muestre o e s la velocidad con la que el softwar e analiza el sonómetro.
• Amplíe el gráfico de barras al mantener pulsado el botón izquierdo del ratón y al seleccionar la
zona del gráfico de barras. Regrese al hacer clic en la tecla UnDo Zoom.
• En el modo zoom, entre en el menú Graph(G) y seleccione la opción Histogram. Haga clic en el
gráfico de barras para cambiarlo en un histograma. Para volver a visualizar el gráfico de barras,
abra el menú Graph(G), seleccione la opción Line y haga clic en el histograma.
• En el modo zoom, haga dos veces clic en el gráfico de b a rras para establecer un punto de partida
(línea verde). Vuelva a hacer clic dos veces en el gráfico de barras para establecer el punto final
(línea azul). Los datos entre estos dos puntos se analizarán (p.ej. valor máx./mín., medio, etc.)
y se visu al iz a rán en la parte inferior del gráfico de barras. Borre las línea s con el botón derecho
del ratón o vu elva a hacer clic dos veces en el gráfico de barras.
• Guarde los datos en tiempo real: Desactive y vuelva a activar la monitorización en tiempo real.
El software ofrece la posibilidad de guardar los datos en un fichero de texto.
• Analizar los datos grabados: Haga clic en la opción DataLogger(D) (esta función no está
disponible en el modo de grabación). Aparece una nueva pantalla. Véase la figura 5 en la página
3 de este manual del usuario para una captura de pantalla.
• Los datos se transmiten del sonómetro a la memoria del software y se borrarán de la memoria
del sonóm etro. Guarde los datos en el ord enador con l a opción Save Data(S) para no
perderlos.
• Haga dos veces clic en un fichero para visualizar el contenido. El gráfic o d e barras ofrece
también las funciones zoom, el punto de partida y el punto final.
• Visualice los datos guardados al hacer clic en la opción Imp ort Data (I).
• Imprima el gráfico de barras al hacer clic en la tecla Print Data (P).
3 para una captura de pantalla (screenshot).
8. Reemplazar la pila
• Desactive el sonómetro.
• Abra el compartimiento de pilas [Q] al a pret ar ligera mente en y al deslizar la tapa ± 1 cm hacia
abajo.
• Saque la pila e introduzca una nueva pila de 9V. Respete la polaridad.
• Cierre el compartimiento de pilas. Asegúrese de que cada diento de la tapa se encuentre
correctamente en las guías.
¡OJO!: Se pueden visualiza r d a tos incorrectos al reem p lazar la pil a mientras
que el sonómetro siga activado. Si es el caso, reinicialice el sonómetro.
Mantenga las p i las lejos del alcance de niños.
02 (22/08/2013) Velleman
22
Page 23

9. Especificaciones
Lo
30 - 80 dB
Med
50 - 100 dB
Hi
80 - 130 dB
precisión
± 1,4 dB (ref. 94 dB @ 1 kHz)
ponderación de frecuencias
A, C
frecuencia de med ició n
rápida (125 ms), lenta (1 s)
rango dinámico
50 dB
rango de frecuencia
31,5 Hz - 8 kHz
micrófono
tipo co nd ensado r electr et (12.7m m)
salidas auxiliares
AC = 1 V R MS y CC = 10 mV/dB
alimentación
pila de 9V (incl.)
autonomía
± 30 horas (con pila alcalina)
dimensiones
278 x 76 x 50 mm
peso
± 350 g
desactivación automática
± 15 min.
temperatura de funcionamiento
0 - 40°C
humedad
< 90 %
manual del usuario, trípode, pila, d estornillador,
USB
rango de
medición
DVM8852
accesorios incluidos
pantalla antiviento, soft w a re para Windows®, cable
Utilice este aparato sólo con los accesorios originales. Velleman NV no será responsable
de daños ni lesiones causad os p or un uso (indeb ido) de este apa rat o. Para más
información sobre este p roducto, visite nuestra página web www.velleman.eu
. Se pueden
modificar las especificaciones y el contenido de este manual sin previo aviso.
02 (22/08/2013) Velleman
23
Page 24

DVM8852
BEDIENUNGSANLEITUNG
1. Einführung
An alle Einwohner der Europ äi schen Union
Wichtige Um w el t informationen über d i es es Produkt
Dieses Symbol auf dem Produkt oder der Verpackung zeigt an, dass die Entsorgung dieses
Produktes nach seinem Lebenszyklus der Umwelt Schaden zufügen kann. Entsorgen Sie die
Einheit (oder verwendeten Batterien) nicht a ls u ns o r t ie r te s Haus müll; d ie Einhe it od er
verwendeten Batterien müssen von einer spezialisierten Firma zwecks Recycling entsorgt
werden. Diese Einheit muss an den Händler oder ein örtliches Recycling-Unternehmen
retourniert werden. Respektieren Sie die örtlichen Umweltvorschriften.
Falls Zweifel b est ehen, wenden Sie sich für Entsorgungsri chtl inien an Ihr e örtliche
Behörde.
Wir bedanken uns für den Kauf des DVM8852! Lesen Sie diese Bedienungsanleitung vor
Inbet r iebnahme s orgf ältig du rch. Überprüfen Sie, ob Transportschäden v orliegen. Sollte dies der Fall
sein, verwenden Sie das Gerät nicht und wenden Sie sich an Ihren Händler.
2. Sicherheitshinweise
Halten Sie Kinder und Unbefugte vom Gerät fern.
Sch ü tzen Sie d as Ge rät vor Reg en und Feuchte. Setzen
Sie das Gerät keiner Flüssigkeit wie z.B. Tropf- oder
Spritzwasser, aus
Schützen Sie das Gerät vor Staub und extremen
Temperaturen. Dieses Schallpegelmessgerät eignet sich
nicht für Anwendung > 2.000 m.
• Bei Schäden, die durch Nichtbeachtung der Bedienungsanleitung verursacht werden, erlischt der
Garantieanspruch. Für daraus resultierende Folgeschäden übernimmt der Hersteller keine
Haftung.
• Bei Schäden verursacht durch eigenmächtige Änderungen erlischt der Garantieanspruch.
3. Allgemeine Ric htli nie n
• Vermeiden Sie Erschütterungen. Vermeiden Sie rohe Gewalt während der Installation und Bedienung
des Gerätes.
• Nehmen Sie das Gerät erst in Betrieb, nachdem Sie sich mit seinen Funktionen vertraut gemacht
haben.
• Eigenmächtige Veränderungen sind aus Sicherheitsgründen verboten.
• Verwenden Sie das Gerät nur für Anwendungen beschrieben in dieser Bedienungsanleitung sonst
kann dies zu Schäden am Produkt führen und erlischt der Garantieanspruch.
4. Eigenschaften
• Nicht für amtliche Messungen geeignet
• Windows®-Softwa re und US B-Treiber für Macintosh®/Linux®
• Datenlogging-Kapazität mit Sp eicher fü r 32. 700 M e ss u ng en
• Balkenanzeige
• max./min. Funktion
• Anzeige eines starken und schwachen Signals
• automatisc he Einste llung der Mess b er eiche : 3 0 - 130 dB
• Uhr
• Auflösung: 0,1 dB
• Anzeige des Messbereichs
• AC/DC-Signalausgang
• Auto-Power-Off-Funktion
• langsame/schnelle Ansprechzeit
• AC/DC-Signalausgang für Anschluss mit Analysator oder X-Y-Recorder
02 (22/08/2013) Velleman
24
Page 25

DVM8852
A
Windschutz
J
Hold-Taste
C
Start/Stopptaste Aufnahme
L
extern er 9 VDC-Anschluss
D
Einstellungstaste
M
mini USB-Anschluss
E
Modustaste
N
AC/DC-Ausgang
F
Wähls chalte r S ignalb e w ertung
O
Mikrofon
G
MAX/MIN-Taste
P
Anschluss Stativ
H
Wähls chalte r B er eich/Nivea u
Q
Batteriefach
I
EIN/AUS-Schalter
1
UNDER
gemessener Wert befindet sich unter dem ausgewählt em Ber eich
2
OVER
gemessener Wert befindet sich über dem ausgewähltem Bereich
3
MAX
Messung des max. Geräuschpegels
4
MIN
Messung des min. Geräuschpegels
5
FAST
schnelle Messung (jede 125 ms)
6
SLOW
langsame Messung (jede 1 s)
7
88
Bereichsanzeige, niedrige Grenze
8
188
Bereichsanz e ige, ho he Gr enze
9
Bargraph
hängt vom ausgewählten Bereich (niedrig, durchschnittlich, hoch,
automatisch) ab
10
DATE
Datum (nur während Einstellung)
11
18:88:88
Uhranzeige während einer normalen Anwendung, Einstellcodes während
Einstellung
13
188.8
gemessener Wert des Geräusc hpege ls
14
automa tische Ab schalt un g e ingesc ha l tet
15
Lo-Bat-Anzeige (ersetzen Sie die Batterie)
16
REC
Datenlogger eingescha ltet, Daten werden gespeichert
17
FULL
Speicher vom Datenlogger ist voll, verbinden Sie das Gerät mit einem PC, um
Daten zu speichern/löschen
18
dBA
A-Bewertung
19
dBC
C-Bewertung
20
AUTO
automa tische Ber eichseinst e l lu ng
21
HOLD
Hold-Modus, Anzeige wird verriegelt
[7]
[8]
Bereich
30
80
niedrig
50
100
durchschnittlich
80
130
hoch
30
130
automatisch
5. Umschreibung
Allgeme i n: Siehe Abb ild u ng 1 und 2, Seite 2 dieser Bedienungsanleitung.
B LCD-Display K Taste Hintergrundbeleuchtung
LCD-Display: Siehe Abbildung 3, Siehe Abbildung.
12 TIME Uhranzeige
6. Anwendung
Allgemeen
• Schieben Sie den Windschutz [A] über das Mikrofon [O] um diese vor dem Wind zu schützen.
• Schal te n Sie das Sc ha l lp eg elme ss ge r ät mit de m EIN /AUS-Schalter [I].
• Wählen Sie den Bereich mit dem Wählschalter für Bereich/Niveau [H]. Die Bereiche werden im
Display [7][8][20] angezeigt. De Skala vom Bargraph [9] hängt vom ausgewählten Bereich ab.
02 (22/08/2013) Velleman
25
Page 26

DVM8852
Spannung: 1 V
Impedanz: 100 Ω
DCAusgang
Spannung: 10 mV/dB
Impedanz: 1 kΩ
Z
Masse
Drücken
Sie #
Minuten TIME
n n
Stellen Sie die Minuten mit der Wählschalter für Bereich/Niveau [H]
ein
A= Vormittag, P= Nachmittag
3
DATE -d- Tag
Stellen Sie den Tag mit der Wählschalter für Bereich/Niveau [H] ein
4
DATE -H- Monat
Stellen Sie den Monat mit der Wählschalter für Bereich/Niveau [H] ein
5
DATE -Y- Jahr
Stellen Sie das Jahr mit der Wählschalter für Bereich/Niveau [H] ein
wieder einzustellen
• Eine Messung außerhalb des eingestellten Bereichs wird mit UNDER [1] oder OVER [2]
angezeigt. Wählen Sie den geeigneten Bereich aus.
• Dieses Schallpegelmessgerät hat zwei Messfrequenzen, nl. eine langsame und eine schnelle
Frequenz. Im langsamen Messmodus nimmt das Schallpegelmessgerät alle 125 ms ein
Schallpegelmuster auf; im schnellen Messmodus geschieht dies jede Sekunde. Wählen Sie eine
Messfrequenz mit der Modustaste [E]. Der ausgewählte Modus wird im Display [5][6]
angezeigt. Die Anzeige wird alle zwei Sekunden aktualisiert.
• Das Schallpegelmessgerät bietet auch zwei Bewertungsfunktionen nl. die A-Bewertung (dBA) un d
die C-Bewertung (dBC):
dBA: der Geräuschpegel wird gemäß dem Frequenzbereich des menschlichen Gehörs
geregelt
dBC: der Geräuschpegel wird gemäß den niedri gen Spek trum freq uen zen geregelt.
Wählen Sie die gewünschte Funktion mit dem Wählschalter für Signalbewertung [F] aus. Die
ausgewählte Funktion wird im Display angezeigt [18][19].
• Halten Sie die Hold-Taste [J] gedrückt, um die Anzeige im Display festzuhalten. Diese Funktion
wird im D isplay [21] angezeigt. Drücken Sie wieder um weiter zu gehen.
• Drücken Sie ein Mal die MAX/MIN-Taste [G] um den Höchstwert anzuzeigen (Display zeigt MAX
[3] an), drücken Sie ein zweites Mal, um den Mindestwert anzuzeigen (Display zeigt MIN [4]
an), drücken Sie ein drittes Mal, um den aktuellen Geräuschpegel anzuzeigen.
• Schalten S ie d e Hi nt e rg rundb eleuch tung mit T aste [K] ein oder aus.
• De Anzeige für die automatische Abschaltung [14] zeigt an, dass die Funktion eingeschaltet ist
[14]. Das Schallpegelmessgerät wird nach ± 15 Minuten automatisch ausgeschaltet. Schalten
Sie die Funktion mit der Einstellungstaste [D] ein und au s.
• Halten Sie d en EIN/AUS-Schalter [I] 3 Sekunden gedrückt, um das Schallpegelmessgerät
auszuschalten (Display zählt ab).
• Sie können das Schallpegelmessgerät auch am Stativ befestigen. Schrauben Sie das m itgelieferte
Stativ am Schallpegelmessgerät [P].
Bemerkung: Verbinden Sie ein externes Gerät, wie einen Frequenzanalysator (nicht mitgeliefert),
Plotter (nicht mitgeliefert) über den AC/DC-Ausgang [N] mit dem Schallpegelmessgerät.
AC-
X
Ausgang
rms/Schritt
Y
Datum- und Uhreinstellung
• Schalten Sie das Schallpegelmessgerät aus.
• Halten Sie die Einstellungstaste [D] gedrück t und drücken Sie nun den EIN /A US-Schalter [I].
Lassen Sie die Einstellungstaste [D] los sobald TIME [12] und Datum angezeigt werden.
• Zeigen Sie da s Einst ellmenü mit de r Ei nstell ungsta s t e [D] an. Drücken Sie nun dieselbe
Einstellungstaste [D] um die Einstellung zu speichern und zum nächsten Einstellniveau zu
gehen. Speichern Sie die Einstellungen und verlassen Sie das Einstellmenü mit der Hold-Taste
[J].
Display
1
Stellen Sie die Stunden mit der Wählschalter für Bereich/Niveau [H]
ein
2
Stunde TIME
h-A oder h-P
6 rSt
Halten Sie die Hold-Taste [J] gedrückt, um die Werk seinstellu ng en
Bemerkung: Der Tag erscheint während der normalen Bildschirmwiedergabe nicht im Display. Der
Tag erscheint nur während des Einstellmodus.
02 (22/08/2013) Velleman
26
Page 27

DVM8852
Datenlogger
• Drücken Sie während der Messung die Start/Stopp-Taste [C] um die Aufnahme der Messung zu
starten/stoppen. Die Aufnahmen können auf PC übertragen werden (siehe §7 Analyse).
• Den Speicher löschen: Schalten Sie zuerst das Schallpegelmessgerät ab. Halten Sie danach die
Start/Stopp-Taste [C] gedrückt während Sie das Schallpegelmessgerät einschalten. Lassen Sie
die Star t/Stop p -Taste [C] los sobald CLR im Display erscheint. Achtung: alle reg istrierte Da ten
im S challpegelme ssgerät werden gelöscht. Üb ertra gen Sie die Daten vom Speicher auf PC wenn
Sie die Daten weiter verwenden möchten.
7. Analyse
• Das Schallpegelmessgerät hat einen Speicher für 32.700 Messungen. Um diese Messungen
analysieren zu können, installieren Sie zuerst die mitgelieferte Software.
Software-Installation
• Legen Sie das mitgelieferte CD-ROM in das CD-ROM-Laufwerk vom PC ein. Öffnen Sie das
Verzeichnis und doppelklicken Sie die Datei setup.exe um die Installation zu starten. Befolgen
Sie die Anweisungen im Bildschirm.
• Verbinden Sie das Schallpegel mes sgerä t über den USB-Port [M] und das mitgelieferte USB-
Kabel mit dem PC.
• Schal te n Sie das Sc ha l lp eg elme ss ge r ät mit de m EIN /AUS-Schalter [I] ein.
• Drücken Sie die Einstellungstaste [D] um die Datenübertragung zu starten. Die Ikone für die
automa tische Ab schalt un g [14] erschein t nicht mehr im Di splay.
• Erkennt der PC die neue Peripherie nicht, so kopieren Sie das CP2101WIN-Verzeichnis vom CDROM auf das lokale Verz eich nis und su c hen Sie d ie T re iber im lok alen Ve r zeichnis übe r e in e n
automatischen Suchauftrag.
Analyse der Dat en
• Doppelklicken Sie die Datei 8852.exe ( ) um die Software zu starten. Wä hlen S ie den rechten
COM-Port in het Menü ComPort(C). Wählen S ie den COM-Port abh ängig vom PC und dem
verwendeten USB-Port. Beim Auswählen des COM-Ports geschieht den Anschluss sofort. Siehe
Abbildung 4, Seite
• Starten oder stoppen Sie das Echtzeit-Monitoring, oder löschen Sie den Bargraph über das Menü
Real Time(R). Mehr Details we rden über dem Bargraph angezeigt.
• Stopp en Sie das Echtzeit-Monitoring wenn Sie die Abtastfrequenz einstellen möchten. Diese
Abtastfrequenz ist NICHT die Abtastfrequenz des Schallpegelmessgerätes, sondern die Frequenz
mit der die Software das Schallpegelmessgerät liest.
• Heranzoomen: Ha l ten Sie die li nk e Mausta ste ged rückt und s chleppen Sie üb er d a s gewünschte
Gebiet. Lassen Sie die linke Maustaste los.
Herauszoomen: Klicken Sie UnDo Zoom.
• Im Zoommodus, klicken Sie d a s Menü Graph(G) und wählen Sie Histogramm. Klicken Sie im
Bargraph um auf ein Histogramm umzuschalten. Kehren Sie zum Bargraph zurück, indem Sie
das Menü Graph(G) öffnen, die Option Line auszuwählen u nd im H is togramm zu klic ken.
• Im Zoommodus, doppelklicken Sie mit der linken Maustaste einen Punkt im Ba rg a rph, um e i nen
Anfangspunkt zu bestimmen (grüne Linie). Doppelklicken Sie mit der linken Maustaste wieder
einen Punkt im Bargraph um einen Endpunkt zu bestimmen (blaue Linie). Die Daten zwischen
den zwei Linien werden analysiert (z.B. Höchst- und Mindestwert, Mittelwert, usw.) und auf der
Unterseite des Bargraphen angezeigt. Entfernen Sie die Linien indem sie mit der linken
Maustaste zwei Mal klicken.
• Speichern Sie die Echtzeit-Daten, indem Sie das Echtzeit-Monitoring stoppen und wieder starten.
Das Schallpegelmessgerät fragt, ob Sie die Daten als Textdatei speichern möchten.
• Analysieren Sie ältere Messungen über das Menü Datenlogger(D). Dies gelingt aber nicht wen
das Schallpeg e l me ssgerät sich im A ufnahm em odus be fi nd et. Es er schein t e i n neues Fenster.
Siehe Abbildung 5, Seite
• Die Daten werden vom Schallpegelmessgerät auf den Speicher der Software kopiert und aus
dem Speicher des Schallpegelmessgerätes gelöscht. Speichern Sie die Daten über das Menü
Save Daten( S) im PC. Machen Sie dies nicht, so werden alle Daten beim Ausschalten gelöscht.
• Doppelklicken Sie mit der linken Maustaste die Datei, um die Daten anzuzeigen. Der Bargraph
bietet auch die Zoomfunktion und Anfangs- und Endpunk t.
• Rufen Sie schon gespeicherte Messungen über das Menü Import Daten (I) ab.
• Drucken Sie den Bargraph über das Menü Print Daten (P) ab.
3 diese r Be dienu ng sanleit ung für einen Scr eensho t.
3 dieser Bedienungsanleitung für einen Screenshot.
02 (22/08/2013) Velleman
27
Page 28

DVM8852
Lo
30 - 80 dB
Med
50 - 100 dB
Hi
80 - 130 dB
Genauigkeit
± 1,4 dB (ref 94 dB @ 1 kHz)
Frequenzbewertung
A, C
Messbereiche
schnell (125ms) , lang sa m (1s)
dynamis cher Bereich
50 dB
Frequenzbereich
31,5 Hz - 8 kHz
Mikrofon
Elektret-Kondensatormikrofon (12.7mm)
Hilfsaugänge
AC(=1Vrms)/(DC=10mV/dB)-Ausgänge
Stromversorgung
9V-Batterie (mitgeliefert)
Lebensdauer Batterie
± 30 Stunden (mit Alkaline-Batterie)
Abmessungen
278 x 76 x 50 mm
Gewicht
± 350 g
automa tische Ab schalt un g
± 15 Min.
Betriebstemperatur
0 - 40°C
Feuchtigkeit
< 90 %
Bedie n ungsan leitun g , Sta t iv , Ba t te rie,
Software, USB-Kabel,
8. Batteriewechsel
• Schalten Sie das Schallpegelmessgerät aus.
• Öffnen Sie das Batteriefach [Q]. Drücken Sie vorsichtig die Markierung ( ) und s chieben S ie den
Deckel etwa ± 1 cm nach un ten.
• Entfer nen Sie d ie Ba t te rie und legen Sie eine neue 9V-Batterie ein. Beachten Sie die Polarität.
• Stellen Sie den Deckel wieder auf und schieben Sie ihn zu. Beachten Sie, dass es richtig
geschlossen wurde.
ACHTUNG: Bei m Durchführen eines Batteriewechsels wenn das
Schallpegelmessgerät noch eingesch al t et i st , k önnen d a Störungen entstehen.
Starten Sie das Schallpegelmessgerät w i eder. Halten Si e die Batterien von
Kindern fern.
9. Technische Daten
Messbereich
mitgeliefertes Zubehör
Schraubendr e her, Wi nd schutz, Windo w s®-
Verwenden Sie d ieses Gerä t nur mit orig inellen Zubehörteilen. V el leman NV übernimmt
keine Haftung für Schaden oder Verletzungen bei (falscher) Anwendung dieses Gerätes.
Für mehr Info rmationen z u d iesem Produkt, siehe www.velleman.eu
. Alle Änderungen
ohne vorherig e Ankündigung v orbehalte n.
02 (22/08/2013) Velleman
28
Page 29

Velleman® Service and Quality Warranty
Since its foundation in 1972, Velleman® acquired extensive
experience in the electronics world and currently distributes its
products in over 85 countries.
All our products fulfil strict quality requirements and legal stipulations
in the EU. In order to ensure the quality, our products regularly go
through an extra quality check, both by an internal quality
department and by specialized external organisations. If, all
precautionary measures notwithstanding, problems should occur,
please make appeal to our warranty (see guarantee conditions).
General Warranty Conditions Concerning Consumer Products
(for EU):
• All consumer products are subject to a 24-month warranty on
production flaws and defective material as from the original date of
purchase.
• Velleman® can decide to replace an article with an equivalent
article, or to refund the retail value totally or partially when the
complaint is valid and a free repair or replacement of the article is
impossible, or if the expenses are out of proportion.
You will be delivered a replacing article or a refund at the value of
100% of the purchase price in case of a flaw occurred in the first
year after the date of purchase and delivery, or a replacing article at
50% of the purchase price or a refund at the value of 50% of the
retail value in case of a flaw occurred in the second year after the
date of purchase and delivery.
• Not covered by warranty:
- all direct or indirect damage caused after delivery to the article
(e.g. by oxidation, shocks, falls, dust, dirt, humidity...), and by the
article, as well as its contents (e.g. data loss), compensation for loss
of profits;
- consumable goods, parts or accessories that are subject to an aging
process during normal use, such as batteries (rechargeable, nonrechargeable, built-in or replaceable), lamps, rubber parts, drive
belts... (unlimited list);
- flaws resulting from fire, water damage, lightning, accident, natural
disaster, etc.…;
- flaws caused deliberately, negligently or resulting from improper
handling, negligent maintenance, abusive use or use contrary to the
manufacturer’s instructions;
- damage caused by a commercial, professional or collective use of
the article (the warranty validity will be reduced to six (6) months
when the article is used professionally);
- damage resulting from an inappropriate packing and shipping of the
article;
- all damage caused by modification, repair or alteration performed
by a third party without written permission by Velleman®.
• Articles to be repaired must be delivered to your Velleman® dealer,
solidly packed (preferably in the original packaging), and be
completed with the original receipt of purchase and a clear flaw
description.
• Hint: In order to save on cost and time, please reread the manual
and check if the flaw is caused by obvious causes prior to presenting
the article for repair. Note that returning a non-defective article can
also involve handling costs.
• Repairs occurring after warranty expiration are subject to shipping
costs.
• The above conditions are without prejudice to all commercial
warranties.
The above enumeration is subject to modification according to
the article (see article’s manual).
Velleman® service- en kwaliteitsgarantie
Velleman® heeft sinds zijn oprichting in 1972 een ruime ervaring
opgebouwd in de elektronicawereld en verdeelt op dit moment
producten in meer dan 85 landen. Al onze producten beantwoorden
aan strikte kwaliteitseisen en aan de wettelijke bepalingen geldig in
de EU. Om de kwaliteit te waarborgen, ondergaan onze producten op
regelmatige tijdstippen een extra kwaliteitscontrole, zowel door onze
eigen kwaliteitsafdeling als door externe gespecialiseerde
organisaties. Mocht er ondanks deze voorzorgen toch een probleem
optreden, dan kunt u steeds een beroep doen op onze waarborg (zie
waarborgvoorwaarden).
Algemene waarborgvoorwaarden consumentengoederen
(voor Europese Unie):
• Op alle consumentengoederen geldt een garantieperiode van 24
maanden op productie- en materiaalfouten en dit vanaf de
oorspronkelijke aankoopdatum.
• Indien de klacht gegrond is en een gratis reparatie of vervanging
van een artikel onmogelijk is of indien de kosten hiervoor buiten
verhouding zijn, kan Velleman® beslissen het desbetreffende artikel
te vervangen door een gelijkwaardig artikel of de aankoopsom van
het artikel gedeeltelijk of volledig terug te betalen. In dat geval krijgt
u een vervangend product of terugbetaling ter waarde van 100% van
de aankoopsom bij ontdekking van een gebrek tot één jaar na
aankoop en levering, of een vervangend product tegen 50% van de
kostprijs of terugbetaling van 50 % bij ontdekking na één jaar tot 2
jaar.
• Valt niet onder waarborg:
- alle rechtstreekse of onrechtstreekse schade na de levering
veroorzaakt aan het toestel (bv. door oxidatie, schokken, val, stof,
vuil, vocht...), en door het toestel, alsook zijn inhoud (bv. verlies van
data), vergoeding voor eventuele winstderving.
- verbruiksgoederen, onderdelen of hulpstukken die onderhevig zijn
aan veroudering door normaal gebruik zoals bv. batterijen (zowel
oplaadbare als niet-oplaadbare, ingebouwd of vervangbaar), lampen,
rubberen onderdelen, aandrijfriemen... (onbeperkte lijst).
- defecten ten gevolge van brand, waterschade, bliksem, ongevallen,
natuurrampen, enz.
- defecten veroorzaakt door opzet, nalatigheid of door een
onoordeelkundige behandeling, slecht onderhoud of abnormaal
gebruik of gebruik van het toestel strijdig met de voorschriften van
de fabrikant.
- schade ten gevolge van een commercieel, professioneel of collectief
gebruik van het apparaat (bij professioneel gebruik wordt de
garantieperiode herleid tot 6 maand).
- schade veroorzaakt door onvoldoende bescherming bij transport
van het apparaat.
- alle schade door wijzigingen, reparaties of modificaties uitgevoerd
door derden zonder toestemming van Velleman®.
• Toestellen dienen ter reparatie aangeboden te worden bij uw
Velleman®-verdeler. Het toestel dient vergezeld te zijn van het
oorspronkelijke aankoopbewijs. Zorg voor een degelijke verpakking
(bij voorkeur de originele verpakking) en voeg een duidelijke
foutomschrijving bij.
• Tip: alvorens het toestel voor reparatie aan te bieden, kijk nog
eens na of er geen voor de hand liggende reden is waarom het
toestel niet naar behoren werkt (zie handleiding). Op deze wijze kunt
u kosten en tijd besparen. Denk eraan dat er ook voor niet-defecte
toestellen een kost voor controle aangerekend kan worden.
• Bij reparaties buiten de waarborgperiode zullen transportkosten
aangerekend worden.
• Elke commerciële garantie laat deze rechten onverminderd.
Bovenstaande opsomming kan eventueel aangepast worden
naargelang de aard van het product (zie handleiding van het
betreffende product).
Garantie de service et de qualité Velleman®
Depuis 1972, Velleman® a gagné une vaste expérience dans le
secteur de l’électronique et est actuellement distributeur dans plus de
85 pays.
Tous nos produits répondent à des exigences de qualité rigoureuses
et à des dispositions légales en vigueur dans l’UE. Afin de garantir la
qualité, nous soumettons régulièrement nos produits à des contrôles
de qualité supplémentaires, tant par notre propre service qualité que
par un service qualité externe. Dans le cas improbable d’un défaut
malgré toutes les précautions, il est possible d’invoquer notre
garantie (voir les conditions de garantie).
Conditions générales concernant la garantie sur les produits
grand public (pour l’UE) :
• tout produit grand public est garanti 24 mois contre tout vice de
production ou de matériaux à dater du jour d’acquisition effective ;
• si la plainte est justifiée et que la réparation ou le remplacement
d’un article est jugé impossible, ou lorsque les coûts s’avèrent
disproportionnés, Velleman® s’autorise à remplacer ledit article par
un article équivalent ou à rembourser la totalité ou une partie du prix
d’achat. Le cas échéant, il vous sera consenti un article de
remplacement ou le remboursement complet du prix d’achat lors
d’un défaut dans un délai de 1 an après l’achat et la livraison, ou un
article de remplacement moyennant 50% du prix d’achat ou le
remboursement de 50% du prix d’achat lors d’un défaut après 1 à 2
ans.
• sont par conséquent exclus :
- tout dommage direct ou indirect survenu à l’article après livraison
(p.ex. dommage lié à l’oxydation, choc, chute, poussière, sable,
impureté…) et provoqué par l’appareil, ainsi que son contenu (p.ex.
perte de données) et une indemnisation éventuelle pour perte de
revenus ;
- toute pièce ou accessoire nécessitant un remplacement causé par
un usage normal comme p.ex. piles (rechargeables comme non
rechargeables, intégrées ou remplaçables), ampoules, pièces en
caoutchouc, courroies… (liste illimitée) ;
- tout dommage qui résulte d’un incendie, de la foudre, d’un
accident, d’une catastrophe naturelle, etc. ;
- out dommage provoqué par une négligence, volontaire ou non, une
utilisation ou un entretien incorrect, ou une utilisation de l’appareil
contraire aux prescriptions du fabricant ;
- tout dommage à cause d’une utilisation commerciale,
professionnelle ou collective de l’appareil (la période de garantie sera
réduite à 6 mois lors d’une utilisation professionnelle) ;
- tout dommage à l’appareil qui résulte d’une utilisation incorrecte ou
différente que celle pour laquelle il a été initialement prévu comme
décrit dans la notice ;
- tout dommage engendré par un retour de l’appareil emballé dans
un conditionnement non ou insuffisamment protégé.
- toute réparation ou modification effectuée par une tierce personne
sans l’autorisation explicite de SA Velleman® ; - frais de transport de
et vers Velleman® si l’appareil n’est plus couvert sous la garantie.
• toute réparation sera fournie par l’endroit de l’achat. L’appareil doit
nécessairement être accompagné du bon d’achat d’origine et être
dûment conditionné (de préférence dans l’emballage d’origine avec
mention du défaut) ;
• tuyau : il est conseillé de consulter la notice et de contrôler câbles,
piles, etc. avant de retourner l’appareil. Un appareil retourné jugé
défectueux qui s’avère en bon état de marche pourra faire l’objet
d’une note de frais à charge du consommateur ;
• une réparation effectuée en-dehors de la période de garantie fera
l’objet de frais de transport ;
• toute garantie commerciale ne porte pas atteinte aux conditions
susmentionnées.
La liste susmentionnée peut être sujette à une
complémentation selon le type de l’article et être mentionnée
dans la notice d’emploi.
Page 30

Garantía de servicio y calidad Velleman®
Desde su fundación en 1972 Velleman® ha adquirido una amplia
experiencia como distribuidor en el sector de la electrónica en más de
85 países. Todos nuestros productos responden a normas de calidad
rigurosas y disposiciones legales vigentes en la UE. Para garantizar la
calidad, sometemos nuestros productos regularmente a controles de
calidad adicionales, tanto a través de nuestro propio servicio de
calidad como de un servicio de calidad externo. En el caso
improbable de que surgieran problemas a pesar de todas las
precauciones, es posible recurrir a nuestra garantía (véase las
condiciones de garantía).
Condiciones generales referentes a la garantía sobre
productos de venta al público (para la Unión Europea):
• Todos los productos de venta al público tienen un perìodo de
garantía de 24 meses contra errores de producción o errores en
materiales desde la adquisición original;
• Si la queja está fundada y si la reparación o sustitución de un
artículo no es posible, o si los gastos son desproporcionados,
Velleman® autoriza reemplazar el artículo por un artículo equivalente
o reembolsar la totalidad o una parte del precio de compra. En este
caso, usted recibirá un artículo de recambio o el reembolso completo
del precio de compra si encuentra algún fallo hasta un año después
de la compra y entrega, o un artículo de recambio al 50% del precio
de compra o el reembolso del 50% del precio de compra si encuentra
un fallo después de 1 año y hasta los 2 años después de la compra y
entrega.
Por consiguiente, están excluidos entre otras cosas:
- todos los daños causados directa o indirectamente al aparato (p.ej.
por oxidación, choques, caída,...) y a su contenido (p.ej. pérdida de
datos) después de la entrega y causados por el aparato, y cualquier
indemnización por posible pérdida de ganancias;
- partes o accesorios, que estén expuestos al desgaste causado por
un uso normal, como por ejemplo baterías (tanto recargables como
no recargables, incorporadas o reemplazables), bombillas, partes de
goma, etc. (lista ilimitada);
- defectos causados por un incendio, daños causados por el agua,
rayos, accidentes, catástrofes naturales, etc.;
- defectos causados a conciencia, descuido o por malos tratos, un
mantenimiento inapropiado o un uso anormal del aparato contrario a
las instrucciones del fabricante;
- daños causados por un uso comercial, profesional o colectivo del
aparato (el período de garantía se reducirá a 6 meses con uso
profesional);
- daños causados por un uso incorrecto o un uso ajeno al que está
previsto el producto inicialmente como está descrito en el manual del
usuario;
- daños causados por una protección insuficiente al transportar el
aparato.
- daños causados por reparaciones o modificaciones efectuadas por
una tercera persona sin la autorización explícita de Velleman®;
- se calcula gastos de transporte de y a Velleman® si el aparato ya
no está cubierto por la garantía.
• Cualquier artìculo que tenga que ser reparado tendrá que ser
devuelto a su distribuidor Velleman®. Devuelva el aparato con la
factura de compra original y transpórtelo en un embalaje sólido
(preferentemente el embalaje original). Incluya también una buena
descripción del fallo;
• Consejo: Lea el manual del usuario y controle los cables, las pilas,
etc. antes de devolver el aparato. Si no se encuentra un defecto en el
artículo los gastos podrían correr a cargo del cliente;
• Los gastos de transporte correrán a carga del cliente para una
reparación efectuada fuera del período de garantía.
• Cualquier gesto comercial no disminuye estos derechos.
La lista previamente mencionada puede ser adaptada según el
tipo de artículo (véase el manual del usuario del artículo en
cuestión).
Velleman® Service- und Qualitätsgarantie
Seit der Gründung in 1972 hat Velleman® sehr viel Erfahrung als
Verteiler in der Elektronikwelt in über 85 Ländern aufgebaut.
Alle Produkte entsprechen den strengen Qualitätsforderungen und
gesetzlichen Anforderungen in der EU. Um die Qualität zu
gewährleisten werden unsere Produkte regelmäßig einer zusätzlichen
Qualitätskontrolle unterworfen, sowohl von unserer eigenen
Qualitätsabteilung als auch von externen spezialisierten
Organisationen. Sollten, trotz aller Vorsichtsmaßnahmen, Probleme
auftreten, nehmen Sie bitte die Garantie in Anspruch (siehe
Garantiebedingungen).
Allgemeine Garantiebedingungen in Bezug auf Konsumgüter
(für die Europäische Union):
• Alle Produkte haben für Material- oder Herstellungsfehler eine
Garantieperiode von 24 Monaten ab Verkaufsdatum.
• Wenn die Klage berechtigt ist und falls eine kostenlose Reparatur
oder ein Austausch des Gerätes unmöglich ist, oder wenn die Kosten
dafür unverhältnismäßig sind, kann Velleman® sich darüber
entscheiden, dieses Produkt durch ein gleiches Produkt zu ersetzen
oder die Kaufsumme ganz oder teilweise zurückzuzahlen. In diesem
Fall erhalten Sie ein Ersatzprodukt oder eine Rückzahlung im Werte
von 100% der Kaufsumme im Falle eines Defektes bis zu 1 Jahr nach
Kauf oder Lieferung, oder Sie bekommen ein Ersatzprodukt im Werte
von 50% der Kaufsumme oder eine Rückzahlung im Werte von 50 %
im Falle eines Defektes im zweiten Jahr.
• Von der Garantie ausgeschlossen sind:
- alle direkten oder indirekten Schäden, die nach Lieferung am Gerät
und durch das Gerät verursacht werden (z.B. Oxidation, Stöße, Fall,
Staub, Schmutz, Feuchtigkeit, ...), sowie auch der Inhalt (z.B.
Datenverlust), Entschädigung für eventuellen Gewinnausfall.
- Verbrauchsgüter, Teile oder Zubehörteile, die durch normalen
Gebrauch dem Verschleiß ausgesetzt sind, wie z.B. Batterien (nicht
nur aufladbare, sondern auch nicht aufladbare, eingebaute oder
ersetzbare), Lampen, Gummiteile, Treibriemen, usw. (unbeschränkte
Liste).
- Schäden verursacht durch Brandschaden, Wasserschaden, Blitz,
Unfälle, Naturkatastrophen, usw.
- Schäden verursacht durch absichtliche, nachlässige oder
unsachgemäße Anwendung, schlechte Wartung, zweckentfremdete
Anwendung oder Nichtbeachtung von Benutzerhinweisen in der
Bedienungsanleitung.
- Schäden infolge einer kommerziellen, professionellen oder
kollektiven Anwendung des Gerätes (bei gewerblicher Anwendung
wird die Garantieperiode auf 6 Monate zurückgeführt).
- Schäden verursacht durch eine unsachgemäße Verpackung und
unsachgemäßen Transport des Gerätes.
- alle Schäden verursacht durch unautorisierte Änderungen,
Reparaturen oder Modifikationen, die von einem Dritten ohne
Erlaubnis von Velleman® vorgenommen werden.
• Im Fall einer Reparatur, wenden Sie sich an Ihren Velleman®Verteiler. Legen Sie das Produkt ordnungsgemäß verpackt
(vorzugsweise die Originalverpackung) und mit dem OriginalKaufbeleg vor. Fügen Sie eine deutliche Fehlerbeschreibung hinzu.
• Hinweis: Um Kosten und Zeit zu sparen, lesen Sie die
Bedienungsanleitung nochmals und überprüfen Sie, ob es keinen auf
de Hand liegenden Grund gibt, ehe Sie das Gerät zur Reparatur
zurückschicken. Stellt sich bei der Überprüfung des Gerätes heraus,
dass kein Geräteschaden vorliegt, könnte dem Kunden eine
Untersuchungspauschale berechnet.
• Für Reparaturen nach Ablauf der Garantiefrist werden
Transportkosten berechnet.
• Jede kommerzielle Garantie lässt diese Rechte unberührt.
Die oben stehende Aufzählung kann eventuell angepasst
werden gemäß der Art des Produktes (siehe
Bedienungsanleitung des Gerätes).
Legen Heirweg 33, 9890 Gavere, Belgium
Imported by Velleman nv
Made in PRC
www.velleman.eu
 Loading...