

Page 1
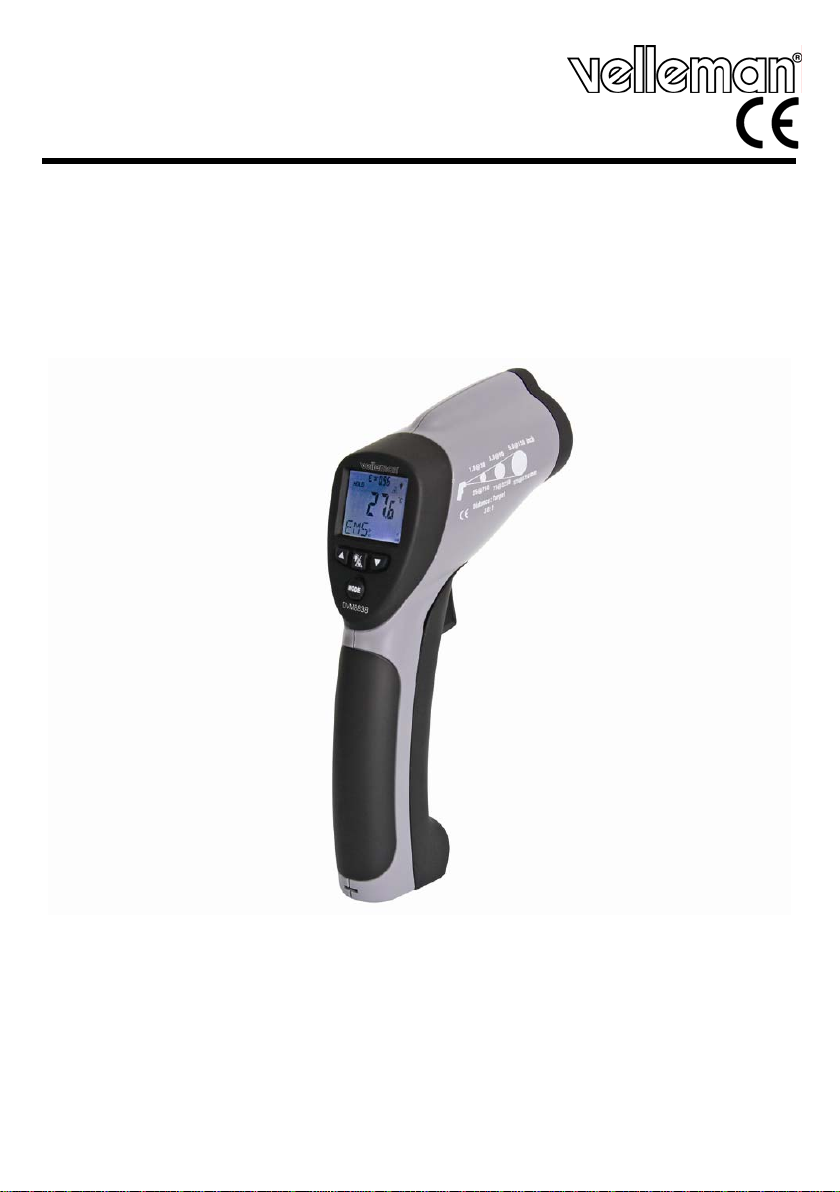
DVM8838
INFRARED THERMOMETER (-50°C TO +1000°C)
INFRAROODTHERMOMETER (-50°C ~ +1000°C)
THERMOMÈTRE INFRAROUGE (-50°C ~ +1000°C)
IR-THERMOMETER (-50°C ~ +1000°C)
TERMÓMETRO INFRARROJO (-50°C ~ +1000°C)
USER MANUAL 3
GEBRUIKERSHANDLEIDING 8
NOTICE D’EMPLOI 13
MANUAL DEL USUARIO 18
BEDIENUNGSANLEITUNG 23
Page 2
DVM8838
00 (23/10/2008) 2 Velleman
®
Page 3
DVM8838
User manual
1. Introduction
To all residents of the European Union
Important environmental information about this product
If in doubt, contact your local waste disposal authorities.
Thank you for choosi ng V el le man! Please read the manual thoroughly before b ringing this
device into service. If the device was damaged in transit, don't instal l or use it and contact
your dealer.
2.
CLASS II
• Damage caused by disreg ar d o f certain guidelines in this manual is not covere d b y the
warranty and the dealer will not accept responsibility for any ensuing defects or problems.
• Note that damage caused b y u s e r modifications to the device is not covered b y the
warranty.
3.
• Protect this device from shocks and abuse. Avoid brute force when operating the device.
• Protected the device against extreme heat and dust.
• Familiarise yourself with the functions of the device before act uall y us ing it .
• All modifications of the devi ce ar e fo rbid den for safet y rea son s.
• Only use the device for its intended purpose. Using the device in an unauthorised way will
void the warranty.
4.
• professional device, quick and easy to use
• very high temperature range
• very high distance to target ratio (30:1)
• built-in laser pointer
• temperature readout in °C or °F
00 (23/10/2008) 3 Velleman
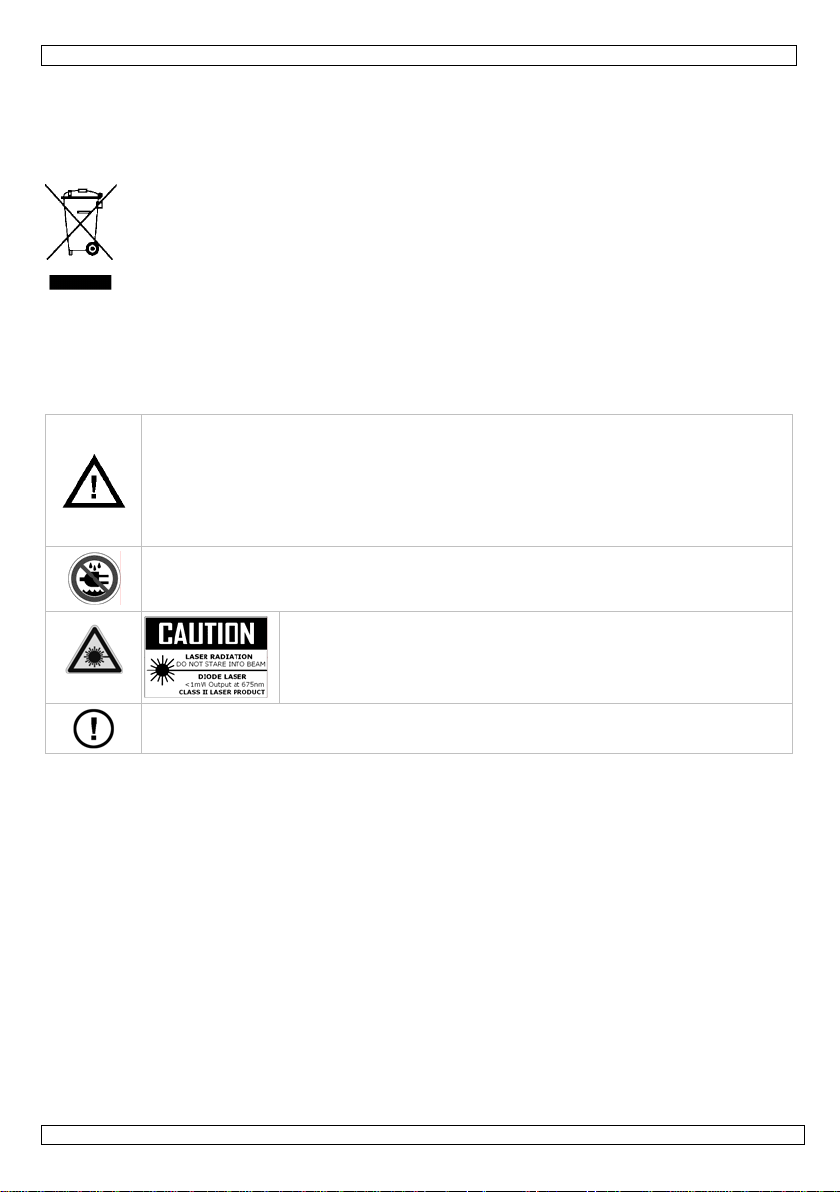
This symbol on the device or the package indicates that disposal of the device
after its lifecycle could harm the environment.
Do not dispose of the unit (or batteries) a s unsorted municipal waste; it should
be taken to a specialized company for recycling.
This device should be returned to your distributor or to a local recycling service.
Respect the local environmental rules.
Safety Instructions
When device is in use, NEVER look directly or indirectly (reflectance) into
the laser beam. NEVER point the laser beam directly or via a reflecting
surface towards other people’s or animals’ eyes. Permanent eye damage will
result. Use extreme caution when the laser beam is turned on.
Do not point the laser beam towards hig hly explosive gases.
Keep out of reach of all children.
Keep this device away from rain, moisture, splashing and dripping liquids.
Visible laser radiation. Do not stare into the beam as eye
damage may occur. This device contains a class 2 laser.
Output power does not exceed 1 mW, wavelength
630~670nm.
DO NOT disassemble or open the cover. No user-serviceable parts inside.
Refer to an authorized dealer for service and/or spare parts.
General Guidelines
Features
®
Page 4
DVM8838
• LCD display with backlight
• data-hold, auto power-off and lock-on function
• MIN, MAX, DIF and record functions
• adjustable emissivity
• high and low alarm
5.
Overview
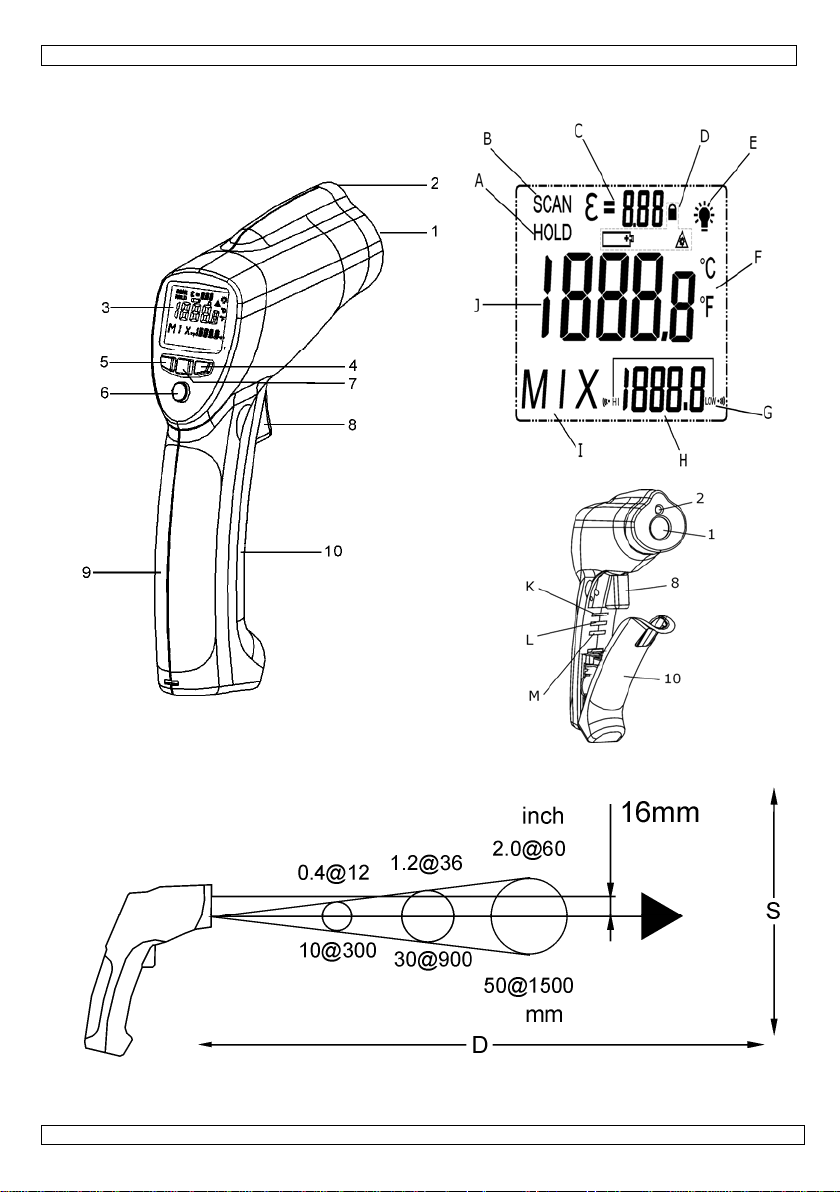
Refer to the drawings on page 2 of this manual.
1 IR sensor 6 mode button
2 laser pointer beam 7 laser/backlight button
3 LCD display 8 measurement trigger
4 down button 9 grip
5 up button 10 battery cover
A hold indication F °C or °F indication
B measuring indication G high and low alarm indication
C emissivity indication and value H MAX, MIN, DIF, AVH, HAL and LAL value
D battery, lock and laser ON indication I indication for H
E backlight ON indication J current measurement value
K °C and °F switch M alarm set switch
L lock on/off switch
6. Operation
• Hold the thermometer by the grip [9] and point the IR sensor [1] towards th e su rfac e of
which the temperature needs to be measured.
• Pull and hold the measurement trigger [8]. The LCD display [3] shows the current
temperature [J].
• During measurement, the word ‘SCAN’ [B] is visible in the LED display. When the
measurement stops (trigger [8] released), the word ‘HOLD’ [A] is shown. The last
measured value will remain on the display until the measurement trigger [8] is pulled
again, or when the thermometer powers-off automatically (after ± 7 seconds).
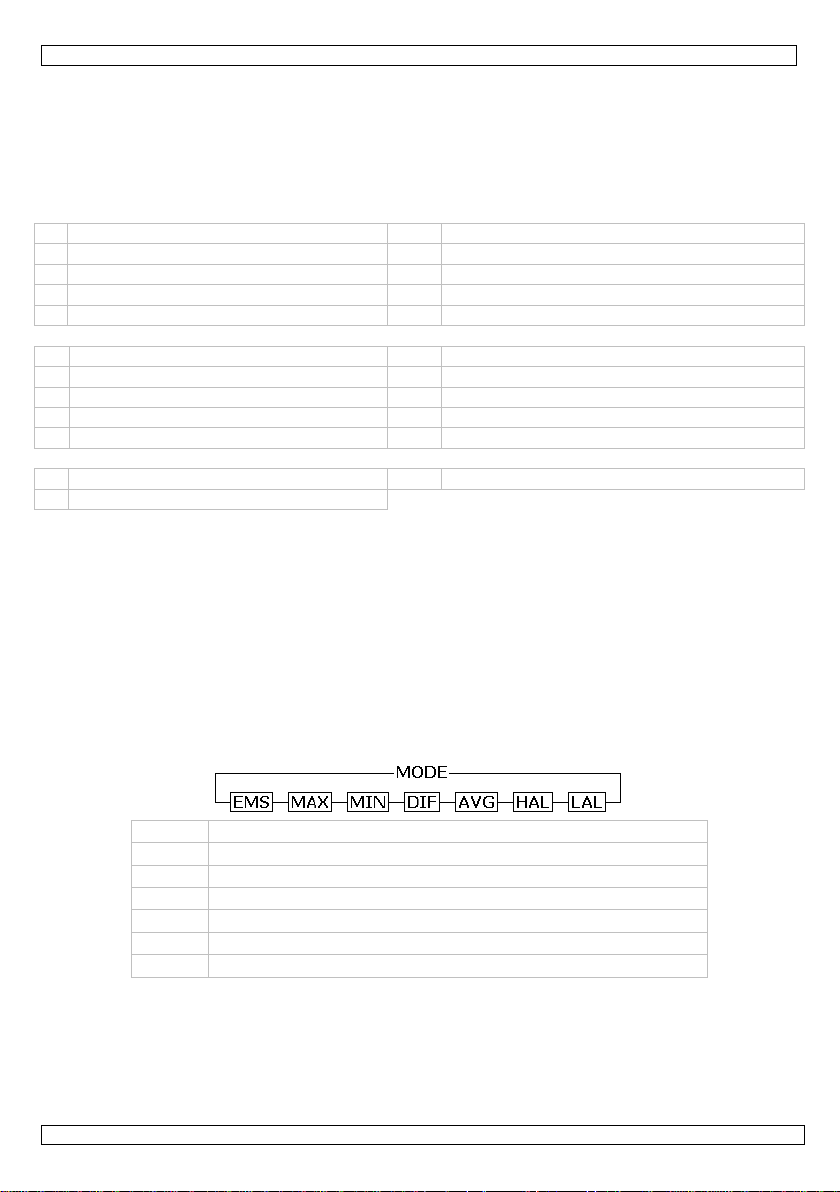
• Depending on the mode, the bottom of th e screen shows the MAX, MIN, DIF, AVH, HAL and
LAL value. Use the mode button [6] to scroll through the modes of the de vic e. Th e mode
[I] and corresponding value [H] are shown on the display.
EMS Emissivity
(*)
MAX Highest measured value
MIN Lowest measured value
DIF Diffe renc e between the highest and lowest measured value
AVG Average value of the temperature
HAL Higher alarm limit
LAL Lower alarm limit
(*)
For more information on emissivity, refer to §7 Useful information.
• To set EMS, HAL or LAL, use the up [5] or down [4] button to adjust the value and press
the mode button [6] again to save the value and go to the next item. To cancel mode
selection, pull the measurement trigger [8]. Pushing the mode button [6] after setting the
lower alarm limit will start the set-up cycle again.
00 (23/10/2008) 4 Velleman
®
Page 5

DVM8838
• Note that MAX, MIN, DIF and AVG only apply to the cu rre nt me asu rin g se ssi on (time
between pulling the trigger [8] and releasing it). Their value is reset when an new
measurement starts or the thermometer switches off.
• To switch between measurements in °C and °F , open the battery cover [10]. The battery
cover has a hinge at the bottom of the device. Hold the battery cover at the top (next to
the measurement trigger [8]) and gently pull aw ay fr om the de vice.
• The °C/°F switch [K] is located just below the measurement trigger [8]. Move this switch
to the desired setting. The current setting is indicated [F] in the display.
• Also under the battery cover [10], there is a lock switch [L]. Move this switch to the ON-
position for continuous measurement. The current settin g is indicated with a lock symbol
[D] in the display. Start measuring by pulling the measurement trigger [8] once. Consider
disabling the laser targeting be am in continuous measuring mode to save battery power. To
stop and disable lock mode, set the switch [L] back to the OFF-position. In lock mode, it is
still possible to adjust EMS, HAL and LAL values.
• The third switch under the battery cover [10] is the alarm set switch [M]. Move this switch
to the ON-position to en able alarm warnings when h igh or low alarm limits a re exceeded.
When enabled, a Hi- and LOW indication [G] are shown on the display.
• Close the battery cover [10] by pushing it back towa r ds the device until it snaps in pl ace .
• When the measured value exceeds a preset alarm limit, an audible alarm signal will be
produced (when the alarm set switch [M] is set to ON), and the according alarm icon in the
display [G] will flash. Alarm will stop when temperature is back within preset limits.
• Push the laser/backlight button [7] to cycle th rough the laser and backlight options. Note
that the laser beam is o nly an aiming aid, be careful when using it. Refer to the safety
instructions.
Push result display
1 backlight on indicator [E]
2 backlight on and laser enabled indicator [E] + [D]
3 backlight off and laser enabled indicator [D]
4 backlight off and laser disabled no indication
Notes:
• The device powers off automatically (after ± 7 sec o nds) when no ac t ivity is de t e c t e d ,
unless it is in lock mode.
• The unit will not measure correctly through transparent surfaces (e.g. glass), as it will
measure the surface temperature of the transparent surface.
• Steam, dust, smoke etc. will ha ve a n egative impact on the measurements accu rac y.
• Measurements on shiny and/or polished surface s are not recommended.
7.
Useful information
Working principl e
The Infra Red sensor of the unit detects energy that is emitted, reflected and transmitted by
a surface. This energy is focussed onto a detector that converts this information into a
temperature reading. The laser beam is only used for aiming purposes.
Ambient temperature
The thermometer automatically compensates ambient temperature conditions. Allow the
thermometer to stabilise to ambient temperature for at least 30 minutes for accurate
measurements.
Surface temperature
When going from low temperature to high temperature measurements or vice versa, the IR
sensor of the thermometer needs a few minutes to adjust.
Distance and spot size
Refer to the drawing on page 2 of this manual.
As the distance (D) from the object increases, the spot size (S) of the area measured by the
unit becomes larger. The focal point for this unit is 914mm (36”). Note that the laser beam
points 16mm above the measurement centre point.
00 (23/10/2008) 5 Velleman
®
Page 6
DVM8838
Field of view
The target must be larger than the spot size to ensure correct measurement. This means
that for smaller targets, the thermometer must be held closer to the target. For best
accuracy, make sure the target is at least twice as large as the spot size.
Emissivity
Emissivity describes the energy-emitting characteristics of materials. Most organic or
oxidized surfaces have an emissivity of ±0.95 (default setting). Measuring shiny or po lished
surfaces will be inaccurate. Use some maski ng tape or paint to compensate, allow sufficient
time for the tape or paint to reach the surface temperature.
Substance Emissivity Substance Emissivity
Asphalt 0.90 to 0.98 Cloth (black) 0.98
Concrete 0.94 Human skin 0.98
Cement 0.96
Sand 0.90
Earth 0.92 to 0.96
Leather
Charcoal
(powder)
Lacquer
Water 0.92 to 0.96 Lacquer (matt) 0.97
Ice 0.96 to 0.98 Rubber (black) 0.94
Snow 0.83
Plastic
Glass 0.90 to 0.95 Timber 0.90
Ceramic 0.90 to 0.94 Paper
Marble 0.94 Chromium oxides 0.81
Plaster 0.80 to 0.90 Copper oxides 0.78
Mortar 0.89 to 0.91
Iron oxides
Brick 0.93 to 0.96 Textiles 0.90
8. Troubleshooting
LCD display doesn’t light up when the
measurements trigger is pulled.
The measured temperature changes very
quickly and the shown value seems unlikely.
Possibly a battery problem. Check and
replace the battery.
Check the emissivity value. When set too
low, inaccurate readings will result.
• Repairs or service should only be carried out by qualified and trained technicians.
9.
Cleaning and storage
• The IR sensor (1) is the most delicate part of the thermometer and should be kept clean
at all times. To do this, only use a soft cloth or cotton bud. Do not use excessive
pressure on the sensor.
00 (23/10/2008) 6 Velleman
0.95 to
1.00
0.96
0.80 to
0.95
0.85 to
0.95
0.70 to
0.94
0.78 to
0.82
®
Page 7
DVM8838
• Wipe the other parts of the thermometer regula rly with a dry cloth. Do not use abrasive
solutions or solvents.
• Do not submerge the thermometer in water or any other liquid.
• There are no user-serviceable parts.
• Contact your dealer for s pa re p a rts if necessary.
• The device must be stored in a place with temperature conditions between - 20° C a nd
+60°C (-4°F and +140°F) and relative humidity lower than 80%.
10.
Battery
• When the battery indicator [D] indicates low battery, replace the battery wit h a new one.
• Open the battery cover [10]. The battery cover has a hinge at the bottom of the device.
Hold the battery cover at the top (next to the measurement trigger [8]) and gently pull
away from the device.
• If necessary switch the lock switch [L] to the OFF-position first.
• Connect a new 9V battery to the thermometer with the battery clip and insert the battery
in the battery compartment.
• Push the cover back towards the device until it snaps into place.
WARNING: malfunction may occur if the power is on when the battery is
replaced. Dispose of batteries in accordance with local regulations.
Keep the battery away from children.
11.
Technical specifications
Temperature Overall range -50°C ~ 1,000°C (-58°F ~ 1,832°F)
Temperature accuracy
T
=23~25°C
amb
=73~77°F)
(T
amb
-50~20°C (-58~68°F)
-20~200°C (-4~392°F)
200~538°C (392~1,000°F)
538~1,000°C (1,000~1,832°F)
±5°C (±9°F)
±1.5% reading ±2°C (3.6°F)
±2.0% reading ±2°C (3.6°F)
±3.5% reading ±5°C (9°F)
Display resolution 0.1°C (0.1°F)
distance-to-spot ratio D:S = 30:1
Response time < 1s
Spectral response 8~14µm
Emissivity Adjustable from 0.10 to 1.00 - step 0.01
Over range indication Display shows ‘-OL’ or ‘+OL’
Operating temperature 0~50°C (32~122°F)
Storage temperature -20~60°C (-4°F~140°F)
Relative humidity 10%~90% operating, < 80% storage
Diode laser Output <1mW, wavelength 630~670nm, Class II laser prod uct
Battery type 1x 9V battery
dimensions 100x56x230mm
weight 290g (10.2oz.)
Use this device with original accessories only. Velleman nv cannot be held
responsible in the event of damage or injury resulte d from (incorrect) use of this
device. For more info concerning this product, please visit our website
www.velleman.eu
. The information in this manual is subject to change without
prior notice.
00 (23/10/2008) 7 Velleman
®
Page 8
DVM8838
Gebruikershandleiding
1. Inleiding
Aan alle ingezetenen van de Europese Unie
Belangrijke milieu-informatie betreffende dit pro d uc t
toestel naar uw verdeler of naar een lokaal recyclagepunt brengen. Respecteer de
plaatselijke milieuwetgeving.
Hebt u vragen, contacteer dan de plaatselijke autoriteiten inzake verwijdering.
Dank u voor uw aankoop! Lees deze handleiding grondig voor u het toestel in gebruik
neemt. Werd het toestel beschadigd tijdens het transport, installeer het dan niet en
raadpleeg uw dealer.
2.
KLASSE 2
• De garantie geldt niet voor schade door het negeren van bepaalde richtlijnen in deze
• Schade door wijzigingen die de gebruiker heeft aangebracht aan het toestel vallen niet
3.
• Bescherm dit toestel tegen schokken. Vermijd brute kracht tijdens de bediening van dit toestel.
• Bescherm dit toestel tegen extreme temperaturen, stof en vochtigheid.
• Leer eerst de functies van het toestel kennen voor u het gaat gebru ike n.
• Om veiligheidsredenen mag de gebruiker geen wijzigingen aanbrengen aan het toestel.
• Gebruik het toestel enkel waarvoor het gemaakt is. Bij onoordeelkundig gebruik vervalt
4.
• professionele thermometer, gemakkelijk en snel te gebruiken
• hoog temperatuurbereik
• zeer hoge verhouding afstand-meetpunt (30:1)
• ingebouwde laserpointer
00 (23/10/2008) 8 Velleman
Dit symbool op het toestel of de verpakki ng geeft aan dat, als het na zijn
levenscyclus wordt weggeworpen, dit toestel schade kan toebreng en aan het milieu.
Gooi dit toestel (en eventuele batterijen) niet bij het gewone huishoudelijke afval;
het moet bij een gespecialiseerd bedrijf terechtkomen voor recyclage. U moet dit
Veiligheidsinstructies
Kijk nooit rechtstreeks of onrechtstreeks in de laserstraal. Richt de
straal NOOIT (direct of via een reflecterend object) in de richting van de ogen
om premanente oogletsels te voorkomen. Gebruik een ingeschakeld toestel
met voorzichtigheid. Richt de straal nooit in de richting van explosieve gassen.
Houd dit toestel uit de buurt van kinderen.
Houd dit toestel uit de buurt van regen, vochtighe id en opspattende
vloeistoffen.
Zichtbare laserstraal. Kijk noo it in de straal om oogletsels te
vermijden. Dit toestel is uitgerust met 2 laserstralen.
Het uitgangsvermogen bedraagt niet meer dan 1 mW,
golflengte 630~670 nm.
De behuizing mag nooit geopend worden. De gebruiker mag geen onderdelen
vervangen. Bestel eventuele reserveonderdelen bij uw dealer.
handleiding en uw dealer zal de verantwoordelijkheid afwijzen voor defecten of problemen
die hier rechtstreeks verband mee houden.
onder de garantie.
Algemene richtlijnen
de garantie.
Eigenschappen
®
Page 9
DVM8838
• weergave van de temperatuur in °C of °F
• lcd-scherm met achtergrondverlichting
• dataholdfunctie, automatische uitschakeling en vegrendeling
• MIN-, MAX-, DIF- en recordmetingen
• instelbare emissiviteit
• hoog en laag alarm
5.
Omschrijving
Raadpleeg de figuren op pagina 2 van deze handleiding.
1 IR-sensor 6 modustoets
2 laserpointer 7 laser/achtergrondverlichting
3 lcd-scherm 8 meetknop
4
5
-toets
-toets
9 handvat
10 batterijvak
A aanduiding ‘data hold’ F °C /°F
B meetaanduiding G laag/hoog alarm
C emissiviteit H MAX, MIN, DIF, AVH, HAL en LAL
D batterij, vergrendeling, laser ingeschakeld I H
E achtergrondverlichting J waarde-uitlezing
K schakelaar °C/°F M alarmschakelaar
L vergrendelschakelaar
6. Gebruik
• Houd de thermometer bij het handvat [9] vast en richt de IR-sensor [1] naar het te meten
object.
• Houd de meetknop [8] ingedrukt. De display [3] geeft de gemeten waarde weer [J].
• Tijdens de meting verschijnt de aa nduiding ‘SCAN’ [B]. Bij het loslaten van de meetknop
[8] verschijnt de aanduidi n g ‘ HO LD ’ [A]. De laatst geme ten waa rde bli jft op de displ a y
weergegeven tot de meetknop [8] opnieuw wordt ingedrukt of tot de thermometer
automatisch uitschakelt (na ± 7 seconden).
• De aanduiding MAX, MIN, DIF, AVH, HAL of LAL verschijnt naargelang de ingestelde
modus. Scroll door de opties met de modustoets [6]. De modus [I] en overeenkomstige
waarde [H] worden op de display weergegeven.
EMS emissiviteit
(*)
MAX hoogst gemeten waarde
MIN laagst gemeten waarde
DIF verschil tussen hoogst en laagste waarde
AVG gemiddelde temperatuurwaarde
HAL hoog alarm
LAL laag alarm
(*)
Voor meer informative over emissiviteit, raadpleeg §7 Nuttige informatie.
• Stel EMS, HAL of LAL in met toets [4] of [5] en bewaar de waarde met de
modustoets [6]. Verlaat het modusmenu door de meetknop [8] in te drukken. Druk de
meetknop [6] opnieuw in na het instellen van de HAL- en LAL-waarde om het instelmenu
opnieuw op te starten.
00 (23/10/2008) 9 Velleman
®
Page 10

DVM8838
• De functies MAX, MIN, DIF en AVG gelden enkel voo r de huid ige meti ng (ti jd tusse n het
indrukken en het loslaten van de meetknop [8]). De waarde wordt gewist bij een nieuwe
meting of indien de thermometer uitschakelt.
• Schakel tussen °C en °F door eerst het batt erijvak [10] open te schuiven. Plaats de
keuzeschakelaar [K] onderaan de meetknop [8] op de gewenste meeteenh eid. De eenheid
[F] wordt op de display weergegeven.
• Het batterijvak [10] bevat ook een vergrendelschakelaar [L]. Plaats deze schakelaar op ON
voor ononderbroken metingen. De ingestelde optie [D] wordt op de display weergegeven.
Start de meting door de meetknop [8] eenmaal i n te drukken (schakel de laserpointer uit
om de batterij te spar en). S c ha ke l de vergrendeloptie uit door de schakelaar [L] op OFF te
plaatsen. In vergrendelmodus kunt u n og stee ds de EMS-, HAL- en LAL-waa r de instellen.
• Met de derde schakelaar [M] stelt u de alarmwaarde in. Plaats de schakelaar op ON om de
functie in te schakelen (de thermometer piept indien de limieten worden overschreden). Een
aanduiding (HI of LOW [G]) verschijnt op de display.
• Sluit het batterijvak [10].
• Druk toets [7] in om de verschillende laser- en achtergrondverlichtingopties te doorlopen.
De laserpointer is ekel een richthulp. Wees voorzichtig bi j het ge brui k van dez e laser en
raadpleeg eerst de veiligheidsinstructies.
druk resultaat display
1 achtergrondverlichting aan aanduiding [E]
2 achtergrondverlichting en laser aan aanduiding [E] + [D]
3 achtergrondverlichting uit en laser aan aanduiding [D]
4 achtergrondverlichting en laser uit geen aanduiding
Opmerkingen:
• De thermometer schakelt automatisch uit na ± 7 seconden, uitgenomen indien de
vergrendelmodus is ingesch a kel d.
• Metingen verricht doorheen transparante objecten, bv. glas, zi jn niet mogeli jk. De
gemeten waarde is die van het transparante object.
• Damp, stof en rook beïnvloeden de nau wkeurigheid van de meting.
• Het is niet aan te raden de temperatuur van een gepoli jst of glanzend object te m eten.
7.
Nuttige informatie
Werkprincipe
De infraroodsensor van dit toestel neemt de uitgestraalde energie van een voorwerp op.
Deze energie wordt door de detector omgezet in een temperatuurwaarde. De laserpo in ter
dient enkel als richthulp.
Omgevingstemperatuur
Deze thermometer houdt automatisch reke ning met de omgevingstemperatuur en
compenseert de waarden. Wacht daarom een 30-tal minuten tot de thermometer op
kamertemperatuur gekomen is alvorens hem te gaan gebruiken.
Oppervlaktetemperatuur
Laat de sensor enkele minuten rusten indien u schak elt van meting van de hoge
temperatuur naar meting van de lage temperatuur en omgekeerd.
Verhouding afstand-meetpunt
Hoe groter de afstand (D) tot het te meten oppervlak, hoe groter het meetpunt (S). Het
focale punt bedraagt 914 mm (36”).
Gezichtsveld
Het te meten object dient groter te zijn dan het meetpunt zelf. Meet de temperatuur van
kleine objecten door de thermometer zeer dicht tegen dit object te houden. Zorg voor een
object dat minstens tweemaal zo groot is als het me etpunt voor de beste resultaten.
00 (23/10/2008) 10 Velleman
®
Page 11

DVM8838
Emissiviteit
Onder emissiviteit verstaan wij de stralingsvermogen van een stof. De meeste organische of
geoxideerde oppervlakken hebben een emissiviteit van ± 0,95 (standaard instelling). Het
meten van glanzende of gepolijste oppervlakken levert onnauwkeurige resultaten op. Bedek
het te meten oppervlak met afdektape of verf en laat wacht tot de tape of de verf de
temperatuur van het oppervlak heeft bereikt.
Materiaal Emissiviteit Materiaal Emissiviteit
Asfalt 0,90 ~ 0,98 Zwarte stof 0,98
Beton 0,94 Menselijke huid 0,98
Cement 0,96 Leer 0,95 ~ 1,00
Zand 0,90 Houtskool 0,96
Aarde 0,92 ~ 0,96 Lak 0,80 ~ 0,95
Water 0,92 ~ 0,96 Lak (mat) 0,97
IJs 0,96 ~ 0,98 Rubber (zwart) 0,94
Sneeuw 0,83 Plastic 0,85 ~ 0,95
Glas 0,90 ~ 0,95 Hout 0,90
Keramiek 0,90 ~ 0,94 Papier 0,70 ~ 0,94
Marmer 0,94 Chroomoxides 0,81
Plaaster 0,80 ~ 0,90 Koperoxides 0,78
Mortier 0,89 ~ 0,91 IJzeroxides 0,78 ~ 0,82
Baksteen 0,93 ~ 0,96 Textiel 0,90
8. Problemen en oplossingen
De display licht niet op bij het indrukken van
de meetknop
Verkeerde uitlezing, gemeten temperatuur
verandert heel snel
• Deze thermometer mag enkel gerepareerd en geijkt worden door een geschoold
technicus.
9.
Onderhoud en opslag
• De sensor [1] is een zeer delicaat onderdeel van de thermometer en moet altijd schoon
gehouden worden. Maak de sensor voorzichtig schoon met een wattenstaafje.
• Maak andere onderdelen schoon met ee n droge, niet-pluizende doek. Gebruik geen alcohol
of solventen.
• Dompel de thermome ter noo i t i n w a ter of een andere vloeistof.
• De gebruiker mag geen onderdelen vervangen.
• Bestel eventuele reserveonderdelen bij uw dealer.
• Bewaar de thermometer in een ruimte met een temperatuur tussen –20°C ~ +60°C en
een vochtigheidsgraad lager dan 80 %.
00 (23/10/2008) 11 Velleman
Controleer en/of vervang de batterij
Raadpleeg de emissiviteitstabel
®
Page 12

DVM8838
10. De batterij
• Vervang de batteri j van zodra de aanduidin g v o o r zwakke batterij [D] op de display
verschijnt.
• Schuif het batterijvak [10] open.
• Plaats schakelaar [L] op OFF indien nodig.
• Plaats een nieuwe 9 V-batterij en sluit het ba tterijvak.
LET OP: Bij het vervangen van de batter ij van een nog ingeschakelde
thermometer kunnen zich storingen voordoen. Herstart de thermometer.
Houd de batterij uit de buurt van kinderen.
11.
Technische specificaties
temperatuurbereik -50°C~1.000°C (-58°F~1.832°F)
nauwkeurigheid
temperatuur
=23~25°C
T
amb
(T
=73~77°F)
amb
-50~20°C (-58~68°F)
-20~200°C (-4~392°F)
200~538°C (392~1.000°F)
538~1.000°C (1.000~1.832°F)
±5°C (±9°F)
±1,5% v.d. uitl. ±2°C (3,6°F)
±2,0% v.d. uitl. ±2°C (3,6°F)
±3,5% v.d. uitl. ±5°C (9°F)
resolutie display 0,1°C (0,1°F)
verhouding afstand-
D:S = 30:1
meetpunt
responstijd < 1s
spectrale respons 8~14 µm
emissiviteit instelbaar van 0,10 to 1,00 – stappen van 0,01
aanduiding buiten bereik ‘-OL’ of ‘+OL’
werktemperatuur 0~50°C (32~122°F)
opslagtemperatuur -20~60°C (-4°F~140°F)
relatieve vochtigheid 10 %~90 % tijdens gebruik, < 80 % opslag
laser < 1 mW, golflengte 630~670 nm, laserproduct klasse II
batterij 1 x 9 V-batterij
afmetingen 100 x 56 x 230 mm
gewicht 290 g
Gebruik dit toestel enkel met originele accessoires. Velleman nv is niet
aansprakelijk voor schade of kwetsuren bij (verkeerd) gebruik van dit toestel.
Voor meer informatie omtrent dit product, zie www.velleman.eu
. De informatie in
deze handleiding kan te allen tijde w orden gewijzigd zonder voorafgaande
kennisgeving.
00 (23/10/2008) 12 Velleman
®
Page 13

DVM8838
NOTICE D’EMPLOI
1. Introduction
Aux résidents de l'Union européenne
Des informations environnementales importantes concernant ce produit
équipements usagés à votre fournisseur ou à un service de recyclage local. Il convient de
respecter la réglementation locale relative à la protection de l’environnement.
En cas de questions, contacter les autorités locales pour élimination.
Nous vous remercions de votre achat ! Lire la présente notice attentivement avant la mise
en service de l’appareil. Si l’appareil a été endommagé pendant le transport, ne pas
l’installer et consulter votre revendeur.
2.
CLASSE 2
• La garantie ne s’applique pas aux dommages survenus en négligeant certaines dir ectives
• Les dommages occasionnés par des modifications à l’appareil par le client ne tombent pas
3.
• Protéger le thermomètre contre les chocs et le traiter avec circonspection pendant
• Tenir le thermomètre à l’écart de la poussiè re, l’humidité et des températures extrêmes.
• Se familiariser avec le fonctionnement de l’appareil avant de l’utiliser.
• Toute modification de l’appareil est interdite pour des raisons de sécurité.
• N’utiliser le thermomètre qu’à sa fonction prévue. Tout autre usage peut causer des
4.
• thermomètre professionnel, facile et rapide à utiliser
• plage de température élevée
00 (23/10/2008) 13 Velleman
Ce symbole sur l'appareil ou l'emballage indique que l’élimination d’un appareil en
fin de vie peut polluer l'environnement. Ne pas jeter un appareil électrique ou
électronique (et des piles éventuelles) parmi les déchets municipaux non sujets au
tri sélectif ; une déchèterie traitera l’appareil en question. Renvoyer les
Prescriptions de sécurité
Utiliser ce thermomètre avec la plus grande précaution. Possibilité de lésions
oculaires. Ne pas regarder directement dans le faisceau lors de l’emploi du
thermomètre. Ne JAMAIS pointer le thermomètre vers les yeux ni vers des
gaz explosifs.
Garder le thermomètre hors de la portée de jeunes enfants.
Protéger le thermomètre contre la pluie, l’humidité et les éclaboussures.
Rayonnement laser visible. Ne pas regarder dans le faisceau
afin d’éviter les lésions oculaires. Appareil à laser de classe 2.
Puissance de sortie < 1 mW, longueur d’onde 635 ~ 660 nm.
NE JAMAIS ouvrir ce thermomètre. Il n’y a aucune pièce maintenab le par
l’utilisateur. Commander des pièces de rechange éventuelles c hez votre
revendeur.
de cette notice et votre revendeur déclinera toute responsa bilité pour les problèmes et les
défauts qui en résultent.
sous la garantie.
Directives générales
l’installation et l’opératio n.
courts-circuits, des brûlures, des électrochocs, etc. Un usage impropre annule d'office la
garantie.
Caractéristiques
®
Page 14

DVM8838
• rapport distance/point de mesure très élevé (30:1)
• visée intégrée
• affichage de la température en °C ou °F
• afficheur LCD rétro-éclairé
• fonction gel d'affichage, extinction automatique et verrouillage
• mesures MIN, MAX, DIF et record
• émissivité réglable
• alarme haut/bas
5.
Description
Consulter les illustrations à la page 2 de cette notice.
1 capteur IR 6 sélecteur de mode
2 visée laser 7 interrupteur laser/rétro-éclairage
3 afficheur LCD 8 bouton de mesure
4
5
touche
touche
9 poignée
10 couvercle du compartiment de la pile
A indication gel d’affichage F indication °C/°F
B indication mode de mesure G indication alarme haut/bas
C indication et valeur émissivité H valeur MAX, MIN, DIF, AVH, HAL, LAL
D indication pile, verrouillage, laser allumé I indication H
E indication rétro-éclairage allumé J valeur mesurée
K sélecteur °C/°F M sélecteur d’alarme
L interrupteur ve rrouillage
6. Emploi
• Prendre le thermomètre par la poignée [9] et pointer le capteur IR [1] vers l’objet à
mesurer.
• Maintenir enfoncé le bouton de mesure [8]. La température [J] est affichée sur le LCD [3].
• L’indication « SCAN » [B] s’affiche pendant la mesure. L’indication « HOLD » [A] s’affiche
dès le relâchement du bouton de mesure [8]. La val eur mesu rée reste af fic hée jus qu ’à ce
que le bouton de mesure [8] soit renfoncé ou jusqu’à ce que le thermomètre s’éteigne.
• L’indication MAX, MIN, DIF, AVH, HAL ou LAL s’affiche au bas de l’afficheur selon le mode
sélectionné. Sélectionner le mode [I] et la valeur [H] à l’aide du sélecteur [6].
EMS émissivité
(*)
MAX valeur mesurée la plus haute
MIN valeur mesurée la plus basse
DIF différence entre la valeur la plus haute et la plus basse
AVG valeur moyenne
HAL seuil d’alarme haut
LAL seuil d’alarme bas
(*)
Plus d’information concernant l’émissivité sous §7 Information utile.
• Régler la valeur EMS, HAL ou LAL à l’aide des touches [4] et [5], et sauvegarder
avec le sélecteur de mode [6]. Quitter le menu de sélection du mode en enfonçant le
bouton de mesure [8]. Renfonce r le sélecteur de mode [6] après réglage des limites
d’alarme pour réaccéder au menu de sélection du mode.
00 (23/10/2008) 14 Velleman
®
Page 15

DVM8838
• Les fonctions ne sont disponibles que pour la valeur mesurée actuelle (délai entre
l’enfoncement et le relâchement du bouton de mesure [8]. Leur valeur s’efface à chaque
nouvelle mesure ou lorsque le therm omè tre s’ét eint.
• Sélectionner l’unité de mesure °C/°F en ouvrant le compartiment de la pil e [10]. Le
sélecteur [K] se trouve au bas du bouton de mesure [8]. Placer le sélecteur sur l’unité de
votre choix. L’unité sélectionnée [F] s’affiche.
• Placer le bouton de verrouillage [L] sur ON pour enclencher le mode de mesure continue.
La sélection [D] s’affiche. Ef fectue r une mesu re en enf onçant une fois le bouton de mesure
[8]. Désactiver la visée en mode de mesure continue pour limiter la consommation
d’énergie. Désactiver le mode de mesure continue en plaçant le bouton de verrouillage [L]
sur OFF. Le mode de mesure continue permet de régler les valeurs E MS, HAL et LAL.
• Placer le sélecteur d’alarme [M] sur ON pour activer les tonalités d’ave rtissement de
d’excès de seuil. L’indication « HI » ou « LOW » [G] s’a ffiche.
• Refermer le compartime nt de la pile [10].
• Enfoncer l’interrupteur laser/retro-éclairage [7] pour dérouler les options de réglage du
laser et du rétro-éclairage. La visée laser n’est qu’une aide pour f aciliter l’alignement du
thermomètre. Utiliser le laser avec précaution. Consulter les prescriptions de sécurité
au préalable.
# de pressio ns fonction afficheur
1 rétro-éclairage allumé indication [E]
2 rétro-éclairage et laser allumés indication [E] + [D]
3 rétro-éclairage allumé et laser éteint indication [D]
4 rétro-éclairage et laser éteints pas d’indication
Remarque :
• Le thermomètre s’éteint automatiquement après un délai de ± 7 secondes, sauf en mode
verrouillé.
• La température de surface mesurée à travers un matériau transparent, p.ex. le verre, ainsi
que celle d’un matériau lu st ré et/ou poli, ne corres po nd r a pa s à la valeur réelle.
• Les vapeurs, la poussière et la fumée influenceront l’exactitude de la mesure de manière
négative.
7.
Information utile
Principe
Le capteur infrarouge du thermomètre détecte l’énergie émise par un objet. Cette énergie
est ensuite convertie en une valeur par un détecteur. Le faisceau laser est une aide pour le
pointage du thermomètre.
Température ambiante
Le thermomètre tient compte des conditions ambiantes. Patienter pendant 30 minutes
jusqu’à ce que le thermomètre ait atteint la température ambiante.
Température de surface
Le capteur IR se réinitialise pendant quelques minutes après la sélection du mode de
mesure.
Rapport distance/point de mesure
Le point de mesure (S) s’élargit au fur et à mesure que la distance (D) e ntre le capteur et
l’objet à mesurer accroît. Le point de focalisation est de 914 mm (36”).
Champ de vision
Veiller à ce que l’objet soit plus grand que le point de mesure (au moins deux fois plus
grand). Tenir le thermomètre à même l’objet pour mesurer la température d’un objet de
petite taille.
00 (23/10/2008) 15 Velleman
®
Page 16

DVM8838
Émissivité
L’émissivité décrit la quantité d’énergie rayonnant d’un objet. La plupart des matières
organiques ou oxydés ont une valeur de ± 0,95 (valeur par défaut). Pour mesurer la
température d’une surface lustrée, appliquer du ruban adhésif non transparent ou un peu
de peinture et patienter jusqu’à ce que le ruban ou la peinture soit à la température de la
surface.
Matériau Emissivité Matériau Emissivité
Asphalte 0,90 ~ 0,98 Étoffe noire 0,98
Béton 0,94 Peau humaine 0,98
Ciment 0,96 Cuir 0,95 ~ 1,00
Sable 0,90 Charbon 0,96
Terre 0,92 ~ 0,96 Vernis 0,80 ~ 0,95
Eau 0,92 ~ 0,96 Vernis (mat) 0,97
Glace 0,96 ~ 0,98 Caoutchouc (noir) 0,94
Neige 0,83 Plastique 0,85 ~ 0,95
Verre 0,90 ~ 0,95 Bois 0,90
Céramique 0,90 ~ 0,94 Papier 0,70 ~ 0,94
Marbre 0,94 Oxyde de chrome 0,81
Plâtre 0,80 ~ 0,90 Oxyde de cuivre 0,78
Mortier 0,89 ~ 0,91 Oxyde de fer 0,78 ~ 0,82
8. Problèmes et solutions
L’afficheur LCD n’est pas éclairé lorsque le
bouton de mesure est enfoncé.
Valeur affichée instable et non réaliste.
• Confier l’entretien à un personne l qualifié.
9.
• Le capteur [1] est la composante la plus déli cate du thermomètre et doit toujours être
propre. Nettoyer le capteur à l’aide d’un chiffon doux ou d’un coton-tige. Ne pas
effectuer de pression sur le capteur.
• Nettoyer le thermomètre à l’aide d’un chiffon non pelucheux. Éviter les alc ools et le s
solvants.
• Ne jamais plonger le thermomètre dans un liquide quelconque.
• Il n’y a aucune pièce maintenable par l’utilisateur.
• Commander des pièces de rechange éventuelles chez votre revendeur.
00 (23/10/2008) 16 Velleman
Brique 0,93 ~ 0,96 Textile 0,90
Problème de pile. Contrôler la pile et
remplacer si nécessaire.
Contrôler la valeur d’émissivité. U ne valeur
trop basse influencera l’affichage de manière
négative.
Entretien et stockage
®
Page 17

DVM8838
• Stocker le thermomètre à une température ambiante entre 10°C et +60°C avec une
humidité inférieure à 80 %.
10.
La pile
• Remplacer la pile dès que l’indication de pile faible [D] s’affiche.
• Ouvrir le compartiment de la pile [10].
• Placer l’interrupteur de verrouillage [L] sur OFF si nécessaire.
• Placer une nouvelle pile 9 V et refermer le compartiment de la pile.
ATTENTION : Des affichages erronés peuvent apparaître lorsque le
remplacement s’effectue tandis que le thermomètre est encore allumé.
Le cas échéant, réinitialiser le thermomètre. Tenir la pile à l’écart des
enfants.
11.
Spécifications techniques
plage de tempér ature -50°C~1.000°C (-58°F~1.832°F)
précision
T
=23~25°C
amb
(T
=73~77°F)
amb
-50~20°C (-58~68°F)
-20~200°C (-4~392°F)
200~538°C (392~1.000°F)
538~1.000°C (1.000~1.832°F)
±5°C (±9°F)
±1,5% de l’aff. ±2°C (3,6°F)
±2,0% de l’aff. ±2°C (3,6°F)
±3,5% de l’aff. ±5°C (9°F)
résolution affich eu r 0,1°C (0,1°F)
rapport distance-point
D:S = 30:1
de mesure
délai de réponse < 1s
réponse spectrale 8~14 µm
émissivité réglable de 0, 10 à 1, 00 – cr ans de 0, 0 1
indication hors plage « -OL » ou « +OL »
température de service 0~50°C (32~122°F)
tempéra tu re d e st oc k ag e -20~60°C (-4°F~140°F)
humidité relative 10 %~90 % pendant usage, < 80 % stockage
laser < 1 mW, longueur d’onde 630~670 nm, produit laser classe 2
pile 1 pile 9 V
dimensions 100 x 56 x 230 mm
poids 290 g
N’employer cet appareil qu’avec des accessoires d’origine. SA Velleman ne sera
aucunement responsable de dommages ou lésions survenus à un usage (incorrect)
de cet appareil. Pour plus d’information concernant cet article, visitez notre site
web www.velleman.eu
. Toutes les informations présentées dans cette notice
peuvent être modifiées sans notification préalable.
00 (23/10/2008) 17 Velleman
®
Page 18

DVM8838
MANUAL DEL USUARIO
1. Introducción
A los ciudadanos de la Unión Europea
Importantes informaciones sobre el medio ambiente conc erniente a este producto
Respete las leyes locales en relación con el medio ambiente.
Si tiene dudas, contacte con las autoridades locales para residuos.
¡Gracias por haber comprado el DVM8838! Lea atentamente las instrucciones del ma nual
antes de usarlo. Si el aparato ha sufrido algún daño en el transporte no lo instale y póngase
en contacto con su distribuidor.
2.
CLASSE 2
• Los daños causados por descuido de las instrucciones de seguridad de este manual
• Los daños causados por modificaciones no autorizadas, no están cubiertos por la garantía.
3.
• No agite el aparato. Evite usar excesiva fuerza durante el manejo y la instalación.
• No exponga este aparato a polvo, humedad y temperaturas extremas.
• Familiarícese con el funcionamiento del aparato antes de utilizarlo.
• Por razones de seguridad, las modificaciones no autorizadas del aparato están prohibidas.
• Utilice sólo el aparato para las aplicaciones descritas en este manual a fin de ev itar p.ej.
4.
• termómetro profesional, fácil y rápido de utilizar
• elevado rango de temperatura
• relación distancia/punto de medición muy elevada (30:1)
• puntero láser incorporado
• visualización de la temperatura en °C o °F
00 (23/10/2008) 18 Velleman
Este símbolo en este aparato o el embalaje indica que, si tira las muestras
inservibles, podrían dañar el medio ambiente. No tire este aparato (ni las pilas, si
las hubiera) en la basura doméstica; debe ir a una empresa especializada en
reciclaje. Devuelva este aparato a su distribuidor o a la unidad de reciclaje local.
Instrucciones de seguridad
No mire directamente al rayo láser para evitar lesiones en los ojos. NUNCA
apunte el termómetro (directamente o indirectamente) a los ojos ni a gases
explosivos. Sea muy cuidadoso al utilizar el aparato.
Mantenga el termómetro lejos del alcance de niños.
No exponga este equipo a lluvia ni humedad ni a ningún tipo de salpicadura o
goteo.
Rayo láser visible. No mire directamente al rayo láser
para evitar lesiones en los ojos. Aparato con láser de clase 2.
Potencia de salida < 1mW, longitud de la onda 635 ~ 660nm.
NUNCA abra el termómetro. El usuario no habrá de efectuar el mantenimiento
de ninguna pieza. Contacte con su distribuidor si necesita piezas de recambio.
invalidarán su garantía y su distribuidor no será responsable de ningún daño u otros
problemas resultantes.
Normas generales
cortocircuitos, quemaduras, descargas eléctricas, etc. Un uso desautorizado puede causar
daños y anula la garantía completamente.
Características
®
Page 19

DVM8838
• pantalla LCD con retroilumin a ción
• retención de lectura (data hold), desactivación automática y bloqueo
• mediciones MIN, MAX, DIF y record
• emisividad ajustable
• alarma 'high' y 'low'
5.
Descripción
Véase la figura en la página Error! Bookmark not defined. de este manual del usuario.
1 sensor IR 6 selector de modo
2 Puntera láser 7 interruptor láser/retroiluminación
3 pantalla LCD 8 botón de medición
4
5
tecla
tecla
9 mango
10 tapa del compartimiento de pilas
A indicación ‘data hold’ F indicación °C/ ° F
B indicación modo de medición G indicación alar ma HI o LOW
C indica ción y valor emisividad H valor MAX, MIN, DIF, AVH, HAL, LAL
D indicación pila, bloqueo, láser activado I indicación H
E indicación retroiluminación activada J valor medido
K selector °C/°F M selector de alarma
L botón de b loqu eo
6. Uso
• Coja el termómetro por el mango [9] y apunte el sensor IR [1] al objeto que quiere medi r.
• Mantenga pulsado el botón de medición [8]. La temperatura [J] se visualiza en la pantalla
LCD 3].
• La indicación « SCA N » [B] se visu aliza durante la medición. La indic aci ón « HOLD » [A]
se visualiza en cuanto s uelte el botón de medición [8]. El valor medido queda visualizado
hasta que vuelva a pulsar el botón de medición [8] o hasta que el termómetro se desactive.
• La indicación MAX, MIN, DIF, AVH, HAL o LAL se visualiza en la parte inferior de la
pantalla dependiente del modo seleccionado. Seleccione el modo [I] y el valor [H] con el
selector [6].
EMS emisividad
(*)
MAX valor medido más elevado
MIN valor medido más bajo
DIF diferencia entre el valor más elevado y más bajo
AVG valor medio
HAL límite de alarma superior
LAL límite de alarma inferior
(*)
Más información sobre la emisiv ida d, véa se §7 Información útil.
• Ajuste el valor EMS, HAL o LAL con las teclas [4] y [5], y guarde con el selector de
modo [6]. Salga del menú de selección del modo al pulsar el botón de medici ón [8]. Vuelva
a pulsar el selector de modo [6] después del ajuste de los límites de alarma para volver a
entrar en el menú de selección del modo.
00 (23/10/2008) 19 Velleman
®
Page 20

DVM8838
• Las funciones sólo están disponibles para el valor medido actual (tiempo entre puls ar y
soltar el botón de medición [8]. El valor se borra al realizar una nueva medición o si el
termómetro se desactiva.
• Seleccione la unidad de medición °C/°F al abri r el compar timie nto de pil as [10]. El selector
[K] está en la parte inferi o r del botón de medición [8]. Ponga el s elector en la unidad que
quiere. La unidad seleccionada [F] se visualiza.
• Ponga el botón de bloqueo [L] en la posición ON para ac tivar el modo de medición continua.
La selección [D] se visualiza. Efectúe una medición al pulsar una vez el botón de medición
[8]. Desactive el puntero láser en el modo de medición continua para ahorrar la batería.
Desactive el modo de medición continua al poner el botón de bloqueo [L] en OFF. El modo
de medición continua permite ajustar los valores EMS, HAL y LAL.
• Ponga el selector de alarma [M] en ON para activar las señales de aviso. El aparato emite
una señal sonora al sobrepasar los límites. La indicación « HI » o « LOW » [G] se visuali za.
• Vuelva a cerrar el compartimiento de pilas [10].
• Pulse el interruptor láse r/retroiluminación [7] para visualizar las opciones de ajuste del
láser y de la retroiluminación. El puntero láser sólo sirve de ayuda para poder apuntar el
termómetro más fácilmente. Sea muy cuidadoso al utilizar el aparato. Consulte las
instrucciones de seguridad.
número de
presiones
función pantalla
1 retroiluminación activada indicación [E]
2 retroiluminación y láser activados indicación [E] + [D]
3 retroiluminación activada y láser
indicación [D]
desactivado
4 retroiluminación et láser
no hay una indicación
desactivados
Nota:
• El termómetro se desactiva aut omáticam ente después de ± 7 segundos, salvo en el modo
de bloqueo.
• No es posible efectuar mediciones a travé s de un material transparente, p.ej. cristal. El
valor medido es la temperatura de la superficie transparente.
• Los vapores, el polvo y el humo influyen la exactitu d d e la medición de manera ne gativa.
7.
Información útil
Principio
El sensor infrarrojo del termómetro detecta la energía emitida por un objeto. Luego, el
detector convierte esta energía en un valor de temperatura. El rayo láser sólo es una ayuda
para apuntar el termómetro.
Temperatura ambiente
El termómetro tiene en cuenta las condicio nes ambientes. Espere 30 minutos hasta que el
termómetro haya alcanzado la temperatura ambiente.
Temperatura de la superficie
El sensor IR se reinicializa durante algunos minutos después de haber seleccionado el modo
de medición.
Relación distancia/punto de medición
Cuanto más grande sea la distancia (D) hasta la superficie que quiere medir, más grande
será el punto de medición (S). El punto focal es de 914mm (36”).
Campo de visión
Asegúrese de que el objeto sea más grande que el punto de medición (mín. dos veces más
grande). Ponga el termómetro lo más cerca posible del objeto para medir la temperatura de
un objeto pequeño.
00 (23/10/2008) 20 Velleman
®
Page 21

DVM8838
Emisividad
La emisividad describe la energía radiant e de un objeto. La mayoría de las materias
orgánicas u oxidadas tienen un valor de ± 0,95 (valor por defecto). Para medir la
temperatura de una superficie brillante o pulida, utilice cinta adhesiva no transparente o un
poco de pintura y espere hasta que la cinta o la pintura haya alcanzado la temperatura de la
superficie.
Materia Emisividad Materia Emisividad
Asfalto 0,90 ~ 0,98
Hormigón 0,94 Piel 0,98
Cemento 0,96 Cuero 0,95 ~ 1,00
Arena 0,90 Hulla (polvo) 0,96
Tierra 0,92 ~ 0,96 Barniz 0,80 ~ 0,95
Agua 0,92 ~ 0,96 Barniz (opaco) 0,97
Hielo 0,96 ~ 0,98
Nieve 0,83 Plástico 0,85 ~ 0,95
Cristal 0,90 ~ 0,95 Madera 0,90
Cerámica 0,90 ~ 0,94 Papel 0,70 ~ 0,94
Mármol 0,94
yeso 0,80 ~ 0,90 Óxido de cuero 0,78
Mortero 0,89 ~ 0,91 Óxido de hierro 0,78 ~ 0,82
Ladrillo 0,93 ~ 0,96 Textil 0,90
8. Solución a problemas
La pantalla LCD no está iluminada si se pulsa
el botón de medición.
El valor visualizado es inestable y no realista.
• El mantenimiento debe ser realizado por personal especializado.
9. Limpieza y almacenamiento
• El sensor [1] es el componente más delicado del termómetro. Asegúrese de que siempre
esté limpio. Limpie el sensor con un paño suave o un bastoncillo de algodón. No efectúe
ninguna presión en el sensor.
• Limpie el termómetro con un paño sin pelusas. No utilice alcohol ni disolventes.
• Nunca sumerja el aparato en un líq uido.
• El usuario no habrá de efectuar el mantenimiento de ninguna pieza.
00 (23/10/2008) 21 Velleman
Tejido (color
negro)
Goma (color
negro)
Óxido de cromo
0,98
0,94
0,81
Problema con la pila. Controle la pila y
reemplácela si fuera necesario.
Controle el valor de emisividad. Un valor
demasiado bajo influenciará la visualización
de manera negativa.
®
Page 22

DVM8838
• Contacte con su distribuidor si necesita piezas de recambio.
• Guarde el termómetro a una temperatura ambiente entre 10°C y +60°C y una humedad
inferior al 80 %.
La pila
10.
• Vuelva a reemplazar la pile en cuanto la indicación de pila baja [D] se visualice.
• Abra el compartimiento de pilas [10].
• Ponga el botón de bloqueo [L] en OFF si fuera necesario.
• Introduzca una nueva pila de 9V y vuelva a cerrar el compartimiento de pilas.
¡OJO!: Es posible que se visualicen valores incor rectos al reemplazar las
pilas si el termómetro está activado. Si es el caso, reinicialice el
termómetro. Mantenga las pilas lejos del alcance de niños.
11.
Especificaciones
rango de tempe ratura -50°C~1.000°C (-58°F~1.832°F)
precisión
T
=23~25°C
amb
=73~77°F)
(T
amb
-50~20°C (-58~68°F)
-20~200°C (-4~392°F)
200~538°C (392~1.000°F)
538~1.000°C (1.000~1.832°F)
±5°C (±9°F)
±1,5% de la lectura ±2°C (3,6°F)
±2,0% de la lectura ±2°C (3,6°F)
±3,5% de la lectura ±5°C (9°F)
resolución pantalla 0,1°C (0,1°F)
relación distancia/ punto
D:S = 30:1
de medición
tiempo de respuesta < 1s
longitud de la onda 8~14 µm
emisividad ajustable de 0,10 a 1,00 – pasos de 0,01
Indicación sobre rango « -OL » o « +OL »
temperatura de
0~50°C (32~122°F)
funcionamiento
temperatura de
-20~60°C (-4°F~140°F)
almacenamiento
humedad relativa 10 %~90 % durante el uso, < 80 % almacenamiento
láser < 1 mW, longitud de la onda 630~670 nm, producto láser clase 2
pila 1 pila de 9V
dimensiones 100 x 56 x 230 mm
peso 290 g
Utilice este aparato sólo con los accesorios originales. Velleman NV no será
responsable de daños ni lesiones causados por un uso (indebid o) de est e aparato.
Para más información sobre este producto, visit e nu est ra págin a web
www.velleman.eu
. Se pueden modificar las especificaciones y el conten ido de este
manual sin previo aviso.
00 (23/10/2008) 22 Velleman
®
Page 23

DVM8838
BEDIENUNGSANLEITUNG
1. Einführung
An alle Einwohner der Europäischen Union
Wichtige Umweltinformationen über dieses Produkt
Respektieren Sie die örtlichen Umweltvorschriften.
Falls Zweifel bestehen, wenden Sie sich für Entsorgungsrichtlinien an Ihre örtliche
Behörde.
Wir bedanken uns für den Kauf des DVM8838! Lesen Sie diese Bedienungsanle itung vor
Inbetriebnahme sorgfältig durch. Überprüfen Sie, ob Transportschäden vorliegen. Sollte dies
der Fall sein, verwenden Sie das Gerät nicht und wenden Sie sich an Ihren Händler.
2.
KLASSE 2
• Bei Schäden, die durch Nichtbeachtung der Bedienungsanleitung verursacht werden,
erlischt der Garantieanspruch. Für daraus resultierende Folgeschäden übernimmt der
Hersteller keine Haftung.
• Bei Schäden verursacht durch eigenmächtige Änderungen erlischt der Garantieanspruch.
3.
• Vermeiden Sie Erschütterungen. Vermeiden Sie rohe Gewalt während der Installation und
Bedienung des Gerätes.
• Schützen Sie das Gerät vor extreme Temperaturen, Staub und Feuchte.
• Nehmen Sie das Gerät erst in Betrieb, nachdem Sie sich mit seinen Funktionen ver traut
gemacht haben.
• Eigenmächtige Veränderungen sind aus Sicherheitsgründen verboten.
• Verwenden Sie das Gerät nur für Anwendungen beschrieben in dieser
Bedienungsanleitung sonst kann dies zu Schäden am Produkt führen und erlischt der
Garantieanspruch.
Dieses Symbol auf dem Produkt oder der Verpackung zeigt an, dass die
Entsorgung dieses Produktes nach seinem Lebenszyklus der Umwelt Schaden
zufügen kann. Entsorgen Sie die Einheit (oder verwendete n Batterien) nicht als
unsortiertes Hausmüll; die Einheit oder verwende ten Batterien müssen von einer
spezialisierten Firma zwecks Recycling entsorgt werden. Diese Einheit muss an
den Händler oder ein örtliches Recycling-Unternehmen retourniert werden.
Veiligheidsinstructies
Seien Sie sehr vorsichtig beim Gebrauch dieses Gerätes. Blicken Sie niemals
direkt in den Laserstrahl während der Anwendung des Gerätes, um
permanente Augenschäden zu vermeiden. Richten Sie das Gerät NIE in die
Richtung der Augen oder Explosivstoffe. Halten Sie Kinder vom Gerät fern.
Schützen Sie das Gerät vor Regen und Feuchte.
Sichtbarer Laserstrahl. Blicken Sie niemals direkt in den
Laserstrahl, um Augenschäden zu vermeiden. Dieses Gerät ist
ein Laserprodukt Klasse 2.
Ausgangsleistung < 1mW, Wellenlänge 635 ~ 660nm.
Öffnen Sie das Gehäuse NIE. Es gibt keine zu wartenden Teile.
Bestellen Sie eventuelle Ersatzunterteile bei Ihrem Fachhändler.
Allgemeine Richtlinien
00 (23/10/2008) 23 Velleman
®
Page 24

DVM8838
4. Eigenschaften
• professionelles Thermometer, einfach und schnell zu verwenden
• hoher Temperaturbereich
• sehr hohe Abstand-zu-Punktgröße (30:1)
• mit eingebautem Laserpointer
• Temperaturanzeige in °C oder °F
• LCD-Display mit Hintergrundbeleuchtung
• Data-Hold- & Auto-Power-Off- und Verriegelungsfunktion
• MIN-, MAX-, DIF- und Recordmessungen
• einstellbarer Emissionsgrad
• High- und Low-Alarm
5.
Umschreibung
Siehe Abbildungen, Seite 2 dieser Bedienungsanleitung.
1 IR-Sensor 6 Modustaste
2 Laserpointer 7 Laser/Hintergrundbeleuchtung
3 LCD-Display 8 Messtaste
4
5
-Taste
-Taste
9 Griff
10 Batteriefach
A Anzeige ‘Data Hold’ F °C /°F
B Messanzeige G niedriger/hoher Alarm
C Emissionsgrad H MAX, MIN, DIF, AVH, HAL un d LAL
D Batterie, Verriegelung, Laser
I H
eingeschaltet
E Hintergrundbeleuchtung J aktueller Messwert
K Schalter °C/°F M Alarmschalter
L Verriegelungstaste
6. Anwendung
• Halten Sie das Thermometer beim Griff [9] fest und richten Sie den IR-Sensor [1] auf den
Gegenstand, den Sie messen möchten.
• Halten Sie die Messtaste [8] gedrückt. Das Display [3] zeigt den gemessenen Wert an [J].
• Während der Messung erscheint ‘SCAN’ [B] im Display. Beim Loslassen der Messtaste [8]
erscheint ‘HOLD’ [A]. Der zuletzt gemessene Wert bleibt im Display a ng ez eigt bis Sie die
Messtaste [8] wieder drücken oder bis sich das Thermometer automatisch absc halt et (nach
± 7 Sekunden).
• Die Anzeige MAX, MIN, DIF, AVH, HAL oder LAL erscheint, abhängig vom eingestellten
Modus. Scrollen Sie mit der Modustaste [6] durch die Optionen. Der Modus [I] und der
entsprechenden Wert [H] werden im Display angezeigt.
EMS Emissionsgrad
(*)
MAX gemessener Höchstwert
MIN gemessene Mindestwert
DIF Unterschied zwischen dem Höchstwert und Mindestwert
AVG durchschnittlicher Temperaturwert
HAL hoher Alarm
LAL niedriger Alarm
(*)
Für mehr Informationen über den Emissionsgrad, siehe §7 Interessante Information.
00 (23/10/2008) 24 Velleman
®
Page 25

DVM8838
• Stellen Sie EMS, HAL oder LAL mit Taste [4] oder [5] ein und speichern Sie den
Wert mit dem Modustaste [6]. Verlassen Sie das Modusmenü, indem Sie die Messtaste [8]
drücken. Drücken Sie die Messtaste [6] nach dem Einstellen des HAL- und LAL- Wertes
wieder, um das Einstellmenü wieder zu starten.
• Die Funktionen MAX, MIN, DIF und AVG gelten n ur fü r die aktuelle Messung (Zeit zwischen
dem Drücken und Loslassen der Messtaste [8]). D er Wert wird bei einer neuen Messung
oder wenn das Thermometer abschaltet gelöscht.
• Schalten Sie zwischen °C und °F, indem Sie zuerst das Batteriefach [10] aufschieben.
Stellen Sie den Wählschalter [K] auf der Unterse ite der Messtaste [8] auf die gewünschte
Messeinheit. Die Einheit [F] wird i m Display angezei g t.
• Das Batteriefach [10] verfügt auch über einen Verriegelungsschalter [L]. Stellen Sie diesen
Schalter für ununterbrochene Messungen au f ON. Di e eingestel lte Opti on [D] wird im
Display angezeigt. Starten Sie die Messung, indem Sie die Messtaste [8] ein Mal drücken
(schalten Sie den Laserpointer aus, um die Batterie zu schonen). Schalten Sie die
Verriegelungsoption a us, indem Sie den Schalter [L] auf OFF ste llen. Im
Verriegelungsmodus kön nen Sie nach wie vor den EMS -, HAL- und LAL-Wert ei nstellen.
• Mit dem dritten Schalter [M] stellen Sie den Alarm wert ein. Stelle n Sie den S chal ter au f ON,
um die Funktion einzuschalten (es e rt önt ein Alarmsignal Beim Überschreiten de r Grenzen).
Eine Anzeige HI oder LOW [G] erscheint im Display.
• Schließen Sie das Batteriefach [10].
• Drücken Sie die Taste [7] um durch die verschiedene Laser- und
Hintergrundbeleuchtungsoptionen zu sc roll en. Der Laserpointer dient nur als Ric hthilfe.
Seien Sie vorsichtig beim Gebrauch der Laserpointer. Lesen Sie die
Sicherheitshinweise.
Druck Ergebnis Display
1 Hintergrundbeleuchtung eingeschaltet Anzeige [E]
2 Hintergrundbeleuchtung und Laser
Anzeige [E] + [D]
eingeschaltet
3 Hintergrundbeleuchtung ausgeschaltet
Anzeige [D]
und Laser eingeschaltet
4 Hintergrundbeleuchtung und Laser
keine Anzeige
ausgeschaltet
Bemerkungen:
• Das Thermometer schaltet automatisch nach ± 7 Sekunden ab, außer wenn der
Verriegelungsmodus eingeschaltet ist.
• Dieses Gerät eignet sich nicht für die Mess ung durch transparente Ob er flächen (z.B. Glas)
da die Temperatur der transpar enten Obe rfl äch e gemessen wi rd.
• Dämpfe, Staub und Rauch werden die Genauigkeit der Messung negativ beeinflussen.
• Wenn Sie glänzende und/oder polierte Oberflächen bekommen Sie ungenaue Werte.
7.
Interessante Information
Betrieb
Der IR-Sensor des Gerätes nimmt die Energie eines Gegenstandes auf. Diese Energie wird
von einem Detektor in einen Temperaturwert umgesetzt. Der Laserpointer dient nur als
Richthilfe.
Umgebungstemperatur
Das Thermometer berücksichtigt die Umgebungstemperatur automatisch und kompensiert
die Werte. Warten Sie deshalb etwa 30 Minuten bis das Thermometer die
Zimmertemperatur erreicht hat, ehe Sie es verwenden.
Oberflächentemperatur
Der Sensor braucht einige Minuten um sich einzustellen, wenn Sie von einer Messung der
hohen Temperatur auf eine Messung der niedrigen Temperatur und umgekehrt, umschalten.
00 (23/10/2008) 25 Velleman
®
Page 26

DVM8838
Abstand-zu-Punktgröße
Je größer der Abstand (D) bis zur Oberfläche, die Sie messen möchten, ist, umso größer ist
der Messpunkt (S). Der Blickpunkt ist 914 mm (36”).
Gesichtsfeld
Beachten Sie dass, die Oberfläche, die Sie messen möchten, größer als den Messpunkt ist.
Beim Halten Sie das Thermometer sehr nahe an der Oberfläche wenn Sie sehr kleine
Oberflächen messen. Eine Oberfläche, die zwei Mal so groß als der Messpunkt ist, gibt die
besten Messergebnisse.
Emissionsgrad
Der Emissionsgrad ist die Strahlungsleistung einer Materie. Die meisten or ganischen oder
oxidierten Oberflächen haben einen Emissionsgrad von ± 0,95 (Standardeinstellung). Das
Messen von glänzenden oder polierten Oberflächen verursacht ungenaue Ergebnisse.
Bedecken Sie die Oberfläche, die Sie messen möchten, mit Abdeckband oder Farbe und
warten Sie bis das Abdeckband oder die Farbe die Temperatur der Oberfläche erreicht hat.
Materie Emissionsgrad Materie Emissionsgrad
Asphalt 0,90 ~ 0,98 Stoff (schwarz) 0,98
Beton 0,94 Haut 0,98
Zement 0,96 Leder 0,95 ~ 1,00
Steinkohle
Sand 0,90
Erde 0,92 ~ 0,96 Lack 0,80 ~ 0,95
Wasser 0,92 ~ 0,96 Lack (matt) 0,97
Eis 0,96 ~ 0,98 Gummi (schwarz) 0,94
Schnee 0,83 Plastik 0,85 ~ 0,95
Glas 0,90 ~ 0,95 Holz 0,90
Keramik 0,90 ~ 0,94 Papier 0,70 ~ 0,94
Marmor 0,94 Chromoxiden 0,81
Putz 0,80 ~ 0,90 Kupferoxiden 0,78
Mörser 0,89 ~ 0,91 Eisenoxiden 0,78 ~ 0,82
Backstein 0,93 ~ 0,96 Textilien 0,90
8. Problemlösung
Das Display leuchtet nicht, wenn Sie d ie
Messtaste drücken
Die gemessene Temperatur ist instabil und
erscheint unwahrscheinlich.
• Lassen Sie dieses Gerät von einem Fachmann warten.
(Pulver)
0,96
Batterieproblem. Überprüfen Sie die Batterie
und führen Sie einen Batteriewechsel durch
wenn nötig
Überprüfen Sie den Emissionswert. Ein Wert,
der zu niedrig eingestellt ist, verursacht
ungenaue Ergebnisse.
00 (23/10/2008) 26 Velleman
®
Page 27

DVM8838
9. Wartung und Lagerung
• Der Sensor [1] ist ein sehr delikater Teil des Thermometers und soll immer sauber
gehalten werden. Reinigen Sie den Sensor vorsichtig mit einem sanften Tuch oder einem
Wattestäbchen.
• Verwenden Sie zur Reinigung der anderen Teile ein trockenes, fusselfreies Tuch.
Verwenden Sie auf keinen Fall Alkohol oder irgendwelche Lösung smittel.
• Tauchen Sie das Gerät nie in Wasser oder eine andere Flüssigkeit.
• Es gibt keine zu wartenden Teile.
• Bestellen Sie eventuelle Ersatzunterteile bei Ihrem Fachhändler.
• Bewahren Sie das Thermometer in einem Zimm er mit einer Temperatur zwischen 10°C ~
+60°C mit einer Feuchtigkeit niedriger als 80 % auf.
10.
Die Batterie
• Ersetzen Sie die Batterie sobald die Anzeige für schwache Batterie [D] im Display erscheint.
• Schieben Sie das Batteriefach [10] auf.
• Stellen Sie den Schalter [L] auf OFF wenn nötig.
• Legen Sie eine neue 9V-Batterie ein und schließen Sie das Batteriefach.
ACHTUNG: Wenn Sie einen Batteriewechsel bei einem eingeschalteten
Thermometer durchführen, können da Störungen auftreten. Starten Sie
das Thermometer wieder. Halten Sie Kinder vom Gerät fe rn.
11.
Technische Daten
Temperaturbereich -50°C~1.000°C (-58°F~1.832°F)
Genauigkeit Temperatur
T
=23~25°C
amb
=73~77°F)
(T
amb
-50~20°C (-58~68°F)
-20~200°C (-4~392°F)
200~538°C (392~1.000°F)
538~1.000°C (1.000~1.832°F)
±5°C (±9°F)
±1,5% der Anzeige ±2°C (3,6°F)
±2,0% der Anzeige ±2°C (3,6°F)
±3,5% der Anzeige ±5°C (9°F)
Auflösung Display 0,1°C (0,1°F)
Abstand-zu-Punktgröße D:S = 30:1
Ansprechzeit < 1s
Wellenlänge 8~14 µm
Emissionsgrad einstellbar van 0,10 to 1,00 – Schritte von 0,01
Anzeige
‘-OL’ of ‘+OL’
Bereichsüberschreitung
Betriebstemperatur 0~50°C (32~122°F)
Lagertemperatur -20~60°C (-4°F~140°F)
Feuchtigkeit 10 %~90 % Betrieb, < 80 % Lagerung
Laser < 1 mW, Wellenlänge 630~670 nm, Laserprodukt Klasse II
Batterie 1 x 9 V-Batterie
Abmessungen 100 x 56 x 230 mm
Gewicht 290 g
Verwenden Sie dieses Gerät nur mit originellen Zubehörteilen. Velleman NV
übernimmt keine Haftung für Schaden oder Verletzungen bei (falscher)
Anwendung dieses Gerätes. Für mehr Informationen zu diesem Produkt, siehe
www.velleman.eu
00 (23/10/2008) 27 Velleman
. Alle Änderungen ohne vorherige Ankündigung vorbehalten.
®
 Loading...