

Page 1
User Manual
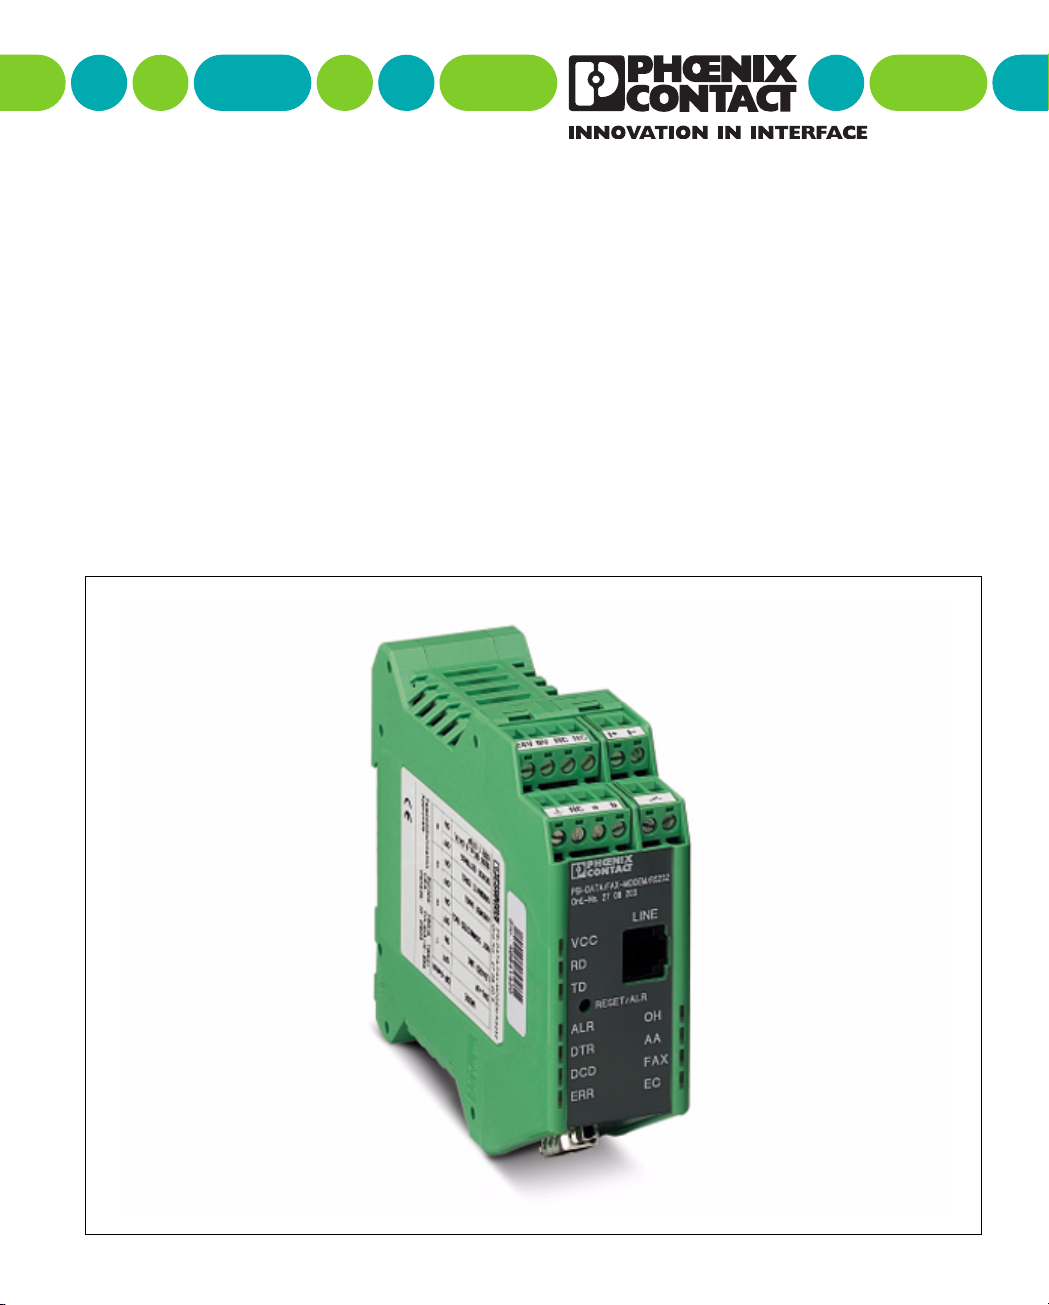
PSI-DATA/FAX-MODEM/RS232
Industrial Modem
Designation:
Order No.:
PSI-DATA/FAX-MODEM/RS232 UM E
26 99 35 4
Page 2

Page 3

User Manual
PSI-DATA/FAX-MODEM/RS232 Industrial Modem
Designation:
Revision:
Order No.:
This user manual is valid for:
PSI-DATA/FAX-MODEM/RS232 industrial modem (Order No. 27 08 20 3)
PSI-DATA/FAX-MODEM/RS232 UM E
02
26 99 35 4
© Phoenix Contact 12/2003
692302
Page 4

Page 5
Please Observe the Following Notes:
In order to ensure the safe use of your device, we recommend that you read this
manual carefully. The following notes provide information on how to use this
manual.
Requirements of the User Group
The use of products described in this manual is oriented exclusively to qualified
electricians or persons instructed by them, who are familiar with applicable national
standards. Phoenix Contact accepts no liability for erroneous handling or damage
to products from Phoenix Contact or third-party products resulting from disregard of
information contained in this manual.
Explanation of Symbols Used
The attention symbol refers to an operating procedure which, if not carefully
followed, could result in damage to hardware and software or personal injury
The note symbol informs you of conditions that must strictly be observed to achieve
error-free operation. It also gives you tips and advice on the efficient use of
hardware and on software optimization to save you extra work.
The text symbol refers to detailed sources of information (manuals, data sheets,
literature, etc.) on the subject matter, product, etc. This text also provides helpful
information for the orientation in the manual.
We Are Interested in Your Opinion
We are constantly attempting to improve the quality of our manuals.
Should you have any suggestions or recommendations for improvement of the
contents and layout of our manuals, we would appreciate it if you would send us
your comments. Please use the universal fax form at the end of the manual for this.
692302
Page 6

PSI-DATA/FAX-MODEM/RS232
Statement of Legal Authority
This manual, including all illustrations contained herein, is copyright protected. Use
of this manual by any third party deviating from the copyright provision is forbidden.
Reproduction, translation, or electronic and photographic archiving or alteration
requires the express written consent of Phoenix Contact. Violators are liable for
damages.
Phoenix Contact reserves the right to make any technical changes that serve the
purpose of technical progress.
Phoenix Contact reserves all rights in the case of patent award or listing of a
registered design. Third-party products are always named without reference to
patent rights. The existence of such rights shall not be excluded.
Windows 3.x, Windows 95, Windows 98, Windows 2000, Windows NT,
Windows ME, Windows XP, and MS-DOS are trademarks of the Microsoft
Corporation.
All other product names used are trademarks of the respective organizations.
Internet
Up-to-date information on Phoenix Contact products can be found on the Internet
at www.phoenixcontact.com
Industry Canada Terminal Equipment Technical Specifications
This equipment meets the applicable Industry Canada Terminal Equipment
Technical Specifications. This is confirmed by the registration number. The
abbreviation, IC, before the registration number signifies that registration was
performed based on a Declaration of Conformity indicating that Industry Canada
technical specifications were met. It does not imply that Industry Canada approved
the equipment.
The RINGER EQUIVALENCE NUMBER (REN) for this terminal equipment is 1.0.
The REN assigned to each terminal equipment provides an indication of the
maximum number of terminals allowed to be connected to a telephone interface.
The termination on an interface may consist of any combination of devices subject
only to the requirement that the sum of the Ringer Equivalence Numbers of all the
devices does not exceed five (5.0).
.
692302
Page 7

Table of Contents
1 PSI-DATA/FAX-MODEM/RS232 Industrial Modem .....................................................1-3
1.2 Application..............................................................................................1-4
1.3 Ordering Data......................................................................................... 1-5
1.3.1 Accessories ............................................................................1-5
1.4 Technical Data........................................................................................1-6
1.4.1 Supply ..................................................................................... 1-6
1.4.2 RS-232 Interface ..................................................................... 1-6
1.4.3 PSTN Port (a/b Line) .............................................................. 1-7
1.4.4 Switching Input and Output ..................................................... 1-8
1.4.5 Text and Telephone Number Memory .................................... 1-8
1.4.6 General Data ..........................................................................1-9
1.5 CE Conformity ...................................................................................... 1-10
2 Quick Installation of a Dial-up Connection....................................................................2-3
2.1 Hardware Installation.............................................................................. 2-3
2.1.1 Default Configuration ..............................................................2-3
2.1.2 Mounting .................................................................................2-4
2.1.3 RS-232 Interface ..................................................................... 2-5
2.1.4 Connecting the Telecommunications Cable ...........................2-6
2.1.5 Supply Voltage ........................................................................ 2-7
2.2 Software Installation ...............................................................................2-8
2.2.1 System Requirements ............................................................ 2-8
2.2.2 Driver Installation .................................................................... 2-9
692302 i
Page 8

Table of Contents
3 Hardware Installation.................................................................................................... 3-3
3.1 Structure................................................................................................. 3-3
3.2 Operating Elements................................................................................ 3-5
3.2.1 Connection Terminals ............................................................. 3-5
3.2.2 Connectors .............................................................................3-5
3.2.3 LEDs .......................................................................................3-6
3.2.4 Pushbutton ..............................................................................3-6
3.2.5 DIP Switches ..........................................................................3-7
3.3 Electrical Connections............................................................................ 3-8
3.3.1 Block Diagram ........................................................................3-9
3.3.2 RS-232 Interface ................................................................... 3-10
3.3.3 Telecommunications Cable .................................................. 3-12
3.3.4 Supply Voltage ...................................................................... 3-13
3.3.5 Switching Input .....................................................................3-13
3.3.6 Switching Output ................................................................... 3-13
4 Software Installation ..................................................................................................... 4-3
4.1 System Requirements ............................................................................ 4-3
4.1.1 Driver Installation .................................................................... 4-4
4.2 Configuration Software........................................................................... 4-7
4.2.1 Installation ...............................................................................4-7
4.2.2 Operation .............................................................................. 4-10
5 Special Functions ......................................................................................................... 5-3
5.1 Permanent Line ......................................................................................5-3
5.2 Alarm Inputs and Alarms........................................................................ 5-4
5.3 Password Protection............................................................................... 5-7
5.3.1 Selecting a Password .............................................................5-7
5.3.2 Disabling Password Protection ...............................................5-7
5.3.3 Password-Protected Call Back ............................................... 5-8
5.3.4 Dial In With Password Protection ...........................................5-8
5.4 Caller ID and Selective Call Acceptance................................................ 5-9
5.4.1 Caller ID Output ......................................................................5-9
5.4.2 Selective Call Acceptance ......................................................5-9
ii 692302
Page 9

PSI-DATA/FAX-MODEM/RS232
5.5 DTMF....................................................................................................5-10
5.5.1 DTMF Alarm .........................................................................5-10
5.5.2 DTMF Control ....................................................................... 5-11
5.6 ASCII to Fax Conversion......................................................................5-12
5.7 SMS in the Fixed-Line Network............................................................ 5-14
5.7.1 Sending SMS Messages ......................................................5-14
5.7.2 Receiving SMS Messages .................................................... 5-14
5.7.3 Control via SMS Messages ..................................................5-16
5.8 Setting a Partner Output.......................................................................5-17
5.8.1 Transmitting Local Inputs to the Partner Output ................... 5-17
5.8.2 Switching the Partner Output via AT Commands ................. 5-17
6 AT Commands..............................................................................................................6-3
6.1 Command Descriptions .......................................................................... 6-4
6.2 AT Commands for MNP and LAPM (V.42bis) ......................................6-15
6.3 V.250 Commands Implemented...........................................................6-20
6.4 S Registers........................................................................................... 6-21
6.5 Bell/CCITT Mode.................................................................................. 6-28
6.6 Modem Confirmations .......................................................................... 6-29
6.7 Processing the Break Character........................................................... 6-31
7 Configuration Help........................................................................................................ 7-3
7.1 Programming Connection for Phoenix Contact Controllers.................... 7-3
7.2 Programming Connection for Siemens S7 300/400............................... 7-5
692302 iii
Page 10

Table of Contents
iv 692302
Page 11

Section 1
This section provides information about
– The data for the industrial modem
PSI-DATA/FAX-MODEM/RS232 Industrial Modem .........................................................1-3
1.2 Application..............................................................................................1-4
1.3 Ordering Data......................................................................................... 1-5
1.3.1 Accessories .............................................................................1-5
1.4 Technical Data........................................................................................1-6
1.4.1 Supply......................................................................................1-6
1.4.2 RS-232 Interface...................................................................... 1-6
1.4.3 PSTN Port (a/b Line) ............................................................... 1-7
1.4.4 Switching Input and Output...................................................... 1-8
1.4.5 Text and Telephone Number Memory..................................... 1-8
1.4.6 General Data ...........................................................................1-9
1.5 CE Conformity ...................................................................................... 1-10
692302 1-1
Page 12

PSI-DATA/FAX-MODEM/RS232
1-2 692302
Page 13
PSI-DATA/FAX-MODEM/RS232 Industrial Modem
1 PSI-DATA/FAX-MODEM/RS232 Industrial Modem
1.1 Description
The PSI-DATA/FAX-MODEM/RS232 DIN-rail
mountable RS-232 modem is specifically designed to
meet industrial demands for remote monitoring. It
provides global access to machines and systems via
permanent and dial-up line connections according to
the V.34 standard. A wide range of security functions,
such as adjustable selective acceptance of calls,
connection establishment with password protection,
and call back function, protect the system against
unauthorized access. One particularly useful feature
for remote system monitoring is the configurable
warning or alarm input. If this input is activated, the
modem calls a user-defined number and sends a
stored text message by fax or SMS. To ensure errorfree operation even in harsh EMC conditions, the
device has high-quality 3-way isolation and integrated
surge voltage protection. The modem also features an
integrated automatic "Sleep" function to increase
battery life and an extremely wide supply voltage
range of 10 V to 60 V, making it suitable for universal
use. Modem startup is very easy using plug & play
and user-friendly configuration software. The modem
is approved for use in public telephone networks in
Europe, the USA, and Canada. Additional approvals
can be provided on request.
Should you have any technical questions, please
contact us:
PSM HOTLINE: +49 - 52 35 - 31 98 90
FAX: +49 - 52 35 - 31 98 99
E-mail: interface-service@phoenixcontact.com
– Can be used globally
– Password-protected access/call back function/
selective acceptance of calls
– Configurable input and output
– Alarm sent directly by SMS or fax via the
integrated switch input (or via AT commands)
– Sends, receives, and evaluates SMS messages
– Wide supply voltage range of 10 V to 60 V DC or
14 V to 40 V AC
– Current-saving "Sleep" mode
– High-quality 3-way isolation
(VCC//RS-232//PTSN)
– Integrated surge voltage protection
– Easy startup using P & P (plug & play) and
user-friendly configuration software
– 3964R-compatible
6 9 2 3 A 0 0 1
692302 1-3
Page 14
PSI-DATA/FAX-MODEM/RS232
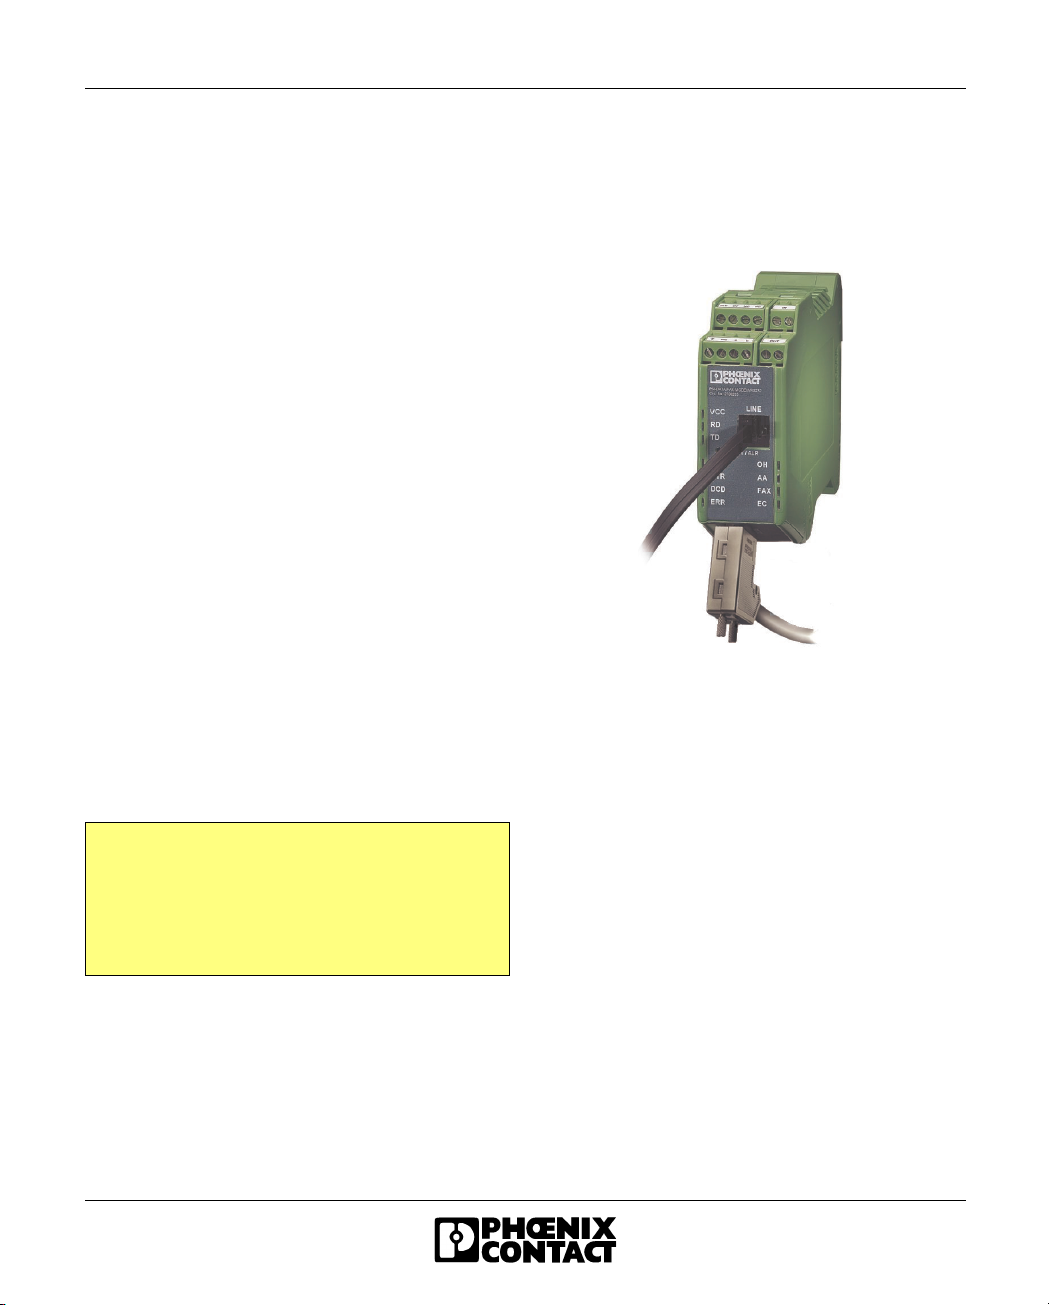
1.2 Application
The PSI-DATA/FAX-MODEM/RS232 modem can be
used universally throughout the world for all popular
modem applications in the following areas:
– Dial-up modem
– Fax modem
– Permanent line modem
– Remote monitoring of systems and machines
– Remote control
– Remote system diagnostics
– Production data acquisition
– Automatic alarm generation
This device has been approved for use in public
telephone networks in the following countries:
– Austria
– Belgium
– Canada
– Denmark
– Finland
– France
– Germany
– Great Britain
– Greece
– Italy
– Ireland
– Luxembourg
– The Netherlands
– Norway
– Portugal
– Spain
– Sweden
– Switzerland
– USA
Approvals for other countries are available on
request.
PS I -D A T A /F A X - M O D E M /R S 2 3 2
O rd .- N o . 2 7 0 8 2 0 3
L I N E
V C C
R D
T D
R E S E T / A L R
A L R
O H
D T R
D C D
E R R
R S 2 3 2
PS I -D A T A /F A X - M O D E M /R S 2 3 2
O rd .- N o . 2 7 0 8 2 0 3
V C C
R D
T D
R E S E T / A L R
A L R
D T R
D C D
E R R
R S 2 3 2
A A
F A X
E C
T e l e p h o n e
n e t w o r k
( P S T N )
L I N E
O H
A A
F A X
E C
PS I -D A T A /F A X - M O D E M /R S 2 3 2
O rd .- N o . 2 7 0 8 2 0 3
V C C
R D
T D
R E S E T / A L R
A L R
D T R
D C D
E R R
R S 2 3 2
Figure 1-1 Dial-up operation
PS I -D A T A /F A X - M O D E M /R S 2 3 2
O rd .- N o . 2 7 0 8 2 0 3
V C C
R D
T D
R E S E T / A LR
A L R
D T R
D C D
E R R
2 0 k m
L I N E
O H
A A
F A X
E C
R S 2 3 2
PS I -D A T A /F A X - M O D E M /R S 2 3 2
O rd .- N o. 2 7 0 8 2 0 3
V C C
R D
T D
R E S E T / A LR
A L R
D T R
D C D
E R R
R S 2 3 2
L I N E
O H
A A
F A X
E C
Figure 1-2 Permanent line operation
PS I -D A T A /F A X - M O D E M /R S 2 3 2
O rd .- N o . 2 7 0 8 2 0 3
L I N E
V C C
R D
T D
R E S E T / A L R
A L R
O H
D T R
A A
D C D
F A X
E R R
E C
R S 2 3 2
T e l e p h o n e
n e t w o r k
PS I -D A T A /F A X - M O D E M /R S 2 3 2
O rd .- N o . 2 7 0 8 2 0 3
V C C
R D
T D
R E S E T / A L R
A L R
D T R
D C D
E R R
L I N E
O H
A A
F A X
E C
R S 2 3 2
( P S T N )
Figure 1-3 Alarm generation
L I N E
O H
A A
F A X
E C
6 9 2 3 A 0 0 2
6 9 2 3 A 0 0 3
S M S
F A X
6 9 2 3 A 0 0 4
1-4 692302
Page 15

PSI-DATA/FAX-MODEM/RS232 Industrial Modem
1.3 Ordering Data
Analog modem, DIN-rail mountable, dial-up and
standard line operation in Europe, USA, and
Canada, RS-232 interface, 3-way isolation, alarm
input/output, 24 V AC/DC supply voltage
Scope of supply: modem, configuration software,
user manual on CD-ROM, RJ-12 cable
1.3.1 Accessories
Compact power supply,
primary switched, 24 V DC,
1 A, DIN-rail mountable, wide
range input
RS-232 cable, 2 m (6.56 ft.), to
connect the modem to a 9-pos.
device interface
RS-232 cable, 2 m (6.56 ft.), to
connect the modem to a
25-pos. device interface
D-SUB connector 9-pos., with
screw connection and cable
feed
85 - 264 V AC
(at 45 - 65 Hz)
90 - 350 V DC
SUB-D9/SUBD9
(female/female)
SUB-D9/SUBD25
(female/female)
Female
connector
Male connector
Type
PSI-DATA/FAX-MODEM/
RS232
MINI-PS-100-240AC/
24DC/1
PSM-KA-9SUB 9/BB/2
METER
PSM-KA-9SUB25/BB/2
METER
SUBCON 9/F-SH
SUBCON 9/M-SH
Order No.
27 08 20 3 1
29 38 84 0 1
27 99 47 4 1
27 61 05 9 1
27 61 49 9
27 61 50 9
Pcs.
pkt.
1
1
692302 1-5
Page 16

PSI-DATA/FAX-MODEM/RS232
1.4 Technical Data
1.4.1 Supply
Supply voltage
Frequency
Current Consumption
- Nominal operation
- Sleep mode (configurable via software)
Indicator
1.4.2 RS-232 Interface
Connection
Device type
Data format/encoding
Data flow check/protocol
Serial transmission rate
LED data indicator
Control signal indicator
10 V to 60 V DC or 16 V to 40 V AC via plug-in
COMBICON screw terminal block
DC or 50 Hz to 60 Hz
< 100 mA (at 24 V)
< 40 mA (at 24 V)
Green LED (VCC), steady light during operation,
flashes in sleep mode
9-pos. D-SUB male connector
DCE
Serial asynchronous UART/NRZ, 7/8 data, 1/2 stop,
1 parity, 10/11-bit character length
Software handshake Xon/Xoff, direct mode, hardware
handshake RTS/CTS or 3964R
Automatic data rate detection (default) or fixed setting
at 300, 1200, 2400, 4800, 9600, 19200, 38400, 57600,
115200 bps, adjustable via software
Green LED (TD)/yellow LED (RD), transmit/receive
data with reference to PSTN port, dynamic
Yellow LED DTR (Data Terminal Ready)
Yellow LED DCD (Carrier Detect)
1-6 692302
Page 17

1.4.3 PSTN Port (a/b Line)
PSI-DATA/FAX-MODEM/RS232 Industrial Modem
Connection
Shield
Operating modes
Dial-up method
Transmission rate
- DCE/DCE
- Fax
Compatibility
Fax compatibility
Instruction set compatibility
Error correction
Data compression
LED data indicator
Audible signaling
Operating diagnostics
Adaptive cable test
Telecommunications approvals
Hardware settings
RJ-12, 6-pos. or plug-in COMBICON screw terminal
block
DC coupled on DIN rail
Dial-up modem, 2-wire half/full duplex
Fax modem, 2-wire half duplex
Permanent line, 2-wire full duplex
Multi-frequency/pulse dial configurable via software
Automatic adjustment according to V.8
300 baud to 33.6 kbaud
2400 baud to 14.4 kbaud
ITU V.42bis, V.42, V.34 extended, ITU V.32bis, V.32,
V.21, V.22bis, V.22, V.23, Bell 212A, and 103,
ITU V.17, Group 3 T.4, T.30, and EIA TR-29
EIA TR-29 Class 2, CCITT V.17, Group 3, V.29, V27ter
AT standard instruction set and extended, V.250 basic
instruction set
V.42 (LAP-M or MNP 2 to 4)
V.42bis (throughput 4:1), MNP 5 (throughput 2:1)
Green LED (OH), off the hook
Yellow LED (AA), automatic answer (automatic call
acceptance), flashes during selective acceptance of
calls
Yellow LED (FAX) fax mode active
Yellow LED (EC) error correction in V.42 mode, flashes
when data compression is active
Integrated piezo
Power on selftest, visualization via LEDs (controller,
SRAM, EEPROM, DSP)
Dial tone test, pulse dial ring test via additional function
in configuration software
TBR21, TBR15, TIA/EIA/IS-968
for Europe, USA, and Canada
4-way DIP for dial-up and permanent line operation
(under removable cover)
692302 1-7
Page 18

PSI-DATA/FAX-MODEM/RS232
1.4.4 Switching Input and Output
Switching input U
Switching output Miniature switching relay 60 V/1 A, N/O contact,
Signaling Red LED (ALR), flashes when an SMS/FAX error
24 V DC/5 mA, input range 9...48 V DC,
Nom
electrically isolated.
Activates one or more of the following:
– A message on the local RS-232
– An SMS (only in dial-up operation)
– A fax (only in dial-up operation)
– Output control at the opposite station
activated by:
– Input control at the opposite station
– An SMS (only in dial-up line operation)
– A local AT command
– An AT command at the opposite station
message is to be sent,
Steady light when alarm has been triggered
Red LED (ERR), if alarm cannot be triggered
Reset (acknowledgment) through:
– SMS (remote)
– AT command (local + remote)
– Pushbutton (local)
1.4.5 Text and Telephone Number Memory
Text memory
SMS
Fax
Telephone number memory
1-8 692302
160 characters
253 characters, 30 kbytes
20 telephone numbers with a maximum of 36 digits
Page 19

1.4.6 General Data
PSI-DATA/FAX-MODEM/RS232 Industrial Modem
CE conformance
Approvals
Telecommunications approvals
Ambient operating temperature range during
operation
ME 35 housing
- Material
- Dimensions (H x W x D in mm (in.))
Weight of device
Functional earth ground
Vibration resistance
Shock test
- Operation
- Storage
Free fall
Degree of protection
3-way electrical isolation
Test voltage
EMC Directive 89/336/EEC
u (in preparation)
TBR21, TBR15, TIA/EIA/IS-968
for Europe, USA, and Canada
0°C to +55°C (+32°F to +131°F)
With 5 pos. bus contact and ground contact
ABS-V0, green
99 x 35 x 114.5 (3.898 x 1.378 x 4.508)
165 g
Functional earth ground to EN DIN rail in housing
5g according to DIN EN 60068-2-6,
1.5 h each in x, y, and z direction
According to IEC 60068-2-27
15g, 11 ms, half-sine shock pulse
30g, 11 ms, half-sine shock pulse
According to IEC 60068-2-32, 1 m (3.281 ft.)
IP20
Supply//PSTN//RS-232
1.5 kV AC, 50 Hz, 1 min. between all ground levels
according to EN 50178 and EN 61131-2
692302 1-9
Page 20

PSI-DATA/FAX-MODEM/RS232
c
1.5 CE Conformity
Conforms to the EMC Directive 89/336/EEC
EMC (Electromagnetic Compatibility)
Noise immunity according to EN 61000-6-2
- Electrostatic discharge (ESD)
- Electromagnetic HF field
Amplitude modulation
Pulse modulation
- Fast transients (burst)
Signal
Supply voltage
- Surge current loads (surge)
Signal
Supply voltage
- Conducted interference
- Noise emission according to EN 50081-2
EN 61000-4-2
EN 61000-4-3
EN 61000-4-4
EN 61000-4-5
EN 61000-4-6
EN 55022
Criterion B
8 kV air discharge
6 kV contact discharge
Criterion A
10 V/m
10 V/m
Criterion A
1 kV/5 kHz
2 kV/5 kHz
Criterion B
1 kV
2 kV
Criterion A
10 V
Limiting curve B
EN 61000 corresponds to IEC 1000
Criterion A: Normal operating characteristics within the specified limits.
Criterion B: Temporary adverse effects on the operating characteristics that the device corrects
independently.
1-10 692302
Page 21

Section 2
This section provides information about
– The data for the industrial modem
Quick Installation of a Dial-up Connection........................................................................ 2-3
2.1 Hardware Installation.............................................................................. 2-3
2.1.1 Default Configuration...............................................................2-3
2.1.2 Mounting..................................................................................2-4
2.1.3 RS-232 Interface...................................................................... 2-5
2.1.4 Connecting the Telecommunications Cable ............................2-6
2.1.5 Supply Voltage......................................................................... 2-7
2.2 Software Installation ...............................................................................2-8
2.2.1 System Requirements ............................................................. 2-8
2.2.2 Driver Installation.....................................................................2-9
692302 2-1
Page 22

PSI-DATA/FAX-MODEM/RS232
2-2 692302
Page 23

Quick Installation of a Dial-up Connection
2 Quick Installation of a Dial-up Connection
The quick startup guide only refers to a standard dial-up connection.
For the configuration of permanent line operation, please refer to Section 5.1,
"Permanent Line".
2.1 Hardware Installation
2.1.1 Default Configuration
The modem is preconfigured to dial-up line operation with automatic data rate
detection by default upon delivery, i.e., all DIP switches are set to "OFF".
692302 2-3
Page 24

PSI-DATA/FAX-MODEM/RS232
2.1.2 Mounting
Only mount and remove modules when the power supply is disconnected.
• Mount the modem on a 35 mm (1.378 in.) EN DIN rail (see Figure 2-1).
The DIN rail must be connected to PE to ensure reliable operation.
6 9 2 3 A 0 3 1
Figure 2-1 Mounting
2-4 692302
Page 25
Quick Installation of a Dial-up Connection
Electrical connection
Only qualified personnel may electrically connect, start up, and operate this
device. According to the safety instructions in this text, qualified personnel are
persons who are authorized to start up, to ground, and to mark devices, systems,
and equipment according to the standards of safety technology. In addition, these
persons must be familiar with all warning instructions and maintenance measures
in this text.
Disregarding this warning may result in damage to equipment and/or serious
personal injury.
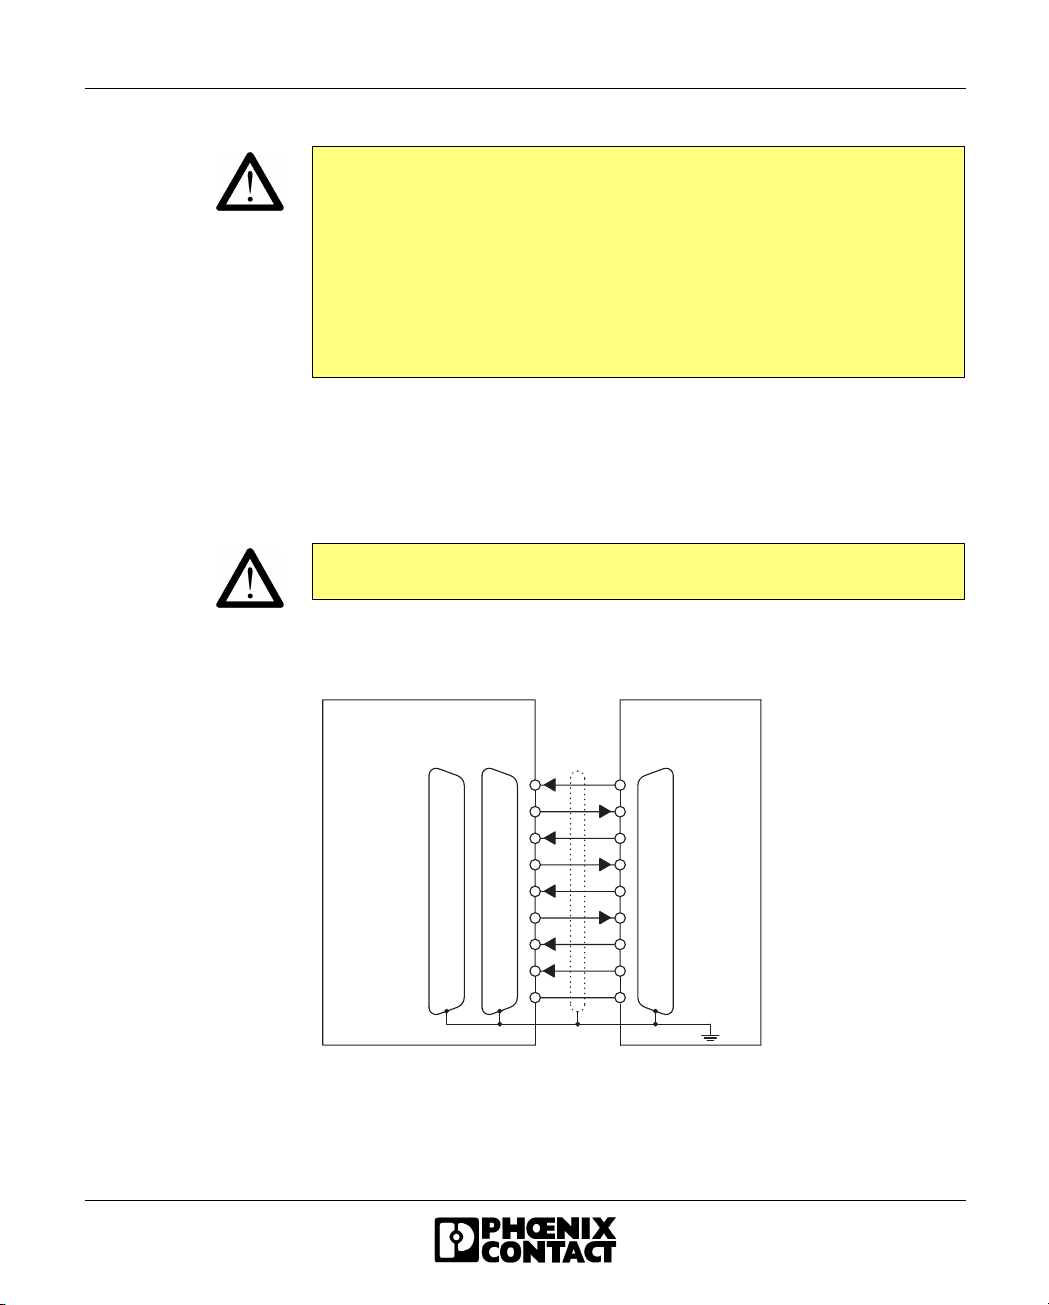
2.1.3 RS-232 Interface
The modem and the PC or another device are connected via the RS-232 cable
PSM-KA-9SUB 9/BB/2 METER (Order No. 27 99 47 4). The cable is an interface
cable with 1:1 connected contacts.
The modem must only be connected to devices which meet the requirements of
EN 60950 ("Safety of Information Technology Devices").
• Use this interface cable to connect the modem to a free COM interface on the
PC.
P C / P L C M o d e m
S U B D
2 5 9
D C D D C D
T x D
R x D
R T S
C T S
D T R
D S R
R I R I
G N D
M a x . 1 5 m
( 4 9 . 2 1 f t . )
S U B D 9
18 1
32 3
23 2
74 7
85 8
42 0 4
66 6
92 2 9
57 5
T x D
R x D
R T S
C T S
D T R
D S R
G N D
6 9 2 3 A 0 3 5
Figure 2-2 RS-232 interface
692302 2-5
Page 26
PSI-DATA/FAX-MODEM/RS232
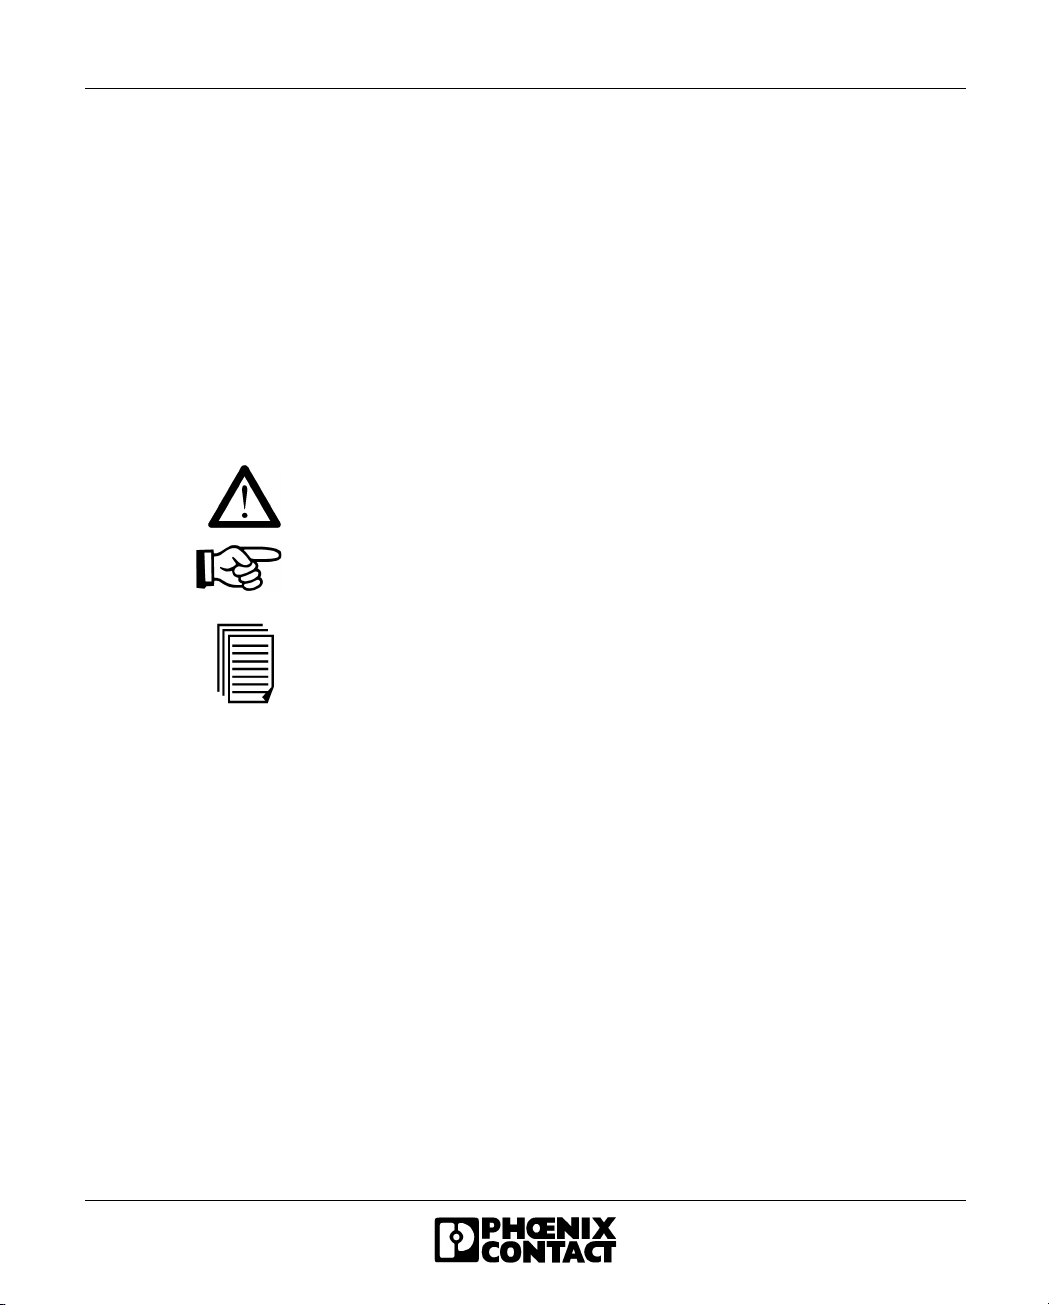
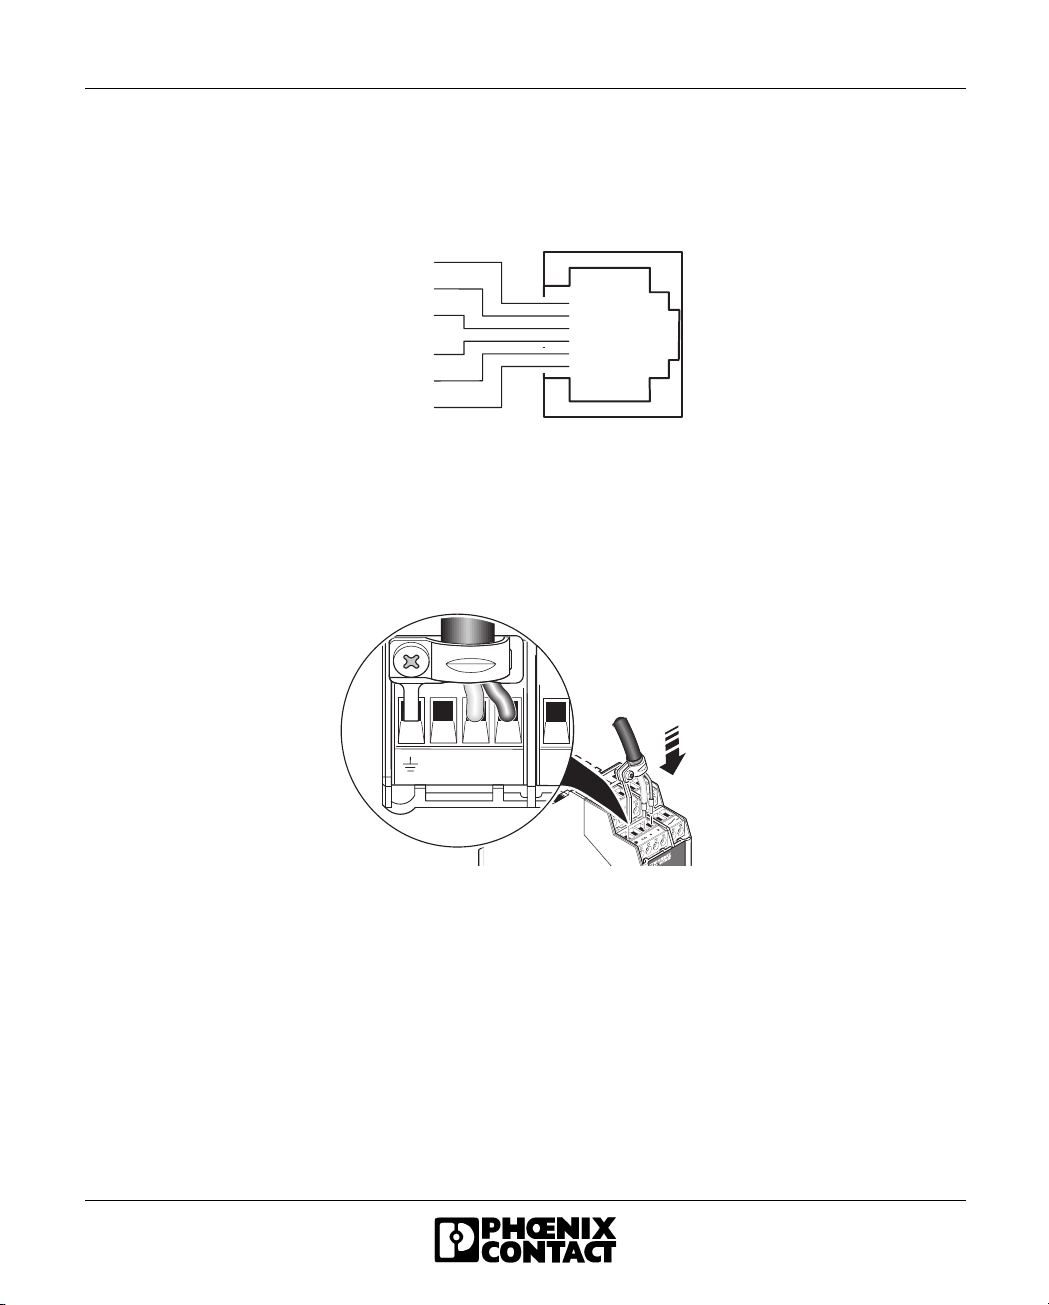
2.1.4 Connecting the Telecommunications Cable
RJ-12/RJ-11
connectors
Connect the telecommunications cable to an RJ-12/RJ-11 connector on the front of
the device. Signals "a" and "b" are assigned to the middle pins, 3 and 4.
R J - 1 2
R J 4 5
6 9 2 3 A 0 3 6
n . c .
b 2
b
a
T D
a 2
R D
n . c .
R D
n . c .
n . c .
T D
n . c .
n . c .
P i n 8
P i n 6
P i n 7
P i n 5
P i n 6
-
P i n 4
P i n 5
P i n 4
P i n 3
P i n 3
+
P i n 2
P i n 2
-
P i n 1
P i n 1
+
Figure 2-3 Connection using an RJ-12/RJ-11 connector
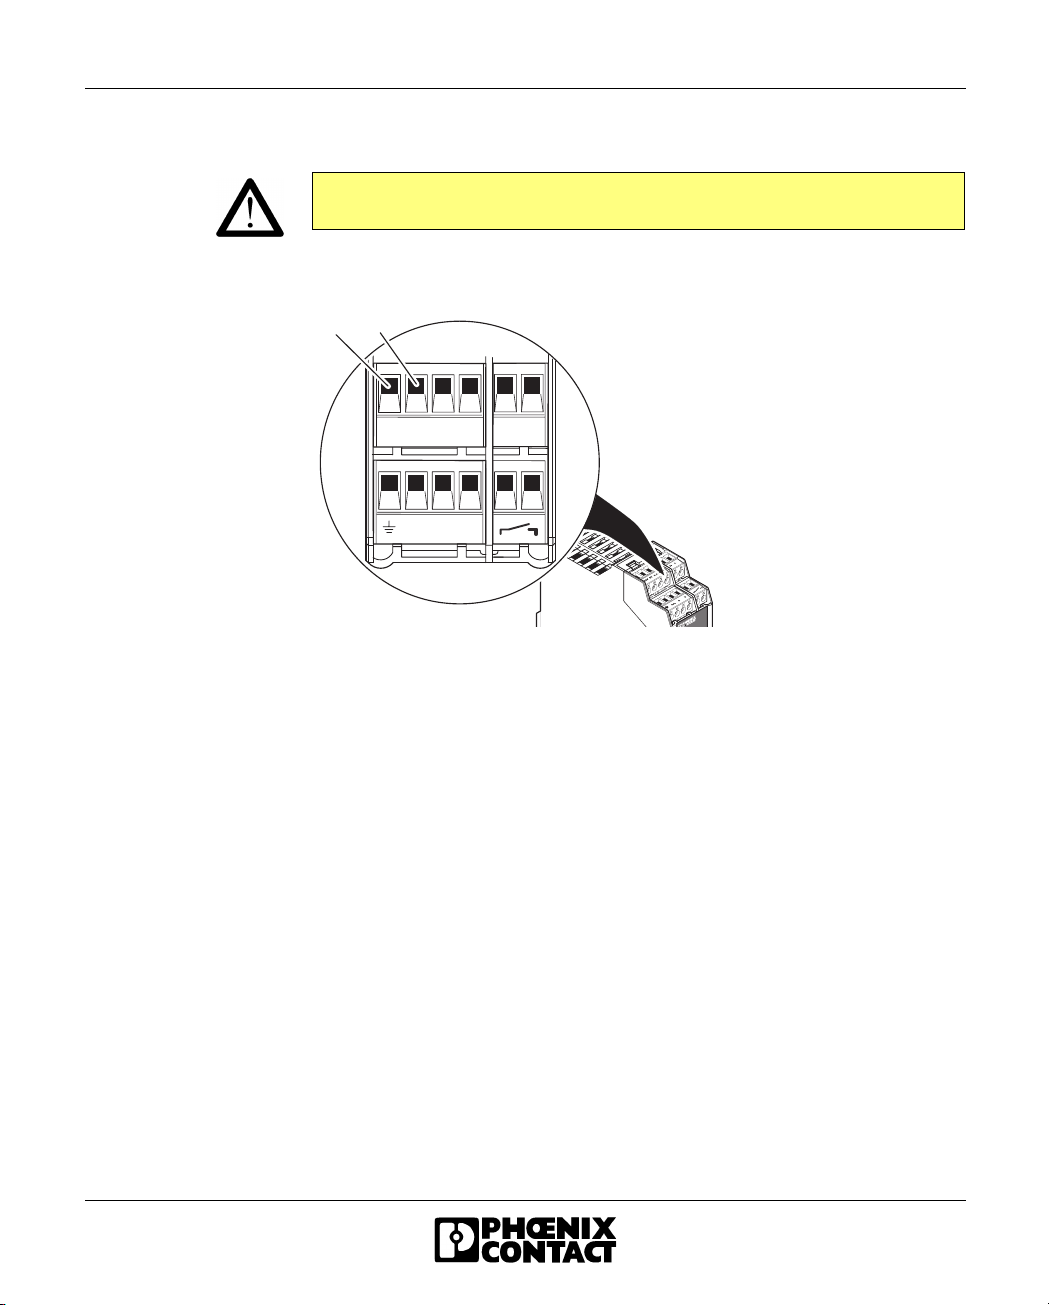
Screw terminal blocks Alternatively, the telecommunications cable can be connected via the plug-in screw
terminal blocks. You can also connect the cable shield using an ME shield clamp,
which can be ordered separately (Order No. 28 53 89 9).
n . c . a b
6 9 2 3 A 0 3 7
Figure 2-4 Connection using plug-in screw terminal blocks
2-6 692302
Page 27
Quick Installation of a Dial-up Connection
2.1.5 Supply Voltage
The PSI-DATA/FAX-MODEM/RS232 module is designed exclusively for SELV
operation according to IEC 60950/EN 60950/VDE 0805.
Connect the 24 V voltage supply to the "24V" and "0V" connection points on the
plug-in screw terminal block.
2 4 V 0 V
2 4 V 0 V n . c . n . c .
i + i -
n . c . a b
6 9 2 3 A 0 3 8
Figure 2-5 Connecting the supply voltage
As soon as the "VCC" LED lights up, the modem is ready for dial-up line operation.
692302 2-7
Page 28
PSI-DATA/FAX-MODEM/RS232
2.2 Software Installation
2.2.1 System Requirements
In principle, any device can be connected to the modem via a free RS-232 interface.
A terminal program, for example, can be used for configuration. More detailed
information can be found in later sections.
A PC with one of the following operating systems is required for the
PSI-MODEM-CONF configuration software and the plug & play function:
Windows 95, Windows 98, Windows ME, Windows NT4.0, Windows 2000 or
Windows XP.
Driver installation differs depending on the operating system. The following
description uses the example of Windows 2000. During installation, always follow
the on-screen instructions.
In the event of any messages indicating that the software does not have a digital
signature from Microsoft, please confirm with "Yes". This will not affect the
operation of the software or your PC in any way.
2-8 692302
Page 29
Quick Installation of a Dial-up Connection
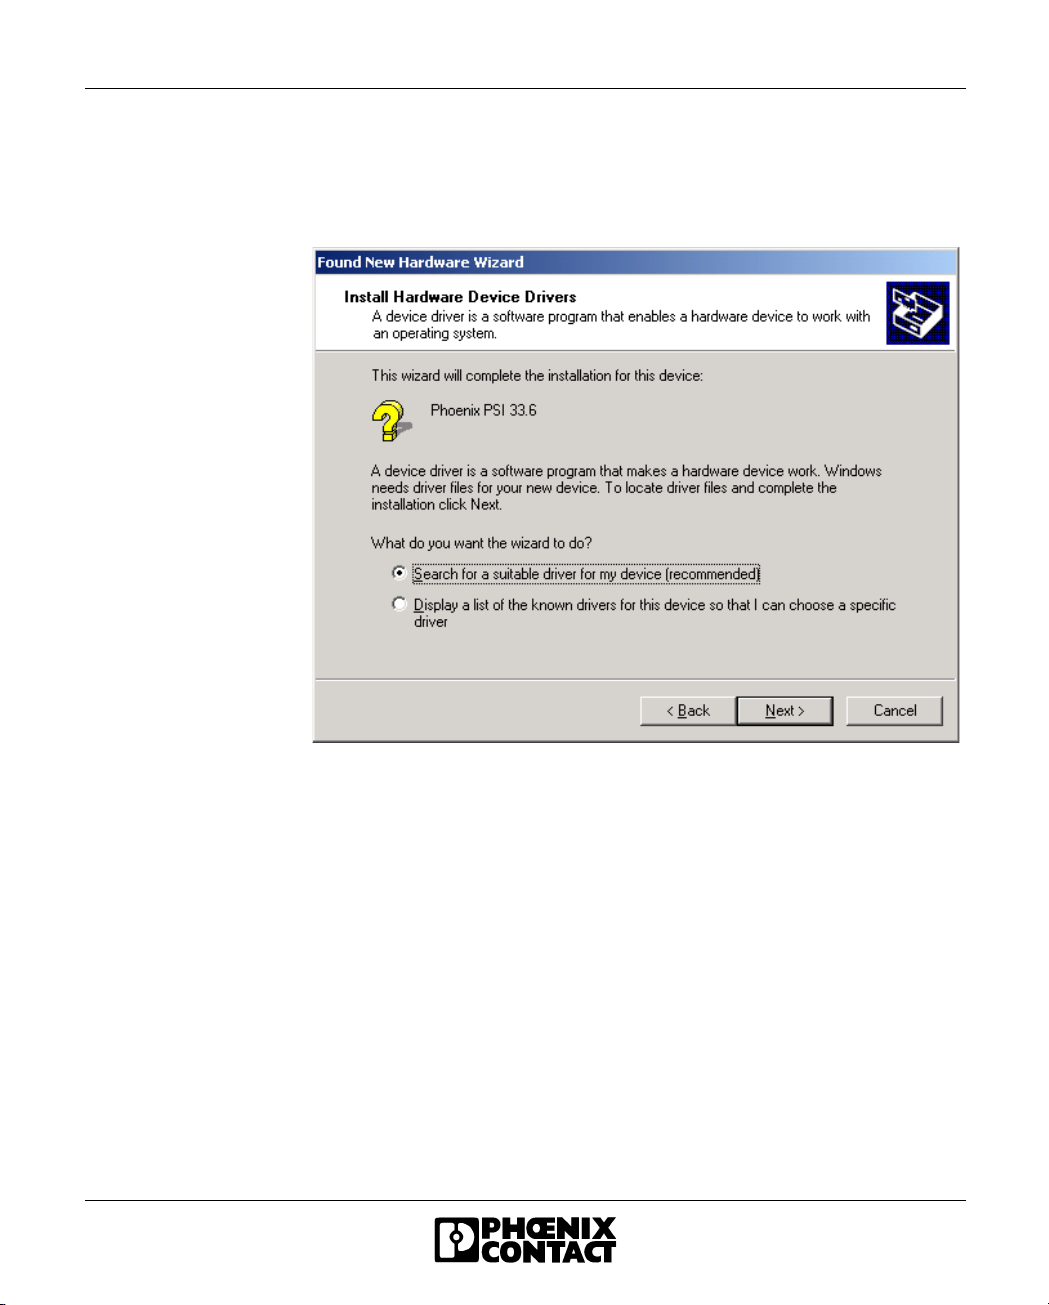
2.2.2 Driver Installation
• Connect the modem to the PC as described above and switch on the supply
voltage. After the PC is started the modem is automatically detected and the
driver can be installed:
• Select "Search for a suitable driver for my device (recommended)" and
click on "Next".
692302 2-9
Page 30
PSI-DATA/FAX-MODEM/RS232
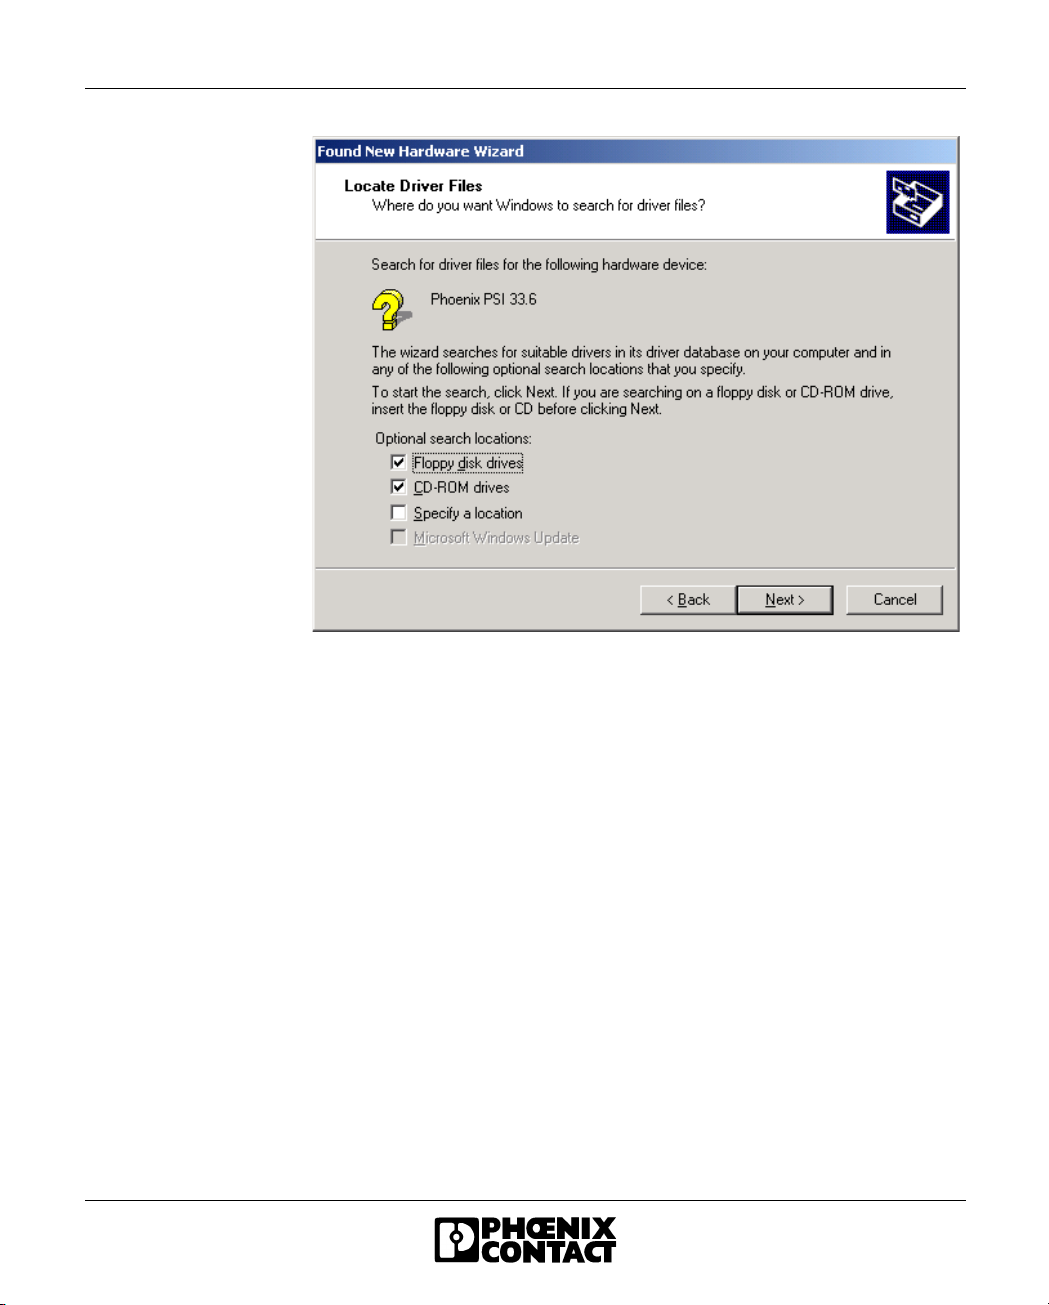
• Insert the CD-ROM provided into the drive and click on "Next".
2-10 692302
Page 31

Quick Installation of a Dial-up Connection
• Click on "Next" to confirm the selection.
• To complete the installation, click on "Finish".
The driver is now installed and the modem is available to application programs,
e.g., the data communications network.
692302 2-11
Page 32

PSI-DATA/FAX-MODEM/RS232
2-12 692302
Page 33

Section 3
This section provides information about
– The installation and connection of your modem
Hardware Installation ........................................................................................................ 3-3
3.1 Structure................................................................................................. 3-3
3.2 Operating Elements................................................................................ 3-5
3.2.1 Connection Terminals.............................................................. 3-5
3.2.2 Connectors .............................................................................. 3-5
3.2.3 LEDs ........................................................................................ 3-6
3.2.4 Pushbutton............................................................................... 3-6
3.2.5 DIP Switches ...........................................................................3-7
3.3 Electrical Connections............................................................................ 3-8
3.3.1 Block Diagram .........................................................................3-9
3.3.2 RS-232 Interface.................................................................... 3-10
3.3.3 Telecommunications Cable ................................................... 3-12
3.3.4 Supply Voltage....................................................................... 3-13
3.3.5 Switching Input ......................................................................3-13
3.3.6 Switching Output.................................................................... 3-13
692302 3-1
Page 34

PSI-DATA/FAX-MODEM/RS232
3-2 692302
Page 35

3 Hardware Installation
3.1 Structure
Housing Dimensions
Hardware Installation
1 1 4 . 5 m m
( 4 . 5 0 8 " )
9 9 m m
( 3 . 8 9 8 " )
3 5 m m
( 1 . 3 7 8 " )
P S I - D A T A / F A X - M O D E M / R S 2 3 2
O rd .- N o . 2 7 0 8 2 0 3
L I N E
V C C
R D
T D
R E S E T / A L R
A L R
O H
D T R
A A
D C D
F A X
E R R
E C
6 9 2 3 B 0 3 0
Figure 3-1 Housing dimensions
Only mount and remove modules when the power supply is disconnected.
• Mount the modem on a 35 mm (1.378 in.) EN DIN rail (see Figure 3-2 on
page 3-4).
The DIN rail must be connected to PE to ensure reliable operation.
692302 3-3
Page 36

PSI-DATA/FAX-MODEM/RS232
Figure 3-2 Mounting
6 9 2 3 A 0 3 1
3-4 692302
Page 37

3.2 Operating Elements
6
5
4
3
2
1
2 6
2 5
2 4
2 3
2 2
2 1
2 0
1 9
7
8
P S I - D A T A / F A X - M O D E M / R S 2 3 2
O r d . - N o . 2 7 0 8 2 0 3
L I N E
V C C
R D
T D
R E S E T / A L R
A L R
D T R
D C D
E R R
O H
A A
F A X
E C
9
1 0
1 1
1 2
1 3
1 4
1 5
1 6
1 7
Hardware Installation
1 8
6 9 2 3 A 0 3 2
Figure 3-3 Operating elements
3.2.1 Connection Terminals
1 Shield (telecommunications cable) 7 Not used
2 Not used 8 Not used
3 a (telecommunications cable a) 9 in+ (9 V to 48 V DC switching input)
4 b (telecommunications cable b) 10 in– (0 V switching input)
5 24 V supply (10 V to 60 V DC, 16 V to 40 V AC) 11 out (switching output, form A contact)
6 0 V supply (0 V) 12 out (switching output, form A contact)
3.2.2 Connectors
13 Line, RJ-12 (telecommunications cable)
18 RS-232 data interface, 9-pos. D-SUB
692302 3-5
Page 38

PSI-DATA/FAX-MODEM/RS232
3.2.3 LEDs
14 OH (Green) Off the hook
15 AA (Yellow) Automatic answer (automatic call acceptance), flashes during selective acceptance
of calls
16 FAX (Yellow) Fax mode
17 EC (Yellow) Error correction in V.42 mode, flashes during data compression
19 ERR (Red) Alarm message could not be sent
20 DCD (Yellow) Data carrier detected, connection established with partner
21 DTR (Yellow) Connected device is ready (e.g., PC or PLC)
22 ALR (Red) Alarm message was sent successfully, flashes when sending
24 TD (Green) Transmit data with reference to the PSTN (telecommunications) connection
25 RD (Yellow) Receive data with reference to the PSTN (telecommunications) connection
26 VCC (Green) Supply voltage present, flashes in "Sleep" mode
3.2.4 Pushbutton
23 RESET/ALR Reset alarm message
3-6 692302
Page 39

3.2.5 DIP Switches
Hardware Installation
1
2
6 9 2 3 A 0 3 3
Figure 3-4 DIP switches
The DIP switches (1) are located behind the cap (2) on the RS-232 interface.
• Insert a small screwdriver into the slot on the bottom of the cap and lever it
open.
DIP Switch Functions
All DIP switches are set to the "OFF" position by default (dial-up line operation).
Switch 1 is used to switch between dial-up line operation (OFF) and permanent line
operation (ON).
The modem cannot be read or configured in permanent line operation.
Switch 2 must be set to the "OFF" position.
The transmission speed is set to 7200 bps in the "ON" position. This transmission
speed is only used for a small number of special applications.
Switch 3 is only used for permanent line operation. In permanent line operation, a
modem must be set to "Originate Mode" (ON) and the partner must be set to
"Answer Mode" (OFF).
692302 3-7
Page 40

PSI-DATA/FAX-MODEM/RS232
Switch 4 is only used in the event of an emergency. If automatic baud rate
detection has been switched off and the device has been configured to a fixed baud
rate without echo and without confirmation, it is very difficult to detect this baud rate
setting.
• In this case, set switch 4 to "ON" and briefly disconnect the supply voltage. The
Table 3-1 DIP switch assignment
Mode DIP Switch
DIAL-UP OFF
LEASED LINE ON
DEVICE SETTINGS OFF
7200 BPS ON
ANSWER (ANS) OFF
ORIGINATE (ORG) ON
DEVICE SETTINGS OFF
19200 BPS; 8 DATA; ODD; 1 STOP ON
modem now starts with a fixed defined setting: 19200 bps, 8 data bits, odd
parity, 1 stop bit.
In normal operation this switch is set to "OFF", i.e., the device starts with the
last saved settings.
1
2
3
4
3.3 Electrical Connections
Electrical connection
Only qualified personnel may electrically connect, start up, and operate this
device. According to the safety instructions in this text, qualified personnel are
persons who are authorized to start up, to ground, and to mark devices, systems,
and equipment according to the standards of safety technology. In addition, these
persons must be familiar with all warning instructions and maintenance measures
in this text.
Disregarding this warning may result in damage to equipment and/or serious
personal injury.
3-8 692302
Page 41

4 x C O M B I C O N
0 V
2 4 V
3.3.1 Block Diagram
U
Hardware Installation
2 4 V
5 V
- +
B a c k p l a n e
E E P R O M
i n -
I n p u t O u t p u t
i n +
b
µ C
a
n . c .
P i n 2
P i n 3
P i n 4
P i n 5
P h o n e L i n e
R J 1 2
a 2
a
b
b 2
U
R e s e t
A L R
D 9 - S U B
1 D C D
3
T x D
2
R x D
7
R T S
8
C T S
6
D S R
4
D T R
9
R I
5
G N D
B a c k p l a n e
R S - 2 3 2
6 9 2 3 A 0 3 4
Figure 3-5 Block diagram
692302 3-9
Page 42

PSI-DATA/FAX-MODEM/RS232
3.3.2 RS-232 Interface
The modem and the PC or another device are connected via the RS-232 cable
PSM-KA-9SUB 9/BB/2 METER (Order No. 27 99 47 4). The cable is an interface
cable with 1:1 connected contacts.
• Use this interface cable to connect the modem to a free COM interface on the
PC.
In rare cases, when connecting a PLC or control system, DCE (Data
Communication Equipment) may be used instead of DTE (Data Terminal
Equipment), which is typical for a PC. If so, the following cables must be crossed
(null modem cable):
– TxD and RxD
– RTS and CTS
– DSR and DTR
If you do not know which type of interface is connected, you can determine the
connect configuration by testing (crossing cables).
Minimum configuration The minimum configuration only requires one connection for TxD, RxD, and GND
(software handshake).
This does not apply to the 3964R protocol for Phoenix Contact controller boards.
Only TxD, RxD, and GND are connected here, but no handshake protocol is
selected.
The modem must only be connected to devices which meet the requirements of
EN 60950 ("Safety of Information Technology Devices").
3-10 692302
Page 43

P C / P L C M o d e m
S U B D
2 5 9
M a x . 1 5 m
( 4 9 . 2 1 f t . )
S U B D 9
Hardware Installation
D C D D C D
T x D
R x D
R T S
C T S
D T R
D S R
R I R I
G N D
18 1
32 3
23 2
74 7
85 8
42 0 4
66 6
92 2 9
57 5
T x D
R x D
R T S
C T S
D T R
D S R
G N D
6 9 2 3 A 0 3 5
Figure 3-6 RS-232 interface
Table 3-2 Meaning of the terminal designations
Designation Meaning
DCD (Data Carrier Detect) Data carrier detected, connection
established
TxD (Transmit Data) Transmit data (refers to PC, PLC, etc.)
RxD (Receive Data) Receive data (refers to PC, PLC, etc.)
RTS (Request To Send) Request to send
CTS (Clear To Send) Clear to send
DTR (Data Terminal Ready) Ready (PC, PLC, etc.)
DSR (Data Set Ready) Ready (modem)
RI (Ring Indicator) Incoming call
GND (Signal Ground) Signal ground
692302 3-11
Page 44

PSI-DATA/FAX-MODEM/RS232
3.3.3 Telecommunications Cable
RJ-12/RJ-11
connectors
Connect the telecommunications cable to an RJ-12/RJ-11 connector on the front of
the device. Signals "a" and "b" are assigned to the middle pins, 3 and 4.
The signals for the optional connection of a telephone are fed back to terminals 2
and 5.
R J - 1 2
R J 4 5
6 9 2 3 A 0 3 6
n . c .
b 2
b
a
T D
a 2
R D
n . c .
R D
n . c .
n . c .
T D
n . c .
n . c .
P i n 8
P i n 6
P i n 7
P i n 5
P i n 6
-
P i n 4
P i n 5
P i n 4
P i n 3
P i n 3
+
P i n 2
P i n 2
-
P i n 1
P i n 1
+
Figure 3-7 Connection using an RJ-12/RJ-11 connector
Screw terminal blocks Alternatively, the telecommunications cable can be connected via the plug-in screw
terminal blocks. You can also connect the cable shield using an ME shield clamp,
which can be ordered separately (Order No. 28 53 89 9).
n . c . a b
6 9 2 3 A 0 3 7
Figure 3-8 Connection using plug-in screw terminal blocks
3-12 692302
Page 45

Hardware Installation
3.3.4 Supply Voltage
The PSI-DATA/FAX-MODEM/RS232 module is designed exclusively for SELV
operation according to IEC 60950/EN 60950/VDE 0805.
The supply voltage must be within the range of 10 V to 60 V DC or 16 V to 40 V AC
(50 - 60 Hz).
Connect the 24 V voltage supply to the "24V" and "0V" connection points on the
plug-in screw terminal block.
2 4 V 0 V
2 4 V 0 V n . c . n . c .
i + i -
n . c . a b
6 9 2 3 A 0 3 8
Figure 3-9 Connections
As soon as the "VCC" LED lights up, the modem is ready.
3.3.5 Switching Input
Table 3-3 Switching input on the plug-in screw terminal block
Connection Meaning
i+ (floating) 9 V to 48 V DC
i– 0 V
3.3.6 Switching Output
The switching output is a floating form A contact and is designed for 60 V/1 A. The
contact is connected to the plug-in screw terminal block marked with the form A
contact symbol (see Figure 3-9).
692302 3-13
Page 46

PSI-DATA/FAX-MODEM/RS232
3-14 692302
Page 47

Section 4
This section provides information about
– The installation of the configuration software
Software Installation ......................................................................................................... 4-3
4.1 System Requirements ............................................................................ 4-3
4.1.1 Driver Installation.....................................................................4-4
4.2 Configuration Software........................................................................... 4-7
4.2.1 Installation................................................................................ 4-7
4.2.2 Operation...............................................................................4-10
692302 4-1
Page 48

PSI-DATA/FAX-MODEM/RS232
4-2 692302
Page 49

4 Software Installation
4.1 System Requirements
In principle, any device can be connected to the modem via a free RS-232 interface.
A terminal program, for example, can be used for configuration. More detailed
information can be found in later sections.
A PC with one of the following operating systems is required for the plug & play
function:
Windows 95, Windows 98, Windows ME, Windows NT4.0, Windows 2000 or
Windows XP.
Driver installation differs depending on the operating system. The following
description uses the example of Windows 2000. During installation, always follow
the on-screen instructions.
In the event of any messages indicating that the software does not have a digital
signature from Microsoft, please confirm with "Yes". This will not affect the
operation of the software or your PC in any way.
Software Installation
692302 4-3
Page 50

PSI-DATA/FAX-MODEM/RS232
4.1.1 Driver Installation
• Connect the modem to the PC as described above and switch on the supply
voltage. After the PC is started the modem is automatically detected and the
driver can be installed:
• Select "Search for a suitable driver for my device (recommended)" and
click on "Next".
4-4 692302
Page 51

Software Installation
• Insert the CD-ROM provided into the drive and click on "Next".
692302 4-5
Page 52

PSI-DATA/FAX-MODEM/RS232
• Click on "Next" to confirm the selection.
• To complete the installation, click on "Finish".
The driver is now installed and the modem is available to application programs,
e.g., the data communications network.
4-6 692302
Page 53

Starting installation
Software Installation
4.2 Configuration Software
The PSI-MODEM-CONF software is used to configure the
PSI-DATA/FAX-MODEM/RS232. Your modem has more functions than can be
mapped in the configuration software. To use these functions, enter additional AT
commands in the "Additional Settings" field (see page 4-19). The AT commands
and their meanings are described in Section "Command Descriptions" on page 6-4.
4.2.1 Installation
• Insert the CD-ROM labeled "PSI-MODEM-CONF" into the CD-ROM drive on
your PC.
• Use the Windows Explorer to start the "Setup_Vx.x.xxx(EN).exe" file located in
the "...:\PSI-CONF" directory.
• Close all other applications and click on "Next".
692302 4-7
Page 54

PSI-DATA/FAX-MODEM/RS232
Accepting the terms of
the license agreement
• Read the terms of the software license agreement thoroughly and click on
You may now select a specific installation folder.
The default setting is "C:\Program Files\PSI-MODEM-CONF".
"Yes" to accept them.
Selecting an
installation folder
• If necessary, select a different folder and click on "Next".
4-8 692302
Page 55

Start copying
Finishing installation
Software Installation
• Click on "Next" to start copying the files. This may take a few seconds
depending on the system.
• Exit setup by clicking on "Finish".
692302 4-9
Page 56

PSI-DATA/FAX-MODEM/RS232
4.2.2 Operation
After installation, you will find the following icon on your desktop:
Starting the software Double-click on this icon to start the PSI-MODEM-CONF configuration software.
Figure 4-1 PSI-MODEM-CONF configuration software
4-10 692302
Page 57

Software Installation
Configuring the
interface
First, you must configure the interface.
• Select the "RS-232" function from the "Options" menu.
• Select the interface to which your modem is connected.
• Adjust the parameters according to your application requirements.
• Save the settings by confirming with "OK".
• Click on the "Write" button to write the settings to the modem.
692302 4-11
Page 58

PSI-DATA/FAX-MODEM/RS232
• Click on the "Read" button to read data from the connected modem.
The software displays the type and version of the firmware, and the serial number
of the modem.
You now have the option of assigning various functions to the integrated modem
switching input.
4-12 692302
Page 59

Software Installation
SMS
For this function the modem requires a service provider that supports SMS in the
fixed-line network. The modem is preset to "Deutsche Telekom". A description of
how to set up other service providers appears on page 4-20.
• Select the "SMS" checkbox to activate the SMS function.
• Enter the telephone number of the SMS receiver in the white "Number" field.
• Write your message in the "SMS Messages" field. The text must not exceed
160 characters.
• Click on the "Write" button to write the settings to the modem.
• To send the SMS message, activate the modem switching input (see Section
"Switching Input" on page 3-13).
692302 4-13
Page 60

PSI-DATA/FAX-MODEM/RS232
Fax
• To activate the fax function select the "Fax" checkbox.
• Enter the telephone number of the fax receiver in the white "Number" field.
• Write your message in the "Fax Message" field. The text must not exceed
253 characters.
• Click on the "Write" button to write the settings to the modem.
• To send the fax message, activate the modem switching input (see Section
"Switching Input" on page 3-13).
You can send fax and SMS messages simultaneously.
4-14 692302
Page 61

Software Installation
Switching Output
For this function, the partner modem must be a "PSI-DATA/FAX-MODEM/RS232"
modem.
• To activate the switching output function select the "Output" checkbox.
• Enter the telephone number of the partner in the white "Number" field.
If you wish to use the devices in permanent line operation, you can enter any
telephone number.
• Enter the password for the partner in the "Password" field, as the partner
switching output is password-protected.
692302 4-15
Page 62

PSI-DATA/FAX-MODEM/RS232
• Specify the modem mode:
– In "Set" mode the modem responds to a positive edge on the local input by
– In "Follow" mode the modem responds to a positive edge on the local input by
• Click on the "Write" button to write the settings to the modem.
Line Test
The "Line Test" function can be used to check that the telecommunications cable is
connected correctly.
• Click on the "Line Test" button to start the line test.
calling the partner and setting the partner output. This output can be reset by
an AT command (local or remote), an SMS, the integrated pushbutton or by
briefly disconnecting the supply voltage.
calling the partner and setting the partner output. This output can be reset by a
falling edge on the same input and by calling the partner again.
The result of the line test is displayed on-screen.
The telecommunications cable is connected
correctly.
Please check the telecommunications cable (see
Section "Telecommunications Cable" on page 3-12).
4-16 692302
Page 63

File Functions
Creates a new project file with the default settings.
Opens a saved project file.
Saves the current settings.
Profile Settings
Click on the "Settings" button .
This opens the "Profile settings" window.
Software Installation
Figure 4-2 "Profile settings" window
692302 4-17
Page 64

PSI-DATA/FAX-MODEM/RS232
Echo If the echo is on, all characters sent by the PC in command mode are sent back by
the modem. The characters can thus be displayed on-screen on the PC.
DCD Signal When the partner carrier detect signal is detected, the RS-232 interface activates
the DCD signal (Data Carrier Detect). Alternatively, this signal can also be
permanently switched on.
DSR Signal The DSR signal (Data Set Ready) of the RS-232 interface can be permanently
switched on or switched off in command mode.
DTR Signal Your modem can process the DTR signal (Data Terminal Ready) as follows:
– The modem returns to command mode if there is no DTR signal at the RS-232
interface.
– The modem hangs up and returns to command mode if there is no DTR signal
at the RS-232 interface.
– The modem hangs up, is reset, and returns to command mode if there is no
DTR signal at the RS-232 interface.
– The modem ignores the DTR signal. This may be necessary when using a
PLC, as the RS-232 interface of a PLC is often unable to provide a DTR signal.
Flow Control The data flow control of the RS-232 interface can be set for various operating
modes:
– For the "Hardware" setting, the CTS and RTS signals are used for a
bidirectional data flow control.
– For the "Software" setting, the data flow control is bidirectional using XON and
XOFF characters.
– In "XON/XOFF Unidirect" mode, the XON character is sent to the PC (DTE) to
start data transmission and the XOFF character is sent to stop data
transmission. The PSI-DATA/FAX-MODEM/RS232 ignores XON and XOFF
characters sent by the PC.
– Data flow control can also be switched off completely. This may be necessary
when protocols such as 3964R are transmitted, which control the flow
independently.
Compression Data compression on the telecommunications cable results in increased data
throughput.
Modulation Method You can specify the transmission method of your modem (default: CCITT).
Table 6-1 on page 6-28 shows how the various settings work.
4-18 692302
Page 65

Software Installation
Result Codes Your modem is configured so that it outputs alphanumeric responses on-screen.
The "Numeric" option can be used if your software package or PLC only supports
numeric confirmations. The relevant settings can be found in Table 6-2 on
page 6-29.
Auto Answer Auto Answer (automatic call acceptance) enables you to specify the number of
rings after which your modem can automatically respond to incoming calls.
Automatic call acceptance is switched off by default upon delivery. Active automatic
call acceptance is indicated by the yellow "AA" (Automatic Answer) LED.
This LED flashes in the event of an incoming call, regardless of automatic call
acceptance.
Dial Tone Detection When dial tone detection is switched on the modem waits for the dial tone before
dialing. Dial tone detection should be switched off in an private branch exchange.
Country Code Select the country where you wish to use your PSI-DATA/FAX-MODEM/RS232. If
your country is not listed, select Europe (CTR21) or the USA.
Speaker The internal speaker can be switched off, always on or only switched on when
establishing a connection.
Additional Settings Your modem has more functions than can be mapped in the configuration software.
To use these functions, enter additional AT commands in the "Additional Settings"
field.
The AT commands and their meanings are described in Section "Command
Descriptions" on page 6-4.
Example: Entering L3 increases the speaker volume.
Additional settings can be saved in the project file via the "Save" button. However,
the are not read from the modem by the configuration software.
692302 4-19
Page 66

PSI-DATA/FAX-MODEM/RS232
SMS Mode When SMS mode is disabled, you can only send SMS messages. In addition, your
service provider must support "SMS in the fixed-line network" (see Section "SMS in
the Fixed-Line Network" on page 5-14).
When SMS mode is enabled, SMS messages received are output to the RS-232
interface. To receive SMS messages, this feature must be supported and enabled
by your SMS provider. In addition, check that the caller ID (CLIP) is transmitted as
far as the modem (usually a problem for many older private branch exchanges).
Enabling SMS receipt using Deutsche Telekom as an example:
• Send an SMS with the text "ANMELD" to telephone number 8888.
• You can log off by sending the text "ABMELD" to telephone number 8888.
In control mode the PSI-DATA/FAX-MODEM/RS232 can be controlled via SMS
messages. For example, you can activate the output, reset the alarm or send the
status of the modem simply by sending an SMS message. In this mode, the SMS
message is not forwarded to the termination equipment, but is evaluated by the
modem itself. The SMS message sent to the modem must be structured as follows:
#<Password>:<Command>
The password is the password stored in the modem (maximum of seven
characters). Please note that not all characters can be sent in the SMS message.
Choose a password according to the SMS character set. If the password is,
e.g., 12345, the message should appear as follows:
#12345:<Command>
The following control commands are available:
RESET Resets the alarm and the switching output
(e.g., AT*AR).
SET:OUTPUT Activates the switching output ("Output").
CLR:OUTPUT Deactivates the switching output ("Output").
SEND:STATUS Sends a status SMS message to the caller.
"Text" Outputs all the characters within the inverted commas
to the RS-232 interface.
Examples #12345:SET:OUTPUT Activates the output.
#12345:SEND:STATUS Sends an SMS message (status report) to the sender.
#12345:"RST PLC" Sends the text RST PLC to the terminal equipment
(RS-232 interface).
#12345:RESET Resets the alarm function and the switching output.
4-20 692302
Page 67

Software Installation
SMS Provider The number for the SMS provider must be stored in the modem memory. It is set to
Deutsche Telekom by default.
• Select your provider from the list. If your provider is not listed, select "No
Provider" and enter the telephone number of your provider in the "Additional
Settings" field as follows:
&Z20=<Number>
Example for Deutsche Telekom: &Z20=01930100
The number saved manually (&Z20) cannot be read by the configuration
software. Therefore save the profile on the PC and reuse it for the next
initialization.
If your modem is used in a private branch exchange, you can prefix the number for
your service provider with the number for dialing an outside line.
Example: 0,
(The comma represents a short pause.)
The field in front of the service provider name can also be used to enter a call-by-
call number. This is required, e.g., if your service provider does not support SMS in
the fixed-line network. In most telephone networks you then have the option of
selecting a different service provider.
Example for Deutsche Telekom: 01033
Store Numbers You can store ten telephone numbers in Store Numbers 0 through 9, which can be
used as a speed dial memory. The use of stored telephone numbers with the DS=n
command is described on page 6-6.
Store Number 0 has additional special functions. This telephone number is used for
password-protected call back. For a description of the call back function, please
refer to Section "Password Protection" on page 5-7. In addition, this number can
also be used for automatic dialing.
Example: %P1 in the "Additional Settings" field
If the DTR signal is now activated at the RS-232 interface, the modem automatically
dials the number in Store Number 0.
If the modem is configured to "Ignore DTR Signal", the modem dials the phone
number in Store Number 0 as soon as it is powered up.
692302 4-21
Page 68

PSI-DATA/FAX-MODEM/RS232
Caller ID Mode Caller ID or CLIP (Calling Line Identification Presentation) is the transmission of the
caller’s telephone number. If this function is enabled at your analog connection, the
PSI-DATA/FAX-MODEM/RS232 can detect, output, and evaluate the caller ID.
When the caller ID output function is activated in the PSI-DATA/FAX-MODEM/
RS232, the caller ID, e.g., for Deutsche Telekom is transmitted after the first ring,
i.e., the modem does not accept the call until after the second ring. The caller ID is
then detected by the PSI-DATA/FAX-MODEM/RS232 and output to the RS-232
interface as follows:
<CRLF>RING<CRLF>
CLIP:0401234…<CRLF>
<CRLF>RING<CRLF>
A telephone number is only then output if a valid caller ID has been detected. It is
only output once for each call.
Selective Call Acceptance
If "Selective Answer" is selected, the PSI-DATA/FAX-MODEM/RS232
automatically checks whether, e.g., the service PC is calling the modem and
establishes a connection. Up to two telephone numbers can be stored in the device,
which the modem compares and automatically establishes a connection if they
match. The fields Caller ID 1 and Caller ID 2 are reserved for this function.
If these numbers are stored in these fields and "Selective Answer" is enabled, the
PSI-DATA/FAX-MODEM/RS232 checks each call to see whether one of the saved
numbers has been called. If so, the modem accepts the call and establishes a
connection, regardless of the settings for automatic call acceptance. Your control
system therefore does not have to evaluate the caller ID and the modem makes
sure that the service numbers (Caller ID 1 and Caller ID 2) reach your system, even
without a call back function.
The telephone number evaluation function has a filter function, which also enables
partial evaluation of the telephone number. The evaluation starts with the last digit
and is carried out for each stored digit. If, for example, from the telephone number
0123456789 only the digits 56789 have been stored, all telephone numbers that
end with these digits are classed as valid. The number of preceding digits is of no
importance. The advantage of this is that various formats (e.g., +49 40 xxxxx and
040 xxxxx) can be evaluated.
The "AA" LED flashes to indicate that this mode is active. The call is only accepted
if the stored numbers match. The caller ID is also output.
Password Enter your password here.
4-22 692302
Page 69

Software Installation
• Click on the "Write" button to write the settings to the modem once they
have all been entered.
692302 4-23
Page 70

PSI-DATA/FAX-MODEM/RS232
4-24 692302
Page 71

Section 5
This section provides information about
– The additional functions of your modem
Special Functions ............................................................................................................. 5-3
5.1 Permanent Line ......................................................................................5-3
5.2 Alarm Inputs and Alarms........................................................................ 5-4
5.3 Password Protection............................................................................... 5-7
5.3.1 Selecting a Password .............................................................. 5-7
5.3.2 Disabling Password Protection ................................................5-7
5.3.3 Password-Protected Call Back ................................................ 5-8
5.3.4 Dial In With Password Protection ............................................5-8
5.4 Caller ID and Selective Call Acceptance................................................ 5-9
5.4.1 Caller ID Output....................................................................... 5-9
5.4.2 Selective Call Acceptance .......................................................5-9
5.5 DTMF....................................................................................................5-10
5.5.1 DTMF Alarm ..........................................................................5-10
5.5.2 DTMF Control ........................................................................ 5-11
5.6 ASCII to Fax Conversion......................................................................5-12
5.7 SMS in the Fixed-Line Network............................................................ 5-14
5.7.1 Sending SMS Messages .......................................................5-14
5.7.2 Receiving SMS Messages..................................................... 5-14
5.7.3 Control via SMS Messages ...................................................5-16
5.8 Setting a Partner Output.......................................................................5-17
5.8.1 Transmitting Local Inputs to the Partner Output .................... 5-17
5.8.2 Switching the Partner Output via AT Commands .................. 5-17
692302 5-1
Page 72

PSI-DATA/FAX-MODEM/RS232
5-2 692302
Page 73

5 Special Functions
5.1 Permanent Line
The PSI-DATA/FAX-MODEM/RS232 modem supports 2-wire permanent line
operation.
– DIP switches for master/slave selection
– Up to 33600 bps/115200 bps (bidirectional, full duplex)
– Automatic connection/continuous line monitoring
– TBR15 approval
– Transmission via its own telephone cable (2-wire) over a distance of up to
20 km (12.43 mi.)
The device is approved for 2-wire permanent lines according to TBR15, i.e., you
can rent a permanent line for a service provider (e.g., Deutsche Telekom) or use
your own private 2-wire line to then establish a point-to-point connection via this
line.
Setting Permanent Line Operation
The settings for permanent line operation, e.g., data save and choice of
transmission speed must first be set and saved with the AT&W command, as the
modem cannot be parameterized in permanent line operation via the RS-232
interface.
Special Functions
DIP Switches
DIP switch 3 should be set first to specify which modem should operate in
"Originate Mode" (ORG) and which modem should operate in "Answer Mode"
(ANS). One of the modems should be set to ORG mode and the partner modem
should be set to ANS mode.
• Set DIP switch 3 to the desired mode:
DIP 3 = OFF ANS mode
DIP 3 = ON ORG mode
Permanent line operation is configured via DIP switch 1.
• Set DIP switch 1 to the "ON" position.
As soon as the power is switched on, the PSI-DATA/FAX-MODEM/RS232 starts
automatic permanent line operation and establishes a connection with the partner.
692302 5-3
Page 74

PSI-DATA/FAX-MODEM/RS232
5.2 Alarm Inputs and Alarms
The PSI-DATA/FAX-MODEM/RS232 modem has one electrically isolated input
and one electrically isolated output. Alarm functions can be assigned to the input,
i.e., SMS and/or fax messages can be automatically sent by activating the input
and/or the output of a partner can be activated.
The control system is configured using AT commands (see Section
"AT Commands" on page 6-3).
Configuring the Input
– Command: AT*A1<CR>
Configure the modem via the following menu items:
CONFIG INPUT 1
SMS (Y/N) Y
FAX (Y/N) Y
OUT (Y/N) Y
If you activate the SMS function with Y, you are prompted to enter the destination
number and the text (160 characters maximum) for the SMS message. End the text
entry with ^Z (Ctrl+Z).
Example for an SMS NUMBER <;>TEXT…<^Z>: 0160123456789;Alarm at input 1 pump failure^Z
If you do not wish to send an SMS or fax message during configuration, enter N.
You then do not have the option of entering the SMS or fax message.
Press "ESC" to cancel an entry. This may take a moment, as all messages have to
be reformatted and then saved.
The number must end with ;. In the fax text, <CR> is the code for a line break, the
ASC text is exited via Ctrl+Z. The maximum line length of 60 characters must not
be exceeded.
Example for a fax NUMBER <;>TEXT…<^Z>: 040999888777;<CR>
JohnDoe<CR>
615N10thStreet<CR>
RichmondVA12345-0123<CR>
<CR>
ALARM MESSAGE
<CR>
Heating failure - pump faulty <^Z>
5-4 692302
Page 75

Special Functions
The number and the password for the partner must be entered for the OUT
configuration. The option can be set to "0" or "1":
Option 0 Set
The partner output is set by activating the local input
Option 1 Follow
The partner output follows the local input. A new call must be made
each time the input changes. Sleep/Power Down mode is disabled in
this mode.
Example for OUT NUMBER <;>PASSWORD<;>OPTION<^Z>: 040999888777;QWERT;0^Z
– AT*A1? command
The AT*A1? command can be used to view the specified configuration again.
Examples AT*A1?<CR>
CONFIG INPUT 1
SMS (Y/N) Y
FAX (Y/N) Y
OUT (Y/N) Y
– SMS (SMS function):
NUMBER <CR>TEXT…<^Z>: 0160123456789<CRLF>Alarm at input 1 pump
failure
– FAX (fax function):
NUMBER <CR>TEXT…<^Z>: 040999888777;<CRLF>
JohnDoe<CRLF>
615N10thStreet<CRLF>
RichmondVA12345-0123<CRLF>
<CRLF>
ALARM MESSAGE
<CRLF>
Heating failure - pump faulty <CRLF>
– OUT (set partner output):
NUMBER <CR>PASSWORD:01291212<CRLF>
QWERT<CRLF>
OPTION:0<CRLF>
When AT*A1?<CR> messages are requested, <CR> is replaced with <CRLF> in
the text. This improves the message display in a terminal program.
692302 5-5
Page 76

PSI-DATA/FAX-MODEM/RS232
Alarm at the Input:
In the event of an alarm at input 1, the alarm message "INPUT 1 ACTIVE" is first
sent to the local RS-232 interface. The configured messages are then sent with the
following priority:
1. Set output
2. SMS message
3. Fax message
The "ALR" LED starts flashing and does not enter the ON state until all the alarm
jobs have been processed. The PSI-DATA/FAX-MODEM/RS232 modem attempts
to send each message (SMS or fax) up to four times.
If this is not possible, an alarm error is generated and the "ERR" LED lights up. The
"ALR" LED remains lit until the alarm is reset with the AT*AR<CR> command, by
pressing the button on the modem or by an SMS.
The modem cannot be addressed at the RS-232 interface while alarm messages
are being sent.
CTS (Clear To Send) is not active during this time. In the event of an AT from the
control system there is no confirmation.
5-6 692302
Page 77

Example
Special Functions
5.3 Password Protection
5.3.1 Selecting a Password
The password can contain up to seven characters from the ASCII character set
(1 to 127), excluding question marks. The password is not case sensitive.
If no password is stored, the modem continues to request the stored telephone
details. The password and telephone number can be stored using the *P=x and
&Zn=x commands (see below).
AT&F Load default setting
AT*P=ASDFG1 Enter the password "ASDFG1"
AT&Z0=012345 Enter the call back number
AT%S1 Activate password protection with call back
ATS0=1 Activate automatic call back
– *P=x command
Stores a password in the permanent memory
The *P=x command stores the password x (maximum of seven characters from the
ASCII character set, excluding question marks) in the permanent memory on the
modem. No password is stored on the modem by default. If no password is stored
and the %S1 or %S2 command is activated, the modem skips the password
request stage.
– *P? command
Displays the stored password
The *P? command displays the stored password.
Your modem has a built-in safety function, which can be activated when your
modem is in auto answer mode (see page 6-22).
5.3.2 Disabling Password Protection
The %S0 command disables password-protected call back (see Section
"Password-Protected Call Back" on page 5-8). By default upon delivery, password
protection is disabled.
692302 5-7
Page 78

PSI-DATA/FAX-MODEM/RS232
5.3.3 Password-Protected Call Back
The %S1 command enables password-protected call back. If you wish to activate
this function, switch your modem to auto answer mode (automatic call acceptance;
ATS0 > 0). Your modem now accepts calls and executes the usual handshake. The
caller is then requested to enter a password. If the password is invalid or the time
allocated for password entry has been exceeded, the caller has two more attempts
to enter the correct password.
When the correct password is entered, the modem aborts the existing connection
to dial the number that is stored in the memory under &Z0. The modem has three
attempts to establish a connection with the call back number.
5.3.4 Dial In With Password Protection
The %S2 command enables password validation when an incoming called is
accepted. In this case, the caller must enter a password after the incoming call has
been accepted. If the password is invalid or the time allocated for password entry
has been exceeded, the caller has two more attempts to enter the correct
password. When the correct password is entered, the modem continues to operate
as usual, otherwise the connection is aborted.
Automatic call acceptance must be activated for all password-protected functions
(see Section "Description of the S Registers" on page 6-22).
5-8 692302
Page 79

Special Functions
5.4 Caller ID and Selective Call Acceptance
5.4.1 Caller ID Output
Caller ID or CLIP (Calling Line Identification Presentation) is the transmission of the
caller’s telephone number. If this function is enabled at your analog connection, the
PSI-DATA/FAX-MODEM/RS232 can detect, output, and evaluate the caller ID.
The AT%G1 command activates the caller ID output function in the PSI-DATA/
FAX-MODEM/RS232. The caller ID, e.g., for Deutsche Telekom is transmitted after
the first ring, i.e., the modem does not accept the call until after the second ring. The
caller ID is detected by the PSI-DATA/FAX-MODEM/RS232 and output to the
RS-232 interface as follows:
<CRLF>RING<CRLF>
CLIP:0401234…<CRLF>
<CRLF>RING<CRLF>
A telephone number is only then output if a valid caller ID has been detected. It is
only output once for each call. The call is accepted according to S register S0.
5.4.2 Selective Call Acceptance
The PSI-DATA/FAX-MODEM/RS232 can automatically check whether it has been
called from a specific telecommunications cable and establishes a connection. Up
to two telephone numbers can be stored in the device, which the modem compares
and automatically establishes a connection if they match. Store numbers 18 and 19
are reserved for this purpose (&Z18, &Z19).
Example AT&Z18=040 123456789
AT&Z19=0170 123 45 69
If these numbers are stored in these fields and "Selective Answer" is enabled
(AT%G3), the PSI-DATA/FAX-MODEM/RS232 checks each call to see whether
one of the saved numbers has been called. If so, the modem accepts the call and
establishes a connection, regardless of the settings for S register S0. Your control
system therefore does not have to evaluate the caller ID and the modem makes
sure that only the service numbers (&Z18 and &Z19) reach your system, even
without a call back function.
The telephone number evaluation function has a filter function, which also enables
partial evaluation of the telephone number. The evaluation starts with the last digit
and is carried out for each stored digit. If, for example, from the telephone number
0123456789 only the digits 56789 have been stored, all telephone numbers that
692302 5-9
Page 80

PSI-DATA/FAX-MODEM/RS232
end with these digits are considered as valid. The number of preceding digits is of
no importance. The advantage of this is that various formats (e.g., +49 40 xxxxx
and 040 xxxxx) can be evaluated.
The flashing "AA" LED indicates that this mode is active. The call is only accepted
if the stored numbers match. The caller ID is also output.
5.5 DTMF
DTMF (Dual Tone Multiplexed Frequency) tones are created by superimposing two
tones from different frequency ranges. The tone lasts 100 ms and is followed by a
100 ms pause.
5.5.1 DTMF Alarm
Once the PSI-DATA/FAX-MODEM/RS232 has dialed a phone (an optional CLIP
decoder is useful for identifying the modem), the termination equipment (PC or
PLC) can generate a DTMF message.
An operator can acknowledge the message with a DTMF tone. The modifier L in
the dialing string (ATD1234….L;) enables the DTMF alarm function. After dialing,
the modem switches to command mode and can now output DTMF tones with the
dialing command (ATDT00000000;). In command mode, the device can detect
DTMF tones and forward them to the RS-232 interface.
DTMF: x<CRLF>
This message is output to the RS-232 interface, where x is the DTMF tone
(0 to 9,*,#).
As an alternative to ATDxxxL; the special dialing string ATDxxxK; can be used.
When the ATDxxxK; command is issued, the modem waits for five seconds of
silence after dialing (i.e., no dial tone means the partner has accepted the call).
The S7 timer is no longer valid in command mode.
The connection can only be can be aborted by the ATH or ATZ command.
5-10 692302
Page 81

Special Functions
5.5.2 DTMF Control
The modem is called by a telephone or calls a telephone. The partner uses DTMF
tones and sends control characters to the modem. The modem decodes these and
outputs the characters to the serial interface.
In order that the modem can be called, this function must be enabled with the ATR1
command. Once the modem has accepted the call, it waits for five seconds for the
DTMF start character (#). If the character is detected, the modem switches to
command mode and sends a signal tone to the partner.
If no start character is detected, the modem starts with the standard modem
handshake. In command mode, the detected DTMF tones are output to the
interface. The start character is not forwarded to the interface.
The S7 timer is no longer valid in command mode.
The connection can only be can be aborted by the ATH or ATZ command.
692302 5-11
Page 82

PSI-DATA/FAX-MODEM/RS232
5.6 ASCII to Fax Conversion
The PSI-DATA/FAX-MODEM/RS232 supports ASCII to fax conversion. The
modem can automatically generate a fax from a simple ASCII string and send it.
The converted fax is limited to 30 kbytes, i.e., each line is limited to 60 characters.
First, the unique ID should be set once (AT+FLID="123"). It is stored in a non-
volatile memory and can be reset at any time.
Send an ASCII fax:
AT*AF<CR>
NUMBER<;>TEXT…^Z:
Following the AT*AF command, you are prompted to enter the number and text.
The number must end with ;. In the text, <CR> is the code for a line break, the ASCII
text is exited via Ctrl+Z. The maximum line length of 60 characters must not be
exceeded, after which a <CR> is automatically inserted. A maximum of
253 characters in total is permitted.
After exiting the entry (Ctrl+Z) the data is converted into a fax and the specified
number is dialed. The conversion may take a moment (approximately 30 seconds
to 1 minute). The fax is then sent. The fax is acknowledged by the hang-up
message (Class2) and OK (successful) or ERROR (unsuccessful). If unsuccessful,
the command must be repeated.
The following character set is used (characters that do not appear in this character
set are replaced by a space):
Table 5-1 Fax characters
Fax Characters ASCII Characters
20
30
40
50
60
70
to 2F
hex
to 3F
hex
to 104F
hex
to 5F
hex
to 6F
hex
to 7F
hex
hex
hex
hex
hex
hex
hex
!,",#,$,%,&,’,(,),*,+,,,-,.,/
0,1,2,3,4,5,6,7,8,9,:,;,<,=,>,?
@,A,B,C,D,E,F,G,H,I,J,K,L,M,N,O
P,Q,R,S,T,U,V,W,X,Y,Z,Ä,Ö,Ü,ß,_
´,a,b,c,d,e,f,g,h,i,j,k,l,m,n,o
p,q,r,s,t,u,v,w,x,y,z,ä,ö,ü,~
5-12 692302
Page 83

Table 5-2 DOS Umlauts
DOS Umlaut ASCII Character
84
94
81
8E
99
9A
E1
hex
hex
hex
hex
hex
hex
hex
ä
ö
ü
Ä
Ö
Ü
ß
Table 5-3 Windows Umlauts
Windows Umlaut ASCII Character
E4
F6
FC
C4
D6
DC
DF
hex
hex
hex
hex
hex
hex
hex
ä
ö
ü
Ä
Ö
Ü
ß
Special Functions
Please note, DOS umlauts and Windows umlauts are only valid in 8-bit data
format.
692302 5-13
Page 84

PSI-DATA/FAX-MODEM/RS232
5.7 SMS in the Fixed-Line Network
You can send and receive SMS messages in the Deutsche Telekom fixed-line
network with the PSI-DATA/FAX-MODEM/RS232. SMS messages can only be
received if this feature has been enabled by Deutsche Telekom and an SMS
message is sent first to log in.
5.7.1 Sending SMS Messages
AT*AS<CR>
NUMBER<;>TEXT…^Z:
Following the AT*AS command, you are prompted to enter the number and text.
The number must end with ;. Exit the message with Ctrl+Z. The message must not
exceed 160 characters.
After exiting the entry (Ctrl+Z), the data is converted and the SMS is automatically
sent. The message is acknowledged by OK (successful) or ERROR (unsuccessful).
If unsuccessful, the command must be repeated.
The number for the SMS provider must be stored in store number 20 (AT&Z20). It
is set to Deutsche Telekom (01930100) by default.
5.7.2 Receiving SMS Messages
When SMS mode is enabled, SMS messages received are output to the RS-232
interface. To receive SMS messages, this feature must be supported and enabled
by your SMS provider. In addition, check that the caller ID (CLIP) is transmitted as
far as the modem (usually a problem for many older private branch exchanges).
The number for the SMS provider must be stored in store number 20 (AT&Z20). It
is set to Deutsche Telekom (01930100) by default.
Enabling SMS receipt using Deutsche Telekom as an example:
• Send an SMS with the text "ANMELD" to telephone number 8888.
• You can log off by sending the text "ABMELD" to telephone number 8888.
5-14 692302
Page 85

SMS messages are preceded by the caller ID (CLIP) of the service provider. The
caller ID is not transmitted until after the first ring, so that the modem does not
respond to the call until the second ring.
The following command activates the receive SMS function:
AT\S1<CR>
The actual message is transmitted after the first ring (RING) and is structured as
follows:
Example RING
RECEIVE SMS
FROM: 0160123456789
DATE/TIME: 05.03.02 / 16:55:00
MESSAGE: RESET PLC 1234 confirmation to 016012345
The last SMS message is stored and can be viewed again via the AT*AS?
command:
AT*AS?
RECEIVE SMS
FROM: 0160123456789
DATE/TIME: 05.03.02 / 16:55:00
MESSAGE: RESET PLC 1234 confirmation to 016012345
OK
Special Functions
692302 5-15
Page 86

PSI-DATA/FAX-MODEM/RS232
5.7.3 Control via SMS Messages
The PSI-DATA/FAX-MODEM/RS232 can be controlled via SMS messages. For
example, you can activate the output, reset the alarm or send the status of the
modem simply by sending an SMS message.
This mode is activated using the AT\S2 command. In this mode, the SMS message
is not forwarded to the termination equipment, but is evaluated by the modem itself.
The SMS message sent to the modem must be structured as follows:
#<Password>:<Command>
The password (AT*P=) is the password stored in the modem (maximum of seven
characters). Please note that not all characters can be sent in the SMS message.
Choose a password according to the SMS character set. If the password is set,
e.g., to AT*P=12345 the message should appear as follows:
#12345:<Command>
The following control commands are available:
RESET Resets the alarm and the switching output
SET:OUTPUT Activates the switching output ("Output").
CLR:OUTPUT Deactivates the switching output ("Output").
SEND:STATUS Sends a status SMS message to the caller.
"Text" Outputs all the characters within the inverted commas
(e.g., AT*AR).
to the RS-232 interface.
Examples #12345:SET:OUTPUT Activates the output.
#12345:SEND:STATUS Sends an SMS message (status report) to the sender.
#12345:"RST PLC" Sends the text RST PLC to the terminal equipment
(RS-232 interface).
#12345:RESET Resets the alarm function and the switching output.
5-16 692302
Page 87

Special Functions
5.8 Setting a Partner Output
5.8.1 Transmitting Local Inputs to the Partner Output
The PSI-DATA/FAX-MODEM/RS232 modem has one electrically isolated input
and one electrically isolated output. Alarm functions can be assigned to the input,
i.e., the partner output, for example, can be activated by activating the input.
The input configuration can be found in Section "Alarm Inputs and Alarms" on
page 5-4.
5.8.2 Switching the Partner Output via AT Commands
The PSI-DATA/FAX-MODEM/RS232 can be used to transmit its input to a partner
output.
Setting/deleting the partner output:
AT*AO<CR>
NUMBER<;>PASSWORD<;>COMMAND^Z:
Following the AT*AO command, you are prompted to enter the number, the
password, and the control command for the partner output. The number must end
with ;. The password length is limited to seven characters.
The following control commands are available:
RESET Resets the alarm and the switching output
(e.g., AT*AR).
SET:OUTPUT Activates the switching output ("Output").
CLR:OUTPUT Deactivates the switching output ("Output").
"Text" Outputs all the characters within the inverted commas
to the RS-232 interface.
After exiting the entry (Ctrl+Z) an attempt is made to contact the partner and
transmit the control command. The message is acknowledged by OK (successful)
or ERROR (unsuccessful). If unsuccessful, the command must be repeated.
692302 5-17
Page 88

PSI-DATA/FAX-MODEM/RS232
5-18 692302
Page 89

Section 6
This section provides information about
– The various AT commands
AT Commands.................................................................................................................. 6-3
6.1 Command Descriptions .......................................................................... 6-4
6.2 AT Commands for MNP and LAPM (V.42bis) ......................................6-15
6.3 V.250 Commands Implemented...........................................................6-20
6.4 S Registers........................................................................................... 6-21
6.5 Bell/CCITT Mode.................................................................................. 6-28
6.6 Modem Confirmations .......................................................................... 6-29
6.7 Processing the Break Character........................................................... 6-31
692302 6-1
Page 90

PSI-DATA/FAX-MODEM/RS232
6-2 692302
Page 91

6 AT Commands
Your modem stores its operating characteristics in a non-volatile memory
(EEPROM). These characteristics can be overwritten using commands and can
thus modify the method of operation of the device. The modem executes
commands as long as it is in command mode. Your modem is automatically in
command mode until you dial a number and establish a connection. You can enter
commands for your modem using appropriate communication software
(e.g., HyperTerminal). The device supports data transmission speeds of 300, 1200,
2400, 4800, 9600, 19,200, 38,400, 57,600, and 115,200 bps.
Make sure that the baud rate setting for your COM port in your communication
software corresponds to one of these speeds.
Modes
The modem can be operated in two modes:
– Command mode: The modem can be configured and controlled via AT
commands. As soon as a connection is established, the modem automatically
switches to data mode.
– Data mode: In this mode, the modem transmits data to the partner.
Command Structure
All commands transmitted to the modem must start with AT and must be confirmed
by pressing ENTER. The commands can be entered in either upper or lower case,
but not a mixture of the two. Spaces may be inserted between the commands so
that the command lines are easier to read.
AT Commands
AT deletes the last command line executed by your modem (if present) and
prepares your modem for the new command line. In addition, AT informs your
modem of the transmission speed, parity, and character length.
For commands that must be specified by a parameter, a missing parameter
corresponds to parameter 0, e.g., ATM = ATM0.
Correcting a Typing Error
If you make a mistake when entering a command, you can correct it using the
backspace key. Pressing the backspace key deletes the last character entered. The
AT at the start of the command line is not deleted.
692302 6-3
Page 92

PSI-DATA/FAX-MODEM/RS232
Repeating the Previous Command
You can instruct your modem to repeat the last command by entering A/ in
command mode. AT is not entered for this command and it does not have to be
confirmed by pressing ENTER, i.e., the command is repeated as soon as A/ is
entered.
6.1 Command Descriptions
AT Attention String
AT is the prefix of a command line and must be entered at the start of each
command line (except for the A/ command or the +++ Escape string). The Attention
characters transmit the transmission speed, character format, and parity of your PC
or terminal to your modem.
If you attempt to execute a command line that does not start with AT, an error
message is generated (except when repeating a command with A/ or using the
+++ Escape string).
A Manual Answering
Use the A command to manually answer a call. The A command can also be used
to convert voice communication into data communication: Once you have
completed the spoken part of the call, the caller enters the ATD command and
ENTER to enable data transmission. The partner responds with the ATA command
and ENTER. Your modem does not execute any commands that appear after the
A in the command line. You must therefore enter all settings before the A
command.
A/ Repeat the Previous Command
The A/ command instructs the modem to repeat the last command line (i.e., the last
command that it stored in its memory). You can use the A/ command to redial a
number if the line was busy on the first attempt or it could not connect.
The A/ command does not have to be preceded by AT or confirmed by pressing
ENTER. You can use the A/ command to repeat the last command line as many
times as you wish until the command is deleted from the modem memory by
either resetting the modem or entering a new command line.
6-4 692302
Page 93

B Set Transmission Method
The B command can be used to operate your modem in Bell and/or CCITT mode
depending on the DTE baud rate and on whether your modem is generating or
answering a call. Table 6-1 on page 6-28 shows how this command works.
DDialing
The D command instructs your modem to dial a number. Enter the number that wish
to dial after the D command. You can modify the D command with the following
additional commands:
P Pulse Dialing
The P modifier generates the call using pulse dialing (German standard).
Enter the modifier after the command, followed by the desired telephone
number.
T Tone Dialing
The T modifier instructs the modem to use tone dialing. Enter the modifier
after the command, followed by the desired telephone number.
W Wait for a Dial Tone
The W modified instructs the modem to wait for a second dial tone. Use
this command in private branch exchanges to wait for a dial tone after
calling an outside line.
Example: ATDP0W555-1111
This command dials 0 for an outside line, waits for a second dial tone and
then dials the number 555-1111.
,Pause
This modifier inserts a 2-second pause before dialing. If, for example, your
modem is located in a private branch exchange (e.g., in offices), where a
number (usually 0) must be dialed for an outside line, insert a comma
between the 0 and the actual telephone number you wish to dial. Your
modem dials 0, waits for two seconds and then dials the telephone
number. If a longer pause is required, you can either insert another comma
in the command line or change the value of the S8 register (see
page 6-23).
@ Wait for Five Seconds of Silence
This modifier instructs the modem to wait until no tone has been detected
on the line for five seconds before dialing the specified number.
AT Commands
692302 6-5
Page 94

PSI-DATA/FAX-MODEM/RS232
! Dial an Outside Line/Divert Calls
Use this modifier to divert a call. Enter the telephone number that is to be
dialed first, then the ! modifier followed by the telephone number to which
the call is to be diverted. Once the modem has established a connection
with the first telephone number, it waits for two seconds and then diverts
the call.
> Dial an Outside Line via a Ground Button
; Return to Command Mode
If your modem is to call another modem and then return to command mode
without disconnecting, enter the ; modifier as the last character in your dial
command line.
L; DTMF Alarm Mode, Without Waiting for Silence
See Section "DTMF Alarm" on page 5-10.
K; DTMF Alarm Mode, With Waiting for Silence
See Section "DTMF Alarm" on page 5-10.
DS=n Dial One of the Stored Telephone Numbers
The DS=n command instructs the mode to dial one of 20 telephone numbers,
where n is a value from 0 through 20. Use the &Z command to store telephone
numbers (see page 6-12).
Example: ATDS=1
The modem dials the telephone number in store number 1.
EEcho
Your modem is set by default to display commands on the PC screen in command
mode (echo). This feature is only necessary if your PC is configured for full duplex
mode.
Most systems operate in full duplex mode. In this case, you can enable the echo
function with the E1 command.
If you are working in half duplex mode, you must disable the echo function with
the E0 command.
6-6 692302
Page 95

+++ Escape String
The escape string can be used to switch your modem from data mode to command
mode without losing the connection with the partner. When you enter the escape
string, your modem outputs an OK message to inform your that it is in command
mode.
Enter ATO to return to data mode and confirm by pressing ENTER. Enter ATH to
hang up and confirm by pressing ENTER.
H Hook (Hang Up)
H0 The modem hangs up.
I Identification
I0 Display the ID number for your modem.
I1 Display the ROM checksum for your modem.
I2 Execute a memory test and output an OK message if the test was
successful.
I3 Display the V.42bis ID number for your modem.
I4 Display the internal ID for your modem.
I8 Display the serial number for your modem.
AT Commands
L Volume Control
L0 Low volume
L1 Low volume
L2 Medium volume
L3 High volume
M Speaker
M0 Speaker off
M1 Speaker on during the connection phase
M2 Speaker always on
692302 6-7
Page 96

PSI-DATA/FAX-MODEM/RS232
O Data Mode/Fall Forward/Fall Backward
O0 Return to data mode if you switched to command mode using the escape
string.
O1 Adjustment after returning to data mode.
O2 Adjustment by increasing the speed (Fall Forward) in increments of
1200 bps after returning to data mode.
O3 Adjustment by decreasing the speed (Fall Backward) in increments of
1200 bps after returning to data mode.
This function is useful if errors emerge, e.g., due to modifying the telephone line
attributes. The Fall Forward/Fall Backward options enable the user to set the
required transmission speed.
P Pulse Dialing
This command sets pulse dialing by default for your modem (see D command).
Q Modem Messages
Q0 Information from the modem about its status and display confirmations on
your PC screen.
Q1 Disable confirmations. This may be necessary, e.g., if a PLC is connected
to your modem and responses would interfere.
Q2 Display confirmations only when the modem has established a
connection.
R DTMF Remote Configuration
R0 DTMF remote configuration off
R1 DTMF remote configuration on
Sr? Read the Modem Register
Your modem has 29 registers (0 through 28), which are used to set the operating
parameters. Sr? can be used to read the values set in the registers.
Sr=n Set Register Values
Sr=n can be used to modify the register values for your modem (see Section
"S Registers" on page 6-21).
6-8 692302
Page 97

T Tone Frequency Dialing
Tone frequency dialing is stored by default.
V Alpha or Numeric Responses
Your modem displays responses on-screen.
V0 Display numeric confirmations. This option can be used if your software
package or PLC only supports numeric confirmations.
V1 Display alpha confirmations (default).
W Additional Confirmations
The W command enables or disables the MNP/V.42, CONNECT, and CARRIER
additional confirmations and determines whether the modem is specifying the DCE
speed (modem speed) or the DTE speed (PC speed).
W0 Disable additional confirmations and display the DTE speed
(e.g., CONNECT 115200).
W1 Enable additional confirmations and display the DCE speed.
CARRIER 33600
PROTOCOL: LAP-M
COMPRESSION: V.42BIS
CONNECT 115200/ARQ
W2 Disable additional confirmations and display the DCE speed
(e.g., CONNECT 33600).
AT Commands
X Confirmation Settings
The X command can be used to control the way in which your modem responds to
specific events. There are five different command sets for answering:
X0 Hayes Smart Modem 300-compatible answering/dummy dialing
(private branch exchange)
X1 As X0 plus all CONNECT answering/dummy dialing
(private branch exchange)
X2 As X1 plus detection of dial tone/proceed-to-dial tone (outside line)
X3 As X1 plus detection of engaged tone/dummy dialing
(private branch exchange)
X4 All answering and detection of dial tone and engaged tone
692302 6-9
Page 98

PSI-DATA/FAX-MODEM/RS232
Y Break Signal
Y0 No transmission of break signals and no response to them.
Y1 Response to break signals. The device sends a break signal for four
seconds before disconnecting. In addition, it aborts an active connection
when it receives a break signal for 1.6 seconds from the partner.
Z Reset
Use the Z command to reset your modem. Your modem then hangs up and loads
configuration profile 0 or 1. This command must be the last one in the command
line.
Z0 Reset and activate stored configuration profile 0.
Z1 Reset and activate stored configuration profile 1.
&C Carrier Detect Signal
&C0 Continuous activation of the carrier detect signal for your modem.
&C1 Set the RS-232-C carrier detect signal for your modem (DCD) when the
modem detects a carrier detect signal from the partner (default).
&D Data Terminal (PC) Ready Signal (DTR)
&D0 Ignore the status of the DTR signal. The DTR signal is always activated,
even when your PC is switched off.
&D1 Reset to command mode if the modem detects a falling edge on the DTR
line.
&D2 Hang up and reset to command mode if the modem detects a falling edge
on the DTR line.
&D3 Hang up, reset, and switch back to command mode if the modem detects
a falling edge on the DTR line.
&E Automatic Speed Adjustment (Fall Forward/Fall Backward)
This feature automatically adjusts the speed if the transmission quality deteriorates
while connected.
&E0 Disable automatic speed adjustment (default).
&E1 Enable automatic speed adjustment.
&F Factory Configuration
The &F command (default) restores the factory settings with V.42bis and enables
hardware flow control.
6-10 692302
Page 99

&K Set DTE Flow Control
The &K command specifies the type of data control that is set between the modem
and the local PC to prevent overruns. Your modem has type types of data flow
control. The selected function depends on the requirements of your PC.
&K0 Disable data flow control.
&K3 Use CTS/RTS signals for bidirectional data flow control. The CTS signal
starts or finishes data transmission from the PC or terminal. The RTS
signal control data transmission to the PC.
If the RTS is disabled, data transmission is finished. If it is enabled, the
modem sends data to the PC.
&K4 Select data flow in both directions (XON/XOFF).
&K5 Select data control in one direction. The modem sends the ASCII
characters XON to the DTE to start data transmission or the ASCII
characters XOFF to end data transmission. However, the modem ignores
XON/XOFF characters that are sent by the DTE.
&O Local Switching Output
&O0 Reset the local switching output.
&O1 Set the local switching output.
AT Commands
&S DSR Options
&S0 Enable the DSR signal (default).
&S1 Enable the DSR signal during the handshake and in data mode and
disable it in test or silent mode.
The DSR is activated when the carrier detect signal is lost.
&V Display Configuration Profiles
The &V command can be used to activate and store the configuration profiles and
to view the first three telephone numbers that are stored on your modem. Any
commands or registers that appear in the active or stored commands, but are not
described in the user manual, can be ignored.
This command can not be activated when the modem is online.
692302 6-11
Page 100

PSI-DATA/FAX-MODEM/RS232
&W Save Active Configuration
This command saves the active configuration in the permanent memory.
&W0 Store the active settings as configuration profile 0.
&W1 Store the active settings as configuration profile 1.
&X Synchronous Pulse Generator
The &X commands specifies the device for which the synchronous pulse generator
is available.
&X0 Generation of the synchronous pulse generator by the modem itself.
&X1 Accept the synchronous pulse generator of the PC or terminal.
&X2 Derive the synchronous pulse generator from the signal of the partner
modem.
&Y Select Active Profile
The &Y command specifies which stored profile is loaded when the modem is
switched on or reset.
&Y0 Use configuration profile 0 (default).
&Y1 Use configuration profile 1.
&Zn=x Store a Telephone Number in the Permanent Memory
The &Zn=x command stores a telephone number (x) (36 digits maximum) in the
permanent memory of the modem. Your modem can store up to 20 telephone
numbers (n = 0 through 20).
%D Clear Down Signal
The %D command specifies whether a Clear Down Signal is used when the
connection is aborted.
%D0 Disable the Clear Down function.
%D1 Enable the Clear Down function (default).
%F Full Duplex/Half Duplex
The %F command switches between half duplex and full duplex mode.
%F0 Full duplex
%F1 Half duplex mode (V.23 only)
6-12 692302
 Loading...