

Page 1
Bedienungsanleitung
Copyright UNOLD AG | www.unold.de
Instructions for use | Notice d´utilisation
Gebruiksaanwijzing | Istruzioni per l’uso
Instrucciones de uso | Instrukcja obsługi
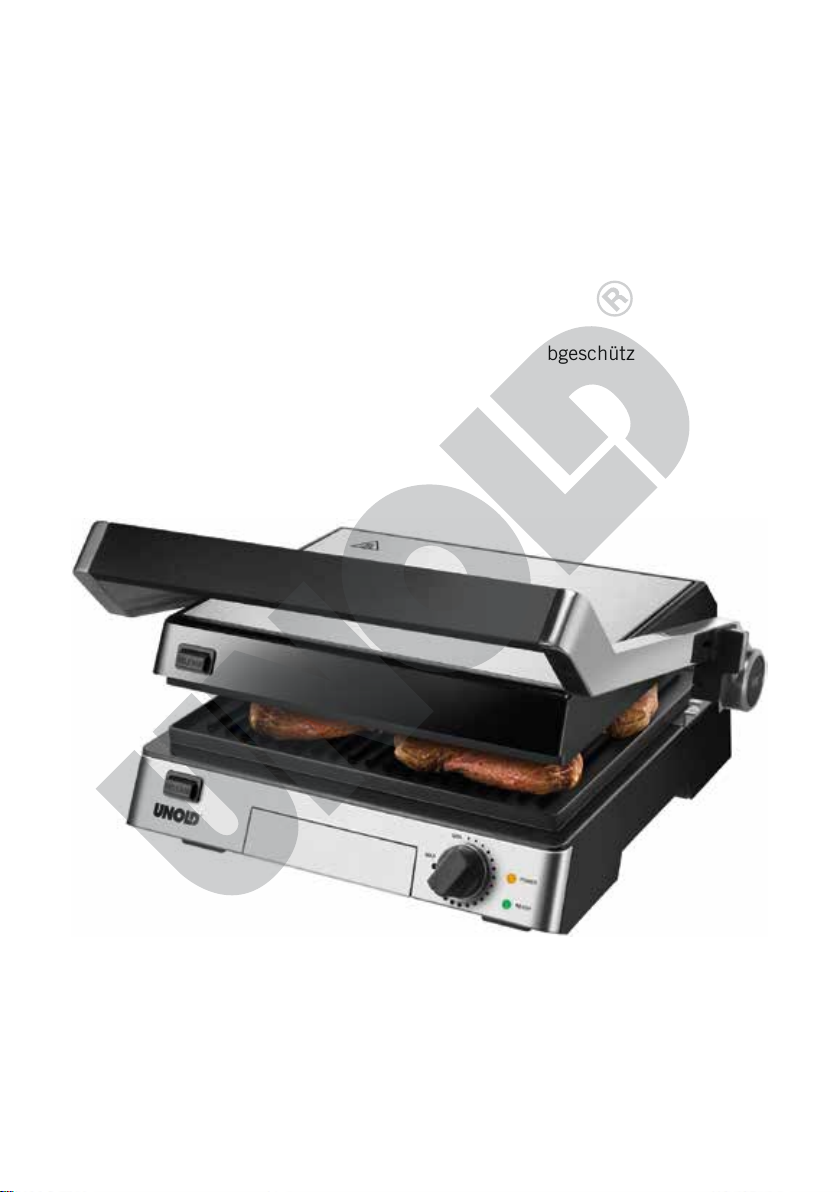
Modell 58526
CONTACT-GRILL STEAK
Page 2

Impressum:
Copyright UNOLD AG | www.unold.de
Bedienungsanleitung Modell 58526
Stand: Mai 2018 /nr
Copyright ©
Mannheimer Straße 4
68766 Hockenheim
Telefon +49 (0) 62 05/94 18-0
Telefax +49 (0) 62 05/94 18-12
E-Mail info@unold.de
Internet www.unold.de
Page 3

Weitere Informationen zu unserem Sortiment erhalten Sie unter www.unold.de
Copyright UNOLD AG | www.unold.de
Page 4

INHALTSVERZEICHNIS
Copyright UNOLD AG | www.unold.de
Bedienungsanleitung Modell 58526
Technische Daten ................................... 8
Symbolerklärung ..................................... 8
Für Ihre Sicherheit .................................. 9
Vor dem ersten Gebrauch......................... 11
Grillplatten einsetzen/entnehmen ............. 12
Temperaturregelung ................................ 12
Grillgut .................................................. 12
Position der Grillplatten .......................... 13
Grillen ................................................... 13
Reinigen und Aufbewahren ...................... 15
Marinaden ............................................. 17
Kontaktgrillen – Tipps und Rezepte .......... 18
Sandwiches und Paninis –
Tipps und Rezepte .................................. 20
Flachgrill – Tipps und Rezepte ................. 21
Garantiebestimmungen ........................... 23
Entsorgung / Umweltschutz ..................... 23
Informationen für den Fachhandel ............ 23
Service-Adressen .................................... 24
Instructions for use Model 58526
Technical Specifications .......................... 25
Explanation of the symbols ...................... 25
For your safety ........................................ 25
Before using the appliance for the
first time................................................ 28
Inserting/removing the grill plates ............. 28
Temperature control ................................ 29
Food to be grilled ................................... 29
Position of the grill plates ........................ 29
Grilling .................................................. 30
Cleaning and storage ............................... 31
Marinades .............................................. 32
Contact-griddling – Tips and recipes ......... 33
Sandwiches and Paninis –
Tips and recipes ..................................... 35
Opened griddling – Tips and recipes ......... 36
Guarantee Conditions .............................. 37
Waste Disposal/Environmental Protection .. 37
Service .................................................. 24
Notice d´utilisation Modèle 58526
Spécification technique .......................... 38
Explication des symboles ......................... 38
Pour votre sécurité .................................. 38
Avant la première utilisation .................... 41
Positionner / Retirer les plaques du grill .... 42
Réglage de la température ....................... 42
Aliment à griller ...................................... 42
Position des plaques du grill .................... 43
Griller .................................................... 43
Nettoyage et rangement .......................... 45
Marinades .............................................. 46
Grillades –astuces et recettes ................... 48
Croque–monsieur, sandwiches,
paninis – astuces et recettes .................... 50
Gril plat (façon barbecue) – astuces
et recettes.............................................. 51
Conditions de Garantie ............................ 52
Traitement des déchets /
Protection de l’environnement .................. 52
Service .................................................. 24
Gebruiksaanwijzing Model 58526
Technische gegevens .............................. 53
Verklaring van de symbolen ...................... 53
Voor uw veiligheid ................................... 53
Vóór het eerste gebruik ............................ 56
Grillplaten inzetten/verwijderen ................ 56
Temperatuurregeling ............................... 57
Grillgerechten......................................... 57
Stand van de grillplaten .......................... 57
Grillen ................................................... 58
Reinigen en opbergen ............................. 60
Marinaden ............................................. 60
Contactgrill – tips en recepten ................. 62
Sandwiches en panini – tips en recepten .. 64
Vlakke grill – tips en recepten .................. 64
Garantievoorwaarden ............................... 66
Verwijderen van afval / Milieubescherming 66
Service .................................................. 24
Page 5

INHALTSVERZEICHNIS
Copyright UNOLD AG | www.unold.de
Istruzioni per l’uso Modello 58526
Dati tecnici ........................................... 67
Significato dei simboli ............................ 67
Per la vostra sicurezza ............................. 67
Prima del primo utilizzo .......................... 70
Inserimento/rimozione delle piastre grill .... 70
Regolazione della temperatura ................. 71
Alimenti grigliabili .................................. 71
Posizione delle piastre grill ...................... 71
Grigliare................................................. 72
Pulizia e conservazione ........................... 74
Marinate ................................................ 75
Griglia a contatto – Consigli e ricette ........ 76
Suggerimenti e ricette per sandwich
e panini ................................................. 78
Barbecue – Consigli e ricette ................... 79
Norme die garanzia ................................. 80
Smaltimento / Tutela dell’ambiente .......... 80
Service .................................................. 24
Manual de instrucciones Modelo 58526
Datos técnicos ....................................... 81
Explicación de símbolos .......................... 81
Para su seguridad ................................... 81
Antes del primer uso ............................... 84
Colocar/retirar las placas de parrilla .......... 85
Regulación de temperatura ...................... 85
Comida para asar .................................... 85
Posición de las placas de parrilla ............. 86
Asar a la parrilla ..................................... 86
Limpieza y almacenamiento ..................... 88
Marinadas .............................................. 89
Asado de contacto –
Recomendaciones y recetas ..................... 91
Sándwiches y Panini –
Recomendaciones y receta ...................... 93
Asado a la parrilla –
Recomendaciones y recetas ..................... 94
Condiciones de Garantia .......................... 95
Disposición/Protección del
medio ambiente ..................................... 95
Service .................................................. 24
Instrukcja obsługi Model 58526
Dane techniczne ..................................... 96
Objaśnienie symboli ................................ 96
Dla bezpieczeństwa użytkownika .............. 96
Przed pierwszym użyciem ........................ 99
Włożenie / wyjęcie płyt grillowych ............. 99
Regulacja temperatury ............................ 100
Grillowane produkty ................................ 100
Pozycja płyt grillowych ............................ 100
Grillowanie ............................................. 101
Czyszczenie i przechowywanie .................. 102
Pomysły na przepisy ................................ 103
Warunki gwarancji................................... 104
Utylizacja / ochrona środowiska ................ 104
Service .................................................. 24
Page 6
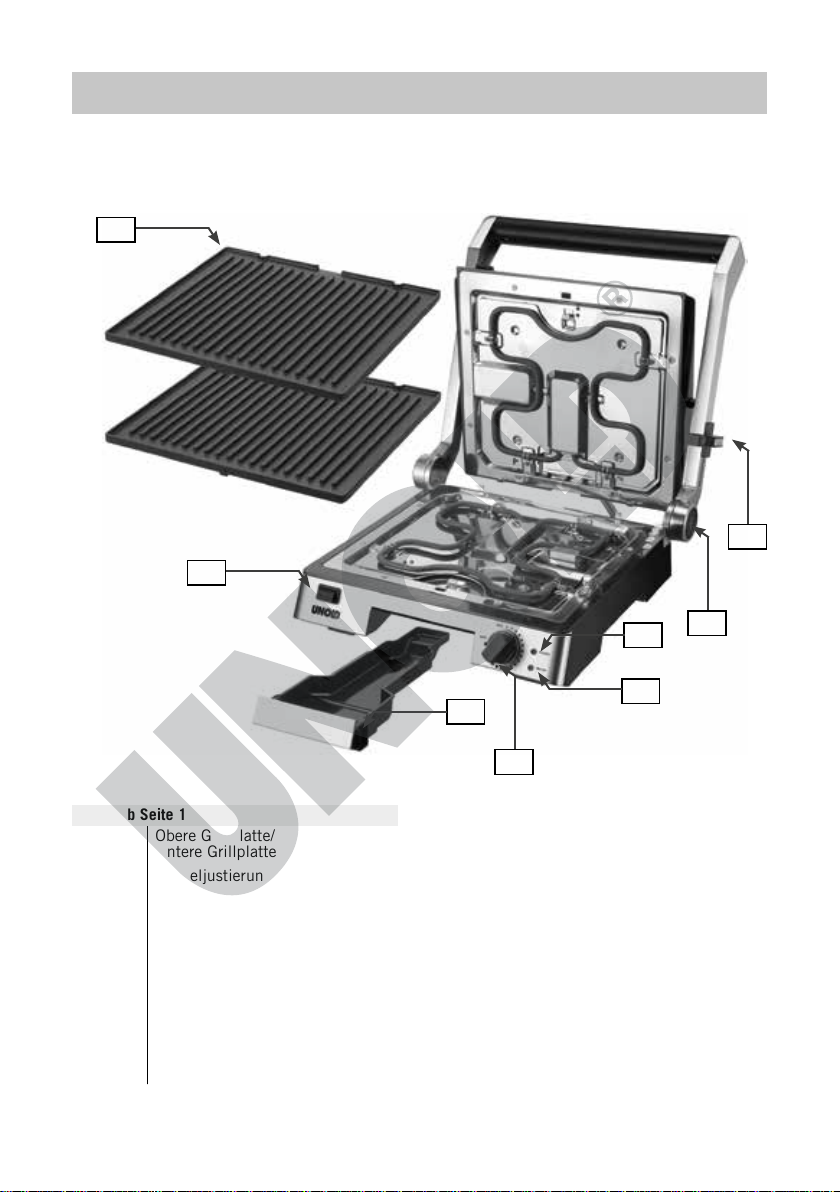
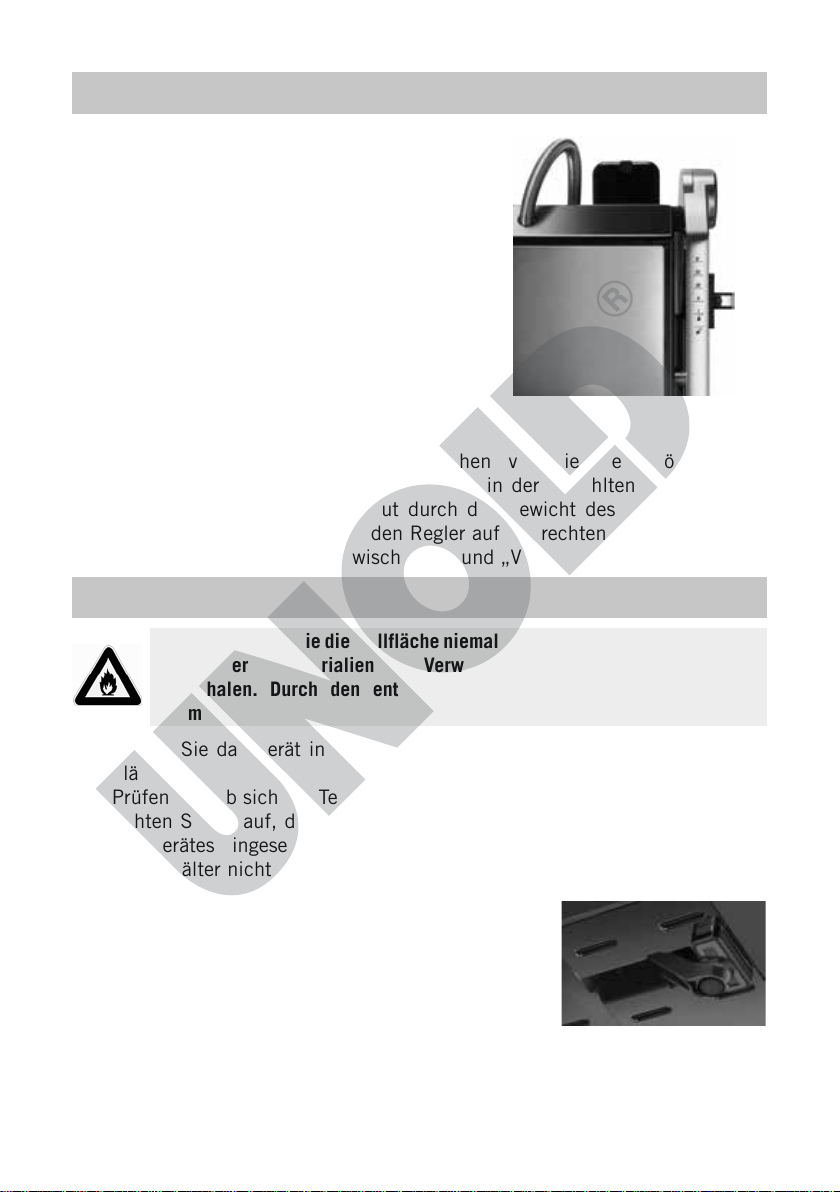
EINZELTEILE
Copyright UNOLD AG | www.unold.de
1
2
8
D Ab Seite 10
1 Obere Grillplatte/
Untere Grillplatte
2 Deckeljustierung
3 Entriegelungstaste für
Klappfunktion
4 Rote Kontrollleuchte „Heizen“
5 Grüne Kontrollleuchte „Ein“
6 Temperaturregler
7 Fettauffangbehälter
8 2 x Entriegelungstasten
Grillplatten
6
4
5
7
6
3
Page 7
EINZELTEILE D | GB | F | NL | IT | ES | PL
Copyright UNOLD AG | www.unold.de
GB Page 25
1 Upper grill plate/
Lower grill plate
2 Lid adjustment element
3 Unlock button for fold function
4 Red indicator light „Heating“
5 Green indicator light „ON“
6 Temperature controller
7 Grease drip pan
8 2 x Unlock buttons - grill plates
F Page 38
1 Plaque de grill supérieure/
Plaque de grill inférieure
2 Ajustement du couvercle
3 Touche de déverrouillage pour
fonction de basculement
4 Témoin lumineux rouge
« Chauffe »
5 Témoin lumineux vert « Marche »
6 Bouton de réglage de
température
7 Récupérateur de graisse
8 2 x Touches de déverrouillage
des plaques du grill
NL Pagina 53
1 Bovenste grillplaat/
Onderste grillplaat
2 Dekselinstelling
3 Ontgrendelingstoets voor
klapfunctie
4 Rode controlelamp „Verwarmen“
5 Groene controlelamp „Aan“
6 Temperatuurregelaar
7 Vetopvangbak
8 2 x Ontgrendelingstoetsen
grillplaten
I Pagina 67
1 Piastra grill superiore/
Piastra grill inferiore
2 Regolazione coperchio
3 Tasto di sblocco per funzione
ribaltamento
4 Spia di controllo rossa
„Riscaldamento“
5 Spia di controllo verde „On“
6 Regolatore di temperatura
7 Recipiente di raccolta del grasso
8 2 x Tasti di sblocco delle piastre
grill
E Página 81
1 Placa de parrilla superior/
Placa de parrilla inferior
2 Ajuste de tapa
3 Tecla de desbloqueo para función
abatible
4 Piloto de control rojo „Calentar“
5 Piloto de control verde „Con“
6 Regulador de temperatura
7 Recipiente colector de grasa
8 2 x Teclas de desbloqueo de las
placas de parrilla
PL Strony 96
1 Górna płyta grillowa/
Dolna płyta grillowa
2 Regulacja pokrywy
3 Przycisk odblokowujący funkcję
składania
4 Czerwona lampka kontrolna
„Nagrzewanie“
5 Zielona lampka kontrolna „WŁ.“
6 Regulacja temperatury
7 Pojemnik na tłuszcz
8 2 x Przycisk odblokowujący płyty
grillowe
7
Page 8
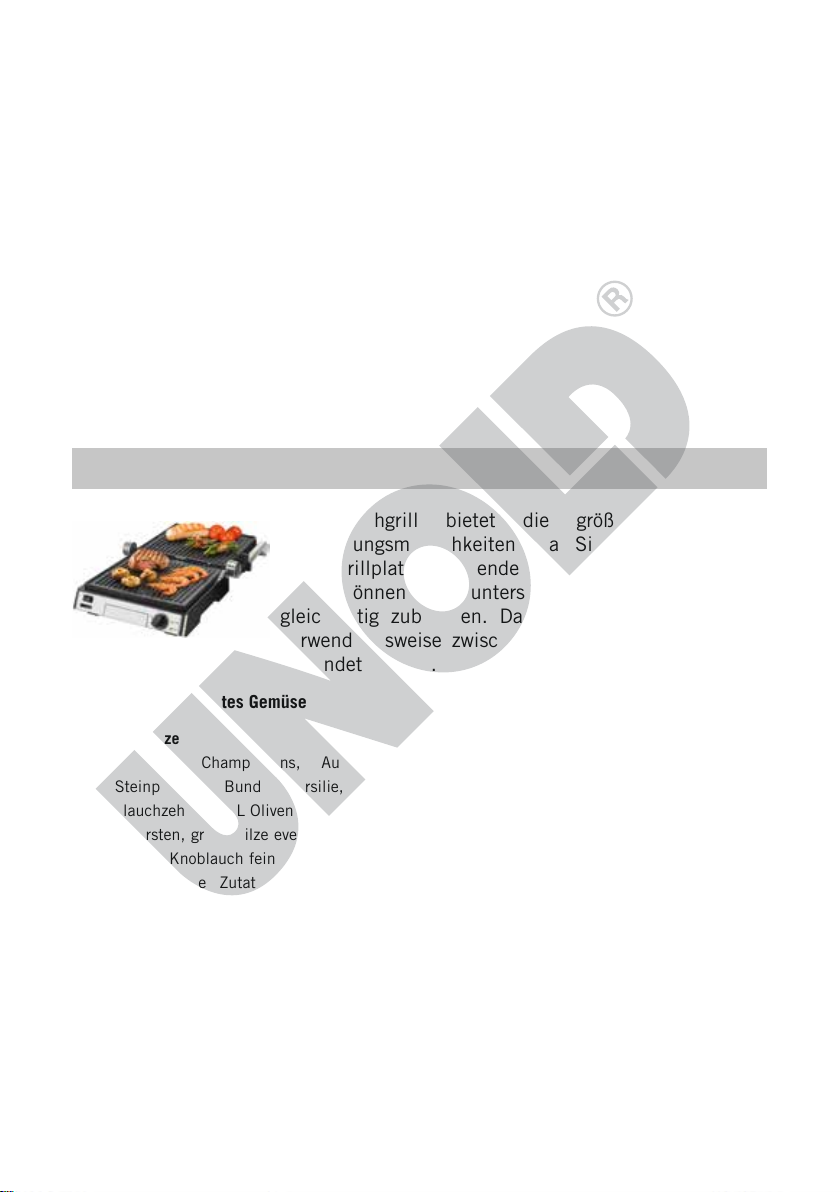
BEDIENUNGSANLEITUNG MODELL 58526
Copyright UNOLD AG | www.unold.de
TECHNISCHE DATEN
Leistung: 1.800–2.000 W, 220–230 V~, 50 Hz
Platten: Antihaftbeschichtet, entnehmbar,
Grillfläche 29,0 x 26,0 cm
Griff: Wärmeisoliert
Größe: Ca. 35,6 x 35,9 x 15,5 cm (B/T/H)
Gewicht: Ca. 4,35 kg
Zuleitung: Ca. 100 cm
Ausstattung: Fettauffangbehälter, stufenlose Temperaturregelung, Grilltem-
peratur bis max. 230 °C, verschiedene Grill-Positionen für das
Oberteil wählbar (Kontaktgrillen, Überbacken, um 90° nach
hinten klappbar, Flachgrill, Verriegelung), Kontrollleuchten für
EIN/AUS und BEREIT; hochwertiges Edelstahlgehäuse, Über-
hitzungsschutz, Platz sparende, stehende Aufbewahrung
Zubehör: Fettauffangbehälter, Bedienungsanleitung mit Rezepten
Änderungen und Irrtümer in Ausstattungsmerkmalen, Technik, Farben und Design vorbehalten
SYMBOLERKLÄRUNG
Dieses Symbol kennzeichnet eventuelle Gefahren, die Verletzungen
nach sich ziehen können oder zu Schäden am Gerät führen.
Dieses Symbol weist Sie auf eine eventuelle Verbrennungsgefahr hin.
Gehen Sie hier immer besonders achtsam vor.
Dieses Symbol weist auf eine eventuelle Brandgefahr hin.
8
Page 9
FÜR IHRE SICHERHEIT
Copyright UNOLD AG | www.unold.de
Bitte lesen Sie die folgenden Anweisungen und bewahren Sie diese auf.
1. Dieses Gerät kann von Kindern ab 8 Jahren sowie von Personen
mit reduzierten physischen, sensorischen oder mentalen
Fähigkeiten oder Mangel an Erfahrung und/oder Wissen benutzt
werden, wenn sie beaufsichtigt oder bezüglich des sicheren
Gebrauchs des Geräts unterwiesen wurden und die daraus
resultierenden Gefahren verstanden haben.
2. Kinder dürfen nicht mit dem Gerät spielen.
3. Reinigung und benutzerseitige Wartung dürfen nicht von Kindern
durchgeführt werden, es sei denn, sie sind älter als 8 Jahre und
werden beaufsichtigt.
4. Bewahren Sie das Gerät und das Kabel außerhalb der Reichweite
von Kindern unter 8 Jahren auf.
5. VORSICHT - Teile dieses Produkts können sehr heiß werden und
Verbrennungen verursachen! In Anwesenheit von Kindern und
gefährdeten Personen ist besondere Vorsicht geboten.
6. Gerät nur an Wechselstrom mit Spannung gemäß Typenschild
anschließen.
7. Das Gerät ist für den Hausgebrauch sowie für ähnliche
Anwendungsfälle bestimmt, z. B.:
vom Personal genutzte Küchenbereiche in Geschäften, Büro
-
räumen und anderen Arbeitsumgebungen;
durch Gäste in Hotels, Motels und anderen Wohnräumen;
in Frühstückspensionen.
8. Dieses Gerät darf nicht mit einer externen Zeitschaltuhr oder
einem Fernbedienungssystem betrieben werden.
9. Tauchen Sie das Gerät keinesfalls in Wasser oder andere Flüssigkeiten ein. Die Zuleitung darf nicht mit Wasser oder anderen Flüssigkeiten in Kontakt kommen. Falls dies doch einmal
geschieht, müssen vor erneuter Benutzung alle Teile vollkommen trocken sein.
Das Gerät bzw. die Zuleitung niemals mit nassen Händen
10.
berühren.
11. Stellen Sie das Gerät aus Sicherheitsgründen niemals auf heiße
Oberflächen, Metalltabletts oder nassen Untergrund.
12. Das Gerät oder die Zuleitung dürfen nicht in der Nähe von Flammen betrieben werden.
Achten Sie darauf, dass die Zuleitung nicht über den Rand der
13.
Arbeitsfläche hängt, da dies zu Unfällen führen kann, wenn z. B.
Kleinkinder daran ziehen.
9
Page 10

14. Wenn Sie ein Verlängerungskabel benutzen, prüfen Sie, ob die-
Copyright UNOLD AG | www.unold.de
ses intakt und für die entsprechende Leistung geeignet ist, da es
sonst zu Überhitzung kommen kann.
Die Zuleitung und ggf. das Verlängerungskabel müssen so ver-
15.
legt sein, dass ein Ziehen oder darüber Stolpern verhindert wird.
Verwenden Sie das Gerät nur in Innenräumen.
16.
17. Lassen Sie das Gerät während des Betriebs nicht unbeaufsichtigt und halten Sie es außerhalb der Reichweite von Kindern.
Vor dem Aufheizen das Kabel bitte vollständig abwickeln, damit
18.
es nicht mit heißen Teilen in Berührung kommt.
19. Decken Sie die Grillfläche niemals mit Aluminiumfolie,
Backpapier oder anderen Materialien ab.
20. Fassen Sie während des Betriebes nie auf die heiße Grillplatte –
Verbrennungsgefahr!
21. Wenn Sie mit geschlossenem Deckel grillen, kann sich unter
dem Deckel heißer Dampf bilden. Achten Sie beim Öffnen des
Deckels darauf, ausreichend Abstand zu halten, um Verbrennungen zu vermeiden.
Um Rauchentwicklung zu vermeiden, überhitzen Sie Ihr Koch-,
22.
Brat- und Backgeschirr nicht; der Rauch kann für kleine Tiere
(z. B. Vögel) mit einem besonders empfindlichen Atmungssystem
gefährlich sein. Wir empfehlen Ihnen, Vögel nicht in der Küche
zu halten.
23. Berühren Sie das Gerät im heißen Zustand nur an den Griffen.
24. Verwenden Sie zum Öffnen des Gerätes nur den Griff.
25. Achten Sie darauf, dass das Gerät während des Betriebes frei
auf einer hitzebeständigen Oberfläche und in ausreichender
Entfernung zu entflammbaren Gegenständen steht.
26. Nach Gebrauch ziehen Sie den Stecker aus der Steckdose und
lassen Sie den Grill auskühlen, bevor Sie das Gerät reinigen und
zur Aufbewahrung wegstellen.
27. Zur Reinigung können Sie die Platte nach dem Erkalten entneh
men und von Hand reinigen. Das Gerät mit einem feuchten Tuch
abwischen.
28.
Um Schäden zu vermeiden, darf das Gerät nicht mit Zubehör
anderer Hersteller oder Marken benutzt werden.
29. Prüfen Sie regelmäßig Stecker und Anschlusskabel auf Verschleiß oder Beschädigungen. Bei Beschädigung des Anschlusskabels oder anderer Teile senden Sie das Gerät bitte zur Überprüfung und Reparatur an unseren Kundendienst. Unsachgemäße
Reparaturen können zu erheblichen Gefahren für den Benutzer
führen und führen zum Ausschluss der Garantie.
10
Page 11
VORSICHT:
Copyright UNOLD AG | www.unold.de
Das Gerät ist während und nach dem Betrieb sehr heiß!
Betreiben Sie das Gerät nie, wenn Wasser oder andere
Flüssigkeiten im Fettauffangbehälter sind – Brandgefahr!
Das Gerät nie betreiben, wenn der Fettauffangbehälter nicht
eingesetzt ist.
Öffnen Sie auf keinen Fall das Gehäuse des Gerätes. Es besteht die Gefahr eines Stromschlages.
Der Hersteller übernimmt keine Haftung bei fehlerhafter Montage, bei unsachgemäßer oder fehlerhafter
Verwendung oder nach Durchführung von Reparaturen durch nicht autorisierte Dritte.
VOR DEM ERSTEN GEBRAUCH
1. Entfernen Sie alle Verpackungsmaterialien und ggf. Transportsicherungen.
Halten Sie Verpackungsmaterial von Kindern fern – Erstickungsgefahr!
2. Prüfen Sie, ob alle Teile vorhanden sind. Wenn Teile fehlen oder beschädigt
sind, wenden Sie sich bitte an Ihren Händler oder an unseren Kundenservice.
3. Vor dem ersten Benutzen empfehlen wir Ihnen, die antihaftbeschichteten
Grillplatten mit einem feuchten Tuch abzuwischen.
4. Befestigen Sie in den Innenseiten des Gerätes jeweils eine Grillplatte (siehe
Kapitel „Grillplatten einsetzen/entnehmen“).
5. Stellen Sie sicher, dass der Fettauffangbehälter eingesetzt ist. Dieser wird
von vorn ins Gehäuse geschoben, bis der Behälter einrastet.
6. Gerät schließen, Stecker in eine Steckdose (220–230 V~, 50 Hz) stecken.
Die grüne Betriebskontrollleuchte leuchtet auf und zeigt an, dass die Heizung in Betrieb ist.
7. Den Temperaturregler auf mittlere Position stellen. Das Vorheizen
beginnt, die rote Kontrollleuchte leuchtet auf. Sobald das Gerät die
voreingestellte Temperatur erreicht hat, erlischt die rote Kontrollleuchte
und die grüne Betriebskontrollleuchte leuchtet auf. Achtung: Die grüne
Betriebskontrollleuchte schaltet sich während des Betriebes abwechselnd
an und aus, abhängig von der aktuellen Heizleistung des Gerätes.
8. Lassen Sie das Gerät für einige Minuten heizen. Achten Sie dabei auf eine
ausreichende Belüftung des Raumes.
9. Bei der Erstbenutzung kann sich etwas Rauch und Geruch bilden, der nach
kurzer Zeit verschwindet.
10. Sie können das Gerät nun verwenden.
11
Page 12
GRILLPLATTEN EINSETZEN/ENTNEHMEN
Copyright UNOLD AG | www.unold.de
1. Zur leichteren Reinigung lassen sich die Platten entnehmen. Drücken Sie
hierfür die jeweilige Entriegelungstaste und ziehen Sie die Grillplatte nach
vorn in Richtung des Griffes.
2. Um die Grillplatten wieder einzusetzen, führen Sie die jeweilige Platte in
die Fixierung und drücken Sie die Platte nach unten, bis diese einrastet.
Prüfen Sie den sicheren Halt der Grillplatten, bevor Sie das Gerät wieder
benutzen.
TEMPERATURREGELUNG
1. Sie können unterschiedliche Temperaturen für die Grillfläche einstellen.
2. Als Richtwerte gelten:
Niedrige Hitze: Schaschlik, Spieße, Würstchen
Mittlere Hitze: Rösten, Spiegeleier backen, Sandwiches
Große Hitze: Grillen, Toasten
Die Heizleistung ist aus Sicherheitsgründen im hinteren mittleren Bereich
der Grillplatten etwas geringer. Hier können Sie optimal dünnere Fleischstücke oder z. B. Gemüse grillen.
GRILLGUT
1. Testen Sie eines unserer Rezepte oder verwenden Sie einfach Ihr übliches
Grillrezept.
2. Wenn Sie zuvor gefrorenes Grillgut verwenden, achten Sie darauf, dass dieses vor dem Grillen vollständig aufgetaut sein muss.
3. Zuvor im Kühlschrank gelagertes Fleisch gelingt am besten, wenn Sie es
einige Zeit vor dem Grillen aus dem Kühlschrank nehmen und bei Raumtemperatur akklimatisieren lassen.
4. Nach Möglichkeit sollte Fleisch (je nach Zubereitung und Fleischart) erst
nach dem Grillen gesalzen werden. Wenn Sie das Fleisch vor dem Grillen
marinieren, wird dies besonders zart und schmackhaft.
5. Durch den Fettauffangbehälter werden Fett und Bratensäfte aufgefangen.
Sie grillen so besonders fettarm und Ihre Speisen sind gesünder und besser
bekömmlich.
12
Page 13
POSITION DER GRILLPLATTEN
Copyright UNOLD AG | www.unold.de
1. Über die Deckeljustierung stellen Sie die
verschiedenen Varianten für die Position
der Grillplatten ein.
Symbol : Der Deckel lässt sich um 90°
nach hinten klappen.
Symbol : Der Deckel kann in
geschlossenem Zustand fixiert werden, so
dass das Gerät nicht mehr geöffnet werden
kann. Achtung: Nur einstellen, wenn das
Gerät vom Stromnetz getrennt ist, und
keine Lebensmittel eingefüllt sind. Ideal,
um das Gerät bequem zu transportieren
oder zu verstauen.
Positionen I bis V: Sie können zwischen verschiedenen Höhen beim
Kontaktgrillen wählen. Der Deckel rastet in der gewählten Höhe ein und
verhindert so, dass das Grillgut durch das Gewicht des Deckels zu sehr
gedrückt wird. Schieben Sie den Regler auf der rechten Seite des Gerätes
auf die gewünschte Höhe zwischen „I“ und „V“.
GRILLEN
Achtung! Decken Sie die Grillfläche niemals mit Aluminiumfolie, Backpapier
oder anderen Materialien ab. Verwenden Sie auch keine AluminiumGrillschalen. Durch den entstehenden Hitzestau kann es zu Bränden
kommen.
1. Stellen Sie das Gerät in geschlossenem Zustand auf eine hitzebeständige
Fläche.
2. Prüfen Sie, ob sich der Temperaturregler in der Position „MIN“ befindet.
3. Achten Sie darauf, dass der Fettauffangbehälter richtig an der Vorderseite
des Gerätes eingesetzt ist. Betreiben Sie das Gerät nie, wenn der Fettauffangbehälter nicht eingesetzt ist, und füllen Sie nie Flüssigkeiten wie z. B.
Wasser in den Fettauffangbehälter.
Hinweis: Klappen Sie immer die zwei Standfüße am
Geräteboden aus! Nur so kann der Fettauffangbehälter
optimal genutzt werden.
Einseitiges Grillen/Flachgrillen
Ideal für weiche, nicht zu dicke Zutaten.
4. Sie können Ihre Speisen nur auf der unteren Grillfläche mit geöffnetem
Deckel grillen oder beide Grillflächen verwenden. Hierfür müssen Sie die
13
Page 14
Deckeljustierung auf stellen, auf die Taste „180°“ (3) drücken und den
Copyright UNOLD AG | www.unold.de
Deckel komplett aufklappen, so dass beide Grillflächen waagrecht sind.
5. Um Energie zu sparen, empfehlen wir, das Gerät mit geschlossenem Deckel
aufzuheizen. Stecken Sie den Stecker in eine Steckdose (220–230 V~,
50 Hz). Die grüne Betriebskontrollleuchte leuchtet auf und zeigt an, dass
die Heizung in Betrieb ist.
6. Den Temperaturregler auf die gewünschte Position stellen. Das Vorheizen
beginnt, die rote Kontrollleuchte leuchtet auf. Sobald das Gerät die voreingestellte Temperatur erreicht hat, erlischt die rote Kontrollleuchte und die
grüne Betriebskontrollleuchte leuchtet auf. Achtung: Die grüne Betriebskontrollleuchte schaltet sich während des Betriebes abwechselnd an und
aus, abhängig von der aktuellen Heizleistung des Gerätes.
7. Öffnen Sie vorsichtig den Gerätedeckel. Berühren Sie dabei den Deckel
ausschließlich am Griff, um Verbrennungen zu vermeiden.
8. Bestreichen Sie die untere Grillplatte (und beim Flachgrillen auch die obere
Grillplatte) mit etwas hitzebeständigem Öl.
9. Legen Sie das gewünschte Grillgut auf und prüfen Sie von Zeit zu Zeit, ob
das Grillgut gewendet werden muss.
10. Prüfen Sie regelmäßig, ob der Fettauffangbehälter voll ist. Wenn der Behälter voll ist, schalten Sie das Gerät aus, lassen Sie das Gerät abkühlen, entleeren Sie den Fettauffangbehälter und fahren Sie dann mit dem Zubereiten
der Speisen fort. Um eine eventuelle Brandgefahr zu vermeiden, darf der
Fettauffangbehälter nie überlaufen.
11. Wenn Ihre Speisen zubereitet sind, drehen Sie den Temperaturregler auf
„MIN“ und ziehen Sie den Stecker aus der Steckdose.
12. Lassen Sie das Gerät vollständig abkühlen, bevor Sie es reinigen.
Kontaktgrillen/Überbacken
Ideal für Fleischstücke oder Sandwiches, das Grillgut muss nicht gewendet werden.
13. Sie können hierbei Ihre Speisen auf der unteren Grillfläche mit geschlossenem Deckel grillen.
14. Um Energie zu sparen, empfehlen wir, das Gerät mit geschlossenem Deckel
aufzuheizen. Stecken Sie den Stecker in eine Steckdose (220–230 V~,
50 Hz). Die grüne Betriebskontrollleuchte leuchtet auf und zeigt an, dass
die Heizung in Betrieb ist.
15. Den Temperaturregler auf die mittlere Position stellen. Das Vorheizen
beginnt, die rote Kontrollleuchte leuchtet auf. Sobald das Gerät die voreingestellte Temperatur erreicht hat, erlischt die rote Kontrollleuchte und die
grüne Betriebskontrollleuchte leuchtet auf. Achtung: Die grüne Betriebskontrollleuchte schaltet sich während des Betriebes abwechselnd an und
aus, abhängig von der aktuellen Heizleistung des Gerätes.
16. Öffnen Sie vorsichtig den Gerätedeckel. Berühren Sie dabei den Deckel
ausschließlich am Griff, um Verbrennungen zu vermeiden.
14
Page 15
17. Bestreichen Sie die untere Grillplatte mit etwas hitzebeständigem Öl.
Copyright UNOLD AG | www.unold.de
18. Legen Sie das gewünschte Grillgut auf.
19. Schließen Sie den Gerätedeckel wieder. Berühren Sie dabei den Deckel
ausschließlich am Griff, um Verbrennungen zu vermeiden.
20. Der Deckel passt sich automatisch der Dicke des Grillgutes an. Sie können
den Abstand zwischen Grillgut und Deckel jedoch auch über die Einstellungen I bis V an der Deckeljustierung auswählen, wie im Kapitel „Position der
Grillplatten“ beschrieben.
21. Prüfen Sie regelmäßig, ob der Fettauffangbehälter voll ist. Wenn der Behälter voll ist, schalten Sie das Gerät aus, lassen Sie das Gerät abkühlen, entleeren Sie den Fettauffangbehälter und fahren Sie dann mit dem Zubereiten
der Speisen fort. Um eine eventuelle Brandgefahr zu vermeiden, darf der
Fettauffangbehälter nie überlaufen.
22. Wenn Ihre Speisen zubereitet sind, drehen Sie den Temperaturregler auf
„MIN“ und ziehen Sie den Stecker aus der Steckdose.
23. Lassen Sie das Gerät vollständig abkühlen, bevor Sie es reinigen.
VORSICHT:
Das Gerät ist während und nach dem Betrieb sehr heiß
REINIGEN UND AUFBEWAHREN
Ziehen Sie vor der Reinigung oder Wartung den Stecker aus der
Steckdose. Warten Sie, bis das Gerät komplett abgekühlt ist.
Das Gerät darf niemals in Wasser getaucht werden!
1. Um die Oberfläche der antihaftbeschichteten Platte nicht zu beschädigen,
benutzen Sie bitte in keinem Fall Topfkratzer oder ähnliche Reinigungswerkzeuge. Verwenden Sie keine scharfen Scheuermittel, Stahlwolle, metallische Gegenstände, heiße Reinigungsmittel oder Desinfektionsmittel, da
diese zu Beschädigungen führen können. Grobe Verunreinigungen entfernen
Sie bitte mit dem mitgelieferten Reinigungsschaber. Dieser ist ausschließlich für diesen Zweck geeignet. Um Schäden an den Platten zu vermeiden,
nutzen Sie den Reinigungsschaber bitte nie, um Ihr Grillgut zu wenden oder
vom Grill zu nehmen.
2. Zur leichteren Reinigung lassen sich die Platten entnehmen. Drücken Sie
hierfür die Entriegelungstaste und ziehen Sie die jeweilige Grillplatte nach
vorn in Richtung des Griffes.
3. Reinigen Sie die Platten mit warmem Wasser, dem Sie etwas mildes Spülmittel zusetzen können, und trocknen Sie anschließend die Platten gut ab.
4. Um die Grillplatten wieder einzusetzen, führen Sie die jeweilige Platte in
die Fixierung und drücken Sie die Platte nach unten, bis diese einrastet.
15
Page 16
Prüfen Sie den sicheren Halt der Grillplatten, bevor Sie das Gerät wieder
Copyright UNOLD AG | www.unold.de
benutzen.
5. Entfernen Sie das ggf. gesammelte Fett aus dem Fettauffangbehälter und
reinigen Sie diesen im warmen Spülwasser. Setzen Sie den vollständig
getrockneten Behälter wieder ins Gehäuse ein und stellen Sie sicher, dass
der Behälter fest im Gehäuse sitzt.
6. Wischen Sie das Gehäuse mit einem gut ausgedrückten, feuchten Tuch ab
und trocknen Sie es gut ab.
7. Achten Sie immer darauf, dass kein Wasser in das Gehäuse eindringen kann.
8. Der Grill lässt sich Platz sparend aufbewahren. Um ein versehentliches Aufklappen zu vermeiden, stellen Sie die Deckeljustierung auf .
9. Bewahren Sie das Gerät an einem trockenen, staubgeschützten Platz auf.
16
Page 17

MARINADEN
Copyright UNOLD AG | www.unold.de
Die folgenden Marinaden eignen sich für Steaks aus Rindfleisch, Schweinefleisch,
Lamm, Geflügel, Fisch und Gemüse. Portionierte Steaks in Marinade einlegen
oder damit bestreichen und mehrere Stunden, am besten über Nacht im
Kühlschrank durchziehen lassen. Gelegentlich in der Marinade wenden. Vor
dem Grillen sollten Sie die Marinade mit einem Küchentuch abtupfen. Mit der
restlichen Marinade können Sie das Grillgut während des Grillens von Zeit zu
Zeit bestreichen.
Feurig-scharfe Marinade
1 Zwiebel, ½ rote Chilischote, 2 EL Olivenöl,
2 EL Rohrzucker, 3 EL Essig, 50 ml Apfelsaft,
50 ml Tomatensaft, 2 TL Worcestersauce,
2 Wacholderbeeren
Zwiebel und Chilischote fein würfeln, in einer
Pfanne im Öl kurz glasig braten. Zucker, Essig
und Apfelsaft zugeben, aufkochen. Vom Herd
nehmen. Tomatensaft, Worcestersauce und
zerdrückte Wacholderbeeren zugeben. Nach
dem Abkühlen das Fleisch darin marinieren.
Biermarinade
4 Lorbeerblätter, 4 Wacholderbeeren, 2 EL
Olivenöl, 1/8 l Doppelbockbier (oder Malzbier,
wenn die Marinade alkoholfrei sein soll), 2 EL
Honig, Saft von ½ Zitrone
Lorbeerblätter und Wacholderbeeren in Öl
anschwitzen, Bier und Honig zugeben und
kurz erhitzen (nicht kochen!). Zitronensaft
zugeben, Marinade abkühlen lassen und Fleisch
marinieren.
Rosmarinmarinade
2 TL getrockneter Rosmarin, 4 Knoblauchzehen,
4 Wacholderbeeren, 8 schwarze Pfefferkörner,
4 TL Senfkörner, 5 EL Olivenöl.
Alle Zutaten außer Öl im Mörser zerstoßen. Die
Paste mit dem Öl mischen und das Fleisch
damit einreiben.
Currymarinade
2 TL Currypulver, ein daumengroßes Stück
frischer Ingwer, 50 ml trockener Weißwein,
100 ml Ananassaft
Ingwer schälen und fein reiben, mit den übrigen
Zutaten mischen, Fleisch damit bestreichen.
Asiatische Marinade
1 EL Honig, 2 TL Sambal Oelek, 1 EL Reiswein,
8 EL süße Sojasauce, 2 EL Orangensaft, 2 EL
Sherry
Zutaten miteinander verrühren und das Fleisch
damit bestreichen.
Kokosmarinade
1 unbehandelte Zitrone, 1 Msp. Cayennepfeffer,
1 daumengroßes Stück frischer Ingwer, 1 Knoblauchzehe, 150 ml ungesüßte Kokosmilch
Ingwer schälen und fein reiben, Knoblauch
schälen und pressen, Zitronenschalen abreiben,
Zitrone auspressen. Ingwer, Knoblauch,
Zitronenschale und –saft mit den anderen
Zutaten vermischen, das Fleisch in die Marinade
legen.
Rotweinmarinade
¼ TL Pimentkörner, 2 Gewürznelken, 2 TL
Senfkörner, 3 Wacholderbeeren, 1 Prise Zimt,
1 TL schwarze Pfefferkörner, 2 EL/150 g rotes
Johannisbeergelee, 100 ml trockener Rotwein
Piment, Nelken, Senfkörner, Wacholderbeeren
und Pfefferkörner im Mörser zerstoßen. Öl in
einer Pfanne erhitzen, die zerkleinerten Gewürze
darin anschwitzen. Johannisbeergelee, Zimt und
Rotwein zugießen und erwärmen, bis das Gelee
flüssig wird. Marinade abkühlen lassen und
Fleisch darin einlegen.
17
Page 18
Orangenmarinade
Copyright UNOLD AG | www.unold.de
Saft von 3 säuerlichen Orangen, 2 TL Estragon,
1 EL Essig, ½ TL Pfeffer.
Alle Zutaten verrühren und das Fleisch darin
einlegen.
Knoblauchmarinade
8 Knoblauchzehen, 1 Zwiebel, 2 TL frisch
gehackte Salbeiblätter, ¼ l Buttermilch.
Knoblauch und Zwiebeln fein würfeln, mit den
anderen Zutaten vermischen und das Fleisch
darin einlegen.
Kümmelmarinade
1 EL Kümmelsaat, ½ TL grob gemahlener
Pfeffer, 2 EL Apfelessig, 2 EL Apfelsaft, 3 EL
Olivenöl
Zutaten vermischen, das Fleisch darin einlegen.
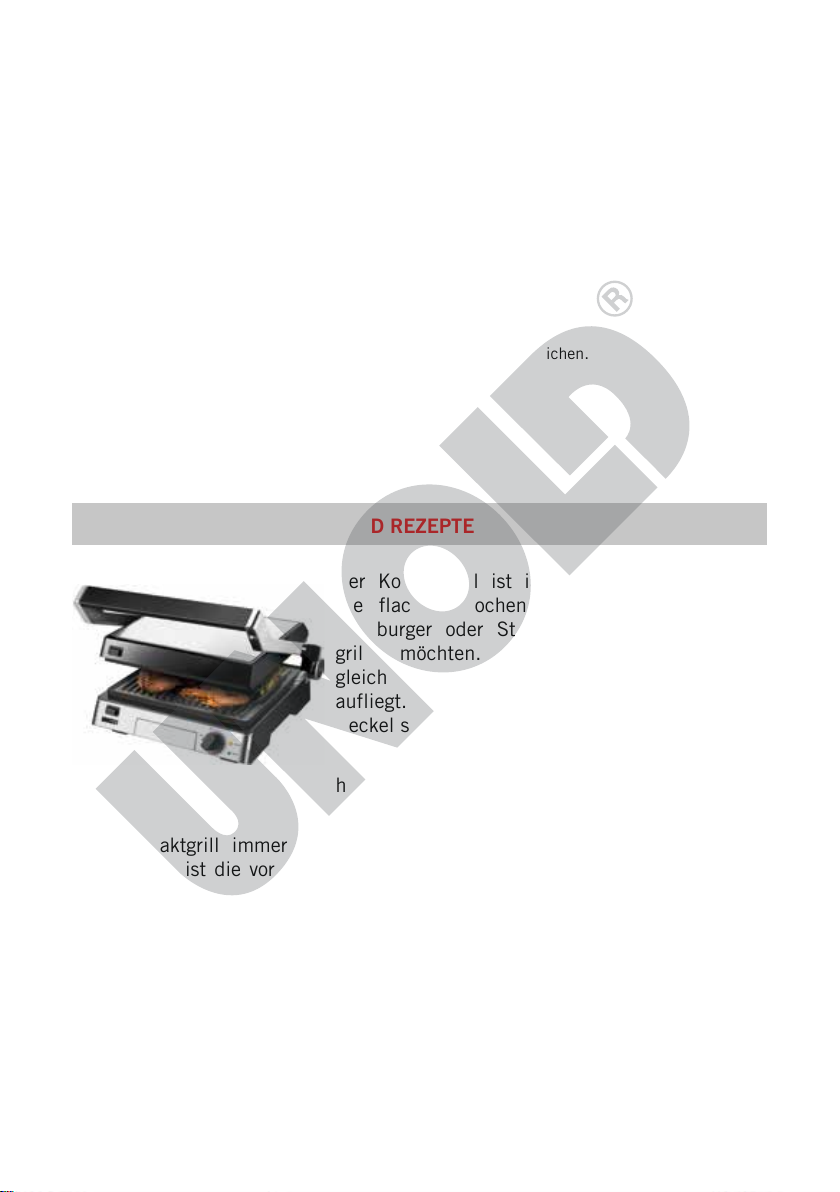
KONTAKTGRILLEN – TIPPS UND REZEPTE
Der Kontaktgrill ist immer dann richtig, wenn
Sie flache, knochenlose Fleischstücke, z. B.
Hamburger oder Steaks oder Gemüsescheiben
grillen möchten. Das Grillgut sollte in etwa die
gleiche Stärke haben, damit das Oberteil stets gut
aufliegt. Zum Kontaktgrillen müssen Sie stets den
Deckel schließen.
Süß-scharfe Marinade
5 EL Honig, 5 EL Sojasauce, 1 Msp. Cayennepfeffer, 1 TL Senfpulver, 2 EL Olivenöl
Zutaten vermischen, das Fleisch darin einlegen.
Zitronenmarinade
6 Knoblauchzehen, 100 ml Olivenöl, Saft
und abgeriebene Schale von 2 unbehandelten
Zitronen, ¼ TL Pfeffer
Knoblauch fein würfeln, mit Zitronenschale,
-saft und Pfeffer verrühren, Fleisch mit der
Marinade bestreichen.
Den Kontaktgrill immer gut vorheizen. Wenn die Kontrollleuchte „Fertig“
aufleuchtet, ist die voreingestellte Temperatur erreicht. Erst dann das Grillgut
auflegen. Ihre Fleischgerichte werden optimal gegrillt, wenn das Grillgut eine
Stärke von 1,5–3 cm hat. Besonders saftig wird Ihr Grillgut, wenn Sie dieses
zuvor marinieren.
Wir empfehlen, das Grillgut erst nach dem Grillen zu salzen, da insbesondere
Rindersteaks oder Leber sonst hart werden können.
Die in den Rezepten genannten Zeiten gelten für beidseitiges Kontaktgrillen.
Sofern nichts anderes angegeben ist, sind die Rezepte jeweils für 4 Personen
berechnet.
18
Bei relativ dünnem Grillgut empfehlen wir die
höchste Stufe, bei Grillgut von ca. 3 cm Stärke
empfehlen wir eine mittlere Stufe.
Page 19

Fleischgerichte
Copyright UNOLD AG | www.unold.de
Hähnchentaschen
4 dünne Hähnchenschnitzel, Salz, Pfeffer,
8 Champignons, 1 Zwiebel, 2 EL Öl, 120 g
geriebener Gouda, 2 TL Majoran, 4 Zahnstocher
Schnitzel flach klopfen, mit Salz und Pfeffer
würzen. Zwiebel in Würfel schneiden, kurz in
Öl in der Pfanne glasig dünsten. Pilze blättrig
schneiden und kurz mitdünsten. Die ZwiebelChampignon-Mischung auf die Schnitzel
streuen, mit geriebenem Käse bestreuen.
Schnitzel zusammenklappen und mit den Zahnstochern fixieren. 2 EL Öl mit dem Majoran
mischen. Die Fleischtaschen damit bestreichen,
auf Stufe 3 ca. 15 Min. grillen, dabei immer
wieder mit dem Majoranöl bestreichen.
Saltimbocca mit Mozzarella
4 dünne Kalbsschnitzel, 4 Scheiben Parma-
schinken, 8 Salbeiblätter, 300 g Mozzarellakäse,
Salz, Pfeffer, 4 geölte Zahnstocher
Schnitzel flach klopfen, mit Salz und Pfeffer
würzen. Jedes Schnitzel mit einer Scheibe
Schinken, 2 Salbeiblättern und 2 dünnen
Scheiben Mozzarella belegen.
Schnitzel zusammenklappen, mit Zahnstocher
feststecken.
Schnitzel auf die Grillplatte legen und auf Stufe
MAX ca. 10 Min. grillen
Pizzaburger
Pro Person:
100 g gemischtes Hackfleisch, 1 Knoblauchzehe
und ½ Zwiebel in feinen Würfeln, 1 Ei, 2 EL
Semmelbrösel, 50 g Gouda, 50 g Kochschinken,
2 TL Tomatenmark, ½ TL Pizzagewürz, evtl.
Salz und Pfeffer (manches Pizzagewürz enthält
schon Salz und Pfeffer), 1 Burgerbrötchen,
2 Blätter Eisbergsalat, 1 EL Mayonnaise,
1 EL Tomatenketchup, 2 Scheiben Tomaten,
2 Scheiben Zwiebel
Hackfleisch, Knoblauch und Zwiebelwürfel, Ei,
Semmelbrösel, in feine Würfel geschnittener
Gouda, fein gewürfelter Schinken, Tomatenmark
und Pizzagewürz zu einem Teig verkneten.
2 flachgedrückte Burger formen.
Die Grillfläche dünn mit Öl einstreichen, die
Burger ca. 6-8 Minuten grillen.
Das Brötchen einmal quer aufschneiden, kurz
von beiden Seiten auf dem Grill toasten. Mit
etwas Mayonnaise bestreichen, Salatblätter
waschen, trocken schleudern, auf die
Mayonnaise legen, darauf einen Burger. Diesen
mit Ketchup bestreichen, den zweiten Burger
darauf stapeln, Tomaten und Ziebeln darüber,
Brötchendeckel darauf.
Kräuter-Lammkoteletts mit Grillgemüse
8 Lammkoteletts, Marinade Nr. 3, 2 Zucchini,
3 Stiele Petersilie, 2 Knoblauchzehen, 2 EL Öl
Koteletts ca. 6 Std. in der Marinade marinieren.
Von jeder Seite ca. 6 Min. grillen.
Zucchini längs in 2 cm dicke Scheiben
schneiden. Knoblauch und Petersilie fein
hacken, mit dem Öl mischen. Zucchini mit
dem Würzöl bestreichen und von jeder Seite ca.
3 Min. grillen.
Fischgerichte
Gegrillter Lachs mit Zitronenbutter
4 kleine Scheiben Lachs, 4 TL Zitronensaft, 4 EL
weiche Butter, 2 TL abgeriebene Zitronenschale,
Salz, Pfeffer
Fisch säubern, mit Zitrone säuern, salzen,
pfeffern und grillen. Butter mit Zitronenschale
vermischen, auf dem gegrillten Lachs anrichten
und servieren.
Garnelenspieße
(als Vorspeise, als Hauptgericht Menge
verdoppeln)
8 geschälte Garnelen, ½ Menge Marinade Nr. 6,
4 geölte Holzspieße
Je 2 Garnelen auf einen Holzspieß stecken, mit
Marinade bestreichen und mind. 1–1,5 Std.
ziehen lassen. Ca. 4–5 Minuten grillen.
19
Page 20

Vegetarische Köstlichkeiten
Copyright UNOLD AG | www.unold.de
Maiskolben
4 Zuckermaiskolben (ohne Blätter), 2 l Salzwasser, 4 EL Olivenöl oder Würzöl
Die Maiskolben in Salzwasser ca. 10 Minuten
kochen, abtropfen lassen. Maiskolben mit
Öl einstreichen, oben und unten je einen
Zahnstocher hineinstechen, damit sich der
Maiskolben problemlos drehen lässt. Ca.
10 Minuten unter mehrmaligem Drehen grillen.
Tipp: Umwickeln Sie die Kolben vor dem Grillen
mit Frühstücksspeck (mit Zahnstochern feststecken).
Gegrillte Auberginen und Zucchini
2 Auberginen, 2 Zucchini, Salz, 1 Portion
Rosmarinmarinade
Auberginen in ½ cm dicke Scheiben schneiden,
mit Salz bestreuen und kurz ziehen lassen.
Danach trocken tupfen. Zucchini längs in ½ cm
dicke Scheiben schneiden.
Zucchini und Auberginen mit der Marinade
bestreichen und ca. 30 Minuten marinieren. Auf
dem vorgeheizten Grill ca. 2–3 Minuten grillen.
Gemüseburger
1 Kohlrabi, 1 kleine Sellerieknolle, 300 g
Möhren, 1 Petersilienwurzel, 1 Bund Petersilie,
2 Knoblauchzehen, 100 g Gouda, 2 Eier, 2 EL
gemahlener Grünkern, 2 EL Semmelbrösel,
Salz, Pfeffer, Öl
Kohlrabi, Sellerie, Möhren und Petersilienwurzel
waschen, schälen und fein raspeln (z.B.
mit dem ESGE-Zauberstab und der ESGEZauberette). Petersilie, Kohlrabigrün und
Knoblauchzehen fein hacken, Käse fein
würfeln. Diese Zutaten mit Eiern, Grünkern,
Semmelbrösel, Salz und Pfeffer zu einem Teig
vermischen. Kleine Burger formen, diese mit
Öl bepinseln, auf die Grillplatte legen und ca.
6 Minuten grillen.
SANDWICHES UND PANINIS – TIPPS UND REZEPTE
Klassische Sandwiches oder Panini bereiten Sie im Kontaktgrill zu. Die
Sandwiches sollten in etwa die gleiche Stärke haben, damit das Oberteil stets
gut aufliegt.
Grundsätzlich können Sie jede Sorte Brot zum Toasten verwenden. Besonders
köstlich werden Panini oder Sandwiches mit Ciabatta, Focaccia oder Baguette.
Den Kontaktgrill immer gut vorheizen. Erst dann das Grillgut auflegen. Bitte grillen
Sie Ihre Sandwiches und Panini nur kurz bei mittlerer bis hoher Einstellung. Bei
einer zu langen Grillzeit kann eventuell enthaltener Käse auslaufen.
Tomaten-Mozzarella-Sandwich
8 Scheiben Toastbrot, 4–8 Scheiben Parmaschinken, 8 Scheiben Tomate, 8 Scheiben Mozzarella, 4 TL Pesto, Margarine
Die Toastbrotscheiben von einer Seite dünn mit
Margarine bestreichen und mit der bestrichenen
Seite nach unten auf einen Teller legen.
20
Auf den unbestrichenen Seiten das Pesto
verteilen. 4 der Brotscheiben mit Parmaschinken,
Tomaten- und Mozzarellascheiben belegen.
Mit den 4 übrigen Brotscheiben abdecken,
dabei muss die mit Margarine bestrichene Seite
außen sein. Auf dem vorgeheizten Grill legen,
Grill schließen und 2-3 Minuten grillen.
Page 21
Arme Ritter
Copyright UNOLD AG | www.unold.de
8 Scheiben Toastbrot, 3 Eier, 150 ml warme
Milch, 1 Prise Salz, 1 Prise Zucker, Margarine
Eier, Milch, Salz und Zucker verquirlen und
die Brotscheiben darin kurz einweichen. Den
vorgeheizten Grill mit etwas Margarine einfetten.
Die Toastscheiben abtropfen lassen, auf den
Grill legen und 2–3 Minuten grillen.
Den Toast mit Zimt und Zucker bestreuen oder
mit Konfitüre servieren.
Hawaii-Toast
8 Scheiben Toastbrot, 4 Scheiben gekochter
Schinken, 8 Scheiben Ananas (gut abgetropft),
4 TL Mayonnaise, 4 Scheiben Gouda, Margarine
FLACHGRILL – TIPPS UND REZEPTE
Der Flachgrill bietet die größte Vielfalt an
Zubereitungsmöglichkeiten, da Sie hier gleichzeitig
beide Grillplatten verwenden können.
Auch können Sie unterschiedlich starkes Grillgut
gleichzeitig zubereiten. Das Grillgut muss bei dieser
Verwendungsweise zwischendurch ein- oder mehrmals
gewendet werden.
Die Toastbrotscheiben von einer Seite dünn
mit Margarine bestreichen und mit der
bestrichenen Seite nach unten auf einen Teller
legen. 4 Brotscheiben auf den unbestrichenen
Seiten mit Mayonnaise bestreichen, dann
mit je einer Scheibe gekochtem Schinken,
Ananas und Käse belegen. Mit den 4 übrigen
Brotscheiben abdecken, dabei muss die mit
Margarine bestrichene Seite außen sein. Auf
dem vorgeheizten Grill legen, Grill schließen
und 2–3 Minuten grillen.
Gegrilltes Gemüse
Knoblauch-Pilze
500 g frische Champignons, Austernpilze
oder Steinpilze, 1 Bund Petersilie, Pfeffer,
2 Knoblauchzehen, 5 EL Olivenöl, Salz
Pilze abbürsten, große Pilze eventuell halbieren
oder vierteln. Knoblauch fein würfeln, Petersilie
fein hacken. Alle Zutaten außer Salz und
Pfeffer mischen und auf der Grillplatte grillen.
Mit einem Pfannenwender häufig wenden. Vor
dem Servieren salzen und pfeffern. Grillzeit ca.
10 Minuten.
Käsepuffer
250 g Zucchini, 100 g grob geriebener Käse,
1 Ei, 2 El Mehl, 1 TL Gemüsebrühe (Pulver),
1 kleine Zwiebel, 2 Prisen Muskat, Öl zum
Braten
Zucchini grob reiben, mit Käse, Ei, Mehl,
Brühpulver, fein gehackter Zwiebel und Muskat
mischen.
Grill auf 200 °C vorheizen. Etwas Öl auf die
Grillfläche geben. Mit einem Esslöffel kleine
Häufchen der Puffermasse auf die Grillplatten
geben und etwas andrücken. Von beiden Seiten
goldbraun braten.
Buntes Grillgemüse
1 Aubergine, 1 Zucchini, 1 Fleischtomate,
1 Gemüsezwiebel, je 1 rote, grüne und gelbe
Paprikaschote, 3 EL Olivenöl, 3 Knoblauchzehen,
1 EL frische Oreganoblätter, Pfeffer
Aubergine, Zucchini, Tomate und Paprika putzen
und in ca. 1,5 cm dicke Streifen schneiden.
Zwiebel in Ringe schneiden, Knoblauch fein
würfeln. Alle Zutaten mit dem Öl mischen, auf
21
Page 22

die Grillplatte geben und ca. 10–12 Minuten
Copyright UNOLD AG | www.unold.de
grillen, dabei häufig mit einem Pfannenwender
oder Grillbesteck wenden. Danach pfeffern.
Gegrilltes Obst
Gegrillte Ananas
1 Ananas, Zucker, Zimt
Die Ananas schälen und den Strunk in der
Mitte entfernen. In ca. 2 cm dicke Scheiben
schneiden. Ca. 3 Minuten auf der Grillplatte
grillen. Mit Zimt und Zucker bestreuen und
zusammen mit Vanilleeis servieren.
Chiliäpfel
4 rote Äpfel, Marinade Nr. 1
Aus den Äpfeln das Kerngehäuse ausstechen,
Äpfel in 1,5 cm dicke Ringe schneiden.
1 Stunde lang in der Marinade marinieren.
Insgesamt 3 Minuten auf der Grillplatte grillen,
zwischendurch einmal vorsichtig wenden.
Die Rezepte in dieser Bedienungsanleitung wurden von den Autoren und von der UNOLD AG
sorgfältig erwogen und geprüft, dennoch kann keine Garantie übernommen werden. Eine Haftung der
Autoren bzw. der UNOLD AG und ihrer Beauftragten für Personen-, Sach- und Vermögensschäden
ist ausgeschlossen.
22
Page 23
GARANTIEBESTIMMUNGEN
Copyright UNOLD AG | www.unold.de
Wir gewähren auf unsere Geräte eine Garantie von 24 Monaten, bei gewerblichem Gebrauch 12
Monate, ab dem Kaufdatum für Schäden, die bei bestimmungsgemäßem Gebrauch nachweislich
auf Werksfehler zurückzuführen sind. Innerhalb der Garantiezeit beheben wir Material- und Herstellungsfehler nach unserem Ermessen durch Reparatur oder Umtausch. Unsere Garantieleistungen
gelten ausschließlich für in Deutschland und Österreich verkaufte Geräte. Bei anderen Ländern wenden Sie sich bitte an den zuständigen Importeur. Geräte, für die eine Mängelbeseitigung beansprucht
wird, senden Sie bitte zusammen mit einer Kopie des maschinell erstellten Kauf belegs, aus dem das
Kaufdatum ersichtlich sein muss, sowie einer Fehlerbeschreibung gut verpackt und freigemacht
an unseren Kundendienst. Im Garantiefall werden dem Kunden in Deutschland und Österreich entstandene Versandkosten zurückerstattet. Von der Garantie ausgeschlossen sind Schäden durch Verschleiß, unsachgemäße Handhabung und Nichteinhaltung der Wartungs- und Pflegeanweisungen.
Der Garantieanspruch erlischt, wenn Reparaturen oder Eingriffe am Gerät von dritter Stelle vorgenommen werden. Eventuelle Ansprüche des Endverbrauchers gegenüber dem Verkäufer oder Händler
werden durch diese Garantie nicht eingeschränkt.
ENTSORGUNG / UMWELTSCHUTZ
Unsere Geräte werden auf hohem Qualitätsniveau für eine lange Nutzungsdauer herge stellt. Regelmäßige Wartung und fachge rechte Reparaturen durch unseren Kundendienst können die Nutzungsdauer des Gerätes verlängern. Wenn ein Gerät defekt und
nicht mehr zu reparieren ist, beachten Sie bitte: Dieses Produkt darf nicht zusammen
mit dem normalen Hausmüll entsorgt werden. Sie müssen dieses Produkt an einer ausgewiesenen Sammelstelle zum Recycling von elektrischen oder elektronischen Geräten
ab liefern. Durch das separate Sammeln und Recyceln von Abfallprodukten helfen Sie
mit, die natürlichen Ressourcen zu schonen und stellen sicher, dass das Produkt in
gesundheits- und umweltverträglicher Weise entsorgt wird.
INFORMATIONEN FÜR DEN FACHHANDEL
Hiermit erklärt die UNOLD AG, dass sich der Contact Grill 58526 in Übereinstimmung mit den
grundlegenden Anforderungen der europäischen Richtlinie für elektromagnetische Verträglichkeit
(2014/30/EU) und der Niederspannungsrichtlinie (2014/35/EC) bendet.
Die Übereinstimmung mit den Regularien bezieht sich auf den Tag der Erstellung dieser Erklärung.
Hiermit bestätigt die UNOLD AG, dass sowohl das Produkt als auch die eingesetzten Rohstoffe den
Vorschriften des LFBG 2005, § 30+31 und der EU-Verordnung 1935/2004 in ihrer jeweils aktuellen
Fassung entspricht. Die gesetzlichen Grenzwerte werden eingehalten.
Hockenheim, 8.8.2017
UNOLD AG, Mannheimer Straße 4, 68766 Hockenheim
Diese Anleitung kann im Internet unter www.unold.de als pdf-Datei heruntergeladen werden.
23
Page 24

SERVICE-ADRESSEN
Copyright UNOLD AG | www.unold.de
DEUTSCHLAND
Kundendienst
Telefon +49 (0) 62 05/94 18-27
Mannheimer Straße 4
68766 Hockenheim
Sie möchten innerhalb der Garantiezeit ein Gerät zur Reparatur einsenden? Auf unserer Internetseite
www.unold.de/ruecksendung können Sie sich einen Rücksendeschein ausdrucken, um damit das
Paket kostenlos bei der Post abzugeben (nur für Einsendungen aus Deutschland und Österreich).
SCHWEIZ ÖSTERREICH
Telefax +49 (0) 62 05/94 18-22
E-Mail service@unold.de
Internet www.unold.de
MENAGROS AG
Hauptstr. 23
CH 9517 Mettlen
Telefon +41 (0) 71 6346015
Telefax +41 (0) 71 6346011
E-Mail info@bamix.ch
Internet www.bamix.ch
DEC
Digital Electronic Center Service GmbH
Kelsenstraße 2
A-1030 Wien
Telefon +43 (0) 1/9616633-0
Telefax +43 (0) 1/9616633-22
E-Mail office@decservice.at
Internet www.decservice.at
POLEN
Quadra-Net
Dziadoszanska 10
61-248 Poznań
Internet www.quadra-net.pl
Diese Anleitung kann im Internet unter www.unold.de als pdf-Datei heruntergeladen werden.
24
Page 25
INSTRUCTIONS FOR USE MODEL 58526
Copyright UNOLD AG | www.unold.de
TECHNICAL SPECIFICATIONS
Power: 1,800–2,000 W, 220–230 V~, 50 Hz
Plates: Non-stick coated,
Handle: Heat insulated
Size: Approx. 35.6 x 35.9 x 15.5 in (L/W/H)
Weight: Approx. 4.35 kg
Power cord: Approx. 100 cm
Features: Grease drip pan, variable temperature control, grill
Accessories: Grease drip pan, operating instructions with recipes
Equipment features, technology, colours and design are subject to change without
notice.
EXPLANATION OF THE SYMBOLS
removable grill surface 29.0 x 26.0 cm
temperature to max. 230°C, different grill positions can be
selected for the upper part (contact grilling, browning, flat
grill can be folded to the rear 90°, locking mechanism),
indicator lights for ON/OFF and READY; high-quality
stainless steel housing, overheating protection circuit,
space-saving vertical storage
This symbol indicates potential hazards that may result in injury or
damage to the appliance.
This symbol indicates a potential burning hazard. Please be especially
careful at all times here.
This symbol indicates a possible fire hazard.
FOR YOUR SAFETY
Please read the following instructions and keep them for later reference.
1. This appliance can be used by children 8 years and older, as
well as by persons with reduced physical, sensory or mental
abilities or with lack of experience and/or knowledge, if they are
supervised or if they have been instructed with regard to safe
25
Page 26

use of the appliance and have understood the dangers that can
Copyright UNOLD AG | www.unold.de
result from use of the appliance.
2. Children must not play with the appliance.
3. Children are not allowed to perform cleaning and user
maintenance, unless they are 8 years of age or older and are
supervised.
4. Keep the appliance and the power cord out of the reach of
children under 8 years of age.
5. CAUTION – parts of this product can become very hot and
cause burn injuries! Particular caution is required if children or
persons at risk are present.
6. Only connect the appliance to an AC power supply with voltage
corresponding to the voltage specified on the rating plate.
7. The appliance is intended for household use only, or for similar
areas of use, such as:
Kitchen areas used by personnel in businesses, office facilities
and other work environments
Use by guests in hotels, motels and other living quarters
Use by guests in bed-and-breakfast establishments
8. This appliance must not be operated with an external timer or a
remote control system.
9. Never immerse the appliance in water or other liquids. Appli
ance and power cord must not come into contact with water or
other liquids.
If this should occur, all parts must be completely
dry before operating the appliance again.
10. Never touch the appliance or power cord with wet hands.
11. For safety reasons, never place the appliance on hot surfaces, a
metal trays or a wet surface.
12. Do not place the appliance or power cord near open flames during operation.
Ensure that the power cord does not hang over the edge of the
13.
counter top or table, since this can cause accidents, for example
if small children pull on the power cord.
14. If you use an extension cord, ensure that it is intact and suitable
for the power draw of the appliance; otherwise, there is a possibility of overheating.
Route the power cord and extension cord, if used, so that there
15.
is no possibility of the cords being pulled or tripped over.
16. Only use the appliance indoors.
17. Never leave the appliance unattended during operation and keep
it out of the reach of children.
18. Before heating, uncoil the power cord completely so that it does
not come into contact with hot parts of the appliance.
26
Page 27
19. Never cover the grill surface with aluminium foil, baking paper
Copyright UNOLD AG | www.unold.de
or other materials.
20. During operation, never grasp the hot grill plate - danger of burn
injuries!
21. When grilling with the cover closed, hot steam can form under
the lid. When opening the lid, maintain a safe distance to avoid
burn injuries.
22. To prevent smoke, do not overheat your cooking, frying, or baking utensils; the smoke can be hazardous for small animals (e.g.
birds) with a particularly sensitive respiratory system. We recommend that you not keep birds in the kitchen.
Only touch the appliance on the handles when it is hot.
23.
24. Only use the handle on the lid to open the appliance.
25. During operation, ensure that the appliance is free standing on
a heat-resistant surface and is a safe distance away from flammable objects.
After use, unplug the plug from the electrical socket and allow
26.
the grill to cool down before cleaning the appliance and putting
it away for safekeeping.
27. For cleaning, after cooling you can remove the plate and clean it
by hand. Wipe off the appliance with a damp cloth.
28. To avoid damage, do not use the appliance with accessories of
other manufacturers or brands.
29. Check the plug and the power cord regularly for wear or damage.
In case of damage to the power cord or other parts, please send
the appliance for inspection and repair to our customer service
department. Unauthorised repairs can result in serious risks to
the user and will void the warranty.
CAUTION:
The appliance is very hot during and after operation!
Never operate the appliance if water or other liquids are in the
grease drip pan - danger of file!
Never operate the appliance if the grease drip pan is not
inserted.
Do not open the housing of the appliance under any circumstances. There is danger of electric shock.
The manufacturer will not be liable in the event of incorrect assembly, improper or incorrect use or if
repairs are carried out by unauthorized third parties.
27
Page 28
BEFORE USING THE APPLIANCE FOR THE FIRST TIME
Copyright UNOLD AG | www.unold.de
1. Remove all packaging materials and any transport safeguards. Keep packaging materials away from children - danger of suffocation!
2. Check whether all parts are present. If parts are missing or damaged, contact your dealer or our customer service department.
3. Before using the appliance for the first time, we recommend that you wipe
off the non-stick coated grill plates with a damp cloth.
4. Fasten one grill plate in each of the inner sides of the appliance (see chapter, „Inserting/removing grill plates“).
5. Ensure that the grease drip pan is inserted. The grease drip pan is pushed
into the housing from the front until it locks in place.
6. Close the appliance, plug the plug into an electrical outlet (220-230 V~,
50 Hz). The green operating indicator light is illuminated and shows that
the heating circuit is in operation.
7. Place the temperature controller in the middle position. Pre-heating starts,
the red indicator light is illuminated. As soon as the appliance has reached
the pre-set temperature, the red indicator light goes out and the green operating indicator light is illuminated. Caution: The green operating indicator
light switches on and off alternately during operation, depending on the
actual heating capacity of the appliance.
8. Let the appliance heat up for several minutes. In this process, ensure that
the room is adequately ventilated.
9. At first use, some smoke and odours can form that will disappear after a
short time.
10. You can now use the appliance.
INSERTING/REMOVING THE GRILL PLATES
1. The plates can be removed for easier cleaning. To do this, press the respective
unlock button and pull the grill plate forward in the direction of the handle.
2. To re-insert the grill plates, guide the respective plate into the fixation
element and press the plate downward until it locks in place. Check to
ensure that the grill plates are held securely, before using the appliance
again.
28
Page 29
TEMPERATURE CONTROL
Copyright UNOLD AG | www.unold.de
1. You can set different temperatures for the grill surface.
2. The following apply as guide values:
Low heat: Shish kebab, sausage
Medium heat: Roasting, cooking fried eggs, sandwiches
High heat: Grilling, toasting
3. For safety reasons the heating capacity is slightly less in the middle rear
area of the grill plates. Here you can optimally grill thinner pieces of meat
or vegetables, for example.
FOOD TO BE GRILLED
1. Try out our recipes or simply use your usual grill recipe.
2. If you plan to grill food that has been frozen, bear in mind that it must be
completely thawed before it is grilled.
3. For meat that has been stored in the refrigerator beforehand, you will obtain
the best results if you take it out of the refrigerator some time before grilling
and let it acclimatise to room temperature.
4. Depending on the preparation method and type of meat, if possible meat
should not be salted until after it is grilled. If you marinate the meat before
grilling it will particularly tender and flavourful.
5. Grease and meat juices are collected in the grease drip tray. Thus you are
grilling with minimal grease and your food is healthier and more easily
digestible.
POSITION OF THE GRILL PLATES
1. Via the lid adjustment element, adjust the different variants for the position
of the grill plates.
Symbol : The lid can swing 90° to the rear.
Symbol : In closed status the lid can be
fixed in place so that the appliance can no
longer be opened. Caution: Only adjust when
the appliance is disconnected from the mains
supply, and food is not in the appliance. Ideal
for conveniently transporting or storing the
appliance.
Positions I to V: You can select different
heights for contact grilling. The lid locks at
the selected height and thus the food is not
subjected to the weight of the lid. Slide the regulator on the right side of
the appliance to the desired height between „I“ and „V“.
29
Page 30
GRILLING
Copyright UNOLD AG | www.unold.de
Caution! Never cover the grill surface with aluminium foil, baking paper or
other materials. Do not use aluminium grilling trays. Fire can occur due to
the heat accumulation.
1. Place the closed appliance on a heat-resistant surface.
2. Check whether the temperature controller is in the „MIN“ position.
3. Ensure that the grease drip pan is properly inserted on the front of the appliance. Never operate the appliance if the grease drip pan is not inserted, and
never fill the grease pan with liquids, such as water. Note: For optimal use
of the grease pan, always flap the two feet on the bottom of the appliance!
Grilling on one side/flat grilling
Ideal for soft ingredients that are not too thick.
4. You have the option of grilling your food only on the lower grill surface with
the lid open, or grilling your food using both grill surfaces. For this you must
set the lid adjustment element on and press the button „180°“ (3), than
swing the lid completely open so that both grill surfaces are horizontal.
5. To save energy, we recommend that you heat up the appliance with the
lid closed. Plug the mains plug of the appliance into an electrical outlet
(220–230 V~, 50 Hz). The green operating indicator light is illuminated
and shows that the heating circuit is in operation.
6. Place the temperature controller at the desired position. Pre-heating starts,
the red indicator light is illuminated. As soon as the appliance has reached
the pre-set temperature, the red indicator light goes out and the green operating indicator light is illuminated. Caution: The green operating indicator
light switches on and off alternately during operation, depending on the
actual heating capacity of the appliance.
7. Open the appliance lid carefully. In so doing, only hold the lid on the handle, to avoid burn injuries.
8. Brush the lower grill plate (and when flat grilling, also the upper grill plate)
with a little heat-resistant oil.
9. Place the desired food on the grill and from time to time check whether the
food must be turned.
10. Regularly check whether the grease drip pan is full. If the grease drip pan
is full, switch off the appliance and let the appliance cool down, empty the
grease drip pan, and then continue preparing the food. To avoid a possible
fire hazard, ensure that the grease drip pan never overflows.
11. When your food is prepared, turn the temperature regulator to „MIN“ and
unplug the plug from the electrical outlet.
12. Allow the appliance to cool completely before cleaning it.
30
Page 31

Contact grilling/browning
Copyright UNOLD AG | www.unold.de
Ideal for pieces of meat or sandwiches, the food does not have to be turned.
13. For this you can grill your food on the lower grill surface with the lid closed.
14. To save energy, we recommend that you heat up the appliance with the
lid closed. Plug the mains plug of the appliance into an electrical outlet
(220–230 V~, 50 Hz). The green operating indicator light is illuminated
and shows that the heating circuit is in operation.
15. Place the temperature controller in the middle position. Pre-heating starts,
the red indicator light is illuminated. As soon as the appliance has reached
the pre-set temperature, the red indicator light goes out and the green operating indicator light is illuminated. Caution: The green operating indicator
light switches on and off alternately during operation, depending on the
actual heating capacity of the appliance.
16. Open the appliance lid carefully. In so doing, only hold the lid on the handle, to avoid burn injuries.
17. Brush a little heat-resistant oil on the lower grill plate.
18. Place the desired food on the grill.
19. Close the appliance lid. In so doing, only hold the lid on the handle, to avoid
burn injuries.
20. The lid adapts automatically to the thickness of the food. However you can
also select the distance between food and lid via the settings I to V on the
lid adjustment element, as described in the chapter „Position of the grill
plates“.
21. Regularly check whether the grease drip pan is full. If the grease drip pan
is full, switch off the appliance and let the appliance cool down, empty the
grease drip pan, and then continue preparing the food. To avoid a possible
fire hazard, ensure that the grease drip pan never overflows.
22. When your food is prepared, turn the temperature regulator to „MIN“ and
unplug the plug from the electrical outlet.
23. Allow the appliance to cool completely before cleaning it.
CAUTION:
The appliance is very hot during and after operation!
CLEANING AND STORAGE
Before cleaning or maintenance, unplug the plug from the
electrical outlet. Wait until the appliance has completely cooled.
Do not - under any circumstances - immerse the appliance in
water!
1. To avoid damaging the non-stick coated plate, do not - under any circumstances - use scouring pads or similar cleaning tools. Do not use any abrasive
scouring agents, steel wool, metal objects, hot cleaning agents or disinfect-
31
Page 32

ants, since they can damage the appliance. Remove coarse contamination
Copyright UNOLD AG | www.unold.de
with the provided cleaning scraper. This scraper is only suited for this purpose. To avoid damaging the plates, never use the cleaning scraper to turn
the food or remove it from the grill.
2. The plates can be removed for easier cleaning. To do this, press the respective unlock button and pull the respective grill plate forward in the direction
of the handle.
3. Clean the plates with warm water to which a little mild washing-up liquid
has been added, then thoroughly dry off the plates.
4. To re-insert the grill plates, guide the respective plate into the fixation element and press the plate downward until it locks in place. Check to ensure
that the grill plates are held securely, before using the appliance again.
5. Remove any grease that may have accumulated from the grease drip pan,
and clean it in warm rinsing water. Re-insert the completely dried pan in the
housing and ensure that the pan is firmly seated in the housing.
6. Wipe off the housing with a well wrung-out, moist cloth and dry it thoroughly.
7. Always ensure that water cannot penetrate into the housing.
8. The grill can be stored to save space. To prevent the lid from swinging open
unintentionally, place the lid adjustment element on .
9. Store the appliance in a dry place where it is protected against dust.
MARINADES
The following marinade are suitable for all types of meat - beef steaks, pork
meat, lamb and poultry Brush the portioned steaks with the marinade and leave
them for several hours, best overnight, in the refrigerator.
Hot spicy marinade
1 onion, ½ red chili pepper, 2 table spoons of
olive oil, 2 table spoons of cane sugar, 3 table
spoons of vinegar, 50 ml of apple juice, 50 ml of
tomato juice, 2 tea spoons of Worcester sauce,
2 juniper berries
Chop onion and chili pepper, roast in a pan with
boil. Add sugar, vinegar, and apple juice, bring
to the boil. Take off the heat, add tomato juice,
Worcester sauce and crushed juniper berries.
Let the marinade cool down, then marinade the
meat.
Beer marinade
4 bay leafs, 4 juniper berries, 2 table spoons of
olive oil, 1/8 l beer (or malt beer, if the marinade
32
has to be without alcohol), 2 table spoons of
honey, juice of ½ lemon
Roast bay leafs and juniper berries in oil, add
beer and honey and heat (do not bring to the
boil!). Add lemon juice. Let the marinade cool
down, then marinade the meat.
Rosemary marinade
2 tea spoons of dried rosemary, 4 cloves of garlic,
4 juniper berries, 8 black pepper corns, 4 tea
spoons of mustard corns, 5 table spoons of
olive oil.
Crush all ingredients except oil in a mortar or
with a kitchen grinder. Mix the mass with the oil
and brush the meat with this marinade.
Page 33

Curry marinade
Copyright UNOLD AG | www.unold.de
2 tea spoons of curry powder, 1 small piece
of fresh ginger, 50 ml dry white wine, 100 ml
pineapple juice
Peel and grate the ginger, mix it with the
other ingredients and brush the meat with this
marinade.
Asian marinade
1 table spoons of honey, 2 tea spoons of sambal
oelek, 1 table spoons of rice wine, 8 table
spoons of sweet soy sauce, 2 table spoons of
orange juice, 2 table spoons of sherry
Mix the ingredients and brush the meat with this
marinade.
Coconut marinade
1 untreated lemon, 1 pinch of cayenne pepper,
1 small piece of fresh ginger, 1 clove of garlic,
150 ml unsugared coconut milk
Peel and grate the ginger, peel and press the
garlic, grate the lemon zest, and press the
lemon. Mix ginger, garlic, lemon zest and lemon
juice with the other ingredients, and marinade
the meat in this marinade.
Red wine marinade
¼ teaspoon of pimentos, 2 cloves, 2 teaspoons
of mustard seed, 3 juniper berries, 1 pinch of
cinnamon, 1 teaspoon of black pepper, 150 g of
red currant jelly, 100 ml of dry red wine
Crash pimentos, cloves, mustard, juniper,
pepper and cinnamon in a mortar. Heat oil in a
pan and add the spices. Add jelly and red wine
and heat until the jelly melts. Let the marinade
cool down and marinade the meat in it.
Orange marinade
juice from 3 sour oranges, 2 teaspoons of tarragon, 1 table spoon of vinegar, ½ tea spoon
of pepper.
Mix all ingredients and marinade the meat.
Garlic marinade
8 cloves of garlic, 1 onion, 2 tea spoons of sage
leafs, ¼ l butter milk.
Chop garlic and onions, mix with the other ingredients and marinade the meat.
Caraway marinade
1 table spoons of caraway seeds, ½ tea spoons
of coarsely ground pepper, 2 table spoons of
apple vinegar, 2 table spoons of apple juice,
3 table spoons of olive oil
Mix the ingredients and marinade the meat.
Sweet hot marinade
5 table spoons of honey, 5 table spoons of soy
sauce, 1 pinch of cayenne pepper, 1 tea spoons
of mustard powder, 2 table spoons of olive oil
Mix the ingredients and marinade the meat.
Lemon marinade
6 cloves of garlic, 100 ml olive oil, juice and
zest of 2 untreated lemons, ¼ tea spoons of
pepper
Chop the garlic, mix with lemon zest and juice,
pepper, and marinade the meat.
CONTACT-GRIDDLING – TIPS AND RECIPES
Contact-griddling is just the right thing for flat, boneless meat like hamburgers
or steaks or even vegetable slices. The food should be of more or less the same
thickness so that the lid rests well on all pieces. For contact-griddling close the
lid.
If the food slices are very thin, the highest level is recommended; if it is of
approx. 3 cm, a medium level is recommended.
33
Page 34

Always heat the appliance up well. Do not put the food on the grill before. The
Copyright UNOLD AG | www.unold.de
optimum thickness for meat is 1.5 – 3 cm. The food will be especially juicy when
marinated before.
We recommend salting the food after griddling, as especially beefsteak or liver
may become dry.
The times indicated in the recipes refer to contact-griddling with both grill plates.
If not otherwise indicated, the following recipes serve 4 persons:
Chicken rolls
4 thin chicken breasts, salt, pepper, 8 button
mushrooms, 1 onion, 2 table spoons of oil, 120
g grated Gouda cheese, 2 table spoons of oil, 2
tea spoons of majoram, 4 clamps or toothpicks
Beat the chicken breasts until they are very
thin, season with salt and pepper. Chop the
onion, and fry in a pan with hot oil. Slice the
mushrooms and add them to the onion. Spread
the mushroom-onion mixture on the chicken
breasts and cover them with grated cheese. Roll
the chicken breasts and fix them with clamps or
toothpicks. Season 2 table spoons of oil with
the majoram, and brush the rolls with this oil,
cook for approx. 25 min., while brushing with
majoram oil from time to time.
Veal rolls with mozzarella
4 thin veal schnitzels, 1 apple, 200 g mixed fresh
fine herbs (basil, lemon balm, origano, thyme,
parsley), or frozen herbs, 1 table spoon of oil,
300 g mozzarella cheese, salt, pepper, 4 oiled
toothpicks
Beat the schnitzels, heat the oil. Chop the herbs
and braise them in the oil. Season the meat
with salt and pepper and spread the herbs on
the meat. Cut the mozzarella into slices and
distribute the cheese on the schnitzels. Roll
the meat and fix the rolls with tooth-picks.
Roast the rolls on the cooking grille for approx.
20 min. while turning several times.
1 egg, 2 tablespoons of bread crumbs, 50 g Gouda,
50 g cooked ham, 2 teaspoons of tomato pulp,
½ teaspoon of pizza spices, salt and pepper (if
still necessary), 1 burger bun, 2 salad leaves,
1 tablespoon of mayonnaise, 1 tablespoon of
tomato ketchup, 2 slices of tomatoes, 2 slices
of onion
Preparation:
Mix meat, garlic and onions, egg, bread crumbs,
grated cheese, chopped ham, tomato pulp and
pizza spices to a dough, form 2 flat burgers.
Oil the grill plate and roast the burgers 6-8
minutes, turn it once. Cut the buns vertically
and toast them shortly on the grill plate. Brush
some mayonnaise on the buns, wash the salad
and place it on the mayonnaise, then lay one
burger on top, brush the burger with ketchup,
then add the second burger, and tomatoes and
onions on top. Cover with the second bun half.
Lamb cutlets with fine herbs
8 lamb cutlets, marinade no. 3, 2 courgettes,
3 stalks of parsley, 2 cloves of garlic, 2 table
spoons of oil
Marinade cutlets for approx. 6 hrs in the
marinade. Cook on the grill for approx. 6 min. on
each side. Cut courgettes lengthwise into slices
of 2 cm. Chop garlic and parsley, and mix the
herbs with the oil. Brush the courgettes with the
garlic oil and cook approx. 3 min. on each side.
Serve with French white bread.
Pizza burger
Ingredients per portion:
100 g mixed minced meat, 1 clove of garlic and
½ onion, both chopped
34
Fish dishes
Grilled salmon with lemon butter
4 small slices of salmon, 4 tsp lemon juice,
4 tblsp soft butter, 2 tsp lemon zest, salt, pepper
Page 35

Clean the fish, sprinkle it with lemon juice
Copyright UNOLD AG | www.unold.de
and pepper and grill it from both sides in the
preheated grill. Mix butter with the lemon zest,
and serve the salmon with the butter.
Prawn skews
8 peeled prawns, ½ quant. of marinade no. 6,
4 oiled wood skewers, 4 pieces of oiled
aluminium foil
Stick 2 prawns each on a skewer, brush them with
the marinade and leave for approx. 1-1,5 hrs.
Lay 1 skewer on a piece of oiled aluminium foil,
close the foil and roast approx. 4-5 minutes on
each side.
Vegetarian delicacies
Corn on the cob
4 cobs (without leafs), 2 l salted water, 4 table
spoons of olive oil
Cook the cobs approx. 10 minutes in salt ed
water, let them drain off. Brush the cobs with oil
and put one toothpick each in the ends for easy
turning. Grill approx. 10 minutes, turn often.
Wrap the cobs into 3 slices of bacon before
grilling (fix with toothpicks).
Tip: Brush the cobs with spicy oil, e.g. sage or
oregano oil.
Grilled eggplants and zucchini
1 long eggplant, salt, 2 small zucchini, 4 tblsp
olive oil, pepper
Cut the stalk from both vegetables. Cut the
eggplant into slices, salt them and leave them
for at least 30 min. Then rinse the slices and
dry them. Cut the zucchini also in slices and
salt slightly. Brush eggplant and zucchini with
oil and grill them in the preheated grill from
both sides.
Vegetable burgers
1 kohlrabi, 1 small celeriac, 300 g carrots,
1 parsnip, 1 bunch of parsley, 2 cloves of garlic,
100 g Gouda cheese, 2 eggs, 2 table spoons
of ground spelt grain, 2 table spoons of bread
crumbs, salt, pepper, oil
Wash, peel and grate kohlrabi, celeriac,
carrots and parsnip. Chop parsley, kohlrabi
leafs and garlic very finely, cut the cheese
into small cubes. Mix these ingredients with
the eggs, the spelt grain, breadcrumbs, salt
and pepper. Form small burgers, brush with
oil and place on the grill plate. Grill approx.
6 minutes from each side.
SANDWICHES AND PANINIS – TIPS AND RECIPES
The classical sandwich or Panini is contact-griddled. The sandwiches should be
of more or less the same thickness so that the lid rests well on all pieces.
In general, you may toast any kind of bread. Paninis or sandwiches will be
especially delicious when using Ciabatta, Focaccia or Baguette.
Always heat the appliance up well. Do not put the food on the grill before.
Griddle your sandwiches and Paninis shortly at medium to high temperature.
When the griddling time is too long and cheese is used, cheese may leak from
the appliance.
Italian Sandwich
8 slices of bread, 4-6 slices of Parma ham,
8 slices of tomato, 8 slices of mozzarella cheese,
4 tsp of pesto, margarine
Spread the outer side of the bread with
margarine and the inner side with pesto. Place
ham, tomato and mozzarella on the inner sides
of four slices of bread and cover them with the
35
Page 36

remaining four slices of bread. Place the bread
Copyright UNOLD AG | www.unold.de
on grill and grill it for about 2-3 minutes.
French Toast
8 slices of bread, 3 eggs, 150 ml warm milk,
1 pinch of salt, 1 pinch of sugar, margarine
Stir eggs, milk, salt and sugar and soak the bread
in this batter. Grease the grill plates slightly with
margarine. Place the bread on grill and grill it
for about 2-3 minutes. Serve the French toast
with sugar and cinnamon or with jam.
Hawaii toast
4 slices of toast bread, some butter, 4 slices of
cooked ham, 4 slices of pineapple, 4 slices of
cheese (e.g. Gouda)
Butter the bread from one side, distribute ham,
pineapple and cheese on top and lay the toast
on the grill plate. Heat the base in a medium
position and the top lid in the highest position
and gratinate the toast for ca. 6-8 min.
OPENED GRIDDLING – TIPS AND RECIPES
Besides the bigger griddling surface, the grill offers a variety of preparation
possibilities when completely open. You may prepare food of different thickness
at the same time. Do not forget to turn the food over once or several times.
Adjust the temperature selector to the desired griddling temperature. Heat the
appliance up for a few minutes before putting food on the grill plates.
The desired temperature is achieved, when the indicator light „Fertig“ [„Ready“]
lights up.
Mushrooms with garlic
500 g fresh button mushrooms, oyster
mushrooms or cepes, 1 bunch of parsley,
pepper, 2 cloves of garlic, 5 table spoons of
olive oil, salt
Brush the mushrooms, chop the garlic and the
parsley, Mix all ingredients except salt and
pepper and grill them on the grill plate. Turn
often. Season with salt and pepper before
serving. Grill approx. 10 minutes
Cheese pancakes
250 g of courgette, 100 g of grated cheese,
1 egg, 2 tblsp of flour, 1 tsp of vegetable stock
powder, 1 small onion, 2 pinches of nutmeg, oil
Grate the courgettes and mix them with cheese,
egg, flour, chopped onion and spices.
Preheat the grill to 200 °C. Oil the grill plates
and place some of the batter on plate. Grill the
pancakes from both sides.
36
Mixed vegetable
1 aubergine, 1 courgette, 1 meat tomato, 1 large
onion, 1 red, green and yellow pepper, 3 table
spoons of olive oil, 3 cloves of garlic, 1 table
spoon of fresh oregano, pepper
Clean aubergine, courgette, tomato and and cut
them into approx. 1,5 cm thick slices. Cut onion
into slices, chop the garlic. Mix all ingredients
with the oil, and grill it on the plate for approx.
10-12 minutes. Turn frequently and season with
pepper. Tipp: Delicious with dark grilled meat.
Grilled fruit
Tipsy pineapple
4 slices pineapple, 4 tsp cherry brandy, 1 tblsp
butter, 2 tsp light honey, 1 pinch of ground
coriander
Dry pineapple slices and sprinkle with cherry
brandy. Leave for 30 min.
Page 37

Melt butter and honey in a pot, season with
Copyright UNOLD AG | www.unold.de
coriander. Grill the pineapple slices from both
sides in the preheated grill, brush occasionally
with the butter honey mixture. Serve with
whipped cream or vanilla or pineapple ice
cream.
Chili apples
4 red apples, marinade no. 1
Remove the core from the apples and cut them
into slices of 1.5 cm thickness. Marinate the
apples for about 1 hour, then grill them about
3 minutes on each side.
The authors have thoroughly considered and tested the recipes included in
these operating instructions. Nevertheless, a guarantee cannot be accepted.
The authors, respectively UNOLD AG and their assignees shall not be liable for
personal injuries, material damages and financial loss.
GUARANTEE CONDITIONS
We grant a 24 months guarantee, and in case of commercial use a 12 months guarantee, starting from the date of purchase
for any damage demonstrably due to manufacturing defects and when the appliance has been used according to its intended
use. Within the warranty period we will remedy defective materials or workmanship through repair or replacement, at our
option. Our warranty terms apply only to appliances sold in Germany and Austria. For other countries, please contact the responsible importer. In the event of a claim for remedy of defects, please send the appliance to our after sales service, properly
packaged and postage paid, together with a copy of the automatically generated sales receipt, which must show the date of
purchase, and a description of the defect. If the defect is covered by the warranty, the customer will be reimbursed for the
shipping costs only in Germany and Austria. The warranty does not cover damage from normal wear, improper handling and
failure to comply with the maintenance and care instructions. The warranty is void if repairs or modifications are made to the
appliance by third parties. Any claims of the end consumer vis-à-vis the retailer are not limited by this warranty.
WASTE DISPOSAL / ENVIRONMENTAL PROTECTION
Our appliances are produced on a high quality level for a long lifetime. Regular maintenance and expert
repairs by our after-sales service can extend the useful life of the appliance. If an appliance is defective
and repair is not possible we ask you to follow the following instructions for disposal. Do not dispose this
appliance together with your standard household waste. Please bring this product to an approved collection
point for recycling of electric and electronic products. By separate collection and disposal of waste products
you help to protect natural resources and ensure, that the product is disposed in an adequate way to protect
health and environment.
The instruction booklet is also available for download: www.unold.de
37
Page 38

NOTICE D´UTILISATION MODÈLE 58526
Copyright UNOLD AG | www.unold.de
SPÉCIFICATION TECHNIQUE
Puissance : 1 800-2 000 W, 220-230 V~, 50 Hz
Plaques : Amovible, avec revêtement anti-adhésif, surface du grill 29,0 x 26,0 cm
Poignée : Thermo-isolante
Dimensions : Env. 35,6 x 35,9 x 15,5 cm (l/p/h)
Poids : Env. 4,35 kg
Câble
d’alimentation : Env. 100 cm
Équipement : Récupérateur de graisse, réglage de température en continu, température du
grill jusqu'à 230 °C max., différentes positions du grill peuvent être choisies
pour la partie supérieur (grilles contact, gratin, rabattable de 90° vers l'arrière,
grill plat, verrouillage), témoins lumineux pour MARCHE / ARRÊT et PRÊT,
boîtier en inox haut de gamme, protection contre la surchauffe, peu encombrant,
rangement vertical
Accessoires : Récupérateur de graisse, mode d'emploi avec recettes
Modifications et erreurs des caractéristiques de l‘équipement, de la technique, des couleurs et du
design réservées.
EXPLICATION DES SYMBOLES
Ce symbole vous indique des risques possibles qui puissent entraîner
des lésions ou des endommagements de l’appareil.
Ce symbole indique le risque d’être brûlé. Soyez prudent en utilisant
l’appareil.
Ce symbole vous informe d‘un éventuel risque d‘incendie.
POUR VOTRE SÉCURITÉ
Veuillez lire les indications suivantes et les conserver.
1. Cet appareil peut être utilisé par des enfants de plus de 8 ans
et par des personnes dont les capacités physiques, sensorielles
ou intellectuelles sont limitées ou dont l’expérience et/ou les
connaissances sont insuffisantes, si ceux-ci sont surveillés ou
s’ils ont été formés à une utilisation sûre de l’appareil et aux
dangers pouvant en résulter.
2. Les enfants ne doivent pas jouer avec l’appareil.
38
Page 39

3. Le nettoyage et la maintenance incombant à l’utilisateur ne
Copyright UNOLD AG | www.unold.de
doivent pas être effectués par des enfants, à moins qu’ils soient
âgés de plus de 8 ans et qu’ils soient surveillés.
4. Conserver l’appareil ainsi que le câble hors de portée des enfants
de moins de 8 ans.
5. ATTENTION : certaines parties de ce produit peuvent devenir
très chaudes et occasionner des brûlures ! Une prudence
particulière est requise en présence d’enfants et de personnes
menacées.
6. Brancher l’appareil uniquement sur du courant alternatif avec
une tension conforme à celle indiquée sur la plaque signalé
-
tique.
7.
L‘appareil est destiné à un usage ménager et à des applications
similaires, par ex. :
des cuisines utilisées par le personnel dans des boutiques, des
bureaux et d‘autres environnements de travail ;
par des clients dans des hôtels, des motels et d‘autres espaces
d‘habitation ;
dans des pensions avec petit déjeuner.
8. Cet appareil ne doit pas être utilisé avec une minuterie externe
ou avec un système de télécommande.
9. Ne plongez en aucun cas l’appareil dans de l’eau ou un autre
liquide. L’appareil et le cordon d‘alimentation ne doivent pas
entrer en contact avec de l’eau ou d’autres liquides. Si cela
devait se produire, toutes les pièces doivent sécher intégrale
-
ment avant de renouveler l’utilisation.
10.
Ne jamais toucher l’appareil ou son cordon d’alimentation avec
les mains mouillées.
11. Pour des raisons de sécurité, l’appareil ne doit jamais être placé
sur des surfaces chaudes, une tablette métallique ou un support
humide.
12. L’appareil ou le câble ne doivent pas être utilisés à proximité de
flammes.
13. Veillez à ce que le câble ne pende pas par-dessus le bord du
plan de travail, cela pouvant provoquer des accidents si un
enfant tire dessus, par exemple.
14. Si vous utilisez une rallonge, vérifiez si celle-ci est intacte et si
elle convient à la puissance utilisée, sans quoi une surchauffe
peut se produire.
15. Le câble d‘alimentation et, le cas échéant, la rallonge, doivent
être disposés de façon à ce qu‘il soit impossible de tirer dessus
ou de trébucher.
39
Page 40

16. Utiliser l‘appareil exclusivement à l‘intérieur.
Copyright UNOLD AG | www.unold.de
17. Ne laissez pas l‘appareil sans surveillance pendant le fonctionnement et maintenez-le hors de portée des enfants.
Avant la chauffe, dérouler intégralement le câble afin qu‘il
18.
n‘entre pas en contact avec des pièces chaudes.
19. Ne couvrez jamais la surface du grill avec du papier aluminium,
du papier de cuisson ou d‘autres matériaux.
20. Ne touchez jamais la plaque chaude du grill durant le fonctionnement : risque de brûlure !
Si vous faites griller avec le couvercle fermé, de la vapeur chaude
21.
peut se former sous le couvercle. Lors de l‘ouverture du couvercle, veillez à maintenir une distance suffisante afin d‘éviter
des brûlures.
Afin d‘éviter le développement de fumées, ne faites pas sur-
22.
chauffer vos plats de cuisson et gamelles ; la fumée peut être
dangereuse pour les petits animaux (par ex. oiseaux) ayant un
système de respiration particulièrement
sensible. Nous vous
recommandons de ne pas installer d‘oiseaux dans votre cuisine.
23. Lorsqu‘il est chaud, touchez uniquement l‘appareil au niveau
des poignées.
24. Pour ouvrir l‘appareil, utilisez uniquement la poignée située sur
le couvercle.
25. Durant le fonctionnement, veillez à ce que l‘appareil se trouve
sur une surface thermorésistante et à une distance suffisante
des objets inflammables.
26. Après utilisation, débranchez la prise de la prise de courant et
laissez le grill refroidir avant de nettoyer l‘appareil et de le ran
-
ger.
27.
Pour le nettoyage, vous pouvez retirer la plaque après le refroi-
dissement et la nettoyer à la main. Essuyer l‘appareil avec un
chiffon humide.
L’appareil ne doit pas être utilisé avec des accessoires d‘autres
28.
fabricants ou marques, afin d’éviter des détériorations.
29. Vérifier régulièrement l‘usure ou les éventuelles détériorations
de la prise et du cordon. Si le câble de raccordement ou d’autres
pièces sont abîmés, envoyer l’appareil pour contrôle et réparation à notre service après-vente. Toute réparation irrégulière peut
provoquer d’importants dangers
pour l’utilisateur et entraîner
l’extinction de la garantie.
40
Page 41

PRUDENCE :
Copyright UNOLD AG | www.unold.de
L‘appareil est très chaud pendant et après le fonctionnement !
N‘utilisez jamais l‘appareil si de l‘eau ou d‘autres fluides se
trouvent dans le collecteur de graisse : risque d‘incendie !
Ne jamais faire fonctionner l‘appareil si le collecteur de
graisse n‘est pas installé.
Ne pas ouvrir le boîtier de l‘appareil. Risque d‘électrocution.
Le fabricant n’est nullement responsable en cas de montage non conforme, d‘utilisation irrégulière ou non
conforme ou suite à l’exécution de réparations par des tiers non autorisés.
AVANT LA PREMIÈRE UTILISATION
1. Retirez tous les matériaux d‘emballage et, le cas échéant, les sécurités de
transport. Tenez le matériel d‘emballage hors de portée des enfants : risque
d‘asphyxie !
2. Vérifier si toutes les pièces sont présentes. Si des pièces manquent ou sont
endommagées, veuillez vous adresser à votre distributeur ou à notre service
après-vente.
3. Avant la première utilisation, nous vous recommandons d‘essuyer les plaques
du grill dotées d‘un revêtement anti-adhésif avec un chiffon humide.
4. Fixez une plaque de grill respectivement aux côtés intérieurs de l‘appareil
(cf. chapitre« Positionner / Retirer les plaques de grill »).
5. Assurez-vous que le récupérateur de graisse est positionné. Celui-ci est
poussé dans le boîtier par l‘avant jusqu‘à ce que le récipient s‘enclenche.
6. Fermer l‘appareil et brancher le cordon dans une prise de courant (220230 V~, 50 Hz). Le témoin lumineux de fonctionnement vert s‘allume et
indique que le chauffage est en fonctionnement.
7. Régler le bouton de réglage de température sur la position du milieu. Le préchauffage commence, le témoin lumineux rouge s‘allume. Dès que l‘appareil a atteint la température prédéfinie, le témoin lumineux rouge s‘éteint et
le témoin lumineux vert de fonctionnement s‘allume. Attention : le témoin
lumineux vert de fonctionnement s‘allume et s‘éteint alternativement pendant le fonctionnement, en fonction de la puissance de chauffe actuelle de
l‘appareil.
8. Laissez l‘appareil chauffer quelques minutes. Ce faisant, assurez une ventilation suffisante dans la pièce.
9. Lors de la première utilisation, un peu de fumée et des odeurs peuvent se
former. Elles disparaîtront rapidement.
10. Vous pouvez maintenant utiliser l‘appareil.
41
Page 42

POSITIONNER / RETIRER LES PLAQUES DU GRILL
Copyright UNOLD AG | www.unold.de
1. Les plaques peuvent être retirées pour faciliter le nettoyage. Pour ce faire,
pressez la touche de déverrouillage et tirez la plaque du grill vers l‘avant en
direction de la poignée.
2. Pour replacer les plaques du grill, guidez la plaque concernée dans la
fixation et pressez la plaque vers le bas jusqu‘à ce qu‘elle s‘enclenche.
Vérifiez la stabilité des plaques avant de réutiliser l‘appareil.
RÉGLAGE DE LA TEMPÉRATURE
1. Vous pouvez utiliser différentes températures pour la surface du grill.
2. Valeurs indicatives :
Chaleur basse : brochettes, pics, saucisses
Chaleur moyenne : faire rissoler, cuire des œufs au plat, sandwichs
Chaleur élevée : griller, toaster
3. Pour des raisons de sécurité, la puissance de chauffe est légèrement
inférieure au niveau de la partie arrière centrale des plaques du grill. Ici, il
est possible de faire cuire à la perfection des morceaux de viande plus fins
ou des légumes, par exemple.
ALIMENT À GRILLER
1. Essayez l‘une de nos recettes ou utilisez tout simplement votre recette de
grill habituelle.
2. Si vous utilisez des aliments surgelés, veillez à ce qu‘ils soient parfaitement
dégelés avant la cuisson.
3. La viande conservée au réfrigérateur au préalable est idéale si vous la sortez du réfrigérateur quelques temps avant la cuisson et que vous la laissez
s‘acclimater à température ambiante.
4. Si possible, la viande (en fonction de la préparation et du type de viande)
doit être salée après la cuisson. Si vous faites mariner la viande avant la
cuisson, elle sera particulièrement tendre et goûteuse.
5. La graisse et les sucs de cuisson sont collectés par le récupérateur de
graisse. Vous grillez ainsi sans graisses et vos plats sont plus sains et parfaitement digestes.
42
Page 43

POSITION DES PLAQUES DU GRILL
Copyright UNOLD AG | www.unold.de
1. Régler les différentes variantes pour la position des plaques du grill à l‘aide
de l‘ajustement du couvercle.
Symbole : Le couvercle peut être rabattu de 90° vers l‘arrière.
Symbole : Le couvercle peut être fixé à l‘état fermé, de telle sorte
que l‘appareil ne peut plus être ouvert. Attention : régler uniquement si
l‘appareil est débranché du secteur et si aucun aliment n‘est placé sur le
grill. Idéal pour transporter ou ranger l‘appareil.
Positions I à V : vous pouvez choisir entre différentes hauteurs pour le
grill de contact. Le couvercle s‘enclenche à la hauteur choisie et empêche
ainsi que les aliments soient trop écrasés par le poids du couvercle. Poussez
le bouton de réglage sur le côté droit de l‘appareil sur la hauteur souhaitée
entre « I » et « V ».
GRILLER
Attention ! Ne couvrez jamais la surface du grill avec du papier aluminium,
du papier de cuisson ou d‘autres matériaux. N‘utilisez pas non plus de
coques de grill en aluminium. Des incendies peuvent être provoqués par
l‘accumulation de chaleur produite.
1. Placez l‘appareil fermé sur une surface thermorésistante.
2. Vérifiez si le bouton de réglage de température se trouve dans la position
« MIN ».
3. Attention : le collecteur de graisse doit être positionné correctement sur la
face avant de l‘appareil. Ne faites jamais fonctionner l‘appareil si le récupérateur de graisse n‘est pas positionné et ne remplissez jamais le récupérateur de graisse de fluides comme, par exemple, de l‘eau. Pour profiter
pleinement de la cuve à graisse, tirez les deux pieds au bas de l‘appareil.
Griller à l‘unilatérale / Griller à plat
Idéal pour les aliments mous, pas trop épais.
4. Vous pouvez faire griller vos aliments uniquement sur la surface inférieure
du grill, couvercle ouvert, ou utiliser les deux surfaces du grill. Pour ce faire,
vous devez régler l‘ajustement de couvercle surappuyez sur le bouton
„180°“ (3) et ouvrir complètement le couvercle de sorte à ce que les deux
surfaces du grill soient horizontales.
5. Pour économiser de l‘énergie, nous recommandons de faire chauffer l‘appareil avec le couvercle fermé. Branchez le cordon dans une prise de courant
(220–230 V~, 50 Hz). Le témoin lumineux de fonctionnement vert s‘allume
et indique que le chauffage est en fonctionnement.
43
Page 44

6. Régler le bouton de réglage de température sur la position du milieu. Le pré-
Copyright UNOLD AG | www.unold.de
chauffage commence, le témoin lumineux rouge s‘allume. Dès que l‘appareil a atteint la température prédéfinie, le témoin lumineux rouge s‘éteint et
le témoin lumineux vert de fonctionnement s‘allume. Attention : le témoin
lumineux vert de fonctionnement s‘allume et s‘éteint alternativement pendant le fonctionnement, en fonction de la puissance de chauffe actuelle de
l‘appareil.
7. Ouvrez le couvercle de l‘appareil avec précaution. Ce faisant, ne touchez le
couvercle qu‘au niveau de la poignée afin d‘éviter toute brûlure.
8. Enduisez la plaque inférieure du grill (et pour griller à plat, la plaque supérieure du grill également) avec un peu d‘huile résistant aux températures
élevées.
9. Placez les aliments souhaités et vérifiez de temps en temps si les aliments
doivent être retournés.
10. Vérifiez régulièrement si le collecteur de graisse est plein. Si le récipient
est plein, éteignez l‘appareil, laissez-le refroidir, videz le récupérateur de
graisse et poursuivez ensuite la préparation de votre plat. Pour éviter un
éventuel risque d‘incendie, le collecteur de graisse ne doit jamais déborder.
11. Si vos aliments sont prêts, tournez le bouton de réglage de la température
sur « MIN » et débranchez la prise.
12. Laissez l’appareil refroidir intégralement avant de le nettoyer.
Grill contact / Gratin
Idéal pour les morceaux de viande ou les sandwichs ; les aliments ne doivent
pas être retournés.
13. Ainsi, vous pouvez faire griller vos aliments sur la surface inférieure du grill
avec le couvercle fermé.
14. Pour économiser de l‘énergie, nous recommandons de faire chauffer l‘appareil avec le couvercle fermé. Branchez le cordon dans une prise de courant
(220–230 V~, 50 Hz). Le témoin lumineux de fonctionnement vert s‘allume
et indique que le chauffage est en fonctionnement.
15. Régler le bouton de réglage de température sur la position du milieu. Le préchauffage commence, le témoin lumineux rouge s‘allume. Dès que l‘appareil a atteint la température prédéfinie, le témoin lumineux rouge s‘éteint et
le témoin lumineux vert de fonctionnement s‘allume. Attention : le témoin
lumineux vert de fonctionnement s‘allume et s‘éteint alternativement pendant le fonctionnement, en fonction de la puissance de chauffe actuelle de
l‘appareil.
16. Ouvrez le couvercle de l‘appareil avec précaution. Ce faisant, ne touchez le
couvercle qu‘au niveau de la poignée afin d‘éviter toute brûlure.
17. Enduisez la plaque inférieure du grill d‘un peu d‘huile résistant aux températures élevées.
18. Positionnez les aliments que vous souhaitez faire griller.
44
Page 45

19. Refermez le couvercle de l‘appareil. Ce faisant, ne touchez le couvercle
Copyright UNOLD AG | www.unold.de
qu‘au niveau de la poignée afin d‘éviter toute brûlure.
20. Le couvercle s‘adapte automatiquement à l‘épaisseur des aliments à griller.
Cependant, vous pouvez également sélectionner l‘écartement entre les aliments et le couvercle à l‘aide des réglages I à V au niveau de l‘ajustement
du couvercle, comme décrit au chapitre « Position des plaques du grill ».
21. Vérifiez régulièrement si le collecteur de graisse est plein. Si le récipient
est plein, éteignez l‘appareil, laissez-le refroidir, videz le récupérateur de
graisse et poursuivez ensuite la préparation de votre plat. Pour éviter un
éventuel risque d‘incendie, le collecteur de graisse ne doit jamais déborder.
22. Si vos aliments sont prêts, tournez le bouton de réglage de la température
sur « MIN » et débranchez la prise.
23. Laissez l’appareil refroidir intégralement avant de le nettoyer.
PRUDENCE :
L‘appareil est très chaud pendant et après le fonctionnement !
NETTOYAGE ET RANGEMENT
Avant le nettoyage ou la maintenance, débranchez le cordon de la
prise secteur. Attendez jusqu’à ce que l‘appareil ait complètement
refroidi.
L‘appareil ne doit jamais être plongé dans l‘eau !
1. Pour ne pas endommager le revêtement anti-adhésif de la plaque, n‘utilisez
en aucun cas de grattoir ou d‘ustensiles de nettoyage similaires. N’utilisez
aucun abrasif puissant, pas de laine de verre, d’objets métalliques, pas de
détergent chaud ou de désinfectant, lesquels pourraient détériorer l‘appareil. Veuillez éliminer les impuretés grossières avec le grattoir de nettoyage
fourni. Ce dernier est exclusivement destiné à cet usage. Afin de ne pas
détériorer les plaques, n‘utilisez jamais le grattoir de nettoyage pour retourner les aliments ou pour les retirer du grill.
2. Les plaques peuvent être retirées pour faciliter le nettoyage. Pour ce faire,
pressez la touche de déverrouillage et tirez la plaque du grill correspondante
vers l‘avant en direction de la poignée.
3. Nettoyez les plaques à l‘eau chaude, à laquelle vous pouvez ajouter un peu
de liquide-vaisselle doux, et séchez ensuite les plaques vigoureusement.
4. Pour replacer les plaques du grill, guidez la plaque concernée dans la fixation et pressez la plaque vers le bas jusqu‘à ce qu‘elle s‘enclenche. Vérifiez
la stabilité des plaques avant de réutiliser l‘appareil.
5. Retirez, le cas échéant, la graisse collectée du récupérateur de graisse et
nettoyez-le à l‘eau chaude. Repositionner le collecteur totalement sec dans
le boîtier et assurez-vous qu‘il est stable.
6. Essuyez le boîtier avec un chiffon humide bien essoré et séchez-le bien.
45
Page 46

7. Veillez toujours à ce que de l’eau ne puisse pas s’introduire dans le boîtier.
Copyright UNOLD AG | www.unold.de
8. Le grill peut être rangé afin de prendre moins de place. Pour éviter que le
couvercle ne se referme par inadvertance, réglez l‘ajustement de couvercle
sur .
9. Conservez l‘appareil dans un endroit sec, à l‘abri de la poussière.
MARINADES
Les marinades suivantes sont bien pour les steaks de boeuf, de porc, d’agneau
ainsi que pour le volailles et du poisson.
Marinez les steaks portionnés dans la marinade ou frottez-les avec de la marinade
et laissez reposer la viande dans la marinade pour plusieures heures ou pendant
la nuit dans le frigidaire. Tournez de temps en temps.
Avant de griller la viande, séchez-la avec un chiffon. En grillant enduisez la
viande de temps en temps avec la marinade.
Marinade pimenté
1 oignon, ½ piment rouge, 2 grandes cuillères
d’huile d’olives, 2 grandes cuillères de sucre
brun, 3 grandes cuillères de vinaigre, 50 ml jus
de pommes, 50 ml jus de tomates, 2 petites
cuillères de sauce Worcester, 2 baies de genièvre
Hachez l’oignon et le piment, étuvez-les dans
une sauteuse avec un peu d’huile. Ajoutez le
sucre, le vinaigre et jus de pommes, laissez
bouillir un instant et prenez du four. Ajoutez le
jus de tomates, la sauce de Worcester et les
baies de genièvre écrasées. Laissez refroidir et
marinez la viande dans la marinade froide.
Marinade à la bière
4 feuilles de laurier, 4 baies de genièvre,
2 grandes cuillères d’huile d’olives, 1/8 l de
bière sombre (ou de bière sombre alcool),
2 grandes cuillères de miel, jus d’un ½ citron
Braisez les feuilles de laurier et les baies
de genièvre écrasées dans l’huile, ajoutez la
bière et le miel et chauffez la marinade (ne
pas bouillir!). Ajoutez le jus de citron, laissez
refroidir la marinade et marinez la viande.
Marinade au romarin
2 petites cuillères de romarin séché, 4 gousses
d’ail, 4 baies de genièvre, 8 baies de poivre noir,
4 petites cuillères de baies de moutarde,
5 grandes cuillères d’huile d’olives.
Ecrasez toutes les ingrédients sauf l’huile
dans un mortier ou dans un moulin électrique.
Mélangez les épices avec l’huile et marinez la
viande.
Marinade au curry
2 petites cuillères de poudre de curry, un petit
morceau de gingembre frais, 50 ml de vin blanc
sec, 100 ml de jus d’ananas
Pelez et râpez le gingembre, mélangez-le avec
les autres ingrédients, marinez la viande.
Marinade asiatique
1 grande cuillère de miel, 2 petites cuillères
de Sambal Oelek, 1 grande cuillère de vin de
riz, 8 grandes cuillères de sauce de soja sucré,
2 grandes cuillères de jus d’orange, 2 grandes
cuillères de Sherry
Mélanger les ingrédients et marinez la viande.
46
Page 47

Marinade au coco
Copyright UNOLD AG | www.unold.de
1 citron non traité, 1 pincée de poivre de
Cayenne, 1 petit morceau de gingembre frais,
1 gousse d’ail, 150 ml lait de coco non sucré
Pelez et râpez le gingembre, pelez et hachez
l’ail, coupez des zestes de citron, pressez le
citron. Mélangez le gingembre, l’ail, les zestes
et le jus de citron avec les autres ingrédients, et
mettez la viande dans la marinade.
Marinade au vin rouge
¼ petites cuillères de baies de piment, 2
clous de girofle, 2 petites cuillères de grains
de moutarde, 3 baies de genièvre, 1 pincée de
canelle, 1 petite cuillère de grains de poivre
noir, 2 grandes cuillères de gelée de groseilles
rouges, 100 ml de vin rouge sec
Ecrasez les piments, les girofles, les grains de
moutarde, les baies de genièvre et le poivre
dans un ou dans un moulin électrique. Chauffez
l’huile dans une sauteuse, ajoutez les épices et
chauffez-les. Ajoutez le gelée de groseilles, le
canelle et le vin rouge et chauffez-les, jusqu’à
ce que le gelée est fondu. Laissez refroidir la
marinade et mariner la viande.
Marinade aux oranges
Jus de 3 oranges surets, 2 petites cuillères
d’estragon, 1 grande cuillère de vinaigre,
½ petite cuillère de poivre.
Mélangez les ingrédients et mariner la viande.
9 Marinade `l’ail. 8 gousses d’ail, 1 oignon, 2
petites cuillères de feuilles de sauge hachées,
¼ l de babeurre.
Hachez l’ail et l’oignon, mélangez-les avec les
autres ingrédients et marinez la viande.
Marinade au cumin
1 grande cuillère cumin (complet), ½ petite cuillère de poivre grossièrement moulu, 2 grandes
cuillères de vinaigre de pommes, 2 grandes
cuillères de jus de pommes, 3 grandes cuillères
d’huile d’olives
Mélangez les ingrédients et mariner la viande.
Marinade sucré et épicé
5 grandes cuillères de miel, 5 grandes cuillères
de sauce de soja, 1 pincée de poivre de
Cayenne, 1 petite cuillère de poudre de moutarde, 2 grandes cuillères d’huile d’olives
Mélangez les ingrédients et mariner la viande.
Marinade aux citrons
6 gousses d’ail, 100 ml huile d’olives, jus et
zestes de 2 citrons non traitées, ¼ petites cuillères de poivre
Hachez les gousses d’ail, mélangez-les avec les
zestes et le jus de citron et le poivre, marinez la
viande avec cette marinade.
47
Page 48

GRILLADES –ASTUCES ET RECETTES
Copyright UNOLD AG | www.unold.de
Le gril de contact convient pour griller toutes les pièces de viande plates et
sans os, par exemple des hamburgers ou des steaks, ainsi que des tranches
de légumes. Les aliments devraient avoir une épaisseur semblable pour que la
partie supérieure repose à une distance égale. Le couvercle devra toujours être
fermé lors des grillades de contact.
Il est recommandé d’utiliser le palier le plus élevé pour les aliments relativement
fins et le palier moyen pour les aliments d’une épaisseur d’environ 3 cm.
Toujours bien préchauffer le gril de contact. Votre viande sera parfaitement
grillée si elle est entre 1,5 et 3 cm d’épaisseur. La viande sera particulièrement
juteuse si elle a mariné auparavant.
Il est recommandé de saler les aliments après la grillade pour éviter que les
steaks de bœuf et le foie ne durcissent.
La durée indiquée dans les recettes est calculée pour le gril de contact à deux
faces.
Les recettes suivantes sont calculées pour 4 personnes, sauf indications
contraires.
Roulades de poulet
4 escaloppes de poulets minces, sel, poivre,
8 champignons de Paris, 1 oignon, 2 grandes
cuillères d’huile, 120 g de fromage Gouda rapé,
2 grandes cuillères d’huile, 2 petites cuillères
de marjolaine, 4 cure-dents
Battez les escaloppes et assaisonnez-les avec
du sel et du poivre, hachez l’oignon et braisez-
les dans l’huile dans une sauteuse avec les
champignons coupées en tranches. Distribuez
cette mixture sur les escaloppes, distribuez le
fromage en haut. Roulez les escaloppes et fixezles avec des cure-dents. Aromatisez 2 grandes
cuillères d’huile avec la marjolaine, enduisez les
roulades avec l’huile aromatisé et grillez-les env.
25 min. en les tournant de temps en temps.
Roulades de veau avec mozzarella
4 escaloppes de veau minces, 1 pomme, 200 g
de fines herbes mixtes (basilic, citronnelle,
origan, thym, persil), 1 grande cuillère huile,
300 g de fromage Mozzarella, sel, poivre,
4 cure-dents
48
Battez les escaloppes, chauffez l’huile. Hachez
les fines herbes et sautez-les dans l’huile. Salez
et poivrez les escaloppes, et distribuez l’huile
aux fines herbes par-dessus. Coupez le fromage
en tranches et placez-le sur les escaloppes.
Roulez les escaloppes, fixez-les avec des curedents.
Grillez les roulades sur la grille pour env.
20 min., tournez-les de temps en temps.
Pizzaburger
Ingrédients: 100 g de viande hachée de porc
et de boeuf,
1 gousse d’ail et ½ oignon en dés, 1 oeuf,
2 cuillères à soupe de chapelure, 50 g
de fromage gouda, 50 g de jambon cuit,
2 cuillères à café de purée de tomates,
½ cuillères à café d’épice pour pizza, sel et
poivre, si nécessaire, 1 petit pain, 2 feuilles
de salade, 1 cuillère à soupe de mayonnaise,
1 cuillère à soupe de ketchup de tomates,
2 tranches de tomates, 2 tranches d’oignon
Page 49

Préparation: Mélanger la viande hachée, l’ail
Copyright UNOLD AG | www.unold.de
et l’oignon, l’oeuf, la chapelure, le fromage, le
jambon en dés, purée de tomates et les épice
de pizza. Former deux boulettes plates et les
griller sur le plat de gril huilé 6- 8 minutes en
les tournant une fois.
Couper le petit pain et le griller quelques
instants. Tartinez le pain avec un peu de
mayonnaise, ajouter le salade lavé, puis la
première boulette. La napper de ketchup, y
mettre la deuxième boulette, les tomates et les
oignons.
Mettre la deuxième moitié du petit pain en haut.
Cotelettes d’agneau avec légumes grillés
8 cotelettes d’agneau, marinade n° 3, 2 courgettes, 3 tiges de persil, 2 gousses d’ail,
2 grandes cuillères d’huile
Marinez le cotelettes env. 6 heures, puis grillez-
les env. 6 min. de chaque côté.
Coupez les courgettes en tranches de 2 cm.
Hachez l’ail et le persil, mélangez-les avec
l’huile. Aromatisez les courgettes avec cet huile
et grillez-les env. 3 min. de chaque côté.
Tuyau: Servez avec de la baguette.
Les poissons
Truites aux fines herbes
4 petites truites , 4 cuillerées à soupe de persil,
4 cuillerées à café de jus de citron, sel, poivre,
beurre
Lavez le poisson, nappez-le à l’intérieur de jus
de citron, fourrez-le de persil, beurrez la truite
et grillez-la dans le gril préchauffé. Assaissonezla de sel et de poivre.
Saumon grillé avec beurre au citron
4 petites tranches de saumon, 4 cuillerées à café
de jus de citron, 4 cuillerées à soupe de beurre mou,
2 cuillerées à café de cestes, sel, poivre
Nettoyez le poisson, nappez-le de jus de citron,
assaissonez-le de sel et de poivre et grillez-le
dans le gril préchauffé. Mélangez le beurre avec
les cestes et garnissez le saumon avec le beurre.
Macquerau
4 petits maqueraux, marinade no. 4 ou no. 12
Lavez et séchez les poissons et marinez-les
pour quelques heures. Grillez les macqueraux
sur les plats canellés env. 12-16 minutes.
Brochettes aux crevettes
8 crevettes pelées, ½ quantité de la marinade
n° 6, 4 brochettes de bois huilées, 4 pièces de
feuille d’aluminium huilé
Attachez 2 crevettes sur une brochette, marinez-les dans l’huile aromatisé pour 1-1,5 heures.
Placez une brochette sur 1 pièce de feuille
d’aluminium huilé, fermez la feuille et grillez
les brochettes env. 4-5 minutes de chaque côté.
Les délicatesses végétariennes
Aubergines et courgettes grillées
2 aubergine, 2 petites courgettes, 4 cuillerées à
soupe d’huile d‘olives, romarin, poivre
Coupez les tiges des légumes. Coupez
l’aubergine en tranches, salez-les et laissez
reposer les tranches salées pour 30 minutes.
Puis rincez les aubergines et séchez-les.
Coupez les courgettes en tranches et salez-les
légèrement.
Nappez les tranches d‘aubergine d‘huile et
grillez-les dans le gril préchauffé.
Accompagnez les légumes d‘une sauce aïoli ou
yaourt-menthe et de baguette.
Epis de maïs
4 épis de maïs sans feuilles, 2 l d’eau salée,
4 grandes cuillères d’huile d’olives
Cuites les épis dans l’eau salée env. 10 min.,
laissez-les égoutter. Brossez les épis avec l’huile
et piquez des cure-dents dans les deux pointes.
Grillez les épis env. 10 minutes en les tournant.
Tuyau: Prenez de l’huile aromatisé, p.e,. au
sauge ou à l’origan.
Emballez les épis dans des tranches de lard
avant de les griller.
49
Page 50

“Burger” de légumes
Copyright UNOLD AG | www.unold.de
1 chou-rave, 1 petit céleri, 300 g de carottes,
1 racine de persil, 1 bouquet de persil,
2 gousses d’ail, 100 g de fromage Gouda,
2 oeufs, 2 grandes cuillères de blé vert moulu,
2 grandes cuillères de panure, sel, poivre, huile
Nettoyer et râpez le chou-rave, le céleri, les
carottes et la racine de persil. Hachez le persil, les
feuilles du chou-rave et les gousses d’ail, Coupez
le fromage en petits morceaux. Mélangez les
ingrédients avec les oeufs, le blé vert, la panure,
du sel et du poivre. Formez des petites boulettes,
enduisez-les d’huile et grillez-les sur la plaque
de gril pour env. 6 minutes de chaque côté.
CROQUE–MONSIEUR, SANDWICHES, PANINIS – ASTUCES ET RECETTES
Préparez les croque-monsieur, les sandwiches classiques et les paninis dans le
gril de contact. Les sandwiches devraient avoir une épaisseur semblable pour
que la partie supérieure repose à une distance égale.
Généralement, toutes les sortes de pain peuvent être toastées. Les paninis et les
sandwiches apprêtés avec de la ciabatta, de la focaccia ou de la baguette sont
absolument délicieux.
Toujours bien préchauffer le gril de contact avant d’y déposer les aliments.
Veuillez griller les croque-monsieur, les sandwiches et les paninis uniquement
en position moyenne ou haute. Le fromage pourra éventuellement couler lors
d’une période de grillade trop longue.
Croque Monsieur
4 tranches de pain blanc, 2 tranches de fromage,
2 tranches de jambon cuit
Variez ce sandwich en ajoutant des cornichons
ou des ananas (conserve).
Placez sur deux tranches de pain beurrées
(côté beurré en bas) une tranche de fromage et
de jambon et à votre choix des ananas ou des
cornichons. Puis couvrez les sandwichs avec les
tranches de pain restantes (côté beurré en haut)
et faites griller les sandwichs dans l’appareil
préchauffé pour env. 2-3 minutes.
Croques Hawaii
4 grande tranches de jambon cuit, 100 g de
fromage rapé, 4 tranches d’ananas, 4 curedents,
4 pièces de feuille d’aluminium huilé, 8 tranches
de pain blanc.
50
Placez une tranche d’ananas sur chaque tranche de jambon, distribuez le fromage pardessus, pliez les tranches et fixez-les avec
des cure-dents. Emballez les rouleaux dans la
feuille d’aluminium huilé et grillez-les 3 min.
de chaque côté. Grillez le pain et servez-le avec
les croques Hawaii. Tuyau: Accompagnez ce plat
d’une salade verte.
Pain perdu
Ingrédients :
4 petits pains, 3 œufs, 300 ml de lait, 50 g
de sucre, ¼ cuillère à thé de cannelle, 50 g de
beurre
Préparation :
Couper les petits pains en tranches de ½ cm
d’épaisseur et placez-les dans une assiette.
Page 51

Verser les œufs, le lait chaud, le sucre et la
Copyright UNOLD AG | www.unold.de
cannelle et répartir de manière homogène sur
les tranches de pain.
Grillez les pains trempés quelques minutes sur
le gril.
GRIL PLAT (FAÇON BARBECUE) – ASTUCES ET RECETTES
En plus de sa double surface de gril, le gril façon barbecue offre une grande
variété de possibilités de préparation, car il permet d’utiliser simultanément
les deux plaques du gril. Ici, vous pouvez préparer simultanément des aliments
de différentes épaisseurs. Avec ce mode d’utilisation, les aliments devront
éventuellement être retournés une ou plusieurs fois.
Réglez la température de grillade désirée à l’aide de l’interrupteur de température.
Chauffez le gril quelques minutes avant d’y déposer les aliments.
Légumes grillés
Champignons à l’ail
500 g de champignons de Paris ou de cêpes,
1 bouquet de persil, poivre, 2 gousses d’ail,
5 grandes cuillères d’huile d’olives, sel
Nettoyez les champignons avec une brosse,
hachez l’ail et le persil. Mélangez les ingrédients
sauf le sel et le poivre et grillez les champignons
sur la plaque de gril en les tour-nant souvent.
Assaisonner de sel et de poivre avant de servir.
Temps de cuisson env. 10 minutes
Crêpes au fromage
250 g de courgettes, 100 g de fromage râpé,
1 oeuf, 2 grandes cuillères de farine, 1 petite
cuillère de fond de légumes granulé, 1 petit
oignon haché, 2 prises de muscat, huile
Râpez les courgettes et mélangez-les avec les
autres ingédients.
Préchaufféz le gril à 200°C. Placez la masse sur
le gril à l‘aide d‘une cuillère et cuisez les crêpes
des deux côtés.
Légumes mixtes
1 aubergine, 1 courgette, 1 grande tomate, 1
grande oignon, 1 poivron rouge, vert et jaune,
3 grandes cuillères d’huile d’olives, 3 gousses
d’ail, 1 grande cuillère d’origan frais, poivre
Nettoyez l’aubergine, la courgette, la tomate et
les poivrons et coupez-les en morceaux de env.
1,5 cm. Coupez l’oignon en tranches, hachez
l’ail. Mélangez les ingrédients avec l’huile, et
grillez-les sur la plaque de gril pour env. 1012 minutes en les tournant souvent. Ajoutez du
poivre avant de servir les légumes.
Tuyau: Délicieux pour accompagner les viandes
sombres.
Fruits grillés
Ananas grillé
1 ananas frais, sucre, canelle
Eplucher l‘ananas et enlevez le milieu. Couper
l‘ananas en tranches de 2 cm. Faites griller les
tranches d’ananas pour env. 3 minutes.
Servez avec du sucre et du canelle et une boule
de glace à la vanille ou à l‘ananas.
Pomme grillée au chili
4 pommes rouges, marinade no. 1
Enlevez le torgnon, coupez-les pommes en
tranches de 1,5 cm. Marinez-les pour 1 heure
dans la marinade. Grillez 3 minutes sur la
plaque de gril en les tournant une fois.
51
Page 52

Les recettes disponibles dans ce mode d’emploi ont été soigneusement examinées et contrôlées
Copyright UNOLD AG | www.unold.de
par leurs auteurs respectifs et par la société UNOLD AG. Notre responsabilité n’est toutefois en
aucun cas engagée. Les auteurs et la société UNOLD AG ainsi que ses représentants déclinent toute
responsabilité en cas de dommages corporels, matériels et pécuniaires.
CONDITIONS DE GARANTIE
En cas d’utilisation conforme et lors de dégâts manifestement dus à des défauts de fabrication, nos appareils sont garantis
24 mois, lors d’utilisation professionnelles 12 mois, à dater de l’achat. Notre garantie n’est valide que pour les appareils
vendus en Allemagne et en Autriche. Dans tout autre pays veuillez contacter l’importateur. Veuillez envoyer à notre adresse
les appareils, pour lesquels vous réclamez une suppression de défauts, avec le bon d’achat montrant la date d’achat, port
payé et proprement emballé. Les coûts de transport seront remboursés en cas de garantie en Allemagne et en Autriche. Les
défauts causés par usure, utilisation incorrecte ou non-respect des instructions de maintenance sont exclus. Notre obligation
de garantie cesse, si de réparations ou des interventions sont accomplies par des tiers. Cette garantie n’affecte pas les droits
du consommateur contre le commerçant.
TRAITEMENT DES DÉCHETS / PROTECTION DE L’ENVIRONNEMENT
Nos appareils sont produits selon un standard élevé de qualité pour une longue durée d’utilisation. Un
entretien régulier et des réparations compétentes par notre service après-vente prolongent cette durée d’utilisation. Si néanmoins l’appareil est endommagé et ne peut plus être réparé, veuillez suivre les instructions
suivantes. Ne jamais disposer ce produit avec les dégâts de ménage. Apportez ce produit à une station de
collection pour récupération de produits électriques et électroniques. Par la collection séparée vous aidez à
protéger les ressources naturelles et prenez soin, que le produit est démonté sans risque pour la santé et
l’environnement.
52
Page 53

GEBRUIKSAANWIJZING MODEL 58526
Copyright UNOLD AG | www.unold.de
TECHNISCHE GEGEVENS
Vermogen: 1.800–2.000 W, 220–230 V~, 50 Hz
Platen: Met anti-aanbaklaag, afneembaar, grilloppervlak 29,0 x 26,0 cm
Greep: Warmte-isolerend
Afmetingen: Ca. 35,6 x 35,9 x 15,5 cm (b/d/h)
Gewicht: Ca. 4,35 kg
Snoer: Ca. 100 cm
Uitvoering: Vetopvangbak, traploze temperatuurregeling, grilltemperatuur tot max. 230 °C,
verschillende grillstanden voor het bovenste gedeelte instelbaar (contactgrillen,
gratineren, 90° naar achteren klapbaar, vlakgrillen, vergrendeling), controlelampjes voor AAN/UIT en GEREED; hoogwaardige rvs behuizing, oververhittingsbeveiliging, plaatsbesparende, staande opberging
Toebehoren: Vetopvangbak, gebruiksaanwijzing met recepten
Wijzigingen en vergissingen in de uitrustingskenmerken, techniek, kleuren en design voorbehouden.
VERKLARING VAN DE SYMBOLEN
Dit symbool wijst op eventuele gevaren die letsel tot gevolg kunnen
hebben of tot schade aan het apparaat leiden.
Dit symbool wijst op een eventueel verbrandingsgevaar. Ga hier altijd
zeer voorzichtig te werk.
Dit symbool attendeert u op een eventueel brandgevaar.
VOOR UW VEILIGHEID
Lees de volgende aanwijzingen a.u.b. door en bewaar ze goed.
1. Dit apparaat kan door kinderen vanaf 8 jaar worden gebruikt
en door personen die over gebrekkige fysieke, sensorische of
geestelijke vaardigheden of gebrek aan ervaring en/of kennis
beschikken, mits zij onder toezicht staan of instructies hebben
gekregen aangaande het veilige gebruik van dit apparaat en de
hieruit resulterende gevaren begrepen hebben.
2. Kinderen mogen niet met het apparaat spelen.
3. Reiniging en onderhoud door de gebruiker mogen niet door
kinderen worden uitgevoerd, tenzij deze ouder dan 8 jaar zijn en
onder toezicht staan.
53
Page 54

4. Berg het apparaat en de kabel op buiten bereik van kinderen
Copyright UNOLD AG | www.unold.de
onder de 8 jaar.
5. VOORZICHTIG - delen van dit product kunnen zeer heet worden
en brandwonden veroorzaken! Wees in aanwezigheid van
kinderen en kwetsbare personen bijzonder voorzichtig.
6. Sluit het apparaat uitsluitend aan op wisselstroom met spanning
overeenkomstig het typeplaatje.
7. Het apparaat is bestemd voor huishoudelijk gebruik of voor soortgelijke doeleinden, bijv.:
voor door het personeel gebruikte keukens in winkels, kantoor-
ruimtes en in andere werkomgevingen;
voor gebruik door gasten in hotels, motels en andere woonruim-
tes;
voor pensions met logies en ontbijt.
8. Dit apparaat mag niet met een externe tijdklok of met een
afstandsbediening bediend worden.
9. Dompel het apparaat nooit in water of andere vloeistoffen. De
apparaat en het snoer mogen niet in contact komen met water of
andere vloeistoffen. Als dit toch eens gebeurt, moeten alle delen
volkomen droog zijn, voordat het apparaat weer gebruikt wordt.
10. Raak het apparaat of het snoer nooit met natte handen aan.
11. Zet het apparaat om veiligheidsredenen nooit neer op hete
oppervlakken, een metalen dienblad of op een natte ondergrond.
12. Het apparaat en het snoer mogen niet in de buurt van open vuur
gebruikt worden.
13. Let op dat het snoer niet over de rand van het werkvlak heen
hangt, omdat dit anders ongevallen kan veroorzaken, als bijv.
kleine kinderen aan de kabel trekken.
14. Als u een verlengkabel gebruikt, controleer dan eerst of de kabel
intact en geschikt is voor het betreffende vermogen, omdat de
kabel anders oververhit kan raken.
15. De aansluitkabel en evt. ook de verlengkabel moeten zodanig
gelegd worden, dat niemand eraan kan trekken of erover kan
struikelen.
16. Gebruik het apparaat uitsluitend binnenshuis.
17. Laat het apparaat tijdens de werking nooit zonder toezicht en
houd het buiten bereik van kinderen.
18. De kabel a.u.b. volledig afwikkelen, voordat u de kookplaat aan
-
zet, zodat de kabel niet met hete delen in aanraking kan komen.
Dek het grilloppervlak nooit af met aluminiumfolie, bakpapier of
19.
andere materialen.
20. Raak de hete grillplaat nooit aan, zolang het apparaat in werking
is – verbrandingsgevaar!
54
Page 55

21. Als u met een gesloten deksel barbecuet, kan zich onder het
Copyright UNOLD AG | www.unold.de
deksel hete stoom vormen. Let er bij het openen van het deksel op dat u voldoende afstand aanhoudt om verbrandingen te
vermijden.
Om rookontwikkeling te voorkomen, dient u ervoor te zorgen
22.
dat uw kook-, braad- en bakgerei niet oververhit raakt; de rook
kan voor kleine dieren (bijv. vogels) met een bijzonder gevoelig
ademhalingsstelsel bijzonder gevaarlijk zijn. Wij raden u aan om
vogels niet in de keuken te houden.
23. Pak het apparaat, als het heet is, uitsluitend aan de handgrepen
vast.
24. Open het apparaat uitsluitend m.b.v. de handgreep aan het deksel.
Zorg ervoor dat het apparaat tijdens de werking op een vrij, hit-
25.
tebestendig oppervlak staat en op voldoende afstand van ontvlambare voorwerpen.
Na gebruik trekt u de stekker uit het stopcontact en laat u de
26.
barbecue afkoelen, voordat u het apparaat reinigt en opbergt.
27. Bij de reiniging kunt u de plaat, nadat ze afgekoeld is, verwijderen en handmatig reinigen. Het apparaat met een vochtige doek
afvegen.
Om schade te vermijden, mag het apparaat niet met toebehoren
28.
van andere fabrikanten of andere merken worden gebruikt.
29. Controleer de stekker en de aansluitkabel regelmatig op slijtage
of beschadiging. Als de aansluitkabel of andere delen beschadigd zijn, stuur het apparaat dan a.u.b. ter controle en reparatie
naar onze klantenservice. Ondeskundige reparaties kunnen ernstige gevaren voor de gebruiker veroorzaken en hebben uitsluiting van de garantie tot gevolg.
LET OP:
Het apparaat is tijdens en na het gebruik heel heet!
Gebruik het apparaat nooit, als zich water of andere vloeistoffen
in de vetopvangbak bevinden – brandgevaar!
Gebruik het apparaat nooit, als de vetopvangbak niet erin
geplaatst is.
Open de behuizing van het apparaat in geen geval. Er bestaat
gevaar voor een elektrische schok.
De fabrikant is niet aansprakelijk, indien het apparaat verkeerd gemonteerd, ondeskundig of foutief
gebruikt of door niet geautoriseerde derden gerepareerd werd.
55
Page 56

VÓÓR HET EERSTE GEBRUIK
Copyright UNOLD AG | www.unold.de
1. Verwijder alle verpakkingsmaterialen en eventuele transportbeveiligingen.
Houd verpakkingsmaterialen verwijderd van kinderen – Verstikkingsgevaar!
2. Controleer of alle onderdelen voorhanden zijn. Als onderdelen ontbreken of
beschadigd zijn, neem dan a.u.b. contact op met de handelaar of met onze
klantenservice.
3. Voordat u het apparaat voor de eerste keer gebruikt, is het raadzaam om
beide van een anti-aanbaklaag voorziene grillplaten met een vochtige doek
af te vegen.
4. Bevestig telkens een grillplaat aan de binnenkanten van het apparaat (zie
het hoofdstuk „Grillplaten aanbrengen/verwijderen“).
5. Controleer of de vetopvangbak correct aangebracht is. Deze wordt van voren
in de behuizing geschoven, totdat de bak vastklikt.
6. Apparaat sluiten, stekker in een stopcontact (220–230 V~, 50 Hz) steken.
Het groene controlelampje is verlicht en geeft aan dat de verwarming in
werking is.
7. De temperatuurregelaar op de middelste stand zetten. Het voorverwarmen
begint, het rode controlelampje is verlicht. Zodra het apparaat de vooringestelde temperatuur bereikt heeft, gaat het rode controlelampje uit en het
groene controlelampje gaat branden. Attentie: Het groene controlelampje
gaat tijdens de werking van het apparaat afwisselend aan en uit, afhankelijk
van het actuele verwarmingsvermogen van het apparaat.
8. Laat het apparaat enkele minuten opwarmen. Zorg er hierbij voor dat de
kamer voldoende geventileerd is.
9. Als het apparaat voor het eerst wordt gebruikt, kan zich een beetje rook- en
geurvorming voordoen die echter na korte tijd verdwijnt.
10. Dan kunt u het apparaat gebruiken.
GRILLPLATEN INZETTEN/VERWIJDEREN
1. U kunt de platen verwijderen, om ze gemakkelijker te kunnen reinigen. Druk
hiervoor op de betreffende ontgrendelingstoets en trek de grillplaat naar
voren, in de richting van de greep.
2. Om de grillplaten weer terug te plaatsen, schuift u de betreffende grillplaat
in de bevestiging en drukt u de plaat omlaag, totdat deze vastklikt. Controleer
of de grillplaten stevig vastzitten, voordat u het apparaat opnieuw gebruikt.
56
Page 57

TEMPERATUURREGELING
Copyright UNOLD AG | www.unold.de
1. U kunt verschillende temperaturen voor het grilloppervlak instellen.
2. Als richtwaarden gelden:
Lage hitte: shaslik, spiezen, worstjes
Gemiddelde hitte: roosteren, spiegeleieren bakken, sandwiches
Grote hitte: grillen, toasten
3. Om veiligheidsredenen is het verwarmingsvermogen achteraan in het midden
van de grillplaten iets geringer. Hier kunt u optimaal dunnere stukken vlees
of bijv. groente grillen.
GRILLGERECHTEN
1. Test een van onze recepten of gebruik gewoon het recept voor het grillen dat
u normaliter gebruikt.
2. Als u levensmiddelen gaat grillen die van tevoren ingevroren waren, let er
dan op dat deze vóór het grillen volledig ontdooid moeten zijn.
3. Vlees dat u van tevoren in de koelkast hebt bewaard, lukt het beste, als u
het enige tijd vóór het grillen uit de koelkast haalt en bij kamertemperatuur
laat acclimatiseren.
4. Zo mogelijk moet aan vlees (afhankelijk van de bereiding en het soort vlees)
pas na het grillen zout toegevoegd worden. Als u het vlees voor het grillen
marineert, wordt het bijzonder mals en smakelijk.
5. Vet en braadjus worden door de vetopvangbak opgevangen. Zo kunt u bijzonder vetarm grillen en zijn uw gerechten gezonder en zijn beter te verteren.
STAND VAN DE GRILLPLATEN
1. Met behulp van de dekselinstelling kunt u
de verschillende varianten voor de stand
van de grillplaten instellen.
Symbool : Het deksel kan 90° naar
achteren geklapt worden.
Symbool : Het deksel kan in gesloten
toestand vastgezet worden, zodat het
apparaat niet meer geopend kan worden.
Attentie: Uitsluitend instellen, als het
apparaat van het stroomnet gescheiden
is en als zich geen levensmiddelen
erin bevinden. Ideaal om het apparaat
comfortabel te transporteren of op te
bergen.
57
Page 58

Standen I tot V: U kunt bij het contactgrillen kiezen tussen verschillende
Copyright UNOLD AG | www.unold.de
hoogtes. Het deksel klikt in de gekozen hoogte vast en voorkomt zodoende
dat de te grillen levensmiddelen door het gewicht van het deksel te veel
ingedrukt worden. Schuif de regelaar aan de rechterkant van het apparaat
naar de gewenste hoogte tussen „I“ en „V“.
GRILLEN
Attentie! Dek het grilloppervlak nooit af met aluminiumfolie, bakpapier of
andere materialen. Gebruik ook geen grillschalen van aluminium. Anders
kan zich warmte ophopen, waardoor branden kunnen ontstaan.
1. Zet het gesloten apparaat op een hittebestendig oppervlak neer.
2. Controleer of de temperatuurregelaar zich in de stand „MIN“ bevindt.
3. Let op dat de vetopvangbak correct aan de voorkant van het apparaat aangebracht is. Gebruik het apparaat nooit, als de vetopvangbak er niet in zit;
doe nooit vloeistoffen, zoals bijv. water, in de vetopvangbak. Om volledig te
profiteren van het vetopvangbak, trek de twee voetjes aan de onderkant van
het apparaat.
Aan één kant grillen/vlakgrillen
Ideaal voor zachte, niet te dikke ingrediënten.
4. U kunt uw levensmiddelen uitsluitend op het onderste grilloppervlak met
geopend deksel grillen of allebei de grilloppervlakken gebruiken. Hiervoor
moet u de dekselinstelling op zetten, druk op de knop „180°“ (3) en het
deksel compleet open klappen, zodat de grilloppervlakken allebei horizontaal staan.
5. Om energie te besparen, raden wij u aan om het apparaat met gesloten
deksel te verwarmen. Steek de stekker in een stopcontact (220–230 V~,
50 Hz). Het groene controlelampje is verlicht en geeft aan dat de verwarming in werking is.
6. De temperatuurregelaar op de gewenste stand zetten. Het voorverwarmen
begint, het rode controlelampje is verlicht. Zodra het apparaat de vooringestelde temperatuur bereikt heeft, gaat het rode controlelampje uit en het
groene controlelampje gaat branden. Attentie: Het groene controlelampje
gaat tijdens de werking van het apparaat afwisselend aan en uit, afhankelijk
van het actuele verwarmingsvermogen van het apparaat.
7. Open het deksel van het apparaat heel voorzichtig. Pak het deksel hierbij
uitsluitend aan de handgreep vast, om verbrandingen te vermijden.
8. Bestrijk de onderste grillplaat (en bij het vlakgrillen ook de bovenste grillplaat) met een beetje hittebestendige olie.
9. Leg de gewenste, te grillen levensmiddelen op de grillplaat en ga af en toe
na, of de levensmiddelen omgedraaid moeten worden.
58
Page 59

10. Controleer regelmatig of de vetopvangbak vol is. Als de bak vol is, schakelt
Copyright UNOLD AG | www.unold.de
u het apparaat uit en laat het afkoelen, dan maakt u de vetopvangbak leeg
en daarna gaat u door met het grillen. Om een eventueel brandgevaar te
vermijden, mag de vetopvangbak nooit overlopen.
11. Als uw gerechten klaar zijn, draait u de temperatuurregelaar naar de stand
„MIN“ en trekt u de stekker uit het stopcontact.
12. Laat het apparaat volledig afkoelen, voordat u het reinigt.
Contactgrillen/gratineren
Ideaal voor stukken vlees of sandwiches, de te grillen levensmiddelen hoeven
niet omgedraaid te worden.
13. U kunt uw gerechten hierbij op het onderste grilloppervlak met gesloten
deksel grillen.
14. Om energie te besparen, raden wij u aan om het apparaat met gesloten deksel te verwarmen. Steek de stekker in een stopcontact (230 V~, 50 Hz). Het
groene controlelampje is verlicht en geeft aan dat de verwarming in werking
is.
15. De temperatuurregelaar op de middelste stand zetten. Het voorverwarmen
begint, het rode controlelampje is verlicht. Zodra het apparaat de vooringestelde temperatuur bereikt heeft, gaat het rode controlelampje uit en het
groene controlelampje gaat branden. Attentie: Het groene controlelampje
gaat tijdens de werking van het apparaat afwisselend aan en uit, afhankelijk
van het actuele verwarmingsvermogen van het apparaat.
16. Open het deksel van het apparaat heel voorzichtig. Pak het deksel hierbij
uitsluitend aan de handgreep vast, om verbrandingen te vermijden.
17. Bestrijk de onderste grillplaat met een beetje hittebestendige olie.
18. Leg de gewenste, te grillen levensmiddelen erop.
19. Sluit het deksel van het apparaat weer. Pak het deksel hierbij uitsluitend
aan de handgreep vast, om verbrandingen te vermijden.
20. Het deksel past zich automatisch aan de dikte van de te grillen levensmiddelen aan. U kunt de afstand tussen de te grillen levensmiddelen en het
deksel echter ook m.b.v. de instellingen I tot V aan de dekselinstelling vastleggen, zoals in het hoofdstuk „Stand van de grillplaten“ beschreven.
21. Controleer regelmatig of de vetopvangbak vol is. Als de bak vol is, schakelt
u het apparaat uit en laat het afkoelen, dan maakt u de vetopvangbak leeg
en daarna gaat u door met het grillen. Om een eventueel brandgevaar te
vermijden, mag de vetopvangbak nooit overlopen.
22. Als uw gerechten klaar zijn, draait u de temperatuurregelaar naar de stand
„MIN“ en trekt u de stekker uit het stopcontact.
23. Laat het apparaat volledig afkoelen, voordat u het reinigt.
LET OP:
Het apparaat is tijdens en na het gebruik heel heet!
59
Page 60

REINIGEN EN OPBERGEN
Copyright UNOLD AG | www.unold.de
Trek eerst de stekker uit het stopcontact, voordat u het apparaat
gaat reinigen of onderhouden. Wacht, totdat apparaat compleet
afgekoeld is.
Het apparaat mag nooit in water gedompeld worden!
1. Gebruik a.u.b. in geen geval pannensponsjes of soortgelijke reinigingsgereedschappen, om het oppervlak van de van een anti-aanbaklaag voorziene
plaat niet te beschadigen. Gebruik geen scherpe schuurmiddelen, staalwol,
metalen voorwerpen, hete schoonmaakmiddelen of desinfecterende middelen, omdat deze het apparaat kunnen beschadigen. Grove verontreinigingen
verwijdert u met de meegeleverde reinigingsschraper. Deze schraper is uitsluitend geschikt voor dit doeleinde. Gebruik de reinigingsschraper a.u.b.
nooit om de te grillen levensmiddelen om te draaien of van de grill te halen,
om schade aan de platen te vermijden.
2. U kunt de platen verwijderen, om ze gemakkelijker te kunnen reinigen. Druk
hiervoor op de ontgrendelingstoets en trek de betreffende grillplaat naar
voren, in de richting van de greep.
3. Reinig de platen met warm water, waaraan u een beetje afwasmiddel kunt
toevoegen, en droog de platen vervolgens goed af.
4. Om de grillplaten weer terug te plaatsen, schuift u de betreffende grillplaat
in de bevestiging en drukt u de plaat omlaag, totdat deze vastklikt. Controleer of de grillplaten stevig vastzitten, voordat u het apparaat opnieuw
gebruikt.
5. Verwijder het vet dat zich evt. in de vetopvangbak heeft verzameld en reinig
de bak in warm afwaswater. Plaats de volledig opgedroogde bak weer in de
behuizing en controleer of de bak stevig in de behuizing vastzit.
6. Veeg de behuizing met een goed uitgewrongen, vochtige doek af en droog de
behuizing vervolgens goed af.
7. Let er steeds op dat er geen water in de behuizing kan dringen.
8. U kunt de barbecue plaatsbesparend opbergen. Stel de dekselinstelling correct in om te voorkomen dat het deksel onbedoeld openklapt .
9. Berg het apparaat op een droge, tegen stof beschermde plek op.
MARINADEN
De navolgende marinaden zijn in gelijke mate geschikt voor steaks van rundvlees, varkensvlees, lam,
gevogelte, vis en groente.
Steaks in porties in de marinade leggen of hiermee besmeren en meerdere uren, bij voorkeur een
nacht lang in de koelkast laten doortrekken. Af en toe omdraaien in de marinade. Voor het barbecuen
dient u de marinade met een keukendoek af te betten. Met de resterende marinade kunt u het
barbecueproduct gedurende het barbecuen van tijd tot tijd besmeren.
60
Page 61

Vurig-scherpe marinade
Copyright UNOLD AG | www.unold.de
1 ui, ½ rode chilipeper, 2 EL olijfolie, 2 EL
rietsuiker, 3 EL azijn, 50 ml appelsap,
50 ml tomatensap, 2 TL worcestersaus,
2 jeneverbessen
Ui en chilipeper in kleine dobbelsteentjes
snijden, in een pan in de olie kort blancheren.
Suiker, azijn en appelsap erbij doen, aan de kook
brengen. Van het fornuis nemen. Tomatensap,
worcestersaus en geprakte jeneverbessen
toevoegen. Na het afkoelen het vlees hierin
marineren.
Biermarinade
4 laurierblaadjes, 4 jeneverbessen, 2 EL olijfolie,
1/8 l dubbelbokbier (of alcoholvrij moutbier),
2 EL honig, sap van een ½ citroen
Laurierblaadjes en jeneverbessen in olie
aanbraden, bier en honing toevoegen en kort
verhitten (niet aan de kook laten komen!).
Citroensap toevoegen, marinade laten afkoelen
en vlees hiermee marineren.
Rosemarijnmarinade
2 TL gedroogde rosmarijn, 4 knoflookteentjes,
4 jeneverbessen, 8 zwarte peperkorrels, 4 TL
mosterdzaadjes, 5 EL olijfolie.
Alle ingrediënten behalve olie in de vijzel
fijndrukken of fijnmalen. De pasta met de olie
mengen en het vlees ermee inwrijven.
Kerriemarinade
2 TL kerriepoeder, een duimgroot stuk verse
gember, 50 ml droge witte wijn, 100 ml ananassap
Gember schillen en fijn raspen, met de overige
ingrediënten mengen, vlees hiermee instrijken.
Aziatische marinade
1 EL honing, 2 TL sambal oelek, 1 EL rijstwijn,
8 EL zoete sojasaus, 2 EL sinaasappelsap 2 EL
sherry
Ingrediënten door elkaar roeren en het vlees
ermee besmeren.
Kokosmarinade
1 onbehandelde citroen, 1 msp. cayennepeper,
1 duimgroot stuk verse gember, 1 teentje
knoflook, 150 ml ongezoete cocosnootmelk
Gember schillen en fijn raspen, knoflook schillen
en persen, citroenschillen raspen, citroen
uitpersen. Gember, knoflook, citroenschil en
–sap met de andere ingrediënten mengen, het
vlees in de marinade leggen.
Rode wijn-marinade
¼ TL pimentkorrels, 2 kruidnagels, 2 TL
mosterdzaadjes, 3 jeneverbessen, 1 snufje
kaneel 1 TL zwarte peperkorrels, 2 EL/150 g
rode bosbessengelei, 100 ml droge rode wijn
Piment, kruidnagels, mosterdzaadjes,
jeneverbessen en peperkorrels in de vijzel malen
of fijnmalen. Olie in een pan op het fornuis
verhitten, de klein gehakte kruiden daarin
lichtjes bruineren. Bosbessengelei, kaneel en
rode wijn erbij gieten en verhitten totdat de gelei
vloeibaar wordt. Marinade laten afkoelen en
vlees erin leggen.
Sinaasappelmarinade
Sap van 3 zure sinaasappels, 2 TL estragon,
1 EL azijn, ½ TL peper.
Alle ingrediënten door elkaar roeren en het vlees
erin leggen.
Knoflookmarinade
8 knoflookteentjes, 1 ui, 2 TL vers gehakte
salieblaadjes, ¼ l karnemelk.
Knoflook en uien in kleine dobbelsteentjes
snijden, met de andere ingrediënten mengen en
het vlees erin leggen.
Kummelmarinade
1 EL kummel (heel), ½ TL grof gemalen peper,
2 EL appelazijn, 2 EL appelsap, 3 EL olijfolie
Ingrediënten mengen en het vlees erin leggen.
61
Page 62

Zoet-scherpe marinade
Copyright UNOLD AG | www.unold.de
5 EL honing, 5 EL sojasaus, 1 msp. cayennepeper, 1 TL mosterdpoeder, 2 EL olijfolie
Ingrediënten mengen en het vlees erin leggen.
Citroenmarinade
6 teentjes knoflook, 100 ml olijfolie, sap en
geraspte schil van 2 onbehandelde citroenen,
¼ TL peper
Knoflookteentjes in kleine dobbelsteentjes
snijden, door de citroenschil, –sap en peper
roeren, vlees met de marinade besmeren.
CONTACTGRILL – TIPS EN RECEPTEN
Gebruik de contactgrill, wanneer u platte stukken vlees zonder botten, bijv. hamburgers of steaks of
groentenschijfjes wilt grillen. Het te grilleren product moet overal ongeveer even dik zijn opdat het
deksel er altijd goed tegen aan ligt. Voor het contactgrillen moet u altijd het deksel sluiten.
Bij relatief dunne te grilleren producten aanbevelen wij de hoogste stand, bij een te grilleren product
van ca. 3 cm dikte aanbevelen wij een gemiddelde stand.
De contactgrill altijd goed voorverwarmen. Het vlees wordt bijzonder mals wanneer u dit vooraf
marineert. Wij aanbevelen om het vlees pas na het grilleren te zouten omdat vooral rundersteaks
en lever anders hard zouden kunnen worden. De in de recepten vermelde tijden gelden voor
contactgrillen aan beide zijden. Indien niet anders vermeld, zijn de navolgende recepten telkens
berekend voor 4 personen.
Kippezakjes
4 dunne kipschnitzels, zout, peper,
8 champignons, 1 ui, 2 EL olie, 120 g geraspte
Goudse kaas, 2 EL olie, 2 TL marjolein,
4 tandenstokers
Schnitzel platkloppen, met zout en peper
kruiden, uien in dobbelsteentjes snijden, kort
in de olie in de pan blancheren. Champignons
in plakjes snijden en kort mee blancheren. Het
mengsel van ui en champignons op de schnitzels
strooien, geraspte kaas erover heen strooien.
Schnitzel samenklappen en met tandenstoker
vastprikken. 2 EL olie met de marjolein mengen,
rollades ermee instrijken, op stand 3 ca.
15 min. grilleren, hierbij steeds weer met de
marjoleinolie instrijken.
Kruiden-lamkoteletten met barbecuegroenten
8 lamkoteletten, marinade nr. 3, 2 courgettes,
3 steeltjes peterselie, 2 knoflookteentjes 2 EL
olie
62
Koteletten ca. 6 uur in de marinade marineren.
Van alle kanten ca. 6 min. grilleren.
Courgettes overlangs in 2 cm dikke plakken
snijden. Knoflook en peterselie fijnhakken, met
de olie mengen. Courgettes met de kruidenolie
instrijken en van alle kanten ca. 3 min. grilleren.
Pizzaburger
Per persoon: 100 g gehakt half-om-half, 1 teentje
knoflook en ½ ui in kleine dobbelsteentjes, 1
ei, 2 EL paneermeel, 50 g Goudse kaas, 50 g
gekookte ham, 2 TL tomatenpuree, ½ TL
pizzakruiden, evtl. zout en peper (sommige
pizzakruiden bevatten reeds zout en peper), 1
broodje, 2 blaadjes ijssla, 1 EL mayonnaise, 1
EL tomatenketchup, 2 plakjes tomaat, 2 plakjes
ui
Gehakt, knoflook en uiendobbelsteentjes, ei,
paneermeel, in kleine dobbelsteentjes gesneden
Goudse kaas, in kleine dobbelsteentjes gesneden
Page 63

ham, tomatenpuree en pizzakruiden tot een
Copyright UNOLD AG | www.unold.de
deeg kneden. 2 platgedrukte burgers vormen.
De grilplaat met een dun laagje olie vetten,
de burgers grilleren, 6- 8 minuten, één keer
omdraaien.
Het broodje één keer overdwars open snijden,
kort van beide kanten op de gril roosteren. Met
een beetje mayonaise insmeren, slablaadjes
wassen, drogen, centrifugeren, op de mayonaise
leggen, daarop de 1e burger. Hierop ketchup
doen, de 2e burger er opleggen, tomaten en
uien erop, deksel van het broodje er opleggen.
Saltimbocca met mozzarella
4 dunne kalfsschnitzels, 4 plakjes Parma-ham,
8 salieblaadjes, 300 g Mozzarella, zout, peper,
4 geoliede tandenstokers
Schnitzel platkloppen, met zout en peper
kruiden. Op elke schnitzel een plakje ham,
2 blaadjes salie en 2 dunne plakjes mozzarella
leggen.
Schnitzel samenklappen en met tandenstoker
vastprikken.
De schnitzels op de grillplaat leggen en op stand
4 ca.10 min. grilleren.
Kostelijkheden met vis
Garnalenspiesjes
(als voorgerecht, als hoofdgerecht hoeveelheid
verdubbelen)
8 geschilde garnalen, ½ hoeveelheid marinade
nr. 6, 4 geoliede houtspiesjes
Elk 2 garnalen op een houtspiesje steken, met
marinade instrijken en ten minste 1-1,5 uur
laten trekken.
Ca. 4-5 minuten grilleren.
tandenstoker erin steken, zodat de maïskolven
probleemloos kunnen worden gedraaid. Ca.
10 minuten grilleren, daarbij meerdere keren
omdraaien.
Tip: Wikkel vóór het grilleren ontbijtspek om de
kolven (met tandenstokers vastprikken).
Groentenburger
1 koolraap, 1 kleine selderijknol, 300 g worteltjes,
1 peterseliewortel, 1 bos peterselie, 2 knoflookteentjes, 100 g Goudse kaas, 2 eieren, 2 EL
gemalen spelt, 2 EL paneermeel, zout, peper,
olie
Koolraap, selderij, worteltjes en peterseliewortel
wassen, schillen en fijn raspen (bijv. met de
ESGE-Zauberstab en de ESGE-Zauberette).
Peterselie, koolraapgroen en knoflookteentjes
fijn maken, kaas in kleine dobbelsteentjes
snijden. Deze ingrediënten met eieren, spelt,
paneermeel, zout en peper tot een deeg mengen.
Kleine burgers vormen, deze met olie insmeren
en op de grillplaat leggen en ca. 6 minuten
grilleren.
Gegrilleerde aubergines en courgettes
2 aubergines, 2 courgettes, zout, 1 portie
rosemarijnmarinade
Aubergines in ½ cm dikke plakjes snijden, met
zout bestrooien en even laten trekken. Daarna
droog betten.
Courgettes overlangs in ½ cm dikke plakjes
snijden.
Courgettes en aubergines met de marinade
insmeren en ca. 30 minuten marineren. Op de
voorverwarmde grill ca. -3 minuten grilleren.
Vitaminerijk barbecueplezier met groente
Maïskolven
4 suikermaïskolven (zonder blaadjes), 2 l
zoutwater, 4 EL olijfolie of kruidenolie
De maïskolven in zoutwater ca. 10 minuten
koken, laten uitlekken. Maïskolven met
olie insmeren, van boven en onder elk een
63
Page 64

SANDWICHES EN PANINI – TIPS EN RECEPTEN
Copyright UNOLD AG | www.unold.de
Typische sandwiches of panini bereid u in de contactgrill. De sandwiches moeten overal ongeveer
even dik zijn opdat het bovenste gedeelte er altijd goed tegen aan ligt.
Principieel kunt u elk soort brood voor het toasten gebruiken. Bijzonder lekker worden panini of
sandwiches met ciabatta, focaccia of baguette. De contactgrill altijd goed voorverwarmen. Pas nu het
te grilleren product op de grill leggen. Grilleer sandwiches en panini alleen maar een kort moment
bij een gemiddelde tot hoge temperatuur. Bij een te lange grilltijd zou eventueel voorhanden kaas er
kunnen uitlopen.
Tomaat-mozzarella-sandwich
8 plakjes toastbrood, 4-8 plakjes Parma-ham,
8 plakjes tomaat, 8 plakjes mozzarella, 4 TL
pesto, margarine
De plakken toastbrood van één zijde dun met
margarine besmeren en met de ingesmerde zijde
naar onder op een bord leggen.
Op de niet ingesmerde zijde de pesto verdelen.
4 plakken brood met Parma-ham en plakjes
tomaat en mozzarella beleggen.
Met de overige 4 plakken brood afdekken,
daarbij moet de met margarine ingesmerde zijde
buiten zijn.
Op de voorverwarmde grill leggen, grill sluiten en
ca. 2-3 minuten grilleren.
Wentelteefjes / French Toast
8 plakjes toastbrood, 3 eieren, 150 ml warme
melk, 1 snufje zout, 1 snufje suiker, margarine
Eieren, melk, suiker en kaneel mengen en de
plakjes brood daarin even laten inweken.
De voorverwarmde grill met een beetje margarine
invetten. De plakjes toast laten uitlekken, op de
grill leggen en ca. 2-3 minuten grilleren.
De toast met kaneel en suiker bestrooien of met
confituur serveren.
Tosti Hawaiï
8 plakjes toastbrood, 4 plakjes gekookte ham,
8 plakjes ananas (goed laten afdruipen), 4 TL
mayonaise, 4 plakjes Goudse kaas, margarine
De plakken toastbrood van één zijde dun met
margarine besmeren en met de ingesmerde zijde
naar onder op een bord leggen. 4 plakjes brood
op de niet ingesmerde zijden met mayonaise
besmeren, dan op elk plakje brood telkens een
plakje gekookte ham, ananas en kaas leggen.
Met de overige 4 plakken brood afdekken,
daarbij moet de met margarine ingesmerde zijde
buiten zijn. Op de voorverwarmde grill leggen,
grill sluiten en ca. 2-3 minuten grilleren.
VLAKKE GRILL – TIPS EN RECEPTEN
De vlakke grill biedt naast het dubbele grillvlak de grootste verscheidenheid van
bereidingsmogelijkheden, omdat u hier tegelijkertijd beide grillplaten kunt gebruiken. Tevens kunt u
te grilleren producten van verschillende dikte tegelijkertijd bereiden. Het te grilleren product moet
hierbij tussendoor één keer of meermaals worden omgedraaid. Stel met de temperatuurregelaar de
gewenste grilltemperatuur in. Verwarm de grill enkele minuten voor, voordat u het te grilleren product
erop legt.
Gegrilleerde groente en fruit
Knoflookchampignons
500 g verse champignons, oesterzwam of
eekhoorntjesbrood, 1 bosje peterselie, peper,
2 knoflookteentjes, 5 EL olijfolie, zout
64
Champignons afborstelen, knoflook fijn in kleine
stukjes snijden, peterselie fijn hakken. Alle
ingrediënten behalve zout en peper mengen
en op de grillplaat grilleren. Met een schep
Page 65

regelmatig omdraaien. Voor het serveren zouten
Copyright UNOLD AG | www.unold.de
en peperen. Grilleertijd ca. 10 minuten
Kaas-pannenkoekjes
250 g courgette, 100 g grof geraspte kaas, 1 ei,
2 EL bloem, 1 TL groentebouillon (poeder),
1 kleine ui, 2 snufjes nootmuskaat, olie voor het
braden
Courgette grof raspen, met kaas, ei, bloem,
bouillonpoeder, fijn gehakte ui en nootmuskaat
mengen.
Grill op 200°C voorverwarmen. Een beetje olie
op de grillplaat geven. Met een eetlepel kleine
hoopjes pannenkoekmassa op de grillplaten
zetten en lichtjes aandrukken. Van beide zijden
goudbruin braden.
Bonte barbecuegroenten
1 aubergine, 1 courgette, 1 vleestomaat, 1 ui,
1 rode, groene en gele paprika, 3 EL olijfolie,
3 knoflookteentjes, 1 EL verse oreganoblaadjes,
peper
Aubergine, courgette, tomaat en paprika
schoonmaken en in ca. 1,5 cm dikke stroken
snijden. Ui in ringen snijden. Knoflook in kleine
dobbelsteentjes snijden. Alle ingrediënten met
de olie mengen, op de grillplaat doen en ca.
10-12 minuten grilleren, hierbij meermaals
met een schep of barbecuebestek omdraaien.
Daarna peperen.
Gegrilleerde ananas
1 ananas, suiker, kaneel
De ananas schillen en de stronk in het midden
verwijderen. In ca. 2 cm dikke plakken snijden.
Ca. 3 minuten op de grillplaat grilleren. Met
suiker en kaneel bestrooien en samen met
vanille-ijs serveren.
Chilliappelen
4 rode appelen, marinade nr. 1
Uit de appelen het klokkenhuis steken, appelen
in 1,5 cm dikke ringen snijden. 1 uur lang in
de marinade marineren. In totaal 3 minuten
op de grillplaat grillleren, tussentijds een keer
voorzichtig omdraaien.
65
Page 66

De recepten in deze gebruiksaanwijzing zijn door de auteurs en door UNOLD AG zorgvuldig ontwikkeld
Copyright UNOLD AG | www.unold.de
en getest. Een garantie kan er echter niet worden aanvaard. De auteurs en/of UNOLD AG en haar
gemachtigden kunnen in geen geval aansprakelijk worden gesteld voor letsel, materiële schade en
financiële schade.
GARANTIEVOORWAARDEN
Wij geven op onze apparaten een garantietermijn van 24 maanden (12 maanden bij commerciële gebruik), gerekend vanaf de
dag van aanschaf. Deze garantie geldt voor schade, die bij correct gebruik aantoonbaar is veroorzaakt door een fout in de productie. Binnen de garantietermijn verhelpen wij materiaal- en productiefouten door herstelling of vervanging naar onze keuze.
Onze garantie is slechts geldig voor in Duitsland en Oostenrijk verkopte apparaten. In andere landen a.u.b. de importeur
aanspreken. Apparaaten, waarvoor garantie in aanspraak wordt genomen, moeten ons samen met een kopie van de machineel
gegenereerde kassabon waaruit de koopdatum duidelijk wordt, alsmede een beschrijving van de fout goed verpakt aan onze
klantenservice worden toegezonden, porto betaald. Als er sprake van garantie is, worden de verzendingskosten in Duitsland
en Oostenrijk aan de klant vergoed. De garantie dekt geen schade veroorzaakt door slijtage, onbehoorlijk gebruik/foutieve handelingen en niet-naleving van de onderhouds- en reinigingsaanwijzingen. Het recht op garantie vervalt, wanneer reparaties
of manipulaties aan het apparaat door derden worden doorgevoerd. Eventuele rechten van de eindgebruiker t.o.v. de verkoper
of distributeur worden door deze garantie niet aangetast.
VERWIJDEREN VAN AFVAL / MILIEUBESCHERMING
Onze apparaten zijn geproduceerd met een hoge qualiteit voor een lange gebruik. Regelmatige onderhoud
en vakkundig reparaties door onze klantenservice verlengt de gebruiksduur. Wanneer het apparat defekt is
en kan niet meer gerepareerd worden, let op de volgende instructies. Dit product mag niet samen met het
normale huishoudelijke afval worden afgevoerd. U dient dit product bij een voor het recycleren van elektrische of elektronische apparaten aangewezen verzamelplaats in te leveren. Door het separaat inzamelen en
recycleren van afvalproducten helpt u mee bij het zuinig omgaan met de natuurlijke hulpbronnen en zorgt u
ervoor dat het product op een gezondheids- en milieuvriendelijke manier afgevoerd wordt.
66
Page 67

ISTRUZIONI PER L’USO MODELLO 58526
Copyright UNOLD AG | www.unold.de
DATI TECNICI
Potenza: 1.800–2.000 W, 220–230 V~, 50 Hz
Piastre: Antiaderenti, asportabili, superficie della griglia 29,0 x 26,0 cm
Maniglia: Termoisolata
Misure: Circa 35,6 x 35,9 x 15,5 cm (L/P/H)
Peso: Circa 4,35 kg
Cavo di
alimentazione: Circa 100 cm
Dotazioni: Recipiente di raccolta del grasso, regolazione continua della temperatura,
temperatura della griglia fino a max. 230 °C, diverse posizioni grill selezionabili
per la parte superiore (grill a contatto, gratinatura, ribaltabile verso dietro di
90°, grill piano, bloccaggio), spie di controllo per ON/OFF e PRONTO; corpo
in acciaio inox di alta qualità, protezione dai surriscaldamenti, conservazione
salvaspazio in verticale
Accessori: Recipiente di raccolta del grasso, istruzioni per l'uso con ricettario
Con riserva di modifiche ed errori relativi a caratteristiche delle dotazioni, tecnica, colore e design
SIGNIFICATO DEI SIMBOLI
Questo simbolo segnala possibili pericoli in grado di provocare lesioni a
persone o danni all‘apparecchio.
Questo simbolo indica un possibile pericolo di ustioni. In presenza di
questo simbolo agire sempre con la massima cautela.
Questo simbolo segnala eventuali pericoli di incendio.
PER LA VOSTRA SICUREZZA
Si raccomanda di leggere e conservare le presenti istruzioni.
1. Questo apparecchio può essere utilizzato da bambini a partire
dagli 8 anni di età e da persone che presentano ridotte capacità
fisiche, sensoriali o mentali o che difettano della necessaria
esperienza e/o conoscenze solo se adeguatamente sorvegliati
o addestrati sull’uso in sicurezza dell’apparecchio e se a
conoscenza dei rischi correlati.
2. I bambini non devono giocare con l’apparecchio.
67
Page 68

3. La pulizia e la manutenzione dell’utente non devono essere
Copyright UNOLD AG | www.unold.de
eseguite da bambini, a meno che non abbiano più di 8 anni e
non vengano sorvegliati.
4. Conservare l’apparecchio e il cavo fuori dalla portata dei bambini
di età inferiore agli 8 anni.
5. CAUTELA - Parti di questo prodotto possono essere molto calde
e causare ustioni! In presenza di bambini e persone a rischio
usare la massima cautela.
6. Collegare l’apparecchio soltanto a corrente alternata con la tensione indicata sulla targhetta.
L‘apparecchio è destinato all‘uso domestico nonché a casi di
7.
impiego analoghi, ad es.:
zone cucina usate dal personale di negozi, uffici ed altri ambienti
di lavoro;
da ospiti di hotel, motel ed altre strutture di soggiorno;
in bed & breakfast.
8. Questo apparecchio non deve essere comandato tramite timer
esterni o sistemi di telecomando.
9. Non immergere mai la macchina in acqua o altri liquidi. L‘apparecchio e il cavo di alimentazione non devono entrare in contatto
con acqua o altri liquidi. Se ciò dovesse succedere, prima del
è
riutilizzo
necessario che tutte le parti siano completamente
asciutte.
10. Non toccare mai né l‘apparecchio né il cavo di alimentazione
con le mani bagnate.
11. Per ragioni di sicurezza non appoggiare mai l‘apparecchio su
superfici calde, vassoi metallici o basi umide.
12. L‘apparecchio e il cavo di alimentazione non devono essere
impiegati nei pressi di fiamme.
13. Assicurarsi che il cavo di alimentazione non penda dal piano di
lavoro, in quanto ciò potrebbe causare infortuni, ad es. se un
bambino piccolo dovesse strattonarlo.
14. Se si usa un cavo di prolunga, controllare che sia integro e ido
neo per la rispettiva potenza, in quanto altrimenti si possono
verificare surriscaldamenti.
15.
Il cavo di alimentazione ed eventualmente la prolunga devono
essere posati in modo che non possano essere strattonati o che
non ci si possa inciampare sopra.
16. Usare l‘apparecchio solo in interni.
17. Durante l‘esercizio non lasciare l‘apparecchio insorvegliato e
tenerlo fuori dalla portata dei bambini.
18. Prima del riscaldamento, svolgere completamente il cavo, perché non venga a contatto con parti calde.
68
Page 69

19. Non coprire mai la superficie della griglia con pellicole di allu-
Copyright UNOLD AG | www.unold.de
minio, carta da forno o altri materiali.
Durante il funzionamento non toccare mai la piastra grill calda
20.
– pericolo di ustioni!
21. Se si griglia a coperchio chiuso, sotto il coperchio può formarsi
del vapore caldo. Nell‘aprire il coperchio, per evitare di ustionarsi, fare attenzione a mantenere una distanza sufficiente.
Per evitare lo sviluppo di fumi, non surriscaldare le stoviglie
22.
usate per la cottura; il fumo può essere pericoloso per i piccoli
animali (ad es. uccellini) con un sistema respiratorio particolarmente delicato. Consigliamo di non tenere uccellini in cucina.
Quando l‘apparecchio è caldo toccare solo le maniglie.
23.
24. Per aprire l‘apparecchio usare soltanto il manico del coperchio.
25. Prestare attenzione che quando è in funzione l‘apparecchio sia
posizionato su una superficie resistente al calore e a sufficiente
distanza dagli oggetti infiammabili.
26. Dopo l‘uso, prima di pulire l‘apparecchio e di riporlo per la conservazione, staccare la spina dalla presa e lasciar raffreddare il
grill.
Per la pulizia è possibile rimuovere la piastra, dopo che si è
27.
raffreddata, e lavarla a mano. Strofinare l‘apparecchio con un
panno umido.
28. Per evitare danni, l‘apparecchio non deve essere utilizzato con
accessori di altri produttori o altri marchi.
29. Controllare regolarmente la spina e il cavo di collegamento per
escludere la presenza di usura o danni. Qualora il cavo di collegamento o altri componenti siano danneggiati inviare l‘apparecchio alla nostra assistenza clienti per la verifica e la riparazione.
Riparazioni inadeguate possono comportare notevoli pericoli per
l‘utente e causare l‘esclusione dalla garanzia.
ATTENZIONE:
Durante e dopo l’utilizzo l’apparecchio è molto caldo!
Non far funzionare mai l‘apparecchio quando nel recipiente
di raccolta del grasso sono presenti acqua o altri liquidi –
pericolo di incendi!
Non far funzionare mai l‘apparecchio senza recipiente di
raccolta del grasso inserito.
Non aprire mai la scocca dell‘apparecchio. Sussiste il pericolo di scosse elettriche.
Il produttore declina qualunque responsabilità in caso di montaggio errato, utilizzi errati o non idonei o
qualora le riparazioni siano eseguite da terzi non autorizzati.
69
Page 70

PRIMA DEL PRIMO UTILIZZO
Copyright UNOLD AG | www.unold.de
1. Rimuovere tutti i materiali da imballo e le eventuali protezioni da trasporto.
Tenere il materiale da imballo fuori dalla portata dei bambini – pericolo di
soffocamento!
2. Controllare che tutte le parti siano presenti. Se delle parti mancano o sono
danneggiate, rivolgersi al rivenditore di fiducia o alla nostra assistenza
clienti.
3. Prima del primo utilizzo consigliamo di strofinare le piastre grill antiaderenti
con un panno umido.
4. Fissare una piastra grill in ciascuno dei lati interni dell‘apparecchio (vedere
il capitolo „Inserimento/rimozione delle piastre grill“).
5. Verificare che il recipiente di raccolta del grasso sia inserito. Va spinto nel
corpo dal davanti finché scatta in posizione.
6. Chiudere l‘apparecchio e inserire la spina in una presa elettrica (220–
230 V~, 50 Hz). La spia di controllo del funzionamento verde si illumina
segnalando che il riscaldamento è in funzione.
7. Portare il regolatore di temperatura sulla posizione centrale. Il preriscaldamento ha inizio, la spia di controllo rossa si illumina. Non appena l‘apparecchio ha raggiunto la temperatura preimpostata, la spia di controllo rossa
si spegne e quella verde, di controllo del funzionamento, si illumina. Attenzione: Ad apparecchio in funzione la spia di controllo del funzionamento
verde si accende e si spegne, alternativamente, a seconda della potenza di
riscaldamento attuale dell‘apparecchio.
8. Lasciar riscaldare l’apparecchio per alcuni minuti prestando attenzione a
un‘adeguata ventilazione del locale.
9. Al primo utilizzo possono formarsi del fumo e un po‘ di odore, che tuttavia
scompaiono dopo poco tempo.
10. A questo punto è possibile utilizzare l‘apparecchio.
INSERIMENTO/RIMOZIONE DELLE PIASTRE GRILL
1. Le piastre possono essere asportate in modo da facilitare la pulizia. Per far
ciò premere l‘apposito tasto di sblocco e rimuovere la piastra grill tirandola
in avanti in direzione della maniglia.
2. Per reinserire le piastre grill, introdurre la griglia nel fissaggio e premere la
piastra verso il basso fino a farla scattare in posizione. Prima di riutilizzare
l‘apparecchio verificare che le piastre grill siano saldamente fissate.
70
Page 71

REGOLAZIONE DELLA TEMPERATURA
Copyright UNOLD AG | www.unold.de
1. E‘ possibile regolare diverse temperature per la superficie della griglia.
2. Fungono da valori orientativi:
Calore basso: per spiedini, salamelle
Calore medio: per arrostire, per uova all‘occhio di bue, sandwich
Calore alto: per grigliare, tostare
3. Per ragioni di sicurezza, nella parte posteriore centrale delle piastre grill la
potenza di riscaldamento è leggermente minore. Qui è possibile grigliare in
maniera ottimale pezzi di carne sottili oppure ad es. verdure.
ALIMENTI GRIGLIABILI
1. Sperimentate le nostre ricette oppure seguite quelle vostre consuete.
2. Quando si grigliano alimenti congelati, prima della cottura accertarsi che
siano completamente scongelati.
3. La carne conservata in frigorifero riesce al meglio togliendola dal frigo qualche tempo prima della cottura alla griglia e lasciandola acclimatare a temperatura ambiente.
4. Se possibile, (a seconda della preparazione e del tipo) la carne dovrebbe
venir salata soltanto dopo la cottura. Marinando la carne prima della cottura
alla griglia la si rende particolarmente tenera e saporita.
5. Grasso e succhi di cottura si raccolgono nel recipiente di raccolta del grasso.
In questo modo si griglia con pochi grassi e le pietanze sono quindi più sane
e digeribili.
POSIZIONE DELLE PIASTRE GRILL
1. Con la regolazione del coperchio, è possibile
scegliere tra le diverse varianti di posizione
delle piastre grill.
Simbolo : Il coperchio può essere ribaltato
indietro di 90°.
Simbolo : Il coperchio può essere
fissato in posizione chiusa, di modo che
l‘apparecchio non possa più essere aperto.
Attenzione: Effettuare la regolazione
soltanto quando l‘apparecchio è disconnesso
dalla rete elettrica e in esso non è presente
alcun cibo. Ideale per trasportare o riporre
comodamente l‘apparecchio.
71
Page 72

Posizioni I - V: E‘ possibile scegliere tra diverse altezze nella grigliatura
Copyright UNOLD AG | www.unold.de
a contatto. Il coperchio si blocca sull‘altezza selezionata, impedendo
così che gli alimenti da grigliare vengano schiacciati eccessivamente dal
peso del coperchio. Spingere il regolatore sul lato destro dell‘apparecchio
sull‘altezza desiderata compresa tra „I“ e „V“.
GRIGLIARE
Attenzione! Non coprire mai la superficie della griglia con pellicole di
alluminio, carta da forno o altri materiali. Per la cottura alla griglia non
usare nemmeno vaschette in alluminio. A causa dell‘accumulo di calore
ciò può infatti provocare incendi.
1. Appoggiare l‘apparecchio, chiuso, su una superficie resistente al calore.
2. Controllare che il regolatore di temperatura si trovi in posizione „MIN“.
3. Verificare che il recipiente di raccolta del grasso sia correttamente inserito
sul lato anteriore dell‘apparecchio. Non far funzionare mai l‘apparecchio
senza recipiente di raccolta del grasso inserito e non versare mai liquidi,
come ad es. acqua, in tale recipiente. Per beneficiare appieno serbatoio di
grasso, estrarre i due piedi sul fondo dell‘apparecchio.
Grigliatura da un unico lato/in piano
Ideale per ingredienti morbidi e non troppo spessi.
4. E‘ possibile grigliare i cibi soltanto sulla superficie inferiore della griglia,
con coperchio aperto, oppure usare entrambe le superfici della griglia. Per
poter usare tale opzione è necessario portare la regolazione del coperchio
su premere il pulsante „180°“ (3) e aprire completamente il coperchio
di modo che le due superfici della griglia siano in orizzontale.
5. Per risparmiare energia consigliamo di riscaldare l‘apparecchio a coperchio chiuso. Inserire la spina in una presa elettrica (220–230 V~, 50 Hz).
La spia di controllo del funzionamento verde si illumina segnalando che il
riscaldamento è in funzione.
6. Portare il regolatore di temperatura sulla posizione desiderata. Il preriscaldamento ha inizio, la spia di controllo rossa si illumina. Non appena l‘apparecchio ha raggiunto la temperatura preimpostata, la spia di controllo rossa
si spegne e quella verde, di controllo del funzionamento, si accende. Attenzione: Ad apparecchio in funzione la spia di controllo del funzionamento
verde si accende e si spegne alternativamente, a seconda della potenza di
riscaldamento attuale dell‘apparecchio.
7. Per evitare ustioni, aprire il coperchio dell‘apparecchio con cautela toccando esclusivamente la maniglia.
72
Page 73

8. Spennellare la piastra grill inferiore (e per la grigliatura in piano anche
Copyright UNOLD AG | www.unold.de
quella superiore) con un po‘ d‘olio resistente al calore.
9. Appoggiarvi sopra i cibi che si desidera grigliare e verificare di tanto in tanto
se devono venir girati.
10. Controllare regolarmente che il recipiente di raccolta del grasso non sia
pieno. Se il recipiente è pieno, spegnere l‘apparecchio e lasciarlo raffreddare, svuotare il recipiente e solo dopo proseguire la preparazione delle
pietanze. Per evitare eventuali pericoli di incendio, il recipiente di raccolta
del grasso non deve mai tracimare.
11. Dopo che le pietanze sono pronte, portare il regolatore di temperatura su
„MIN“ e quindi staccare la spina dalla presa elettrica.
12. Lasciar raffreddare completamente l‘apparecchio prima di pulirlo.
Grigliatura a contatto/gratinatura
Ideale per pezzi di carne o sandwich, gli alimenti non devono essere girati.
13. In questo caso i cibi possono essere grigliati sulla superficie inferiore della
griglia a coperchio chiuso.
14. Per risparmiare energia consigliamo di riscaldare l‘apparecchio a coperchio
chiuso. Inserire la spina in una presa elettrica (230 V~, 50 Hz). La spia di
controllo del funzionamento verde si illumina segnalando che il riscaldamento è in funzione.
15. Portare il regolatore di temperatura sulla posizione centrale. Il preriscaldamento ha inizio, la spia di controllo rosso si illumina. Non appena l‘apparecchio ha raggiunto la temperatura preimpostata, la spia di controllo rossa
si spegne e quella verde, di controllo del funzionamento, si accende. Attenzione: Ad apparecchio in funzione la spia di controllo del funzionamento
verde si accende e si spegne alternativamente, a seconda della potenza di
riscaldamento attuale dell‘apparecchio.
16. Per evitare ustioni, aprire il coperchio dell‘apparecchio con cautela toccando esclusivamente la maniglia.
17. Spennellare la piastra grill inferiore con un po‘ d‘olio resistente al calore.
18. Appoggiarvi sopra i cibi che si desidera grigliare.
19. Richiudere il coperchio dell‘apparecchio. Per evitare ustioni, toccare il
coperchio esclusivamente per la maniglia.
20. Il coperchio si adatta automaticamente allo spessore degli alimenti da grigliare. Tuttavia è possibile selezionare la distanza tra materiale da grigliare e
coperchio anche scegliendo tra le posizioni I - V della regolazione del coperchio, come illustrato nel capitolo „Posizione delle piastre grill“.
21. Controllare regolarmente che il recipiente di raccolta del grasso non sia
pieno. Se il recipiente è pieno, spegnere l‘apparecchio e lasciarlo raffreddare, svuotare il recipiente e solo dopo proseguire con la preparazione delle
73
Page 74

pietanze. Per evitare eventuali pericoli di incendio, il recipiente di raccolta
Copyright UNOLD AG | www.unold.de
del grasso non deve mai tracimare.
22. Dopo che le pietanze sono pronte, portare il regolatore di temperatura su
„MIN“ e quindi staccare la spina dalla presa elettrica.
23. Lasciar raffreddare completamente l‘apparecchio prima di pulirlo.
ATTENZIONE:
Durante e dopo l’utilizzo l’apparecchio è molto caldo!
PULIZIA E CONSERVAZIONE
Prima della pulizia o della manutenzione staccare la spina dalla
presa elettrica. Attendere che l‘apparecchio si sia raffreddato
completamente.
L‘apparecchio non deve essere immerso in acqua!
1. Per non danneggiare la superficie della piastra antiaderente, non usare
mai pagliette per pentole o attrezzi per pulizia analoghi. Non usare prodotti
abrasivi, lana d’acciaio, oggetti metallici, detergenti caldi o disinfettanti
in quanto possono causare danni. Lo sporco ostinato può essere rimosso
con l‘apposito raschino fornito in dotazione. Il raschino è idoneo soltanto
per questo scopo. Per evitare di danneggiare le piastre, non usare mai il
raschino per girare gli alimenti da grigliare o per toglierli dal grill.
2. Le piastre possono essere asportate in modo da facilitare la pulizia. Per
asportarle premere il tasto di sblocco e rimuovere la piastra grill tirandola in
avanti in direzione della maniglia.
3. Pulire le piastre con acqua calda, cui sia stato aggiunto un po‘ di detergente
delicato e quindi asciugarle perfettamente.
4. Per reinserire le piastre grill, introdurre la relativa griglia nel fissaggio e premere la piastra verso il basso finché scatta in posizione. Prima di riutilizzare
l‘apparecchio verificare la salda tenuta delle piastre grill.
5. Rimuovere l‘eventuale grasso raccolto dal recipiente di raccolta e pulire
quest‘ultimo con acqua calda e detersivo per stoviglie. Reinserire il recipiente completamente asciutto nel corpo e accertarsi che sia saldamente
posizionato.
6. Strofinare il corpo con un panno umido ben strizzato e quindi asciugarlo
accuratamente.
7. Assicurarsi che l‘acqua non penetri nel corpo dell‘apparecchio.
8. Il grill può essere conservato in maniera salvaspazio. Per prevenire aperture
involontarie, impostare la regolazione del coperchio su .
9. Conservare l‘apparecchio in un luogo asciutto e protetto dalla polvere.
74
Page 75

MARINATE
Copyright UNOLD AG | www.unold.de
Le seguenti marinate sono adatte indistintamente per bistecche di manzo, maiale, agnello, carni
bianche, pesce e verdure.
Immergere le bistecche già porzionate nella marinata oppure spennellare le bistecche con la marinata
e lasciare riposare diverse ore, possibilmente tutta la notte in frigorifero. Di tanto in tanto girare la
carne nella marinata. Prima di grigliare, tamponare il prodotto con un panno da cucina per rimuovere
la marinata. Spennellare il prodotto di tanto in tanto con la marinata rimanente durante la cottura.
Marinata piccante
1 cipolla, ½ peperoncino rosso, 2 cucchiai di
olio d’oliva, 2 cucchiai di zucchero di canna,
3 cucchiai di aceto, 50 ml di succo alla mela,
50 ml di succo di pomodoro, 2 cucchiaini di
salsa worcester, 2 bacche di ginepro
Tagliare a dadini sottili la cipolla e il peperoncino
e rosolare brevemente nell’olio in una padella.
Aggiungere zucchero, aceto e succo alla mela,
quindi cuocere. Togliere dal fuoco. Aggiungere
succo al pomodoro, salsa worcester e bacche
di ginepro tritate. Far raffreddare, quindi far
marinare la carne.
Marinata alla birra
4 foglie di alloro, 4 bacche di ginepro, 2 cucchiai
di olio d’oliva, 1/8 l di birra Doppelbock (o birra di
malto se si preferisce una marinata analcolica),
2 cucchiai di miele, succo di ½ limone
Rosolare leggermente le foglie d’alloro e le
bacche di ginepro nell’olio, aggiungere la birra
e il miele e riscaldare brevemente (non far
bollire!). Aggiungere il succo di limone, far
raffreddare la marinata e immergervi la carne.
Marinata al rosmarino
2 cucchiaini di rosmarino essiccato, 4 spicchi
d’aglio, 4 bacche di ginepro, 8 semi di pepe
nero, 4 cucchiaini di grani di senape, 5 cucchiai
di olio d’oliva.
Pestare tutti gli ingredienti (ad esclusione
dell’olio) nel mortaio o tritarli per esempio con
il frullatore a immersione ESGE (con funzione
macinatura). Mescolare l’impasto all’olio e
ungervi la carne.
Marinata al curry
2 cucchiaini di polvere di curry, un pezzo di
zenzero fresco della dimensione di un pollice,
50 ml di vino bianco secco, 100 ml di succo
d’ananas
Pelare lo zenzero, tritarlo finemente e aggiungere
agli altri ingredienti. Quindi ungervi la carne.
Marinata asiatica
1 cucchiaio di miele, 2 cucchiaini di Sambal
Oelek, 1 cucchiaio di vino di riso, 8 cucchiai
di salsa alla soia dolce, 2 cucchiai di succo
d’arancia, 2 cucchiai di sherry
Mescolare tutti gli ingredienti e ungervi la carne.
Marinata al cocco
1 limone non trattato, 1 puntina di pepe
Cayenne, un pezzo di zenzero fresco della
dimensione di un pollice, 1 spicchio d’aglio,
150 ml di latte di cocco non zuccherato
Pelare lo zenzero e tritarlo finemente, pelare
l’aglio e spremere, grattugiare la buccia di
limone, spremere il limone. Mescolare zenzero,
aglio, buccia e succo di limone con gli altri
ingredienti, quindi mettere la carne nella
marinata.
Marinata al vino rosso
¼ di cucchiaino di grani di peperoncino,
2 chiodi di garofano, 2 cucchiaini di grani
di senape, 3 bacche di ginepro, 1 pizzico di
cannella, 1 cucchiaino di grandi di pepe nero,
2 cucchiai/150 g di gelatina di ribes rossi, 100
ml di vino rosso secco
75
Page 76

Pestare peperoncino, chiodi di garofano, grani
Copyright UNOLD AG | www.unold.de
di senape, bacche di ginepro e grani di pepe nel
mortaio o tritarli con il frullatore a immersione
ESGE (con funzione macinatura). Riscaldare
l’olio in una padella e rosolare leggermente le
spezie tritate. Aggiungere la gelatina di ribes, la
cannella e il vino rosso, quindi scaldare finché
la gelatina diventa liquida. Far raffreddare la
marinata e immergervi la carne.
Marmellata all’arancia
Succo di 3 arance amarognole, 2 cucchiaini di
dragoncello, 1 cucchiaio di aceto, ½ cucchiaino
di pepe.
Mescolare tutti gli ingredienti e immergervi la
carne.
Marinata all’aglio
8 spicchi d’aglio, 1 cipolla, 2 cucchiaini di
foglie di salvia tritata, ¼ l di latticello.
Tagliare a dadini sottili l’aglio e la cipolla,
mescolare agli altri ingredienti e immergervi la
carne.
Marinata al cumino
1 cucchiaio di semi di cumino, ½ cucchiaino
di pepe macinato grossolanamente, 2 cucchiai
di aceto di mela, 2 cucchiai di succo di mela,
3 cucchiai di olio d’oliva
Mescolare tutti gli ingredienti e immergervi la
carne.
Marinata dolce-piccante
5 cucchiai di miele, 5 cucchiai di salsa di soia,
1 puntina di pepe Cayenne, 1 cucchiaino di
polvere di senape, 2 cucchiai di olio d’oliva
Mescolare tutti gli ingredienti e immergervi la
carne.
Marinata al limone
6 spicchi d‘aglio, 100 ml di olio d’oliva, succo e
buccia grattugiata di 2 limoni non trattati, ¼ di
cucchiaino di pepe
Tagliare gli spicchi d’aglio a dadini, mescolare
alla buccia e al succo di limone e al pepe,
quindi la carne con la marinata.
GRIGLIA A CONTATTO – CONSIGLI E RICETTE
La griglia a contatto è ideale per grigliare pezzi di carne piatti e disossati, per esempio hamburger o
cotolette, oppure fette di verdure. Gli alimenti da cuocere devono essere di spessore simile, affinché
la parte superiore possa aderire uniformemente. Per grigliare a contatto è necessario chiudere
sempre il coperchio.
In caso di alimenti relativamente sottili, suggeriamo l’impostazione più alta, con alimenti dello
spessore di circa 3 cm consigliamo un livello medio.
Ricordarsi sempre di preriscaldare bene la griglia a contatto.I piatti di carne si cuociono al meglio
se la carne ha uno spessore di 1,5-3 cm. Per ottenere delle pietanze particolarmente saporite, si
consiglia di marinarle prima di cuocerle.
Ricordarsi inoltre di salare la carne solo dopo la cottura, poiché altrimenti tende a indurirsi,
soprattutto se si tratta di bistecche di manzo o fegato.
I tempi indicati nelle ricette valgono per una cottura con griglia a contatto su entrambi i lati.
Se non specificato diversamente, le ricette che seguono sono pensate per 4 persone.
Saccottini di pollo
4 cotolette di pollo sottili, sale, pepe,
8 Champignon, 1 cipolla, 2 cucchiai di
olio, 120 g di formaggio Gouda grattugiato,
76
2 cucchiai di olio, 2 cucchiaini di maggiorana,
4 stuzzicadenti
Pestare bene le cotolette fino a farle diventare
sottili, condire con sale e pepe, tagliare la
Page 77

cipolla a dadini, dorare brevemente nell’olio in
Copyright UNOLD AG | www.unold.de
una padella. Tagliare i funghi a fettine sottili
e cuocerli brevemente assieme al preparato.
Cospargere il preparato a base di Champignon e
cipolle sulla cotoletta e aggiungervi il formaggio
grattugiato. Arrotolare le cotolette e fissare
con lo stuzzicadenti. Mescolare 2 cucchiai
di olio con la maggiorana, spennellare il tutto
sugli involtini e grigliare per circa 15 minuti al
livello 3, continuando a insaporire con l’olio alla
maggiorana.
Pizzaburger
Per persona:
100 g di carne macinata mista, 1 spicchio
d’aglio e ½ cipolla tagliata a dadini sottili,
1 uovo, 2 cucchiai di pangrattato, 50 g di
formaggio Gouda, 50 g di prosciutto cotto, 2
cucchiaini di polpa di pomodoro, ½ cucchiaino
di aromi per pizza, eventualmente sale e pepe
(alcuni aromi per pizza contengono già sale
e pepe), 1 panino per hamburger, 2 foglie di
lattuga, 1 cucchaio di maionese, 1 cucchiaio di
ketchup al pomodoro, 2 fette di pomodoro, 2
fette di cipolla
Amalgamare carne macinata, aglio, cipolla a
dadini, uovo, pangrattato, Gouda tagliato a
dadini, prosciutto tagliato a dadini, polpa di
pomodoro e aromi per pizza fino a farli diventare
un impasto omogeneo. Formare 2 hamburger
piatti. Oliare leggermente la superficie della
griglia, cuocere la carne per 6-8 minuti, ruotare
una volta. Tagliare i panini e tostarli brevemente
sulla griglia su entrambi i lati. Spalmare un po’
di maionese, lavare la lattuga, asciugarla bene e
posizionarla sulla maionese, quindi appoggiarvi
sopra il primo hamburger. Cospargerlo di
ketchup, quindi posizionare il secondo
hamburger, i pomodori e le cipolle. Coprire il
panino con l’altra metà del pane.
Cotolette di agnello alle erbe aromatiche con
verdura grigliata
8 cotolette di agnello, marinata n. 3, 2 zucchine,
3 rametti di prezzemolo, 2 spicchi d’aglio,
2 cucchiai di olio
Fare marinare le cotolette per circa 6 ore
nella marinata. Grigliare su ogni lato per circa
6 minuti. Tagliare le zucchine per il lungo in fette
dallo spessore di 2 cm. Tritare finemente l’aglio
e il prezzemolo e mescolare il tutto con l’olio.
Cospargere le zucchine con l’olio aromatizzato e
grigliare su ogni lato per 3 minuti.
Saltimbocca con mozzarella
4 cotolette di vitello sottili, 4 fette
di prosciutto Parma, 8 foglie di salvia, 300 g di mozzarella, sale, pepe,
4 stuzzicadenti oliati
Pestare la cotoletta fino a farla diventare sottile,
quindi aromatizzare con sale e pepe. Coprire
ogni cotoletta con una fetta di prosciutto,
2 foglie di salvia e 2 fette sottili di mozzarella.
Arrotolare le cotolette e fissarle con gli
stuzzicadenti. Posizionare la cotoletta sulla
piastra e grigliare a livello 4 per circa 10 minuti.
Delizie al pesce
Sgombri
4 sgombri pronti alla cottura di piccole
dimensioni, marinata n. 4 o n. 12
Lavare gli sgombri, asciugare tamponando
e cospargere con la marinata all’interno e
all’esterno. Lasciare riposare per circa 4 ore.
Mettere gli sgombri sulla piastra scanalata e fare
grigliare per circa 12-16 minuti.
Suggerimento: anziché gli sgombri, è possibile
usare anche trote, sardine, aringhe, anguille
ecc.
77
Page 78

Spiedini di gamberi
Copyright UNOLD AG | www.unold.de
(come antipasto. Se preparati come pietanza
principale, raddoppiare le dosi)
8 gamberi spellati, ½ quantitativo di marinata
n. 6, 4 spiedini in legno oliati
Infilare 2 gamberi per ogni spiedino, cospargere
con la marinata e lasciar riposare per 1-1,5 ore.
Grigliare per circa 4-5 minuti.
Una carica vitaminica a base di verdure
Pannocchie di mais
4 pannocchie di mais dolce (senza foglie), 2 l
di acqua salata, 4 cucchiai di olio d’oliva o
aromatizzato
Cuocere le pannocchie di mais in acqua salata
per circa 10 minuti. Lasciare sgocciolare.
Cospargere di olio le pannocchie, infilare uno
stuzzicadente per parte in alto e in basso in
modo da poter girare la pannocchia senza
problemi. Grigliare per circa 10 minuti
ruotando ripetutamente. Suggerimento: prima
di grigliarle, avvolgere le pannocchie con
della pancetta affumicata (fissare con gli
stuzzicadenti).
Hamburger alle verdure
1 cavolo rapa, 1 cuore di sedano piccolo, 300 g
di carote, 1 radice di prezzemolo, 1 mazzetto di
prezzemolo, 2 spicchi d’aglio, 100 g di Gouda, 2
uova, 2 cucchiai di spelta macinata, 2 cucchiai
di pangrattato, sale, pepe, olio
Lavare il cavolo rapa, il sedano, le carote e la
radice di prezzemolo, sbucciare e grattugaire
finemente (p.e. con lo sbattitore a immersione
ESGE-Zauberstab e la tritatutto ESGEZauberette). Tritare finemente il prezzemolo,
le foglie di cavolo rapa e gli spicchi d’aglio,
tagliare il formaggio a dadini. Amalgamare bene
questi ingredienti con uova, spelta, pangrattato,
sale e pepe. Formare dei piccoli hamburger,
spennellare d’olio e grigliare su ogni lato per 6
minuti.
Melanzane e zucchine grigliate
2 melanzane, 2 zucchine, sale, 1 porzione di
marinata al rosmarino
Tagliare la melanzana per il lungo in fette dello
spessore di 1/2 cm, salare e lasciare riposare
brevemente. Quindi asciugare tamponando.
Tagliare le zucchine per il lungo in fette dallo
spessore di 1/2 cm.
Cospargere le zucchine e le melanzane con
la marinata e marinare per circa 30 minuti.
Cuocere sulla griglia preriscaldata per circa
2-3 minuti.
SUGGERIMENTI E RICETTE PER SANDWICH E PANINI
La griglia a contatto è l’ideale per preparare i classici sandwich o panini. I sandwich devono avere
tutti uno spessore simile, affinché la parte superiore possa aderire uniformemente.
In linea generale per tostare è possibile utilizzare qualsiasi tipo di pane. I panini o i sandwich sono
particolarmente saporiti se preparati con ciabatte, focacce o baguette.
Ricordarsi sempre di preriscaldare bene la griglia a contatto. Solo allora collocare gli ingredienti
da cuocere. Si consiglia di cuocere i sandwich e panini solo brevemente a un livello medio-alto.
Cuocendo troppo a lungo, il formaggio contenuto nei panini può fuoriuscire.
Sandwich con pomodori e mozzarella
8 fette di pane da toast, 4-8 fette di prosciutto
Parma, 8 fette di pomodoro, 8 fette di mozzarella,
4 cucchiaini di pesto, margarina
78
Spalmare un po’ di margarina su un lato delle
fette di toast e appoggiarle su un piatto con il
lato imburrato verso il basso.
Distribuire il pesto sul lato non imburrato.
Page 79

Imbottire 4 fette di pane con il prosciutto Parma
Copyright UNOLD AG | www.unold.de
e le fette di mozzarella e pomodoro.
Ricoprire con le rimanenti 4 fette di pane. Il lato
con la margarina deve essere all’esterno.
Sistemare sulla griglia preriscaldata, quindi
chiudere il coperchio e cuocere per 2-3 minuti.
Pan dorato / French Toast
8 fette di pane da toast, 3 uova, 150 ml di latte caldo,
1 pizzico di sale, 1 pizzico di zucchero,
Margarina
Sbattere bene le uova insieme a latte, sale e
zucchero, quindi ammorbidirvi le fette di pane
Imburrare la griglia preriscaldata con un po’
di margarina. Fare sgocciolare le fette di
pane, posizionare sulla griglia e cuocere per
2-3 minuti.
Cospargere con cannella e zucchero, oppure
servire con della confettura.
Toast Hawaii
8 fette di pane da toast, 4 fette di prosciutto cotto,
8 fette di ananas (ben sgocciolato), 4 cucchiaini
di maionese, 4 fette di formaggio Gouda,
margarina
Spalmare un po’ di margarina su un lato delle
fette di toast e appoggiarle su un piatto con il
lato imburrato verso il basso.
Spalmare sul lato non imburrato delle 4 fette
la maionese, quindi appoggiare una fetta di
prosciutto cotto, ananas e formaggio.
Ricoprire con le rimanenti 4 fette di pane. Il lato
con la margarina deve essere all’esterno.
Sistemare sulla griglia preriscaldata, quindi
chiudere il coperchio e cuocere per 2-3 minuti.
BARBECUE – CONSIGLI E RICETTE
Oltre alla doppia superficie per grigliare, il barbecue offre la più ampia gamma di possibilità di
cottura, poiché con questa funzione è possibile usare contemporaneamente entrambe le piastre.
Inoltre è possibile preparare insieme alimenti di diverso spessore. Con questa funzione gli alimenti
devono essere girati una o più volte durante la cottura.
Con il termostato impostare la temperatura di cottura desiderata. Prima di collocare gli alimenti,
preriscaldare l’apparecchio per alcuni minuti.
Verdure alla griglia
Funghi all’aglio
500 g di Champignon freschi, funghi pleurotus
o porcini, 1 mazzetto di prezzemolo, pepe,
2 spicchi di aglio, 5 cucchiai di olio d’oliva, sale
Spazzolare i funghi, tagliare a dadini l’aglio e
tritare finemente il prezzemolo. Grigliare tutti
gli ingredienti ad eccezione del sale e del pepe.
Girare spesso con una paletta per padelle. Prima
di servire, salare e pepare. Tempo di cottura:
circa 10 minuti.
Käsepuffer (polpettine al formaggio)
250 g di zucchine, 100 g di formaggio
grattugiato grossolanamente, 1 uovo, 2 cucchiai
di farina, 1 cucchiaino di brodo vegetale
(polvere), 1 cipolla piccola, 2 pizzichi di noce
moscata, olio per cuocere
Grattugiare grossolanamente le zucchine e
amalgamare con formaggio, uovo, farina, brodo
vegetale, cipolla tritata finemente e noce
moscata.
79
Page 80

Preriscaldare la griglia a 200 °C. Versare un
Copyright UNOLD AG | www.unold.de
po’ d’olio sulla superficie della griglia. Con un
cucchiaio formare piccoli grumi di impasto e
appoggiarli sulla griglia, premendo leggermente.
Dorare su entrambi i lati.
Verdura alla griglia multicolore
1 melanzana, 1 zucchina, 1 pomodoro con molta
polpa, 1 cipolla, 1 peperone rosso, 1 verde e
1 giallo, 3 cucchiai di olio d’oliva, 3 spicchi d’aglio,
1 cucchiaio di origano fresco, pepe
Lavare la melanzana, la zucchina, il pomodoro
e i peperoni, quindi tagliarli a striscioline
dallo spessore di 1,5 cm. Tagliare le cipolle
ad anelli, tagliare a dadini l‘aglio. Mescolare
tutti gli ingredienti con l’olio, porre sulla griglia
e cuocere per circa 10-12 minuti, girando
Le ricette di queste istruzioni per l’uso sono state ideate e verificate dagli autori e da UNOLD AG.
Tuttavia non può essere emessa alcuna garanzia. È esclusa la responsabilità degli autori, di UNOLD
AG e dei rispettivi incaricati per danni provocati a persone, cose o materiali.
ripetutamente con le posate apposite. Quindi
pepare.
Ananas alla griglia
1 ananas, zucchero, cannella
Sbucciare l’ananas e tagliare a metà. Tagliare a
fette dallo spessore di 2 cm. Grigliare per circa
3 minuti sulla piastra. Cospargere con cannella
e zucchero e servire con gelato alla vaniglia.
Mela al chili
4 mele rosse, marinata n. 1
Togliere il torsolo alle mele e tagliarle in anelli
dallo spessore di 1,5 cm. Fare marinare per
1 ora nella marinata. Grigliare sulla piastra per
3 minuti, girando con cura una volta durante la
cottura.
NORME DIE GARANZIA
I nostri prodotti sono garantiti per 24 mesi, 12 mesi in caso di uso professionale, dalla data di acquisto per i guasti manifestatisi durante un utilizzo conforme alle disposizioni e attribuibili in modo dimostrabile a difetti di fabbricazione. Nel periodo
di garanzia porremo rimedio ai difetti materiali e di produzione secondo la nostra valutazione, procedendo alla riparazione
o alla sostituzione dell’apparecchio. Le nostre prestazioni di garanzia valgono esclusivamente per gli apparecchi venduti
in Germania e Austria. In tutti gli altri casi rivolgersi all‘importatore. Gli apparecchi per i quali si richiede la riparazione di
guasti ci devono essere inviati con spedizione affrancata e debitamente imballati, unitamente a una copia del documento
di acquisto redatto a macchina dal quale risulti la data di vendita, nonché la descrizione del guasto. In caso di garanzia al
cliente verranno rimborsati i costi di spedizione sostenuti in Germania e Austria. Sono esclusi dalla garanzia i guasti dovuti
all’usura, all’uso inappropriato o al mancato rispetto delle regole di manutenzione. Il diritto di garanzia decade qualora siano
state effettuate riparazioni o interventi da parte di terzi. Eventuali diritti del consumatore finale verso il venditore o negoziante
non vengono limitati dalla presente garanzia.
SMALTIMENTO / TUTELA DELL’AMBIENTE
I nostri apparecchi vengono prodotti rispettando un elevato standard qualitativo per una lunga durata di
utilizzo. Una corretta manutenzione e riparazioni adeguate a cura dal nostro servizio clienti possono prolungare la durata di utilizzo del prodotto. Se un apparecchio è difettoso e non più riparabile, per il suo smaltimento si presti attenzione ai punti che seguono. Questo prodotto non deve essere smaltito unitamente ai
comuni rifiuti domestici. Consegnare il prodotto a un centro di raccolta per il riciclaggio dei rifiuti elettrici o
elettronici. Con la raccolta differenziata dei rifiuti e dei prodotti riciclabili è possibile contribuire alla tutela
delle risorse naturali e far smaltire il prodotto nel rispetto dell’ambiente e della salute.
80
Page 81

MANUAL DE INSTRUCCIONES MODELO 58526
Copyright UNOLD AG | www.unold.de
DATOS TÉCNICOS
Potencia: 1.800–2.000 W, 220–230 V~, 50 Hz
Placas: Con revestimiento antiadherente, retirable,
superficie de parrilla 29,0 x 26,0 cm
Asa: Con aislamiento térmico
Tamaño: Aprox. 35,6 x 35,9 x 15,5 cm (An/Pr/Al)
Peso: Aprox. 4,35 kg
Cable de
alimentación: Aprox. 100 cm
Equipamiento: recipiente colector de grasa, regulación de temperatura continua, temperatura
de asado hasta máx. 230 °C, se pueden seleccionar diferentes posiciones
de asado para la parte superior (asado por contacto, gratinado, abatible
hacia atrás a 90°, parrilla plana, bloqueo), pilotos de control para CON/
DES y LISTO; carcasa de acero inoxidable de alta calidad, protección contra
sobrecalentamiento, tamaño compacto, se puede guardar en posición vertical,
Accesorios: Recipiente colector de grasa, instrucciones de uso con recetas
Salvo modificaciones y errores a nivel de las características de equipamiento, la tecnología, los colores
y el diseño
EXPLICACIÓN DE SÍMBOLOS
Este símbolo se asocia con riesgos eventuales que pueden provocar
lesiones o daños en el aparato.
Este símbolo hace referencia a un eventual riesgo de quemaduras.
Proceda siempre con especial cuidado.
Este símbolo indica un posible peligro de incendio.
PARA SU SEGURIDAD
Lea y conserve las siguientes instrucciones.
1. Este aparato puede ser usado por niños a partir de 8 años, así
como por personas con una capacidad física, mental o sensorial
reducida o carentes de experiencia y/o conocimientos siempre
que estén supervisados o hayan sido correspondientemente
instruidos en el manejo seguro de dicho aparato y comprendan
los peligros que conlleva.
81
Page 82

2. El aparato no es un juguete.
Copyright UNOLD AG | www.unold.de
3. No está permitido que los niños lleven a cabo la limpieza o el
mantenimiento del usuario a no ser que tengan más de 8 años y
estén supervisados.
4. Guarde el aparato y el cable fuera del alcance de niños menores
de 8 años.
5. PRECAUCIÓN: ¡Algunas de las piezas de este producto pueden
llegar a calentarse demasiado y causar quemaduras! Tener
especial cuidado si hay niños o personas que puedan estar en
peligro presentes.
6. Conecte el aparato solo a corriente alterna con una tensión de
acuerdo con la placa de características.
7. El aparato está diseñado para su uso doméstico así como para
casos de aplicación similares, p. ej.:
áreas de cocina utilizadas por el personal en comercios, oficinas
y otros entornos de trabajo;
por huéspedes en hoteles, moteles y otras viviendas;
en establecimientos de alojamiento con desayuno.
8. Este aparato no debe utilizarse con un reloj programador externo
ni con un sistema de mando a distancia.
9. De ninguna manera sumerja el aparato en agua o en otros líquidos.
El aparato y el cable de alimentación no deben entrar en contacto
con agua u otros líquidos. Si a pesar de ello, esto ocurriese
alguna vez, todas las piezas deberán estar completamente secas
antes de un nuevo uso.
10. No toque nunca el aparato o el cable de alimentación con las
manos húmedas.
11. Por razones de seguridad jamás coloque el aparato sobre super
ficies calientes, sobre bandejas metálicas o sobre una base
mojada.
El aparato o el cable de alimentación no deben utilizarse cerca
12.
de llamas.
13. Preste atención a que el cable de alimentación no cuelgue del
borde de la superficie de trabajo dado que ello puede conducir a
accidentes si, p. ej., los niños pequeños tiran de él.
14. Si usa un cable de prolongación, compruebe si está intacto y si
es adecuado para la potencia correspondiente porque de lo contrario puede producirse un sobrecalentamiento.
El cable de alimentación y dado el caso, el cable de prolon-
15.
gación, deben ser colocados de tal manera de evitar que sean
tirados o que se pueda tropezar.
Utilice el aparato solo en espacios interiores.
16.
82
Page 83

17. No deje el aparato sin vigilancia durante su funcionamiento y
Copyright UNOLD AG | www.unold.de
manténgalo fuera del alcance de los niños.
18. Antes de calentar, desenrolle completamente el cable para que
no entre en contacto con las piezas calientes.
19. No cubra nunca la superficie de la parrilla con papel de aluminio, con papel de horno o con otros materiales.
Nunca toque la placa de parrilla caliente durante el funciona-
20.
miento. ¡Peligro de quemaduras!
En caso de asar con la tapa cerrada, se puede formar vapor
21.
caliente debajo de la misma. Al abrir la tapa preste atención a
mantener una distancia suficiente para evitar quemaduras.
22. Para evitar la formación de humo, no sobrecaliente su vajilla
de cocinar, asar y hornear; el humo puede ser peligroso para
animales pequeños (p. ej., pájaros) con un sistema respiratorio
especialmente sensible. Recomendamos no tener a los pájaros
en la cocina.
23. Cuando el aparato esté caliente tóquelo solo por las asas.
24. Para abrir el aparato utilice solo el asa en la tapa.
25. Preste atención a que el aparato esté colocado libremente sobre
una superficie resistente al calor y a una distancia suficiente de
los objetos inflamables durante el funcionamiento.
26. Después del uso, retire la clavija de la caja del enchufe y deje
enfriar la parrilla antes de limpiar el aparato y almacenarlo.
27. Para la limpieza puede extraer la placa después de que se haya
enfriado y limpiarla manualmente. Limpiar el aparato con un
paño húmedo.
28. Para evitar daños en el aparato, este no debe ser usado con
accesorios de otros fabricantes o marcas.
29. Compruebe regularmente los desgastes o deterioros en la clavija
y en el cable de alimentación. En caso de daños en el cable de
alimentación o en otras piezas envíe el aparato para su verifi
cación y reparación a nuestro servicio de atención al cliente.
Las reparaciones inadecuadas pueden ocasionar considerables
peligros para el usuario y tienen como consecuencia la exclusión
de la garantía.
83
Page 84

PRECAUCIÓN:
Copyright UNOLD AG | www.unold.de
El aparato está muy caliente durante y después del
funcionamiento.
No utilice nunca el aparato cuando haya agua u otros líquidos
en el recipiente colector de grasa. ¡Peligro de incendio!
No utilice nunca el aparato si el recipiente colector de grasa
no está colocado.
No abra la carcasa del aparato en ningún caso. Existe peligro
de descarga eléctrica.
El fabricante no es responsable en caso de montaje erróneo, uso inapropiado o equivocado o después de
haber sido efectuadas reparaciones por terceros no autorizados.
ANTES DEL PRIMER USO
1. Retire todos los materiales de embalaje y, dado el caso, los seguros de
transporte. Mantenga el material de embalaje alejado de los niños. ¡Peligro
de asfixia!
2. Compruebe que todas las piezas están disponibles. En caso de que falten
piezas o estén deterioradas, diríjase a su proveedor o a nuestro servicio de
atención al cliente.
3. Antes del primer uso, recomendamos limpiar con un paño húmedo las placas de parrilla con revestimiento antiadherente.
4. En las partes interiores del aparato fije una placa de parrilla correspondientemente (véase capítulo „Colocar/retirar placas de parrilla“).
5. Asegúrese de que el recipiente colector de grasa esté colocado. Se empuja
desde el lado delantero en la carcasa hasta que encaja el recipiente.
6. Cerrar el aparato, enchufar la clavija en una toma de corriente (220–230 V~,
50 Hz). El piloto de control de funcionamiento verde ilumina e indica que la
calefacción está en funcionamiento.
7. Poner el regulador de temperatura a la posición central. Se inicia el precalentamiento, el piloto de control rojo se ilumina. En cuanto el aparato haya
alcanzado la temperatura preajustada, se apaga el piloto de control rojo y
se ilumina el piloto de control de funcionamiento verde. Atención: El piloto
de control de funcionamiento verde se conecta y se desconecta alternativamente durante el funcionamiento según la potencia calorífica actual del
aparato.
8. Deje enfriar el aparato durante unos minutos. Preste atención a que la ventilación del recinto sea suficiente.
9. Durante el primer uso puede formarse algo de humo y de olores que desaparecen tras un breve tiempo.
10. Ahora puede utilizar el aparato.
84
Page 85

COLOCAR/RETIRAR LAS PLACAS DE PARRILLA
Copyright UNOLD AG | www.unold.de
1. Para una limpieza más sencilla se pueden retirar las placas de parrilla.
Para ello, pulse la tecla de desbloqueo correspondiente y tire de la placa de
parrilla hacia delante en dirección al asa.
2. Para volver a colocar las placas de parrilla, coloque la placa correspondiente
en la fijación y empújela hacia abajo hasta que encaje. Compruebe la
sujeción segura de las placas de parrilla antes de volver a utilizar el aparato.
REGULACIÓN DE TEMPERATURA
1. Puede ajustar diferentes temperaturas para la superficie de parrilla.
2. Como valores orientativos rigen:
Temperatura baja: brochetas, pinchos, salchichas
Temperatura media: asar, freír huevos, sándwiches
Temperatura alta: asar, tostar
3. Por razones de seguridad, la potencia calorífica es algo inferior en el área
posterior central de las placas de parrilla. Aquí podrá asar trozos de carne
más finos o, p. ej., verduras, de forma óptima.
COMIDA PARA ASAR
1. Pruebe una de nuestras recetas o simplemente utilice su receta habitual
para asar.
2. Al utilizar comida para asar previamente congelada, tenga en cuenta que
debe estar completamente descongelada antes de asarla.
3. La carne almacenada previamente en la nevera se hará mejor si la retira de
la nevera antes de asarla y deja que quede a temperatura ambiente.
4. De ser posible, la carne (según la preparación y el tipo de carne) se debe
salar solo después de asarla. Si adoba la carne antes de asarla, esta quedará
especialmente tierna y sabrosa.
5. Mediante el recipiente colector de grasa se recogen la grasa y los líquidos
de cocción. De este modo, asará con bajo contenido en grasa y su comida
será más sana y fácil de digerir.
85
Page 86

POSICIÓN DE LAS PLACAS DE PARRILLA
Copyright UNOLD AG | www.unold.de
1. Mediante el ajuste de la tapa se ajustan
las diferentes variantes para la posición de
las placas de parrilla.
Símbolo : La tapa se puede abatir 90°
hacia atrás.
Símbolo : La tapa se puede fijar en
estado cerrado de modo que no pueda
abrirse más el aparato. Atención: Realizar
el ajuste solo cuando el aparato está
desconectado y no haya alimentos
en el mismo. Ideal para transportar
cómodamente el aparato o para guardarlo.
Posiciones I a V: Puede elegir entre diferentes alturas durante el asado
por contacto. La tapa encaja en la altura seleccionada evitando así que
se aplaste demasiado el producto a asar por el peso de la tapa. Deslice el
regulador por el lado derecho del aparato a la altura deseada entre „I“ y
„V“.
ASAR A LA PARRILLA
¡Atención! No cubra nunca la superficie de la parrilla con papel de
aluminio, con papel de horno ni con otros materiales. Tampoco utilice
bandejas de aluminio para parrilladas. Pueden producirse incendios por la
acumulación de calor.
1. Deposite el aparato cerrado sobre una superficie resistente al calor.
2. Compruebe que el regulador de temperatura esté en posición „MÍN“.
3. Procure que el recipiente colector de grasa esté correctamente insertado en
el lado delantero del aparato. No utilice nunca el aparato si el recipiente
colector de grasa no está insertado y no vierta nunca líquidos como, p. ej.,
agua, en el mismo. Para beneficiarse totalmente de la antecámara de grasa,
sacar los dos pies en la parte inferior de la unidad.
Asar con una plancha/con plancha llana
Ideal para ingredientes blandos y no demasiado gruesos.
4. Puede asar su comida solamente en la superficie de la parrilla inferior con
la tapa abierta o utilizar ambas superficies de parrilla. En este caso tendrá
que poner el ajuste de la tapa en, pulse el botón „180°“ (3) y abrir la
tapa completamente de modo que las dos superficies de la parrilla queden
en horizontal.
5. Para ahorrar energía recomendamos calentar el aparato con la tapa cerrada.
Enchufe la clavija en una toma de corriente (220–230 V~, 50 Hz). El piloto
86
Page 87

de control de funcionamiento verde ilumina e indica que la calefacción está
Copyright UNOLD AG | www.unold.de
en funcionamiento.
6. Poner el regulador de temperatura en la posición deseada. Se inicia el precalentamiento, el piloto de control rojo se ilumina. En cuanto el aparato
haya alcanzado la temperatura preajustada, se apaga el piloto de control
rojo y se ilumina el piloto de control de funcionamiento verde. Atención: El
piloto de control de funcionamiento verde se conecta y se desconecta alternativamente durante el funcionamiento según la potencia calorífica actual
del aparato.
7. Abra con cuidado la tapa del aparato. Para evitar quemaduras, toque la tapa
exclusivamente por el asa.
8. Unte la placa de la parrilla inferior (y en caso de asado con la parrilla llana
también la placa de la parrilla superior) con un poco de aceite resistente al
calor.
9. Coloque el producto que desea asar y compruebe de vez en cuando si es
necesario darle la vuelta.
10. Compruebe regularmente si el recipiente colector de grasa está lleno. Si
el recipiente está lleno, desconecte el aparato, deje que se enfríe, vacíe el
recipiente colector de grasa y continúe después con la preparación de la
comida. El recipiente colector de grasa no debe nunca rebosar para evitar
un posible peligro de incendio.
11. Cuando su comida esté preparada, gire el regulador de temperatura a „MÍN“
y retire la clavija de la caja del enchufe.
12. Deje enfriar el aparato por completo antes de limpiarlo.
Asado por contacto/gratinado
Ideal para trozos de carne o sándwiches, no es necesario dar la vuelta al producto que se va a asar.
13. Puede asar su comida en la superficie de parrilla inferior con la tapa cerrada.
14. Para ahorrar energía recomendamos calentar el aparato con la tapa cerrada.
Enchufe la clavija en una toma de corriente (220–230 V~, 50 Hz). El piloto
de control de funcionamiento verde ilumina e indica que la calefacción está
en funcionamiento.
15. Poner el regulador de temperatura en la posición central. Se inicia el precalentamiento, el piloto de control rojo se ilumina. En cuanto el aparato haya
alcanzado la temperatura preajustada, se apaga el piloto de control rojo y
se ilumina el piloto de control de funcionamiento verde. Atención: El piloto
de control de funcionamiento verde se conecta y se desconecta alternativamente durante el funcionamiento según la potencia calorífica actual del
aparato.
16. Abra con cuidado la tapa del aparato. Para evitar quemaduras, toque la tapa
exclusivamente por el asa.
17. Unte la placa de parrilla inferior con un poco de aceite resistente al calor.
87
Page 88

18. Coloque el producto que desea asar.
Copyright UNOLD AG | www.unold.de
19. Cierre de nuevo la tapa del aparato. Para evitar quemaduras, toque la tapa
exclusivamente por el asa.
20. La tapa se ajusta automáticamente al grosor del producto a asar. También
puede seleccionar la distancia entre el producto a asar y la tapa mediante
los ajustes I a V en el selector de la tapa tal y como se describe en el capítulo „Posición de las placas de parrilla“.
21. Compruebe regularmente si el recipiente colector de grasa está lleno. Si
el recipiente está lleno, desconecte el aparato, deje que se enfríe, vacíe el
recipiente colector de grasa y continúe después con la preparación de la
comida. El recipiente colector de grasa no debe nunca rebosar para evitar
un posible peligro de incendio.
22. Cuando su comida esté preparada, gire el regulador de temperatura a „MÍN“
y retire la clavija de la caja del enchufe.
23. Deje enfriar el aparato por completo antes de limpiarlo.
PRECAUCIÓN:
El aparato está muy caliente durante y después del funcionamiento.
LIMPIEZA Y ALMACENAMIENTO
Antes de proceder a la limpieza o al mantenimiento, retire la
clavija de la caja del enchufe. Espere hasta que el aparato se
haya enfriado completamente.
¡No sumerja nunca el aparato en agua!
1. Para no deteriorar la superficie de la placa con revestimiento antiadherente,
no utilice nunca estropajos abrasivos o herramientas de limpieza parecidas.
No utilice productos de limpieza agresivos, lana o estopa de acero, objetos metálicos, productos de limpieza calientes ni desinfectantes, ya que
pueden producir daños. Los restos de suciedad de mayor tamaño se deben
eliminar preferentemente con el rascador de limpieza suministrado. Este es
adecuado exclusivamente para este fin. Para evitar deterioros en las placas,
no utilice nunca el rascador para darle la vuelta al producto a asar o para
retirarlo de la parrilla.
2. Para una limpieza más sencilla se pueden retirar las placas de parrilla. Para
ello, pulse la tecla de desbloqueo y tire de la placa de parrilla correspondiente hacia delante en dirección al asa.
3. Limpie las placas con agua caliente añadiéndole un poco de detergente
suave y después séquelas bien.
4. Para volver a colocar las placas de parrilla, coloque la placa correspondiente
en la fijación y empújela hacia abajo hasta que encaje. Compruebe la sujeción segura de las placas de parrilla antes de volver a utilizar el aparato.
88
Page 89

5. Retire la grasa que pueda haberse acumulado en el recipiente colector de
Copyright UNOLD AG | www.unold.de
grasa y límpielo en agua caliente. Vuelva a colocar el recipiente completamente seco en la carcasa y asegúrese de que esté fijamente alojado en la
misma.
6. Limpie la carcasa con un paño húmedo bien escurrido y séquela bien después.
7. Asegúrese siempre de que no se filtre agua a la carcasa.
8. La parrilla se puede guardar para ahorrar espacio. Para evitar que la tapa se
abra accidentalmente, ponga el ajuste de la tapa en .
9. Guarde el aparato en un lugar seco y protegido contra el polvo.
MARINADAS
Los siguientes adobos son apropiados de igual manera para bistecs de carne de ternera, carne de
cerdo, cordero, aves, pescado y verduras y hortalizas. Coloque los bistecs en la marinada o cúbralos
con la misma y déjelos macerar durante varias horas en el frigorífico, mejor durante toda la noche.
De vez en cuando déles la vuelta. Antes de asar al grill, debería secar la carne marinada con un papel
de cocina. Con el resto del adobo puede untar los alimentos mientras se están asando.
Adobo muy picante
1 cebolla, ½ chile rojo, 2 cucharadas de
aceite de oliva, 2 cucharadas de azúcar de
caña, 3 cucharadas de vinagre, 50 ml de
zumo de manzana, 50 ml de zumo de tomate,
2 cucharadita de salsa Worcester, 2 bayas de
enebro
Pique finamente la cebolla y el chile, sofríalos
brevemente en una sartén con aceite. Añada
el azúcar, el vinagre y el zumo de manzana y
llévelo a ebullición. Retírelo del fuego. Añada el
zumo de tomate, la salsa Worcester y las bayas
de enebro picadas. Una vez enfriado, meta ahí la
carne para marinar.
Marinada de cerveza
4 hojas de laurel, 4 bayas de enebro, 2 cucharadas
de aceite de oliva, 1/8 l de cerveza fuerte (o cerveza
de malta, si la marinada debe ser sin alcohol),
2 cucharadas de miel, el zumo de ½ limón
Dore las hojas de laurel y las bayas de enebro
en aceite, añada la cerveza y la miel y caliente
brevemente sin que llegue a hervir. Añada el
zumo de limón, deje que se enfríe la marinada y
adobe la carne.
Marinada de romero
2 cucharaditas de romero seco, 4 dientes de
ajo, 4 bayas de enebro, 8 granos de pimienta
negra, 4 cucharaditas de granos de mostaza,
5 cucharadas de aceite de oliva.
Pique todos los ingredientes en el mortero,
excepto el aceite, o tritúrelos por ej. con la
batidora de brazo ESGE (molinillo). Mezcle la
pasta con el aceite y unte la carne con la mezcla.
Marinada de curry
2 cucharaditas de curry en polvo, un trozo de
jengibre del tamaño del pulgar, 50 ml de vino
blanco seco, 100 ml de zumo de piña
Pele el jengibre y rállelo fino, mézclelo con
el resto de ingredientes, unte la carne con la
mezcla.
Adobo asiático
1 cucharadas de miel, 2 cucharaditas de
sambal oelek, 1 cucharadas de vino de arroz, 8
89
Page 90

cucharadas de salsa de soja dulce, 2 cucharadas
Copyright UNOLD AG | www.unold.de
de zumo de naranja, 2 cucharadas de vino de
Jerez
Mezcle los ingredientes y cubra la carne la
mezcla.
Marinada de coco
1 limón sin tratar, 1 pizca de pimienta de cayena,
1 trozo de jengibre fresco del tamaño del pulgar,
1 diente de ajo, 150 ml de leche de coco no
azucarada
Pele el jengibre y rállelo fino, pele el ajo y
píquelo, ralle la piel del limón y exprímalo.
Mezcle el jengibre, la piel de limón y el zumo
con los demás ingredientes, coloque la carne en
la marinada.
Marinada de vino tinto
¼ cucharaditas de granos de pimienta de
Jamaica, 2 clavos, 2 cucharaditas de granos de
mostaza, 3 bayas de enebro, 1 pizca de canela,
1 cucharaditas de granos de pimienta negra,
2 cucharadas/150 g de confitura de grosella
roja, 100 ml de vino tinto seco
Pique la pimienta de Jamaica, los clavos, los
granos de mostaza y los granos de pimienta en
el mortero o tritúrelos con la batidora de brazo
ESGE (molinillo). Caliente aceite en una sartén,
dore brevemente las especias picadas. Vierta la
confitura de grosella, la canela y el vino tinto
y caliéntelo hasta que la confitura se vuelva
líquida. Deje enfriar la marinada y coloque la
carne.
Pique los ajos y la cebolla finos, mézclelos con
el resto de ingredientes y coloque la carne.
Marinada de comino
1 cucharadas de semillas de comino,
½ cucharaditas de pimienta molida gruesa,
2 cucharadas de vinagre de manzana,
2 cucharadas de zumo de manzana, 3 cucharadas de aceite de oliva
Mezcle los ingredientes y coloque la carne.
Adobo dulce-picante
5 cucharadas de miel, 5 cucharadas de salsa
de soja, 1 pizca de pimienta de cayena,
1 cucharaditas de polvo de mostaza, 2 cucharadas de aceite de oliva
Mezcle los ingredientes y coloque la carne.
Escabeche de limón
6 dientes de ajo, 100 ml de aceite de oliva,
el zumo y la ralladura de 2 limones sin tratar,
¼ cucharaditas de pimienta
Pique los ajos finos, mézclelos con la ralladura
y el zumo de limón y la pimienta, cubra la carne
con el escabeche.
Marinada de naranja
El zumo de 3 naranjas ácidas, 2 cucharaditas
de estragón, 1 cucharadas de vinagre,
½ cucharaditas de pimienta.
Mezcle todos los ingredientes y coloque la carne.
Adobo de ajo
8 dientes de ajo, 1 cebolla, 2 cucharaditas de
hojas de salvia recién picadas, ¼ l de suero de
mantequilla.
90
Page 91

ASADO DE CONTACTO – RECOMENDACIONES Y RECETAS
Copyright UNOLD AG | www.unold.de
El asado de contacto es indicado para carnes planas y sin hueso como las hamburguesas o los
filetes o incluso las verduras. Los alimentos a asar deben tener prácticamente el mismo grosor
para que la parte superior se adapte bien. Para el asado de contacto debe cerrar siempre la tapa.
Si los alimentos a asar tienen un grosor fino, recomendamos el ajuste máximo de la temperatura,
si el grosor es de unos 3 cm, recomendamos un ajuste medio de la temperatura. Siempre debe
calentar bien la barbacoa de contacto. Las carnes se asarán óptimamente cuando tienen un grosor
de entre 1,5 y 3 cm. Los alimentos salen especialmente jugosos si los marina previamente con una
marinada a su gusto. Recomendamos sazonar los alimentos con sal después de asarlos, ya que de
lo contrario especialmente los filetes o el hígado podrían endurecerse. Los tiempos indicados en las
recetas aplican al asado de contacto. Si no se indicara lo contrario, las recetas siguientes son para
4 personas.
Carnes y aves
Bolsitas de pollo
4 escalopes finos de pollo, sal, pimienta,
8 champiñones, 1 cebolla, 2 cucharadas de
aceite, 120 g de gouda rallado, 2 cucharaditas
de mejorana,4 palillos
Aplane bien los escalopes con el martillo de
madera, condimente con sal y pimienta, corte la
cebolla en dados y dórela brevemente en aceite
en la sartén. Corte los champiñones en hojas
y rehogue conjuntamente un poco. Extienda
la mezcla de cebolla y champiñones sobre los
escalopes, espolvoree con el queso rallado.
Doble los escalopes y ciérrelos con los palillos.
Mezcle 2 cucharadas de aceite con la mejorana,
unte con ello los filetes rellenos, áselos al nivel
3 aprox. 15 min. y úntelos varias veces con el
aceite de mejorana.
Hamburguesa-pizza
Por persona:
100 g de carne picada mezclada, 1 diente de
ajo y ½ cebolla en dados pequeños, 1 huevo,
2 cucharadas de pan rallado, 50 g de gouda,
50 g de jamón cocido, 2 cucharaditas de
concentrado de tomate, ½ cucharaditas de
condimento para pizza, en caso necesario
sal y pimienta (algunos condimentos para
pizza ya contienen sal y pimienta), 1 pan de
hamburguesa, 2 hojas de lechuga iceberg,
1 cucharadas de mayonesa, 1 cucharadas de
ketchup, 2 rodajas de tomate, 2 rodajas de
cebolla
Haga una masa con la carne picada, el ajo y los
dados de cebolla, el huevo, el pan rallado, el
gouda cortado en pequeños daditos, el jamón
picado finamente, el concentrado de tomate y
las especias para pizza. Forme 2 hamburguesas
aplanadas.
Unte la superficie del grill ligeramente con
aceite, ase las hamburguesas, 6-8 minutos,
déles la vuelta una vez.
Corte el pan en dos, tuéstelo brevemente por los
dos lados en el grill. Unte un poco de mayonesa,
lave las hojas de lechuga, séquelas, colóquelas
sobre la mayonesa y encima la primera
hamburguesa. Unte ésta con ketchup, apile
91
Page 92

encima la segunda hamburguesa, coloque los
Copyright UNOLD AG | www.unold.de
tomates y la cebolla y la tapa del pan encima.
Chuletas de cordero a las finas hierbas con
verduras asadas
8 chuletas de cordero, el adobo nº 3, 2 calabacines,
3 ramilletes de perejil, 2 dientes de ajo,
2 cucharadas de aceite
Deje macerar las chuletas aprox. 6 horas en el
adobo. Áselas aprox. 6 minutos por cada lado.
Corte los calabacines a lo largo en rodajas de
2 cm de grueso. Pique finamente el ajo y
el perejil, mézclelos con el aceite. Unte los
calabacines con el aceite aromático y áselos
aprox. 3 minutos por cada lado
Saltimbocca con mozzarella
4 escalopes de ternera finos, 4 lonchas de jamón
de Parma, 8 hojas de salvia, 300 g de queso
mozzarella, sal, pimienta, 4 palillos engrasados
Aplane los escalopes con el martillo de madera
y salpimiente. Cubra cada escalope con una
loncha de jamón, 2 hojas de salvia y 2 finas
rodajas de mozzarella.
Doble los escalopes y ciérrelos con los palillos.
Ponga los escalopes sobre la placa grill y áselos
al nivel 4 durante 10 minutos aprox.
Delicias de pescado
Caballa
4 caballas pequeñas listas para cocinar, adobo
nº 4 o nº 12
Limpie las caballas, séquelas con papel de
cocina y úntelas por dentro y por fuera con el
adobo, déjelo marinar durante 4 horas aprox.
Ponga las caballas sobre la placa grill acanalada
y áselos durante 12-16 minutos aprox.
Consejo: En vez de caballas puede utilizar
también truchas, sardinas, arenques, anguilas,
etc.
Pinchos de gambas
(aperitivo; si desea prepararlo como plato
principal doble las cantidades)
8 gambas peladas, ½ cantidad del adobo nº 6,
4 pinchos de madera engrasados
Coloque 2 gambas en cada pincho de madera,
úntelo con el adobo y déjelo marinar al menos
1-1,5 horas.
Áselo durante 4-5 minutos aprox.
Verduras al grill, asados ricos en vitaminas
Mazorcas de maíz
4 mazorcas de maíz dulce (sin hojas), 2 l agua
con sal, 4 cucharadas de aceite de oliva o aceite
aromático
Hierva las mazorcas de maíz en agua con sal
durante 10 minutos aprox. y escúrralas. Unte
las mazorcas con aceite, clave un palillo en cada
uno de sus dos extremos, para que las mazorcas
puedan girarse sin problemas. Áselas durante
10 minutos aprox. y gírelas repetidamente.
Consejo: Antes de asarlas enrolle las mazorcas
con panceta (fíjelas con palillos).
Hamburguesa de verduras
1 colinabo, 1 apio nabo pequeño, 300 g de
zanahorias, 1 raíz de perejil, 1 manojo de perejil,
2 dientes de ajo, 100 g de gouda, 2 huevos,
2 cucharadas de tofú molido, 2 cucharadas de
pan rallado, sal, pimienta, aceite
Lave, pele y ralle finamente el colinabo, el apio
nabo y la raíz de perejil (por ej. con la batidora
de brazo ESGE y el accesorio picador de ESGE).
Pique finamente el perejil, la parte verde del
colinabo y los dientes de ajo, corte el queso
en dados pequeños. Mezcle estos ingredientes
junto con los huevos, el tofú, el pan rallado, la
sal y la pimienta hasta formar una masa. Forme
pequeñas hamburguesas, píntelas con aceite,
colóquelas sobre la placa grill y áselas durante
6 minutos aprox.
Berenjenas y calabacines al grill
2 berenjenas, 2 calabacines, sal, 1 porción de
marinada de romero
92
Page 93

Corte las berenjenas en rodajas de ½ cm de
Copyright UNOLD AG | www.unold.de
grosor, espolvoréelas con sal y déjelas marinar
brevemente. A continuación, séquelas con papel
de cocina. Corte los calabacines verticalmente
en rodajas de ½ cm de grueso. Cubra los
calabacines y las berenjenas con la marinada y
déjelo macerar aprox. 30 minutos. Áselos aprox.
2-3 minutos sobre el grill precalentado.
SÁNDWICHES Y PANINI – RECOMENDACIONES Y RECETA
Prepare los sándwiches clásicos o los panini con la barbacoa cerrada. Los sándwiches deben tener
prácticamente el mismo grosor para que la parte superior se adapte bien.
Generalmente podrá utilizar cualquier pan para los sándwiches. Los panini salen especialmente ricos
con chapata, focaccia o baguette. Siempre debe calentar bien la barbacoa de contacto. Este es el
momento en el que puede colocar los alimentos a asar. Prepare los sándwiches y los panini sólo con
un ajuste mediano a alto. Cuando el tiempo de asar se prolonga demasiado, el queso que contienen
los sándwiches o los panini puede rebosar.
Sándwich de tomates con mozzarella
8 rebanadas de pan de molde, 4-8 lonchas de
jamón de Parma, 8 rodajas de tomate, 8 rodajas
de mozzarella, 4 cucharaditas de pesto,
margarina
Unte las rebanadas de pan de molde por un lado
con un poco de margarina y colóquelas sobre un
plato, con la cara untada hacia abajo.
Extienda el pesto sobre las caras sin untar.
Cubra 4 rebanadas con el jamón de Parma y las
rodajas de tomate y mozzarella.
Tápelas con las 4 rebanadas restantes, en este
caso la cara untada con margarina debe quedar
hacia afuera.
Colóquelas sobre el grill precalentado, cierre el
aparato y tueste durante 2-3 minutos.
Torrijas de leche / tostadas francesas
8 rebanadas de pan de molde, 3 huevos, 150 ml
de leche templada, 1 pizca de sal, 1 pizca de
azúcar, margarina
Bata los huevos, la leche, la sal y el azúcar
y sumerja ahí dentro las rebanadas de pan
brevemente.
Engrase el grill precalentado con un poco de
margarina. Deje escurrir las rebanadas, póngalas
sobre el grill y tuéstelas durante 2-3 minutos.
Espolvoree la tostada con canela y azúcar o
sírvala con confitura.
Tostadas Hawaii
8 rebanadas de pan de molde, 4 lonchas de jamón
de York, 8 rodajas de piña (bien escurridas),
4 cucharaditas de mayonesa, 4 lonchas de
gouda, margarina
Unte las rebanadas de pan de molde por un lado
con un poco de margarina y colóquelas sobre un
plato, con la cara untada hacia abajo.
Unte con mayonesa 4 rebanadas por el lado sin
untar, a continuación cubra cada una con una
loncha de jamón de York, de piña y de queso.
Tápelas con las 4 rebanadas restantes, en este
caso la cara untada con margarina debe quedar
hacia afuera.
Colóquelas sobre el grill precalentado, cierre el
aparato y tueste durante 2-3 minutos.
93
Page 94

ASADO A LA PARRILLA – RECOMENDACIONES Y RECETAS
Copyright UNOLD AG | www.unold.de
Aparte de la superficie doble, el asado a la parrilla ofrece numerosos tipos de preparación cuando la
barbacoa está abierta. También podrá preparar alimentos de diferentes grosores. Debe dar la vuelta
a los alimentos una o varias veces al asarlos a la parrilla. Ajuste el selector de temperatura a la
temperatura deseada. Caliente el equipo durante unos minutos antes de colocar los alimentos a asar.
Verduras, hortalizas y fruta al grill
Setas al ajillo
500 g de champiñones frescos, champiñones
chinos o boletos, 1 manojo de perejil, pimienta,
2 dientes de ajo, 5 cucharadas de aceite de
oliva, sal
Limpie las setas con un cepillo, pique los ajos
y el perejil finos. Mezcle todos los ingredientes
excepto la sal y la pimienta y áselos sobre la
placa grill. Déle la vuelta a menudo con ayuda
de una paleta de cocina. Salpimiente antes de
servir. Tiempo de asar al grill: aprox. 10 minutos.
Tortas de queso
250 g de calabacines, 100 g de queso rallado
grueso, 1 huevo, 2 cucharadas de harina,
1 cucharaditas de caldo de verduras (polvo),
1 cebolla pequeña, 2 pizcas de nuez moscada,
aceite para freír
Ralle el calabacín grueso, mézclelo con el
queso, huevo, harina, caldo en polvo, cebolla
picada fina y nuez moscada.
Coloque en el grill precaliente a 200 °C. Vierta
algo de aceite sobre la superficie del grill. Con
ayuda de una cuchara sopera ponga pequeños
montoncitos de la masa de las tortas sobre las
placas y aplástelas un poco. Fríalas por ambos
lados hasta que se doren.
Lave la berenjena, el calabacín, el tomate y los
pimientos y córtelos en tiras de aprox. 1,5 cm
de grosor. Corte las cebollas en aros, pique los
ajos finos. Mezcle todos los ingredientes con el
aceite, póngalos sobre la placa del grill y áselos
aprox. 10-12 minutos; al mismo tiempo vaya
dándole la vuelta a menudo con una paleta de
cocina o utensilios para el grill. A continuación,
añada pimienta.
Piña al grill
1 piña, azúcar, canela
Pele la piña y retire el tallo del centro. Córtela
en rodajas de unos 2 cm de grosor. Áselas
durante 3 minutos aprox. sobre la placa del grill.
Espolvoréelas con canela y azúcar y sírvalas
acompañadas con helado de vainilla.
Manzanas al chile
4 manzanas rojas, el adobo nº 1
Extraiga el corazón de las manzanas, córtelas en
aros de 1,5 cm de grosor. Póngalas a macerar
durante 1 hora en el adobo. Áselas un total de
3 minutos sobre la placa del grill, de vez en
cuando déles la vuelta con cuidado.
Grill de hortalizas variadas
1 berenjena, 1 calabacín, 1 tomate de ensalada,
1 cebolla blanca, 1 pimiento morrón de cada
color (rojo, verde y amarillo), 3 cucharadas de
aceite de oliva, 3 dientes de ajo, 1 cucharadas
de hojas de orégano frescas, pimienta
94
Page 95

Las recetas del presente manual de instrucciones han sido cuidadosamente seleccionadas y probadas
Copyright UNOLD AG | www.unold.de
tanto por sus autores como por UNOLD AG quienes, no obstante, no asumen garantía alguna. Queda
explícitamente excluida cualquier responsabilidad de los autores y UNOLD AG o sus delegados por
daños personales, materiales o financieros.
CONDICIONES DE GARANTIA
La garantía para nuestros equipos es de 24 meses, y de 12 meses en el caso de uso comercial, a partir de la fecha de
compra, cubriendo los daños que con un uso acorde a lo prescrito pueden atribuirse fehacientemente a defectos de fabricación. Dentro del período de garantía, solucionamos errores de material y de fabricación a consideración nuestra mediante
reparación o cambio. Nuestros servicios de garantía son válidos únicamente para los aparatos que han sido vendidos en
Alemania y Austria. Para todos los demás casos diríjase por favor al importador correspondiente. Aquellos aparatos que se
presentan para eliminar errores, por favor enviarlos junto a una copia del comprobante de compra extendido a máquina, del
cual debe desprenderse la fecha de compra, así como una breve descripción de las deficiencias, apropiadamente embalado
y con los sellos correspondientes a nuestro servicio al cliente. En caso de garantía, los gastos de envío serán restituidos al
cliente solamente en Alemania y Austria. Aquellos daños causados por desgaste están excluidos de la garantía, así como
manipulación incorrecta, e incumplimiento de las condiciones de mantenimiento y cuidado. El derecho a garantía expira si las
reparaciones o mantenimiento son realizadas por terceros. Todo reclamo del consumidor final ante el vendedor, comerciante
no se ve afectado por esta garantía.
DISPOSICIÓN/PROTECCIÓN DEL MEDIO AMBIENTE
Nuestros aparatos se fabrican con un alto nivel de calidad por un largo período de uso. El mantenimiento
regular y las reparaciones de tipo técnico a través de nuestro servicio al cliente pueden prolongar la duración del aparato. Cuando un aparato está defectuoso y ya no puede repararse, por favor considere en la disposición final los siguientes puntos: Este producto no puede ser eliminado junto a la basura domiciliaria.
Usted debe entregar este producto a un lugar oficial para el reciclaje de aparatos eléctricos o electrónicos.
Mediante la clasificación por separado y el reciclaje de productos residuales, Usted contribuye a proteger
los recursos naturales y asegura que el producto sea eliminado de forma salubre y acorde con el medio
ambiente.
95
Page 96

INSTRUKCJA OBSŁUGI MODEL 58526
Copyright UNOLD AG | www.unold.de
DANE TECHNICZNE
Moc: 1800-2000 W, 220-230 V~, 50 Hz
Płytki: Antyadhezyjne, wyjmowane,
powierzchnia grillowania 29,0 x 26,0 cm
Uchwyt: Z izolacją cieplną
Rozmiary: Ok. 35,6 x 35,9 x 15,5 cm (szer./ głęb. /wys.)
Ciężar: Ok. 4,35 kg
Przewód
zasilający: Ok. 100 cm
Wyposażenie: Pojemnik na tłuszcz, bezstopniowa regulacja temperatury, temperatura gril-
lowania do maks. 230 °C, możliwość wyboru różnych pozycji grillowania dla
górnej części grilla (grillowanie kontaktowe, zapiekanie, możliwość rozłożenia
o 90°, grill płaski, blokada), lampki kontrolne WŁ./WYŁ. i GOTOWE, wysokiej
jakości obudowa ze stali szlachetnej, możliwość przechowywania w pozycji
pionowej
Akcesoria: Pojemnik na tłuszcz, instrukcja obsługi z przepisami
Zmiany i błędy w opisie wyposażenia, technice, kolorach i konstrukcji są zastrzeżone.
OBJAŚNIENIE SYMBOLI
Symbol ten oznacza ewentualne niebezpieczeństwa, które mogą
prowadzić do obrażeń lub uszkodzenia urządzenia.
Symbol ten wskazuje na ewentualne niebezpieczeństwo poparzenia.
Zawsze postępować tutaj ze szczególną ostrożnością.
Ten symbol wskazuje na ewentualne niebezpieczeństwo pożaru.
DLA BEZPIECZEŃSTWA UŻYTKOWNIKA
Prosimy przeczytać poniższe instrukcje i zachować je do użytku w
przyszłości.
1. Urządzenie może być używane przez dzieci w wieku powyżej 8
lat oraz osoby o ograniczonej sprawności fizycznej, sensorycznej
czy umysłowej lub osoby nie posiadające doświadczenia i/lub
wiedzy, jeśli są one nadzorowane lub zostały przeszkolone w
zakresie bezpiecznego użytkowania i zrozumiały wynikającego z
tego zagrożenia.
2. Nie wolno dzieciom bawić się urządzeniem.
96
Page 97

3. Czyszczenia i konserwacji, które powinien wykonać użytkownik,
Copyright UNOLD AG | www.unold.de
nie mogą wykonywać dzieci poniżej 8 lat. Dzieci w wieku powyżej
8 lat mogą robić to pod nadzorem.
4. Urządzenie z przewodem przechowywać w miejscu niedostępnym
dla dzieci w wieku poniżej 8 lat.
5. OSTROŻNIE! Niektóre części tego produktu mogą być bardzo
gorące i powodować oparzenia! Zachować szczególną ostrożność
w obecności dzieci i osób zagrożonych.
6. Urządzenie należy podłączać wyłącznie do prądu przemiennego
o napięciu podanym na tabliczce znamionowej.
7. Urządzenie przeznaczone jest do użycia w gospodarstwie domo
wym lub w podobnych zastosowaniach, np.
w kuchniach używanych przez personel w sklepach, pomiesz-
czeniach biurowych i innych środowiskach pracy;
przez gości w hotelach, motelach i w innych pomieszczeniach
mieszkalnych;
w pensjonatach ze śniadaniem.
8. Urządzenie nie może pracować z zewnętrznym programatorem
zegarowym lub systemem zdalnego sterowania.
9. W żadnym wypadku nie wolno obudowy zanurzać w wodzie lub
w innych cieczach. Wyłącznik z produktu i kabel nie mogą stykać się z wodą ani z innymi cieczami. Jeśli to nastąpiło, przed
ponownym użyciem
wszystkie części należy całkowicie wysuszyć.
10. Urządzenia ani kabla nie należy nigdy dotykać mokrymi dłońmi.
11. Ze względów bezpieczeństwa nigdy nie stawiać urządzenia na
gorących powierzchniach, blacie metalowym lub na wilgotnym
podłożu.
12. Urządzenie ani kabel nie mogą znajdować się w pobliżu pło-
mieni.
Zwrócić uwagę na to, aby przewód nie zwisał poza krawędź
13.
powierzchni roboczej, gdyż może to prowadzić do wypadków, np.
gdy pociągną za niego małe dzieci.
14. Jeśli używa się przewodu przedłużającego, sprawdzić, czy jest
nieuszkodzony i nadaje się dla odpowiedniej mocy, gdyż w przeciwnym wypadku może nastąpić przegrzanie.
Przewód zasilający i ewentualnie przewód przedłużający muszą
15.
być tak ułożone, aby zapobiec pociągnięciu lub potknięciu się o
nie.
16. Używać urządzenia wyłącznie wewnątrz pomieszczeń.
17. Podczas pracy nie pozostawiać urządzenia bez nadzoru i trzymać
z dala od dzieci.
18. Przed rozgrzaniem całkowicie rozwinąć kabel, aby nie miał on
kontaktu z gorącymi częściami.
-
97
Page 98

19. Nigdy nie przykrywać powierzchni grillowania folią aluminiową,
Copyright UNOLD AG | www.unold.de
papierem do pieczenia lub innym materiałem.
20. Podczas pracy nigdy nie chwytać za gorącą płytą grillową – niebezpieczeństwo oparzeń!
Podczas grillowania z zamkniętą pokrywą może pod nią powsta-
21.
wać gorąca para. Podczas otwierania pokrywy zachować wystarczający odstąp, aby uniknąć oparzeń.
Aby uniknąć powstawania dymu, nie przegrzewać naczyń do
22.
gotowania, smażenia i pieczenia; dym może być niebezpieczny
dla mniejszych zwierząt (np. ptaków) o szczególnie wrażliwym
układzie oddechowym. Zalecamy nie trzymać ptaków w kuchni.
23. Gorące urządzenie należy dotykać tylko za uchwyty.
24. Do otwarcia urządzenia używać tylko uchwytu na pokrywie.
25. Zwrócić uwagę na to, aby urządzenie podczas pracy stało swo-
bodnie na powierzchni odpornej na działanie wysokiej temperatury i w wystarczającej odległości od palnych przedmiotów.
Po użyciu wyciągnąć wtyczkę z gniazdka i odczekać, aż grill się
26.
ochłodzi, zanim urządzenie zostanie wyczyszczone i odstawione
do przechowywania.
27. Do czyszczenia płytę można po ochłodzeniu wyjąć i wyczyścić
ręcznie. Wytrzeć urządzenie wilgotną ściereczką.
28. Aby uniknąć szkód, nie wolno urządzenia używać z akcesoriami
innych producentów lub marek.
29. Regularnie kontrolować wtyczkę i kabel instalacyjny pod kątem
oznak zużycia lub uszkodzenia. Gdy uszkodzony jest kabel
lub inne części, prosimy odesłać urządzenie do sprawdzenia i
naprawy do naszego serwisu klienta. Nieprawidłowo przeprowa
dzone naprawy mogą prowadzić do powstania znacznych zagrożeń dla użytkownika i prowadzą do utraty gwarancji.
-
OSTROŻNIE:
Podczas i po zakończeniu używania urządzenie jest bardzo
gorące!
Nigdy nie używać urządzenia, gdy w pojemniku na tłuszcz
znajduje się woda lub inne ciecze – ryzyko pożaru!
Nigdy nie używać urządzenia bez włożonego pojemnika na
tłuszcz.
W żadnym wypadku nie otwierać obudowy urządzenia. Istnieje niebezpieczeństwo porażenia prądem elektrycznym.
Producent nie przejmuje odpowiedzialności za nieodpowiednie bądź wadliwe użytkowanie lub po
przeprowadzonych naprawach przez nieautoryzowane zakłady bądź niekompetentne osoby.
98
Page 99

PRZED PIERWSZYM UŻYCIEM
Copyright UNOLD AG | www.unold.de
1. Usunąć cały materiał opakowaniowy i ewentualne zabezpieczenia transportowe. Przechowywać opakowania poza zasięgiem dzieci – ryzyko uduszenia!
2. Sprawdzić, czy obecne są wszystkie części. Jeżeli brak jest części lub części
są uszkodzone, prosimy zwrócić się do punktu sprzedaży lub naszego ser-
wisu klienta.
3. Przed pierwszym użyciem zalecamy przetrzeć płyty grillowe z powłoką anty-
adhezyjną wilgotną ściereczką.
4. Przymocować do wewnętrznych stron urządzenia po jednej płycie grillowej
(patrz rozdział „Włożenie / wyjęcie płyt grillowych“).
5. Upewnić się, czy pojemnik na tłuszcz jest włożony. Wkłada się go od przodu
do obudowy, aż zatrzaśnięcia się pojemnika.
6. Zamknąć urządzenie, włożyć wtyczkę do gniazdka (220-230 V~, 50 Hz).
Zielona lampka kontrolna zapala się sygnalizując, że nagrzewanie jest włą-
czone.
7. Ustawić regulator temperatury w środkowym położeniu. Rozpoczyna się roz-
grzewanie, zapala się czerwona lampka kontrolna. Gdy urządzenie osiągnie ustawioną temperaturę, gaśnie czerwona lampka kontrolna i zapala się
zielona lampka kontrolna. Uwaga: Zielona lampka kontrolna włącza się i
wyłącza na zmianę podczas pracy, zależnie od aktualnej mocy grzejnej urzą-
dzenia.
8. Zaczekać kilka minut, aż urządzenie rozgrzeje się. Zwrócić uwagę na wystar-
czającą wentylację pomieszczenia.
9. Podczas pierwszego użycia może powstawać niewielki dym i zapachy, które
po chwili znikają.
10. Teraz urządzenie jest gotowe do użytku.
WŁOŻENIE / WYJĘCIE PŁYT GRILLOWYCH
1. Do łatwiejszego czyszczenia można płyty wyjąć z urządzenia. W tym celu
nacisnąć odpowiedni przycisk odblokowujący i wyciągnąć płytę grillową do
przodu w kierunku uchwytu.
2. Aby ponownie włożyć płyty grillowe, włożyć odpowiednią płytę w mocowanie,
po czym nacisnąć na dół, aż płyta zatrzaśnie się. Sprawdzić pewne osadzenie
płyt grillowych przed ponownym użyciem urządzenia.
99
Page 100

REGULACJA TEMPERATURY
Copyright UNOLD AG | www.unold.de
1. Istnieje możliwość ustawienia różnych temperatur powierzchni grillowej.
2. Wartości orientacyjne:
Niska temperatura: szaszłyki, rożna, kiełbaski
Średnia temperatura: dania z rusztu, jajka sadzone, kanapki
Wysoka temperatura: grillowanie, tostowanie
3. Moc grzewcza jest ze względów bezpieczeństwa nieco niższa w tylnym,
środkowym obszarze płyt grillowych. Tam można optymalnie grillować
cieńsze kawałki mięsa lub np. warzywa.
GRILLOWANE PRODUKTY
1. Zachęcamy do wypróbowania jednego z naszych przepisów lub Państwa
przepisów.
2. Jeżeli grillowane są mrożone produkty, muszą one przed grillowaniem zostać
całkowicie rozmrożone.
3. Mięso przechowywane w lodówce grilluje się najlepiej, gdy wyjmie się je na
jakiś czas przed grillowaniem z lodówki.
4. W razie możliwości należy mięso (zależnie od rodzaju przyrządzenia i rodzaju
mięsa) solić dopiero po ugrillowaniu. Mięso marynowane przed grillowaniem
jest szczególnie delikatne i smaczne.
5. W pojemniku na tłuszcz zbierają się tłuszcz i soki. W ten sposób można gril-
lować z małą ilością tłuszczu i przyrządzać zdrowe i lepiej strawne potrawy.
POZYCJA PŁYT GRILLOWYCH
1. Za pomocą regulacji pokrywy można w różny
sposób ustawić płyty grillowe.
Symbol : Pokrywa daje się ustawić pod
kątem 90°.
Symbol : Pokrywę w zamkniętym stanie
można zablokować, urządzenie nie daje się
otworzyć. Uwaga: Wybierać to ustawienie
tylko wtedy, gdy urządzenie jest odłączone
od prądu i nie ma w nim żywności. To idealne
ustawienie na czas transportu lub podczas
przechowywania urządzenia.
Pozycje I - V: Umożliwiają wybór między różnymi wysokościami podczas
grillowania kontaktowego. Pokrywa zatrzaskuje się na wybranej wysokości i
zapobiega w ten sposób nadmiernemu przygnieceniu potrawy pod wpływem
ciężaru pokrywy. Przesunąć regulator z prawej strony urządzenia na żądaną
wysokość między „I“ i „V“.
100
 Loading...