

Page 1

Page 2

Page 3

Contents
The FCC Wants You To Know ............................................................1
Scanning Legally .................................................................................2
Introduction ..........................................................................................3
Using this Manual ............................................................................5
Understanding Scanning .....................................................................6
Conventional Scanning ....................................................................6
Simplex Operation .......................................................................6
Repeater Operation .....................................................................6
Trunked Scanning ............................................................................7
Motorola Trunking ........................................................................7
EDACS Trunking .........................................................................8
LTR Trunking .............................................................................10
Understanding Banks and Channels .............................................10
Getting More Information ...................................................................11
A Quick Look at Your Scanner ..........................................................12
Buttons and Controls ......................................................................12
Display Icons .................................................................................13
Included With Your Scanner ..............................................................14
Setting Up Your Scanner ...................................................................15
Installing the Battery Pack .............................................................15
Charging the Battery Pack .............................................................15
Nickel-Metal Hydride Battery Disposal ..........................................16
Installing the Antenna ....................................................................16
Installing the Belt Clip ....................................................................16
Using Headphones or an External Speaker ..................................16
Listening Safely .............................................................................17
Basic Operation .................................................................................18
Turning On the Scanner ................................................................18
Setting the Squelch .......................................................................18
Using the Menu .............................................................................19
Manually Selecting a Channel .......................................................19
Scanning Programmed Channels ..................................................20
Locking/Unlocking Banks ...............................................................20
Locking/Unlocking Channels .........................................................20
Restoring All Locked Out Channels ..............................................20
Priority Scanning ............................................................................21
Priority Plus Scanning ...................................................................21
Listening to the Input Channel .......................................................21
Using the Backlight ........................................................................22
Dimmer Light Setting .................................................................22
Dimmer Time Setting .................................................................22
Controlling How Much Information Appears ..................................22
Turning the Key Beep On/Off ........................................................23
Locking the ENTER key ................................................................23
Locking the Keypad .......................................................................23
Disabling the APCO25 Card ..........................................................23
Turning Battery Save On/Off .........................................................24
Muting All Audio .............................................................................24
Setting Squelch Mode ...................................................................24
Trunk Scanning Options ................................................................25
Searching for Active Talkgroups (ID Search) ............................25
Scanning Only Stored Talkgroups (ID Scan) ............................25
Monitoring Talkgroup ID’s ..........................................................25
Selecting Talkgroup Lists to Scan .............................................25
Page 4

Holding on a Single Talkgroup ..................................................26
Locking Out Talkgroups .............................................................26
EDACS Blockout ........................................................................26
Unlocking All Talkgroups ...........................................................27
EDACS Patch Tracking .............................................................27
Searching ..........................................................................................28
Holding on an Active Frequency ...................................................28
Setting Chain Search .....................................................................28
Setting Data Skip ...........................................................................28
Skipping Frequencies ....................................................................29
Storing Found Frequencies ...........................................................29
Automatically Storing Frequencies ................................................30
Setting Subaudible Tones for Searching .......................................30
Searching for Subaudible Tones ...................................................30
Attenuating All Search Ranges .....................................................31
Setting DELAY for All Search Ranges ..........................................31
Setting a Search Range ................................................................31
Searching for Trunk Systems ........................................................32
Service Search ..................................................................................33
Service Search Skip ......................................................................33
Using Weather Search and Weather Alert (SAME) ......................34
Searching for a Weather Broadcast ..........................................34
Using Weather Alert (SAME) .....................................................34
Testing the Weather Alert ..........................................................36
Programming Bank Information .........................................................37
Bank Configuration ........................................................................37
Assigning Bank Names .................................................................37
General Programming .......................................................................38
Deleting Frequencies from Channels ............................................38
Transferring Channel Information ..................................................38
Entering Alpha Information ............................................................38
General Programming Tips ...........................................................38
Programming Conventional Channels ...............................................40
1. Select a Channel to Program ....................................................40
2. Enter the Frequency ..................................................................40
3. Assigning a Text Tag .................................................................41
Setting the Delay ...........................................................................41
Setting the Subaudible Tone Option .............................................41
Setting Beep Alert ..........................................................................42
Setting the Attenuator ....................................................................42
Changing the Frequency Step .......................................................43
Setting the Modulation Mode .........................................................43
Setting Priority Channels ...............................................................44
Programming Trunked Systems ........................................................45
Setting Trunking Delay ..................................................................46
Using I-Call (Motorola and EDACS only) ......................................46
Turning I-Call On and Off for ID Search ....................................46
Turning I-Call On for ID Scan ....................................................47
Setting Priority Talkgroups (Motorola and EDACS only) ...............47
Multi-Track .....................................................................................47
Multi-Track Operational Details .................................................48
Programming Motorola Systems .......................................................49
Using Control Channel Programming ............................................49
Programming Type 2/Digital 800 and 900 MHz Systems .............50
Programming Type2/Digital VHF and UHF Systems ....................50
Programming Type I and IIi Hybrid Systems .................................51
Toggling the Status Bit ..................................................................52
Page 5

Toggling End Code Detect ............................................................53
Programming EDACS Systems .........................................................54
Programming EDACS Channels ...................................................54
Setting EDACS Emergency Alert ..................................................55
Setting EDACS Decimal Mode ......................................................55
Programming APCO 25 Systems ......................................................56
Setting APCO 25 Sound Quality ...................................................56
Programming LTR Systems ..............................................................58
Programming Talkgroups ..................................................................59
Storing Known Talkgroups ............................................................59
Storing Found Talkgroups .............................................................59
Deleting Stored Talkgroup ID’s ......................................................60
Adding a Text Tag to an ID List ....................................................60
Seeing Talkgroup Activity ..............................................................60
Using the Remote Interface ...............................................................61
PC Control Mode ...........................................................................61
Cloning Scanner Settings ..............................................................61
Care and Maintenance ......................................................................63
General Use ...................................................................................63
Location .........................................................................................63
Cleaning .........................................................................................63
Repairs ..........................................................................................63
Birdies ............................................................................................63
Troubleshooting..................................................................................64
Specifications......................................................................................66
Glossary of Terms .............................................................................67
Appendix ............................................................................................71
One Year Limited Warranty ...............................................................81
Page 6

Page 7

The FCC Wants You
To Know
This scanner has been tested and found to comply with the
limits for a scanning receiver, pursuant to Part 15 of FCC
rules. These limits are designed to provide reasonable
protection against harmful interference in a residential
installation. This scanner generates, uses, and can radiate
radio frequency energy and, if not installed and used in
accordance with the instructions, may cause harmful
interference to radio communications.
However, there is no guarantee that interference will not occur
in a particular installation. If this scanner does cause harmful
interference to radio or television reception, which can be
determined by turning the scanner on and off, you are
encouraged to try to correct the interference by one or more
of the following measures:
• Reorient or relocate the receiving antenna
• Increase the separation between the scanner and the
receiver
This device complies with Part 15 of FCC rules. Operation is
subject to the following two conditions: 1) This device may not
cause harmful interference, and 2) this device must accept
any interference received, including interference that may
cause undesired operation.
1
Page 8

Scanning Legally
Your scanner covers frequencies used by many different
groups, including police and fire departments, ambulance
services, government agencies, private companies, amateur
radio services, military operations, pager services, and wire
line (telephone and telegraph) service providers. It is legal to
listen to almost every transmission your scanner can receive.
However, there are some transmissions that you should never
intentionally listen to. These include:
• Telephone conversations (cellular, cordless, or other private
means of telephone signal transmission)
• Pager transmissions
• Any scrambled or encrypted transmissions
According to the Electronic Communications Privacy Act
(ECPA), you are subject to fines and possible imprisonment
for intentionally listening to, using, or divulging the contents of
such a conversation unless you have the consent of a party to
the conversation (unless such activity is otherwise illegal).
This scanner has been designed to prevent the reception of
cellular telephone transmissions and the decoding of
scrambled transmissions. This is done to comply with the
legal requirement that scanners be manufactured so they are
not easy to modify to pick up these transmissions. Do not
open your scanner’s case to make any modifications that
could allow it to pick up transmissions that are illegal to
monitor. Modifying or tampering with your scanner’s internal
components or using it in a way other than as described in
this manual could invalidate your warranty and void your FCC
authorization to operate it.
In some areas, mobile use of this scanner is unlawful or
requires a permit. Check the laws in your area. It is also illegal
in many areas (and a bad idea everywhere) to interfere with
the duties of public safety officials by traveling to the scene of
an incident without authorization.
Uniden®and Bearcat®are registered trademarks of Uniden
America Corporation.
TrunkTracker is a proprietary trademark of Uniden America
Corporation.
Other trademarks used throughout this manual are the
property of their respective holders.
2
Page 9

Introduction
The BC296D APCO 25 Digital Trunking Scanner connects
you to the exciting world of scanning. Capable of scanning
conventional frequencies, analog trunking systems, and the
most popular digital trunking systems, it is a great all-in-one
solution to your scanning needs.
Here is a brief list of some of the systems you can monitor
with your BC296D:
• Motorola Type I, II, IIi Hybrid, and APCO 25 Phase 1 Digital
Systems (including 3600 bps and 9600 bps control channel
systems) EDACS and EDACS SCAT trunking systems used
by police, fire, ambulance, and other local and state public
safety agencies as well as utilities and other businesses.
• LTR trunking systems used by local businesses and a few
public safety agencies.
• Conventional Digital APCO 25 frequencies
• CB, GMRS, FRS, Marine, and other 2-way radios used by
families, truckers, and community groups
• Business Band frequencies used nationwide
• Amateur Radio frequencies used by licensed radio operators to report emergency weather conditions, experiment
with new communications methods, or just to chat.
• Local and national government agencies
• Civil and military aircraft
• FM and TV Broadcast channels
• NOAA Weather Radio
• And much, much more!
The table below lists the frequency ranges, the default mode
(AM, FM, or Wideband FM), and the default frequency step
for each range.
Frequency Range
25.0000 - 27.9950 AM 5
28.0000 - 53.9900 FM 10
54.0000 - 71.9500 WFM 50
72.0000 - 75.9950 FM 5
76.0000 - 87.9500 WFM 50
88.0000 - 107.9000 WFM 100
108.0000 - 136.9750 AM 25
137.0000 - 161.9950 FM 5
162.0000 - 173.9875 FM 12.5
Mode Step
(MHz)
(kHz)
Frequency Range
174.0000 - 215.9500 WFM 50
216.0000 - 224.9950 FM 5
225.0000 - 399.9500 AM 50
400.0000 - 512.0000 NFM 12.5
806.0000 - 823.9875 NFM 12.5
849.0125 - 868.9875 NFM 12.5
894.0125 - 956.0000 NFM 12.5
1240.0000 - 1300.0000 NFM 12.5
Mode Step
(MHz)
(kHz)
3
Page 10

In addition, here are a few more of the many features your
scanner has. To get the most from your scanner, be sure to
review this entire manual.
• APCO Project 25 Phase 1 Compatible – works on the
latest 9600 bps systems, including systems that use C4FM
and CQPSK modulation.*
• Four-line, 16-character, Alpha Display – makes it easy for
you to see who is talking by displaying the assigned text tag
instead of just a frequency or talkgroup ID number.
• Automatic Digital Detect – allows the scanner to switch to
digital voice decoding when it detects valid APCO 25 data
without any special programming.
• 1000 Channels – lets you store frequencies in 10 banks of
100 channels each.
• 1000 Talkgroup ID’s – lets you store 10 groups of 10 ID’s
each per bank.
• Multi-System Tracking – scans conventional and trunking
systems at the same time.
• Included PC Programming Software and Cable – makes
programming your scanner much easier. Full-featured
software included (no registration needed).
• 10 Priority Channels – switches to the channel you assign
as priority if there is activity, so you won’t miss a thing.
• Priority Talkgroups – increases the priority of selected
talkgroups so the scanner is more likely to switch to them if
there is activity.
• Priority Plus Scanning – lets you scan only those
channels you have selected as priority channels.
• CTCSS and DCS Squelch Modes – prevents interference
from stations not using the mode you select; search mode
displays the CTCSS or DCS tone being used by the
received station.
• Preprogrammed Service Search – makes it easy to find
interesting frequencies used by public safety, news media,
TV broadcast, weather, amateur radio, FRS, GMRS, special
low power, railroad, aircraft, marine, and racing services.
• Data Skip – automatically skips frequencies that have a
constant-level transmission such as used on data channels
for some systems, paging systems, and internally generated
birdies.
*Note: Performance on digital systems can vary due to signal quality,
multipath interference, and cellular interference. Unlike analog
trunking, where you can hear the audio with some interference mixed
in, interference in a digital system completely blocks the signal. If you
do not get good digital reception, try adjusting your location or your
antenna until reception improves.
4
Page 11

• SAME Weather Alert with FIPS – lets you set your
scanner to listen for a SAME event code from the local
weather service; sounds an alert and displays the text
description for any alert received. FIPS programming lets
you restrict the alerts to one county.
• Turbo Search – searches for activity on frequencies at up
to 300 steps per second (in the 5 kHz step ranges).
• Backlit Holographic Display – provides for great visibility
at any angle, day or night.
• Battery Save – automatically reduces power requirements
when you are holding on a single channel or frequency and
there is no activity.
• Rechargeable NiMH Battery Pack and Charger –
provides you with the most economical power options
available.
• Scanner Clone Mode – lets you connect your scanner
directly to another scanner to clone all channels and
settings.
Using this Manual
To get the most from this manual, review the contents to
become familiar with the basic functions available. If you are
new to scanning or trunktracking, be sure to read the
“Understanding Scanning” section for a quick background on
the technology behind the hobby.
The first thing you’ll need to do is plug the AC charger into the
scanner. See “Setting Up Your Scanner” if you need any help
doing this.
Next, you’ll want to listen to see what you can hear with your
scanner. Install the antenna, then press SERVICE and use
the scroll bar to select TV Broadcast. Assuming you are in an
area with a strong enough TV broadcast, your scanner should
soon stop on a station’s audio program. Listen to this, or try
searching another service for something more interesting,
while you review the rest of the manual.
5
Page 12

Understanding Scanning
This section provides you with the background on how
scanning works. You don’t really need to know all of this to
use your scanner, but some background knowledge will help
you to get the most from your BC296D.
Conventional Scanning
Conventional scanning is a relatively simple concept. Each
group of users in a conventional system is assigned a single
frequency (for simplex systems) or two frequencies (for
repeater systems) to use. Any time one of them transmits,
their transmission always goes out on the same frequency.
Up until the late 1980’s this was the primary way that radio
systems operated. Even today, there are a lot of 2-way radio
users who operate using a conventional system:
• Aircraft
• Amateur Radio
• FRS/GMRS Users
• Broadcast AM/FM/TV Stations
• Many Business Radio users
When you want to store a conventional system, all you need
to know is the frequency they operate on.
When you are scanning a conventional system, the scanner
stops very briefly on each channel to see if there is activity. If
there isn’t, the scanner quickly moves to the next channel. If
there is, then the scanner pauses on the transmission until it
is over.
Simplex Operation
Simplex systems use a single frequency for both transmit and
receive. Most radios using this type of operation are limited to
line-of-sight operation. This type of radio is frequently used at
construction job sites, and with inexpensive consumer radios
such as GMRS/FRS radios. The range is typically 1-5 miles,
depending upon the terrain and many other factors.
Repeater Operation
Repeater systems use two frequencies: one transmits from
the radio to a central repeater; the other transmits from the
repeater to other radios in the system. With a repeater based
system, the repeater is located on top of a tall building or on a
radio tower that provides great visibility to the area of
6
Page 13

operation. When a user transmits (on an input frequency), the
signal is picked up by the repeater and retransmitted (on an
output frequency). The user’s radios always listen for activity
on the output frequency and transmit on the input frequency.
Since the repeater is located very high, there is a very large
line of sight. Typical repeater systems provide coverage out to
about a 25 mile radius from the repeater location.
Trunked Scanning
While conventional scanning worked great while there were
only a few groups wanting to use the frequencies, with the
advent of smaller, lower-cost radios more and more agencies
and businesses wanted to take advantage of the utility of 2way radio. As a result, the bands that were used most
became full, so new users were not able to take advantage of
the technology as quickly as they wanted.
Trunking solved this frequency shortage by allowing multiple
groups to use the same set of frequencies in a very efficient
way. While each type of trunking system operates a little
differently (see the next few sections), they all work on the
same basic premise: even in a system with a lot of users, only
a few users are ever transmitting at any one time.
Instead of being assigned a frequency, as with conventional
systems, each group is assigned a Talkgroup ID. A central
computer controls the frequency each group operates
on...and this frequency selection is made each time a user
transmits. So, while on a conventional system queries, replies,
and follow-ups are all on a single frequency, they could each
be on completely different frequencies on a trunked system.
This semi-random frequency assignment made monitoring
such a system impossible prior to Uniden’s invention of the
Trunktracking scanner.
Motorola Trunking
While there are 4 different types of Motorola trunking systems,
they all use the same basic trunking method. The system
consists of one control channel plus one or more voice
channels (typically 10, 20, or 30 total channels). When a user
presses Push To Talk (PTT) to transmit, their radio first sends
their talkgroup information to the control channel. The
computer then assigns that talkgroup to a specific voice
channel and transmits that data over the control channel. All
radios in that talkgroup switch over to the assigned voice
channel and the user can begin speaking. This all typically
takes place in about a second...the person transmitting hears
a beep from their radio when the channel is assigned and it is
OK to start talking.
7
Page 14

The four systems in use are:
• Motorola Type I – the radios send the radio ID, the fleet
and subfleet talkgroup ID to the control channel each time
they transmit. To program a Type I system, you need to
know the system’s fleet map. The most common fleet maps
are included at the back of this manual. You can also find
fleet map resources on the web.
• Motorola Type II – the radios only send the radio ID and
radio channel code to the control channel. The central computer keeps a database of radio ID’s and which talkgroup is
assigned to which channel code for each radio, so with this
system the user’s radio sends only about 1/3 the data as a
Type I system with each transmission. Type II systems do
not use Fleet-subfleet talkgroups; instead they use a 5-digit
ID for each talkgroup.
• Type IIi Hybrid — these systems support a mix of both
Type I and Type II users. Like Type I systems, you must
know the system’s fleetmap to ensure proper tracking.
• Motorola Astro Digital — for channel control purposes,
this type of system operates just like a Type II system —
although the control channel can be a 3600 bps data rate
(for mixed analog/digital systems) or a 9600 bps (for digitalonly systems). Pure digital systems can be implemented
under APCO 25 Phase 1 or Phase 2 standards. Your
BC296D is able to decode all unencrypted digitized voice
traffic on either mixed mode or digital-only APCO 25 Phase
1 systems.
One big difference you will notice with digital versus analog
transmissions, is that with analog systems, you might be able
to hear weak signals interspersed with hissing. As you move
further away from the system, the interference gradually
increases until you are unable to make out the transmission.
With digital systems, the cutoff point is much more abrupt.
You might have a small area where partial decoding
occurs...in which case you will hear partial and garbled audio.
However, once the scanner is unable to receive the data well
enough to decode it, the audio stops entirely. For the best
range, antenna selection and placement is critical. See
“Installing the Antenna” for more information.
EDACS Trunking
EDACS trunking works in much the same way as Motorola
trunking with a couple of major differences. In an EDACS
system, each frequency used by the system is assigned a
Logical Channel Number (LCN) so that less data needs to be
transmitted by the control channel. Also, talkgroups are
assigned in an Agency-Fleet-Subfleet (AFS) hierarchy. Also,
there is one variation of EDACS called SCAT that your
BC296D can monitor.
8
Page 15

• Logical Channel Numbers – each frequency used by the
system is assigned an LCN. This information is
programmed into each user radio. When a user presses
PTT, their radio sends their AFS information to the control
channel. The computer then assigns that talkgroup to a
channel and sends the LCN so that all other radios in that
talkgroup will switch to the correct channel. To program a
EDACS system in your scanner, you will need to know both
the frequencies used by the system and the LCN for each
frequency so that you can program the frequencies in LCN
order.
• Agency-Fleet-Subfleet – talkgroup ID’s for EDACS
systems are assigned in a way that makes it easy to see at
a glance the affiliation of the user. Each radio is assigned a
2-digit agency identifier from 00 – 15. For example, 01
might be used by the police, 02 by ambulance service, 03
by the fire department, and so on. Each agency is then
subdivided up to 16 times to provide fleet identification, and
then 8 more times to identify subfleets.
For example, the complete AFS for the Police Department
West District’s dispatch channel might be 01-062. 01
identifies the agency as the police department, 06 identifies
the fleet as the West district, and 02 identifies the subfleet
as the dispatch channel. While these assignments are
somewhat arbitrary and vary from system to system, there
are many resources on the web for finding the assignments
for most systems.
Because of the logical hierarchy of the AFS system, your
BC296D lets you assign wildcard ID’s that let you, for
example, use only one ID memory to identify all units in
either an agency or a fleet.
• EDACS SCAT – EDACS SCAT (Single Channel
Autonomous Trunking) systems operate on a single channel
and alternate control data with analog voice traffic. While
your BC296D cannot track ID’s in this system, it can
eliminate the control data so that all you hear is the voice
transmissions when you monitor this type of system.
9
Page 16

LTR Trunking
LTR®(Logic Trunked Radio) systems are trunking systems
used primarily by business or private communications service
providers, such as taxicabs, delivery trucks, and repair
services. These systems encode all control information as
digital subaudible data that accompanies each transmission,
so there is no separate control channel. Users on an LTR
system are assigned to specific talkgroups, which are
identified by the radio as six digit numbers. These numbers
are in the form AHHUUU, where:
A= Area code (0 or 1)
H= Home repeater (01 through 20)
U= User ID (000 through 254)
When the scanner receives a transmission on a channel set
to the LTR mode, it first decodes the LTR data included with
the transmission. In the ID Search mode, the scanner stops
on the transmission and displays the talkgroup ID on the
display. In the ID Scan mode, the scanner only stops on the
transmission if the LTR data matches a talkgroup ID that you
have stored in the bank’s talkgroup ID list and have not
locked out.
LTR systems are frequently programmed so that each radio
has a unique User ID.
LTR systems also need to be programmed into your scanner
in channel-order.
Since many LTR systems use only odd-numbered channel
slots, you would program these systems using only the
corresponding odd-numbered channels in a bank (for
example, you would program a system with channels at 1, 3,
5, and 9 into Trunk 2 channels 101, 103, 105, and 109).
Understanding Banks and Channels
The memory in your scanner is organized into 10 banks of
100 channels each. Each bank can contain conventional
channels as well as 1 trunking system. For each trunking
system, each bank can also store 10 groups of 10 talkgroup
ID’s (100 per bank).
10
Page 17

Getting More Information
By itself, this manual really only provides part of what you
need to know to have fun scanning – how to program and use
the scanner. The two supplied Conventional and Trunking
frequency guides will give you a good head start on the other
part of what you need to know – what frequencies have
interesting content. You can also find a wealth of information
on the Internet...check out scanners.uniden.com for the latest
frequency information in your area.
In addition, you can contact the following source of frequency
information:
• Scanner Master
(800) 722-6701 (Hours are from 10:00 a.m. to 5:00 p.m.
Eastern Time Monday through Friday.)
To purchase another copy of the conventional or trunking
frequency guide, contact one of the following:
• Uniden Parts Department
(800) 554-3988 (Hours are from 8:00 a.m. to 5:00 p.m.
Central Time Monday through Friday.)
• Your Local Dealer
11
Page 18
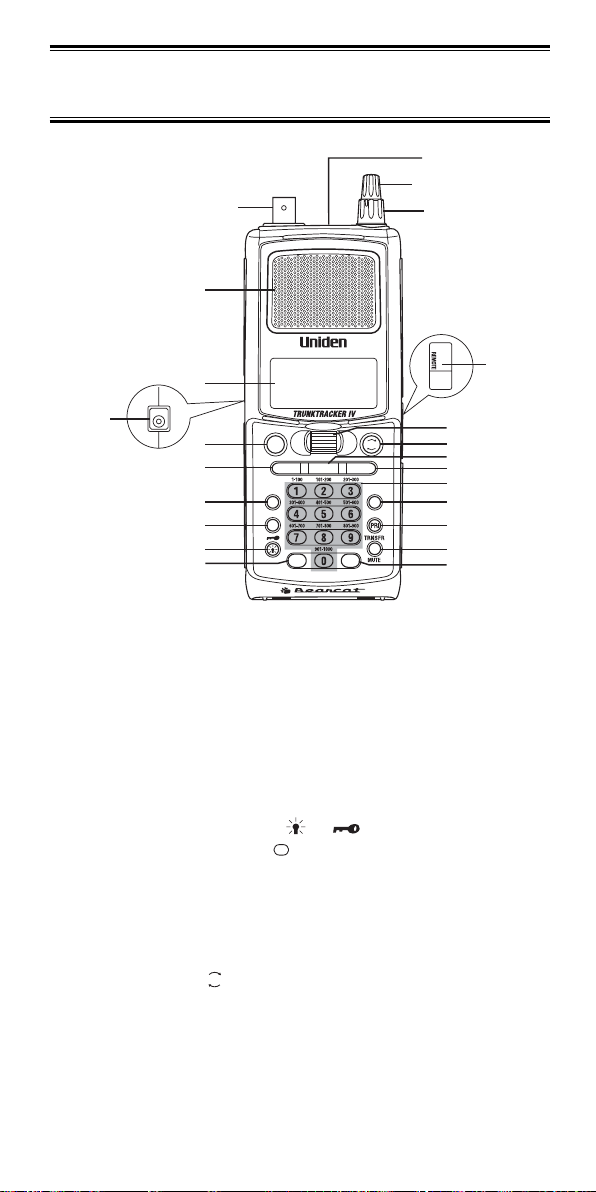
A Quick Look at Your
RSM
.
2
1
3
4
5
6
7
8
9
10
22
23
21
20
19
18
17
16
15
14
13
12
11
SEARCH
SCAN
BC296D
SERVICE
CH/
FRQ
MENU/BACK
L/O
.
SELECT
REVERSE
TRUNK
RSM
E
HOLD/
MAN
Scanner
Buttons and Controls
1. Antenna Connector
2. Speaker
3. Display
4. DC Power Jack
5. Hold/Manual/Channel/Frequency Key (HOLD/MAN)
6. Scan Key (SCAN)
7. Menu/Back Key (MENU/BACK)
8. Lockout Key (L/O)
9. Light/Keypad Lock Key (/ )
10. Decimal/Reverse Key ( )
11. Earphone Jack
12. Volume/ON/OFF Control
13. Squelch Control
14. Remote Jack
15. Scroll Control
16. Resume Key ( )
17. Service Key (SERVICE)
18. Search Key (SEARCH)
19. Numeric Keypad
20. Trunk Key (TRUNK)
21. Priority Key (PRI)
22. Transfer/Mute Key (TRNSFR/MUTE)
23. Enter/Select Key (E)
12
Page 19

Display Icons
DESCRIPTION
Priority Channel Indicator
Lock Out Mode Indicator
Scan/Search Direction Indicator
Chain Search Mode Indicator
Service Search Mode Indicator
Scan Mode Indicator
ID Scan Mode Indicator
ID Search Mode Indicator
Channel Type
Conventional Type
Tr unk Type
Motorola Tracking Type
LTR Tracking Type
EDACS Tracking Type
Control Channel Data
Voice Channel Data
Digital Communications
P25: APCO Project 25
Receiving Mode Indicators
Signal Meter
Battery Indicator appears when the battery needs
to be charged. The scanner also beeps every
15 seconds to let you know the battery is low.
ICON
P
L
/
O
SRCH
SRVC
SCAN
ID SCAN
ID SEARCH
C
M
L
E
DAT
LNK
P25
AM,FM
WFM,NFM
13
Page 20

Included With Your
Scanner
If any of these items are missing or damaged, immediately
contact your place of purchase or call Uniden Parts
Department at: 800-554-3988, 8:00 to 11:30 a.m. and 12:30
to 5:00 p.m., Central Time, Monday through Friday.
• BC296D Scanner
• AC Adapter/Charger (AD-600U)
• Ni-MH Battery (BP-250)
• Rubber Antenna
• PC Cable
• Belt clip
• Operating Guide
• BC296D SS CD-ROM
• TrunkTracker Frequency Guide
• Conventional Frequency Guide
•Other Printed Material
14
Page 21
Setting Up Your Scanner
HOLD/
MAN
CH/
FRQ
RSM
S
C
A
N
S
E
R
V
IC
E
S
E
A
R
C
H
M
E
N
U
/B
A
C
K
L
/O
S
E
L
E
C
T
M
U
T
E
R
E
V
E
R
S
E
T
R
U
N
K
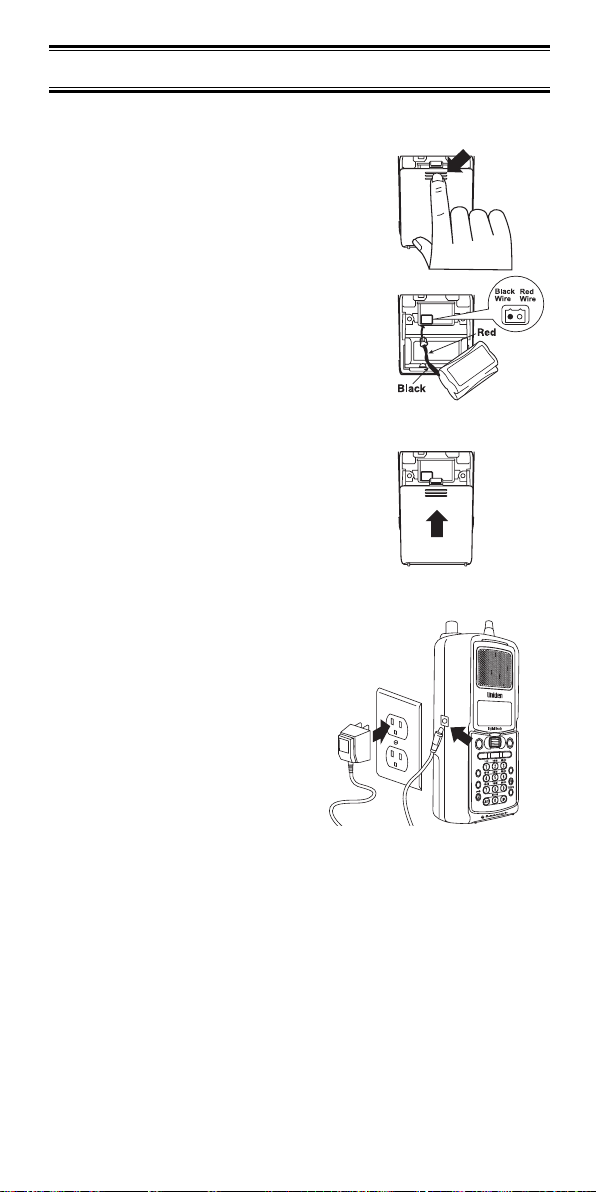
Installing the Battery Pack
1. Open the cover.
2. Connect the battery pack connector
observing the correct polarity.
3. Replace the cover and press down
until it clicks into place.
Charging the Battery Pack
Use the AC Adapter/Charger
to power the BC296D from an
AC outlet and charge its
battery pack. You can use
your scanner while the battery
charges.
To fully charge the battery,
leave the AC Adapter/Charger
connected for 14 – 16 hours.
Note: Disconnect the AC Adapter/Charger from the unit when
charging is complete.
15
Page 22
Nickel-Metal Hydride Battery Disposal
When the battery supplied with your scanner no longer holds
a charge, you need to replace it. Contact Uniden Parts
department for a replacement battery pack.
Nickel-hydride batteries must be disposed of properly.
Minnesota requires you to recycle nickel-metal hydride
batteries.
Association at 1-800-225-PRBA for information concerning
reclamation and disposal of nickel-metal hydride batteries.
Contact the Portable Rechargeable Battery
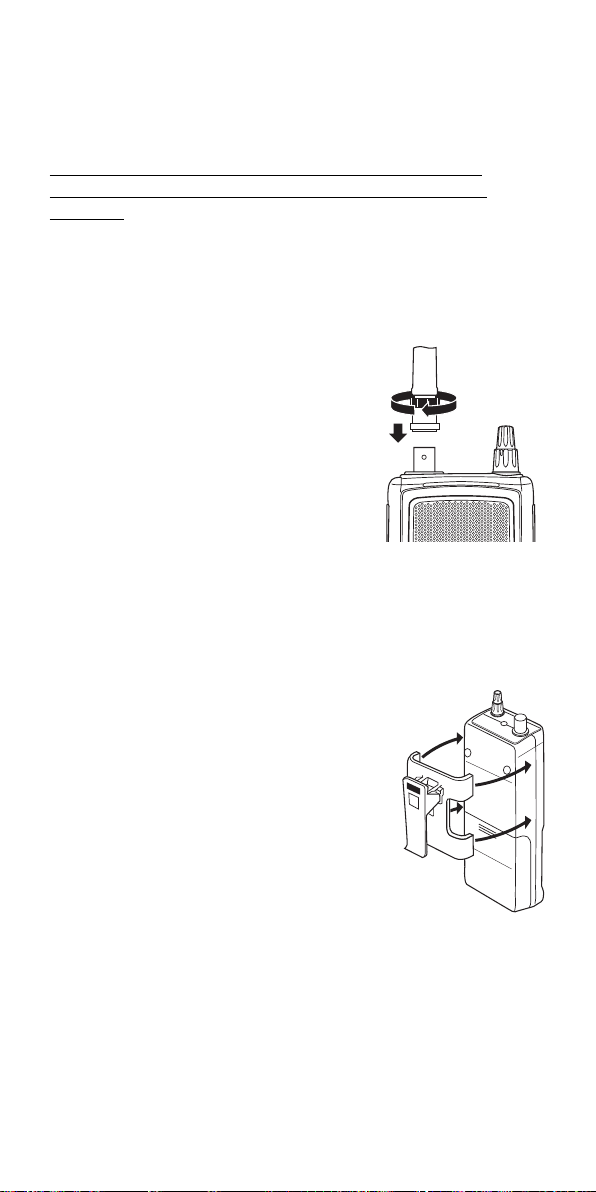
Installing the Antenna
Twist the antenna’s BNC connector
onto the BNC jack on the scanner, as
shown.
If you are frequently traveling in a
system’s fringe area, you might want
to connect an external antenna for
better reception and range. While the
supplied antenna works well for
general use, an external antenna will
enhance performance on weak
systems.
An antenna properly selected for the band you are monitoring
can greatly extend the range, especially when you are
monitoring digital trunking systems.
Installing the Belt Clip
The belt clip is designed to fit snugly on
the back of the scanner.
Line up the four snap-in arms with the
grooves on the scanner and snap the belt
clip into place, as shown.
Using Headphones or an
External Speaker
For private listening, or for listening in a noisy area, you can
plug a 1/8-inch (3.5mm) mini-plug earphone’s or headphone’s
or monitor speaker’s (not supplied) cable into the headphone
jack on top of the scanner. This automatically disconnects the
scanner’s internal speaker.
16
Page 23

Listening Safely
To protect your hearing, follow these guidelines when you use
an earphone or headphones.
• Do not use an earphone to listen to the WX alert siren
test or when in SAME Alert mode. The alert tone’s volume is not adjustable and damage to your hearing
could occur.
• Do not listen at extremely high volume levels. Extended
high-volume listening can lead to permanent hearing loss.
• Set the VOL (VOLUME) to the lowest setting before you
begin listening. After you begin listening, adjust the VOL
(VOLUME) to a comfortable level.
• Once you set the VOL (VOLUME), do not increase it. Over
time, your ears adapt to the volume level, so a volume level
that does not cause discomfort might still damage your
hearing.
17
Page 24

Basic Operation
STRONG SIGNALS
MEDIUM SIGNALS
WEAK SIGNALS
NOISE
STRONG SIGNALS
MEDIUM SIGNALS
WEAK SIGNALS
NOISE
STRONG SIGNALS
MEDIUM SIGNALS
WEAK SIGNALS
NOISE
This section is your main reference for using the scanner
once you have programmed conventional and trunked
systems. Note that there are some slight differences to some
functions depending on whether you are trying to affect
conventional operation or trunked operation. Be sure to refer
to the appropriate section depending on the mode you are
using.
Turning On the Scanner
Turn the VOL (VOLUME) control clockwise out of the detent
position. The scanner automatically starts scanning. Since
there are no frequencies programmed in your scanner initially,
you may not receive any signals. Once you set the squelch
and program some frequencies, you will begin hearing
conversations regularly.
Setting the Squelch
To set the squelch, you must be in the hold mode, and you
should not be receiving a
signal on your scanner.
1. Press HOLD/MAN until
you do not hear a signal.
2. Make sure that the VOL
(VOLUME) is set to a
comfortable listening level.
3. Think of the Squelch
Control as a gate. Turn
the SQUELCH control fully
counterclockwise. This
raises the “Squelch Gate”
so high that only very
strong signals can get
through.
4. Turn SQUELCH clockwise
until you hear a hiss. This
lowers the “Squelch Gate”
so that everything gets
through – noise, weak
signals, medium signals
and strong signals.
18
Page 25

5. Turn SQUELCH back counter-clockwise just until the hiss
stops. Now the “Squelch Gate” allows only clear signals
through.
Note: For Trunk Scanning, a good squelch setting is critical.
The recommended setting is midpoint. If you set the
squelch too high, the scanner might not reliably stop
on the control channel.
Using the Menu
Many of your scanner’s functions are accessed through its
menu system. For complete information about a menu option,
see the section referencing its use. A complete list of the
menu structure is included in the back of this manual. To
select a menu item, first press MENU/BACK to go to the firstlevel menu. Then, either press the number key corresponding
to the option you want to select, or use the scroll bar to
highlight the option then press E.
To back up a menu level, press MENU/BACK.
Notes: • To change a setting that affects either a specific
bank or channel, first select a channel within the
bank or the channel that you want to modify.
• To check the settings for a channel, press and hold
MENU/BACK for 2 seconds.
In this manual, we represent navigation through the
menu with the following notation:
MAIN MENU → SUB MENU 1 → SUB MENU
2
For example to access the DIMMER LIGHT option,
the notation is:
3:SYSTEM OPTION → 1:DIMMER →
1:DIMMER LIGHT
To access this option, press MENU/BACK, then
scroll to each menu option and press E. Or, press
MENU/BACK, 3, 1, 1.
• Some menu items are not numbered. To access
these options, you must manually navigate to the
selection using the scroll bar.
Manually Selecting a Channel
To manually select a channel, press HOLD/MAN, the channel
number, then HOLD/MAN again. The scanner displays the
information stored in that channel.
Notes: • If the channel contains trunked system information,
frequency data is not displayed.
19
Page 26

• If you are trunk scanning, you need to first press
TRUNK to exit the trunking mode.
Scanning Programmed Channels
Before you can scan, you must first program channels. See
the appropriate programming section for complete
instructions.
To begin scanning, simply turn on your scanner or, if the
scanner is not currently scanning, press SCAN. The scanner
checks each system you have programmed that is not locked
out and stops if there is activity. SCAN scrolls across the
display, right to left.
When the scanner receives a signal on a programmed
channel, it stops on that channel and displays the channel
information (text tag, channel number, trunk mode).
Locking/Unlocking Banks
When you are scanning conventional banks, the scanner
displays the digit corresponding to all unlocked banks. To lock
out a bank so that the scanner does not scan its channels,
press the number that corresponds to the bank. The scanner
replaces that bank’s number with a dash.
To unlock locked-out banks, simply press that bank’s number
again. The scanner displays that bank’s number and includes
it when scanning.
Note: You cannot lockout all banks. One bank must be
unlocked at all times.
Locking/Unlocking Channels
To lock out a channel so that the scanner does not stop on it
while scanning, press L/O when the scanner is stopped on
that channel or manually select the channel and press L/O.
To unlock the channel, manually select it and press L/O
again.
Note: You cannot lockout all channels in a bank. One
channel must remain unlocked. If you want to lock out
an entire bank, see the previous section.
Restoring All Locked Out Channels
To simultaneously unlock all channels, press HOLD/MAN,
then press and hold L/O for 2 seconds. The scanner beeps
twice and unlocks all channels.
20
Page 27

Priority Scanning
When Priority Scan is turned on, the scanner checks the
conventional priority channels in the unlocked banks every 2
seconds or the priority ID’s in trunked systems every 4
seconds between transmissions. If a signal is present on a
priority channel, the scanner switches to monitor that
transmission, even if it had been stopped on another channel.
One channel or talkgroup ID in each bank is designated as
the priority.
To turn on Priority Scan, repeatedly press PRI until the
scanner displays PRIORITY ON. To turn Priority Scan off,
repeatedly press PRI until the scanner displays PRIORITY
OFF.
Note: If all priority channels in unlocked banks are locked
out, the scanner displays ERROR when you try to turn
on the priority scan mode.
Priority Plus Scanning
To scan only the priority channels in the unlocked banks,
while scanning repeatedly press PRI until the scanner
displays PRIORITY PLUS. To turn off Priority Plus, repeatedly
press PRI to select PRIORITY ON or PRIORITY OFF.
Note: Priority Plus only operates in the scan mode; not in the
hold or search mode.
Listening to the Input Channel
Repeater-based systems, such as public safety conventional,
trunked systems, and some other business and amateur radio
systems, use two sets of frequencies – input frequencies and
output frequencies (see “Understanding Scanning”). You
normally listen to the output frequency, as it can generally be
received from a much farther range. Sometimes, though, you
might want to know if the mobile unit is nearby. To do this,
check the input frequency by pressing REVERSE. If you hear
the transmission, then the mobile unit is probably within 2 or 3
miles of your location.
21
Page 28

Using the Backlight
To turn on the backlight, press . The next two sections
describe how to change the backlight options.
Dimmer Light Setting
The Dimmer Light setting sets the brightness of the display
backlight.
3:SYSTEM OPTION → 1:DIMMER →
1:DIMMER LIGHT
1:HIGH
Set the backlight to the brightest setting
2:MEDIUM
Set the backlight to be dimmer
Dimmer Time Setting
The Dimmer Time setting adjust how long the backlight stays
on when activated.
3:SYSTEM OPTION → 1:DIMMER →
2:DIMMER TIME
1:15SECONDS
Set the backlight to stay on for 15 seconds then turn
off
2:INFINITE
Set the backlight to stay on until you manually turn it
off.
Controlling How Much Information Appears
The scanner normally displays trunk, frequency, receiving
mode, and a signal meter when it is scanning. This option
allows you to reduce how much information your scanner
displays.
3:SYSTEM OPTION → 2:SCREEN MASK
1:ON
Display all information
2:OFF
Display reduced information
22
Page 29

Turning the Key Beep On/Off
When Key Tone is turned on, the scanner beeps each time
you press a key.
3:SYSTEM OPTION → 3:KEY BEEP
1:ON
Turn on the key beep
2:OFF
Turn off the key beep
Locking the ENTER key
To prevent accidentally changing channel settings, you can
lock the ENTER key.
3:SYSTEM OPTION → 4:ENTER LOCK
1:ON
The ENTER key is disabled.
2:OFF
The ENTER key operates normally.
Note: The ENTER key operates normally when selecting
menu options, even when you set the option to ON.
Locking the Keypad
To prevent accidental operation, you can lock the keypad.
Simply press and hold ( / ) for 2 seconds. If you press
a key when the keypad is locked, the scanner displays
KEYPAD LOCK ON. To unlock the keypad, simply press and
hold ( / ) for 2 seconds.
Note: When the keypad is locked, , HOLD/MAN, and
RSM still operate.
Disabling the APCO25 Card
If you are not in an area where there is an APCO 25 digital
system, you can save battery power by disabling the APCO
25 (P-25) card.
3:SYSTEM OPTION → 0:P-25 CARD
1:ENABLE
The card is enabled
2:DISABLE
The card is disabled
23
Page 30

Turning Battery Save On/Off
The battery save features extends battery life by setting the
scanner in a low-power mode when it is held on a single
channel or frequency (in the search mode) and there is no
transmission.
3:SYSTEM OPTION → :BATTERY SAVE
1:ON
The battery save feature is on. You might miss a brief
portion of transmissions when held on a channel or
frequency, but battery life is extended.
2:OFF
The battery save feature is off.
Muting All Audio
To mute all audio, press and hold MUTE for 2 seconds. The
scanner operates normally, but no audio sounds from the
scanner. To turn audio back on, press and hold MUTE for 2
seconds.
Setting Squelch Mode
You can set the scanner to either stop on any transmission
during searching or scanning, or only stop on transmissions
that include a specific CTCSS or DCS subaudible tone (see
“Understanding Scanning” for information about subaudible
tones).
3:SYSTEM OPTION → 8:SQ MODE
1:CSQ
Carrier Squelch mode; the scanner stops on any
transmission regardless of whether a subaudible tone
is present.
2:TONE SQ
The scanner stops on transmissions that include a
matching subaudible tone or have no tone at all.
When you select this option, you also need to set the
appropriate tone in either the channel memory or for
the search range.
3:TONE SEARCH
When the scanner stops on a transmission, it will
then scan the subaudible tones to determine the
correct setting. When the scanner has found the
correct tone, it flashes the tone on the display. If you
store that frequency into a channel, the tone is also
stored.
24
Page 31

Trunk Scanning Options
When you are scanning a trunked system, there are several
trunking-only options available to you. This section outlines
these options.
Searching for Active Talkgroups (ID Search)
If you want to hear all activity on a system, use the ID Search
mode. While scanning a trunking system, press SEARCH
while scanning that system; or, press and hold TRUNK until
the scanner flashes READY TO ID SEARCH. The
BC296D stops on every active talkgroup, regardless of
whether you have programmed it into your scanner.
Notes: • If you have not yet programmed any ID’s for the
system, this is the only mode available.
• In the ID search mode, the scanner displays the
alpha tags associated with the stored talkgroups or
NEW for talkgroups you have not stored.
Scanning Only Stored Talkgroups (ID Scan)
To scan only those talkgroups you have stored into your
scanner, press SCAN while scanning that system; or, press
and hold TRUNK until the scanner displays READY TO ID
SCAN. When one of the talkgroups you have stored becomes
active, the scanner switches to that transmission and displays
the ID number and the alpha tag for that talk group.
Note: You must store at least two talkgroup IDs in the
system for ID scanning to work.
Monitoring Talkgroup ID’s
To see all of the ID’s that are active on the system, while
monitoring a trunked system press TRUNK. The scanner
stops trunking the system and instead holds on the system’s
control channel. You hear the control data and the scanner
displays every talkgroup ID as it becomes active in the
system. To resume trunktracking, press TRUNK again.
Selecting Talkgroup Lists to Scan
When the scanner is in the ID Scan mode, you can select
which ID lists you want the BC296D to scan. First, if you are
scanning a Motorola or EDACS system, ensure that you are
in the Scan List mode. Press REVERSE until the scanner
displays “List” at the left side of line 3 in the display when it
has not stopped on a talkgroup or on the left side of line 4 if it
has stopped on a talkgroup. Then, press the number
corresponding to the ID list you want to turn on or off.
25
Page 32

Holding on a Single Talkgroup
.
.
To hold on an active talkgroup when scanning or searching,
press HOLD/MAN. The BC296D stops scanning and holds on
the current trunking system. It only receives transmissions on
the talkgroup that was active when you pressed HOLD/MAN.
To select a talkgroup to hold on when that talkgroup is not
active, you must first program that talkgroup into an ID list.
Then, while scanning that system, use the scroll bar to select
the talkgroup ID to hold on.
To select a talkgroup to hold on when that group is not active,
while ID scanning or ID searching the system, press
HOLD/MAN. Then, either enter the ID or (if you have stored
the ID) scroll to the ID you want to hold on.
Locking Out Talkgroups
Like conventional scanning, you can lockout unwanted
talkgroup traffic on trunking systems. This is particularly
important if you are ID Searching a trunking system, as many
systems share both voice traffic (that you usually want to
hear) with some data traffic from water meter systems, door
alarms, traffic signals and other data sources that you don’t
want to hear.
To lockout a talkgroup, press L/O when the scanner stops on
that group. Or, if you have stored the talkgroup in an ID list,
select that ID and press L/O.
To unlock a talkgroup stored in a scan list, use the scroll bar
to manually select that ID, then press L/O to unlock it.
To unlock an ID you locked out during ID search or ID scan:
2:SCAN OPTION → 2:TRUNK → Select the Bank
→ 6:L/O ID REVIEW
Then, use the scroll bar to select the ID you want to unlock
and press L/O.
Or, press HOLD/MAN then press L/O for 2 seconds to clear
all the lockouts from the system.
EDACS Blockout
This is a powerful form of lockout that is only available for
EDACS systems. EDACS Blockout lets you lockout entire
Agencies or Fleets, not just individual talkgroups. To use
blockout, while scanning an EDACS system, press
HOLD/MAN then press L/O for 2 seconds to clear all the
lockouts from the system. Then enter the agency or the
agency and fleet and press then L/O. For example, to
lockout agency 4, press 04 L/O.
26
Page 33

Unlocking All Talkgroups
To unlock all talkgroups for a system:
2:SCAN OPTION → 2:TRUNK → Select the Bank
→ 6:L/O ID REVIEW
Then, use the scroll bar to select the ID you want to unlock
and press L/O.
Or, press HOLD/MAN then press L/O for 2 seconds to clear
all the lockouts from the system.
EDACS Patch Tracking
EDACS systems sometimes bring several talkgroups together
in a ‘Patch’. A patch might be used by a police agency at
night to provide a single channel with a single dispatcher for a
wide area. A patch is created when a single, temporary
talkgroup substitutes for the original talkgroups. While the
patch is running, which may be for hours or days, the original
talkgroups cease to be used. If you were monitoring one of
these talkgroups, you might think there was no traffic, but in
fact the talkgroup was operating at the different temporary
number.
If a talkgroup in your Scan List is patched, your scanner will
continue to receive it under its new identity until the patch has
ended. When a patch is being received, the radio will display
PATCH ID, and will show the temporary common talkgroup
plus all the included talkgroups in a cycling display. The
BC796D is limited to following one patches. The temporary
talkgroups used for patches are usually found in AFS code
15-xxx, and sometimes 00-xxx.
27
Page 34

Searching
Your BC296D includes powerful search features that let you
discover new active frequencies in your area. You can save
up to 10 custom search ranges in your scanner. This section
details how to use custom search ranges and also details the
various settings that affect search operation.
To start a search, first program one or more search ranges
(see “Setting a Search Range”). Then, press SEARCH. The
scanner begins searching within the selected search range.
To change to a different search range, press the number
button associated with that range.
By default, your scanner only searches one range at a time.
To search multiple ranges, turn on Chain Search (see “Setting
Chain Search”). When you turn on Chain Search, each time
you press a number button, the associated range is turned on
or off. Note that you must have at least one range turned on
at all times.
Holding on an Active Frequency
To hold on the current frequency, press HOLD/MAN. To
resume searching, press RSM.
Setting Chain Search
1:SERVICE OPTION → :CHAIN SEARCH →
1:CHAIN SEARCH
1:ON
The scanner allows you to search multiple ranges
simultaneously.
2:OFF
The scanner searches only one range at a time.
Setting Data Skip
The scanner normally stops on any frequency with activity,
and remains there until either the activity stops or you press
RSM or use the scroll bar to resume scanning. However,
some signals are identifiable by the scanner as data signals,
and you can set the scanner to automatically skip these
channels.
28
Page 35

3:SYSTEM OPTION → 7:DATA SKIP
1:ON
The scanner skips data frequencies.
2:OFF
Data skip is turned off.
Note: Even with this option turned on, the scanner might
pause for a couple of seconds on data transmissions
before resuming.
Skipping Frequencies
If a particular frequency continues to interrupt search
scanning, it is possible to set your scanner to skip the
frequency.
To skip over a frequency, press L/O when the scanner is
stopped on a frequency you want to skip.
Notes: • You can program up to 200 skip frequencies. The
201st skip frequency entered causes the first
skipped frequency to unlock.
• If all frequencies in the search range are set to
skip, a beep sounds and it moves to Search Hold
mode. To resume searching:
1) Unskip all skipped frequencies
—- OR —-
2) Select a different Search Frequency range.
To unskip all skipped frequencies, press and hold
L/O for 2 seconds in Search Hold mode.
Storing Found Frequencies
If you find a frequency you want to save into a channel,
simply press TRNSFR when the scanner is stopped on that
frequency. The scanner displays the lowest-numbered empty
channel. Use the scroll bar to select the channel you want to
save the frequency into, then press E.
Notes: • If you have already stored this frequency, the scan-
ner displays WARNING DUPLICATE and the channel where the frequency is stored. To store the frequency anyway, press E again.
• After you store the frequency, the scanner resumes
searching.
• If all channels are used, the scanner defaults to the
last-used channel prior to entering the search mode.
29
Page 36

Automatically Storing Frequencies
During searching, you can have the scanner automatically
store active frequencies into a bank you choose.
1:SERVICE OPTION → :CHAIN SEARCH →
6:AUTO STORE → 1:ON
1. Press the numbers corresponding to the banks you want
the scanner to store found frequencies into.
2. Press SEARCH to start the auto-store operation.
3. Press HOLD/MAN to stop auto-store. The scanner exits
the auto-store mode.
Note: To ensure that you catch most active frequencies for
the band, you should allow the auto-store operation to
continue through at least a few complete sweeps of the
band. Depending on the types of services, some
occasionally active frequencies might not have activity
for minutes or hours at a time.
Setting Subaudible Tones for Searching
You can set the scanner to only stop on transmissions that
either have no subaudible tone or include a specified CTCSS
or DCS tone during searches. This setting affects all search
ranges. For this feature to work, you need to turn on the Tone
Mode (see “Setting Squelch Mode”).
1:SERVICE OPTION → :CHAIN SEARCH →
5:TONE DATA
1:CTCSS
Lets you set the CTCSS tone.
2:DCS
Lets you set the DCS.
3:OFF
Does not use subaudible tones.
Note: If, instead of pressing E to select a tone you press L/O,
the scanner will stop on any transmission except for
those with the selected tone.
Searching for Subaudible Tones
If you set the system tone option to 3:TONE SEARCH (see
“Setting Squelch Mode”), the scanner will determine the
correct tone for the received signal.
30
Page 37

Attenuating All Search Ranges
If you are near a strong RF source, you might need to
attenuate the input signal in order to search properly. To turn
on this option for all search ranges:
1:SERVICE OPTION → :CHAIN SEARCH →
4:ATTENUATOR
1:ON
The attenuator is turned on.
2:OFF
The attenuator is turned off.
Setting DELAY for All Search Ranges
You can set the scanner to have a 2-second delay after the
end of a transmission before searching resumes. This slows
searching, but helps you prevent missing replies on a
frequency.
1:SERVICE OPTION → :CHAIN SEARCH →
3:DELAY
1:ON
The delay is turned on.
2:OFF
The delay is turned off.
Setting a Search Range
Before you can use a range search, follow these steps to
program at least one of the 10 custom search ranges.
1. Activate the search range mode by using the menu:
1:SERVICE OPTION → :CHAIN SEARCH →
2:SEARCH RANGE
or by pressing and holding SEARCH for 2 seconds.
2. Use the scroll bar to select the range you want to
program, then press E.
3. Set the following options:
1:RANGE
Select, then follow the prompts to enter the lower and
upper frequency limits for the search range.
2:STEPS
Select, then set the step size to use while searching
the custom range. If you select 9:AUTO, the
scanner will use the step sizes most often assigned
for each band.
31
Page 38

3:MODE
Select, then set the modulation mode to use while
searching the custom range. If you select 5:AUTO,
the scanner will use the modulation mode most often
used for each band.
4:ALPHA TAG
Select, then assign an alpha tag to the search range.
5:TRUNK
See “Searching for Trunk Systems.”
4. Press MENU/BACK, then repeat Steps 2 and 3 for
additional search ranges.
Searching for Trunk Systems
1:SEARCH OPTION → :CHAIN SEARCH →
2:SEARCH RANGE → Select the range → 5:TRUNK
This option lets you search for a Motorola trunking control
channel within the selected range. To activate this function,
select 1:ON, then select an appropriate trunk plan. Most areas
use Plan 1, so this setting should work in most cases.
Note: This feature only works for 800 MHz and 900 MHz
Motorola trunking systems.
If the scanner detects a trunking control channel, it will begin
to track that system. The scanner displays the talk group
numbers as they become active.
32
Page 39

Service Search
The Service Search feature lets you scroll through the
following twelve preprogrammed services. The frequencies
selected for these services are the most commonly used
around the U.S.
• 1:WEATHER • 7:RAILROAD
• 2:PUBLIC SAFETY • 8:AIR
• 3:NEWS • 9:CB RADIO
• 4:TV BROADCAST • 0:FRS & GMRS
• 5:HAM RADIO • :RACING
• 6:MARINE • :SPECIAL
Note: Special Frequencies are low-power, itinerant,
“splinters” and other frequencies which are commonly
used at special events and other locations and may or
may not be licensed.
To access this feature:
1. Press SERVICE.
––– OR –––
Use the menu to select 1:SERVICE OPTION.
2. Select a preprogrammed service to search by selecting
from the Service Search menu.
Note: Except for Weather, when you press E to select a
service, searching begins immediately. For weather
search options, see “Using Weather Search and
Weather Alert.”
Service Search Skip
You can set the scanner to skip up to 100 unwanted
frequencies during Service Search.
To skip over a frequency, press L/O when the scanner has
stopped at a frequency you want to skip.
To restore a skipped frequency during search, press
HOLD/MAN select the desired frequency using the scroll bar,
then press L/O.
To restore all skipped frequencies, press and hold L/O for
2 seconds.
33
Page 40

Notes: • You can not skip frequencies in the Weather
Service mode.
• If you start Service Searching for a service that has
all frequencies locked out, you hear a beep and the
scanner moves to the Hold mode.
Using Weather Search and Weather Alert
(SAME)
Your scanner allows you to either search for a local NOAA
weather broadcast, or be set to alert when a SAME weather
alert is broadcast on a NOAA channel.
Searching for a Weather Broadcast
To search for a weather broadcast in your area:
1:SERVICE OPTION → 1:WEATHER →
1:MONITOR
The scanner begins to search the frequencies used by the
National Weather Service for these broadcasts. When it finds
a broadcast, it stops on the channel until you select another
option or reception of the signal stops.
Note: NOAA broadcasts are continuous broadcasts. You will
only lose reception if you move out of a coverage area.
If the signal is lost, the scanner resumes searching for
a weather transmission.
Using Weather Alert (SAME)
Important: Your scanner has been primarily designed to be a
radio scanner. While it incorporates weather alert as one
feature, we strongly recommend that you not use the scanner
as your sole means for receiving emergency alerts. Your local
electronics retailer carries several weather radios specifically
designed for this function.
SAME (Specific Area Message Encoding) was adopted late in
the last century to replace the wide-area alerts previously
used. Weather alerts today are preceded by a digital packet
that identifies not only the type of alert, but also the
geographic location for the alert. Thus, it is possible for a
weather broadcast that can be received across many counties
to be targeted to a single county.
To specify a county, SAME uses a standard established by
the US Census bureau, called FIPS. The format of a FIPS
code is:
34
Page 41

DSSCCC
Where
D = area subdivision (0=entire area)
SS = State code (00=all states)
CCC = County code (000=all counties)
For example, the FIPS code for Tarrant County, Texas is:
048439 (48=Texas; 439=Tarrant County).
Some counties are further subdivided, in which cases, the first
digit will be 0 for all subdivisions in the county and each
subdivision will be labeled 1-9.
To program your scanner to alert you when the weather
service issues an alert, you must set the scanner to the alert
mode, and then leave the scanner monitoring the weather
service. You cannot scan and monitor for weather alerts at the
same time.
To limit alerts to a specific area, you must also program in the
FIPS code(s) for the area(s) you want to receive alerts for.
The scanner can be set to either alert for all areas, or only the
areas you have programmed. You can get FIPS codes for
your area by calling the National Weather Service at 1-888NWR-SAME or visit their web site at
http://www.nws.noaa.gov/nwr/indexnw.htm.
To program weather alert operation:
1:SERVICE OPTION → 1:WEATHER →
2:ALERT
1. Select 1:ON to turn on weather alert.
2. Use the scroll bar to select either ALL FIPS or one of
the 15 programmable FIPS positions.
3. If you need to program a FIPS code, press E, then enter
the code and press E again.
4. Press MENU/BACK two times.
5. Select 1:MONITOR.
The scanner displays WX ALERT ON. All audio is muted
until an alert is received.
Note: If you lose power or turn off the scanner, the scanner
keeps the weather alert mode.
35
Page 42

Warning: Never listen to the scanner using a headphone or
earphone when you have put the scanner in the
weather alert mode. The volume control is disabled in this mode, and the loud alert sound could
damage your hearing.
If an event is issued, the scanner displays the text for the
event and sounds an alert. The alert sound used depends on
the type of event received:
Statements: 2-tone beep
Watches: 2-tone trill
Warnings: Siren
The chart in the back of this manual details the various events
and the type of alert produced.
Testing the Weather Alert
To test the alert to see what each alert sounds like, monitor
the weather mode, then press HOLD/MAN. Hold PRI for 2
seconds to start the test. Press any key to exit the test. The
scanner sounds each of the three alert types repeatedly.
Warning: Never listen to the scanner using a headphone or
earphone when you are testing weather alert. The
volume control is disabled in this mode, and the
loud alert sound could damage your hearing.
36
Page 43

Programming Bank
Information
In addition to channel and trunking system information you
program into each bank (covered in the following sections),
this section covers general bank information.
Bank Configuration
Each of your scanner’s banks holds 100 channels that can be
a mix of conventional (non-trunked) channels and one
trunking system. Bank 1 holds Channels 001-100, Bank 2
holds Channels 101-200, and so on through Bank 0 which
holds Channels 901-1000.
Additionally, each bank that includes a trunking system can
also hold up to 100 Talkgroup ID’s for that system.
Assigning Bank Names
To give a bank a name that the scanner displays when it
stops on a channel in that bank:
3:SYSTEM OPTION → 9:BANK TAG
1. Use the scroll bar to select the bank you want to tag, then
press E.
2. Use the scroll bar to select the letter, then press RSM to
move the entry position one space to the right or press
HOLD/MAN to move the entry position one space to the
left.
3. When you have entered the tag, press E to save the tag
and return to Step 1.
37
Page 44

General Programming
This section includes procedures that apply regardless of
whether you are programming conventional or trunked
channels.
Deleting Frequencies from Channels
To delete a stored frequency, manually select the channel,
then press 0 and E. The contents of the channel are erased.
Transferring Channel Information
To transfer settings from one channel to another:
1. Manually select the channel with the information you want
to transfer.
2. Press TRNSFR. The scanner displays the lowest-
numbered empty channel. To select a different channel,
use the scroll bar to select the channel.
3. Press E. All channel information is stored in the target
channel and deleted from the original channel.
Note: Trunking system information is not transferred.
Entering Alpha Information
Your BC296D lets you assign text tags to banks, channels,
talkgroups, and search ranges. Follow these steps to enter a
text tag.
1. Use the scroll bar to select the letter.
2. Press RSM to advance to the next letter or HOLD/MAN to
back up to a previous letter.
3. When you have completed the text tag, press E to accept
the entry.
General Programming Tips
• Do not program weather frequencies into channels. Since
they have continuous broadcasts, your scanner will always
stop on them. Use weather service search to access NOAA
weather broadcasts.
• Group related services into a bank. For example, program
city trunk system in Bank 1, amateur radio in Bank 2, and
so on.
38
Page 45

• To quickly program a series of channels, start with the lowest-numbered channel. The scanner automatically
advances to the next channel by default when you complete
programming a channel.
• Make a programming plan before you sit down to program
your scanner. Write down what frequency you will store in
each channel, along with other system information. Or, use
the supplied software to organize your information before
you start. Keep a record of what you programmed in case
you lose programming. This lets you more quickly program
the scanner the next time.
• Entered frequencies are rounded off according to the step
size for the channel.
• When you store a new frequency in a channel, the text tag
previously assigned to that channel is deleted.
39
Page 46

Programming
.
Conventional Channels
Each bank can hold a mix of conventional channels plus one
trunking system. This section describes how to store known
frequencies into conventional channels. The first few sections
are intended to be performed in the order indicated if you are
entering information the first time. If you are editing existing
information, manually select the channel, then use the
complete menu process to access the information you want to
change.
Note: To quickly store only a frequency in a channel,
manually select the channel, enter the frequency, then
press E. Do not use this method for Trunking systems,
however, as these systems require additional
information to scan correctly.
1. Select a Channel to Program
To start, first select the channel you want to program:
2:SCAN OPTION → 1:CONVENTIONAL
Enter the channel number, then press E.
2. Enter the Frequency
a. Press 1 or highlight 1:FREQUENCY and press E.
b. Enter the frequency you want to program, then press E.
Notes: • If the channel already had a frequency
programmed, it appears above the prompt.
• If you select a frequency that is not valid, the
scanner displays ERROR OUT OF BAND.
Enter a correct frequency to continue.
• If you enter a frequency that has already been
stored in the scanner, the scanner displays
WARNING DUPLICATE and the channel
number that contains the duplicate. To save the
frequency anyway, press E. Otherwise, press
to cancel and enter a different frequency.
• If you change an existing frequency, all other
information stored for that channel is deleted or set
back to default values.
40
Page 47

3. Assigning a Text Tag
a. Use the scroll bar to select the channel you want to tag,
then press E.
b. Use the scroll bar to select the letter, then press RSM to
move the entry position one space to the right or press
HOLD/MAN to move the entry position one space to the
left.
c. When you have entered the tag, press E to save the tag.
The scanner displays
1:OTHER CHANNEL
Select to pick another channel to program from Step
1
2:CHANNEL OPTION
Select to set additional channel options (see the
following sections).
3:DONE
Exit the channel setting and menu mode.
Setting the Delay
2:SCAN OPTION → 1:CONVENTIONAL →
Channel No. → 2:DELAY
The delay option lets you set a 2-second delay after a
transmission for each channel. This slows down scanning, but
helps to prevent missing replies.
1:ON
Turn on the delay for the channel
2:OFF
Turn off the delay
Setting the Subaudible Tone Option
2:SCAN OPTION → 1:CONVENTIONAL →
Channel No. → 3:TONE DATA
Some radio systems use special tones to prevent interference
from other nearby systems operating on the same
frequencies. When tones are being used, the radios only open
squelch when a transmission with a matching tone is present
on the frequency. Some services, such as FRS, GMRS, and
Business Band refer to these tones as Quiet Codes, Privacy
Codes, or similar and use a number to associate a particular
tone. The table in the back of the manual provides a cross
reference to common associations. For this feature to work,
you need to turn on the Tone Mode (see “Setting Squelch
Mode”).
41
Page 48

1:CTCSS
Continuous Tone Coded Squelch System (CTCSS) is
used with Amateur Radio, FRS, GMRS, Business
Band, and other systems. When you select this
option, the scanner only opens squelch when a
matching CTCSS tone is present on the frequency.
2:DCS
Digital Coded Squelch is similar to CTCSS, but
instead of differentiating codes using frequencies,
DCS always uses the same frequency but encodes it
with a binary value. When you select this option, the
scanner only opens squelch when a matching DCS
value is present on the frequency.
3:OFF
The scanner opens squelch regardless of the
presence of tones.
Note: If, instead of pressing E to select a tone you press L/O,
the scanner will stop on any transmission except for
those with the selected tone.
Setting Beep Alert
2:SCAN OPTION → 1:CONVENTIONAL →
Channel No. → 4:BEEP ALERT
1:ON
The scanner sounds three alert tones when it stops
on a transmission on this channel.
2:OFF
Beep Alert is off.
Setting the Attenuator
2:SCAN OPTION → 1:CONVENTIONAL →
Channel No. → 5:ATTENUATOR
If you are near a very strong signal source, the signal can
overload the scanner’s RF front end, causing poor audio
quality or missed reception.
1:ON
RF attenuation is on for the channel
2:OFF
RF attenuation is off for the channel
42
Page 49

Changing the Frequency Step
2:SCAN OPTION → 1:CONVENTIONAL →
Channel No. → 6:STEPS
The channel frequency step option controls the frequency
step size used when you manually tune up or down from the
frequency stored in the channel. Your BC296D is
preprogrammed with the most common steps sizes for each
band, so you seldom need to change this setting.
1:5KHz
Use 5 kHz steps
2:6.25KHz
Use 6.25 kHz steps
3:7.5KHz
Use 7.5 kHz steps
4:10KHz
Use 10 kHz steps
5:12.5KHz
Use 12.5 kHz steps
6:25KHz
Use 25 kHz steps
7:50KHz
Use 50 kHz steps
8:100KHz
Use 100 kHz steps
9:AUTO
Automatically set the step size based on the band
Setting the Modulation Mode
2:SCAN OPTION → 1:CONVENTIONAL →
Channel No. → 7:MODE
Radio transmissions are modulated in several different ways.
The BC296D is able to demodulate the most common
transmission types. Your scanner has the most common
modulation mode preset for each band, so you seldom have
to change this option. However there are occasional services
that use a modulation mode that is not standard for that band.
1:AM
Amplitude Modulation
2:FM
Frequency Modulation
3:WFM
Wideband FM
43
Page 50

4:NFM
Narrowband FM
Setting Priority Channels
You can set one conventional channel in each bank as a
priority channel. When you turn on the Priority Scan option
(see “Priority Scanning”), the scanner automatically checks
these channels every 2 seconds to see if there is activity. If
there is, the scanner immediately switches to the priority
channel.
Notes: • The scanner does not check priority channels in
locked-out banks.
• The scanner does not check priority channels if the
channel is locked out.
By default, the first channel of each bank is set as priority. To
change the priority channel:
1. Manually select the channel you want to set as priority.
2. Press and hold PRI for 2 seconds. The scanner beeps and
the new priority assignment is made.
Note: To program priority talkgroup ID’s for trunk scanning,
see “Setting Priority Talkgroups.”
44
Page 51

Programming Trunked
Systems
Your BC296D is designed to scan most major types of
trunking systems, including APCO Project 25 Phase 1 digital
communication systems. These systems are briefly described
here. For a more technical description of each system, see
“Understanding Scanning.” General trunking options are also
covered in this section. To program the systems, refer to the
sections in the manual referenced below
• APCO Project 25 Phase 1 Systems — Digital systems
that support the APCO Project 25 protocol developed by the
Association of Public Safety Communications Officials
(APCO), the Telecommunications Industry Association (TIA)
and Electronic Industries Alliance (EIA). Systems can operate in conventional, trunked (9600), trunked (3600) and
mixed-modes (analog and digital) in any frequency band
including UHF, VHF, 800 MHz, and 900 MHz. See
“Programming Motorola Systems.”
• MOTOROLA – Including Type I, Type II, Hybrid, SMART-
NET, and Privacy Plus. Motorola systems are widely used
by public safety and business users. Most are on the 800
MHz band, and recent systems are appearing on other
bands. See “Programming Motorola Systems.”.
• EDACS – Including “Wideband” 9600 baud, and
“Narrowband” 4800 baud systems. “Wideband” systems are
mostly on the 800 MHz band, and are used by public safety, utilities, and business users. Some systems are used on
the VHF and UHF bands. “Narrowband” systems are used
in the 935-940 MHz band, many by utilities. See
“Programming EDACS Systems.”
• EDACS SCAT – These systems are mainly used in the
Midwestern United States and are one-channel trunking
sites using the EDACS format. See “Programming EDACS
Systems.”
• LTR – These systems are mostly for business users, and
found on the UHF, 800 and 900 MHz bands. See
“Programming LTR Systems.”
When tracking these types of systems, remember these
important points:
• Your scanner defaults to monitor Motorola Type II systems;
however, you can change this if the system in your area is
different.
45
Page 52

• The frequencies for many of the trunked public safety systems are listed in the TrunkTracker National Public Safety
Trunked System Frequency Guide included with your
BC296D scanner. Frequencies sometimes change, check
with scanner.uniden.com for the latest information.
Setting Trunking Delay
Setting a delay for trunking systems helps to ensure that you
do not miss replies while scanning.
2:SCAN OPTION → 2:TRUNK → Select the bank
→ 4:DELAY
1:ON
The scanner pauses on a talkgroup for 2 seconds at
the end of each transmission to help ensure you don’t
miss replies.
2:OFF
Delay is turned off.
Using I-Call (Motorola and EDACS only)
I-Calls are direct unit-to-unit transmissions that are not heard
by other users. Your BC296D can monitor these
transmissions in either the search mode or (if you have stored
the unit number as a talkgroup) in the scan mode.
When the scanner stops on an I-Call, the scanner displays the
individual radio unit ID instead of a talkgroup ID.
EDACS or Motorola Type 1 i nnnnn
Motorola Type 2 7 nnnnn
Note: • Each radio in a system has its own unique unit ID.
Unit ID’s are not published for systems, and since
officers might not use the same radio every day, it
is difficult to predict who and what you will hear for
a specific radio ID.
• Since a conversation consists of two or more
radios, and each radio has its own ID, if you hold
on an I-Call, you will only hear one side of the
conversation.
Turning I-Call On and Off for ID Search
2:SCAN OPTION → 2:TRUNK → Select the bank
→ 8:I-CALL
1:ON
The scanner will stop on I-Calls or normal talkgroups.
2:OFF
The scanner ignores I-Calls.
46
Page 53

3:ONLY
.
.
The scanner only stops on I-Calls.
Turning I-Call On for ID Scan
To receive I-Calls for ID Scan, simply store the radio unit
number as ( ) plus the unit number in place of the
talkgroup. To receive any I-Call while scanning, enter the ICall wildcard ( ) 0. For EDACS and Motorola Type 1
systems, this appears as i0; for Motorola Type 2 systems, this
appears as 700000.
Setting Priority Talkgroups (Motorola and
EDACS only)
Talkgroup priority works slightly different than conventional
priority. With talkgroup priority, the priority talkgroups are only
checked when the scanner is on the control channel. So, if
you have delay turned on for the system or are holding on an
ID, the scanner will immediately switch to the priority talkgroup
if it becomes active during the 2-second delay or while there
is no transmission on the held talkgroup.
To assign a talkgroup as the priority talkgroup, select it in
Scan Hold mode (see “Holding on a Single Talkgroup”). Then,
press and hold PRI for 2 seconds.
Multi-Track
The BC296D allows you to track more than one system at a
time. Here are some highlights of this feature:
❖ You can actually track up to 10 trunking systems at
one time.
❖ You can trunk, scan, or search and scan conventional
frequencies at the same time.
❖ You can program conventional frequencies in the same
bank as trunking systems.
After the scanner finishes checking a trunked system
for activity, it will conventionally scan the other
frequencies in the bank (remember, only trunking
frequencies are programmed in Trunk mode).
To scan a mix of trunking and conventional banks, select the
banks you wish to be active, and then press SCAN. The
scanner will instantly begin scanning. If you have not
programmed a trunking bank with talkgroup ID’s, you will
receive NO ID (----) message for that bank.
You can switch to Search mode and the scanner will search
for any active ID’s on the system.
47
Page 54

Note: To switch ID Scan or ID Search, press and hold
TRUNK or, press SCAN or SEARCH while scanning.
Multi-Track Operational Details
When more than one trunk system is active (for example two
or more trunked systems or a trunked system and one or
more conventional frequencies), the radio jumps between
systems/frequencies as follows:
TRUNK SCAN: The scanner moves to a trunked system
and looks for IDs in your Scan List(s) for up to 1 second.
If it finds no activity on your programmed talkgroups, it
moves on to conventional channels in the same bank or to
the next active bank.
If the scanner finds that a talkgroup in one of your active
Scan Lists becomes active, you will begin to hear that
communication and the scanner will display the proper
talkgroup number and any alpha tag. When the
communication ends, the scanner will wait for 2 seconds
for any further replies and, if none, the scanner will move
to the conventional channels in the same bank or to the
next bank. The scanner will not look for any other IDs
within the same trunked system (as this would slow the
scan process). If you press RSM while you are listening to
one ID, the scanner will check to see if another ID in your
Scan List is active. It will disregard the ID to which you
were just monitoring.
TRUNK SEARCH: This mode works similarly to Trunk
Scan. If the scanner finds any (non-locked-out) ID when
it checks the control channel, you will hear it. You will then
hear any replies that follow within 2 seconds. After that the
scanner will move on and not continuously search the
system for additional IDs (on busy systems you would never
leave the system if this were the case). If you press the
RSM key while monitoring one ID, the radio will check if any
other IDs are active (it will disregard the ID you just left),
and if none are active, it will move on.
48
Page 55

Programming Motorola
Systems
Follow the instructions in this section to program information
for Motorola Type I, II, IIi Hybrid, and APCO 25 Digital
trunking systems.
Using Control Channel Programming
Your scanner has a powerful feature that lets you program in
only the control channels for Motorola 800 and 900 MHz
systems. This can greatly shorten the time it takes to program
system information.
2:SCAN OPTION → 2:TRUNK → Select the bank
→ :CNTRL CH ONLY
For 900 MHz systems, you can then simply turn the feature
on or off. For 800 MHz systems, you need to select the band
plan for the system:
1:PLAN1
Use if the last three digits of all of the frequencies
used by the system end in 125, 375, 625, or 875.
2:PLAN2
Use if the highest frequency used by the system is
above 866 MHz and if the last three digits end in 000,
125, 250, 375, 500, 625, 750, or 875.
3:PLAN3
Use if the last three digits of all the frequencies in the
system end in 000, 250, 500, or 750.
4:PLAN4
Use if the highest frequency in the system is below
866 MHz and if the last three digits end in 000, 125,
250, 375, 500, 625, 750, or 875.
5:OFF
Select to turn off control channel programming for this
bank.
Note: • Many systems alternate control channels. To prop-
erly track the system, you need to program all alternate control channels.
• If you do not know all of the frequencies for a system, but know at least one control channel, start by
selecting Plan 1 (the most common type). If you
notice that you seem to be missing transmissions
and replies, try each of the other plans until you
find the one that works best.
49
Page 56

Programming Type 2/Digital 800 and 900 MHz
Systems
To program a Type 2/Digital 800 or 900 MHz system, you
need to know the frequencies that the system uses.
1. Select the trunk programming mode.
2:SCAN OPTION → 2:TRUNK
2. Use the scroll bar to select the bank you want to program,
then press E.
1:TRUNK TYPE → 1:ON
3. Select one of the following trunk types for Motorola Type 2
or digital Systems:
1:TYPE2/P25 800
Motorola Type 2 or Digital systems in the 800 MHz
band
3:TYPE2/P25 900
Motorola Type 2 or Digital systems in the 900 MHz
band
4. Select the channel to store the information into.
2:TRUNK CHANNEL
Use the scroll bar to select a channel within the bank to
store a system frequency, then press E.
5. Store the channel information
1:FREQUENCY
Enter the frequency for the channel, then enter an Alpha
Tag for the channel.
Repeat Steps 4 and 5 to store the rest of the frequencies for
the system. Then, see “Programming Talkgroups.”
Programming Type2/Digital VHF and UHF
Systems
To program a Type 2/Digital VHF or UHF system, you need to
know the frequencies the system uses and also the Base,
Space, and Offset settings. These settings are normally
provided along with the system frequencies.
1. Select the trunk programming mode.
2:SCAN OPTION → 2:TRUNK
2. Use the scroll bar to select the bank you want to program,
then press E.
1:TRUNK TYPE → 1:ON
50
Page 57

3. Select one of the following trunk types for Motorola Type 2
or digital Systems:
4:TYPE2/P25 UHF
Motorola Type 2 or Digital systems in the UHF (450 –
512 MHz) band
5:TYPE2/P25 VHF
Motorola Type 2 or Digital systems in the VHF (148 –
406 MHz) band
4. Set the Base, Space and Offset settings.
Note: Your BC296D allows you to enter up to three Base,
Space, Offset configurations. However, most
systems only use one configuration.
a. Use the scroll bar to select the configuration to
program, then press E.
BASE CONFIG 1
b. Enter the system’s base frequency, then press E.
c. Enter the system’s space frequency, then press E.
d. Enter the system’s channel offset, then press E.
Repeat a-d or press MENU/BACK three times to continue
programming the system.
5. Select the channel to store the information into.
2:TRUNK CHANNEL
Use the scroll bar to select a channel within the bank to
store a system frequency, then press E.
6. Store the channel information
1:FREQUENCY
Enter the frequency for the channel, then enter an Alpha
Tag for the channel.
Repeat Steps 5 and 6 to store the rest of the frequencies for
the system. Then, see “Programming Talkgroups.”
Programming Type I and IIi Hybrid Systems
To program a Type I or IIi Hybrid system, you need to know
the system’s fleet map in addition to the frequency information
for the system. Fleet map information is usually provided with
the frequencies for the system.
1. Select the trunk programming mode.
2:SCAN OPTION → 2:TRUNK
2. Use the scroll bar to select the bank you want to program,
then press E.
1:TRUNK TYPE → 1:ON
51
Page 58

3. Select the following trunk type for Motorola Type I
Systems:
2:TYPE1
Motorola Type I and IIi Hybrid Systems
4. Enter the fleet map information.
Your scanner has the most common fleet maps
preprogrammed. Refer to Appendix B for a complete list of
these fleet maps.
Use the scroll bar to select the preprogrammed fleetmap
1-16 or, if the fleet map does not match a preprogrammed
set, select USER CUSTOM. Then, use the scroll bar to
select the size code for each block.
5. Select the channel to store the information into.
2:TRUNK CHANNEL
Use the scroll bar to select a channel within the bank to
store a system frequency, then press E.
6. Store the channel information
1:FREQUENCY
Enter the frequency for the channel, then enter an Alpha
Tag for the channel.
Repeat Steps 5 and 6 to store the rest of the frequencies for
the system. Then, see “Programming Talkgroups.”
Toggling the Status Bit
Motorola talkgroup ID’s are sent as a 16-bit binary number.
Normally, the last 4 positions in the number are 0’s, which
result in all talkgroups being equally divisible by 16. These
last four bits, however, can be used by the trunking system to
indicate various status conditions. For example, an
emergency status could be indicated by setting the secondfrom last digit to 1. Talkgroup 33264, then would be sent on
the system as 33266 when the radio triggered its emergency
status. By default, the BC296D ignores the last four digits of
every talkgroup, effectively rounding them down to the nearest
multiple of 16 regardless of the status bits.
2:SCAN OPTION → 2:TRUNK → Select the bank
→ 9:STATUS BIT
1:ON
Talkgroups are rounded down to the next multiple of
16.
2:OFF
Talkgroups are not rounded down, so you can
determine the value of the status bits.
52
Page 59

Toggling End Code Detect
At the end of each transmission, a digital burst is sent so that
radios on the system will quickly switch back to the control
channel. Your scanner also listens for this code.
2:SCAN OPTION → 2:TRUNK → Select the bank
→ 0:END CODE
1:DETECT
The scanner detects the end code and immediately
switches back to the control channel.
2:IGNORE
The scanner waits for the carrier to drop before
switching back to the control channel.
53
Page 60

Programming EDACS
Systems
Follow the instructions in this section to program information
for EDACS Wide, EDACS Narrow, and EDACS SCAT
trunking systems. Note that to program these systems, in
addition to knowing the system type and frequencies used,
you must know the logical channel numbers (LCN) for the
system’s frequencies. This information is usually provided with
the frequency and other information. For more information
refer to “Understanding Scanning.”
Programming EDACS Channels
1. Select the trunk type.
2:SCAN OPTION → 2:TRUNK → Select the
bank → 1:TRUNK TYPE → 1:ON
6:EDCS WIDE
Select for 9600 baud EDACS systems.
7:EDCS NARROW
Select for 4800 baud EDACS systems.
8:EDCS SCT.
Select for EDACS SCAT systems.
2. Program each trunk channel in LCN order (not frequency
order). If you program this in the wrong order, the scanner
will not go to the correct channel when scanning.
2:TRUNK CHANNEL
ENTER CHANNEL No.
a. Enter the channel to program.
1:FREQUENCY
b. Enter the frequency then the alpha tag for the channel
Repeat a and b for each channel in the system.
Note: EDACS SCAT systems use only one channel.
Once you complete channel programming, see “Programming
Talkgroups.”
54
Page 61

Setting EDACS Emergency Alert
When the emergency status is sent on an EDACS radio, you
can have your scanner alert you to the transmission.
2:SCAN OPTION → 2:TRUNK → Select the bank
→ 9:EMERGENCY ALT
1:ON
The scanner beeps three times to alert you and
flashes EMERGENCY during emergency
transmissions.
2:OFF
The scanner does not handle emergency
transmissions any differently than other
transmissions.
Setting EDACS Decimal Mode
By default your scanner displays EDACS talkgroups in AFS
format (see “Understanding Scanning”). However, you can
use this option to display and enter talkgroups in digital
format.
2:SCAN OPTION → 2:TRUNK → Select the bank
→ 0:EDCS ID FORM
1:AFS
Display the talkgroup ID in Agency-Fleet-Subfleet
(AFS) format.
2:DECIMAL
Display the talkgroup ID in decimal format.
55
Page 62

Programming APCO 25
Lower Mid Upper
Band
Min Default Max Default Min Default Max
800MHz 33 533 1833 1985 2042 3342 3842
UHF 33 633 1833 1985 2042 3342 3842
VHF 330 930 2130 2147 2264 3464 4064
Systems
To program an APCO 25 system, follow the steps in the
appropriate section for conventional or Motorola Trunking.
APCO 25 systems require only 1 additional setting: Sound
Quality.
Setting APCO 25 Sound Quality
Each APCO 25 system has slightly different system settings
that control how the audio is digitized. To get the best sound
quality, you need to match as closely as possible the system’s
settings.
To adjust the sound quality:
1. While monitoring a specific APCO P-25 talkgroup, press
the HOLD/MAN key.
2. Press and hold the 9 key. On Line 1 of the screen you will
see SOUND QULTY: 0050 (for example). This shows
the Sound Quality. The lower the level the better the
Sound Quality.
3. To manually set the sound quality, rotate the scroll bar up
or down. As the threshold adjusts in increments of 100 at
the bottom of the screen watch the Sound Quality level
increase or decrease and continue to rotate the scroll bar
until you have achieved the best Sound Quality level.
Notes: • When APCO P-25 signal is not received, SOUND
QULTY: **** appears on the display.
• You must be receiving an APCO P-25 signal to
make this adjustment
A chart showing the Threshold Adjustment Range is listed
below.
4. Once you have adjusted the Sound Quality to the best
possible level, press E.
Press RSM to exit the Sound Quality Adjustment Mode.
56
Page 63

Notes: • To cancel the adjusted threshold level, press
.
.
key.
• The adjusted threshold level for the current
frequency can be set back to the default value by
pressing and holding the key.
• When you change the Sound Quality it affects all
other APCO 25 signals in that same band. (UHF,
VHF, or 800MHz).
57
Page 64

Programming LTR
Systems
Follow the instructions in this section to program information
for LTR trunking systems. For more information about LTR
systems, refer to “Understanding Scanning.”
2:SCAN OPTION → 2:TRUNK → Enter the bank
→ 1:TRUNK TYPE → 1:ON → 9:LT →
2:TRUNK CHANNEL
1. Enter the channel number.
1:FREQUENCY
2. Enter the frequency and alpha tag for the channel.
Repeat these steps for all channels in the system. Then,
refer to “Programming Talkgroups.”
Note: LTR systems must be programmed in channel order,
skipping unused channels. For example, if the LTR
system you are programming uses only Channels 1, 3,
5, and 7, program frequencies in the first, third, fifth,
and seventh channels in the bank.
58
Page 65

Programming Talkgroups
...
.
For many of the trunk scanning features to operate, you need
to program the scanner with the talkgroup ID’s. Each bank
can store up to 100 talkgroups in 10 ID groups of 10
talkgroups each. Group similar talkgroups together in the
same ID group. When scanning, you can turn ID groups on
and off with a quick keypress.
Storing Known Talkgroups
Follow these steps to store talkgroups you have gotten from a
list.
2:SCAN OPTION → 2:TRUNK → Select the bank
→ 3:TALK GROUP
1. Use the scroll bar to select the talkgroup to program, then
press E.
2. Select 1:ID and press E.
3. For Type 2/Digital systems, enter the up to 5-digit
talkgroup ID, then press E.
For Type I systems, enter the 3-digit fleet, for the
dash, then the subfleet number.
For EDACS systems, enter the two-digit agency, for
the dash, then the fleet and subfleet number.
For LTR systems, enter the area code, , home
repeater number, , ID number, then E.
Note: If you replace an existing ID, the alpha tag is also
deleted.
4. Select 2:ALPHA TAG and press E.
5. Enter the alpha tag for the talkgroup.
Note: The alpha tag defaults to the numeric talkgroup ID.
6. If you want the scanner to beep three times to alert you
when the talkgroup is active, select 3:BEEP ALERT and
press E; then, select 1:ON.
7. Press MENU/BACK.
Repeat this procedure for each talkgroup in the system.
Storing Found Talkgroups
While you are ID Searching (see “Searching for Active
Talkgroups”), you can quickly store an active talkgroup ID into
an ID memory.
59
Page 66

1. While the scanner is receiving the talkgroup, press
HOLD/MAN to hold on that talkgroup.
2. Press TRNSFR. The scanner displays the lowest
numbered empty ID group memory.
3. Use the scroll bar to select the memory you want to store
the ID into, then press E.
Deleting Stored Talkgroup ID’s
To delete a stored talkgroup ID:
1. While scanning a trunked system in the ID scan mode
(see “Scanning Only Stored Talkgroups”), press
HOLD/MAN.
Or, to use the menu system:
2:SCAN OPTION → 2:TRUNK → Select the
bank → 3:TALK GROUP
2. Use the scroll bar to select the talkgroup ID you want to
delete, then press E.
3. Select 1:ID and press E.
4. Press 0, then press E.
Adding a Text Tag to an ID List
To add a text tag to each of the 10 ID lists in each bank:
2:SCAN OPTION → 2:TRUNK → Select the bank
→ 5:ID LIST TAG → Select the list → Enter the
alpha tag
Seeing Talkgroup Activity
In the ID Scan mode, the scanner normally only displays the
ID for talkgroups that you have stored into a scan list. This
setting lets you see the ID’s for all talkgroups as they become
active when the scanner is monitoring the control channel.
The scanner still only switches to a talkgroup if you have
stored it into a scan list.
2:SCAN OPTION → 2:TRUNK → Select the bank
→ 7:ACTIVITY ID
1:ON
Display every talkgroup ID as it becomes active.
2:OFF
Only display active stored talkgroup ID’s.
60
Page 67

Using the Remote
HOLD/
MAN
SCAN
CH/
FRQ
MENU/BACK
L/O
.
SELECT
REVERSE
TRUNK
RSM
E
SEARCH
SERVICE
Interface
You can connect your scanner to either a PC or another
BC296D using the remote interface cable port. This allows
you to either control and program your scanner using a PC
and the supplied software and cable or clone the memory
from one BC296D into another BC296D (gender
changer/coupler required, not supplied).
PC Control Mode
To connect the Scanner to a PC, plug the scanner end of the
supplied RS232C cable into the remote port which is on the
side of the scanner. Plug the other end of the cable into your
PC’s serial port.
Start the remote mode and set the scanner’s communications
speed:
3:SYSTEM OPTION → 5:PC CONTROL
To use PC control, set the scanner to any setting other than
off. You will usually want to set the speed to its highest
setting. If you seem to be having communications problems
between the scanner and PC, set this setting to a lower value.
Cloning Scanner Settings
You will need to purchase an RS232C null modem
adapter/gender changer to connect your scanners together.
(These items are available at your local electronics stores.)
To connect the Scanners together, plug the scanner ends of
the cables into the scanners, then connect the PC ends of the
cables to the null modem adapter/gender changer
Clone all of the programming of one BC296D into another, by
selecting:
61
Page 68

3:SYSTEM OPTION → 6:CLONE
.
CLONE
== >
MASTER UNIT
CLONE
== <
SLAVE UNIT
CLONE
ERROR
MASTER UNIT
on both scanners. Then, on the scanner that has the data you
want to transfer, select MASTER and press E. On the scanner
that you want to transfer the data into, select SLAVE and
press E. Then, press SCAN on both scanner to start the
transfer.
Caution: This deletes all data from the unit you select as
SLAVE. Make certain that you pick the correct settings for each scanner to prevent data loss.
During transfer both scanners display the following.
When transfer is complete, the scanners display COMPLETE.
Turn both scanners off and then back on to initialize them.
If data transfer is not successful, the following message
appears.
To clear the error, press . To exit the clone mode,
repeatedly press MENU/BACK.
62
Page 69

Care and Maintenance
General Use
• Turn the scanner OFF before disconnecting the power.
• Always write down the programmed frequencies in the
event of memory loss.
• If memory is lost, simply reprogram each channel.
The display shows 000.0000 in all channels when there has
been a memory loss.
• Always press each button firmly until you hear the entry
tone for that key entry, unless you have turned 2:OFF the
3:KEY BEEP in the menu system.
Location
• Do not use the scanner in high-moisture environments such
as the kitchen or bathroom.
• Avoid placing the unit in direct sunlight or near heating
elements or vents.
• If the scanner receives strong interference or electrical
noise, move it or its antenna away from the source of the
noise. If possible, a higher elevation, may provide better
reception.
Cleaning
• Disconnect the power to the unit before cleaning.
• Clean the outside of the scanner with a mild detergent.
To prevent scratches, do not use abrasive cleaners or
solvents. Be careful not to rub the LCD window.
• Do not use excessive amounts of water.
Repairs
• Do not attempt any repair. The scanner contains no user
serviceable parts. Contact the Uniden Customer Service
Center or take it to a qualified repair technician.
Birdies
• All radios can receive birdies (undesired signals). If your
scanner stops during Scan mode and no sound is heard, it
may be receiving a birdie. Birdies are internally generated
signals inherent in the electronics of the receiver.
Press L/O to lockout the channel, and then press RSM to
resume scanning.
63
Page 70

Troubleshooting
Problem Suggestion
Scanner won't work. 1. Check the connections at both ends of the AC Adapter.
2. Turn ON the wall switch of your room. You could be
using an outlet controlled by the wall switch.
3. Move the AC Adapter to another wall outlet.
Improper reception. 1. Check the antenna connection.
2. Move the scanner.
3. You may be in a remote area which could require an
optional multi-band antenna. Check with your dealer or
local electronics store.
Scan won't stop. 1. Adjust squelch threshold - refer to page 18, "Setting the
Squelch".
2. Check the antenna connection.
3. Check to see if many of the channels are Loc ked Out.
If so, the scanner has less chance of finding an
active channel.
4. Review each channels frequency to see if it is still
stored in Memory and is correct.
5. Its possible that none of the programmed frequencies
are currently active.
Scan won't start. 1. Press the
SCAN
key again.
2. Adjust squelch threshold - refer to page 18, "Setting the
Squelch".
3. Check to see if all channels are Lock ed Out.
Weather Scan won't work. 1. Adjust squelch threshold - refer to page 18, "Setting the
Squelch".
2. Check the antenna.
4. Check to see if Key Lock is ON (see page 23).
Problem Suggestion
Scanner won't track.
1. Missing the Data Frequency.
2. Change to a Type 1 Scanner setup.
Review "Appendix" on page 71.
Scanner won't stop 1. No IDs have been programmed.
during Scan List mode.
2. The IDs you have stored are not active.
Scanner will not acquire 1. Adjust the squelch for Trunking mode.
data channel. See page 18.
2. Missing the frequency used for the data channel.
Check your frequency list.
Missing replies 1. Change to a Type 1 scanner setup.
to conversations. Review "Appendix" on page 71.
2. Try another Preset Fleet Map or Program your own
Fleet Map.
3. Check to see that all of the systems frequencies
have been entered.
Channel Activity 1. May be a telephone interconnect call, which are
Indicators are flashing intentionally blocked by your scanner.
but no sound is heard.
2. The ID on your display is not activ e .
Scanner not tracking 1. Logical channel numbers (frequencies) for the system
an EDACS system are not programmed in the correct order.
properly. Check frequency resources and reprogram.
2. Not all frequencies for the system are programmed.
Check frequency resources.
If your BC296D is not performing properly, try the following
steps.
If you experience difficulty while in TrunkTracker mode, try the
following steps.
64
Page 71

If you still cannot get satisfactory results while using your
Problem Suggestion
APCO P25 CARD
NOT INSTALLED
appear when the scanner
is turned ON.
Neither APCO P25
CARD INSTALLED
9600 SYSTEM nor
APCO P25 CARD
NOT INSTALLED
appear when the scanner
is turned ON.
Scratchy or robotic sound
is heard during
communications.
Digital communication is
not heard.
DATA sound is heard at
the beginning of digital
communications.
Robotic sound is heard.
When CARD ERROR
appears every 10 seconds
while you are using P-25
Card.
1. Check to see if the P-25 Card is properly installed.
1. Check to see if the P-25 Card Mode is 1:ENABLE
or 2:DISABLE in the Menu mode.
1. Move to a location where the signal strength is
strong.
2. Modulation accuracy of transmissions sent can be
low.
1. Verify the accuracy of the frequencies of the P-25
system you are trying to monitor.
2. You might be in a dead-spot for the P-25 system you
are trying to monitor. Check other locations in the
area.
1. APCO project 25 systems can send data before
voice communication.
2. Data sound can be heard when signal strength is
weak.
1. Check to see if the ENC message appears on the
display.
The scanner doesn’t monitor encrypted voice
communications.
1. Re-install the P-25 Card.
scanner or if you want additional information, please call or
write the Uniden Parts and Service Division. The address and
phone number is listed in the warranty at the end of this
manual. If you would like immediate assistance, please call
Customer Service at (800)297-1023.
If you have internet access, you can visit
scanner.uniden.com for additional information.
65
Page 72

Specifications
Certified in accordance with FCC Rules and Regulations Part 15,
Subpart C, as of date of manufacture.
Channel: 1000
Banks: 10 (100 channels each)
Service Bands: 12 preprogrammed search bands
Frequency Range: 25.0 - 27.995 MHz AM
Operating Temperature:
Scan Rate: 100 channels per second MAX.
Search Rate: 100 steps per second MAX.
Scan Delay: 2 seconds
Audio Output: 240 mW nominal
Internal Speaker: 8 ohms (36 mm outer diameter)
Power Requirements: AD600U AC Adapter
Antenna: Rubber Antenna (included)
Antenna Jack: BNC type
External Jacks: DC 12 V Power Jack
Size: 65mm (W) x 45mm (D) x 153mm (H)
Weight: 350 g (12 3/8 oz.)
Features and specifications are all subject to change without notice.
(including the NOAA Weather
Service band)
28.0 - 53.99 MHz FM
54.0 - 71.95 MHz WFM
72.0 - 75.995 MHz FM
76.0 - 87.95 MHz WFM
88.0 - 107.9 MHz WFM
108.0 - 136.975 MHz AM
137.0 - 161.995 MHz FM
162.0 - 173.9875 MHz FM
174.0 - 215.95 MHz WFM
216.0 - 224.995 MHz FM
225.0 - 399.95 MHz AM
400.0 - 512.0 MHz NFM
806.0 - 823.9875 MHz NFM
849.0125 - 868.9875 MHz NFM
894.0125 - 956.0 MHz NFM
1240.0 - 1300.0 MHz NFM
–
20 °C to +60 °C (–4°F to 140°F)
(conventional mode)
(Normal Search)
300 steps per second MAX.
(Turbo Search)
(8Ω internal speaker)
38 mW nominal
(32Ω stereo headphone)
9 mW nominal
(64Ω earphone)
(12V DC, 500mA)
or
4.8V DC 1500mAh (internal battery)
(center is positive)
Remote Jack
Earphone Jack
66
Page 73

Glossary of Terms
Alpha tag - This term refers to an alphanumeric text tag that
you can enter to describe the individual frequencies that
you have programmed. Rather than having to associate a
specific frequency to the individuals that are using it, you
can enter the actual name of the group. This will eliminate
the need for memorizing the group’s frequency.
Attenuator - This scanner comes with a feature to attenuate
or reduce the signal strength. The built-in attenuator can be
turned on specific frequencies to prevent strong signals
from overloading the scanner input, possibly damaging the
scanner or missing other transmissions due to the repeated
stopping on the stronger signal.
Clone - This term identifies the ability to set up a duplicate
scanner. This function allows you to clone all the
programming information, including frequencies, talkgroups
and alpha tags as well as bank settings and other
parameters from one BC296D to another or BC796D.
Control Channel - This is the frequency within a trunking
system that runs the system. On Control Channels
(sometimes called Data Channels) you will hear a buzz saw
sound. For the most part, it is the sound of the system’s
central computer directing talkgroups to particular voice
(working) frequencies within the system.
CTCSS - (Continuous Tone Controlled Squelch System)
refers to a system where the radio receivers are equipped
with tone responsive devices which allow audio signals to
appear at the audio output, select voice processing such as
scrambling or control repeater functions only when a carrier
modulated with a specific tone is received. This method
may be used to restrict access to the repeater or receiver,
or reduce interference where several stations with output
frequencies in close proximity of each other make it difficult
to hear the conversation you are interested in. With CTCSS
squelching, you can eliminate the possibility of hearing
unwanted conversations by selecting one of the 38 standard
subaudible tones. You will only hear those transmissions
that have been programmed on specific frequencies with
the specific subaudible tone that you have selected.
DCS - (Digital Controlled Squelch) refers to a system where
the radio receivers are equipped with data burst responsive
devices which allow audio signals to appear at the audio
output, select voice processing such as scrambling or
control repeater functions only when a carrier modulated
67
Page 74

with specific data burst is received. This method may be
used to restrict access to the repeater or receiver, or reduce
interference where several stations with output frequencies
in close proximity of each other make it difficult to hear the
conversation you are interested in. With DCS squelching,
you can eliminate the possibility of hearing unwanted
conversations by selecting one of the 104 standard data
burst subaudible tones. You will only hear those
transmissions that have been programmed on specific
frequencies with the specific subaudible tone that you have
selected.
Enter Lock - This is the term used for locking the keypad.
This prevents accidental re-programming of channels and
talkgroups entered into memory. The default setting is OFF.
When ENTER LOCK is enabled, the following functions will
be disabled:
• Enter or modify the Memory Channel frequency
• Enter or modify the Tone information
• Enter or modify the Trunking ID. ( this can be modified
through the menu screen.)
FIPS Codes - For the purpose of broadcasting weather
information, the NWS (National Weather Service) has
divided the United States into regions by state and county
(or parish, where applicable) then assigned a 6 digit FIPS
code to identify each county or parish. The first digit
represents the county subdivision, the next two represents
the state, and the last three digits represent the county or
parish. Your scanner can receive all SAME alert signals
broadcasted within about a 50-mile radius of where you
install it. So if you only want to hear the counties that are
nearest to your area, you can choose specifically the FIPS
code of areas that you want. This lets you avoid hearing
warnings that apply to an area within a 50-mile radius but
not necessarily in your county or parish.
I-Call - Most communications within a trunked system are
group calls where one unit (such as a dispatcher)
communicates with all the units within her group (all the
patrol vehicles on the east side of town, for example).
The units within this group comprise what is typically known
as a talkgroup. There are some communications which are
direct unit-to-unit conversations where one individual
converses with another individual. The call is initiated by a
radio and is directed to another single radio. Within the
system, no one outside of these two users hears the
conversation. This call is referred to as I-Call.
68
Page 75

Key Beep - This is another term for the tone you hear as a
keypad acknowledgement beep. The default setting is on.
If you have turned the Key Beep off, you now have a silent
keypad. You will not hear a tone each time you press a key.
NWR S.A.M.E. Weather Alert - In 1994, the National
Oceanic and Atmospheric Administration (NOAA) began
broadcasting coded signals called FIPS (Federal
Information Processing System) codes along with the
standard weather broadcasts for stations in your area.
These codes identify an emergency and the specific
geographic area (such as your county) affected by the
emergency. The scanner was developed with SAME
(Specific Area Messaging Encoding) technology.
This allows you scanner to receive, interpret, and display
the information about the codes so you can determine if the
emergency might affect you area.Each FIPS code identifies
a specific geographic area (defined by the National Weather
Service) so your scanner sounds an alert only when a
weather emergency is declared in those locations.
This helps you more efficiently track the weather conditions
in and around your area.
PC Control - This term is associated with the ability to
program frequencies and other useful information via a
computer by means of third party software. You can change
the transfer speed on the scanner needed to be compatible
with your PC. (See page 61)
Scan List - When you designate a bank to be a trunking
bank, your scanner sets up 10 Scan Lists, which are simply
list of your favorite IDs. Each list can contain up to 10 IDs,
so you can store a total of 100 IDs for each trunk bank.
These lists are designed to help you organize the trunking
system users into categories.
Screen Mask - Screen Mask reduces the amount of
information that appears on the display. Alpha tags that you
have set for a channel along with a few function icons will
appear only on the display. This mode is particularly useful
in public safety vehicles where that are already overloaded
with information. Screen Mask does not work in Search
mode.
Status Bit - This term refers to Motorola Type II systems.
There is a method by which special types of
communications utilize unique talk group numbers.
For example, if all emergency calls are set to occur on a
specific talk group number then you will not miss the
transmission even if you have not programmed all the talk
group numbers. With the Status Bit on and you have
programmed the unique number, then you don’t have to
69
Page 76

worry what the rest of the groups numbers are. The topic of
interest will be picked up.
Talkgroup - A group of users within a trunked system that
communicates with one another.
70
Page 77

Appendix
Preset Map 1
Size Code
SIZE CODE 11
SIZE CODE 11
SIZE CODE 11
SIZE CODE 11
SIZE CODE 11
SIZE CODE 11
SIZE CODE 11
SIZE CODE 11
Block
1
0
2
3
4
5
6
7
Preset Map 2
Size Code
SIZE CODE 4
SIZE CODE 4
SIZE CODE 4
SIZE CODE 4
SIZE CODE 4
SIZE CODE 4
SIZE CODE 4
SIZE CODE 4
Block
1
0
2
3
4
5
6
7
Preset Map 3
Size Code
SIZE CODE 4
SIZE CODE 4
SIZE CODE 4
SIZE CODE 4
SIZE CODE 4
SIZE CODE 4
SIZE CODE 12
(SIZE CODE 12)
Block
1
0
2
3
4
5
6
7
Preset Map 5
Size Code
SIZE CODE 4
SIZE CODE 4
SIZE CODE 12
(SIZE CODE 12)
SIZE CODE 4
SIZE CODE 4
SIZE CODE 4
SIZE CODE 4
Block
1
0
2
3
4
5
6
7
Preset Map 7
Size Code
SIZE CODE 10
SIZE CODE 10
SIZE CODE 11
SIZE CODE 4
SIZE CODE 4
SIZE CODE 4
SIZE CODE 4
SIZE CODE 4
Block
1
0
2
3
4
5
6
7
Preset Map 8
Size Code
SIZE CODE 1
SIZE CODE 1
SIZE CODE 2
SIZE CODE 2
SIZE CODE 3
SIZE CODE 3
SIZE CODE 4
SIZE CODE 4
Block
1
0
2
3
4
5
6
7
Preset Map 6
Size Code
SIZE CODE 3
SIZE CODE 10
SIZE CODE 4
SIZE CODE 4
SIZE CODE 12
(SIZE CODE 12)
SIZE CODE 12
(SIZE CODE 12)
Block
1
0
2
3
4
5
6
7
Preset Map 4
Size Code
SIZE CODE 12
(SIZE CODE 12)
SIZE CODE 4
SIZE CODE 4
SIZE CODE 4
SIZE CODE 4
SIZE CODE 4
SIZE CODE 4
Block
1
0
2
3
4
5
6
7
Preset Fleet Maps
71
Page 78

Preset Map 9
Preset Map 11
Preset Map 13
Preset Map 15 Preset Map 16
Preset Map 14
Preset Map 12
Preset Map 10
Size Code
SIZE CODE 4
SIZE CODE 4
SIZE CODE 0
SIZE CODE 0
SIZE CODE 0
SIZE CODE 0
SIZE CODE 0
SIZE CODE 0
Block
1
0
2
3
4
5
6
7
Size Code
SIZE CODE 0
SIZE CODE 0
SIZE CODE 0
SIZE CODE 0
SIZE CODE 0
SIZE CODE 0
SIZE CODE 4
SIZE CODE 4
Block
1
0
2
3
4
5
6
7
Size Code
SIZE CODE 4
SIZE CODE 0
SIZE CODE 0
SIZE CODE 0
SIZE CODE 0
SIZE CODE 0
SIZE CODE 0
SIZE CODE 0
Block
1
0
2
3
4
5
6
7
Size Code
SIZE CODE 3
SIZE CODE 3
SIZE CODE 11
SIZE CODE 4
SIZE CODE 4
SIZE CODE 0
SIZE CODE 0
SIZE CODE 0
Block
1
0
2
3
4
5
6
7
Size Code
SIZE CODE 4
SIZE CODE 4
SIZE CODE 4
SIZE CODE 11
SIZE CODE 11
SIZE CODE 0
SIZE CODE 12
(SIZE CODE 12)
Block
1
0
2
3
4
5
6
7
Size Code
SIZE CODE 3
SIZE CODE 10
SIZE CODE 10
SIZE CODE 11
SIZE CODE 0
SIZE CODE 0
SIZE CODE 12
(SIZE CODE 12)
Block
1
0
2
3
4
5
6
7
Size Code
SIZE CODE 4
SIZE CODE 3
SIZE CODE 10
SIZE CODE 4
SIZE CODE 4
SIZE CODE 4
SIZE CODE 12
(SIZE CODE 12)
Block
1
0
2
3
4
5
6
7
Size Code
SIZE CODE 0
SIZE CODE 0
SIZE CODE 0
SIZE CODE 0
SIZE CODE 0
SIZE CODE 0
SIZE CODE 0
SIZE CODE 4
Block
1
0
2
3
4
5
6
7
72
Page 79

User Defined Fleet Maps
Block
(1 digit)
Subfleet
(1 or 2 digits)
Which Fleet
within the Block
(2 or 3 digits)
Type I Programming Information
When a Type I system is designed, the address information
for all the IDs are divided into 8 equal sized blocks. When you
program your scanner to track a Type I system, you must
select a size code for each of these blocks. When you have
assigned a size code to all 8 blocks, you have defined the
Fleet Map for the system you're tracking. Each size code
determines the number of Fleets, Subfleets, and IDs each
block will have. For example, a size code of "4" has one Fleet,
which is divided into 16 separate Subfleets, and it has a total
of 512 individual IDs.
When a block is assigned a size code, the Fleet or Fleets
created within the block are assigned a Type I ID. The way
these IDs display on your scanner depends on the block
number and the blocks size code. When a Type I ID displays,
the left most digit represents the block which contains the ID.
The next two or three digits identify which Fleet is active, and
the last digit(s) identifies the Subfleet.
The details concerning how the size codes are selected by a
Type I system designer are highly dependent on the specific
needs of the systems users. Some organizations may want
many subfleets with only a few radios each, while another
organization may want only a few subfleets with many radios
each. Your task is to program your fleet map with the same
size code assignments as the trunked system. If you do this
accurately, you'll track all the Fleet-Subfleet combinations
used by the system. In other words, you'll hear complete
communications while monitoring a trunked system.
If you don't already know the size codes used, you'll have to
guess at them. But since you don't have to figure out all the
blocks at once, this isn't as hard as it seems. Select a size
code for a block, and then press SCAN. Now listen to the
communications. If you decide you are receiving most of the
replies to the conversations with IDs assigned to the block
you just programmed, then you've probably selected the right
size code and can work on the next block of the map.
73
Page 80

Finally, for most public safety systems there are some size
Size Fleets Subfleets IDs
Blocks
Used
0 Reserves block for Type II IDs +
1 128 4 16 1
216 8 64 1
38 8 128 1
41 16 512 1
564 4 32 1
632 8 32 1
732 4 64 1
816 4 128 1
98 4 256 1
10 4 8 256 1
11 2 16 256 1
12 1 16 1024 2
13 1 16 2048 4
14 1 16 4096 8
codes which are more common. SIZE CODE 3 and SIZE
CODE 4 are probably the most common, followed by SIZE
CODE 10, SIZE CODE 11, and SIZE CODE 12.
Fleet Map Size Codes
Size Code Restrictions
If you select SIZE CODE 12, 13, or 14, there are some
restrictions as to which blocks can be used for these codes.
• SIZE CODE 12 can only be assigned to Blocks 0, 2, 4,
or 6.
• SIZE CODE 13 can only be assigned to Blocks 0 and 4.
• SIZE CODE 14 can only be assigned to Block 0.
Since these SIZE CODES require multiple blocks, you will be
prompted for the next available block when programming a
Fleet Map. For example, if you assign Block 0 as an SIZE
CODE 12, you will be prompted for Block 2, the next block
available, instead of Block 1. And if you assign Block 0 as
SIZE CODE 14, you would not see another prompt because
all available blocks have been used.
74
Page 81

Hurricane/Tropical Storm Warning HUW 0 HURRICANE
Tsunami Warning TSW 0 TSUNAMI
Coastal Flood Warning CFW 0 COASTAL FLOOD
Special Marine Warning SMW 0 SPECIAL MARINE
Avalanche Warning AVW 0 AVALANCHE
Volcano Warning VOW 0 VOLCANO
Shelter In Place Warning SPW 0 SHELTER
Civil Danger Watch CDA 0 CIVIL DANGER
Radiological Hazard Watch RHA 0 RADIOLOGICAL
Hazardous Material Watch HMA 0 HAZARDOUS
Winter Storm Watch WSA 0 WINTER STORM
High Wind/ Dust Storm Watch HWA 0 HIGH WIND
Tornado Watch TOA 0 TORNADO
Severe Thunderstorm Watch SVA 0 THUNDERSTORM
Flash Flood Watch FFA 0 FLASH FLOOD
Flood Watch FLA 0 FLOOD
Hurricane/ Tropical Storm Watch HUA 0 HURRICANE
Tsunami Watch TSA 0 TSUNAMI
Coastal Flood Watch CFA 0 COASTAL FLOOD
Avalanche Watch AVA 0 AVALANCHE
Volcano Watch VOA 0 VOLCANO
Event Code Standard Event Level (Siren Type) LCD Display
Warning Watch Statement Test
Emergency Action Notification EAN 0 EMG NOTIFY
Emergency Action Termination EAT 0 EMG TERMINATE
National Information Center NIC 0 NATIONAL INFO
Tornado Warning # TOW
(or TOR)
0 TORNADO
Service Thunderstorm Warning # SVW
(or SVR)
0 THUNDERSTORM
Flash Flood Warning FFW 0 FLASH FLOOD
Flash Warning FLW 0 FLOOD
Winter Storm Warning WSW 0 WINTER STORM
Blizzard Warning BZW 0 BLIZZARD
High Wing/ Dust Storm Warning HWW 0 HIGH WIND
Radio logical Hazard Warning RHW 0 RADIOLOGICAL
Civil Danger Warning CDW 0 CIVIL DANGER
Local Area Emergency LAE 0 LOCAL EMG
Hazardous Material Warning HMW 0 HAZARDOUS
Civil Emergency Message CEM 0 CIVIL EMG
Immediate Evacuation Warning IEW 0 EVACUATION
Immediate Evacuation Notice EVI 0 EVACUATE NOTE
Law Enforcement Warning LEW 0 LAW ENFORCEMENT
Fire Warning FRW 0 FIRE
NWR-SAME EVENT CODE
75
Page 82

Event Code Standard
Event Level (Siren Type)
LCD Display
Warning Watch Statement Test
Severe Weather Statement SVS 0 SEVERE WX
Special Weather Statement SPS 0 SPECIAL WX
Flash Flood Statement FFS 0 FLASH FLOOD
Flood Statement FLS 0 FLOOD
Hurricane Statement HLS 0 HURRICANE
National Periodic Test NPT 0 NATION PERIOD
Required Monthly Test RMT 0 MONTHLY
Required Weekly Test RWT 00WEEKLY
System Demonstration/ Practice DMO Note SYSTEM DEMO
National Hazard Warning NHW 0 NATION HAZARD
Unknown Emergency Tune TV **E 0 UNKNOWN TV
Unknown Warning Tune TV **W 0 UNKNOWN TV
Unknown Watch Tune TV **A 0 UNKNOWN TV
Unknown Statement Tune TV **S 0 UNKNOWN TV
Administrative Message ADR 0 ADMIN MESSAGE
Child Abduction Emergency CAE CHILD EMERGENCY
Dusd Storm Warning DSW DUST STORM
Earthquake Warning EQW EARTHQUAKE
Network Message Notification NMN 0
0
NETWORK MESSAGE
911 telephone Outage Emergency TOE
0
911 PHONE OUTAGE
Nuclear Power Plant Warning NUW
0
NUCLEAR PLANT
Tropical Storm Warning TRW TROPICAL STORM
Tropical Storm Watch TRA
0
TROPICAL STORM
Dust Storm Watch DSA
0
0
DUST STORM
Earthquake Watch EQA
0
0
0
Missing Child Statement MIS
0
MISSING CHILD
Nuclear Power Plant Test Messag NPM NUCLEAR PLANT
Nuclear Power Plant Warning NPW 0 NUCLEAR PLANT
Nuclear Power Plant Warning NPP 0 NUCLEAR PLANT
School Closing Statement SCS
0
0
Dam Break Warning DBW DAM BREAK
EATHQUAKE
SCHOOL CLOSING
Note: Demo alerts are displayed but no audible alert is generated.
Range Offset
29.520 - 29.580 +0.1 MHz
29.620 - 29.680 -0.1 MHz
52.010 - 52.990 +1 MHz
53.010 - 53.990 -1 MHz
143.750 +4.375 MHz
143.900 +4.25 MHz
144.510 - 144.890 +0.6 MHz
145.110 - 145.490 -0.6 MHz
146.010 - 146.385 +0.6 MHz
146.415 - 146.505 +1 MHz
146.595 +1 MHz
146.610 - 146.985 -0.6 MHz
147.000 - 147.390 +0.6 MHz
147.415 - 147.505 -1 MHz
147.595 -1 MHz
147.600 - 147.990 -0.6 MHz
148.125 -4.375 MHz
148.150 -4.25 MHz
222.120 - 223.380 +1.6 MHz
223.720 - 224.980 -1.6 MHz
420.000 - 424.9875 +5 MHz
425.000 - 429.9875 -5 MHz
440.000 - 444.9875 +5 MHz
REVERSE LIST
Range Offset
445.000 - 449.9875 -5 MHz
450.000 - 454.9875 +5 MHz
455.000 - 459.9875 -5 MHz
460.000 - 464.9875 +5 MHz
465.000 - 469.9875 -5 MHz
470.000 - 472.9875 +3 MHz
473.000 - 475.9875 -3 MHz
476.000 - 478.9875 +3 MHz
479.000 - 481.9875 -3 MHz
482.000 - 484.9875 +3 MHz
485.000 - 487.9875 -3 MHz
488.000 - 490.9875 +3 MHz
491.000 - 493.9875 -3 MHz
494.000 - 496.9875 +3 MHz
497.000 - 499.9875 -3 MHz
500.000 - 502.9875 +3 MHz
503.000 - 505.9875 -3 MHz
506.000 - 508.9875 +3 MHz
509.000 - 511.9875 -3 MHz
806.000 - 823.9875 +45 MHz
851.000 - 868.9875 -45 MHz
896.000 - 901.000 +39 MHz
935.000 - 940.000 -39 MHz
The reverse frequency for trunked systems is determined by
the trunking system settings and can vary from the standard
band plans.
76
Page 83

CTCSS Frequency List (Hz)
DCS Tone Code
67.0
91.5
118.8
156.7
210.7
71.9
94.8
123.0
162.2
218.1
74.4
97.4
127.3
167.9
225.7
77.0
100.0
131.8
173.8
233.6
79.7
103.5
136.5
179.9
241.8
82.5
107.2
141.3
186.2
250.3
85.4
110.9
146.2
192.8
88.5
114.8
151.4
203.5
023
051
114
143
174
245
266
332
411
452
506
612
703
025
053
115
145
205
246
271
343
412
454
516
624
712
026
054
116
152
212
251
274
346
413
455
523
627
723
031
065
122
155
223
252
306
351
423
462
526
631
731
032
071
125
156
225
255
311
356
431
464
532
632
732
036
072
131
162
226
261
315
364
432
465
546
654
734
043
073
132
165
243
263
325
365
445
466
565
662
743
047
074
134
172
244
265
331
371
446
503
606
664
754
77
Page 84

123456789
0
WEATHER
PUBLIC SAFETY
NEWS
TV BROADCAST
HAM RADIO
MARINE
RAILROAD
AIR
CB RADIO
FRS & GMRS
RACING
SPECIAL
CHAIN SEARCH
1
2
MONITOR
ALERT
1: ON
FIPS CODE 1::
FIPS CODE15
ALL FILPS CODE
12345
6
CHAIN SEARCH
SEARCH RANGE
(RANGE NO. SELECT)
DELAY
ATTENUATOR
TONE DATA
AUTO STORE
1: ON/ 2:OFF
1: ON/ 2:OFF
1: ON/ 2:OFF
1: CTCSS/ 2: DCS/ 3: OFF
1: ON/ 2:OFF
1
2
345
RANGE
STEPS
MODE
ALPHA TAG
TRUNK
1 SERVICE OPTION
2: OFF
ENTER LOWER, ENTER UPPER
1: 5KHz/2: 6.25KH/3: 7.5KH/4: 10KHz/5: 12.5KHz/
6: 25KHz/7: 50KHz/8: 100KHz/9: AUTO
1: AM/2: FM/3: WFM/4: NFM/5: AUTO
PLAN 1
PLAN 2
PLAN 3
PLAN 4
1:ON
2:OFF
BC296D Flow Charts
78
Page 85

1 2
CONVENTIONAL
(CHANNEL SELECT)
TRUNK
(BANK SELECT)
12345
6 7
FREQUENCY
DELAY
TONE DATA
BEEP ALERT
ATTENUATOR
STEPS
MODE
FREQUENCY
1: ON/ 2:OFF
1: CTCSS/2: DCS/ 3: OFF
1: ON/ 2:OFF
1: ON/ 2:OFF
1: 5KHz/ 2: 6.25KHz/ 3: 7.5KHz/
4: 10 KHz/ 5: 12.5 KHz/ 6: 25 KHz/
7: 50 KHz/ 8: 100 KHz/ 9: AUTO
1:AM/ 2:FM/ 3:WFM/ 4:NFM
ALPHA TAG
1
2
3 4
5
678 89900
TRUNK TYPE
TRUNK CHANNEL
(CHANNEL SELECT)
TALK GROUP
(ID NO. SELECT )
DELAY
ID LIST TAG
L/O ID REVIEW
ACTIVITY ID
I-CALL
(MOTOROLA/ EDACS)
ID SCAN LIST (LTR)
EMERGENCY ALT
STATUS BIT (MOTOROLA)
EDACS ID FORM (EDACS)
END CODE (MOTOROLA)
CNTRL CH ONLY
(TYPE1/ TYPE2 800,900)
1
2
1: ON/ 2: OFF
1: ON/ 2: OFF
1: ON/ 2: OFF/ 3: ONLY 1: ON/ 2: OFF
1: ON/ 2: OFF
1: AFS/ 2: DECIMAL
1: DETECT/ 2: IGNORE
(TYPE2 800/TYPE1 SYSTEM)
1: PLAN1/ 2: PLAN2/ 3: PLAN3/
4: PLAN4/ 5: OFF
(TYPE 2 900 SYSTEM)
1: ON/ 2: OFF
FREQUENCY
STEPS
ALPHA TAG
1: 5KHz/2: 6.25 KHz/ 3: 7.5KH/ 4: 10KHz/
5: 12.5KHz/6: 25KHz/7: 50KHz/8: 100KHz/
9: AUTO
1
2
3 4 5
678
9
1
2
ON
OFF
TYPE2/P25 800
TYPE1 TYPE2/P25 900 TYPE2/P25 UHF TYPE2/P25 VHF EDCS WIDE
EDCS NARROW
EDCS SCT.
LT
123
ID
ALPHA TAG
BEEP ALERT
SET FLEET
MAP USER
CUSTOM /
PRESET 1-16 SET BASE
CONFIG 1-3
SET BASE
CONFIG 1-3
ENTER SPACE
FREQUENCY ENTER SPACE
FREQUENCY
ENTER
OFFSET
CHANNEL
ENTER
OFFSET
CHANNEL
2 SCAN OPTION
ENTER BASE
FREQUENCY ENTER BASE
FREQUENCY
79
Page 86

1
234
5
678 9 0
DIMMER
SCREEN MASK
KEY BEEP
ENTER LOCK
PC CONTROL
CLONE
DATA S KI P
SQ MODE BANK TAG
(SELECT BANK)
P-25 CARD
BATTERY SAVE
DIMMER LIGHT
DIMMER TIME
1: ON/ 2:OFF
1: ON/ 2:OFF
1: ON/ 2:OFF
1: 2400 bps / 2: 4800 bps /
3: 9600 bps/ 4: 19200 bps/
5: 38400 bps/ 6: 57600 bps/
7: OFF
MASTER / SLAVE
1: ON/ 2:OFF
1: CSQ/ 2: TONE SQ/
3: TONE SEARCH
1: ENABLE/ 2: DISABLE
1: ON/ 2: OFF
1: HIGH/ 2: MEDIUM
1: 15SECONDS/ 2: INFINITE
3 SYSTEM OPTION
80
Page 87

One Year Limited Warranty
Important: Evidence of original purchase is required for warranty
service.
WARRANTOR: UNIDEN AMERICA CORPORATION (Uniden)
ELEMENTS OF WARRANTY: Uniden warrants, for one year, to the
original retail owner, this Uniden product to be free from defects in
materials and craftsmanship with only the limitations or exclusions
set out below.
WARRANTY DURATION: This warranty to the original user shall
terminate and be of no further effect 12 months after the date of
original retail sale. The warranty is invalid if the Product is
(A) damaged or not maintained as reasonable or necessary,
(B) modified, altered, or used as part of any conversion kits,
subassemblies, or any configurations not sold by Uniden,
(C) improperly installed, (D) serviced or repaired by someone other
than an authorized Uniden service center for a defect or malfunction
covered by this warranty, (E) used in any conjunction with equipment
or parts or as part of any system not manufactured by Uniden, or
(F) installed or programmed by anyone other than as detailed by the
owners manual for this product.
STATEMENT OF REMEDY: In the event that the product does not
conform to this warranty at any time while this warranty is in effect,
warrantor will either, at its option, repair or replace the defective unit
and return it to you without charge for parts, service, or any other cost
(except shipping and handling) incurred by warrantor or its
representatives in connection with the performance of this warranty.
Warrantor, at its option, may replace the unit with a new or
refurbished unit. THE LIMITED WARRANTY SET FORTH ABOVE
IS THE SOLE AND ENTIRE WARRANTY PERTAINING TO THE
PRODUCT AND IS IN LIEU OF AND EXCLUDES ALL OTHER
WARRANTIES OF ANY NATURE WHATSOEVER, WHETHER
EXPRESS, IMPLIED OR ARISING BY OPERATION OF LAW
INCLUDING, BUT NOT LIMITED TO ANY IMPLIED WARRANTIES
OF MERCHANTABILITY OR FITNESS FOR A PARTICULAR
PURPOSE. THIS WARRANTY DOES NOT COVER OR PROVIDE
FOR THE REIMBURSEMENT OR PAYMENT OF INCIDENTAL
OR CONSEQUENTIAL DAMAGES. Some states do not allow this
exclusion or limitation of incidental or consequential damages so the
above limitation or exclusion may not apply to you.
LEGAL REMEDIES: This warranty gives you specific legal rights,
and you may also have other rights which vary from state to state.
This warranty is void outside the United States of America.
PROCEDURE FOR OBTAINING PERFORMANCE OF WARRANTY:
If, after following the instructions in the owners manual you are certain
that the product is defective, pack the Product carefully (preferably
in its original packaging). The product should include all parts and
accessories originally packaged with the Product. Include evidence
of original purchase and a note describing the defect that has caused
you to return it. The Product should be shipped freight prepaid, by
traceable means, to warrantor at:
UNIDEN AMERICA CORPORATION
Parts and Service Division
4700 Amon Carter Boulevard
(800) 554-3988, 7 a.m. to 5 p.m. Central Time, Monday through
Fort Worth, TX 76155
Friday
81
Page 88

 Loading...