

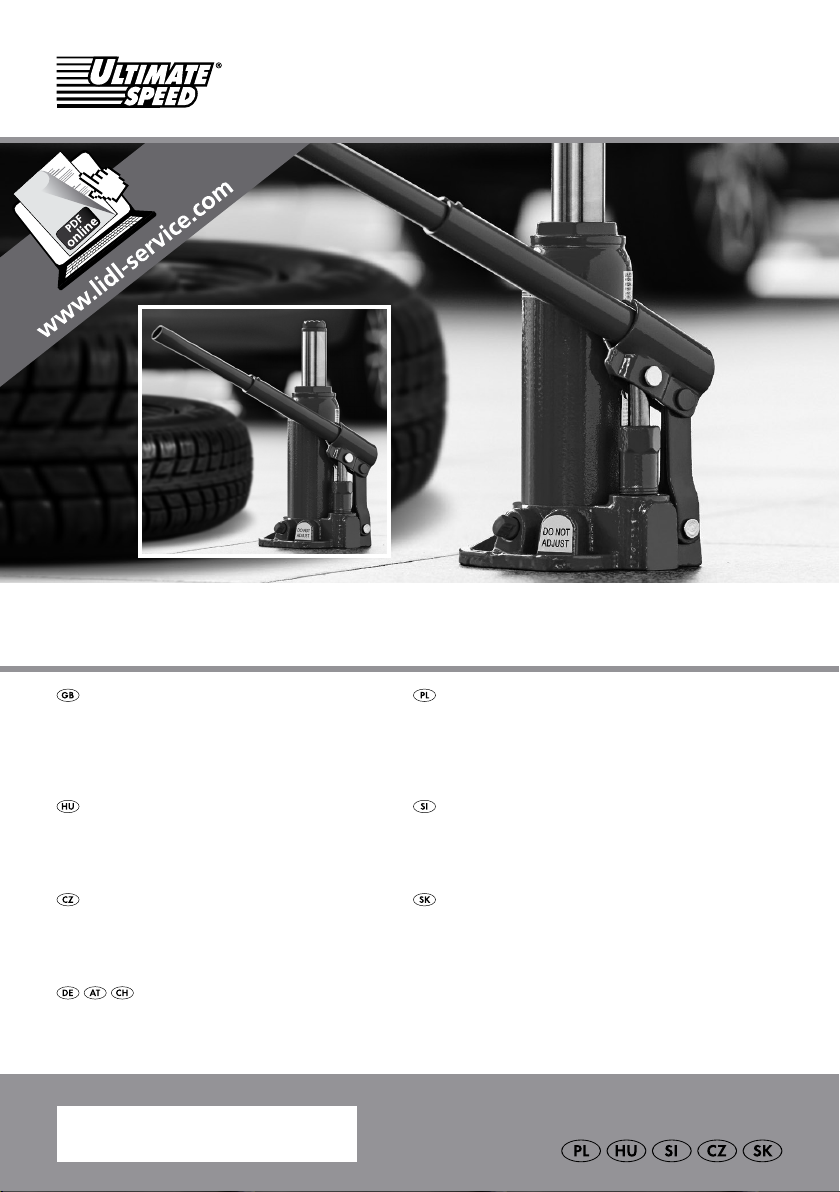
Page 1
HYDRAULIC BOTTLE JACK
HYDRAULIC BOTTLE JACK
Operation and Safety Notes
Translation of original operation manual
HIDRAULIKUS AUTÓEMELŐ
Kezelési és biztonsági utalások
Az originál használati utasítás fordítása
HYDRAULICKÝ ZVEDÁK
Pokyny pro obsluhu a bezpečnostní pokyny
Překlad originálního provozního návodu
HYDRAULIK-WAGENHEBER
Bedienungs- und Sicherheitshinweise
Originalbetriebsanleitung
IAN 100540
HYDRAULICZNY PODNOŚNIK
SAMOCHODOWY
Wskazówki dotyczące obsługi i bezpieczeństwa
Tłumaczenie oryginalnej instrukcji obsługi
HIDRAVLIČNA DVIGALKA ZA AVTOMOBILE
Navodila za upravljanje in varnostna opozorila
Prevod originalnega navodila za uporabo
HYDRAULICKÝ ZDVIHÁK
Pokyny pre obsluhu a bezpečnostné pokyny
Preklad originálneho návodu na obsluhu
Page 2

GB Operation and Safety Notes Page 4
PL Wskazówki dotyczące obsługi i bezpieczeństwa Strona 10
HU Kezelési és biztonsági utalások Oldal 16
SI Navodila za upravljanje in varnostna opozorila Stran 22
CZ Pokyny pro obsluhu a bezpečnostní pokyny Strana 28
SK Pokyny pre obsluhu a bezpečnostné pokyny Strana 34
DE / AT / CH Bedienungs- und Sicherheitshinweise Seite 40
Page 3
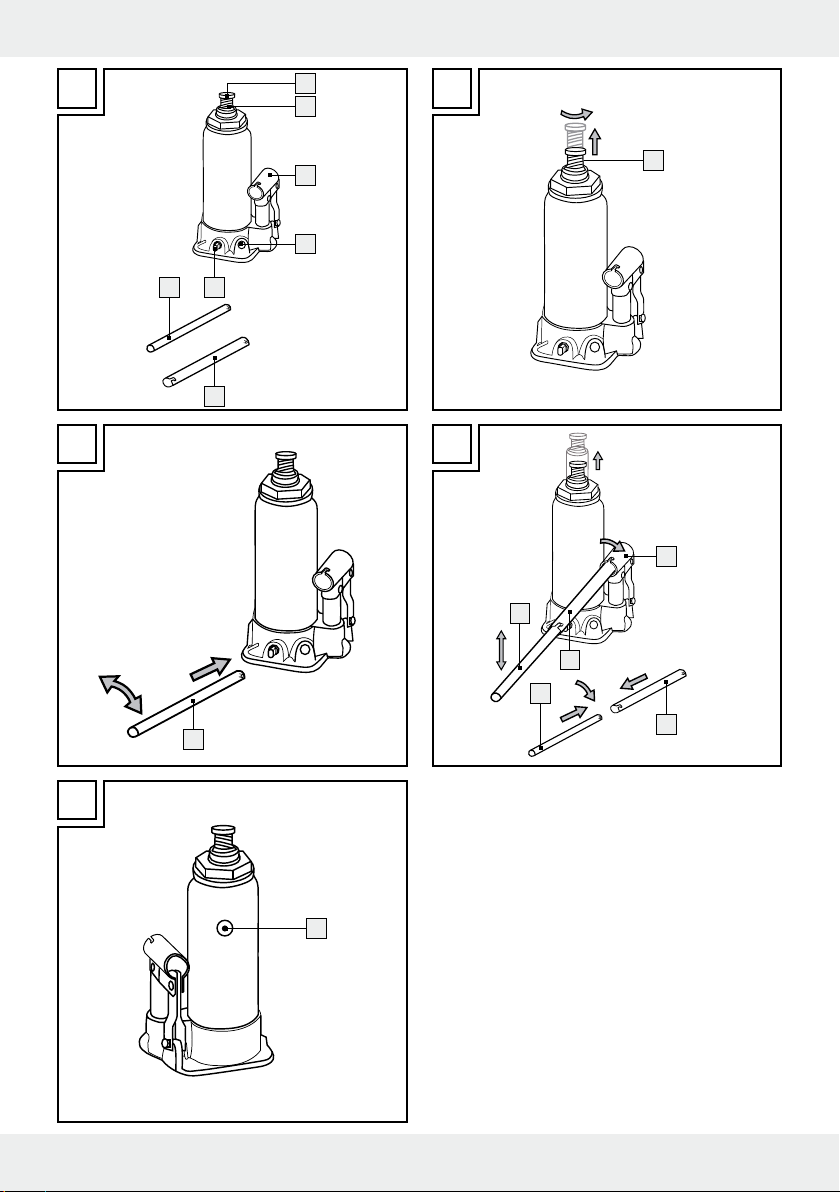
1
2
BA
C
3
4
5
7
6
2
D
3
7
6
7
7
6
E
8
3
Page 4

Proper use ...................................................................................................................................... Page 5
Description of parts ................................................................................................................Page 5
Technical data .............................................................................................................................. Page 5
Included items ............................................................................................................................. Page 5
Safety notes .................................................................................................................................. Page 5
Use
Raising the vehicle...............................................................................................................................Page 6
Lowering the vehicle ...........................................................................................................................Page 6
Cleaning and Care ................................................................................................................... Page 7
Maintenance and storage
Topping up the hydraulic oil / greasing ............................................................................................. Page 7
Removing air from the hydraulic system ............................................................................................ Page 7
Storing..................................................................................................................................................Page 7
Troubleshooting ........................................................................................................................Page 8
Disposal ............................................................................................................................................ Page 8
Informations
Declaration of Conformity .................................................................................................................. Page 8
4 GB
Page 5
Hydraulic Bottle Jack
Q
Proper use
The hydraulic vehicle jack is intended for raising and
lowering motor vehicles. Other uses or modification
of the hydraulic vehicle jack shall be considered as
improper use and may lead to injury or damage.
The manufacturer will not accept liability for loss or
damage arising from improper use. The product is
not intended for commercial use.
Note: Reclose the release valve
Q
Description of parts
1
Support plate
2
Extension screw
3
Lifting handle socket
4
Safety valve
5
Release valve
6
Lifting handle (for pump mechanism)
7
Rod (for release valve)
8
Oil plug
Q
Technical data
Stroke: approx. 18.5 - 36 cm
Maximum load: 3000 kg
Weight: approx. 3.0 kg
Hydraulic oil: Complies with ISO VG 15
Q
Included items
1 Hydraulic vehicle jack
1 Lifting handle
1 Rod for release valve
1 Operating instructions
5
after each use!
Safety notes
DANGER! Follow the instructions below to
avoid the threat of loss of life, injury, or damage
to the product etc.
J Always use axle stands and wheel chocks in
addition to your hydraulic vehicle jack. Never
work under a raised vehicle unless you have
taken additional safety precautions. This is
intended to prevent the vehicle from rolling
away, sliding off or overturning the jack.
J Use the product on a solid, level surface only.
Using the product on an unstable or uneven
surface – such as a gravel surface – may lead
to the load slipping.
J
J The person operating the jack must observe the
J Never work under the raised load if it has not
J Do not allow the hydraulic vehicle jack to be
J Before using the hydraulic vehicle jack take
J Even with safety measures in place always
J Make sure that no petrol, battery acid or
J Check that no person or object is under the
J Lower the vehicle slowly.
J Check that all parts have been assembled and
J Before each use check that the hydraulic vehicle
Ensure that you never exceed the
3000
allowable (rated) load capacity.
kg
jack and the load during all movements.
been made secure by suitable means.
used by uninstructed or inexperienced persons.
precautions to prevent the vehicle from rolling
away. Put the handbrake on, place the vehicle
in gear (with automatic gearboxes set to “P”)
and chock the wheels.
remain alert and make a visual check that the
support plate
1
is firmly seated against the
vehicle jacking point.
any other dangerous substance can flow out of
the vehicle when the vehicle is being lifted.
vehicle before you lower it.
fitted properly and are undamaged.
jack is working properly. Check the screws and
valves of the hydraulic vehicle jack for correct
seating and look out for hydraulic oil leaks in
particular.
5 GB
Page 6
J Never use the hydraulic vehicle jack for mov-
ing or loading a vehicle. Never use it to lift a
whole vehicle completely off the ground.
J Make sure that no-one – especially a child
– is in the vehicle and that everyone is kept at
an adequate distance away from the vehicle
when the hydraulic vehicle jack is in use.
J Never change the setting of the safety valve
4
It is preset to the correct setting in the factory
and must never be readjusted later.
J Do not use the hydraulic car jack if the sealing
(safety valve
4
) is damaged.
J Before using the vehicle jack, the user must be
made familiar with the device by an experienced
person. The pump force and the transferred
force are equal to approximately 350 N.
J If the markings on the product are damaged
enough so as to be illegible then the vehicle
jack must not be used until the markings are
renewed.
J No modifications may be carried out to the
hydraulic bottle jack. Any physical modification of the device and its compliance with
EN 1494 / A1: 2008.
J The applied force when using the vehicle jack
must not exceed 350 N. The equates to a
force on the lever of approximately 35 kg.
J
CAUTION! RISK OF SHEARING
AND CRUSHING INJURY! Keep
your fingers away from the area of
the lifting handle socket
3
while pumping.
Failure to observe this advice may result in
shearing and crushing injury.
The operating temperature of the hydraulic oil
of this equipment is between -20 °C to +40 °C.
Do not use this equipment in rooms exposed to
fire hazards, where flammable or explosive
vapours or dusts may be present (e.g. in stables, barns or paint shops).
Only use this device to lift and lower the vehicle,
not to keep the vehicle in a lifted position. Do
not move it whilst raising or lowering.
Do not use the equipment if oil leaks are present.
After use return all parts used into their original
position. Have the hydraulic oil or oil pump
replaced by a professional if the parts can no
longer be moved.
Q
Use
Q
Raising the vehicle
CAUTION! RISK TO LIFE! Check that the
vehicle jack and axle stands are in an undamaged
condition before you use them. Ensure that the
hydraulic vehicle jack is used only in combination
.
with axle stands. Have your axle stands to hand before raising the vehicle. If you do not use axle stands,
the vehicle may tip over and cause a risk to life.
Follow these steps:
j
Ensure that the support plate 1 is fully lowered
and the extension screw
2
is completely
screwed in before you put away the vehicle jack.
j
Place the hydraulic vehicle jack in the desired
position. In choosing the position, observe the
provisions of the owner‘s manual for your vehicle.
j
If necessary screw out the extending screw 2
until it comes into contact with the underside of
the vehicle (Fig. B).
j
Connect the rod 7 to the lifting handle 6 to
extend the lifting handle.
J
CAUTION! RISK OF SHEARING
AND CRUSHING INJURY! Keep
your fingers away from the area of
the lifting handle socket
3
while pumping.
Failure to observe this advice may result in
shearing and crushing injury.
j
Guide the end of the lifting handle 6 into the
lifting handle socket
3
and pump the vehicle
up to the desired height (Fig. D).
j
Place the axle stands under the designated
jacking points under the vehicle.
j
Relieve the load from the vehicle jack by placing the rod
release valve
7
with the oval opening on to the
5
, then turning the rod 7 slightly
anticlockwise before turning it back immediately.
The support plate
1
drops slightly and the
vehicle is held on the axle stands.
Q
Lowering the vehicle
DANGER TO LIFE! Check that no person or
object is under the vehicle before you lower it.
6 GB
Page 7

CAUTION! Lower the vehicle slowly, other-
wise there is the danger of injury and damage
to the product or to the vehicle.
j
First raise the vehicle slightly in order to be able
to remove the axle stands. Proceed as described
in the section on „Raising the vehicle“.
j
Remove the axle stands.
j
Place the rod 7 with oval opening on to the
release valve
5
and turn the rod slowly anti-
clockwise (Fig. C). The vehicle is lowered slowly.
Note: The more quickly the rod
7
is turned
anticlockwise, the faster the vehicle is lowered.
Therefore you should proceed very cautiously
at first in order to get a feeling for the correct
speed.
j
Lower the support plate 1 until it is no longer
loaded. Then pull the vehicle jack out from
under the vehicle. Press down on the support
1
plate
j
j
j
until it is fully lowered.
Close the release valve 5 by turning the rod 7
on the release valve
5
clockwise.
Take the rod 7 off the release valve 5.
If it is extended, screw the extension screw 2
back down into the jack body.
Q
Cleaning and Care
j Liberally grease all external moving parts.
j Clean the hydraulic trolley jack using a slightly
oily cloth.
j Never use harsh or corrosive cleaning agents.
Q
Maintenance and storage
Q
Topping up the
hydraulic oil / greasing
Note: Use only hydraulic oil that complies with
ISO VG 15.
j
Place the rod 7 with oval opening on to the
release valve
(Fig. C) until the support plate
j
Pull the oil plug 8 out of the oil reservoir.
j
Introduce hydraulic oil from a suitable vessel into
5
and turn the rod anticlockwise
1
is fully lowered.
the oil reservoir. Fill the hydraulic oil reservoir
up to the bottom edge of the filling opening.
j
Remove any air present in the hydraulic system.
To do this follow steps 3 - 4 in section on
“Removing air from the system”.
j
Replace the oil plug 8 back into the oil reservoir opening.
j
Grease all moving parts on the vehicle jack
regularly to prevent corrosion.
j
Top up with approximately 100 – 105 ml oil if
all the oil has been used up.
Q
Removing air from
the hydraulic system
Air in the hydraulic system may detrimentally affect
the proper functioning of the vehicle jack.
Proceed as follows to remove air from
the hydraulic system:
1. Place the rod
release valve
(Fig. C) until the support plate
2. Pull the oil plug
3. Guide the lifting handle
handle socket
several times to allow any air to escape.
4. Place the rod
release valve
(Fig. C). The release valve
again.
5. Replace the oil plug
voir opening.
6. If necessary, repeat steps 1 - 5 until all the air
has escaped.
7
with oval opening on to the
5
and turn the rod anticlockwise
1
is fully lowered.
8
out of the oil reservoir.
6
into the lifting
3
and pump it up and down
7
with oval opening on to the
5
and turn the rod clockwise
5
is now closed
8
back into the oil reser-
j
Stand the vehicle jack upright on a level, flat
surface.
j
Screw the extension screw 2 completely
down into the jack body.
Q
Storing
j
Place the rod 7 with oval opening on to the
release valve
5
and turn the rod anticlockwise
7 GB
Page 8
(Fig. C) until the support plate 1 is fully
lowered.
j
Screw the extension screw 2 completely
down into the jack body.
j
Store the hydraulic vehicle jack and the lifting
handle in a dry environment and protected from
moisture.
j
Ensure that the support plate 1 is fully lowered
and the extension screw
2
is completely screwed
in before you put away the vehicle jack. This will
prevent the oil escaping from the oil plug
j
Grease all moving parts on the vehicle jack
regularly to prevent corrosion.
Q
Troubleshooting
= The pump mechanism works only partially.
= There is too much hydraulic oil in the cylinder.
= Remove the excess quantity of hydraulic oil
from the cylinder.
= There is air in the hydraulic system.
= Remove the air in the hydraulic system (see the
section on “Removing air from the hydraulic
system“).
8
Q
.
Disposal
The packaging and ancillary packing
consist entirely of environmentally-friendly
materials. They can be disposed of at
your local recycling facility.
= Fault
= Cause
= Remedy
= The vehicle jack does not raise the vehicle at
all or does not raise it high enough.
= The release valve 5 was not properly closed.
= Close the release valve 5 completely (see the
section on “Raising the vehicle“).
= There is not enough hydraulic oil in the vehicle
jack.
= Top up the hydraulic oil (see the section on
“Topping up the hydraulic oil / greasing“).
= There is too much hydraulic oil in the cylinder.
= Remove the excess quantity of hydraulic oil from
the cylinder.
= There is air in the hydraulic system.
= Remove the air in the hydraulic system (see the
section on “Removing air from the hydraulic
system“).
= The vehicle jack gives way under load.
= The release valve 5 was not properly closed.
= Close the release valve 5 completely (see the
section on “Raising the vehicle“).
= Hydraulic oil escapes.
= There is too much hydraulic oil in the cylinder.
= Remove the excess quantity of hydraulic oil from
the cylinder.
In the interest of the environment, do not
throw out the product with your household refuse. Take it to a suitable centre
where it can be disposed of properly.
Your local council will be able to tell you
where the collection centres are located
and their opening times.
Dispose of the hydraulic oil in an environmentally
compatible manner. Ask your local repair garage
to see to its disposal or find your nearest waste
materials collection centre.
Q
Informations
Q
Declaration of Conformity
We, OWIM GmbH & Co. KG Stiftsbergstraße 1,
D-74167 Neckarsulm, hereby declare under our
sole responsibility that the product: Hydraulic Bottle
Jack, Model No.: Z31224, Version: 07 / 2014, to
which this declaration refers, complies with the
standards / normative documents of 2006 / 42 / EC.
8 GB
Page 9

Related harmonised standard: EN 1494 / A1: 2008
Tobias Koenig
Division Manager
Neckarsulm, 15 May 2014
The complete declaration of conformity can be
viewed at: www.owim.com
9 GB
Page 10

Użytkowanie urządzenia zgodne z przeznaczeniem ........................... Strona 11
Opis części ................................................................................................................................... Strona 11
Dane techniczne......................................................................................................................Strona 11
Zakres dostawy ..................................................................................................................... Strona 11
Wskazówki dotyczące bezpieczeństwa ........................................................... Strona 11
Stosowanie
Podnoszenie samochodu .................................................................................................................Strona 12
Obniżanie samochodu .................................................................................................................... Strona 13
Czyszczenie i pielęgnacja ...............................................................................................Strona 13
Konserwacja i składowanie
Uzupełnianie oleju hydraulicznego / smarowanie ........................................................................ Strona 13
Usuwanie powietrza z układu hydraulicznego ............................................................................. Strona 14
Składowanie .....................................................................................................................................Strona 14
Usuwanie błędόw ................................................................................................................ Strona 14
Usuwanie ..................................................................................................................................... Strona 15
Informacje
Deklaracja zgodności ......................................................................................................................Strona 15
10 PL
Page 11

Hydrauliczny podnośnik
samochodowy
Wskazówki dotyczące
bezpieczeństwa
Q
Użytkowanie urządzenia
zgodne z przeznaczeniem
Hydrauliczny podnośnik samochodowy jest przeznaczony do podnoszenia i opuszczania samochodów.
Inne zastosowania hydraulicznego podnośnika samochodowego lub przeprowadzenie w nim zmian
jest uznawane za niezgodne z przeznaczeniem i
może prowadzić do ryzyk, takich jak obrażenia
ciała i uszkodzenia. Za szkody powstałe wskutek
niezgodnego z przeznaczeniem użytkowania podnośnika producent nie ponosi żadnej odpowiedzialności. Produkt nie jest przewidziany do celów
zarobkowych.
Wskazówka: Po każdym użyciu podnośnika
należy zamknąć zawór opuszczający
Q
Opis części
1
Siodło podnośnika
2
Śruba przedłużająca
3
Przegub pompy
4
Zawόr bezpieczeństwa
5
Zawόr spustowy
6
Drążek dźwigni (do mechanizmu pompowania)
7
Drążek (do zaworu spustowego)
8
Zatyczka zbiornika oleju
Q
Dane techniczne
Wysokość podnoszenia: ok. 18,5 - 36 cm
Maksymalny udźwig: 3000 kg
Ciężar: ok. 3,0 kg
Olej hydrauliczny: zgodnie z ISO VG 15
Q
Zakres dostawy
1 Hydrauliczny podnośnik samochodowy
1 Drążek dźwigni
1 Drążek do zaworu spustowego
1 Instrukcja obsługi
5
!
NIEBEZPIECZEŃSTWO! Przestrzegaj po-
niższych instrukcji, gdyż w przeciwnym razie
grozi niebezpieczeństwo utraty życia, obrażenia
ciała oraz uszkodzenia produktu lub pojazdu.
Jako dodatkowego zabezpieczenia do hydrau-
licznego podnośnika samochodowego zawsze
używaj podstawek (koziołków) pod nadwozie
oraz klinów podkładanych pod koła. Nigdy
nie pracuj pod podniesionym samochodem,
jeżeli nie przedsięwziąłeś żadnych dalszych
środków bezpieczeństwa. W ten sposób unikniesz stoczenia, ześlizgnięcia lub wywrócenia
się samochodu.
Używaj produktu wyłącznie na mocnych i
równych powierzchniach. Na powierzchniach
nieumocnionych i nierównych – takich jak na
przykład nawierzchnie tłuczniowe – może
dojść do zsunięcia się obciążenia.
Zwracaj uwagę na to, żeby nigdy
nie przekroczyć w górę dopuszczalnego obciążenia znamionowego
(nośności).
Koniecznym jest, żeby osoba obsługująca pod-
nośnik mogła obserwować w trakcie wszystkich
ruchów podnośnik i obciążenie.
Niedozwolone jest pracowanie pod pod-
niesionym obciążeniem, o ile nie zostało ono
zabezpieczone odpowiednimi środkami.
Nie pozwalaj, żeby hydrauliczny podnośnik
samochodowy użytkowały osoby niewykwalifikowane i niedoświadczone.
Przed użyciem hydraulicznego podnośnika
samochodowego zabezpiecz samochód przed
stoczeniem się. Zaciągnij hamulec ręczny, włącz
jakiś bieg (w przypadku skrzyni automatycznej
biegów „P“) i zabezpiecz samochód za pomocą
klinów podkładanych pod koła.
Mimo środków bezpieczeństwa bądź stale
uważny i w trakcie całej pracy przy samochodzie obserwuj, czy talerz nośny jest mocno
osadzony na zamocowaniu podnośnika samochodowego
1
.
Należy zapewnić, żeby podczas podno-
szenia samochodu nie mogły wyciekać z niego
11 PL
Page 12
benzyna, ciecz akumulatorowa ani inne niebezpieczne substancje.
Upewnij się, że pod samochodem nie znajdują
się żadne osoby lub przeszkody, gdy go
opuszczasz.
Opuszczaj samochód wyłącznie powoli.
Skontroluj, czy wszystkie części są prawidłowo
zmontowane i nieuszkodzone.
Przed każdym użyciem skontroluj sprawność
funkcjonowania hydraulicznego podnośnika
samochodowego. Skontroluj hydrauliczny podnośnik samochodowy zwłaszcza pod względem
wyciekającego oleju hydraulicznego, mocnego
osadzenia wszystkich śrub i zaworów.
Nigdy nie używaj hydraulicznego podnośni-
ka samochodowego do transportowania lub
załadowywania jakiegoś pojazdu. Nigdy nie
podnoś całego samochodu.
Zwróć uwagę na to, żeby w samochodzie
nie znajdowały się żadne osoby, zwłaszcza
dzieci, oraz na to, żeby osoby znajdujące się
w pobliżu zachowywały wystarczający odstęp
od samochodu, gdy hydrauliczny podnośnik
samochodowy jest w użyciu.
W żadnym wypadku nie przestawiać zaworu
bezpieczeństwa
4
. Jest on fabrycznie właściwie ustawiony i nie musi być ponownie regulowany.
Podnośnika hydraulicznego nie należy w żad-
nym wypadku używać, jeśli stempel (zawór
bezpieczeństwa
4
) jest uszkodzony.
Przed użyciem podnośnika samochodowego
użytkownik musi zostać przeszkolony z obsługi
przez doświadczoną osobę. Siły pompowania
i przenoszenia wynoszą około 350 N.
Jeżeli oznaczenia na produkcie są uszkodzone
i są nieczytelne, nie należy używać urządzenia
aż do ich odnowienia.
Nie przebudowywać podnośnika hydraulicz-
nego. Każda zmiana konstrukcyjna urządzenia
wpływa na bezpieczeństwo i zgodność z normą
EN 1494 / A1:2008.
Podczas korzystania z podnośnika nie wolno
przekraczać siły 350 N. To odpowiada sile
około 35 kg na dźwigni.
UWAGA! NIEBEZPIECZEŃ-
STWO ODNIESIENIA OBRAŻEŃ SPOWODOWANE
ZMIAŻDŻENIEM! Podczas pompowania
należy zawsze trzymać palce z daleka od
zakresu ramy dźwigni podnośnika
3
. Wprzeciwnym razie może dojść do obrażeń spowodowanych zmiażdżeniem.
Temperatura użytkowa oleju hydraulicznego
tego urządzenia wynosi między -20 °C a
+40 °C.
Nie użytkuj urządzenia w pomieszczeniach
zagrożonych pożarem, w których mogą występować palne lub wybuchowe pary lub pyły
(na przykład w stajniach, w stodołach lub w
lakierniach).
Urządzenia należy używać wyłącznie do pod-
noszenia i opuszczania urządzenia, nie zaś do
utrzymywania w podniesionej pozycji. Przy
podnoszeniu lub opuszczaniu nie należy się
poruszać.
W przypadku zauważenia śladów wyciekania
oleju nie należy używać urządzenia.
Po każdym użyciu urządzenia wszystkie uży-
wane części należy odstawić do początkowej
pozycji. Jeśli części urządzenia nie dają się
przesunąć, wymianę oleju hydraulicznego lub
pompy olejowej należy zlecić profesjonalnemu
personelowi.
Q
Stosowanie
Q
Podnoszenie samochodu
OSTROŻNIE! ZAGROŻENIE ŻYCIA! Przed
zastosowaniem podnośnika samochodowego oraz
podpόrek należy najpierw dokonać kontroli pod
względem stanu jakości. Należy mieć na uwadze,
że hydrauliczny podnośnik samochodowy może być
jedynie zastosowany w kombinacji z podpόrkami.
Należy je przygotować przed rozpoczęciem podnoszenia samochodu. Brak podpόrek może spowodować wywrόcenie samochodu, co wiąże się z
zagrożeniem życia.
12 PL
Page 13
Należy postępować w sposόb następujący:
j Należy uważać na to, aby siodło podnośnika
1
było całkowicie obniżone, a śruba przedłu-
2
żająca
była do końca przykręcona pod-
czas przechowywania podnośnika.
j
Podnośnik samochodowy należy ustawić w
wymaganej pozycji. Należy przy tym przestrzegać instrukcji obsługi samochodu.
j
W razie konieczności należy wykręcić śrubę
przedłużyjącą
2
, aż dotknie ona podwozia
samochodu (rys. B).
j
Należy połączyć drążek 7 z drążkiem dźwi-
6
gni
J
, aby przedłużyć drążek dźwigni.
OSTROŻNIE! ZAGROŻENIE
OBRAŻENIEM PRZEZ ZMIAŻDŻENIE! W trakcie pompowania
należy zawsze trzymać palce z dala od prze-
gubu pompy
3
. W przeciwnym razie może
dojść do obrażeń przez zmiażdżenia.
j
Należy umieścić drążek 6 w przegubie pompy
3
i pompując podnosić samochόd do wyma-
ganej wysokości (rys. D).
j
Należy ustawić podpόrki pod dopuszczone
punkty podparcia samochodu.
j
Należy odciążyć podnośnik samochodowy,
nakładając drążek
zawόr spustowy
7
owalnym otworem na
5
, obracając lekko drążek 7
w kierunku przeciwnym do kierunku ruchu
wskazόwek zegara i następnie natychmiast znowu obracać z powrotem. Siodło podnośnika
przesuwa się w dόł i samochόd jest podtrzymywany przez podpόrki.
Q
Obniżanie samochodu
j
Proszę usunąć podpόrki.
j
Proszę nałożyć drążek 7 owalnym otworem
na zawόr spustowy
7
kiem
w kierunku przeciwnym do kierunku
5
i obracać lekko drąż-
ruchu wskazόwek zegara (rys. C). Samochόd
zostaje wolno obniżany.
Wskazόwka: Im mocniej obraca się drąż-
7
kiem
w kierunku przeciwnym do kierunku ruchu wskazόwek zegara, tym szybciej samochόd
zostaje obniżany. Ze względu na to, należy
najpierw bardzo ostrożnie obracać, aby uzyskać wyczucie dla właściwego tempa.
j
Proszę tak daleko obniżyć siodło podnośnika 1,
aby nie było ono obciążone. Następnie należy
usunąć podnośnik samochodowy spod samochodu. Należy stworzyć nacisk na siodło podnośnika
j
Proszę zamknąć zawόr spustowy 5, obracając drążkiem
1
, aż do jego całkowitego obniżenia.
7
na zaworze spustowym 5 w
kierunku zgodnym z kierunkiem ruchu wskazόwek
zegara.
j
Proszę usunąć drążek 7 z zaworu spustowe-
5
go
j
Q
1
j Posmaruj dobrze wszystkie części ruchome
.
Należy ponownie wkręcić śrubę przedłużają-
2
cą
, o ile jest ona wykręcona.
Czyszczenie i pielęgnacja
położone na zewnątrz.
j Czyść hydrauliczny podnośnik samochodowy
lekko naoliwioną szmatą.
j W żadnym wypadku nie używaj ostrych ani
żrących środków czyszczących.
NIEBEZPIECZEŃSTWO UTRATY ŻYCIA!
Upewnij się, że pod samochodem nie znajdują
się żadne osoby lub przeszkody, gdy go
opuszczasz.
OSTROŻNIE! Opuszczaj samochód wyłącznie
powoli. W przeciwnym razie grozi niebezpieczeństwo obrażeń ciała i uszkodzenia na
produkcie względnie na samochodzie.
j
Najpierw należy nieco podnieść samochόd,
aby usunąć podpόrki. Proszę postępować
zgodnie z opisem podanym w rozdziale „Podnoszenie samochodu”.
Q
Konserwacja i składowanie
Q
Uzupełnianie oleju
hydraulicznego / smarowanie
Wskazόwka: Należy stosować jedynie olej hy-
drauliczny zgodny z normą ISO VG 15.
j
Podnośnik samochodowy należy ustawić w pozycji pionowej na rόwnej, poziomej powierzchni.
13 PL
Page 14

j
Należy całkowicie wkręcić śrubę przedłużają-
2
cą
j
.
Proszę nałożyć drążek 7 owalnym otworem
na zawόr spustowy
7
kiem
w kierunku przeciwnym do kierunku
5
i obracać lekko drąż-
ruchu wskazόwek zegara (rys. C), aż do całkowitego obniżenia siodła podnośnika
j
P
roszę wyciągnąć zatyczkę 8 ze zbiornika oleju.
j
Proszę napełnić zbiornik oleju olejem hydraulicz-
1
.
nym, używając do tego odpowiednie naczynie.
Proszę napełnić olej hydrauliczny do dolnej
krawędzi otworu do napełniania.
j
Proszę ewentualnie usunąć powietrze znajdujące się w układzie hydraulicznym. Należy postępować zgodnie z krokami 3-4, jak podano
w rozdziale „Usuwanie powietrza z układu
hydraulicznego“.
j
Proszę ponownie założyć zatyczkę 8 na
zbiornik oleju.
j
Należy regularnie smarować wszystkie ruchome części podnośnika samochodowego, aby
zapobiec korozji.
j
Po całkowitym zużyciu oleju należy napełnić
ok. 100 – 105 ml.
Q
Usuwanie powietrza z układu
hydraulicznego
Powietrze w układzie hydraulicznym może prowadzić do zaburzeń w funkcjonowaniu podnośnika
samochodowego.
Powietrze z układu hydraulicznego
należy usunąć w następujący sposób:
1. Proszę nałożyć drążek
na zawόr spustowy
w kierunku przeciwnym do kierunku ruchu
wskazόwek zegara (rys. C), aż do całkowitego
obniżenia siodła podnośnika
2. Proszę wyciągnąć zatyczkę
oleju.
3. Proszę wprowadzić drążek dźwigni
przegub pompy
razy, aby usunąć powietrze.
4. Proszę nałożyć drążek
na zawόr spustowy
7
owalnym otworem
5
i obracać drążkiem 7
1
.
8
ze zbiornika
3
oraz pompować kilka
7
owalnym otworem
5
i obracać drążkiem w
6
w
kierunku zgodnym z kierunkiem ruchu
wskazόwek zegara (rys. C). Zawόr spustowy
5
jest ponownie zamknięty.
5. Proszę ponownie założyć zatyczkę
8
na
zbiornik oleju.
6. W razie konieczności należy powtόrzyć kroki
1 - 5, aż do całkowitego usunięcia powietrza.
Q
Składowanie
j
Proszę nałożyć drążek 7 owalnym otworem
na zawόr spustowy
5
i obracać drążkiem w
kierunku przeciwnym do kierunku ruchu
wskazόwek zegara (rys. C), aż do całkowitego obniżenia siodła podnośnika
j
Należy całkowicie wkręcić śrubę przedłużają-
2
cą
j
.
Hydrauliczny podnośnik samochodowy oraz
1
.
drążek dźwigni należy składować w suchych
warunkach oraz chronić przed wilgocią.
j
W trakcie składowania podnośnika samochodowego należy zwracać uwagę, aby siodła
podnośnika
zycji i śruba przedłużająca
1
znajdował się w najniższej po-
2
była całkowicie
wkręcona. Zapobiega to przed wyciekaniem
oleju z zatyczki
j
Należy regularnie smarować wszystkie rucho-
8
.
me części podnośnika samochodowego, aby
zapobiec korozji.
Q
Usuwanie błędόw
= Błąd
= Powόd
= Naprawa
= P
odnośnik samochodowy nie podnosi samoch
odu
lub nie wystarczająco wysoko.
= Zawór spustowy 5 nie został właściwie
zamknięty.
= Należy całkowicie zamknąć zawór spustowy 5
(zobacz rozdział „Podnoszenie samochodu“).
= Za mało oleju hydraulicznego w podnośniku
samochodowym.
14 PL
Page 15

= Należy dopełnić oleju hydraulicznego (zobacz
rozdział „Uzpełnianie oleju hydraulicznego /
smarowanie“).
= W cylindrze znajduje sie za dużo oleju hy-
draulicznego.
= Należy usunąć nadmiar oleju hydraulicznego
z cylindra.
= W układzie hydraulicznym znajduje się
powietrze.
= Należy usunąć pwietrze z układu hydraulicz-
nego (zobacz rozdział „Usuwanie powietrza z
układu hydraulicznego“).
= Podnośnik samochodowy nie znosi obciążenia.
= Zawór spustowy 5 nie został właściwie
zamknięty.
= Należy całkowicie zamknąć zawór spustowy 5
(zobacz rozdział „Podnoszenie samochodu“).
= Olej hydrauliczny wycieka.
= W cylindrze znajduje sie za dużo oleju hy-
draulicznego.
= Należy usunąć nadmiar oleju hydraulicznego
z cylindra.
= Mechanizm pompy funkcjonuje jedynie czę-
ściowo.
= W cylindrze znajduje sie za dużo oleju hy-
draulicznego.
= Należy usunąć nadmiar oleju hydraulicznego
z cylindra.
= W
układzie hydraulicznym znajduje się powietrze
= Należy usunąć powietrze z układu hydraulicz-
nego (zobacz rozdział „Usuwanie powietrza z
układu hydraulicznego“).
W interesie ochrony środowiska nie wyrzucać produktu, gdy wysłuży się, do
śmieci domowych, tylko przekazać go
do specjalistycznego punktu utylizacji.
Informacje odnośnie punktów zbiórki
odpadów przeznaczonych do utylizacji
oraz godzin ich otwarcia można uzyskać
u lokalnych władz administracyjnych.
Zleć, żeby olej hydrauliczny został usunięty do
odpadów w sposób przyjazny dla środowiska
naturalnego. Zapewnij usunięcie oleju poprzez
warsztat specjalistyczny lub zwróć się do najbliższego punktu zbiorczego substancji szkodliwych.
Q
Informacje
Q
Deklaracja zgodności
My, OWIM GmbH & Co. KG Stiftsbergstraße 1,
D-74167 Neckarsulm, deklarujemy z pełną odpowiedzialnością, że produkt: hydrauliczny podnośnik samochodowy, nr modelu: Z31224, wersja:
07 / 2014, do ktόrej odnosi się niniejsza deklaracja
zgodny jest z normami / dokumentami normatywnymi Dyrektywy Maszynowej 2006 / 42 / EC.
Zastosowana norma zharmonizowana:
EN 1494 / A1:2008
.
Q
Usuwanie
Opakowanie i materiał opakowania
składają się wyłącznie z materiałów
przyjaznych dla środowiska. Mogą być
one utylizowane w lokalnych pojemnikach
do recyklingu.
Tobias Koenig
Division Manager
Neckarsulm, 15 May 2014
Tę dokumentację można w razie potrzeby pobrać
pod adresem www.owim.com.
15 PL
Page 16

Rendeltetésszerű alkalmazás ......................................................................................Oldal 17
A részek megnevezése ......................................................................................................Oldal 17
Műszaki adatok .......................................................................................................................Oldal 17
A szállítmány tartalma .......................................................................................................Oldal 17
Biztonsági utasítások ..........................................................................................................Oldal 17
Használat
Gk. megemelése ................................................................................................................................Oldal 18
A gk. leeresztése ................................................................................................................................Oldal 19
Tisztítás és ápolás ...................................................................................................................Oldal 19
Karbantartás és tárolás
Hidraulika olaj utántöltése / bezsírozás ...........................................................................................Oldal 19
Levegő eltávolítása a hidraulikus rendszerből .................................................................................Oldal 20
Tárolás ................................................................................................................................................Oldal 20
Hibák elhárítása ......................................................................................................................Oldal 20
Mentesítés .....................................................................................................................................Oldal 20
Információk
Konformitásnyilatkozat ......................................................................................................................Oldal 21
16 HU
Page 17

Hidraulikus autóemelő
Q
Rendeltetésszerű alkalmazás
A hidraulikus autóemelő gépjárművek megemelésére és leeresztésére készült. Más alkalmazások, vagy
a hidraulikus autóemelő megváltoztatása nem rendeltetésszerűnek számítanak és kockázatokhoz,
mint például életveszélyes sérülésekhez és károsodásokhoz vezethetnek. A rendeltetésétől eltérő alkalmazásokból származó károkért a gyártó nem
áll jót. A termék nem ipari alkalmazásokra készült.
Utalás: Minden egyes használat után zárja el a
leeresztő szelepet
Q
A részek megnevezése
1
tehertartó tányér
2
hosszabbító csavar
3
emelőrúd befogó
4
biztonsági szelep
5
leeresztő szelep
6
emelőkar (a pumpáló mechanizmus számára)
7
rúd (leeresztő szelep számára)
8
olajelzáró dugó
Q
Műszaki adatok
Emelési magasság: kb. 18,5 - 36 cm
Maximális teherbírás: 3000 kg
Súly: kb. 3,0 kg
Hidraulika-olaj: az ISO VG 15 szerint
Q
A szállítmány tartalma
1 hidraulikus gépjármű emelő
1 emelőrúd
1 rúd a leeresztő szelep számára
1 használati útmutató
5
!
Biztonsági utasítások
VESZÉLY! Tartsa be a következő utasításokat,
ellenkező esetben életveszély, sérülések, valamint a termék ill a gk. megkárosodása fenyeget.
A hidraulikus autóemelőhöz kiegészítésként
mindig használjon alátámasztó bakokat és
kerékkitámasztó ékeket. Soha ne dolgozzon
megemelt gépkocsi alatt, ha nem foganatosított
további biztonsági intézkedéseket. Segítségével megakadályozza a gépkocsi elgurulását,
elcsúszását vagy elbillenését.
A terméket csak szilárd és sima felületeken
használja. Nem szilárd és nem sima felületeken – mint pl. kavicsokkal boritott felületeken –
a teher elcsúszhat.
Szükséges, hogy a kezelő személy az emelő
készüléket és a terhet minden mozgatáskor
szemmel tudja tartani.
Megemelt teher alatt a munkavégzés nem
megengedett, amennyiben az megfelelő eszközök által nincsen biztosítva.
Ne engedje meg, hogy a hidraulikus autóeme-
lőt szakképzetlen, vagy tapasztalatlan személyek használják.
A hidraulikus autóemelő használata előtt bizto-
sítsa, hogy a gk. ne gurulhasson el. Húzza be
a kéziféket, tegye sebességbe az autót (automata sebességváltónál a „P“ helyzet) és biztosítsa a gk.-t kerékkitámasztó ékekkel.
A biztonsági intézkedések ellenére is legyen
mindig figyelmes és figyeljen a gk.-n végzett
munka egész ideje alatt arra, hogy a tehertartó tányér
tóján.
Biztosítsa, hogy a gk. megemelése alkalmá-
val se benzin, se akkumulátor folyadék se pedig
más veszélyes anyag ki ne folyhasson.
Bizonyosodjon meg róla, hogy a gk. alatt sze-
mélyek vagy akadályok ne legyenek, amikor
azt leereszti.
A gk.-t csak lassan eressze le.
Ügyeljen arra, hogy a megengedett
névleges terhet (teherbírást) sohase
lépje túl.
1
szilárdan álljon az autóemelő tar-
17 HU
Page 18

Vizsgálja meg, hogy mindegyik rész szakszerű-
en van-e felszerelve és hogy sértetlen-e.
Minden használat előtt ellenőrizze a hidraulikus
autóemelő működőképességét. Vizsgálja meg
a hidraulikus autóemelőt különösen az esetleg
kifolyó olaj, valamint a csavarok és szelepek
szilárd állása tekintetében.
Soha ne használja a hidraulikus autóemelőt
szállításra, vagy gépjármű rakodásához. Soha
ne emelje fel az egész gépkocsit.
Ügyeljen arra, hogy amikor a hidraulikus
autóemelőt használják, a gk.-ban személyek –
,de különösen gyermekek – ne tartózkodjanak
és a közelben tartózkodó személyek megfelelő
távolságra legyenek a gk.-tól.
Soha ne állítsa át a nyomáskiegyenlítő szele-
4
pet
. A szerviz már korrektül beállította és
nem kell utánaállítani.
Semmiképpen ne használja a hidraulikus autó-
emelőt, ha a (biztonsági szelep
4
) pecsétje
sérült.
A felhasználónak az autóemelő alkalmazása
előtt egy tapasztalt személy segítségével meg
kell ismerkednie a készülékkel. A pumpáló és
átviteli erők nagysága kb. 350 N.
Ha a terméken található jelölések megsérültek
és ezáltal olvashatatlanná válnak, azt tanácsoljuk, hogy az autóemelőt annak felújításáig ne
használja.
Ne hajtson végre átalakításokat a hidraulikus
autóemelőn. A készülék bármilyen szerkezeti
megváltoztatása befolyásolja annak biztonságát és az EN 1494 / A1:2008-nak való megfelelését.
Az autóemelő használata során az alkalma-
zott erő nem haladhatja meg a 350 N-t. Ez az
emelőkarnál kb. 35 kg -os erőnek felel meg.
VIGYÁZAT! ZÚZÓDÁS ÁLTALI
SÉRÜLÉSVESZÉLY! A pumpáló
folyamat során mindig tartsa távol
ujjait a pumparúd- felvevőtől
3
. Ellenkező
esetben zúzódási sérülések keletkezhetnek.
A készülék hidraulika-olajának üzemi hőmér-
séklete -20 °C és +40 °C között van.
Ne használja a készüléket tűzveszélyes helyi-
ségekben, melyekben gyúlékony, vagy
robbanékony gőzök, vagy porok lehetnek (pl.
istálókban, csűrökben vagy lakkozó- csarnokokban).
Csak a jármű felemeléséhez és leengedéséhez
használja az eszközt, felemelt helyzetben való
tartásra ne. Emelés, vagy leengedés közben ne
mozgassa.
Ne használja a készüléket, ha kifutott olaj nyo-
mait találja.
Az eszköz minden használata után tegye visz-
sza az összes használt alkatrészt az eredeti
helyére. A hidraulikaolaj, vagy az olajpumpa
cseréjét szakszemélyzettel végeztesse, ha az
eszköz alkatrészeit nem lehet állítani.
Q
Használat
Q
Gk. megemelése
VIGYÁZAT! ÉLETVESZÉLY! Előbb bizonyo-
sodjon meg a gépjármű emelő és az alátámasztó
bakok sértetlenségéről, mielőtt azokat használná.
Vegye figyelembe, hogy a hidraulikus gépjármű
emelőt csak alátámasztó bakokkal kombinálva szabad használni. A gépkocsi megemelése előtt készítse
azokat elő. Ha alátámasztó bakokat nem alkalmaz,
a gk. oldalra billenése fenyeget, ami életveszélyt
jelenthet.
Járjon el a következőképpen:
j
Ügyeljen arra, hogy a tehertálca 1 legyen
teljesen leengedve és a hosszabbító- csavar
2
teljesen becsavarva, amikor a járműemelőt
tárolja.
j
Állítsa a hidraulikus gépjármű emelőt a kívánt
helyzetbe. Eközben vegye figyelembe a gk.
gépkönyvének az utasításait
j
Ha szükséges, csavarja ki a hosszabbító csavart
2
addig, amíg az a gk. aljához ér (B ábra).
j
Hosszabbított emelőrúd elérése céljából kösse
össze a rúdat
J
7
az emelőrúddal 6.
VIGYÁZAT! BECsÍPŐDÉSEK
ÁLTALI SÉRÜLÉSVESZÉLYEK!
Tartsa az ujjait a pumpálási eljárás
alatt mindig távol az emelőrúd befogótól
3
.
Ellenkező esetben becsípődések által megsérülhet.
18 HU
Page 19

j
Dugja az emelőrúdat 6 az emelőrúd befogó-
3
ba
és pumpálja a gk.-t a kívánt magassági
szintre (D ábra).
j
Állítsa az alátámasztó bakokat a gk. engedélyezett alátámasztási pontjai alá.
j
Tehermentesítse a gépjármű emelőt úgy, hogy
7
a rúdat
lepre
az ovális nyílásával a leeresztő sze-
5
dugja, a rúdat 7 egy keveset az
óramutató járásával ellentétes irányba csavarja és utána rögtön visszacsavarja. A tehertartó
1
tányér
egy kissé leereszkedik és a gk.-t az
alátámasztó bakok megtartják.
Q
A gk. leeresztése
ÉLETVESZÉLY! Bizonyosodjon meg róla, hogy
a gk. alatt személyek vagy akadályok ne legyenek, amikor azt leereszti.
VIGYÁZAT! A gk.-t csak lassan eressze le. El-
lenkező esetben sérülésveszély és az autóemelő
és / vagy a gk. megkárosodása fenyeget.
j
Előbb emelje meg egy keveset a gk.-t, hogy az
alátámasztó bakokat el tudja távolítani. A megemelésnél járjon el a „Gk. megemelése“ fejezetben leírtak szerint.
j
Távolítsa el az alátámasztó bakokat.
j
Dugja a rúdat 7 az ovális nyílásával a leeresztő szelepre
5
és csavarja a rúdat lassan
az óramutató járásával ellentétes irányba (C
ábra). A gk. lassan leereszkedik.
Utalás: Minél erősebben csavarja a rúdat
az óramutató járásával ellentétes irányba, annál gyorsabban ereszti le a gk.-t. Ezért csavarja
a rúdat előbb nagyon óvatosan, hogy ezáltal
megérezze a helyes leeresztési sebességet.
j
Eressze le a tehertartó tányért annyira 1, hogy
az már ne legyen megterhelve. Utána húzza ki
a gépjármű emelőt az autó alól. Nyomja le a
tehertartó tányért
1
addig, amíg az teljesen
leerszkedett.
j
Zárja el a leeresztő szelepet 5 úgy, hogy a
leeresztő szelepen
5
levő rúdat 7 az óra-
mutató járásának az irányába csavarja.
j
Húzza le a rúdat 7 a leeresztő szelepről 5.
j
Csavarja a hosszabbító csavart 2, ha az ki
van csavarva, újra lefelé.
Q
Tisztítás és ápolás
j Zsírozza be jól az összes kívül álló mozgatha-
tó részt.
j Tisztítsa a hidraulikus autóemelőt egy gyengén
beolajozott kendővel.
j A tisztításhoz semmiképpen se használjon súroló,
vagy maró hatású tisztítószereket.
Q
Karbantartás és tárolás
Q
Hidraulika olaj utántöltése /
bezsírozás
Utalás: Csak ISO VG 15 - nek megfelelő hidrauli-
ka olajat alkalmazzon.
j
Állítsa a gépjármű emelőt függőlegesen egy
síma és vízszintes felületre.
j
Csavarja le teljesen a hosszabbító csavart 2.
j
Dugja a rúdat 7 az ovális nyílásával a leeresztő
szelepre
tató járásával ellentétes irányba (C ábra) addig,
amíg a tehertartó tányért
j
Húzza ki az olajelzáró dugót 8 az olajtartályból.
j
Töltse a hidraulika olajat egy arra megfelelő
edény segítségével az olajtartályba. Töltse
meg az olajtartályt hidraulika olajjal a betöltő
nyílás alsó pereméig.
7
j
Távolítsa el a hidraulikus rendszerből az esetleg
benne található levegőt. Ebből a célból járjon
el a „Levegő eltávolítása a hidraulikus
renszerből“ fejezet 3-4 lépései szerint.
j
Dugja az olajelzáró dugót 8 újra az olajtartályba.
j
A korrózió megakadályozásához zsírozza be
rendszeresen a gépjármű emelő valamennyi
mozgatható részét.
j
Ha az olaj teljesen elhasználódott, töltsön után
kb. 100 – 105 ml olajat.
5
és csavarja a rúdat lassan az óramu-
1
teljesen leeresztette.
19 HU
Page 20

Q
Levegő eltávolítása a
hidraulikus rendszerből
Levegő jelenléte a hidraulikus rendszerben a gépjármű emelő működésének a lerontásához vezethet.
Q
Hibák elhárítása
= hiba
= ok
= elhárítás
A hidraulikus rendszerben található lev
egő
eltávolításához járjon el a következőképpen:
1. Dugja a rúdat
szelepre
7
az ovális nyílásával a leeresztő
5
és csavarja a rúdat lassan az óramutató járásával ellentétes irányba (C ábra) addig,
amíg a tehertartó tányért 1 teljesen leereszkedett.
2. Húzza ki az olajelzáró dugót 8 az olajtartályból.
3. Dugja az emelőrúdat
3
ba
és pumpáljon többször, hogy a levegő
6
az emelőrúd befogó-
ezáltal eltávozhasson.
4. Dugja a rúdat
eresztő szelepre
7
az ovális nyílásával a le-
5
és csavarja a rúdat az
óramutató járásának az irányába (C ábra). A
leeresztő szelep
5. Dugja az olajelzáró dugót
5
most újra le van zárva.
8
újra az olajtar-
tályba.
6. Szükség esetén ismételje meg az 1-5 lépéseket
addig, amíg a levegő a rendszerből teljesen
eltávozott.
Q
Tárolás
j
Dugja a rúdat 7 az ovális nyílásával a leeresztő szelepre
5
és csavarja a rúdat lassan az
óramutató járásával ellentétes irányba (C ábra),
amíg a tehertartó tányért
1
teljesen leereszke-
dett.
j
Csavarja le teljesen a hosszabbító csavart 2.
j
Tárolja a hidraulikus gépjármű emelőt és az
emelőrúdat száraz és nedvességtől védett helyen.
j
Ügyeljen arra, hogy amikor a gépjármű emelőt
tárolja, a tehertartó tányért
gyen eresztve és a hosszabbító csavar
1
teljesen le le-
2
teljesen be legyen csavarva. Így elkerüli, hogy az
olajelzáró dugóból
j
A korrózió megakadályozásához zsírozza be
8
olaj léphessen ki.
rendszeresen a gépjármű emelő valamennyi
mozgatható részét.
= A gépjármű emelő nem emeli fel a gk.-t vagy
nem emeli azt elég magasra.
= A leeresztő szelep 5 nincs teljesen lezárva.
= Zárja el 5 teljesen a leeresztő szelepet (lásd
a „Gk. megemelése“ fejezetet).
= Nincs elég hidraulika olaj a gépjármű emelőben.
= Töltsön után hidraulika olajat (lásd a „Hidraulika
olaj utántöltés / bezsírozás“ fejezetet).
= Az olajhengerben túl sok hidraulika olaj található.
= Távolítsa el az olajhengerből a felesleges meny-
nyiségű hidraulika olajat.
= Levegő jutott a hidraulikus rendszerbe.
= Távoltsa el a levegőt a hidraulikus rendszerből
(lásd a „Levegő eltávolítása a hidraulikus rend-
szerből“ fejezetet).
= A gépjármű emelő enged a terhelésnek.
= A leeresztő szelep 5 nincs teljesen lezárva.
= Zárja el 5 teljesen a leeresztő szelepet (lásd
a „Gk. megemelése“ fejezetet).
= Hidraulika olaj szivárog ki.
= Az olajhengerben túl sok hidraulika olaj található.
= Távolítsa el az olajhengerből a felesleges meny-
nyiségű hidraulika olajat.
= A pumpáló mechanizmus csak részben működik.
= Az olajhengerben túl sok hidraulika olaj található.
= Távolítsa el az olajhengerből a felesleges meny-
nyiségű hidraulika olajat.
= Levegő jutott a hidraulikus rendszerbe.
= Távoltsa el a levegőt a hidraulikus rendszerből
(lásd a „Levegő eltávolítása a hidraulikus rend-
szerből“ fejezetet).
Q
Mentesítés
A csomagolás környezetbarát anyagok-
ból áll, amelyek a helyi újraértékesítési
gyűjtőhelyeken keresztül mentesíthetők.
20 HU
Page 21

A környezetvédelem érdekében ne dobja kiszolgált terméket a háztartási szemétbe, hanem juttassa azt el egy szakszerű mentesítéshez. A gyűjtőhelyeket és
azok nyitvatartási idejét az illetékes hivatalánál érdeklődheti meg
Mentesítse a hidraulika olajat környezetbarát módon. A mentesítését biztosítsa egy javítóműhelyen
történő leadás által, vagy forduljon a legközelebbi
ártalmas anyagok gyűjtőhelyéhez.
Q
Információk
Q
Konformitásnyilatkozat
Mi, a OWIM GmbH & Co. KG Stiftsbergstraße 1,
D-74167 Neckarsulm, ezúton egyedüli felősségünkre
nyilatkozzuk, hidraulikus autóemelő, modell-sz.:
Z31224, verzió: 07 / 2014 termék, amelyre ez a
nyilatkozat vonatkozik, a 2006 / 42 / EC szabványoknak / normativ dokumentumoknak megfelel.
Alkalmazott harmonizált szabvány:
EN 1494 / A1:2008
Tobias Koenig
Division Manager
Neckarsulm, 15 May 2014
A teljes megfelelőségi nyilatkozat megtalálható a
www.owim.com oldalon
21 HU
Page 22

Predvidena uporaba ............................................................................................................ Stran 23
Opis delov ..................................................................................................................................... Stran 23
Tehnični podatki ....................................................................................................................... Stran 23
Obseg dobave ........................................................................................................................... Stran 23
Varnostni napotki ................................................................................................................... Stran 23
Uporaba
Dvig motornega vozila ...................................................................................................................... Stran 24
Spuščanje motornega vozila ............................................................................................................. Stran 25
Čiščenje in nega ........................................................................................................................ Stran 25
Vzdrževanje in skladiščenje
Dolivanje hidravličnega olja / podmazovanje ................................................................................. Stran 25
Odstranjevanje zraka iz hidravličnega sistema ............................................................................... Stran 25
Skladiščenje ........................................................................................................................................ Stran 26
Odpravljanje napak ............................................................................................................. Stran 26
Odstranjevanje ......................................................................................................................... Stran 26
Informacije
Izjava o skladnosti ............................................................................................................................. Stran 27
22 SI
Page 23

Hidravlična dvigalka za
avtomobile
Varnostni napotki
Q
Predvidena uporaba
Hidravlična dvigalka za avto je namenjena za
dvigovanje in spuščanje motornih vozil. Uporaba v
druge namene ali spreminjanje hidravlične dvigalke
za avto ni skladno z določili in lahko vodi do tveganj
kot npr. življenjsko nevarnih poškodb oseb in povzročitve okvar. Za škodo, nastalo pri nestrokovni
uporabi, proizvajalec ne prevzame jamstva. Izdelek
ni namenjen za profesionalno uporabo.
Opozorilo: Po vsaki uporabi ventil za spuščanje 5
zaprite!
Q
Opis delov
1
podložni krožnik
2
podaljševalni vijak
3
vpenjalo za dvižni drog
4
varnostni ventil
5
ventil za spuščanje
6
dvižni drog (za črpalni mehanizem)
7
drog (za izpustni ventil)
8
zaporni čep za olje
Q
Tehnični podatki
Višina dviga: pribl. 18,5 - 36 cm
Maksimalna nosilnost: 3000 kg
Teža: pribl. 3,0 kg
Hidravlično olje: v skladu z ISO VG 15
Q
Obseg dobave
1 hidravlična dvigalka za avto
1 dvižni drog
1 drog za izpustni ventil
1 navodilo za uporabo
NEVARNOST! Upoštevajte naslednja navo-
dila, v nasprotnem primeru grozijo življenjska
nevarnost, poškodbe kot tudi povzročitve škode
na izdelku oz. motornem vozilu.
Dodatno s hidravlično dvigalko za avto vedno
uporabljajte podstavna stojala in kolesne pod-
ložne kline. Nikoli ne delajte pod dvignjenim
motornim vozilo, če niste izvedli nobenih dru-
gih varnostnih ukrepov. Tako preprečite premik,
zdrs ali prevrnitev vozila.
Izdelek uporabljajte samo na trdnih, ravnih
površinah. Na neutrjenih in neravnih površinah –
kot npr. na gramoznih površinah – lahko pride
do zdrsa tovora.
Pazite na to, da nikoli ne prekoračite
dovoljene nazivne obremenitve
(nosilnosti).
Upravljalec mora imeti možnost opazovanja
dvižne naprave in tovora pri vseh premikih.
Delo pod dvignjenim tovorom ni dovoljeno,
dokler tovor ni zavarovan z ustreznimi pripo-
močki.
Hidravlične dvigalke za avto ne dajte v upora-
bo nekvalificiranim in neizkušenim osebam.
Motorno vozilo pred uporabo hidravlične
dvigalke za avto zavarujte pred premikanjem.
Pritegnite ročno zavoro, menjalnik prestavite v
prestavo (pri avtomatiku „P“) in motorno vozilo
zavarujte s pomočjo kolesnih podložnih klinov.
Kljub varnostnim ukrepom bodite vedno pozor-
ni in med delom na motornem vozilu opazujte,
ali se podložni krožnik
1
čvrsto prilega povr-
šini avtomobila za namestitev dvigalke za avto.
Zagotovite, da pri dvigovanju motornega
vozila ne more priti do iztekanja bencina, aku-
mulatorske tekočine ali drugih nevarnih snovi.
Prepričajte se, da se pod motornim vozilom ne
nahajajo osebe ali ovire.
Motorno vozilo spuščajte počasi.
Prekontrolirajte, če so vsi deli ustrezno montirani
in nepoškodovani.
Pred vsako uporabo preverite tehnično uporab-
nost hidravlične dvigalke za avto. Na hidravlič-
ni dvigalki za avto še posebno preverite, ali
23 SI
Page 24

izteka hidravlično olje ter ali so vsi vijaki in
ventili dobro pritrjeni.
Hidravlične dvigalke za avto nikoli ne upora-
bljajte za prestavljanje ali natovarjanje vozila.
Nikoli ne dvigajte celotnega vozila.
Kadar je hidravlična dvigalka za avto v uporabi,
pazite na to, da se v motornem vozilu ne
nahajajo osebe – še posebno otroci – in da
osebe, ki se nahajajo v bližini, upoštevajo
zadostno razdaljo do motornega vozila.
Varnostnega ventila 4 nikoli ne uravnavajte
sami. Tovarniško je pravilno nastavljen in ga ni
potrebno uravnavati.
Hidravlične dvigalke za avto v nobenem prime-
ru ne uporabite, če je pečat (varnostni ventil
4
poškodovan.
Pred uporabo dvigalke za avto mora uporabnika
seznaniti z napravo izkušena oseba. Črpalne
in prenosne sile znašajo približno 350 N.
Če so oznake na izdelku tako poškodovane,
da se jih več ne da prebrati, odsvetujemo nadaljnjo uporabo dvigalke za avto, dokler oznake
niso obnovljene.
Na hidravlični dvigalki za avto ničesar ne spre-
minjajte / predelujte. Vsakršna konstruktivna sprememba naprave vpliva na varnost in skladnost
naprave s standardom EN 1494 / A1:2008.
Pri uporabi dvigalke za avto se uporabljene
sile 350 N ne sme prekoračiti. To ustreza sili
približno 35 kg na ročici.
PREVIDNO! NEVARNOST
ZARADI ZMEČKANIN! Med postopkom črpanja vedno držite prste
stran od področja zajema dvižnega droga
3
V nasprotnem primeru lahko pride do poškodb
zaradi zmečkanin.
Obratovalna temperatura hidravličnega olja te
naprave je med -20 °C in +40 °C.
Naprave ne uporabljajte v prostorih, kjer
obstaja nevarnost požara zaradi potencialne
prisotnosti vnetljivih ali eksplozivnih hlapov ali
prahu (npr. v hlevih, skednjih ali lakirnicah).
Napravo uporabljajte le za dviganje in spušča-
nje vozila in ne za držanje v dvignjenem položaju. Med dviganjem ali spuščanjem, naprave
ne premikajte.
Naprave ne uporabljajte, če opazite sledi izte-
čenega olja.
Po vsaki uporabi naprave, postavite vse dele
nazaj na prvotno mesto. Hidravlično olje ali čr-
palko za olje naj zamenja strokovnjak, če de-
lov naprave ni možno prestaviti.
Q
Uporaba
Q
Dvig motornega vozila
POZOR! ŽIVLJENJSKA NEVARNOST!
Najprej se prepričajte, da so dvigalka za avto in
podstavna stojala v brezhibnem stanju, preden jih
)
uporabljate. Upoštevajte, da se sme hidravlično
dvigalko za avto uporabljati samo v kombinaciji s
podstavnimi stojali. Podstavna stojala pripravite,
preden motorno vozilo dvignete. Če ne uporabljate
podstavnih stojal, lahko pride do prevračanja motornega vozila, kar lahko predstavlja življenjsko nevarnost.
Ravnajte kot sledi:
j
Pazite, da bo pri skladiščenju dvigalke za avtomobile podložni krožnik
podaljševalni vijak
j
Hidravlično dvigalko za avto postavite v želen
1
v celoti spuščen in
2
v celoti privit.
položaj. Pri tem upoštevajte navodilo za uporabo motornega vozila.
j
Če je potrebno, podaljševalni vijak 2 odvijte,
da se dotakne tal motornega vozila (sl. B).
j
Drog 7 združite z dvižnim drogom 6, da
dobite podaljšani dvižni drog.
J
.
POZOR! NEVARNOST PO-
ŠKODB ZARADI ZMEČKANIN!
Med postopkom črpanja prste vedno
držite stran od območja vpenjala za dvižni
3
drog
. V nasprotnem primeru lahko pride do
poškodb zaradi zmečkanin.
j
Dvižni drog 6 vstavite v vpenjalo za dvižni
3
drog
in motorno vozilo s črpanjem dvignite
na želeno višino (sl. D).
j
Podstavna stojala postavite pod dovoljene
podporne točke motornega vozila.
j
Nato dvigalko za avto razbremenite, tako da
7
drog
z ovalno odprtino nataknete na ventil
za spuščanje
5
, drog 7 nekoliko zavrtite v
24 SI
Page 25

nasprotno smer urnega kazalca in ga takoj
zopet zavrtite nazaj. Podložni krožnik
1
se
nekoliko spusti in motorno vozilo držijo podstavna stojala.
Q
Vzdrževanje in skladiščenje
Q
Dolivanje hidravličnega
olja / podmazovanje
Q
Spuščanje motornega vozila
ŽIVLJENJSKA NEVARNOST! Prepričajte
se, da se pod motornim vozilom ne nahajajo
osebe ali ovire, kadar vozilo spuščate.
POZOR! Motorno vozilo spuščajte počasi. V
nasprotnem primeru grozita nevarnost poškodb
in povzročitve škode na izdelku oz. motornemu
vozilu!
j
Motorno vozilo najprej nekoliko dvignite, da
lahko odstranite podstavna stojala. Za dvigovanje ravnajte tako, kot je opisano v poglavju
„Dvig motornega vozila“.
j
Odstranite podstavna stojala.
j
Drog 7 z ovalno odprtino nataknite na ventil
za spuščanje
5
in drog počasi vrtite v na
sprotno smer urnega kazalca (sl. C). Motorno
vozilo se počasi spušča.
Opozorilo: Čim močneje drog
7
vrtite v nasprotno smer urnega kazalca, tem bolj hitro se
motorno vozilo spušča. Zaradi tega vrtite zelo
previdno, da dobite občutek za pravilno hitrost.
j
Podložni krožnik 1 toliko spustite, da ni več
obtežen. Nato dvigalko za avto potegnite ven
izpod avtomobila. Izvajajte pritisk na podložni
1
krožnik
j
Ventil za spuščanje 5 zaprite, tako da drog 7
na ventilu za spuščanje
, dokler ni popolnoma spuščen.
5
vrtite v smeri urnega
kazalca.
j
Drog 7 snemite z ventila za spuščanje 5.
j
Podaljševalni vijak
2
zopet privijte navzdol,
če je bil odvit.
Q
Čiščenje in nega
j Vse zunanje, premične dele dobro namastite.
j
Hidravlično dvigalko za avto čistite z rahlo
naoljeno krpo.
j
Na noben način ne uporabljajte ostrih ali
jedkih čistilnih sredstev.
Opozorilo: Uporabljajte samo hidravlična olja,
skladna z ISO VG 15.
j
Dvigalko za avto postavite navpično na gladko,
vodoravno površino.
j
P
odaljševalni vijak 2 popolnoma privijte navzdol.
j
Drog 7 z ovalno odprtino nataknite na ventil
za spuščanje
5
in drog vrtite v nasprotno
smer urnega kazalca (sl. C), da se podložni
1
krožnik
j
Zaporni čep za olje 8 potegnite ven iz tanka
popolnoma spusti.
za olje.
j
Hidravlično olje s pomočjo primerne posode
nalijte v tank za olje. Hidravlično olje napolnite
do spodnjega roba odprtine za dolivanje.
j
Po potrebi odstranite zrak, ki se eventualno nahaja v hidravličnem sistemu. V ta namen ravnajte tako, kot je opisano v 3-4 koraku v poglavju
„
Odstranjevanje zraka iz hidravličnega sistem
j
Zaporni čep za olje 8 ponovno vtaknite v
a“.
tank za olje.
j
Vse premične dele dvigalke za avto redno namastite, da preprečite pojav korozije.
j
Dolijte pribl. 100 – 105 ml olja, kadar je olje v
celoti porabljeno.
Q
Odstranjevanje zraka iz
hidravličnega sistema
Zrak v hidravličnem sistemu lahko negativno vpliva
na delovanje dvigalke za avto.
Za odstranjevanje zraka iz hidravličnega
sistema ravnajte kot sledi:
1. Drog
2. Zaporni čep za olje
3. Dvižni drog
7
z ovalno odprtino nataknite na ventil
za spuščanje
5
in drog vrtite v nasprotno s
mer urnega kazalca (sl. C), da se podložni kro-
1
žnik
popolnoma spusti.
8
potegnite ven iz tanka
za olje.
6
vstavite v vpenjalo za dvižni
25 SI
Page 26

drog 3 in z večkratnim črpanjem omogočite,
da zrak lahko uhaja ven.
4. Drog
7
z ovalno odprtino nataknite na ventil
za spuščanje
5
in drog vrtite v smeri urnega
kazalca (sl. C). Ventil za spuščanje
5
je zdaj
zopet zaprt.
5. Zaporni čep za olje
8
ponovno vtaknite v
tank za olje.
6. Po potrebi korake 1-5 ponavljajte, dokler zrak
ni popolnoma odstranjen.
Q
Skladiščenje
j
Drog 7 z ovalno odprtino nataknite na ventil
za spuščanje
5
in drog vrtite v nasprotno
smer urnega kazalca (sl. C), da se podložni
1
krožnik
j
Podaljševalni vijak 2 popolnoma privijte nav-
popolnoma spusti.
zdol.
j
Hidravlično dvigalko za avto in dvižni drog
hranite na suhem in zaščiteno pred vlago.
j
Pazite na to, da je podložni krožnik 1 popolnoma spuščen in podaljševalni vijak
2
v celoti
privit, kadar dvigalko za avto skladiščite. tako
preprečite, da bi olje lahko iztekalo iz zapornega čepa za olje
j
Vse premične dele dvigalke za avto redno
8
.
namastite, da preprečite pojav korozije.
= V hidravličnem sistemu se nahaja zrak.
= Odstranite zrak iz hidravličnega sistema (glejte
poglavje „Odstranjevanje zraka iz hidravličnega
sistema“).
= Dvigalka za avto pod obremenitvijo popusti.
= Ventil za spuščanje 5 ni bil pravilno zaprt.
= Ventil za spuščanje 5 popolnoma zaprite
(glejte poglavje „Dvig motornega vozila“).
= Hidravlično olje izteka.
= V cilindru se nahaja preveč hidravličnega olja.
= Prekomerno količino hidravličnega olja odstra-
nite iz cilindra.
= Črpalni mehanizem deluje samo deloma.
= V cilindru se nahaja preveč hidravličnega olja.
= Prekomerno količino hidravličnega olja odstra-
nite iz cilindra.
= V hidravličnem sistemu se nahaja zrak.
= Odstranite zrak iz hidravličnega sistema (glejte
poglavje „Odstranjevanje zraka iz hidravličnega
sistema“).
Q
Odstranjevanje
Embalaža je sestavljena iz ekoloških
materialov, ki jih lahko odlagate na
lokalnim lokacijah za recikliranjem.
Q
Odpravljanje napak
= napaka
= vzrok
= odpravljanje problema
= Dvigalka za avto motornega vozila ne dvigne
ali ga ne dvigne dovolj visoko.
= Ventil za spuščanje 5 ni bil pravilno zaprt.
= Ventil za spuščanje 5 popolnoma zaprite
(glejte poglavje „Dvig motornega vozila“).
= V dvigalki za avto ni dovolj hidravličnega olja.
= Dolijte hidravlično olje (glejte poglavje „Doliva-
nje hidravličnega olja / podmazovanje“).
= V cilindru se nahaja preveč hidravličnega olja.
= Prekomerno količino hidravličnega olja odstra-
nite iz cilindra.
26 SI
V interesu varovanja okolja odsluženega
izdelka ne odvrzite med hišne odpadke,
temveč ga oddajte v strokovno odstranjevanje. O zbirnih mestih in njihovem odpiralnem času se lahko informirate pri pristojni upravi.
Hidravlično olje zavrzite na okolju prijazen način.
Zagotovite odstranjevanje preko strokovne servisne
delavnice ali se obrnite na najbližje zbirno mesto
za škodljive odpadke.
Page 27

Q
Informacije
Q
Izjava o skladnosti
Mi, podjetje OWIM GmbH & Co. KG Stiftsbergstraße 1, D-74167 Neckarsulm, z vso odgovornostjo
izjavljamo, da je ta izdelek: hidravlična dvigalka
za avtomobile, model št.: Z31224, verzija:
07 / 2014, na katerega se ta izjava nanaša, v
skladu s standardi / normativnimi dokumenti
2006 / 42 / EC.
Uporabljeni harmonizirani standard:
EN 1494 / A1:2008
Tobias Koenig
Division Manager
Neckarsulm, 15 May 2014
Celotno izjavo o skladnosti najdete na spletni strani
www.owim.com
27 SI
Page 28

Použití ke stanovenému účelu ................................................................................... Strana 29
Popis dílů ...................................................................................................................................... Strana 29
Technické údaje ...................................................................................................................... Strana 29
Rozsah dodávky ....................................................................................................................Strana 29
Bezpečnostní pokyny ........................................................................................................ Strana 29
Použití
Zvedání motorového vozidla .......................................................................................................... Strana 30
Spouštění motorového vozidla dolů ............................................................................................... Strana 31
Čistění a ošetřování ............................................................................................................. Strana 31
Údržba a skladování
Doplnění hydraulického oleje / mazání .......................................................................................... Strana 31
Odstranění vzduchu z hydraulického systému ..............................................................................Strana 31
Skladování ........................................................................................................................................Strana 32
Odstranění chyb .....................................................................................................................Strana 32
Zlikvidování ...............................................................................................................................Strana 32
Informace
Prohlášení o shodě ...........................................................................................................................Strana 32
28 CZ
Page 29

Hydraulický zvedák
Q
Použití ke stanovenému účelu
Hydraulický zvedák vozu je určen ke zvedání a
spouštění dolů motorových vozidel. Jiná použití
nebo změny hydraulického zvedáku vozu neplatí
jako použití ke stanovenému účelu a mohou vést k
rizikům, jako jsou poranění a poškození. Za škody
vzniklé z použití k nestanovenému účelu nepřevezme
výrobce ručení.
Výrobek není určen k průmyslovému použití.
Upozornění: Po každém použití je zapotřebí
zavřít ventil
Q
1
Zatěžovací talíř
2
Prodlužovaní šroub
3
Upínač zvedací tyče
4
Pojistný ventil
5
Spouštěcí ventil
6
Zvedací tyč (hustící mechanizmus)
7
Tyč (pro vypouštěcí ventil)
8
Ucpávka oleje
Q
Výška zdvihu: cca 18,5 - 36 cm
Maximální nosnost: 3000 kg
Váha: cca 3,0 kg
Hydraulický olej: podle normy ISO VG 15
Q
1 hydraulický zvedák vozu
1 zvedací tyč
1 tyč pro vypouštěcí ventil
1 návod k obsluze
5
ke spuštění dolů!
Popis dílů
Technické údaje
Rozsah dodávky
Bezpečnostní pokyny
NEBEZPEČÍ! Řiďte se níže uvedenými poky-
ny, v opačném případě může dojít k ohrožení
života, poranění, nebo i poškození výrobku,
popř. motorového vozidla.
Používejte společně se zvedákem vždy bloky
na podložení a klíny pod kola. Nikdy nepracujte pod nadzvednutém motorovém vozidle
bez dalších bezpečnostních opatření. Tak
zabráníte pojíždění, sklouznutí nebo převrhnutí
vozidla.
Výrobek používejte jen na pevných, rovných
plochách. Na nepevných a nerovných plochách – jako jsou např. štěrkové podklady –
může dojít ke sklouznutí zátěže.
Je zapotřebí, aby mohla osoba, obsluhují zve-
dák, pozorovat břemeno při všech vykonávaných pohybech.
Není dovoleno pracovat pod zvednutým
břemenem, pokud není vhodným prostředkem
zajištěno.
Nenechte používat hydraulický zvedák
nekvalifikovanou a nezkušenou osobu.
Před použitím hydraulického zvedáku zajistěte
motorové vozidlo proti pojíždění. Zatáhněte
ruční brzdu, zařaďte rychlostní stupeň (u automatiky nastavte polohu „P“) a zajistěte motorové
vozidlo klíny pod koly.
Buďte navzdory bezpečnostním opatřením
neustále opatrní a pozorujte během práce na
motorovém vozidle, jestli sedí talíř
na místě.
Zajistěte, aby při zvedání motorového vozidla
nemohl vytéct benzín, kapalina baterie nebo
jiné nebezpečné látky.
Před spouštěním vozidla se ujistěte, že se pod
motorovým vozidlem nenacházejí osoby nebo
předměty.
Spouštějte vozidlo pomalu.
Zkontrolujte, jestli jsou všechny díly odborně
namontované a v bezvadném stavu.
Dbejte na to, aby jste nikdy nepřekročili přípustnou jmenovitou zátěž
(nosnost).
1
pevně
29 CZ
Page 30

Před každým použitím přezkoušejte funkce zve-
dáku. Kontrolujte u zvedáku obzvlášť těsnost
hydraulického systému, utažení šroubů a ventilů.
Hydraulický zvedák nepoužívejte nikdy k pře-
pravě nebo nakládání vozidla. Nikdy nezvedejte celé vozidlo.
Dbejte na to, aby se při používání zvedáku
nenacházely žádné osoby – zejména děti – v
motorovém vozidle a aby měly osoby v blízkosti
dostatečný odstup.
Nikdy nepřestavujte pojistný ventil 4. Ventil je
již z výroby správně nastavený a nemusí se
seřizovat.
Nepoužívejte v žádném případě zvedák, jestli-
že je pečeť pojistného ventilu
4
poškozená.
Uživatel musí být před použitím zvedáku zaško-
lený zkušenou osobou. Síla pumpy a převáděcí
síly dosahují hodnoty přibližně 350 N.
Při nečitelných označeních na zvedáku se
nedoporučuje jeho používání než se značky
obnoví.
Neprovádějte na zvedáku žádné změny.
Každá konstrukční změna zvedáku má vliv na
jeho bezpečnost a plnění požadavků podle
EN 1494 / A1:2008.
Při používání zvedáku nesmí použitá síla pře-
kročit hodnotu 350 N. Tato hodnota odpovídá
síle na páce přibližně ve výši 35 kg.
POZOR! NEBEZPEČÍ ZRANĚNÍ
USKŘÍPNUTÍM! Během pumpování držte prsty v odstupu od uchy-
cení páky
3
. Jinak může dojít ke zranění
uskřípnutím.
Hydraulický olej ve zvedáku zaručuje jeho
funkci při provozních teplotách mezi -20° C
až +40° C.
Nepoužívejte zvedák v místnostech, ve kterých
se mohou nacházet hořlavé nebo výbušné
plyny a prachy (např. ve chlévech, kůlnách
nebo lakovnách).
Používejte zvedák pouze ke zvedání a spouštění
motorového vozidla, nepoužívejte ho k držení
ve zvednuté poloze. Při zvedání nebo spouštění
zvedák neposunujte.
Nepoužívejte zvedák, jestliže jste zjistili netěs-
nost jeho systému.
Po každém použití zvedáku nastavte všechny
použité části opět do původní polohy. Jestliže
není možné přestavit díly zvedáku, nechte vymě-
nit odborníkem hydraulický olej nebo pumpu.
Q
Použití
Q
Zvedání motorového vozidla
POZOR! NEBEZPEČÍ OHROŽENÍ ŽIVOTA!
Předtím než použijete zvedák vozu a podpěrky pod
karoserii se nejprve ujistěte o jejich neporušeném
stavu. Mějte na paměti, že hydraulický zvedák
vozu se smí použít jen vkombinaci spodpěrkami
pro karoserii. Připravte je před zvedáním motorového vozidla. Nepoužijete-li podpěrky pro karoserii
hrozí nebezpečí převrácení motorového vozidla,
což může znamenat nebezpečí ohrožení života.
Postupujte následujícím způsobem:
j
Při skladování zvedáku dbejte na to, aby byl
jeho zatěžovací talíř
prodlužovací šroub
j
Nastavte hydraulický zvedák vozu do požado-
1 kompletně spuštěný a
2 úplně zašroubovaný.
vané polohy. Přitom dbejte na provozní návod
motorového vozidla.
j
Vyšroubujte, je-li třeba, prodlužovací šroub 2, až
se dotkne podlahy motorového vozidla (obr. B).
j
Spojte tyč 7 se zvedací tyčí 6, abyste získali
prodlouženou zvedací tyč.
J
POZOR! NEBEZPEČÍ PORANÉ-
NÍ POHMOŽDĚNÍM! Při hustícím
postupu chraňte vždy své prsty před
oblastí upínače zvedací tyče
3
. Jinak může
dojít kporaněním pohmožděním.
j
Zaveďte zvedací tyč 6 do upínače zvedací
3
tyče
a nahuštěním zvedněte motorové vozi-
dlo do požadované výšky (obr. D).
j
Postavte podpěrky pro karoserii pod přípustné
opěrné body motorového vozidla.
j
Zvedák vozu odlehčíte tím, že tyč 7 s oválným
otvorem nasadíte na spouštěcí ventil
5
, tyčí 7
trochu otočíte proti směru pohybu hodinových
ručiček a pak okamžitě otočíte znovu zpět. Zatěžovací talíř
1
vyjede trochu dolů a motorové
vozidlo je drženo podpěrkami pro karoserii.
30 CZ
Page 31

Q
Spouštění motorového
vozidla dolů
NEBEZPOEČÍ OHROŽENÍ ŽIVOTA!
Ujistěte se, že se pod motorovým vozidlem
nenacházejí osoby nebo překážky, spouštíte-li
je dolů.
POZOR! Motorové vozidlo spouštějte pomalu
dolů. Jinak hrozí nebezpečí poranění a poškození na výrobku, popř. na motorovém vozidle.
j
Motorové vozidlo nejprve trochu nadzvedněte,
abyste mohli odstranit podpěrky pro karoserii.
Postupujte tak, jak je uvedeno v kapitole „Zvedání motorového vozidla“.
j
Podpěrky pro karoserii odstraňte.
j
Nasaďte tyč 7 oválným otvorem na spouštěcí
5
ventil
a otočte tyč pomalu proti směru pohybu hodinových ručiček (obr. C). Motorové
vozidlo se pomalu spustí dolů.
Upozornění: Čím silněji otáčíte tyčí
směru pohybu hodinových ručiček, tím rychleji
se motorové vozidlo spustí dolů. Otáčejte proto
nejprve velmi opatrně, abyste získali pocit
správné rychlosti.
j
Spusťte zatěžovací talíř 1 tak daleko, aby nebyl
už více zatížený. Zvedák vozu pak pod autem
vytáhněte. Na zatěžovací talíř
až je úplně spuštěn dolů.
j
Spouštěcí ventil 5 zavřete tím, že tyč 7 našroubujete ve směru pohybu hodinových ručiček
na spouštěcí ventil
j
Tyč 7 stáhněte ze spouštěcího ventilu 5.
j
Prodlužovací šroub 2 znovu dolů zašroubujte,
5
.
je-li vyšroubován.
1
vyviňte tlak,
7
proti
Q
Údržba a skladování
Q
Doplnění hydraulického
oleje / mazání
Upozornění: Použijte jen hydraulické oleje podle
ISO VG 15.
j
Zvedák vozu postavte vždy kolmo na rovnou,
vodorovnou plochu.
j
Prodlužovací šroub 2 vyšroubujte úplně dolů.
j
Nasaďte tyč 7 oválným otvorem na spouštěcí
5
ventil
a otočte tyč pomalu proti směru pohybu
hodinových ručiček (obr. C), až je zatěžovací
1
talíř
j
j
úplně spuštěn dolů.
Vytáhněte ucpávku oleje 8 zolejové nádrže.
Naplňte hydraulický olej vhodnou nádobou do
olejové nádrže. Naplňte hydraulický olej až ke
spodní hraně plnicího otvoru.
j
Odstraňte eventuálně vzduch nacházející se
vhydraulickém systému. K tomu postupujte tak,
jak je popsáno v krocích 3-4 v kapitole „Odstranění vzduchu z hydraulického systému“.
j
Zátku oleje 8 vsaďte znovu do olejové nádrže.
j
Pohyblivé díly zvedáku vozu pravidelně namažte,
aby se zabránilo korozi.
j
Doplňte cca. 100 – 105 ml oleje, je-li olej
kompletně spotřebován.
Q
Odstranění vzduchu z
hydraulického systému
Vzduch vhydraulickém systému může způsobit
omezení funkce zvedáku vozu.
Q
Čistění a ošetřování
j Všechny vně se nacházející pohyblivé díly
dobře natřete tukem.
j
Hydraulický zvedák vozu očistěte mírně
naolejovanou tkaninou.
j
V žádném případě nepoužívejte ostré nebo
žíravé čisticí prostředky.
Kodstranění vzduchu zhydraulického systému postupujte následujícím způsobem:
1. Nasaďte tyč
ventil
7
oválným otvorem na spouštěcí
5
a otočte tyčí pomalu proti směru pohybu hodinových ručiček (obr. C), až je zatěžovací talíř
2. Vytáhněte ucpávku oleje
3. Zaveďte zvedací tyč
tyče
1
úplně spuštěn dolů.
8
zolejové nádrže.
6
do upínače zvedací
3
a nahustěte několikrát vzduch, abyste
nechali vzduch uniknout.
31 CZ
Page 32

4. Nasaďte tyč 7 oválným otvorem na spouštěcí
5
ventil
a otočte tyčí ve směru pohybu hodi-
nových ručiček (obr. C). Spouštěcí ventil
5
je
nyní znovu uzavřen.
5. Zátku oleje
8
vsaďte znovu do olejové nádrže.
6. Zopakujte v případě potřeby kroky 1-5, až
vzduch úplně unikl.
Q
Skladování
j
Nasaďte tyč 7 oválným otvorem na spouštěcí
5
ventil
a otočte tyčí proti směru pohybu hodi-
nových ručiček (obr. C), až je zatěžovací talíř
1
úplně spuštěn dolů.
j
Prodlužovací šroub 2 vyšroubujte úplně dolů.
j
Hydraulický zvedák vozu a zvedací tyč skladujte suché a chráněné před vlhkostí.
j
Dbejte na to, aby byla zatěžovací talíř 1 úplně
spuštěná dolů a prodlužovací šroub
2
úplně
zašroubovaný, skladujete-li zvedák vozu. Tak
se vyhnete vystoupení oleje ze zátky oleje
j
Pohyblivé díly zvedáku vozu pravidelně na-
8
mažte, aby se zabránilo korozi.
= Zvedák vozu pod zátěží povolí.
= Spouštěcí ventil 5 nebyl správně uzavřen.
= Zavřete úplně spouštěcí ventil 5 (viz kapitolu
„Zvedání motorového vozidla“).
= Vystupuje hydraulický olej.
= Ve válci se nachází příliš mnoho hydraulického
oleje.
= Odstraňte přebytečné množství hydraulického
oleje zválce.
= Hustící mechanizmus funguje jen částečně.
= Ve válci se nachází příliš mnoho hydraulického
oleje.
= Odstraňte přebytečné množství hydraulického
oleje zválce.
= Vhydraulickém systému se nachází hydraulický
olej.
= Odstraňte vzduch v hydraulickém systému (viz
kapitolu „Odstranění vzduchu z hydraulického
systému“).
.
Q
Zlikvidování
Q
Odstranění chyb
= Chyba
= Příčina
= Odstranění
= Zvedák vozu motorové vozidlo nezvedá nebo
nedostatečně vysoko.
= Spouštěcí ventil 5 nebyl správně uzavřen.
= Zavřete úplně spouštěcí ventil 5 (viz kapitolu
„Zvedání motorového vozidla“).
= Ve zvedáku vozu není dost hydraulického oleje.
= Hydraulický olej doplňte (viz kapitolu „Doplnění
hydraulického oleje / mazání“).
= Ve válci se nachází hydraulický olej.
= Odstraňte přebytečné množství hydraulického
oleje zválce.
= Vhydraulickém systému se nachází vzduch.
= Odstraňte vzduch v hydraulickém systému (viz
kapitolu „Odstranění vzduchu z hydraulického
systému“).
32 CZ
Obal a obalový materiál se skládají vý-
hradně z ekologicky vhodných materiálů. Lze je zlikvidovat v místních recyklačních nádobách.
Vysloužilé zařízení neodhoďte do domácího odpadu, nýbrž je odevzdejte k
odbornému zlikvidování. O sběrnách a
jejich otevíracích hodinách se můžete informovat u příslušné správy.
Hydraulický olej nechejte ekologicky vhodně zlikvidovat. Zajistěte zlikvidování odbornou opravnou
nebo se obraťte na nejbližší sběrnu škodlivých látek.
Q
Informace
Q
Prohlášení o shodě
My OWIM GmbH & Co. KG Stiftsbergstraße 1,
D-74167 Neckarsulm, prohlašujeme na vlastní
Page 33

zodpovědnost, že výrobek: Hydraulický zvedák,
model č.: Z31224, verze: 07 / 2014, k němuž se
prohlášení
dokum
vztahuje, souhlasí s normami / normativními
enty směrnice 2006 / 42 / EC.
Použité sladěné normy: EN 1494 / A1:2008
Tobias Koenig
Division Manager
Neckarsulm, 15 May 2014
Kompletní prohlášení o konformitě najdete na
webové stránce: www.owim.com.
33 CZ
Page 34

Použitie k určenému účelu .............................................................................................Strana 35
Popis dielov ................................................................................................................................Strana 35
Technické údaje ...................................................................................................................... Strana 35
Obsah dodávky .....................................................................................................................Strana 35
Bezpečnostné upozornenia .......................................................................................... Strana 35
Použitie
Zdvíhanie vozidla ............................................................................................................................Strana 36
Spúšťanie vozidla nadol ..................................................................................................................Strana 37
Čistenie a ošetrovanie .......................................................................................................Strana 37
Údržba askladovanie
Doplnenie hydraulického oleja / mazanie .....................................................................................Strana 37
Vypustenie vzduchu z hydraulického systému ............................................................................... Strana 37
Skladovanie ......................................................................................................................................Strana 38
Odstraňovanie porúch......................................................................................................Strana 38
Likvidácia ..................................................................................................................................... Strana 38
Informácie
Vyhlásenie ozhode ......................................................................................................................... Strana 39
34 SK
Page 35

Hydraulický zdvihák
Q
Použitie k určenému účelu
Hydraulický zdvihák je určený pre zdvíhanie a
spúšťanie vozidiel. Použitie na iný účel alebo zmeny hydraulického zdviháka znamenajú použitie v
rozpore surčeným účelom, čo môže viesť k vzniku
poranení a škôd. Za škody, ktoré vzniknú v prípade
používania na nesprávny účel, výrobca nepreberá
žiadnu záruku. Výrobok nie je určený pre priemyselnú prevádzku.
Poznámka: Po každom používaní zatvorte spúšťací ventil
Q
1
2
3
4
5
6
7
8
Q
Výška zdvihu: cca. 18,5 - 36 cm
Maximálna nosnosť: 3000 kg
Hmotnosť: cca. 3,0 kg
Hydraulický olej: podľa ISO VG 15
Q
1 hydraulický zdvihák
1 zdvíhacia tyč
1 tyč pre spúšťací ventil
1 návod na obsluhu
5
!
Popis dielov
Nosný tanier
Predlžovacia skrutka
Uchytenie zdvíhacej tyče
Poistný ventil
Spúšťací ventil
Zdvíhacia tyč (pre pumpovací mechanizmus)
Tyč (pre spúšťací ventil)
uzatváracia zátka olejovej nádrže
Technické údaje
Obsah dodávky
Bezpečnostné upozornenia
NEBEZPEČENSTVO! Dodržujte nasledujúce
pokyny, inak môže dôjsť k ohrozeniu života,
vzniku poranení alebo poškodeniu výrobku
príp. vozidla.
Spolu s hydraulickým zdvihákom vždy použí-
vajte podperné stojany a kliny pod kolesá
vozidla. Nikdy nepracujte pod nadvihnutým
vozidlom, ak ste nevykonali žiadne ďalšie bezpečnostné opatrenia. Tak zabránite posunu,
zošmyknutiu alebo prevráteniu vozidla.
Výrobok používajte iba na pevných, rovných
plochách. Na nerovných a neupevnených plochách – ako napríklad štrkový povrch – môže
dôjsť k zošmyknutiu bremena.
Je potrebné, aby osoba, ktorá obsluhuje prístroj,
mohla počas všetkých pohybov sledovať zdvíhací prístroj a bremeno.
Nie je dovolené pracovať pod nadvihnutým
bremenom, ak toto bremeno nie je istené vhodnými prostriedkami.
Hydraulický zdvihák nesmú používať nekvali-
fikované a neskúsené osoby.
Pred používaním hydraulického zdviháka zaistite
vozidlo proti pohybu. Zatiahnite ručnú brzdu,
zaraďte rýchlosť (v prípade automatickej prevodovky „P“) a zaistite vozidlo klinmi pod kolesami.
Napriek bezpečnostným opatreniam buďte
vždy opatrní a počas celej doby práce na
vozidle kontrolujte, či záťažový tanier
ne sedí na zdviháku.
Ubezpečte sa, že pri nadvihovaní vozidla
nevyteká benzín, kvapalina z batérie ani iné
nebezpečné substancie.
Ubezpečte sa, že sa pod vozidlom nenachá-
dzajú žiadne osoby alebo iné prekážky, keď
vozidlo spúšťate.
Vozidlo spúšťajte nadol len veľmi pomaly.
Skontrolujte, či sú všetky časti odborne namon-
tované a nepoškodené.
Dbajte na to, aby ste nikdy neprekročili povolené menovité zaťaženie
(nosnosť).
1
pev-
35 SK
Page 36

Pred každým používaním skontrolujte funkčnosť
hydraulického zdviháka. Predovšetkým skontrolujte prípadne vytekajúci hydraulický olej, pevné priliehanie všetkých skrutiek a ventilov.
Hydraulický zdvihák nikdy nepoužívajte na
transport alebo nakladanie nákladu na vozidlo.
Nikdy nezdvíhajte celé vozidlo.
Dbajte na to, aby sa vo vozidle nenachá-
dzali žiadne osoby - predovšetkým deti - a aby
osoby, ktoré sú v blízkosti vozidla, mali dostatočný odstup od vozidla, keď pracujete s hydraulickým zdvihákom.
Nikdy neprestavujte bezpečnostný ventil 4.
Je výrobne správne nastavený a dodatočné
nastavovanie nie je potrebné.
Nikdy nepoužívajte hydraulický zdvihák, ak je
pečať (bezpečnostný ventil
4
) poškodená.
Používateľ zdviháka musí byť pred začatím po-
užívania oboznámený s prístrojom prostredníctvom skúsenej osoby. Zdvíhacia a prenosná
sila má približne 350 N.
Ak sú označenia na výrobku nečitateľné, od-
porúčame nepoužívať zdvihák, kým nebudú
obnovené.
Na hydraulickom zdviháku nevykonávajte
žiadne prestavby. Všetky konštrukčné zmeny
prístroja majú vplyv na bezpečnosť a zhodu
prístroja s normou EN 1494 / A1:2008.
Pri používaní zdviháka sa nesmie prekročiť
vynaložená sila 350 N. To zodpovedá sile
približne 35 kg na páke.
POZOR! NEBEZPEČENSTVO
PORANENIA POMLIAŽDENÍM! Počas procesu pumpovania
držte prsty vždy vzdialené od oblasti príjmu
zdviháka
3
. Inak môže dôjsť k poraneniam v
dôsledku pomliaždenia.
Prevádzková teplota hydraulického oleja tohto
prístroja je od -20 °C do +40 °C.
Nepoužívajte prístroj v priestoroch s nebezpe-
čenstvom požiaru, v ktorých by sa mohli nachádzať horľavé alebo výbušné výpary alebo
prachy (napr. v stajniach, stodolách alebo
lakovniach).
Používajte prístroj iba na zdvíhanie alebo spúšťa-
nie vozidla, nie pre držanie v zdvihnutej polohe.
Pri zdvíhaní alebo spúšťaní ním nepohybujte.
Ak zbadáte stopy po vytečenom oleji, prístroj
nepoužívajte.
Po každom použití prístroja uveďte všetky pou-
žívané časti naspäť do ich pôvodnej polohy.
Výmenu hydraulického oleja alebo olejového
čerpadla prenechajte odbornému personálu,
ak sa časti prístroja nedajú prestaviť.
Q
Použitie
Q
Zdvíhanie vozidla
POZOR! NEBEZPEČENSTVO OHROZE-
NIA ŽIVOTA! Pred uvedením do prevádzky v pr-
vom rade skontrolujte, či sú zdvihák a podperné
stojany vnepoškodenom stave. Nezabúdajte, že
hydraulický zdvihák možno používať len vkombinácii s podpernými stojanmi. Pred zdvíhaním vozidla
preto najskôr pripravte stojany. Ak nepoužijete
podperné stojany, vzniká riziko pádu vozidla, čo
môže znamenať nebezpečenstvo ohrozenia života.
Postupujte nasledovným spôsobom:
j
Dbajte na to, aby bol záťažový tanier 1 kom-
pletne znížený a predlžovacia skrutka
2
úplne
zaskrutkovaná, keď zdvihák skladujete.
j
Položte hydraulický zdvihák na určenú pozíciu.
Riaďte sa pritom návodom na obsluhu vozidla.
j
Ak je to potrebné, vyskrutkujte predlžovaciu
2
skrutku
natoľko, kým sa nebude dotýkať
spodnej časti vozidla (obr. B).
j
Spojte tyč 7 so zdvíhacou tyčou 6, aby ste
získali predĺženú zdvíhaciu tyč.
J
POZOR! NEBEZPEČENSTVO
POMLIAŽDENIA! Počas pumpo-
vania nikdy nedávajte prsty do
priestoru uchytenia zdvíhacej tyče
3
. Vopač-
nom prípade hrozí riziko pomliaždenia.
j
Zaveďte zdvíhaciu tyč 6 do uchytenia zdvíhacej
3
tyče
a pumpujte, kým sa vozidlo dostane do
želanej výšky (obr. D)
j
Umiestnite podperné stojany pod určené oporné
body vozidla.
j
Zdvihák odľahčíte tým, že nasadíte tyč 7
oválnym otvorom na spúšťací ventil
5
,tyč 7
krátko otočíte proti smeru hodinových ručičiek
36 SK
Page 37

anásledne hneď otočíte opačným smerom.
Nosný tanier
1
sa spustí oniečo nižšie avo-
zidlo držia podperné stojany.
Q
Spúšťanie vozidla nadol
NEBEZPEČENSTVO OHROZENIA
ŽIVOTA! Ubezpečte sa, že sa pod vozidlom
nenachádzajú žiadne osoby ani iné prekážky,
keď vozidlo spúšťate nadol.
POZOR! Vozidlo spúšťajte iba pomaly. V
opačnom prípade hrozí nebezpečenstvo úrazu
a poškodenia výrobku príp. vozidla.
j
Vozidlo najprv mierne nadvihnite, aby ste
mohli odstrániť podperné stojany. Pri zdvíhaní
vozidla použite postup opísaný vkapitole
„Zdvíhanie vozidla“.
j
Odstráňte podperné stojany.
j
Nasaďte tyč 7 oválnym otvorom na spúšťací
5
ventil
aotáčajte tyč pomaly proti smeru hodinových ručičiek (obr. C). Vozidlo sa pomaly
spustí nadol.
Upozornenie: Čím silnejšie otáčate tyč
7
proti smeru hodinových ručičiek, tým rýchlejšie
sa spúšťa vozidlo nadol. Zo začiatku preto otáčajte opatrne, aby ste vedeli odhadnúť správnu
rýchlosť spúšťania.
j
Nosný tanier 1 spustite nadol tak, aby na
ňom nebola žiadna záťaž. Vytiahnite zdvihák
spod vozidla. Tlačte na nosný tanier
1
, kým
sa nespustí úplne nadol.
j
Zatvorte spúšťací ventil 5 otočením tyče 7
na spúšťacom ventile
5
vsmere hodinových
ručičiek.
j
Stiahnite tyč 7 zo spúšťacieho ventilu 5.
j
Zaskrutkujte predlžovaciu skrutku 2 nadol v
prípade, že je vyskrutkovaná.
Q
Čistenie a ošetrovanie
j Dobre namažte všetky vonkajšie pohyblivé diely.
j
Hydraulický zdvihák čistite jemne naolejovanou utierkou.
j
V žiadnom prípade nepoužívajte agresívne
alebo leptavé čistiace prostriedky.
Q
Údržba askladovanie
Q
Doplnenie hydraulického
oleja / mazanie
Upozornenie: Používajte výhradne hydraulický
olej vsúlade s ISO VG 15.
j
Postavte zdvihák vo vertikálnej polohe na vodorovnú plochu.
j
Zaskrutkujte predlžovaciu skrutku 2 úplne nadol.
j
Nasaďte tyč 7 oválnym otvorom na spúšťací
5
ventil
aotáčajte tyč proti smeru hodinových
ručičiek (obr. C), kým sa nosný tanier
úplne nadol.
j
Vytiahnite uzatváraciu zátku 8 zolejovej
nádrže.
j
Použitím vhodnej nádoby nalejte hydraulický olej
do olejovej nádrže. Nalejte olej až po dolný
okraj plniaceho otvoru.
j
Vypustite vzduch, ktorý sa prípadne nachádza
v hydraulickom systéme. Postupujte, ako je uvedené vbodoch 3 – 4 vkapitole „Vypustenie
vzduchu z hydraulického systému“.
j
Znovu nasaďte uzatváraciu zátku 8 na
olejovú nádrž.
j
Všetky pohyblivé časti zdviháka pravidelne
namažte, aby ste predišli hrdzaveniu.
j
Keď spotrebujete všetok olej, doplňte cca
100 – 105 ml oleja.
Q
Vypustenie vzduchu
z hydraulického systému
Vzduch v hydraulickom systéme môže viesť k poruchám fungovania zdviháka.
Pri vypúšťaní vzduchu z hydraulického
systému postupujte nasledovne:
1. Nasaďte tyč
ventil
ručičiek (obr. C), kým sa nosný tanier
spustí úplne nadol.
2. Vytiahnite uzatváraciu zátku
nádrže.
7
oválnym otvorom na spúšťací
5
aotáčajte tyč proti smeru hodinových
8
zolejovej
1
nespustí
1
ne-
37 SK
Page 38

3. Zaveďte zdvíhaciu tyč 6 do uchytenia zdvíhacej tyče
3
apumpujte niekoľkokrát, aby
mohol vzduch unikať.
4. Nasaďte tyč
ventil
čičiek (obr. C). Spúšťací ventil
7
oválnym otvorom na spúšťací
5
aotáčajte tyč v smere hodinových ru-
5
je teraz opäť
zatvorený.
5. Znovu nasaďte uzatváraciu zátku
8
na
olejovú nádrž.
6.
Podľa potreby opakujte kroky 1 – 5, kým vzduc
neunikne úplne.
= Odstráňte nadbytočné množstvo hydraulického
oleja zvalca.
= V hydraulickom systéme sa nachádza vzduch.
= Vypustite vzduch z hydraulického systému (pozri
kapitolu „Vypustenie vzduchu z hydraulického
systému“).
= Zdvihák povoľuje, keď je zaťažený.
= Spúšťací ventil 5 nebol správne zatvorený.
h
= Úplne zatvorte spúšťací ventil 5 (pozri kapitolu
„Zdvíhanie vozidla“).
Q
Skladovanie
j
Nasaďte tyč 7 oválnym otvorom na spúšťací
5
ventil
aotáčajte tyč proti smeru hodinových
ručičiek (obr. C), kým sa nosný tanier
1
nespustí
úplne nadol.
j
Zaskrutkujte predlžovaciu skrutku 2 úplne nadol.
j
Hydraulický zdvihák azdvíhaciu tyč skladujte
na suchom mieste achráňte pred vlhkosťou.
j
Dbajte na to, aby pri skladovaní zdviháka bola
vždy nosný tanier
predlžovacia skrutka
1
spustená úplne dolu a
2
úplne zaskrutkovaná.
Zabránite tak prípadnému vytekaniu oleja
cezuzatváraciu zátku
j
Všetky pohyblivé časti zdviháka pravidelne
8
.
namažte, aby ste predišli hrdzaveniu.
Q
Odstraňovanie porúch
= porucha
= príčina
= odstránenie poruchy
= Zdvihák nezdvíha motorové vozidlo vôbec
alebo do nedostatočnej výšky.
= Spúšťací ventil 5 nebol správne zatvorený.
= Úplne zatvorte spúšťací ventil 5 (pozri kapitolu
„Zdvíhanie vozidla“).
= Zdvihák nemá dostatok hydraulického oleja.
= Doplňte hydraulický olej (pozri kapitolu „Dopl-
nenie hydraulického oleja / mazanie“).
= Vo valci sa nachádza príliš veľa hydraulického
oleja.
= Vyteká hydraulický olej.
= Vo valci sa nachádza príliš veľa hydraulického
oleja.
= Odstráňte nadbytočné množstvo hydraulického
oleja zvalca.
= Pumpovací mechanizmus funguje len čiastočne.
= Vo valci sa nachádza príliš veľa hydraulického
oleja.
= Odstráňte nadbytočné množstvo hydraulického
oleja zvalca.
= V hydraulickom systéme sa nachádza vzduch.
= Vypustite vzduch z hydraulického systému (pozri
kapitolu „Vypustenie vzduchu z hydraulického
systému“).
Q
Likvidácia
Obal a obalový materiál pozostávajú vý-
lučne z ekologických materiálov. Môžu
sa zlikvidovať v miestnych
recyklačných nádobách.
Ak výrobok doslúžil, vzáujme ochrany
životného prostredia nehádžte ho do
domového odpadu, ale prineste ho na
odbornú likvidáciu. Ozberných miestach
aotváracích časoch sa môžete informovať uVášho kompetentného správneho
úradu.
Hydraulický olej nechajte ekologicky zlikvidovať.
Likvidáciou poverte odbornú opravárenskú dielňu alebo sa obráťte na najbližšiu zberňu škodlivých látok.
38 SK
Page 39

Q
Informácie
Q
Vyhlásenie ozhode
My, OWIM GmbH & Co. KG Stiftsbergstraße 1,
D-74167 Neckarsulm, Veľká Británia, vyhlasujeme
na vlastnú zodpovednosť, že produkt: Hydraulický
zdvihák, č. modelu: Z31224, verzia: 07 / 2014,
na ktorý sa vzťahuje toto vyhlásenie, je vsúlade
snorma mi / normatívnymi dokumentmi smernice
2006 / 42 / EC.
Príslušná harmonizovaná norma:
EN 1494 / A1:2008
Tobias Koenig
Division Manager
Neckarsulm, 15 May 2014
Kompletné konformitné vyhlásenie nájdete na stránke
www.owim.com
39 SK
Page 40

Bestimmungsgemäße Verwendung ......................................................................... Seite 41
Teilebeschreibung .................................................................................................................... Seite 41
Technische Daten ......................................................................................................................Seite 41
Lieferumfang ................................................................................................................................ Seite 41
Sicherheitshinweise ................................................................................................................ Seite 41
Gebrauch
Kfz anheben ........................................................................................................................................ Seite 42
Kfz absenken ....................................................................................................................................... Seite 43
Reinigung und Pflege ............................................................................................................ Seite 43
Wartung und Lagerung
Hydraulik-Öl nachfüllen / Einfetten .....................................................................................................Seite 43
Luft aus dem Hydraulik-System entfernen .......................................................................................... Seite 44
Lagerung .............................................................................................................................................. Seite 44
Fehler beheben ..........................................................................................................................Seite 44
Entsorgung ..................................................................................................................................... Seite 45
Informationen
Konformitätserklärung ......................................................................................................................... Seite 45
40 DE/AT/CH
Page 41

Hydraulik-Wagenheber
Q
Bestimmungsgemäße
Verwendung
Der hydraulische Wagenheber ist zum Heben und
Absenken von Kraftfahrzeugen bestimmt. Andere
Verwendungen oder Veränderungen des hydraulischen Wagenhebers gelten als nicht bestimmungsgemäß und können zu Risiken wie lebensgefährlichen
Verletzungen und Beschädigungen führen. Für aus
bestimmungswidriger Verwendung entstandene
Schäden übernimmt der Hersteller keine Haftung.
Das Produkt ist nicht für den gewerblichen Einsatz
bestimmt.
Hinweis: Schließen Sie nach jeder Benutzung
das Absenkventil
Q
Teilebeschreibung
1
Lastteller
2
Verlängerungsschraube
3
Hubstangenaufnahme
4
Sicherheitsventil
5
Absenkventil
6
Hubstange (für Pumpmechanismus)
7
Stange (für Ablassventil)
8
Ölverschlussstopfen
Q
Technische Daten
Hubhöhe: ca. 18,5 - 36 cm
Tragkraft maximal: 3000 kg
Gewicht: ca. 3,0 kg
Hydraulik-Öl: gemäß ISO VG 15
Q
Lieferumfang
1 Hydraulischer Wagenheber
1 Hubstange
1 Stange für Ablassventil
1 Bedienungsanleitung
5
!
Sicherheitshinweise
GEFAHR! Befolgen Sie die nachstehenden
Anweisungen, andernfalls drohen Lebensgefahr,
Verletzungen, sowie Beschädigungen am Produkt
bzw. Kfz.
J Verwenden Sie zusätzlich zum hydraulischen
Wagenheber stets Unterstellböcke und Radkeile.
Arbeiten Sie niemals unter einem angehobenen
Kfz, wenn Sie keine weiteren Sicherungsmaß-
nahmen getroffen haben. So verhindern Sie ein
Wegrollen, Abrutschen oder Kippen des Fahr-
zeugs.
J Benutzen Sie das Produkt nur auf festen, ebenen
Flächen. Auf nicht befestigten und unebenen
Flächen – wie z.B. Schotterdecken – kann es
zum Verrutschen der Last kommen.
J
J Es ist erforderlich, dass die Bedienungsperson
J Es ist nicht erlaubt, unter der angehobenen Last
J Lassen Sie den hydraulischen Wagenheber
J Sichern Sie das Kfz vor der Benutzung des
J Seien Sie trotz Sicherungsmaßnahmen stets
J Stellen Sie sicher, dass beim Anheben des
J Vergewissern Sie sich, dass sich keine Personen
J Senken Sie das Kfz nur langsam ab.
J Kontrollieren Sie, ob alle Teile sachgerecht
Achten Sie darauf, dass Sie niemals
3000
die zulässige Nennlast (Tragkraft)
kg
überschreiten.
das Hubgerät und die Last während aller Be-
wegungen beobachten kann.
zu arbeiten, solange sie nicht durch geeignete
Mittel gesichert ist.
nicht von unqualifizierten und unerfahrenen
Personen benutzen.
hydraulischen Wagenhebers gegen Wegrollen.
Ziehen Sie die Handbremse an, legen Sie einen
Gang ein (bei Automatik „P“) und sichern Sie
das Kfz mittels Radkeilen.
aufmerksam und beobachten Sie während der
gesamten Arbeit am Kfz, ob der Lastteller
1
fest auf der Wagenheberaufnahme sitzt.
Kfz weder Benzin, Batterieflüssigkeit noch an-
dere gefährliche Substanzen auslaufen können.
oder Hindernisse unter dem Kfz befinden, wenn
Sie dieses absenken.
montiert und unversehrt sind.
41 DE/AT/CH
Page 42

J Überprüfen Sie vor jedem Gebrauch die Funkti-
onstüchtigkeit des hydraulischen Wagenhebers.
Kontrollieren Sie den hydraulischen Wagenheber
insbesondere auf auslaufendes Hydrauliköl, den
festen Sitz aller Schrauben und Ventile.
J Benutzen Sie den hydraulischen Wagenheber
niemals zum Transportieren oder Beladen
eines Fahrzeugs. Heben Sie niemals das
gesamte Fahrzeug an.
J Achten Sie darauf, dass sich keine Personen –
insbesondere Kinder – im Kfz befinden und in
der Nähe befindliche Personen ausreichend
Abstand zum Kfz halten, wenn der hydraulische
Wagenheber in Gebrauch ist.
J Verstellen Sie niemals das Sicherheitsventil
4
Es ist werksseitig korrekt eingestellt und muss
nicht nachjustiert werden.
J Verwenden Sie den hydraulischen Wagenheber
keinesfalls, wenn das Siegel (Sicherheitsventil
4
beschädigt ist.
J Der Anwender ist vor dem Gebrauch des
Wagenhebers durch eine erfahrene Person mit
dem Gerät vertraut zu machen. Die Pump- und
Übertragungskräfte betragen ungefähr 350 N.
J Sind die Markierungen auf dem Produkt bis
zur Unleserlichkeit beschädigt, ist von einer
weiteren Nutzung des Wagenhebers abgeraten, bis diese erneuert wurden.
J Nehmen Sie keine Umbauarbeiten am hydrau-
lischen Wagenheber vor. Jegliche konstruktive
Veränderung des Geräts hat Einfluss auf die
Sicherheit und die Übereinstimmung des Geräts
mit der EN 1494 / A1:2008.
J Beim Benutzen des Wagenhebers darf die auf-
gewendete Kraft 350 N nicht überschreiten.
Dies entspricht einer Kraft von ungefähr 35 kg
am Hebel.
J
VORSICHT!
VERLETZUNGSGE-
FAHR DURCH QUETSCHUNGEN!
Halten
Sie Ihre Finger während des
Pumpvorgangs immer vom Bereich der Hub-
stangenaufnahme
3
fern. Andernfalls kann es
zu Verletzungen durch Quetschungen kommen.
J Die Betriebstemperatur des Hydrauliköls dieses
Geräts liegt bei -20° C bis +40° C.
J Verwenden Sie das Gerät nicht in feuerge-
fährdeten Räumen, in denen brennbare oder
explosive Dämpfe oder Stäube vorhanden
sein könnten (z.B. in Ställen, Scheunen oder
Lackierhallen).
J Benutzen Sie das Gerät nur zum Heben und
Absenken des Kfz, nicht zum Halten in angeho-
bener Stellung. Bewegen Sie es nicht beim
Heben oder Absenken.
J Benutzen Sie das Gerät nicht, wenn Sie Spuren
von ausgelaufenem Öl vorfinden.
J Stellen Sie nach jedem Gebrauch des Geräts
alle benutzten Teile wieder in ihre ursprüngliche
Position zurück. Lassen Sie das Hydrauliköl oder
die Ölpumpe von Fachpersonal austauschen,
wenn Teile des Geräts sich nicht verstellen lassen.
.
Q
Gebrauch
Q
)
Kfz anheben
VORSICHT! LEBENSGEFAHR! Vergewissern
Sie sich zunächst über den unversehrten Zustand
von Wagenheber und Unterstellböcken, bevor Sie
diese verwenden. Beachten Sie, dass der hydraulische Wagenheber nur in Kombination mit Unterstellböcken verwendet werden darf. Stellen Sie diese
vor dem Anheben des Kfz bereit. Falls Sie keine
Unterstellböcke verwenden, droht ein Abkippen des
Kfz, was Lebensgefahr bedeuten kann.
Gehen Sie wie folgt vor:
j
Achten Sie darauf, dass der Lastteller 1
komplett abgesenkt ist und die Verlängerungsschraube
2
vollständig eingedreht ist, wenn
Sie den Wagenheber lagern.
j
Stellen Sie den hydraulischen Wagenheber in
die gewünschte Position. Beachten Sie dabei
die Betriebsanleitung des Kfz.
j
Drehen Sie, falls notwendig, die Verlängerungsschraube
2
heraus, bis sie den Boden des
Kfz berührt (Abb. B).
j
Verbinden Sie die Stange 7 mit der Hubstange
6
, um eine verlängerte Hubstange zu erhalten.
J
VORSICHT!
VERLETZUNGSGE-
FAHR DURCH QUETSCHUNGEN!
Halten Sie Ihre Finger während des
Pumpvorgangs immer vom Bereich der Hub-
42 DE/AT/CH
Page 43

stangenaufnahme 3 fern. Andernfalls kann es
zu Verletzungen durch Quetschungen kommen.
j
Führen Sie die Hubstange 6 in die Hubstangenaufnahme
3
ein und pumpen Sie das Kfz
auf die gewünschte Höhe (Abb. D).
j
Stellen Sie die Unterstellböcke unter die zulässigen
Stützpunkte des Kfz.
j
Entlasten Sie den Wagenheber, indem Sie die
7
Stange
senkventil
mit der ovalen Öffnung auf das Ab-
5
aufsetzen, die Stange 7 etwas
gegen den Uhrzeigersinn drehen und dann
sofort wieder zurückdrehen. Der Lastteller
fährt etwas herunter und das Kfz wird von den
Unterstellböcken gehalten.
j
Ziehen Sie die Stange 7 vom Absenkventil 5
ab.
j
Drehen Sie die Verlängerungsschraube 2
wieder herunter, falls Sie herausgeschraubt ist.
Q
Reinigung und Pflege
j
Fetten Sie alle außen liegenden, beweglichen
Teile gut ein.
j
Reinigen Sie den hydraulischen Wagenheber
1
mit einem leicht eingeölten Tuch.
j
Verwenden Sie keinesfalls scharfe oder ätzende
Reinigungsmittel.
Q
Kfz absenken
LEBENSGEFAHR! Vergewissern Sie sich, dass
sich keine Personen oder Hindernisse unter dem
Kfz befinden, wenn Sie dieses absenken.
VORSICHT! Senken Sie das Kfz nur langsam
ab. Andernfalls drohen Verletzungsgefahr und
Beschädigungen am Wagenheber und / oder
dem Kfz.
j
Heben Sie zunächst das Kfz etwas an, um die
Unterstellböcke entfernen zu können. Gehen Sie
zum Anheben vor wie im Kapitel „Kfz anheben“
beschrieben.
j
Entfernen Sie die Unterstellböcke.
j
Setzen Sie die Stange 7 mit der ovalen Öffnung auf das Absenkventil
5
auf und drehen
Sie die Stange langsam gegen den Uhrzeigersinn (Abb. C). Das Kfz wird langsam abgesenkt.
Hinweis: Je stärker Sie die Stange
7
den Uhrzeigersinn drehen, um so schneller wird
das Kfz abgesenkt. Drehen Sie deshalb zunächst
sehr vorsichtig, um ein Gefühl für die richtige
Geschwindigkeit zu bekommen.
j
Senken Sie den Lastteller 1 soweit ab, dass er
nicht mehr belastet ist. Ziehen Sie den Wagenheber dann unter dem Auto hervor. Üben Sie
Druck auf den Lastteller
1
aus, bis er vollständig
abgesenkt ist.
j
Schließen Sie das Absenkventil 5, indem Sie
die Stange
7
auf dem Absenkventil 5 im
Uhrzeigersinn drehen
gegen
Q
Wartung und Lagerung
Q
Hydraulik-Öl nachfüllen /
Einfetten
Hinweis: Verwenden Sie nur Hydraulik-Öle gemäß
ISO VG 15.
j
Stellen Sie den Wagenheber senkrecht auf eine
ebene, waagerechte Fläche.
j
Drehen Sie die Verlängerungsschraube 2
vollständig herunter.
j
Setzen Sie die Stange 7 mit der ovalen Öffnung auf das Absenkventil
Sie die Stange gegen den Uhrzeigersinn (Abb.
C), bis der Lastteller
j
Ziehen Sie den Ölverschlussstopfen 8 aus
dem Öltank.
j
Füllen Sie Hydrauliköl mit einem geeigneten
Gefäß in den Öltank. Füllen Sie das HydraulikÖl bis an die Unterkante der Einfüllöffnung.
j
Entfernen Sie eventuell vorhandene Luft im
Hydraulik-System. Gehen Sie dazu wie in den
Schritten 3-4 im Kapitel „Luft aus dem HydraulikSystem entfernen“ vor.
j
Setzen Sie den Ölverschlussstopfen 8 wieder
in den Öltank ein.
j
Fetten Sie alle beweglichen Teile des Wagenhebers regelmäßig ein, um Korrosion zu
verhindern.
j
Füllen Sie ca. 100 – 105 ml Öl nach, wenn
das Öl komplett verbraucht ist.
5
auf und drehen
1
vollständig abgesenkt ist.
43 DE/AT/CH
Page 44

Q
Luft aus dem
Hydraulik-System entfernen
Luft im Hydraulik-System kann zu Beeinträchtigungen
bei der Funktion des Wagenhebers führen.
Q
Fehler beheben
= Fehler
= Ursache
= Behebung
Gehen Sie zum Entfernen der Luft aus dem
Hydraulik-System wie folgt vor:
1. Setzen Sie die Stange
auf das Absenkventil
7
mit der ovalen Öffnung
5
auf und drehen Sie
die Stange gegen den Uhrzeigersinn (Abb. C),
bis der Lastteller
2. Ziehen Sie den Ölverschlussstopfen
1
vollständig abgesenkt ist.
8
aus
dem Öltank.
3. Führen Sie die Hubstange
genaufnahme
3
ein und pumpen mehrmals,
6
in die Hubstan-
um die Luft entweichen zu lassen.
4. Setzen Sie die Stange
nung auf das Absenkventil
7
mit der ovalen Öff-
5
auf und drehen
Sie die Stange im Uhrzeigersinn (Abb. C). Das
Absenkventil
5. Setzen Sie den Ölverschlussstopfen
5
ist nun wieder geschlossen.
8
wieder
in den Öltank ein.
6. Wiederholen Sie bei Bedarf die Schritte
1-5, bis die Luft vollständig entwichen ist.
Q
Lagerung
j
Setzen Sie die Stange 7 mit der ovalen Öffnung
auf das Absenkventil
5
auf und drehen Sie
die Stange gegen den Uhrzeigersinn (Abb. C),
bis der Lastteller
j
Drehen Sie die Verlängerungsschraube 2
1
vollständig abgesenkt ist.
vollständig herunter.
j
Lagern Sie den hydraulischen Wagenheber
und die Hubstange trocken und vor Feuchtigkeit geschützt.
j
Achten Sie darauf, dass der Lastteller 1 komplett abgesenkt ist und die Verlängerungsschraube
2
vollständig eingedreht ist, wenn
Sie den Wagenheber lagern. So vermeiden
Sie, dass Öl aus dem Ölverschlussstopfen
8
austreten kann.
j
Fetten Sie alle beweglichen Teile des Wagenhebers regelmäßig ein, um Korrosion zu verhindern.
= Der Wagenheber hebt das Kfz nicht oder nicht
hoch genug an.
= Das Absenkventil 5 wurde nicht richtig ge-
schlossen.
= Schließen Sie das Absenkventil 5 vollständig
(siehe Kapitel „Kfz anheben“).
= Es ist nicht genug Hydraulik-Öl im Wagenheber.
= Füllen Sie Hydraulik-Öl nach (siehe Kapitel
„Hydraulik-Öl nachfüllen / Einfetten“).
= Es befindet sich zuviel Hydraulik-Öl im Zylinder.
= Entfernen Sie die überschüssige Menge Hydraulik-
Öl aus dem Zylinder.
= Es befindet sich Luft im Hydraulik-System.
= Entfernen Sie die Luft im Hydraulik-System
(siehe Kapitel „Luft aus dem Hydraulik-System
entfernen“).
= Der Wagenheber gibt unter Belastung nach.
= Das Absenkventil 5 wurde nicht richtig ge-
schlossen.
= Schließen Sie das Absenkventil 5 vollständig
(siehe Kapitel „Kfz anheben“).
= Hydraulik-Öl tritt aus.
= Es befindet sich zuviel Hydraulik-Öl im Zylinder.
= Entfernen Sie die überschüssige Menge Hydrau-
lik-Öl aus dem Zylinder.
= Der Pump-Mechanismus funktioniert nur teilweise.
= Es befindet sich zuviel Hydraulik-Öl im Zylinder.
= Entfernen Sie die überschüssige Menge Hydrau-
lik-Öl aus dem Zylinder.
= Es befindet sich Luft im Hydraulik-System.
= Entfernen Sie die Luft im Hydraulik-System
(siehe Kapitel „Luft aus dem Hydraulik-System
entfernen“).
44 DE/AT/CH
Page 45

Q
Entsorgung
Die Verpackung besteht aus umweltfreund-
lichen Materialien, die Sie über die örtlichen Recyclingstellen entsorgen können.
Werfen Sie Ihr Produkt, wenn es ausgedient hat, im Interesse des Umweltschutzes
nicht in den Hausmüll, sondern führen Sie
es einer fachgerechten Entsorgung zu.
Über Sammelstellen und deren Öffnungszeiten können Sie sich bei Ihrer zuständigen Verwaltung informieren.
Lassen Sie Hydrauliköl umweltgerecht entsorgen.
Stellen Sie die Entsorgung durch eine ReparaturFachwerkstatt sicher oder wenden Sie sich an die
nächste Schadstoffsammelstelle.
Q
Informationen
Q
Konformitätserklärung
Wir, OWIM GmbH & Co. KG Stiftsbergstraße 1,
D-74167 Neckarsulm, erklären in alleiniger Verantwortung, dass das Produkt: Hydraulik-Wagenheber,
Modell-Nr.: Z31224, Version: 07 / 2014, auf das
sich diese Erklärung bezieht, mit den Normen /
normativen Dokumenten der 2006 / 42 / EC
übereinstimmt.
Die komplette Konformitätserklärung finden Sie
unter: www.owim.com
Angewandte harmonisierte Norm:
EN 1494 / A1: 2008
Tobias Koenig
Bereichsleiter
Neckarsulm, 15. Mai 2014
45 DE/AT/CH
Page 46

OWIM GmbH & Co. KG
Stiftsbergstraße 1
D-74167 Neckarsulm
Model-No.: Z31224
Version: 07 / 2014
Last Information Update · Stan informacji
Információk állása · Stanje informacij
Stav informací · Stav informácií
Stand der Informationen: 06 / 2014
Ident.-No.: Z31224062014-4
IAN 100540
4
 Loading...