Trimble NOMAD 900G GETTING STARTED GUIDE


 Trimble Nomad 900G series
  Quick start guide
This guide provides an overview of the features and functions of the Trimble® Nomad® 900G series handheld.
For more information, refer to the Nomad 900 Series Handheld Computer Getting Started Guide,
provided on the Nomad 900 Series Documentation CD.
For the latest information, including release notes, go to www.trimble. com/nomadg_ts.shml.
1
Install and charge the battery
Important – Be sure to charge the battery fully (approximately 4.5 hours) before operating the unit.
1. Select the appropriate outlet |
2. Connect the outlet adapter to |
||
adapter for the AC adapter. |
the charger. |
||
|
|
|
|
|
|
|
|
3. Insert the battery in the |
4. Using the Philips screwdriver |
||
battery compartment on the |
end of the stylus, secure the |
||
back of the Nomad. |
battery door. |
||
|
|
|
|
|
|
|
|
5. Plug the charger into power strip or wall outlet.
4
What’s in the box? |
|
|
|
|
|
||
|
|
|
|
|
|
|
|
|
|
|
|
|
|
|
|
|
|
|
|
|
|
|
|
|
|
|
|
|
|
|
|
|
|
|
|
|
|
|
|
|
|
|
|
|
|
|
|
|
|
|
|
|
|
||
|
|
|
|
|
|
|
|
1. |
Nomad handheld computer |
2. |
Battery and battery door |
||||
3. |
AC adapter (charger) |
4. |
Hand strap |
||||
5. |
Screen protectors |
6. |
USB cable |
||||
7. |
Lanyard |
8. |
Stylus |
||||
9. |
Documentation CD |
|
|
|
|
|
|
|
|
|
|
|
|
|
|
|
|
|
2 |
|
|
|
|
6. |
Plug the barrel end of the |
|
7. Charge the battery until the |
||||
|
charger into the power port |
|
|
battery LED is green. |
|||
|
on the bottom of the Nomad. |
|
|
|
|
|
|
|
|
|
|
|
|
|
|
|
|
|
|
|
|
|
|
Turn on the handheld
The first time you turn on the handheld, press and hold the Power key. Follow the on-screen instructions to align the touch screen, using the stylus to tap on the screen.
Select the time zones and set the correct date and time on the handheld.
You can protect your data by setting a password on the handheld. When set, this password is required every time the unit is turned on. Follow the on-screen instructions to set your password, or select Next to skip this step.
5
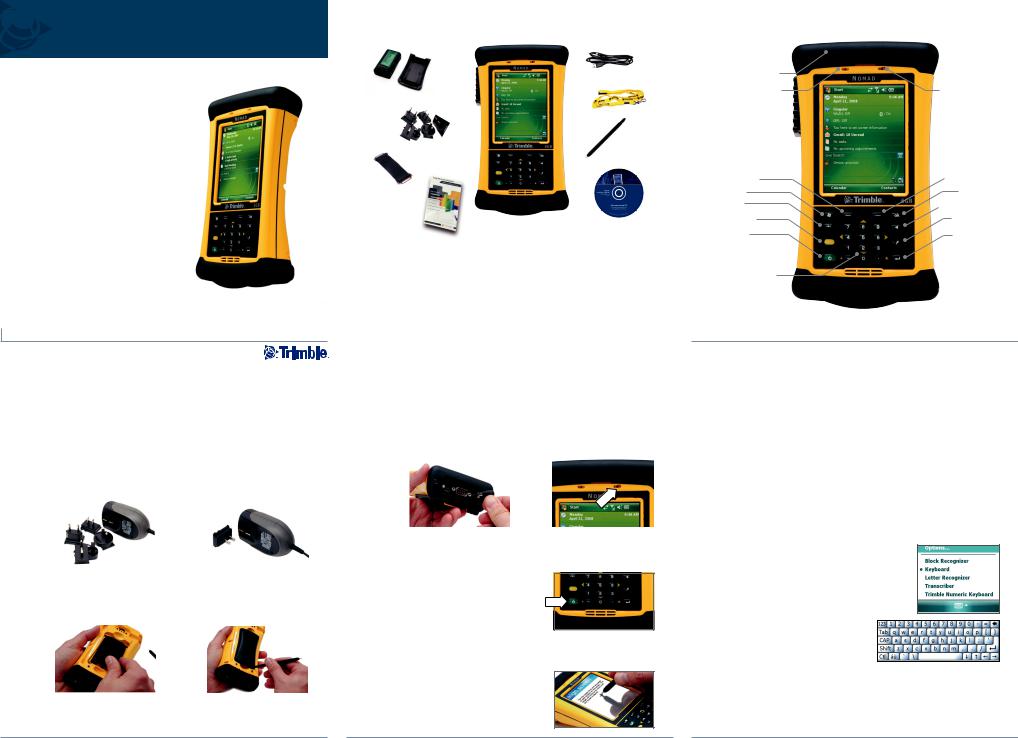
Getting to know your handheld
Expansion Cap
Notification LED |
Battery LED |
Application |
Application |
|
Soft Key* |
Soft Key* |
|
Start* |
OK* |
|
Tab* |
Backspace* |
|
|
||
Shift Key* |
Today* |
|
Power |
Enter* |
|
Number pad and |
* denotes |
|
navigation keys |
||
assignable keys |
||
|
||
|
3 |
NOTE: If your unit has the following features, these keys are assigned:
Flashlight - Left Softkey; Scanner - Right Softkey; Camera - Today Key
3
Interacting with the handheld
Trimble recommends that you use only the stylus provided to tap on the touch screen.
Use the stylus to:
•Tap the screen once to open items and select options.
•Tap and hold the stylus on an item to see a pop-up menu of available actions. Then tap the action you want to perform.
To enter text, use one of the input panels.
To display the current input panel, tap a text box.
To select an input panel, tap the arrow next to the Input Panel button and then tap the input panel you want to use.
The Keyboard input panel is shown to the right. To enter characters, tap on the keyboard.
TIPS –
To enter special characters, tap  to display keypads containing numbers and symbols. To
switch back to the main keyboard, tap
 again.
To make the keys larger, tap the Input Selector arrow and then tap Options. In the Input method list, select Keyboard and then select Large Keys.
6
 Loading...