


 Loading...
GPS Pathfinder® Office
Getting Started Guide

GPS Pathfinder® Office
Getting Started Guide
Version 2.90
Part Number 34231-29-ENG
Revision A
January 2002
Corporate Office
Trimble Navigation Limited
Mapping and GIS Division 645 North Mary Avenue Post Office Box 3642 Sunnyvale, CA 94088-3642 U.S.A.
Phone: +1-408-481-8940, 1-800-545-7762 Fax: +1-408-481-7744
www.trimble.com
Copyright and Trademarks
© 1999–2002, Trimble Navigation Limited. All rights reserved. For STL support, the GPS Pathfinder Office software uses the Moscow Center for SPARC Technology adaptation of the SGI Standard Template Library. Copyright © 1994 Hewlett-Packard Company, Copyright © 1996, 97 Silicon Graphics Computer Systems, Inc., Copyright © 1997 Moscow Center for SPARC Technology.
The Globe & Triangle logo, Trimble, QuickPlan, and TerraSync are trademarks of Trimble Navigation Limited.
Aspen, Asset Surveyor, GeoExplorer, and GPS Pathfinder are trademarks of Trimble Navigation Limited, registered in the United States Patent and Trademark Office.
All other trademarks are the property of their respective owners.
Printed in the United States of America. Printed on recycled paper.
Release Notice
This is the January 2002 release (Revision A) of the GPS Pathfinder Office Getting Started Guide, part number 34231-29-ENG. It applies to version 2.90 of the GPS Pathfinder Office software.
The following limited warranties give you specific legal rights. You may have others, which vary from state/jurisdiction to state/jurisdiction.
Software and Firmware Limited Warranty
Trimble warrants that this Trimble software product (the “Software”) shall substantially conform to Trimble’s applicable published specifications for the Software for a period of ninety (90) days, starting from the date of delivery.
Warranty Remedies
Trimble's sole liability and your exclusive remedy under the warranties set forth above shall be, at Trimble’s option, to repair or replace any Product or Software that fails to conform to such warranty (“Nonconforming Product”) or refund the purchase price paid by you for any such Nonconforming Product, upon your return of any Nonconforming Product to Trimble.
Warranty Exclusions
These warranties shall be applied only in the event and to the extent that: (i) the Products and Software are properly and correctly installed, configured, interfaced, stored, maintained and operated in accordance with Trimble's relevant operator's manual and specifications, and; (ii) the Products and Software are not modified or misused. The preceding warranties shall not apply to, and Trimble shall not be responsible for, any claim of warranty infringement is based on (i) defects or performance problems that arise from the combination or utilization of the Product or Software with products, information, systems or devices not made, supplied or specified by Trimble; (ii) the operation of the Product or Software under any specification other than, or in addition to, Trimble's standard specifications for its products; (iii) the unauthorized modification or use of the Product or Software; (iv) damage caused by lightning, other electrical discharge, or fresh or salt water immersion or spray; or (v) normal wear and tear on consumable parts (e.g., batteries).
THE WARRANTIES ABOVE STATE TRIMBLE’S ENTIRE LIABILITY AND YOUR EXCLUSIVE REMEDIES PERFORMANCE OF THE PRODUCTS AND SOFTWARE. EXCEPT AS EXPRESSLY PROVIDED IN THIS AGREEMENT, TRIMBLE FURNISHES THE PRODUCTS AND SOFTWARE AS-IS, WITH NO WARRANTY, EXPRESS OR IMPLIED, AND THERE IS EXPRESSLY EXCLUDED THE IMPLIED WARRANTIES OF MERCHANTABILITY AND FITNESS FOR A PARTICULAR PURPOSE. THE STATED EXPRESS WARRANTIES ARE IN LIEU OF ALL OBLIGATIONS OR LIABILITIES ON THE PART OF TRIMBLE ARISING OUT OF, OR IN CONNECTION WITH, ANY PRODUCTS OR SOFTWARE. SOME STATES AND JURISDICTIONS DO NOT ALLOW LIMITATIONS ON DURATION OF AN IMPLIED WARRANTY, SO THE ABOVE LIMITATION MAY NOT APPLY TO YOU.
Limitation of Liability
TO THE MAXIMUM EXTENT PERMITTED BY APPLICABLE LAW, TRIMBLE SHALL NOT BE LIABLE TO YOU FOR ANY INDIRECT, SPECIAL, OR CONSEQUENTIAL DAMAGES OF ANY KIND OR UNDER ANY CIRCUMSTANCE OR LEGAL THEORY RELATING IN ANY WAY TO THE PRODUCTS OR SOFTWARE, REGARDLESS WHETHER TRIMBLE HAS BEEN ADVISED OF THE POSSIBILITY OF ANY SUCH LOSS AND REGARDLESS OF THE COURSE OF DEALING WHICH DEVELOPS OR HAS DEVELOPED BETWEEN YOU AND TRIMBLE. BECAUSE SOME STATES AND JURISDICTIONS DO NOT ALLOW THE EXCLUSION OR LIMITATION OF LIABILITY FOR CONSEQUENTIAL OR INCIDENTAL DAMAGES, THE ABOVE LIMITATION MAY NOT APPLY TO YOU.
IN ANY CASE, TRIMBLE'S SOLE LIABILITY, AND YOUR SOLE REMEDY UNDER OR FOR BREACH OF THIS AGREEMENT, WILL BE LIMITED TO THE REFUND OF THE PURCHASE PRICE OR LICENSE FEE PAID FOR THE PRODUCTS OR SOFTWARE.
Contents
About This Manual
Scope and Audience . . . . . . . . . . . . . . . . . . . . . . . . . . . .ix Related Information . . . . . . . . . . . . . . . . . . . . . . . . . . . . x Technical Assistance . . . . . . . . . . . . . . . . . . . . . . . . . . .xi Your Comments . . . . . . . . . . . . . . . . . . . . . . . . . . . . . .xi Document Conventions . . . . . . . . . . . . . . . . . . . . . . . . . xii
1Introduction
2Installation
Introduction . . . . . . . . . . . . . . . . . . . . . . . . . . . . . . . . 4 Hardware and Software Requirements . . . . . . . . . . . . . . . . . . 4
Installing GPS Pathfinder Office on a Standalone Computer. . . . . . |
. |
5 |
Installing or Upgrading the Software . . . . . . . . . . . . . . |
. |
5 |
Installing GPS Pathfinder Office on a Network. . . . . . . . . . . . . |
20 |
|
Network Server Installation . . . . . . . . . . . . . . . . . . . |
20 |
|
Network Client Installation . . . . . . . . . . . . . . . . . . . |
21 |
|
3Basics of Operation
Introduction . . . . . . . . . . . . . . . . . . . . . . . . . . . . . . . 24 Starting the GPS Pathfinder Office Software . . . . . . . . . . . . . . 24 Setting the Time Zone . . . . . . . . . . . . . . . . . . . . . . 25 Selecting a Project . . . . . . . . . . . . . . . . . . . . . . . . 25
Application Window . . . . . . . . . . . . . . . . . . . . . . . . . . |
26 |
Windows . . . . . . . . . . . . . . . . . . . . . . . . . . . . . . . . |
28 |
Saving the Window Layout . . . . . . . . . . . . . . . . . . . |
28 |
GPS Pathfinder Office Getting Started Guide v

Contents
|
Map Window . . . . . . . . . . . . . . . . . . . . . . . . . . . |
29 |
|
Time Line Window . . . . . . . . . . . . . . . . . . . . . . . . |
29 |
|
Manipulating and Moving the Windows . . . . . . . . . . . . . |
30 |
|
Toolbars . . . . . . . . . . . . . . . . . . . . . . . . . . . . . . . . . |
35 |
|
Types of Toolbars in the GPS Pathfinder Office software . . . . 35 |
|
|
Displaying a Toolbar . . . . . . . . . . . . . . . . . . . . . . . |
36 |
|
Floating a Toolbar . . . . . . . . . . . . . . . . . . . . . . . . |
36 |
|
Selecting a Tool in a Toolbar . . . . . . . . . . . . . . . . . . . |
37 |
|
Standard Toolbar . . . . . . . . . . . . . . . . . . . . . . . . . |
38 |
|
Project Toolbar . . . . . . . . . . . . . . . . . . . . . . . . . . |
39 |
|
Mouse Toolbar . . . . . . . . . . . . . . . . . . . . . . . . . . |
39 |
|
Utility Toolbar . . . . . . . . . . . . . . . . . . . . . . . . . . |
41 |
|
Shortcut Menus . . . . . . . . . . . . . . . . . . . . . . . . . . . . . |
42 |
|
Measurement Units . . . . . . . . . . . . . . . . . . . . . . . . . . . |
43 |
|
Available Units . . . . . . . . . . . . . . . . . . . . . . . . . . |
44 |
|
Exiting the GPS Pathfinder Office Software . . . . . . . . . . . . . . |
45 |
4 |
Tutorial |
|
|
Introduction . . . . . . . . . . . . . . . . . . . . . . . . . . . . . . . |
48 |
|
Scenario . . . . . . . . . . . . . . . . . . . . . . . . . . . . . . . . . |
49 |
|
Lesson 1: Configuring the GPS Pathfinder Office Software . . . . . . |
50 |
|
Starting the GPS Pathfinder Office Software . . . . . . . . . . |
50 |
|
Setting the Local Time Zone . . . . . . . . . . . . . . . . . . . |
51 |
|
Selecting a Project . . . . . . . . . . . . . . . . . . . . . . . . |
52 |
|
Selecting a Coordinate System . . . . . . . . . . . . . . . . . . |
55 |
|
Lesson 2: Preparing to Collect Data . . . . . . . . . . . . . . . . . . |
57 |
|
GPS Data Collection . . . . . . . . . . . . . . . . . . . . . . . |
57 |
|
Features. . . . . . . . . . . . . . . . . . . . . . . . . . . . . . |
58 |
|
Attributes . . . . . . . . . . . . . . . . . . . . . . . . . . . . . |
58 |
|
Opening a Data Dictionary . . . . . . . . . . . . . . . . . . . . |
59 |
|
Printing the Data Dictionary . . . . . . . . . . . . . . . . . . . |
65 |
|
Transferring Data to a Data Collector . . . . . . . . . . . . . . |
66 |
v i GPS Pathfinder Office Getting Started Guide

Contents
Lesson 3: Differentially Correcting the Field Data . . . . . . . . . . . 67 Lesson 4: Viewing and Editing the Data . . . . . . . . . . . . . . . . 75 Opening the Data Files . . . . . . . . . . . . . . . . . . . . . . 76 Displaying the Map and Time Line Windows . . . . . . . . . . 77 Loading the Background Files . . . . . . . . . . . . . . . . . . 78 Configuring the Map Window . . . . . . . . . . . . . . . . . . 85 Viewing the Attributes of a Feature . . . . . . . . . . . . . . . 89 Viewing the Offset of a Feature . . . . . . . . . . . . . . . . . 90 Printing the Data . . . . . . . . . . . . . . . . . . . . . . . . . 91 Lesson 5: Exporting Data to a GIS or CAD System . . . . . . . . . . 94 Lesson 6: Updating the Data . . . . . . . . . . . . . . . . . . . . . . 98 Editing the Tutorial Data Dictionary . . . . . . . . . . . . . . . 99 Saving the Data Dictionary . . . . . . . . . . . . . . . . . . . 105 Importing Data From a GIS . . . . . . . . . . . . . . . . . . . 106 Lesson 7: Back in the Office . . . . . . . . . . . . . . . . . . . . . . 112 Opening the Updated Data File . . . . . . . . . . . . . . . . . 113 Finding a Feature . . . . . . . . . . . . . . . . . . . . . . . . . 113 Viewing the Positions of a Feature . . . . . . . . . . . . . . . . 115 Using Layers to View a Feature . . . . . . . . . . . . . . . . . 116 Viewing the Status of a Feature . . . . . . . . . . . . . . . . . 118 Measuring Distances . . . . . . . . . . . . . . . . . . . . . . . 119 Exporting Data to Update the GIS . . . . . . . . . . . . . . . . 120 Lesson 8: Special Lesson . . . . . . . . . . . . . . . . . . . . . . . . 121 Batch Processing . . . . . . . . . . . . . . . . . . . . . . . . . 121 Managing Waypoints. . . . . . . . . . . . . . . . . . . . . . . 128
A Troubleshooting
Introduction . . . . . . . . . . . . . . . . . . . . . . . . . . . . . . . 136 Installation Problems . . . . . . . . . . . . . . . . . . . . . . . . . . 136 Map and Time Line Display . . . . . . . . . . . . . . . . . . . . . . 137 Printers and Plotters . . . . . . . . . . . . . . . . . . . . . . . . . . . 139
GPS Pathfinder Office Getting Started Guide v i i

Contents
Internet Problems . . . . . . . . . . . . . . . . . . . . . . . . . . . . 140 Connection Problems. . . . . . . . . . . . . . . . . . . . . . . 140 Files Not Present on the Internet Server . . . . . . . . . . . . . 142
Web Map Server Problems . . . . . . . . . . . . . . . . . . . . . . . 144 Internet Connection Problems . . . . . . . . . . . . . . . . . . 145 Web Map Server Connection Problems . . . . . . . . . . . . . 145
General . . . . . . . . . . . . . . . . . . . . . . . . . . . . . . . . . 148
Index
vi i i GPS Pathfinder Office Getting Started Guide
About This Manual
Welcome to the GPS Pathfinder® Office software. This software, together with its associated utilities, provides all the functionality you need to correct, view, and edit GPS data collected in the field, and to export it in a format suitable for your GIS, CAD, or spatial database system. This manual describes how to install, set up, and use the GPS Pathfinder Office software.
Scope and Audience
Even if you have used other Global Positioning System (GPS) products before, Trimble recommends that you spend some time reading this manual to learn about the special features of this product. We assume you are familiar with basic GPS and GIS concepts, which are explained in the Mapping Systems General Reference. If you are not familiar with GPS:
•Read the booklet GPS, A Guide to the Next Utility (available from Trimble).
•Visit our website, www.trimble.com, for an interactive look at Trimble and GPS.
Trimble assumes that you are familiar with Microsoft Windows, and know how to use a mouse, select options from menus and dialog boxes, make selections from lists, and use online Help.
GPS Pathfinder Office Getting Started Guide ix

About This Manual
Related Information
Other manuals in this set include the Mapping Systems General Reference. This manual introduces the basic principles of using GPS to make maps. It provides the background information you need to use Trimble Navigation Limited’s mapping products including GPS receivers, data collectors, and software.
Other sources of related information are:
•Help – The software has built-in, context-sensitive online Help that lets you quickly find the information you need. Access it from the Help menu. Alternatively, click the Help button in a window, or press [F1]. This comprehensive Help system reads like an online manual. Use the scroll buttons to move from page to page.
•Release Notes – The release notes describe new features of the product, information not included in the documentation, and any changes to the documentation.
•Readme.rtf file – The release notes are also available as a readme.rtf file. To read this file, double-click it or use a text editor to open it. The installation program also copies it into the program directory (C:\Program Files\GPS Pathfinder Office\).
•World Wide Web (WWW) site – For an interactive look at Trimble, visit our site on the World Wide Web (www.trimble.com). You can also download the latest software updates, language files, and documentation.
•Trimble training courses – Consider a training course to help you use your GPS system to its fullest potential. For more information, visit the Trimble website at www.trimble.com/support/training.htm.
x GPS Pathfinder Office Getting Started Guide

About This Manual
Technical Assistance
If you have a problem and cannot find the information you need in the product documentation, contact your local distributor.
Alternatively, request technical support using the Trimble website at www.trimble.com/support/support.htm.
Your Comments
Your feedback about the supporting documentation helps us to improve it with each revision. To forward your comments, do one of the following:
•Send an e-mail to ReaderFeedback@trimble.com.
•Complete the Reader Comment Form at the back of this manual and mail or fax it according to the instructions at the bottom of the form.
If the reader comment form is not available, send comments and suggestions to the address in the front of this manual. Please mark it
Attention: Technical Publications Group.
GPS Pathfinder Office Getting Started Guide x i

About This Manual
Document Conventions
The document conventions are as follows:
Convention |
Definition |
|
|
Italics |
identifies software menus, menu commands, dialog |
|
boxes, and the dialog box fields. |
Helvetica Narrow |
represents messages printed on the screen. |
Courier Bold |
represents information that you must type in a |
|
software screen or window. |
Helvetica Bold |
identifies a software command button. |
[Ctrl] |
is an example of a hardware function key that you |
|
must press on a personal computer (PC). If you |
|
must press more than one of these at the same |
|
time, this is represented by a plus sign, for example, |
|
[Ctrl]+[C]. |
|
|
xi i GPS Pathfinder Office Getting Started Guide

C H A P T E R
1
Introduction
The GPS Pathfinder® Office software is produced by Trimble Navigation Limited for managing and processing data collected using Trimble mapping and GIS data collection systems. It provides all of the tools that you need for managing a data collection project, handling data from the entire range of mapping and GIS data collection systems that use Trimble Global Positioning System (GPS) receivers.
The software runs under the following Microsoft operating systems:
•Windows 95
•Windows 98
•Windows NT 4.0
•Windows 2000
•Windows Me
•Windows XP
The GPS Pathfinder Office software lets you:
•plan the best times to collect GPS positions, using the QuickPlan™ mission planning utility

1 Introduction
•create separate projects, which lets you manage the data associated with these projects effectively and conveniently
•construct and edit data dictionaries, which are used to control the data collection operation and ensure that the collected data is complete, accurate, and compatible with your GIS, CAD package, or database
•convert data from a GIS or database format to the Trimble SSF format so that you can take the data back into the field to check and update it
•transfer files to and from handheld data collectors and field computers
•display and edit collected data in the office, optionally overlaying this data onto a vector or raster background, or a Web Map Server map.
•process the GPS positional data to improve its accuracy
•export the collected, processed, and edited data to a GIS, CAD, or database format
•produce a scaled plot as a paper record of the data
2 GPS Pathfinder Office Getting Started Guide

C H A P T E R
2
Installation
■Introduction
■Hardware and software requirements
■Installing the GPS Pathfinder Office software on a standalone computer
■Installing the GPS Pathfinder Office software on a network

2 Installation
Introduction
This chapter describes how to install a new copy of the GPS Pathfinder Office software and how to upgrade the software from a previously installed version.
Use the following components when you install the GPS Pathfinder Office software:
•The GPS Pathfinder Office software installation CD
•Your computer
•The existing GPS Pathfinder Office security key (if you are upgrading from version 2.11 or earlier)
•The existing GPS Pathfinder Office software (if you are upgrading from version 2.50 or later)
•Serial number and authorization key
Hardware and Software Requirements
The minimum requirements to run the GPS Pathfinder Office software are:
•a Pentium PC, 133 MHz or faster with math coprocessor
•32 MB RAM and 160 MB of free disk space for a standard installation (with space for data files)
•SVGA screen (gray scale or color)
•1 RS232 serial port (for data collector communication)
•Keyboard with mouse or trackball
•CD-ROM drive
•Microsoft Windows Me, Windows 98, Windows 95, Windows XP, Windows 2000, or Windows NT version 4.0 (service pack 4 or later)
•Internet Explorer version 4.0 or later
4 GPS Pathfinder Office Getting Started Guide

Installation 2
Installing GPS Pathfinder Office on a Standalone Computer
This section explains how to:
•install the GPS Pathfinder Office software on a standalone computer
•upgrade from a previous version of the GPS Pathfinder Office or GEO-PC software on a standalone computer
To install or upgrade the GPS Pathfinder Office software on a network, see page 20.
Installing or Upgrading the Software
The installation program uses the name, serial number, and authorization key you enter to detect whether you are upgrading from an existing installation or installing the software for the first time.
If the serial number indicates that you are upgrading, the installation proceeds only if the previous version is still installed on your computer. Make sure that the latest version of the GPS Pathfinder Office software is installed to a different folder from your current (earlier) version. If the earlier version requires a security key, this must be connected to your computer for the upgrade to proceed.
You can choose the language that the GPS Pathfinder Office software will use: English, Chinese, French, German, Japanese, Korean, Portuguese, Russian, or Spanish.
If you install a language for which Help files are not available, you can still install Help files in another language.
If you are running virus-scanning software that checks all files, Trimble recommends that you set it to check program files only, while installing the GPS Pathfinder Office software. Otherwise the installation may run very slowly.
GPS Pathfinder Office Getting Started Guide 5
2 Installation
Before you install or upgrade the GPS Pathfinder Office software:
•Close all Windows programs.
•Have Microsoft Windows Me, Windows 98, Windows 95, Windows XP, Windows 2000, or Windows NT version 4.0 (service pack 4 or later) installed on the computer.
•Make sure that you have local or domain administration rights, if you are running Windows 2000 or Windows NT. For more information, see your system administrator.
To install or upgrade the GPS Pathfinder Office software:
1.Turn on the computer and start Microsoft Windows.
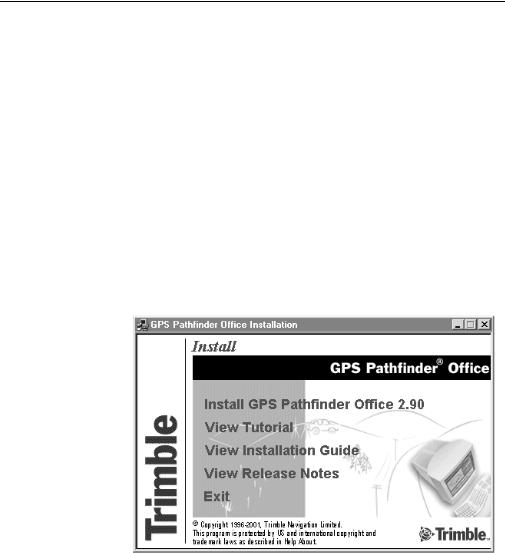
2.Insert the GPS Pathfinder Office CD in the CD-ROM drive of your computer.
The Setup program should start automatically:
If the Setup program does not start automatically:
–On the Windows taskbar, click Start and select the Run command. The Run dialog appears. In the Open field, type d:\msetup.exe (the drive letter may be different on your
computer) and click OK.
6 GPS Pathfinder Office Getting Started Guide
|
Installation 2 |
C |
|
Warning – If you are installing GPS Pathfinder Office under Windows XP |
|
|
or Windows 2000 and you do not have administrator rights, a Windows |
|
dialog appears asking if you want to continue to install GPS Pathfinder |
|
Office under the current account, or if you want to install it under an |
|
administrative account. When you click OK to continue, the installation |
|
procedure stops. To successfully install GPS Pathfinder Office under |
|
Windows XP or Windows 2000, refer to the GPS Pathfinder Office |
|
Release Notes. |
|
|
3.Click Install GPS Pathfinder Office 2.90.
After a short loading period, the Select Setup Language dialog appears.
4.Select the language that you require to run the installation and click Next. To run the rest of the GPS Pathfinder Office software in a language other than English, you must download the appropriate language update from the Web. For more information, see page 17.
5.If your computer has a virus scanner running, the following message appears:
6.Click OK. The Welcome dialog appears.
Note – If you are running an early version of Windows 95 that
does not have the Microsoft Distributed Component Object Model (DCOM1) installed, a message appears asking you to upgrade some system files. Click Yes. The files will be updated. Restart your computer and then start the GPS Pathfinder Office installation process again.
1.DCOM, a technology that enables software components to communicate directly with each other across networks, including the Internet and intranets.
GPS Pathfinder Office Getting Started Guide 7
2 Installation
7.Read the information in this dialog. You are reminded to close all Windows programs. Clicking Cancel now (or at any later stage) stops the installation process without installing any files on the computer.
8.Click Next.
The Software License Agreement dialog appears.
9.Read the information in this dialog and click Yes to agree to the license conditions. Click No to stop the installation process without installing any files on the computer.
The following dialog appears:
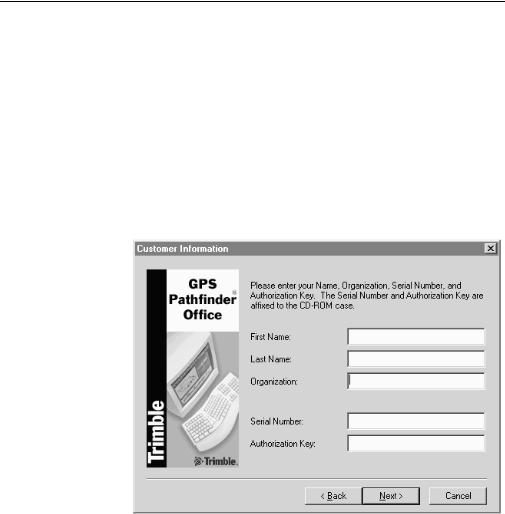
10.Enter the following information:
a.In the First Name and Last Name fields, enter your name.
b.In the Organization field, enter the name of the company or organization that you represent.
c.In the Serial Number field, enter the serial number exactly as shown on the GPS Pathfinder Office CD-ROM case.
8 GPS Pathfinder Office Getting Started Guide
Installation 2
d.In the Authorization Key field, enter the authorization key as shown on the GPS Pathfinder Office CD-ROM case (the capitalization does not matter).
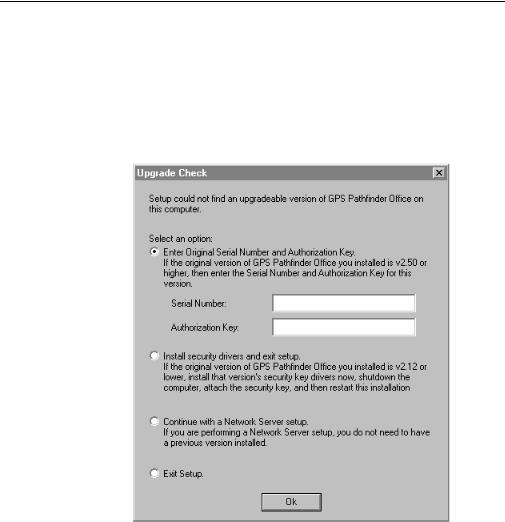
11.Click Next. If you are upgrading from a previous version of the GPS Pathfinder Office software, and the installation program cannot find an earlier version of the software to upgrade, the following dialog appears:
12.Select one of the options in the dialog, and follow the accompanying instructions.
If you select an option that requires a serial number and authorization key, make sure that these are from your original installation of the GPS Pathfinder Office software—not from any subsequent upgrade installations.
GPS Pathfinder Office Getting Started Guide 9
2 Installation
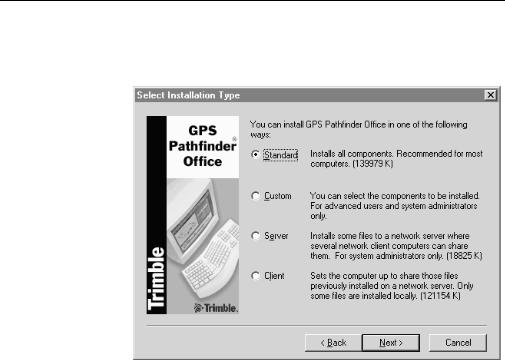
Once you correctly enter the serial number and authorization key, or if you selected the network server setup, when you click OK in the Upgrade Check dialog, the following dialog appears:
13.Do one of the following:
–Select Standard to begin the default installation.
This option installs all components of the GPS Pathfinder Office software.
–Select Custom to begin a custom installation.
This option lets you choose the components of the GPS Pathfinder Office software to be installed. Select it if you want to save disk space and if you know that you only require certain components installed. When you select this option and click Next, the Select Components dialog appears.
Note – To install GPS Pathfinder Office onto a network as a server or client installation, see page 20.
14. Click Next.
1 0 GPS Pathfinder Office Getting Started Guide
Installation 2
If you chose the Custom option above, go to Step 17.
If you chose the Standard option above, the following dialog appears:
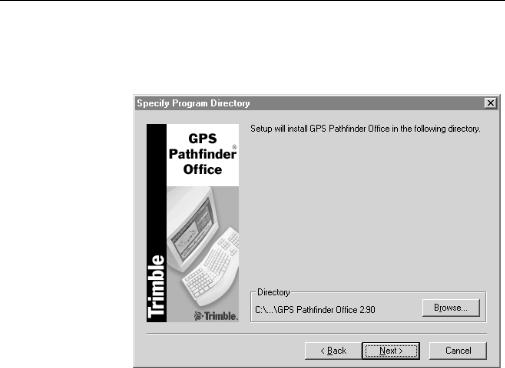
15.Select the folder where you want to install the GPS Pathfinder Office software. By default, the folder is C:\Program Files\GPS Pathfinder Office 2.90. To change it, click Browse.
16.Click Next.
GPS Pathfinder Office Getting Started Guide 1 1

2 Installation
If you chose the Custom option at Step 13, the following dialog appears:
By default, all components are selected; this is equivalent to performing a Standard installation.
17.Clear the check box beside any components you do not want to install.
The Destination Directory field displays the folder where the selected components of the GPS Pathfinder Office software are installed. By default, this is set to C:\Program Files\GPS Pathfinder Office 2.90. To change it, click Browse.
1 2 GPS Pathfinder Office Getting Started Guide

Installation 2
18.Click Next.
If you have not installed the GPS Pathfinder Office software or another Trimble software product before, the Specify Trimble Common Files Destination Directory dialog appears:
a.In the Directory group, select the folder where you want to install common components used by the GPS Pathfinder Office software and other Trimble products. By default, the folder is C:\Program Files\Common Files\Trimble. To change it, click Browse.
b.Click Next.
19.If the GPS Pathfinder Office software is already installed on your computer, the following dialog appears:
GPS Pathfinder Office Getting Started Guide 1 3

2 Installation
20.If you want to overwrite the settings defined in a previously installed version of GPS Pathfinder Office select the check boxes beside those settings. Do not select any settings you want to keep.
–Select the Project definitions check box to install new GPS Pathfinder Office project definitions. Any project definitions that have been created in a previous installation of the GPS Pathfinder Office software will be overwritten. The data in those project folders is not deleted.
–Select the Coordinate system zones and sites check box to overwrite all coordinate systems. Do not select this check box if you have created custom coordinate systems.
–Select the Export, Import, Batch settings check box to overwrite all export, import, and batch settings. Do not select this check box if you have created custom export, import, or batch settings.
–Select the All other settings check box to overwrite custom icons for points and the default window settings.
21.Click Next.
The Specify Data Directory dialog appears.
22.In the Directory group, select the folder where you want to store projects and data. The first time you create a project, this will be the default folder. The tutorial files are also installed in this folder. By default, this is set to C:\Pfdata. If necessary, click Browse to change it.
Note – To avoid upgrade problems, Trimble recommends that you set your default data folder to be a folder on your local drive.
23.Click Next.
1 4 GPS Pathfinder Office Getting Started Guide
Installation 2
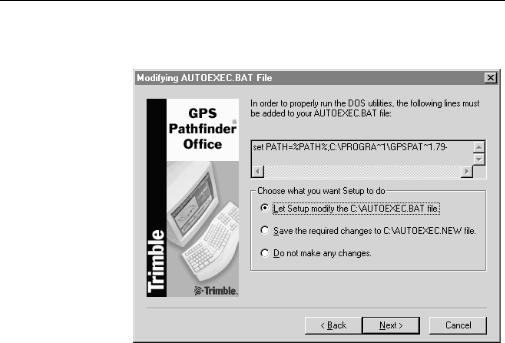
If you are running Windows Me, Windows 98, or Windows 95, the following dialog appears:
GPS Pathfinder Office may require changes to be made to the autoexec.bat file on the computer. Any changes that need to be made are shown in this dialog.
If you do not want the Setup program to automatically make the changes for you, select the option to save the changes to a separate file or to do nothing.
–Click Next.
Note – Even if you do not make the changes now, the changes to the autoexec.bat file must be made at some stage for the DOS utilities provided with the GPS Pathfinder Office software to run correctly.
The Setup program begins installing files. A progress bar indicates how far the installation has advanced.
GPS Pathfinder Office Getting Started Guide 1 5

2 Installation
Depending on the installation options you have chosen, several other messages may appear. For example, if you install the Export or Import utilities, a message relating to the installation of the Microsoft Data Access Components (MDAC) software may appear.
If system files have been updated during the installation process, the following dialog appears:
Backup copies of the original system files are made, as shown in the dialog.
24.Click Next.
The Tutorial dialog appears.
If you have not used the GPS Pathfinder Office software before, Trimble recommends that you work through the tutorial.
25.Click View Tutorial to view or print the tutorial.
1 6 GPS Pathfinder Office Getting Started Guide
Loading...