


ELECTRIC COOKER
SIE 233
GB
2

WARNINGS
It is most important that this instruction book should be retained with the appliance for future reference. Should the appliance be sold or transferred, always ensure that the book is left with the appliance in order that the new owner can get to know the functions of the appliance and the relevant warnings.
These warnings are provided in the interest of safety. You MUST read them carefully before installing or using the appliance.
Installation
•This cooker must be installed by qualified personnel, according to the manufacturer’s instructions and to the relevant British Standards.
•This cooker is heavy. Take care when moving it.
•Remove all packaging before using the cooker.
•Ensure that the electrical supply complies with the type stated on the rating plate.
•Do not attempt to modify the cooker in any way.
Child Safety
•This cooker is designed to be operated by adults. Do not alow children to play near or with the cooker.
•The cooker gets hot when it is in use and retain their heat for a long period after use. Children should be kept away until it has cooled.
•Children can also injure themselves by pulling pans or pots off the cooker.
During use
•This cooker is intended for domestic cooking only. It is not designed for commercial or industrial purposes.
•Do not use this cooker if it is in contact with water. Do not operate the cooker with wet hands.
•The grill pan will become hot during use, always use oven gloves when removing or replacing a hot grill pan.
•During use the appliance becomes hot. Care should be taken to avoid touching heating elements inside the oven.
•Ensure the control knobs are in the ‘OFF’ position when not in use.
•When using other electrical appliances, ensure the cable does not come into contact with the hot surfaces of the cooker.
•Unstable or misshapen pans should not be used on the hob hotplates as unstable pans can cause an accident by tipping or spillage.
•Never leave the cooker unattended when cooking with oil and fats.
•This cooker should be kept clean at all times. A build-up of fats or foodstuffs could result in a fire.
•The oven must be switched off before removing the guard and after cleaning the guard must be replaced in accordance with the manufacturer's instructions.
•Only clean this oven in accordance with the instructions.
•Never use plastic dishes in the oven or on the hob hotplates. Never line any part of the oven with aluminium foil.
•Always ensure that the oven vent which is located at the centre back of the hob is left unobstructed to ensure ventilation of the oven cavity.
•Perishable food, plastic items and aerosols may be affected by heat and should not be stored above the cooker.
Service
•This cooker should only be repaired or serviced by an authorised Service Engineer and only genuine approved spare parts should be used.
 Environmental Information
•After installation, please dispose of the packaging with due regard to safety and the environment.
•When disposing of an old appliance, make it unusable, by cutting off the cable.
Your safety is of paramount importance.
Therefore, if you are unsure about any of the meanings of these WARNINGS, contact the:
Customer Care Departement Telephone: 08705 950950
3

|
CONTENTS |
Instructions for the Installer |
|
Technical features |
5 |
Installation |
6 |
Location |
6 |
Electrical connections |
7 |
Instructions for the User |
|
Use and care |
8 |
Before the first use of the oven |
9 |
Electric oven |
10 |
- Oven function control knob |
10 |
- Thermostat control knob |
10 |
Using the fan oven |
11 |
Grilling |
12 |
Electric hotplates |
13 |
Hints and tips |
14 |
Maintenance and cleaning |
16 |
Oven bulb replacement |
17 |
Something Not Working |
18 |
Service and spare parts |
19 |
Guarantee Conditions |
20 |
How to read the instruction book
The symbols below will guide you when reading the instruction book
Safety instructions
Step by Step Operation
Advice and recommendations
Environmental Information
4

INSTRUCTIONS FOR THE INSTALLER
TECHNICAL FEATURES
Dimensions |
Height |
|
900 mm |
|
Width |
|
500 mm |
|
Depth |
|
600 mm |
|
Oven Capacity |
|
45 l |
|
|
|
|
Hob |
Front left |
Hob element Ø 180 mm |
2000 - 2090 W |
|
Back left |
Hob element Ø 145 mm |
1000 - 1050 W |
|
Front right |
Hob element Ø 145 mm |
1000 - 1050 W |
|
Back right |
Hob element Ø 180 mm |
1500 - 1570 W |
|
|
|
|
|
Total hob rating |
|
5500 - 5760 W |
|
|
|
|
Oven |
Grill element |
|
1825 - 1900 W |
|
Convection fan |
|
35 W |
|
Circular heating element |
|
1825 - 1900 W |
|
Light in the oven |
|
Lamp 25W type E14 |
|
Cleaning |
|
manual |
|
|
|
|
|
Total oven rating |
|
1885 - 1960 W |
Supply |
Rated voltage |
|
230 - 240 V |
|
Rated frequency |
|
50 Hz |
|
|
|
|
Accessories |
Oven grid |
|
|
|
Roasting tray / grill pan |
|
|
|
Trivet |
|
|
|
2 handles |
|
|
|
|
|
|
|
Total cooker rating |
|
7385 - 7720 W |
|
|
|
|
This appliance complies with:
European Council Directive 73/23/EEC
EMC Directive 89/336/EEC
CE Marking Directive 93/68/EEC
5

INSTALLATION
 This cooker must be installed in accordance with the IEE Wiring Regulations (Current Edition). Detailed recommendations are contained in the following British Standards Codes Of Practice:
B.S. 6172/ B.S. 5440, Par.2 and B.S. 6891 Current Editions.
The appliance must be installed in accordance with " X " specification (EN60.335-2.6). The cooker must not be installed higher than the worktop.
Please ensure that when the appliance is installed it is easily accessible for the engineer in the event of a breakdown.
Before your appliance is connected to the mains electricity supply, check to ensure that the voltage and the frequency shown on the rating plate corresponds with your supply voltage.
This appliance must be earthed.
LOCATION
The cooker has been registered as a “Class X”appliance according to Fire Risk Regulations. Any adjacent cabinets or walls must not exceed the cooker’s height.
The cooker may be located in a kitchen, a kitchen/diner or bed sitting room, but not in a bathroom, shower room or garage.
The minimum distance combustible material can be fitted above the cooker in line with the edges of the cooker is 660 mm (see fig.)
 The appliance must be set on a heatproof floor. The adjustable feet must not be removed.
Levelling
The appliance is provided with adjustable small feet placed in the back and front corners of the base.
By adjusting the small feet it is possible to change the height of the appliance so as to ensure a better levelling with other surfaces and an even distribution of the liquids contained in pots and pans.
mm |
600 mm |
660 |
min 150 mm |
|
6
ELECTRICAL CONNECTIONS
 Any electrical work required to install this hob and the supply cable should be carried out by a qualified electrician or competent person, in accordance with the current regulations.
 THIS COOKER MUST BE EARTHED.
 The manufacturer declines any liability should these safety measures not be observed.
 Before any maintenance or cleaning can be carried out, you must DISCONNECT the cooker from the electricity supply.
This cooker is designed to be connected to a 230-240V AC, 50Hz electrical supply.
To connect to the electricity supply, use cable type H05 RR-F.
Before connection, make sure the electricity supply voltage is the same as that indicated on the rating plate.
The cooker is supplied without supply cable. A flexible supply cable must be fitted, in accordance with the specification gived in the relevant table no. 1.
The electrical connection should be made using a double pole isolating switch (cooker control switch) with at least 3mm contact separation in all poles. The cable must have conductors of sufficiently high cross-sectional area to prevent overheating or deterioration.
The switch should be sited within 2m of the cooker and be easily accessible at all times.
The yellow-green grounding cable must not be interrupted by the switch.
NOTE: The earth wire should be about 2 cm longer than the live and neutral wires.
After installation and connecting, the cable must be placed so that it cannot at any point reach a temperature of more than 50°C above the ambient temperature.
The manufacturer disclaims any responsibility should these safety instructions not be carried out.
 If the supply cable is damaged, it must be replaced by the manufacturer or its service agent or a similarly qualified person in order to avoid a hazard.
Before connecting check that:
•The fuse and household electrical installation can carry the absorbed current of the appliance (see rating plate);
•The cooker connection outlet or the cooker control switch is easily accessible when the appliance is installed.
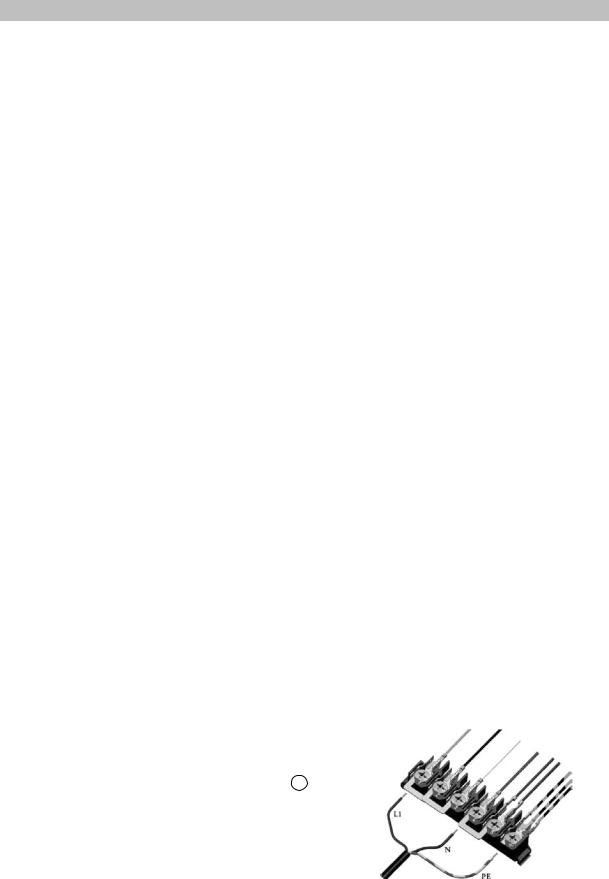
How to proceed?
•Unscrew and remove the protective cover at the back of the appliance;
•Connect the power cable to the terminal block of the cooker according to the table no.1;
•Secure by means of cable clamp;
•Make sure that the connection to the terminal block is matching the supply system, see table no.1;
•Refit and screw the protective cover on the back of the appliance.
|
|
|
|
|
|
|
|
|
Table no. 1 |
||||||||||
|
|
|
|
|
|
|
|
|
|
|
|
|
|
|
|
|
|||
Rated voltage |
|
|
|
230 V 1N |
|
||||||||||||||
Connection type |
Single phase (UK) |
|
|||||||||||||||||
Cable connection |
|
1 |
2 |
3 |
4 |
5 |
|
|
|
|
|
|
|
|
|||||
|
|
|
|
|
|
|
|
|
|
|
|
|
|
|
|
|
|
|
|
|
|
|
|
|
|
|
|
|
|
|
|
|
|
|
|
|
|
|
|
to the terminal block |
|
|
|
|
|
|
|
|
|
|
|
|
|
|
|
|
|
|
|
L1 |
|
|
|
|
N |
|
PE |
|
|||||||||||
|
|
|
|
|
|
|
|||||||||||||
Mains Voltage |
|
|
|
|
|
230 V |
|
|
|
|
|
|
|
|
|
|
|||
|
|
|
|
|
|
|
|
|
|
|
|
|
|
|
|
|
|||
Voltage of heating elements |
|
|
|
|
|
230 V |
|
|
|
|
|
|
|
|
|
|
|||
Fuse capacity |
|
|
|
|
|
32 A |
|
|
|
|
|
|
|
|
|
|
|||
Cable section |
|
|
|
3 x 6 mm2 |
|
||||||||||||||
7

INSTRUCTIONS FOR THE USER
USE AND CARE
A.Hob with electric plates
B.Control panel
C.Shelf supports
D.Shelf
E.Door handle
F.Oven door
G.Drawer
H.Adjustable feet
CONTROL PANEL
A
B
C
D
E F
G
H
BACK LEFT |
FRONT LEFT |
FRONT RIGHT |
BACK RIGHT |
TEMPERATURE |
SELECTOR |
|
1 |
2 |
3 |
4 |
|
5 |
6 |
7 |
8 |
1. |
Back left hotplate control knob |
|
5. |
Oven thermostat |
|
|
|
||
2. |
Front left hotplate control knob |
|
6. |
Oven thermostat pilot light |
|
||||
3. |
Front right hotplate control knob |
|
7. |
Main pilot light |
|
|
|
||
4. |
Back right hotplate control knob |
|
8. |
Oven function control knob (selector) |
|||||
8
 Loading...