


MODEL 6808
OWNER’S MANUAL
TABLE OF CONTENTS
3BEFORE YOU PROCEED
4SAFETY PRECAUTIONS
5TOOLS, SUPPLIES AND REQUIRED EQUIPMENT
6ANATOMY OF THE SLASH 4X4
7QUICK START: GETTING UP TO SPEED
8TQi RADIO AND VELINEON BRUSHLESS POWER SYSTEM
16 ADJUSTING THE ELECTRONIC SPEED CONTROL
18 DRIVING YOUR MODEL
20 BASIC TUNING ADJUSTMENTS
22MAINTAINING YOUR MODEL
23ADVANCED TUNING ADJUSTMENTS
27 TQi ADVANCED TUNING GUIDE
INTRODUCTION
Thank you for purchasing the Slash 4X4 equipped with the Velineon® Brushless Power System. The Velineon Power System lets you experience the best that brushless motor technology has to offer. Incredible speed, efficient operation, long run times, and low-maintenance operation are just some of the benefits. We are confident you will be rewarded with high-speed performance in a durable, long-lasting product.
This manual contains the instructions you will need to operate and maintain your model so that you can enjoy it for years to come. We want you to feel confident that you own one of the bestperforming models in the market and that it is backed by a team of professionals who aim to provide the highest level of factory support possible. Traxxas models are about experiencing total performance and satisfaction, not just with your model, but also with the company that stands behind it.
We know you’re excited about getting your new model on the road, but it’s very important that you take some time to read through the Owner’s Manual. This manual contains all the
necessary set-up and operating procedures that will allow you to unlock the performance potential that Traxxas engineers designed into your model. Also be sure to read and follow the precautions and warnings in this manual and on any labels or tags attached to your model. They are there to educate you on how to operate your model safely and also get maximum life and performance from your model.
Even if you are an experienced R/C enthusiast, it’s important to read and follow the procedures in this manual.
Thank you again for going with Traxxas. We work hard every day to assure you receive the highest level of customer satisfaction possible. We truly want you to enjoy your new model!
Traxxas Support
Traxxas support is with you every step of the way. Refer to the next page to find out how to contact us and what your support options are.
Quick Start
This manual is designed with a Quick Start path that outlines the necessary procedures to get your model up
and running in the shortest time possible. If you are an experienced R/C enthusiast you will find it helpful and fast. Be sure and read through the rest of the manual to learn about important safety, maintenance, and adjustment procedures. Turn to page 7 to begin.
2 • SLASH 4X4

BEFORE YOU PROCEED
Carefully read and follow all instructions in this and any accompanying materials to prevent serious damage to your model. Failure to follow these instructions will be considered abuse and/or neglect.
Before running your model, look over this entire manual and examine the model carefully. If for some reason you decide it is not what you wanted, then do not continue any further. Your hobby dealer absolutely cannot accept a model for return or exchange after it has been run.
WARNINGS, HELPFUL HINTS, & CROSS-REFERENCES
Throughout this manual, you’ll notice warnings and helpful hints identified by the icons below. Be sure to read them!
An important warning about personal safety or avoiding damage to your model and related components.
Special advice from Traxxas to make things easier and more fun.
 Refers you to a page with a related topic.
SUPPORT
If you have any questions about your model or its operation, call the Traxxas Technical Support line toll-free at:
1-888-TRAXXAS (1-888-872-9927)*
Technical support is available Monday through Friday from
8:30am to 9:00pm central time. Technical assistance is also available at Traxxas.com/support. You may also e-mail customer support with your question at support@Traxxas.com. Join thousands of registered members in our online community at Traxxas.com.
Traxxas offers a full-service, on-site repair facility to handle any of your Traxxas service needs. Maintenance and replacement parts may be purchased directly from Traxxas by phone or online at BuyTraxxas.com. You can save time, along with shipping
and handling costs, by purchasing replacement parts from your local dealer.
Do not hesitate to contact us with any of your product support needs. We want you to be thoroughly satisfied with your new model!
Traxxas
1100 Klein Road
Plano, Texas 75074
Phone: 972-265-8000
Toll-free 1-888-TRAXXAS
Internet Traxxas.com
E-mail: support@Traxxas.com
Entire contents ©2012 Traxxas. Traxxas, Ready-To-Race, Ready- To-Win, Slash, Slash 4X4, Velineon and ProGraphix are trademarks or registered trademarks of Traxxas. Other brand names and marks are the property of their respective holders and are used only for purposes of identification. No part of this manual may be reproduced or distributed in print or electronic media without the express written permission of Traxxas. Specifications are subject to change without notice.
*Toll-free support is available to U.S. residents only.
SLASH 4X4 • 3
 All instructions and precautions outlined in this manual should be strictly followed to ensure safe operation of your model.
 This model is not intended for use by children under 14 years of age without the supervision of a responsible and knowledgeable adult. Gearing and battery choice (see LiPo Batteries, right) effect the skill level of the model. See chart below.
|
|
Gearing: |
Stock Pinion |
Battery: |
7-Cell NiMH |
Voltage*: |
8.4V |
mAh: |
3000+mAh |
|
|
|
|
Gearing: |
Opt. Pinion |
Battery: |
7-Cell NiMH |
Voltage*: |
8.4V |
mAh: |
3000+mAh |
|
|
|
|
Gearing: |
Stock Pinion |
Battery: |
3S 20C LiPo |
Voltage*: |
11.1V |
mAh: |
5000+ mAh |
|
|
|
|
Gearing: |
Opt. Gearing |
Battery: |
3S 20C LiPo |
Voltage*: |
11.1V |
mAh: |
5000+ mAh |
*Nominal
See the gearing chart on page 23 for more information.
1
4 • SLASH 4X4
SAFETY PRECAUTIONS
All of us at Traxxas want you to safely enjoy your new model. Operate your model sensibly and with care, and it will be exciting, safe, and fun for you and those around you. Failure to operate your model in a safe and responsible manner may result in property damage and serious injury. The precautions outlined in this manual should be strictly followed to help ensure safe operation. You alone must see that the instructions are followed and the precautions are adhered to.
IMPORTANT POINTS TO REMEMBER
•Your model is not intended for use on public roads or congested areas where its operation can conflict with or disrupt pedestrian or vehicular traffic.
•Never, under any circumstances, operate the model in crowds of people. Your model is very fast and could cause injury if allowed to collide with anyone.
•Because your model is controlled by radio, it is subject to radio interference from many sources that are beyond your control. Since radio interference can cause momentary losses of radio control, always allow a safety margin in all directions around the model in order to prevent collisions.
•The motor, battery, and speed control can become hot during use. Be careful to avoid getting burned.
•Don’t operate your model at night, or anytime your line of sight to the model may be obstructed or impaired in any way.
•Most importantly, use good common sense at all times.
BATTERIES AND BATTERY CHARGING
Your model uses rechargeable batteries that must be handled with care for safety and long battery life. Make sure to read and follow all instructions and precautions for charging and maintaining the batteries. It is your responsibility to charge
and care for the battery packs properly. In addition to your battery and charger instructions, here are some more tips to keep in mind.
•Use the supplied charger to charge the included battery. See “Charging your Battery Pack” on page 11.
•Never leave batteries to charge unattended.
•Remove the battery from the model while charging.
•Always unplug the battery from the electronic speed control when the model is not in use and when it is being stored or transported.
•Allow the battery pack to cool off between runs (before charging).
•Children should have responsible adult supervision when charging and handling batteries.
•Do not use battery packs that have been damaged in any way.
•Do not use battery packs that have damaged wiring, exposed wiring, or a damaged connector.
•Only use approved chargers for NiMH battery packs (such as the Traxxas EZ-Peak™ Charger, Part #2930). Do not exceed the maximum charge rate of 4 amps.
•Do not short-circuit the battery pack. This may cause burns and severe damage to the battery pack.
•Do not burn or puncture the batteries. Toxic materials could be released. If eye or skin contact occurs, flush with water.
•Store the battery pack in a dry location, away from heat sources and direct sunlight.
•Nickel Metal Hydride batteries must be recycled or disposed of properly.
Recycling Your Traxxas Power Cell NiMH Battery
Traxxas strongly encourages you to recycle your Power Cell battery when it has reached the end of its useful life. Do not throw your battery in the trash. All Power Cell battery packs display the RBRC (Rechargeable Battery Recycling Corporation) icon, indicating they are recyclable. To find a recycling center near you, ask your local hobby dealer or visit www.rbrc.org.
LiPo Batteries
Lithium Polymer (LiPo) batteries are becoming popular for use in R/C models due to their compact size, high energy density, and high-current output. However, these types of batteries require special care and handling
procedures for long life and safe operation. Warning: LiPo batteries are intended only for advanced users that are educated on the risks associated with LiPo battery use. Traxxas does not recommend that anyone under the age of 16 use or handle LiPo battery packs without the supervision of a knowledgeable and responsible adult.
Your model is able to use LiPo batteries with nominal voltage not to exceed 11.1 volts (3S packs). LiPo batteries have a minimum safe discharge voltage threshold that should not be exceeded. The Velineon VXL-3s electronic speed control is equipped with built-in Low-Voltage Detection that alerts the driver when LiPo batteries have reached their minimum voltage (discharge) threshold. It is the driver’s responsibility to stop immediately to prevent the battery pack from being discharged below its safe minimum threshold.
Low-Voltage Detection on the speed control is just one part of a comprehensive plan for safe LiPo battery use. It is critical for you, the user, to follow all
other instructions supplied by the battery manufacturer and the charger manufacturer for proper charging, use, and storage of LiPo batteries. Do not attempt to charge LiPo batteries with the Traxxas charger included in this package. Make sure you understand how to use your LiPo batteries. Be aware that Traxxas shall not be liable for any special, indirect, incidental, or consequential damages arising out of the installation and/or use of LiPo batteries in Traxxas models. If you have questions about LiPo battery usage, please consult with your local hobby dealer or contact the battery manufacturer. As a reminder, all batteries should be recycled at the end of their useful life.
SPEED CONTROL
•Disconnect the Batteries: Always disconnect the battery pack from the speed control when not in use.
•Transmitter on First: Switch on your transmitter first before switching on the speed control to prevent runaways and erratic performance.
•Don’t Get Burned: The heat sink can get extremely hot, so be careful not to touch it until it is cool. Supply adequate airflow for cooling.
•Use Stock Connectors: If you decide to change the battery or motor connectors, only change one battery or motor connector at a time. This will prevent damage from accidentally mis-wiring the speed control. Please note that modified speed controls can be subject to a rewiring fee when returned for service. Removing the battery connector on the speed control or using the same-gender connectors on the speed control will void the product’s warranty.
•Insulate the Wires: Always insulate exposed or damaged wiring with heat shrink tubing to prevent short circuits
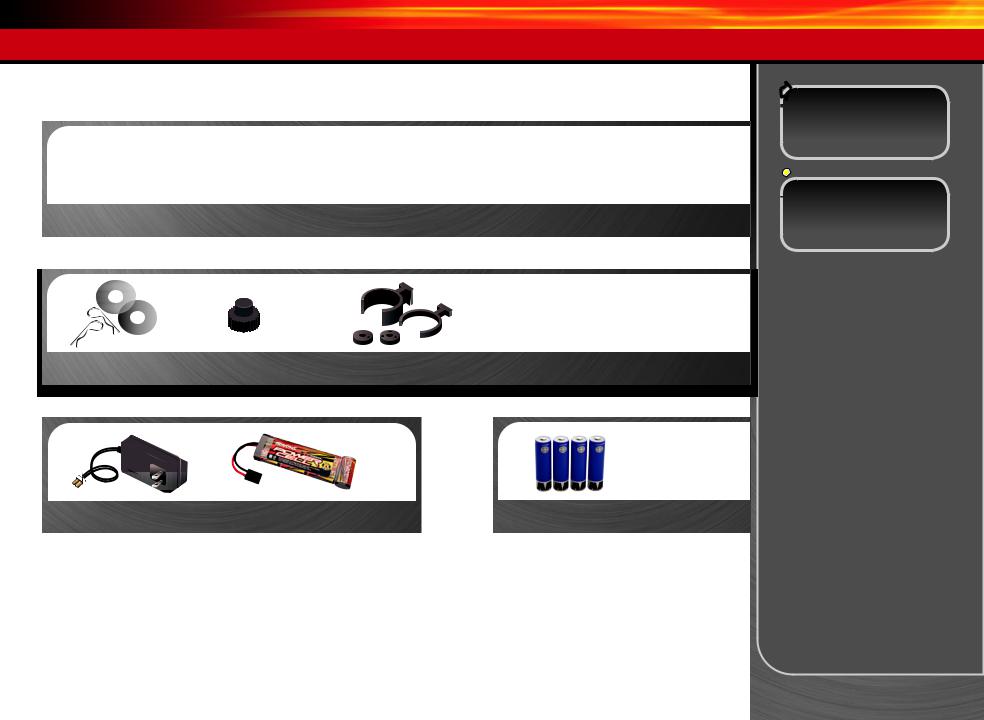
TOOLS, SUPPLIES AND REQUIRED EQUIPMENT
Your model comes with a set of specialty metric tools. You’ll need to purchase other items, available from your hobby dealer, to operate and maintain your model.
SUPPLIED TOOLS AND EQUIPMENT
2.5mm “L” wrench |
2.0mm “L” wrench |
1.5mm “L” wrench |
U-joint wrench |
8mm/4mm wrench |
4-way wrench |
|
|
|
|
|
|
Body clips and body |
Optional Pinion |
Various pre-load spacers and shock |
Foam battery spacer for 6-cell |
washers |
Gear see page 23 |
pistons (on plastic tree) see page 21 |
or small battery packs |
REQUIRED EQUIPMENT
(SOLD SEPARATELY)
NiMH battery charger* |
7-cell NiMH battery pack with |
4 AA alkaline |
|
Traxxas High-Current Connector* |
batteries |
||
|
|||
|
|
|
 For more information on batteries, see Use the Right Batteries on page 11.
 Recommended Equipment
These items are not required for the operation of your model, but are a good idea to include in any R/C toolbox:
•Safety glasses
•Thin, hobby-quality cyanoacrylate instant tire glue (CA glue)
•Hobby knife
•Side cutters and/or needle nose pliers
•Philips screwdriver
•Soldering iron
*Battery and charger style are subject to change and may vary from images.
SLASH 4X4 • 5

ANATOMY OF THE SLASH 4X4
Half Shaft |
Battery Compartment |
Spur Gear |
Battery Hold-Down |
Turnbuckle |
Battery |
(Rear Camber Link) |
Traxxas High-Current |
|
|
|
Connector |
Rear |
|
Body Mount |
|
|
|
|
|
|
|
|
|
|
|
|
|
Rear Bumper |
|
|
|
||
|
|
|
|
|
|
Rear Shock Tower |
|
Motor |
|||
|
(Velineon 3500) |
||||
|
|
|
Electronic Speed |
||
Rear Suspension Arm |
Pinion Gear |
Control (VXL-3s) |
|||
Nerf Bar |
|||||
|
|
|
|||
|
|
Slipper Clutch |
LED Light Pipe |
||
Front
Suspension Arm
Front Body
Mount
Chassis
Drive Shaft
Receiver
Box
Steering
Servo
Antenna
Mount
Turnbuckle (Toe Link)
Steering Block
(Axle Carrier)
Caster Block
(C-Hub)
Front
Shock Tower
Front Bumper
Shock
(Oil Damper)
Turnbuckle
(Front Camber Link)
Half Shaft
6 • SLASH 4X4
QUICK START: GETTING UP TO SPEED
The following guide is an overview of the procedures for getting your model running. Look for the Quick Start logo on the bottom corners of Quick Start pages.
1. Read the safety precautions on page 4
For your own safety, understand where carelessness and misuse could lead to personal injury and product damage.
2. Charge the battery pack • See page 11
Fully charge the included battery pack. Begin charging your battery right away.
3. Install batteries in the transmitter • See page 11
The transmitter requires 4 AA alkaline or rechargeable batteries.
4. Install the battery pack in the model • See page 12
Your model requires a fully charged battery pack.
5. Turn on the radio system • See page 13
Make a habit of turning the transmitter on first, and off last.
6. Check servo operation • See page 14
Make sure the steering servo is working correctly.
7. Range test the radio system • See page 14
Follow this procedure to make sure your radio system works properly at a distance and that there is no interference from outside sources.
8. Detail your model • See sidebar, page 8
Apply other decals if desired.
9. Drive your model • See page 18
Driving tips and adjustments for your model.
10. Maintaining your model • See page 22
Follow these critical steps to maintain the performance of your model and keep it in excellent running condition.
 The Quick Start Guide is not intended to replace the full operating instructions available in this manual. Please read this entire manual for complete instructions on the proper use and maintenance of your model.
Look for the Quick Start logo at the bottom of Quick Start pages.
SLASH 4X4 • 7
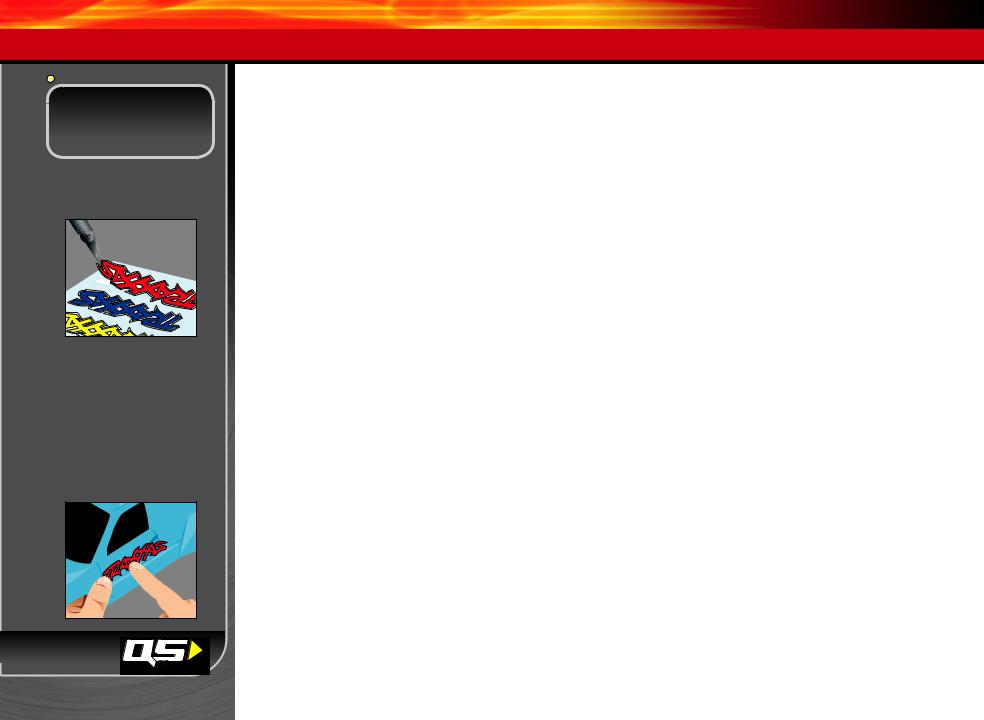
 Applying the Decals
The main decals for your model have been applied at the factory. The decals are printed on self-adhesive clear mylar and are die-cut for easy removal. Use a hobby knife to lift the corner of a decal and lift it from the backing.
To apply the decals, place one end down, hold the other end up, and gradually smooth the decal down with your finger as you go. This will prevent air bubbles. Placing both ends of the decal down and then trying to smooth it out will result in air pockets. Look at the photos on the box for typical decal placement.
8
8 • SLASH 4X4
TRAXXAS TQi RADIO & VELINEON POWER SYSTEM
INTRODUCTION
Your model includes the latest Traxxas TQi 2.4GHz transmitter with Traxxas Link™ Model Memory. The transmitter’s easy-to-use design provides instant driving fun for new R/C enthusiasts, and also offers a full compliment of pro-level tuning features for advanced users
– or anyone interested in experimenting with the performance of their model. The steering and throttle channels feature adjustable Exponential, End Points, and Sub-Trims. Steering and braking Dual Rate are also available. Many of the next-level features are controlled by the Multi-Function knob, which can be programmed to control
a variety functions. The detailed instructions (page 27) and Menu Tree (page 29) included in this manual will help you understand and operate the advanced functions of the new TQi radio system. For additional information and how-to videos, visit Traxxas.com.
RADIO AND POWER SYSTEM TERMINOLOGY
Please take a moment to familiarize yourself with these radio and power system terms. They will be used throughout this manual. A detailed explanation of the advanced terminology and features of your new radio system begins on page 27.
2.4GHz Spread Spectrum – This model is equipped with the latest R/C technology. Unlike AM and FM systems that require frequency crystals and are prone to frequency conflicts, the TQi system automatically selects and locks onto an open frequency, and offers superior resistance to interference and “glitching.”
BEC (Battery Eliminator Circuit) - The BEC can either be in the receiver or in the ESC. This circuit allows the receiver and servos to be powered by the main battery pack in an electric model. This eliminates the need to carry a separate pack of 4 AA batteries to power the radio equipment.
Brushless Motor - A D/C brushless motor replaces the brushed motor’s traditional commutator and brush arrangement with intelligent electronics that energize the electromagnetic windings in sequence to provide rotation. Opposite of a brushed motor, the brushless motor has its windings (coils) on the perimeter of the motor can and the magnets are mounted to the spinning rotor shaft.
Cogging - Cogging is a condition sometimes associated with brushless motors. Typically it is a slight stutter noticed when accelerating from a stop. It happens for a very short period as
the signals from the electronic speed control and the motor synch with each other. The VXL-3s electronic speed control is optimized to virtually eliminate cogging.
Current - Current is a measure of power flow through the electronics, usually measured in amps. If you think of a wire as a garden hose, current is a measure of how much water is flowing through the hose.
ESC (Electronic Speed Control) - An electronic speed control is the electronic motor control inside the model. The VXL-3s electronic speed control uses advanced circuitry to provide precise, digital proportional throttle control. Electronic speed controls use power more efficiently than mechanical speed controls so that the batteries run longer. An electronic speed control also has circuitry that prevents loss of steering and throttle control as the batteries lose their charge.
Frequency band - The radio frequency used by the transmitter to send signals to your model. This model operates on the 2.4GHz direct-sequence spread spectrum.
kV Rating - Brushless motors are often rated by their kV number. The kV rating equals no-load motor rpm with 1 volt applied. The kV increases as the number of wire turns in the motor decreases. As the kV increases, the current draw through the electronics also increases. The Velineon 3500 motor is a 10-turn, 3500 kV motor optimized for the best speed and efficiency in lightweight 1/10 scale models.
LiPo - Abbreviation for Lithium Polymer. Rechargeable LiPo battery packs are known for their special chemistry that allows extremely high energy density and current handling in a compact size. These are high performance batteries that require special care and handling. For advanced users only.
mAh – Abbreviation for milliamp hour. A measure of the capacity of the battery pack. The higher the number, the longer the battery will last between recharges.
Neutral position - The standing position that the servos seek when the transmitter controls are at the neutral setting.
NiCad - Abbreviation for nickel-cadmium. The original rechargeable hobby pack, NiCad batteries have very high current handling, high capacity, and can last up to 1000 charging cycles.
Good charging procedures are required to reduce the possibility of developing a “memory” effect and shortened run times.
NiMH - Abbreviation for nickel-metal hydride. Rechargeable NiMH batteries offer high current handling, and much greater resistance to the “memory” effect. NiMH batteries generally allow higher capacity than NiCad batteries. They can last up to 500 charge cycles. A peak charger designed for NiMH batteries is required for optimal performance.
Receiver - The radio unit inside your model that receives signals from the transmitter and relays them to the servos.
Resistance - In an electrical sense, resistance is a measure of how an object resists or obstructs the flow of current through it. When flow is constricted, energy is converted to heat and is lost. The Velineon power system is optimized to reduce electrical resistance and the resulting power-robbing heat.
Rotor - The rotor is the main shaft of the brushless motor. In a brushless motor, the magnets are mounted to the rotor, and the electromagnetic windings are built into the motor housing.
Sensored - Sensored refers to a type of brushless motor that uses an internal sensor in the motor to communicate rotor position information back to the electronic speed control. The VXL-3s electronic speed control is able to use sensored motors when applications benefit from them (such as some sanctioned racing classes).
Sensorless - Sensorless refers to a brushless motor that uses advanced instructions from an electronic speed control to provide smooth operation. Additional motor sensors and wiring are not required. The VXL-3s electronic speed control is optimized for smooth sensorless control.
Servo - Small motor unit in your model that operates the steering mechanism.
Solder Tabs - Accessible, external contacts on the motor that allows for easy wire replacement. The Velineon 3500 is equipped with solder tabs.
Transmitter - The hand-held radio unit that sends throttle and steering instructions to your model.
Trim - The fine-tuning adjustment of the neutral position of the
TRAXXAS TQi RADIO & VELINEON POWER SYSTEM
servos, made by adjusting the throttle and steering trim knobs on the face of the transmitter. Note: The Multi-Function knob must be programmed to serve as a throttle trim adjustment.
Thermal Shutdown Protection - Temperature sensing electronics used in the VXL-3s electronic speed control detect overloading and overheating of the transistor circuitry. If excessive temperature is detected, the unit automatically shuts down to prevent damage to the electronics.
2-channel radio system - The TQi radio system, consisting of the receiver, the transmitter, and the servos. The system uses two channels: one to operate the throttle and one to operate the steering.
Voltage - Voltage is a measure of the electrical potential difference between two points, such as between the positive battery terminal and ground. Using the analogy of the garden hose, while current is the quantity of water flow in the hose, voltage corresponds to the pressure that is forcing the water through the hose.
IMPORTANT RADIO SYSTEM PRECAUTIONS
•For maximum range, always point the front of transmitter toward the model.
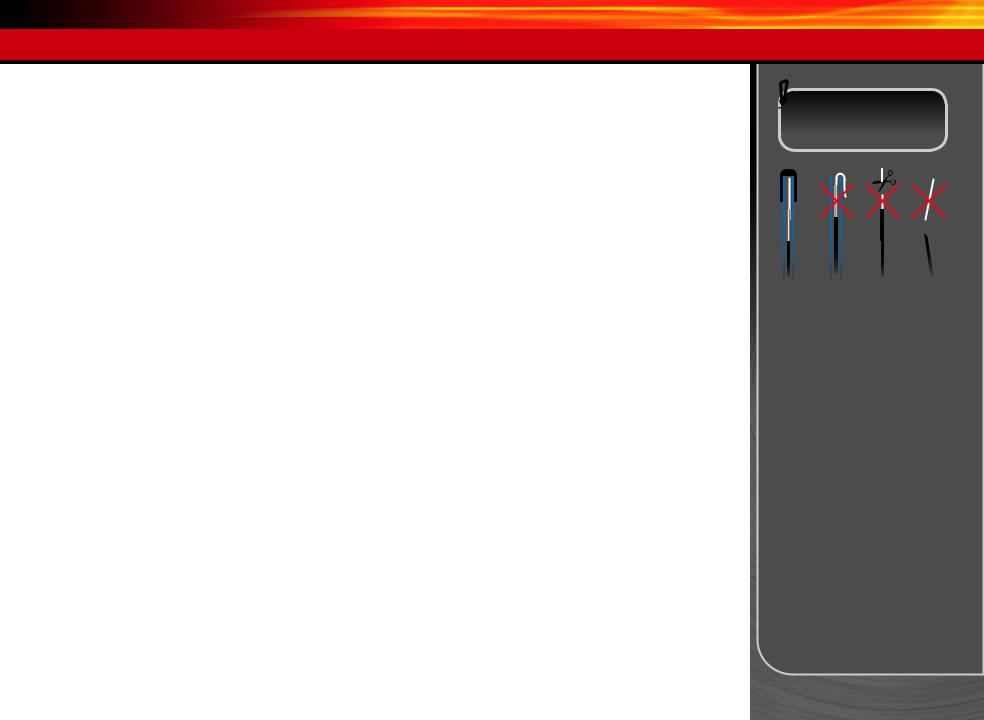
•Do not kink the receiver’s antenna wire. Kinks in the antenna wire will reduce range.
•DO NOT CUT any part of the receiver’s antenna wire. Cutting the antenna will reduce range.
•Extend the antenna wire in the model as far as possible for maximum range. It is not necessary to extend the antenna wire out of the body, but wrapping or coiling the antenna wire should be avoided.
•Do not allow the antenna wire to extend outside the body without the protection of an antenna tube, or the antenna wire may get cut or damaged, reducing range. It is recommended to keep the wire inside the body (in the antenna tube) to prevent the chance of damage.
 To prevent loss of radio range do not kink or cut the black wire, do not bend or cut the metal tip, and do not bend or cut the white wire at the end of the metal tip.
Correct |
No |
No |
No |
SLASH 4X4 • 9
TRAXXAS TQi RADIO & VELINEON POWER SYSTEM
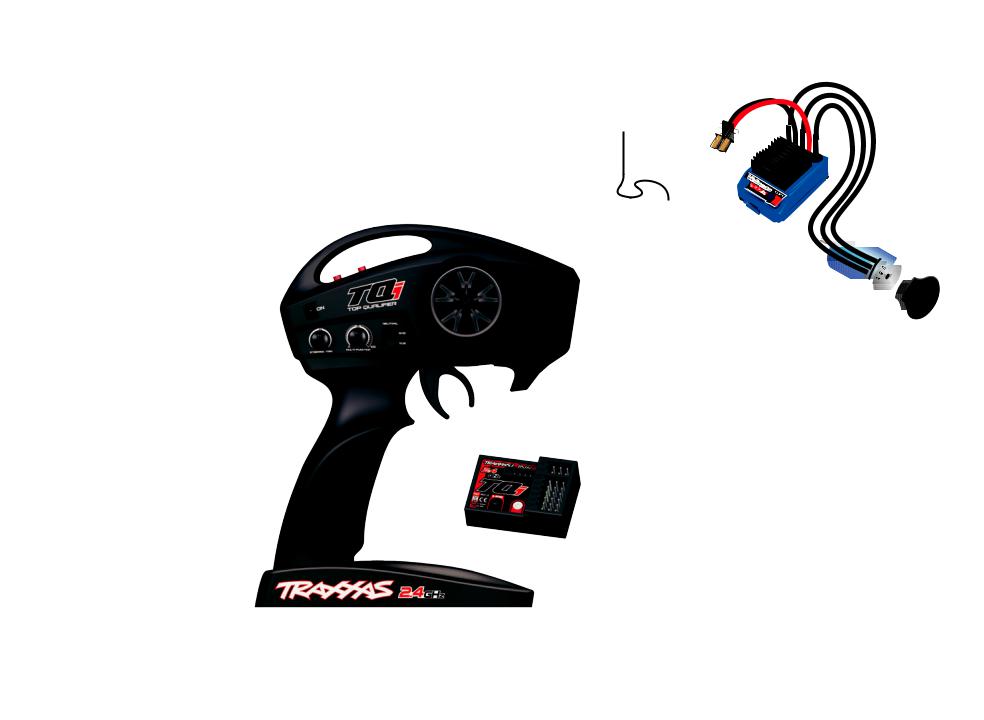
Your model is equipped with the newest TQi 2.4GHz transmitter ESC/Motor Wiring Diagram with Traxxas Link™ Model Memory. The transmitter has two
channels for controlling your throttle and steering. The receiver inside the model has 5 output channels. Your model is equipped with one servo and an electronic speed control.
TRANSMITTER AND RECEIVER
Set Button |
|
Throttle Neutral |
Steering Wheel |
||||||||
Red/Green Status LED |
|
Adjust |
|
|
|
||||||
|
|
|
|
||||||||
|
|
|
|
|
|
||||||
|
|
|
|
|
|
||||||
see page 28 for more info |
|
|
|
|
|
|
|
|
|||
|
|
|
|
|
|
|
|||||
Menu Button |
|
|
|
|
|
|
|
|
|
|
|
|
|
|
|
|
|
|
|
|
|
|
|
|
|
|
|
|
|
|
|
|
|
|
|
|
|
|
|
|
|
|
|
|
|
|
|
|
|
|
|
|
|
|
|
|
|
|
|
Steering
Trim
Multi-Function
Knob
Sensor Expansion
Port**
Throttle
Trigger
Link
Button
LED
Power Switch |
Battery Compartment |
MODEL WIRING DIAGRAM
Traxxas High-Current |
||
Connector (Male) |
||
to Battery |
|
|
Antenna |
|
|
Receiver |
|
|
|
Channel 2 |
|
|
Electronic |
|
|
Speed Control |
|
|
V/T - Voltage/Temp Senor Port** |
|
|
RPM - RPM Sensor Port** |
|
|
BATT/ |
|
|
CH5 - Battery/Channel 5* |
|
|
CH4 - Channel 4* |
|
Channel 1 |
CH3 - Channel 3* |
|
CH2 - Speed Control |
||
Steering Servo |
||
CH1 - Steering Servo |
||
|
||
|
CH1 - Channel 1* |
|
Velineon
Brushless Motor
(see side bar for proper motor wiring)
Motor Cap
* Not used ** Accessory sensor port for use with TQi Docking Base
(see Traxxas.com and included materials for more information)
VXL-3S ELECTRONIC SPEED CONTROL
Traxxas High-Current
Connector (Male) to Battery
to Motor
Cooling Fan  Connector
(for optional use)
LED |
Heat Sink |
|
|
|
EZ-Set Button |
Auxiliary Port |
(On/Off Button) |
|
|
(for optional use) |
Receiver cable |
|
|
|
(RX wire) |
10 • SLASH 4X4
** Accessory sensor port for use with TQi Docking Base (see Traxxas.com and included materials for more information)
 Loading...