


MODEL 4908
OWNERS MANUAL
INTRODUCTION |
|
CONTENTS |
|
BEFORE YOU PROCEED.................................................. |
2 |
SAFETY PRECAUTIONS................................................... |
3 |
TOOLS, SUPPLIES AND REQUIRED EQUIPMENT......... |
4 |
ANATOMY OF YOUR T-MAXX 3.3.................................... |
5 |
QUICK START: GETTING UP TO SPEED......................... |
6 |
GLUING THE TIRES AND DECORATING YOUR T-MAXX 3.3...6
INTRODUCTION
Thank you for purchasing the new T-Maxx 3.3. This T-Maxx is our biggest and meanest Maxx ever and we are confident it will reward you with many hours of exciting monster truck action.
We know you’re excited about getting your new T-Maxx 3.3 on the road, but it’s very important that you take some time to read through the Owners Manual. This manual contains all the necessary set-up, break-in, tuning, and operating procedures that allow you to unlock the incredible performance and adjustment potential that Traxxas engineers designed into T-Maxx 3.3. Even if you are an experienced
R/C enthusiast, it’s important to read and follow the procedures in this manual. T-Maxx 3.3 contains new technologies in the engine, suspension, and transmission operation that you may not be familiar with. Pay particular attention to the fuel and break-in requirements for the engine. The advanced design of the TRX 3.3 Racing Engine has a special break-in procedure that has been developed and proven to produce the best-performing engine possible. Using traditional or old-fashioned procedures could reduce engine performance and longevity.
T-Maxx 3.3 is made to be a complete package that starts with the highest level of engineering; a professionally produced DVD to acquaint you with the starting, racing, and maintenance procedures; and is equipped stock with the most powerful Ready-To-Race® engine available. We want you to feel confident that you own the best-performing truck in the market and that it is backed by a team of professionals who aim to provide the highest level of factory support possible. T-Maxx 3.3 is about experiencing total performance and satisfaction, not just with your truck, but also with the company that stands behind it.
Thank you again for going with Traxxas. We work hard every day to assure you the highest level of customer satisfaction possible. We truly want you to enjoy your new T-Maxx 3.3!
THE TRAXXAS TQ-3 RADIO SYSTEM.............................. |
7 |
THE TRX 3.3 RACING ENGINE..................................... |
11 |
DRIVING YOUR T-MAXX 3.3.......................................... |
22 |
TUNING ADJUSTMENTS................................................ |
23 |
MAINTAINING AND STORING YOUR T-MAXX 3.3........ |
27 |
TROUBLESHOOTING..................................................... |
28 |
INDEX............................................................................. |
30 |
Traxxas Support
Traxxas support is with you every step of the way. Refer below to find out how to contact us and what your support options are.
Quick Start
This manual is designed with a Quick Start path that outlines the necessary procedures to get your model up and running in
the shortest time possible. If you are an
experienced R/C enthusiast you will find it helpful and fast. Be sure and read through the rest of the manual to learn about important safety, maintenance, and adjustment procedures. Turn to page 6 to begin.
BEFORE YOU PROCEED
Carefullyreadandfollowallinstructionsinthisandanyaccompanying materialstopreventseriousdamagetoyourT-Maxx3.3.Failureto followtheseinstructionswillbeconsideredabuseand/orneglect.
Before running your T-Maxx 3.3, look over this entire manual and examine the truck carefully. If for some reason you decide the T-Maxx 3.3 is not what you wanted, then do not continue any further. Your hobby dealer absolutely cannot accept a T-Maxx 3.3 for return or exchange after it has been run.
Warnings, Helpful Hints, & Cross-References
Throughout this manual, you’ll notice warnings and helpful hints identified by the icons below. Be sure to read them!
An important warning about personal safety or avoiding damage to your model and related components.
 Special advice from Traxxas to make things easier and more fun.
 Refers you to a page with a related topic.
SUPPORT
If you have any questions about your T-Maxx 3.3 or its operation, call the Traxxas Technical Support line toll-free at: 1-888-TRAXXAS (1-888-872-9927)*
Technical support is available Monday through Friday from 8:30 am to 9:00 pm central time. Technical assistance is also available at www.Traxxas.com. You may also e-mail customer support with your question at support@Traxxas.com. Join hundreds of Traxxas R/C enthusiasts in our online community at www.Traxxas.com.
Traxxas offers a full-service, on-site repair facility to handle any of your Traxxas service needs. Maintenance, replacement parts, and accessories may be purchased directly from Traxxas by phone or online at www.BuyTraxxas.com. You can save time, along with shipping and
handling costs, by purchasing replacement parts from your local dealer. Do not hesitate to contact us with any of your product support needs. We want you to be thoroughly satisfied with your new T-Maxx 3.3!
2 • T-MAXX 3.3 OWNERS MANUAL

INTRODUCTION
SAFETY PRECAUTIONS
AllofusatTraxxaswantyoutosafelyenjoyyournewT-Maxx3.3.Operate yourT-Maxx3.3sensiblyandwithcare,anditwillbeexciting,safe,and funforyouandthosearoundyou.FailuretooperateyourT-Maxx3.3ina safeandresponsiblemannermayresultinpropertydamageandserious injury.Theprecautionsoutlinedinthismanualshouldbestrictlyfollowed tohelpensuresafeoperation.Youalonemustseethattheinstructionsare followedandtheprecautionsareadheredto.
Important Points to Remember
•T-Maxx 3.3 is very fast! The T-Maxx 3.3 is intended for experienced users with a high level of skill. The TRX 3.3 Racing Engine is extremely powerful and may require skilled driving to maintain control.
•The engine, brakes, and exhaust system may become extremely hot during use. Be careful not to touch the parts, especially when refueling or stopping the engine.
•Model engine fuel is dangerous and highly poisonous. Always follow all directions and precautions printed on the fuel container. Model engine fuel is poisonous to humans and animals. Drinking the fuel can cause blindness and death. Handle with care and respect.
•Model engine fuel, especially when in a fuel dispensing bottle, may look like a cool drink to a child. Keep all fuel out of the reach of children at all times. Do not place fuel containers on the ground where children can reach them while you are driving.
•Model engine fuel is flammable. Never allow smoking, sparks, heat or flame in the presence of fuel or fuel vapors.
•Prolonged exposure to the engine exhaust can be harmful. Avoid breathing the engine exhaust. Always run your T-Maxx 3.3 outdoors, in a well-ventilated area. Never run the engine indoors.
•Do not operate your T-Maxx 3.3 at night, or anytime your line of sight to the model may be obstructed or impaired in any way.
•Never operate your T-Maxx 3.3 in crowds of people or busy pedestrian areas. T-Maxx 3.3 is very fast and could cause injury to those unaware of its presence. Keep small children at a safe distance away from the operating area.
•Because T-Maxx 3.3 is controlled by radio, it is subject to radio interference from many sources beyond your control. Since radio interference can cause momentary loss of control, always allow a safety margin in all directions around your model to prevent collisions.
•The engine can be loud. If the noise makes you uncomfortable, wear ear protection. Be considerate of your neighbors by not running your model early in the morning or late in the evening.
•Most importantly, use good common sense at all times.
Children (minors) under 16 years of age and inexperienced drivers should not operate the T-Maxx 3.3 without the supervision of a responsible and knowledgeable (experienced) adult.
Traxxas |
Traxxas U.K. |
Entire contents ©2008 Traxxas. Traxxas, Maxx, T-Maxx 3.3, TRX 3.3 Racing Engine, |
1100 Klein Road |
P.O. Box 1128 |
TQ-3, Top Fuel, EZ-Start, Ready-To-Race, Ready-To-Win, and ProGraphix are |
Plano, Texas 75074 |
Winterbourne, Bristol BS36-2SH |
trademarks or registered trademarks of Traxxas. Other brand names and marks |
Phone: 972-265-8000 |
England |
are the property of their respective holders and are used only for purposes of |
Toll-free 1-888-TRAXXAS |
Phone: 44-117-956-1002 |
identification. No part of this manual may be reproduced or distributed in print or |
E-mail: support@Traxxas.com |
Internet: www.Traxxas.com |
electronic media without the express written permission of Traxxas. |
|
T-MAXX 3.3 OWNERS MANUAL • 3

TOOLS, SUPPLIES, AND REQUIRED EQUIPMENT
T-Maxx 3.3 comes with a set of specialty metric tools. You’ll need to purchase other items, available from your hobby dealer, to operate and maintain your model.
SUPPLIED TOOLS AND EQUIPMENT
|
|
|
|
|
|
|
|
|
|
|
|
|
|
“L” wrench set: |
Antenna nut wrench |
Universal (glow plug) |
8mm/5mm wrench |
|||
1.5mm, 2.0mm, 2.5mm |
wrench |
|||||
|
|
|
|
|||
|
|
|
|
|
|
|
Pre-load spacers and shock pistons |
Body clips |
|
(on parts tree) seepage23 |
||
|
REQUIRED TOOLS AND EQUIPMENT
10%quart-#5010
20%quart-#5020
33%quart-#5030
10%gallon-#5060
20%gallon-#5070
33%gallon-#5080
Extra oiled air filter set |
Suspension multi-tool |
|
(pre-filter and primary filter) |
||
|
||
(sold separately) |
|
Traxxas Top Fuel™ |
Fuel dispensing bottle |
12 AA alkaline |
NiCad or NiMH 7.2V |
|
Traxxas part #5001 shown |
batteries |
battery pack |
|
|
|
|
NiCad or NiMH batterycharger |
After-run oil to protect |
Traxxas part #3030X shown |
the engine from corrosion |
ACCESSORY EQUIPMENT (sold separately)
TRXPowerCharger |
RXPowerPackbattery |
Traxxas part #3030X |
Traxxas part #3037 |
Small (1/8 inch) flat-blade |
Air filter oil |
screwdriver for tuning |
Traxxas part #5263 |
Recommended Equipment
These items are not required for the operation of your model, but are a good idea to include in any R/C toolbox:
•Safety glasses
•Thin, hobby-quality cyanoacrylate instant tire glue (CA glue)
•Hobby knife
•Side cutters and/or needle nose pliers
•Philips screwdriver
•Soldering iron
TRXChargerDCcaradapter |
RXwiringharness |
Traxxas part #3032 |
Traxxas part #3034 |
4 • T-MAXX 3.3 OWNERS MANUAL
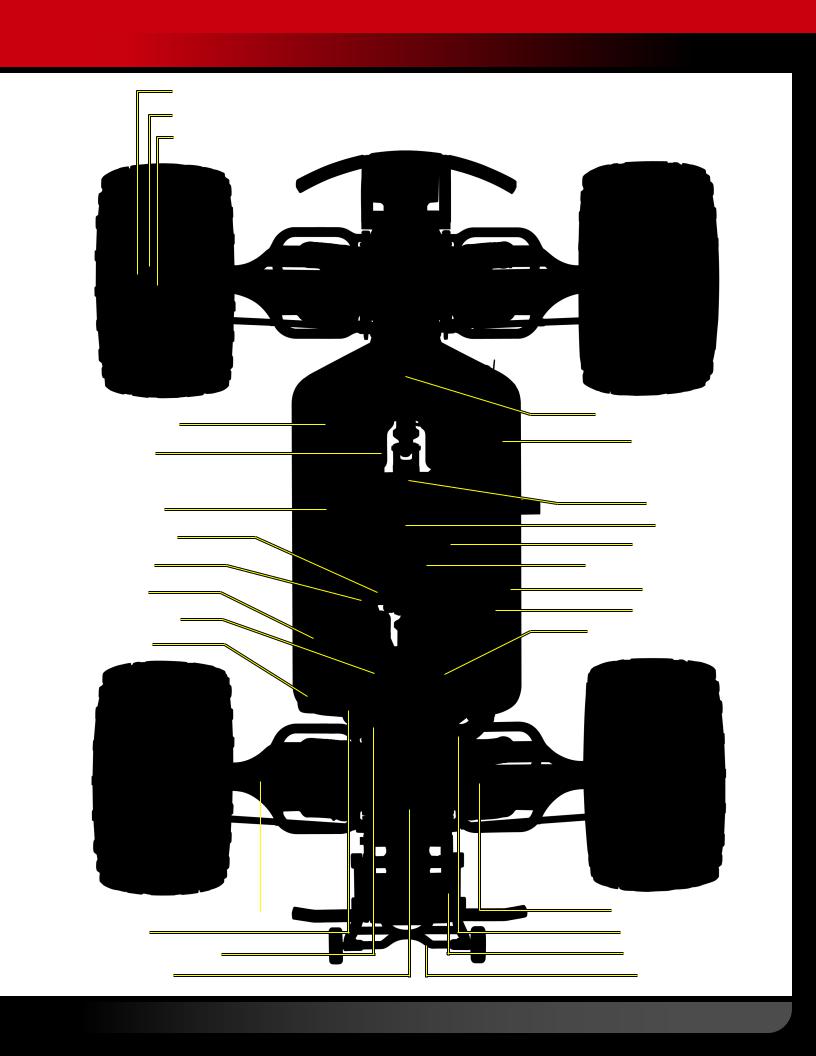
ANATOMY OF YOUR T-MAXX 3.3
Hex Hub |
Skid Plate |
|
|
|
|
|
|
|
|
|
|
Bulkhead |
|
|
|
Front |
Axle Carrier |
Differential |
|
|
|
|
|
|
|
|
|
Shock Tower |
|
Suspension Arm |
|||
|
|
|
|
|
|
|
|
|
|
Toe Link |
||||||
|
|
|
|
|
|
|
|
|
|
|
||||||
Pivot Ball |
Front Bumper |
|
|
|
|
|
|
|
|
Ultra Shock™ |
|
|
||||
|
|
|
|
|
|
|
|
|
|
|||||||
|
|
|
|
|
|
|
|
|
(Turnbuckle) |
|||||||
|
|
|
|
|
|
|
|
|
|
|
|
(Oil Damper) |
|
|
|
|
|
|
|
|
|
|
|
|
|
|
|
|
|
|
|
|
|
|
|
|
|
|
|
|
|
|
|
|
|
|
|
|
|
|
|
|
|
|
|
|
|
|
|
|
|
|
|
|
|
|
|
|
|
|
|
|
|
|
|
|
|
|
|
|
|
|
|
|
|
|
|
|
|
|
|
|
|
|
|
|
|
|
|
|
|
|
|
|
|
|
|
|
|
|
|
|
|
|
|
|
|
|
Steering Servo
Brake Rod
On/Off Switch 
Battery Box
Slipper Clutch
Spur Gear
Fuel Cap
EZ-Start Motor
Fuel Tank
Driveshaft (Half Shaft) 
Fuel Line
Engine Shut-off Clamp
EZ-Start Plug
Throttle/Brake Servo
Receiver Box
 Antenna Mount
 Chassis
Disc Brake
Air Filter
Transmission
Two-Speed Access Plug
Tuned Pipe
Pressure Line
TRX 3.3 Racing Engine
see pg. 13 for details
Body Mount Post
Exhaust Header
Bumper Mount
Wheelie Bar
T-MAXX 3.3 OWNERS MANUAL • 5
QUICK START: GETTING UP TO SPEED
The following guide is an overview of the procedures for getting your model running. Look for the Quick Start logo on Quick Start entries. The Quick Start Guide is not intended to replace the full operating instructions available in this manual. Please read this entire manual for complete instructions on the proper use and maintenance of your model.
 1. Read the safety precautions on page 3
For your own safety, understand where carelessness and misuse could lead to personal injury.
 9. Range test the radio system • See page 10
Follow this procedure to make sure your radio system works properly at a distance and that there is no interference from outside sources.
 2. Charge the EZ-Start battery pack • See page 17
The EZ-Start requires a fully charged 7.2-volt battery pack (sold separately).
 10. Fill the fuel tank • See page 14
Use your fuel-dispensing bottle (sold separately) to fill the tank.
 3. Install the antenna • See page 9.
Install the antenna mast on the T-Maxx 3.3.
 4. Install batteries • See page 8
T-Maxx 3.3 requires 12 AA alkaline or rechargeable batteries for the transmitter (8) and receiver (4) (sold separately).
 11. Connect the EZ-Start to the model • See page 17
Learn the proper way to use the EZ-Start electric starting system.
 12. Start the engine • See page 18
Learn to use the correct starting procedure for your TRX 3.3.
 5. Decal and Install the body • See below
You will need to use the body during break in, so it’s best to apply any additional decals before you use the body.
 6. Install the EZ-Start battery • See page 17
Install and connect a charged 7.2-volt battery pack in the EZ-Start controller.
 13. Break-in your engine • See page 18
Follow the break-in instructions exactly to ensure the best-performing, longest-lasting engine.
 14. Tune your engine • See page 20
Learn how to set the fuel mixture needles for optimum engine performance.
|
|
7. Turn on the radio system • See page 9 |
|
|
15. Drive your T-Maxx 3.3 • See page 22 |
|
|
|
|
|
|
Make a habit of turning the transmitter on first, and off last. |
Learn to use the two-speed functions on your truck, |
||||
|
|
|
along with important driving precautions. |
||
|
|
8. Check servo operation • See page 10 |
|
|
16. Maintaining your Truck • See page 27 |
|
|
|
|
||
|
|
|
|
||
Make sure the throttle and steering servos are |
Follow these critical steps to maintain the performance of your |
||||
working correctly. |
T-Maxx 3.3 and keep it in excellent running condition. |
||||
GLUING TIRES AND DECORATING YOUR T-MAXX 3.3
Tire Gluing
The factory tires on your T-Maxx 3.3 are already glued to the rims. The tires must be glued to the rims to prevent the rims from spinning inside the tires. The instructions here are provided to show you how to glue replacement tires to the rims in the future. Use CA tire glue available from your local hobby dealer. You can glue the tires without removing the wheels from the truck. For clarity, these instructions show the process with the wheels removed.
1. Remove a wheel from T-Maxx 3.3 using the larger (8mm) end of the universal (glow
plug) wrench.
2. Use your thumb to push the side of the tire away from the rim. Place one or two drops of CA glue into the opening and release the tire. Capillary action will draw the glue around the bead of the tire.
3.Repeat step two at four or five points around the rim, until the tire is completely secured to the rim. Turn the rim over and repeat the process for the inside of the rim/tire. Repeat for the other three wheels.
4.Reinstall the wheels, make sure none of the axle pins have fallen out from behind the hex hubs.
Applying the Decals
The main decals have already been
applied to your T-Maxx 3.3. The extra decals provided are die-cut for easy removal. Use a hobby knife to lift the corner of a decal and remove it from the backing.
Carefully position the decal over the
desired location and press one side on  the body. Pull the decal tight and use a
finger to gradually smooth out any air bubbles as you apply the decal.
Look at the photos on the box for typical decal placement.
6 • T-MAXX 3.3 OWNERS MANUAL
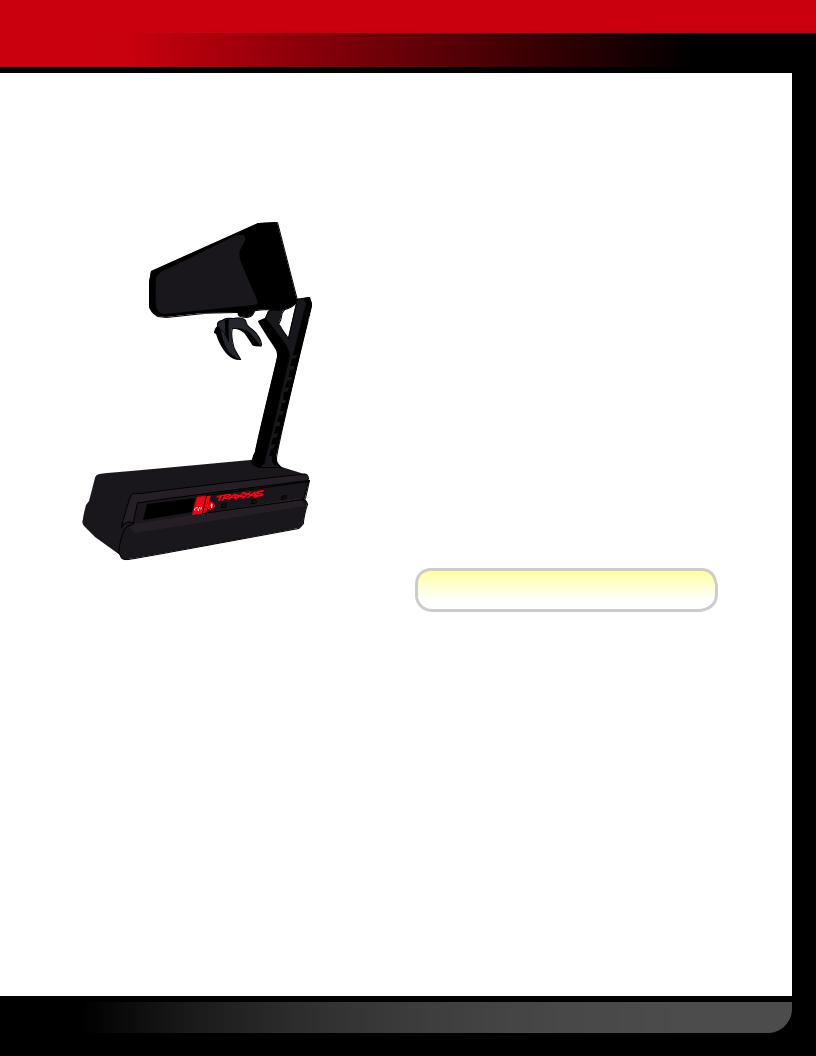
THE TRAXXAS TQ-3 RADIO SYSTEM
Your T-Maxx 3.3 is equipped with the TQ-3 radio system. The TQ-3 is a 3-channel system that provides up to a quarter mile range and control for up to three servo outputs.
TQ-3 TRANSMITTER |
T-MAXX 3.3 WIRING DIAGRAM |
4-cell Battery |
|
|
|
|
Holder |
Antenna |
Throttle Neutral Adjust |
|
|
|
|
|
|
|
Steering Wheel |
|
|
Throttle Trim |
|
On/Off |
|
|
Switch |
|
|
|
|
|
|
Steering Trim |
|
Antenna |
|
|
|
|
|
Steering
Servo
Throttle
Trigger
|
|
CH.1 |
|
CH.2 |
|
|
CH.3 |
|
|
|
Servo Reversing |
|
|
Switch |
Power Switch |
Battery Compartment |
Power Indicator |
|
|
Receiver |
|
|
|
|
Battery |
Throttle/Brake |
|
|
|
|
|||
|
|
|
|
|||
|
|
|
|
|||
|
|
|
|
|
Servo |
|
|
|
|
|
|
Channel 1 |
|
|
|
|
|
|
|
|
|
|
|
|
|
Channel 2 |
|
|
|
|
|
|
|
|
|
|
|
|
|
Channel 3 |
|
|
|
|
|
|
|
Don’t push the transmitter antenna down from the top. Pull it down from the bottom, one segment at a time, to prevent binding and kinking the antenna mast.
RADIO SYSTEM TERMINOLOGY
Please take a moment to familiarize yourself with these radio-system terms. They will be used throughout this manual.
5-Cell Pack - Another term for RX Pack or rechargeable receiver pack. An RX Pack is made up of five rechargeable NiMH battery cells and is used in place of the 4AA batteries in a model.
Channel - The 27 MHz frequency band is divided into 6 channels so that up to six models can be operated simultaneously. Each channel is referred to by its flag color and channel number, as shown below.
CHANNEL |
FREQUENCY |
FLAG |
TRAXXAS |
|
BAND |
COLOR |
PART NO. |
1 |
26.995 |
BROWN |
2031 |
2 |
27.045 |
RED |
2032 |
3 |
27.095 |
ORANGE |
2033 |
4 |
27.145 |
YELLOW |
2034 |
5 |
27.195 |
GREEN |
2035 |
6 |
27.255 |
BLUE |
2036 |
Clearing your frequency - A routine, verbal check to make sure nobody else in your area is operating on the same channel. Always
clear your frequency by calling out your channel number before operating your model. Wait or move to another area if your channel is already being used.
Crystal (X-tal) - The plug-in device that determines which channel the radio system will operate on. For each channel, there are two crystals, one for the receiver and one for the transmitter. Of those two crystals, the one marked “RX” with the lower number (.455 MHz lower) must be inserted into the receiver.
Frequency band - The radio frequency used by the transmitter to send signals to your T-Maxx 3.3. All Traxxas RTR models operate on a 27 MHz frequency band.
mAh – Abbreviation for milliamp hour. Measure of the capacity of the battery pack. The higher the number, the longer the battery will last between recharges.
Neutral position - The standing position that the servos seek when the transmitter controls are at the neutral setting.
NiCad - Abbreviation for nickel-cadmium. The original rechargeable hobby pack, NiCad batteries have very high current handling, high capacity, and can last up to 1000 charging cycles. Good charging procedures are required to reduce the possibility of developing a “memory” effect and shortened run times.
T-MAXX 3.3 OWNERS MANUAL • 7
THE TQ-3 RADIO SYSTEM
NiMH - Abbreviation for nickel-metal hydride. Rechargeable NiMH batteries offer high current handling, and much greater resistance to the “memory” effect. NiMH batteries generally allow higher capacity than NiCad batteries. They can last up to 500 charge cycles. A peak charger designed for NiMH batteries is required for optimal performance.
Receiver - The radio unit inside your T-Maxx 3.3 that receives signals from the transmitter and relays them to the servos.
RX - RX is a common abbreviation for the radio receiver and items associated with it.
Servos - Small motor units in your T-Maxx 3.3 that operate the throttle and steering mechanisms.
Three-channel radio system - The TQ-3 radio system, consisting of the receiver, the transmitter, and the servos. The system uses three channels: one to operate the throttle, one to shift the transmission, and one to operate the steering.
Transmitter - The hand-held radio unit that sends throttle and steering instructions to your T-Maxx 3.3.
Trim - The fine-tuning adjustment of the neutral position of the servos, made by turning the throttle and steering trim knobs on the face of the transmitter.
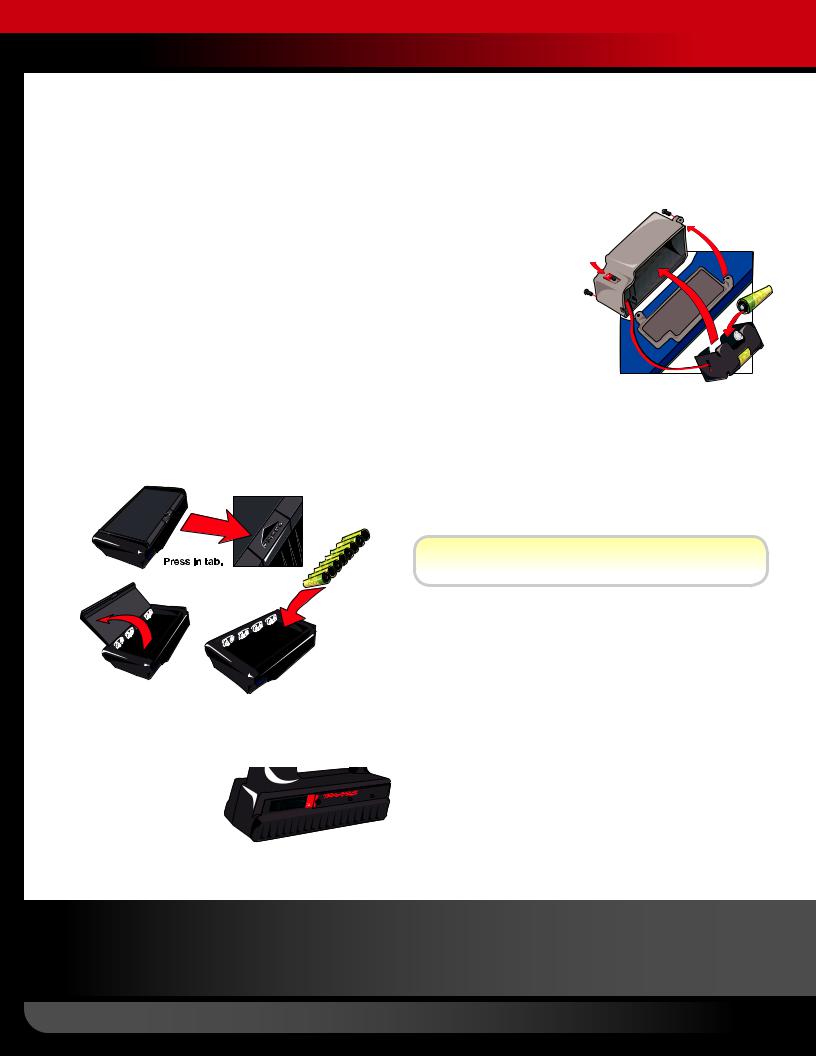
INSTALLING TRANSMITTER BATTERIES
Your TQ transmitter uses 8 AA batteries. The battery compartment is located in the base of the transmitter.
1.Remove the battery compartment door by pressing the tab and lifting the door up.
2.Install the batteries in the correct orientation as indicated in the battery compartment.
3.Reinstall the battery door and snap it closed.
4.Turn on the transmitter and |
CH.1 |
CH.2 |
|
check the power indicator for |
|
a solid red light. |
|
If the power indicator light
flashes, then the transmitter batteries are weak, discharged or possibly installed incorrectly. Replace with new or freshly charged batteries. The
power indicator light does not indicate the charge level of the battery pack installed in the model. If the power indicator doesn’t light red, check the polarity of the batteries. Check rechargeable batteries for a full charge.
INSTALLING RECEIVER BATTERIES
The radio receiver in your model uses 4 AA batteries. The battery holder for the receiver batteries is located underneath the battery cover. The battery cover can be identified by
the on/off switch.
1.Remove the battery cover by removing the two 3x10mm
buttonhead cap screws from the cover.
2.Remove the battery holder
and install 4 AA alkaline |
4-cell |
|
batteries. Make careful note of the |
||
holder |
||
|
battery |
|
battery polarity by comparing against |
|
|
the diagrams in the battery holder. |
|
3.Insert the battery holder into the battery cover.
4.Direct the battery wires through the slot in the battery cover. If the wires are not properly routed, they may become broken or shorted, causing radio system failure and loss of control.
5.Reinstall the battery cover and secure with the screws.
Topreventlosingcontrolofyourmodel,itisimportanttostopatthefirst signofweakreceiverbatteriestoavoidlosingcontrol.Visiblewarning signalsincludesluggishsteeringresponseandshortenedradiorange.
 Iftheradiosystemdoesn’tappeartoworkwhenthetransmitterand
receiverswitchesareturnedon,checkforcorrectbatteryinstallation.
TraxxasTRXPowerSystem(optional)
TheoptionalTraxxasTRXPowerSystemcanbepurchased 

 separatelytopowertheradiosystemintheT-Maxx3.3.


 Benefitsincludetheeconomyofarechargeable5-cell
nickelmetalhydride(NiMH)batterypackthatreplacesAA
alkalinebatteries,andincreasedvoltagefordramatically
improvedservoperformance.TheTRXPowerCharger
 (Part#3030X)isapeakdetectingunitthatwillchargethe RXPowerPack(Part#3036flatpackor#3037humppack)inaboutonehour. Thepeakdetectioncircuitryautomaticallyshutsoffthechargerwhenthe maximumchargehasbeenachieved.TheTRXPowerChargeralsoincludesa 7.2Vadapterforcharging7.2VEZ-Startbatteries.TheTRXPowerChargercan operateoneitherACorDCpower.AspecialwiringharnessforT-Maxx(Traxxas part#3034)thatincludesahandyexternalchargingjackisrequired.
TheoptionalDCcaradapter(Part#3032)featuresatangle-free,  extralongwireandintegratedfuse.Thelongchargingcord
  allowsthemodeltoremainoutsidethecarwhilecharging.

 Caution!Neverchargebatteriesinanenclosedcarinterior

 orwhiledriving.Neverleavechargingbatteriesunattended. Monitorthemclosely.
Traxxas’integratedTRXPowerSystemistheeasiestwaytoaddthepowerand economyofrechargeablebatteriestoyourT-Maxx3.3.Consultyourhobby dealerforpurchasinginformation.
 UsetheRightBatteries
Your transmitter uses AA batteries. Use new alkaline batteries, or rechargeable batteries such as NiCad or NiMH (Nickel Metal Hydride) batteries in your transmitter. Make sure rechargeable batteries are fully charged according to the manufacturer’s instructions.
If you use rechargeable batteries in your transmitter, be aware that when they begin to lose their charge, they lose power more quickly than regular alkaline batteries.
Caution: Discontinue running your model at the first sign of weak batteries (flashing red light) to avoid losing control.
8 • T-MAXX 3.3 OWNERS MANUAL

THE TQ-3 RADIO SYSTEM
SETTING UP THE ANTENNA |
|
|
|
|
|
|
|||
|
|
|
|
|
|
||||
1. Locatetheblackantennawire |
|
|
|
Antenna |
|||||
thatexitsthereceiverbox. |
|
|
|
|
|
|
Tip |
||
|
|
|
|
|
|
||||
|
|
|
|
|
|
|
|||
|
|
|
|
|
|
Antenna |
|||
2. If there are any kinks in the black antenna |
|
|
|
Sleeve |
|||||
wire, it will be more difficult to push through |
|
|
|
||||||
|
|
|
|
|
|
||||
the antenna tube. Pull the wire straight |
|
|
|
|
|
|
|||
by sandwiching it between your thumb |
|
|
|
|
|
|
|||
and index finger and running your fingers |
|
|
|
|
|
|
|||
along the length of the wire (with medium |
|
|
|
|
|
|
|||
pressure). Insert the end of the wire into one |
|
|
|
|
|
|
|||
end of the antenna tube (the antenna tube, |
|
|
|
|
|
|
|||
tip, crimp nut and sleeve are located in the |
|
|
Antenna |
||||||
documents bag). Push the wire all the way |
|
|
|||||||
|
|
|
|
Tube |
|||||
|
|
|
|
||||||
through the antenna tube. |
|
|
|
|
|
|
|||
|
|
Spray a little window cleaner on the |
|
|
|
|
|
|
|
|
|
|
|
|
|
|
|
||
|
|
antenna wire to make it easier to push |
|
|
|
|
|
|
|
|
|
through the antenna tube. |
|
|
|
|
|
|
|
3.Insertthebaseofthetubeintotheantenna |
|
|
|
|
|
|
|||
post.Takecarenottocrimptheantennawire. |
|
|
|
|
|
|
|||
4. Slide the crimp nut over the antenna tube |
|
|
Antenna |
||||||
and screw it onto the antenna post. Use |
|
|
|
Wrench |
|||||
|
|
|
|
|
|
||||
the supplied tool to tighten the crimp nut |
|
|
|
|
|
|
|||
on the post just until the antenna tube is |
|
|
|
|
|
|
|||
securely in place. Do not over tighten or |
|
|
|
|
|
|
|||
crush the antenna wire against the chassis. |
|
|
Antenna |
||||||
5. Fold the top of the antenna wire over the |
|
|
Crimp Nut |
||||||
|
|
|
|
|
|
||||
top of the antenna tube. Slide the antenna |
|
|
Antenna |
||||||
sleeve over the tube to retain the antenna |
|
|
|
|
Post |
||||
wire. Now slide the antenna tip onto the top |
|
|
|
|
|
|
|||
of the antenna tube. |
|
|
|
|
|
|
|||
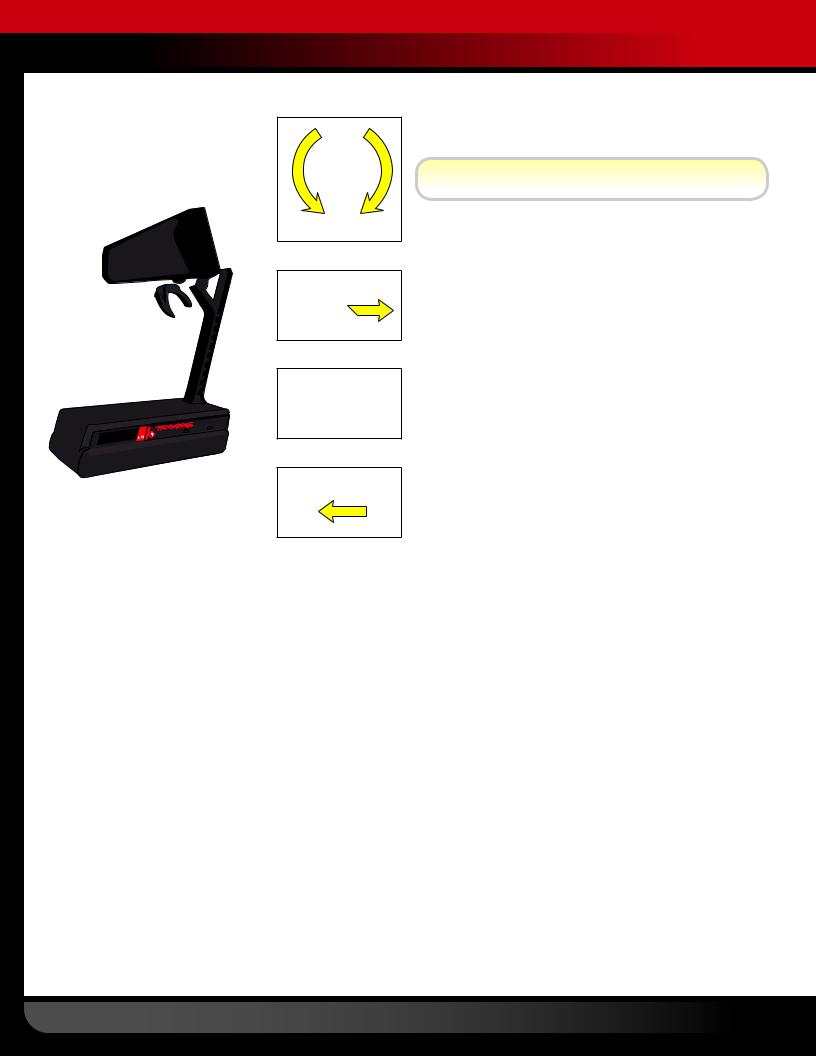
6. On the transmitter, always fully extend |
|
|
|
|
|
|
|||
the telescoping antenna when running |
|
|
|
|
|
|
|||
|
|
|
|
|
|
||||
your model. Make a habit of holding the |
|
|
|
|
|
|
|||
|
|
|
|
|
|
||||
transmitter so the antenna points straight up. |
|
|
|
|
|
|
|||
Don’t shorten the length of the antenna wire. Its length is tuned to the frequency band; cutting it could severely shorten the radio system’s range.
TQ-3 RADIO SYSTEM ADJUSTMENTS
In addition to the electronic throttle and steering trim controls, your radio system features throttle neutral adjustment and servo reversing switches.
Throttle Neutral Adjustment
The throttle neutral adjustment is located on the transmitter face and controls the forward/reverse travel of the throttle trigger. Change the adjustment by pressing the button and sliding it to the desired position. There are two settings available:
• 50/50: Allows equal travel for both acceleration and braking.
• 70/30: Allows more throttle travel (70%) and less brake travel (30%).
50/50 is the required setting for T-Maxx 3.3 with the TRX 3.3 Racing Engine.
Electronic Throttle Trim
The electronic throttle trim located on the face of the transmitter adjusts the neutral (center) point of the throttle servo when the servo is at rest. This control has been preset for you at the factory. If necessary, adjust the
control so that the carburetor is at idle, and the brakes are not applied (the model will roll freely). Do not use the throttle trim to raise or lower the engine idle speed. Make the idle speed adjustment on the carburetor.
Electronic Steering Trim
The electronic steering trim located on the face of the transmitter adjusts the neutral (center) point of the steering servos when the servos are at rest. Adjust this control to make the model drive straight with no steering input at the wheel.
Servo Reversing Switches
The servo reversing switches are located on the front of the transmitter, next to the on/off switch. Moving a switch reverses the direction of the corresponding servo. Each switch corresponds to a channel, as shown below. For example, if you turn the steering wheel to the right and your front wheels turn left, you would move the channel 1 switch to correct the servo direction. It may be necessary to adjust the corresponding trim control after 
moving a switch.
The default
position for the servo reversing
switches is shown.
TQ-3 RADIO SYSTEM RULES
•Each time you prepare to run your T-Maxx 3.3, you must clear your frequency to be sure no one else in the area is using the same channel as you.
There are six possible channels, numbered
1 through 6. Each is represented by a color. Look at the crystal plugged into the back of your transmitter to determine which channel your truck is assigned to.
• Always turn your TQ-3 transmitter on first
and off last. This procedure will help to prevent your T-Maxx 3.3 from receiving stray signals from another transmitter, or other source, and running out of control.
•Always have the transmitter and receiver turned on before you start the engine. Never turn the radio system off while the engine is running. The on/off switch in the model only turns the receiver on and off. It does not turn off the engine.
•Always use new or freshly charged batteries for the transmitter, and make sure the receiver batteries are fresh. Weak batteries will limit the radio signal between the receiver and the transmitter. Loss of the radio signal can cause you to lose control of your T-Maxx 3.3.
1 2
2 3
3
Always turn your |
Always turn your |
Then start your engine. |
transmitter on first. |
receiver on second. |
|
Remember, always turn the TQ-3 transmitter onfirst and offlast to avoid damage to your T-Maxx 3.3. Never turn the radio off while the engine is running.
T-MAXX 3.3 OWNERS MANUAL • 9
THE TQ-3 RADIO SYSTEM
TQ-3 RADIO SYSTEM CONTROLS
HiZZg^c\ |
|
|
|
|||
; |
I |
|
I |
|||
J |
||||||
|
||||||
|
|
G |
||||
|
|
|
||||
: |
|
|
|
|
|
|
A |
|
|
|
|
C |
|
|
|
|
|
|
||
C |
|
|
|
|
|
|
|
|
|
|
G |
||
G |
|
|
|
|||
|
|
|
> |
|||
J |
|
|
< |
|||
|
|
|
|
|
||
I |
|
I |
= |
|||
|
|
|
|
|||
|
|
|
|
|
||
7gV`Z |
|
|
|
|
||
CZjigVa
CH.1
CH.2
 CH.3
CH.3
6XXZaZgViZ
USING THE TQ-3 RADIO SYSTEM
The TQ-3 Radio System was pre-adjusted at the factory. The adjustment should be checked before running the
model, in case of movement during shipping. Here’s how:
1.Fullyextendthechromeantennamastonthetransmitterandturnthe switchon.Theredindicatorlightonthetransmittershouldbesolidred (notflashing).
2.Turnonthereceiverswitchinthemodel.Theswitchislocatedinthe sideoftheradiocompartment.
3.PositionT-Maxx3.3sothatitsfrontwheelsareofftheground.
4.Turnthesteeringwheelonthetransmitterbackandforthandcheck forrapidoperationofthesteeringservo.Also,checkthatthesteering mechanismisnotlooseorbinding.Ifthesteeringoperatesslowly,then makesureyouhavefreshreceiverbatteries.
5.Whenlookingdownatmodel,thefrontwheelsshouldbepointing straightahead.Ifthewheelsareturnedslightlytotheleftorright, slowlyadjustthesteeringtrimcontrolonthetransmitteruntiltheyare pointingstraightahead.
6.Operatethethrottletrigger
onthetransmitterand 


 checkforrapidoperation


 ofthethrottleservo.When


 thethrottletriggeris


 pulledback,thecarburetor


shouldopen(slidemoves
out).Whenthethrottletriggerispushedallthewayforward,thebrake shouldlock.
7.Onceadjustmentsaremade,turnoffthereceiveronyourT-Maxx3.3, followedbythehand-heldtransmitter.
When the engine is running, don’t use the throttle trim on the transmitter to adjust the engine idle speed. Instead, use the idle speed adjustment on the carburetor.
RANGE-TESTING THE TQ-3 RADIO SYSTEM
Before each running |
I]gdiiaZ |
|
session with your |
||
|
||
T-Maxx 3.3, you should range-test |
|
|
your radio system to ensure that it |
|
|
operates properly. |
7gV`Z |
|
|
||
1. Turnontheradiosystemand |
I]gdiiaZ$7gV`Z |
|
checkitsoperationasdescribed |
||
HZgkd |
||
intheprevioussection(Using |
|
|
theTQ-3RadioSystem). |
|
|
2. Haveafriendholdthemodel |
|
|
withtheengineoff. |
|
|
3. Makesureyourtransmitter |
|
|
antennaisfullyextended,and |
HiZZg^c\ |
|
thenwalkawayfromthemodel |
HZgkd |
|
|
||
withthetransmitteruntilyou |
|
|
reachthefarthestdistanceyou |
T-Maxx 3.3 |
|
plantooperatethemodel. |
Servo Operation |
|
|
4.Operatethecontrolsonthetransmitteronceagaintobesurethatthe modelrespondscorrectly.
5.Donotattempttooperatethemodelifthereisanyproblemwiththe radiosystemoranyexternalinterferencewithyourradiosignalat yourlocation.
10 • T-MAXX 3.3 OWNERS MANUAL
 Loading...