

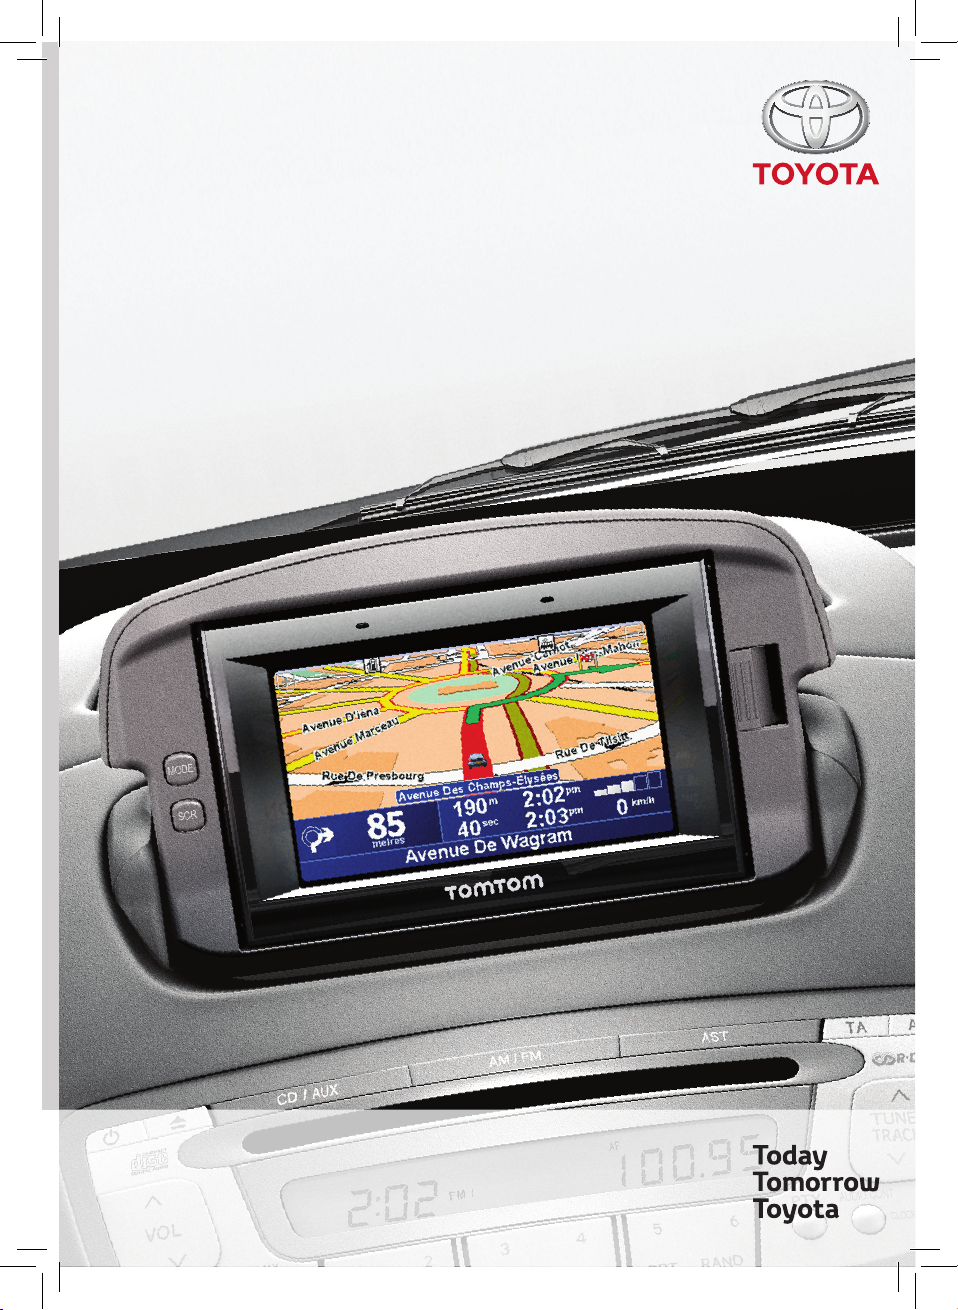
Toyota Aygo Connect Multimedia
Owners manual
TACM2010_Cover_EN.indd 5 10/1/10 6:32 PM

TACM2010_EN.book Page 1 Tuesday, October 5, 2010 3:44 PM
Table of Contents
Before Use
1. Introduction ..................................................................................4
2. Safety Instruction.........................................................................5
3. Warnings.......................................................................................6
Limitations of the navigation system .................................................... 6
4. Safety precautions.......................................................................7
5. Before use ....................................................................................9
Operation
1. About This Receiver ..................................................................10
Control Names and Operations .......................................................... 10
Panel Switches .................................................................................. 10
Turning the POWER ON or OFF ......................................................... 11
Power ON .......................................................................................... 11
Power OFF......................................................................................... 11
Switching Between the Audio and Navigation Screen ..................... 11
Turning the PND Display ON and OFF............................................... 11
Open and Close the device ................................................................. 11
Detaching/Attaching the PND ............................................................. 12
Using the PND ................................................................................... 12
How to Detach the PND from the Main Unit ...................................... 12
Attaching the PND ............................................................................. 12
Hands-Free Microphone and Light Sensor........................................ 13
Operation Conditions of this Receiver .............................................. 13
1TABLE OF CONTENTS

TACM2010_EN.book Page 2 Tuesday, October 5, 2010 3:44 PM
2 TABLE OF CONTENTS
2. Using TomTom Navigation........................................................14
Before you start ................................................................................... 14
Switching on....................................................................................... 14
Setting up........................................................................................... 14
Troubleshooting ................................................................................. 14
Improving reception ........................................................................... 15
Take care of your TomTom................................................................ 15
Light sensor ....................................................................................... 15
Making your first journey .................................................................... 16
Driving View ......................................................................................... 18
Main menu ......................................................................................... 18
TomTom Traffic.................................................................................... 19
Introducing TomTom HOME ............................................................... 19
Installing TomTom HOME.................................................................. 19
MyTomTom Account.......................................................................... 20
Discover more ...................................................................................... 20
TomTom Map Share
Help me!............................................................................................. 20
Hands-free calling .............................................................................. 20
Safety preferences............................................................................. 20
TM
...................................................................... 20

TACM2010_EN.book Page 3 Tuesday, October 5, 2010 3:44 PM
Audio Operations
1. Using the USB Music File Player..............................................21
Playing USB Music Files ..................................................................... 21
Connecting USB to USB connector and disconnecting
USB from USB connector .................................................................. 21
Selecting a Desired Music File ........................................................... 22
Finding a Desired Music File .............................................................. 22
Repeatedly Playing the Same Music File........................................... 23
Random Play of Music Files ............................................................... 23
About USB devices.............................................................................. 24
Playable USB Memory Standards ..................................................... 24
Playable MP3 File Standards............................................................. 24
ID3 Tags ............................................................................................ 24
Format of USB Memory ..................................................................... 24
How to operate portable audio devices
1. Using the iPod Player ................................................................25
Listening to the iPod ........................................................................... 25
Connecting iPod to iPod connector and disconnecting
iPod from iPod connector................................................................... 25
Selecting the Desired Music File ........................................................ 26
Finding a Desired Music File .............................................................. 26
About iPod software version .............................................................. 27
3TABLE OF CONTENTS
Reference
1. Troubleshoot ..............................................................................28
When You Think There Is a Malfunction ............................................ 28
2. Specifications.............................................................................30
3. PND Charging Information........................................................30

TACM2010_EN.book Page 4 Tuesday, October 5, 2010 3:44 PM
4 BEFORE USE
Introduction
Thank you for your purchase of the Navigation System. Please read this manual
carefully to ensure proper use.
The Navigation System is one of the most technologically advanced vehicle accessories ever
developed. The system receives satellite signals from the Global Positioning System (GPS)
operated by the U.S. Department of Defense. Using these signals and other vehicle sensors,
the system indicates your present position and assists in locating a desired destination.
The navigation system is designed to select efficient routes from your present starting location
to your destination. The system is also designed to direct you to a destination that is unfamiliar
to you in an efficient manner. Map database is made based on TomTom maps, whose
information source comes from Tele Atlas maps. The calculated routes may not be the shortest
nor the least traffic congested. Your own personal local knowledge or “short cut” may at times
be faster than the calculated routes.
The system will provide both a visual map and audio instructions. The audio instructions will
announce the distance remaining and the direction to turn in, approaching an intersection.
These voice instructions will help you keep your eyes on the road and are timed to provide
enough time to allow you to maneuver, change lanes or slow down.
Please be aware that all current vehicle navigation systems have certain limitations that
may affect their ability to perform properly. The accuracy of the vehicle’s position
depends on the satellite condition, road configuration, vehicle condition or other
circumstances.
© 2010 TOYOTA MOTOR CORPORATION
All rights reserved. This material may not be reproduced or copied, in whole or in part, without
the written permission of Toyota Motor Corporation.
© 2010 TOM TOM INTERNATIONAL B.V.
®
TomTom
owned by TomTom International B.V.
and the “two hands” logo are among the trademarks or registered trademarks
CAUTION
TACM2010_EN.book Page 5 Tuesday, October 5, 2010 3:44 PM
Safety Instruction
5BEFORE USE
To use this system in the safest possible
manner, follow all the safety tips shown
below.
This system is intended to assist in reaching
the destination and, if used properly, can do
so. The driver is solely responsible for the
safe operation of your vehicle and the safety
of your passengers.
Do not use any feature of this system to the
extent it becomes a distraction and prevents
safe driving. The first priority while driving
should always be the safe operation of the
vehicle. While driving, be sure to observe all
traffic regulations. Prior to the actual use of
this system, learn how to use it and become
thoroughly familiar with it. Read the entire
manual to make sure you understand the
system. Do not allow other people to use this
system until they have read and understood
the instructions in this manual.
For your safety, some functions may become
inoperable when driving.
● For safety the driver should not operate
the navigation system while he/she is
driving. Insufficient attention to the road
and traffic may cause an accident.
● While driving, be sure to obey the traffic
regulations and maintain awareness of
the road conditions. If a traffic sign on
the road has been changed, route
guidance may provide wrong
information such as the direction of a
one way street.
While driving, listen to the voice instructions
as much as possible and glance at the screen
briefly and only when it is safe. However, do
not totally rely on voice guidance. Use it just
for reference. If the system cannot determine
the current vehicle position correctly, there is
a possibility of incorrect, late, or non-voice
guidance.
The data in the system may occasionally be
incomplete. Road conditions, including
driving restrictions (no left turns, street
closures, etc.) frequently change. Therefore,
before following any instruction from the
system, look to see whether the instruction
can be done safely and legally.
This system cannot warn about such things
as the safety of an area, condition of streets,
and availability of emergency services. If
unsure about the safety of an area, do not
drive into it. Under no circumstances is this
system a substitute for the driver’s
personal judgement.
Use this system only in locations where it is
legal to do so. Some countries/provinces may
have laws prohibiting the use of audio and
navigation screens next to the driver.
TACM2010_EN.book Page 6 Tuesday, October 5, 2010 3:44 PM
6 BEFORE USE
Warnings
■ Limitations of the navigation system
This navigation system calculates the current
vehicle position using satellite signals,
various vehicle signals, map data, etc.
However, the accurate position may not be
shown depending on the satellite condition,
road configuration, vehicle condition or other
circumstances.
The Global Positioning System (GPS)
developed and operated by the U.S.
Department of Defense provides an accurate
current vehicle position, normally using 4 or
more satellites, and in some cases 3
satellites. The GPS system has a certain
level of inaccuracy. While the navigation
system will compensate for this most of the
time, occasional positioning errors of up to
100 m (300 feet) can and should be
expected. Generally, position errors will be
corrected within a few seconds.
When your vehicle is receiving signals from
the satellites, the blocked bar marks appear
at the bottom right of the screen.
The GPS signal may be physically
obstructed, leading to inaccurate vehicle
position on the map display. Tunnels, tall
buildings, trucks, or even the placement of
objects on the instrument panel may obstruct
the GPS signals.
The GPS satellites may not send signals due
to repairs or improvements being made to
them.
Even when the navigation system is receiving
clear GPS signals, the vehicle position may
not be shown accurately or inappropriate
route guidance may occur in some cases.
NOTICE
The installation of window tinting may
obstruct the GPS signals. Most window
tinting contains some metallic content that
will interfere with GPS signal reception. We
advise against the use of window tinting on
vehicles equipped with navigation systems.
WARNING
TACM2010_EN.book Page 7 Tuesday, October 5, 2010 3:44 PM
Safety precautions
● Do not modify this system for any uses other than that specified herein. Toyota will not be held
liable for damages including, but not limited to serious injury, death or property damage
resulting from installations that enable unintended operation.
● When the vehicle is in motion, never take your eyes off the road to make adjustments to the
main unit. You must pay attention to the road at all times to avoid accidents; do not let operation
or adjustment of the main unit distract you from operating the vehicle responsibly.
● The driver should not look at the screen while driving. Doing so may result in as accident.
● Do not place foreign objects in iPod or USB input terminal. Fires or shocks may result.
● Do not disassemble or alter this main unit. Doing so may result in an accident, fire or shock.
● Do not let water or foreign objects enter the internal parts of this main unit. Doing so may result
in smoke, fire or shock.
● Do not use when main unit is malfunctioning (the screen is not lit or no sound comes out). Doing
so may result in an accident, fire or shock.
● Always replace fuses with fuses of identical capacity and characteristics. Never use a fuse with
a higher capacity than the original fuse. Using the wrong type of fuse may cause a fire or severe
damage.
● If foreign objects or water enters the main unit, smoke or a strange odor may be emitted. If this
occurs, stop using the main unit immediately and contact your authorized repairer. Accidents,
fire, or shocks may result if you continue to use the main unit under these conditions.
● The driver should not change iPod or USB memory while driving. Doing so may result in as
accident. You must first stop or park your car in a safe location and then proceed to remove or
insert iPod and/or USB.
● Keep volume to a reasonable level so that you can hear sounds from outside the vehicle,
including warning sounds, voices, and sirens. Failure to do so may cause an accident.
● Be careful that your hands and fingers do not get pinched when closing the cover. Injuries may
result.
● Do not put your hands or fingers into the iPod or USB input terminal. Injuries may result.
● The volume should be set at a moderate level to avoid hearing damage when the main unit is
powered on.
● Do not operate when sound such as distortion is being emitted.
● This main unit uses invisible laser light. Do not disassemble or alter this main unit. If any
problems occur, contact the authorized repairer where you purchased the main unit.
● Altering this main unit may cause exposure to laser emissions (which may damage your
eyesight), or result in an accident, fire or shocks.
● If the main unit is dropped or the cosmetics appear broken, turn off the power to the main unit
and contact your authorized repairer. If used in this condition, fires or shocks may result.
7BEFORE USE
TACM2010_EN.book Page 8 Tuesday, October 5, 2010 3:44 PM
8 BEFORE USE
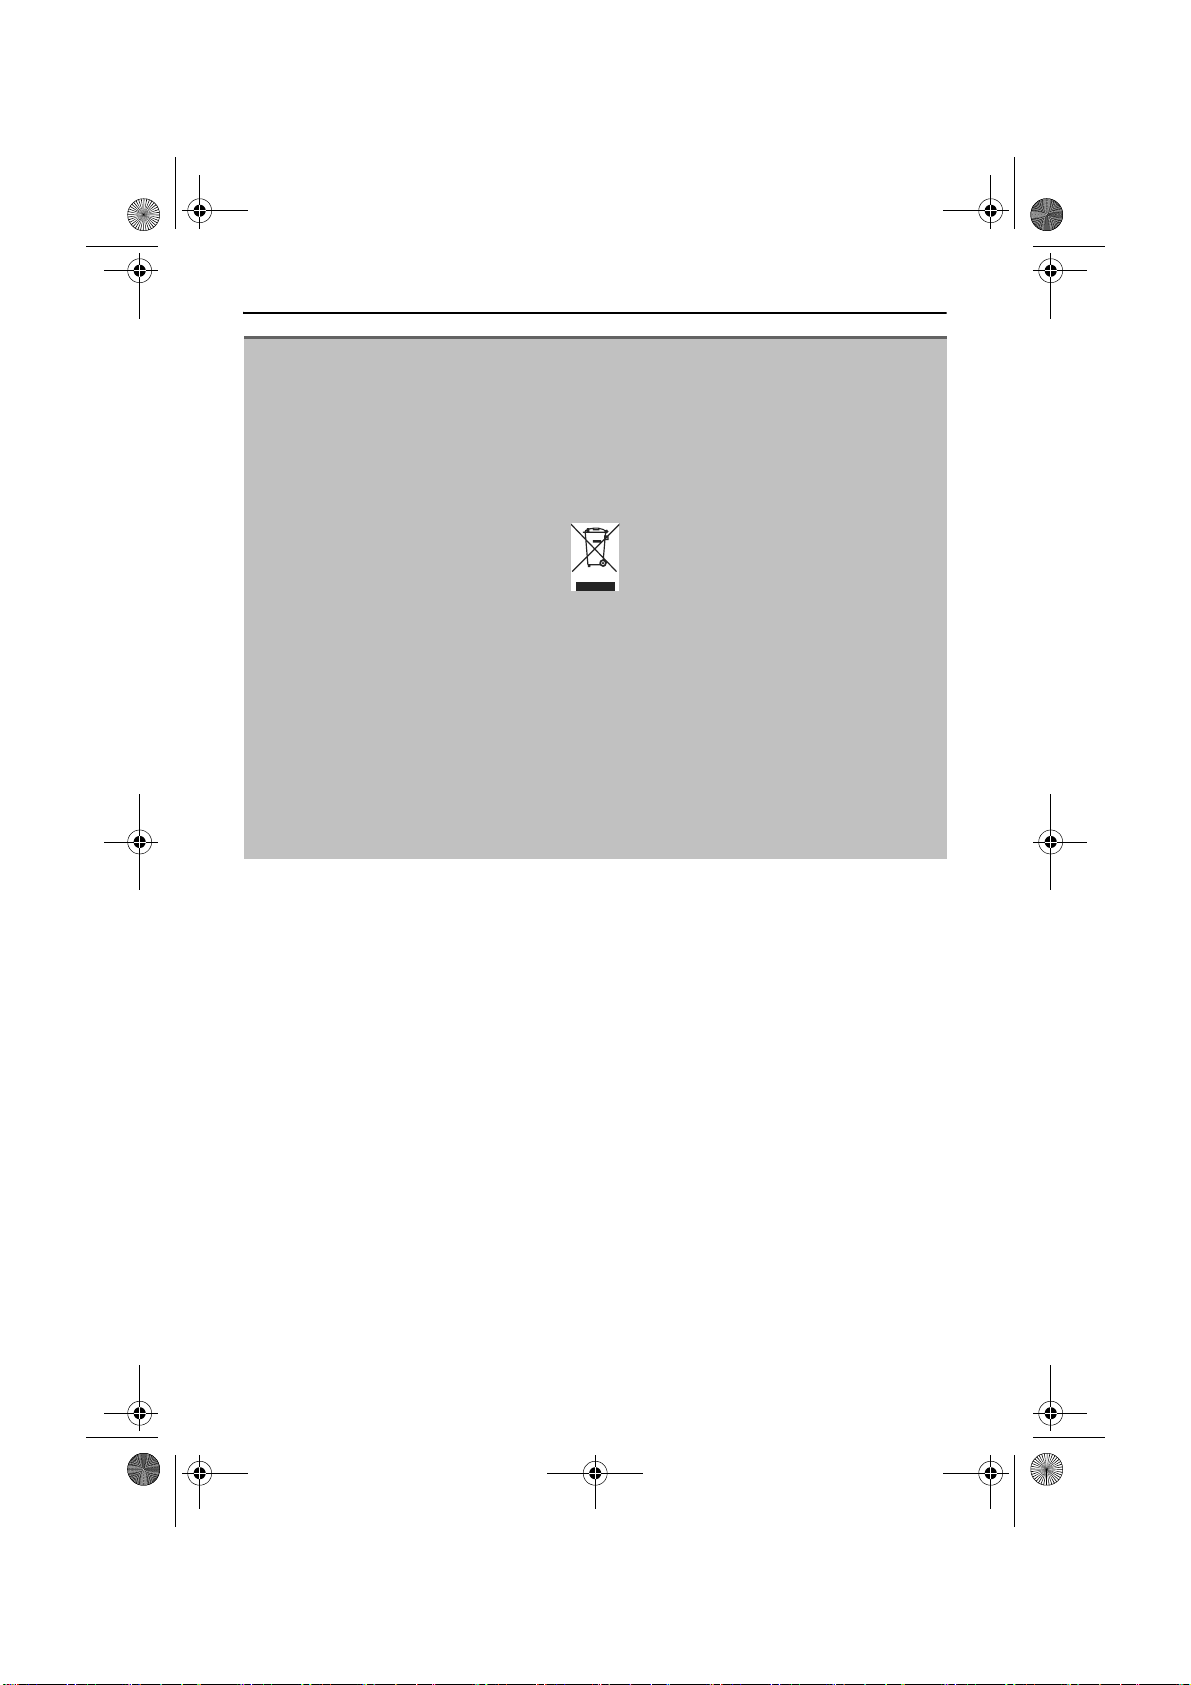
● In accordance with the European Directive 2002/96/EC (for Waste Electric and Electronic
Equipment=WEEE), this product, which is labeled with a crossed-out wheeled bin, may not be
disposed of with household waste in member states of the EU.
WEEE: Waste Electrical and Electronic Equipment
When disposing of this product in an EU member state, dispose of it properly in accordance
with the laws of that state, for example by returning it to the distributor.
WEEE has potential effects on the environment and human health as a result of the presence
of hazardous substances. You can help to eliminate these effects and to enhance reuse/
recycling/ other forms of recovery by your cooperation.
● If using this receiver immediately after having purchased it or after having stored it
disconnected from the vehicle battery, the present location may not be displayed accurately.
Wait a short while and the GPS positioning will correct the displayed position.
● This device is a precision-engineered equipment and the information that you record on it after
purchase can be lost as a result of static electricity, electrical noise, vibration and other
influences. It is recommended that you keep a separate record of the information you store in
the main unit.
● Note that the following events are not covered by the warranty.
➀ Corruption or loss of the data resulting from failure or incorrect operation of the unit, or any
problems associated with it, or due to the effects of electrical noise or other influences.
➁ Corruption of loss of the data resulting from misuse of the unit by the purchaser or a
third party.
CAUTION
TACM2010_EN.book Page 9 Tuesday, October 5, 2010 3:44 PM
Before use
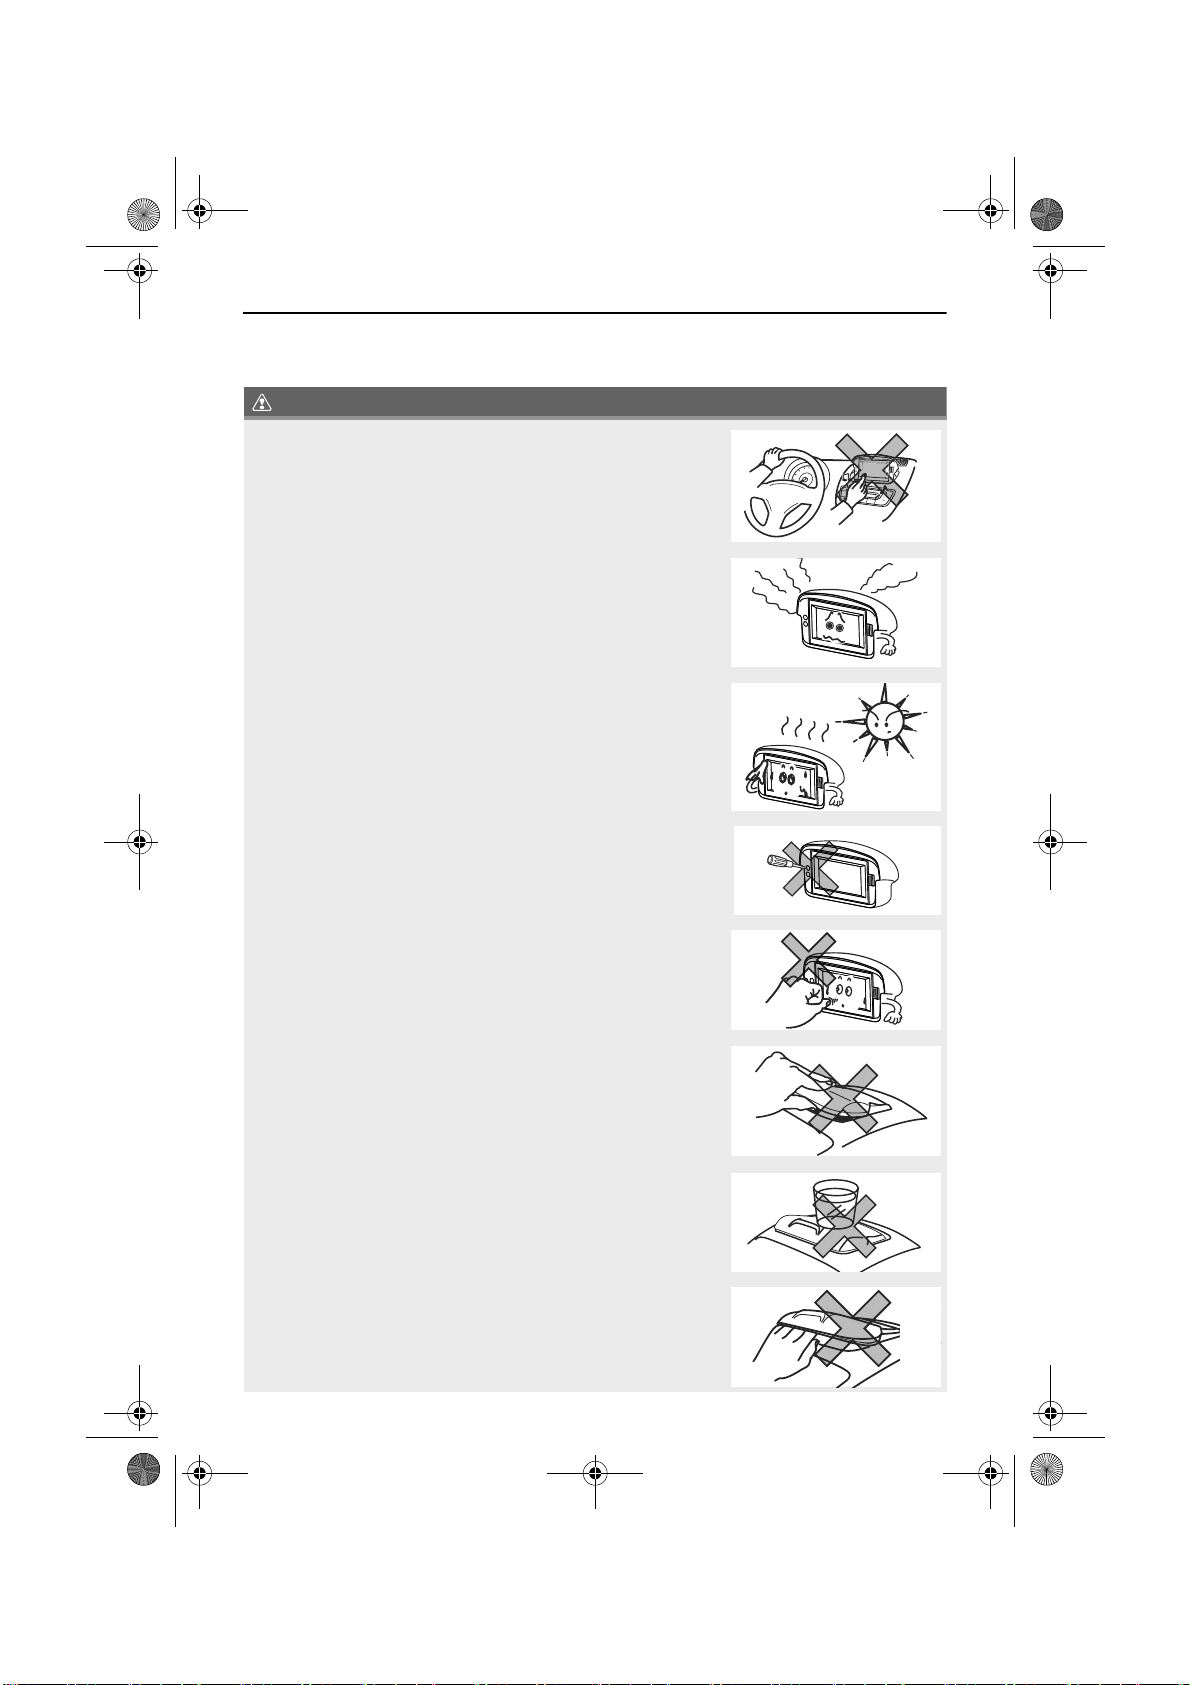
● Be very careful and pay full attention to safety when operating
the audio and the navigation controls while driving. Otherwise
accidents may occur. Also, be sure to set the volume so that
you can still adequately hear sounds outside the vehicle.
Improper use may result in a traffic accident.
● Never continue to use the system if it is malfunctioning in any
way. If smoke, abnormal noises or abnormal odors are noticed,
turn off the power immediately. Immediately turn off the audio in
such situations.
Exercise caution regarding the temperature inside the vehicle.
● The temperature inside the vehicle can increase during hot
weather.
Wait for the temperature inside the vehicle to drop before using
this receiver.
Otherwise damage may result.
9BEFORE USE
● Do not disassemble or modify this receiver.
The main unit has a precisely designed structure, so consult
your authorized repairer in the event any unsatisfactory
performance is observed.
● Do not apply excessive force to the monitor.
Otherwise damage may result.
● Do not apply excessive force to open and close the dock.
Otherwise damage may result.
● Do not leave any objects on the closed dock.
● Be careful not to get your fingers or other objects caught.
Interference can cause an injury or damage the main unit.

IMPORTANT
CD / AUX
SCAN
DISC
1
2
3
4
5
6
AUX
TA
PTY
TUNE
TRACK
AF
AM / FM
AST
RPT RAND
AUDIO CONT
H
M
CLOCK
VOL
SCR
MODE
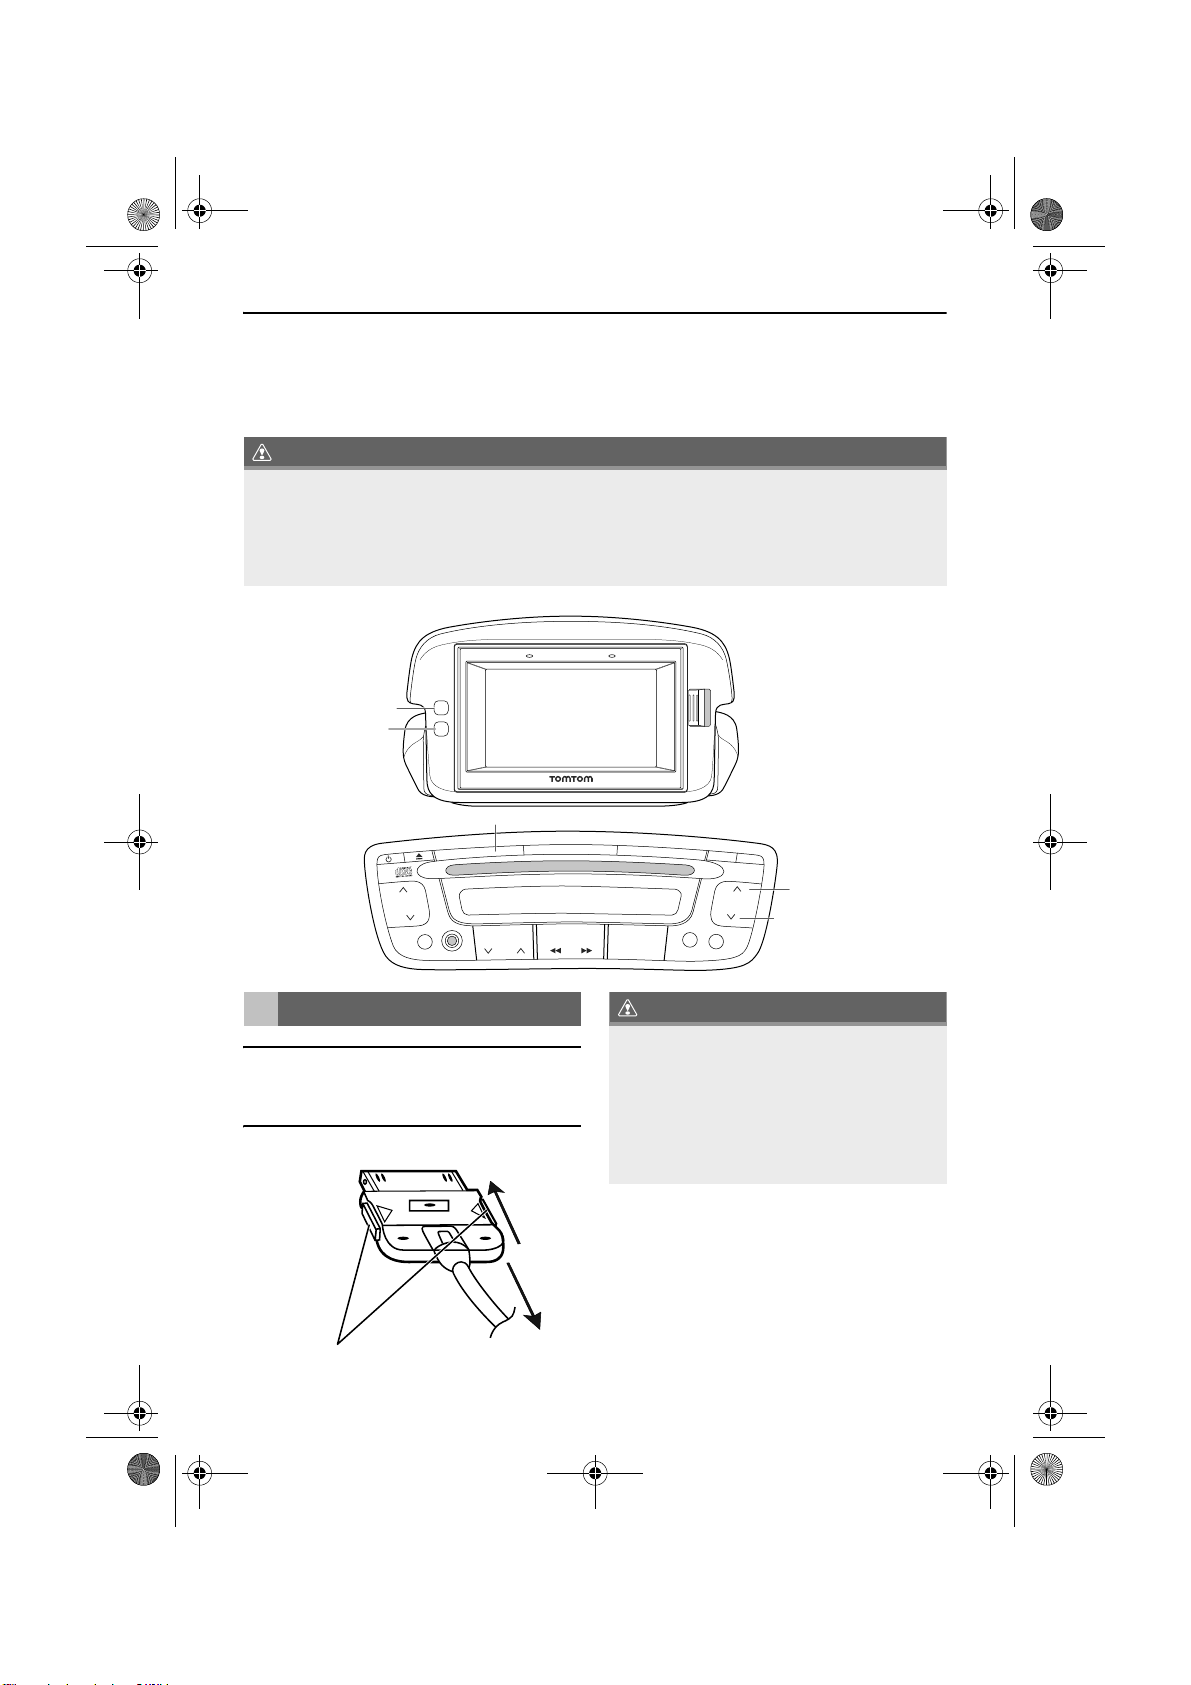
Microphone Light sensor
PND display
TACM2010_EN.book Page 10 Tuesday, October 5, 2010 3:44 PM
10 OPERATION
About This Receiver
Control Names and Operations
You can operate this receiver by pressing the panel buttons (panel switches) or by touching the
switches displayed on the screen (touch switches).
● During traffic announcement, [MODE] and [SCR] buttons are deactivated.
■ Panel Switches
Press each panel switch to operate it.
1 [MODE] button Switches SOURCE between iPod and USB.
2
[ ] button
3
[VOL] and
4 [SCR] button
5
[TUNE TRACK] and
Turns RADIO ON or OFF.
Adjusts volume. Please see specifications in the Aygo Owners Manual.
Switches between the NAVI screen and AUDIO screen only when USB
or iPod mode is selected.
Selects iPod and USB tracks.
6 [CD/AUX] button Switches to music mode for iPod or USB.
7 Release button Removes the right side of the PND from the main unit.

WARNING
IMPORTANT
TACM2010_EN.book Page 11 Tuesday, October 5, 2010 3:44 PM
11OPERATION
Turning the POWER ON or OFF
● When the main unit's power is turned on
for the first time or if the battery terminals
have been disconnected, e.g. for vehicle
maintenance, and the power is then turned
back on, the audio will start up in the FM
mode.
When the audio is turned off, the navigation
screen is displayed continuously as long as it
is selected.
■ Power ON
Make sure that Dock is open.
When the vehicle power is OFF, press [ ]
button.*
●The power will come ON.
When the vehicle power is ON.
●The power will come ON.
■ Power OFF
●When dock is closed
●When vehicle is off
* Please see Aygo Owners Manual how to turn on
or off audio.
Switching Between the Audio and Navigation Screen
After USB/iPod is detected by the system,
each time you press the [SCR] button, the
display switches between the NAVIGATION
and AUDIO screens.
Turning the PND Display ON and OFF
You can close PND display by closing the
dock. When you open dock, PND will restart.
Open and Close the device
You can open and close the dock as shown
below.

ATTENTION
IMPORTANT
IMPORTANT
TACM2010_EN.book Page 12 Tuesday, October 5, 2010 3:44 PM
12 OPERATION
Detaching/Attaching the PND
■ Using the PND
The navigation function can also be used
even if the PND is detached from the main
unit.
For details on using PND, please see Using
TomTom Navigation chapter.
■ How to Detach the PND from the Main Unit
● When detaching the PND, take care NOT
to touch its rear side.
● When detaching PND, make sure that
PND does not fall down.
● In case PND is detached while listening
USB/iPod, radio will select previously
selected radio mode.
■ Attaching the PND
● When attaching the PND, do not press the
monitor display.
● If the PND gets wet, do not attach it to the
main unit.
Latch the left-hand side of PND to this
1
receiver.
● Engage the catch at the left end of the
PND with the lock on the main unit.
Attach the PND to this receiver.
2
● Press the right-hand side of PND until it
clicks in position.
Press the Release button.
1
● The right-hand side of PND will be
unlatched from this receiver.
Remove the PND.
2
● Hold the PND on the right side, lift up and
pull it toward you to remove it.

IMPORTANT
Microphone Light sensor
TACM2010_EN.book Page 13 Tuesday, October 5, 2010 3:44 PM
13OPERATION
Hands-Free Microphone and Light Sensor
The PND is equipped with a built-in handsfree microphone and a light sensor. For
details on how to use the hands-free call
function or configure light sensor settings,
refer to the Using TomTom Navigation
chapter.
● Pressing a sharp object against the handsfree microphone or the light sensor may
damage them.
● Keep your phone in a distance to avoid
interference noise.
Operation Conditions of this Receiver
You can or cannot operate this receiver in the
following conditions.
Below table already asumes that PND is
docked. Without PND, none of the features
will function.
TomTom device in docked condition.
Cover Key Radio Screen
Closed OFF OFF
Closed OFF ON
Closed ON OFF
Closed ON ON
Open OFF OFF
Open ON OFF
Open OFF ON
Open ON ON
* Navigation only
When screen is OFF, neither navigation,
USB nor iPod will function.
→
→
→
→
→
→
→
→
OFF
OFF
OFF
OFF
OFF
ON*
ON
ON

IMPORTANT
Reset
On/Off
button
TACM2010_EN.book Page 14 Tuesday, October 5, 2010 3:44 PM
14 OPERATION
Using TomTom Navigation
Before you start
■ Switching on
Your TomTom can be used without docking it
in dock. A mount is available as an accessory
so that you can use your TomTom in other
cars.
The first time you switch on your TomTom, it
may take up to 20 seconds to start. To switch
off your TomTom when it is not connected to
dock, press and hold the On/Off button for 2
seconds.
■ Setting up
To set up your navigation device, you need to
answer a few questions by tapping the
screen.
● Take care to select the correct language,
since the language you choose will be
used for all menus and written instructions.
■ Troubleshooting
Always make sure that you are using the
latest version of the TomTom application on
your TomTom. You can update the
application using TomTom HOME.
If you have problems turning on your
TomTom, try resetting your TomTom.
To reset your TomTom, use a straightened
paper clip, or something similar, to push the
reset button. The reset button is on the
bottom of your TomTom. Then turn your
TomTom on.

WARNING
IMPORTANT
TACM2010_EN.book Page 15 Tuesday, October 5, 2010 3:44 PM
15OPERATION
■ Improving reception
If your TomTom takes longer than 5 minutes
to find your current position, make sure that
the device is in an open space away from tall
objects, such as buildings or trees.
When you connect your TomTom to your
computer, you can use TomTom HOME to
download information about GPS satellite
positions during the next 7 days. This helps
your TomTom to find your position faster.
● The first time you switch on your TomTom,
it may take more than 5 minutes to find
your position.
■ Take care of your TomTom
Never leave your TomTom or accessories on
view when you leave the car or they may
become an easy target for thieves.
You can set a password for your TomTom
which must be entered every time you start
your TomTom.
It is important to take care of your TomTom.
● Your TomTom is not designed for use in
extreme temperatures and any such
exposure may cause permanent damage.
● Do not open the casing of your TomTom
under any circumstances. Doing so may
be dangerous and will invalidate the
warranty.
● Wipe or dry the screen of your TomTom
using a soft cloth. Do not use any liquid
cleaners.
■ Light sensor
Your TomTom uses a light sensor to detect
the background light level and can
automatically adjusts the brightness of the
screen and switch to night view.
To use the light sensor to make these
changes, tap Brightness preferences in the
Preferences menu. You can then select
these options:
● Turn brightness down when dark
● Switch to night view when dark
● Link night view to headlights is not
supported by this unit.

IMPORTANT
TACM2010_EN.book Page 16 Tuesday, October 5, 2010 3:44 PM
16 OPERATION
Making your first journey
Planning a route with your TomTom is easy.
To plan your first route, follow the steps
below.
● You should always plan your journey
before you start driving. It is dangerous to
plan a route while driving.
Tap the screen to bring up the Main
1
Menu.
Note: The buttons on your TomTom are
shown in full colour unless a button is
currently unavailable. For example, the
button named Find alternative... in the Main
Menu is not available until you have planned
a route.
Tap Navigate to...
2
Tap Address.
3
In this example, we will enter an exact
address.
Tap Street and house number.
4
Note: When planning a trip for the first time
your TomTom asks you to choose a country.
Your choice is saved and used for all routes
you plan.
You can change this setting at any time by
tapping the country flag.

TACM2010_EN.book Page 17 Tuesday, October 5, 2010 3:44 PM
Start to type the name of the town
5
where you want to go. Tap the name
when it is shown in the list.
TIP
"
● Instead of typing the name, tap this button
to say the address by speaking to your
TomTom.
Start to type the name of the street and
6
select it when it is shown.
Now enter the house number of your
7
destination and then tap Done.
Your TomTom asks if you need to
8
arrive at a particular time. For this
exercise, tap NO.
The route is calculated by your
TomTom.
17OPERATION
When the route has been calculated,
9
tap Done.
Your TomTom will immediately begin to
guide you to your destination, using both
spoken instructions and on-screen directions.

TACM2010_EN.book Page 18 Tuesday, October 5, 2010 3:44 PM
18 OPERATION
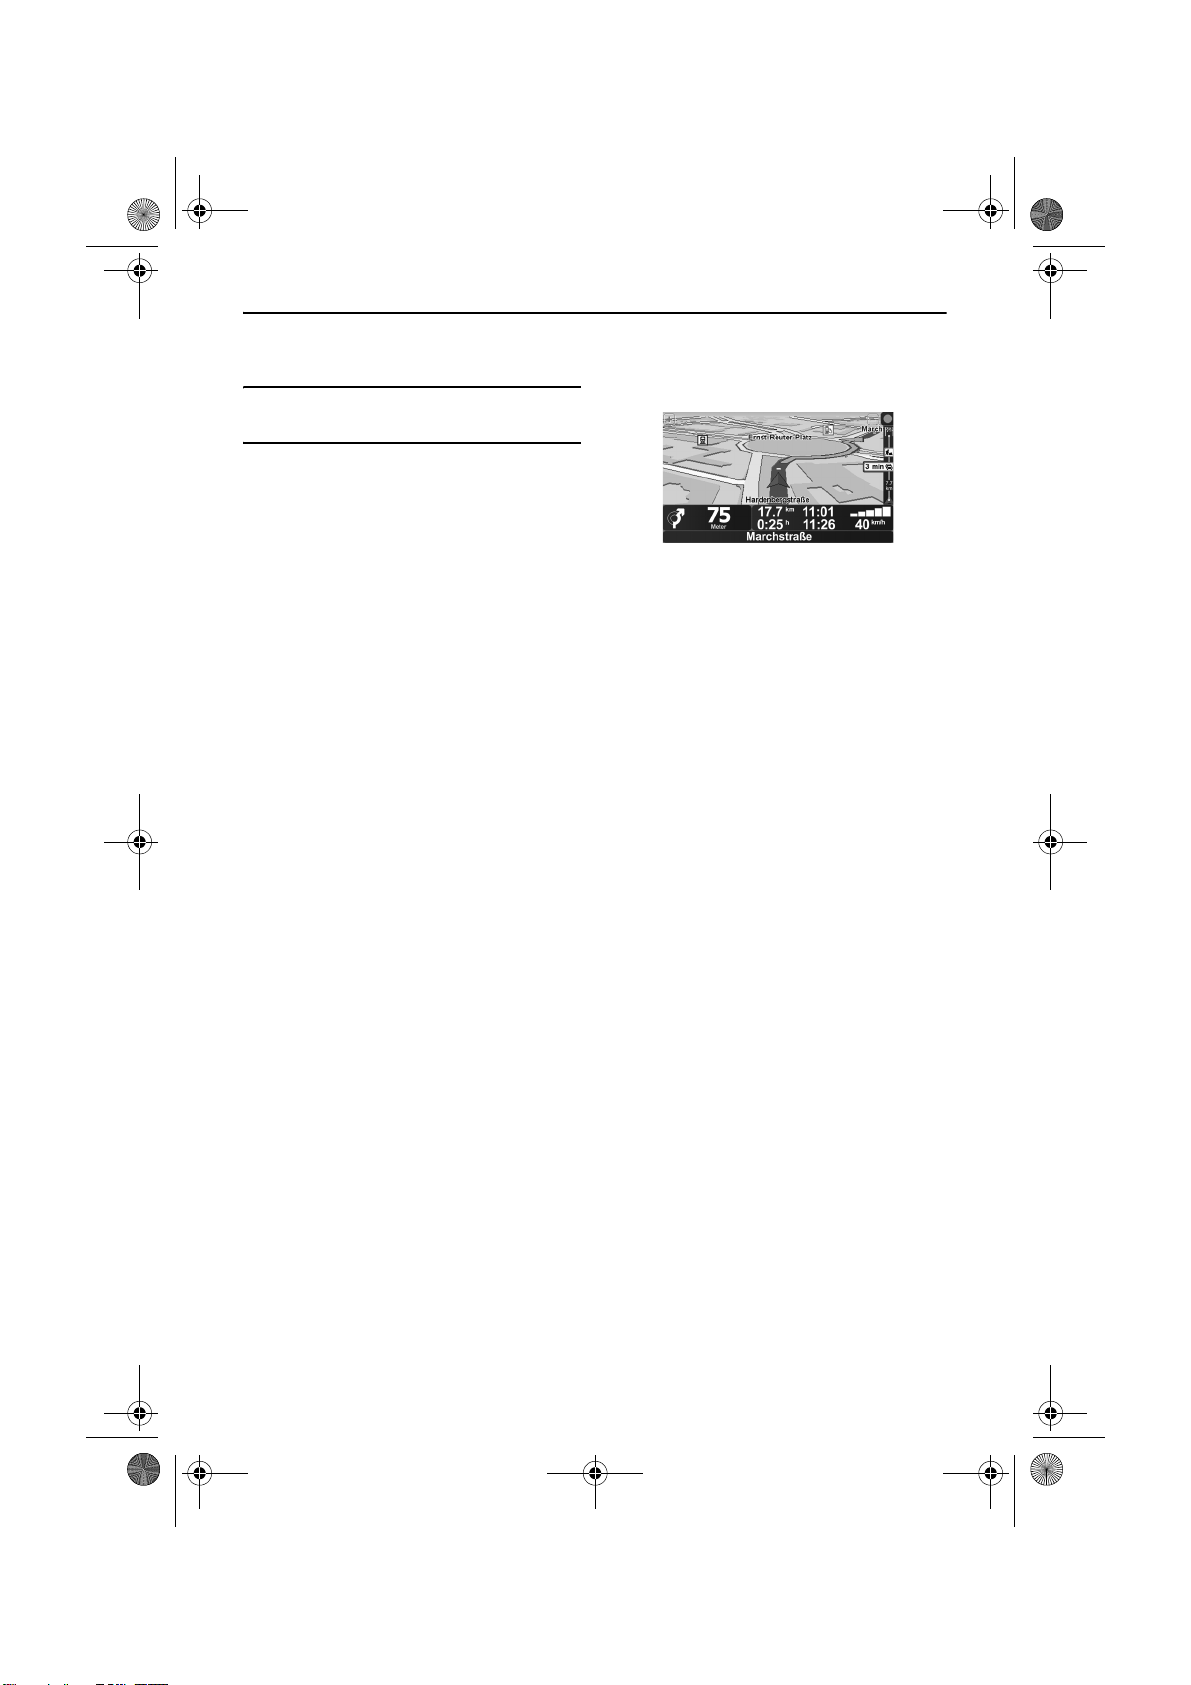
Driving View
When your TomTom starts, you are shown
the Driving View along with detailed
information about your current location.
Tap the centre of the screen at any time to
open the Main Menu.
Note: The Driving View is shown in black and
white until your TomTom locates your current
position.
Ⓐ Tap + and - to zoom in and out.
Ⓑ Quick menu - switch this on in the
Preferences menu.
Ⓒ Your current position.
Ⓓ The name of the next major road or road
sign information, if applicable.
Ⓔ Traffic bar - traffic information is available
from TomTom Traffic. TomTom Traffic
requires a Bluetooth
phone.
For more information about how to
subscribe to and receive TomTom Traffic,
go to tomtom.com/services.
To set up traffic information, tap
TomTom Traffic in the Main Menu.
Ⓕ Navigation instruction for the road ahead.
Tap this area to repeat the last spoken
instruction and to change the volume.
Ⓖ The name of the street you are on.
®
-enabled mobile
Ⓗ Information about your journey such as
journey time, remaining distance and
arrival time.
To change the information shown, tap
Status bar preferences in the
Preferences menu.
Ⓘ GPS signal strength.
■ Main menu
Tap the screen at any time when TomTom
displays the Driving View to open the Main
Menu.
● Navigate to...
Tap this button to start planning a route.
● Find alternative...
Tap this button if you want to avoid part of
your route, travel via a specific location or
calculate an alternative route.
● Help me!
Help me! provides an easy way for you to
find and contact emergency service
centres and other specialist services.
● Mobile phone
This button opens the mobile phone menu.
You can, for example, make calls, and
write or read messages.
● Change preferences
This button opens the Preferences menu.
You can change many things about the
way TomTom looks and behaves.

TACM2010_EN.book Page 19 Tuesday, October 5, 2010 3:44 PM
Hidden buttons and features
● When you first start using your TomTom,
not all the buttons will be shown in the
menu.
● Many buttons and some more advanced
features are hidden because you will not
need these features very often.
● To show all buttons and features, tap
Show ALL menu options in the
Preferences menu.
● To hide these buttons again, tap Show
fewer menu options in the Preferences
menu.
TomTom Traffic
TomTom Traffic is a TomTom Service,
available as a subscription, for receiving upto-date traffic information from the best local
sources.
Note: TomTom Traffic is not available in all
countries or areas. Go to tomtom.com/
services to check availability in your country.
To use TomTom Traffic, you will need to
establish a wireless data connection (GPRS,
EDGE, UMTS, CDMA) between your
TomTom device and a Bluetooth enabled
mobile phone and you must have a wireless
data subscription with your mobile network
operator. For more information, go to
tomtom.com/phones
To use TomTom Traffic, do the following:
Tap TomTom Traffic in the Main
1
Menu.
You will be prompted to set up a wireless
data connection with your mobile phone, and
then to enter your MyTomTom account
details.
Tap Enable Traffic.
2
19OPERATION
Introducing TomTom HOME
TomTom HOME is a free application for your
computer that helps you manage the
contents of your TomTom device. Connect to
HOME frequently to get the latest updates for
your device.
TIP
"
● To get the most from HOME, we
recommend using a broadband internet
connection.
■ Installing TomTom HOME
To install TomTom HOME on your computer,
do the following:
Connect your computer to the internet.
1
Connect your device to your computer
2
using a USB cable, then switch your
device on.
HOME starts to install.
Note: If HOME does not install automatically,
you can also download it from tomtom.com/
home
Once installed, TomTom HOME starts
automatically when you connect your device
to your computer and turn it on.

TACM2010_EN.book Page 20 Tuesday, October 5, 2010 3:44 PM
20 OPERATION
■ MyTomTom Account
In order to buy content and services through
TomTom HOME you will have to set up a
MyTomTom account for the device you want
to buy the content for. You will be asked to
create an account when you start using
TomTom HOME.
Discover more
■ TomTom Map ShareTM
Tap Map corrections to change
the map on your TomTom, for
example:
● Block and unblock streets.
● Change the traffic direction of a one-way
street.
● Add or change a street name.
With TomTom HOME you can join the
TomTom Map Share community to share
your corrections and use map corrections
made by others.
Note: TomTom Map Share is not available in
all regions. For more information, go to
tomtom.com/ mapshare
■ Hands-free calling
If you have a mobile phone
with Bluetooth, you can use
your TomTom to make phone
calls and send and receive
messages.
To establish a connection between your
mobile phone and your TomTom, tap Mobile
phone in the Main Menu, then follow the
instructions on the screen.
For a list of supported phones, go to
tomtom.com/phones.
■ Safety preferences
Take a look at the safety
preferences. These will help
you enjoy using your TomTom
while you concentrate on
driving safely.
We strongly recommend that you consider
using the Safety preferences which can be
found in the Preferences menu.
■ Help me!
Help me! provides an easy way
for you to find and contact
emergency service centres and
other specialist services.
Help me! also includes a selection of useful
documents covering topics such as First Aid
and car maintenance.

IMPORTANT
CAUTION
TACM2010_EN.book Page 21 Tuesday, October 5, 2010 3:44 PM
Using the USB Music File Player
This receiver can play a music file stored in a USB memory. This receiver can play MP3 files
only.
You can play a music file in USB memory only when the PND and USB memory are attached to
this receiver and when the radio is on.
21AUDIO OPERATIONS
VOL
SCAN
MODE
SCR
CD / AUX
AUX
MODE
SCR
Volume UP
Volume DOWN
Playing USB Music Files
■ Connecting USB to USB connector and disconnecting USB from USB connector
1
CD/AUX
DISC
AM / FM
3
2
4
5
RPT RAND
AST
6
PTY
AUDIO CONT
TA
TUNE
TRACK
CLOCK
AF
H
M
Track UP
Track DOWN
● After connecting the USB memory (while a
message “Don't remove the storage
device until scanning is finished” is
displayed), do not turn off the power or
remove the PND/USB memory. Before
removing the USB memory, switch the
display to the audio screen and touch
.

IMPORTANT
CAUTION
Find
Select
TACM2010_EN.book Page 22 Tuesday, October 5, 2010 3:44 PM
22 AUDIO OPERATIONS
● When a USB memory device is attached,
the receiver may take a time to scan and
read the file tag information. To shorten
this scan time, try to store only MP3 files in
the USB memory and to reduce the
number of folders in the USB memory.
● Please wait until all of the songs are
detected to select USB mode.
● After engine start, radio will select the
previously selected radio mode.
● You cannot connect a USB portable audio
player/USB memory to this unit via a USB
hub. Not all multimedia portable devices
are compatible.
● Navigation instructions mute all speakers.
Connect the USB memory to the USB
1
connector.
Selecting a Desired Music File
You can select a track you want to play.
Press the [TRACK ] or [TRACK ]
1
button.
● Track Up:
Advances to the next file.
● Track Down:
Returns to the previous file.
● The selected track (file) will be played.
Finding a Desired Music File
Press [CD/AUX] button on Radio to
2
select audio mode. Radio will select
audio mode after CD and/or AUX
depending on their connectivity.
Press [MODE] button on the dock to
3
toggle between USB and iPod if both
of them are connected.
● Playback will begin.
● Before disconnecting the USB memory
from this receiver, always switch the
display to the audio mode screen and
touch . Loss of data may result if this
procedure is not followed.
● If you disconnect the USB memory or the
PND from this receiver when a music file of
USB memory is being played, the radio
returns to the previous operation mode.
● For your safety you are advised not to
operate the , , and
buttons when your car is running.
Touch .
1

Album
Genre
Repeat song
Repeat song
Preferences
Shuffle songs
Shuffle songs
TACM2010_EN.book Page 23 Tuesday, October 5, 2010 3:44 PM
23AUDIO OPERATIONS
To select a track to play, touch
Playlist Artist
2
or .
● This displays the list screen of the selected
mode.
Touch the name of the music file to be
3
played.
● This plays the selected music file.
● When or appears, touch them
to change the page of the music file list.
● You can search for a file or artist name by
touching .
, , , ,
Find
Song
Repeatedly Playing the Same Music File
Preferences
Touch .
1
Touch .
2
● This repeatedly plays the currently played
music file.
● Once you touch , the
selected music file will be repeated until
the repeat function is released. Touch
repeat play.
Repeat song
again to cancel the
Random Play of Music Files
Touch .
1
● You can search for a music file by entering
alphanumeric characters.
Shuffle songs
Touch .
2
● Once you touch , the
random play continues until you cancel it.
Touch again to cancel
the random play.

A total of 2000
files can be
created within
a single USB
memory.
Files aside from
MP3 files
(Example:
004.txt)
are included in
the 2000 files.
001.mp3
005.mp3
004.txt
003.mp3
002.mp3
1498.mp3
2000.mp3
1499.mp3
TACM2010_EN.book Page 24 Tuesday, October 5, 2010 3:44 PM
24 AUDIO OPERATIONS
About USB devices
■ Playable USB Memory Standards
● Supported USB devices:
Max storage size: 4 GB
● Supported file format:
FAT 16/32
● Supported audio format:
MP3
● Maximum current:
500mA
● Compatibility:
USB 1.0/1.1 (The MAX transfer rate is 12M
bps for USB1.1.)
● Mass memory support:
USB mass storage (such as an externally
attached HDD) is not supported.
■ Playable MP3 File Standards
● Supported standards:
MPEG-1, MPEG-2, and MPEG-2.5
● Supported sampling frequencies:
MPEG-1: 32, 44.1, 48
MPEG-2: 16, 22.05, 24
MPEG-2.5: 8, 11.025, 12
● Supported bit rates:
8 to 320K bps
* Supported VBR (64 to 320K bps)
* Does not support free format.
● Supported channel modes:
Monaural, Stereo, Joint Stereo, DualChannel
■ ID3 Tags
MP3 files have an “ID3 Tag” that allows input
of information so that data such as a track
title and artist can be saved.
This receiver supports ID3v. 1.0, 1.1, 2.2, 2.3
and 2.4.
■ Format of USB Memory
The following explains the definitions of these
standards.
● Maximum directory layers:
8 layers
● Maximum characters for file names:
Up to 254 characters (Total of folder name,
file name, “.”, and 3-character file
extension)
● File name characters that you can use:
A to Z, 0 to 9, and underscore (_)
● Max number of files that can be stored in a
single memory:
2000 files
IMPORTANT
CAUTION
When disconnecting the iPod connector, grasp
the connector firmly and pull it towards you.
Connect directly to iPod.
TACM2010_EN.book Page 25 Tuesday, October 5, 2010 3:44 PM
Using the iPod Player
This receiver can play iPod music. By using it, you can perform operations, for example,
selecting a track from the list or changing to the random playback mode.
● You can play a music file on the iPod only when the PND and iPod are attached to this receiver
and when the radio is on.
● For details on the iPod functions, refer to the iPod operation manual.
● iPod video is not supported by this system.
● iPod is a trademark of Apple Inc., registered in the U.S. and other countries.
25HOW TO OPERATE PORTABLE AUDIO DEVICES
VOL
SCAN
MODE
SCR
CD / AUX
AUX
1
MODE
SCR
Listening to the iPod
■ Connecting iPod to iPod connector and disconnecting iPod from iPod connector
CD/AUX
DISC
AM / FM
3
2
4
5
RPT RAND
AST
6
TA
AF
Track UP
H
TUNE
TRACK
M
PTY
AUDIO CONT
Track DOWN
CLOCK
● Disconnect headphones and other
accessories from the iPod before
connecting it to this receiver. Failure to do
so may make it impossible to operate the
iPod from this receiver.
● If the iPod's equalizer has been preset,
sound output may be distorted when it is
connected to the connection cable.

IMPORTANT
CAUTION
Select
Artist
Album
Song
TACM2010_EN.book Page 26 Tuesday, October 5, 2010 3:44 PM
26 HOW TO OPERATE PORTABLE AUDIO DEVICES
● Track Down:
● When you attach your iPod, the music
restarts from the stopped position. If you
switched the power ON/OFF or if you
detached the PND, the music restarts from
the stopped position.
● The iPod will begin playing the music file it
was playing before it was connected. If the
receiver cannot detect the music file that
was playing previously, it will begin playing
from the first music file.
● When a iPod is attached, the receiver may
take a time to scan and read the file tag
information. Please wait until all of the
songs are detected to select iPod mode.
● After engine start, radio will select the
previously selected radio mode.
● Navigation instructions mute left speaker.
Connect iPod to the iPod connector.
1
If pressed once:
Returns to the beginning of the file being
played.
If pressed twice:
Returns to the previous file.
Finding a Desired Music File
If the iPod or PND is disconnected from this
receiver while playing a music file on the
iPod, you will return to the previously
selected radio mode.
Touch .
1
Press [CD/AUX] button on Radio to
2
select audio mode. Radio will select
audio mode after CD and/or AUX
depending on their connectivity.
Press [MODE] button on the dock to
3
toggle between USB and iPod if both
of them are connected.
● Playback will begin.
Selecting the Desired Music File
You can select a desired song or video.
Press the [TRACK ] or [TRACK ]
1
button.
● Track Up:
Advances to the next file.
To select a track or program to play,
2
● This displays the list screen of the selected
mode.
3
● This plays the selected music file.
● When or appears, touch them
to change the page of the music file list.
● You can search for a file or artist name by
touching .
Playlist
touch , , ,
Genre Audio books
, , or .
Touch the name of the music file to be
played.
Find

TACM2010_EN.book Page 27 Tuesday, October 5, 2010 3:44 PM
● For your safety you are advised not to
operate the , , and
Find
buttons when your car is running.
● You can search for a music file by entering
alphanumeric characters.
About iPod software version
27HOW TO OPERATE PORTABLE AUDIO DEVICES
The iPod software versions that are
supported by this unit are as follows:
No iPod model Firmware
1 Classic 4G 3.1.1
2 Classic 4G Photo 1.2.1
3 Classic 5G Video 1.3
4 Classic 6G Video 1.1.2
5 Mini 2G 1.4.1
6 Nano 1G 1.3.1
7 Nano 2G 1.1.3
8 Nano 3G 1.1.3
9 Nano 4G 1.0.3
Note: No guarantee applies to iPod
operations and future updated versions of
iPod software

CAUTION
[Reset] button
TACM2010_EN.book Page 28 Tuesday, October 5, 2010 3:44 PM
28 REFERENCE
Troubleshoot
When You Think There Is a Malfunction
A slight difference in operation may be mistaken for a malfunction. Please check the items in
the following table first.
If the unit does not work, even after the appropriate remedial action has been taken, please
contact your authorized repairer.
If a problem occurs, for instance when the main unit does not respond to any button presses, or
the display does not work correctly, press the [Reset] button using a paper clip or similar item.
Phenomenon Possible cause Action
The screen is dark for a brief
period when the power is turned
on at low temperatures.
The display is distorted for a brief
period after the power is turned
No sound comes out. Volume is poorly adjusted or
Navigation instruction come out
of only one side (front left).
* Depending on your mobile phone, the mute function may not work correctly. If it does not, press the [MUTE]
button on the main unit. Refer to the TomTom Web site (http://tomtom.com/phones/compatibility) for details on
applicable phone models.
on.
This is a characteristic of LCDs. This is not a malfunction. Wait for
This is a characteristic of LCD
backlighting.
MUTE is functioning.
The music is muted when the
PND is attached to the main unit
● the voice guidance is ON.
● talking in the hands-free
This is characteristics of system.
and when:
*
mode
Only when USB is playing,
instructions come out of both
sides.
display will stabilize after a brief
music can be heard again when
the voice guidance finishes or the
a brief period.
This is not a malfunction. The
period.
Check the volume pressing
volume button on radio or
pressing Navigation instruction
for the road ahead tab on PND
screen. Or cancel the MUTE
function.
This is not a malfunction. The
hands-free mode is turned off.
This is not a malfunction.

TACM2010_EN.book Page 29 Tuesday, October 5, 2010 3:44 PM
Phenomenon Possible cause Action
Selecting iPod video is possible
but video is not shown.
iPod video is not supported by the
system.
No audio is output. The vehicle ignition switch has
not been turned on.
There is a point of light on the
display.
At least 99.99% of the pixels on
the LCD panel are effective, but it
is possible that 0.01% of the
pixels may not light or may stay
lighted.
USB/iPod does not playback. Error in file decoding.
CD/AUX button does not swich to
audio mode.
System can still be detecting
USB/iPod files.
USB/iPod is not supported by the
system.
Illumination can not be linked to
headlights.
Link night view to headlights is
not possible with this system.
29REFERENCE
This is not a malfunction. Please
do not press video button even if
displayed. In case, button is
pressed, please follow below
steps to go back to audio mode.
1. Touch Select button
2. Touch Music button
Turn the vehicle ignition switch to
[ACC] or [ON].**
This is not a defect.
Press [TRACK or ] to try
another song.
Detach/Attach the PND to check
the connection.
Detach/Attach USB/iPod to check
the connection.**
Please wait until all files are
completely detected.**
Please see the list of compatible
USB/iPods in this manual.
See Light Sensor section in Using
TomTom Navigation chapter to
set illumination.
** If the above actions can not solve the phenomenon, apply reset for dock as below.
1. Turn off the vehicle.
2. Wait 30 seconds.
3. Turn on the vehicle.
4. Recheck if phenomenon continues. If it continues, contact your authorized repairer.

" "
Charging
(Green with indication)
(Green)
(Without indication)
" "
(Green)
(Without indication)
" "
(Red)
(Without indication)
TACM2010_EN.book Page 30 Tuesday, October 5, 2010 3:44 PM
30 REFERENCE
Specifications
<GENERAL>
Power Supply 12 V DC
Current Drain 3 A
Dimensions (whole unit) (W × H × D) 7.7" × 2.5" × 5" (195 x 66 x 133 mm)
Weight (whole unit) 1.1 lbs (515 g)
Dimensions (PND only) (W × H × D) 5" × 3.2" × 1" (130 × 82.5 × 24.5 mm)
Weight (PND only) 0.4 lbs (0.2 kg)
Operating temperature range (only PND) 14°F to 131°F (-10°C to +55°C)
Operating temperature range (without PND)
PND storage guarantee temperature* -4°F to 140°F (-20°C to +60°C)
Storage temperature range (without PND) -40°F to +176°F (-40°C to +80°C)
Suitable load impedance 4 Ω
* Do not leave this machine inside a vehicle for a long period of time if there is a possibility the
guaranteed PND storage temperature may be exceeded. Doing so will result in a failure.
<DISPLAY>
DISPLAY 4.3" WQVGA
Resolution 480 × 272 pixels
-4°F to 158°F (-20°C to +70°C)
<USB MEMORY SECTION>
USB Interface 1.1
Frequency Response 20 Hz to 20.000 Hz ±3 dB
S/N Ratio (A-weighted) 75 dB
Please see audio manual for audio specifications.
The information contained in this manual may not be completely applicable to this receiver due
to changes in product specifications, external view, etc.
PND Charging Information
To protect the battery, the temperature range within which the battery can be charged is 32°F
to +113°F (0°C to +45°C). This is an indication of switching to trickle charging mode due to
PND battery exceeding charging temperature specifications. To help prevent the PND from
exceeding the charging temperature, remove the PND from vehicle when not in use.
If necessary, please use a USB cable and continue charging from a PC.
Battery condition Indicator
Charging
Full
Charging in High Temp
Empty High Temp

PZ49X90330BG
PZ49X90330CS
PZ49X90330DA
PZ49X90330NL
*PZ49X90330EN*
*PZ49X90330NL*
*PZ49X90330DA*
*PZ49X90330CS*
*PZ49X90330BG*
PZ49X90330EN
TACM2010_Cover_EN.indd 4 10/1/10 6:32 PM
Publication no. AOM 001 347
Printed in UK (September 2010)
 Loading...