


MODEL VTD1431/VTD2031 USER GUIDE
DIGITAL VIDEO
Region  / ALL discs only
Combination TV and
DVD Video Player
TELETEXT
5M20201A Cov-In |
1 |
27/2/04, 10:19 AM |
IMPORTANT
Unauthorized recording of copyright television programmes, films, video tapes and other materials may infringe on the rights of copyright owners and be contrary to copyright laws.
WARNING
To prevent fire or shock hazard, do not expose this equipment to rain or moisture.
MAINS SUPPLY
This unit is designed to operate from AC 230V~240V 50Hz household mains supply.
This unit is supplied with an approved 13 amp (BS 1363) fused mains plug. When replacing the fuse always use a 5 amp (BS 1362) approved type.
Never use this plug if the fuse cover is missing. To obtain a replacement fuse cover contact your store.
If the mains sockets in your home differ or are not suitable for the type of plug supplied, then the plug should be cut from the mains lead and a suitable type fitted.
WARNING: If the mains plug is cut from the mains lead of this appliance the plug must be destroyed. A mains plug with bared wires is hazardous if engaged in a mains output line socket.
You must use a 13 amp plug (BS 1363) and fit a 5 amp fuse (BS 1362). If any other type of plug is used a 5 amp fuse must be fitted, either in the plug, adaptor or at the distribution board.
WIRING INSTRUCTIONS
The wires in the mains lead are coloured in accordance with the following code: BLUE — NEUTRAL
BROWN — LIVE
As the colours of the wires in the mains lead of the appliance may not correspond to the coloured markings identifying the terminals in your plug, proceed as follows:
The wire which is coloured BLUE must be connected to the terminal which is marked with the letter N or coloured black.
The wire which is coloured BROWN must be connected to the terminal which is marked with the letter L or coloured red.
No connection is to be made to the Earth (E,  ) terminal.
CAUTION:
THIS UNIT IS A CLASS 1 LASER PRODUCT. HOWEVER THIS UNIT USES A VISIBLE LASER BEAM WHICH COULD CAUSE HAZARDOUS RADIATION EXPOSURE IF DIRECTED. BE SURE TO OPERATE THE PLAYER CORRECTLYAS INSTRUCTED.
THE FOLLOWING CAUTION LABEL IS LOCATED ON THE REAR PANEL OF THE UNIT.
CLASS 1
LASER PRODUCT
WHEN THIS UNIT IS PLUGGED INTO THE WALL OUTLET, DO NOT PLACE YOUR EYES CLOSE TO THE OPENING OF THE DISC TRAY AND OTHER OPENINGS TO LOOK INTO THE INSIDE OF THIS UNIT.
USE OF CONTROLS OR ADJUSTMENTS OR PERFORMANCE OF PROCEDURES OTHER THAN THOSE SPECIFIED HEREIN MAY RESULT IN HAZARDOUS RADIATION EXPOSURE.
DO NOT OPEN COVERS AND DO NOT REPAIR YOURSELF. REFER SERVICING TO QUALIFIED PERSONNEL.
NOTES ON MOISTURE CONDENSATION
Moisture condensation damages the unit. Please read the following carefully.
Moisture condensation occurs, for example, when you pour a cold drink into a glass on a warm day. Drops of water form on the outside of the glass. In the same way, moisture may condense on the head drum or the optical pick-up lens inside this unit, one of the most crucial internal parts of the unit.

 Moisture condensation occurs during the following cases.
 When you bring the unit directly from a cold place to a warm place.
 When you use the unit in a room where you just turned on the heater, or a place where the cold wind from the air conditioner directly hits the unit.
 In summer, when you use the unit in a hot and humid place just after you move the unit from an air conditioned room.
  When you use the unit in a humid place.

 Do not use the unit when moisture condensation may occur.
If you use the unit in such a situation, it may damage discs and internal parts. Remove the disc, connect the power cord of the unit to the wall outlet, turn on the unit, and leave it for two or three hours. After two or three hours, the unit will have warmed up and evaporated any moisture. Keep the unit connected to the wall outlet and moisture condensation will seldom occur.
5M20201A Cov-In |
2 |
27/2/04, 10:19 AM |

PRECAUTIONS
SOME DOS AND DON'TS ON THE SAFE USE OF EQUIPMENT
This equipment has been designed and manufactured to meet international safety standards but, like any electrical equipment, care must be taken if you are to obtain the best results and safety is to be assured. So, please read the points below for your own safety. They are of a general nature, intended to help you with all your electronic consumer products and some points may not apply to the goods you have just purchased.
**************
DO read the operating instructions before you attempt to use the equipment.
DO ensure that all electrical connections (including the mains plug, extension leads and interconnections between the pieces of equipment) are properly made and in accordance with the manufacturer's instructions. Switch off and withdraw the mains plug before making or changing connections.
DO consult your dealer if you are ever in doubt about the installation, operation or safety of your equipment.
DO be careful with glass panels or doors on equipment.
**************
DON'T remove any fixed cover as this may expose dangerous voltages.
DON'T obstruct the ventilation openings of the equipment with items such as newspapers, tablecloths, curtains, etc. Overheating will cause damage and shorten the life of the equipment. DON'T allow electrical equipment to be exposed to dripping or splashing, or objects filled with liquids, such as vases, to be placed on the equipment.
DON'T place hot objects or naked flame sources such as lighted candles or nightlights on, or close to equipment. High temperatures can melt plastic and lead to fires.
DON'T use makeshift stands and NEVER fix legs with wood screws - to ensure
complete safety always fit the manufacturer's approved stand or legs with the fixings provided according to the instructions.
DON'T use equipment such as personal stereos or radios so that you are distracted from the requirements of traffic safety. It is illegal to watch television whilst driving.
DON'T listen to headphones at high volume, as such use can permanently damage your hearing.
DON'T leave equipment switched on when it is unattended unless it is specifically stated that it is designed for unattended operation or has a stand-by mode. Switch off using the switch on the equipment and make sure that your family know how to do this. Special arrangements may need to be made for infirm or handicapped people.
DON'T continue to operate the equipment if you are in any doubt about it working
normally, or if it is damaged in any way -switch off, withdraw the mains plug and consult your dealer.
ABOVE ALL
---NEVER let anyone especially children push anything into holes, slots or any other opening in the case - this could result in a fatal electrical shock;
---NEVER guess or take chances with electrical equipment of any kind
---it is better to be safe than sorry!
*************
1
5M20201A P01-07 |
1 |
27/2/04, 1:33 PM |
FEATURES
TV |
• Multi-Angle |
• Auto Set up (Channel) |
• Repeat Playback |
• Auto Channel Memory |
• Memory/Random Playback |
• TELETEXT Function |
• Zoom |
• On-Screen Programming |
• Video Aspect Ratio |
• Picture Control Adjustments |
• Parental Control |
• Auto Power Shut Off |
• Digital output for Dolby Digital (AC-3) and DTS |
DVD Player |
• Playback of DVD, Video-CD, SVCD, Audio-CD |
and MP3/WMA/JPEG-CD |
|
• Digital Audio Jack (Coaxial) |
• PAL & NTSC DVDs playback |
• Multi-Language |
• A-B Repeat playback |
CONTENTS |
|
PREPARATION |
|
PRECAUTIONS ......................................................... |
1 |
LOCATION OF CONTROLS ...................................... |
3 |
REMOTE CONTROL ................................................. |
4 |
AERIAL CONNECTIONS ........................................... |
6 |
CONNECTION TO OTHER EQUIPMENT ................. |
7 |
TV OPERATION |
|
AUTOMATIC TUNING SYSTEM ............................... |
9 |
PRESETTING THE CHANNELS ............................. |
10 |
TV OPERATIONS .................................................... |
13 |
CONVENIENT FUNCTIONS ................................... |
14 |
PICTURE ADJUSTMENTS ...................................... |
15 |
AV COLOUR ADJUSTING ...................................... |
16 |
RECEPTION OF INTERFERENCE ......................... |
17 |
TELETEXT ............................................................... |
18 |
ADVANCED FUCTION OF DVD SECTION
SETTING THE ASPECT RATIO OF TV SCREEN .. |
34 |
SETTING ON SCREEN DISPLAY ........................... |
34 |
DYNAMIC RANGE CONTROL ................................ |
35 |
PARENTAL CONTROL SETTING ........................... |
36 |
TO CHANGE THE PARENTAL LEVEL ................... |
37 |
TEMPORARY DISABLING OF RATING LEVEL BY |
|
DVD DISC ................................................................ |
38 |
SETTING MENU LANGUAGE ................................. |
39 |
SETTING SUBTITLE LANGUAGE .......................... |
40 |
SETTING AUDIO SOUNDTRACK LANGUAGE ...... |
41 |
ADDITIONAL INFORMATION |
|
LANGUAGE CODE LIST ......................................... |
42 |
BEFORE REQUESTING SERVICE ......................... |
43 |
SPECIFICATION ..................................................... |
44 |
DISC PLAYBACK OPERATION |
|
DISC ........................................................................ |
20 |
PREPARATION ....................................................... |
21 |
STATUS DISPLAY OF DISC ................................... |
21 |
PLAYBACK PROCEDURE ...................................... |
22 |
SPECIAL PLAYBACK .............................................. |
23 |
MP3/WMA/JPEG/PLAYBACK ................................. |
24 |
SETTING THE JPEG INTERVAL ............................ |
26 |
SETTING THE SELECT FILES ............................... |
27 |
ZOOMING ................................................................ |
28 |
LOCATING DESIRED SCENE ................................ |
28 |
REPEAT PLAYBACK ............................................... |
29 |
PROGRAM PLAYBACK/RANDOM PLAYBACK ..... |
30 |
MARKING DESIRED SCENES ............................... |
31 |
CHANGING SOUNDTRACK LANGUAGE/ |
|
SUBTITLES ............................................................. |
32 |
CHANGING ANGLES .............................................. |
33 |
TITLE SELECTION .................................................. |
33 |
DVD MENU .............................................................. |
33 |
*This product incorporates copyright protection technology that is protected by method claims of certain U.S. patents and other intellectual property rights owned by Macrovision Corporation and other rights owners. Use of this copyright protection technology must be authorized by Macrovision Corporation or other rights owners and is intended for home and other limited viewing uses only unless otherwise authorized by Macrovision Corporation or other rights owners. Reverse engineering or disassembly is prohibited.
*Manufactured under license from Dolby Laboratories. “Dolby” and the double-D symbol are trademarks of Dolby Laboratories. Confidential unpublished works.
*“DTS” and “DTS Digital Out” are trademarks of Digital Theater Systems, Inc.
*Unauthorized recording of copyrighted television programs, films, video cassettes and other materials may infringe the rights of copyright owners and be contrary to copyright laws.
2
5M20201A P01-07 |
2 |
27/2/04, 2:04 PM |
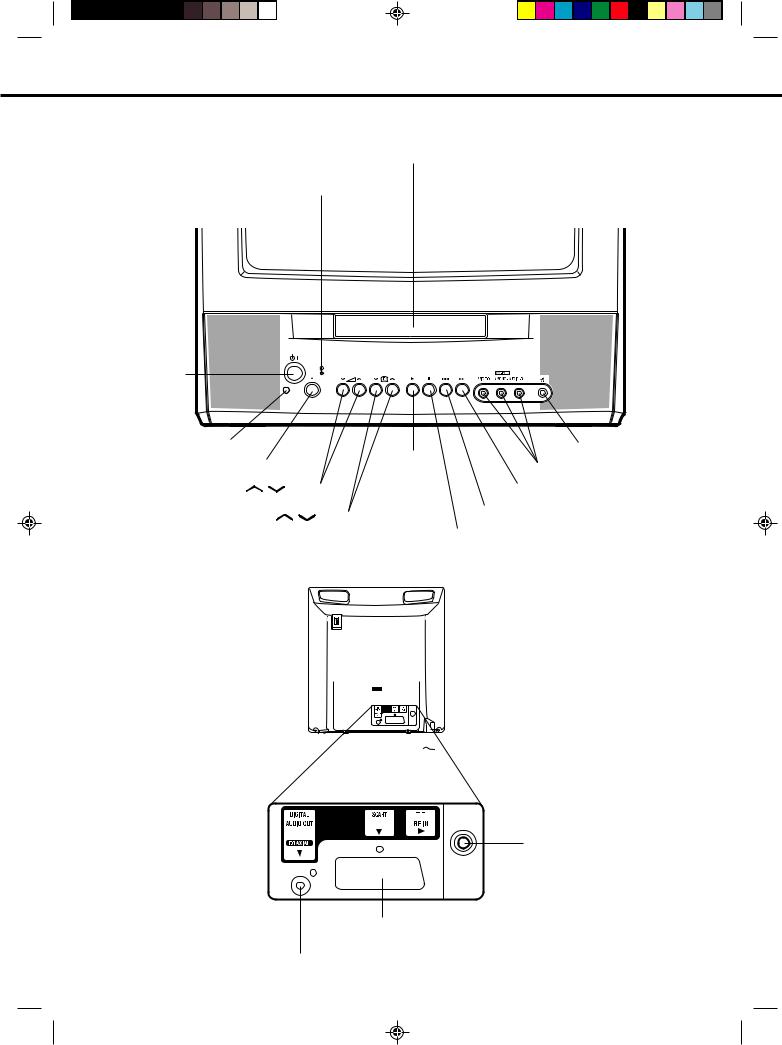
LOCATION OF CONTROLS
This owner's manual uses the illustrations of VTD1431.
Front
Disc tray
STANDBY ( ) Indicator
Power ( ) button
Remote sensor |
|
|
Phones socket |
OPEN/CLOSE button |
|
PLAY button |
VIDEO/AUDIO IN (L/R) jacks (AV2) |
|
|
||
VOLUME / |
buttons |
|
Forward SKIP button |
CHANNEL |
/ buttons |
|
Reverse SKIP button |
|
|
|
STOP button |
Rear
Indoor Aerial Holder 
 Mains Lead to AC outlet
RF IN jack
21 pin SCART (AV1)
COAXIAL DIGITAL AUDIO OUT jack
3
5M20201A P01-07 |
3 |
26/2/04, 12:05 PM |

REMOTE CONTROL
|
|
|
|
|
|
page |
TV/DVD |
Select to operate TV or DVD |
8,9,13,21 |
||||
|
|
|
|
|||
OPEN/CLOSE |
Open or Close the tray |
|
22 |
|||
|
|
|
|
|||
ON/STANDBY |
Power on/off |
|
9 |
|||
|
|
|
|
|
|
|
0-9 |
|
|
|
Direct channel selection of TV |
|
13 |
|
|
|
|
Input setting |
|
28,30 |
|
|
|
|
Enter a security code |
|
36,37 |
|
|
|
|
|||
VOLUME ▲/▼ |
Volume Up/Down |
|
13 |
|||
MUTE |
Mute |
|
14 |
|||
|
|
|
|
|||
CALL |
Display TV or DVD operation status |
|
14,21 |
|||
|
|
|
|
|||
0/AV |
Scart Input or AV-Front input |
|
14 |
|||
|
|
|
|
|||
TEXT/MIX/TV |
Select teletext |
|
18 |
|||
MARKER |
Index for DVD |
|
31 |
|||
|
|
|
|
|||
TOP MENU |
Select title of a DVD disc |
|
33 |
|||
|
|
|
|
|||
SUBTITLE |
Set Subtitle of a DVD disc |
|
32 |
|||
AUDIO |
Change sound track language of DVD |
|
32 |
|||
|
|
|
|
|||
ANGLE |
Change playback angle of a DVD disc |
|
33 |
|||
|
|
|||||
SETUP/MENU |
Display menu of setup 9~12,15~16,34~37,39~41 |
|||||
|
|
|
|
|||
DVD MENU |
Select menu of a DVD disc |
|
33 |
|||
|
|
|||||
CANCEL |
Cancel input data in the setting mode 14,15,28,31,36,37 |
|||||
|
|
|
|
|||
ZOOM/ |
Zoom (for DVD playback) |
|
28 |
|||
CH RTN |
Switch between present/last channel |
|
14 |
|||
CH/PAGE ▲/▼ |
Select channel of the TV |
|
13,14 |
|||
|
|
|
|
Utilize the teletext |
|
19 |
▲/▼/B/A |
Cursor buttons |
|
|
|||
RETURN |
Remove DVD set up menu |
|
34 |
|||
SELECT/ENTER |
Enter information in the menu/Select option in the menu |
|||||
SEARCH8/9 |
Reverse search or Forward search playback |
23 |
||||
REVEAL |
Reveal |
|
19 |
|||
PLAY |
Playback |
|
22 |
|||
SUB PAGE |
Sub page |
|
19 |
|||
JUMP |
Locating desired scene |
|
28 |
|||
SKIP |
|
/ |
|
Skip chapter to forward or reverse direction |
|
23 |
|
|
|
||||
|
|
|
||||
HOLD |
Hold |
|
18 |
|||
STOP |
Stop |
|
22 |
|||
F/T/B |
F/T/B |
|
19 |
|||
|
|
|
||||
REPEAT A-B |
Repeat playback between A and B (DVD/CD) |
29 |
||||
|
|
|
|
|||
SLOW ˆ/] |
Slow motion playback |
|
23 |
|||
Four Coloured buttons Access the Teletext |
|
18 |
||||
|
|
|
|
|||
PAUSE |
Still picture |
|
23 |
|||
PLAY MODE |
Select playback mode |
|
29,30 |
|||
4
5M20201A P01-07 |
4 |
26/2/04, 12:05 PM |
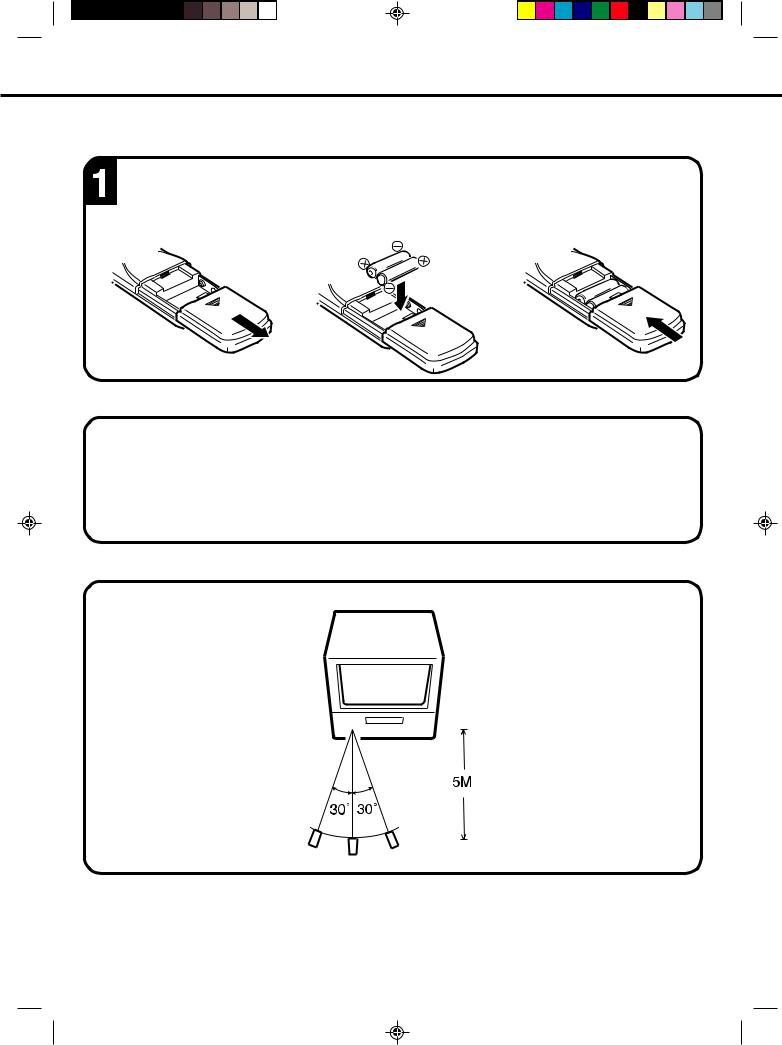
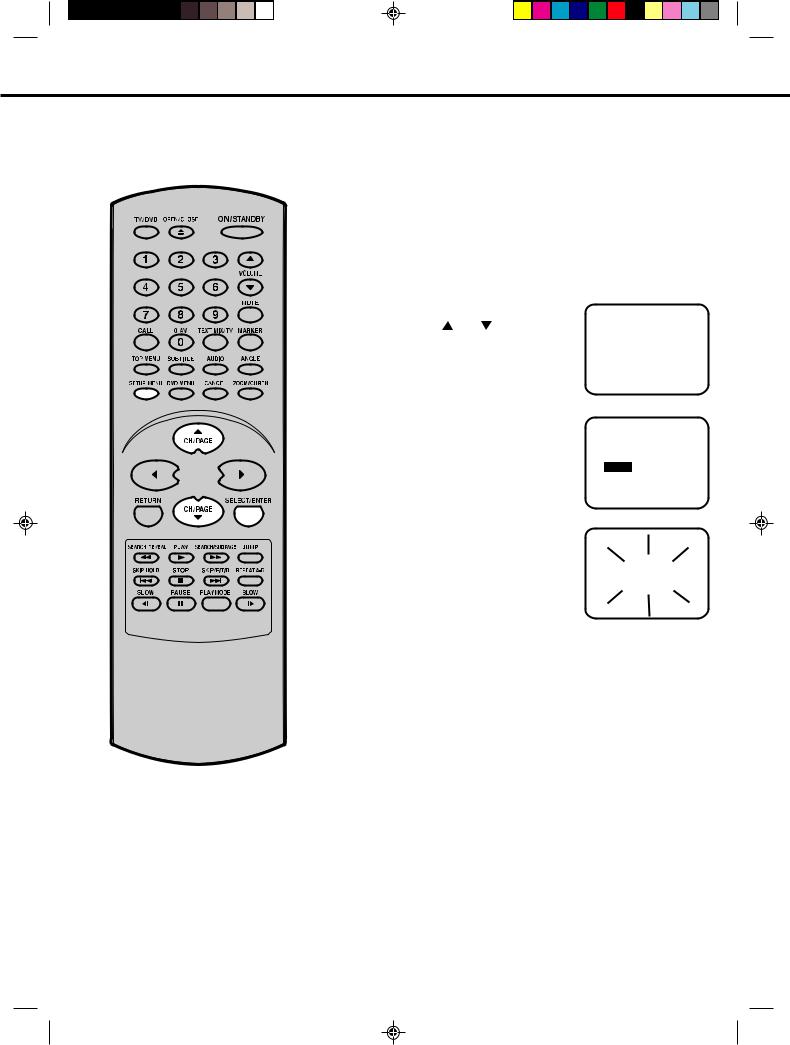
REMOTE CONTROL
BATTERY INSTALLATION
Open the battery compartment cover in the direction of the arrow.
BATTERY CAUTIONS
|
Install two “AAA/R03/UM-4” |
|
Replace the cover. |
|
(penlight size) batteries, |
|
|
|
paying attention to the |
|
|
|
polarity diagram in the |
|
|
|
battery compartment. |
|
|
|
|
|
|
•Use two "AAA/R03/UM-4" size penlight batteries for the remote control transmitter.
•The batteries may last approximately one year depending on how much the remote control is used. For best performance it is recommended batteries be replaced on a yearly basis, or when remote operation becomes erratic.
•Do not mix old and new batteries.
•Weak batteries can leak and severely damage the remote control transmitter. Always remove batteries as soon as they become weak.
EFFECTIVE DISTANCE OF THE REMOTE CONTROL TRANSMITTER
NOTES: • When direct sunlight, an incandescent lamp, fluorescent lamp or any other strong light shines on the remote sensor, the remote operation may be unstable.
•When there is an obstacle between the unit and the transmitter, the remote control transmitter may not operate.
5
5M20201A P01-07 |
5 |
26/2/04, 12:05 PM |
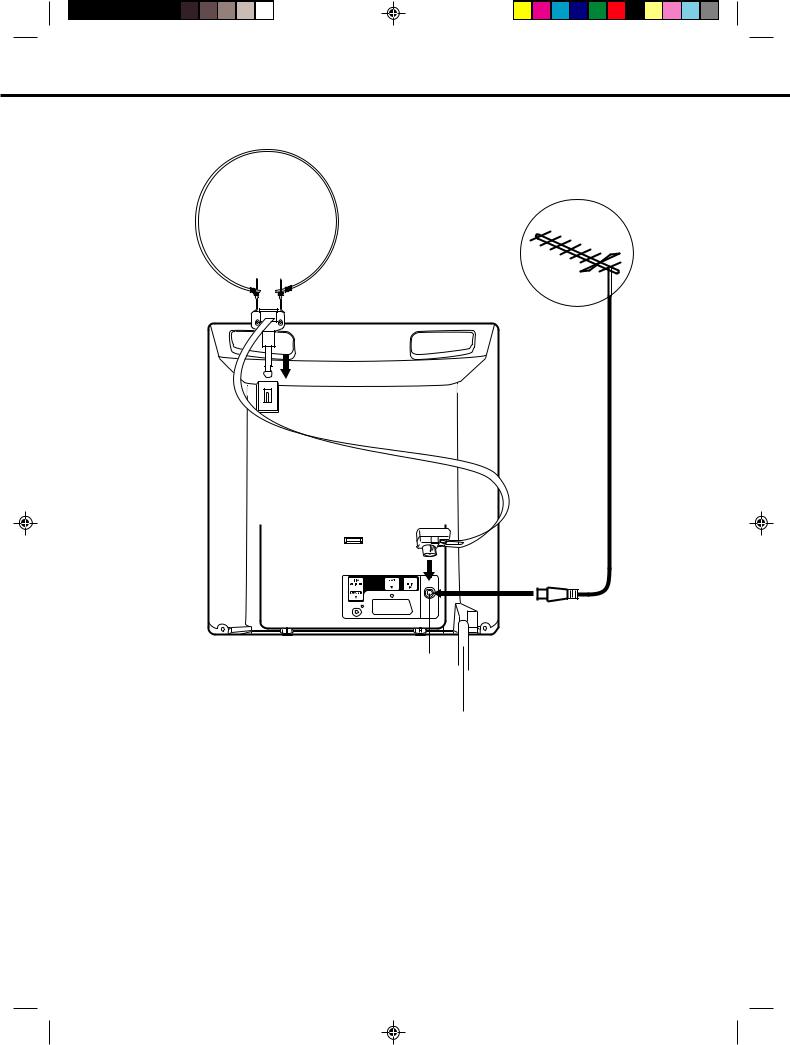
AERIAL CONNECTIONS
Connect an indoor or outdoor aerial to the aerial socket at the rear panel as shown below. For all aerial circuit problems, please consult your local dealer.
(A)
(B)
RF IN
Aerial socket 
Mains lead
(A)INDOOR AERIAL
A loop aerial is supplied with the unit (VTD1431 only). Insert the aerial holder into the mounting hole on the back cabinet until it locks into place. Insert the aerial adaptor (supplied with VTD1431 only) to the aerial socket. Adjust the angle of the loop aerial to receive the best possible picture.
(B)EXTERNAL AERIAL
The type of aerial required depends on the position of your home, it's distance from the transmitter and local interference. If you do not have an aerial and you are uncertain of what to buy, you should seek the advice of a local aerial contractor.
6
5M20201A P01-07 |
6 |
26/2/04, 12:05 PM |
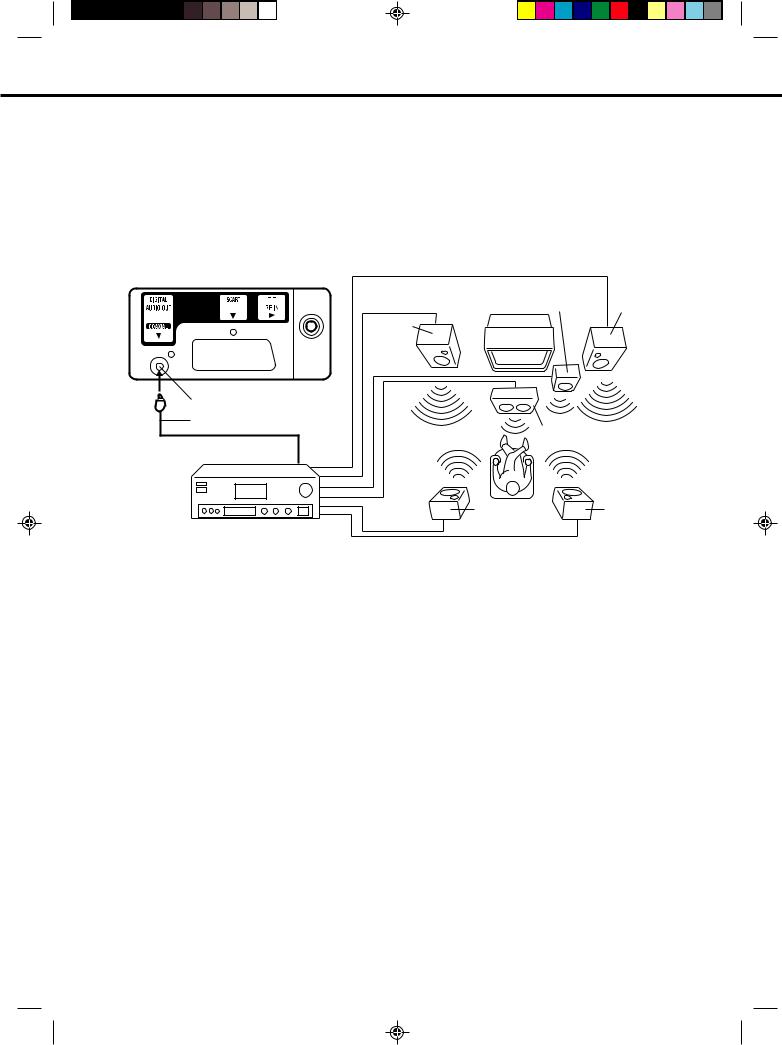
CONNECTION TO OTHER EQUIPMENT
The exact arrangement you use to interconnect various video and audio components to the unit is dependent on the model and features of each component. Check the Owner's Manual provided with each component for the location of video and audio inputs and outputs.
Using an AV Amplifier with built-in digital surround
If you are using an Amplifier with a built-in digital surround sound decoder (such as Dolby Digital / DTS / MPEG / etc.), you can connect it as shown below.
Rear of unit
|
Front |
This unit Subwoofer |
Speaker |
(Right) |
Front
Speaker
(Left)
Coaxial Digital Audio Output
Coaxial digital cable (not supplied)
Center Speaker
To Coaxial Digital Audio Input 
Surround |
Surround |
Speaker (Left) |
Speaker (Right) |
AV Amplifier with built-in digital surround decoder as listed above
*Manufactured under license from Dolby Laboratories. “Dolby” and the double-D symbol are trademarks of Dolby Laboratories. Confidential unpublished works.
*DTS and DTS Digital Out are trademarks of Digital Theatre Systems, Inc.
NOTES:
•When you make the connections above, make sure that the power of all units is switched off at the mains.
•Some DTS decoders which do not support DVD-DTS interface may not work properly with the unit.
•When playing DTS encoded material, the sound will only be available through the Digital Audio Output Socket.
7
5M20201A P01-07 |
7 |
26/2/04, 12:05 PM |
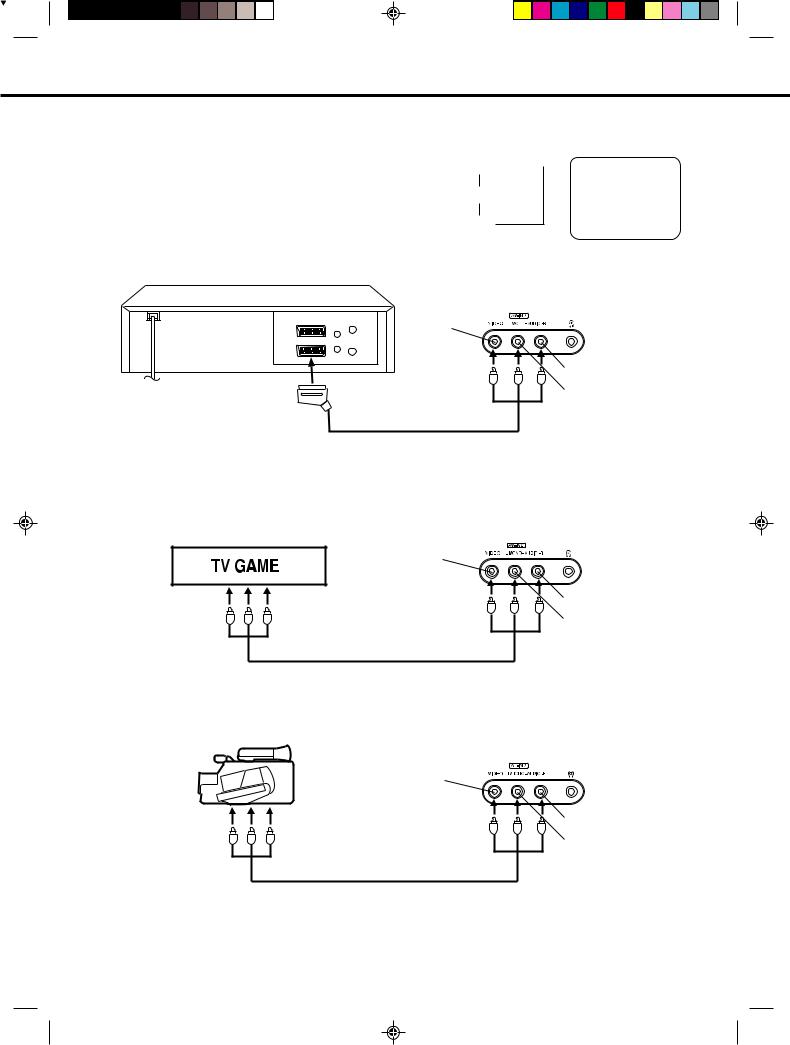
CONNECTION TO OTHER EQUIPMENT
Input Selection
If you connect the unit to a VCR, camcorder or games console, you can select this input by pressing the 0/AV button.
Press the TV/DVD button to select TV mode and then press the 0/AV button repeatedly to select AV1 or AV2.
1. To connect the unit to a VCR
Press the 0/AV button to select AV2 to use the TV as a monitor.
AV1(Scart socket)
AV2(Front-AV-input)
TV-program
Front of unit
VIDEO IN
To Scart socket of VCR
Scart cable (not supplied)
AV1
AUDIO IN (R)
AUDIO IN (L)
2. To connect the TV to a TV Game
The unit can also be used as a display device for many video games. However, due to the wide variety of different types of signal generated by these devices and subsequent hook-up variations required, they have not all been included in the suggested connection diagrams. Press the 0/AV button to select AV2 to use the TV as a monitor. You'll need to consult each component's Owner's Manual for additional information.
|
Front of unit |
|
VIDEO IN |
To Audio/Video OUT |
AUDIO IN (R) |
|
AUDIO IN (L) |
Audio/Video cord (not supplied)
3. To connect the TV to a camcorder
Connect the camcorder to the unit as shown.
Press the 0/AV button to select AV2 to use the TV as a monitor.
Front of unit
Camcorder |
VIDEO IN |
AUDIO IN (R)
AUDIO IN (L)
Audio/Video cord (not supplied)
4. To connect the unit to another TV set (ie. a widescreen set) (see P.34)
Connect the unit and another TV set with a Scart cable.
Press the AV button on another TV to monitor the input from the Scart cable.
8
5M20201A P08-17 |
8 |
26/2/04, 12:05 PM |
AUTOMATIC TUNING SYSTEM
Your television has an Automatic Tuning System which makes tuning in your television easy. This Automatic tuning System scans the entire reception range in your area and automatically stores all available channels of suitable signal strength in the correct order e.g. BBC1 will tune into channel 1, BBC2 will tune into channel 2, etc.
ONLY WHEN YOU TURN ON THIS UNIT FOR THE FIRST TIME, THE AUTOMATIC TUNING PROCESS WILL BE AVAILABLE.
1 Press the Main POWER switch on the unit.
Then press the ON/STANDBY button on the remote control.
2 Press the SELECT/ENTER button.
Your unit will now automatically tune in all available channels.
CONNECT AERIAL TO TV
THEN PRESS ENTER TO
START AUTO TUNING
AUTO TUNING
When the programme on the screen stops changing and the sound comes on, the tuning process is complete.
NOTE: If you use the supplied loop aerial (VTD1431only), weak channels may not be stored automatically. You will need to tune these manually.
9
5M20201A P08-17 |
9 |
26/2/04, 12:06 PM |
PRESETTING THE CHANNELS
Once you have connected up this unit, you will need to tune in the channels in order to watch TV stations. There are two ways that you can do this:
NOTES:
•If you want to skip any channels, refer to page 14.
•When the unit is in the AV mode, you can’t preset the channels.
10
- Automatic tuning The stations will be preset in the order that they appear when the automatic tuning is activated.
- Manual tuning In this mode the TV searches until a picture appears. If it is a station that you want to keep, you can choose which channel preset you want to store it on. You repeat this procedure for each station until you have stored all the desired stations.
AUTOMATIC TUNING |
|
|
|||
1 Press SETUP/MENU. |
the |
MENU |
|||
Press |
or |
to select |
|
||
CHANNEL SETUP mode, then |
CHANNEL SETUP |
||||
PICTURE |
|||||
press SELECT/ENTER. |
|
||||
|
AV COLOUR PAL |
||||
PRESS: ▲/ ▼/ ENTER / MENU
2 Press  or
or  to select the AUTO mode, then press
SELECT/ENTER.
3 All available channels in your area are automatically scanned and stored in the memory of the unit. When the programme on the screen stops changing and the sound comes on, the tuning process is complete.
CHANNEL SETUP
MANUAL
AUTO
CH ALLOCATION
PRESS: ▲/ ▼/ ENTER / MENU
4 Press SETUP/MENU twice.
The unit will return to normal TV screen.
•The automatic tuning will not necessarily store the channels in the correct order (BBC1 on CH 1 etc.). If you want to change the order of the stored channels, please see page 12.
5M20201A P08-17 |
10 |
26/2/04, 12:06 PM |
PRESETTING THE CHANNELS
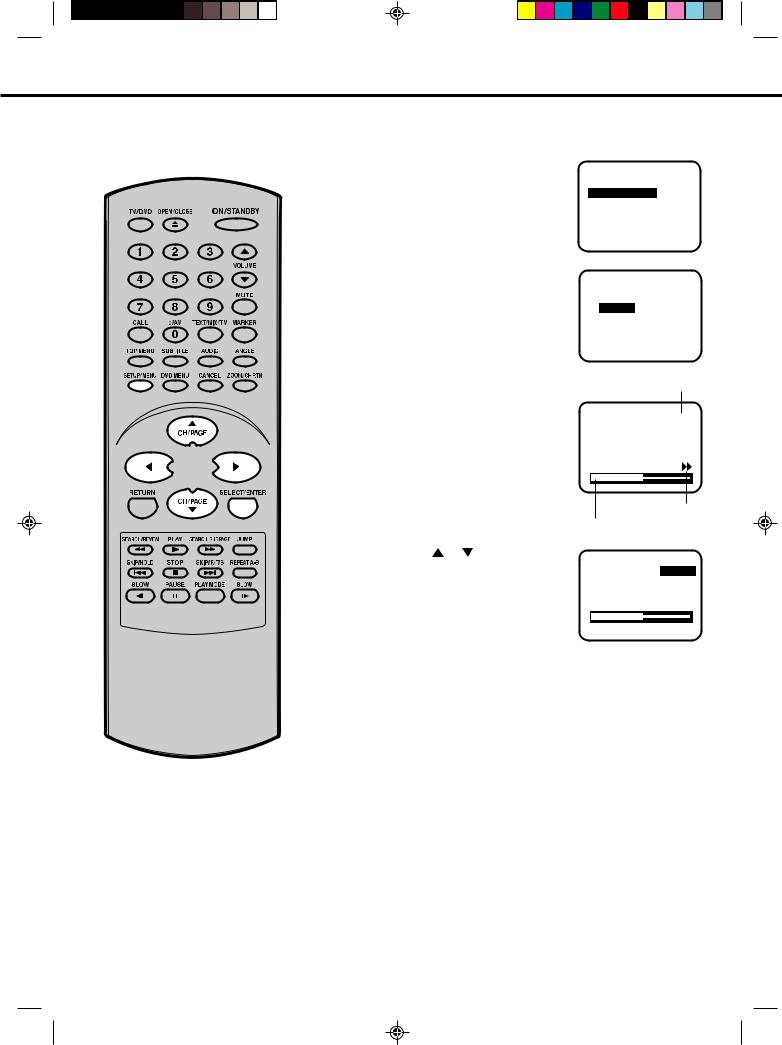
MANUAL TUNING
How to tune a station to channel 10 position.
1 Press SETUP/MENU.
Press  or
or  to select the CHANNEL SETUP mode, then press SELECT/ENTER.
MENU
CHANNEL SETUP PICTURE
AV COLOUR PAL
PRESS: ▲/ ▼/ ENTER / MENU
2 Press  or
or  to select the MANUAL mode, then press
SELECT/ENTER.
CHANNEL SETUP
MANUAL
AUTO
CH ALLOCATION
PRESS: ▲/ ▼/ ENTER / MENU
3 Press  or
or  until the picture appears on screen. If this is not your desired channel, press
  or
or  until your desired channel appears.
If you need to make the picture clearer, use  or
or  (FINE TUNING).
Then press SELECT/ENTER.
CH position
Searching direction Tuning segment bar
▲ ▼
the required channels
11
5M20201A P08-17 |
11 |

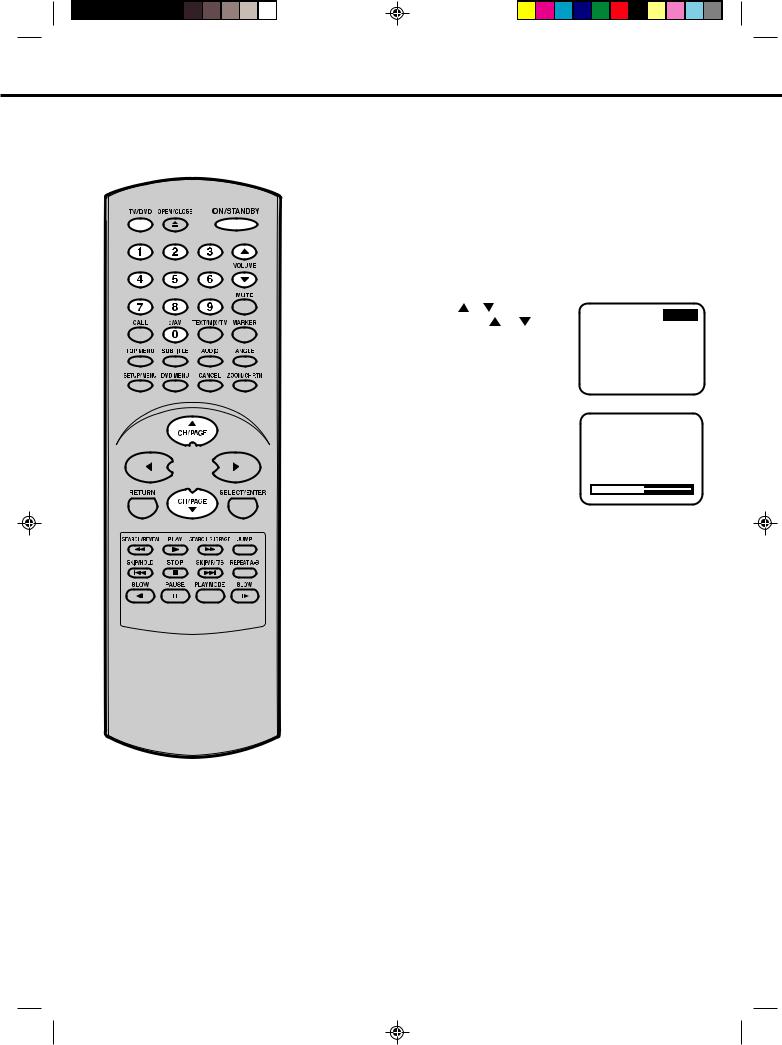
PRESETTING THE CHANNELS
TO CHANGE THE CHANNELS
EXAMPLE: Changing of channel position from CH2 and CH5.
1 Press SETUP/MENU.
Press  or
or  to select the CHANNEL SETUP mode, then press SELECT/ENTER.
MENU
CHANNEL SETUP PICTURE
AV COLOUR PAL
PRESS: ▲/ ▼/ ENTER / MENU
2 Press  or
or  to select the CH ALLOCATION mode, then press
SELECT/ENTER.
3 Press  or
or  to select the channel position No. (broadcasting) which you want to change. Then press SELECT/ENTER.
4 Press  or
or  to select the channel allocation No. that you want to change to.
CHANNEL SETUP
MANUAL
AUTO
CH ALLOCATION
PRESS: ▲/ ▼/ ENTER / MENU
CH 2
CH ALLOCATION CH 1
PRESS: ▲/ ▼/ ENTER / MENU
CH 2
CH ALLOCATION CH 5
5 Press SELECT/ENTER. The numbers of the stations are changed. Repeat steps 3 - 4 to change the order of other channels. Then press SETUP/ MENU three times to return to normal TV screen.
Before setting
PRESS: ▲/ ▼/ ENTER / MENU
CH 5
CH ALLOCATION CH 2
PRESS: ▲/ ▼/ ENTER / MENU
|
|
After setting
12
5M20201A P08-17 |
12 |
26/2/04, 12:06 PM |
TV OPERATIONS
After completing the connection and presetting the channels, follow these steps for viewing.
NOTE:
On screen display will disappear after 4 seconds.
Automatic Power Shut Off
If a station being viewed stops broadcasting for about 15 minutes, the unit will automatically shut itself off and go into standby mode.
1 Press Power ( ) on the front panel of the unit. Then press ON/STANDBY on the remote control (STANDBY indication will goes off). Press TV/DVD to select TV mode.
2 Direct Channel Selection buttons (0-9)
Press the Direct Channel Selection button on the remote control.
1-9 CH: Press your required number only.
10-80 CH: Press the two digits in accordance to the channel numbers required.
CH/PAGE /
Press CH/PAGE or on the |
|
|
|
remote control. |
|
3 The VOLUME can be adjusted by pressing the VOLUME  or
or  on the remote control.
13
5M20201A P08-17 |
13 |
26/2/04, 12:06 PM |
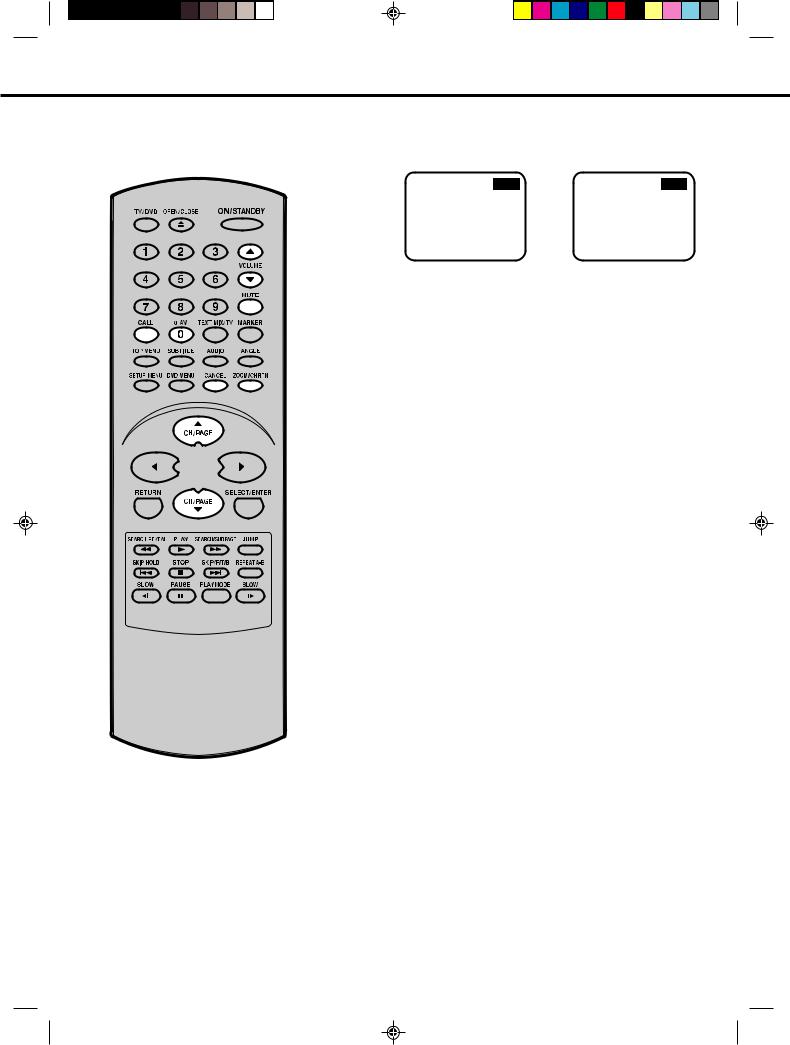
CONVENIENT FUNCTIONS
The following functions are available from the remote control handset only.
14
TV/AV Selection
For receiving the desired signal:
Press 0/AV to select the TV or AV mode.
|
|
TV position - to view a |
AV position - to receive |
normal TV. |
through the direct Video |
|
input. AV1 (from 21 pin |
|
SCART socket on the rear) |
|
or AV2 (from Audio/Video |
|
in jacks on the front) |
|
indicator appears on the |
|
screen in AV mode. |
CHANNEL RETURN
This button allows you to go back to the previous channel by pressing CH RTN. Press this button again to return to the channel you were watching.
CALL
When you press this button once, the channel number will appear. Press this button again, then the display will disappear.
MUTE
When MUTE is pressed, the TV sound will be turned off completely. To disable this function, press the button again or VOLUME  or
or  .
.
SKIP FUNCTION
After all channels available in your area have been set in memory, you can skip unwanted channels as follows.
1 Press CH/PAGE  or
or  to select the channel which you want to skip.
2 Press CANCEL.
When a channel is skipped, the channel number will blink.
3 Skip all unwanted channels the same way following step 1-2.
NOTE:
TocanceltheSKIPfunction,press DIRECTCHANNELSELECTION (numeric buttons) to select the channel which you want to cancel, then press CANCEL again.
5M20201A P08-17 |
14 |
26/2/04, 12:06 PM |
 Loading...