


REMOTE CONTROLLER FOR AIR CONDITIONER (SPLIT TYPE)
Owner’s Manual
Remote Controller
Model name:
Wireless Remote Controller Kit
RBC-AX31U(W)-E
RBC-AX31U(WS)-E
Owner’s Manual |
|
Remote controller for air |
1 English |
conditioner (Split type) |
Generic model name |
Wireless remote controller |
and signal receiving part |
|
|
|
RBC-AX31U(W)-E |
WH-H1JE2 |
RBC-AX31U(WS)-E |
(Wireless remote controller |
|
model name) |
|
|
Manuel du proprietaire |
|
|
|
|
|
|
|
|
|
|
|
Télécommande pour climatiseur |
Français |
|
|
||
|
|
||||
(Type split) |
15 |
|
|
||
Betriebsanleitung |
|
|
|
|
|
|
|
|
|
|
|
|
|
|
|
|
|
Fernbedienung für klimagerät |
29 |
Deutsch |
|
|
|
(Split-typ) |
|
|
|||
|
|
|
|
|
|
Wireless remote controller |
Signal receiving |
(WH-H1JE2) |
part |
Manuale del proprietario |
|
|
|
|
|
Telecomando per condizionatore |
Italiano |
|
d’aria (Tipo split) |
43 |
|
Manual del propietario |
|
|
|
|
|
Control remoto para aire |
57 |
Español |
acondicionado (Tipo split) |
||
Manual do utilizador |
|
|
|
|
|
Controlador remoto para ar |
71 |
Português |
condicionado (Tipo split) |
||
Gebruiksaanwijzing |
|
|
|
|
|
Afstandsbediening voor |
85 |
Nederlands |
airconditoner (Gesplitst type) |
||
Εγχειρίδιο χρήσης |
|
|
|
|
|
ΤηλεΧειριστηριο για κλιματιστικο |
Ελληνικά |
|
(ΤυΠου split) |
99 |
|
Руководство пользователя |
|
|
|
|
|
ПультдистанционногоупРавлениЯдлЯ |
Русский |
|
кондиционеРа(Сплит-системы) |
113 |
|
Kullanım Kılavuzu |
|
|
|
|
|
Klİma İçİn uzaktan kumanda |
|
Türkçe |
(Split tİp) |
127 |
|
Wireless Remote Controller Kit |
Owner’s Manual |
|
•Please read this Owner’s Manual carefully for correct use before using your Wireless Remote Controller Kit. Be sure to read “PRECAUTIONS FOR SAFETY”
•After you read this manual, please keep it with the Owner’s Manual of the air conditioner in a place where you can access it quickly.
Contents |
|
|
1 |
PRECAUTIONS FOR SAFETY . . . . . . . . . . . . . . . . . . . . . . . . . . |
. 2 |
2 |
PART NAMES AND FUNCTIONS . . . . . . . . . . . . . . . . . . . . . . . . . |
3 |
3 |
HOW TO OPERATE INDOOR UNIT . . . . . . . . . . . . . . . . . . . . . . . |
7 |
4 |
HOW TO OPERATE THE TIMER . . . . . . . . . . . . . . . . . . . . . . . . . |
8 |
5 |
HOW TO ADJUST AIR DIRECTION . . . . . . . . . . . . . . . . . . . . . . . |
9 |
6 |
SLIDE SWITCH . . . . . . . . . . . . . . . . . . . . . . . . . . . . . . . . . . . . . . |
10 |
7 |
HOW TO INSERT BATTERIES . . . . . . . . . . . . . . . . . . . . . . . . . . |
10 |
8 |
HOW TO HANDLE THE REMOTE CONTROLLER . . . . . . . . . . . |
11 |
9 |
NOTES ON PROPER USE . . . . . . . . . . . . . . . . . . . . . . . . . . . . . . |
11 |
10 |
ADDRESS . . . . . . . . . . . . . . . . . . . . . . . . . . . . . . . . . . . . . . . . . . |
12 |
11 |
HOW TO PERFORM EMERGENCY OPERATION . . . . . . . . . . . |
13 |
12 |
BEFORE ASKING FOR REPAIR WORK . . . . . . . . . . . . . . . . . . |
14 |
1-EN |
– 1 – |
Wireless Remote Controller Kit |
Owner’s Manual |
|
1 PRECAUTIONS FOR SAFETY
 WARNING
WARNINGS ABOUT INSTALLATION
•Make sure to ask the qualified installation professional in electric work to install the remote controller.
If the remote controller is inappropriate installed by yourself, it may cause electric shock or fire, etc.
•Make sure to install the air conditioner specified by TOSHIBAand ask the exclusive dealer when installing. If the air conditioner is installed by yourself, it may cause electric shock or fire, etc.
WARNINGS ABOUT OPERATION
• |
Prevent any liquid from falling into the remote controller. |
|
|
Do not spill juice, water or any kind of liquid. |
EN |
|
It may cause machine failure, electric shock or fire, etc. |
|
• |
When you are aware of something abnormal with the air conditioner (smells like |
|
something burning, etc.), immediately turn off the main power supply switch or circuit breaker to stop the air conditioner, and make contact with the dealer.
If the air conditioner is continuously operated with something abnormal, it may cause machine failure, electric shock or fire, etc.
WARNINGS ABOUT MOVEMENT AND REPAIR
•Do not repair any unit by yourself.
Whenever the air conditioner needs repair, make sure to ask the dealer to do it. If it is repaired imperfectly, it may cause electric shock or fire, etc.
•When reinstalling the air conditioner, contact with the dealer.
If the installation is insufficient, it may cause electric shock or fire, etc.
 CAUTION
CAUTIONS ABOUT INSTALLATION
•Do not install the remote controller in a place where its signals do not reach the indoor unit.
•Do not install the remote controller in the place under the direct sunlight and close to any heat source. It may cause machine failure.
•The fluorescent lamp with rapid start system or inverter system may disturb the signal reception. For details, contact with the dealer of the air conditioner you have purchased.
CAUTIONS ABOUT OPERATION
•Do not drop or apply strong shock to the air conditioner. It may cause remote controller failure.
•Use batteries that meet the specifications.
– 2 – |
2-EN |

Wireless Remote Controller Kit |
Owner’s Manual |
|
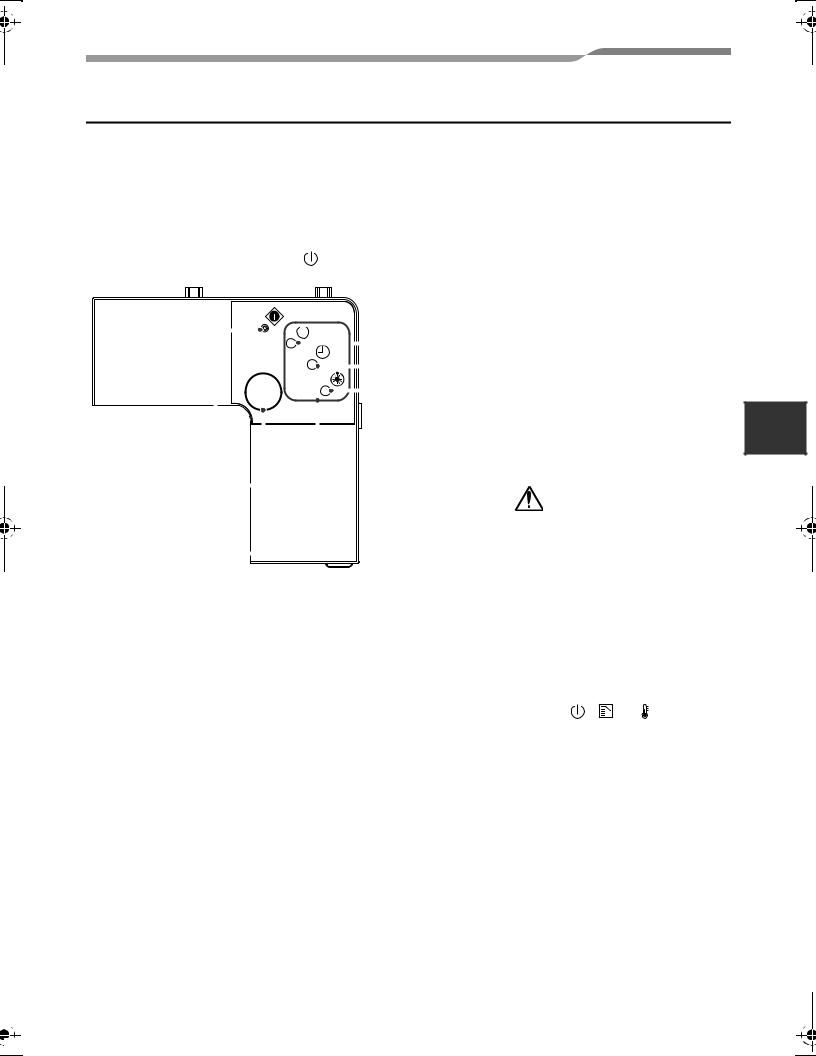
2 PART NAMES AND FUNCTIONS
Remote Controller (WH-H1JE2)
• Up to 8 indoor units in a group can be controlled by one remote controller.
1 |
|
7 |
RESET button |
11 |
|
Used after batteries are replaced or the slide |
|
|
8 |
switch is switched. (See page 10) |
|
|
|
Slide switch (See page 10) |
|
2 |
12 |
9 |
Battery compartment (See page 10) |
10 |
Cover |
||
|
13 |
|
Slide the cover downward holding its both |
ADR |
|
sides. |
|
|
14 |
11 |
Remote controller sensor |
3 |
|
Senses the ambient temperature when the |
|
|
remote controller is selected with the sensor |
||
4 |
|
|
button. |
5 |
15 |
12 Operation mode display |
|
ADR |
Displays the air conditioner operation mode. |
|
|
|
|
|
(This illustration shows all display contents.) |
6
7
8 
ACL SENSOR
13 |
AUTO louver display differs according |
18 |
to the installed unit. (See page 9) |
14 |
Setup temperature button |
9
10
1 Transmitting part
2 Start/Stop button
Starts and stops the air conditioner alternately.
3 Mode select button
Selects an operation mode.
4 Air volume button
5 Time setup button
Used for timer setting. (See page 8)
6 Filter button
No function
Every pushing this button, temperature rises by 1°C.
Every pushing this button, temperature lowers by 1°C.
15 Swing/air direction button (See page 9)
16 Address button (See page 12)
17 Ventilation button
The remote controller is not operated even if this switch is pushed. (no function)
18 Sensor button
Selects the temperature sensor of the remote controller.
The temperature sensor of the indoor unit is selected by default. While the indoor unit temperature sensor is selected,  is displayed on the display.
3-EN |
– 3 – |
Wireless Remote Controller Kit |
Owner’s Manual |
|
Signal Receiving Part
• The signal receiving part is attached to the |
The rear of signal receiving part |
|||||||||||||
|
indoor unit. |
The following switches are provided on the |
||||||||||||
• Hereinafter, all remote controller button |
rear of the signal receiving part. For their |
|||||||||||||
|
names are indicated with respective |
settings, contact the dealer from whom you |
||||||||||||
|
symbols displayed on the remote |
purchased the air conditioner. |
||||||||||||
|
controller. |
• |
Header/follower switch |
|
||||||||||
Example: Start/Stop button → |
|
Normally, set this switch to “HEADER” to |
||||||||||||
|
|
|
|
|
|
|
|
|
|
|
|
|
use the remote controller as a header. |
|
|
|
|
|
|
|
|
|
|
|
|
|
|
The remote controller can be used |
|
|
|
|
|
|
|
|
|
|
|
|
4 |
|
together with the wired remote controller |
|
|
|
|
|
|
|
|
|
|
|
|
|
|||
|
|
|
|
|
|
|
|
|
|
|
|
(sold separately). |
|
|
|
|
|
|
|
|
|
|
|
|
|
|
|
||
|
|
|
|
|
5 |
• |
Test run switch |
|
||||||
|
|
|
|
|
|
|
||||||||
|
|
|
|
|
|
|
|
|
|
|
6 |
|
Do not use this switch in normal operation, |
|
|
|
|
|
|
|
|
but use for service. |
|
||||||
|
|
|
|
|
|
|
|
|
|
|
|
|
|
|
|
1 |
|
|
|
|
|
|
|
|
|
|
• Address switches (See page 12) |
||
|
|
|
|
|
|
|
|
|
|
|
||||
|
|
|
|
|
|
|
|
|
|
|
|
|
Distinguish transmit signals and receive |
|
|
2 |
|
|
|
|
|
|
|
|
|
|
|
signals. |
|
|
|
|
|
|
|
|
|
|
|
|
|
CAUTION |
||
|
|
|
|
|
|
|
|
|
|
|
|
|||
|
|
|
|
|
|
|
|
|
|
|
|
|
||
|
|
|
|
|
|
|
|
|
|
|
|
|
||
|
|
|
|
|
|
|
|
|
|
|
|
|
||
|
3 |
|
|
|
|
|
|
|
|
|
• If “pi, pi” sound is heard with the Run |
|||
|
|
|
|
|
|
|
|
|
|
|
LED lighting and the Timer and Not |
|||
|
|
|
|
|
|
|
|
|
|
|
||||
1 |
Emergency operation button |
|
Ready LEDs flashing alternately while |
|||||||||||
|
the heat-pump type air conditioner is |
|||||||||||||
2 |
(See page 13) |
|
used, desired operation mode is |
|||||||||||
Signal receiver |
|
disabled. The same is true if the AUTO |
||||||||||||
|
Receives signals from the remote controller. |
|
mode is selected in a model that is not |
|||||||||||
3 |
LEDs |
|
provided with the cool/heat auto |
|||||||||||
|
function. |
|
||||||||||||
|
Any of these LEDs flashes during an error |
|
|
|||||||||||
|
• |
Even if you push , |
or when |
|||||||||||
|
state. |
|||||||||||||
|
|
remote controller operation is disabled |
||||||||||||
|
When an LED flashes, see “BEFORE |
|
||||||||||||
|
|
by the central control or other means, “pi” |
||||||||||||
|
ASKING FOR REPAIR WORK” on page 14. |
|
||||||||||||
4 |
|
is heard 5 times and the button operation |
||||||||||||
Run LED (green) |
|
|||||||||||||
|
is not accepted. |
|
||||||||||||
|
Lights while the air conditioner is working. |
|
|
|||||||||||
5 |
|
|
|
|||||||||||
Timer LED (green) |
|
|
|
|||||||||||
Lights while the timer is reserved.
6 Not Ready LED (orange)
•Lights in the heating mode at the beginning of operation or during defrosting or when the temperature controller is activated.
•Flashes during an error state.
– 4 –
EN |
4-EN
 Loading...