


Satellite® 1620CDS/ 1640CDT User’s Guide
If you need assistance, please see Appendix E in this guide

ii
Models: Satellite 1620CDS/1640CDT
Instructions for IC CS-03 certified equipment
1NOTICE: The Industry Canada label identifies certified equipment. This certification means that the equipment meets certain telecommunications network protective, operational and safety requirements as prescribed in the appropriate Terminal Equipment Technical Requirements document(s). The Department does not guarantee the equipment will operate to the user’s satisfaction.
Before installing this equipment, users should ensure that it is permissible to be connected to the facilities of the local telecommunications company. The equipment must also be installed using an acceptable method of connection. The customer should be aware that compliance with the above conditions may not prevent degradation of service in some situations.
Repairs to certified equipment should be coordinated by a representative designated by the supplier. Any repairs or alterations made by the user to this equipment, or equipment malfunctions, may give the telecommunications company cause to request the user to disconnect the equipment.
Users should ensure for their own protection that the electrical ground connections of the power utility, telephone lines and internal metallic water pipe system, if present, are connected together. This precaution may be particularly important in rural areas.
Caution: Users should not attempt to make such connections themselves, but should contact the appropriate electric inspection authority, or electrician, as appropriate.
2The user manual of analog equipment must contain the equipment’s Ringer Equivalence Number (REN) and an explanation notice similar to the following:
The Ringer Equivalence Number (REN) of this device is 0.9B.
NOTICE: The Ringer Equivalence Number (REN) assigned to each terminal device provides an indication of the maximum number of terminals allowed to be connected to a telephone interface. The termination on an interface may consist of any combination of devices subject only to the requirement that the sum of the Ringer Equivalence Numbers of all the devices does not exceed 5.

iii
3The standard connecting arrangement (telephone jack type) for this equipment is jack type(s): USOC RJ11C.
CD-ROM Safety Instruction
The CD-ROM drive employs a laser system. To ensure proper use of this product, please read this instruction manual carefully and retain for future reference. Should the unit ever require maintenance, contact an authorized service location.
Use of controls, adjustments or the performance of procedures other than those specified may result in hazardous radiation exposure.
To prevent direct exposure to the laser beam, do not try to open the enclosure.
Location of the required label
(Sample shown below. Location of the label and manufacturing information may vary.)
CAUTION: This appliance contains a laser system and is classified as a “CLASS 1 LASER PRODUCT.” To use this model properly, read the instruction manual carefully and keep it for your future reference. In case of any trouble with this model, please contact your nearest “AUTHORIZED service station.” To prevent direct exposure to the laser beam, do not try to open the enclosure.
Use of controls or adjustments or performance of procedures other than those specified in the owner’s manual may result in hazardous radiation exposure.

iv
General Precautions
Toshiba computers are designed to optimise safety, minimise strain and withstand the rigors of portability. However, certain precautions should be observed to further reduce the risk of personal injury or damage to the computer. Be certain to read the general precautions below and to note the cautions included in the text of the manual.
Stress injury
Carefully read the Safety Instruction Manual. It contains information on prevention of stress injuries to your hands and wrists than can be caused by extensive keyboard use. The User's Guide also includes information on work space design, posture and lighting that can help reduce physical stress.
Heat Warning
The base of the PC can become very warm; while the temperature will not be too hot to the touch, prolonged physical contact may result in a temporary heat imprint on the skin. It is recommended that prolonged physical contact is avoided.
Also, if the computer has been used for a long time, avoid direct contact with the metal plate supporting the I/O ports. It can become hot.
Mobile phones
Use of mobile phones can interfere with the PC sound system. The PC operation is not impaired but it is recommended that a distance of 30cm is maintained between the PC & the mobile phone.
Pressure or impact damage
Do not apply heavy pressure to the computer or subject it to strong impact. Excessive pressure or impact can cause damage to computer components or otherwise cause malfunctions.
PC card overheating
Some PC cards can become hot with prolonged use. If two cards are installed, both can become hot even if only one is used extensively. Overheating of a PC card can result in errors or instability in the PC card operation. Also, be careful when you remove a PC card that has been used for a long time.

v
EU Declaration of Conformity
Toshiba declares, that this conforms to the following Standards:
"The product complies with the requirements of the Low Voltage Directive 73/ 23/EEC and the EMC Directive 89/336/EEC."
This product carries the CE-Mark in accordance with the related European Directives. CE-Marking is the responsibility of Toshiba Europe, Hammfelddamm 8, 41460 Neuss, Germany.
Working environment
This product was designed to fulfil the EMC (electromagnetic compatibility) requirements to be observed for so-called "Residential, commercial and light industry environments".
Toshiba do not approve the use of this product in working environments other than the above mentioned "Residential, commercial and light industry environments".
For example, the following environments are not approved:
Industrial Environments (environments with a mains voltage >230V~)
Medical Environments
Automotive Environments
Aircraft Environments
If this product is supplied with a network port, please refer to the paragraph "Network connection".
Any consequences resulting from the use of this product in working environments that are not approved are not the responsibility of Toshiba Europe GmbH.
The consequences of the use of this product in non-approved working environments may be:

vi
Interference with other devices or machines in the near surrounding area
Malfunction of, or data loss from, this product caused by disturbances generated by other devices or machines in the near surrounding area
Therefore Toshiba strongly recommend that the electromagnetic compatibility of this product should be suitably tested in all non-approved working environments before use. In the case of automobiles or aircraft, the manufacturer or airline respectively should be asked for permission before use of this product.
Furthermore, for general safety reasons, the use of this product in environments with explosive atmospheres is not permitted.
Network connection (class A warning)
If this product has networking capabilities and will be connected to a network, Class A radiation limits will be observed (in accordance with technical conventions). This means that if the product will be used in a domestic environment, other devices in the near surrounding may suffer interference. Consequently, please do not use this product in such environments (for example a living room), otherwise you could be held responsible for any ensuing interference.
CE compliance
This product and the original options are designed to observe the related EMC (Electromagnetic compatibility) and safety standards. However, Toshiba should not guarantee that this product still observes these EMC standards if options or cables not produced by Toshiba are connected or implemented. In this case the persons who have connected/ implemented those options / cables have to assure that the system (PC plus options / cables) still fulfils the required standards. To avoid in general EMC problems following advice should be observed:
Only CE marked options should be connected / implemented
Only best shielded cables should be connected
Conformity Statement
The equipment has been approved to [Commission Decision "CTR21"] for panEuropean single terminal connection to the Public Switched Telephone Network (PSTN).

vii
However, due to differences between the individual PSTNs provided in different countries the approval does not, of itself, give an unconditional assurance of successful operation on every PSTN network termination point.
In the event of problems, you should contact your equipment supplier in the first instance.
Network Compatibility Statement
This product is designed to work with, and is compatible with the following networks. It has been tested to and found to conform with the additional requirements contained in EG 201 121.
Germany |
- ATAAB AN005, AN006, AN007, AN009, AN010, and |
|
DE03, 04, 05, 08, 09, 12, 14, 17 |
Greece |
- ATAAB AN005, AN006 and GR01, 02, 03, 04 |
Portugal |
- ATAAB AN001, 005, 006, 007, 011 and P03, 04, 08, 10 |
Spain |
- ATAAB AN005, 007, 012, and ES01 |
Switzerland |
- ATAAB AN002 |
All other countries |
- ATAAB AN003, 004 |
Specific switch settings or software setup are required for each network.
The hookflash (timed break register recall) function is subject to separate national type approval. It has not been tested for conformity to national type regulations, and no guarantee of successful operation of that specific function on specific national networks can be given.
Copyright
This guide is copyrighted by Toshiba Corporation with all rights reserved. Under the copyright laws, this guide cannot be reproduced in any form without the prior written permission of Toshiba. No patent liability is assumed, however, with respect to the use of the information contained herein.
© 2000 by Toshiba Corporation. All rights reserved.

viii
Notice
The information contained in this manual, including but not limited to any product specifications, is subject to change without notice.
TOSHIBA CORPORATION (TOSHIBA) PROVIDES NO WARRANTY WITH REGARD TO THIS MANUAL OR ANY OTHER INFORMATION CONTAINED HEREIN AND HEREBY EXPRESSLY DISCLAIMS ANY IMPLIED WARRANTIES OF MERCHANTABILITY OR FITNESS FOR ANY PARTICULAR PURPOSE WITH REGARD TO ANY OF THE FOREGOING. TOSHIBA ASSUMES NO LIABILITY FOR ANY DAMAGES INCURRED DIRECTLY OR INDIRECTLY FROM ANY TECHNICAL OR TYPOGRAPHICAL ERRORS OR OMISSIONS CONTAINED HEREIN OR FOR DISCREPANCIES BETWEEN THE PRODUCT AND THE MANUAL. IN NO EVENT SHALL TOSHIBA BE LIABLE FOR ANY INCIDENTAL, CONSEQUENTIAL, SPECIAL, OR EXEMPLARY DAMAGES, WHETHER BASED ON TORT, CONTRACT OR OTHERWISE, ARISING OUT OF OR IN CONNECTION WITH THIS MANUAL OR ANY OTHER INFORMATION CONTAINED HEREIN OR THE USE THEREOF.
Trademarks
Satellite, Noteworthy, and AccuPoint are registered trademarks, SecureSleep is a trademark, and InTouch is a service mark of Toshiba America Information Systems, Inc. and/or Toshiba Corporation.
AMD and K6-2 are registered trademarks of Advanced Micro Devices.
Microsoft, MS-DOS, Windows, NetMeeting, and Outlook are registered trademarks of Microsoft Corporation.
Photo CD is a trademark of Eastman Kodak.
PS/2 is a trademark of International Business Machines Corporation.
SoundBlaster is a registered trademark of Creative Technology, Ltd.
All other brand and product names are trademarks or registered trademarks of their respective companies.

Contents |
|
Part I: Getting To Know Your Computer |
|
Chapter 1: Finding Your Way Around........................................ |
1 |
Front with the display closed.................................................. |
1 |
Left side.................................................................................... |
2 |
Right side................................................................................. |
3 |
Back.......................................................................................... |
4 |
Underside................................................................................. |
5 |
Front with the display open.................................................... |
6 |
System indicator panel....................................................... |
7 |
Chapter 2: |
|
Getting Started .......................................................................... |
11 |
Making sure you have everything........................................ |
11 |
Selecting a place to work...................................................... |
11 |
Creating a computer-friendly environment..................... |
11 |
Keeping yourself comfortable.......................................... |
12 |
Other precautions.................................................................. |
15 |
Setting up your computer..................................................... |
16 |
Connecting the AC adapter .............................................. |
17 |
ix

x |
|
Charging the battery......................................................... |
18 |
Connecting a printer (optional)........................................ |
19 |
Adding memory (optional)................................................... |
20 |
Installing a memory module............................................ |
20 |
Removing a memory module......................................... |
22 |
Connecting a mouse............................................................. |
23 |
Using a serial mouse........................................................ |
23 |
Using a PS/2 mouse ........................................................ |
23 |
Using the computer for the first time.................................. |
24 |
Opening the display panel................................................ |
24 |
Turning on the computer for the first time..................... |
25 |
Adjusting brightness and contrast.................................. |
26 |
Using the AccuPoint pointing device.............................. |
26 |
Registering your computer.............................................. |
29 |
Chapter 3: Learning the Basics................................................ |
31 |
Precautions............................................................................ |
31 |
Computing tips...................................................................... |
32 |
Using the keyboard............................................................... |
33 |
Character keys .................................................................. |
33 |
Ctrl, Fn, and Alt keys......................................................... |
34 |
Function keys.................................................................... |
34 |
Windows special keys...................................................... |
34 |
Overlay keys...................................................................... |
35 |
Starting a program................................................................ |
36 |
Starting a program from the Start menu........................ |
36 |
Starting a program from Explorer................................... |
37 |
Starting a program from Run menu on the taskbar...... |
37 |
Saving your work.................................................................. |
38 |
Printing your work................................................................ |
39 |
Backing up your files ............................................................ |
40 |
Copying to a diskette........................................................ |
40 |
Using the Backup Wizard................................................. |
40 |
Using compact discs............................................................ |
41 |
|
xi |
Inserting compact discs into the CD-ROM drive |
........... 42 |
Removing a CD with the computer on ........................... |
43 |
Removing a CD with the computer off........................... |
43 |
Caring for compact discs................................................. |
43 |
Using PC Cards ..................................................................... |
44 |
Inserting PC Cards............................................................ |
45 |
Removing PC Cards......................................................... |
46 |
Hot swapping.................................................................... |
47 |
Using your computer at the office....................................... |
48 |
Using a computer lock.......................................................... |
48 |
Setting up for communications........................................... |
49 |
Connecting the modem to a telephone line.................... |
50 |
Connecting your computer to a network........................ |
50 |
Connecting directly to a remote computer ......................... |
51 |
File transfer protocols....................................................... |
52 |
Toshiba’s online resources ................................................... |
52 |
Turning off the computer...................................................... |
52 |
Caring for your computer..................................................... |
53 |
Cleaning the computer..................................................... |
53 |
Moving the computer....................................................... |
54 |
Restoring the preinstalled software..................................... |
54 |
Restoring the complete system....................................... |
54 |
Restoring Toshiba utilities and drivers............................ |
55 |
Chapter 4: Mobile Computing.................................................. |
57 |
Toshiba’s energy-saver design............................................. |
57 |
Managing power usage........................................................ |
58 |
Running the computer on battery power............................ |
58 |
Using additional battery packs......................................... |
59 |
Battery safety precautions ............................................... |
59 |
Maximizing battery life...................................................... |
59 |
Charging batteries................................................................. |
60 |
Charging the main battery................................................ |
60 |
Charging the RTC battery................................................. |
61 |

xii |
|
Using a battery charger.................................................... |
62 |
Monitoring battery power..................................................... |
62 |
Determining remaining battery power............................ |
62 |
Conserving battery power ............................................... |
63 |
What to do when the battery runs low........................... |
63 |
Changing the main battery................................................... |
65 |
Removing the battery ...................................................... |
65 |
Inserting a charged battery.............................................. |
66 |
Disposing of used batteries safely....................................... |
67 |
Traveling tips.......................................................................... |
67 |
Part II: Technical Reference |
|
Chapter 5: Exploring Your Options.......................................... |
73 |
Adding a printer..................................................................... |
73 |
Personalizing your desktop.................................................. |
76 |
Customizing the taskbar .................................................. |
77 |
Emulating a full-size keyboard............................................. |
77 |
Using MS-DOS programs.................................................... |
78 |
Chapter 6: If Something Goes Wrong..................................... |
81 |
Problems that are easy to fix................................................ |
82 |
Problems when you turn on the computer........................ |
84 |
Fixing device-related problems............................................ |
85 |
Memory card problems .................................................. |
85 |
Power problems .............................................................. |
86 |
Keyboard problems.......................................................... |
87 |
AccuPoint problems......................................................... |
88 |
Display problems ............................................................. |
89 |
Disk drive problems ........................................................ |
91 |
CD-ROM drive problems................................................. |
93 |
Sound system problems ................................................ |
94 |
PC Card problems ........................................................... |
95 |
Printer problems .............................................................. |
97 |

|
xiii |
Modem problems ............................................................ |
98 |
Develop good computing habits.......................................... |
99 |
If you need further assistance............................................ |
100 |
Before you call................................................................. |
100 |
Contacting Toshiba......................................................... |
101 |
Part III: Appendixes |
|
Appendix A: Hot Keys............................................................. |
105 |
Appendix B: Features and Specifications.............................. |
109 |
Certification...................................................................... |
114 |
Optional accessories and devices.................................. |
115 |
Appendix C: Power Cable Connectors.................................. |
117 |
Appendix D: Video Modes ..................................................... |
119 |
Appendix E: International Warranty....................................... |
125 |
What the warranty covers.............................................. |
125 |
Toshiba's Worldwide Computer Representatives........ |
127 |
Toshiba addresses for the Internet/World Wide Web.. 130 |
|
Toshiba Bulletin Board Service addresses in Europe .. |
130 |
Appendix F: If your computer is stolen................................. |
133 |
Index......................................................................................... |
137 |

This guide . . . . . . . . . . . . . . . . . . . . . . . . . . . . . . . . . . . . . . . . . . . . . . . . . . . xv Safety icons . . . . . . . . . . . . . . . . . . . . . . . . . . . . . . . . . . . . . . . . . . . . . . . . . xvi Other documentation . . . . . . . . . . . . . . . . . . . . . . . . . . . . . . . . . . . . . . . . . xvii Service options . . . . . . . . . . . . . . . . . . . . . . . . . . . . . . . . . . . . . . . . . . . . . xviii

Introduction
Welcome to the world of portable computing. With your new Toshiba Satellite® computer, your work can accompany you wherever you go.
Satellite 1620CDS and 1640CDT computers provide fast and easy Internet access. Microsoft® Windows® 98 Second Edition is already installed on your computer. It offers exciting new features and easy Internet access.
This guide
This guide introduces the computer’s features. You can:
Read the entire guide from beginning to end.
Skim through and stop when a topic interests you.
Use the table of contents and the index to find specific information.
If you are new to computers, or have not used a notebook computer before, read through the first couple of chapters to familiarize yourself with the parts of the computer and how to turn it on. After that, seek out whatever interests you most.
xv
xvi
Safety icons
This manual contains safety instructions that must be observed in order to avoid potential hazards that could result in personal injuries, damage to your equipment, or loss of data. The safety cautions have been classified according to the seriousness of the risk, and the following icons highlight these instructions as follows:
DANGER: This icon indicates the existence of a hazard that could result in death or serious bodily injury if the safety instruction is not observed.
WARNING: This icon indicates the existence of a hazard that could result in bodily injury if the safety instruction is not observed.
CAUTION: This icon indicates the existence of a hazard that could result in damage to equipment or property if the safety instruction is not observed.
NOTE: This icon indicates information that relates to the safe operation of the equipment or related items.
xvii
Other icons used
Additional icons highlight other helpful or educational information:
TECHNICAL NOTE: This icon provides technical information about the unit.
HINT: This icon denotes helpful hints and tips.
DEFINITION: This icon indicates the definition of a term used in the text.
Other documentation
Your computer comes with the following documentation:
This user’s guide, which contains technical information about how the computer works.
Safety Instruction manual.
The Windows 98 Second Edition documentation which explains the features of the Microsoft Windows 98 Second Edition operating system.

xviii
Service options
Toshiba offers a full line of service options built around its warranty programs. See the warranty and service material included with your computer for registration information.
If you have a problem or need to contact Toshiba, see Appendix E.

xix
PART I
GETTING TO KNOW YOUR
COMPUTER
What is in Part I
This part is designed to give a quick overview of your computer. Many details and all technical information can be found in Parts II and III. Do not hesitate to skip around. This user’s guide was not meant to be read from cover to cover.
xxi

Chapter 1
Front with the display closed . . . . . . . . . . . . . . . . . . . . . . . . . . . . . . . . . . . . |
1 |
Left side . . . . . . . . . . . . . . . . . . . . . . . . . . . . . . . . . . . . . . . . . . . . . . . . . . . . . |
2 |
Right side . . . . . . . . . . . . . . . . . . . . . . . . . . . . . . . . . . . . . . . . . . . . . . . . . . . . |
3 |
Back . . . . . . . . . . . . . . . . . . . . . . . . . . . . . . . . . . . . . . . . . . . . . . . . . . . . . . . . |
4 |
Underside . . . . . . . . . . . . . . . . . . . . . . . . . . . . . . . . . . . . . . . . . . . . . . . . . . . . |
5 |
Front with the display open . . . . . . . . . . . . . . . . . . . . . . . . . . . . . . . . . . . . . |
6 |
FindingYourWay
Around
This chapter presents a “grand tour” of your Satellite computer with illustrations to guide you along your way. It serves as a reference when you need to locate specific parts of the computer.
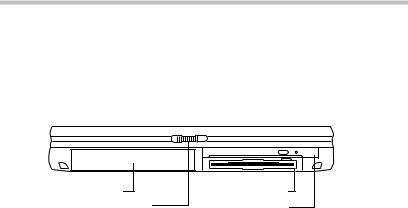
Front with the display closed
Battery |
Diskette drive |
Display latch |
CD-ROM drive |
The display latch keeps the display panel closed and locked. To open the display panel, slide the latch to the right and raise the panel.
The diskette drive allows you to use either high-density or double-density 3.5-inch diskettes.
The CD-ROM drive allows you to install and run programs from application CDs. You can also use it to play audio, and view video and PhotoCD™ discs.
1
2 |
Finding Your Way Around |
Left side |
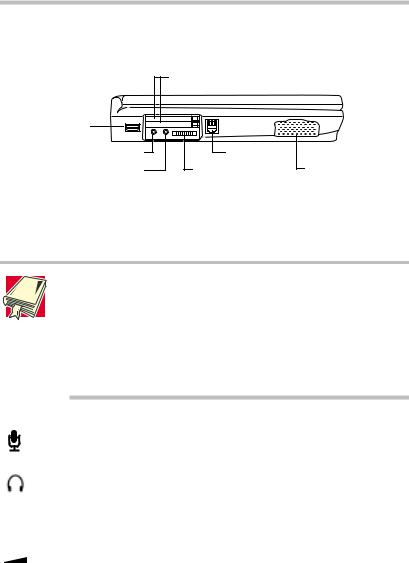
Left side
|
PC Card slots (2) |
|
USB port |
|
|
Microphone jack |
Modem jack |
|
Headphone jack |
Volume control dial |
Speaker |
The USB (Universal Serial Bus) port allows you to connect USB peripherals to your computer, such as a keyboard, pointing device or monitor.
DEFINITION: USB is a peripheral expansion standard that supports a data-transfer rate of up to 12 Mbps. USB peripherals have a single standard for cables and connectors.
The USB standard allows you to install and remove USB devices while the computer is on. Switching devices without turning off the computer is called “hot swapping.”
The 3.5 mm microphone jack lets you connect an external monaural microphone or other audio-input device.
The 3.5 mm headphone jack lets you connect stereo headphones or other audio-output device, such as external speakers. Connecting headphones or other devices to this jack automatically disables the internal speakers.
The volume control dial lets you adjust the loudness of the system speakers.
The modem jack lets you use a modular phone cable to connect the modem directly to a standard telephone outlet.
Part I: Getting to Know Your Computer

Finding Your Way Around |
3 |
Right side |
The two stacked CardBus-ready PCMCIA-compatible PC Card slots allow you to install additional devices. Each slot can accommodate a Type I or Type II PC Card. Both slots are required to install a Type III PC Card.
CAUTION: Keep foreign objects out of the PC Card slots. A pin or similar object that accidentally gets into a slot can damage the computer's circuitry.
The left stereo speaker lets you hear the computer’s audio output—such as system alarms associated with your software and music from audio CDs.
Right side
Shutdown button
Speaker
Security lock slot
PS/2 port
The security lock slot allows you to attach an optional computer cable lock to secure the computer to a large, heavy object, such as your desk.
The PS/2™ port allows you to connect an optional PS/2- compatible mouse or external keyboard. You can attach an optional Y-cable that allows you to use a PS/2 mouse and a PS/2 keyboard simultaneously.
The Shutdown button allows you to turn off the computer when it is not responding to the keyboard. Pressing this button overrides the Windows 98 Second Edition Power Options settings. Use this
Part I: Getting to Know Your Computer
4 |
Finding Your Way Around |
Back |
button only if all other attempts at turning off the computer have failed.
CAUTION: Do not use a pencil to press the Shutdown button. Pencil lead can break off inside the computer and damage it. Instead, use a slim object such as a straightened paper clip.
The right stereo speaker lets you hear the computer’s audio output—such as system alarms associated with your software and music from audio CDs.
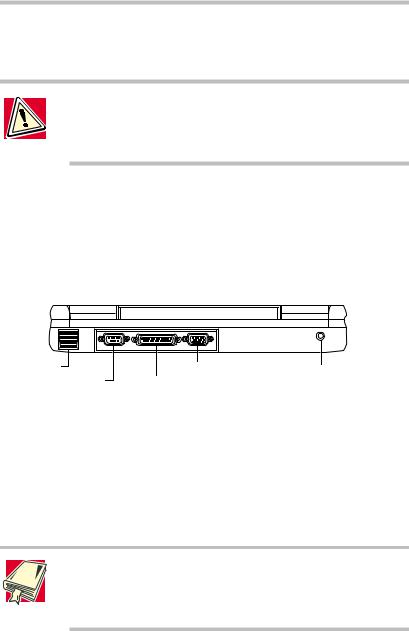
Back
Fan |
Video port |
DC IN socket |
Serial port |
Parallel port |
|
The fan prevents the computer’s central processing unit (CPU) and internal electronic components from overheating.
The serial port lets you connect a serial mouse, serial printer, or other serial device.
The parallel port lets you connect a parallel printer, or other parallel device, including ECP-compatible devices.
DEFINITION: ECP (Extended Capabilities Port) is a parallelport standard for PCs that support bi-directional communication between the PC and attached devices (such as a printer).
The video port allows you to connect an external monitor.
Part I: Getting to Know Your Computer

Finding Your Way Around |
5 |
Underside |
The DC IN socket is where you plug in the AC adapter.
CAUTION: To prevent possible overheating of the CPU, avoid blocking the fan vents.
Underside
Memory slot cover
Battery release latch
Battery
The memory slot cover protects the expansion memory module.
The battery provides DC power to the computer.
The battery release latch secures the battery to the computer and prevents it from falling out.
Part I: Getting to Know Your Computer
6 |
Finding Your Way Around |
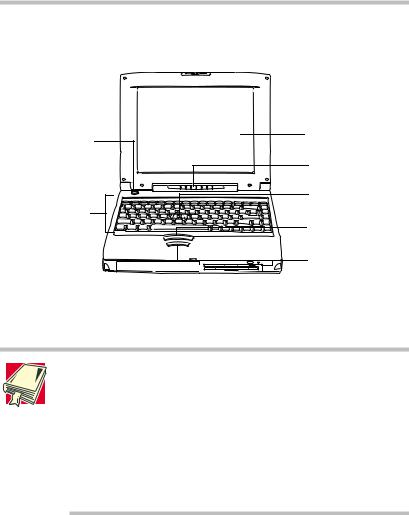
Front with the display open |
Front with the display open
Power |
Screen |
|
button |
|
|
|
Status panel |
|
|
AccuPoint |
|
Keyboard |
pointing device |
|
Primary control |
||
|
||
|
button |
|
|
Secondary control |
|
|
button |
The screen is a 12.1-inch diagonal, DSTN or TFT color liquid crystal display (LCD) with 800 x 600 resolution.
DEFINITION: DSTN (Double-layer SuperTwist Nematic) is a passive-matrix LCD technology that uses two display layers to counteract the color shifting that occurs with conventional supertwist displays.
TFT (Thin Film Transistor) is a type of LCD flat-panel display screen in which each pixel is controlled by from one to four transistors. Screens with TFT technology (sometimes called active-matrix LCDs) provide the best resolution of all the flat-panel displays.
The power button turns the computer on and off.
The keyboard provides all the functionality of a full-size keyboard.
The front panel provides a palm rest to assist you in maintaining proper posture while using the computer.
The function keys, when used with the Fn key, activate various system functions, such as access to the Internet.
Part I: Getting to Know Your Computer
Finding Your Way Around |
7 |
Front with the display open |
The computer’s pointing device comprises an AccuPoint pointing device and two control buttons. The AccuPoint allows you to position the cursor on the screen. The control buttons work with the AccuPoint. The larger button acts as the primary button on a mouse. The smaller button acts as the secondary mouse button.
The lights on the status panel provide information about various keyboard and system functions.
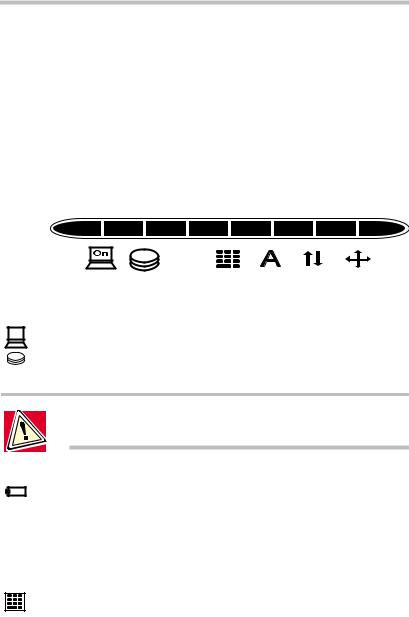
System indicator panel
|
|
|
|
|
|
|
|
|
|
|
|
|
|
|
|
|
|
|
|
|
|
|
|
|
|
|
|
|
|
|
|
|
|
|
On/off Hard disk Battery |
Numeric |
Caps |
Scroll |
Cursor |
|||||||||||
|
drive |
mode |
lock |
lock |
control |
|||||||||||
On |
The on/off light glows green when the computer is on. |
|
|
|
||||||||||||
The hard disk drive light flashes green when the hard disk drive is being accessed.
CAUTION: Never turn off the computer while any of the drives are in use. Doing so may result in a loss of data.
The battery light indicates the main battery’s current charge. It glows green when the battery is fully charged. It flashes green while the battery is being charged. It glows red when the charge is below 10 percent. It flashes red when the charge reaches 2 percent. It does not glow if the external power source is disconnected or if the battery is completely discharged.
The numeric mode light glows when the numeric overlay is on. When this light is on, pressing an overlay key displays the number printed on the right front of the key instead of the letter printed on the top of the key.
Part I: Getting to Know Your Computer

8 |
Finding Your Way Around |
Front with the display open |
The caps lock light glows when you press the Caps Lock key. When this light is on, pressing a letter key on the keyboard produces an uppercase (capital) letter.
The scroll lock light glows when the scroll lock function is active. The scroll lock key temporarily prevents the display from updating and controls the way the cursor control keys work with some programs. It’s up to the program to implement this behavior. Many programs ignore the scroll lock setting.
The cursor control mode light glows when the cursor control overlay is on. When this light is on, pressing an overlay key moves the cursor in the direction of the white arrow printed on the left top of the key instead of the letter printed on the key.
Part I: Getting to Know Your Computer
 Loading...