


OWNER’S MANUAL
AIR CONDITIONER (SPLIT TYPE)
For general public use
Indoor unit
RAS-107, 137, 167SKV Series
Outdoor unit
RAS-107, 137, 167SAV Series
ENGLISH
ESPAÑOL
FRANÇAIS
ITALIANO
DEUTSCH PORTUGUÊS POLSKI
ČESKY HRVATSKI MAGYAR NEDERLANDS
ΕΛΛΗΝΙΚΑ
SVENSKA
SUOMI
NORSK
DANSK
ROMÂNĂ
БЪЛГАРСКИ
EESTI LATVISKI SLOVENČINA SLOVENŠČINA
1110250170
1110250170_EN.indd 1 |
12/23/09 3:46:23 PM |
PRECAUTIONS FOR SAFETY
|
• Do not install, repair, open or remove the cover. It may expose you |
|
to dangerous voltages. Ask the dealer or the specialist to do this. |
|
• Turning off the power supply will not prevent potential electric |
|
shock. |
DANGER |
• The appliance shall be installed in accordance with national wiring |
regulation. |
|
• Means for disconnection from the supply having a contact |
|
|
separation of at least 3 mm in all poles must be incorporated in the |
|
fixed wiring. |
|
|
|
• Do not expose your body directly to cool air for a long time. |
|
• Do not insert your finger or any article into the air inlet/outlet. |
|
• When an abnormality (burning smell, etc.) occurs, stop the air |
|
conditioner and disconnect the power supply or turn off the |
|
breaker. |
|
• This appliance is not intended for use by persons (including |
WARNING |
children) with reduced physical, sensory or mental capabilities, or |
lack of experience and knowledge, unless they have been given |
|
|
supervision or instruction concerning use of the appliance by a |
|
person responsible for their safety. |
|
• Children should be supervised to ensure that they do not play with |
|
the appliance. |
|
• Do not wash the unit with water. It may cause an electric shock. |
|
• Do not use this air conditioner for other purposes such as |
|
preserving food, breeding animal, etc. |
|
• Do not step or put anything on the indoor/outdoor unit. It may |
|
cause an injury or damage the unit. |
|
• Do not touch aluminium fin because it may cause an injury. |
CAUTION |
• Before cleaning the unit, turn off the main switch or the circuit |
breaker. |
|
|
• When the unit won’t be used for a long time, turn off the main |
|
switch or the circuit breaker. |
|
• It is recommended that maintenance be performed by a specialist |
|
when the unit has been operated for a long time. |
|
|
1 INDOOR UNIT DISPLAY
Models: RAS-137, 167SKV Series |
|
|
||||||||||||||
|
|
|
|
|
|
|
|
|
|
|
|
|
|
|
1 |
Hi POWER (Green) |
|
|
|
|
|
|
|
|
|
|
|
|
|
|
|
||
Hi POWER |
|
FILTER |
PRE. DEF TIMER OPERATION |
2 FILTER (Orange) |
||||||||||||
|
|
|
|
|
|
|
|
|
|
|
|
|
|
|
3 |
PRE. DEF (DE-FROST) (Orange) |
|
|
|
|
|
|
|
|
|
|
|
|
|
|
|
||
|
|
|
|
|
|
|
|
|
|
|
|
|
|
|
4 |
TIMER (Yellow) |
|
|
|
|
|
|
|
|
|
|
|
|
RESET |
5 OPERATION (Green) |
|||
|
|
|
|
|
|
|
|
|
|
|
|
|
|
|
6 |
RESET button |
Models: RAS-107SKV Series |
|
|
||||||||||||||
|
|
CLEANING |
|
|
|
|
|
|
|
|
|
1 |
OPERATION (Green) |
|||
|
|
|
|
|
|
|
|
|
|
|
|
|
|
|
2 |
TIMER/CLEANING (Yellow) |
RESET |
|
TIMER |
OPERATION |
|
|
3 |
RESET button |
|||||||||
|
|
|
|
|
|
|
|
|
|
|
|
|
|
|
||
|
|
|
|
|
|
|
|
|
|
|
|
|
|
|
|
|
2 PREPARATION BEFORE USE
Preparing Filters
1.Open the air inlet grille and remove the air filters.
2.Attach the filters. (see detail in the accessory sheet).
Loading Batteries
1. Remove the battery cover.
A C L 2. Insert 2 new batteries (AAA type) following the (+) 


and (–) positions.
Clock Setup
1. Push CLOCK ● by tip of the pencil.
2. |
Press |
ON |
or |
OFF : adjust the time. |
3. |
Press |
SET |
: Set the time. |
|
Remote Control Reset
1. Remove the battery.
2. Press .
.
3. Insert the battery.
3 AIRFLOW DIRECTION
|
|
FIX |
|
1 |
Press |
: Move the louver in |
|
|
the desired vertical direction. |
|
|
|
|
|
|
|
|
SWING |
|
2 |
Press |
: Swing the air |
|
automatically and press again to |
|
||
|
stop. |
|
|
|
|
|
|
3 |
For horizontal direction, adjust |
|
|
manually. |
|
|
|
|
|
|
|
Note:
•Do not move the louver manually by others.
•The louver may automation positioning by come operation mode.
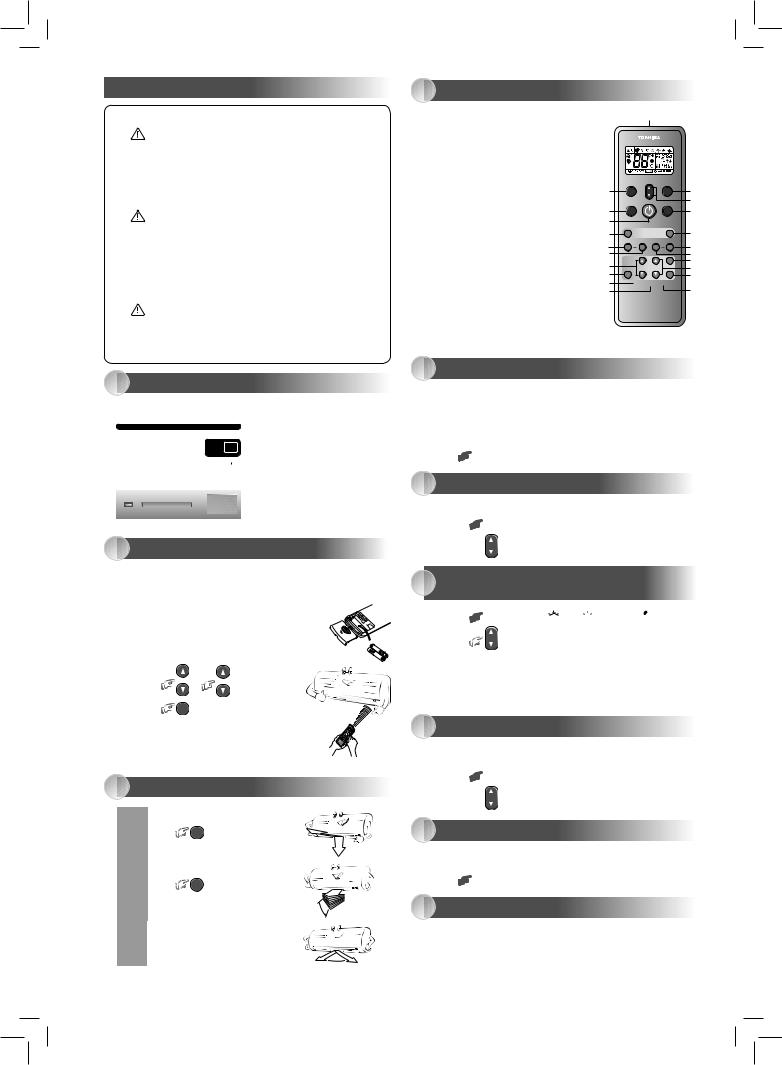
4 REMOTE CONTROL
1Infrared signal emitter
2Start/Stop button
3Mode select button (MODE)
4Temperature button (TEMP)
5Fan speed button (FAN)
6Swing louver button (SWING)
7Set louver button (FIX)
8On timer button (ON)
9Off timer button (OFF)
! Sleep timer button (SLEEP) " Setup button (SET)
# Clear button (CLR)
$ Memory and Preset button (PRESET) % One Touch button (ONE-TOUCH)
& High power button (Hi-POWER) ( Economy button (ECO)
) Quiet button (QUIET)
~ Comfort sleep button (COMFORT SLEEP) + Filter reset button (FILTER)
, Clock Reset button (CLOCK) - Check button (CHK)
02%3%4 &!.
4%-0
/.% 4/5#( -/$%
15)%4 |
#/-&/24 |
3,%%0 |
|
37).' &)8 |
(I 0/7%2 %#/ |
4)-%2 |
#,2 |
/. |
/&& |
3,%%0 |
3%4 |
#(+ &),4%2
 #,/#+
#,/#+
5 ONE-TOUCH
Press the “ONE-TOUCH” button for fully automated operation that is customised to the typical consumer preferences in your region of the world. The customised settings control temperature air flow strength, air flow direction and other settings to provide you alternate contact with “ONETOUCH” of the button. If you prefer other settings you can select from the many other operating functions of your Toshiba unit.
ONE-TOUCH
Press : Start the operation.
6 AUTOMATIC OPERATION
To automatically select cooling, heating, or fan only operation
MODE
1.Press : Select A.
2.Press  TEMP : Set the desired temperature.
7COOLING / HEATING / FAN ONLY OPERATION
MODE
1. Press : Select Cool
 , Heat


 , or Fan only
  .
.
2. Press |
TEMP |
: Set the desired temperature. |
Cooling: Min. 17°C, Heating: Max. 30°C, Fan Only:
No temperature indication
FAN
3.Press 
 : Select AUTO, LOW
  , LOW+
  , MED
, MED 
 , MED+
 , or HIGH

 .
.
8 DRY OPERATION
For dehumidification, a moderate cooling performance is controlled automatically.
MODE
1.Press : Select Dry
  .
.
2.Press TEMP : Set the desired temperature.
9 Hi-POWER OPERATION
To automatically control room temperature and airflow for faster cooling or heating operation (except in DRY and FAN ONLY mode)
Hi-POWER
Press : Start and stop the operation.
10 ECO OPERATION
To automatically control room to save energy (except in DRY and FAN ONLY mode)
ECO
Press : Start and stop the operation.
Note: Cooling operation; the set temperature will increase automatically 1 degree/hour for 2 hours (maximum 2 degrees increase). For heating operation the set temperature will decrease.
1110250170_EN.indd 2 |
12/23/09 3:46:29 PM |

11 TEMPORARY OPERATION
In case of the misplaced or discharged remote control
•Pressing the RESET button, the unit can start or stop without
using the remote control.
• Operation mode is set on AUTOMATIC operation, preset temperature is 25°C and fan operation is automatic speed.
12 |
TIMER OPERATION |
|
|
|
||||
|
|
|
|
|
||||
|
|
|
Setting the ON Timer |
Setting the OFF Timer |
||||
|
1 |
|
Press |
ON |
: Set the desired |
Press |
OFF : Set the desired |
|
|
|
|
|
|
ON timer. |
|
|
OFF timer. |
|
|
|
|
|
|
|
|
|
|
2 |
|
Press |
SET |
: Set the timer. |
Press |
SET |
: Set the timer. |
|
|
|
|
|
|
|
|
|
|
3 |
|
Press |
CLR |
: Cancel the |
Press |
CLR |
: Cancel the |
|
|
|
|
timer. |
|
|
timer. |
|
|
|
|
|
|
|
|
||
Daily timer allows the user to set both the ON & OFF timers and will be activated on a daily basis.
Setting Daily Timer
1 |
Press |
ON |
: Set the ON |
3 |
Press |
SET . |
|
|
|
timer. |
|
|
|
|
|
|
|
|
|
|
2 |
Press |
|
: Set the OFF |
4 |
Press |
SET button |
OFF |
during the ( |
or ) mark |
||||
|
|
|
timer. |
|
flashing. |
|
•During the daily timer is activating, both arrows ( ,
,  ) are indicated.
Note:
•Keep the remote control in accessible transmission to the indoor unit; otherwise, the time lag of up to 15 minutes will occur.
•The setting will be saved for the next same operation.
13 PRESET OPERATION
Set your preferred operation for future use. The setting will be memorized by the unit for future operation (except airflow direction).
1. Select your preferred operation.
PRESET
2. Press and hold for 3 seconds to memorize the setting. The P mark displays.
PRESET
3. Press 
 : Operate the preset operation.
14 AUTO RESTART OPERATION
To automatically restart the conditioner after the power failure (Power of the unit must be on.)
Setting
1.Press and hold the RESET button on the indoor unit for 3 seconds to set the operation. (3 beep sound and OPERATION lamp blink 5 time/sec for 5 seconds)
• Do not operate ON timer and OFF timer.
2.Press and hold the RESET button on the indoor unit for 3 seconds to cancel the operation. (3 beep sound but OPERATION lamp does not blink)
15 QUIET OPERATION
To operate at super low fan speed for quiet operation (except in DRY mode)
QUIET
Press : Start and stop the operation.
Note: Under certain conditions, QUIET operation may not provide adequate cooling or heating due to low sound features.
16 COMFORT SLEEP OPERATION
To save energy while sleeping, automatically control air flow and automatically turn OFF.
COMFORT
SLEEP
Press 
 : Select 1, 3, 5 or 9 hrs for OFF timer operation.
Note: The cooling operation, the set temperature will increase automatically 1 degree/hour for 2 hours (maximum 2 degrees increase). For heating operation, the set temperature will decrease.
17 SLEEP TIMER OPERATION
To start the sleep timer (OFF timer) operation
Press SLEEP : Select 1, 3, 5 or 9 hrs for OFF timer operation.
18 MAINTENANCE
 Firstly, turn off the circuit breaker.
Filter Reset (Some models only)
FILTER lamp lights on; the filter must be cleaned.
To turn off the lamp, push the RESET button on the indoor unit or the FILTER button on the remote control.
Indoor Unit and Remote Control
•Clean the indoor unit and the remote control with a wet cloth when needed.
•No benzine, thinner, polishing powder or chemically-treated duster.
19 SELF CLEANING OPERATION (COOL AND DRY OPERATION ONLY)
To protect bad smell caused by the humidity in the indoor unit.
1.If the  button is pressed once during “Cool” or “Dry” mode, the fan will continue to run for other 30 minutes, then it will turn off automatically. This will reduce the moisture in the indoor unit.
2.To stop the unit immediately, press the  more 2 times within 30 seconds.
20OPERATION AND PERFORMANCE
1.Three-minute protection feature: To prevent the unit from being activated for 3 minutes when suddenly restarted or switched to ON.
2.Preheating operation: Warm up the unit for 5 minutes before the heating operation starts.
3.Warm air control: When the room temperature reaches the set temperature, the fan speed is automatically reduced and the outdoor unit will stop.
4.Automatic defrosting: Fans will stop during defrost operation.
5.Heating capacity: Heat is absorbed from outdoors and released into the room. When the outdoor temperature is too low, use another recommended heating apparatus in combination with the air conditioner.
6.Consideration for accumulated snow: Select the position for outdoor unit where it will not be subjected to snow drifts, accumulation of leaves or other seasonal debris.
7.Some minor cracking sound may occur when unit operating. This is normal because the cracking sound may be caused by expansion/ contraction of plastic.
Note: Item 2 to 6 for Heating model
Air conditioner operating conditions
|
Temp. |
Outdoor Temperature |
Room Temperature |
Operation |
|
||
|
|
|
|
Heating |
|
–15°C ~ 24°C |
Less than 28°C |
Cooling |
|
–10°C ~ 46°C |
21°C ~ 32°C |
Dry |
|
–10°C ~ 46°C |
17°C ~ 32°C |
21 TROUBLESHOOTING (CHECK POINT)
The unit does not operate. |
Cooling or Heating is abnormally low. |
• The power main switch is |
• The filters are blocked with dust. |
turned off. |
• The temperature has been set |
• The circuit breaker is |
improperly. |
activated to cut off the power |
• The windows or doors are opened. |
supply. |
• The air inlet or outlet of the outdoor |
• Stoppage of electric current |
unit is blocked. |
• ON timer is set. |
• The fan speed is too low. |
|
• The operation mode is FAN or DRY. |
22 REMOTE CONTROL A-B SELECTION
To separate using of remote control for each indoor unit in case of 2 air conditioner are installed nearly.
Remote Control B Setup.
1.Press RESET button on the indoor unit to turn the air conditioner ON.
2.Point the remote control at the indoor unit.
3.Push and hold CHK ● button on the Remote Control by the tip of the pencil. “00” will be shown on the display.
MODE
4.Press during pushing CHK ●. “B” will show on the display and “00” will disappear and the air conditioner will turn OFF. The Remote Control B is memorized.
Note: 1. Repeat above step to reset Remote Control to be A.
2. Remote Control A has not “A” display.
3. Default setting of Remote Control from factory is A.
EN ES FR IT DE PT PL CZ CR HU NL GR SV FI NO DK RO BG EE LV SK SI
1110250170_EN.indd 3 |
12/23/09 3:46:31 PM |
PRECAUCIONES SOBRE SEGURIDAD
|
• No instale ni repare la unidad, ni abra o retire la tapa. Si lo hace, |
|
se expone a una descarga eléctrica. Solicite ayuda al distribuidor |
|
o a un especialista. |
|
• Aunque apague la fuente de alimentación no evitará una |
|
potencial descarga eléctrica. |
PELIGRO |
• Este aparato debe instalarse según las normas de instalación |
eléctrica de cada país. |
|
|
• En la instalación fija deben incorporarse dispositivos de |
|
desconexión del suministro eléctrico con una separación de |
|
contacto de 3 mm como mínimo en todos los polos. |
|
• No exponga el cuerpo directamente a la corriente de aire frío |
|
durante mucho tiempo. |
|
• No introduzca los dedos ni ningún artículo en la toma/salida de |
|
aire. |
|
• Cuando note alguna anomalía (olor a quemado, etc.), detenga |
|
el acondicionador de aire y desconecte la línea de alimentación |
|
principal o apague el disyuntor. |
ADVERTENCIAS |
• Este aparato no está pensado para ser utilizado por personas |
(incluyendo niños) con capacidades mentales, sensoriales o |
|
|
físicas reducidas, o falta de experiencia y conocimiento, a no ser |
|
que reciban la autorización al uso o vigilancia de una persona |
|
responsable por su seguridad. |
|
• Los niños deberían ser vigilados para asegurar que no jueguen |
|
con el aparato. |
|
• No lave la unidad con agua. Puede ocasionar una descarga |
|
eléctrica. |
|
• No utilice el acondicionador de aire para fines especiales tales |
|
como conservar alimentos, criar animales, etc. |
|
• No se pare sobre la unidad interior o exterior ni coloque nada |
|
sobre ella. Podría lesionarse o dañar la unidad. |
|
• No tocar la aleta de aluminio ya que podría causar una lesión. |
PRECAUCIÓN |
• Antes de limpiar la unidad, desconecte el interruptor principal o el |
disyuntor. |
|
|
• Cuando no se va a utilizar la unidad por un tiempo considerable, |
|
desconecte el interruptor principal o el disyuntor. |
|
• Se recomienda que el mantenimiento sea realizado por un |
|
especialista, cuando la unidad haya sido utilizada durante un |
|
largo período de tiempo. |
|
|
1 PANEL DE INDICACIÓN DE LA UNIDAD INTERIOR
Modelos: RAS-137, 167SKV Series |
|
|
||||||||||||
|
|
|
|
|
|
|
|
|
|
|
|
|
1 |
Hi POWER (Verde) |
|
|
|
|
|
|
|
|
|
|
|
|
|
||
Hi POWER |
FILTER |
PRE. DEF TIMER OPERATION |
2 FILTER (Naranja) |
|||||||||||
|
|
|
|
|
|
|
|
|
|
|
|
|
3 |
PRE. DEF (DE-FROST) (Naranja) |
|
|
|
|
|
|
|
|
|
|
|
|
|
||
|
|
|
|
|
|
|
|
|
|
|
|
|
4 |
TIMER (Amarilla) |
|
|
|
|
|
|
|
|
|
|
RESET |
5 OPERATION (Verde) |
|||
Modelos: RAS-107SKV Series |
6 |
Botón RESET |
||||||||||||
|
|
|||||||||||||
|
|
CLEANING |
|
|
|
|
|
|
|
|
1 |
OPERATION (Verde) |
||
|
|
|
|
|
|
|
|
|
|
|
|
|
2 |
TIMER/CLEANING (Amarilla) |
RESET |
TIMER |
OPERATION |
|
|
3 |
Botón RESET |
||||||||
|
|
|
|
|
|
|
|
|
|
|
|
|
||
|
|
|
|
|
|
|
|
|
|
|
|
|
|
|
2 PREPARATIVOS PREVIOS
Preparación de los filtros
1.Abra la rejilla de entrada de aire y extraiga los filtros de aire.
2.Fije los filtros. (ver detalles en la hoja complementaria)
Carga de las pilas
1. Retire la cubierta de la batería |
L |
|
AC |
2.Inserte 2 pilas nuevas (tipo AAA) en las posiciones correctas (+) y (–).
Configuración del reloj
1. Pulse CLOCK ● con la punta del lápiz.
2. Pulse |
ON o |
OFF : para configurar la |
hora. |
|
|
3. Pulse  SET : Ajuste el temporizador.
Reinicio del Control Remoto
1. Retire la batería. 2. Pulse 
 .
.
3. Introduzca la batería.
3 DIRECCIÓN DEL FLUJO DE AIRE
|
FIX |
|
|
1 |
Pulse |
: Mueva el deflector |
|
|
en la dirección vertical deseada. |
|
|
|
|
|
|
|
SWING |
|
|
2 |
Pulse |
: La dirección del |
|
flujo de aire oscila automáticamente; |
|
||
|
pulse de nuevo para detener. |
|
|
|
|
|
|
3 |
Ajuste la dirección horizontal |
|
|
manualmente. |
|
|
|
|
|
|
|
Nota:
•No mueva el deflector manualmente para otras direcciones.
•El deflector se posicionará de modo automático mediante el modo de operación.
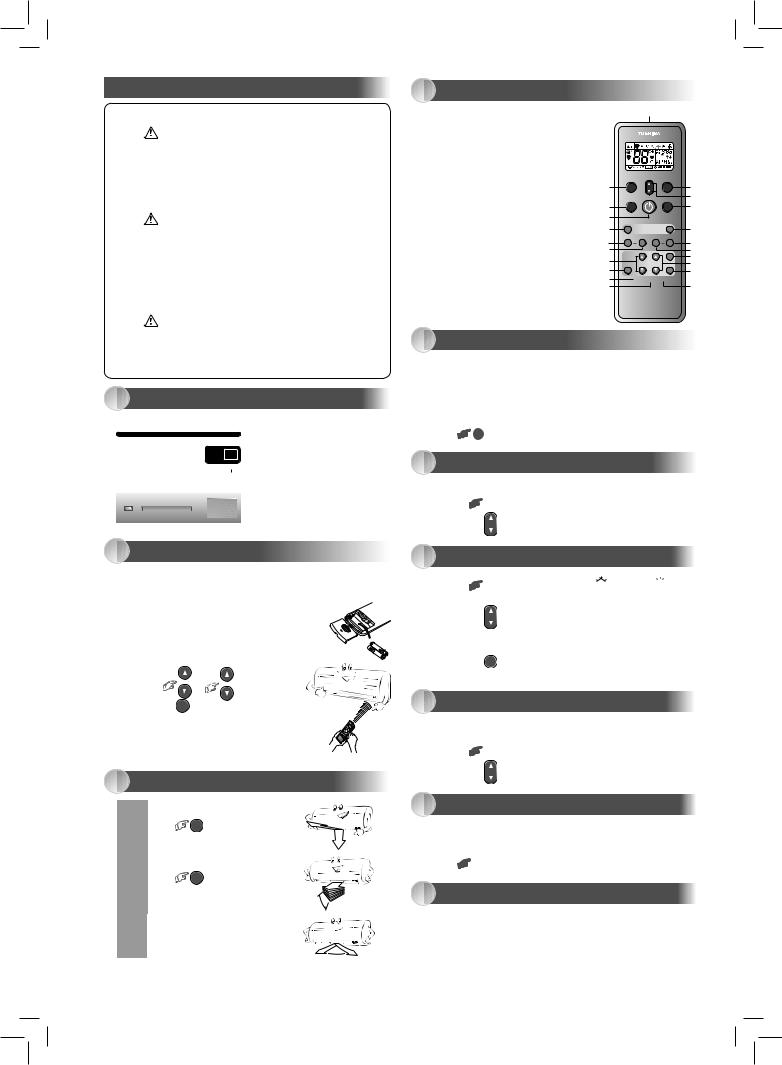
4 CONTROL REMOTO
1Emisor de señales infrarrojas
2Botón de funcionamiento/parada
3Botón selector de modo (MODE)
4Botón de temperatura (TEMP)
5Botón de velocidad del ventilador (FAN)
6Botón de rotación del deflector (SWING)
7Botón de ajuste de dirección (FIX)
8Botón del temporizador de encendido (ON)
9Botón del temporizador de apagado (OFF) ! Botón del temporizador de dormir (SLEEP) " Botón de Configuración (SET)
# Botón de borrado (CLR)
$ Botón de memoria y de presintonización (PRESET) % Botón de Único Toque (ONE-TOUCH)
& Botón de alta potencia (Hi-POWER) ( Botón de modo económico (ECO) ) Botón de silenciamiento (QUIET)
~ Botón de confort nocturno (COMFORT SLEEP) + Botón de reinicio de filtro (FILTER)
, Botón de reinicio de reloj (CLOCK) - Botón de comprobación (CHK)
02%3%4 &!.
4%-0
/.% 4/5#( -/$%
15)%4 |
#/-&/24 |
3,%%0 |
|
37).' &)8 |
(I 0/7%2 %#/ |
4)-%2 |
#,2 |
/. |
/&& |
3,%%0 |
3%4 |
#(+ &),4%2
 #,/#+
#,/#+
5 ONE-TOUCH
Pulse el botón “ONE-TOUCH” para una operación totalmente automática, personalizada según las preferencias por defecto del consumidor, de su zona del mundo. La configuración personalizada controla la fuerza de salida de la temperatura del aire, la dirección de salida del aire, y otras características para proporcionarle contacto alterno con “ONE-TOUCH” del botón. Si prefiere otra configuración, puede seleccionarla desde cualquier otra función operativa de su unidad Toshiba.
ONE-TOUCH
Pulse : Empezar la operación.
6 FUNCIONAMIENTO AUTOMÁTICO
Para seleccionar automáticamente la refrigeración, calefacción o ventilación
MODE
1.Pulse : Seleccione A.
2.Pulse  TEMP : Ajuste la temperatura deseada.
7 REFRIGERACIÓN / CALEFACCIÓN / VENTILACIÓN
MODE
1.Pulse : Seleccione Refrigeración
 , Calefacción


 , o Ventilación
  .
.
2.Pulse  TEMP : Ajuste la temperatura deseada.
Refrigeración: Mín. 17°C, Calefacción: Máx. 30°C, Ventilación: No hay
indicación de temperatura
FAN
3.Pulse 
 : Seleccione AUTO, LOW
  , LOW+
  , MED
, MED 
 , MED+
 , o HIGH

 .
.
8 FUNCIONAMIENTO DE DESHUMIDIFICACIÓN
Para la deshumidificación, el rendimiento de refrigeración moderado se controla automáticamente.
MODE
1.Pulse : Seleccione Deshumidificación
  .
.
2.Pulse TEMP : Ajuste la temperatura deseada.
9 FUNCIONAMIENTO DE ALTA POTENCIA (Hi-POWER)
Para controlar automáticamente la temperatura ambiente y circulación de aire para una refrigeración más rápida u operación de calefacción (excepto en modo DRY o FAN ONLY)
Hi-POWER
Pulse : Inicia y detiene el funcionamiento.
10 FUNCIONAMIENTO DEL TEMPORIZADOR ECO
Para controlar automáticamente la temperatura ambiente para ahorrar energía (excepto en modo DRY o FAN ONLY)
ECO
Pulse : Inicia y detiene el funcionamiento.
Nota: operación de refrigeración; la temperatura actual aumentará automáticamente 1 grado/ hora durante 2 horas (aumento máximo de 2 grados). Para la operación de calefacción, la temperatura actual disminuirá.
1110250170_ES.indd 4 |
12/23/09 3:54:20 PM |

11 FUNCIONAMIENTO TEMPORAL
Si pierde el control remoto o las pilas están agotadas
•Pulse el botón RESET para activar o detener la unidad sin necesidad de utilizar el control remoto.
• El modo de operación se configura en operación AUTOMATIC, la temperatura preconfigurada es de 25°C y la operación de ventilación tiene una velocidad utomática.
12 FUNCIONAMIENTO DEL TEMPORIZADOR
|
Temporizador ON (encendido) |
Temporizador OFF (apagado) |
||||||
1 |
Pulse |
ON |
: |
Ajuste el temporizador |
Pulse |
OFF |
: |
Ajuste el temporizador |
|
|
|
|
ON deseado. |
|
|
|
OFF deseado. |
2 |
Pulse |
SET |
: |
Ajuste el temporizador. |
Pulse |
SET |
: |
Ajuste el temporizador. |
3 |
Pulse |
CLR |
: |
Cancele el |
Pulse |
CLR |
: |
Cancele el |
|
|
|
|
temporizador. |
|
|
|
temporizador. |
El temporizador diario permite al usuario ajustar los temporizadores ON y OFF, y se activará a diario.
Ajuste del temporizador diario
1 |
Pulse |
ON |
: Ajuste el |
3 |
Pulse |
SET . |
|
|
|
temporizador ON. |
|
|
|
2 |
|
|
|
4 |
Pulse |
SET el botón |
Pulse |
OFF |
: Ajuste el |
mientras parpadea la flecha |
|||
|
|
|
temporizador OFF. |
|
( o |
). |
|
|
|
|
|
|
|
•Mientras se activa el temporizador diario, se muestran las dos flechas ( , ).
Nota:
•Tenga el control remoto donde sus señales puedan alcanzar el receptor de la unidad interior; de no ser así, las señales pueden tener un retraso de hasta 15 minutos.
•El ajuste se guardará para la próxima vez que se utilice esta función.
13 FUNCIONAMIENTO PREDEFINIDO
Ajuste la operación que prefiera para su uso en el futuro. La unidad memorizará el ajuste para cada modo de funcionamiento (excepto dirección del flujo de aire).
1. Seleccione la operación que prefiera.
|
PRESET |
2. Pulse y mantenga presionado |
durante 3 segundos para |
memorizar el ajuste. Se muestra la señal P.
PRESET
3. Pulse 
 : Se inicia el funcionamiento predefinido.
14 FUNCIONAMIENTO DE REINICIO AUTOMÁTICO
Para que el acondicionador de aire se reinicie tras una interrupción del suministro eléctrico (la unidad debe estar activada).
Ajuste
1.Mantenga pulsado el botón RESET de la unidad interior durante 3 segundos para realizar la operación. (3 pitidos y la luz de OPERATION parpadea 5 veces por segundo durante 5 segundos).
• No maneje el temporizador ON ni el temporizador OFF.
2.Mantenga pulsado el botón RESET de la unidad interior durante 3 segundos para cancelar la operación. (3 pitidos, pero la luz de OPERATION no parpadeará)
15 FUNCIONAMIENTO SILENCIOSO
Para funcionamiento a velocidad súper baja del ventilador en modo silencioso (excepto en modo DRY)
QUIET
Pulse : Inicia y detiene el funcionamiento.
Nota: Bajo ciertas condiciones, la operación QUIET no proporcionará una refrigeración o calefacción adecuada debido a las características de sonido bajo.
16 FUNCIONAMIENTO DE CONFORT NOCTURNO
Para ahorrar energía durante la noche, controle la salida de aire automáticamente y póngala en OFF.
COMFORT
SLEEP
Pulse 
 : Seleccione 1, 3, 5 o 9 horas para el temporizador de apagado.
Nota: La operación de refrigeración, la temperatura actual aumentará automáticamente 1 grado/hora durante 2 horas (incremento máximo de 2 grados). Para la operación de calefacción, la temperatura actual disminuirá.
17 FUNCIONAMIENTO DE TEMPORIZADOR NOCTURNO
Para iniciar el funcionamiento del temporizador nocturno (temporizador OFF) Pulse SLEEP : Seleccione 1, 3, 5 o 9 horas para el temporizador de apagado.
1110250170_ES.indd 5
18 MANTENIMIENTO
 Primero, desconecte el disyuntor.
Reinicio de Filtro (sólo en algunos modelos)
La luz FILTER se enciende; el filtro deberá limpiarse.
Para apagar la luz, pulse el botón RESET de la unidad interior o el botón FILTER del control remoto.
Unidad interior y control remoto
•Limpie la unidad interior y el control remoto con un paño húmedo cuando sea necesario.
•No utilice bencina, disolvente, crema para pulir ni un limpiador tratado químicamente.
19FUNCIONAMIENTO DE AUTOLIMPIEZA (SÓLO DURANTE REFRIGERACIÓN Y DESHUMIDIFICACIÓN)
Para evitar el mal olor que produce la humedad en la unidad interior
1.Si pulsa el botón  una vez durante el modo “Refrigeración” o “Deshumidificación”, el ventilador seguirá funcionando durante 30 minutos, tras los cuales se desactivará automáticamente. Esto reducirá la humedad de la unidad interior.
2.Para detener inmediatamente la unidad, pulse  2 veces más en 30 segundos.
20FUNCIONAMIENTO Y RENDIMIENTO
1.Función de protección de tres minutos: Para evitar que la unidad se active durante 3 minutos al ponerla en funcionamiento inmediatamente después de haberla parado o cuando ponga en ON el conmutador.
2.Funcionamiento de precalentamiento: Calienta la unidad durante 5 minutos antes que se active el funcionamiento de calefacción.
3.Control del aire caliente: Cuando la temperatura de la habitación alcance la temperatura establecida, la velocidad del ventilador se reducirá de forma automática y se detendrá la unidad exterior.
4.Desescarche automático: Los ventiladores se paran durante el funcionamiento de desescarche.
5.Capacidad de calefacción: Se absorbe el calor del exterior y se libera en la habitación. Cuando la temperatura exterior sea muy baja, utilice otro aparato de calefacción recomendado en combinación con el acondicionador de aire.
6.Consideración de la nieve acumulada: Seleccione para la unidad exterior una ubicación donde no esté sometida a nevadas, acumulación de hojas u otros residuos de temporada.
7.Puede producirse algún pequeño sonido de rotura durante el funcionamiento de la unidad. Esto es normal ya que el sonido de rotura podría causarse por la expansión/contracción de plástico.
Nota: Elementos 2 a 6 del modelo de calefacción
Condiciones de funcionamiento del acondicionador de aire
|
Temp. |
Temperatura |
Temperatura |
|
|
||
Funcionamiento |
|
exterior |
Ambiente |
|
|
|
|
Calefacción |
|
–15°C ~ 24°C |
Inferior a 28°C |
Refrigeración |
|
–10°C ~ 46°C |
21°C ~ 32°C |
Deshumidificación |
|
–10°C ~ 46°C |
17°C ~ 32°C |
21SOLUCIÓN DE PROBLEMAS (PUNTOS DE COMPROBACIÓN)
La unidad no funciona. |
La unidad no refrigera o calienta bien. |
|
|
• El interruptor principal |
• Los filtros están bloqueados por el polvo. |
de alimentación está |
• La temperatura no se ha ajustado |
desactivado. |
correctamente. |
• El disyuntor se ha activado |
• Hay puertas o ventanas abiertas. |
para interrumpir el suministro |
• La entrada o salida de aire de la unida |
eléctrico. |
exterior está bloqueada. |
• Interrupción de la corriente |
• La velocidad del ventilador es muy baja. |
eléctrica |
• El modo de funcionamiento es FAN o DRY. |
• El temporizador ON está |
|
ajustado. |
|
22 SELECCIÓN A-B DEL CONTROL REMOTO
Para separar utilizando el control remoto para cada unidad interior en el caso de que haya 2 unidades de aire acondicionado instaladas cerca.
Configuración B del Control Remoto
1.Pulse el botón RESET de la unidad interior para activar el aire acondicionado en ON.
2.Apunte el control remoto hacia la unidad interior.
3.Mantenga pulsado el botón CHK ● del Control Remoto con la punta
del lápiz. Aparecerá “00” en la pantalla.
|
|
MODE |
||||
4. Pulse |
mientras mantenga presionado CHK ●. Aparecerá “B” |
|||||
en la pantalla y “00” desaparecerá y el aire acondicionado se apagará. |
||||||
El Control Remoto B se memorizará. |
||||||
Nota: 1. |
Repita el paso de arriba para reiniciar el |
|||||
|
Control Remoto en A. |
|
||||
2. |
El Control Remoto A no dispone de “A”. |
|
|
|
|
|
3. |
La configuración por defecto de fábrica del |
|
||||
|
Control Remoto es la A. |
|
|
|
|
|
|
|
|
|
|||
|
|
12/23/09 |
||||
EN
ES
FR
IT
DE
PT
PL
CZ
CR
HU
NL
GR
SV
FI
NO
DK
RO
BG
EE
LV
SK
SI
3:54:23 PM

MESURES DE SECURITE
|
• N’essayez pas d’installer ou de réparer l’appareil vous-même, d’ouvrir |
|
ou de déposer le couvercle. Vous risqueriez d’être exposé à des |
|
tensions dangereuses. Confiez ces opérations à votre revendeur ou à |
|
un spécialiste. |
|
• La mise hors tension n’évite pas le risque d’électrocution. |
DANGER |
• L’ appareil doit être installé conformément à la réglementation nationale |
en vigueur pour le câblage. |
|
|
• Vous devez incorporer au câblage fixe un dispositif qui déconnecte |
|
l’alimentation et dont les contacts sont séparés d’au moins 3 mm à tous |
|
les pôles. |
|
• Evitez d’exposer directement votre corps à l’air froid pendant une |
|
période prolongée. |
|
• N’insérez pas les doigts ou tout autre objet dans l’entrée/sortie d’air. |
|
• En présence d’une anomalie (odeur de brûlé, etc.) arrêtez le climatiseur |
|
et débranchez l’alimentation ou mettez le disjoncteur hors tension. |
|
• Cet appareil n’est pas conçu pour être utilisé par des personnes (y |
AVERTISSEMENT |
compris les enfants) aux capacités physiques, sensorielles ou mentales |
diminuées, ou manquant d’expérience ou de connaissances, sauf si une |
|
|
personne responsable de leur sécurité leur a expliqué le fonctionnement |
|
de l’appareil et les garde sous surveillance. |
|
• Les enfants doivent être surveillés afin de garantir qu’ils ne jouent pas |
|
avec l’appareil. |
|
• Ne nettoyez pas l’appareil à l’eau. Cela risquerait de provoquer une |
|
électrocution. |
|
• N’utilisez pas le climatiseur à d’autres fins que la conservation des |
|
aliments, l’élevage d’animaux, etc. |
|
• Ne posez pas le pied ou tout autre objet sur l’unité intérieure/extérieure. |
|
Vous risqueriez de vous blesser ou d’ endommager l’unité. |
ATTENTION |
• Ne touchez pas à l’ailette en aluminium pour éviter de vous blesser. |
• Avant de nettoyer l’appareil, mettez hors tension l’interrupteur général |
|
ou le disjoncteur. |
|
|
• Lorsque vous envisagez de ne pas utiliser l’appareil pendant une |
|
période prolongée, désactivez l’interrupteur principal ou le disjoncteur. |
|
• Il est recommandé de confier l’entretien à un technicien spécialisé après |
|
que l’appareil ait été utilisé pendant une période prolongée. |
|
|
1 AFFICHAGE DE L’UNITE INTERIEURE
Modèles: RAS-137, 167SKV Series |
|
|
||||||||||||
|
|
|
|
|
|
|
|
|
|
|
|
|
1 |
Hi POWER (Vert) |
|
|
|
|
|
|
|
|
|
|
|
|
|
||
Hi POWER |
FILTER |
PRE. DEF TIMER OPERATION |
2 FILTER (Orange) |
|||||||||||
|
|
|
|
|
|
|
|
|
|
|
|
|
3 |
PRE. DEF (DE-FROST) (Orange) |
|
|
|
|
|
|
|
|
|
|
|
|
|
||
|
|
|
|
|
|
|
|
|
|
|
|
|
4 |
TIMER (Jaune) |
|
|
|
|
|
|
|
|
|
|
RESET |
5 OPERATION (Vert) |
|||
|
|
|
|
|
|
|
|
|
|
|
|
|
6 |
Touche RESET |
Modèles: RAS-107SKV Series |
|
|
||||||||||||
|
|
CLEANING |
|
|
|
|
|
|
|
|
1 |
OPERATION (Vert) |
||
|
|
|
|
|
|
|
|
|
|
|
|
|
2 |
TIMER/CLEANING (Jaune) |
RESET |
TIMER |
OPERATION |
|
|
3 |
Touche RESET |
||||||||
|
|
|
|
|
|
|
|
|
|
|
|
|
||
|
|
|
|
|
|
|
|
|
|
|
|
|
|
|
2 PREPARATION AVANT L’EMPLOI
Préparation des filtres
1.Ouvrez la grille d’entrée d’air et retirez les filtres à air.
2.Attachez les filtres. (voir les détails dans la fiche des accessoires).
Mise en place des piles
1.Retirez le couvercle du compartiment des piles.
2. Insérez deux piles neuves (type AAA) |
A |
|
CL |
en respectant les polarités (+) et (–). |
|
Réglage de l’heure |
|
1. Appuyez sur CLOCK • avec la pointe d’un stylo.
2. Appuyez sur |
ON ou |
OFF : réglez l’heure. |
3. Appuyez sur  SET : Programmez la minuterie.
Réinitialisation de la télécommande
1. Retirez la pile.
2. Appuyez sur 
 .
.
3. Insérez la pile.
3 DIRECTION DU FLUX D’AIR
|
FIX |
|
1 |
Appuyez sur |
: Pour bloquer |
le volet de soufflage dans la |
||
|
direction souhaitée. |
|
SWING
Appuyez sur 
 : Pour mettre 2 le volet de soufflage en balayage
automatique. Ré-appuyez pour l’arrêter.
3 |
Pour le réglage latéral, effectuez |
celui-ci manuellement. |
Remarque:
•Ne déplacez pas le volet de soufflage manuellement.
•Le volet de soufflage peut se positionner automatiquement par le biais d’un mode de fonctionnement.
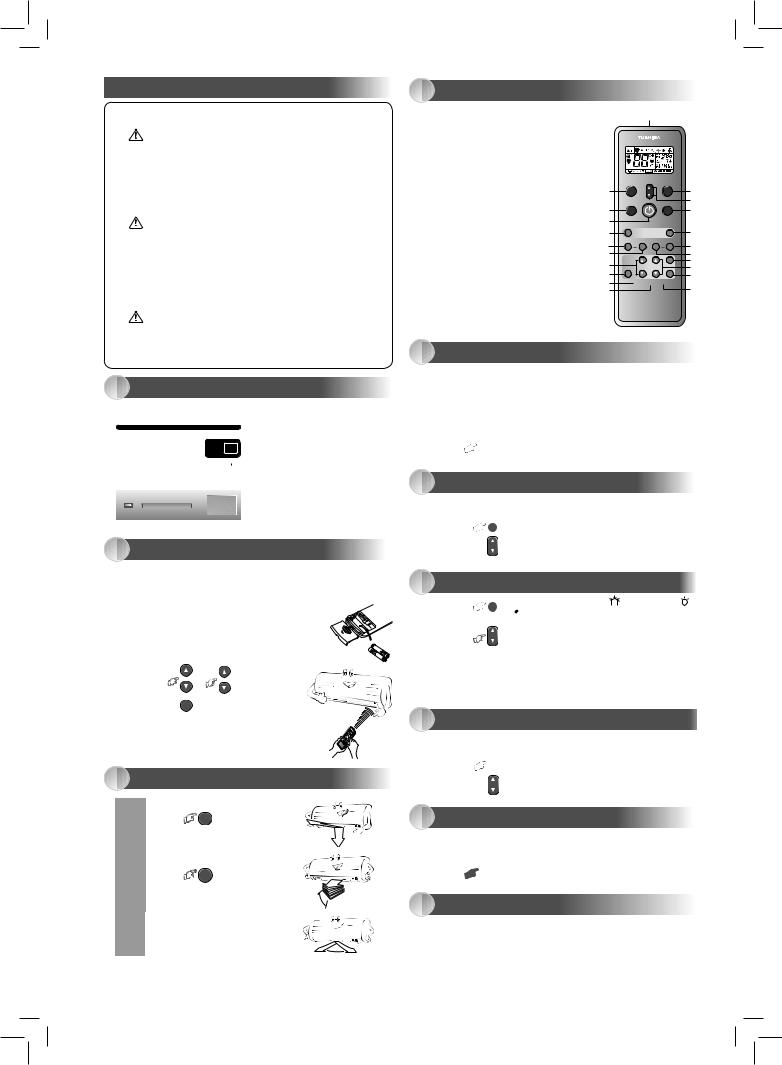
4 TÉLÉCOMMANDE
1Emetteur de signaux infrarouges
2Touche de marche/arrêt
3Touche de sélection de mode (MODE)
4Touche de réglage de la température (TEMP)
5Touche de vitesse de ventilation (FAN)
6Touche de balancement du volet de soufflage (SWING)
7Touche de réglage de la claire-voie (FIX)
8Touche de mise en marche de la minuterie (ON)
9Touche d’arrêt de la minuterie (OFF)
! Touche de minuterie d’arrêt automatique (SLEEP) " Touche de réglage (SET)
# Touche d’effacement (CLR)
$ Touche de mémoire et préréglage (PRESET) % Touche unique (ONE-TOUCH)
& Touche de boost de puissance (Hi-POWER) ( Touche d’économie (ECO)
) Touche de mode silencieux (QUIET)
~ Touche de confort nocturne (COMFORT SLEEP) + Touche de réinitialisation du filtre (FILTER)
, Touche de réinitialisation de l’horloge (CLOCK) - Touche de vérification (CHK)
02%3%4 &!.
4%-0
/.% 4/5#( -/$%
15)%4 |
#/-&/24 |
3,%%0 |
|
37).' &)8 |
(I 0/7%2 %#/ |
4)-%2 |
#,2 |
/. |
/&& |
3,%%0 |
3%4 |
#(+ &),4%2
 #,/#+
#,/#+
5 ONE-TOUCH
Appuyez sur la touche “ONE-TOUCH” pour un fonctionnement totalement automatique adapté aux préférences du consommateur dans votre région du monde. Les réglages personnalisés contrôlent la force du flux d’air
de température, la direction du flux d’air et d’autres réglages pour vous fournir un contact alterné avec la fonction “ONE-TOUCH” de la touche. Si vous préférez d’autres réglages, vous pouvez faire votre choix parmi les nombreuses fonctions d’exploitation de votre appareil Toshiba.
ONE-TOUCH
Appuyez sur : Démarrez le fonctionnement.
6 FONCTIONNEMENT AUTOMATIQUE
Ce mode sélectionne automatiquement le refroidissement, le chauffage ou le ventilateur uniquement, mais contrôle aussi la vitesse de ventilation
MODE
1.Appuyez sur : Sélectionnez A.
2.Appuyez sur  TEMP : Réglez la température souhaitée.
7 REFROIDISSEMENT / CHAUFFAGE / VENTILATION SEULE
|
|
|
MODE |
1. |
Appuyez sur |
: Sélectionnez Froid , Chaud , ou Ventilation |
|
|
seule |
. |
|
2. |
Appuyez sur |
TEMP : Réglez la température souhaitée. |
|
Refroidissement: Min. 17°C, Chauffage: Max. 30°C, Ventilation seule: Pas d’indication de température
FAN
3.Appuyez sur 
 : Sélectionnez AUTO, LOW
  , LOW+
  , MED
, MED 
 , MED+
 , ou HIGH

 .
.
8 DESHUMIDIFICATION (REFROIDISSEMENT SEULEMENT)
Pour la déshumidification, un dispositif de refroidissement modéré est contrôlé automatiquement.
MODE
1.Appuyez sur : Sélectionnez Dry
  .
.
2.Appuyez sur TEMP : Réglez la température souhaitée.
9 MODE Hi-POWER
Pour contrôler automatiquement la température de la pièce et le flux d’air pour un refroidissement et un chauffage plus rapides (sauf pour les modes DRY et FAN ONLY).
Hi-POWER
Appuyez sur : Démarrez et arrêtez l’opération.
10 MODE ECO
Pour contrôler automatiquement les économies d’énergie d’une pièce (sauf pour les modes DRY et FAN ONLY)
ECO
Appuyez sur : Démarrez et arrêtez l’opération.
Remarque: Mode refroidissement; la température définie augmentera automatiquement d’1 degré/heure pendant 2 heures (2 degrés d’augmentation maximum). Pour le mode chauffage, la température définie diminuera.
1110250170_FR.indd 6 |
12/23/09 4:07:04 PM |

11 FONCTIONNEMENT TEMPORAIRE
Utilisez ce mode quand les piles de la télécommande sont à plat ou que la télécommande est mal positionnée.
•L’appui de la touche RESET permet de démarrer et d’arrêter l’appareil sans utiliser la télécommande.
• Le mode de fonctionnement est réglé sur AUTOMATIC, la température prédéfinie est de 25°C et le mode de fonctionnement du ventilateur est réglé sur vitesse automatique.
12 FONCTIONNEMENT DE LA MINUTERIE
|
Réglage de la mise en marche de la |
Réglage de la mise en arrêt de la |
||||
|
|
minuterie |
|
minuterie |
||
1 |
Appuyez sur |
ON |
: Réglez la minuterie |
Appuyez sur |
OFF : Réglez la minuterie |
|
|
|
|
ON souhaitée. |
|
|
OFF souhaitée. |
|
|
|
|
|
|
|
2 |
Appuyez sur |
SET |
: Programmez la |
Appuyez sur |
SET |
: Programmez la |
|
|
minuterie. |
|
|
minuterie. |
|
|
|
|
|
|
||
|
|
|
|
|
|
|
3 |
Appuyez sur |
CLR |
: Pour annuler la |
Appuyez sur |
CLR |
: Pour annuler la |
|
|
programmation. |
|
|
programmation. |
|
|
|
|
|
|
||
La minuterie quotidienne permet à l’utilisateur de régler les minuteries ON et OFF, et elle s’activera quotidiennement.
Réglage de la minuterie quotidienne
1 |
Appuyez sur |
ON |
: Programmez la |
3 |
Appuyez sur |
SET . |
|
|
|
|
minuterie ON. |
|
|
|
|
|
|
|
|
|
|
|
|
2 |
Appuyez sur |
OFF |
: Programmez la |
4 |
Appuyez sur la touche |
SET pendant que |
|
|
|
|
minuterie OFF. |
|
les flèches ( |
ou ) clignotent. |
|
|
|
|
|
|
|
|
|
•Lorsque la minuterie quotidienne est activée, les deux flèches ( ,
, ) sont affichées
Remarque:
•Maintenez la télécommande dans la zone de transmission accessible à l’unité intérieure, sinon un décalage de 15 minutes se produira.
•Le réglage est mémorisé pour la même opération suivante.
13 MODE PREREGLAGE
Réglez votre mode préféré pour un usage ultérieur. Le réglage est mémorisé par l’appareil pour l’opération suivante (hormis direction du flux d’air).
1. Sélectionnez votre mode préféré.
PRESET
2.Appuyez sur and hold et maintenez-la enfoncée pendant 3 secondes pour mémoriser le réglage. Le symbole P s’affiche.
3. Appuyez sur |
PRESET : Le mode de fonctionnement préréglé est activé. |
14 OPERATION DE REDEMARRAGE AUTOMATIQUE
Cette fonction redémarre automatiquement le climatiseur après une panne secteur (à condition que l’appareil soit sous tension).
Réglage
1.Maintenez la touche RESET de l’unité intérieure enfoncée pendant trois secondes pour définir le mode. (On entend 3 bips et l’indicateur OPERATION clignote 5 fois/seconde pendant 5 secondes).
• N’utilisez pas la minuterie ON et la minuterie OFF.
2.Maintenez la touche RESET de l’unité intérieure enfoncée pendant 3 secondes pour annuler le mode. (On entend 3 bips mais l’indicateur OPERATION ne clignote pas)
15 FONCTIONNEMENT SILENCIEUX
Pour un fonctionnement du ventilateur à vitesse super réduite en mode silencieux (sauf en mode DRY)
QUIET
Appuyez sur : Démarrez et arrêtez l’opération.
Remarque: Sous certaines conditions, le mode QUIET peut ne pas fournir un refroidissement ou un chauffage adéquat à cause de caractéristiques sonores faibles.
16 FONCTIONNEMENT DE CONFORT NOCTURNE
Pour économiser de l’énergie pendant votre sommeil, le contrôle du flux d’air se fait automatiquement et l’arrêt est automatique.
|
COMFORT |
|
SLEEP |
Appuyez sur |
: Sélectionnez 1, 3, 5 ou 9 heures pour programmer |
l’arrêt automatique de l’appareil passé le délai choisi.
Remarque: En mode refroidissement, la température définie augmentera automatiquement d’1 degré/heure pendant 2 heures (2 degrés d’augmentation maximum). Pour le mode chauffage, la température définie diminuera.
17 FONCTIONNEMENT DE LA MINUTERIE NOCTURNE
Pour activer le fonctionnement de la minuterie nocturne (minuterie OFF)
Appuyez sur  SLEEP : Sélectionnez 1, 3, 5 ou 9 heures pour programmer l’arrêt automatique de l’appareil passé le délai choisi.
1110250170_FR.indd 7
18 ENTRETIEN
 Commencez par mettre le disjoncteur hors tension.
Réinitialisation du filtre (certains modèles seulement)
L’indicateur FILTER s’éclaire; le filtre doit être nettoyé.
Pour éteindre l’indicateur, appuyez sur la touche RESET de l’unité intérieure ou sur la touche FILTER de la télécommande.
Unité intérieure et télécommande
•Nettoyez l’unité intérieure et la télécommande avec un chiffon humide quand cela s’avère nécessaire.
•N’utilisez pas de benzène, de thérébentine, de poudre de polissage ou un chiffon traité chimiquement.
19 OPERATION DE NETTOYAGE AUTOMATIQUE (MODES FROID ET DESHUMIDIFICATION SEULEMENT)
Ce mode évite les mauvaises odeurs dégagées par l’humidité présente dans l’unité intérieure.
1.Si vous appuyez une fois sur la touche  en mode “Froid” ou “Déshumidification”, le ventilateur continue de tourner pendant 30 minutes supplémentaires, puis s’arrête automatiquement. Cela réduit l’humidité accumulée dans l’unité intérieure.
2.Pour arrêter immédiatement l’unité, appuyez 2 fois de plus sur  dans les 30 secondes.
20FONCTIONS ET PERFORMANCES
1.Fonction de protection de trois minutes: Cette fonction empêche l’appareil de fonctionner pendant 3 minutes environ en cas de remise en marche immédiate après un arrêt de l’appareil.
2.Fonction de préchauffage: Préchauffe l’appareil pendant 5 minutes avant de souffler de l’air chaud.
3.Commande d’air chaud: Quand la température ambiante atteint la température définie, la vitesse du ventilateur est automatiquement réduite et l’unité extérieure est arrêtée.
4.Dégivrage automatique: Les ventilateurs s’arrêtent pendant le dégivrage.
5.Capacité de chauffage: La chaleur est absorbée de l’extérieur et libérée dans la pièce. Quand la température extérieure est insuffisante, il est recommandé d’utiliser un autre appareil de chauffage associé au climatiseur.
6.Conseils pour éviter les accumulations de neige: Choisissez pour l’unité extérieure un emplacement qui n’est pas exposé aux flocons de neige, et à l’accumulation de feuilles ou autres débris saisonniers.
7.Quelques faibles sons de craquement peuvent se faire entendre pendant le fonctionnement de l’appareil. Ceci est normal car ces craquements peuvent être provoqués par l’expansion/la contraction du plastique.
Remarque: Les points 2 à 6 s’appliquent aux modèlex réversibles.
Conditions de fonctionnement du climatiseur
Temp. |
|
Température |
|
Mode de |
Température extérieure |
||
Intérieure |
|||
|
|||
fonctionnement |
|
|
|
Chauffage |
–15°C ~ 24°C |
Moins de 28°C |
|
Refroidissement |
–10°C ~ 46°C |
21°C ~ 32°C |
|
Déshumidification |
–10°C ~ 46°C |
17°C ~ 32°C |
21 DEPANNAGE (ELEMENTS A VERIFIER)
L’appareil ne fonctionne pas. |
Le refroidissement ou le chauffage |
|
estanormalement lent. |
||
|
||
• L’interrupteur d’alimentation principal est |
• Les filtres sont encrassés. |
|
hors tension. |
• La température n’ a pas été réglée |
|
• Le disjoncteur est activé pour couper |
correctement. |
|
l’alimentation. |
• Les fenêtres ou les portes sont ouvertes. |
|
• L’alimentation électrique est coupée. |
• L’entrée ou la sortie d’air de l’unité |
|
• La minuterie ON est réglée. |
extérieure est obstruée. |
|
|
• La vitesse du ventilateur est trop lente. |
|
|
• Le mode de fonctionnement FAN ou DRY |
|
|
est activé. |
22 SÉLECTION DE TÉLÉCOMMANDE A-B
Pour distinguer l’utilisation de la télécommande pour chaque unité intérieure dans le cas où 2 climatiseurs sont installés à proximité.
Réglage B de la télécommande.
1.Appuyez sur la touche RESET de l’unité intérieure pour mettre le climatiseur en marche.
2.Pointez la télécommande en direction de l’unité intérieure.
3.Maintenez la touche CHK • de la télécommande enfoncée avec la pointe d’un
stylo. “00” apparaît sur l’afficheur.
MODE
4.Appuyez sur la touche sans relâcher la touche CHK •. “B” apparaît sur l’afficheur. “00” disparaît et le climatiseur s’arrête. La télécommande B est mémorisée.
Remarque: 1. Répétez les étapes ci-dessus pour réinitialiser la télécommande en A.
2. La télécommande A n’a pas d’affichage “A”. 3. Le réglage par défaut d’usine de la
télécommande est A.
12/23/09
EN
ES
FR
IT
DE
PT
PL
CZ
CR
HU
NL
GR
SV
FI
NO
DK
RO
BG
EE
LV
SK
SI
4:07:07 PM
PRECAUZIONI PER LA SICUREZZA
|
• Non installare, riparare, aprire o rimuovere il coperchio. Ci si potrebbe esporre |
|
a tensioni pericolose. Chiedere al rivenditore o a uno specialista di effettuare |
|
questa operazione. |
|
• Lo spegnimento dell’alimentazione non evita il potenziale pericolo di scosse |
|
elettriche. |
PERICOLO |
• L’apparecchio verrà installato conformemente alle norme di cablaggio |
nazionali. |
|
|
• Nel cablaggio fisso deve essere incluso uno strumento per lo scollegamento |
|
dall’alimentazione, munito di una separazione dei contatti di almeno 3 mm in |
|
tutti i poli. |
|
• Non esporre il corpo direttamente all’aria fredda per un lungo periodo di |
|
tempo. |
|
• Non infilare le dita o oggetti vari nella presa di ingresso/uscita aria. |
|
• Quando si verifica un evento anomalo (odore di bruciato, ecc.), spegnere |
|
il condizionatore d’aria e scollegare l’alimentazione elettrica, o spegnere |
|
l’interruttore di circuito. |
ATTENZIONE |
• Questo apparecchio non deve essere usato da persone (inclusi i bambini) con |
capacità fisiche, sensoriali o mentali ridotte, o che mancano di esperienza e |
|
|
conoscenza, a meno che non abbiano ricevuto una supervisione o istruzioni |
|
sull’uso dell’apparecchio da parte di una persona responsabile della loro |
|
sicurezza. |
|
• I bambini devono ricevere supervisione per assicurare che non giochino con |
|
l’apparecchio |
|
• Non lavare l’unità con acqua. Si potrebbe ricevere una scossa elettrica. |
|
• Non utilizzare questo condizionatore d’aria per altri scopi, quali la |
|
conservazione del cibo, ecc. |
|
• Non camminare e non collocare alcun oggetto sull’unità interna/esterna. Si |
|
potrebbero provocare incidenti o danni all’unità. |
|
• Non toccare l’aletta in alluminio perchè ci si potrebbe ferire. |
AVVERTENZA |
• Prima di pulire l’unità, spegnere l’interruttore di alimentazione principale o |
l’interruttore di circuito. |
|
|
• Se l’unità non verrà utilizzata per un lungo periodo di tempo, spegnere |
|
l’interruttore principale o l’interruttore di circuito. |
|
• In caso di funzionamento prolungato, le procedure di manutenzione devono |
|
essere svolte da personale specializzato. |
1 DISPLAY DELL’UNITÀ INTERNA
Modelli: RAS-137, 167SKV Series |
|
|
||||||||||||
|
|
|
|
|
|
|
|
|
|
|
|
|
1 |
Hi POWER (Verde) |
|
|
|
|
|
|
|
|
|
|
|
|
|
||
Hi POWER |
FILTER |
PRE. DEF TIMER OPERATION |
2 FILTER (Arancione) |
|||||||||||
|
|
|
|
|
|
|
|
|
|
|
|
|
3 |
PRE. DEF (DE-FROST) |
|
|
|
|
|
|
|
|
|
|
|
|
|
||
|
|
|
|
|
|
|
|
|
|
|
|
|
|
(Arancione) |
|
|
|
|
|
|
|
|
|
|
RESET |
4 TIMER (Giallo) |
|||
|
|
|
|
|
|
|
|
|
|
|
|
|
5 |
OPERATION (Verde) |
Modelli: RAS-107SKV Series |
6 Tasto RESET |
|||||||||||||
|
|
CLEANING |
|
|
|
|
|
|
|
|
1 |
OPERATION (Verde) |
||
|
|
|
|
|
|
|
|
|
|
|
|
|
2 |
TIMER/CLEANING (Giallo) |
RESET |
TIMER |
OPERATION |
|
|
3 |
Tasto RESET |
||||||||
|
|
|
|
|
|
|
|
|
|
|
|
|
||
|
|
|
|
|
|
|
|
|
|
|
|
|
|
|
2 PREPARATIVI PRIMA DELL’USO
Preparazione dei filtri
1.Aprire la griglia della presa d’aria e rimuovere i filtri dell’aria.
2.Collegare i filtri. (per informazioni dettagliate consultare la scheda accessori)
Caricamento della batterie
1. Togliere il coperchio batteria. |
A |
|
CL |
2.Inserire 2 nuove batterie (tipo AAA) rispettando le posizioni (+) e (–).
Impostazione orologio
1. Premere CLOCK • con la punta di una matita.
2. Premere |
ON o |
OFF : per impostare l’ora. |
3. Premere  SET : Impostare il timer.
Reset telecomando
1. Togliere la batteria. 2. Premere 
 . 3. Inserire la batteria.
3 DIREZIONE DEL FLUSSO D’ARIA
|
|
FIX |
|
1 |
Premere |
: Spostare il |
|
deflettore di ventilazione nella |
|
||
|
direzione verticale desiderata. |
|
|
|
|
|
|
|
|
SWING |
|
2 |
Premere |
: Orientare l’aria |
|
automaticamente e premere di |
|
||
|
nuovo per fermare. |
|
|
|
|
|
|
3 |
Per la direzione orizzontale, |
|
|
regolare manualmente. |
|
||
|
|
|
|
Nota:
•Non spostare manualmente le feritoie di ventilazione.
•Quando si utilizza la modalità di funzionamento, è possibile posizionare la leva automaticamente.
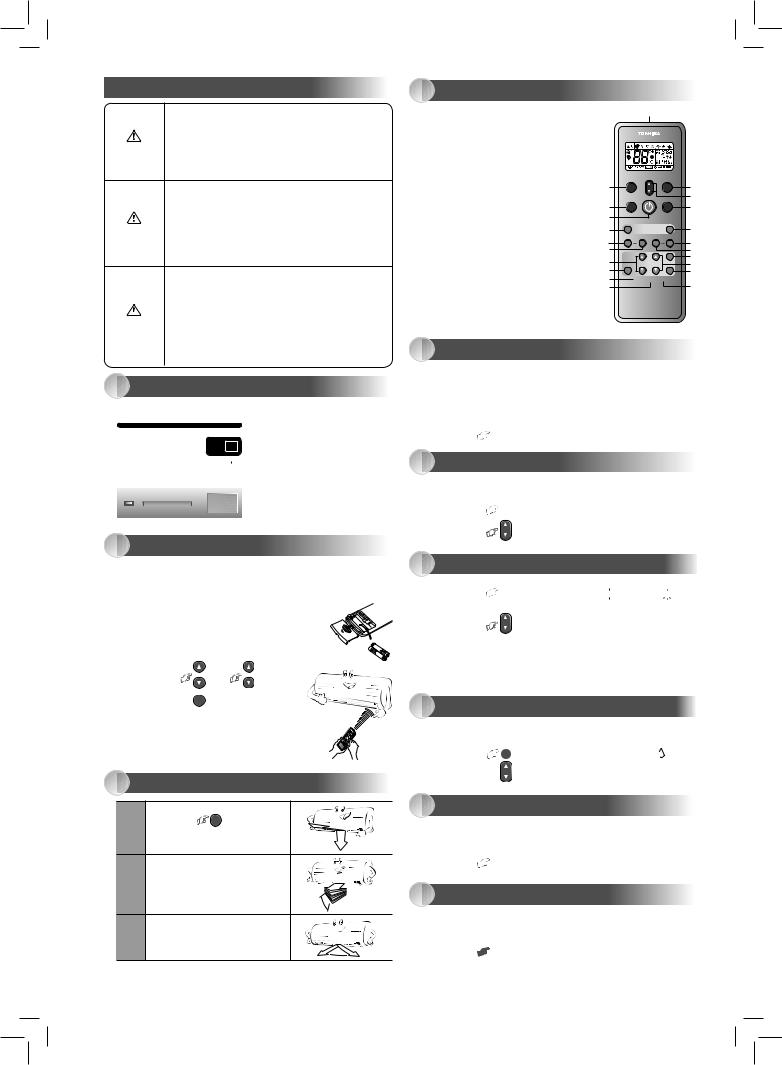
4 TELECOMANDO
1Emettitore di segnali infrarossi
2Tasto di accensione/spegnimento
3Tasto di selezione del modo (MODE)
4Tasto della temperatura (TEMP)
5Tasto di regolazione della velocità del ventilatore (FAN)
6Tasto di oscillazione feritoie di alimentazione (SWING)
7TTasto di regolazione della griglia (FIX)
8Tasto di accensione a timer (ON)
9Tasto di spegnimento a timer (OFF)
! Tasto timer spegnimento automatico (SLEEP) " Tasto di impostazione (SET)
# Tasto di annulla (CLR)
$ Tasto di memorizzazione e preselezione (PRESET) % Tasto One touch (ONE-TOUCH)
& Tasto alta potenza (Hi-POWER) ( Tasto Economy (ECO)
) Tasto funzionamento silenzioso (QUIET)
~ Tasto Comfort per la notte (COMFORT SLEEP) + Tasto di reset filtro (FILTER)
, Tasto di reset orologio (CLOCK) - Tasto di controllo (CHK)
02%3%4 &!.
4%-0
/.% 4/5#( -/$%
15)%4 |
#/-&/24 |
3,%%0 |
|
37).' &)8 |
(I 0/7%2 %#/ |
4)-%2 |
#,2 |
/. |
/&& |
3,%%0 |
3%4 |
#(+ &),4%2
 #,/#+
#,/#+
5 ONE-TOUCH
Premere il tasto “ONE-TOUCH” per rendere completamente automatico il funzionamento personalizzato in base alle tipiche preferenze dei clienti che vivono in questa zona del mondo. Le impostazioni personalizzate
controllano la temperatura ambiente, la forza e la direzione del flusso d’aria e altre impostazioni in modo da fornire un contatto alternativo con il pulsante “ONE-TOUCH”. Se si desidera selezionare altre impostazioni, scegliere tranquillamente tra le numerose funzioni operative dell’unità Toshiba.
ONE-TOUCH
Premere : avviare il funzionamento.
6 FUNZIONAMENTO AUTOMATICO
Per selezionare automaticamente il raffreddamento, il riscaldamento o la ventilazione e per controllare la velocità del ventilatore.
MODE
1.Premere : Selezionare A.
2.Premere TEMP : Impostare la temperatura desiderata.
7 RAFFREDDAMENTO / RISCALDAMENTO / SOLA VENTILAZIONE
MODE
1.Premere : Selezionare Raffreddamento
 , Riscaldamento


 , o Sola ventilazione
  .
.
2. Premere |
TEMP : Impostare la temperatura desiderata. |
Raffreddamento: Min. 17°C, Riscaldamento: Max. 30°C, Sola ventilazione: Indicazione di temperatura assente
FAN
3.Premere 
 : Selezionare AUTO, LOW
  , LOW+
  , MED
, MED 
 , MED+
 , o HIGH

 .
.
8 FUNZIONAMENTO IN DEUMIDIFICAZIONE (SOLO RAFFREDDAMENTO)
Per la deumidificazione è prevista una moderata azione di raffreddamento con controllo automatico.
MODE
1.Premere : Selezionare Deumidificazione
  .
.
2.Premere TEMP : Impostare la temperatura desiderata.
9 FUNZIONAMENTO Hi-POWER
Per controllare automaticamente la temperatura ambiente e il flusso dell’aria e ottenere un’azione di raffreddamento e riscaldamento più rapida (tranne che nelle modalità DRY e FAN ONLY)
Hi-POWER
Premere : Accendere e spegnere la funzione.
10 FUNZIONAMENTO ECO
Per controllare automaticamente la temperatur a ambiente, in modo da risparmiare energia (tranne che nelle modalità DRY e FAN ONLY)
ECO
Premere : Accendere e spegnere la funzione.
Nota: Raffreddamento; la temperatura impostata aumenterà automaticamente di 1 grado all’ora per 2 h (aumento massimo di 2 gradi). Per il riscaldamento le temperatura impostate diminuiranno.
1110250170_IT.indd 8 |
12/23/09 3:58:35 PM |

11 FUNZIONAMENTO TEMPORANEO
Qualora il telecomando fosse temporaneamente indisponibile o scarico
•Premendo il tasto RESET, l’unità può accendersi o spegnersi senza usare il telecomando.
• La modalità di funzionamento è impostata su AUTOMATICA, la temperatura reimpostata è di 25°C e il funzionamento della ventola è impostato sulla velocità automatica.
12 FUNZIONAMENTO DEL TIMER
|
Impostazione del timer ON |
Impostazione del timer OFF |
||||
|
|
|
|
|
|
|
1 |
Premere |
ON |
: Impostare il timer ON. |
Premere |
OFF |
: Impostare il timer OFF. |
|
|
|
|
|
|
|
2 |
Premere |
SET |
: Impostare il timer. |
Premere |
SET |
: Impostare il timer. |
|
|
|
|
|
|
|
3 |
Premere |
CLR |
: Annullare il timer. |
Premere |
CLR |
: Annullare il timer. |
|
|
|
|
|
|
|
Il timer quotidiano consente all’utente di impostare entrambi i timer ON e OFF e sarà attivato solo su base quotidiana.
Impostazione timer quotidiano
1 |
Premere |
ON |
: Impostare il |
3 |
Premere |
SET |
. |
|
|
|
timer ON. |
|
|
||
|
|
|
|
|
|
|
|
|
|
|
|
|
|
|
|
2 |
Premere |
OFF |
: Impostare il |
4 |
Premere il tasto |
SET mentre il |
|
|
|
|
timer OFF. |
|
simbolo ( o |
) lampeggia. |
|
|
|
|
|
|
|
|
|
•Durante l’attivazione del timer quotidiano sono indicate entrambe le frecce ( ,
,  ).
).
Nota:
•Posizionare il telecomando in modo che riesca a trasmettere il segnale all’unità interna, altrimenti si può verificare un ritardo temporale fino a 15 minuti.
•L’impostazione verrà salvata per il prossimo funzionamento dello stesso tipo.
13 FUNZIONI PRESET
Impostare la modalità di funzionamento preferenziale, per poterla selezionare in futuro. L’impostazione verrà memorizzata dall’unità per il funzionamento futuro (tranne la direzione del flusso dell’aria).
1. Selezionare la modalità di funzionamento preferenziale.
|
PRESET |
2. Per memorizzare l’impostazione tenere premuto |
per più di 3 |
secondi. Viene visualizzato il simbolo P. |
|
PRESET
3. Premere 
 : Usare la funzione di preselezione.
14 FUNZIONE DI RIACCENSIONE AUTOMATICA
Per riavviare automaticamente il condizionatore dopo un’interruzione dell’energia elettrica (l’alimentazione dell’unità deve essere accesa.)
Impostazione
1.Premere e tenere premuto per 3 secondi il tasto RESET dell’unità interna, per impostare il funzionamento (si udranno 3 bip e la spia OPERATION lampeggerà per 5 volte/secondo per 5 secondi)
• Non utilizzare i tasti di accensione e spegnimento timer.
2.Premere e tenere premuto per 3 secondi il tasto RESET dell’unità interna, per annullare il funzionamento (si udranno 3 bip ma la spia OPERATION non lampeggerà)
15 FUNZIONAMENTO QUIET
Modalità silenziosa, con ventole attivate a velocità bassissima (tranne che in modalità DRY)
QUIET
Premere : Accendere e spegnere la funzione.
Nota: In certe condizioni, il funzionamento QUIET può non fornire la temperatura di raffreddamento o riscaldamento desi derate a causa delle funzioni silenziose.
16 FUNZIONAMENTO COMFORT SLEEP
Per risparmiare energia di notte, controllare automaticamente il flusso dell’aria e SPEGNERE automaticamente l’unità.
|
COMFORT |
|
SLEEP |
Premere |
: Selezionare 1, 3, 5 o 9 ore per il funzionamento del |
timer OFF. |
|
Nota: Raffreddamento; la temperatura impostata aumenterà automaticamente di 1 grado all’ora per 2 h (aumento massimo di 2 gradi). Per il riscaldamento le temperatura impostate diminuiranno.
17 FUNZIONAMENTO CON TIMER DI SPEGNIMENTO
Per attivare la funzione di spegnimento automatico (timer OFF)
Premere SLEEP : Selezionare 1, 3, 5 o 9 ore per il funzionamento del timer OFF.
18 MANUTENZIONE
 Prima di tutto, spegnere l’interruttore di circuito.
Reset filtro (Solo in alcuni modelli)
La spia FILTER si accende; è necessario pulire il filtro.
Per spegnere la spia, premere il tasto RESET dell’unità interno o il tasto FILTER del telecomando.
Unità interna e telecomando
•Pulire l’unità interna e il telecomando con uno strofinaccio bagnato, quando necessario.
•Non usare benzina, diluenti, detersivi o strofinacci sottoposti a un trattamento chimico.
19FUNZIONE DI PULIZIAAUTOMATICA (SOLO RAFFREDDAMENTO E FUNZIONAMENTO DEUMIDIFICAZIONE)
Per evitare i cattivi odori causati dall’umidità nell’unità interna
1.Se il tasto  viene premuto una volta nella modalità “Raffreddamento” o “Deumidificazione”, il ventilatore resta in funzione per altri 30 minuti, quindi si spegne automaticamente. In questo modo si avrà una riduzione dell’umidità nell’unità interna.
2.Per arrestare l’unità immediatamente, premere  più di due volte entro 30 secondi.
20FUNZIONAMENTO E PRESTAZIONI
1.Funzione di protezione per tre minuti: Ritarda l’avviamento dell’unità venga per 3 minuti a seguito di una riattivazione improvvisa.
2.Funzione di preriscaldamento: Riscaldare l’unità per 5 minuti prima che abbia inizio la funzione di riscaldamento.
3.Controllo dell’aria calda: Quando la temperatura ambiente raggiunge il valore impostato, la velocità del ventilatore viene automaticamente ridotta e l’unità esterna si arresta.
4.Sbrinamento automatico: I ventilatori si spengono durante l’operazione di sbrinamento.
5.Capacità di riscaldamento: Il calore viene assorbito dall’esterno e rilasciato nel locale. Quando la temperatura esterna è troppo bassa, usare un altro apparecchio di riscaldamento insieme al condizionatore d’aria.
6.Considerazioni relative all’accumulo di neve: Per l’unità esterna, scegliere una posizione in cui essa non risulti soggetta all’accumulo di neve, foglie o detriti associati alle varie stagioni.
7.Durante il funzionamento dell’unità potrebbero udirsi dei rumori di urti. Tutto ciò è normale, in quanto tali rumori sono causati dall’espansione/ contrazione della plastica.
Nota: Procedura da 2 a 6 per il modello per riscaldamento
Condizioni di esercizio del condizionatore d’aria
Temp. |
Temperatura esterna |
Temperatura |
|
Operazione |
ambiente |
||
|
|||
Riscaldamento |
–15°C ~ 24°C |
Inferiore a 28°C |
|
Raffreddamento |
–10°C ~ 46°C |
21°C ~ 32°C |
|
Deumidificazione |
–10°C ~ 46°C |
17°C ~ 32°C |
21 SOLUZIONE DEI PROBLEMI (PUNTO DI CONTROLLO)
L’unità non funziona. |
Il raffreddamento o il riscaldamento è |
|
anormalmente basso. |
||
|
||
• L’interruttore di alimentazione |
• I filtri sono ostruiti dalla polvere. |
|
principale è spento. |
• La temperatura è stata impostata in modo errato. |
|
• L’interruttore di circuito è attivato |
• Le finestre o le porte sono aperte. |
|
per interrompere l’alimentazione. |
• La presa di entrata o di uscita dell’aria dell’unità esterna |
|
• Interruzione della corrente elettrica |
è ostruita. |
|
• Il timer ON è impostato. |
• La velocità del ventilatore è troppo bassa. |
|
|
• La modalità di funzionamento è FAN o DRY. |
22 SELEZIONE A-B DEL TELECOMANDO
Comando da utilizzare in caso 2 condizionatori siano installati in prossimità l’uno dell’altro, in modo da separarli tramite il telecomando di ogni unità interna.
Impostazione di B sul telecomando
1.Premere il tasto RESET dell’unità interna per ACCENDERE il condizionatore.
2.Puntare il telecomando verso l’unità interna.
3.Premere e tenere premuto il tasto CHK • del telecomando con la punta
di una matita. Sul display verrà visualizzato “00”.
MODE
4.Premere contemporaneamente al tasto CHK •. Sul display verrà visualizzato “B”, “00” scomparirà e il condizionatore VERRÀ SPENTO. Viene memorizzata l’indicazione “B” del telecomando.
Nota: 1. Ripetere il punto precedente per impostare nuovamente il telecomando su A.
2. L’indicazione “A” non viene mai visualizzata sul display.
3. L’impostazione predefinita del telecomando è su “A”.
EN ES FR IT DE PT PL CZ CR HU NL GR SV FI NO DK RO BG EE LV SK SI
1110250170_IT.indd 9 |
12/23/09 3:58:38 PM |
SICHERHEITSVORKEHRUNGEN
•Installieren, reparieren und öffnen Sie das Gerät nicht und entfernen Sie die Abdeckung nicht (hohe Spannungen). Wenden Sie sich für Installationsund Reparaturarbeiten immer an Fachpersonal.
•Auch bei ausgeschaltetem Gerät besteht die Gefahr eines elektrischen
|
Schlags! |
GEFAHR |
• Die Installation der Klimaanlage muss in Übereinstimmung mit den örtlichen |
Vorschriften zur Installation elektrischer Geräte erfolgen. |
•Bei einer Festverdrahtung muss eine Möglichkeit zum Trennen der Anlage von der Stromversorgung mit eingebaut werden, die einen Trennabstand von mindestens 3 mm an allen Polen aufweist.
•Setzen Sie sich nicht längere Zeit direkt dem kühlen Luftstrom aus der Anlage aus.
•Stecken Sie keine Gegenstände in den Lufteinbzw. Luftauslass und fassen Sie nicht mit den Fingern hinein.
•Bei einer Störung (Brandgeruch usw.) stoppen Sie die Anlage, trennen Sie sie
vom Stromnetz oder betätigen Sie den Trennschalter.
WARNUNG • Personen (einschl. Kinder) mit eingeschränkten körperlichen, sensorischen oder geistigen Fähigkeiten sowie Personen ohne ausreichende Erfahrung und Kenntnisse dürfen das Gerät nur unter Aufsicht und Anleitung durch eine Aufsichtsperson bedienen.
•Bei Kindern ist darauf zu achten, dass sie nicht mit dem Gerät spielen.
•Reinigen Sie die Anlage nicht mit Wasser (Gefahr eines elektrischen Schlags).
•Verwenden Sie die Klimaanlage bestimmungsgemäß, also nicht zum Kühlen von Lebensmitteln usw.
•Stellen Sie sich nicht auf das Innen-/Außengerät und stellen Sie nichts darauf. Andernfalls besteht Verletzungsgefahr und es kann zu Schäden am Gerät kommen.
 • Berühren Sie den Aluminiumflügel nicht, denn es besteht Verletzungsgefahr. VORSICHT • Schalten Sie die Anlage vor dem Reinigen am Hauptschalter/Trennschalter
aus.
• Wenn Sie die Anlage länger nicht verwenden, schalten Sie sie am Hauptschalter/Trennschalter aus.
• Nach einem langen Betrieb empfiehlt es sich, das Gerät von einer autorisierten Kundendienststelle warten zu lassen.
1 DISPLAY DES INNENGERÄTS
Modelle: RAS-137, 167SKV Series |
|
|
||||||||||||
|
|
|
|
|
|
|
|
|
|
|
|
|
1 |
Hi POWER (Grün) |
|
|
|
|
|
|
|
|
|
|
|
|
|
||
Hi POWER |
FILTER |
PRE. DEF TIMER OPERATION |
2 FILTER (Orange) |
|||||||||||
|
|
|
|
|
|
|
|
|
|
|
|
|
3 |
PRE. DEF (DE-FROST) (Orange) |
|
|
|
|
|
|
|
|
|
|
|
|
|
||
|
|
|
|
|
|
|
|
|
|
|
|
|
4 |
TIMER (Gelb) |
|
|
|
|
|
|
|
|
|
|
RESET |
5 OPERATION (Grün) |
|||
|
|
|
|
|
|
|
|
|
|
|
|
|
6 |
Taste RESET |
Modelle: RAS-107SKV Series |
|
|
||||||||||||
|
|
CLEANING |
|
|
|
|
|
|
|
|
1 |
OPERATION (Grün) |
||
|
|
|
|
|
|
|
|
|
|
|
|
|
2 |
TIMER/CLEANING (Gelb) |
RESET |
TIMER |
OPERATION |
|
|
3 |
Taste RESET |
||||||||
|
|
|
|
|
|
|
|
|
|
|
|
|
||
|
|
|
|
|
|
|
|
|
|
|
|
|
|
|
2 VORBEREITUNGEN
Vorbereiten der Filter
1.Öffnen Sie das Lufteinlassabdeckgitter und nehmen Sie die Luftfilter heraus.
2.Bringen Sie die Filter an. (nähere Informationen finden Sie auf dem Blatt für Zubehör).
Einlegen von Batterien |
|
1. Nehmen Sie die Abdeckung ab. |
ACL |
2.Legen Sie 2 neue AAA-Batterien unter Beachtung der Markierungen (+) und (–) polaritätsrichtig ein.
Einstellen der Zeit
1. Drücken Sie mit der Bleistiftspitze auf CLOCK •.
2. Drücken Sie |
ON oder |
OFF : Stellen Sie |
die Uhrzeit ein. |
|
|
3.Drücken Sie  SET : Hiermit aktivieren Sie den Timer.
Zurücksetzen der Fernbedienung
1. Entfernen Sie die Batterie. 2. Drücken Sie 
 .
.
3. Legen Sie die Batterie ein.
3 RICHTUNG DES LUFTSTROMS
|
|
FIX |
1 |
Drücken Sie |
: Bewegen Sie |
die Luftströmungslamellen vertikal in |
||
|
die gewünschte Richtung. |
|
SWING
Drücken Sie 
 : Der Luftstrom 2 schwenkt automatisch von oben nach
unten und zurück. Zum Stoppen drücken Sie die Taste erneut.
Die horizontale Richtung des 3 Luftstroms stellen Sie bitte von
Hand ein.
Hinweis:
•Bewegen Sie die Luftströmungslamellen manuell nicht durch Fremdobjekte.
•Im Betriebsmodus kann der Hebel automatisch gesetzt werden.
4 FERNBEDIENUNG
1Infrarotsender
2Start-/Stopptaste
3Betriebsmodusauswahltaste (MODE)
4Temperaturtaste (TEMP)
5Taste für die Ventilatorgeschwindigkeit (FAN)
6Luftstromschwenktaste (SWING)
7Luftstromfeststelltaste (FIX)
8Einschalttimertaste (ON)
9Ausschalttimertaste (OFF)
! Sleep-Timer-Taste (SLEEP) " Einstelltaste (SET)
# Löschtaste (CLR)
$ Taste zum Vornehmen und Abrufen gespeicherter Einstellungen (PRESET)
% One-Touchtaste (ONE-TOUCH)
& Hochleistungstaste (Hi-POWER) ( Stromspartaste (ECO)
) Flüsterbetriebstaste (QUIET)
~ Nachtkomforttaste (COMFORT SLEEP) + Filterbetriebstaste (FILTER)
, Uhrbetriebstaste (CLOCK) - Kontrolltaste (CHK)
02%3%4 &!.
4%-0
/.% 4/5#( -/$%
15)%4 |
#/-&/24 |
3,%%0 |
|
37).' &)8 |
(I 0/7%2 %#/ |
4)-%2 |
#,2 |
/. |
/&& |
3,%%0 |
3%4 |
#(+ &),4%2
 #,/#+
#,/#+
5 ONE-TOUCH
Drücken Sie die “ONE-TOUCH”-Taste für einen vollautomatischen Betrieb, der speziell auf die Wünsche der Verbraucher entwickelt wurde. Mit der “ONE-TOUCH” Taste werden Ihnen alternierende Möglichkeiten wie kontrollierte Luftstromstärke, Richtung der Luftströmung usw. geboten. Falls Sie andere Einstellungen bevorzugen, können Sie diese aus den vielen weiteren Betriebsfunktionen Ihres Toshiba Geräts auswählen.
ONE-TOUCH
Drücken Sie : Beginn des Betriebs.
6 AUTOMATIK
Zur automatischen Auswahl von Kühlbetrieb, Heizbetrieb, Nur-Ventilator- Betrieb
MODE
1. Drücken Sie : Wählen Sie A.
|
TEMP |
2. Drücken Sie |
: Stellen Sie die gewünschte Temperatur ein. |
7 KÜHLBETRIEB / HEIZBETRIEB / NUR-VENTILATOR-BETRIEB
MODE
1.Drücken Sie : Wählen Sie Kühlbetrieb
 , Heizbetrieb
 , oder Nur-Ventilator
  .
.
2. Drücken Sie |
TEMP : Stellen Sie die gewünschte Temperatur ein. |
Kühlbetrieb: Min. 17°C, Heizbetrieb: Max. 30°C, Nur-Ventilator: Keine
Temperaturanzeige
FAN
3.Drücken Sie 
 : Wählen Sie AUTO, LOW
  , LOW+
  , MED
, MED 
 , MED+
 , oder HIGH

 .
.
8 ENTFEUCHTUNGSBETRIEB (NUR KÜHLEN)
Für die Entfeuchtung wird automatisch eine moderate Kühlleistung eingestellt.
MODE
1.Drücken Sie : Wählen Sie den Entfeuchtungsbetrieb
  .
.
2.Drücken Sie TEMP : Stellen Sie die gewünschte Temperatur ein.
9 HOCHLEISTUNGSBETRIEB
Nur Raumtemperatur, Luftstrom und Betriebsmodus werden für schnelleres Kühlen bzw. Heizen automatisch gesteuert (nicht im Betriebsmodus DRY (Entfeuchtung) und FAN ONLY (Nur-Ventilator).
Hi-POWER
Drücken Sie : Starten und stoppen Sie den Hochleistungsbetrieb.
10 STROMSPARMODUS (ECO)
Raumtemperatur, Ventilatorgeschwindigkeit und Betriebsmodus werden für Energie sparenden Betrieb automatisch gesteuert (nicht im Betriebsmodus DRY (Entfeuchtung) und FAN ONLY (Nur-Ventilator)).
ECO
Drücken Sie : Starten und stoppen Sie den Hochleistungsbetrieb.
Hinweis: Kühlbetrieb; die eingestellte Temperatur wird automatisch 2 Stunden lang um1 Grad/Stunde erhöht (maximale Erhöhung um 2 Grad). Beim Heizen sinkt die eingestellte Temperatur.
1110250170_DE.indd 10 |
12/23/09 3:51:52 PM |
11 TEMPORÄRER BETRIEB
Dank dieser Funktion können Sie die Klimaanlage auch dann bedienen, wenn Sie die Fernbedienung nicht finden können oder die Batterien erschöpft sind.
•Wenn Sie die Taste RESET drücken, können Sie die Klimaanlage ohne Fernbedienung starten und stoppen.
• Der Betriebsmodus ist auf AUTOMATIC eingestellt; die voreingestellte Temperatur beträgt 25°C und der Ventilator ist auf automatische Geschwindigkeit eingestellt.
12 TIMERBETRIEB
|
Einstellen des ON-Timers |
Einstellen des OFF-Timers |
||||
1 |
Drücken Sie |
ON |
: Stellen Sie den |
Drücken Sie |
OFF : Stellen Sie den |
|
|
|
|
Einschalttimer ein. |
|
|
Ausschalttimer ein. |
|
|
|
|
|
|
|
2 |
Drücken Sie |
SET |
: Hiermit aktivieren Sie |
Drücken Sie |
SET |
: Hiermit aktivieren Sie |
|
|
den Timer. |
|
|
den Timer. |
|
|
|
|
|
|
||
|
|
|
|
|
|
|
3 |
Drücken Sie |
CLR |
: Hiermit schalten Sie |
Drücken Sie |
CLR |
: Hiermit schalten Sie |
|
|
den Timer aus. |
|
|
den Timer aus. |
|
|
|
|
|
|
||
|
|
|
|
|
|
|
Mit dem täglichen Timer können der Einschalt- (ON) und der Ausschalttimer (OFF) eingestellt werden. Die Aktualisierung erfolgt täglich.
Einstellung des täglichen Timers
1 |
Drücken Sie |
ON |
: Zum Einstellen des |
3 |
Drücken Sie |
SET . |
|
|
|
|
Einschalttimers. |
|
|
|
|
|
|
|
|
|
|
|
|
2 |
Drücken Sie |
OFF |
: Zum Einstellen des |
4 |
Drücken Sie die Taste |
SET solange die |
|
|
|
|
Ausschalttimers. |
|
Markierung ( |
oder ) blinkt. |
|
|
|
|
|
|
|
|
|
|
|
|
|
|
|
|
|
•Wenn der tägliche Timer aktiviert ist, werden beide Pfeile ( ,
, ) angezeigt.
Hinweis:
•Der Abstand zwischen Fernbedienung und Innengerät darf nicht größer als die Reichweite der Fernbedienung sein. Andernfalls kommt es zu einer Verzögerung von bis zu 15 Minuten.
•Die Einstellung wird gespeichert und steht wieder zur Verfügung, wenn Sie die Funktion das nächste Mal verwenden.
13 BETRIEB MIT VOREINSTELLUNGEN
Stellen Sie den gewünschten Betriebsmodus zur späteren Verwendung ein. Zum Speichern und Abrufen von Einstellungen. (mit Ausnahme der Luftstromrichtung)
1. Wählen Sie den gewünschten Betriebsmodus.
PRESET
2. Halten Sie die Taste 3 Sekunden lang gedrückt, um die Einstellung zu speichern. Die Markierung P wird angezeigt.
|
PRESET |
3. Drücken Sie |
: Hiermit starten Sie die Klimaanlage mit den zuvor |
gespeicherten Einstellungen.
14 NEUSTARTAUTOMATIK
Zum automatischen Neustarten der Klimaanlage nach einem Stromausfall. Die Anlage muss eingeschaltet sein.
Einstellen
1.Halten Sie die RESET-Taste am Innengerät für 3 Sekunden gedrückt, um die Betriebseinstellung zu speichern. (3 Pieptöne und die Lampe OPERATION blinkt 5-mal/Sek für 5 Sekunden)
• Aktivieren Sie den ON-Timer und OFFTimer nicht.
2.Halten Sie die Taste RESET am Innengerät für 3 Sekunden gedrückt, um den Betriebsmodus zu löschen. (3 Pieptöne, aber die Lampe OPERATION blinkt nicht)
15 FLÜSTERBETRIEB
Zur Verringerung der Ventilatorgeschwindigkeit auf ein Minimum für einen besonders leisen Betrieb (nicht im Entfeuchtungsbetrieb)
QUIET
Drücken Sie : Starten und stoppen Sie den Hochleistungsbetrieb.
Hinweis: Unter bestimmten Bedingungen bietet der Betriebsmodus QUIET nicht genug Kühlung oder Heizung, wegen zu niedriger Geräusche.
16 NACHTKOMFORTBETRIEB
Zum Energiesparen während der Nacht, automatische Kontrolle des Luftstroms und automatische Abschaltung.
COMFORT
SLEEP
Drücken Sie 
 : Stellen Sie für den Ausschalttimer (OFF-Timer) 1, 3, 5 oder 9 Stunden ein.
Hinweis: Kühlbetrieb; die eingestellte Temperatur wird automatisch 2 Stunden lang um 1 Grad/Stunde erhöht (maximale Erhöhung um 2 Grad). Beim Heizen sinkt die eingestellte Temperatur.
17 SLEEP-TIMER-BETRIEB
Zum Starten des Sleep-Timer-Betriebs (OFF-Timer-Betrieb).
Drücken Sie  SLEEP : Stellen Sie für den Ausschalttimer (OFF-Timer) 1, 3, 5 oder 9 Stunden ein.
18 WARTUNG
 Schalten Sie die Anlage zunächst am Trennschalter aus.
Zurücksetzen des Filters (Nur bei einigen Modellen)
FILTER Lampe leuchtet auf; der Filter muss gereinigt werden.
Um die Lampe auszuschalten, drücken Sie die RESET-Taste am Innengerät oder die FILTER-Taste auf der Fernbedienung.
Innengerät und Fernbedienung
•Reinigen Sie das Innengerät und die Fernbedienung bei Bedarf mit einem feuchten Tuch.
•Benzin, Verdünner, Scheuerpulver oder chemisch behandelte Staubtücher dürfen nicht verwendet werden.
19SELBSTREINIGUNGSBETRIEB (NUR KÜHLUND ENTFEUCHTUNGSBETRIEB)
Zum Schutz vor unangenehmen Gerüchen, die durch Feuchtigkeit im Innengerät verursacht werden können.
1.Wenn die Taste  im Kühl- (“Cool”) bzw. Entfeuchtungsbetrieb (“Dry”) einmal gedrückt wird, läuft der Ventilator noch weitere 30 Minuten und schaltet sich dann automatisch aus. Dies verringert die Feuchtigkeit im Innengerät.
2.Drücken Sie innerhalb von 30 Sekunden zweimal die Taste  , um das Gerät sofort abzuschalten.
20BETRIEBS-UND LEISTUNGSMERKMALE
1.Dreiminütige Einschaltverzögerung zum Schutz der Anlage: Wenn die Klimaanlage ausund sofort wieder eingeschaltet bzw. neu gestartet wird, verzögert diese Funktion den Betriebsstart um etwa 3 Minuten.
2.Vorheizvorgang: Die Klimaanlage wird 5 Minuten lang vorgeheizt, bevor der Heizbetrieb startet.
3.Warmluftkontrolle: Wenn die eingestellte Raumtemperatur erreicht ist, wird die Ventilatorgschwindigkeit automatisch reduziert und das Außengerät stoppt.
4.Automatischer Abtauvorgang: Während des Abtauvorgangs laufen die Ventilatoren nicht.
5.Heizbetrieb: Beim Heizbetrieb wird Außenwärme aufgenommen und in den Raum geführt. Wenn die Außentemperatur sehr niedrig ist, empfiehlt es sich, zum Heizen nicht allein diese Klimaanlage, sondern in Kombination damit ein weiteres Heizgerät zu verwenden.
6.Achtung bei Schneeverwehungen: Wählen Sie den Standort für das Außengerät so, dass die Funktion des Geräts nicht von Schneeverwehungen, Laub oder anderen jahreszeitlichen Einflüssen beeinträchtigt wird.
7.Kleine knackende Geräusche können während des Betriebs auftreten. Dies ist normal, da die Geräusche durch Ausdehnung/Kontraktion des Plastiks auftreten können.
Hinweis: Punkt 2 und 6 gelten nur für das Heizmodell.
Betriebsbedingungen der Klimaanlage
|
Temp. |
Außentemperatur |
Raumtemperatur |
Betrieb |
|
||
|
|
|
|
Heizen |
|
–15°C ~ 24°C |
Unter 28°C |
Kühlen |
|
–10°C ~ 46°C |
21°C ~ 32°C |
Entfeuchten |
|
–10°C ~ 46°C |
17°C ~ 32°C |
21 |
STÖRUNGSBEHEBUNG |
||
|
|
|
|
|
|
Die Klimaanlage funktioniert nicht. |
Die Kühloder Heizleistung ist |
|
|
unzureichend. |
|
|
|
|
|
|
• |
Der Hauptnetzschalter ist ausgeschaltet. |
• In den Filtern hat sich Staub angesammelt. |
|
• |
Der Trennschalter wurde ausgelöst, um |
• Die Temperatur wurde nicht richtig eingestellt. |
|
|
die Stromversorgung zu unterbrechen. |
• Fenster oder Türen sind geöffnet. |
|
• |
Die Stromversorgung ist unterbrochen. |
• Lufteinlass oder Luftauslass des Außengeräts |
|
• |
Der On-Timer ist eingestellt. |
sind blockiert. |
|
|
|
• Die Ventilatorgeschwindigkeit ist zu niedrig. |
|
|
|
• Als Betriebsmodus ist FAN (Ventilator) oder DRY |
|
|
|
(Entfeuchtung) eingestellt. |
22 FERNBEDIENUNG A-B Wahl
Werden 2 Klimageräte installiert, muss die Fernbedienung für jedes Innengerät getrennt werden.
Fernbedienung B-Installation.
1.Drücken Sie am Innengerät die Taste RESET, um das Klimagerät anzustellen.
2.Richten Sie die Fernbedienung auf das Innengerät.
3.Halten Sie die Taste CHK • auf der Fernbedienung mit der Spitze eines Bleistifts
gedrückt. “00” wird im Display angezeigt.
MODE
4.Drücken Sie und CHK • gleichzeitig drücken. Die Zuordnung “B” erscheint im Display. “00” verschwindet im Display und das Klimagerät wird ausgeschaltet. Die Zuordnung B der Fernbedienung wird gespeichert.
Hinweis: 1. Wiederholen Sie die obigen Schritte, um die Fernbedienung auf Zuordnung A umzustellen.
2. Die Fernbedienung A zeigt im Display kein “A”.
3. Die Werkseinstellung der Fernbedienung steht auf A.
EN ES FR IT DE PT PL CZ CR HU NL GR SV FI NO DK RO BG EE LV SK SI
1110250170_DE.indd 11 |
12/23/09 3:51:55 PM |

PRECAUÇÕES RELATIVAS A SEGURANÇA
•Não instale, repare, abra ou retire a tampa, pois poderá ficar exposto a tensões perigosas. Encarregue o concessionário ou um técnico especializado desta tarefa.
•O facto de desligar a alimentação de corrente eléctrica não impede um eventual choque eléctrico.
PERIGO |
• O aparelho será instalado em conformidade com o regulamento nacional de |
instalações eléctricas. |
•Nas cablagens fixas tem de ser incorporado um meio de desconexão da alimentação com um intervalo de contactos de, pelo menos, 3 mm em todos os pólos.
•Evite expor directamente o corpo ao caudal de ar frio por períodos prolongados.
•Não insira os dedos ou qualquer dispositivo na entrada/saída de ar.
•Se ocorrer uma anomalia (cheiro a queimado, etc.), pare o aparelho de ar condicionado e desligue a alimentação eléctrica ou o disjuntor.
•Este aparelho foi concebido para ser utilizado por pessoas (inclusive crianças)
 com capacidades mentais, sensoriais e físicas reduzidas, o com falta de AVISO experiência e conhecimento, a não ser que se encontrem sob a supervisão da
pessoa responsável pela sua segurança ou que tenham recebido instruções relativas à utilização do aparelho.
•As crianças devem ser vigiladas para se certificar de que não brincam com o aparelho.
•Não proceda à lavagem da unidade com água. Poderão ocorrer choques eléctricos.
•Não utilize a unidade para outros fins, tais como a conservação de alimentos, criação de animais, etc.
•Não pise nem coloque objectos em cima da unidade interior/exterior. Isto pode provocar danos ou avaria na unidade.
 • Não toque na barra de alumínio porque tal pode provocar uma lesão. CUIDADO • Antes de proceder à limpeza da unidade, desligue o interruptor principal ou o
disjuntor.
• Quando a unidade não for utilizada por períodos prolongados, desligue o interruptor principal ou o disjuntor.
• É recomendável que a manutenção seja feita por um especialista autorizado, quando a unidade estiver em funcionamento por um período prolongado.
1 MOSTRADOR DA UNIDADE INTERIOR
Modelos: RAS-137, 167SKV Series |
|
|
||||||||||||
|
|
|
|
|
|
|
|
|
|
|
|
|
1 |
Hi POWER (Verde) |
|
|
|
|
|
|
|
|
|
|
|
|
|
||
Hi POWER |
FILTER |
PRE. DEF TIMER OPERATION |
2 FILTER (Laranja) |
|||||||||||
|
|
|
|
|
|
|
|
|
|
|
|
|
3 |
PRE. DEF (DE-FROST) (Laranja) |
|
|
|
|
|
|
|
|
|
|
|
|
|
||
|
|
|
|
|
|
|
|
|
|
|
|
|
4 |
TIMER (Amarelo) |
|
|
|
|
|
|
|
|
|
|
RESET |
5 OPERATION (Verde) |
|||
|
|
|
|
|
|
|
|
|
|
|
|
|
6 |
Botão RESET |
Modelos: RAS-107SKV Series |
|
|
||||||||||||
|
|
CLEANING |
|
|
|
|
|
|
|
|
1 |
OPERATION (Verde) |
||
|
|
|
|
|
|
|
|
|
|
|
|
|
2 |
TIMER/CLEANING (Amarelo) |
RESET |
TIMER |
OPERATION |
|
|
3 |
Botão RESET |
||||||||
|
|
|
|
|
|
|
|
|
|
|
|
|
||
|
|
|
|
|
|
|
|
|
|
|
|
|
|
|
2 PREPARAÇÃO ANTES DA UTILIZAÇÃO
Preparação dos filtros
1.Abra a grelha de admissão de ar e remova os filtros de ar.
2.Fixe os filtros. (Consultar a folha de acessórios pormenorizadamente)
Carregamento das pilhas
1.Retirar a tampa da bateria.
2. Insira 2 pilhas novas (tipo AAA) tendo |
A |
CL |
|
|
|
atenção à orientação dos pólos (+) e (–). |
|
Configuração do relógio |
|
1.Carregue em CLOCK (Relógio) • utilizando a ponta de um lápis.
2. Carregue em |
ON ou |
OFF : (Desligado) |
ajuste a hora. |
|
|
3. Carregue em  SET : Programe o temporizador.
Reinicialização do controlo remoto
1. Retire as pilhas.
2. Carregue em 
 . 3. Introduza as pilhas.
3 DIRECÇÃO DO CAUDAL DE AR
|
|
FIX |
|
1 |
Carregue em |
: Mova o |
|
|
difusor na direcção vertical desejada. |
|
|
|
|
|
|
|
|
SWING |
|
2 |
Carregue em |
: Incline o |
|
caudal de ar automaticamente e |
|
||
|
carregue novamente para parar. |
|
|
|
|
|
|
3 |
O ajuste na direcção horizontal tem |
|
|
de ser realizado manualmente. |
|
||
|
|
|
|
Nota:
•Não movimente a lâmina manualmente.
•A lâmina pode posicionar-se automaticamente ligando o modo de funcionamento.
4 CONTROLO REMOTO
1Emissor de infra-vermelhos
2Botão de colocação em funcionamento/paragem
3Botão de selecção do modo (MODE)
4Botão da temperatura (TEMP)
5Botão de velocidade da ventoinha (FAN)
6Botão de oscilação das lâminas (SWING)
7Botão de regulação do difusor (FIX)
8Botão para programar a hora de conexão (ON)
9Botão para programar a hora de desconexão (OFF) ! Botão do temporizador de desactivação automática
(SLEEP)
" Botão de configuração (SET)
# Botão “Clear” (Inicialização) - (CLR)
$ Botão memória e pré-selecção (PRESET)
% Tecla de funcionamento automático (ONE-TOUCH) & Botão de alta potência (Hi-POWER)
( Botão de economia (ECO) ) Botão silencioso (QUIET)
~ Botão sleep conforto (COMFORT SLEEP) + Botão de reinicialização do filtro (FILTRO) , Botão de reinicialização do relógio (CLOCK) - Botão de inspecção (CHK)
02%3%4 &!.
4%-0
/.% 4/5#( -/$%
15)%4 |
#/-&/24 |
3,%%0 |
|
37).' &)8 |
(I 0/7%2 %#/ |
4)-%2 |
#,2 |
/. |
/&& |
3,%%0 |
3%4 |
#(+ &),4%2
 #,/#+
#,/#+
5 TOQUE ÚNICO
Pressione o botão “ONE-TOUCH” (Funcionamento automático) para activar o funcionamento automático personalizado de acordo com as preferências comuns dos consumidores na sua parte do mundo. As definições personalizadas controlam a temperatura do fluxo de ar, a direcção do fluxo de ar e outras definições que disponibilizam um contacto alternativo através do botão “ONE-TOUCH”. Se preferir outras definições pode seleccioná-las recorrendo a muitas outras funções operacionais da sua unidade Toshiba.
ONE-TOUCH
Carregue em : Início da operação.
6 OPERAÇÃO AUTOMÁTICA
Para seleccionar automaticamente arrefecimento, aquecimento ou operação exclusiva da só ventoinha
MODE
1.Carregue em : Seleccione A.
2.Carregue em TEMP : Regule a temperatura desejada.
7 OPERAÇÃO DE ARREFECIMENTO / AQUECIMENTO / SÓ VENTOINHA
MODE
1.Carregue em : Seleccione Arrefecimento
 , Aquecimento
 , ou Só ventoinha
  .
.
2.Carregue em  TEMP : Regule a temperatura desejada.
Arrefecimento: Mín. 17°C, Aquecimento: Máx. 30°C, Só ventoinha: Sem
indicação de temperatura
FAN
3.Carregue em 
 : Seleccione AUTO, LOW
  , LOW+
  , MED
, MED 
 , MED+
 , ou HIGH

 .
.
8 FUNCIONAMENTO A SECO (APENAS ARREFECIMENTO)
Para o processo de desumidificação, o arrefecimento moderado é controlado automaticamente.
MODE
1.Carregue em : Seleccione Seco
  .
.
2.Carregue em TEMP : Regule a temperatura desejada.
9 OPERAÇÃO Hi-POWER
Para controlar automaticamente a temperatura ambiente e o fluxo de ar para uma operação de arrefecimento ou aquecimento mais rápida (excepto quando no modo DRY (Seco) e FAN ONLY (Só ventoinha))
Hi-POWER
Carregue em : Inicie e pare a operação.
10 OPERAÇÃO ECO
Para controlar automaticamente a temperatura ambiente poupando energia (excepto quando no modo DRY (Seco) e FAN ONLY (Só ventoinha)
ECO
Carregue em : Inicie e pare a operação.
Nota: Na operação de arrefecimento, a temperatura configurada irá aumentar automaticamente em 1 grau/hora durante 2 horas (aumento de 2 graus no máximo). A temperatura irá diminuir no caso da operação de aquecimento.
1110250170_PT.indd 12 |
12/23/09 4:02:31 PM |

11 FUNCIONAMENTO TEMPORÁRIO
No caso de não se saber onde está o telecomando ou de as pilhas estarem descarregadas
•Se se carregar no botão RESET, a unidade pode ser colocada em funcionamento ou parada sem o telecomando.
•O modo de funcionamento está configurado para a operação
AUTOMATIC (Automático), a temperatura predefinida é de 25°C e a operação da ventoinha encontra-se na velocidade automática.
12 |
OPERAÇÃO TIMER |
|
|
|
|||
|
|
|
|
||||
|
|
Configuração de ON Timer |
Configuração de OFF Timer |
||||
1 |
Carregue em |
ON |
: Defina o temporizador |
Carregue em |
OFF |
: Defina o temporizador |
|
|
|
|
|
ON desejado. |
|
|
OFF desejado. |
|
|
|
|
|
|
|
|
2 |
Carregue em |
SET |
: Programe o |
Carregue em |
SET |
: Programe o |
|
|
|
temporizador. |
|
|
temporizador. |
||
|
|
|
|
|
|
||
3 Carregue em CLR : Cancele o temporizador. Carregue em
 CLR : Cancele o temporizador.
O temporizador diário permite ao utilizador definir ambos os temporizadores ON e OFF e os mesmos serão activados diariamente.
Configurar o temporizador diário
1 |
Carregue em |
ON |
: Definir o |
3 |
Carregue em |
SET . |
|
|
|
temporizador ON. |
|
|
|
|
|
|
|
|
|
|
2 |
Carregue em |
OFF |
: Definir o |
4 |
Carregue no botão |
SET enquanto a |
|
|
|
temporizador OFF. |
|
marca ( ou ) estiver a piscar. |
|
|
|
|
|
|
|
|
•No decorrer da activação do temporizador diário, ambas as setas ( ,
, ) são indicadas.
Nota:
•Mantenha o telecomando dentro do alcance de transmissão à unidade interior, caso contrário poderá ocorrer um atraso até 15 minutos.
•A configuração será guardada para a próxima operação igual.
13 OPERAÇÃO PRESET
Defina o tipo de funcionamento preferido para posterior utilização. A configuração será guardada pela unidade para operação futura (excepto direcção do fluxo de ar).
1. Seleccione o tipo de funcionamento preferido.
PRESET
2. Carregue e mantenha carregado o botão durante 3 segundos para memorizar a definição. É mostrada a marca P.
PRESET
3. Carregue em : Execute a operação pré-configurada.
14 OPERAÇÃO AUTO RESTART
Para reiniciar automaticamente o sistema de ar condicionado após uma falha de energia (A unidade tem de estar ligada à corrente.)
Configuração
1.Pressione ininterruptamente o botão RESET (Reinicializar) na unidade interior durante 3 segundos para configurar o funcionamento. (é emitido um sinal sonoro – 3 bips – e a lâmpada indicadora do funcionamento (OPERATION) irá piscar 5 vezes/segundo durante 5 segundos).
•Não opere a activação (ON) do temporizador nem a desactivação (OFF) do temporizador.
2.Pressione ininterruptamente o botão RESET (Reinicializar) na unidade interior durante 3 segundos para cancelar o funcionamento. (é emitido um sinal sonoro – 3 bips – mas a lâmpada indicadora do funcionamento (OPERATION) não pisca)
15 FUNCIONAMENTO SILENCIOSO
Funcionamento silencioso em velocidade de ventoinha super reduzida para (excepto em modo DRY (Seco))
QUIET
Carregue em : Inicie e pare a operação.
Nota: Sob determinadas condições, a operação QUIET (Silenciosa) pode não fornecer arrefecimento ou aquecimento adequados por causa das baixas características sonoras.
16 FUNCIONAMENTO SLEEP CONFORTO
Para poupar energia enquanto dorme, a unidade irá controlar automaticamente o fluxo de ar e desligar-se (OFF) automaticamente.
COMFORT
SLEEP
Carregue em 
 : Seleccione 1, 3, 5 ou 9 horas para operação OFF timer.
Nota: Na operação de arrefecimento, a temperatura configurada irá aumentar automaticamente em 1 grau/hora durante 2 horas (aumento de 2 graus no máximo). A temperatura irá diminuir no caso da operação de aquecimento.
17 FUNCIONAMENTO TEMPORIZADOR SLEEP
Para iniciar o funcionamento do temporizador sleep (temporizador OFF) Carregue em SLEEP : Seleccione 1, 3, 5 ou 9 horas para operação OFF timer.
1110250170_PT.indd 13
18 MANUTENÇÃO
 Em primeiro lugar, desligue o disjuntor.
Reinicialização do filtro (Em alguns modelos apenas)
A lâmpada indicadora do filtro (FILTER) acende-se; o filtro tem de ser limpo. Para desligar a lâmpada, pressione o botão RESET (Reinicialização) na unidade interior ou o botão FILTER (Filtro) no controlo remoto.
Unidade interior e telecomando
•Limpe a unidade interior e o telecomando com um pano humedecido, sempreq ue for necessário.
•Não use benzina, diluente, pó para polir ou produtos de limpeza do pó quimicamente tratados.
|
|
|
|
|
|
|
|
EN |
|
19 |
OPERAÇÃO DE AUTO-LIMPEZA (OPERAÇÃO DE |
ES |
|||||||
|
|
ARREFECIMENTO E A SECO APENAS) |
|
||||||
|
Para prevenir maus odores causados pela humidade na unidade interior |
FR |
|||||||
1. |
Se o botão |
for carregado uma vez durante o modo “Arrefecimento” |
|||||||
|
|
ou “Seco”, a ventoinha irá continuar a trabalhar durante mais 30 |
|
||||||
|
|
minutos, desligando-se então automaticamente. Isto permitirá a |
IT |
||||||
|
|
diminuição de humidade na unidade interior. |
|
|
|||||
2. |
Para parar imediatamente a unidade, prima |
mais 2 vezes em 30 |
|||||||
|
|
segundos. |
|
|
|
|
|
|
|
|
|
|
|
|
|
|
|
DE |
|
20 |
OPERAÇÃO E DESEMPENHO |
PT |
|||||||
1. |
Função de protecção de três minutos: Para impedir que a unidade seja activada |
||||||||
|
|||||||||
|
|
durante 3 minutos, quando de um rearranque ou ligação súbitos. |
PL |
||||||
2. |
Operação de pré-aquecimento: Aquecimento da unidade durante 5 minutos |
||||||||
|
|
antes de começar a operação de aquecimento. |
|
|
|||||
3. |
Aqueça controle de ar: Quando a temperatura no quatro atinge o valor |
|
|||||||
|
|
programado, a velocidade da ventoinha é automaticamente reduzida e a |
CZ |
||||||
4. |
unidade exterior pára. |
|
|
|
|||||
Descongelamento automático: As ventoinhas param durante a operação de |
|
||||||||
|
|
descongelamento. |
|
|
|
CR |
|||
5. |
Capacidade de aquecimento: O calor é absorvido do exterior e libertado no |
||||||||
|
|
quatro. Quando a temperatura exterior é demasiado baixa, utilize outro aparelho |
|||||||
|
|
de aquecimento recomendado em conjunto com o aparelho de ar condicionado. |
|
||||||
6. |
Possibilidade de acumulação de neve: Seleccione uma localização para a |
HU |
|||||||
|
|
unidade exterior, de modo que esta não fique exposta à acumulação de neve, |
|||||||
|
|
folhas ou outros detritos sazonais. |
|
|
|||||
7. |
Pode ocorrer algum som menor quando a unidade está a operar. Isto é normal |
|
|||||||
|
|
visto que o som pode ser provocado pela expansão/contracção do plástico. |
NL |
||||||
|
Nota: Item 2 a 6 para o modelo de aquecimento |
|
|
||||||
|
Condições de operação do aparelho de ar condicionado |
GR |
|||||||
|
|
|
|
|
|
||||
|
|
Temp. |
Temperatura exterior |
|
Temperatura |
||||
|
Operação |
|
|
||||||
|
|
|
|
|
ambiente |
|
|||
|
Aquecimento |
|
|
–15°C ~ 24°C |
|
Inferior a 28°C |
SV |
||
|
Arrefecimento |
|
|
–10°C ~ 46°C |
|
21°C ~ 32°C |
|||
|
Seco |
|
|
–10°C ~ 46°C |
|
17°C ~ 32°C |
|
||
|
|
|
|
|
|
|
|
FI |
|
21 |
RESOLUÇÃO DE PROBLEMAS (PONTO DE CONTROLO) |
NO |
|||||||
|
|
|
|
|
|
|
|||
|
|
A unidade não funciona. |
O arrefecimento ou aquecimento são |
DK |
|||||
|
|
anormalmente baixos. |
|||||||
|
|
|
|
|
|||||
|
|
|
|
|
|
||||
|
|
|
|
||||||
|
• O interruptor de corrente principal |
• Os filtros estão bloqueados com pó. |
|
||||||
|
está desligado. |
|
|
• A temperatura foi regulada incorrectamente. |
|
||||
|
• O disjuntor está activado para cortar |
• As janelas ou portas estão abertas. |
RO |
||||||
|
a corrente. |
|
|
• A entrada ou saída de ar da unidade exterior está bloqueada. |
|||||
|
• Interrupção da corrente eléctrica |
• A velocidade da ventoinha é demasiado baixa. |
|||||||
|
• ON timer está configurado. |
• O modo de operação é FAN ou DRY. |
|
||||||
|
|
|
|
|
|
|
|
BG |
|
|
|
|
|
|
|
|
|
||
22 |
CONTROLO REMOTO SELECÇÃO A-B |
EE |
|||||||
|
Para separar a utilização do controlo remoto para cada unidade interior na |
LV |
|||||||
|
eventualidade da instalação de 2 unidades de ar condicionado adjacentes. |
||||||||
|
Configuração do controlo remoto B. |
|
|
||||||
1. |
Pressione o botão RESET (Reinicialização) na unidade interior para ligar (ON) a |
SK |
|||||||
|
|
unidade de ar condicionado. |
|
|
|
||||
2. |
Aponte o controlo remoto à unidade interior. |
|
|
||||||
3. |
Pressione ininterruptamente o botão CHK • no controlo remoto utilizando a |
|
|||||||
|
|
ponta de um lápis. A indicação “00” irá surgir no ecrã. |
SI |
||||||
|
|
|
MODE |
|
|
|
|||
4. |
Carregue em |
|
enquanto pressiona CHK •. A indicação “B” irá surgir |
|
|||||
|
|
no ecrã e a indicação “00” irá desaparecer e a unidade de ar condicionado irá |
|
||||||
|
|
desligar-se (OFF). O controlo remoto B é memorizado. |
|
||||||
Nota: 1. Repita o passo anterior para reconfigurar o controlo remoto para a posição A.
2. O controlo remoto A não apresenta a indicação “A” no ecrã.
3. A predefinição do controlo remoto de fábrica é A.
12/23/09 4:02:34 PM

ZASADY BEZPIECZEŃSTWA
|
• Nie wolno samodzielnie instalować ani przeprowadzać napraw |
|
|
urządzenia, jak również otwierać bądź zdejmować pokrywy. Może |
|
|
to grozić porażeniem prądem o wysokim napięciu. Wykonanie |
|
|
tych czynności należy zlecić sprzedawcy lub wykwalifikowanemu |
|
|
personelowi. |
|
|
• Odcięcie dopływu prądu nie chroni przed możliwym porażeniem prądem |
|
NIEBEZPIECZEŃSTWO |
elektrycznym. |
|
• Urządzenie powinno być zainstalowane zgodnie z krajowymi przepisami |
||
|
dotyczącymi instalacji elektrycznych. |
|
|
• Stała instalacja elektryczna winna być wyposażona w urządzenie |
|
|
odłączające zasilanie o odstępie między stykami wynoszącym |
|
|
przynajmniej 3 mm. |
|
|
• Unikać dłuższego bezpośredniego wystawienia ciała na podmuch |
|
|
chłodnego powietrza. |
|
|
• Nie należy wkładać palców lub innych obiektów do otworów wlotu/wylotu |
|
|
powietrza. |
|
|
• W przypadku zauważenia nieprawidłowego działania klimatyzatora (np. |
|
|
swąd) należy wyłączyć urządzenie i odłączyć zasilanie lub wyłączyć |
|
OSTRZEŻENIE |
wyłącznik automatyczny. |
|
• Niniejsze urządzenie nie jest przeznaczone do użytku przez osoby |
||
|
(w tym dzieci) z ograniczoną sprawnością fizyczną, czuciową lub |
|
|
umysłową, ani przez osoby, które nie posiadają odpowiedniego |
|
|
doświadczenia ani wiedzy, chyba że zostały przeszkolone lub są pod |
|
|
nadzorem osoby odpowiedzialnej za ich bezpieczeństwo. |
|
|
• Należy dopilnować, aby dzieci nie bawiły się urządzeniem. |
|
|
• Nie myć urządzenia wodą. Grozi to porażeniem prądem elektrycznym. |
|
|
• Nie używać klimatyzatora w pomieszczeniach przeznaczonych do |
|
|
innych celów, takich jak przechowywanie pożywienia, hodowla zwierząt |
|
|
itp. |
|
|
• Nie stawać ani kłaść żadnych przedmiotów na urządzeniu |
|
|
wewnętrznym/zewnętrznym. Działanie takie może spowodować |
|
|
uszkodzenie ciała lub urządzenia. |
|
|
• Nie należy dotykać aluminiowego radiatora, co może spowodować |
|
UWAGA |
urazy. |
|
• Przed przystąpieniem do czyszczenia, należy wyłączyć urządzenie za |
||
|
||
|
pomocą głównego wyłącznika zasilania lub wyłącznika automatycznego. |
|
|
• Jeśli klimatyzator nie będzie używany przez dłuższy czas, należy |
|
|
wyłączyć główny wyłącznik zasilania lub wyłącznik automatyczny. |
|
|
• Zaleca się, aby wszelkie czynności konserwacyjne po długim okresie |
|
|
eksploatacji urządzenia, były dokonywane przez serwis. |
|
|
|
1 WYŚWIETLACZ URZĄDZENIA WEWNĘTRZNEGO
Rodzaje Typów: RAS-137, 167SKV Series |
|
|||||||||||||||||
|
|
|
|
|
|
|
|
|
|
|
|
|
|
|
|
1 |
|
Wysokonapięciowy (Zielona) |
Hi POWER |
|
FILTER |
|
|
|
|
|
|
|
|
|
2 |
FILTR (Pomarańczowy) |
|||||
PRE. DEF TIMER OPERATION |
||||||||||||||||||
|
|
|
|
|
|
|
|
|
|
|
|
|
|
|
|
3 |
|
PRE. DEF (DE-FROST) |
|
|
|
|
|
|
|
|
|
|
|
|
|
|
|
|
|
|
(Pomarańczowy) |
|
|
|
|
|
|
|
|
|
|
|
|
RESET |
4 |
TIMER (Żółta) |
||||
|
|
|
|
|
|
|
|
|
|
|
|
|
|
|
|
5 |
|
OPERATION (Zielona) |
Rodzaje Typów: RAS-107SKV Series |
6 |
|
Przycisk RESET |
|||||||||||||||
|
|
|
||||||||||||||||
|
|
CLEANING |
|
|
|
|
|
|
|
|
|
|
1 |
|
OPERATION (Zielona) |
|||
|
|
|
|
|
|
|
|
|
|
|
|
|
|
|
|
2 |
|
TIMER/CLEANING (Żółta) |
RESET |
|
TIMER |
OPERATION |
|
|
|
3 |
|
Przycisk RESET |
|||||||||
|
|
|
|
|
|
|
|
|
|
|
|
|
|
|
|
|
||
|
|
|
|
|
|
|
|
|
|
|
|
|
|
|
|
|
|
|
4 ZDALNE STEROWANIE
1Przekaźnik promieni podczerwonych
2Przycisk Start/Stop
3Przycisk wyboru trybu (MODE)
4Przycisk temperatury (TEMP)
5Przycisk prędkości wentylatora (FAN)
6Przycisk swobodnego ruchu żaluzji wentylacyjnych (SWING)
7Przycisk ustawienia żaluzji (FIX)
8Przycisk programatora czasu włączenia (ON)
9Przycisk programatora czasu wyłączenia (OFF) ! Przycisk programowanego wyłączenia (SLEEP) " Przycisk programowania (SET)
# Przycisk usuwania (CRL)
$ Przycisk pamięci i ustawień(PRESET)
% Przycisk Sensora Dotykowego (ONE-TOUCH) & Przycisk intensywnego działania (Hi-POWER) ( Przycisk trybu niskiego poboru mocy (ECO)
) Przycisk wyciszania (QUIET)
~ Przycisk komfortowego wyłączenia (COMFORT SLEEP)
+Przycisk programowania filtra (FILTER) , Przycisk programowania zegara (CLOCK) - Przycisk trybu sprawdzania (CHK)
02%3%4 &!.
4%-0
/.% 4/5#( -/$%
15)%4 |
#/-&/24 |
3,%%0 |
|
37).' &)8 |
(I 0/7%2 %#/ |
4)-%2 |
#,2 |
/. |
/&& |
3,%%0 |
3%4 |
#(+ &),4%2
 #,/#+
#,/#+
5 SENSOR DOTYKOWY
Nacisnąć przycisk “ONE-TOUCH” w celu całkowitego automatycznego działania, zgodnego z preferencjami użytkownika, typowymi dla danego regionu. Ustawienia użytkownika kontrolują temperaturę cyrkulacji powietrza, jego kierunek cyrkulacji, i inne typowe ustawienia, poprzez naprzemienne zastosowanie przycisku sensora dotykowego “ONE-OTUCH”. W celu zmiany ustawień, można wybrać inne funkcje działania urządzenia firmy Toshiba.
ONE-TOUCH
Naciśnij przycisk : Rozpocząć działanie.
6 DZIAŁANIE AUTOMATYCZNE
Urządzenie samoczynnie wybiera funkcję chłodzenia, nagrzewania lub pracy wentylatora
MODE
1.Naciśnij przycisk : Wybierz A.
2.Naciśnij przycisk TEMP : Ustaw żądaną temperaturę.
2 PRZYGOTOWANIE PRZED UŻYCIEM
Przygotowanie filtrów
1.Otwórz kratkę wlotu powietrza i wyjmij filtry powietrza.
2.Zainstaluj filtry. (patrz szczegóły w opisie akcesoriów)
Wkładanie baterii
1. Zdjąć osłonę baterii. |
A |
|
CL |
2.Włóż dwie nowe baterie (typ AAA)
pamiętając, aby nie pomylić biegunów baterii (+) i (–).
Ustawianie Zegara
1. Nacisnąć CLOCK • za pomocą np. koniuszka ołówka.
2. Naciśnij przycisk |
ON lub |
OFF : aby |
ustawić czas. |
|
|
3. Naciśnij przycisk  SET : Ustaw programator.
Programowanie Pilota Zdalnego Sterowania
1. Usunąć baterie.
2. Naciśnij przycisk 
 . 3. Włożyć baterie.
3 KIERUNEK STRUMIENIA POWIETRZA
|
|
FIX |
1 |
Naciśnij przycisk |
: Ustaw |
żaluzje, aby wyregulować pionowy |
||
|
strumień powietrza. |
|
SWING
Naciśnij przycisk 
 : Uruchom 2 automatyczną funkcję ruchu
(SWING) i naciśnij ponownie, aby zatrzymać.
3 |
Poziomy strumień powietrza |
wyreguluj ręcznie. |
Uwaga:
•Nie należy przesuwać ręcznie żaluzji wentylacyjnych.
•Żaluzje wentylacyjne automatycznie ustawiają się w pozycji, zgodnie z trybem działania.
7 CHŁODZENIE / NAGRZEWANIE / TYLKO WENTYLATOR
MODE
1.Naciśnij przycisk : Wybierz Chłodzenie
 , Nagrzewanie

 , lub Tylko wentylator
  .
.
2.Naciśnij przycisk  TEMP : Ustaw żądaną temperaturę. Chłodzenie: 17°C lub powyżej, Grzanie: 30°C lub poniżej, Tylko
wentylator: Brak wskazania temperatury
FAN
3.Naciśnij przycisk  : Wybierz AUTO, LOW
  , LOW+
  , MED
, MED 
 , MED+
 , lub HIGH

 .
.
8 OPERACJA OSUSZANIA (TYLKO CHŁODZENIE)
W trakcie operacji Osuszania, urządzenie samoczynnie kontroluje funkcję chłodzenia ustawioną na poziom średni.
MODE
1.Naciśnij przycisk : Wybierz Osuszanie
  .
.
2.Naciśnij przycisk TEMP : Ustaw żądaną temperaturę.
9 TRYB Hi-POWER
Urządzenie automatycznie kontroluje temperaturę cyrkulacji powietrza w pomieszczeniu dla lepszego jego chłodzenia lub ogrzewania (z wyjątkiem trybu działania DRY lub FAN ONLY)
Hi-POWER
Naciśnij przycisk : Uruchom i zatrzymaj pracę.
10 DZIAŁANIE W TRYBIE NISKIEGO POBORU MOCY
Urządzenie automatycznie kontroluje zużycie energii w pomieszczeniu (z wyjątkiem trybu DRY lub FAN ONLY)
ECO
Naciśnij przycisk : Uruchom i zatrzymaj pracę.
Uwaga: Tryb chłodzenia; ustawienia temperatury zmaleją automatycznie o 1 stopień/godz. przez 2 godziny działania urządzenia (maksymalnie o 2 stopnie). W przypadku trybu ogrzewania ustawienia temperatury automatycznie wzrosną.
1110250170_PL.indd 14 |
12/23/09 4:01:48 PM |

11 DZIAŁANIE FUNKCJI TEMPORARY
Ta funkcja służy do sterowania urządzeniem w wypadku zagubienia pilota zdalnego sterowania lub wyczerpania baterii zasilających pilota
•Naciskając przycisk RESET można uruchomić lub wyłączyć klimatyzator bez korzystania z pilota.
• Tryb działania zostaje ustawiony na AUTOMATIC, wstępnie ustawienie temperatury to 25°C,
a działanie prędkości wentylatora zostaje automatycznie przyspieszone.
12 OBSŁUGA PROGRAMATORA
|
Ustawianie programatora czasu |
Ustawianie programatora czasu |
||||
|
włączenia ON |
wyłączenia OFF |
||||
|
Naciśnij przycisk |
|
: Ustaw żądaną |
Naciśnij przycisk |
|
: Ustaw żądaną |
1 |
|
ON |
godzinę włączenia |
OFF |
||
|
|
godzinę wyłączenia |
||||
|
|
|
urządzenia ON. |
|
|
urządzenia OFF. |
|
|
|
|
|
|
|
|
|
|
|
|
|
|
2 |
Naciśnij przycisk |
SET |
: Ustaw programator. |
Naciśnij przycisk |
SET |
: Ustaw programator. |
|
|
|
|
|
|
|
3 |
Naciśnij przycisk |
CLR |
: Skasuj ustawienia |
Naciśnij przycisk |
CLR |
: Skasuj ustawienia |
|
|
programatora. |
|
|
programatora. |
|
|
|
|
|
|
||
Czas włączenia ON i wyłączenia OFF można ustawić przy pomocy programatora dziennego, który będzie codziennie stosował te ustawienia.
Ustawianie programatora dziennego.
1 |
Naciśnij przycisk |
ON |
: Ustaw programator |
3 |
Naciśnij przycisk |
SET . |
|
|
|
czasu włączenia ON. |
|
|
|
|
|
|
|
|
|
|
2 |
Naciśnij przycisk |
OFF |
: Ustaw programator |
4 |
Naciśnij przycisk |
SET gdy miga |
|
|
|
czasu wyłączenia OFF. |
|
wskaźnik ( lub |
) . |
|
|
|
|
|
|
|
|
|
|
|
|
|
|
•Podczas aktywowania funkcji programatora dziennego, wyświetlane są obie strzałki ( ,
,  ).
).
Uwaga:
•Pilot powinien się znajdować w odpowiedniej odległości od urządzenia wewnętrznego; w przeciwnym razie wystąpi opóźnienie do 15 minut.
•Ustawienie zostanie zachowane dla kolejnej operacji tego samego typu.
13 USTAWIENIA POCZĄTKOWE
Istnieje możliwość zapamiętania ustawień najczęściej wykonywanej operacji w celu ich późniejszego wykorzystania. Zapamiętywanie ustawień dla przyszłego wykorzystania (nie dotyczy ustawienia kierunku strumienia powietrza).
1. Wybierz najczęściej wykonywaną operację.
|
PRESET |
2. Naciśnij i przytrzymaj przez 3 sekundy przycisk |
aby zapamiętać |
ustawienie. Wyświetlone zostanie wskazanie P. |
|
PRESET
3.Naciśnij przycisk 
 : Rozpocznij pracę urządzenia według zaprogramowanych ustawień.
14 OPERACJA AUTOMATYCZNEGO WZNAWIANIA PRACY
Automatyczne wznawianie pracy klimatyzatora po zaniku napięcia (Zasilanie urządzenia musi być włączone.)
Ustawianie
1.Nacisnąć i przytrzymać przycisk RESET na wewnętrznym urządzeniu prze 3 sekundy, w celu ustawienia trybu działania. (3 sygnały dźwiękowe, a lampka OPERATION mrugnie 5 razy/sek. przez 5 sekund)
• Nie obsługiwać funkcji timer ON i timer OFF.
2.Nacisnąć i przytrzymać przycisk RESET na wewnętrznym urządzeniu przez 3 sekundy, w celu anulowania trybu działania. (3 sygnały dźwiękowe, bez mrugającej lampki OPERATION)
15 CICHE DZIAŁANIE
Maksymalne zwolnienie prędkości wiatraka w celu wyciszenia urządzenia
(z wyjątkiem trybu DRY)
QUIET
Naciśnij przycisk : Uruchom i zatrzymaj pracę.
Uwaga: W pewnych warunkach, tryb działania QUIET może nie dostarczać odpowiedniego chłodzenia czy ogrzewania, zgodnie z niskoszumowym trybem działania.
16 DZIAŁANIE FUNKCJI KOMFORTOWEGO WYŁĄCZENIA
Urządzenie kontroluje zużycie energii podczas trybu uśpienia, automatycznie kontrolując cyrkulację powietrza, i automatycznie wyłączając się.
COMFORT
SLEEP
Naciśnij przycisk 
 : Wybierz ustawienie programatora czasu wyłączenia 1, 3, 5 lub 9 godz.
Uwaga: Tryb chłodzenia, ustawiona temperatura automatycznie zmniejszy się o 1 stopień/godz. przez 2 godziny działania urządzenia. W przypadku trybu ogrzewania, ustawienia temperatury automatycznie wzrosną.
17 DZIAŁANIE FUNKCJI PROGRAMOWANEGO WYŁĄCZENIA
Uruchamianie funkcji programowanego wyłączenia (programator WYŁ.)
Naciśnij przycisk  SLEEP : Wybierz ustawienie programatora czasu wyłączenia 1, 3, 5 lub 9 godz.
18 KONSERWACJA
 Należy najpierw wyłączyć wyłącznik automatyczny.
Programowanie filtru (tylko niektóre z typów urządzeń)
Lampka filtru zapalona; filtr musi zostać oczyszczony.
W celu wyłączenia lampki, nacisnąć przycisk RESET na wewnętrznym urządzeniu, lub przycisk FILTER na pilocie zdalnego sterowania.
Urządzenie wewnętrzne i pilot
•Urządzenie wewnętrzne oraz pilota należy w miarę potrzeby wycierać wilgotną szmatką.
•Nie należy stosować benzyny, rozcieńczalnika, proszku polerskiego ani odpylnika obrabianego chemicznie.
19OPERACJA SAMOCZYSZCZENIA (TYLKO CHŁODZENIE I OSUSZANIE)
Ochrona przed nieprzyjemnym zapachem wywoływanym osadzaniem się wilgoci w urządzeniu wewnętrznym
1.Po jednokrotnym naciśnięciu przycisku  podczas pracy w trybie “Chłodzenia” lub “Osuszania”, wentylator będzie kontynuował pracę przez kolejnych 30 minut, a następnie wyłączy się automatycznie. Funkcja ta umożliwia redukcję wilgotności w środku urządzenia wewnętrznego.
2.W celu natychmiastowego zatrzymania, nacisnąć jeszcze 2 razy w ciągu 30 sekund.
20SPOSÓB I SKUTECZNOŚĆ DZIAŁANIA
1.Funkcja trzyminutowej ochrony: Uniemożliwia uruchomienie klimatyzatora przez około 3 minuty po nagłym ponownym uruchomieniu lub włączeniu zasilania (ON).
2.Operacja nagrzewania wstępnego: Nagrzewanie urządzenia przez 5 minut przed rozpoczęciem podgrzewania powietrza.
3.Kontrola ciepłego powietrza: Kiedy temperatura pomieszczenia osiągnie nastawiony poziom, szybkość obrotów wentylatora zostaje automatycznie zmniejszona i urządzenie zewnętrzne przestaje pracować.
4.Automatyczne odszranianie: W trakcie odszraniania wentylatory zostają zatrzymane.
5.Zdolność grzewcza: Ciepło jest absorbowane z zewnątrz budynku i uwalniane wewnątrz pomieszczenia. Jeżeli temperatura na zewnątrz jest zbyt niska, poza klimatyzatorem zaleca się stosować również inne urządzenia grzewcze.
6.Niebezpieczeństwo związane z nagromadzeniem śniegu: Urządzenie zewnętrzne powinno być umieszczone w miejscu, w którym nie zagraża mu nawiewanie śniegu, gromadzenie się liści lub innych odpadów sezonowych.
7.Podczas działania urządzenie mogą dochodzić pewne małoznaczące dźwięki. Stanowi to normalne działanie urządzenia, spowodowane pracą elementów plastycznych.
Uwaga: Punkty 2-6 dotyczą modelu grzewczego
Warunki pracy klimatyzatora
|
Temp. |
Temperatura |
Temperatura pokojowa |
|
|
||
Operacja |
|
Zewnętrzna |
|
|
|
||
|
|
|
|
Nagrzewanie |
|
–15°C ~ 24°C |
Poniżej 28°C |
Chłodzenie |
|
–10°C ~ 46°C |
21°C ~ 32°C |
Osuszanie |
|
–10°C ~ 46°C |
17°C ~ 32°C |
21 PROBLEMY I ICH PRZYCZYNY
|
Urządzenie nie działa. |
Mała skuteczność chłodzenia lub nagrzewania. |
|
|
|
• |
Wyłączono główny wyłącznik |
• Nadmierne nagromadzenie zanieczyszczeń |
|
zasilania. |
doprowadziło do zatkania filtrów. |
• Doszło do uruchomienia wyłącznika |
• Temperatura została ustawiona nieprawidłowo. |
|
|
automatycznego, który spowodował |
• W pomieszczeniu otwarto drzwi lub okna. |
|
odcięcie zasilania. |
• Wlot lub wylot powietrza urządzenia zewnętrznego |
• |
Zanik napięcia |
jest zatkany. |
• Ustawiony jest programator czasu |
• Szybkość obrotów wentylatora została ustawiona na |
|
|
włączenia (ON). |
zbyt niski poziom. |
|
|
• Klimatyzator jest ustawiony na tryb FAN lub DRY. |
22 PILOT ZDALNEGO STEROWANIA SELEKCJA A-B
Oddzielne zastosowanie pilota zdalnego sterowania dla każdego z 2 urządzeń klimatyzacji, zainstalowanych w bezpośredniej bliskości.
Ustawianie Pilota Zdalnego Wybierania B
1.Naciśnij przycisk RESET na wewnętrznym urządzeniu, w celu załączenia urządzenia klimatyzacji.
2.Skierować pilot zdalnego sterowania na wewnętrzne urządzenie.
3.Nacisnąć i przytrzymać przycisk CHK • na pilocie zdalnego sterowania,
używając np. końcówki ołówka. Na wyświetlaczu pojawi się “00”.
|
MODE |
4. Naciśnij przycisk |
podczas przytrzymywania CHK •. Na wyświetlaczu |
pojawi się “B”, co spowoduje zniknięcie „00” i wyłączenie urządzenia klimatyzacji. Oznacza to, że ustawienia Pilota Zdalnego Sterowania zostały zapamiętane.
Uwaga: 1. Powtórzyć powyższe czynności, w celu ponownego programowania Pilota Zdalnego Sterowania jako A.
2. Pilot Zdalnego Sterowania nie posiada wyświetlania znaku “A”.
3. Standardowym ustawieniem fabrycznym Pilota Zdalnego Sterowania jest A.
EN ES FR IT DE PT PL CZ CR HU NL GR SV FI NO DK RO BG EE LV SK SI
1110250170_PL.indd 15 |
12/23/09 4:01:51 PM |
 Loading...