


RAS-10JKVP-E
ENGLISHFRANÇAISDEUTSCHITALIANOESPAÑOLǼȁȁǾȃǿȀǾPORTUGUÊS
AIR CONDITIONER (SPLIT TYPE)
nchasing this TOSHIBA Air Conditioner. Please read this owner’s manual carefully before using your Air Conr.
OWNER’S MANUAL
MODE D’EMPLOI
BEDIENUNGSANLEITUNG
MANUALE DI ISTRUZIONI
MANUAL DEL PROPIETARIO
ȅǻǾīǿǼȈ ȋȇǾȈǼȍȈ
MANUAL DO UTILIZADOR
For general public use
CLIMATISEUR (TYPE SEPARE)
Pour utilisation grand public
KLIMAGERÄT (GETEILTE AUSFÜHRUNG)
Für allgemeine Verwendung
CONDIZIONATORE D’ARIA (TIPO SPLIT)
Per l’uso in generale
ACONDICIONADOR DE AIRE (TIPO SEPARADO)
Para el uso público general
ȀȁǿȂǹȉǿȈȉǿȀȅ (ǻǿǹǿȇȅȊȂǼȃȅȊ ȉȊȆȅȊ)
īȚĮ ȖİȞȚțȒ įȘµȩıȚĮ ȤȡȒıȘ
SISTEMA DE AR CONDICIONADO (TIPO SPLIT)
Para utilização geral
Indoor Unit Outdoor Unit
Unité intérieure Unité extérieure
Innenraumgerät Außengerät
Unità interna Unità esterna
Unidad interior Unidad exterior
ǼıȦIJİȡȚțȒ µȠȞȐįĮ ǼȟȦIJİȡȚțȒ µȠȞȐįĮ
Unidade interior Unidade exterior
RAS-10JKVP-E / RAS-10JAVP-E
RAS-13JKVP-E / RAS-13JAVP-E
Thank you for purchasing this TOSHIBA Air Conditioner. Please read this owner’s manual
carefully before using your Air Conditioner.
Avant tout, merci d’avoir porté votre choix sur un climatiseur TOSHIBA. Veuillez lire
attentivement ce mode d’emploi avant de mettre en service le climatiseur.
Wir danken Ihnen für den Kauf dieses TOSHIBA-Klimageräts. Lesen Sie die
Bedienungsanleitung sorgfältig durch, bevor Sie das Gerät in Betrieb nehmen.
Grazie per aver acquistato questo Condizionatore d’Aria TOSHIBA. Prima di usare il
Condizionatore d’Aria, si consiglia di leggere con attenzione il presente manuale.
Gracias por adquirir este acondicionador de aire TOSHIBA. Lea este manual del propietario
detenidamente antes de utilizar su acondicionador de aire.
ǼȣȤĮȡȚıIJȠȪµİ ȖȚĮ IJȘȞ ĮȖȠȡȐ ĮȣIJȠȪ IJȠȣ țȜȚµĮIJȚıIJȚțȠȪ IJȘȢ ȉȅȈǿȂȆǹ. ȆĮȡĮțĮȜİȓıșİ ȞĮ
įȚĮȕȐıİIJİ ʌȡȠıİțIJȚțȐ IJȚȢ ȠįȘȖȓİȢ ȤȡȒıİȦȢ ʌȡȚȞ ȤȡȘıȚµȠʌȠȚȒıİIJİ IJȠ ȀȜȚµĮIJȚıIJȚțȩ ıĮȢ.
Obrigado por ter adquirido este sistema de ar condicionado da TOSHIBA. Leia atentamente
este manual do utilizador antes de utilizar o sistema de ar condicionado.
1
ENGLISHFRANÇAISDEUTSCHITALIANOESPAÑOLNEDERLANDSPORTUGUÊSǼȁȁǾȃǿȀǾ
EN
WARNING
• Be sure to ask a dealer or a store specialized in electric work to install the air conditioner.
• If the air conditioner is improperly installed by yourself, it can cause some problems such as water
leaks, electric shock, fire, and so on.
• Be sure to always ground the air conditioner.
• Do not connect the ground wire to gas pipes, water pipes, lightning rods or ground wires of
telephones. If the air conditioner is improperly grounded, it can cause an electric shock.
• Avoid cooling the room too strongly or exposing the human body to cool wind for a long time because
it can be detrimental to your health.
• Never insert fingers or sticks into the air outlet and air inlet to avoid getting injured and damaging the
machine because there are fans running at a high speed inside both the air inlet and air outlet.
• When you notice something unusual with the air conditioner (such as a burning smell or weak cooling
power), immediately turn off the main switch and the circuit breaker from the main power supply to
stop the air conditioner, and contact the dealer.
• If the air conditioner is continuously operated when something is wrong, it can cause machine failure,
electric shock, fire, and so on.
• Do not spill water or other liquid on the indoor unit. If the unit is wet, it can cause an electric shock.
• Do not attempt to move or repair the unit by yourself.
• Since there is high voltage inside the unit, you can get an electric shock when removing the cover and
main unit.
• Always ask the dealer to move the air conditioner for re-installing it in another place. If it is improperly
installed, it can cause electric shock or fire.
• Whenever the air conditioner needs repairs, request repairs from the dealer.
If the air conditioner is repaired improperly it can cause an electric shock or fire.
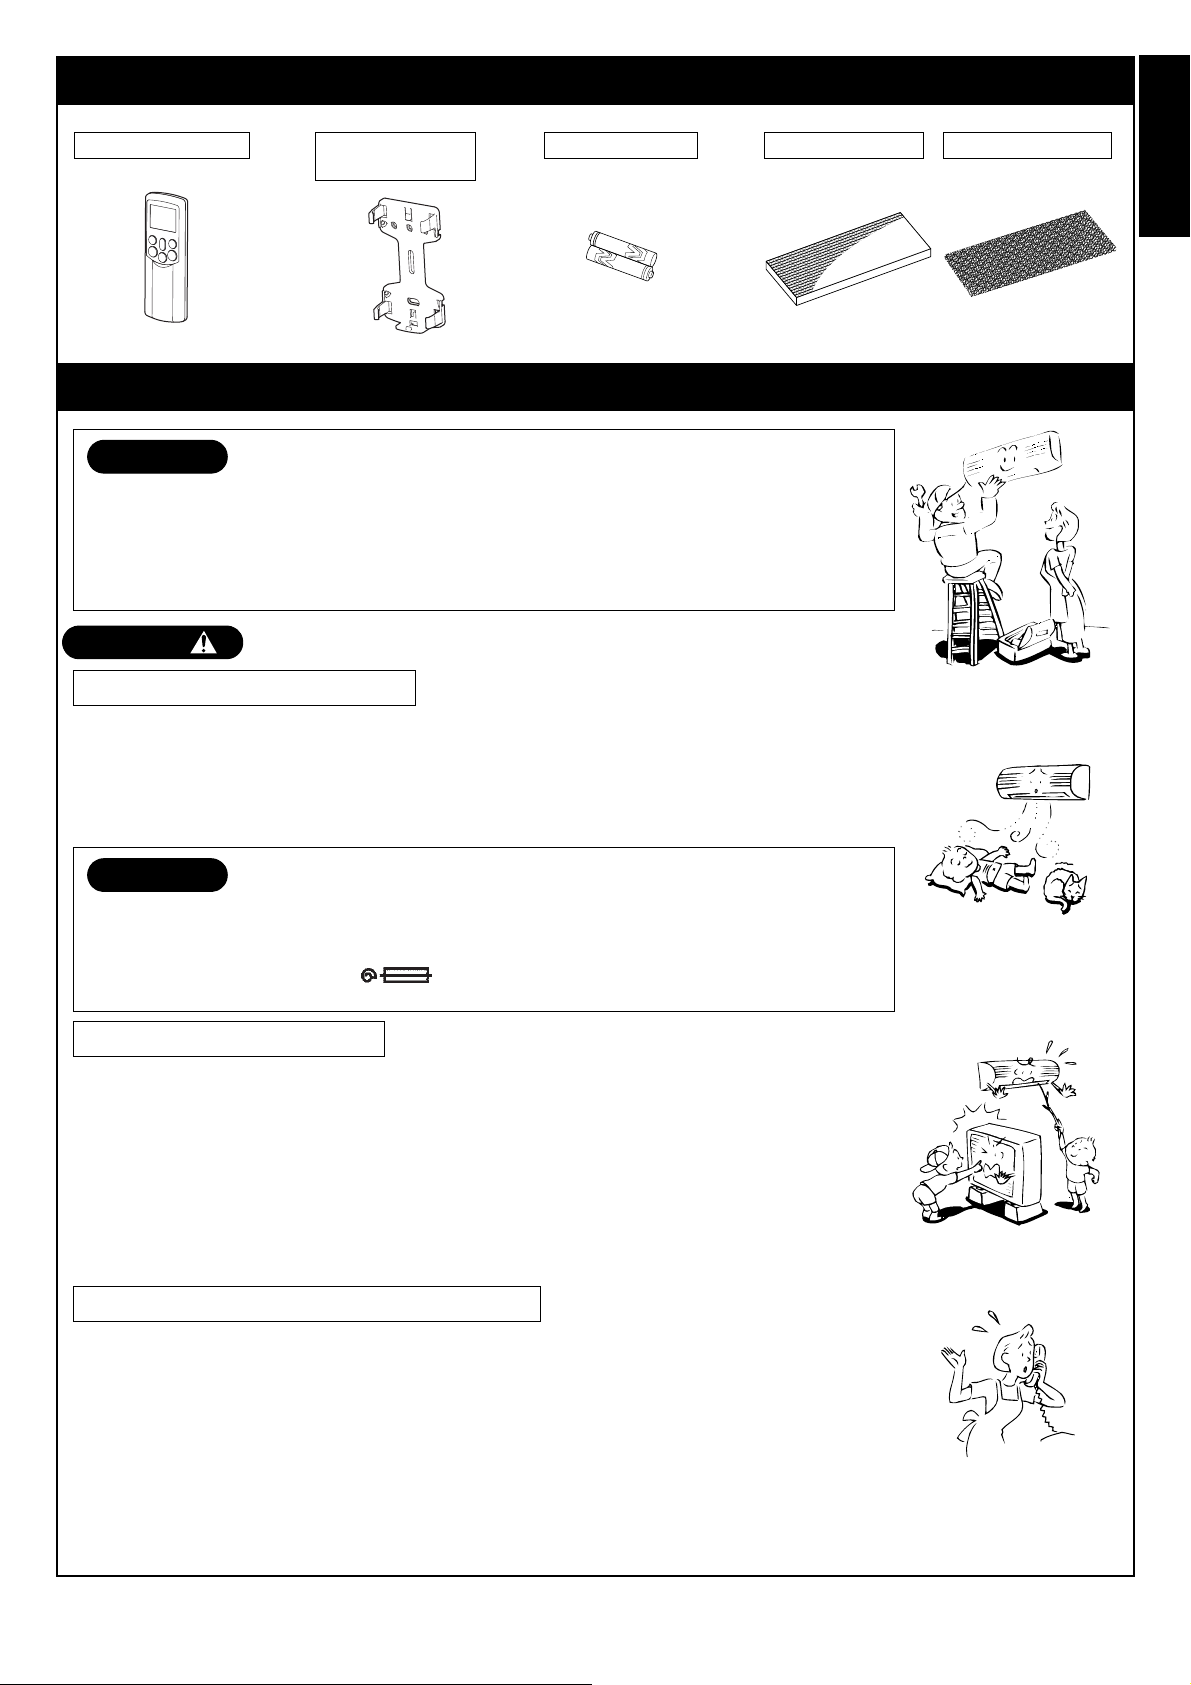
ACCESSORIES
AIR FILTER COMPONENTS
SAFETY PRECAUTIONS
DANGER
• DO NOT ATTEMPT TO INSTALL THIS UNIT BY YOURSELF. THIS UNIT REQUIRES A QUALIFIED
INSTALLER.
• DO NOT ATTEMPT TO REPAIR THE UNIT BY YOURSELF. THIS UNIT HAS NO COMPONENTS
WHICH YOU CAN REPAIR.
• OPENING OR REMOVING THE COVER WILL EXPOSE YOU TO DANGEROUS VOLTAGES.
• TURNING OFF THE POWER SUPPLY WILL NOT PREVENT POTENTIAL ELECTRIC SHOCK.
INSTALLATION WARNINGS
CAUTION
TO DISCONNECT THE APPLIANCE FROM THE MAIN POWER SUPPLY
This appliance must be connected to the main power supply by a circuit breaker or a switch with a
contact separation of at least 3 mm.
The installation fuse (25A D type ) must be used for the power supply line of this air
conditioner.
OPERATION WARNINGS
MOVEMENT AND REPAIR WARNINGS
Remote control Remote control
holder
Batteries (two) Zeolite-plus filter Zeolite-3G filter
2
EN
CAUTION
.
• Securely lay the drain hose for the best draining results.
• Incorrect drainage can cause flooding in the house and furniture to get wet.
• Be sure to connect the air conditioner to a dedicated power supply having the rated voltage.
Otherwise, the unit can break down or cause a fire.
• Do not install the unit in a place where inflammable gas can leak.
• A fire can result if inflammable gas accumulates around the unit.
• The indoor unit shall be installed so that the top of the indoor unit is at least 2 m in height. Also, avoid
putting anything on the top of the indoor unit.
• Carefully read this manual before starting the air conditioner. The manual includes a lot of important
information for daily operation.
• Do not use this air conditioner for other purposes such as preserving food, precision instruments, art
objects, breeding animals, or growing potted plants.
• Do not install this air conditioner in a special-purpose room such as a ship or any kind of vehicle.
Doing so could harm machine performance.
• Avoid exposing potted plants and animals to wind from the air conditioner because it harms their
health and growth.
• When the air conditioner is operated together with a combustion device in the same place, pay
careful attention to ventilation and let fresh air into the room.
Poor ventilation can cause an oxygen shortage.
• When the air conditioner is used in a closed room, pay careful attention to the ventilation of the room.
Poor ventilation can cause an oxygen shortage.
• Do not touch the operation buttons with wet hands. Doing so could cause an electric shock.
• Do not place any combustion device in a place where it is directly exposed to wind from the air
conditioner. Doing so could cause incomplete combustion.
• When the air conditioner will not be used for an extended period of time, turn off the main switch or
the circuit breaker for added safety. Disconnecting from the power supply protects the unit from
lightning and power surges.
• Do not put a container with water such as a vase on the unit because water can enter into the unit
and cause an electric shock due to deterioration in the electric insulation.
• Check the concrete blocks underneath the outdoor unit occasionally. If the base is left damaged or
deteriorated, the unit can topple over and could possibly cause an injury.
• Do not wash the unit with water. This could cause an electric shock.
• Do not use alcohol, benzene, thinner, glass cleaner, polishing powder or other solvent for cleaning
the unit because they can deteriorate and damage the air conditioner.
• Before cleaning the unit, be sure to turn off the main switch or circuit breaker to prevent injuries from
the electric fan running inside.
• For details of the cleaning method, refer to “USUAL MAINTENANCE” and “SPECIAL
MAINTENANCE” on pages 18 to 22.
• Do not put anything on or step on the indoor unit and outdoor unit. If you do so, it can topple over and
cause an injury.
• To allow the air conditioner to operate at maximum performance, operate within the operating
temperature range specified in the instructions. Failure to do so can cause a malfunction, break
down, or water to leak from the unit.
INSTALLATION CAUTIONS
OPERATION CAUTIONS
3
ENGLISHFRANÇAISDEUTSCHITALIANOESPAÑOLNEDERLANDSPORTUGUÊSǼȁȁǾȃǿȀǾ
EN
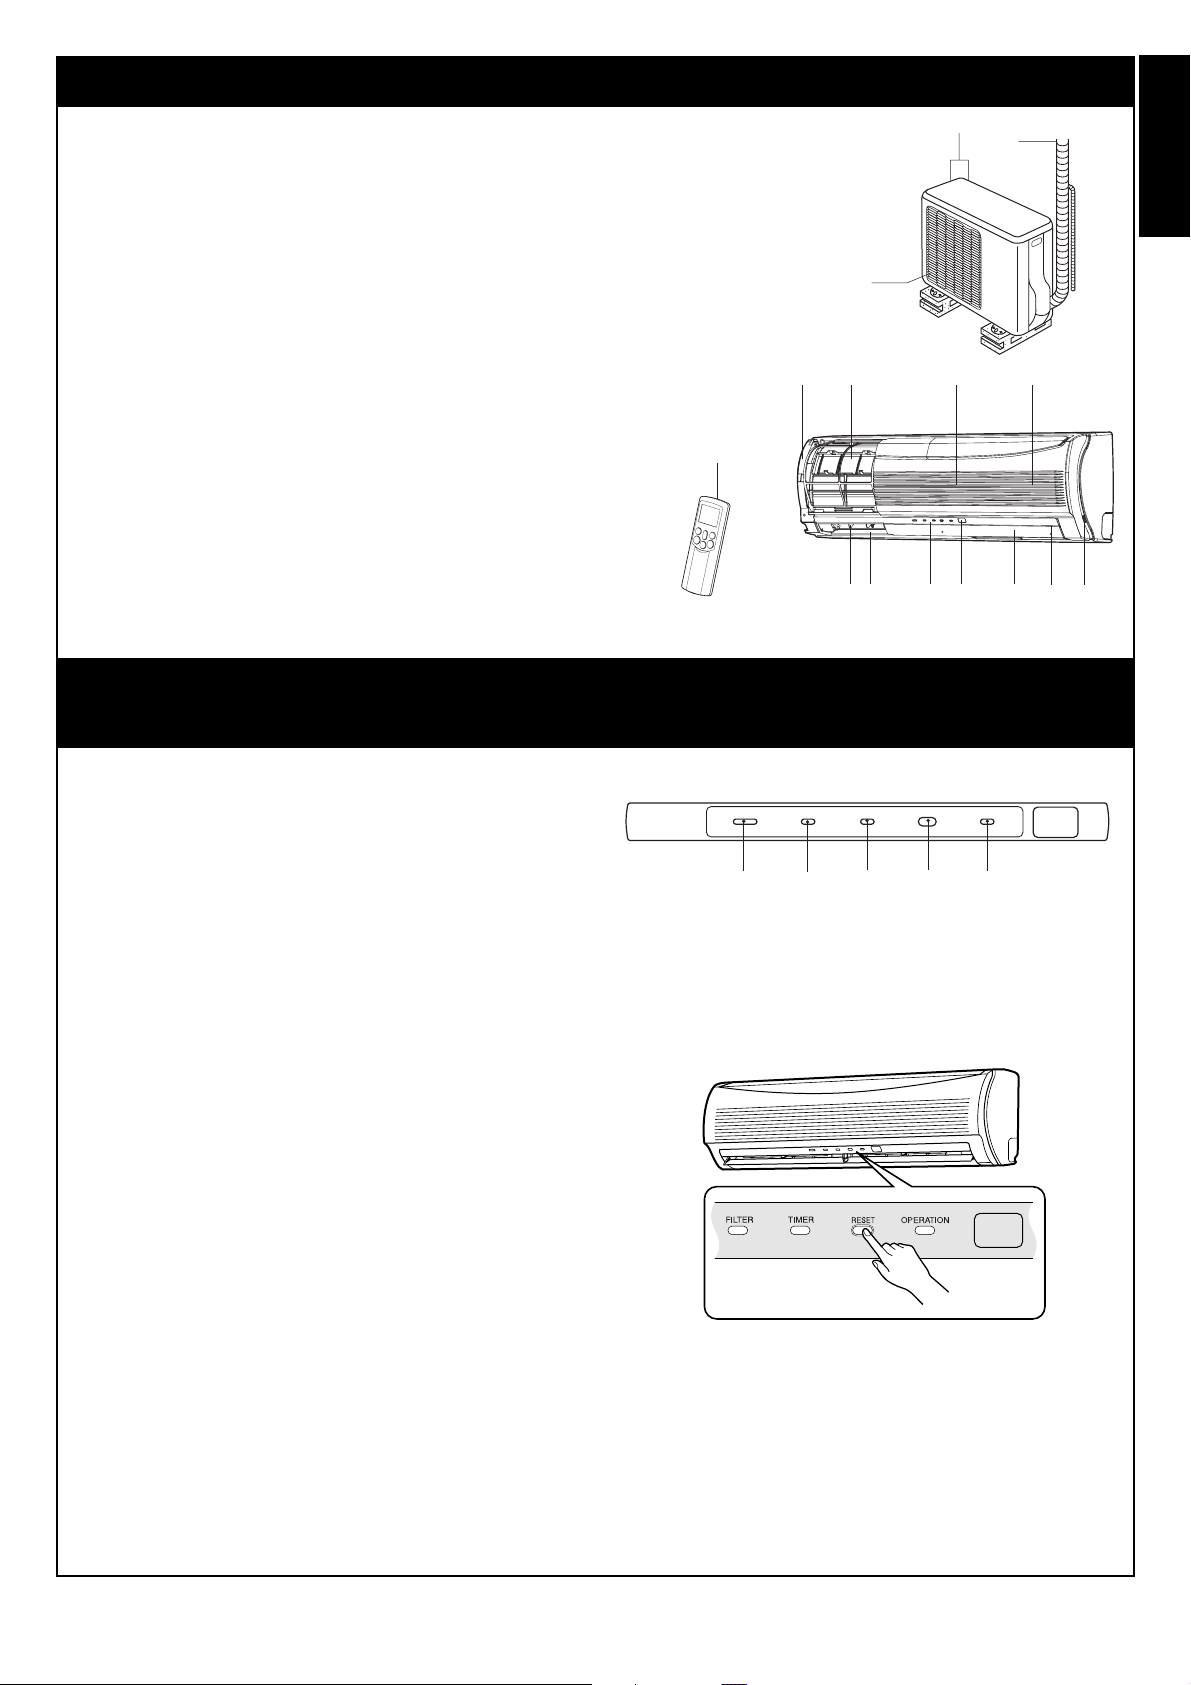
Outdoor unit
a Drain hose, refrigerant connecting pipe and electric wires
b Air inlet (Side and rear)
c Air outlet
Indoor unit
d Room temperature sensor
e Front panel
f Air inlet grille
g Air filter
h Air outlet
i Horizontal air flow louver
j Vertical air flow louver
k Display panel
l Infrared signal receiver
m Remote control
n Dust collecting unit
o Air ionizer
Display panel
The operating states are shown below.
a PLASMA indicator (Blue)
b FILTER indicator (Orange)
c TIMER indicator (Yellow)
d RESET button
e OPERATION indicator (Green/*Orange)
The operation indicators flash rapidly (five times per second)
when a safety protection feature is activated.
* The OPERATION indicator is orange when the auto restart
function is activated.
RESET button
If you misplace or lose the remote control or its batteries are used
up, push the RESET button.
1. Push the RESET button to start the air conditioner. Push this
button again to stop operation.
NAMES OF PARTS
NAMES AND FUNCTIONS OF INDICATORS AND CONTROLS
ON INDOOR UNIT
a
b
c
do
fn
g
e
i
h
kl j
m
PLASMA FILTER TIMER
RESET
PLASMA FILTER TIMER OPERATION
a
b
c
d
e

4
EN
REMOTE CONTROL AND ITS FUNCTIONS
a Infrared signal transmitter
Transmits signals to the indoor unit.
b button
Press the button to start operation. (A receiving beep is
heard.) Press the button again to stop operation. (A
receiving beep is heard.)
If no receiving sound is heard from the indoor unit, press
the button twice.
c Mode select button (MODE)
Press this button to select a mode. Each time you press
the button, the modes cycle in order from A: Auto
changeover control, : Cool, : Dry, : Heat and back
to A.
(A receiving beep is heard.)
d Temperature button ( )
.. The temperature setting is increased to 30°C.
... The temperature setting is reduced to 17°C.
(A receiving beep is heard.)
e Fan speed button (FAN)
Press this button to select the fan speed. When you select
AUTO, the fan speed is automatically adjusted according to
the room temperature. You can also manually select the
desired fan speed from five available settings.
(LOW , LOW+ , MED , MED+ ,
HIGH ) (A receiving beep is heard.)
f Auto louver button (SWING)
Press this button to swing the louver. (A receiving beep is
heard.)
Press the button again to stop the louver from swinging. (A
receiving beep is heard.) () see page 14.)
g Set louver button (FIX)
Press this button to adjust the air flow direction. (A
receiving beep is heard.) () see page 14.)
h ON timer button (ON)
Use this button to change the clock and ON timer times.
To move up the time, press of the “ON ” button.
To move down the time, press of the “ON ” button.
i OFF timer button (OFF)
Use this button to change the OFF timer times.
To move up the time, press of the “OFF ” button.
To move down the time, press of the “OFF ” button.
j Reserve button (SET)
Press this button to store the time settings. (A receiving
beep is heard.)
k Cancel button (CLR)
Press this button to cancel the ON timer and OFF timer. (A
receiving beep is heard.)
l High power button (Hi POWER)
Press this button to start high power operation. () see
page 16.)
m Memory button (MEMO)
Press this button to ready for storing the settings.
Hold down the button for more than 3 seconds to store the
setting indicated on the remote control and until the
mark is displayed. () see page 13.)
n Automatic operation button (AUTO)
Press this button to operate the air conditioner
automatically.
(A receiving beep is heard.) () see page 16.)
o Economy button (ECO)
Press this button to operate the air conditioner
economically. () see page 16.)
p FILTER button
Press this button to turn off the filter cleaning indicator on
the indoor unit.
Press this button after cleaning the air filter. () see
page 19.)
q PRESET button
Press this button to operate the air conditioner according to
the settings stored using the MEMO button. () see
page 13.)
r Air purifying button (PAP)
Press this button to start the electrical air purifying
operation.
Press the button again to stop operation.
s Sleep timer button (SLEEP)
Press this button to start the sleep timer (OFF timer)
operation.
You can select the OFF timer time from among four
settings (1, 3, 5 or 9 hours).
TEMP
ON
ON
OFF
OFF
PAP
AUTO
PRESET
MODE
CLOCK
CHECK
FILTER
RESET
HiPOWER
ECO
MEMO
CLR
SET
SWING
FIX
FAN
SLEEP
ON
OFF
a
b
r
d
e
c
l
g
f
k
h
n
q
m
o
s
j
p
i
TEMP
1
.
3
.
5
.
9H
5
ENGLISHFRANÇAISDEUTSCHITALIANOESPAÑOLNEDERLANDSPORTUGUÊSǼȁȁǾȃǿȀǾ
EN
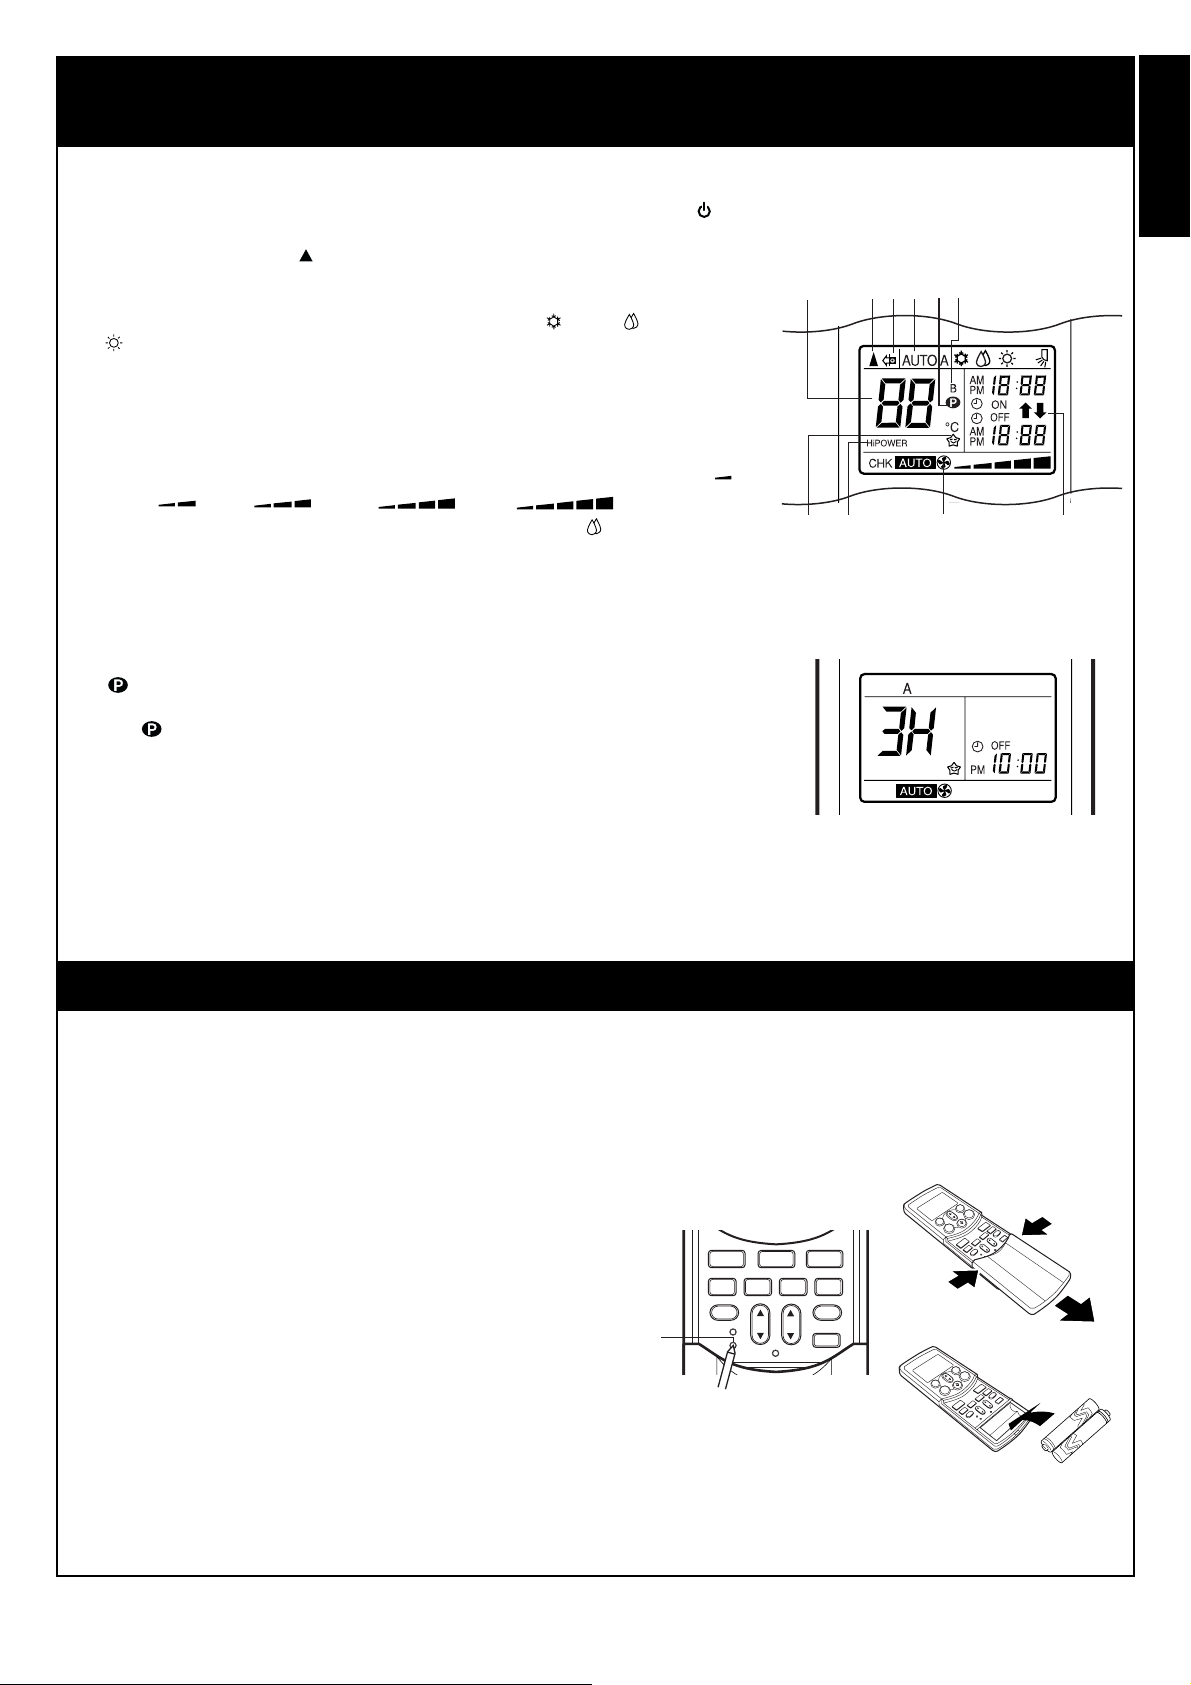
Display
All indicators, except for the clock time indicator, are displayed by pressing the button.
a Transmission mark
This transmission mark ( ) indicates when the remote control transmits signals to the indoor unit.
b Mode indicator
Indicates the current operation mode.
(AUTO: Automatic control, A: Auto changeover control, : Cool, : Dry,
:Heat)
c Temperature indicator
Indicates the temperature setting (17°C to 30°C).
d Air purifying indicator
Shows that the electrical air purifying operation is in progress.
e FAN speed indicator
Indicates the selected fan speed. AUTO or one of five fan speed levels (LOW ,
LOW+ , MED , MED+ , HIGH ) can be shown.
Indicates AUTO when the operating mode is either AUTO or : Dry.
f TIMER and clock time indicator
The time setting for timer operation or the clock time is indicated.
The current time is always indicated except during TIMER operation.
g Hi POWER indicator
Indicates when Hi POWER operation starts.
Press the Hi POWER button to start and press it again to stop operation.
h (MEMORY) indicator
Flashes for 3 seconds when the MEMO button is pressed during operation.
The mark is shown when holding down the button for more than 3 seconds
while the mark is flashing.
Press another button to turn off the mark.
i ECO indicator
Indicates when the ECO is activated.
Press the ECO button to start and press it again to stop operation.
j A. B change indicator remote control
Press the CHECK point and FIX button at the same time to change the remote
control setting from “A” to “B”. (Priority is given to the “A” setting.)
The E-Parts of the indoor unit are also changed to the “B” setting.
Loading the remote control batteries
a Remove the cover, and insert the batteries.
b Press the RESET button.
The clock indicator flashes.
Adjust the clock.
Reattach the cover.
Batteries
• To replace the batteries, use two new batteries (AAA type).
• The batteries will last about one year under normal usage.
• Replace the batteries if there is no receiving beep from the
indoor unit or when the air conditioner cannot be operated using
the remote control.
• To avoid malfunctions due to battery leakage, remove the
batteries when not using the remote control for more than one
month.
NAMES AND FUNCTIONS OF INDICATORS ON REMOTE
CONTROL
PREPARATION AND CHECK BEFORE USE
f
e
gi
c
ab
h
jd
• In the illustration, all indicators are shown
for purposes of explanation. During
operation, only the relevant indicators are
shown on the remote control.
CLOCK
CHECK
FILTER
RESET
CLR
SET
SWING
FIX
FAN
ON
OFF
b
HiPOWER
ECO
MEMO
SLEEP
1
.
3
.
5
.
9H
• Slide off the cover while pressing the sides.
• Battery replacement
Be careful not to reverse the (+) position and the (–)
position.
6
EN
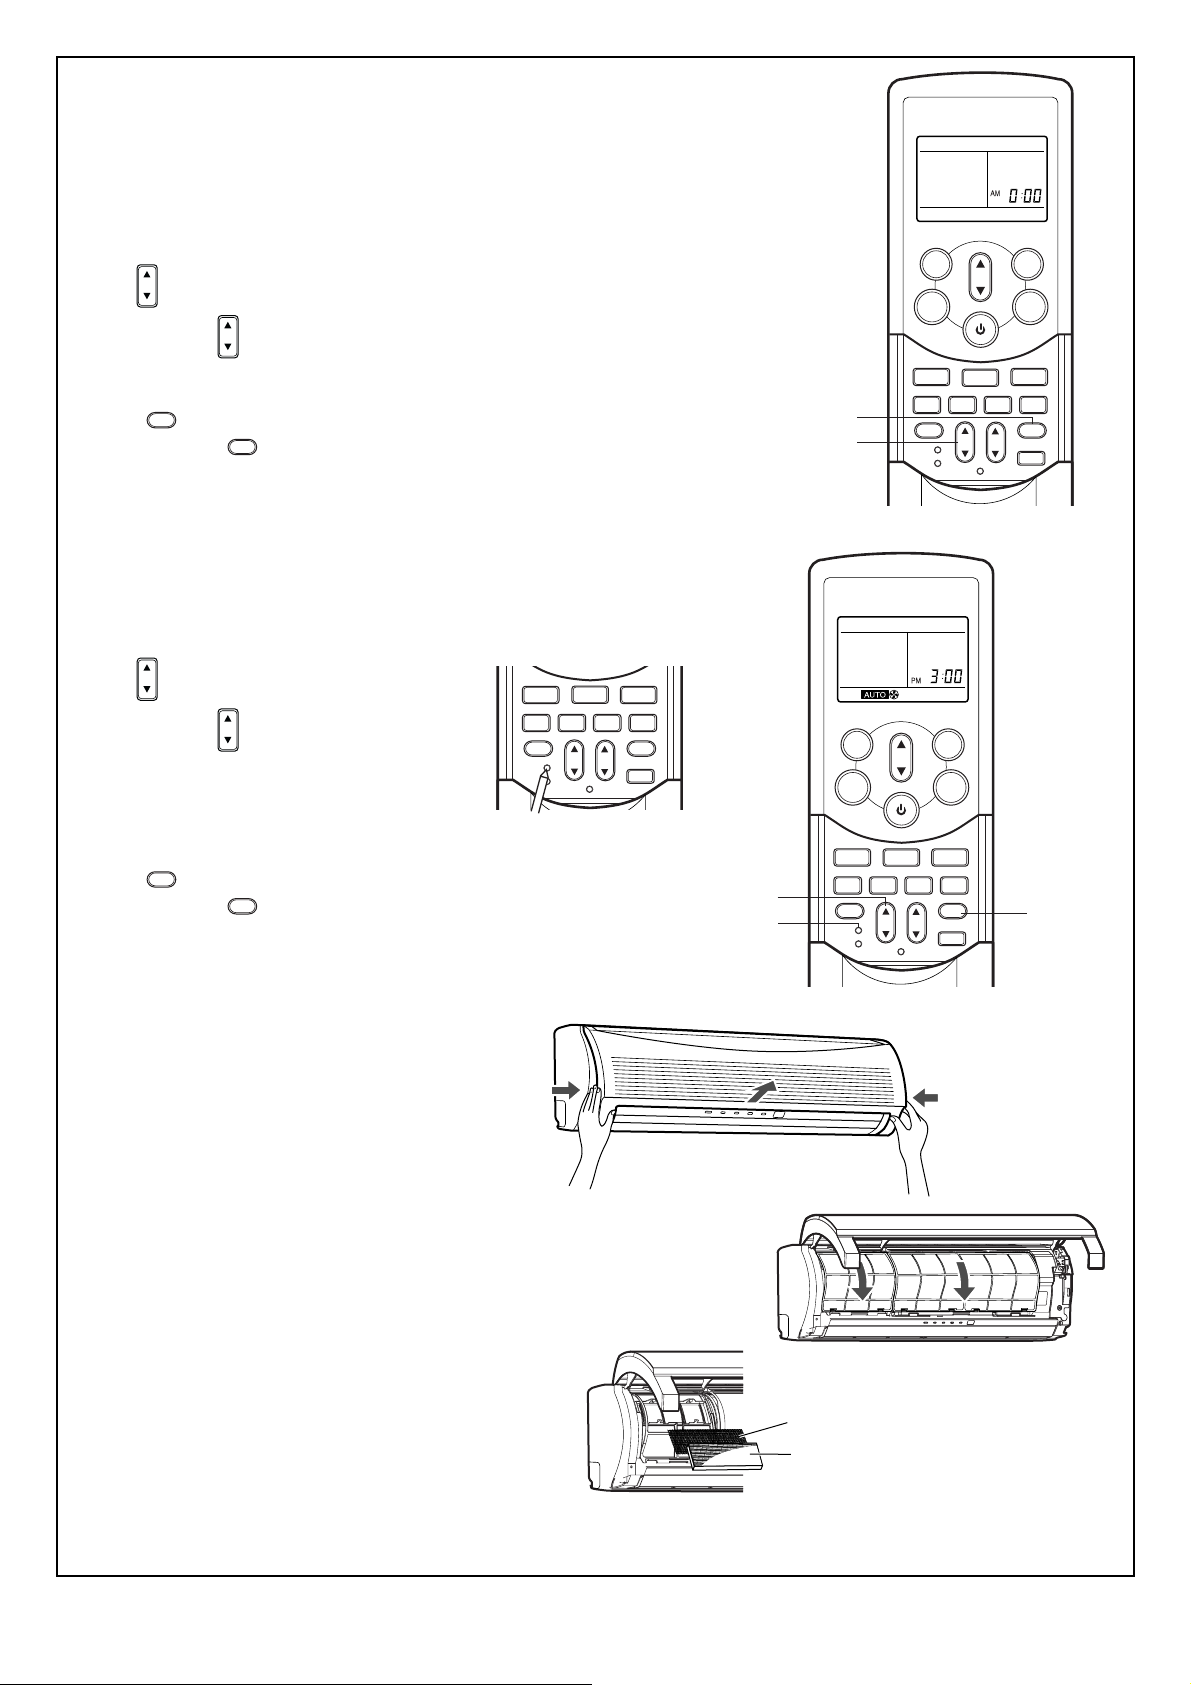
Setting the clock
Before you start operating the air conditioner, set the clock of the remote control using the
procedures given in this section. The clock panel on the remote control will indicate the
time regardless of whether the air conditioner is in use or not.
Initial setting
When batteries are inserted in the remote control, the clock panel displays AM 0:00 and
flashes.
a ON button
Press the ON button to set the current time.
Each press of the ON button changes the time in one minute increments.
Holding down the ON button changes the time in ten minute increments.
b SET button
Press the SET button.
The current time is displayed and the clock starts.
Adjusting the clock
a CLOCK button
Press the CLOCK button.
The CLOCK indicator flashes.
b ON button
Press the ON button to set the current
time.
Each press of the ON button changes the
time in one minute increments.
Holding down the ON button changes the
time in ten minute increments.
c SET button
Press the SET button.
The current time is displayed and the clock
starts.
Preparing the filters
a Open the air inlet grille, and remove the air filters.
b Attach the supplied Zeolite-plus filter and
Zeolite-3G filter.
AUTO
PRESET
CLOCK
CHECK
FILTER
RESET
CLR
SET
SWING
FIX
FAN
ON
OFF
a
b
PAP
MODE
HiPOWER
ECO
MEMO
SLEEP
TEMP
1
.
3
.
5
.
9H
ON
ON
SET
SET
CLOCK
CHECK
FILTER
RESET
CLR
SET
SWING
FIX
FAN
ON
OFF
HiPOWER
ECO
MEMO
SLEEP
1
.
3
.
5
.
9H
AUTO
PRESET
CLOCK
CHECK
FILTER
RESET
CLR
SET
SWING
FIX
FAN
ON
OFF
a
b
c
PAP
MODE
HiPOWER
ECO
MEMO
SLEEP
TEMP
1
.
3
.
5
.
9H
Push CLOCK
ON
ON
SET
SET
Zeolite-3G filter
Zeolite-plus filter
7
ENGLISHFRANÇAISDEUTSCHITALIANOESPAÑOLNEDERLANDSPORTUGUÊSǼȁȁǾȃǿȀǾ
EN
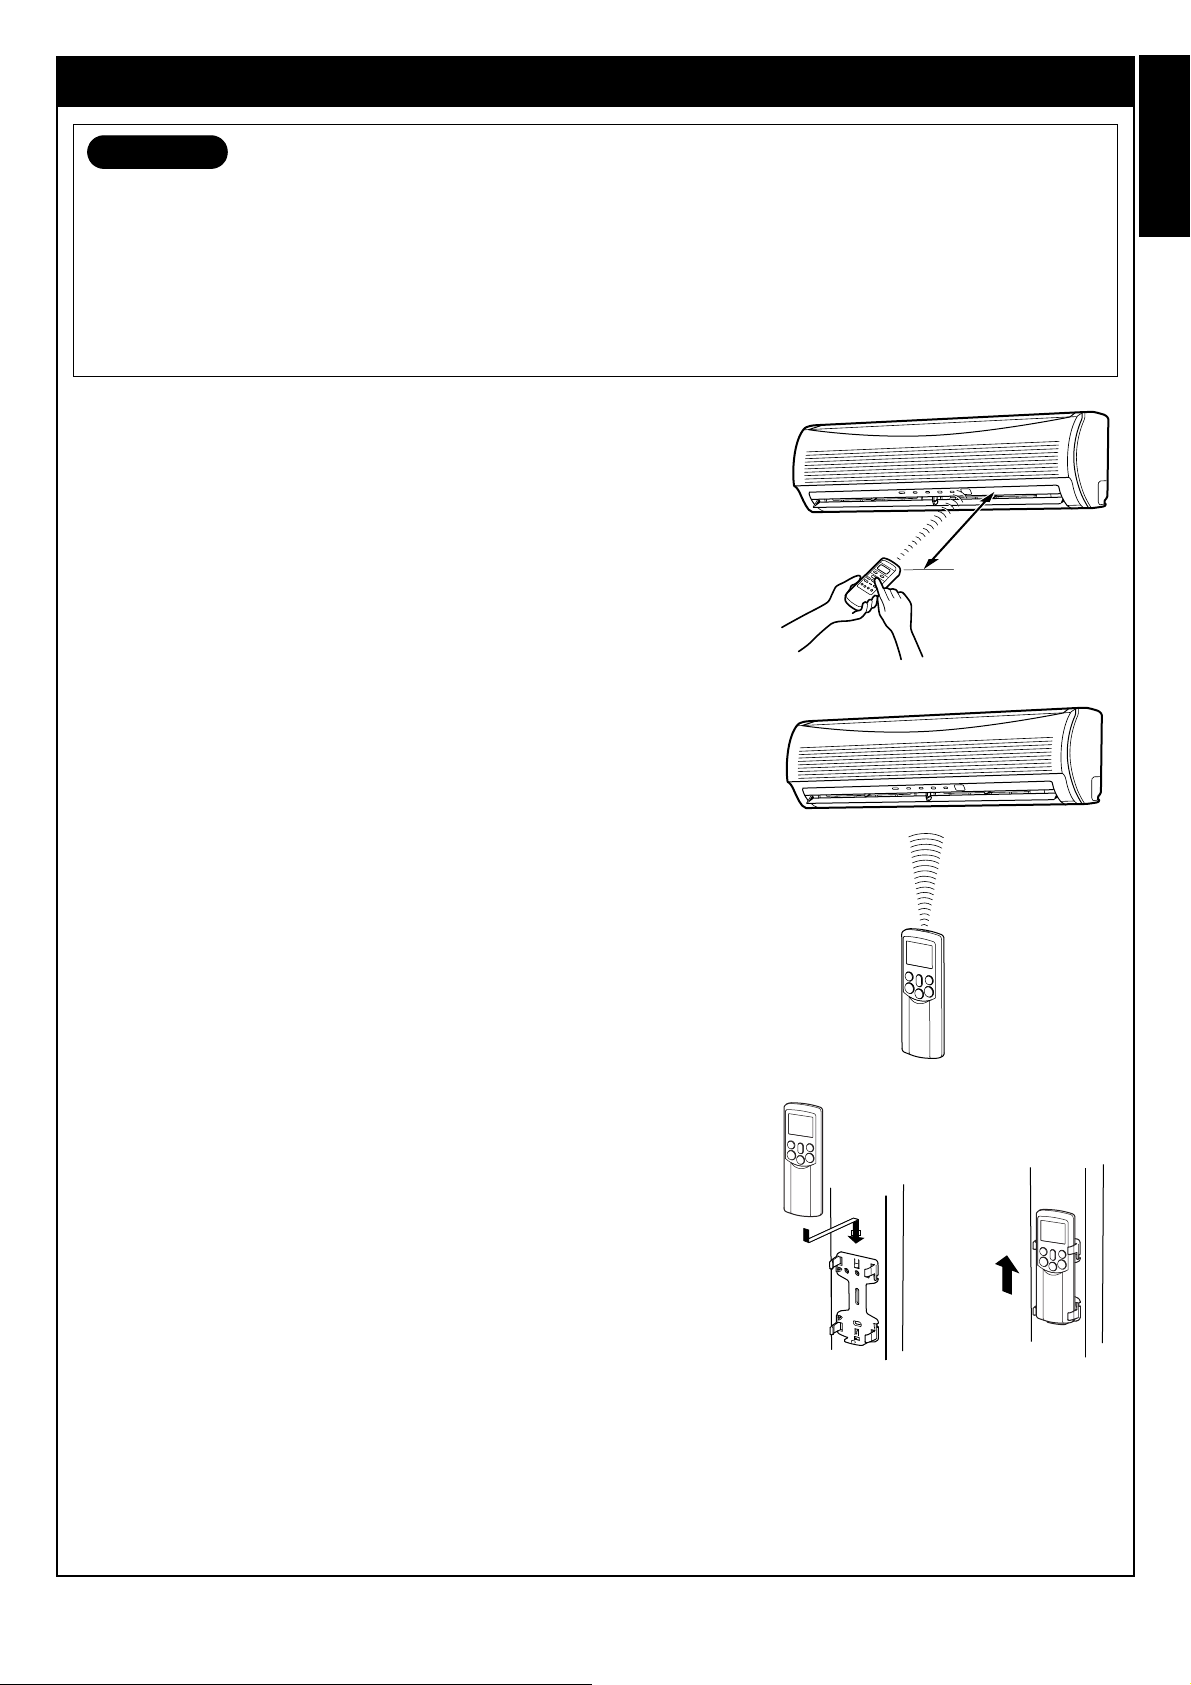
Location of the remote control
• Keep the remote control where its signals can reach the receiver of the indoor unit
(a distance of up to 7 m is allowed).
• When you select timer operation, the remote control automatically transmits a
signal to the indoor unit at the specified time.
If you keep the remote control in a location where proper signal transmission is
blocked, a time lag of up to 15 minutes may occur.
Remote control holder
Installing the remote control holder
• Before you actually install the remote control holder on a wall or pillar, check
whether the remote control signals can be received by the indoor unit.
Mounting and removing the remote control
• To mount the remote control, hold it parallel to the remote control holder and push
it in fully. To remove the remote control, slide the remote control upwards and out
from the holder.
USING THE REMOTE CONTROL
CAUTION
• The air conditioner will not operate if curtains, doors or other objects block the signals from the remote control to the indoor
unit.
• Be careful that liquids do not spill onto the remote control.
Do not expose the remote control to direct sunlight or heat.
• If the infrared signal receiver on the indoor unit is exposed to direct sunlight, the air conditioner may not function properly.
Use curtains to prevent sunlight from reaching the receiver.
• Signals may not be properly received, if the room using the air conditioner has fluorescent lighting with electronic starters. If
you are planning on using fluorescent lamps, consult with your local dealer.
• If other electrical appliances are activated by the remote control, move these appliances or consult with your local dealer.
7 m
8
EN
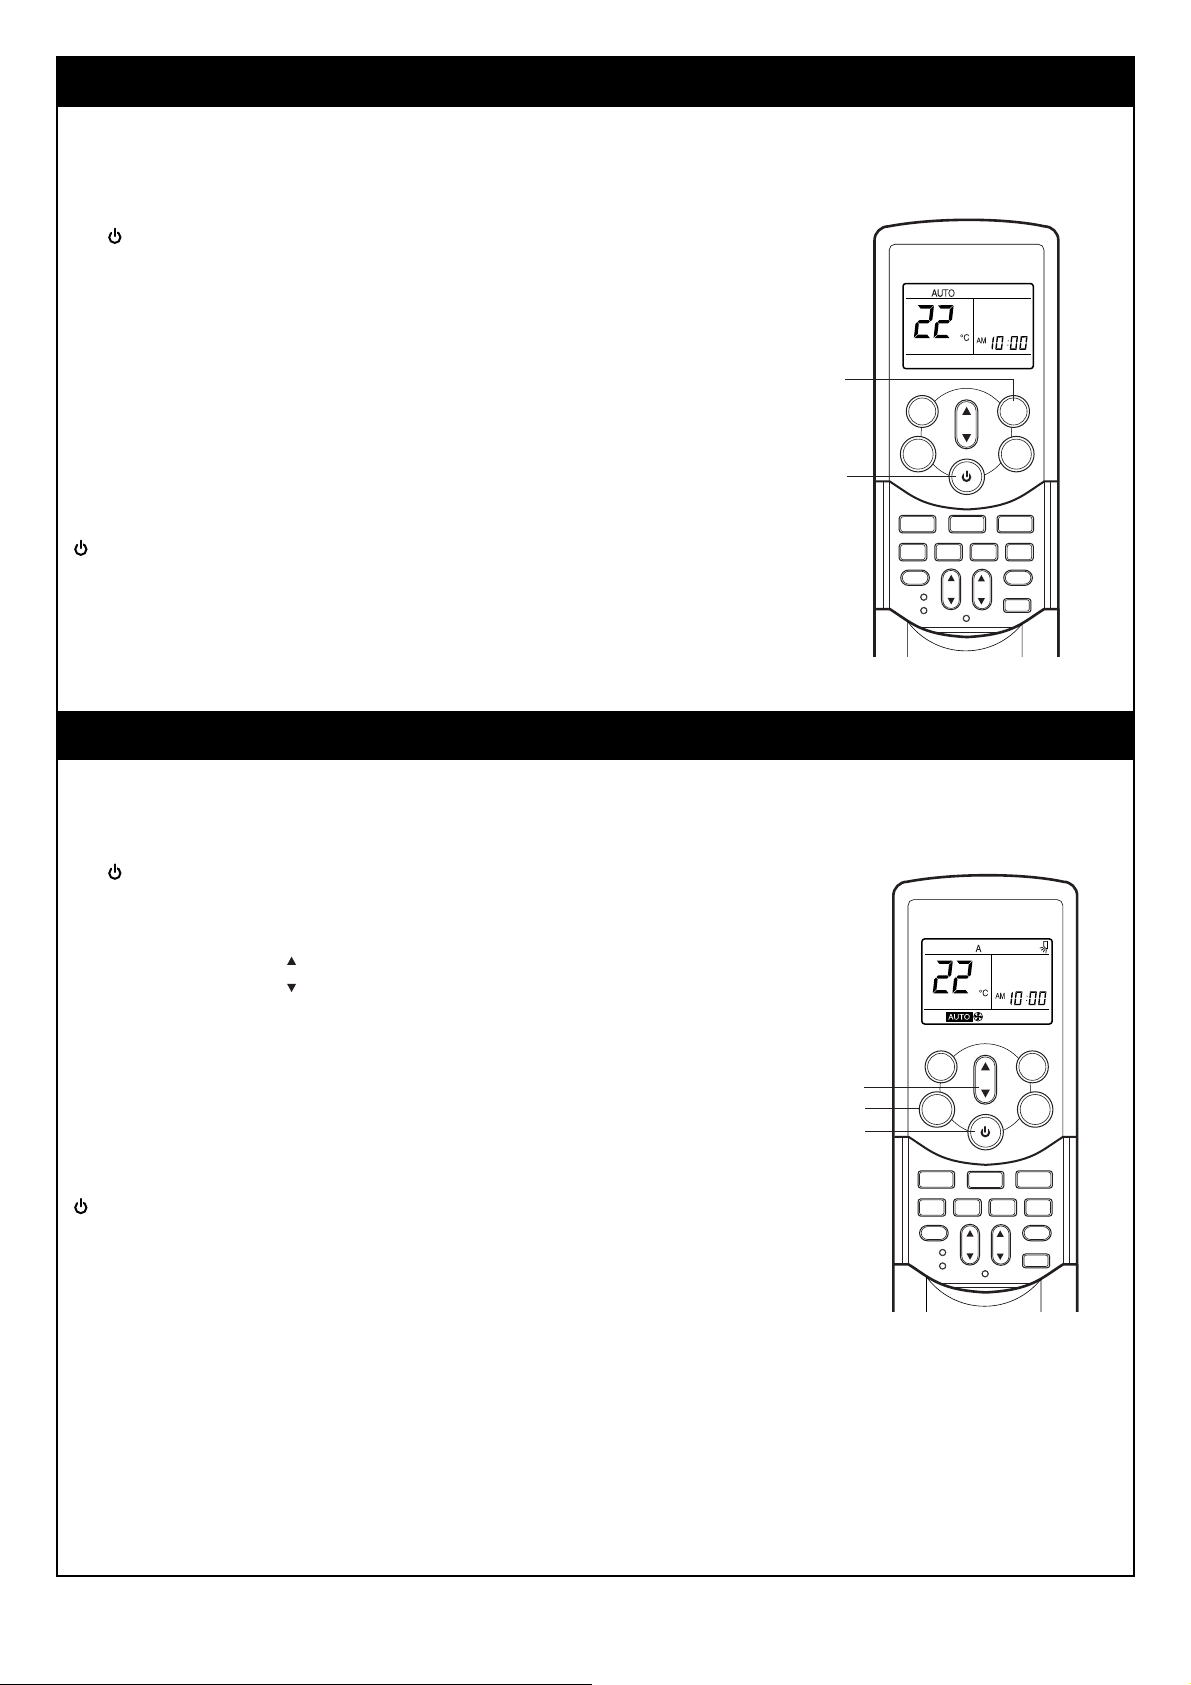
When you set the air conditioner to AUTO mode, it automatically selects cooling, heating, or fan only operation depending on the room
temperature. () see page 16.)
The fan speed and louver are also automatically controlled.
Start
a button
Press this button to start the air conditioner.
b AUTO button (AUTO)
Press AUTO button.
• The OPERATION indicator (green or orange) on the display panel of the indoor unit
lights. The operating mode is selected according to the room temperature and
operation starts after approximately 3 minutes.
• If the AUTO mode is uncomfortable, you can select the desired conditions manually.
The temperature, fan speed and louver position can be changed, and MODE is also
changed from AUTO to A when the fan speed or louver position is changed.
The fan speed indicator is also shown.
Stop
button
Press this button again to stop the air conditioner.
When you set the air conditioner to A mode or switch over from AUTO operation because of a change in settings, the air conditioner
automatically selects cooling, heating, or fan only operation depending on the room temperature. () see page 16.)
Start
a button
Press this button to start the air conditioner.
b Mode select button (MODE)
Select A.
c Temperature button ( )
Set the desired temperature.
• The OPERATION indicator (green or orange) on the display panel of the indoor unit
lights. The operating mode is selected according to the room temperature and operation
starts after approximately 3 minutes.
• The temperature, fan speed and louver position can be changed. You can select the
desired conditions manually.
Stop
button
Press this button again to stop the air conditioner.
AUTOMATIC OPERATION
AUTOMATIC OPERATION (AUTO CHANGEOVER)
AUTO
PRESET
CLOCK
CHECK
FILTER
RESET
CLR
SET
SWING
FIX
FAN
ON
OFF
a
b
PAP
MODE
HiPOWER
ECO
MEMO
SLEEP
TEMP
1
.
3
.
5
.
9H
AUTO
PRESET
CLOCK
CHECK
FILTER
RESET
CLR
SET
SWING
FIX
FAN
ON
OFF
a
b
c
PAP
MODE
HiPOWER
ECO
MEMO
SLEEP
TEMP
1
.
3
.
5
.
9H
TEMP
 Loading...