


COMPLIANT MANAGER
Network Configuration Guide
Model name:
BMS-CM1280FTLE
Compliant Manager
Never connect the Compliant Manager to the Internet.
We assume no responsibility for any problems resulting from connection to the
Prohibited Internet.
Only local area connection is allowed for the Compliant Manager.
This guide describes the setting procedure for connecting the Compliant Manager to your personal computer (abbreviated to “PC” hereinafter) via the network.
PC operation to monitor and control air conditioners is detailed in the Owner’s Manual (Web Version).
1. System Configuration of PC
The PC to be connected must meet the following system configuration conditions so that the Compliant Manager operates normally.
<Operating system>
•Microsoft Windows XP
•Microsoft Windows Vista
<Hardware>
•Screen resolution 1024 × 768 pixels or more
<Browser>
•Firefox 2.0
•Internet Explorer version 6.0 or version 7.0
2.Connecting LAN Cable
Connect the LAN cable to the connector on the top of the Compliant Manager.
3. Client PC Settings
3-1. Setting IP Address
<Windows XP>
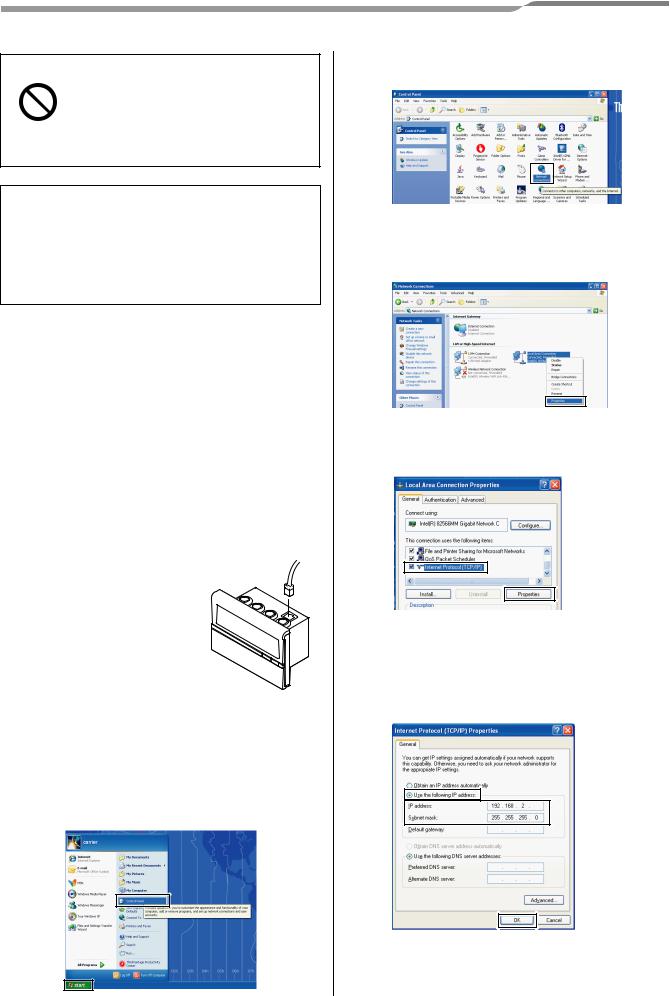
1)Log on to the system with the PC administrator’s account.
2)Click [Start] -> [Control Panel]. (Fig.1)
Fig.1
Network Configuration Guide
3)Click [Network Connections]. (Fig.2)
Fig.2
4)Right-click [Local Area Connection] and choose “Properties” from the contextual menu. (Fig.3)
Fig.3
5)Select the “Internet Protocol (TCP/IP)” checkbox, and click [Properties]. (Fig.4)
Fig.4
6)Select the “Use the following IP address:” radio button, and set as follows:
IP address: 192.168.2.*** (***: Excluding 30) Subnet mask: 255.255.255.0
Then click [OK]. (Fig.5)
Fig.5
7) Close all the windows.
2 (EN)
Compliant Manager
<Windows Vista>
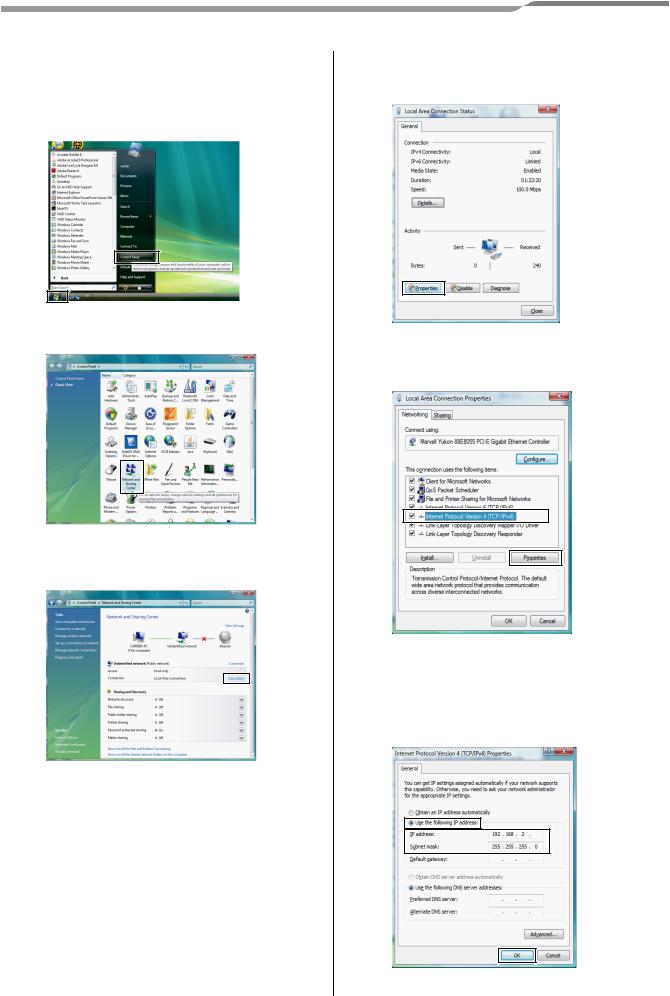
1)Log on to the system with the PC administrator’s account.
2)Click [Start] -> [Control Panel]. (Fig.1)
Fig.1
3)Click [Network and Sharing Center]. (Fig.2)
Fig.2
4)Click “View status” of Local Area Connection. (Fig.3)
Fig.3
Network Configuration Guide
5)Click [Properties] in the Local Area Connection Status window. (Fig.4)
Fig.4
6)Select the “Internet Protocol Version 4 (TCP/ IPv4)” checkbox, and click [Properties]. (Fig.5)
Fig.5
7)Select the “Use the following IP address:” radio button, and set as follows:
IP address: 192.168.2.*** (***: Excluding 30) Subnet mask: 255.255.255.0.
Then click [OK]. (Fig.6)
Fig.6
8) Close all the windows.
3 (EN)
 Loading...