

Page 1

Europe, Middle East
ENGLISH
FRANÇAIS
DEUTSCH
NEDERLANDS
ITALIANO
ESPAÑOL
PORTUGUÊS
РУССКИЙ
ČESTINA
TÜRKÇE
POLSKI
SVENSKA
SUOMI
SLOVENCINA
MAGYAR NYELV
תירבע
ﺔﻴﺑﺮﻌﻟا
North America/
Norteamérica
ENGLISH
FRANÇAIS
ESPAÑOL
Latin America/
América Latina
ENGLISH
ESPAÑOL
PORTUGUÊS
日本語
繁體中文
한국어
Page 2

1/12
User Manual
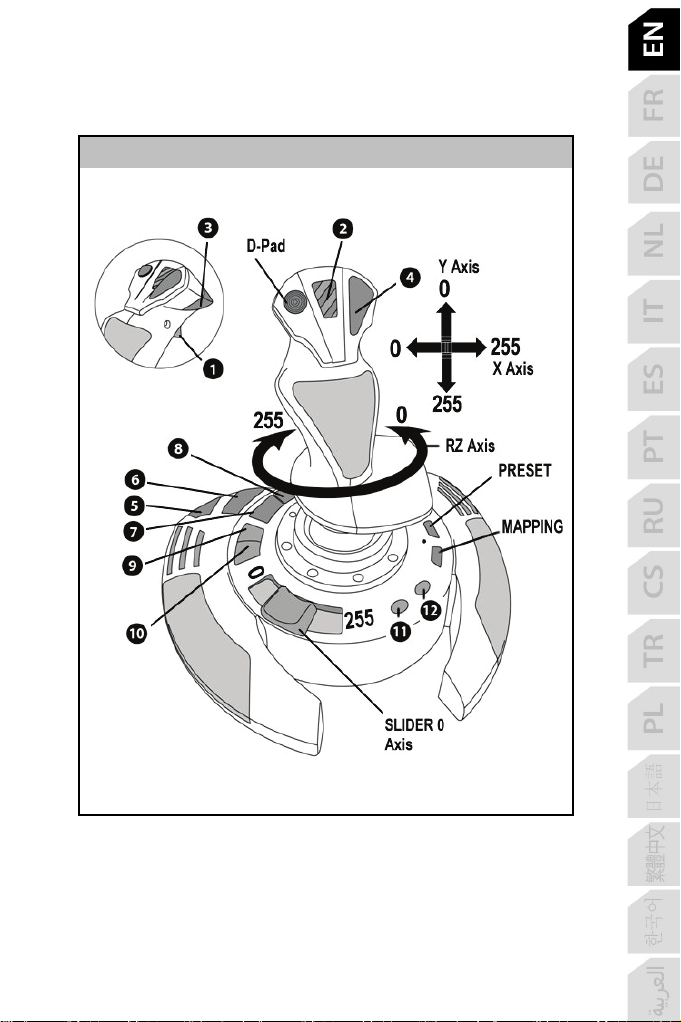
TECHNICAL FEATURES
1. USB selector (PC / PS3) 6. Sliding thumb throttle
2. PC and PlayStation®3 USB connector 7. LED
3. Multidirectional “Point Of View” hat-switch 8. PRESET button
4. 12 action buttons (to select programming)
5. Rudder function via twisting handle 9. Handle resistance
with locking screw adjustment dial
Page 3

2/12
PC
INSTALLATION ON PC
1. Set your joystick’s USB selector (1) to the “PC” position.
2. Connect the USB connector (2) to one of your computer’s USB ports. Windows will
automatically detect the new device.
3. The drivers are installed automatically.
Follow the on-screen instructions to complete the installation.
4. Click Start/Settings/Control Panel and then double-click Game Controllers.
The Game Controllers dialog box displays the joystick’s name with OK status.
5. In the Control Panel, click Properties to configure your joystick.
Test device: Lets you test and view all of your joystick’s functions.
You are now ready to play!
IMPORTANT NOTES FOR PC
- Your joystick’s USB selector (1) must always be set to the “PC” position before connecting
your joystick.
- When connecting your joystick: Leave the handle and rudder centered and do not move
them (to avoid any calibration problems).
Page 4
3/12
“AUTOMATIC PRESET” CONFIGURATION - PC
“AUTOMATIC PRESET” diagram on PC
RED LED
This preset corresponds to the default configurations for most aerial simulation games on
PC.
It will therefore allow you to start playing your game right away, without having to reconfigure
your joystick.
Page 5

4/12
PLAYSTATION®3
INSTALLATION ON PLAYSTATION®3
1. Set your joystick’s USB selector (1) to the “PS3” position.
2. Connect the USB connector (2) to one of your console’s USB ports.
3. Switch on your console.
4. Launch your game.
You are now ready to play!
USING THE “HOME / PS” BUTTON
Your joystick’s “Home / PS” button allows you to exit your games, access menus and directly
switch off your PlayStation®3 system.
IMPORTANT NOTES FOR PLAYSTATION®3
- Your joystick’s USB selector (1) must always be set to the “PS3” position before
connecting your joystick.
- In “1 Player” mode: If your official gamepad is on, you must switch it to “controller port 2” in
order for your joystick to be functional.
- On PlayStation®3, the joystick is only compatible with PlayStation®3 games (and will not
function with PlayStation® 2 games).
- When connecting your joystick: Leave the handle, rudder and throttle centered and do not
move them (to avoid any calibration problems).
Page 6

5/12
“AUTOMATIC PRESET” CONFIGURATION - PLAYSTATION®3
“AUTOMATIC PRESET” diagram on PlayStation®3
RED LED
This preset corresponds to the default configurations for most aerial simulation games on
PlayStation®3. It will therefore allow you to start playing your game right away, without
having to reconfigure your joystick.
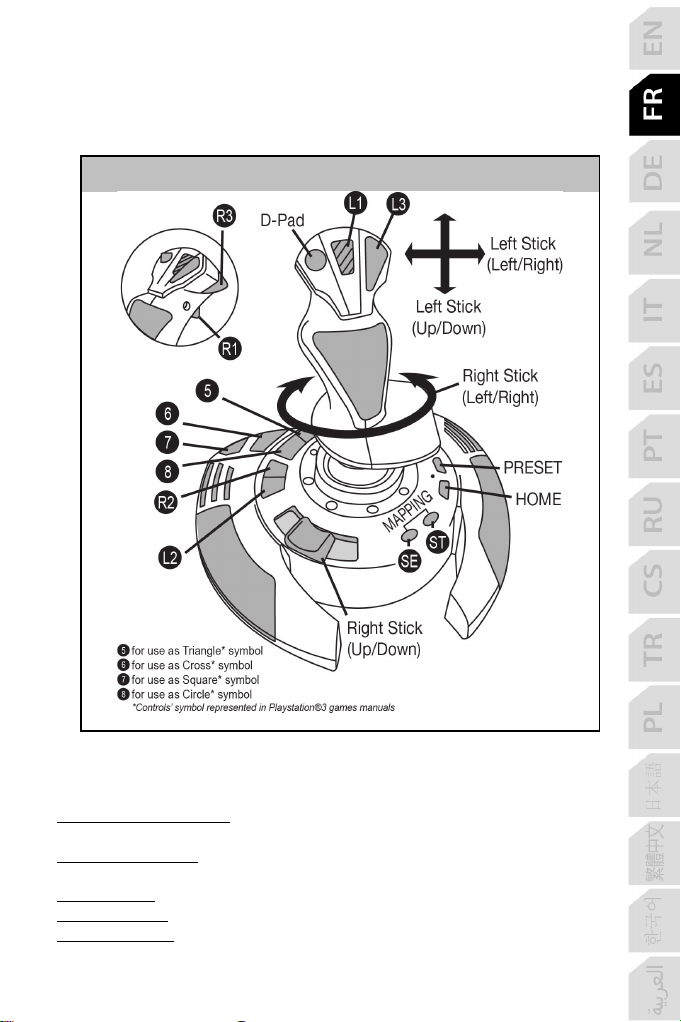
The 4 handle directions: Correspond to the 4 directions on your gamepad’s left mini-stick.
The throttle (6): Corresponds to the Up/Down directions on your gamepad’s right mini-stick.
The rudder (5): Corresponds to the Left/Right directions on your gamepad’s right mini-stick.
MAPPING button: Simultaneously press SELECT (SE) + START (ST).
HOME / PS button: Simply press the button.
Page 7

6/12
GETTING TO KNOW YOUR JOYSTICK
Adjustable handle resistance
Depending on your gaming style, you may prefer to have an ultra-sensitive joystick, which
responds to the slightest movement, or a firmer joystick, which offers a certain resistance
when you use it.
Your joystick’s handle resistance is adjustable, in order to adapt to all gamers. To adjust it,
use the handle resistance adjustment dial (9) located under your joystick’s base.
Throttle
The throttle is in the form of a thumb slider (6), easily accessible with your left hand resting
on the base of your joystick.
Rudder function
Your joystick features a rudder function, which in a plane corresponds to the pedals used by
the pilot to turn the steering, allowing the plane to pivot around its vertical axis (therefore
making the plane turn left or right). This rudder function is accessible on your joystick by
rotating the handle to the left or right.
If you are not using the rudder function in your games (or if you have programmed it onto
action buttons), you can disable handle rotation thanks to the locking screw (5) located on
the handle’s base.
Use a flat head screwdriver to change the screw’s position and thus lock/unlock the rudder
function.
Multidirectional “Point Of View” hat-switch
Your joystick features a “Point Of View” hat-switch (3) which, as its name indicates, allows
you (in games which permit) to instantly view everything that’s going on around your plane.
To do so, simply go to your game’s configuration menu and program the different views (rear
view, left view, right view, and also external views) onto the directions of the “Point Of View”
hat-switch.
Of course, you can also use the “Point Of View” hat-switch for other functions instead (firing,
etc.).
Page 8

7/12
2 PROGRAMMING MODES
The PRESET button (8) and LED (7) allow you to view the type of programming selected:
AUTOMATIC (preprogrammed) or MANUAL (programmed by yourself).
A single press of this button will allow you to switch from one programming mode to the
other, even during the course of a game.
• AUTOMATIC PRESET: RED LED
This represents the default programming: the axes, positions of the buttons and of the hatswitch are preprogrammed.
PLEASE REFER TO THE “AUTOMATIC PRESET” CONFIGURATION DIAGRAMS.
• MANUAL PRESET: GREEN LED
This represents your own person programming:
- The buttons, axes and the hat-switch can be switched between themselves.
- You can modify the programming to suit your taste and whenever you like.
- Programming is automatically saved in your joystick (even when it is disconnected).
- When your “MANUAL PRESET” is blank, it is identical to the “AUTOMATIC PRESET”.
PROGRAMMING / MAPPING
You can program your joystick using the MAPPING button.
Attention: This button is not located in the same position on PC and PS3 (please refer to
• Examples of possible applications:
• Exception:
the diagrams):
- On PC: Directly press the button in question.
- On PS3: Simultaneously press START (ST) + SELECT (SE).
- Switching the positions of buttons.
- Switching axes between themselves = directions of the handle, of the throttle or of the
rudder (In this case, you must map the 2 directions of the first axis to those of the
second.)
- Switching the 2 directions of the same axis.
- Switching buttons with a direction of an axis or of the hat-switch.
On PlayStation®3, the START (ST) and SELECT (SE) buttons also correspond to the
MAPPING button (and therefore may not be reprogrammed).
Page 9

8/12
PROGRAMMING PROCEDURE
Steps
Action
LED
Enable MANUAL PRESET (8)
by pressing the button.
2
Press and release the MAPPING button.
OFF
Press and release the button or direction to
program.
Press and release the button or direction onto
which you wish to place your function.
Steps
Action
LED
1
Enable your MANUAL PRESET (8).
GREEN
Press and hold the MAPPING button
for 2 seconds.
FLASHES GREEN
2 SECONDS
Step
Action
LED
Simultaneously press the buttons
MAPPING + 11 (SE) + 12 (ST)
FLASHES GREEN/RED
2 SECONDS
1
3
4
Your “MANUAL PRESET” is now enabled and up to date
(with your programming carried out).
GREEN
FLASHES GREEN
GREEN
EEPROM MEMORY
• Your joystick features an internal chip which saves all of your “MANUAL PRESET”
programming in memory (even when the joystick is switched off or unplugged for a long
period of time).
• You can save a different “MANUAL PRESET” for each platform used (one for PC and one
for PlayStation®3).
ERASING A “MANUAL PRESET”
2
Your “MANUAL PRESET” is now blank
(and once again identical to the “AUTOMATIC PRESET”).
RETURNING TO “FACTORY SETTINGS”
You can erase all of your programming or settings carried out on both PC and PlayStation®3
with a single step:
1
All of your “MANUAL PRESETS” (PC + PS3) or settings are now blank.
Note: This operation will completely restart your joystick
(on PC, we therefore recommend that you do this outside of games).
Page 10

9/12
TROUBLESHOOTING AND WARNING
• My joystick doesn’t function correctly or appears to be improperly
calibrated:
- Switch off your computer or your console, disconnect your joystick, reconnect your joystick
and then re-launch your game.
- When connecting your joystick: Leave the handle, rudder and throttle centered and do not
move them (to avoid any calibration problems).
- Exit your game, disconnect your joystick, verify that the USB selector (PC / PS3) (1) is set
to the proper position, then reconnect your joystick.
• I can’t configure my joystick:
- In your game’s “Options / Controller / Gamepad or Joystick” menu: Select the most
appropriate configuration or completely reconfigure the controller options.
- Please refer to your game’s user manual or online help for more information.
- You can also use your joystick’s “MAPPING” function to resolve this type of problem.
• My joystick is too sensitive or not sensitive enough:
- Your joystick self-calibrates on its own after you have made a few movements on the
different axes.
- In your game’s “Options / Controller / Gamepad or Joystick” menu: Adjust the sensitivity or
dead zones for your controller (if this option is available).
- Adjust the handle resistance using the dial (9) located under your joystick’s base.
Page 11

10/12
CONSUMER WARRANTY INFORMATION
Worldwide, Guillemot Corporation S.A., whose registered office is located at Place du
Granier, B.P. 97143, 35571 Chantepie, France (hereinafter “Guillemot”) warrants to the
consumer that this Thrustmaster product shall be free from defects in materials and
workmanship, for a warranty period which corresponds to the time limit to bring an action for
conformity with respect to this product. In the countries of the European Union, this
corresponds to a period of two (2) years from delivery of the Thrustmaster product. In other
countries, the warranty period corresponds to the time limit to bring an action for conformity
with respect to the Thrustmaster product according to applicable laws of the country in which
the consumer was domiciled on the date of purchase of the Thrustmaster product (if no such
action exists in the corresponding country, then the warranty period shall be one (1) year
from the original date of purchase of the Thrustmaster product).
Notwithstanding the above, rechargeable batteries are covered by a warranty period of six
(6) months from the date of original purchase.
Should the product appear to be defective during the warranty period, immediately contact
Technical Support, who will indicate the procedure to follow. If the defect is confirmed, the
product must be returned to its place of purchase (or any other location indicated by
Technical Support).
Within the context of this warranty, the consumer’s defective product shall, at Technical
Support’s option, be either replaced or returned to working order. If, during the warranty
period, the Thrustmaster product is subject to such reconditioning, any period of at least
seven (7) days during which the product is out of use shall be added to the remaining
warranty period (this period runs from the date of the consumer’s request for intervention or
from the date on which the product in question is made available for reconditioning, if the
date on which the product is made available for reconditioning is subsequent to the date of
the request for intervention). If permitted under applicable law, the full liability of Guillemot
and its subsidiaries (including for consequential damages) is limited to the return to working
order or the replacement of the Thrustmaster product. If permitted under applicable law,
Guillemot disclaims all warranties of merchantability or fitness for a particular purpose.
This warranty shall not apply: (1) if the product has been modified, opened, altered, or has
suffered damage as a result of inappropriate or abusive use, negligence, an accident,
normal wear, or any other cause unrelated to a material or manufacturing defect (including,
but not limited to, combining the Thrustmaster product with any unsuitable element, including
in particular power supplies, rechargeable batteries, chargers, or any other elements not
supplied by Guillemot for this product); (2) if the product has been used for any use other
than home use, including for professional or commercial purposes (game rooms, training,
competitions, for example); (3) in the event of failure to comply with the instructions provided
by Technical Support; (4) to software, said software being subject to a specific warranty; (5)
to consumables (elements to be replaced over the product’s lifespan: disposable batteries,
audio headset or headphone ear pads, for example); (6) to accessories (cables, cases,
pouches, bags, wrist-straps, for example); (7) if the product was sold at public auction.
This warranty is nontransferable.
The consumer’s legal rights with respect to laws applicable to the sale of consumer goods in
his or her country are not affected by this warranty.
Page 12

11/12
TECHNICAL SUPPORT
Additional warranty provisions
During the warranty period, Guillemot shall not provide, in principle, any spare parts, as
Technical Support is the only party authorized to open and/or recondition any Thrustmaster
product (with the exception of any reconditioning procedures which Technical Support may
request that the consumer carry out, by way of written instructions – for example, due to the
simplicity and the lack of confidentiality of the reconditioning process – and by providing the
consumer with the required spare part(s), where applicable).
Given its innovation cycles and in order to protect its know-how and trade secrets, Guillemot
shall not provide, in principle, any reconditioning notification or spare parts for any
Thrustmaster product whose warranty period has expired.
In the United States of America and in Canada, this warranty is limited to the product’s
internal mechanism and external housing. In no event shall Guillemot or its affiliates be held
liable to any third party for any consequential or incidental damages resulting from the
breach of any express or implied warranties. Some States/Provinces do not allow limitation
on how long an implied warranty lasts or exclusion or limitation of liability for consequential
or incidental damages, so the above limitations or exclusions may not apply to you. This
warranty gives you specific legal rights, and you may also have other rights which vary from
State to State or Province to Province.
Liability
If permitted under applicable law, Guillemot Corporation S.A. (hereinafter “Guillemot”) and its
subsidiaries disclaim all liability for any damages caused by one or more of the following: (1)
the product has been modified, opened or altered; (2) failure to comply with assembly
instructions; (3) inappropriate or abusive use, negligence, an accident (an impact, for
example); (4) normal wear; (5) the use of the product for any use other than home use,
including for professional or commercial purposes (game rooms, training, competitions, for
example). If permitted under applicable law, Guillemot and its subsidiaries disclaim all
liability for any damages unrelated to a material or manufacturing defect with respect to the
product (including, but not limited to, any damages caused directly or indirectly by any
software, or by combining the Thrustmaster product with any unsuitable element, including in
particular power supplies, rechargeable batteries, chargers, or any other elements not
supplied by Guillemot for this product).
https://support.thrustmaster.com
Page 13

12/12
FCC STATEMENT
*
1. This device complies with Part 15 of the FCC Rules. Operation is subject to the following
two conditions:
(1) This device may not cause harmful interference, and
(2) This device must accept any interference received, including interference that may cause
undesired operation.
2. Changes or modifications not expressly approved by the party responsible for compliance
could void the user's authority to operate the equipment.
COPYRIGHT
© 2022 Guillemot Corporation S.A. All rights reserved. Thrustmaster® is a registered
trademark of Guillemot Corporation S.A. All other trademarks are the property of their
respective owners. Illustrations not binding. Contents, designs and specifications are subject
to change without notice and may vary from one country to another. Made in China.
WARNING: This product can expose you to chemicals including Bisphenol A
(BPA) which is known to the State of California to cause birth defects or other
reproductive harm. For more information go to http://www.p65warnings.ca.gov/
ENVIRONMENTAL PROTECTION RECOMMENDATION
In the European Union: At the end of its working life, this product should not
be disposed of with standard household waste, but rather dropped off at a
collection point for the disposal of Waste Electrical and Electronic
Equipment (WEEE) for recycling.
This is confirmed by the symbol found on the product, user manual or
packaging.
recycling and other forms of processing Waste Electrical and Electronic Equipment, you can
make a significant contribution towards helping to protect the environment.
Please contact your local authorities for information on the collection point nearest you.
For all other countries: Please adhere to local recycling laws for electrical and electronic
equipment.
Retain this information. Colours and decorations may vary.
Plastic fasteners and adhesives should be removed from the product before it is used.
www.thrustmaster.com
*Applicable to EU, UK and Turkey only
Depending on their characteristics, the materials may be recycled. Through
Page 14

1/12
Manuel de l'utilisateur
CARACTÉRISTIQUES TECHNIQUES
1. Sélecteur USB « PC » ou « PS3 » 6. Manette des gaz
2. Connecteur « USB » PC et PlayStation®3 7. Led lumineuse
3. Croix Multidirectionnelle « Point de vue » 8. Bouton PRESET
4. 12 boutons d’action (pour choisir son programme)
5. Palonnier par rotation du manche 9. Molette de réglage
avec vis de blocage de la résistance du manche
Page 15

2/12
PC
INSTALLATION SUR PC
1. Mettre le sélecteur USB (1) de votre Joystick en position « PC »
2. Reliez le connecteur USB (2) à l'un des ports USB de votre unité centrale.
Windows détectera automatiquement le nouveau périphérique.
3. L'installation des pilotes est automatique.
Suivez les instructions affichées à l'écran pour terminer l'installation.
4. Sélectionnez Démarrer/Paramètres/Panneau de configuration puis double-cliquez sur
Contrôleurs de jeu
La boîte de dialogue Contrôleurs de jeu affichera le nom du Joystick avec l'état OK.
5. Dans le Control Panel, cliquez sur Propriétés pour configurer votre Joystick.
Test du périphérique : vous permet de tester et visualiser l’ensemble des fonctions.
Vous êtes maintenant prêt à jouer !
REMARQUES IMPORTANTES SUR « PC »
- Le sélecteur USB (1) de votre Joystick doit toujours être positionné sur « PC » avant de le
connecter
- Lorsque vous branchez votre Joystick : laissez le manche, le palonnier et la manette des gaz
centrés et évitez de les déplacer (pour éviter tout problème de calibration).
Page 16

3/12
LED ROUGE
CONFIGURATION DU « PRESET AUTOMATIQUE » - PC
Schéma du « PRESET AUTOMATIQUE » sur PC
Ce preset correspond aux configurations par défaut de la plupart des jeux de simulation aérienne
sur PC.
Il vous permettra donc de lancer directement votre jeu sans avoir à reconfigurer votre Joystick.
Page 17

4/12
PLAYSTATION®3
INSTALLATION SUR « PLAYSTATION®3 »
1. Mettez le sélecteur USB (1) de votre Joystick en position « PS3 ».
2. Branchez le connecteur USB (2) sur un port USB de la console.
3. Allumez votre console.
4. Lancez le jeu.
Vous êtes maintenant prêt à jouer !
UTILISATION DU BOUTON « HOME / PS »
Le bouton « Home / PS » de votre Joystick vous permettra de quitter vos jeux, d’accéder aux
menus et d’éteindre directement votre système PlayStation®3
REMARQUES IMPORTANTES SUR PLAYSTATION®3
- Le sélecteur USB (1) de votre Joystick doit toujours être positionné sur « PS3 » avant de le
connecter.
- En mode « 1 Joueur » si votre manette officielle est allumée, il est alors nécessaire de basculer
celle-ci en « port manette 2 » afin que votre Joystick soit fonctionnel.
- Sur PlayStation®3, le Joystick n’est compatible qu’avec les jeux PlayStation®3
(et ne fonctionnera pas avec les jeux PlayStation® 2).
- Lorsque vous branchez votre Joystick : laissez le manche et le palonnier centrés et évitez de les
déplacer (pour éviter tout problème de calibration).
Page 18
5/12
LED ROUGE
CONFIGURATION DU « PRESET AUTOMATIQUE » - PLAYSTATION®3
Schéma du « PRESET AUTOMATIQUE » sur PlayStation®3
Ce preset correspond aux configurations par défaut de la plupart des jeux de simulation aérienne
sur PlayStation®3. Il vous permettra de lancer directement votre jeu sans avoir à reconfigurer
votre Joystick.
Les 4 directions du manche : Correspondent aux 4 directions du mini-stick gauche de votre
manette.
La manette des gaz (6) : Correspond à la direction Haut/Bas du mini-stick droit de votre
manette.
Le palonnier (5) : Correspond à la direction Gauche/Droite du mini-stick droit de votre manette.
Bouton MAPPING : Appuyez simultanément sur SELECT (SE) + START (ST).
Bouton HOME / PS : Appuyez simplement sur le bouton.
Page 19

6/12
À LA DÉCOUVERTE DE VOTRE JOYSTICK
Résistance du manche ajustable
Selon votre façon de jouer, vous voudrez un joystick ultra-sensible, qui réponde à la moindre
impulsion, ou au contraire un joystick plus dur, qui présente une certaine résistance lorsque vous
le manipulez.
La résistance du manche de votre Joystick est ajustable pour s’adapter à tous les joueurs.
Utilisez pour cela la molette de réglage de la résistance (9) située sous la base de votre joystick.
Manette des gaz
La manette des gaz est représentée sous la forme d’une molette (6), facilement accessible avec
la main gauche reposant sur la base de votre Joystick.
Fonction Palonnier
Votre Joystick dispose d’une fonction palonnier, qui correspond dans un avion aux pédales
actionnées par le pilote pour faire braquer la gouverne de direction, qui permet de faire pivoter
l’avion autour de son axe vertical (entraînant ainsi un virage de l’avion vers la gauche ou la
droite). Cette fonction palonnier est accessible sur votre joystick par rotation du manche vers la
gauche ou la droite.
Si vous n’utilisez pas la fonction palonnier dans vos jeux (ou que vous l’avez programmée sur
des boutons d’action), vous pouvez désactiver la rotation du manche grâce à la vis de blocage
(5) située à la base du manche.
Utilisez un tournevis à tête plate pour modifier sa position et ainsi verrouiller/déverrouiller la
fonction palonnier.
Croix Multidirectionnelle « Point de vue »
Votre Joystick est doté d’une Croix Point de vue (3) qui, comme son nom l’indique, vous
permettra (dans les jeux le permettant) de surveiller instantanément tout ce qui se passe autour
de votre avion. Il vous suffit pour cela, depuis le menu de configuration de votre jeu, de
programmer les différentes vues (vue arrière, vue sur la gauche, vue sur la droite, mais aussi
vues externes) sur les directions de la croix Point de vue.
Vous pouvez bien entendu réserver la Croix Point de vue à d’autres utilisations (tir, etc.).
Page 20

7/12
2 MODES DE PROGRAMMATION
Le bouton PRESET (8) et la Led Lumineuse (7) vous permettent de visualiser le type de
programmation choisi : AUTOMATIQUE (préprogrammé) ou MANUEL (programmé par vousmême).
Une simple pression sur ce bouton vous permettra (même en cours de jeu) de basculer d’une
programmation à l’autre.
• PRESET AUTOMATIQUE : Led ROUGE
Il s’agit ici de la programmation par défaut : les axes, la position des boutons et de la croix sont
préprogrammés
REPORTEZ-VOUS AUX SCHEMAS « CONFIGURATION DU PRESET AUTOMATIQUE ».
• PRESET MANUEL : Led VERTE
Il s’agit ici de vos programmations personnelles :
- Les boutons, les axes et la croix peuvent être inversés entre eux.
- Vous pouvez modifier à votre convenance et à volonté ces programmations.
- Elles sont automatiquement sauvegardées à l’intérieur de votre Joystick (même débranché).
- Lorsque que votre « PRESET MANUEL » est vierge, il est alors identique au « PRESET
AUTOMATIQUE ».
PROGRAMMATION / MAPPING
Vos programmations s’effectuent à l’aide du bouton MAPPING.
Attention : Sur PC ou sur PS3, ce bouton n’a pas le même emplacement (reportez-vous aux
• Exemples d’applications possibles :
• Exception :
schémas) :
- Sur PC : appuyez directement sur le bouton concerné
- Sur PS3 : appuyez simultanément sur START (ST) + SELECT (SE)
- Inverser la position des boutons
- Inverser des axes entre eux = directions du manche, de la manette des gaz ou du palonnier
(Dans ce cas, vous devez basculer les 2 directions du 1er
axe vers le second.)
- Inverser les 2 directions du même axe
- Inverser des boutons avec la direction d’un axe ou de la croix
Sur PlayStation®3, les boutons START(ST) et SELECT(SE) correspondent également au
bouton MAPPING (et ne peuvent donc pas être reprogrammés)
Page 21

8/12
PROCÉDURE DE PROGRAMMATION
Couleur
1
Activez PRESET MANUEL (8)
en appuyant sur le bouton.
VERT
2
ETEINT
3
Pressez et relâchez le bouton
ou la direction à programmer.
CLIGNOTE VERT
4
Pressez et relâchez le bouton ou la direction sur lequel
ou laquelle vous désirez placer votre fonction.
VERT
Couleur
de la LED
1
Activez votre PRESET MANUEL (8)
VERT
Pressez et maintenez appuyé le bouton MAPPING
pendant 2 secondes.
CLIGNOTE VERT
2 SECONDES
Etapes
Action
Couleur de la LED
CLIGNOTE
2 SECONDES
Etapes Action
Pressez et relâchez le bouton MAPPING.
Votre « PRESET MANUEL » est désormais actif et actualisé
(avec votre programmation effectuée).
de la LED
MÉMOIRE EEPROM
• Votre Joystick dispose d'une puce interne qui garde en mémoire l’ensemble de vos
programmations « PRESET MANUEL » (même Joystick éteint ou débranché pendant une
longue période).
• Vous pouvez enregistrer un « PRESET MANUEL » différent sur chaque support utilisé
(un sur PC et un sur PlayStation®3)
EFFACER UN « PRESET MANUEL »
Etapes Action
2
Votre « PRESET MANUEL » est désormais vierge
(et redevenu identique au « Preset Automatique »).
RETOUR AU « PARAMÉTRAGE D’USINE »
Effacez en une seule manipulation l’ensemble de vos programmations ou réglages effectués à la
fois sur PC et sur PlayStation®3 :
1
L’ensemble de vos « PRESET MANUEL » (PC + PS3) ou réglages sont désormais vierges.
Remarque : Cette manipulation a pour effet de redémarrer complètement votre Joystick
(sur PC, il est donc recommandé d’effectuer cette opération en dehors des jeux).
Appuyez simultanément sur les boutons
MAPPING + 11(SE) + 12(ST)
VERT/ROUGE
Page 22

9/12
DÉPANNAGE ET AVERTISSEMENT
• Mon Joystick ne fonctionne pas correctement ou semble mal calibré :
- Eteignez votre ordinateur ou votre console, déconnectez votre Joystick, rebranchez et relancez
votre jeu.
- Lorsque vous branchez votre Joystick : laissez le manche, le palonnier et la manette des gaz
centrés et évitez de les déplacer (pour éviter tout problème de calibration).
- Quittez votre jeu, débranchez votre Joystick, vérifier la bonne position du sélecteur USB
« PC/PS3 » (1), puis rebranchez le tout.
• Je n’arrive pas à configurer mon Joystick :
- Dans le menu « Options / Contrôleur / Manettes ou Joystick » de votre jeu : choisissez la
configuration appropriée ou reconfigurez complètement les options du contrôleur.
- Reportez-vous au manuel de l’utilisateur ou à l’aide en ligne de votre jeu pour plus
d’informations.
- Vous pouvez également utiliser la fonction « MAPPING » de votre Joystick pour résoudre ce
type de problème.
• Mon Joystick est trop ou pas assez sensible :
- Votre Joystick s’auto-calibre de manière autonome après quelques mouvements effectués sur
les différents axes.
- Dans le menu « Options / Contrôleur / Manettes ou Joystick » de votre jeu : ajustez la sensibilité
et les zones mortes de votre Contrôleur (si l’option est disponible).
- Ajustez la résistance du manche à l’aide de la molette (9) située sous la base de votre joystick.
Page 23

10/12
INFORMATIONS RELATIVES À LA GARANTIE AUX CONSOMMATEURS
Dans le monde entier, Guillemot Corporation S.A., ayant son siège social Place du Granier, B.P. 97143, 35571
Chantepie, France (ci-après « Guillemot ») garantit au consommateur que le présent produit Thrustmaster est
exempt de défaut matériel et de vice de fabrication, et ce, pour une période de garantie qui correspond au délai pour
intenter une action en conformité de ce produit. Dans les pays de l’Union Européenne, ce délai est de deux (2) ans à
compter de la délivrance du produit Thrustmaster. Dans les autres pays, la durée de la période de garantie
correspond au délai pour intenter une action en conformité du produit Thrustmaster selon la législation en vigueur
dans le pays où le consommateur avait son domicile lors de l’achat du produit Thrustmaster (si une telle action en
conformité n’existe pas dans ce pays alors la période de garantie est de un (1) an à compter de la date d’achat
d’origine du produit Thrustmaster).
Si, au cours de la période de garantie, le produit semble défectueux, contactez immédiatement le Support Technique
qui vous indiquera la procédure à suivre. Si le défaut est confirmé, le produit devra être retourné à son lieu d’achat
(ou tout autre lieu indiqué par le Support Technique).
Dans le cadre de la garantie, le consommateur bénéficiera, au choix du Support Technique, d'un remplacement ou
d'une remise en état de marche du produit défectueux. Si, pendant la période de garantie, le produit Thrustmaster
fait l'objet d'une telle remise en état, toute période d'immobilisation d'au moins sept jours vient s'ajouter à la durée de
la garantie qui restait à courir (cette période court à compter de la demande d'intervention du consommateur ou de la
mise à disposition pour remise en état du produit en cause, si cette mise à disposition est postérieure à la demande
d'intervention). Lorsque la loi applicable l’autorise, toute responsabilité de Guillemot et ses filiales (y compris pour les
dommages indirects) se limite à la remise en état de marche ou au remplacement du produit Thrustmaster. Lorsque
la loi applicable l’autorise, Guillemot exclut toutes garanties de qualité marchande ou d’adaptation à un usage
particulier.
Cette garantie ne s’appliquera pas : (1) si le produit a été modifié, ouvert, altéré, ou a subi des dommages résultant d’une
utilisation inappropriée ou abusive, d’une négligence, d’un accident, de l’usure normale, ou de toute autre cause non liée à
un défaut matériel ou à un vice de fabrication (y compris, mais non limitativement, une combinaison du produit
Thrustmaster avec tout élément inadapté, notamment alimentations électriques, batteries, chargeurs, ou tous autres
éléments non-fournis par Guillemot pour ce produit) ; (2) si le produit a été utilisé en dehors du cadre privé, à des fins
professionnelles ou commerciales (salles de jeu, formations, compétitions, par exemple). (3) en cas de non-respect des
instructions du Support Technique ; (4) aux logiciels, lesdits logiciels faisant l’objet d’une garantie spécifique ; (5) aux
consommables (éléments à remplacer pendant la durée de vie du produit : piles, coussinets de casque audio, par
exemple) ; (6) aux accessoires (câbles, étuis, housses, sacs, dragonnes, par exemple) ; (7) si le produit a été vendu aux
enchères publiques.
Cette garantie n’est pas transférable.
Les droits légaux du consommateur au titre de la législation applicable dans son pays à la vente de biens de
consommation ne sont pas affectés par la présente garantie.
Par exemple, en France, indépendamment de la présente garantie, le vendeur reste tenu de la garantie légale de
conformité mentionnée aux articles L. 217-4 à L.217-12 du code de la consommation et de celle relative aux défauts
(vices cachés) de la chose vendue, dans les conditions prévues aux articles 1641 à 1648 et 2232 du code civil. La loi
applicable (c'est-à-dire la loi française) impose de reproduire les extraits de la loi française suivants :
Article L. 217-4 du code de la consommation :
Le vendeur livre un bien conforme au contrat et répond des défauts de conformité existant lors de la délivrance.
Il répond également des défauts de conformité résultant de l'emballage, des instructions de montage ou de
l'installation lorsque celle-ci a été mise à sa charge par le contrat ou a été réalisée sous sa responsabilité.
Article L. 217-5 du code de la consommation :
Le bien est conforme au contrat :
1° S'il est propre à l'usage habituellement attendu d'un bien semblable et, le cas échéant :
- s'il correspond à la description donnée par le vendeur et possède les qualités que celui-ci a présentées à l'acheteur
sous forme d'échantillon ou de modèle ;
- s'il présente les qualités qu'un acheteur peut légitimement attendre eu égard aux déclarations publiques faites par
le vendeur, par le producteur ou par son représentant, notamment dans la publicité ou l'étiquetage ;
2° Ou s'il présente les caractéristiques définies d'un commun accord par les parties ou est propre à tout usage
spécial recherché par l'acheteur, porté à la connaissance du vendeur et que ce dernier a accepté.
Article L. 217-12 du code de la consommation :
L'action résultant du défaut de conformité se prescrit par deux ans à compter de la délivrance du bien.
Page 24

11/12
Article L. 217-16 du code de la consommation :
Lorsque l'acheteur demande au vendeur, pendant le cours de la garantie commerciale qui lui a été consentie lors de
l'acquisition ou de la réparation d'un bien meuble, une remise en état couverte par la garantie, toute période
d'immobilisation d'au moins sept jours vient s'ajouter à la durée de la garantie qui restait à courir.
Cette période court à compter de la demande d'intervention de l'acheteur ou de la mise à disposition pour réparation
du bien en cause, si cette mise à disposition est postérieure à la demande d'intervention.
Article L. 1641 du code civil :
Le vendeur est tenu de la garantie à raison des défauts cachés de la chose vendue qui la rendent impropre à l'usage
auquel on la destine, ou qui diminuent tellement cet usage que l'acheteur ne l'aurait pas acquise, ou n'en aurait
donné qu'un moindre prix, s'il les avait connus.
Article L. 1648 alinéa 1
er
du code civil :
L'action résultant des vices rédhibitoires doit être intentée par l'acquéreur dans un délai de deux ans à compter de la
découverte du vice.
Stipulations additionnelles à la garantie
Pendant la période de garantie, Guillemot ne fournira, en principe, pas de pièce détachée car le Support Technique
est seul habilité tant à ouvrir qu'à remettre en état tout produit Thrustmaster (à l'exception des remises en état que le
Support Technique demanderait, par instructions écrites, au consommateur d'effectuer -par exemple en raison de la
simplicité et de l'absence de confidentialité du processus de remise en état-, en lui fournissant, le cas échéant, la ou
les pièces détachées nécessaires).
Compte tenu de ses cycles d'innovation et pour préserver ses savoir-faire et secrets, Guillemot ne fournira, en
principe, ni notice de remise en état, ni pièce détachée pour tout produit Thrustmaster dont la période de garantie est
expirée.
Aux États-Unis d’Amérique et au Canada, la présente garantie est limitée au mécanisme interne et au boîtier externe du
produit. En aucun cas, Guillemot ou ses sociétés affiliées ne sauraient être tenues responsables envers qui que ce soit de tous
dommages indirects ou dommages accessoires résultant du non-respect des garanties expresses ou implicites. Certains
États/Provinces n’autorisent pas la limitation sur la durée d’une garantie implicite, ou l’exclusion ou la limitation de responsabilité
pour les dommages indirects ou accessoires, de sorte que les limitations ou exclusions ci-dessus peuvent ne pas vous être
applicables. Cette garantie vous confère des droits spécifiques ; vous pouvez également bénéficier d’autres droits qui peuvent
différer d’un État/Province à l’autre.
Responsabilité
Lorsque la loi applicable l’autorise, Guillemot Corporation S.A. (ci-après « Guillemot ») et ses filiales excluent toute
responsabilité pour tous dommages causés par un ou plusieurs des faits suivants: (1) le produit a été modifié, ouvert,
altéré, (2) l’irrespect des instructions de montage, (3) l’utilisation inappropriée ou abusive, la négligence, l’accident (un
choc, par exemple), (4) l’usure normale du produit, (5) l’utilisation du produit en dehors du cadre privé, à des fins
professionnelles ou commerciales (salles de jeu, formations, compétitions, par exemple). Lorsque la loi applicable
l’autorise, Guillemot et ses filiales excluent toute responsabilité pour tout dommage dont la cause n’est pas liée à un
défaut matériel ou à un vice de fabrication du produit (y compris, mais non limitativement, tout dommage causé
directement ou indirectement par tout logiciel, ou par une combinaison du produit Thrustmaster avec tout élément
inadapté, notamment alimentations électriques, batteries, chargeurs, ou tous autres éléments non-fournis par Guillemot
pour ce produit).
Page 25

12/12
COPYRIGHT
SUPPORT TECHNIQUE
*
*
© 2021 Guillemot Corporation S.A. Tous droits réservés. Thrustmaster
Corporation S.A. Toutes les autres marques sont la propriété de leurs propriétaires respectifs. Illustrations non
contractuelles. Le contenu, la conception et les spécifications sont susceptibles de changer sans préavis et de varier
selon les pays. Fabriqué en Chine.
RECOMMANDATION RELATIVE A LA PROTECTION DE L’ENVIRONNEMENT
Dans les autres pays : Veuillez-vous reporter aux législations locales relatives au recyclage des équipements
électriques et électroniques.
Informations à conserver. Les couleurs et décorations peuvent varier.
Il est recommandé de retirer les attaches en plastique et les adhésifs avant d’utiliser le produit.
www.thrustmaster.com
*Applicable à l’UE, au RU et la Turquie uniquement
Dans l’Union Européenne : En fin de vie, ce produit ne doit pas être éliminé avec les déchets
ménagers normaux mais déposé à un point de collecte des déchets d'équipements électriques
et électroniques en vue de son recyclage.
Ceci est confirmé par le symbole figurant sur le produit, le manuel utilisateur ou l’emballage.
En fonction de leurs caractéristiques, les matériaux peuvent être recyclés. Par le recyclage et
par les autres formes de valorisation des déchets d'équipements électriques et électroniques,
vous contribuez de manière significative à la protection de l’environnement. Veuillez consulter
les autorités locales qui vous indiqueront le point de collecte concerné.
®
est une marque déposée de Guillemot
https://support.thrustmaster.com
Page 26

1/12
Benutzerhandbuch
TECHNISCHE FEATURES
1. USB Wahlschalter(PC / PS3) 6. Daumenschieber-Drosselklappe
2. PC und PlayStation®3 USB Stecker 7. LED
3. Multidirektionaler “Point Of View” Kopfschalter 8. PRESET (Voreinst.-)Button
4. 12 Actionbuttons (zur Programmauswahl)
5. Ruderfunktion via Drehgriff 9. Justierungsschraube für
mit Feststellschraube Griffwiederstand
Page 27

2/12
PC
INSTALLATION AUF DEM PC
1. Setzen Sie den USB Wahlschalter (1) Ihres Joysticks auf die Position “PC”.
2. Stecken Sie den USB Stecker (2) in einen freien USB Port Ihres Computers. Windows wird
nun das neue Gerät automatisch erkennen.
3. Die Treiber werden automatisch installiert.
Befolgen Sie die Bildschirmanweisungen, um die Installation zu komplettieren.
4. Klicken Sie auf Start/Einstellungen/Systemsteuerung und dann (doppel-)klicken Sie auf
Gamecontroller.
In der Dialogbox von Gamecontroller wird der Name des Joysticks mit dem OK Status
angezeigt.
5. Klicken Sie auf Eigenschaften im Kontrollfenster, um Ihren Joystick zu konfigurieren.
Test Gerät: Hier können Sie alle Funktionen Ihres Joysticks testen und sich ansehen.
Sie können nun gleich mit Spielen loslegen!
WICHTIGE ANMERKUNGEN FÜR PC
- Der USB Wahlschalter (1) Ihres Joysticks muß immer vor dem Anschluß an Ihren Computer auf
die Position “PC” gestellt werden.
- Beim Anschluß Ihres Joysticks: Lassen Sie den Griff und das Ruder in der Mitte stehen und
bewegen diese nicht (um Kalibrierungsprobleme zu vermeiden).
Page 28

3/12
Rote LED
“AUTOMATISCHE PRESET”-KONFIGURATION - PC
“AUTOMATISCHES PRESET” Diagramm auf dem PC
Diese Voreinstellung korrespondiert mit den vorgegebenen Konfigurationswerten für die meisten
Flugsimulationsspielen auf dem PC.
Daher sind Sie in der Lage sofort „Abzuheben“, ohne Ihren Joystick rekonfigurieren zu müssen.
Page 29

4/12
PLAYSTATION®3
INSTALLATION AUF DER PLAYSTATION®3
1. Setzen Sie den USB Wahlschalter (1) Ihres Joysticks auf die Position “PS3”.
2. Stecken Sie den USB Stecker (2) in einen freien USB Port Ihrer Konsole.
3. Schalten Sie Ihre Konsole ein.
4. Rufen Sie Ihr Spiel auf.
Sie können nun gleich mit Spielen loslegen!
BENUTZEN DES “HOME / PS” BUTTON
Der “Home / PS” Button Ihres Joysticks ermöglicht Ihnen das Beenden Ihrer Spiele, Zugang zu
den Spielemenüs und das direkte Ausschalten Ihres PlayStation®3 Systems.
WICHTIGE ANMERKUNGEN FÜR PLAYSTATION®3
- Der USB Wahlschalter (1) Ihres Joysticks muß immer vor dem Anschluß an Ihre Konsole auf die
Position“PS3” gestellt werden.
- Im “1 Player (Spieler)” Modus: Ist Ihr offizielles Gamepad an, müssen Sie dieses auf den
“Kontrollerport 2” umschalten, damit Ihr Joystick funktionieren kann.
- Auf der PlayStation®3 ist der Joystick ausschließlich kompatibel mit PlayStation®3 Spielen (und
funktioniert auf keinen Fall mit PlayStation® 2 Spielen).
- Beim Anschluß Ihres Joysticks: Lassen Sie den Griff und das Ruder in der Mitte stehen und
bewegen diese nicht (um Kalibrierungsprobleme zu vermeiden).
Page 30

5/12
Rote LED
“AUTOMATISCHE PRESET” KONFIGURATION - PLAYSTATION®3
“AUTOMATISCHES PRESET” Diagramm auf PlayStation®3
Diese Voreinstellung korrespondiert mit den vorgegebenen Konfigurationswerten für die meisten
Flugsimulationsspielen auf der PlayStation®3. Daher sind Sie in der Lage sofort „Abzuheben“,
ohne Ihren Joystick rekonfigurieren zu müssen
Die 4 Richtungen des Griffs: Korrespondiert mit den 4 Richtungen des linken Mini-Sticks Ihres
Gamepads.
Die Drosselklappe (6): Korrespondiert mit den Hoch/Runter Richtungen des rechten Mini-Sticks Ihres
Gamepads.
Das Ruder (5): Korrespondiert mit den Links/Rechts Richtungen des rechte Mini-Sticks Ihres
Gamepads..
MAPPING(Zuordnungs-) Button: Drücken Sie gleichzeitig SELECT (SE) + START (ST).
HOME / PS Button: Drücken Sie einfach diesen Button.
Page 31

6/12
LERNEN SIE IHREN JOYSTICK KENNEN
Justierbarer Griffwiederstand
Je nach der Art des Spiels, möchten Sie vielleicht einen hochsensiblen Joystick haben, der auf
die kleinsten Bewegungen reagiert - oder einen festeren Joystick, der einen deutlich spürbaren
Wiederstand beim benutzen bietet.
Der Griffwiederstand Ihres Joysticks ist justierbar, um diesen allen Spielern anpaßbar zu machen.
Zur Justierung nutzen Sie bitte die Justierungsschraube (9), die Sie unten an der Basis des
Joysticks finden.
Drosselklappe
Die Drosselklappe hat hier die Form eines Daumen-Schiebereglers (6), leicht mit der linken Hand
erreichbar, die komfortabel auf der Basis des Joysticks aufliegt.
Ruderfunktion
Ihr Joystick verfügt über eine Ruderfunktion, die in einem Flugzeug den Pedalen entspricht, die
ein Pilot zur Steuerung benutzt, um das Flugzeug um seine vertikale Achse zu drehen (danach
fliegt das Flugzeug entweder nach rechts oder links). Diese Ruderfunktion können Sie mit dem
Joystick mittels drehen des Griffes nach rechts oder links ausführen.
Sollten Sie die Ruderfunktion in Ihren Spielen nicht nutzen wollen (oder haben diese auf die
Actionbuttons programmiert), können Sie die Griffrotation dank der Feststellschraube (5) an der
Basis deaktivieren.
Benutzen Sie dazu einen flachen Schraubenzieher, um die Position der Schraube zu verändern
und somit die Ruderfunktion zu sperren oder zu entsperren.
Multidirektionaler “Point Of View” Kopfschalter
Ihr Joystick enthält einen “Point Of View” Kopfschalter (3), mit dem Sie – wie der Name schon
sagt - alles beobachten können (in Spielen, die dies gestatten), was um das Flugzeug herum
geschieht. Um dies ausführen zu können, gehen Sie einfach in das Konfigurationsmenü Ihres
Spiels und programmieren die verschiedenen Blickwinkel (Rücksicht, Sicht nach links/rechts und
ebenfalls externe Blickwinkel) auf die Richtungen des “Point Of View” Kopfschalters.
Natürlich können Sie dem “Point Of View” Kopfschalter auch andere Funktionen (Feuern, etc.)
zuweisen.
Page 32

7/12
2 PROGRAMMIERMODI
Der PRESET Button (8) und die LED (7) gestatten Ihnen den Typ der gewählten Programmierung
zu sehen: AUTOMATISCH (vorprogrammiert) oder MANUELL (selbstprogrammiert).
Einmaliges drücken dieses Buttons erlaubt Ihnen das Umschalten von einem zum anderen
Programmodus – auch während des Spiels.
• AUTOMATISCHE VOREINSTELLUNG: ROTE LED
Dies repräsentiert die werksseitige Programmierung: Die Achsen, Positionen der Buttons und des
Kopfschalters sind vorprogrammiert.
BITTE SCHAUEN SIE SICH DAS DIAGRAMM “AUTOMATISCHE PRESET” KONFIGURATION AN.
• MANUELLE VOREINSTELLUNG: GRÜNE LED
Dies repräsentiert Ihre eigene Programmierung:
- Die Buttons, Achsen und der Kopfschalter können untereinander geschaltet werden.
- Sie können die Programmierung jederzeit nach Ihrem Gusto modifizieren.
- Die Programmierung wird automatisch in Ihrem Joystick gespeichert (auch wenn dieser
nicht mit einem Gerät verbunden ist).
- Ist Ihr “MANUELLES PRESET” leer, so ist dieses identisch mit dem “AUTOMATISCHEN
PRESET”.
PROGRAMMIEREN / MAPPING (Zuordnung)
Sie können Ihren Joystick mittels des MAPPING Buttons programmieren.
Achtung: Dieser Button ist für PC und PS3 nicht an der gleichen Stelle zu finden (bitte
• Beispiele möglicher Applikationen:
• Ausnahme:
schauen Sie in den Diagrammen nach):
- Auf dem PC: Drücken Sie direkt auf den entsprechenden Button.
- Auf der PS3: Drücken Sie gleichzeitig START (ST) + SELECT (SE).
- Umschalten der Buttonpositionen.
- Umschalten der Achsen untereinander = Richtungen des Griffs, auf die Drosselklappe oder
auf das Ruder (in diesem Fall müssen Sie die zwei Richtungen der ersten Achse auf die der
zweiten Achse zuordnen).
- Umschalten der beiden Richtungen der gleichen Achse.
- Schalten der Buttons auf eine Achsenrichtung oder auf den Kopfschalter.
Auf der PlayStation®3 sind der START (ST) und SELECT (SE) Button korrespondierend zum
MAPPING Button (und können daher nicht umprogrammiert werden).
Page 33

8/12
PROGRAMMIERPROZEDUR
Schritte
Aktion
LED
MANUELLES PRESET (8) durch drücken des
Buttons aktivieren.
2
Drücken und loslassen des MAPPING Buttons.
AUS
Drücken und loslassen des Buttons/Richtung,
der/die programmiert werden soll.
Drücken und loslassen des Buttons/Richtung, auf
der/die Funktion plaziert werden soll.
Schritte
1
Aktivieren Sie Ihr MANUELLES PRESET (8).
GRÜN
Drücken und halten des MAPPING Buttons
für 2 Sekunden.
BLINKT FÜR 2
SEKUNDEN GRÜN
Schritt
Aktion
LED
BLINKT FÜR 2
GRÜN/ROT
1
3
4
Ihr “MANUELLES PRESET” ist nun aktiviert und aktuell
(mit Ihrer Programmierung).
GRÜN
BLINKT GRÜN
GRÜN
EEPROM SPEICHER
• Ihr Joystick verfügt über einen internen Speicherchip, der alle Ihre “MANUELLEN PRESETS”
Programmierungen abspeichert (auch wenn der Joystick für längere Zeit ausgeschaltet oder
ausgestöpselt wurde).
• Sie können für jede Plattform verschiedene “MANUELLE PRESETS” speichern (eine für PC
und eine für PS®3).
Löschen eines “MANUELLEN PRESETS”
Aktion LED
2
(und erneut identisch mit dem “AUTOMATISCHEN PRESET”).
Ihr “MANUELLES PRESET” ist nun leer
Rückkehr zur “WERKSEINSTELLUNG”
Sie können all Ihre Programmierungen für beide Plattformen - PC and PlayStation®3 – mit einem
einzigen Schritt löschen:
1
All Ihre “MANUELLEN PRESETS” (PC + PS3) oder Einstellungen sind nun gelöscht.
Bitte beachten: Diese Prozedur starte Ihren Joystick komplett neu (insofern sollten Sie diese
Aktion auf dem PC nur außerhalb eines laufenden Spiels ausführen).
Drücken Sie gleichzeitig die Buttons
MAPPING + 11 (SE) + 12 (ST)
SEKUNDEN
Page 34

9/12
FEHLERBESEITIGUNG UND WARNUNG
• Mein Joystick scheint nicht richtig zu funktionieren oder scheint nicht richtig kalibriert
zu sein:
- Schalten Sie Ihre Konsole oder Ihren Computer aus und stöpseln den Joystick komplett von
dem jeweiligen System ab. Danach schließen Sie selbigen wieder an, starten Ihr jeweiliges
System und starten das Spiel erneut.
- Beim Anschluß des Joysticks: Griff, Ruder und Drosselklappe mittig stehen lassen und nicht
bewegen (um Kalibrierungsprobleme zu vermeiden).
- Beenden Sie Ihr laufendes Spiel und stöpseln Sie Ihren Joystick komplett vom jeweiligen
System ab. Überzeugen Sie sich, ob der USB Wahlschalter (PC / PS3) (1) in der richtigen
Position ist. Schließen Sie danach Ihren Joystick wieder an und rufen Ihr Spiel auf.
• Ich kann meinen Joystick nicht konfigurieren:
- In Ihrem Spiel- oder Joystick-Menü rufen Sie bitte auf: “Optionen / Kontroller / Gamepad oder
Joystick”. Wählen Sie nun die am besten geeignete Konfiguration oder rekonfigurieren Sie
komplett die Kontrolleroptionen.
- Bitte lesen Sie in der Bedienungsanleitung Ihres Spiels für mehr Informationen nach oder
bemühen Sie die Online-Hilfefunktion.
- Sie können auch die “MAPPING” Funktion Ihres Joysticks nutzen, um dieses Problem zu
beheben.
• Mein Joystick ist zu empfindlich oder nicht empfindlich genug:
- Ihr Joystick kalibriert sich selbständig, nachdem Sie einige Bewegungen auf verschiedenen
Achsen ausgeführt haben.
- Im Menü des Spiels “Optionen / Kontroller / Gamepad oder Joystick” aufrufen: Justieren Sie die
Empfindlichkeit oder toten Winkel (falls diese Optionen zur Verfügung stehen)
- Justieren Sie den Griffwiederstand mittels der Justierungsschraube (9) an der Unterseite der
Basis Ihres Joysticks.
Page 35

10/12
Kunden-Garantie-Information
Guillemot Corporation S.A. mit Hauptfirmensitz in Place du Granier, B.P. 97143, 35571 Chantepie, France
(fortfolgend “Guillemot”) garantiert Kunden weltweit, daß dieses Thrustmaster Produkt frei von Mängeln in
Material und Verarbeitung für eine Gewährleistungsfrist ist, die mit der Frist für eine Mängelrüge bezüglich
des Produktes übereinstimmt. In den Ländern der Europäischen Union entspricht diese einem Zeitraum von
zwei (2) Jahren ab Kaufdatum des Thrustmaster Produktes. In anderen Ländern entspricht die
Gewährleistungsfrist der zeitlichen Begrenzung für eine Mängelrüge bezüglich des Thrustmaster Produktes in
Übereinstimmung mit anwendbarem Recht des Landes, in dem der Kunde zum Zeitpunkt des Erwerbs eines
Thrustmaster Produktes wohnhaft ist. Sollte eine entsprechende Regelung in dem entsprechenden Land nicht
existieren, umfasst die Gewährleistungspflicht einen Zeitraum von einem (1) Jahr ab dem originären
Kaufdatum des Thrustmaster Produktes.
Sollten bei dem Produkt innerhalb der Gewährleistungsfrist Defekte auftreten, kontaktieren Sie unverzüglich
den technischen Kundendienst, der die weitere Vorgehensweise anzeigt. Wurde der Defekt bestätigt, muß
das Produkt an die Verkaufsstelle (oder an eine andere Stelle, je nach Maßgabe des technischen
Kundendienstes) retourniert werden.
Im Rahmen dieser Garantie sollte das defekte Produkt des Kunden, je nach Entscheidung des technischen
Kundendienstes, entweder ausgetauscht oder repariert werden. Sollte während der Garantiezeit das
Thrustmaster Produkt einer derartigen Instandsetzung unterliegen und das Produkt während eines Zeitraums
von mindestens sieben (7) Tagen nicht benutzbar sein, wird diese Zeit der restlichen Garantiezeit
hinzugefügt. Diese Frist läuft ab dem Zeitpunkt, an dem der Wunsch des Verbrauchers bezüglich einer
Intervention vorliegt oder ab dem Tag, an dem das fragliche Produkt zur Instandsetzung zur Verfügung steht,
falls das Datum, an dem das Produkt zur Instandsetzung zur Verfügung steht, dem Datum des Antrags auf
Intervention nachfolgt. Wenn nach geltendem Recht zulässig, beschränkt sich die volle Haftung von Guillemot
und ihrer Tochtergesellschaften auf die Reparatur oder den Austausch des Thrustmaster Produktes (inklusive
Folgeschäden). Wenn nach geltendem Recht zulässig, lehnt Guillemot alle Gewährleistungen der
Marktgängigkeit oder Eignung für einen bestimmten Zweck ab.
Der Gewährleistungsanspruch verfällt: (1) Falls das Produkt modifiziert, geöffnet, verändert oder ein Schaden
durch unsachgemäßen oder missbräuchlichen Gebrauch hervorgerufen wurde, sowie durch Fahrlässigkeit,
einen Unfall, Verschleiß oder irgendeinem anderen Grund – aber nicht durch Material- oder
Herstellungsfehler (einschließlich, aber nicht beschränkt auf, die Kombination der Thrustmaster Produkte mit
ungeeigneten Elementen, insbesondere Netzteile, Akkus, Ladegeräte, oder andere Elemente, die von
Guillemot für dieses Produkt nicht mitgeliefert wurden); (2) Falls das Produkt für eine andere Nutzung als zum
privaten Hausgebrauch, einschließlich für professionelle oder kommerzielle Zwecke (z. B. Spielhallen,
Training, Wettkämpfe) verwendet wird; (3) Im Falle der Nichteinhaltung der durch den technischen Support
erteilten Anweisungen; (4) Durch Software. Die besagte Software ist Gegenstand einer speziellen Garantie;
(5) Bei Verbrauchsmaterialien (Elemente, die während der Produktlebensdauer ausgetauscht werden, wie z.
B. Einwegbatterien, Ohrpolster für ein Audioheadset oder für Kopfhörer); (6) Bei Accessoires (z. B. Kabel,
Etuis, Taschen, Beutel, Handgelenk-Riemen); (7) Falls das Produkt in einer öffentlichen Versteigerung
verkauft wurde.Diese Garantie ist nicht übertragbar.
Die Rechte des Kunden in Übereinstimmung mit anwendbarem Recht bezüglich des Verkaufs auf
Konsumgüter im Land der/der Kunden/Kundin wird durch diese Garantie nicht beeinträchtigt.
Page 36

11/12
Zusätzliche Gewährleistungsbestimmungen
Während der Garantiezeit bietet Guillemot grundsätzlich keine Ersatzteile an, da der technische
Kundendienst der einzige autorisierte Partner zum Öffnen und/oder Instandsetzen jedweden ThrustmasterProdukts ist (mit Ausnahme von irgendwelchen Instandsetzungsprozeduren, die der Kunde nach Maßgabe
des technischen Kundendienstes und durch schriftliche Instruktionen sowie der Zurverfügungstellung des/der
eventuell erforderlichen Ersatzteil(s)(e) selbst in der Lage ist durchzuführen – zum Beispiel aufgrund der
Einfachheit und einer nicht erforderlichen Geheimhaltung des Instandsetzungsverfahrens).
Aufgrund seiner Innovationszyklen und um sein Know-how und seine Geschäftsgeheimnisse zu schützen,
bietet Guillemot grundsätzlich keine Instandsetzungs-Benachrichtigung oder Ersatzteile für alle Thrustmaster
Produkte an, deren Garantiezeit abgelaufen ist.
Haftung
Wenn nach dem anwendbar en Recht zulässi g, lehnen Guillem ot Corporation S.A. (fortfolgend "Guillemot")
und ihre Tochtergesellschaften jegliche Haftung für Schäden, die auf eine oder mehrere der folgenden
Ursachen zurückzuführen sind, ab: (1) das Produkt wurde modifiziert, geöffnet oder geändert; (2)
Nichtbefolgung der Montageanleitung; (3) unangebrachte Nutzung, Fahrlässigkeit, Unfall (z. B. ein Aufprall);
(4) normalem Verschleiß; (5) Die Verwendung des Produkts für jedwede andere Nutzung als zum privaten
Hausgebrauch, einschließlich professionelle oder kommerzielle Zwecke (z. B. Spielhallen, Training,
Wettkämpfe). Wenn nach anwendbarem Recht zulässig, lehnen Guillemot und seine Niederlassungen
jegliche Haftung für Schäden, die nicht auf einen Material- oder Herstellungsfehler in Bezug auf das Produkt
beruhen (einschließlic h, aber nicht beschränkt auf, etwaige Schäden, die direkt oder indirekt durch Software
oder durch die Kombination der Thrustmaster Produkte mit ungeei gneten Elementen, insbesondere Netzteile,
Akkus, Ladegeräte, oder andere Elemente, die von Guillemot für dieses Produkt nic ht geliefert wurden), ab.
TECHNISCHER SUPPORT
https://support.thrustmaster.com
Page 37

12/12
COPYRIGHT
*
*
© Guillemot Corporation S.A. 2021. Alle Rechte vorbehalten. Thrustmaster
Warenzeichen der Guillemot Corporation S.A. Alle anderen Handelsmarken sind im Besitz Ihrer jeweiligen
Eigentümer. Illustrationen nicht verbindlich. Inhalte, Design und Spezifikationen können ohne vorherige
Ankündigung geändert werden und können von Land zu Land unterschiedlich sein. Hergestellt in China.
Hinweise zum Umweltschutz
Für alle anderen Länder: Bitte beachten Sie die lokalen Entsorgungsrichtlinien/-Gesetze bezüglich
elektrischen und elektronischen Equipments.
Wichtige Informationen. Die Farben und Verzierungen können abweichen.
Plastikhalterungen und Aufkleber bitte vor der Nutzung des Produktes entfernen.
www.thrustmaster.com
* Nur in der E U, dem Vereinigten Königreich und der Türkei anwendbar
In der Europäischen Union: Dieses Produkt darf nach Ende seiner Lebensdauer nicht über
den Hausmüll entsorgt werden, sondern muss an einem Sammelpunkt für das Recycling
von elektrischen und elektronischen Geräten abgegeben werden.
Das Symbol auf dem Produkt, der Gebrauchsanleitung oder der Verpackung weist darauf
hin.
Die Werkstoffe sind gemäß ihrer Kennzeichnung wiederverwertbar. Mit der
Wiederverwertung, der stofflichen Verwertung oder anderen Formen von Altgeräten leisten
Sie einen wichtigen Beitrag zum Schutz unserer Umwelt. Bitte erfragen Sie bei der
Gemeindeverwaltung die zuständige Entsorgungsstelle.
®
ist ein eingetragenes
Page 38

1/12
Handleiding
TECHNISCHE KENMERKEN
1. USB-schakelaar (pc of PS3) 6. Duimschuif-throttle
2. USB-connector voor pc en PlayStation®3 7. LED
3. Multidirectionele Point-Of-View-hat-switch 8. PRESET-knop
4. 12 actieknoppen (om programmering te selecteren)
5. Roerfunctie via schommelstick 9. Wiel voor aanpassen
met fixatieschroef stickweerstand
Page 39

2/12
PC
INSTALLATIE OP DE PC
1. Zet de USB-schakelaar (1) van de joystick in de stand PC.
2. Sluit de USB-connector (2) aan op een van de USB-poorten van de computer. Windows
herkent het nieuwe apparaat automatisch.
3. De drivers worden automatisch geïnstalleerd.
Volg de aanwijzingen op het scherm om de installatie te voltooien.
4. Klik op Start/Configuratiescherm en dubbelklik vervolgens op Game Controllers.
In het dialoogvenster Game Controllers dat nu wordt geopend, ziet u de naam van de
joystick met als status OK.
5. Klik op Eigenschappen in het Configuratiescherm om de joystick te configureren.
Test device: Hiermee kunt u alle functies van de joystick testen en bekijken.
Nu kan er gespeeld worden!
BELANGRIJKE OPMERKINGEN VOOR PC-GEBRUIKERS
Zet de USB-schakelaar (1) van de joystick altijd in de stand PC voordat u de joystick
aansluit.
- Zorg dat de stick en het roer tijdens het aansluiten van de joystick steeds in het midden
worden gehouden (dit ter voorkoming van problemen met de kalibratie).
Page 40

3/12
AUTOMATIC PRESET-CONFIGURATIE - PC
AUTOMATIC PRESET-diagram voor pc
RODE LED:
Deze voorinstellingen zijn geschikt als standaardinstellingen voor de meeste flightsimulationgames voor pc's.
Met deze speelklare instellingen kunt u de joystick dus direct gebruiken.
Page 41

4/12
PLAYSTATION®3
INSTALLATIE OP DE PLAYSTATION®3
1. Zet de USB-schakelaar (1) van de joystick in de stand PS3.
2. Sluit de USB-connector (2) aan op een van de USB-poorten van de console.
3. Zet de console aan.
4. Start de game.
Nu kan er gespeeld worden!
DE HOME- / PS-KNOP (6) GEBRUIKEN
Met de Home- / PS-knop van de joystick kunt u een game verlaten, naar de menu's gaan van uw
PlayStation®3 of de PlayStation®3 direct uitzetten.
BELANGRIJKE OPMERKINGEN VOOR PLAYSTATION®3-GEBRUIKERS
Zet de USB-schakelaar (1) van de joystick altijd in de stand PS3 voordat u de joystick aansluit.
- In 1 Player-modus: als uw officiële gamepad aan staat, moet u deze op controller port 2 zetten
anders werkt uw joystick niet.
- Op een PlayStation®3 is de joystick alleen compatibel met PlayStation®3-games (de joystick
werkt niet met PlayStation® 2-games).
- Zorg dat de stick, het roer en de throttle tijdens het aansluiten van de joystick steeds in het
midden worden gehouden (dit ter voorkoming van problemen met de kalibratie).
Page 42

5/12
"AUTOMATIC PRESET"-CONFIGURATIE - PLAYSTATION®3
AUTOMATIC PRESET-diagram voor PlayStation®3
RODE LED:
Deze voorinstellingen zijn geschikt als standaardinstellingen voor de meeste flightsimulationgames voor de PlayStation®3. Met deze speelklare instellingen kunt u de joystick dus direct
gebruiken.
De vier richtingen van de stick: komen overeen met de vier richtingen op de
linkerministick van de gamepad.
De throttle (6): komt overeen met de omhoog/omlaag-richting op de rechterministick van de
gamepad.
Het roer (5): komt overeen met de links/rechts-richting op de rechterministick van de
gamepad.
MAPPING-knop: Druk tegelijkertijd op de knoppen SELECT (SE) en START (ST).
HOME / PS-knop: Druk op de knop.
Page 43

6/12
DE DIVERSE FUNCTIES VAN de joystick
Stick met instelbare weerstand
Bij de ene game wilt u graag een supergevoelige joystick die reageert op de minste of
geringste aanraking en bij een andere game wilt u een stick die pas in actie komt als u er
flink tegen duwt.
De weerstand van de stick is instelbaar zodat u er alle soorten games mee kunt spelen. U
kunt de weerstand instellen met het wiel voor het aanpassen van de stickweerstand (9)
onder aan de voet van de joystick.
Throttle
De throttle heeft de vorm van een duimschuifregelaar (6), en is gemakkelijk te bedienen als
uw linkerhand op de voet van de joystick rust.
Roerfunctie
De joystick beschikt over een roerfunctie die correspondeert met de pedalen in een vliegtuig
waarmee de piloot het stuur bedient om het vliegtuig om de verticale as te laten vliegen (om
een bocht naar links of rechts te maken). Deze roerfunctie is beschikbaar op uw joystick
door de stick naar links of rechts te draaien.
Als u de roerfunctie niet nodig hebt in uw games (of deze besturing aan een actieknop hebt
toegewezen), kunt u de stick vastzetten met de fixatieschroef (5) in de voet van de stick.
Gebruik een gewone schroevendraaier om de roerfunctie vast of los te zetten.
Multidirectionele Point-Of-View-hat-switch
De joystick beschikt over een Point Of View-hat-switch (3) waarmee u in een keer een
overzicht krijgt van alles dat zich rondom uw vliegtuig afspeelt (indien de game deze
mogelijkheid biedt). Als u deze functie wilt gebruiken, hoeft u alleen maar in het
instellingenmenu van uw game de verschillende views (links, rechts, naar voren, naar
achteren) op de richtingen van de Point of View-hat-switch te programmeren.
De Point Of View-hat-switch kan natuurlijk ook voor andere functies worden gebruikt
(schieten, enz.).
Page 44

7/12
TWEE PROGRAMMEERMODI
Met de PRESET-knop en LED (8) kunt u zien welk type programmering is geselecteerd:
AUTOMATIC (voorgeprogrammeerd) of MANUAL (door uzelf geprogrammeerd).
Met één druk op deze knop kunt u (zelfs tijdens de game) van de ene programmeermodus
naar de andere overschakelen.
• AUTOMATIC PRESET: RODE LED
Dit is de standaardprogrammering: de assen, posities van de knoppen en de hat-switch zijn
voorgeprogrammeerd.
RAADPLEEG DE AUTOMATIC PRESET-CONFIGURATIEDIAGRAMMEN.
• MANUAL PRESET: GROENE LED
Hiermee wordt de programmering aangegeven die u zelf hebt ingevoerd:
- De knoppen, assen en de hat-switch kunnen onderling worden verwisseld.
- U kunt de programmering naar eigen voorkeur wijzigen wanneer u maar wilt.
- Uw programmering wordt automatisch op uw joystick opgeslagen (zelfs als deze niet is
aangesloten).
- Als voor uw MANUAL PRESET geen programmering is opgegeven, is MANUAL
PRESET identiek aan AUTOMATIC PRESET.
PROGRAMMERING / MAPPING
U kunt de joystick programmeren met de MAPPING-knop.
Let op: Deze knop heeft een andere positie op de pc en de PS3 (zie de diagrammen):
• Voorbeelden van mogelijke toepassingen:
- De positie van knoppen verwisselen.
- De assen onderling verwisselen, ofwel de richtingen van de stick, de throttle of het roer
(in dit geval moet u de twee richtingen van de eerste as koppelen aan die van de
tweede as).
- De twee richtingen van dezelfde as verwisselen.
- De knoppen verwisselen met een richting van een as of de hat-switch.
• Uitzondering:
Op een PlayStation®3 komen de knoppen START (ST) en SELECT (SE) ook overeen
met de MAPPING-knop (en kunnen daarom mogelijk niet opnieuw worden
geprogrammeerd).
- Op de pc: Druk op de knop in kwestie.
Op de PS3: Druk tegelijkertijd op de knoppen START (ST) +
-
SELECT (SE).
Page 45

8/12
PROGRAMMEERPROCEDURE
Stappe
n
Schakel MANUAL PRESET (8) in door op de knop te
drukken.
2
Druk op de MAPPING-knop (6) en laat deze weer los.
UIT
Druk op de te programmeren knop of richting en laat
deze weer los.
KNIPPERT
GROEN
Druk op de knop of richting waarop u de functie wilt
onderbrengen en laat deze weer los.
Stappe
n
1
Schakel uw MANUAL PRESET in (8).
GROEN
KNIPPERT GROEN
SECONDEN
Stap
Actie
LED
KNIPPERT
SECONDEN
Actie LED
1
GROEN
3
4
GROEN
Uw MANUAL PRESET is nu ingeschakeld en bijgewerkt (uw programmering is uitgevoerd).
EEPROM-GEHEUGEN
• Uw joystick beschikt over een ingebouwde chip die uw MANUAL PRESET-
programmering in het geheugen bewaart, zelfs als de joystick wordt uitgezet of
langere tijd wordt ontkoppeld.
• U kunt voor elk platform dat u gebruikt verschillende MANUAL PRESET-
instellingen opslaan (een preset voor een pc en een voor een PlayStation®3).
EEN MANUAL PRESET WISSEN
Actie LED
2 Houd de MAPPING-knop (6) twee seconden ingedrukt.
GEDURENDE 2
Uw MANUAL PRESET is nu gewist
(en is weer identiek aan de AUTOMATIC PRESET-programmering).
TERUGZETTEN OP FABRIEKSINSTELLINGEN
U kunt al uw programmeringen en instellingen voor een pc of PlayStation®3 in één stap
wissen:
1
Druk tegelijkertijd op beide knoppen.
MAPPING + 11 (SE) + 12 (ST)
Al uw MANUAL PRESETS (= pc + PS3) of instellingen zijn nu gewist.
Opmerking: met deze procedure wordt uw joystick helemaal opnieuw opgestart
(voor pc's adviseren we daarom ook dat u dit niet tijdens het spelen van een game doet).
GROEN/ROOD
GEDURENDE 2
Page 46

9/12
PROBLEMEN OPLOSSEN EN WAARSCHUWINGEN
• De joystick werkt niet goed of lijkt niet goed gekalibreerd te zijn
- Zet uw computer of console uit, koppel uw joystick los, sluit de joystick opnieuw aan en
start de game opnieuw op.
- Zorg dat de stick, het roer en de throttle tijdens het aansluiten van de joystick steeds in het
midden worden gehouden (dit ter voorkoming van problemen met de kalibratie).
- Sluit de game af, koppel de joystick los, controleer of de PC/PS3 USB-schakelaar (1) in de
goede stand staat en sluit alles weer aan.
• Ik kan mijn joystick niet configureren:
- Ga in de game naar het menu met opties voor de controller en de joystick. Selecteer de
meest geschikte configuratie of stel de controller-opties volledig opnieuw in.
- Raadpleeg de handleiding of de online help van de game voor meer informatie.
- U kunt ook de MAPPING-functie van uw joystick gebruiken om dit soort problemen op te
lossen.
• Mijn joystick reageert te gevoelig of reageert niet gevoelig genoeg:
- De joystick wordt automatisch gekalibreerd wanneer u deze een paar maal in de richting
van de verschillende assen hebt bewogen.
- Ga in de game naar het menu met opties voor de controller en de joystick. Pas de
gevoeligheid of dode zones van de controller aan (indien deze optie beschikbaar is).
- Pas de weerstand van de stick aan met het wiel (9) onder aan de voet van de joystick.
Page 47

10/12
Informatie met betrekking tot kopersgarantie
Wereldwijd garandeert Guillemot Corporation S.A., het statutair adres gevestigd aan de Place du Granier,
B.P. 97143, 35571 Chantepie, Frankrijk, (hierna te noemen “Guillemot”) aan de de koper dat dit Thrustmasterproduct vrij zal zijn van materiaal- en fabricagefouten gedurende een garantieperiode gelijk aan de tijd
maximaal vereist om een restitutie/vervanging voor dit product te claimen. In landen van de Europese Unie
komt dit overeen met een periode van twee (2) jaar vanaf het moment van levering van het Thrustmasterproduct. In andere landen komt de garantieperiode overeen met de tijd maximaal vereist om een
restitutie/vervanging voor dit Thrustmaster-product te claimen zoals wettelijk is vastgelegd in het land waarin
de koper woonachtig was op de datum van aankoop van het Thrustmaster-product. Indien een dergelijk
claimrecht niet wettelijk is vastgelegd in het betreffende land, geldt een garantieperiode van één (1) jaar vanaf
datum aankoop van het Thrustmaster-product.
Indien u in de garantieperiode een defect meent te constateren aan dit product, neem dan onmiddellijk contact
op met Technical Support die u zal informeren over de te volgen procedure. Als het defect wordt bevestigd,
dient het product te worden geretourneerd naar de plaats van aankoop (of een andere locatie die wordt
opgegeven door Technical Support).
Binnen het gestelde van deze garantie wordt het defecte product van de koper gerepareerd of vervangen,
zulks ter beoordeling van Technical Support. Indien het Thrustmaster- product tijdens de garantieperiode is
onderworpen aan een dergelijk herstel, wordt elke periode van ten minste zeven (7) dagen waarin het product
niet in gebruik is, opgeteld bij de resterende garantieperiode (deze periode loopt vanaf de datum van verzoek
van de consument voor interventie of vanaf de datum waarop het product in kwestie beschikbaar is gesteld
voor herstel als de datum waarop het product ter beschikking wordt gesteld voor herstel later is dan de datum
van het verzoek om interventie). Indien toegestaan door van toepassing zijnde wetgeving, beperkt de
volledige aansprakelijkheid van Guillemot en haar dochterondernemingen (inclusief de aansprakelijkheid voor
vervolgschade) zich tot het repareren of vervangen van het Thrustmaster-product. Indien toegestaan door van
toepassing zijnde wetgeving, wijst Guillemot elke garantie af met betrekking tot verhandelbaarheid of
geschiktheid voor enig doel.
Deze garantie is niet van kracht: (1) indien het product aangepast, geopend of gewijzigd is, of beschadigd is
ten gevolge van oneigenlijk of onvoorzichtig gebruik, verwaarlozing, een ongeluk, normale slijtage, of enige
andere oorzaak die niet gerelateerd is aan een materiaal- of fabricagefout (inclusief maar niet beperkt tot het
combineren van het Thrustmaster-product met enig ongeschikt element waaronder in het bijzonder
voedingsadapters, oplaadbare batterijen, opladers of enig ander element niet geleverd door Guillemot voor dit
product); (2) als het product is gebruikt voor enig ander doel dan thuisgebruik, zoals maar niet exclusief een
professioneel of commercieel doel (bijvoorbeeld game rooms, training, wedstrijden); (3) indien u zich niet
houdt aan de instructies zoals verstrekt door Technical Support; (4) op software die onder een specifieke
garantie valt; (5) op verbruiksartikelen (elementen die tijdens de levensduur van het product worden
vervangen zoals bijvoorbeeld batterijen of pads van een headset of koptelefoon); (6) op accessoires (zoals
bijvoorbeeld kabels, behuizingen, hoesjes, etui's, draagtassen of polsbandjes); (7) indien het product werd
verkocht op een openbare veiling.
Deze garantie is niet overdraagbaar.
De wettelijke rechten van de koper die in zijn/haar land van toepassing zijn op de verkoop van
consumentproducten worden op generlei wijze door deze garantie beperkt.
Page 48

11/12
Aanvullende garantiebepalingen
Gedurende de garantieperiode zal Guillemot in principe nooit reserveonderdelen leveren omdat Technical
Support de enige partij is die bevoegd is een Thrustmaster-product te openen en/of te herstellen (met
uitzondering van een herstelprocedure die de klant door Technical Support gevraagd wordt uit te voeren met
behulp van schriftelijke instructies – omdat deze procedure bijvoorbeeld eenvoudig is en het herstelproces
niet vertrouwelijk is – en door het verstrekken aan de consument van de benodigde onderdelen, indien van
toepassing).
Gezien de innovatiecycli en om haar knowhow en handelsgeheimen te beschermen, zal Guillemot in principe
nooit een herstelbeschrijving of reserveonderdelen verstrekken voor een Thrustmaster-product waarvan de
garantieperiode is verstreken.
Aansprakelijkheid
Indien toegestaan door van toepassing zijnde wetgeving, wijzen Guillemot Corporation S.A. (hierna te
noemen “Guillemot”) en haar dochterondernemingen alle aansprakelijkheid af voor enige schade veroorzaakt
door één van de volgende oorzaken: (1) indien het product aangepast, geopend of gewijzigd is; (2) de
montage-instructies niet zijn opgevolgd; (3) oneigenlijk of onvoorzichtig gebruik, verwaarlozing, een ongeluk
(bijvoorbeeld stoten); (4) normale slijtage; (5) het gebruik van het product voor enig ander doel dan
thuisgebruik, zoals maar niet exclusief een professioneel of commercieel doel (bijvoorbeeld game rooms,
training, wedstrijden). Indien toegestaan onder van toepassing zijnde wetgeving, wijzen Guillemot en haar
dochterondernemingen alle aansprakelijkheid af voor enige schade aan dit product niet gerelateerd aan een
materiaal- of fabricagefout (inclusief maar niet beperkt tot enige schade direct of indirect veroorzaakt door
enige software, of door het combineren van het Thrustmaster-product met enig ongeschikt element waaronder
in het bijzonder voedingsadapters, oplaadbare batterijen, opladers of enig ander element niet geleverd door
Guillemot voor dit product).
TECHNISCHE ONDERSTEUNING
https://support.thrustmaster.com
Page 49

12/12
COPYRIGHT
*
*
© 2021 Guillemot Corporation S.A. Alle rechten voorbehouden. Thrustmaster
®
is een geregistreerd
handelsmerk van Guillemot Corporation S.A. Alle andere handelsmerken zijn eigendom van de
respectieve eigenaren. Afbeeldingen zijn niet bindend. Inhoud, ontwerp en specificaties kunnen zonder
kennisgeving vooraf worden gewijzigd en kunnen per land verschillen. Geproduceerd in China.
AANBEVELINGEN VOOR DE BESCHERMING VAN HET MILIEU
In de Europese Unie: Gooi dit product na het einde van de levensduur niet weg met
het normale afval, maar breng het naar het door uw gemeente aangewezen
inzamelpunt voor elektrische en/of computerapparatuur.
Ter herinnering is hiertoe op het product, de gebruikshandleiding of de verpakking
een symbool aangebracht.
De meeste materialen kunnen worden gerecycled. Door recycling en andere
methoden voor verantwoorde verwerking van afgedankte elektrische en
elektronische apparaten kunt u een belangrijke bijdrage leveren aan de bescherming
van het milieu.
Neem contact op met uw gemeente voor informatie over een inzamelpunt bij u in de buurt.
In alle andere landen: houd u aan de plaatselijk milieuwetgeving voor elektrische en elektronische
apparaten.
Bewaar deze informatie. De kleuren en decoraties kunnen variëren.
Plastic bevestigingen en hechtmaterialen moeten van het product worden verwijderd voordat het wordt
gebruikt.
www.thrustmaster.com
*Alleen van toepassing in de EU, het VK en Turkije
Page 50

1/12
Manuale d’uso
CARATTERISTICHE TECNICHE
1. Selettore USB (PC / PS3) 6. Slider per manetta
2. Connettore USB PC e PlayStation®3 7. LED
3. Hat-switch per “Visuale” multi-direzionale 8. Pulsante PRESET
4. 12 pulsanti azione (scelta della programmazione)
5. Funzione timone tramite impugnatura rotante 9. Regolatore della resistenza
con vite di bloccaggio dell’impugnatura
Page 51

2/12
PC
INSTALLAZIONE SU PC
1. Imposta il selettore USB del tuo joystick (1) in posizione “PC”.
2. Collega il connettore USB (2) ad una porta USB del tuo computer. Windows individuerà
automaticamente la nuova periferica.
3. I driver si installeranno automaticamente.
Completa l’installazione seguendo le istruzioni che compaiono sullo schermo.
4. Clicca su Start/Impostazioni/Pannello di controllo e fai quindi doppio clic su
Periferiche di gioco.
Nella finestra di dialogo Periferiche di gioco comparirà il nome del joystick con
associato lo stato di OK.
5. Nel Pannello di controllo, clicca su Proprietà per configurare il tuo joystick.
Test periferica: ti permette di testare e visualizzare tutte le funzioni del tuo joystick.
Ora sei pronto per giocare!
AVVISO IMPORTANTE PER UTENTI PC
- Prima di collegare il tuo joystick, assicurati sempre che il relativo selettore USB (1) si trovi
in posizione “PC”.
- Per evitare problemi di calibrazione, quando colleghi il tuo joystick, lascia la leva e il timone
al centro, senza muoverli.
Page 52

3/12
CONFIGURAZIONE “PROFILO AUTOMATICO” - PC
Diagramma del “PROFILO AUTOMATICO” per PC
LED ROSSO
Questo profilo corrisponde alle configurazioni predefinite per la maggior parte dei giochi di
simulazione aerea per PC.
Ciò ti permetterà, pertanto, di iniziare a giocare immediatamente, senza dover configurare il
tuo joystick.
Page 53

4/12
PLAYSTATION®3
INSTALLAZIONE SU PLAYSTATION®3
1. Imposta il selettore USB (1) del tuo joystick in posizione “PS3”.
2. Collega il connettore USB (2) ad una porta USB della tua console.
3. Accendi la tua console.
4. Avvia il tuo gioco.
Ora sei pronto per giocare!
USO DEL PULSANTE “HOME / PS”
Tramite il pulsante “Home / PS” del tuo joystick, potrai uscire dai giochi, accedere ai menu e
spegnere direttamente il tuo sistema PlayStation®3.
AVVISO IMPORTANTE PER UTENTI PLAYSTATION®3
- Prima di collegare il tuo joystick, accertati sempre che il selettore USB (1) si trovi in
posizione “PS3”.
- In modalità “1 giocatore”: se il tuo gamepad originale è acceso, affinché il tuo joystick
funzioni correttamente, dovrai spostare il gamepad sulla “porta controller 2”.
- Su PlayStation®3, il joystick è compatibile unicamente con giochi PlayStation®3 (non
funzionerà con titoli PlayStation® 2).
- Per evitare problemi di calibrazione, quando colleghi il tuo joystick, lascia la leva e il timone
al centro, senza muoverli.
Page 54

5/12
LED ROSSO
CONFIGURAZIONE “PROFILO AUTOMATICO” - PLAYSTATION®3
“Diagramma del “PROFILO AUTOMATICO” per PlayStation®3
Questo profilo corrisponde alle configurazioni predefinite per la maggior parte dei giochi di
simulazione aerea per PlayStation®3. Ciò ti permetterà, pertanto, di iniziare a giocare
immediatamente, senza dover configurare il tuo joystick.
Le 4 direzioni della leva: corrispondono alle 4 direzioni del mini-stick sinistro del tuo
gamepad.
La manetta (6): corrisponde alle direzioni Su/Giù del mini-stick destro del tuo gamepad.
Il timone (5): corrisponde alle direzioni Destra/Sinistra del mini-stick destro del tuo
gamepad.
Pulsante MAPPING: pressione simultanea dei pulsanti SELECT (SE) + START (ST).
Pulsante HOME / PS: pressione dell’omonimo pulsante.
Page 55

6/12
INIZIARE A CONOSCERE IL TUO JOYSTICK
Resistenza della leva regolabile
A seconda del tuo stile di gioco, potresti desiderare un joystick ultra-sensibile, che risponda
al più piccolo movimento, oppure un joystick più duro, che offra una maggiore resistenza
durante l’uso.
La resistenza regolabile della leva del tuo joystick, rende questo controller adattabile a tutti i
giocatori. Per impostare il livello di resistenza, utilizza l’apposita rotella (9) posta nella parte
inferiore della base del tuo joystick.
Manetta
La manetta è in forma di slider (6), facilmente accessibile con la mano sinistra,
comodamente appoggiata alla base del tuo joystick.
Funzione timone
Il tuo joystick è dotato di una funzione timone, che in un aeroplano corrisponde ai pedali
utilizzati dal pilota per virare, consentendo all’aeroplano di oscillare lungo il suo asse
verticale (facendolo pertanto girare a sinistra o a destra). Questa funzione timone del tuo
joystick è utilizzabile ruotando l’impugnatura verso sinistra o verso destra.
Se nei tuoi giochi non usi la funzione timone (o se la hai associate ai pulsanti azione), puoi
disattivare la rotazione dell’impugnatura grazie all’apposita vite di blocco (5) posta alla base
dell’impugnatura stessa.
Usa un cacciavite a “lama” per cambiare la posizione della vite, bloccando/sbloccando così
la funzione timone.
Hat-switch “Visuale” multidirezionale
Il tuo joystick è dotato di un hat-switch “Visuale” (3) che, come dice la parola stessa, ti
consente (nei giochi che lo permettono) di poter dare un’occhiata istantanea a tutto quanto
avviene attorno al tuo abitacolo. Per usufruire di questa funzione, accedi al menu di
configurazione del tuo gioco e associa le differenti visuali (posteriore, sinistra, destra e le
visuali esterne) alle direzioni dell’hat-switch “Visuale”.
Naturalmente, potrai associare all’hat-switch “Visuale” anche alter funzioni alternative
(sparo, ecc.).
Page 56

7/12
2 MODALITÀ DI PROGRAMMAZIONE
Tramite il pulsante PRESET (8) ed il LED (7) puoi sapere quale sia la programmazione
attualmente selezionata: AUTOMATICA (pre-impostata) o MANUALE (da te programmata).
Con una singola pressione del suddetto pulsante potrai passare da una modalità di
programmazione all’altra, persino durante il corso di un gioco.
• PROFILO AUTOMATICO: LED ROSSO
Questa è la programmazione predefinita: gli assi, le posizioni dei pulsanti e dell’ hat-switch
sono pre-programmati.
CONSULTA I DIAGRAMMI DELLA CONFIGURAZIONE “PROFILO AUTOMATICO”.
• PROFILO MANUALE: LED VERDE
Questa è la tua programmazione personale:
- I pulsanti, gli assi e l’hat-switch possono essere scambiati tra loro.
- In qualsiasi momento, potrai modificare la programmazione per meglio adattarla alle
tue esigenze.
- La programmazione manuale viene salvata automaticamente nel tuo joystick (anche
quando questo non è collegato).
- Se il tuo “PROFILO MANUALE” è vuoto, questo risulterà identico al “PROFILO
AUTOMATICO”.
PROGRAMMAZIONE / MAPPING
Puoi programmare il tuo joystick utilizzando il pulsante MAPPING.
Attenzione: questo pulsante non si trova nella medesima posizione per PC e PS3 (ti
consigliamo di consultare i relativi diagrammi):
- Per PC: premi direttamente il pulsante in questione.
- Per PS3: premi simultaneamente i pulsanti START (ST) + SELECT (SE).
• Esempi di possibili applicazioni:
- Scambio di posizioni tra i pulsanti.
- Scambio degli assi tra loro = direzioni della leva, della manetta o del timone
(associando le 2 direzioni del primo asse alle 2 del secondo)
- Scambiare le 2 direzioni di un medesimo asse.
- Scambiare i pulsanti con una direzione di un asse o dell’hat-switch.
• Eccezione:
Su PlayStation®3, i pulsanti START (ST) e SELECT (SE) corrispondono anch’essi al
pulsante MAPPING (e non possono, pertanto, essere riprogrammati).
Page 57

8/12
PROCEDURA DI PROGRAMMAZIONE
Pass
o
Attiva il PROFILO MANUALE (8)
premendo il pulsante.
2
Premi e rilascia il pulsante MAPPING.
SPENTO
Premi e rilascia il pulsante o la direzione che intendi
programmare.
LAMPEGGIA IN
VERDE
Premi e rilascia il pulsante o la direzione cui desideri
associare la funzione in questione.
Pass
o
1
Attiva il tuo PROFILO MANUALE (8).
VERDE
LAMPEGGIA IN
SECONDI
Pass
o
LAMPEGGIA IN
PER 2 SECONDI
Azione LED
1
3
4
Il tuo “PROFILO MANUALE” è ora attivo ed aggiornato
(comprendente la tua programmazione appena effettuata).
VERDE
VERDE
MEMORIA EEPROM
• Il tuo joystick è dotato di un chip interno che conserva in memoria tutte le programmazioni
del tuo “PROFILO MANUALE” (anche nel caso in cui il joystick risulti spento o scollegato
per un lungo periodo di tempo).
• Puoi salvare un diverso “PROFILO MANUALE” per ogni piattaforma di gioco utilizzata
(uno per PC ed uno per PlayStation®3).
CANCELLAZIONE DI UN “PROFILO MANUALE”
Azione LED
2 Tieni premuto il pulsante MAPPING per 2 secondi.
Il tuo “PROFILO MANUALE” è stato cancellato
(tornando ad essere identico al “PROFILO AUTOMATICO”).
VERDE PER 2
RIPRISTINO DELLE “IMPOSTAZIONI DI FABBRICA”
Puoi cancellare tutte le tue programmazioni e le impostazioni per PC e PlayStation®3 con
una sola operazione:
Azione LED
1
Tutti i tuoi “PROFILI MANUALI” (PC + PS3) e le tue impostazioni sono state cancellate.
Nota: questa operazione riavvierà completamente il tuo joystick
(pertanto, su PC, ti consigliamo di effettuarla al di fuori dei giochi).
Premi simultaneamente i pulsanti
MAPPING + 11 (SE) + 12 (ST)
ROSSO/VERDE
Page 58

9/12
RISOLUZIONE DEI PROBLEMI E AVVISI
• Il mio joystick non funziona come dovrebbe o sembra non essere
calibrato correttamente:
- Spegni il tuo computer o la tua console, scollega il tuo joystick, quindi ricollegalo e riavvia il
tuo gioco.
- Quando colleghi il tuo joystick: lascia la leva, il timone e la manetta al centro, evitando di
muoverli (per non incappare in problemi di calibrazione).
- Esci dal tuo gioco, scollega il joystick, verifica che il selettore USB (PC / PS3) (1) si trovi
nella posizione corretta, quindi ricollega il tuo joystick.
• Non riesco a configurare il mio joystick:
- Nel menu del tuo gioco “Opzioni / Controller / Gamepad o Joystick”: seleziona la
configurazione più appropriata o riconfigura le opzioni del controller.
- Per maggiori informazioni, fai riferimento al manuale d’uso o all’help online del tuo gioco.
- Per risolvere questi tipi di problemi, puoi anche utilizzare la funzione “MAPPING” del tuo
joystick.
• Il mio joystick è troppo sensibile o non abbastanza sensibile:
- Il tuo joystick potrebbe essersi calibrato mentre hai effettuato alcuni movimenti lungo gli
assi.
- Nel menu del tuo gioco “Opzioni / Controller / Gamepad o Joystick”: regola la sensibilità o
le zone morte del tuo controller (qualora questa opzione sia disponibile).
- Regola la resistenza della leva utilizzando la rotella (9) posta sotto la base del joystick.
Page 59

10/12
Informazioni sulla garanzia al consumatore
A livello mondiale, Guillemot Corporation S.A., avente sede legale in Place du Granier, B.P. 97143, 35571
Chantepie, Francia (d’ora in avanti “Guillemot”) garantisce al consumatore che il presente prodotto
Thrustmaster sarà privo di difetti relativi ai materiali e alla fabbricazione, per un periodo di garanzia
corrispondente al limite temporale stabilito per la presentazione di un reclamo riguardante la conformità
del prodotto in questione. Nei paesi della Comunità Europea, tale periodo equivale a due (2) anni a partire
dalla consegna del prodotto Thrustmaster. In altri paesi, la durata della garanzia corrisponde al limite
temporale stabilito per la presentazione di un reclamo riguardante la conformità del prodotto Thrustmaster
in base alle leggi applicabili nel paese in cui il consumatore risiedeva alla data di acquisto del prodotto
Thrustmaster (qualora nel paese in questione non esistesse alcuna norma a riguardo, il periodo di
garanzia corrisponderà a un (1) anno a partire dalla data originale di acquisto del prodotto Thrustmaster).
Qualora, durante il periodo di garanzia, il prodotto dovesse apparire difettoso, contatti immediatamente
l’Assistenza Tecnica, che le indicherà la procedura da seguire. Qualora il difetto dovesse essere
confermato, il prodotto dovrà essere riportato al luogo di acquisto (o qualsiasi altro luogo indicato
dall’Assistenza Tecnica).
Nel contesto della presente garanzia, il prodotto difettoso di proprietà del consumatore potrà essere
sostituito o reso nuovamente funzionante, a discrezione dell’Assistenza Tecnica. Se, durante il periodo
coperto dalla garanzia, il prodotto Thrustmaster fosse oggetto di tale rimessa in operatività, alla rimanente
durata della garanzia dovrà essere aggiunto un periodo di almeno sette (7) giorni, durante il quale il
prodotto risulta non utilizzabile (tale periodo intercorre dalla data della richiesta di intervento da parte del
consumatore o dalla data in cui il prodotto in questione è reso disponibile per la rimessa in operatività,
questo nel caso in cui tale data sia successiva alla data di richiesta di intervento). Qualora le leggi
applicabili in materia lo consentano, la totale responsabilità di Guillemot e delle sue controllate (compresi i
danni conseguenti) si limita alla rimessa in operatività o alla sostituzione del prodotto Thrustmaster.
Qualora le leggi applicabili in materia lo consentano, Guillemot declina ogni garanzia sulla commerciabilità
o la conformità a finalità particolari.
La presente garanzia non potrà essere applicata: (1) se il prodotto è stato modificato, aperto, alterato o ha
subito danni derivanti da un uso inappropriato o non autorizzato, da negligenza, da un incidente, dalla
semplice usura, o da qualsiasi altra causa non riconducibile a difetti nei materiali o nell'assemblaggio
(compresi, ma non i soli, prodotti Thrustmaster combinati con elementi inadatti, tra cui, in particolare,
batterie ricaricabili, caricatori o qualsiasi altro elemento non fornito da Guillemot per questo prodotto); (2)
nel caso in cui il prodotto sia stato utilizzato per qualsiasi altro scopo al di fuori dell’uso domestico,
comprese finalità professionali o commerciali (esempio: sale giochi, allenamenti, concorsi); (3) in caso di
mancato rispetto delle istruzioni fornite dall'Assistenza Tecnica; (4) in caso di software, ovvero software
soggetto a una specifica garanzia; (5) ai materiali di consumo (elementi che richiedono la loro sostituzione
al termine della loro durata di esercizio come, ad esempio, batterie di tipo convenzionale o cuscinetti
protettivi per auricolari o cuffie); (6) agli accessori (ad esempio, cavi, custodie, borsette, borse, cinturini);
(7) se il prodotto è stato venduto ad un'asta pubblica.
La presente garanzia non è trasferibile.
I diritti legali del consumatore, stabiliti dalle leggi vigenti in materia di vendita di beni di consumo nel
relativo paese, non vengono intaccati dalla presente garanzia.
Page 60

11/12
Disposizioni addizionali sulla garanzia
Per tutta la durata della garanzia, in linea di principio, Guillemot non fornirà alcuna parte di ricambio, in
quanto la sola Assistenza Tecnica è la parte autorizzata ad aprire e/o rimettere in funzionamento tutti i
prodotti Thrustmaster (fatta eccezione per eventuali procedure di rimessa in operatività che l’Assistenza
Tecnica potrebbe richiedere al consumatore, attraverso istruzioni scritte – viste, ad esempio, la semplicità
e la mancanza di riservatezza della procedura di rimessa in operatività – e fornendo al consumatore le
necessarie parti di ricambio, se ve ne fosse l’esigenza).
Considerando i propri cicli di innovazione e per proteggere il proprio know-how e i propri segreti
commerciali, in linea di principio, Guillemot non fornirà alcuna notifica o parte di ricambio finalizzata alla
rimessa in attività di un qualunque prodotto Thrustmaster il cui periodo di garanzia risultasse scaduto.
Responsabilità
Qualora le leggi applicabili in materia lo consentano, Guillemot Corporation S.A. (d'ora in avanti
“Guillemot”) e le sue controllate declinano ogni responsabilità per qualsiasi danno derivante da almeno
una delle seguenti condizioni: (1) il prodotto è stato modificato, aperto o alterato; (2) mancato rispetto
delle istruzioni di installazione; (3) uso inappropriato o non permesso, negligenza, incidente (come, ad
esempio, un impatto); (4) semplice usura; (5) utilizzo del prodotto per qualsiasi altro scopo al di fuori
dell’uso domestico, comprese finalità professionali o commerciali (esempio: sale giochi, allenamenti,
concorsi). Qualora le leggi applicabili in materia lo consentano, Guillemot e le sue controllate declinano
ogni responsabilità per qualsiasi danno non riconducibile a difetti nei materiali o nella fabbricazione del
prodotto (compresi, ma non i soli, potenziali danni causati direttamente o indirettamente da un qualunque
software, oppure dall’uso del prodotto Thrustmaster in combinazione con elementi inadatti, tra cui, in
particolare, batterie ricaricabili, caricatori o qualsiasi altro elemento non fornito da Guillemot per questo
prodotto).
ASSISTENZA TECNICA
https://support.thrustmaster.com
Page 61

12/12
COPYRIGHT
*
*
© 2021 Guillemot Corporation S.A. Tutti i diritti riservati. Thrustmaster
proprietà di Guillemot Corporation S.A. Tutti gli altri marchi appartengono ai legittimi proprietari.
Illustrazioni escluse. I contenuti, i design e le caratteristiche possono essere oggetto di modifiche senza
preavviso e possono variare da un Paese all’altro. Fabbricato in Cina.
RACCOMANDAZIONI SULLA TUTELA DELL’AMBIENTE
Nell’Unione Europea: Al termine della sua vita operativa, questo prodotto non
dovrebbe essere gettato assieme ai comuni rifiuti, ma dovrebbe essere portato ad
un apposito punto di raccolta destinato al riciclaggio del Materiale Elettrico ed
Elettronico.
Ciò è confermato dal simbolo riportato sul prodotto, nel manuale d’uso o sulla
confezione.
A seconda delle proprie caratteristiche, i materiali potrebbero essere riciclati.
Tramite il riciclaggio ed altre forme di trattamento del Materiale Elettrico ed
Elettronico, è possibile fornire un importante contributo per la salvaguardia dell’ambiente.
Per conoscere i punti di raccolta più vicini a te, contatta le autorità locali competenti.
In tutti gli altri Paesi: per favore, rispetta le leggi locali sul riciclo dei materiali elettrici ed elettronici.
Informazioni da conservare. I colori e le decorazioni possono variare.
I ganci di plastica e gli adesivi dovrebbero essere rimossi dal prodotto prima che quest’ultimo venga
utilizzato.
www.thrustmaster.com
*Valido solo in UE, Regno Unito e Turchia
®
è un marchio registrato di
Page 62
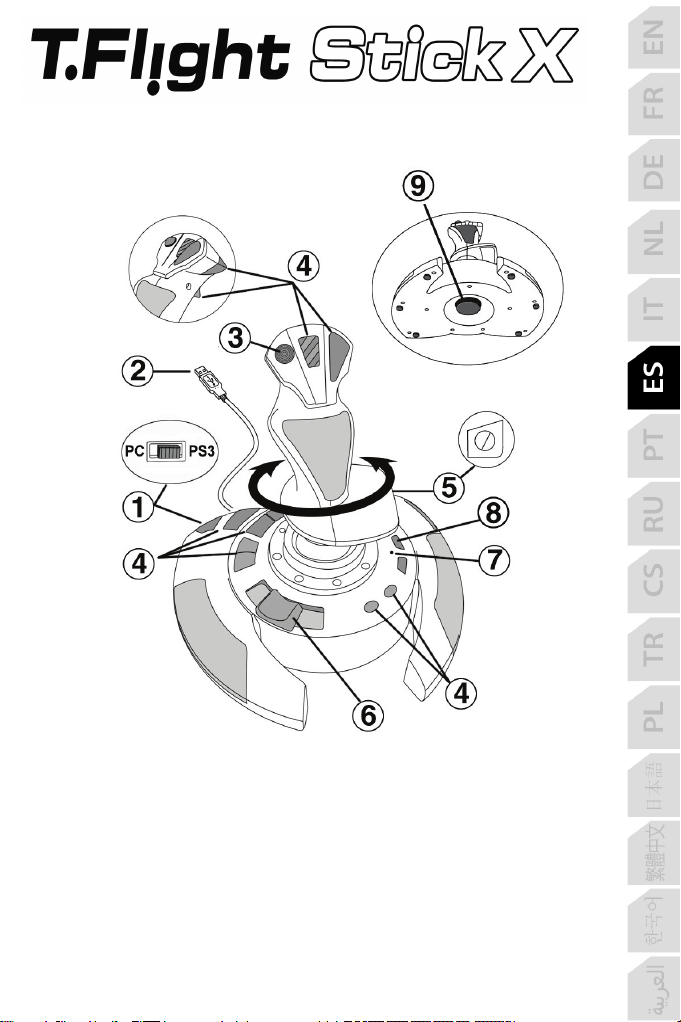
1/12
Manual del usuario
CARACTERÍSTICAS TÉCNICAS
1. Selector de USB (PC / PS3) 6. Acelerador deslizante de pulgar
2. Conector USB para PC y PlayStation®3 7. LED
3. Hat-switch multidireccional de “Punto de vista” 8. Botón PRESET
4. 12 botones de acción (para seleccionar programación)
5. Función de timón mediante palanca giratoria 9. Rueda de ajuste de
con tornillo de bloqueo resistencia de la palanca
Page 63

2/12
PC
INSTALACIÓN EN PC
1. Pon el selector de USB (1) del joystick en la posición “PC”.
2. Enchufa el conector USB (2) a uno de los puertos USB del ordenador. Windows detectarán
automáticamente el nuevo dispositivo.
3. Los controladores se instalan de forma automática.
Sigue las instrucciones en pantalla para completar la instalación.
4. Haz clic en Inicio/Configuración/Panel de control y luego haz doble clic en Dispositivos de
juego.
El cuadro de dialogo Dispositivos de juego muestra el nombre del joystick con el estado OK.
5. En el Panel de control, haz clic en Propiedades para configurar el joystick.
Probar dispositivo: Te permite probar y ver todas las funciones del joystick.
¡Ya estás listo para jugar!
NOTAS IMPORTANTES PARA PC
- El selector de USB (1) del joystick siempre debe estar puesto en la posición “PC” antes de
conectar el joystick.
- Cuando conectes el joystick: Deja la palanca y el timón centrados y no los muevas (para evitar
problemas de calibración).
Page 64

3/12
CONFIGURACIÓN “AUTOMATIC PRESET” - PC
Diagrama “AUTOMATIC PRESET” en PC
LED ROJO
Este preset corresponde a las configuraciones predeterminadas de la mayoría de los juegos de
simulación aérea en PC.
Por lo tanto te permitirá empezar a jugar rápido a tu juego, sin tener que reconfigurar el joystick.
Page 65

4/12
PLAYSTATION®3
INSTALACIÓN EN PLAYSTATION®3
1. Pon el selector de USB (1) del joystick en la posición “PS3”.
2. Enchufa el conector USB (2) a uno de los puertos USB de la consola.
3. Enciende la consola.
4. Ejecuta el juego.
¡Ya estás listo para jugar!
UTILIZACIÓN DEL BOTÓN “HOME / PS”
El botón “Home / PS” del joystick te permite salir de los juegos, acceder a los menús y apagar
directamente el sistema PlayStation®3.
NOTAS IMPORTANTES PARA PLAYSTATION®3
- El selector de USB (1) del joystick siempre debe estar puesto en la posición “PS3” antes de
conectar el joystick.
- En modo “1 Jugador”: si el gamepad oficial está encendido, debes cambiarlo al “puerto de
gamepad 2” para que el joystick sea funcional.
- En PlayStation®3, el joystick sólo es compatible con juegos de PlayStation®3 (y no funcionará
con juegos de PlayStation® 2).
- Cuando conectes el joystick: Deja la palanca, el acelerador y el timón centrados y no los
muevas (para evitar problemas de calibración).
Page 66

5/12
LED ROJO
CONFIGURACIÓN “AUTOMATIC PRESET” - PLAYSTATION®3
Diagrama “AUTOMATIC PRESET” en PlayStation®3
Este preset corresponde a las configuraciones predeterminadas de la mayoría de los juegos de
simulación aérea en PlayStation®3. Por lo tanto, te permitirá empezar a jugar rápido a tu juego,
sin tener que reconfigurar el joystick.
Las 4 direcciones de la palanca: Corresponden con 4 direcciones del mini-stick izquierdo del
gamepad.
El acelerador (6): Corresponde con las direcciones Arriba/Abajo del mini-stick derecho del
gamepad.
El timón (5): Corresponde con las direcciones Izquierda/Derecha del mini-stick derecho del
gamepad.
Botón MAPPING: Pulsa simultáneamente SELECT (SE) + START (ST).
Botón HOME / PS: Simplemente pulsa el botón.
Page 67

6/12
CONOCE LAS FUNCIONES DEL JOYSTICK
Resistencia ajustable de la palanca
Dependiendo de como juegues, puedes querer un joystick ultrasensible que responda hasta al
toque más ligero, o puedes preferir un joystick más firme que oponga algo de resistencia cuando
lo muevas.
La resistencia de la palanca en el joystick es ajustable, para adaptarlo a las preferencias de
todos los jugadores. Para ajustarla, utiliza la rueda de ajuste de resistencia (9) localizada bajo la
base del joystick.
Acelerador
El acelerador tiene forma de deslizador de pulgar (6), fácilmente accesible con tu mano izquierda
reposando en la base del joystick.
Función de timón
El joystick incorpora una función de timón, que en un avión corresponde con los pedales
utilizados por el piloto para girar la dirección, permitiendo al avión pivotar sobre su eje vertical
(haciendo que el avión gire a la izquierda o a la derecha). Esta función de timón es accesible en
el joystick girando la palanca a la izquierda o a la derecha.
Si no utilizas la función de timón en los juegos (o si la has programado en los botones de acción),
puedes deshabilitar la rotación de la palanca gracias al tornillo de bloqueo (5) situado en la base
de la palanca.
Utiliza un destornillador de cabeza plana para cambiar la posición del tornillo y de este modo
bloquear/desbloquear la función de timón.
Hat-switch multidireccional de “Punto de vista”
El joystick incorpora un hat-switch de “Punto de vista” (3) que, cómo su nombre indica, te permite
(en juegos que lo permitan) ver de forma instantánea todo lo que hay alrededor de tu avión. Para
utilizar esta función simplemente dirígete al menú de configuración del juego y programa las
diferentes vistas (vista trasera, vista a la izquierda, vista a la derecha, y también las vistas
externas) en las direcciones del hat-switch de “Punto de vista”.
Por supuesto, también puedes utilizar el hat-switch de “Punto de vista” para otras funciones
(disparar, etc.).
Page 68

7/12
2 MODOS DE PROGRAMACIÓN
El botón PRESET (8) y el LED (7) te permiten ver el tipo de programación seleccionada:
AUTOMATIC (preprogramada) o MANUAL (programada por ti mismo).
Una sola pulsación de este botón te permitirá cambiar de un modo de programación a otro,
incluso en el transcurso de un juego.
• AUTOMATIC PRESET: LED ROJO
Esto representa la programación predeterminada: los ejes, las posiciones de los botones y del
hat-switch están preprogramadas.
CONSULTA LOS DIAGRAMAS DE CONFIGURACIÓN “AUTOMATIC PRESET”.
• MANUAL PRESET: LED VERDE
Esto representa tu propia programación personal:
- Los botones, ejes y el hat-switch se pueden intercambiar entre sí.
- Puedes modificar la programación a tu gusto y siempre que quieras.
- La programación se guarda automáticamente en el joystick (incluso cuando está
desconectado).
- Cuando se borra la “MANUAL PRESET” es idéntica a la “AUTOMATIC PRESET”.
PROGRAMACIÓN / MAPEADO
Puedes programar el joystick utilizando el botón MAPPING.
Atención: Este botón no se encuentra en la misma posición en PC y PS3 (consulta los
diagramas):
- En PC: Pulsa directamente el botón en cuestión.
- En PS3: Pulsa simultáneamente START (ST) + SELECT (SE).
• Ejemplos de aplicaciones posibles:
- Intercambio de las posiciones de los botones.
- Intercambio de los ejes entre si = direcciones de la palanca, del acelerador o del timón (En
este caso, debes mapear las 2 direcciones del primer eje en las del segundo.)
- Intercambio de las 2 direcciones del mismo eje.
- Intercambio de botones con una dirección de un eje o del hat-switch.
• Excepción:
En PlayStation®3, los botones START (ST) y SELECT (SE) también se corresponden con el
botón MAPPING (y por lo tanto no se pueden reprogramar).
Page 69

8/12
PROCEDIMIENTO DE PROGRAMACIÓN
Pasos
Acción
LED
Activa MANUAL PRESET (8)
pulsando el botón.
2
Pulsa y suelta el botón MAPPING.
APAGADO
PARPADEA EN
VERDE
Pulsa y suelta el botón o dirección en el que quieras
colocar tu función.
Pasos
Acción
LED
1
Activa tu MANUAL PRESET (8).
VERDE
Pulsa y mantén pulsado el botón MAPPING
durante 2 segundos.
PARPADEA EN VERDE
2 SEGUNDOS
Paso
Acción
LED
PARPADEA EN
2 SEGUNDOS
1
3 Pulsa y suelta el botón o dirección a programar.
4
Tu “MANUAL PRESET” ahora está activada y actualizada
(con tu programación aplicada).
VERDE
VERDE
MEMORIA EEPROM
• El joystick incorpora un chip interno que guarda toda tu programación “MANUAL PRESET” en
memoria (incluso cuando el joystick está apagado o desconectado durante un período largo
de tiempo).
• Puedes guardar un “MANUAL PRESET” diferente para cada plataforma utilizada (uno para
PC y uno para PlayStation®3).
PARA BORRAR UN “MANUAL PRESET”
2
Tu “MANUAL PRESET” ya se ha borrado
(y vuelve a ser idéntica a la “AUTOMATIC PRESET”).
PARA VOLVER A LA “CONFIGURACIÓN DE FÁBRICA”
Con un solo paso puedes borrar toda tu programación o ajustes realizados tanto para PC como
para PlayStation®3:
1
Todas tus “MANUAL PRESETS” (PC + PS3) o ajustes ya se han borrado.
Nota: Esta operación reiniciará completamente el joystick
(por lo tanto, en PC te recomendamos que hagas esto fuera de los juegos).
Pulsa simultáneamente los botones
MAPPING + 11 (SE) + 12 (ST)
VERDE/ROJO
Page 70

9/12
RESOLUCIÓN DE PROBLEMAS Y ADVERTENCIAS
• Mi joystick no funciona correctamente o no parece estar calibrado
adecuadamente:
- Apaga el ordenador o la consola, desconecta el joystick, vuelve a conectar el joystick y luego
vuelve a ejecutar el juego.
- Cuando conectes el joystick: Deja la palanca, el acelerador y el timón centrados y no los
muevas (para evitar problemas de calibración).
- Sal del juego, desconecta el joystick, verifica que el selector de USB (PC / PS3) (1) está puesto
en la posición correcta y vuelve a conectar el joystick.
• No puedo configurar el joystick:
- En el menú “Opciones / Controlador / Gamepad o Joystick” del juego: Selecciona la
configuración más apropiada o reconfigura completamente las opciones del controlador.
- Consulta el manual de usuario del juego o la ayuda online para tener más información.
- También puedes utilizar la función “MAPPING” del joystick para resolver este tipo de problema.
• Mi joystick es demasiado sensible o no lo bastante sensible:
- El joystick se autocalibra por sí solo después de que hayas realizado algunos movimientos en
los distintos ejes.
- En el menú “Opciones / Controlador / Gamepad o Joystick” del juego: Ajusta la sensibilidad o
las zonas muertas del controlador (si esta opción está disponible).
- Ajusta la resistencia de la palanca utilizando la rueda (9) situada bajo la base del joystick.
Page 71

10/12
INFORMACIÓN DE GARANTÍA AL CONSUMIDOR
En todo el mundo, Guillemot Corporation S.A., cuyo domicilio legal se encuentra en Place du Granier,
B.P. 97143, 35571 Chantepie, Francia (en lo sucesivo “Guillemot”) garantiza al consumidor que este
producto de Thrustmaster estará libre de defectos de materiales y mano de obra, durante un período de
garantía que corresponde al límite de tiempo para interponer una acción legal referida a la conformidad
en relación con este producto. En los países de la Unión Europea, esto corresponde a un período de dos
(2) años a partir de la entrega del producto de Thrustmaster. En otros países, el período de garantía
corresponde al límite de tiempo para interponer una acción legal referida a la conformidad en relación con
este producto de Thrustmaster según las leyes aplicables del país en el que el consumidor estuviese
domiciliado en la fecha de compra del producto de Thrustmaster (si no existiese una acción similar en el
país correspondiente, entonces el período de garantía será de un (1) año a partir de la fecha de compra
original del producto de Thrustmaster).
Si el producto resultase defectuoso durante el período de garantía, hay que ponerse en contacto
inmediatamente con el Soporte Técnico, que indicará el procedimiento a seguir. Si se confirma el defecto,
el producto debe devolverse a su lugar de compra (o a cualquier otra ubicación indicada por el Soporte
Técnico).
Dentro del contexto de esta garantía, el producto defectuoso del consumidor será sustituido o restaurado
su funcionamiento correcto. Si, durante el período de garantía, el producto de Thrustmaster fuese
sometido a dicho reacondicionamiento, cualquier período de cómo mínimo siete (7) días durante el que el
producto no se pueda usar se añadirá al período de garantía restante (este período va desde la fecha de
petición de intervención del consumidor o desde la fecha en la que el producto se entrega para el
reacondicionamiento, si la fecha en la que el producto se entrega para el reacondicionamiento fuese
posterior a la fecha de la petición de intervención). Si la ley aplicable lo permite, toda la responsabilidad
de Guillemot y sus filiales (incluso por daños resultantes) se limita a la restauración del funcionamiento
correcto o la sustitución del producto de Thrustmaster. Si la ley aplicable lo permite, Guillemot renuncia a
todas las garantías de comerciabilidad o adecuación para un propósito determinado.
Esta garantía no se aplicará: (1) si el producto ha sido modificado, abierto, alterado o ha sufrido daños como
resultado de un uso inapropiado o abuso, negligencia, accidente, desgaste normal, o cualquier otra causa no
relacionada con un defecto de materiales o fabricación (incluyendo, pero no de forma exclusiva, la
combinación del producto de Thrustmaster con cualquier elemento no adecuado, incluyendo en particular
fuentes de alimentación, baterías recargables, cargadores o cualquier otro elemento no suministrado por
Guillemot para este producto); (2) si el producto se ha empleado para otro uso distinto del doméstico,
incluyendo fines profesionales o comerciales (salones de juego, entrenamiento, competiciones, por ejemplo);
(3) en caso de incumplimiento de las instrucciones proporcionadas por el Soporte Técnico; (4) a software, es
decir software sujeto a una garantía específica; (5) a consumibles (elementos que se tienen que reemplazar a
lo largo de la vida del producto: por ejemplo, baterías desechables o almohadillas para auriculares de audio);
(6) a accesorios (por ejemplo, cables, cajas, bolsas, bolsos o muñequeras); (7) si el producto se ha vendido
en una subasta pública.
Esta garantía no es transferible.
Los derechos legales del consumidor en relación con las leyes aplicables a la venta de productos de
consumo de su país no se ven afectados por esta garantía.
Page 72

11/12
Provisiones de garantía adicionales
Durante el período de garantía, Guillemot no proporcionará, en principio, ninguna pieza de repuesto, ya
que el Soporte Técnico es el único autorizado para abrir y/o reacondicionar los productos de
Thrustmaster (con la excepción de los procedimientos de reacondicionamiento que el Soporte técnico
puede solicitar que lleve a cabo el consumidor, mediante instrucciones por escrito – por ejemplo, debido a
la simplicidad y la falta de confidencialidad del proceso de reacondicionamiento – y suministrando al
consumidor las piezas de repuesto necesarias, si hiciese falta).
Debido a sus ciclos de innovación y para proteger su know-how y secretos comerciales, Guillemot no
proporcionará, en principio, ninguna pieza de repuesto ni instrucciones de reacondicionamiento para los
productos de Thrustmaster cuyo período de garantía haya vencido.
En los Estados Unidos de América y en Canadá, esta garantía está limitada al mecanismo interno del
producto y al alojamiento externo. En ningún caso, Guillemot ni sus filiales serán responsables ante
terceros por daños resultantes o fortuitos resultado del incumplimiento de cualquier garantía expresa o
implícita. En algunos estados o provincias no se permite la limitación de la duración de una garantía
implícita ni la exclusión o limitación de responsabilidad por daños resultantes o fortuitos, por lo que las
limitaciones o exclusiones anteriores pueden no ser aplicables. Esta garantía ofrece derechos legales
específicos al consumidor, que también puede tener otros derechos que pueden variar de un estado a
otro o de una provincia a otra.
Responsabilidad
Si la ley aplicable lo permite, Guillemot Corporation S.A. (en lo sucesivo “Guillemot”) y sus filiales
renuncian a toda responsabilidad por los daños causados por uno o más de los siguientes motivos: (1) el
producto ha sido modificado, abierto o alterado; (2) incumplimiento de las instrucciones de montaje; (3)
uso inapropiado o abuso, negligencia, accidente (un impacto, por ejemplo); (4) desgaste normal; (5) el
producto se ha empleado para otro uso distinto del doméstico, incluyendo fines profesionales o
comerciales (salones de juego, entrenamiento, competiciones, por ejemplo). Si la ley aplicable lo permite,
Guillemot y sus filiales renuncian a toda responsabilidad por los daños no relacionados con defectos de
materiales o fabricación en relación con el producto (incluyendo, pero no de forma exclusiva, los daños
causados de forma directa o indirecta por cualquier software, o por combinar el producto de Thrustmaster
con cualquier elemento no adecuado, incluyendo en particular fuentes de alimentación, baterías
recargables, cargadores o cualquier otro elemento no suministrado por Guillemot para este producto).
SOPORTE TÉCNICO
https://support.thrustmaster.com
Page 73

12/12
COPYRIGHT
*
*
© 2021 Guillemot Corporation S.A. Todos los derechos reservados. Thrustmaster® es una marca registrada
de Guillemot Corporation S.A. Todas las demás marcas son propiedad de sus respectivos dueños.
Ilustraciones no definitivas. El contenido, la concepción y las especificaciones son susceptibles de cambiar
sin previo aviso y varían según el país. Fabricado en China.
RECOMENDACIÓN DE PROTECCIÓN AMBIENTAL
En la Unión Europea: Al terminar su vida útil, este producto no debe tirarse en un
contenedor de basuras estándar, sino que debe dejarse en un punto de recogida de
desechos eléctricos y equipamiento electrónico para ser reciclado.
Esto viene confirmado por el símbolo que se encuentra en el producto, manual del
usuario o embalaje.
Dependiendo de sus características, los materiales pueden reciclarse. Mediante el
reciclaje y otras formas de procesamiento de los desechos eléctricos y el
equipamiento electrónico puedes contribuir de forma significativa a ayudar a proteger
Contacta con las autoridades locales para más información sobre el punto de recogida más cercano.
Para los demás países: cumpla las leyes locales sobre reciclaje de equipos eléctricos y electrónicos.
Esta información debe conservarse. Los colores y motivos decorativos pueden variar.
Los adhesivos y los cierres de plástico se deben quitar del producto antes de utilizarlo.
www.thrustmaster.com
*Aplicable únicamente a la UE, Reino Unido y Turquía
el medio ambiente.
Page 74

1/12
Manual do Utilizador
CARACTERÍSTICAS TÉCNICAS
1. Seletor USB (PC / PS3) 6. Botão de potência deslizante
2. Conector USB para o PC e a PlayStation®3 controlado pelo polegar
3. Hat switch de “ponto de vista” multidirecional 7. LED
4. 12 botões de ações 8. Botão PRESET
5. Função de leme de direção via manípulo giratório (para selecionar a programação)
com parafuso de bloqueio 9. Roda de ajuste da resistência do
manípulo
Page 75

2/12
PC
INSTALAÇÃO NO PC
1. Ajuste o seletor USB (1) do joystick para a posição “PC”.
2. Ligue o conector USB (2) a uma das portas USB do computador. O Windows irá detetar
automaticamente o novo dispositivo.
3. Os controladores são instalados automaticamente.
Siga as instruções apresentadas no ecrã para concluir a instalação.
4. Clique em Iniciar/Definições/Painel de Controlo e faça duplo clique em Controladores
de jogos.
A caixa de diálogo Controladores de jogos mostra o nome do joystick com o estado
OK.
5. No Painel de Controlo, clique em Propriedades para configurar o joystick.
Testar dispositivo: permite-lhe testar e ver todas as funções do joystick.
Está agora pronto para começar a jogar!
NOTAS IMPORTANTES PARA O PC
- Tem de ajustar sempre o seletor USB (1) do joystick para a posição “PC” antes de ligar o
joystick.
- Ao ligar o joystick: deixe o manípulo e o leme de direção centrados e não os mova (para
evitar problemas de calibragem).
Page 76

3/12
CONFIGURAÇÃO “PREDEFINIÇÃO AUTOMÁTICA” – PC
Esquema da “PREDEFINIÇÃO AUTOMÁTICA” no PC
LED VERMELHO
Esta predefinição corresponde às configurações predefinidas para a maioria dos jogos de
simulação de voo no PC.
Como tal, permite-lhe começar a jogar imediatamente, sem ter de reconfigurar o joystick.
Page 77

4/12
PLAYSTATION®3
INSTALAÇÃO NA PLAYSTATION®3
1. Ajuste o seletor USB (1) do joystick para a posição “PS3”.
2. Ligue o conector USB (2) a uma das portas USB do sistema PlayStation®3.
3. Ligue o sistema PlayStation®3.
4. Inicie o jogo.
Está agora pronto para começar a jogar!
UTILIZAR O BOTÃO “HOME / PS”
O botão “Home / PS” do joystick permite-lhe sair dos jogos, aceder aos menus e desligar
diretamente o sistema PlayStation®3.
NOTAS IMPORTANTES PARA A PLAYSTATION®3
- Tem de ajustar sempre o seletor USB (1) do joystick para a posição “PS3” antes de ligar o
joystick.
- No modo “1 jogador”: se o seu gamepad oficial estiver ligado, tem de mudá-lo para a
“porta do controlador 2” para que o joystick funcione.
- Na PlayStation®3, o joystick apenas é compatível com jogos para a PlayStation®3 (e não
funcionará com jogos para a PlayStation® 2).
- Ao ligar o joystick: deixe o manípulo, o leme de direção e a alavanca de potência
centrados e não os mova (para evitar problemas de calibragem).
Page 78

5/12
CONFIGURAÇÃO “PREDEFINIÇÃO AUTOMÁTICA” – PLAYSTATION®3
Esquema da “PREDEFINIÇÃO AUTOMÁTICA” na PlayStation®3
LED VERMELHO
Esta predefinição corresponde às configurações predefinidas para a maioria dos jogos de
simulação de voo na PlayStation®3. Como tal, permite-lhe começar a jogar imediatamente,
sem ter de reconfigurar o joystick.
4 direções do manípulo: correspondem às 4 direções na minialavanca esquerda do
gamepad.
Alavanca de potência (6): corresponde às direções Para cima/Para baixo na minialavanca
direita do gamepad.
Leme de direção (5): corresponde à direções Esquerda/Direita na minialavanca direita do
gamepad.
Botão MAPPING: prima simultaneamente SELECT (SE) + START (ST).
Botão HOME / PS: prima simplesmente o botão.
Page 79

6/12
APRESENTAÇÃO DO SEU JOYSTICK
Resistência ajustável do manípulo
Consoante o seu estilo de jogo, poderá preferir ter um joystick ultrassensível, que responde
ao mínimo movimento, ou um joystick mais firme, que oferece uma certa resistência quando
o utiliza.
A resistência do manípulo do joystick é ajustável, a fim de se adaptar a todos os jogadores.
Para ajustá-la, utilize a roda de ajuste da resistência do manípulo (9), situada na base do
joystick.
Alavanca de potência
A alavanca de potência tem a forma de um botão deslizante controlado pelo polegar (6),
facilmente acessível com a mão esquerda assente na base do joystick.
Função de leme de direção
O joystick inclui uma função de leme de direção, que, num avião, corresponde aos pedais
utilizados pelo piloto para rodar a direção, permitindo ao avião girar à volta do seu eixo
vertical (e fazendo o avião virar à esquerda ou à direita). Esta função de leme de direção
está acessível no joystick rodando o manípulo para a esquerda ou para a direita.
Se não estiver a utilizar a função de leme de direção nos jogos (ou se a tiver programado
em botões de ações), pode desativar a rotação do manípulo através do parafuso de
bloqueio (5) situado na base do joystick.
Utilize uma chave de vendas de ponta chata para alterar a posição do parafuso de bloqueio
e, desta forma, bloquear/desbloquear a função de leme de direção.
Hat switch de “ponto de vista” multidirecional
O seu joystick possui um hat switch de “ponto de vista” (3), o qual, como o nome indica,
permite-lhe (nos jogos compatíveis) ver instantaneamente tudo o que se passa à volta do
seu avião. Para tal, simplesmente aceda ao menu de configuração do jogo e programe as
diferentes vistas (vista traseira, vista da esquerda, vista da direita e também as vistas
externas) nas direções do hat switch de “ponto de vista”.
Evidentemente, também pode utilizar o hat switch de “ponto de vista” para outras funções
(disparar, etc.).
Page 80

7/12
2 MODOS DE PROGRAMAÇÃO
O botão PRESET (8) e o LED (7) permitem-lhe ver o tipo de programação selecionada:
AUTOMÁTICA (pré-programada) ou MANUAL (programada por si).
Uma única pressão neste botão permite-lhe mudar de um modo de programação para o
outro, inclusive durante um jogo.
• PREDEFINIÇÃO AUTOMÁTICA: LED VERMELHO
Este representa a programação predefinida: os eixos e as posições dos botões e do hat
switch são pré-programados.
CONSULTE OS ESQUEMAS DA CONFIGURAÇÃO “PREDEFINIÇÃO AUTOMÁTICA”
• PREDEFINIÇÃO MANUAL: LED VERDE
Este representa a sua própria programação pessoal:
- Os botões, os eixos e o hat switch podem ser trocados entre eles.
- Pode alterar a programação de acordo com as suas preferências e sempre que
pretender.
- A programação é guardada automaticamente no joystick (mesmo quando é desligado).
- Quando a sua “PREDEFINIÇÃO MANUAL” está vazia, é idêntica à “PREDEFINIÇÃO
AUTOMÁTICA”.
PROGRAMAÇÃO / MAPEAMENTO
Pode programar o joystick utilizando o botão MAPPING.
Atenção: Este botão não está situado na mesma posição no PC e na PS3 (consulte os
• Exemplos de aplicações possíveis:
• Exceção:
esquemas):
- No PC: prima diretamente o botão em questão.
- Na PS3: prima simultaneamente START (ST) + SELECT (SE).
- Trocar as posições dos botões.
- Trocar os eixos entre eles = direções do manípulo, da alavanca de potência ou do
leme de direção (neste caso, tem de mapear as 2 direções do primeiro eixo nas 2
direções do segundo eixo).
- Trocar as 2 direções do mesmo eixo.
- Trocar os botões com uma direção de um eixo ou do hat switch.
Na PlayStation®3, os botões START (ST) e SELECT (SE) correspondem igualmente ao
botão MAPPING (pelo que não podem ser reprogramados).
Page 81

8/12
Passos
Ação
LED
Ative a PREDEFINIÇÃO MANUAL (8)
premindo o botão.
2
Prima e solte o botão MAPPING.
APAGADO
Prima e solte o botão ou a direção para
programar.
Prima e solte o botão ou a direção no qual
pretende colocar a sua função.
Passos
Ação
LED
1
Ative a sua PREDEFINIÇÃO MANUAL (8).
VERDE
Prima continuamente o botão MAPPING
durante 2 segundos.
PISCA A VERDE
2 SEGUNDOS
Passo
Ação
LED
PISCA A
2 SEGUNDOS
PROCEDIMENTO DE PROGRAMAÇÃO
1
3
4
VERDE
PISCA A VERDE
VERDE
A sua “PREDEFINIÇÃO MANUAL” encontra-se agora ativada e atualizada
(com a sua programação executada).
MEMÓRIA EEPROM
• O seu joystick possui um chip interno que guarda todas as suas programações
“PREDEFNIÇÃO MANUAL” na memória (mesmo quando o joystick é encerrado ou
desligado da plataforma durante um longo período de tempo).
• Pode guardar uma “PREDEFINIÇÃO MANUAL” diferente para cada plataforma utilizada
(uma para o PC e uma para a PlayStation®3).
APAGAR UMA “PREDEFINIÇÃO MANUAL”
2
A sua “PREDEFINIÇÃO MANUAL” encontra-se agora vazia
(e novamente idêntica à “PREDEFINIÇÃO AUTOMÁTICA”).
REPOR AS “DEFINIÇÕES DE FÁBRICA”
Pode apagar todas as suas programações ou definições executadas simultaneamente no
PC e na PlayStation®3 com um único passo:
1
Todas as suas “PREDEFINIÇÕES MANUAIS” (PC + PS3) ou definições encontram-se
agora vazias.
Nota: Esta operação irá reiniciar completamente o joystick
(no PC, pelo que recomendamos que o faça fora dos jogos).
Prima simultaneamente os botões
MAPPING + 11 (SE) + 12 (ST)
VERDE/VERMELHO
Page 82

9/12
RESOLUÇÃO DE PROBLEMAS E ADVERTÊNCIA
• O meu joystick não funciona corretamente ou parece estar mal calibrado:
- Encerre o computador ou a consola, desligue o joystick, volte a ligar o joystick e em
seguida reinicie o jogo.
- Ao ligar o joystick: deixe o manípulo, o leme de direção e a alavanca de potência
centrados e não os mova (para evitar problemas de calibragem).
- Saia do jogo, desligue o joystick, verifique se o seletor USB (PC / PS3) (1) está ajustado
para a posição correta e em seguida volte a ligar o joystick.
• Não consigo configurar o meu joystick:
- No menu Opções / Controlador / Gamepad ou Joystick do jogo: selecione a configuração
mais adequada ou reconfigure completamente as opções do controlador.
- Consulte o manual do utilizador ou a ajuda online do jogo para mais informações.
- Pode também utilizar a função “MAPPING” do joystick para resolver este tipo de problema.
• O meu joystick é demasiado sensível ou não é suficientemente sensível:
- O seu joystick autocalibra-se sozinho assim que tiver executado alguns movimentos nos
diferentes eixos.
- No menu Opções / Controlador / Gamepad ou Joystick: ajuste a sensibilidade ou as zonas
mortas do controlador (se esta opção estiver disponível).
- Ajuste a resistência do manípulo utilizando a roda (9) situada sob a base do joystick.
Page 83

10/12
INFORMAÇÕES SOBRE A GARANTIA PARA O CONSUMIDOR
A Guillemot Corporation S.A., com sede social sita em Place du Granier, B.P. 97143, 35571
Chantepie, França (a seguir designada como “Guillemot”) garante a nível mundial ao consumidor
que este produto Thrustmaster está livre de defeitos em termos de materiais e fabrico durante um
período de garantia que corresponde ao limite de tempo para intentar uma ação de conformidade
relativamente a este produto. Nos países da União Europeia, isto corresponde a um período de dois
(2) anos desde a entrega do produto Thrustmaster. Noutros países, o período de garantia
corresponde ao limite de tempo para intentar uma ação de conformidade relativamente ao produto
Thrustmaster de acordo com a legislação em vigor do país no qual o consumidor residia à data de
compra do produto Thrustmaster (se a dita ação não existir no país correspondente, então o
período de garantia será de um (1) ano a partir da data de compra original do produto Thrustmaster.
No caso de o produto apresentar algum defeito durante o período da garantia, contacte
imediatamente o Suporte Técnico, que lhe indicará o procedimento a tomar. Se esse defeito se
confirmar, o produto terá de ser devolvido ao respetivo local de compra (ou qualquer outro local
indicado pelo Suporte Técnico).
No âmbito da presente garantia, e por opção do Suporte Técnico, o produto defeituoso do
consumidor será substituído ou reparado. Se, durante o período da garantia, o produto
Thrustmaster for submetido à dita reparação, qualquer período mínimo de (7) dias durante o qual o
produto estiver fora de serviço será adicionado ao período da garantia restante (este período
decorre desde a data do pedido intervenção pelo consumidor ou desde a data em que o produto em
questão é disponibilizado para reparação, se a data em que o produto é disponibilizado para
reparação for posterior à data do pedido de intervenção). Se for permitido pela legislação em vigor,
a responsabilidade total da Guillemot e das respetivas filiais (incluindo para danos indiretos) está
limitada à reparação ou à substituição do produto Thrustmaster. Se for permitido pela legislação em
vigor, a Guillemot rejeita todas as garantias de comercialização ou adequação a um fim específico.
A presente garantia não se aplicará: (1) se o produto tiver sido modificado, aberto, alterado ou
danificado em resultado de utilização inadequada ou abusiva, negligência, acidente, desgaste
normal ou qualquer outra casa relacionada com um defeito de material ou fabrico (incluindo, mas
sem limitação, combinar o produto Thrustmaster com qualquer elemento inadequado, incluindo, em
particular, fontes de alimentação, baterias recarregáveis, carregadores ou quaisquer outros
elementos não fornecidos pela Guillemot para este produto); (2) se o produto tiver sido utilizado fora
do âmbito da utilização doméstica, incluindo para fins profissionais ou comerciais (salas de jogos,
treino e competições, por exemplo); (3) na eventualidade de incumprimento das instruções
fornecidas pelo Suporte Técnico; (4) a software, estando o mesmo sujeito a uma garantia
específica; (5) a consumíveis (elementos para substituir ao longo da vida útil do produto: baterias
descartáveis, auscultadores de áudio ou auriculares de auscultadores, por exemplo); (6) a
acessórios (cabos, estojos, bolsas, sacos e correias de pulso, por exemplo); (7) se o produto foi
vendido num leilão público.
A presente garantia não é transmissível.
Os direitos legais do consumidor no que concerne à legislação aplicável à venda de bens de
consumo no seu país não são afetados pela presente garantia.
Page 84

11/12
SUPORTE TÉCNICO
Disposições de garantia adicionais
Durante o período da garantia, a Guillemot não fornecerá, em princípio, quaisquer peças de
substituição, uma vez que o Suporte Técnico é a única parte autorizada a abrir e/ou reparar
qualquer produto Thrustmaster (à exceção de quaisquer procedimentos de reparação que o Suporte
Técnico possa pedir ao consumidor para realizar, através de instruções por escrito – por exemplo,
devido à simplicidade e à falta de confidencialidade do processo de reparação – e fornecendo ao
consumidor a(s) peça(s) de substituição necessária(s), quando aplicável).
Tendo em conta os seus ciclos de inovação, e a fim de proteger o seu know-how e segredos
comerciais, a Guillemot não fornecerá, em princípio, qualquer notificação de reparação ou peças de
substituição para produtos Thrustmaster cujo período da garantia tenha expirado.
Responsabilidade
Se for permitido ao abrigo da legislação aplicável, a Guillemot Corporation S.A. (a seguir designada
“Guillemot”) e as respetivas filiais rejeitam qualquer responsabilidade por danos resultantes de uma
ou mais das seguintes causas: (1) o produto foi modificado, aberto ou alterado; (2) incumprimento
das instruções de montagem; (3) utilização inadequada ou abusiva, negligência ou acidente (um
impacto, por exemplo); (4) desgaste normal; (5) utilização do produto fora do âmbito além da
utilização doméstica, incluindo para fins profissionais ou comerciais (salas de jogos, treino e
competições, por exemplo). Se for permitido ao abrigo da legislação aplicável, a Guillemot e as
respetivas filiais rejeitam qualquer responsabilidade por danos relacionados com um defeito de
material ou fabrico relativamente ao produto (incluindo, mas sem limitação, quaisquer danos
causados direta ou indiretamente por qualquer software ou por combinar o produto Thrustmaster
com qualquer elemento inadequado, incluindo, em particular, fontes de alimentação, baterias
recarregáveis, carregadores ou quaisquer outros elementos não fornecidos pela Guillemot para este
produto).
https://support.thrustmaster.com
Page 85

12/12
*
*
DIREITOS DE AUTOR
© 2021 Guillemot Corporation S.A. Todos os direitos reservados. Thrustmaster
®
é uma marca
registada da Guillemot Corporation S.A. Todas as outras marcas comerciais são pertencem aos
respectivos proprietários. As ilustrações não são vinculativas. Os conteúdos, desenhos e
especificações estão sujeitos a alteração sem aviso prévio e podem variar de país para país.
Fabricado na China.
RECOMENDAÇÕES DE PROTECÇÃO AMBIENTAL
Na União Europeia: Quando este produto chegar ao fim da sua vida útil, não o
elimine juntamente com os resíduos domésticos normais; em vez disso, deixe-o num
ponto de recolha de resíduos de equipamento eléctrico e electrónico (REEE) para
posterior reciclagem.
O símbolo presente no produto, no manual de utilizador ou na caixa confirma-o.
Os materiais podem ser reciclados, dependendo das suas características. Através da
reciclagem e de outras formas de processamento de resíduos de equipamento
eléctrico e electrónico, pode dar um importante contributo no sentido de ajudar a
proteger o ambiente.
Contacte as autoridades locais para saber onde fica o ponto de recolha mais perto da sua área de
residência.
Relativamente a todos os outros países: Respeite a legislação local sobre a reciclagem de
equipamento eléctrico e electrónico.
Informações a reter. As cores e as decorações podem variar.
Os fechos e os adesivos devem ser removidos do produto antes da utilização.
www.thrustmaster.com
*Aplicável apenas à União Europeia, Reino Unido e Turquia
Page 86

1/12
1. Селектор USB (ПК / PS3)
6. Управление сектором газа
2/12
Руководство пользователя
ТЕХНИЧЕСКИЕ ХАРАКТЕРИСТИКИ
2. USB-разъем для подключения ПК
и PlayStation®3
3. Многонаправленный
переключатель вида «hat-switch»
4. 12 командных кнопок
5. Функция штурвала с помощью
вращающейся рукоятки
большим пальцем
7. Индикатор
8. Кнопка PRESET
(ПРЕДУСТАНОВКИ) (для выбора
режима программирования)
9. Регулятор сопротивления рукоятки
с винтовой фиксацией, круговая
шкала настройки
Page 87

ПК
УСТАНОВКА НА ПК
1. Установите селектор USB джойстика (1) в положение ПК.
2. Подключите разъем USB (2) к одному из USB-портов компьютера. Операционные
системы Windows автоматически обнаружат новое устройство.
3. Драйверы устанавливаются автоматически.
Для завершения процесса установки выполните инструкции, которые будут
появляться на экране.
4. Выберите Start (Пуск)/Settings (Настройка)/Control Panel (Панель управления),
после чего двойным нажатием кнопки мыши выберите пункт Game Controllers
(Игровые контроллеры).
Диалоговое окно Game Controllers (Игровые контроллеры) выводит название
джойстика и его состояние OK.
5. В окне Control Panel (Панель управления), выберите пункт Properties (Свойства)
и настройте конфигурацию джойстика.
Кнопка Test device (Проверить устройство): Протестируйте и просмотрите все
функции джойстика.
Теперь можно начинать игру!
ВАЖНЫЕ ЗАМЕЧАНИЯ ПО РАБОТЕ С ПК
- Селектор USB джойстика (1) всегда должен быть установлен в положение «ПК»
(“PC”) перед подключением джойстика.
- При подключении джойстика: Оставьте рукоятку и основной штурвал в центральном
положении и не трогайте их (чтобы избежать проблем с калибровкой).
Page 88

3/12
ПК - КОНФИГУРАЦИЯ «АВТОМАТИЧЕСКИЕ ПРЕДУСТАНОВКИ»
СХЕМА - ПК «АВТОМАТИЧЕСКИЕ ПРЕДУСТАНОВКИ»
КРАСНЫЙ ИНДИКАТОР
На схеме представлена предустановленная конфигурация для большинства авиаигр
на ПК.
Предустановленная конфигурация позволяет начать игру сразу же, не меняя
настройки джойстика.
Page 89

4/12
PLAYSTATION®3
ПОДКЛЮЧЕНИЕ К PLAYSTATION®3
1. Установите селектор USB джойстика (1) в положение “PS3”.
2. Подключите разъем USB (2) к одному из портов USB на пульте.
3. Включите пульт.
4. Запустите игру.
Теперь можно начинать игру!
ИСПОЛЬЗОВАНИЕ КНОПКИ HOME / PS
С помощью кнопки Home / PS, находящейся на джойстике, можно выйти из игры, войти в
меню и напрямую выключить систему PlayStation®3.
ВАЖНЫЕ ЗАМЕЧАНИЯ ПО РАБОТЕ С PLAYSTATION®3
- Селектор USB джойстика (1) всегда должен быть установлен в положение PS3 перед
подключением джойстика.
- В режиме одного игрока (1 Player): Если официальная версия контроллера включена,
необходимо переключить его на «порт 2 контроллера», чтобы джойстик работал.
- В приставке PlayStation®3 джойстик совместим только с играми для PlayStation®3 (и не
будет работать с играми для PlayStation® 2).
- При подключении джойстика: Оставьте рукоятку, основной штурвал и слайдер сектора
газа в центральном положении и не двигайте их (чтобы избежать проблем с калибровкой).
Page 90

5/12
PLAYSTATION®3 – КОНФИГУРАЦИЯ «АВТОМАТИЧЕСКИЕ
ПРЕДУСТАНОВКИ»
КРАСНЫЙ ИНДИКАТОР
На схеме представлена предустановленная конфигурация PlayStation®3 для
большинства игр симуляции полетов. Это позволяет начать игру сразу же, не меняя
настройки джойстика.
4 положения рукоятки: Соответствуют 4 положениям левого мини-джойстика
игрового контроллера.
Рычаг газа (6): Соответствует направлениям верх/вниз правого мини-джойстика
игрового контроллера.
Штурвал (5): Соответствует направлениям Влево/Вправо правого мини-джойстика
игрового контроллера.
Кнопка MAPPING (ПЕРЕОПРЕДЕЛЕНИЕ) Одновременно нажмите кнопки SELECT (SE)
+ START (ST).
Кнопка HOME / PS: Просто нажмите кнопку.
Page 91

6/12
ИЗУЧЕНИЕ ДЖОЙСТИКА
Настраиваемое сопротивление рукоятки
В зависимости от стиля игры можно настроить джойстик так, чтобы он реагировал на
малейшее движение (сверхчувствительность), или, наоборот, уменьшить
чувствительность джойстика так, чтобы он оказывал определенное сопротивление при
игре.
Настройки сопротивления ручки джойстика можно изменить так, чтобы оно
соответствовало индивидуальному стилю игры. Для настройки используйте круговую
шкалу настройки сопротивления (9), которая располагается под основанием
джойстика.
Управление скоростью
Управление скоростью представлено в форме ползунка, который перемещается с
помощью большого пальца. Им легко управлять левой рукой.
Функции штурвала
Джойстик оснащен функцией штурвала; в настоящем самолете пилот осуществляет
такие маневры с помощью педалей рулевого управления, которые изменяют
положение самолета относительно его оси по вертикали, что позволяет
поворачивать самолет влево или вправо. Поверните рукоятку джойстика влево
или вправо, чтобы проверить данную функцию.
Если функция штурвала не используется (или запрограммирована через командные
кнопки), отключите функцию вращения рукоятки, закрутив болт, расположенный на
основании рукоятки.
С помощью отвертки для шурупов с плоской головкой измените положения болта и
таким образом включите/отключите функцию штурвала.
Многонаправленный переключатель вида «Точка Обзора»
Джойстик оснащен переключателем вида «Точка Обзора», который позволяет (в играх,
где эта функция поддерживается) мгновенно видеть все, что происходит вокруг
самолета. Перейдите в меню конфигурации игры и настройте разные обзоры (обзор
сзади, обзор слева, обзор справа и также внешние обзоры) в соответствии с
направлениями переключателя вида «Точки Обзора».
Также можно использовать верхний переключатель «Точка обзора» для других
функций (например, открытие огня и т.д.).
Page 92

7/12
2 РЕЖИМА ПРОГРАММИРОВАНИЯ
Кнопка ПРЕДУСТАНОВКИ (PRESET) (8) с индикатором (7) позволяет просмотреть
выбранный режим программирования: АВТОМАТИЧЕСКИЙ (встроенный) или РУЧНОЙ
(пользовательский).
Однократное нажатие на эту кнопку позволит переключаться из одного режима в
другой даже во время игры.
АВТОМАТИЧЕСКАЯ ПРЕДУСТАНОВКА (AUTOMATIC PRESET): КРАСНЫЙ
ИНДИКАТОР
Режим настроек по умолчанию: оси, положения командных кнопок и переключатель вида
заданы по умолчанию.
СМ. СХЕМЫ КОНФИГУРАЦИИ РЕЖИМА АВТОМАТИЧЕСКИХ ПРЕДУСТАНОВОК
РУЧНАЯ ПРЕДУСТАНОВКА (MANUAL PRESET): ЗЕЛЕНЫЙ ИНДИКАТОР
Эти установки назначаются пользователем:
- Функции кнопок, оси и переключателя вида могут быть переключены между
собой.
- Изменяйте функции кнопок по вашему желанию в любое время.
- Настройки джойстика сохранятся автоматически (даже если джойстик не
подключен).
- - Когда пользовательские предустановки “MANUAL PRESET” не заданы,
настройки аналогичны режиму автоматических предустановок “AUTOMATIC
PRESET”.
ПРОГРАММИРОВАНИЕ/ПЕРЕОПРЕДЕЛЕНИЕ
Программируйте джойстик, используя кнопку переопределения (MAPPING).
Внимание: Чтобы обнаружить эту кнопку обратитесь к схеме:
-
На ПК: Просто нажмите данную кнопку.
-
На PS3: Одновременно нажмите кнопки START (ST) + SELECT (SE).
Примеры возможного применения:
- Переключение положений кнопок.
- Переключение оси между собой = управление рукояткой, управление скоростью
или штурвалом (В этом случае, переопределите 2 направления для первой оси на
направления второй.)
- Установите 2 направления для одной и той же оси.
- Переключение кнопок с направлениями осей или переключателем вида.
Исключение:
В PlayStation®3 кнопки START (ST) и SELECT (SE) соответствуют кнопке
ПЕРЕОПРЕДЕЛЕНИЕ (и не могут перепрограммироваться).
Page 93

8/12
ПРОЦЕДУРА ПРОГРАММИРОВАНИЯ
Этапы
Действие
Индикатор
Включите режим «ПОЛЬЗОВАТЕЛЬСКИЕ
ПРЕДУСТАНОВКИ» нажатием кнопки (8)
2
Нажмите и отпустите кнопку «ПЕРЕОПРЕДЕЛЕНИЕ»
ВЫКЛ.
Нажмите и отпустите программируемую кнопку или
направление джойстика.
МИГАЕТ
ЗЕЛЕНЫЙ
Нажмите и отпустите кнопку или направление, куда
необходимо поместить данную функцию.
Этапы
Действие
Индикатор
1
Включите режим “MANUAL PRESET” (8).
ЗЕЛЕНЫЙ
- Нажмите и удерживайте кнопку MAPPING
(ПЕРЕОПРЕДЕЛИТЬ) в течение 2 секунд.
Мигает 2 секунды
зеленый свет
Шаг
Действие
Индикатор
Одновременно нажмите кнопки
(ST)
В течение 2 секунд
зеленым/красным
1
3
ЗЕЛЕНЫЙ
4
ЗЕЛЕНЫЙ
«ПОЛЬЗОВАТЕЛЬСКИЕ ПРЕДУСТАНОВКИ» включены и настроены
(программирование выполнено).
ВСТРОЕННАЯ ПАМЯТЬ
В игровой джойстик встроен чип, благодаря которому все назначенные вами
“ПОЛЬЗОВАТЕЛЬСКИЕ НАСТРОЙКИ” сохраняются в памяти (даже когда джойстик
выключен или отсоединен в течение длительного периода времени).
Сохраните различные «ПОЛЬЗОВАТЕЛЬСКИЕ ПРЕДУСТАНОВКИ» для каждой
используемой платформы (для ПК и для PlayStation®3)
УДАЛЕНИЕ «ПОЛЬЗОВАТЕЛЬСКИХ ПРЕДУСТАНОВОК»
2
«ПОЛЬЗОВАТЕЛЬСКИЕ ПРЕДУСТАНОВКИ» отсутствуют
(они снова соответствуют автоматическим настройкам)
ВОЗВРАТ К ЗАВОДСКИМ НАСТРОЙКАМ
Удалите все установленные и заданные настройки на платформах ПК и PlayStation®3
за один шаг:
1
ПРЕДУСТАНОВКИ (MAPPING) + 11 (SE) + 12
индикатор мигает
Теперь все ПОЛЬЗОВАТЕЛЬСКИЕ ПРЕДУСТАНОВКИ (ПК + PS3) удалены.
Примечание: После этой операции джойстик будет перезагружен.
(поэтому на ПК рекомендуется производить данную операцию после выхода из игры).
Page 94

9/12
ПОИСК, УСТРАНЕНИЕ НЕИСПРАВНОСТЕЙ И ПРЕДУПРЕЖДЕНИЯ
Джойстик работает неправильно или не откалиброван:
- Отключите компьютер или приставку, отсоедините джойстик, снова подсоедините его
и запустите игру.
- При подключении джойстика: Оставьте рукоятку, основной штурвал и ручку
управления скоростью в центральном положении и не двигайте ними (чтобы избежать
любых проблем с калибровкой).
- Выйдите из игры, полностью отсоедините джойстик, убедитесь в том, USB селектор
ПК/PS3 (1) находится в правильном положении, и снова подсоедините джойстик.
Я не могу настроить джойстик:
В меню игры Options (Параметры)/Controller (Контроллер)/Gamepad (Игровой
контроллер) или Joystick (Джойстик): Выберите более подходящую конфигурацию или
полностью перенастройте функции контроллера.
- Дополнительную информацию смотрите в руководстве пользователя игры или в
Интернете.
- Для решения этой проблемы также можно воспользоваться функцией джойстика
«ПРЕДУСТАНОВКА».
Джойстик слишком или недостаточно чувствительный:
Джойстик автоматически калибруется после того, как сделано несколько движений
джойстиком в разных направлениях.
В меню игры Options (Параметры)/Controller (Контроллер)/ Gamepad (Игровой
контроллер) или Joystick (джойстик)": Настройте чувствительный или
нечувствительный режим для контроллера (если эта функция доступна).
- Настройте сопротивление ручки с помощью круговой шкалы (9), находящейся под
основанием джойстика.
Page 95

10/12
Сведения о потребительской гарантии
Корпорация Guillemot Corporation S.A., зарегистрированная по адресу Place du Granier, B.P. 97143, 35571
Chantepie, Франция, (далее — «Guillemot») гарантирует своим клиентам во всем мире, что в данном изделии
Thrustmaster не будет выявлено никаких дефектов материалов и производства в течение гарантийного
периода, который равен сроку предъявления претензии по соответствию для данного изделия. В странах
Европейского Союза этот срок соответствует двум (2) годам с момента поставки изделия Thrustmaster. В
других странах гарантийный период равен сроку предъявления претензии по соответствию для изделия
Thrustmaster, определяемому соответствующим законодательством страны, в которой проживал потребитель
на момент приобретения изделия Thrustmaster (если подобные претензии не действуют в соответствующей
стране, гарантийный период равняется одному (1) году с первоначальной даты приобретения изделия
Thrustmaster).
В случае обнаружения дефектов изделия во время гарантийного периода незамедлительно обратитесь в
службу технической поддержки, сотрудники которой определят дальнейшую процедуру. Если дефект будет
подтвержден, изделие следует вернуть по месту приобретения (или в любое другое место, указанное службой
технической поддержки).
В рамках действия гарантии дефектное изделие будет, по усмотрению службы технической поддержки,
заменено или возвращено в рабочее состояние. Если в течение гарантийного срока изделие Thrustmaster
будет подвержено такому восстановлению, к оставшемуся гарантийному сроку прибавляется период времени,
но не менее семи (7) дней, во время которого изделие находилось вне употребления (началом этого периода
считается дата запроса покупателя о вмешательстве или дата предоставления дефектного изделия для
восстановления, если изделие было предоставлено для восстановления позднее, чем был сделан запрос о
вмешательстве). В мере, разрешенной применимым законодательством, полная ответственность компании
Guillemot и ее дочерних компаний (в том числе косвенный ущерб) ограничивается восстановлением рабочего
состояния или заменой изделия Thrustmaster. В мере, разрешенной применимым законодательством,
компания Guillemot отказывается от любых гарантий коммерческой пригодности или пригодности для
определенной цели.
Настоящая гарантия не распространяется: (1) на ситуации, когда изделие было видоизменено, открыто,
модифицировано или получило повреждения в результате недопустимого или неправильного использования,
небрежности или несчастного случая, естественного износа или любой другой причины, не связанной с
дефектом материалов или производства (включая, помимо прочего, использование изделия Thrustmaster
совместно с любыми неподходящими элементами, в частности — с блоками питания, аккумуляторами,
зарядными устройствами и любыми другими элементами, не входящими в комплектацию Guillemot для
данного изделия); (2) на случаи использования продукта в любых целях, кроме бытовых, в том числе на
случаи профессионального или коммерческого применения (например, в игровых залах, для проведение
обучения и соревнований); (3) на ситуации, когда указания службы технической поддержки не были
выполнены; (4) на ПО, так как на такое ПО распространяется отдельная гарантия; (5) на расходные
материалы (элементы, предназначенные для замены в течение срока службы изделия: например, батарейки
и ушные подушки для гарнитур или наушников); (6) на аксессуары (например, кабели, чехлы, сумки, футляры,
наручные ремешки); (7) на случаи продажи изделия с открытого аукциона.
Данная гарантия не подлежит передаче.
Настоящая гарантия не ущемляет прав потребителя, предоставляемых ему применимыми законами в
отношении продажи потребительских товаров в соответствующей стране.
Page 96

11/12
Дополнительные условия гарантии
В течение гарантийного срока компания Guillemot, в общем и целом, не предоставляет никаких запасных
частей, так как вскрытие и/или модификацию любых изделий Thrustmaster вправе осуществлять только служба
технической поддержки (за исключением каких-либо процедур по модификации, которые служба технической
поддержки может предложить выполнить клиенту путем письменных инструкций и предоставления, при
необходимости, требуемых запасных частей: например, в связи с отсутствием статуса сложности или
конфиденциальности у такой восстановительной процедуры).
С учетом периода освоения новых изделий и в целях защиты своих ноу-хау и коммерческих тайн компания
Guillemot, в общем и целом, не предоставляет каких-либо уведомлений о восстановлении или запасных
частей для любых изделий Thrustmaster с истекшим гарантийным сроком.
Ответственность
В мере, разрешенной применимым законодательством, компания Guillemot Corporation S.A. (далее —
«Guillemot») и ее дочерние предприятия отказываются от любой ответственности за любой ущерб, вызванный
одним или несколькими из следующих факторов: (1) видоизменение, вскрытие или модификация изделия; (2)
несоблюдение инструкций по сборке; (3) недопустимое или неправильное использование, небрежность,
несчастный случай (например, физическое воздействие); (4) естественный износ; (5) использование продукта
в любых целях, кроме бытовых, в том числе профессиональное или коммерческое применение (например, в
игровых залах, для проведение обучения и соревнований). В мере, разрешенной применимым
законодательством, компания Guillemot и ее дочерние предприятия отказываются от любой ответственности
за любой ущерб, не связанный с дефектами материалов или изготовления, в отношении данного изделия
(включая, помимо прочего, любой ущерб, вызванный прямо или опосредованно любым программным
обеспечением или использованием изделия Thrustmaster с любыми неподходящими элементами, в частности
— блоками питания, аккумуляторами, зарядными устройствами и любыми другими элементами, не
входящими в комплектацию Guillemot для данного изделия).
ТЕХНИЧЕСКОЙ ПОДДЕРЖКИ
https://support.thrustmaster.com
Page 97

12/12
АВТОРСКОЕ ПРАВО
© 2021 Guillemot Corporation S.A. Все права защищены. Thrustmaster® является
зарегистрированной торговой маркой Guillemot Corporation. Все прочие торговые марки являются
собственностью соответствующих владельцев. Иллюстрации могут не соответствовать внешнему
виду/функциям конкретного изделия. Содержание руководства, конструкция и технические
характеристики изделия изменяются без предварительного уведомления и зависят от страны
приобретения.
При пользовании изделием учитывайте следующее: цвета и дизайн могут различаться.
Пластиковые стяжки и клейкую ленту следует снять перед использованием изделия.
www.thrustmaster.com
Page 98

1/12
Uživatelský manuál
TECHNICKÉ VLASTNOSTI
1. Přepínač USB (PC / PS3) 6. Posuvný ovladač plynu
2. USB konektor pro PC a PlayStation®3 7. LED
3. Více směrový kloboučkový přepínač “Point Of View” 8. Tlačítko PRESET
4. 12 akčních tlačítek (pro programování)
5. Ovládání směrovky otáčením rukověti 9. Kroužek pro nastavení
s uzamykacím šroubem odporu rukověti
Page 99

2/12
PC
INSTALACE NA PC
1. USB přepínač (1) nastavte do pozice “PC”.
2. USB konektor (2) připojte k jednomu z USB rozhraní vašeho počítače. Windows
automaticky detekují nové zařízení.
3. Ovladače budou automaticky nainstalovány.
Postupujte podle pokynů na displeji a dokončete instalaci.
4. Klikněte na Start/Settings/Control Panel a pak otevřete Ovládací panel hry.
Zobrazí se dialogové okno ovládacího panelu hry s názvem joysticku a stavem OK.
5. V ovládacím panelu klikněte na vlastnosti, abyste mohli nakonfigurovat svůj joystick.
Test zařízení: Pro testování a prohlížení všech funkcí vašeho joysticku.
Nyní jste připraveni ke hře!
DŮLEŽITÉ POZNÁMKY PRO PC
- USB přepínač vašeho joysticku (1) musí být vždy nastaven v pozici “PC” před tím, než
joystick připojíte.
- Při připojování vašeho joysticku: rukověť a směrovku ponechte ve středové poloze a
nepohybujte s nimi (zabráníte tím problémům s kalibrací).
Page 100

3/12
“AUTOMATICKÉ PŘEDVOLBY” KONFIGURACE - PC
Schéma “AUTOMATICKÉ PŘEDVOLBY” na PC
ČERVENÁ LED
Tato předvolba odpovídá výchozímu nastavení pro většinu leteckých simulačních her na PC.
Toto vám umožní okamžitě spustit vaši hru, aniž by bylo nutné překonfigurovat váš joystick.
 Loading...