

TI
TI-89/TI-92 Plus/Voyage™ 200
Organizer Suite
Getting Started
Introducing Organizer Navigate in Organizer
Start and Quit Organizer
How To…
Use the Calendar Work With Contacts
Work With Events Send and Receive Info
Wo rk With Tasks
More Information
Install Apps Customer Support
Delete Apps Error Messages
5/14/03 © 2003 Texas Instruments

Important Information
Texas Instruments makes no warranty, either express or implied, includi ng but not
lim i t ed to any i mplied warranti es of merchantability and fitness for a particular purpose,
regarding any program s or book materials and makes such materials av ai lable solely on
an "as-is" basis. In no event shall Texas Instruments be liable to anyone for special,
collateral, incidental, or consequential damages in connection with or ari s i ng out of the
purchase or use of these materials, and the sole and exclusive liability of Texas
Instrum ents, r egardless of t he form of action, shall not exceed the purchase price of this
product. Moreover, Texas Instruments shall not be liable for any claim of any k i nd
whatsoever against the use of these materials by any other party.
Permission i s hereby granted to teachers to reprint or phot oc opy i n c l as sr oom,
workshop, or seminar quant ities the pages in this work that car r y a Texas Instruments
copyright noti ce. These pages are designed to be reproduced by teachers for use in their
classes, workshops, or seminars, provided each copy made shows the copyright notice.
Such copies may not be sold, and fur t her distribution i s expressly prohibi t ed. Except as
authorized above, prior writt en permi ss i on must be obtained from Texas Instruments
Incorporated to reproduce or transmit this work or por t ions thereof in any other form or
by any other electronic or mechanical means, including any i nformation storage or
retrieval system, unl ess expressly permitt ed by federal copyright law. Send inquiries to
this address:
Texas Instruments Incorporat ed
7800 Banner Drive, M/S 3918
Dallas, TX 75251
Attention: Manager, Business Services
Graphing product applications (Apps) ar e li censed. See the terms of the license
agreement for this produc t .
Apple, Macintosh, Microsoft , and Wi ndows are registered trademark s of t heir r espective
owners.
TI-89 / TI-92 Plus / Voyage™ 200 PLT Organizer Suite Page 2

Introducing the Organizer Suite
The Or ganiz er suite for the TI- 89 / TI-92 Pl us / Voyag e™ 200 PLT
consists of a g r oup of han d held software ap plications (Apps) that
let you organize your schedu l e ar ound events, t asks, and contact
information.
• Use the Calendar
App to view your sch edule by the day,
week, month, or year.
• Use the Planner
App to schedule events, or plan ned activiti es
linked to a time or dat e ( for exam ple, meetings and
appointments).
• Use the Tasks
App to keep track of reminder s and things to
do.
• Use the Contacts
App to r et ai n contact i nformation for friends,
family, students, teachers, and business associates.
You can op en Organizer Apps from the Apps desk top, the
APPLICATIONS menu , or any open Organizer App.
Languages
This application is available in English, French, German, and
Spanish. The corresponding language localization software must
also be installed and running.
TI-89 / TI-92 Plus / Voyage™ 200 PLT Organizer Suite Page 3
Getting Started with the Organizer Apps
Viewing the Calendar App
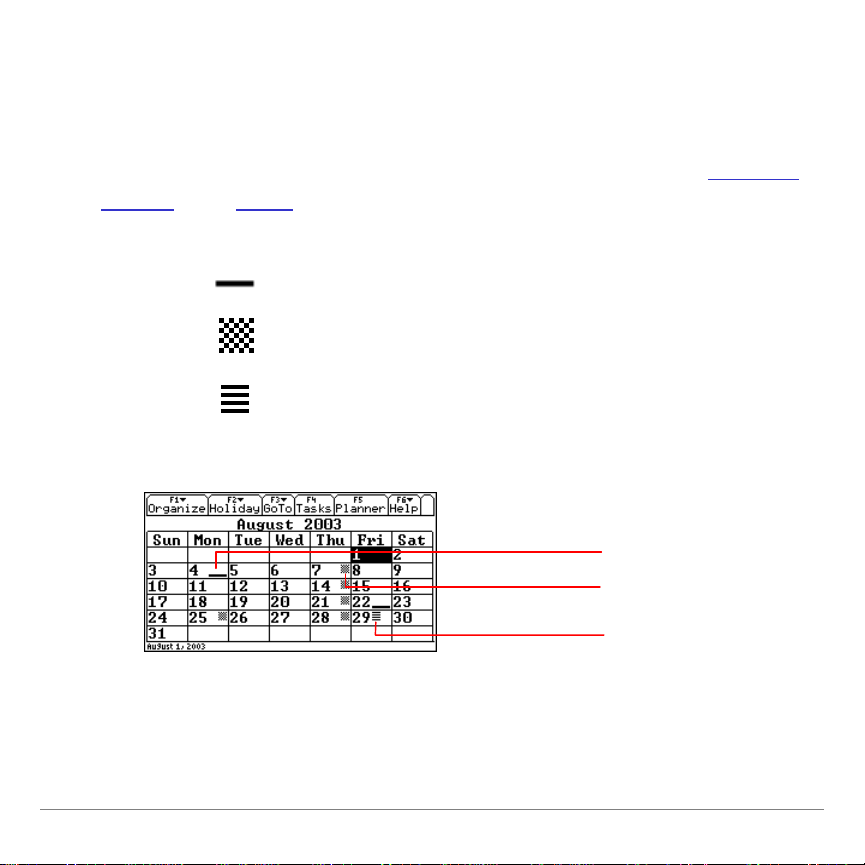
The Calendar App di s plays a monthl y calendar with t he holidays
events
, and tasks that you schedule, di splayi ng th ese symbol s t o
distinguish each one:
Holiday
Event
Task
Holiday
Event
Task
,
TI-89 / TI-92 Plus / Voyage™ 200 PLT Organizer Suite Page 4
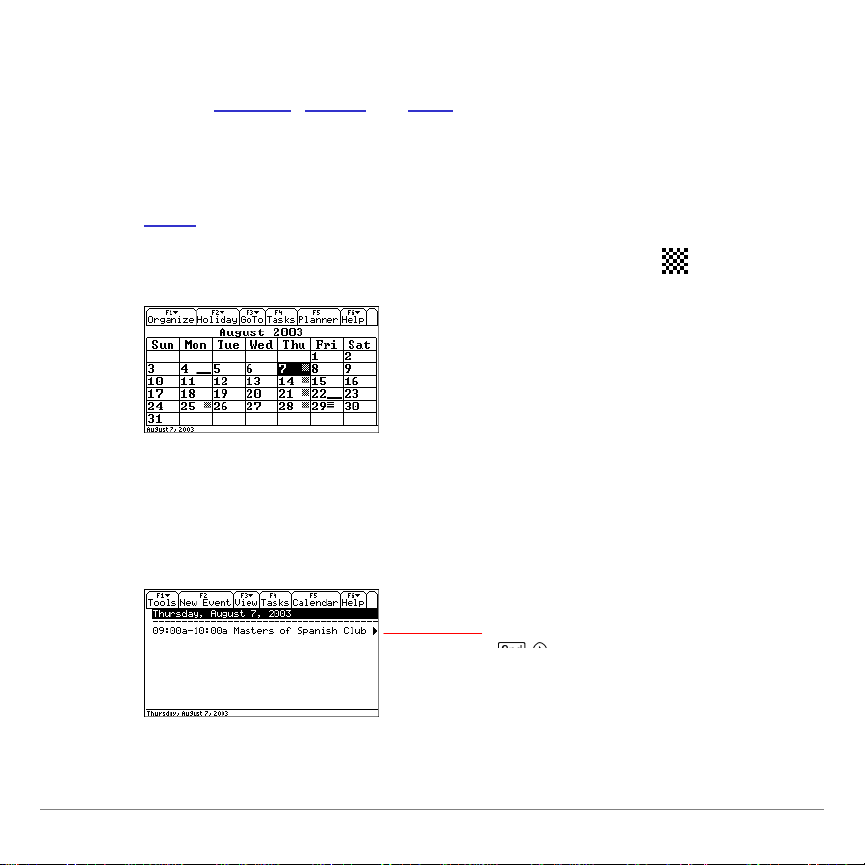
Viewing a Holiday, Event, or Task From the Calendar App
To view a holiday
, event, or task, select a date wit h the
appropriate symbol and press ¸. For example, t o view an
event:
1. Start
2. Highli ght a date t hat disp l ays an event symbol (
the Calendar App.
).
3. Press ‡ or ¸.
The Planner screen displ ays the event s sc heduled on the
selected date.
To view more text, press
TI-89 / TI-92 Plus / Voyage™ 200 PLT Organizer Suite Page 5
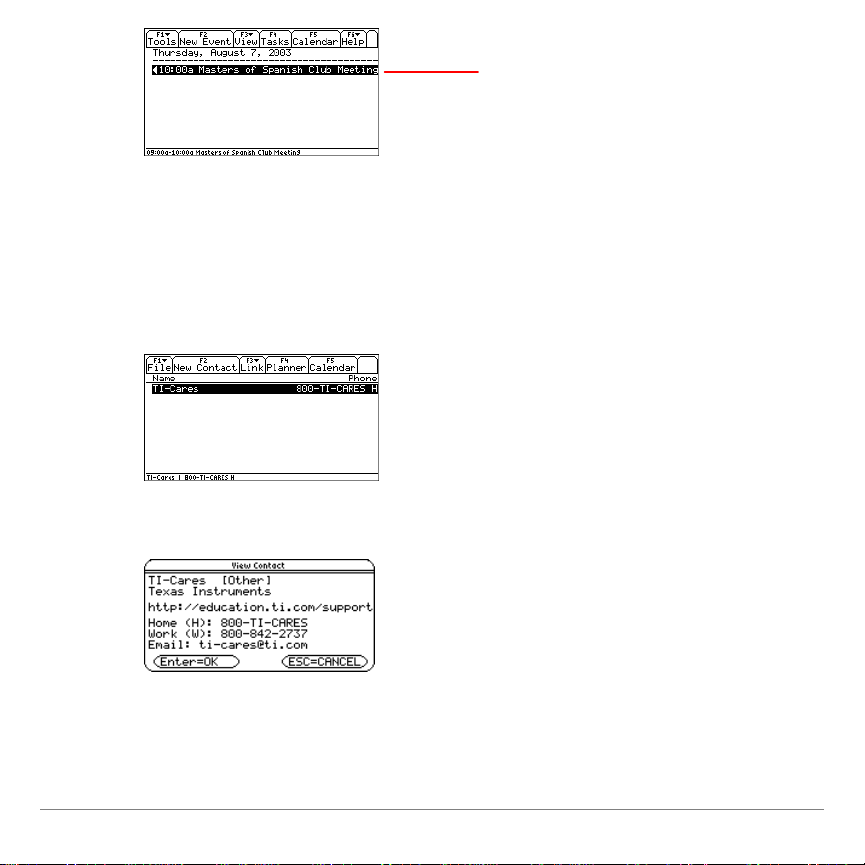
To view preceding text,
press 2 A.
4. Press ‡ or ¸ to return to t he calendar.
Viewing Contact Information From the Calendar App
1. To view the Contacts screen, press ƒ
1:Contacts.
2. To view contact det ails, select a contact an d press ¸.
3. Press N, and th en ‡ to retu r n to the Calendar.
TI-89 / TI-92 Plus / Voyage™ 200 PLT Organizer Suite Page 6
Setting Holidays
You can add h ol idays to y our calen dar.
Note You can set more than one holiday on one date.
To add a repeating holiday:
1. From the calendar, pr ess «.
— or —
Press „
2:Set Holiday.
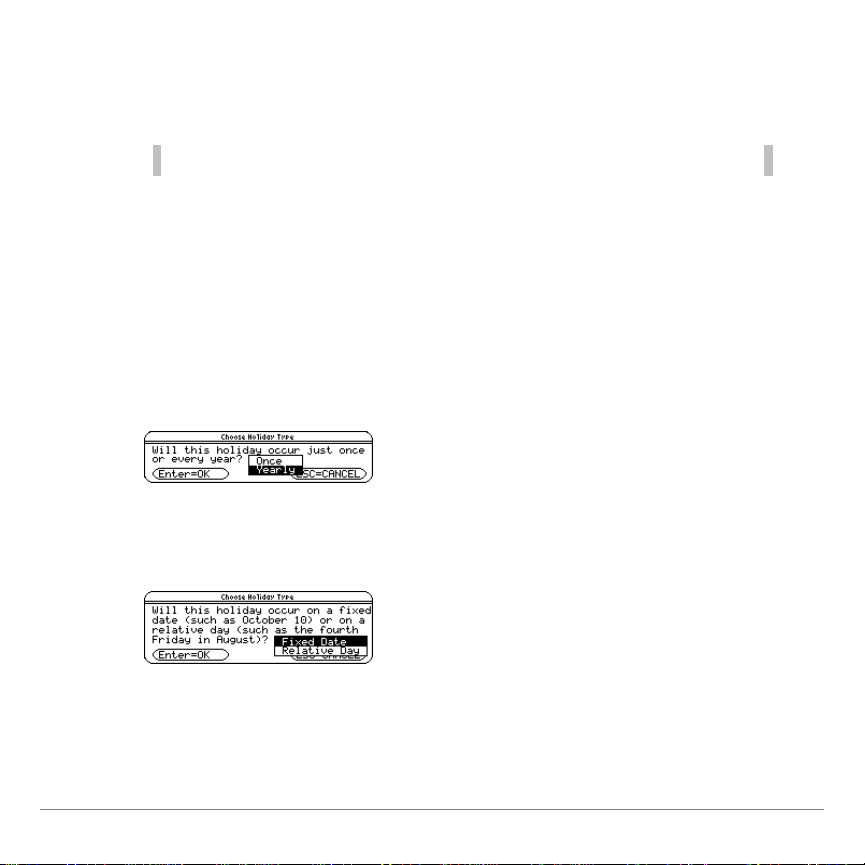
2. The Choose Holi day dialog box appear s.
3. Select Yearly and press ¸ ¸. The Choose Holi day
Typ e di alog box appears.
4. Select Fixed Date or Relative Day.
• Select Fixed Date if the holi day occurs on a specific dat e
(for example, August 15).
TI-89 / TI-92 Plus / Voyage™ 200 PLT Organizer Suite Page 7
• Select Relative Day i f t he holiday occurs on a specific day
(for example, the fourth Friday in August).
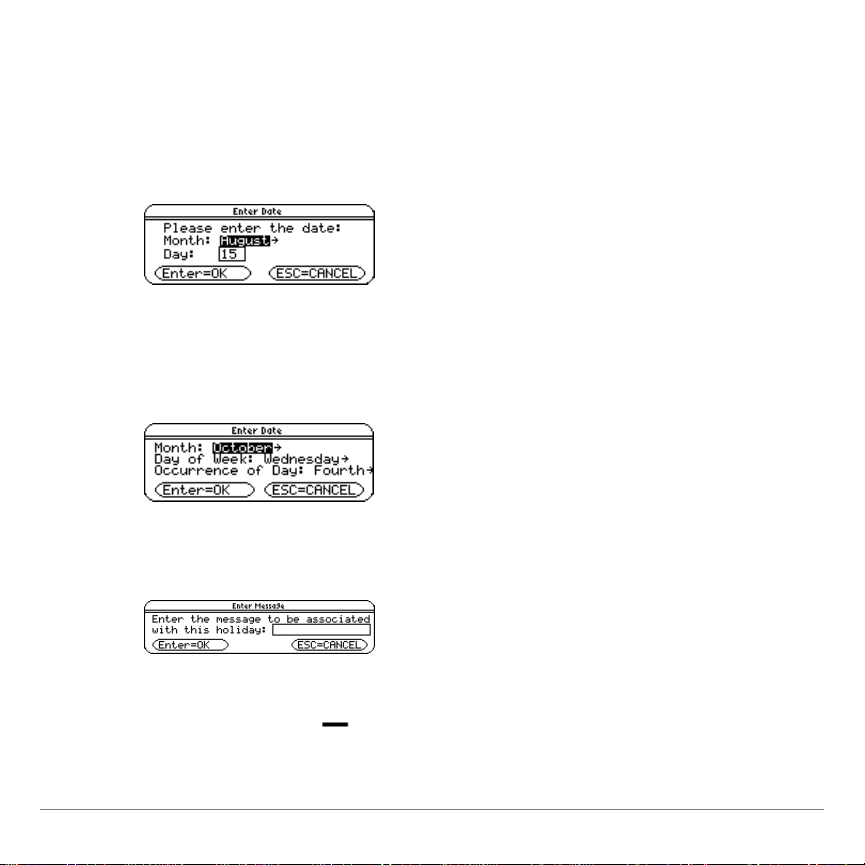
5. Press ¸ ¸. The En t er Dat e di al og box ap pears.
• For a Fixed Date, selec t t he Month and type th e Day.
— or —
• For a Relative Day, sel ect the Mont h, Day of Week, and
Occurrence of Day.
6. Press ¸ ¸. The En t er M essa ge dialog box appear s.
7. Type t he name of th e holiday and press ¸ ¸. The
holiday symb ol (
) appears on the calendar at th e dat e
entered.
TI-89 / TI-92 Plus / Voyage™ 200 PLT Organizer Suite Page 8
Note Enter a name of up to 25 characters, including letters with or without
capitalization , numbers, punctuation, and accented characters.
To add a one-time holiday:
1. From the calendar, pr ess «.
— or —
Press „
2:Set Holiday.
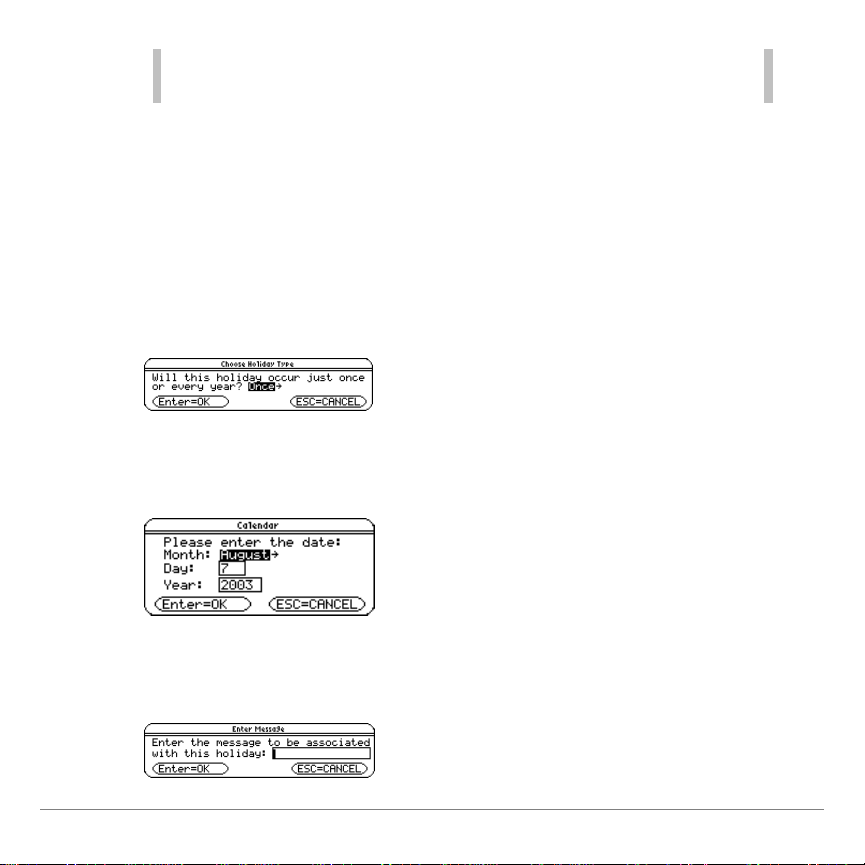
2. The Choose Holi day Type dialog box appear s.
3. Select Once and press ¸. The Calendar dial og box
appears.
4. Enter the date and press ¸ ¸. The Enter M es sage
dialog box appear s.
TI-89 / TI-92 Plus / Voyage™ 200 PLT Organizer Suite Page 9

5. Enter th e holiday m ess age and pre ss ¸ ¸. The
holiday symb ol (
) appears on the calendar at th e dat e
entered.
Deleting Holidays
1. From the calendar, select a dat e w ith a h ol i day and pr es s 0.
— or —
Press „
3:Delete Holiday.
2. The Delete Holi day dialog box appear s.
3. Select a holi day to delete and press ¸ ¸.
Deleted holiday no
longer displayed.
TI-89 / TI-92 Plus / Voyage™ 200 PLT Organizer Suite Page 10
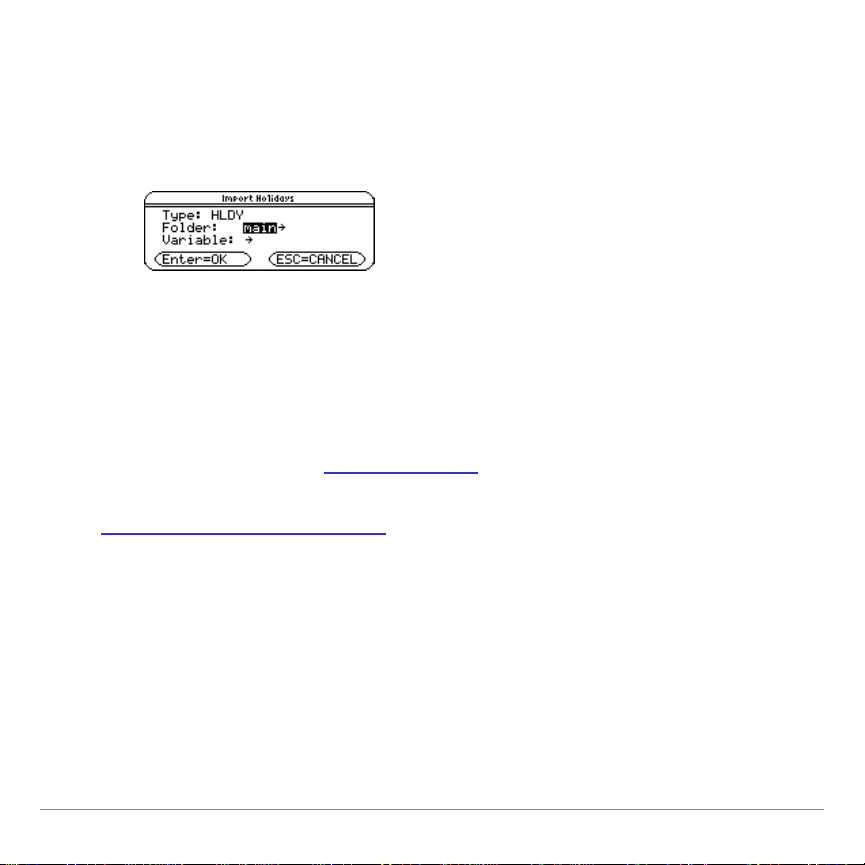
Importing Holidays
1. From the calendar, pr ess „
4:Import.
2. The I m port Holidays dialog box appear s.
3. Select the folder and file name ( variable), and then
press ¸.
Accessing Calendar Format Options
You can access the Stor e Fi les As
format opti on from the
Calendar (for deta i l s on how to change form at options , see
Changing Format Options
).
TI-89 / TI-92 Plus / Voyage™ 200 PLT Organizer Suite Page 11

Working With the Clock
The Or ganiz er suite u ses t he time an d date informat i on from the
clock on your h andheld device. For det ai led instr uctions on
operating th e c l ock, refer to the Voyage 200 Apps Desktop
module available at education.ti.com/guides
.
If you r c l ock is tu r ned off or if your handheld device does not
include a clock, openin g the Calendar displ ays a dialog box
promp t ing you to en t er the date.
1. Start
the Calen dar Ap p. Th e Cal endar dialog box appea rs .
Press B to display a li st of
months.
2. Select a Month and pr ess ¸.
TI-89 / TI-92 Plus / Voyage™ 200 PLT Organizer Suite Page 12
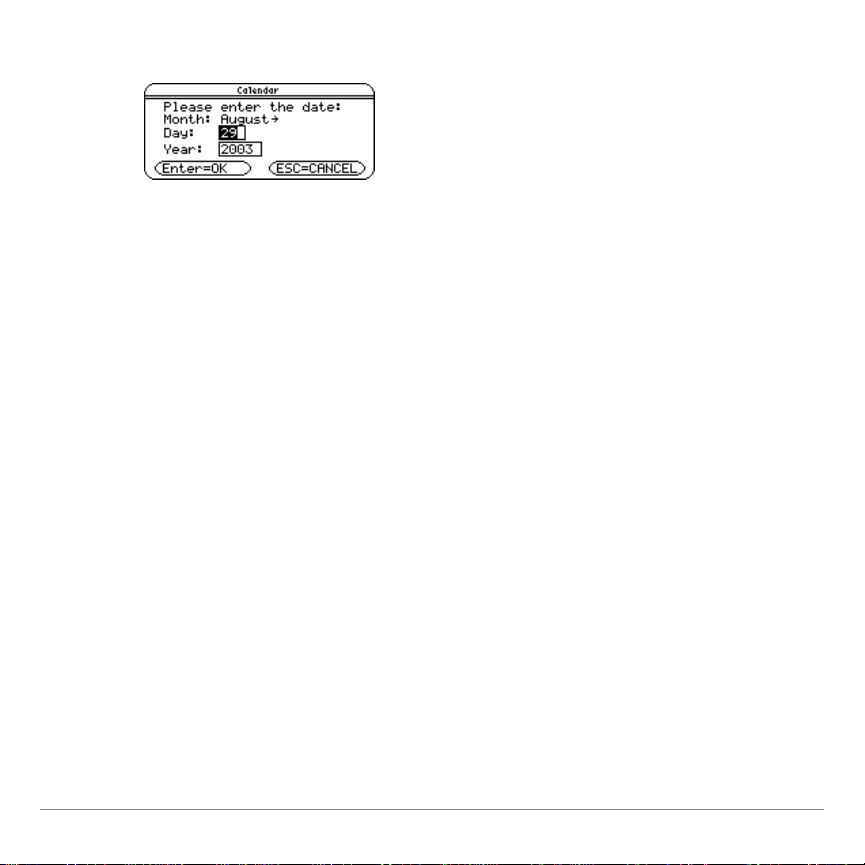
3. Type a Day and press D.
4. Type a Year and press ¸ ¸. The calendar appears
with t he entered dat e high ligh t ed.
TI-89 / TI-92 Plus / Voyage™ 200 PLT Organizer Suite Page 13
Working With Events
Use the Planner App to schedule events, or planned activiti es
linked to a day or t i m e of day (for exampl e, cl as ses, m eeting s,
and app ointmen ts).
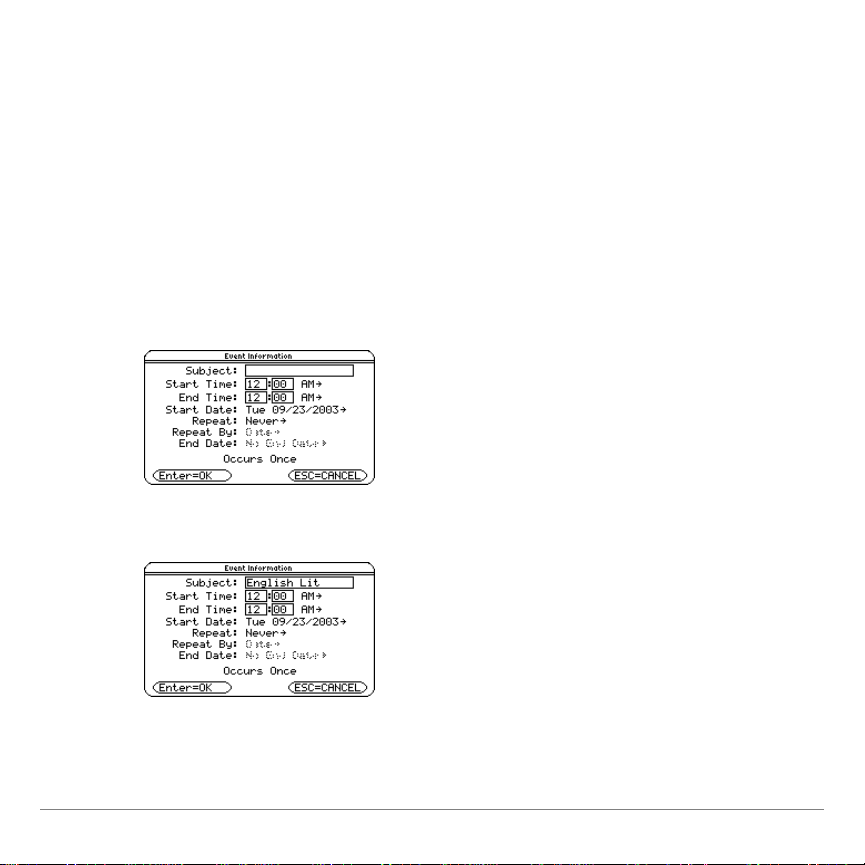
Adding an Event
1. From the Plan ner screen, press „. The Event I nformation
dialog box appear s.
2. Type a name in t he Subj ect fi el d and press D.
TI-89 / TI-92 Plus / Voyage™ 200 PLT Organizer Suite Page 14
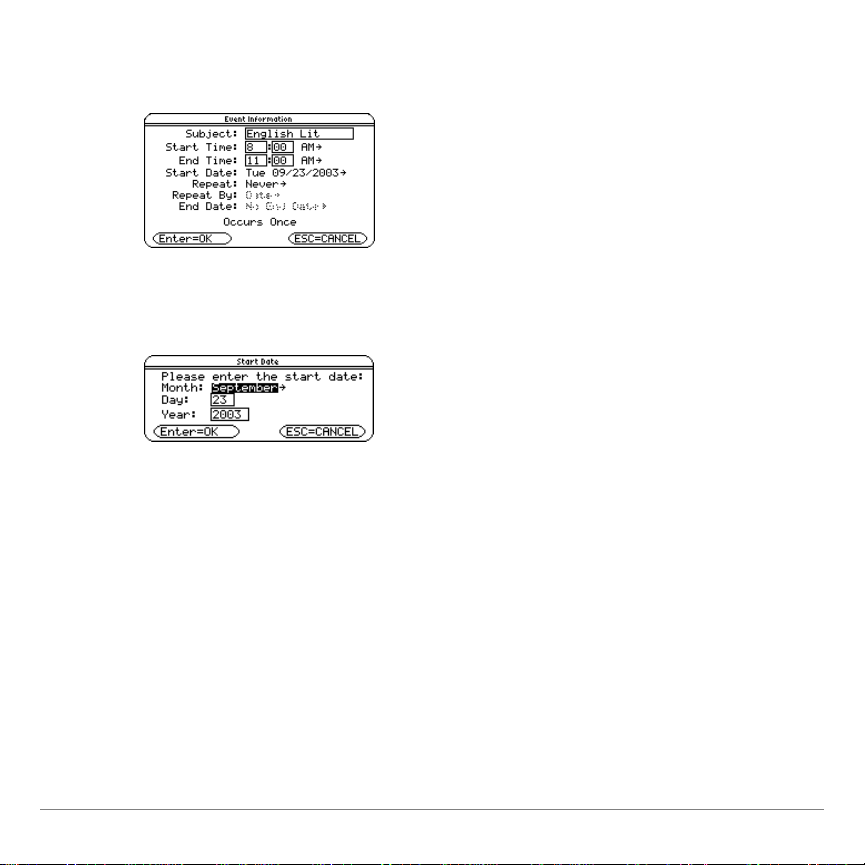
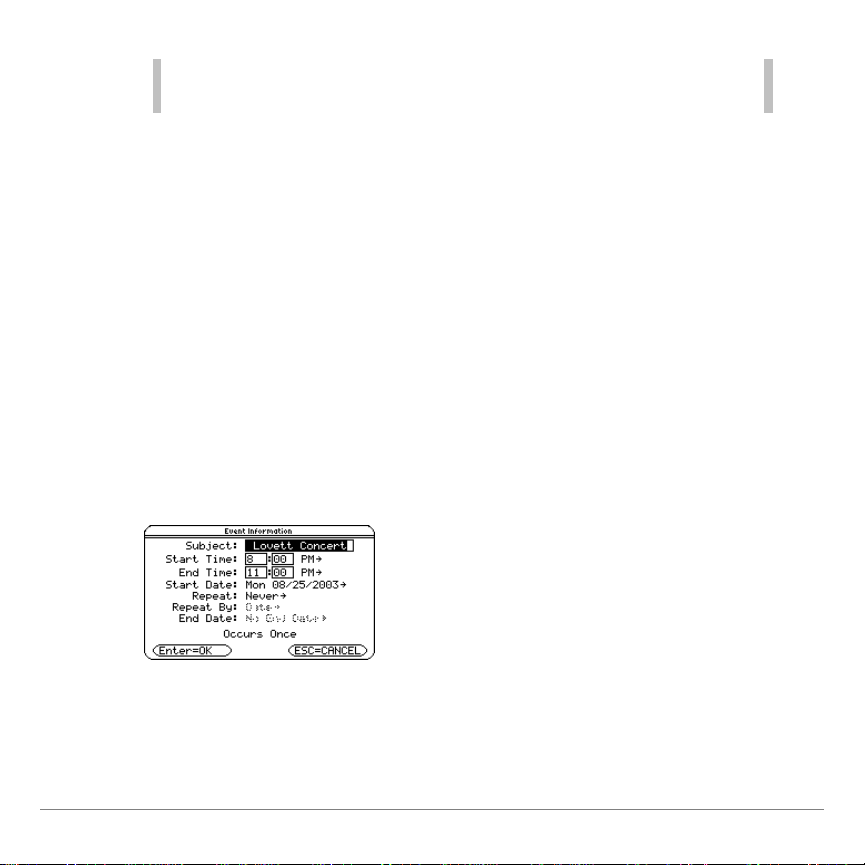
3. Enter a Start Time and an End Tim e, pressin g D to move
from field to field.
4. Select the Star t Date field and press B. The Start Date dialog
box app ear s .
5. Select a Month, and then ty pe a Day and Year, pressin g D to
move from field to field.
6. Press ¸ ¸ to save the ent ry and return to t he Event
Inform at ion dialog box.
7. For a one-tim e- only event, press ¸ to save the data
entered in the Event Informat ion dialog box and r et urn to t he
Planner scr een.
— or —
For a repeat event , proceed to step 8.
TI-89 / TI-92 Plus / Voyage™ 200 PLT Organizer Suite Page 15
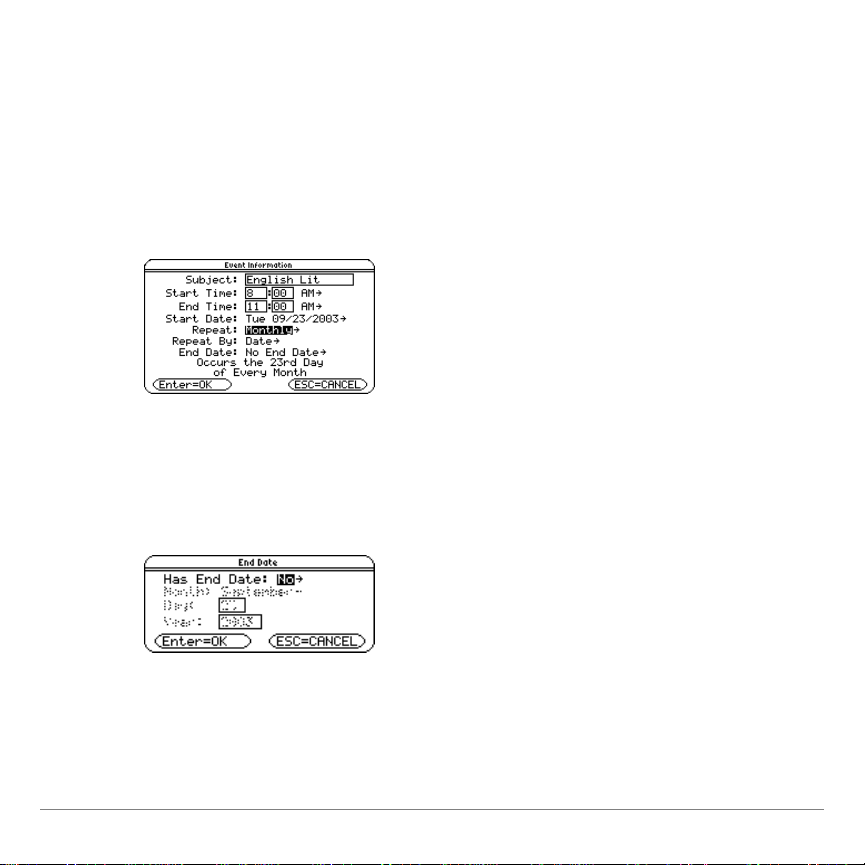
8. Press B in th e Repeat field, sel ect a r epeat sequence from
the list, and press ¸.
• The End Date field activates for all rep eat sequen ces
except Never.
• If the r epeat sequence selected i s m onthly or yearl y, th e
Repeat By field act i vates.
9. In the Repeat By fi el d, select eith er Date or Day from the list.
10. In t he End Date field, press B. The End Date dialog box
appears.
TI-89 / TI-92 Plus / Voyage™ 200 PLT Organizer Suite Page 16
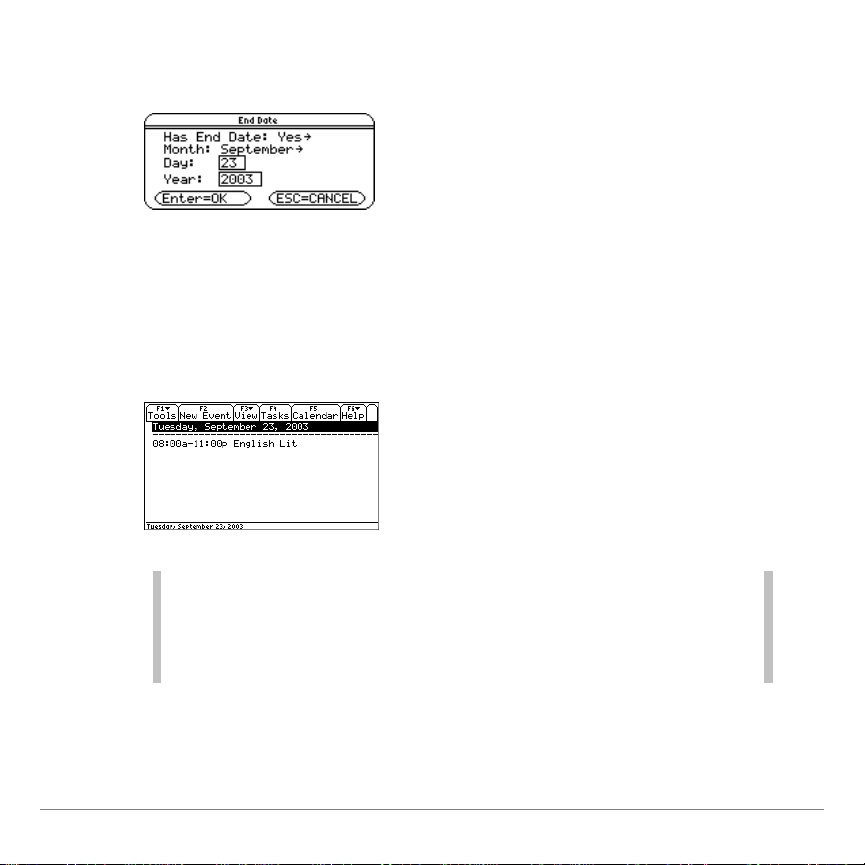
11. In t he Has End Date field, select Yes to activate the Month,
Day, and Year fields.
12. Enter an End Date and pr ess ¸ ¸ to save the entry
and retu r n to the Event Informat i on dialog box.
13. Press ¸. The schedu l ed even t appears on the Planner
screen.
Note
TI-89 / TI-92 Plus / Voyage™ 200 PLT Organizer Suite Page 17
• You can also press ƒ
Information dialog box.
• You can also press ¥ N ( TI-92 Plus / V oyage™ 200 P LT) to
open the Event Informat ion dialog bo x.
1:New Event to open the Event
Viewing an Event
From the cal endar, pr ess ‡.
— or —
Highlight a date displaying an event symbol (
To view an event on another date:
) and press ¸.
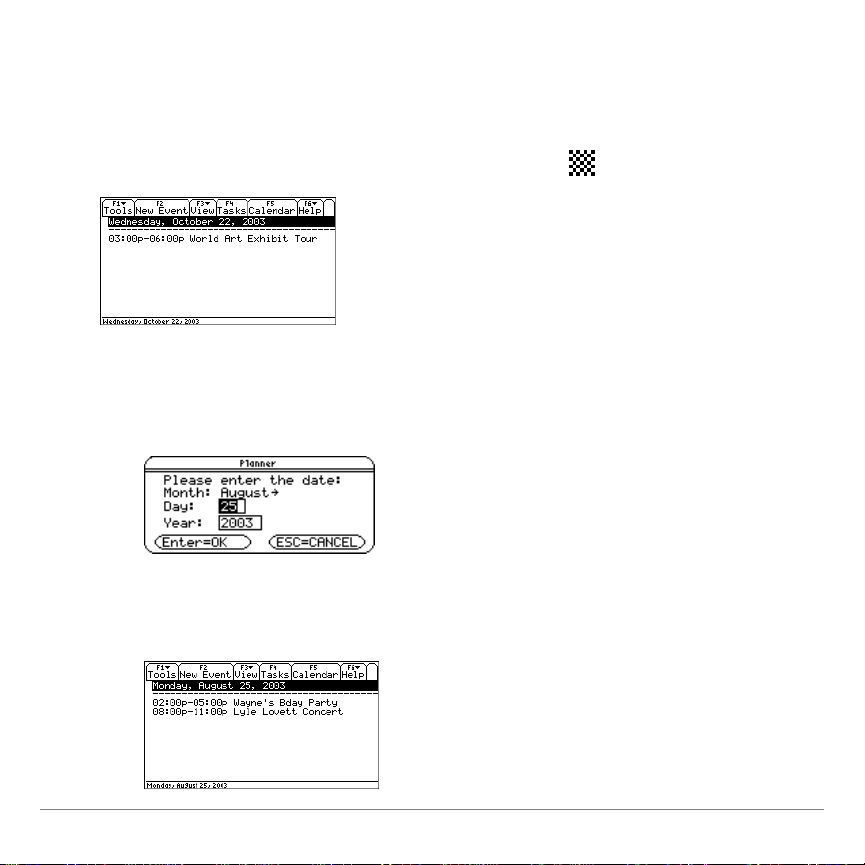
1. Press …
1:Date. The Planner dialog b ox appears.
2. Enter a Mont h, Day, and Year, and t hen pres s ¸ ¸.
The Planner screen displ ays the event s on the sel ect ed dat e.
TI-89 / TI-92 Plus / Voyage™ 200 PLT Organizer Suite Page 18
Tip You can al so press key shortcuts to go to the next or previous day,
week, month, or year.
Duplicating an Event
You can du plicate or copy and paste an exi st i ng event t o cr eat e a
duplicate event or n ew even t .
For example, i f tw o event s s hare the same i nformation, you can
duplicate or copy and past e one event, make changes, and then
save instead of enter ing i dentical i nformation t wice.
1. From the Plan ner screen, select an event and press
ƒ
2:Duplicate Event. The Event In form at ion dialog box
appears.
TI-89 / TI-92 Plus / Voyage™ 200 PLT Organizer Suite Page 19
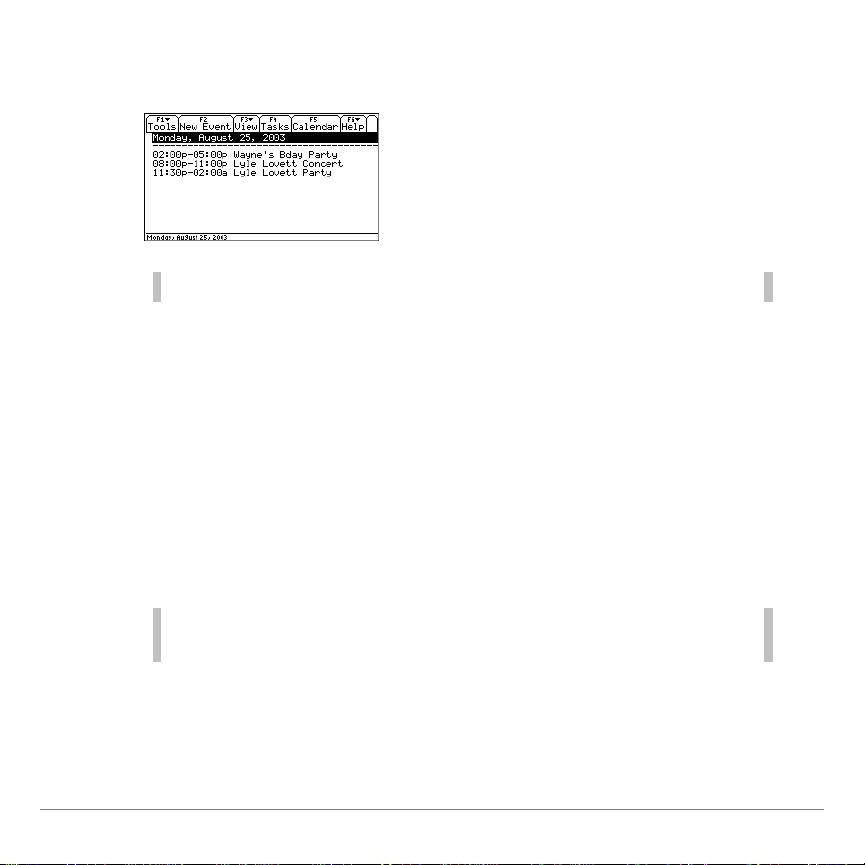
2. Edit as desired an d press ¸ ¸. The dupli cat ed event
appears on the Planner screen.
Tip You can al so press Á to duplicate the selected event.
Editing an Event
1. From the Plan ner screen, select an event and press
ƒ
3:Edit Event.
2. In the Event Information di a l og box, edit as desired and press
¸ ¸. The edi t ed event appears on the Plan ner
screen.
Tip You can al so press ¥ O (TI- 92 Plus / Voyage™ 200) to edit the
selected even t.
TI-89 / TI-92 Plus / Voyage™ 200 PLT Organizer Suite Page 20

Cutting an Event
From the Planner screen, select an event and press
ƒ
4:Cut Event.
Note You can al so press ¥ X (TI-92 Plus / Voyage™ 200) to cut the
selected even t.
Copying and Pasting an Event
1. Select an event and press ¥ 6 (TI-89) or ¥ C.
— or —
Press ƒ
5:Copy Event.
2. Press ¥ 7 (TI-89) or ¥
V.
— or —
Press ƒ
6:Paste Event.
3. In the Event Information di a l og box, p r ess ¸ if you do n ot
want to edit the information.
— or —
Edit as desired and press ¸ ¸.
4. The past ed event appears on the Planner screen.
TI-89 / TI-92 Plus / Voyage™ 200 PLT Organizer Suite Page 21

Deleting an Event
1. From the Plan ner screen, select an event and press
ƒ
7:Delete Event. The Delete Event dialog box appear s.
2. Press ¸. The sel ec t ed even t is removed from the scr een.
Note You can al so press 0 to delete the selected event.
Clearing All Events
To clear all events on a sel ect ed dat e:
1. Press ƒ
8:Clear All.
2. In the Clear All di al og box, press ¸ to confirm that you
want t o del et e all events on t he selected date.
TI-89 / TI-92 Plus / Voyage™ 200 PLT Organizer Suite Page 22

Formatting the Planner App
You can access the Stor e Fi les As
Files As format option from
the Plan ner App ( for det a i l s o n how to change form at options, see
Changing Format Options
).
Tip
You can al so press ¥ Í (TI-89) or ¥ F to open the FORMATS
dialog box.
Purging Old Events and Holidays
To pu r ge old events an d holidays occurrin g before a selecte d
date and th us free RAM:
1. From the Plan ner screen, press ƒ
B:Purge Old Events. The
Purge O l d Event s dialog b ox appears.
2. Press ¸ to confirm t hat you want t o del ete all old event s
and holidays occur r ing b efore the selected dat e .
TI-89 / TI-92 Plus / Voyage™ 200 PLT Organizer Suite Page 23

Working With Tasks
The Ta sks App l et s you creat e a l i s t of tasks, or thing s t o do.
In addition t o cr eat ing, ed i t i ng, copyin g, pasting, and deleting
tasks, you can:
• Assign priority levels (1 thr ough 5) and categories ( school,
work, personal, oth er , not filed)
• Add due dates
• Flag tasks as either com plete or i ncomplet e
• Sort tasks by th e date added, date comp l eted, task priorit y,
and categor y
TI-89 / TI-92 Plus / Voyage™ 200 PLT Organizer Suite Page 24

Adding a Task
1. Start
the Tasks App.
2. Press „ from the T asks screen.
3. Type t ext in th e blank sc reen.
4. (optional ) Assi gn a priority ,category, and du e dat e.
5. Press ƒ to save the task . The new t as k appear s i n the list.
TI-89 / TI-92 Plus / Voyage™ 200 PLT Organizer Suite Page 25

Note
• You can also press ƒ
• You can also press ¥ N ( TI-92 Plus / V oyage™ 200 P LT) to
create a new task.
• By default, tasks are assigned a prior ity of 3, category of not
filed, and no due date.
Duplicating a Task
1:New Task to create a new task.
Select a task and press ƒ
2:Duplicate Task. The dup licate task
appears i n the l i st.
Note You can al so press Á to duplicate the selected task.
Editing a Task
1. Select a task and press ¸.
TI-89 / TI-92 Plus / Voyage™ 200 PLT Organizer Suite Page 26

2. Edit the task.
3. Press ƒ. The edit ed t ask appears i n the li st .
Cutting a Task
Select a task and press ƒ
Note You can al so press ¥ X (TI-92 Plus / Voyage™ 200 PLT) to cut the
selected task.
TI-89 / TI-92 Plus / Voyage™ 200 PLT Organizer Suite Page 27
4:Cut Task.

Copying and Pasting a Task
1. Select a task and press ¥ 6 (TI-89) or ¥
C.
— or —
Press ƒ
2. Press ¥ 7 (TI-89) or ¥
5:Copy Task.
V, and then press ¸.
— or —
Press ƒ
6:Paste Task, and then press ¸.
Deleting a Task
1. From the Tasks screen, select a task and press ƒ
. The Delete Task dialog box app ear s.
Task
7:Delete
2. Press ¸. The selec t ed tas k is removed from the screen.
Note You can al so press 0 to delete the selected event.
TI-89 / TI-92 Plus / Voyage™ 200 PLT Organizer Suite Page 28

Clearing All Tasks
You can ch oose to clear all of t he tasks y ou have compl et ed or all
of the task s you have entered.
1. Press ƒ
8:Clear All. The Clear All dial og box appears.
2. Press ¸ to delete all Completed Tas ks.
— or —
Press B to display th e Delet e menu, sel ect Al l Tasks, and
press ¸ to delete all of the t as ks you have entered.
To cancel t he action, press N.
TI-89 / TI-92 Plus / Voyage™ 200 PLT Organizer Suite Page 29

Formatting the Tasks App
Pressing ƒ
9:Format in th e T asks App accesses th e follow ing
format opti ons (for detail s on how t o change form at options, s ee
Changing Format Options
• Font
• Show
• Sort
• View
• View
• Store
Size
Lines
By
Completed T as ks
Category
Files As
):
TI-89 / TI-92 Plus / Voyage™ 200 PLT Organizer Suite Page 30

Assigning a Task Priority
You can p r i or i tize tasks on a scale of 1 throug h 5, wit h 1 the most
important.
1. Select a task.
Priority of 5
2. Press 2 ˆ (TI-89) or ˆ to display th e T as k Settin gs dialog
box.
3. Select the T ask Priorit y menu and a prior i ty opt i on from 1
through 5.
TI-89 / TI-92 Plus / Voyage™ 200 PLT Organizer Suite Page 31

4. Press ¸ ¸. The task appear s w ith its revised priority.
on status line
New priority of 3
Assigning a Task Category
1. Select a task.
Category displayed
2. Press 2 ˆ (TI-89) or ˆ to display th e T as k Settin gs dialog
box.
TI-89 / TI-92 Plus / Voyage™ 200 PLT Organizer Suite Page 32

3. Open the Category menu and select a category.
4. Press ¸ ¸. The task appear s w ith its assi gned
category in the list.
New category displayed
Marking a Task Complete or Incomplete
1. Select a task.
TI-89 / TI-92 Plus / Voyage™ 200 PLT Organizer Suite Page 33

2. Press … to mark t he task complete. The task appears at t he
bottom of the list w ith a ch eck mark beside it.
Task marked by ➼ moves
to bottom of list.
Note You can al so mark a task complete in the Task Settings dialog box.
To retu r n a task to i ncompl et e st atus, select it and press …. The
check mar k beside i t disappear s.
To hide com pleted tasks:
1. Press ƒ
9:Format to open the FORMATS dialog box.
2. Select the View Com pleted Tasks menu and select No.
TI-89 / TI-92 Plus / Voyage™ 200 PLT Organizer Suite Page 34

3. Press ¸ ¸. The com pleted task is hidde n.
Adding a Task Due Date
1. Select a task.
2. Press 2 ˆ (TI-89) or ˆ to open t he Task Set t i ngs dial og
box.
3. In the Due Date field, press B.
TI-89 / TI-92 Plus / Voyage™ 200 PLT Organizer Suite Page 35

4. In the Due Date dialog box, sel ect Yes.
5. Press ¸. The Month, Day, and Year fiel ds become active.
6. Open the Month menu , sel e ct a m onth from t he list, and press
¸.
TI-89 / TI-92 Plus / Voyage™ 200 PLT Organizer Suite Page 36

7. Highli ght the Day field an d type a day of the mon t h.
8. Highli ght the Year field, type a y ear , and press ¸ ¸.
9. Press ¸ to close th e Task Setti ngs dial og box. T he due
date appear s in th e l i s t and in the status l i ne.
Due date
TI-89 / TI-92 Plus / Voyage™ 200 PLT Organizer Suite Page 37

Sorting Tasks
You can sort t asks by :
• Date (default)
• Category
• Priority
• Completed st at us
1. Open the Tasks App.
2. Press ƒ 9:Format to open the FORMATS dialog box.
TI-89 / TI-92 Plus / Voyage™ 200 PLT Organizer Suite Page 38

3. Open the Sort By menu and select an op t i on.
4. Press ¸ ¸.
TI-89 / TI-92 Plus / Voyage™ 200 PLT Organizer Suite Page 39

Working With Contacts
The Cont ac t s App lets you save the names, addresses, phone
numbers, and ot her inform at ion of you r personal, school, an d
business contacts.
Adding a New Contact
1. Start
2. Press „ or ƒ
the Contacts App.
1:New Contact. The New Cont act dialog box
appears.
3. Type t he contact i nformation . At l eas t one of the Last Name,
First Name, or Company fiel ds must be used.
TI-89 / TI-92 Plus / Voyage™ 200 PLT Organizer Suite Page 40

4. Press ¸ ¸. The n ew contact appears in the l i st.
Tip
You can al so press ¥ N (TI-92 Plus / Voyage™ 200 PLT) to open
the New Contact dialog box.
Viewing Details About a Contact
1. From the Cont act s scr een, select a contact.
2. Press ¸.
TI-89 / TI-92 Plus / Voyage™ 200 PLT Organizer Suite Page 41

3. Press ¸ to open t he Edit Cont act di alog box and view
more inform at i on or N to close the View Cont ac t w indow.
Editing a Contact
1. Select a contact and press ¸ ¸. The Edit Contact
dialog box appear s.
2. Edit the text.
3. Press ¸ ¸.
TI-89 / TI-92 Plus / Voyage™ 200 PLT Organizer Suite Page 42

Tip
You can al so press ¥ O (TI- 92 Plus / Voyage™ 200 PLT) to open
the Edit Contact dialog box.
Deleting a Contact
1. From the Cont act s scr een, select a contact and press
7:Delete Contact. The Delete Con t ac t m ess age box
ƒ
appears.
2. Press ¸. The sel ect ed contact is removed from the
screen.
Tip You can al so press 0 to delete the selected contact.
TI-89 / TI-92 Plus / Voyage™ 200 PLT Organizer Suite Page 43

Cutting a Contact
From the Contacts scr een, select a contact and press ƒ
Contact
Tip You can al so press ¥ 5 (TI-89) or ¥ X to cut a contact.
.
4:Cut
Duplicating or Copying and Pasting a Contact
You can du plicate or copy and paste an exi st i ng contact to create
a dupli c at e contact or a n ew contact.
For example, i f tw o contacts shar e som e of the same information,
you can dupl i cat e or c opy and paste one con t ac t , m ake changes,
and then save instead of entering all of the sam e informatio n
twice.
1. From the Cont act s scr een, select a contact and press Á or
ƒ
2:Duplicate Contact. The Edit Contac t di alog box appears.
TI-89 / TI-92 Plus / Voyage™ 200 PLT Organizer Suite Page 44

2. Press ¸. The duplicate contact appears in the l i s t .
Tip You can al so edit and save contact information using th is option.
To copy and paste a contact:
1. From the Cont act s scr een, select a contact and press
ƒ
5:Copy Contact.
2. To paste the contact , press ƒ
6:Paste Contact. The Edit
Contact dialog box appears.
3. Edit the con t a ct i nformation as desired and press ¸. The
new con t act appears in the l i st .
TI-89 / TI-92 Plus / Voyage™ 200 PLT Organizer Suite Page 45

Tip
You can al so press ¥ 6 (TI-89) or ¥ C to copy a contact and
¥ 7 (TI-89) or ¥ V to paste a contact.
Viewing Contacts by Category
1. From the Contacts screen , press ƒ
FORMATS dialog box.
9:Format to open the
2. Open the View Categ or y menu a nd select a men u option.
3. Press ¸ ¸. The l i st of contacts for th e s el ected
category appears.
TI-89 / TI-92 Plus / Voyage™ 200 PLT Organizer Suite Page 46

Formatting the Contacts App
• The Contacts App lets y ou access the followi n g format options
(for details on how to change form at options , see Changing
Format Options):
• View
• Display
• Font
• Store
Category
in List
Size
Files As
Tip You can al so press ¥ Í (TI-89) or ¥ F to open the FORMATS
dialog box.
TI-89 / TI-92 Plus / Voyage™ 200 PLT Organizer Suite Page 47

Using Format Options
Format opt i ons let y ou person al ize th e O r ganiz er Apps.
Calendar/Planner Tasks Contacts
Option App(s) Description
Display in
List
Contacts Specify the informat ion displayed by Category,
Company, Email, Fax, Pager, Phone (First
Available
, Home, Work, Mobil e), Other,
None. Default: Phone > First A vailable
Font Size Contacts
Tasks
Adjust the size of tex t.
• Tasks options: Normal, Large
• Contacts options: Normal, Small
• Default: Normal
Show
Lines
Sort By Tasks Sort tasks by Date (oldest to most recent),
Tasks View notebook lines on screen. Default: No
Category (school, work, personal, other, not
Priority (1 through 5), or Completed (no
filed),
to yes). Default:
TI-89 / TI-92 Plus / Voyage™ 200 PLT Organizer Suite Page 48
Date

Option App(s) Description
Store Fi les
As
View
Category
View
Completed
Tasks
Calendar
Contacts
Planner
Tasks
Contacts
Tasks
Tasks View compl eted tasks in addition to tasks not
Choose how entries are stored in memory.
Default:
• The
• The
• The
Tip: Because entries stored in RAM ar e lost when
memor y is reset, consider using
minimiz e the chance of losing data.
View all entries or specify a category (All,
Archived
Archived opt ion stores files in user-data
archive, a safe location out si de of RAM where
files cannot be edited or deleted inadvertent ly.
This option also ensures the availability of
additional free RA M .
RAM (Locked) option locks files in RAM
so they cannot be edited or deleted
inadvertently.
RAM (Unlocked) option stores files in
RAM.
Archived to
School, Work, Personal, Other, Not filed).
Default:
completed. Default:
All
Yes
TI-89 / TI-92 Plus / Voyage™ 200 PLT Organizer Suite Page 49

Changing Format Options
1. From the Calen dar App, p r ess ƒ
4:Format.
— or —
From the T as ks, Planner, or Cont act s Ap p, press
9:Format.
ƒ
Planner/Tasks Apps FORMATS dialog box
2. In the FORMATS dialog box, use the cursor keys to highlight an
option and open the menu.
3. Select a menu set ting and press ¸.
4. To save setting s an d close t he di alog box, pr ess ¸ again .
Tip
TI-89 / TI-92 Plus / Voyage™ 200 PLT Organizer Suite Page 50
You can al so press ¥ Í (TI-89) or ¥ F to open the FORMATS
dialog box.

Navigating in the Organizer Apps Suite
Using Menus
For help using the TI-89 / TI-92 Plus / Voyage™ 200 personal
learning tool ( PLT ) , r efer t o t he comprehensive guidebook s at
education.ti.com/guides
Calendar App Key Shortcuts
Go to: Shortcut
Date D
Today T
Prev ious day A
Next day B
Prev ious week C
Next week D
.
Prev ious month 2 A
Next month 2 B
Prev ious year ¹ A
TI-89 / TI-92 Plus / Voyage™ 200 PLT Organizer Suite Page 51

Go to: Shortcut
Next year ¹ B
Set Holi day «
Delete Holiday 0
View Holiday |
Planner ¸
Both the GoTo Today menu option and the shortcut will be
Note
unavailable if you r clock is turn ed off or your handhel d device does
not include a clock.
TI-89 / TI-92 Plus / Voyage™ 200 PLT Organizer Suite Page 52

Planner/Tasks/Contacts Apps Key Shortcuts
Function
New task/event /contact
Duplicat e task/ev ent/contact
Edit task/event/contact
Cut task/event/cont act
Copy task/event/contac t
Paste task/event/contact
Delete task/event/ c ontact
TI-89
Shortcut
NA ¹ N
Á Á
NA ¹ O
NA ¹ X
NA ¹ C
NA ¹ V
0 0
TI-92 Plus / Voyage™
200 Shortcut
TI-89 / TI-92 Plus / Voyage™ 200 PLT Organizer Suite Page 53

Checking Status Line Information
The stat us lin e, l o cat ed at t he bott om of t he screen, di s plays
information about the sel ected item.
Calendar Information
When t he calendar is displayed, th e st at us lin e di s plays the
selected date an d holiday ( i f an y).
Date and holiday
displayed
Planner Information
When a holiday or even t i s display ed, the stat us lin e shows the
selected hol iday or event al ong wi t h the ti m e.
Event and time
displayed
TI-89 / TI-92 Plus / Voyage™ 200 PLT Organizer Suite Page 54

Tasks Information
Type of task and due
When t asks are disp l ayed, the st at us lin e shows th e t ype of task
selected and t he due date.
Contact Information
date displayed
When contacts are di splayed, the status line s hows the selected
contact i nformation.
Selected information
displayed
TI-89 / TI-92 Plus / Voyage™ 200 PLT Organizer Suite Page 55

Errors, Error Messages, and Restrictions
Warning Messages
Message Description
Task due date set in
the past. Are you sure?
Tasks cannot be run in
split-screen mode with
Planner. Would you
like to close Planner
and run Tasks in Full
Screen mode?
Occurs if you set a due
the current date).
Press ¸ to accept the due dat e.
— or —
Press N to return to t he Due Da te Entry di alog
box.
Occurs when you try to display the Tasks and
Planner Apps sim ultaneously i n spl it-screen
mode.
Press ¸ to display the Tasks App and close
the Planner App.
— or —
Press N to display the Planner App and close
the Tasks App. The home screen replaces the
Task App in the split screen.
date in the past (before
TI-89 / TI-92 Plus / Voyage™ 200 PLT Organizer Suite Page 56

Error Messages
Message Description
Day is out o f range for
specified month and
must be a nu mber.
Day is out o f range for
specified month.
Year must be a 4-d igit
number.
Year must be bet ween
1754 and 4091.
Could not open file. Occurs if another application leaves a task file
There w as an error
saving the tasks. Not
all tasks were saved.
Based on user input, a com bination of these
four error messages is displayed when an
invalid number is entered i n the Due Date
Entry dialog box.
Enter valid numbers only.
open or the symbol table has become corr upt.
Occurs if there is an error wri ting the tasks
file(s). Som e tasks could not be saved.
TI-89 / TI-92 Plus / Voyage™ 200 PLT Organizer Suite Page 57

Message Description
Tasks 1.0 req uires OS
Version 2.05 or higher.
The Tasks App requires Advanced
Mathemat ics Software Versi on 2.05 or later t o
run. Tasks are deleted from the handheld
device.
Install the Advanc ed M athemati c s Software
Version 2.05 operating system, avail able from
education.ti.com/softwareupdates
File cannot be read. It
has an unknown
Occurs when the Tasks App does not
understand the for mat of a tasks file.
format.
Task does not exi st ! Occurs when the Planner App launches the
Tasks App and requests a task to be edited
that does not exist.
Not enough memory to
save changes. Y our
tasks will not be
modified.
Occurs when the Tasks App runs out of
memor y before it c an save the tasks f iles. In
normal c ircumstanc es, t he Tasks App lim its
operations to those i t can successfully save.
However, in rare circ umstances, memory can
be exhausted and all c hanges are not saved.
The Tasks App attempts to detect this and
leaves previous tasks intact.
TI-89 / TI-92 Plus / Voyage™ 200 PLT Organizer Suite Page 58

Message Description
Not enough memory to
perform operation.
Occurs when the Tasks App does not have
enough free memory t o per form the requested
operation.
Folder Occurs when the Tasks App cannot create the
ORGANIZER folder.
Free RAM by del eting unneeded tasks.
TI-89 / TI-92 Plus / Voyage™ 200 PLT Organizer Suite Page 59

Sending and Receiving Organizer Information
Organ i zer in formation can be transferr ed between link ed
handh eld devices. You can t r ansfer contact s either from withi n
the Contacts App or from the
screen to t ransfer all other Org anizer i nformation .
For more in forma t i on on sending an d rec ei ving files u s i ng th e
TI- 89 / TI-92 Plus / Voyag e™ 200 PLT , r efer t o the
compreh ensive gui debook for your han dheld device at
education.ti.com/guides
Note Organizer information must be saved in the correct folder or will not
be accessible by the Organizer Apps.
• When transferring contact i nformation, select the
CONTACTS folder on the r ec eiving dev ice.
• When transferring all other Organizer i nform at ion, select the
ORGANIZER fol der on the receiving device.
.
VAR-LINK screen. Use t he VAR-LINK
TI-89 / TI-92 Plus / Voyage™ 200 PLT Organizer Suite Page 60

Installing the Organizer Apps
Detailed Flash App in stallation inst r uctions ar e avail able from
education.ti.com/guides
You will need:
• A TI-89 / TI-92 Pl us / Voyag e™ 200 PLT with t he latest
Advanced Mathemat ics Software Op er at i ng Syst em . Dow nload
a free copy from education.ti.com/softwareupdates.
.
• A computer using ei t her Microsoft®Windows®or Appl e
®
Macintosh®operating sy st em software.
• A TI-G RAPH LI NK™ cab le that connects the
TI- 89 / TI-92 Pl us / Voyag e™ 200 PLT and a comp uter. The
cable is avail able for pu r chase from retail stores, on l ine
retailers , and inst r uctional dealers. You m ay also purchase the
cable from the TI O nlin e St ore at education.ti.com/buy
.
• TI Connect™ software, which is compatible with most current
TI graphing products.
— or —
TI- G RAPH LI NK softwar e for either t he TI- 89 or TI-92 Pl us. All
connect i vit y software is avail able free from
education.ti.com/softwareupdates.
TI-89 / TI-92 Plus / Voyage™ 200 PLT Organizer Suite Page 61

Starting and Quitting the Organizer Apps
The instructions in this guidebook refer to this Flash App only. For
help using the TI-89 / T I-92 Plu s / Voyage™ 200 PLT, r efer t o the
compreh ensive gui debook for your han dheld device at
education.ti.com/guides
Starting an Organizer App
• With t he Apps desktop turned on , press O to display the
desktop , high l ight Calendar, Cont act s, Pl anner, or Tasks, an d
press ¸.
— or —
With t he Apps desktop turned off, p res s ¹ O, highlight
Calendar, Con t acts, Planner, or Tasks, and press ¸.
Dependin g on the O r ganiz er Ap p selected, on e of the followin g
screens appear s.
.
Calendar screen
TI-89 / TI-92 Plus / Voyage™ 200 PLT Organizer Suite Page 62

Contacts scr een
Planner screen
Tasks screen
Note
You can al so open other Organizer Apps from within an open
Organizer App.
Quitting the Organizer Apps
Press 2 K from any s cr een.
TI-89 / TI-92 Plus / Voyage™ 200 PLT Organizer Suite Page 63

Deleting an App
Deleting an App removes it from the handheld device and
increases space for other Apps. Before delet i ng an App, con si der
makin g a back up copy for reinst allation .
1. Quit
2. Press 2 ° to displ ay the
the application.
VAR-LINK [ALL] screen.
3. Press 2 ‰ (TI-89) or ‰ to display th e l i s t of installed
applications.
4. Select the ap plicati on you w ant to delete.
5. Press ƒ
1:Delete. The VAR-LINK delete confirmat ion dialog
box displays.
6. Press ¸ to delete the appl i cation.
TI-89 / TI-92 Plus / Voyage™ 200 PLT Organizer Suite Page 64

TI Support and Service Information
For General Information
E-mail:
Phone: 1.800.TI.CARES (1.800.842.2737)
ti-cares@ti.com
for U.S., Canada, Mexico, Puerto Rico, and Virgin Islands
only
Home Page:
Customer
Support Center:
International
Information:
education.ti.com
education.ti.com/support
education.ti.com/support
(Click International Information)
For TI-Navigator™ Technical Questions
E-mail:
Phone: 1.866.TI.NAVIGATOR (1.866.846.2844)
ti-navigator@ti.com
For Technical Questions
Phone: 1.972.917.8324
For Product (hardware) Service
Customers in the U.S., Canada, Mexico, Puerto Rico and Vir gi n I slands: Always
contact Texas Instruments Customer Support before returning a product for s ervic e.
All other cust omers: Refer to the leaflet enclosed with this pr oduct ( har dwar e) or
contact your local Texas Instruments retailer/dist r ibutor.
TI-89 / TI-92 Plus / Voyage™ 200 PLT Organizer Suite Page 65

Texas Instruments License Agreement
BY INSTALLING THIS SOFTWARE YOU AGREE TO ABIDE BY THE FOLLOWING PROVISIONS
1. LICENSE: Texas Instruments Incorporated (“TI”) grants you a license to
use and copy the soft war e pr ogr am ( s ) ( “ Lic ens e M aterials”) contained on
this diskett e/CD/web site. You, and any subsequent user, m ay only us e t he
Licensed Materials on T ex as Instruments dev ic es .
2. RESTRICTIONS: You may not r ev er s e- as s em ble or r ev er s e- c om pile t he
Licensed Materials. Y ou m ay not sell, rent, or leas e c opies that you make.
3. COPYRIGHT: The Licens ed M aterials and any accompanying
documentation are copy r ighted. If you mak e c opies , do not delete the
copyright notice, trademark, or pr otective notices from the copies.
4. WARRANTY: TI does not warr ant that the Licensed M aterials or
documentation will be fr ee from errors or t hat they will meet your s pec ific
requirements. THE LICENSED MATERIALS ARE PROVIDED “AS IS” TO
YOU OR ANY SUBSEQUENT USER.
5. LIMITATIONS: TI makes no warranty or condition, either express or
implied, including but not lim ited to any implied warrant ies of merchantability
and fitness for a par ticular purpose, regarding the Licensed Materials.
In no event shall TI or its suppliers be liable for any indirect, incidental, or
consequential damages, loss of profits, loss of use or data, or interruption
of business, whether the alleged damages are labeled in tort, contract, or
indemnity.
Some states or jurisdictions do not allow the exclusion or limitation of
incidental or consequential damages, so the above limitation may not
apply.
TI-89 / TI-92 Plus / Voyage™ 200 PLT Organizer Suite Page 66

Page Reference
This PDF document contai ns el ec tronic bookmarks for on-screen navigation. If
you print t his document, use the page numbers below to find specific topics.
Important Information...................................................................................2
Introducing the Organizer Suite....................................................................3
Languages...............................................................................................3
Getting Started with the Organizer Apps.......................................................4
V i e wing t h e C a l e nd a r Ap p..............................................................................4
V i e wing a Ho liday, E vent, or Task From t he C alen d a r A p p...............................5
Viewing Contact Information From the Calendar App...............................6
Setting Holidays.......................................................................................7
Deleting Holidays...................................................................................10
Importing Holidays.................................................................................11
Accessing Calendar Format Options......................................................11
Working With the Clock .........................................................................12
Working With Events ..................................................................................14
Adding an Event.....................................................................................14
Viewing an Event...................................................................................18
Duplicating an Event..............................................................................19
Editing an Event.....................................................................................20
TI-89 / TI-92 Plus / Voyage™ 200 PLT Organizer Suite Page 67

Cutting an Event....................................................................................21
Copying and Pasting an Event...............................................................21
Deleting an Event...................................................................................22
Clearing All Events.................................................................................22
Formatting the Planner App ...................................................................23
Purging Old Events and Holidays...........................................................23
Working With Tasks...................................................................................24
Adding a Task........................................................................................25
Duplicating a Task..................................................................................26
Editing a Task........................................................................................26
Cutting a Task........................................................................................27
Copying and Pasting a Task...................................................................28
Deleting a Task......................................................................................28
Clearing All Tasks..................................................................................29
Formatting the Tasks App ......................................................................30
Assigning a Task Priority........................................................................31
Assigning a Task Category.....................................................................32
Marking a Task Complete or Incomplete................................................ 33
Adding a Task Due Date ........................................................................35
Sorting Tasks .........................................................................................38
TI-89 / TI-92 Plus / Voyage™ 200 PLT Organizer Suite Page 68

Working With Contacts...............................................................................40
Adding a New Contact............................................................................40
Viewing Details About a Contact ............................................................41
Editing a Contact....................................................................................42
Deleting a Contact..................................................................................43
Cutting a Contact ...................................................................................44
Duplicating or Copying and Pasting a Contact........................................ 44
Viewing Contacts by Category................................................................46
Formatting the Contacts App..................................................................47
Using Format Options.................................................................................48
Changing Format Options......................................................................50
Navigating in the Organizer Apps Suite ......................................................51
Using Menus..........................................................................................51
Calendar App Key Shortcuts..................................................................51
Planner/Tasks/Contacts Apps Key Shortcuts..........................................53
Checking Status Line Information...............................................................54
Calendar Information..............................................................................54
Planner Information................................................................................54
Tasks Inf ormation ..................................................................................55
Contact Information................................................................................55
TI-89 / TI-92 Plus / Voyage™ 200 PLT Organizer Suite Page 69

Errors, Error Messages, and Restrictions.................................................... 56
Warning Messages.................................................................................56
Error Messages......................................................................................57
Sending and Receiving Organizer Information............................................60
Installing the Organizer Apps......................................................................61
Starting and Quitting the Organizer Apps....................................................62
Starting an Organizer App......................................................................62
Quitting the Organizer Apps...................................................................63
Deleting an App..........................................................................................64
TI Support and Service Information............................................................65
For General Information.........................................................................65
For TI-Navigator™ Technical Questions.................................................65
For Technical Questions........................................................................65
For Product (hardware) Service..............................................................65
Texas Instruments License Agreement.......................................................66
TI-89 / TI-92 Plus / Voyage™ 200 PLT Organizer Suite Page 70
 Loading...