

Page 1

TI-89 Titanium
Graphing Calculator
Page 2

TI-89 Titanium Graphing Calculator 2
Important Information
Texas Instruments makes no warranty, either express or implied, including but not limited
to any implied warranties of merchantability and fitness for a particular purpose,
regarding any programs or book materials and makes such materials available solely on
an "as-is" basis. In no event shall Texas Instruments be liable to anyone for special,
collateral, incidental, or consequential damages in connection with or arising out of the
purchase or use of these materials, and the sole and exclusive liability of Texas
Instruments, regardless of the form of action, shall not exceed the purchase price of this
product. Moreover, Texas Instruments shall not be liable for any claim of any kind
whatsoever against the use of these materials by any other party.
USA FCC Information Concerning Radio Frequency Interference
This equipment has been tested and found to comply with the limits for a Class B digital
device, pursuant to Part 15 of the FCC rules. These limits are designed to provide
reasonable protection against harmful interference in a residential installation. This
equipment generates, uses, and can radiate radio frequency energy and, if not installed
and used in accordance with the instructions, may cause harmful interference to radio
communications. However, there is no guarantee that interference will not occur in a
particular installation.
If this equipment does cause harmful interference to radio or television reception, which
can be determined by turning the equipment off and on, you can try to correct the
interference by one or more of the following measures:
• Reorient or relocate the receiving antenna.
• Increase the separation between the equipment and receiver.
• Connect the equipment into an outlet on a circuit different from that to which the
receiver is connected.
Page 3

TI-89 Titanium Graphing Calculator 3
• Consult the dealer or an experienced radio/television technician for help.
Caution: Any changes or modifications to this equipment not expressly approved
by Texas Instruments may void your authority to operate the equipment.
© 2005 Texas Instruments Incorporated
Windows and Macintosh are trademarks of their respective owners.
Page 4

Getting Started 4
Getting Started
Getting StartedGetting Started
Getting Started
Initial start-up
Initial start-up Initial start-up
Initial start-up
Installing the AAA Batteries
Installing the AAA BatteriesInstalling the AAA Batteries
Installing the AAA Batteries
The TI-89 Titanium uses four AAA alkaline batteries and a backup silver oxide battery
(SR44SW or 303). The backup battery is already installed, and the AAA batteries are
provided with the product.
1. Remove the battery cover from the back of the calculator.
2. Unwrap the four AAA batteries provided with your product and insert them in the
battery compartment. Arrange the batteries according to the polarity (+ and -)
diagram in the battery compartment.
3. Replace the battery cover on the calculator. The cover should snap into place.
Page 5

Getting Started 5
Turning on your
Turning on your Turning on your
Turning on your TI-89 Titanium
TI-89 TitaniumTI-89 Titanium
TI-89 Titanium for the first time
for the first time for the first time
for the first time
After installing the batteries included with the calculator, press ´. The Apps desktop
appears.
Note: If your calculator initializes the preinstalled Apps, a progress bar will appear with
the message “
Installation in progress . . . Do not interrupt!” instead of the
Apps desktop. To avoid losing Apps, do not remove the batteries during initialization.
(You can re-install Apps from either the Product CD-ROM or education.ti.com
.)
Adjusting the contrast
Adjusting the contrastAdjusting the contrast
Adjusting the contrast
The Apps desktop
The Apps desktopThe Apps desktop
The Apps desktop
The Apps desktop is the starting point for operating your TI-89 Titanium. Your installed
Apps appear on the Apps desktop as icons organized in categories for easy access.
From the Apps desktop, you can:
• Open Apps.
Progress bar
• To lighten the display, press and hold 8 and tap
|.
• To darken the display, press and hold 8 and tap
«.
CHAR
VAR-LINK
Page 6
Getting Started 6
• Select and edit categories of Apps.
• View all of the Apps installed on your calculator.
• View the full name of the highlighted App.
• View and edit the time and date.
• Check status line information.
• View split-screen mode information.
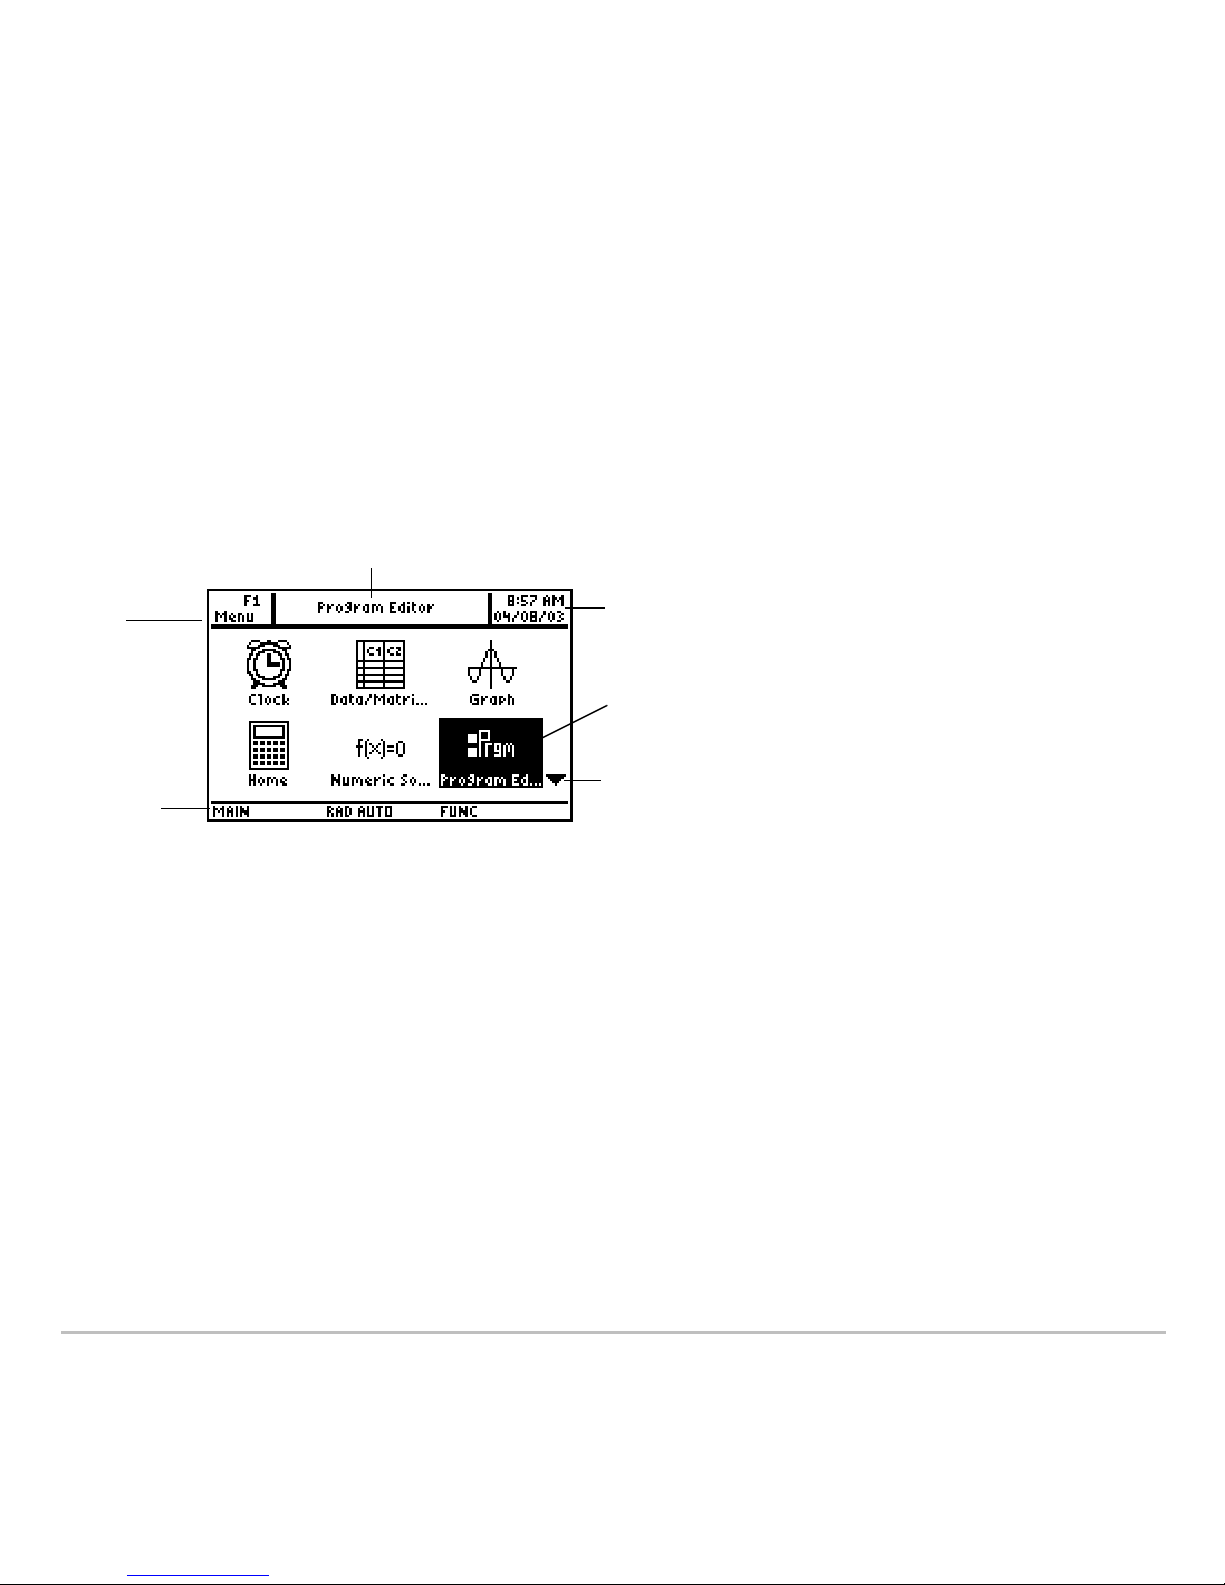
TI-89 Titanium Apps desktop
Ê View full name of highlighted App.
Ë View time and date.
Ì Press ¸ to open highlighted App.
Í Scroll down to view additional Apps.
Î Check status line information.
Ë
Ì
Ê
Ï
Î
Í
Page 7

Getting Started 7
Ï Edit categories.
To return to the Apps desktop at any time, press O. The last category selected
appears with the last open App highlighted.
Turning off the calculator
Turning off the calculatorTurning off the calculator
Turning off the calculator
Press 2®. The next time you turn on the calculator, the Apps desktop appears with
the same settings and memory contents retained. (If you turned off the Apps desktop,
the calculator Home screen appears.)
You can use either of the following keys to turn off the TI-89 Titanium.
Press: Description
2 ® (press 2
and then press
®)
Settings and memory contents are retained by
the Constant Memory™ feature.
• You cannot, however, use 2 ® if an error
message is displayed.
• When you turn the TI-89 Titanium on again, it
displays either the Home screen or the Apps
desktop (regardless of the last application you
used).
¥ ® (press ¥
and then press
®)
Similar to
2 ® except:
• You can use ¥ ® if an error message is
displayed.
• When you turn the TI-89 Titanium on again, it
will be exactly as you left it.
Page 8

Getting Started 8
Note: ® is the second function of the ´ key.
The calculator’s Automatic Power Down™ (APD™) feature prolongs battery life by
turning the calculator off automatically following several minutes of inactivity. When you
turn on the calculator after APD:
• The display, cursor, and any error conditions are exactly the same as before APD.
• All settings and memory contents are retained.
Note: APD does not occur if a calculation or program is in progress, unless the program
is paused. If a program is running but waiting for a key press, APD will occur after
several minutes of inactivity.
Page 9
Getting Started 9
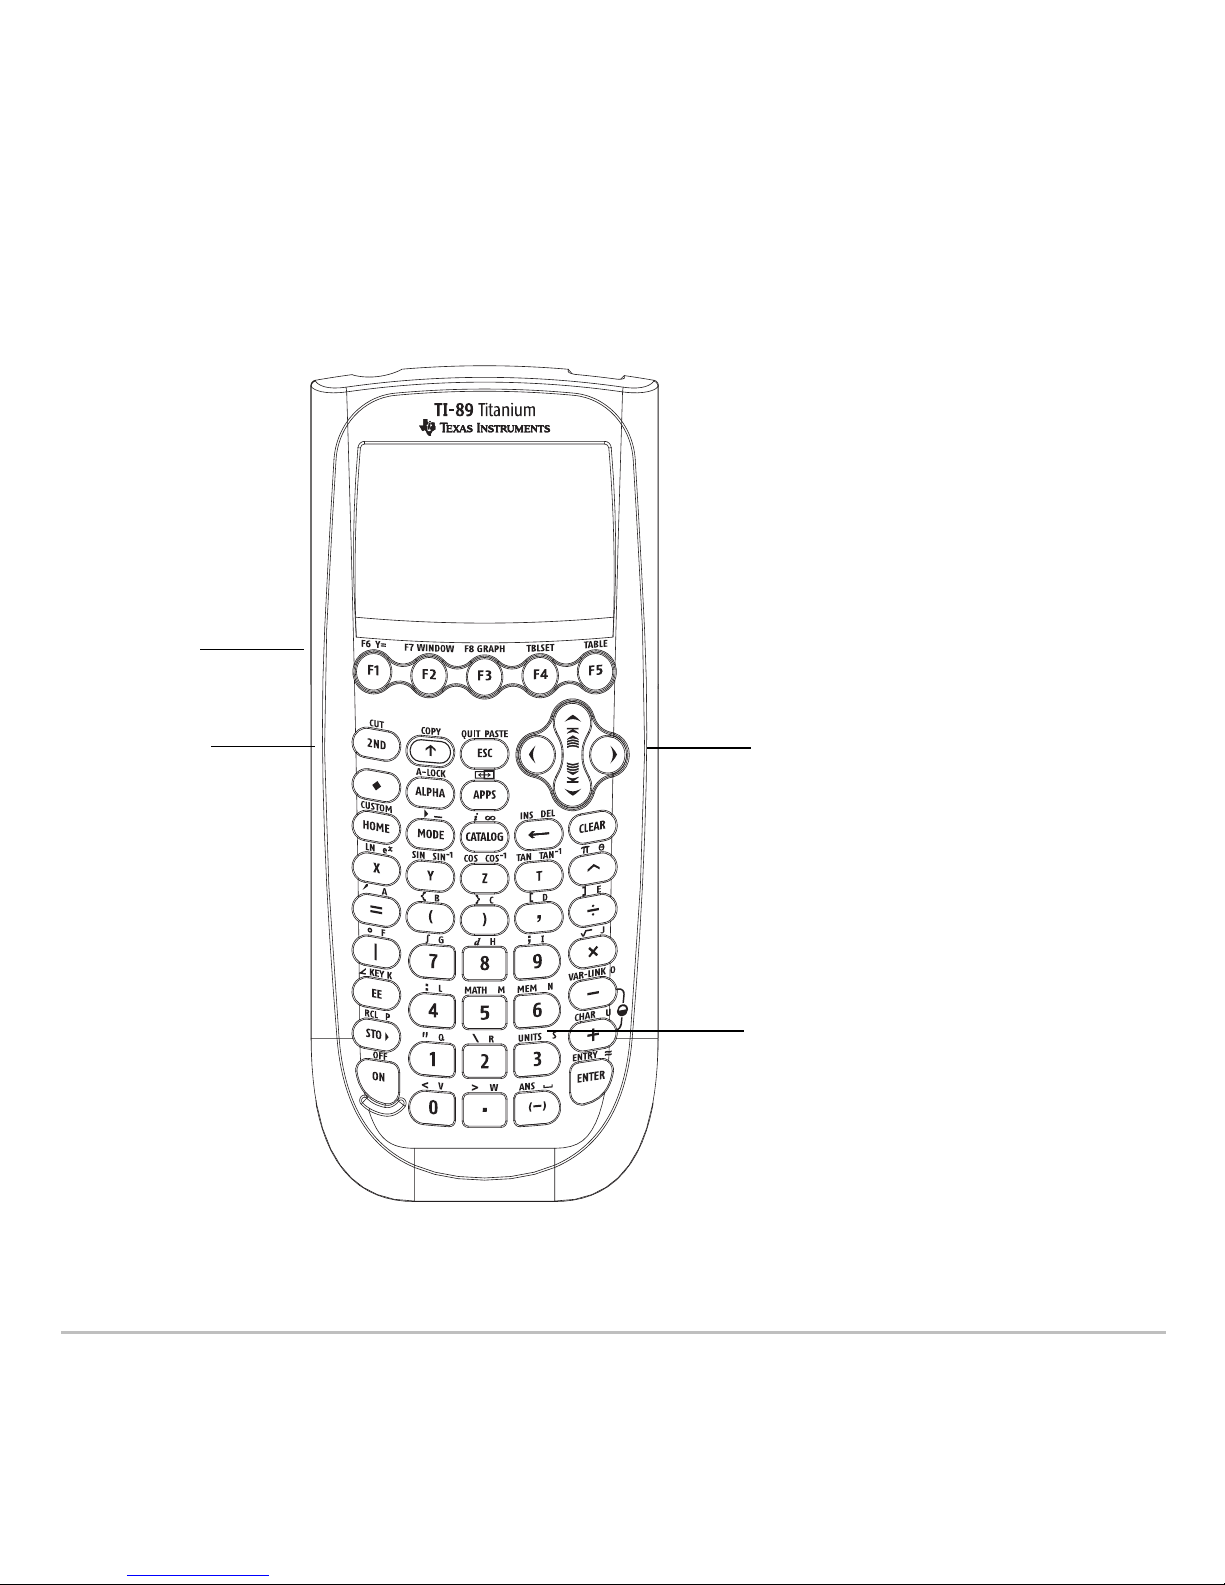
TI-89 Titanium
TI-89 TitaniumTI-89 Titanium
TI-89 Titanium keys
keys keys
keys
Ë
Ì
Í
Ê
Page 10

Getting Started 10
TI-89 Titanium keys
Ê Function keys (ƒ– Š) open toolbar menus, access Apps, and edit categories of
Apps.
Ë Cursor keys (A, B, C, D) move the cursor.
Ì Numeric keypad performs math and scientific functions.
Í Modifier keys (2, 8, 7) add features by increasing the number of key commands.
Entering special characters
Entering special charactersEntering special characters
Entering special characters
Use the CHAR (Character) menu and key commands to enter special characters. The
CHAR menu lets you access Greek, math, international, and other special characters.
An on-screen keyboard map shows the locations of shortcuts used to enter other
commonly used characters.
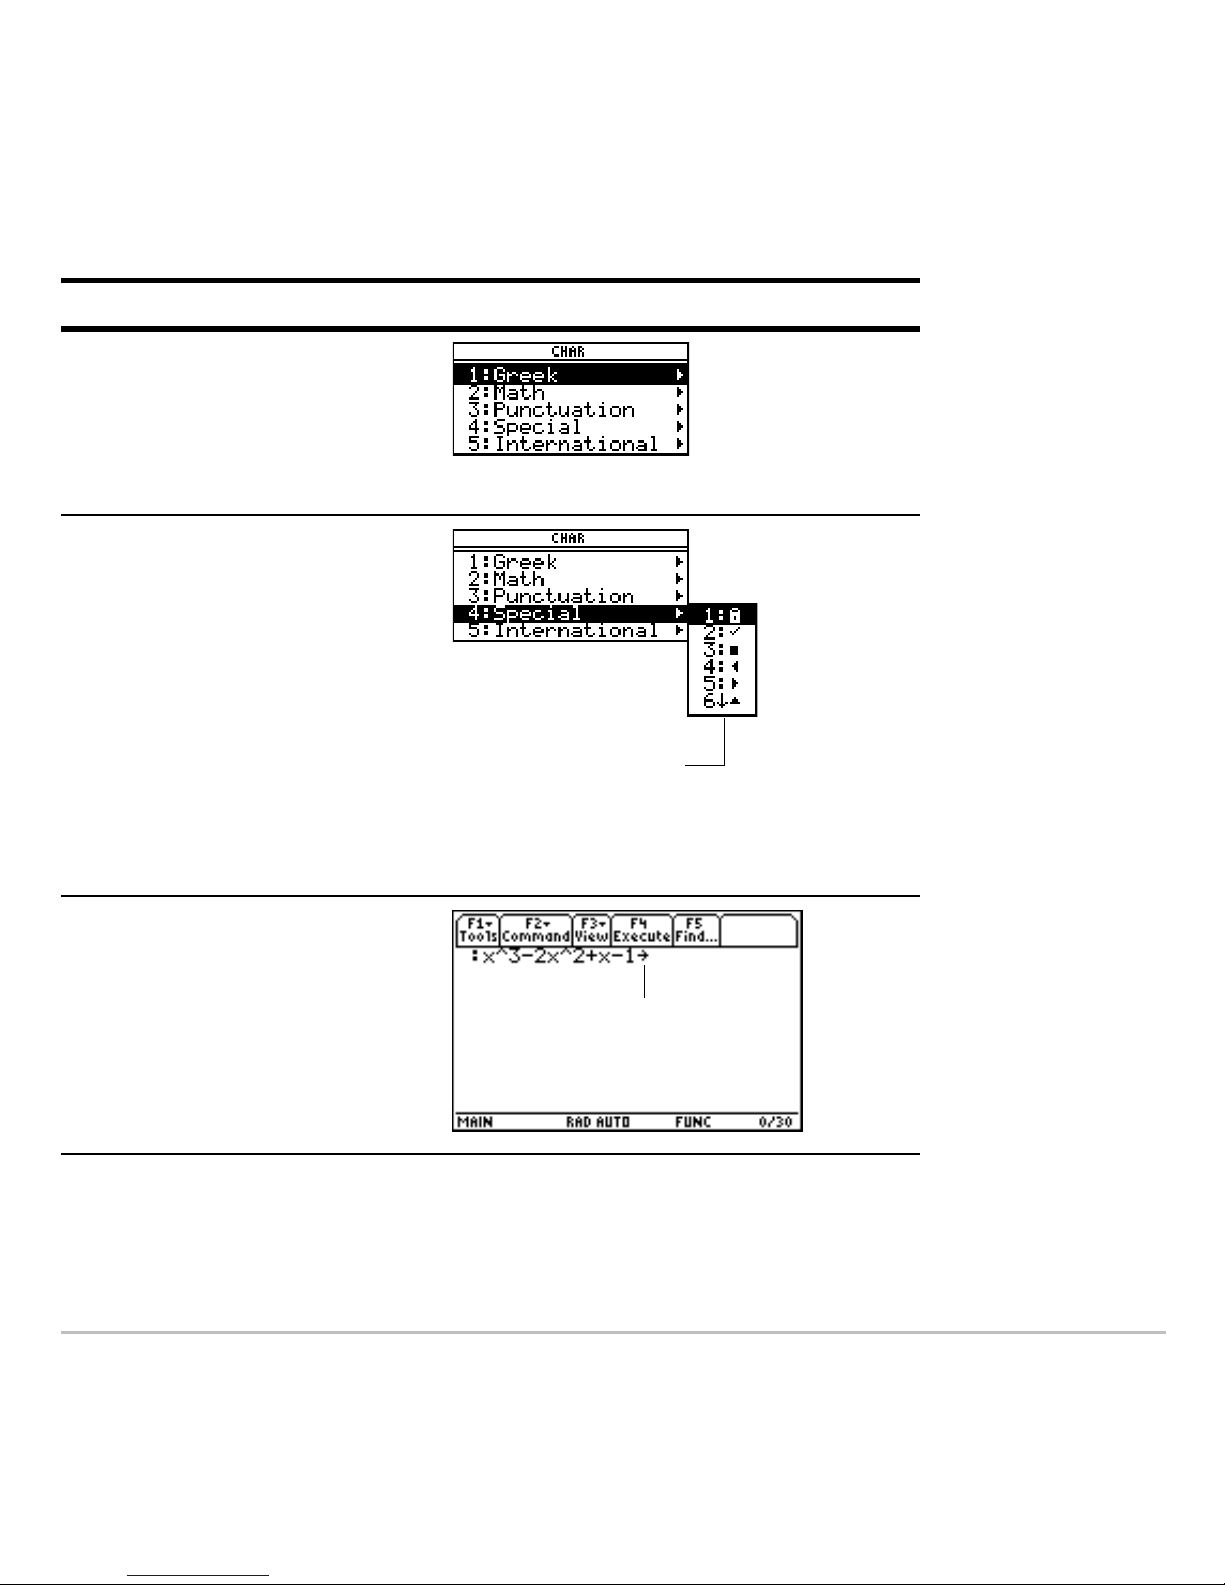
To select characters from the CHAR menu:
1. Press 2G. The CHAR menu appears.
2. Use the cursor keys to select a category. A submenu lists the characters in that
category.
3. Use the cursor keys to select a character, and press ¸.
Page 11
Getting Started 11
Example: Enter the right arrow symbol (→) in the Text Editor.
To open the keyboard map, press 8”. The keyboard map appears.
Press Result
2G
4
9
– or –
Press
D repeatedly to
select 9:
→
and press
¸
Scroll down for
more characters.
Symbol displayed at cursor
location.
Page 12
Getting Started 12
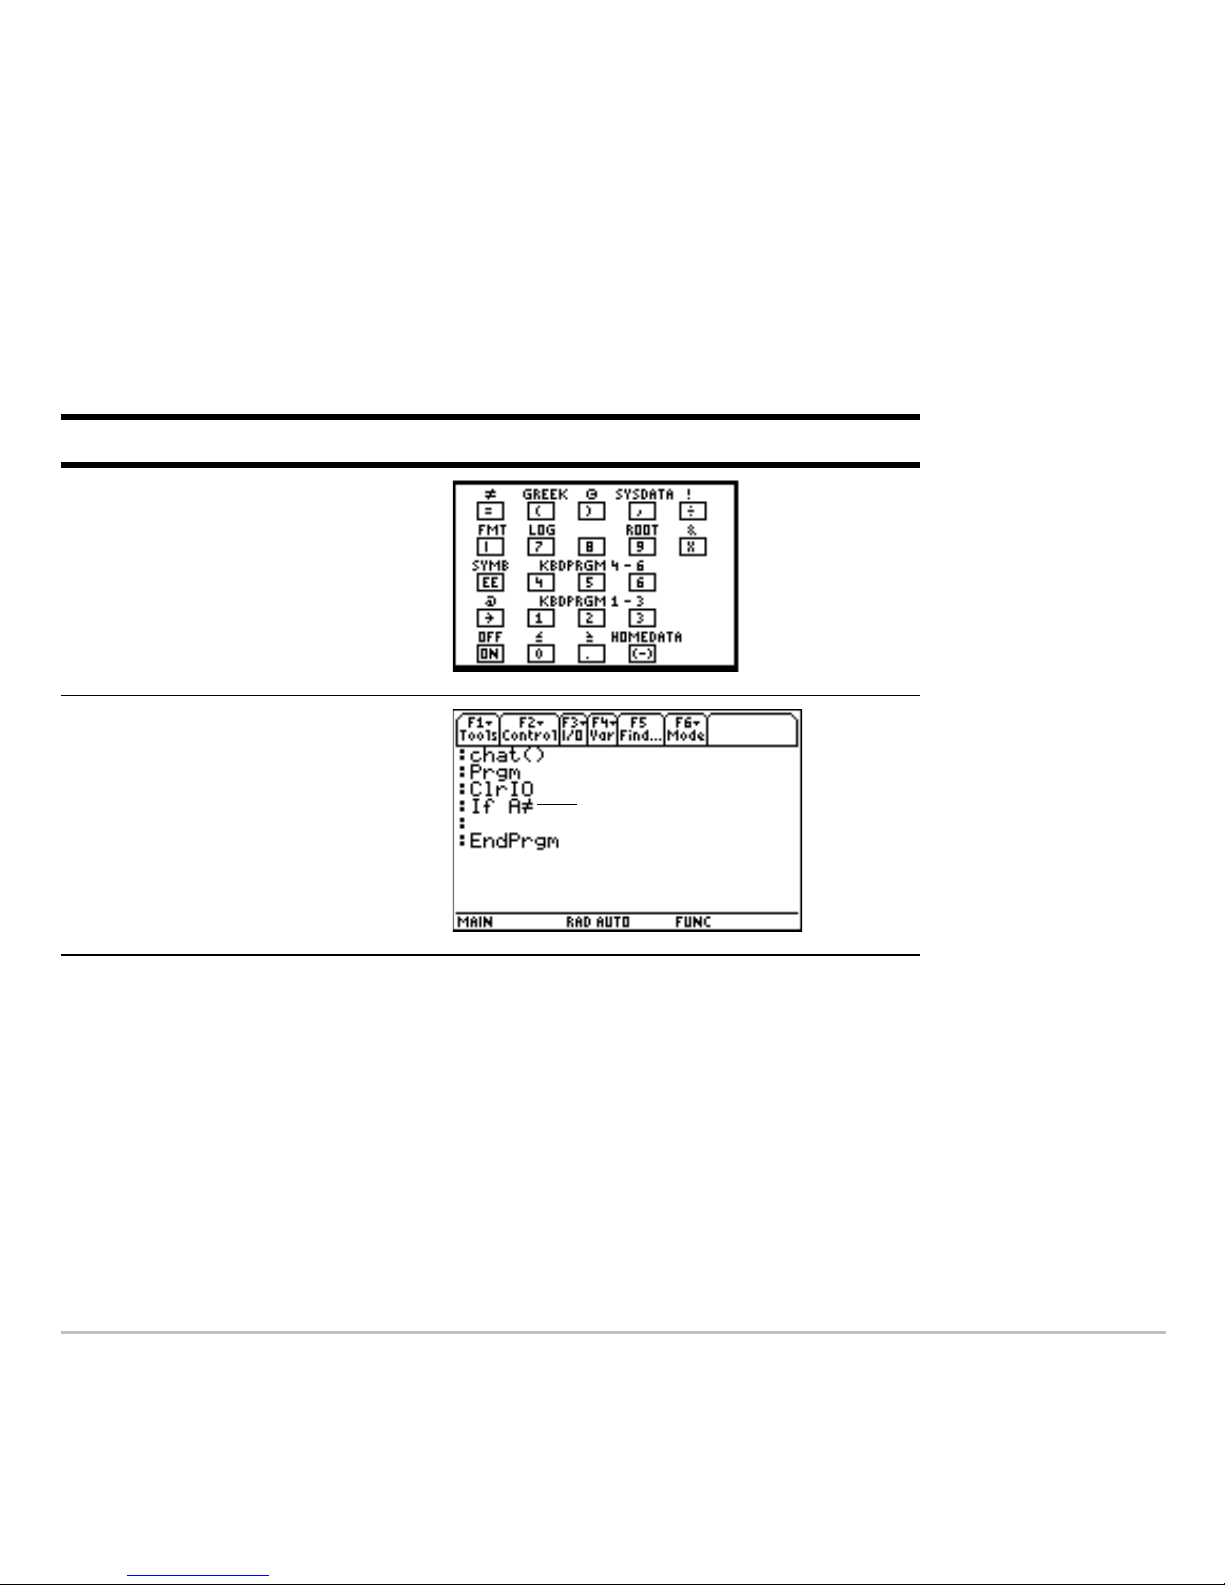
To type most characters, press 8 and the corresponding key. Press N to close the
map.
Example: Use the keyboard map to find the “not equal to” symbol (ƒ) shortcut and enter
the symbol in the Program Editor.
Press Result
8”
¥Á
Symbol
displayed at
cursor location.
Page 13

Getting Started 13
Modifier keys
Modifier keysModifier keys
Modifier keys
Modifier keys add features by increasing the number of keyboard operations at your
fingertips. To access a modifier function, press a modifier key and then press the key for
the corresponding operation.
Keys Description
2
(Second)
Accesses Apps, menu options, and other
operations. Second functions are printed above
their corresponding keys in the same color as
the
2 key.
8
(Diamond)
Accesses Apps, menu options, and other
operations. Diamond functions are printed
above their corresponding keys in the same
color as the
8 key.
¤
(Shift)
Types an uppercase character for the next letter
key you press. Also used with A and B to
highlight characters when editing.
j
(Alpha)
Lets you type alphabetic characters without a
QWERTY keypad. Alpha characters are printed
above their corresponding keys in the same
color as the
j key.
Page 14
Getting Started 14
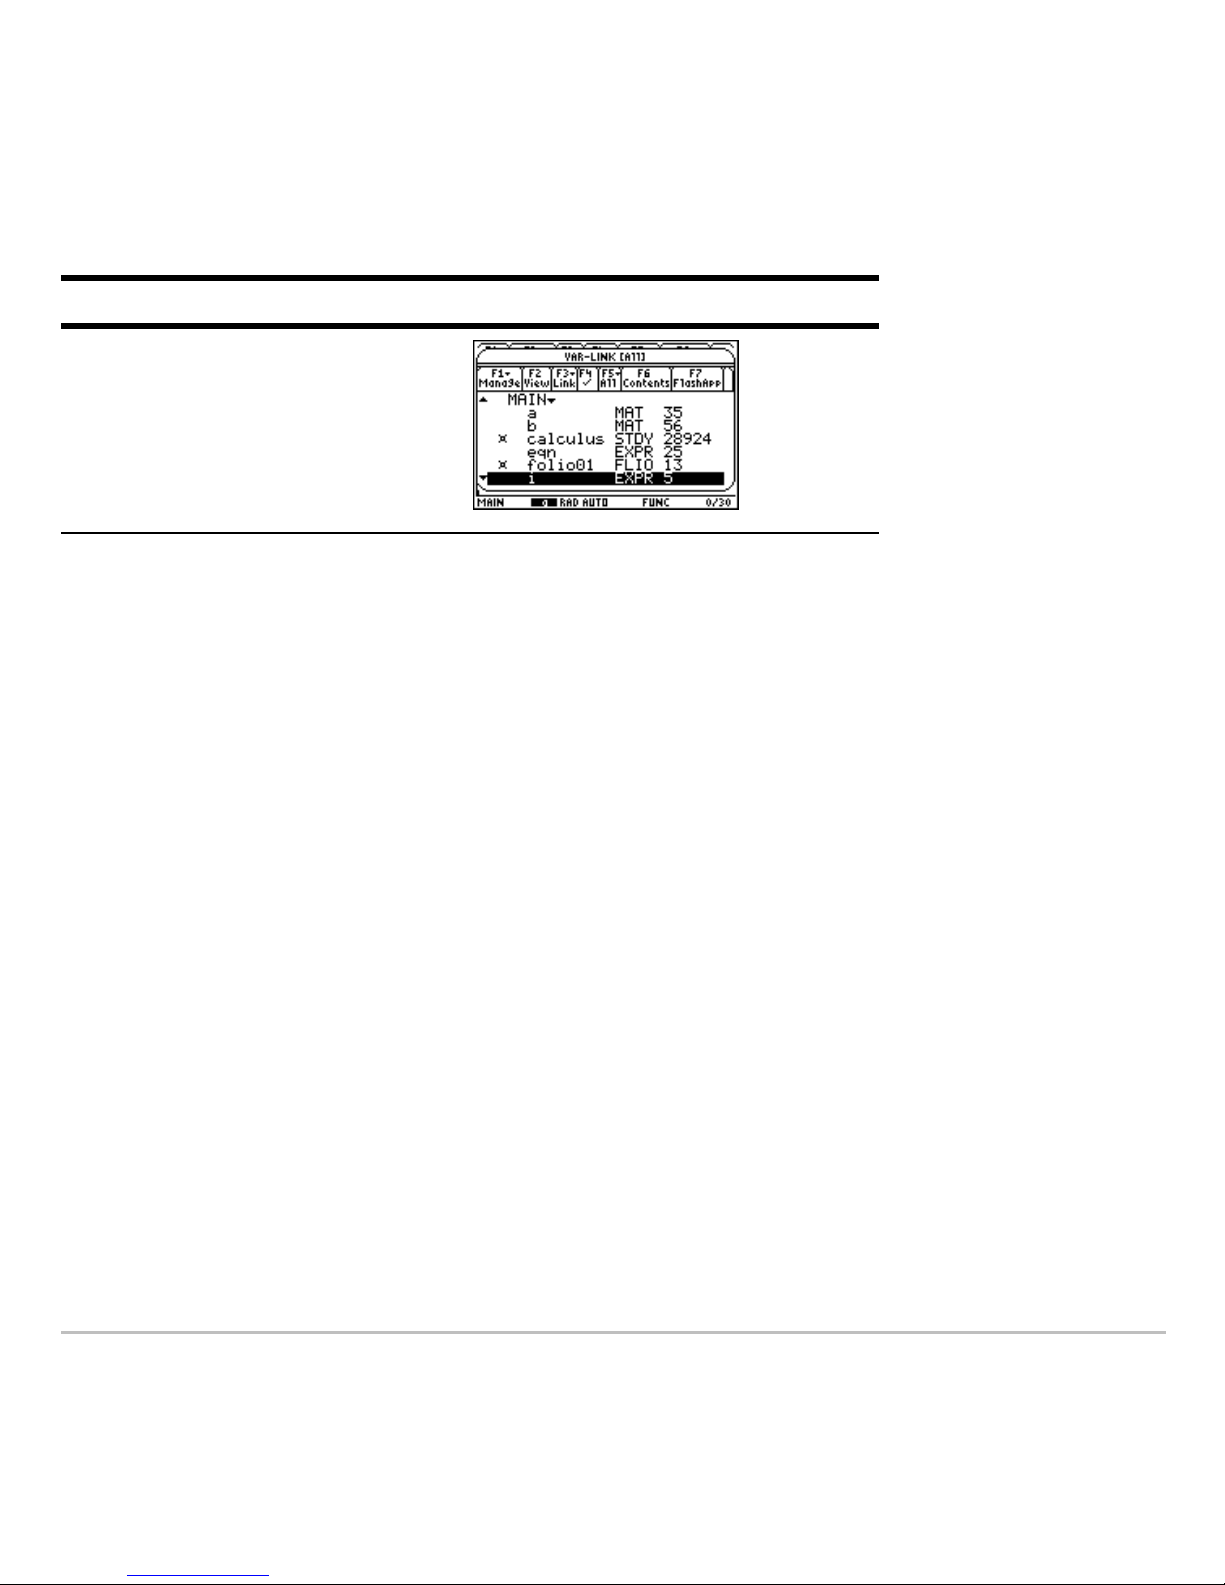
Example: Access the VAR-LINK [All] screen, where you can manage variables and Apps.
Function keys
Function keysFunction keys
Function keys
Use the function keys to perform the following operations:
• On the Apps desktop, open Apps and select or edit Apps categories.
• On the calculator Home screen, open toolbar menus to select math-related
operations.
• Within Apps, open toolbar menus to select App options.
Numeric keypad
Numeric keypadNumeric keypad
Numeric keypad
The numeric keypad lets you enter positive and negative numbers.
To enter a negative number, press ? before typing the number.
Note: Don’t confuse the negation key (?) with the subtraction key (|).
Press Result
2°
Page 15

Getting Started 15
To enter a number in scientific notation:
1. Type the numbers that precede the exponent. (This value can be an expression.)
2. Press ^. The exponent symbol (í) follows the numbers you entered.
3. Type the exponent as an integer with up to three digits. (As the following example
shows, you can use a negative exponent.)
Example: On the calculator Home screen, enter 0.00685 using scientific notation.
Other important keys
Other important keysOther important keys
Other important keys
Press Result
6 ¶ 85
^
?
3
¸
Key Command Description
8#
Displays the Y= Editor.
Page 16

Getting Started 16
8$
Displays the Window Editor.
8%
Displays the Graph screen.
8&
Sets parameters for the Table
screen.
8'
Displays the Table screen.
¥5
¥6
¥7
These keys let you edit entered
information by performing a cut,
copy, or paste operation.
O
Displays the Apps desktop.
8 O
With the Apps desktop off,
displays the FLASH
APPLICATIONS menu.
2a
Switches between the last two
chosen Apps.
2¾
Turns the custom menu on and off.
24
Converts measurement units.
¥
Designates a measurement unit.
0
Deletes the character to the left of
the cursor (backspace).
8.
Deletes the character to the right
of the cursor.
2/
Switches between insert and
overwrite modes.
Key Command Description
Page 17

Getting Started 17
Mode settings
Mode settings Mode settings
Mode settings
Modes control how the TI-89 Titanium displays and interprets information. All numbers,
including elements of matrices and lists, are displayed according to the current mode
settings. When the TI-89 Titanium is turned off, the Constant Memory™ feature retains
all of the mode settings you have selected.
To view the TI-89 Titanium mode settings:
2¯
Displays the MEMORY screen.
½
Displays a list of commands.
2£
Recalls the contents of a variable.
§
Stores a value to a variable.
2G
Displays the CHAR menu, which
lets you select Greek letters,
international accented characters,
and other special characters..
2K
• In full-screen mode, displays
the Apps desktop.
• In split-screen mode, displays
the full-screen view of the active
App.
• With the Apps desktop off,
displays the calculator Home
screen.
Key Command Description
Page 18
Getting Started 18
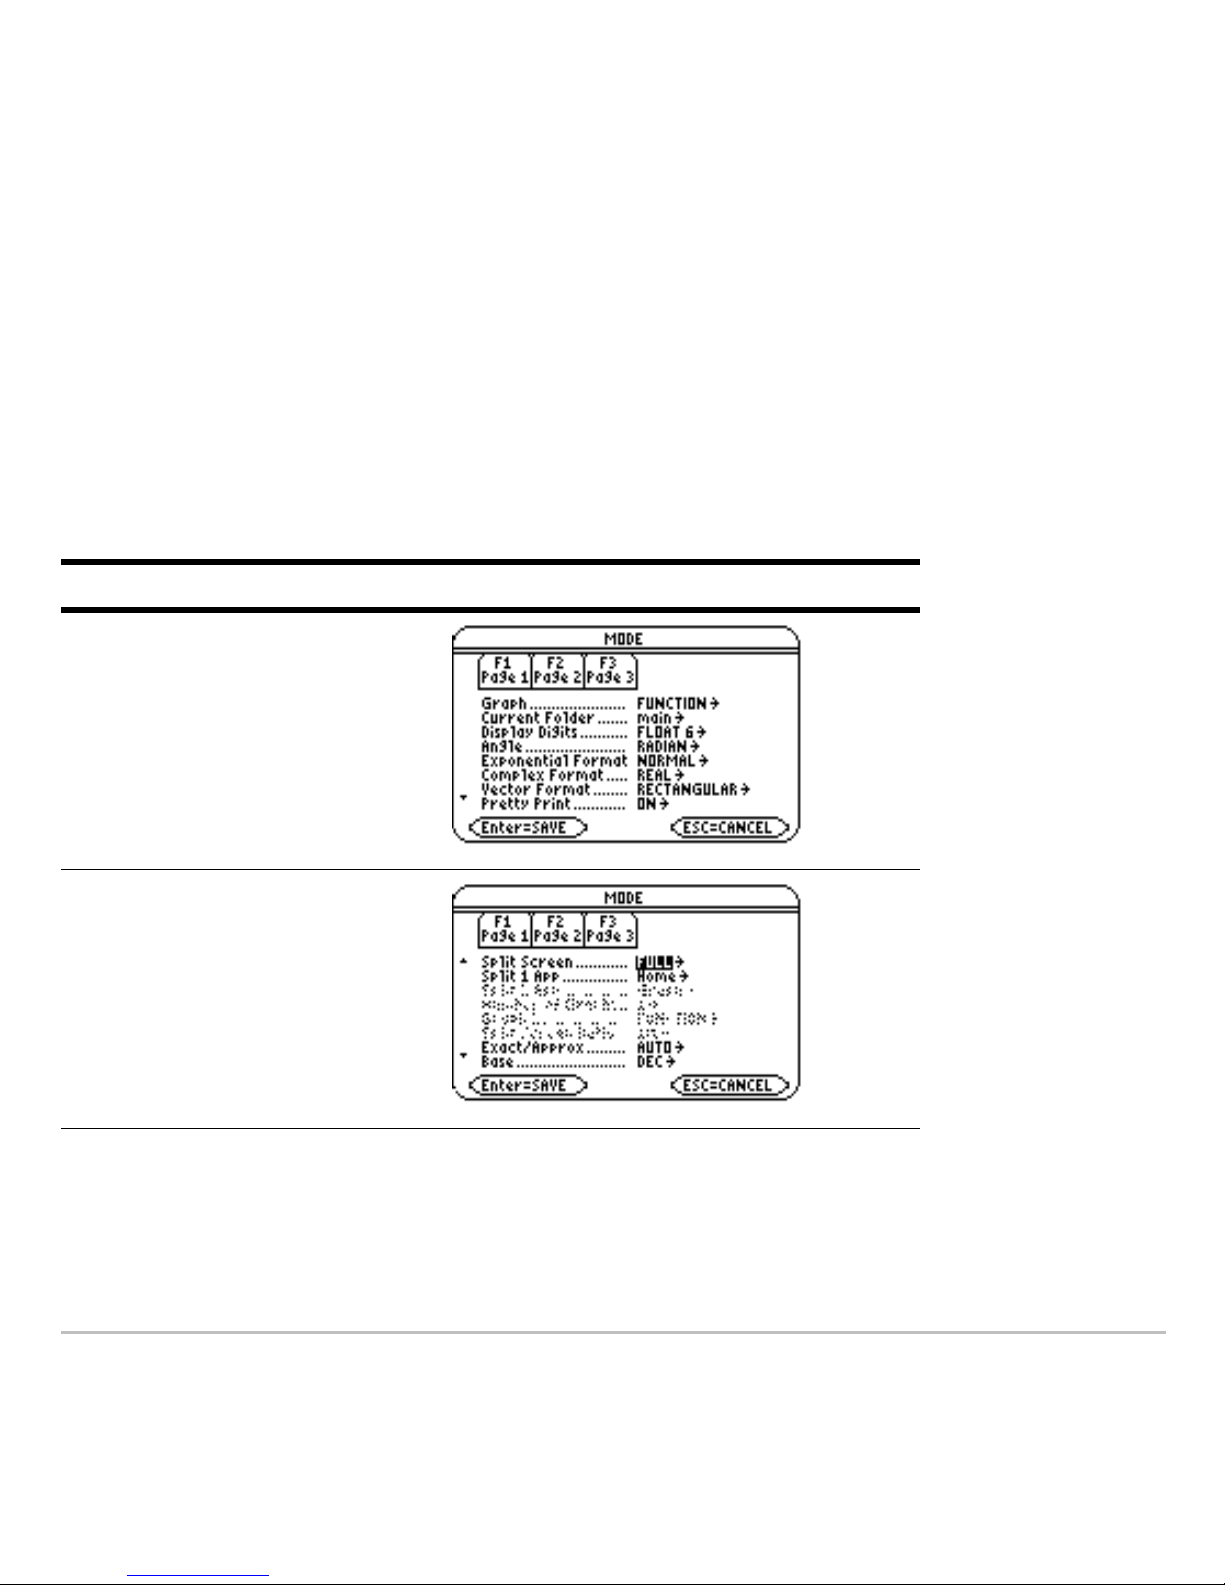
1. Press 3. Page 1 of the MODE dialog box appears.
2. Press „ or … to display the modes listed on Page 2 or Page 3.
Note: Modes that are grayed out are available only if other required mode settings are
selected. For example, the Custom Units mode listed on Page 3 is available only if the
Unit System mode is set to CUSTOM.
Viewing mode settings
Viewing mode settingsViewing mode settings
Viewing mode settings
Press Result
3
ã„
Page 19

Getting Started 19
Changing mode settings
Changing mode settingsChanging mode settings
Changing mode settings
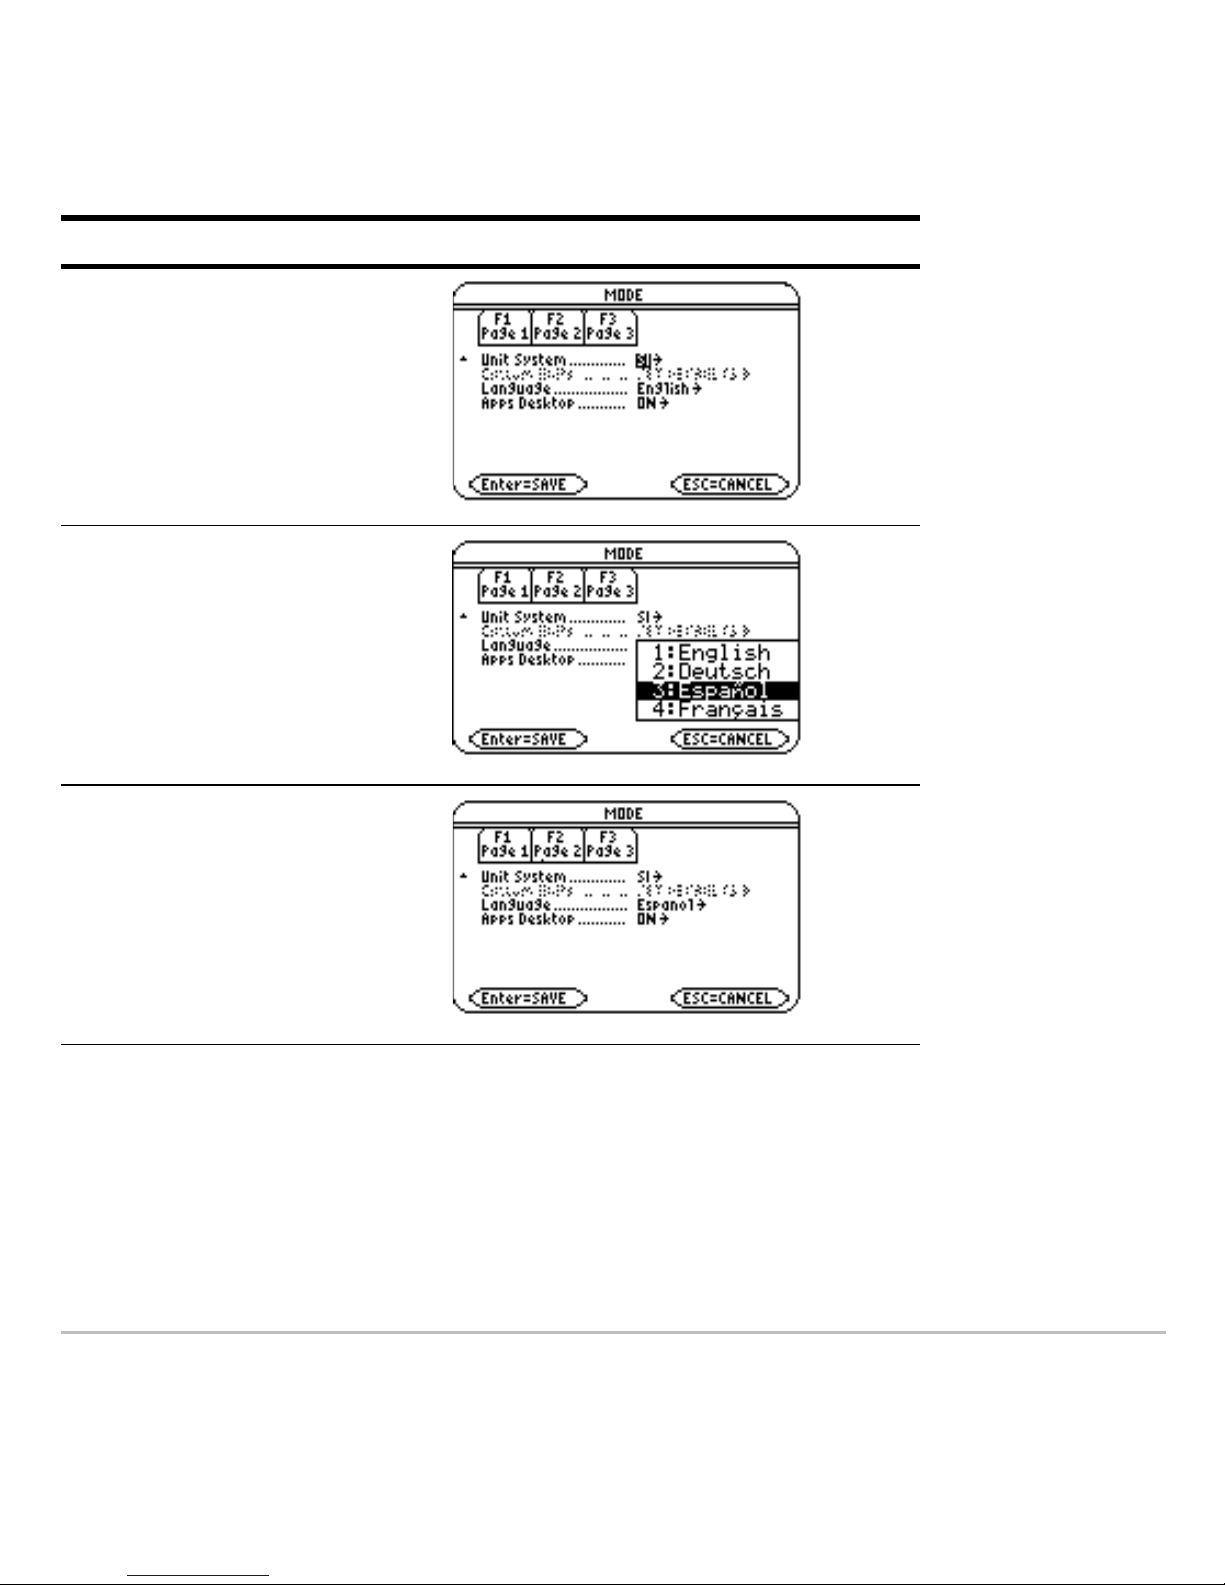
Example: Change the Language mode setting to Spanish (Español).
…
Press Result
3
…
Press Result
Page 20
Getting Started 20
Scroll down to the Language
field.
D
Press B
and then press D until
3:Español is highlighted.
Note:
Your menu list might
vary, depending on the
languages installed.
¸
Press Result
Page 21
Getting Started 21
To return the Language mode setting to English, repeat the steps, selecting 1:English in
the Language field.
Using the Catalog to access commands
Using the Catalog to access commands Using the Catalog to access commands
Using the Catalog to access commands
Use the Catalog to access a list of TI-89 Titanium commands, including functions,
instructions, and user-defined programs. Commands are listed alphabetically.
Commands not beginning with a letter are found at the end of the list (&, /, +, –, etc.).
The Catalog Help App includes details about each command.
Options not currently valid are grayed out. For example, the Flash Apps
(
…) menu option is grayed out if no Flash applications are installed on your TI-89
Titanium; the User-Defined (
†) menu option is grayed out if you have not created a
function or program.
¸
Note: The previous open App
appears (in this example, the
calculator Home screen).
Press Result
Page 22

Getting Started 22
Note: Typing a letter takes you to the first command in the list starting with the same
letter.
Select commands from the Catalog and insert them onto the calculator Home screen
entry line or paste them to other Apps, such as the Y= Editor, Text Editor, or CellSheet
Apps.
Press Result
½
(displays Built-in commands)
…
(displays Flash Apps
commands, if any)
†
(displays User-Defined
commands, if any)
Page 23
Getting Started 23
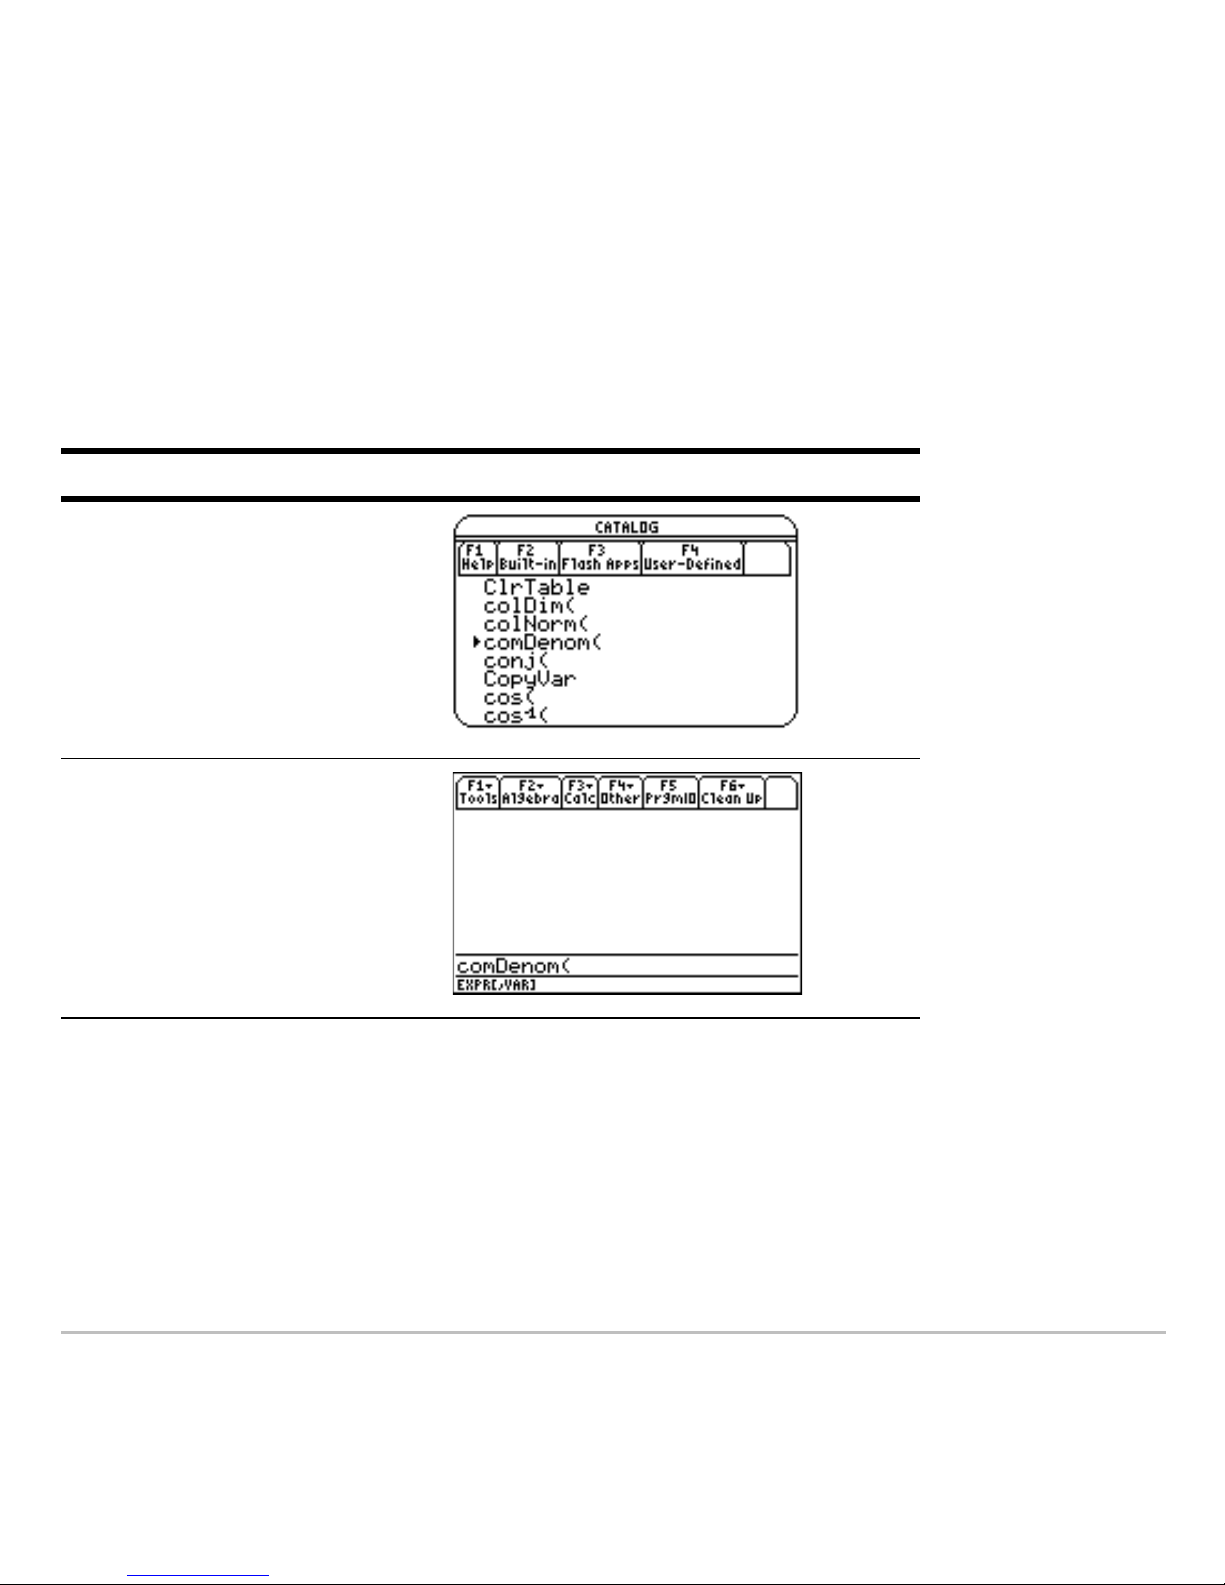
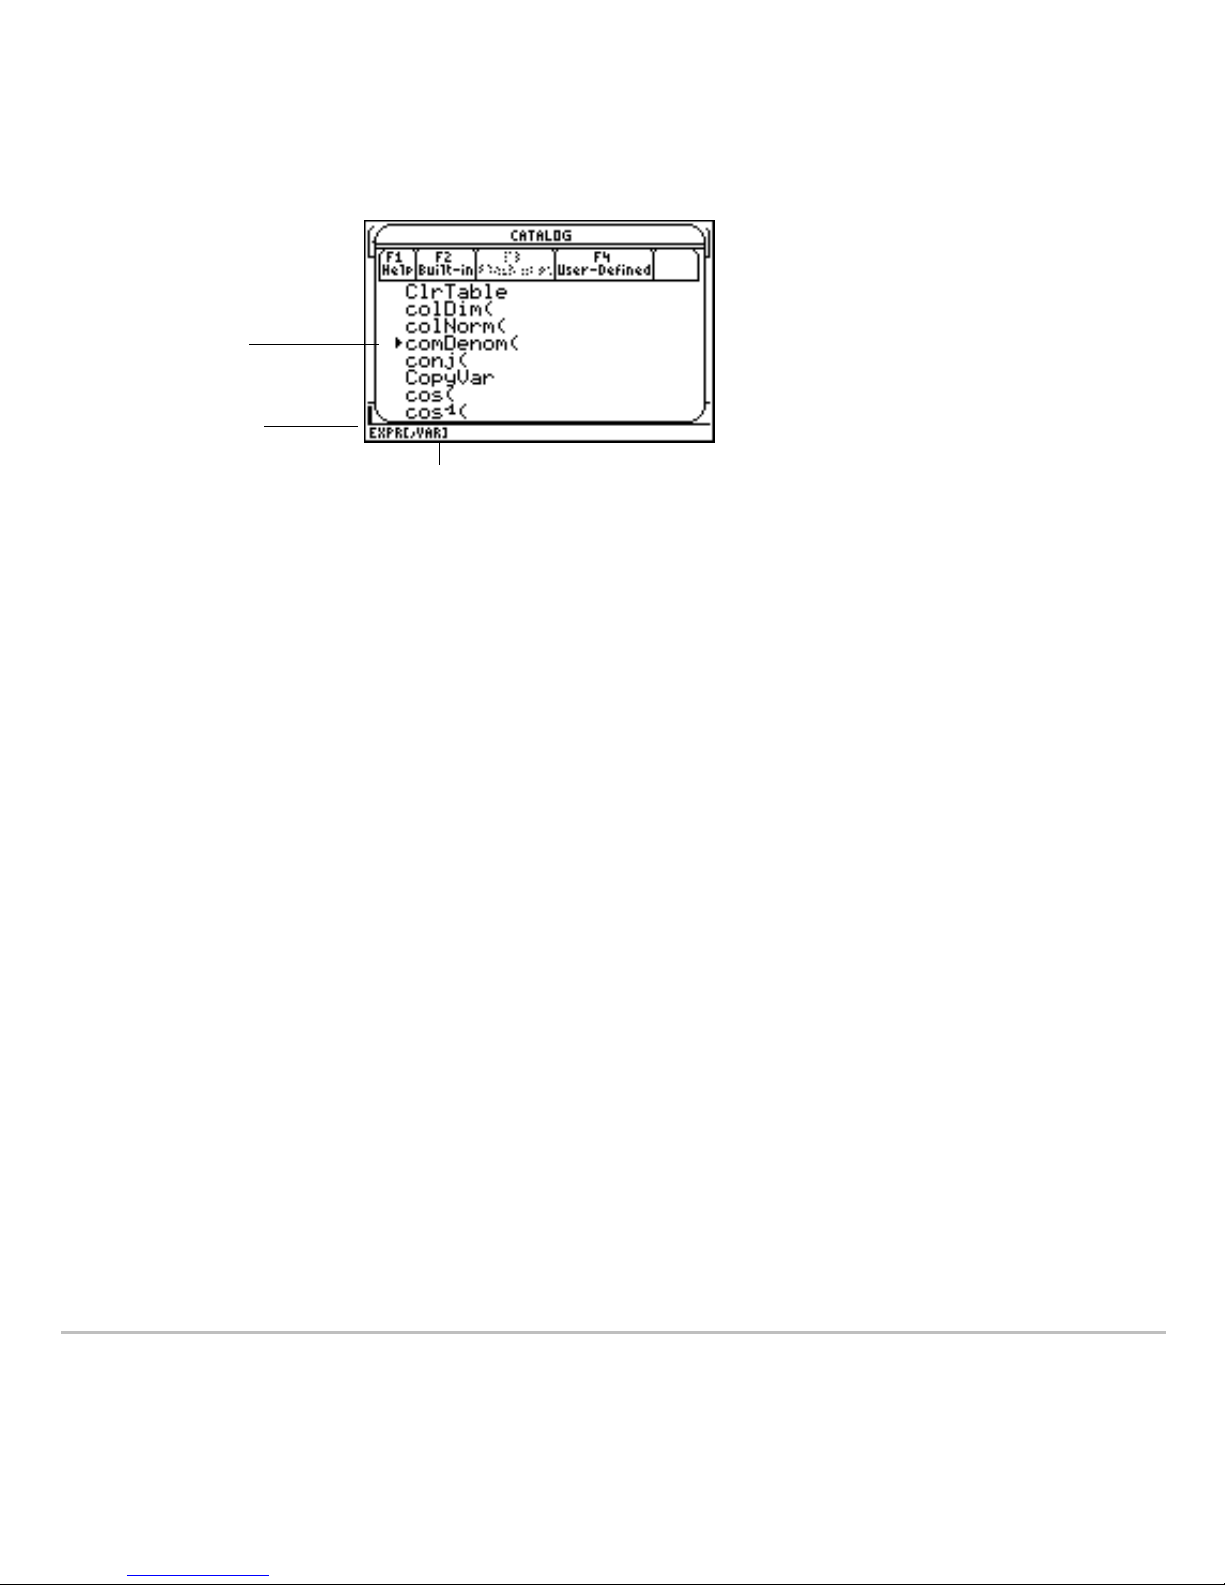
Example: Insert the comDenom( command on the calculator Home screen entry line.
Note: Before selecting a command, position the cursor where you want the command to
appear.
Pressing 2D advances the Catalog list one page at a time.
The status line displays any required and optional parameters for the selected
command. Optional parameters appear in square brackets.
Note: Pressing ƒ will also display the parameters for the selected command.
Press Result
½ C
2D
Then press D until the pointer is
at the comDenom( function.
¸
Page 24
Getting Started 24
To exit the Catalog without selecting a command, press N.
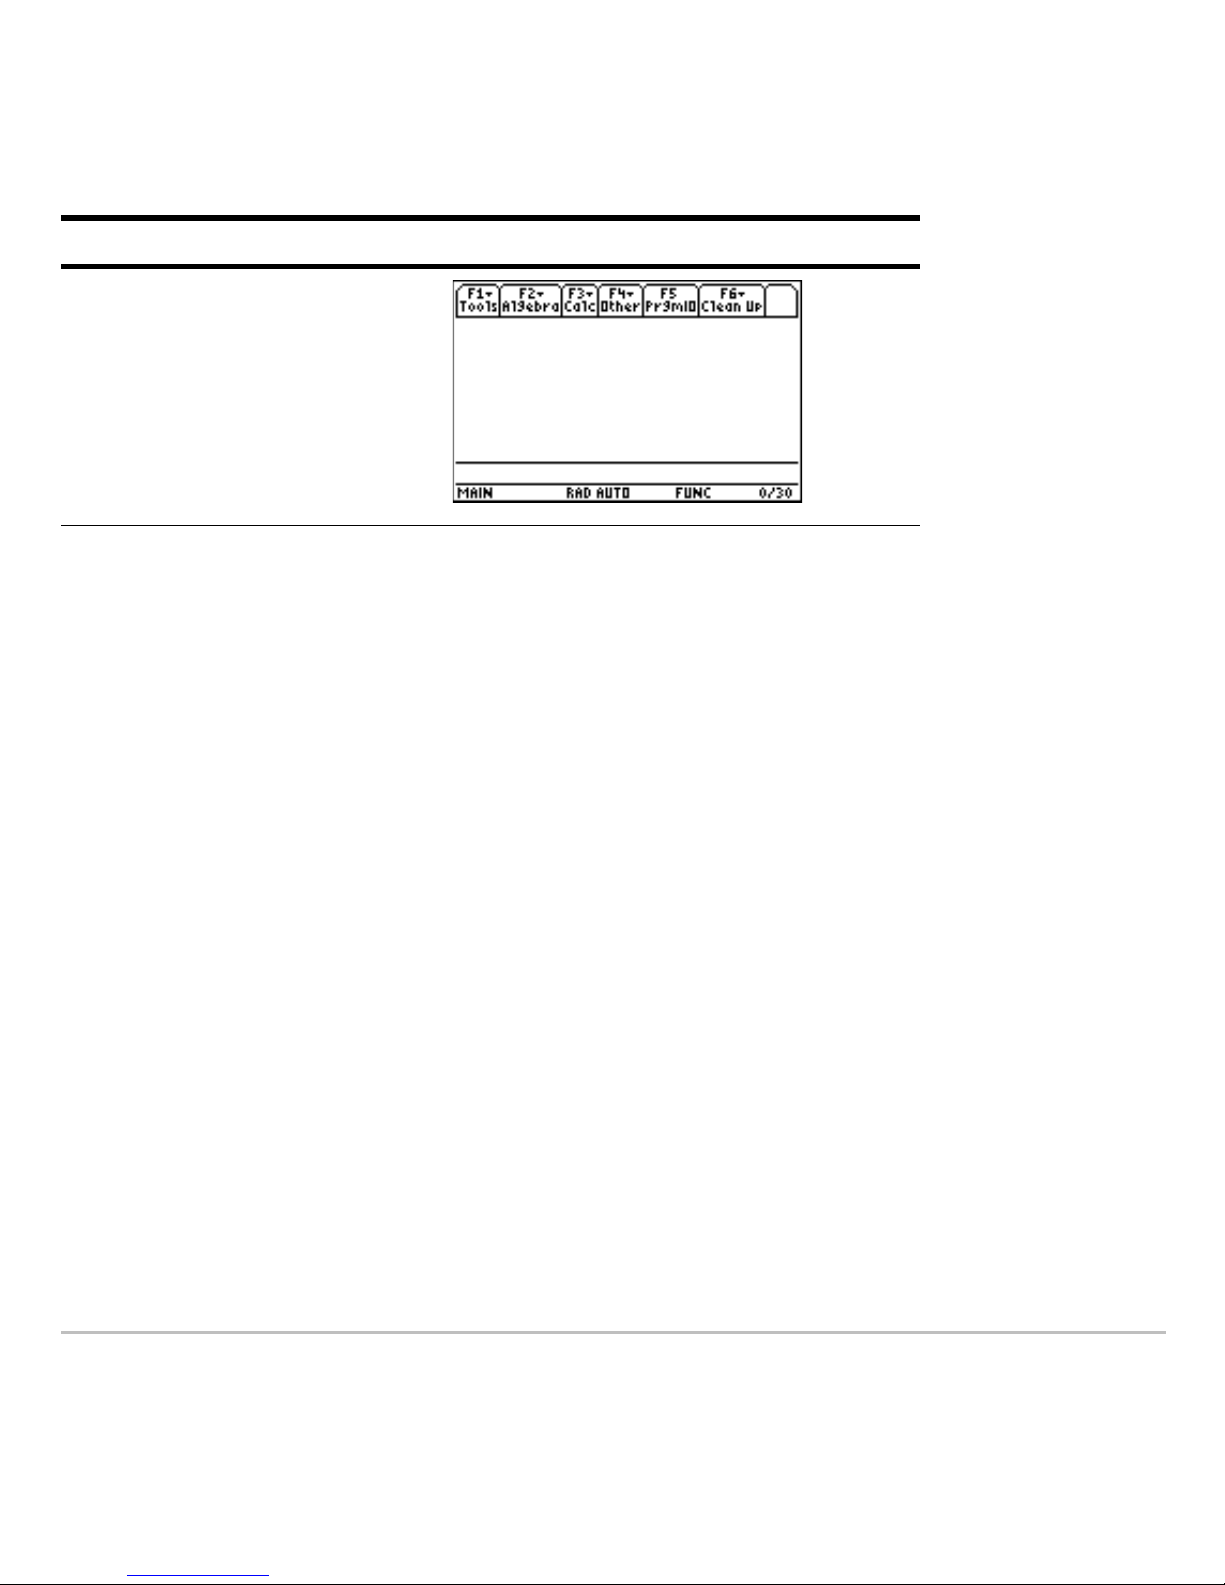
Calculator Home screen
Calculator Home screenCalculator Home screen
Calculator Home screen
The calculator Home screen is the starting point for math operations, including executing
instructions, evaluating expressions, and viewing results.
To display the calculator Home screen, press: "
You can also display the calculator Home screen from the Apps desktop by highlighting
the Home icon and pressing ¸.
Selected
command
Command
parameters
Brackets [ ] indicate optional parameters
Page 25
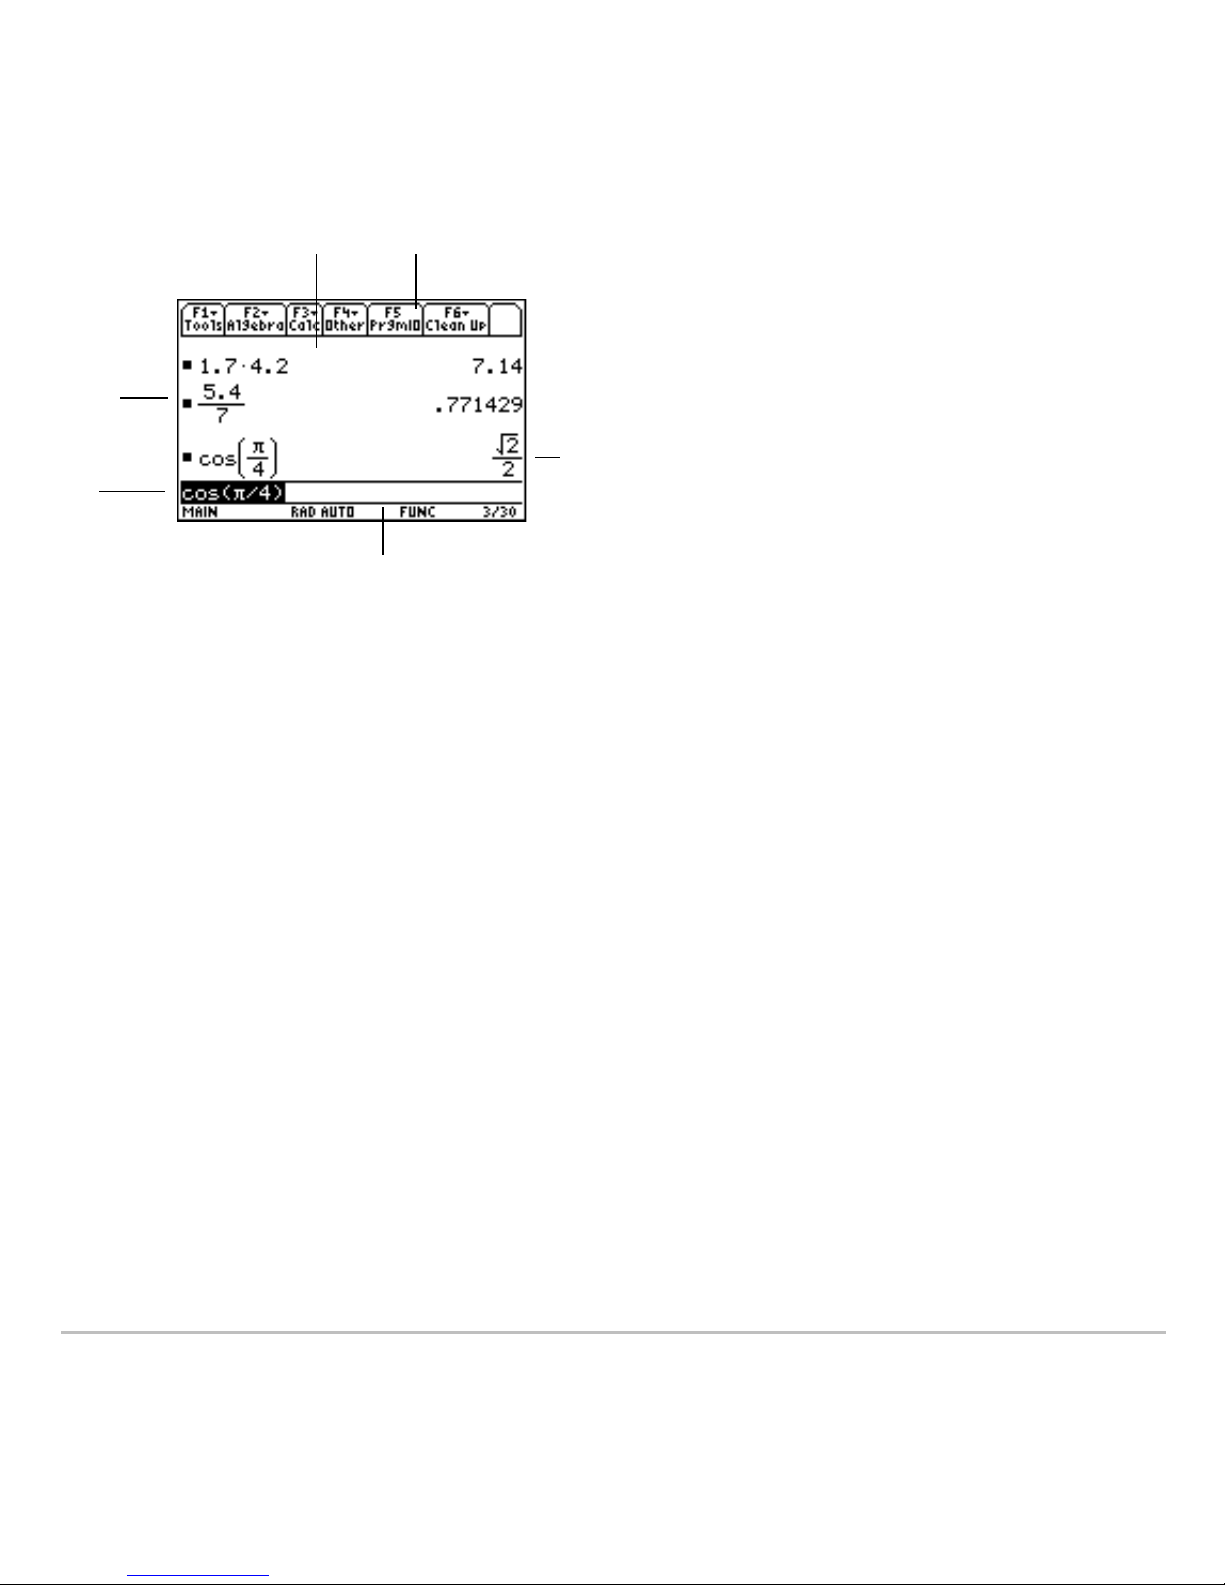
Getting Started 25
Ê History area lists the entry/answer pairs entered.
Ë Tabs display menus for selecting lists of operations. Press ƒ, „, and so on to
display menus.
Ì Result of last entry is displayed here. (Note that results are not displayed on the entry
line.)
Í Status line shows the current state of the calculator.
Î Entry line displays your current entry.
Ï Your previous entry is displayed here.
To return to the Apps desktop from the calculator Home screen, press O.
Ê
Ë
Ï
Î
Í
Ì
Page 26

Getting Started 26
About the history area
About the history areaAbout the history area
About the history area
The history area displays up to eight entry/answer pairs, depending on the complexity
and height of the expressions. When the display is filled, information scrolls off the top of
the screen. Use the history area to:
• Review previous entries and answers. Use the cursor keys to view entries and
answers that have scrolled off the screen.
• Recall or auto-paste a previous entry or answer onto the entry line to reuse or edit.
(For more information, see the electronic Operating the Calculator chapter.)
The cursor, which normally rests on the entry line, can be moved into the history area.
The following table shows you how to move the cursor around in the history area.
To Do this
View entries/answers
scrolled off the screen
From the entry line, press C to highlight the last
answer.
Continue using
C to move the cursor from
answer to entry through the history area.
Go to the oldest or
newest entry/answer pair
If the cursor is in the history area, press
8C or
8D.
View an entry or answer
too long for one line (8
is displayed at the end of
the line)
Move the cursor to the entry or answer. Use A
or
B to scroll left or right and 2A or 2B to
go to the beginning or end.
Return cursor to the entry
line
Press
N, or press D until the cursor is back
on the entry line.
Page 27

Getting Started 27
Interpreting history information on the status line
Interpreting history information on the status lineInterpreting history information on the status line
Interpreting history information on the status line
Use the history indicator on the status line for information about the entry/answer pairs.
For example:
If the cursor is on the entry line:
If the cursor is in the history area:
Modifying the history area
Modifying the history areaModifying the history area
Modifying the history area
To change the number of pairs that can be saved:
1. From the calculator Home screen, press ƒ and select
9:Format.
2. Press B and use C or D to highlight the new number.
3. Press ¸¸.
To clear the history area and delete all saved pairs:
• From the calculator Home screen, press ƒ and select
8:Clear Home.
– or –
Total number of pairs
currently saved
________
8/30
_______
Maximum number of
pairs that can be saved
Pair number of the
highlighted
entry/answer
_______
8/30
_______
Total number of pairs
currently saved
Page 28

Getting Started 28
•Enter ClrHome on the calculator Home screen entry line.
To delete an entry/answer pair, move the cursor to either the entry or answer, and press
0 or M.
Working with Apps
Working with AppsWorking with Apps
Working with Apps
The TI-89 Titanium organizes Apps by category on the Apps desktop. To select a
category, press a function key („ through 2 Š ). The App icons for the selected
category appear on the Apps desktop.
Note: If the name under an Apps desktop icon is truncated, use the cursor keys to
highlight the icon. Now view the full name at the top of the Apps desktop.
Opening Apps
Opening AppsOpening Apps
Opening Apps
Use the cursor keys or press the first letter of the App name to highlight the Apps icon on
the Apps desktop and press ¸. The App either opens directly or displays a dialog
box. The most common dialog box lists these options for the App:
Note: The TI-89 Titanium uses the general term variable to refer to the App data files that
you create.
Option Description
Current Returns the screen displayed when you last viewed
the App. If no current App variable exists, the New
dialog box appears.
Open Lets you open an existing file.
Page 29
Getting Started 29
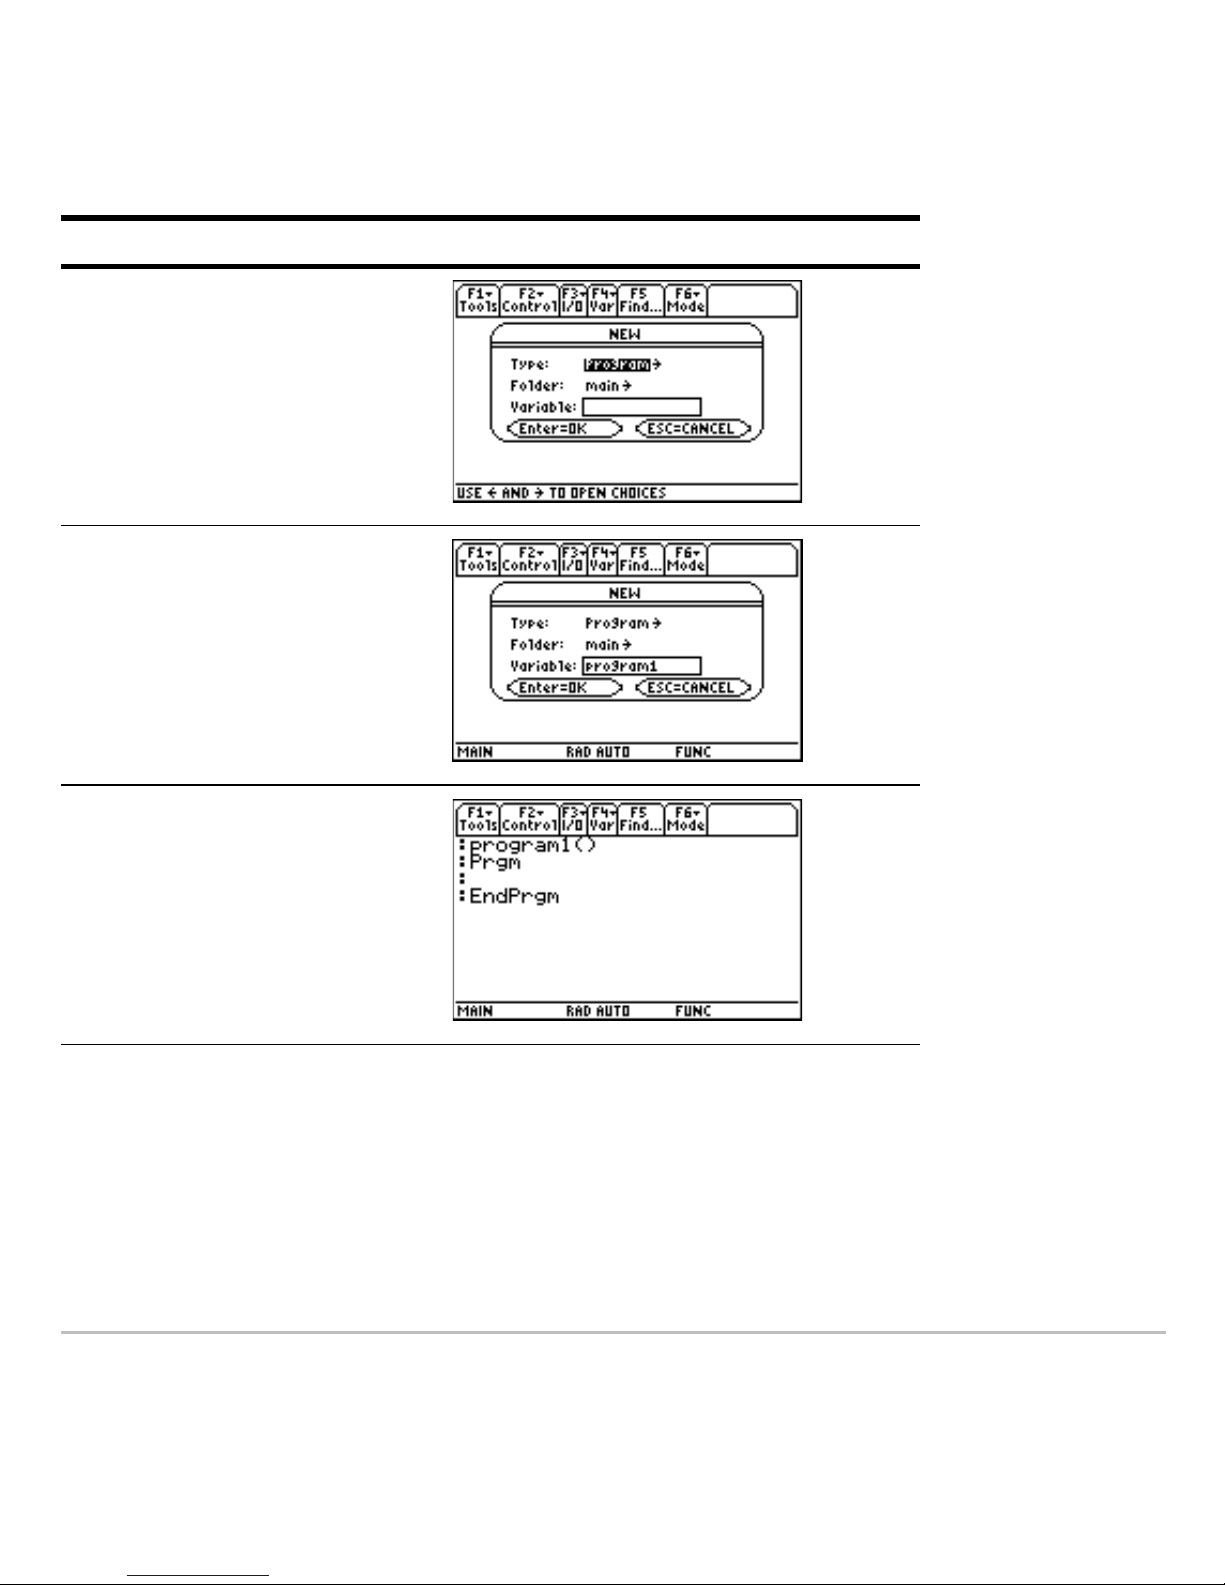
Select an option, enter any required information, and press ¸. The App appears.
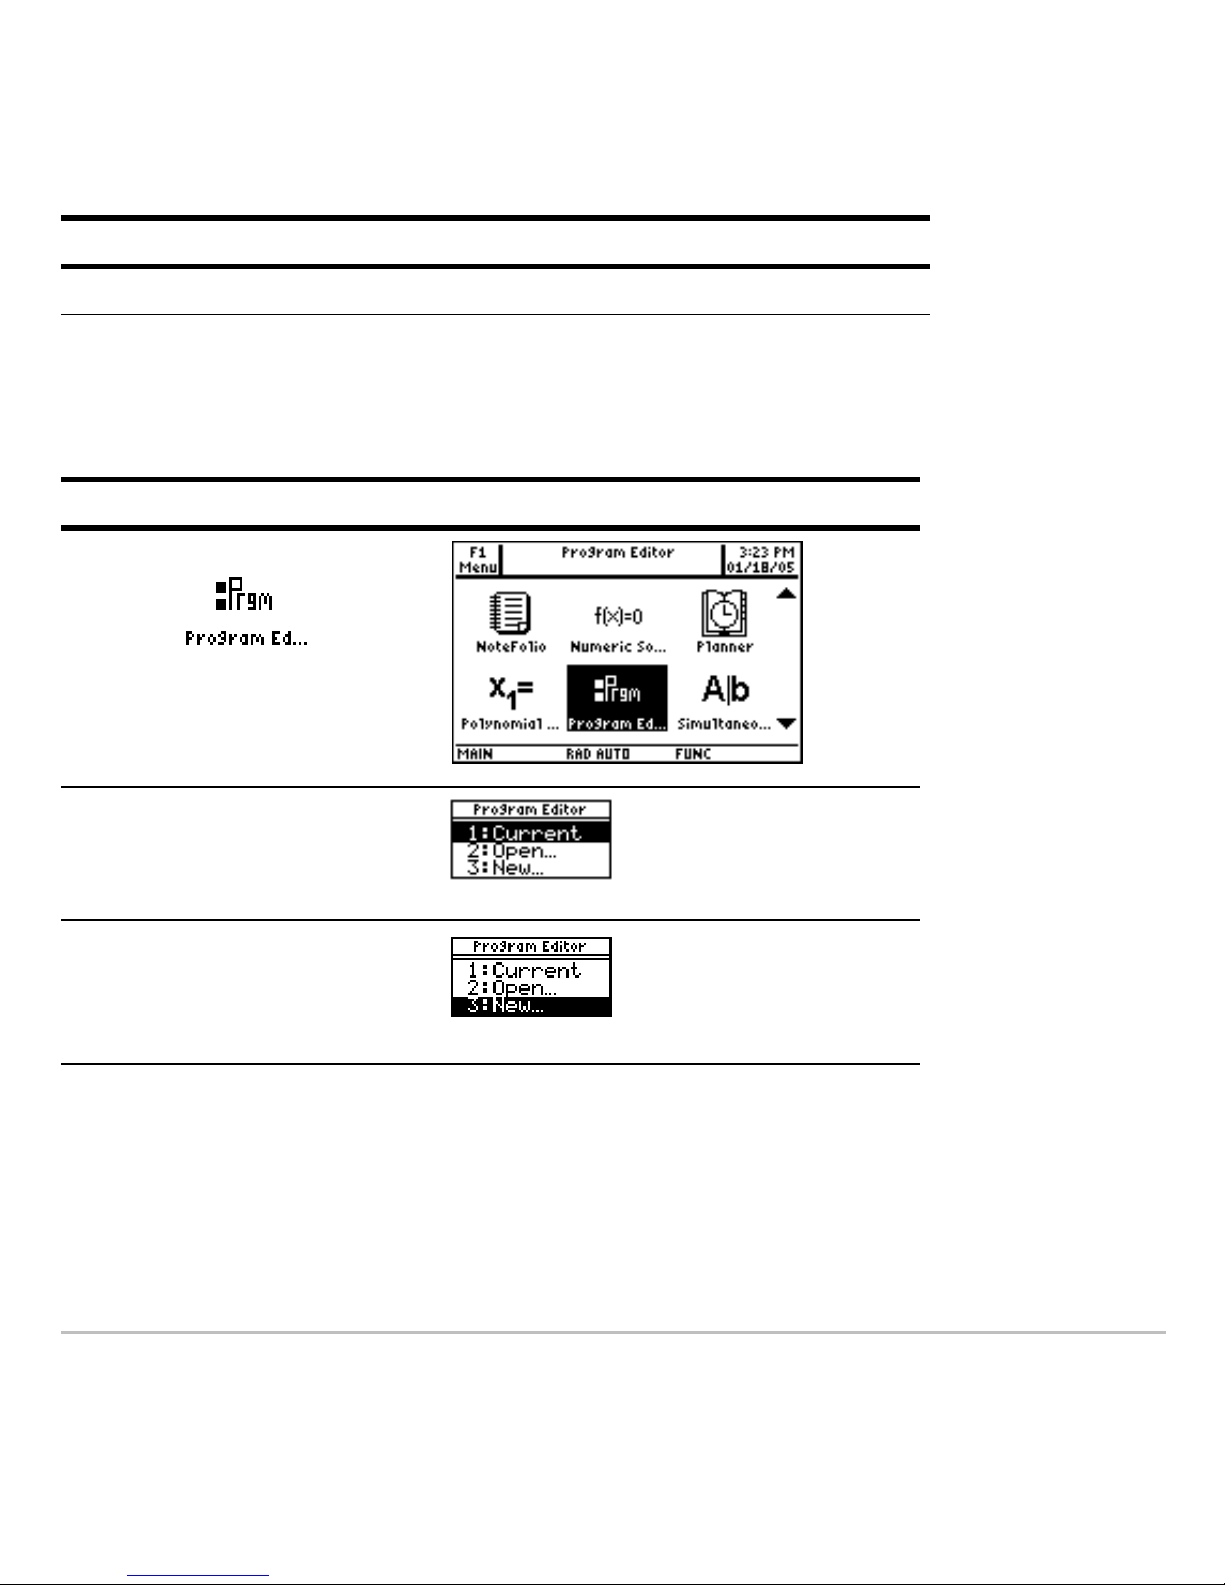
Example: Create a new program using the Program Editor.
New Creates a new file with the name typed in the field.
Press Result
Use cursor keys to highlight
¸
3
Option Description
Page 30
Getting Started 30
The newly created program variable, program1, is saved to the Main folder.
¸
DD
program1
¸¸
Press Result
Page 31

Getting Started 31
Returning to the Apps desktop from within an App
Returning to the Apps desktop from within an AppReturning to the Apps desktop from within an App
Returning to the Apps desktop from within an App
Press O. The icons for the last Apps category selected appear on the Apps desktop
with the icon for the last App opened highlighted.
You can also return to the Apps desktop by pressing 2K in full-screen mode. In
split-screen mode, press 2K twice.
To return to the last open App from the Apps desktop, press 2a.
Selecting an Apps category
Selecting an Apps categorySelecting an Apps category
Selecting an Apps category
On the TI-89 Titanium, the Apps category names appear only in the
F1 Menu. To select
an Apps category, press ƒ
2:Select Category and use the cursor keys to highlight an
Apps category, and then press ¸ to select the highlighted category. You can also
use the function key shortcuts to select a category from the keypad (use the 2 key if
necessary). The App icons for the selected category appear on the Apps desktop.
The App icons for the selected category appear on the Apps desktop.
Key Description
„ All
Icons for all installed Apps displayed. Not
customizable.
… English
Customizable category. English is the default.
† SocialSt
Customizable category. SocialSt (social studies)
is the default.
‡ Math
Customizable category. Math is the default.
Page 32

Getting Started 32
Example: Select the All category.
If you select an Apps category containing no Apps, a message appears to confirm that
the category is empty and point you to the ƒ
1:Edit Categories menu, where you can
add App shortcuts to the category. (See “Customizing the Apps
categories” on page 33.)
Press ¸ or N to clear the message and return to the Apps desktop.
2 ˆ
Graphing
Customizable category. Graphing is the default.
2 ‰ Science
Customizable category. Science is the default.
2 Š Organizr
Customizable category. Organizr (organizer) is
the default.
Press Result
„
Key Description
Page 33

Getting Started 33
Customizing the Apps
Customizing the Apps Customizing the Apps
Customizing the Apps categories
categoriescategories
categories
The TI-89 Titanium organizes your Apps into seven categories, six of which you can
customize to fit your individual needs. (The All category contains every installed App and
cannot be edited.)
To customize the … through 2Š Apps categories:
1. Select ƒ
1:Edit Categories. A submenu displays the six customizable Apps
category names. (The All category is not listed.)
2. Highlight an Apps category and press ¸. The Edit Categories dialog box
appears with a list of installed Apps and a text box with the category name
highlighted.
3. To change the Apps category name, type the desired name.
Note: Enter a name of up to eight characters, including letters with or without
capitalization, numbers, punctuation, and accented characters.
4. To add or remove an App shortcut from the category, press D as required to
highlight the box next to the App, then press B to add or remove the check mark (9).
5. To save the changes and return to the Apps desktop, press ¸.
Page 34

Getting Started 34
Example: Replace the Social Studies category with the Business category and add the
CellSheet and Finance App shortcuts.
Press Result
ƒ
B
2
– or –
D¸
Page 35

Getting Started 35
2 ™
¤
Bus iness
D
©
B
D
©
B
Press Result
Page 36

Getting Started 36
Open Apps and split-screen status
Open Apps and split-screen statusOpen Apps and split-screen status
Open Apps and split-screen status
Your TI-89 Titanium lets you split the screen to view two Apps simultaneously. For
example, view the Y= Editor and Graph screens simultaneously to see the list of
functions and how they are graphed.
Select the Split Screen mode from Page 2 of the MODE screen. The TI-89 Titanium
displays the selected Apps in the split-screen view as shown. Split the screen
horizontally (top-bottom) or vertically (left-right).
¸
†
Press Result
Page 37

Getting Started 37
To return to the Apps desktop, press O. The split-screen status appears at the top of
the Apps desktop with the names of the open Apps and the portions of the screen in
which each is displayed. The highlighted numeral indicates the split-screen portion
where the next App you open will appear.
Note: The Apps desktop always appears in the full-screen view.
Top-bottom split screen
Split-screen status (highlight
indicates the portion where the
next App selected will open.)
Names of open Apps
Page 38

Getting Started 38
More information is available about using split screens. (For more information, see the
electronic Split Screens chapter.)
Checking status information
Checking status informationChecking status information
Checking status information
Look to the status line, located at the bottom of the screen, for information about the
current state of your TI-89 Titanium.
Indicator Meaning
Ê Current folder
Name of the selected folder (MAIN is the
default folder.)
Ë Modifier key Selected modifier key (2, 8, 7), if any.
Ì Angle mode
Selected units in which angle values are
displayed and interpreted (RAD, DEG, GRAD)
Í Exact/Approx mode
Mode in which answers are calculated and
displayed (AUTO, EXACT, APPROX)
Î Graph number
Active of two independent graphs in splitscreen mode (GR#1, GR#2)
Ï Graph mode
Selected type of graph that can be plotted
(FUNC, PAR, POL, SEQ, 3D, DE)
ÊË
Ì
Í
Î
Ï
Ð
Ñ
Ò
Page 39

Getting Started 39
Turning off the Apps desktop
Turning off the Apps desktopTurning off the Apps desktop
Turning off the Apps desktop
You can turn off the Apps desktop from the MODE dialog box. If you do, open Apps from
the APPLICATIONS menu. To open the APPLICATIONS menu, press O.
Example: Turn off the Apps desktop.
Ð
Entry/Answer pairs
22/30–Number of entry/answer pairs (default is
30, maximum is 99) in the history area of the
calculator Home screen.
Ñ Replace batteries
Displayed when batteries are low (BATT). If
BATT is highlighted with a black background,
change the batteries as soon as possible
().
Ò Busy/Pause,
Locked/Archived
variable
BUSY–Calculation or graph is in progress
PAUSE–You paused a graph or program
Œ–Variable opened in the current editor is
locked or archived and cannot be modified
Press Result
3
Indicator Meaning
Page 40

Getting Started 40
To turn on the Apps desktop, repeat the procedure, selecting ON in the Apps Desktop
mode field. To return to the Apps desktop from the calculator Home screen, press O.
Using the clock
Using the clock Using the clock
Using the clock
Use the CLOCK dialog box to set the time and date, select the clock display format, and
turn the clock off and on.
…
DDBC
¸¸
Note: The previous open App
appears (in this example, the
calculator Home screen).
Press Result
Page 41

Getting Started 41
The clock is turned on by default. If you turn off the clock, all Clock dialog box options
except Clock ON/OFF are grayed out.
Displaying the CLOCK dialog box
Displaying the CLOCK dialog boxDisplaying the CLOCK dialog box
Displaying the CLOCK dialog box
1. Use the cursor keys to highlight the Clock icon on the Apps desktop.
2. Press ¸. The CLOCK dialog box appears with the Time Format field highlighted.
Note: Because the CLOCK dialog box displays the settings current at the time you open
the dialog box, you might need to update the time before exiting.
Setting the time
Setting the timeSetting the time
Setting the time
1. Press B to open the list of time formats.
2. Press C or D to highlight an option, then press ¸. The selected format appears
in the Time Format field.
3. Press D to highlight the Hour field.
4. Type the hour, then press D to highlight the Minute field.
5. Type the minute(s).
6 indicates you
can scroll down
for more options)
Page 42

Getting Started 42
6. If the time format is 24 hours, proceed to step 9.
— or —
If the time format is 12 hours, press D to highlight the AM/PM field.
7. Press B to open the list of AM/PM options.
8. Press C or D to highlight an AM/PM option, then press ¸. The selected AM/PM
option appears.
9. Set the date (for procedures, see Setting the date).
— or —
To save your settings and exit, press ¸. The time is updated in the top right
corner of the Apps desktop.
Setting the date
Setting the dateSetting the date
Setting the date
1. Press C or D as required to highlight the Date Format field.
2. Press B to open the list of date formats.
3. Press C or D to highlight an option, then press ¸. The selected format appears
in the Date Format field.
4. Press D to highlight the Year field.
5. Type the year, then press D to highlight the Month field.
6. Press B to open the list of months.
7. Press C or D to highlight an option, then press ¸. The selected month appears
in the Month field.
8. Press D to highlight the Day field.
Page 43

Getting Started 43
9. Type the day, then press ¸ ¸ to save your settings and exit. The date is
updated in the top right corner of the Apps desktop.
Example: Set the time and date to 19/10/02 (October 19, 2002) at 1:30 p.m.
Press Result
Use cursor keys to highlight
¸
D
1 D
Time and date
Page 44

Getting Started 44
30 D
BD
¸D
Press Result
Page 45

Getting Started 45
BD
¸D
2002
Press Result
Page 46

Getting Started 46
DB
Scroll down to October
and press ¸
D
19
Press Result
Page 47

Getting Started 47
Turning off the clock
Turning off the clockTurning off the clock
Turning off the clock
From the Apps desktop, open the CLOCK dialog box and select OFF in the Clock field.
Example: Turn off the clock.
¸¸
Press Result
Use cursor keys to highlight
Press Result
Revised time and date
Clock on
Page 48

Getting Started 48
To turn on the clock, repeat the procedure, selecting ON in the Clock field. Remember to
reset the time and date.
¸
Scroll down to the Clock field.
BC ¸
¸
Press Result
Clock off
Page 49

Getting Started 49
Using menus
Using menusUsing menus
Using menus
To select most TI-89 Titanium menus, press the function keys corresponding to the
toolbars at the top of the calculator Home screen and most App screens. Select other
menus using key commands.
Toolbar menus
Toolbar menusToolbar menus
Toolbar menus
The starting point for TI-89 Titanium math operations, the calculator Home screen
displays toolbar menus that let you choose math-related options.
Toolbar menus also appear at the top of most App screens. These menus list common
functions of the active App.
Other menus
Other menusOther menus
Other menus
Use key commands to select the following menus. These menus contain the same
options regardless of the screen displayed or the active App.
Press To display
2G
CHAR menu. Lists characters not available on the
keyboard; characters are organized by category
(Greek, math, punctuation, special, and
international).
2I
MATH menu. Lists math operations by category.
Page 50

Getting Started 50
Selecting menu options
Selecting menu optionsSelecting menu options
Selecting menu options
• Press the number or letter to the left of the option you want to select.
— or —
• Press C or D to select the option, and press ¸.
Note: If the first menu option is selected, press C to select the last option on the menu. If
the last menu option is selected, press D to select the first option on the menu.
O
APPLICATIONS menu. Lists the installed Apps.
(Menu is available only when the Apps desktop is
turned off; Apps are normally accessed from the
Apps desktop.)
8O
FLASH APPLICATIONS menu. Lists the installed
Flash Apps. (Menu is available only when Apps
desktop is turned off; Flash Apps are normally
accessed from the Apps desktop.)
Press To display
Page 51

Getting Started 51
Example: Select factor( from the Algebra menu on the calculator Home screen.
Press Result
Press:
"
– or –
From the Apps desktop, use the
cursor keys to highlight
and press ¸
„
2
– or –
D¸
6 indicates
Algebra menu will
open when you
press
„.
Page 52

Getting Started 52
Selecting submenu options
Selecting submenu optionsSelecting submenu options
Selecting submenu options
A small arrow symbol (ú) to the right of a menu option indicates that selecting the option
will open a submenu.
Example: Select
ord( from the MATH menu on the calculator Home screen.
Press Result
2I
$ points to
additional options.
Page 53

Getting Started 53
Using dialog boxes
Using dialog boxesUsing dialog boxes
Using dialog boxes
An ellipsis (…) at the end of a menu option indicates that choosing the option will open a
dialog box. Select the option and press ¸.
D
– or –
CCB
B
– or –
C¸
Press Result
Page 54

Getting Started 54
Example: Open the SAVE COPY AS dialog box from the Window Editor.
Press Result
O
Use the cursor keys to highlight
and press ¸
ƒ
2
– or –
D¸
Press B to display
a list of folders.
Type the name of
the variable.
Press
¸ twice to save and
Page 55

Getting Started 55
Note: Pressing the 8 S key shortcut also opens the SAVE COPY AS dialog box in most
Apps.
Canceling a menu
Canceling a menuCanceling a menu
Canceling a menu
To cancel a menu without making a selection, press N.
Moving among toolbar menus
Moving among toolbar menusMoving among toolbar menus
Moving among toolbar menus
To move among the toolbar menus without selecting a menu option:
• Press the function key (ƒ through Š) of a toolbar menu.
• Press a function key, then press B or A to move from one toolbar menu to the next.
Press B from the last menu to move to the first menu. Press A to move from the first
menu to the last menu.
Note: If you press B when a menu option with a submenu is selected, the submenu will
appear instead of the next toolbar menu. Press B again to move to the next menu.
More information is available about menus. (See the electronic Operating the Calculator
chapter.)
Custom menu
Custom menuCustom menu
Custom menu
The custom menu provides quick access to your most commonly used options. Use the
default custom menu or create your own using the Program Editor. You can include any
available TI-89 Titanium command or character.
Page 56

Getting Started 56
The custom menu replaces the standard toolbar menu on the calculator Home screen.
(For details on creating a custom menu, see the electronic Programming chapter.) More
information is available about custom menus. (See the electronic Operating the
Calculator chapter.)
Example: Turn on and turn off the custom menu from the calculator Home screen.
Example: Restore the default custom menu.
Press Result
2F
2F
Default custom menu
Normal toolbar menu
Page 57

Getting Started 57
Note: Restoring the default custom menu erases the previous custom menu. If you
created the previous custom menu with a program, you can run the program again to
reuse the menu.
Press Result
2F
(to turn off the custom menu and
turn on the standard toolbar
menu)
2 ˆ
3
– or –
DD¸
Page 58

Getting Started 58
Opening Apps with the Apps desktop turned off
Opening Apps with the Apps desktop turned offOpening Apps with the Apps desktop turned off
Opening Apps with the Apps desktop turned off
If you turn off the Apps desktop, use the APPLICATIONS menu to open Apps. To open
the APPLICATIONS menu with the Apps desktop off, press O.
Note: If you press O with the Apps desktop turned on, the Apps desktop will appear
instead of the APPLICATIONS menu.
Example: With the Apps desktop turned off, open the Window Editor from the
APPLICATIONS menu.
¸
Press Result
O
Press Result
Page 59

Getting Started 59
To access Apps not listed on the APPLICATIONS menu, select 1:FlashApps.
Using split screens
Using split screensUsing split screens
Using split screens
The TI-89 Titanium lets you split the screen to show two Apps at the same time. For
example, display both the Y= Editor and Graph screens to compare the list of functions
and how they are graphed.
Setting split-screen mode
Setting split-screen modeSetting split-screen mode
Setting split-screen mode
You can split the screen either top to bottom or left to right from the MODE dialog box.
The split-screen setting stays in effect until you change it.
1. Press 3 to display the MODE dialog box.
2. Press „ to display the Split Screen mode setting.
3. Press B to open the Split Screen mode menu.
4. Press D as required to highlight either TOP-BOTTOM or LEFT-RIGHT.
5. Press ¸. The Split Screen mode setting displays the option you selected.
6. Press ¸ again to save this change and display the split screen.
3
– or –
DD¸
Press Result
Page 60

Getting Started 60
Example: Set split-screen mode to TOP-BOTTOM.
Press Result
3
„
BD
Page 61

Getting Started 61
Setting the initial Apps for split screen
Setting the initial Apps for split screenSetting the initial Apps for split screen
Setting the initial Apps for split screen
After you select either TOP-BOTTOM or LEFT-RIGHT split-screen mode, additional
mode settings become available.
¸
¸
Press Result
Full-screen mode Split-screen mode
Page 62

Getting Started 62
To set the initial App for each split-screen portion:
1. Select the Split 1 App mode setting and press B to display a menu of available
Apps. (See “Setting split-screen mode
” on page 59.)
2. Press D or C to highlight the App and press ¸.
3. Repeat steps 1 and 2 for the Split 2 App mode setting.
Example: Display the Y= Editor in the top screen and the Graph App in the bottom
screen.
Mode Description
Split 2 App Lets you specify the App displayed in the bottom or
right portion of the split screen. Works together with
Split 1 App, which lets you specify the App displayed
in the top or left portion of the split screen.
Number of Graphs Lets you set up and display two independent graphs.
Press Result
DB
Page 63

Getting Started 63
2
DB
4
¸
Press Result
Page 64

Getting Started 64
If you set Split 1 App and Split 2 App to the same nongraphing App or to the same
graphing App with Number of Graphs set to 1, the TI-89 Titanium exits split-screen mode
and displays the App in full-screen mode.
Selecting the active App
Selecting the active App Selecting the active App
Selecting the active App
In split-screen mode, only one App can be active at a time.
• To switch between active Apps, press 2a.
• To open a third App, press O and select the App. This App replaces the active
split-screen App.
Exiting split-screen mode
Exiting split-screen modeExiting split-screen mode
Exiting split-screen mode
Exit split-screen mode in any of the following ways:
• Press 2 K to close the active App and display the full-screen view of the other
open App.
• If the Apps desktop is turned off, pressing 2 K replaces the active split-screen
App with the calculator Home screen. Pressing 2K again turns off the split-
screen mode and displays the calculator Home screen in full-screen mode.
• Select Split Screen on Page 2 of the MODE dialog box, set split-screen mode to
FULL, and press ¸.
• Press 2 K twice to display the Apps desktop
More information is available about using split screens. (See the electronic Split Screens
chapter.)
Page 65

Getting Started 65
Managing Apps and operating system (OS) versions
Managing Apps and operating system (OS) versionsManaging Apps and operating system (OS) versions
Managing Apps and operating system (OS) versions
Using the TI-89 Titanium connectivity features, you can download Apps from:
• The TI Educational & Productivity Solutions (E&PS) Web site at:
education.ti.com/latest
• The CD-ROM included with your TI-89 Titanium.
• A compatible graphing calculator.
Adding Apps to your TI-89 Titanium is like loading software on a computer. All you need
is TI Connect software and the USB computer cable that came with your TI-89
Titanium.
For system requirements and instructions to link to compatible calculators and download
TI Connect software, Apps, and OS versions, see the TI E&PS Web site.
Before downloading Apps to your TI-89 Titanium, please read the license agreement on
the CD-ROM or TI Web site.
Finding the OS version and identification (ID) numbers
Finding the OS version and identification (ID) numbers Finding the OS version and identification (ID) numbers
Finding the OS version and identification (ID) numbers
If you purchase software from the TI E&PS Web site or call the customer support
number, you will be asked to provide information about your TI-89 Titanium. You will find
this information on the ABOUT screen.
Page 66

Getting Started 66
To display the ABOUT screen, press ƒ 3:About from the Apps desktop. The ABOUT
screen displays the following information about your TI-89 Titanium:
Ê OS version
Ë Hardware version
Ì Unit ID (required to obtain certificates for installing purchased Apps). Similar to a serial
number. Write this number down and keep it in a safe place in case the calculator is ever
lost or stolen.
Í Apps certificate revision number (Cert. Rev.)
Î Product identifier (Product ID). Similar to a model number.
Note that your screen will be different than the one shown above.
Ë
Ì
Ê
Î
Í
Page 67

Getting Started 67
Deleting an Application
Deleting an ApplicationDeleting an Application
Deleting an Application
Deleting an application removes it from the TI-89 Titanium and increases space for other
applications. Before deleting an application, consider storing it on a computer for
reinstallation later.
1. Quit the application.
2. Press 2° to display the VAR-LINK (All) screen.
3. Press 2 ‰ to display the list of installed applications.
4. Select the application you want to delete by pressing †. (Press † again to
deselect.)
5. Press ƒ
1:Delete. The VAR-LINK delete confirmation dialog box displays.
6. Press ¸ to delete the application.
Note: Only Flash Apps can be deleted.
Connecting your
Connecting your Connecting your
Connecting your TI-89 Titanium
TI-89 TitaniumTI-89 Titanium
TI-89 Titanium to other devices
to other devices to other devices
to other devices
The TI-89 Titanium includes both a mini-USB port and a standard I/O port. Ports are
used to link two compatible graphing calculators or connect to a computer or peripheral
device.
In addition, the teacher model of the TI-89 Titanium includes an accessory port. This port
is used to output visual data so that a classroom can view the calculator’s display on a
video device or overhead screen.
To connect your calculator to a computer – Connect your TI-89 Titanium using the
USB port and the included USB computer cable.
Page 68

Getting Started 68
To connect your calculator to another calculator – Use the USB unit-to-unit cable or
an I/O unit-to-unit cable to connect the TI-89 Titanium to a compatible graphing
calculator or peripheral device, such as a TI-89 or TI-92 Plus graphing calculator or the
CBL 2™ and CBR™ systems.
To show your calculator’s display to the classroom – Use the accessory port to
connect the TI-Presenter™ video adapter to the teacher model of the TI-89 Titanium.
The TI-Presenter video adapter provides a video interface between the calculator and
video display or recording devices. Or use the accessory port to connect the
TI ViewScreen overhead panel to your calculator. The TI ViewScreen overhead panel
enlarges and projects the display so an entire class can view it. For more information
about the TI-Presenter video adapter and TI ViewScreen panel, see the TI E&PS Web
site at education.ti.com
.
I/O portUSB port
TI-89 Titanium ports
Page 69

Getting Started 69
Batteries
BatteriesBatteries
Batteries
The TI-89 Titanium uses four AAA alkaline batteries and a backup silver oxide battery
(SR44SW or 303). The backup battery is already installed, and the AAA batteries are
provided with your product.
Important OS download information
Important OS download informationImportant OS download information
Important OS download information
New batteries should be installed before beginning an OS download.
When in OS download mode, the APD feature does not function. If you leave your
calculator in download mode for an extended time before you actually start the
download, your batteries may become depleted. You will then need to replace the
depleted batteries with new batteries before downloading.
Accessory port
I/O portUSB port
TI-89 Titanium ports (teacher model)
Page 70

Getting Started 70
You can also transfer the OS to another TI-89 Titanium using a USB unit-to-unit cable . If
you accidentally interrupt the transfer before it is complete, you will need to reinstall the
OS via a computer. Again, remember to install new batteries before downloading.
Please contact Texas Instruments as described in Service & Support Information, if you
experience a problem.
Battery Precautions
Battery PrecautionsBattery Precautions
Battery Precautions
Take these precautions when replacing batteries:
• Do not leave batteries within the reach of children.
• Do not mix new and used batteries. Do not mix brands (or types within brands) of
batteries.
• Do not mix rechargeable and non-rechargeable batteries.
• Install batteries according to polarity (+ and –) diagrams.
• Do not place non-rechargeable batteries in a battery recharger.
• Properly dispose of used batteries immediately.
• Do not incinerate or dismantle batteries.
Installing the AAA Batteries
Installing the AAA BatteriesInstalling the AAA Batteries
Installing the AAA Batteries
1. Remove the battery cover from the back of the calculator.
2. Unwrap the four AAA batteries provided with your product and insert them in the
battery compartment. Arrange the batteries according to the polarity (+ and -)
diagram in the battery compartment.
Page 71

Getting Started 71
3. Replace the battery cover on the calculator. The cover should snap into place.
Replacing the AAA (alkaline) batteries
Replacing the AAA (alkaline) batteriesReplacing the AAA (alkaline) batteries
Replacing the AAA (alkaline) batteries
As the batteries lose power, the display begins to dim, especially during calculations. If
you find yourself increasing the contrast frequently, replace the AAA alkaline batteries.
The status line also gives battery information.
Before replacing the batteries, turn off the TI-89 Titanium by pressing 2® to avoid
losing information stored in memory. Do not remove both the back-up battery and the
AAA alkaline batteries at the same time.
Indicator Meaning
Batteries are low.
Replace batteries as soon as possible.
Page 72

Getting Started 72
Replacing the backup (silver oxide) battery
Replacing the backup (silver oxide) batteryReplacing the backup (silver oxide) battery
Replacing the backup (silver oxide) battery
1. To replace the silver oxide backup battery, remove the battery cover and unscrew
the tiny screw holding the BACK UP BATTERY cover in place.
2. Remove the old battery and install a new SR44SW or 303 battery, positive (+) side
up. Replace the cover and the screw.
Page 73

Previews 73
Previews
PreviewsPreviews
Previews
Performing Computations
Performing ComputationsPerforming Computations
Performing Computations
This section provides several examples for you to perform from the Calculator Home
screen that demonstrate some of the computational features of the TI-89 Titanium. The
history area in each screen was cleared by pressing ƒ and selecting
8:Clear Home,
before performing each example, to illustrate only the results of the example’s
keystrokes.
Showing Computations
Showing ComputationsShowing Computations
Showing Computations
Steps and keystrokes Display
Compute sin(p/4) and display the result in
symbolic and numeric format. To clear the
history area of previous calculations, press ƒ
and select
8:Clear Home.
Press 2 W 2 T e 4 d ¸ 8 ‘
Page 74

Previews 74
Finding the Factorial of Numbers
Finding the Factorial of NumbersFinding the Factorial of Numbers
Finding the Factorial of Numbers
Expanding Complex Numbers
Expanding Complex NumbersExpanding Complex Numbers
Expanding Complex Numbers
Steps and keystrokes Display
Compute the factorial of several numbers to
see how the TI-89 Titanium handles very
large integers. To get the factorial operator (!),
press 2I, select
7:Probability, and then
select
1:!.
Press 5 2 I 7 1 ¸ 20 2 I 7 1
¸ 30 2 I 7 1 ¸
Steps and keystrokes Display
Compute (3+5i)3 to see how the TI-89
Titanium handles computations involving
complex numbers.
Press c 3 « 5 2 ) d Z 3 ¸
Page 75

Previews 75
Finding Prime Factors
Finding Prime FactorsFinding Prime Factors
Finding Prime Factors
Finding Roots
Finding RootsFinding Roots
Finding Roots
Steps and keystrokes Display
Compute the factors of the rational number
2634492. You can enter “factor” on the entry
line by typing
FACTOR on the keyboard, or by
pressing „ and selecting
2:factor(.
Press „ 2 2634492 d ¸
(Optional) Enter other numbers on your own.
Steps and keystrokes Display
Find the root of the expression (x,y). You can
enter “root” on the entry line by typing
ROOT
on the keyboard, or by pressing 8 9.
This example illustrates using the root
function and how the expression is displayed
in “pretty print” in the history area.
Press 8 9 X b Y d ¸
Page 76

Previews 76
Expanding Expressions
Expanding ExpressionsExpanding Expressions
Expanding Expressions
Reducing Expressions
Reducing ExpressionsReducing Expressions
Reducing Expressions
Steps and keystrokes Display
Expand the expression (xN5)3. You can enter
“expand” on the entry line by typing
EXPAND
on the keyboard, or by pressing „ and
selecting
3:expand(.
Press „ 3 c X | 5 d Z 3 d ¸
(Optional) Enter other expressions on your
own.
Steps and keystrokes Display
Reduce the expression (x2N2xN5)/(xN1) to its
simplest form. You can enter “propFrac” on
the entry line by typing
PROPFRAC on the
keyboard, or by pressing „ and selecting
7:propFrac(.
Press „ 7 c X Z 2 | 2 X | 5 d e c X |
1 d d ¸
Page 77

Previews 77
Factoring Polynomials
Factoring PolynomialsFactoring Polynomials
Factoring Polynomials
Solving Equations
Solving EquationsSolving Equations
Solving Equations
Steps and keystrokes Display
Factor the polynomial (x2N5) with respect to x.
You can enter “factor” on the entry line by
typing
FACTOR on the keyboard or by
pressing „ and selecting
2:factor(.
Press „ 2 X Z 2 | 5 b X d ¸
Steps and keystrokes Display
Solve the equation x2N2xN6=2 with respect to
x.
You can enter “
solve(” on the entry line by
selecting “
solve(” from the Catalog menu, by
typing
SOLVE( on the keyboard, or by
pressing „ and selecting
1:solve(.
The status line area shows the required
syntax for the marked item in the
Catalog
menu.
Press „ 1 X Z 2 | 2 X | 6 Á 2 b X d
¸
Page 78

Previews 78
Solving Equations with a Domain Constraint
Solving Equations with a Domain ConstraintSolving Equations with a Domain Constraint
Solving Equations with a Domain Constraint
Solving Inequalities
Solving InequalitiesSolving Inequalities
Solving Inequalities
Steps and keystrokes Display
Solve the equation x2N2xN6=2 with respect to
x where x is greater than zero. The “with” (I)
operator provides domain constraint.
Press „ 1 X Z 2 | 2 X | 6 Á 2 b X d Í
X 2 Ã 0 ¸
Steps and keystrokes Display
Solve the inequality (x2>1,x) with respect to x.
Press „ 1XZ 2 2Ã1 d¸
Page 79

Previews 79
Finding the Derivative of Functions
Finding the Derivative of FunctionsFinding the Derivative of Functions
Finding the Derivative of Functions
Finding Implicit Derivatives
Finding Implicit DerivativesFinding Implicit Derivatives
Finding Implicit Derivatives
Steps and keystrokes Display
Find the derivative of (xNy)3/(x+y)2 with
respect to x.
This example illustrates using the calculus
differentiation function and how the function is
displayed in “pretty print” in the history area.
Press 2 = c X | Y d Z 3 e c X « Y
d Z 2 b X d ¸
Steps and keystrokes Display
Compute implicit derivatives for equations in
two variables in which one variable is defined
implicitly in terms of another.
This example illustrates using the calculus
implicit derivative function.
Press … D X Z 2 « Y Z 2 Á 100 bX b Y
d ¸
Page 80

Previews 80
Finding the Integral of Functions
Finding the Integral of FunctionsFinding the Integral of Functions
Finding the Integral of Functions
Solving Problems Involving Vectors
Solving Problems Involving VectorsSolving Problems Involving Vectors
Solving Problems Involving Vectors
Steps and keystrokes Display
Find the integral of x…sin(x) with respect to x.
This example illustrates using the calculus
integration function.
Press 2 < X p 2 W X d b X d ¸
Steps and keystrokes Display
1. Input a row or column of vectors.
Press 2 g ? 6 b 0 b 0 2 h §
j d ¸2 g 4 b 0 b 2 2
h § j a ¸2 g ? 1 b 2
b 1 2 h § j b ¸2 g
7 b 6 b 5 2 h § j c ¸
2. Solve (x* a+y*b+z*c=d {x,y,z})
Press „ 1 X p j a « y p j b « z
p j c Á j d b 2 [ X b Y
b Z 2 \ d ¸
Page 81

Previews 81
Log to Any Base
Log to Any BaseLog to Any Base
Log to Any Base
Converting Angle Measures
Converting Angle MeasuresConverting Angle Measures
Converting Angle Measures
Steps and keystrokes Display
Find log (x,b). You can enter “log” on the entry
line by typing
LOG on the keyboard, or by
pressing 8 7.
Press
8 7 X , j b d ¸
Steps and keystrokes Display
1. Display the MODE dialog box. For Angle
mode select
DEGREE. Convert 345
degrees to Gradian angle measure.
You can enter “ ú
Grad ” on the entry line
by selecting “ ú
Grad ” from the Catalog
menu, or from the Math menu by pressing
2 I and selecting
2:angle, A:úGrad.
Press 3 D D D B 2 ¸ 345 2
v 2 I 2 j A ¸
Page 82

Previews 82
Symbolic Manipulation
Symbolic ManipulationSymbolic Manipulation
Symbolic Manipulation
Solve the system of equations 2x N 3y = 4 and Lx + 7y = L12. Solve the first equation so
that x is expressed in terms of y. Substitute the expression for x into the second
2. Convert 345 degrees to Radian angle
measure.
You can enter “ ú
Rad ” on the entry line by
selecting “ ú
Rad ” from the Catalog menu,
or from the Math menu by pressing 2
I and selecting
2:angle, B:úRad.
Press 3 D D D B 2 ¸ 345 2
v 2 I 2 j B ¸
Note: You can also use ó,ô, or
G
to
override the angle mode setting
temporarily.
Steps and keystrokes Display
Page 83

Previews 83
equation, and solve for the value of y. Then substitute the y value back into the first
equation to solve for the value of x.
Steps and keystrokes Display
1. Display the Home screen and clear the
entry line. Solve the equation 2x N 3y = 4
for x.
„
1 selects solve( from the Algebra
menu. You can also type
solve( directly
from the keyboard or select it from the
Catalog.
Press " M M „ 1 2 X | 3 Y
Á 4 b X d ¸
2. Begin to solve the equation Lx+7y=L12
for y, but do not press ¸ yet.
Press „ 1 ? X « 7 Y Á ? 12 b Y d
3. Use the “with” operator to substitute the
expression for x that was calculated from
the first equation. This gives the value of
y.
The “with” operator is displayed as | on
the screen.
Use the auto-paste feature to highlight the
last answer in the history area and paste
it to the entry line.
Press Í C ¸ ¸
Page 84

Previews 84
This example is a demonstration of symbolic manipulation. A one-step function is
available for solving systems of equations.
Constants and Measurement Units
Constants and Measurement UnitsConstants and Measurement Units
Constants and Measurement Units
Using the equation f = m…a, calculate the force when m = 5 kilograms and a = 20
meters/second
2
. What is the force when a = 9.8 meters/second2. (This is the
4. Highlight the equation for x in the history
area.
Press C C C
5. Auto-paste the highlighted expression to
the entry line. Then substitute the value of
y that was calculated from the second
equation.
Press ¸ Í C ¸ ¸
The solution is:
x = L8/11 and y = L20/11
Steps and keystrokes Display
Page 85

Previews 85
acceleration due to gravity, which is a constant named _g). Convert the result from
newtons to kilograms of force.
Steps and keystrokes Display
1. Display the MODE dialog box, Page 3. For
Unit System mode, select SI for the metric
system of measurements.
Results are displayed according to these
default units.
Press 3 … B 1 ¸
2. Create an acceleration unit for
meters/second
2
named _ms2.
The
UNITS dialog box lets you select units
from an alphabetical list of categories.
You can use 2D and 2C to scroll
one page at a time through the
categories.
If you use the
UNITS dialog box to select a
unit, the _ is entered automatically. Now,
instead of re-entering _m/_s
2
each time
you need it, you can use _ms2. Also, you
can now use the
UNITS dialog box to
select _ms2 from the Acceleration
category.
Press 2 À D B M ¸ e 2
À D D D D B S ¸ Z 2 9 8
5 2 ™ MS j 2 ¸
Page 86

Previews 86
Basic Function Graphing I
Basic Function Graphing I Basic Function Graphing I
Basic Function Graphing I
The example in this section demonstrates some of the graphing capabilities of the TI-89
Titanium keystrokes. It illustrates how to graph a function using the
Y= Editor. You will
3. Calculate the force when
m = 5 kilograms (_kg) and
a = 20 meters/second
2
(_ms2).
If you know the abbreviation for a unit,
you can type it from the keyboard.
Press 5 8 5 2 ™ KG j p 20
8 5 2 ™ MS j 2 ¸
4. Using the same m, calculate the force for
an acceleration due to gravity
(the constant _g).
For _g, you can use the pre-defined
constant available from the
UNITS dialog
box or you can type _g.
Press 5 8 5 2 ™ KG j p 2
À B j G ¸ ¸
5. Convert to kilograms of force (_kgf).
2 4 displays the 4 conversion operator.
Press B 2 4 8 5 2 ™ KGF
j ¸
Steps and keystrokes Display
Page 87

Previews 87
learn how to enter a function, produce a graph of the function, trace a curve, find a
minimum point, and transfer the minimum coordinates to the Home screen.
Explore the graphing capabilities of the TI-89 Titanium by graphing the function
y=(|x
2
N3|N10)/2.
Steps and keystrokes Display
1. Display the Y= Editor.
Press 8 #
2. Enter the function
(abs(x
2
N3)N10)/2.
The screen shot shows the “pretty print”
display at
y1=.
Press c ½ A ¸ X Z 2 | 3 d
| 1 0 d e 2 ¸
3. Display the graph of the function.
Select
6:ZoomStd by pressing 6 or by
moving the cursor to
6:ZoomStd and
pressing ¸.
Press „ 6
entry line
Page 88

Previews 88
4. Turn on Trace.
The tracing cursor, and the x and y
coordinates are displayed.
Press …
5. Open the
MATH menu and select
3:Minimum.
Press ‡ D D ¸
6. Set the lower bound.
Press B (right cursor) to move the tracing
cursor until the lower bound for x is just to
the left of the minimum node before
pressing ¸ the second time.
Press B ... B ¸
7. Set the upper bound.
Press B (right cursor) to move the tracing
cursor until the upper bound for x is just to
the right of the minimum node.
Press B ... B
Steps and keystrokes Display
tracing cursor
Page 89

Previews 89
Basic Function Graphing II
Basic Function Graphing II Basic Function Graphing II
Basic Function Graphing II
Graph a circle of radius 5, centered on the origin of the coordinate system. View the
circle using the standard viewing window (
ZoomStd). Then use ZoomSqr to adjust the
viewing window.
8. Find the minimum point on the graph
between the lower and upper bounds.
Press ¸
9. Transfer the result to the Home screen,
and then display the Home screen.
Press 8 ? "
Steps and keystrokes Display
1. Display the MODE dialog box. For Graph
mode, select
FUNCTION.
Press 3 B 1 ¸
Steps and keystrokes Display
minimum point
minimum coordinates
Page 90

Previews 90
2. Display the Home screen. Then store the
radius, 5, in variable r.
Press " 5 9 j R ¸
3. Display and clear the
Y= Editor. Then
define y1(x) = , the top half of
a circle.
In function graphing, you must define
separate functions for the top and bottom
halves of a circle.
Press 8 # , 8 ¸ ¸ 2 ]
j R Z 2 | X Z 2 d ¸
4. Define y2(x) = , the function for
the bottom half of the circle.
The bottom half is the negative of the top
half, so you can define y2(x) = Ly1(x).
Use the full function name
y1(x), not
simply y1.
Press ¸ ? Y 1 c X d ¸
Steps and keystrokes Display
5!r
r
2
x
2
–()
r
2
x2––
Page 91

Previews 91
Note: There is a gap between the top and bottom halves of the circle because each half
is a separate function. The mathematical endpoints of each half are (L5,0) and (5,0).
Depending on the viewing window, however, the plotted endpoints for each half may be
slightly different from their mathematical endpoints.
5. Select the
ZoomStd viewing window,
which automatically graphs the
functions.
In the standard viewing window, both the
x and y axes range from L10 to 10.
However, this range is spread over a
longer distance along the x axis than the
y axis. Therefore, the circle appears as
an ellipse.
Press „ 6
6. Select
ZoomSqr.
ZoomSqr increases the range along the
x axis so that circles and squares are
shown in correct proportion.
Press „ 5
Steps and keystrokes Display
Notice slight gap
between top and
bottom halves.
Page 92

Previews 92
Basic Function Graphing III
Basic Function Graphing IIIBasic Function Graphing III
Basic Function Graphing III
Use the “Detect Discontinuities” graph format to eliminate faux asymptotes and
connections in a jump discontinuity.
Steps and keystrokes Display
1. Display the MODE dialog box. For Graph
mode, select
FUNCTION. For Angle mode,
select
RADIAN.
Press 3 B 1 D D D B 1 ¸
2. Open the Y= Editor and enter y1(x)=1/(x-
1).
Press 8 # 1 e c X | 1 d ¸
3. Display the Graph Formats dialog box
and set “Detect Discontinuities” to OFF
Note: The second item on the Graph
Format dialog is not greyed out, which
means it can be set to sequential “Seq” or
simultaneous “Simul”.
Press 8 Í D D D D D D B 1 ¸q
Page 93

Previews 93
4. Execute the Graph command, which
automatically displays the Graph screen.
Observe the “faux” asymptotes contained
in the graph.
Press 8 %q
5. Display the Graph Formats dialog box
and set “Detect Discontinuities” to ON.
Note: The second item on the Graph
Format dialog is greyed out, which means
the graph order is set to sequential “Seq”.
Press 8 Í D D D D D D B 2 ¸
6. Execute the
Graph command, which
automatically displays the Graph screen.
No”faux” asymptotes are present on the
graph.
Note: Graphing speed may slow
considerably when “Detect
Discontinuities” is set to ON.
Press 8 %(q
Steps and keystrokes Display
Page 94

Previews 94
Parametric Graphing
Parametric GraphingParametric Graphing
Parametric Graphing
Graph the parametric equations describing the path of a ball kicked at an angle (q) of 60¡
with an initial velocity (v
0
) of 15 meters/sec. The gravity constant g = 9.8 meters/sec2.
Ignoring air resistance and other drag forces, what is the maximum height of the ball and
when does it hit the ground?
Steps and keystrokes Display
1. Display the MODE dialog box. For Graph
mode, select
PARAMETR IC.
Press 3 B 2 ¸
2. Display and clear the
Y= Editor. Then
define the horizontal component
xt1(t) = v
0
t cos q.
Enter values for v
0
and q.
Press 8 # , 8 ¸ ¸ 15T p
2 X 60 2 “ d ¸
Type T p 2 X, not T 2 X.
Enter a ¡ symbol by typing either 2“
or 2I2 1. This ensures a number
is interpreted as degrees, regardless of
the angle mode.
xt1(t)=15t…cos(60¡)
Page 95

Previews 95
3. Define the vertical component
yt1(t) = v
0
tsinqN(g/2)t2.
Enter values for v
0
, q, and g.
Press ¸ 15T p 2 W 60 2 “ d
| c 9.8 e 2 d T Z 2 ¸
4. Display the
Window Editor. Enter
Window variables appropriate for
this example.
You can press either D or ¸ to enter
a value and move to the next variable.
Press 8 $ 0 D 3 D .02 D ? 2
D 25 D 5 D ? 2 D 10 D 5
5. Graph the parametric equations to model
the path of the ball.
Press 8 %
6. Select
Trace. Then move the cursor
along the path to find the:
• y value at maximum height.
• t value where the ball hits the
ground.
Press … B or A as necessary
Steps and keystrokes Display
Page 96

Previews 96
Polar Graphing
Polar Graphing Polar Graphing
Polar Graphing
The graph of the polar equation r1(q) = A sin Bq forms the shape of a rose. Graph the
rose for A=8 and B=2.5. Then explore the appearance of the rose for other values of A
and B.
Steps and keystrokes Display
1. Display the MODE dialog box. For Graph
mode, select
POLAR. For Angle mode,
select
RADIAN.
Press 3 B 3 D D D B 1 ¸
2. Display and clear the
Y= Editor. Then
define the polar equation r1(q)=Asin Bq.
Enter 8 and 2.5 for A and B, respectively.
Press 8 # , 8 ¸ ¸ 8 2 W
2.5 8 Ï d ¸
Page 97

Previews 97
3. Select the ZoomStd viewing window,
which graphs the equation.
• The graph shows only five rose
petals.
- In the standard viewing window,
the Window variable qmax = 2p.
The remaining petals have q
values greater than 2p.
• The rose does not appear
symmetrical.
- Both the x an y axes range from
L10 to 10. However, this range is
spread over a longer distance
along the x axis than the y axis.
Press „ 6
4. Display the
Window Editor, and change
qmax to 4p.
4p will be evaluated to a number when
you leave the
Window Editor.
Press 8 $ D 4 2 T
Steps and keystrokes Display
Page 98

Previews 98
Sequence Graphing
Sequence Graphing Sequence Graphing
Sequence Graphing
A small forest contains 4000 trees. Each year, 20% of the trees will be harvested (with
80% remaining) and 1000 new trees will be planted. Using a sequence, calculate the
number of trees in the forest at the end of each year. Does it stabilize at a certain
number?
5. Select
ZoomSqr, which regraphs the
equation.
ZoomSqr increases the range along the
x axis so that the graph is shown in
correct proportion.
Press „ 5
You can change values for A and B as
necessary and regraph the equation.
Initially After 1 Year After 2 Years After 3 Years . . .
4000 .8 x 4000
+ 1000
.8 x (.8 x 4000 +
1000) + 1000
.8 x (.8 x (.8 x
4000 + 1000) +
1000) + 1000
. . .
Steps and keystrokes Display
Page 99

Previews 99
Steps and keystrokes Display
1. Display the MODE dialog box. For Graph
mode, select
SEQUENCE.
Press 3 B 4 ¸
2. Display and clear the
Y= Editor. Then
define the sequence as
u1(n) = iPart(.8…u1(nN1)+1000).
Use
iPart to take the integer part of the
result. No fractional trees are harvested.
To access
iPart(, you can use 2I,
simply type it, or select it from the
CATALOG.
Press 8 # , 8 ¸ ¸ 2 I
1 4 . 8 j U1 c j N | 1 d « 1000
d ¸
3. Define ui1 as the initial value that will be
used as the first term.
Press ¸ 4000 ¸
4. Display the
Window Editor. Set the n and
plot Window variables.
nmin=0 and nmax=50 evaluate the size of
the forest over 50 years.
Press 8 $ 0 D 50 D 1 D 1 D
Page 100

Previews 100
5. Set the x and y Window variables to
appropriate values for this example.
Press 0 D 50 D 10 D 0 D 6000 D 1000
6. Display the Graph screen.
Press 8 %
7. Select
Trace. Move the cursor to trace
year by year. How many years (nc) does it
take the number of trees (yc) to stabilize?
Trace begins at nc=0.
nc is the number of years.
xc = nc since n is plotted on the x axis.
yc = u1(n), the number of trees at
year n.
Press … B and A as necessary
Steps and keystrokes Display
By default, sequences
use the Square
display style.
 Loading...