

Page 1

TI-86
GRAPHING CALCULATOR
GUIDEBOOK
TI-GRAPH LINK, Calculator-Based Laboratory, CBL, CBL 2, Calculator-Based Ranger, CBR, Constant Memory, Automatic Power
Down, APD, and EOS are trademarks of Texas Instruments Incorporated.
Windows is a registered trademark of Microsoft Corporation.
IBM is a registered trademark of International Business Machines Corporation
Macintosh is a registered trademark of Apple Computer, Inc.
Copyright © 1997, 2001 by Texas Instruments Incorporated
Page 2

ii
Important
Texas Instruments makes no warranty, either expressed or implied, including but not limited to any implied warranties of
merchantability and fitness for a particular purpose, regarding any programs or book materials and makes such materials available
solely on an “as-is” basis.
In no event shall Texas Instruments be liable to anyone for special, collateral, incidental, or consequential damages in
connection with or arising out of the purchase or use of these materials, and the sole and exclusive liability of Texas
Instruments, regardless of the form of action, shall not exceed the purchase price of this equipment. Moreover, Texas
Instruments shall not be liable for any claim of any kind whatsoever against the use of these materials by any other party.
US FCC Information Concerning Radio Frequency Interference
This equipment has been tested and found to comply with the limits for a Class B digital device, pursuant to Part 15 of the FCC
rules. These limits are designed to provide reasonable protection against harmful interference in a residential installation. This
equipment generates, uses, and can radiate radio frequency energy and, if not installed and used in accordance with the
instructions, may cause harmful interference with radio communications. However, there is no guarantee that interference will
not occur in a particular installation.
If this equipment does cause harmful interference to radio or television reception, which can be determined by turning the
equipment off and on, you can try to correct the interference by one or more of the following measures:
♦
Reorient or relocate the receiving antenna.
♦
Increase the separation between the equipment and receiver.
♦
Connect the equipment into an outlet on a circuit different from that to which the receiver is connected
♦
Consult the dealer or an experienced radio/television technician for help.
.
Page 3

Table of Contents
iii
TI-86 Quick Start 1
Preparing to Use Your New TI-86 ..................................................... 2
Installing the AAA Batteries ......................................................... 2
Turning On and Turning Off the TI-86.......................................... 2
Adjusting the Contrast .................................................................2
Resetting All Memory and Defaults.............................................. 3
Calculating on the Home Screen.......................................................3
Calculating the Sine of a Number.................................................3
Storing the Last Answer to a Variable..........................................3
Using a Variable in an Expression ................................................4
Editing an Expression ................................................................... 4
Displaying a Complex Number as a Result...................................5
Using a List with a Function......................................................... 5
Displaying the Integer Part of Real Numbers in a List .................. 6
Removing (Exiting) a Menu..........................................................6
Finding the Square Root............................................................... 7
Calculating Derivatives................................................................. 7
Retrieving, Editing, and Re-evaluating the Previous Entry ...........8
Converting Degrees Fahrenheit to Degrees Celsius...................... 8
Storing an Unevaluated Expression to an Equation Variable .......9
Plotting Functions on the Graph Screen............................................ 9
Displaying and Entering Functions in the Equation Editor............9
Changing the Graph Style of a Function.....................................10
Plotting a Function on the Graph Screen....................................11
Tracing a Function......................................................................11
Evaluating y for a Specific x Value (During a Trace) ................... 12
Changing a Window Variable Value........................................... 12
Deselecting a Function ...............................................................13
Zooming In on a Portion of the Graph Screen ............................ 14
Chapter 1: Operating the TI-86 15
Installing or Replacing Batteries .....................................................16
When to Replace Batteries .........................................................16
Turning On and Turning Off the TI-86.............................................17
Adjusting the Display Contrast........................................................17
The Home Screen ............................................................................18
Displaying Entries and Answers..................................................18
Entering Numbers ...........................................................................19
Entering Negative Numbers .......................................................19
Using Scientific or Engineering Notation....................................20
Entering Complex Numbers........................................................ 20
Entering Other Characters............................................................... 21
The 2nd Key................................................................................21
Page 4

iv
TI-86 Table of Contents
The ALPHA Key........................................................................... 21
ALPHA-lock and alpha-lock........................................................ 22
Common Cursors........................................................................ 22
Cursor Direction Keys ................................................................. 23
Inserting, Deleting, and Clearing Characters..............................23
Entering Expressions and Instructions ............................................24
Entering an Expression...............................................................24
Using Functions in Expressions ..................................................25
Using an Instruction ................................................................... 25
Entering Functions, Instructions, and Operators ........................25
Entering Consecutive Entries...................................................... 26
The Busy Indicator...................................................................... 26
Interrupting a Calculation or Graph ...........................................26
Diagnosing an Error ........................................................................ 27
Correcting an Error..................................................................... 27
Reusing Previous Entries and the Last Answer ...............................28
Retrieving the Last Entry ............................................................ 28
Retrieving and Editing the Last Entry .........................................28
Retrieving Previous Entries......................................................... 28
Retrieving Multiple Entries......................................................... 29
Clearing the ENTRY Storage Area ..............................................29
Retrieving the Last Answer ........................................................29
Using Ans Preceding a Function.................................................30
Storing Results to a Variable ...................................................... 30
Using TI-86 Menus..........................................................................31
Displaying a Menu......................................................................31
The Menu Keys...........................................................................32
Selecting a Menu Item................................................................32
Exiting (Removing) a Menu ........................................................33
Viewing and Changing Modes ........................................................34
Changing a Mode Setting...........................................................34
Chapter 2: The CATALOG, Variables, and Characters 37
The CATALOG .................................................................................38
Storing Data to Variables ................................................................ 39
Creating a Variable Name ..........................................................39
Storing a Value to a Variable Name ...........................................40
Storing an Unevaluated Expression............................................40
Storing an Answer......................................................................41
Copying a Variable Value ...........................................................41
Displaying a Variable Value........................................................ 41
Recalling a Variable Value..........................................................42
Classifying Variables as Data Types. ...............................................42
The CATLG-VARS (CATALOG-Variables) Menu...........................43
Selecting a Variable Name .........................................................44
The CUSTOM Menu.........................................................................44
Entering CUSTOM Menu Items................................................... 44
Clearing CUSTOM Menu Items...................................................45
Deleting a Variable from Memory ..............................................45
Page 5

TI-86 Table of Contents
v
The CHAR (Character) Menu...........................................................45
The CHAR MISC (Miscellaneous) Menu...................................... 46
The CHAR GREEK Menu............................................................. 46
The CHAR INTL (International) Menu......................................... 46
Adding a Modifier to a Vowel ....................................................46
Chapter 3: Math, Calculus, and Test Operations 47
Keyboard Mathematical Functions .................................................48
The MATH Menu............................................................................. 49
The MATH NUM (Number) Menu............................................... 49
The MATH PROB (Probability) Menu.......................................... 50
The MATH ANGLE Menu............................................................ 51
The MATH HYP (Hyperbolic) Menu.............................................51
The MATH MISC (Miscellaneous) Menu..................................... 52
The InterpolateàExtrapolate Editor............................................ 53
The CALC (Calculus) Menu.............................................................. 54
The TEST (Relational) Menu............................................................55
Using Tests in Expressions and Instructions ............................... 56
Chapter 4: Constants, Conversions, Bases, and Complex Numbers 57
Using Built-In and User-Created Constants..................................... 58
The CONS (Constants) Menu...................................................... 58
The CONS BLTIN (Built-In Constants) Menu............................... 58
Creating or Redefining a User-Created Constant .......................60
The Constant Editor Menu..........................................................60
Entering a Constant Name in an Expression ..............................61
Converting Units of Measure ..........................................................61
Converting a Unit of Measure ....................................................61
The CONV (Conversions) Menu .................................................. 62
The CONV LNGTH (Length) Menu ..............................................63
The CONV AREA Menu...............................................................63
The CONV VOL (Volume) Menu..................................................63
The CONV TIME Menu................................................................63
The CONV TEMP (Temperature) Menu ....................................... 63
The CONV MASS Menu ..............................................................64
The CONV FORCE Menu.............................................................64
The CONV PRESS (Pressure) Menu ............................................. 64
The CONV ENRGY (Energy) Menu ..............................................64
The CONV POWER Menu............................................................64
The CONV SPEED Menu .............................................................64
Converting a Value Expressed as a Rate ....................................65
Number Bases .................................................................................65
Number Base Ranges .................................................................66
One’s and Two’s Complements .................................................. 66
The (Number) BASE Menu.......................................................... 66
The BASE Õ-Ú (Hexadecimal Characters) Menu.........................67
Entering Hexadecimal Digits.......................................................67
The BASE TYPE Menu.................................................................67
Page 6

vi
TI-86 Table of Contents
The BASE CONV (Conversion) Menu .......................................... 68
Converting Number Bases.......................................................... 68
The BASE BOOL (Boolean) Menu ...............................................68
Results of Boolean Operations ................................................... 69
The BASE BIT Menu.................................................................... 69
Using Complex Numbers................................................................. 70
Complex Results......................................................................... 70
Using a Complex Number in an Expression................................ 71
The CPLX (Complex Number) Menu........................................... 71
Chapter 5: Function Graphing 73
Defining a Graph............................................................................. 74
Setting the Graph Mode .................................................................74
The GRAPH Menu ........................................................................... 75
Using the Equation Editor ............................................................... 76
The Equation Editor (GRAPH y(x)=) Menu .................................76
Defining a Function in the Equation Editor ................................77
Notes about Defining Function Equations..................................78
Selecting Graph Styles................................................................ 79
Setting the Graph Style in the Equation Editor........................... 80
Using Shading Patterns to Differentiate Functions..................... 80
Viewing and Changing OnàOff Status of Stat Plots ................... 81
Setting the Window Variables......................................................... 81
Displaying the Window Editor.................................................... 82
Changing a Window Variable Value........................................... 82
Setting Graphing Accuracy with
Setting the Graph Format................................................................83
Displaying a Graph.......................................................................... 85
Pausing or Stopping a Graph in Progress ...................................85
Modifying a Drawn Graph..........................................................85
Graphing a Family of Curves ......................................................86
Smart Graph ............................................................................... 86
x and @y ...............................83
@
Chapter 6: Graph Tools 87
Graph Tools on the TI-86 ................................................................ 88
The GRAPH Menu.......................................................................88
Using the Free-Moving Cursor....................................................89
Graphing Accuracy .....................................................................89
Tracing a Graph...............................................................................90
Stopping and Resuming a Trace.................................................91
Resizing the Graph Screen with ZOOM Operations.........................91
The GRAPH ZOOM Menu ...........................................................91
Defining a Custom Zoom In........................................................ 93
Setting Zoom Factors..................................................................93
Zooming In and Zooming Out on a Graph..................................93
Storing and Recalling Zoom Window Variable Values................95
Using Interactive Math Functions ...................................................95
The GRAPH MATH Menu............................................................ 95
Settings That Affect GRAPH MATH Operations .......................... 96
Using ROOT, FMIN, FMAX, or INFLC ..........................................97
Page 7

TI-86 Table of Contents
vii
Using ‰f(x), DIST, or ARC ............................................................98
Using dyàdx or TANLN............................................................... 99
Using ISECT .............................................................................. 100
Using YICPT.............................................................................. 100
Evaluating a Function for a Specified x......................................... 101
Drawing on a Graph......................................................................101
Before Drawing on a Graph .....................................................102
Saving and Recalling Drawn Pictures ....................................... 102
Clearing Drawn Pictures........................................................... 103
The GRAPH DRAW Menu ......................................................... 103
Shading Areas of a Graph ........................................................104
Drawing a Line Segment ..........................................................105
Drawing a Vertical or Horizontal Line ......................................106
Drawing a Circle.......................................................................106
Drawing a Function, Tangent Line, or Inverse Function ...........107
Drawing Freehand Points, Lines, and Curves ...........................107
Placing Text on a Graph........................................................... 108
Turning On or Turning Off Points .............................................108
Chapter 7: Tables 109
Displaying the Table......................................................................110
TABLE Menu............................................................................. 110
The Table.................................................................................. 110
Independent and Dependent Variables in the Table ................111
Navigating the Table................................................................ 111
The Table Menus ...................................................................... 112
Setting Up the Table .....................................................................113
Viewing and Editing Dependent Variable Equations ...............114
Clearing the Table.........................................................................114
Chapter 8: Polar Graphing 115
Preview: Polar Graphing ...............................................................116
Defining a Polar Graph..................................................................117
Setting Polar Graphing Mode...................................................117
The GRAPH Menu.....................................................................117
Displaying the Polar Equation Editor........................................118
Setting the Graph Screen Window Variables............................ 118
Setting the Graph Format.........................................................119
Displaying the Graph................................................................119
Using Graph Tools in Pol Graphing Mode.....................................119
The Free-Moving Cursor ........................................................... 119
Tracing a Polar Equation ..........................................................120
Moving the Trace Cursor to a q Value...................................... 121
Using Zoom Operations............................................................ 121
The GRAPH MATH Menu.......................................................... 122
Evaluating an Equation for a Specified q..................................122
Drawing on a Polar Graph........................................................122
Page 8

viii
TI-86 Table of Contents
Chapter 9: Parametric Graphing 123
Preview: Parametric Graphing ......................................................124
Defining a Parametric Graph......................................................... 125
Setting Parametric Graphing Mode.......................................... 126
The GRAPH Menu.....................................................................126
Displaying the Parametric Equation Editor............................... 126
Selecting and Deselecting a Parametric Equation ....................127
Deleting a Parametric Equation................................................ 127
Setting the Graph Screen Window Variables............................ 127
Setting the Graph Format......................................................... 128
Displaying the Graph................................................................ 128
Using Graph Tools in Param Graphing Mode................................ 128
The Free-Moving Cursor........................................................... 128
Tracing a Parametric Function.................................................. 128
Moving the Trace Cursor to a t Value.......................................129
Using Zoom Operations............................................................ 129
The GRAPH MATH Menu.......................................................... 130
Evaluating an Equation for a Specified t ..................................130
Drawing on a Parametric Graph............................................... 130
Chapter 10: Differential Equation Graphing 131
Defining a Differential Equation Graph.........................................132
Setting Differential Equation Graphing Mode ..........................132
The GRAPH Menu.....................................................................133
Setting the Graph Format......................................................... 133
Displaying the Differential Equation Editor ..............................134
Setting the Graph Screen Window Variables............................ 135
Setting the Initial Conditions....................................................136
Setting the Axes .......................................................................137
Differential Equation Graphing Tips .........................................137
The Built-In Variable fldPic .......................................................138
Displaying the Graph................................................................138
Entering and Solving Differential Equations..................................139
Graphing in SlpFld Format........................................................ 139
Transforming an Equation into a First-Order System................ 140
Graphing in DirFld Format........................................................141
Graphing a System of Equations in FldOff Format....................142
Solving a Differential Equation for a Specified Value ...............144
Using Graph Tools in DifEq Graphing Mode .................................144
The Free-Moving Cursor ........................................................... 144
Tracing a Differential Equation................................................. 144
Moving the Trace Cursor to a t Value.......................................145
Drawing on a Differential Equation Graph ...............................145
Drawing an Equation and Storing Solutions to Lists.................145
Using ZOOM Operations...........................................................147
Drawing Solutions Interactively with EXPLR.............................148
Evaluating Differential Equations for a Specified t ...................150
Page 9

TI-86 Table of Contents
ix
Chapter 11: Lists 151
Lists on the TI-86 .......................................................................... 152
The LIST Menu.......................................................................... 152
The LIST NAMES Menu............................................................. 153
Creating, Storing, and Displaying Lists..........................................153
Entering a List Directly in an Expression................................... 153
Creating a List Name by Storing a List .....................................154
Displaying List Elements Stored to a List Name .......................154
Displaying or Using a Single List Element ................................155
Storing a New Value to a List Element..................................... 155
Complex List Elements .............................................................156
The List Editor ............................................................................... 156
The List Editor Menu ................................................................156
Creating a List Name in the Unnamed Column ........................ 157
Inserting a List Name into the List Editor .................................157
Displaying and Editing a List Element ......................................158
Deleting Elements from a List ..................................................158
Removing a List from the List Editor ........................................158
Using List Operations.................................................................... 159
The LIST OPS (Operations) Menu .............................................159
Using Mathematical Functions with Lists .....................................161
Attaching a Formula to a List Name .............................................162
Comparing an Attached List with a Regular List ......................163
Using the List Editor to Attach a Formula ................................163
Using the List Editor With Attached-Formula Lists ................... 164
Executing and Displaying Attached Formulas ..........................164
Handling Errors Related to Attached Formulas.........................165
Detaching a Formula from a List Name....................................166
Editing an Element of a Attached Formula List ........................166
Chapter 12: Vectors 167
Vectors on the TI-86 .....................................................................168
Creating, Storing, and Displaying Vectors.....................................169
The VECTR (Vector) Menu ........................................................169
The VECTR NAMES Menu.........................................................169
Creating a Vector in the Vector Editor......................................169
The Vector Editor Menu............................................................170
Creating a Vector on the Home Screen.....................................170
Creating a Complex Vector.......................................................171
Displaying a Vector...................................................................171
Using a Vector in an Expression ...............................................172
Editing Vector Dimension and Elements...................................172
The VECTR MATH Menu...........................................................173
The VECTR OPS (Operations) Menu..........................................173
The VECTR CPLX (Complex) Menu ...........................................175
Using Mathematical Functions with Vectors.................................176
Chapter 13: Matrices 177
Matrices on the TI-86....................................................................178
Creating, Storing, and Displaying Matrices ...................................178
Page 10

x
TI-86 Table of Contents
The MATRX (Matrix) Menu ......................................................178
The MATRX NAMES Menu ....................................................... 178
Creating a Matrix in the Matrix Editor .....................................178
The Matrix Editor Menu ...........................................................179
Creating a Matrix on the Home Screen ....................................180
Creating a Complex Matrix ......................................................180
Displaying Matrix Elements, Rows, and Submatrices...............181
Using a Matrix in an Expression...............................................181
Editing Matrices in the Matrix Editor .......................................182
Editing Matrices on the Home Screen ......................................182
The MATRX MATH Menu .........................................................183
The MATRX OPS (Operations) Menu........................................ 184
The MATRX CPLX (Complex ) Menu......................................... 185
Using Mathematical Functions with Matrices............................... 185
Chapter 14: Statistics 187
Statistical Analysis on the TI-86.................................................... 188
Setting Up a Statistical Analysis.................................................... 188
The STAT (Statistics) Menu....................................................... 188
Entering Statistical Data........................................................... 189
The LIST NAMES Menu............................................................. 189
The STAT CALC (Calculations) Menu........................................ 189
Automatic Regression Equation Storage.................................. 191
Results of a Statistical Analysis..................................................... 192
The STAT VARS (Statistical Variables) Menu............................ 192
Plotting Statistical Data.................................................................194
The STAT PLOT Status Screen...................................................194
The STAT PLOT Menu ............................................................... 195
Setting Up a Stat Plot ............................................................... 195
Turning On and Turning Off a Stat Plot .................................... 195
The PLOT TYPE Menu (Selecting a Plot Type)...........................196
Plot Type Characteristics ..........................................................196
The STAT DRAW Menu..................................................................199
Forecasting a Statistical Data Value..............................................199
Chapter 15: Equation Solving 201
Preview: The Equation Solver........................................................202
Entering an Equation in the Equation-Entry Editor........................203
Setting Up the Interactive-Solver Editor........................................204
Entering Variable Values ..........................................................204
Controlling the Solution with Bounds and a Guess .................. 204
Editing the Equation.................................................................205
The Solver Menu.......................................................................206
Solving for the Unknown Variable ................................................206
Graphing the Solution...................................................................207
Solver Graph Tools........................................................................207
The Solver ZOOM Menu ...........................................................208
The Simultaneous Equation Solver................................................ 208
Entering Equations to Solve Simultaneously ............................208
Storing Equation Coefficients and Results to Variables............210
The Polynomial Root-Finder..........................................................211
Page 11

TI-86 Table of Contents
xi
Entering and Solving a Polynomial........................................... 211
Storing a Polynomial Coefficient or Root to a Variable ............ 212
Chapter 16: Programming 213
Writing a Program on the TI-86 ....................................................214
The PRGM Menu ...................................................................... 214
Creating a Program in the Program Editor ...............................214
The Program Editor Menu ........................................................ 215
The PRGM IàO (InputàOutput) Menu...................................... 215
The TI-86 Key Code Diagram ...................................................217
The PRGM CTL Menu ...............................................................218
Entering a Command Line........................................................ 220
Menus and Screens in the Program Editor ...............................220
Running a Program ....................................................................... 221
Breaking (Interrupting) a Program ...........................................222
Working with Programs ................................................................223
Managing Memory and Deleting a Program ............................ 223
Editing a Program.....................................................................223
Calling a Program from Another Program................................224
Copying a Program to Another Program Name........................ 225
Using and Deleting Variables within a Single Program ............225
Running an Assembly Language Program ....................................225
Entering and Storing a String........................................................ 226
The STRNG (String) Menu ........................................................227
Creating a String ......................................................................227
Chapter 17: Memory Management 229
Checking Available Memory .........................................................230
The MEM (Memory) Menu .......................................................230
Checking Memory Usage..........................................................230
Deleting Items from Memory ........................................................231
The MEM DELET (Delete) Menu ...............................................231
Resetting the TI-86 .......................................................................232
The MEM RESET (Reset) Menu.................................................232
ClrEnt (Clear Entry)...................................................................232
Chapter 18: The TI-86 Communication Link 233
TI-86 Linking Options....................................................................234
Linking Two TI-86s...................................................................234
Linking a TI-86 and a TI-85......................................................234
Linking a TI-86 and a CBL 2/CBL or CBR System......................234
Linking a TI-86 and a PC or Macintosh ....................................235
Downloading Programs from the Internet................................235
Connecting the TI-86 to Another Device.......................................235
The LINK Menu......................................................................... 236
Selecting Data to Send..................................................................236
The LINK SEND Menu...............................................................236
Initiating a Memory Backup .....................................................237
Selecting Variables to Send ......................................................238
The SEND WIND (Window Variables) Screen............................238
Sending Variables to a TI-85 ....................................................239
Page 12

xii
TI-86 Table of Contents
The LINK SND85 (Send Data to TI-85) Menu ...........................239
Preparing the Receiving Device..................................................... 240
Transmitting Data .........................................................................240
Receiving Transmitted Data.......................................................... 241
Repeating Transmission to Several Devices .............................242
Error Conditions .......................................................................242
Insufficient Memory in Receiving Unit......................................242
Chapter 19: Applications 243
Using Math Operations with Matrices ..........................................244
Finding the Area between Curves................................................. 245
The Fundamental Theorem of Calculus......................................... 246
Electrical Circuits........................................................................... 248
Program: Taylor Series ..................................................................250
Characteristic Polynomial and Eigenvalues................................... 252
Convergence of the Power Series .................................................254
Reservoir Problem......................................................................... 256
Predator-Prey Model..................................................................... 258
Program: Sierpinski Triangle .........................................................260
Chapter 20: A to Z Function and Instruction Reference 261
Quick-Find Locator........................................................................ 262
Alphabetical Listing of Operations................................................ 266
Appendix 379
TI-86 Menu Map...........................................................................380
Handling a Difficulty......................................................................392
Error Conditions ............................................................................393
Equation Operating System (EOSé)..............................................397
Implied Multiplication ..............................................................397
Parentheses..............................................................................397
TOL (The Tolerance Editor)............................................................398
Computational Accuracy ............................................................... 399
Support and Service Information...................................................400
Product Support........................................................................400
Product Service.........................................................................401
Other TI Products and Services.................................................401
Warranty Information....................................................................402
Customers in the U.S. and Canada Only...................................402
Australia & New Zealand Customers Only................................403
All Customers outside the U.S. and Canada.............................404
Index
Page 13
TI-86 Quick Start
Preparing to Use Your New TI-86........................................ 2
Calculating on the Home Screen.......................................... 3
Plotting Functions on the Graph Screen .............................. 9
M1 M2
F1 F2 F3
-
TI 86
M3
M4
M5
F4
F5
Page 14

2
Quick Start
After about four minutes of
inactivity, the TI-86 turns off
automatically.
$
If you release
or # while
adjusting the contrast, you
-
must press
again to
continue the adjustment.
Preparing to Use Your New TI-86
The brief examples in the TI-86 Quick Start demonstrate some common TI-86 features.
Before you begin, you must install the batteries, turn on the calculator, adjust the contrast,
and reset the memory and the defaults. Chapter 1 has more details on these topics.
Installing the AAA Batteries
Four AAA batteries are included in the TI-86 retail package. Remove the batteries from the
package and install them in the battery compartment on the back of the calculator. Arrange
N
the batteries according to the polarity (+ and
Turning On and Turning Off the TI-86
To turn on the TI-86, press ^, which is in the bottom-left corner of the
keyboard. You should see the entry cursor ( Å ) blinking in the top-left
corner of the screen. If you do not see it, adjust the contrast (see below).
To turn off the calculator, press -, and then the key under
^
. This guidebook uses brackets ( ã and ä ) to express - and
keystroke combinations. For example, to turn off the TI-86, press - .
Adjusting the Contrast
Press and release the yellow - key.
Press and hold $ or # (above or below the half-shaded circle).
♦
To darken the screen contrast, press and hold $.
♦
To lighten the screen contrast, press and hold #.
) diagram in the battery compartment.
, which is
OFF
1
MODE
QUIT
EXIT
LINK
x-VAR
MORE
x
INS
DEL
alpha
ALPHA
2nd
=
RCL
BASE
ST
O
1
CHAR
OFF
ON
0
U
Y
Page 15

To express - and
keystroke combinations, this
guidebook places brackets
ä
ã
and
around the word
)
(
above the key to press.
The TI-86 on-screen division
symbol is a forward slash
, as in a fraction.
( à )
Following evaluation, the
entry cursor automatically
moves to the next line, ready
for a new entry.
When the TI-86 evaluates an
expression, it automatically
stores the answer to the builtin variable
any previous value.
Ans
1
, replacing
Quick Start
Resetting All Memory and Defaults
To reset all memory and defaults, press -
Defaults set
are displayed on the home screen, confirming that all memory and defaults are
™ ( & )
. The messages
Mem cleared
and
reset. You may need to adjust the contrast after memory and default reset.
Calculating on the Home Screen
To replicate the screens shown in the Quick Start activities, reset all memory and defaults
once before you begin. Before doing an activity, press
before the entry retrieval and integer-part examples). Otherwise, the screens your TI-86
shows may differ from the screens pictured next to the activities.
Calculating the Sine of a Number
Enter the sine function. (
Enter a value. You can enter an expression,
which is evaluated when you press
Evaluate the problem. The evaluation of the
b
expression sine(pà4) is displayed.
:) =
D - ~ F
.
b
Storing the Last Answer to a Variable
Paste the store symbol (
Since a value must precede
not enter a value, the TI-86 automatically
Ans
pasted
before ¶. (
¶
) to the screen.
¶
, but you did
continued
:
(
X
)
:
)
to clear the screen (except
4
E
3
Page 16

4
Quick Start
When ALPHA-lock is on and
you press a key, the letters
printed in blue above the
keys are pasted to the
screen. In the ex a m p l e , p r e s s
Z
to enter a V.
You need not move the
cursor to the end of the line
to evaluate the expression.
Enter the variable name to which you want
to store the last answer. ALPHA-lock is on.
Store the last answer to the variable. The
stored value is displayed on the next line.
Using a Variable in an Expression
Enter the variable, and then square it. (:)
Evaluate. The value stored to the variable
V
is squared and displayed.
Editing an Expression
Enter the expression
Change
Move the cursor to the beginning of the
3.2
to
expression and insert a value. The insert
cursor blinks between
Evaluate. The result is displayed. b
(25+14)(4N3.2)
2.3
. ! ! ! ! 2 "
3
and 25.
.(:)
ä
ã
V
b
ä
ã
1
I
V
b
25
D
\ 14 E
4
D
T 3 ` 2 E
- ! - p
3
3
Page 17
a
negates a value, as in
T
subtracts, as in
An ellipsis (...) indicates that
the result continues beyond
the screen.
5N2=3
2
L
.
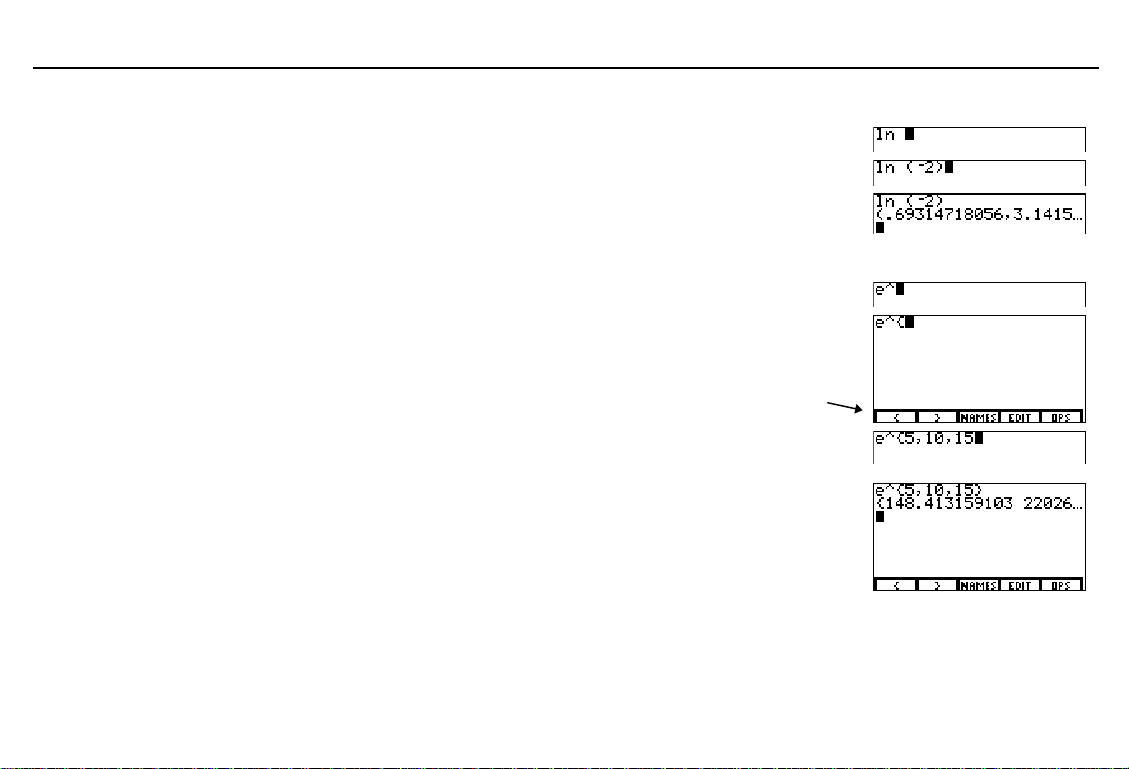
Displaying a Complex Number as a Result
.
Enter the natural log function. (:) B
Enter a negative number. D a
Evaluate. The result is displayed as a
complex number.
Using a List with a Function
Enter the exponential function. (:) - ‚
Display the
open brace (
On the TI-86,
list.
menu, and then select the
LIST
{
) from the
{
specifies the beginning of a
LIST
menu.
2
E
b (press "
to display more)
- ”
&
LIST
menu
Quick Start
5
Enter the list elements. Separate each
element from the next with a comma.
Select the close brace (
}
) from the
menu to specify the end of the list.
Evaluate. The results of the constant
raised to the 5th, 10th, and 15th powers are
displayed as list elements.
LIST
e
5
P 10 P
15
'
b (press "
to display more)
Page 18

6
Quick Start
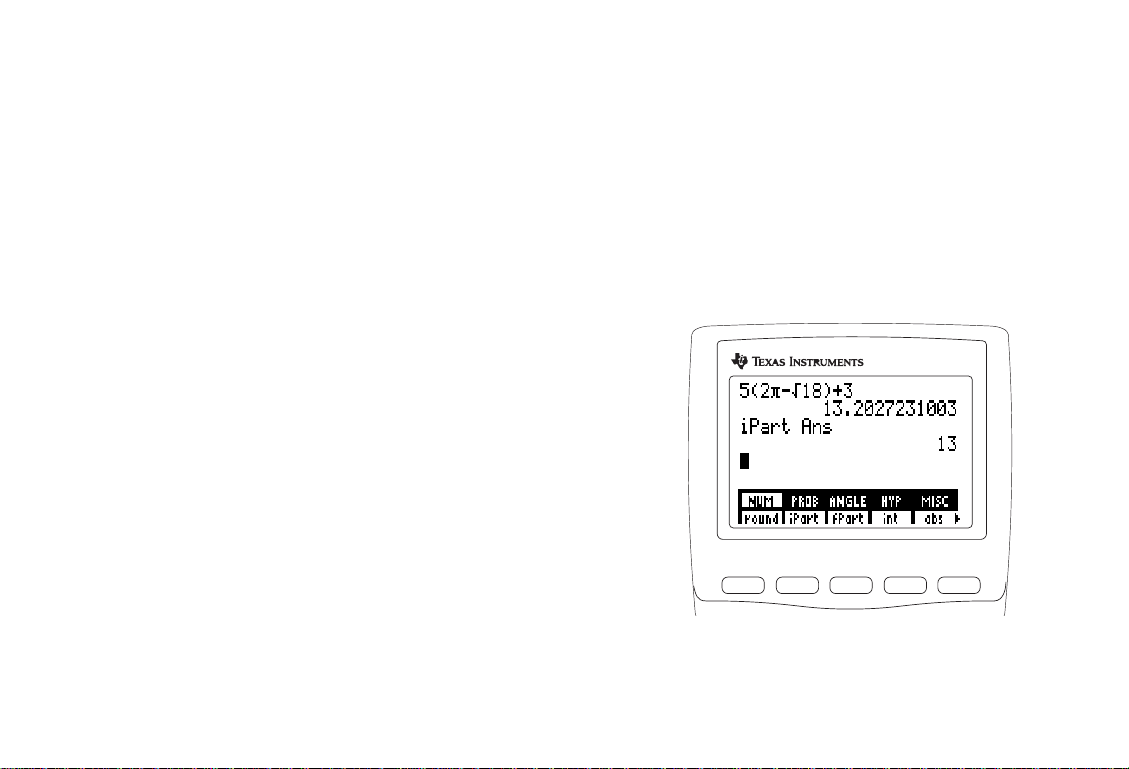
Displaying the Integer Part of Real Numbers in a List
Display the
automatically replaces the
the last activity.)
Select
NUM
menu. The
Select the
the
MATH NUM
menu. (The
MATH
to display the
menu shifts up.
MATH
iPart
(integer part) function from
iPart
menu.
MATH
menu from
LIST
MATH NUM
is pasted to the
menu
- Œ
MATH
&
MATH NUM
'
menu
menu
screen. (The previous entry was left on the
screen to illustrate the effect of
iPart
on the
previous answer.)
Paste
Ans
to the cursor location. (The
-
¡
result list from the previous activity is
stored to
Display the integer part of the result list
Ans
.)
b
elements from the previous activity.
Removing (Exiting) a Menu
In the previous example, the
MATH NUM
Remove the
menu are displayed (- Π&).
MATH NUM
menu from the screen. .
MATH
menu and the
Remove the
menu from the screen. .
MATH
Page 19

Finding the Square Root
Paste the square root function to the screen. (:) - ˆ
Quick Start
7
Enter a value for which you want to find the
square root.
Evaluate the expression. The square root of
144
is displayed.
Calculating Derivatives
Display the
der1
.
Enter an expression (
variable (
Evaluate. The first derivative of
x
respect to
menu, and then select
CALC
2
x
) with respect to a
) at a given point (8).
x
at 8 is displayed.
x
2
with
144
b
(:)
- †
(
CALC
menu
2 I P 2
P 8 E
b
Page 20
8
When you press
TI-86 stores the expression
or instruction you entered to
the built-in memory storage
area called
When expressing a
measurement for a
conversion, you do not enter
a unit symbol manually. For
example, you need not enter
¡
Quick Start
b
.
ENTRY
to designate degrees.
, the
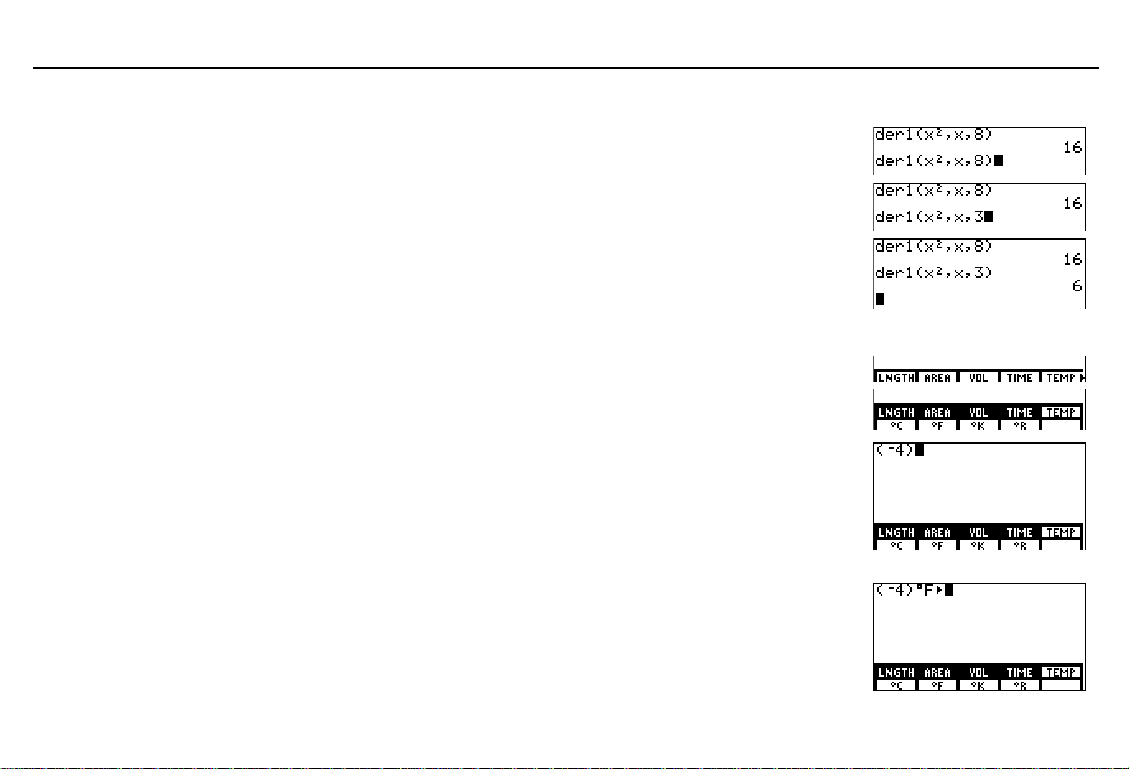
Retrieving, Editing, and Re-evaluating the Previous Entry
Retrieve the last entry from the previous
- ¢
example. (The last activity was not cleared.)
Edit the retrieved entry. ! !
2
Evaluate. The first derivative of
respect to
x
at 3 is displayed.
x
with
3
b
Converting Degrees Fahrenheit to Degrees Celsius
Display the
Display the
menu shifts up and
Enter the known measurement. If the
measurement is negative, use parentheses.
In this example, if you omit parentheses,
the TI-86 converts 4¡F to about
which it then negates (changes the sign
of), returning a positive 15.5¡C.
¡
Select
F
to designate Fahrenheit as the
known measurement unit.
conversion symbol ( 4 ) are displayed after
the measurement. (
menu. (:) - ’
CONV
CONV TEMP
TEMP
menu. The
CONV
is highlighted.
*
D a
L
15.5¡C,
'
¡
F
and the
continued
)
4
E
Page 21

When storing to an equation
variable using
equation variable first, then
and then the unevaluated
expression. This is the
opposite from the order for
storing to most other
variables on the TI-86.
=
, enter the
Quick Start
¡
C
Select
to which you want to convert.
Convert. The ¡C equivalent of
displayed.
to designate Celsius as the unit
L
4¡F is
&
b
Storing an Unevaluated Expression to an Equation Variable
Enter the built-in equation variable
=
,
Enter the equals sign (=). 1
Enter an expression in terms of
Store the expression.
y1
.(:) - n
x
.
The next section shows how to graph the functions
ä
ã
=
5
D = 2 E
b
y1=5(sin x)
ã
Y
ä
1
and
y2=5(cos x)
.
Plotting Functions on the Graph Screen
The TI-86 plots four types of functions on the graph screen. To plot a graph, you must store
an unevaluated expression to a built-in equation variable.
Each activity in this section builds upon the activity that precedes it. You must start here
and perform the activities in the sequence in which they are presented. The first activity in
this section assumes you are continuing from the last activity in the previous section.
Displaying and Entering Functions in the Equation Editor
Display the
GRAPH
menu. (
continued
) 6
9
Page 22
10
Quick Start
In the equation editor, you
must express each equation
in terms of the independent
variable
mode only; Chapter 5).
To display up to seven graph
styles, depending on the
graphing mode, repeat
x
(in
Func
graphing
(
.
y(x)=
Select
display the equation editor.
unevaluated expression stored to
from the
GRAPH
menu to
5(sin x)
is the
y1
previous activity. The equation editor
menu is displayed as the lower menu.
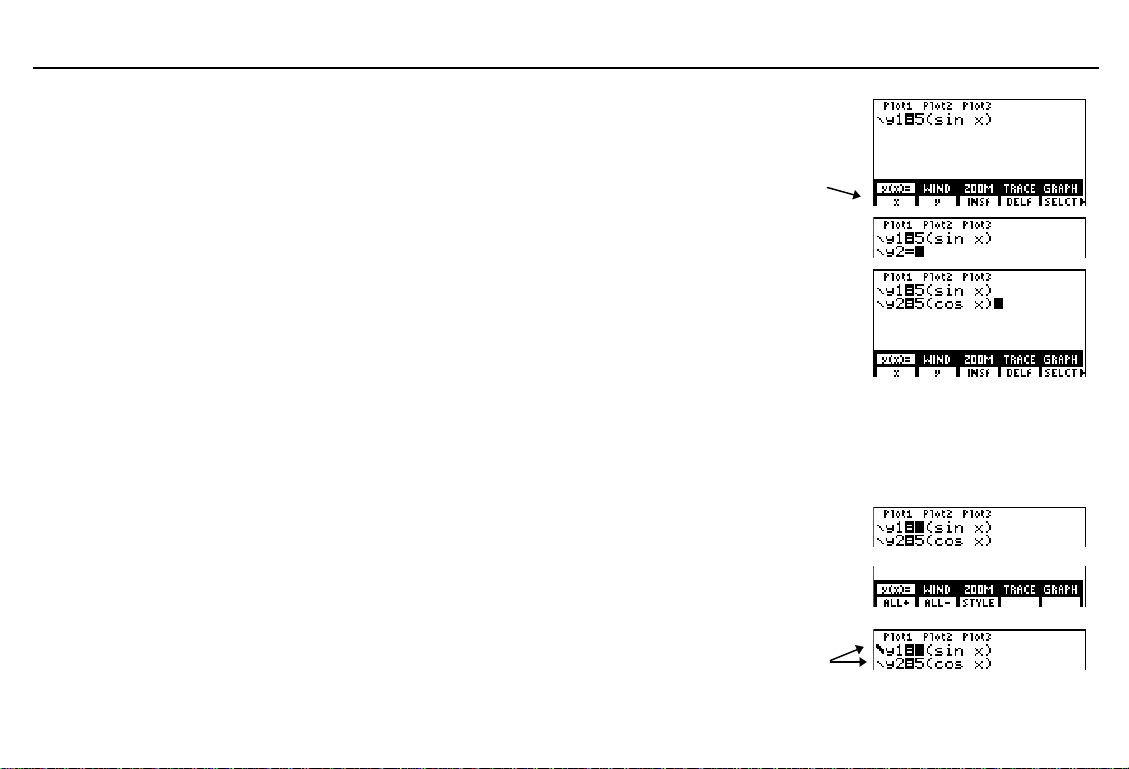
Move the cursor down. The
y2=
prompt is
in the
&
equation
editor menu
#
displayed.
Enter the expression
5(cos x)
at the
y2=
5
D > 2 E
prompt. Notice that the equals sign (=) of
y2
is highlighted after you enter 5. Also,
the equals sign of
y1
is highlighted. This
indicates that both equations are selected
to be graphed (Chapter 5).
Changing the Graph Style of a Function
In the equation editor, the icon to the left of each equation specifies the style in which the
graph of that equation appears when you plot it on the graph screen.
Move the cursor to
Display the next menu group of the equation
editor menu. ( 4 at the end of a menu group
indicates that the menu has more items.)
Select
STYLE
menu to set ¼ (thick) graph style for
y1
. $
from the equation editor
y1
/
(
.
graph style icons
Page 23

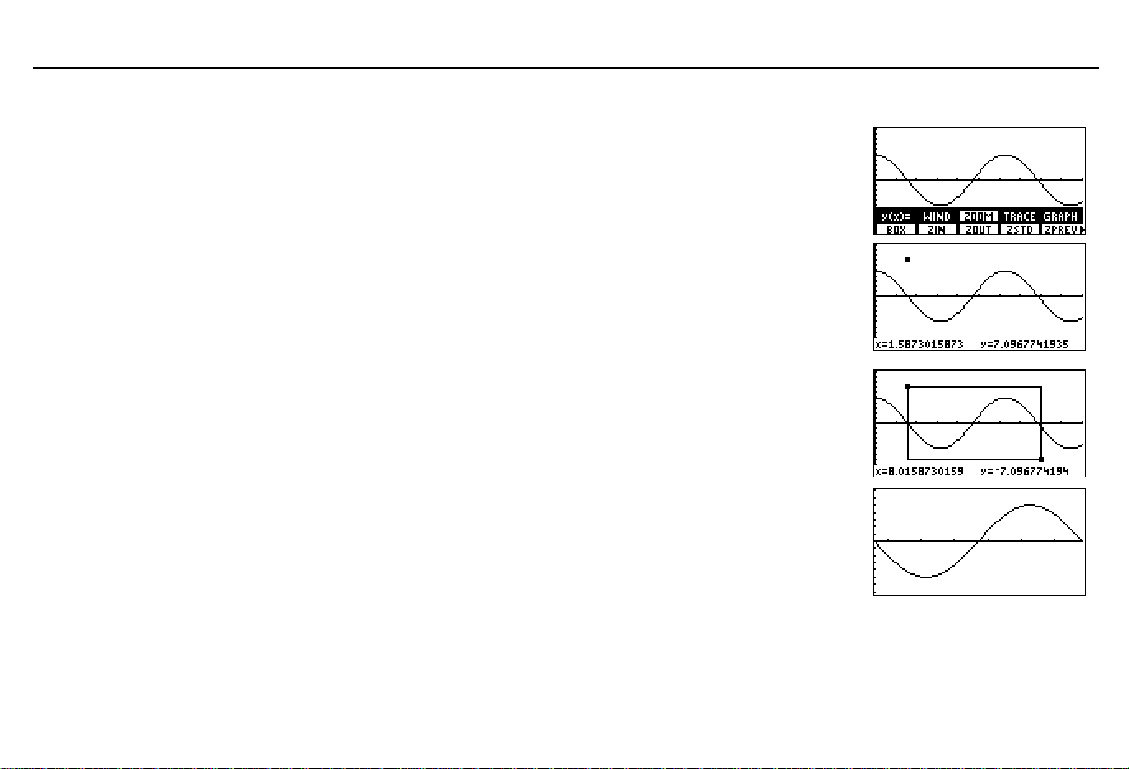
Plotting a Function on the Graph Screen
GRAPH
Select
from the
GRAPH
menu to
plot the graph on the graph screen. The xand y-axes and
GRAPH
menu are
displayed. Then each selected graph is
plotted in the order in which it is listed in
the equation editor.
When the graph is plotted, you can move
the free-moving cursor (
+
) around the
graph screen. The cursor coordinates are
displayed at the bottom of the graph.
Tracing a Function
TRACE
Select
from the
GRAPH
menu to
activate the trace cursor, with which you
can trace along the graph of any selected
function. The number of the current
function (the
1
in y1) is displayed in the
top-right corner.
Move the trace cursor from the function
to the function y2. The 1 in the top-right
corner changes to
the value of
2
; the y value changes to
y2
x=0
at
. (
continued
y1
)
- i
" # ! $
)
$
Quick Start
free-moving cursor
trace cursor
11
Page 24

12
Quick Start
The window variables values
determine the dimensions of
the graph screen.
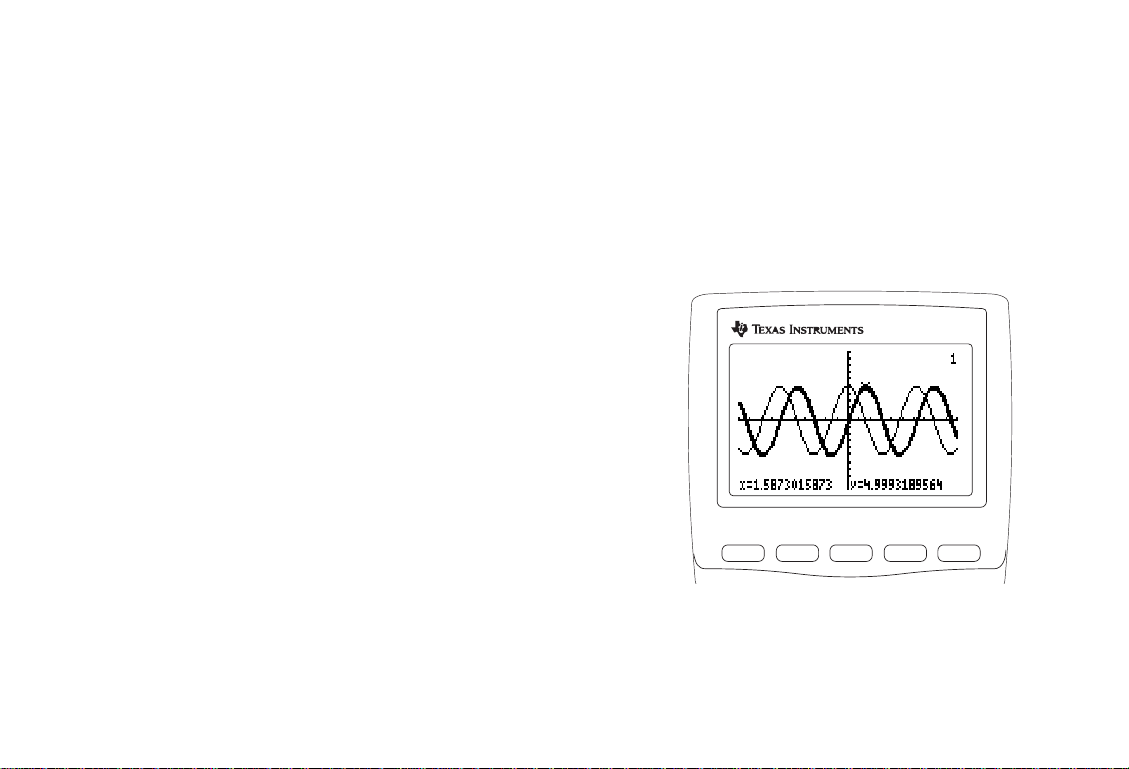
Trace the function
displayed
5(cos x)
y
value is the solution for
at the current x value, which also
y2
. As you trace, the
" and !
is displayed on the screen.
Evaluating y for a Specific x Value (During a Trace)
Enter a real number (or an expression that
resolves to a real number) that is within
the dimensions of the current graph
screen. When you enter the first character,
x=
the
prompt is displayed.
y2
Evaluate
x=6
at
. The trace cursor
moves directly to the solution. The
or solution of the equation at
x
, is
displayed on the screen.
y
value,
6
b
Changing a Window Variable Value
Display the
Select
GRAPH
WIND
display the window editor.
(
menu. 6
from the
GRAPH
menu to
continued
'
)
Page 25

Quick Start
13
Change the value stored in the
window variable to 0.
Plot the graph on the redefined graph
screen. Since
fourth quadrants of the graph plane are
displayed.
xMin=0
, only the first and
xMin
Deselecting a Function
y(x)=
Select
display the equation editor and equation
editor menu. The
y(x)=
and
Select
menu to deselect the function
equals sign is no longer highlighted.
Plot the graph on the graph screen. Since
you deselected
To select a function in the equation editor,
repeat these steps. (
and deselects functions.)
from the
is highlighted.
SELCT
from the equation editor
GRAPH
GRAPH
y1
, the TI-86 only plots y2.
SELCT
menu to
menu shifts up
y1=
both selects
0
*
&
*
. The
- i
Page 26
14
Quick Start
Zooming In on a Portion of the Graph Screen
ZOOM
Select
menu. The
ZOOM
is highlighted.
to display the
GRAPH
menu shifts up and
GRAPH ZOOM
(
BOX
Select
to activate the zoom-box cursor.
Move the zoom-box cursor to a point that is
to be a corner of the redefined graph screen,
and then mark the point with a small square.
Move the cursor away from the small
square to a point that is to be the opposite
corner of the redefined graph screen. As
you move the cursor, a rectangle is drawn
on the graph.
Zoom in on the graph. The window
variables change automatically to the
specifications of the zoom box.
Clear the menus from the graph screen.
from the
GRAPH ZOOM
menu
&
" # ! $
b
" # ! $
b
:
Page 27
Operating
1
Installing or Replacing Batteries ........................................ 16
Turning On and Turning Off the TI-86 ...............................17
Adjusting the Display Contrast ..........................................17
The Home Screen............................................................... 18
Entering Numbers.............................................................. 19
Entering Other Characters .................................................20
Entering Expressions and Instructions ...............................24
Diagnosing an Error ........................................................... 27
Reusing Previous Entries and the Last Answer ..................28
Using TI-86 Menus ............................................................31
Viewing and Changing Modes........................................... 34
the TI-86
M1 M2
F1 F2 F3
-
TI 86
M3
M4
M5
F4
F5
Page 28

16
To express - and
keystroke combinations, this
guidebook places brackets
( ã and ä )
above the key to press.
Do not remove the lithium
backup battery unless four
fresh AAA batteries are in
place.
Properly dispose of the old
batteries.
If you do not use your TI-86
frequently, the AAA batteries
could last more than two
weeks after the first lowbattery message.
Chapter 1: Operating the TI-86
1
around the word
Installing or Replacing Batteries
Your new TI-86 includes four AAA alkaline batteries. You must install them before you can
turn on the calculator. A lithium backup battery is installed in the calculator already.
If the calculator is on, turn it off (press - ) to avoid loss of information stored in memory.
Slide the protective cover over the keyboard.
Holding the calculator upright, push down on the battery cover latch, and then remove the cover.
Remove all four old batteries.
Install four new AAA alkaline batteries, arranged according to the polarity (+ and N) diagram
inside the battery compartment.
Replace the battery cover by inserting the two prongs into the two slots at the bottom of the
battery compartment, and then push the cover until the latch snaps closed.
When to Replace Batteries
When the AAA batteries are low, a low-battery message is
displayed as you turn on the calculator. Generally, the
calculator will continue to operate for one or two weeks
after the low-battery message is first displayed.
Eventually, the TI-86 will turn off automatically and will
not operate until you replace the AAA batteries.
The lithium backup battery is inside the battery compartment, above the AAA batteries. It
retains all memory when the AAA batteries are low or have been removed. To avoid loss of
data, do not remove the lithium battery unless four fresh AAA batteries are installed.
Replace the lithium backup battery about every three or four years.
Page 29

Chapter 1: Operating the TI-86
17
Properly dispose of the old
battery.
$
If you release
or # while
adjusting the contrast, you
-
must press
again to
continue the adjustment.
To replace the lithium backup battery, remove the battery cover and unscrew the tiny
screw holding the
BACK UP BATTERY
according to the polarity (+ and
cover in place. Install a new
N
) diagram on the cover. Replace the cover and screw.
CR1616
or
CR1620
battery
Turning On and Turning Off the TI-86
To turn on the TI-86, press ^.
♦
previously had turned off the calculator by
If you
pressing - , the TI-86 clears any errors and
displays the home screen as it was last displayed.
♦
If Automatic Power Down
TM
(APDTM) previously had
turned off the calculator, the TI-86 will return as you
left it, including the display, cursor, and any error.
To turn off the TI-86 manually, press - . All settings and memory contents are
TM
retained by the Constant Memory
feature. Any error condition is cleared.
APD turns off the TI-86 automatically after about four minutes of non-use to extend battery life.
RCL
ST
OFF
PRQ
,
=
O
ON
CONV
CONS
4
BASE TES MEM
T
U
VW
1
2
:
CHAR
Y
Z
0
STRNG
ANS
S
65
3
(
(
Adjusting the Display Contrast
Press and release the yellow - key.
MODE
Press and hold $ or # (above or below the half-shaded circle).
♦
To darken the screen contrast, press and hold $.
♦
To lighten the screen contrast, press and hold #.
2nd
alpha
ALPHA
QUIT
LINK
EXIT
x-VAR
MORE
x
INS
DEL
Page 30

18
Chapter 1: Operating the TI-86
The TI-86 has 40 contrast
settings, so each number
0
through 9 represents four
settings.
You need not clear the home
screen to begin a new entry.
You can adjust the display contrast anytime to suit your viewing angle and lighting
0
conditions. As you adjust, a number from
(lightest) to 9 (darkest) in the top-right corner
indicates the current contrast setting. The number is not visible when the contrast is
extremely light or dark.
As the batteries weaken over time, the actual contrast level of each number shifts. For
3
example, say you set the contrast to
4
need to set the contrast to
, then 5, then 6, and so on, to retain the original contrast level.
with fresh batteries. As the batteries weaken, you will
However, you need not replace the batteries until the low-battery message is displayed.
The Home Screen
When you first turn on your TI-86, the home screen is displayed. Initially, the home screen
is a blank screen, except for the entry cursor ( Å ) in the top-left corner. If you do not see
the cursor, press -, and then press and hold # or $ to adjust the contrast (page 17).
On the home screen, you can enter and evaluate expressions, and view the results. You also
can execute instructions, store and recall variable values, and set up graphs and editors.
To return to the home screen from any other screen, press -
Displaying Entries and Answers
The home screen displays up to eight lines with a maximum of 21 characters per line. If an
expression or series of instructions exceeds 21 characters and spaces, it automatically
continues on the next line.
After all eight lines are full, text scrolls off the top of the display. You can press $ to scroll
up the home screen, only as far as the first character in the current entry. To retrieve, edit,
and re-execute previous entries, use -
¢
(page 28).
l
.
Page 31

Chapter 1: Operating the TI-86
e
e
19
The mode settings control th
way the TI-86 interprets
expressions and displays
answers (page 34).
The TI-86 on-screen division
symbol is a forward slash
, as in a fraction.
( à )
Always use parentheses to
clarify negation when you us
conversion instructions
(Chapter 4).
When an entry is executed on the home screen, the
answer is displayed on the right side of the next line.
Done
When you execute an instruction,
is typically
Entry
Answer
displayed on the right side of the next line.
If an answer is too long to display on the screen, an
ellipsis (...) is displayed, initially to the right. To view
Entry
Answer
more of the answer, press ". When you do, an ellipsis
is displayed to the left. To scroll back, press !.
Entering Numbers
A symbol or abbreviation of each key’s primary function is printed in white on the key. For
example, when you press \, a plus sign is pasted to the cursor location. This guidebook
1, 2, 3
describes number-entry keystrokes as
Entering Negative Numbers
To enter a negative number, press a (the negate key), and then press the appropriate
L
number keys. For example, to enter
5
number using T (the subtract key). a and T are two different keys with different uses.
The order in which the TI-86 evaluates negation and other functions within an expression is
governed by the Equation Operating Systemè (Appendix). For example, the result of
L
16
, while the result of
E
to clarify the intended use of the negation symbol.
2
(L4)
is 16. If you are unsure about the order of evaluation, use D and
, and so on, instead of Y Z [.
, press a 5. Do not attempt to express a negative
2
L
4
is
Page 32

20
In scientific notation only, one
digit precedes the decimal.
In engineering notation, one,
two, or three digits precede
the decimal and the power of
10 exponent is a multiple of 3.
Chapter 1: Operating the TI-86
Using Scientific or Engineering Notation
Enter the mantissa (part of the number that precedes
the exponent). This value can be an expression.
E
Paste
to the cursor location. C
If the exponent is negative, paste
L
to the cursor location.
Then enter a one-, two-, or three-digit exponent.
Evaluate the expression. b
19
D
F 2 E
2
a
When you include scientific- or engineering-notation numbers in an expression, the TI-86
does not necessarily display answers in scientific or engineering notation. The mode
settings (page 34) and the size of the number determine the notation of displayed answers.
Entering Complex Numbers
On the TI-86, the complex number a+bi is entered as
in rectangular complex-number form or as
q
r
(
(a,b)
in polar
)
complex-number form. For more information about
complex numbers, read Chapter 4.
Entering Other Characters
This is the 2nd key
This is the ALPHA key
2nd
alpha
ALPHA
QUIT
EXIT
LINK
x-VAR
MODE
MORE
x
INS
DEL
Page 33

X
STAT
To enter a space within text,
1 ¤
press
not valid within variable
names.
For convenience, you can
2
press
x
n
ä
ã
commonly used
The
Name=
symbol
automatically.
. Spaces are
instead of
to enter the
x
variable.
prompt and store
(¶)
set ALPHA-lock
-
Chapter 1: Operating the TI-86
21
The 2nd Key
The - key is yellow. When you press -, the cursor
becomes Æ (the 2nd cursor). When you press the next key,
the yellow character, abbreviation, or word printed above
- š
the
STAT
returns
menu
that key is activated, instead of the key’s primary function.
The ALPHA Key
1
The
key is blue. When you press
becomes ³ (the uppercase ALPHA cursor). When you
press the next key, the blue uppercase character printed
1
, the cursor
STAT
X
returns an
ã
ä
X
1
above that key is pasted to the cursor location.
When you press lowercase alpha cursor). When you press the next key, the
n
, the cursor becomes Ï (the
STAT
X
- n
returns an
X
ã
x
lowercase version of the blue character is pasted to the
cursor location.
ALPHA-lock and alpha-lock
To enter more than one uppercase or lowercase alpha character consecutively, set ALPHAlock (for uppercase letters) or alpha-lock (for lowercase letters).
To set ALPHA-lock when the entry cursor is displayed, press
♦
To cancel ALPHA-lock, press
♦
To switch from ALPHA-lock to alpha-lock, press -
1
.
1 1
n
.
.
X
ä
To set alpha-lock when the entry cursor is displayed, press -
♦
To cancel alpha-lock, press
1 1
.
n 1
.
Page 34

22
A
Chapter 1: Operating the TI-86
In most cases, the
appearance of the cursor
indicates what will happen
when you press the next key.
Graphs and editors
sometimes use additional
cursors, which are described
in other chapters.
♦
To switch from alpha-lock to ALPHA-lock, press
1
.
You can use - when ALPHA-lock or alpha-lock is on. Also, if you press a key that has no
blue character above it, such as
6, 3
, or !, the key’s primary function still applies.
Common Cursors
Entry
Insert
Second
LPHA
alpha
Full
♦
♦
♦
Å
Enters a character at the cursor, overwriting any existing character
__
Inserts a character at the cursor location and shifts remaining characters right
Æ
Enters a 2nd character or executes a 2nd operation (yellow on the keyboard)
³
Enters an uppercase ALPHA character (blue on the keyboard)
Ï
Enters the lowercase version of an ALPHA character (blue on the keyboard)
Ä
Accepts no data; maximum characters are entered at a prompt or memory is full
If you press
1
If you press -
after - p, the cursor becomes an underlined
1
after - p, the cursor becomes an underlined
A
(A).
a
If you press - after - p, the insert cursor becomes an underlined # (
(a).
#
).
Page 35

The entry cursor
overwrites characters.
( Å )
Chapter 1: Operating the TI-86
Cursor Direction Keys
-
$ scrolls/moves cursor up
-
$ darkens screen contrast
!
moves cursor left
-
! moves cursor to beginning of entry
-
# scrolls/
- #
moves cursor down
lightens screen contrast
"
- "
If you hold down ", #, !, or $, the cursor continues to move.
Inserting, Deleting, and Clearing Characters
- p
3
:
Changes the cursor to the insert cursor ( __ ); inserts characters at the insert cursor and
shifts remaining characters right; to cancel insert, press - p or press ", #, !, or
Deletes a character at the cursor; to continue deleting to the right, hold down
Clears the current entry on the home screen;
: :
moves cursor right
moves cursor to end of entry
3
clears the entire home screen
23
$
Page 36

24
Chapter 1: Operating the TI-86
Entering Expressions and Instructions
Entering an Expression
An expression is any combination of numbers and variables that serve as arguments for one
or more functions. On the TI-86, you typically enter an expression in the same order as you
would write it on paper. For example,
You can use an expression on the home screen to
calculate an answer.
In most places where a value is required, you can use an
expression to enter the value.
For example, enter an expression as a window variable value
(Chapter 5). When you press #, $,
evaluates the expression and replaces it with the result.
To enter an expression, you enter numbers, variables, and functions from the keyboard and
menus (page 31). When you press
location) according to EOS order-of-evaluation rules (Appendix), and the answer is displayed.
To enter the expression 3.76 ÷ (
then evaluate it, you would press these keys:
3
` 76 F D a 7 ` 9 \ - ˆ 5 E \ 2 < 45
2
p
r
5 tan xStat
,
b
b
L
7.9 + ‡5) + 2 log 45 and
.
, or
, the expression is evaluated (regardless of the cursor
, and
, the TI-86
b
40((L5+3)N(2+3))
are expressions.
Page 37

In this guidebook, optional
arguments are shown in
brackets
include these brackets when
you enter the arguments.
The A to Z Reference
describes all TI-86 functions
and instructions, including
their required and optional
arguments.
In the
the first item beginning with a
letter, press that letter (as in
ãLä
ã
and ä ). Do not
(
CATALOG
in the example).
, to move to
Chapter 1: Operating the TI-86
25
Using Functions in Expressions
A function returns a value. Some examples of functions are
÷
,
, + , ‡ , and
log
. To use
L
functions, you usually must enter one or more valid arguments.
When this guidebook describes the syntax of a function or instruction, each argument is in
angle
sin
italics. For example:
. Press = to enter
measurement (or an expression that resolves to
sin
, and then enter a valid
angle
). For functions or instructions with
angle
more than one argument, you must separate each argument from the other with a comma.
Some functions require the arguments to be in parentheses. When you are unsure of the
evaluation order, use parentheses to clarify a function’s place within an expression.
Using an Instruction
ClDrw
An instruction initiates an action. For example,
is an instruction that, when executed,
clears all drawn elements from a graph. You cannot use an instruction in an expression.
Generally, the first letter of each instruction name is uppercase on the TI-86. Some
(
instructions take more than one argument, as indicated by an open parenthesis (
end of the name. For example,
Circl(
requires three arguments,
Circl(x,y,
radius
) at the
)
.
Entering Functions, Instructions, and Operators
log 45
You can enter a function, instruction, or operator in any of three ways (
♦
Paste it to the cursor location from the keyboard or a menu (<
♦
Paste it to the cursor location from the
♦
Enter it letter by letter ( -
CATALOG
n 1
ãLä ãOä ãGä
w &
(-
1 1
¤
45
, for example).
).
ã
ä
& &
L
45).
b
45
).
As you can see in the example, using the built-in function or instruction typically is easier.
Page 38

26
Chapter 1: Operating the TI-86
When you select a function, instruction, or operator, a symbol comprising one or more
characters is pasted to the cursor location. Once the symbol is pasted to the cursor
location, you can edit individual characters.
In the example, the
indicates that the value
before it is to be stored to the
variable after it (Chapter 2).
To paste
press
to the screen,
¶
X
.
symbol
¶
For example, assume that you pressed -
yMin
to the cursor location as part of an expression. Then you realized you wanted
Instead of pressing nine keys to select
w / / * & & b
xMin
, you can simply press ! ! ! !
2
to paste
xMin
.
.
Entering Consecutive Entries
To enter two or more expressions or instructions
consecutively, separate each from the next with a colon
(- ). When you press
b
, the TI-86 executes
each entry from left to right and displays the result of the last expression or instruction. The
entire group entry is stored in last entry (page 28).
The Busy Indicator
When the TI-86 is calculating or graphing, a moving vertical line is displayed as the busy
indicator in the top-right corner of the screen. When you pause a graph or a program, the
busy indicator is replaced by the pause indicator, a moving vertical dotted line.
Interrupting a Calculation or Graph
To interrupt a calculation or graph in progress, press ^. When you interrupt a calculation,
ERROR 06 BREAK
the
♦
To return to the home screen, select
♦
To go to the beginning of the expression, select
message and menu are displayed.
QUIT
(press *).
GOTO
(press &). Press
b
to
recalculate the expression.
Page 39

Chapter 1: Operating the TI-86
g
27
Chapter 5: Function Graphin
introduces graphing.
If a syntax error occurs within
a stored equation during
program execution, select
GOTO
to return to the
equation editor, not to the
program (Chapter 5).
When you interrupt a graph, a partial graph and the
♦
To return to the home screen, press
♦
To restart graphing, select an instruction that displays the graph.
: :
GRAPH
menu are displayed.
or any non-graphing key.
Diagnosing an Error
When the TI-86 detects an error, it returns an error
message, such as
ERROR 04 DOMAIN
The Appendix describes each error type and possible
reasons for the error.
♦
If you select
:
♦
If you select
QUIT
(or press -
), the home screen is displayed.
GOTO
, the previous screen is displayed with the cursor on or near the error.
Correcting an Error
Note the error type (
GOTO
Select
Determine the cause for the error. If you cannot, refer to the Appendix for possible causes.
Correct the error and continue.
, if available. The previous screen is displayed with the cursor on or near the error.
ERROR ## errorType
ERROR 07 SYNTAX
or
l
or
).
:
.
Page 40

28
Chapter 1: Operating the TI-86
Reusing Previous Entries and the Last Answer
Retrieving the Last Entry
When you press
instruction, the entire expression or instruction is placed in a storage area called
(last entry). When you turn off the TI-86,
b
on the home screen to evaluate an expression or to execute an
is retained in memory.
ENTRY
ENTRY
To retrieve the last entry, press -
¢
. The current
line is cleared and the entry is pasted to the line.
Retrieving and Editing the Last Entry
On the home screen, retrieve the previous
entry.
Edit the retrieved entry.
Re-execute the edited entry.
- ¢
! ! ! ! !
b
32
Retrieving Previous Entries
The TI-86 retains as many previous entries as possible in
, up to a capacity of 128
ENTRY
bytes. To scroll from the newest to the older previous entries stored to
- ¢
. If you press -
stored entry is displayed again; continuing to press -
¢
after displaying the oldest stored entry, the newest
¢
repeats the order.
ENTRY
, repeat
Page 41

Consecutively entered entries
)
separated by colons (page 26
are stored as one entry.
The formula for finding the
area of a circle is
The equation solver (Chapter
15) is another tool with which
you can perform this task.
A=pr
2
.
Chapter 1: Operating the TI-86
29
Retrieving Multiple Entries
To store two or more expressions or instructions together to
line, separating each from the other with a colon, and then press
the entire group is stored in
. The example below shows one of many ways you can
ENTRY
, enter them on one
ENTRY
b
. Upon execution,
manipulate this feature to avoid tedious manual re-entry.
Use trial and error to find the radius
of a circle with an area of 200 square
centimeters. Store
guess, then execute
Retrieve
new guess. Continue guessing to
approach the answer of
8¶r:pr
8
to r as your first
2
p
r
.
2
and insert
200
7.958
.
as a
8
X - n
-
:
] - ~
[
1 I b
- ¢
7
- !
b
- p `
ã
R
ã
R
ä
1
ä
958
Clearing the ENTRY Storage Area
To clear all data from the
ClrEnt
select
from the
MEM
storage area, begin on a blank line on the home screen,
ENTRY
menu (press -
™ *
), and then press
b
.
Retrieving the Last Answer
When an expression is evaluated successfully on the home screen or in a program, the TI-86
Ans
stores the answer to a built-in variable called
(last answer).
complex number, list, vector, matrix, or string. When you turn off the TI-86, the value in
Ans
may be a real or
Ans
is retained in memory.
Page 42

30
Chapter 1: Operating the TI-86
147
tomatoes.
Ans
to the cursor location, press - ¡. You can use the
Ans
.
1.7
meters
1
` 7
b
147
b
4
M
F -
`
¡
2
To copy the variable name
Ans
variable
anywhere that the value stored to it is valid. When the expression is evaluated,
the TI-86 calculates the result using the value stored in
Calculate the area of a garden plot
4.2
by
meters.
Calculate the yield per square meter if the plot
produces a total of
Using Ans Preceding a Function
Previous answers are stored to
Ans
. If you begin an expression by entering a function that
requires a preceding argument, the TI-86 automatically enters
5
Enter and execute an expression.
Enter a function without an argument.
pasted to the screen, followed by the function.
Ans
is
F
9
M
`
b
2
b
9
Storing Results to a Variable
Calculate the area of a circle with radius
meters.
Calculate the volume of a cylinder of radius
meters and height
Store the result to the variable V.
3.3
meters.
5
5
- ~
b
3
M
`
b
X
b
5
I
3
ä
ã
V
Ans
as the argument.
Page 43

Chapter 1: Operating the TI-86
A
31
Using TI-86 Menus
The symbols for many TI-86 features are found in menus instead of on the TI-86 keyboard.
Displaying a Menu
The way to display a particular menu depends on the menu’s location on the TI-86.
Menu-Displaying Method Example
Press a key that has a menu name on it
Press - and then a 2nd-key menu name -
Select a menu name from another menu -
Select an editor or selection screen - ” ) displays the list editor menu with the list editor
ccidentally commit an error 1
6
displays the
Œ
Π&
X b
displays the
GRAPH
menu
MATH
menu
displays the
displays the error menu
MATH NUM
menu
Some TI-86 menus have as
many as 25 items.
", #, !
work on menus.
, and $ do not
When you display a menu, a menu group of one to five items is displayed on the bottom of the
screen. If the more symbol ( 4 ) is displayed after the fifth item in a menu group, the menu
continues for at least one more menu group. To view the next menu group, press
/
. The
last menu group of one to five items does not have a 4 symbol.
For example, press -
When you see 4 here...
Œ
to display
the
...press / to display
the next menu group.
MATH
menu.
From the last menu group, press
again to return to the first menu group.
/
Page 44

32
The Appendix Menu Map
shows every TI-86 menu.
Typically, a TI-86 menu item
is five characters long or less.
/
menu; it does not scroll the
upper menu.
Chapter 1: Operating the TI-86
only scrolls the lower
The Menu Keys
-
upper menu keys
lower menu keys
- l
- e
upper menu items
clears all menus
through i selects
M1 M2 M3 M4 M5
&
' ( )
QUIT
- . /
*
/ scrolls lower menu groups
.
removes the lower menu
Selecting a Menu Item
When you display a menu, one to five items are displayed.
To select a menu item, press the menu selection key directly
below the item. For example, in the
NUM
press & to select
, press ' to select
menu to the right,
MATH
PROB
, and so on.
& ' ( )
*
When you select a menu item that displays another menu, the first menu moves up one line
on the screen to make room for the new menu. All items on the original menu are displayed
in reverse type, except the item you selected.
When you select
NUM
...
...the
MATH
menu moves up
and the
MATH NUM
menu is displayed.
To remove the
move the
MATH
MATH NUM
menu down, press ..
menu and
Page 45

Chapter 1: Operating the TI-86
e
33
To select an item from the upper menu, press - and the appropriate key e through i.
To remove a menu from the
bottom of a graph screen,
:
press
graph (Chapter 5).
after plotting th
To select
To select
PROB
from the upper menu, press
iPart
from the lower menu, press
- f
'
.
.
When an editor menu is displayed as the upper menu, and you select an item from the lower
menu that displays yet another menu, the editor menu remains as the upper menu.
When you select
Upper: equation editor menu
Lower:
MATH
NUM
menu
from the lower menu... The
...the equation editor
menu remains
and the
MATH NUM
menu is displayed.
Upper: equation editor menu
Lower:
menu disappears.
MATH
MATH NUM
menu
Exiting (Removing) a Menu
To remove the lower menu from the screen, press
...the
When you press ....
Upper:
Lower:
menu
MATH
MATH NUM
menu Lower:
MATH NUM
and the
menu moves down.
MATH
menu No menu
MATH
.
.
menu disappears
Press
the
MATH
.
again, and
menu disappears.
Page 46

34
In the screen to the right, the
default mode settings are
highlighted along the left side
of the screen.
This example changes the
decimal mode setting to 2, as
in U.S. dollars and cents.
In
answer is more than 12 digits
or the absolute value of the
answer < .001, it is displayed
in scientific notation.
Notation modes do not affect
how you enter numbers.
Chapter 1: Operating the TI-86
Normal
notation, if the
Viewing and Changing Modes
To display the mode settings, press settings are highlighted. Mode settings control how the
TI-86 displays and interprets numbers and graphs. The
Constant Memory feature retains current mode settings
when the TI-86 is turned off. All numbers, including
elements of matrices and lists, are displayed according to
the mode settings.
Changing a Mode Setting
Move the cursor to the line of the setting that you
want to change (decimal setting in the example).
Move the cursor to the setting you want (2 decimal
places).
Execute the change.
Notation Modes
Normal
Sci
Eng
Displays results with digits to the left and right of the decimal (as in
(scientific) Displays results in two parts: significant digits (with one digit to the left of
the decimal) are displayed to the left of
to the right of
(engineering) Displays results in two parts: significant digits (with one, two, or three
digits to the left of the decimal) are displayed to the left of
of 10 (which is always a multiple of 3) is displayed to the right of
E
(as in
m
1.234567E5
. The current
#
" " "
b
E
and the appropriate power of 10 is displayed
)
123456.7
E
and the appropriate power
E
(as in
)
123.4567E3
)
Page 47

Non-decimal modes are valid
n
only on the home screen or i
the program editor.
Decimal Modes
Float
(fixed) (
(floating) Displays results up to 12 digits, plus any sign and the floating decimal point
012345678901
digits to the right of the decimal point (rounds answers to the specified decimal place);
the second
Angle Modes
Radian
Degree
Interprets angle values as radians; displays answers in radians
Interprets angle values as degrees; displays answers in degrees
Complex Number Modes
RectC
PolarC
(rectangular complex mode) Displays complex-number results as
(polar complex mode) Displays complex-number results as
Graphing Modes
Func
Pol
Param
DifEq
(function graphing) Plots functions where y is a function of
(polar graphing) Plots functions where r is a function of
(parametric graphing) Plots relations where x and y are functions of
(differential equation graphing) Plots differential equations in terms of
Number Base Modes
Dec
Bin
Oct
Hex
(decimal number base) Interprets and displays numbers as decimal (base 10)
(binary number base) Interprets numbers as binary (base 2); displays Ü suffix with answers
(octal number base) Interprets numbers as octal (base 8); displays Ý suffix with answers
(hexadecimal number base) Interprets numbers as hexadecimal (base 16); displays
suffix with answers
Chapter 1: Operating the TI-86
; each number is a setting) Displays results with the specified number of
0
sets 10; the second 1 sets 11
(real,imaginary)
(magnitude
x
q
±
angle)
t
t
35
ß
Page 48

36
Chapter 1: Operating the TI-86
Vector modes do not affect
how you enter vectors.
d
The value stored to
dxNDer
(Appendix).
affects
Vector Coordinate Modes
RectV
CylV
SphereV
(rectangular vector coordinates) Displays answers in the form
vectors and
(cylindrical vector coordinates) Displays results in the form
vectors and
(spherical vector coordinates) Displays results in the form ãr ±
vectors and
Differentiation Modes
dxDer1
dxNDer
(exact differentiation) Uses
value for each function in an expression (
restricts the kinds of functions that are valid in the expression)
(numeric differentiation) Uses
for an expression (
are valid in the expression)
ã
ä
x y z
for three-element vectors
ã
±
ä
r
q
z
for three-element vectors
ã
±
±
ä
r
q
f
for three-element vectors
der1
dxNDer
is less accurate than
ã
ä
x y
for two-element
ã
±
ä
r
q
for two-element
ä
q
for two-element
(Chapter 3) to differentiate exactly and calculate the
dxDer1
is more accurate than
nDer
to differentiate numerically and calculate the value
dxDer1
, but more kinds of functions
dxNDer
, but it
Page 49

The CATALOG,
2
The CATALOG .................................................................... 38
Storing Data to Variables................................................... 39
Classifying Variables as Data Types................................... 42
The CUSTOM Menu ...........................................................44
The CHAR (Character) Menu.............................................. 45
Variables, and Characters
M1 M2
F1 F2 F3
-
TI 86
M3
M4
M5
F4
F5
Page 50

38
Chapter 2: The
CATALOG
, Variables, and Characters
The
CATALOG
item on the
menu.
is the first
CATLG-VARS
The CATALOG
The
CATALOG
do not begin with a letter (such as
displays all TI-86 functions and instructions in alphabetical order. Items that
- w &
4
Bin
+
or
) are at the end of the
CATALOG
.
The selection cursor ( 4 ) indicates the current item. To select an item from the
move the selection cursor to the item and press b. The
CATALOG
disappears and the
name is pasted to the previous cursor location.
b
.
Use # or
to move 4 to
an item...
$
...and press
The item is pasted
to the cursor
location.
To jump... Do this:
To the first item beginning with a particular letter Press the letter; ALPHA-lock is on
BLANK
CATALOG
are on the
Press $ from the first
PAGE
PAGE
CATALOG
CUSTOM
menu of up to 15
To special characters at the end of the
Down one whole screen Select
Up one whole screen Select
The menu items
CUSTM
and
With them, you can create and edit your own
variables, including program names. For details about the
$
from the
#
from the
menu and each
CUSTOM
CATALOG
CATALOG
CATALOG
VARS
CATALOG
menu, read page 44.
CATALOG
item
menu ( & )
menu ( ' )
,
screen menu.
items and
Page 51

This chapter describes the
first two data storage
methods listed here. The
other methods are described
in the appropriate chapters.
Chapter 2: The
CATALOG
, Variables, and Characters
39
Storing Data to Variables
On the TI-86, data can be stored to variables in several ways. You can:
♦
♦
♦
♦
♦
The TI-86 has built-in variable names with specific purposes, such as equation variables, list
names, statistical result variables, window variables, and
of them. They are introduced in the appropriate chapters of this guidebook.
Creating a Variable Name
You can create your own variable name when you use
data. When you create a user-created variable name, follow these guidelines.
♦
♦
♦
♦
X
Use
Use
Use an editor’s
to store a value to a variable.
=
to store an unevaluated expression to an equation variable.
Name=
prompt to store several types of data to a variable.
Change TI-86 settings or reset defaults and memory to the factory settings.
Execute functions that cause the TI-86 to store data automatically to built-in variables.
Ans
. You can store values to some
X
=
Name=
,
, or a
prompt to store
The user-created variable name can be from one to eight characters long.
The first character must be a letter, which includes all
as Ñ, ñ, Ç, and ç from the
CHAR MISC
menu.
CHAR GREEK
menu items, as well
A user-created variable name cannot replicate a TI-86 feature symbol or built-in
variable. For example, you cannot create
function symbol. You cannot create
Ans
abs
, because
, because it is already a built-in variable name.
abs
is the absolute value
The TI-86 distinguishes between uppercase and lowercase characters in variable
names. For example,
Ans
only
is a built-in variable name;
ANS, Ans
, and
ans
are three different variable names. Therefore,
ANS
and
ans
can be user-created variable names.
Page 52

40
Chapter 2: The
CATALOG
, Variables, and Characters
Storing a Value to a Variable Name
Enter a value, which can be an expression. - ~
Enter ¶ (the store symbol) next to the value. X
Create a variable name one to eight characters
long, starting with a letter. ALPHA-lock is on.
Store the value to the variable. The value
stored to the variable is displayed as a result.
Storing an Unevaluated Expression
When you store an expression to memory using
evaluated and the result is stored to a variable.
5
I
ä ãRä ãEä ãAä
ã
A
b
(with the ¶ sign), the expression is
X
When you use =,
first, then
In contrast, when you use
is first, then ¶, then
value
.
variable
=
, then
variable
expression
is
When you store an unevaluated expression using
1
, or the equation editor
=
ã
ä
(Chapter 5), or the equation solver (Chapter 15), the unevaluated expression is stored to an
equation variable.
To store an unevaluated expression on the home screen or in a program, the syntax is:
.
¶
,
variable
where
You can use
expression
=
variable
always precedes the equals sign and
to store a mathematical expression to an equation variable. For example,
=
expression
always follows the equals sign.
F=M¹A
.
Page 53

In the example, the TI-86
multiplies the value stored to
AREA
To paste
location, you can press
w (
selection cursor
and press
To paste
location, press
times
AREA
b
¶
to the cursor
3.3
.
to the cursor
, move the
to
(4)
.
X
.
-
AREA
Chapter 2: The
CATALOG
, Variables, and Characters
Storing an Answer
To store an answer to a variable before you evaluate another expression, use
Enter and evaluate an expression.
Store the answer to a user-created
variable or to a valid built-in variable.
,
The value stored to the variable is
displayed as a result.
1 1
ä ãRä ãEä ãAä
ã
A
3
M
X
` 3
ã
V
b
ä ãOä ãLä
1
b
Copying a Variable Value
To copy the contents of
variableA
into
variableB
, the syntax is:
variableA¶variableB
X
and
41
Ans
.
To paste a variable name,
you can select it from a
menu (page 42).
VARS
For example,
RegEq¶y1
stores the regression equation (Chapter 14) to the variable y1.
Displaying a Variable Value
With the cursor on a blank line on the
home screen, paste the variable name to
the cursor location, as described above.
Display the contents of the variable.
- w (
#
(location may
b
vary)
b
You also can display variables containing some data types by displaying them in the
appropriate editor (such as the list editor or window variable editor) or graph. These
methods are detailed in subsequent chapters of this guidebook.
Page 54

42
e
To cancel
Editing a recalled value does
not change the value stored
to the variable.
When you store data in an
editor, the TI-86 recognizes
the data type according to th
editor. For example, only
vectors are stored using the
vector editor.
Chapter 2: The
:
, press
RCL
CATALOG
.
, Variables, and Characters
Recalling a Variable Value
Move the cursor to where you want to
insert the recalled variable value.
Display the
Rcl
prompt at the bottom of
the screen. ALPHA-lock is on.
Enter the variable name you want to recall.
Recall the variable contents to the cursor
location. The
Rcl
prompt disappears and
the entry cursor returns.
100
M
- –
[V] [O] [L]
b
Classifying Variables as Data Types
The TI-86 classifies variables according to data type and places each variable on a data-type
selection screen. You can display each screen by selecting the appropriate data type from
the
CATLG-VARS
If data... The TI-86 classifies the data type as... For example:
Begins with { and ends with
Begins with ã and ends with
Begins with ãã and ends with ää A matrix (
menu, as described on page 43. Here are some examples.
}
ä
A list (
VARS LIST
A vector (
VARS VECTR
screen)
screen)
VARS MATRX
screen)
{1,2,3}
ã
ä
1,2,3
ãã
1,2,3äã4,5,6äã7,8,9
ää
Page 55

Chapter 2: The
t
CATALOG
, Variables, and Characters
43
To display additional menu
groups, press
The list names
yStat
and
variables on the
screen.
/
.
fStat, xStat
are statistical resul
VARS STAT
The CATLG-VARS (CATALOG-Variables) Menu
CATLG ALL REAL CPLX LIST
CATLG
ALL
REAL
CPLX
,
LIST
VECTR
MATRX
STRNG
EQU
CONS
PRGM
GDB
PIC
STAT
WIND
Displays the
Displays a selection screen with all variables and names of all data types
Displays a selection screen with all real number variables
Displays a selection screen with all complex number variables
Displays a selection screen with all list names
Displays a selection screen with all vector names
Displays a selection screen with all matrix names
Displays a selection screen with all string variables
Displays a selection screen with all equation variables
Displays a selection screen with all user-defined constants
Displays a selection screen with all program names
Displays a selection screen with all graph database names
Displays a selection screen with all picture names
Displays a selection screen with all statistical result variables
Displays a selection screen with all window variables
CATALOG
- w
VECTR MATRX STRNG EQU CONS
4
PRGM GDB PIC STAT WIND
4
Page 56

44
t
The example assumes that
the real-number variables
AREA
example on page 41 have no
been deleted from memory.
Chapter 2: The
VOL
and
from the
CATALOG
, Variables, and Characters
Selecting a Variable Name
Select the appropriate data-type selection
screen from the
Move the cursor to the variable you want
to select.
Select the variable you want. b
CATLG-VARS
menu.
- w (
#
When copying items into the
CUSTOM
menu cells and menu groups.
menu, you can skip
The CUSTOM Menu
You can select up to 15 items from the
- w & (
CATALOG
and
instructions, and other items -- to create your own
menu, press
9
. Use & through * and
/
Entering CUSTOM Menu Items
CUSTM
Select
CUSTOM
Move the selection cursor ( 4 ) to the item you
want to copy to the
Copy the item to the
select, replacing any previous item.
To enter more items, repeat steps 2 and 3
using different items and cells.
Display the
from the
menu is displayed. ALPHA-lock is on.
CUSTOM
CATALOG
CUSTOM
CUSTOM
menu. -l 9
. The
menu.
menu cell you
screens -- program names, functions,
VARS
CUSTOM
menu. To display your
CUSTOM
to select items like any other menu.
- w
& (
ã
ä
# # #
C
(
Page 57

To clear an item from the
second or third menu group,
/
press
displayed, and then select it.
You cannot delete a TI-86
built-in variable.
You cannot delete a program
variable using
until the item is
DelVar(
.
Chapter 2: The
CATALOG
, Variables, and Characters
45
Clearing CUSTOM Menu Items
BLANK
Select
CUSTOM BLANK
Clear the menu item.
To clear more items, repeat steps 2 and 3.
from the
CATALOG
menu is displayed.
menu. The
- w
& )
(
Deleting a Variable from Memory
From the home screen or in a program, to delete from memory one user-created variable
name (except a program name) and its contents, the syntax is:
DelVar(
variable
)
To delete user-created variable names and their contents (including program names), display
the
MEM DELET
(Chapter 16). Deleting a variable does not remove it from the
b
menu (-
™ '
), select the data type, select the variable, and then press
CUSTOM
menu (page 44).
The CHAR (Character) Menu
MISC GREEK INTL
miscellaneous international
characters characters menu
menu Greek
characters menu
- Ÿ
Page 58

46
Chapter 2: The
CATALOG
, Variables, and Characters
Ñ, ñ, Ç
, and ç are valid as
any character of a variable
name, including the first
letter.
%, '
, and ! can be functions.
All
CHAR GREEK
are valid variable-name
characters, including the first
p
letter.
( - ~ )
as a character;
constant on the TI-86.
menu items
is not valid
p
is a
The CHAR MISC (Miscellaneous) Menu -
Ÿ &
MISC GREEK INTL
?#&%'
The CHAR GREEK Menu -
Ÿ '
!@$~ |
4
¿ÑñÇç
4
MISC GREEK INTL
abg@d4H qlmr
τ
fJ
The CHAR INTL (International) Menu -
4G s
Ÿ (
MISC GREEK INTL
´`^¨
You can combine modifiers on the
CHAR INTL
menu with uppercase or lowercase vowels to
create vowels used in some languages. You can use these vowels in variable names and text.
Adding a Modifier to a Vowel
Select the modifier from the
CHAR INTL
menu. ALPHA-lock is on. If necessary,
switch to alpha-lock.
Enter the uppercase or lowercase vowel
over which you want the modifier.
- Ÿ ( )
- n
ã
ä
O
Page 59

Math, Calculus,
3
Keyboard Mathematical Functions ....................................48
The MATH Menu................................................................ 49
The CALC (Calculus) Menu ................................................54
The TEST (Relational) Menu............................................... 55
and Test Operations
M1 M2
F1 F2 F3
-
TI 86
M3
M4
M5
F4
F5
Page 60

48
s
1
)
The A to Z Reference details
which data types are valid
arguments for each function.
The most common
mathematical functions are
on the TI-86 keyboard. For
syntax, details, and example
of these functions, refer to
the A to Z Reference.
x
is equivalent to the
reciprocal, 1àx.
Chapter 3: Math, Calculus, and Test Operations
-
(the multiplicative inverse
Keyboard Mathematical Functions
You can use these mathematical functions in expressions with real or complex values. You
can use some of them with lists, vectors, matrices, or strings.
When you use lists, vectors, or matrices, the valid functions return a list of results calculated
on an element-by-element basis. If you use two lists, vectors, or matrices in the same
expression, they must be equal in dimension.
Key Function Key Function
\
T
M
F
a
I
- ˆ
- ƒ
@
- z
C
+
(add)
N
(subtract)
¹
(multiply)
à
(divide)
M
(negate)
2
(square)
‡
(square root)
1
L
(inverse)
^
(raise to a specified power)
10^
(10 to a specified power)
(exponent)
E
=
>
?
- {
- |
- }
<
B
- ‚
- ~
sin
(sine)
cos
(cosine)
tan
(tangent)
1
L
sin
(arcsine; inverse of sine)
1
L
cos
(arccosine; inverse of cosine)
1
L
tan
(arctangent; inverse of tangent)
log
(logarithm)
ln
(natural log)
x
e
(constant e raised to a power)
p
(constant pi; 3.1415926535898)
Page 61

Chapter 3: Math, Calculus, and Test Operations
49
value
can sometimes be an
expression, list, vector, or
matrix. For details about
specific syntax options and
examples, refer to the A to Z
Reference.
The MATH Menu
NUM PROB ANGLE HYP MISC
number angle miscellaneous math
menu menu functions menu
probability hyperbolic interpolate
menu menu editor
The MATH NUM (Number) Menu -
- Œ
4
Π&
NUM PROB ANGLE HYP MISC
round iPart fPart int abs
value
round(
value
iPart
value
fPart
value
int
value
abs
value
sign
valueA,valueB
min(
list
min(
max(
max(
mod(
)
valueA,valueB
list
)
numberA,numberB
#ofDecimals
[
,
)
)
]
Rounds
)
Returns the integer part or parts of
Returns the fractional part or parts of
Returns the largest integer less than or equal to
Returns the absolute value or magnitude of
Returns
Returns the smaller of
Returns the smallest element of
Returns the larger of
Returns the largest element of
Returns
)
value
1
if
numberA
4
to 12 decimal places or to
value
is positive; 0 if
modulo
INTER
sign min max mod
#ofDecimals
value
value
value
value
is 0;
L
value
if
1
valueA
and
value
valueB
list
valueA
and
valueB
list
numberB
is negative
Page 62

50
Chapter 3: Math, Calculus, and Test Operations
(factorial) is valid for non-
!
integers.
randInt, randNorm
randBin
are abbreviated in
the
MATH PROB
, and
menu.
The MATH PROB (Probability) Menu -
NUM PROB ANGLE HYP MISC
! nPr nCr rand randIn
value
!
items
items
rand
randInt(
ã
randNorm(
stdDeviation
ã
randBin(
number
nPr
number
nCr
lower,upper
#ofTrialsä
,
#ofTrialsä
,
#ofTrials
)
mean
)
,
,
probabilityOfSuccess
ã
#ofSimulationsä
,
)
Returns the factorial of a real
Returns the number of permutations of
time
Returns the number of combinations of
time
Returns a random number > 0 and < 1; to control a random number
sequence, first store an integer seed value to
(random integer) Returns a random integer bound by the specified
integers,
lower
integer
specify an integer > 1 for
(random normal) Returns a random real number from a normal
distribution specified by
random numbers, specify an integer > 1 for
(random binomial) Returns a random real number from a binomial
distribution, where
return a list of random numbers, specify an integer > 1 for
#ofSimulations
Π'
randN randBi
4
upper
#ofTrials
mean
#ofTrials ‚
value
items
items
(
n
(
n
rand
) taken
) taken
(such as
number
number
0¶rand
; to return a list of random integers,
stdDeviation
and
; to return a list of
#ofTrials
1 and 0
probabilityOfSuccess
(r) at a
(r) at a
)
1; to
Page 63

Chapter 3: Math, Calculus, and Test Operations
51
angle
can be a list for ¡ ,
4
.
DMS
and
In a calculation, the result of
degrees'minutes'seconds
a
entry is treated as degrees in
Degree
angle mode only. It is
treated as radians in
angle mode.
value
can sometimes be an
expression, list, vector, or
matrix. For details about
specific syntax options and
examples, refer to the A to Z
Reference.
r
,
Radian
'
The MATH ANGLE Menu -
Π(
NUM PROB ANGLE HYP MISC
or'4DMS
¡
angle
angle
degrees
angle
r
minutes'seconds
'
4
DMS
Overrides current angle mode setting to express
Overrides current angle mode setting to express
Designates an angle as
'
Displays
degrees
angle
in degrees¡minutes'seconds" format, even though you use
minutes'seconds
'
The MATH HYP (Hyperbolic) Menu -
NUM PROB ANGLE HYP MISC
sinh cosh tanh sinh
value
sinh
value
cosh
value
tanh
1
L
value
sinh
1
L
value
cosh
1
L
value
tanh
-
1
cosh
Returns the hyperbolic sine of
Returns the hyperbolic cosine of
Returns the hyperbolic tangent of
Returns the hyperbolic arcsine of
Returns the hyperbolic arccosine of
Returns the hyperbolic arctangent of
degrees, minutes
to enter a DMS angle
'
Π)
-
1
4
tanh
-
1
value
value
value
value
value
value
, and
angle
angle
seconds
in degrees
in radians
Page 64

52
p
x
Chapter 3: Math, Calculus, and Test Operations
value
can sometimes be an
expression, list, vector, or
matrix. For details about
specific syntax options, refer
to the A to Z Reference.
The MATH MISC (Miscellaneous) Menu -
NUM PROB ANGLE HYP MISC
sum prod seq lcm gcd
list
sum
list
prod
expression,variable
seq(
end
4
Frac
%
step
[
,
,
begin
valueA,valueB
lcm(
valueA,valueB
gcd(
value
value
ercent%number
coefficientList,xValue
pEval(
th
x
‡
root
value
value
eval
,
]
)
)
)
Returns the sum of the elements of
Returns the product of the elements of
Returns a list in which each element is the value of
evaluated for
variable
Returns the least common multiple of
Returns the greatest common divisor of
Displays
Returns
Returns
Returns the value of a polynomial (whose coefficients are given in
)
coefficientList
Returns the
value
as a fraction
value
divided by 100 (multiplied by .01)
percent
) at
xthroot
Returns a list of the values of all selected functions in the current
graphing mode for the real
Π*
Frac % pEval
44
begin
from
number
of
xValue
value
of
value
x
‡
list
list
expression
end
by
valueA
valueA
step
and
and
valueB
valueB
to
of the independent variable
eval
Page 65

Chapter 3: Math, Calculus, and Test Operations
53
To interpolate y from the
home screen, select
from the
enter
To interpolate x from the
home screen, enter
inter(y1,x1,y2,x2,y)
You can store individual
values with the
(Chapter 2).
CATALOG
inter(x1,y1,x2,y2,x)
inter(
, and then
.
X
key
The InterpolateàExtrapolate Editor -
Π/ &
Using the interpolateàextrapolate editor, you can interpolate or extrapolate a value linearly,
given two known pairs and the x-value or y-value of the unknown pair.
Display the interpolateàextrapolate editor.
.
Enter real values for the first known pair
(x1,y1). The values can be expressions.
Enter values for the second known pair
(x2,y2).
Enter a value for either the
y
value of the unknown pair.
If necessary, move the cursor to the value
for which you want to solve (
Select
SOLVE
.
x
value or the
x
or y).
- Π/ &
3
b
4
b
1
b
$
or
#
5
4
b
b
*
The result is interpolated or extrapolated and displayed; the variables x and y are not
changed. A solid square in the first column indicates the interpolated or extrapolated value.
After solving for a value, you can continue to use the interpolateàextrapolate editor.
Page 66

54
v
Chapter 3: Math, Calculus, and Test Operations
You must set
use the calculus functions.
evalF, nDer, der1
For
variable
der2
,
or complex number or list.
You can use
expression
nDer
once in
fnInt, fMin
For
lower
<
Dec
can be a real
der1
. You can use
expression
, and
upper
must be true.
mode to
, and
and
der2
fMax
.
The CALC (Calculus) Menu
evalF nDer der1 der2 fnInt
- †
fMin fMax arc
4
The calculus functions return values with respect to any user-created variable, to built-in
variables
expression,variable,value
evalF(
expression,variable ã,valueä
nDer(
in
,
expression,variableã,valueä
der1(
expression,variableã,valueä
der2(
expression,variable
fnInt(
lower,upper
expression,variable
fMin(
lower,upper
expression,variable
fMax(
lower,upper
expression,variable
arc(
start,end
eqn
)
and
)
)
)
, and to graphing variables such as x, t, and q.
exp
)
Returns the value of
given variable
)
Returns an approximate numerical derivative of
respect to
ariable
)
Returns the value of the first derivative of
variable
)
Returns the value of the second derivative of
variable
to
,
Returns the numerical integral of
between
,
Returns the minimum value of
between
,
Returns the maximum value of
between
,
Returns the length of a segment of a curve defined by
variable
value
for the current variable value or specified variable
for the current variable value or specified variable
lower
lower
lower
with respect to
expression
value
for the current variable value or specified
upper
and
and
and
variable
upper
upper
boundaries
boundaries
boundaries
between
with respect to
expression
expression
expression
expression
expression
start
and
with respect to
with respect to
variable
expression
with respect to
with respect
with respect to
expression
end
for a
with
value
value
variable
variable
variable
Page 67

Chapter 3: Math, Calculus, and Test Operations
55
Relational functions are valid
for two lists of the same
length. When
are lists, a list of
valueB
results calculated element by
element is returned.
valueA
and
The built-in variable d defines the step size in calculating
mode only) and
fMax(
, and
arc(
. The value of each must be >0. These factors affect the accuracy of the
calculations. As
example,
nDer(A^3,A,5)
arc(
. The built-in variable
d
becomes smaller, the approximation typically is more accurate. For
returns
75.0001
tol
defines the tolerance in calculating
d
=.01
if
, but returns 75 if
The function integral error value is stored to the variable
arc(
For
evalF(, der1(, der2(, fMin(, fMax(, nDer(, seq(
and
fnInt(
while
dxDer1
mode is set, these functions are not valid in
, and any equation variable, such as y1.
nDer(
fnIntErr
dxNDer
(in
d
=.0001
(Appendix).
(Appendix).
differentiation
fnInt(, fMin(
expression
You can approximate the fourth derivative at the current value of x with this formula:
nDer(nDer(der2(x^4,x),x),x)
The TEST (Relational) Menu
= = < >
valueA
valueA
valueA
valueA
==
valueB
<
valueB
>
valueB
valueB
(equal to) Returns
valueB
(less than) Returns
valueB; valueA
(greater than) Returns
greater than
(less than or equal to) Returns 1 if
is not less than or equal to
.
- ˜
‚4ƒ
1
if
can be real or complex numbers, lists, vectors, matrices, or strings
1
if
and
valueB
valueB; valueA
is equal to
valueA
is less than
valueA
must be real numbers or lists
1
if
valueA
and
valueB
valueA
valueB; valueA
valueB
valueB
is greater than
must be real numbers or lists
is less than or equal to
and
valueB
; returns 0 if not equal;
; returns 0 if
valueB
must be real numbers or lists
valueA
; returns 0 if
valueB
valueA
is not less than
valueA
; returns 0 if
,
:
and
is not
valueA
Page 68

56
Chapter 3: Math, Calculus, and Test Operations
You can use relational
functions to control program
flow (Chapter 16).
valueA‚valueB
ƒ
valueA
valueB
(greater than or equal to) Returns
0
returns
real numbers or lists
(not equal to) Returns
valueB; valueA
to
matrices, or strings
if
valueA
is not greater than or equal to
1
valueA
if
valueB
and
1
valueA
if
is not equal to
can be real or complex numbers, lists, vectors,
is greater than or equal to
valueB; valueA
valueB
; returns 0 if
and
valueB
valueB
valueA
;
must be
is equal
Using Tests in Expressions and Instructions
The TI-86 Evaluation Operating System (Appendix) performs all operations except Boolean
operators before it performs relational functions. For example:
The expression
♦
2+2==2+3
evaluates to 0. The TI-86 performs the addition first, and then
compares 4 to 5.
The expression
♦
2+(2==2)+3
evaluates to 6. The TI-86 performs the test in parentheses
first, and then adds 2, 1, and 3.
Page 69

Constants, Conversions,
4
Using Built-In and User-Created Constants .......................58
Converting Units of Measure............................................. 61
Number Bases.................................................................... 65
Using Complex Numbers ...................................................70
Bases, and Complex Numbers
M1 M2
F1 F2 F3
-
TI 86
M3
M4
M5
F4
F5
Page 70

58
Chapter 4: Constants, Conversions, Bases, and Complex Numbers
Using Built-In and User-Created Constants
A constant is a variable with a specific value stored to it. The
common constants built into the TI-86. You cannot edit the value of a built-in constant.
You can create your own constants and add them to the user-created constant menu for
easy access. To enter a user-created constant, you must use the user-created constant
editor (page 60); you cannot use
X
=
to create a constant.
or
CONS BLTIN
menu items are
You can select built-in
constants from the
CONS BLTIN
them using the keyboard and
the
CHAR GREEK
menu or enter
menu.
The CONS (Constants) Menu -
BLTIN EDIT USER
built-in user-created
constants menu constants menu
user-created
constants editor
‘
The CONS BLTIN (Built-In Constants) Menu -
BLTIN EDIT USER
Na k Cc ec Rc
4
4m0H
‘ &
Gc g Me Mp Mn
0h c u
Page 71

To use p, press
select it from the
e^
To use
To use
, press
e
, press
- ~
or
CATALOG
- ‚
- n ãE
.
Chapter 4: Constants, Conversions, Bases, and Complex Numbers
Built-In Constant Constant Name Constant Value
Na
k
Cc
ec
Rc
Gc
g
Me
Mp
Mn
m
0
H
0
h
c
u
.
p
ä
.
e
Avogadro's number 6.0221367E23 mole
Boltzman's constant 1.380658
Coulomb constant 8.9875517873682E9 N m
Electron charge 1.60217733
Gas constant 8.31451 Jàmole K
Gravitational constant 6.67259
Earth acceleration due to gravity 9.80665 màsec
Mass of an electron 9.1093897
Mass of a proton 1.6726231
Mass of a neutron 1.6749286
Permeability of a vacuum 1.2566370614359
Permittivity of a vacuum 8.8541878176204
Planck's constant 6.6260755
Speed of light in a vacuum 299,792,458 màsec
Atomic mass unit 1.6605402
Pi 3.1415926535898
Base of natural log 2.718281828459
E
L
E
L
11 N m
E
E
E
E
E
23 JàK
E
L
19 C
2
L
31 kg
L
27 kg
L
27 kg
L
34 J sec
L
27 kg
1
L
2
à
kg
E
L
6 NàA
E
L
12 Fàm
59
2
2
à
C
2
2
Page 72

60
CONS USER
the names of all stored usercreated constants, arranged
alphanumerically.
196.9665 is the atomic
weight of gold (Au).
You can enter a value later.
If you select
first constant name is
displayed, or
last constant name is
displayed, the
menu replaces the
EDIT
You also can delete a
constant from the
DELET
Chapter 4: Constants, Conversions, Bases, and Complex Numbers
menu items are
PREV
when the
NEXT
when the
CONS USER
menu.
CONS
CONS
MEM
screen.
Creating or Redefining a User-Created Constant
Display the
Display the constant editor. The
prompt,
Value=
menu are displayed. ALPHA-lock is on.
Enter a constant name. Either enter a new name
one to eight characters long, starting with a letter,
or select a name from the
The cursor moves to the
CONS EDIT
Enter the real or complex constant value, which
can be an expression. The value is stored to the
constant as you enter it. The user-created
constant becomes a
The Constant Editor Menu -
PREV NEXT DELET
PREV
NEXT
DELET
Displays the name and value (if any) of the previous constant on the
Displays the name and value (if any) of the next constant on the
Deletes the name and value of the constant currently displayed in the constant editor
menu. - ‘
CONS
Name=
prompt, and
CONS USER
CONS USER
Value=
prompt and the
menu.
menu is displayed (see below).
CONS USER
menu item.
‘ '
name
'
ä
ã
- n
A
ã
ä
b
U
196
`
b
9665
or
#
CONS USER
CONS USER
menu
menu
Page 73

You can enter a conversion
expression anywhere that an
expression is valid.
2
L
In the example,
Celsius is converted to
degrees Fahrenheit.
Always use parentheses
when
value
degrees
is negative.
Chapter 4: Constants, Conversions, Bases, and Complex Numbers
61
Entering a Constant Name in an Expression
You can enter a constant in an expression in any of three ways.
♦
Select the constant name from the
♦
Select a user-created constant name from the
♦
Use the ALPHA keys, alpha keys, and other character keys to enter a constant name.
CONS BLTIN
menu or the
VARS CONS
CONS USER
screen.
menu.
Converting Units of Measure
With the TI-86, you can convert a value measured in one unit into its equivalent value in
another unit of measure. For example, you can convert inches to yards, quarts to liters, or
degrees Fahrenheit to degrees Celsius.
The units of measure from which and to which you convert must be compatible. For
example, you cannot convert inches to degrees Fahrenheit, or yards to calories. Each menu
item on the
LNGTH
(
), volume (
Converting a Unit of Measure
To use any conversion instruction, the syntax is:
value)currentUnit4newUnit
(
Enter the real
Display the
Select the
menu (page 62) represents a unit-of-measure group, such as length
CONV
VOL
), and pressure (
to be converted.
value
CONV
menu.
TEMP
conversion group.
PRESS
). Within each menu, all units are compatible.
2
E
D a
- ’
*
Page 74

62
Chapter 4: Constants, Conversions, Bases, and Complex Numbers
Select the current unit of measure (
conversion group menu. The unit abbreviation
and conversion symbol ( 4 ) are pasted to the
cursor location.
Select the new unit of measure (
conversion group menu. The unit abbreviation is
pasted to the cursor location.
Convert the measurement.
¡
¡
F
) from the
C
) from the
&
'
b
The CONV (Conversions) Menu -
LNGTH AREA VOL TIME TEMP
length volume temperature speed force energy
menu menu menu menu menu menu
Important:
and its negation sign, as in
area menu time menu mass menu pressure menu power menu
When you convert a negative value, you must enclose in parentheses the value
. Otherwise, the TI-86 order of evaluation will perform the
(L4)
’
MASS FORCE PRESS ENRGY POWER
4
SPEED
4
conversion first, and then apply the negation to the converted value.
If you enter... ...The TI-86 converts it to...
(L4)¡C4¡F
L4¡C4¡
F
24.8
degrees Fahrenheit (L4¡ Celsius converted to degrees Fahrenheit)
L
39.2
degrees Fahrenheit (4¡ Celsius converted to degrees Fahrenheit, then negated)
Page 75

Chapter 4: Constants, Conversions, Bases, and Complex Numbers
63
The CONV LNGTH (Length) Menu -
mm
cm
m
in
ft
millimeters
centimeters
meters
inches
feet
The CONV AREA Menu -
2
ft
m
mi
square feet
2
square meters
2
square miles
yd
km
mile
nmile
lt-yr
’ '
2
km
acre
2
in
The CONV VOL (Volume) Menu -
liter
gal
qt
pt
oz
liters
gallons
quarts
pints
ounces
The CONV TIME Menu -
sec
mn
hr
seconds
minutes
hours
3
cm
3
in
3
ft
3
m
cup
’ )
day
yr
week
’ &
yards
kilometers
miles
nautical miles
light-years
square kilometers
acres
square inches
’ (
cubic centimeters
cubic inches
cubic feet
cubic meters
cups
days
years
weeks
The CONV TEMP (Temperature) Menu -
¡
C
degrees Celsius
¡
F
degrees Fahrenheit
’ *
¡
K
degrees Kelvin
mil
mils
Ang
Angstroms
fermi
fermis
rod
rods
fath
fathoms
2
cm
square centimeters
2
yd
square yards
ha
hectares
tsp
teaspoons
tbsp
tablespoons
ml
milliliters
galUK
UK gallons
ozUk
UK ounces
ms
milliseconds
m
s
microseconds
ns
nanoseconds
¡
R
degrees Rankin
Page 76

64
J
Chapter 4: Constants, Conversions, Bases, and Complex Numbers
The CONV MASS Menu -
gm
kg
lb
grams
kilograms
pounds
The CONV FORCE Menu -
N
dyne
Newtons
dynes
’ / &
amu
atomic mass units
slug
slugs
’ / '
tonf
ton force
kgf
kilogram force
The CONV PRESS (Pressure) Menu -
atm
bar
Nàm
atmospheres
bars
2
Newtons per square meter
2
lbàin
pounds per square inch
mmHg
millimeters of mercury
2
mmH
millimeters of water
The CONV ENRGY (Energy) Menu -
J
cal
Btu
oules
calories
British thermal units
The CONV POWER Menu -
hp
W
horsepower
Watts
The CONV SPEED Menu -
ftàs
màs
feet per second
meters per second
ft-lb
foot-pounds
kw-hr
kilowatt hours
eV
electron Volts
’ / *
ftlbàs
calàs
foot-pounds per second
calories per second per minute
’ / / &
miàhr
miles per hour
kmàhr
kilometers per hour
’ / (
’ / )
ton
tons
mton
metric tons
lbf
pound force
inHg
inches of mercury
inH2O
inches of water
erg
ergs
l-atm
liter-atmospheres
Btuàm
British thermal units
knot
knots
Page 77

To enter a forward slash
à
, you can use the F key
(
)
or paste it from the
CATALOG
.
Chapter 4: Constants, Conversions, Bases, and Complex Numbers
Converting a Value Expressed as a Rate
To convert a value expressed as a rate on the home screen, you can use parentheses and
à
the division operator (
). For example, if a car travels 325 miles in 4 hours, and you want
to know the rate of speed in kilometers per hour, enter this expression:
(325à4)miàhr4kmàhr
This expression returns
131
kmàhr (rounded up).
65
You also can return this result using only a forward slash, as in:
325mile4kmà4hr4hr
Number Bases
The number base mode setting (Chapter 1) controls how the TI-86 interprets an entered
number and displays results on the home screen. However, you can enter numbers in any
number base using number base designators Ü, Ý, Þ, and ß. Then you can display the result
on the home screen in any number base using number base conversions.
All numbers are stored internally as decimal. If you perform an operation in a mode setting
Dec
other than
calculation and expression.
For example, in
, the TI-86 performs integer mathematics, truncating to an integer after every
Hex
mode,
1à3+7
returns 7h (1 divided by 3, truncated to 0, and then added to 7).
Page 78

66
Chapter 4: Constants, Conversions, Bases, and Complex Numbers
Number Base Ranges
Binary, octal, and hexadecimal numbers on the TI-86 are defined in these ranges.
Type Low ValueàHigh Value Decimal Equivalent
Binary 1000 0000 0000 0001
0111 1111 1111 1111
Octal 5120 6357 4134 0001
2657 1420 3643 7777
Hexadecimal
ÚÚÚÚ Õ50× ÙÚ
0000 5ÕÚ3 107Õ 3
One’s and Two’s Complements
To obtain the one's complement of a binary number, enter the
the number. For example,
not 111100001111
To obtain the two's complement of a binary number, press a before entering the number.
For example,
L
111100001111
in
mode returns
Bin
85 ×001
ÚÚÚ
in
b
b
o
o
h
h
mode returns
Bin
1111000011110001
L
32,767
32,767
L
99,999,999,999,999
99,999,999,999,999
L
99,999,999,999,999
99,999,999,999,999
function (page 68) before
not
1111000011110000
.
Ü
.
Ü
The (Number) BASE Menu -
Õ-Ú
hexadecimal base conversion rotateàshift
characters menu menu
menu base type Boolean operator
TYPE CONV BOOL BIT
menu menu
—
Page 79

menu items and
BASE ÕBASE TYPE
not the same as regular
alphabetical characters.
Ú
menu items are
Chapter 4: Constants, Conversions, Bases, and Complex Numbers
The BASE Õ-Ú (Hexadecimal Characters) Menu -
This is the
BASE Õ-
Õ
ЦЧШЩЪ
menu displayed on the home screen. To use Õ, press
Ú
TYPE CONV BOOL BIT
— &
- e
67
.
In the example, the upper
menu is the list editor menu
- ”
(
base mode).
If
not set, you must enter the
designator, even if the
number contains a special
hexadecimal character.
in
Dec
number
Hex
number base mode is
When an editor menu is the upper menu, Õ and ...Õ and Ö move to two separate cells, and Ù and
are combined in one cell. If you press & or /... are combined. To switch back, press * or /.
Ö
{ } NAMES " OPS { } NAMES " OPS
Õ-Ö× Ø Ù Ú
4
ХЦЧШЩ
Entering Hexadecimal Digits
To enter a hexadecimal number, use the number keys as you would for a decimal number.
ß
Select the hexadecimal characters Õ through Ú from the menu as needed.
The BASE TYPE Menu -
Õ-Ú
TYPE
CONV BOOL BIT
— '
ÜßÝÞ
In an expression, you can designate a number in any number base, regardless of mode.
After you enter the number, select the appropriate base type symbol from the
menu. The base type symbol is pasted to the cursor location. Here are some examples.
In
In
Dec
Bin
mode (default):
mode:
10Ü+10
10ß+10
10ß+10
10Þ+10
b
b
b
b
10010
1100
12
26
In
Oct
mode:
10Ü+10
10Þ+10
Hex
Ü
In
mode:
Ü
10Ü+10
10Þ+10
b
b
b
b
BASE TYPE
12
Ý
22
Ý
12
ß
1
Õß
Ú
-
Ú
Page 80

68
Chapter 4: Constants, Conversions, Bases, and Complex Numbers
value
can be an expression,
list, vector, or matrix. For
detailed syntax descriptions,
refer to the A to Z Reference.
The BASE CONV (Conversion) Menu -
Õ-Ú
4
value
value
Bin
TYPE CONV BOOL BIT
4
Bin
4
Hex
Hex
4
Displays
Displays
Oct
4
value
as binary
value
as hexadecimal
Dec
4
Converting Number Bases
In
mode, solve
Dec
Add
to the result and convert it to
1
Add
to the result and convert it to
1
Add
to the result and convert it to
1
Add
to the result and convert it to
1
10Ü + Úß + 10Ý + 10
The BASE BOOL (Boolean) Menu -
Õ-Ú
and or xor not
valueA
TYPE CONV BOOL BIT
valueB valueA or valueB valueA
and
.
number base display.
Bin
number base display.
Hex
number base display.
Oct
number base display.
Dec
— )
— (
value
value
4
Oct
4
Dec
Displays
Displays
valueB
xor
value
as octal
value
as decimal
10Ü+Úß+10Ý+10
Ans+14Bin
Ans+14Hex
Ans+14Oct
Ans+1
not
b
b
b
b
value
b
100100
46
39
35
25
Ü
ß
Ý
Page 81

Both the argument and the
result must be within defined
number ranges (page 66).
Chapter 4: Constants, Conversions, Bases, and Complex Numbers
Results of Boolean Operations
When a Boolean expression is evaluated, the arguments are converted to hexadecimal
integers and the corresponding bits of the arguments are compared, as this table shows.
Results
valueA
If
is... ...and
1 1 1100
1 0 0110
0 1 0111
0 0 0001
valueB
is...
and or xor not
valueA
(
The result is displayed according to the current mode setting. For example:
♦
In
Bin
mode,
101 and 110
returns
100Ü
Hex
.
♦
In
mode,
5 and 6
returns 4ß.
69
)
Rotate and shift operate on
16 base digits. To minimize
an overflow error, enter the
argument in binary form.
The BASE BIT Menu -
Õ-Ú
rotR rotL shftR shftL
rotR
rotL
shftR
shftL
TYPE CONV BOOL BIT
value
value
value
value
Rotates
Rotates
Shifts
Shifts
value
value
value
value
right
left
right
left
— *
Page 82

70
Variable names with complex
numbers stored to them are
listed on the
screen (Chapter 2).
Lists, matrices, and vectors
can have complex elements.
Chapter 4: Constants, Conversions, Bases, and Complex Numbers
VARS CPLX
Using Complex Numbers
A complex number has two components: real (a) and imaginary (+bi). On the TI-86, you
enter the complex number a+bi as:
real,imaginary
(
♦
You can enter a complex number in rectangular or polar form, regardless of the current
complex number mode setting. The separator (
♦
To enter rectangular form, separate
♦
To enter polar form, separate
)
in rectangular form
magnitude
real
(
♦
magnitude±angle) in polar form
,
or ± ) determines the form.
imaginary
and
and
angle
with a comma (P).
with an angle symbol (- ).
The graph format settings
RectGC
(Chapter 5) determine the
complex number form of
graph screen coordinates.
and
PolarGC
Each component (
real, imaginary, magnitude
expression that evaluates to a real number; expressions are evaluated when you press
RectC
When
complex number mode is set, complex
, or
angle
) can be a real number or an
b
numbers are displayed in rectangular form, regardless of
the form in which you enter them (as shown to the right).
PolarC
When
complex number mode is set, complex
numbers are displayed in polar form, regardless of the
form in which you enter them (as shown to the right).
Complex Results
Complex numbers in results, including list, matrix, and vector elements, are displayed in
the form (rectangular or polar) specified by the mode setting (Chapter 1) or by a display
conversion instruction (page 61).
♦
♦
When
When
Radian
angle mode is set, results are displayed as
Degree
angle mode is set, results are displayed as
magnitude±angle
(
real,imaginary
(
)
.
)
.
.
Page 83

Chapter 4: Constants, Conversions, Bases, and Complex Numbers
v
71
You can enter the name or a
complex list, vector, or matrix
as an argument for any
menu item.
CPLX
For example, when
(1.32565429614±12.7643896828)
PolarC
and
Degree
.
modes are set,
(2,1)N(1±45)
returns
Using a Complex Number in an Expression
♦
Enter the complex number directly.
♦
Use the ALPHA keys, alpha keys, and other character keys to enter a complex variable.
♦
Select a complex variable from the
VARS CPLX
The CPLX (Complex Number) Menu -
conj real imag abs angle
conj (real,imaginary)
conj (magnitude
real (real,imaginary)
real (magnitude
imag (real,imaginary)
imag (magnitude
abs (real,imaginary)
abs (magnitude
±
±
angle)
±
±
angle)
angle)
angle)
Returns the complex conjugate of a complex value, list, vector or
matrix; the result is
Returns
(magnitude
Returns the real portion of a complex number, list, vector, or matrix as
a real number; the result is
Returns
magnitude
Returns the imaginary (non-real) portion of a complex number, list,
ector, or matrix as a real number; the result is
Returns
magnitude
(Absolute value) Returns the magnitude (modulus) of a complex
number, list, vector, or matrix of complex numbers; the result is
2
‡(real
Returns
imagi nary
+
magnitude
‹
4 4
(real,
±L
angle)
¹
cosine(
¹
sine(
2
)
screen.
Rec
L
imaginary)
real
angle
)
angle
)
4
Pol
imaginary
Page 84

72
Chapter 4: Constants, Conversions, Bases, and Complex Numbers
Select { and } from the
menu.
You must enter commas to
separate list elements.
LIST
angle (real,imaginary)
4
Rec
±
angle)
angle (magnitude
complexValue
Returns the polar angle of a complex number, list, vector, or matrix
calculated as
quadrant or
Returns
Displays
angle
complexValue
1
L
tan
(imaginary
L
p
in the third quadrant); the result is tan
(where
L
à
real)
p<anglep
(adjusted by p in the second
)
in rectangular format
1
L
imaginaryàreal
(
(real,imaginary)
,
regardless of complex mode setting; valid only at the end of a command
complexValue
complexValue
is indeed complex
in polar format (
magnitude
±
angle
), regardless
complexValue
4
Pol
and only when
Displays
of complex mode setting; valid only at the end of a command and only
complexValue
when
is indeed complex
You can enter a complex list, vector, or matrix directly. The syntax below is for lists. To
enter a complex vector or matrix, substitute brackets for braces below and use the correct
form for either data type (Chapters 12 and 13).
In rectangular form, to use lists of complex numbers with
conj, real, imag, abs
, and
angle
, the
syntax is:
realA,imaginaryA
conj{(
In polar form, to use lists of complex numbers with
realB,imaginaryB
),(
realC,imaginaryC
),(
conj, real, imag, abs
...
),
}
, and
angle
, the
syntax is:
magnitudeA±angleA
real{(
magnitudeB±angleB
),(
magnitudeC±angleC
),(
...
),
}
When you use a list the TI-86 calculates the result element by element and returns a list, in
which each element is expressed according to the complex mode setting.
)
Page 85

5
Defining a Graph................................................................ 74
Setting the Graph Mode ....................................................74
The GRAPH Menu .............................................................. 75
Using the Equation Editor.................................................. 76
Setting the Window Variables ...........................................81
Setting the Graph Format ..................................................83
Displaying a Graph ............................................................85
Function Graphing
M1 M2
F1 F2 F3
-
TI 86
M3
M4
M5
F4
F5
Page 86

74
p
Chapter 5: Function Graphing
Some of these steps are not
necessary every time you
define a graph.
Defining a Graph
This chapter describes the process for graphing functions in
process is similar for each TI-86 graphing mode. Chapters 8, 9, and 10 describe the unique
aspects of polar, parametric, and differential equation graphing modes. Chapter 6 describes
various graphing tools, many of which you can use in all graphing modes.
Set the graphing mode (page 74).
Define, edit, or select one or more functions in the equation editor (pages 76 and 77).
Select the graph style for each function (page 79).
Deselect stat plots, if necessary (page 81).
Set the viewing window variables (page 81).
Select the graph format settings (page 83).
Func
graphing mode, but the
Setting the Graph Mode
To display the mode screen, press -
Func
settings, including
graphing mode, are highlighted in the
icture to the right. The graphing modes are on the fifth line.
Func
♦
♦
♦
♦
(function graphing)
Pol
(polar graphing; Chapter 8)
Param
(parametric graphing; Chapter 9)
DifEq
(differential equation graphing; Chapter 10)
m
. All default mode
Page 87

Chapter 1 describes all mode
settings in detail.
Chapter 5: Function Graphing
75
Each graphing mode has a unique equation editor. You must select the graphing mode and
Dec
number base mode before you enter the functions. The TI-86 retains in memory all
equations stored to the
Func, Pol, Param
, and
DifEq
equation editors. Each mode also has
unique graph format settings and window variables.
Stat plot onàoff status, zoom factors, mode settings, and tolerance apply to all graphing
modes; changing the graphing mode does not affect them.
These mode settings affect graphing results.
♦
♦
Radian
dxDer1
or
or
Degree
angle mode affects the interpretation of some functions.
dxNDer
differentiation mode affects plotting of selected functions.
Chapter 6 describes these
menu items:
GRAPH
ZOOM, TRACE, MATH
DRAW, STGDB, RCGDB
EVAL, STPIC
, and
,
,
RCPIC
The GRAPH Menu
y(x)= WIND ZOOM TRACE GRAPH
y(x)=
WIND
ZOOM
TRACE
.
GRAPH
MATH
DRAW
Displays the equation editor; use this screen to enter functions to be graphed
Displays the window editor; use this editor to change graph screen dimensions
Displays the
Activates the trace cursor; use this cursor to trace along the graph of a specific function
Displays the graph screen; graphs all selected functions and turned on stat plots
Displays the
Displays the
GRAPH ZOOM
GRAPH MATH
GRAPH DRAW
6
MATH DRAW FORMT STGDB RCGDB
4
EVAL STPIC RCPIC
4
menu; use these items to change the graph screen dimensions
menu; use this menu to explore graphs mathematically
menu; use this menu to draw on graphs or test pixels
Page 88

76
Chapter 5: Function Graphing
FORMT
STGDB
RCGDB
EVAL
STPIC
RCPIC
Displays the graph format screen; use this screen to select graph format settings
Displays the
Displays the
Displays the
Displays the
Displays the
Name=
prompt and
Name=
prompt and
Eval x=
prompt; enter an x for which you want to solve the current function
Name=
prompt and
Name=
prompt and
STGDB
menu; use this prompt to enter a
RCGDB
STPIC
RCPIC
menu; use this menu to recall a graph database
menu; use this prompt to enter a
menu; use this menu to recall a picture
GDB
PIC
variable
variable
Using the Equation Editor
To display the equation editor in
y(x)=
from the
GRAPH
menu (
6 &
shifts up and the equation editor menu is displayed as the
lower menu. You can store up to 99 functions in the
equation editor, if sufficient memory is available.
If a function is selected, its equals sign (=) is highlighted in the equation editor. If the
function is deselected, its equals sign is not highlighted. Only selected functions are plotted
when the TI-86 plots a graph.
The Equation Editor (GRAPH y(x)=) Menu
y(x)= WIND ZOOM TRACE GRAPH
x y INSf DELf SELCT
graphing mode, select
Func
GRAPH
). The
6 &
4
menu
ALL+ ALLNSTYLE
Page 89

Chapter 5: Function Graphing
77
To move from the first
equation editor function to
the last, press
To move to the beginning or
end of an equation, press
- !
or
An ellipsis indicates that an
equation continues beyond
the screen.
- "
$
.
.
x
y
INSf
Pastes the variable x to the current cursor location (same as 2 or - n
Pastes the variable y to the current cursor location (same as - n
Inserts a deleted equation variable (function) name above the current cursor location
(only the variable name is inserted)
DELf
SELCT
ALL+
N
ALL
STYLE
Deletes the function that the cursor is on
Changes the selection status of the function that the cursor is on (selects or deselects)
Selects all defined functions in the equation editor
Deselects all defined functions in the equation editor
Assigns the next of seven available graph styles to the function that the cursor is on
Defining a Function in the Equation Editor
Display the equation editor.
If functions are stored in the equation editor,
move the cursor down until a blank function is
displayed.
Enter an equation in terms of
function. When you enter the first character,
the function is selected automatically. (The
function’s equals sign is highlighted.)
Move the cursor to the next function.
x
to define the
6 &
( # or
b )
4
= 2
b or #
ä
ã
)
X
ä
ã
)
Y
Page 90

78
Chapter 5: Function Graphing
You can edit expressions you
inserted using
Rcl
.
Notes about Defining Function Equations
♦
You can include functions, variables, constants, matrices, matrix elements, vectors,
vector elements, lists, list elements, complex values, or other equations in the equation.
♦
If you include matrices, vectors, or complex values, the equation must evaluate to a real
number at each point.
♦
You can include another defined function in an equation. For example, given
y2=4+y1
and
♦
To enter a function name, select
, the function y2 would equal 4 plus the sine of x.
y
from the equation editor menu, and then enter the
y1=sin x
appropriate number.
♦
To insert the contents of an equation variable, use
Rcl
equation variable at the
prompt, use the ALPHA keys, alpha keys, and other
RCL
(Chapter 1). To enter the
character keys.
♦
To select all functions from the home screen or in the program editor, select
CATALOG
the
♦
To select specific functions from the home screen or in the program editor, select
from the
function, and press
♦
To deselect functions from the home screen or in the program editor, use
same way you use
♦
When a function evaluates to a non-real number, the value is not plotted on the graph;
(or enter the individual characters) and press
CATALOG
(or enter the individual characters), enter the number of each
b
. For example, to select
FnOn
to select functions.
y1, y3
b
.
, and y5, enter
FnOn 1,3,5
FnOn
FnOff
no error is returned.
.
the
from
FnOn
Page 91

The TI-86 graphs all selected
e
functions on the same graph
screen.
¾
(shade above) and
¿
(shade below) are availabl
Func
only in
Â
(dot) is available in all
graphing modes except
DifEq
graphing mode.
graphing mode.
Chapter 5: Function Graphing
79
Selecting Graph Styles
Depending on which graphing mode is set, the TI-86 offers up to seven distinct graph styles.
You can assign these styles to specific functions to visually differentiate each from the others.
For example, you can show
Ây2=
dotted line (
), and shade the area above y3 (
y1
as a connected line (
¾y3=
»y1=
in the equation editor) and y2 as a
).
Also, you can manipulate the styles to illustrate actual phenomena graphically, such as a ball
flying through the air (using Á) or the circular movement of a chair on a Ferris wheel (using À).
Icon Style Characteristics of the Plotted Function
»
¼
¾
¿
À
Á
Â
Line
Thick
Above
Below
Path
Animate
Dot
A solid line connects each plotted point; this is the default in
A thick solid line connects each plotted point
Shades the area above the function
Shades the area below the function
A circle cursor traces the leading edge of the function and draws a path as it plots
A circle cursor traces the leading edge of the function as it plots; does not draw a path
A small dot represents each plotted point; this is the default in
To set the graph style from a program, select
GrStl(
from the
CATALOG
Connected
Dot
mode
mode
(A to Z Reference).
Page 92

80
Chapter 5: Function Graphing
In the example,
above) is selected for
window variables are set to
the default values (page 82).
¾
(shade
y2
. All
Setting the Graph Style in the Equation Editor
Display the equation editor.
Move the cursor to the function or functions for
which you want to set the graph style.
Display the equation editor menu item
Select
STYLE
repeatedly to scroll the graph
style icons to the left of the equation name.
STYLE
.
6 &
#
/
( (
¾
or
¿
If you assign
function that graphs a family
of curves (page 86), the
same pattern rotation applies
to the members of the family
of curves.
to a
View the graph with the new graph style.
Clear the
GRAPH
menu to view the graph only.
- *
:
Using Shading Patterns to Differentiate Functions
When you select ¾ (shade above) or ¿ (shade below) for more than one function, the TI-86
rotates through a series of four shading patterns.
First shaded function: vertical lines
♦
Second shaded function: horizontal lines
♦
Third shaded function: negatively sloping diagonal lines
♦
Fourth shaded function: positively sloping diagonal lines
♦
The rotation returns to vertical lines for the fifth shaded function and repeats the order.
Page 93

Chapter 5: Function Graphing
Viewing and Changing OnàOff Status of Stat Plots
Plot1 Plot2 Plot3
on the top line of the equation editor displays the onàoff status of each stat
plot (Chapter 14). When a plot name is highlighted on this line, the plot is on.
To change the onàoff status of a stat plot from the equation editor, press $, ", and ! to
place the cursor on
Plot1, Plot2
, or
Plot3
, and then press
b
.
Setting the Window Variables
The graph screen window represents the portion of the
coordinate plane displayed on the graph screen. By setting
window variables, you can define the graph screen window
boundaries and other attributes.
81
To remove tick marks from
both axes, set
yScl=0
Small
graph resolution but may
cause the TI-86 to plot
graphs more slowly
xScl=0
.
xRes
values improve
and
.
xMin, xMax, yMin
(x scale) is the number of units represented by the distance from one tick mark to the next
xScl
, and
are the graph screen boundaries.
yMax
tick mark on the x-axis.
(y scale) is the number of units represented by the distance from one tick mark to the
yScl
next tick mark on the y-axis.
sets pixel resolution for function graphs only, using integers 1 through 8.
xRes
♦
♦
At
At
(the default), functions are evaluated and graphed at each pixel on the x-axis.
xRes=1
, functions are evaluated and graphed at every eighth pixel along the x-axis.
xRes=8
Page 94

82
Chapter 5: Function Graphing
xMin<xMax
both must be true to graph
successfully.
In the example,
changed to
and
0
.
yMin<yMax
yMin
is
Displaying the Window Editor
To display the window editor, select
menu (
6 '
). Each graphing mode has a unique
WIND
from the
GRAPH
window editor. The window editor to the right shows the
Func
default values in
xRes=1
(x resolution) is below
graphing mode. $ indicates that
yScl
on the window editor.
Changing a Window Variable Value
Display the window editor.
Move the cursor to the window variable you
want to change.
Edit the value, which can be an expression.
Evaluate any expressions and store the value.
6 '
# # #
0
b
or
#
To change a window variable value from the home screen or in the program editor, enter
the value, and then press
screen ( -
w / /
X
. Either select the window variable from the
WIND
) or enter individual characters. Press
VARS WIND
b
.
Page 95

Chapter 5: Function Graphing
Setting Graphing Accuracy with @x and @y
The window variables
@
x
and
@
y
define the distance from the center of one pixel to the
center of any adjacent pixel. When you display a graph, the values of
calculated from
@
x
xMin+xMax
=(
xMin, xMax, yMin
)à126
, and
yMax
using these formulas:
@
y
=(
yMin+yMax
)à62
@
x
and
83
@
y
are
The TI-86 retains
independent format settings
for each graphing mode.
DifEq
graphing mode, the
In
graph format screen key
sequence is
(Chapter 10).
6 / &
@
x
@
y
and
are not on the window editor. To change them, you must follow the steps above
for changing a window variable value from the home screen or in the program editor. When
you change the values stored to
yMax
from
@
x
xMin
,
,
@
y
, and
yMin
@
, and the new values are stored.
x
@
y
and
, the TI-86 automatically recalculates
xMax
and
Setting the Graph Format
To display the graph format screen, select
GRAPH
menu (
6 / (
). The graph format settings
define various characteristics of the displayed graph. The
current settings are highlighted.
To change a setting, move the cursor onto the new setting,
and then press
b
, the same as on the mode screen.
FORMT
from the
Page 96

84
Chapter 5: Function Graphing
DifEq
graphing mode has a
unique set of graph format
settings (Chapter 10).
Grid points cover the graph
screen in rows that
correspond to the tick marks
on each axis.
RectGC
PolarGC
CoordOn
CoordOff
DrawLine
DrawDot
SeqG
SimulG
GridOff
GridOn
AxesOn
AxesOff
LabelOff
LabelOn
Displays the cursor location as rectangular graph coordinates x and y; when
RectGC
is set, plotting the graph, moving the free-moving cursor, and tracing update x and y; if
CoordOn
Displays the cursor location as polar graph coordinates R and q; when
plotting the graph, moving the free-moving cursor, and tracing update
CoordOn
format also is selected, x and y are displayed
format also is selected, R and q are displayed
PolarGC
x, y, R
is set,
and q; if
Displays the cursor coordinates at the bottom of the graph
Does not display the cursor coordinates at the bottom of the graph
Draws a line between the points calculated for the functions in the equation editor
Plots only the calculated points for the functions in the equation editor
(sequential graphing) Evaluates and plots one function completely before evaluating
and plotting the next function
(simultaneous graphing) Evaluates and plots all selected functions for a single value
x
of
and then evaluates and plots them for the next value of
x
Omits the grid points from the display
Displays grid points
Displays the axes
Omits the axes from the display;
AxesOff
overrides the
LabelOffàLabelOn
format
setting
Omits the axis labels from the display
Labels the axes, if
various labels in
AxesOn
DifEq
is also selected; x and y for
mode
Func, Pol
, and
Param
modes;
Page 97

In the example graph to the
right, all default settings
related to graphing are set.
To view the graph without the
menu on the bottom
GRAPH
line, press
plotting the graph.
When you pause, the busy
indicator in the top-right
corner becomes a dotted line.
:
after
Chapter 5: Function Graphing
85
Displaying a Graph
To display a graph, select
from the
GRAPH
menu. The graph
screen is displayed. If the graph is
newly defined, the busy indicator is
displayed at the top-right corner as
the TI-86 draws the graph.
In
SeqG
format, the TI-86 draws each selected function one by one, in function-name
♦
order (for example,
In
SimulG
format, the TI-86 draws all selected graphs simultaneously.
♦
You can display and explore a graph from a program (Chapter 16). To use graphing commands
on the home screen, select them from the
Pausing or Stopping a Graph in Progress
♦
To pause graph plotting, press
♦
To stop graph plotting, press ^. To replot, select
Modifying a Drawn Graph
To remove these items from the graph screen: Press (or select):
Cursor, coordinate values, or menus (To restore menus, press . or
Free-moving cursor and coordinate values but not the menus
Cursor and coordinate values but not the menus
GRAPH
y1
is graphed first, y2 is graphed second, and so on).
CATALOG
b
. To resume plotting, press
or entering the individual characters.
b
GRAPH
from the
6
again.
GRAPH
:
)
b
6
menu.
GRAPH
or
Page 98

86
Chapter 5: Function Graphing
When you use more than one
list in an expression, all lists
must have the same
dimension.
Graphing a Family of Curves
If you enter a list as an element in an equation, the TI-86 plots the function for each value in the
SimulG
list, graphing a family of curves. In
graphing order mode, the TI-86 graphs all functions
sequentially for the first element in each list, then for the second element, and so on.
For example,
{2,4,6} sin x
graphs
three functions:
2 sin x, 4 sin x
, and
6 sin x
.
The equation
{2,4,6} sin ({1,2,3} x)
also graphs three functions:
2 sin x, 4 sin (2x)
, and
6 sin (3x)
.
Smart Graph
Smart Graph displays the previously displayed graph when you press
6
, as long as all
factors that would cause replotting are unchanged since the graph was last displayed. Smart
Graph replots if you performed any of these actions since the graph was last displayed.
♦
Changed a mode setting that affects graphs
♦
Changed a function or stat plot that was plotted on the last graph screen
♦
Selected or deselected a function or stat plot
♦
Changed the value of a variable in a selected function
♦
Changed the value of a window variable setting
♦
Changed a graph format setting
Page 99

6
Graph Tools on the TI-86................................................... 88
Tracing a Graph ................................................................. 90
Resizing the Graph Screen with ZOOM Operations ...........91
Using Interactive Math Functions ...................................... 95
Evaluating a Function for a Specified x............................ 101
Drawing on a Graph ........................................................101
Graph Tools
M1 M2
F1 F2 F3
-
TI 86
M3
M4
M5
F4
F5
Page 100

88
Chapter 6: Graph Tools
Graph Tools on the TI-86
Chapter 5 describes how to use the
GRAPH
define and display the graph of a function in
to use the other
menu items to apply preset graph screen dimensions, explore the
GRAPH
menu items
Func
y(x)=, WIND, GRAPH
graphing mode. This chapter describes how
graph and trace specific functions, perform mathematical analyses, draw on graphs, and store
and recall graphs and drawings. You can use most graph tools in all four graphing modes.
, and
FORMT
to
This is the
Func
graphing mode. The
menu differs slightly
GRAPH
from graphing mode to
graphing mode.
GRAPH
menu in
The GRAPH Menu
6
y(x)= WIND ZOOM TRACE GRAPH
ZOOM
TRACE
MATH
DRAW
STGDB
RCGDB
EVAL
Displays the
Activates the trace cursor; use this cursor to trace along graphs of specific functions
Displays the
Displays the
Displays the
Displays the
Displays the
GRAPH ZOOM
GRAPH MATH
GRAPH DRAW
Name=
prompt and
Name=
prompt and
Eval x=
menu; use these items to apply preset graph screen dimensions
menu; use this menu to explore graphs mathematically
menu; use this menu to draw on graphs
prompt; use this prompt to enter an x value for which you want to
solve the current function
STPIC
RCPIC
Displays the
Displays the
Name=
Name=
prompt and
prompt and
MATH DRAW FORMT STGDB RCGDB
4
EVAL STPIC RCPIC
4
GDB
menu; use this prompt to enter a
GDB
menu; use this menu to recall a
PIC
menu; use this prompt to enter a
PIC
menu; use this menu to recall
PIC
GDB
GDB
variable
PIC
variable
variable
variable
 Loading...