

Page 1
Page 2

TABLE OF CONTENTS
CHAPTER 1: INSTALLING GIGASTUDIO 4..................................................................................................................5
Windows Operating Systems Compatibility ..............................................................................................................5
With Other Programs and Peripherals .........................................................................................................................6
Removing a Previous Installation of GigaStudio........................................................................................................8
Installing GigaStudio 4.....................................................................................................................................................9
Installing GigaStudio 4 Content.................................................................................................................................. 12
Getting Help .................................................................................................................................................................... 12
CHAPTER 2: USER INTERFACE BASICS...................................................................................................................13
Selecting MIDI Ports ..................................................................................................................................................... 13
Selecting Components with the Toolbar.................................................................................................................... 13
Changing Pane Heights: Splitter Bar..........................................................................................................................15
Changing Component (Window) Size ....................................................................................................................... 15
Floating and Docking Components ............................................................................................................................ 15
Other View Menu Options............................................................................................................................................ 18
Resetting User Interface Settings ................................................................................................................................. 21
Fader, Knob, and Slider Adjustments ......................................................................................................................... 21
CHAPTER 3: MIDI MIXER.............................................................................................................................................. 24
MIDI Basics...................................................................................................................................................................... 24
MIDI Mixer Parameters ................................................................................................................................................ 24
The MIDI Mixer: Loading, Unloading, Attaching, and Detaching Files ..............................................................26
Stack Properties .............................................................................................................................................................. 36
Channel Properties Window........................................................................................................................................ 40
CHAPTER4: QUICKSOUND EXPLORER ................................................................................................................... 44
Launching QuickSound.................................................................................................................................................. 45
Editing QuickSound Settings ....................................................................................................................................... 46
QuickSound ToolBar Buttons ...................................................................................................................................... 60
Convert Instruments to Giga4 ..................................................................................................................................... 61
CHAPTER 5: LOADED INSTRUMENTS VIEW......................................................................................................... 62
Showing and Hiding the Loaded Instruments View ................................................................................................62
Loaded Instruments View Information ...................................................................................................................... 63
Loading Instruments into the MIDI Mixer Via Drag-and-Drop .......................................................................... 63
Loaded Instruments View Context Menu.................................................................................................................. 63
Bank/Patch Assignment Window ............................................................................................................................... 64
CHAPTER 6: THE VIRTUAL KEYBOARD .................................................................................................................66
Apply ing the Virtual Keyboard ................................................................................................................................... 66
Showing and Hiding the Virtual Keyboard............................................................................................................... 66
Color Coding .................................................................................................................................................................. 67
Virtual Keyboard Range and Size Buttons................................................................................................................. 67
Resizing the Virtual Keyboard When Floating......................................................................................................... 68
Velocity Sensitiv ity Controls ...................................................................................................................................... 68
Master Tuning Control .................................................................................................................................................69
CHAPTER 7: QUICKEDIT............................................................................................................................................... 70
Opening QuickEdit......................................................................................................................................................... 70
QuickEdit Architecture ................................................................................................................................................. 71
The Keyboard Section.................................................................................................................................................... 72
Dimensions Overview ................................................................................................................................................... 76
Wave Display .................................................................................................................................................................. 79
Articulation Section: General Tab...............................................................................................................................81
Articulation Section: Amplitude/Pitch Tab............................................................................................................... 87
Page 3

Articulation Section: Filter Tab ................................................................................................................................... 95
MIDI Control Section.................................................................................................................................................... 96
Filter Envelope Section................................................................................................................................................100
Articulation Section: Dyn Expression Tab..............................................................................................................105
Articulation Section: Loop Tab ..................................................................................................................................109
CHAPTER 8: DSP STATION ......................................................................................................................................... 113
DSP Station Tabs ..........................................................................................................................................................113
Input Tab.........................................................................................................................................................................113
Aux Send Controls .......................................................................................................................................................124
Dynamics Processor ....................................................................................................................................................127
Equalizer.........................................................................................................................................................................131
Aux Returns Tab ...........................................................................................................................................................138
Groups Tab..................................................................................................................................................................... 139
Output Masters Tab......................................................................................................................................................140
CHAPTER 9: NFX PLUG-INS .......................................................................................................................................142
NFX Common Attributes ........................................................................................................................................... 142
NFX-1 Reverb Parameters .......................................................................................................................................... 147
NFX-2 Chorus Parameters .........................................................................................................................................148
NFX-3 Delay Parameters ............................................................................................................................................149
NFX-4 EQ Contour Parameters................................................................................................................................150
CHAPTER 10: GIGAPULSE........................................................................................................................................... 151
Title Bar .......................................................................................................................................................................... 151
Acoustic Space...............................................................................................................................................................152
Placement Selection......................................................................................................................................................155
Input Levels .................................................................................................................................................................... 157
Mic Masters ...................................................................................................................................................................157
Front, Wide, and Surround Mic Groups..................................................................................................................158
Microphone Replacement............................................................................................................................................ 159
Tail Model ......................................................................................................................................................................161
Mic to Mixer Routing ..................................................................................................................................................162
Importing Stereo WAVE Files into GigaPulse ...................................................................................................... 163
CHAPTER 11: MIDI CONTROL................................................................................................................................... 167
About MIDI Control ....................................................................................................................................................167
MIDI Mixer: Both Control & Controller ................................................................................................................167
DSP Station....................................................................................................................................................................168
NFX Plug-Ins ................................................................................................................................................................169
MIDI Control Parameters........................................................................................................................................... 169
CHAPTER 12: REWIRE ..................................................................................................................................................172
Configuring GigaStudio 4 for ReWire .................................................................................................................... 173
Configuring the Host Program for ReWiring with GigaStudio 4: Overview .................................................175
ReWiring GigaStudio 4 with Ableton Live 7.......................................................................................................... 178
ReWiring GigaStudio 4 with Sony Acid Pro 6.......................................................................................................179
ReWiring GigaStudio 4 with Steinberg Cubase 4 and Nuendo........................................................................... 181
ReWiring GigaStudio with Pro Tools LE 7.4......................................................................................................... 183
ReWiring GigaStudio 4 with Cakewalk Sonar 7.................................................................................................... 186
ReWiring GigaStudio 4 with Cakewalk Project5 .................................................................................................. 188
ReWiring GigaStudio 4 with Adobe Audition 3....................................................................................................189
CHAPTER 13: CONFIGURATION AND TROUBLESHOOTING........................................................................192
Giga Configuration Manager .....................................................................................................................................192
Synthesizer Settings .....................................................................................................................................................193
Mixer Engine................................................................................................................................................................. 196
Hardware........................................................................................................................................................................ 196
ReWire/Plugins ............................................................................................................................................................198
GigaPulse/Convolution ..............................................................................................................................................200
Page 4

Troubleshoot .................................................................................................................................................................201
GigaStudio Settings...................................................................................................................................................... 203
General PC Optimization............................................................................................................................................ 205
More Troubleshooting Tips....................................................................................................................................... 207
Deciphering the GigaStudio log files........................................................................................................................209
Page 5
CHAPTER 1: INSTALLING GIGASTUDIO 4
GigaStudio 4 can be extremely powerful; the more powerful your computer, the more you can take advantage
of GigaStudio 4’s features. Following is important information about optimizing and configuring your
computer for best results with digital audio production in general, and GigaStudio 4 in particular.
Windows Operating Systems Compatibility
GigaStudio 4 is compatible with Windows XP (Home or Professional Edition) running the Service Pack 2
patch (SP2), Vista 32-bit, and Vista-64 bit. GigaStudio 4 is not supported for systems running Windows XP
Media Center Edition, Windows 2000, Server 2000, 98, ME, NT, 95, or 3.1, nor under Apple’s Boot Camp
utility for the Macintosh. Although GigaStudio 4 may run under Windows 2000, XP Media Center Edition,
or Boot Camp, this is not approved by TASCAM and users do so at their own risk.
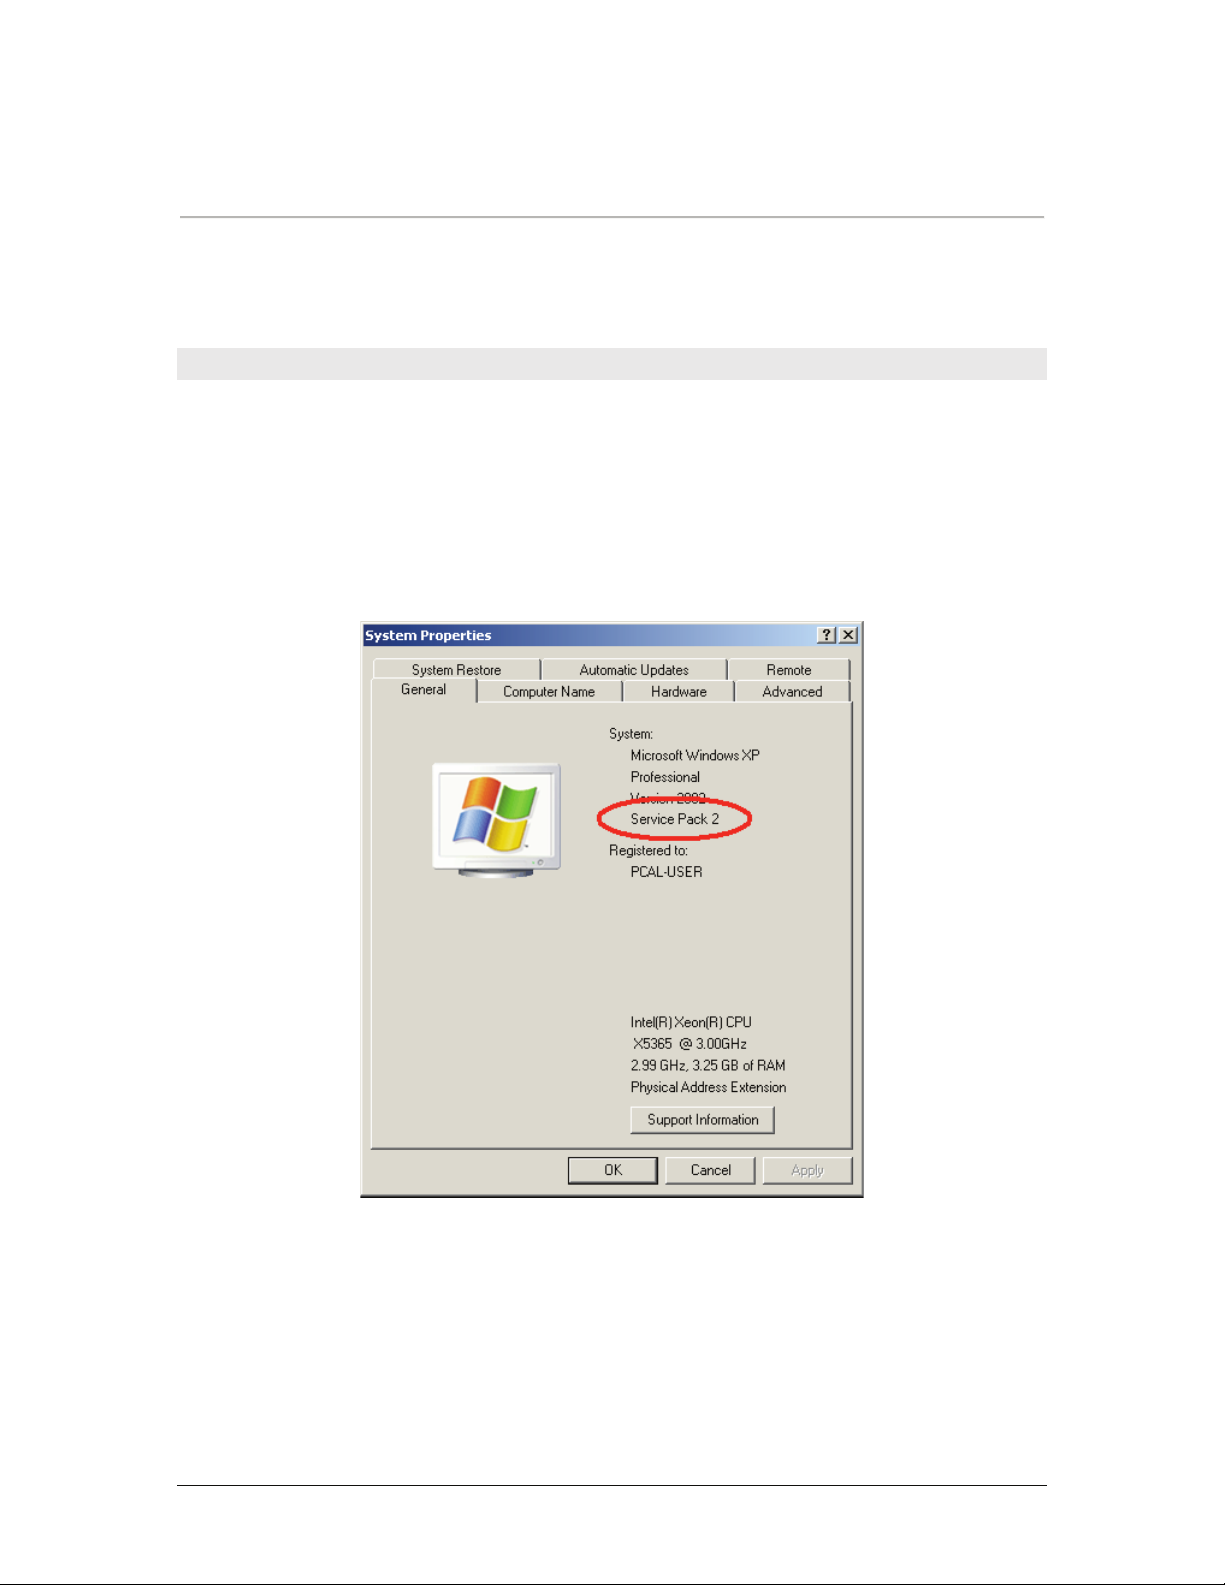
To find out if your version of XP is running Service Pack 2, right-click on the “My Computer” icon in the
Start Menu and select “Properties.” In the General section, it will read “Service Pack 2” below the listed operating system if SP2 is installed.
GigaStudio 4 Reference Manual 5
Page 6
With Other Programs and Peripherals
While GigaStudio 4 co-exists well with other programs, removing or disabling startup applications, system
utilities (e.g., Norton Utilities or McAfee), internal and external hardware devices (e.g., tape drives, scanners,
TV tuners, non-essential sound or MIDI drivers), and other non-essential elements may increase GigaStudio’s
performance. Remember—the more you demand of GigaStudio, the more GigaStudio will demand of your
system resources.
It’s also a good idea to use the latest drivers for various peripherals (graphics card, audio interfaces, etc.).
With HyperThreading
GigaStudio 4 is not compatible with HyperThreading techonology. However, it is not necessary to disable
this in the system BIOS.
A Word About Computers
The original GigaSampler was ahead of its time, and in some respects, had to wait for computer technology to
catch up. As a result, it required top-of-the-line computers. Thanks to modern technologies like dual core
processors and inexpensive RAM, even many of today’s less expensive computers can run GigaStudio 4.
However, the better your computer, the further you can push GigaStudio—for example, a really good
computer might make the difference between being able to run 16 and 128 instruments simultaneously.
For those seeking the ultimate level of performance, GigaStudio 4 can run on newer, 64-bit operating systems
like 64-bit Vista that let GigaStudio access virtually unlimited amounts of RAM. But it’s equally at home with
32-bit systems like Windows XP.
Disk Management
It’s best to have separate drives for your:
• OS and applications (C: drive)
• DAW data files
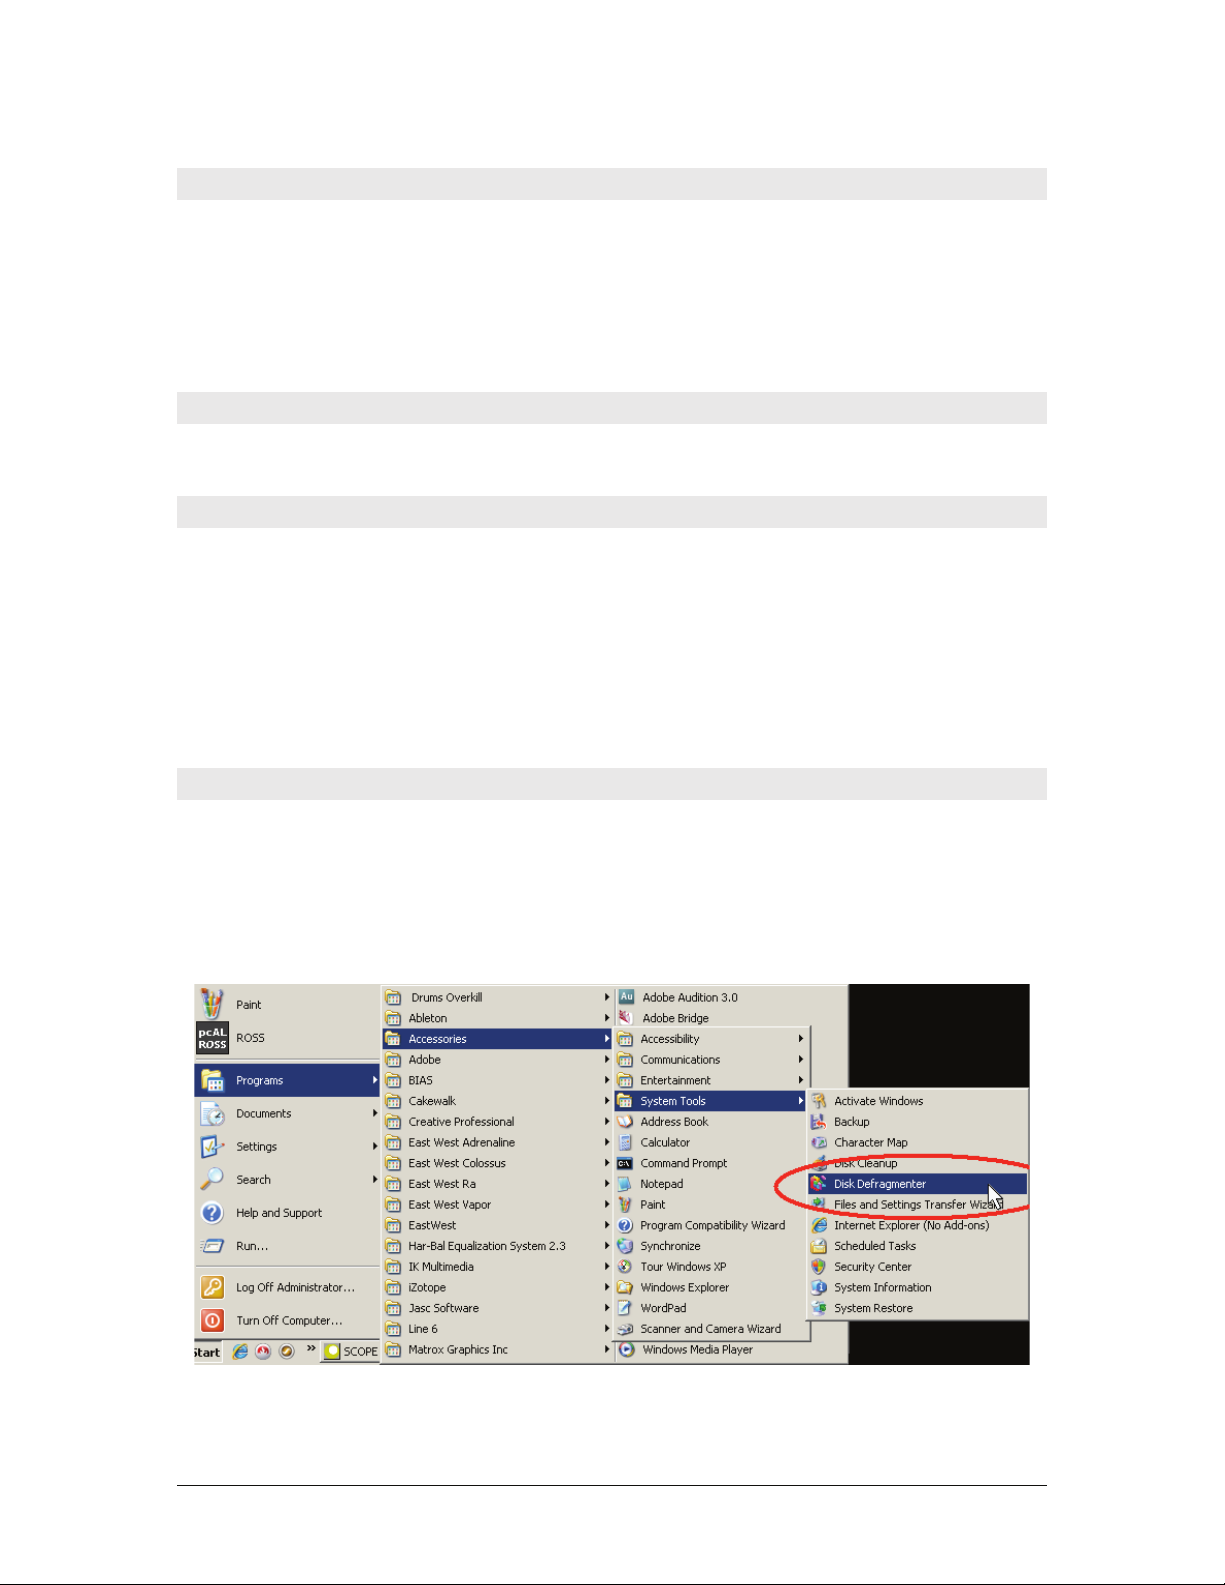
• GigaStudio 4 sound libraries. Defragment this drive often using the Windows Defragment
utility. (Start > Programs > Accessories > System Tools > Disk Defragmenter)
GigaStudio 4 Reference Manual 6
Page 7

As all these processes are hard disk-intensive, dividing the load over different drives allows for
more complex projects, with more stable operation. Creating a separate audio partition on the
same drive as your OS and programs is not satisfactory; this causes the OS drive to work even
harder, as it is simultaneously seeking application data in one partition and streaming audio data
from another. A dedicated drive for your content frees up both drives to separately access the
program data and the audio data.
If your motherboard has only two IDE or SATA connectors, you would normally connect the
system drive to the primary connector (IDE 1 or SATA 1) and the audio drive to the secondary
connector (IDE2 or SATA 2). Set each hard drive’s jumper to master (a diagram on the drive itself
will show where to place the jumper to select master mode). Configure your CD or DVD drive as
the slave device on IDE1 or SATA1, and make sure that it is sharing the system drive connection
ribbon cable and not the audio drive connection ribbon cable to which your dedicated audio drive
connects. This will insure uninterrupted data flow to and from the more critical audio drive. If
your motherboard has a separate IDE or SATA controller(s), your setup will be more flexible as
well as allowing for more physical drives.
The impulse content should ideally be placed on yet another separate drive from the .Gig content,
or on the system drive with the OS and programs.
Also, each IDE drive must have DMA enabled (System > Control Panel). To do this in Windows
XP:
1. Right-click My Computer, located on the Desktop or in the start menu, and choose Properties.
2. Select the Hardware tab.
3. Click the Device Manager button.
4. Double-click on the IDE ATA/ATAPI Controllers entry to expand it.
5. Locate and double-click the device for your IDE/ATA controller channel.
6. In the Properties dialog, click the Advanced Settings tab.
7. Under Transfer mode, select DMA if available, and click OK.
8. Repeat for any additional IDE/ATA drives.
GigaStudio 4 Reference Manual 7
Page 8
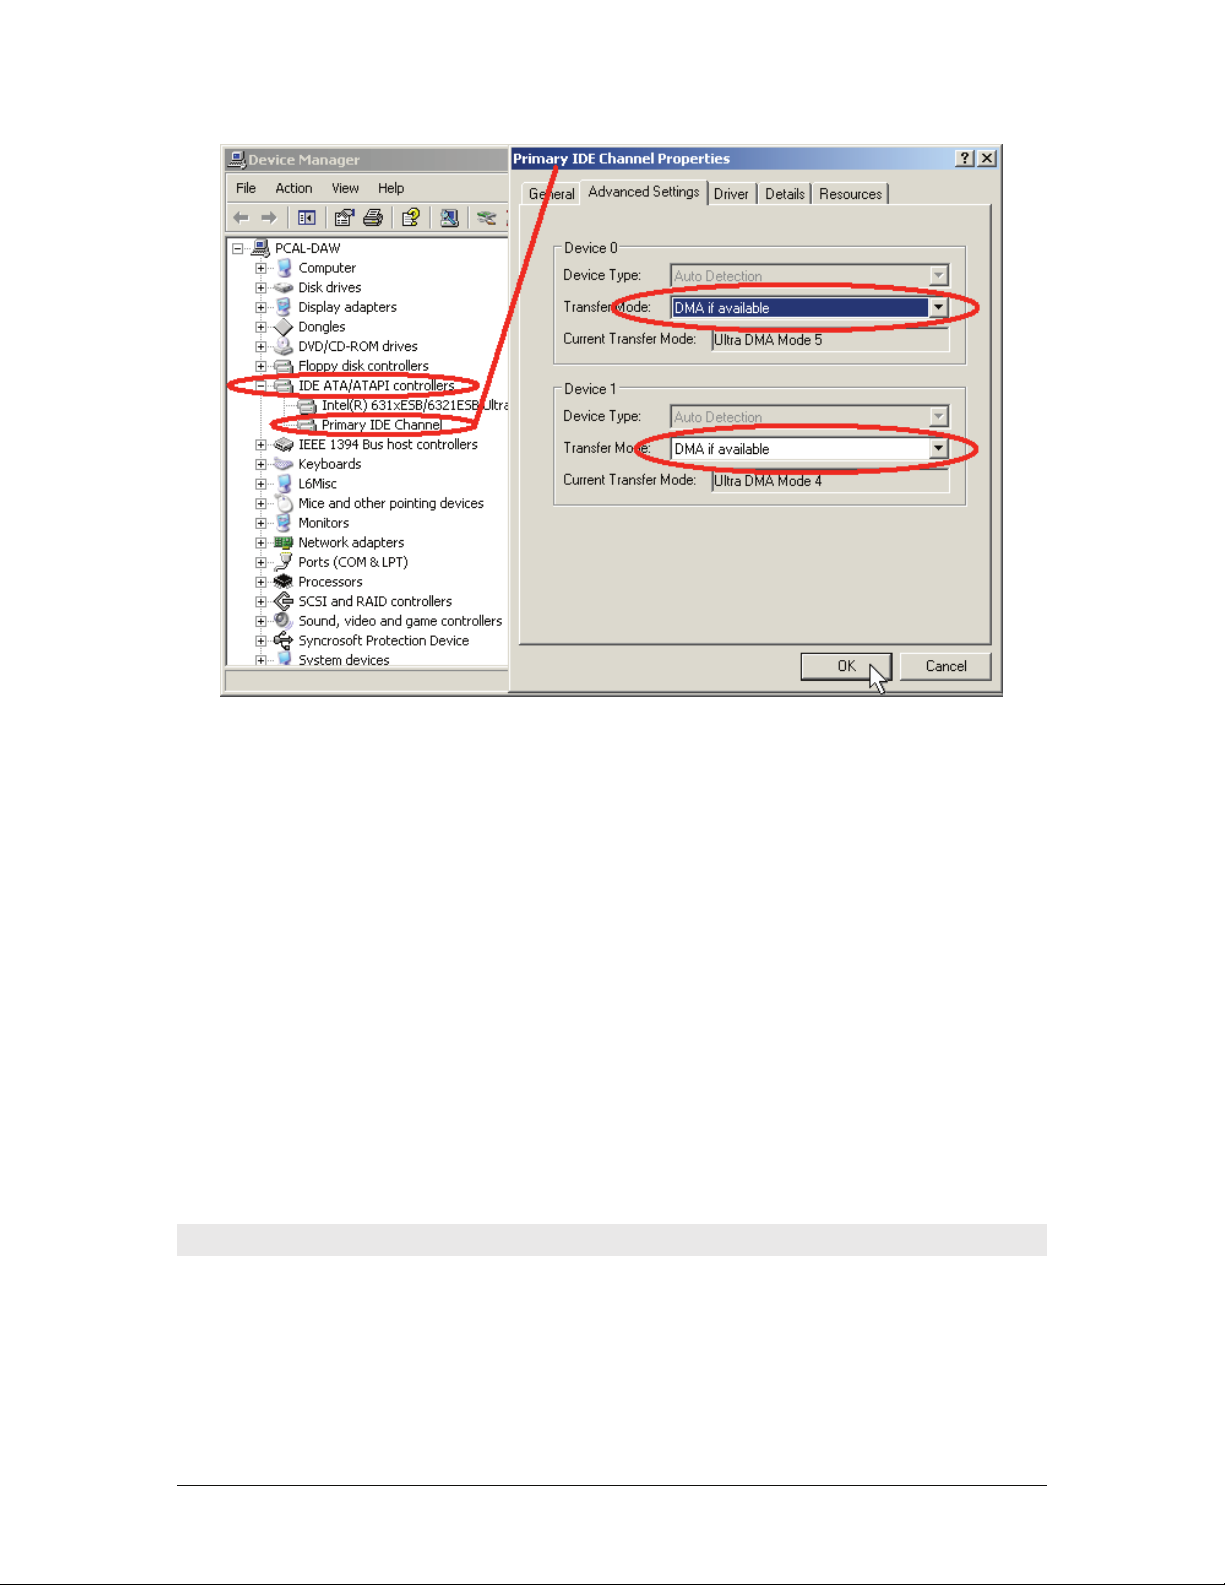
9. Click OK to close the Device Manager dialog.
10. Close the System Control Panel.
Once you have restarted, follow steps 1-6 above once again to make sure “DMA” is in fact still set to enabled.
If your computer is unable to keep this setting or your computer doesn’t allow enabling DMA, and you are
having problems running GigaStudio, you (or one of your technically -minded friends) may need to change a
setting in your system BIOS (Basic Input Output System).
To access your computer’s BIOS you must restart your computer. During the initial startup your computer
will tell you which key to press in order to enter the setup program. Typically, repeatedly pressing either the
[Delete] or [F2] key during the initial stages of the boot process will access the BIOS on most (but certainly not
all) motherboards. Refer to your motherboard manual for manufacturer specific BIOS commands. Press the
corresponding key during startup. You should see an “Entering Setup” message. If present, make this change
to your computer’s BIOS:
Allow PCI Bus Masters = Enabled
In addition to checking the BIOS if DMA is not available, you can also check in device manager under “Hard
disk controllers” and make sure that you have the IDE controller and not the ATA controller. If you have an
ATA controller, update the hard disk controller driver to “standard dual IDE controller.”
Removing a Previous Installation of GigaStudio
Before installing GigaStudio 4, you will need to remove any previous version of GigaStudio from your
computer. If you attempt to install GigaStudio 4 without removing a previous version, you’ll see a screen that
tells you a previous version of GigaStudio 4 is installed, and will be removed.
However, you may have performance (.GSP), articulation (.ART), and/or instrument (.GIG) files saved in the
same directory as you GigaStudio installation. Any .GSP, .ART, or .GIG files that show up under either of
GigaStudio 4 Reference Manual 8
Page 9

the directories C:\Program Files\Nemesys or C:\Program Files\Tascam will be removed during the
uninstall process and you will lose all of the data in those directories.
Be sure that you back up any performance files (.GSP), articulation files (.ART), and instruments
(.GIG) before proceeding with the uninstall. You will still be able to use any of these with GigaStudio 4.
Check for these file types visually with the Windows file explorer, or using the Windows search tool.
To uninstall your previous GigaStudio installation:
1. Click the Windows Start button.
2. Go to the Control Panel item on your Start Menu. Double-click the Add or Remove Programs option
in the list.
3. In the installed programs list, locate and click on the Tascam GigaStudio item.
4. Click the Change/Remove button to remove the previous version of GigaStudio.
Windows will ask you if you want to continue with the removal of the previous version of GigaStudio. When
the removal process is complete, you will be prompted to restart the computer. At this point you may want to
save any open files and close any open programs. If you just want to keep working and install GigaStudio 4
later, you can choose not to restart at this time.
Once the computer has restarted, you have successfully uninstalled your previous version of GigaStudio.
Installing GigaStudio 4
1. Insert the GigaStudio 4 Installation disc in your computer’s drive; allow it to spin up and be recognized.
2. When the “splash” screen appears, click on Install GS4. (If this screen does not appear, navigate to your
CD drive, right-click on it and select Open, then double-click on the Giga4_Install.exe fi le.)
3. If you are prompted to remove a previous version of GigaStudio, refer to the preceding section on
Removing a Previous Version of GigaStudio. It is not possible to proceed any further until you have
successfully removed your existing version of GigaStudio. Otherwise, continue.
GigaStudio 4 Reference Manual 9
Page 10
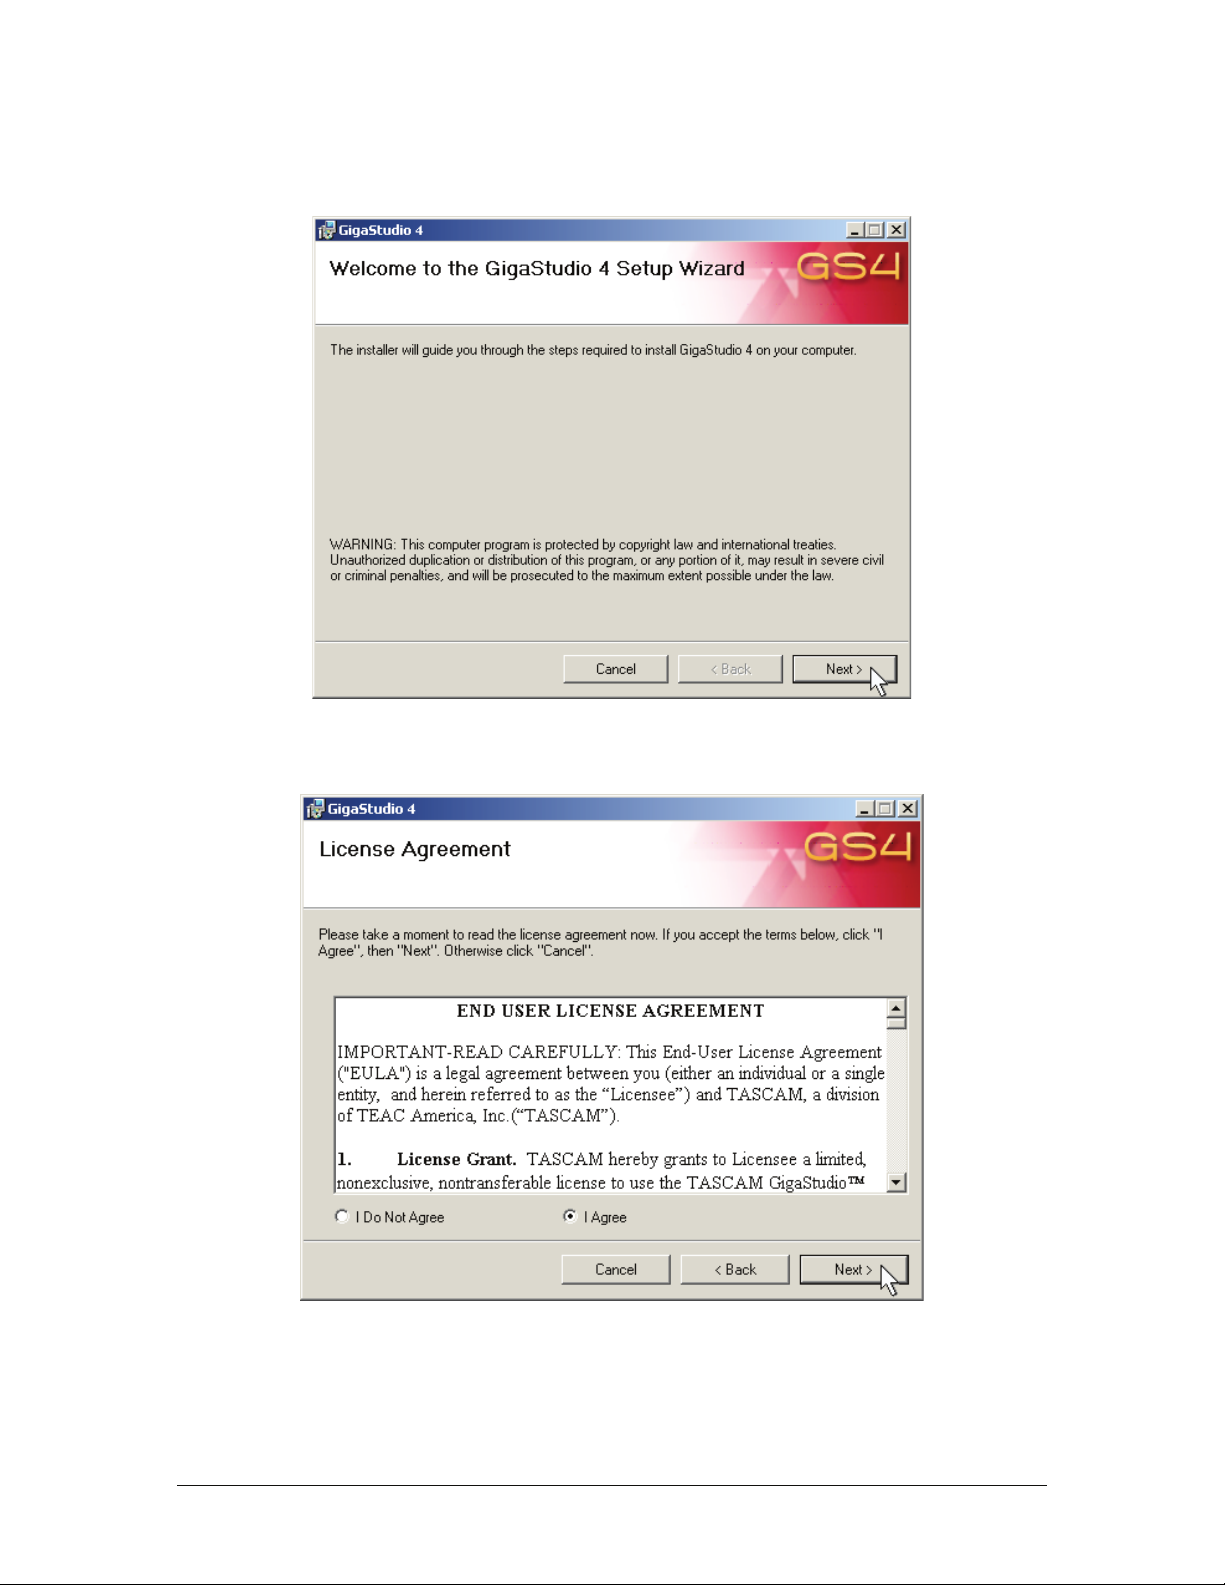
4. The GigaStudio 4 Setup Wizard screen appears. After reading the Warning, click on Next to continue.
5. Look over the license agreement, which is a legally binding contract between you and TASCAM. If you
agree to the terms, click on “I Agree” then click on the Next button. Otherwise, click on Cancel.
6. The Select Installation Folder screen appears. Here you can choose whether to install GigaStudio 4 for
all users (Everyone) or just yourself. Unless you have a compelling reason not to install GigaStudio on
your C: drive under Program Files, TASCAM highly recommends that you retain the defaults.
Otherwise, you can click on Browse and navigate to a different drive.
GigaStudio 4 Reference Manual 10
Page 11
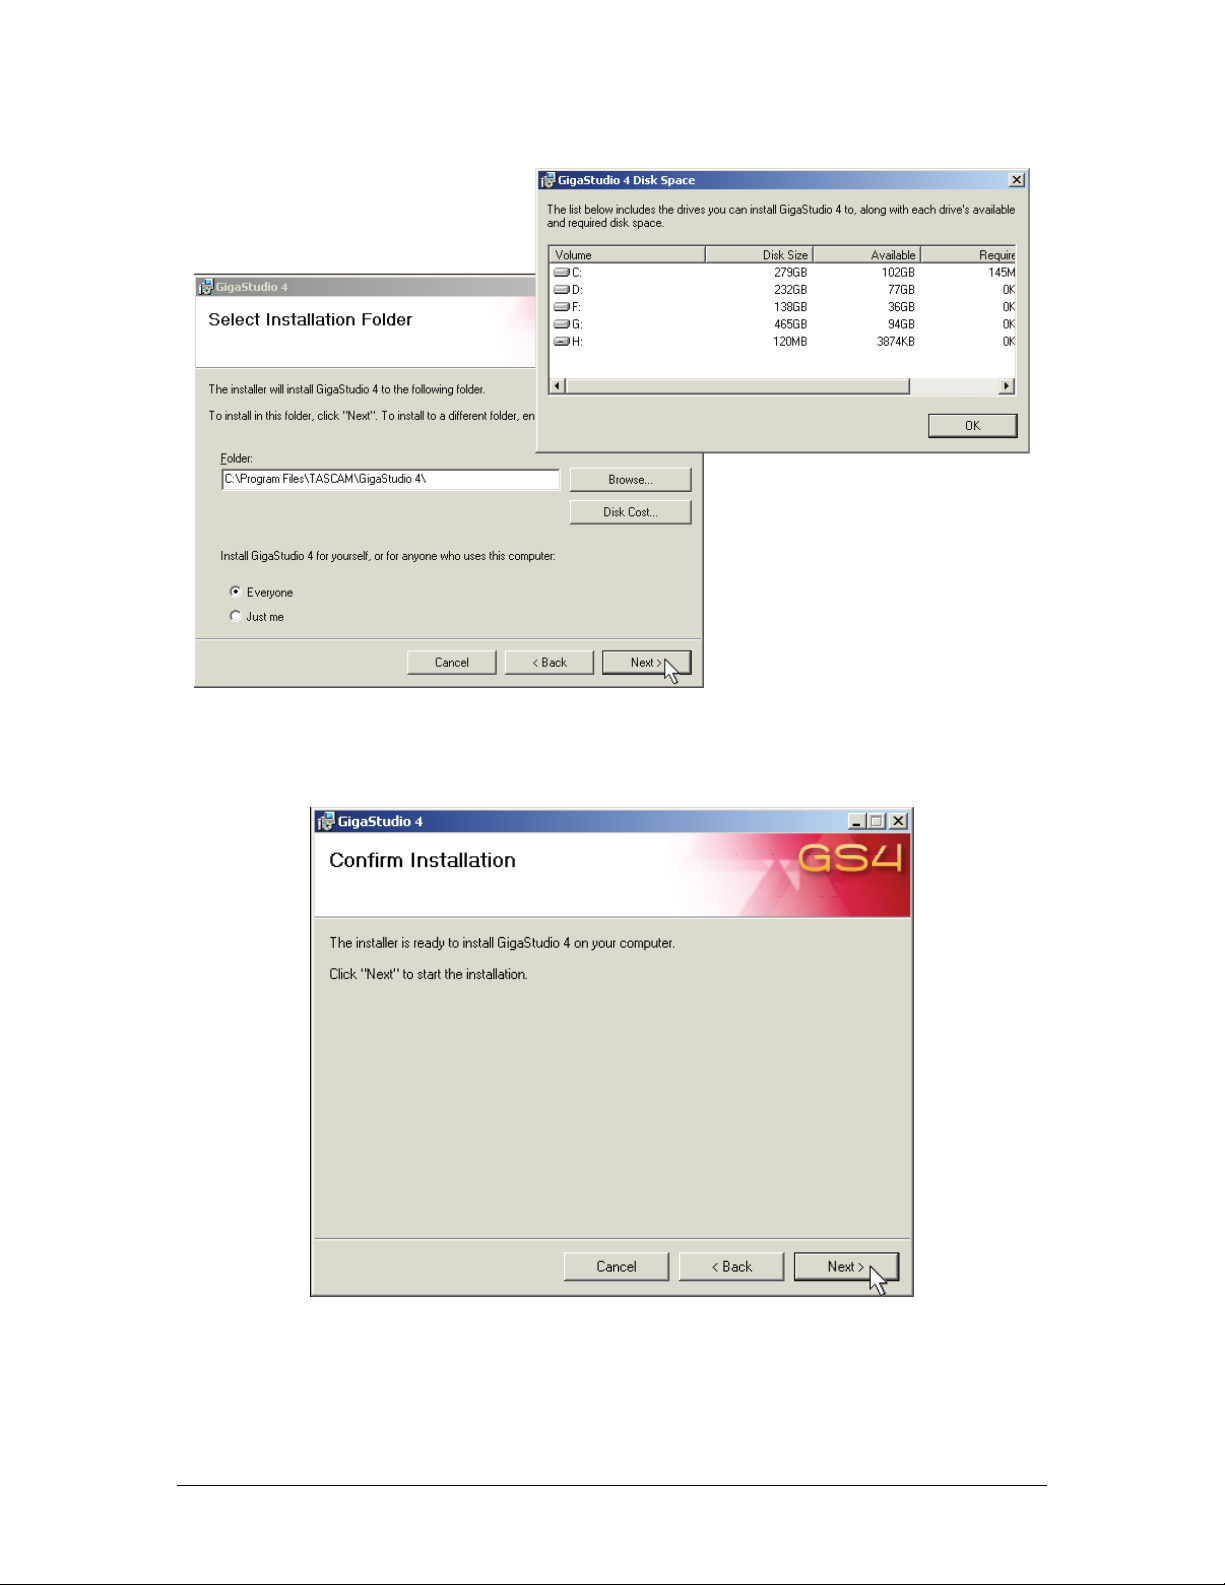
7. The Confirm Installation screen appears. Click on Next to start the installation process, or Back if you
entered information incorrectly and want to re-enter it. After clicking on Next, a progress bar appears
to inform you of the overall progress.
8. After a successful installation, the Installation Complete screen appears. If this screen does not appear,
the two most likely causes are that your system does not meet the minimum requirements, or that you
have tried to install GigaStudio 4 into a drive that lacks sufficient space. Correct the source of the
GigaStudio 4 Reference Manual 11
Page 12
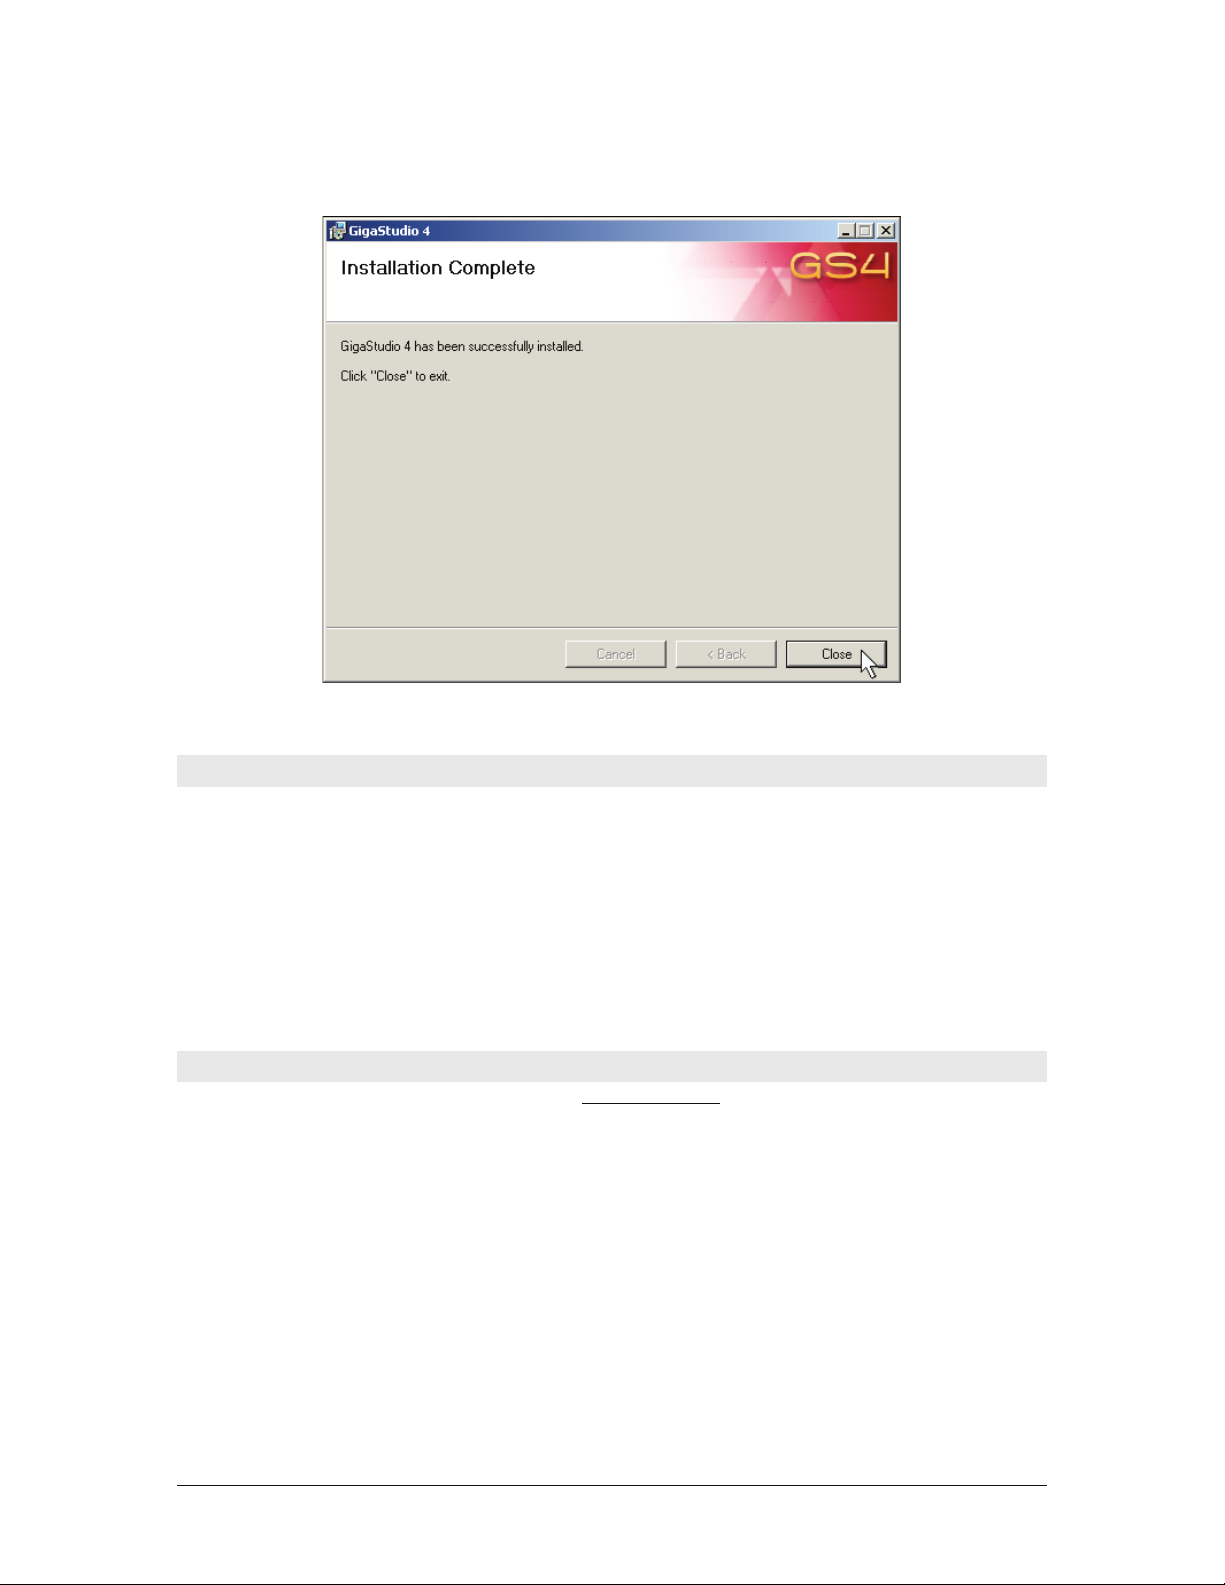
problem, reboot your computer, then start the installation process over. Otherwise, click on Close. The
main GigaStudio 4 program is now installed.
9. Restart your computer before attempting to use GigaStudio 4.
Installing GigaStudio 4 Content
The content provided with GigaStudio 4 can be installed now or later. To install all or part of the content now,
double-click on the content you want to install, and follow the instructions to assign the drive and folder
location for the content to be installed.
• The folder destination option for factory instruments is [drive letter]:\Tascam\Gigs.
The folder destination option for factory impulses is [drive letter]:\Tascam\Gpulse\Common.
• When you run GigaStudio for the first time, you will need to make some settings and specify some user
information. Also, see the GigaStudio Configuration Manager section for details on matching
GigaStudio with the sound and MIDI hardware installed on your system.
Getting Help
The first place to check is the TASCAM web site at www.tascam.com. GigaStudio 4 receives periodic updates
to improve performance, and you should check for these first. Also, updates to this manual, as well as
tutorials, are posted there, as well as all information regarding how to contact tech support.
GigaStudio 4 Reference Manual 12
Page 13
CHAPTER 2: USER INTERFACE BASICS
The user interface has many user-definable features that let you customize GigaStudio 4’s look and feel for the
way you like to work. As with any set of tools, as your experience increases you’ll be able to refine
GigaStudio’s look and feel to best fit your working style.
GigaStudio consists of many components that can be resized, selected, hidden, and further configured and
manipulated in multiple ways.
Selecting MIDI Ports
At the bottom of the MIDI Mixer Port window are tabs for each of the eight available MIDI Ports. (Note: Your
MIDI interface hardware may not support eight independent ports.) Each port allows up to 16 MIDI channels
of instruments, and you can stack up to 128 instruments per channel. So, with a sufficiently powerful
computer, it’s theoretically possible to have 16,384 instruments loaded simultaneously.
Click on a port’s tab to view the 16 MIDI channels of the selected MIDI Port. Or, use the keystroke Alt + n
where n is the number of a MIDI Port. Example: Alt + 3 selects the Port 3 view and brings its 16-channel
display to the front. (For a complete list of keystroke shortcuts, see the Keystroke Appendix.)
Selecting Components with the Toolbar
The toolbar selects various views and functions; clicking on a button calls up a particular function. When you
hold your mouse cursor over a button, a tooltip text tells you the button’s function. From left to right, these
buttons are:
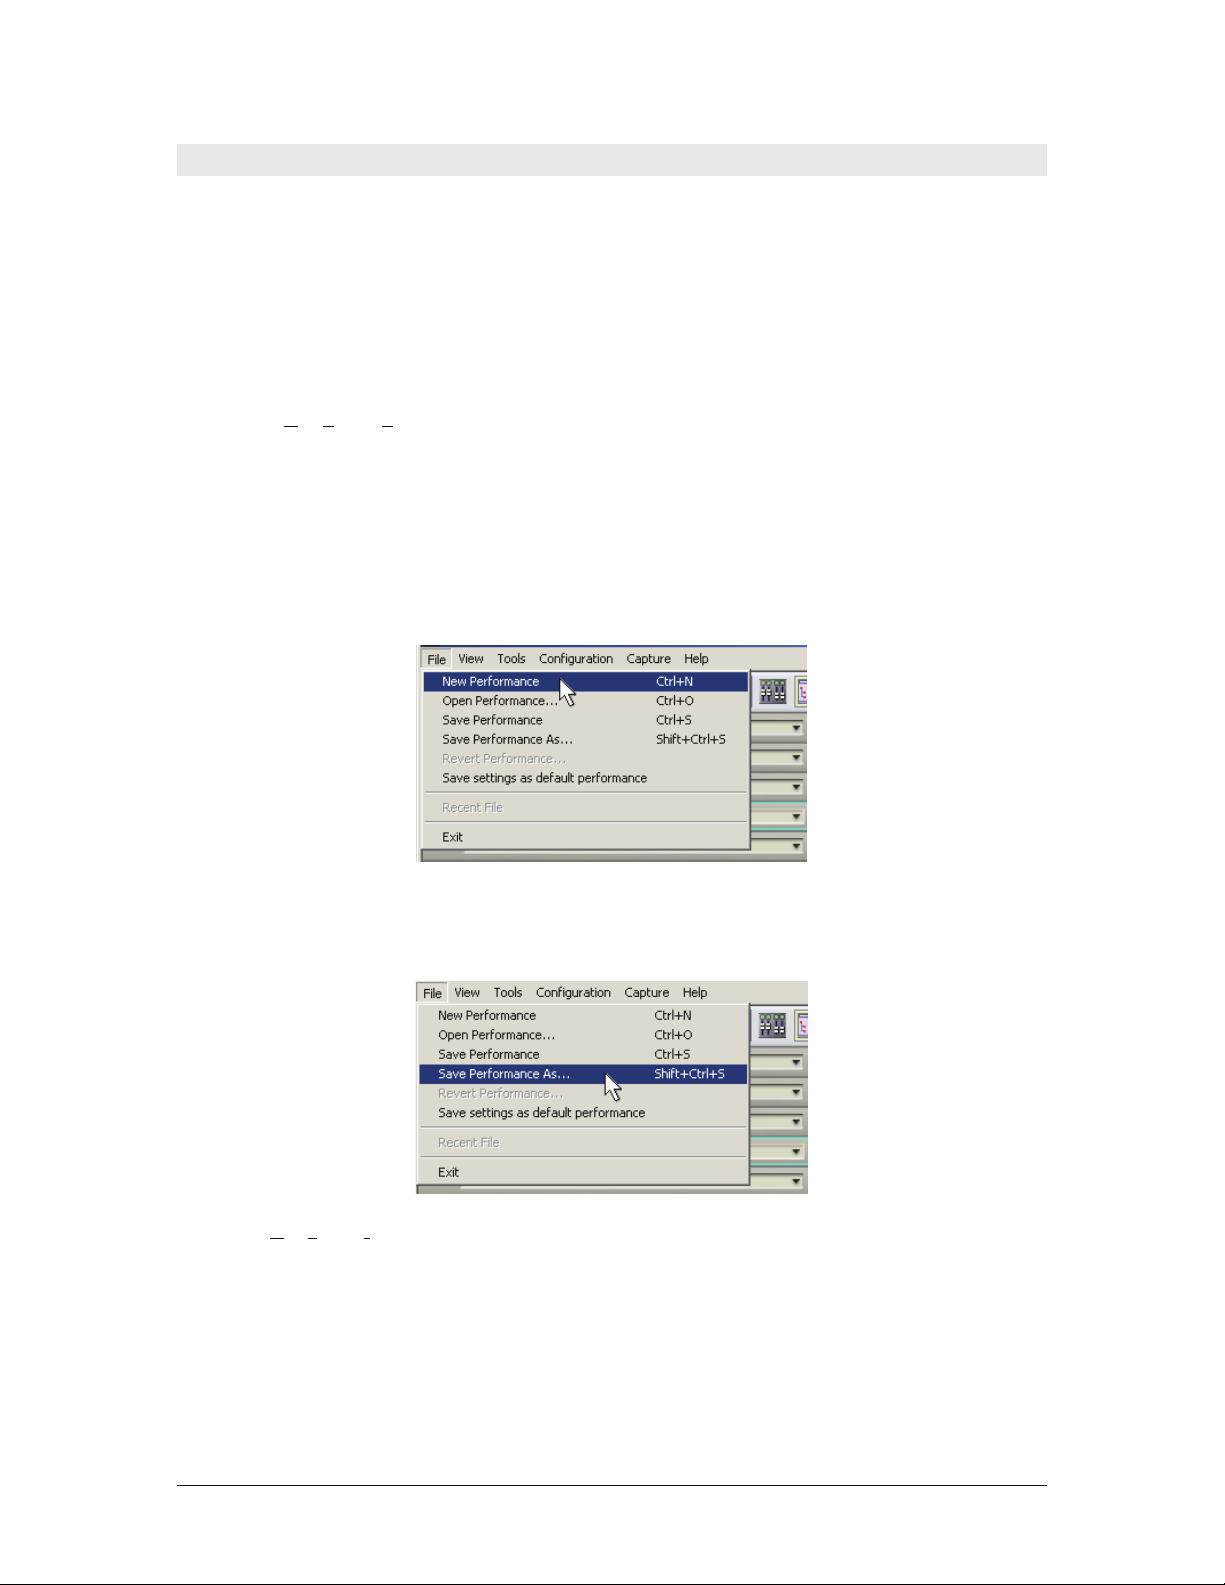
New Performance: Creates a new GigaStudio 4 performance (alternate: Go File menu > New Performance or
type Ctrl-N)
Open Performance: Opens a browser to find a GigaStudio 4 performance (alternate: Go File menu > Open
Performance or type Ctrl-O).
Save Performance: Save the current GigaStudio 4 performance (alternate: Go File menu > Save Performance
or type Ctrl-S).
Launch Giga Editor: Opens GigaStudio 4’s Instrument Editor.
Launch Sequencer: Opens the sequencer program specified when configuring GigaStudio 4.
Launch Wave Editor: Opens the wave editing program specified when configuring GigaStudio 4.
GigaStudio 4 Reference Manual 13
Page 14
Launch QuickSound: Opens the QuickSound Explorer database for finding files easily (alternate: Go Tools
menu > Launch QuickSound Explorer or hit the F10 function key on your computer’s keyboard).
Show/hide MIDI Mixer: Toggles between showing and hiding the MIDI Mixer window (alternate: Go View
menu > MIDI Mixer or type Ctrl-M).
Show/hide DSP Station: Toggles between showing and hiding the DSP Station window (alternate: Go View
menu > DSP Station or type Ctrl-D).
Show/hide Loaded Instruments: Toggles between showing and hiding the Loaded Instruments window
(alternate: Go View menu > Loaded Instruments or type Ctrl-L).
Show/hide Virtual Keyboard: Toggles between showing and hiding the Virtual Keyboard window (alternate:
Go View menu > Keyboard or type Ctrl-K).
Start Audio Capture: Click to capture GigaStudio’s master output channels to disk. (Note: This is not
available in ReWire mode, described later).
Stop Audio Capture: Click to stop audio capture.
Discard: Click to discard a complete or partial audio capture.
Capture tool status: Shows the status of the audio capture tool. This has no editable parameters.
Available hard disk space for recording: Shows the hard drive space available for recording. This has no
editable parameters.
Audio Engine on/off: When on, click on the red square to stop the engine. When off, click on the green arrow
to start the engine.
Reset: Reset GigaStudio 4 to a preferred state. The options are described later in this chapter.
GigaStudio 4 Reference Manual 14
Page 15
Changing Pane Heights: Splitter Bar
When several panes are viewable within the main GigaStudio 4, splitter bars appear between the windows.
When the cursor is over a splitter bar, it becomes an up/down arrow cursor. Click and drag to move the
splitter bar so that one pane increases in height while the other decreases.
Changing Component (Window) Size
According to standard Windows protocol, you can adjust a component’s overall size by placing the cursor
over any of its corners. When the cursor becomes a diagonal two-headed arrow, click and drag the component
to increase or decrease its size.
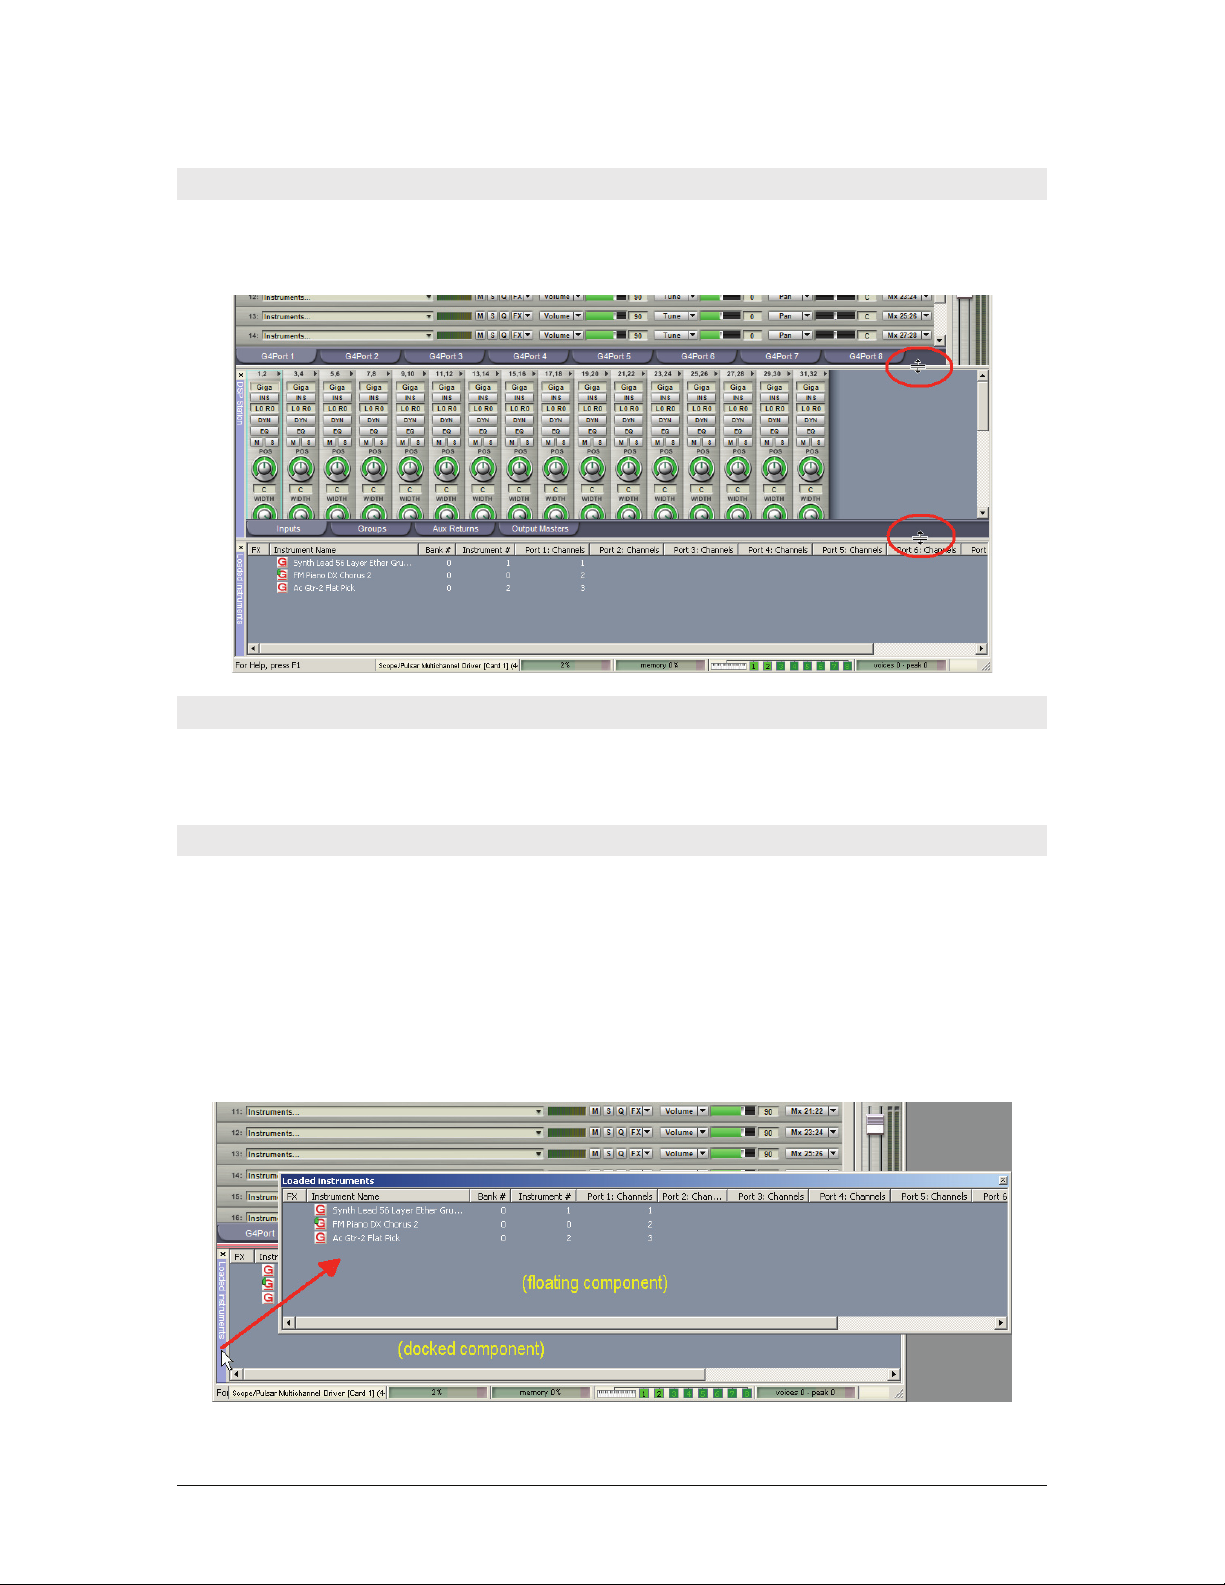
Floating and Docking Components
You can “float” or “dock” the Loaded Instruments list, Virtual Keyboard, and DSP Station components (the
QuickSound Explorer opens in its own window, so it is inherently floating). Docking places the component
within the main GigaStudio window. Floating allows removing the component from the window, which is
particularly handy with dual- and triple-monitor setups—for example, you might want to place the MIDI
Mixer in one monitor, and the DSP Station in another.
Floating Components
To float a component, click on its name label along the left-hand edge, and drag it away from where it is
docked. The component will now float above the rest of the user interface.
GigaStudio 4 Reference Manual 15
Page 16
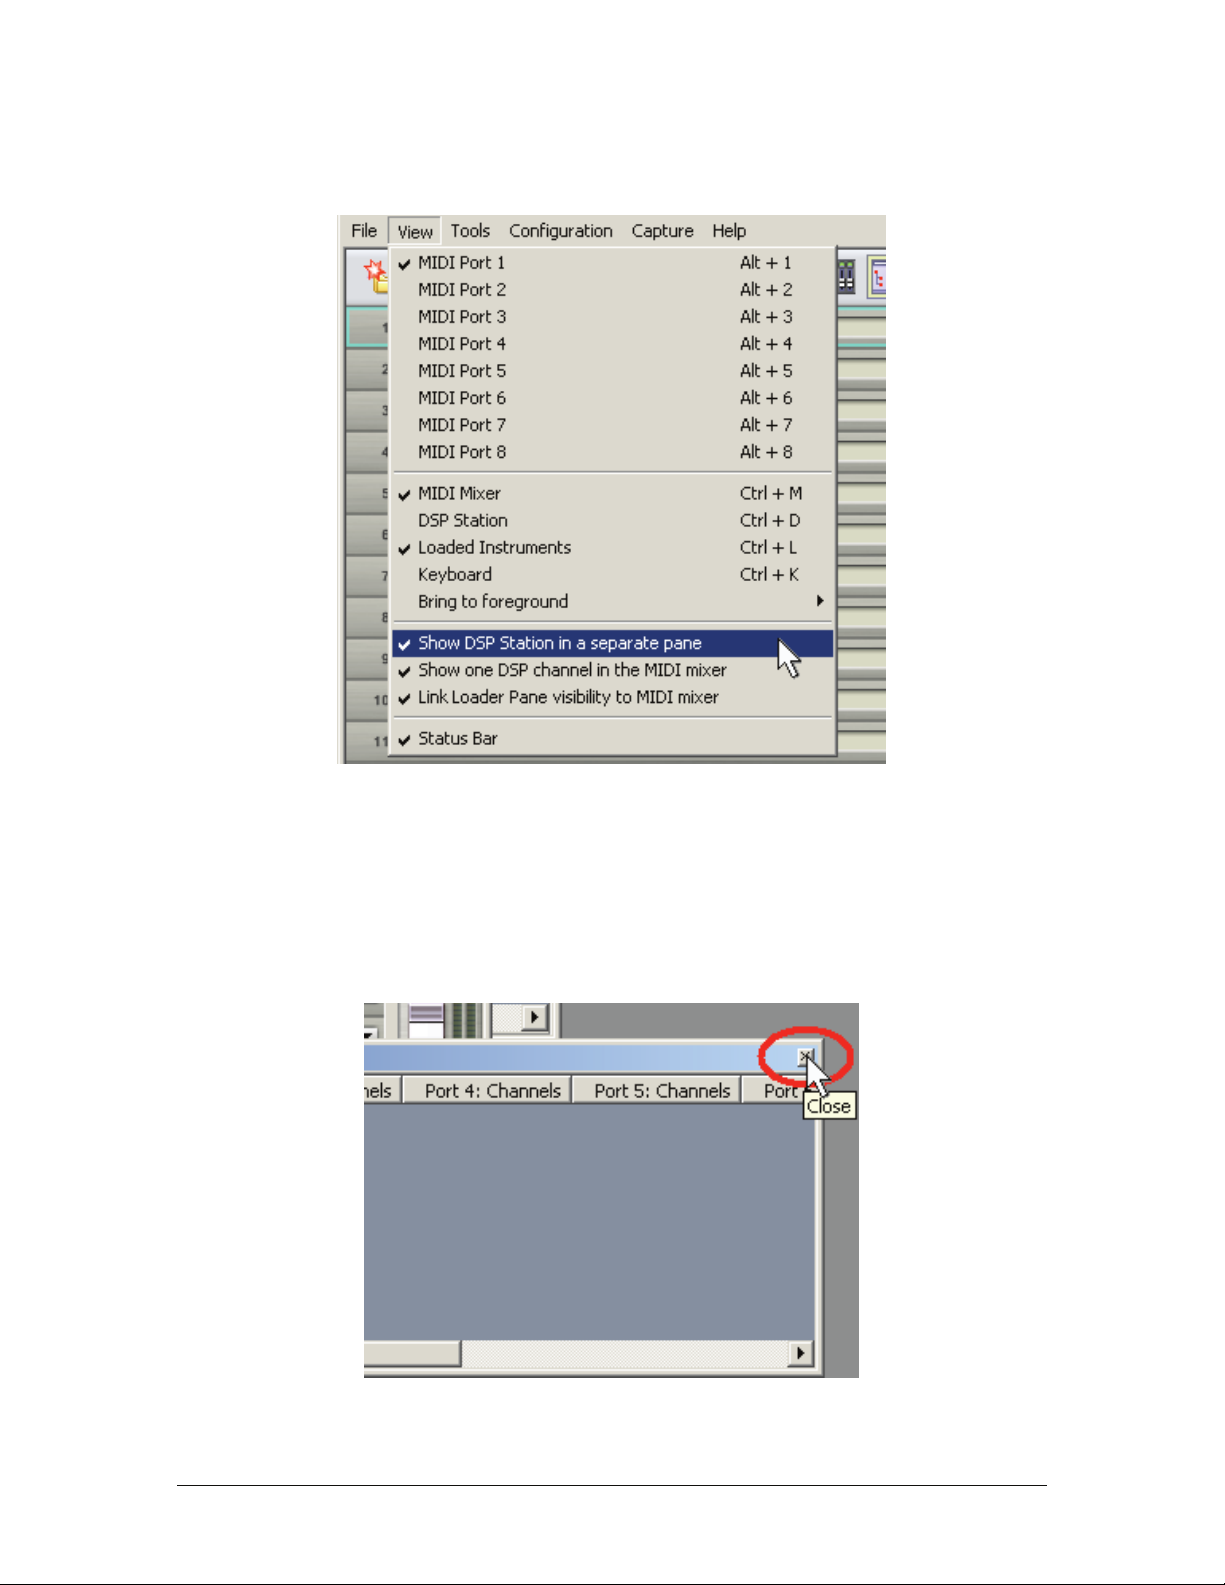
Note that to float the DSP Station, you must first select the View Menu option “Show DSP Station in a separate
pane.”
To move a floating object around the screen, grab its title bar and drag it with the mouse. When you find a
suitable place for the component, release the mouse and the object will stick in place until it is moved again or
hidden from view.
To hide a component and free up screen space, you have several options (remember, the component is only a
click away if you need to use it again).
If the component is f loating, click on the X (standard Windows close function) in the upper right corner.
GigaStudio 4 Reference Manual 16
Page 17
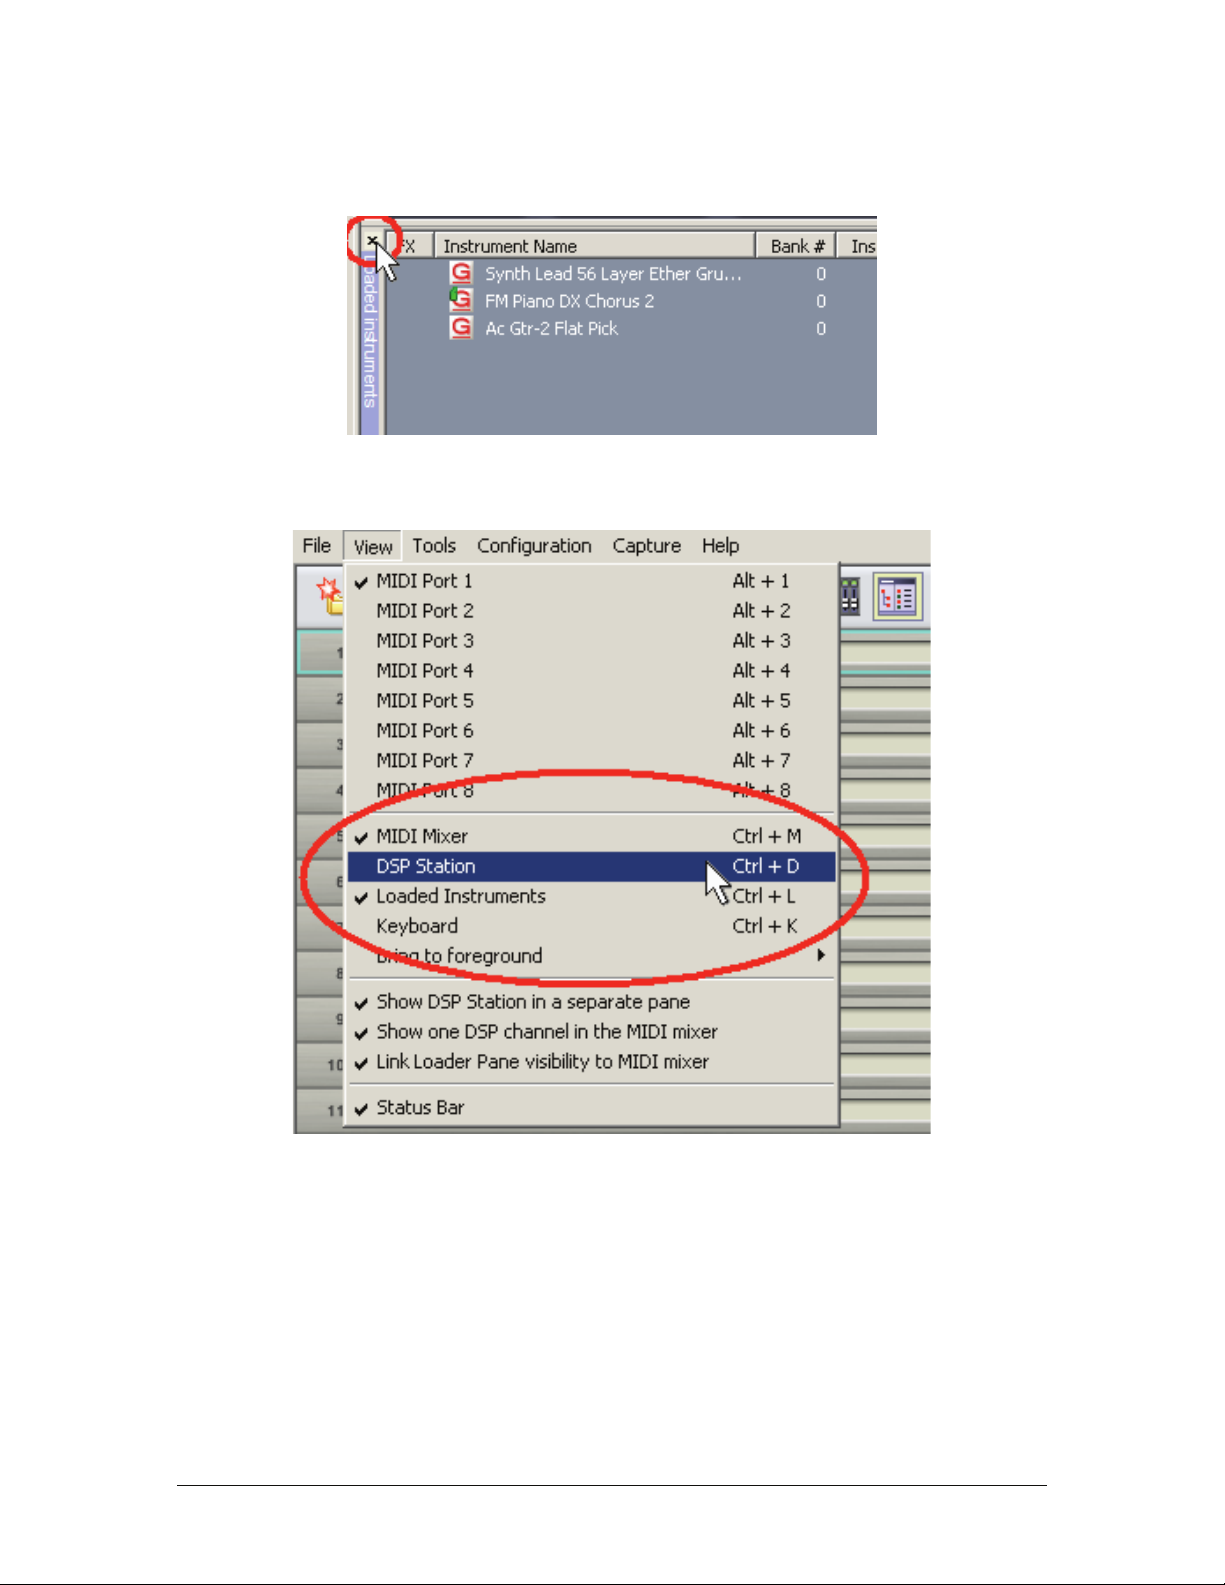
If the component is docked, click on the X in the upper left corner, above the name label, of the component you
want to hide.
In the View menu, you can check (show) or uncheck (hide) the MIDI Mixer, DSP Station, Loaded Inst ruments
Pane, and Keyboard Pane.
GigaStudio 4 Reference Manual 17
Page 18
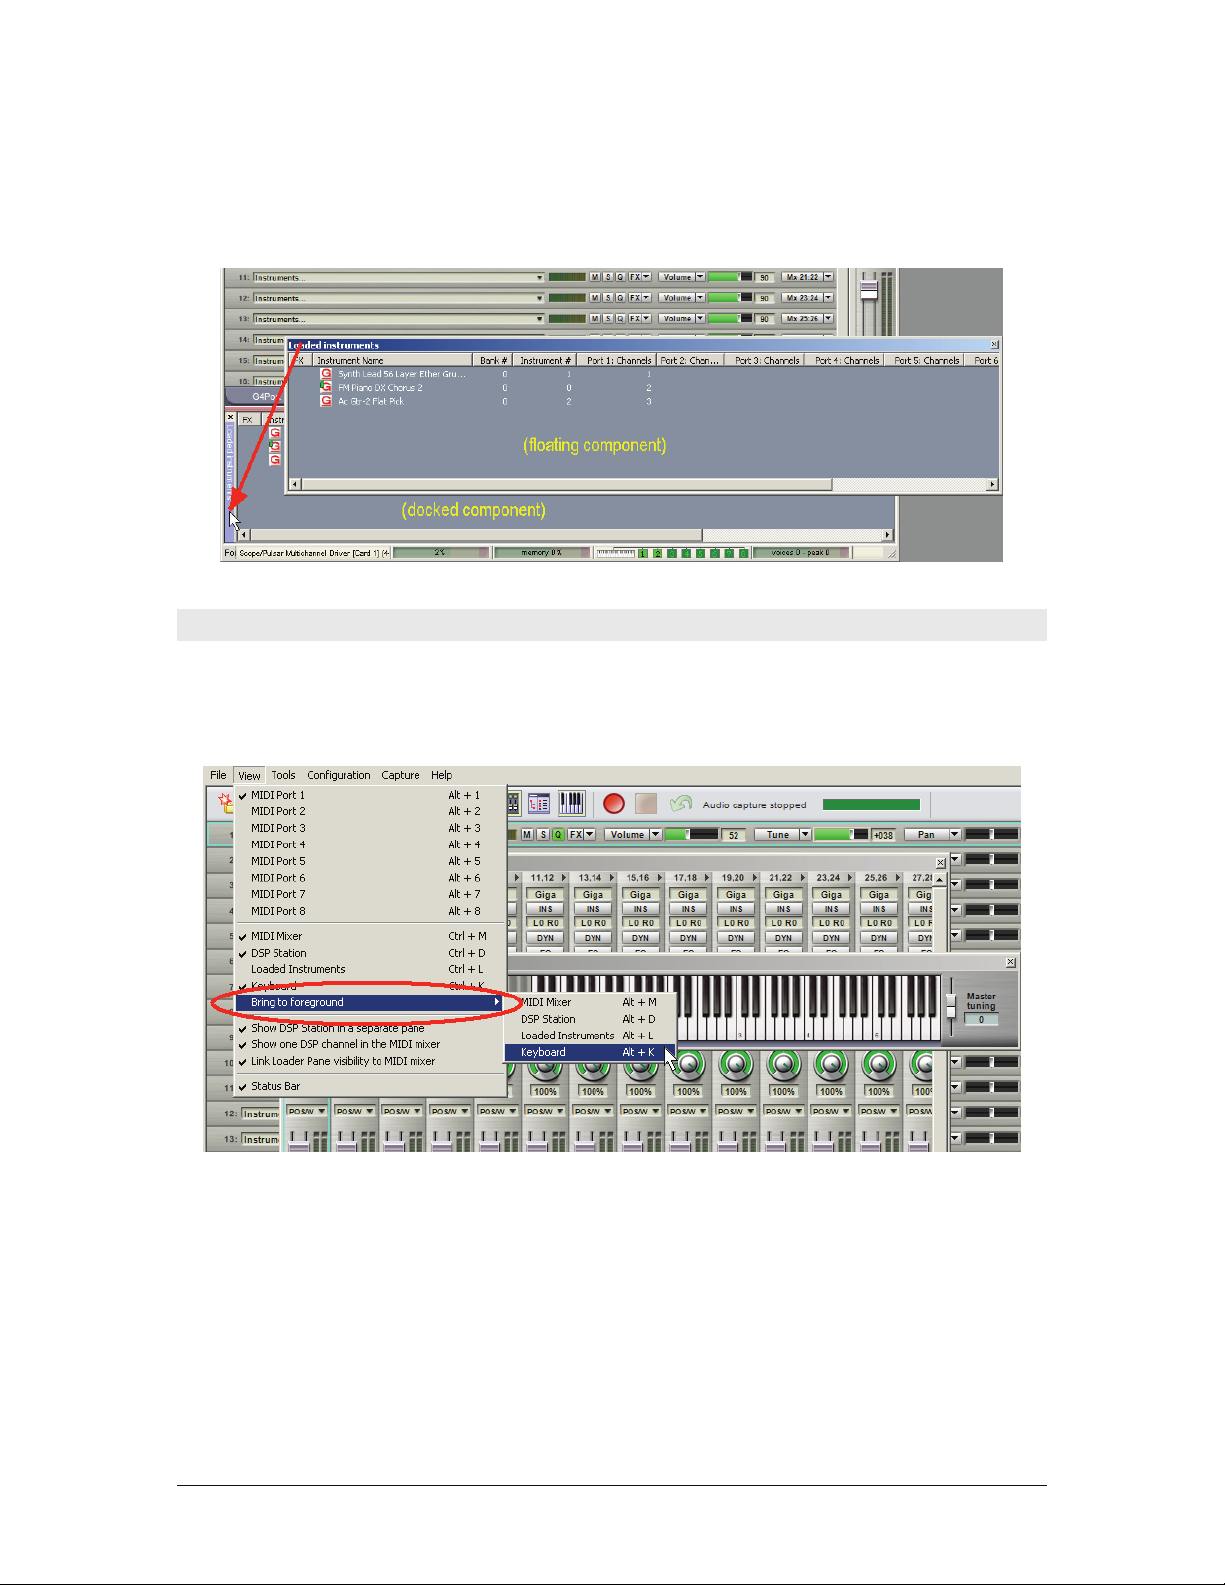
Docking Components
To dock a floating component, click on the title bar, and drag so that the left side of the component’s window
approaches the left side of the main GigaStudio window. Upon releasing the mouse, the component will dock
within GigaStudios’s main window.
Other View Menu Options
Bring to Foreground
This option allows selecting a particular window and bringing it to the front. For example, if the DSP Station
and Loaded Instruments components are floating on top of the Keyboard and you go Bring to Foreground >
Keyboard (or type the Alt – K shortcut), the Keyboard will jump to the top of the stack.
GigaStudio 4 Reference Manual 18
Page 19
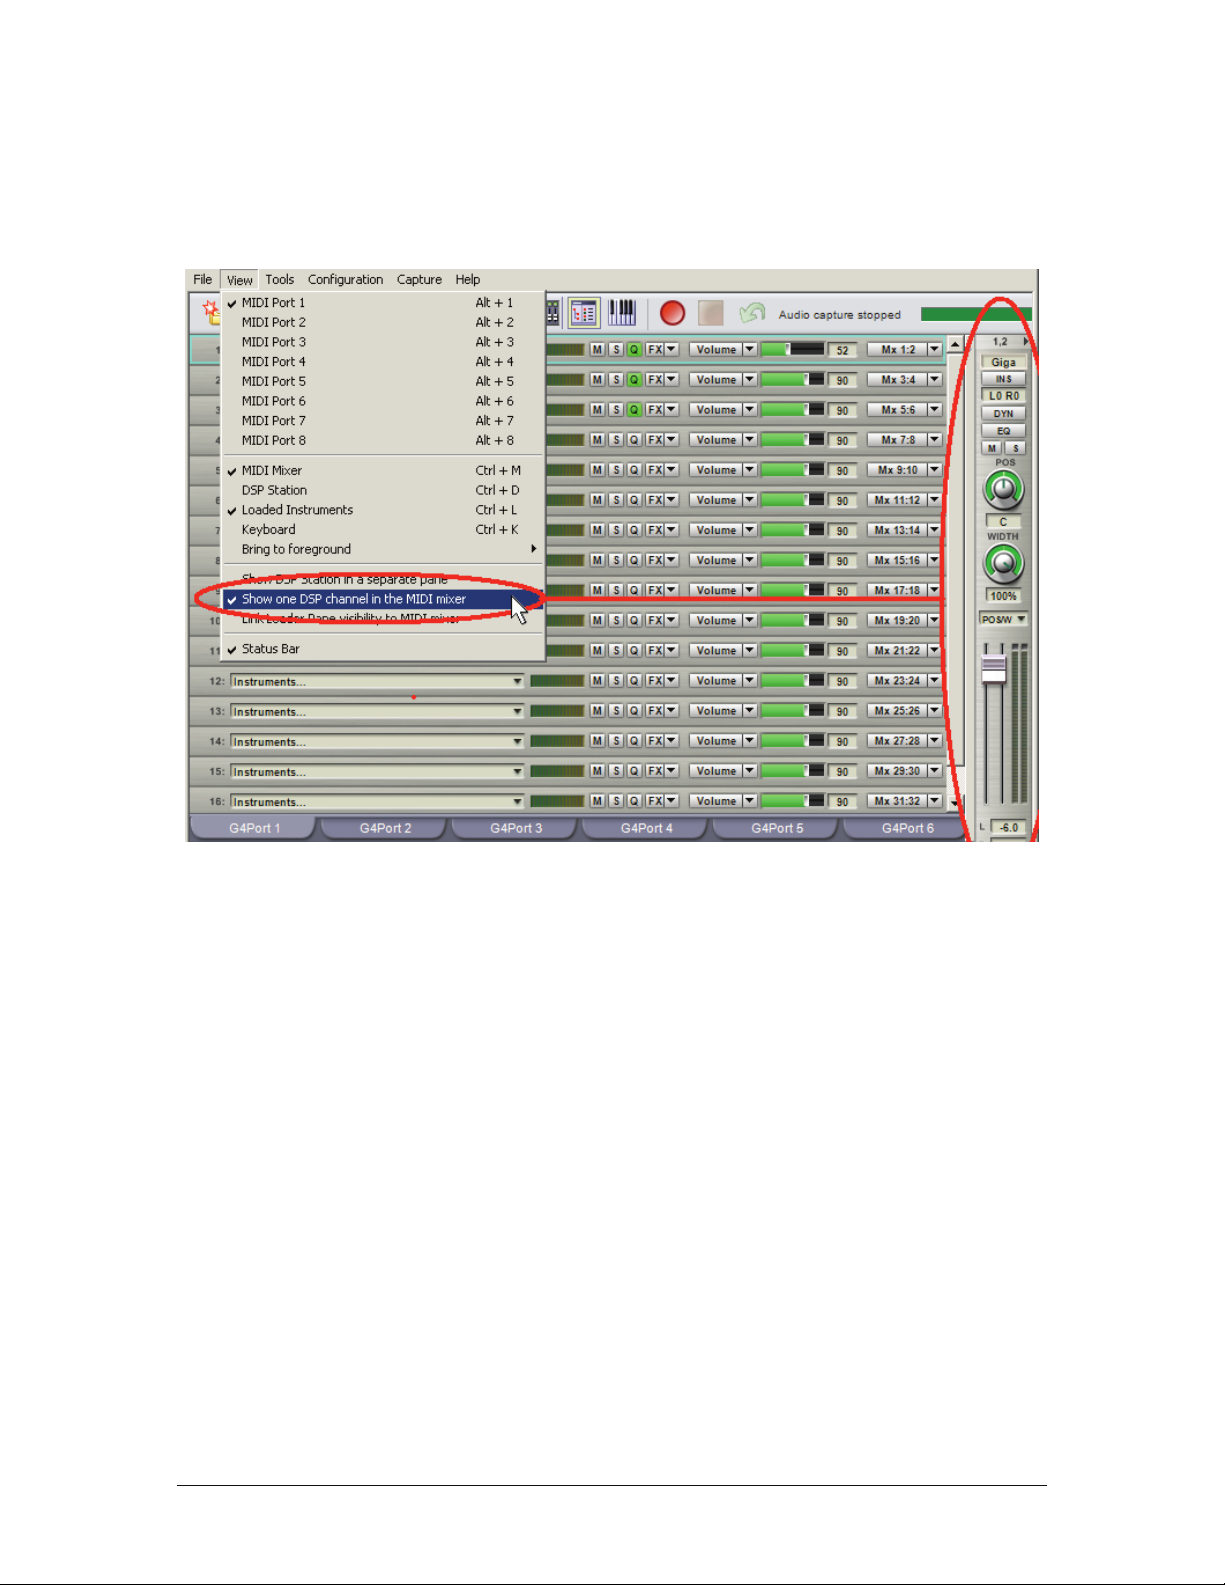
Show One DSP Channel in the MIDI Mixer
This is somewhat like the “Inspector” feature found in DAWs like Cubase and Sonar, as it shows the DSP
channel st rip for the selected MIDI Mixer channel. Its location is fixed toward the right side of the MIDI
Mixer.
Link Loader Pane Visibility to MIDI Mixer
If checked, the Loaded Instruments Pane will show if you’ve selected the MIDI Mixer, and will hide if you
select the DSP Station. However, note that the Show/Hide Loaded Instruments toolbar button or menu option
takes priority, even with the DSP Station selected and the Link Loader option checked.
GigaStudio 4 Reference Manual 19
Page 20
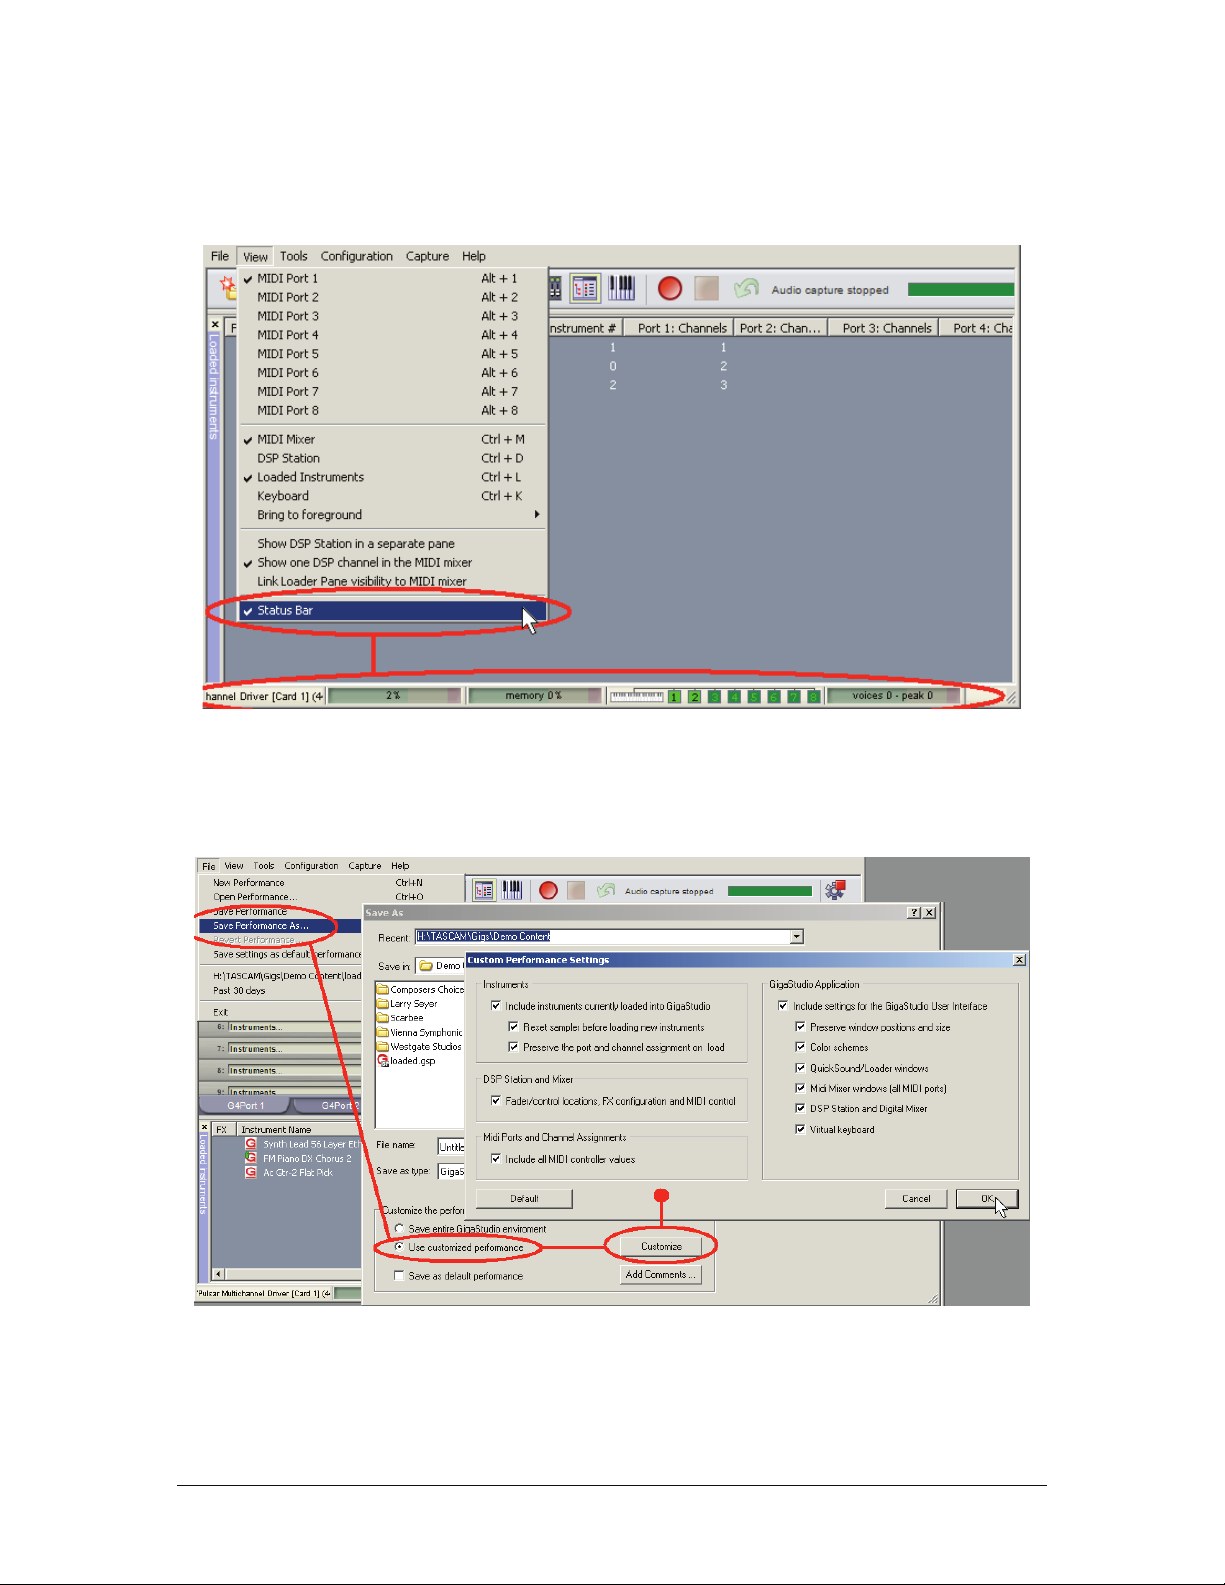
Status Bar
This shows/hides the Status Bar along the bottom that displays CPU and memory consumption, MIDI Port
activity, and the like. Hide this to regain a little bit of screen space.
Saving User Interface Settings
All the aspects of the user-defined interface components can be saved in the “Save As…” options (located in
the File menu) of a saved performance. To do this, check the Use Customized Performance button, and click on
Customize to see your options of what can be saved.
GigaStudio 4 Reference Manual 20
Page 21
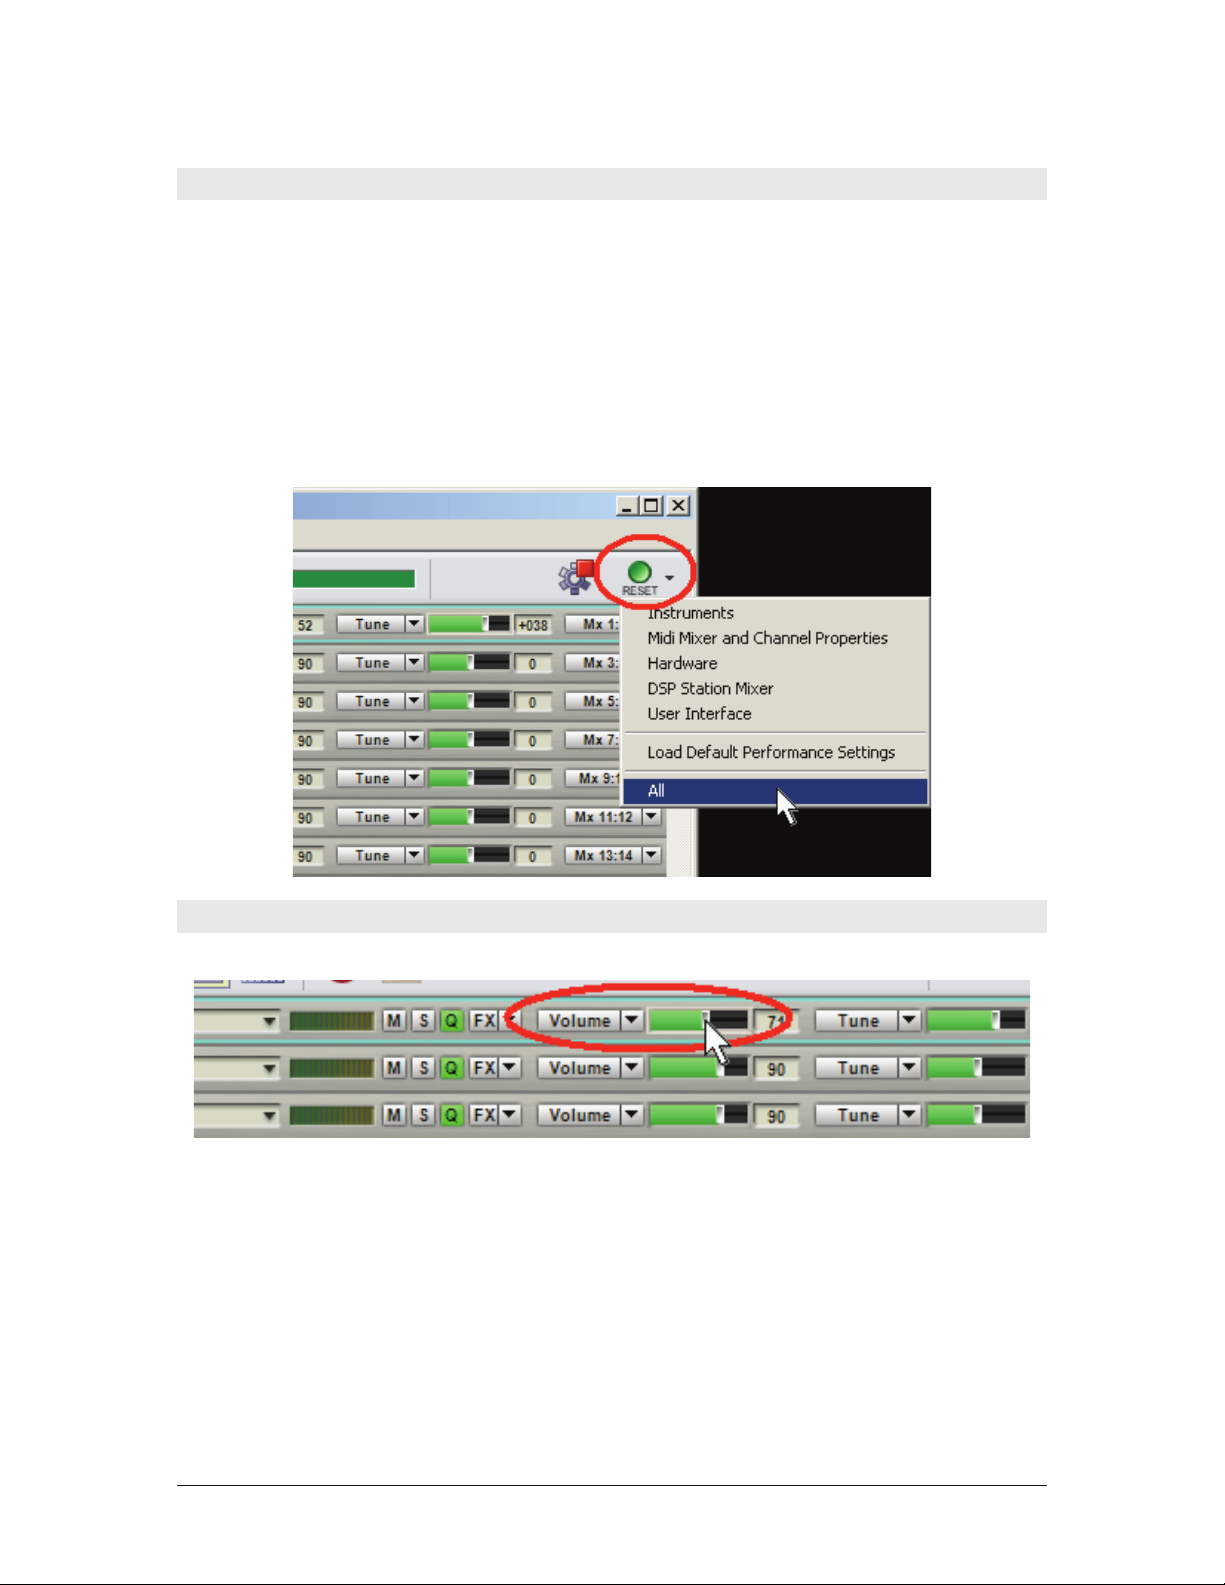
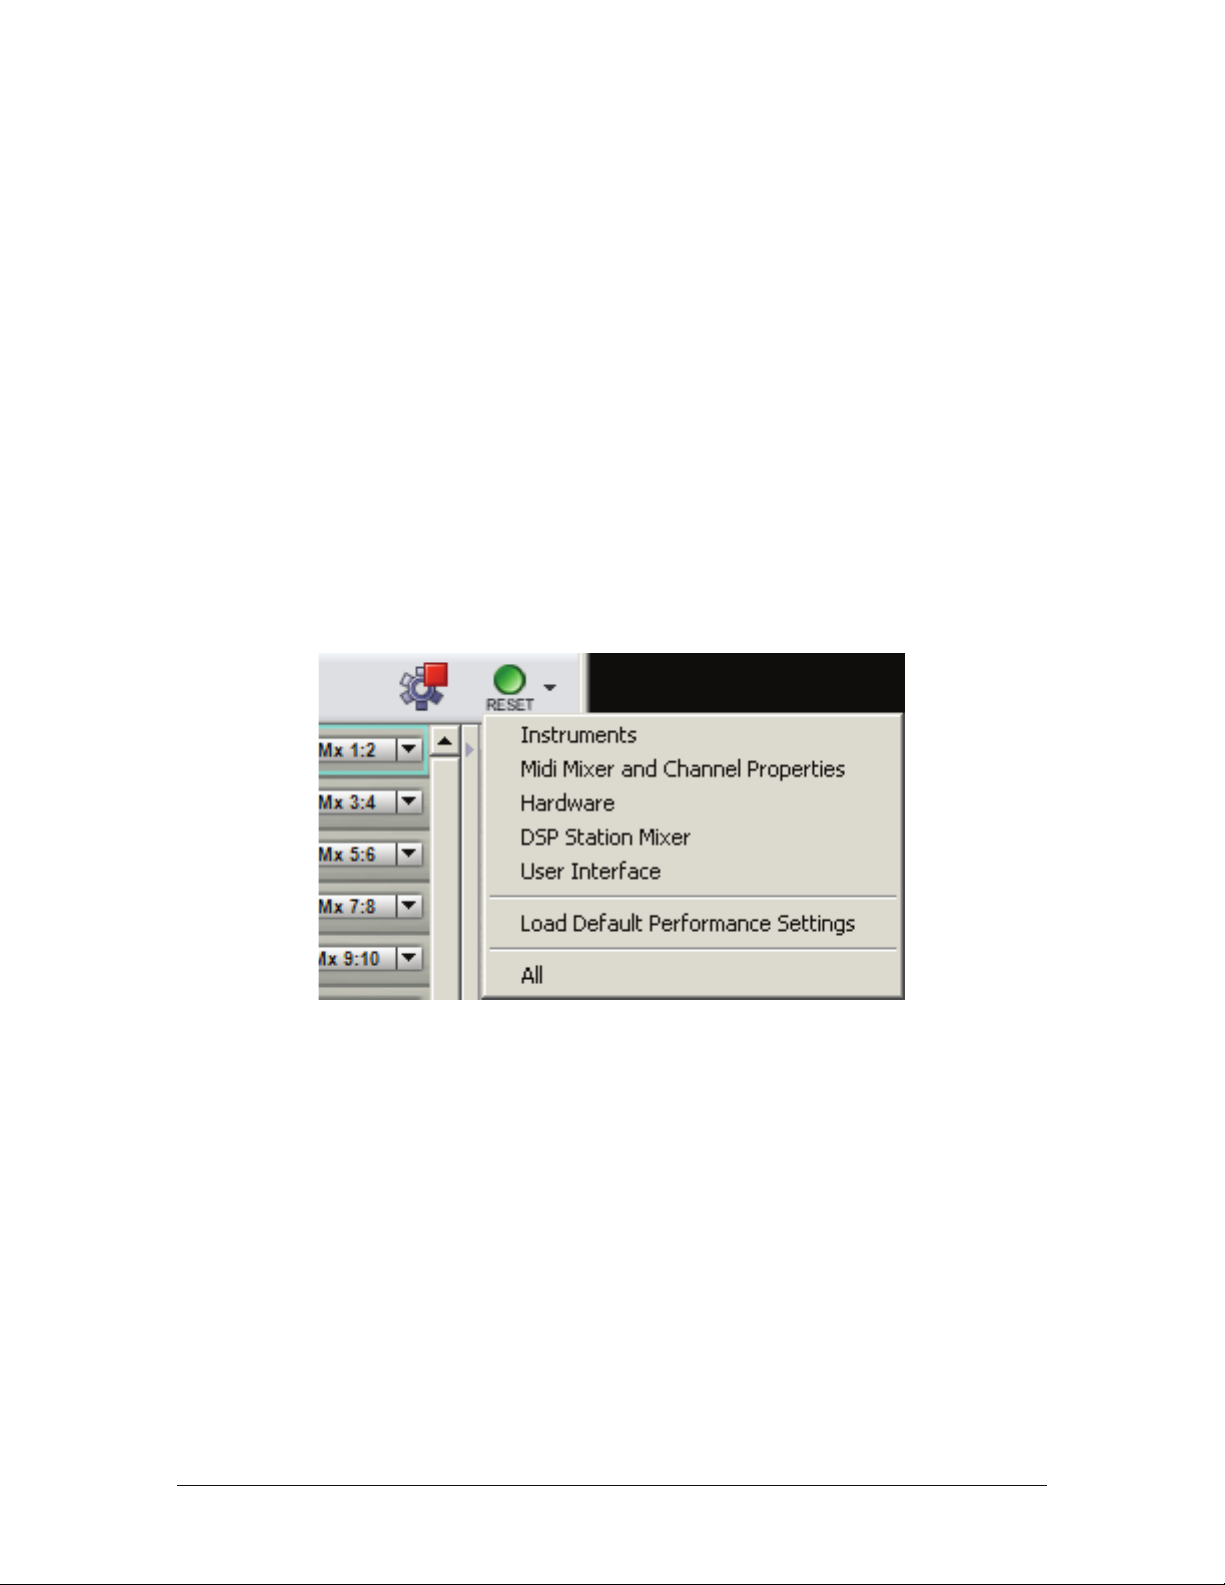
Resetting User Interface Settings
There are several user-defined options from the adjacent drop-down menu.
• Reset just Instruments (unloads all instruments from memory)
• MIDI Mixer and Channel Properties (returns mixer to the default state)
• Hardware (re-establishes audio connection)
• DSP Station Mixer (returns DSP Station to the default state)
• User Interface (returns window sizes and positions to the default state)
• Load Default Performance Settings (loads user-defined default settings).
• All (resets all of the above options to the default state). All will likely reset any instruments you may
have loaded, so you will be asked if you want to save anything before the reset occurs.
Fader, Knob, and Slider Adjustments
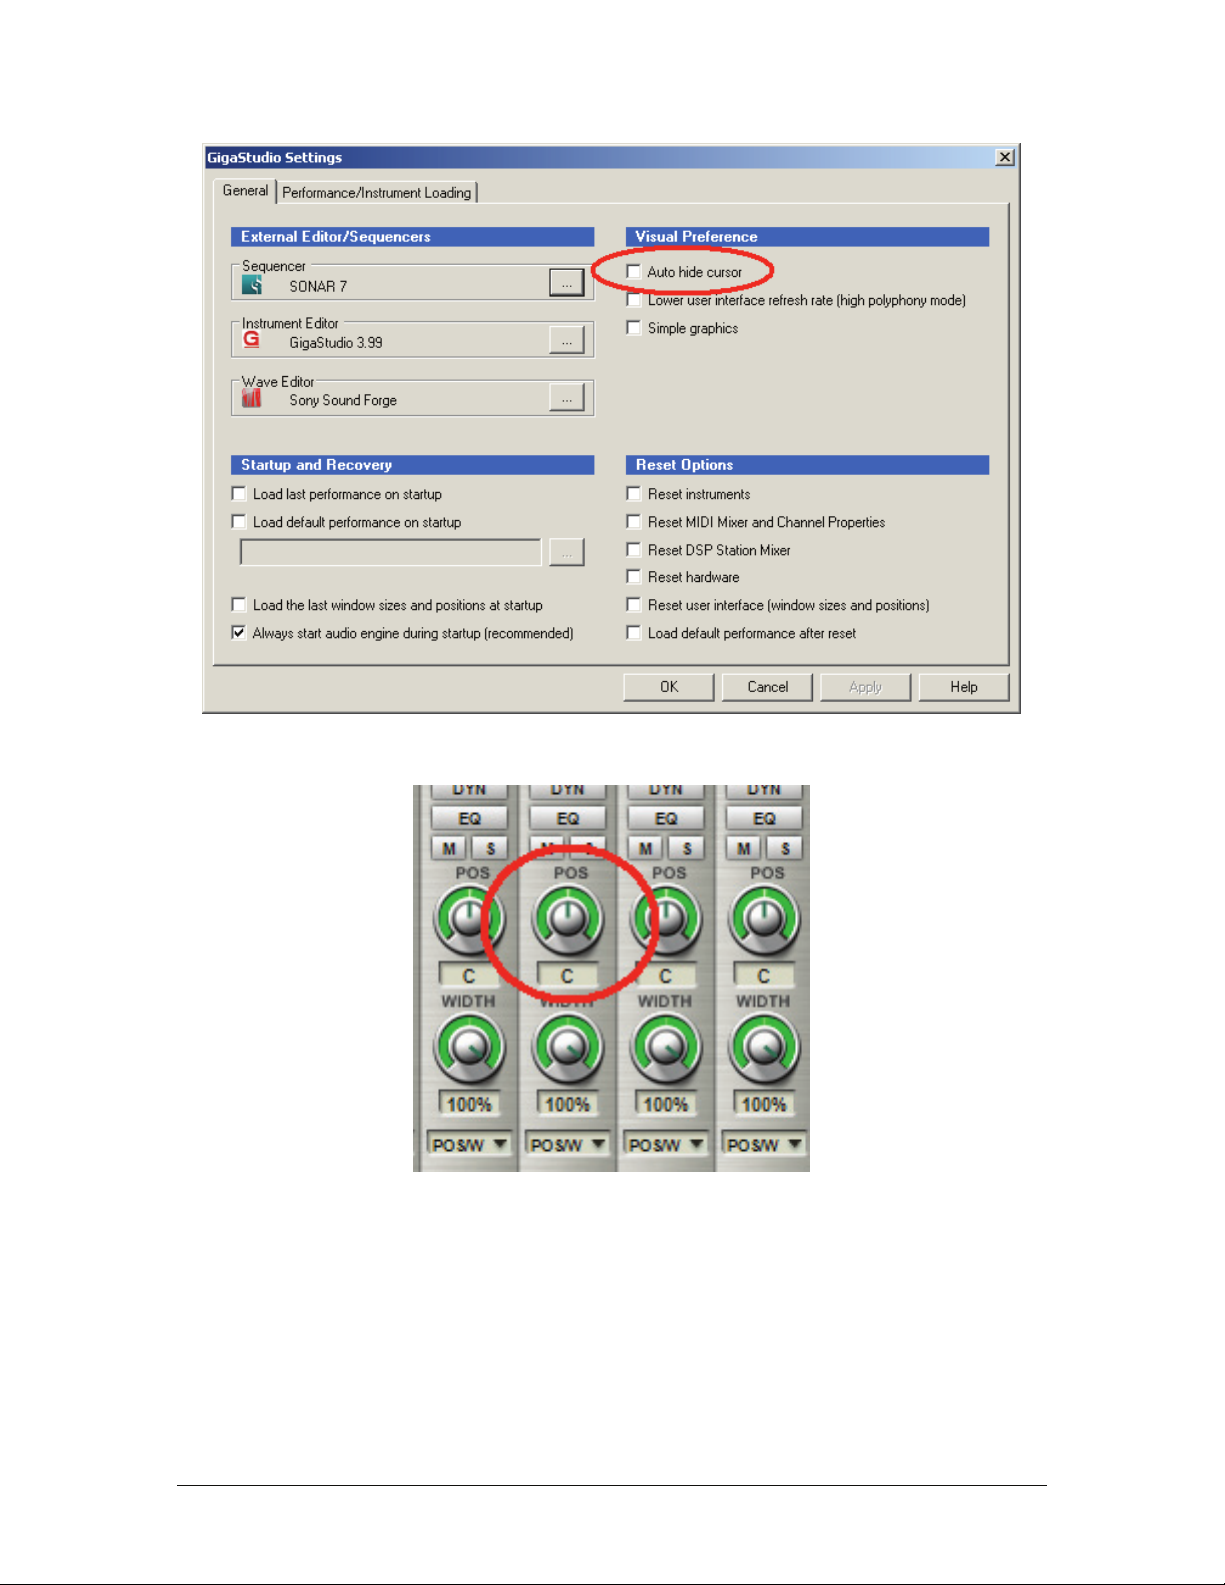
To adjust the various control widgets in GigaStudio 4, click directly on the control and drag.
As soon as you drag the mouse, the cursor will disappear so you can see the widget movement as well as its
displayed value. If you prefer that the cursor not disappear, go Configuration > GigaStudio Settings > General
tab and under Visual Preferences, uncheck the “Auto hide cursor” option.
GigaStudio 4 Reference Manual 21
Page 22
The direction in which you drag the mouse determine the widget movement behavior:
For knobs, click and drag the cursor:
• Up or right to adjust knob clockwise
• Down or left to adjust knob counter-clockwise
• Diagonally for fine adjustment
GigaStudio 4 Reference Manual 22
Page 23
For faders (vertical), click and drag the cursor:
• Up to adjust the fader upward
• Down to adjust the fader downward
• Diagonally left-to-right to make fine adjustments upward
• Diagonally right-to-left to make fine adjustments downward
For Sliders (horizontal), drag the cursor:
• Right to adjust the slider right-ward
• Left to adjust the slider left-ward
• Diagonally left-to-right to make fine adjustments rightward
• Diagonally right-to-left to make fine adjustments leftward
• Hold the [Alt] key while dragging for fine adjustment either way
GigaStudio 4 Reference Manual 23
Page 24
CHAPTER 3: MIDI MIXER
The MIDI Mixer section is where you load instruments (as well as stack/layer them) and perform basic MIDI
mixing functions such as mute, solo, tune, pan, and set volume. Note that all of these controls affect only MIDI
data; the audio data of each instrument is then routed to the DSP Station where you can apply EQ, effects,
dynamics control, and more.
MIDI Basics
The MIDI spec provides for 16 channels of data, each of which can drive a separate instrument. MIDI was
invented in the early 1980s, when a synthesizer was hardware that cost thousands of dollars, so 16 channels
was considered adequate. Over time, this became more and more of a limitation, so interfaces started including
multiple MIDI ports, each of which could provide 16 channels of data. Thus, a MIDI interface with four ports
could send data to (4 x 16) 64 different instruments.
GigaStudio 4 can accept data from up to 8 MIDI ports, with 16 channels per port — that’s 128 instruments.
Furthermore, you can layer up to 128 instrument sounds on a single channel (referred to as Sub-Channels),
giving the ability to address a theoretical maximum of 16,384 instruments! So for all practical purposes,
GigaStudio provides an unlimited sonic palette.
MIDI Mixer Parameters
Each MIDI port channel (and sub-channel) has a full complement of mixer-like controls. Following is a
numbered diagram and description of each parameter in the MIDI Mixer view.
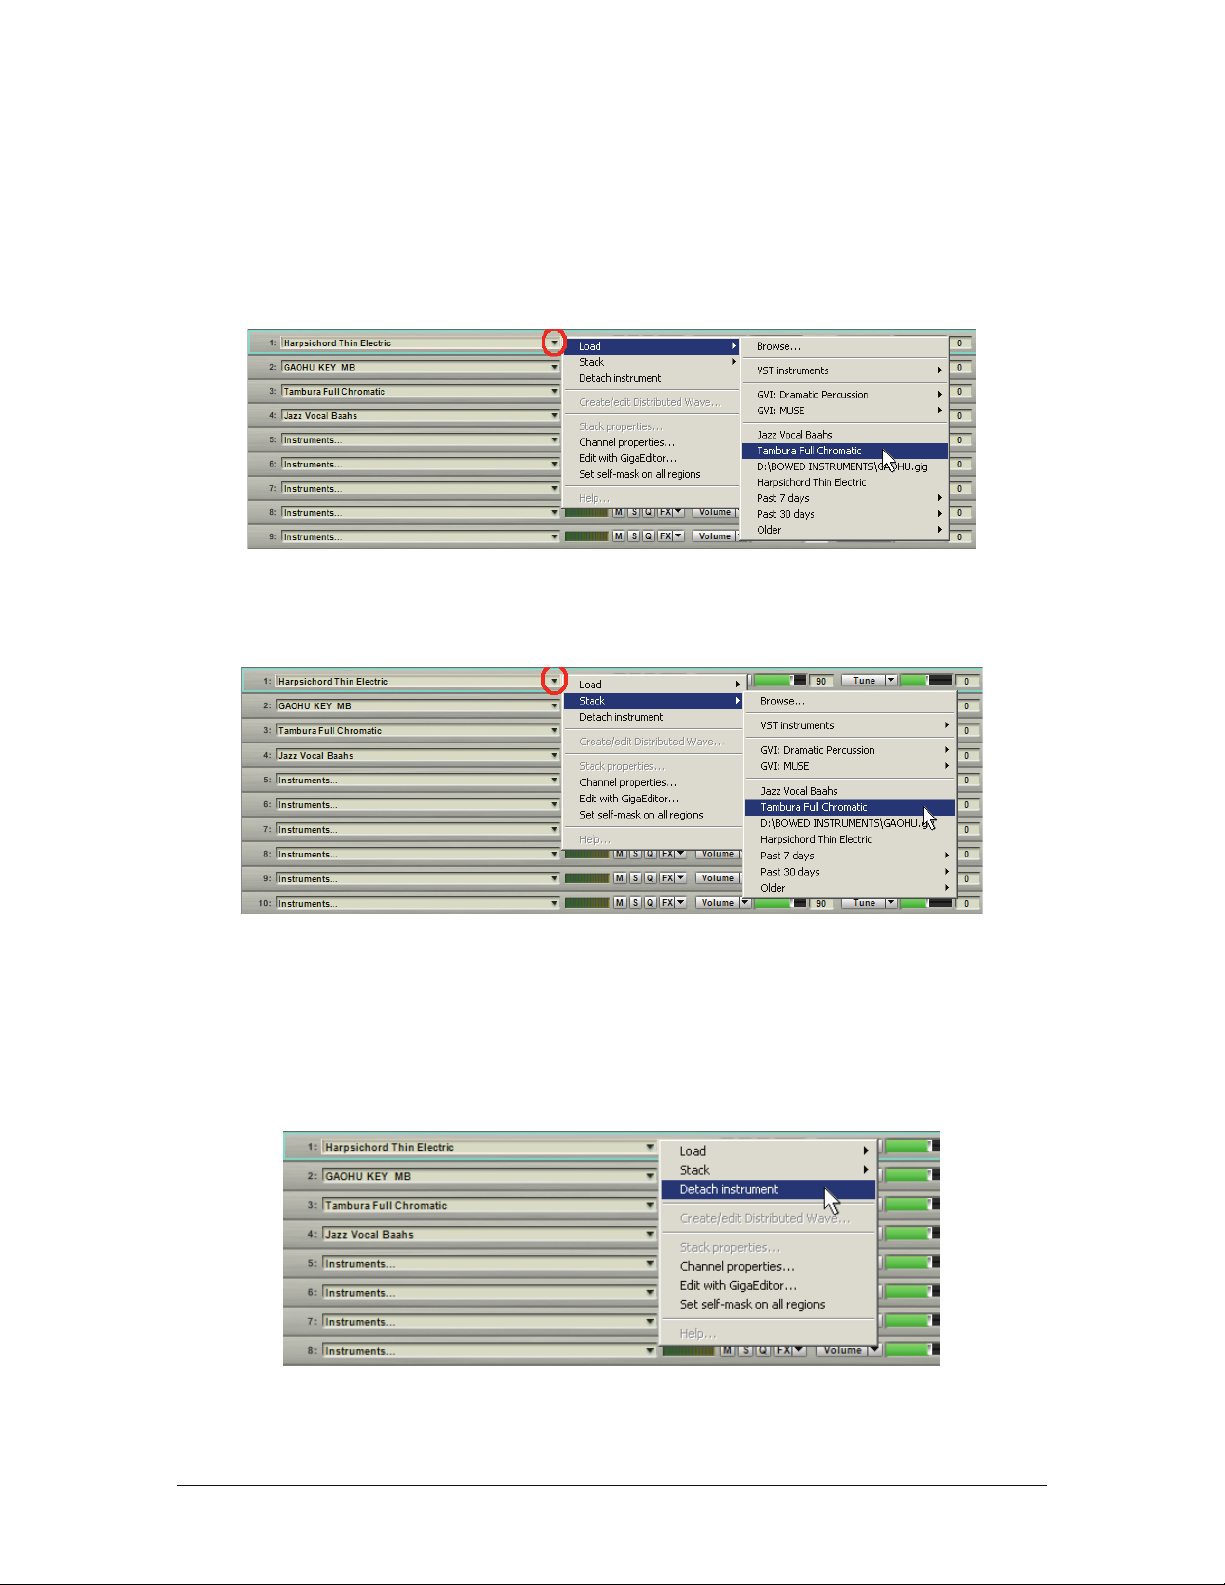
1. Channel Slot: The channel slot field is where you load and “detach” (remove from channel) instruments
that are assigned to a particular MIDI channel. Upon attaching an instrument to a channel or sub-channel, the
instrument’s name appears in the channel slot field. Cl icking on the Channel S lot drop-down menu opens a
GigaStudio 4 Reference Manual 24
Page 25
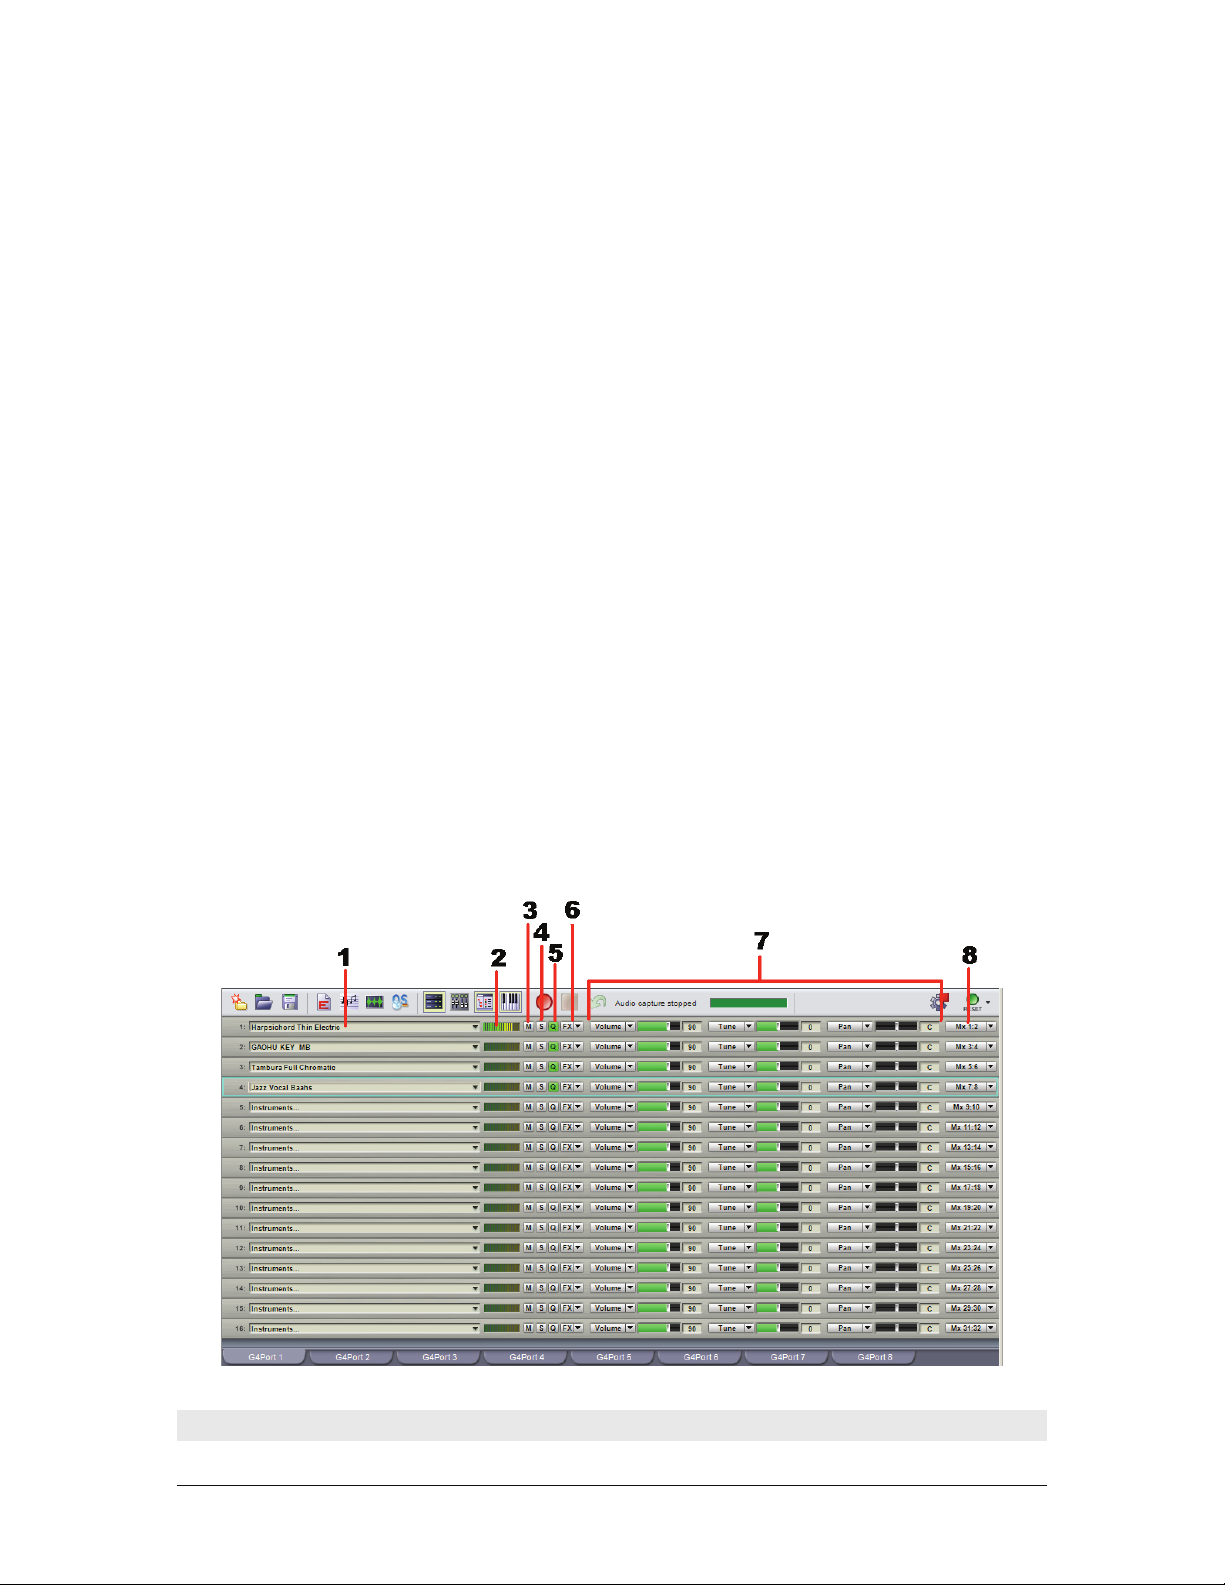
channel-specific menu that allows you to Load, Stack, or Detach instruments, edit Stack and Channel
properties (keyboard mapping), and more.
2. MIDI activity meter: Illuminates when the channel receives MIDI data, with higher velocities causing
more meter segments to light.
3. Mute: Silences the channel’s incoming MIDI so it produces no sound. This affects all sub-channels.
4. Solo: Silences all channel’s Incoming MIDI other than the soloed channel. This affects all sub-channels.
5. Q(uickEdit) button: When a MIDI channel contains an instrument, the Q button turns bright green
(active). Clicking the Q button opens the QuickEdit View for the instrument loaded on that particular channel.
Multiple QuickEdit views for multiple instruments can be open simultaneously.
6. FX: For instruments that have an embedded convolution effect using the GigaPulse Convolution Processor
included with GigaStudio, this button will be bright green. Clicking on the FX button displays the GigaPulse
view. If the instrument has more than one embedded instance of GigaPulse, a popup menu appears that allows
you to select the desired instance.
7. Assignable MIDI sliders: The three available MIDI sliders default to controlling a channel’s Volume,
Tune, and Pan, but can be assigned to any MIDI controller from 1 to 119 as well as prog ram change, fine tune,
and course tune via the controller name’s drop-down menu. This provides a convenient way to adjust MIDI
continuous controller (CC) data from the main MIDI Mixer view. Note that changing a slider assignment does
not alter the value of any previous assignment. Example: If you use a slider to set a channel’s volume level,
then change the slider to control LFO modulation, the volume level remains where you set it.
8. Output assign: This allows assigning a channel to a specific input of the DSP Station mixer. GigaStudio 4
defaults to the DSP Station having 32 channels (16 stereo), but this can be changed by opening Configuration
> Mixer and selecting the Mixer tab. Usually, the default of one stereo DSP input for each of Port 1’s MIDI
channels is the most convenient setup, where MIDI Mixer channel 1 goes to DSP Station inputs 1+2 MIDI
Mixer channel 2 goes to DSP Station inputs 3+4, etc.
GigaStudio 4 Reference Manual 25
Page 26
The MIDI Mixer: Loading, Unloading, Attaching, and Detaching Files
GigaStudio 4 File Formats
You can load (and save) a variety of file formats into MIDI mixer slots via the File menu. These are:
.GIG Files: These can contain multiple (single) instruments, arranged in banks, that may be loaded or stacked
into the MIDI mixer’s individual channels using the MIDI Channel drop-down menus or the Quicksound
Explorer. When loading a GIG file that contains multiple instruments, all of the contained instruments are
loaded into RAM, but only the first instrument is attached to the specified MIDI channel. .GIG files are created,
edited and saved using the GigaEditor Application.
.GSP Files: G
require hardly any disk space) and contain a map of every instrument loaded, every knob, fader, audio effect
(NFX and VST), slider setting, and GigaPulse plug-in setting, as well as the size and arrangement of the
various graphical components as they are displayed on your monitor(s). There are two main ways to create a
new performance file:
• Start with a blank new performance by going Fi le > New Performance. The default Perfo rmance has
igaStudio Performance files contain no audio or MIDI data, but instead are small files (they
empty instrument loader slots, faders at nominal settings, and no FX. After loading the desired
instruments and making any desired tweaks, you can then save the performance.
• Open an existing perfo rmance file, change it as des ired, then go File > Save Performance As… to
create an additional performance with a new and unique name. This lets you create variations derived
from the same basic template of loaded instruments, mixer settings, tweaks, and plug-ins, but each
tailored to a specific application.
.GSI Files: G
igaStudio Instrument files are simplified .GSP files that recall loaded instruments, MIDI Mixer
settings/routing, as well as instrument specific QuickEdit and GigaPulse tweaks. The main difference is that
loading a .GSP file resets (clears) the sampler before loading any instruments, while a .GSI file can be loaded
into a session that already contains instrument assignments. .GSI files can be loaded on any empty MIDI
channel and do not recall any DSP Station or graphical UI settings.
.GSI files can contain single or multiple instruments that are either loaded on separate MIDI channels or on a
single MIDI channel as a stacked instrument. If you load multiple .GSI files, you can always save this
collection as a .GSP file.
GigaStudio 4 Reference Manual 26
Page 27
Stacking vs. Loading
There are two ways to add instruments to a channel in the MIDI mixer after clicking on a MIDI Channel’s
drop-down menu: Load and Stack.
Load: This replaces anything currently loaded in a MIDI Mixer channel. If the channel already contained
instruments, they are “detached” from the channel but not “unloaded” from memory (see below).
Stack: This adds an instrument to a MIDI mixer channel without detaching any currently loaded
instrument(s), thus la yering the new instrument with any instruments already loaded in the channel. The
“Stack” option is not available until at least one instrument is loaded on a MIDI mixer channel.
Detaching vs. Unloading
There are two ways to remove instruments from the MIDI mixer: Detach and Unload.
Detach Instrument: This is available from the MIDI Channel’s drop-down menu. Detaching clears the
Instrument from a MIDI mixer channel assignment. However, the instrument remains loaded in the Sampler’s
memory (RAM) and can therefore be recalled by a program change either into the original channel to which it
was assigned, or into an alternate MIDI channel.
GigaStudio 4 Reference Manual 27
Page 28
Unload ing: This is available from the Loaded Instruments window (described later) and removes the
Instrument both from any MIDI channel assignments and from the Sampler’s memory altogether, thus
freeing up RAM.
Loading a Single File into a MIDI Channel
A MIDI channel that contains no instrument displays “Instruments...” in its channel slot field. To load a File
using a channel’s drop-down menu:
1. Click on the Down Arrow located on the right border of the channel slot field of an empty MIDI channel to
open that channel’s drop-down menu.
2. Move the cursor over the “Load” menu item. Up to four Load options/sections will appear in the following
order: Browse, VST Instruments, GVI Instruments, and Recently loaded Instruments.
Browse
The “Recent” field shows recently-accessed folders. If you select one of these, it will appear in the “Look In”
field, which uses standard Windows navigation techniques to find folders containing GigaStudio 4compatible files. The drop-down button (a) shows your computer’s file tree; the four navigation buttons are
Back button (b), Up One Level of the file tree (c), create New Folder (d), and View Options (e).
Upon selecting a folder, the main pane shows any .GIG or .GSI files within the folder.
GigaStudio 4 Reference Manual 28
Page 29
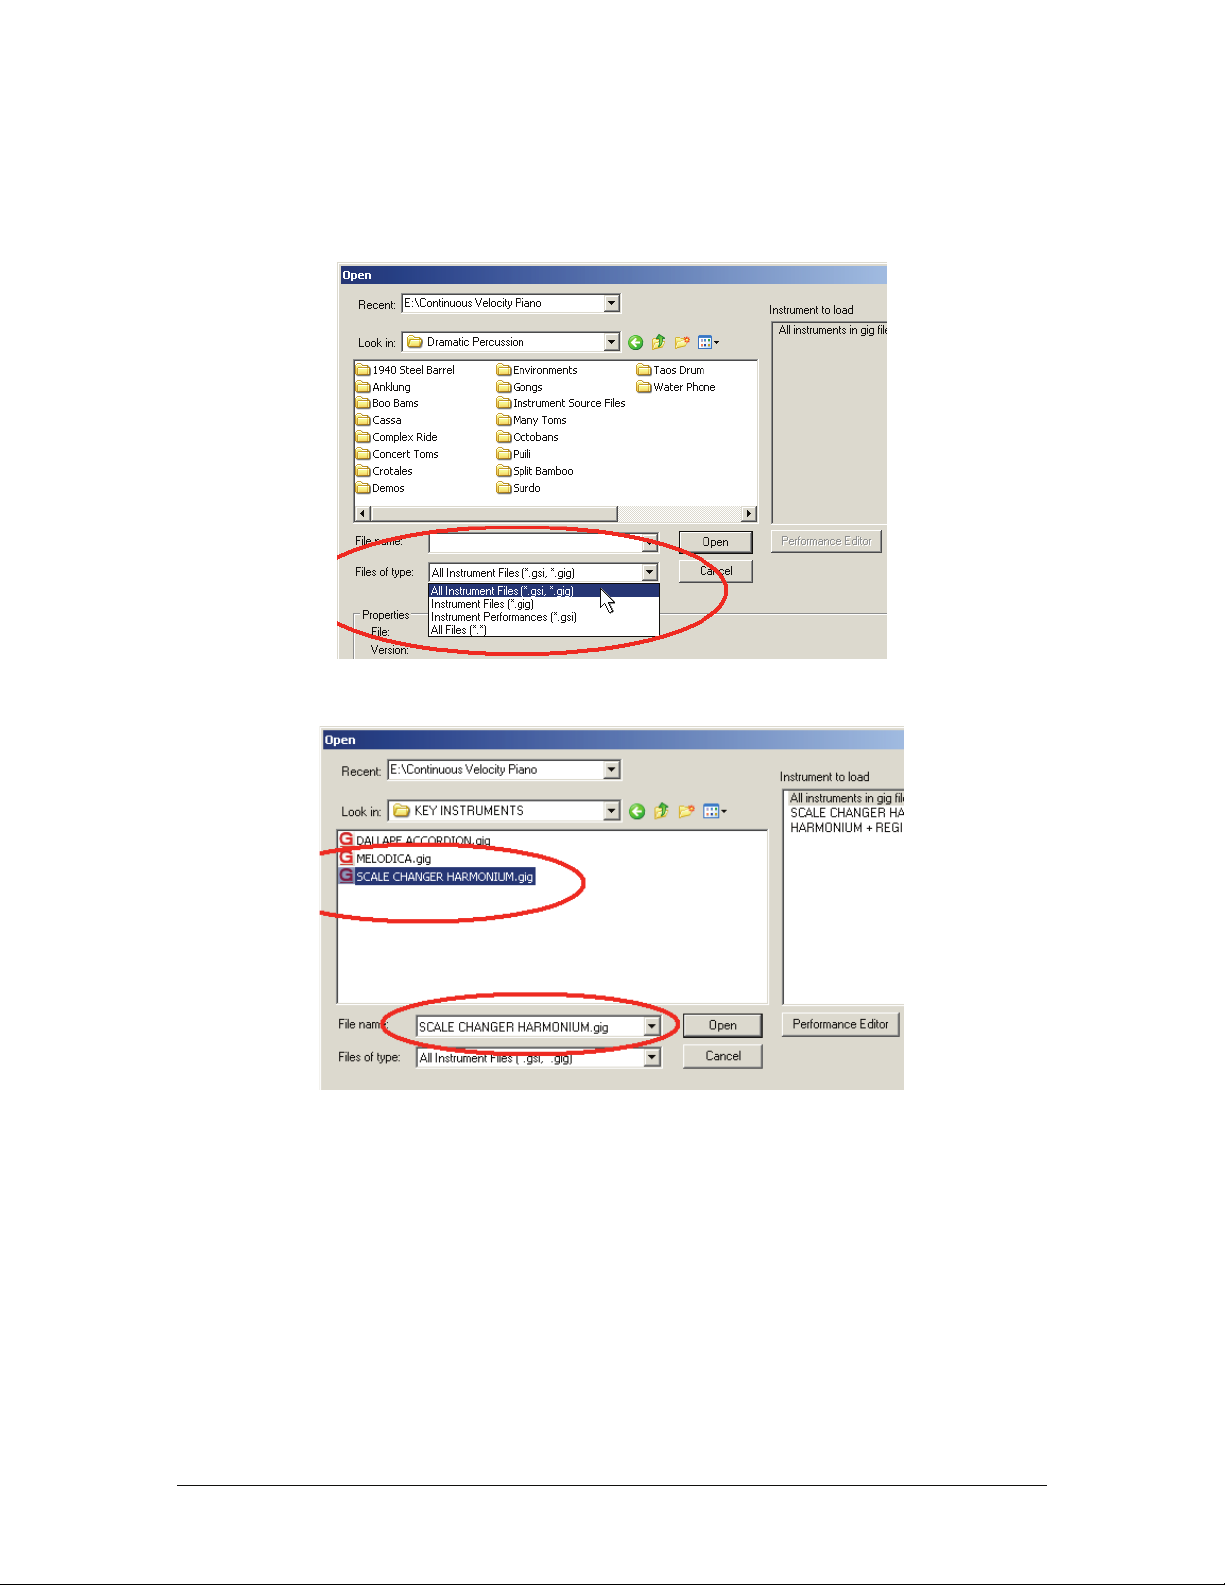
In the Files of Type field, you can choose to display only .GIG, only .GSI, both types of files, or All Files
(including non-GVI compatible types). Note that .GSP files are loaded using the main GigaStudio File menu
since performances affect all MIDI channels simultaneously.
Click on a file name, and its name appears in the File Name field.
GigaStudio 4 Reference Manual 29
Page 30
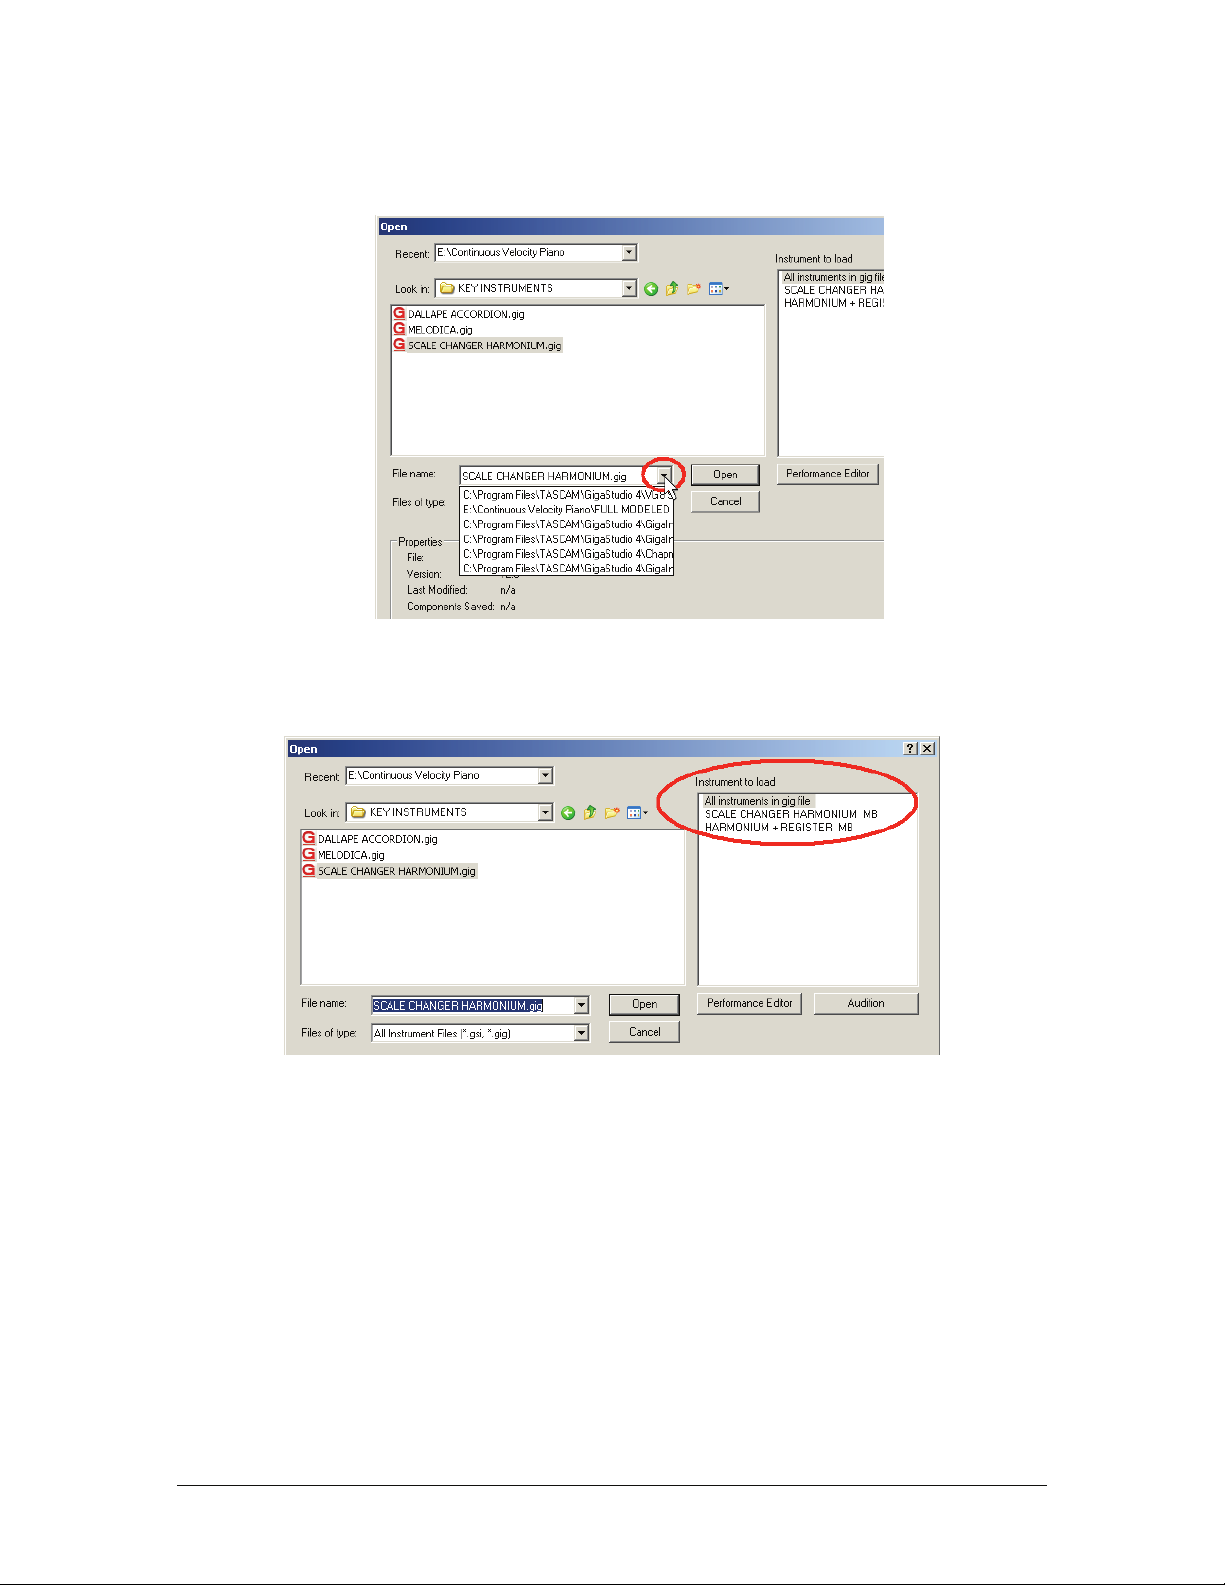
Clicking on the downward arrow in the File Name field shows a list of recently-accessed files.
The individual instruments contained in a highlighted .GIG file show up in the “Instruments to load”
pane. Here you can select to load an individual instrument or “All Instruments in Gig File.”
GigaStudio 4 Reference Manual 30
Page 31

The Properties section shows the file name, version, and other information.
Once you’ve selected the instrument(s) you want to load, click on Open. This closes the “Open” dialog and
loads the selected Instrument(s) into GigaStudio.
Loading VST Instruments
The second section of the Channel Load Menu lists all available VST Instruments. Here you can select any
Giga-compatible VST instrument that’s installed on your computer. Note that for a VSTi to appear in this
menu, it must be included in the VSTi search paths as defined in the Giga Configuration Manager’s
Rewire/Plugins tab.
Loading GVI Compatible Virtual Instruments
The third section of the Channel Load Menu Lists all the GVI wrapped content that is installed on your system.
It is possible to load GVI based third-party protected and non-protected content (e.g., Sonivox Muse,
DigitalSoundWorks Dramatic Percussion, Ilio Plectrum, etc.) directly into GigaStudio to take advantage of
extended functionality and Kernel mode performance. Once loaded into Giga, these Instruments behave in the
same fashion as traditional .GIG instruments.
Like VSTi’s, wrapped GVI search paths are specified in the Rewire/Plugins section of Configuration Manager.
Each GVI wrapped instrument installer will give you the option of where to install, however, the default
directory is:
C:\Program Files\Tascam\Instruments
Wrapped GVI instruments installed into this directory will automatically be added to the GS4 channel load
menus. If you choose to install a wrapped GVI instrument in a directory other than the default, it will be
GigaStudio 4 Reference Manual 31
Page 32

necessary to manually add the specified install directory to the Configuration Manager’s GVI-Compatible
Virtual Instruments Search Paths.
When a wrapped GVI instrument is loaded into GS4, the sample data is loaded directly into the specified MIDI
channel and appears as traditional GIG content would appear. The GVI UI (Custom or otherwise) is not loaded
into GS4, only the raw instrument and sample data.
Of course since wrapped GVI’s are embedded content by design, it is not possible to open wrapped GVI
instruments in the Giga Editor. You can however make changes to the instrument using QuickEdit and save
those changes into a GSI or GSP performance.
Recent Files List
Below the GVI wrapped instrument section of the Channel Load Menu is the Recent Files list. This shows
recently-loaded instruments; to prevent the list from getting excessively long, there are additional subcategories for Past 7 Days, Past 30 Days, and Older. If you choose one of the files from this list, it will load
automatically on the specified channel.
The Load Status Bar
The Status Bar along the bottom of the GigaStudio main interface monitors loading progress. Note: When
loading a multi-instrument GIG file, only the first instrument will be attached to the specified MIDI channel.
The other instruments are loaded into memory and appear in the Loaded Instruments pane.
There are three components to the Load Status bar. From left to ri ght, these are:
Pause button (1). Click to pause or cancel the loading process.
Status field (2). This field monitors the overall progress of all instruments currently loading.
Progress field (3). If multiple Instruments are being loaded, this field shows which of the set of
instruments is being loaded (e.g., 2/7 means that the second of seven instruments is being loaded), the
instrument’s name, and how much of the instrument has been loaded.
GigaStudio 4 Reference Manual 32
Page 33

Stacking Files on a MIDI Channel
Once a channel contains one or more loaded instruments, the option to Stack instruments appears in that
channel’s drop-down menu. Stack works similarly to Load and uses the same type of browser, but layers the
newly selected instrument on the same channel with the currently loaded instrument. Without defining a
Keyswitch (see below), MIDI messages sent to that channel are passed to all instruments on the stack, which
play back simultaneously.
Note: To drag-and-drop a .GIG file from QuickSound or the desktop into a mixer channel and have it stack
with an instrument instead of overwrite it, hold down the Ctrl key as you drag-and-drop.
A Stacked Instrument has two components, the “Main” Instrument channel (1) and the subsequent stack
“Members” (2) that appear in “sub-channels” (3) beneath the Main Stacked Instrument MIDI channel.
• Changes made to a Main Stacked Instrument’s MIDI Mixer parameters affect all of the sub-channels.
• Changes made to a sub-channel’s MIDI Mixers parameters affect only that single instrument.
GigaStudio 4 Reference Manual 33
Page 34

Detaching a Sub-Channel Instrument
To detach one sub-channel instrument while leaving the other ones in place, click on the downward pointing
arrow toward the right of the sub-channel field, and select ‘Detach instrument’.
Note: When detaching single sub-channel instruments from a S tacked Instrument that contains a
Keyswitch, it may be necessary to redefine the Keyswitch within the channel’s S tack Properties (see
below).
Renaming a Stacked Instrument
The simplest way to rename a stacked instrument is to click the current stack name within the Main
channel’s slot field (the field’s background turns yellow, and the name is highlighted with a blue background),
type in a new name and press ‘Enter’ to confirm.
You can also rename a stacked instrument using the Stack Properties dialog, as described in the Stack
Properties section.
GigaStudio 4 Reference Manual 34
Page 35

Show/Hide Sub-Channels
Because a stacked instrument can contain many sub-channels, it may be useful to collapse a stacked
instrument so that only the Main Instrument channel is visiblein the MIDI Mixer. The black arrow to the
left of the Main Instrument channel field toggles between showing or hiding the stack’s sub-channels.
Instrument Loading via Drag-and-Drop
There are several ways to load instruments into the MIDI mixer via drag-and-drop.
• Drag-and-drop a .GIG or .GSI file from the desktop into a MIDI mixer channel. If the channel already
contains an instrument, the existing file will be detached. To stack files on a MIDI channel, hold down
the Ctrl key while dragging and dropping.
• Drag-and-drop a .GIG or .GSI file from the QuickSound Explorer into a MIDI mixer channel. If the
channel already contains an instrument, the existing fi le wil l be detached. To stack files on a MIDI
channel, hold down the Ctrl key while dragging and dropping from Quicksound.
• Drag-and-drop a .GIG or .GSI file from the Loaded Instruments pane into a MIDI mixer channel. If the
channel already contains an inst rument, the exis ting file will be detached. To stack files on a MIDI
channel, hold down the Ctrl key while dragging and dropping.
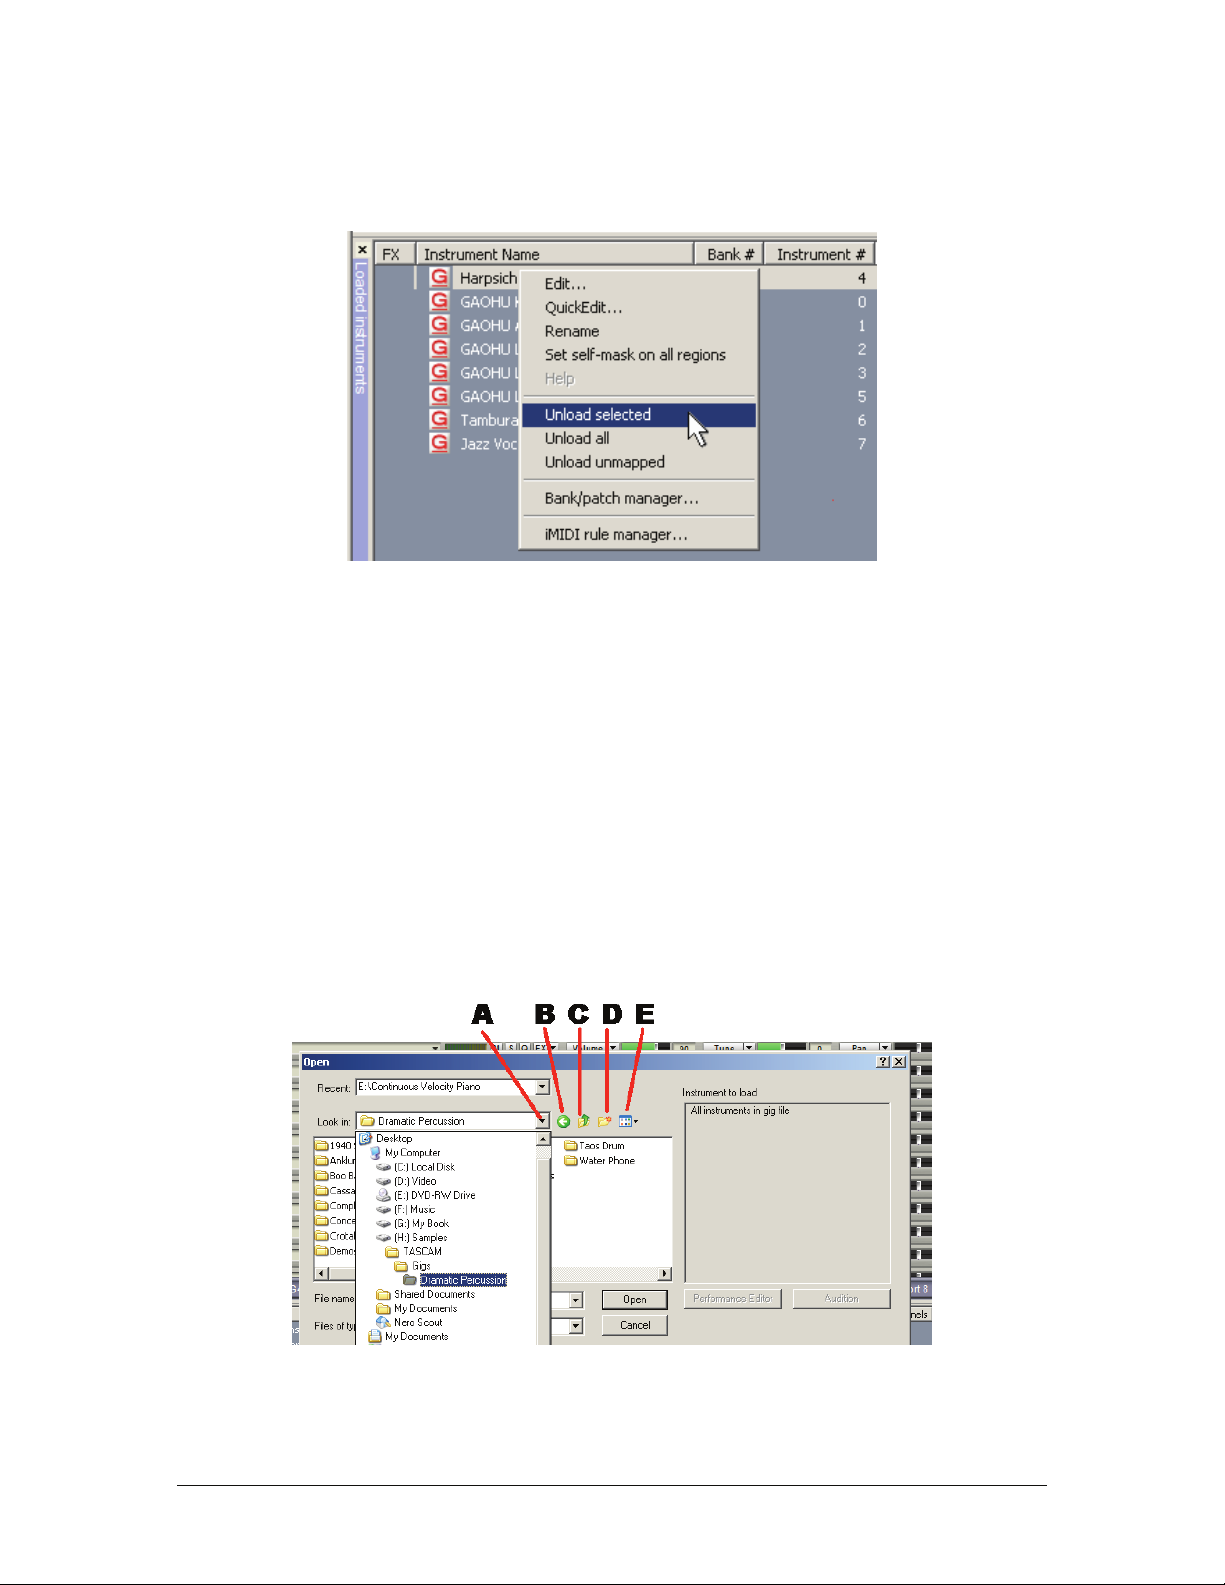
Unloading Instruments Using the Loaded Instruments Window
Once an instrument is loaded into GVI, it remains loaded in memory (RAM) whether it is presently attached
to a MIDI channel or not. This makes it possible to attach/detach loaded instruments quickly using MIDI
program changes.
However, i f you want to recla im RAM, you need to unload an instrument, not just detach it. This requires
using the Loaded Instruments Window, which shows all instruments currently loaded into GigaStudio
memory.
There are three unload options available by right-clicking on an instrument in the Loaded Instruments
window.
• Unload selected: Unloads the single selected instrument on which you right-clicked.
• Unload all: Unloads all loaded instruments displayed in the Loaded Instruments window.
• Unload unmapped: Unloads all instruments that are not currently attached to a MIDI channel.
GigaStudio 4 Reference Manual 35
Page 36

Stack Properties
Once multiple instruments have been stacked on a MIDI channel, the Stack Properties menu item becomes
available in that MIDI channel’s drop-down menu.
The Stack Properties dialog allows several functions:
• Rename stacks (1 - remember to hit ‘Enter’ to confirm rename).
• Enable and define Key or MIDI Controller-based instrument switching (Keyswitching) among the sub-
channel instruments (2).
• Limit an instrument’s keyboard range to create splits (3).
• Load, save, and edit stack templates (4).
GigaStudio 4 Reference Manual 36
Page 37

Adding a Keyswitch to an Instrument Stack
The default behavior for a Stacked Instrument is for all of the sub-channel instruments to play back when a
note is triggered, making it easy to create rich, layered instruments. However, you can limit Stacked
Instrument playback to one sub-channel instrument at a time and control which sub-channel is active using
either a MIDI Controller or a Keyboard-based Keyswitch.
With a MIDI controller, moving the controller “scrolls” through the sub-channels. Example: Rotating the
mod wheel fully back might select one sub-channel, rotating it forward might select a different sub-channel,
and rotating it between these extremes select yet another sub-channel. With a Keyswitch, hitting C might
choose one sub-channel, C# another, and D a third.
Instrument Selector
To enable MIDI switching for a Stacked Instrument, open the Stack Properties dialog from the Main MIDI
channel’s drop-down menu. Within the Stack Properties dialog, choose either Keyswitch or MIDI Controller
from the Instrument Selector drop-down menu. Choosing None (default) causes all stack members to play
back simultaneously.
Filter CC messages:
When Keyswitching is enabled, the ‘Filter CC messages’ option will block incoming MIDI CC messages from
all inactive sub-channels.
GigaStudio 4 Reference Manual 37
Page 38

Keyswitch: Define the Keyswitch keyboard range by either typing in the boundaries manually or using the
Learn feature (click on Learn, then play the low boundary note first, then the high boundary note). The
Keyswitch range should include one note for every instrument on the stack.
MIDI Controller: Specify a controller using either the Controller drop-down menu or the Learn feature
(click the Learn button and move the desired controller to make the assignment).
Use (X) Instruments: Use this drop-down list to specify how many of the stack members are to be included
in the instrument switching. Unless you are including embedded GigaPulse instruments on your stack that do
not contain playable playable regions, leave this value set to All. Note: Because GigaPulse FX Modules are to
be applied to all sub-channels and because they are not sample-based instruments, they do not need to be
included in a Keyswitch. Therefore, you would exclude GigaPulse FX Modules from a Stacked Instrument
keyswitch.
Click “OK” to confirm changes and close the Stack Properties dialog.
Renaming a Stacked Instrument
With the Stack Properties dialog open, click on the Stack Name field. The background turns yellow, and the
name acquires a blue background. Type in the new name, then hit the computer keyboard’s Enter key to apply
your changes. Click “OK” to close the Stack Properties dialog.
GigaStudio 4 Reference Manual 38
Page 39

Playzones Section
The Virtual Keyboard in the Stack Properties dialog’s Playzones section can trigger notes as well as provide a
visual reference for the various keyboard ranges of each instrument on the stack. Instruments in the stack are
listed below the Virtual Keyboard in strips, with small triangular “handles” showing the upper and lower
keyboard range covered by the instrument. Click in a strip to make that instrument the current instrument.
The Virtual Keyboard uses color-coding to identify various aspects of the layers.
Yellow: The currently-selected instrument layer.
Light purple: Other instrument layers.
Light blue: Stack Keyswitches.
Diagonal blue stripes: These indicate note regions on the stack that are beyond the range of the currently
selected instrument layer.
To modify an instrument’s active (playable) keyboard range, use the triangular handles located in the lower
half of each instrument strip. First select the instrument layer by clicking in the strip, then move the upper and
lower boundary brackets to the desired range.
Template Toolbar
Stack Properties templates store and recall all Stack Properties parameters except for the stack name. They can
be organized in Collections (banks) and contain user-specified comments or descriptions. The following
options are available.
GigaStudio 4 Reference Manual 39
Page 40

Clear Settings: Resets all Stack Properties parameters to their default settings.
Load Template: Click to display a drop-down menu from which you can load a previously-saved template.
Save Template: Click to bring up a dialog that allows specifying the Template and Collection name, as well as
adding template-specific descriptions.
Edit Templates: Use this dialog to rename templates, reorganize templates, create new Collections, modify a
template’s description, delete templates, or view a template’s properties.
Channel Properties Window
Each MIDI channel has a Channel Properties window that allows remapping incoming MIDI data (Source Keys) to alternate outgoing note values (Destination Keys) on a note-by-note basis. To open the Channel Properties window, select the Channel Properties menu item from the desired MIDI channel’s drop-down menu.
GigaStudio 4 Reference Manual 40
Page 41

Source Keys
The upper keyboard in the channel properties window represents the channel’s Source Keys. These incoming
MIDI note values are constant, regardless of its Destination note. Example: When you change the Source Key’s
Destination note from C2 to C3, an incoming C2 Note-On message will trigger the sample that is mapped to
C3 on that channel.
Destination Keys
The lower keyboard in the channel properties window displays the channel’s Destination Keys, which
represent the note values that are passed on to the sampler in place of the incoming Source Keys original note
value.
Channel Properties Tools
Remap/Play
The Remap/Play button (default) allows auditioning and remapping samples by dragging them from the
Source Key window into the Destination Key window. To select multiple Source keys, ctrl-click or shift-click
them.
GigaStudio 4 Reference Manual 41
Page 42
Revert to Original
If a Key is highlighted in the Destination Key window, it has been remapped. The highlighted key represents
the pitch of the Source Key, while the Destination Key pitch is shown as text near the top of the keyboard.
Example: If the C6 key is highlighted in the Destination Keys keyboard and the text at the top of the key says
D6, then the C6 Source Key has been remapped to D6.
To clear a remapped key, click on Revert to Original, then click on the remapped Source Key on either
keyboard.
Map to Silence
To disable incoming MIDI data on a particular key, click the Map to Silence button and click on the key you
would like to silence on either the source or destination keyboard. Silenced keys are colored dark gray in the
Destination Keys keyboard.
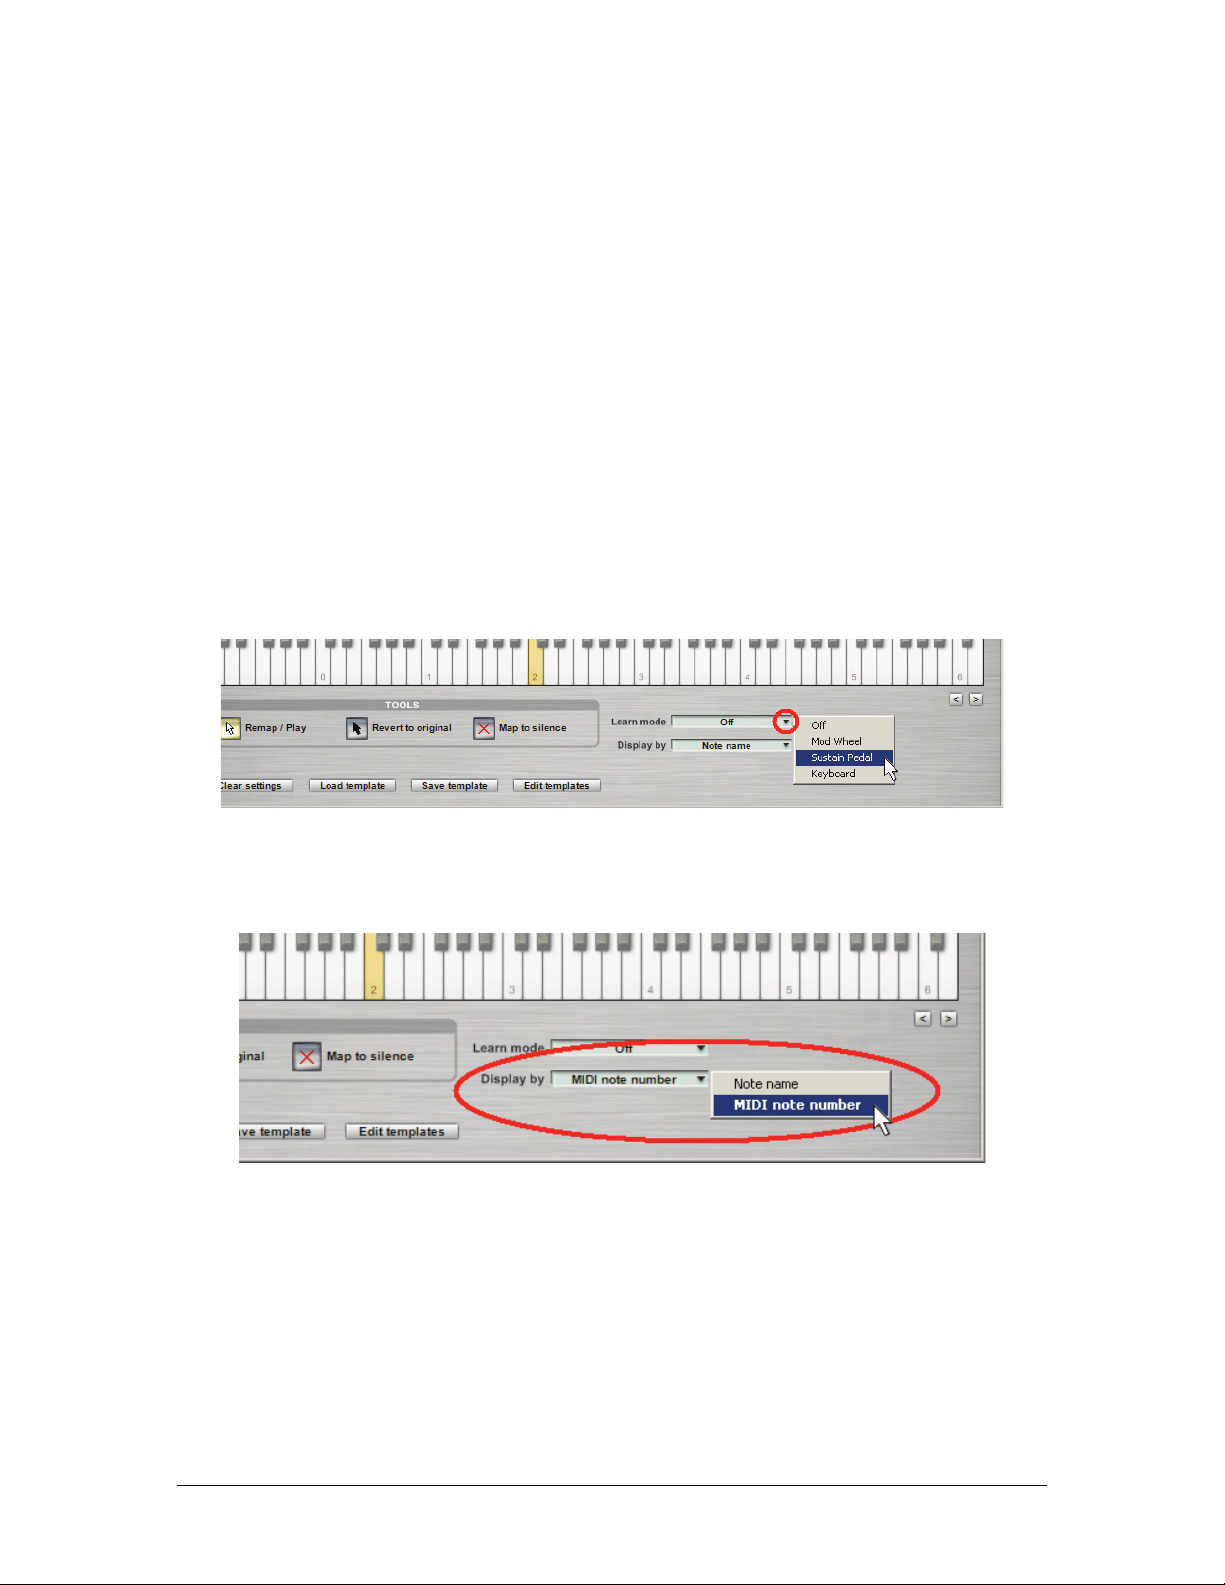
Re-Mapping Via Learn Mode
Instead of using the Channel Properties virtual keyboards, you can select a MIDI controller from the Learn
Mode drop-down menu that allows you to remap keys by toggling between source and destination input keys.
Example: If you select Sustain pedal as the controller, you can remap keys by pressing the sustain pedal,
selecting the Source Key, releasing the pedal, then selecting the Destination Key.
Display By Option
Use this menu to choose whether remapped keys in the Destination Keys keyboard have pitches displayed as
note names (e.g., A#, C, etc.) or MIDI note numbers (e.g., 64, 75, etc.).
GigaStudio 4 Reference Manual 42
Page 43
Set self-mask on all regions
There is now an option to enable self-masking from the MIDI Mixer channel pulldown
menus, and also by right-clicking on an instrument in the loaded instruments window. This
setting gets saved with a performance. Enabling self-masking in this fashion (as opposed to
using Quickedit or the GigaEditor) will affect all regions within the instrument. Changing
this setting on an instrument that had some regions set to self mask while some were not will
force all regions to the new setting.
Show/Hide Single DSP Channel in MIDI Mixer
This is a cool new feature that allows users to always have a channel’s DSP controls visible without showing
the entire DSP Mixer. This feature is enabled by selecting the “Show one DSP Channel in the MIDI Mixer”
option from within the GigaStudio View Menu.
The active/visible DSP channel corresponds to the currently selected MIDI channel. I.E. If MIDI channel 2 is
selected (outlined blue) and routed to DSP Channels 7,8, then the visible DSP channel Strip controls will
correspond directly to DSP Channels 7,8.
You will also notice that small grey arrows appear on the left hand column of the DSP channel strip; these
correspond to which MIDI channels are routed through the currently active DSP channel. In other words,
when an arrow is present between the horizontal MIDI strip and the DSP Channel Strip, it means that the
corresponding MIDI channel is routed thru the visib le DSP channel.
Wide/Narrow view
Just like in the DSP Mixer, The MIDI Mixer’s optional DSP Channel Strip can be seen in either Wide view or
Narrow view. You can toggle between the two views by clicking on the small black triangle located in the
upper right hand corner of the DSP Channel Strip.
GigaStudio 4 Reference Manual 43
Page 44
CHAPTER4: QUICKSOUND EXPLORER
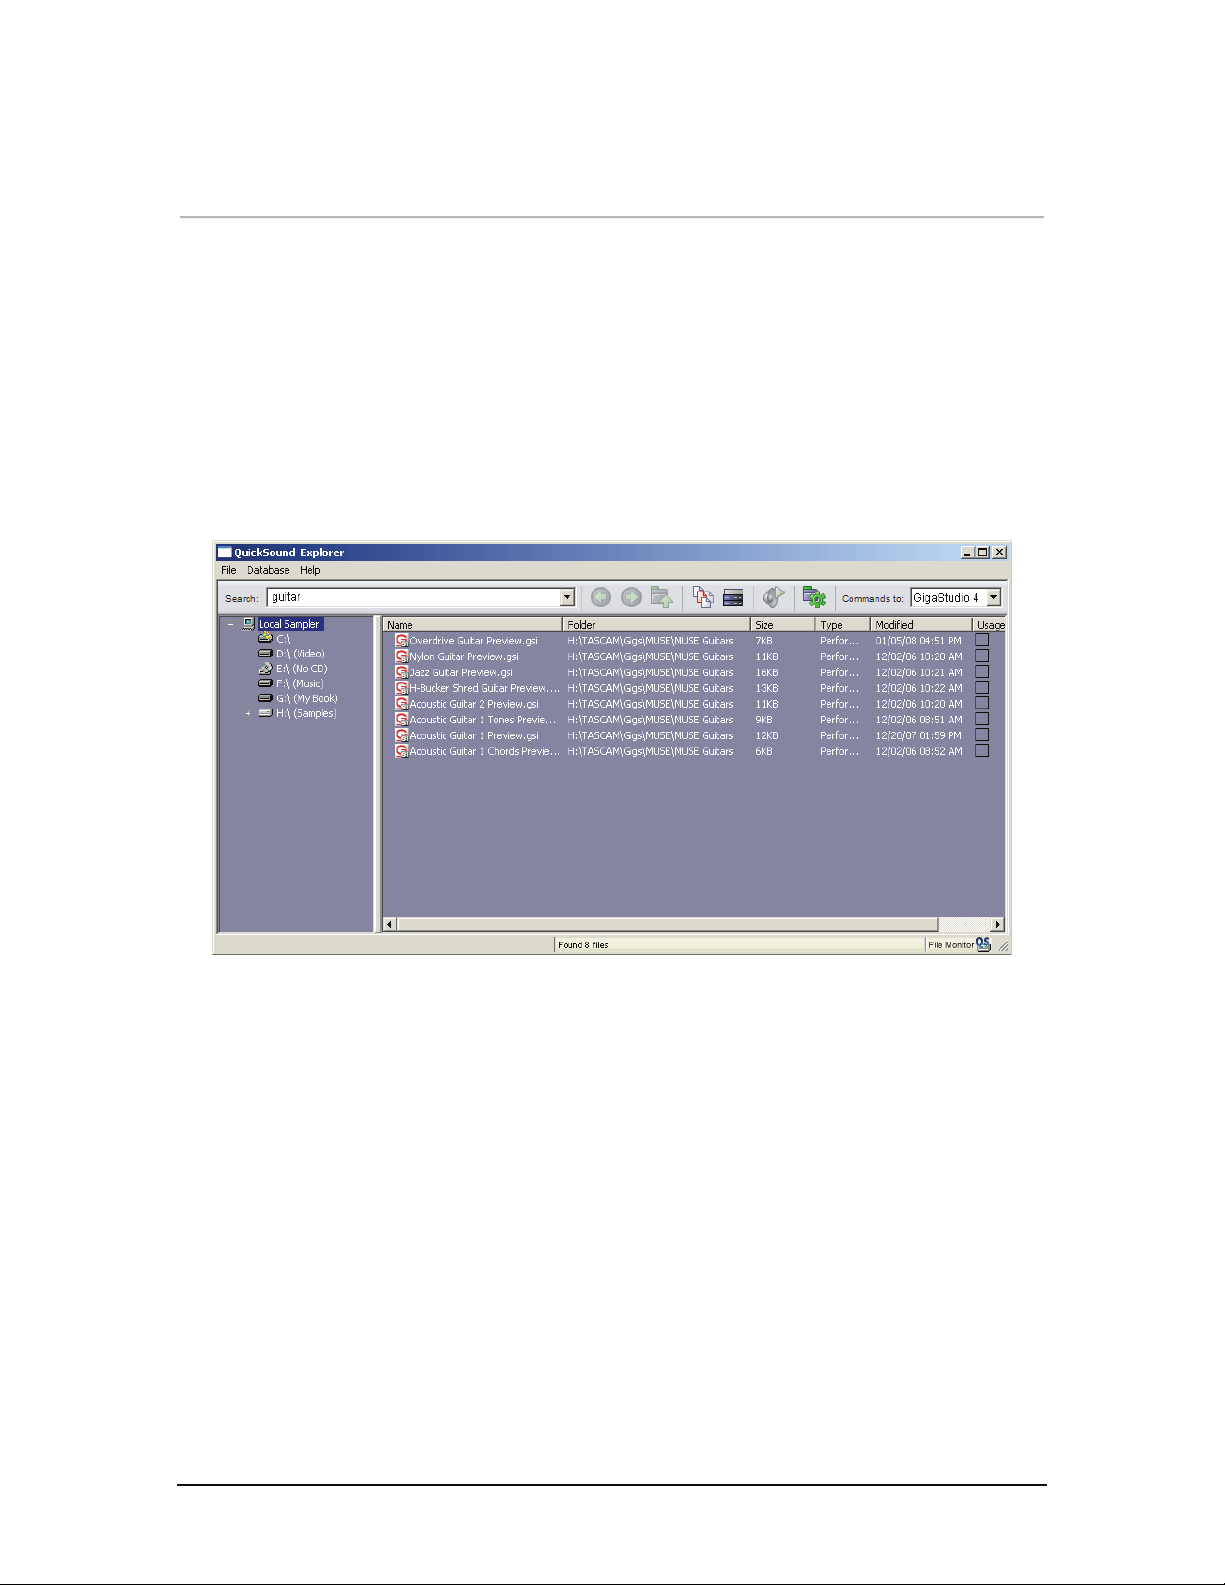
As your sample library grows, it becomes essential to find, audition and load sounds rapidly. QuickSound
Explorer provides an efficient library management system within a single application.
Performing a QuickSound search is simple:
1. Select and highlight the local sampler, a drive, or a folder you want to search.
2. Type in a search keyword or choose a default file extension from the drop-down list
of the QuickSound search field.
QuickSound will then look for files that match your search terms. In the following example, QuickSound
Explorer has returned results for ‘guitar’ sounds.
Incidentally. the QuickSound function has been completely re-designed for GigaStudio 4. In previous
versions, the QuickSound search/database/load function was built as an internal view in GigaStudio. It has
now become a standalone application in order to provide unified QuickSound functionality to both
GigaStudio and GVI (Giga Virtual Instrument).
QuickSound also includes an easy way to audition selected sounds via the Windows Sound System, so it’s not
even necessary to have a GSIF-compatible interface connected in order to listen to potential GigaStudio
sounds.
GigaStudio 4 Reference Manual 44
Page 45

Launching QuickSound
There are three main ways to launch QuickSound:
• Click on the QS button in the GigaStudio 4 toolbar.
• Go Start > Programs > TASCAM > QuickSound > QuickSound Explorer.
• If QuickSound Explorer’s file monitoring function is on (as described later), then a QS button will appear
in the System Tray. Right-click on the button, then select Launch QuickSound Explo rer.
GigaStudio 4 Reference Manual 45
Page 46

Editing QuickSound Settings
When you first launch QuickSound it may be necessary to customize your database by configuring various
QuickSound settings. To open the QuickSound configuration choose Database > Edit Settings from the main
menu section, or click on the Configure button (the one with the gear) in the QuickSound toolbar.
Following are the functions you’ll find under each of the three Edit Setting tabs.
Search Configuration Tab
GigaStudio 4 Reference Manual 46
Page 47
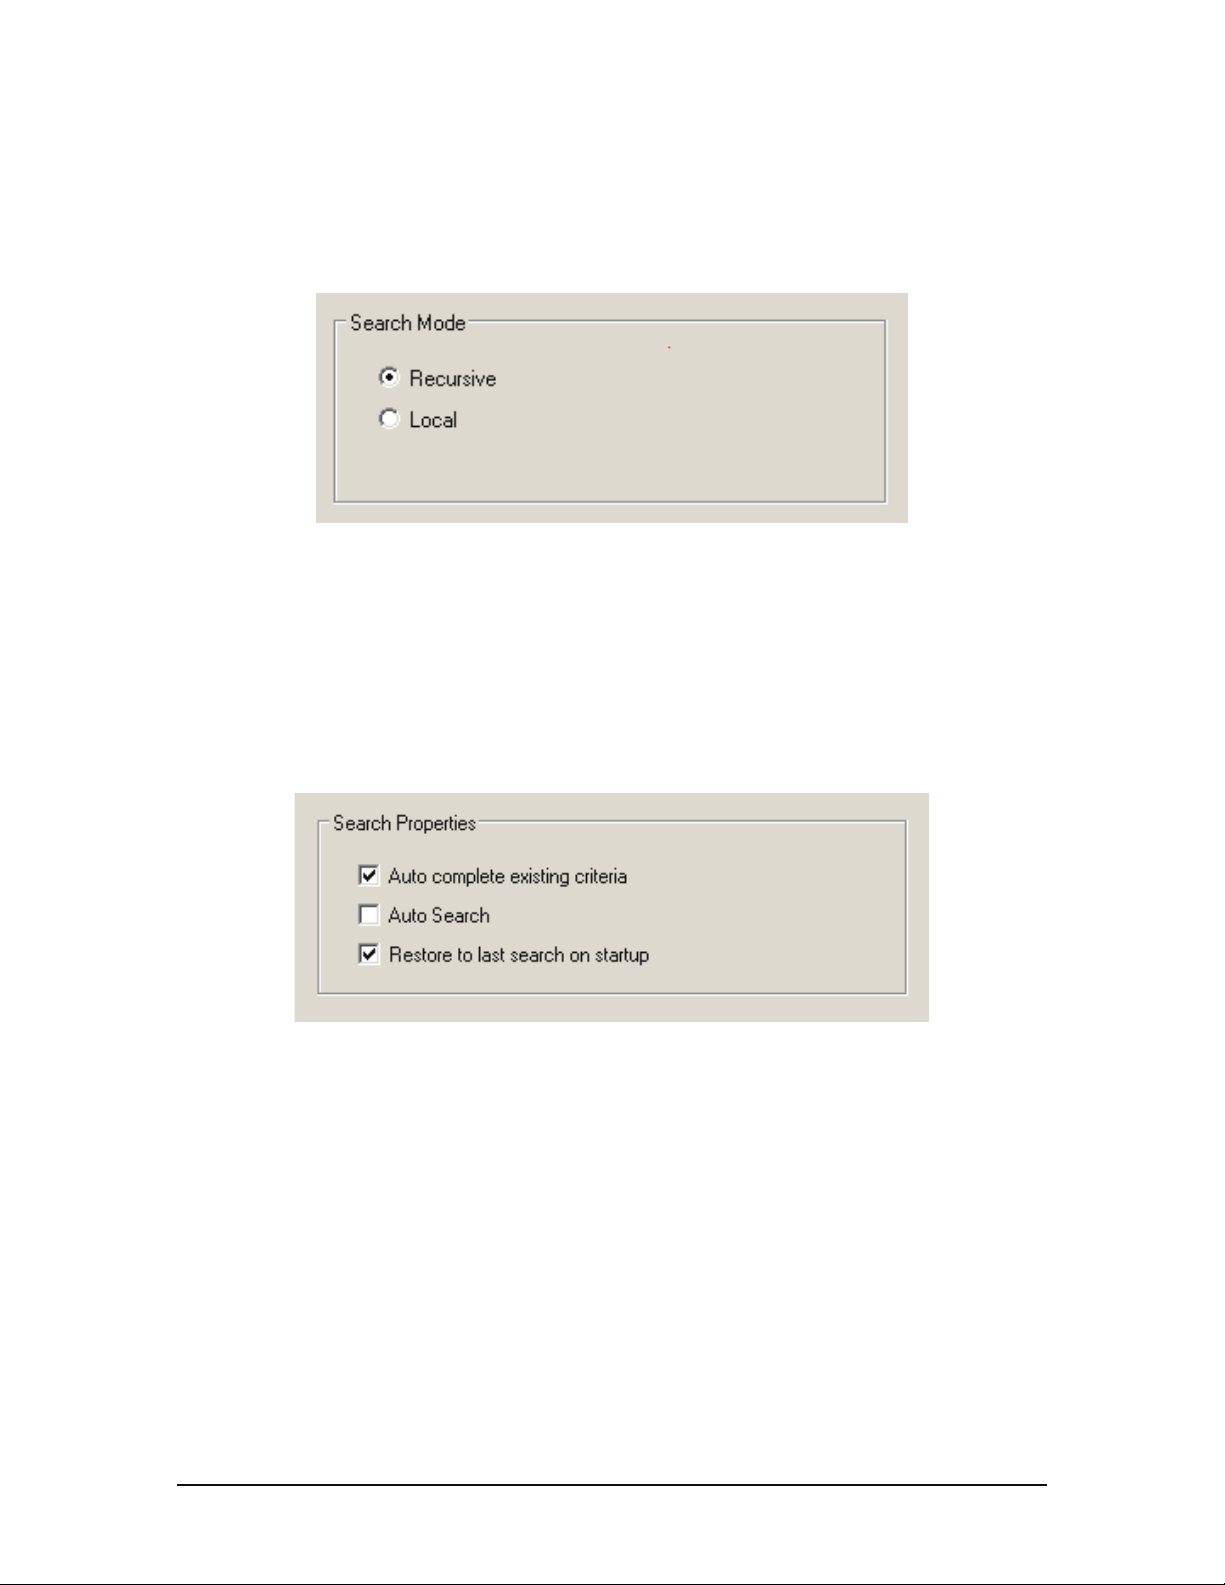
Search Mode
Choose Recursive to include all tree-level drives, folders (sub-directories) and file names that are within the
top branch selected in the QuickSound window.
Choose Local to look in only a specific location, excluding any contained sub-directories.
Search Properties
• Auto Complete Existing Criteria. Check this for searches that involve files with names like .gig, *.gig,
etc. Auto Completion speeds up searches for known file types.
• Auto Search. When enabled, GigaSampler will start to search for files as soon as you add a character to
the QuckSound search field. This is normally disabled as the process can be intensive for large databases,
but for smaller databases, this feature can often save you the trouble of typing in an instrument’s full
name.
• Restore to last search on startup. If checked, QuickSound Explorer will automatically default on startup
to the most recent search in your last QuickSound session.
GigaStudio 4 Reference Manual 47
Page 48

Results Properties
• Show only instruments that match search. This option will ONLY show those instruments within a
file that match a particular search criteria. The recommendation is to uncheck this option if the desired
results are to see all the instruments of a file. With this option selected, you will not see the '+' icon in
your results
• Automatically expand gigs to show instruments. Folders containing GigaStudio instruments that meet
the search criteria will be expanded automatically to show all instruments within the .gig files. You
therefore don’t need to expand each view manuall y.
• Show keyword hit report. Check this to display the number of keyword results in a search. Example:
Searching with the keyword “piano” might display “< PIANO> 7 files under selected directory” above the
search field.
• Verbose hit reporting. Check this to see detailed information about the list of files that match the
specified keywords.
• Clear search favorites list. During the course of doing searches, you will likely develop a list of
favorites. Click on this to clear the list so you can build a new list of favorites.
GigaStudio 4 Reference Manual 48
Page 49

Results Window’s Reset Configuration
You can determine which results are shown, and the order in which they’re sorted. Example: If you don’t care
about an instrument’s size, uncheck “Size Column” and size won’t appear as part of the results report.
Conversely, if Sample Rate is important, you can check that. Following are descriptions of Properties you can
decide to show (box checked) or hide (box unchecked).
• Name displays the .gig file name (expandable to show all instruments contained within the .gig file).
• Folder displays the instrument’s fi le path and the name of the containing folder.
• Size displays the instrument file size in kilobytes.
• Type shows brief details regarding the file type such as “16 bit wave file,” “Gig file 4.0,” and
“Performance.”
• Modified displays the date and time the file was last edited or changed.
• MemFootPrint displays the amount of memory (in kilobytes) needed to load the instrument.
• Chans is for wave files and displays “stereo” or “mono,” depending on the file type.
• SampleRate is for wave files (e.g., a sample rate of 44.1kHz).
• Group Flag displays a defined group for the instrument.
• Usage displays a percentage, a bar display, and the number of times an instrument, wave file, or
performance has been loaded.
GigaStudio 4 Reference Manual 49
Page 50

Furthermore, you can change the order in which results are displayed. To do this:
1. Click on a field to highlight it.
2. Click on the Move Up or Move Down arrows to change the field’s position in the list.
Watch Folders Configuration Tab
This tab lets you determine the folder(s) that Quicksound will use to create the QuickSound Database. On this
tab, you can also choose to enable/disable ‘file monitoring’ functionality, which when enabled will update the
Quicksound database by automatically logging changes to the specified directories.
GigaStudio 4 Reference Manual 50
Page 51

Available Folders
This browser lets you search for and select the directories that Quicksound will monitor for additions or
deletions to the existing database. It is used in conjunction with the Selected folders window.
To add a folder to the database’s “watch list”:
1. Under Available folders, navigate to the desired folder. Ctrl-click to select more than one folder.
2. Click on the > button that points to the Selected folders pane.
3. The folders you selected in Step 1 will now show up in the Selected folders window, and will be included
when the database is rebuilt and optionally monitored for changes.
To give a folder priority in a search (i.e., determine the order in which folders will be searched):
1. Click on a folder in the Selected Folder window.
2. Click on the Up Arrow button to the right of the window to move its priority up, or click on the Down
Arrow button to move its priority down.
GigaStudio 4 Reference Manual 51
Page 52

To remove a folder from the list of selected folders so that it is no longer monitored:
1. Under Selected Folders, click on the folder you want to remove to highlight it.
2. Click on the < button that points away from the Selected folders pane.
3. The folder you selected in Step 1 will no longer be monitored after the database is rebuilt.
File Types. You can choose whether certain file types are ignored or included in a search. Check the box
corresponding to the file types you want included in a search. Available file types are:
• WAV – Audio files
• GIG – GigaStudio Content Files
• GSP – GigaStudio Performances
• GSI – GigaStudio Performance Instruments
• PRF – GigaSampler Performance files
• ART – GigaEditor Articulation files
GigaStudio 4 Reference Manual 52
Page 53

QuickSound File Monitoring
File monitoring is a background task that allows the QuickSound database to remain current as files are added
to and removed from the system. Whenever File Monitoring is enabled, the creation, deletion, update, and
movement of Giga file types is tracked and reported to QuickSound. QuickSound ensures these file types are
actually Giga files before processing them. If a new Giga file type is created or updated on the system, the file
is parsed for keyword, instrument, and other attributes which are stored in the QuickSound database for user
queries, faster loading, and missing file resolution. While convenient, this does require some hard disk
activity and CPU power. QuickSound Explorer allows you to turn this function off if it interferes with
extremely CPU-intensive tasks.
Many improvements to the QuickSound database engine have been implemented to speed up searches. Also,
fixes were implemented in GS4 to address apparent system hangs when using search delimiters such as
“NOT”.
The File Monitoring section shows whether file monitoring is On or Off. If file monitoring is on and you want
to stop this process, click on Stop File Monitoring. If it is off and you want to start the process, click on Start
File Monitoring.
If you want file monitoring to start automatically when Windows starts, check the box that says
“Automatically start file monitoring when Windows starts.”
When File Monitoring is enabled you will notice a ‘QS’ icon in the the System Tray.
GigaStudio 4 Reference Manual 53
Page 54

Akai Converter
GigaStudio includes a utility that can convert Akai S1000 and S3000 format samples into a format suitable for
GigaStudio. There are several customization options for this conversion process.
Conversion Options
Akai format files are often dual mono. When the Akai Converter converts Akai Programs, it can detect if
mono samples are intended to be used together as a stereo pair. To create a merged stereo file, select the Merge
L/R Samples option.
GigaStudio 4 Reference Manual 54
Page 55

To have the Akai Converter attempt to emulate the imported file’s filter settings, check Use Akai Filter Info.
GigaStudio 4 Reference Manual 55
Page 56

Scope of Operation
Select one option from the list of pre-defined conversion operations. You may set the double-click operations
mentioned later under “Short Cut Operations” independently for Partitions and Volumes (NonPrograms),
Programs, and Items in the Batch List. Or, you may set them all to the same operation. Here are the options:
• All converts all non-programs, programs, and batch conversion items in the same operation.
• Non-programs converts Akai disk partitions or volumes to the .gig format.
• Programs converts only the Akai file’s program data to the .gig format.
• Batch items converts only instruments and programs in the batch list.
Temporary Disk Usage
When you drag/drop Akai objects to MIDI channels or the Virtual Keyboard, the Akai Converter converts the
S1000/S3000 CD/Partitions/Volumes/Programs on the fly into .gig or .wav files. These files are considered
transient and go into a temporary directory. To specify a drive and folder to hold this temporary directory,
use the “Browse” button to bring up a folder browser dialog where you can specify or change this directory.
Note: Akai Converter will automatically append a ‘Temp’ directory onto the end of the path shown. This
‘Temp’ directory is subject to deletion.
As these temporary files accumulate, you may want to delete them to regain hard drive space. There are two
ways to do this:
• To empty the temp directory automatically after a conversion operation, select the Empty Temp
Directory When Disk is Ejected or Program Exits option.
• To retain the contents of the temp directory until you want to delete it, choose the Empty Temp
Directory Manually (using Akai Converter Context Menu) option. Empty the directory by right-
clicking the converted files and selecting the appropriate context menu option.
GigaStudio 4 Reference Manual 56
Page 57

Note: To prevent specific files in this directory from being removed, right-click on them and set their
properties to “Read Only.” When you invoke a deletion option, the Read Only files will not be affected.
Short Cut Operations
You can define the Akai Converter double-click operation to one of a list of pre-defined operations for a
shortcut. The default setting is for a double-click to act as if you had performed a single click.
An example of a time-saving shortcut for an operation would be “Combine to Gig > GSEdit.” In this example,
double-clicking on a multi- selection would combine the selected instruments to a .gig file, then automatically
open them in the GigaStudio Instrument Editor for further design and custom parameter adjustment.
GigaStudio 4 Reference Manual 57
Page 58

Rebuild the Database
If File Monitoring is on, then the database is constantly being updated. However, if you prefer to turn off
automatic monitoring, you can also rebuild the database manually at any time by choosing Database > Rebuild
from the main Quicksound menu. Note that this may take some time, particularly if you have a lot of files
spread over many drives.
If you choose to turn off File Monitoring, it is recommended that you rebuild the database whenever any
significant changes are made to any of the specified Quicksound Folders.
Check Database Statistics
Choose Database > View Status to see statistics on the QuickSound database as well as a file count of WAV,
GIG, GSP, GSI, PRF, and ART files.
GigaStudio 4 Reference Manual 58
Page 59

Check Database Log
Choose Database > View Log File to see a log of database- related stats— when created, when modified,
number of fi les added, file path records, and more…
Run Diagnostics
As a troubleshooting option, choose Database > Run Diagnostics. This displays file statistics as the database
is being built, thus letting you monitor any possible corrupt files that interfere with the database building
process.
GigaStudio 4 Reference Manual 59
Page 60

QuickSound ToolBar Buttons
Audition Sounds within the QuickSound Application
Once the QuickSound database has been built, you can listen to the files via QuickSound’s audition button.
Simple highlight the desired Instrument/Audio file and click the Audition Button in the main Quicksound
Toolbar (speaker with play button).
This is separate from GigaStudio and plays back sounds through the Windows sound system. As a result, you
first need to make sure that Windows is set to play back through your desired monitoring system.
Configuring the Windows XP Sound System
• Choose Start > Settings > Control Panel, then double-click on Sounds and Audio Devices.
• Click on the Sounds tab and for Sound Scheme, select No Sounds. This is recommended so that system
sounds don’t blast your ears while you’re auditioning sounds via QuickSound.
• Click on the Audio tab and under Sound Playback, Default Device, use the drop-down menu to select the
desired sound card you want to use for monitoring. You can adjust volume by clicking on the Volume
button.
• Click on Apply if it’s not grayed-out, then click on OK.
Auditioning Instruments using GigaStudio
When the Audition Mode button is enabled (highlighted yellow) in the main Quicksound toolbar, doubleclicking on an instrument will default to loading on the same selected GigaStudio channel every time. This
allows you to rapidly load instrument variations onto a single MIDI channel to audition with your keyboard.
When the Audition Instruments button is disabled, double-clicking on an instrument will instead load that
instrument into the next empty MIDI channel in GigaStudio.
Stacking with Stack Mode
When the Stack Mode Button in the main Quicksound Toolbar is enabled, double clicking on an instrument
in QuickSound will stack that instrument on the currently selected channel in GigaStudio.
It is also possible to Stack multiple instruments simultaneously by first selecting multiple instruments, then
holding the Ctrl key while dragging and dropping them onto the desired MIDI channel in Giga.
Commands to: feature
With both GigaStudio and GVI installed on your system, it is necessary to specify which application you are
currently using. This is to make sure that double-clicking on an instrument loads that instrument into the
desired platform. Use the drop-down menu to choose between compatible installed applications.
GigaStudio 4 Reference Manual 60
Page 61

Convert Instruments to Giga4
When you right-click on an instrument or database folder in QuickSound you are given the option to convert
an instrument or group of instruments to the Giga4 format. While this conversion can increase performance
of older instrument formats when used in GigaStudio4, it is not backwards compatible. So, older instruments
converted to Giga4 format will no longer playback on older versions of GigaStudio.
GigaStudio 4 Reference Manual 61
Page 62

CHAPTER 5: LOADED INSTRUMENTS VIEW
When you load an instrument into GigaStudio 4’s MIDI Mixer, a small portion of each sample contained
in that instrument (less than 1 second of each sample’ s attack) is loaded into the computer’s memory (hard
drive and/or RAM). Detaching an instrument from within the MIDI Mixer removes it from the MIDI
Mixer, but does not remove (unload) it from memory. This is important if you want to use program change
commands to change instruments within a channel slot, as the instrument will already be waiting in
memory and recalled instantly, as opposed to having to loading the instrument from scratch.
To simplify instrument management, GigaStudio 4 includes a Loaded Instruments view that shows all
instruments currently loaded into memory, whether active or detached. The Loaded Instruments view can
either dock with the main UI or float.
Showing and Hiding the Loaded Instruments View
The hide/show Loaded Instruments button on the main toolbar toggles between hiding the Loaded Instruments
view and recalling it to its previous location. Going View > Loaded Instruments, or typing Ctrl-L performs
the same function.
GigaStudio 4 Reference Manual 62
Page 63

Loaded Instruments View Information
The Loaded Instruments view arranges information about instruments that are loaded into memory in
several columns.
FX: Indicates whether GigaPulse Convolution is programmed into the instrument.
Instrument Name: Shows the identifying name of the instrument. This is the name that shows up in the
MIDI Mixer slot when an instrument is attached to a MIDI channel.
Bank #: The first 128 (0-127) banks are reserved for normal non-stacked instrument assignments. An
instrument’s bank number is determined within the Giga Editor. Stacked instruments can also be managed
using MIDI bank select. When a stacked instrument is created it defaults to bank 8192.
Instrument #: This represents the program change number that will call up this instrument. Program
changes are numbered 0-127.4
Port X: Channels: There’s a column for each MIDI port that shows the channel(s) over which an instrument
will receive MIDI data. Example: If an instrument called “Guitar” shows 1 under Port 1: Channels and 3 under
Port 2: Channels, then sending MIDI data over channel 1 via Port 1, and/or over channel 3 via Port 2, with
trigger the Guitar instrument.
Loading Instruments into the MIDI Mixer Via Drag-and-Drop
A loaded inst rument can also be attached to a MIDI Mixer channel via drag-and-d rop.
• Dragging the instrument from the Loaded Instrument view into a MIDI Mixer channel, or sub-channel in
the case of a Stacked instrument, replaces what was previously loaded on that channel.
• Ctrl-dragging the instrument into a MIDI Mixer channel that already contains an existing instrument
stacks the new instrument with the old.
Loaded Instruments View Context Menu
Right-clicking on an instrument in the Loaded Instrument view brings up a context-sensitive menu with
several options.
Edit: Loads the selected Instrument into the GigaStudio Instrument Editor.
QuickEdit: Calls up the QuickEdit view for the selected instrument.
GigaStudio 4 Reference Manual 63
Page 64

Rename: Allows renaming the Instrument. New names show up immediately in the MIDI Mixer window.
Set Self-Mask on All Regions: With Self Masking enabled, playing louder velocities will shut off any
sustaining softer velocities of the same note region that are still decaying. Enabling self-masking in this
fashion (as opposed to using Quickedit or the GigaEditor) will affect ALL regions within the instrument.
Enabling this setting on an instrument that already had some regions set to self-mask while some were not
will force all regions to the new setting.
Help: Brings up help information on the Loaded Instruments view.
Unload Selected: Unloads the instruments currently highlighted in the Loaded Instruments view.
Unload All: Unloads all instruments from GigaStudio 4 memory. These unloaded instruments will no
longer be selectable by program changes.
Unload Unmapped: Unloads all instruments from memory that are not assigned to a MIDI channel.
Bank/Patch Manager: Brings up the Band/Patch Manager window, where you can edit bank and
instrument numbers. See the subsequent section for more information.
iMIDI Rule Manager: Brings up the iMIDI Rule Manager window which allows the adding, removing
and editing of iMIDI rules for that particular instrument. See the iMIDI Rule Manager chapter for more
information on the Intelligent MIDI tools.
Bank/Patch Assignment Window
This window allows changing Bank and Patch (Program Change) assignments for all instruments currently
loaded into GigaStudio 4.
Changing Bank and Patch Assignment for a Single Instrument
1. Click on the Instrument whose Bank and Patch assignment you want to change.
2. Under Bank/Patch Assignment, choose the new Bank and Patch number by highlighting the existing
number in the field and typing over it, or using the increment/decrement buttons toward the right.
3. Click on ‘Apply to Selected Patches’ to make the assignment “stick.”
Changing Bank and Patch Assignments for Multiple Instruments
1. Ctrl-click on the Instruments whose Bank and Patch assignment you want to change.
2. Under Bank/Patch Assignment, choose the new Bank and Patch number by highlighting the existing
number in the field and typing over it, or using the increment/decrement buttons toward the right.
3. Click on ‘Apply to Selected Patches’ to make the assignment “stick.”
GigaStudio 4 Reference Manual 64
Page 65

Note that all selected patches will have the same Bank number, but for program changes, the patch numbers
go sequentially from the highest patch in the list to the lowest, up to one below the patch number.
Example: If there are 10 instruments loaded and you Ctrl-click on the first three and select Patch #34, the
first three patch numbers will be 31, 32, and 33, going from the highest position on the list to the lowest.
Patch Conflict Rules
If you create a patch assignment that conflicts with a previous patch assignment, you have two options:
Move old instrument to next available patch, on bank: Enter the new Bank number in the Bank field
by highlighting the existing number in the field and typing over it, or using the increment/decrement
buttons toward the right. The old patch with the conflicting assignment will be moved to the new Bank.
Move new instrument to next available bank/patch: GigaStudio 4 looks for the next unassigned patch
number (or if all patches in a Bank are assigned, to the next Bank that contains unassigned patches) and
moves the assignment for the conflicting instrument to the new patch and/or bank.
Export Patches to File
Click to create a Notepad document, similar to the one shown here, that contains the Bank/Patch
assignments for all the currently loaded instruments in your performance.
If you also want this document to include Port and Channel data, check the Port/Channel Detail box.
Commit Changes
After reviewing the Bank and Patch assignment data, if you are satisfied with the results, click on Commit
Changes to close the window and proceed. If you do not want to make the changes, click on Cancel.
GigaStudio 4 Reference Manual 65
Page 66

CHAPTER 6: THE VIRTUAL KEYBOARD
There are several Virtual Keyboards in GigaSampler 4: including the QuickEdit Keyboard, which is
optimized for editing instrument parameters within the QuickEdit view, and the Virtual Keyboard view
(this view either docks or floats within GigaStudio 4), which is optimized for the following functions:
• Playing the keyboard with a mouse to audition sounds rapidly, allowing you to test and edit sounds
even if a hardware keyboard isn’t connected.
• Seeing the playable range of each instrument.
• Seeing any keyswitched articulations (within Dimensions and/or Stacks) that may be programmed into
the instrument.
Applying the Virtual Keyboard
• The Virtual Keyboard plays over one MIDI channel. If the selected MIDI port channel instrument is
linked and/or stacked with other instruments, then those instruments will be triggered as well.
• The Virtual Keyboard monitors MIDI note on activity on all port channels.
• You can use the Virtual Keyboard display in conjunction with the QuickEdit Keyboard, as well as the two
Distributed Wave Keyboards. With multiple instances of QuickEdit and Distributed Wave, it is possible
to show as many different keyboard displays at one time as you (or your screen space) can handle.
Showing and Hiding the Virtual Keyboard
The hide/show keyboard button on the main tool bar toggles between hiding the Virtual Keyboard view and
recalling it to its previous location. Going View > Keyboard or typing Ctrl-K performs the same function.
GigaStudio 4 Reference Manual 66
Page 67
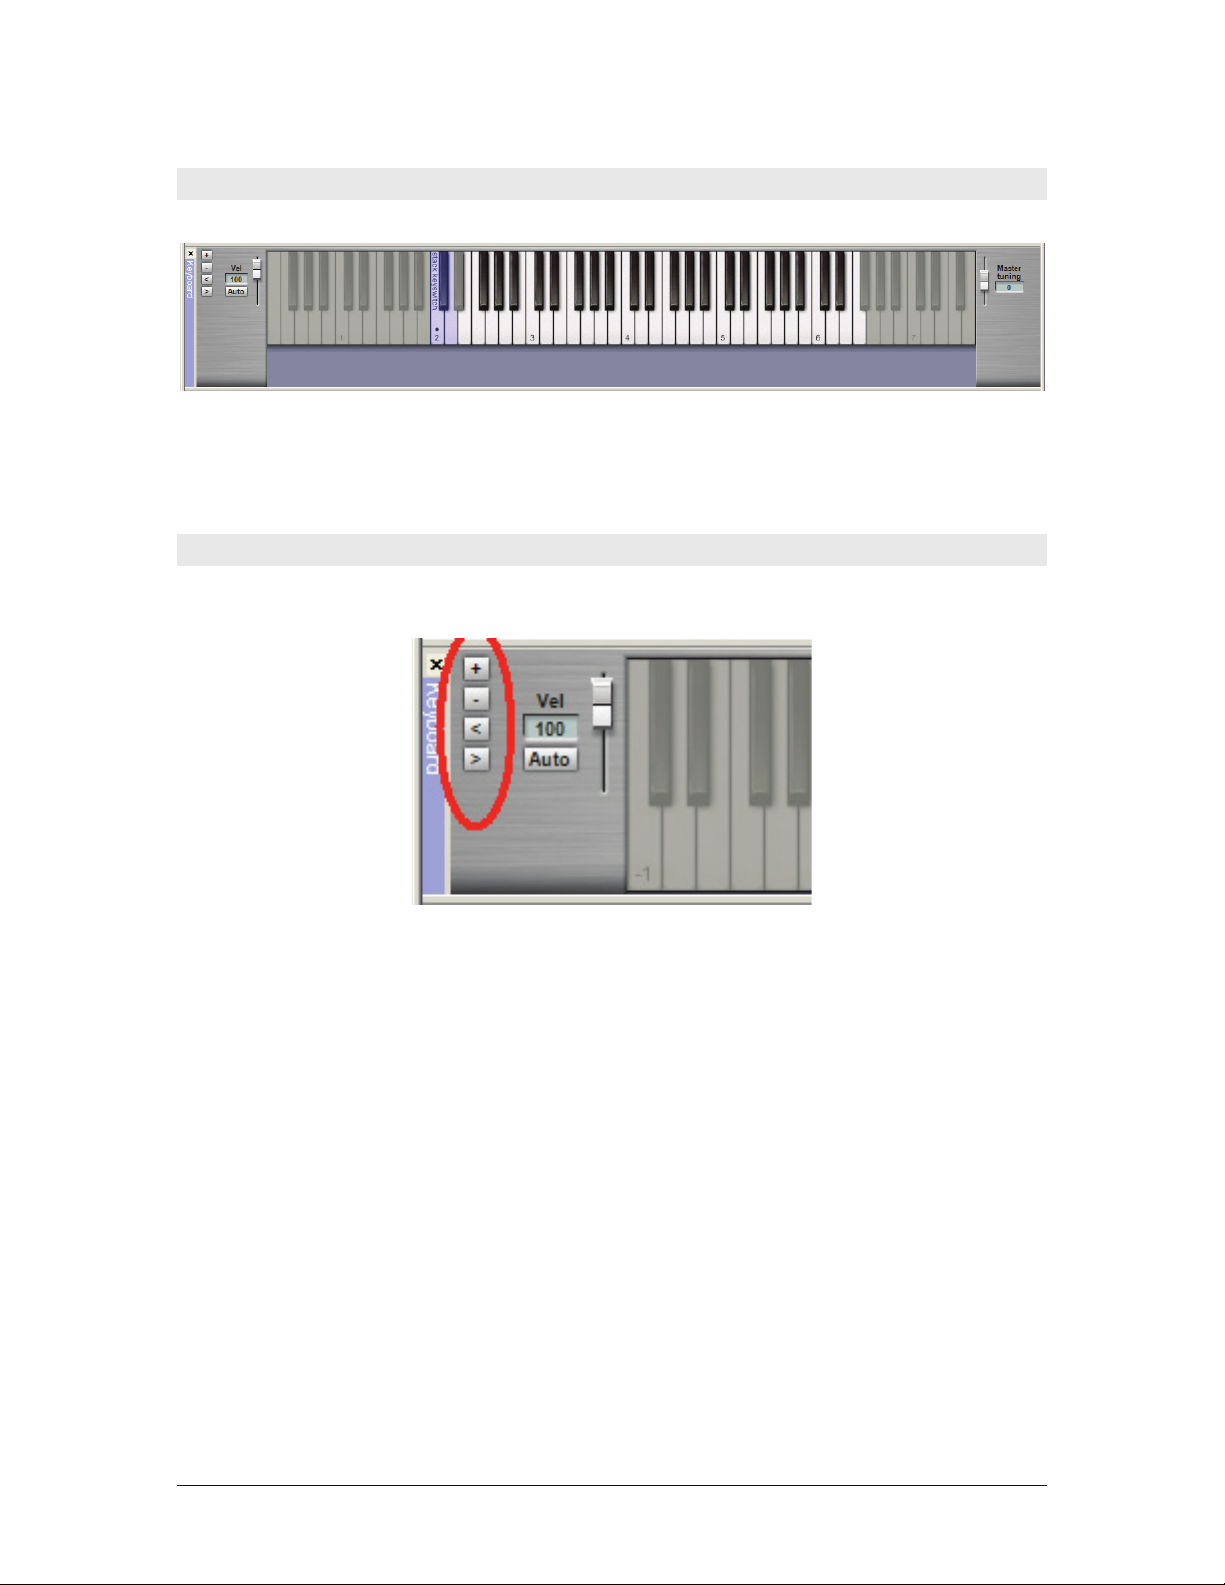
Color Coding
To indicate the function of each active keyboard region, the corresponding keys are color-coded.
Black/White: Indicate an instrument’s playable range.
Gray: Shows unused keys.
Green: Indicates a Dimension keyswitch (a black dot shows the currently active key)
Blue: Indicates a Stacked Instrument keyswitch (a black dot shows the currently active key)
Virtual Keyboard Range and Size Buttons
The four buttons toward the left of the Virtual Keyboard control the visible keyboard range and overall
keyboard size.
(+) : Increases the size of the keys, in eight increments total. Increasing the size of the keys decreases the
number of keys you can see at one time.
(-) : Decreases the size of the keys, in eight increments total. Decreasing the size of the keys allows seeing
more keys at a time.
(<) : Scrolls the Virtual Keyboard to the left, so that lower notes are visible as opposed to higher notes.
(>) : Scrolls the Virtual Keyboard to the right, so that higher notes are visible as opposed to lower notes.
GigaStudio 4 Reference Manual 67
Page 68

Resizing the Virtual Keyboard When Floating
As mentioned previously, you can float the Virtual Keyboard anywhere you want on the screen, such as
onto a second monitor. The range and size buttons work as described above, but additionally, you can
resize the keyboard by placing the cursor over any corner/edge of the Virtual Keyboard window, then
clicking and dragging.
Velocity Sensitivity Controls
The Virtual Keyboard is also velocity-sensitive. With Auto option enabled (highlighted green), clicking
toward the bottom of a key produces a higher velocity while clicking towards the top of a key produces a
lower velocity.
With Auto disabled (gray), the slider sets a fixed velocity level, as shown in the field to the slider’s left.
GigaStudio 4 Reference Manual 68
Page 69

Master Tuning Control
The Master Tuning fader located on the right edge of the Virtual Keyboard view can be used to perform an
offset tuning for all instruments on all port/channels at the same time. The Master Tuning offset is limited to a
positive/negative value of 50 cents (one half of one semitone). This feature is new to GS4 and can be useful
when using Giga to add instrumentation to an already existing project, with it’s own unique tuning reference.
GigaStudio 4 Reference Manual 69
Page 70

CHAPTER 7: QUICKEDIT
The QuickEdit interface lets you view, select, and edit various parameters of loaded instruments. Any edits
made with QuickEdit can be saved at the performance level in either a .GSI or .GSP file; the original .GIG file
instrument is not changed. There are three ways to save your edits to an instrument:
• The recommended method is to use QuickEdit and save your edits with a custom instrument level
performance (.GSI). This creates a performance that can be loaded as an inst rument to any port/channel
while retaining the existing session environment.
• Use QuickEdit and save your edits with the session performance (.GSP). This will save the entire
GigaStudio environment along with the edits you performed to any instrument(s) with QuickEdit. You
might use this to create a session template.
• Use the GigaStudio Instrument Editor to make permanent edits to an instrument. You can make edits to
Instruments using the Giga Editor by selecting “Edit” after right-clicking on an Instrument in the Loaded
Instruments window. Please see the GigaStudio Editor manual for additional details.
Opening QuickEdit
There are two ways to call up QuickEdit.
• Click the green ‘Q’ button on the associated MIDI Mixer channel slot.
• Right-click on an instrument in the Loaded Instruments list and select QuickEdit.
GigaStudio 4 Reference Manual 70
Page 71

QuickEdit Architecture
QuickEdit groups parameters into multiple function tabs to streamline the editing process.
1. The Waveform display shows the waveform being edited and a timeline of a sample’s duration, but also
superimposes envelope and LFO characteristics so you can see how they affect the waveform.
2. The five QuickEdit page selector tabs choose which function to edit.
3. Each QuickEdit page groups editing controls related to a particular tabbed function (Filter, Loop, etc.).
4. The Dimension display shows how dimensions are arranged across the keyboard, and allows for a number
of different dimension editing modes.
5. As with the MIDI mixer, the virtual keyboard remains onscreen, so you can trigger notes and test your
edits.
GigaStudio 4 Reference Manual 71
Page 72

Undo and Redo
The Undo and Redo buttons are essential editing tools.
Undo returns to the previous edit. Redo restores an edit. Note: GigaStudio 4 has multiple levels of undo, so
you can trace your way back through multiple edits.
Compare function: Use Undo/Redo to compare a particular edit by going back and forth between Undo and
Redo.
The Keyboard Section
The keyboard at the bottom of the QuickEdit window allows you to pick particular regions, notes, splits, etc.
for editing. If you can’t see the keyboard, click on the small arrow to the left of the Keyboard label.
GigaStudio 4 Reference Manual 72
Page 73

Edit Modes and Selections
The are several dimension select options you can choose from when editing an Instrument, as selected in the
fields just above the virtual keyboard. These are generally intended to specify which portions of the
instrument you want to edit—the entire instrument, just some regions, just some dimensions, etc.
MIDI Select
Enable MIDI Select (the button turns green) to use MIDI note messages (from the virtual keyboard, an external
keyboard, or sequencer track) to select a region(s) or split(s) for editing.
GigaStudio 4 Reference Manual 73
Page 74

Keyboard Select Drop-Down Menu
Before performing edits, you should specify whether they will affect All Regions of an Instrument (i.e., all
notes over the full range of the instrument) or Individual Regions (i.e., notes that cover a particular range of
the Instrument). If you select Indiv idual Regions you wil l then need to choose the regions to be edited. For
example, you might want to reduce the high frequency response for the entire Instrument, or only for an
individual region that seems excessively bright.
All Regions: Edits all regions within an Instrument’s complete note range.
Individual Regions: Edits selected regions.
With Individual Regions selected, a graphic appears above the keyboard that shows each region as a white
“box” directly above the keys making up the region. Remember that an alternative to selection by clicking (as
mentioned below) is to enable MIDI Select and send MIDI note messages to GigaStudio 4.
Click on region: Selects region. The selected region “box” turns from white to yellow.
Click on region and Shift-click on another region: Selects all regions in between the clicked regions.
Ctrl-click on region: Adds a region to the regions to be edited. This region need not be contiguous with other
regions.
You can also combine Shift-click and Ctrl-click operations to select a range of regions along with individual,
non-contiguous regions.
GigaStudio 4 Reference Manual 74
Page 75

Keyboard Color-Coding
• (A) Bright yellow keys indicate the region with the focus, i.e., the region whose parameters are being
displayed in the articulation section above the keyboard.
• (B) Dim yellow keys indicate selected regions other than the focus to which edits nonetheless will be
applied.
• (C)White keys are active parts of an instrument’s range, but not part of a selection.
• (D) Gray keys are unassigned.
Dimension Select Drop-Down Menu
Each note region of an instruments is divided into a number of dimension splits, such as L/R for stereo files,
multiple velocities, Round Robin, etc. Edits applied to an instrument’s dimension splits can either apply to all
region splits simultaneously or on an individual, split-by-split basis. To make a choice, click the Dimension
select option and choose among All splits, Stereo pairs, or Individual splits.
All splits: Selects all dimension splits associated with specified regions
Stereo pairs: Groups L/R stereo dimension splits while allowing other individual dimension selections
Individual splits: Allows for individual selection of all dimensions, including L/R stereo dimensions
GigaStudio 4 Reference Manual 75
Page 76

Edit Mode Drop-Down Menu
These options determine how turning a knob affects the parameter being edited.
Absolute: In absolute mode, the parameter is set to exactly the value you specify, in both the focus region and
in any other selected regions.
Relative: In relative mode, the parameter is increased or decreased by the same amount in all selected regions.
For instance, if you change the focus region from 3 to 5, you may be changing other selected regions from 6 to
8, or from 9 to 11.
Proportional: In proportional mode, the parameter is increased or decreased by the same ratio in all selected
regions. For instance, if you change the focus region from 3 to 5, you may be changing other selected regions
from 6 to 10 or from 9 to 15, in a multiplicative manner.
Dimensions Overview
Between the Articulation section and the Keyboard section is the Dimensions View section. If it is not visible,
click on the arrow to the left of the Dimensions label.
This displays all the available pre-programmed Dimension controllers contained in the loaded instrument,
and lets you correlate keyboard notes to particular Dimensions. It is important to understand the dimension
architecture of an Instrument when performing QuickEdits.
GigaStudio 4 Reference Manual 76
Page 77

About Dimensions
Dimensions are one of the most important concepts in GigaStudio 4, as they allow real-time MIDI control
over which samples are triggered. Dimensions are basically control sources such as MIDI controllers,
velocity splits, release triggers, layers, Smart MIDI dimensions, and stereo splits.
The number of available splits depends on the instrument’s complexity. An instrument can have a maximum
of 256 dimension splits per region (128 for stereo samples). Stereo is considered a dimension.
It’s up to the instrument designer to decide how to allocate these resources. This can be done on a note-by-note
basis, or a global dimension can affect the instrument’s entire range and depth. Example: Some note regions
may be mono with 32 velocities, while others are stereo with two velocity splits and mod wheel on four splits
with eight keyswitched dimensions. Furthermore, regions can simply be mono or stereo, with no other
dimensions applied.
Seeing Which Dimensions Affect Which Notes
With most dimensions, a small line with a number appears over a yellow dimension strip. This number
represents a MIDI keyboard note number. As you drag it left and right, when the note reaches a different split,
the Articulation section changes to show the articulation parameter values for that particular split.
There are also two numeric fields to the right of each dimension strip. The first digit of the left field shows the
Dimension on which the key number indicator sits, and the digit to the right, the total number of splits in the
Dimension. The right-most field shows the same number as the note number indicator. Example: If the second
split out of five (going from left to right) ranges from note 30 to note 60, and the key number indicator is on
note 42, then the two fields will show 2/5 and 42.
Dimension Types
Dimension types are shown in the gray strips toward the left of the Dimensions section.
GigaStudio 4 Reference Manual 77
Page 78

Stereo Split
This is the first and most basic Dimension. There is no MIDI control of this dimension; it’s either mono or
stereo.
Velocity Splits
With a velocity split, the dynamics with which you hit the keyboard determines which sample is triggered.
This is most often used for samples of instruments with dynamics that vary from soft to loud. Acoustic
instruments tend to get brighter and more “aggressive” as they get louder, so recording samples that range
from loud to soft, and triggering them based on velocity, makes for a much more convincing instrument
emulation.
Sustain Pedal
The MIDI Sustain Pedal switches back and forth between samples. This is commonly used for piano libraries
that have separate pedal up and down samples, or drum libraries with open and closed hi-hats.
MIDI Controllers
This allows a continuous controller (such as Mod Wheel) to switch between various samples. A good example
would be using the Mod Wheel to switch from a guitar string sound to a guitar harmonic.
Layers
You can have several samples layered on top of each other, playing together at once. You can even have
individual MIDI control of each layer’s volume, or have a MIDI controller sweep between the layers (crossfade
layering).
Key-Switch
This original Giga invention lets you use MIDI keyboard notes to switch instantly between various samples.
This is often used for orchestral instruments that have several articulations. You can instantly switch from
Long Sustain to Staccato to Legato to Trills to Tremolo, and so on, all on one MIDI channel.
“Round Robin” and Random
These dimensions switch the samples automatically each time you play a note. Round Robin plays a predetermined sample order while Random triggers the samples randomly. This is useful when hitting a note
repeatedly, such as a snare drum, and you want each note to be slightly different.
Smart MIDI
This Dimension is used for MIDI tools such as the Pattern Alternator, the Repetition Tool, and the Legato
Mode Tool. For more information, see the section on Smart MIDI tools.
GigaStudio 4 Reference Manual 78
Page 79

Wave Display
The Wave display at the top of the QuickEdit window allows for drag-and-drop editing of envelope, filter, and
LFO parameters. Click on a parameter control knob, or anywhere within one of the control sections (e.g.,
Amplitude LFO), and the Wave view will show its displayed nodes and graphic envelope. You can also click on
one of the labels toward the right of the Wave (A-ENV, F-ENV, etc.) to show and edit the corresponding
envelope.
Each control type has a corresponding color and line style for editing purposes. These lines exist on top of the
wave view, with node points for dragging to adjust their values. The color and style for the different control
types are:
Amplitude Envelope (A-ENV): Yellow lines connect the envelope nodes.
Filter Envelope (F-ENV): Purple lines connect the envelope nodes.
Pitch Envelope (P-ENV): Blue lines connect the envelope nodes.
Amplitude LFO (A-LFO): Yellow sine wave with a single adjustment node.
Filter LFO (F-LFO): Purple sine wave with a single adjustment node.
Pitch LFO (P-LFO): Blue sine wave with a single adjustment node.
To adjust the envelopes and LFOs, select a control type and drag the node(s) in the wave view to adjust
individual parameters. The edits are immediate, and saved with the performance. These are non-destructive
edits (i.e., the original .GIG instrument is not affected by the QuickEdit functions). To make a permanent edit
to a .GIG instrument, load it into the GigaStudio 4 Instrument Editor.
GigaStudio 4 Reference Manual 79
Page 80

You can zoom in and out on the waveform (from seeing a single sample to seeing the entire waveform), as well
as scroll forward and backward through it. This is essential on the Loop Page, but is also very useful for finetuning envelope parameter settings. There are two ways to navigate; the first method uses the navigation
buttons.
< Scrolls toward the beginning of the waveform
+ Zooms in on the waveform (greater magnification)
- Zooms out on the waveform (less magnification)
> Scrol ls toward the end of the waveform
The second method is to use the “elastic overview” strip located to the left of the navigation buttons. The strip
represents the length of the sample. The section shown in the waveform display is represented by a purple
block. When you move your cursor over this block, the cursor turns into a double-ended arrow. You can now
navigate in three ways.
• Click in the block and drag left or right to see a different part of the waveform.
• Click on the block’s left edge. Dragging right zooms in, with the right side of the block (and therefore the
right side of the waveform) remaining stationary. Dragging left zooms out, all the way to the beginning if
desired.
• Click on the block’s right edge. Dragging left zooms in, with the left side of the block (and therefore the
left side of the waveform) remaining stationary. Dragging right zooms out, all the way to the end if
desired.
• Double click on the purple portion of the “elastic overview” strip to zoom out to the full waveform.
GigaStudio 4 Reference Manual 80
Page 81

Articulation Section: General Tab
Volume (0 to -Infinity dB)
This sets the entire Instrument’s output level by using attenuation, measured in dB. A value of 0 provides no
attenuation. The more negative the number (turn the control counter-clockwise), the greater the degree of
attenuation. -Inf, the maximum amount of attenuation, equals no output signal.
Pan (-64 to 63)
Adjusts the Instrument’s location in the stereo field. -64 is full left, 0 is center, and 63 is full right.
Global Tune (-49 to 50 cents)
Set the overall fine pitch adjustment in cents. 100 cents equals one semi-tone (a single half-step), so the fine
tuning range can be set anywhere from a quarter-tone flat to a quarter-tone sharp. Tip: If one note in a region is
slightly out of tune, select only that region and adjust its tuning.
Self-Mask (on/off)
With Self Masking enabled, playing louder velocities will shut off any sustaining softer
velocities of the same note region that are still decaying. This is highly effective in reducing Giga’s voice
count, especially for sustaining instruments like ride cymbals that are triggered repeatedly.
Sustain Defeat (on/off)
Defeats whatever effect is caused by pressing the sustain pedal for the selected regions.
GigaStudio 4 Reference Manual 81
Page 82

Volume Modulation Section
Being able to modulate volume creates more realistic dynamics.
Controller Drop-Down Menu
Choose a MIDI controller, channel aftertouch, or velocity to modulate volume (or choose none if no controller
is desired).
GigaStudio 4 Reference Manual 82
Page 83

Invert Switch (on/off)
This inverts the action of the selected controller. Example: When inverted, higher velocity values lower the
volume rather than raise it.
Threshold (0 to 127)
Sets a level below which the controller has no effect, e.g., a minimum volume level.
Velocity Response Section
This determines how the controller selected under Volume Modulation affects the output level. For example,
you can adjust velocity response to match your playing style (soft, heavy, whatever) and keyboard controller
response. If your controller already has a custom response, you can set GigaStudio 4 to add no response
changes of its own.
Velocity Curve Drop-Down Menu
GigaStudio 4 Reference Manual 83
Page 84

Choose one of three velocity curves from this drop-down menu.
0 - Nonlinear: Velocity is weighted so that medium to high input velocities cover most of the output velocity
range. The five curves show the five options offered by the Velocity Range slider (described in the next
section).
1 - Linear: The velocity corresponds directly to your playing; a linear increase in how hard you play leads to a
linear output velocity increase. Choose this if your controller has a custom response you already like. The five
lines show the five options offered by the Velocity Range slider (described in the next section). The top line is
the Low curve, where all input velocities are converted to a constant velocity value of 127. The lowest line is
for the High curve, where the output velocity equals the input velocity. The other options offset velocity to
various extents. Use the curve that provides the best “feel” for your keyboard and playing style.
2 - Special: This as a more exaggerated version of the nonlinear response. Moderate playing produces mostly
low velocities, then velocity output increases rapidly as you play harder. The five lines show the five options
offered by the Velocity Range slider (described in the next section).
GigaStudio 4 Reference Manual 84
Page 85

Velocity Range
This is somewhat like a “compressor” for dynamic range. Just as audio compression appears to bring up lowlevel audio, at the low Velocity Range setting, low incoming velocity values are boosted somewhat. This boost
becomes progressively less at higher settings. At the High setting, the dynamic range follows the full range of
your keyboard’s dynamics.
Scale
This value is used to scale the currently selected velocity curve in order to further customize the filter’s
response to incoming velocity. The filter response can be scaled to open more quickly by entering values
higher than 20; this results in higher filter cutoff frequencies at lower velocities and yields on overall brighter
response. Values lower than 20 will cause the filter to open more slowly over the velocity range, yielding an
overall darker filter response. The scaling range is 0-127 with a default value of 20. This parameter is only
available when the Cutoff Controller is set to “None”.
Release Curve Drop-Down Menu
GigaStudio 4 can respond to release velocity MIDI messages, which are transmitted when you release a key or
keys.
0 - Nonlinear: Velocity is weighted so that medium to high input release velocities cover most of the output
release velocity range. You need to have progressively faster release times to reach higher velocities.
1 - Linear: The velocity corresponds directly to your playing; a linear increase in release time results in a
linear increase in release velocity. Choose this if your controller has a custom response you already like.
GigaStudio 4 Reference Manual 85
Page 86

2 - Special: This is a more exaggerated version of the nonlinear response. Moderate release times produce
mostly low release velocities, then the release velocity output increases rapidly with faster release times.
Choose the one that feels the most natural to your playing style.
Release Range
As with Velocity Range, this is somewhat like a “compressor” for release velocity. At the low Velocity Range
setting, the effect of low release velocity values are boosted somewhat. This boost becomes progressively less
at higher settings. At the High setting, the release velocity value follows the full range of your keyboard’s
dynamics.
Release Trigger Decay
When release time is tied to the envelope release time, Trigger Decay influences the speed of the release time,
from 0 (fastest) to 8 (slowest).
Instrument Global Section
Pitch Bend Range (0 to 12 Semitones)
This sets the how much pitch will be bent when the pitch bend wheel is set to either extreme of its rotation.
Example: With 2, the maximum pitch bend range is 2 semitones. With 12, the maximum pitch bend range is
12 semitones (one octave).
This control affects all regions. You cannot have separate bend ranges for individual regions.
GigaStudio 4 Reference Manual 86
Page 87

Piano Release Mode
This option is intended for Piano samples. On a real piano, you can step on the sustain pedal very quickly after
releasing the notes and you will still get some strings resonance. This checkbox allows GigaStudio to emulate
that when used in conjunction with pedal down samples.
(Note that this mode is for use only with piano libraries that use actual pedal down samples. It’s not needed
when the ambience is supplied by GigaPulse.)
Articulation Section: Amplitude/Pitch Tab
Amplitude Envelope Parameters
An envelope represents how a sound’s dynamic properties change over time: How the sound begins, what
occurs during the sustain characteristics, and how it returns to silence. All acoustic sounds have associated
envelopes. The three primary aspects of any given sound affected by envelopes are amplitude (volume),
frequency (pitch), and harmonic content (timbre or filter). In QuickEdit, these are controlled by the Amplitude
Envelope, Pitch Envelope, and Filter Envelope respectively.
GigaStudio 4 Reference Manual 87
Page 88

General Envelope Information
The Envelope and LFO shapes are superimposed over the waveform graphic. You choose what to display with
the Envelope/LFO selection buttons to the right of the waveform.
There are two ways to alter the envelope shape:
• Rotate the envelope control knobs
• Click on and drag nodes (the large dots) on the envelope graphic.
Note that you can display any envelope in any tabbed view. Example: While on the Amplitude/Pitch page, you
can display the Filter envelope. This is helpful as sometimes you want to adjust one envelope while seeing
another envelope’s shape.
GigaStudio 4 Reference Manual 88
Page 89

Amplitude Envelope Section
The following graphic indicates the portions of an envelope that relate to the following parameters.
Pre-Attack (0 to 100%)
(A) The sets the level from which the attack time begins, thus allowing the sound to start at any level from
silent to full volume. The value expresses a percentage of the maximum level. Example: 50.00 sets the
beginning of the attack envelope to half of the sample level.
Attack (0 to 10 seconds)
(B) This parameter sets the duration for the envelope to go from the Pre-Attack level to the maximum
possible level. Longer attacks are characteristic of wind instruments; plucked instruments have virtually no
attack.
Decay 1 (0 to 60 seconds)
(C) Decay is the amount of time it takes for the envelope to fall from the maximum level to the level set by the
Sustain parameter (described next).
Sustain (0 to 100%)
(D) Sets the level the envelope attains after the decay phase is complete.
Hold (on/off)
(E) If a sample has a loop point, the Hold function will prevent the first decay (Decay 1) from happening until
the sample has played through its entire loop one time.
This is handy for natural decaying instruments like Piano or Guitar that have small looped samples. When
Hold is set to “Yes” the sample will hold its volume until it plays through the loop. Once it has played through
GigaStudio 4 Reference Manual 89
Page 90

the loop, it will then start the first decay down to the sustain level. This can make for a more realistic envelope
for short looped samples. It gives them a little more of a natural personality despite the artificial looping.
Note: Hold is available on the Amplitude Envelope but not the Filter Envelope.
Decay 2 (0 to 60 seconds, or infinite)
(F) This determines how long the envelope remains at the sustain level. If set to Infinite, the sustain phase will
last as long as the associated key is held down. Note that once the Decay 2 time has elapsed, the Release phase
(described next) will begin, regardless of whether you’re holding down the associated key or not.
Release (0 to 60 seconds)
(G) Release specifies how long it will take for the envelope to fall back to 0 from the current sustain level.
• If Decay 2 is set to “Infinite,” the release phase will begin when the note is released.
• If Decay 2 is set between 0 and 60 seconds, then the release phase will start after that amount of time has
elapsed.
• If you release the note before the Decay time has elapsed, then the release will begin upon releasing the
key.
Pitch Envelope Section
The Pitch envelope has only two parameters.
Attack (0 to 60 seconds)
This parameter sets the time for the pitch envelope to attack up to the original pitch or decay down to it, with
the amount of pitch change set by the Depth control.
Depth (-1200 to 1200 cents)
When centered, the Pitch Envelope has no effect. Turning further counter-clockwise (negative values) sets a
lower initial pitch, which glides up to standard pitch for the duration of the Attack time. Turning further
clockwise (positive values) sets a higher initial pitch, which glides down to standard pitch over the duration
set by the Attack time. The maximum amount of initial pitch deviation is 1200 cents (one octave).
GigaStudio 4 Reference Manual 90
Page 91

Amp Envelope Modulation Section
The Modulation controls allow real-time MIDI control of the Attack, Decay and Release of the Amplitude
envelope.
Controller
Choose a MIDI controller, channel aftertouch, or velocity to provide a modulation source for the Amp
Envelope parameters. There are 25 possibilities, including none.
Invert
This inverts the action of the selected controller. Example: Normally, higher velocity values lengthen the
Decay time. When inverted, higher velocity values shorten the Decay time.
Attack, Decay, Release
The Attack, Decay, and Release parameters have four different modulation levels. Each parameter is
independent of the others.
Off : The parameter ignores the MIDI Controller.
Low: Very light response to the MIDI Controller. Example: With Invert off and Attack being modulated, high
velocity notes will extend the attack time a little bit.
Med: Moderate response to the MIDI Controller. In the example above, high velocity notes will extend the
attack time by considerably more.
High: Provides the maximum parameter variation based on the MIDI Controller value. Example: With Invert
off and Release being modulated, higher velocities will give much longer release times. With Invert on, higher
velocities will give much shorter release times.
Note that the effect of modulation depends on the envelope settings. Example: If the envelope Attack time is
zero, the Mod controller won’t affect it, as you can’t make zero longer or shorter. Once you enter a parameter
higher than zero, this controller will then have an effect. Shorter Attack times result in very light changes with
the Mod controller, while longer times result in more drastic changes with the Mod controller. The Decay
and Release settings work similarly.
GigaStudio 4 Reference Manual 91
Page 92

Amplitude LFO (Low Frequency Oscillator) Section
LFOs control various parameters cyclically, thus automating continuously repeating changes over time. The
Amplitude LFO provides tremolo effects (periodic variations in level).
Frequency (0.1 To 10Hz)
This sets the LFO frequency. The amplitude LFO frequency is superimposed on the waveform when A-LFO is
selected with the Envelope/LFO buttons toward the right of the waveform display. Also note that a node is
located toward the left side of the waveform. You can adjust frequency by dragging this node.
Control Source
This allows controlling the LFO depth from several possible sources, as selected from a drop-down menu.
GigaStudio 4 Reference Manual 92
Page 93

0 – Internal: The LFO depth is controlled solely by the Internal Depth control.
1 – Mod Wheel: An external mod wheel controller determines the LFO depth, with its maximum limit set by
the External Depth control.
2 – Breath Control: An external breath controller determines the LFO depth, with its maximum limit set by
the External Depth control.
3 – Int+Mod Wheel: This allows for a constant amount of LFO depth supplied by the Internal LFO function,
with additional modulation provided by an external mod wheel. These work as described above under 0 Internal and 1 - Mod Wheel.
4 – Int+Breath Ctrl: This allows for a constant amount of LFO depth supplied by the Internal LFO function,
with additional modulation provided by an external breath controller. These work as described above under 0
- Internal and 2 – Breath Control.
Internal Depth (-4800 to 4800)
This determines the amount of LFO modulation when Internal is the control source (described above).
Negative values and positive values give the same audible effect, but with multiple layers or instruments, you
might want to have one sound increasing in level while another sound decreases in level, in a complementary
way.
External Depth (-4800 to 4800)
This determines the amount of LFO modulation when Mod Wheel or Breath Control is selected as a control
source, as described previously. Negative values and positive values work as described for Internal Depth.
Invert (on/off)
Turning this on is the equivalent to changing the Depth parameters from a positive value to the equivalent
negative value, or vice-versa.
Synch (on/off)
When on, all LFOs start from the same starting point. When off, all LFOs are free-running.
Pitch LFO Section
The Pitch LFO provides vibrato effects (periodic variations in pitch).
GigaStudio 4 Reference Manual 93
Page 94

Frequency (0.1 to 10Hz)
Thi s sets the LFO frequency. The Pitch LFO frequency is superimposed on the waveform when P-LFO is
selected with the Envelope/LFO buttons toward the right of the waveform display. Also note that a node is
located toward the left side of the waveform. You can adjust frequency by dragging this node.
Control Source
This allows controlling the LFO depth from several possible sources, as selected from a drop-down menu.
0 – Internal: The LFO depth is controlled solely by the Internal Depth control.
1 – Mod Wheel: An external mod wheel controller determines the LFO depth, with its maximum limit set by
the External Depth control.
2 – Breath Control: An external breath controller determines the LFO depth, with its maximum limit set by
the External Depth control.
3 – Int+Mod Wheel: This allows for a constant amount of LFO depth supplied by the Internal LFO function,
with additional modulation provided by an external mod wheel. These work as described above under 0 Internal and 1 - Mod Wheel.
4 – Int+Breath Ctrl: This allows for a constant amount of LFO depth supplied by the Internal LFO function,
with additional modulation provided by an external breath controller. These work as described above under 0
- Internal and 2 – Breath Control.
GigaStudio 4 Reference Manual 94
Page 95

Internal Depth (-1200 to 1200)
This determines the amount of LFO modulation when Internal is selected as a control source. The maximum
amount of pitch change is plus and minus 1200 cents, or one octave above and below the initial pitch. Negative
values and positive values give the same audible effect, but with multiple layers or instruments, you might
want to have one sound increasing in pitch while another sound decreases in pitch, in a complementary way.
External Depth (-1200 to 1200)
This determines the amount of LFO modulation that’s applied when Mod Wheel or Breath Control is selected
as a control source. Negative values and positive values work as described previously.
Invert (on/off)
Turning this on is the equivalent to changing the Depth parameters from a positive value to the equivalent
negative value, or vice-versa.
Synch (on/off)
When on, all LFOs start from the same starting point. When off, all LFOs are free-running.
Articulation Section: Filter Tab
Filters shape a sound’s timbre by reducing and/or boosting the amplitude of specific frequency ranges. An
instrument can sound duller, brighter, thinner, fatter, etc. through the use of filtering.
For sound design and creative effects, filter parameters can be modulated by various control sources such as
velocity, aftertouch, continuous controllers, envelopes, and more.
Filter Section
This section determines the static filter characteristics to which modulation can be added.
Type
GigaStudio 4 offers four filter types. The graph toward the right provides a graphic representation of the filter
frequency response.
GigaStudio 4 Reference Manual 95
Page 96

0 – None: The filter is bypassed and has no effect on the sound.
1 – Lowpass: The response attenuates high frequencies above a user-settable cutoff frequency, but lets low
frequencies pass through.
2 – Highpass: The response attenuates low frequencies below a user-settable cutoff frequency, but lets high
frequencies pass through.
3 – Bandpass: The response peaks at the cutoff frequency; frequencies above and below that frequency are
attenuated.
4 – Bandreject: The response is reduced at the cutoff frequency; frequencies above and below that frequency
are not affected.
Cutoff (0 to 127)
This sets the initial filter cutoff frequency to which modulation can be applied. 0 is the minimum possible
frequency, 127 the maximum.
Min Cutoff (0 to 127)
Minimum cutoff sets a lower frequency limit. Example: With a lowpass filter response, bringing the filter
cutoff down below the signal’s lowest frequency will mute the sound. Setting a minimum cutoff frequency can
prevent this from happening.
Res (0 to 127)
Resonance creates an amplitude peak at the cutoff frequency (except in Bandreject mode), where it creates an
amplitude dip). The maximum resonance is set close to the point of self-oscillation, and will resonate
according to the frequency content of the waveform that is being filtered.
Dyn (on or off)
Enabling the ‘Dyn’amic option increases the overall resonance by dynamically scaling the Q (in addition to the
cutoff frequency of the filter) in accordance with changes of envelope and/or external control.
MIDI Control Section
Cutoff Controller
This parameter assigns a MIDI controller to provide real-time continuous control over the filter cutoff
frequency.
GigaStudio 4 Reference Manual 96
Page 97

There are 10 modulation options. Assigning a MIDI controller overrides the Cutoff setting in the Filter
section.
Invert
This inverts the action of the selected controller. Example: When inverted, raising the controller value will
lower the filter cutoff rather than raise it.
Resonance Controller
This parameter assigns a MIDI controller to provide real-time continuous control over the filter resonance.
There are four modulation options. Assigning a MIDI controll er overrides the Resonance setting in the Filter
section.
Key Response Section
This is where you can tie the filter cutoff to velocity and pitch.
Vel Curve
This works in conjunction with the Velocity Dynamic Range (described next). Three different velocity curves
are available.
GigaStudio 4 Reference Manual 97
Page 98

0 – Nonlinear: Velocity is weighted so that medium to high input velocities cover most of the output velocity
range.
1 – Linear: The output velocity is directly proportional to the input velocity.
2 – Special: This exaggerates the nonlinear response even further. Moderate playing produces mostly low
velocities, then the velocity output increases rapidly as you play harder.
Choose the response that works best with your playing. Players with a light touch will probably choose the
linear response, while players with a heavy touch will likely prefer the nonlinear or special response.
GigaStudio 4 Reference Manual 98
Page 99

Vel Dyn Range
This alters the velocity curve’s dynamic range. There are five response options.
1 – High
2 – Medium high
3 – Medium
4 – Medium low
5 – Low
The High setting has no effect on the velocity curve, and attains the widest dynamic range. As the dynamic
range gets lower, the velocity curve is “compressed” so that lower input velocities produce higher output
velocities. In practical terms, this means lower dynamic ranges are more sensitive to lower input velocities.
For example, with the Linear curve selected in conjunction with the lowest velocity dynamic range, any input
velocity produces an output velocity value of 127.
Key Tracking (on/off)
When enabled, the filter cutoff frequency tracks note pitch. Therefore, every note will have similar-sounding
timbres. When disabled, the cutoff frequency remains constant, regardless of pitch.
Break Pt (0 to 127)
Break point sets the MIDI note value at which filter keyboard tracking begins (the default is 60, or middle C).
Example: The filter cutoff could be constant below a certain note, then track keyboard pitch above that note.
GigaStudio 4 Reference Manual 99
Page 100

Filter Envelope Section
The following graphic indicates the portions of an envelope that relate to the following parameters.
Pre-Attack (0 to 100%)
(A) This sets the cutoff frequency at which the attack time begins, thus allowing the cutoff to start at any
frequency, from minimum to maximum. The value expresses a percentage of the available cutoff frequency
range.
Attack (0 to 10 seconds)
(B) This parameter sets the duration for the envelope to go from the Pre-Attack cutoff frequency to the
maximum possible cutoff frequency.
Decay 1 (0 to 60 seconds)
(C) Decay is the amount of time it takes for the envelope to fall from the maximum cutoff frequency to the
cutoff frequency set by the Sustain parameter (described next).
Sustain (0 to 100%)
(D) Sets the cutoff frequency the envelope attains after the decay phase is complete.
Decay 2 (0 to 60 seconds, or infinite)
(E) This determines how long the envelope remains at the sustain level. If set to Infinite, the sustain phase will
last as long as the associated key is held down. Note that once the Decay 2 time has elapsed, the Release phase
(described next) will begin, regardless of whether you’re holding down the associated key or not.
GigaStudio 4 Reference Manual 100
 Loading...