


®
HD-35NAS
USB/LAN-Festplattenlaufwerk
USB/LAN Hard Drive
Lecteur de disque dur USB/LAN
Unità a disco rigido USB/LAN
Unidad de disco rígido USB/LAN
USB/LAN–PUSB/LAN–P
USB/LAN–P
USB/LAN–PUSB/LAN–P
USB/LAN-Ä»¼¸ÂÍà µ°Ä»ÀÃ
ohon peohon pe
ohon pe
ohon peohon pe
User’s Manual
PřPř
írír
učkučk
Př
ír
učk
PřPř
írír
učkučk
vného disvného dis
vného dis
vného disvného dis
Handbuch
Manuel
Manuale
Manual
a uživa uživ
a uživ
a uživa uživ
atat
at
atat
´È¶ºÂ°µºÀ
kk
uu
k
u
kk
uu
eleele
ele
eleele
– 1 –
Entsorgung des Geräts
Das Gerät darf nicht mit dem Hausmüll entsorgt werden. Erkundigen Sie sich bei den zuständigen kommunalen Einrichtungen, welche
Entsorgungsmöglichkeiten es für elektronische Geräte gibt.
Disposing of the Product
Your device should no be placed in municipal waste. Please check local regulations for disposal of electronic products.
Mise à la décharge de l’appareil
L’appareil ne doit jamais être mis à la décharge municipale. Veuillez consulter la réglementation locale concernant l’élimination des produits électroniques.
Smaltimento del prodotto
Non gettare il prodotto nei rifiuti normali. Attenersi alle disposizioni locali per lo smaltimento di prodotti elettronici.
Desecho del producto
El aparato no debe lanzarse junto con los residuos municipales. Compruebe la legislación local acerca del desecho de productos electrónicos.
Deitar fora o aparelho
O aparelho não deve ser colocado no lixo municipal. Informe-se acerca das regulamentações sobre como deitar fora equipamento electrónico.
. . ! .
Utylizacja produktu
Urządzenie nie powinien się znaleźć na wysypisku śmieci. Należy zapoznać się z przepisami dotyczącymi utylizacji urządzeń elektonicznych
obowiązującymi w danym rejonie.
Likvidace výrobků
Výrobek se nesmí vyhazovat do obec-ního odpadu. Seznamte se s místními předpisy pro likvidaci elektronických výrobků.
ÁÀº½½²Åº»¯ µº²È¶°ÂºÄ¸ Ÿà ÄÆÄ»¶Æ¯Ã
ÄÆÄ»¶Æ¯ µ¶¾ ¶ÁºÅ®Á¶Å²º ¾² Á¶Å²ÈŶ° ÄŲ Àº»º²» ²ÁÀ°½½²Å². ¾¸½¶Âʹ¶°Å¶ ²ÁÍ ÅºÃ ²Â½Íµº¶Ã µ¸½Àź»®Ã ÆÁ¸Â¶Ä°¶Ã, ´º² ÅÀ ÁÀº¶Ã
µÆ¾²ÅÍŸŶà ²ÁÀº½½²Åº»¯Ã µº²È¶°ÂºÄ¸Ã ÆÁÂÈÀƾ ´º² ¸¼¶»ÅÂÀ¾º»®Ã ÄÆÄ»¶Æ®Ã.
• Alle in diesem Druckwerk mitgeteilten Daten, Merkmale und Beschreibungen können sich jederzeit und ohne besondere Ankündigung ändern.
• Alle enthaltenen Firmennamen und Produktbezeichnungen sind Warenzeichen der jeweiligen Inhaber. Alle Rechte vorbehalten.
• Changes in specifications and features may be made without notice or obligation.
• Company and product names provided herein are trademarks of their respective companies.
• Toutes les informations données dans ce manuel peuvent être modifiées à tout moment sans avis spécial.
• Toute raison sociale et désignation de produit constitue une marque de fabrique du propriétaire respectif.
• Tutti i marchi ed i nomi commerciali costituiscono i marchi di fabbrica dell’attuale proprietario.
• Tutte le informazioni contenute nel presente manuale istruzioni possono essere modificate in qualsiasi momento senza preavviso.
• Todos los datos de este manual, características y descripciones pueden modificarse en cualquier momento y sin previo aviso.
• Todos los nombres de empresas y denominaciones de productos contenidos aquí son marca registrada del propietario correspondiente.
• Todos os nomes comerciais e designações de produtos aqui incluídos são marcas registadas dos respectivos titulares.
• Todos os dados, características e descrições apresentados no presente impresso podem ser alterados em qualquer momento e sem aviso prévio.
• ,
.
• .
• Wszystkie dane zawarte w tym podręczniku, właściwości i opisy mogą ulec zmianie w dowolnym momencie i bez stosownego uprzedzenia.
• Wszystkie podane tu nazwy firm i produktów są znakami towarowymi każdego z właścicieli. Wszelkie prawa zastrzeżone.
• Všechny údaje, znaky a popisy uvedené v této tiskovině se mohou kdykoli a bez zvláštního oznámení změnit.
• Všechny zde uvedené názvy firem a označení výrobků jsou ochrannými známkami příslušných majitelů. Všechna práva vyhrazena.
z
¼² Е² µ¶µА½®¾², И²В²»Е¸ВºДЕº» »²º Б¶Вº´В²З®Г БАЖ ²¾²З®ВА¾Е²º Д¶ ²ЖЕН ЕА ®¾ЕЖБА ½БАВАО¾ ¾² ²¼¼¿АЖ¾ ²¾ БД² ДЕº´½¯ ИК°à БВА¸´АО½¶¾¸ ºµº²°Е¶В¸
²¾²»А°¾КД¸.
z
¼² Е² Б¶Вº¶ИН½¶¾² А¾Н½²Е² ¶Е²ºВºП¾ »²º А¾А½²Д°¶Г БВАЛН¾ЕК¾ ²БАЕ¶¼АО¾ ¶½БАВº» Д¯½²Е² ЕК¾ ¶»ДЕАЕ¶ ºµºА»Е¸ЕП¾. ¶ ¶БºЗО¼²¿¸ Н¼К¾ ЕК¾ µº»²ºК½ЕК¾.
Copyright © 2005-2006, TEAC Corporation. All rights reserved. Edition: April 2006
– 2 –
1
2
– 3 –
3
4
5
– 4 –
6
7
8
– 5 –

DEUTSCH
Sie haben sich mit dem TEAC HD-35NAS für eines der leistungsstärksten USB/LAN-Festplattenlaufwerke auf dem Markt entschieden.
Lieferumfang: externes USB/LAN-Festplattenlaufwerk, CD-ROM mit Treibersoftware, USB-Kabel, Netzteil, dieses Handbuch
•
Speicherkapazität Das HD-35NAS ist mit unterschiedlichen Speicherka-
•
pazitäten verfügbar.
Schnittstelle USB 2.0 (Universal Serial Bus) / Ethernet LAN (RJ-45)
•
Dateisystem FAT32
•
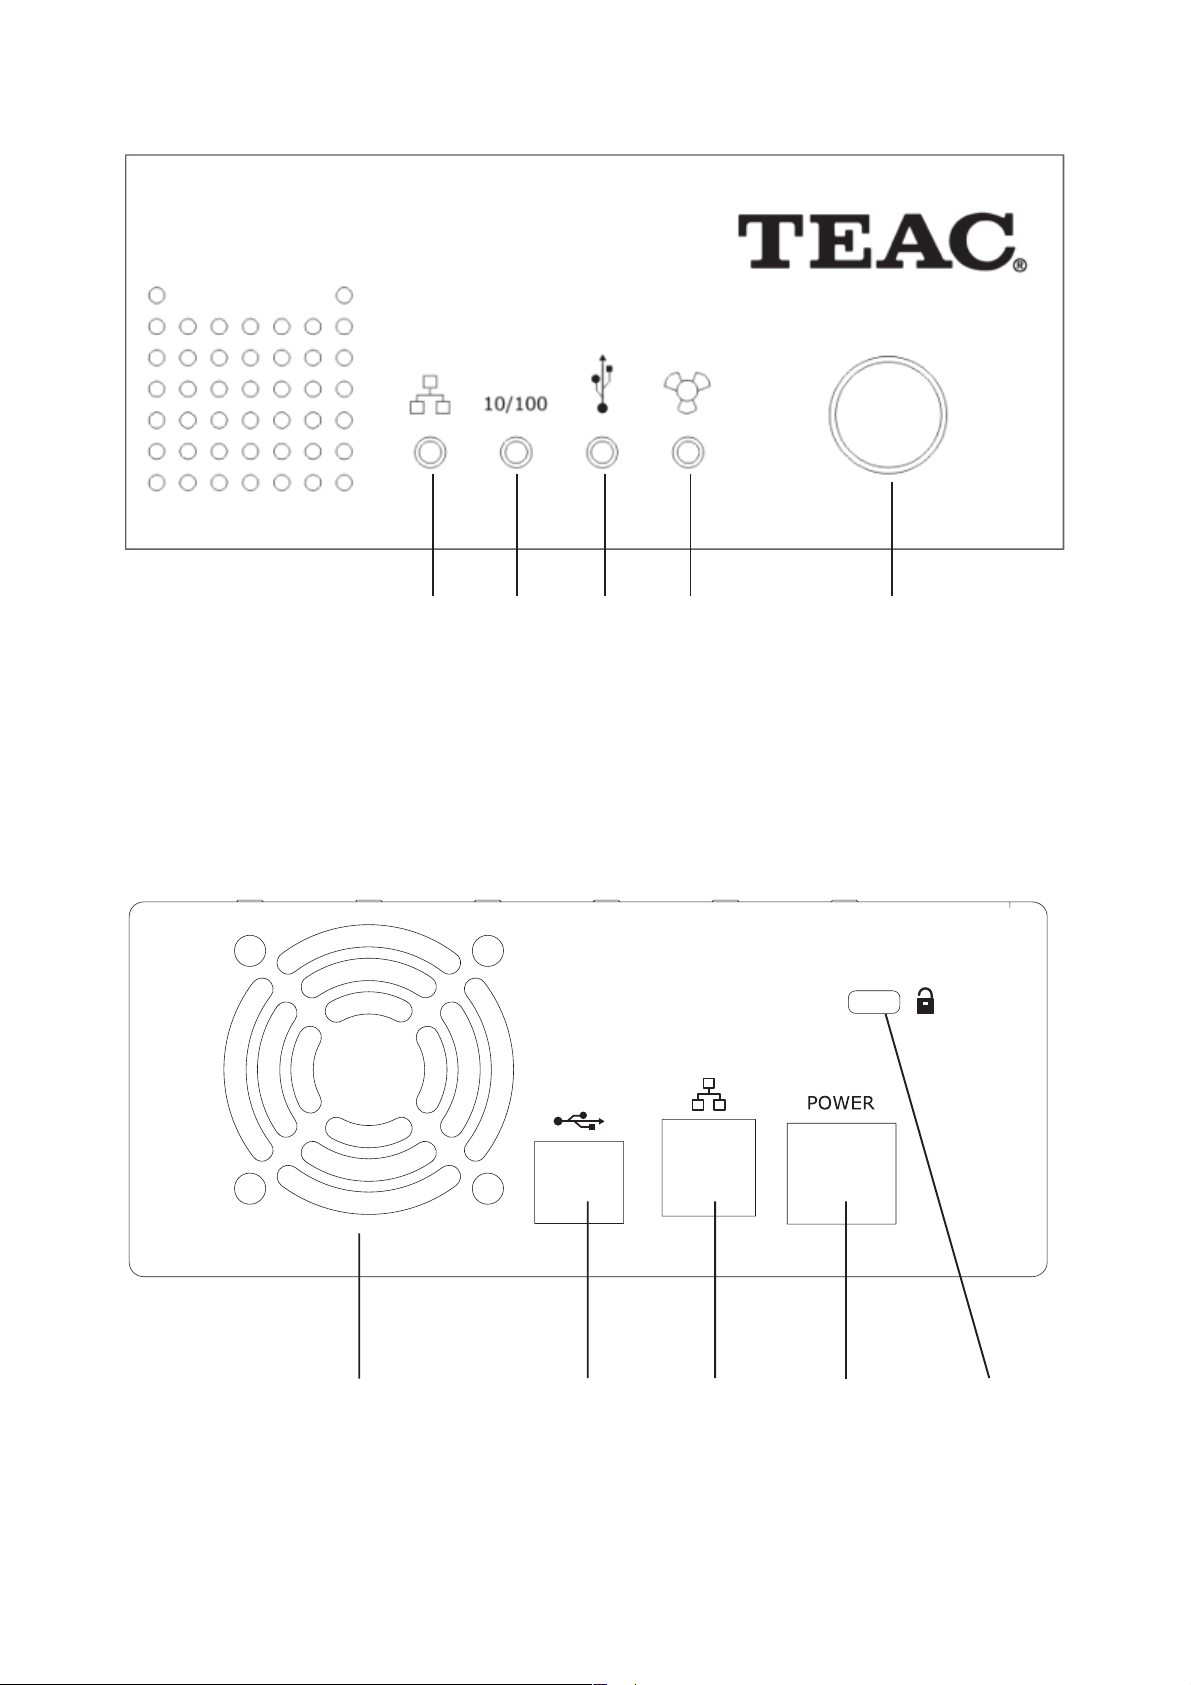
Die Bedienelemente auf der Vorderseite (siehe Abbildung 1)
Abmessung 136 mm (B) x 60 mm (H) x 208,5 mm (T)
•
Gewicht 2,3 kg
•
Netzteil 12 V, 1,5 A/5 V 1,5 A
•
Sicherheitsstandards UL, FCC, CE, TÜV
•
LED Status Beschreibung
LAN LED ein LAN ist aktiviert, eine Verbindung besteht.
10/100 ein Transferrate ist auf 100 Mbit/s eingestellt.
USB2.0 ein Über USB an einen Rechner angeschlossen.
blinkt Über das LAN werden Daten übertragen.
aus LAN nicht angeschlossen.
aus Transferrate ist auf 10 Mbit/s eingestellt.
blinkt Über die USB2.0 Schnittstelle werden Daten übertragen.
aus USB nicht angeschlossen.
LED Status Beschreibung
Lüfter ein Eingebauter Lüfter arbeitet fehlerhaft.
Ein-/Aus-
schalter/LED ein Das Laufwerk ist eingeschaltet.
aus Lüfter arbeitet einwandfrei.
aus Das Laufwerk ist ausgeschaltet.
Die Bedienelemente auf der Rückseite (siehe Abbildung 2)
Lüfterauslass
USB2.0 USB2.0-Anschlussbuchse
LAN NIC (RJ-45) Anschlussbuchse für PC,
Hub/Switch, ADSL-Modem
Stromversorgung Anschussbuchse für das externe Netzteil
Sicherheitsöse Anbringen eines Standard-Sicherheit-
schlosses für Notebooks möglich
LAN-Betrieb
Wichtigste Merkmale im LAN-Betrieb: automatische IP-Konfiguration (DHCP Client oder Server), SMB über TCP/IP, Unterstützung für FTP-Clientzugriffe, Zugriffsrechteverwaltung auf Freigabeebene, Web-Browser-basierte Administration
Systemvoraussetzungen
Einen oder mehrere Rechner mit Netzwerkkarten (NIC); Web-Browser wie Internet Explorer, Netscape Navigator oder Firefox für die Netzwerk-gestützte Administration; optional: ADSL- oder Kabelmodem mit mindestens einer IP-Adresse; optional: Internet Gateway mit DNS-Unterstützung; optional: Ethernet-Hub/Switch zum
Anschluss mehrerer Rechner
Installation
Schließen Sie das HD-35NAS mit einem RJ-45-Kabel an Ihrem PC, Hub/Switch, ADSL/Kabel-Modem an . Wichtig: Gleichzeitig darf kein USB-Kabel angeschlossen sein. Stecken Sie das externe Netzteil an . Hinweis: Achten Sie darauf, für das Netzteil eine leicht zugängliche Steckdose in der Nähe des Geräts zu
benutzen. Schalten Sie das HD-35NAS mit dem Einschaltknopf auf der Vorderseite ein. Es arbeitet jetzt als LAN-Festplatte.
Konfiguration
Standardmäßig ist im HD-35NAS ein DHCP-Server eingebaut, der Ihrem PC alle erforderlichen Internetparameter zuweisen kann. Zunächst müssen Sie aber die
ISP-Parameter eingeben. Konfigurieren Sie Ihren PC so, dass er vom HD-35NAS die IP-Adresse automatisch zugewiesen erhält. Dadurch wird es möglich, den
Browser-gestützten Konfigurationsmanager zu verwenden.
Windows 2000/XP
Wählen Sie im Start-Menü Einstellungen und dann Systemsteuerung. Doppelklicken Sie auf Netzwerkverbindungen. Klicken Sie mit der rechten Maustaste auf LANVerbindung und dann auf Eigenschaften. Wählen Sie Internetprotokoll (TCP/IP) und klicken Sie auf Eigenschaften. Aktivieren Sie
beziehen
und
DNS-Serveradresse automatisch beziehen.
Klicken Sie auf OK, um die Einstellungen zu übernehmen.
Windows 98SE/ME
Wählen Sie im Start-Menü Einstellungen und dann Systemsteuerung. Doppelklicken Sie nun Netzwerk an. Suchen Sie den Eintrag
TCP/IP ->
IP-Adresse automatisch beziehen.
lungen zu übernehmen.
Name Ihrer Netzwerkkarte
Optional: Falls erforderlich, entfernen Sie bitte vorhandene Einträge für DNS und Gateway. Klicken Sie auf OK, um die Einstel-
und klicken Sie dann Eigenschaften an. Wählen Sie die Registerkarte IP-Adresse an. Aktivieren Sie
IP Adresse automatisch
Starten des Konfigurationsmanagers
Starten Sie Ihren Internet-Browser (Internet Explorer, NetScape Navigator, FireFox etc.). Rufen Sie die Adresse http://storage auf. Geben Sie den Usernamen und
das zugehörige Passwort ein.
Hinweis: Werksseitig sind als Username admin und als Passwort admin eingetragen.
Nach dem der Loginvorgang erfolgreich absolviert wurde, sehen Sie die Status-Seite.
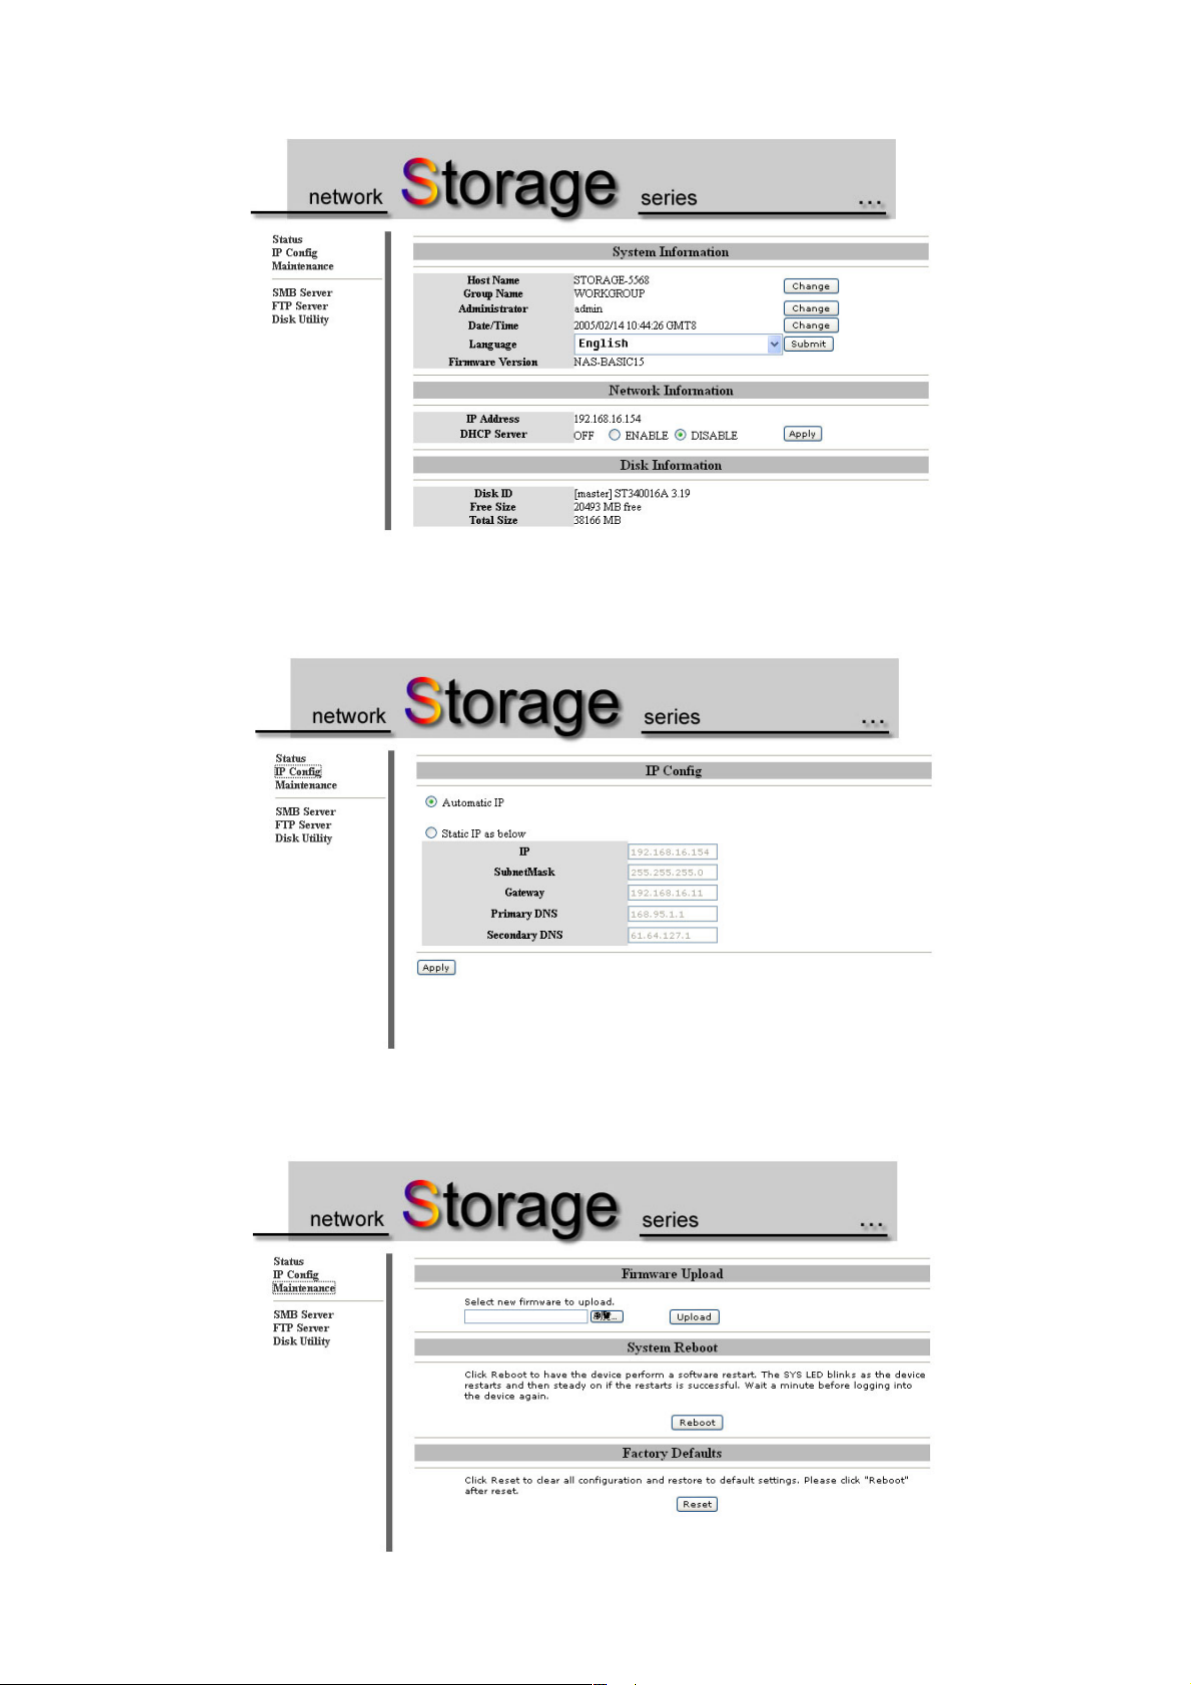
Status-Seite (siehe Abbildung 3)
linke Spalte
Funktion Beschreibung
Status Einstellungen und Status
IP Config Einstellen der Netzwerkadresse
Maintenance Firmware, Einstellungen, Reset
SMB Server Dateiserver (freigegebene Verzeichnisse)
FTP Server Datei-Transfer
Disk Utility Scan Disk und Formatieren der Festplatte
System Information (Systeminformationen)
Funktion Beschreibung
Host name unverwechselbarer Name zur Identifikation im LAN
Group name Arbeitsgruppe, der die Festplatte zugeordnet ist
Administrator dient zum Setzen des Namens und des Passworts des Administra-
Date/Time Synchronisieren der Zeit mit einem Zeitserver
Language Codepage des Dateisystems
Firmware version aktuelle Version der Firmware
Hinweis: Wechseln Sie Language nach der Erstinstallation nicht mehr. Beim Wechseln
auf eine andere Einstellung kann es zu Datenverlusten kommen.
tors
Network Information (Netzwerkinformationen)
Funktion Beschreibung
IP Address aktuelle Netzwerkadresse der Festplatte
DHCP Server automatisches Zuweisen einer Netzwerkadresse
und anderer Netzwerkeinstellungen für PCs
Disk Information (Platteninformationen)
Funktion Beschreibung
Disk ID Modellnummer der Festplatte
Free Size vorhandene freie Speicherkapazität
Total Size Gesamtkapazität
– 6 –

DEUTSCH
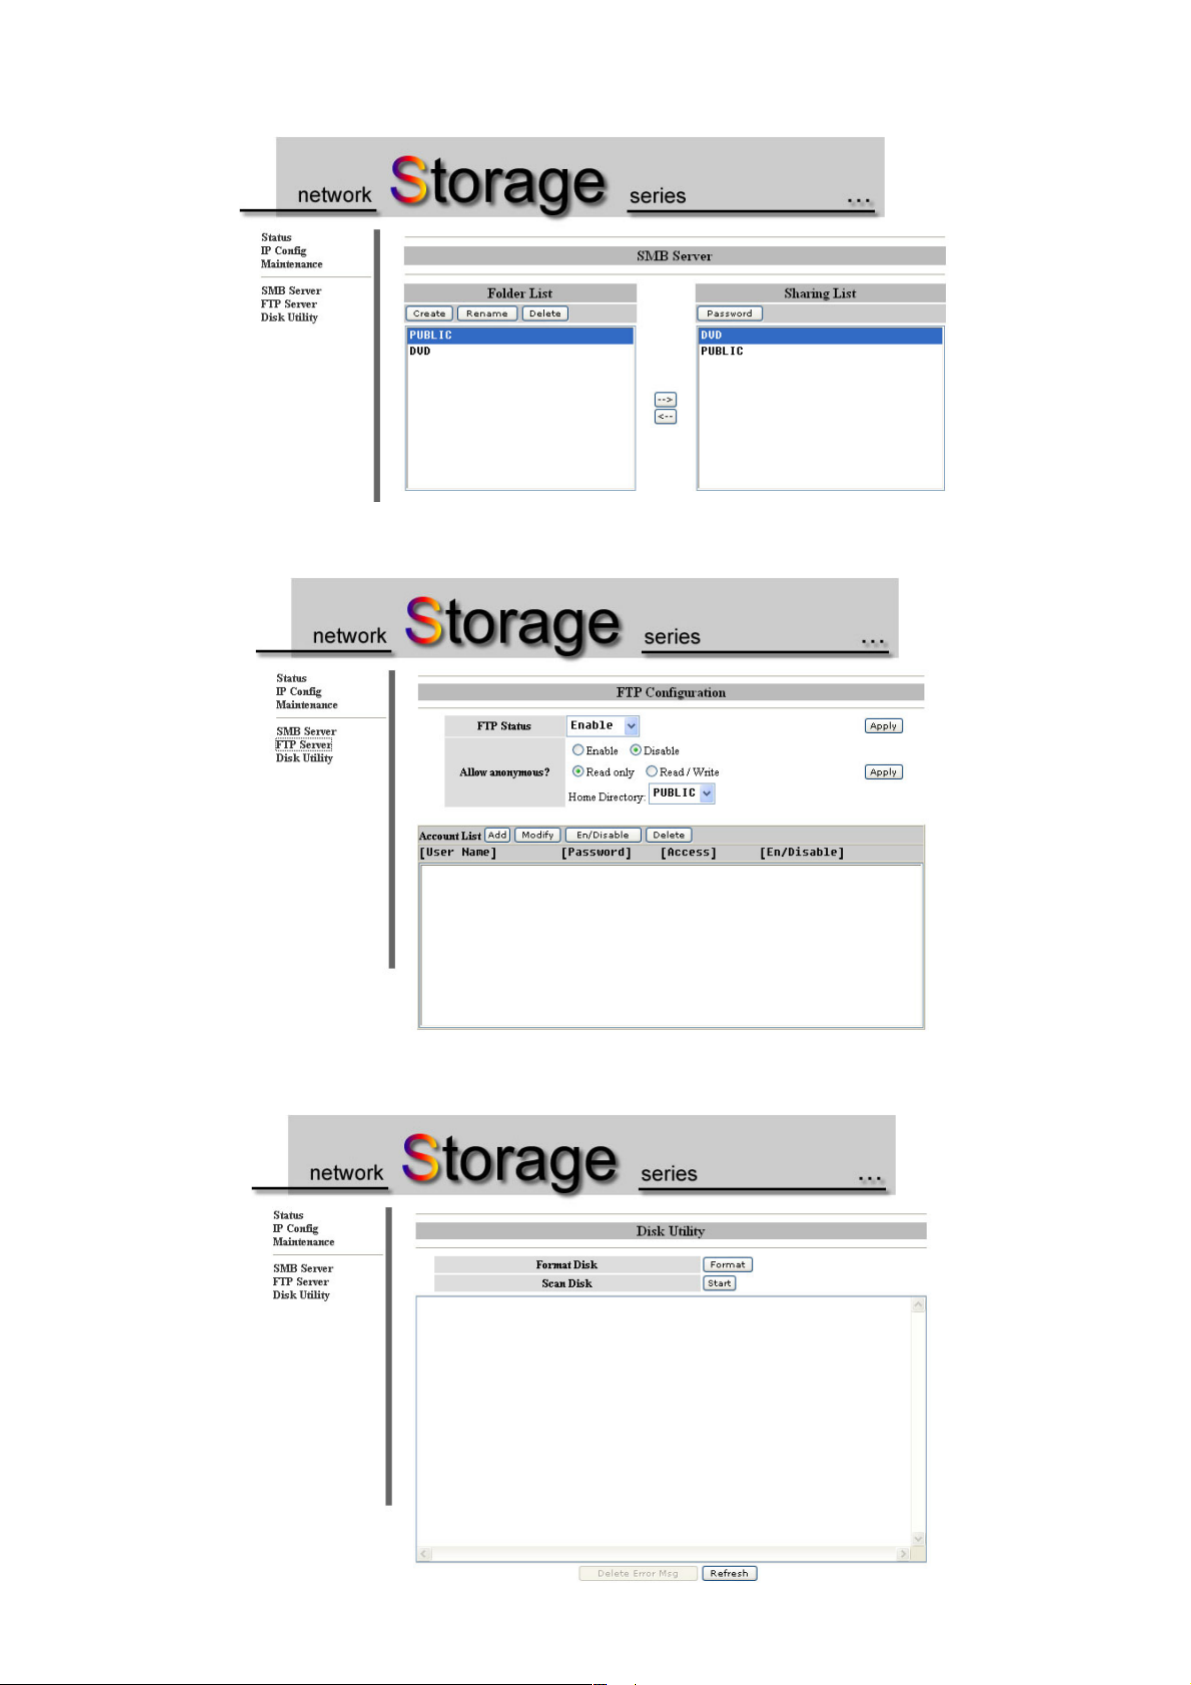
IP-Konfigurationsseite (siehe Abbildung 4)
IP Config (IP-Konfiguration)
Funktion Beschreibung
Automatic IP automatisches Zuweisen der IP Adresse oder Aktivieren als DHCP-Server
Static IP as below manuelles Setzen der Netzwerkadresse, IP-Adresse, Subnetzwerkmaske, Gateway, DNS
Maintenance-Seite (siehe Abbildung 5)
Firmware Upload
Wollen Sie die Firmware aktualisieren, betätigen Sie Browse, wählen Sie die Firmware aus und drücken Sie dann Upload. Warten Sie einige Sekunden, bis die
Prozedur abgeschlossen ist. Das erfolgreiche Abschließen der Aktualisierung wird angezeigt. Anschließend muss das HD-35NAS neu gestartet werden.
System Reboot
Starten Sie das HD-35NAS mit Reboot neu.
Factory Defaults
Betätigen Sie die Schaltfläche Reset, wenn Sie die werksseitigen Voreinstellungen wieder herstellen wollen.
SMB-Server-Seite (siehe Abbildung 6)
Folder List
In dieser Liste können mit Sie Create (neu anlegen), Rename (Umbenennen) und Delete (Löschen) alle Ordner auf der Festplatte administrieren. Wählen Sie einen
Ordner aus und betätigen Sie -->, um ihn in die Sharing List (Liste mit im LAN freigegebenen Ordnern) einzutragen.
Sharing List
Soll ein freigegebener Ordner mit einem Passwort gesichert werden, wählen Sie ihn zunächst an und betätigen dann die Schaltfläche Password.
FTP Server (siehe Abbildung 7)
FTP Configuration
Funktion Beschreibung
FTP Status Der FTP-Server kann aktiviert/deaktiviert werden.
Allow anonymous? Damit wird ein Gast-Account aktiviert, der jedermann Zugriff
Read Only Der Gast-Account wird auf Nur Lesen eingestellt.
Read/Write Der Gast-Account wird auf Schreiben/Lesen eingestellt.
Home Directory Freigegebener Ordner für den Gast-Account.
auf den FTP-Dienst ermöglicht.
Account List
Hier werden Accounts für verschiedene User angelegt und Ihre Zugriffsrechte festgelegt.
Funktion Beschreibung
User Name Name des User-Accounts
Password zugeordnetes Passwort
Access Zugriffstyp: Nur Lesen (Read Only) oder Schreiben/
En/Disable Account aktivieren/deaktivieren
Lesen (Read/Write)
Dienstprogramme für die Festplatte (siehe Abbildung 8)
Disk Utility (Dienstprogramme)
Funktion Beschreibung
Format Disk dient zum Formatieren der Festplatte.
Scan Disk sucht Festplattenfehler wie „verlorene Cluster“ und korrigiert sie.
USB-Betrieb
Systemvoraussetzungen
USB-Schnittstelle (USB 2.0 oder USB 1.1), Windows 98SE/Me/2000/XP oder neuer, Mac OS 9, X oder neuer
Installation
Schalten Sie Ihre TEAC USB-Festplatte aus (Ein-/Ausschalter ). Schalten Sie Ihren Rechner ein. Stecken Sie das Stromversorgungskabel in die Buchse auf der
Rückseite der USB-Festplatte ein. Stecken Sie das Netzkabel des Netzteils in eine Steckdose. Hinweis: Achten Sie darauf, für das Netzteil eine leicht zugängliche
Steckdose in der Nähe des Geräts zu benutzen. Stecken Sie den größeren Stecker des mitgelieferten USB-Verbindungskabels an der USB-Schnittstelle Ihres
Computers an. Stecken Sie das andere Ende des USB-Verbindungskabels in die USB-Buchse auf der Rückseite Ihrer USB-Festplatte. Wichtig: Gleichzeitig darf kein
RJ-45-Kabel angeschlossen sein. Schalten Sie die TEAC USB-Festplatte ein . Vergewissern Sie sich, daß die LED auf der Vorderseite der TEAC USB-Festplatte
aufleuchtet.
Treiber
Windows: Für das TEAC HD-35NAS müssen keine Treiber installiert werden (Ausnahme Windows98SE). Als Plug-and-Play-Gerät wird es automatisch erkannt.
Macintosh: Ihr Macintosh erkennt automatisch die USB-Festplatte und zeigt auf dem Desktop ein entsprechendes Symbol an.
Das Abstecken der USB-Platte vom Computer
Windows: Klicken Sie mit der linken Maustaste auf das Icon in der Taskleiste in der rechten unteren Ecke des Bildschirms. Klicken Sie mit der linken Maustaste auf das
in Frage kommende Laufwerk. Nach einigen Sekunden erscheint die Nachricht, dass das Laufwerk jetzt gesichert vom PC abgesteckt werden kann. Klicken Sie auf „OK“
und stecken Sie das USB-Kabel ab.
Macintosh: Ziehen Sie das Symbol für die USB-Festplatte auf das Mülleimer-Symbol auf Ihrem Desktop. Danach können Sie die USB-Festplatte abstecken.
Das Ausschalten der USB-Festplatte
Schalten Sie Ihre USB-Festplatte erst aus, nachdem Sie sie am Rechner abgesteckt oder nachdem Sie das Betriebssystem heruntergefahren haben. Schalten Sie die
USB-Festplatte auf keinen Fall aus, während Ihr Rechner im Normalbetrieb arbeitet.
Sicherheitshinweise
Um Brandgefahr und elektrische Schläge zu vermeiden, dürfen Sie das Gerät auf keinen Fall Feuchtigkeit oder Regen aussetzen. Versuchen Sie nicht das Gerät zu
öffnen, da dies zu einem elektrischen Schlag führen kann. Überlassen Sie Reparatur und Wartung dem dafür autorisierten Personal.
– 7 –

ENGLISH
Thank you for purchasing the TEAC External USB/LAN Hard Drive.
Package Contents: external USB/LAN Hard Drive, CD-ROM containing driver software, USB interface cable, AC power adapter, this user’s manual
•
Capacity The HD-35NAS is available with several different capacities.
•
Interface USB 2.0 (Universal Serial Bus) / Ethernet LAN (RJ-45)
•
File System FAT32
•
Dimensions 136 mm (W) x 60 mm (H) x 208.5 mm (D)
•
Front Side User Controls (see figure 1)
Weight 2,3kg
•
AC power adapter 12 V, 1,5 A/5 V 1,5 A
•
Safety Standards UL, FCC, CE, TÜV
•
LED State Description
LAN LED ON Lan is active and connection established
10/100 ON Transfer Speed is set to 100Mbps
flashing Data is transmitted through LAN
OFF Disconnect from LAN
OFF Transfer Speed is set to 10Mbps
LED State Description
USB2.0 ON Connected to PC
FAN ON Internal Fan Failure
POWER ON Unit is powered on
flashing Data is transmitted through USB 2.0 port
OFF Disconnected from PC
OFF Fan working O.K.
OFF Unit is powered off
Back Side User Controls (see figure 2)
Fan Aperture
USB2.0 USB 2.0 Interface to PC
LAN NIC (RJ45) Interface to PC, Hub/Switch, ADSL Modem
Power Adapter Power Adapter Input
Security Slot To Secure HD-35NAS using standard Notebook Keylock
LAN Mode
Key Features: Access through USB 2.0 or RJ45 (LAN) connection, automatic IP configuration (DHCP Client or Server), SMB through TCP/IP, FTP client access, Share
Level Access Security, Web-based Management
System Requirements
One or more computers with network card (NIC); Internet browser like Internet Explorer, Netscape, Firefox for Web-based configuration management; optional:
ADSL or Cable Modem with at least one public IP; optional: Internet Gateway with Dynamic DNS support (DDNS); optional: Ethernet Hub/Switch to connect more than one
computer
Installation
Connect RJ-45 cable from HD-35NAS to PC/Hub/Switch/ADSL/Cable Modem . Important: Please note the USB cable must be removed. Attach power adapter outlet
to HD-35NAS. Important: Please use a wall outlet which is easily accessible and located near the unit. Press Power-On button at front bezel. Then HD-35NAS
function as a LAN Hard Disk Drive.
Configuring your PC
By default, HD-35NAS has built-in DHCP server, which can assign all internet settings to your PC, but before starting you need to enter your ISP parameters. Please
configure your PC to receive IP automatically. This way you can access to HD-35NAS as a web-based configuration manager.
Windows 2000/XP
In the Windows task bar, click START button, point to Setting, and then select Control Panel. Double-Click Network and Dialup Connections icon. RightClick Local Area Connection icon and select Properties. Select Internet Protocol(TCP/IP) and click OK. Please check the radio button labeled
automatically
and the radio button
Obtain DNS server address automatically
. Click OK to confirm the changes and exit.
Windows 98SE/ME
In the Windows task bar, click START button, point to Setting, and then select Control Panel. Double-Click Network icon. Search for TCP/IP->
card
icon and select Properties. Select IP Address tab. Please check the radio button labeled
settings for DNS and Gateway. Click OK to confirm the changes and exit.
Obtain an IP address automatically
. optional: Please clear pre-existing
Obtain an IP address
Name of your network
Getting Start with Configuration Manager
Double-Click your internet browser, like Internet Explorer, Netscape or FireFox. Type in the location or URL: http://storage. Type in Username and Password.
Note: Default Username: admin and Password: admin
After successful login you will see current STATUS page
Status Page (see figure 3)
left column
Function Description
Status Basic Settings and Status
IP Config. Network Address Configuration
Maintenance Firmware, Setting, Reset
SMB Server File Server (Remote Folder)
FTP Server File Transfer
Disk Utility Hard Disk Format and Scan Disk
System Information
Function Description
Host name Unique name to be identify on the LAN
Group name Workgroup where reside this LanDisk
Administrator Set Administrator name and password
Date/Time Synchronize current time with time server
Language File System Codepage
Firmware Version Current Firmware version
Note: Don’t change Language setting after first time configuration.
Data may loss when you swap to different file system.
Network Information
Function Description
IP Address Current LanDisk network address
DHCP Server Assign to PCs the network address and other internet
setting automatically
Disk Information
Function Description
Disk ID Hard Disk Model No.
Free Size Remaining free space on the hard disk
Total Size The entire space of the hard disk
– 8 –

ENGLISH
IP Configuration Page (see figure 4)
IP Config
Function Description
Automatic IP Receive network address automatically or activate as DHCP Server
Static IP as below Set network address manually. IP, Subnet Mask, Gateway, DNS
Maintenance page (see figure 5)
Firmware Upload
If you want to update a new firmware, please press Browse button and select it; then press Upload to continue. Wait a few seconds to complete the procedure. It will show
update successful and reboot is required.
System Reboot
Press Reboot button to reboot the system.
Factory Defaults
In case you want to restore to default setting press Reset button.
SMB Server Page (see figure 6)
Folder List
Here you can Create, Rename or Delete different folders to be appear as shared folders on the LAN. Please select the folder and press --> to transfer to the Sharing List.
Sharing List
If you want to set Password to the shared folder, please select the desired folder and press Password.
FTP Server Page (see figure 7)
FTP Configuration
Function Description
FTP Status You can enable or disable FTP server service.
Allow anonymous? You can enable guest account to let anyone to access to LanDisk
Read only Set the guest account to read permission only
Read/Write Set the guest account permission to read and write
Home Directory The shared folder used for guest account
Account List
You can create different user’s account and set its permission level.
Function Description
Username: User’s login name
Password: User’s login password
Access Read only or Read/Write permission
En/Disable Enable or Disable user’s account
Disk Utility Page (see figure 8)
Disk Utility
Function Description
Format Disk Initialize the hard disk to be used for the first time.
Scan Disk Scan hard disk for lost clusters and fix them.
USB Mode
System Requirements
An available USB port (USB version 1.1 or 2.0), Windows 98SE/Me/2000/XP or later, Mac OS 9, X or later
Installation
Turn off the power to your USB hard drive (power switch ). Turn on the power to your computer. Insert the power cable plug into the input connector on the rear panel
of the USB hard drive. Plug the other end of the power cable into an AC outlet. Important: Please use a wall outlet which is easily accessible and located near the
unit. Connect the wider plug of the included USB 2.0 cable to a USB port on your computer. Connect the other end of the USB 2.0 cable to the USB 2.0 port on the rear
panel of the USB hard drive. Turn on the power switch on the USB hard drive. Confirm that the Power LED on the USB hard drive lights up.
Driver
Windows: There is no need to install drivers for your TEAC HD-35PUK (with the exception of Windows98SE). As a plug-and-play device it is recognized automatically.
Macintosh: The Macintosh automatically detects the USB hard drive and displays the icon for the USB hard drive on your Macintosh desktop.
Disconnecting the USB Hard Drive from a Computer
Windows: Left-click on the Hardware disconnecting icon on the Taskbar at the lower right of the screen. Left-click on the applicable drive.The message that the USB
storage device can be safely disconnected appears in a few seconds to allow you to remove the USB cable connecting the drive and the computer. Click the OK button to
pull out the USB cable.
Macintosh: Drag the icon for the USB hard drive to the Trash icon on the Macintosh desktop. You may now safely disconnect the USB hard drive from your computer.
Safety Precautions
To prevent fire or shock, do not expose the unit to moisture or rain.
To prevent electrical shock, do not attempt to disassemble the hard drive. Refer servicing to authorized personnel.
– 9 –

FRANÇAIS
Avec le TEAC HD-35NAS, vous avez opté pour un des lecteurs de disques durs USB/LAN les plus puissants sur le marché.
Contenu de la livraison: lecteur de disques durs USB/LAN externe, CD-ROM avec logiciel des gestionnaires, câble de prise USB, alimentation en courant, ce
•
Capacité de mémoire Le HD-35NAS est disponible avec différentes
•
Interface USB 2.0 (Universal Serial Bus) / Ethernet LAN (RJ-45)
•
Système informatique FAT32
•
Eléments de commande sur la face avant (voir la figure 1)
LED Etat Description
LAN LED ON Le LAN est activé, une liaison est établie.
10/100 ON Le taux de transfert est ajusté sur 100 Mbit/s.
USB2.0 ON Relié à un ordinateur par la prise USB.
clignote Des données sont transmises par le LAN.
OFF Le LAN n’est pas raccordé.
OFF Le taux de transfert est ajusté sur 10 Mbit/s.
clignote Des données sont transmises via l’interface USB2.0.
OFF USB non raccordée.
Eléments de commande sur la face arrière (voir la figure 2)
Sortie du ventilateur
USB2.0 Prise de connexion USB2.0
LAN Prise de connexion NIC (RJ-45) pour le PC, Hub/Switch,
le modem ADSL
Mode LAN
Caractéristiques les plus importantes dans le mode LAN : configuration IP automatique (Client ou Serveur DHCP), SMB via TCP/IP, soutien pour les accès Client au
FTP, gestion des droits d’accès au niveau d’autorisation, administration basée sur le Web-Browser
manuel
capacités de mémoire.
Dimensions 136 mm (l) x 60 mm (h) x 208,5
•
Poids 2,3 kg
•
Alimentation en courant 12 V, 1,5 A/5 V 1,5 A
•
Normes de sécurité UL, FCC, CE, TÜV
•
LED Etat Description
Ventilateur ON Le ventilateur intégré ne fonctionne pas
Bouton de
misesous/hors ON Le lecteur est enclenché.
tension/LED OFF Le lecteur est déconnecté.
Alimentation en Prise de connexion de l’alimentation externe
courant
Œillet de sécurité Le montage d’une serrure de sécurité standard pour un
OFF Le ventilateur fonctionne parfaitement.
correctement.
ordinateur portable est possible.
mm (p)
Configuration requise
Un ou ou plusieurs ordinateurs avec cartes réseau (NIC); Web-Browser comme Internet Explorer, Netscape Navigator ou Firefox pour l’administration assistée par le
réseau; en option : modem ADSL ou câblé avec au moins une adresse IP; en option : Internet Gateway avec soutien DNS; en option : Ethernet-Hub/Switch pour
raccorder plusieurs ordinateurs
Installation
Reliez l’HD-35NAS avec un câble RJ-45 à votre PC, Hub/Switch, modem ADSL/câblé à . Important : aucun câble USB ne doit être branché simultanément.
Connectez l’alimentation externe au . Remarque : veillez à utiliser une prise de courant facilement accessible à proximité de l’appareil pour l’alimentation.
Enclenchez l’HD-35NAS avec le bouton d’enclenchement sur la face avant. Il fonctionne maintenant comme disque dur LAN.
Configuration
Dans la version standard, un serveur DHCP qui peut attribuer à votre PC tous les paramètres Internet nécessaires, est intégré dans l’HD-35NAS. Tout d’abord, vous
devez entrer les paramètres ISP. Configurez votre PC de sorte qu’il reçoive automatiquement une attribution de l’adresse IP de la part de l’HD-35NAS. Cela permet
d’utiliser le manager de configuration assisté par le Browser.
Windows 2000/XP
Sélectionnez les Réglages dans le menu Démarrer et ensuite le Panneau de configuration. Double-cliquez sur Connexions réseau. Cliquez avec le bouton droit de
la souris sur Connexion au réseau local et ensuite sur Propriétés. Sélectionnez Protocole Internet (TCP/IP) et cliquez sur Propriétés. Activez
IP automatiquement
et
Obtenir les adresses des serveurs DNS automatiquement.
Cliquez sur OK pour reprendre les réglages.
Obtenir une adresse
Windows 98SE/ME
Sélectionnez les Réglages dans le menu Démarrer et ensuite le Panneau de configuration. Double-cliquez maintenant sur Réseau. Cherchez l’enregistrement TCP/
IP ->
Nom de cotre carte réseau
si nécessaire, supprimez les enregistrements existants pour DNS et Gateway. Cliquez sur OK pour reprendre les réglages.
et cliquez ensuite sur Propriétés. Sélectionnez l’onglet Adresse IP. Activez
Obtenir une adresse IP automatiquement.
En option :
Démarage du manager de configuration
Lancez votre Internet-Browser (Internet Explorer, NetScape Navigator, FireFox etc.). Appelez l’adresse http://storage. Entrez le nom d’utilisateur et le mot de passe
correspondant.
Remarque : le réglage d’usine a prévu admin comme nom d’utilisateur et admin comme mot de passe.
Vous apercevez la page d’état après avior terminé correctement la procédure d’accès.
Page d’état (voir la figure 3)
Colonne gauche
Fonction Description
Etat Réglages et état
IP Config Réglage de l’adresse de réseau
Maintenance Firmware, réglages, Reset
SMB Server Serveur de fichiers (répertoires autorisés)
FTP Server Transfert de fichiers
Disk Utility Scan Disk et formatage du disque dur
System Information (Informations sur le système)
Fonction Description
Host name Nom sans équivoque pour l’identification dans le LAN
Group name Groupe de travail auquel est attribué le disque dur
Administrator Sert à ajuster le nom et le mot de passe de l’administrateur
Date/Time Synchronisation du temps avecv un serveur de temps
Language Codepage du système informatique
Firmware version Version actuelle du Firmware
Remarque : Ne changez plus le Language après la première installation. Des pertes
de données peuvent se produire lors d’un changement sur un autre réglage.
– 10 –
Network Information (Informations sur le réseau)
Fonction Description
IP Address Adresse actuelle du réseau du disque dur
DHCP Server Attribution automatique d’une adresse de réseau et
d’autres réglages de réseau pour des PC
Disk Information (Informations sur le disque)
Fonction Description
Disk ID Numéro de modèle du disque dur
Free Size Capacité de mémoire libre existante
Total Size Capacité totale

FRANÇAIS
Page de configuration IP (voir la figure 4)
IP Config (Configuration IP)
Fonction Description
Automatic IP Attribution automatique de l’adresse IP ou activation comme serveur DHCP
Static IP as below Ajustement manuel de l’adresse de réseau, de l’adresse IP, du menu de sous-réseau, Gateway, DNS
Page Maintenance (voir la figure 5)
Firmware Upload
Si vous souhaitez actualiser le Firmware, actionnez le Browse, sélectionnez le Firmware et appuyez ensuite sur Upload. Attendez quelques secondes jusqu’à ce que la
procédure soit terminée. La terminaiswon correcte de l’actualisation est affichée. Ensuite, l’HD-35NAS doit être redémarré.
System Reboot
Démarrez à nouveau l’HD-35NAS avec Reboot.
Factory Defaults
Cliquez sur le bouton Reset si vous voulez rétablir les pré-réglages d’usine.
Page de serveur SMB (voir la figure 6)
Folder List
Dans cette liste, vous pouvez gérer tous les dossiers figurant sur le disque dur avec Create (créer nouvellement), Rename (re-nommer) et Delete (effacer). Sélectionnez
un des fichiers et actionnez —> pour l’enregistrer dans la Sharing List (liste avec des dossiers autorisés dans le LAN).
Sharing List
Si un dossier autorisé doit être assuré par un mot de passe, sélectionnez-le tout d’abord, puis cliquez sur le bouton Password.
Serveur FTP (voir la figure 7)
Configuration FTP
Fonction Description
FTP Status Le serveur FTP peut être activé/désactivé.
Allow anonymous? De cette manière, un compte d’hôte (Gast-Account) qui permet
Read Only Le Gast-Account est ajusté sur « lecture seulement ».
Read/Write Le Gast-Account est ajusté sur « écriture/lecture ».
Home Directory Dossier autorisé pour le Gast-Account.
à chacun d’accéder au service FTP, est activé.
leurs droits d’accès.
Fonction Description
User Name Nom du compte d’utilisateur (User-Account)
Password Mot de passe attribué
Access Type d’accès : seulement lecture (Read Only) ou
En/Disable Activer/désactiver l’Account
écriture/lecture (Read/Write)
Account List
C’est ici que sont créés les Accounts pour différents utilisateurs et que sont définis
Utilitaires pour le disque dur (voir la figure 8)
Disk Utility (Programmes utilitaires)
Fonction Description
Format Disk Sert à formater le disque dur.
Scan Disk Recherche des défauts du disque dur, comme des « Cluster perdus » et les corrige.
Mode USB
Système requise
Une prise USB (USB 2.0 ou USB 1.1), Windows 98SE/Me/2000/XP ou plus récent, Mac OS 9, X ou plus récent
Installation
Mettez votre lecteur de disques durs USB hors tension (bouton de marche/arrêt ). Enclenchez l’ordinateur. Branchez le câble d’alimentation en courant dans la prise
sur la face arrière du lecteur de disques durs USB. Branchez le câble du réseau secteur de l’alimentation dans une prise de courant. Remarque : veillez à utiliser une
prise de courant facilement accessible à proximité de l’appareil pour l’alimentation. Branchez le plus grand connecteur du câble de liaison USB contenu dans la
livraison à la prise USB de votre ordinateur. Branchez l’autre extrémité du câble de liaison USB dans la prise USB sur la face arrière de votre lecteur de disques durs
USB. Important : aucun câble RJ-45 ne doit être branché simultanément. Enclenchez le lecteur de disques durs TEAC USB. Assurez-vous que la LED sur la
face avant du lecteur de disques durs TEAC USB est allumée.
Pilotes
Windows: Il n’est pas nécessaire d’installer des gestionnaires pour le TEAC HD-35NAS (exceptions: Windows98SE). Il est reconnu automatiquement en tant qu’appareil
plug-and-play.
Macintosh: Le Macintosh reconnaît automatiquement le lecteur de disques durs USB et affiche une icône correspondante sur l’ordinateur de bureau.
Déconnexion du lecteur de disques durs USB de l’ordinateur
Windows: Cliquer avec le bouton gauche de la souris sur l’icône de la barre des tâches situé dans le coin inférieur droit de l’écran. Cliquer avec le bouton gauche de la souris
sur le lecteur en question. Après quelques secondes apparaît le message que le lecteur peut désormais être débranché de façon sûre. Cliquer sur «OK» et débrancher le câble
USB.
Macintosh: Glissez-déplacez l’icône du lecteur de disques durs USB vers le symbole de la corbeille sur votre ordinateur de bureau. Ensuite, vous pouvez déconnecter le
lecteur de disques durs USB.
Mise hors tension du lecteur de disques durs USB
Eteignez votre lecteur de disques durs USB seulement après l’avoir déconnecté de l’ordinateur ou après avoir terminé la session avec le logiciel d’exploitation. Ne mettez
en aucun cas le lecteur de disques durs USB hors tension pendant que l’ordinateur tourne en fonctionnement normal.
Avis de sécurité
L’appareil ne doit en aucun cas être exposé à l’humidité ou à la pluie pour éviter les risques d’incendie et les décharges électriques. N’essayez pas d’ouvrir l’appareil car
cela peut provoquer une décharge électrique. Veuillez confier les réparations et la maintenance au personnel agréé à ces fins.
– 11 –

ITALIANO
Con il TEAC HD-35NAS si è deciso per un drive a disco rigido USB/LAN più potenti esistenti sul mercato.
Dotazione: drive esterno a disco rigido USB/LAN, CD-ROM con software per driver, cavo per interfacce USB, alimentatore di rete, questo
•
Capacità di memoria L’HD-35NAS è disponibile con diverse
•
Interfaccia USB 2.0 (Universal Serial Bus) / Ethernet LAN
•
Struttura di file FAT32
•
Elementi di comando sul lato anteriore (vedi figura 1)
LED Stato Descrizione
LAN LED acceso LAN attivata, collegamento attivo.
10/100 acceso Velocità di trasferimento impostata su 100 Mbit/s.
USB2.0 acceso Collegamento ad un computer mediante USB.
Elementi di comando sul lato posteriore (vedi figura 2)
lampeggiante Trasmissione di dati in corso sulla LAN.
spento LAN non collegata.
spento Velocità di trasferimento impostata su 10 Mbit/s.
lampeggiante Trasmissione di dati in corso attraverso l’interfaccia
spento USB non collegata.
manuale
capacità di memoria.
(RJ-45)
USB2.0.
Dimensioni 136 mm (L) x 60 mm (A) x 208,5 mm (P)
•
Peso 2,3 kg
•
Alimentatore di rete 12 V, 1,5 A/5 V 1,5 A
•
Norme di sicurezza UL, FCC, CE, TÜV
•
LED Stato Descrizione
Ventilatore acceso Funzionamento scorretto del ventilatore
spento Funzionamento corretto del ventilatore
Interruttore acceso Unità a disco rigido accesa.
On/Off/LED spento Unità a disco rigido spenta.
incorporato.
incorporato.
Scarico del ventilatore
USB2.0 Connettore USB2.0
LAN Connettore NIC (RJ-45) per PC, hub/switch, modem
ADSL
Alimentazione elettrica Connettore per l’alimentatore esterno
Occhiello di sicurezza Possibilità di applicazione di un lucchetto
standard per notebook
Modo operativo LAN
Caratteristiche più importanti nel modo operativo LAN: configurazione IP automatica (DHCP client o server), SMB mediante TCP/IP, supporto per accessi client FTP,
gestione dei diritti di accesso a livello di abilitazione, amministrazione basata su web browser.
Requisiti del sistema
Uno o più computer con schede di rete (NIC); web browser come Internet Explorer, Netscape Navigator o Firefox per l’amministrazione assistita da rete; opzione: modem
ADSL o via cavo con almeno un indirizzo IP; opzione: Internet gateway con supporto DNS; opzione: hub/switch Ethernet per il collegamento di più computer.
Installazione
Collegare la HD-35NAS al PC, hub/switch, model ADSL/ via cavo mediante un cavo RJ-45 . Importante: durante questa operazione non deve essere collegato
nessun altro cavo USB. Collegare l’alimentatore esterno . Nota: collegare l’alimentatore ad una presa di corrente facilmente accessibile nelle vicinanze
dell’apparecchio. Accendere la HD-35NAS con l’interruttore sul lato anteriore. Il disco rigido LAN è ora in funzione.
Configurazione
Nella HD-35NAS è incorporato un server DHCP in grado di assegnare al PC tutti i necessari parametri Internet. Innanzitutto occorre tuttavia immettere i parametri ISP.
Configurare il PC in modo che riceva automaticamente l’indirizzo IP dalla HD-35NAS. In questo modo è possibile utilizzare il programma di configurazione guidata
assistito dal browser.
Windows 2000/XP
Nel menu Start selezionare Impostazioni e quindi Pannello di controllo. Fare un doppio clic su Connessioni di rete. Con il pulsante destro del mouse fare clic su
Connessione LAN e quindi su Proprietà. Selezionare Internet Protocol (TCP/IP) e fare clic su Proprietà. Attivare
server address automatically.
Fare clic su OK per applicare le impostazioni.
Windows 98SE/ME
Nel menu Start selezionare Impostazioni e quindi Pannello di controllo. Fare un doppio clic su Rete. Individuare la voce TCP/IP ->
un doppio clic su Proprietà. Selezionare il registro Indirizzo IP. Attivare
DNS e gateway. Fare clic su OK per applicare le impostazioni.
Obtain an IP address automatically.
Avvio del programma di configurazione guidata
Avviare il browser Internet (Internet Explorer, NetScape Navigator, FireFox ecc.). Richiamare l’indirizzo http://storage. Immettere il nome di utente e la relativa password.
Nota: il nome di utente e la password predefiniti sono entrambi admin.
Dopo aver effettuato correttamente il login, viene visualizzata la pagina di stato.
Obtain an IP address automatically
Opzionale: Se necessario, eliminare le voci presenti per
Nome della scheda di rete
e
Obtain DNS
e fare
Pagina di stato (vedi figura 3)
Colonna sinistra
Funzione Descrizione
Status Impostazioni e stato
IP Config Impostazione dell’indirizzo di rete
Maintenance Firmware, impostazioni, reset
SMB Server File server (directory abilitate)
FTP Server Trasferimento di file
Disk Utility Scan Disk e formattazione del disco rigido
System Information (Informazioni sul sistema)
Funzione Descrizione
Host name Nome univoco per l’identificazione nella LAN
Group name Gruppo di lavoro assegnato al disco rigido
Administrator Per l’impostazione del nome e della password
Date/Time Sincronizzazione temporale con un server orario
Language Codepage della struttura di file
Firmware version Versione attuale del firmware
Nota: dopo la prima installazione non modificare più Language. Passando ad
un’altra impostazione, si possono verificare perdite di dati.
dell’amministratore
Network Information (Informazioni di rete)
Funzione Descrizione
IP Address Indirizzo di rete attuale del disco rigido
DHCP Server Assegnazione automatica dell’indirizzo di rete e di altre
impostazioni di rete per PC
Disk Information (Informazioni sul disco)
Funzione Descrizione
Disk ID Numero di modello del disco rigido
Free Size Capacità di memoria libera disponibile
Total Size Capacità di memoria totale
– 12 –

ITALIANO
Pagina di configurazione IP (vedi figura 4)
IP Config (Configurazione IP)
Funzione Descrizione
Automatic IP Assegnazione automatica dell’indirizzo IP o attivazione come server DHCP
Static IP as below Impostazione manuale di indirizzo di rete, indirizzo IP, maschera subnet, gateway e DNS
Pagina Maintenance (vedi figura 5)
Firmware Upload
Per aggiornare il firmware premere il pulsante Browse, selezionare il firmware e premere quindi Upload. Attendere qualche secondo fino al termine della procedura. La
conclusione corretta dell’aggiornamento viene visualizzata. Al termine è necessario riavviare la HD-35NAS.
System Reboot
Riavviare la HD-35NAS con Reboot.
Factory Defaults
Premere il pulsante Reset per ripristinare le impostazioni predefinite originarie.
Pagina SMB Server (vedi figura 6)
Folder List
In questo elenco è possibile gestire tutte le cartelle del disco rigido mediante Create (creazione), Rename (ridenominazione) e Delete (eliminazione). Selezionare una
cartella e premere —> per aggiungerla allo Sharing List (elenco contenente le cartelle abilitate nella LAN).
Sharing List
Per proteggere con una password una cartella abilitata, selezionarla e premere quindi il pulsante Password.
FTP Server (vedi figura 7)
FTP Configuration
Funzione Descrizione
FTP Status Il server FTP può essere attivato/disattivato.
Allow anonymous? Attivazione di un guest account che consente ad ognuno di
Read Only Il guest account viene impostato su sola lettura.
Read/Write Il guest account viene impostato su lettura/scrittura.
Home Directory Cartella abilitata per il guest account.
accedere al servizio FTP.
Account List
In questo elenco vengono creati account per diversi user e definiti i loro diritti di
accesso.
Funzione Descrizione
User Name Nome dell’user account
Password Password associato
Access Tipo di accesso: Read Only (sola lettura) o Read/Write
En/Disable Attivazione/disattivazione dell’account
(lettura/scrittura)
Programmi di utilità per il disco rigido (vedi figura 8)
Disk Utility (Programmi di utilità)
Funzione Descrizione
Format Disk Per la formattazione del disco rigido
Scan Disk Ricerca di errori del disco rigido come „cluster persi“ e loro correzione
Modo operativo USB
Condizioni preliminari necessarie per il sistema
Un´interfaccia USB (USB 2.0 o USB 1.1), Windows 98SE/Me/2000/XP più nuovo, Mac 9, X più nuovo
Installazione
Spegnere il disco rigido USB (Interruttore di accensione/spegnimento ). Accendere il calcolatore. Innestare il cavo di alimentazione della corrente nella presa sul retro
del disco rigido USB. Innestare il cavo di rete in una presa. Nota: collegare l’alimentatore ad una presa di corrente facilmente accessibile nelle vicinanze dell’ap-
parecchio. Innestare la spina più grande del cavo di collegamento USB 2.0 facente parte della dotazione all´interfaccia USB del Suo computer. Innestare l´altra estremità
del cavo di collegamento USB nella presa USB sul retro del Suo disco rigido USB.Importante: durante questa operazione non deve essere collegato nessun altro
cavo RJ-45. Ora accendere il disco rigido TEAC USB. Accertarsi che il LED sul lato anteriore del disco rigido TEAC USB si accenda.
Installare il software del driver
Windows: Per il TEAC HD-35NAS non devono essere installati driver (eccezione Windows98SE). Come apparecchio “Plug-and-Play“, essa viene riconosciuta automa-
ticamente.
Macintosh: Il Suo Macintosh riconosce automaticamente il disco rigido USB e sul desktop mostra un relativo simbolo.
Disinnestare il disco USB dal computer
Windows: Cliccare con il tasto sinistro del mouse sull´icona nella striscia delle task nell´angolo a destra in basso dello schermo. Cliccare con il tasto sinistro del mouse
sul possibile drive desiderato. Dopo pochi secondi appare la notizia che il drive ora può essere disconnesso dal PC senza rischi. Cliccare su ”OK” e disconnettere il cavo
USB.
Macintosh: Trascini il simbolo del disco rigido USB sul simbolo secchio dei rifiuti sul Suo desktop. Poi può disinnestare il disco rigido USB.
Spegnere il disco rigido USB
Spenga il Suo disco rigido USB solo dopo che lo ha disinestatto sul calcolatore o dopo aver disattivato il sistema operativo. Non spenga in nessun caso il disco rigido
USB mentre il Suo calcolatore funziona normalmente.
Istruzioni di sicurezza
Per evitare pericoli di incendio e scosse elettriche, non si deve esporre in nessun caso l´apparecchiatura a umidità o pioggia.
Non cercare di aprire l ´apparecchio, dato che ciò può provocare una scossa elettrica. Lasciar fare le riparazioni e la manutenzione al personale autorizzato.
– 13 –

ESPAÑOL
Con el TEAC HD-35NAS ha adquirido uno de los drives de disco rígido USB/LAN de la más alta potencia que hay en el mercado.
Volumen de suministro: Drive externo de disco rígido USB/LAN, CD-ROM con programa de controladores, cable de intefaz USB, fuente de alimentación, este
•
Capacidad de memoria El HD-35NAS está disponible en varias
•
Interfaz USB 2.0 (Universal Serial Bus) / Ethernet LAN
•
Sistema de archivo FAT32
•
Elementos de control en la parte delantera (ver Figura 1)
LED Estado Descripción
LAN LED Conectado Se activa la LAN, hay conexión.
10/100 Conectado Se ha establecido una velocidad de
USB2.0 Conectado Conectado a un ordenador por USB
Destello Se están transmitiendo datos por la LAN
Desconectado La LAN no está conectada
Desconectado Se ha establecido una velocidad de
Destello Se están transmitiendo datos por la interfaz
Desconectado El USB no está conectado
Elementos de control en la parte posterior (ver Figura 2)
Salida del ventilador
USB2.0 Enchufe de conexión de USB2.0
LAN Enchufe de conexión NIC (RJ-45) para PC, Hub/Switch,
Funcionamiento de la LAN
manual
capacidades de almacenamiento.
(RJ-45)
transferencia de 100 Mbit/s.
transferencia de 10 Mbit/s.
USB2.0
Modem ADSL
Dimensiones 136 mm (ancho) x 60 mm (alto) x 208,5 mm
•
Peso 2,3 kg
•
Fuente de alimentación 12 V, 1,5 A/5 V 1,5 A
•
Normas de seguridad UL, FCC, CE, TÜV
•
LED Estado Descripción
Ventilador Conectado Funcionamiento defectuoso del ventilador
Interruptor
de conexión/
desconexión/ Conectado La unidad está conectada
LED Desconectado La unidad está desconectada
Alimentación de corriente Enchufe de conexión para la fuente de
Lengüeta de seguridad Es posible incluir una traba de seguridad
Desconectado El ventilador funciona sin problemas
(profundo)
incorporado
alimentación externa
estándar para notebooks
Principales características del funcionamiento de la LAN: Configuración IP automática (Cliente o Servidor DHCP), SMB por TCP/IP, soporte para acceso a cliente FTP,
manejo de derechos de acceso por niveles de habilitación, Administración basada en web browser
Requerimientos de sistema
Uno o más ordenadores con tarjetas de red (NIC); web browser como Internet Explorer, Netscape Navigator o Firefox para la administración con soporte de red; opcional:
cable modem o ADSL con una dirección IP como mínimo; opcional: Internet Gateway con soporte DNS; opcional: Ethernet Hub / Switch para conectar varios ordenadores
Instalación
Conecte el HD-35NAS con un cable RJ-45 a su PC, Hub/Switch, ADSL/ cable modem en . Importante: No debe conectarse al mismo tiempo ningún cable USB.
Enchufe la fuente de alimentación externa en . Aviso: Procure utilizar un enchufe fácilmente accesible para la fuente de alimentación cerca del aparato.
Encienda la HD-35NAS con el botón de encendido en la parte delantera. Ahora funciona como disco rígido en LAN.
Configuración
Generalmente en HD-35NAS se instala un servidor DHCP que le asigna a su PC los parámetros de Internet requeridos. Pero luego usted deberá ingresar los parámetros
ISP. Configure su PC de manera tal que automáticamente obtenga de la HD-35NAS la dirección IP asignada. De esta manera es posible usar el administrador de
configuración con soporte de browser.
Windows 2000/XP
Seleccione en el menú Iniciar Definições y luego Paìnel de controlo. Haga doble click en Conexiones de red y de acceso telefónico. Con el botón derecho del mouse
haga click en Conexión de área local y luego en Propiedades. Seleccione Protocolo de Internet (TCP/IP) y haga click en Propiedades. Active
IP automáticamente
y
Obtener la dirección del servidor DNS automáticamente.
Haga click en Aceptar para aceptar la configuración.
Obtener una dirección
Windows 98SE/ME
Seleccione en el menú Iniciar Definições y luego Paìnel de controlo. Haga doble click en Red. Busque TCP/IP ->
Propiedades. Seleccione la tarjeta de registro Dirección IP. Active
haya para DNS y Gateway. Haga click en Aceptar para aceptar la configuración.
Obtener una dirección IP automáticamente.
Nombre de su tarjeta de red
Opcional: Si fuera necesario, elimine las entradas que
y haga click en
Inicio del administrador de configuración
Inicie su browser de Internet (Internet Explorer, NetScape Navigator, FireFox etc.). Llame la dirección http://storage. Ingrese el nombre de usuario y la correspondiente
contraseña.
Una vez completo el proceso de Login, aparece la página de estado.
Nota: De fábrica viene configurado el nombre de usuario admin y la contraseña admin.
Página de estado (ver Figura 3)
Columna de la izquierda
Función Descripción
Status Configuraciones y estado
IP Config Configuración de la dirección de red
Maintenance Firmware, Configuraciones, Reset
SMB Server Servidor de archivos (directorios habilitados)
FTP Server Transferencia de archivos
Disk Utility Scan Disk y formateo del disco rígido
System Information (Datos del sistema)
Función Descripción
Host name Nombre específico de identificación en la LAN
Group name Nombre de grupo asignado al disco rígido
Administrator Establece el nombre y la contraseña de administrador
Date/Time Sincroniza el tiempo con un servidor de tiempo
Language Codepage del sistema de archivos
Firmware version Versión actual del firmware
Nota: Después de la primera instalación no vuelva a cambiar la configuración de
Language. Podrían perderse datos si modifica esta configuración.
– 14 –
Network Information (Datos de la red)
Función Descripción
IP Address Dirección de red actual del disco rígido
DHCP Server Asignación automática de una dirección de red y otras
configuraciones de red para PCs
Disk Information (Datos del disco)
Función Descripción
Disk ID Número de modelo del disco rígido
Free Size Espacio de memoria libre disponible
Total Size Capacidad total

ESPAÑOL
Página de configuración de IP (ver Figura 4)
IP Config (Configuración de IP)
Función Descripción
Automatic IP Asignación automática de la dirección IP o activación como DHCP-Server
Static IP as below Configuración manual de la dirección de red, dirección IP, máscara de la subred, Gateway, DNS
Página de mantenimiento (ver Figura 5)
Upload del firmware
Si desea actualizar el firmware, active la función de Browse, seleccione el firmware y luego pulse Upload. Aguarde unos segundos hasta que se complete el proceso.
Cuando se completa la actualización, aparece la indicación en pantalla. Luego deberá reiniciarse la HD-35NAS.
System Reboot
Reinicie la HD-35NAS con Reboot.
Factory Defaults
Active la función Reset cuando desee modificar las configuraciones de fábrica.
Página de SMB Server (ver Figura 6)
Folder List
En esta lista es posible administrar todas las carpetas del disco rígido con Create (crear), Rename (cambiar el nombre) o Delete (eliminar). Seleccione una carpeta y
active la función —>, para ingresarla a la Sharing List (lista de carpetas habilitadas en la LAN).
Sharing List
Cuando una carpeta está protegida con contraseña, seleccione primero la carpeta y luego active Password.
FTP Server (ver Figura 7)
Configuración del FTP
Función Descripción
FTP Status Puede activarse o desactivarse el servidor FTP.
Allow anonymous? Con esta función es posible activar una cuenta de invitado,
Read Only La cuenta de invitado está configurada para Solo Lectura.
Read/Write La cuenta de invitado está configurada para Lectura/
Home Directory Carpeta habilitada para la cuenta de invitado.
que le da acceso a cualquier usuario al servidor FTP.
Escritura
Account List
Aquí se crean cuentas para distintos usuarios y se establecen sus derechos de
acceso.
Función Descripción
User Name Nombre del usuario de la cuenta
Password Contraseña asignada
Access Tipo de acceso: Solo Lectura (Read Only) o Lectura / Escritura
En/Disable Activación / desactivación de la cuenta
(Read/Write)
Programa de servicio para el disco rígido (ver Figura 8)
Disk Utility (Programa de servicio)
Función Descripción
Format Disk Formatea el disco rígido
Scan Disk Analiza el disco rígido en busca de defectos como „clusters perdidos“ y los corrige.
Funcionamiento del USB
Requisitos del sistema
Una interfaz USB (USB 2.0 o USB 1.1), Windows 98SE/Me/2000/XP o más nuevo, Mac OS 9, X o más nuevo
Instalación
Apague su disco duro USB TEAC (Interruptor de conexión/desconexión ). Encienda su ordenador. Enchufe el cable de alimentación de corriente en la hembrilla
situada en la parte posterior del disco duro USB. Enchufe el cable de red de la fuente de alimentación en un enchufe. Aviso: Procure utilizar un enchufe fácilmente
accesible para la fuente de alimentación cerca del aparato. Enchufe el conector más grande del cable de conexión USB 2.0 que se incluye en el volumen de
suministro en la interfaz USB de su ordenador. Enchufe el otro extremo del cable de conexión USB en la hembrilla USB situada en la parte posterior de su disco duro
USB. Importante: No debe conectarse al mismo tiempo ningún cable RJ-45. Encienda el disco duro USB TEAC . Asegúrese de que el LED situado en la parte
frontal del disco duro USB TEAC está encendido.
Instalación del programa de controladores
Windows: No es necesario instalar controladores para el TEAC HD-35NAS (excepto con Windows98SE). Como aparato Plug-and-Play, es detectado automáticamente.
Macintosh: Su Macintosh reconoce automáticamente el disco duro USB y muestra en el escritorio un icono correspondiente.
La desconexión del disco USB del ordenador
Windows: Haga clic con el botón izquierdo del ratón sobre el icono de la barra de herramientas en la esquina inferior derecha de la pantalla. Haga clic con el botón
izquierdo del ratón sobre la unidad que se nos pregunta. Después de unos cuantos segundos aparecerá la comunicación de que la unidad ya se puede desenchufar del
PC. Haga clic sobre «Aceptar» y desenchufe el cable USB.
Macintosh: Arrastre el icono del disco duro USB hasta el icono de la papelera de reciclaje situado en el escritorio. Después puede quitar el disco duro USB.
La desconexión del disco duro USB
Desconecte su disco duro USB sólo después de haberlo quitado de su ordenador o después de haber apagado el sistema operativo. No desconecte el disco duro USB
bajo ningún concepto mientras su ordenador trabaja en funcionamiento normal.
Indicaciones de seguridad
Para evitar el peligro de incendio y las descargas eléctricas no está permitido bajo ningún concepto exponer el equipo a la humedad o a la lluvia. No intente abrir el
equipo, ya que se puede ocasionar una descarga eléctrica. Encargue las reparaciones y el mantenimiento a personal autorizado al respecto.
– 15 –

ČESKYČESKY
ČESKY
ČESKYČESKY
Vaší koupí TEAC HD-35NAS jste se rozhodli pro jednu z nejvýkonnějších USB/LAN–pohon pevného disku, které jsou na trhu k dostání.
Obsah dodávky:Obsah dodávky:
Obsah dodávky: externí USB/LAN–pohon pevného disku, CD, USB 2.0/1 .1 propojovací kabel, napájecí zdroj, tato příručka
Obsah dodávky:Obsah dodávky:
•
Kapacita paměti příslušné údaje jsou uvedeny na obalu
•
Rozhraní USB 2.0 (Universal Serial Bus) / Ethernet LAN (RJ-45)
•
Systém souborů FAT32
•
Rozměry 136 mm (š) x 60 mm (v) x 208,5 mm (h)
•
Váha 2,3 kg
•
Napájecí zdroj 12 V, 1,5 A/5 V 1,5 A
•
Bezpečnostní standarty UL, FCC, CE, TÜV
•
Ovládací prOvládací pr
Ovládací pr
Ovládací prOvládací pr
LEDLED
LED
LEDLED
LAN LED svítí LAN je aktivována, existuje spojení.
10/100 svítí Rychlost přenosu je nastavena na 100 Mbit/s.
USB2.0 svítí Připojení na počítač přes USB.
Ovládací prOvládací pr
Ovládací pr
Ovládací prOvládací pr
Výstupní otvor ventilátoru
USB2.0 Zdířky připojení USB2.0
LAN Zdířky NIC (RJ-45) pro PC, Hub/Switch, ADSL-Modem
PrPr
oo
vv
oz LANoz LAN
Pr
o
v
oz LAN
PrPr
oo
vv
oz LANoz LAN
Nejdůležitější charakteristiky provozu LAN: automatická IP-konfigurace (DHCP Client nebo Server), SMB přes TCP/IP, podpora pro přístup klienta FTP, spravování práva přístupu na
úrovni uvolnění, správa založená na Web-browseru
PřPř
edpoklady predpoklady pr
Př
edpoklady pr
PřPř
edpoklady predpoklady pr
Jeden nebo více počítačů s kartami NIC; Web-Browser jako Internet Explorer, Netscape Navigator nebo Firefox pro správu podporovanou sítí; na přání: ADSL- nebo kabelový modem
s nejméně jednou IP-adresou; na přání: Internet Gateway s podporou DNS; na přání: Ethernet-Hub/Switch k připojení více počítačů
InstInst
alacealace
Inst
alace
InstInst
alacealace
Spojte HD-35NAS kabelem RJ-45 se svým PC, Hub/Switch, ADSL/Kabel-Modem na .
Upozornění: Dbejte na to, abyste použili zásuvku v blízkosti přístroje snadno přístupnou pro napájecí zdroj. Zapněte HD-35NAS vypínačem na přední straně. Nyní pracuje jako
pevný disk LAN.
KK
onfonf
igurigur
K
onf
igur
KK
onfonf
igurigur
Standardně je v HD-35NAS zabudován DHCP-server, který vašemu PC může dodat všechny potřebné internetové parametry. Nejprve ale musíte zadat parametry ISP. Konfigurujte
svůj PC tak, že dostane z HD-35NAS IP-adresu automaticky. Tím bude možno použít konfiguračního manažera podporovaného browserem.
vky na přvky na př
vky na př
vky na přvky na př
StSt
aa
St
a
StSt
aa
bliká LAN přenáší data.
vypnuta LAN není připojena.
vypnuta Rychlost přenosu je nastavena na 10 Mbit/s.
bliká Přes rozhraní USB2.0 se přenášejí data.
vypnuta USB není připojen.
vky na zadní strvky na zadní str
vky na zadní str
vky na zadní strvky na zadní str
aceace
ace
aceace
vv
v
vv
o syo sy
o sy
o syo sy
ední strední str
ední str
ední strední str
PP
opisopis
P
opis
PP
opisopis
aně (viz obraně (viz obr
aně (viz obr
aně (viz obraně (viz obr
stémstém
stém
stémstém
aně (viz obraně (viz obr
aně (viz obr
aně (viz obraně (viz obr
ázáz
ek 2)ek 2)
áz
ek 2)
ázáz
ek 2)ek 2)
ázáz
áz
ázáz
ek 1)ek 1)
ek 1)
ek 1)ek 1)
LEDLED
LED
LEDLED
Ventilátor svítí Vestavěný ventilátor pracuje vadně.
Vypínač/LED svítí Pohon je zapnut.
Přívod proudu Zdířky připojení vnějšího napájecího zdroje
Bezpečnostní očko Možnost připojení standardního bezpečnostního zámku pro
PP
ozoz
or: Současně se nesmí přor: Současně se nesmí př
P
oz
or: Současně se nesmí př
PP
ozoz
or: Současně se nesmí přor: Současně se nesmí př
StSt
aa
vv
PP
a
v
aa
vv
notebooky
ipoipo
jit žádný USB-Kjit žádný USB-K
ipo
jit žádný USB-K
ipoipo
jit žádný USB-Kjit žádný USB-K
P
PP
opisopis
opis
opisopis
abel. abel.
abel. Zastrčte vnější napájecí zdroj na .
abel. abel.
St
StSt
vypnuta Ventilátor pracuje bezvadně.
vypnuta Pohon je vypnut.
Windows 2000/XP
Vyberte v menu
Vlastnosti. Vlastnosti.
Vlastnosti. Vyberte
Vlastnosti. Vlastnosti.
Klikněte na
OK, OK,
OK, abyste
OK, OK,
Spustit N
ast
Spustit NSpustit N
astast
PrPr
oo
tt
okok
ol sítě Intol sítě Int
Pr
o
t
ok
ol sítě Int
PrPr
oo
tt
okok
ol sítě Intol sítě Int
převzali nastavení.
eníení
a
v
ení a potom
aa
vv
eníení
Ovládací panelyOvládací panely
Ovládací panely. Klikněte dvakrát na
Ovládací panelyOvládací panely
erer
nene
t (Tt (T
CP/IP) CP/IP)
er
ne
t (T
CP/IP) a klikněte na
erer
nene
t (Tt (T
CP/IP) CP/IP)
VlastnostiVlastnosti
Vlastnosti. Aktivujte
VlastnostiVlastnosti
ZísZís
Zís
ZísZís
SíťSíť
Síť
SíťSíť
oo
o
oo
kk
at adrat adr
k
at adr
kk
at adrat adr
vv
á přá př
ipoipo
jeníjení
v
á př
ipo
jení. Klikněte pravým tlačítkem myši na
vv
á přá př
ipoipo
jeníjení
esu IP zesu IP z
e sere ser
vv
erer
e ser
e sere ser
u DHCP autu DHCP aut
v
er
u DHCP aut
vv
erer
u DHCP autu DHCP aut
esu IP z
esu IP zesu IP z
omatickyomaticky
omaticky
omatickyomaticky
a Zísa Zís
a Zís
a Zísa Zís
PřPř
ipoipo
jení k místní síti jení k místní síti
Př
ipo
jení k místní síti a potom na
PřPř
ipoipo
jení k místní síti jení k místní síti
kk
at adrat adr
esu seresu ser
vv
erer
esu ser
esu seresu ser
u DNS autu DNS aut
v
er
u DNS aut
vv
erer
u DNS autu DNS aut
k
at adr
kk
at adrat adr
omatickyomaticky
omaticky
omatickyomaticky
Spustit NSpustit N
astast
aa
vv
Windows 98SE/ME
Spustit NSpustit N
astast
aa
vv
Vyberte v menu
rejstříkovou kartu
OKOK
OK, abyste
převzali nastavení.
OKOK
Spustit N
Spustit NSpustit N
AA
drdr
esa IPesa IP
A
dr
esa IP. Aktivujte
AA
drdr
esa IPesa IP
ast
astast
a
aa
eníení
v
ení a potom
vv
eníení
Ovládací panelyOvládací panely
Ovládací panely. Klikněte dvakrát na
Ovládací panelyOvládací panely
ZísZís
kk
at adrat adr
esu IP zesu IP z
e sere ser
vv
erer
Zís
ZísZís
k
at adr
kk
at adrat adr
esu IP z
esu IP zesu IP z
e ser
e sere ser
u DHCP autu DHCP aut
v
er
u DHCP aut
vv
erer
u DHCP autu DHCP aut
SíťSíť
Síť. Najděte zápis
SíťSíť
omatickyomaticky
. .
omaticky
. Na přání: V případě potřeby odstraňte existující záznamy pro DNS a Gateway. Klikněte na
omatickyomaticky
. .
TT
CP/IP -> CP/IP ->
T
CP/IP ->
TT
CP/IP -> CP/IP ->
Jméno vJméno v
Jméno v
Jméno vJméno v
aší síťaší síť
aší síť
aší síťaší síť
oo
vv
é ké k
arar
tt
o
v
é k
ar
t
oo
vv
é ké k
arar
tt
yy
y a klikněte pak na
yy
VlastnostiVlastnosti
Vlastnosti. Vyberte
VlastnostiVlastnosti
..
.
..
StSt
arar
t kt k
onfonf
igurigur
St
ar
t k
onf
StSt
arar
t kt k
onfonf
Nastartujte svého internetového browsera (Internet Explorer, NetScape Navigator, FireFox ap.). Vyvolejte adresu http://storage. Zadejte jméno uživatele a příslušné heslo.
UU
pozpoz
oror
nění: nění:
U
poz
or
nění: Od výrobce jsou nastaveny
UU
pozpoz
oror
nění: nění:
Jakmile proběhl úspěšně login, podívejte se na stavovou stránku.
StSt
aa
vv
oo
vv
á strá str
St
a
v
o
v
á str
StSt
aa
vv
oo
vv
á strá str
LeLe
vý sloupecvý sloupec
Le
vý sloupec
LeLe
vý sloupecvý sloupec
FF
unkunk
cece
F
unk
ce
FF
unkunk
cece
Status Nastavení a stav
IP Config Nastavení adresy sítě
Maintenance Firmware, nastavení, reset
SMB Server Server souborů (uvolněné adresáře)
FTP Server Přenos dat
Disk Utility Scan Disk a formátování pevného disku
System Information (
FF
unkunk
cece
F
unk
ce
FF
unkunk
cece
Host name Nezaměnitelné jméno k identifikaci v LAN
Group name Pracovní skupina, jíž je přiřazen pevný disk
Administrator Slouží k nastavení jména a hesla administrátora
Date/Time Synchronizace času s časovým serverem
Language Codepage datového systému
Firmware version Aktuální verze firmware
UU
pozpoz
oror
nění: nění:
U
poz
or
nění: Po první instalaci už neměňte jazyk. Při změně na jiné nastavení
UU
pozpoz
oror
nění: nění:
může dojít ke ztrátě dat.
ačního manažačního manaž
igur
ačního manaž
igurigur
ačního manažačního manaž
ánkánk
a (viz obra (viz obr
ánk
a (viz obr
ánkánk
a (viz obra (viz obr
PP
opisopis
P
opis
PP
opisopis
SySy
Sy
SySy
PP
opisopis
P
opis
PP
opisopis
stémostémo
stémo
stémostémo
ázáz
áz
ázáz
admin admin
admin jako
admin admin
ek 3)ek 3)
ek 3)
ek 3)ek 3)
vv
é infé inf
v
é inf
vv
é infé inf
erer
er
erer
aa
a
aa
oror
mace)mace)
or
mace)
oror
mace)mace)
uživatel
admin admin
a
admin jako heslo.
admin admin
InfInf
oror
Network Information (
FF
unkunk
cece
F
unk
ce
FF
unkunk
cece
IP Address Aktuální adresa sítě pevného disku
DHCP Server Automatické přidělení adresy sítě a dalších nastavení sítě
Disk Information (
FF
unkunk
cece
F
unk
ce
FF
unkunk
cece
Disk ID Číslo modelu
Free Size Existující volná paměťová kapacita
Total Size Celková kapacita
PP
opisopis
P
opis
PP
opisopis
pro PC
InfInf
Inf
InfInf
PP
opisopis
P
opis
PP
opisopis
mace o síti)mace o síti)
Inf
or
mace o síti)
InfInf
oror
mace o síti)mace o síti)
oror
mace o dismace o dis
or
mace o dis
oror
mace o dismace o dis
pevného disku
kk
u)u)
k
u)
kk
u)u)
– 16 –

ČESKYČESKY
ČESKY
ČESKYČESKY
IP kIP k
onfonf
igurigur
ační strační str
ánkánk
igurigur
igur
igurigur
PP
opisopis
P
opis
PP
opisopis
eseese
t, t,
ese
t, chcete-li
eseese
t, t,
vv
v
vv
a (viz obra (viz obr
ánk
a (viz obr
ánkánk
a (viz obra (viz obr
ace)ace)
ace)
ace)ace)
ázáz
áz
ázáz
erer
u (viz obru (viz obr
er
u (viz obr
erer
u (viz obru (viz obr
IP k
onf
igur
onfonf
igurigur
cece
ce
cece
a údra údr
a údr
a údra údr
ww
arar
e Ue U
w
ar
e U
ww
arar
e Ue U
em Rem R
ebooeboo
em R
eboo
em Rem R
ebooeboo
oror
y Defy Def
or
y Def
oror
y Defy Def
a SMB-Sera SMB-Ser
a SMB-Ser
a SMB-Sera SMB-Ser
ační str
ační strační str
IP kIP k
onfonf
IP k
onf
IP kIP k
onfonf
žbžb
y (viz obry (viz obr
žb
y (viz obr
žbžb
y (viz obry (viz obr
ploadpload
pload
ploadpload
tt
t
tt
aultsaults
aults
aultsaults
RR
R
RR
Sharing ListSharing List
Sharing List (seznam adresářů uvolněných v LAN).
Sharing ListSharing List
IP kIP k
IP Config (
FF
unkunk
F
unk
FF
unkunk
Automatic IP Automatické přidělení IP adresy nebo aktivace jako DHCP-Server
Static IP as below Manuální nastavení adresy sítě, IP adresy, masky podsítě, gateway, DNS
StrStr
ánkánk
Str
ánk
StrStr
ánkánk
FirFir
mm
Fir
m
FirFir
mm
Chcete-li aktualizovat firmware, stiskněte
se oznámí. Nakonec se musí HD-35NAS znovu nastartovat.
SySy
stst
Sy
st
SySy
stst
Nastartujte nově HD-35NAS pomocí
FF
actact
F
act
FF
actact
Klikněte na tlačítko
StrStr
ánkánk
Str
ánk
StrStr
ánkánk
FF
older Listolder List
F
older List
FF
older Listolder List
V tomto seznamu můžete spravovat všechny adresáře na pevném disku:
abyste jej zapsali do
Sharing ListSharing List
Sharing List
Sharing ListSharing List
Má-li být uvolněný adresář zajištěn heslem, nejprve jej vyberte a potom klikněte na tlačítko
ázáz
ek 4)ek 4)
áz
ek 4)
ázáz
ek 4)ek 4)
ek 5)ek 5)
ek 5)
ek 5)ek 5)
BrBr
oo
ww
se, se,
Br
o
w
se, vyberte si firmware a stiskněte potom
BrBr
oo
ww
se, se,
RR
ebooeboo
tt
R
eboo
t.
RR
ebooeboo
tt
obnovit původní nastavení parametrů výrobce.
ázáz
ek 6)ek 6)
áz
ek 6)
ázáz
ek 6)ek 6)
CrCr
eateat
e e
Cr
eat
e (založení nového),
CrCr
eateat
e e
UU
ploadpload
U
pload. Počkejte několik sekund, než se pochod ukončí. Úspěšné zakončení aktualizace
UU
ploadpload
PP
P
PP
RR
ename ename
R
ename (přejmenování) a
RR
ename ename
asswassw
oror
dd
assw
or
d.
asswassw
oror
dd
DeleDele
tt
e e
Dele
t
e (mazání). Vyberte si adresář a stiskněte
DeleDele
tt
e e
—>—>
—>,
—>—>
FTP SerFTP Ser
FTP Ser
FTP SerFTP Ser
FTP kFTP k
FTP k
FTP kFTP k
FF
F
FF
FTP Status FTP server se může aktivovat/deaktivovat.
Allow anonymous? Tím se aktivuje účet hosta, který umožní každému přístup ke
Read Only Účet hosta se nastaví pouze na čtení.
Read/Write Účet hosta se nastaví na psaní/čtení.
Home Directory Uvolněný adresář pro účet hosta.
SlužSluž
Služ
SlužSluž
SlužSluž
Služ
SlužSluž
FF
F
FF
Format Disk slouží k formátování pevného disku.
Scan Disk hledá vady pevného disku jako „ztracené cluster“ a opravuje je.
PrPr
Pr
PrPr
PřPř
Př
PřPř
USB-rozhraní (USB 2.0 nebo USB 1.1), 98SE/Me/2000/XP nebo novější, Mac OS 9, X nebo novější
InstInst
Inst
InstInst
Zapněte Váš počítač. Pomocí příslušných pak napájecí zdroj . Upozornění: Dbejte na to, abyste použili zásuvku v blízkosti přístroje snadno přístupnou pro napájecí zdroj.
Spojte tu větší koncovku od přiloženého USB-propojovacího kabelu s USB-rozhraním Vašeho počítače. Druhý konec USB-kabelu zasuňte do USB-zástrčky na zadní straně Vašeho
USB-pevného disku.
na přední straně TEAC USB-pevného disku.
OvladačeOvladače
Ovladače
OvladačeOvladače
WW
W
WW
MacintMacint
Macint
MacintMacint
vv
er (viz obrer (viz obr
v
er (viz obr
vv
er (viz obrer (viz obr
onfonf
igurigur
onf
igur
ace
onfonf
igurigur
unkunk
cece
unk
ce
unkunk
cece
ební prební pr
ební pr
ební prební pr
ební prební pr
ogrogr
ební pr
ogr
ební prební pr
unkunk
unk
unkunk
oo
o
oo
edpoklady syedpoklady sy
edpoklady sy
edpoklady syedpoklady sy
indoindo
indo
indoindo
ogrogr
cece
ce
cece
vv
oz USBoz USB
v
oz USB
vv
oz USBoz USB
alacealace
alace
alacealace
ww
s: s:
w
s: Pro TEAC HD-35NAS nemusí být žádné ovladače instalované (výjimka Windows98SE). Jako Plug-and-Play-přístroj to bude automaticky samo naleznuto.
ww
s: s:
osh: osh:
osh: Váš Macintosh pozná ten USB-pevný disk automaticky a na pracovním stole Vám ukáže odpovídající ikonu.
osh: osh:
ázáz
ek 7)ek 7)
áz
ek 7)
ázáz
ek 7)ek 7)
aceace
aceace
PP
opisopis
P
opis
PP
opisopis
službě FTP.
ogrogr
amam
y pry pr
ogr
ogrogr
amam
am
amam
o peo pe
am
y pr
o pe
amam
y pry pr
o peo pe
yy
y
yy
PP
opisopis
P
opis
PP
opisopis
stémustému
stému
stémustému
PP
ozoz
or: Současně se nesmí přor: Současně se nesmí př
P
oz
or: Současně se nesmí př
PP
ozoz
or: Současně se nesmí přor: Současně se nesmí př
vný disvný dis
vný dis
vný disvný dis
k (viz obrk (viz obr
k (viz obr
k (viz obrk (viz obr
ipoipo
jit žádný Rjit žádný R
ipo
jit žádný R
ipoipo
jit žádný Rjit žádný R
ázáz
áz
ázáz
AA
ccount Listccount List
A
ccount List
AA
ccount Listccount List
Zde se zakládají účty pro různé uživatele a jejich přístupová práva.
FF
unkunk
cece
F
unk
ce
FF
unkunk
cece
User Name Jméno účtu uživatele.
Password Přiřazené heslo
Access Typ přístupu: Jen čtení (Read Only) nebo Psaní/Čtení (Read/
En/Disable Aktivace/deaktivace účtu
ek 8)ek 8)
ek 8)
ek 8)ek 8)
J-45-KJ-45-K
abel. abel.
J-45-K
abel. Zapněte HD-35NAS vypínačem na přední straně. Ujistěte se, že se rozsvítila kontrolní lampa LED
J-45-KJ-45-K
abel. abel.
PP
opisopis
P
opis
PP
opisopis
Write)
OdpoOdpo
jení USB-disjení USB-dis
Odpo
jení USB-dis
OdpoOdpo
jení USB-disjení USB-dis
WW
indoindo
ww
s:s:
W
indo
w
s: Stiskněte levé tlačítko myši a zvolte ikonu v hlavním panelu na obrazovce ve spodním pravém rohu. Tipněte levým tlačítkem myši na ten disk, který přichází do úvahy.
WW
indoindo
ww
s:s:
Po několika vteřinách se objeví oznámení, že se nyní může disk bezpečně odpojit od počítače. Zvolte ˝OK˝ a odpojte USB-kabel.
MacintMacint
osh: osh:
Macint
osh: Potáhněte symbol pro USB-pevný disk na ikonu odpadkového koše na Vašem praacovním stole. Poté můžete USB-pevný disk odpojit.
MacintMacint
osh: osh:
Bezpečnostní upozBezpečnostní upoz
Bezpečnostní upoz
Bezpečnostní upozBezpečnostní upoz
Aby se zamezilo vzniku požáru a elektrických ran nesmí být přístroj v žádném případě vystaven vlhkosti nebo dešti.Nezkoušejte sami přístroj otevřít, neboť by mohlo dojít k
elektrické ráně. Přenechejte opravu a údržbu přístroje personálu, který je k tomu autorizovaný.
kk
u od počítu od počít
k
u od počít
kk
u od počítu od počít
oror
něnínění
or
nění
oror
něnínění
ačač
ač
ačač
ee
e
ee
– 17 –

¼¼¸¾º»
Á
Á
W
Á
W
»
A
¶ ÅÀ¾ TEAC HD35NAS ®È¶Å¶ ²ÁÀ»Å¯Ä¶º ®¾²¾ ²ÁÍ ÅÀÆà »ÀÂÆDz°ÀÆà ÄŸ¾ ²´À USB/LAN-Ä»¼¸ÂÍ µ°Ä»À Æɸ¼Ï¾ ¶ÁºµÍĶʾ.
z ¢¶Âº¶Èͽ¶¾Àà ¶¿ÀÁ¼ºÄ½ÍÃ: ¿ÊŶº»Íà USB/LAN-Ä»¼¸ÂÍà µ°Ä»ÀÃ, CD-ROM ½¶ ¼À´ºÄ½º»Í Àµ¸´Ï¾, USB interface »²¼ÏµºÀ, ÅÀ Á²ÂϾ ¶´È¶ºÂ°µºÀ,
z
¨Ê¸ź»ÍŸŲ ¡ HD35NAS µº²Å°¹¶Å²º ½¶ µºÇÀ¶à Èʸź»ÍŸŶÃ, ¶Á¾Ê
z
Interface USB 2.0 (Universal Serial Bus)/Ethernet LAN (RJ-45)
ÄŸ ÄÆÄ»¶Æ²Ä°² ²¾²Ç®Â¶Å²º ¸ Èʸź»ÍŸŲ ŸÃ
ÄÆ´»¶»Âº½®¾¸Ã ÄÆÄ»¶Æ¯Ã.
¥² ДЕАºИ¶°² И¶ºВºД½АО ДЕ¸ ½БВАДЕº¾¯ Б¼¶ЖВ (³¼®Á¶ º»Í¾² 1)
LED ²ÅÄŲĸ ¢¶Âº´Â²Ç¯
LAN LED on LAN ¶°¾²º ¶¾¶Â´ÀÁÀº¸½®¾À, ÆÁÂȶº ½º² Äξµ¶Ä¸.
²¾²³Àij¯¾¶º ®ÄÊ ÅÀÆ LAN ´°¾¶Å²º ½¶Å²ÇÀ ²Âȶ°Ê¾.
10/100 on ¥²ÈΟŲ ½¶Å²ÇÀÂà ¶°¾²º Âƹ½ºÄ½®¾¸ ÄŲ 100 Mbit/s.
off LAN µ¶¾ ¶°¾²º Äƾµ¶µ¶½®¾À.
off ¥²ÈΟŲ ½¶Å²ÇÀÂà ¶°¾²º Âƹ½ºÄ½®¾¸ ÄŲ 10 Mbit/s.
¥² ÄÅÀºÈ¶°² ȶºÂºÄ½ÀÎ ÄŸ¾ Á°ÄÊ Á¼¶Æ (³¼®Á¶ º»Í¾² 2)
ЕВАЗАµАЕº»Н
z
º²ÄÅĶºÃ 136 mm (¢) x 60mm (¦) x 208,5 mm ()
z
ÂÀÃ 2300 g
z
ЕВАЗАµАЕº»Н 12V 1,5A/5V 1,5A
z
¤Å¾Å²ÂÅ ²ÄDz¼¶°²Ã CE, UL, FCC, TÜV
LED ²ÅÄŲĸ ¢¶Âº´Â²Ç¯
USB2.0 on ®ÄÊ USB Äξµ¶Ä¸ ½¶ ®¾²¾ ÆÁÀ¼À´ºÄů.
²¾²³Àij¯¾¶º ®ÄÊ ÅÀÆ USB2.0 interface ´°¾¶Å²º ½¶Å²ÇÀ ²Âȶ°Ê¾.
off USB µ¶¾ ¶°¾²º Äƾµ¶µ¶½®¾À.
¾¶½ºÄů²à on ¡ ¶¾Äʽ²Åʽ®¾Àà ²¾¶½ºÄů²à µ¶¾ ¼¶ºÅÀÆ´¶° ÄÊÄÅ.
off ¡ ²¾¶½ºÄů²à ¼¶ºÅÀÆ´¶° ÈÊ°à ÁÂÀ³¼¯½²Å².
º²»ÍÁŸà on ½À¾µ² ¶°¾²º ¶¾¶Â´ÀÁÀº¸½®¾¸.
ON/OFF/LED off ½À¾µ² ¶°¾²º ²Á¶¾¶Â´ÀÁÀº¸½®¾¸.
¿ÀµÀà ²¾¶½ºÄů²
USB2.0 USB2.0-ÆÁÀµÀȯ Äξµ¶Ä¸Ã
LAN NIC (RJ-45) ÆÁÀµÀȯ Äξµ¶Ä¸Ã ´º² PC, Hub/Switch, ADSL-
Modem
ЕВАЗАµАД°² В¶О½²ЕАГ ¦БАµАИ¯ ДО¾µ¶Д¸Г ´º² ¶¿КЕ¶Вº»Н
µ²»ÅμºÀà ²ÄDz¼¶°²Ã °¾²º ¶Çº»Å¯ ¸ ÅÀÁÀ¹®Å¸Ä¸ ½º²Ã ÄžŲÂÅ
ЕВАЗАµАЕº»Н
»¼¶ºµ²ÂºÃ ²ÄDz¼¶°²Ã ´º² notebooks
LAN-¶ºÅÀÆ´°²
¤¸½²¾Åº»ÍŶ² Ȳ²»Å¸ÂºÄź» ÄŸ¾ LAN-¼¶ºÅÀÆ´°²: ²ÆÅͽ²ÅÀ IP-configuration (DHCP Client ¯ µº²»À½ºÄů), SMB ½®ÄÊ TCP/IP, ЖБАДЕ¯Вº¿¸ ´º² FTP-Client
ÂÀijĶºÃ, µº²È¶°ÂºÄ¸ µº»²ºÊ½Åʾ ÁÂÍij²Ä¸Ã Ķ ¶Á°Á¶µÀ »Àº¾ÍȸÄÅʾ ²Âȶ°Ê¾, µº²È¶°ÂºÄ¸ ³²ÄºÄ½®¾¸ Ķ Web-Browser
¢ВАМБА¹®Д¶ºГ ДЖДЕ¯½²ЕАГ
¾²Г ¯ Б¶ВºДДНЕ¶ВАº ЖБА¼А´ºДЕ®Г ½¶ »ВЕ¶Г µº»ЕОАЖ (NIC), Web-Browser НБКГ Internet Explorer, Netscape Navigator ¯ Firefox ´º² Е¸ µЖ¾²ЕНЕ¸Е² µº²И¶°ВºД¸Г ½®ДК
µº»ЕОАЖ, БВА²ºВ¶Еº»: ADSL- ¯ »²¼Кµº²»Н ½Н¾Е¶½ ½¶ ЕАЖ¼ИºДЕА¾ ½º² µº¶О¹Ж¾Д¸ IP, БВА²ºВ¶Еº»: Internet Gateway ½¶ DNS-ЖБАДЕ¯Вº¿¸, БВА²ºВ¶Еº»: EthernetHub/Switch ´º² Е¸ ДО¾µ¶Д¸ Б¶ВºДДАЕ®ВК¾ ЖБА¼А´ºДЕП¾
´»²ÅÄŲĸ
¤Æ¾µ®¶Å¶ ÅÀ¾ HD-35NAS ½¶ ®¾² RJ-45-»²¼ÏµºÀ ÄÅÀ PC IJÃ, Hub/Switch, ADSL/»²¼Êµº²»Í-½Í¾Å¶½. ¤¸½²¾Еº»Н: ¥²ЖЕНИВА¾² µ¶¾ ¶БºЕВ®Б¶Е²º ¾² ¶°¾²º
ДЖ¾µ¶µ¶½®¾А »²¾®¾² USB-»²¼ПµºА. ¥АБА¹¶Е¶°Е¶ ЕА ¶¿КЕ¶Вº»Н ЕВАЗАµАЕº»Н
¶Î»À¼¸ ÁÂÍij²Ä¸ »À¾Å ÄŸ ÄÆÄ»¶Æ¯. ¾¶Â´ÀÁÀº¶°Å¶ ÅÀ¾ HD-35NAS ½¶ ÅÀ »ÀƽÁ° ¶¾¶Â´ÀÁÀ°¸Ä¸Ã
Ä»¼¸ÂÍà µ°Ä»ÀÃ.
. ¦Á͵¶º¿¸: ¢ВАД®И¶Е¶ ¾² ИВ¸Дº½АБАº¶°Е¶ ´º² ЕА ЕВАЗАµАЕº»Н ½º² БВ°·² ½
ДЕ¸¾ ½БВАДЕº¾¯ Б¼¶ЖВ. ЖЕНГ ¼¶ºЕАЖВ´¶° ЕПВ² КГ LAN-
Configuration
¤ÅÀ ÄžŲÂÅ ¶¿ÀÁ¼ºÄ½Í ÄÅÀ¾ HD-35NAS ¶°¾²º ¶¾Äʽ²Åʽ®¾Àà ®¾²Ã DHCP-µº²»À½ºÄůÃ, À ÀÁÀ°Àà ½ÁÀ¶° ¾² ²ÁÀµÏĶº ÄÅÀ PC ͼ¶Ã źà ²Á²ºÅÀν¶¾¶Ã
²В²½®ЕВАЖГ internet. ²Е’ ²ВИ¯¾ Н½КГ БВ®Б¶º ¶Д¶°Г ¾² ¶ºД´¶Е¶ ЕºГ ISP-Б²В²½®ЕВАЖГ. £Ж¹½°·¶Е¶ ЕА configuration ДЕА PC Д²Г »²Е Е®ЕАºА ЕВНБА, ПДЕ¶ ¾² ЕАЖ
²БАµ°µ¶Е²º ²ЖЕН½²Е² ²БН ЕА¾ HD-35NAS ¸ µº¶О¹Ж¾Д¸ IP. ¶ ЕА¾ ЕВНБА ²ЖЕН ´°¾¶Е²º ¶Зº»ЕН ¾² ИВ¸Дº½АБАº¶°Е²º А Browser-ЖБАДЕ¸Вº·Н½¶¾АГ configuration manager.
indows 2000/XP
Áº¼®´¶Å¶ ÄÅÀ ½¶¾ÀÎ ¾²Â¿¸, £Æ¹½°Ä¶ºÃ »²º ÄŸ Äƾ®È¶º² ¢°¾²»²Ã ¶¼®´ÈÀÆ. ¾¶Å¶ µºÁ¼Í »¼º» ¶Á¾Ê Äźà ¤Æ¾µ®Ä¶ºÃ µº»ÅÎÀÆ. ¾¶Å¶ »¼º» ½¶ ÅÀ µ¶¿° Á¼¯»ÅÂÀ ÅÀÆ
À¾Åº»ºÀÎ ¶Á¾Ê ÄÅÀ LAN-Äξµ¶Ä¸ »²º ÄŸ Äƾ®È¶º² ÄÅÀ µºÍŸŶÃ. Áº¼®´¶Å¶ ÅÀ ¢ÂÊÅÍ»À¼¼À internet (TCP/IP) »²º »¾¶Å¶ »¼º» ¶Á¾Ê Äźà µºÍŸŶÃ.
¾¶Â´ÀÁÀº¶°Å¶ ÆÅͽ²Å¸ ²Á͵Àĸ µº¶Î¹Æ¾Ä¸Ã IP »²º ÆÅͽ²Å¸ ²Á͵Àĸ µº¶Î¹Æ¾Ä¸Ã µº²»À½ºÄů DNS. ¾¶Å¶ »¼º» ÄÅÀ OK, ´º² ¾² ¶З²В½АДЕАО¾ Аº ВЖ¹½°Д¶ºГ.
indows 98SE/ME
Áº¼®´¶Å¶ ÄÅÀ ½¶¾ÀÎ ¾²Â¿¸, £Æ¹½°Ä¶ºÃ »²º ÄŸ Äƾ®È¶º² ¢°¾²»²Ã ¶¼®´ÈÀÆ. ¾Å¶ µºÁ¼Í »¼º» Åϲ ÄÅÀ µ°»ÅÆÀ. ¾²·¸ÅŶ Ÿ¾ »²Å²Èϸĸ TCP/IP -> ¾À½² ŸÃ
ÂŲà IJà µº»ÅÎÀÆ »²º »¾¶Å¶ »¼º» ÄÅÀ µºÍŸŶÃ. Бº¼®´¶Е¶ Е¸¾ »ВЕ² ½¸ЕВПАЖ µº¶Î¹Æ¾Ä¸ IP. ¾¶Â´ÀÁÀº¶°Å¶ ÆÅͽ²Å¸ ²Á͵Àĸ µº¶Î¹Æ¾Ä¸Ã IP. ¢ÂÀ²ºÂ¶Åº»:
¾ ²Б²ºЕ¶°Е²º, Б²В²»²¼¶°Д¹¶ ¾² ²З²ºВ®Д¶Е¶ ЕºГ ЖБВИАЖД¶Г ¶´´В²З®Г ´º² DNS »²º Gateway. ¾¶Е¶ »¼º» ДЕА OK, ´º² ¾² ¶З²В½АДЕАО¾ Аº ВЖ¹½°Д¶ºГ.
¾²Â¿¸ ÅÀÆ Configuration Manager
¾À°´¶Å¶ ÅÀ¾ Internet-Browser (Internet Explorer, NetScape Navigator, FireFox »Å¼.). ²¼¶°Å¶ Ÿ µº¶Î¹Æ¾Ä¸ http://storage. ºÄ´¶Å¶ ÅÀ ;À½² ȯğ »²º ÅÀ¾
²¾Å°ÄÅÀºÈÀ »Êµº»Í ÁÂÍij²Ä¸Ã.
¦Á͵¶º¿¸: ÁÍ ÅÀ ¶Â´ÀÄÅĺÀ ¶°¾²º »²Å²Èʸ½®¾² Êà ;À½² ȯğ: admin »²º Êà »Êµº»Íà ÁÂÍij²Ä¸Ã: admin.
ÇÀÎ ®È¶Å¶ À¼À»¼¸ÂÏĶº ½¶ ¶ÁºÅÆÈ°² Ÿ µº²µº»²Ä°² ÅÀÆ login (¶ºÄ͵ÀÆ), ³¼®Á¶Å¶ Ÿ Ķ¼°µ² »²ÅÄŲĸÃ.
¤¶¼°µ² »²ÅÄŲĸà (³¼®Á¶ º»Í¾² 3)
ºÄŶ¯ Äů¼¸
¶ºÅÀÆ´°² ¢¶Âº´Â²Ç¯
Status £Æ¹½°Ä¶ºÃ »²º »²ÅÄŲĸ
IP Config £Î¹½ºÄ¸ Ÿà µº¶Î¹Æ¾Ä¸Ã µº»ÅÎÀÆ
Maintenance Firmware, Âƹ½°Ä¶ºÃ, Reset
SMB Server º²»À½ºÄůà ²Âȶ°Ê¾ (»Àº¾ÍȸÄÅÀº »²Å¼À´Àº)
FTP Server ¶Å²ÇÀ ²Âȶ°Ê¾
Disk Utility Scan Disk »²º ÇÀ½ºĽ² ÅÀÆ Ä»¼¸ÂÀÎ µ°Ä»ÀÆ
System Information (Б¼¸ВАЗАВ°¶Г ДЖДЕ¯½²ЕАГ)
¶ºÅÀÆ´°² ¢¶Âº´Â²Ç¯
Host name ¨²Â²»Å¸ÂºÄź»Í ;À½² ´º² Ÿ¾ ²¾²´¾Ïºĸ ÄÅÀ
Group name ¡½µ² ¶Â´²Ä°²Ã, ÄŸ¾ ÀÁÀ°² ¶°¾²º
dministrator ¨Â¸Äº½¶Î¶º ´º² ÅÀ¾ ÀÂºÄ½Í ÅÀÆ À¾Í½²ÅÀà »²º
Date/Time ¤Æ´ÈÂÀ¾ºÄ½Íà Ÿà Ï²à ½¶ ®¾² µº²»À½ºÄů
Language ʵº»ÀĶ¼°µ² ÅÀÆ ÄÆÄů½²ÅÀà ²Âȶ°Ê¾
Firmware version ¥Â®ÈÀÆIJ ®»µÀĸ ÅÀÆ Firmware
LAN
Ų¿º¾À½¸½®¾Àà À Ä»¼¸ÂÍà µ°Ä»ÀÃ
»Êµº»ÀÎ ÁÂÍij²Ä¸Ã ÅÀÆ µº²È¶ºÂºÄů
ÈÂ;ÀÆ
¦Á͵¶º¿¸: ¸¾ ²¼¼·¶Å¶ Ÿ ´¼ÏÄIJ ½¶Å Ÿ¾ ÁÂÏŸ ¶´»²ÅÄŲĸ. ²Å Ÿ¾ ²¼¼²´¯ Ķ
½º² ¼¼¸ ВО¹½ºД¸ ½БАВАО¾ ¾² БВА»¼¸¹¶° ²БП¼¶º² µ¶µА½®¾К¾.
Network Information (Б¼¸ВАЗАВ°¶Г µº»ЕОАЖ)
¶ºÅÀÆ´°² ¢¶Âº´Â²Ç¯
IP Address ¥Â®ÈÀÆIJ µº¶Î¹Æ¾Ä¸ µº»ÅÎÀÆ ÅÀÆ Ä»¼¸ÂÀÎ µ°Ä»ÀÆ
DHCP Server ÆÅͽ²Å¸ ²Á͵Àĸ ½º² µº¶Î¹Æ¾Ä¸Ã µº»ÅÎÀÆ »²º ¼¼Ê¾ Âƹ½°Ä¶Ê¾ µº»ÅÎÀÆ
Disk Information (Б¼¸ВАЗАВ°¶Г µ°Д»АЖ)
¶ºÅÀÆ´°² ¢¶Âº´Â²Ç¯
Disk ID º¹½Íà ½À¾Å®¼ÀÆ ÅÀÆ Ä»¼¸ÂÀÎ µ°Ä»ÀÆ
Free Size º²¹®Äº½¸ ¶¼¶Î¹¶Â¸ Èʸź»ÍŸŲ
Total Size ¤Æ¾À¼º»¯ Èʸź»ÍŸŲ
´º² ÅÀ PC
– 18 –

¼¼¸¾º»
A
A
´
W
W
Å
¦
Á
IP-Ķ¼°µ² ÅÀÆ configuration (³¼®Á¶ º»Í¾² 4)
IP Config (IP-configuration)
¶ºÅÀÆ´°² ¢¶Âº´Â²Ç¯
utomatic IP ÆÅͽ²Å¸ ²Á͵Àĸ Ÿà µº¶Î¹Æ¾Ä¸Ã IP ¯ ¶¾¶Â´ÀÁÀ°¸Ä¸ Êà DHCP-µº²»À½ºÄůÃ
Static IP as below Á͵Àĸ Ÿà µº¶Î¹Æ¾Ä¸Ã µº»ÅÎÀÆ ²ÁÍ ÅÀ ȯğ, µº¶Î¹Æ¾Ä¸ IP, Ä»² Subnet, Gateway, DNS
Maintenance-Ķ¼°µ² (³¼®Á¶ º»Í¾² 5)
Firmware Upload
¾ ¹®¼¶Å¶ ¾² ¶¾¸½¶ÂÏĶŶ ÅÀ Firmware, ¶Áº¼®´¶Å¶ ÅÀ Browse, ¶Áº¼®´¶Å¶ ÅÀ Firmware »²º Á²ÅŶ ÄŸ Äƾ®È¶º² Upload. ¢¶Âº½®¾¶Å¶ ½¶Âº» µ¶ÆŶÂͼ¶ÁŲ, ½®Èº ¾²
À¼À»¼¸Âʹ¶° ¸ µº²µº»²Ä°². Á¶º»À¾°·¶Å²º ¸ ¶ÁºÅÆȯà À¼À»¼¯ÂÊĸ Ÿà ¶¾¸½®ÂÊĸÃ. ¤Å¸ Äƾ®È¶º² Á®Á¶º ¾² ¶»Å¶¼¶ÄŶ° ¶Á²¾¶»»°¾¸Ä¸ ÅÀÆ HD-35NAS.
System Reboot
»Å¶¼¶°Å¶ ¾®² ¶»»°¾¸Ä¸ ÅÀÆ HD-35NAS ½¶ Reboot.
Factory Defaults
¢²ÅŶ ÅÀ »ÀƽÁ° Reset, ¶¾ ¹®¼¶Å¶ ¾² ¶Á²¾²Ç®Â¶Å¶ Á¼º Äźà ¶Â´ÀÄŲĺ²»®Ã Âƹ½°Ä¶ºÃ.
SMB-Server-Ķ¼°µ² (³¼®Á¶ º»Í¾² 6)
Folder List
¤Å¸ ¼°ÄŲ ²Æů ½ÁÀ¶°Å¶ ½¶ Create (µ¸½ºÀÆ´°²), Rename (½¶ÅÀ¾À½²Ä°²) »²º Delete (µº²´Â²Ç¯) ¾² µº²È¶ºÂºÄŶ°Å¶ ͼÀÆà ÅÀÆà Dz»®¼ÀÆà ¶Á¾Ê ÄÅÀ¾ Ä»¼¸ÂÍ µ°Ä»À.
Áº¼®´¶Å¶ ®¾²¾ Ç»¶¼À »²º Á²ÅŶ
-->, ´º² ¾² ÅÀ¾ »²Å²ÈʯĶŶ ÄŸ Sharing List (¼°ДЕ² ½¶ ЕАЖГ »Аº¾НИВ¸ДЕАОГ ДЕА LAN Dz»®¼ÀÆÃ).
Sharing List (¼°ÄŲ »Àº¾¯Ã ȯĸÃ)
¾ ®¾²Г »Аº¾НИВ¸ДЕАГ З»¶¼АГ АЗ¶°¼¶º ¾² БВАДЕ²Е¶ЖЕ¶° ½¶ ®¾²¾ »Кµº»Н БВНД³²Д¸Г, ÅÀ¾ ¶Áº¼®´¶Å¶ ÁÂÏŲ »²º Á²ÅŶ ÄŸ Äƾ®È¶º² ÅÀ »ÀƽÁ° Password.
FTP Server (³¼®Á¶ º»Í¾² 7)
FTP Configuration
¶ºÅÀÆ´°² ¢¶Âº´Â²Ç¯
FTP Status ¡ FTP-µº²»À½ºÄůà ½ÁÀ¶° ¾²
llow anonymous? ¶ ²ÆÅÍ ½ÁÀ¶° ¾² ¶¾¶Â´ÀÁÀº¸¹¶° ®¾²Ã ¼À´²Âº²Ä½ÍÃ
Read Only ¤ÅÀ¾ ¼À´²Âº²Ä½Í ¶ÁºÄ»®ÁŸ ¶ÁºÅ®Á¶Å²º ½Í¾À ¸ ²¾´¾Êĸ.
Read/Write ¤ÅÀ ¼À´²Âº²Ä½Í ¶ÁºÄ»®ÁŸ ¶ÁºÅ®Á¶Å²º ²¾´¾Êĸ/¶´´Â²Ç¯.
Home Directory Àº¾ÍȸÄÅÀà ǻ¶¼Àà ´º² ÅÀ ¼À´²Âº²Ä½Í ¶ÁºÄ»®ÁŸ.
¶¾¶Â´ÀÁÀº¸¹¶°/²Á¶¾¶Â´ÀÁÀº¸¹¶°.
¶ÁºÄ»®ÁŸ, À ÀÁÀ°Àà ¶ÁºÅ®Á¶º Ÿ¾ ÁÂÍij²Ä¸ ÄÅÀ¾
ÀÁÀºÀµ¯ÁÀŶ ÄŸ¾ FTP-ÆÁ¸Â¶Ä°².
Account List
µП µ¸½ºАЖВ´АО¾Е²º Аº ¼А´²Вº²Д½А° ´º² µºЗАВАЖГ ИВ¯ДЕ¶Г »²º
»²¹АВ°·А¾Е²º Е² µº»²ºП½²Е² БВНД³²Д¸Г.
¶ºÅÀÆ´°² ¢¶Âº´Â²Ç¯
User Name ¾À½² ÅÀÆ È¯ÄŸ ¼À´²Âº²Ä½Ï¾ ȸÄÅϾ
Password ÁÀµºµÍ½¶¾Àà »Êµº»Íà ÁÂÍij²Ä¸Ã
Access ¥ÎÁÀà ÁÂÍij²Ä¸Ã: ;À ²¾´¾Êĸ (Read Only) ¯
En/Disable ¾¶Â´ÀÁÀ°¸Ä¸/²Á¶¾¶Â´ÀÁÀ°¸Ä¸ ¼À´²Âº²Ä½Ï¾
²¾´¾Êĸ/¶´´Â²Ç¯ (Read/Write)
À¸¹¸Åº» ÁÂÀ´Â½½²Å² ´º² ÅÀ Ä»¼¸ÂÍ µ°Ä»À (³¼®Á¶ º»Í¾² 8)
Disk Utility (À¸¹¸Åº» ÁÂÀ´Â½½²Å²)
¶ºÅÀÆ´°² ¢¶Âº´Â²Ç¯
Format Disk ¨Â¸Äº½¶Î¶º ´º² ÅÀ ÇÀ½ºĽ² ÅÀÆ Ä»¼¸ÂÀÎ µ°Ä»ÀÆ.
Scan Disk ¾²·¸Å ÄǼ½²Å² ÄÅÀ Ä»¼¸ÂÍ µ°Ä»À ÍÁÊà „Ȳ½®¾² Cluster“ »²º ²ÁÀ»²¹ºÄŠŲ ÄǼ½²Å².
USB-¶ºÅÀÆ´°²
¢ВАМБА¹®Д¶ºГ ДЖДЕ¯½²ЕАГ
USB-interface (USB 2.0/1.1), Windows98SE/ME/2000/XP ¯ ¾¶ÏŶÂÀ, Mac OS 9, X ¯ ¾¶ÏŶÂÀ
´»²ÅÄŲĸ
Á¶¾¶Â´ÀÁÀº¶°Å¶ ÅÀ¾ TEAC USB Ä»¼¸ÂÍ µ°Ä»À (µº²»ÍÁŸà ON/OFF ). ¾¶В´АБАº¶°Е¶ ЕА¾ ЖБА¼А´ºДЕ¯ Д²Г. ¥АБА¹¶Е¶°Е¶ ЕА »²¼ПµºА ЕВАЗАµАД°²Г В¶О½²ЕАГ ДЕ¸¾
ЖБАµАИ¯
ÄŸ¾ Á°ÄÊ Á¼¶Æ ÅÀÆ USB Ä»¼¸ÂÀÎ µ°Ä»ÀÆ. ¥А ¼¼А »²¼ПµºА ЕАЖ ЕВАЗАµАЕº»АО ЕАБА¹¶Е¶°Е²º Д¶ ½º² БВ°·². ¦Á͵¶º¿¸: ¢ÂÀĮȶŶ, ¾² ȸĺ½ÀÁÀº¶°Å
º² ЕА ЕВАЗАµАЕº»Н ½º² БВ°·² ½¶ ¶О»А¼¸ БВНД³²Д¸ »А¾Е ДЕ¸ ДЖД»¶Ж¯. ¥ÀÁÀ¹¶Å¶°Å¶ ÅÀ ½¶´²¼ÎŶÂÀ ³ÎĽ² ÅÀÆ ÁÂÀ½¸¹¶Æͽ¶¾ÀÆ USB-»²¼Êµ°ÀÆ Äξµ¶Ä¸Ã ÄÅÀ
USB interface ÅÀÆ ÆÁÀ¼À´ºÄů IJÃ. ¥ÀÁÀ¹¶Å¶°Å¶ ÅÀ ¼¼À »ÂÀ ÅÀÆ USB-»²¼Êµ°ÀÆ Äξµ¶Ä¸Ã ÄŸ¾ USB-ÆÁÀµÀȯ
¤¸½²¾Åº»Í: ¥²ЖЕНИВА¾² µ¶¾ ¶БºЕВ®Б¶Е²º ¾² ¶°¾²º ДЖ¾µ¶µ¶½®¾А »²¾®¾² »²¼ПµºА RJ-45. ¾¶Â´ÀÁÀº¶°Å¶ ÅÀ¾ TEAC USB Ä»¼¸ÂÍ µ°Ä»À
²¾²½½®¾¸ ¸ ¼ÆȾ°² LED
ДЕ¸ ½БВАДЕº¾¯ Б¼¶ЖВ ДЕА¾ TEAC USB Ä»¼¸ÂÍ µ°Ä»À.
ÄŸ¾ Á°ÄÊ Á¼¶Æ ÅÀÆ USB Ä»¼¸ÂÀÎ µ°Ä»ÀÆ.
. ¶³²ºÊ¹¶°Å¶, Íź ¶°¾²º
¡µ¸´À°
indows: º² ÅÀ¾ TEAC HD-35NAS µ¶¾ ȶº·¶Å²º ¾² ¶´»²Å²ÄůĶŶ »²¾®¾²¾ Àµ¸´Í (¿²°Â¶Ä¸: Windows98SE). ªÃ ÄÆÄ»¶Æ¯ Plug-and-Play ²¾²´¾Ê°·¶Å²º
²ÆÅͽ²Å².
Macintosh: ¡ Macintosh IJà ²¾²´¾Ê°·¶º ²ÆÅͽ²Å² ÅÀ¾ USB-Ä»¼¸ÂÍ µ°Ä»À »²º µ¶°È¾¶º ¶Á¾Ê ÄŸ¾ À¹Í¾¸ ®¾² ²¾Å°ÄÅÀºÈÀ Äν³À¼À.
²ÁÀÄξµ¶Ä¸ ÅÀÆ USB-µ°Ä»ÀÆ ²ÁÍ ÅÀ¾ ÆÁÀ¼À´ºÄů
indows: ¾¶Å¶ »¼º» ½¶ ÅÀ ²ÂºÄŶÂÍ Á¼¯»ÅÂÀ ÅÀÆ ÁÀ¾Åº»ºÀÎ ¶Á¾Ê ÄÅÀ ¶º»À¾°µºÀ ÄŸ ½Á² ¶Â´²ÄºÏ¾ ÄŸ µ¶¿º »ÅÊ ´Ê¾°² Ÿà À¹Í¾¸Ã . ¾¶Å¶ »¼º» ½¶ ÅÀ
²ÂºÄŶÂÍ Á¼¯»ÅÂÀ ÅÀÆ ÁÀ¾Åº»ºÀÎ ¶Á¾Ê ÄÅÀ¾ ÄÆ´»¶»Âº½®¾À Ä»¼¸ÂÍ µ°Ä»À. ¶Å ²ÁÍ ½¶Âº» µ¶ÆŶÂͼ¶ÁŲ ¶½Ç²¾°·¶Å²º ÅÀ ½¯¾Æ½² Íź À Ä»¼¸ÂÍà µ°Ä»Àà ½ÁÀ¶°
ϲ ¾² ²ÁÀÄƾµ¶¹¶° ½¶ ²ÄǼ¶º² ²ÁÍ ÅÀ PC. ¾¶Å¶ »¼º» ÄÅÀ „OK“ »²º ²ÁÀÄƾµ®¶Å¶ ÅÀ USB-»²¼ÏµºÀ.
Macintosh: ¤Î¶Ŷ ÅÀ Äν³À¼À ´º² ÅÀ¾ USB-Ä»¼¸ÂÍ µ°Ä»À ¶Á¾Ê ÄÅÀ Äν³À¼À ÅÀÆ »µÀÆ ²¾²»Î»¼Êĸà ¶Á¾Ê ÄŸ¾ À¹Í¾¸ IJÃ. ¤Å¸ Äƾ®È¶º² ½ÁÀ¶°Å¶ ¾²
²ÁÀÄƾµ®Ä¶Å¶ ÅÀ¾ USB-Ä»¼¸ÂÍ µ°Ä»À.
²Á¶¾¶Â´ÀÁÀ°¸Ä¸ ÅÀÆ USB-Ä»¼¸ÂÀÎ µ°Ä»ÀÆ
Á¶¾¶Â´ÀÁÀº¶°Å¶ ÅÀ¾ USB-Ä»¼¸ÂÍ µ°Ä»À, ½Í¾À ½¶Å Ÿ¾ ²ÁÀÄξµ¶Ä¸ ÅÀÆ ²ÁÍ ÅÀ¾ ÆÁÀ¼À´ºÄů ¯ ²ЗНЕАЖ ®È¶Å¶ Ŷ½²Å°Ä¶º Ÿ ¼¶ºÅÀÆ´°² ÅÀÆ ¼¶ºÅÀÆ´º»ÀÎ
ÄÆÄů½²ÅÀÃ. ¤¶ »²½º Á¶Â°ÁÅÊĸ µ¶¾ ²Á¶¾¶Â´ÀÁÀº¶°Å¶ ÅÀ¾ USB-Ä»¼¸ÂÍ µ°Ä»À »²Å Ÿ µºÂ»¶º² ÁÀÆ À ÆÁÀ¼À´ºÄůà ³Â°Ä»¶Å²º Ķ »²¾À¾º»¯ ¼¶ºÅÀÆ´°².
ÁÀµ¶°¿¶ºÃ ²ÄDz¼¶°²Ã
º² ¾² ²ÁÀÇδ¶Å¶ ÅÀ¾ »°¾µÆ¾À ÁÆ»²´ºÃ »²º ¸¼¶»ÅÂÀÁ¼¸¿°²Ã, Ķ »²½º Á¶Â°ÁÅÊĸ ¸ ÄÆÄ»¶Æ¯ µ¶¾ ¶ÁºÅ®Á¶Å²º ¾² ¶»Å°¹¶Å²º Ķ ƴ²İ² ¯ ³ÂÀȯ. ¸¾
ÂÀÄÁ²¹¯Ä¶Å¶ ¾² ²¾À°¿¶Å¶ Ÿ ÄÆÄ»¶Æ¯, µºÍź ²ÆÅÍ ½ÁÀ¶° ¾² ÁÂÀ»²¼®Ä¶º ¸¼¶»ÅÂÀÁ¼¸¿°². ÁºÄ»¶Æ®Ã »²º Äƾů¸ĸ ¶ÁºÅ®Á¶Å²º ¾² ¶»Å¶¼ÀξŲº ½Í¾À ²ÁÍ
¶¿АЖДºАµАЕ¸½®¾А ´º² ЕА Д»АБН ²ЖЕН БВАДКБº»Н.
– 19 –

GARANTIEKARTE
Modell Seriennummer
Name des Eigentümers
Adresse
Name des Händlers Kaufdatum
Adresse des Händlers
Dauer der Gewährleistung
TEAC Corporation, nachfolgend TEAC genannt, gewährt dem Erstkäufer für dieses Produkt ab dem Datum des Kaufs
zwei (2) Jahre Garantie bezüglich jedes etwaigen Defekts an Material und Herstellung. Gemäß der nachstehenden
Bedingungen wird das betreffende TEAC Produkt von den autorisierten TEAC Servicestellen, den autorisierten Facheinzelhändlern oder den autorisierten Servicestellen der Facheinzelhändler ohne Berechnung von Material- und Arbeitskosten repariert. Die Servicestelle entscheidet, ob das Gerät als ganzes oder nur die defekten Teile ausgetauscht werden. Die TEAC Tochtergesellschaften, die autor isierten TEAC Servicestellen und die autorisierten Servicestellen der
Facheinzelhändler übernehmen die Garantieleistung in den anderen EG- und EFTA-Mitgliedsstaaten im Rahmen der in
dieser Garantie definierten Bestimmungen.
Gewährleistungsumfang
Soweit dies nachfolgend nicht ausgeschlossen wird, umfaßt die Gewährleistung alle etwaigen Defekte an Material und
Herstellung. Folgendes ist aus dem Gewährleistungsumfang ausdrücklich ausgeschlossen:
1. Schäden am Gehäuse.
2. Geräte, die verändert wurden oder deren Seriennummern verfälscht, verändert oder entfer nt wurden.
3. Schäden oder Fehlfunktionen, die auf folgendes zurückzuführen sind:
(a) Höhere Gewalt, fehlerhafter und/oder nicht bestimmungsgemäßer Gebrauch,
(b) Gebrauch, der nicht den im Handbuch angegebenen Verfahrensweisen entspricht,
(c) Transportschäden jedweder Art. Für Transportschäden haftet das Frachtunternehmen. (Alle mit dem Transpor t
verbundenen expliziten und impliziten Risiken sind nicht Bestandteil der Haftung von TEAC.)
(d) unsachgemäß ausgeführte Reparaturen oder Reparaturversuche durch nicht von TEAC autorisierte Personen
und/oder Unternehmen,
(e) alle Schäden, die nicht unmittelbar als Produktdefekt anzusehen sind, insbesondere Schäden, die durch
sachgemäßen Gebrauch seitens des Anwenders wie beispielsweise unzureichende Kühlluftzufuhr entstanden sind,
(f) Schäden durch unsachgemäßes Anwenden der Software,
(g) regelmäßige Inspektionen,
(h) Wartung bzw. Reparatur von Teilen infolge normalen, betriebsbedingtem Verschleiß,
(i) Anpassung an national unterschiedliche technische oder sicherheitsrelevante Anforderungen, wenn das Pro-
dukt nicht in dem Land eingesetzt wird, für das es ursprünglich konzipiert und hergestellt worden ist.
Wer kann die Gewährleistung in Anspruch nehmen
Gewährleistungsansprüche können ausschließlich vom Ersterwerber des Produkts in Anspruch genommen werden.
Welche Kosten werden übernommen
TEAC übernimmt die Kosten für die im Rahmen einer Garantiereparatur anfallende Arbeitszeit und die Materialien, die
im Rahmen dieser Gewährleistungsbestimmungen definiert sind. Frachtkosten und Versandversicherung werden im
folgenden Abschnitt diskutiert.
Gewährleistungsabwicklung
1. Falls Ihr Gerät innerhalb der Garantiezeit Service benötigt, wenden Sie sich bitte an Ihren für dieses Produkt autorisierten Fachhändler. Falls Sie in Ihrer Nähe keinen Fachhändler finden, nehmen Sie bitte mit der TEAC Niederlassung Kontakt auf.
2. Ihr Fachhändler teilt Ihnen Namen und Adresse der nächstgelegenen autorisierten Servicestation mit.
Schicken Sie das Produkt oder die als defekt vermuteten Teile spesenfrei (Fracht- und Versicherungskosten müssen
von Ihnen bezahlt werden) an die Servicestation. Fügen Sie bitte eine Kopie des Kaufbelegs bei und füllen Sie die
Garantiekarte vollständig aus (mit Angabe der Seriennummer des Geräts). TEAC behält sich vor, Garantieleistungen
abzulehnen, falls Garantiekarte und Kaufnachweis nicht im Sinne der vorliegenden Bestimmungen vorgelegt werden.
Falls die erforderlichen Reparaturen von den Gewährleistungsbestimmungen abgedeckt sind und das Produkt zur
nächstgelegenen Servicestation geschickt wurde, werden die Kosten für Rückfracht und Versicherung freigemacht.
Bitte schicken Sie das Gerät nicht ohne unsere ausdrückliche Zustimmung direkt an TEAC (siehe auch
Rücksendeformular).
Einschränkungen der Gewährleistung und Ausschluß implizierter Ansprüche
Soweit dies nicht dem jeweils gültigen national anwendbaren Recht widerspricht, sind folgende Ansprüche ausgeschlossen:
1.
un-
TEAC begrenzt seine Leistungspflicht aus der Gewährleistung ausschließlich auf Reparatur oder Ersatz nach freier
Wahl von TEAC sowie der autorisierten Servicestellen, der autorisierten Facheinzelhändler und deren autorisierten
Servicestellen. Weitergehende Ansprüche sind in vollem Umfang ausgeschlossen. TEAC über nimmt keine Haftung für
Schäden an anderen Gegenständen realer oder virtueller Natur, insbesondere an Software und/oder Datenbeständen,
die durch Defekte in TEAC Produkten verursacht wurden. Weiterhin sind alle Ansprüche aus Mangel an Benutzbarkeit,
entgangenem Umsatz und/oder Gewinn sowie alle anderen impliziten und expliziten Haftungen ausdrücklich ausgeschlossen.
2.
Alle impliziten Gewährleistungsansprüche und Vorbehalte, einschließlich solcher, aber nicht beschränkt auf diese, wie
die Vermarktbarkeit und/oder die Gebrauchsfähigkeit für einen bestimmten Zweck, werden hiermit explizit ausgeschlossen.
Diese Garantiebestimmungen berühren das national festgelegte Verbraucherrecht nicht.
WARRANTY CARD
Owner’s name
Address
Dealer’s names
Dealer’s address
Warranty Period
TEAC Corporation, hereinafter called TEAC, warrants this product against any defect in material and workmanship for
two (2) years from the date of purchase by the original retail purchaser. According to the following terms this TEAC
product will be repaired without charge of labor and materials by the authorized TEAC service stations, by the authorized
TEAC dealers and/or their authorized service stations. TEAC, the authorized TEAC service stations, the authorized
TEAC dealers and/or their authorized service stations may decide wether the defective product will be repaired or
replaced as a whole or partially. The TEAC dependancies, the authorized TEAC service stations, the author ized TEAC
dealers and/or their authorized service stations will also honour this warranty in the other EC and EFTA member states
based on the terms in this warranty conditions.
What is Covered and What is Not Covered.
Except as specified below, this warranty covers any defects in materials and workmanship of this product. The following
are not covered by the warranty:
1. Damage to or deterioration of the external cabinet.
2. Any unit that has been altered or on which the serial number has been defaced, modified, or removed.
3. Damage, deterioration or malfunction resulting from:
(a) accident, misuse, abuse or neglect;
(b) failure to follow instructions supplied with the product;
(c) any shipment of the product. Any damage arising of transportation is the liability of the freigth company. Any
damage arising of transportation and any implicit and explicit risks are the liability of the freigth company.This is
expressivly not a liability of TEAC;
(d) repair or attempted repair by anyone not authorized by TEAC to repair this product;
(e) causes other than product defects, including lack of technical skill, competence or experience of the user. Espe-
cially damages which may arise of incidential use respectively by improper ventilation,
(f) damages caused by improper or incorrect installation of software,
(g) periodic check-ups,
(h) maintenance respectively repair of parts due to normal wear and tear,
(i) adoptions or adjustments to the product in order to conform to different national technical or safety standards of
any country other than the one for which the product was originally designed and manufactured.
Model Serial no.
Date of purchase
Who May Enforce the Warranty
This warranty may be enforced only by the original retail purchaser.
What We Will Pay For
We will pay all labor and material expenses for items covered by the warranty. Payment of shipping and insurance charge
is discussed in the next section of this warranty.
How You Can Get Warranty Service
1. If your unit needs service during the warranty period, please contact the local authorized distributor for this product.
If you are unable to locate such a distributor, please contact your TEAC facility at the address indicated below.
2. After identifying the nearest authorized service station for this product the product or any parts believed to be defective must be shipped freight and insurance prepaid to such service station, together with a copy of this warranty
certificate and a copy of your sales receipt, showing the date of purchase. Please ensure to fill out the warranty
certificate correctly (do not forget the serial number of the product). TEAC reserves the right to refuse the guarantee
service if the documents are missing or incomplete in the understanding of this terms.
If the necessary repairs are covered by the warranty, and if you have sent the product or parts of it to the nearest
authorized service station, the return freight and insurance charges will be prepaid.
Please do not return your unit to the TEAC factory without our prior authorization (see also RMA form)!
Limitations of Liability and Exclusion of Implied Warranties
Unless considered unenforceable or unlawfull under the applicable national law:
1. TEAC’s liability for any defective product is limited to repair or replacement of the product, at TEAC's option and the
option of authorized service stations, authorized dealers and their authorized service stations. No one is authorized
to assume any greater liability on TEACs behalf. TEAC shall not be liable for any damage to any other properties
independant of their virtual or real nature especially there is no liability for any damage to any kind of software and/
or any kind of databases caused by TEAC products.Furthermore TEAC is not liable for damages arising out of loss
of use, loss of revenue or profits, or any other damages, wether incidential, consequential, or otherwise.
2. All implied warranties or conditions, including but not limited to warranties or conditions of merchantability and fitness
for a particular purpose, hereby are excluded.
These warranty terms do not affect any statutory rights of consumers which were granted by the respective national laws.
Im Garantiefall sprechen Sie mit Ihrem Fachhändler.
In case of warranty contact your dealer.
En cas de garantie veuillez contacter votre distributeur.
Per eventi di garanzia contattare il rivenditore.
Para temas relacionados con la garantía consulte al
vendedor del equipo.
Em caso de garantia queira dirigir-se ao agente
autorizado mais próximo.
"
o # .
W przypadku napraw gwarancyjnych proszę zwrócić się po
poradę do fachowego personelu z wyspecjalizowanych
sklepów.
V případě záruky poraďte se s Vaším odborným prodavačem.
º² ·¸Å¯½²Å² ¶´´Î¸Ä¸Ã ¶Áº»Àº¾Ê¾¶°Å¶ ½¶ ÅÀ ¶½ÁÀº»Í »²ÅÄŸ½², ÄÅÀ
ÀÁÀ°À »¾²Å¶ Ÿ¾ ²´ÀÂ.
Technical Service Depots (Europe)
TEAC Europe GmbH, DSPD
Technical Support Tel: +49 (0) 180 5 55 83 79
Mo-Fr from 9:00 – 17:00 CET
Technical Support Fax: +49 (0) 611 7158 666
Online RMA: http://www.teac.de/RMA
Internet: http://www.teac.de/support
For Russia:
Technical Support Tel: +380 44 23 92 364
Technical Support Fax: +380 44 23 92 364
E-Mail: teac@folgat.com
All other countries please call: +49 (0) 180 5 55 83 79
– 20 –
 Loading...