


Z
CR-H 101DAB
CD Receiver
REFERENCE MANUAL

IMPORTANT SAFETY INSTRUCTIONS
CAUTION: TO REDUCE THE RISK OF ELECTRIC SHOCK, DO
NOT REMOVE COVER (OR BACK). NO USER-SERVICEABLE
PARTS INSIDE. REFER SERVICING TO QUALIFIED SERVICE
PERSONNEL.
The lightning flash with arrowhead symbol,
<
B
WARNING: TO PREVENT FIRE OR
SHOCK HAZARD, DO NOT EXPOSE THIS
APPLIANCE TO RAIN OR MOISTURE.
within an equilateral triangle, is intended
to alert the user to the presence of uninsulated “dangerous voltage” within the
product’s enclosure that may be of sufficient magnitude to constitute a risk of
electric shock to persons.
The exclamation point within an equilateral triangle is intended to alert the user to
the presence of important operating and
maintenance (servicing) instructions in the
literature accompanying the appliance.
CAUTION
o DO NOT REMOVE THE EXTERNAL CASES OR CABINETS TO
EXPOSE THE ELECTRONICS. NO USER SERVICEABLE PARTS
ARE INSIDE.
o IF YOU ARE EXPERIENCING PROBLEMS WITH THIS
PRODUCT, CONTACT THE STORE WHERE YOU PURCHASED
THE UNIT FOR A SERVICE REFERRAL. DO NOT USE THE
PRODUCT UNTIL IT HAS BEEN REPAIRED.
o USE OF CONTROLS OR ADJUSTMENTS OR PERFORMANCE
OF PROCEDURES OTHER THAN THOSE SPECIFIED HEREIN
MAY RESULT IN HAZARDOUS RADIATION EXPOSURE.
IN USA/CANADA, USE ONLY ON 120 V SUPPLY.
The nameplate is located on the bottom of the unit as
shown below.
Front side
CLASS " apparatus with double insulation, and no
protective earth provided.
The Bluetooth® word mark and logos are registered trademarks owned by Bluetooth SIG, Inc. and any use of such marks by TEAC
CORPORATION is under license.
© 2013 CSR plc and its group companies. The aptX® mark and the aptX logo are trade marks of CSR plc or one of its group companies and may be registered in one or more jurisdictions.
This product is protected by certain intellectual property rights of Microsoft. Use or distribution of such technology outside of
this product is prohibited without a license from Microsoft.
Windows is a registered trademark of Microsoft Corporation in the United States and/or other countries.
Mac, Mac OS and OS X are trademarks of Apple Inc., registered in the U.S. and other countries.
Other company names, product names and logos in this document are the trademarks or registered trademarks of their respective owners.
Nameplate
2

1) Read these instructions.
2) Keep these instructions.
3) Heed all warnings.
4) Follow all instructions.
5) Do not use this apparatus near water.
6) Clean only with dr y cloth.
7) Do not block any ventilation openings. Install in accordance with the manufacturer's instructions.
8) Do not install near any heat sources such as radiators,
heat registers, stoves, or other apparatus (including
amplifiers) that produce heat.
9) Do not defeat the safety purpose of the polarized or
grounding-type plug. A polarized plug has two blades
with one wider than the other. A grounding type plug
has two blades and a third grounding prong. The wide
blade or the third prong are provided for your safety. If
the provided plug does not fit into your outlet, consult
an electrician for replacement of the obsolete outlet.
10) Protect the power cord from being walked on or
pinched particularly at plugs, convenience receptacles,
and the point where they exit from the apparatus.
11) Only use attachments/accessories specified by the
manufacturer.
12) Use only with the cart, stand,
tripod, bracket, or table specified by the manufacturer,
or sold with the apparatus.
When a cart is used, use caution when moving the cart/
apparatus combination to
avoid injury from tip-over.
13) Unplug this apparatus during lightning storms or when
unused for long periods of time.
14) Refer all servicing to qualified service personnel.
Servicing is required when the apparatus has been
damaged in any way, such as power-supply cord or plug
is damaged, liquid has been spilled or objects have fallen
into the apparatus, the apparatus has been exposed to
rain or moisture, does not operate normally, or has been
dropped.
o The apparatus draws nominal non-operating power
from the AC outlet with its POWER or STANDBY/ON
switch not in the ON position.
o The mains plug is used as the disconnect device, the dis-
connect device shall remain readily operable.
o Caution should be taken when using earphones or
headphones with the product because excessive sound
pressure (volume) from earphones or headphones can
cause hearing loss.
CAUTION
o Do not expose this apparatus to drips or splashes.
o Do not place any objects filled with liquids, such as
vases, on the apparatus.
o Do not install this apparatus in a confined space
such as a book case or similar unit.
o The apparatus should be located close enough to
the AC outlet so that you can easily reach the power
cord plug at any time.
o If the product uses batteries (including a battery
pack or installed batteries), they should not be
exposed to sunshine, fire or excessive heat.
o CAUTION for products that use replaceable lithium
batteries: there is danger of explosion if a battery is
replaced with an incorrect type of battery. Replace
only with the same or equivalent type.
V
Precautions concerning batteries
Misuse of batteries could cause them to rupture or leak leading to fire, injury or the staining of nearby things. Please read
and observe the following precautions carefully.
o Be sure to insert the batteries with correct positive (¥)
and negative (^) orientations.
o Use batteries of the same type. Never use different types
of batteries together.
o If the remote control is not used for a long time (more
than a month), remove the batteries to prevent them
from leaking.
o If the batteries leak, wipe away the leakage inside the
battery compartment and replace the batteries with
new ones.
o Do not use batteries of types other than those specified.
Do not mix new batteries with old ones or use different
types of batteries together.
o Do not heat or disassemble batteries. Never throw bat-
teries into fire or water.
o Do not carry or store batteries with other metallic
objects. The batteries could short circuit, leak or explode.
o Never recharge a battery unless it is confirmed to be a
rechargeable type.
3

IMPORTANT SAFETY INSTRUCTIONS (continued)
Pb, Hg, Cd
Laser information
This product contains a semiconductor laser system inside
the cabinet and is classified as a “CLASS 1 LASER PRODUCT”.
To prevent being exposed to the laser beam, do not try to
open the enclosure.
Laser:
Type: EP-HD870PB
Manufacturer: GUANGDONG EVER BRIGHT GROUP CO.,LTD
Laser output: Less than 1 mW on the objective lens
Wavelength: 792±25 nm
Model for USA
This product has been designed and manufactured according to FDA regulations “title 21, CFR, chapter 1, subchapter
J, based on the Radiation Control for Health and Safety Act
of 1968”, and is classified as class ! laser product. There is not
hazardous invisible laser radiation during operation because
invisible laser radiation emitted inside of this product is completely confined in the protective housings.
The label required in this regulation is as follows:
Front side
Bottom
For European Customers
Disposal of electrical and electronic equipment and batteries and/or accumulators
(a) All electrical/electronic equipment and waste
batteries/accumulators should be disposed of
separately from the municipal waste stream via
collection facilities designated by the government
or local authorities.
(b) By disposing of electrical/electronic equipment
and waste batteries/accumulators correctly, you
will help save valuable resources and prevent any
potential negative effects on human health and the
environment.
(c) Improper disposal of waste electrical/electronic
equipment and batteries/accumulators can have
serious effects on the environment and human
health because of the presence of hazardous substances in the equipment.
(d) The Waste Electrical and Electronic
Equipment (WEEE) symbols, which show
wheeled bins that have been crossed
out, indicate that electrical/electronic
equipment and batteries/accumulators
must be collected and disposed of separately from household waste.
If a battery or accumulator contains more
than the specified values of lead (Pb),
mercury (Hg), and/or cadmium (Cd) as
defined in the Battery Directive (2006/66/
EC), then the chemical symbols for those
elements will be indicated beneath the WEEE
symbol.
(e) Return and collection systems are available to end
users. For more detailed information about the
disposal of old electrical/electronic equipment and
waste batteries/accumulators, please contact your
city office, waste disposal service or the shop where
you purchased the equipment.
DECLARATION OF CONFORMITY
We, TEAC AUDIO EUROPE, Gutenbergstr. 3,
82178 Puchheim, Germany declare in own
responsibility, the TEAC product described
in this manual is in compliance with the
corresponding technical standards.
4
Wireless equipment precautions
Compliance of radio transmitter and
interference
Model for USA
Declaration of Conformity
Responsible party:
TEAC AMERICA, INC.
Address: 1834 Gage Road, Montebello,
California, U.S.A.
Telephone number : 1-323-726-0303
This device complies with Part 15 of the FCC Rules.
Operation is subject to the following two conditions: (1)
this device may not cause harmful interference, and (2)
this device must accept any interference received, including interference that may cause undesired operation.
Labeling of authorization
FCC ID: XEGCR-H101
Model for Canada
Compliance of radio transmitter
This device complies with Industry Canada’s license-exempt
RSSs. Operation is subject to the following two conditions:
1) This device may not cause interference; and
2) This device must accept any interference, including
interference that may cause undesired operation of the
device.
Labeling of authorization
IC: 1559C-CRH101
Compliance of interference
This Class B digital apparatus complies with Canadian
ICES-003.
Model for EEA (European Economic Area)
This equipment complies with the harmonised standards of
DIRECTIVE 1999/5/EC (R&TTE).
Labeling of conformity
CE marking:
CAUTION
Authorization of wireless devices are different in countries or
regions. Please use only in the country where you purchased
the product.
o Depending on the countr y, restrictions on the use of
Bluetooth wireless technology might exist.
Radiation Exposure requirements
This equipment meets the regulation, which is recognized
internationally, for the case of human exposure to radio
waves generated by the transmitter.
Statement of compliance
Model for USA
This equipment complies with FCC radiation exposure limits
set forth for an uncontrolled environment and meets the
FCC radio frequency Exposure Guidelines.
Model for Canada
This equipment complies with IC RSS-102 radiation exposure
limits set forth for an uncontrolled environment.
EEA (European Economic Area) model
This equipment complies with EN.62311; Assessment of
electronic and electrical equipment related to human exposure restrictions for electromagnetic fields; the harmonised
standard of DIRECTIVE 1999/5/EC.
CAUTION
Changes or modifications not expressly approved by the
party responsible for compliance could void the user’s
authority to operate the equipment.
Information for interference (FCC requirements)
This equipment has been tested and found to comply with the
limits for a Class B digital device, pursuant to Part 15 of the FCC
Rules. These limits are designed to provide reasonable protection against harmful interference in a residential installation.
This equipment generates, uses, and can radiate radio frequency energy and, if not installed and used in accordance
with the instructions, may cause harmful interference to
radio communications.
However, there is no guarantee that interference will not
occur in a particular installation.
If this equipment does cause harmful interference to radio or
television reception, which can be determined by turning the
equipment off and on, the user is encouraged to try to correct
the interference by one or more of the following measures.
o Reorient or relocate the equipment and/or the receiving
antenna.
o Increase the separation between the equipment and
receiver.
o Connect the equipment into an outlet on a circuit differ-
ent from that to which the receiver is connected.
o Consult the dealer or an experienced radio/T V techni-
cian for help.
5

Included accessoriesTable of contents
Thank you for choosing TEAC product.
Read this manual carefully to get the best performance from
this unit.
After reading it, keep it in a safe place for future reference.
IMPORTANT SAFETY INSTRUCTIONS ........................2
Wireless equipment precautions ............................5
Included accessories ........................................6
Using the TEAC Global Site ..................................6
Before use ..................................................7
Setting the clock. . . . . . . . . . . . . . . . . . . . . . . . . . . . . . . . . . . . . . . . . . . .7
Adjusting the clock automatically ...........................7
Notes about discs ..........................................8
Connecting the DAB/FM antenna ...........................9
Connections .............................................. 10
Connecting speakers ..................................... 12
Using the remote control ................................. 13
Names and functions of parts (remote control) ............ 14
Names and functions of parts (main unit) ................. 16
Basic operation ........................................... 17
Display information ....................................... 21
Listening to CDs .......................................... 23
Listening to FM radio ..................................... 27
RDS ......................................................29
Using DAB tuner .......................................... 31
Playing back music on a computer ........................ 34
Bluetooth® function ......................................36
Settings .................................................. 37
Message list .............................................. 39
Troubleshooting ..........................................40
Specifications ............................................. 41
Check to be sure the box includes all the supplied accessories shown below.
Please contact the store where you purchased this unit if
any of these accessories are missing or have been damaged
during transportation.
Power cord × 1
Remote control (RC-1324) × 1
Batteries for remote control (AAA) × 2
Basic DAB/FM antenna × 1
Owner’s manual × 1
o Keep this manual in a safe place for future reference.
o See page 43 for information about the warranty.
Using the TEAC Global Site
You can download updates for this unit from the TEAC
Global Site: http://teac-global.com/
1) Open the TEAC Global Site.
2) In the TEAC Downloads section, click the desired language to open the Downloads website page for that
language.
NOTE
If the desired language does not appear, click Other
Languages.
3) Click the product name in the “Products” section.
4) Select and download the updates that are needed.
6

Setting the clockBefore use
V
Placement of the unit
o Avoid placing it in high temperature environments
such as in direct sunlight or close to a source of heat.
Moreover, do not place the unit on an amplifier or any
other device that generates heat. Doing so could cause
discoloration, deformation or malfunction.
o Do not place anything on top of the unit. Do not put
cloth on top of the unit or place it on top of bedding or
thick carpet.
Maintenance
Wipe dirt from the top cover and other panel surfaces using
a soft cloth that has been slightly dampened with a diluted
neutral cleanser.
Do not use chemically-treated wipes, thinner or similar substances because they could damage the surface of the unit.
V
For safety, disconnect the power cord from
the outlet before cleaning.
This unit has a clock built-in.
After completing connections, set the current time.
The time appears on the display when, for example, the unit
is in standby mode.
o See “Set clock (time settings)” on page 38 for how to
set the clock.
Example of display when in standby
T AM 09:18
Current time
Appears when the on/off timer is on
o The clock will be reset if the unit's power cord is discon-
nected from an outlet. Reset the current time when you
use the unit.
o The clock is not perfectly precise, so we recommend
resetting the time occasionally.
Adjusting the clock automatically
The clock setting of this unit can be automatically adjusted
by DAB or RDS clock time (CT) data it receives.
To turn on/off DAB or RDS automatic clock adjustment,
select DAB or RDS as the playback source for the one
you want to set (page 17) and hold down the RDS
button for at least 8 seconds.
Display
example
o DAB and RDS CT automatic clock settings cannot both
o If automatic clock adjustment is on, the unit adjusts its
If you tune in a DAB/RDS station that is broadcasting incorrect CT data, the clock might be incorrectly adjusted. This
could eventually affect timer operation.
If you do not want the clock of this unit to be set by received
DAB/RDS CT data, turn off automatic clock adjustment for
that type of data.
DAB DAB CT on
FM CT off
be enabled at the same time. If you enable one, the
other will be automatically disabled.
clock when that type of CT data is received, regardless of
whether DAB or RDS mode is selected.
7

Notes about discs
Types of discs that can be played by
this unit
CDs (12cm) with the Compact Disc Digital Audio
logo
o This logo appears on disc labels and packaging.
o This unit cannot play 8cm CDs.
CD-R and CD-RW discs that have been properly
recorded and finalized using the audio CD format.
CD-R and CD-RW discs that have been written with
MP3 or WMA files and finalized.
o Multi-session discs are not supported.
This unit cannot play discs of types other than those above.
If you try to play any other type of disc with this
V
unit, loud noises that damage speakers or harm
hearing could occur. Never try to play any type of
disc other than those shown above.
o WMA files
Windows Media Audio Professional (WMA Pro) and
Windows Media Audio Lossless (WMA Lossless) formats
are not supported.
o Depending on the quality of the disc and the condition
of the recording, playback might not be possible.
o This unit cannot read or play the following types of discs.
CD-ROM discs
Video CDs
Super Audio CDs
DVD video discs
DVD audio discs
DVD-ROM discs
CD-R/CD-RW discs
This unit can play CD-R/CD-RW discs that are in audio CD
format (CD-DA) or that contain MP3 or WMA format files.
o In order to play a disc created by a CD recorder, be sure
to finalize it.
o Depending on the quality of the disc and the condition
of the recording, playback might not be possible. For
details, see the operation manual for the device you are
using.
o If you have any questions about how to handle a CD-R
or CD-RW disc, contact the seller of the disc directly.
Precautions for use
o Do not use cracked discs because they could damage
the unit.
o Do not apply labels or other materials to discs. Do not
use discs that have had tape, stickers or similar materials
removed from them as they may have left a sticky residue on the disc’s surface. Other discs to avoid are ones
that have exposed glue around the edges of stickers, for
example. Using such a disc in this unit could cause the
disc to become stuck or could damage the unit.
o When writing something on the label side of a disc, use
a felt tip permanent marker. The use of a ballpoint pen or
other pen with a hard tip could damage the disc, making
it unplayable.
o Never use commercially-available CD stabilizers. Doing
so could make the disc unplayable or damage the unit.
o Never use discs with irregular shapes, including heart-
shaped and octagonal discs, because they could
damage the unit.
If you load a DVD video, DVD audio, DVD-ROM or
V
similar disc into this unit, the unit will try to play
it and spin at high speed. If you accidentally load
such a disc, the disc could be damaged, so do not
try to remove it until it stops spinning.
o This unit might not be able to properly play Copy
Control CDs, Dual Discs or other special CDs that do not
conform to the Red Book CD standard. Operation and
sound quality cannot be guaranteed when special discs
are used in this unit. If playback of a special disc should
cause trouble, contact the seller of the disc.
8
o To remove a disc from its case, while pressing down on
the center of the case, hold the disc by its edges. Do not
touch the side of the disc that has the data encoded on
it (unlabeled side).

Connecting the DAB/FM antenna
If a disc will not load properly
If a disc becomes caught or is otherwise difficult to insert,
do not push it in forcefully. Press the eject (-) button and
remove the disc once before reinserting it. (Pushing a disc
forcefully could damage the unit.)
Storing discs
o Discs should be stored in their cases when not being
used. Failure to do so could result in warping and
scratches.
o Do not leave discs in places that are exposed to direct
sunlight or that are very humid or hot. Doing so could
cause discs to become deformed or degraded, making
them unplayable.
o CD-R and CD-RW discs are more susceptible to the
impacts of heat and ultraviolet rays than ordinary
CDs. For this reason, do not leave them for long times
in places that are exposed to direct sunlight or near
devices that generate heat, for example.
o Always clean discs before storing them. Leaving a disc
in an unclean state might result in skipping or degraded
sound quality.
Maintenance
o If the side of the disc that has the data encoded on it
(unlabeled side) becomes dirty with fingerprints or dust,
use a soft cloth to wipe the surface from the center
directly toward the edge.
Indoor antenna
Connect the included antenna to the antenna connector on
the rear panel and extend the antenna.
Fix the antenna to a window frame, wall or other position
that improves reception the most.
Outdoor antenna
In an area where DAB signals are weak, use an outdoor DAB
antenna.
There are two main types of antennas available.
Multi-element
o Never use record cleaners, antistatic treatments, thinners
or similar chemicals to clean discs. Such chemicals could
harm the surface of the disc.
Dipole
9

Connections
V
After all connections are complete, connect the power cord’s plug to the AC wall outlet.
o Read the instructions of each device that you intend to use with this unit.
o Do not bundle connecting cables with power cords. Doing so could cause noise.
o Be sure to connect each plug securely.
RCA cable
USB cable
A
DC
Install the dedicated
driver on the computer
before connecting this
unit to it (page 34).
B
Optical digital cable
E F
RCA cable
Included power cord
10
Audio output
(LINE OUT, etc.)
Cassette deck,
MD player, etc.
DIGITAL OUT
(OPTICAL)
device
Line input
jack
SubwooferDigital audio output
c
Wall outlet

A
USB port
Use to input digital audio from a computer. Connect
to the USB port of a computer to input digital audio
from it.
Use a commercially-available USB cable.
ATTENTION
Install the dedicated TEAC driver software on the computer before connecting the unit (page 34).
B
DAB/FM antenna connector
When receiving a DAB/FM broadcast, extend this
antenna and position it for the best reception.
After moving this unit, readjust the position again.
For detailed information about how to make DAB/FM
antenna connections, see page 9.
C
Analog audio input connectors (LINE IN)
Use these to input analog audio.
Connect an audio output device such as a cassette deck
or MD player to these jacks using commercially-available
RCA cables.
Use commercially-available cables for connections.
Connect the R connector of this unit to the right (R)
connector of the audio output device and the L connector of this unit to the left (L) connector of the audio
output device.
V
Do not use any power cord other than the
one included with this unit. Use of other
power cords could result in fire or electric
shock. Unplug the cord from the outlet
when not using the unit for a long time.
D
Digital audio input connector (OPTICAL)
Input digital audio. Connect the digital audio output
connector of a digital audio device to it.
Use a commercially-available optical digital (TOS)
cable to make the connection.
o Sampling frequencies up to 192 kHz are supported.
E
SUBWOOFER OUT connector
If you want to use a subwoofer, connect it to this
connector.
o The output level is linked to the VOLUME controls
on the front of the unit and on the remote control.
F
Power inlet (~IN)
Insert the included power cord here.
After all other connections are complete, connect the
power cord's plug to a wall outlet.
11

Connecting speakers
V
Precautions when making connections
o After all connections are complete, connect the power
cord’s plug to the AC wall outlet.
o Read the instructions of each device that you intend to
use with this unit.
CAUTION
o When not connecting LS-101HR speakers, use speakers
with 4–8Ω nominal impedance. If speakers with different
impedance ratings are used, the protection circuit could
operate, causing sound output to stop.
o The red speaker terminals are positive (+) and the black
speaker terminals are negative (−). Generally, the + wire
of the speaker cable is marked to distinguish it from
the − wire of the cable. Connect the marked wire to
the red + terminal and the unmarked wire to the black
− terminal.
o The metal portions of the two separate wires should
not touch. If they touch an electrical short might occur.
Shorted wires can create a fire hazard or cause equipment failure.
Never allow speaker cables to cause a short.
o Be sure to insert each plug securely. To prevent hum and
noise, avoid bundling the cables together with the AC
power cord or other cables.
LS-101HR speakers or speakers with
4–8Ω nominal impedance
How to connect speakers
1 Turn the terminal cap counterclockwise to
loosen it. The speaker terminal caps cannot
be fully removed from the unit.
2 Insert the wire into the terminal and turn the
terminal cap clockwise to securely connect it.
o Make sure none of the wire insulation is under the
terminal and only the bare, stripped wire is touching
the terminal.
3 Conrm that the cable is fastened securely
by gently pulling the cable.
12

Using the remote control
Connecting with banana plugs
You can also make connections using commercially-available banana plugs. First, connect the banana plugs to the
speaker cables and then connect the plugs to the terminals.
o Keep the caps tightened when in use.
o Carefully read the instructions for the banana plugs that
you are using.
Notice about the European model
In accordance with European safety regulations, connecting banana plugs to speaker terminals is not
allowed on European models. The holes into which
banana plugs could be inserted have been covered
with black caps. Connect speakers using bare wires or
spade lugs. If a black cap should become separated
from its terminal, return it to its original position.
Precautions for use
V
Misuse of batteries could cause them to
rupture or leak leading to fire, injury or
the staining of items nearby. Please read
and observe the precautions on page 3
carefully.
o When using the remote control, point it toward the
remote control signal receiver on the main unit from a
distance of 5 m (16 ft) or less. Do not place obstructions
between the main unit and the remote control.
o The remote control might not work if the remote control
signal receiver on the main unit is exposed to sunlight or
bright lights. In this case, try moving the main unit.
o Beware that use of this remote control could cause the
unintentional operation of other devices that can be
controlled by infrared rays.
Installing batteries
Remove the cover on the back of the remote control, and
insert 2 AAA batteries into the case, aligning them with the
¥ and ^ indications. Replace the cover.
Battery Replacement
If the operation range of the remote control decreases, the
batteries have become exhausted. In this case, replace the
batteries with new ones.
Dispose of the used batteries according to the instructions
on them or requirements set by your local municipality.
13
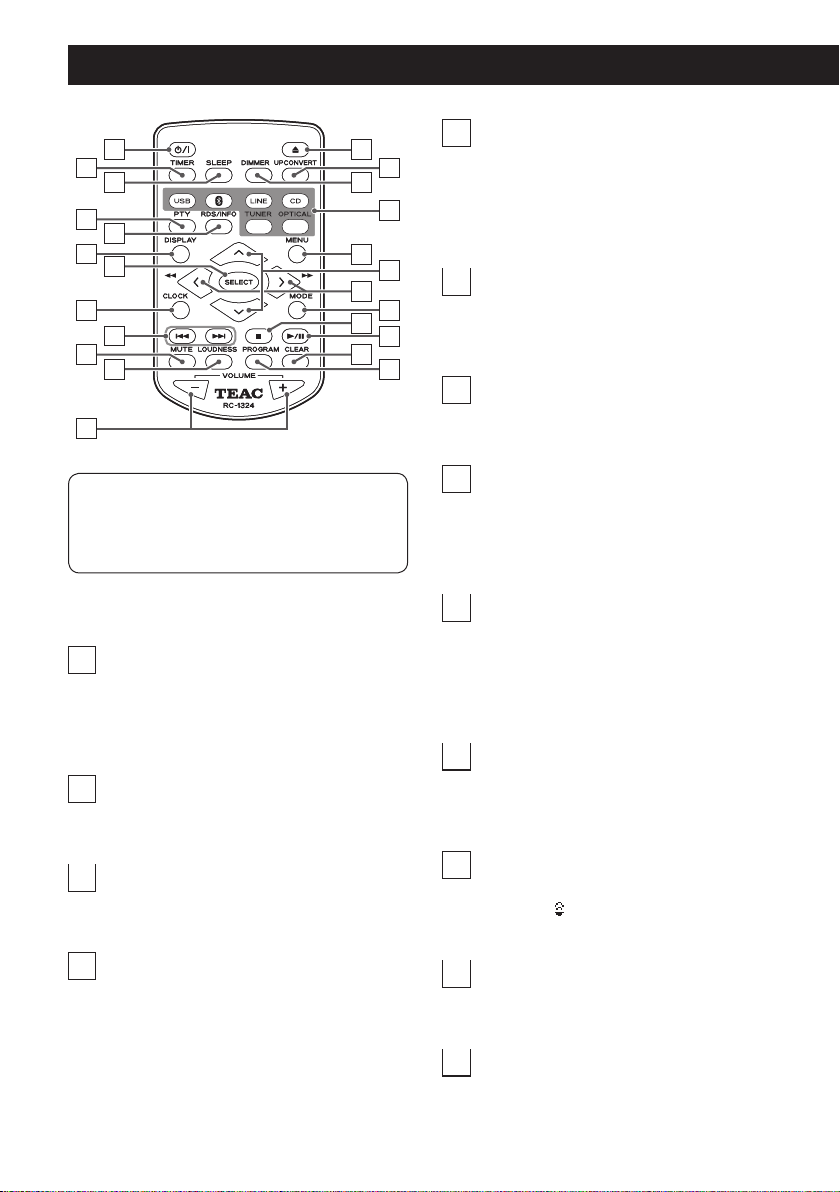
Names and functions of parts (remote control)
l
a
b
c
d
e
f
g
h
i
j
k
When both the main unit and the remote control have
buttons with the same functions, the instructions in this
manual refer only to one, but the other can be used in
the same way.
a
Standby/on (¤) button
Press this button to turn the unit on and put it in
standby. When the unit is ON, the ring around the
main unit STANDBY/ON (¤) button lights blue.
b
TIMER button
Use to set the on/off timer.
m
o
q
s
u
w
e
RDS/INFO button
n
p
r
t
v
When the playback source is FM, use this button
to select an RDS mode. Please ignore “INFO” on the
remote control unit. (INFO function does not work on
this unit.)
f
DISPLAY button
Use to change the text shown on the bottom line of
the display.
x
g
SELECT button
Use to change settings.
h
CLOCK button
Press repeatedly to show the time and the on/off timer
setting, and then return to showing the previous information on the display.
i
Skip (.//) buttons
When the playback source is CD, use to skip to the
previous or next track.
When the playback source is DAB/FM, use to change
presets.
j
MUTE button
Press this button to mute the sound temporarily. To
restore the sound, press it again.
k
c
SLEEP button
Use to set the sleep timer.
d
PTY button
Use to search for stations by program type (PTY).
LOUDNESS button
Press to turn low-frequency emphasis on and off.
When on, the icon appears on the display.
l
VOLUME (−/+) buttons
Use these to adjust the volume.
m
Eject (-) button
Press to partially eject the disc. Hold the disc by its
edges and pull it out.
14

n
UPCONVERT button
Press this button to turn upconversion on and off.
o
DIMMER button
Press to change the display brightness.
p
Source buttons
Use these buttons to select the playback source.
q
MENU button
Press to enter setting mode.
r
Direction (k/j) buttons
When the playback source is CD, use to select folders.
(MP3/WMA only)
When the playback source is DAB/FM, use to change
presets.
s
Direction (l/;) buttons
Search (m/,) buttons
When the playback source is CD, press during playback
to search backward/forward.
When the playback source is FM, use to lower/raise the
frequency received. Press and hold for at least two seconds to begin automatically selecting stations.
When the playback source is DAB, press to select a
DAB menu item.
v
Play/pause (7/9) button
When the playback source is CD and the unit is
stopped or paused, press to start disc playback.
Use this button to pause playback during playback.
When the playback source is FM, use to select presets
and frequencies.
w
CLEAR button
Use to clear programmed tracks.
x
PROGRAM button
When the playback source is CD, use with program
playback.
When the playback source is DAB/FM, use with radio
station presets.
t
MODE button
When the playback source is CD, use to switch
between repeat playback and shuffle playback.
When the playback source is FM, use to switch
between stereo and mono.
u
Stop (8) button
Press during playback to stop playback.
15

Names and functions of parts (main unit)
A
J
BC DE
FG HI
A
STANDBY/ON (¤) button
Press this button to turn the unit on and put it in
standby. When the unit is ON, the ring around the
button lights blue.
o When this unit is in standby mode, it consumes
standby power. For this reason, we use the term
“standby” rather than “off”.
B
C
D
E
Disc slot
Insert a disc here. After a disc is inserted partway, the
unit will automatically draw it in.
Skip (.//) buttons
When the playback source is CD, use to skip to the
previous or next track. During playback, press and hold
to search backward/forward.
Play/pause (7/9) button
When paused, press to resume playback.
Press during playback to pause.
Press again to resume playback.
Stop/eject (8/-) button
Press during playback to stop playback.
When stopped, press to partially eject the disc. Hold
the disc by its edges and pull it out.
16
F
PHONES jack
Connect headphones (3.5mm stereo mini plug) here.
o When headphones are connected to the unit,
audio will not be output from the SPEAKERS terminals on its back.
G
SOURCE knob
Turn to select the playback source.
H
Remote control signal receiver
Receives signals from the remote control. When operating the remote control, point it at this sensor.
I
Display
This shows a variety of information.
J
VOLUME knob
Use this knob to adjust the volume. To increase the
volume, turn the knob clockwise. To decrease the volume, turn the knob counterclockwise.
o When the volume is adjusted with the remote
control, the main unit volume knob will not turn
in response.
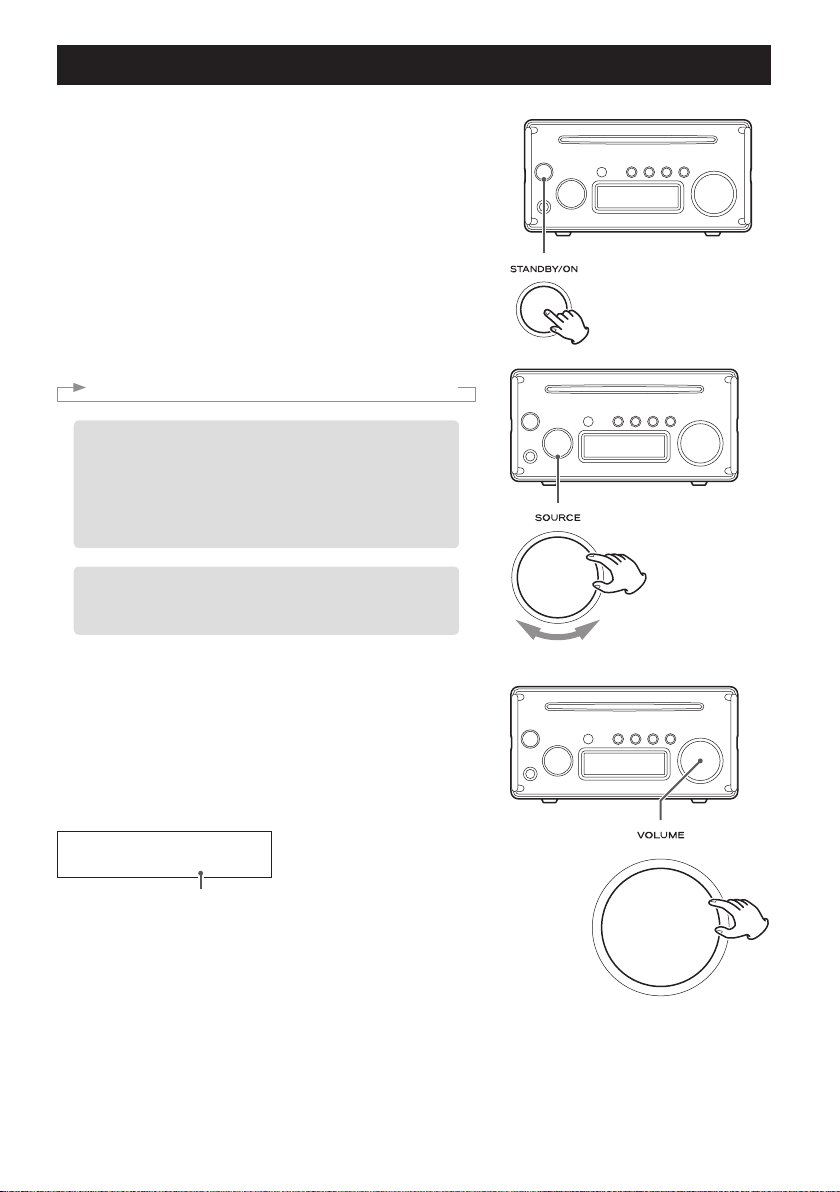
Basic operation
Turning the unit on/off (standby)
Press the STANDBY/ON (¤) button to turn the unit on. The indicator
lights blue when on.
Press the button again to put the unit in standby. The indicator becomes
unlit.
Changing the playback source
Turn the SOURCE knob to select the playback source.
The name of the selected playback source is shown.
Turn the SOURCE knob clockwise to change the playback source in the
following order.
USB w Bluetooth w LINE w CD wDAB w FM w OPTICAL
o If a digital audio format other than PCM is input, “No Signal”
will be shown and no sound will be output.
If this is the case, the connected digital audio output device
might have a “PCM” digital output format setting that would
enable playback. Refer to the operation manual for that device
to make this setting.
o To use this unit with a Windows computer, you must install
the dedicated driver on that computer before setting this unit
to USB and playing audio files on the computer (page 34).
Adjusting the volume
Turn the VOLUME knob or use the VOLUME buttons on the remote control
to adjust the volume to the appropriate level.
o The volume setting will be shown when you turn the VOLUME knob.
As the value increases, the volume becomes louder.
Display example
CD
VOLUME 15
Volume
MIN: Minimum volume
MAX: Maximum volume
17

Basic operation (continued)
Upconversion
You can use the upconversion function with digital input (USB, Bluetooth,
CD, OPTICAL).
Press the UPCONVERT button on the remote control to enable the upconversion function. The icon will appear on the display.
Input sampling frequencies and sampling frequencies after
upconversion
Input sampling frequency Sampling frequency after upconversion
44.1 kHz 88.2 kHz
48 kHz 96 kHz
88.2 kHz 176.4 kHz
96 kHz 192 kHz
176.4 kHz 176.4 kHz
192 kHz 192 kHz
HR loudness
Press the remote control LOUDNESS button to turn low-frequency emphasis on and off. When on, the icon appears on the display.
Since this uses high-resolution (192kHz/24-bit) digital audio processing, it
can enhance low frequencies without degrading the audio quality.
Muting playback
If you want to temporarily mute the volume of this unit, press the MUTE
button on the remote control.
“MUTING” appears on the display when muted.
Display
example
Press the MUTE button on the remote control again to return to the previous volume level.
o Muting will stop if you change the playback source or use the VOLUME
CD PLAY
MUTING
knob or remote control VOLUME buttons (−/+).
Dimmer
Press the remote control DIMMER button to cycle through display brightness levels.
Bright Dim Unlit
o This setting is retained when the unit is in standby.
18

On/off timer
The unit can turn on/off (standby) at a set time.
o Confirm that the unit's clock is set correctly in advance.
o Use the included remote control to set the timer.
Setting the on/off time
1 Press the TIMER button.
7 Press the TIMER button to complete mak-
ing settings.
Be sure to set the Timer ON/OFF setting to ON to make
the unit turn on/off at the set times.
Turning the timer function on/off
2 Press a direction (l/;) button to show
“2.Setting”, and press the SELECT button.
Timer MENU
< 2.Setting >
3 Set the time to turn the unit on.
The hour position blinks. Use the direction (k/j)
buttons to set the hour of the on time and press the
SELECT button. Next, the minute position blinks. Set it
in the same manner.
Display
example
On Time
AM 07:00
4 Set the time to turn the unit o (standby).
Display
example
Off Time
AM 08:00
5 Select the playback source.
Use the direction (k/j) buttons to select the playback source (CD or TUNER) and press the SELECT
button.
Display
example
o If you select CD, load a CD before putting the unit
Select source
CD
in standby.
6 Set that playback volume.
Use the direction (k/j) buttons to set the volume
and press the SELECT button.
Display
example
Select volume
Volume 23
1 Press the TIMER button.
o When the unit is at its factory default settings
before on and off times have been set, if you press
the TIMER button, “First Timer Set” will appear on
the display. You must set these before proceeding.
2 Press a direction (l/;) button to show
“1.ON/OFF”, and press the SELECT button.
Timer MENU
< 1.ON/OFF >
3 Press a direction (k/j) button to turn
the timer on or off and press the SELECT
button.
Display
example
Timer MENU
Timer ON
4 Press the TIMER button to complete mak-
ing settings.
5 Press the STANDBY/ON (¤) button to put
the unit into standby.
o When the timer is set to ON, “T” will be shown at
the bottom left of the display when the unit is put
in standby (page 7).
o If the unit is already on, the timer will not function
at the scheduled times. Always put the unit into
standby to enable the timer to function.
o If the playback source is CD, but no CD is loaded,
the FM radio will play instead.
19

Basic operation (continued)
Checking the timer setting
Press the CLOCK button to show the current time and then the timer
setting.
Display
example
Using the sleep timer
This function puts the unit in standby after a set amount of time passes.
Press the SLEEP button to set the amount of time (in minutes) until the unit
enters standby.
When the sleep timer is enabled, the display becomes dim.
Display
example
When the sleep timer is enabled, press the SLEEP button once to show the
amount of time until standby for a few seconds.
Press it again to reset the time.
Automatic power saving function
This unit has an automatic power saving function.
The operation of this function depends on the automatic power saving
setting and the selected playback source.
o See “APS (automatic power saving) setting” on page 38 for how to set
When automatic power saving is on
If there is no signal from the selected playback source and no operation
has occurred for about 30 minutes, the unit will enter standby mode.*
o Turn the unit on again to end standby.
*Power consumption in standby mode is 1 W or less.
CD
Timer ON
30 60 90 OFF
CD PLAY
SLEEP 25
the automatic power saving function.
Checking whether automatic power saving is on or off
When automatic power saving is on
“APS ON” is shown when the unit is turned on.
When automatic power saving is off
“APS OFF” is shown when the unit is turned on.
20

Display information
Press the DISPLAY button to change the information shown
on the display.
o The display contents shown below are examples.
External input
Press the DISPLAY button to change the information shown
on the display for about two seconds.
When set to USB or OPTICAL
Playback source
OPTICAL
Fs: 44.1 kHz
Input signal sampling frequency
OPTICAL
VOLUME 07
Volume
When set to LINE or Bluetooth
Playback source
LINE
PM 07:18
Time
LINE
VOLUME 07
Volume
DAB display
DLS message
DAB Classic
DLS message 2/5
Information supplied by the radio station
Program type
DAB Classic
LIGHT M
Type of music
Ensemble name
DAB Classic
RadioSawston
Ensemble name
Channel and frequency
DAB Classic
08B 197.648MHz
Station
Frequency
Bit rate
DAB Classic
256kbps DAB
Bit rate
Sound mode
FM
Playback source
FM
P03 87.5MHz
Preset number*
Frequency range
*This appears when a preset is selected.
Date and time
DAB Classic
10:30 29-03-2015
Current time
Current date (dd-mm-yyyy)
Signal strength
DAB Classic
¡¡¡¡¡¡¡¡
Signal strength
21

Display information (continued)
CD
Audio CD
Stopped
Playback source Status
CD STOP
08 60:43
Total number of tracks
Playing back
CD PLAY
05 00:01
Number of track being
played
CD TRACK-R
05 04:53
Remaining time of track being played
(minutes/seconds)
Total playback time
(minutes/seconds)
Status
Elapsed time of track being
played (minutes/seconds)/
Disc with audio files
Stopped
Playback source Status
CD STOP
012 126 --:--
Total number of folders
Playing back
When playback starts, the data format appears followed by the status
Number of folder playing
back
Total number of files
CD PLAY
000 003 00:01
Number of file
playing back
CD PLAY
ROOT/Song1234
Folder name/file name
Elapsed time of track
being played
(minutes/seconds)
CD TOTAL-R
05 27:55
22
CD PLAY
TITLE:Song1234
Song name (ID3 tag)
Remaining disc time
(minutes/seconds)
CD PLAY
ARTIST:Musician
Artist (ID3 tag)
CD PLAY
ALBUM:Music_A
Album (ID3 tag)
The root folder is shown as “ROOT”.
o If the information does not fit in one line, it will scroll.

Listening to CDs
Playing a CD
1 Hold the disc by its edges with the labeled side up and
insert it partway.
2 Push the disc in further until just before it disappears.
It will automatically be drawn in to the slot.
If a disc becomes caught or is otherwise difficult to insert, do not
push it in forcefully. Press the eject (-) button and remove the
disc once before trying to reinsert it. (Pushing a disc forcefully could
damage the unit.)
3 Press the play/pause (7/9) button.
During playback, PLAY appears at the top of the display.
o If CD Auto Start is ON when a CD is loaded, the playback source
will be set to CD and playback will start automatically (page
38).
Pausing playback
Press the play/pause (y/9) button to pause playback.
To resume playback from the position where it was paused, press the play/
pause (y/9) button again.
When paused, PAUSE appears at the top of the display.
Stopping playback
Press the stop/eject (8/-) button to stop playback.
Ejecting a disc
When CD playback is stopped, press the stop/eject (8/-) button.
Press to partially eject the disc. Hold the disc by its edges and pull it out.
o Pressing the stop/eject (8/-) button will eject the disc regardless of
the selected playback source.
Skipping to search for a track
Press a skip (.//) button to skip to the previous or next track. Keep
pressing until you reach the track you want.
o During playback, press the . button once to return to the begin-
ning of the current track. When you want to play an earlier track, press
the . button repeatedly until you reach that track.
o During program playback, tracks from earlier or later in the program
will be played back.
23

Listening to CDs (continued)
Searching for part of a track
Press and hold a skip (.//) button on the unit to search backward/
forward. Release the button when you find the desired part.
With the remote control, press and hold a direction (l/;) button to search
backward/forward. Release the button when you find the desired part.
Selecting and playing tracks on a disc that
contains audio files
Root folder
MP3/WMA file
1
MP3/WMA file
2
002 folder
MP3/WMA file
3
MP3/WMA file
4
004 folder
MP3/WMA file
003 folder
MP3/WMA file
5
6
7
MP3/WMA file
Conduct the following operations when
stopped.
Moving between folders
Selecting files
Folder
1
– 9 is the order of file playback.
005 folder
8
9
MP3/WMA file
MP3/WMA file
Repeat/shuffle playback
Each time you press the MODE button on the remote control, the repeat/
shuffle mode changes as shown in the illustration.
o During program playback, only repeating all tracks is possible.
*”RP-FOLDER” does not appear during music CD playback.
24
Repeat one track (RP-ONE)
Repeat one folder (RP-FOLDER)*
Repeat all tracks (RP-ALL)
Shuffle (SHUFFLE)
Repeat & shuffle (RP-SHFFL)
Ordinary playback

Program playback
Program playback is only possible with audio CDs.
Any of the following operations will clear all the tracks from the program.
o Ejecting the disc
o Using the STANDBY/ON button on the unit to put it into standby
Using program playback
1 Press the PROGRAM button.
MEM and the track number blink.
o Press when stopped.
2 Use the skip (.//) buttons to select a track and
press the SELECT button to add it to the program.
o Repeat to add more tracks as desired.
o You can also press the PROGRAM button to add a track.
3 Press the play/pause (y/9) button to start program
playback.
Checking and changing the program
1 Press the PROGRAM button.
MEM and the playback order number blink.
Display
example
CD MEM STOP
01 P-01
Track number
Playback order number
Example display
CD MEM STOP
01 P-01
Track number
Playback order number
2 Use the skip (. // ) buttons to change the
playback order number shown and check the track
number.
Changing the program
1) Show the playback order number of the track that you want to
change.
2) Press the PROGRAM button.
3) Select a track and press the PROGRAM button to add it to the
program in place of the original track.
Removing a track from the program
1) Show the playback order number of the track that you want to
remove.
2) Press the CLEAR button.
Continued on the next page e
25

Listening to CDs (continued)
3 Press the play/pause (y/9) button to start program
playback.
NOTE
To start program playback again after stopping, press the PROGRAM
button and then the play/pause (y/9) button.
Adding tracks to the program
1 Press the PROGRAM button.
MEM and the track number blink.
2 Select a track and press the PROGRAM button to add
it to the program.
o Repeat to add more tracks as desired.
3 Press the play/pause (y/9) button to start program
playback.
Removing all tracks from the program
1 When stopped, press and hold the CLEAR button.
2 When “Program clear?” appears, press the SELECT but-
ton to remove all tracks from the program.
Display
example
To cancel the operation, press the stop (8) or CLEAR button.
CD STOP
Program clear?
26

Listening to FM radio
FM mode
Press the MODE button to switch between stereo and mono reception.
FM mode
Display
example
STEREO
Receive stereo FM broadcasts in stereo.
MONO
Receive FM broadcasts in mono. When the reception of an FM stereo
broadcast is poor, select this mode. The sound becomes mono, but noise is
also reduced, making it sound better.
Changing the received frequency
Increasing the received frequency
Press the direction (;) button to increase the received frequency one step.
Press and hold the direction (;) button to search for a station in the
higher-frequency direction.
Decreasing the received frequency
Press the direction (l) button to decrease the received frequency one step.
Press and hold the direction (l) button to search for a station in the
lower-frequency direction.
FM STEREO
107.90MHz
Frequency range
o “STEREO” will be shown when receiving in stereo.
Broadcast station presets
This unit can have up to 20 FM station presets.
Setting presets manually
1 Tune in the station that you want to add as a preset.
2 Press the PROGRAM button.
3 Use the skip (.//) buttons to select the preset
number to assign to that station.
An * appears to the right of preset numbers that already have station
assignments.
4 Press the PROGRAM or SELECT button to save the
preset.
FM STEREO
P01 107.90MHz
Preset number
o Preset numbers between 01 and 20 can
be assigned.
27

Listening to FM radio (continued)
Setting presets automatically
The unit can automatically search for stations that it can receive and assign
them to preset numbers.
Press and hold the PROGRAM button.
The unit will search for stations from the lowest receivable frequency to the
highest and assign them to preset numbers.
o After 20 presets have been assigned, “Full” will blink on the display and
automatic preset assignment will stop.
Selecting presets
Use the direction (k/j) buttons to change the preset number.
Display
example
Selecting presets using the main unit
Press the play/pause (7/9) button to switch between preset selection
and frequency selection.
Press the play/pause (7/9) button to show a preset number on the display, and use the skip (.//) buttons to change the preset number.
FM
P03 87.5MHz
Preset number
o When a preset number is not shown, you can use the skip (.//)
buttons to change the reception frequency.
28

RDS
The Radio Data System (RDS) is a broadcasting service that allows stations
to send additional information along with the regular radio program signal.
1 Tune in to an FM RDS station (page 17).
2 Press the remote control RDS button.
Pressing the RDS button cycles through RDS modes as follows:
Program service (PS)
When you select Program service, “PS” will appear to the right of
“FM” and then the program service name or station's name will be
displayed. If there is no program service data, the frequency will be
displayed.
RDS Program type (PTY)
When you select RDS Program type, “PTY” will appear to the right of
“FM” and then the program type will be displayed.
RDS Radio text (RT)
When you select RDS Radio text, “RT” will appear to the right of “FM”
and then information from the station consisting of up to 64 characters will be displayed.
RDS Clock time (CT)
Displays time information provided by the station.
o This setting is disabled when the unit is shipped new from the
factory. To change this setting, see page 7.
PTY search
You can search for stations by program type. This function is available only
through the RDS services of FM frequency stations in Europe.
1 Press the PTY button.
“PTY SEARCH“ appears on the display.
FM PTY SEARCH
< NEWS >
2 Use the direction (k/j) buttons to select the desired
program.
You can select from 31 program types (PTY).
3 Press the SELECT button.
The unit starts searching.
o When the program type that you have selected is found, search-
ing stops and the program type will be displayed.
o If a matching program type is not found during PTY Search, it
will stop at the frequency set before searching started.
o If you want to stop searching, press the PTY button.
29

RDS (continued)
NEWS:
Brief announcements, events, public opinion, reports and
real situations.
AFFAIRS:
Suggestions, including practical announcements other than
news, documents, discussion and analysis.
INFO:
Useful and reference information, such as weather forecasts,
consumer guides and medical advice.
SPORT:
Sports-related programs.
EDUCATE:
Educational and cultural information.
DRAMA:
All kinds of radio concerts and serial dramas.
CULTURE:
All aspects of national or local culture, including religious
events, philosophy, social science, language and theatre.
SCIENCE:
Programs on natural science and technology.
VARIED:
Popular programs such as quizzes, entertainment news,
interviews, comedy and satire.
POP M:
Programs of commercial and popular songs, including music
sales volumes, etc.
ROCK M:
Modern music generally composed and played by young
musicians.
EASY M:
Popular music usually lasting for less than 5 minutes.
LIGHT M:
Classical music, instrumental music, chorus, and light music
favored by general audiences.
CLASSICS:
Orchestral music including great operas and symphonies,
chamber music and so on.
OTHER M:
Other music styles, including rhythm & blues and reggae.
WEATHER:
Weather reports and forecasts.
FINANCE:
Financial reports, commerce and trading.
CHILDREN:
Children’s programs.
SOCIAL:
Social affairs.
RELIGION:
Religious programs.
PHONE IN:
Programs in which the public expresses its views by phone.
TRAVEL:
Travel reports.
LEISURE:
Programs concerning recreational activities.
JAZZ:
Jazz music.
COUNTRY:
Country music.
NATION M:
National music.
OLDIES:
Music from the so-called golden age of popular music.
FOLK M:
Folk music.
DOCUMENT:
Documentaries.
TEST:
Broadcast when testing emergency broadcast equipment or
receivers. Not intended for searching or dynamic switching
for consumer receivers.
ALARM!:
A program with notifications about emergencies and natural
disasters.
30

Using DAB tuner
Setting up your DAB tuner
The first time you listen to the DAB radio, it will scan for DAB stations and
build a station list.
The unit will scan for broadcast services in the local area and add them to
the station list as they are found.
Listening to DAB Radio
1 Turn the SOURCE knob or press the remote control
TUNER button to select DAB.
When the scanning process has finished, the DLS (Dynamic Label
Segment) will appear on the second line of the display.
DAB
Scanning...
c
DAB Classic
DLS message 1/5
2 Select the station you want to listen to using the direc-
tion (;) button.
Setting the DAB display
You can change what is shown on the second line of the display while
listening to DAB.
Each time you press the DISPLAY button, the information shown changes
as shown in the illustration to the right.
DLS message
The Dynamic Label Segment (DLS) is a scrolling text label supplied by the
radio station. It may be information about music titles or details regarding
the program or station.
Program type
This is a description of the type of music broadcast by the radio station
such as Pop, Rock or Classical music.
Ensemble name
This is the name of the ensemble that is broadcasting the program.
Channel and frequency
This is the station and frequency of the currently playing broadcast.
Bit rate
The is the bit rate and sound mode of the broadcast currently being
received.
Date and time
This is the current date and time.
o When shipped new from factory, DAB clock time (CT ) setting is
enabled and FM RDS CT setting is disabled. See page 7 to change
this setting.
Signal strength
Use this to check the signal strength of the current station.
DLS (Dynamic Label Segment)
Program type
Ensemble name
Channel and frequency
Bit rate
Date and time
Signal strength
31

Using DAB tuner (continued)
Using the DAB menu
In DAB mode, use the DAB menu to access various functions.
1 In DAB mode, press the remote control MENU button.
2 Press the direction (l/;) buttons to select the menu
item you want, and press the SELECT button.
Local scan
The unit will scan the DAB bands between 10A and 13F and add the stations found to the station list.
DAB MENU
L.scan-sure?
Press the SELECT button to start scanning.
DAB MENU
Scanning...
Full scan (auto scan)
The unit will scan the DAB bands between 5A and 13F and add the stations
found to the station list.
DAB MENU
Full scan-sure?
Press the SELECT button to start scanning.
DAB MENU
Scanning...
Local scan
Full scan
Manual tune
Preset mode
DRC (Dynamic Range Control)
Station order
Manual tune
This option allows you to manually tune in a station and view the strength
of the signal as it changes. This could be useful when adjusting or positioning an antenna for better reception.
DAB ManualTune
07A 188.928MHz
Use the direction (l/;) buttons to select the desired station, and
press the SELECT button to show the signal strength of that station.
DAB ManualTune
¡¡¡¡¡¡¡¡
o Press the SELECT button again to return to the ordinary display.
32

Preset mode
Use this to select the DAB preset station you want.
DABP01 Classic
DLS message2/5
DRC
Use this option to adjust the amount of Dynamic Range
Control (DRC) applied to received broadcasts. DRC is used to
reduce the range between high and low volumes of audio
and is sometimes applied at the broadcast source. Pop music
might have a high value of DRC applied, appropriate for constantly high listening levels, while classical music broadcasts
might have no DRC applied to allow the listener to hear the
full dynamic range of the source volume.
o You can select one of the three DRC settings: off, low,
high.
When set to high, the broadcast DRC is applied. Set to
low, only half the broadcast DRC value is applied. Set to
off, no DRC is applied.
DAB MENU
< DRC OFF >
Station order
You can set the order in which stations are listed.
AlphaNumeric
This is the default order. Stations are listed by name with
numbers first and then alphabetically by station name.
Ensemble
Channels are listed by ensemble name.
DAB MENU
< AlphaNumeric >
Press the direction (l / ; ) buttons to select
AlphaNumeric or Ensemble, and press the SELECT
button.
33

Playing back music on a computer
Installing the driver on a computer
This unit can be connected by USB and used with a computer running one of the following operating systems.
Operation is not guaranteed with operating systems other
than the following (As of September 2015).
Mac OS
The unit works with the following versions.
OS X Lion 10.7
OS X Mountain Lion 10.8
OS X Mavericks 10.9
OS X Yosemite 10.10
This unit can be operated with the standard OS driver, so
there is no need to install a driver.
Windows OS
The unit works with the following versions.
Windows 7 (32/64-bit)
Windows 8 (32/64-bit)
Windows 8.1 (32/64-bit)
Windows 10 (32/64-bit)
Installing the driver on the computer
Before you can use this unit to play files on a Windows computer, you must first download the dedicated driver from the
TEAC Global Site and install it on the computer.
TEAC Global Site
http://teac-global.com/
About the transmission mode
This unit connects using high-speed asynchronous mode.
Transmittable sampling frequencies are 44.1kHz, 48 kHz,
88.2kHz, 96kHz, 176.4kHz and 192kHz.
When properly connected, you will be able to select “TEAC
USB AUDIO DEVICE” as an audio output from the computer.
o In asynchronous mode, the audio data sent from the
computer is processed using this unit's clock, reducing
data transmission jitter.
Downloading the TEAC HR Audio
Player application
Our TEAC HR Audio Player application (Mac and Windows
versions available) supports playback of high-resolution
audio files. You can download it from TEAC Global Site.
TEAC Global Site
http://teac-global.com/
o This unit does not support the playback of DSD files.
ATTENTION
Install the dedicated driver software on the computer
before connecting the unit by USB.
If a computer is connected to this unit before the driver is
installed, proper operation will not be possible.
o For instructions about driver installation procedures,
please access the Downloads page from the TEAC Global
site (http://teac-global.com/).
o Depending on the combination of hardware and soft-
ware, proper operation might not be possible even with
the above operating systems.
34

Playing back audio files from a computer
1 Connect this unit to the computer using a USB cable.
o To use a Windows computer, you must install the dedicated driver
beforehand (page 34).
o No driver is necessary when using a Mac computer.
o Use a USB cable with a connector that matches that of this unit.
2 Turn the computer on.
o Confirm that the computer has started up correctly.
3 Press the STANDBY/ON (¤) button to turn the unit
on.
4 Turn the SOURCE knob to select USB.
5 Start playback of an audio le on the computer.
If you can adjust the volume from the computer, set it to its maximum level and use this unit's VOLUME knob to adjust the level for
the best audio quality.
o If you are using the TEAC HR Audio Player Application, the vol-
ume cannot be adjusted from the computer.
Turn this unit's VOLUME knob to MIN before starting playback. Then,
gradually turn it up.
USB cable
o The computer and this unit cannot control each other.
o Do not do any of the following when playing back an audio file via USB. Doing so could cause the computer to malfunc-
tion. Always quit the music playback software before doing any of the following.
i
Disconnect the USB cable i Put the unit into standby
o When playing back an audio file via USB, computer operation sounds will also be output. If you do not want these sounds
to be output, make appropriate settings on the computer to turn them off.
o If you connect this unit with the computer or you set the playback source to USB after starting music playback software,
music files might not play back properly. If this occurs, restart the music playback software or restart the computer.
i
Change the playback source
35

Bluetooth® function
Bluetooth notes
When using this unit with a mobile phone or other Bluetooth
devices, they should be no more than about 10 m (33 ft)
apart. Depending on the circumstances of use, however, the
effective transmission distance might be shorter.
Wireless communication with every device that supports
Bluetooth wireless technology is not guaranteed.
To determine the compatibility between this unit and
another device that supports Bluetooth wireless technology,
refer to that device’s operation manual or contact the shop
where you purchased it.
1 Turn the SOURCE knob to select Bluetooth.
Display
example
Bluetooth
PM 07:28
Bluetooth indicator
2 Pair or connect with another Bluetooth
device.
Pairing with another Bluetooth device
Pairing this unit with another Bluetooth device is necessary the first time you connect with that Bluetooth
device.
If no paired Bluetooth device is found, this unit will
become ready to pair with another device. When this
unit is ready to pair, its Bluetooth indicator blinks.
When this unit's Bluetooth indicator is blinking, conduct pairing using the other Bluetooth device.
For details, refer to the operation manual of that
Bluetooth device.
When pairing with a Bluetooth device that supports
aptX® or AAC, it will automatically connect using aptX
or AAC.
Connecting with an already paired Bluetooth
device
When the playback source of this unit is set to
Bluetooth and the other Bluetooth device is on, the
Bluetooth function will be enabled and they should
connect automatically.
If they do not connect automatically, connect them
manually.
o If a request for a passcode appears on the screen
of the Bluetooth device, enter “0000” (four zeros).
o When this unit and the other Bluetooth device are
connected, the Bluetooth indicator stops blinking
and stays lit.
o When pairing or connecting with another Bluetooth
device, they should be within a few meters of each
other. If they are too far apart, pairing and connection afterwards might become impossible.
o When Bluetooth is selected as the playback source
for this unit, the Bluetooth device that was last
connected to it will automatically be connected
again. If you want to connect with a different
Bluetooth device, conduct pairing with that
device.
o This unit will store information for up to eight
pairable devices. If more than eight devices are
paired, the oldest pairing information will be deleted
and the new pairing information will be added.
V
ATTENTION
Even when this unit or the other Bluetooth device is
ready to connect, if the Bluetooth indicator on this unit
continues to blink for 10 minutes, it will automatically
enter standby mode. To use this unit, you must turn
it on again.
If the indicator continues blinking for a long time,
restart both this unit and the other Bluetooth device
and then reconnect them.
36

Settings
3 Start playback on the other Bluetooth
device.
o Confirm that the volume is turned up on the other
Bluetooth device. If you do not turn up the volume on the playback device, no sound might be
output from this unit.
o Depending on the connected Bluetooth device,
you might not be able to adjust the volume. For
details, refer to the operation manual of that
Bluetooth device.
Warning about Bluetooth device
operation
You can use the following buttons on the main unit or the
remote control to control a connected Bluetooth device.
Play/pause (7/9) button
Skip (.//) buttons
o Depending on the Bluetooth device being used, it might
not respond to remote control operations and actual
operations could differ.
1 Press the MENU button.
2 Use the direction (l/;) buttons to change
the setting item and press the SELECT
button.
Display
example
Press the ; button to cycle through the following
items.
Press the l button to cycle through these items in
reverse order.
Menu
< 1.Set clock >
1.Set clock
2.CD setting
3.APS setting
4.FA. Reset
3 Use the direction (k /j ) buttons to
change the setting, and press the SELECT
button to conrm the change.
Display
example
Current Time
12H/24H
The selected item blinks.
o When there are multiple settings, press the SELECT
button to show the next setting.
Repeat procedures 2–3 to set other items as
necessary.
o Press the MENU button instead to cancel the set-
ting change.
4 Press the MENU button to complete mak-
ing settings.
37

Settings (continued)
Set clock (time settings)
o You can also adjust the clock setting automatically (page
7).
Current Time (time display)
Select 12-hour or 24-hour display.
Display
example
Current Time (time shown)
Set the current time in order of hours and minutes.
Display
example
Set the clock in the following manner.
Current Time
12H/24H
Current Time
PM 11:45
1 Use the direction (k/j) buttons to select
“12h” or “24h”, and press the SELECT
button.
2 Use the direction (k/j) buttons to input
the hour, and press the SELECT button.
3 Use the direction (k/j) buttons to input
the minute, and press the SELECT button.
This completes setting the time.
APS (automatic power saving)
setting
Display
example
o When shipped new from the factory, the automatic
OFF: The automatic power saving function is disabled.
ON: The automatic power saving function is enabled.
Menu
APS OFF
power saving function is set to OFF in models for the US
and Canada and ON in models for Europe.
FA. Reset (restoring default settings)
Display
example
When “OK?” appears, press the SELECT button to restore settings to their factory default values.
The unit will enter standby after settings are restored.
Factory Reset
OK?
CD setting
CD Auto Start
o This is set to OFF when shipped new from the factory.
OFF: CD will not automatically play when loaded.
ON: CD will automatically play when loaded.
Display
example
CD Auto Start
OFF
38

Message list
Operation messages
No Disc No disc has been loaded.
Reading A disc is being read.
EJECT A disc is being ejected.
No Signal The USB/OPTICAL input is not receiving an input signal.
Connected The USB input is connected to a computer.
Fs: *** kHz This shows the sampling frequency (Fs) of the track playing through the USB or OPTICAL input.
AUTO POWER SAVE This appears 30 seconds before the automatic power saving function puts the unit into
standby.
Error messages
Disc Error The loaded disc has a scratch or other defect or it does not comply with standards.
Not Support Playback of the loaded disc is not supported.
OVER LOAD A problem occurred with speaker output. Turn off the power and check the connections.
39

Troubleshooting
General
The unit does not turn on.
(The power switch LED does not light.)
e Check that the power cord is completely plugged into
the power outlet. If the outlet is switched, confirm that
the switch is in the ON position.
e Connect a different electrical device to the outlet to
confirm that it is supplying power.
Remote control does not work.
e Point the remote control at the front panel of the unit
from a distance of less than about 5 m (16 ft).
e The remote control will not work if there is an obstruc-
tion between it and the main unit. In this case, try
changing the position.
e If the batteries are exhausted, replace both of them
with new ones.
A television set or another device operates in error.
e Some televisions that are able to receive signals from
wireless remote controls might be operated in error by
this unit's remote control. If this should occur, use the
main unit's buttons.
No sound is output or very little sound is output.
e Confirm connections with the amplifier and speakers.
e Confirm connections with other devices.
There is noise.
e Place the unit as far away as possible from TVs, micro-
wave ovens and other devices that have strong
magnetism.
Radio
A station cannot be received. The reception is poor.
e Select a broadcast station.
e If reception is poor, try repositioning the antenna.
e If a TV is near the unit, turn the TV off.
Stereo broadcasts become mono.
e Press the remote control MODE button to select stereo.
CD Player
Playback is not possible.
e If the disc is upside down, reload it with the labeled
side up.
e If the disc is dirty, wipe it clean.
e Depending on the quality and recording conditions
of the disc, some CD-R/CD-RW discs cannot be played
back.
e CD-R/CD-R W discs that have not been finalized cannot
be played back.
The sound skips.
e Vibrations can cause the sound to skip. Install this unit
in a stable location.
e If the disc is dirty, wipe it clean.
e Do not use discs that are scratched or cracked.
MP3 and WMA files
Playback is not possible.
e Check the file extension. Files are recognized by their
extensions: “.mp3” for MP3 files and “.wma” for WMA
files.
e The MP3/WMA file might be damaged.
e Check the file format. This unit can play MP3 and WAV
files (page 41)
The names of tracks, artists and albums are not shown.
e There is no ID3 tag information for the music file. Use a
computer, for example, to prepare MP3/WMA files with
corrected ID3 tag information.
ID3 tags cannot be used with WAV files.
Some characters are not shown correctly.
e If the file information uses Japanese, Chinese or other
double-byte characters, playback is possible but the
name will not be shown correctly.
40
Since this unit uses a microcontroller, external noise and
other interference can cause the unit to malfunction. If
this occurs, unplug the power cord, wait for a while, and
then turn the power back on to restart operations.

Specifications
CD Player
Playback media ............................ CD-DA, CD-R/RW
Only 12cm discs can be used
Format ........................... ISO9660 LEVEL 1/2/JOLIET
Maximum number of files ............250 (including folders)
Maximum number of folders. . . . . . . . . . . . . . . . . . . . . . . . . . . . . . 99
Playable audio formats
MP3
Extension ..............................“.mp3”, “.MP3”
Bit rate ................... 32 kbps – 320 kbps or VBR
Sampling frequency
16 kHz, 22.05 kHz, 24 kHz, 32 kHz, 44.1 kHz, 48 kHz
Supported standards .......MPEG-1/2 Audio Layer-3
WMA
Extension .............................“.wma”, “.WMA”
Bit rate ................... 32 kbps – 320 kbps or VBR
Sampling frequency
8kHz, 11.025kHz, 16kHz, 22.05kHz, 32kHz,
44.1kHz, 48kHz
Supported standard ......................WMA ver.9
Digital audio input
Supported sampling frequencies (PCM)
44.1 kHz, 48 kHz, 88.2 kHz, 96 kHz, 176.4 kHz, 192 kHz
Supported bit depths ..................................16/24
Bluetooth
Bluetooth version .........................................3.0
Output ............................................... Class 2
Supported profile ......................................A2DP
Codecs .......................................SBC, AAC, aptX
Headphones output
Rated output .................. 80 mW + 80mW (32 Ω, 1 kHz)
Total harmonic distortion ............................. 0.03%
Tuner
Frequency range
FM ...............................87.5 MHz to 108.0 MHz
DAB tuner
Tuning range ....................Band 3, 174 MHz – 240 MHz
Input ......................................50 Ω, unbalanced
Max signal ............................................ 0 dBm
Sensitivity ..................................... −97 dBm typ
Adjacent channel rejection ........................ 35 dB typ
Amplifier Section
Maximum output ........26 W + 26 W (JEITA 10%, 1 kHz, 4 Ω)
Rated output ............. 20 W + 20 W (JEITA 1%, 1 kHz, 4 Ω)
Total harmonic distortion ............ 0.08% (1 kHz, 4 Ω, 1 W)
Signal-to-noise ratio
LINE IN ............................................90 dB
(IHF-A/LPF 20kHz/1kHz, 2V input)
Frequency Response ............. 20 Hz – 45 kHz (−5 dB)
General
Power supply ..........................AC 220–240 V (50 Hz)
Power consumption ....................................21 W
External dimensions
182 × 93 × 221 mm (7 1/4" × 3 3/4" × 8 3/4")
(W × H × D, including protrusions)
Weight .......................................2.2kg (4 7/8 lb)
Operating temperature ....................... +5°C to +35°C
Operating humidity .......... 5% to 85% (no condensation)
Storage temperature ........................ −20°C to +55°C
Included accessories
Power cord × 1
Remote control (RC-1324) × 1
Batteries for remote control (AAA) × 2
Basic DAB/FM antenna × 1
Owner’s manual × 1
o In order to improve the product, specifications and appear-
ance could be changed at any time without warning.
o Weight and dimensions are approximate.
o Illustrations in this manual might differ in part from the
actual product.
41

42

WARRANTY/GARANTIE/GARANTÍA/GARANTIE/GARANZIA/
GARANTIE/GARANTI
Europe/Europa
This product is subject to the legal warranty regulations of the country of purchase. In case of a defect or a
problem, please contact the dealer where you bought
the product.
Ce produit est sujet aux réglementations concernant la
garantie légale dans le pays d’achat. En cas de défaut ou
de problème, veuillez contacter le revendeur chez qui
vous avez acheté le produit.
Las condiciones de garantía de este aparato están sujetas a las disposiciones legales sobre garantía del país
en el que ha sido adquirido. En caso de garantía, debe
dirigirse al establecimiento donde adquirió el aparato.
Dieses Gerät unterliegt den gesetzlichen Gewährleistungsbestimmungen des Landes, in dem es erworben wurde.
Bitte wenden Sie sich im Gewährleistungsfall an den
Händler, bei dem sie das Gerät erworben haben.
Questo apparecchio è conforme alle norme sulla
garanzia vigenti nel rispettivo Paese in cui esso è stato
acquistato. Si prega di rivolgersi al proprio commerciante, presso il quale è stato acquistato l’apparecchio,
nel caso in cui si voglia richiedere una prestazione in
garanzia.
Dit product valt onder de wettelijke garantievoorschriften van het land waar het is aangeschaft. Neem bij een
defect of probleem contact op met de leverancier waar
u het product heeft gekocht.
För denna produkt gäller det lagliga garantiregleringar
av landet där köpet gjordes. Vid fel eller problem kontakta vänligen återförsäljaren, där du köpte produkten.
In countries/regions other than the
USA, Canada and Europe
This warranty gives you specific legal rights, and you
may also have other rights that vary by country, state or
province.
If you have a warranty claim or request, please contact
the dealer where you bought the product.
该保证书赋予了顾客特定的合法权利,并且因国
家,州或省等地域的不同,顾客可能拥有其他权
利。如需申请或要求保修,请与购买本产品的销售
店进行联系。
43

Z
TEAC CORPORATION
TEAC AMERICA, INC. 1834 Gage Road, Montebello, California 90640 U.S.A. Phone: +1-323-726-0303
TEAC AUDIO EUROPE
This device has a serial number located on its back panel. Please record the serial number
and retain it for your records.
Model name: CR-H101DAB Serial number
1-47 Ochiai, Tama-shi, Tokyo 206-8530, Japan Phone: +81-42-356-9156
Gutenbergstr. 3, 82178 Puchheim, Germany Phone: +49-8142-4208-141
0216 MA-2264A
 Loading...