

Page 1
Quick Start Guide
a
b
c
d
e
3
2
1
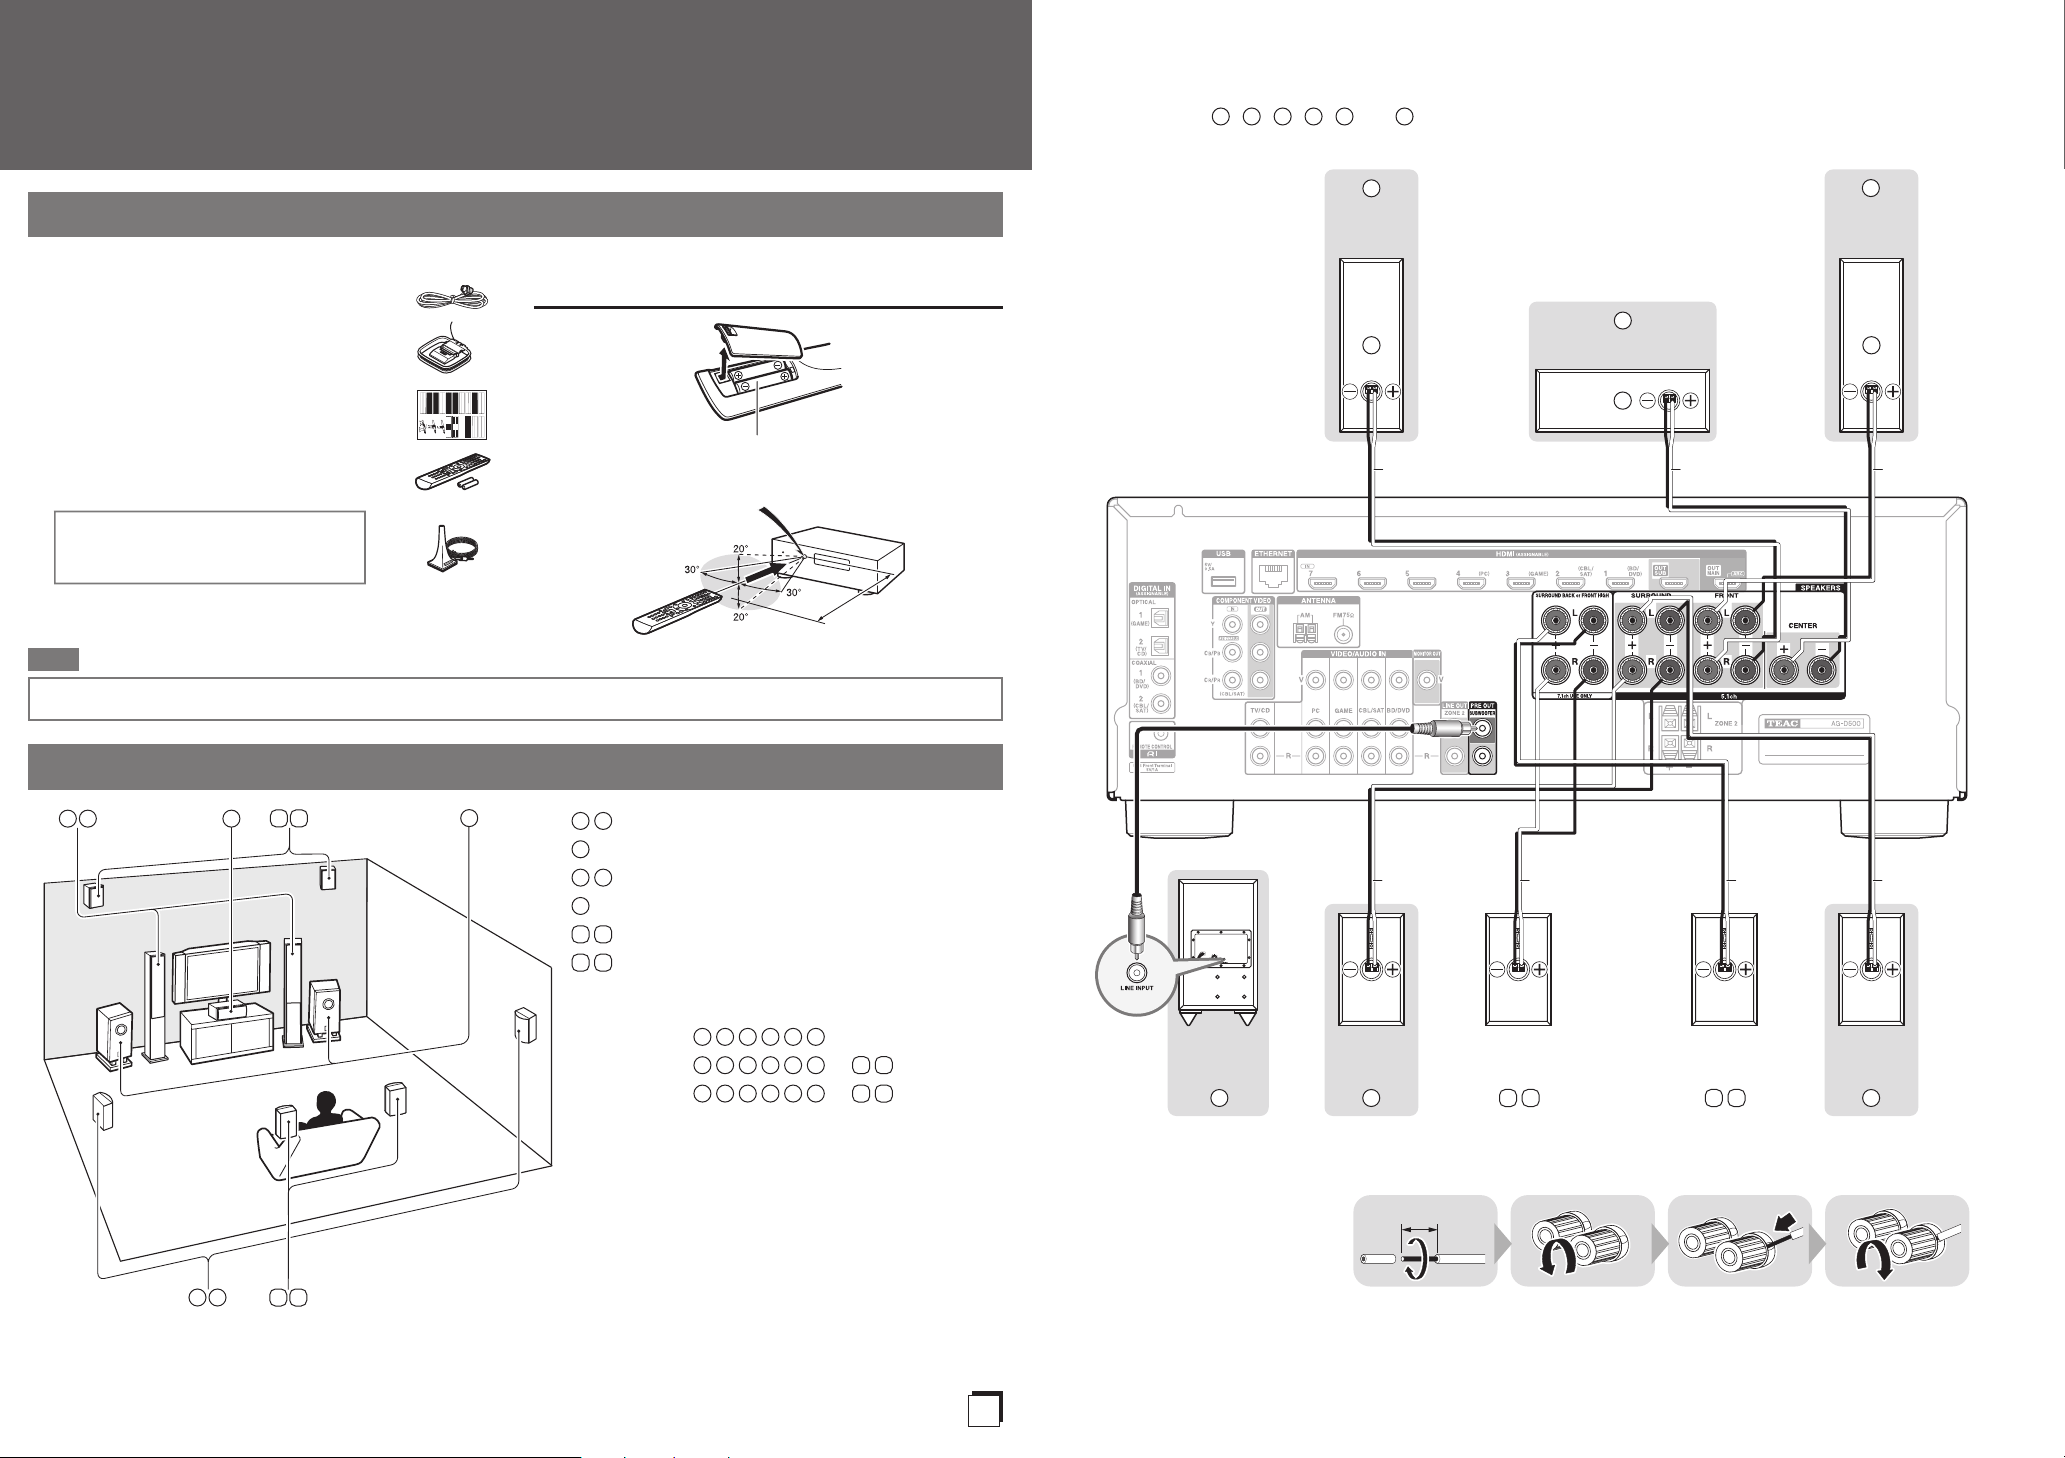
Speaker Cable
7 8
9
10
1 2
4 5
3
6
1
2
3
4
5
6
7
8
9
10
12345
6
12345
6
7
8
12345
6
9
10
12-15mm
6
5
4
2
3
1
8
10
7
9
E
n
AG-D500
Please connect 1, 2, 3, 4, 5 and 6 for 5.1-channel surround.
Supplied Accessories
Make sure you have the following accessories:
Indoor FM antenna
a
AM loop antenna
b
Speaker cable labels
c
Remote controller and
d
two batteries (AA/R6)
Speaker setup microphone
e
The AV receiver can automatically perform
speaker and surround settings, so that you
can easily enjoy a surround sound tailored
to your listening environment. Connect the
supplied microphone to the AV receiver and
follow the on-screen instructions.
When performing automatic speaker
setup, connect your TV to the AV receiver
and make the room as quiet as possible.
Note
Using the Remote Controller
Batteries (AA/R6)
Remote control sensor
AV receiver
Approx. 5 m
Before connecting the power cord, connect all of your speakers and AV components.
1. Connecting Your Speakers
Front
speaker R
Center speaker
Red Green White
Front
speaker L
SN 29401346
Front speakers
Center speaker
Surround speakers
Subwoofer(s)
Surround back speakers
Front high speakers
Speaker Configuration
5.1-channel:
7.1-channel:
7.1-channel:
+
+
Powered
subwoofer
Surround
speaker R
Surround back or
Front high speaker R
Surround back or
Front high speaker L
BlueGray Tan Brown
Surround
speaker L
- 2 -
Page 2

2. Connecting Your Components
HDMI
IN
HDMI
OUT
HDMI
OUT
HDMI
OUT
HDMI
OUT
HDMI
IN
DIGITAL
OPTICAL
OUT
AUDIO
OUT
L
R
VIDEO
IN
AV OUT
WAN
LAN
Connecting Components without HDMI
Connecting Components with HDMI
Blu-ray Disc/
DVD player
Satellite/cable
set-top box, etc.
Personal
computer
TV
Please turn on “HDMI Control(RIHD)”
from the setup menu.
Game
console
TV
Game
console
The components connected to each terminal (BD/DVD, GAME, etc.) can be selected with the input selector buttons of the same
name on the front panel. Note that these default assignments can be changed. For details, please refer to the instruction manual.
■
Listening to TV audio (Optional)
TV
Choose an audio connection that matches
your TV (without Audio Return Channel).
When using a TV that
supports Audio Return
Channel, both audio/
video signals from the AV
receiver and the audio
output from the TV are
carried bi-directionally on
a single HDMI cable.
■
Video upconversion to HDMI
*1
If you’ve connected your TV to the AV receiver with an HDMI
cable, composite video and component video sources can be
upconverted and output by the HDMI output.
TV
*1 In order for
the receiver
to upconvert
component
input to HDMI
output, the
source output
MUST be set
to 480i/576i.
- 3 - - 4 -
Portable player
The content information is displayed (lists are
displayed) on-screen, and you can control the
contents while looking at the TV screen.
Connecting to the Network (Optional)
The following diagram shows how you can connect the AV receiver to your home
network. In this example, it’s connected to a LAN port on a router, which has a
4-port 100Base-TX switch built-in.
Internet radio
Modem
Router
Computer or media server
Page 3

1 2
B D / DV D
I n p u t
A u d io
V i d e o
I n f or m a t i o n
L i s t e n i n g Mo de
1 2
3 4 5
3. Turning On & Basic Operations
1 5 2 4
5
1
4
2
4. Using the Setup User Interface
The on-screen menus appear only on a TV that is connected to the HDMI OUT MAIN. If your TV is connected to other video
outputs, use the AV receiver’s display when changing settings.
Tip
If the menu doesn’t appear, make sure the appropriate external input is selected on your TV.
•
Turn on the AV receiver.
1
Select the input source.
2
Start playback on the source component.
3
Adjust the volume.
4
Select a listening mode and enjoy!
5
Quick Setup
The Quick Setup provides quick access to frequently used
settings. You can change settings and view the
current information.
■
Opening the Quick Setup
■
Navigating through the menus
Input
You can select the input source while viewing the
related information.
Audio
You can change various audio settings such as tone
controls, the subwoofer and center channel levels.
Information
You can view various information about the currently
selected input source.
Listening Mode
You can select the listening modes that are grouped
in categories.
■
Closing the menu
Setup Menu (Home Menu)
The Setup menu provides extended setup that includes
settings for advanced users. All the settings are organized in a
user-friendly structure, which covers the whole TV screen area.
■
Opening the Setup menu (Home Menu)
“Setup”
■
Navigating through the menus
■
Returning to the main menu
■
Closing the menu
- 5 - - 6 -
Note
This procedure can also be performed on the AV receiver by
•
using SETUP, the cursor buttons, and ENTER.
Page 4

a
i
j
k
l
f
d
c
b
g
h
e
TEAC AUDIO EUROPE [Europe Head Oce ] Liegnitzer Straße 6, 82194 Gröbenzell, Germany Tel: +49 (0)8142-420-8141-141
Website: www.teac-audio.eu e-Mail: support_de@teac-audio.eu
TEAC AUDIO EUROPE [UK Branch Oce] Unit 19, Building 6 Croxley Green Business Park Hatters Lane Watford Hertfordshire WD18 8YH United Kingdom
e-Mail: support_eu@teac-audio.eu
MA-1852A
5. Getting to Know the AV receiver
a c ed f g h i j k l mb
r t
o qpn s
uv
Remote Controller
Front Panel
Each input selector button (BD/DVD, GAME, etc.) selects the input terminal with the same name on the rear panel.
Note that these default assignments can be changed. For details, please refer to the instruction manual.
Sets the AV receiver to On or Standby.
a
Selects Zone 2.
b
The remote control sensor receives signals from the
c
remote controller.
Displays various information.
d
Selects listening modes.
e
RT/PTY/TP: Used for RDS (Radio Data System)
f
RDS works only in areas where RDS broadcasts are available.
Stores or deletes radio presets.
g
Selects the Auto or Manual tuning mode.
h
Displays various information about the currently selected
i
input source.
Accesses the setup menus.
j
When the AM or FM input source is selected,
k
used to tune the tuner, and e PRESET r are used to select
radio presets.
When used with onscreen menus, they work as cursor buttons
to select and set items. ENTER is also used with
onscreen menus.
TUNING q are
w
Returns to the previous menu.
l
Adjusts the volume.
m
Selects the Pure Audio listening mode.
n
The indicator lights when this mode is selected.
Connects a standard pair of stereo headphones.
o
Connects a camcorder or similar for audio/video playback.
p
Adjusts the tone.
q
Selects the input sources.
r
Connects an iPod/iPhone.
s
Connects a USB storage or portable player for playback of
t
music files.
Connects the speaker setup microphone.
u
Lights depending on the AV receiver’s setting status.
v
To control the AV receiver, press RECEIVER to select
Receiver mode.
Sets the AV receiver to On or Standby.
a
Selects the remote controller modes or the input sources.
b
Selects and adjusts settings.
c
Accesses the quick setup menus.
d
Selects listening modes.
e
Adjusts the display brightness.
f
Mutes or unmutes the AV receiver.
g
Displays various information about the currently selected
h
input source.
Adjusts the volume.
i
Returns to the previous menu.
j
Accesses the HOME menu.
k
Used for the Sleep function.
l
6. Troubleshooting
Can’t turn on the AV receiver.
Make sure that the power cord is proper ly plugged into the wall outlet.
The AV receiver turns off unexpectedly.
The AV receiver will automatically enter standby mode when Auto S tandby is set
and launched.
There’s no sound, or it’s very quiet.
Make sure that the proper digital source is selected.
There’s no picture.
Make sure that all video con necting plug s are pushed in all the way.
If you can’ t resolve the issue yourself, try resetting the AV receiver before
contac ting the dealer from whom you purchased this unit.
To reset the AV receiver to its factory default s, turn it on and, while holding
down CBL / SAT, press STANDBY/ ON. “Clear” will appear o n the
AV receiver’s display and the AV receiver will enter standby mode.
Note that resett ing the AV rec eiver will delete your radio presets and
custom settings.
- 7 -
 Loading...