

Page 1
PRODUCT MANUAL
ENGLISH VERSION
harmonyG
Page 2

Introduction . . . . . . . . . . . . . . . . . . . . . . . . . . . . . . . 4
QuickStart . . . . . . . . . . . . . . . . . . . . . . . . . . . . . . . . .6
Typical Setups . . . . . . . . . . . . . . . . . . . . . . . . . . . .11
Front Panel Diagram . . . . . . . . . . . . . . . . . . . . .12-14
Back Panel Diagram . . . . . . . . . . . . . . . . . . . . . . .15
Getting To Know Harmony-G
Loading Presets . . . . . . . . . . . . . . . . . . . . . . . . . . . .16
Making Harmonies . . . . . . . . . . . . . . . . . . . . . . . . . .16
Using the Tone Button . . . . . . . . . . . . . . . . . . . . . . .16
Mixing . . . . . . . . . . . . . . . . . . . . . . . . . . . . . . . . . . . .16
Adjusting the Harmony Level . . . . . . . . . . . . . . . . . .16
Changing the FX Volume . . . . . . . . . . . . . . . . . . . . .16
Adjusting the Guitar Volume . . . . . . . . . . . . . . . . . .17
Thicken Your Voice with the Double Button . . . . . . .17
Editing Presets . . . . . . . . . . . . . . . . . . . . . . . . . . . . .17
What Do the Voice 1&2 Buttons Do? . . . . . . . . . . . .17
What Does Higher Lower etc. Mean? . . . . . . . . . . .18
Storing Edited Presets . . . . . . . . . . . . . . . . . . . . . . .18
Changing the FX . . . . . . . . . . . . . . . . . . . . . . . . . . .18
Using the Tuner . . . . . . . . . . . . . . . . . . . . . . . . . . . .18
For Advanced Users
How to Use the Manual Button . . . . . . . . . . . . . . . .19
Advanced FX Style Select . . . . . . . . . . . . . . . . . . . .19
How to Use Alternate Tone Settings . . . . . . . . . . . .20
Guitar Reverb and Detune . . . . . . . . . . . . . . . . . . . .20
Changing the Number of Presets . . . . . . . . . . . . . .21
External Mixing with Mono and Dry Outputs . . . . . .22
Performing a Factory Reset . . . . . . . . . . . . . . . . . . .22
How to Change the Tuning Reference . . . . . . . . . . .22
FAQ and Troubleshooting . . . . . . . . . . . . . . . . . . .23
Specifications . . . . . . . . . . . . . . . . . . . . . . . . . . . . .25
Table of Contents
TC Helicon Vocal Technologies Ltd.
info@tc-helicon.com
Manual revision 1.1 – SW – V 1.0 Prod. No: E60509011
English Version
Page 3

4
Welcome to VoiceTone Harmony-G
Harmony-G was built for the singer who wants the
highest quality and most interesting live vocal production
possible. It puts a complete vocal production center
into your hands including harmony singers that follow
your singing and guitar playing.
Ease of use and convenience were of utmost
importance in the design of Harmony-G. This allows
singers to utilize all of its features quickly and easily.
Harmony-G presents a selection of professionallyauthored patches. When out-of-the-box sounds aren't
enough, Harmony-G provides editing controls to
customize the presets to your preference.
Product information is updated regularly, so be sure to
check www.tc-helicon.com for the latest news.
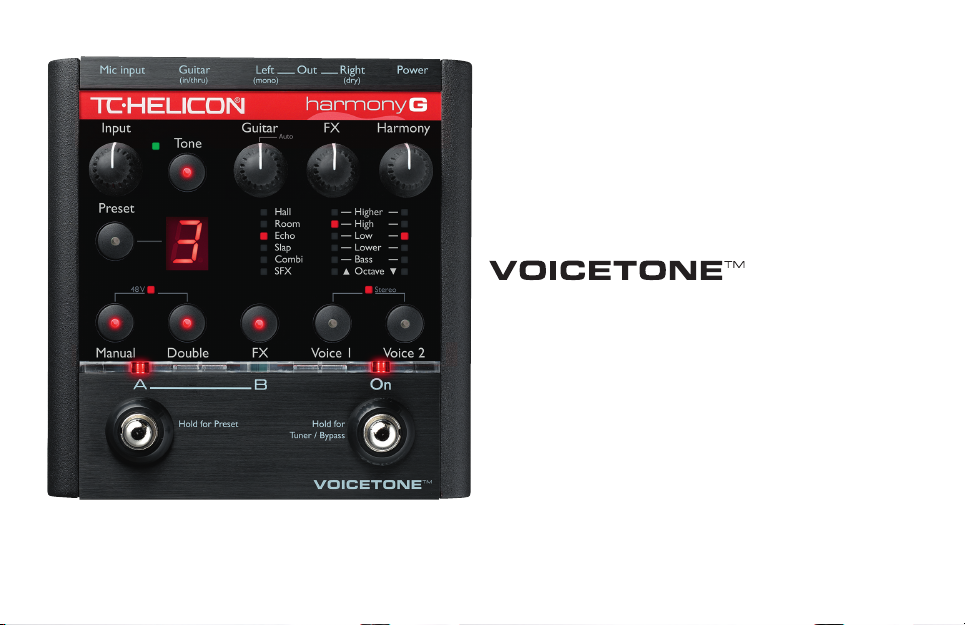
Features:
o Adds one or two harmony voices directed by your
guitar playing
o Overdub-style vocal doubling feature adds richness
to your lead voice
o High quality reverb and delay effects
o Guitar signal can be sent to your guitar amp or
routed through Harmony-G’s effects
o Part A/B switch to allow instant selection of your
two favorite sounds
o Quick and easy tweaking and storage of presets
o XLR mic level input and output in stereo or mono
o Clean, studio quality mic preamp with phantom
power
Introduction
Page 4

5
About TC-Helicon
At TC-Helicon we truly believe that the voice is the
world's most beautiful instrument. We don't mean to
degrade other beautiful instruments, but the singing
voice is the anthropological source for all things melodic.
You should know there is a dedicated group of
engineers, researchers and product specialists based in
Victoria BC, Canada, who spend every waking moment
of their working lives listening, talking, singing, and
interacting with singers and those who have passion for
the singing voice.
All this knowledge and experience is used to design
products respecting and empowering the modern
vocalist. Our products focus on removing barriers and
inspiring creativity in performance. That's why our
products range from near-field personal vocal monitors
to floor-based vocal multi-effects pedals.
Enjoy!
The TC-Helicon Team
a TC Group company
Introduction
Page 5
6
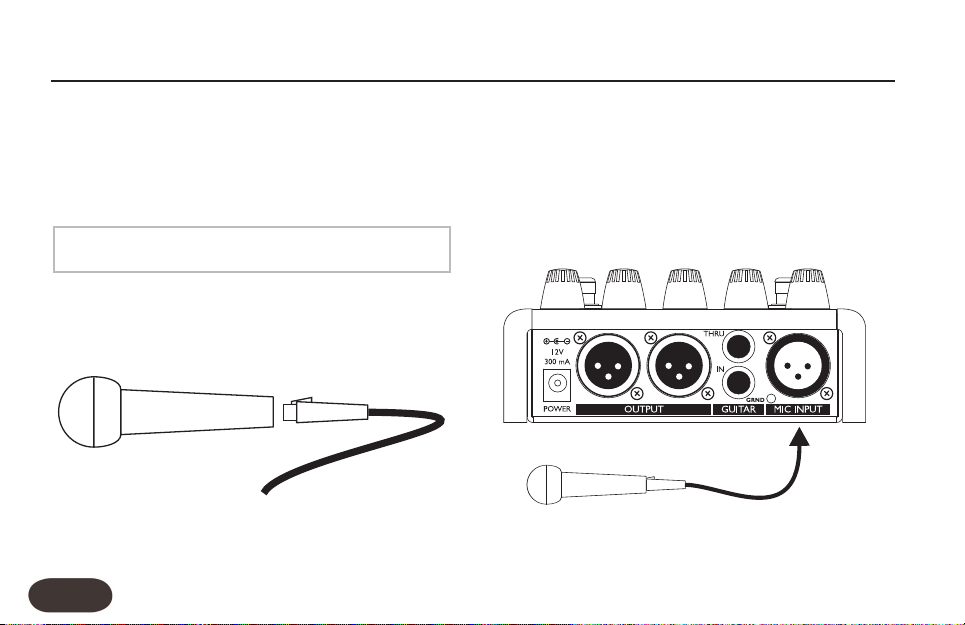
Step 1:
Connect your microphone to a mic cable
Step 2:
Connect the mic cable to the Mic Input on Harmony-G
Quick Start
Make sure Harmony-G is not powered at this time.
NOTE:
Page 6
7
Step 3:
While you’re connecting and setting up, lower the fader
on your mixer channel to off. Connect a mic cable from
the Left/(mono) Out to a mic input on your sound
system.
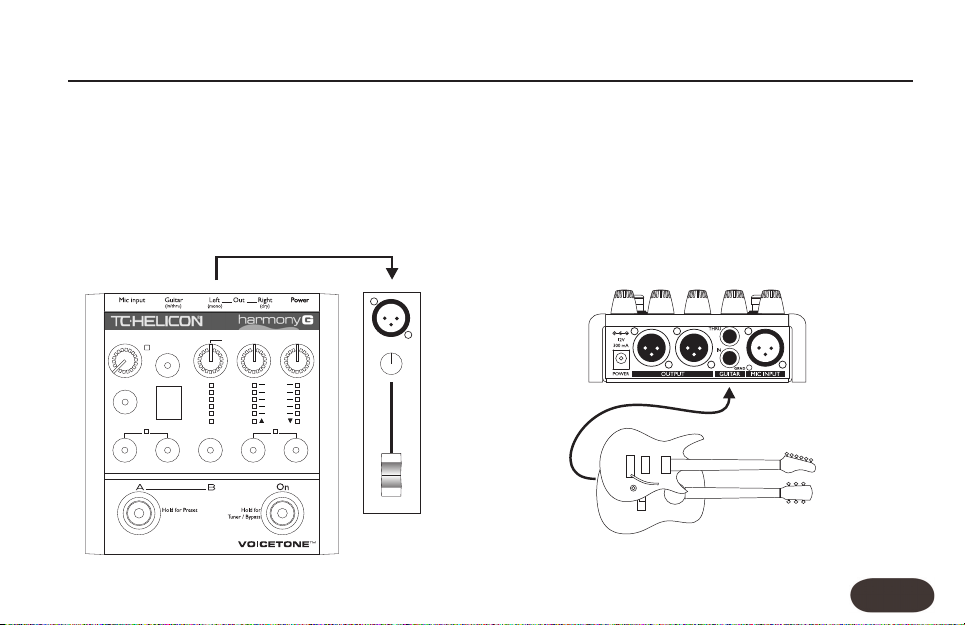
Step 4:
Connect a 1/4” guitar cable from your electric or
acoustic guitar to the Guitar IN. For now, we won’t use
the Guitar THRU so the guitar sound will be mixed with
your voice and effects. It will come out of the Left
(mono) main output.
Quick Start
Input
Tone
Guitar FX Harmony
Preset
Manual Double FX Voice 1 Voice 2
Hall
Room
Echo
Slap
Combi
SFX
Higher
High
Low
Lower
Bass
Octave
48V Stereo
3
Auto
#
Pan
Page 7
8
Step 5:
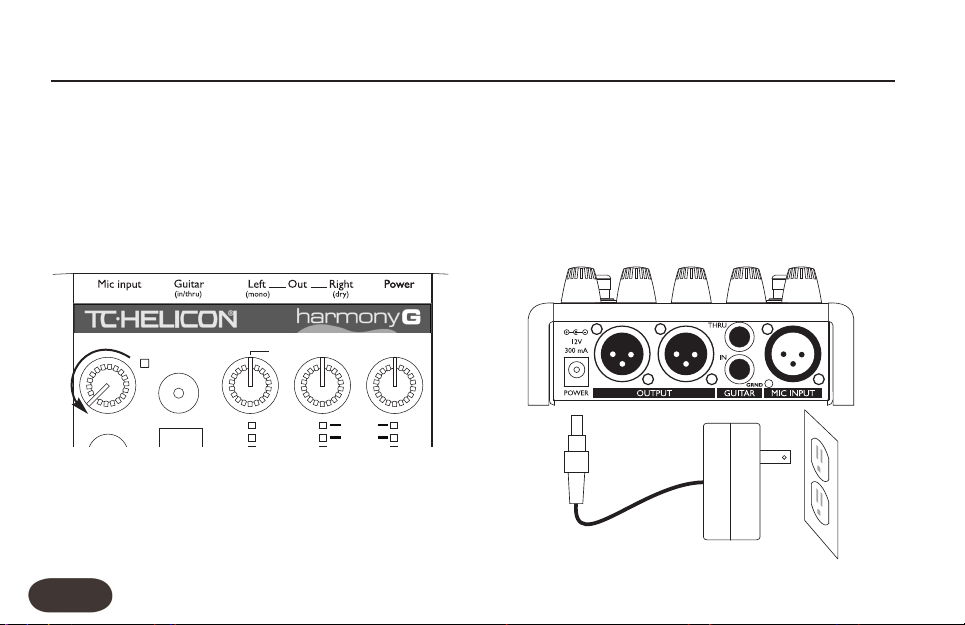
Set the Input Knob fully left then set the Guitar, FX and
Harmony knobs to the 12 O’Clock position.
Step 6:
Connect Harmony-G's power adapter to main power
and to the Power Input on Harmony-G. There is no
power switch so plugging it in automatically turns it on.
Quick Start
Input
Tone
Guitar FX Harmony
Preset
Hall
Room
Higher
High
Auto
#
Page 8
9
Step 7:
While singing through your microphone, raise the Input
Knob until the Input Light turns green, sometimes
orange on louder parts, but never red.
Step 8:
In preparation for your first listen, check that the LEDs
conform to the status shown in the boxes below. You
can press the button associated with the LEDs to change
them if necessary.
Quick Start
Input
Tone
Guitar FX Harmony
Auto
Input
Tone
Guitar FX Harmony
Preset
Manual Double FX Voice 1 Voice 2
Hall
Room
Echo
Slap
Combi
SFX
Higher
High
Low
Lower
Bass
Octave
48V Stereo
3
Auto
#
1
Press so
LED is ON
Press so
LED is OFF
Press to light
LED
Press to load
Preset 1 if it’s
not already
loaded
Page 9

10
Step 9:
Slowly raise the fader on your mixer channel as you sing
into your mic. Once you’ve reached a comfortable
listening level you should hear your voice clearly with
some reverb effect added.
It’s important to take a moment and tune your guitar
before checking out the harmonies. Hold the On button
to enter Harmony-G’s Tuner/Bypass mode. Pluck a single
string at a time to see its pitch.You will see which note
it’s closest to in the Preset display and whether the string
is sharp or flat in the LED bank above the FX and Voice
1 and Voice 2 buttons.Adjust each string until they’re all
in tune.
Now you’re ready to hear Harmony-G’s harmony
voices. Press the On footswitch and sing a song you
know while strumming the guitar chords to the song.
Remember that your guitar directs the harmonies so
ensure that your guitar volume control is turned up.
Quick Start
You can now experiment with all of Harmony-G’s
features starting by pressing the Preset button to load
the different presets and then pressing the A/B
footswitch to hear each preset’s A and B settings.
Please read this short manual to ensure you get the
most from Harmony-G!
Page 10

11
Typical Setups
Electric Guitar Setup
The dotted line indicates optional stereo operation
Acoustic Guitar Setup
Page 11

12
3. Guitar Mix Knob
Controls your guitar volume when it’s routed to the main
outputs (when the Guitar Thru jack is not used).The center
Auto detent position automatically balances your guitar
volume with your voice.Adjusting above or below the Auto
position removes the automatic guitar level feature.
4. FX (Effects) Level Knob
Raises or lowers the mix level of the effect selected with
the FX button.
5. Harmony Level Knob
Adjusts the mix levels of the harmony and double effects.
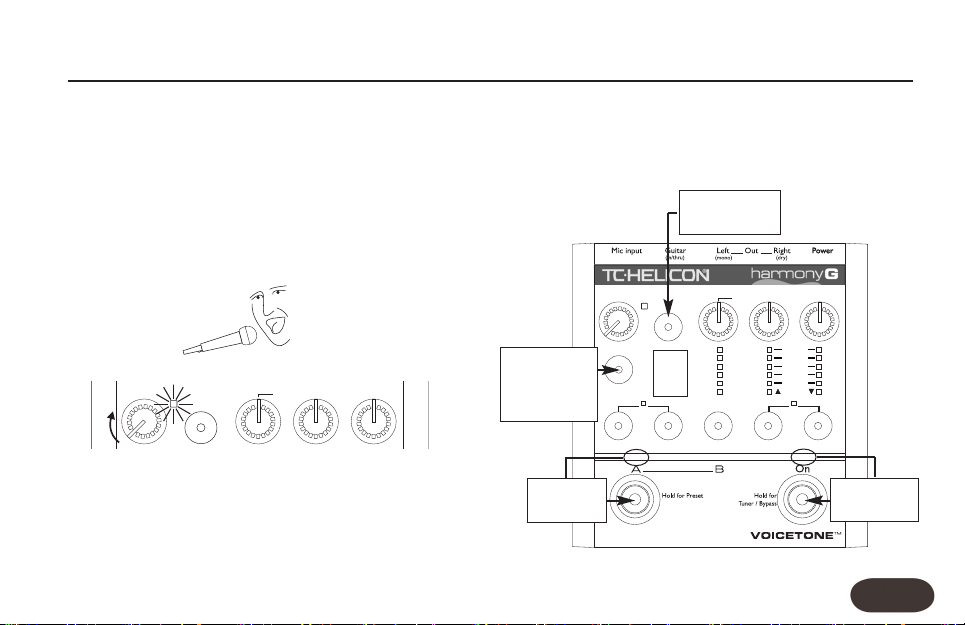
Front Panel
Input
Tone
Guitar FX Harmony
Auto
1 2 3 4 5
1. Input Knob and LED
Adjust the Input Knob so that while you sing, the LED
beside it flashes green, sometimes orange but never red.
2.Tone Button
This engages the Live Engineer Effects which
automatically modifies your voice and makes it sound
smoother and brighter. When engaged, this effect is
always on your voice, even in Bypass.
Page 12

13
6. Preset Select Button and Preset Display
Press to cycle through the 5 presets numbered 1 to 5 shown
in the Preset display. Hold to store changes you make.The
sharp sign (#) is used in the Tuner and Manual modes.
7. 48 Volt Phantom Power LED
For condensor mics, hold the Manual and Double buttons
for 2 seconds to engage and disengage phantom power.
8. Manual Mode Button
Press to toggle guitar control of the harmonies. See how
to use this feature in the “For Advanced Users” section.
9. Double Voice Button
Press this button to simulate the sound of you singing
along with yourself for added thickness.
10. FX Button and LED Display
Pressing the FX button cycles through the effect styles
and FX Off (no LEDs lit) for the current preset.
11. Stereo Select Button
Press and hold the Voice 1 and Voice 2 buttons for 2
seconds to toggle between stereo and mono output.
12.Voice Buttons and Display
Press either of the Voice 1 or Voice 2 buttons to:
a) change the associated voice’s harmony interval
b) enable the harmony voice when its LED is off
c) turn the voice off
The same interval for both voices adds thickness to the
harmony voices.
Front Panel
Preset
Manual Double FX Voice 1 Voice 2
Hall
Room
Echo
Slap
Combi
SFX
Higher
High
Low
Lower
Bass
Octave
48V Stereo
3
#
6
7
12
8 9 10 11
Page 13

13. LED Indicator Bar
This translucent bar indicates the A or B selection of
each preset and status of the On footswitch.
14. Preset A and B Select Footswitch
If you only need to access your two favorite sounds in
performance, tapping the A/B footswitch will toggle
between them quickly. If you would like to access more
presets with this footswitch, hold it to enter Preset
Select mode. Now, pressing the A/B button cycles
forward through the five “A” preset settings or “B” preset
settings, depending on whether an A or B was loaded
when you held the footswitch.
15. On Footswitch
Tapping this footswitch engages or disengages the
doubling and harmony effects in the current preset. The
reverb and delay FX will remain active on your voice
even with the harmonies muted. Holding this footswitch
enters Tuner/Bypass mode for silent guitar tuning and
bypassing of all processing except for Tone.
Front Panel
14
3
14
15
13
Page 14

Back Panel
15
operation see “External Mixing with Mono and Dry
Outputs” in the “For Advanced Users” section.
3. Guitar Connections
Plug a 1/4” cable directly from your guitar into the IN
jack. If you use effect pedals, they should be connected
after Harmony-G. The input is high impedance. Plug a
1/4” cable from the THRU jack to your first effect pedal
or to your amplifier/PA.
4. Guitar Ground Lift
If you hear a buzz when you plug in a cable from the
THRU to your amp or PA, press this button in. If the
THRU jack is not used and your guitar sound is routed
internally, the Ground Lift switch should be left out.
5. Mic Input
Plug an XLR-equipped microphone cable from your mic
into this jack.
1 2 3
4
5
1. Power Input
Accepts the connector from the supplied DC power
adaptor. Connecting power to Harmony-G turns it on
immediately as there is no on/off switch on the product.
2. Outputs
These XLR jacks supply the main output of Harmony-G
in stereo or mono. For more information on mono
Page 15

Loading Presets
Press the Preset button to load the next preset and
change the sound. If you need to access your two
favorite sounds while standing, tapping the A/B
footswitch will toggle between them quickly.
If you would like to access more presets while standing,
hold the A/B footswitch to enter Preset select mode.
Now,pressing the A/B button cycles through the five “A”
preset settings or “B” preset settings, depending on
whether an A or B was loaded when you held the
footswitch.
Making Harmonies
Play a song on your guitar and sing. Press the On
footswitch to hear the harmony voices in the preset you
have loaded. Press the On footswitch again to mute the
harmony voices so you can sing with no harmony.
Using the Tone Button
When you activate the Tone button, your voice will
sound smoother and brighter. There are three high
quality studio effects that accomplish this: adaptive
“Shape” EQ, adaptive compression, and de-essing.
Mixing
The three control knobs: Guitar,FX and Harmony, adjust
how much guitar, vocal harmony and FX are added to
your lead voice.The balance you create will be the same
for all presets. The factory-set levels at the center
position have been programmed for optimum sound.
Adjusting the Harmony Level
Turn the Harmony control to raise or lower the amount
of harmony added to your voice. If the Double button is
on, the extra voice it adds will be adjusted as well.
Changing the FX Volume
Turn the FX control knob to raise or lower the mix level
of the effect style selected with the FX button.
Getting to Know Harmony-G
16
Page 16

Adjusting Your Guitar Volume
If your guitar is sent to the main outputs (Guitar Thru
jack is not used), the Guitar control knob adjusts how
much guitar sound is added to the mix.The center Auto
detent position engages Automix which slowly (around
20 seconds) but continually adjusts your guitar volume
while you play so that your voice is never lost in the mix.
If you find that your guitar volume reduces while not
singing, other instruments may be leaking into your mic.
To overcome this, reduce the Input control so that other
sounds around you do not light the green LED. Also, try
aiming other instruments away from your mic.
If you find Automix is not working at all, you need to
raise the level of your guitar either with its volume
control or a preamp.
Thicken Your Voice with the Double Button
Activating this button will simulate the effect of you
singing along with yourself to make your lead voice
sound thicker. It can be stored on or off in each preset.
Editing Presets
You can change the settings of the Double, FX, Voice 1
and Voice 2 features to your liking by pressing their
associated buttons. Pressing the Preset button will cancel
your edits and load the next preset.The Manual button
is an advanced feature detailed in the “For Advanced
Users” section.
What Do the Voice 1&2 Buttons Do?
Pressing either of these buttons can be used to select
harmony “voicings” for that voice or to turn the voice
off.Voicing is the term describing a pitch-shifted version
of your voice at a musically determined pitch.
Getting to Know Harmony-G
17
Page 17

What Does Higher, Lower etc. Mean?
These names define the harmony arrangement in the
current preset. Careful arrangement of harmony voices
is an effective way of emulating a favorite band’s vocal
style. The following describe the typical intervals
produced by Harmony-G.
o Higher - Generally a 5th interval or 7 semitones
above your voice
o High - Generally a minor or major 3rd interval or
3-4 semitones above your voice
o Low - Generally a minor or major 3rd interval or
3-4 semitones below your voice
o Lower - Generally a 6th interval or 8 semitones
below your voice
o Bass - This deep voice follows the root note of
your current guitar chord
o Octave Up and Down - Follows your voice exactly
12 semitones above or below regardless of the
guitar chord you play.
Storing Edited Presets
You can store a changed preset for the next time you
need it. Press and hold the Preset button to store both
the A and B settings for that preset number. If you save
your two favorite A and B settings at preset 1, they will
be ready when you power up without you having to
load them each time. Note that the positions of the
Input, Tone, Guitar, FX, and Harmony controls are not
saved, as they are global.
Changing the FX
Press the FX button to change the reverb and delay
style in the preset you are currently on. If you prefer this
setting, it can be stored with the preset.
Using the Tuner
Hold the On footswitch to enter Tuner/Bypass mode.
The On led will flash. Pluck the single open string you
want to tune and you’ll see the note it’s closest to in the
Preset display.As well, a pattern of LEDs in the FX styles
and Voice 1&2 indicator areas will show whether the
Getting to Know Harmony-G
18
Page 18

string is sharp or flat. As you raise or lower the pitch of
the string, the FX and Voice 1/ Voice 2 indicator LEDs will
light as shown.
Shows string is in tune
Shows string is sharp
Hall
Room
Echo
Slap
Combi
SFX
Higher
High
Low
Lower
Bass
Octave
Hall
Room
Echo
Slap
Combi
SFX
Higher
High
Low
Lower
Bass
Octave
Shows string is flat
Press the On footswitch to exit Tuner/Bypass mode.
Hall
Room
Echo
Slap
Combi
SFX
Higher
High
Low
Lower
Bass
Octave
Hall
Room
Echo
Slap
Combi
SFX
Higher
High
Low
Lower
Bass
Octave
Getting to Know Harmony-G
19
Page 19

20
How to Use the Manual Mode
There may be times when you want to disengage guitar
control of your harmonies and use a fixed key (e.g. E
Minor) instead. Using Manual mode does this. It could be
that you aren’t playing your guitar in a particular song or
that you’ve used fixed-key harmony in other TC-Helicon
products and found it works better and sounds unique
for some songs. In these cases, you can use the Manual
mode, also known as “Scale” in other TC-Helicon
products.
To use Manual mode, hold both footswitches then play
a chord on your guitar. If your song is in E minor for
example, play a simple Emin chord. As you strike the
chord, Harmony-G will automatically exit the key setting
mode so you can sing right away. Note that chords
containing extensions such as 7ths are not recognized.
If some of the harmony notes don’t sound correct to
you, you can choose from the three alternate scales by
re-entering Manual mode described above, and before
you play the chord, tapping the A/B footswitch to cycle
through the three alternate major or minor scales. A
number from 1 to 3 will show your selection in the
Preset display until you play the chord. If none of these
work, then it’s best to turn off the Manual button and
return to guitar-controlled harmony. If you wish to reuse Manual mode and the key you’ve just set next time
you power up, you can hold the Preset button to store
it to the current preset number.
Advanced FX Style Select
Each effect style (Hall, Room etc.) has additional selections.
To browse additional Hall sounds, for example, first cycle
the FX button to the Hall style, then hold the FX button.
Tap the FX button to sample the options that are
numbered in the preset display. Once you’ve found one
you like, press and hold the FX button to exit. Hold the
Preset button to store if desired. Note that cycling through
the FX styles again with the FX button will return your edit
to the default style (#1) in each style bank.
For Advanced Users
Page 20

For Advanced Users
How to Choose Alternate Tone Settings
The factory default for the Tone button accomodates a
wide range of singers but there are options to fur ther
customize this feature.
To access the Alternate Tone settings, hold the Tone
button until you see the Preset number display flash.You
can tap the Tone button to cycle through the numbered
choices shown below:
d: Default setting best for most situations
1: Choose this if you have a very bright-sounding PA
2: This option adds “warmth” to your voice
3: Increased compression. Caution: this increases the
likelihood of feedback
Guitar Reverb and Detune
When mixing the guitar input internally, reverb will be
automatically added to your guitar.The guitar reverb style
depends on the currently loaded FX style. The guitar
reverb and voice FX level are controlled by the FX knob.
You’re able to add a separate detune effect to your
guitar when you enter the Advanced FX Select mode
(Hold the FX button) and then press the Double button
so its LED lights. After you’ve exited Advanced FX Select
mode, you can still add or remove the vocal doubling
effect with the Double button without changing your
guitar’s detune sound. As with the other FX, the guitar
detune effect can be stored on or off in different presets.
Changing the Number of Presets
The default configuration of Harmony-G is to offer five
presets each having an A and B setting. This allows you to
cycle through them with a reasonable amount of footswitch
or Preset button pushes. If you need access to more presets
and are willing to step through them with the footswitch or
Preset button, or you would like to reduce the number so
you can cycle through three favorites for example, there is a
way to set this in Harmony-G.
To set the accessible number of presets, power up
holding the Preset button. After a moment, the number
“5“ will show the default number of presets. Tap the
21
Page 21

Preset button to extend the limit to up to ten (shown
as “0”) or back down to three (1 and 2 are not options).
Hold the Preset button to store this setting and exit to
normal operation.
External Mixing with Mono and Dry Outputs
If you prefer, you can leave the level balancing between
your dry voice (Tone active only) and a mono signal of
the Harmony, Double and FX to your sound engineer.
Ensure the Stereo LED is not lit and that the Harmony
knob is set to full right. Connect the outputs to two
channels of your audio mixer. The Left (Mono) output
will send the “wet” effects and the Right (Dry) output
will send your dry voice. These can be adjusted by your
sound engineer.
Performing a Factory Reset
A reset will delete all of your edited presets and return
all settings to the factory defaults.To reset the unit,insert
the power connector while holding the Manual and
Voice 2 buttons.
To Change the Tuning Reference
By default, Harmony-G is tuned to A=440 Hz and the
harmony voices will sound in tune when you sing with a
guitar tuned to A=440. If you will be playing guitar and
singing with an instrument tuned to a different reference
e.g. a piano that has dropped in overall pitch, you can
change Harmony-G’s reference with the following
procedure.
Press and hold the Manual, Double and FX buttons
simultaneously as you plug in the power adapter.Then
place your microphone near the instrument you want to
tune to and play any single note from it. Press any button
to exit to normal function.
You can now tune your guitar to the new reference.Your
guitar and the harmony voice’s pitch will match the
reference instrument.
Note that the tuning reference is reset to A440 the next
time power is removed from Harmony-G.
For Advanced Users
22
Page 22

My guitar doesn’t change the harmonies.What’s
wrong?
o Turn up the volume control on your guitar.
o Confirm your guitar cable is good by connecting
your guitar directly to your amp.
o Remove any guitar effect pedals between your
guitar and Harmony-G’s input.
o Ensure that you are playing guitar chords made up
of at least a root note and a major or minor third.
o Ensure the Manual button is off
My guitar volume is changing when I sing, can I
adjust it manually?
o Adjust the Guitar level control so that it is above
or below the center Auto position.
My guitar is connected to my amp but I can’t
hear it.What’s wrong?
o Press the On footswitch to exit Bypass/Tuner
mode
My FX level is up but the sound is still dry
o You’re likely set to the Off FX style. Press the FX
button to activate and cycle through the FX styles.
I want to talk to the audience with no FX on,
how do I do that?
o Hold the On footswitch to enter Bypass/Tuner
mode.
Where can I find support for this product?
o Point your browser to www.tc-helicon.com. On
our webpage, you’ll find links to our support site
and support contact information.
Can I turn the harmonies off in a preset?
Yes, press either the Voice 1 or Voice 2 buttons so that
the LEDs above them are not lit.
FAQ and Troubleshooting
23
Page 23

Guitar Performance Tips
To ensure that the harmony voices follow your guitar
playing closely, it’s best to play as cleanly as you can. Also,
at the beginning of your song, it’s important to play a
chord if you want to sing right at the beginning.
Your guitar should be well-tuned to the onboard tuner
or an external one set to A=440 Hz. If the song section
you want vocal harmony on has fast chord changes,
single note runs or very slow arpeggios, you can use
Manual mode to produce harmony.
Singing Performance Tips
The more in-tune you sing, the better the harmonies will
sound. There is a slight amount of pitch correction on
the harmony voices but it’s mostly up to you! Try to
ensure that your amp or monitor is not facing directly
into your mic as this can confuse Harmony-G.
Can I Use Alternate Tunings On My Guitar?
Alternate tunings e.g. drop D, DADGAD, etc. are okay.
The most important notes of your chord, as far as
Harmony-G is concerned, are the chord root and the
third, so make sure these notes are clearly voiced.Your
guitar can be tuned to alternate tunings as long as you
are in tune with the onboard tuner.
FAQ and Troubleshooting
24
Page 24

25
Specifications
Analog Inputs
Mic Connector Balanced XLR, Input Impedance 1kOhm
Mic Input Sensitivity @ 0dBFS -44dBu to +2dBu
Mic Input Sensitivity @ 12dB headroom -56dBu to -10dBu
Guitar In Connector Unbalanced 1/4”, Input Impedance 1MOhm
Guitar In Sensitivity +15dBu @ 0dBFS
EIN -126dBu @ max. mic amp gain, Rg = 150 Ohm
Analog Outputs
Main Output Connectors Balanced XLR
Output Impedance 40 Ohm
Output Level +2dBu @ 0dBFS
Guitar Thru Connector Unbalanced 1/4” Phone Jack
Guitar Thru Output Impedance 270 Ohm
Input to Output Analog Audio Performance
Dynamic Range, Mic. @ Min gain >108dB, 20 Hz - 20kHz *A-weighted
Dynamic Range, Mic. @ -18dBu sensitivity > 104dB, 20hz - 20kHz*
THD+ Noise, Mic. @ Min gain <-90dB
Frequency Response, max gain -1.5dB @ 40 Hz,+0/-0.3 dB (200Hz to 20 kHz)
Guitar In to Thru Dynamic Range >119dB
Tuning Mute Attenuation >100dB
Conversion Characteristics
Sample Rate 48 kHz,Converter AKM AK4620B
AD / DA Conversion 24 bit, 128x oversampling
bitstream
EMC & Safety
Complies with EN 55103-1 and EN 55103-2
FCC part 15, Class B, CISPR 22, Class B
Certified to IEC 65, EN 60065, UL6500 and
CSA E60065 CSA FILE #LR108093
Environment
Operating Temperature 32° F to 122° F (0° C
to 50° C)
Storage Temperature -22° F to 167° F (-30° C
to 70° C)
Humidity Max. 90 % non-condensing
Supplementary
Dimensions 130mm x 132mm x 41mm (5" x
5.25" x 1.5")
Weight 1.5 lb. (0.72 kg)
Warranty Parts and labor 1 year
All specifications and features subject to change
without notice.
 Loading...