

Page 1
ENGLISH VERSION
Page 2

WARNING
To reduce the risk of fire or electric shock, do not expose this appliance
to rain or moisture.
CAUTION
This equipment has been tested and found to comply with the limits for
a Class B digital device pursuant to Part 15 of FCC Rules. Operation is
subject to the following two conditions: (1) This device may not cause
harmful interference, and (2) this device must accept any interference
received, including interference that may cause undesired operation.
The lightning symbol within a triangle means, “Electrical
caution!” It indicates the presence of information about
operating voltage and potential risks of electrical shock.
The exclamation point within a triangle means, “Caution!”
Please read the information next to all caution signs.
Page 3

Introduction .................................................... page 4
Quick Start .......................................................page 6
Using Two VoiceTone Pedals ........................page 11
Front & Back Panel Descriptions ...............page 12
Setup Configurations ....................................page 14
Phantom Power ..............................................................page 14
Standard Setup ................................................................page 15
Stereo Setup .....................................................................page 16
Sound Engineer Setup .................................................page 17
Patches, Performances, & Parts ...................page 18
Performing Applications ...............................page 21
Single Effect Performances ........................................page 21
A/B Effect Performances ............................................page 22
Sequenced Performances ..........................................page 23
Effect & Genre Descriptions .......................page 24
Reverb ..................................................................................page 24
Delay & Tap Tempo .......................................................page 25
μMod ....................................................................................page 26
Transducer .........................................................................page 27
Genre Descriptions ......................................................page 27
Patch List .........................................................page 29
FAQ & Troubleshooting ...............................page 35
Super Edit Mode & Restore ........................page 37
Specifications ..................................................page 38
Tear-Out Section ...........................................page 39
3
Table of Contents
TC Helicon Vocal Technologies Ltd.
Sindalsvej 34, DK-8240 Risskov – info@tcelectronic.com
Manual revision 1.1 – SW – V 1.0 | Prod. No: E60507412
English Version
Page 4

4
Welcome to VoiceTone Create
VoiceTone Create was built for the performance
minded singer desiring studio quality effects on stage. In
essence, Create is the professional producer and all of
his/her tools, boiled down into one easy to use, and very
portable pedal. The effects in VoiceTone Create are
produced by the very same algorithms used in high-end
studio hardware processors and software plug-ins. In
terms of audio quality (noise floor, harmonic distortion,
and frequency response), Create surpasses anything that
has come before it, and unarguably exceeds even the
most stringent "audiophile" standards. To make your life
as easy as possible, Create presents a wide pallet of
professionally authored sounds, offering singers instant
portholes into the secrets behind producing great
sounds for any music genre. Where out-of-the-box
sounds aren't enough, Create provides powerfully
simple tweak controls, intelligently designed to give you
exactly what you need to find the sound you want.
Many audience members, band members and sound
engineers may be surprised to see a singer taking
control over their sound. We think it's about time!
Features:
o Reverb: halls, rooms, plates, spring, ambience
o Delay: tap tempo, ping pong, slaps, taps
o μMod: microshift, thicken, chorus, flange, phaser
o Transducer : distortion, telephone, megaphone, filters
o 99 music-style-based effect patches
o 5 "favorite" user performances each including flexible
A/B effect switching
o Quick and easy tweaking of patches
o XLR mic level I/O in stereo or mono
o Clean, studio quality mic preamp with phantom power
Introduction
Page 5

5
About TC-Helicon
At TC-Helicon we truly believe that the voice is the
world's most beautiful instrument. We don't mean to
degrade other beautiful instruments, but the singing
voice is the anthropological source for all things melodic.
In the words of the founders of TC-Helicon,
"Everything we do is dedicated to this instrument (the
singing voice). We envision a world where those who
work with the voice in live and recording situations can
bring out the very best from any performance, and
where the possibilities of vocal craft are endless."
Our mission was galvanized by a simple question:
"Isn't it time that someone finally provided dedicated
tools and solutions for voice?"
So what does this all mean to singers? It means that you
should know there is a dedicated group of engineers,
researchers and product specialists, based in Victoria, BC,
Canada, who spend ever y waking moment of their
working lives listening, talking, singing, and interacting
with singers and those who have passion for the singing
voice. All this knowledge and experience is used to
design products respecting and empowering the
modern vocalist. Our products focus on removing
barriers and inspiring creativity in performance. That's
why our products range from near-field personal vocal
monitors to floor-based vocal multi-effects pedals.
Enjoy.
The TC-Helicon Team
a TC Group company
Introduction
Page 6
6
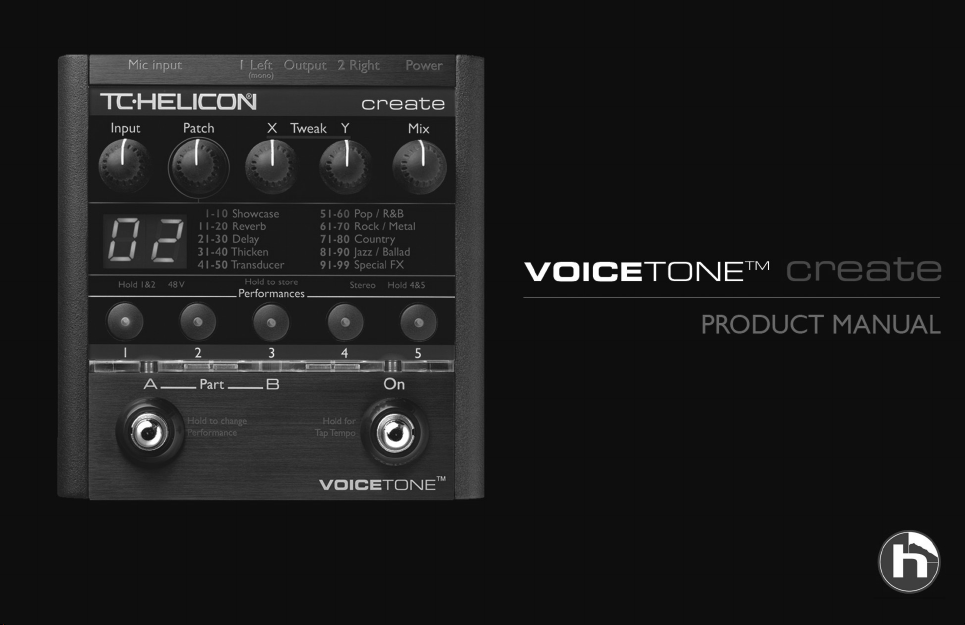
Step 1:
Connect your microphone to a mic cable
Step 2:
Connect the mic cable to the Mic Input on Create
Quick Start
Make sure Create is not powered.
NOTE:
Page 7
7
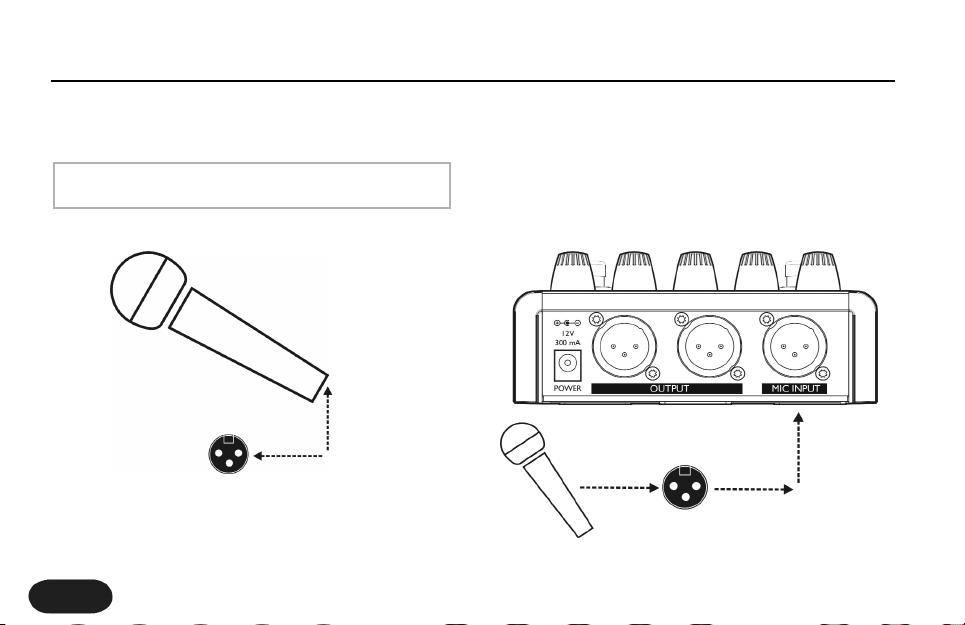
Step 3:
Connect a mic cable to the Left (mono) Output of
Create.
Step 4:
Connect the mic cable from Create to a mic input on
your sound system.
Quick Start
At this point it would be best to turn the gain and/or
volume on your sound system's mic input to off.
NOTE:
Page 8
8
Step 5:
Set the Input Knob fully left, and the Mix Knob to 12
o'clock.
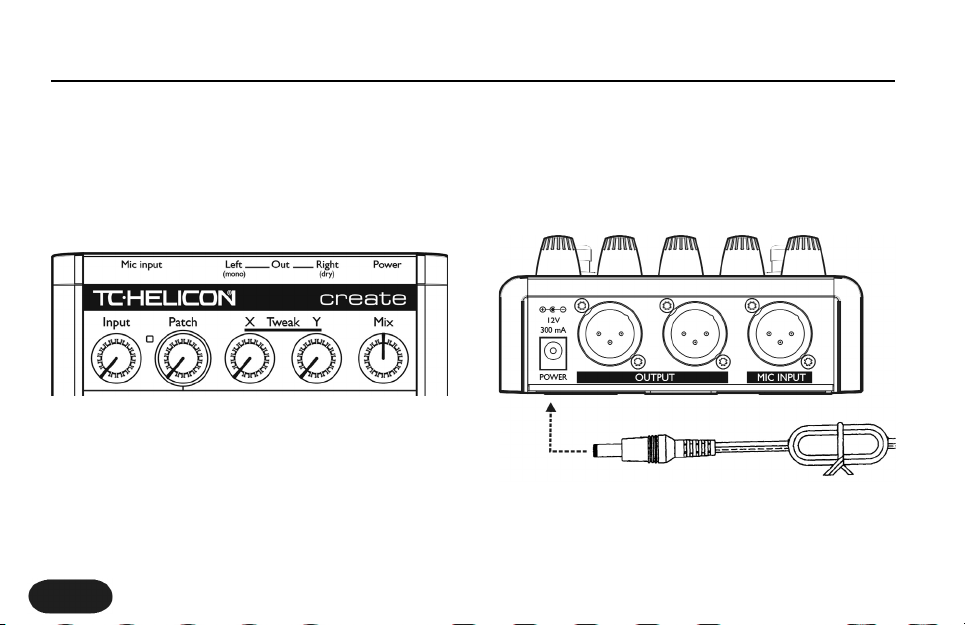
Step 6:
Connect Create's power adapter to main power and to
the Power Input on Create.
Quick Start
Page 9

9
Step 7:
While singing through your microphone, raise the Input
Knob until the Input Light turns green, sometimes
orange on louder parts, but never red.
Step 8:
Raise the gain and/or volume on your sound system mic
input channel and master volume until you hear a good
level from your vocals.
Quick Start
Page 10
10
Step 9:
You're ready to add effects to your voice.
a. Turn the effect on or off with the Right Footswitch.
b. Listen to different patches by slowly turning the
Patch Knob.
Quick Start
Page 11
You can use two VoiceTone pedals in series. Generally,
VoiceTone Create should be the last device in the chain
before connecting to your PA.
Step 1:
Follow the Quick Start guide for both VoiceTone Pedals.
Step 2:
Instead of connecting your first VoiceTone pedal to the
PA, connect its mono output to the mic input on Create.
Step 3:
Connect the 2nd VoiceTone pedal, in this case Create to
the PA.
Step 4:
Set VoiceTone Create’s Input Knob fully left.
Step 5:
Use the first pedal’s Input Knob to set the microphone
gain.
11
Using Two VoiceTone Pedals
Page 12
12
1. Input Knob
Controls the microphone pre-amplifier gain. Create can
accept dynamic or condenser microphones.
2. Input Light
Indicates the input level of the microphone. Flashing
green, sometimes orange is good. Flashing red is clipping
- not good!
3. Patch Knob
Selects from the 99 effect patches.
4.Tweak X / Y Knobs
Controls two useful aspects of the selected patch.
5. Mix Knob
Sets the global mix of effects and dry. 12 o'clock is the
default position.
Front & Back Panel Descriptions
1 2 3 4 5
6
8
7
9
10
11
Page 13

13
6. Numeric Display
Indicates the current patch. When tweaking, temporarily
indicates the tweak value for the last edited Tweak Knob.
7. Phantom Power Light
Indicates phantom power on or off.
8. Performance Button 1 - 5
Displays the current loaded performance.
9. Stereo Light
Indicates stereo mode on or off.
10. Left Footswitch
Switches between part A / B as well as performances.
11. Right Footswitch
Toggles effects on / off and tap tempo.
12. Mic Input
Microphone connection.
13. Left Output (mono)
Connects to a sound system (used for standard mono
setup)
14. Right Output (dry)
Connects to a sound system (used in stereo setup, or
sound engineer setup)
15. Power Input
Input connector for supplied power supply.
Front & Back Panel Descriptions
1213
14
15
Page 14

14
Phantom Power
Before using any setup configuration, determine the type
of microphone you are using:
Dynamic microphone: phantom power off.
Condenser microphone: phantom power on.
Enabling Phantom Power:
1. Confirm that your sound system master level is off.
2. Connect Create's power adapter to main power
and to the Power Input on Create.
3. Press and hold Performance Buttons 1 and 2
simultaneously until the Phantom Power Light comes on.
To turn phantom power off, repeat this step.
Setup Configurations
Set your sound system level to off when you are
turning phantom power on/off as it can create a
“pop” sound in your speakers.
NOTE:
Page 15

15
Standard Setup
The standard setup for VoiceTone Create couldn't be
easier - put Create between your microphone and your
microphone input on your sound system. In this
configuration the Right Output is not used. The Left
Output is a mono mix of effects and dry, based on the
setting of the Mix Knob.
Configuring Standard Setup:
1. Connect your microphone to Create's Mic Input.
2. Connect to your sound system as indicated: Left
Output to a mic input channel on your sound system.
3. Connect Create's power adapter to main power
and to the Power Input on Create.
Setup Configurations
The default for Create is stereo mode off (mono). If
the Stereo Light is on, press and hold Performance
Buttons 4 and 5 simultaneously until the Stereo Light
turns off.
NOTE:
Page 16

16
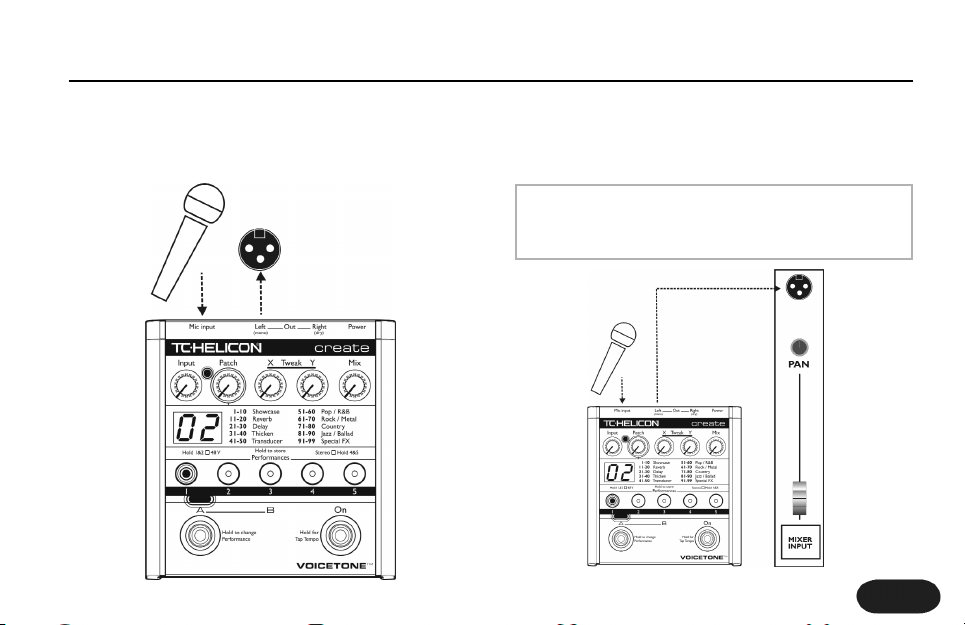
Stereo Setup
If you run your sound system in stereo, you can enable
stereo mode. In this setup, effect patches have more
spatial effect. In this configuration, the Left and Right
Outputs are connected to two inputs on your sound
system. The Mix Knob controls the balance of stereo
effects and dry.
Configuring Stereo Setup:
1. Connect your microphone to Create's Mic Input.
2. Connect to your sound system as indicated: Left
Output and Right Outputs to two mic input channels on
your sound system. Set the pan pots on your sound
system fully left (from Create's Left Input) and fully right
(from Create's Right Output).
3. Connect Create's power adapter to main power
and to the Power Input on Create.
4. Press and hold Performance Buttons 4 and 5
simultaneously until the Stereo Light comes on.To turn
stereo mode off, repeat this step.
Setup Configurations
Page 17

17
Sound Engineer Setup
If you are in a situation where a live sound engineer
mixes your vocal sound, you have the option of giving
them control over your wet/dry mix. In this
configuration the live sound engineer will have one
channel on their mixing console with your dry vocal, and
the other channel with the fully wet mono effects.They
can mix between the two to get the desired effect
balance.
Configuring Sound Engineer Setup:
1. Connect your microphone to Create's Mic Input.
2. Connect to your sound system as indicated: Left
and Right Outputs to two mic inputs on your sound
system. Set your sound system’s pan pots to center.
3. Connect Create's power adapter to main power
and to the Power Input on Create.
4. Confirm that stereo mode is off. If the Stereo Light
is on, press and hold Performance Buttons 4 and 5
simultaneously until the Stereo Light turns off.
5. Turn the Mix Knob fully right. In this configuration,
the sound engineer will have access to your dry voice on
the Right Output, and your fully effected voice on the
Left Output.
Setup Configurations
Page 18

18
Getting to Know the Basics
VoiceTone Create has a simple yet sophisticated interface for selecting and
performing from an extensive list of tweakable effects patches. Patch selection
and tweaks can be stored in performances. Any changes not stored are lost
when the unit is powered off.
Patches, Performances, & Parts
VoiceTone Create is a
completely live interface. Any
tweak you make in any
performance or part occurs
instantaneously and is
remembered when you move
between parts and
performances. However, when
you remove power from
Create, all once-in-a-lifetime
sounds you have created with
your tweaks and selections
leave with the audience. If you
want to preserve your creative
ideas, you can store your
performances (and their A/B
parts) by individually pressing
and holding their flashing
Performance Buttons.
PERFORMING AND STORING
Page 19

19
Patches
VoiceTone contains 99 effect patches. Each patch can
have any combination of settings and effects including
reverbs, delays, μMod, and Transducer. The patches are
organized into categories. Refer to the Patch List section
for descriptions of the categories and each effect Patch.
Selecting Patches:
1. Turn effects on by tapping the Right Footswitch so
that the Effect On Light turns red.
2. Select a patch by turning the Patch Knob to the
desired patch number as indicated on the Numeric
Display.
Tweaking Selected Patches:
1. Turn the knobs labeled Tweak X or Tweak Y to
change the patch's sound. When you turn the Tweak
Knobs, the Numeric Display shows the specific X or Y
value. After several seconds, the X or Y value display
times out, and the selected patch number is again
indicated on the Numeric Display.
Performances and Parts
Performances and parts allow you to sequence through
your favorite effect patches while keeping your hands
free to practice mic techniques, or wave to your adoring
audience. There are five performance locations. Each
location has an A and a B part. Each of these locations
can store a specific patch including any tweaks made
with the Tweak Knobs. When a performance is stored,
both the A and B part are stored simultaneously.
Selecting Performances and Parts
1. Press a Performance Button (1 - 5) to select that
performance.
2. Press the Left Footswitch to toggle between part A
and part B of the selected performance. The selected
part is indicated by the Part A/B Lights.
Patches, Performances, & Parts
The Patch List section details assigned tweak
parameters.
NOTE:
Page 20

20
Storing Performances and Parts
1. Press and hold a Performance Button to store the
currently selected patch and tweaks to that
performance location. The Part A/B Lights will flash to
indicate a successful store.
Patches, Performances, & Parts
When a Performance Button is flashing it’s letting
you know that the performance has been changed.
The flashing also reminds you that the performance
has not been stored. To store, read the section on
Storing Performances and Parts below.
NOTE:
Page 21

21
Getting Comfortable Performing
Performance options with VoiceTone Create are extensive for a floor based
effect. Getting comfortable with the Left Footswitch and various options will
give you complete creative control over your effects. To gain experience
performing with Create, we've provided walkthroughs on the three stages of
performing; Single Effect, A/B Effect, and Sequenced performances.
Single Effect Performances
This is the simplest method for using the pedal, and is the best place to start.
Any performer who wants the same effect all night will find this application
is as deep as they’ll need to go.
1. Select performance 1, part A, by pushing Performance Button 1, and
pushing the Left Footswitch to toggle part A.
2. Turn the effect on with the Right Footswitch.
3. Find a sound you like by turning the Patch Knob. (Tweak if desired).
5. Press and hold Performance Button 1 to store the patch.
Performance Applications
If you have selected a patch
that contains a longer delay
sound, you may have the
option of using the tap tempo
feature. Tap tempo allows you
to synchronize the delay effect
with the tempo of your music
by tapping with your foot.You
can enter and exit tap mode by
push and holding the Right
Footswitch for 2 seconds. For
more information on tap
tempo, see the Effect
Description | Using Tap Tempo
section. Additionally, note that
with long delays or reverb tails,
turning the effect off will allow
the "tail" to continue while you
continue to sing with no effect.
TAP TEMPO
Page 22

22
A/B Effect Performances
Now that you've mastered using a single performance, and you've heard a
lot of different effects, it's time to make use of the Left Footswitch.
Using A/B is a great creative step for any performer. Even if you only need
one effect for all your songs, you still may want your audience to hear sonic
contrast between your verse, chorus, or bridge. Or perhaps in a night of
always thickening your voice with MicroShift (patch 31), you have one song
that you want a Slow Old Radio Verb (patch 90) to emulate a vintage
recording.Whatever the reason, getting comfortable with A/B performances
will give you more control.
1. Select performance 1, part A, by pushing Performance Button 1, and
pushing Left Footswitch to toggle to part A.
2. Enable the effect with the Right Footswitch.
3. Select patch 31 by turning the Patch Knob.
4. Press the Left Footswitch to switch to part B.
Performance Applications
A great way to build energy
during a song is to change an
effect from the verse to the
chorus, or bridge to chorus.
These changes can be
completely different sounds
such as going from Silk Dream
(patch 1) to distorted vocals
on Megaphone (patch 42). But
sometimes you want to add a
subtle change to the current
patch, and certain patches are
better for this than others.
These patches are called
Verse-Chorus patches and are
labeled in the Patch List
section. Select one of these
presets for both parts of a
performance then experiment
by changing the tweak settings
from part A to part B so that
the sound changes in an
interesting way.
CHANGES DURING A SONG
Page 23

23
5. Select patch 90 by turning the Patch Knob.
6. Press the Left Footswitch to change between your
tweaked versions of patch 31 and patch 90.
7. If you like both your part A and part B settings, press
and hold Performance Button 1 to store the
performance.
Sequenced Performances
Now you're ready to be the master of your vocal
performance domain. Learning how to sequence
through performances using the press and hold feature
of the Left Footswitch allows you to easily step through
all five performances.
1. Select a part and choose a patch for each
Performance Button.
2. Enable the effect with the Right footswitch.
3. Press and hold the Left Footswitch until both the
Part A and Part B Lights are on.
4. Press the Left Footswitch to cycle through the five
performances as indicated by the Performance Button
Lights (1 - 5).
5. If you want to return to A/B mode, press and hold
the Left Footswitch until one of the A/B lights are lit.
6. Remember, any changes you make to the 5
performances must be stored individually. First select
the performance you'd like to store with a single press,
then press and hold it for 2 seconds to store.
Performance Applications
If you had part A selected when you enabled
sequencing through performances, you'll hear part A
of each performance. If you had part B selected
when you enabled sequencing through
performances, you'll hear part B.
NOTE:
Page 24

24
Reverb
The reverb effect is the most common vocal effect.
Reverb can imitate the natural sound of spaces like
churches, clubs and halls. However, not all reverb sounds
imitate a real space. Many reverb effects are recreations
of electro-mechanical effects like Plates and Springs.
All reverbs are made up of early reflections (rooms), and
the longer reverberant sounds (tails). Common controls
are the level of the room (Room Level), and the level
and decay of the tail (Tail Level, Reverb Decay).
Additionally, a small delay can be added between the dry
voice and the reverb signal (Predelay).
By far the most important control for reverb is the level.
One reverb patch can have a very different result for the
audience whether it is mixed subtly, or up front in the
mix.
A good way of breaking down the various reverb effects
is as follows:
Spaces:
- Halls
- Rooms
Devices:
- Plates
- Springs
Selecting Reverb Patches
1. Turn effects on by pressing the Right Footswitch.
2. Browse through patches 11 through 20 by turning
the Patch Knob.
3. Use the Tweak Knobs to alter the reverb effect.The
most common assignments for the Tweak Knobs are
combinations of level, decay, style, and predelay.
Effect & Genre Descriptions
Page 25

25
Delay
The delay effect is essentially a configurable echo.You
can control how far apart the echoes occur (Delay
Time), and whether the echoes fade out quickly, or build
on themselves like you were trapped in house of
mirrors (Feedback). In addition, there are filtering and
stereo controls that allow for many popular delay
sounds. Delays can be categorized into two categories
of which Create is fully capable of producing.
Short Delays:
- Slaps
Long Delays (max stereo delay is 1800ms)
- Mono taps
- Stereo taps
- Syncopated taps
- Ping-pongs (in stereo, sound goes left to right)
Selecting a Delay patch
1. Enable the effect by pressing the Right Footswitch.
2. Browse through patches 21 through 30 by turning
the Patch Knob.
3. Use the Tweak Knobs to alter the delay effect. The
most common assignments for the Tweak Knobs are
feedback, delay time, and high-cut.
Using Tap Tempo
Long delay effects don't tend to sound good unless
they're synchronized with the tempo of your song.
When you hear a long delay sound, you can generally
use the tap tempo feature to synchronize the delay to
your tempo. The tempo is saved with a performance
part during the store procedure.
1. Enable the effect by pressing the Right Footswitch.
Effect & Genre Descriptions
Many presets have tap tempo. Listen for a long delay
sound, or refer to the Patch List section where tap
tempo patches are indicated.
NOTE:
Page 26

26
2. Select patch 21 - Mono Tap by turning the Patch
Knob until 21 is indicated on the Numeric Display.
3. Press & hold the Right Footswitch for two seconds.
The Effect On Light will flash the patch's stored tempo.
4. Tap the Right Footswitch in time with your song
(usually only a few beats are necessary) until you are
satisfied you've matched the tempo. The Effect On light
will continue to flash at the tempo you've entered. Press
and hold the Right Footswitch to exit tap mode.
μMod
μMod is short for micro-modulation ("μ" is the scientific
symbol for micro). The μMod effect is capable of
creating many different sounds that range from subtle
and unobtrusive to creatively destructive.The effect uses
a combination of stereo pitch shifting (Detune), small
amounts of stereo delay (Delay), and then a complex
path of filtering, feedback, and modulation. μMod does a
faithful job of emulating classic detune and thickening
sounds which have been common since the 60's.
However, often these effects don't get noticed by the
audience until they are turned off. What do get noticed
right away are the more extreme uses of μMod that
produce sounds that modulate over time.
μMod effects:
- Micropitch
- Detune
- Thicken
- Chorus
- Flanger
Effect & Genre Descriptions
If the Effect On Light is not flashing, or momentarily
flashes rapidly then stops, tap tempo is not available
for the patch you selected. Select another patch
from the Patch List that has tap tempo enabled.
NOTE:
Tap tampo is stored with each part when a
performance is stored.
NOTE:
Page 27

27
Selecting μMod Patches
1. Turn effects on by pressing the Right Footswitch.
2. Select a μMod patch by turning the Patch Knob.
(μMod effects are located from patch 31 to 40).
3. Use the Tweak Knobs to alter the μMod effect.The
most common assignments for the Tweak Knobs are
level, feedback, depth speed.
Transducer
This is the block that helps create so many of the earcandy effects in popular music, as well as replicating the
vintage audio quality of older audio effects and
recordings. Within transducer there is a configurable
distortion block with internal filtering and curves, as well
as a bandwidth block, which emulates the frequency
response of various audio devices like phones and
radios.
Selecting Transducer Patches
1. Turn effects on by pressing the Right Footswitch.
2. Select a Transducer patch by turning the Patch Knob.
(Transducer effects are located from patch 41 to 50).
3. Use the Tweak Knobs to alter the Transducer effect.
The most common assignments for the Tweak Knobs
are bandwidth, pre/post gain, distortion amount, and lo
cut.
Effect & Genre Descriptions
μMod often sounds good in combination with
reverb.Therefore, many μMod patches have reverb
level assigned to a Tweak Knob so you can add that
effect.
NOTE:
Page 28

28
Using Distortion (continued from Transducer):
Many transducer patches include distortion, which can
be a great way of adding a brief altered character to
your voice. Distor tion quality is very dependent on the
quality and level of your input voice. It's important that
you've set your input level properly (refer to step 7 of
the Quick-Start Guide). If there is not enough level, the
distortion will not be triggered enough to be audible.
The sound of distortion can be very different on low
frequencies versus high frequencies. Lastly, distortion can
increase the risk of feedback.Test, and reduce your levels
before performance if necessary to ensure you are
below the threshold for feedback.
Genre Descriptions
A lot of users tell us, "I don't understand how [so and
so] creates that [such and such] effect on that [best
selling] album. We've been researching common
industry practices for years, so our in-house experts had
no problem authoring patches for each of the major
music genres.
VoiceTone Create's Genre banks are unique and offer
instant inspiration. The categories are very broad. By
browsing all the patches in a genre you'll most likely be
able to find something that matches your sound. Even
better, when rehearsing, trying out different patches will
inspire song ideas.The genres are:
Pop/R&B
Rock/Metal
Country
Jazz/Ballad
Special FX
Effect & Genre Descriptions
Page 29

Number - Patch Number
Bank
Shows the type of effect, or genre of music for which the
patch is intended. Showcase is a collection of patches
representing our favorite sounds.
Name
Patch names either give you a sense of how it sounds,or
where it would be good to use it.
29
Patch List
Tweak X / Y
Indicates what the Tweak Knobs control.
Tap Tempo
Patches where tap tempo can be set.
Verse/Cho
Use Tweek X and Y to enhance this patch and store to
parts A and B for use in different parts of a song.
Page 30

Patch List
30
Page 31

Patch List
31
Page 32

Patch List
32
Verse/Cho
Page 33

Patch List
33
Page 34

Patch List
34
Page 35

35
FAQ & Troubleshooting:
1. I'm not getting any sound out of Create
a. Confirm the power adapter is properly connected
by checking that a patch number is lit on the Numeric
Display.
b. Confirm your microphone is connected properly by
talking through microphone and looking for the Input
Light to light green or orange. If the Input Light is going
on, check your connections and settings on your sound
system. If the Input Light is not on, press the Right
Footswitch and turn the effect off, then try varying the
Input Knob and see if you can start to hear the
dry/unaffected signal through your sound system.
Additionally, if you have a condenser microphone,
ensure phantom power is enabled.
2. I'm not hearing any effect from Create, just
my dry voice
a. If you're running in stereo output mode, ensure the
Effect On Light is on. If it's off, press the Effect On button
once to engage it. Additionally, ensure the Mix Knob is
not in the off position (fully left).
b. If you're running in mono output mode, confirm
which outputs are connected to your sound system.
Only the Left Output will produce effects. If it's not
producing any effect sound, ensure the Effect On Light is
on. If it's off, press the Effect On button once to engage
it. Additionally, ensure the Mix Knob is not in the off
position (fully left). If you are using the Right Output in
regular output mode, realize it's a dry output that
cannot produce effects - use the Left Output.
3. I don't hear any difference when I turn a
Tweak X or Tweak Y Knob.
a. Ensure the Effect On Light is on. If it's off, press the
Effect On button once to engage it. Additionally, ensure
the Mix Knob is not in the off position (fully left).
b. Check the Patch List section and confirm what
controls are assigned to X and Y to get a sense of what
FAQ & Troubleshooting
Page 36

36
to listen for. Some controls are subtle like Reverb
PreDelay, Hi and Lo Colour, and Reverb Decay.
c. Try both Tweak Knobs. Sometimes, especially when
two levels are assigned, you won't hear the result of one
Tweak Knob if the other Tweak Knob is set to "0".
d. Tweak Knobs have “soft pickup”. Try turning the
knob fully leff to right, then setting the desired value.
4. Tap Tempo is not functioning properly
a. Confirm that you’ve selected a patch that has Tap
Tempo enabled by checking the Patch List, then press
and hold the Right Footswitch. If the Effect On Light
flashes rapidly once, then select another patch with Tap
Tempo enabled.
b. If the tempo is indicated by the Effect On Light
flashing in time to the music, confirm the effect is turned
on. Press and hold the Right footswitch to get out of Tap
Tempo mode. Check to make sure the Effect On Light
is on. If it’s not, push the Right Footswitch to enable it.
c. If you’ve confirmed it is a Tap Tempo patch, and the
effect is on, change Tweak X and Y controls that are
associated with Delay (Level, Feedback, Division).
5. My sound is distorted.
a. If your sound is only distorted when you have the
effect on, Check if the current patch is a Transducer
patch that has distortion enabled. Try changing Tweak X
and Y controls assigned to distor tion (Distor tion Type,
Distortion Level, Transducer Level, Transducer Type,
Transducer Pre/Post Gain). If distortion persists, try
turning the Input Knob to the left.
b. If your sound is distorted when the effect is off,try
turning the Input Knob to the left until the Input Light is
green and sometimes orange. If the Input Light is still
flashing red, sing further away from the microphone, or
send the mic signal through an aux send on an external
mixer.
FAQ & Troubleshooting
Page 37

37
Super Edit Mode & Reset
Super Edit Mode
You might wonder how the developers and product
managers at TC-Helicon authored patches for
VoiceTone Create. Similar to methods used on other
products, a special mode was created for setting
advanced parameters. In and around the office, this
mode in VoiceTone Create was called Super Edit Mode.
Super Edit Mode allows access to dozens of parameters
per effect.These parameters are used to design any of
the 99 patches in Create. While using this mode during
final design we recognized it’s a powerful feature for an
advanced or curious user.
Visit the VoiceTone Create website and browse for the
Super Edit Mode link where a manual on this mode is
published.
http://www.tc-helicon.com/voicetonecreate
Restoring to Factory State
If at any time you want to get VoiceTone Create back to
its original presets and settings, follow this procedure.
1. Disconnect the power adapter from Create
2. Press and Hold Performance Buttons 1 & 2 while
plugging the power adapter into Create.
3. Create will clear all the performance information and
return it to factory settings. Once this is done (it only
takes a couple seconds), Create is ready to go.
Page 38

38
Specifications
Analog Inputs
Connectors Balanced XLR, Input Impedance 1kOhm
Mic Input Sensitivity @ 0dBFS -44dBu to +2dBu
Mic Input Sensitivity @ 12dB headroom -56dBu to -10dBu
EIN -128dBu @ max. mic amp gain, Rg = 150 Ohm
Analog Outputs
Connectors Balanced XLR
Output Impedance 40 Ohm
Output Level @ 0dBFS +2dBu
Input to Output Analog Audio Performance
Dynamic Range, Mic. @ Min gain >108dB,20 Hz - 20kHz *A-weighted
Dynamic Range, Mic. @ -18dBu sensitivity > 104dB, 20hz - 20kHz*
THD+ Noise, Mic. @ Min gain <-90dB
Frequency Response, max gain -1.5dB @ 40 Hz, +0/-0.3 dB (200Hz
to 20 kHz)
Conversion Characteristics
Sample Rate 48 kHz, Converter AKM AK4620B
AD / DA Conversion 24 bit, 128x oversampling bitstream
EMC & Safety
Complies with EN 55103-1 and EN
55103-2 FCC part 15, Class B, CISPR 22,
Class B
Certified to IEC 65, EN 60065, UL6500
and CSA E60065 CSA FILE #LR108093
Environment
Operating Temperature 32° F to 122° F
(0° C to 50° C)
Storage Temperature -22° F to 167° F (30° C to 70° C)
Humidity Max. 90 % non-condensing
Supplementary
Dimensions 130mm x 132mm x 41mm
(5" x 5.25" x 1.5")
Weight 1.5 lb. (0.72 kg)
Warranty Parts and labor 1 year
Page 39

39
Quick Setup
1. Connect the mic/cable to the Mic Input on Create
2. Connect a mic cable from the Left (mono) Output of
Create to a mic input on your sound system.
3. Set the Input Knob fully left, and the Mix Knob to 12
o'clock.
4. Connect Create's power adapter to main power and to
the Power Input on Create.
5. While singing through your microphone, turn the Input
Knob to the right until the Input Light turns green, sometimes
orange on louder par ts, but never red.
6. Turn up your sound system level. You're ready to add
effects to your voice.
Information for Your Sound Engineer
Don’t Worry
It can be a scary night when a singer brings an effects pedal to
a gig and you are expected to get good sound. Don’t worr y,
VoiceTone Create has a quality mic pre with 109 dB SNR, and
the patches are authored specifically for voice.
Phantom Power
Create can supply phantom power to a condenser mic - press
and hold Buttons 1 & 2 until the 48V light turns on. Sending
external power to Create will not cause damage, but there will
be a pop when power is removed.
Output Level
The outputs on Create are +1dBu, just like a hot condenser
microphone.You won’t need a DI box.
Output Configurations
If you want to mix wet and dry yourself, take Create out of
stereo mode (hold Buttons 4 and 5 until the Stereo light turns
off) and turn the Mix Knob fully right. In this configuration, the
Left Output is fully wet and the Right Output is fully dry.
Tear-Out | Reference
Tear this page out, plasticize it and carry it with you to gigs for reference
Page 40

40
Tear-Out | Patch Tweak List
Tear this page out, plasticize it and carry it with you to gigs for reference
 Loading...