

Page 1

Table of Contents
IContents
Part I Introduction
................................................................................................................................... 21 About TC-Helicon
Part II Quickstart
Part III Common Tasks
................................................................................................................................... 31 Backing up your presets
................................................................................................................................... 52 Upgrading your product's firmware
................................................................................................................................... 73 Restoring your presets
................................................................................................................................... 104 Registering your TC-Helicon product
Part IV Getting Around
................................................................................................................................... 121 Device Bar
................................................................................................................................... 132 Control Button
................................................................................................................................... 153 Home
.......................................................................................................................................................... 16Product and Feed Filter Bar
.......................................................................................................................................................... 16Banner Window
.......................................................................................................................................................... 16Post Window
................................................................................................................................... 184 Presets
.......................................................................................................................................................... 18Tools
.......................................................................................................................................................... 21Working Data
.......................................................................................................................................................... 22Details
.......................................................................................................................................................... 24Archives
.......................................................................................................................................................... 25Online Library
................................................................................................................................... 275 Firmware
.......................................................................................................................................................... 28Current Version
.......................................................................................................................................................... 29Versions
................................................................................................................................... 306 Manuals
................................................................................................................................... 327 Account
1
3
3
12
Part V Tips
................................................................................................................................... 331 Keyboard Shortcuts
................................................................................................................................... 342 Multi-user OS accounts
................................................................................................................................... 343 Products with Part A and B
Part VI Troubleshooting
................................................................................................................................... 351 Can't see any posts
................................................................................................................................... 352 My product is not recognized
................................................................................................................................... 353 There are no posts for my product
................................................................................................................................... 364 No tab, copy or paste in the Account page
................................................................................................................................... 365 Can't find my archives
© 2011 TC-Helicon Vocal Technologies
33
35
I
Page 2

VoiceSupport - 1.2.00II
................................................................................................................................... 366 VoiceLive Touch Favorites
© 2011 TC-Helicon Vocal Technologies
Page 3

1 Introduction
VoiceSupport is your TC-Helicon USB enabled product’s connection to the online world. TC-Helicon
designs its USB enabled products to grow and evolve, just like your use of our vocal processors.
VoiceSupport is the application that allows you to install new firmware updates, stay in touch with the
latest news, tips & tricks, and singing advice as well maintain your personal database of presets.
Key Features:
• Drag & drop preset librarian functions
• Access to online preset library
• Delivers customizable content about your products and other TC Helicon products
• VoiceCouncil feeds for the latest advice for singers
• Firmware upgrading
• Account management
• Access to support and product manuals
Windows Requirements:
- XP SP2 or SP3
- Vista 32 or 64 bit
- Windows 7 32 or 64 bit
Introduction 1
Mac Requirements:
- OSX 10.4, 10.5, and 10.6 supported. (OSX 10.6 recommended)
About TC-Helicon
QuickStart
© 2011 TC-Helicon Vocal Technologies
Page 4
VoiceSupport - 1.2.002
1.1 About TC-Helicon
At TC-Helicon, we truly believe that the voice is the world's most beautiful instrument. We don't mean to
degrade other beautiful instruments, but the singing voice is the anthropological source for all things
melodic.
You should know there is a dedicated group of engineers, researchers and product specialists based in
Victoria BC, Canada, who spend every waking moment of their working lives listening, talking, singing,
and interacting with singers and those who have passion for the singing voice. All this knowledge and
experience is used to design products respecting and empowering the modern vocalist.
Our products focus on removing barriers and inspiring creativity in performance. That's why our products
range from near-field personal vocal monitors to floor-based vocal multi-effects pedals.
Enjoy!
The TC-Helicon Team
a TC Group company
© 2011 TC-Helicon Vocal Technologies
Page 5
2 Quickstart
1. Make sure your computer is connected to the internet.
2. If you have USB-enabled TC-Helicon products, connect them to your Windows or Mac computer.
3. Install the VoiceSupport software.
4. Run VoiceSupport.
4. Choose common tasks below for getting started, or get a full overview in the Getting Around section.
3 Common Tasks
Backing up your presets
Upgrading your product's firmware
Restoring your presets
Registering your TC-Helicon product
Quickstart 3
Getting Around will give you detail on all the pages in VoiceSupport
3.1 Backing up your presets
This section describes how to create an Archive using VoiceSupport. For more detailed information on
the preset page, go to the Presets section.
1. Connect your product via USB.
2. Run VoiceSupport.
3. Confirm your product is selected. A connected product appears at the bottom left hand corner of the
window in blue.
4. Select the Presets page. To download presets from your unit, hit the button shown in the center of
the preset page. (Note: By default, the application will not download all the presets into the Working
Data on startup. To change these options, see the Control Button section.)
© 2011 TC-Helicon Vocal Technologies
Page 6
VoiceSupport - 1.2.004
6. Click the icon and name your archive. You can rename the archive in the Details window.
© 2011 TC-Helicon Vocal Technologies
Page 7

Common Tasks 5
Learn more about preset management.
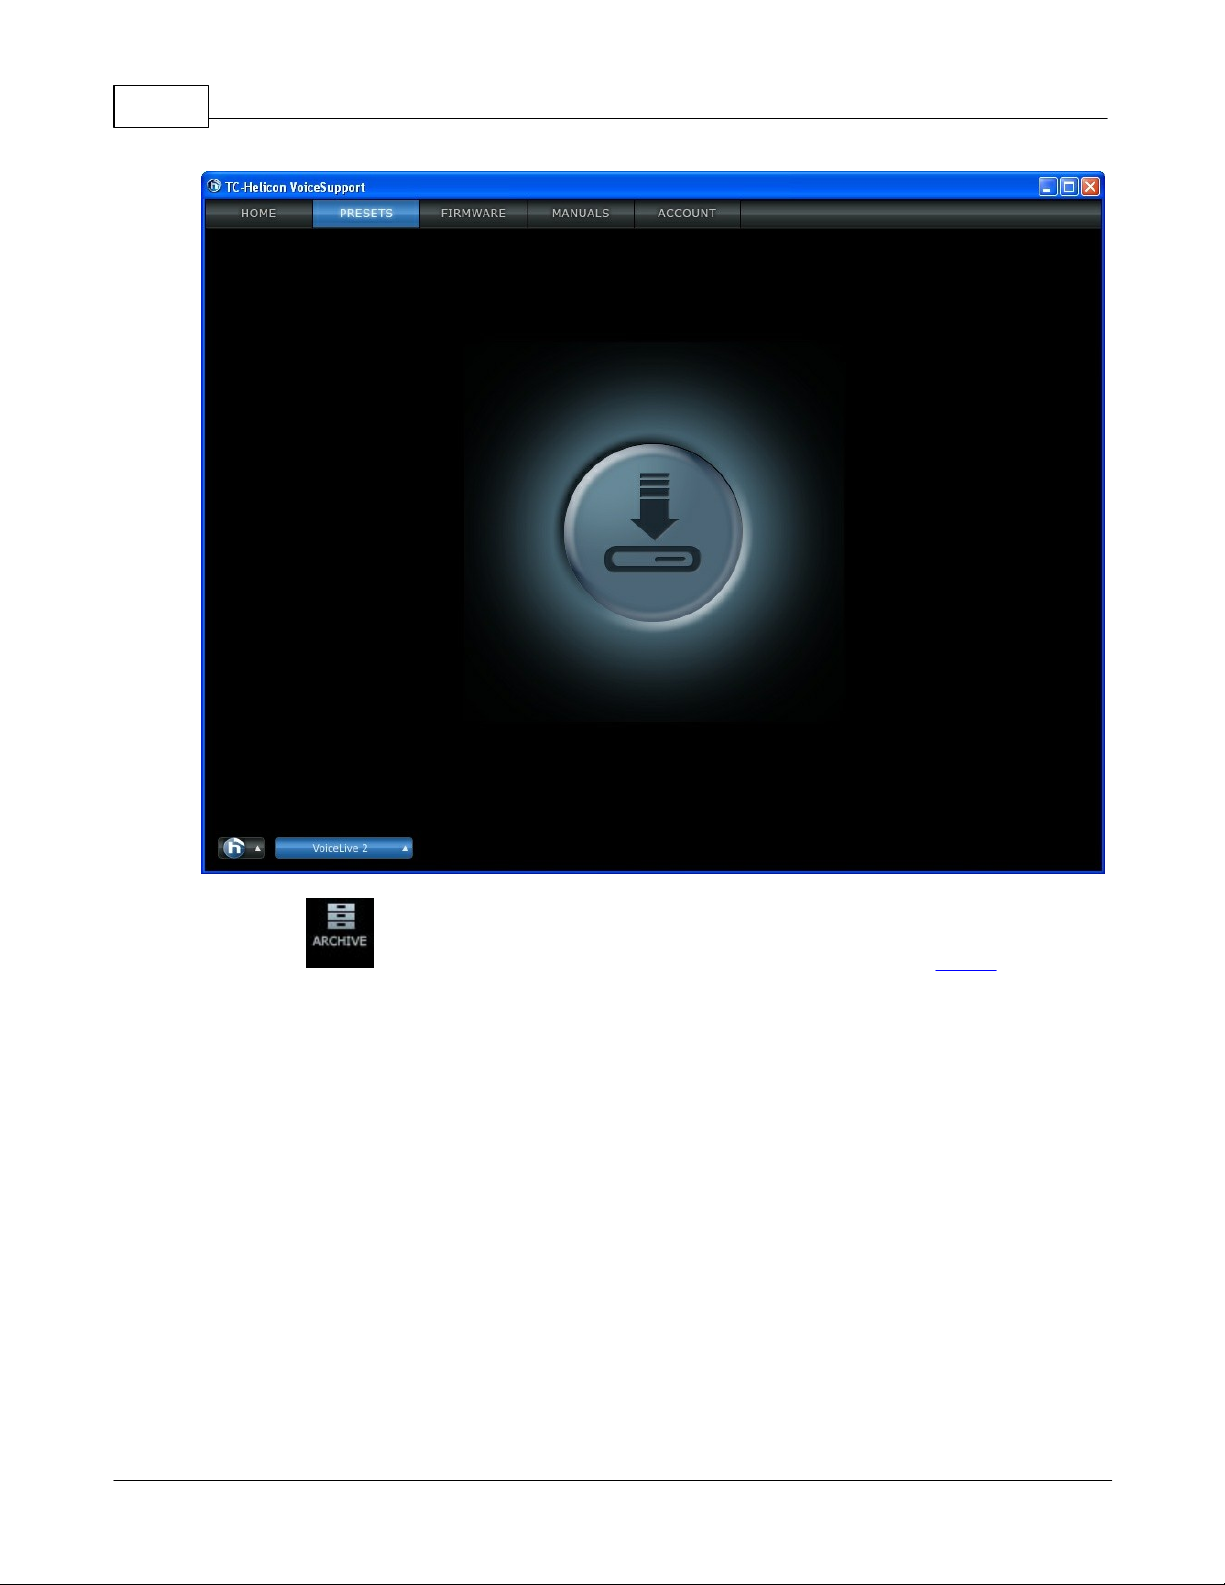
3.2 Upgrading your product's firmware
1. Connect your product via USB.
2. Run VoiceSupport.
3. Confirm your product is connected. A connected product appears at the bottom left hand corner of the
window in blue.
4. Select the Firmware page.
© 2011 TC-Helicon Vocal Technologies
Page 8
VoiceSupport - 1.2.006
5. Select the firmware you want to install. New firmware is indicated by a icon.
6. Click Yes to update firmware.
7. After starting a firmware update, the software will show a pop up box which warns the user that the
device must restart on its own after a software update.
8. After the firmware is loaded and your product restarts, click the Rescan button to reconnect your
product.
Warning: Do NOT press Rescan or turn your product off manually during the update process.
Wait for the product to restart on its own before pressing Rescan.
© 2011 TC-Helicon Vocal Technologies
Page 9

Learn more about updating your firmware.
3.3 Restoring your presets
This section describes how to restore your presets from an Archive. For more detailed information on
the preset page, go to the Presets section.
1. Connect your product via USB.
Common Tasks 7
2. Run VoiceSupport.
3. Confirm your product is selected. A connected product appears at the bottom left hand corner of the
window in blue.
4. Select the Presets page. Archives for your connected product are shown below the Working Data
window.
© 2011 TC-Helicon Vocal Technologies
Page 10
VoiceSupport - 1.2.008
5. Select the presets from the Archive you would like to restore. You can use Keyboard Shortcuts to
select all presets. If you want restore all presets from an Archive, you can drop them onto the Working
Data title bar which is always shown at the top of the Working Data window.
© 2011 TC-Helicon Vocal Technologies
Page 11

Common Tasks 9
7. Drag and drop the presets on to the Working Data tab.
8. Select Copy presets.
Below, presets 1 - 25 have been copied from the Archive to the Working Data and are shown in red. To
learn more about the Working Data, go here.
© 2011 TC-Helicon Vocal Technologies
Page 12
VoiceSupport - 1.2.0010
8. Click the icon to send the changes to the connected product.
Learn more about preset management.
3.4 Registering your TC-Helicon product
1. Connect your product via USB.
2. Run VoiceSupport.
3. Select the Account page.
© 2011 TC-Helicon Vocal Technologies
Page 13

Common Tasks 11
4. Follow the steps on screen.
5. When you are asked for your serial number, you can find it by click the Arrow on the connected
product and selecting Device Info. A window will show your serial number.
© 2011 TC-Helicon Vocal Technologies
Page 14

VoiceSupport - 1.2.0012
4 Getting Around
VoiceSupport contains five main pages:
Home - View videos, tips & tricks, articles on singing and more.
Presets - Manage your product's presets.
Firmware - Update to newer firmware.
Manuals - Find Manuals for your currently selected device and all TC Helicon products.
Account - Register your TC-Helicon product and manage your email subscriptions.
All pages also contain:
Device Bar
Control Button
4.1 Device Bar
The device bar shows all the TC-Helicon products currently connected to your computer.
© 2011 TC-Helicon Vocal Technologies
Page 15

The connected product is highlighted in blue. Other products recognized via USB are shown in grey. You
can only manage one product at a time. You can switch which product is connected by clicking on
another product on the Device bar. If you have more than one of the same product, you can choose
which one is selected by clicking on the white arrow icon of the connected product.
4.2 Control Button
The Control Button provides central access to common VoiceSupport functions.
Getting Around 13
Manage:
-Scan for Devices: Scans the USB devices connected to your computer for TC-Helicon products. Use
this feature if you’ve disconnected or connected TC-Helicon products while the VoiceSupport is running.
© 2011 TC-Helicon Vocal Technologies
Page 16

VoiceSupport - 1.2.0014
-Disconnect: Disconnects the currently connected device.
-Show Device Info: Will display the serial number and manufacturing date of the device connected.
-Show MIDI Devices: Will show all USB MIDI devices connected to your computer.
Options:
-Device Management:
-Automatic: When a device is connected, it automatically gets the data from the device.
-Manually: (default) Will not download presets unless you request the application to do so.
-Use Data From Last Download: This option will use the data from the previous session. This can be
useful when switching between multiple devices. However, if you perform changes on your device, make
sure you Get Data if you want to keep those changes.
-Data Export: Sets the default folder for data export operations.
© 2011 TC-Helicon Vocal Technologies
Page 17

-Firmware Management: The Reset Firmware List will delete all local copies of firmware files. Once
VoiceSupport is re-started, the application will download new copies from the server.
Register: Register takes you to the Account tab.
Help: The help option provides links to the TC Helicon website, as well as the offline manual and
information about the version of VoiceSupport currently installed.
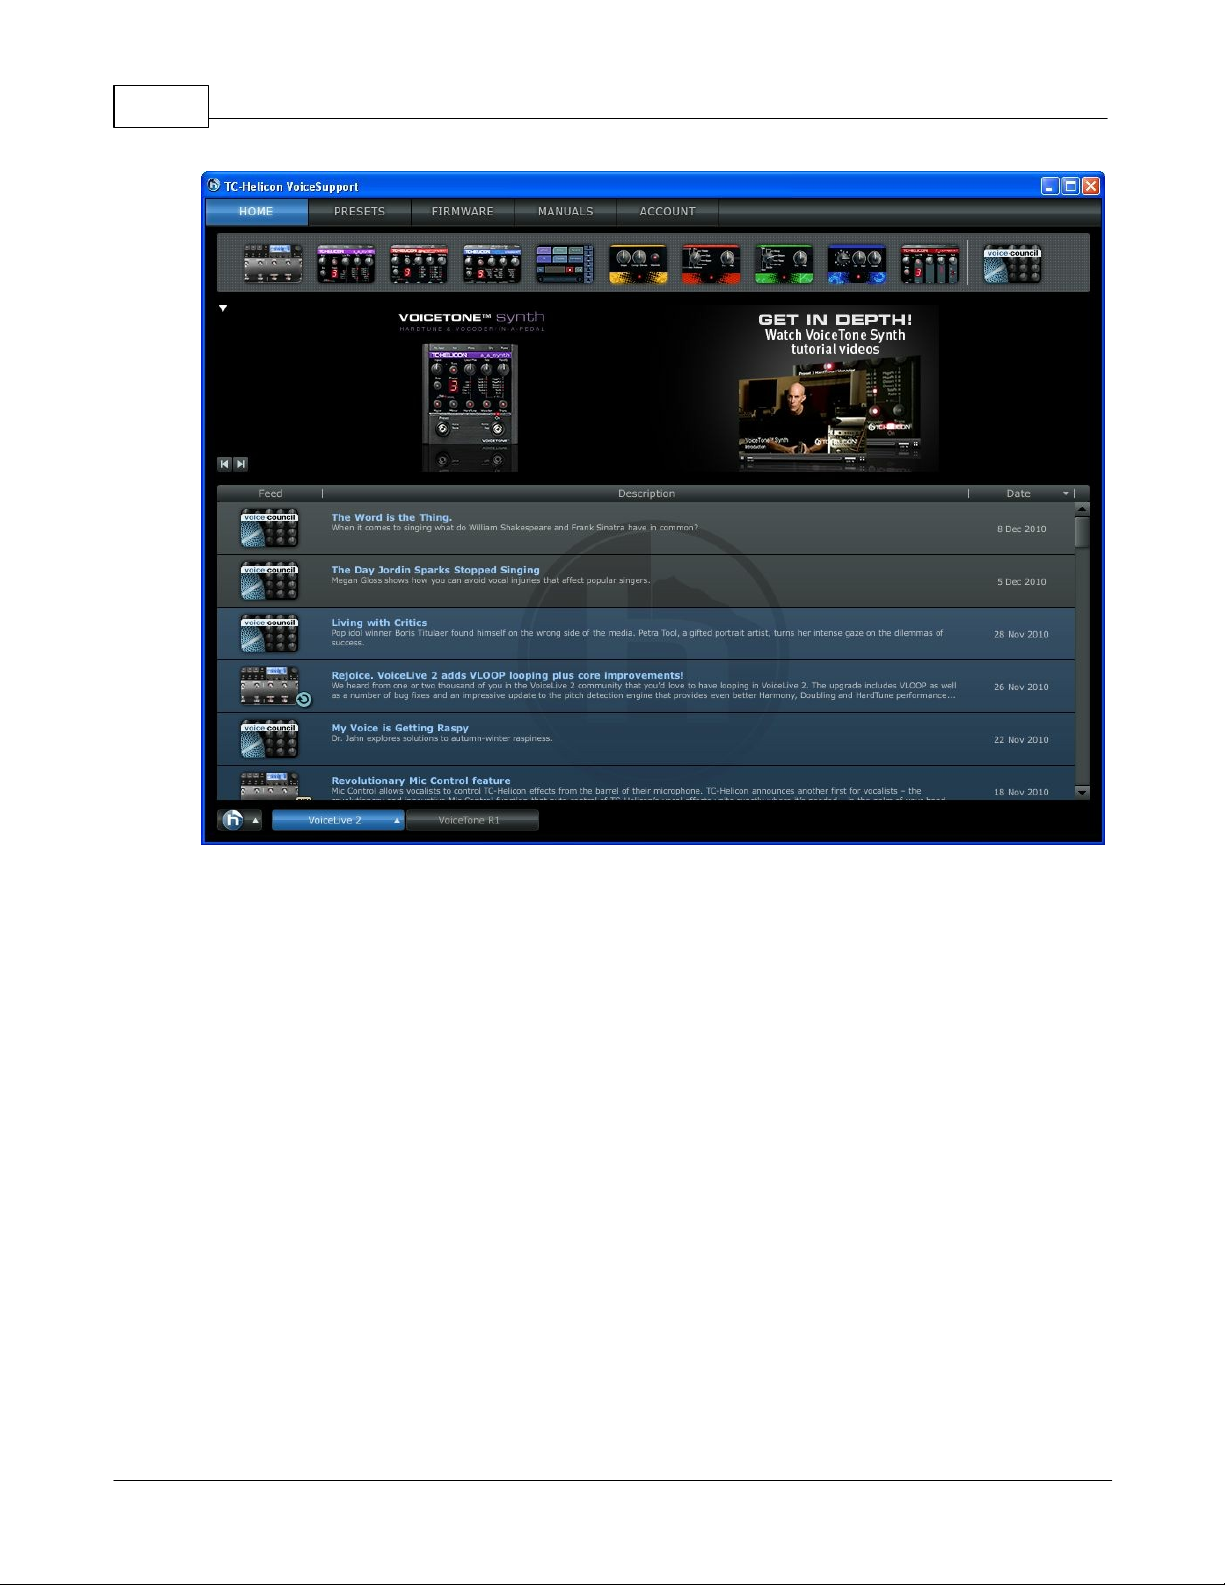
4.3 Home
Home is the landing page for VoiceSupport. On this page you can get the latest news, see your
connected devices and filter your content experience. When your first run VoiceSupport it will scan for
connected TC-Helicon devices and get the data from the currently selected device.
There are five main areas to the Home page:
Product and Feed Filter Bar
Banner Window
Post Window
Control Button
Device Bar
Getting Around 15
© 2011 TC-Helicon Vocal Technologies
Page 18

VoiceSupport - 1.2.0016
4.3.1 Product and Feed Filter Bar
The Product and Feed Filter bar allows you to filter the content which is displayed in the Post Window.
Content from a product you have currently connected to the VoiceSupport application is automatically
selected when you open VoiceSupport.
Products: To change what product posts are displayed in the Post Window, you can click on the icon
for each product. Selected products are shown in full color, whereas products which are not selected
are shown in grey.
VoiceCouncil: VoiceCouncil is an online magazine for contemporary vocalists. Every week it publishes
articles and videos on topics ranging from vocal heath and technique, to gear and technology. To add
posts from the VoiceCouncil RSS feed, click on the VoiceCouncil icon on the far right.
4.3.2 Banner Window
The Banner Window displays the latest news and videos about TC Helicon artists and products. The
articles and posts displayed in this window will change depending on which products you have selected
in the Product and Feed Filter Bar.
To view the articles posted in the Banner Window, click on the image.
To minimize the Banner Window, click the white arrow in the top left of the window.
To browse through the articles. use the forward and back arrows in the bottom left of the window.
4.3.3 Post Window
This is where you can see the latest posts. Each post is either for a TC-Helicon product or
VoiceCouncil. The posts displayed in the the Post Window are affected by the products you have
selected in the Product and Feed Filter Bar.
© 2011 TC-Helicon Vocal Technologies
Page 19

Getting Around 17
The posts can be organized by Date (default), Description (alphabetical), or by Feed type.
You can also filter the Post Window by categories. To change the filtering options, click anywhere in
the Post Window. This will bring up the menu shown below.
Select Categories: If the category is shown in color, posts that have this category association will be
displayed. If a category is shown in grey, it will not be displayed.
-All: Displays all posts.
-None: Displays only VoiceCouncil posts.
© 2011 TC-Helicon Vocal Technologies
Page 20

VoiceSupport - 1.2.0018
Note: Each post can have more than one Category tag.
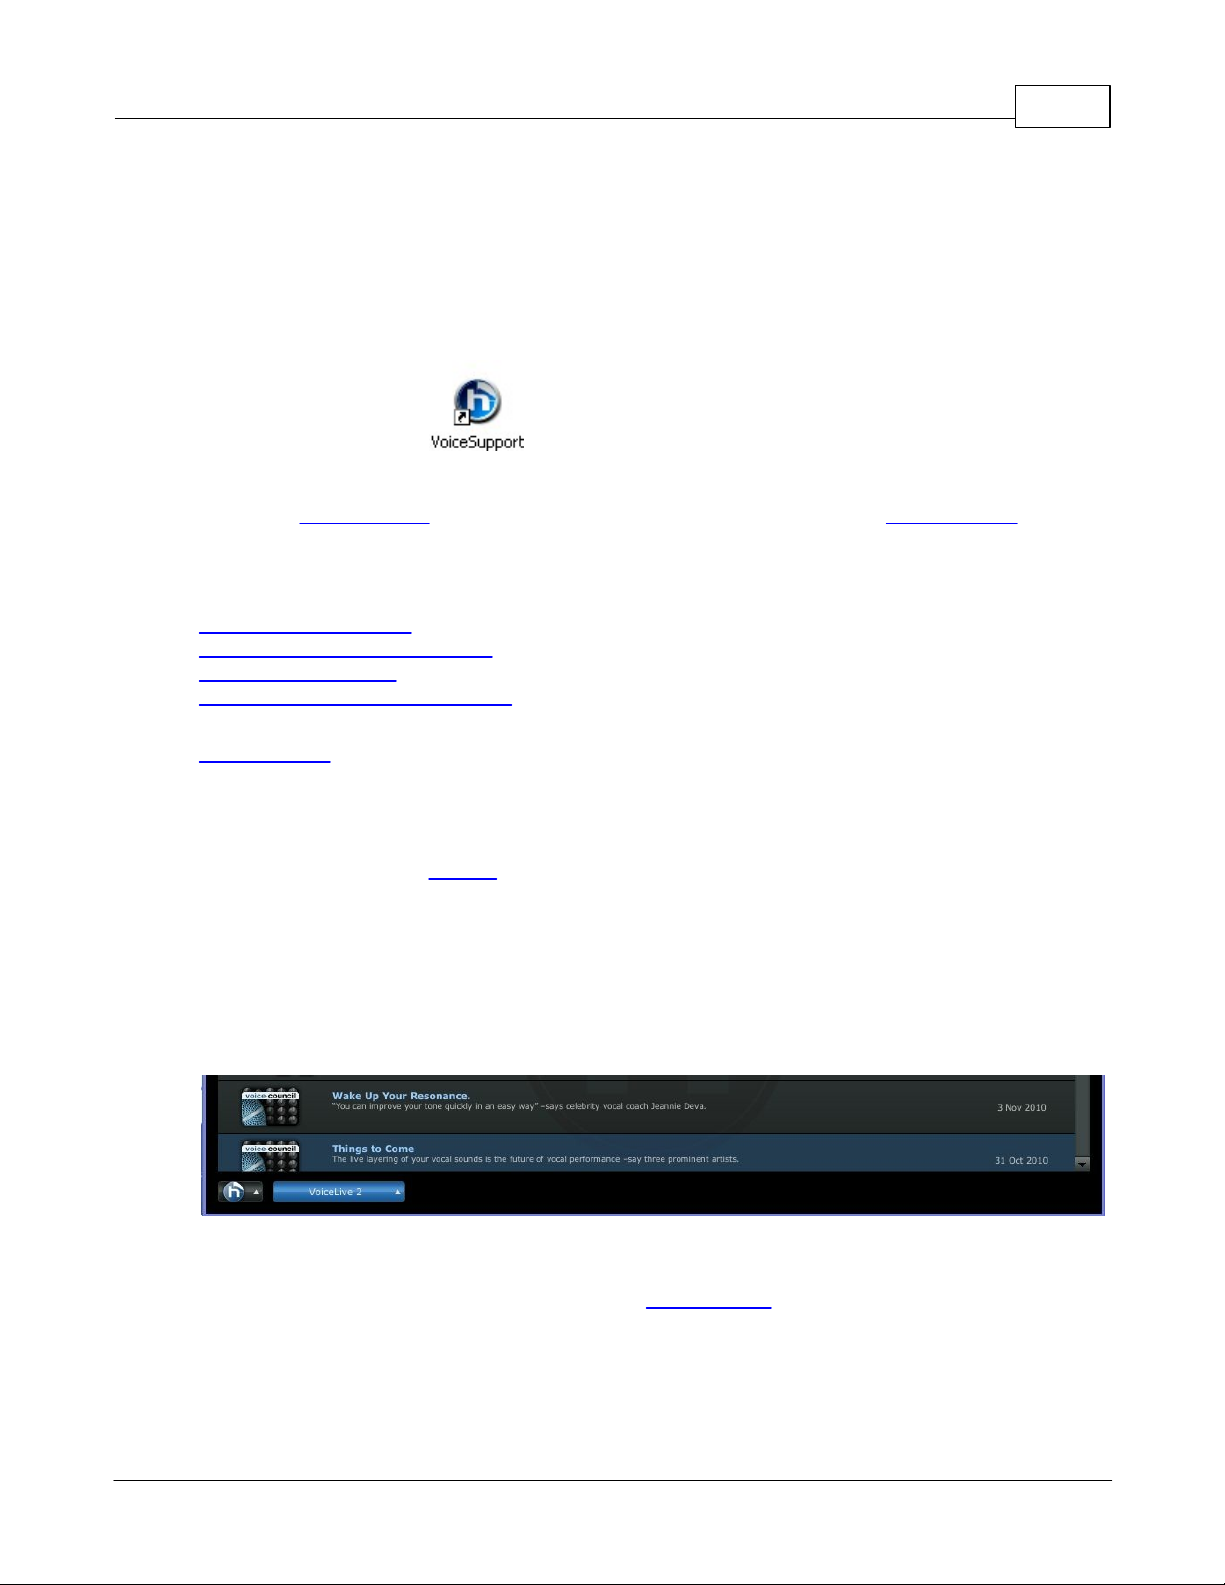
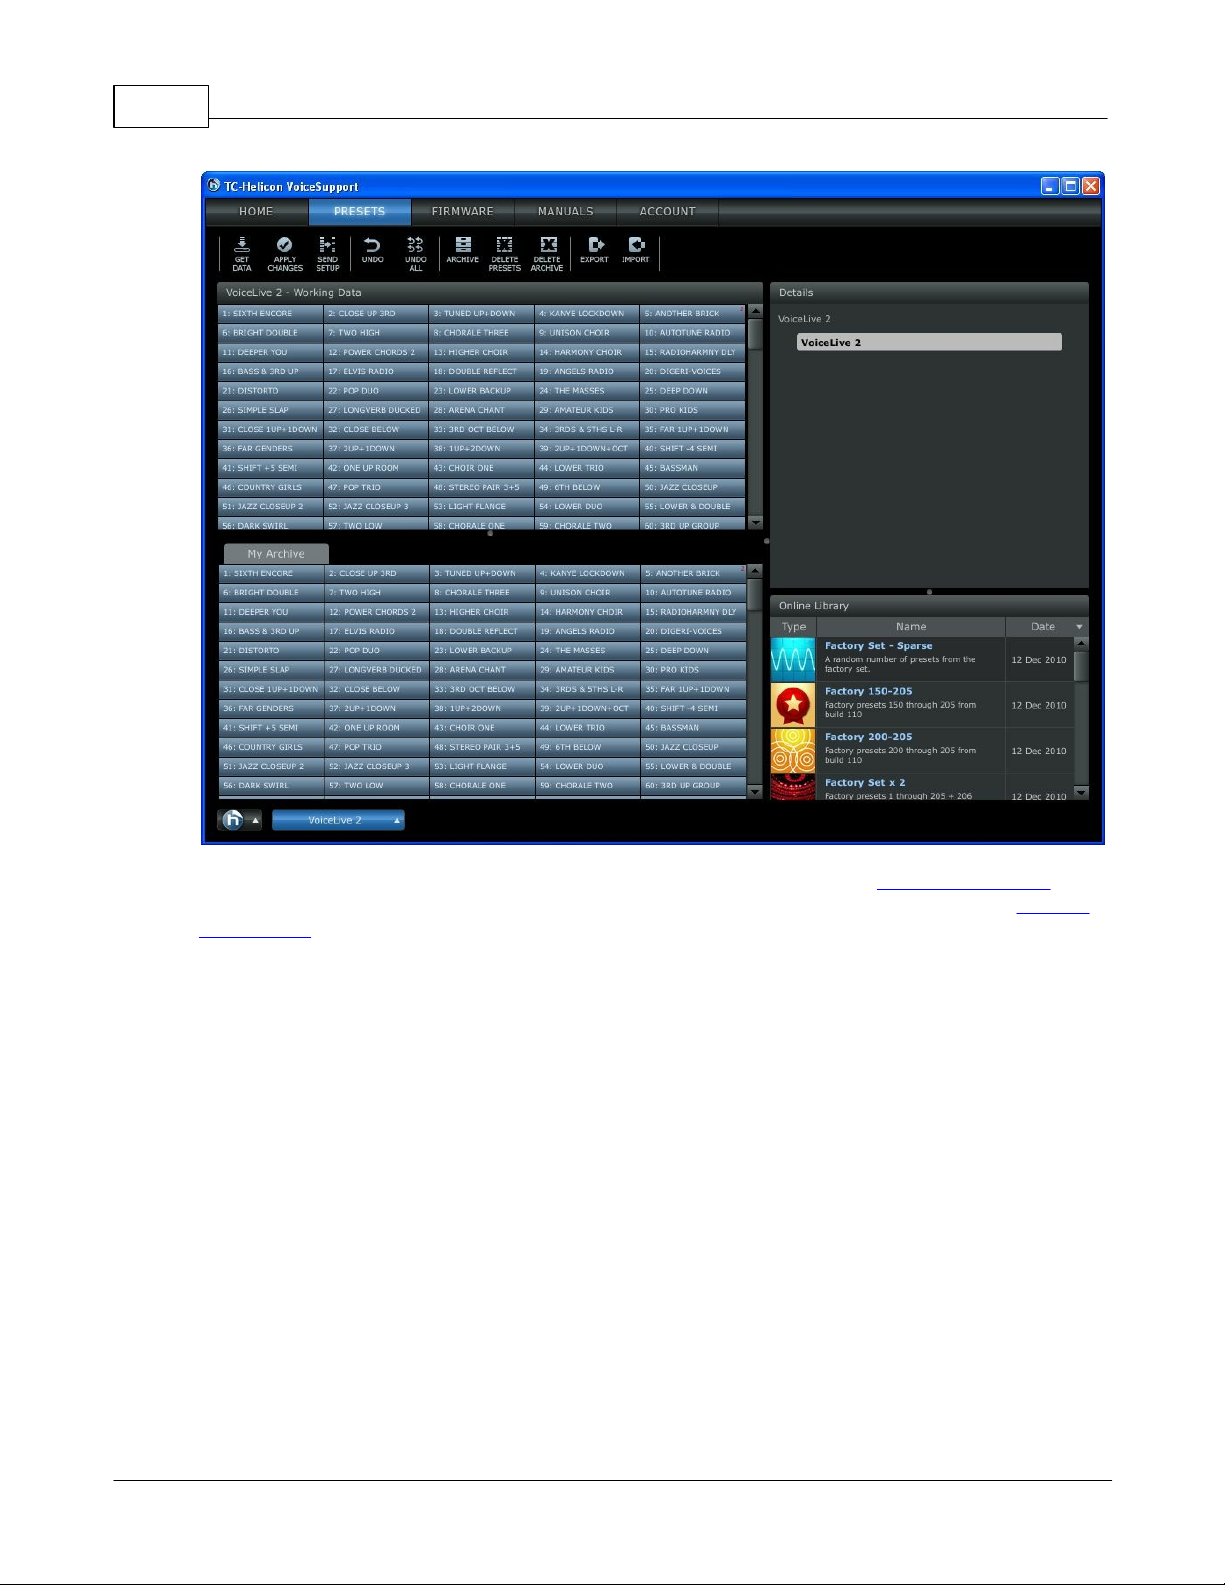
4.4 Presets
The preset page is where you get to make your product your own by re-arranging, backing up, and
renaming your presets. You must have a connected device to use the preset management features.
There are five main areas in the Preset page:
Tools
Working Data
Details
Archives
Online Library
4.4.1 Tools
Get Data: Downloads the presets from your connected product into the Working Data view.
© 2011 TC-Helicon Vocal Technologies
Page 21

Getting Around 19
Apply Changes: Sends all modified presets from the working data to your connected product.
Send Setup: Sends the setup data stored with the Working Data or Archive view to the device. Setup
Data is automatically received from your device when you click Get Data.
Undo: Undoes the last operation.
Undo All: Undoes all changes to both the Working Data and Archives.
Archive: Stores the Working Data view to an archive. This a great way of making sets or having a pool
of presets to choose from.
Delete Presets: Deletes the currently selected presets. Note: You can also use the DELETE key.
Delete Archive: Deletes the currently selected Archive.
Export: Allows preset and setup data to be exported to MIDI Sysex format. This allows sharing with
other users, or integrating of preset and setup management in a DAW.
© 2011 TC-Helicon Vocal Technologies
Page 22

VoiceSupport - 1.2.0020
Location: Select the location on your computer where you want to store the data.
File Handling: Select whether you want presets to be stored as individual SYSEX files or as a single
SYSEX file for all data selected.
File Naming: Customize the naming of the SYSEX file.
Export Data: Choose the data you want to export.
Export Source: Choose where you want to export the data from – the Working Data view, or from an
Archive.
Import: Allows SYSEX preset and setup data to be imported. This allows sharing with other users and
restoring from backups.
© 2011 TC-Helicon Vocal Technologies
Page 23

Browse: Choose the SYSEX file you want to import.
Import Destination: Select where you want to import to – directly to Working Data or to an Archive.
Starting Preset Location: If you’re importing SYSEX with multiple presets, you can select the starting
preset location to import the data, or use the original order saved in the SYSEX data.
4.4.2 Working Data
The Working Data view is where you can drag and drop your preset tiles into any order (this is also true
for Archives).
Getting Around 21
Working Data Title Bar: You can drag all presets from an Archive onto the Working Data Title Bar. The
presets will be copied starting at preset 1.
A preset tile can show a number of different states:
Default, unselected preset tile. This color indicates that the preset data in the working view matches the
preset data on your connected product.
This color indicates the preset is selected.
© 2011 TC-Helicon Vocal Technologies
Page 24

VoiceSupport - 1.2.0022
Preset with steps. The number in the top right corner of the tile indicates the number of steps in that
preset.
This color indicates the preset in this location has been deleted.
This color indicates the preset has been renamed, moved, swapped, copied or merged; the preset data
in the working view is different that the preset data on your connected product.
Moving Presets:
Simply click and hold a preset, then drag it to a new location. When you select a preset you can use
the common keyboard shortcuts buttons to select multiple presets.
When a preset is selected you can:
Move: Moves the preset to the new location. It will delete the preset from its current location and will
overwrite the existing preset in the new location.
Copy: Copies the preset to the new location (it will delete the preset in the new location if it is not
empty).
Swap: Switches the locations of the selected preset and the preset from the new location.
Add as Steps: Will merge all selected presets into a single preset with multiple steps (only available on
products that support steps).
4.4.3 Details
The Details area shows preset name and steps (if supported by your product) for the currently selected
preset or the Archive name for your currently selected Archive. When using the Online Library the
Details area will display the name of the Online Library as well as the content.
© 2011 TC-Helicon Vocal Technologies
Page 25

Getting Around 23
Preset Name: Click in this area to change the name of the preset. Once you have changed the name,
you must apply changes before the changes are saved to your device.
Preset Steps: Preset steps can be moved around and copied from other presets. Shown above the
second step has been copied from Preset 12: Power Chords 2 (step 1.) Once you have applied the
changes to the device, the second step will loose its reference name and be called Step Number 2.
If a preset has steps, the order can be changed by dragging and dropping in a new order. In addition,
steps can be deleted using the DELETE key. Steps can also be dragged and dropped from the Details
window to the Working Data and Archives.
© 2011 TC-Helicon Vocal Technologies
Page 26

VoiceSupport - 1.2.0024
Archive Name: Click in the area to change the name of the Archive.
Presets: Shows the listing of presets included in the currently selected Archive. Note: The preset
listing is only available for archives from the Online Library. User archives can only display the Archive
Name, the preset listing is in the Archive tab.
4.4.4 Archives
Archives are managed in an identical manner to the Working Data. An Archive created in VoiceSupport
remains stored after the application is shut down.
© 2011 TC-Helicon Vocal Technologies
Page 27

Getting Around 25
To load an archive onto your product:
1. Select all the presets in the Archive (Keyboard Shortcuts).
2. Drag the presets on to the Working Data tab.
3. Press Apply Changes.
Note: Archives created may not be visible if the firmware you used to create the Archive does not match
the current firmware on your product.
4.4.5 Online Library
The online library contains sets of presets that are authored by TC Helicon which are not included in the
factory default. These presets are always available to users when using VoiceSupport.
When you click on a set of presets from the Online Library, the listing of the presets contained are
shown in the Details area.
-To load all presets from an Online Library into the Working Data, select the Icon from the Online Library
window and drag it into the working data. The presets will be loaded into the working data starting at the
preset you drop the icon onto to.
-To load all presets from an Online Library into the Working Data starting at preset 1, drag and drop the
icon from the Online Library onto the Working Data title bar.
-To load individual presets from an Online Library into the Working Data, select the desired preset from
the Details window and drag and drop into the Working Data.
© 2011 TC-Helicon Vocal Technologies
Page 28

VoiceSupport - 1.2.0026
-To create an Archive from the Online Library, drag the icon from the Online Library into the Archive
Window. This will create a local copy on your computer that will be available when you are not
connected to the internet.
© 2011 TC-Helicon Vocal Technologies
Page 29

Getting Around 27
4.5 Firmware
The Firmware page gives you the current version of your connected product’s firmware and allows you to
update your firmware.
Current Version
Versions
© 2011 TC-Helicon Vocal Technologies
Page 30

VoiceSupport - 1.2.0028
4.5.1 Current Version
The current version of firmware on your device is shown in the top right of the Firmware page or can be
found using Device Info.
© 2011 TC-Helicon Vocal Technologies
Page 31

Getting Around 29
4.5.2 Versions
All versions available for your currently connected product are listed in the Firmware tab. Any versions
which are newer than the Current Version are highlighted blue and display a "New" icon on the right.
© 2011 TC-Helicon Vocal Technologies
Page 32

VoiceSupport - 1.2.0030
Upgrading your product's firmware.
4.6 Manuals
The Manuals page gives you quick access to all TC Helicon product manuals. To view manuals for any
TC Helicon product, click on the product in the Manual tab.
© 2011 TC-Helicon Vocal Technologies
Page 33

Getting Around 31
If you have a product connected to VoiceSupport the Manual tab will display only the manuals for your
connected device.
© 2011 TC-Helicon Vocal Technologies
Page 34

VoiceSupport - 1.2.0032
4.7 Account
The Account page allows you to register your product and maintain subscriptions.
© 2011 TC-Helicon Vocal Technologies
Page 35

Getting Around 33
For more info on registering your account see Registering your TC-Helicon product.
5 Tips
Keyboard Shortcuts Multi-user OS accounts Products with Part A and B
5.1 Keyboard Shortcuts
PC Keyboard Shortcuts: Keyboard shortcuts are available on the Preset Page
Select All: CTRL + A - This command can be used in the Working Data Window, Archives Window and
the Details Window. First select one preset in the window, then press CTRL + A.
Select Range: Shift - This command can be used in the Working Data Window, Archives Window and
the Details Window. To select a range, click the first preset, hold Shift, and then click the last preset.
Select Specific: CTRL - This command can be used in the Working Data Window, Archives Window
and the Details Window. To select specific presets or steps, hold down the CTRL key and click the
desired presets or steps.
MAC Keyboard Shortcuts:
© 2011 TC-Helicon Vocal Technologies
Page 36

VoiceSupport - 1.2.0034
Product
Preset
VoiceSupp
ort Preset
1A11B112A22B123A33B134A44B14etc.
etc.
Product
Preset
VoiceSupp
ort Preset
1A11B12A22B23A33B34A44B4etc.
etc.
Select All: COMMAND + A - This command can be used in the Working Data Window, Archives
Window and the Details Window. First select one preset in the window, then press COMMAND + A.
Select Range: SHIFT - This command can be used in the Working Data Window, Archives Window
and the Details Window. To select a range, click the first preset, hold SHIFT, and then click the last
preset.
Select Specific: COMMAND - This command can be used in the Working Data Window, Archives
Window and the Details Window. To select specific presets or steps, hold down the COMMAND key
and click the desired presets or steps.
5.2 Multi-user OS accounts
On Windows, VoiceSupport will support multi-user accounts. The application will run in any account.
However, personal data, such as archive data, will be stored with the user account.
On Mac, multi-user accounts are not supported. It's advised to only install and run VoiceSupport under a
single account.
5.3 Products with Part A and B
If your TC-Helicon has Part A and B associated with its presets, such as Create XT and Harmony-G XT,
it's important to understand how this translates in VoiceSupport.
VoiceTone Create XT displays preset information in VoiceSupport as follows:
VoiceTone Harmony G XT displays preset information in VoiceSupport as follows:
© 2011 TC-Helicon Vocal Technologies
Page 37

6 Troubleshooting
Can't see any posts
My product is not recognized
There are no posts for my product
No tab, copy or paste in the Account page
Can't find my archives
VoiceLive Touch Favorites
6.1 Can't see any posts
There are several reasons why you may not be able to see any posts.
1. You are likely not connected to the internet. You may see the list of posts, but if you click on a post
and there is no post shown, then VoiceSupport is likely not finding an internet connection.
2. If you don't see any posts in the content window, check your Product and Feed Filter Bar settings to
make sure you are not filtering out content.
3. Check you OS requirements to make sure you are using the recommended version.
Troubleshooting 35
6.2 My product is not recognized
There are several steps you can take if your product is not recognized by VoiceSupport.
1. Confirm you have an internet connection (VoiceSupport will tell you on startup if you are not
connected).
2. Try re-scanning by pressing the Control Button, then select Manage, then click Scan for Devices.
3. If your device still isn't recognized press the Control Button, then select manage, then click Show
MIDI Devices. If the product is in the list, try restarting VoiceSupport.
4. If your device is not in the list, navigate into your Operating System to find what devices are
connected. If your device is not connected, try disconnecting power and USB to the device, and then
reconnecting.
If none of these steps rectify the problem, contact support www.tc-helicon.com/support
6.3 There are no posts for my product
If there are no posts listed for your product:
1. Confirm your product is connected. If it is not connected you can link here to troubleshooting tips on
connecting your product.
2. Check your Product and Feed Filter Bar settings. Make sure All categories and and My Product or All
products are selected.
© 2011 TC-Helicon Vocal Technologies
Page 38

VoiceSupport - 1.2.0036
6.4 No tab, copy or paste in the Account page
VoiceSupport does not support the tab button or copy and paste functions within the account page on a
PC. However, you can click the LAUNCH IN BROWSER link to register your product or manage your
account in your browser.
6.5 Can't find my archives
If you can't find your Archives on your VoiceLive 2 it's likely you've updated your TC-Helicon product to a
new version of firmware that is not compatible with your old presets. To get access to those presets:
1. downgrade your firmware to the version you used to make the Archives.
2. Click the preset page, your archives associated with that firmware will be accessible.
3. Click Export.
4. Select where you want to export to using the Browse button.
5. Select All Presets as export data.
6. Set Export Source to be the name of the Archive you want to access after you have upgraded.
7. Upgrade to the new version of firmware, rescan when your product has rebooted.
8. Select your product, and click the Preset page.
9. Select Import.
10. Browse to the file you exported.
11. Select the destination as Working Data and click Start Import.
12. When presets have been imported into the Working Data, click Apply Changes.
6.6 VoiceLive Touch Favorites
VoiceLive Touch Favorites are stored at the bottom of the preset window from Preset 276 to Preset 300.
© 2011 TC-Helicon Vocal Technologies
Page 39

Troubleshooting 37
Bank A: Preset 276-280
Bank B: Preset 281-285
Bank C: Preset 286-290
Bank D: Preset 291-295
Bank E: Preset 296-300
© 2011 TC-Helicon Vocal Technologies
 Loading...