

Page 1
User’s Manual
Page 2

Page 3
IMPORTANT SAFETY INSTRUCTIONS
Voltage Line plug according to standard.
110-125V UL817 and CSA C22.2 no 42.
220-230V CEE 7 page VII, SR section 107-2-D1/IEC 83 page C4.
240V BS 1363 of 1984. Specification for 13A fused plugs and switched and un-switched socket outlets.
The lightning flash with an arrowhead symbol within an
equilateral triangle, is intended to alert the user to the
presence of uninsulated “dangerous voltage” within the
product’s enclosure that may be of sufficient magnitude to
constitute a risk of electric shock to persons.
The exclamation point within an equilateral triangle is
intended to alert the user to the presence of important
operating and maintenance (servicing) instructions in the
literature accompanying the product.
1 Read these instructions.
2 Keep these instructions.
3 Heed all warnings.
4 Follow all instructions.
5 Do not use this apparatus near water.
6 Clean only with dry cloth.
7 Do not block any ventilation openings. Install in accordance with the manufacturer's instructions.
8 Do not install near any heat sources such as radiators, heat registers, stoves, or other apparatus (including amplifiers) that produce heat.
9 Do not defeat the safety purpose of the polarized or grounding-type plug. A polarized plug has two blades with one wider than the other. A
grounding type plug has two blades and a third grounding prong. The wide blade or the third prong are provided for your safety. If the provided
plug does not fit into your outlet, consult an electrician for replacement of the obsolete outlet.
10 Protect the power cord from being walked on or pinched particularly at plugs, convenience receptacles, and the point where they exit from the
apparatus.
11 Only use attachments/accessories specified by the manufacturer.
12
Use only with the cart, stand, tripod, bracket, or table specified by the manufacturer, or sold with the apparatus. When a cart is used,
use caution when moving the cart/apparatus combination to avoid injury from tip-over.
13 Unplug this apparatus during lightning storms or when unused for long periods of time.
14 Refer all servicing to qualified service personnel. Servicing is required when the apparatus has been damaged in any way, such as power-
supply cord or plug is damaged, liquid has been spilled or objects have fallen into the apparatus, the apparatus has been exposed to rain or
moisture, does not operate normally, or has been dropped.
Warning!
• To reduce the risk of fire or electrical shock, do not expose this equipment to dripping or splashing and ensure that no objects filled with liquids,
such as vases, are placed on the equipment.
• This apparatus must be earthed.
• Use a three wire grounding type line cord like the one supplied with the product.
• Be advised that different operating voltages require the use of different types of line cord and attachment plugs.
• Check the voltage in your area and use the correct type. See table below:
• This equipment should be installed near the socket outlet and disconnection of the device should be easily accessible.
• To completely disconnect from AC mains, disconnect the power supply cord from the AC receptable.
• The mains plug of the power supply shall remain readily operable.
• Do not install in a confined space.
• Do not open the unit - risk of electric shock inside.
Caution:
You are cautioned that any change or modifications not expressly approved in this manual could void your authority to operate this equipment.
Service
• There are no user-serviceable parts inside.
• All service must be performed by qualified personnel.
Page 4

4
Certificate Of Conformity
TC Electronic A/S, Sindalsvej 34, 8240 Risskov,
Denmark, hereby declares on own responsibility that
following products:
TC-Helicon VoicePro
- that are covered by this certificate and marked with
CE-label conforms with following standards:
EN 60065 Safety requirements for mains
(IEC 60065) operated electronic and related
apparatus for household and similar
general use
EN 55103-1 Product family standard for audio,
video, audio-visual and entertainment
lighting control apparatus for
professional use. Part 1: Emission.
EN 55103-2 Product family standard for audio,
video, audio-visual and entertainment
lighting control apparatus for
professional use. Part 2: Immunity.
With reference to regulations in following directives:
73/23/EEC, 89/336/EEC
Issued in Risskov, June 2005
Mads Peter Lübeck
Chief Executive Officer
IMPORTANT SAFETY INSTRUCTIONS
This equipment has been tested and found to comply with the limits for a Class B Digital device, pursuant to part 15 of the FCC rules.
These limits are designed to provide reasonable protection against harmful interference in residential installations. This equipment
generates, uses and can radiate radio frequency energy and, if not installed and used in accordance with the instructions, may cause harmful interference to radio communications. However, there is no guarantee that interference will not occur in a particular installation.
If this equipment does cause harmful interference to radio or television reception, which can be determined by turning the equipment off and on, the
user is encouraged to try to correct the interference by one or more of the following measures:
• Reorient or relocate the receiving antenna.
• Increase the separation between the equipment and receiver.
• Connect the equipment into an outlet on a circuit different from that to which the receiver is connected.
• Consult the dealer or an experienced radio/TV technician for help.
Caution:
You are cautioned that any change or modifications not expressly approved in this manual could void your authority to operate this equipment.
For the customers in Canada:
This Class B Digital apparatus meets all requirements of the Canadian Interference-Causing Equipment Regulations ICES-003.
Cet appareil numérique de la classe B respecte toutes les exigences du Réglement sur le matériel brouilleur du Canada.
This Class B digital apparatus complies with Canadian ICES-003. Cet appareil numérique de la classe B est conforme à la norme NMB-003 du Canada.
Page 5

5
Table of Contents
oduction
Section 1: Introduction
Welcome to VoicePro . . . . . . . . . . . . . . . . . . .7
Registering VoicePro . . . . . . . . . . . . . . . . . . . .8
Support . . . . . . . . . . . . . . . . . . . . . . . . . . . . . . .8
Section 2: Getting Started
Front Panel Descriptions . . . . . . . . . . . . . . . . . .9
Back Panel Descriptions . . . . . . . . . . . . . . . . .10
Audio Connections . . . . . . . . . . . . . . . . . . . . . .11
Latency . . . . . . . . . . . . . . . . . . . . . . . . . . . . . .11
Analog Setup . . . . . . . . . . . . . . . . . . . . . . . . . .11
Digital Setup . . . . . . . . . . . . . . . . . . . . . . . . . .12
Aux Send or Insert . . . . . . . . . . . . . . . . . . . . . .12
Understanding Dry Lead and VirtuaLead . . . . .13
Selecting presets . . . . . . . . . . . . . . . . . . . . . . .13
Searching for presets using the Browser . . . . .13
Editing presets overview . . . . . . . . . . . . . . . . .14
Adjusting the Mix . . . . . . . . . . . . . . . . . . . . . . .14
Enabling / disabling Blocks . . . . . . . . . . . . . . .14
Storing presets . . . . . . . . . . . . . . . . . . . . . . . . .15
Using VoicePro's Help System . . . . . . . . . . . . .15
Section 3: Music Applications
Introduction . . . . . . . . . . . . . . . . . . . . . . . . . . .17
Creating Harmony . . . . . . . . . . . . . . . . . . . . . .18
Adding Doubling effects . . . . . . . . . . . . . . . . . .20
Correcting vocal pitch . . . . . . . . . . . . . . . . . . .20
Modifying vocal melody . . . . . . . . . . . . . . . . . .22
Modifying vocal phrasing . . . . . . . . . . . . . . . . .22
Modifying vocal character . . . . . . . . . . . . . . . .23
Working with Classic FX . . . . . . . . . . . . . . . . .25
Shaping a voice with EQ and Dynamics . . . . . .26
Creating Special FX . . . . . . . . . . . . . . . . . . . . .27
Section 4: Dialog Speech Applications
Introduction . . . . . . . . . . . . . . . . . . . . . . . . . . .29
Changing the Character of a performance . . . .29
Re-creating the sound of a phone, radio, etc . .30
Creating a low pitched voice . . . . . . . . . . . . . .31
Re-phrasing the timing of a performance . . . . .31
Shaping a voice with EQ and Dynamics . . . . . .32
Special FX with Speech . . . . . . . . . . . . . . . . . .33
Section 5: Live Performance Applications
Introduction . . . . . . . . . . . . . . . . . . . . . . . . . . .35
Hookup . . . . . . . . . . . . . . . . . . . . . . . . . . . . . .35
Notes on VoicePro features in live performance 35
Optimizing Latency . . . . . . . . . . . . . . . . . . . . .36
MIDI and live performance control . . . . . . . . . .36
Section 6: Detailed Parameter Descriptions
HOME . . . . . . . . . . . . . . . . . . . . . . . . . . . . . . .37
UTILITY . . . . . . . . . . . . . . . . . . . . . . . . . . . . . .38
HELP . . . . . . . . . . . . . . . . . . . . . . . . . . . . . . . .42
TAP . . . . . . . . . . . . . . . . . . . . . . . . . . . . . . . . .43
HARMONY . . . . . . . . . . . . . . . . . . . . . . . . . . .43
MULTI-FX . . . . . . . . . . . . . . . . . . . . . . . . . . . .48
TRANSDUCER . . . . . . . . . . . . . . . . . . . . . . . .50
MATRIX . . . . . . . . . . . . . . . . . . . . . . . . . . . . . .50
DYNAMICS . . . . . . . . . . . . . . . . . . . . . . . . . . .52
EQ . . . . . . . . . . . . . . . . . . . . . . . . . . . . . . . . . .53
TIME . . . . . . . . . . . . . . . . . . . . . . . . . . . . . . . .55
PITCH . . . . . . . . . . . . . . . . . . . . . . . . . . . . . . .56
CHARACTER . . . . . . . . . . . . . . . . . . . . . . . . .60
MIX . . . . . . . . . . . . . . . . . . . . . . . . . . . . . . . . .63
BROWSER . . . . . . . . . . . . . . . . . . . . . . . . . . .63
STORE . . . . . . . . . . . . . . . . . . . . . . . . . . . . . .64
Section 7: Optimizing HybridTMPitch Shifting
Introduction . . . . . . . . . . . . . . . . . . . . . . . . . . .65
Non-HybridTMpitch shifting techniques . . . . . . .65
Understanding HybridTMParameters . . . . . . . .66
Working with small shift intervals . . . . . . . . . . .66
Working with large up-shifts . . . . . . . . . . . . . . .66
Working with large down-shifts . . . . . . . . . . . . .66
Emulating other shifting algorithms . . . . . . . . . .67
Section 7: Harmony and Tuning
Harmony . . . . . . . . . . . . . . . . . . . . . . . . . . . . .69
Diatonic and Chromatic Harmony . . . . . . . . . . .71
Just Tuning . . . . . . . . . . . . . . . . . . . . . . . . . . .71
Section 8: Appendix
Detailed Application Descriptions . . . . . . . . . . .73
Configurable MIDI Implementation . . . . . . . . . .74
Download-able PC/MAC based Editor . . . . . . .74
Terms & Descriptions . . . . . . . . . . . . . . . . . . . .75
Signal Diagram . . . . . . . . . . . . . . . . . . . . . . . .76
Technical Specifications . . . . . . . . . . . . . . . . . .77
specifications, interface, and features are subject to change without
notice due to continued product improvement
TC Helicon 6710 Bertram Plc. Victoria BC, Canada
info@tc-helicon.com
VoicePro Rev 1.01 - SW 1.0
English version Prod. No. 606086012
Page 6

6
Page 7

7
Section 1: Introduction
Welcome to VoicePro
Thank you for selecting VoicePro as a key part of your
toolkit for producing the human voice. The years of
research, development and sonic verification that went into
VoicePro is intended to benefit professionals responsible
for bringing out the best in the human voice. TC-Helicon’s
proprietary voice processing algorithms allow all of the
dimensions of the voice to be refined. Appreciating the
complexity of producing memorable dialog and hit vocal
lines, TC-Helicon surrounded its core technology with
voice-optimized versions of all the auxiliary blocks
necessary for voice production.
Features:
• Voice-optimized tools & effects
• Pitch: shift the voice using a transparent and versatile
Hybrid Shifting
TM
algorithm with an 8 octave shift range
• Time: creative and humanized control over time shifting
using FlexTime
TM
• Character: manipulate or enhance a voice's character
using VoiceModeling
TM
• Harmony: four voices of natural sounding intelligent
harmony
• Transducer: emulate telephones, radios, and
megaphones, and introduce distortion
• µMod: dial up an endless amount of the classic microshifted sounds including flange, and chorus
• Delay: voice-optimized delay includes ducking and tap
tempo
• Reverb: TC Electronic's classic algorithms
• EQ/Dynamics: standard filtering and leveling tools from
TC Electronic's arsenal of respected algorithms
Application-based user interface
• 250 user and 250 factory presets created by focused
listening to vocals, dialog effects and the masters who
created them
• Preset Browser: Select your source and application to
browse the best presets as creative starting points
• Matrix: Presets become palettes through four top-level
parameters and a dedicated feature visualization
assignable to each preset
Professional quality hardware design
• >110 dB (unweighted) dynamic range Analog I/O
• 2 in, 8 out AES/EBU digital I/O
Included with VoicePro
Your VoicePro box should include the following items. If
you can not locate an item below, please see the Support
section of the Introduction.
- VoicePro
- appropriate power cable
- AES/EBU 2 in, 8 out break-out cable
- user’s manual
- registration card
About TC-Helicon
TC-Helicon is a joint-venture company created early in the
21st century that is owned by TC Group (Denmark) and
IVL Technologies Ltd (Canada).
TC-Helicon’s core value is that the voice is the world's
most beautiful instrument. Therefore, everything TCHelicon does is dedicated to this instrument. TC-Helicon
envisions a world where those who work with voice are
able to bring out its very best and where the possibilities of
vocal craft are endless.
The company's mission was galvanized by a simple
question, "Isn't it time that someone finally provided
dedicated tools and solutions for voice?"
TC-Helicon is revolutionizing the vocal channel by
providing innovative tools and solutions for people who
create and work with the speaking and singing voice. Our
customers include the most demanding of live performers,
producers, broadcasters and recording engineers.
Enjoy!
The TC-Helicon Team
Page 8

8
Section 1: Introduction
Registering VoicePro
There are two methods for registering your VoicePro:
• Online: visit www.tc-helicon.com/VoicePro and click
Product Registration in the left hand column.
• Mail: complete and return the registration card included
with your product
Support
If you run into technical challenges, TC-Helicon will be
more than happy to help. There are a number of sources
for product support. We've prioritized them below according
to the speed at which you will access the help information.
1.Help Button: VoicePro has an integrated context
sensitive help system. You can access the help system
from any tab in VoicePro by clicking the Help Button.
More information about VoicePro Help is covered in
Section 2: Getting Started.
2.Manual: The manual for VoicePro is extensive. It's a
good source of application information and in depth
answers for common questions.
3.On-Line: visit www.tcsupport.tc to search and ask for
answers on up to date questions about VoicePro.
4.Phone: International: +45 8742 7000 | USA & Canada:
805 373 1828
Page 9
9
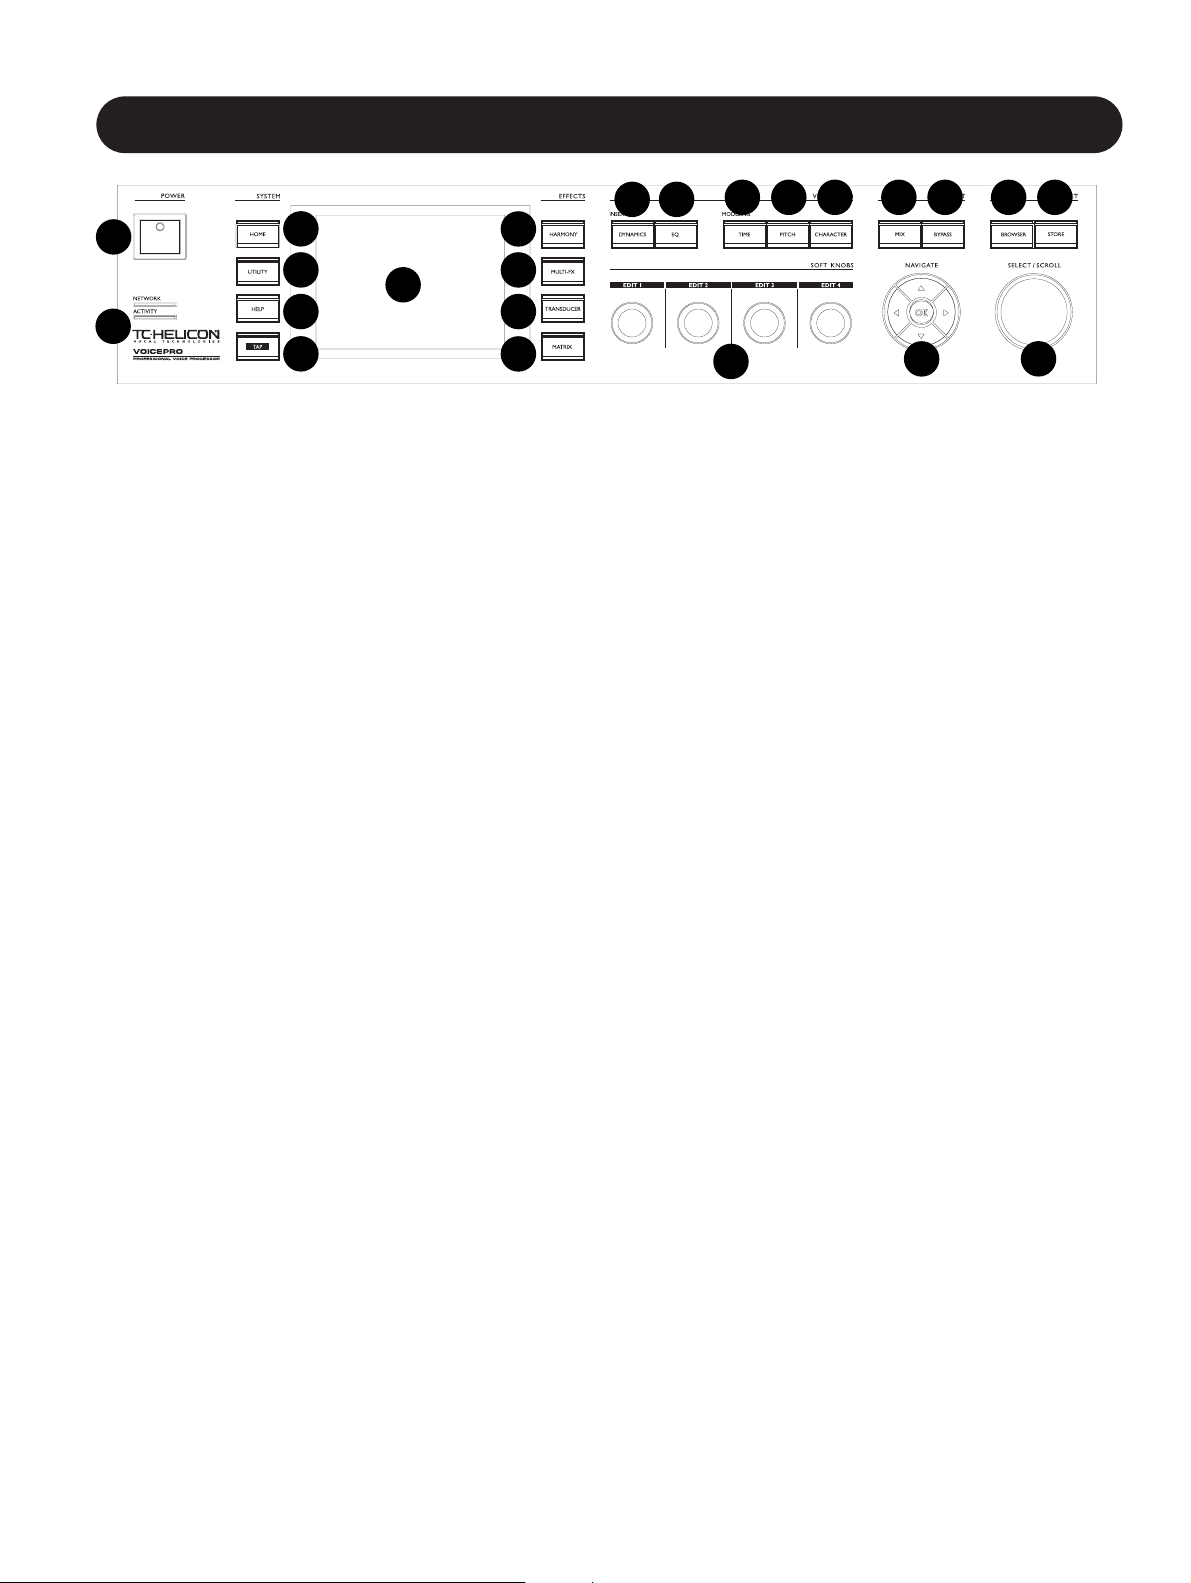
Section 2: Getting Started
Front Panel Description
1. Power
Pressing the Power Switch downwards engages power. The
boot-up sequence takes approximately 10 seconds.
2. Network and Activity LEDs
These LEDs show network status.
3. Home
This button allows preset information to be viewed, previewed
and recalled.
4. Utility
The group of Tabs accessed with the Utility Button configure
I/O, System, MIDI and other non-preset parameters.
5. Help
Context-sensitive help can be viewed by pressing the Help
Button.
6. Tap
Delay times can be controlled by tapping in a tempo.
7. Display
VoicePro utilizes a 320x240 pixel colour display to represent all
feedback and control information.
8. Harmony
Accesses the tabs for controlling the 4 intelligent Hybrid
TM
Shifting algorithms for creating harmony.
9. Multi-FX
µMod, Delay and Reverb Tabs are accessed using this button.
10. Transducer
Accesses the tabs that reproduce telephone, radio, noise and
other transducer effects.
11. Matrix
The Matrix Button allows you to toggle processing blocks on
and off as well as assign the preset visualization and top-level
editable parameters.
12. Dynamics
This button provides control over the dry and VirtuaLead voice
compressor and de-esser.
13. EQ
Access the 4-band parametric EQ and low-cut with this button.
14. Time
The Time Mode and its controls are accessed with this button.
15. Pitch
Correction, Shifting and Freestyle pitch shifting are accessed
with this button.
16. Character
The VoiceModeling
TM
Blocks are accessed with this button.
17. Soft Knobs
The Soft Knobs allow adjustment of four parameters at a time.
18. Mix
The Mix Button allows you to control the levels and routing of
VoicePro's inputs and effects. There are two mixer scenes
which are accessed by the Left and Right Arrows.
19. Bypass
Pressing this button engages the bypass mode as set in the
Utility | System Tab.
20. Navigate group:
OK Button
On the Home or Browser page, OK recalls a previewed
preset. On Effect and VirtuaLead pages, OK enables or
disables the block. In other pages OK is given various
functions described onscreen.
Up, Down, Left and Right Arrow Buttons
The directional arrows are mainly used to navigate
through tabs and edit rows.
21. Browser
Use the Browser Button to quickly access presets by searching
by source and application.
22. Store
Pressing the Store Button brings up the store menu. After a
name and store location have been selected, pressing Store
will save the current preset.
23. Select/Scroll
When the Home Button is lit, Select/Scroll allows previewing of
presets. The rest of the time Select/Scroll allows selection of
edit parameter rows.
1
2
3
7
4
5
6
8
12
17
20
23
9
10
11
13
14 15 16 18 19 21 22
Page 10

10
Section 2: Getting Started
Back Panel Description
1. Voice Input
This is the main analog input for voice or monophonic
instruments. All processing blocks in VoicePro can be used
on audio signals received at this input.
2. Auxilliary Input
This input allows analog audio sources of any kind to be
routed to the µMod, Delay, Reverb and Transducer effects.
3. Left and Right Outputs
A full analog stereo mix is always provided on these
outputs.
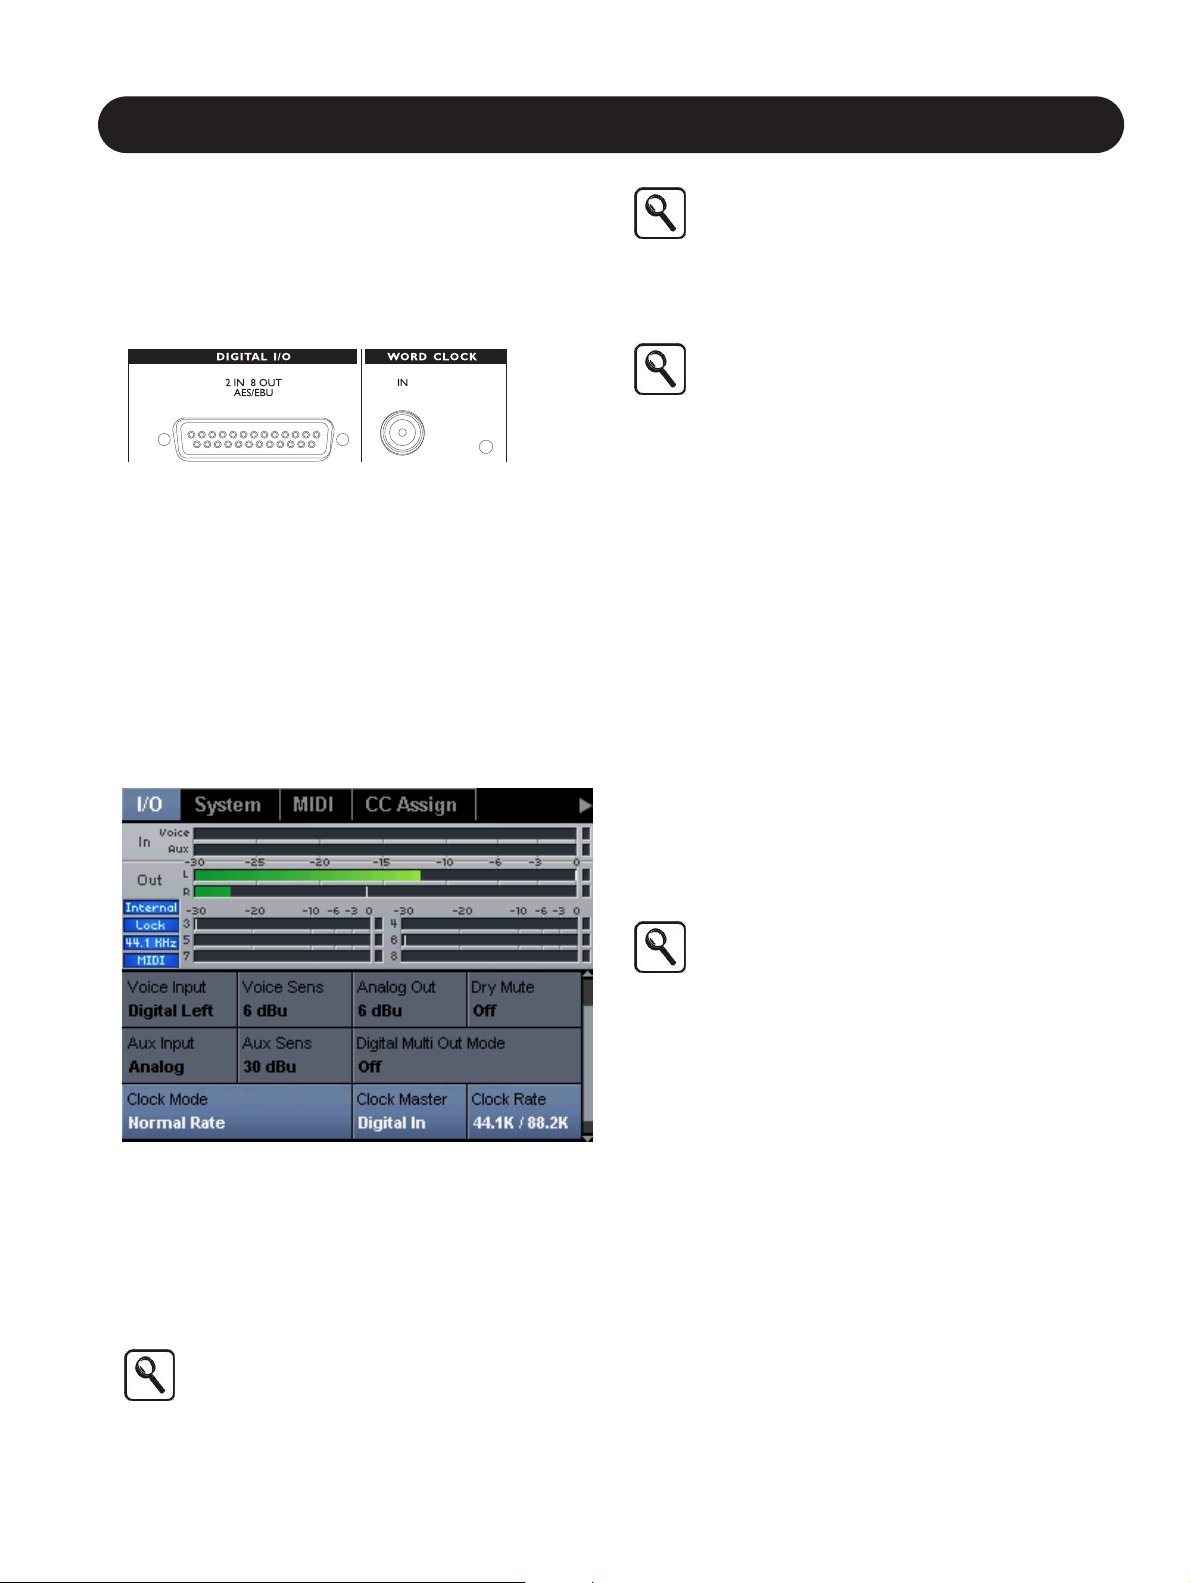
4. AES-EBU Digital I/O
Digital input and multi-channel output is provided using a
DB-25 connector. Using the supplied break-out cable or
standard DB-25 cable, VoicePro can receive separate
digital voice and auxilliary input signals. The 8 digital
outputs are configurable in the Utlity | I/O Tab. Digital
outputs 1 and 2 are fixed to the full stereo mix.
5. Wordclock
Use a standard BNC cable to synchronize VoicePro to
external wordclock.
6. Ethernet
Ethernet can be used to facilitate software upgrades and
other improvements as they become available.
7. MIDI IN / OUT
By connecting VoicePro to a MIDI-equipped computer,
editing, automation, and other control is possible. A MIDI
keyboard controller can also be connected here to allow
setting of harmony and pitch shifting intervals.
8. RS-232
Currently not supported
9. Power
VoicePro has a auto-sensing power supply allowing use
with worldwide power voltages and frequencies.
1 2 3
4 5
6 7 8
9
Page 11
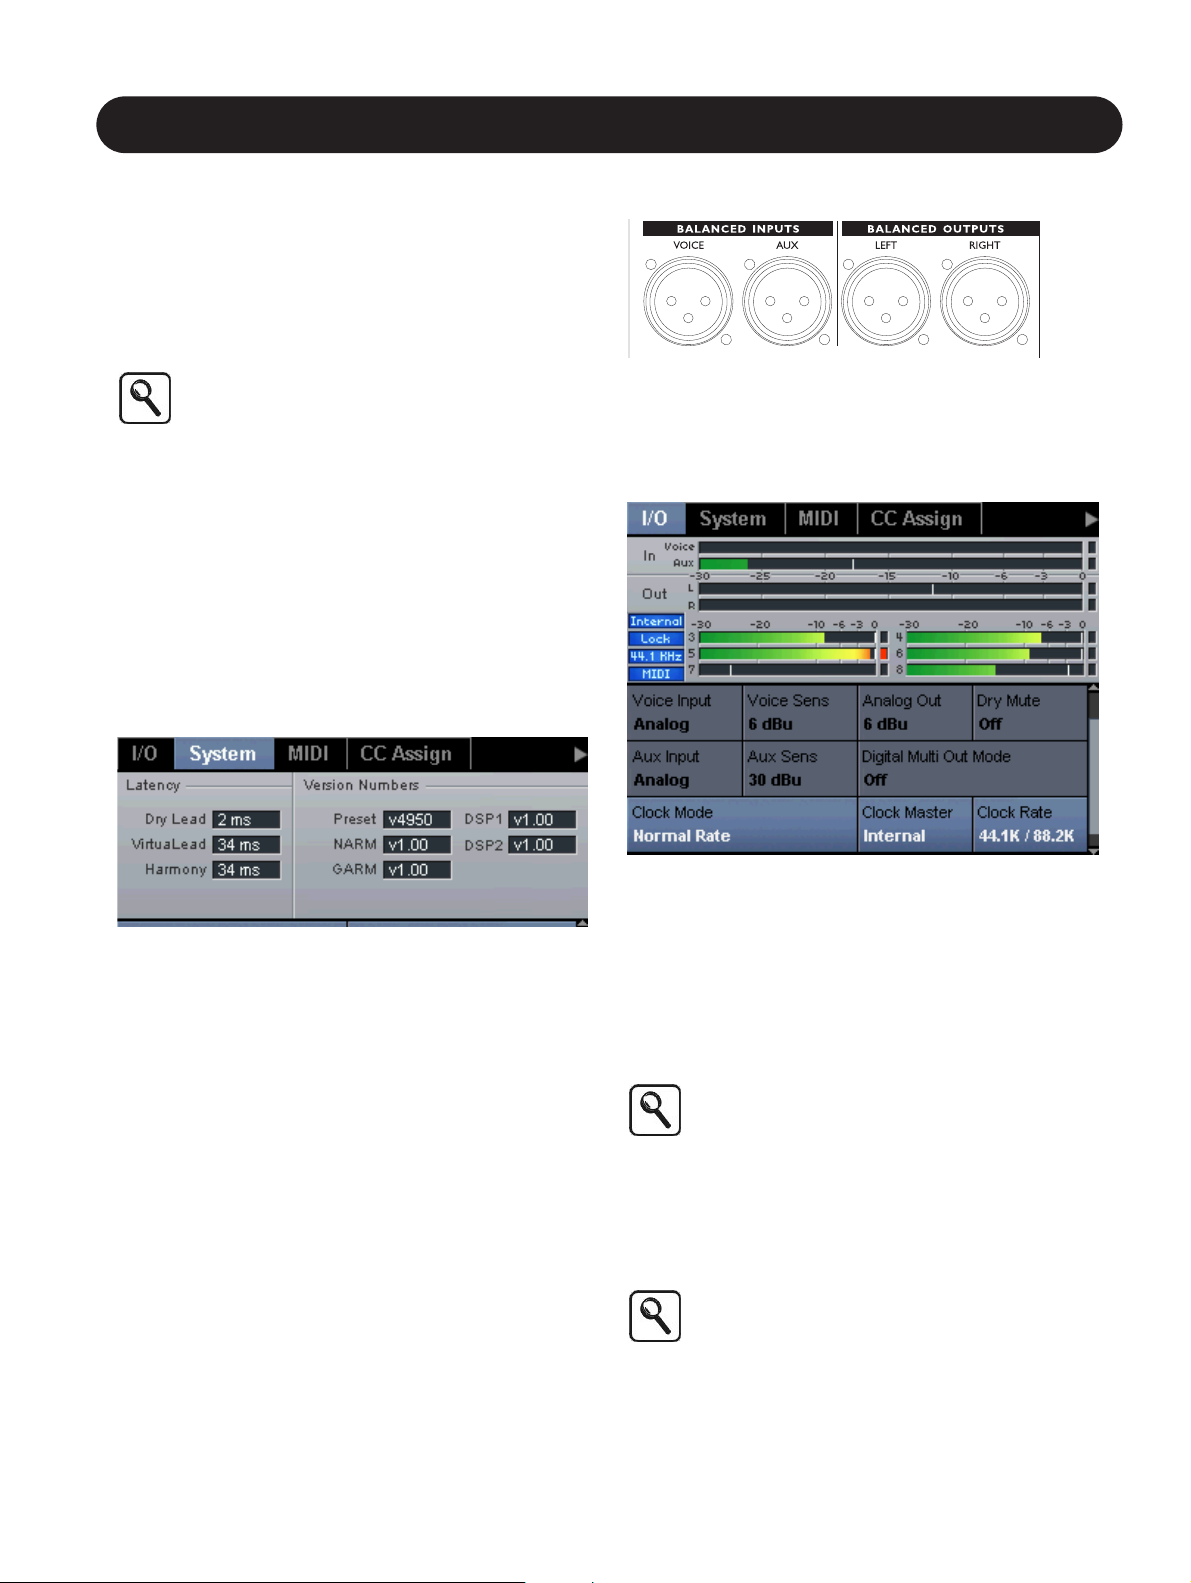
11
Section 2: Getting Started
Audio Connections
VoicePro allows you to work with analog or digital ins and
outs. This section describes how to setup the inputs and
outputs. When you’ve decided between Analog or Digital
Setup, read; “Aux Send or Insert” in this section. The
section will help you decide how to configure VoicePro
within your mixing environment.
The default mode for VoicePro is set for unity
Analog I/O. To get going quickly, connect to an
analog source and go to “Setting Levels”
Latency
Processing Time, Pitch, and Character for the human voice
requires analysis beyond the typical audio product. To
preserve audio quality, the analysis and processing
requires latency (delay) to be introduced into the system.
After you choose your setup, it’s wortwhile determining the
Latency of VoicePro and compensating your mixing
environment. For some applications, like Harmony,
VoicePro’s latency may be acceptable without
compensation.
Finding VoicePro Latency
1. Press the Utlity Button and then use the Left / Right
Arrow Buttons to navigate to the Utitlity | System Tab
2. Note the Latency in the visualization area.
Compensating for Latency
If you are using a DAW as a mixing environment there is
usually a feature to slip or delay tracks. When you’ve
determined VoicePro’s latency, delay all tracks except the
vocal track by the latency amount. Another method is to
slip the vocal track backwards by the latency amount.
Analog Setup
Making Connections
1.Connect your analog audio source to the Female XLR on
the rear panel labeled “Voice Input”.
2.Connect the analog outputs of VoicePro to a stereo input.
Utility setup for analog IO.
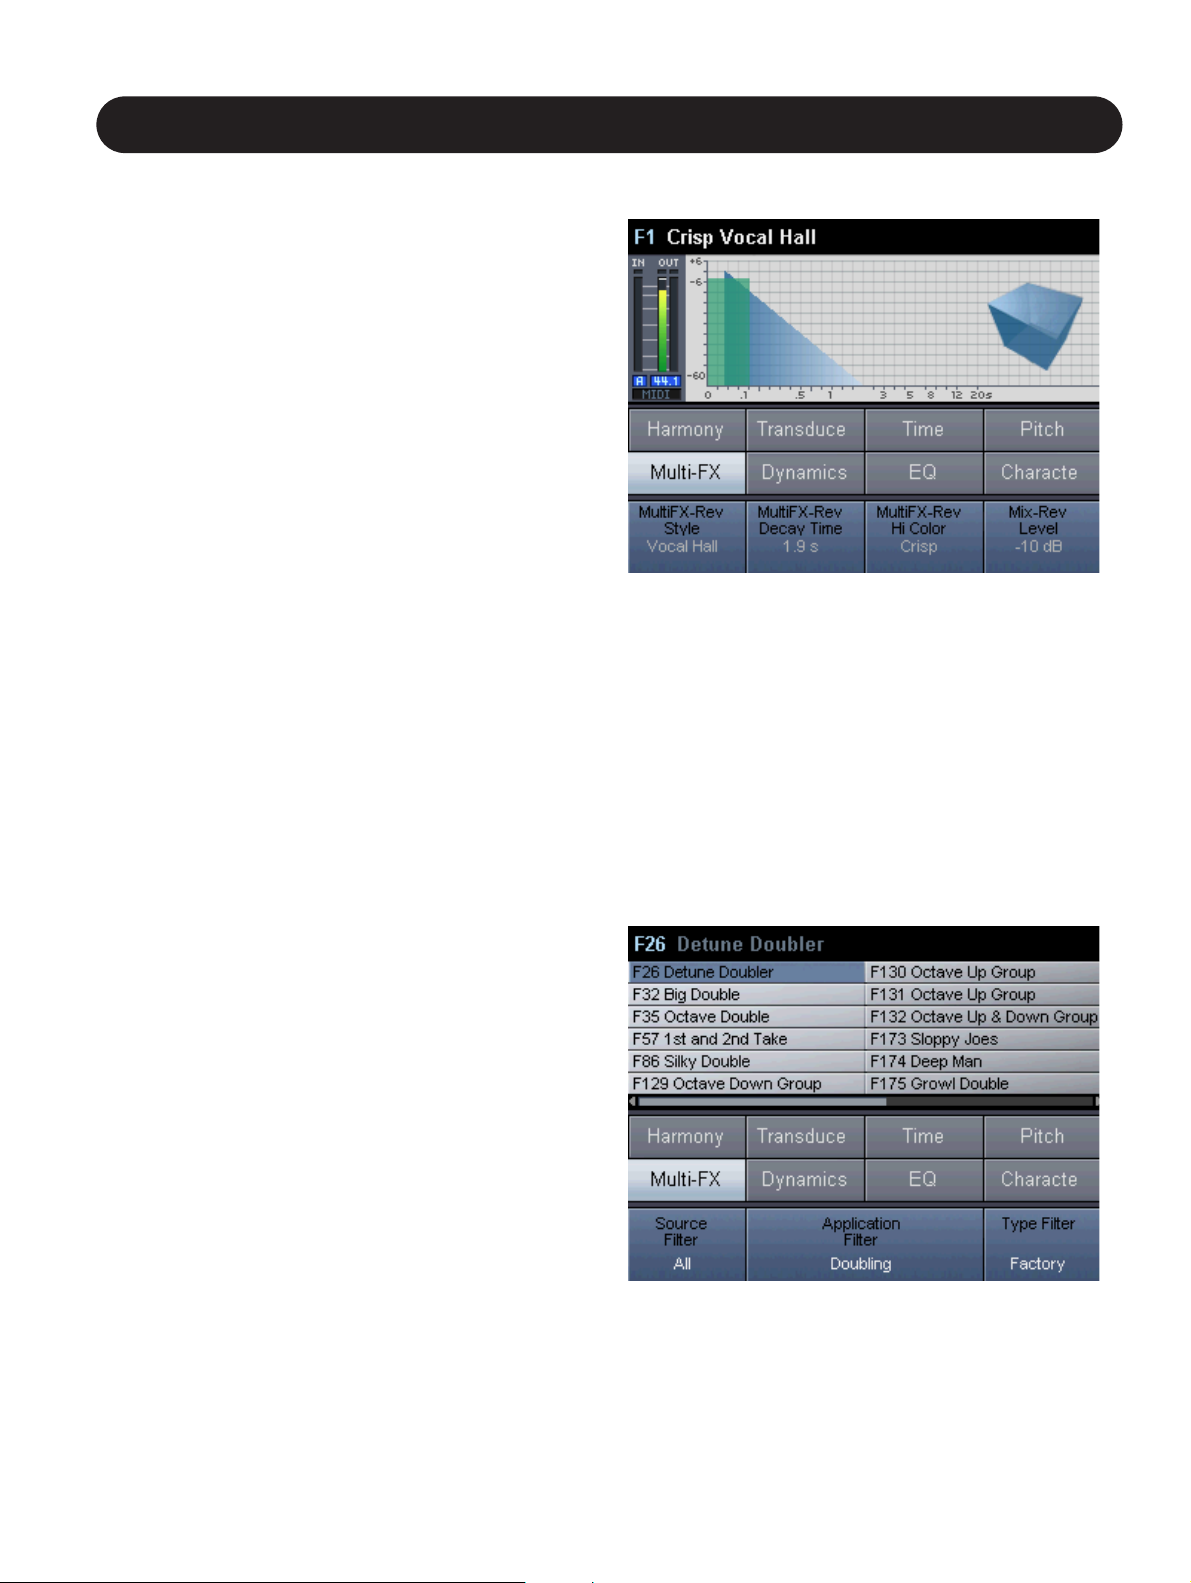
1.Go to the Utility | I/O Tab and set Voice Input and Aux
Input to "Analog"; Clock Mode to "Normal Rate" and
Clock Master to "Internal".
Setting levels
1.Send a vocal signal to the input
2.Navigate to the Utility | I/O Tab. Adjust the Voice Sens
Parameter until the In Meter displays peaks of around -6
dB.
The Voice Sens value represents the signal level
that, when applied to the input, will result in the
meters showing 0dB. A signal greater than the
Voice Sens Value will result in input clipping.
3.Set the Analog Out Paramater to the same value as
Voice Sens. This will configure VoicePro to have unity
gain. Additional ouput gain is possible with the Analog
Out Parameter.
Unity Gain is when VoicePro has an equal signal
at the input and output when in Bypass. The
Analog Out setting represents the signal level at
the output when the Out Meters display 0dB. It is
not possible to achieve Unity Gain when Voice
Sens is set to 3 dBu since VoicePro does not
support this Analog Out level.
Page 12
12
Section 2: Getting Started
Digital Setup
This section describes how to make digital audio
connections to VoicePro. Using the digital audio interface
provides the most flexibility in a studio environment. You
can configure the 8 channels of digital output for separation
of the voices and effects.
Making Connections
Digital I/O is accessed through the female DB25 on the
rear panel along with the included DB25 to XLR AES
adapter.
1.Connect the male end of the DB25 connector to the
female DB25 connector on VoicePro.
2.Connect the AES/EBU digital output of your audio source
to the female XLR on the AES/EBU adapter cable.
3.Connect the male XLR labeled "Channel 1,2" of the
DB25 connector to the appropriate AES/EBU input in
your mixing environment.
Utility Setup for Digital Inputs with External Clock
1.Go to the Utility | I/O Tab and set the Voice Input to
"Digital Left".
2.Set the Clock Rate Parameter to match the sampling rate
of your mixing environment. If your mixing environment
is running at 88.2 kHz or 96 kHz, set the Rate Mode
Parameter to "Double Rate".
3.Set the Clock Master Parameter to "External". This will
cause VoicePro to derive its clock from the digital input.
To provide the best possible jitter rejection,
VoicePro uses a narrow clock rate detection
algorithm. Therefore, to detect the external clock
rate, VoicePro's clock rate must be set in the same
range.
Some sound cards with digital I/O will only accept
digital input if they are set up as the “Slave”, that
is, they need to get their clock from their digital
input. If this is the case, then you will need to have
at least one of the Digital Outputs connected to the
sound card, as well as the Digital input, and set the
Clock Master to "Internal".
The Left/Right Output meters are for the Analog
Out. There may be a minor discrepancy between
the actual Digital Out Level and the meters.
Digital Multi Out Mode Parameter
Digital Out channels 1 and 2 always carry the stereo mixed
output. There are three modes for configuring digital out
channels 3 through 8.
"Off" - In this mode, digital output channels 3 through 8 are
disabled.
"Voices: Harm, Dry, Vlead" - Routes Harmony voices 1
through 4 to channels 3 through 6, Dry Lead to channel 7,
and VirtuaLead to channel 8.
"Blocks: Harm,FX,Lead" - Routes stereo harmony to
channels 3 and 4, stereo mixed Dry Lead and VirtuaLead
to channels 5 and 6, and a stereo mix of stereo Multi-FX to
channels 7 and 8.
Utility Setup for Multi-Channel Digital Out
1.Navigate to the Utility | I/O Tab.
2.Using the Up and Down Arrows, locate the Digital Out
Parameter.
3.Use Edit 3 to select the desired mode.
Outputs 3 through 8 are muted when Bypass is
activated regardless of the Multi-Channel Output
Mode
Aux Send or Insert
There are two common ways VoicePro can be used as a
voice processor: on an Aux Send (parallel routing), or as
an Insert (serial routing).
When to use VoicePro on an aux buss
This scheme is useful if you want to layer effects on top of
a dry signal routed separately into your mixer. If you are
mainly using VoicePro for the purpose of adding
harmonies, special effects and doubling for singing voices
or classic effects, then an aux send configuration will work
well. VoicePro has it’s own dry path that will have to be
muted in order to work in this scheme.
How to setup VoicePro with an aux send
1. Press the Utility Button and scroll to the I/O Tab.
2. Set Dry Lead to "off". This will allow VoicePro to operate
like a standard aux send processor.
3. From your mixing environment, use a mono aux send to
route audio into the Voice or Aux input. Route VoicePro’s
outputs to returns or dedicated channels in your mixer.
Page 13
13
Section 2: Getting Started
When to use VoicePro as a channel insert
If you are mainly using VoicePro for the purpose of pitch
correction, dynamics and EQ, Character voice
transformation, or for processing speaking voices, then an
insert configuration will work well. This is also the most
flexible routing scheme if you plan to use the other
features available in VoicePro. In this configuration, there
is no dry path routed around VoicePro to your mixer as
there is with the aux send scheme; VoicePro handles this
internally.
How to setup up VoicePro as a channel insert
1. Press the Utility Button and scroll to the I/O Tab
2. Ensure that the Dry Lead Parameter is set to "on".
3. Because VoicePro is a mono in, stereo, or multi-output
device, there are two methods you can use in your
mixing environment to setup VoicePro as an insert.
a. VoicePro on a mono aux send which returns to stereo
channels. Ensure that your mixer’s aux send is set to
pre-fader and that the fader level for the channel is set
to off or infinity. This is the best method for setting up an
insert when using the 8 digital outputs.
b. VoicePro as a stereo insert. Have your lead vocal or
dialog track returning to two channels or a stereo
channel in your mixing environment. Send a stereo
channel output to the Voice and Aux inputs of VoicePro.
Connect the outputs of VoicePro as a stereo return to
the sending channel’s insert return pair, or connect to
another stereo channel. The default Aux Input Level
Setting in all of VoicePro’s Factory presets is "off" in the
mixer, but if you make user presets, ensure that this
remains “off” when used in the insert configuration.
Understanding DryLead &
VirtuaLead
VoicePro contains two lead paths. In your mixing
environment you often have a doubled version of your
vocal, or you comp two tracks together.
The Dry Lead is affected by the Dynamics and EQ Blocks.
Additionally, it can be sent to the Multi-FX Blocks.
The VirtuaLead is the same as Dry Lead except it is also
processed by the Time, Pitch and Character Blocks.
For Doubling presets, Dry Lead and VirtuaLead are often
mixed together. For Character presets, the Dry Lead is
typically turned off. Depending on the type of application,
the mix between these paths will be different.
See the Signal Diagram in the Appendix Section for
detailed information.
Selecting Presets
When the Home Button is lit, the Select/Scroll Wheel is
used to scroll through all Factory and User presets. The
Factory Bank of 250 presets are presented first followed by
any User Bank presets.
The Preset Change Parameter in the UTILITY | System
Tab determines whether presets are loaded instantly or
merely previewed as you decide which one to load.
Upon loading a new preset, you will see the Home Screen
and the Home Button lit.
Searching for Presets using the
Browser
The Browser allows you to narrow your search for presets
based on application filters you can specify. This is very
useful when you consider the product has the capability of
storing 500 presets.
Press the Browser Button from any screen. The top half of
the screen shows the presets that match the search criteria
displayed on the bottom line of the screen. By using the
Page 14
14
Section 2: Getting Started
Soft Knobs you can specify any or all of the three search
filters as follows:
• Source Filter - Here you select whether you want to see
presets for music only or dialog only. When this value is
set to “All”, the Source Filter is disengaged.
• Application Filter - Here you can choose whether you’d
like to see Pitch Correction or Doubling presets, for
example.
• Type Filter - The final criteria narrows the search to
looking in the Factory Bank only, User Bank only, or both
banks in alphabetical, as opposed to numerical, order.
See the Detailed Application Descriptions in the
Appendix Section to get an understanding of what
an application will do.
Editing Presets Overview
Once a preset is loaded and the Home Screen is
displayed, the four Soft Knobs provide access to the most
useful parameters unique to each preset. The values of
these parameters can be edited and stored as desired.
If you want to edit a preset further, you can press any
button in the Effects and VirtuaLead Button groups to
access more edit parameters. This will expose the Edit
Tabs that you can scroll through with the Left and Right
Arrow Buttons. There are over 300 editable paramaters!
Having located an Edit Tab, you then select the edit rows
with the Up and Down Arrow Buttons or the scroll wheel.
The scroll bar on the lower right indicates if there are more
screens below what is visible, and where you are in the list.
The Soft Knobs now allow editing of the four parameters on
the selected row.
Adjusting the Mix
To control levels of the various effects blocks, press the Mix
Button. You will see the controls for the effects presented in
a simulated mixer layout. Additional mixer channels are
made available by pressing the Left or Right Arrow Buttons.
The controls are arranged in rows of four parameters, to
choose one, use the Up and Down Arrows or Scroll Wheel.
The Soft Knobs are then used to adjust the desired levels.
Below are notes on the unique features of the mixer.
• The Pre/Post Send switch determines whether the audio
signals from the three effects sends are scaled by the
Level Parameter (Post) or whether the Level Parameter
has no effect (Pre).
• The Width Parameter allows the panorama of the stereo
channels to be changed. The “minimum” setting blends
left and right into a mono signal and the “maximum”
setting preserves the original stereo panning.
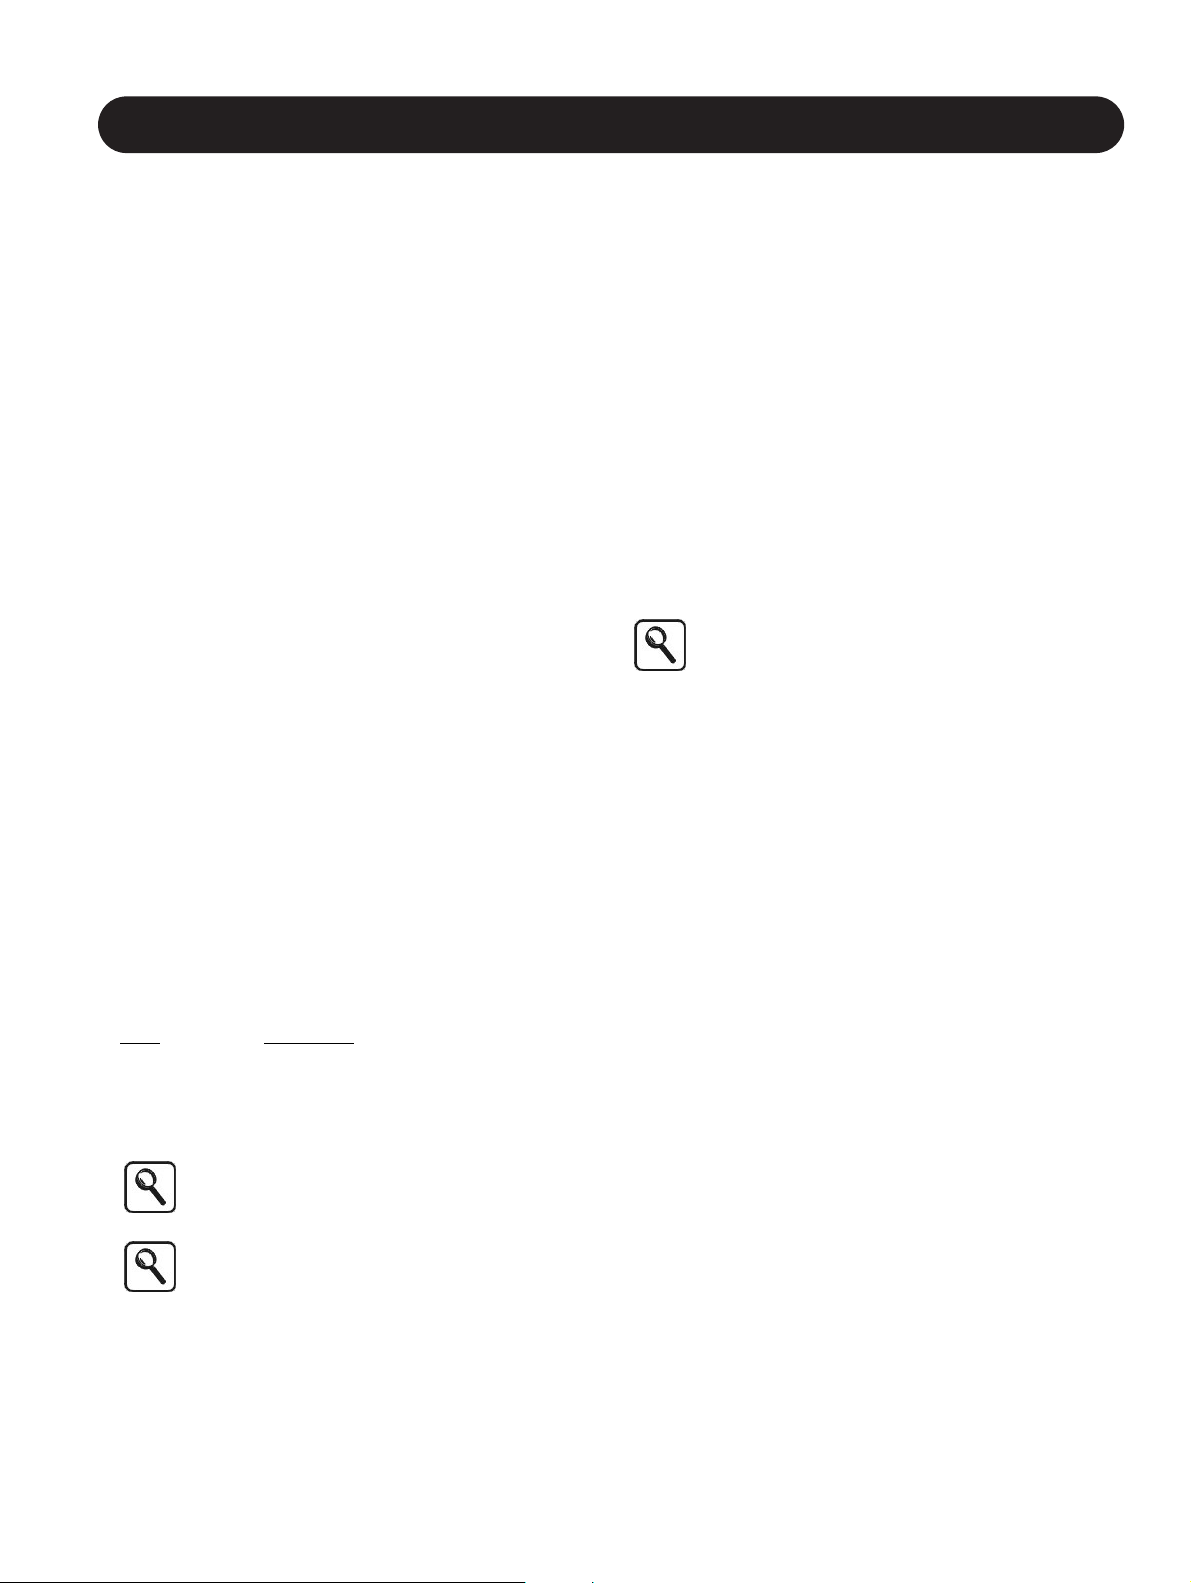
Enabling / Disabling Blocks
Because any preset can be composed of up to 15 different
audio effects, the Matrix\Blocks Tab presents a block
overview and simplifies muting or engaging individual
effects. Press the Matrix Button and scroll to the Blocks
Tab using the Left or Right Arrow Buttons. As with the other
edit screens, the controls are laid out in rows of four, and
are accessible with the Arrow Buttons. Turning the
respective Soft Knob to the left will mute an effect while
turning to the right will engage it.
In any editing screen, the current block can be
toggled on or off by pressing the OK Button. When
the block is disabled you will see a “BLOCK OFF”
message overlayed on the Visualization Area.
Engaging a block may not immediately produce
sound from the effect because it depends on
correct mixer settings. Press the Mix Button to
confirm that the Level Parameter for the effect is
turned up. In the case of the Multi-FX, also ensure
that Send Levels have been set. You may also
need to check that the particular effect Edit Tab
has a style loaded that is not set to “Off”.
Page 15
15
Section 2: Getting Started
Storing Presets
When you would like to store an edited preset in the User
Bank, press the Store Button. Within the Store Screen, you
have the option to:
• cancel the store operation by pressing any button except
Bypass, Help or Tap
• choose the destination preset number with the Scroll
Wheel
• rename the preset with the Soft Knobs
• choose the closest source and application criteria (this is
highly recommended to simplify browsing later)
Press the Store Button again to save the preset with your
attributes.
Using VoicePro's Help System
A unique and helpful feature of VoicePro is the integrated,
context-sensitive help system. Accessing the information
you need can be done while viewing the Overview Tab or
by searching in the Contents Tab.
Every button that lights up on the front panel has a Help
text section except the Bypass Button. The quickest way to
learn more about any particular Effect Tab or Utility Tab is
to press the Help Button while viewing a screen you would
like to know more about. To make the Help system even
more useful, each Tab has a dedicated section containing
descriptions of each parameter on the screen.
Alternatively, you can browse the overall Help
system from the table of contents without having to
navigate to each particular edit screen.
Help on Help
1. Press the Help Button any time VoicePro is turned on.
Information on the current parameter tab will be
presented in the Help Screen.
2. To switch between the Contents and Overview Tab, use
the Left and Right Arrow keys.
3. To read further down either the Contents or Overview
pages, use the Up/Down Arrow keys or the Scroll Wheel
Page 16

16
Page 17

17
Section 3: Music Applications
Introduction
VoicePro’s applications in music vocal production require
settings and features that differ from dialogue (speaking)
post production. The differences are mainly in the use of
musical pitch shifts for harmony; making voices sound
thicker through various techniques; and targeting formerly
time consuming techniques used by music audio
engineers and producers.
This section is more of an introduction to music
applications as opposed to a detailed discussion. For an
in- depth look at each parameter, read the Detailed
Parameter Description section.
In this section we cover:
• Creating harmony
• Adding doubling effects
• Pitch correcting vocals
• Modifying vocal melody
• Modifying vocal phrasing
• Modifying vocal character
• Working with classic effects
• Creating special effects (Cher, Transducer, Dry Off)
• Shaping vocals with EQ, Dynamics and the Spectral
block
Page 18
18
Section 3: Music Applications
Creating Harmony
The sound of human voices singing together in harmony
adds excitement and intensity to music. VoicePro offers
you the ability to instantly experiment with different
harmony lines as well as to produce finished recorded
vocals.
Each harmony preset in VoicePro is based on one of five
different harmony modes you can use to add authentic
sounding virtual harmony voices to your mix. Offering more
than one Harmony Mode is necessary because, like a
human singer who has to hear an accompanying
instrument in order to sing in harmony, VoicePro needs
musical input. Each harmony mode provides an alternate
method for providing this musical input. From the relatively
"hands off" Scale Harmony Mode, to the completely "hands
on" Notes Mode, you can choose a range of methods to
balance the amount of moment-by-moment input, with the
resulting harmony sound you desire.
T
erm
Description
Harmony Mode Method by which musical input is sent to
VoicePro.
Diatonic Refers to the tone structures in major
and minor scales. Knowledge of these
scale structures is the "intelligence"
VoicePro uses to produce automatic
harmony.
Interval The distance between two pitches
Notes Mode Fully manual harmony mode where notes
and chords performed on a MIDI
keyboard are used to select the fixed
harmony pitches independent of the pitch
of the sung note.
Notes 4Ch Mode A second Notes Mode where each note
is received on a different MIDI channel
from a sequencer program, enabling
unique pitch bends on each channel.
Chord Mode An intelligent harmony mode where a
sequence of chords played on a MIDI
keyboard are interpreted to produce
musically correct pitches that move
according to the pitch of the sung note.
Scale Mode An automatic harmony mode where you
set only the key and scale of your song.
Usually, no on-going musical input from a
keyboard is required.
Shift Mode This is the one non-intelligent harmony
mode where a fixed interval is set for
each harmony voice that is maintained
throughout the song.
Humanization Various methods by which VoicePro
introduces random variations to the
sound that mimic human deviations in
pitch and timing.
How to create harmony using a Notes Mode preset
1.Connect a MIDI keyboard to VoicePro (see Utility section
for MIDI details)
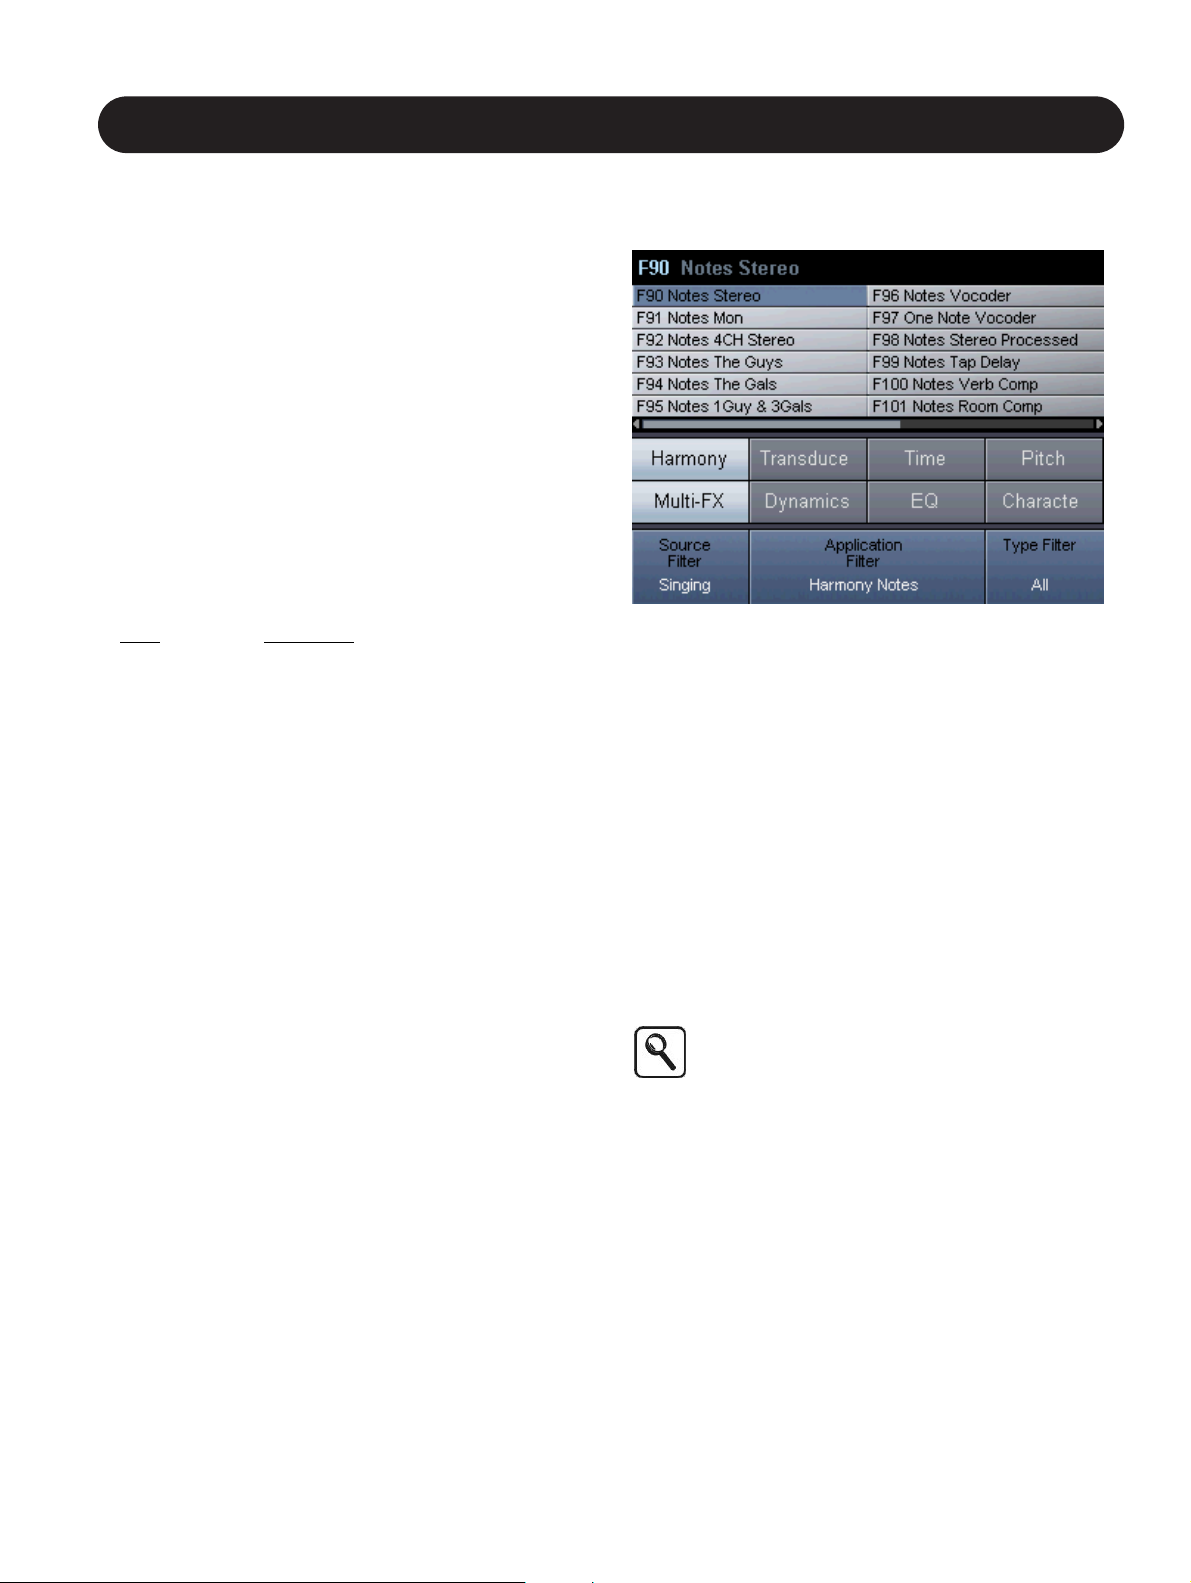
2.Navigate to the browser and set the Source Filter to
“Singing” and the Application Filter to “Harmony Notes”,
then select a preset using the Scroll Wheel and Ok
Button.
3.Perform a keyboard part of up to 4 simultaneous notes
while the source audio plays. Pitch Bend and MIDI
controllers can be used.
How to create harmony using a Notes 4CH Mode
preset
1.Connect the output of a MIDI sequencer to VoicePro (see
Utility section for MIDI details)
2.Navigate to the browser and set the Source Filter to
“Singing” and the Application Filter to “Harmony Notes
4CH”, then select a preset using the Scroll Wheel and
Ok Button.
3.Press “play” on the sequencer while the source audio
plays or while you sing in time with the MIDI tracks.
Notes 4 Channel Mode
The best way to benefit from this type of harmony
is to use a MIDI+Audio sequencer to send
synchronized MIDI and audio tracks to VoicePro.
First, record or import a vocal track into the
sequencer, then perform up to 4 different harmony
parts on separate MIDI channels in
synchronization with the vocal.
Page 19
19
Section 3: Music Applications
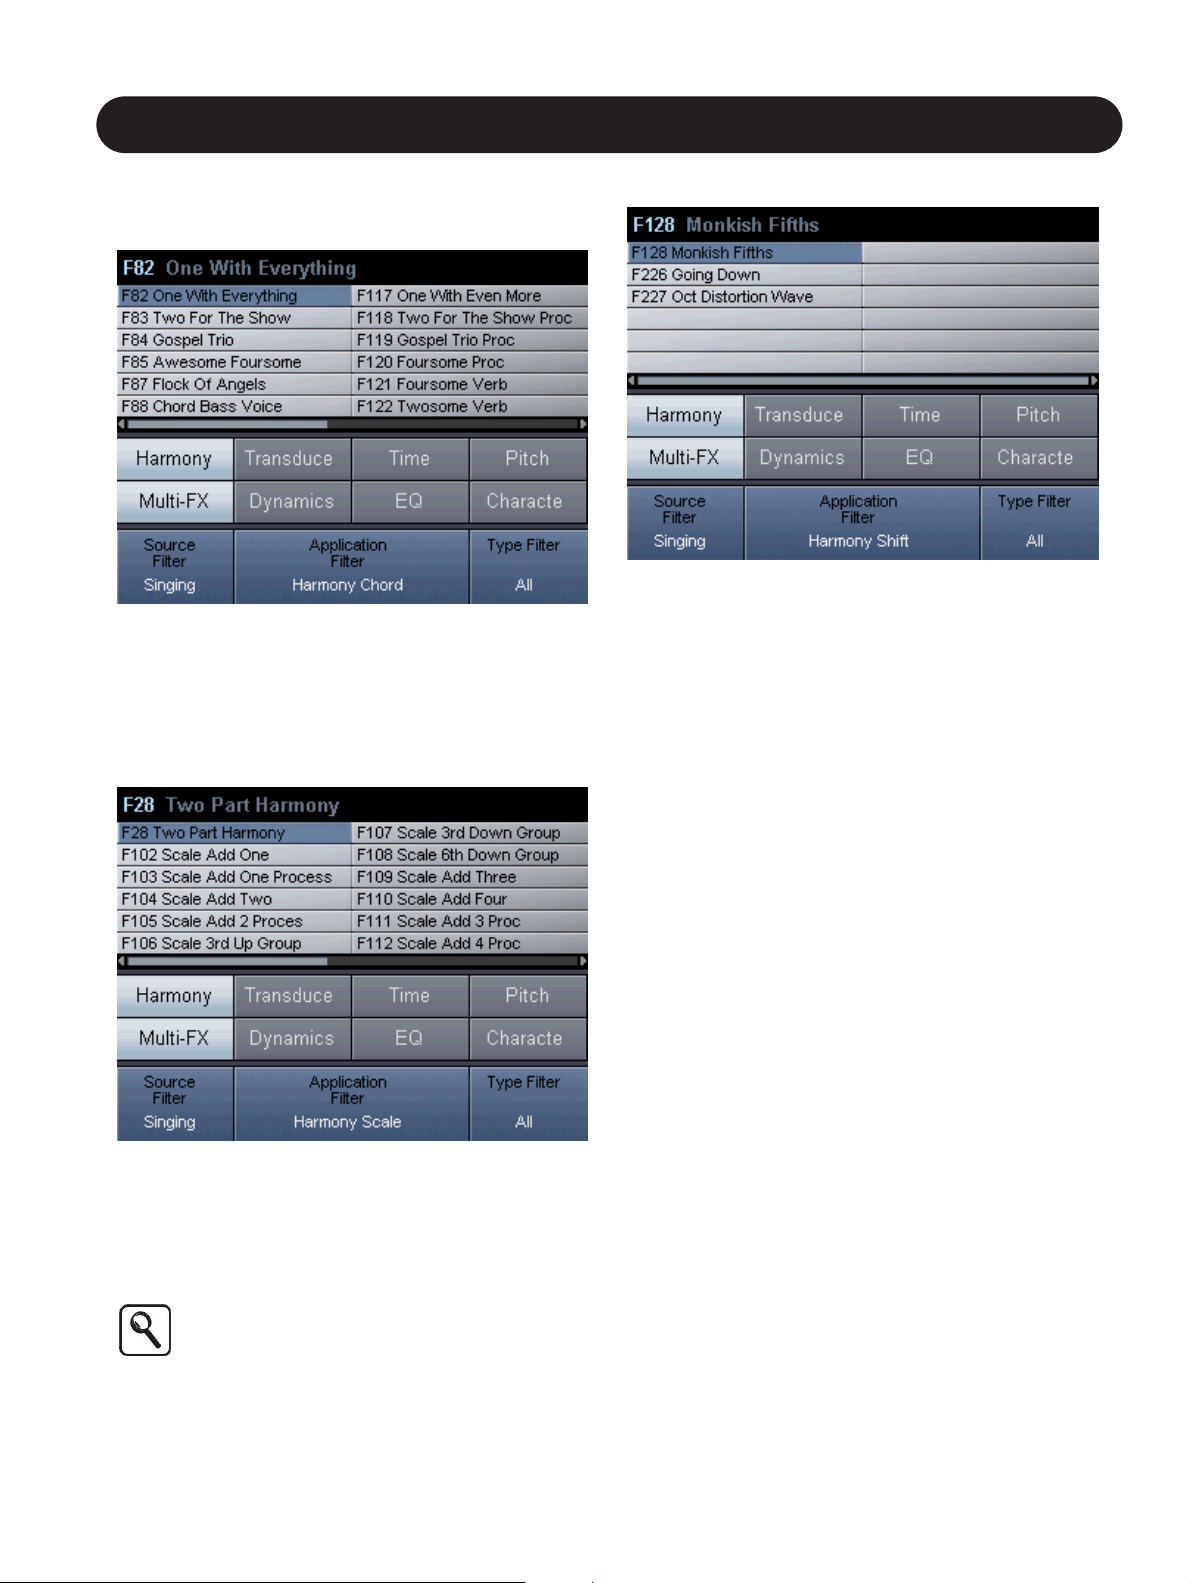
How to create harmony using a Chord Mode preset
1.Connect the output of a MIDI keyboard to VoicePro (see
Utility section for MIDI details)
2.Navigate to the browser and set the Source Filter to
“Singing” and the Application Filter to “Harmony Chord”,
then select a preset using the Scroll Wheel and Ok
Button.
3.Play keyboard chords of 2 or more simultaneous notes
while you sing.
How to create harmony using a Scale mode preset
1.Navigate to the browser and set the Source Filter to
“Singing” and the Application Filter to “Harmony Scale”,
then select a preset using the Scroll Wheell and Ok
Button.
2.Use the Edit Knobs to match the key and scale of the
vocal track.
Scale mode tip
Often the key and scale can be set to the first or
last chord in a song e.g. G Major. You can try the
alternate major and minor scale settings in
VoicePro to suit the song. If no key and scale
settings seem to work, then a custom scale can be
crafted or you can use the other MIDI controlled
presets based on Notes and Chord harmony
modes.
How to create harmony using a Shift Mode preset
1.Navigate to the browser and set the Source Filter to
“Singing” and the Application Filter to “Harmony Shift”, then
select a preset using the Scroll Wheel and Ok Button.
2.Adjust the Shift Interval Parameter to your taste using the
appropriate soft knob
Troubleshooting
If you are having trouble producing harmony, go through
the questions below to make sure the most common items
are configured correctly.
1. Are VoicePro’s Harmony MIDI channels set to the same
values as your sequencer or keyboard?
2. Is the MIDI indicator showing MIDI input?
3. Do you have the correct input selected i.e. digital or
analog, voice or aux?
4. Is the vocal sung to an instrument properly tuned to
A=440Hz?
Page 20
20
Section 3: Music Applications
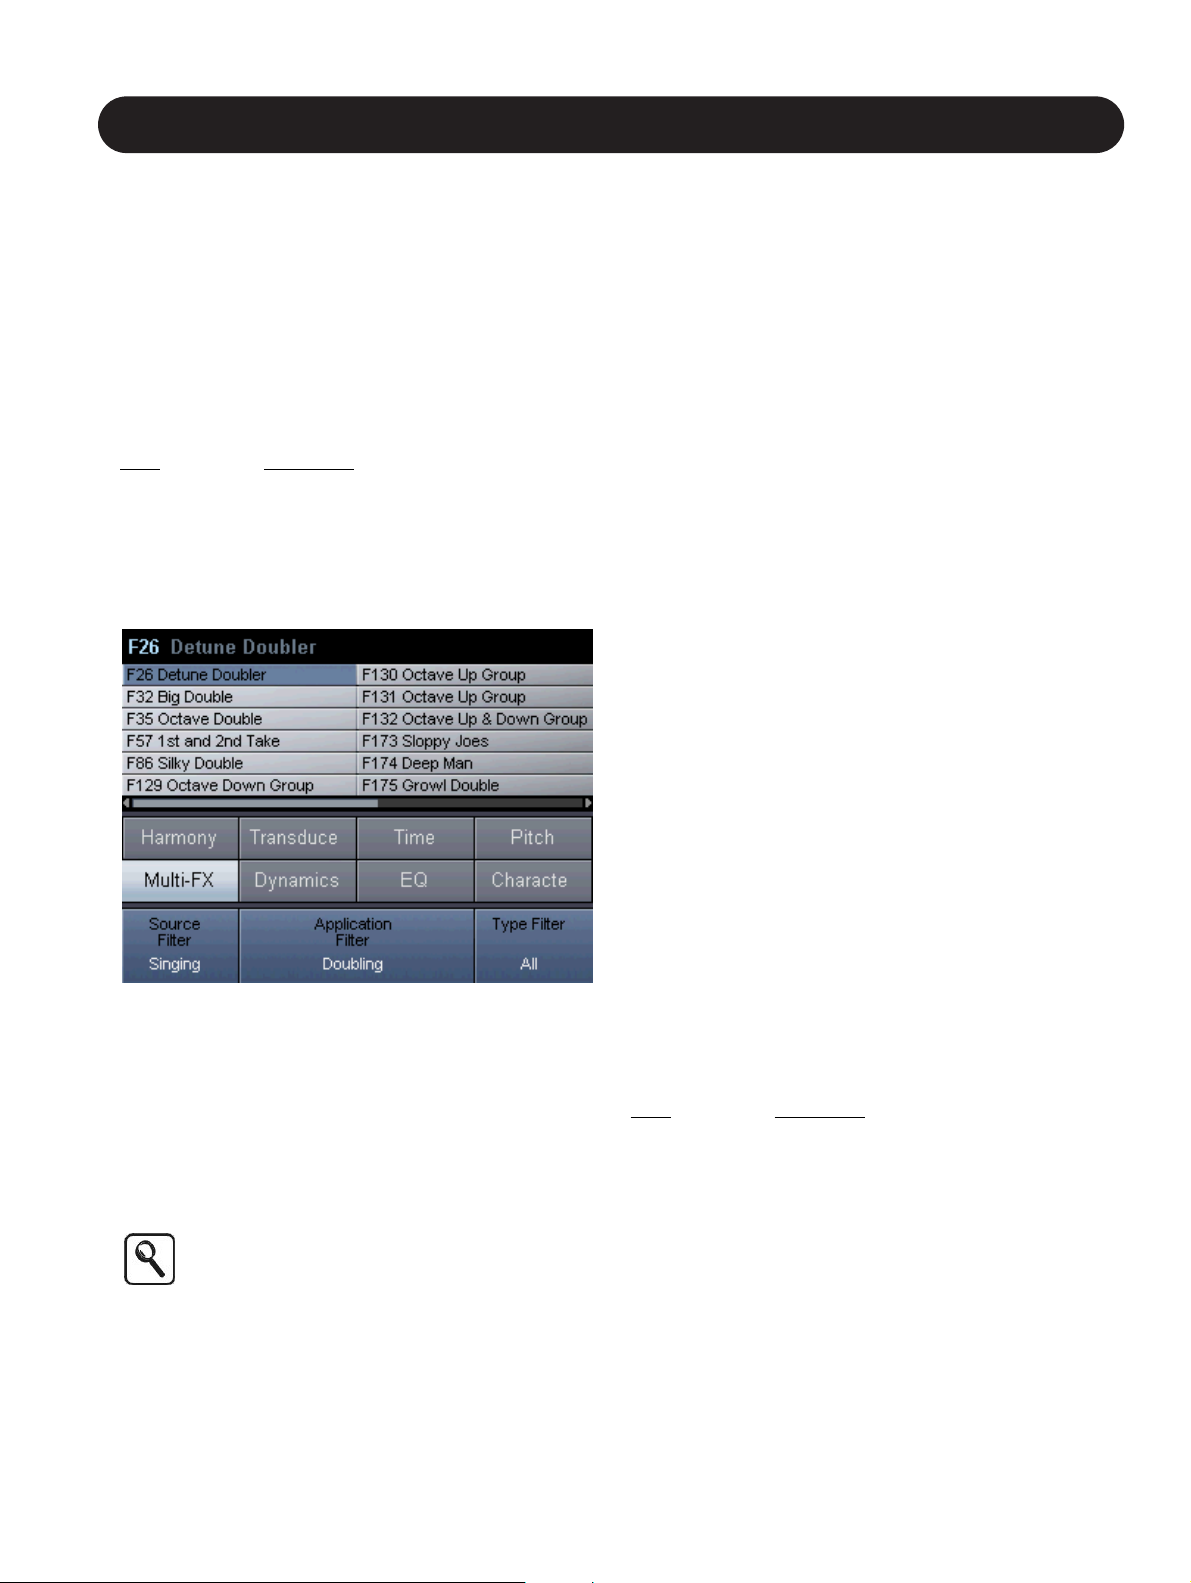
Adding Doubling Effects
A frequently used technique is to have a singer overdub
the same line several times to add richness and chorusing.
Some audio products try to simulate this effect, and while
they can create interesting sounds, they don’t recreate the
actual sound of overdubbed singers.
VoicePro has presets that accurately recreate the many
current doubling methods, sythesized and real. The fastest
way to find the doubling effect you require is to use the
Browser’s Search Function detailed below.
T
erm Description
Unison The same pitch
Micro shift Refers to an effect where detuned copies
of a vocal are played back at the same
time. Sometimes there is a time-varying
delay.
How to create doubling effects
1.Press the Browser Button.
2.Set the Source Filter to “Singing” and Application Filter to
“Doubling” with the appropriate Soft Knobs, to isolate the
Doubling presets.
3.Play the track or sing.
4.Scroll through the list using the Select/Scroll Wheel until
you find the sound you prefer.
5.Press the Home Button to access and adjust the
Assigned Edit Parameters for the preset you have
chosen.
Inflection, µMod and Harmony blocks can be used
individually or in combination to produce doubling
sounds. µMod is generally used to provide the
classic micro-pitched/detune doubling sounds.
Harmony and Inflection are used for more natural
sounds or extreme doubling sounds.
Correcting Vocal Pitch
More and more recorded singers, some great and some
still learning, are having their tuning adjusted with pitch
correction tools, more than ever before. This is a common
technique used to put a high gloss on vocals, and as a
result, the music buying public has grown to expect this
sound. VoicePro offers the control and transparent shifting
quality to allow you to produce the best vocal possible.
Tuning the pitch of a sung vocal track so that it still sounds
natural requires a little background information. First of all,
the ultimate natural pitch correction is to have a good
singer sing the track well! Once the singer has given their
best performance, you can apply the combination of subtle
automatic and targeted manual retuning with VoicePro.
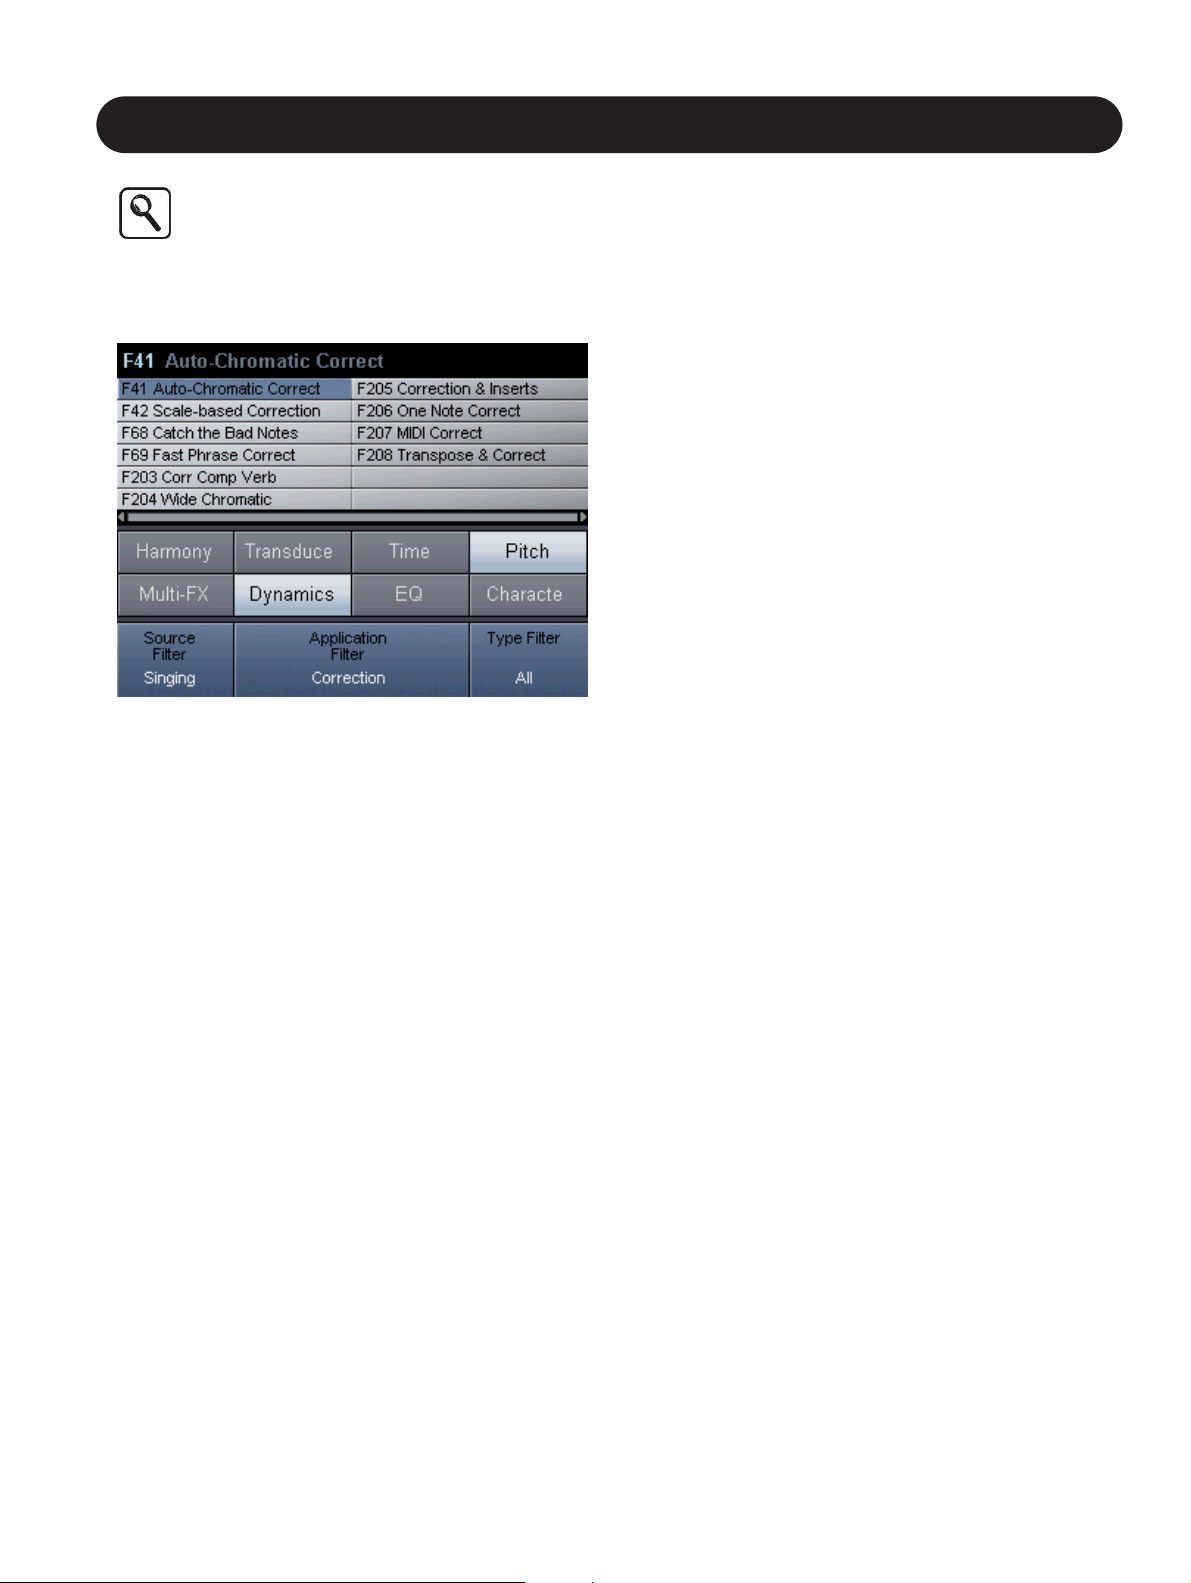
There are three ways of implementing pitch correction in
VoicePro:
• Scale-based automatic mode
• Scale-based automatic mode with temporary MIDI
override
• MIDI manual mode
In the Scale-Based mode, a key and scale for the song
needs to be set. For many styles of music this will work for
the entire song. For periodic sung notes that fall outside
the scale you’ve set, the best option is to use MIDI. Press
the notes on a MIDI keyboard that you would like the input
note forced to and then remove the notes allowing the
automatic mode to resume.
If the same note or notes are always corrected to the
wrong note or not being corrected at all, then you can
create a new custom scale or edit one of the factory
scales.
If you want to leave most of the singing unaffected and
correct only the odd note, you can disable the automatic
scale-based mode and use only a MIDI keyboard to trigger
correction where you feel it’s required.
T
erm Description
Window The pitch range around a scale tone
where correction will occur.
Key The musical center of the song i.e. key of
C
Scale Major, minor or custom (edited); these
are the target notes that the vocal is
nudged towards.
Attack Rate When a singer's pitch falls winthin the
Window, the Attack Rate Parameter sets
how fast the vocal will be shifted to the
Window’s center.
Amount Can be used to reduce the effect of
correction if desired.
Page 21
21
Section 3: Music Applications
Finding the correct Key and Scale:
Often the key and scale can be set to the first or
last chord in a song e.g. G Major. If no key and
scale settings seem to work, then a custom scale
can be crafted or you can switch to manual MIDI
control
How to apply automatic pitch correction to a vocal
1.Navigate to the browser and set the Source Filter to
“Singing” and the Application Filter to “Correction”, then
select a preset using the Scroll Wheel and Ok Button.
2.Enter the key and scale of the song using the
appropriate Soft Knobs.
3.Adjust the Attack Rate Parameter with the appropriate
Soft Knob to balance the rate of incoming new notes and
the speed at which correction happens. A value of “20” is
a good place to start.
4.Some songs have a chord structure in which a single key
and scale setting may not work. Your options are to:
• Change key and scale for each song section.
• Create a custom pitch correction scale.
• Chose the manual pitch correction mode that allows
you to press notes on a MIDI keyboard to provide the
target pitches for correction. (see next paragraph)
Using MIDI to correct notes outside the scale
1. Follow the steps outlined previously to set a key, scale
and associated parameters that work for most of your
song.
2. Connect a MIDI keyboard to VoicePro (see Utility section
for MIDI details)
3. Pressing a single note, or cluster of notes will cause
VoicePro to apply pitch correction when the input falls
within the MIDI Window around any of the pressed
notes. Releasing the notes allows the automatic
correction to resume. The MIDI correct notes are also
affected by the MIDI Rate Parameter.
How to apply manual pitch correction
1.Connect a MIDI keyboard to VoicePro (see Utility section
for MIDI details)
2.Navigate to the browser and set the Source Filter to
“Singing” and the Application Filter to “Correction”, then
select a preset using the Scroll Wheel and Ok Button.
3.Press the notes that require retuning on the MIDI
keyboard as they are sung.
4.Adjust the Attack Rate Parameter if required using the
appropriate Soft Knob.
Page 22
22
Section 3: Music Applications
Modifying Vocal Melody
While most producers like to think they have the lead or
harmony vocal melody arranged correctly before having the
singer sing it, there are times when the pitch of a note or
phrase needs to be changed after the singer has left your
studio. You can re-schedule the singer and set up the
signal path again to duplicate the sound or you can use
VoicePro's high quality pitch shifting to make the change.
The technique is much the same as when applying manual
pitch correction, only the target pitches are farther from the
singer's input note. Also, Soft Knob Parameters and shift
techniques for presets differ from those used for pitch
correction.
How to modify vocal melody
1.Connect a MIDI keyboard to VoicePro (see Utility section
for MIDI details)
2.Select or create a preset with Pitch Shift Mode set for the
VirtuaLead path.
3.Select the target notes on the MIDI keyboard to which
you want the singer's pitch shifted to as they are sung.
4.Adjust the Smoothing Parameter if required using the
appropriate Soft Knob.
Modifying vocal phrasing
A large part of a successful vocal is getting the timing just
right. Having a vocalist linger or accelerate through certain
words can link the vocal and instrument tracks better for an
improved, and cohesive mix. Rather than have a singer
record take after take to get phrasing right, you can get
them to sing as close as possible and then edit using
VoicePro.
In VoicePro, you have the ability to manipulate vocal
phrasing in a spontaneous way using the front panel Soft
knobs.
T
erm Description
Playback Rate Think of this as the "accelerator" and
"brake pedal" for the timing of the
incoming audio.
Reset Returns playback to real time instantly
Accelerating playback is only possible if you set
the Reset Position to “Middle” or “Back” and then
select “Reset”.
In order to slow time down you’ll have to wait until
the recording buffer fills with audio.
How to slow vocal phrasing (no delay)
1. Using the Matrix | Blocks Tab configure a preset with all
blocks off except Time. Use Mix to tunr all levels off
except VirutaLead
2. Navigate to the Time | Mode Tab and set the Mode to
“Rate Freestyle”
2. Turn the Soft Knob controlling Playback Rate to the left
to slow playback.
3. Turn the Soft Knob for the Reset Parameter any
direction to resume realtime playback.
How to speed up and slow vocal phrasing
1. Follow steps 1-2 above
2. Set the Reset Position to “Middle” and selec the Reset
Parameter
3. Turning the Playback Rate Soft Knob to the left slows
playback speed and turning to the right increases the
speed.
5. Turn the Soft Knob for the Reset Parameter any
direction to resume realtime playback.
When the Reset Position is set to “Middle”
configure your DAW for 2500 ms of delay
compensation to stay synchronized.
Page 23
23
Section 3: Music Applications
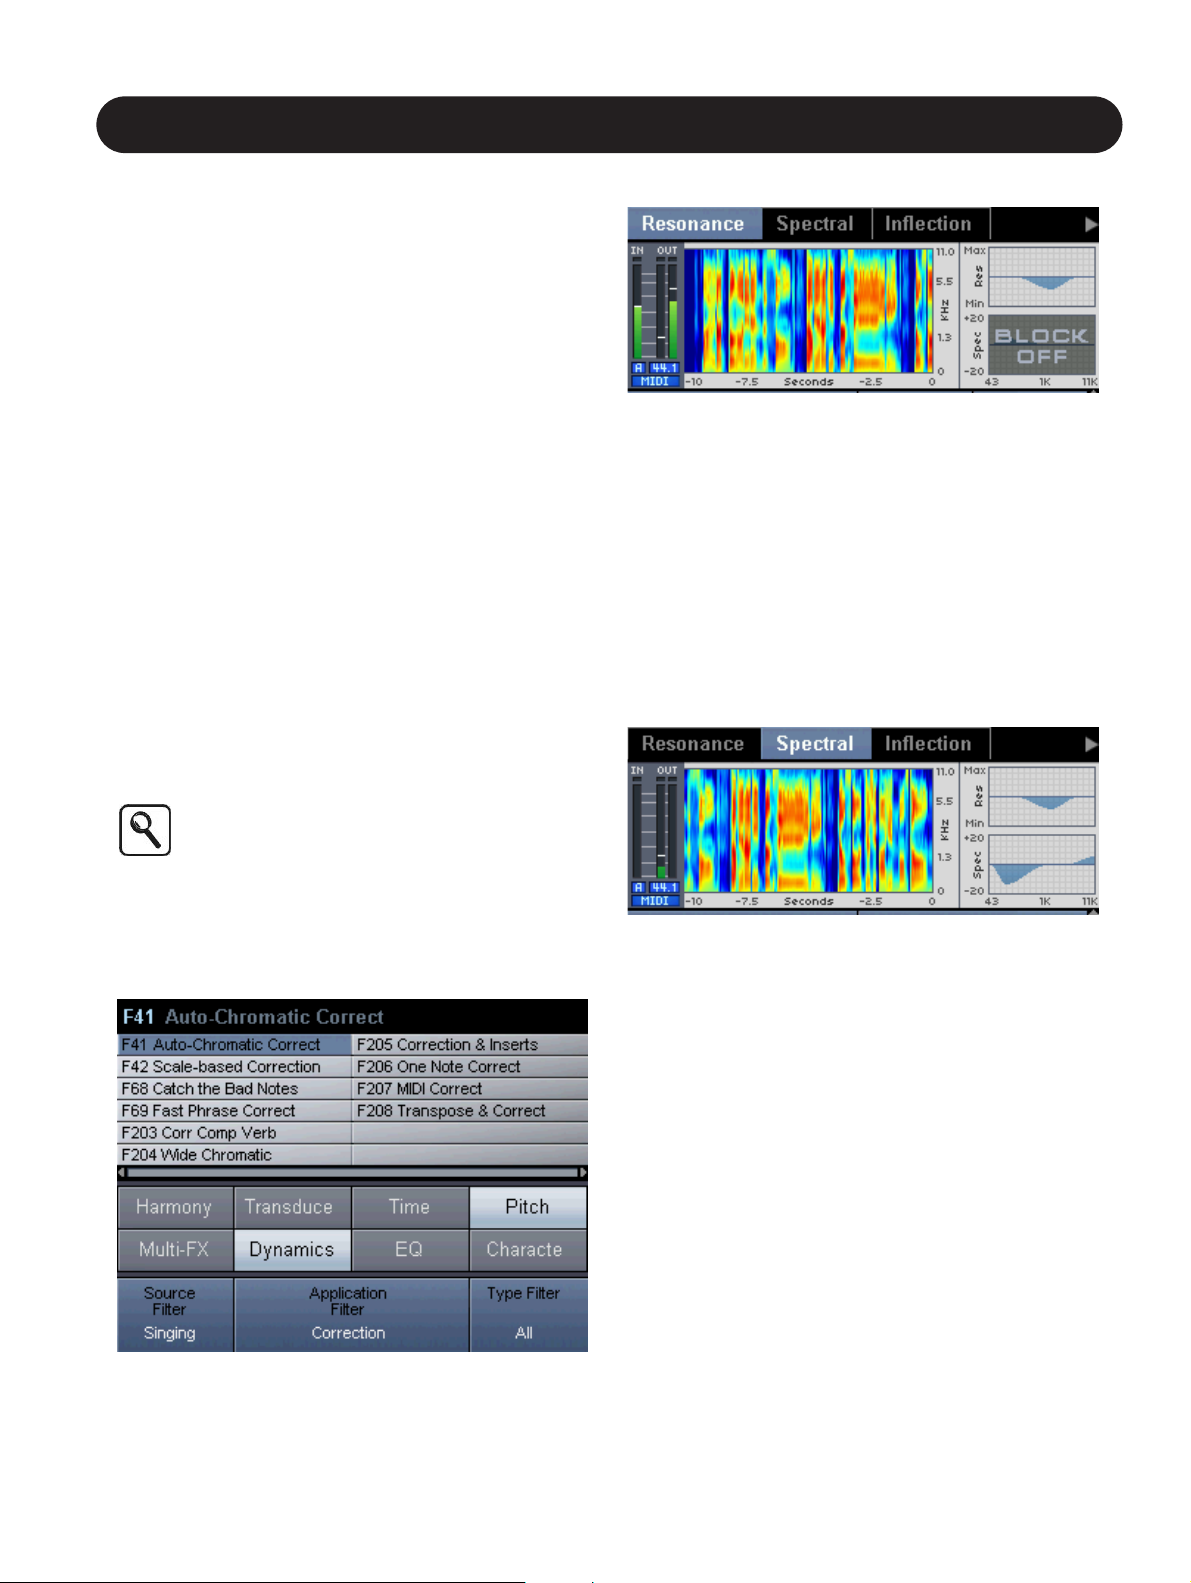
Modifying Vocal Character
In VoicePro, character is the term used for the over-all
effects of a group of blocks found under the Character
Button:
• Resonance
• Spectral
• Inflection
• Vibrato
• Breath
• Growl
As the name suggests a new vocal character can be given
to an existing voice which allows you to accomplish a wide
range of production goals: You can enhance a thinsounding vocal performance without EQ, produce
convincing character voices for children's songs in
animated movies, create interesting choir and duet tracks,
and many more effects. Applications are discussed with the
individual blocks.
Each character block can be used independently or
combined with the others into a preset. The Factory
presets have been created containing various groups of
these blocks as a starting point. Understanding what each
block does will help you to use, edit, and create presets
effectively.
A note about Styles in VoicePro:
Styles are presets-within-presets that allow you to
get the sound you want faster. A large number of
user and behind-the-scene parameters are
required to construct a particular effect, so styles
are created that combine the settings. You can edit
the styles, and the changes you make will be
stored with the preset.
How to load a character preset
1.Navigate to the browser and set the Source Filter to
“Singing” and the Application Filter to “Character”, then
select a preset using the Scroll Wheel and Ok Button.
How to use resonance to modify vocal character
1.Follow instruction in “How to load a character preset.”
2. Use the Matrix | Blocks Tab to turn off all blocks except
Resonance.
The Resonance block simulates changes in the physiology
of the vocal tract. In musical applications, this can be used,
for example, to make a singer's voice sound deeper
without shifting the pitch, or to make a singer sound
younger. Resonance can also disguise a singer's voice as
a special effect in the breakdown or hook section of a
song. Singers who sing a number of simultaneous ad spots
in a single market could use presets based on resonance
to simulate another singing voice.
How to use Spectral to shape vocal character
1.Follow instruction in “How to load a character preset.”
2. Use the Matrix | Blocks Tab to turn off all blocks except
Spectral.
Spectral is an intelligent EQ that can be used to restore
energy in frequencies modified by the Resonance block.
The intelligence in Spectral comes from the fact that
sibilants (S, T, D sounds etc) are not processed by any EQ
adjustments unless you want them processed. This has
applications beyond mere compensation; consider that you
can now boost highs for a bright, modern sound, without
the usual increase in sibilance.
Page 24
24
Section 3: Music Applications
How to use Inflection to add variation to vocal
character
1.Follow instruction in “How to load a character preset”.
2. Use the Matrix | Blocks Tab to turn off all blocks except
Inflection.
Inflection is the automatic pitch and timing modification
block in VoicePro. It can superimpose the pitch warbles,
scoops, and natural timing fluctuations of human singing
onto any voice. In musical applications, Inflection could
produce a "second take" that, when mixed with the dry
track, could sound very convincingly like a singer doubling
themselves. Inflection could also be used to modify the
beginning of notes with small pitch scoops that can
introduce quirky personality into a track.
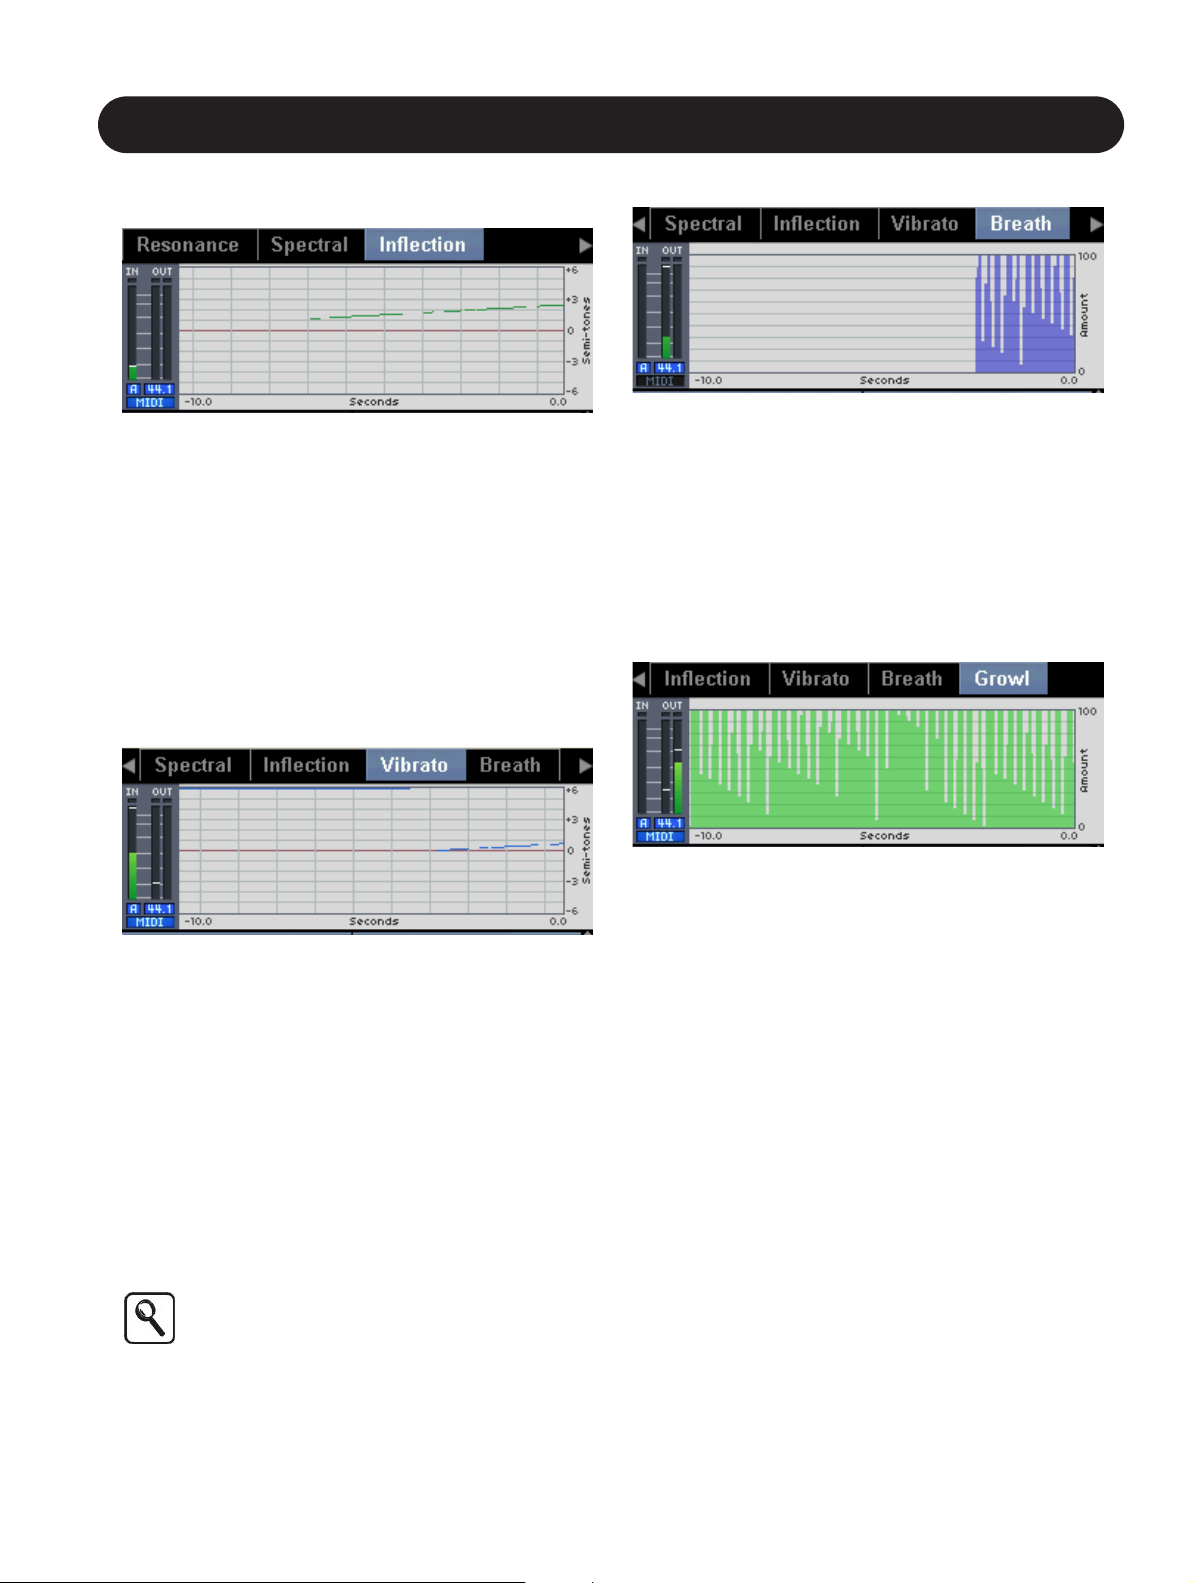
How to use Vibrato to create alternate characters
1.Follow instruction in “How to load a character preset”.
2. Use the Matrix | Blocks Tab to turn off all blocks except
Vibrato.
Vibrato as a singing technique needs no introduction, yet
its implementation in VoicePro should be clarified. The
Vibrato block can be used to create an alternate singing
persona for singers. A distinctly unique vocal backup group
can be made by the same singer overdubbing multiple
tracks while singing through the Vibrato block. This is more
effective than the singer attempting to sing in an unnatural
way for an extended period of time. Strikingly real character
modification is possible using the various Vibrato styles
because they have been created by detailed examinination
of many singers' voices.
When changing Vibrato Styles, the effect won’t
change until a onset triggers the new style.
How to use Breath to introduce air
1.Follow instruction in “How to load a character preset”.
2. Use the Matrix | Blocks Tab to turn off all blocks except
Breath.
The Breath block can be used to create the intimate sound
of a breathy singer or a breathy performance. At extreme
settings, the Breath block can turn a track sung in full
voice, into a whisper. This and other varied Breath styles
are available to closely match the voice of the singer and
the requirements of the track.
How to use Growl
1.Follow instruction in “How to load a character preset”.
2. Use the Matrix | Blocks Tab to turn off all blocks except
Growl.
Growl adds an effect that evokes the gravelly voices of
singers like Louis Armstrong and Bob Seger. While a
preset using the Growl effect can easily be dialed up to
process a recorded voice, the most effective use is to have
the singer hear the effect while they sing. This allows them
to modulate the volume of their voice to introduce the effect
when desired. There are various Growl styles available to
suit the track.
Page 25

25
Section 3: Music Applications
Working with Classic FX
In VoicePro, the effects that are termed "classic" are
created using the µMod, Delay and Reverb blocks. The
resulting effects include:
• Reverb
• Reverb with ducking
• Delay
• Delay with ducking
• Tap Tempo Delay
• Chorus
• Flange
• Stereo detuning
• Combination sounds (Reverb & Delay, etc.)
The Reverb and Delay effect blocks perform their named
functions, and the µMod (micromod) block performs the
Chorus, Flange, and Stereo Detuning functions. Each block
has a number of pre-programmed styles to allow fast
access to a number of interesting and useful effects without
parameter editing. Of course, you can edit the styles and
store the changes with the preset.
How to load a Classic FX preset
1.Navigate to the browser and set the Source Filter to
“Singing” and the Application Filter to “Classic FX”, then
select a preset using the Scroll Wheel and Ok Button.
How to enable classic effects in a preset
1. Press the Matrix Button.
2. Press the Up or Down Arrow Buttons to highlight the
Multi-FX row.
3. Turn the appropriate Soft Knobs clockwise to enable the
effects desired.
4. If you hear no effects even though audio input is
present, press the Mix Button.
5. Use the Right or Left Arrow Buttons to scroll the screen
so that you can see the effects send levels at the top of
the screen. These are usually set at nominal send
settings in the Factory presets but you can adjust them if
needed using the Arrow Buttons and Soft Knobs.
6. Use the Arrow Buttons to reveal the effects return levels
at the bottom of the screen. These are usually set at
nominal send settings in the Factory presets but you can
adjust them if needed using the Arrow Buttons and Soft
Knobs.
How to mute the classic effects in a preset
1. Press the Matrix Button.
2. Press the Up or Down Arrow Buttons to highlight the
Multi-FX row.
3. Turn the appropriate Soft Knobs counter-clockwise to
mute any effects enabled in the preset.
4. Press Store twice if you want to save the change to the
preset.
5. Press the Home Button.
How to edit the classic effects
1. Follow the previous instructions to enable the desired
effects block in the Matrix and to confirm signal routing is
correct in the mixer.
2. Press the Multi-FX Button to access the effect editing
parameters.
3. Press the Right or Left Arrow Buttons to locate the tab
containing parameters for the effect you want to edit e.g.
Reverb.
4. Use the Up and Down Arrow Buttons to locate the Edit
row containing the Style Parameter.
5. Turn the appropriate Soft Knob to change to the desired
style.
6. If further editing is required, you can edit all parameters
using a combination of the Up and Down Arrow Buttons
and the Soft knobs.
7. Press Store twice to save edits with the preset.
Page 26

26
Section 3: Music Applications
Shaping Vocals with
Equalization and Dynamics
There are two independent but identical sets of high
precision EQ and dynamics processors in VoicePro. One
set is inserted in the harmony voice path affecting only the
harmony voices. The other set is inserted before the input
signal is split off to the Dry Lead and VirtuaLead signal
paths.
Additionally, the Spectral Block under Character is also an
effective tool for shaping vocals.
Regardless of which path you insert these blocks into, the
controls are the same:
EQ:
• Low cut frequency
• Low shelf gain and frequency
• Mid 1 gain, frequency and bandwidth
• Mid 2 gain, frequency and bandwidth
• High shelf gain and frequency
Dynamics
• Threshold
• Ratio
• Release
• Makeup
• Knee
• Mode
De-Ess
• Amount
• Frequency
While other features of VoicePro can be adequately
controlled with the four Assigned Edit Parameters on the
Home Screen, full control of the EQ and dynamics blocks
is done in their respective tabs.
How to apply dynamics and EQ in VoicePro
1. Navigate to the browser and set the Source Filter to
“Singing” and the Application Filter to “Shaping”, then
select a preset using the Scroll Wheel and Ok Button.
2. If you would like to edit controls not found on the Home
Screen, press the Dynamics button which will take you to
the tabs for compression, and de-essing where you will
find the complete set of controls.
3. Use the Up/Down Arrow Buttons and Soft knobs to
locate the desired parameters and to adjust them.
4. Follow the previous instructions to add EQ. The
processing blocks can be used simultaneously if
required.
How to add Dynamics and EQ to an existing preset
1. After loading the desired preset, press the Matrix Button
to enable the processing blocks you require.
2. To access insert parameters on the Dry Lead or
VirtuaLead path, press the Dynamics or EQ Buttons.
3. To access insert parameters on the Harmony path, press
the Harmony Button, then use the Arrow Buttons to
locate the EQ, Compressor and De-Ess tabs.
3. Use the Up/Down Arrow Buttons and Soft Knobs to
locate and adjust the required parameters.
4. Press the Store button twice to save.
Note that there is plenty of gain available for each
of the four EQ bands and compressor makeup to
seriously exceed the headroom in VoicePro. If you
hear unmusical cracking sounds while adjusting
these, reduce the amount of send to the unit or
reduce the Voice Sensitivity Parameter in
Utility/IO.
Page 27

27
Section 3: Music Applications
Creating Special Effects
By combining multiple blocks in VoicePro with different Mix
routings, it’s possible to create limitless Special FX. These
Special FX can be useful in finding a hook for a bridge or
chorus of a song. Some Special FX can be low in the mix.
Other Special FX are meant to be the same level as the
dry voice.
How to load a Special FX preset
1. Navigate to the browser and set the Source Filter to
“Singing” and the Application Filter to “Special FX”, then
select a preset using the Scrol Wheel and Ok Button.
Tips for designing Special FX presets
• Mix: experiment with using “Pre” for FX sends and
turning off the Dry, VirtuaLead and Harmony levels.
• FX Routing: try routing an FX send signal itonto µMod.
Then route µMod into Delay, and Delay in Reverb.
• Modulated Noise: select a Transducer Noise Style. Set
the routing to VirtuaLead. Then set the VirtuaLead µMod
send to pre and set the VirtuaLead level to “off”.
• Harmony: create a custom scale in “Scale” mode where
each note is assigned to the same note. This creates
interesting monophonic voices.
Page 28

28
Page 29

29
Section 4: Dialog and Speech Applications
Introduction
VoicePro has a number of applications for working with the
spoken word. With the Time, Pitch and Character
algorithms, any dialog performance can be enhanced or
transformed after the artist has left the studio. Additionally,
allowing the artist to monitor Character, Pitch & Time, and
Special FX presets in real-time, provides the opportunity for
further creativity.
This section provides step-by-step instructions on how to
get quick and creative Dialog/Speaking results with
VoicePro.
In this section we cover:
• Changing the Character of a performance
• Re-creating the sound of a phone, radio or other
transducer
• Creating a low pitched voice
• Re-phrasing the timing of a performance
• Shaping a voice with EQ, Dynamics and Character
• Special FX with speech
Changing the Character of a
Performance
Every human voice has its own signature character. A
talented voice-over artist controls their performance to
mimic many different voices. Changing the Character of a
performance allows you to expand and tweak the sound of
any given performance.
An important question to answer before modifying
character is whether you want an enhancement or a
transformation.
Enhancements are when you want to preserve the original
Character of the voice but bring out certain subtleties.
Typically, a good enhancement will use fewer Character
effects and/or pitch shifts smaller than 2 semitones. The
Amount Parameters for the Character blocks are typically
set at "Unity" or less.
Transformations are when you want the processed voice to
be dramatically different than the input voice.
Transformations will often use multiple Character blocks
and pitch shifts great than 2 semitones. The Amount
Parameters for the Character blocks are typically set at
"Unity" or above.
Transformations can be more realistic when the
voice artist can monitor the preset in real-time. In
this configuration, the artist will modify their voice
to bring out certain aspects of the preset.
How to select a Character preset
1. Enter the Browser Tab by pressing the Browser Button.
2. Use Edit 1 and 2 to configure the Source Filter to
"Speaking", and the Application Filter to "Character".
3. Using the Select/Scroll Wheel or the Arrows to preview
one of the Character presets.
4. When you've selected a preset, press "Ok" to load the
previewed preset.
Page 30

30
Section 4: Dialog and Speech Applications
Changing the gender or formants of a voice
1. Start with a Character preset loaded
2. Enter Matrix | Blocks Tab by pressing the Matrix Button
and using the Arrow Buttons.
3. Disabled all blocks except "Resonance"
4. Enter the Character | Resonance Tab by pressing the
Character Button and using the Arrow Buttons.
5. Use Edit 1 to audition various Resonance Styles. Try
raising or lowering the Amount Parameter for an
enhancement or transformation effect
If a Resonance Style effect does not seem to be
audible on a given voice, try Shifting the
Frequency Shift Parameter up or down to tune the
Style.
Getting the Spectral Balance right for Character
change
Sometimes when a Resonance is applied to a voice, the
spectral response needs to be compensated. You'll know
this is the case because your immediate thought will be to
reach for EQ. For better results, follow the steps below.
1. Start with a Character preset and disable all blocks
except Resonance and Spectral.
2. Enter the Character | Spectral Tab by pressing the
Character Button and using the Arrow Buttons.
3. Use Edit 1 to audition various Spectral Styles . Use the
Frequency Shift Parameter to tune the Style to the input
voice. Try raising or lowering the Amount Parameter.
Adding Rasp or Growl to a Voice
If rasp or growl is already apparent in a voice, the Breath
or Growl Block are very effective at naturally exaggerating
the effect.
1. Start with a Character preset and disable all blocks
except Growl
2. Enter the Character | Growl Tab by pressing the
Character Button and using the Arrow Buttons.
3. Use Edit 1 to audition various Growl Styles. Try changing
the Amplitude and Edge Weight Parameters to raise or
lower the growl affect based on level or word onsets.
More growl or raspy voice sounds are possible
using combinations of the Resonance Style
"Throaty Voice" and the Breath Styles "Light Rasp"
and "Heavy Rasp".
Re-creating the Sound of a Phone,
Radio or other Transducer
VoicePro's Transducer emulates the tonal, distortion, and
noise components of various transducer devices. These
devices include combinations of the components including
phones and radios. The components can also be used on
their own to create distortions, band filters, and modulated
noise patterns.
How to select a Transducer preset
1. Enter the Browser Tab by pressing the Browser Button.
2. Use Edit 1 and 2 to configure the Source Filter to
"Speaking", and the Application Filter to "Transducer".
3. Using the Select/Scrol Wheel or the Arrows to preview
one of the Transducer presets.
4. When you've selected a preset, press "Ok" to load the
previewed preset.
Factory presets with Application set to
"Transducer" only use the Transducer Block. The
Special FX Application contains some presets that
make use of the Transducer block in combination
with Reverbs, Delays, etc.
Selecting a Transducer Style and modifying the sound
1. Start with a Transducer preset and disable all blocks
except Transducer
2. Enter the Transducer | Transducer Tab by pressing the
Tranducer Button and using the Arrow Buttons.
3. Use Edit 1 to audition various Transducer Styles. It is
normal for the levels to be quite different between Styles.
4. To add or reduce noise in the Style use the Overall
Noise Amout Parameter.
5. To add or reduce distortion in the Style use the Distortion
Amount Parameter.
Page 31

31
Section 4: Dialog and Speech Applications
Creating a low pitched voice
Interesting animated characters, monster or alien voices
are often created with large down-shifts. Follow the steps
below to down-shift and adjust the quality.
1. Enter the Browser Tab by pressing the Browser Button.
2. Use Edit 1 and 2 to configure the Source Filter to
"Speaking", and the Application Filter to "Pitch & Time".
3. Using the Select/Scroll Wheel or the Arrows to select the
preset "Large Down Shift"
4. When you've selected the preset, press "Ok" to load.
5. Enter the Pitch | Pitch Shift Tab by pressing the Pitch
Button and using the Arrow Buttons.
6. Set the Coarse Shift Parameter to the desired downshift
amount
7. Manipulate the UV Shift Amount and Formant Correct
Amount to modify the quality of the down-shift.
The Downshift Quality Parameter is best used for
smoothing out the 'breaks" in a voice introduced
when its down-shifted beyond an octave.
Re-phrasing the Timing of a
Performance
VoicePro's Time Block uses TC-Helicon's FlexTime
TM
algorithm to stretch and speed up a voice performance.
The buffer for the Time effects is 5 seconds. The main
application for the Time block is dynamic control over the
phrasing of a voice by slowing down and speeding up
words or phrases. Additionally, it is possible to reduce or
increase the length of a 30 second voice clip by +/-17%
Real-time control over timing
1. Enter the Browser Tab by pressing the Browser Button.
2. Use Edit 1 and 2 to configure the Source Filter to
"Speaking", and the Application Filter to "Pitch & Time".
3. Using the Select/Scroll Wheel or the Arrows to select the
preset "Pitch & Time Freestyle"
4. When you've selected the preset, press "Ok" to load.
5. Enter the Time | Rate Freestyle Tab by pressing the
Time Button and using the Arrow Buttons.
The Time block is typically configured to start at
the beginning of the buffer. This means the first
operation has to be slowing down the voice.
However, it is possible with the Reset Position
Parameter to set the buffer starting point to be
"Middle" This will allow the audio rate to be
increased or decreased.
Page 32

32
Section 4: Dialog and Speech Applications
Shortening or lengthening the timing of a voice
1. Enter the Browser Tab by pressing the Browser Button.
2. Use Edit 1 and 2 to configure the Source Filter to
"Speaking", and the Application Filter to "Pitch & Time".
3. Using the Select/Scrol Wheel or the Arrows to select the
preset "Pitch & Time Freestyle"
4. When you've selected the preset, press "Ok" to load.
5. Use the Matrix | Blocks Tab to disable all blocks except
Time
5. Enter the Time | Rate Freestyle Tab by pressing the
Time Button and using the Arrow Buttons.
6. If you want to lengthen the clip set the Reset Position to
“Front”. If you want to shorten the clip set the Reset
Position to “Back”
7. On Edit Row 1, turn Edit 3 to Reset the buffer
8. Set the Rate Range to “Small” and Tape Effect to “0”
9. Set the appropriate Playback Rate to shorten or
lenghthen the audio clip. To start again, turn Edit 3 on
Edit Row 1 to reset the Buffer.
The UV Mod Parameter effects the quality of the
time shift. When UV Mod is set to 100, all unvoiced signals are time shifted. This can sound
unnatural. A UV Mod setting below 20 can
reproduce more natural results. However, when
UV Mod is set below 100, the resulting Playback
Rate will not be precise because no time
stretching will occur during un-voiced signals.
Shaping a voice with EQ, Dynamics
and Character
There are two independent but identical sets of high
precision EQ and dynamics processors in VoicePro. One
set is inserted in the harmony voice path affecting only the
harmony voices. The other set is inserted before the input
signal is split off to the dry and VirtuaLead signal paths.
Additionally, the Spectral Block under Character is also an
effective tool for shaping vocals.
Regardless of which path you insert these blocks into, the
controls are the same:
EQ:
• Low cut frequency
• Low shelf gain and frequency
• Mid 1 gain, frequency and bandwidth
• Mid 2 gain, frequency and bandwidth
• High shelf gain and frequency
Dynamics
• Threshold
• Ratio
• Release
• Makeup
• Knee
• Mode
De-Ess
• Amount
• Frequency
While other features of VoicePro can be adequately
controlled with the four Assigned Edit Parameters on the
Home Screen, full control of the EQ and dynamics blocks
is done in their respective tabs.
How to apply dynamics and EQ in VoicePro
1. Navigate to the browser and set the Source Filter to
“Speaking” and the Application Filter to “Shaping”, then
select a preset using the Scroll Wheel and Ok Button.
Page 33

33
Section 4: Dialog and Speech Applications
2. If you would like to edit controls not found on the Home
Screen, press the Dynamics Button which will take you
to the tabs for compression and de-essing where you will
find the complete set of controls.
3. Use the Up/Down Arrow Buttons and Soft knobs to
locate the desired parameters and to adjust them.
4. Follow the previous instructions to add EQ. The
processing blocks can be used simultaneously if
required.
How to add dynamics and EQ to an existing preset
1. After loading the desired preset, press the Matrix Button
to enable the processing blocks you require.
2. To access insert parameters on the dry or VirtuaLead
path, press the Dynamics or EQ Buttons.
3. Use the Up/Down Arrow Buttons and Soft Knobs to
locate and adjust the required parameters.
4. Press the Store button twice to save.
Note that there is plenty of gain available for each
of the four EQ bands and compressor makeup to
seriously exceed the headroom in VoicePro. If you
hear unmusical cracking sounds while adjusting
these, reduce the amount of send to the unit or
reduce the Voice Sensitivity Parameter in Utility |
I/O.
Special FX with Speech
The Special FX presets were created to quickly call up
sounds which are notoriously time consuming to re-create
in the post production environment.
How to load a Special FX preset
1. Navigate to the browser and set the Source Filter to
“Speaking” and the Application Filter to “Special FX”,
then select a preset using the Scroll Wheel and Ok
Tips for designing a Special FX
• Mix: experiment with using “Pre” for FX sends and
turning off the Dry, VirtuaLead and Harmony levels.
• FX Routing: try routing an FX send signal into µMod.
Then route µMod intro Delay, and Delay in Reverb.
• Modulated Noise: select a Transducer Noise Style. Set
the routing to VirtuaLead. Then set the VirtuaLead µMod
send to pre and set the VirtuaLead level to “off”.
• Harmony: create a custom scale in “Scale” mode where
each note is assigned to the same note. This creates
interesting monophonic voices.
Page 34

34
Page 35

35
Section 5: Live Performance Applications
Introduction
While VoicePro is an excellent tool for the studio, it can
also be used for creating memorable voice effects in a live
performance setting. Every musical group that features the
human voice can benefit from using VoicePro including
single acts or duos, touring pop acts and, live theatre
performers.
This section is more of an introduction to live vocal
processing applications as opposed to detailed feature
discussions. Further parameter detail is found in the
Detailed Parameters Description Section.
In this section we cover:
• Live hookups
• Some features applicable to live performance.
• Finding presets
• Optimizing latency
• Using MIDI
Hookup:
VoicePro does not feature a microphone preamp so this
must be handled externally by an onstage or house
console. In a live show it's best to run VoicePro as a monosend stereo-return channel insert with routing of the dry
signal handled by VoicePro's internal mixer. This allows the
onstage performer the use of VoicePro’s voice
transformation capabilites as well as dynamics and EQ.
Also, some effects, such as uMod, often sound best fully
wet. VoicePro has an analog hardware bypass when power
is removed which adds a good measure of security in highpressure live shows. Also, the auxilliary input allows use of
VoicePro's non-pitch shifting effects for other instruments
and singers in bands that have their audio mixer onstage.
Notes on VoicePro features in live
performance:
Pitch correction, harmony, dynamics and EQ, vocal
transformation, distortion, and Classic FX can all be
used effectively when performing live.
• Pitch correction will help deliver a more polished vocal in
live performance. One thing to note is that a singer hearing
their corrected voice in the monitor may be distracted at
first. If this is the case, the signal from the mic can be split
so that the monitor produces the unprocessed vocal and
the main house mix contains the corrected vocal. Also,
each song usually requires different key and scale settings
which can be saved as unique presets, and recalled by the
onstage performer or sound crew.
• Using the four additional voices within VoicePro for
harmony and doubling in live performance can produce
succesful results. Whether the harmonies are controlled by
a MIDI keyboard or by recalling user-specified key and
scale presets for each song, even a single harmony voice
produced by VoicePro will seriously improve vocals.
• Dynamics and EQ are usually handled by a front-of-
house sound mixer because he or she is responsible for
fitting vocals into the whole mix. This doesn't mean they
shouldn't be used by the performer with an onstage
VoicePro. Also be aware that these effects can increase
the risk of monitor feedback.
• Vocal transformation can create memorable vocal effects
live, compensate for a thin sounding voice, and even add
extra breathiness where it's required.
• Distortion and band-limited megaphone effects are
frequently used in pop songs and these can now be easily
generated live with VoicePro. The same caveat regarding
feedback with dynamics and EQ applies here.
• Reverb, modulation effects, and delay fit perfectly in live
performance and give the onstage performer more control
of effects, but its important to be aware of the balance of
dry and effect in the mix the audience hears.
Page 36

36
Section 5: Live Performance Applications
Optimizing Latency
Latency is a term for audio signal delay that results from
DSP processes. When performing live, delay between
singing and hearing the resulting sound from the monitors
can be distracting. VoicePro has a system setting that you
can adjust if necessary to trade audio performance for
lower latency. The factory default latency setting may work
fine for you depending on which audio processing block
you’re using. If you would like to lower the latency then you
can adjust the Latency Mode Parameter to do so.
How to adjust latency for live performance
1.Press the Utility Button
2.Use the Arrow Buttons to locate the System Tab
3.Scroll down to the Latency Mode Parameter
4.Use the Soft Knobs to choose the value that works best
for you while vocalizing through the preset you intend to
use in performance.
MIDI and live performance control
VoicePro has no connection for a footswitch, so toggling
presets, bypass etc. live is only possible with a third-party
MIDI foot controller. If you want live control of effect levels
etc., one or more MIDI volume pedals would be required as
well.
If you will be using VoicePro for live harmonies, then you
will need to send MIDI control signals for Notes and Chord
mode presets from a MIDI keyboard. This requires
VoicePro’s MIDI channel and continuous controller (CC)
settings to match your keyboard and footswitch devices.
How to set VoicePro's MIDI Parameters
1.Press the Utility Button
2.Scroll to the MIDI Tab using the Arrow Buttons
3.Use the Arrows and Soft Knobs to locate and adjust the
relevant parameters (more information on MIDI is found in
Detailed Parameters: System). Usually, for live
performance, the main settings that have to match the
onstage MIDI controllers are Harmony V1(All) Channel
and, if you will be adjusting levels and ranges, the CC
Channel.
Page 37

37
Section 6: Detailed Parameter Descriptions
HOME
The Home Page allows for preset recall, status,
visualization and top-level editing. Aspects of the Home
Page are assigned per preset. This allows each preset to
be tailored to its application.
Recalling Presets
The Home Page presets can be previewed and recalled
using the Select/Scroll knob and the OK Button. In the
default "Preset Preview" mode, the block's status, editable
parameters and preset name are previewed. When the OK
Button is pushed, the previewed preset is recalled. In
"Preset Immediate" mode, presets are recalled immediately
when the Select/Scroll knob is turned.
The Home Page is split into the following elements from
top to bottom:
Preset Number / Name
The current or previewed preset number is represented
with "F" for factory presets or "U" for user presets. The
number corresponds to presets 1 through 250. Blank user
presets are not displayed. A "*" before a preset name
indicates the preset has been edited. White text indicates
the live/current preset while blue text indicates a previewed
and inactive preset.
Status Area
The Status Area shows vocal input and stereo output
meters. The index lines on the meters reflect the following
values top to bottom: -3 dB, -6 dB, -10 dB, -15 dB, -30 dB.
The red indicators above the meters display clip/overload
status. Below the meters, input status is displayed using
the following format: "D" for digital input, "A" for analog
input, followed by the sampling rate. "MIDI" is displayed
when MIDI data is detected at the MIDI input.
Assigned Visualization
Each preset can have a visualization assigned to the home
page. A visualization is the graphical area on any tab that
provides feedback for that tab. Factory presets are
authored to have the most useful assigned visualization for
the intended application. The home page visualization is
assigned on the MATRIX | Visualization Tab.
Preset Status Area
The Preset Status Area contains indicators for the top-level
blocks that have been enabled for the current or previewed
preset. Any individual block enabled under the Character,
Multi-FX and Dynamics Button; will cause its parent
indicator to show "enabled" in the preset status area.
Assigned Edit Parameters
Each preset can contain up to four assignable parameters
displayed on the bottom of the Home Page. These
parameters can be controlled using the 4 soft knobs.
Factory presets are authored to have the most useful
Assigned Edit Parameters for the intended application.
Page 38

38
Section 6: Detailed Parameter Descriptions
UTILITY | I/O
The UTILITY / I/O Tab sets the analog and/or digital
input/output configuration. Below are descriptions of the
various parameters:
Voice / Aux Input
Selects the input source for the lead or aux path.
Voice / Aux Sens. and Analog Out
In combination, these parameters are used for attaining the
best possible dynamic range when using VoicePro with
analog devices. Voice / Aux Sens sets the maximum input
operating level. Analog Out sets the maximum output
operating level. Nominal values for use in a typical auxiliary
send configuration on a mixer would be 3dBu for inputs,
and 24dBu for outputs.
Digital Multi Out Mode
This parameter configures the functionality of digital output
channels 3 to 8 (digital channels 1 & 2 are always fixed to
master stereo output). The three options are as follows:
"Off": no output on channels 3 to 8
"Voices": Harmony voices 1 to 4 on channels 3 to 6, lead
voice on channels 7, VirtuaLead on channel 8.
"Blocks": stereo harmony on channels 3 and 4, stereo lead
on channels 5 and 6, stereo Multi-FX on channels 7 and 8.
Clock Mode
Set this parameter at "Normal Rate" when working with
sampling rates of 44.1K or 48K. For sampling rates of
88.2K or 96K, set the parameter to "Double Rate".
Clock Master
Synchronizes VoicePro's digital inputs to the clock rate
from "Internal", "Word Clock" or "Digital In".
Clock Rate
When Clock Master is set to "Internal", the Clock Rate
parameter sets the sampling rates based on the Clock
Mode. If the Clock Master Parameter is set to "Digital" or
"External", the Clock Rate Parameter sets the target
sampling rate to which VoicePro will lock.
Master Output Level
Sets the stereo output level to the stereo analog and digital
channels 1 and 2.
Page 39

39
Section 6: Detailed Parameter Descriptions
UTILITY | System
This tab configures the functions related to bypass, latency,
and preset change. Below are descriptions of the various
parameters:
Bypass Mode
This parameter configures the functionality of the Bypass
Button. There are four options:
"Default" bypasses all the processing in VoicePro. Dry
Lead is routed to both left and right outputs
"Default with EQ & Comp" is the same as "default" mode
except Dynamics & EQ are left on.
"Harmony Mute" this is a harmony performance mode
where the harmony voices are turned on and off.
"Digital Wire" bypasses the voice input to the left
analog/digital 1 output, and the aux input to the right
analog/digital 2 output. This mode is useful when VoicePro
is being used for analog to digital conversion.
Key/Scale/Chord
When using the harmony block, musical information is
provided in the form of chords, key, and scale to produce
intelligent results. The Key/Scale/Chord Parameter
configures whether that information is set globally or by
preset.
Preset Change
There are two modes of Preset Change in VoicePro.
"Immediate" triggers preset changes when the Select/Scroll
knob is used on the Home Page. "Preview" requires the
OK Button to be pressed to load the selected preset.
Latency Mode
VoicePro contains several latency modes. These modes
affect the VirtuaLead path. The "Nominal" setting gives the
best quality. Lower latencies are useful for performing live
or monitoring applications. The latency of the VirtuaLead,
Dry Lead, and Harmonies are shown in the visualization
area.
Dry Delay
When Dry Delay is set to "None" the Dry Lead is outputed
as fast as the system allows. When "Harmony Sync" is
selected, the Dry Lead is delayed to synchronize with the
Harmony Processing.
Tuning Reference
All the Pitch and Harmony Parameters related to shifting
the pitch of the voice input are tuned to this reference.
A440 Hz is the default reference. Use this parameter for
tuning VoicePro in a situation where the reference tuning of
instruments is sharp or flat.
Page 40

40
Section 6: Detailed Parameter Descriptions
UTILITY | MIDI
The UTILITY / MIDI Tab configures MIDI functionality.
Below are descriptions of the various parameters:
CC Channel
Sets the channel to send and receive user interface control
messages (CCs).
VirtuaLead Channel
Sets the channel to receive Notes and pitch-bend
information for the VirtuaLead Pitch Block. How the Pitch
Block reacts to MIDI depends on the Pitch mode. See
PITCH / MODE for more information.
Harmony V1(all) Ch, V2-4
Sets the MIDI channel to receive notes and pitch-bend
information for the Harmony Block. "Harmony V1(all) Ch"
is the only channel used if the harmony mode is set to
Chord or Notes Mode. If the Harmony Mode is set to
"Notes 4 Channel", then the MIDI channels for Voice 2, 3,
and 4 are used for shifting the associated voices.
Filter
With this parameter, VoicePro can ignore Program
changes, SysEx, or both types of MIDI messages.
MIDI Clock
Determines whether global tempo is derived from MIDI
Clock or from the Tap Tempo Button.
Split Zone/Note
The Split Zone and Split Note Parameters divide the
keyboard into two zones. Notes coming from the one zone
are ignored while notes from the other zone are treated as
valid. Split Note Parameter sets the split point in MIDI.
Split Zone Parameter defines if notes above or below the
split note are accepted.
Notes Transpose
Transposes the incoming MIDI notes a specified number of
octaves. This applies to all incoming notes whether they
are destined for the Harmony or Pitch Block.
UTILITY | CC Assign
VoicePro contains a configurable CC assignment engine.
Up to 70 of VoicePro's preset parameters can be assigned
to any CC.
CC Assign Style
VoicePro contains several CC Assign Styles. This is a quick
way to get external control setup. The included styles
emulate aspects of other TC-Helicon products or typical
external control applications:
- Default - standard for VoicePro
- VoicePrismPlus
- VoiceWorks
- VoiceLive
- VoiceOne
- Quintet
Assigning CCs
Each of the 70 assignments has its own editing row. In the
edit row, choose the parameter and then the CC number.
Parameters and CCs must be mapped in a one-to-one
relationship.
Page 41

41
Section 6: Detailed Parameter Descriptions
UTILITY | Visualization
The Visualization Tab allows customization of graphics.
This includes some colors, types of pitch plots, and meter
peak hold times.
UTILITY | File
The UTLITY / File Tab allows for the backing up and
restoring of presets and utility parameters via MIDI. Use
the OK Button to execute the action.
Action
Select whether you want to dump, restore or erase data in
the product. The Dump Action requires the MIDI Out to be
connected to a MIDI sequencer or data filer. Press the OK
Button to execute the action.
Include
This parameter determines what data is dumped, restored
or erased when the OK Button is pressed. When the value
is set to "Presets", use the Preset Number Parameter to
select the preset. "All Presets" will dump all presets, or
restore/erase all user presets. The last option is "System
Settings", which will dump or restore all the parameters
under the Utility Button.
Page 42

42
Section 6: Detailed Parameter Descriptions
UTILITY | Network
This tab configures the networking parameters associated
with connecting VoicePro via TCP/IP for software updates.
Help for setting these parameters is included with software
updates.
DHCP is helpful when setting up VoicePro to an
established network. However, DHCP can
increase boot-up time. When not uploading
software it’s suggested to leave the parameter
disabled.
HELP
The Help System in VoicePro is context sensitive. Pressing
the Help Button will bring you to the Topic Tab related to
the function being viewed on the display. While in the help
system, you can tab right to the Contents Tab, where you
can navigate through all the topics.
Page 43

43
Section 6: Detailed Parameter Descriptions
TAP
The Tap Button is used to set the delay time in presets
where the Delay Source Parameter is set to tempo. In this
configuration, tapping the Tap Button will calculate a BPM
value.
HARMONY | Mode
The HARMONY / Mode Tab is used to configure how the
harmony voices will be generated. There are various levels
of intelligence and MIDI control for each mode. The
parameters for each mode can be different.
Mode: Shift
Shift Mode is best used for doubling and special FX. Shift
is the most basic mode of operation for the Harmony Block.
The harmony voices can be shifted a semi-tone away from
the input note. In this mode there is no musical intelligence.
Mode: Scale
In Scale Mode, harmonies use key and scale information to
create musically correct, diatonic harmonies. Scale Mode
harmonies are more dynamic than Chord Mode harmonies.
However, in some situations a custom scale needs to be
created on the Scale Tab.
Mode: Chord
In Chord Mode, harmonies use chord information to create
intelligent, diatonic harmonies based on the input pitch.
Chords can be detected in real time via MIDI or using the
Root/Chord Parameter.
Mode: Notes & Notes (4ch)
In this Mode, you provide VoicePro with specific MIDI note
information to determine the pitch of the harmony voices.
When "Notes (4ch)" is selected, each harmony voice is
assigned a MIDI channel. When "Notes" is selected, a
single MIDI channel controls the 4 harmony voices.
Key & Scale (available in Scale Mode)
Use these parameters to set the scale root (key) and scale
type. The scale defines the map for how the harmony
voices will react to the input pitch. Available scales are
Major/Minor 1,2 and 3. However, in some situations a
custom scale needs to be created on the Scale Tab.
Bend Range
This parameter sets how far a MIDI pitch-bender will shift
the voice.
Page 44

44
Section 6: Detailed Parameter Descriptions
Tuning
VoicePro includes three tuning options. These options have
no effect in Notes mode.
"Equal" Tuning uses approximations for the tuning of each
note, allowing us to easily alter the key of our music
without re-tuning our instruments. This is the same way
synthesizers are tuned.
"Just" Tuning maintains the relative ratios between pitches,
creating perfect harmonies. Just Tuning will sound natural
the majority of the time..
"Barbershop" Tuning differs from Just Tuning in Chord
Mode and is best used for a cappella applications.
Hold
This control engages the Harmony Hold feature. When set
to "On", Harmony Hold freezes the harmony voices while
allowing the lead voice to ad lib over top. When a preset is
stored, the parameter will always be saved as "Off".
Hold Release
Sets a fade-out time for the hold feature when returned to
the "Off" value.
Attack/Release (available in Chord and Notes Modes)
Attack Mode sets the envelope attack and release times for
harmony voices. Using these parameters can make
entrances and ends of harmony notes more natural. This
function works when Latch is "off" and MIDI is being used.
Latch (available in Chord and Notes Modes)
When enabled, the last chord remains active after the
notes have been released. When disabled, harmony output
stops when MIDI notes are released.
Root/Chord (available in Chord Modes)
Use these parameters to set the chord root (key) and chord
type. The chord defines the allowable notes for the
harmony voices.
Harmony | Shift, Scale, Chord or
Notes
The majority of parameters in this tab are vertically
assigned to one of the harmony voices: "V1" for voice 1,
"V2" for voice 2, etc.
Level
Each harmony voice can have its own level. There is also
an "Off" value to disable that harmony voice. Since up to 4
voices of harmony can be added, be sure to leave
headroom for additional level.
Voicing (available in Shift, Scale and Chord Modes)
In Shift Mode, the voices are shifted relative to the input
note. The values range from -24 semitones to +24
semitones creating parallel harmonies.
In Scale Mode, the Voicing Parameter specifies the interval
of the harmony note with respect to the input note
according to the selected scale. The range of values goes
from -2 octaves +2 octaves. For example, a setting of +3rd
will result in a harmony voice a third above the input voice,
related to the current scale.
In Chord Mode, the Voicing Parameter specifies the
relation of the harmony note to the input note with respect
to the current chord. The harmony voices are always notes
in the chord. A setting of "Up1" places the harmony voice
on the next chord tone above the input voice.
Pan
Each harmony voice can have its own stereo pan position.
Spreading the harmony voices within the stereo field can
help de-couple the harmony voices from the input voice,
resulting in more natural harmonies.
Gender
This parameter shifts the formants (often called gender) of
the harmony voices. Use it to alter the character of the
voice ranging from -50 (a big person with a deep voice) to
0 (no change) to +50 (mice/alien sound).
Page 45

45
Section 6: Detailed Parameter Descriptions
Custom Scales in Scale Mode
Note Source/Input Note
The Note Source and Input Note Parameters are used to
create custom scales. When Note Source is set to
"Manual", the Input Note value can be set to any note in
the scale. When Note Source is set to "Sung", the Input
Note is set by the input pitch.
Output Note
Use these parameters to set the desired output note for
each harmony voice for the select Input Note. To create a
complete scale, make sure Output Notes are assigned for
each Input Note.
HARMONY | Humanize
The HARMONY / Humanize Tab provides an overall style
as well as detailed control over the performance of the
harmony voices. Humanize makes the harmony voices
very natural or effected.
Style
This parameter configures all the parameters in the
Humanize Block. It provides quick access to different
qualities of performance.
Smoothing
Sets how much of the input pitch nuance is applied to the
output voice. Values from "50%" to "70%" produce the
most natural results. A value of "0%" helps produce a Cherlike effect.
Portamento
Portamento sets the time in milliseconds to reach a target
note when a harmony voice changes pitch.
Pitch/Time Random
These parameters apply a humanized randomization of the
harmony voices' time and pitch contour. Moderate use of
these parameters is very useful for de-coupling the
harmonies from the lead.
Detune
With the Detune Parameter, a fixed amount of pitch-shift
can be applied to the harmony voices.
Scoop
The Scoop Parameter adds humanized pitch envelopes at
the onsets of notes, further disconnecting the harmonies
from the lead.
Vib Style & Amount
A modeled vibrato can be added to each harmony voice
using a combination of Vib Style and Vib Amount
Parameters. The vibrato styles are based on the analysis
of real singers.
Page 46

46
Section 6: Detailed Parameter Descriptions
HARMONY | EQ
The EQ in the Harmony Block is designed using double
precision filter algorithms. The resulting shape of all the
filters is displayed in the visualization area.
Low/High Gain, Freq
The low and high bands are 2nd-order shelving filters.
When any band's parameters are adjusted, a line
representing the EQ curve for that specific band is shown.
Mid 1/2 Gain, Freq, BW
The 2 mid-bands are 2nd-order parametric filters. When
any band's parameters are adjusted, a line representing
the EQ curve for that specific band is shown.
Low Cut
The low cut is a 4th-order filter. There are preset cut-off
points of "60 Hz", "80 Hz" and "120 Hz".
HARMONY | Compressor
The Harmony Compressor contains two modes depending
on what dynamic effect is desired. The compressor
visualization provides representation of the compressor
curve and real-time gain reduction amount.
Mode
The two modes for the compressor are "Compress" and
"Comp/Limit". The "Compress" mode is a variable knee
compressor. The compressor is triggered by RMS level
with automatic make-up gain. This makes it useful when
trying to get a smooth compressed sound. The
"Comp/Limit" mode is triggered by Peak Levels with
traditional attack/release controls.
Threshold/Ratio
These parameters operate like any standard compressor.
Threshold Parameter sets the input level when
compression will occur. Ratio Parameter determines the
amount of gain reduction when the threshold is triggered.
Make-up/Output Gain
When the mode is "Compress", the makeup gain is
automatic. However, an offset can be applied using the
Make-up Gain Parameter. When the mode is "Comp/Limit",
Output Gain can be added to the desired level.
Attack / Release
In both modes, the release parameter determines the
speed at which the compressor stops reducing levels. In
"Comp/Limit" mode, the Attack Parameter determines the
speed at which the compressor starts reducing levels.
Because of the variable knee modes with "Compress",
there is no Attack Parameter.
Knee
In "Compress" mode there are two knee modes. In "Hard"
mode, the compressor ratio is used immediately when the
threshold is reached. In "Soft" mode, the compressor ratio
is gradually reached as the level increases past the
threshold. "Soft" mode is ideal for a smooth compressor
sound.
Page 47

47
Section 6: Detailed Parameter Descriptions
Insert Path
The compressor can be inserted "Pre EQ" or "Post EQ".
The "Pre EQ" value is useful for targeting compression on
specific frequency bands.
HARMONY | De-ees
Use the Harmony De-esser to help reduce the sibilant
levels associated with homophonic harmony parts.
Amount
Sets the amount that the De-esser will reduce sibilant
levels.
Frequency
Sets the center point of the de-esser detection circuit that
decides when to reduce sibilant sounds.
Page 48

48
Section 6: Detailed Parameter Descriptions
MULTI- FX | µMod
µMod is short for MicroMod. By combining micro-pitch
shifters, modulated delay, and feedback, the µMod block
can create micro-shifts, choruses, flanges, and anything in
between.
Style
The µMod style is essentially a preset for the µMod block.
A style sets all the µMod Parameters.
Detune L/R
This sets the amount of pitch shifting in the left and right
input to the µMod block. The shifting can be +/- 25 cents.
Mod Speed, Depth, Phase, Wave
The Mod Parameters in µMod control the modulation of the
delay parameter. The combination of modulation speed,
depth, phase, and waveform are necessary to create
flanged and chorused sounds.
Delay L/R
A subtle amount of delay on the right and left path adds
depth to the µMod effect.
Feedback / X Feedback L/R
Feedback is essential for going beyond a simple detune
sound with the µMod Block. X Feedback allows the left and
right channel to be fed into each other for creating complex
sounds.
MUTLI-FX | Delay
The Delay Block in VoicePro has been optimized for the
voice. These optimizations include tempo control and a
ducking feature for keeping mixes clean.
Style
The Delay Style is essentially a preset for the block. A style
sets all the Delay Parameters.
Setting Source & Delay
There are four source modes for controlling the delay
times:
"Tempo" Delay times are controlled by the Tap Button or
the incoming MIDI clock. There are global parameters for
how tempo is acquired on the Utility / System page. The
delay times can still be adjusted to fine-tune the sound.
"Time" Delay is set with the Time L and Time R
Parameters. Changing tempo does not change the delay
times.
"Tempo left only" & "Tempo right only" Synchronize only
one side of the delay to tempo.
Duck Thresh, Release, Attenuation
The ducking feature attenuates the output of the delay
based on the level of the input voice. Setting the threshold
at "-24 dB" and attenuation at "- 60 dB" will ensure the
delay sounds is only heard at the end of a vocal line.
Lead / VirtLead / Harm / Aux Balance
The Balance Parameters allow the stereo inputs to the
delay to be focused towards the left, right, or center of the
stereo delay input. This is useful in creating more complex
ping-pong effects.
Page 49

49
Section 6: Detailed Parameter Descriptions
MULTI-FX | Reverb
VoicePro's Reverb has been tuned for voice applications.
The parameters allow control over the tail and room,
allowing ambiences or spaces to be created. The room
sound of the reverb is created through early reflections.
The room level, shape, and size can be controlled
separately. The tail sound is the decay part of the reverb.
Style
The Reverb Style is essentially a preset for the block. A
style sets all the Reverb Parameters.
Duck Thresh, Release, Attenuation
The ducking feature attenuates the output of the Reverb
based on the level at the input. Setting the threshold at "24 dB" and attenuation at "- 60 dB" will ensure the Reverb
sounds are only heard at the end of a vocal line.
TRANSDUCER
The Transducer Block emulates the noise, bandwidth and
distortion characteristics of phones, radios and
megaphones. There are three elements that make up a
Transducer sound. Each element has its own tab: Band
Shape, Distortion, and Noise. The Main Page gives overall
control of the Transducer sound.
Style
The Transducer Style is essentially a preset for the block. A
style sets all Transducer Parameters in all tabs.
Input / Output Gain
The input and output gain for the Transducer can be key in
creating a sound. A perfect example is a quiet person
talking through a phone with its volume turned up. This
requires balance of those controls to emulate the correct
sound for a specific Transducer setup.
Distortion Amount, Overall Noise Level and Band Shape
Enable give Main-Tab access to the most important
parameter from the other Transducer Tabs.
Routing
There are 3 routing choices for the Transducer Block:
"VirtuaLead Only", "Harmony Only", "Stereo Output".
TRANSDUCER | Band Shape
The Band Shape section provides filters to emulate the
bandwidth and resonances associated with various
transducer devices. Additionally, the Frequency Fading
introduces reception anomalies.
Low / High Cut
Use these filters to replicate the band-width limitations of
phones or radios. The filtering is applied before the
Distortion Block.
Presence Gain, Freq, BW
This is a standard parametric filter used to bring out the
resonant frequency of the intended device.
Page 50

50
Section 6: Detailed Parameter Descriptions
Frequency Fade Amount / Rate
Frequency fading emulates the phase anomalies
introduced in radios due to reception quality. Best used
when emulating any device that communicates without
wires.
TRANSDUCER | Distortion
The Distortion Block in Transducer is simple to use. Pick a
style and set the amount of distortion. 0 will result in no
distortion effect. The styles are created with the amount set
at "unity". The benefit of the block comes from the
complexity of the styles. The distortion algorithm can
reproduce non-standard curves to reproduce anything from
solid-state distortion to a torn speaker.
TRANSDUCER | Noise
A real-world transducer can have a complex noise pattern
generated by the means of communication or by the device
itself. The TRANSDUCER / Noise Block allows various
noise patterns to be created.
Overall Noise Level
This parameter is on the output of the Noise Block.
Therefore, hiss, pink, buzz, or hum level must be on before
any output is heard.
Hiss Level / Freq
Hiss is the noise pattern often associated with tape
playback. The sound can also be heard in radio
transmissions. In general, a higher hiss frequency would
represent a higher quality transducer device.
Pink Level / High Cut / Low Cut
Pink noise is broadband noise. By adjusting the High and
Low Cut, the noise can be shaped to match the band
shape characteristics of a transducer device.
Buzz Level
Buzz is the noise pattern often associated with a guitar
amplifier.
Hum Level / Power Freq.
A hum noise pattern is typically a result of grounding
problems in an audio path. The frequency of hum is
affected by main voltage. Therefore, 60 Hz emulates the
hum sound for North America and Japan, 50 Hz represents
most other countries.
MATRIX | Blocks
The MATRIX / Block Tab allows quick access for the
enabling and disabling of blocks in VoicePro.
Use the Up and Down Arrow Buttons to highlight one of the
five lines. The four soft knobs enable/disable the blocks on
the highlighted line. For convenience, you can
enable/disable any block directly on the block's edit tab
using the OK Button.
The Harmony Compressor, De-ess and EQ blocks are only
available when Harmony is engaged.
Page 51

51
Section 6: Detailed Parameter Descriptions
MATRIX | Edit Assign
Use this tab to select the four assigned edit parameters on
the Home Page for this preset. Each horizontal edit column
is used to assign a parameter to a soft-knob . The first two
parameters select the menu and tab for the parameter. The
third parameter selects the parameter from the selected
menu and tab.
MATRIX | Visualization
Use this tab to select the assigned visualization on the
Home Page for your preset. The factory presets have been
designed with the most useful visualization for the preset
application.
Page 52

52
Section 6: Detailed Parameter Descriptions
DYNAMICS | Compress
The compressor contains two modes depending on what
dynamic effect is desired. The compressor visualization
provides representation of the compressor curve and realtime gain reduction amount.
Mode
The two modes for compressor are "Compress" and
"Comp/Limit". The "Compress" mode is a variable knee
compressor. The compressor is triggered by RMS levels
with automatic make-up gain. This makes it useful when
trying to get a smooth compressed sound. The
"Comp/Limit" mode is triggered by Peak levels with
traditional attack/release control.
Threshold / Ratio
These parameters operate like any standard compressor.
Threshold sets the input level at which compression will
occur. Ratio determines the amount of gain reduction at
which the threshold is triggered.
Make-up / Output Gain
When the mode is "Compress" the make-up gain is
automatic. However, an offset can be applied using the
Make-up Gain Parameter. When the mode is "Comp/Limit",
Output Gain can be added to the desired level.
Attack / Release
In both modes the Release Parameter determines the
speed at which the compressor stops reducing levels. In
"Comp/Limit" mode, the Attack Parameter determines the
speed at which the compressor starts reducing levels.
Because of the variable knee modes with "Compress",
there is no Attack Parameter.
Knee
In "Compress" mode there are two knee modes. In "Hard"
mode, the compressor ratio is used immediately when the
threshold is reached. In "Soft" mode, the compressor ratio
is gradually reached as the level increases past the
threshold. "Soft" mode is ideal for a smooth compressor
sound.
Insert Path
The compressor can be inserted "Pre EQ" or "Post EQ".
The "Pre EQ" value is useful for targeting compression on
specific frequency bands.
Page 53

53
Section 6: Detailed Parameter Descriptions
DYNAMICS | De-ess
Use the VirtuaLead de-esser to help reduce sibilant levels.
Amount
Sets the amount that the De-ess will reduce sibilant levels.
Frequency
Sets the center point of the de-ess detection circuit that
decides when to reduce sibilant sounds.
EQ
The EQ in the VirtuaLead block is designed using double
precision filter algorithms. The resulting shape of all the
filters is displayed in the visualization area.
Low / High Gain, Freq
The low and high bands are 2nd-order shelving filters.
When any band's parameters are adjusted, a line
representing the EQ curve for that specific band is shown.
Mid 1 / 2 Gain, Freq., BW
The 2 mid-bands are 2nd-order parametric filters. When
any band's parameters are adjusted, a line representing
the EQ curve for that specific band is shown.
Low Cut
The low cut is a 4th-order filter. There are preset cut-off
points of "60 Hz", "80 Hz" and "120 Hz".
Page 54

54
Section 6: Detailed Parameter Descriptions
TIME | Mode
The Time Block uses TC-Helicon's FlexTime algorithm for
stretching and shrinking the audio in natural and effected
ways. There are two modes for controlling Time: Position
Freestyle Mode allows the position of the voice to be freely
set within VoicePro's time buffer, and Rate Freestyle Mode
allows the speed of the audio to be controlled.
TIME | Position Freestyle
VoicePro contains a 5-second Time buffer. With Position
Freestyle Mode, you control the position of the voice within
that buffer.
Position Delta / Sensitivity
The Position Delta and Sensitivity Parameters work
together. The Sensitivity Parameter sets the time shift
amount in 'ms' for each Delta value. If Sensitivity is set to
20 ms, then each click of the Delta Parameter will shift the
pitch up or down by 20 ms. For subtle changes of a
performance, set the sensitivity to smaller values.
Smoothing
Lower smoothing values will cause the time to jump
abruptly according to the sensitivity amount on each click
of the edit knob. Higher Smoothing values will glide through
each click. A value of “100” won’t allow the position to be
moved with the Position Delta Parameter.
Reset / Reset Position
The Reset and Reset Position Parameters work together.
When the reset Parameter is moved by a single click, the
position of the voice is moved automatically to the Reset
Position. This is very useful for extending notes in a song
as the voice can be reset to back to real-time with a single
click.
Tape Effect
When the Tape Effect value is "0", time is manipulated
without effecting pitch. As the Tape Effect value increases,
the pitch is shifted in a similar way to the effect of slowing
down a tape. Slowing a tape down shifts the pitch down.
Speeding up the tape, shifts the pitch up.
UV Mode
When the UV Mode Parameter is set to "0", the un-voiced
portions of a voice signal, such as 'esses' are not time
shifted. This is similar to how we time stretch our own
voice. As the value increases, the un-voiced portions of the
voice are time-shifted.
Page 55

55
Section 6: Detailed Parameter Descriptions
Hold
Hold freezes the input voice when the parameter is
engaged. At this point, the position can be moved within
the buffer.
TIME | Rate Freestyle
VoicePro contains a 5 seconds Time buffer. With Rate
Freestyle mode, you control the playback speed of the
input voice.
Playback Rate / Rate Range
The Position Rate and Rate Range Parameters work
together. Rate Range sets the amount to which you can
speed up or slow down the input voice. The Playback Rate
Parameter changes the rate within the rate range.
Smoothing
Lower smoothing values will quickly jump from by the
sensisity value on each turn of the Position Delta
Parameter. Higher Smoothing values will glide through
each click.
Reset / Reset Position
The Reset and Reset Position Parameters work together.
When the ResetParameter is moved by a single click, the
position of the voice is moved automatically to the Reset
Position. This is very useful for extending notes in a song
as the voice can be reset to back to real-time with a single
click.
Tape Effect
When the Tape Effect value is "0", time is manipulated
without effecting pitch. As the Tape Effect value increases,
the pitch is shifted in a similar way to the effect of slowing
down a tape. Slowing a tape down shifts the pitch down.
Speeding up the tape, shifts the pitch up.
UV Mod
When the UV Mode Parameter is set to "0", the un-voiced
portions of a voice signal, such as 'esses' are not time
shifted. This is similar to how we time stretch our own
voice. As the value increases, the un-voiced portions of the
voice are time-shift.
Hold
Hold freezes the input when the parameter is engaged. At
this point, the position can be moved within the buffer.
Page 56

56
Section 6: Detailed Parameter Descriptions
PITCH | Mode
The pitch block in VoicePro has several modes. The
visualization for the pitch block changes based on the
mode. This tab also contains parameters that adjust the
sound of the pitch shifting.
Modeling Optimization
To support legacy type pitch shifting, modeling optimization
can be turned off. In this state, transitions can be heard
when turning off various Character blocks. However, in this
state the legacy pitch shift sounds used for effects like
monster pitch shifts can be produced. It can also be useful
to turn modeling optimization off when doing small pitch
shifts in, for example, pitch correction applications.
Formant Correct Amount
Formants affect the naturalness of a pitch shift. In VoicePro
formants and pitch can be shifted separately. The Formant
Correction Amt control sets the amount the formants are
corrected/shifted. When set to "0", formants are shifted with
the pitch like an instrument shifter. When set to "100", the
formants are not shifted like a PSOLA shifter. When set to
Auto, the amount of formant correction is modified as a
function of shift amount to sound the most natural.
Formant Offset
The overall formant structure of the voice can be shifted up
to sound more feminine and even chipmunk like at extreme
settings. Formants can be shifted down to sound more
masculine or monster like. This control moves the
formants independent of the pitch shift.
Un-Shift Atten
This parameter allows the un-voiced (sibilant) signals to be
attenuated when pitch shifting. The effect is more
noticeable the larger the shift.
UV Shift Amount
This parameter determines the amount that the unvoiced is
shifted relative to the voiced signal. When this parameter
is set to "100" the algorithm shifts unvoiced signals by the
same amount as the voiced signals. When this parameter
is "0", the algorithm will not shift the unvoiced sections
regardless of the amount the voiced signal is being shifted.
Intermediate values of this parameter will shift the unvoiced
by a fraction of what the voiced signal is being shifted.
When this parameter is set to "auto" the UV shift amount is
set automatically for you.
Downshift Quality
This parameter can adjust the tonal quality of large down
shifts. The effect of the parameters becomes more
apparent for large down shifts.
Page 57

57
Section 6: Detailed Parameter Descriptions
PITCH | Pitch Correct
With good use of VoicePro's automatic pitch correction, you
can achieve musical and natural result that is very time
consuming to achieve with graphical based pitch editing.
The parameters are described below.
Attack Rate
Attack Rate determines the rate it takes for the input pitch
to be shifted to the corrected note. Settings between “16”
and “40” provide the most natural results. Effects can be
created with extreme settings. Window and Attack Rate
Parameters are key in achieving transparent correction.
Window
The Window Parameter works in conjunction with the
selected or custom correction scales/notes. The window
value determines how close in pitch a sung note needs to
be to a note in the correction scale for correction to be
applied. Lowering this value can help VoicePro chose the
right correction note. Higher values can sometimes help
when using a single note custom scale to correct a very out
of tune note.
Amount
This parameter musically controls the amount of pitch
correction applied to the input note. The actual amount
varies based on the amount a voice is out of tune.
Root / Scale
Match the Key and Scale Parameter to the melody being
pitch corrected. The key and scale determine the notes that
the pitch corrector will correct to. Create a custom scale for
more complex or single note corrections
MIDI Attack / Window
The pitch corrector can also be controlled via MIDI. When
MIDI is used, the Attack & Window Parameters can be set
to different values. This can be useful as sometimes MIDI
is used to quickly override a single with agressive
correction settings. MIDI notes received temporarily
override the correction scale.
Custom Note Select / Enable
These parameters allow a custom correction scale to be
used. Select the Custom Note using the Select Parameter
and then turn it "off" or "on" in the scale using the Enable
Parameter.
Page 58

58
Section 6: Detailed Parameter Descriptions
PITCH | Pitch Shift
The pitch shift mode offers fixed pitch shifting by semitone
and cents. MIDI control is also supported for re-pitching
melody lines or creating a harmony part.
Coarse / Fine Shift
The Coarse Parameter shifts the pitch up or down with a
range of +/- 48 semitones. The Fine Parameter shifts the
pitch, relative to the Coarse Parameter, by +/- 99 cents.
The distance between semitones is 100 cents.
Portamento
When MIDI notes are used to control the pitch shift,
Portamento sets the time in milliseconds to reach a MIDI
note.
MIDI Latch
When enabled, the last MIDI note sent to the pitch shift is
used until a new note is received. This allows robot voices
to be created by triggering the note of the desired
monotone voice with MIDI Latch on.
MIDI Smoothing
Sets how much of the input pitch nuance is applied to the
pitch shifted voice.
PITCH | Pitch Freestyle
Pitch Freestyle is ideal for creatively shifting pitch in nonmusical applications like dialog.
Shift Delta / Sensitivity
The Shift Delta and Sensitivity Parameters work together.
Sensitivity sets the shift amount in cents for each Delta
value. If Sensitivity is set to 20 cents, then each click of the
Delta Parameter will shift the pitch up or down by 20 cents.
For subtle changes of a performance, set the sensitivity
below 25 cents. For more extreme effects try values above
50 cents.
Reset Trigger / Shift
The Reset Parameters allow pitch of the input to be reset
to a set value. The Reset Shift Parameter sets the pitch in
semitones where the input voice will be shifted when the
Reset Trigger Parameter is turned. A single click on the
Reset Trigger Parameter triggers the reset shift.
Smooth
The Smooth Parameter is useful when the sensitivity is
higher. When smooth is set to lower values, stepping can
be heard as the voice goes from one pitch to another.
When set at higher values, the shifting is smoothed out.
Page 59

59
Section 6: Detailed Parameter Descriptions
CHARACTER | Resonance
Resonance allows you change the positioning of the
harmonic content that forms the identity of a voice. The
results can yield anything from subtle tonal changes to a
new character. The Freq Shift Parameter is very useful for
tuning the Resonance Style to qualities of different voices.
Style
A Resonance Style sets all the Resonance Parameters to a
preset sound. The styles are authored with the amount at
"Unity". A style can be very dependent on the input voice.
The name of the style will give you some indication of what
the Style will do.
Amount
The Amount Parameter allows you to get more or less of
the selected Style. With a value of "Unity", all the
Resonance Parameters represent their actual values.
Above or below unity, the parameters are scaled to achieve
more or less of the sound.
Length
Alters the apparent vocal tract length. Changing length is
similar to changing the apparent gender of the input voice.
Band Gain, Freq, BW
There are three parametric bands controlled by Gain, Freq
and BW, which control the spectral region that is modified.
A positive or negative gain moves spectral energy to higher
or lower frequencies respectively. Typically, the first,
second and third band operate at low, mid and high
frequency ranges respectively.
Freq Shift
Shifts the frequency center of all of the parametric bands.
This can be used to tune a Resonance Style to a particular
voice.
UV Balance
Controls how Resonance is applied to voiced and unvoiced segments. A value of “0” applies Resonance to
voiced and unvoiced evenly, whereas positive values apply
more Resonance to unvoiced and less Resonance to
voiced. Similarly, negative values apply more Resonance to
voiced and less Resonance to unvoiced.
Page 60

60
Section 6: Detailed Parameter Descriptions
CHARACTER | Spectral
The Spectral block is a voice-modeled EQ that reflect the
natural equalization equivalent to the control a singer has
over his or her own voice. Most Spectral Parameters will
appear very similar to a traditional EQ. However, the
results achieved can be much more natural and more
dynamic. The Freq Shift Parameter is very useful for tuning
the Spectral style to qualities of different voices.
Style
A Spectral Style sets all the Spectral Parameters to a
preset sound. The Styles are authored with the amount at
"Unity". A style can be very dependent on the input voice.
The name of the Style will give you an indication of what
the Style will do.
Amount
The Amount Parameter allows you to get more or less of
the Selected Style. With a value of "Unity", all the Spectral
Parameters represent their actual values. Above or below
unity, the parameters are scaled to achieve more or less of
the sound.
Band Gain, Freq, BW
There are three parametric bands controlled by Gain, Freq
and BW, which control the spectral region that is modified.
A positive or negative gain boosts or cuts spectral energy
respectively.
Freq Shift
Shifts the frequency center of all of the parametric bands.
This can be used to tune a Spectral Style to a particular
voice.
UV Balance
Controls how Spectral is applied to voiced and un-voiced
segments. A value of “0” applies Spectral to voiced and
unvoiced evenly, whereas positive values apply more
Spectral to unvoiced and less Spectral to voiced. Similarly,
negative values apply more spectral to voiced and less
Spectral to unvoiced.
CHARACTER | Inflection
The Inflection effect humanizes pitch, time, and level to
create realistic doubled parts or re-takes.
Style
An Inflection Style sets all the Inflection Parameters to a
preset sound. The styles are authored with the amount at
"Unity". A style can be very dependent on the input voice.
The name of the Style will give you an indication of what
the Style will do.
Amount
Amount allows you to get more or less of a Style. With a
value of "Unity", all the Inflection Rarameters represent
their actual values. Above or below unity, the parameters
are scaled to achieve more or less of the sound.
Pitch Time & Level Rate / Rand.
These controls effect the humanization of pitch, time and
level. The Rand. Parameter sets the amount that the pitch,
time and level can fluctuate. The Rate Rarameter
determines the speed of the fluctuations.
UV Mod
When the UV Mode parameter is set to "0", the un-voiced
portions of a voice signal, such as 'esses' are not pitch nor
time shifted. This is similar to how we time stretch our own
voice. As the value increases, the un-voiced portions of the
voice are pitch and time shifted.
UV Atten
This parameter reduces the level of the un-voiced signals
from the Inflection Block.
Scoop Dur/Level/Rand Mod
The parameters control pitch inflections that occur at the
onset of notes. Scoop Dur determines how low the
inflection will last after the onsert of the note. Rand Mod
will randomize each onset inflection.
Scoop Duration / Rand.
Scoops are small pitch inflections at the beginning of notes.
Page 61

61
Section 6: Detailed Parameter Descriptions
The Scoop Duration parameters set how long these
inflections last after a note starts. The Rand. Parameter
determines how often they occur.
CHARACTER | Vibrato
The Vibrato effect models the sound of human vibratos
onto the input voice. The waveforms that control the vibrato
are modeled from real singers.
Style
A Vibrato Style sets all the Vibrato Parameters to a preset
sound. The Styles are authored with the amount at "Unity".
A Style can be very dependent on the input voice. The
name of the style will give you an indication of what the
Style will do.
Amount
Amount allows you to get more or less of a Style. With a
value of "Unity", all the Vibrato Parameters represent their
actual values. Above or below unity, the parameters are
scaled to achieve more or less of the sound.
Attack/Depth/Sustain/Release
Just like a synthesizer, the Vibrato style can be shaped
with Attack, Depth, Sustain and Release Parameters.
Attack will determine speed at which the Vibrato gets to its
target amount. Depth will modify the amount of vibrato in
each cycle. Sustain determines how long the vibrato will
stay active. Release sets the time it takes for the vibrato
effect to go off. It's important to note that vibrato is typically
triggered with note onsets.
Onset Delay
Sets the amount of time following a note onset it takes the
vibrato to reach its target amount.
Rate
Sets the speed at which the vibrato modulates.
Trem Amt/Phase
Vibrato also modifies level. The Trem Amt and Phase
parameters control how much the level fluctuates and its
phase relationship when compared to the pitch modulation.
Rand Mod.
Allows an overall randomization to be applied to the vibrato
style.
Page 62

62
Section 6: Detailed Parameter Descriptions
CHARACTER | Breath
The Breath effect can bring out raspy or breathy sound
already preset in a voice. Breath also creates interesting
glottal effects like whispering.
Style
A Breath Style sets all the Breath Parameters to a preset
sound. The Styles are authored with the amount at "Unity".
A Style can be very dependent on the input voice. The
name of the Style will give you an indication of what the
Style will do.
Amount
The Amount Parameter allows you to get more or less of
the selected Style. With a value of "Unity", all the Breath
Parameters represent their actual values. Above or below
unity, the parameters are scaled to achieve more or less of
the sound.
CHARACTER | Growl
The Growl effect can bring out vocal sounds where the
throat is constricted.
Style
A Growl Style sets all the Growl Parameters to a preset
sound. The Styles are authored with the amount at "Unity".
A Style can be very dependent on the input voice. The
name of the Style will give you an indication of what the
Style will do.
Amount
The Amount Parameter allows you to get more or less of
the selected Style. With a value of "Unity" all the Growl
Parameters represent their actual values. Above or below
unity, the parameters are scaled to achieve more or less of
the sound.
Amplitude Weight/Thres.
The Amplitude Parameters scale the amount of Growl
based on the input level. The Amplitude Threshold
Parameter determines the level where growl will begin to
be applied.
Edge Weight
The Edge Parameters scale the amount of Growl triggered
at the onsets of signals. Edge Probability determines how
often Growl is triggered on onsets. The Release Times sets
how long it takes for the Edge Growl to dissipate.
Page 63

63
Section 6: Detailed Parameter Descriptions
MIX
To facilitate the creation of complete presets, VoicePro
contains a full featured mixer. Mix is based around a
traditional mixer. Vertical strips are used for each overall
VoicePro block. Each block then contains typical mixer
controls like sends, pans, levels, etc.
Dry Lead
This is the voice input signal through Dynamics and EQ
inserts.
VirtuaLead
This is the output of the Dry Lead signal after going
through Time, Pitch & Character.
Harmony
This is the stereo mix output of the Harmony Block.
Overall FX
Controls the overall level of µMod, Delay and Reverb
µMod, Delay, Reverb
Controls stereo output level of the respective blocks
Aux Input
This is the signal present at the Aux Input which can not be
routed through Harmony or VirtuaLead.
Sends
The effects sends for Dry Lead, VirtuaLead, Harmony, Aux
Input are configurable pre or post fader.
Pan / Width
The mono blocks Dry Lead, VirtuaLead, and Aux Input
have standard pan controls to set stereo position. The
stereo blocks have width controls that range from full
stereo to mono.
BROWSER
The Browser is your starting point for finding a vocal
sound. There are three filters on the Browser page to help
choose the right preset. Use the Scroll Wheel to preview a
preset. Press the OK Button to load the selected preset.
Source Filter
VoicePro can show presets intended for "Singing" or
"Speaking" voices. When "All" is selected, all presets are
shown based on the other filter settings.
Application Filter
Each preset is assigned an application. VoicePro contains
11 application types: Correction, Doubling, Harmony,
Classic FX, Special FX, Character, Pitch & Time,
Transducer, Live, Other. The Harmony application can also
be filtered by the Harmony Mode.
Type Filter
Type allows "All", "Factory" or "User" presets to be shown.
Additionally, the presets can be browsed alphabetically
instead of sequentially.
Page 64

64
Section 6: Detailed Parameter Descriptions
STORE
When you want to quickly save a preset just press "Store"
to enter the Store Screen. Use the Scroll Wheel to select
the target user location to store to. Then press "Store"
again to execute.
Naming Presets
Each of the four edit knobs has its own purpose for editing
a preset name.
"Edit Knob 1" sets the cursor position.
"Edit Knob 2" selects the character.
"Edit Knob 3" inserts spaces when turned clock-wise and
deletes characters when turned counter-clockwise.
"Edit Knob 4" Jumps to lowercase, uppercase, or symbol
characters.
Pushing the OK Button toggles a character map for easier
edting.
Setting Source & Application
Setting the Source & Application will allows the preset to be
categorized under the Browser Tab. Use the Down Arrow to
navigate to the Source & Application Edit Row. The preset
source can be set to "Singing" or "Speaking". There are 11
application types to choose from.
Page 65

65
Section 7: Optimizing HybridTMPitch Shifting
Introduction
Whenever you enable the Pitch Block or load a preset with
it enabled, you are using VoicePro's Hybrid Shifting
TM
algorithm. The Hybrid ShiftingTMalgorithm is a proprietary
TC-Helicon technique that provides four main benefits:
• It is more natural and transparent than other pitch shifting
techniques for voice
• It has a wider usable shift range
• It has the ability to emulate the sound of other pitch
shifting techniques
• It is integrated with VoiceModeling
TM
for manipulating
voice character
This section discusses ways to get the best from our pitch
shifting algorithm
In this section we cover:
• Background on non-Hybrid Pitch
TM
Shifting Techniques
• Understanding the Hybrid Shifting
TM
parameters
• Working with small shift intervals
• Raising the pitch most effectively
• Lowering the pitch most effectively
• Emulating the sound of other shifting algorithms
Background on non-HybridTMPitch
Shifting Techniques
If you're interested in understanding why the Hybrid
Shifting
TM
algorithm offers its four main benefits, it's helpful
to get an understanding by comparing it to other pitch
shifting techniques. If you want to get the benefits right
away, skip to "Understanding the Hybrid Shifting
TM
parameters".
There are two pitch shifting algorithms most prevalent in
audio production; the technique we refer to as Instrumental
(non formant-corrected) Pitch Shifting and PSOLA (or
formant-corrected) Pitch Shifting.
“Instrument” Pitch Shifting
Instrument Pitch Shifting resamples the frequency scale of
an audio signal. Reading and writing samples at different
rates can alter the pitch of the audio signal. Instrumental
Pitch Shifting is not suited to processing the human voice
when shifting by more than a few semitones. The human
voice contains resonant frequencies called formants which
are responsible for the perception of different vowels and
the overall character of the voice. The formant structure of
the human voice is due to the shape of the vocal tract and
is not affected by fluctuations in pitch. Instrumental Pitch
Shifting shifts the entire vocal signal including formants,
which causes the naturalness of a pitch-shifted voice to
decrease as the shift amount increases.
Due to the limitations of the Instrument Pitch Shifting
technique, the number of music and dialog production
applications is limited. In music production, the technique is
used for correcting mild intonation errors (pitch correction)
or for detune effects where the overall shift is less than 100
cents (100 cents = 1 semitone). In this instance, the
degradation of natural formant quality is less apparent. In
dialog production, the instrumental technique is employed
when natural formant quality is not important. This is
popular for animated character effects that do not need to
conform to the formant structure of the human voice.
“PSOLA” Pitch Shifting
PSOLA Pitch Shifting is a formant-corrected vocal pitch
shifting method that works by changing the pitch of the
human voice without altering the formant frequencies. By
detecting the pitch of a voice, it can be windowed and cut
out at a pitch synchronous rate and then pasted back in at
a different rate. This process causes the pitch of the signal
to be altered while maintaining the original formant
structure. The primary drawbacks of PSOLA Pitch Shifting
are the audible artifacts created by incorrect detection of
input pitch as well as buzziness when the pitch is shifted
down by an octave or more.
PSOLA shifting is mainly used in music production on nonlead vocal effects. Non-lead vocal parts include harmony
parts and octave doubling. These pitch-shifted voices can
be mixed at a level sufficiently low relative to the lead vocal
that the artifacts are not exposed. For dialog production,
Page 66

66
Section 7: Optimizing HybridTMPitch Shifting
where the voice is predominant in the mix, artifacts
significantly degrade the perceived audio quality.
Understanding HybridTMShifting
parameters
Each Pitch mode (Correct, Shift and Freestyle) has six
common parameters that control the shift quality.
Modeling Optimization
To support legacy type pitch shifting, modeling optimization
can be turned off. In this state, transitions can be heard
when turning off various Character blocks. However, in this
state, the legacy pitch shift sounds used for effects like
“monster pitch shifts” can be produced. It can also be
useful to turn modeling optimization off when doing small
pitch shifts in, for example, pitch correction applications.
Formant Correct Amount
Formants affect the naturalness of a pitch shift. In VoicePro
formants and pitch can be shifted separately. The Formant
Correction Amt control sets the amount the formants are
corrected/shifted. When set to "0", formants are shifted with
the pitch like an instrument shifter. When set to "100", the
formants are not shifted like a PSOLA shifter. When set to
Auto, the amount of formant correction is modified as a
function of shift amount to sound the most natural.
Formant Offset
The overall formant structure of the voice can be shifted up to
sound more feminine or chipmunk like. Or formants can be
shifted down to sound more masculine to monster like. This
control moves the formants independently from the pitch shift.
UV Shift Attenuation
This parameter allows the un-voiced (sibilant) signals to be
attenuated when pitch shifting. The effect is more
noticeable when shift intervals are larger.
UV Shift Amount
This parameter determines the amount that the unvoiced is
shifted relative to the voiced signal. When this parameter
is set to "100" the algorithm shifts unvoiced signals by the
same amount as the voiced signals. When this parameter
is "0", the algorithm will not shift the unvoiced sections
regardless of the amount the voiced signal is being shifted.
Intermediate values of this parameter will shift the unvoiced
by a fraction of what the voiced signal is being shifted.
When this parameter is set to "auto", the UV shift amount
is set automatically for you.
Downshift Quality
This parameter can adjust the tonal quality of large down
shifts. The effect of the parameters becomes more
apparent for large down shifts.
Working with small shift intervals
A small interval is considered anything less than 2
semitones.
1.Select or create a preset that only has the Pitch block
enabled, and the VirtuaLead Level set to "0dB”, and dry
and harmony turned off.
2.Navigate to the Pitch Mode Tab. Use the Edit Knobs to
select "Pitch Shift" for the mode parameter.
3.Set the Pitch quality parameters within the guidelines
below:
4.Navigate to the Pitch Shift Tab and select a small interval
shift using the Coarse or Fine Shift parameters.
5.Modify the Pitch parameters above based on their
ranges to further tune the shift.
Working with large up-shifts
A large up-shift is considered a shift interval more than 2
semitones above the input voice. The range of values will
change as you move beyond an octave.
1.Select or create a preset that only has the Pitch block
enabled, and the VirtuaLead Level set to "0dB", and dry
and harmony turned off.
2.Navigate to the Pitch Mode Tab. Use the Edit Knobs to
select "Pitch Shift" for the mode parameter.
3.Set the Pitch quality parameters within the guidelines
following:
4.Navigate to the Pitch Shift Tab and select a large up-shift
using the Coarse or Fine Shift parameters.
6.Modify the Pitch parameters above based on their
ranges to further tune the shift.
Working with large down-shifts
A large down-shift is considered anything more than 2
semitones. The ranges of values will change as you move
beyond an octave down-shift.
1.Select or create a preset that only has the Pitch block
enabled, and the VirtuaLead Level set to "0dB", and dry
and harmony turned off.
Parameter
Modeling Optimization
Formant Correct Amount
Formant Offset
UV Shift Attenuation
UV Shift Amount
Downshift Quality
+2 to +12
On
Auto
0
0
Auto
0
+12 to +36
On
Auto
0
20 to 60
0 to 100
N/A
Shift Interval
Parameter
Modeling Optimization
Formant Correct Amount
Formant Offset
UV Shift Attenuation
UV Shift Amount
Downshift Quality
On
Auto
0
0
Auto
0
Page 67

67
Section 7: Optimizing HybridTMPitch Shifting
2.Navigate to the Pitch Mode Tab. Use the Edit Knobs to
select "Pitch Shift" for the mode parameter.
3.Set the Pitch quality parameters within the guidelines
below:
4.Navigate to the Pitch Shift Tab and select a large downshift using the Coarse or Fine Shift parameters.
5.Modify the Pitch parameters above based on their
ranges to further tune the shift.
Emulating the sound of other shifting algorithms
By setting the Pitch parameters to the correct values, you can
emulate the sound of a PSOLA or Instrument shifter.
1. Select or create a preset that only has the Pitch block
enabled, and the VirtuaLead Level set to "0dB", and dry and
harmony turned off
2. Navigate to the Pitch Mode Tab. Use the Edit Knobs to
select "Pitch Shift" for the mode parameter.
3. Set the Pitch quality parameters within the guidelines below:
4.Navigate to the Pitch Shift Tab and shift using the Coarse
or Fine Shift parameters.
Parameter
Modeling Optimization
Formant Correct Amount
Formant Offset
UV Shift Attenuation
UV Shift Amount
Downshift Quality
+2 to +12
Off or On
Auto
0
0
Auto to 20
0
+12 to +36
Off or On
Auto
0
20 to 60
20 to 100
0 to 50
Shift Interval
Parameter
Modeling Optimization
Formant Correct Amount
Formant Offset
UV Shift Attenuation
UV Shift Amount
Downshift Quality
PSOLA
Off
100
0
0
0-100
0
Instrument
Off
0"
0
0
100
0
Shift Interval
Page 68

68
Page 69

69
Section 8: Harmony and Tuning
Harmony
Here's where we can go into a little more depth about
harmonies. We've tried to keep it practical, focusing on
what VoicePro can do for you.
Harmony Hold
Truly an innovation, the Harmony Hold feature lets you
sustain the backing harmony voices while you continue to
sing through them. On activation, you can freeze the
syllable the harmony voices are producing, and they will
hold it in a very natural way until you cancel Harmony Hold.
Harmony Modes
VoicePro has five different harmony modes, which offer five
unique methods of creating harmony. Once we get into
describing the more complex harmony modes, we’ll be
showing you examples based on the C major scale. If you
are unfamiliar with this scale we’ve shown C major here.
Notes Mode
In this Mode, you provide the VoicePro with specific MIDI
note information to determine the pitch of the harmony
voices. VoicePro has two “/Notes” harmony modes, single
and 4 channel. The VoicePro may be set to Notes 4
Channel mode through the Harmony Mode Tab. Notes 4
Channel mode allows you to send 4 channels of MIDI
information, including MIDI Pitch Bend, one for each
individual harmony voice. This is the most direct and
flexible way of creating harmonies, allowing you to weave
complex melodies and counter harmonies irrespective of
your lead vocal.
Shift Mode
Also known as “Fixed Interval”, this takes the pitch of your
lead voice and creates harmonies a set number of
semitones away, based on that pitch. The method of
creating harmonies, using a fixed number of semitones
relative to an input note or pitch, is called chromatic
harmony, the theory of which we'll go into later. We
consider this type of harmonizing to be non-intelligent
because VoicePro is not set to any particular key or scale.
These are pure, parallel harmonies. The most common
shift harmony voices are the 5th (7 semitones) and octave
(12 semitones), ranging from two octaves below or above
the input pitch.
Below is The C Major scale, showing third above chromatic
scale harmony, as used in VoicePro Shift Mode.
Black = Lead & Grey = Harmony
Chord Mode
Chord harmonies take your chord information to create
intelligent, diatonic harmonies based on your voice. To
make “Chord” harmonies, you need to input in real time the
chords of the song. This may be done either via MIDI or
through a programmed sequence of chord roots and types
via CC control changes. Chord information consists of the
chord root and type, which define the 3 or 4 notes in a
given chord. In Chord mode Voicepro will only create
harmony voices that fall on the notes of the chord. Chord
harmonies are “intelligent” because they decipher the chord
you’re playing and the note you’re singing to produce
musically pleasing harmonies. When 1 above is defined as
a harmony voice (Up1), the next note from the chord above
the input note is output for that harmony voice.
The subsequent illustration shows the harmony notes for
the C major scale with a voicing selection of a C major
chord and a single “one above”.
Root: C, Chord Type: Maj, Voicing: Up1
Black = Lead & Grey = Harmony
You might have noticed that each harmony note can cover
more than one input note, or that each input note doesn’t
necessarily have a unique harmony note. For instance, C
and D both have E as the 3rd above, E and F share G, and
so on. This gives a more stepped sound to the harmony as
the changes are both greater in magnitude and less
frequent than when using other harmony methods (shift
mode for example). The benefit of this method is that it is
very easy to integrate vocal harmonies into your songs if
you already know their chord progressions!
Scale mode
Scale Harmonies use key and scale information to create
musically correct, diatonic harmonies. Most popular music
uses a single scale, so you usually only have to input the
information at the beginning of your song. “Scalic”
harmonies are more dynamic than the chordal harmonies
because there are unique harmony notes for each input
note. The subsequent illustration shows the harmony notes
for the C major scale with a single “third above” harmony
voice. You can see from the next diagram that the “Scalic”
harmonies are intelligent and closely follow your lead voice
for a tighter sound.
Black = Lead & Grey = Harmony
Under the Harmony Key is a parameter called Smoothing.
When set to 100%, the harmony voices follow your input
pitch, errors and all, but when set to 0%, the harmonies will
jump directly to the scale harmony notes, kind of like a
Page 70

70
Section 8: Harmony and Tuning
hard pitch correction on the harmony voice. Setting the
Smoothing parameter between 0 and 100% is like having
variable amounts of pitch correction on the harmonies.
VoicePro has five preprogrammed harmony scales: three
major, three minor and one custom per preset. To create a
custom scale or pitch map see HARMONY / Chord Tab in
the Detailed Parameter Description Section
It can also be tricky to pick out the key in some songs. An
example is “Sweet Home Alabama”. Listening, you might
think this song is in the key of “D”, as that’s the first chord,
but the harmonies actually work best in the key of “G” -- try
running the song through VoicePro to hear for yourself.
Setting the scale can also take a bit of practice. For songs
centered around the third or root of the scale it might not
sound like there’s any noticeable differences between the
three major or three minor scales. This is because your
song doesn’t hit any of the scale’s altered notes. A melody
centered around the fifth of the scale, (such as B in the key
of E), highlights the differences between the scales. Try the
“Sha Lala Lala ...La Tee Daa” chorus of Van Morrison’s
“Brown Eyed Girl” (key: E, scale: major, 3rd above voicing)
with each major scale to hear the audible difference
between them. For the minor scales, Santana’s “Evil Ways”
(key: G, scale: minor, 3rd above voicing) highlights the
differences between the three minor scales.
The following table illustrates the third and fifth above for a
given input note to illustrate the differences between the six
different scales. “nc” means no change, in that the
harmony voice will simply keep or transition smoothly from
its previous pitch until the lead voice pitch changes to a
non “nc” note.
Lead Voice C C# D Eb E F F# G G# A Bb B
MAJ1
3rd Above E nc F nc G A nc B nc C D D
5th Above G nc A nc B C nc D nc E F F
MAJ2 3rd above E nc F nc G A nc C nc C D D
5th above G nc A nc C C nc E nc E F F
MAJ3 3rd above E nc F nc G A nc Bb nc C D D
5th above G nc A nc Bb C nc D nc E F F
MIN1 3rd above Eb nc F G nc Ab nc Bb C nc D nc
5th above G nc BbBbnc C nc D Ebnc F nc
MIN2 3rd above Eb nc F G nc A nc Bb C nc D nc
5th above G nc A Bb nc C nc D Eb nc F nc
MIN3 3rd above Eb nc F G nc Ab nc B C nc D nc
5th above G nc A Bb nc C nc D Eb nc F nc
Page 71

71
Section 8: Harmony and Tuning
Diatonic and Chromatic Harmony
We've described scale and chord harmonies as diatonic,
and shift harmonies as chromatic; but what do those words
mean?
Look at a piano keyboard. Between middle "C" and the
next "C" there are twelve keys - 7 white keys and 5 black
keys. Each of those keys are pitched one semitone apart
for a total of, you guessed it, 12 semitones. The chromatic
scale uses all twelve semitone notes opposed to the
diatonic scales. Thus there is only one chromatic scale, but
12 each of the major, minor, etc. diatonic scales (C major,
C# major, D major, etc). Most of us have grown up hearing
the traditional "doh ray me fah so la tee doh" diatonic
scale, so that harmonies based on the diatonic scale sound
correct.
What does this mean, harmony-wise?
Diatonic scale harmonies can only use notes from the
underlying diatonic scale, so a “third above” harmony voice
actually varies between 3 and four semitones above the
lead note where the chromatic harmony would stay exactly
4 semitones (a major 3rd) above each note.
To recap: we have three different harmony modes that use
chromatic or diatonic scales.
Shifting, which uses the chromatic, 12 semitone scale,
changes the input pitch by a fixed number of semitones:
Chord, which uses the root, third, fifth and sometimes
seventh of the many diatonic scales, pitches the harmony
voice to the closest note contained within the chord:
Scale, which uses one of many diatonic scales, pitches the
harmony voice to the nearest note contained within the
scale:
Theory aside, the best way to get great sound is to
experiment with all of VoicePro's possible harmony modes.
Not only will you develop an intuitive sonic sense of what
works best where, but by investigating different
permutations and combinations you could discover some
delightful sounds you might otherwise have missed.
Just Tuning
What is Just tuning (or Just intonation)? This is the practice
of maintaining the relative and perfect mathematical ratios
between pitches, creating “perfect” harmonies. Just tuning
is different from Equal temperament tuning which is what
most of us use and hear everyday. Equal temperament
uses approximations for the tuning of each note, allowing
us to easily alter the key of our music without re-tuning our
instruments. Although probably no one has ever told you
this, your expensive grand piano and the last great
keyboard synthesizer you bought are both out of tune!
Well, to be fair we can say instead that they are all tuned
using Equal temperament.
Harmony is the result of the interaction between differing
audible frequencies in ratios that sound musical to the
human ear. A more exact ratio leads to a nicer sounding
harmony. Most instruments like the piano are absolute by
nature, meaning that each note has a specific pitch.
Unfortunately, with this method of tuning we lose the ability
to create perfect ratios when playing multiple notes. As a
result, much of the harmony you’ve heard in music has not
been perfectly in tune!
Singers, especially when performing multi-part a cappella
(no accompaniment) music, base their tuning on how it
harmonically sounds with other singers. The natural
tendency, and what sounds best, is to sing with Just tuning
so that inharmonic “beating” is minimized. One of the goals
in Barbershop quartet singing is to strive for “Just relative
intonation” so that a sub-frequency is audible. Achieving
this goal results in what Barbershop fans often describe as
the coveted "ring and lock" sound. In Barbershop music it
is the lead singer's responsibility to try to sing the melody
as close to the tuning of a piano (equal temperament) as
possible. The other singers must then tune their harmonies
to the melody using Just relative intonation. VoicePro is
able to do this in both the Just and Barbershop tuning
modes.
When the Just or Barbershop Modes are selected in the
VoicePro, the harmony tunings are based on the following
relationships:
Minor 3rd = 3 cycles for every 4 cycles of the input
Major 3rd = 5 cycles for every 4 cycles of the input
5th = 3 cycles for every 2 cycles of the input.
Barbershop differs from Just tuning in Chord mode. Just
tuning will use the root of the chord for the tuning
reference, while Barbershop tuning uses the input notes as
the tuning reference. For this reason it is better to use
Barbershop in an a-cappella situation and Just when
playing with other instruments, because Just tuning sounds
more in-tune with the other instruments that most likely
have Equal temperament tuning.
Our best advice is to experiment and use your ears!
Page 72

72
Page 73

73
Section 9 : Appendix
Detailed Application Descriptions
VoicePro's Browser is an efficient tool for getting to the
right preset. Understanding the criteria behind the Sources
and Applications of the Factory presets will help you get
good results.
Source: Singing
Singing presets were created with music and melody in
mind. Many of the singing presets shift the pitch for
doubling, correction and/or harmony creation.
Application: Correction
Correction presets make use of the pitch block, EQ and
dynamics to musically correct intonation and dynamic
problems. These presets will not contain any other
effect.
Application: Doubling
Doubling presets add dimension and richness to voices
in a natural or effected way. The µMod, Harmony and
Inflection effects are used on their own or in
combination to produce doubling sounds. Some
doubling presets contain octave shifting and other
auxiliary effects.
Application: Harmony (all, Shift, Scale, Chord,
Notes)
Harmony presets use 1 to 4 of VoicePro's Harmony
voices for intelligent harmony parts. You can refine the
search by looking for a specific harmony control mode.
Harmony presets may use other auxiliary effects to
create a complete vocal sound.
Application: Character
Character presets are useful for enhancing aspects of a
voice’s character. Examples of enhancements are
bringing out breathiness, adding air, and deepening the
gender.
Application: Classic FX
The Classic FX presets have been crafted to emulate
popular reverb, delay, flange and combination effects
commonly used on vocals.
Application: Special FX
Special FX presets are good starting points for finding
an interest hook for a song. Special FX presets may be
subtle or out of this world. Any or all blocks are used in
these presets.
Application: Transducer
Transducer presets use the Transducer Block to offer
Distortions and Telephone effects.
Application: Shaping
Shaping presets offer starting points for simple Dynamics
and EQ processing.
Application: Live
The select group of Live presets has been authored for
use at VoicePro's lowest latency rates. These presets
offer Doubling, Correction, and Character starting points
for processing.
Application: Other
The other application can be used when authoring User
Presets that don't meet other application criteria.
Source: Speaking
Speaking presets were created with dialog effects and
Character enhancement in mind. Pitch shifting may be
used on Speaking presets. However, the shifts will not
relate to a musical scale.
Application: Pitch & Time
Pitch & Time presets are intended for real-time
manipulation of dialog expressiveness. The top-level
editable parameters are setup for creative control. Some
of the presets start with no pitch or time shifting.
Application: Character
Character presets are useful for enhancing aspects of a
voice’s character. Examples of enhancements are
bringing out breathiness, adding air, and deepening the
gender. Pitch shifting is also used to alter character.
Application: Special FX
Special FX presets offer excellent starting points for
monsters, aliens and animated characters.
Application: Transducer
Transducer presets use the Transducer Block to emulate
the sound of telephones, radios, cockpits, etc.
Application: Shaping
Shaping presets offer starting points for simple dynamics
and EQ processing.
Application: Other
The other application can be used when authoring User
Presets that don't meet other application criteria.
Page 74

74
Section 9 : Appendix
Configurable MIDI Implementation
VoicePro MIDI CC configuration is configurable. Therefore,
you can define the implemenation. There are several CC
Assign Styles to choose from that emulate other TCHelicon products. The default implementation is listed
below.
Downloadable PC/MAC Based
Editor
A third party, PSI Craft has designed a PC/MAC Based
Editor for controlling VoicePro from a computer. The editor
can be downloaded at
www.tc-helicon.com/editors
To use the Editor you must have a computer with a MIDI
device connected to VoicePro. Installation and User’s
Manual for the Editor is provided with the download.
CC Tab Parameter
1 Matrix | Blocks Harmony on/off
2 Matrix | Blocks Harmony Comp on/off
3 Matrix | Blocks Harmony De-ess on/off
4 Matrix | Blocks Harmony EQ on/off
5 Matrix | Blocks uMod on/off
6 Matrix | Blocks Delay on/off
7 Matrix | Blocks Reverb on/off
8 Matrix | Blocks Transducer on/off
9 Matrix | Blocks Compressor on/off
10 Matrix | Blocks De-ess on/off
11 Matrix | Blocks EQ on/off
12 Matrix | Blocks Time on/off
13 Matrix | Blocks Pitch on/off
14 Matrix | Blocks Resonance on/off
15 Matrix | Blocks Spectral on/off
16 Matrix | Blocks Inflection on/off
17 Matrix | Blocks Vibrato on/off
18 Matrix | Blocks Breath on/off
19 Matrix | Blocks Growl on/off
20 Mix Dry Lead Pan
21 Mix Dry Lead Pan
22 Mix VirtuaLead Pan
23 Mix VirtuaLead Level
24 Mix Harmony Level
25 Mix Overall FX Level
26 Mix Delay Level
27 Mix uMod Level
28 Mix Reverb Level
29 Mix Aux Pan
30 Mix Aux Level
31 Utility Master Out Level
32 Time Rate
33 Time Hold
34 Freestyle Shift Delt
35 Inflection Style
36 Inflection Amount
37 Vibrato Style
38 Vibrato Amount
39 Breath Style
40 Breath Amount
41 Growl Style
42 Growl Amount
43 Spectral Style
44 Spectral Amount
45 Resonance Style
46 Resonance Amount
Page 75

75
Section 9 : Appendix
Terms & Descriptions
There are some general terms when using VoicePro that
are helpful to understand. Additionally, some VoicePro
applications require specific understanding of terms. These
terms are summarized below.
General
T
erm Description
Voiced Voiced describes vowel sounds produced
by the human voice. Voiced sounds have
a recognizable pitch
Un-Voiced Un-Voiced describes sounds produced
by the human voice that don’t have
pitched signals. These sounds can
include breaths, sibilant sounds like ‘sss’,
etc.
Interval The distance between two pitches
Harmomy
T
erm
Description
Harmony Mode Method by which musical input is sent to
VoicePro.
Diatonic Refers to the tone structures in major
and minor scales. Knowledge of these
scale structures is the "intelligence"
VoicePro uses to produce automatic
harmony.
Interval The distance between two pitches
Notes Mode Fully manual harmony mode where notes
and chords performed on a MIDI
keyboard are used to select the fixed
harmony pitches independent of the pitch
of the sung note.
Notes 4Ch Mode A second Notes Mode where each note
is received on a different MIDI channel
from a sequencer program, enabling
unique pitch bends on each channel.
Chord Mode An intelligent harmony mode where a
sequence of chords played on a MIDI
keyboard are interpreted to produce
musically correct pitches that move
according to the pitch of the sung note.
Scale Mode An automatic harmony mode where you
set only the key and scale of your song.
Usually, no on-going musical input from a
keyboard is required.
Shift Mode This is the one non-intelligent harmony
mode where a fixed interval is set for
each harmony voice that is maintained
throughout the song.
Humanization Various methods by which VoicePro
introduces random variations to the
sound that mimic human deviations in
pitch and timing.
Doubling
T
erm Description
Unison The same pitch
Micro shift Refers to an effect where detuned copies
of a vocal are played back at the same
time. Sometimes there is a time-varying
delay.
Correction
T
erm Description
Window The pitch range around a scale tone
where correction will occur.
Key The musical center of the song i.e. key of
C
Scale Major, minor or custom (edited); these
are the target notes that the vocal is
nudged towards.
Attack Rate When a singer's pitch falls winthin the
Window, the Attack Rate Parameter sets
how fast the vocal will be shifted to the
Window’s center.
Amount Can be used to reduce the effect of
correction if desired.
Time Phrasing
T
erm Description
Playback Rate Think of this as the "accelerator" and
"brake pedal" for the timing of the
incoming audio.
Reset Returns playback to real time instantly
Page 76

76
Section 9 : Appendix
Page 77

77
Section 9 : Appendix
 Loading...