

Page 1
VoiceOne
Voice Pitch and Modeling Tool
UUSSEERR’’SS MMAANNUUAALL
Page 2

Page 3
a
IMPORTANT SAFETY INSTRUCTIONS
1 Read these instructions.
2 Keep these instructions.
3 Heed all warnings.
4 Follow all instructions.
5 Do not use this apparatus near water.
6 Clean only with dry cloth.
7 Do not block any ventilation openings.
Install in accordance with the
manufacturer's instructions.
8 Do not install near any heat sources such
as radiators, heat registers, stoves, or other
apparatus (including amplifiers) that
produce heat.
9 Do not defeat the safety purpose of the
polarized or grounding-type plug. A
polarized plug has two blades with one
wider than the other. A grounding type plug
has two blades and a third grounding
prong. The wide blade or the third prong
are provided for your safety. If the provided
plug does not fit into your outlet, consult an
electrician for replacement of the obsolete
outlet.
10 Protect the power cord from being walked
on or pinched particularly at plugs,
convenience receptacles, and the point
where they exit from the apparatus.
11 Only use attachments/accessories
specified by the manufacturer.
12 Unplug this apparatus during lightning
storms or when unused for long periods of
time.
13 Refer all servicing to qualified service
personnel. Servicing is required when the
apparatus has been damaged in any way,
such as power-supply cord or plug is
damaged, liquid has been spilled or objects
have fallen into the apparatus, the
apparatus has been exposed to rain or
moisture, does not operate normally, or has
been dropped.
• This equipment should be installed near the
socket outlet and disconnection of the
device should be easily accessible.
• Do not install in a confined space.
• Do not open the unit - risk of electric shock
inside.
Caution:
You are cautioned that any change or
modifications not expressly approved in this
manual could void your authority to operate this
equipment.
Service
• There are no user-serviceable parts inside.
• All service must be performed by qualified
personnel.
Warning!
• To reduce the risk of fire or electric shock,
do not expose this apparatus to rain or
moisture.
• This apparatus must be earthed.
• Use a three wire grounding type line cord
like the one supplied with the product.
• Be advised that different operating voltages
require the use of different types of line
cord and attachment plugs.
• Check the voltage in your area and use the
correct type. See table below:
Voltage Line plug according to standard
110-125V UL817 and CSA C22.2 no 42.
220-230V CEE 7 page VII, SR section
107-2-D1/IEC 83 page C4.
240V BS 1363 of 1984.
Specification for 13A fused
plugs and switched and
unswitched socket outlets.
The lightning flash with an arrowhead
symbol within an equilateral triangle, is
intended to alert the user to the
presence of uninsulated "dangerous voltage"
within the product's enclosure that may be of
sufficient magnitude to constitute a risk of
electric shock to persons.
The exclamation point within an
equilateral triangle is intended to alert
the user to the presence of important
operating and maintenance (servicing)
instructions in the literature accompanying the
product.
Page 4

b
IMPORTANT SAFETY INSTRUCTIONS
Certificate Of Conformity
TC Electronic A/S, Sindalsvej 34, 8240
Risskov, Denmark, hereby declares on own
responsibility that following products:
VoiceOne
- Voice Pitch and Modeling Tool
- that is covered by this certificate and
marked with CE-label conforms with
following standards:
EN 60065 Safety requirements for mains
(IEC 60065) operated electronic and
related apparatus for household
and similar general use
EN 55103-1 Product family standard for
audio,video, audio-visual and
entertainment lighting control
apparatus for professional
use. Part 1: Emission.
EN 55103-2 Product family standard for
audio, video, audio-visual and
entertainment lighting control
apparatus for professional
use. Part 2: Immunity.
With reference to regulations in following
directives:
73/23/EEC, 89/336/EEC
Issued in Risskov, April 2002
Anders Fauerskov
Chief Executive Officer
EMC / EMI.
This equipment has been tested and found to
comply with the limits for a Class B Digital
device, pursuant to part 15 of the FCC rules.
These limits are designed to provide
reasonable protection against harmful
interference in residential installations. This
equipment generates, uses and can radiate
radio frequency energy and, if not installed and
used in accordance with the instructions, may
cause harmful interference to radio
communications. However, there is no
guarantee that interference will not occur in a
particular installation. If this equipment does
cause harmful interference to radio or television
reception, which can be determined by turning
the equipment off and on. The user is
encouraged to try to correct the interference by
one or more of the following measures:
• Reorient or relocate the receiving antenna.
• Increase the separation between the
equipment and receiver.
• Connect the equipment into an outlet on a
circuit different from that to which the
receiver is connected.
• Consult the dealer or an experienced
radio/TV technician for help.
For the customers in Canada:
This Class B digital apparatus complies with
Canadian ICES-003.
Cet appareil numérique de la classe B est
conforme à la norme NMB-003 du Canada.
Page 5

3
TABLE OF CONTENTS
INTRODUCTION
Table of Contents . . . . . . . . . . . . . . . .3
Text Conventions . . . . . . . . . . . . . . . .3
Quick Start Guide . . . . . . . . . . . . . . . .4
Introduction . . . . . . . . . . . . . . . . . . . . .9
BASIC OPERATION
Front Panel . . . . . . . . . . . . . . . . . . . .10
Rear Panel . . . . . . . . . . . . . . . . . . . .12
Setups . . . . . . . . . . . . . . . . . . . . . . .13
Signal Flow . . . . . . . . . . . . . . . . . . . .14
Preset Handling
Preset Types . . . . . . . . . . . . . . . . . . .15
Recall . . . . . . . . . . . . . . . . . . . . . . . .15
Edit . . . . . . . . . . . . . . . . . . . . . . . . . .15
Store . . . . . . . . . . . . . . . . . . . . . . . . .15
Preset Backup via MIDI . . . . . . . . . . .15
VOICE MODELING EDIT PARAMETERS
Introduction . . . . . . . . . . . . . . . . . . . .16
VM Inflection . . . . . . . . . . . . . . . . . . .16
VM Vibrato . . . . . . . . . . . . . . . . . . . .16
VM Spectral . . . . . . . . . . . . . . . . . . .16
VM Breath . . . . . . . . . . . . . . . . . . . .16
VM Growl . . . . . . . . . . . . . . . . . . . . .16
VM Resonance . . . . . . . . . . . . . . . . .16
PITCH EFFECTS EDIT PARAMETERS
Introduction . . . . . . . . . . . . . . . . . . . .19
Pitch Correction Parameters . . . . . . .19
PureShift
(TM) Mode . . . . . . . . . . . . . .19
Pitch Shift Parameters . . . . . . . . . . .19
Pitch Shift Modes . . . . . . . . . . . . . . .19
I/O SETUP
I/O Setup . . . . . . . . . . . . . . . . . . . . . .22
Inputs and Input Gain . . . . . . . . . . . .22
Digital Clock, Dither, Status Bits . . . .22
Lo-Cut . . . . . . . . . . . . . . . . . . . . . . .22
Analog Input / Output Range . . . . . . .22
Latency . . . . . . . . . . . . . . . . . . . . . . .22
Bypass Modes . . . . . . . . . . . . . . . . .22
MIDI / UTILITY
MIDI Control Parameters . . . . . . . . . .23
Voice Modeling Self Controls . . . . . .23
VM Parameter Lock . . . . . . . . . . . . . 24
Bulk Dump . . . . . . . . . . . . . . . . . . . .24
Foot switch Control . . . . . . . . . . . . . .24
Sysex ID . . . . . . . . . . . . . . . . . . . . . .24
Program Bank . . . . . . . . . . . . . . . . . .24
Tuning Reference . . . . . . . . . . . . . . .24
Viewing Angle . . . . . . . . . . . . . . . . . .24
MIDI IMPLEMENTATION
Pitch Correction. . . . . . . . . . . . . . . . . 25
Pitch Shifting . . . . . . . . . . . . . . . . . . .26
Voice Modeling . . . . . . . . . . . . . . . . .27
Other Parameters . . . . . . . . . . . . . . .28
Non-Registered Parameter Numbers .29
ADDITIONAL INFORMATION
Technical Specifications . . . . . . . . . .30
Preset/Style/Applications Guide:
Preset List . . . . . . . . . . . . . . . . . . . .31
Voice Modeling Styles . . . . . . . . . . . .34
Pitch Correction Scale Definitions . . .39
Voice One Tips . . . . . . . . . . . . . . . . .40
TEXT CONVENTIONS
Names of front panel controls, display items
and keys are displayed in BOLD CAPITALS.
In function descriptions, front panel items
appear in PLAIN CAPITALS. Names of second
level edit parameters are in Bold Mixed Case
lettering. In function descriptions, they appear
in Plain Mixed Case. Abreviations of menu
items are in BOLD CAPITALS, and their
descriptions in Bold Mixed case. Alphabetical
listings of parameter values will be in plain
Italic. Special notes appear in Italic, plain or
Bold.
Rev 3.0 – SW – V 1.02English Version
Prod. No: E60501201
Page 6

4
QUICK START BEFORE YOU BEGIN
Thank you for purchasing the TC-Helicon VoiceOne Vocal Pitch and Modeling Tool.We know
you want to get started right away. By reading this Quick Start guide you will be up and running in a matter of minutes. Please use this to get into the main functions of VoiceOne, but
do refer to the main manual for more detailed features and descriptions.
The TC-Helicon Team
www.tc-helicon.com
BEFORE YOU BEGIN
1) Check the contents of your VoiceOne carton. You should have received:
• VoiceOne unit
• Power cable appropriate to the power receptacles for you region
• VoiceOne User Manual
• This VoiceOne Quickstart Manual
• VoiceOne Preset, Style and Application Pamphlet
• TC-Electronic Catalog
• Warranty Card
2) Observe basic safety precautions:
• Operate from a regulated power receptacle.
• Do not open the unit! There are no user serviceable parts inside.
• Turn amplifiers and speakers down or off when patching in this equipment.
WHAT DOES VOICEONE DO?
VoiceOne is a special product for the human voice.
With this tool you now have the power to do:
• Voice Modeling
(TM) Effects
- Inflection including FlexTime(TM)
- Vibrato
- Resonance (Warp)
- Growl
- Breath
- Spectral (Voice Optimized Equalizer)
• Pitch Shifting and Correction to +/- 2 octaves, by reference to
scales, note mapping, fine tuned cent unit shifts, MIDI notes and
• Pitch Bend
• PureShift(TM) Full DSP Mode for Pitch Effects.
• Foot switch control of select parameters.
• Extensive MIDI control of effect parameters.
Let’s get started!
Page 7
5
QUICK START SETUP - AUDIO AND MIDI
SETTING UP VOICEONE
Note: Do not turn the unit on until you make all of your setup connections.
1) Connect the power cable to the back of VoiceOne and plug it in to the power receptacle.
2) Connect your audio source - a) Connect the output from your mixer, preamp or other balanced
equipment to VoiceOne, using XLR analog cable to Channel 1, or b) an S/PDIF digital cable to
the DI jack. See the I/O SETUP section for Digital I/O information. VoiceOne defaults to analog
settings.
3) Connect your Audio Output - a) Connect the Balanced Analog Output from Channel 1 to your
mixer, recorder or monitor system using balanced XLR cable. b) You may also connect the
S/PDIF Out ‘DO’ to your S/PDIF digital equipment.
4) Connect your MIDI devices - a) Connect the MIDI Out from your controller or sequencer to the
MIDI In in VoiceOne. b) Connect the MIDI Thru to your other MIDI devices if you choose.
c) Connect the MIDI Out to your MIDI recorder or sound module.
5) Footswitch - You may connect a footswitch to control the bypass features. See the I/O SETUP
section for details.
6) Set the Input and Output Knobs to full counter-clockwise as a precaution for power-up.
7) Power up VoiceOne using the POWER key.
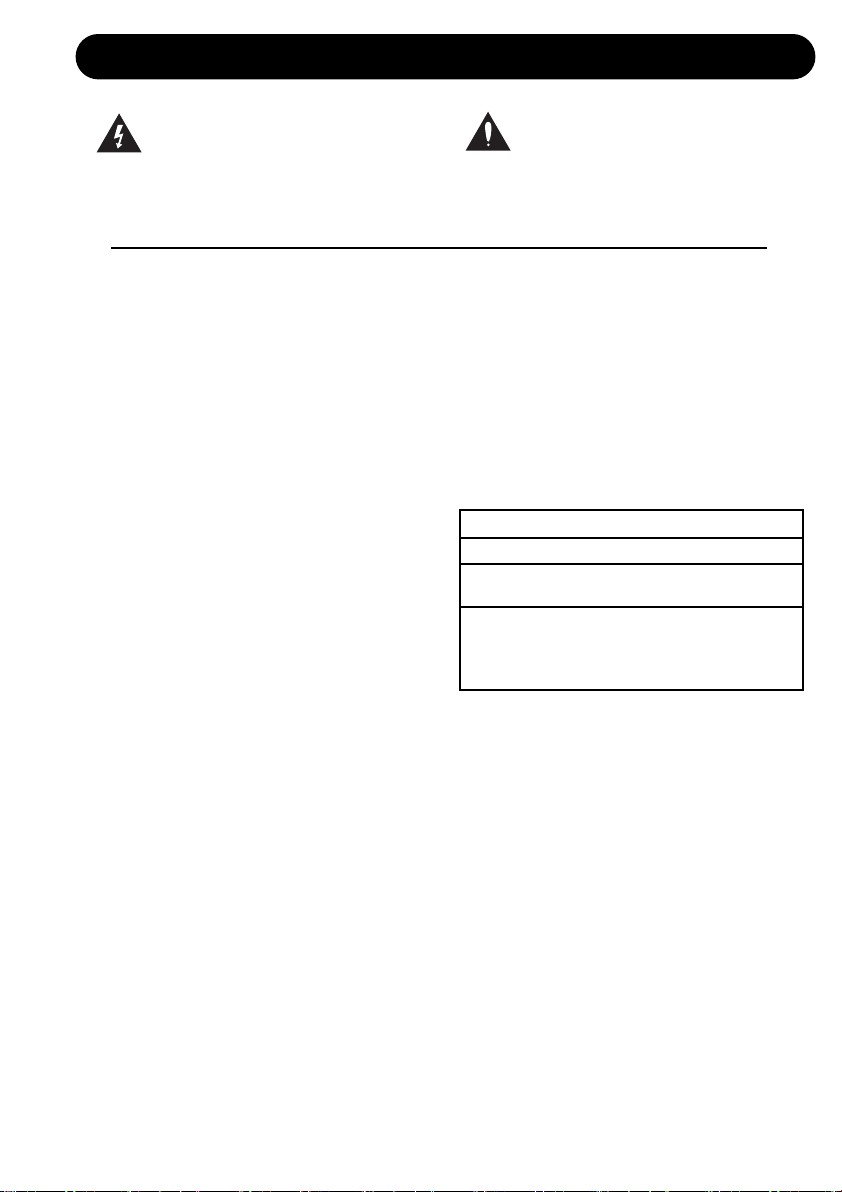
Rear Panel Diagram
2a 3a 2b 3b 4a 4b 4c 5
7 6 6
You’re now connected and powered up! You can now set the input gain of your signal to a
strong level without clipping (The leftmost meter labelled IN will light up red if there is an
overload). Use the Input knob to adjust this.
Now let’s take a look at the front panel controls...
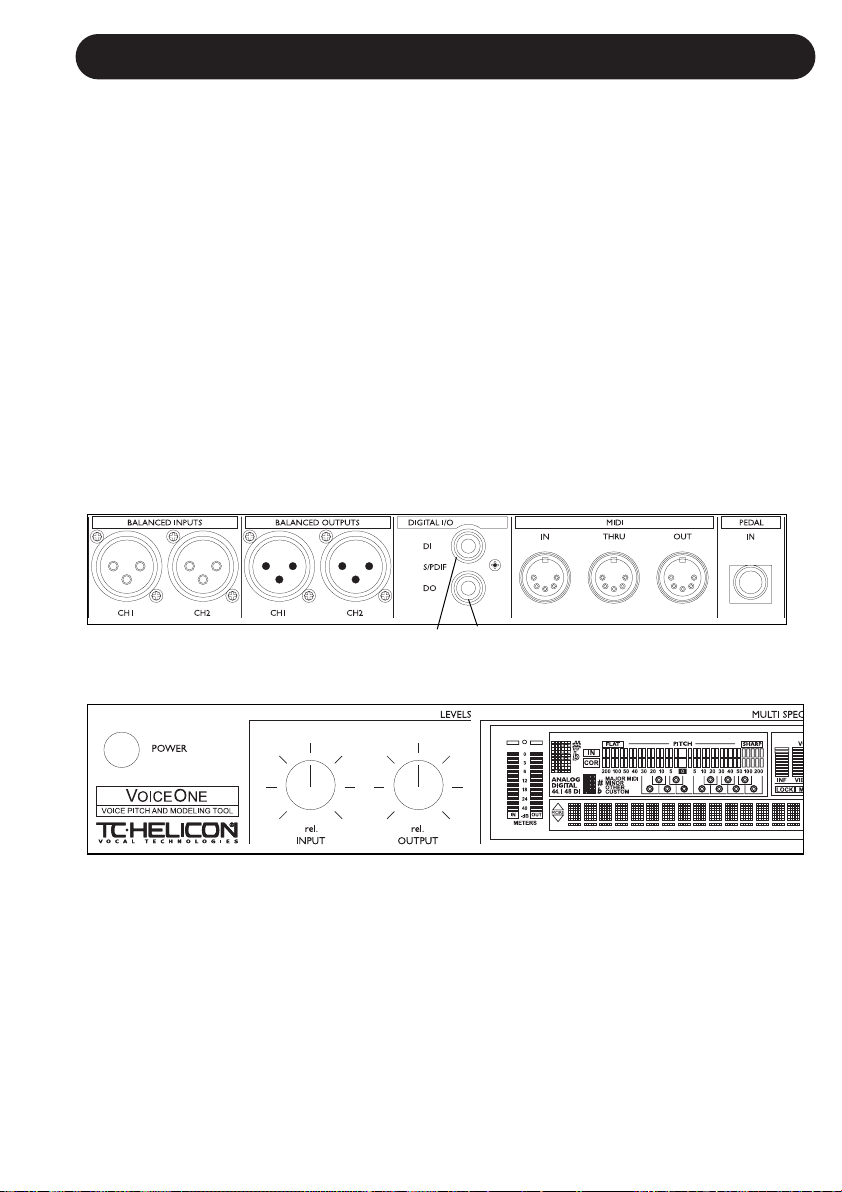
FRONT PANEL NAVIGATION
Page 8
6
Now that you know how the buttons are set up, you can experiment with browsing the presets. Use the DATA wheel to do this. Press the Voice Modeling and Pitch keys to toggle the
effects on and off. Turn the wheel to preset 99. This is the preset we will use to explore the
individual effects.
Let’s look at the effects and what they do...
FRONT PANEL NAVIGATION
PITCH and VOICE MODELING KEYS
A single click will activate/deactivate the effect. Double clicking on
the key will enter the edit menu of
the effect algorithm. A lit key LED
indicates that the effect block is
active.
FUNCTION KEYS: I/O and MIDI/UTIL
A single click will enter the parameters for editing.
RECALL KEY
Use the DATA wheel to scroll
through the presets, then press
RECALL to load the preset.
STORE
Press STORE once to save a preset.
Select a location using the DATA
wheel. Press ENTER to confirm this
operation. To edit the name, use the
ARROW keys to scroll through the
letter positions, and the DATA wheel
to select a character. Press ENTER
or STORE to finish.
DATA WHEEL
ARROW KEYS
ENTER KEY
BYPASS KEY
Bypasses all
functions, allowing the original
input audio to
pass.
QUICK START FRONT PANEL CONTROLS
Page 9

7
QUICK START VOICEMODELING EDIT PARAMETERS
VOICE MODELING (VM) STYLES AND
AMOUNTS
Here’s a good way to get started hearing all of
the Voice Modeling effects with your vocal.
• Go to factory preset 99 - we’ll use this preset
to do our experiments.
• Press the VM effect key so that it lights - the
effect is now active. Choose between
Inflection, Vibrato, Spectra, Breath, Growl
and Resonance.
• Double click that same key to enter the edit
parameters.
• Set the Amount to 50% - a midrange value.
• Use the ARROW DOWN key to scroll to the
next parameter - the styles. Styles are like
miniature factory presets for the VM
categories. Refer to the Preset, Style and
Application guide for descriptions on the
effects applications, and the style functions.
INFLECTION EFFECTS
The inflection effect can alter the inflection of
your vocals in different ways. You can add
various types of "scooping" effects to the
onsets of a lead vocal for instance, but
inflection is also the place where you can find
the humanization tools that will help you give a
harmony line its own identity or create
extremely natural doubling effect. Inflection
provides tools such as portamento, pitch and
timing randomization (using our FlexTime
(TM)
algorithm) as well as up/down scoop models.
VIBRATO EFFECTS
Vibrato is a pitch and amplitude effect that
singers often use in their delivery of a piece of
music. It is a combination of various
characteristics of the voice being repeatedly
altered in a oscillating fashion. Every singer's
vibrato is unique. The Vibrato Styles are based
on real vocalists’ vibratos. We have analyzed a
large set of parameters from a voice database
and created various vibrato models. The
Vibrato setting names reflect the style of the
vocals from which they were extracted.
Experimentation is the key to finding a style
setting that best suits your application. You
might begin incorporating Vibrato into your
sound by setting the VIB Amt control to 50%.
This setting matches the depth level that we
analyzed in our modeling subjects. You can
then vary the effect from this middle range up
or down to suit your taste.
SPECTRAL EFFECTS
The Spectral styles reflect the natural
equalization equivalent to the native control a
singer has over his or her own voice, and apply
this equalization to the VM voice. These styles
may be used in conjunction with the
resonances, or purely as additional tonal control
over the VM voice.
BREATH EFFECTS
The Breath styles add breathiness to the vocal.
This varies from a whisper, all the way to a
rough, raspy sound, such as is found in hard
rock and ‘alternative’ rock music.
Some styles are sensitive to the dynamics of
the incoming vocal, meaning that they can be
‘played’ by varying the level of what is sung into
Voice One. This is also known as ‘self-control’.
GROWL EFFECTS
Growl in VoiceModeling mimics friction activity
between the larynx and epiglottis regions of the
vocal tract. This is a ‘character’ phenomenon
used in high energy rock, blues or old soul
music for example.
The Growl effect also models the changes in
the vocal tract shape that growling requires,
altering the vocal resonance characteristics.
Some styles are sensitive to the dynamics of
the incoming vocal, meaning that the effect can
be controlled by the volume of what is sung into
Voice One. This is also known as ‘self-control’.
RESONANCE EFFECTS
Resonance styles allow you to take the
harmonic content that forms the identity of the
incoming voice and change the content’s
positioning to yield a new character to the
sound. Some styles change the voice to a
heavier, darker chest resonance, while others
lighten the sound to more of a head and throat
resonance. Some styles also change the voice
in a more complex way that depends on the
input voice.
Page 10

QUICK START PITCH EFFECTS EDIT PARAMETERS
PITCH CORRECTION
Again, we will use Factory preset #99 for our
experiments. Turn all of the VM effects off for
now by pressing their keys on the front panel.
Press the CORRECT key in preset #99 to turn
on the effect. We have set this up to correct to
a chromatic scale, with a default root of C.
Double Click the CORRECT key and use the
ARROW keys to find the COR Window or
correction window. Sing or play a vocal into
VoiceOne, and adjust this window with the
DATA wheel. You should also work with the
COR Attack and COR Amount parameters to
change the strictness and amount of correction.
Refer to the main PITCH CORRECTION and
PITCH CORRECTION SCALE DEFINITIONS
sections to investigate the other correction
scales, entering a custom scale, and correction
via MIDI control.
PITCH SHIFTING
Shift Amount/Mode
To understand how the shift amount is applied
in the various modes, it is a good idea to be
familiar with how VoiceOne shows the shift
offsets in the various modes. Please refer to
the PITCH SHIFT section for details.
In our Quickstart test preset (Factory #99) the
setting for SHI Mode is Chromatic. You can
then apply a static shift to the vocal by
changing the SHI Amount. This value is in
cents. 100 cents = one semitone. Experiment
with upshifts and downshifts. When finished,
press the SHIFT key to return to the top level
screen. Press the CORRECT button to disable
the Pitch Correction.
Now, let’s do an intelligent shift. We’re going to
use a major scale as our basis.
Remember, to hear the effect, the SHIFT key
must be pressed so that the LED lights.
Double-click the SHIFT key, and use the
ARROW keys to find the SHI Mode parameter.
Select Major 1 with the DATA wheel. With the
Arrow keys, scroll to the SHI Amount
parameter, and select the interval you want to
shift to. Try ‘3rd’ as an experiment. The scale is
in C major, since you haven’t changed the root
note in the Correction section. You should now
hear your input shifted to a diatonic 3rd above
C, depending on the notes you send in. If you
sing C, you should hear E.
There you have a basic hands on
demonstration on how some of the many
functions of VoiceOne are accessed. We
invite you to explore these features in depth
in the main User’s Manual.
Have fun with VoiceOne!
Visit our website for technical support,
literature, information, presets, FAQs,
promotions and many other items related to
TC-Helicon Vocal Products.
www.tc-helicon.com
Thank You
The TC-Helicon Team
8
Page 11

9
INTRODUCTION
Thank you for purchasing the TC-Helicon VoiceOne Voice Modeling Tool. This is a unique,
state of the art processor designed specifically for vocal applications. We know you will
enjoy using it, as much as we enjoyed designing it for you.
The TC-Helicon VoiceOne is designed for studio applications as well as live applications. VoiceOne
allows manipulation of a singer's voice to introduce unique vocal enhancement, pitch correction and
pitch shift effects. With VoiceOne you can sculpt a vocal to have unique breathiness, growl, rasp
and resonant characteristics. The result? Any vocal can have a vastly expanded character range
that goes far beyond the ability of what a single singer can produce.
VoiceOne also enables stylistic pitch effects such as vibrato and inflections, along with world class
pitch correction and pitch shifting.
VoiceOne is a tool that makes the voice elastic and pliable. With VoiceOne, the best characteristics
of a voice can be brought out and new characteristics can be added.
Features:
• Voice Modeling (TM) Effects:
- Inflection including FlexTime(TM)
- Vibrato
- Resonance (Warp)
- Growl
- Breath
- Spectral
• Static Pitch Shift
• MIDI Based Pitch Shifting
• Scale Based Pitch Correction / Shifting
• MIDI Based Pitch Correction
• PureShift
(TM) Full DSP Mode
• Custom Main LCD display giving feedback on key data.
• Flexible and simple parameter editing.
• Foot switch control of select parameters.
• Extensive MIDI control of effect parameters.
Please refer to this manual often, as there are many features and variations to explore.
Our website is another good source for applications, support and other user services.
We know you will appreciate VoiceOne as an inspirational creative device as much as a complete
Voice Modeling tool. Enjoy!
The TC-Helicon Team
www.tc-helicon.com
Page 12
10
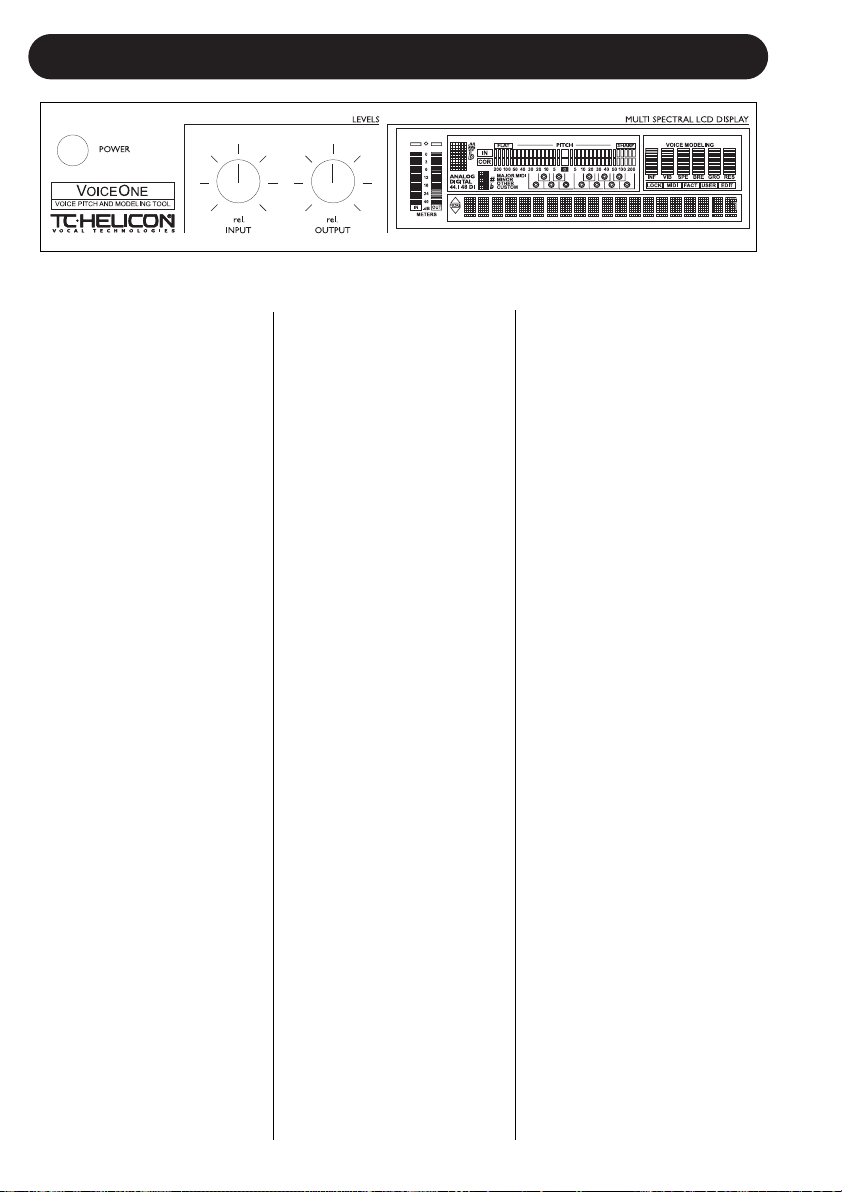
FRONT PANEL
POWER KEY
On/Off switch for the unit.
INPUT LEVEL KNOB
Adjusts the Input level.
Range: 12dB. The global input
range can be set in the I/O
menu.
OUTPUT LEVEL KNOB
Adjusts the Output level.
Range: 12dB. The global
output range can be set in the
I/O menu. This knob controls
overall output level. It is not
correlated with the output
meter. The Output Meter
measures output levels and
DSP activity before the signal
is affected by the Output knob.
INPUT METERS
Peak meter showing Input
level. The Meter range is: 0 to
-40dB.
INPUT OVERLOAD LEDS
The Overload LEDs indicate
that the Input level is too high,
or there is an internal DSP
overflow.
INPUT TYPE ANALOG / DIGITAL
DIGITAL: Indicates digital input
mode is selected.
44.1/48kHz: Indicates the
current sample rate. If external
clock is selected the
44.1/48kHz indicator will blink
until a valid clock can be
determined.
If digital input is selected but
no valid digital signal can be
detected the DIGITAL indicator
will blink.
DI LED
Indicates that external digital
clock input is selected.
CURRENT NOTE INDICATOR
Indicates the current note
being sung.
CURRENT SCALE TONIC
INDICATOR
Displays the tonic note of the
current scale.
CURRENT SCALE TYPE
INDICATOR
Shows the scale type currently
selected in the preset.
SCALE NOTE KEYBOARD
INDICATOR
A piano-style representation of
the notes in the currently
selected scale. A lit circle
around the note shows the
current note being sung.
INTONATION METER
Displays the position in cents
above or below the nearest
pitch shown by the current
note indicator.
CORRECTION METER
Displays the amount in cents
of correction applied to the
note or melody being sung.
MIDI IN
Indicates incoming MIDI
information.
VOICE MODELING AMOUNT
DISPLAY
This display shows the amount
of Voice Modeled (VM) effect
in each of the six categories
used in the current preset.
TEXT DISPLAY
Displays the preset number
and name, effects parameters,
and aids in menu navigation
and parameter value selection.
EDITED
When this LED is lit the
currently recalled preset has
been edited but not yet stored.
FACT / USER
Indicates whether you are
operating in the FACTORY or
in the USER preset bank.
Page 13
11
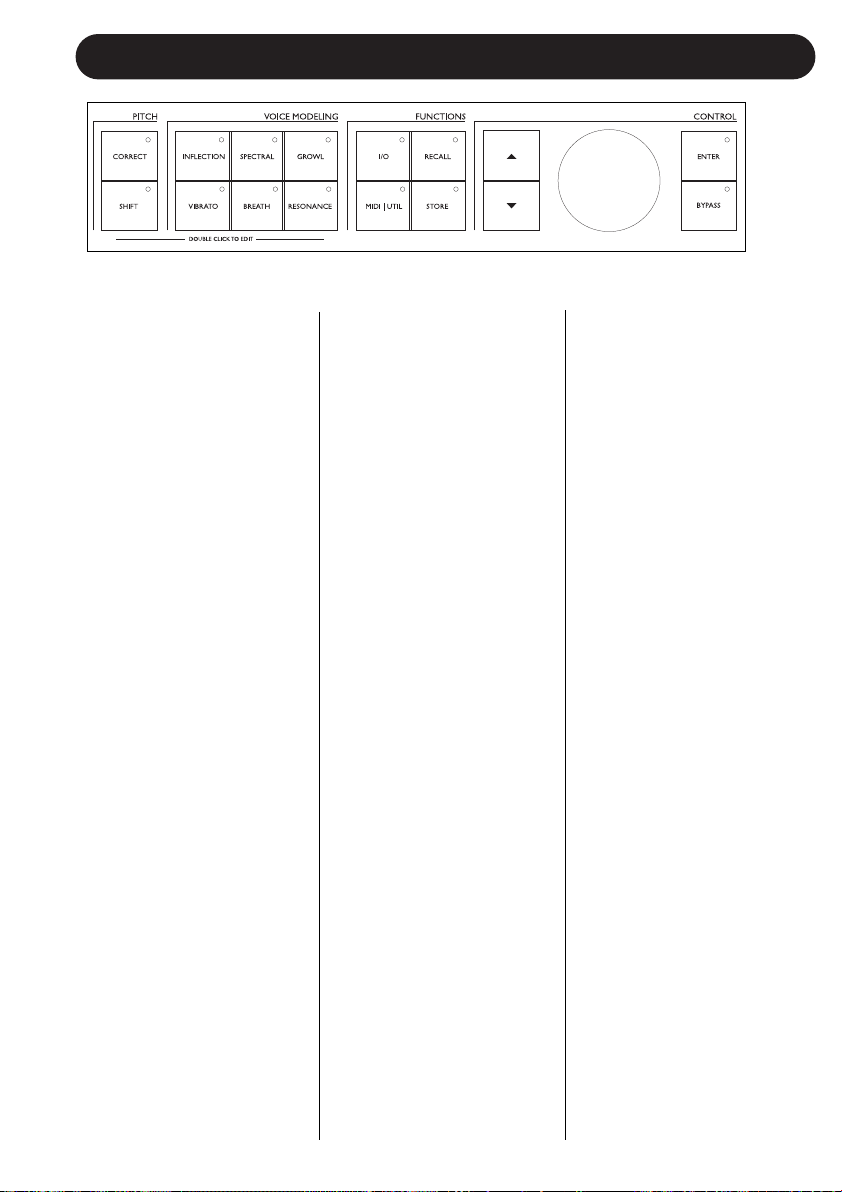
FRONT PANEL
FRONT PANEL CONTROLS -
GENERAL INFORMATION
A single click will activate or
deactivate the effect. Double
clicking on the key will enter
the Edit menu of the effect
algorithm. A lit key LED
indicates that the effect block
is active.
PITCH CORRECTION KEY
On/Off/Edit key for the Pitch
Correction block.
PITCH SHIFT KEY
On/Off/Edit key for the Pitch
Shift block.
INFLECTION KEY
On/Off/Edit key for the
Inflection block.
VIBRATO KEY
On/Off/Edit key for the Vibrato
block.
SPECTRAL KEY
On/Off/Edit key for the Vocal
Spectral EQ block.
BREATH KEY
On/Off/Edit key for the Breath
block.
GROWL KEY
On/Off/Edit for the Growl
block.
RESONANCE KEY
On/Off/Edit for the Resonance
block.
I/O
The I/O menu is where all
Input and Output related
parameters are controlled.
MIDI/UTIL
Press to access all MIDI and
other general parameters.
RECALL
Press RECALL to initiate a
recall operation. Use the wheel
to select preset. Then press
ENTER or RECALL to confirm
operation.
STORE
Press STORE once to save a
preset. Select location using
the DATA wheel in the Control
section. Now press STORE to
confirm operation.
The name of the preset can be
altered before pressing
STORE for confirmation. To do
this use the ARROW keys to
select letter-space and the
DATA wheel to select letter.
When done press STORE to
confirm the entire STORE
operation.
ARROW KEYS
Used to scroll through
parameters when editing a
block.
DATA WHEEL
This wheel is used to select
the preset number to be
recalled, or to set the value of
a parameter when editing.
ENTER
Used to confirm a parameter
edit, or function.
BYPASS
Press to bypass all effects.
Page 14

12
REAR PANEL
Balanced
XLR
Analog
Inputs
Balanced
XLR
Analog
Outputs
MIDI
In, Out, Thru
Footswitch
Jack
Digital
S/PDIF
Input/
Output
MIDI Cable
DIN CONNECTOR
5POLE - MALE
45 degrees
DIN CONNECTOR
5POLE - MALE
45 degrees
max. 10m
SHIELDED CABLE (3 or 5 wires + screen)
Note!
The analog Input and Output
connectors on the VoiceOne are
balanced XLR jacks. Optimal
performance with balanced equipment
is achieved using balanced cables.
Balanced XLR to
Balanced 1/4” Cable
Balanced XLR Cable
- 3 Pin Type
Page 15

Connecting and Setting up Voice One - Analog
Connecting and Setting up Voice One - Digital
Note: You can have an analog input and a digital output, or a digital input and an
analog ouput on VoiceOne if you desire. You may also use both analog and digital
outputs simultaneously.
Analog Audio Setup:
• Connect Auxiliary Send from Mixer or output
from preamp to input 1 on VoiceOne. Voice one
does not accept a microphone directly. Run a
microphone into a mixer or mic preamp first,
then route to the VoiceOne. If you wish, place
insert processors like a compressor before
VoiceOne in the chain. Input 1 is the default
input. You may use only one input at a time.
• Connect Outputs 1 and 2 to two channels on
your mixing desk. In the I/O parameters, select
the Output to have VM signal routed to the left
or the right output. The opposite output from the
one you choose for the VM signal will be a dry
output. You may now place these outputs
anywhere in the stereo field. Effects such as
reverb, delays and chorusing may be added in
the chain after VoiceOne if desired.
• Adjust the input level on the front panel of
VoiceOne to prevent audio clipping.
Digital Audio Setup:
• Connect the S/PDIF Digital Out from your sound
source to the Digital Input (DI) on the rear of
VoiceOne.
• In the I/O menus, choose which channel the
VoiceOne will read its input from.
• Connect the Digital Out (DO) to the Digital Input
of your recording or mixing equipment. If the
VoiceOne is to be the master device, set the
clock to either 44.1kHz or 48kHz. This setting
will depend on the rate you require to match
your recording gear. If the Voice One is to be the
slave device, set the clock to Digital.
• Refer to the I/O section of the manual for more
information.
• As in the previous setup, place preamps and
compressors before VoiceOne, and effects
devices after VoiceOne.
13
SETUPS
Page 16

14
SETUPS & SIGNAL FLOW
Connecting and Setting up VoiceOne - MIDI
Signal Flow
MIDI Setup:
• Connect the MIDI Out of your MIDI controller
or sequencer to the MIDI In of VoiceOne.
• You can set different MIDI channels to
receive for the main MIDI section, for MIDI
pitch shifting, and for MIDI pitch correction.
You may also send the MIDI pitch output on
its own channel as well. See the MIDI/Util
section later in the manual.
• Be sure that your controller or sequencer is
transmitting on the same MIDI channel that
VoiceOne is set to receive on. Voice One
defaults to Channel 1.
• Connect the VoiceOne MIDI Out to a
sequencer or sound source input if you wish
to use the MIDI Pitch Output of VoiceOne.
The MIDI channel of this output may be
selected in the MIDI / UTIL menu.
• Changing parameters on the front panel
sends the coresponding MIDI data to the
MIDI out.
• Connect VoiceOne’s MIDI Thru to pass the
MIDI input on to other devices unchanged.
• Connect the VoiceOne MIDI In and Out to a
MIDI Sequencer, Librarian or another
VoiceOne for sending and receiving Preset
dumps via MIDI System Exclusive.
Page 17

15
PRESET HANDLING
• Press STORE.
At this point you may edit the preset name.
To alter the preset name; use the ARROW
keys to move cursor between the character
positions, and the DATA wheel to select
character.
• Press STORE to store the preset with the
new name. If you choose not to alter the
preset name, simply press STORE without
altering the characters. This completes the
Store operation.
Backup Presets Via MIDI
The User bank can be dumped for backup via
MIDI to either a sequencer or another
VoiceOne. This is how to do it::
• Connect VoiceOne MIDI Out to MIDI In on
either another VoiceOne or sequencer.
• Enter the Utility menu by pressing the
MIDI/UTIL key and scroll to select Bulk
Dump using the ARROW KEYS.
• If connected to another VoiceOne simply
press ENTER and the entire User bank will
be copied to the other VoiceOne.
• If connected to a sequencer let the
sequencer record in OMNI mode (all
channels) and press ENTER on the
VoiceOne.
The VoiceOne is always ready to receive a
MIDI System Exclusive Bulk Dump.
Simply connect MIDI Out from the device you
are dumping from (or another VoiceOne) to the
MIDI In on the VoiceOne. Send the bulk dump.
This sends out the User preset bank. If you are
dumping from a sequencer, simply play the
sequence holding the bulk sysex material you
previously recorded from a VoiceOne sysex
dump. Be sure you play back the sequence at
the same tempo or slower than the tempo that
the sequence was recorded at. You will need to
press the RECALL key to load a preset from a
bank dumped into the unit.
Preset types
Factory presets
The VoiceOne holds 100 factory presets.
Factory presets can be edited and stored in any
User location. You cannot store presets into a
factory location.
User presets
User presets can be edited and stored in any
User location. You can store up to 50 user
presets in the User bank.
Recall
Recalling a preset means loading/activating a
preset.
• Press RECALL to enter the RECALL menu.
• Use the DATA wheel to preview presets.
Blinking front panel lights indicate preview
mode. Previewing means that you are not
actually changing/loading the preset until
ENTER is pushed.
• Press ENTER or RECALL to recall/activate
the preset.
• Press any other key at any time during
previewing to return to the currently recalled
preset.
Edit
To edit preset parameters:
• Double click on the Pitch or VM key you
would like to edit,
• Select parameters using the ARROW KEYS
and change values using the DATA wheel.
• See the following section for instructions on
how to store a preset.
Store
To store a preset with the same name:
• Press STORE.
If the preset you are about to store is a
Factory preset the VoiceOne suggests the
first available User location, but you can
select any of the 50 locations using the DATA
wheel.
If the preset you are about to store is a User
preset, the VoiceOne remains on the current
location of the preset.
You can, however, store at any of the 50
User locations. Select location using the
DATA wheel.
Page 18

16
VOICEMODELING EDIT PARAMETERS
EDITING VOICE MODELING PARAMETERS
GENERAL INFORMATION
A single click will activate/deactivate the effect.
Double clicking on the key will enter the Edit
menu of the VM effect algorithm. Lit key LED
indicates active effect block. As all human
voices are unique in their character, every input
voice will be affected differently by VoiceOne.
The Style parameter in each category is a
collection of different Voice Modeling
algorithms. Each one has its own unique
application. You choose a style to work with,
and use the other parameters in the category to
manipulate the style further. Simple
descriptions are provided in the Preset/
/Style/Applications Guide further on in this
manual.
INFLECTION PARAMETERS
The inflection effect can alter the inflection of
your vocals in different ways. You can add
various types of "scooping" effects to the
onsets of a lead vocal for instance, but
inflection is also the place where you can find
the humanization tools that will help you give a
harmony line its own identity or create
extremely natural doubling effect. Inflection
provides tools such as portamento, pitch and
timing randomization (using our FlexTime
(TM)
algorithm) as well as up/down scoop models.
INF Amount
The depth of the inflection applied to the signal.
INF Style
A list of base Inflection types, each with unique
characteristics.
INF Retrig.
Selects how often the ‘scoop’ effect is applied.
Voice One listens for a silenced or unvoiced
duration that you specify. Based on the setting,
the inflection will be placed at the start of the
next note. This parameter has no effect if the
current style does not feature a scooping effect.
INF Length
Sets the rate of ‘scoop’ or ‘portamento’ toward
the original sung pitch. This parameter has no
effect if the current style does not feature a
scooping or a portamento effect.
INF PitRnd
Applies small variations or pitch randomization
to the pitch contour. At a value of 100% the
maximum randomization will be +/- 50 cents.
This parameter is used to give human-like
enhancements to the pitch, just like we hear in
real vocals. This is useful for creating natural
sounding doubling/harmony voices and MIDI
pitch-shifted melodies. You can try it on heavily
pitch-corrected vocals as well.
INF TimRnd / INF TimeDly
These two parameters control our proprietary
FlexTime
(TM) algorithm. FlexTime
(TM) allows you
to alter the timing of your vocal track by slowing
down or ‘catching up’ the rate at will (without
altering the pitch). TimRnd is a time
randomization parameter. It is very useful for
harmony and doubling since it decorrelates the
timing of the two voices and makes them sound
like two independent voices. TimRnd is scaled
by the Inflection amount. It is also expressed as
a percentage of the TimDly. For instance, if the
TimDly is set to 100ms, TimRnd is at 50% and
INF Amt is at 50%, the actual delay will be
randomized between 75 and 100ms. TimeDly
controls the delay of the processed voice
dynamically. It is not scaled by the Inflection
amount. You can manually control this
parameter by controlling it in real time via MIDI
(CC#45). Increasing the delay will slow down
the track (the faster you increase the delay, the
more it slows down) and decreasing it will make
the processed vocals speed up (and catch up
with the dry signal when the delay is back to 0).
TimBuf - Inflection Time Buffer - This
parameter can 'slip' your vocal track. When the
dry track is delayed, the buffer can run the
effected audio 'ahead' as well as 'behind' for the
ultimate doubler - not just a delay but a time
randomizer, using the dry signal as a pivot. An
increased TimBuf setting gives more range to
the TimRnd (Time Randomization) setting, but
decreases the range of the TimDly (Time
Delay).
Note: If you choose to use the TimBuf
parameter in a MIDI sequence, it is a good idea
to send the CC for the buffer first. Changing this
buffer during performance will introduce audio
clicks. Don't worry, because you can always
change the randomization amount and time
delay in real-time using the TimDly and TimRnd
parameters instead.
Page 19

17
VOICEMODELING EDIT PARAMETERS
VIBRATO PARAMETERS
Vibrato is a pitch and amplitude effect that
singers often use in their delivery of a piece of
music. It is a combination of various
characteristics of the voice being repeatedly
altered in a oscillating fashion. Every singer's
vibrato is unique. The Vibrato Styles are based
on real vocalist's vibratos. We have analyzed a
large set of parameters from a voice database
and created various vibrato models. The
Vibrato setting names reflect the style of the
vocals from which they were extracted.
Experimentation is the key to finding a style
setting that best suits your application. You
might begin incorporating Vibrato into your
sound by setting the VIB Amt control to 50%.
This setting matches the depth level that we
analyzed in our modeling subjects. You can
then vary the effect from this middle range up
or down to suit your taste.
VIB Amount
The depth of vibrato applied to the signal.
VIB Style
A list of base Vibrato types, each with unique
characteristics.
VIB OnsTim - Vibrato Onset Time
Sets the delay before the onset of the Vibrato
effect.
VIB OnsRnd - Vibrato Onset Randomization
A parameter that randomizes the delay
parameter of the vibrato. The randomized
values fall between the VIB OnsTim setting and
the percentage of this set in VIB OndRnd. For
instance, if your Delay is set to 2000ms and
your Randomization is set to 50%, your
randomization of the delay will fall between
2000 and 1000ms. This contributes to a more
human-like feel, as vibrato entrances are not
always at an equal value.
VIB PerTim - Vibrato Period Time
Sets the period or speed of the vibrato.
VIB PerRnd - Vibrato Period Random
A randomization on top of the existing vibrato
period.
SPECTRAL PARAMETERS
The Spectral styles reflect the natural
equalization equivalent to the native control a
singer has over his or her own voice, and apply
this equalization to the VM voice. These styles
may be used in conjunction with the
resonances, or purely as additional tonal
control over the VM voice.
SPE Amount
The amount of Spectral EQ applied to the
signal.
SPE Style
A list of base Spectral EQ types, each with
unique characteristics.
Page 20

18
VOICEMODELING EDIT PARAMETERS
BREATH PARAMETERS
The Breath styles add breathiness to the vocal.
This varies from a whisper, all the way to a
rough, raspy sound, such as is found in hard
rock and ‘alternative’ rock music.
Some styles are sensitive to the dynamics of
the incoming vocal, meaning that they can be
‘played’ by varying the level of what is sung into
Voice One. This is also known as ‘self control’.
BRE Amount
The amount of breath effect incorporated into
the signal.
BRE Style
A list of base Breath types, each with unique
characteristics.
Note: When using the whisper effects, the
shift and correct blocks may seem to not be
working. What's actually happening is there is
no pitch to shift or correct to in whisper mode.
BRE Harm’X
Singing with breath implies opening the vocal
folds more, and thus changing the harmonic
structure: your voice sounds more mellow when
you make it breathy. This parameter controls
how much the harmonics are altered when
adding breath to the voice. At 0% the
harmonics are not altered, at 100% the
harmonic shaping is at its maximum.
GROWL PARAMETERS
Growl in VoiceModeling mimics friction activity
between the larynx and epiglottis regions of the
vocal tract. This is a ‘character’ phenomenon
used in high energy rock, blues or old soul
music for example.
The Growl effect also models the changes in
the vocal tract shape that growling requires,
altering the vocal resonance characteristics.
Some styles are sensitive to the dynamics of
the incoming vocal, meaning that the effect can
be controlled by the volume of what is sung into
Voice One. This is also know as self-control.
GRO Amount
Controls the level of Growl applied to the
signal.
GRO Style
A list of base Growl types, each with unique
characteristics.
RESONANCE PARAMETERS
Resonance styles allow you to take the
harmonic content that forms the identity of the
incoming voice and change the content’s
positioning to yield a new character to the
sound. Some styles change the voice to a
heavier, darker chest resonance, while others
lighten the sound to more of a head and throat
resonance. Some styles also change the voice
in a more complex way that depends on the
input voice. So, try them with the voice you
intend to process.
RES Amount
Controls the amount of formant resonance
change to the incoming voice.
RES Style
A list of base Resonance types, each with
unique characteristics.
RES Tract
Alters the apparent vocal tract length,
facilitating a gender change to the input voice.
Page 21

19
PITCH EFFECTS EDIT PARAMETERS
EDITING PITCH EFFECTS PARAMETERS-
GENERAL INFORMATION
A single click will activate/deactivate the effect.
Double clicking on the key will enter the Edit
menu of the pitch effect algorithm. Lit key LED
indicates active effect block.
PITCH CORRECTION PARAMETERS
COR Scale - Scale Type
The selections in this category are: Major,
Minor, Other, Custom and MIDI. Other scales
come from the predefined list below. Their
notes based on the root you select appear on
the KEYBOARD in the display. Custom scales
are entered via the COR Custom parameter
below. When the MIDI scale type is selected,
the Voice One corrects to MIDI notes supplied
from a MIDI controller device.
Scale types:
Major
Minor - Natural
Minor - Harmonic
Minor - Ascending Melodic
Chromatic
Dorian
Phrygian
Lydian
Mixolydian
Locrian
Half-Whole Diminished
Whole-Half Diminished
Altered
Neopolitan Minor
Neopolitan Major
Enigmatic
Whole tone
Leading Whole-Tone
Overtone
Augmented
Pentatonic - Major
Pentatonic - Minor
Pentatonic - Dominant
Blues
BeBop (Maj7)
COR Root
The beginning pitch or center tone of the scale
can be selected here. The Pitch Corrector
and Shifter rely on the selection of a root to
correct/shift pitch. If you choose the MIDI
scale type, this parameter does not apply to the
corrector and the value is not displayed on the
front panel. The root selection still applies to
the shifter in this case.
COR Window
Sets the maximum distance between the input
pitch and a note to correct to. An out of tune
pitch must fall within this range to have
correction applied. The LCD display will show
the range to 200 cents above or below the
pitch. A value setting of 600 cents is infinite
correction. With infinite correction all notes are
corrected no matter how many notes there are
in the scale or how out of tune the singer is.
COR Attack
Sets the responsiveness of the correction. 0%
is slow, and 100% is fast correction.
COR Amt - Correction Amount
The Amount control scales the amount of
automatic correction applied to the input voice.
The range is from 0% to 100%. However, 0%
does not mean that the correction is turned off.
The amount of correction that is applied
depends on how far out of tune the input is.
This allows for a very musical way of correcting
pitch, by correcting the large pitch errors while
preserving the natural micro variations around
the correct pitch. For example, a) with the
amount set to 100%, a 10 cent flat input will be
corrected by 10 cents and a 50 cent flat input
will be corrected by 50 cents. b) With the
amount set to 80%, a 10 cent flat input will be
corrected by approx. 5 cents and a 50 cent flat
input will be corrected by approx. 40 cents. c)
With the amount set to 0%, a 10 cent flat input
will not be corrected and a 50 cent flat input will
be corrected by approx. 10 cents.
COR Custom - Scale
Press the ENTER key to begin. The display will
read, COR Custom *Editing*
Use the DATA wheel to scroll around the notes
on the KEYBOARD in the display. The ‘cursor’
is a clear circle. When you arrive at the note
you want, press the ENTER key. The note you
selected will light up. To turn a selected note off
press the ENTER key. Repeat this scrolling /
enter process to add other notes if you wish.
The settings you make take effect immediately.
The custom scale tones you enter are not
octave specific. If the notes you choose are the
same as a Scale Type from the pre-defined
scales, the scale name will flash in the display.
If you leave the preset before storing it, you will
lose the scale setting.
BeBop (dominant)
BeBop (minor)
Hungarian Minor
Hungarian Major
Hungarian Gypsy
Prometheus
HiraJoshi
Iwato
Kumoi
Hawaiian
Kokin
Spanish
Egyptian
Ritusen
Pelog
Pelog2
Javanese Pelog
Oriental
Gypsy
Arabian
Hindu
Persian
Chinese
Custom
MIDI
Page 22

20
PITCH EFFECTS EDIT PARAMETERS
note in the scale. For example, if the selected
COR Scale is ‘Gypsy’, and you shift to the 5th
note, you turn the DATA wheel until you see ‘+5
deg’ in the display. With a root note of C, the
note would be G#(Ab). Again, you can see the
note names mapped in the SHI Map section
(see below).
When you select SHI Mode Custom, the
Amount parameter is not applicable (N/A). The
shift amount is directly determined by the input
note to output note relationship in the Shift Map
as described below.
Note:If the MIDI scale is selected in the COR
scale selection, SHI Amount shows N/A. A
shift map cannot be generated in this
situation because the number of notes in
the correct scale can be changing all the
time.
SHI Map
Dialing the DATA wheel changes the IN note so
that the out note will immediately reflect the
target shift note, depending on the current
mode and amount settings. The map is always
viewed (and acted upon) relative to the current
root as selected in the Correction Effect. This
allows you to browse what is actually
happening for the current shift mode. The "<>"
brackets indicate that the user can press
ENTER to edit. Pressing ENTER will allow the
user to turn the encoder to change the "OUT"
note for the currently selected "IN" note. When
editing, the screen will show "*IN = OUT*".
Once you begin editing, the Shift Mode will be
automatically set to "Custom". If the mode was
previously not custom, whatever the shift map
was will be copied to the preset's custom shift
map for editing. This allows you to choose for
example a Major 1 scale, set an offset amount,
and then press the ENTER key while in the SHI
Map screen which will copy the map to the
custom space allowing you to make changes.
When editing the OUT note, the user can scroll
to the beginning or end of the list to select
"NC", meaning “No Change”. No Change tells
the shifter to keep the last harmony. Each scale
degree of the map has a possibility of being
shifted no more than 2 octaves in either
direction. Pressing ENTER again will return the
shift map to "browse mode". One shift map is
stored per preset, in the same way custom
scales are. In custom scale mode, you cannot
change the shift amount, as it is already directly
specified by the shift map. In chromatic mode,
PITCH SHIFT PARAMETERS
SHI Amnt/SHI Mode - Shift Amount/Mode
To understand how the shift amount is applied
in the various modes, it is a good idea to be
familiar with how VoiceOne shows the shift
offsets. At any time, you can check the status of
shifted notes by referring to the Shift Map. (See
Below). The mode selected decides the way
the shift is expressed. SHI Mode sets the shift
mode - the way in which VoiceOne interprets
the Shift Amount.
In Chromatic mode, the shift is shown in terms
of cents away from the input, to +/- 2400cents,
(+/- 2 Octaves). 100 cents equals one
semitone. Here you can perform special fine
tuned shifts, of any range +/- 2400cents.
In all modes except Chromatic mode, VoiceOne
generates a shift map that describes the
outgoing shift amount for each of the twelve
possible input notes. The Maj1,2,3 and
Minor1,2,3 modes use the root of the Cor Scale
and the offset you supply under Shift Amount to
generate a shift map that will create three
useful variations of both major and minor
harmonies. The Cor Scale mode directly builds
the shift map from the current Cor Scale
(whether it be a factory or custom scale). The
Custom mode allows you to manually specify
the twelve input note to output note
relationships. The following describes each of
the modes in detail:
In Major1,2,3 and Minor1,2,3 modes, the Shift
Amount is based on offsets from the root note.
For the Major1,2,3 and Minor 1,2,3 scales, the
amount is expressed as scale tone intervals.
This is shown as ‘Unison’, 2nd 3rd etc. up to
the Octave. For example, with a C root, a G
would be the 5th. The Major and Minor modes
each have 3 variations. This allows a better fit
to harmonizing different progressions using
major and minor scales. Try the variations for
the best fit.
When the SHI Mode COR Scale is used, the
degrees are shown as ‘+1 deg, +2 deg’ etc.,
depending on the number of notes in the
selected scale. Cor Scale mode takes as its
base the scale you select in the Pitch
CORRECT section, in the COR Scale
parameter. This scale is displayed on the
keyboard. Here you also have a range of +/two octaves. This way, if you have a scale that
is less than 7 notes, you can shift to any target
Page 23

21
the shift map screen will show "NA", as the shift
amount may not be exactly specified in 100
cent intervals. The shift map is updated
immediately as you change the out note,
allowing you to audition possibilities while you
sing. If the corrector is using a MIDI scale and
you has select COR Scale shift mode, the Map
will show "NA" as a shift map is not calculable
under this condition.
*SHI Formnt - Voice Formants Edit
Allows the user to set the formant character of
the voice. Values above 0 extend the vocal
tract for a more masculine or mature sound,
and a negative value shortens the vocal tract
for a thinner, more youthful sound.
Note: this control is available in PureShift
mode only.
*SHI Hybrid - Hybrid Shifter Ratio
Controls the pitch shifting algorithm. At 0%, the
pitch shifter corrects the formants when
transposing the voice, preserving the character
of the original sound. At 100%, the algorithm
does not preserve the formants, so they are
shifted the same amount as the pitch, creating
the typical "chipmunk" effect when performing a
large upshift. In many cases, smaller shifts are
best at a high percentage of non-formant
corrected shifting. When set to Auto, VoiceOne
adjusts this parameter dynamically in order to
achieve the best naturalness at any shift
amount.
Note: this control is available in PureShift
mode only.
PureShift
(TM)
PureShift(TM) is a special full DSP operating
mode. When this mode is set to on, only the
pitch shifting effects (Pitch, Correct, Inflection
and Vibrato) are available. By bypassing the
non-pitch oriented VoiceModeling
(TM) blocks, we
allocate more processing power to the pitch
shifting function and thus achieve even higher
quality and lower latency shifting. Two
parameters become available in this mode.
Please see *SHI Formnt, and *SHI Hybrid
above.
Notes on the Hybrid Shifter:
The shifter operates differently depending on
the shift mode, however the final offset in all of
these modes will be smoothed/naturalized by
the various inflection styles if active. The final
input to the hybrid shifter will be the shift offset
(calculated by the shift block), plus the
correction offset (calculated by the correct
block), plus any incoming pitch bend data, plus
any active scooping and vibrato. The shift offset
is calculated differently based on the shift block
state:
Shif
t-Map modes (Major123, Minor123, Scale
Deg, Custom)
The singer's closest note is supplied by the
correct block (may be corrected or not), and is
used to calculate the offset using the current
shift map (taking into account the possibility of
"no change" mappings). The shift map is an
array of the twelve semitones and their
corresponding shift amounts.
Chromatic mode
The chromatic shift amount is used as the
offset.
MIDI Override Mode
The offset is calculated to maintain the pitch of
the incoming MIDI notes by nullifying the effect
of the corrector and adapting to the singer's
raw input pitch.
Shif
t Block Disabled
The shift offset is zero.
PITCH EFFECTS EDIT PARAMETERS
Page 24

22
I/O SETUP
input pitch, or manual where the user sets a
fixed low cut frequency threshold.
Low Cut Thresh.
Sets the frequency threshold of the low cut
filter. Note that the maximum depends on the
filtering mode. This equates to 265Hz when in
manual mode, or infinity when in adaptive
mode.
Dither -Off, 8, 16, 20 bits...
Going from one type of bit resolution to a lower,
e.g. from 24 bit to 16 bit, you actually loose 8
bits of information. The process of cutting off
bits is called truncation and it introduces digital
distortion of low level signals, due to incomplete
signal information. To compensate for this dither must be applied. Dither is a small amount
of filtered noise that generates randomization at
the noise floor, ensuring a less distorted low
level signal. Dithering is relevant only on digital
outputs and it is always the receiving device
that determines the number of bits you must
dither to. A signal delivered to a CDR or a DAT
recorder should normally be dithered to 16 bit.
In other words - when using the digital Outputs
from the Voice One to feed any 16 or 20 bit
equipment you should dither to that value via
the Voice One.
Status Bits
S/PDIF, AES/EBU
Select the format of digital information received
or transmitted. Note that the default value will
be S/PDIF. Also note that the connectors to
most systems employing AES/EBU use XLR
jacks. You may need to use special cables to
connect from the Voice One digital RCA jacks to
XLR jacks on AES/EBU format equipment.
Digital In Gain
Adjusts the Digital In level. This parameter is
only active when Digital In is selected.
Input Range
Range: Pro/Consumer
Sets the sensitivity of the Voice One Input.
Default setting is “Pro” which will match most
preamps.
Output Range
Range: 2dBu - 20dBu
Sets the maximum gain range of the analog
output stage.
I/O Setup
In the I/O menu you will find input/output
settings, analog/digital, Status Bit and Dither.
For any successful operation of the VoiceOne
these parameters must be correctly set. All
parameters in the I/O menu are ‘global’
parameters that are not stored with the presets.
These parameters are ‘remembered’ by
VoiceOne when powering off.
BASIC OPERATION
• Press I/O
• Select parameters using the ARROW KEYS
in the CONTROL Section.
• Change values using the DATA wheel.
PARAMETERS
Input
Select between Analog Ch 1, Analog Ch 2,
Digital Left, and Digital Right Inputs.
Output
Select from VM Ch 1(Delay Ch 2), or VM Ch 2
(Delay Ch 1). You can select to have Voice
Modeling and Pitch Correction output on one
channel, and the process delay-matched dry
signal on the opposite.
Clock
Set the Internal digital audio clock to 44.1kHz,
48 kHz, or Digital. Use the Digital setting if the
Voice One is the slave device, and the Internal
clock frequencies if the VoiceOne is to be the
master device.
PLEASE NOTE:
When using internal clock with external digital
audio, the incoming digital audio must be in
sync with the VoiceOne internal clock in order
to avoid slip-samples. The **Rate Mismatch**
error message will occur in the display if the
VoiceOne detects slip-samples. Typically this
problem only occurs in special clock setups e.g.
if the VoiceOne is running via internal clock,
while processing audio from the Digital Input. If
the incoming clock and the internal clock do not
match the VoiceOne will display the above
written error message.
Low Cut Filter
Off, Adaptive, Manual
The low cut filter can either be off, adaptive
where the threshold frequency adapts to the
Page 25

23
I/O SETUP - MIDI/UTIL
Latency
The choices in this parameter are Normal ,
Medium and Low latency. Low latency mode is
the lowest latency setting that will not
compromise quality. There is a small process
delay required to do Voice Modeling. The
lowest latency/delay is available in
PureShift
(TM) correction mode. Entering
PureShift(TM) mode will disable the non-pitch
Voice Modeling effects and their portion of the
display. You may then bypass the latency of the
VM effects, and apply all DSP power to pitch
effects. For studio applications, a higher latency
setting will give you the best audio quality.
Values: Normal Mode (PureShif
t Off)
low latency is 13 ms
medium latency is 21 ms
normal latency is 33 ms
PureShif
t
low latency is 9 ms
medium latency is 16 ms
normal latency is 33 ms
Bypass Mode - No Delay, Maintain Delay
Controls the bypass mode. When set to No
Delay, there will be no delay in the audio path
when you engage the bypass. When set to
Maintain Delay the unit will maintain the
processing delay.
MIDI UTIL
All parameters in the MIDI/UTIL menu are
“general” parameters that are not stored
with the presets.
MIDI Channel - Range: Off,1-16.
Sets the responding MIDI channel of the
VoiceOne. When set to off, VoiceOne disables
CC input, NRPN input, pitch bend input, and
NRPN/CC output.
MIDI Pitch Shift Ch - Values: Off,1-16. Set the
channel on which to receive pitch shift
information - the notes to shift to. The pitch shift
and pitch correct MIDI channels can not be the
same.
MIDI Pitch Corr Ch
Values:1-16. Sets the channel on which to
receive MIDI pitch information from a controller
or sequencer in the form of MIDI notes.
About the Adaptive Low Cut Filter
Unwanted “rumble” in the low frequency area
can occur even on recorded instruments whose
main frequency area is situated considerably
higher. This could be a vocal track where the
singer is breathing close to the microphone. It
could also simply 50 or 60 cycle hum from
poorly shielded cables. Situations like this will
disturb the tightness of the low frequency area
and to solve that problem you use a low cut
filter. The Adaptive Low Cut Filter in VoiceOne
allows you to set the threshold frequency
relatively high without fearing that it will cut off
important low frequencies. As the input gets
closer to the threshold, the Low Cut Threshold
Frequency simply adapts and moves
downwards.
MIDI Pitch Out Ch
Values: Off, 1-16. Sets the MIDI channel on
which to output pitch data.
MIDI Prg Change
Values: Off, On. Ignores incoming MIDI
Program Change messages.
Bend Range
Values: 0 to +/- 2400 cents. Sets the range for
MIDI Pitch Bend messages. 2400 cents is a
range equivalent to two octaves.
Breath Ctrl
Values: Auto, Manual.
When set to Auto, the self-control is enabled.
The type of self-control is defined by the style
you choose. Auto mode scales the breath effect
dynamically between 0 and the dialed amount.
This is the standard operating mode. However,
you may want to add breath in specific sections
of your vocals and therefore have full control
over the effect amount. This is what the Manual
mode is for. When set to Manual, breath selfcontrol is disabled: the amount of effect being
applied is determined by the BRE Amount
parameter only. You can then use the MIDI
CC#2 (breath amount) to control the breath in
real-time. Do not forget to set it back to Auto
when you are finished with manual control, so
you can take advantage of the intelligent selfcontrol feature again.
Page 26

24
MIDI/UTIL
Growl Ctrl
Values: Auto, Manual. When set to Auto, the
self-control is enabled. The type of self-control
is defined by the style you choose. Auto mode
scales the growl effect dynamically between 0
and the dialed amount. This is the standard
operating mode. However, you may want to
add growl in specific sections of your vocals
and therefore have full control over the effect
amount. This is what the Manual mode is for.
When set to Manual, growl self-control is
disabled: the amount of effect being applied is
determined by the GRO Amount parameter
only. You can then use the MIDI CC#57 (Growl
amount) to control the breath in real-time. Do
not forget to set it back to Auto when you are
finished with manual control, otherwise your
growl styles will sound unnatural (growl is not
intended to be applied continuously, unless you
desire that effect).
Vibrato Ctrl
Values: Auto, Manual. When set to Auto, the
vibrato envelope generator is enabled. How
long a note has to be held until the vibrato
begins, how fast it fades in, how long it lasts,
etc. is defined by the style you choose. This is
the standard operating mode. However, you
may want to add vibrato manually in specific
sections of your vocals and therefore have full
control over the effect amount. This is what the
Manual mode is for. When set to Manual,
vibrato envelope is disabled: the amount of
effect being applied is determined by the VIB
Amount parameter only. You can then use the
modulation wheel of a MIDI keyboard for
instance (CC#1) to control the vibrato amount
in real-time. Do not forget to set it back to Auto
when you are finished with manual control, so
you can take advantage of the intelligent selfcontrol feature again.
VM Parm Lock
When this parameter is set to Off (default), any
changes made to the VM parameters other
than style and amount are replaced by the
style’s defaults when the style is changed. If
VM Parm Lock is On, the user controllable VM
parameters are not changed when the style
changes.
Bulk Dump
Press ENTER to perform a total Bulk dump of
all presets to an external MIDI device such as a
MIDI sequencer.
The VoiceOne is always ready to receive MIDI
Bulk dump information. See the section
“Presets Backup Via MIDI” for more information
on this in the Preset handling chapter.
The user preset bank can be sent and received
via MIDI System exclusive, as a ‘sysex dump’.
Foot Switch
Values: Off, Bypass Norm, Bypass Dual . This
allows you to assign the foot switch jack to one
of the bypass configurations. This is handy if
you choose to use a one-button foot switch. On
a two or three button foot switch, BP Norm
means that either button (except the center
button on a 3 button switch) will toggle bypass.
Bypass Dual means that the first button
changes the Bypass Mode to No Delay and
then toggles bypass, while the second button
changes the Bypass Mode to Maintain Delay
and then toggles bypass. The third button of a 3
button switch is not supported.
Sysex ID
Values: 0-126, all.
The VoiceOne’s System Exclusive ID number.
Program bank
Determines which bank an external MIDI device
will address in VoiceOne when sending a
program change. The options are; External,
Factory or User. When External is selected
controller #32 can be used to address either the
Factory or the User bank. Factory bank:
Controller #32=0 User bank: Controller #32=1.
Tuner Ref
Values: 400Hz-480Hz. Sets the tuning
reference of the units, upon which to base the
pitch effects.
View Angle
Adjusts the LCD display backlight for better
viewing comfort.
Note: Triple Clicking the MIDI/UTIL key at
any time will reset all note-ons for both
Pitch Correction and Pitch Shifting. This
allows you to reset any ‘stuck’ notes without
powering down the unit. This is also known
as a ‘MIDI Panic Button’.
Page 27

25
MIDI IMPLEMENTATION - PITCH CORRECTION
CATEGORY CC DATA RANGE DESCRIPTION
Pitch Correction (COR)
Pitch Correction On / Off 26 0-127 0-63 off 64-127 on
Scale Type 16 0-49 Scales as defined in the
COR Scale parameter
Root 49 0-11 C=0, G=7, B=11 etc.
Pitch Window 21 0-127 0=0 cents
64=300 cents
127=600 cents= infinity
Attack 22 0-127 0=fast, 127=slow
Correction Amount 23 0-127 0=less correction
127=most correction
PureShift Mode 30 0-127 0-63 off, 64-127 on
Custom Scale Notes 18 MSB 0nnopqrsB (Binary Pattern)
nn reserved
o=1 C note on
p=1 C#/Db note on
q=1 D note on
r=1 D#/Eb note on
s=1 E note on
50 LSB 0tuvwxyzB
t=1 F note on
u=1 F#/Gb note on
v=1 G note on
w=1 G#/Ab note on
x=1 A note on
y=1 A#/Bb note on
z=1 B note on
o...z=0 notes off use 0 value
Example Custom Scale Message:
Intended scale: C, E, G, B based on a C root.
Message: CC#18, 00010001 (converts to 17 decimal), CC#50, 00010001 (17 decimal)
Page 28

26
MIDI IMPLEMENTATION - PITCH SHIFTING
CATEGORY CC DATA RANGE DESCRIPTION
Pitch Shift (SHI)
Pitch Shift 14 0-127 0-63 off
0-127 on
Shift Amount (Scale Mode Only) 3 0-127 0-40 = down 24 notes
41= down 23 notes
. . .
63 = down 1 note
64 = no shift
65 = up one note
. . .
87 = up 23 notes
88-127 = up 24 notes
Shift Amount (Chromatic Mode) 98 NRPN LSB 00
99 NRPN MSB 00
6,38 Data Entry 0-3FFFh
MSB LSB
00 00h -2400 cents
40 00h 0 cents
7F 7Fh +2400 cents
*Use the full range of NRPN 0 to control the shift amount between -2400
and +2400 cents.
Amount (cents) MSB LSB "Combined Value"
-2400 00h 00h 0
0 40h 00h 8192
+2400 7Fh 7Fh 16383
Where "combined value" = MSB*128 + LSB
Shift Mode 63 0-8 0 = Chromatic
1 = Major 1
2 = Major 2
3 = Major 3
4 = Minor 1
5 = Minor 2
6 = Minor 3
7 = Cor Scale
8 = Custom
Formant Shift 25 0-127 64=Flat
<64=Shorter Vocal Tract
>64=Longer Vocal Tract
Hybrid Ratio 24 0-127 0=100% VoiceOne Formant
Corrected Shifting
127=100% Instrumental
Conventional Shifting
Page 29

27
MIDI IMPLEMENTATION - VOICE MODELING
CATEGORY CC DATA RANGE DESCRIPTION
Voice Modeling Inflection (INF)
Inflection On/Off 15 0-63 off
64-127 on
Inflection Amount 55 0-127
Inflection Style 54 0-#of Styles
Inflection Retrigger 31 0-127
Inflection Length 35 0-127
Inflection Pitch Randomization 41 0-127
Inflection Time Randomization 44 0-127
Inflection Time Delay 45 0-127
Inflection Time Buffer 85 0-127
Voice Modeling Vibrato (VIB)
Vibrato On/Off 17 0-127 0-63 off
64-127 on
Vibrato Amount 88 0-127
Vibrato Style 52 0-#of Styles
Vibrato Onset Time 46 0-127 Up to 2 seconds
Vibrato Onset Randomization 47 0-127
Vibrato Period Time 86 0-127 0=100ms, 127=250ms.
Vibrato Period Randomization 87 0-127
Mod wheel CC1 data adds vibrato to whatever the current vibrato amount setting is in the current
preset. The value can never go below the current setting and cannot go above 100. If the user sets
the vibrato amount to 0, the mod wheel will have a rang of 0 to 100%. Increasing the preset vibrato
amount will simply raise the low point of the mod wheel's accessible range.
This extra amount remains while the box is turned on or until a preset is recalled, or until the user
changes the vibrato amount parameter either from the front panel or MIDI CC 88, or until the Mod
Wheel is restored to 0.
Voice Modeling Resonance (RES)
Resonance On/Off 51 0-127 0-63 off
64-127 on
Resonance Amount 59 0-127
Resonance Styles 58 0-# of Styles
Resonance Tract 9 0-127
Voice Modeling Growl (GRO)
Growl On/Off 20 0-127 0-63 off
64-127 on
Growl Amount 57 0-127
Growl Style 56 0-# of Styles
Voice Modeling Breath (BRE)
Breath On/Off 19 0-127 0-63 off
64-127 on
Breath Amount 2 0-127
Breath Style 53 0-# of Styles
Breath Harmonics 27 0-127
Voice Modeling Spectral (SPE)
Spectra On/Off 28 0-127 0-63 off
64-127 on
Spectral Amount 61 0-127
Spectral Style 60 0-# of Styles
Page 30

28
MIDI IMPLEMENTATION
CATEGORY CC DATA RANGE DESCRIPTION
Bypass All 62 0-63 bypass
64-127 active
Tuning Reference 101 RPN MSB 00
100 RPN LSB 01
6,38 Data Entry 0-3FFFh
MSB LSB
00 00h -100 cents
40 00h 0 cents
7F 7Fh +99.99 cents
The table below shows how to set the MSB and LSB to achieve
various cents offsets as per the standard MIDI specification, and how they
translate into the frequency in Hz (VoiceOne specifies Tuner Reference in Hz).
Hz Equivalent MSB LSB Cents away from A440
~415 00h 00h -100.00
~427 20h 00h - 50.00
~432 30h 00h - 30.00
440 40h 00h 0.00
~448 53h 00h +30.00
~453 60h 00h +50.00
~466 7Fh 7Fh +99.99
The MSB sets an offset range between 0 = -100 and 127 = +99 cents, 64
equating to 0 cents.
The LSB tacks on a fine amount setting between 0 = 0.00 and 127 = 0.99 cents.
To convert from a cents offset to an equivalent Hz as indicated by Tuner
Ref under the Utility menu, use the following formula:
Hz = 440 * (2 ^ (cents / 1200))
For software that only allows you to specify RPN data as one "combined
value" between 0 and 16383, here is a formula that you can use:
"combined value" = MSB*128 + LSB
For example, if you want 453 Hz as your tuning reference, you would choose
MSB = 60 and LSB = 0, which using the above formula gives you a
"combined value" of 7680.
Please see the NRPN section for the complete list of NRPN controllable parameters.
Pitch Bend
Input Pitch
Note On C2-C6
Continuous Pitch Bend range of +/- 2 semi-tones
Note Off
Pitch Bend 0-3FFFh
Page 31

29
MIDI IMPLEMENTATION - NRPN
MIDI NRPN Table
The VoiceOne can be primed to receive NRPN (Non-Registered Parameter Number) messages by
first opening the appropriate "NRPN gate". This is done by sending the appropriate NRPN# using
the MSB and LSB NRPN CCs (CC99 and CC98 respectively). Once the gate is open, use the MSB
and LSB Data Entry CCs (CC6 and CC38) respectively to change the value of the selected parameter. When finished, be sure to close the "NRPN gate" by sending 127 to the MSB and LSB
**RPN** CCs (CC101 and CC100). Note that the MIDI spec dictates the use of the same mechanism to close both the NRPN gate and the RPN gate.
As an example, here is how to set the "Bypass Mode" to "Delay"
CC 99 Value 0
CC 98 Value 2 first two CCs open the "Bypass Mode" NRPN gate
CC 6 Value 1
CC 38 Value 0 MSB sets to "Delay", LSB is ignored in this case
CC 101 Value 127
CC 100 Value 127 sending 127s closes the open NRPN gate.
The following table lists all of the available NRPN controllable parameters.
The NRPN MSB (CC#99) is always 0 and the NRPN LSB (CC#98) is the number from the table (0-
10).
NRPN # Data Range
0 - Shift Amount MSB LSB (Range)
00 00h -2400 cents
40 00h 0 cents
7F 7Fh +2400 cents
1 - Bend Range MSB LSB (Range)
00 00h 0 cents
7F 7Fh +2400 cents
2 - Bypass Mode MSB (Selection)
00 Normal
01 Manual
3 - BreathCtrl MSB (Selection)
00 Auto
01 Manual
4 - GrowlCtrl MSB (Selection)
00 Auto
01 Manual
5 - VibCtrl MSB (Selection)
00 Auto
01 Manual
NRPN # Data Range
6 - LCut Filt MSB (Selection)
00 Off
01 Adaptive
02 Manual
7 - LCut Thrsh MSB (Range)
00 ~56Hz
7F ~266Hz
8 - Input Select MSB (Selection)
00 A-Ch.1
01 A-Ch.2
02 D-Left
03 D-Right
9 - Output Select MSB (Selection)
00 VM-Left
01 VM-Right
10 - Latency MSB (Selection)
00 Normal
01 Medium
02 Low
Page 32

30
TECHNICAL SPECIFICATIONS
Digital Inputs and Output
Connectors:
Formats:
Output Dither:
Sample Rates:
Frequency Response DIO:
Analog Input
Connectors:
Impedance, Bal / Unbal:
Max. Input Level:
Min. Input Level for 0 dBFS:
Sensitivity:
A to D Conversion:
A to D Delay:
Dynamic Range:
THD:
Frequency Response:
Crosstalk:
Analog Outputs
Connectors:
Impedance Balanced /
Unbalanced:
Max. Output Level:
Output Ranges:
D to A Conversion:
D to A Delay:
Dynamic Range:
THD:
Frequency Response:
Crosstalk:
EMC
Complies with:
Safety
Certified to:
Environment
Operating Temperature:
Storage Temperature:
Humidity:
Control Interface
MIDI:
Pedal:
General
Finish:
Display
Dimensions:
Weight:
Mains Voltage:
Power Consumption:
Warranty Parts and labor:
RCA Phono (S/PDIF)
S/PDIF (24 bit), EIAJ CP-340, IEC 958
HPF/TPDF dither 24/20/16/8 bit
44.1 kHz, 48 kHz
DC to 23.9 kHz ± 0.01 dB @ 48 kHz
XLR, balanced
21 kOhm / 13 kOhm
+24 dBu
0 dBu
@ 12 dB headroom: -12 dBu to +12 dBu
24 bit, 128 x oversampling bitstream
0.65 ms / 0.70 ms @ 48 kHz / 44.1 kHz
100 dB typ, 20 Hz - 20 kHz
typ <92 dB (0,0025 %) @ 1 kHz
+0/-0.1 dB @ 48 kHz, 20 Hz to 20 kHz
<-95 dB, 20 Hz to 20 kHz
XLR, balanced
40 Ohm
+20 dBu (balanced)
Balanced: 20/14/8/2 dBu
Unbalanced: 14/8/2 dBu
24 bit, 128 x oversampling bitstream
0.63 ms / 0.68 ms @ 48 kHz / 44.1 kHz
104 dB typ, 20 Hz to 20 kHz
typ <-94 dB (0.002 %) @ 1 kHz, +20 dBu Output
+0/-0.5 dB @ 48 kHz, 20 Hz to 20 kHz
<-100 dB, 20 Hz to 20 kHz
EN 55103-1 and EN 55103-2, FCC part 15 Class B,
CISPR 22 Class B
IEC 60065, EN60065, UL6500 and CSA E60065
CSA FILE #LR108093
32° F to 122° F (0° C to 50° C)
-22° F to 167° F (-30° C to 70° C
Max. 90 % non-condensing
In/Out/Thru: 5 Pin DIN
1/4" phone jack
Anodized aluminum front
Plated and painted steel chassis
23 character / 280 icon STN-LCD display
19" x 1.75" x 8.2" (483 x 44 x 195 mm)
4.1 lb. (1.85 kg)
100 to 240 VAC, 50 to 60 Hz (auto-select)
<15 W
1 year
Due to continuous development these specifications
are subject to change without notice.
Page 33

31
Presets - Factory
Note: The designation 'VM' in the preset
name means that some Voice Modeling
effects are included in the preset.
1 VoiceModel Teen
A young voice without the high maintenance
singer. AKA the fountain of youth preset. Build
your 'Boy Band' tracks here as well.
2 VoiceModel Older
A more mature vocal tract sound.
3 VoiceModelWhisper
The TC-Helicon whisper effect. Any full blown
vocal can have a whisper.
4 FlexTime Extreme
Maxing out the FlexTime phenomenon.
5 Corect Chromatic
Simple pitch correction to the nearest note in
the chromatic scale
6 Correct Mon Chere
Hard pitch correction, a la hit pop records. The
bridge between pop and a robotic voice.
7 Shift Instrumental
Conventional Instrumental pitch shifting.
8 Shift Formant Cor
Formant corrected pitch shifting.
9 Shift Hybrid TM
TC-Helicon's patented Hybrid shifter can
combine the best aspects of instrumental and
Voice modeled shifting.
10 Shift Model
Voice Model based formant corrected pitch
shifting.
‘
11 Tight Double
A doubling effect where the dry and randomized
delay voice are close together in time.
12 Scoop Double
Doubling with a scoop effect, separating the
styes of the dry and modeled voice for contrast.
13 Loose Double
Doubling with heavy delay and randomization
settings - a very big sound.
14 Shift +5th
15 Shift +8veInflect
With Inflection parameters
16 Shift -8ve
17 Shift
8ve Frap - Down so low the ground rumbles.
The 'Frap' name describes the sound in
informal terms.
18 Shift +8ve VM
Shift and Voice Modeling
19 Shift Trailer Vox
That classic movie trailer voice that appears on
everything. Uses the R&B resonance, a -400
cent shift, and medium rough Breath.
20 Shift R&B Soprano
An octave shift with female overtones.
21 Shift Nervous
A multi-effect including pitch correction,
rsonance, and a nervous sounding vibrato.
22 Shift Radio Voice
Some famous speeches in the days of lo-fi
come to mind when using this preset.
23 Harmony 6th below
Harmony presets - -
24 Harmony 3rd Above
25 Harmony +3rd VM
26 Harmony +6th VM
27 AutoPitch Triad
Quantizes input pitches to a triad.
28 AutoPitch Maj2min
Changes major mode vcal to minor mode.
29 AutoPitch Compres
Compresses the overall pitch range.
30 AutoPitch Invert
31 AutoPitch Expand
Expands the overall pitch range.
PRESET/STYLE/APPLICATIONS GUIDE
Page 34

32
PRESET/STYLE/APPLICATIONS GUIDE
32 MIDI Portamento
MIDI control of pitch shifting, with smooth
portamento transitions between notes triggered
on a MIDI device or in a sequencer.
33 MIDI Pitcher
MIDI Pitch shifting with no formant alterations
34 MIDI Pitcher Big
MIDI Pitch shifting with formants corrected to
give a full, deep sound.
35 MIDI Pitch Small
MIDI Pitch Shifting with formants corrected to
give a smaller, youthful sound.
36 Corr Smooth Major
Pitch correction to a major scale as a
reference. Simply adjust the root to match the
root of your song in a major key.
37 Corr Smooth Minor
Pitch correction to a minor scale as a
reference. Simply adjust the root to match the
root of your song in a minor key.
38 Corr Smooth MIDI
Pitch correction using input MIDI notes as
reference.
39 Corr MedChromatic
Pitch correction to a chromatic scale with semistrict parameters for quantizing pitch.
40 Corr Medium Major
More stringent pitch correction to a major scale
reference.
41 Corr Medium MIDI
MIDI pitch correction with more stringent
correction parameters.
42 Corr Hard Iwato
Strong pitch correction to the exotic Iwato
scale. See the supported Pitch Correction scale
table to view the semitone structure.
43 Corr Hard MIDI
Very stringent correction to input MIDI notes.
44 Corr Bangkok
Another exotic correction scale. See the
supported Pitch Correction scale table to view
the semitone structure.
45 VM Fast Vibrato
Voice Modeled Vibrato.
46 VM Folk Vibrato
Voice Modeled Vibrato.
47 VM Mac The Knife
A Vegas style lounge sound.
48 VM Intimate R&B
Smooth with lots of close-miked sound.
49 VM Deep Opera Vib
A good operatic simulator.
50 VM Broadway
Reminescent of the days of the 'show tunes'
and musicals.
51 VM Hiccups Vib
A fun vibrato.
52 Scoop City
Scoops in the inflection section.
53 VM Barbie Scoop
A pouty scoop with a teen-pop flavor.
54 Country Scoop
Scoop inflections similar to those in country
music.
55 VM Mid Cut
Spectral preset concentrating on some 'muddy'
midrange frequencies.
56 VM Up-Tilt
Cut in the low-end, and boost in the high end.
57 VM LoCut MidBoost
Another spectral curve.
58 VM More Kick
Spectral wake-up call.
59 VM Doomp
Adding a low frequency push.
60 VM Whump
Another low frequency push.
61 VM Natural Breath
An example of natural modeled breathiness.
Page 35

33
62 VM Dirty Breath
A breath preset more akin to rock and
alternative rock styles. Lots of harmonic
content.
63 VM Leaky Pipes
Noisy breath sound.
64 VM A LittlePhlegm
A very noisy sound from the Growl styles.
65 VM Raspy Throat
Great for rock vocals.
66 VM Fire Breather
Human or dragon? Perhaps both in this glottal
ensemble.
67 VM Rock Throat
Get the energy, don't do the damage. A combo
of rasp from the breath section, and a light
Growl.
68 VM Growl Adaptive
This preset 'Growls' on the loud notes, and
holds back on the lighter ones.
69 VM Whiskey
Getting that raunchy sound doesn't mean you
have to drink hard liquor and smoke cigarettes.
It's all in this preset.
70 VM R&B Diva Alto
Smooth & full.
71 VM George Shrinks
Brings any vocal down to size.
72 VM Peanut Butter
Sticks to the roof of your mouth. This is a fun
one.
73 VM To Die For
Intimate close-mic sound with vibrato - lots of
presence.
74 VM Fou Fou Girl
For the girl who has everything but a hit pop
record.
75 VM Rich and Full
A nice VM combination.
PRESET/STYLE/APPLICATIONS GUIDE
76 VM Big Booty
How low can you go? Another 'big-izer'.
77 VM Kimmy
A female combo.
78 VM Danke Schoen
A show-tune special combo.
79 VM Stretch Neck
Changing the vocal tract for a bigger sound.
80 VM Big Blues
A bluesman impression.
81 VM The Sting
A bright, brazen inflection/breath combo.
82 VM Godfather
The sound of a big, powerful man.
83 VM Marlboro
A rough character voice.
84 VM Steve Irk
An interesting character voice.
85 VM Garth Raider
One from the movies.
86 VM Steroid Boy
Sound bigger than you really are.
87 VM Ethel
A female character voice.
88 VM Dark Stranger
The character voice of someone you wouldn't
want to meet in a dark alley.
89 VM BAMMMMMM
A hard hitting combo.
90 VM On the Ritz
Back to the 30s.
91 SFX Wild
As the name implies.
92 SFX Can't Sing
Wild pitch effects.
93 SFX Lava Lamp
A throwback to the 60s.
Page 36

34
PRESET/STYLE/APPLICATIONS GUIDE
94 SFX Mice
95 SFX Tarzan
The classic ape-man.
96 SFX Wham Bam
97 SFX Witching Hour
A spooky voice.
98 SFX Breakdown
A strange hybrid of pitch and breath.
99 Quickstart Preset
The tour preset as described in the VoiceOne
Quick Start Manual.
100 Blank Template
A blank canvas with which to paint your vocals.
You can begin here, then save your creation to a
user location.
VOICE MODELLING STYLES
Inflection
MIDI CCs: On/Off: 15
Style: 54
Style Value and Name
0 Double - Used for doubling of the lead voice - light time randomization.
1 DblScoop - Doubling setting with a scoop on the effected voice.
2 Loose - Heavy time randomization doubling style.
3 ScoopUp - Inflection scoops up to the sung pitch.
4 ScoopDwn - Inflection scoops up to the sung pitch.
5 ScpUpOver - A scoop that begins below the sung pitch, travels above the pitch, then r
returning down to the sung pitch.
6 ScpDwnOvr - A scoop that begins above the sung pitch, travels below the pitch, then
returning up to the sung pitch.
7 AllOver - Random length scoops at the depth (amount) you select.
8 PickaKey - Pitch distortions using scoops.
9 TapeStart - Simulation of an analog tape machine starting up, slurring the audio to reach the
proper speed.
10 UpThere - A very dramatic down scoop. A large scoop at an amount of 50%.
11 Portamento - Adds smoothness to pitch shifts and pitch correction note transitions.
Vibrato
MIDI CCs: On/Off: 17
Style: 52
Note: These Vibrato styles were modeled after real singers singing in the musical genres noted in
the style names.
Style Value and Name
0 Ballad - A style typical of slow pop ballads of the 1970s.
1 Broadway - The classic vibrato of the New York Show-Tune sound.
2 ClassicRk - Classic Rock - A rich and potent sound.
3 Country - The mellow oscillation found in country music.
Page 37

35
4 Crooner - The classic sound of the Las Vegas entertainers.
5 DeepJazz - Reminescent of the great jazz singers of the 1950s.
6 Discreet - A very light vibrato.
7 Folk - A nice, warm and pleasant vibrato.
8 Funk - An energetic sound from the 70s.
9 HeadVoice - A very resonant vibrato, using pitch and amplitude modulation.
10 HiEnergy - A fast vibrato.
11 LiteJazz - A lighter jazz sound.
12 Lounge - The bold and big sound of the lounge entertainer.
13 MelloFolk - A sweet, mellow sound.
14 MellowPop - Light accents to a pop vocal.
15 NervTremo - A very fast, ‘nervous’ and choppy vibrato.
16 OperaTen - The sound of a classical Tenor singer.
17 TnrDelayd - A classical tenor sound with a delayed onset.
18 PopDiva - The sound heard on many hit pop recordings.
19 PopDivaXT - A thicker and fuller Pop Diva vibrato, with a faster onset time.
20 R&B - VIbrato from another pop music culture - Rhythm and Blues.
21 SloGospel - The big sound of the southern US Gospel singer.
22 SloRock - A rock vibrato typically used in slower pieces.
23 Smoothpop - A smoother pop vibrato.
24 Soprano - The vibrato sound of a classical soprano.
25 Tremolo - No pitch modulation, just amplitude modulation.
26 WarmVibe - A warm and quick vibrato sound.
27 Jungle - Special Effect. The sound of the jungle-man.
28 Landing - The sound of a close encounter with a spaceship landing.
29 Motorbike - A motorcycle-like sound.
30 Nervous - Special effect. An agitated, uneasy sound.
31 Sheep - Special effect. The likeness of sheep bleating in the field.
32 Siren - Special Effect.The sound of a North American emergency vehicle.
33 Slicer - Special effect. A choppy alternative to a standard vibrato.
34 Surprise - Special Effect. A sudden pitch change when you least expect it.
35 UFO - Special Effect. The sound of your science-fiction imagination.
Spectral
MIDI CCs: On/Off: 28
Style: 60
Style Value and Name
0 LoCut - Low frequency cut
1 LoRoloff - A smooth slope reducing the low frequencies.
2 LoMdCut1 - A cut applied to the lower mid-range frequencies.
3 LoMidCut2 - A different low-midrange frequency cut.
4 LoMidCut3 - A third variation on the low-mid frequency cut.
5 LoCtMdBst - Low frequency cut, midrange boost
6 LoBoostDp - Low frequency boost, with a deep sound.
7 Doomp - If you say the word, you’ll get the idea of how this affects your vocal - a low
frequency boost.
8 MidCut1 - A reduction of midrange frequencies.
9 MidCut2 - A variation on the midrange frequency reduction.
10 MidCut3 - Another variation on the midrange frequency reduction.
11 DeHonk - A midrange reduction on those frequencies that can give a nasal sound.
12 DeHonk2 - Another midrange reduction on those frequencies that can give a nasal sound.
PRESET/STYLE/APPLICATIONS GUIDE
Page 38

36
PRESET/STYLE/APPLICATIONS GUIDE
13 DeHonk3 - A third midrange reduction on those frequencies that can give a nasal sound.
14 Honk - A midrange boost for a nasal or congested sound.
15 Whump - A midrange boost that packs a lot of punch.
16 MidBoost1 - A midrange frequency boost.
17 MidBoost2 - A variation on a midrange frequency boost.
18 MidBoost3 - Another variation on a midrange frequency boost.
19 MdHiBoost - Boosts the midrange and high frequencies.
20 HiCut1 - A reduction of high frequencies.
21 HiCut2 - A variation on a reduction of high frequencies.
22 HiRolloff - A reduction of high frequencies, using a smooth curve
23 HiBoost1 - A boost of high frequencies.
24 HiBoost2 - A variation on a boost of high frequencies.
25 UpTilt - A frequency boost to the high end of the spectrum that resembles a diagonal line on
a graph.
26 Sizzle - Accentuates the highest frequencies.
27 AMRadio - Simulates the low fidelity / reduced frequency response of the AM radio band.
Breath
MIDI CCs: On/Off: 19
Style: 53
Abbreviation definitions:
Rsp=Rasp - extreme friction in the vocal tract common in rock music.
Amp=Amplitude - the VoiceModel is sensitive to high amplitude.
Style Value and Name
0 Natural - A simple natural sounding breath model.
1 FadeInAir - An airy sound that fades in as the sung note sustains.
2 LightAir - A light, airy breath sound.
3 Intimate - A simulation of the breath sound of a singer who is very close to a condenser
microphone.
4 QuietAir - A subtle, airy breath effect.
5 SoftAir - A smooth breath sound.
6 FadeInNat - The natural breath style, but with the breath fading in as the sung note
progresses.
7 HighEnd - A breath sound with a lot of high frequency content.
8 Softened - A softer breath sound with less high frequency content.
9 FadeInRx - Another breath style that fades in as a note is sung.
10 MedRough - A rougher breath sound.
11 DirtyAir - An airy breath sound, but with some granularity
12 DarkAir - A deeper and fuller breath sound.
13 DarkHeavy - A breathy sound with a lot of low frequency content.
14 RaspAir - A raspy sound with breathy overtones.
15 DirtyAir2 - An airy breath sound, but with granularity.
16 AmpAirRsp - An airy, raspy sound that is triggered when the input voice sings louder.
17 OnsetRasp - A rasp sound that is triggered at the onset of a phrase.
18 Raspy - A rasp sound that you might find in heavy rock music.
19 Raspy Too - Another rasp variation.
20 Sandy - A smoother rasp sound.
21 NoisyCord - Overtones similar to the sound of ravaged vocal chords.
22 RspMidCut - A rasp sound with thess midrange frequencies.
23 Overtoney - Special Effect. A glottal sound with a lot of harmonic content.
24 Phlegmmy - Special Effect. As if you sang with a cold.
25 Tracheoto - Special Effect. Trachea gymnastics.
26 SFX - Special Effect. A TC-Helicon laboratory experiment!
Page 39

37
27 Whisper1 - Reduces a full on singing voice to a whispering tone.
28 Whisper2 - A variation on the whisper sound with differend frequency response.
Growl
MIDI CCs: On/Off: 20
Style: 56
Abbreviation definitions:
Adapt=Adaptive - The algorithm listens for extremes in amplitude from the vocal, and applies the
effect upon detection.
Cnst=Throat Constriction
Onst=Onset
RevConst=Reverse Throat Constriction
Style Value and Name
0 AdaptCnst - A throat constriction effect that thickens the sound as the amplitude of the vocal
increases.
1 AdptCns2 - Another Throat constriction algorithm, triggered by a loud input vocal.
2 Amplitude - Growl that is amplitude driven
3 Amplitud2 - Growl that is amplitude driven, but with a rough and grainy texture.
4 Amplitude3 - Yet another amplitude driven growl.
5 Blues - A growl reminescent of blues styles of the southern USA.
6 BigBlues - A variation on the Blues Growl.
7 ChaChow - A sharp, abrasive growl. ‘Cha Chow’ comes from a vocal line that was sung
while testing VoiceOne.
8 Grainy - Growl with graininess, or a gruff sound.
9 Grainy2 - Growl with graininess. This one is a bit tighter than the Grainy style.
10 Growl - A standard growl sound.
11 Growl2 - A variation on the standard growl sound.
12 HeavyAdap - Growl that is vry sensitive to aplitude for its triggering, moreso than styles 2,3,
and 4.
13 LiteConst - Light Throat constriction effect on high amplitude vocals.
14 OnsetConst - Throat constriction effects triggered on the onset of a phrase.
15 RevConst - Throat constriction working in reverse. The sound is deeper and fuller until the
amplitude of the vocal triggers the normal sound to return.
16 RevCnst2 - A variation on reverse throat constriction.
17 Seldom - Growl that occurs infrequently.
18 TooMuch - Growl that is very sensitive to amplitude. Includes throat constriction.
19 WierdOnset - Growl with throat constriction that appears in the phrase where you may not
expect to hear it.
PRESET/STYLE/APPLICATIONS GUIDE
Page 40

38
PRESET/STYLE/APPLICATIONS GUIDE
Resonance
MIDI CCs: On/Off: 51
Style: 58
Note: Each Resonance style will sound different with each input vocal. Some styles may have little
effect on the voice, while others may be affected substantially.
Style Value and Name
0 SlinkyPop - A resonance sound that thins out the voice to sound similar to a youthful pop
singer.
1 Narrow - Resonance that thins the voice.
2 PalateUp - The sound of a singer resonating primarily in the soft palate area.
3 FatTongue - Simulation of a singer with a large tongue to add to the resonant sound.
4 Sumo - A very big style to simulate a very big person.
5 Long - A model of a long vocal cavity.
6 WideMouth - A model of a singer with a large vocal cavity.
7 R&B - Resonance used to get a fuller, darker voice for American R&B styles.
8 Phattener - Another character resonance for a bigger, fatter sound.
9 Smooth - A subtle warp to change the generall character of the vocal.
10 Trans1- The transmute styles were created with the idea that the voice might not simply
sound ‘larger’ or ‘smaller’, but just different in some way. Experiment with the transmutes
when you need subtle colorations.
11 Trans2
12 Trans3
13 Trans4
14 Trans5
15 Trans6
16 Trans7
17 Trans8
18 Trans9
19 WideVibe - A funky and large sound.
20 Nosy - A nasal resonance sound
21 Crazed - Something wild and crazy.
Page 41

39
Scale Name
Major
Minor (natural)
Minor (harmonic)
Minor (asc melodic)
Chromatic
Ionian (Major)
Dorian
Phrygian
Lydian
Mixolydian
Aeolian (nat. min.)
Locrian
Half-Whole Diminished
Whole-Half Diminished
Altered
Neopolitan Minor
Neopolitan Major
Enigmatic
Whole-tone
Leading whole-tone
Overtone
Augmented
Pentatonic (Maj)
Pentatonic (Min)
Pentatonic (Dom)
Blues
BeBop (maj7)
BeBop (dom)
BeBop (min)
Hungarian Minor
Hungarian Major
Hungarian Gypsy
Prometheus
HiraJoshi
Iwato
Kumoi
Hawaiian
Kokin
Spanish
Egyptian
Ritusen
Pelog
Pelog2
Javenese Pelog
Oriental
Gypsy
Arabian
Hindu
Persian
Chinese
Notes
0,2,4,5,7,9,11
0,2,3,5,7,8,10
0,2,3,5,7,8,11
0,2,3,5,7,9,11
0,1,2,3,4,5,6,7,8,9,10,11
0,2,4,5,7,9,11
0,2,3,5,7,9,10
0,1,3,5,7,8,10
0,2,4,6,7,9,11
0,2,4,5,7,9,10
0,2,3,5,7,8,10
0,1,3,5,6,8,10
0,1,3,4,6,7,9,10
0,2,3,5,6,8,9,11
0,1,3,4,6,8,10
0,1,3,5,7,8,11
0,1,3,5,7,9,11
0,1,4,6,8,10,11
0,2,4,6,8,10
0,2,4,6,8,10,11
0,2,4,6,7,9,10
0,3,4,7,8,11
0,2,4,7,9
0,3,5,7,10
0,2,4,7,10
0,3,5,6,7,10
0,2,4,5,7,8,9,11
0,2,4,5,7,9,10,11
0,2,3,4,5,7,9,10
0,2,3,6,7,8,11
0,3,4,6,7,9,10
0,2,3,6,7,8,10
0,2,4,6,10
0,2,3,7,8
0,1,5,6,10
0,1,5,7,8
0,2,3,7,9
0,1,5,7,10
0,1,4,5,7,8,10
0,2,5,7,10
0,2,5,7,9
0,1,3,7,8
0,1,3,7,10
0,1,3,5,8
0,1,4,5,6,9,10
0,1,4,5,7,8,11
0,2,4,5,6,8,10
0,2,4,5,7,8,10
0,1,4,5,6,8,11
0,4,6,7,11
PITCH CORRECTION (COR) SCALE DEFINITIONS
Number system is based on semi-tones above the root.
Page 42

40
VOICEONE TIPS
change to a lighter sound when the singer
strains. Remix artist might treat this effect like a
phaser or flanger, but with a completely new
twist - try that with an EQ!
Self Control and MIDI Control
Vibrato, Breath and Growl have a self-control
mechanism that modulates the effect amount
based on various characteristics of the input
signal. However, if you want to have full control
over the effect amount at any time (via MIDI for
instance), you can disable the self-control by
setting Vibrato Ctrl, Breath Ctrl and Growl Ctrl
to Manual in the MIDI/Util menu.
Repitching a melody via MIDI - Inflection
Parameters (INF)
If you control the pitch of your vocals through a
MIDI keyboard, the Inflection effect provides
pitch naturalization features that will make it
sound more natural. A few styles dedicated to
this task are available.
Doubling - Inflection Parameters (INF)
To achieve the best doubling effect, the only
thing you need to use is one of the Inflection
styles designed for this purpose. Record your
vocals through the box and mix with the dry,
one track being slightly panned to the left and
the other one to the right. That's it! (You might
also want to delay the dry signal slightly).
Holding a harmony note longer than the
lead voice - Inflection Parameters (INF)
You can make VoiceOne extend a note by
using the FlexTime(TM) algorithm. When you
hold a long note, increase the INF TimeDly
parameter (CC#45) to its maximum long
enough before the end of the note. When the
input note ends, VoiceOne keeps singing for a
while. Immediately after the end of the note,
reset the parameter. If you want the note to be
sustained for a shorter period of time, set
TimeDly to a lower value.
Natural Sounding Harmony - Shift
Parameters (SHI)
To achieve natural sounding harmonies, use
the few inflection styles designed especially for
this task. It will help give your harmony line its
own identity by de-correlating it from the lead
voice. In some cases, slightly slipping the dry
track back in time (e.g. delaying it) so the
harmony voice can sometimes be ahead of the
lead voice) will improve the result.
Setup Tip - Inputs (MIDI/UTIL)
You can connect two separate sources to feed
VoiceOne, and select between them in the
MIDI/UTIL menu. You can have the output from
a preamp or compressor connected to one
input, while a separate source from another
device is connected to the other input. This
might save repatching devices when you want
to preview signals from two different sources.
Setup Tip - Outputs
You can use both sets of outputs
simultaneously in VoiceOne. You may wish to
send the digital outputs to a digital recorder or
computer sequencer, and send the analog
outputs to a monitor system.
Humanization - Pitch Randomization
Parameters
To get a more human-like sound from your
Processed vocal, work with the Randomizing
parameters:
Inflection Pitch Randomization (INF PitRnd),
Inflection Time Randomization (INF TimRnd),
Adaptive Glottal Controls - Growl Styles
(GRO)
To apply a 'hands-free' aspect to the vocal
delivery, choose a glottal style that employs
amplitude sensitivity. See the Preset / Style
pamphlet for details on the adaptive controls
available to the style. The louder your input
gain, the more glottal is applied. You may use
this to apply growl to emphasized notes in the
phrase. Some glottal styles also couple this
with a change in resonance, simulating the
emphasis a blues singer places on certain
'growled' notes.
Stacking Vocals
To make your multitracked vocals sound more
like a true vocal group instead of just multiples
of you, try running one part to tape several
times, each through a different warp style. You
could also sing each track independently for an
even bigger effect. Stack the tracks, mix to
stereo, add your favorite effects and enjoy.
Changing Formants 'On-the-Fly' Resonance Styles and Amounts (RES)
Remember that you're not limited to one
resonance style within a vocal. You can use
MIDI control change commands to do a
'resonance sweep' on a sustained note, or
Page 43

41
Pitch Corrected Harmony
If you turn on Pitch Correction while in Scale
Mode, your output ‘harmony’ voice will be pitch
corrrected as well.
Thanks for exploring VoiceOne's unique
technology with us! We invite you to watch
our website for updates, user stories, news,
support and other activities involving TCHelicon and Voice Processing technology.
Join us at:
http://www.tc-helicon.com
The TC-Helicon Team
VOICEONE TIPS
 Loading...