

Page 1
Getting started – English quick guide
VoiceLive3
Page 2

Page 3

Important safety instructions 1
Before you begin 3
Introduction 5
Making connections 6
Inputs 6
Outputs 6
1. Vocals and guitar using
guitar/headphone cable 7
2. Stereo vocal and stereo guitar
(2 channels) 8
3. Stereo vocals and stereo guitar
(4 channels) 9
4. Mono vocals and mono guitar
(dual mono mode) 10
5. Stereo vocals and guitar amplifier 11
6. Mono vocals and guitar amplifier 12
7. Stereo vocals and MIDI keyboard 13
Let’s get going! 14
Auto Gain 14
Setting input gain on your mixer 14
Time to have some fun! 14
Explore the sounds 14
VoiceLive3 for acoustic guitar players 15
Let’s make it a HIT! 15
Are we there yet? 15
Technical specifications 16
Getting started – English quick guide 1
Page 4

VoiceLive3
Getting started – English quick guide
2 VoiceLive3
Page 5

Important safety instructions
Caution
Important safety instructions
1. Read these instructions.
2. Keep these instructions.
3. Heed all warnings.
4. Follow all instructions.
5. Do not use this apparatus near water.
6. Clean only with a dry cloth.
7. Do not block any ventilation openings. Install in accordance with the manufacturer’s
instructions.
8. Do not install near any heat sources such
as radiators, heat registers, stoves, or other
apparatus (including amplifiers) that produce heat.
9. Do not defeat the safety purpose of the polarized or grounding-type plug. A polarized
plug has two blades with one wider than
the other. A grounding-type plug has two
blades and a third grounding prong. The
wide blade or the third prong is provided for
your safety. If the provided plug does not fit
into your outlet, consult an electrician for
replacement of the obsolete outlet.
10. Protect the power cord from being walked
on or pinched, particularly at plugs, convenience receptacles, and the point where
they exit from the apparatus.
11. Only use attachments/accessories specified by the manufacturer.
12. Use only with a cart, stand, tripod,
bracket, or table specified by the
manufacturer, or sold with the apparatus. When a cart is used, use
caution when moving the cart/apparatus
combination to avoid injury from tip-over.
13. Unplug this apparatus during lightning
storms or when unused for long periods of
time.
14. Refer all servicing to qualified service personnel. Servicing is required when the apparatus has been damaged in any way,
such as power-supply cord or plug is damaged, liquid has been spilled or objects
have fallen into the apparatus, the apparatus has been exposed to rain or moisture,
does not operate normally, or has been
dropped.
You are cautioned that any change or modifications not expressly approved in this manual
could void your authority to operate this equipment.
Service
– All service must be performed by qualified
personnel.
– There are no user-serviceable parts inside.
Warning
– To reduce the risk of fire or electric shock, do
not expose this apparatus to rain or moisture
and objects filled with liquids, such as vases,
should not be placed on this apparatus.
– This apparatus must be earthed.
– Use a three wire grounding type line cord like
the one supplied with the product.
– Be advised that different operating voltages
require the use of different types of line cord
and attachment plugs.
– Check the voltage in your area and use the
correct type.
Voltage Line plug according to standard
110 to 125V UL817 and CSA C22.2 no42.
220 to 230V CEE7 page VII, SR section 107-
2-D1 / IEC83 page C4.
– This equipment should be installed near the
socket outlet and disconnection of the device
should be easily accessible.
– To completely disconnect from AC mains, dis-
connect the power supply cord from the AC
receptacle.
– The mains plug of the power supply shall re-
main readily operable.
– Do not install this device in a confined space.
– For use at an altitude of 2000m or lower.
– Do not open the unit – risk of electric shock
inside.
Getting started – English quick guide 1
Page 6

Important safety instructions
EMC / EMI
Electromagnetic compatibility /
Electromagnetic interference
This equipment has been tested and found to
comply with the limits for a Class B digital device, pursuant to part 15 of the FCC rules.
These limits are designed to provide reasonable
protection against harmful interference in residential installations. This equipment generates,
uses and can radiate radio frequency energy
and, if not installed and used in accordance with
the instructions, may cause harmful interference
to radio communications. However, there is no
guarantee that interference will not occur in a
particular installation.
If this equipment does cause harmful interference to radio or television reception, which can
be determined by turning the equipment off and
on, the user is encouraged to try to correct the
interference by one or more of the following
measures:
Explanation of graphic symbols
The lightning bolt triangle is used to
alert the user to the presence of uninsulated “dangerous voltages” within
the unit’s chassis that may be of sufficient magnitude to constitute a risk of
electric shock to humans.
The exclamation point triangle is used
to alert the user to presence of important operating and service instructions
in the literature accompanying the
product.
– Reorient or relocate the receiving antenna.
– Increase the separation between the equip-
ment and receiver.
– Connect the equipment into an outlet on a cir-
cuit different from that to which the receiver is
connected.
– Consult the dealer or an experienced ra-
dio / TV technician for help.
For customers in Canada
This Class B digital apparatus complies with Canadian ICES-003.
Cet appareil numérique de la classe B est
conforme à la norme NMB-003 du Canada.
2 VoiceLive3
Page 7

Before you begin
Before you begin
About the VoiceLive3 quick guide
This quick guide will help you learn understanding and operating your VoiceLive3.
You can download the most current version of
this quick guide from
tc-helicon.com/products/voicelive-3/support/
To get the most from this quick guide, please
read it from start to finish, or you may miss important information.
Be sure to download the
VoiceLive3 reference manual!
Please note that this document is just a quick
guide – not the full manual! It is intended to get
you up and running with your VoiceLive3, but we
really just skim the surface here.
For information on all of the functions and features in your new VoiceLive 3, make sure you
download the complete reference manual from
tc-helicon.com/products/voicelive-3/support/.
VoiceSupport
VoiceSupport is the application that allows you
to fully unlock the potential of your TC-Helicon
product and stay in touch with the latest news,
tips and tricks.
VoiceSupport key features include:
– Professionally authored preset libraries
– Direct access to product manuals
– Update messaging – helping you stay up to
date with the latest software
– Drag & drop preset management
– Customizable content about your products
– VoiceCouncil feeds for the latest advice for
singers
– Firmware upgrading
– Account management
– Access to support.
You can download VoiceSupport for Microsoft
Windows and Mac OS X from
tc-helicon.com/products/voicesupport/
Please register your VoiceLive3
Getting support
If you still have questions about the product after reading this quick guide and the reference
manual, please get in touch with TC-Helicon
Support:
tc-helicon.com/support/
Getting started – English quick guide 3
To register your VoiceLive3 using the VoiceSupport software, launch VoiceSupport and click on
the ACCOUNT button.
! Please note that registration of your product is
NOT required to use VoiceSupport, download
presets, update firmware or contact support.
Page 8
Before you begin
XLR Male XLR Female
Combo Jack
MIDI Jack
1/4 inch jack
XLR Male XLR Female
Combo Jack
MIDI Jack
1/4 inch jack
Power Input
Mini USB
1/8 inch jack GRND Lift
USB Type A
USB Type B
XLR Male XLR Female
Combo Jack
MIDI Jack
1/4 inch jack
Power Input
Mini USB
1/8 inch jack GRND Lift
USB Type A
USB Type B
XLR Male XLR Female
Combo Jack
MIDI Jack
1/4 inch jack
XLR Male XLR Female
Combo Jack
MIDI Jack
1/4 inch jack
Power Input
Mini USB
1/8 inch jack GRND Lift
USB Type A
USB Type B
XLR Male XLR Female
Combo Jack
MIDI Jack
1/4 inch jack
Power Input
Mini USB
1/8 inch jack GRND Lift
USB Type A
USB Type B
XLR Male XLR Female
Combo Jack
MIDI Jack
1/4 inch jack
Power Input
Mini USB
1/8 inch jack GRND Lift
USB Type A
USB Type B
XLR Male XLR Female
Combo Jack
MIDI Jack
1/4 inch jack
Power Input
Mini USB
1/8 inch jack GRND Lift
USB Type A
USB Type B
XLR Male XLR Female
Combo Jack
Power Input
Mini USB
1/8 inch jack GRND Lift
USB Type A
USB Type B
Power Input
XLR Male XLR Female
Power Input
1/8 inch jack GRND Lift
XLR Male XLR Female
Combo Jack
MIDI Jack
1/4 inch jack
Power Input
Mini USB
1/8 inch jack GRND Lift
USB Type A
USB Type B
Diagrams
Live3 in a particular setup. This means the “what
you hear” section in the lower right corner does
not show guitar sounds coming from the PA –
even though they might at a gig.
Legend
The following symbols are used in the setup examples section of this quick guide:
3
5 5
4
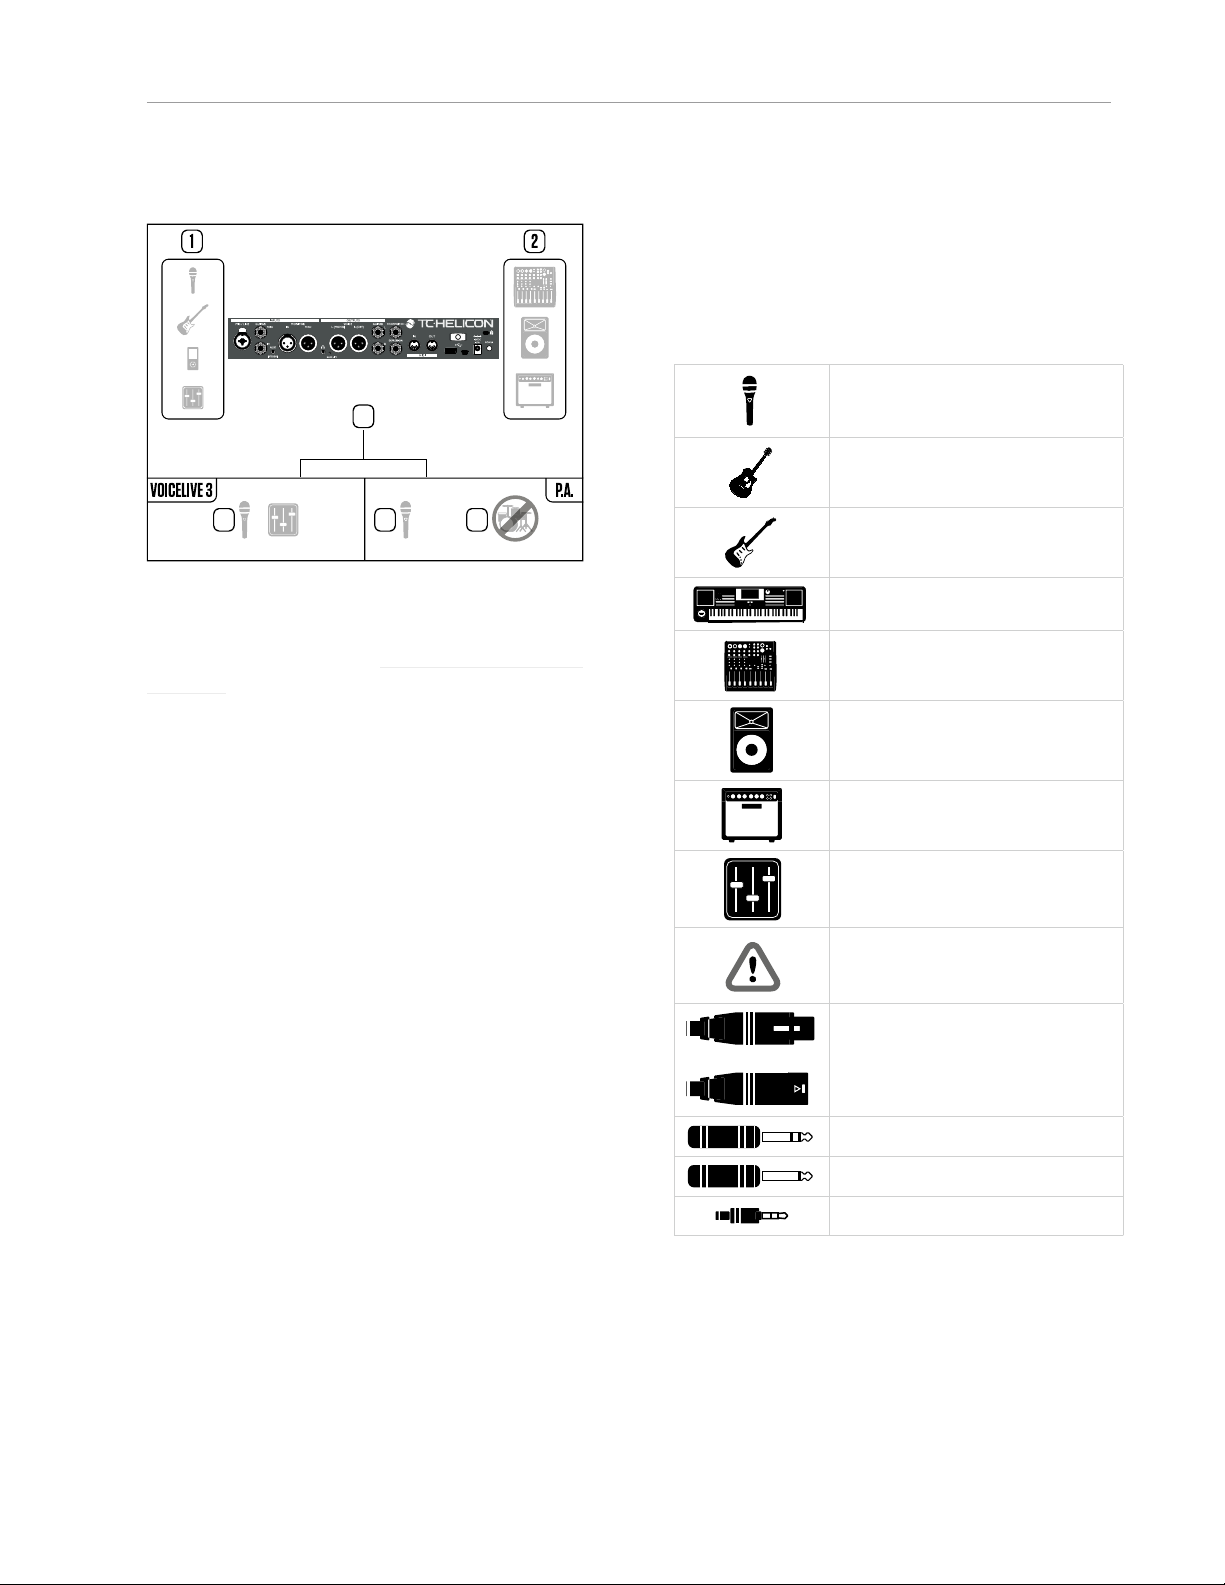
To give you clear and concise representations of
what goes where, we have provided several connection diagrams in the “Making connections”
(page 6) section. There are a few things we
would like you to keep in mind as you follow
these diagrams:
– Signal sources that go into your VoiceLive 3
(e.g. microphone or guitar) will always be
shown to the left of the back panel image (1).
– “Downstream” devices (mixers, speakers) will
always be shown to the right of the back panel
image (2).
– The box in the lower left corner shows what
signals you will hear from the VoiceLive 3
headphone output.
– The box in the lower right corner shows what
you will hear from your mixer / PA speakers.
This could be anything from a “stick system”
or a portable/all-in-one loudspeaker system
to powered studio monitors or even a DAW
recording interface.
In many cases, what you hear from the VoiceLive3 headphone output and your PA will be the
same (5) – but it can also be different.
Microphone
Acoustic guitar
Electric guitar
Keyboard or other instrument
Mixing desk
P. A .
Guitar or keyboard amp
Monitor mix
Important
XLR cable
TRS cable
TS (guitar) cable
1/8” cable
Please note that we do not account for other inputs or instruments in these diagrams – so you
won’t see pictures of drums (4) etc. When a setup example includes a connection to your guitar
amp, we do not show that amp being miked and
sent through the PA (which often is the case) –
we are just showing you how to connect Voice-
4 VoiceLive3
Page 9

Introduction
VoiceLive3 key features
Introduction
Just to whet your appetite, here is a basic overview of VoiceLive3’s many exciting features!
Thank you for purchasing
VoiceLive3!
Your new Vocal, Guitar and Loop processor is
quite an amazing piece of technology. With literally thousands of effect combinations and many
versatile controls, you can completely customize
your sound.
VoiceLive 3 replaces stand-alone vocal processors, guitar multi effects units and phrase
loopers – reducing your “gig weight” to what
you can throw in a backpack.
We’re really excited to get you up and running
quickly, so let’s get started!
In the box
The VoiceLive 3 box should contain the following items:
– 1 VoiceLive3 vocal processor
– 1 power adaptor
– 1 USB cable
– 1 guitar/headphone cable
– this manual.
If you are missing an item, please contact your
retailer immediately.
Inspect all items for signs of transit damage. In
the unlikely event of transit damage, inform the
carrier and supplier.
If damage has occurred, keep all packaging as it
can be used as evidence of excessive handling
force.
Vocal Effects Suite
– Adaptive Tone
– EQ
– Compression
– De-ess
– Reverb
– Delay (Echo)
– Double
– Harmony
– Choir
– Vocoder / Talk Box / Vocal Sy nth
– Rhythmic
– µMod (pronounced “micro mod”):
Flanger / Chorus / D etune
– Transducer
– HardTune
– Whammy
Guitar Effects Suite
– Amp Simulation
– Reverb
– Delay
– µMod: Flanger / Chor us / Detune
– Drive
– Compressor
– Rhythm / Tremolo
– Wah Wah
– Octave Down
Multi-Phrase Looper
– Loop Assist™ quantization
– Swap Mode
For ea sy verse / chorus / br idge style loopin g.
– Onboard loop storage
– Customizable button layout
Completely remappable footswitches
– Easy Top-Level Editing
Deep controls when you’re ready
– HIT function
Add multiple effects to Vocals, Guitar or both
with one button press.
– Direct guitar out – go straight to your amp.
– Independent headphone mix
Perfect for in-ear monitoring without an ex-
pensive transmitter/receiver system.
Getting started – English quick guide 5
Page 10

Making connections
Making connections
4
SWITCH-3
2 3 6 57 1
Inputs
1. Connect the supplied power adapter to the
12 V DC jack of your VoiceLive3 and plug the
adapter into a wall outlet. Do not power up
your VoiceLive3 yet.
2. Plug your microphone into the MIC / LINE jack
using an XLR cable.
3. Connect your guitar to the GUITAR IN jack using a ¼” Tip Sleeve (TS) cable (i.e., a regular
guitar cable).
4. Connect your MP3 player or smartphone to
the AUX jack using a 1/8” cable.
5. Connect your MIDI master keyboard or synthesizer to the MIDI IN jack using a MIDI cable.
6. Plug your Switch-3 into the FOOTSWITCH
jack using a ¼” Tip Ring Sleeve (TRS) cable
(the cable that came with the Switch-3).
7. Plug your Expression pedal into the EXPRESSION jack.
! Do you have a condenser, MP-75 or e835FX
microphone? When the unit is powered up
(there’s a few more steps before that happens), you’ll need to enable Phantom Power.
To enable Phantom Power, press SETUP and
navigate to the INPUT tab using the < and >
buttons below the large control knob. Find the
Mic Type parameter and change it to Condenser. Press SETUP to exit. These instructions are also printed on the bottom of your
VoiceLive3.
Outputs
Depending on what kind of amplification system
you are using, there are lots of options. We cover
a few common setups on the following pages.
In the reference manual, we’ll show many more
connection options, including incoming monitor
mixes.
6 VoiceLive3
Page 11
Making connections
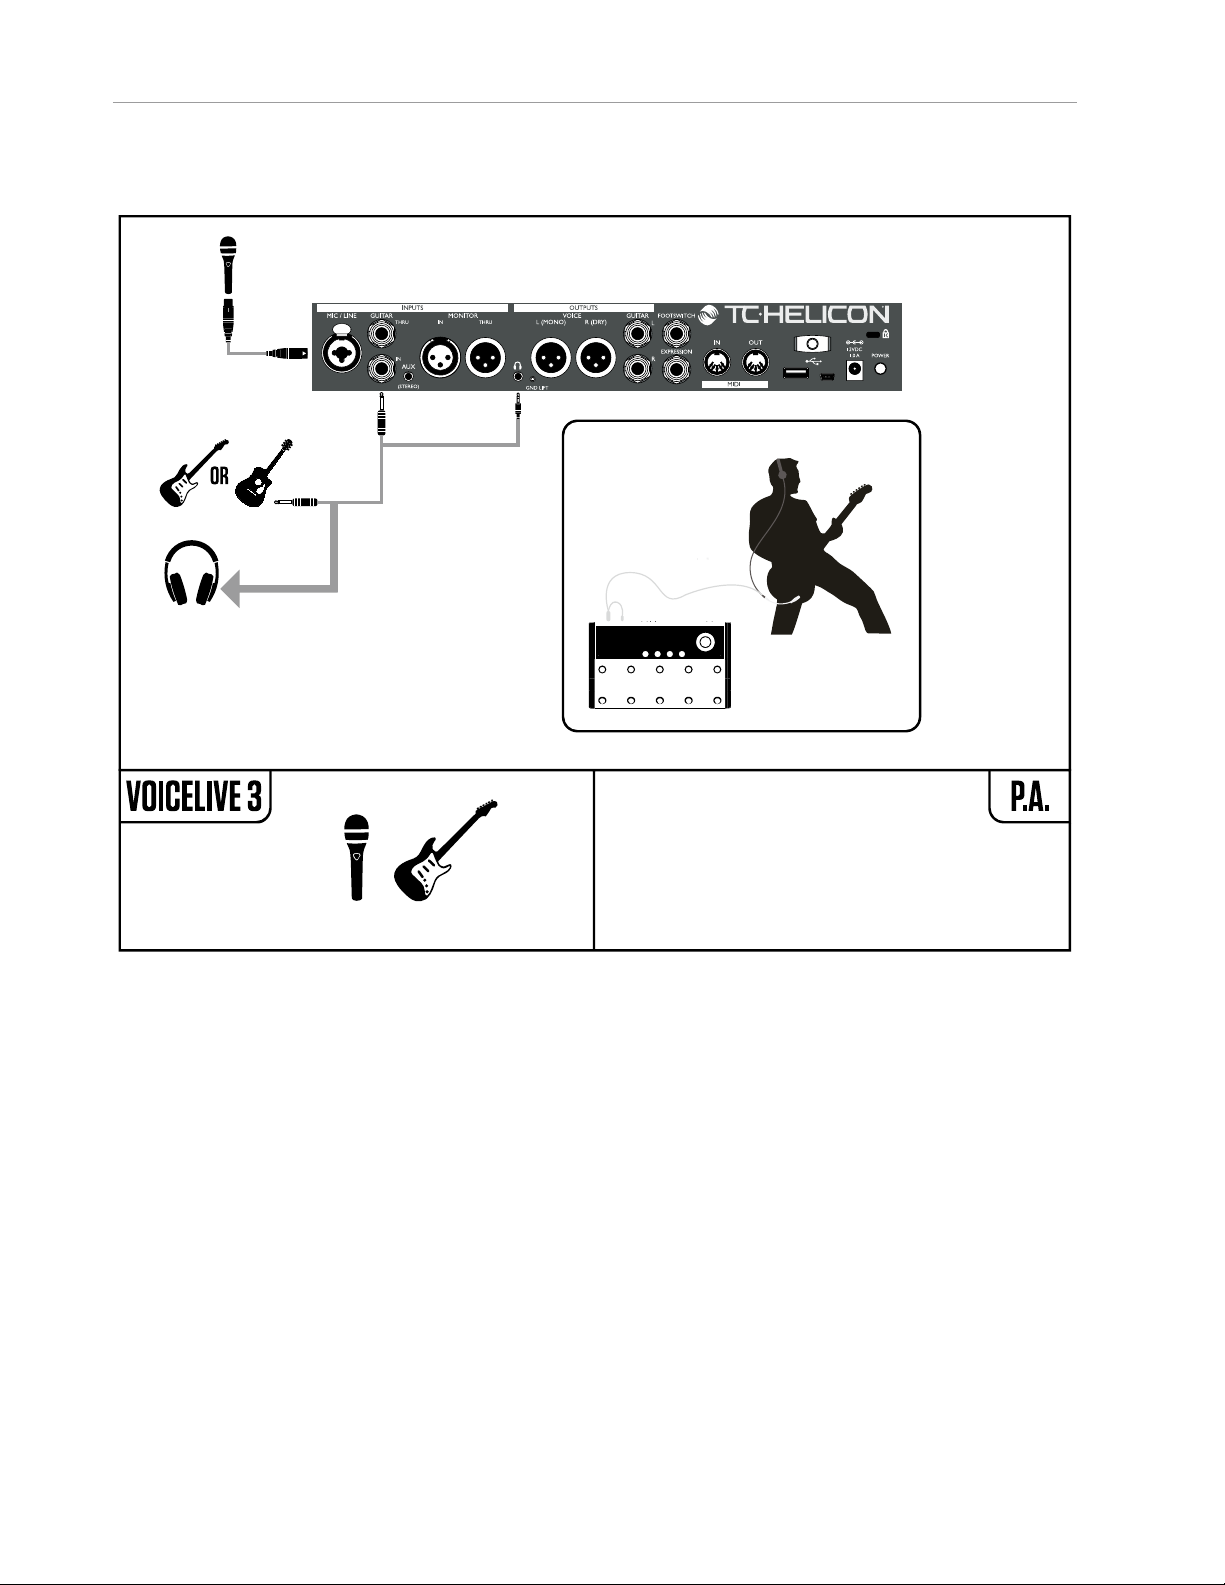
1. Vocals and guitar using guitar/headphone cable
This setup utilizes the included guitar/headphone
cable, which is perfect for personal monitoring in
any setup. You will see that the two smaller ends
of the cable are different. One end has a male
headphone jack beside the guitar jack. Connect
these to the GUITAR IN and HEADPHONE jacks.
The other end plugs into your guitar and has a female jack for your headphones/in-ear monitors.
Getting started – English quick guide 7
Page 12

Making connections
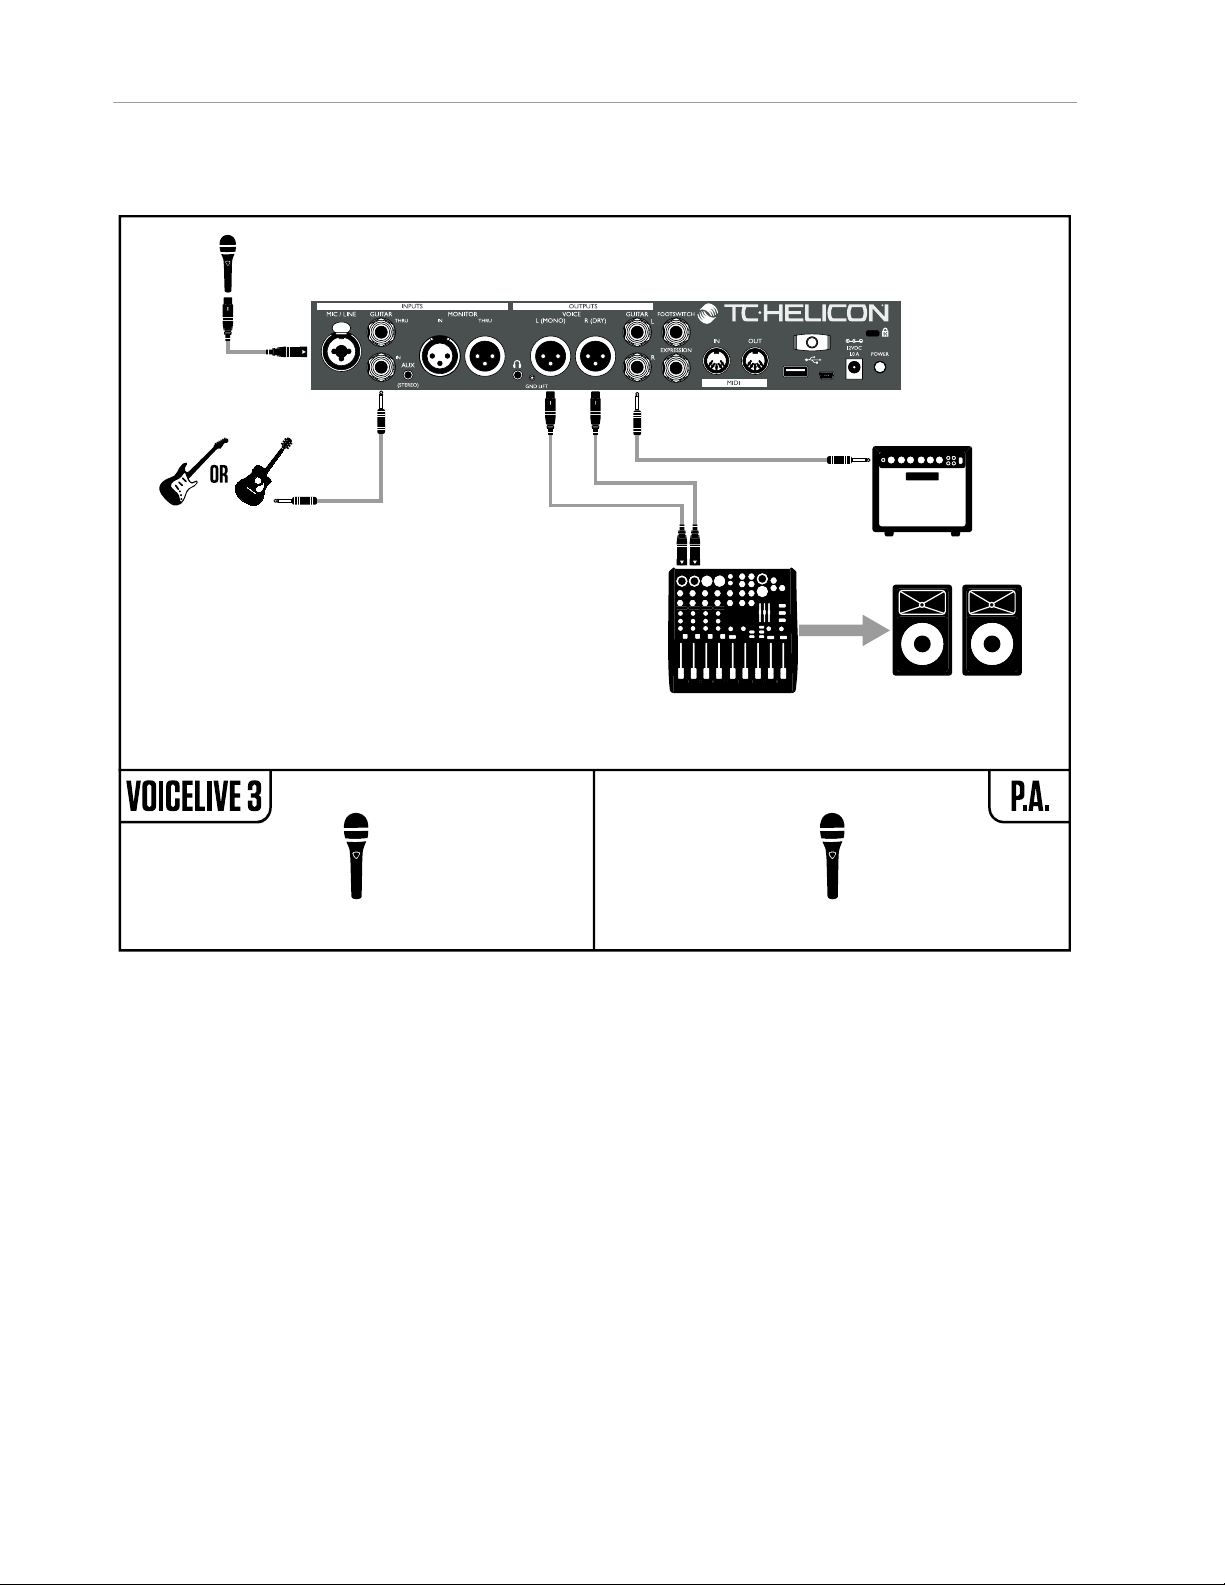
2. Stereo vocal and stereo guitar (2 channels)
This is a very common setup for both live performances with a stereo PA (double-check that
the venue PA system is actually in stereo!) or for
basic 2 channel recording.
8 VoiceLive3
Page 13

Making connections
3. Stereo vocals and stereo guitar (4 channels)
L R
VoiceLive 3 features “jack sensing” on several
inputs and outputs. With this connection setup,
all guitar signals are removed from the XLR signal path when ¼” Guitar OUT connections are
made. This gives you separate stereo channels
for your vocals and guitar. This is a great setup
for connecting to a 4 channel audio interface.
Getting started – English quick guide 9
Page 14

Making connections
4. Mono vocals and mono guitar (dual mono mode)
If you are not using a guitar amplifier, this is a
common connection setup for most live venues,
since the PA is typically in mono. It also allows
a sound tech to control the overall balance between your vocals and guitar.
Output modes can be changed in the Setup/Output menu.
10 VoiceLive3
Page 15
Making connections
5. Stereo vocals and guitar amplifier
Keep in mind that your guitar amp may be miked
and come out through the PA. That part of the
signal flow isn’t shown in this setup example.
Guitar output is automatically muted in the XLR
signal path when a 1/4” guitar out connection is
made.
Getting started – English quick guide 11
Page 16

Making connections
6. Mono vocals and guitar amplifier
Keep in mind that your guitar amp may be miked
and come out through the PA. That part of the
signal flow isn’t shown in this setup example.
Guitar output is automatically muted in the XLR
signal path when a 1/4” guitar out connection is
made.
12 VoiceLive3
Page 17

Making connections
7. Stereo vocals and MIDI keyboard
VoiceLive3 is not a synthesizer and cannot convert MIDI note messages to audio. The MIDI connection is only used for NaturalPlay chord detection and other control data. You will still need to
connect your keyboard to the PA or an amplifier
for it to be heard!
Getting started – English quick guide 13
Page 18
Let’s get going!
Let’s get going!
Make all connections as seen in “Making connections” (page 6).
Before you power up VoiceLive3, make sure that
the amplifier or PA it is connected to is muted or
turned all the way down!
Press the POWER switch on the back of the unit.
! Booting will take a few seconds – so it is nor-
mal if you see a blank screen for a short while.
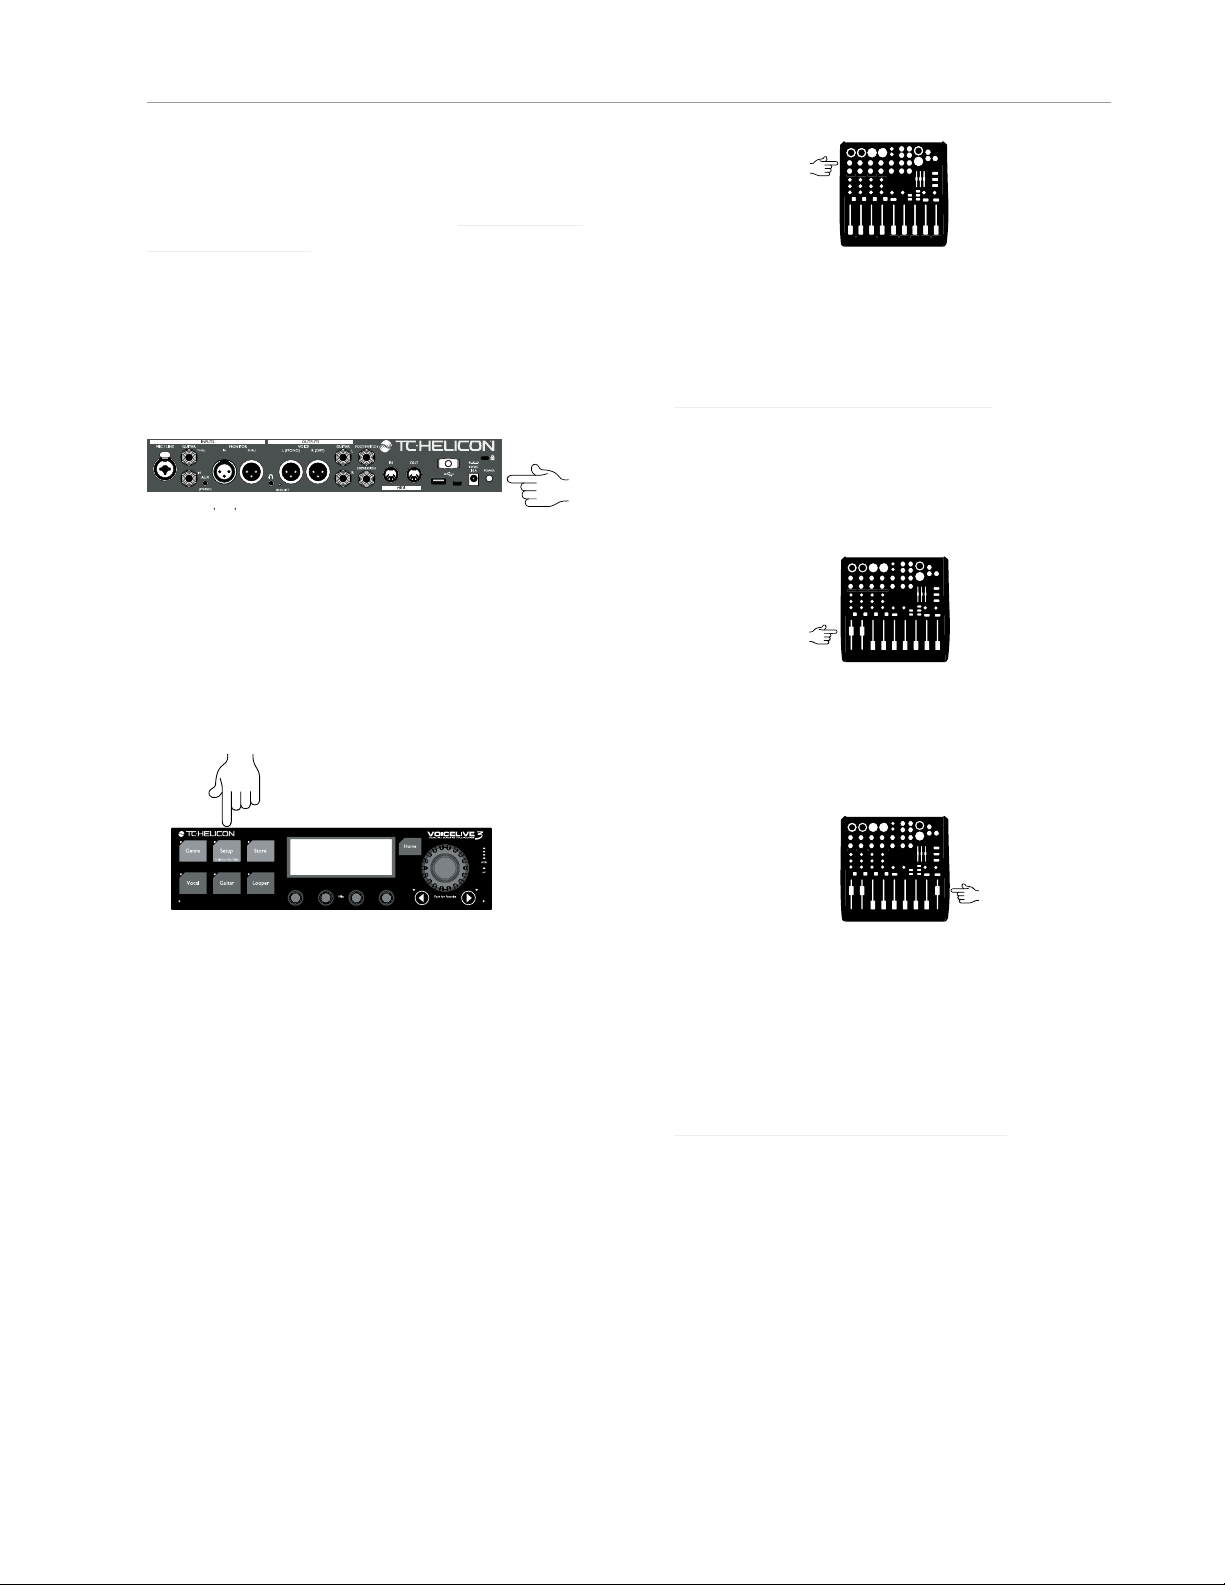
Auto Gain
The easiest way to set the input levels for your
microphone and guitar is to press and hold the
Setup button.
For additional information on input trim, please
refer to your PA or mixer’s instruction manual.
If you need a bit more guidance, check out this
“Craig’s Corner” video explaining mixer setup:
youtube.com/watch?v=qq0AOtafIjs
Time to have some fun!
It’s time to hear what your VoiceLive3 really can
do! Set the VoiceLive 3 channel faders on your
mixer to 0 or “Unity”, whichever applies.
. Slowly turn up the master/main volume on your
PA/Mixer (and on your guitar amp if you are
hooked up to one).
You will see a series of on-screen instructions.
When you are done, gain settings will be optimized for your microphone and guitar.
You should only have to use Auto Gain once.
There is no need to go through this procedure
each time you power on the unit.
If you have a condenser, MP-75, or e835FX mic,
this is a good time to enable it. Follow the instructions printed on the bottom of your VoiceLive3.
Setting input gain on your mixer
While singing and playing at your loudest volume, slowly turn up the input gain/trim knobs
of the mixer channels your VoiceLive 3 is connected to. When the clip indicator on your mixer
lights up, reduce input gain/trim slightly.
14 VoiceLive3
If you encounter feedback, turn the master volume down until it goes away. For more information on feedback and how to overcome it, check
out this “Craig’s Corner” video:
youtube.com/watch?v=VlN1RJ4gcAo
Explore the sounds
The best way to get an idea of your VoiceLive3’s
potential is to browse the presets. The factory
presets have tons of great sounds, so we suggest you carve out a little time to go through and
listen to them.
Sing and play!
Page 19

Let’s get going!
To browse presets, press the footswitches with
the up and down arrows on the far left.
Note which presets you enjoy the most – you can
use them as a starting point for creating your
own presets later.
VoiceLive3 for acoustic
guitar players
VoiceLive 3 comes with pristine reverbs, modulation effects, EQs and delays to make your
acoustic guitar sound better than it ever has.
However, you may not want heavy overdrive or
radical flanging applied to the output of your
handmade masterpiece…
If you have a nice effects setup for your acoustic guitar that you want to use for all your songs,
press SETUP, go to the SYSTEM tab and set ALL
GUITAR FX GLOBAL to ON. This will “lock” the
guitar effects so they won’t change when you
switch presets.
Let’s make it a HIT!
When you are checking out presets, be sure to
press the HIT button.
Editing HIT settings is covered in the reference
manual.
Are we there yet?
Frankly, we haven’t even started…
By now, you have probably realized that we have
merely scratched the surface of what you can
do with your VoiceLive3 – there is a lot to learn
and do!
If you really want to know how deep the rabbit
hole goes, download the full reference manual
for your VoiceLive3. It will show you how to…
– use vocal, guitar and loop “layers”
– edit presets
– turn individual effects on and off
– remap effect buttons
– use Harmony modes effectively
– tweak all effect parameters
– create and edit loops
– Global effects assignments
– browse presets by genre
– adapt audio signal routings to your needs
– mix audio signals
– set up MIDI controls
– … and much more!
You can download the VoiceLive 3 reference
manual from
tc-helicon.com/products/voicelive-3/support/.
HIT allows you to add (or remove) multiple effects for both your vocals and/or guitar with a
single button press. It can be used as a flexible “A/B” feature for two variations of a preset,
or as a “turbo”. E.g., HIT allows you to bring in
Harmony at just the right time, or you can use it
to turn off the Delay and activate the Vocoder in
the bridge of a song. Be adventurous – HIT really brings out new and interesting facets of the
presets.
Getting started – English quick guide 15
Page 20

Technical specifications
Technical specifications
Inputs
Voice connector Combo Balanced XLR/
Balanced TRS ¼”phone jack
Input impedance
balanced
Mic input level @
0dBFS
Line input level @
0dBFS
EIN @ max mic gain rg
= 150ohm
Mic SNR >100dB at typical Mic Input
A to D conversion 24 Bit, 128 x oversampling
Guitar connector ¼” phone jack
Guitar input impedance 1 MOhm
Guitar input level @
0dBFS
Guitar input SNR >10 8 d B
A to D conversion 24 Bit, 128x oversampling
Monitor connector Balanced XLR
Input impedance
balanced
Monitor input level @
0dBFS
Aux
Aux connector 1/8” stereo mini jack
Aux input level @
0dBFS
Analog outputs
Voice out connectors balanced XLR
Output impedance
balanced/unbalanced
Output range @ 0dBFS Line Level: +14dBu; Mic
Dynamic range >109dB, 20 Hz to 20kHz
Frequency response +0/-0.3dB, 20 Hz to 20kHz
D to A conversion 24 Bit, 128 x oversampling
Guitar out connectors 1/4” TRS phone jack
Output impedance
balanced/unbalanced
Output range @ 0dBFS Line Level: +14dBu;
Dynamic range >101dB, 20 Hz to 20kHz
3.08kOhm
-52dBu to +7dBu
-40dBu to +19dBu
-127 dBu
gain
bitstream, 110dB SNR
A-weighted
-2dBU to 14dBu
bitstream, 110dB SNR
A-weighted
25kOhm
+16 d B u
+2dBu
300/150 Ohm
Level: -2dBu
bitstream, 115dB SNR
A-weighted
442/221 Ohm
Mic Level: - 2dBu
D to A conversion 24 Bit, 128 x oversampling
bitstream, 106dB SNR
A-weighted
Headphone out
Headphone out
connector
Guitar thru
Buffered guitar input
connector
Output impedance
bal/unbal.
Monitor thru
Direct connection to
monitor input connector
Control
USB USB-B, USB-A
MIDI in 5 Pin DIN
Pedal 1/4” TRS phone jack
Power
External power supply 100 to 240 VAC,
Power consumption < 14 W
Safety
EMC Complies with EN 55103-
Safety Certified to IEC65, EN
Operating requirements
Operating temperature 32° F to 122° F
Storage temperature -22° F to 167° F
Humidity max. 90 % non-condensing
Size & weight
Dimensions 9” x 4” x 7” (230 x 100 x 180)
Weight 5lb. (2.3kg)
Warranty
See www.tc-helicon.com/support for warranty
information.
1/8” Mini stereo jack, 50
Ohm, +14dBu max
1/4” TRS phone jack
270/540 Ohms
Balanced XLR
50 to 60 Hz (auto-select)
1:2009, EN 55103-2:2009,
FCC CFR 47 Part 15B and
ICES-003:2004 4th Ed.
60065, UL6500 and CSA
IEC65, EN 60065, UL6500
and CSA
(0° C to 50° C)
(-30° C to 70° C)
16 VoiceLive3
 Loading...