

Page 1
D01303820B
DR-100)#
Linear PCM Recorder
Reference Manual
Page 2

Contents
1 – Introduction ..............................................4
Features .................................................................................. 4
Conventions used in this manual ..................................4
Recycling lithium-ion rechargeable batteries .......... 4
Trademarks and copyrights ............................................. 4
About SD cards .................................................................... 5
Precautions for use ..........................................................................5
2 – Names and functions of parts .................. 6
Top ............................................................................................ 6
Front.........................................................................................7
Rear .......................................................................................... 7
Left side .................................................................................. 7
Right side ............................................................................... 8
Bottom .................................................................................... 8
Home Screen ........................................................................ 8
Basic menu operation procedures..............................10
Menu list ........................................................................................... 12
Function menu list ........................................................................ 13
3 – Preparation ..............................................14
Powering the unit .............................................................14
Using the built-in battery ........................................................... 14
Using AA batteries ........................................................................ 14
Using an AC adapter (sold separately) .................................. 15
Using an external battery pack (sold separately) .............. 15
Inserting and removing SD cards ................................15
Inserting the card .......................................................................... 15
Removing the card ....................................................................... 15
SD card write protection switches .......................................... 15
HOLD function for preventing accidental operation
Turning the power on and off (putting it in standby) ...
Turning the unit on ....................................................................... 16
Turning the unit off (putting it in standby) .......................... 16
Resume function ........................................................................... 16
.. 16
16
Selecting the language ................................................... 16
If you accidentally select the wrong language................... 16
Setting the date and time .............................................. 17
Preparing an SD card for use ........................................17
Preparing the recording inputs ...................................17
Recording with the built-in mics ............................................. 17
Recording with connected mics .............................................. 17
Recording external devices ....................................................... 18
Recording from digital devices ................................................ 18
Using the built-in speaker for playback ....................19
Connecting monitoring equipment ..........................19
Adjusting playback volume........................................... 19
Connecting cameras ........................................................19
4 – Recording ................................................20
Recording .............................................................................20
Remaining recording time display ..............................20
Listening while recording (monitoring) ....................20
Setting where to save files .............................................21
Setting the file format and sampling frequency ... 21
Recording in mono (file type setting) ......................21
Setting recording input sources ..................................21
Setting power used by mics..........................................22
Using phantom power ................................................................ 22
Using plug-in power ................................................................... 22
Setting the low-cut filter ................................................23
Using the limiter ................................................................23
Using the Level Control Function................................23
Using mid-side microphones .......................................24
Setting the characteristics of the digital filter (A/D)
...24
Improving recording signal-to-noise (Dual ADC
function) ...............................................................................25
Starting recording automatically (AUTO REC func-
tion) ........................................................................................25
Recording in LEVEL mode .......................................................... 25
Recording in DIGITAL mode ...................................................... 26
Capturing the moment before recording starts (PRE
REC function)
.......................................................................26
Create a new file while continuing to record (file
incrementing function) ...................................................26
Create a new file manually while recording ........................ 26
Creating new files automatically at a set time interval ... 27
Recording two files simultaneously (DUAL REC
function) ...............................................................................27
Recording at two different levels (dual level recording) . 27
Recording with two different formats (dual format
recording) ........................................................................................ 27
Names of backup files when using dual recording........... 28
Using the auto tone function .......................................28
Turning XRI data recording on/off ..............................28
Recording times ................................................................29
5 – Playback ...................................................30
Playing recordings ............................................................30
Pausing playback........................................................................... 30
Stopping playback ........................................................................ 30
Searching backward and forward ........................................... 30
Changing the playback position ............................................. 30
Selecting files for playback (skipping) .......................30
Repeat playback (LOOP PLAY) ......................................30
Changing the speed of playback (VSA playback)..31
6 – Working with Files and Folders..............32
Opening the Browse Screen .........................................32
Icons on the Browse Screen ..........................................32
Basic Browse Screen operations ..................................32
File operations ...................................................................32
Folder operations ..............................................................33
Creating new folders .......................................................34
Protecting files ...................................................................34
Deleting files .......................................................................34
Dividing files .......................................................................34
Dividing files manually (DIVIDE function) ............................ 34
Dividing files at marks (MARK DIVIDE function)................. 35
Setting the file name format ........................................36
TASCAM DR-100MKIII
2
Page 3

Contents
Setting the WORD item ............................................................... 36
Resetting file numbers ....................................................37
7 – Mark functions ........................................38
Mark types ........................................................................... 38
Adding marks .....................................................................38
Adding marks manually .............................................................. 38
Adding marks automatically ..................................................... 38
Adding marks at peak levels ..................................................... 39
Moving between marks (mark skipping) .................39
Deleting marks ...................................................................39
8 – Settings and Information .......................40
Making power and display settings ...........................40
Setting the automatic power saving function .................... 40
Set the priority battery type ...................................................... 40
Setting the AA battery type ...................................................... 40
Setting the backlight ................................................................... 40
Setting the backlight brightness ............................................. 40
Adjusting the display contrast ................................................. 40
Turning indicators off .................................................................. 40
Setting the peak level function ................................................ 41
Viewing information ........................................................ 41
File information page .................................................................. 41
Card information page ................................................................ 42
Firmware version page ................................................................42
XRI date the information page ................................................. 42
Restoring factory default settings ..............................43
Formatting SD cards ........................................................ 43
Power-on recording function .......................................44
Attenuating the output ..................................................44
Restricting the line output level .............................................. 44
Restricting the headphone output level. ............................. 44
Audio performance ..........................................................50
General .................................................................................51
Dimensional drawings ....................................................51
9 – Connecting with a Computer .................45
Transferring files to a computer ..................................45
Transferring files from a computer .............................45
Disconnecting from a computer .................................45
10 – Using the REMOTE jack .........................46
Using a remote control (TASCAM RC-10) ..................46
Setting up a remote control ...................................................... 46
Using the remote control ........................................................... 46
Using a footswitch (TASCAM RC-3F)...........................46
Setting up the footswitch .......................................................... 46
Using the footswitch .................................................................... 46
11 – Messages ................................................47
12 – Troubleshooting ....................................49
13 – Specifications ........................................50
Ratings ..................................................................................50
Input/output ratings ........................................................50
Analog audio input and output ratings ................................ 50
Digital input .................................................................................... 50
Control input/output ratings .................................................... 50
TASCAM DR-100MKIII
3
Page 4

1 – Introduction
Li-ion00
Features
•
Linear PCM recorder that supports 192kHz/24-bit resolution
•
Uses SD/SDHC/SDXC cards as recording media
•
Two types of stereo microphones—directional and
omnidirectional—allow high-quality stereo recording
•
Various input jacks support diverse applications
•
XLR/TRS combo jacks that support +4dBu line level and
+48V phantom power enable the connection of external
mics and devices
•
20dB headroom for both mic and line inputs
•
Dual ADC function improves signal-to-noise performance
using two AD converters
•
Power-on recording function can start recording
immediately after starting up.
•
Dual level recording function allows two files to be
recorded at different levels
•
Dual format recording function allows recording with two
different formats
•
Continuous operation for extended times is possible by
using the built-in battery and AA batteries together
Conventions used in this manual
The following conventions are used in this manual.
•
When we refer to buttons, connectors and other parts of
this unit and other equipment, we use a bold font like this:
MENU button.
•
When we show messages, for example, that appear on the
unit’s display, the typeface looks like this: MENU.
•
SD memory cards are called “SD cards”.
•
Words that appear on the computer display are shown in
quotation marks like this: “DR-100MK3”.
Trademarks and copyrights
•
TASCAM is a trademark of TEAC CORPORATION, registered
in the U.S. and other countries.
•
SDXC Logo is a trademark of SD-3C, LLC.
•
MPEG Layer-3 audio coding technology licensed from
Fraunhofer IIS and Thomson.
•
Supply of this product does not convey a license nor imply
any right to distribute MPEG Layer-3 compliant content
created with this product in revenue-generating broadcast
systems (terrestrial, satellite, cable and/or other distribution
channels), streaming applications (via Internet, intranets
and/or other networks), other content distribution systems
(pay-audio or audio-on-demand applications and the like)
or on physical media (compact discs, digital versatile discs,
semiconductor chips, hard drives, memory cards and the
like). An independent license for such use is required. For
details, please visit http://mp3licensing.com.
•
Blackfin® and the Blackfin logo are registered trademarks of
Analog Devices, Inc.
•
Other company names, product names and logos in this
document are the trademarks or registered trademarks of
their respective owners.
Information is given about products in this manual only
for the purpose of example and does not indicate any
guarantees against infringements of third-party intellectual
property rights and other rights related to them. TEAC
Corporation will bear no responsibility for infringements on
third-party intellectual property rights or other liabilities that
occur as a result of the use of this product.
Recycling lithium-ion rechargeable batteries
This unit uses a built-in rechargeable lithium-ion battery.
When you no longer need a battery, take it to a shop that partic-
ipates in rechargeable battery recycling rather than throwing it
away in order to preserve precious resources.
If you are uncertain, please contact TASCAM customer support
service.
Properties copyrighted by third parties cannot be used for
any purpose other than personal enjoyment and the like
without the permission of the right holders recognized by
copyright law. Always use this equipment properly.
TEAC Corporation will bear no responsibility for rights
infringements committed by users of this product.
TASCAM DR-100MKIII
4
Page 5

About SD cards
This unit uses SD cards for recording and playback.
It can use 64MB–2GB SD cards, 4–32GB SDHC cards and
48–128GB SDXC cards.
A list of SD cards that have been confirmed for use with this unit
can be found on our web site. Please access to a product page of
this product from the TEAC Global Site (http://teac-global.com)
to find the list or contact the TASCAM customer support service.
Precautions for use
SD cards are delicate media. In order to avoid damaging SD
cards, please take the following precautions when handling
them.
•
Do not leave them in extremely hot or cold places.
•
Do not leave them in extremely humid places.
•
Do not let them get wet.
•
Do not put things on top of them or twist them.
•
Do not hit them.
•
Do not remove or insert them during recording, playback,
data transmission or other access.
•
When transporting them, put them into cases, for example.
1 – Introduction
TASCAM DR-100MKIII
5
Page 6
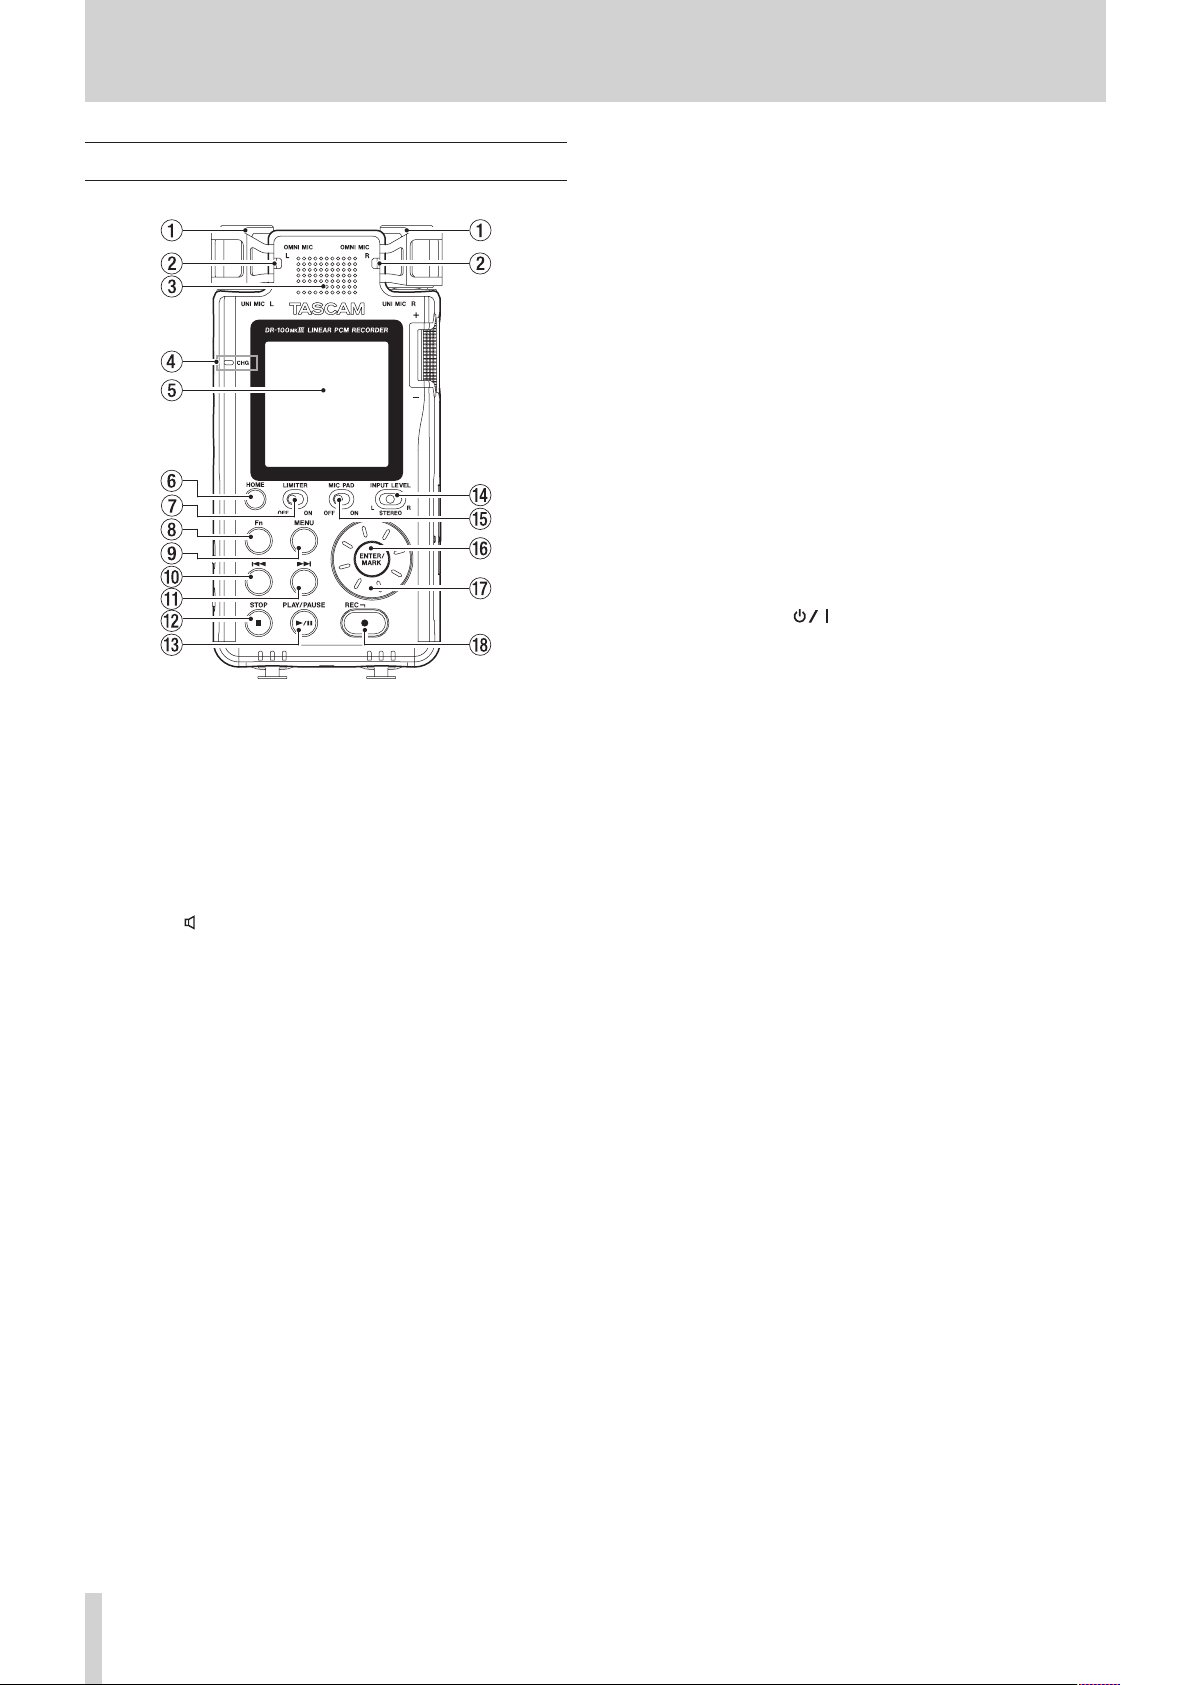
2 – Names and functions of parts
Top
1 UNI MIC L/R (built-in directional stereo mic)
This built-in mic is a stereo electret condenser microphone.
2 OMNI MIC L/R (built-in omnidirectional stereo mic)
This built-in mic is a stereo electret condenser microphone.
3 Built-in speaker (mono)
Use this built-in speaker to listen to recordings.
Sound will not be output from the speaker in the following
conditions.
o The (speaker) switch is set to OFF
o Recording/recording standby
o When headphones are connected
4 CHG (charge) indicator
This lights orange when the built-in battery is charging and
becomes green when charging completes. (See “Using the
built-in battery” on page 14.)
5 Display
Shows a variety of information.
6 HOME button
When any other screen is open, press this button to return to
the Home Screen.
7 LIMITER switch
This enables the limiter. (See “Using the limiter” on page
23.)
8 Fn button
When the Home Screen is open, press to open the FUNCTION
screen. (See “Basic menu operation procedures” on page
10.)
0 . button
When the Home Screen is open, use to skip files and search
backward. Press this button while pressing and holding the
ENTER/MARK button to move to the previous mark.
When a menu is open, use this to move between screens
and move the cursor.
q / button
When the Home Screen is open, use to skip files and search
forward. Press this button while pressing and holding the
ENTER/MARK button to move to the next mark.
Use to create a new file manually (divide) while recording.
When a menu is open, use this to move between screens
and move the cursor.
w STOP [8] button
Press during playback to pause playback at the current
position.
Press when paused to return to the beginning of the
playback file.
Press when recording or in recording standby to stop
recording.
Press and hold the (power) button for at least 10
seconds while pressing this button to force the unit to turn
off (enter standby).
e PLAY/PAUSE [7/9] button
When the Home Screen is open and the unit is stopped,
press this button to start playback.
Press when playing to pause playback.
When a file is selected on the Browse Screen, press this
to return to the Home Screen and play that file from the
beginning.
r INPUT LEVEL switch
Select which inputs are affected by operation of the input
level knob.
t MIC PAD switch
Use to change input sensitivity.
y ENTER/MARK button
When using a menu setting screen, press to confirm the
selected item.
Press to add marks manually when recording or playing
back.
Press the . or / button while pressing and holding this
button to move to the previous or next mark, respectively.
(See “Moving between marks (mark skipping)” on page
39.)
u Wheel
Use to select items and change values on setting screens.
Use also to change the file playback position.
i REC [0] button/REC indicator
When stopped, press this button to put the unit into
recording standby. The REC indicator will start to blink.
Press when recording to start recording standby.
9 MENU button
When the Home Screen is open, press to open the MENU
screen. (See “Basic menu operation procedures” on page
10.)
When the MENU screen is open, press this button to return to
the Home Screen.
TASCAM DR-100MKIII
6
Page 7
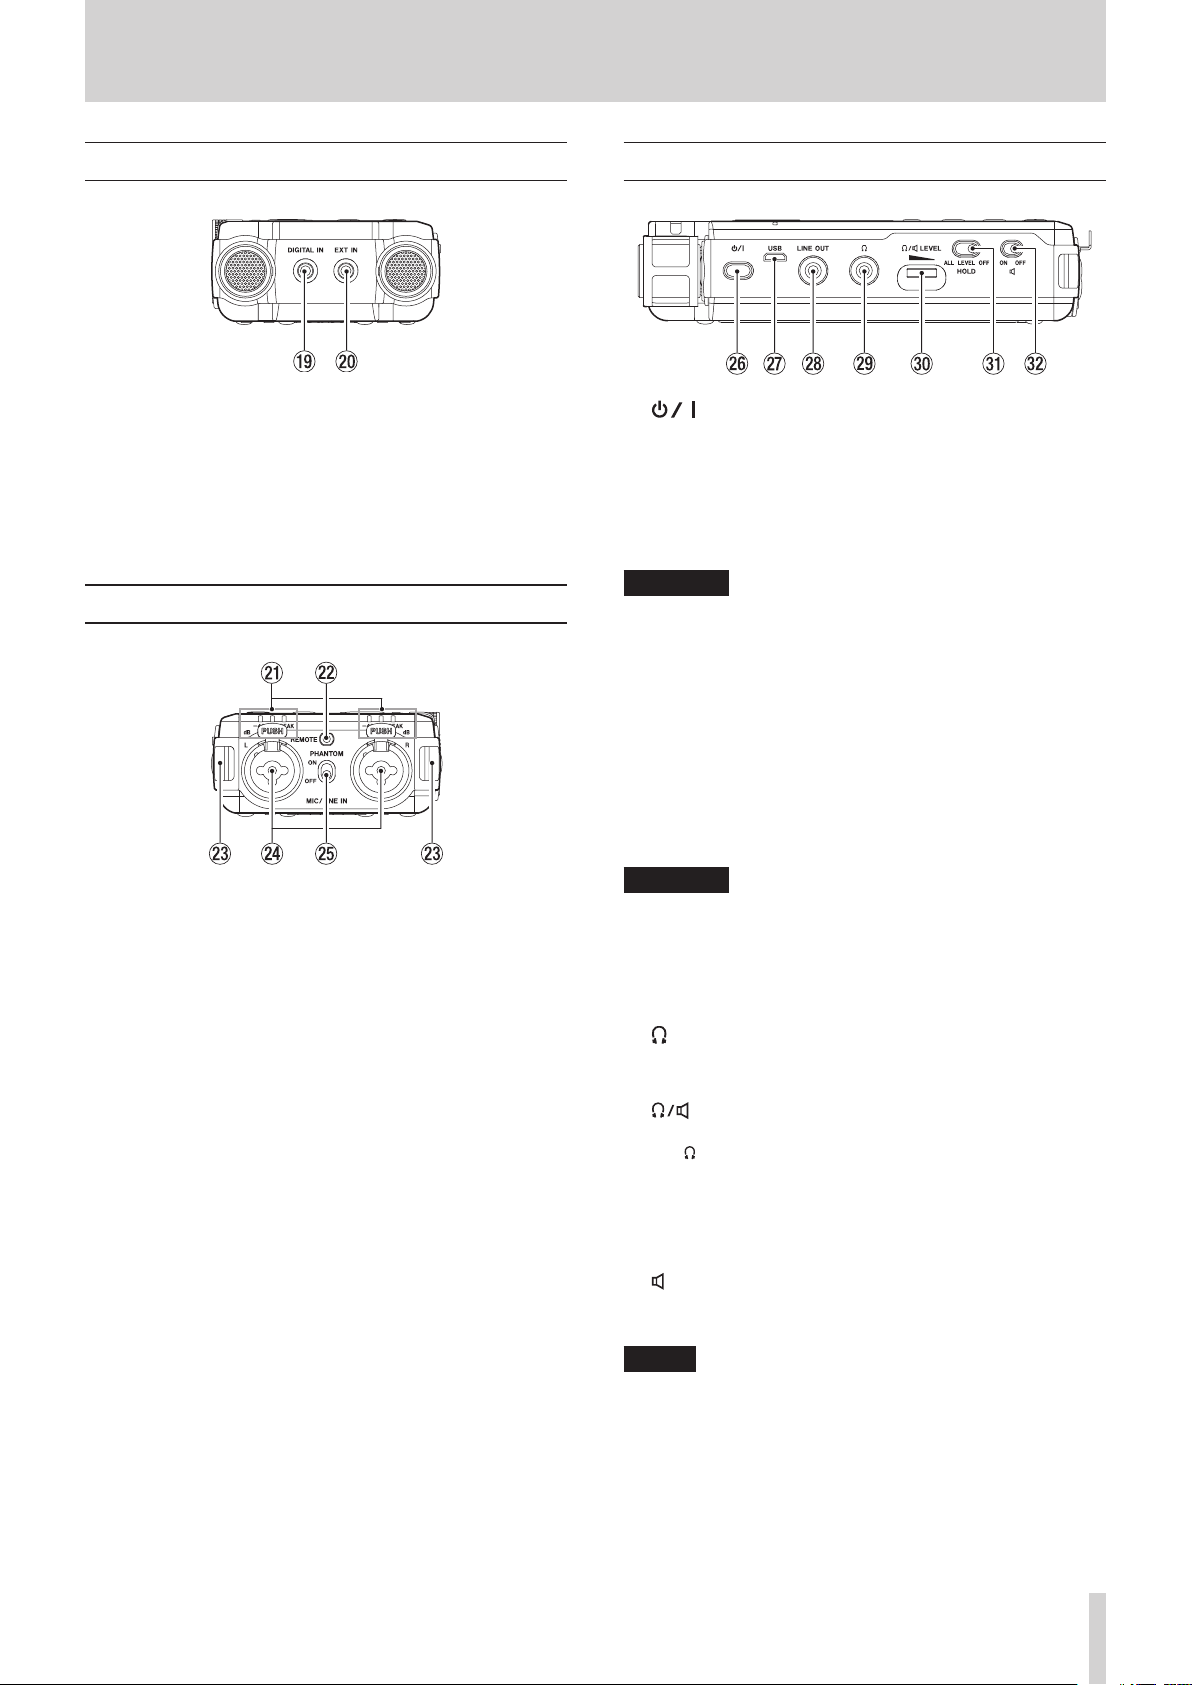
2 – Names and functions of parts
Front
o DIGITAL IN connector
Connect the included digital input conversion cable to
input digital signals into this unit. (See “Recording from digital
devices” on page 18.)
p EXT IN connector
Use a stereo mini jack cable to connect with the line output
jack of an audio device, for example.
Rear
Left side
h (power) button
Press and hold this button to turn the unit on and to put it
into standby (off).
Press and hold this button for at least 10 seconds while
pressing the STOP [8] button to force the unit to turn off
(enter standby).
CAUTION
Before turning the unit on, lower the volumes of connected
equipment to their minimum levels.
Failure to do so might cause sudden loud noises, which
could harm your hearing or result in other trouble.
j USB port
This is a Micro-B USB port.
Use a USB cable (A to Micro-B) to connect the unit to a
computer. (See “9 – Connecting with a Computer” on page
45.)
The USB port can supply power to the unit. (See “Powering
the unit” on page 14.)
a Level indicators
The -48 (dB), -6 (dB) or PEAK indicators light according to
the input levels.
s REMOTE jack
Connect a TASCAM RC-3F footswitch or TASCAM RC-10
wired remote control (both sold separately) here. This
enables remote starting and stopping of playback and other
functions. (See “9 – Connecting with a Computer” on page
45.)
d Strap attachments
f MIC/LINE IN L/R jacks (XLR/TRS)
These balanced analog jacks are XLR mic and standard TRS
inputs.
XLR (1: GND, 2: HOT, 3: COLD)
TRS (Tip: HOT, Ring: COLD, Sleeve: GND)
g PHANTOM switch
Set whether phantom power is on or off for the MIC/LINE IN
jacks. (See “Using phantom power” on page 22.)
CAUTION
The unit should be connected directly to the computer, not
through a USB hub.
k LINE OUT jack
Use this to connect with the line input jack of an amp or
other equipment.
l (headphone) jack
Use this jack to connect headphones. (See “Connecting
monitoring equipment” on page 19.)
; (headphone/speaker) LEVEL volume
Use to adjust the volume output from the built-in speaker
and (headphones).
z HOLD switch
Slide this switch to ALL or LEVEL to enable the hold
function that can prevent accidental operation. (See “HOLD
function for preventing accidental operation” on page 16.)
x (speaker) switch
When set to ON, sound will be output from the built-in
speaker.
NOTE
Even when set to ON, sound will not be output when the
unit is recording, in recording standby or has headphones
connected.
TASCAM DR-100MKIII
7
Page 8
2 – Names and functions of parts
Right side
c Battery compartment (AA batteries)
Install batteries (2 AA) in this compartment to power the
unit. (See “Using AA batteries” on page 14.)
v SD card slot
Insert an SD card here.
b Input level knob
Use this to adjust the input signal volume.
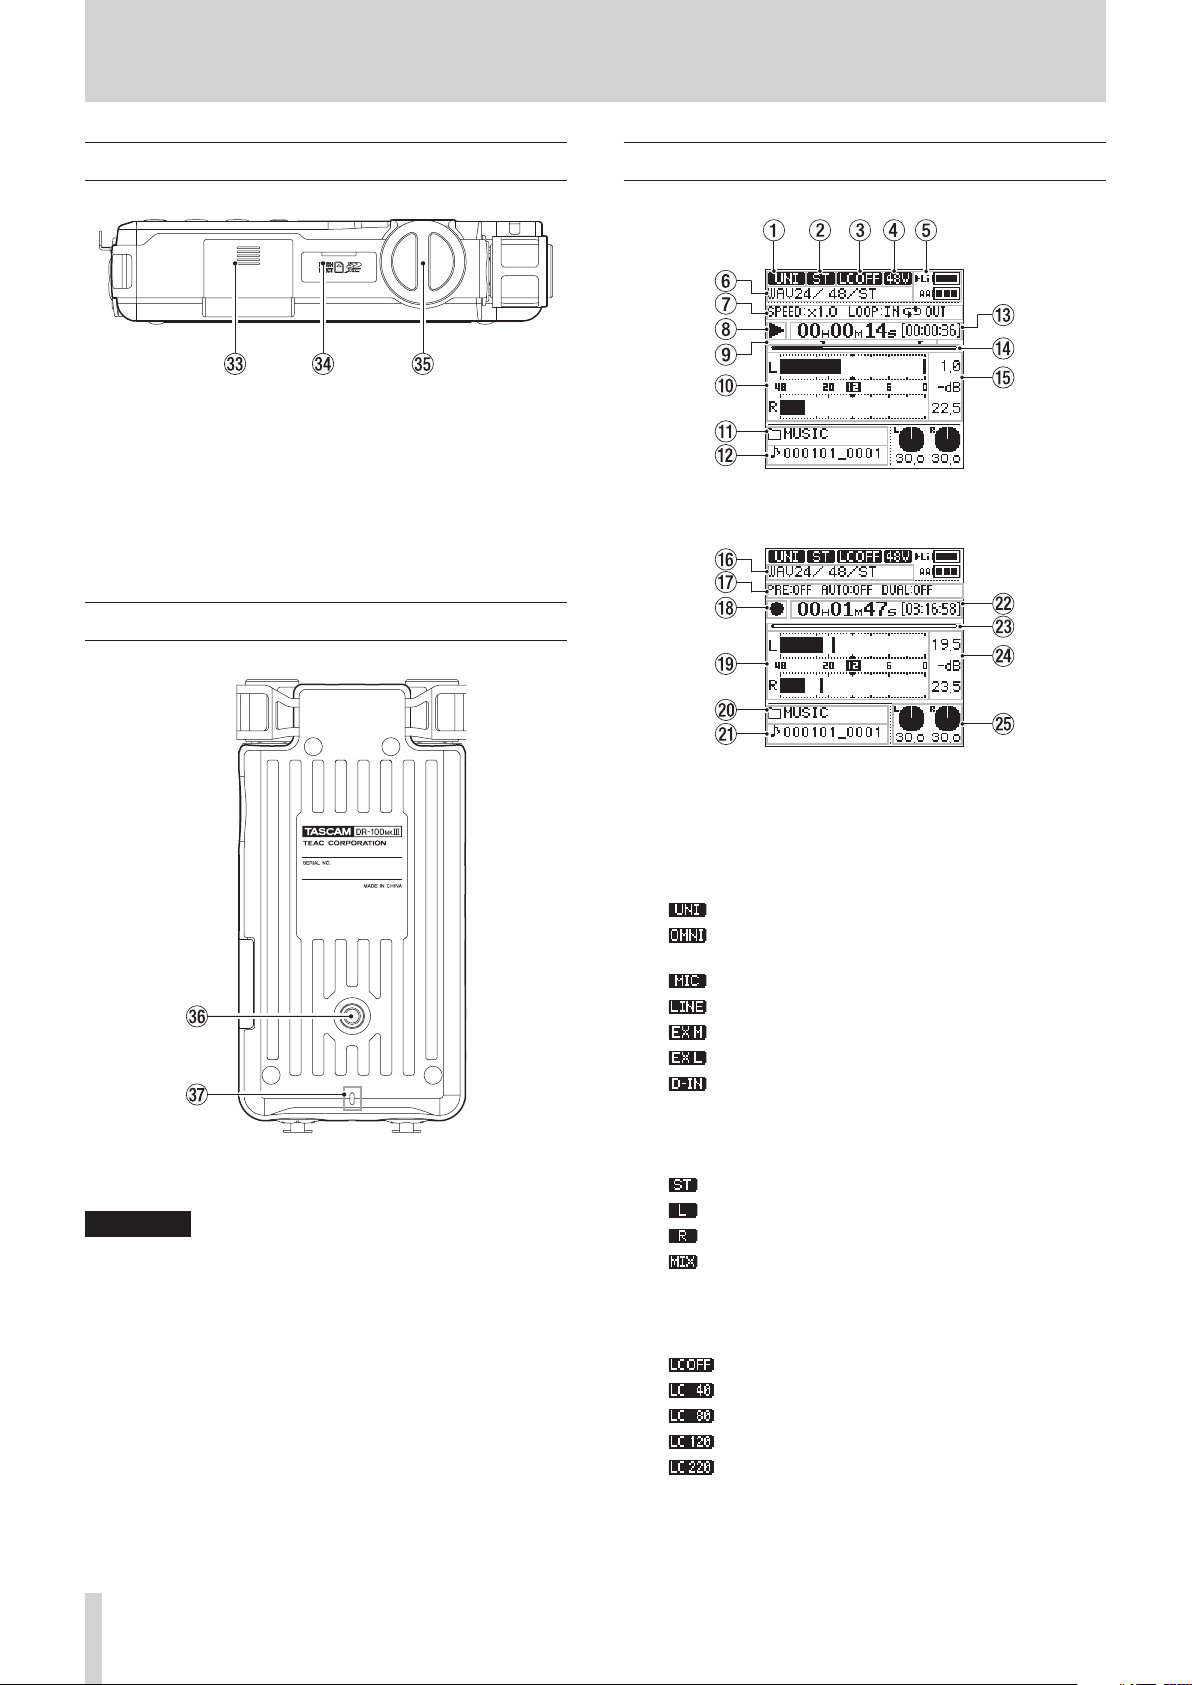
Bottom
Home Screen
Stopped/playing
n Tripod mounting threads (1/4-inch)
Use to attach this unit to a tripod.
CAUTION
•
Securely tighten all the screws on the tripod or microphone
stand to prevent the unit from falling off.
•
When using this unit attached to a tripod or microphone
stand, place it on a level surface.
•
Some tripods have different screw specifications that make
direct connection impossible. Use a commercially-available
adapter with such tripods.
•
Screws longer than 4.5 mm cannot be attached.
m REC indicator
This functions in the same way as the REC indicator on the
top of the unit.
Recording/recording standby
Input source
1
This shows the input source set with the I/O SETTING
screen SOURCE item. (See “Setting recording input sources”
on page 21.)
UNI MIC (built-in directional mic) input
MIC/LINE IN jack connected mic input
MIC/LINE IN jack connected line level input
EXT IN jack connected mic input
EXT IN jack connected line level input
DIGITAL IN jack connected digital input
Input channel indicator (ST/L/R/MIX)
2
This shows the REC SETTING screen FILE TYPE item setting.
(See “Recording in mono (file type setting)” on page 21.)
Stereo input/stereo file
Left channel input/mono file
Right channel input/mono file
L-R mix input/mono file
3 Low cut filter on/off status
This icon shows whether the low cut filter is on or off. (See
“Setting the low-cut filter” on page 23.)
OMNI MIC
input
Low cut filter off
Low cut filter on (40 Hz)
Low cut filter on (80 Hz)
Low cut filter on (120 Hz)
Low cut filter on (220 Hz)
(built-in omnidirectional mic)
TASCAM DR-100MKIII
8
Page 9
2 – Names and functions of parts
4 Phantom power supply status
When the PHANTOM switch is set to ON, this icon shows the
phantom power supply voltage. (See “Setting the phantom
power voltage” on page 22.)
No icon Phantom power off
Phantom power on with +48V supplied
Phantom power on with +24V supplied
Power supply status
5
When powered by batteries, a t appears next to the icon
for the type of battery being used. (See “Set the priority
battery type” on page 40.)
The amount of battery power remaining is shown in the
battery icons with 14 levels for the built-in battery and 3
levels for the AA batteries.
Built-in battery e e
AA batteries e e
When the battery type being used runs out of power, its icon
blinks and the t moves to the icon for the other type of
battery.
If both types of batteries run out power, their icons blink,
indicating that the unit will soon turn off (enter standby).
File format
6
This shows the format, sampling frequency and number of
channels of the playing file.
Playback speed/loop playback status
7
This shows the setting status of the VSA and loop playback
functions.
SPEED This shows the VSA playback function status.
LOOP This shows the loop playback function status.
Transport status (stopped/playing)
8
This icon shows the recorder operation status.
Playback file name
w
The file name or tag information of the file currently being
played back is shown.
When ID3 tag information is available for an MP3 file being
played, it is given priority for display.
If a file is protected, a mark appears before the file name.
(See “Protecting files” on page 34.)
NOTE
ID3 tag information includes the titles and artists names
that can be saved in MP3 files.
e Playback time/remaining playback time
Shows the elapsed time and remaining playback time
(hours: minutes: seconds) of the playing file.
r Playback position
The current playback position is shown by a bar. As playback
progresses, the bar extends from the left.
t Peak value in decibels (dB)
These show the maximum (peak) playback levels in decibels.
y Recording format
This shows the format, sampling frequency and number of
channels of the file being recorded.
u Recording function information
This shows the settings of the dual, pre and automatic
recording functions.
DUAL This shows the dual recording function
status.
PRE This shows the prerecording function status.
AUTO This shows the automatic recording function
status.
Transport status (recording standby/recording)
i
This icon shows the recorder operation status.
Indicator Meaning
8
Stopped at the beginning of the file
9
Paused
y
Playing back
,
Searching forward
m
Searching backward
/
.
Loop playback IN (starting) and OUT (ending) points
9
When the loop playback function is on, these show the loop
IN (starting) and OUT (ending) points.
Level meters
0
These show the maximum (peak) playback levels.
Playback folder name
q
This shows the name of the folder that contains the file
playing back.
Skipping to the beginning of the next file
Skipping to the beginning of the current or
previous file
IN (starting) point
OUT (ending) point
Indicator Meaning
09
Level meters
o
These show the input signal levels.
Recording folder name
p
This shows the name of the folder where the recording file
will be saved.
Recording file name
a
The file name that will automatically be given to the
recorded file is shown.
Recording time/remaining recording time
s
This shows the elapsed time (hours: minutes: seconds) of the
file being recorded and the remaining available time (hours:
minutes: seconds) on the SD card using the set input source,
file format and sampling frequency.
d Recording position
This bar shows the remaining available time (hours: minutes:
seconds) on the SD card using the set input source, file
format and sampling frequency.
As recording progresses, the bar extends from the left.
f Peak input level in decibels (dB)
Peak input level values are shown in decibels.
When the input level exceeds the peak level, the icon
appears.
Recording standby
0
Recording
TASCAM DR-100MKIII
9
Page 10
2 – Names and functions of parts
Input levels
g
These show the input level setting values.
Basic menu operation procedures
The operation procedures for both the MENU and FUNCTION
screens are basically the same.
Here we explain MENU screen operations using dual recording
settings as an example.
1. Open the MENU screen.
When the Home Screen is open, press the MENU button to
open the MENU screen.
o Press the HOME button to return to the Home Screen.
2. Open the REC SETTING screen.
Turn the wheel to move the cursor to the menu item you
want to change (REC SETTING in this case), and press the
ENTER/MARK button.
The DUAL REC screen opens.
o Setting values that cannot be changed because of the
operation mode, for example, are shown as ***.
o Press the . button to return to the previous screen.
o Press the HOME button to return to the Home Screen.
4. Change the setting.
Turn the wheel to move the cursor to the item you want
to change (MODE in this case), and press the ENTER/MARK
button.
The REC SETTING screen opens.
o Press the . button to return to the previous screen.
o Press the HOME button to return to the Home Screen.
3. Open the DUAL REC screen.
Turn the wheel to move the cursor to the item you want to
change (DUAL REC in this case), and press the ENTER/MARK
button.
The setting selection screen opens.
o This current setting is shown at the top right. Just
moving the cursor does not change the setting.
o Before pressing the ENTER/MARK button to confirm
the change, press the . button to cancel the change
and return to the previous screen.
o Press the HOME button to cancel the change and
return to the Home Screen.
o Press the MENU button to cancel the change and
return to the MENU screen.
o Press the ENTER/MARK button to confirm the change
and return to the previous screen.
TASCAM DR-100MKIII
10
Page 11
2 – Names and functions of parts
Turn the wheel to move the cursor to FORMAT, and press the
ENTER/MARK button.
You can change FORMAT item settings in a similar manner.
When finished, press the HOME button to return to the
Home Screen.
NOTE
•
The MENU screen cannot be opened when recording or in
recording standby.
•
The items that appear on the FUNCTION screen differ
according to whether the unit status is stopped/playing or
recording/recording standby).
8
Switching ON/OFF settings
If a setting is ON/OFF, it has no setting selection screen, and you
can change it quickly.
Example: Changing the PRE REC setting
Press the ENTER/MARK button to open the confirmation
screen.
When a confirmation screen appears, the cursor always starts
on NO.
Press the ENTER/MARK button when the cursor is on NO to
cancel execution and return to the previous screen.
Turn the wheel to move the cursor to YES and press the
ENTER/MARK button to execute the function and return to
the previous screen.
o Press the HOME button to cancel execution and return
to the Home Screen.
o Press the MENU button to cancel execution and return
to the MENU screen.
Press the ENTER/MARK button.
The setting is changed.
The setting changes each time you press the ENTER/MARK
button.
8
Changing settings and executing functions that
require confirmation
Depending on the content of the setting, a message screen
requiring confirmation of the change might appear.
Example: Executing quick formatting.
TASCAM DR-100MKIII
11
Page 12
2 – Names and functions of parts
Menu list
Press the MENU button to open the MENU screen.
The menu items are as follows.
Menu item Function Page
BROWSE
REC SETTING
I/O SETTING
MARK SETTING
POWER/DISPLAY
SYSTEM
FORMAT
SAMPLE
FILE TYPE
XRI
DUAL REC
FILE INC
AUTO REC
PRE REC
AUTO TONE
SOURCE
A/D FILTER
DUAL ADC
LOW CUT
LEVEL CONTROL
MS DECODE
PHANTOM VOLT
PLUG IN POWER
OUTPUT ATT
AUTO MARK
PEAK MARK
MARK SKIP
AUTO PWR SAVE
BATTERY
BACKLIGHT
BRIGHTNESS
CONTRAST
INDICATORS
PEAK LEVEL
INFORMATION
DATE/TIME
FILE NAME
FILE No.RESET
REMOTE
LANGUAGE
INITIALIZE
MEDIA FORMAT
USB STORAGE
Work with files and folders on the SD card see page 32
Set the recording file format
Setting the sampling frequency
Set the file type see page 21
Turn XRI data recording on/off see page 28
Set dual recording function see page 27
Set the recording time interval for automatically dividing (creating
new) files
Set the auto-recording function see page 25
Set the pre-recording function see page 26
Set the auto tone function see page 28
Set the input source see page 21
Set the A/D converter filter see page 24
Turn on/off this function that improves S/N performance see page 25
Set the low-cut filter see page 23
Set the level control function see page 23
Set the mid-side decoding function see page 24
Set the phantom power voltage see page 22
Turn plug-in power on/off see page 22
Set the output attenuator function see page 44
Set the automatic mark function see page 38
Turn the peak mark function on/off see page 39
Set the mark skip mode see page 39
Set the automatic power saving function see page 40
Makes settings related to the built-in and replaceable batteries see page 40
Set the time the backlight stays lit see page 40
Set the backlight brightness see page 40
Adjust the contrast see page 40
Turn indicators on/off see page 40
Set the level meter peak hold function see page 41
Shows a variety of information. see page 41
Set the date and time see page 17
Set the file name format. see page 36
Reset the file number. see page 37
Make connected remote control settings see page 46
Set the language shown on the display see page 16
Restore factory default settings see page 43
Format the SD card see page 43
Switch to USB mass storage device mode see page 45
see page 21
see page 27
CAUTION
•
When recording or in recording standby, the MENU screen will not open.
•
The settings for all menu items are retained even when the unit is turned off (in standby).
TASCAM DR-100MKIII
12
Page 13
2 – Names and functions of parts
Function menu list
The Function menu includes functions that are used on the selected playback file or the recording file.
•
When the Home Screen is open, press the Fn button to open the FUNCTION Screen.
The functions shown depend on the state of the unit when the Fn button is pressed.
Menu item Function Page
CHANGE PROTECT
FILE DELETE
Stopped, paused or
playing back
Recording/recording
standby
•
When a folder or file is selected on the Browse Screen, press the Fn button to open theFOLDER MENU or FILE MENU screen.
DIVIDE
LOOP PLAY
VSA PLAY
MS DECODE
FILE INFORMATION
LOW CUT
LEVEL CONTROL
MS DECODE
BATTERY
Change the protection of the file selected on the Home Screen see page 34
Delete the file selected on the Home Screen see page 34
Divide the file selected on the Home Screen see page 34
Make loop playback settings see page 30
Make VSA playback settings see page 31
Set the mid-side decoding function see page 24
Show file information for the file selected on the Home Screen see page 41
Set the low-cut filter see page 23
Set the level control function see page 23
Set the mid-side decoding function see page 24
Make settings related to the built-in and replaceable batteries see page 40
Menu item Function Page
Show file information for the selected file see page 32
Delete the selected file see page 34
Change the protection status of the selected file see page 34
Delete all marks in the selected file see page 33
Delete all files in the selected folder see page 33
Delete the selected folder see page 33
File selected on
Browse Screen
Folder selected on
Browse Screen
FILE INFORMATION
FILE DELETE
CHANGE PROTECT
CLR ALL MARKS
ALL FILES DELETE
FOLDER DELETE
TASCAM DR-100MKIII
13
Page 14
3 – Preparation
Powering the unit
This unit uses a built-in rechargeable lithium-ion battery.
This unit can also be powered by 2 AA batteries, by using a
commercially-available USB cable to supply USB bus power
or by a TASCAM PS-P520E AC adapter. The USB cable can also
be connected a TASCAM BP-6AA external battery pack ( sold
separately).
This unit can use alkaline, Ni-MH or lithium AA batteries.
Using the built-in battery
Charge it before using the unit the first time after purchase and
after it has not been used for a long time.
8
Charging the built-in battery
The built-in battery can be charged in the following two ways.
•
Charging with an AC adapter
Connect a TASCAM PS-P520E AC adapter (sold separately)
to the unit's USB port and charge the unit. (See “Using an AC
adapter (sold separately)” on page 15.)
The charging time is about 4.5 hours.
•
Charging from a connected computer
Use a USB cable (A to Micro-B) to connect a computer to the
unit's USB port and charge the unit. (See “9 – Connecting with a
Computer” on page 45.)
The charging time is about 10 hours.
NOTE
•
Always connect this unit and the computer directly. If
connected through a USB hub or other device, charging
might not occur properly.
•
When connected by USB, the unit will charge even when it is
not turned on.
•
The CHG (charge) indicator will light as follows when
charging.
Lit orange: charging
Lit green: charging complete
CHG (charge) indicator
Using AA batteries
1. Slide the battery compartment cover toward the bottom of
the unit to open it.
2. Install 2 AA batteries with their ¥ and ^ marks as shown in
the battery compartment.
3. Close the battery compartment cover.
Set the type of batteries used in order to allow the unit to
accurately show the amount of power remaining and determine
whether enough power is available for proper operation. (By
default, this is set to alkaline batteries.) (See “Setting the AA
battery type” on page 40.)
CAUTION
•
Manganese dry cell batteries cannot be used with this unit.
•
This unit cannot recharge Ni-MH batteries. Use a commercially available recharger.
NOTE
A great amount of power is required to provide phantom
power to a condenser microphone. If you use a condenser
microphone while running the unit on AA batteries (alkaline,
Ni-MH or lithium), the operation time will be shortened.
If you need to operate the unit for a long time, use a TASCAM
PS-P520E AC adapter or TASCAM BP-6AA external battery
pack (both sold separately) to power the unit.
8
Using both battery power supplies together
Continuous operation for an extended amount of time is
possible by using the built-in battery and AA batteries together.
When the amount of remaining power in the priority battery
source becomes insufficient, the unit automatically switches to
the other battery source and continues operating. (See “Set the
priority battery type” on page 40.)
The AA batteries can be changed when the built-in battery is
powering the unit.
TASCAM DR-100MKIII
14
CAUTION
Changing the AA batteries when they are powering the unit
could interrupt the power causing loss of recording data
and settings, for example.
Before changing the AA batteries, confirm on the Home
Screen that the built-in battery has sufficient remaining
power and set the battery priority to the built-in battery.
To use AA batteries as the priority battery type, after
changing the batteries, set them as the priority type.
You can change the priority battery type with the POWER/
DISPLAY screen BATTERY item when stopped or playing or
the FUNCTION screen BATTERY item when recording or in
recording standby.
Page 15
3 – Preparation
Using an AC adapter (sold separately)
As shown in the illustration, connect a TASCAM PS-P520E AC
adapter (sold separately) to the unit's USB port and charge the
unit.
TASCAM
PS-P520E (sold separately)
AC outlet
Micro-B
USB connector
NOTE
When the AC adapter is connected, power will be supplied
from the AC adapter. The unit can be used while it is
charging.
Inserting and removing SD cards
CAUTION
•
SD cards that meet SD, SDHC or SDXC standards can be used
with this unit.
•
A list of SD cards that have been confirmed for use with this
unit can be found on our web site. Please access to a product
page of this product from the TEAC Global Site (http://
teac-global.com) to find the list or contact the TASCAM
customer support service.
Inserting the card
1. Open the SD card slot cover.
2. Insert an SD Card into the slot as shown in the illustration
until it clicks into place.
3. Close the SD card slot cover.
CAUTION
Noise may occur when recording with a microphone if the
unit is too close to the AC adapter. In such a case, keep sufficient distance between the AC adapter and the unit.
Using an external battery pack (sold separately)
Connect a TASCAM BP-6AA external battery pack (designed for
use with this unit and sold separately) to the recorder with a USB
cable (A to Micro-B) as shown in the illustration. For details, see
the BP-6AA Owner’s Manual.
TASCAM BP-6AA (sold separately)
Micro-B
USB connector
CAUTION
The unit cannot detect the remaining battery charge of a
BP-6AA.
Removing the card
1. Open the SD card slot cover.
2. Press the SD card in gently and then release it to allow it to
come out.
SD card write protection switches
SD cards have protection switches that prevent writing new
data to them.
If you slide the protect switch to the LOCK position, file recording
and editing will not be possible. Unlock the write-protection in
order to record, erase and otherwise edit data on the card.
Writable Write-protected
TASCAM DR-100MKIII
15
Page 16
3 – Preparation
HOLD function for preventing accidental operation
You can slide the HOLD switch to LEVEL or ALL to disable
controls and prevent accidental operation.
ALL
Operations of the input level knob and all buttons are
disabled
LEVEL
Operations of the input level knob are disabled
OFF Hold function is off
Turning the power on and off (putting it in standby)
CAUTION
•
Turn down the volume of the monitoring system connected
to the unit before turning the unit on/off (standby).
•
Do not wear connected headphones when turning the unit
on or off (putting it in standby). Noise could damage the
headphone driver unit or harm your hearing.
CAUTION
Always use the (power) button to turn the unit off (put
it in standby).
If shutdown procedures are not conducted, recording data
and settings, for example, could all be lost. Lost data and
settings cannot be restored.
Resume function
When you turn the unit off (put it in standby), it remembers the
position where it was stopped.
Next time it is turned on, you can start playback from the
position where it was stopped.
NOTE
The position where stopped is stored on the SD card. The
resume function will not work if the card is changed.
Selecting the language
You can change the language shown on the display. The first
time you turn the unit on after purchasing it, the LANGUAGE
screen will open. You can set the language used on this screen.
You can also change this setting with the SYSTEM screen
LANGUAGE item.
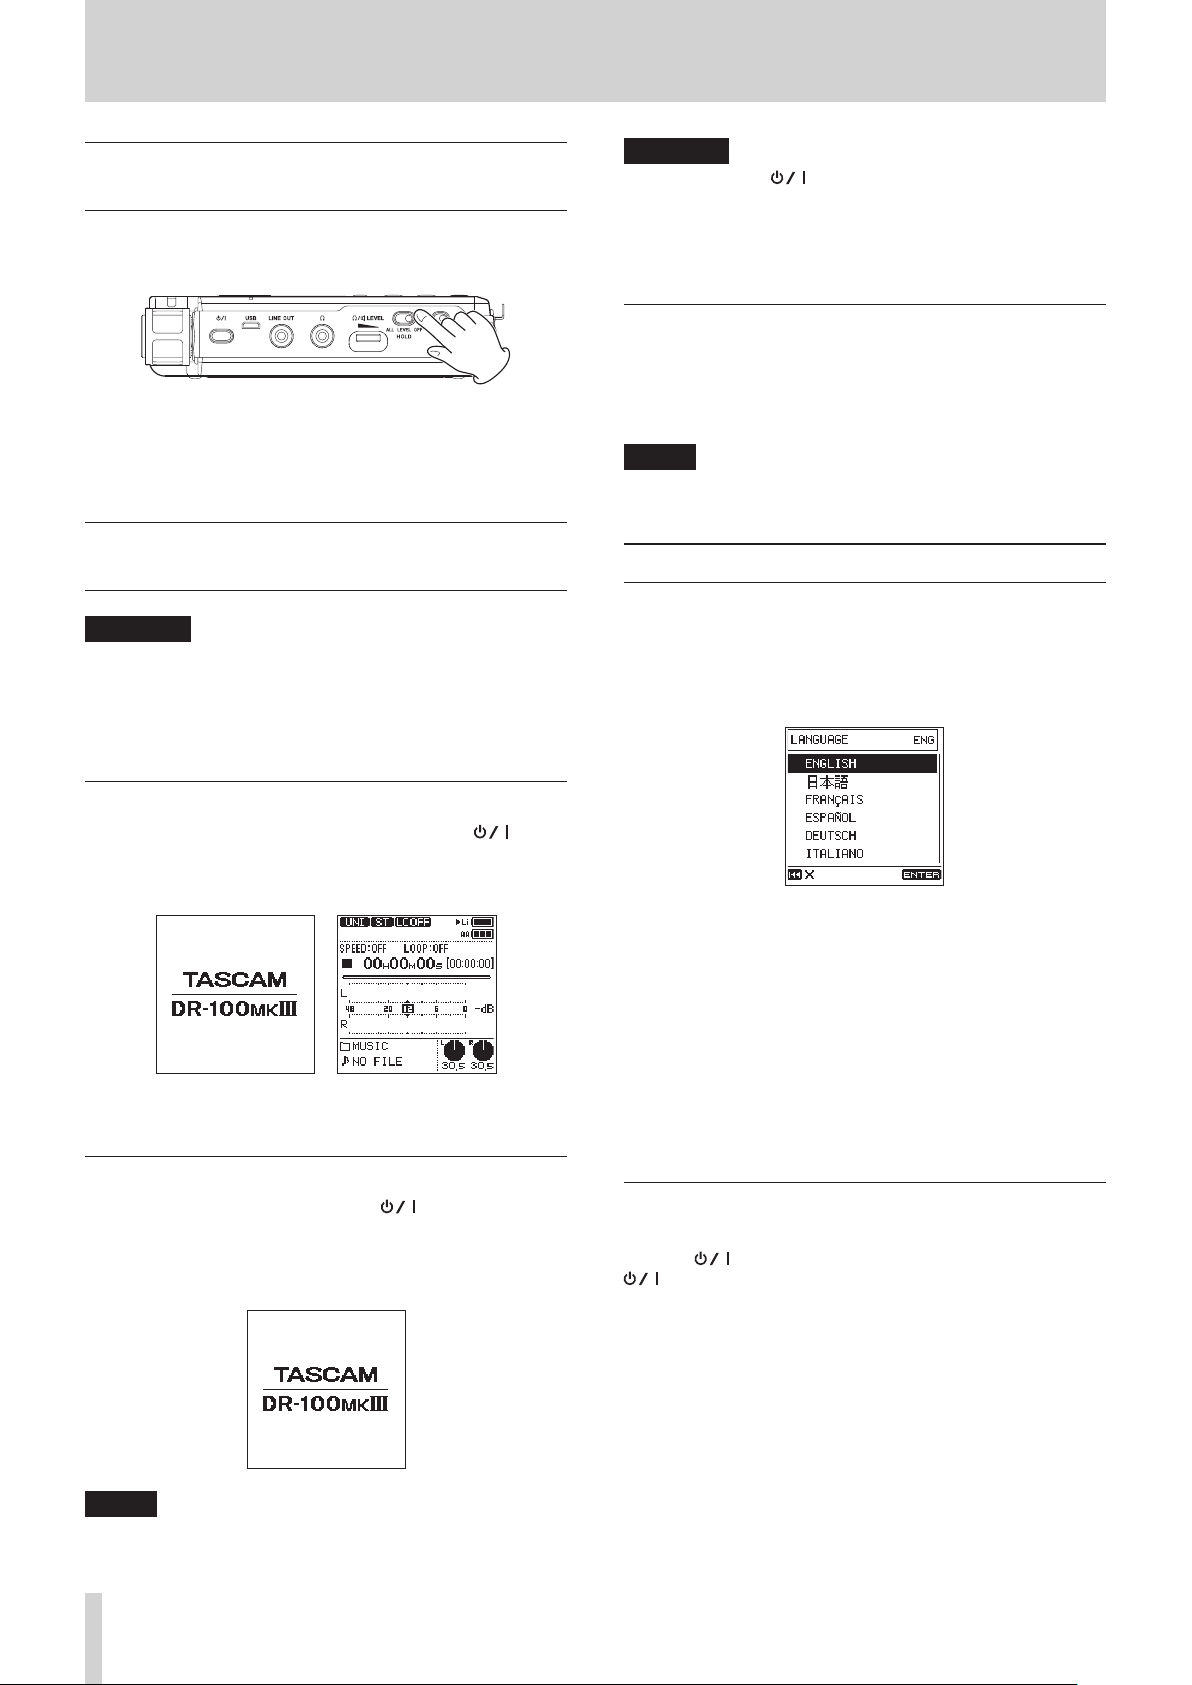
Turning the unit on
When the unit is off (in standby), press and hold the
(power) button until the start-up screen appears.
The Home Screen appears after the unit starts up.
Start-up Screen Home Screen
Turning the unit off (putting it in standby)
When the unit is on, press and hold the (power) button
until the shutdown screen appears.
The unit turns off (enters standby) after it completes its
shutdown process.
1. Turn the wheel to move the cursor and select the language.
Options
ENGLISH: use English
日本語: use Japanese
FRANÇAIS: use French
ESPAÑOL: use Spanish
DEUTSCH: use German
ITALIANO: use Italian
2. After making the selection, press the ENTER/MARK button
to confirm it.
If you accidentally select the wrong language
Press the (power) button to turn it off, and then press the
(power) button again while pressing the MENU button.
The language selection menu where you can set the language
appears.
NOTE
You cannot turn the unit off (put it in standby) when it is
recording or in recording standby.
TASCAM DR-100MKIII
16
Page 17

3 – Preparation
Setting the date and time
You can set the unit to automatically assign file names based
on the date and time of the built-in clock. (See “Setting the file
name format” on page 36.)
By setting the clock in advance, the recording date and time can
be added to files accurately.
The first time you turn the unit on after purchasing it and
whenever the date and time has been reset, the DATE/TIME
screen where you can set the date and time will open. You can
also change this setting with the SYSTEM screen DATE/TIME item.
1. Turn the wheel to move the cursor to the item (year/month/
day/hour/minute/second) you want to set, and press the
ENTER/MARK button.
2. Turn the wheel to change the value, and press the ENTER/
MARK button.
3. Turn the wheel to move the cursor to OK, and press the
ENTER/MARK button to confirm the setting.
Preparing the recording inputs
You can select the input source from multiple options according
to the application. Settings must be made according to the
input source used. (See “Setting recording input sources” on
page 21.)
Recording with the built-in mics
8
Using the built-in directional mics (UNI MIC) to
record
This is suited for instrumental performances, bands and other
live recordings as well as field recordings, for example.
Point the built-in directional mics (UNI MIC) at the sound source
and place the unit in a stable location where there is little
vibration.
NOTE
The date and time will be reset to the default if the unit does
not receive power from the built-in battery, AA batteries or
an external power supply for a few minutes.
Preparing an SD card for use
The following message appears if an unformatted card is
installed in the unit when it is turned on.
In order to use an SD card in this unit, you must format it first.
Press the ENTER/MARK button to format the card.
CAUTION
•
Formatting will erase all the data on the SD card. Back up to
a computer, for example before formatting a card.
•
When formatting a card, the unit should be powered by an
external power supply or batteries with sufficient remaining
power.
8
Using the built-in omnidirectional mics (OMNI MIC)
to record
This is suited for recording meetings and other situations where
you want to capture all the sound in a large space. Place the unit
in a stable location where there is little vibration.
Recording with connected mics
Connect mics to the MIC/LINE IN XLR or TRS jacks.
Connect a stereo mic to the EXT IN jack.
Point the mics at the sound source and place the unit in a stable
location where there is little vibration.
NOTE
You can also use the SYSTEM screen MEDIA FORMAT item to
format a card. (See “Formatting SD cards” on page 43.)
TASCAM DR-100MKIII
17
Page 18

3 – Preparation
Stereo mic
Recording external devices
Connect external audio devices to the MIC/LINE IN XLR or TRS
jacks.
When using a stereo mini cable, connect it to the EXT IN jack.
Audio devices
and other
external
equipment
Mic
Audio devices
and other
external
equipment
Recording from digital devices
Use the included digital input conversion cable to connect the
output of a digital audio device to the DIGITAL IN jack.
Digital mixer, digital recorder, digital
amp, etc.
Set the I/O SETTING screen SOURCE item to DIGITAL to enable
recording of digital output from a digital audio device. (See
“Setting recording input sources” on page 21.)
TASCAM DR-100MKIII
18
Page 19

3 – Preparation
Using the built-in speaker for playback
Set the (speaker) switch to ON to listen to playback from the
built-in speaker.
NOTE
Even if the (speaker) switch is set to ON, the speaker will
not output sound when the unit is recording, in recording
standby or connected to headphones.
Connecting monitoring equipment
To listen with an external monitoring system (powered monitor
speakers or an amplifier and speakers), connect it to the LINE
OUT jack.
To listen with headphones, connect them to the (headphone)
jack.
Connecting cameras
When recording video on a camera, this unit can simultaneously
record the same sound as the camera. Connect this unit and the
camera as follows to input sound into the camera.
DSLR camera
External mic input jack
NOTE
When connected to a camera, the line output level can be
attenuated 30 dB. (See “Restricting the line output level” on
page 44.)
Powered monitor speakers or
amplifier and speakers
Headphones
Adjusting playback volume
Use the (headphone/speaker) LEVEL control to adjust the
volume output from the built-in speaker and (headphone)
jack. (See “Restricting the headphone output level.” on page
44.)
TASCAM DR-100MKIII
19
Page 20

4 – Recording
Recording
With this unit, you can record audio with even better quality
by changing the recording format and sampling frequency, as
well as setting the various functions, including the limiter, level
control and low-cut filter.
Here, we explain basic recording using the UNI MIC (built-in
directional mics).
1. Place the recorder.
Point the built-in directional mics (UNI MIC) at the sound
source and place the unit in a stable location where there is
little vibration. (See “Preparing the recording inputs” on page
17.)
2. Select the input source.
Set the input source to UNI MIC. (See “Setting recording
input sources” on page 21.)
To change where recording files are saved, see “Setting
where to save files” on page 21.
3. Start recording standby.
Press the REC button to start recording standby. The REC
indicator will blink.
4. Adjust the recording level.
Watch the level meters and level indicators as you turn the
input level knob to adjust the recording level.
You can check the input level with both the level meters and
level indicators.
While watching the level meters, adjust the recording level
so that they do not peak with −12dB as a guideline.
Distortion could occur if the input level exceeds the peak
level. If the peak level is exceeded, an icon appears in
the peak input level decibel (dB) display area and the PEAK
level indicator lights.
Selecting channels to adjust
o Set the INPUT LEVEL switch to STEREO to adjust the
recording levels of both left and right (L/R) channels
simultaneously.
o If you want to change the left-right balance, set the
INPUT LEVEL switch to L or R to adjust the recording
level of that channel independently.
o If the right and left input levels are different, this
difference will be maintained when the INPUT LEVEL
switch is set to to STEREO so you can adjust them
together again.
Changing the mic input sensitivity.
If the peak level is exceeded even when the input level
knob is turned down as much as possible, set the MIC
PAD switch to ON.
If the peak level is still exceeded, lower the volume of
the sound source or increase the distance between the
mics and the sound source.
NOTE
•
Recording levels cannot be adjusted if the input source is set
to DIGITAL or the level control function is set to AUTO LEVEL.
Set to DIGITAL Set to AUTO LEVEL
•
MIC PAD is disabled if the input source is set to LINE, EXT
LINE or DIGITAL.
•
When DIGITAL is selected as the input source, if a digital
input becomes unlocked during recording, the unit will
switch back to the input source set before selecting DIGITAL
and continue recording.
5. Start recording.
Press the REC button when in recording standby to start
recording. The REC indicator will stop blinking and stay lit.
Pausing recording
Press the REC button during recording to pause
recording. The REC indicator will blink.
Press the REC button again to resume recording.
6. Stop recording.
Press the STOP button to stop recording.
CAUTION
This unit has a high-gain design to allow it to record even
sounds that are quiet. For this reason, if the recording level
is set high when using an AC adapter, touching the mic
might cause you to hear noise (humming or rumbling).
Be careful not to touch the built-in mic when recording with
it.
Remaining recording time display
When the remaining recording time (open card space) becomes
10 minutes or less when recording, the remaining recording
time will blink on the Home Screen.
When time runs out, a "Card Full" message will appear and
recording will stop.
NOTE
When the file size reaches 2 GB during recording, a new file
will be created automatically and recording will continue
without pause. Moreover, if the recording time exceeds
24 hours, a new file will be created automatically and
recording will continue without pause.
Listening while recording (monitoring)
When in recording standby or during recording, the speaker
does not output sound even if the (speaker) switch is set to
ON.
TASCAM DR-100MKIII
20
Page 21

4 – Recording
If you use speakers for monitoring, particularly when recording
with mics, the sound output from the speakers could be picked
up, resulting in unwanted recording or feedback noise.
Use headphones to monitor the sound while adjusting the input
levels or recording.
Use the (headphones/speaker) LEVEL volume control to
adjust the monitoring level. This does not affect the sound being
recorded.
Setting where to save files
Set the folder where recorded files are saved.
1. Select the MENU screen BROWSE item to open the Browse
Screen. (See “Basic menu operation procedures” on page
10.)
2. Select the folder where files are saved.
3. Press the ENTER/MARK button to confirm the folder where
files are saved and return to the Home Screen.
To create a new folder, see “Creating new folders” on page
34.
Setting the file format and sampling frequency
Use the items on the REC SETTING screen to set the recorded file
format before you start recording. (See “Basic menu operation
procedures” on page 10.)
8
Setting the file format
Open the FORMAT screen and set the file format.
NOTE
When the file format is MP3, 192.0 kHz, 176.4 kHz, 96.0
kHz and 88.2 kHz cannot be selected.
Recording in mono (file type setting)
1. Select the REC SETTING screen FILE TYPE item to open the
FILE TYPE screen. (See “Basic menu operation procedures”
on page 10.)
2. Set the recording channels.
Option Meaning
STEREO (default)
MONO-L
MONO-R
MONO-MIX
Left and right channel inputs recorded
as stereo file
Left channel input recorded as mono file
Right channel input recorded as mono
file
Left and right channel inputs mixed to
mono and recorded as mono file
Setting recording input sources
Options
WAV(BWF) 24 bit
(default)
WAV(BWF) 16 bit
MP3 320 kbps
MP3 256 kbps
MP3 192 kbps
MP3 128 kbps
Audio
quality
High Short
Low Long
Recording
time
3 3
c c
NOTE
•
BWF is a format created for broadcasting that has the same
sound quality as the standard WAV format. It also uses the
same “.wav” file extension as WAV files. In this manual, we
distinguish these file types by using the terms BWF and WAV.
•
WAV/BWF formats are higher quality than MP3 formats.
•
MP3 formats allow for longer recording than WAV/BWF
formats.
•
With MP3 formats, higher values provide better recording
quality.
8
Setting the sampling frequency
Open the SAMPLE screen and set the sampling frequency.
Options
192.0 kHz
176.4 kHz
96.0 kHz
88.2 kHz
48.0 kHz (default)
44.1 kHz
Audio
quality
High Short
Low Long
Recording
time
3 3
c c
Use the I/O SETTING screen SOURCE item to set the recording
input source.
1. Select the I/O SETTING screen SOURCE item to open the
SOURCE screen. (See “Basic menu operation procedures” on
page 10.)
2. Set the input source.
Option Meaning
UNI MIC
(default)
OMNI MIC
MIC
LINE
EXT MIC
EXT LINE
DIGITAL
UNI MIC (built-in directional mic) input
OMNI MIC (built-in omnidirectional mic)
input
MIC/LINE IN jack XLR input
MIC/LINE IN jack TRS plug input
EXT IN jack mic input
EXT IN jack line input
DIGITAL IN jack input
TASCAM DR-100MKIII
21
Page 22

4 – Recording
Setting power used by mics
Using phantom power
1. Set the phantom power voltage to match the connected
mics. (See “Setting the phantom power voltage” on page
22.)
2. Set the PHANTOM power switch to ON only when a
condenser microphone that requires phantom power is
connected to the MIC/LINE IN jack.
3. When phantom power is turned on, a confirmation pop-up
message appears.
Press the ENTER/MARK button to supply phantom power to
the MIC/LINE IN jack.
If you set the PHANTOM power switch to OFF while the
confirmation pop-up message is open, the message will
close and phantom power will not be enabled.
NOTE
•
If you set the PHANTOM power switch to ON when the
charge of the battery being used is low, a BATTERY LOW
pop-up message will open and phantom power will not be
enabled.
•
When phantom power is being supplied the or icon
will appear
•
When using phantom power during battery operation, the
operation time might be reduced drastically depending
on the mic. We recommend using a TASCAM PS-P520E AC
adapter (sold separately) or, for battery operation, the
built-in battery or a TASCAM BP-6AA external battery pack.
•
Do not connect or disconnect the AC adapter when using
phantom power. The unit could turn off even when batteries
are installed, resulting in recorded data becoming damaged
or lost.
•
When using USB bus power, the unit might not be able to
supply phantom power depending on the computer.
8
Setting the phantom power voltage
1. Select the I/O SETTING screen PHANTOM VOLT item to open
the PHANTOM VOLT screen. (See “Basic menu operation proce-
dures” on page 10.)
2. Set the supplied phantom power voltage.
Options: +48V (default), +24V
NOTE
Battery power will be consumed faster when set to +48V
than when set to +24V.
Using plug-in power
Plug-in power can be supplied when a small condenser mic that
requires plug-in power supply is connected to the EXT IN jack.
1. Select the PLUG IN POWER item on the I/O SETTING screen.
(See “Basic menu operation procedures” on page 10.)
CAUTION
•
Do not connect or disconnect mics from the MIC/LINE IN
jack while phantom power is ON. Doing so could cause
a loud noise and might damage this unit and connected
equipment.
•
Turn phantom power ON only when using a condenser
microphone that requires phantom power. Turning
phantom power on when a dynamic mic or other external
device that does not require it is connected could damage
this unit and connected equipment.
•
When using condenser mics that require phantom power
and dynamic mics together, be sure to use balanced
dynamic mics. Unbalanced dynamic mics cannot be used
when phantom power is enabled.
•
Supplying phantom power to some ribbon mics will break
them. If you are unsure, do not supply phantom power to a
ribbon mic.
•
Some condenser microphones will not operate when
phantom power is set to +24V.
•
The battery operation time depends on the mic being used.
For details, refer to the mic operation manual.
TASCAM DR-100MKIII
22
2. Turn plug-in power on or off.
Options: OFF (default), ON
CAUTION
When connecting a dynamic mic or external mic that has its
own battery, do not turn plug-in power on. If plug-in power
is on, it could damage the connected mic.
Page 23

4 – Recording
Setting the low-cut filter
The low-cut filter can reduce bothersome noise, such as from
wind, air-conditioners and projectors.
1. Select the I/O SETTING screen LOW CUT item to open the
LOW CUT screen. (See “Basic menu operation procedures” on
page 10.)
2. Set the cutoff frequency of the low-cut filter during input.
Options: OFF (default), 40 Hz, 80 Hz, 120 Hz, 220 Hz
NOTE
This setting can also be changed when in recording standby
or recording on the FUNCTION screen. In this case, you can
change the sound while monitoring the actual sound. (See
“Function menu list” on page 13.)
Using the limiter
Using the limiter can reduce distortion due to sudden excessive
sound input.
Using the Level Control Function
You can set the level control function for use with mic input.
1. Select the I/O SETTING screen LEVEL CONTROL item to open
the LEVEL CONTROL screen. (See “Basic menu operation
procedures” on page 10.)
2. Set the operation mode of the level control function.
Option Meaning
OFF (default)
AUTO LEVEL
PEAK REDUCTION
NOTE
•
If the input source is set to LINE, EXT LINE or DIGITAL, the
level control function is disabled.
•
When AUTO LEVEL is selected, the input level knob has no
effect because the volume is adjusted automatically.
•
You can also change this setting with the FUNCTION screen
LEVEL CONTROL item. (See “Function menu list” on page
13.)
This turns level control off.
When the input sound level is too low or
too high, the recording volume will be
increased or decreased automatically to
an appropriate level.
This function reduces the recording level
automatically to a level that will not
distort when input sounds are too loud.
The recording level will not be raised
automatically. The recording level can be
raised manually if required.
NOTE
•
Distortion of sounds may occur when signals that are very
loud are input even if the LIMITER function is activated.
In such a case, lower the recording level or increase the
distance between the mic and the sound source.
•
The limiter is disabled if the input source is set to DIGITAL.
•
When the limiter function is being used, the dual ADC
function cannot be used at the same time. (See “Improving
recording signal-to-noise (Dual ADC function)” on page
25.)
TASCAM DR-100MKIII
23
Page 24

4 – Recording
Using mid-side microphones
The mid-side decoder allows recording with mid-side mics.
1. Connect the mid-side mic.
Connect the mid-side mic mid to the MIC/LINE IN L jack and
the side to the MIC/LINE IN R jack.
2. Set the decoding mode.
Select the MS DECODE item on the I/O SETTING or FUNCTION
screen to open the MS DECODE screen. (See “Basic menu
operation procedures” on page 10.)
Select the MODE item and set the decoding mode when using
a mid-side mic.
Option Meaning
The decoder is not used.
OFF (default)
REC
MONITOR
3. Adjust the levels.
Adjust the MID and SIDE levels to adjust the width of the
sound. Move the cursor to the item to adjust, and press the
ENTER/MARK button to enable changing the setting.
When a mid-side mic is connected, always
select REC or MONITOR.
Use to record sound after decoding.
The monitored sound is also decoded.
Use to record sound that is not decoded.
The monitored sound is decoded.
Setting the characteristics of the digital filter (A/D)
You can set the characteristics of the digital filter used during
A/D conversion. This allows alteration of the sound quality after
conversion.
1. Select the I/O SETTING screen A/D FILTER item to open the
A/D FILTER screen. (See “Basic menu operation procedures”
on page 10.)
2. Select the A/D filter characteristics.
Option Meaning
A FIR digital filter with a sharp roll-off that
FIR1
FIR2
SHORT
DELAY1
(default)
SHORT
DELAY2
TIP
FIR digital filters
These filters have an established reputation for audio
quality. They feature a tonal quality with both dense rich
reverberations and crisp sounds.
SHORT DELAY digital filters
These feature tonal qualities that are close to the original
sounds. The starts of sounds and the reverberations are
natural without any pre-echo in the impulse response.
sharply cuts signals outside the audio band
is used.
A FIR digital filter with a slow roll-off that
gently cuts signals outside the audio band is
used.
A SHORT DELAY type digital filter with a
sharp roll-off that sharply cuts signals outside
the audio band is used.
A SHORT DELAY type digital filter with a slow
roll-off that gently cuts signals outside the
audio band is used.
After changing the setting, press the ENTER/MARK button
to confirm it.
NOTE
You can also change this setting with the FUNCTION screen
MS DECODE item. (See “Function menu list” on page 13.)
TASCAM DR-100MKIII
24
Page 25

4 – Recording
Improving recording signal-to-noise (Dual ADC function)
The dual ADC function realizes even better signal-to-noise
performance and can suppress noise even when recording quiet
input sounds.
1. Select the I/O SETTING screen DUAL ADC item. (See “Basic
menu operation procedures” on page 10.)
2. Turn the dual ADC function ON or OFF.
Options: OFF (default), ON
NOTE
•
This function is disabled if the input source is set to DIGITAL.
•
When this function is being used, the following functions
cannot be used at the same time.
• Dual level recording (See “Recording at two different levels
(dual level recording)” on page 27.)
• Dual format recording (See “Recording with two different
formats (dual format recording)” on page 27.)
• Limiter (See “Using the limiter” on page 23.)
Starting recording automatically (AUTO REC function)
The AUTO REC function can be used to start recording automatically
How it works depends on the operation mode.
NOTE
When in recording standby, the REC indicator blinks faster
than during ordinary recording.
TIP
By using this in combination with the PRE REC function, you
can record events without losing the beginnings of sounds.
2. Use the MODE item to set the automatic recording function
mode to LEVEL.
NOTE
Operation using LEVEL mode is possible even if the input
source is set to DIGITAL.
3. Use the END MODE item to set what happens after automatic
recording ends. After the input signal goes below the END
LEVEL setting and the END DELAY time passes, operation is
as follows.
Option Meaning
PAUSE
FILE INC
(default)
4. Use the START LEVEL item to set the level at which
recording starts.
Recording starts automatically when the input signal
exceeds the set level.
Options: OFF, -6 dB, -12 dB (default), -24 dB, -48 dB
5. Use the END LEVEL item to set the level at which recording
stops.
Recording stops automatically when the input signal stays
below the set level for the set END DELAY time.
Options: OFF, -6 dB, -12 dB, -24 dB, -48 dB (default)
6. Use the END DELAY item to set the time until the recording
stops.
Recording will continue if the input signal becomes higher
than the END LEVEL before this time elapses.
Options: 1 sec, 2 sec, 3 sec, 4 sec, 5 sec (default)
7. Press the REC [0] button to enter recording standby.
When in standby, a START LEVEL guide appears on the
meters.
Pause, but record to the same file when
recording starts again
Pause, and create a new file when
recording starts again (file incrementation)
Recording in LEVEL mode
In LEVEL mode, recording starts automatically when the input
signal exceeds the set level. You can also set whether the
recording pauses or the file is incremented when the input
signal goes below the set level.
1. Select the REC SETTING screen AUTO REC item to open the
AUTO REC screen. (See “Basic menu operation procedures” on
page 10.)
After recording starts, an END LEVEL guide appears on the
meters.
TASCAM DR-100MKIII
25
Page 26

4 – Recording
8. Press the STOP [8] button to stop recording.
Recording in DIGITAL mode
In DIGITAL mode, recording starts automatically when the input
signal exceeds the fixed standard level (−54 dB).
1. Select the REC SETTING screen AUTO REC item to open the
AUTO REC screen. (See “Basic menu operation procedures” on
page 10.)
2. Use the MODE item to set the automatic recording function
mode to DIGITAL.
3. Press the REC [0] button to enter recording standby.
In DIGITAL mode, recording starts automatically when
the input signal exceeds the fixed standard level (−54 dB).
Moreover, after recording starts, track divisions from the
digital input (CD or MD) will be detected and new files will
be created automatically.
4. Press the STOP [8] button to stop recording.
Capturing the moment before recording starts (PRE REC function)
By using prerecording when the unit is in recording standby,
you can capture up to two seconds of the signal input before
recording is started normally.
1. Select the PRE REC item on the REC SETTING screen. (See
“Basic menu operation procedures” on page 10.)
2. Turn the pre-recording function ON or OFF.
Options: OFF (default), ON
TIP
By using this in combination with the AUTO REC function,
you can record events without losing the beginnings of
sounds.
NOTE
If the amount of time in record standby is less than two
seconds, the sound for that amount of time is recorded.
Create a new file while continuing to record (file incrementing function)
With this function, you can stop recording of the current file and
continue recording in a new file. This can be done manually or
automatically after a set amount of time has elapsed.
NOTE
•
When new files are created, incremental numbers are added
to the end of each file name.
•
If the name of a file to be created would be the same as that
of an existing file, the number will be incremented until the
new file has a unique name.
•
A new file cannot be created if the total number of folders
and files would exceed 5000.
Create a new file manually while recording
During recording, press the / button to create a new file
while continuing to record.
NOTE
Files shorter than 2 seconds cannot be created (4 seconds if
the sampling frequency is 88.2kHz).
TASCAM DR-100MKIII
26
Page 27

4 – Recording
Creating new files automatically at a set time interval
Recording of the current file can be stopped and a new file
can be created automatically when the time set with the REC
SETTING screen FILE INC item is exceeded.
Follow the procedures below to set the time that new files are
automatically created during recording.
1. Select the REC SETTING screen FILE INC item to open the
FILE INC screen. (See “Basic menu operation procedures” on
page 10.)
2. Set the time that new files are automatically created.
Options: OFF (default), 5 min, 10 min, 15 min, 30 min
Recording two files simultaneously (DUAL REC function)
Recording at two different levels (dual level recording)
Recording with the level set as high as possible is important for
achieving high audio quality, but distortion will occur if the level
is too high.
Dual level recording allows a second recording to be recorded
simultaneously at a level 12dB lower than the set recording
level, resolving this concern.
This allows you to set the recording level high and make a
backup recording at a lower level in case distortion occurs.
This function can be used not only with the built-in mics but
also with connected external mics.
2. Set the dual recording mode to LEVEL.
3. Press the REC [0] button to enter recording standby.
On the Home Screen, LEVEL will appear next to DUAL in the
recording function information area.
4. Press the REC [0] button again to start dual recording.
Recording with two different formats (dual format recording)
This unit can simultaneously record the same recording in two
different formats (WAV and MP3), creating two separate files.
NOTE
•
When using dual format recording, set the FORMAT item to
WAV16.
•
Dual format recording cannot used if the sampling
frequency is 88.2, 96, 176.4 or 192 kHz.
•
The dual ADC function cannot be used at the same time.
•
If the limiter is on, it will affect both files.
1. Select the REC SETTING screen DUAL REC item to open the
DUAL REC screen. (See “Basic menu operation procedures” on
page 10.)
NOTE
•
Dual level recording cannot used if the sampling frequency
is 176.4 or 192 kHz.
•
This function is disabled if the input source is set to DIGITAL.
•
The dual ADC function cannot be used at the same time.
•
If the limiter is on, it will not affect the backup recording.
1. Select the REC SETTING screen DUAL REC item to open the
DUAL REC screen. (See “Basic menu operation procedures” on
page 10.)
2. Set the dual recording mode to FORMAT.
TASCAM DR-100MKIII
27
Page 28

4 – Recording
TASCAM_0002. WAV
TA
V
TA
3. Select the FORMAT item and set the dual recording MP3
format.
Options: MP3 320 kbps (default), MP3 256 kbps, MP3 192
kbps, MP3 128 kbps
4. Press the REC [0] button to enter recording standby.
On the Home Screen, FORMAT will appear next to DUAL in the
recording function information area.
Names of backup files when using dual recording
A backup file created by dual recording has "_D" added to its file
name.
A backup file created by dual format recording has "_D" added
to its file name, and change to “.mp3”extension.
Using the auto tone function
The auto tone function can be used to automatically insert a
tone signal (1kHz sine wave) whenever recording starts and
stops.
By connecting the LINE OUT jack to the audio input jack of a
DSLR camera, both units can record the same tone signals to
their files. These tones can be used as guides to synchronize the
files in video editing software.
For details about how to connect the unit with a DSLR camera,
see “Connecting cameras” on page 19.
1. Select the REC SETTING screen AUTO TONE item to open the
AUTO TONE screen. (See “Basic menu operation procedures”
on page 10.)
2. Select the MODE item and set where tone signals are inserted.
Options: OFF (default), HEAD (recording start only),
HEAD+TAIL (recording start and stop)
3. Select the LEVEL item and set the tone volume.
Options: -12 dB, -18 dB(default), -24 dB, -30 dB, -36 dB
NOTE
•
Even if you select HEAD+TAIL, no tone signal will be added at
the end when recording is paused.
SCAM_0002_D.WA
SCAM_0002_D.mp3
1 Recording file number
2 "D" indicates dual recording
3 ".mp3" dual format recording backup file extension
Turning XRI data recording on/off
When recording with WAV file formats, the XRI data recording
function can be turned on to save recording setting information
at the time of recording as XRI data.
When shipped new from the factory, the XRI data recording
function is set to ON. To turn the XRI data recording setting off,
set the XRI item on the REC SETTING screen to OFF.
1. Select the XRI item on the REC SETTING screen. (See “Basic
menu operation procedures” on page 10.)
2. Turn XRI data recording ON/OFF.
Options: OFF, ON (default)
NOTE
You can check and delete XRI data. (See “XRI date the information page” on page 42.)
TASCAM DR-100MKIII
28
Page 29

4 – Recording
Recording times
The table below shows maximum recording times by file format on SD/SDHC/SDXC cards of different capacities (in hours and minutes).
File format (recording setting)
44.1kHz 6:17 12:35 50:23
48kHz 5:47 11:34 46:17
WAV (BWF) 16-bit (STEREO)
WAV (BWF) 24-bit (STEREO)
128kbps 44.1/48kHz 69:26 138:00 555:00
MP3 (STEREO/MONO)
•
The recording times shown above are estimates. They might differ depending on the SD/SDHC/SDXC card in use.
•
The recording times shown above are not continuous recording times, but rather they are the total possible recording times for the
SD/SDHC/SDXC card.
•
If the recording time exceeds 24 hours, a new file will be created automatically and recording will continue without pause.
•
If recorded in mono WAV format, maximum recording times will be about twice those above.
•
If using dual recording in WAV/BWF format, maximum recording times will be about half those above.
192kbps 44.1/48kHz 46:17 92:35 370:00
256kbps 44.1/48kHz 34:43 69:26 277:00
320kbps 44.1/48kHz 27:46 55:33 222:00
88.2kHz 3:08 6:17 25:11
96kHz 2:53 5:47 23:08
176.4kHz 1:34 3:08 12:35
192kHz 1:26 2:33 11:34
44.1kHz 4:11 8:23 33:35
48kHz 3:51 7:42 30:51
88.2kHz 2:05 4:11 16:47
96kHz 1:55 3:51 15:25
176.4kHz 1:02 2:05 8:23
192kHz 00:57 1:55 7:42
4 GB 8 GB 32 GB
SD/SDHC/SDXC card capacity
TASCAM DR-100MKIII
29
Page 30

5 – Playback
Playing recordings
When the Home Screen is open and playback is stopped or
paused, press the PLAY/PAUSE [y/9] button to start playback.
Pausing playback
When the Home Screen is open, press the PLAY/PAUSE [y/9]
or STOP [8] button to pause.
Press the PLAY/PAUSE [y/9] button again to resume playback.
Stopping playback
When the Home Screen is open, press the STOP [8] button
while paused to return to the beginning of the file.
Searching backward and forward
When the Home Screen is open and a track is playing back
or stopped, press and hold the . or / button to search
forward or backward.
Release the button to stop again or resume playback.
NOTE
Press and hold the . or / button to accelerate the
search speed.
Repeat playback (LOOP PLAY)
With this function, you can continuously repeat (loop) the
playback of an interval between two points.
1. Press the Fn button to open the FUNCTION screen, and select
the LOOP PLAY item. (See “Basic menu operation procedures”
on page 10.)
2. Turn the loop playback function on.
Options: OFF (default), ON
3. Loop playback mode will be enabled when you return to the
Home Screen.
IN appears in the loop playback status area.
Changing the playback position
Turn the wheel while the Home Screen is open when playing,
paused or stopped to move the playback position.
Stop turning the wheel to stop again or resume playback.
Selecting files for playback (skipping)
When the Home Screen is open, press the . and / buttons
to select the file for playback.
Press the . button when in the middle of a file to return to
the beginning of that file. Press the . button when at the
beginning of a file to skip to the beginning of the previous file.
If you press the / button when located at the beginning or
middle of a file, the playback position will skip to the beginning
of the next file.
NOTE
You can also use the browse screen to select files for
playback. (See “6 – Working with Files and Folders” on page
32.)
4. During playback or when paused, press the ENTER/MARK
button to set the IN (starting) point.
5. Press the ENTER/MARK button again to set the OUT
(ending) point.
TASCAM DR-100MKIII
30
Page 31

5 – Playback
6. Press the ENTER/MARK button again to clear the IN
(starting) and OUT (ending) points.
NOTE
•
When in loop playback mode, the mark function is disabled.
•
If neither IN or OUT points are set, the entire file will be
played repeatedly from start to finish in single track loop
playback mode.
•
You cannot set the IN and OUT points in different files.
•
If you select a different file, the IN and OUT point settings
will be cleared.
Changing the speed of playback (VSA playback)
The unit features a VSA (Variable Speed Audition) playback
function that changes the playback speed without changing the
pitch.
CAUTION
The VSA function cannot be used with files recorded
with sampling frequencies of 88.2, 96, 176.4 or 192 kHz.
However, the playback speed can still be changed in these
cases.
1. Press the Fn button to open the FUNCTION screen, and select
the VSA PLAY item. (See “Basic menu operation procedures”
on page 10.)
2. Press the ENTER/MARK button to open the VSA PLAY
screen.
3. Use the VSA item to turn the VSA function on.
Options: OFF (default), ON
4. Use the SPEED item to set the playback speed.
Options: ×0.5 – ×2.0 (in ×0.1 increments, ×1.0 default)
TASCAM DR-100MKIII
31
Page 32

6 – Working with Files and Folders
You can manage audio files inside the MUSIC folder on the SD
card in a folder structure.
You can also choose folders and files on the Browse Screen to
play or delete them, for example.
Moreover, you can also use the function menu with selected
files to protect or delete them, for example.
NOTE
•
If you connect the unit with a computer by USB, or mount
the SD card on a computer using a card reader or other
input, you can use the computer to change the folder
structure within the MUSIC folder and to edit file names.
•
Using a computer to change the folder structure or edit file
names, however, could cause the order of the files to change
when played back on the unit.
Opening the Browse Screen
To open the Browse Screen, select the BROWSE item on the MENU
screen, and press the ENTER/MARK button. (See “Basic menu
operation procedures” on page 10.)
Basic Browse Screen operations
On the BROWSE Screen, folders and audio files appear in lists in
the same way files are shown on a computer.
Folders can only be made to two levels.
8
Selecting files
1. Turn the wheel to move the cursor to the desired file.
2. Press the ENTER/MARK button to select that file and return
to the Home Screen.
3. Press the PLAY/PAUSE [7/9] button to select that file,
return to the Home Screen and start playback.
8
Selecting folders
1. Turn the wheel to move the cursor to the desired folder.
2. Press the ENTER/MARK button to select that folder and
return to the Home Screen.
8
Opening folders
Turn the wheel to move the cursor to the desired folder, and
press the / button to open it.
8
Closing folders
The content of the folder that contains the file selected on the
Home Screen is shown.
Icons on the Browse Screen
The meanings of icons that appear on the BROWSE Screen are
as follows.
8
MUSIC folder ( )
This is the top level folder.
8
Audio file ( / )
This is an audio file.
This is an unprotected audio file.
This is a protected audio file.
8
Folder ( )
This is a folder that contains subfolders.
8
Folder ( )
This is a folder that does not contain subfolders.
8
Open folder ( )
The contents of the folder marked with this icon currently
appear on the display.
8
New folder ( )
This creates a new folder.
At any point, press the . button to close that folder and open
the folder that contains it.
File operations
Select the desired file on the Browse Screen, and press the Fn
button to open the FILE MENU screen.
You can use the following functions with the selected file.
8
FILE INFORMATION
Information (date/time, size) about the selected file appears.
Executing the FILE INFORMATION item opens the FILE INFOR-
MATION screen.
TASCAM DR-100MKIII
32
When the FILE INFORMATION screen is open, press the .
button to return to the Browse Screen.
Page 33

6 – Working with Files and Folders
8
FILE DELETE
Delete the selected file.
Executing the FILE DELETE item opens a confirmation screen.
Select YES to continue execution or select NO to cancel. Then,
press the ENTER/MARK button.
NOTE
When the Home Screen is open, you can press the Fn button
to open the FUNCTION Screen where files can also be deleted.
(See “Deleting files” on page 34.)
8
CHANGE PROTECT
Use this function to protect or stop protecting the selected file.
Executing the CHANGE PROTECT item opens a confirmation
screen.
Folder operations
Select the desired folder on the Browse Screen, and press the Fn
button to open the FOLDER MENU screen.
You can use the following functions with the selected folder.
8
ALL FILES DELETE
This deletes all files in the selected folder.
Executing the ALL FILES DELETE item opens a confirmation
screen.
Select YES to continue execution or select NO to cancel. Then,
press the ENTER/MARK button.
NOTE
•
If a file is protected, a mark appears before the file name
on the Home Screen and the Browse Screen.
•
When the Home Screen is open, you can press the Fn button
to open the FUNCTION Screen where the protection of files
can also be changed. (See “Protecting files” on page 34.)
8
CLR ALL MARKS
Use this to clear all the marks in the selected file.
Executing the CLR ALL MARKS item opens a confirmation screen.
Select YES to continue execution or select NO to cancel. Then,
press the ENTER/MARK button.
NOTE
•
You cannot erase read-only files and files that are not recognized by this unit.
•
Files on a different level of the selected folder will not be
deleted.
8
FOLDER DELETE
Delete the selected empty folder.
Executing the FOLDER DELETE item opens a confirmation screen.
Select YES to continue execution or select NO to cancel. Then,
press the ENTER/MARK button.
Select YES to continue execution or select NO to cancel. Then,
press the ENTER/MARK button.
TASCAM DR-100MKIII
33
Page 34

6 – Working with Files and Folders
Creating new folders
You can create new folders on the Browse Screen.
1. Move the cursor to NEW FOLDER at the bottom of the folder
list and press the ENTER/MARK button.
2. After selecting NEW FOLDER and pressing the ENTER/MARK
button, a confirmation screen opens.
3. Select YES to continue execution or select NO to cancel. Then,
press the ENTER/MARK button.
This creates a new folder and returns to the Home Screen.
NOTE
Since the unit supports only a two-level folder structure, NEW
FOLDER does not appear in second-level folders.
Protecting files
Deleting files
The currently selected file on the Home Screen can be deleted.
1. While the Home Screen is open when stopped, press the Fn
button to open the FUNCTION screen.
2. Select the FILE DELETE item, and press the ENTER/MARK
button to open a confirmation screen.
3. Select YES to continue execution or select NO to cancel. Then,
press the ENTER/MARK button.
Dividing files
A recorded file can be divided manually or at a mark point.
CAUTION
•
MP3 files cannot be divided.
•
If the SD card does not have enough open space, division
might not be possible.
•
Division is not possible if the file name would become more
than 200 characters long.
•
Division is not possible if a file that already exists has the
same name as the name that would be given to a new file
created by division.
•
Division deletes the original file.
You can protect and stop protecting the selected file on the
Home Screen.
1. While the Home Screen is open when stopped, press the Fn
button to open the FUNCTION screen.
2. Select the CHANGE PROTECT item, and press the ENTER/
MARK button to open a confirmation screen.
3. Select YES to continue execution or select NO to cancel. Then,
press the ENTER/MARK button.
NOTE
If a file is protected, a mark appears before the file name
on the Home Screen and the Browse Screen.
Dividing files manually (DIVIDE function)
A recorded file can be divided into two at a specified position.
1. While the Home Screen is open when stopped or paused,
press the Fn button to open the FUNCTION screen.
2. Select the DIVIDE item, and press the ENTER/MARK button
to open the DIVIDE screen.
TASCAM DR-100MKIII
34
Page 35

6 – Working with Files and Folders
3. Selecting the DIVIDE item and pressing the ENTER/MARK
button will open another DIVIDE screen.
4. Set the division point.
Use the wheel and skip between marks to move. You can
also play the file and listen to it when searching for a desired
point.
5. After setting the division point and pressing the ENTER/
MARK button, a confirmation screen opens.
Dividing files at marks (MARK DIVIDE function)
Files can be divided at points where marks have been added.
(See “Adding marks” on page 38.)
1. While the Home Screen is open when stopped or paused,
press the Fn button to open the FUNCTION screen.
2. Select the DIVIDE item and press the ENTER/MARK button
to open the DIVIDE screen.
3. Select the MARK DIVIDE item, and press the ENTER/MARK
button to open a confirmation screen.
6. Select YES to continue execution or select NO to cancel. Then,
press the ENTER/MARK button.
NOTE
After dividing a file, two new files with "a" and "b" added to
the end of the original file name are created.
Examples:
File name before division
160531_0003.wav
File names after division
160531_0003_a.wav (part before division point)
160531_0003_b.wav (part after division point)
TIP
Add marks at positions where you want to divide a file in
advance to make them easier to find later. (See “Adding
marks” on page 38.)
4. Select YES to continue execution or select NO to cancel. Then,
press the ENTER/MARK button.
NOTE
•
Division is only possible at MARK, LEVEL and TIME marks.
(See “Mark types” on page 38.)
•
A Can't Divide No Mark message will appear if the file has
no marks.
•
After dividing a file, new files with "_01", " _02", " _03" and so
on added to the end of the original file name are created in
order.
Example: file with 2 marks
File name before division
160531_0003.wav
File names after division
160531_0003_01.wav
160531_0003_02.wav
160531_0003_03.wav
•
When used together with the automatic marking function,
long recordings can automatically be divided into files with
individual songs, for example. (See “Adding marks” on page
38.)
CAUTION
Mark division is not possible if there is an interval of two
seconds or less between marks.
TASCAM DR-100MKIII
35
Page 36

6 – Working with Files and Folders
TASCAM_0001. WAV
Setting the file name format
You can select the format of names given to files recorded by
this unit.
File names consist of a name part and a number part.
1: File name
2: File number
1. Select the SYSTEM screen FILE NAME item to open the FILE
NAME screen. (See “Basic menu operation procedures” on
page 10.)
2. Select the TYPE item and set the file name format.
Setting the WORD item
1. On the TYPE screen, if you select WORD, the EDIT item will
appear on the FILE NAME screen.
2. Select the EDIT item to open the EDIT screen.
3. Use the . and / buttons to move the cursor, and turn
the wheel to select the character.
In addition to the alphabet and numbers, the following
characters can be used:
! # $ % & ' ( ) + , - . ; = @ [ ] ^ _ ` { } ~
4. After setting the word, press the ENTER/MARK button to
confirm it.
Option Meaning
The date is used as the file name (in
DATE (default)
WORD
yymmdd format).
Example: 160530_0001.wav
The 6-character file name set with the
WORD item is used as the file name.
Example: TASCAM_0001.wav
NOTE
When data is selected, file names are given based on the
date of the built-in clock. By setting the clock in advance,
the recording date and time can be added to files accurately.
(See “Setting the date and time” on page 17.)
TASCAM DR-100MKIII
36
Page 37

6 – Working with Files and Folders
Resetting file numbers
Numbers are added to the names of recorded audio files.
These numbers are added in recording order. By default, these
numbers are set not to reset (OFF). When set to OFF, the numbers
will continue to be added in order even if the card is changed
or formatted. This makes file management easier. When set to
ON, or when the RESET option is used, the final numbers can be
restarted.
1. Select the SYSTEM screen FILE No.RESET item to open the
FILE No.RESET screen. (See “Basic menu operation procedures” on page 10.)
2. Set the file number reset function.
Option Meaning
OFF (default)
ON
RESET
The file number is not reset.
The file number is reset automatically after
formatting, when a new folder is created or
when all the files in a folder are deleted.
This resets the file number the next time a
file is created.
3. When the RESET item is selected, a confirmation screen
opens.
4. Select YES to continue execution or select NO to cancel. Then,
press the ENTER/MARK button.
TASCAM DR-100MKIII
37
Page 38

7 – Mark functions
Marks can be used to cue for playback or as guides for dividing
files. Moreover, in addition to adding marks manually, they can
also be added automatically in response to the input signal level
or at set time intervals.
Mark types
The mark types and the conditions when they are added are as
follows.
Mark
name
MARK
LEVEL
TIME
PEAK
DIN ERR
BOF
Condition
Added manually or when track divisions are
detected in digital input
Added when the input signal exceeds the set level
Added when the set recording time elapses
Added when the input signal exceeds the peak level
Added when digital input synchronization is lost
and when it is restored
Added when an SD card writing error occurs during
recording (BOF: buffer overflow)
NOTE
•
The maximum number of marks that can be added to each
file is 99. The mark data is stored in the file.
•
Mark information added to WAV files can be used with
software and equipment that supports the BWF format.
•
Mark information added to MP3 files can only be used with
this unit.
•
Marks cannot be added to protected files. Remove
protection to use these functions.
Adding marks
Adding marks manually
When playing, recording or in recording standby, press the
ENTER/MARK button to add a mark at any point.
When a mark is added, a pull-up appears at the bottom of the
display.
Adding marks automatically
The AUTO MARK function can add marks automatically during
recording.
1. Select the MARK SETTING screen AUTO MARK item to open the
AUTO MARK screen. (See “Basic menu operation procedures”
on page 10.)
2. Use the MODE item to set the automatic mark function mode.
Options: OFF (default), LEVEL, TIME, DIGITAL
3. If the automatic mark function mode is set to LEVEL or TIME,
the following settings can also be made.
o LEVEL
Marks are added automatically when the input signal
exceeds the set level.
Options: -6 dB, -12 dB (default), -24 dB, -48 dB
o TIME
Marks are added automatically when the set time passes.
Options: 5 min, 10 min, 15 min, 30 min, 60 min (default)
NOTE
After a LEVEL mark is added, another LEVEL mark will not be
added until at least 10 seconds has passed.
•
The [ xx ] in the mark name is a number given to all marks
that is incremented in order.
•
Marks added during playback are saved when playback
stops. If you press the . or / button before stopping,
marks will be saved before skipping to another file.
•
When using the built-in mics, the sound of pressing the
button to add a mark could be recorded. To prevent this, use
a remote control.
TASCAM DR-100MKIII
38
Page 39

7 – Mark functions
Adding marks at peak levels
Marks can be added automatically when input signals exceed
the peak level during recording. Use this to find when the peak
level was exceeded after recording.
1. Select the PEAK MARK item on the MARK SETTING screen. (See
“Basic menu operation procedures” on page 10.)
2. Turn the peak mark function on/off.
Options: OFF (default), ON
NOTE
•
These marks are added two seconds before the peak level
was exceeded.
•
After a peak mark is added, another peak mark will not be
added until at least 10 seconds have passed.
Moving between marks (mark skipping)
Deleting marks
You can delete marks that have been added by this unit when
stopped or paused.
1. You can skip to marks that you want to delete when stopped
or paused. (See “Moving between marks (mark skipping)” on
page 39.)
2. Press the ENTER/MARK button to open the confirmation
screen.
3. Select YES to continue execution or select NO to cancel. Then,
press the ENTER/MARK button.
When stopped, paused or playing back, press the . or /
button while pressing the ENTER/MARK button to move (skip)
to the previous or next mark. When skipping, the mark name
appears in a pull-up at the bottom of the display.
Since there are multiple mark types, you can choose which type
to use when skipping.
NOTE
You cannot move to a mark in a different file.
1. Select the MARK SETTING screen MARK SKIP item to open the
MARK SKIP screen. (See “Basic menu operation procedures”
on page 10.)
2. Set the mark skip mode.
Options: ALL (default), MARK, LEVEL, TIME, PEAK, DIN ERR,
BOF
TASCAM DR-100MKIII
39
Page 40

8 – Settings and Information
Making power and display settings
Make power and display settings for this unit on the POWER/
DISPLAY screen. (See “Basic menu operation procedures” on
page 10.)
Setting the automatic power saving function
Select the AUTO PWR SAVE item to set the amount of time from
when the unit last operated or was used until the unit automatically turns off (enters standby).
Options: OFF (unit does not automatically turn off), 3 min, 5
min, 10 min, 30 min (default)
Set the priority battery type
Set whether to use the built-in battery or the AA batteries first
when AA batteries are loaded in the unit.
With one battery type as the priority power source and the other
as the backup source, if the amount of remaining power in the
priority source becomes insufficient, the unit can automatically
switch to the other source and continue operating.
1. Select the BATTERY item to open the BATTERY screen. (See
“Basic menu operation procedures” on page 10.)
NOTE
•
A t appears next to the icon for the type of battery
currently being used in the battery supply status area on the
Home Screen.
•
After switching to the backup battery source, the unit
will automatically switch back to the priority source if it
becomes charged again.
•
If an external power source is connected when operating on
power from AA batteries, that source will be used instead
and operation will continue while recharging.
Setting the AA battery type
Set the type of AA batteries used.
This setting is used to show the amount of remaining AA battery
charge and determine if the unit has enough power for normal
operation.
1. Select the BATTERY item to open the BATTERY screen. (See
“Basic menu operation procedures” on page 10.)
2. Select the AA TYPE item and set the type of AA batteries
used.
Options: ALKALI (alkaline, default), Ni-MH (nickel-metal
hydride), LITHIUM (lithium)
2. Select the PRIORITY item and set the priority battery type.
Option Meaning
Li-Ion (default)
AA
Use the built-in battery battery first
Use the AA batteries first
CAUTION
If the charge of the backup battery source also becomes too
low, the unit will turn off.
Setting the backlight
Select the BACKLIGHT item and set the time until the backlight
automatically turns OFF after the last operation when operating
on battery power.
Options: OFF (always off), 5 sec (default), 10 sec, 15 sec,
30 sec, ALWAYS
TIP
Even when set to OFF or ALWAYS you can turn the backlight
on or off by pressing and holding the HOME button when
the Home Screen is open.
Setting the backlight brightness
Select the BRIGHTNESS item and set the backlight brightness.
Options: HIGH (default), MID, LOW
Adjusting the display contrast
Select the CONTRAST item and set the display contrast.
Options: 1 – 20 (default: 8)
Turning indicators off
Select the INDICATORS item and set whether to turn off the level
and REC indicators.
Options: ALL ON (default), LEVEL OFF, ALL OFF
TASCAM DR-100MKIII
40
Page 41

8 – Settings and Information
Setting the peak level function
8
Setting the peak level value
Set the peak level at which the icon appears and the PEAK
level indicator lights.
1. Select the PEAK LEVEL item, and open the PEAK LEVEL
screen. (See “Basic menu operation procedures” on page
10.)
2. Select the LEVEL item and set the peak level value.
Options: -0.1 dB, -0.5 dB, -1.0 dB, -2.0 dB (default)
8
Setting the peak hold time
Set the level meter peak hold time.
1. Select the PEAK LEVEL item, and open the PEAK LEVEL
screen. (See “Basic menu operation procedures” on page
10.)
2. Select the HOLD item, and set the level meter peak hold time.
Viewing information
Use the INFORMATION screen to view various types of information about the unit.
Follow the procedures below to view the INFORMATION screen.
1. Select the SYSTEM screen INFORMATION item to open the
Information Screen. (See “Basic menu operation procedures”
on page 10.)
The Information Screen has four pages. The FILE page
opens first.
2. Turn the wheel to change the page shown.
FILE page
Shows information about the currently loaded audio file
CARD page
Shows the use status of the currently loaded SD card
Firmware page
Shows the unit’s system firmware version.
XRI page
This shows XRI data recorded in WAV (BWF) files.
File information page
The FILE page shows information about the currently loaded
audio file.
Options: OFF, 1 sec (default), HOLD (always show)
8
Clearing held peak levels
When HOLD is selected on the HOLD screen, peak indicators will
remain until cleared.
When the Home Screen is open, press and hold the Fn button to
clear held peaks.
8
FILE
The file name
8
FORMAT
Shows the audio file type.
For WAV files, this shows the bit length and sampling frequency
(Hz).
For MP3 files, this shows the bit rate (kbps) and sampling
frequency (Hz).
8
CHANNEL
Shows if it is stereo or mono.
8
DAT E
Shows the file creation date.
8
TIME
Shows the file creation time.
TASCAM DR-100MKIII
41
Page 42

8 – Settings and Information
8
SIZE
Shows the file size.
NOTE
You can also check this screen with the FUNCTION screen
FILE INFORMATION item. (See “Function menu list” on page
13.)
Card information page
The CARD page shows the status of the currently loaded SD card.
8
TOTAL FILE
Shows the number of playable files contained by the MUSIC
folder.
8
TOTAL FOLDER
Shows the total number of folders in the MUSIC folder.
8
TOTAL SIZE
Shows the total SD card capacity.
8
USED SIZE
Shows the amount of space used on the SD card.
8
REMAIN SIZE
XRI date the information page
The XRI page shows the XRI (eXtended Recording Information)
data, which includes the input volume and other recording
settings, added to WAV (BWF) files.
NOTE
You can also check this screen with the FUNCTION screen
FILE INFORMATION item. (See “Function menu list” on page
13.)
8
Deleting XRI data
1. When the XRI page is open, press the Fn button to open the
XRI menu.
2. The XRI DELETE item will be selected, so press the ENTER/
MARK button to open a confirmation screen.
Shows the amount of space unused on the SD card.
Firmware version page
The FIRMWARE page shows the firmware version used by the
unit.
8
VERSION
Shows the system firmware version used by the unit.
3. Select YES to continue execution or select NO to cancel. Then,
press the ENTER/MARK button.
TASCAM DR-100MKIII
42
Page 43

8 – Settings and Information
Restoring factory default settings
Use this to restore various settings to their factory default
values.
1. Select the SYSTEM screen INITIALIZE item, and press the
ENTER/MARK button to open a confirmation screen. (See
“Basic menu operation procedures” on page 10.)
2. Select YES to continue execution or select NO to cancel. Then,
press the ENTER/MARK button.
NOTE
Initializing the unit does not reset the date and time or
language settings.
Formatting SD cards
Formatting will erase all the data on the SD card.
Back up important recording data to a computer, for example
before formatting a card.
Formatting automatically creates new “MUSIC” and “UTILITY”
folders as well as a “dr-1.sys” file.
CAUTION
When formatting a card, the unit should be powered
by a TASCAM PS-P520E AC adapter (sold separately) or
batteries (built-in or AA) with sufficient remaining power.
Proper formatting is not possible if the unit turns off (enters
standby) during formatting.
1. Select the SYSTEM screen MEDIA FORMAT item to open the
MEDIA FORMAT screen. (See “Basic menu operation proce-
dures” on page 10.)
2. Select the type of formatting.
Option Meaning
QUICK (default)
ERASE
Execute quick formatting.
Erase and format the card.
NOTE
•
Using the ERASE option might restore an SD card that
has decreased writing performance due to repeated
use. Execute an ERASE formatting if "Write error REC
continue" or "Card slow Check BOF mark" messages
appear during recording.
•
ERASE formatting checks the memory for errors while
formatting, so it takes more time than QUICK formatting.
3. Press the ENTER/MARK button to open the confirmation
screen.
QUICK selected ERASE selected
4. Select YES to continue execution or select NO to cancel. Then,
press the ENTER/MARK button.
TASCAM DR-100MKIII
43
Page 44

8 – Settings and Information
Power-on recording function
When the unit is off (in standby mode), press and hold the REC
[0] button while pressing the power button to turn it on and
start recording immediately.
Otherwise, the unit operates normally after starting up.
Attenuating the output
Restricting the line output level
When the unit's line output is input to a camera, the output level
can be attenuated 30 dB.
1. Select the I/O SETTING screen OUTPUT ATT item to open the
OUTPUT ATT screen. (See “Basic menu operation procedures”
on page 10.)
Restricting the headphone output level.
They volume might differ depending on the headphones used.
Make settings suitable for the headphones being used. The
default value (EAR PROTECTION) is low in order to protect
hearing.
1. Select the I/O SETTING screen OUTPUT ATT item to open the
OUTPUT ATT screen. (See “Basic menu operation procedures”
on page 10.)
2. Select the PHONES item and set the output level of the
(headphone) jack.
2. Select the LINE item and set the output level of theLINE
OUT jack.
Options: 0 dB (default), -30 dB
Options: 0 dB, -10 dB, -16 dB, EAR PROTECTION* (default)
*Output level recommended by the European Union
TASCAM DR-100MKIII
44
Page 45

9 – Connecting with a Computer
By connecting this unit with a computer using a commercially-available USB cable, you can transfer audio files on the SD
card in the unit to a computer, as well as transfer audio files on
the computer to the SD card in the unit.
This unit can handle audio files of the following formats.
WAV (BWF): 44.1/48/88.2/96/176.4/192kHz, 16/24-bit
MP3: 44.1/48kHz, 128/192/256/320kbps
NOTE
•
We recommend connecting this unit to a computer that
supports USB 2.0 HIGH SPEED mass storage class.
•
Instead of using USB to connect the unit and a computer,
you can also conduct the same operations by removing
the SD card from the unit and connecting it directly to a
computer that has a built-in SD card slot or by using a card
reader.
•
Both WAV and BWF files use the same ".wav" extension.
1. Use a USB cable (A to Micro-B) to connect a computer to the
unit's USB port.
Computer
Micro-B USB plug
CAUTION
The unit should be connected directly with the computer
instead of via a USB hub.
2. Select the SYSTEM screen USB STORAGE item, and press
the ENTER/MARK button to open a screen confirming
connection with the computer. (See “Basic menu operation
procedures” on page 10.)
4. This unit appears on the computer as an external drive
named “DR-100MKIII" (if the card was formatted by this
unit).
NOTE
Power is supplied from the USB port if the USB cable is
connected to the unit even if it contains batteries. (USB bus
power is prioritized.)
Transferring files to a computer
1. Click the "DR-100MKIII" drive on the computer screen to
show the "MUSIC" and "UTILITY" folders.
2. Open the "MUSIC" folder and drag and drop the files that
you want to transfer to the computer to destinations of your
choice.
Transferring files from a computer
1. Click the "DR-100MKIII" drive on the computer screen to
show the "MUSIC" and "UTILITY" folders.
2. Copy the audio files on the computer that you want to the
"MUSIC" folder.
TIP
•
You can manage the "MUSIC" folder from the computer.
•
You can create subfolders in the "MUSIC" folder up to the
second level for use with this unit. Subfolders can be made
to two levels. The unit cannot recognize subfolders and
audio files on the third level or below.
•
If you name the subfolders and music files, these names will
appear on the screen of this unit.
Disconnecting from a computer
Before disconnecting the USB cable, use the proper procedures
for your computer to unmount the unit (as an external drive).
See the computer’s operation manual for instructions about
how to unmount an external volume.
Press the ENTER/MARK button to disconnect from the
computer and return to the Home Screen.
3. Select YES to continue execution or select NO to cancel. Then,
press the ENTER/MARK button.
The unit enters USB storage mode and connects with the
computer
Make sure that the SD card is inserted in the unit properly.
TASCAM DR-100MKIII
45
Page 46

10 – Using the REMOTE jack
This unit has a REMOTE jack.
Connect a TASCAM RC-3F footswitch or TASCAM RC-10 wired
remote control (both sold separately) here to enable remote
operation of this unit.
Using a remote control (TASCAM RC-10)
TASCAM RC-10 (sold separately)
Setting up a remote control
1. Select the SYSTEM screen REMOTE item to open the REMOTE
screen. (See “Basic menu operation procedures” on page
10.)
Using a footswitch (TASCAM RC-3F)
TASCAM RC-3F (sold separately)
Setting up the footswitch
1. Select the SYSTEM screen REMOTE item to open the REMOTE
screen. (See “Basic menu operation procedures” on page
10.)
2. Set the TYPE item to RC-3F (default: RC-10).
2. Set the TYPE item to RC-10(default).
Function button operations
Function button
F1 F2 F3 F4
INPUT L VOL+
INPUT L VOL- INPUT VOL+ INPUT VOL-
NOTE
Use the INPUT LEVEL selection switch to set what is
affected by operation of the F3/F4 buttons (L/STEREO/R).
Using the remote control
Press the function (F1–F4) buttons on the wired remote control
to use the operations assigned to them on the REMOTE screen.
3. Select the MODE item and set the footswitch mode.
Options: PLAY (default), REC1, REC2, MINUTES
MODE
PLAY
REC1
REC2
MINUTES
* During playback to move back a 3 seconds.
L C R
.
8
8
*
Footswitch
7/9
0/9
0/9
7/9
/
FILE INC
MARK SET
ON/OFF
Using the footswitch
Press the pedals of the footswitch to use the operations
assigned to them by the REMOTE screen MODE item.
VSA
TASCAM DR-100MKIII
46
Page 47

11 – Messages
The following is a list of the pop-up messages that might appear
on the unit under certain conditions.
Refer to this list if one of these pop-up messages appears on the
DR-100MKIII and you want to check the meaning or determine a
proper response.
Message Meaning and response
ALL HOLD on
LEVEL HOLD on
Battery empty
Battery low
Built in Batt.
needs charging
Built in Batt.
must be charged
before using
No card
Card protected
Card error
Card full
Format error
Format card
Invalid card
Change card
MBR error
Init card
Write error
REC continue
Card slow
Check BOF mark
Invalid sys file
Make sys file
No sys file
Make sys file
The input level knob and all buttons have
been disabled by the HOLD switch.
The input level knob has been disabled by
the HOLD switch.
Recharge the built-in battery or replace the
removable batteries.
Charge the built-in battery.
Load an SD card.
Move the write-protection switch to the
unlocked position in order to record or erase
data on the SD card.
The SD card was not recognized.
Change the SD card.
The SD card has no remaining space.
The SD card is not formatted properly or the
card is broken.
Press the ENTER/MARK button to start
formatting.
Formatting will erase all the data on the SD
card.
Something might be wrong with the SD
card.
Change the SD card.
The SD card is not formatted properly or the
card is broken.
Press the ENTER/MARK button to start
formatting.
Formatting will erase all the data on the SD
card. If formatting is not possible, change
the SD card.
Writing to the SD card timed out. This has
caused audio to be interrupted and noise to
occur.
A BOF mark is added at the point when
audio was interrupted.
SD card writing performance has become
worse.
A BOF mark has been added at the point
when audio was interrupted because writing
to the SD card timed out.
Check the audio around the BOF mark.
Execute the erase format function or change
the SD card.
The system file required to operate this unit
is invalid.
Press the ENTER/MARK button to create a
system file.
The system file is missing. This unit requires
a system file for operation.
Press the ENTER/MARK button to create a
system file.
Message Meaning and response
The audio file is not a supported format.
Non-supported
File full
File not found
Can't delete
File protected
Can't divide
File too short
Can't divide
Current file MP3
Can't divide
Dup file name
Can't divide
No mark
Can't divide
Short interval
Can't divide
No file
Can't divide
File name err
MARK full
Can't delete
Not empty
No XRI data
Can't MARK
File protected
Can't MARK
File length
Digital-In
Unlock
Digital-In
Lock
DIN sample
Unmatch
I/O too short
Thermal Alert
Connect USB PWR
Thermal Alert
Please see “9 – Connecting with a Computer”
on page 45 for file formats that this unit
can use.
Recording is not possible because the total
number of folders and files would exceed
the limit of 5000.
A file cannot be found or a file might be
damaged.
Please check that file.
Remove protection from a file before trying
to delete it.
The file is too short, so it cannot be divided.
MP3 files cannot be divided.
The divide function would cause the file
name to be the same as that of an existing
file in the same folder.
Use a computer to change the file name.
Files that do not have marks cannot be
divided with this function.
Mark division will not work when the
interval between marks is two seconds or
less.
There is no audio file.
Division is not possible because the file
name would exceed the limit of 200
characters.
Use a computer to change the file name.
The number of marks has reached the limit
of 99.
You cannot delete a folder that contains
files.
Delete all the files in the folder and try again.
No XRI data has been saved in the file. Turn
the XRI data recording function ON before
starting recording.
XRI data cannot be saved when recording
MP3 files.
Marks cannot be added because the file is
protected from writing.
Remove protection from a file if you want to
add marks to it.
Marks cannot be added because the file is
too short.
Nothing is connected to the digital input
(DIGITAL IN) jack or the signal is not being
input correctly.
Check the digital connection.
Digital input has been properly detected.
The digital input sampling frequency does
not match the recording setting.
The IN and OUT points are too close
together. Set them with at least 1 second
between them.
The internal temperature has become higher
or lower when using the built-in battery or
AA batteries.
You can continue to use the unit by
powering it with a USB connection.
The internal temperature has become
higher or lower.
The system will shut down automatically.
TASCAM DR-100MKIII
47
Page 48

11 – Messages
Message Meaning and response
Dual level recording cannot used if the
No DUAL REC now
high SAMPLE
No DUAL REC now
SOURCE is DIGITAL
Can't save data
File error
Not continued
Player error
Writing failed
Error-XX
(XX is a number.)
sampling frequency is 176.4 or 192 kHz.
Dual format recording cannot used if the
sampling frequency is 88.2, 96, 176.4 or 192
kHz.
Dual format recording cannot used if the
input source is DIGITAL.
If any of these errors occurs, turn the unit off
and restart it.
If the power cannot be turned off, remove
the AA batteries, disconnect the TASCAM
PS-P520E AC adapter (sold separately) and
disconnect the TASCAM BP-6AA battery
pack.
If the power still cannot be turned off, press
and hold the (power) button for at least
10 seconds while pressing the STOP button.
This will force the unit to turn off (start
standby mode).
If these error messages continue to appear
frequently, please contact the store where
you purchased this unit or a TASCAM
customer support service.
TASCAM DR-100MKIII
48
Page 49

12 – Troubleshooting
If you are having trouble with the operation of this unit, please
try the following before seeking repair. If these measures do
not solve the problem, please contact the store where you
purchased this unit or TASCAM customer support service.
8
The unit will not turn on.
•
Confirm that the built-in battery has enough charge or that
the replaceable batteries are installed correctly.
•
Confirm that the TASCAM PS-P520E AC adapter (sold
separately) power plug and the USB connector are securely
connected. The unit might not operate properly through a
USB hub.
•
Confirm that the HOLD switch is set to OFF.
8
The unit turns off automatically.
•
Is the automatic power saving function on?(See “Setting the
automatic power saving function” on page 40.)
o Since this unit complies with the European Standby Power
Regulations (ErP), the automatic power saving function
operates regardless of whether the unit is being powered
by an AC adapter or batteries. If you do not want to use
the automatic power saving function, set it to "OFF". (The
factory default setting is "30 min". )
8
The CHG indicator alternately lights orange and
green.
•
Proper charging might not be possible in a location that
is too hot or too cold. Charging is possible when the
temperature is between 0−30°C.
8
The remaining charge of the built-in battery is not
shown accurately
•
The remaining charge of the built-in battery might not be
shown accurately when the unit is purchased. Discharge
and charge the battery completely once to enable the
unit to relearn the remaining battery charge and show it
accurately.
8
Recording is not possible.
•
Confirm that the the SD card has enough open space.
•
Recording becomes impossible when the total number of
files reaches 5000.
8
The input sound is extremely quiet or loud.
•
Check input level settings.
•
Check the output levels of connected external equipment.
8
The output sounds unnatural.
•
Check the playback speed (VSA playback function).
•
Confirm that the level control function is not on.
8
I cannot erase a file.
•
A protected (read only) file cannot be erased.
8
This unit’s files do not appear on the computer.
•
Confirm that the unit is properly connected to the
computer using its USB port. The unit might not operate
properly if connected through a USB hub.
•
Confirm that the unit is in USB storage mode.
8
I accidentally set the wrong language.
•
Press the (power) button to turn it off, and then press
the (power) button again while pressing the MENU
button.
The language selection menu where you can set the
language appears.
8
The unit does not function.
•
Confirm that the HOLD switch is set to OFF.
•
The unit will not function when in USB storage mode.
•
If operation becomes abnormal, press and hold the
(power) button for at least 10 seconds while pressing
the STOP button. This will force the unit to turn off (start
standby mode).
8
The SD card is not recognized.
•
Confirm that the SD card is inserted completely.
8
No sound is output.
•
Confirm the unit's headphone/speaker output level.
•
Check the monitoring system connections and volume
level.
•
No sound is output from the speaker in the following
conditions.
o The (speaker) switch is set to OFF
o The unit is recording or in recording standby
o Headphones are connected
TASCAM DR-100MKIII
49
Page 50

13 – Specifications
Ratings
8
Recording media
SD card (64 MB−2 GB)
SDHC card (4 GB−32 GB)
SDXC card (48 GB–128 GB)
8
Recording/playback formats
WAV (BWF): 44.1/48/88.2/96/176.4/192kHz, 16/24-bit
MP3: 44.1/48kHz, 128/192/256/320kbps
8
Number of channels
2 channels (stereo)
8
(headphone) jack
Connector: 3.5mm (1/8”) stereo mini jack
Maximum output: 40mW + 40mW (when headphones
connected, into 32 Ω load)
8
Built-in speaker
0.4W (mono)
Digital input
8
DIGITAL IN connector
Connector: 3.5mm (1/8”) TS jack (using dedicated conversion
cable)
Format: IEC60958-3 (S/PDIF)
Input/output ratings
Analog audio input and output ratings
8
MIC/LINE IN jacks (XLR support phantom power)
Connectors:
XLR-3-31
(1: GND, 2: HOT, 3: COLD)
6.3mm (1/4") standard TRS jacks
(Tip: HOT, Ring: COLD, Sleeve: GND)
When MIC input source selected
Maximum input level: +2 dBu (PAD on)
Minimum input level: −70.5 dBu (PAD off)
Input impedance
i XLR input: 2 kΩ or more
i TRS input: 20 kΩ or more
When LINE input source selected
Maximum input level: +24 dBu
Nominal input level: +4 dBu
Input impedance: 20 kΩ or more
8
EXT IN jack (can provide plug-in power)
Connector: 3.5mm (1/8”) stereo mini jack
When EXT MIC input source selected
Maximum input level: −2.8 dBu (PAD on)
Minimum input level: −62.8 dBu (PAD off)
Input impedance: 50 kΩ or more
When EXT LINE input source selected
Maximum input level: +6 dBV
Nominal input level: −10 dBV
Input impedance: 2 kΩ or more
8
LINE OUT jack
Connector: 3.5mm (1/8”) stereo mini jack
Output impedance: 200 Ω
When LINE input source selected
Nominal output level: −14 dBV
Maximum output level: +6 dBV
At other times
Nominal output level: −10 dBV
Maximum output level: +6 dBV
Control input/output ratings
8
USB port
Connector type: Micro-B
Format: USB 2.0 HIGH SPEED mass storage class
8
REMOTE jack
Connector: 2.5mm (3/32") TRS jack
Audio performance
8
Frequency response
MIC/LINE IN (MIC, PAD On) to LINE OUT
MIC/LINE IN (LINE) to LINE OUT
EXT IN (MIC, PAD On) to LINE OUT
EXT IN (LINE) to LINE OUT
20 Hz−20 kHz +0.5 dB/−1 dB
(44.1/48kHz sampling frequency, JEITA)
20 Hz−40 kHz +0.5 dB/−2 dB
(88.2/96kHz sampling frequency, JEITA)
20 Hz−80 kHz +0.5 dB/−4 dB
(176.4kHz/192kHz sampling frequency, JEITA)
8
Distortion
MIC/LINE IN (MIC, PAD On) to LINE OUT
MIC/LINE IN (LINE, +20dBu In) to LINE OUT
EXT IN (MIC, PAD On) to LINE OUT
EXT IN (LINE) to LINE OUT
0.007% or less
(44.1/48/88.2/96/176.4/192kHz sampling frequency, JEITA)
8
S/N ratio
MIC/LINE IN (MIC, PAD On) to LINE OUT
MIC/LINE IN (LINE) to LINE OUT
EXT IN (MIC, PAD On) to LINE OUT
EXT IN (LINE) to LINE OUT
102 dB or more
(44.1/48/88.2/96/176.4/192kHz sampling frequency, JEITA)
8
Equivalent input noise (EIN)
124 dBu or lower
Note: based on JEITA CP-2150
TASCAM DR-100MKIII
50
Page 51

13 – Specifications
General
8
Power
Built-in lithium-ion rechargeable battery
2 AA batteries (alkaline, NiMH or lithium-ion)
USB bus power from a computer
AC adapter (TASCAM PS-P520E, sold separately)
External battery pack (TASCAM BP-6AA, sold separately)
8
Power consumption
7.5 W (maximum)
8
Battery operation time (continuous operation)
•
Using built-in (lithium-ion rechargeable) battery
Operation
Use conditions
UNI MIC (built-in directional mic) input
Phantom power unused
STEREO WAV (BWF)/44.1kHz
16-bit recording
MIC/LINE IN jack/mic input
Phantom power used (+48V, 3mA×2 load)
STEREO WAV (BWF)/44.1kHz
16-bit recording
•
Using alkaline batteries (EVOLTA)
time (in hours
and minutes)
About 12 hours
About 6 hours
MIC/LINE IN jack/mic input
Phantom power used (+48V, 3mA×2 load)
STEREO WAV (BWF)/44.1kHz
16-bit recording
About 3:30
NOTE
•
When using phantom power, the operation time might be
reduced depending on the mic being used.
•
The battery operation times (during continuous operation)
could vary depending on the media being used.
8
Charging time
•
By USB: about 10 hours
•
Using PS-P520E: about 4.5 hours
8
Dimensions
80 x 155.7 x 35 mm (width × height × depth, excluding
protrusions)
8
Weight
425 g (including batteries)/375 g (not including batteries)
8
Operating temperature range
0°C–40°C (32°F–104°F)
Dimensional drawings
Operation
Use conditions
UNI MIC (built-in directional mic) input
Phantom power unused
STEREO WAV (BWF)/44.1kHz
16-bit recording
MIC/LINE IN jack/mic input
Phantom power used (+48V, 3mA×2 load)
STEREO WAV (BWF)/44.1kHz
16-bit recording
•
Using NiMH battery (eneloop)
Use conditions
UNI MIC (built-in directional mic) input
Phantom power unused
STEREO WAV (BWF)/44.1kHz
16-bit recording
MIC/LINE IN jack/mic input
Phantom power used (+48V, 3mA×2 load)
STEREO WAV (BWF)/44.1kHz
16-bit recording
•
Using lithium-ion batteries (Energizer Ultimate Lithium)
Use conditions
UNI MIC (built-in directional mic) input
Phantom power unused
STEREO WAV (BWF)/44.1kHz
16-bit recording
time (in hours
and minutes)
About 1 hour
Operation
time (in hours
and minutes)
Operation
time (in hours
and minutes)
About 7 hours
About 2:45
About 3:30
About 2:15
155.7mm
80mm
•
Illustrations in this manual might differ in part from the
actual product.
•
Specifications and external appearance might be changed
without notification to improve the product.
35mm
TASCAM DR-100MKIII
51
Page 52

TEAC CORPORATION
Phone: +81-42-356-9143
1-47 Ochiai, Tama-shi, Tokyo 206-8530 Japan
https://tascam.jp/jp/
TEAC AMERICA, INC. http://tascam.com/
Phone: +1-323-726-0303
1834 Gage Road, Montebello, California 90640 USA
TEAC UK Ltd. http://tascam.eu/
Phone: +44-8451-302511
2 Huxley Road, Surrey Research Park, Guildford, GU2 7RE, United Kingdom
TEAC EUROPE GmbH http://tascam.eu/
Phone: +49-611-71580
Bahnstrasse 12, 65205 Wiesbaden-Erbenheim, Germany
TEAC SALES & TRADING(SHENZHEN) CO., LTD http://tascam.cn/
Phone: +86-755-88311561~2
Room 817, Block A, Hailrun Complex, 6021 Shennan Blvd., Futian District, Shenzhen 518040, China
0822.MA-2413A
 Loading...