

Tascam DR-100 Service Manual
DR-100
Portable Digital Recorder
CONTENTS
1. Specifications
2. Test Mode
3. Updating of System Firmware
4. Message Display glossary
5. Block Diagram
6. Level Diagram
7. Exploded Views and Parts List
8. Notes for Disassembly / Assembly
9. PC Boards and Parts List
10. Included Accessories
Effective : May, 2009
・・・・・・・・・・・・・・・・・・・・・・・・・・・・・・・・・・・
・・・・・・・・・・・・・・・・・・・・・・・・・・・・・・・・・・・・・・
・・・・・・・・・・・・・・・・・・
・・・・・・・・・・・・・・・・・・・・・・
・・・・・・・・・・・・・・・・・・・・・・・・・・・・・・・・・
・・・・・・・・・・・・・・・・・・・・・・・・・・・・・・・・・
・・・・・・・・・・・・・・・・・・
・・・・・・・・・・・・・・・・・・・・・・・
・・・・・・・・・・・・・・・・・・・・・・・・・・・
・・・・・・・・・・・・・・
10
13
18
20
27
30
32
43
目次
3
5
1. 仕様
2. テストモード
3. SystemF/Wのバージョンアップ
4. メッセージ一覧
5. ブロックダイアグラム
6. レベルダイアグラム
7. 分解図とパーツリスト
8. 分解・組み立て上の注意
9. 基板図とパーツリスト
10. 付属品
・・・・・・・・・・・・・・・・・・・・・・・・・・・・・・・・・・・・・・・・・・・・・
・・・・・・・・・・・・・・・・・・・・・・・・・・・・・・・・・・・・・
・・・・・・・・・・・・・・・・・・・
・・・・・・・・・・・・・・・・・・・・・・・・・・・・・・・・・・
・・・・・・・・・・・・・・・・・・・・・・・・・・・・・
・・・・・・・・・・・・・・・・・・・・・・・・・・・・・・
・・・・・・・・・・・・・・・・・・・・・・・・・・・・・
・・・・・・・・・・・・・・・・・・・・・・・・・・・
・・・・・・・・・・・・・・・・・・・・・・・・・・・・・
・・・・・・・・・・・・・・・・・・・・・・・・・・・・・・・・・・・・・・・・・
S-0187
3
5
10
13
18
20
27
30
32
43
1. Specifications
仕様
TASCAM DR-100
Audio input ratings
● XLR MIC IN (L, R) inputs
Connectors: XLR-3-32equivalent (balanced)
Input impedance: 1.2 kΩ
● GAIN HIGH setting
Standard input level: -58 dBu
Maximum input level: -42 dBu
● GAIN MID setting
Standard input level: -36 dBu
Maximum input level: -20 dBu
● GAIN LOW setting
Standard input level: -14 dBu
Maximum input level: +2 dBu
● LINE IN input
Connector: 3.5 mm stereo minijack
Input impedance: 23 kΩ
Standard input level: -10 dBV
Maximum input level: +6 dBV
● LINE OUT output
Connector: 3.5 mm stereo minijack
Standard output level: -10 dBV
Maximum output level: +6 dBV
オーディオ入出力定格
● XLRMICIN(L/R)入力
端子: XLR-3-32相当(バランス)
入力インピーダンス: 1.2kΩ
● GAINHIGH時
基準入力レベル: ー58dBu
最大入力レベル: ー42dBu
● GAINMID時
基準入力レベル: ー36dBu
最大入力レベル: ー20dBu
● GAINLOW時
基準入力レベル: ー14dBu
最大入力レベル: +2dBu
●
LINEIN入力
端子: 3.5mmステレオミニジャック
入力インピーダンス: 23kΩ
基準入力レベル: ー10dBV
最大入力レベル: +6dBV
● LINEOUT出力
端子: 3.5mmステレオミニジャック
基準出力レベル: ー10dBV
最大出力レベル: +6dBV
● output
Connector: 3.5 mm stereo minijack
Maximum output : 25 mW + 25 mW
(with 32 Ω headphone connection)
● Built-in speakers
Output: 0.4 W
Audio performance
Frequency response (LINE IN → LINE OUT):
20 Hz–20 kHz, +1/-3 dB (44.1 kHz)
20 Hz–22 kHz, +1/-3 dB (48 kHz)
Distortion (LINE IN → LINE OUT):
Less than 0.01%
S/N ratio (LINE IN → LINE OUT):
90 dB or more
● Compatible audio files:
MP3 files: 32–320 kbps,
sampling frequency 44.1/48 kHz,
VBR playback, ID3 tag support up
to Ver 2.4
● 出力
端子: 3.5mmステレオミニジャック
最大出力: 25mW+25mW
(32Ωヘッドホン接続時)
● 内蔵スピーカー
出力: 0.4W
オーディオ性能
周波数特性(LINEIN→ LINEOUT):
20Hz〜20kHz、 +1/−3dB(44.1kHz)
20Hz〜22kHz、 +1/−3dB(48kHz)
歪率(LINEIN→ LINEOUT):
0.01%以下
S/N比(LINEIN→ LINEOUT):
90dB以上
一般
● 対応音声ファイル:
MP3ファイル: 32kbps〜320kbps、
サンプリング周波数44.1kHz/48kHz、
VBR再生対応、ID3タグ(Ver1〜2.4)
をサポート
−2−

TASCAM DR-100
WAV files: sampling frequency 44.1/48 kHz,
bit length: 16/24-bit
● Recording media: SD cards (64 MB–2 GB) and
SDHC cards (4 GB–32 GB)
● File system:
FAT partition: FAT16/32
● Battery life (continuous operation):
Lithium ion battery (BP-L2):
About 5 hours (recording time)
About 5 hours (playback time)
Ni-MH batteries (HR15/51):
About 4 hours (recording time)
About 4 hours (playback time)
Alkaline batteries (LR6):
About 2 hours (recording time)
About 2 hours (playback time)
(Backlight off, set to 128-kbps mp3.Varies according to
use conditions.)
● Operation temperature range:
0–40º C
● Power consumption:
1.7 W (MP3 playback)
5.5 W (maximum)
● External dimensions (mm):
80 (w) x 153 (h) x 35 (d)
(excluding protrusions)
● Weight: 290 g (not including batteries)
Accessory (sold separately)
● AC adapter: PS-P520
Requirements for connected computers
● Windows: Pentium 300 MHz or better
128 MB or more memory USB port
(USB 2.0 recommended)
● Macintosh: 266 MHz Power PC, iMac, G3, G4
or better
64MB or more memory
USB port (USB 2.0 recommended)
● Recommended USB host controller:
Intel chipset
● Supported OS:
Windows: Windows 2000 Professional SP4
or newer,Windows XP, Windows
Vista
Macintosh: Mac OS X 10.2 or newer
WAVファイル: サンプリング周波数44.1kHz/48kHz
ビット長: 16/24ビット
● 記録媒体: SDカード(64Mバイト〜2Gバイト)
およびSDHCカード(4Gバイト〜
32Gバイト)
● ファイルシステム:
FATパーティション: FAT16/32
● 電池持続時間(連続動作時):
専用リチウムイオン充電池(BP-L2)使用時:
約5時間(JEITA録音時間)
約5時間(JEITA音楽再生時間)
ニッケル水素電池使用時:
約4時間(JEITA録音時間)
約4時間(JEITA音楽再生時間)
アルカリ乾電池使用時:
約2時間(JEITA録音時間)
約2時間(JEITA音楽再生時間)
(バックライト消灯、MP3128kbps時。使用状況により
変動することがあります。)
●
使用温度範囲:
● 消費電力: 1.7W(MP3再生時)
●
外形寸法:
● 質量: 290g(電池を含まず)
0〜40℃
5.5W(最大)
80(幅)×153(高さ)×35(奥行)
mm(突起部含まず)
別売アクセサリー
●
ACアダプター:
PS-P520
接続するパソコンの条件
● Windowsマシン: Pentium300MHz以上
128MB以上のMemory
USBポート(推奨:USB2.0)
● Macintoshマシン: PowerPC、iMac、G3、G4
266MHz以上
64MB以上のMemory
USBポート(推奨:USB2.0)
● 推奨USBホストコントローラー:
Intel製チップセット
● サポートOS:
Windows: Windows2000Professional
SP4以上 /XP/Vista
Macintosh: MacOSX10.2以上
−3−

Dimensional drawing (寸法図)
TASCAM DR-100
−4−

2. Test Mode
テストモード
TASCAM DR-100
1. How to enter test mode
While holding down the HOME+MENU+ENTER keys,
switch the power on.
The LCD shows the following message: The LCD backlight is lit.
2. Displays explained
● DATA encoder (0-999)
● Shows the name of a key pressed
● Power supply voltage (255 steps)
"Li" shown when powered on Li-Ion
battery; "AA" shown when powered on
AA battery;
"" shown when connected to an
AC outlet.
● Read in input volume value
● USB connection
● Card detection
When card protecting SW is turned on, the
key mark is displayed.
● Operation indicator
● Event acceptance indicator. This indicator
reacts when keys are operated for example
1. テストモードの起動方法
「HOME+MENU+ENTER」キーを押しながら電源を投入す
る。
LCDに下記を表示する。バックライトは点灯。
2. 画面の説明
● DATAエンコーダ(0〜999)
● 押されたキーを表示。
● 電源供給電圧(255段階)
Li:Li-Ionバッテリ AA:単三電池
AC接続時:
● 入力VolumeL/R読み取り値
● USB接続
● カード検出
カードのプロテクトSWがONのとき
鍵マークを表示。
●
動作インジケータ
● イベント受付インジケータ。キーなど
操作すると反応。
3. Checking LEDs
REC LED: turns on when the REC key is pressed.
PEAK LED: turns on when the PLAY/PAUSE key is
pressed.
They turn off when the keys are held pressed for a certain
time.
4. Menu
Pressing the MENU key reveals the following menu.
Options are selectable using the
encoder.
ENTER: mode selection
MENU: back to the TOP screen
3. LED
RECLED: RECキーで点灯する。
PEAKLED: PLAY/PAUSEキーで点灯する。
全てキーを長押しすると点滅する。
4. MENU
MENUキーを押すと下記メニューを表示する。
エンコーダ操作で項目の移動をする。
ENTER: 項目の選択。
MENU: TOP画面へ。
−5−
TASCAM DR-100
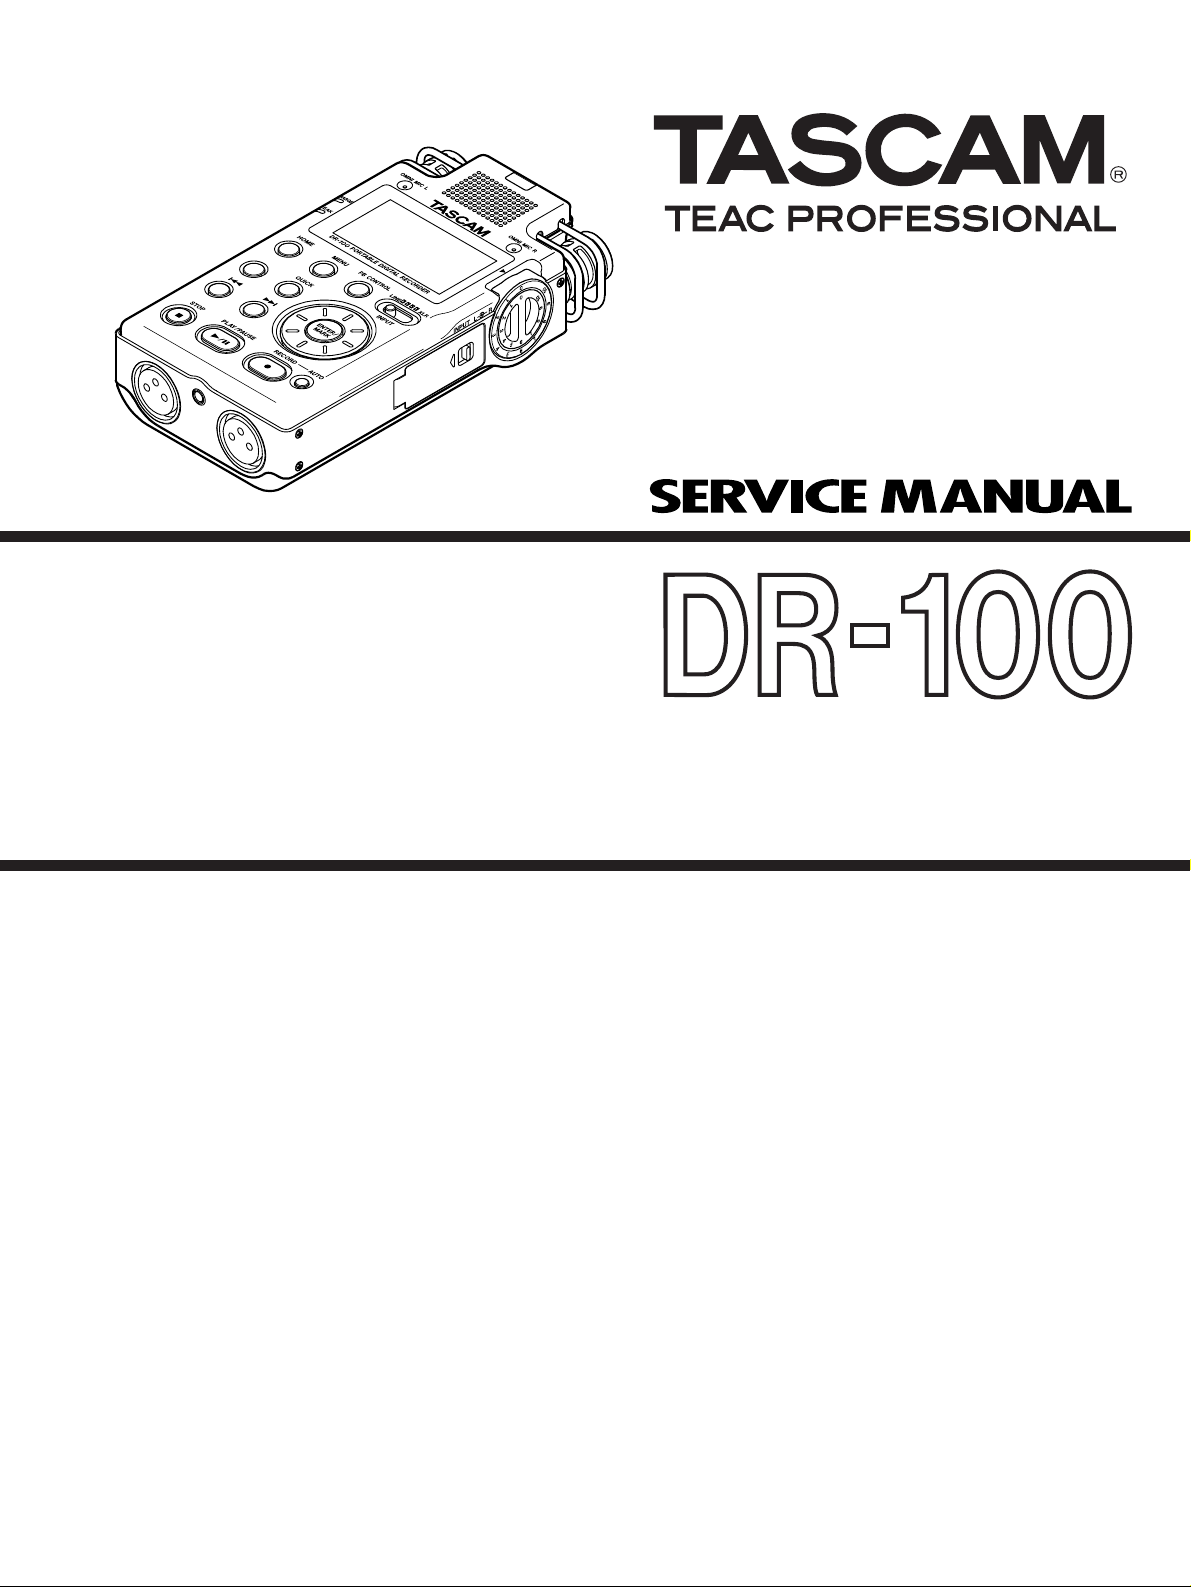
1) INPUT
Selecting "INPUT" and pressing the ENTER key gets you to
the following menu:
● INPUT Select SW
● MIC GAIN SW
● Limiter SW
● Phantom Power SW
● Speaker Sw
● Headphone Jack SW
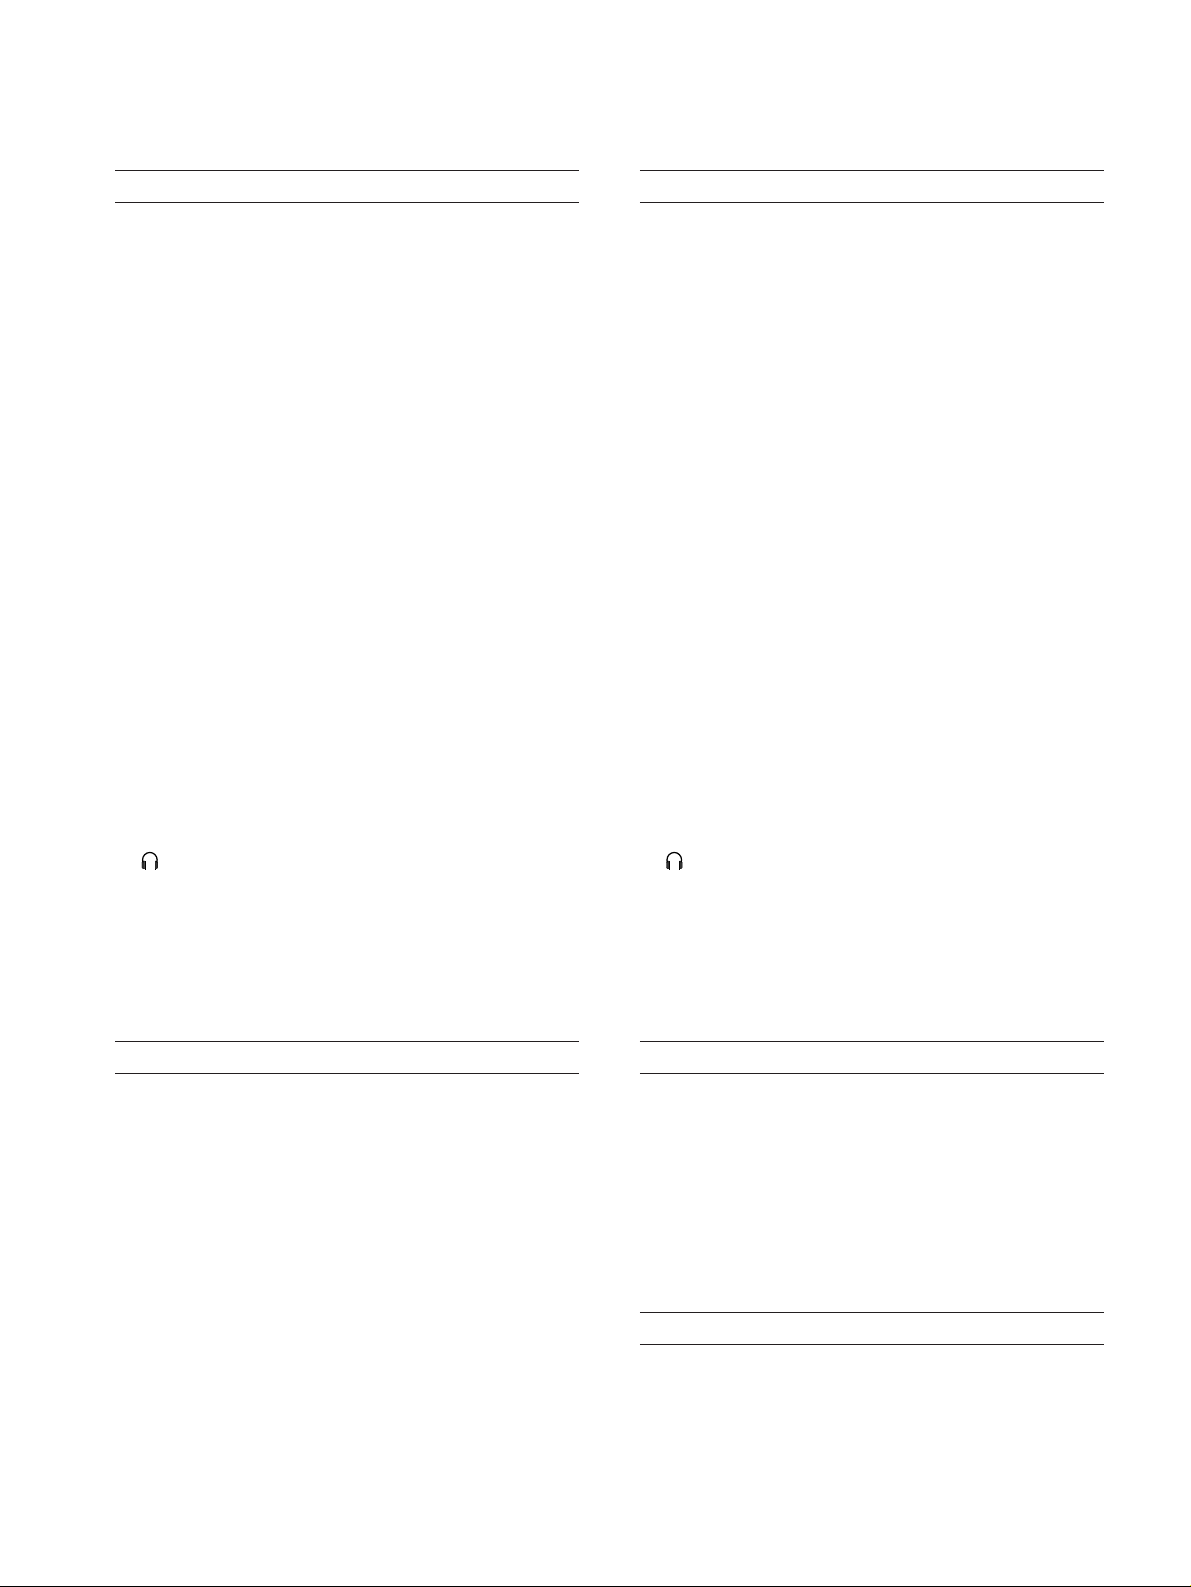
2) CARD
Selecting "CARD" and pressing the ENTER key gets you to
the following menu:
1)INPUT
"INPUT"を選択してENTERキーを押すと下記メニューを表
示する。
● 入力セレクトSW
● MICGAINSW
● リミッターSW
● ファントム電源SW
● スピーカーSW
●
ヘッドフォンジャックSW
2)CARD
"CARD"
を選択してENTERキーを押すと下記メニューを表示
する。
Identify: Read in data
Pressing the ENTER key indicates the following information:
● Manufacturer ID
● OEM/Application ID
● Product name
● Product revision
● Product serial number
● Manufacturing date
● Raw Size
Read One: Read in data from the card per sector
At each press of the
¯ key, data is read in from the card
per sector.
Identify: カードから情報の読み込み
ENTERキーを押すと下記の情報を表示する。
● ManufacturerID
● OEM/ApplicationID
●
Productname
● Productrevision
● Productserialnumber
● Manufacturingdate
● RawSize
ReadOne:カードから1セクタ読み込み
¯キーを押すと、押すたびにカードから1セクター毎のデ
ータの読み込みを行なう。
−6−
TASCAM DR-100
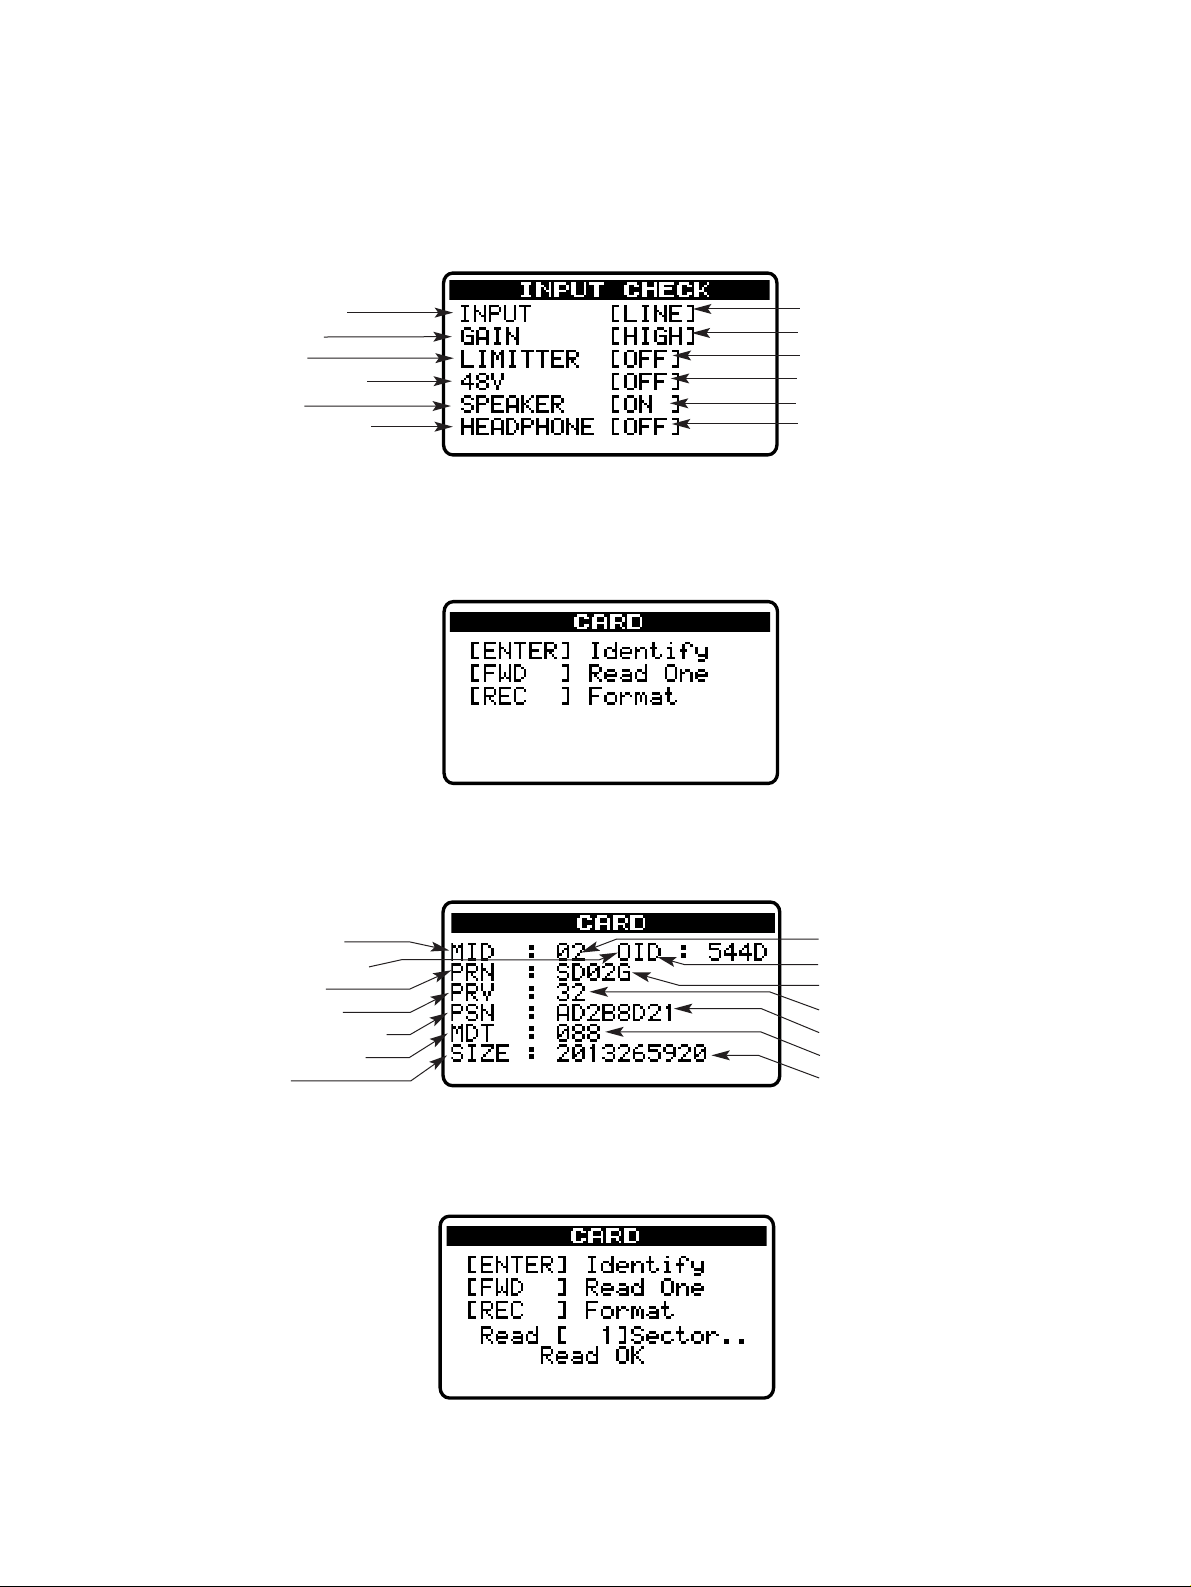
Format: Card formatting
At a press of the REC key, the following screen appears:
If ENTER key is pressed at this screen, the card starts
being formatted. Upon completion of the formatting
process, "Complete" is displayed.
Pressing MENU brings you back to the top screen.
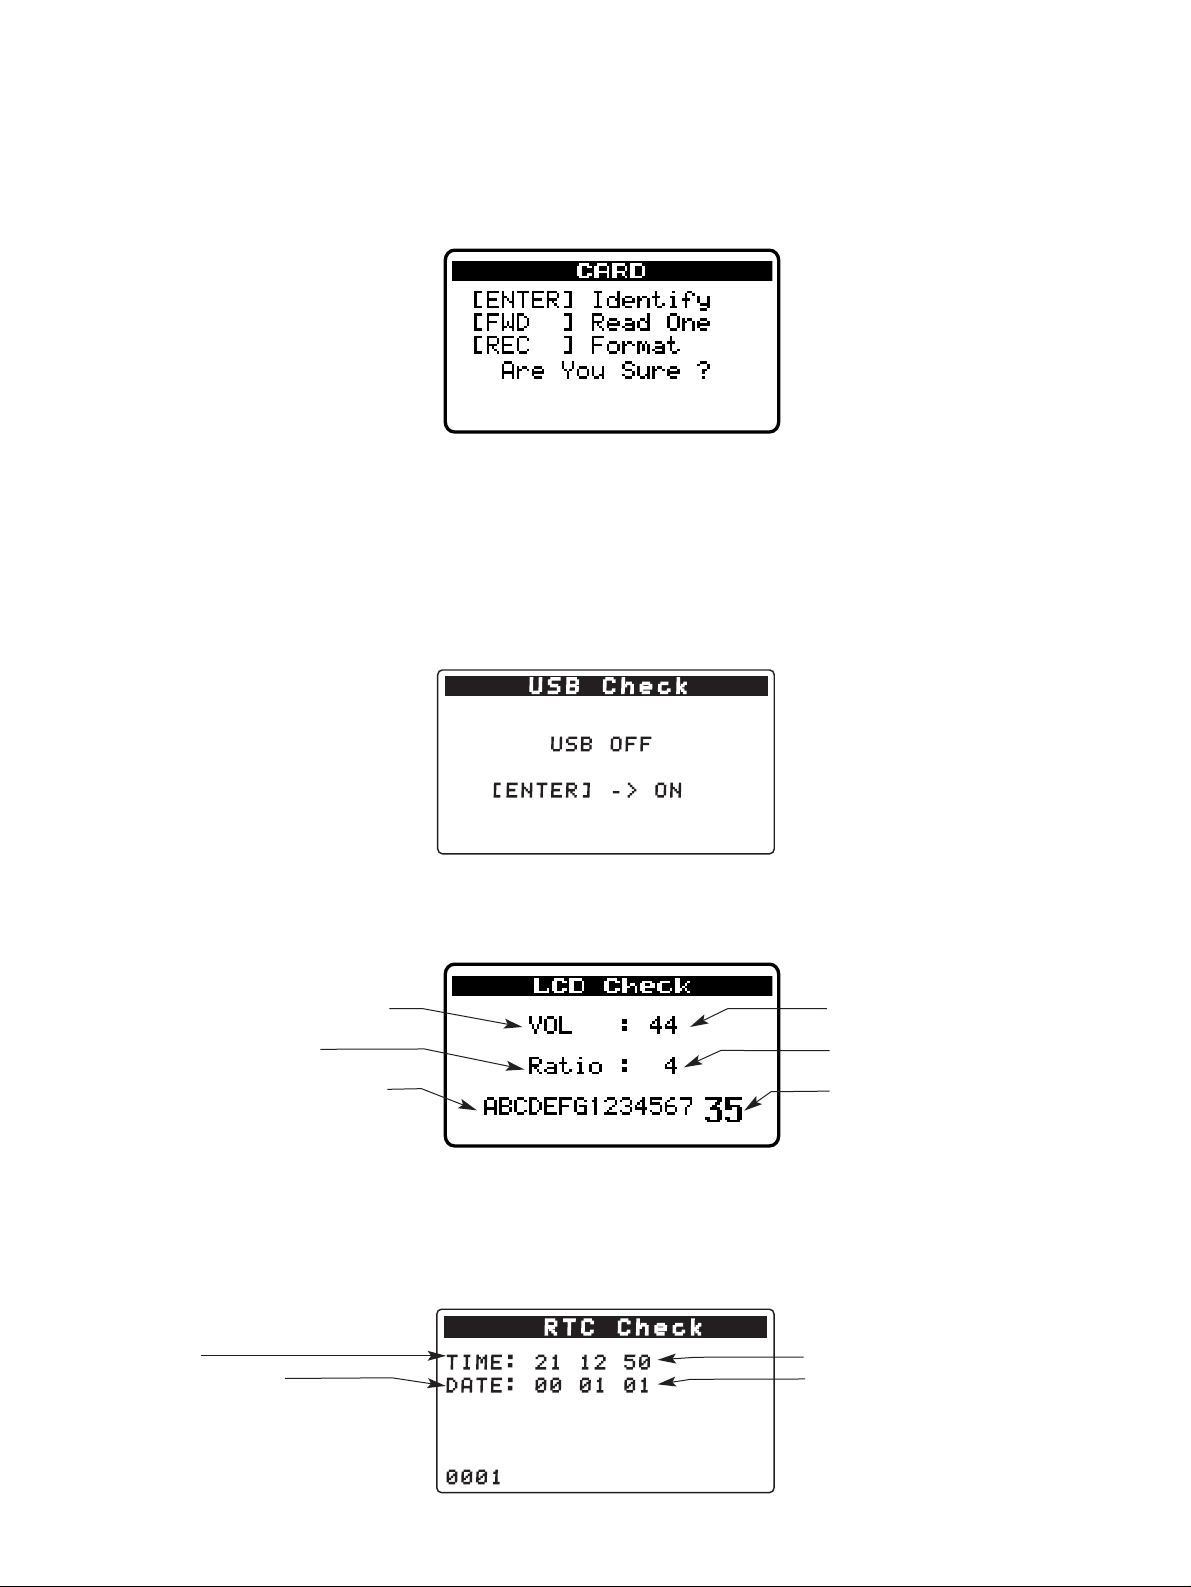
3) USB Check
Select "USB" and press the ENTER key.
Each time the ENTER key is pressed, the indication alternates between ON and OFF.
U
Format:カードフォーマット
RECキーを押すと下記画面を表示する。
ここでENTERキーを押すとFormatを実行し、実行後、
"Complete"を表示して終了する。
MENUでTop画面へ戻る。
3) USBCheck
"USB"を選択してENTERキーを押す。
ENTERキーを押すたびにON/OFFを繰り返す。
U S B C h e k
SB OF
EN ER -> ON
4) LCD Check
Select "LCD" and press ENTER key and the following are
displayed:
● Contrast adjustment
(IO: +; LOP: -)
● adjustment
¯: +; Â: -)
(
● Characters for after-
image check
STOP/HOME key : Reverse
5) RTC Check
Select "RTC" and press ENTER key and the following are
displayed:
Real-time clock indication.(Date and time indication only)
● Time
● Date (yy/mm/dd)
The year of 2000 is indicated as
"00".
IME: 2 2 50
D
A E: 0 0 0 0
4) LCDCheck
"LCD"を選択してENTERキーを押すと下記画面を表示する。
● コントラスト調整
IO:+ LOOP:−
● コントラスト調整傾き
(¯:+ Â:−)
● 残像確認用キャラクタ
STOP/HOME: 反転
5) RTCCheck
"RTC"を選択してENTERキーを押すと下記画面を表示する。
リアルタイムクロック表示(日時の表示のみ)。
C C h e c k
● 時刻.
● 日付(年月日)
年は2000年を00と表
示
000
−7−
TASCAM DR-100
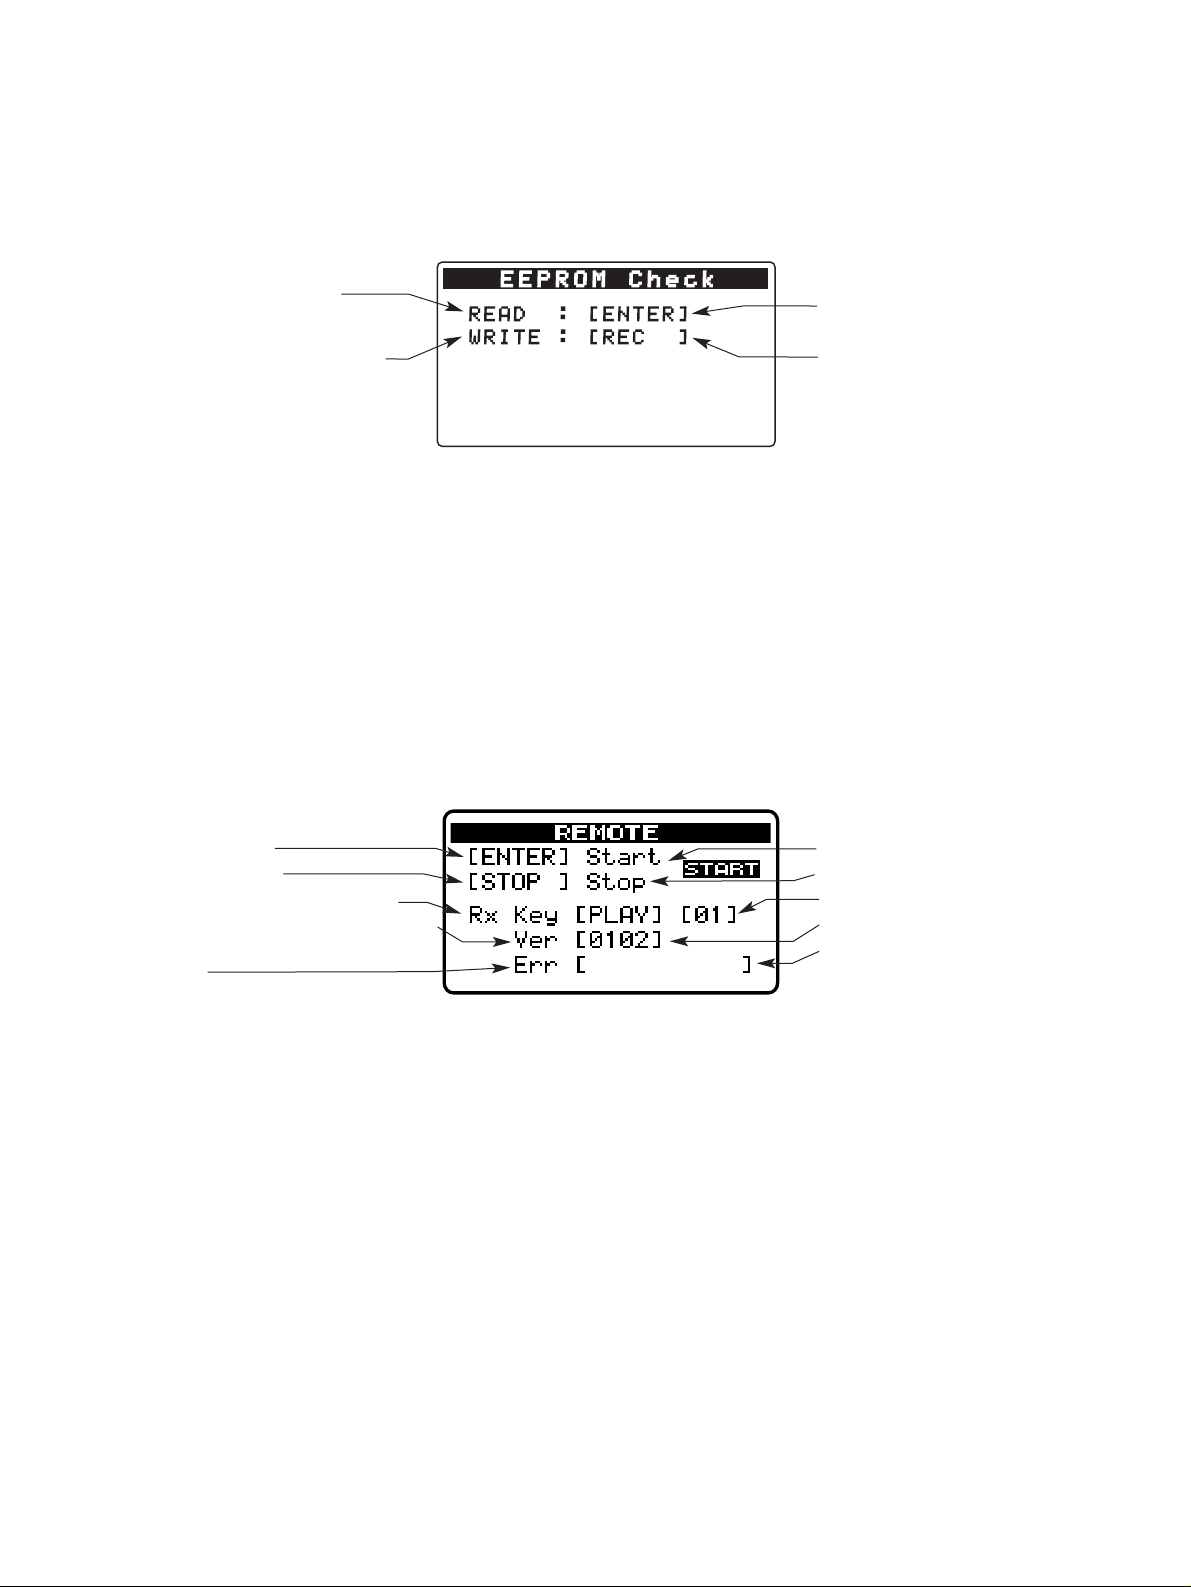
6) EEPROM Check
Select "EEPROM" and press ENTER key and the following
are displayed:
● Read in from the ROM
"Reading..." is displayed at a
press of the ENTER key.
● Writing all zeros to the ROM
READ : EN ER
W
RI E : REC
The writing process starts at a
press of the ENTER key in
response to "Are you sure?"
To cancel the process, press the
MENU key.
If errors occur during either the read or the write, the
following are displayed:
Timeout Err: No response from the EEPROM
Error: Errors at data send/receive time
Verify Err: Errors in verification during the write
process
7) REMOTE Check
Select "REMOTE" and press ENTER key and the following
are displayed:
6) EEPROMCheck
"EEPROM"を選択してENTERキーを押すと下記画面を表示す
る。
E P R O M C h e
READ/WRITE共にエラーの場合には下記を表示する。
Timeout Err: EEPROMの応答なし
Error: データ送信/受信時のエラー
Verify Err: Write時のベリファイエラー
7) REMOTECheck
"REMOTE"を選択してENTERキーを押すと下記画面を表示す
る。
● ROMの読み込み実行。
ENTERキーで「
●
ROMのオールゼロ書き込み。
「
Are you sure ?」後にENTERキー
で書き込み。
MENUキーでキャンセル。
Reading...」を表示。
● Function start
● Function cease
● Receive key, Status Command
● Firmware version of Remote control
MCU
● Error
"Timeout ": Time Out
"Unkown Res": Illegal response
"Unkown Key": Undefined key code
"Rx Error ": Receive error
"System ": System error
"Version ": Inconsistent version
"CustomCode": Inconsistent custom code
"Unkown ": Unknown error
8) BG
Select "BG" and press ENTER key:
Background samples
(¯): Previous; REW(Â): Next
FWD
●
リモート動作開始
● リモート動作停止
●
受信キー、ステータスコード
● リモート用マイコンFWバージョン
●
エラー
"Timeout ": タイムアウト
"Unkown Res": 不正なレスポンス
"Unkown Key": 未定義キーコード
"Rx Error ": 受信エラー
"System ": システムエラー
"Version ": バージョン不一致
"CustomCode": カスタムコード
"Unkown ": 未知なエラー
8) BG
"BG"を選択してENTERキーを押す。
背景サンプル
FWD(¯):後 REW(Â):前
不一致
−8−
TASCAM DR-100
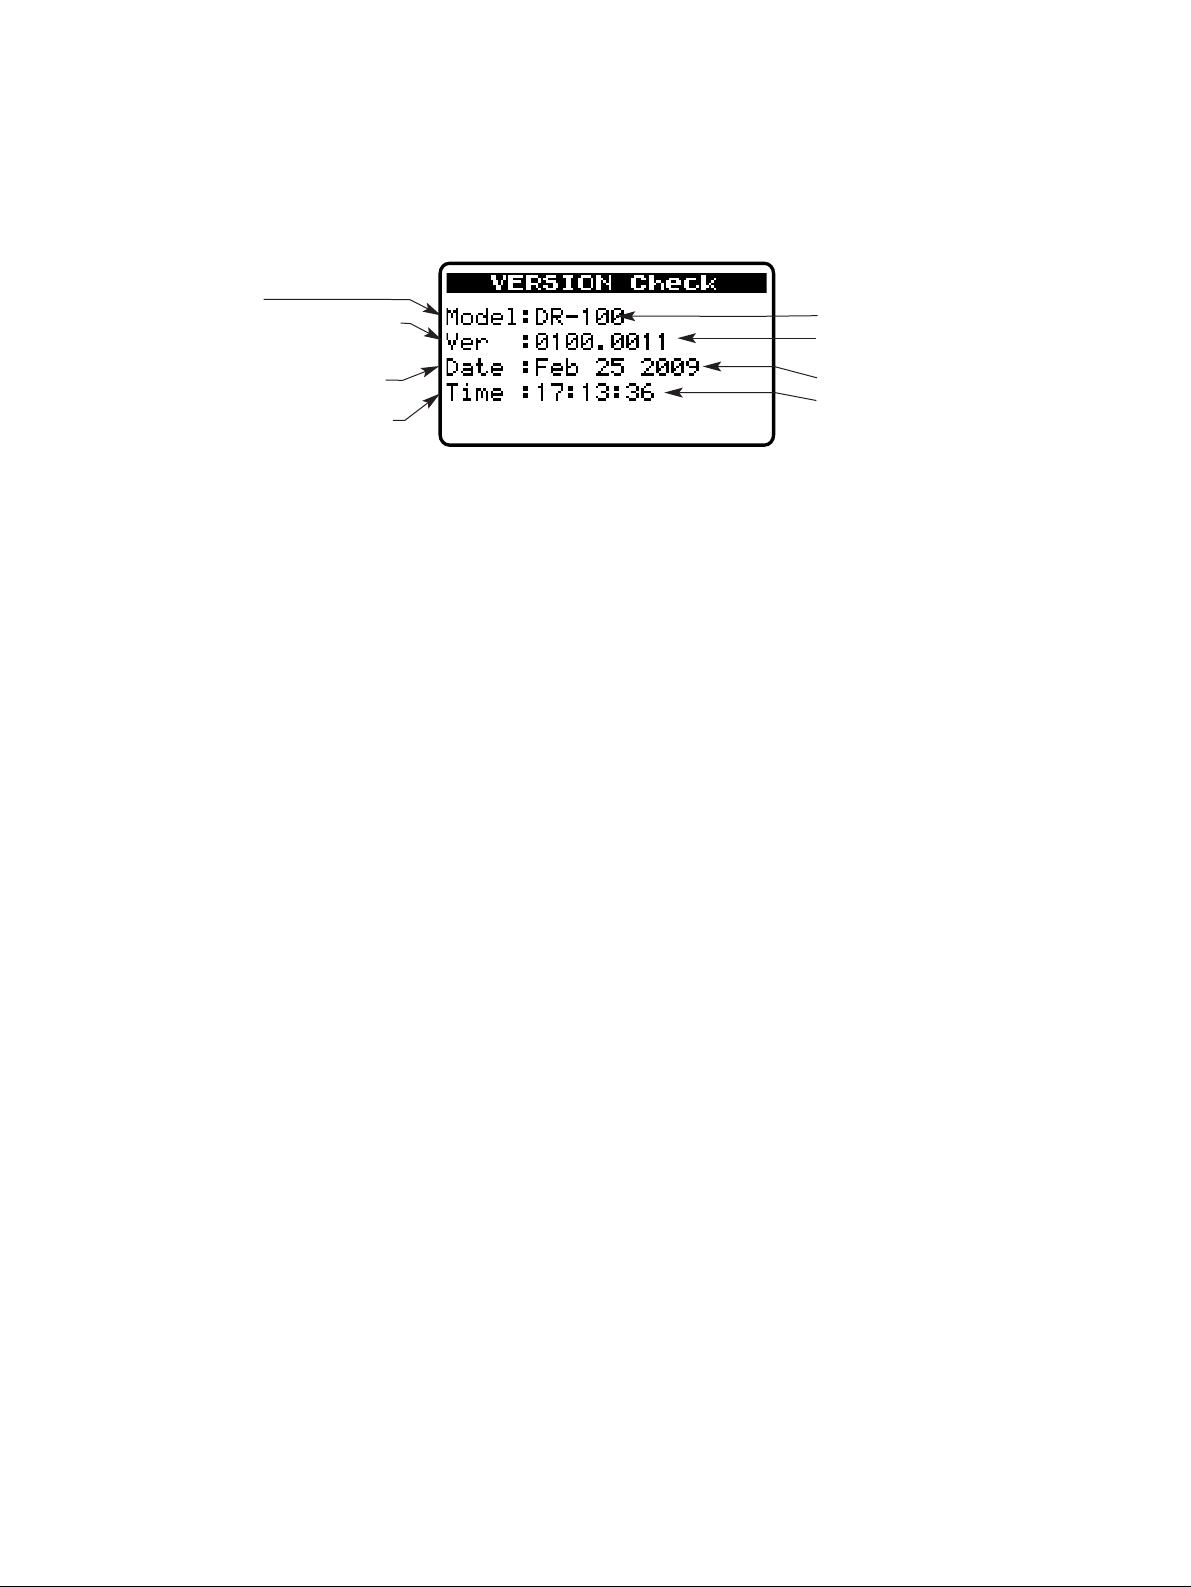
9) VERSION Check
Select "VERSION" and press ENTER key and the following
are displayed:
● Model Name
● Version of the system firmware.
The last 4 digits indicate a build
number
● on which the system firmware
was built.
● which the system firmware was
built.
9) VERSIONCheck
"VERSION"を選択してENTERキーを押すと下記画面を表示す
る。
● モデル名
●
システムファームのバージョン。
後半の4桁はビルド番号
● ファームビルド日付
● ファームビルド時刻
−9−

Updating of Firmware
3.
ファームウェアーアップデート方法
TASCAM DR-100
1. Preparations
1) Make the connection between this unit and the PC using a
USB cable.
2) Place the update file in the UTILITY folder in the unit.
3) Perform the USB device "remove" action on the PC, and
then switch off the power to the unit.
2. START-UP
While holding down the PLAY and MENU keys, switch the
power on.
The LCD looks like this:
R O G R A M U P D A
DR 0_ 5 0
DR 0_ 6 . 0
DR 0_ 7 . 02
Update files are shown with extensions.
The USB connection can be made at this point.
When USB connected, the normal USB screen appears.
When unplugging the USB cable, the unit shifts to the
normal start-up.
That is to say, the update screen reappears when
unplugging the USB cable while holding down the PLAY
and MENU keys.
1.準備
1) 本体とPCをUSBケーブルで接続する。
2) アップデートファイルを本体の「UTILITY」フォルダに置く。
3) PCでUSBデバイスの
す。
"取り外し" を行い、本体の電源を落と
2.起動
ENTER+MENUキーを押しながら電源を投入する。
LCDに下記を表示する。
アップデートファイルを拡張子付きで表示する。
この時点でUSB接続することが可能です。
接続すると通常と同じUSB画面となり、USBケーブルを抜
くと通常起動する。
従って、PLAY+MENUキーを押しながらUSBケーブルを抜
けば再びアップデート画面となる。
3. Displays explained
1) When only a single file is available:
DR 0_ 7 . 02
2) When multiple files are available:
P R O G R A M U P D A E
R- 00_ 5 . 0
R- 00_ 6 . 0
R-100_ 7 . 02
When there are 6 or more files, use the dial to move the
cursor over them.
3.画面の説明
1) ファイルが一つの場合
R O G A M U P D A
2) ファイルが複数の場合
5つ以上の場合はダイヤルでカーソル移動する。
−10−
TASCAM DR-100
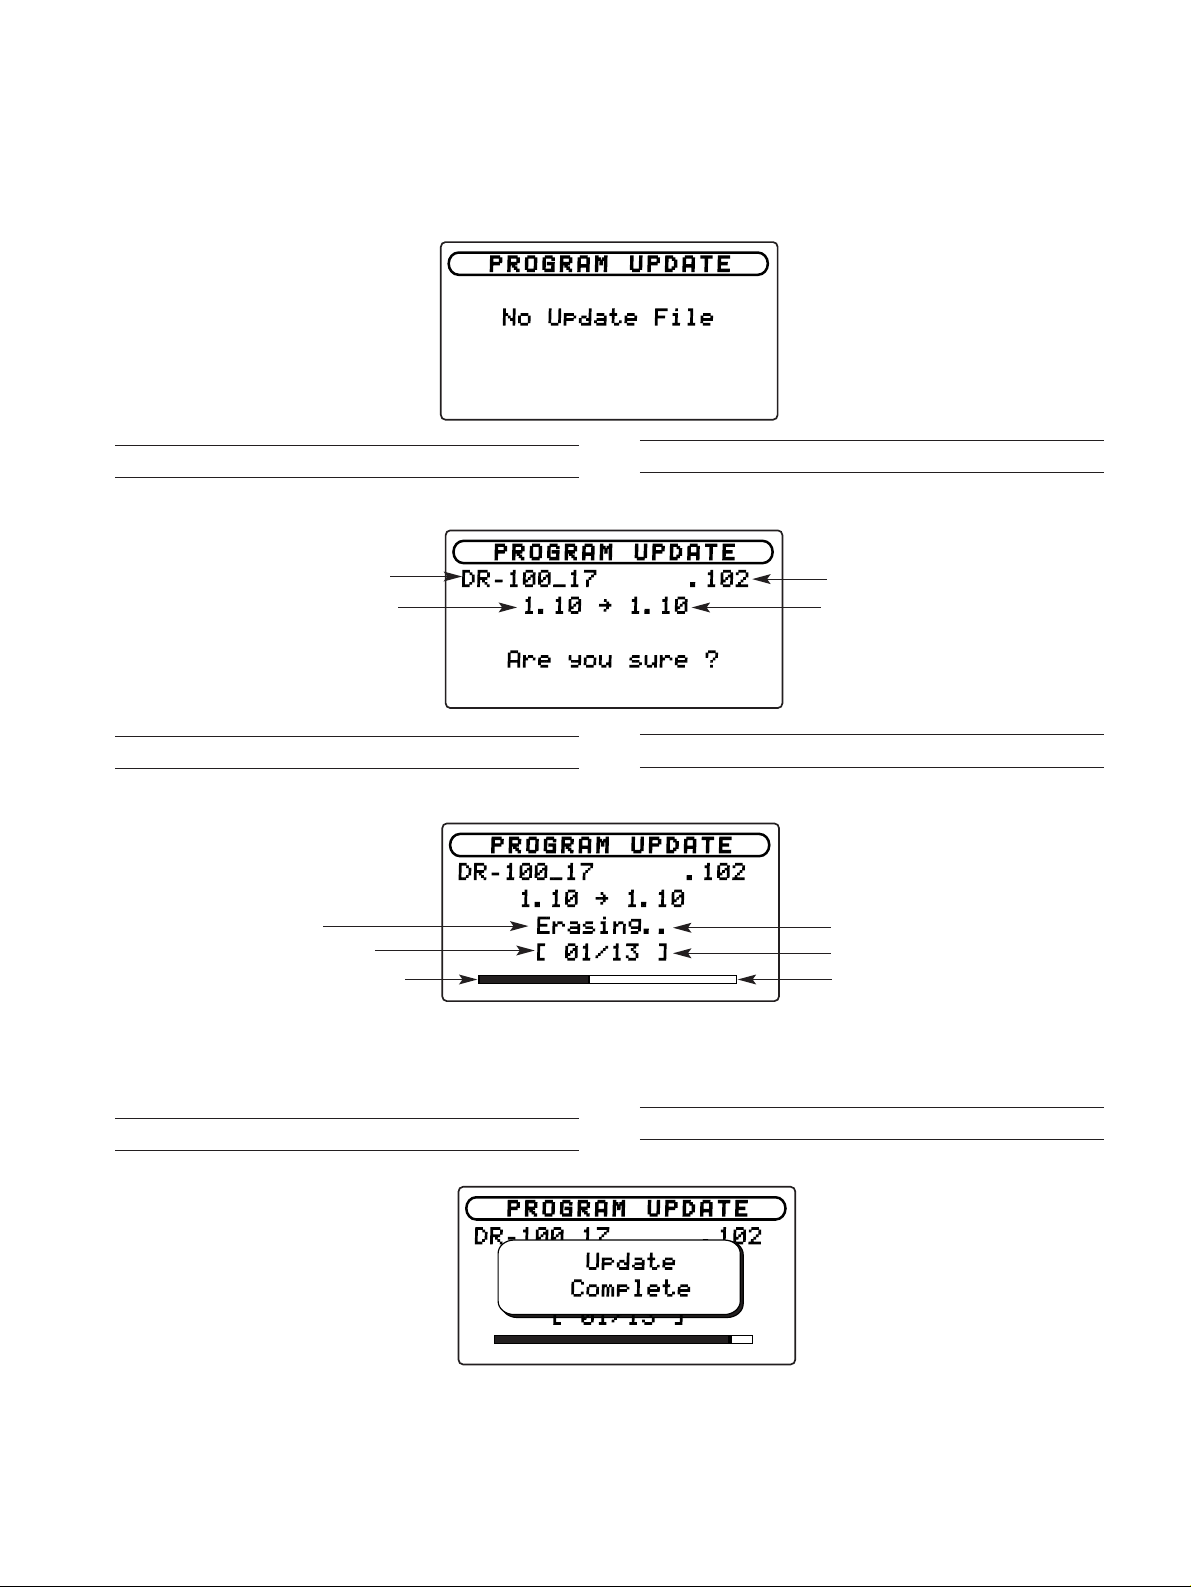
3) When no update file is available:
Nothing can be done.
P R G R A M U P D A E
No Upda e ile
4. File confirmation
Select a target file and press the ENTER key .
● Name of the file selected
● Current version at left and
DR- 0_17 . 02
0 ˘ 0
New version at right
Are you s re ?
5. Getting update started
The update process starts when pressing the ENTER key .
3) ファイルが無い場合
何も操作できません。
4.ファイルの確認
対象のファイルを選択し、ENTERキーを押す。
R O G A M P D A E
● 選択したファイル名
● 左:現バージョン 右:新バージョン
5.アップデート実行
ENTERキーを押すとアップデートを実行する。
P R O G R M U P D A E
R- 00_ . 02
. 0 ˘ . 0
● Task progress.
● FLASH sector number
● Writing progress by sector
0 / 3 ]
Pressing the MENU key brings you back to the file selection screen, as at step 2, without performing the update.
6. Completion
P R O G R A M U P A E
R- 00 7 . 02
0 / 3
Upon completion of the update process, "Complete" is
displayed and the unit automatically switched off.
Era ing .
6.完了
Upda e
Com le e
●
動作状況
●
FLASHのセクタ番号
● セクタ単位の書き込み進捗
アップデートを実行せず、2.のファイル選択画面へ戻るには
MENUキーを押す。
アップデートが完了すると "Complete" と表示して自動的に電
源が切れる。
−11−
TASCAM DR-100
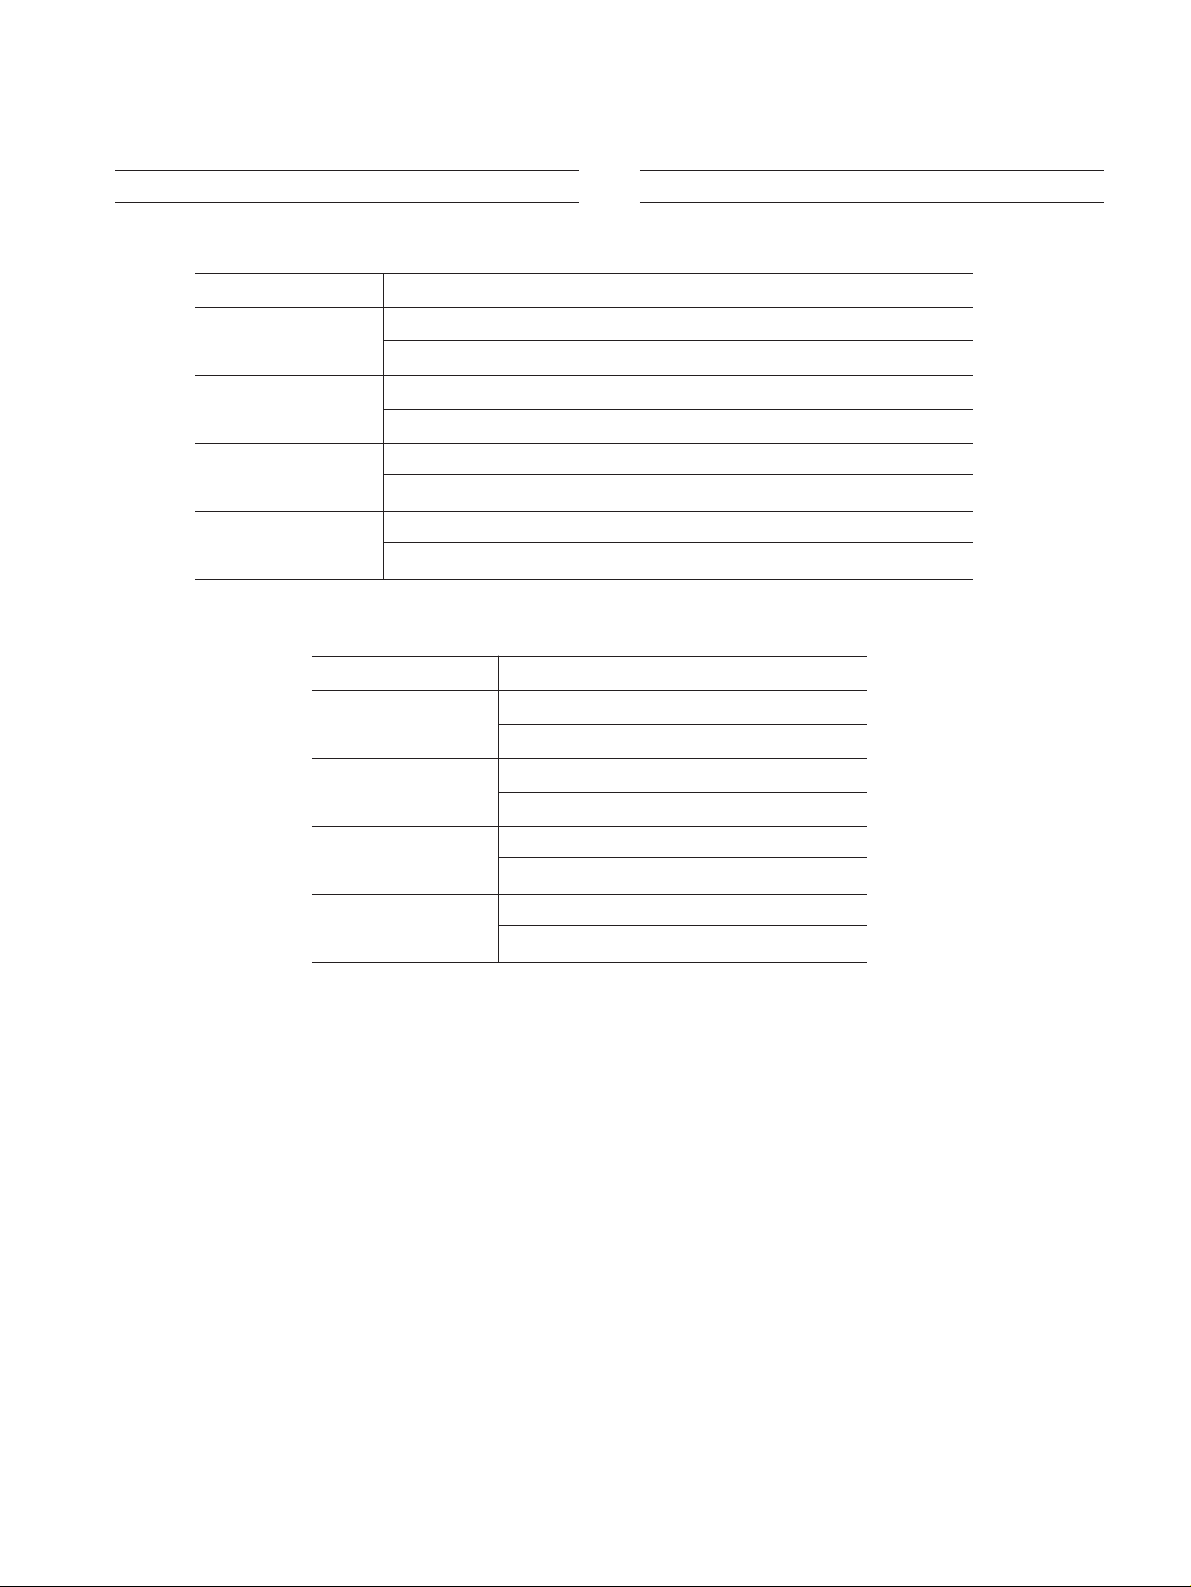
7. Error messages
1) If an error occurs when selecting a file, the
following messages appear:
Messages
2) If an error occurs in the data rewriting process, the
following messages appear:
(メッセージ)
Product
Old Version
Checksum
Update File
Messages
The product ID of the file does not match (the file may be for other products).
ファイルのプロダクトIDが一致しない(別製品のファイルの可能性がある)。
The file version is older than the current one.
現バージョンよりもファイルのバージョンが古い。
The checksum does not match.
ファイルのチェックサムが一致しない。
Error in file reading.
ファイル読み込みエラー。
(メッセージ)
Error in erasing.
Flash Erase
消去エラー
Blank error as a result of data erasure.
Flash Blank
消去後のブランクエラー
Error in writing.
Flash Write
書き込みエラー
Error in verification after data has been written.
Flash Verify
書き込み後のベリファイエラー
7.エラー
1) ファイル選択時にエラーが発生した場合のメッセージ
Meaning (内容)
2) 書き換え時にエラーが発生した場合のメッセージ
Meaning (内容)
−12−
Message Display glossary
4.
メッセージ一覧
TASCAM DR-100
The following is a list of the popup messages that
might appear on the DR-100 under certain conditions.
Refer to this list if one of these popup messages
appears and you want to check the meaning or
determine a proper response.
Messages
(メッセージ) Meaning and response(内容と対処方法)
The DIVIDE function would cause the file name to exceed 200 characters. The DIVIDE function
adds "_a" or "_b" to the end of the file name. Before choosing the DIVIDE function, connect the
File Name ERR
unit to a computer and edit the file name to less than 198 characters.
DIVIDEによりファイル名の文字数が200文字を超えました。DIVIDEを行うとファイル名の末尾に
「a」または「b」が追加されます。DIVIDEを行う前にパソコンと接続し、198文字以下のファイ
ル名に変更してください。
The DIVIDE function would cause the file name to be the same as that of an existing file. The
DIVIDE function adds "_a" or "_b" to the end of the file name. Before choosing the DIVIDE function, connect the unit to a computer and edit the file name.
Dup File Name
DIVIDEにより作成されるファイルと同じファイル名のファイルが同じフォルダ内に既に存在しま
す。DIVIDEを行うとファイル名の末尾に「a」または「b」が追加されます。DIVIDEを行う前に
パソコンと接続し、ファイル名を変更してください。
The file added to the playlist cannot be found or a file could be damaged. Please check the file in
question.
File not found
プレイリストに登録されているファイルが見つからないか、ファイルが壊れている可能性がありま
す。対象のファイルを確認してください。
以下にポップアップメッセージの一覧表を示します。
DR-100では状況に応じてポップアップメッセージが表
示されますが、それぞれのメッセージの内容を知りたい
とき、および対処方法を知りたいときにこの表をご覧く
ださい。
Non-Supported
Battery Empty
I/O Too Short
File Not Found
PLAYLIST
No PLAYLIST
PLAYLIST FULL
The audio file is not a supported format. Check the file format (using a.computer).
「ファイルの形式がサポート対象外です。」
対象の音楽ファイルの形式が対象外である場合に表示されます。対象ファイルのエンコード形式を確
認してください。
The battery is almost out of power. Recharge the lithium-ion battery and/or replace the AA batteries.
電池の残量がありません。専用リチウムイオン充電池でご使用の場合は充電し、単3形電池でご使用
の場合は電池を交換してください。
The IN and OUT points are too close together. Reset the IN and OUT points with at least 1 second between them.
IN点とOUT点の間隔が短すぎます。1秒以上空けて設定してください。
The file in the Playlist cannot be found. Please confirm that the file is still in the Music Folder.
プレイリストに登録されているファイルが見つかりません。MUSICフォルダ内に対象のファイルが
あるか確認してください。
No files have been added to the Playlist. Add a file to the Playlist or change the play mode to
something besides PLAYLIST.
プレイリストにファイルが登録されていません。プレイリストにファイルを登録するか、プレイモー
ドを「PLAYLIST」以外に設定してください。
The playlist is full. You cannot add more than 99 tracks to the Playlist.
プレイリストが一杯です。プレイリストには最大99ファイルまで登録可能です。
−13−
 Loading...