

Page 1
»
DP-02
DP-02CF
DIGITAL PORTASTUDIO
D01001200A
OWNER'S MANUAL
Page 2

IMPORTANT SAFETY PRECAUTIONS
CAUTION: TO REDUCE THE RISK OF ELECTRIC SHOCK, DO NOT REMOVE
COVER (OR BACK). NO USER-SERVICEABLE PARTS INSIDE. REFER SERVICING
TO QUALIFIED SERVICE PERSONNEL.
The lightning flash with arrowhead symbol, within equilateral triangle, is intended
to alert the user to the presence of uninsulated “dangerous voltage” within the
product’s enclosure that may be of sufficient magnitude to constitute a risk of
electric shock to persons.
The exclamation point within an equilateral triangle is intended to alert the user to
the presence of important operating and maintenance (servicing) instructions in
the literature accompanying the appliance.
This ap p l i ance ha s a s e r i a l nu m b e r
located on the rear panel. Please record
th e m ode l n umber and ser ial numbe r
and retain them for your records.
Model number
Serial number
SHOCK HAZARD, DO NOT EXPOSE THIS
APPLIANCE TO RAIN OR MOISTURE.
For U.S.A.
TO THE USER
This equi p m e n t ha s b e e n te s ted and found to
comply with the limits for a Class B digital device,
pursuant to Par t 15 of the FCC Rules. These limits
are d e s igne d t o prov i de rea s onabl e p r ote c tion
ag a i n st har m f u l in t e r f e r enc e in a re side n t i al
installation. This equipment generates, uses, and
can ra d iate ra dio frequ e n cy energy an d, if not
installed and used in accordance with the instruction
manual, may cause h armful inter ference to radio
communications.
However, there is no guarantee that interference will
not occur in a particular installation. If this equipment
does cause harmful interference to radio or television
reception, which can be determined by turning the
equipment off and on, the user is encouraged to
try to correct the interference by one or more of the
following measures.
a) Reorient or relocate the receiving antenna.
b) Increase the separation between the equipment
and receiver.
c) Con n e c t th e eq u i p m e n t in to an ou t l e t on a
circuit different from that to which the receiver is
connected.
d) Consult the dealer or an experienced radio/TV
technician for help.
WARNING: TO PREVENT FIRE OR
Declaration of Conformity
Model Number : DP-02/DP-02CF
Trade Name : TASCAM
Responsible party : TEAC AMERICA, INC.
Address : 7733 Telegraph Road, Montebello,
California, U.S. A.
Telephone number : 1-323-727-7663
This device complies with Part 15 of the FCC Rules.
Operation is subject to the following two conditions:
(1) this device may not cause harmful interference, and
(2) this device must accept any interference recieved,
inc l u d ing inte r fe r ence that ma y ca u se undesire d
operation.
CAUTION
Ch ang es o r mo dificati ons to thi s eq uip ment not
expres s l y approved by TE AC CORPO R ATION
for compliance could void the user's author ity to
operate this equipment.
2 TASCAM DP-02/ DP-02C F
Page 3
IMPORTANT SAFETY INSTRUCTIONS
1 Read these instructions.
2 Keep these instructions.
3 Heed all warnings.
4 Follow all instructions.
5 Do not use this apparatus near water.
6 Clean only with dry cloth.
7 Do not blo ck any ventil ati on o penings. Inst all in
accordance with the manufacturer's instructions.
8 Do no t install ne ar any he at sou r c e s such as
radiators, heat registers, stoves, or other apparatus
(including amplifiers) that produce heat.
9 Do not defeat the safety purpose of the polarized
or grounding-type plug. A polarized plug has two
blades with one wider than the other. A grounding
type plug has t wo b lades and a third grou ndi ng
prong. The wi d e blade or the th i r d prong are
provided for your safety. If the provided plug does
not fit into you r outl et, consult an e lec trician for
replacement of the obsolete outlet.
Do not expose this apparatus to drips or splashes.
•
Do not place any objects filled with liquids, such as
•
vases, on the apparatus.
Do not install this apparatus in a confined space such
•
as a book case or similar unit.
The apparatus should be located close enough to the
•
AC outlet so that you can easily grasp the power cord
plug at any time.
An appa r a tus with Cl a s s I c o n structi o n sh all be
•
connected to an AC outlet with a protective grounding
connection.
Batteries ( batter y pack or batteries installed) should
•
not be exposed to excessive heat such as sunshine,
fire or the like.
Excessive sound pressure from earphones and head-
•
phones can cause hearing loss.
The apparatus draws nominal non-operating power
•
from the AC ou t l et with its STANDBY/ O N in th e
Standby position.
10 Prot e c t th e pow e r co r d from being walke d on
or pinc he d pa r ti c u l a r l y at plugs, co n venience
receptacles, and the point where they exit from the
apparatus.
11 Only use attachments /accessories specified by the
manufacturer.
12 Use onl y with the car t, stand, tripod, bracket, or
table specified by the manufacturer, or sold with the
apparatus. When a cart is used, use caution when
moving the ca r t /apparatus combin ation to avoi d
injury from tip-over.
13 Unplug this apparatus during lightning sto rms or
when unused for long periods of time.
14 Refer all servicing to qualified service personne l.
Servicing is required when the apparatus has been
damaged in any way, such as power-supply cord or
plug is damaged, liquid has been spilled or objects
have fallen into the apparatus, the apparatus has
been exposed to rain or moisture, does not operate
normally, or has been dropped.
TASCAM DP-02/ DP-02C F 3
Page 4
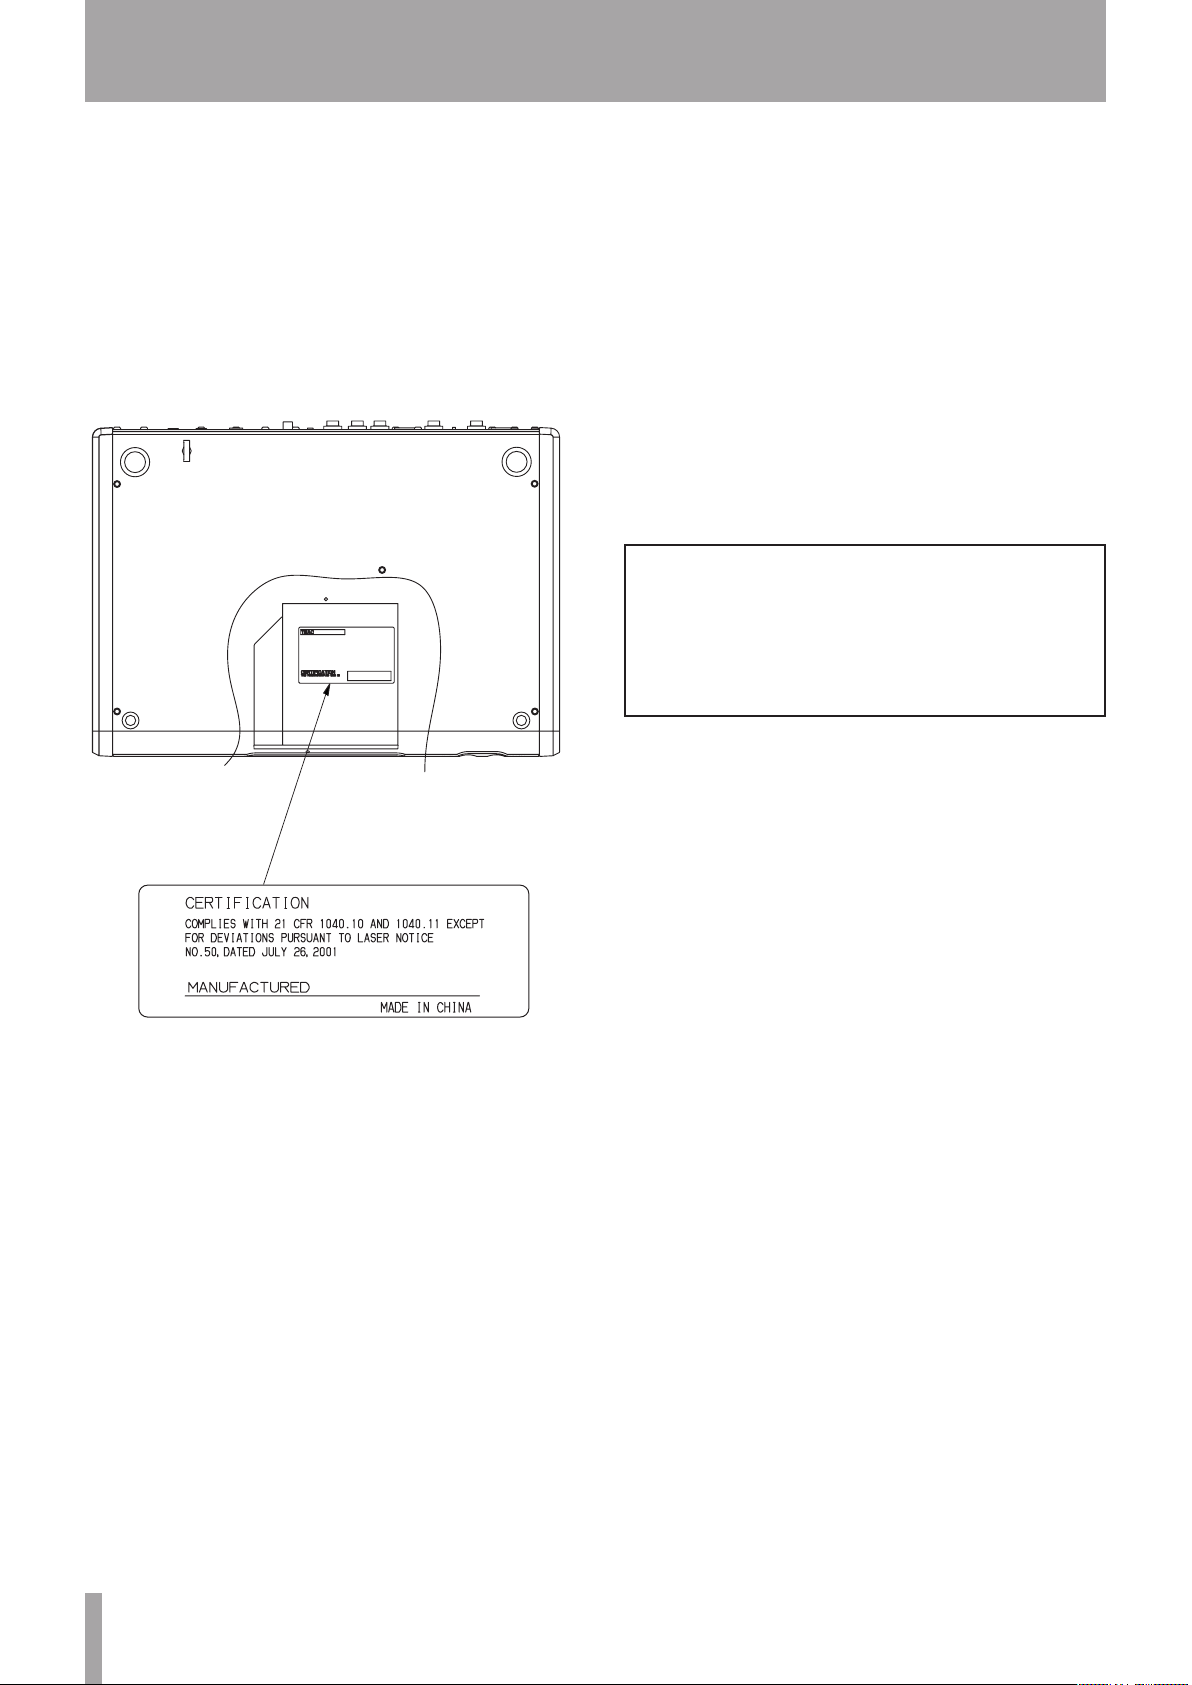
Safety Information
1
For USA
This product has been designed and manufactured
according to FDA regulations "title 21, CFR, chapter
1, subchapter J, based on the Radiation Control for
Health and Safety Act of 1968", and is classified as
a class 1 laser product. There is no hazardous invisible laser radiation during operation because invisible laser radiation emitted inside of this product is
completely confined in the protective housings.
The label required in this regulation is shown at 1.
CAUTION
• DO NOT REMOVE THE PROTECTIVE HOUSING
USING A SCREWDRIVER.
• USE OF CONTROLS OR ADJUSTMENTS OR
PERFORMANCE OF PROCEDURES OTHER THAN
THOSE SPECIFIED HEREIN MAY RESULT IN
HAZARDOUS RADIATION EXPOSURE.
• IF THIS PRODUCT DEVELOPS TROUBLE,
CONTACT YOUR NEAREST QUALIFIED SERVICE
PERSONNEL, AND DO NOT USE THE PRODUCT
IN ITS DAMAGED STATE.
• CLASS 1M INVISIBLE LASER RADIATION WHEN
OPEN AND INTERLOCKS DEFEATED. DO NOT
VIEW DIRECTLY WITH OPTICAL INSTRUMENTS.
Optical pickup:
Type : HOP-6201T
Manufacturer : Hitachi Media Electronics Co,Ltd.
Laser output : Less than 75 mW on the objective lens
(record)
Wavelength : 777 to 787 nm
4 TASCAM DP-02/ DP-02C F
Page 5

Contents
1 – Starting out with your
DP-02/DP-02CF ....................... 7
Getting started .................................. 7
DP-02 Line-up ................................................ 7
Manual conventions...................................... 7
Copyright .......................................................8
What’s in the box .......................................... 8
Precautions for placement and use ............. 8
Beware of condensation ............................... 8
Media considerations (DP-02CF only) .......... 8
Loading the CF card into the unit
(DP-02CF only) ................................... 9
Starttup & shutdown ........................ 9
Starting up the unit ......................................9
Shutting down the unit .............................. 10
The ACCESS light ......................................... 10
How to play back demo songs
(DP-02 only) ......................... 10
Navigation ....................................... 11
The SHIFT key ................................... 11
Titling ............................................... 11
Connecting your unit to other
equipment ...........................12
Balanced XLR inputs ................................... 14
Features of the DP-02/DP-02CF ....... 15
Top panel ..................................................... 15
Front panel .................................................. 19
Rear panel .................................................... 20
Side panel (DP-02CF only) ..........................20
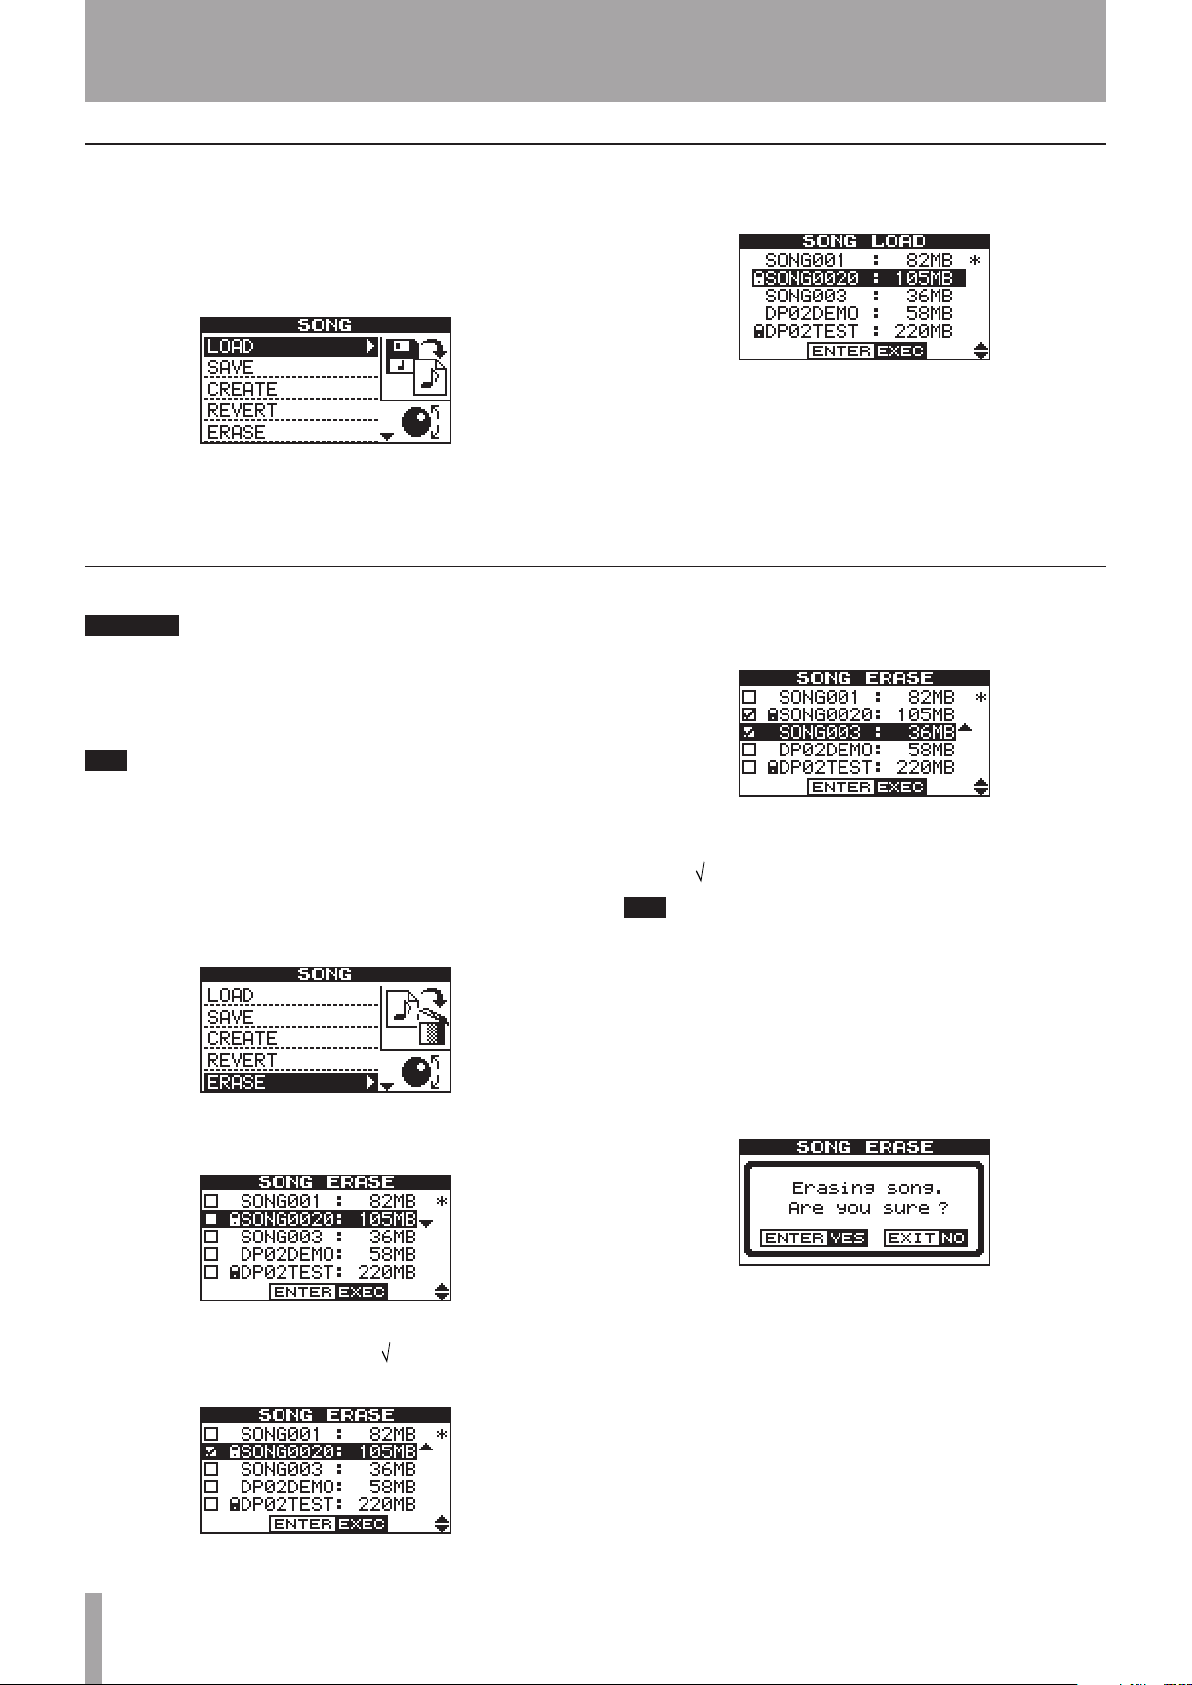
Managing your songs .....................21
Creating a new song ................................... 21
Storing songs ............................................... 21
Reverting to last version ............................ 21
Loading a saved song ................................. 22
Erasing a song(s) ......................................... 22
Song information ........................................23
Assigning inputs .............................23
Clearing an assignment..................................... 23
Recording ......................................... 24
More advanced features .................24
Using marks to locate positions ................. 24
Punching recording .....................................25
Bouncing ......................................................25
Track editing ................................................ 25
Undoing/Redoing an operation .................25
Undoing the last action and redoing the undo
action .................................................... 25
Undoing/Redoing actions at once ............. 26
Deleting unused data .................................26
Mixdown and matering ..................27
Mixdown ...................................................... 27
Mastering ..................................................... 27
2 – Advanced techniques ......... 29
Location ........................................... 29
Direct location ............................................. 29
Location marks ............................................ 29
To set a location mark ...................................... 29
To move to a location mark ..............................29
To delete a location mark ................................. 29
To edit a location mark ..................................... 29
IN and OUT marks ....................................... 30
Using the meters .............................30
EQ settings ....................................... 31
Punching ..........................................32
Rehearsal .....................................................32
Punch recording .......................................... 33
Pre-roll and post-roll time .............. 33
Bouncing .......................................... 34
Repeat .............................................. 34
Setting the repeat interval ......................... 35
Working in bars & beats .................35
Tempo setting .............................................35
Selecting the time mode ............................35
Metronome .................................................. 36
When “INTERNAL” is selected at “Output”
[internal metronome] ..............................36
When “MIDI” is selected at “Output”
[MIDI metronome] ..................................36
Working With MIDI ..........................37
MIDI Clock, etc............................................. 37
MIDI timecode ............................................. 37
When “OFF” is selected at “Output” ................37
Disk/CF card management ..............38
Selecting the active partition ..................... 38
Formatting a disk/card ...............................39
Formatting a partition ................................ 40
Formatting the FAT partition ..................... 40
Automatic song creation ............................ 41
Initializing a Compact Flash card
(the DP-02 only) .............................. 41
Advanced song management......... 41
Coping songs ............................................... 41
Protecting a song ........................................ 42
Using the USB connection ..............42
System requirements ..................................42
Disconnecting from Windows 2000 / XP /
Vista systems .......................................... 42
TASCAM DP-02/ DP-02C F 5
Page 6

Contents
Disconnecting from a Macintosh system ...........43
"Open" and "Close" ....................................43
Backing up and restoring songs ....44
Backing up ................................................... 44
Restoring a song .........................................45
Importing and exporting tracks .... 45
Importing a track ........................................ 45
Exporting tracks .......................................... 46
Exporting the mastered stereo tracks ....... 47
About track editing ......................... 47
IN, OUT and TO ................................. 48
Using edit mode ..........................................48
Track editing function .....................48
COPY ® PASTE ............................................48
COPY ® INSERT ........................................... 49
MOVE ® PASTE ........................................... 49
MOVE ® INSERT .......................................... 50
OPEN ............................................................50
CUT ............................................................... 51
SILENCE ........................................................ 51
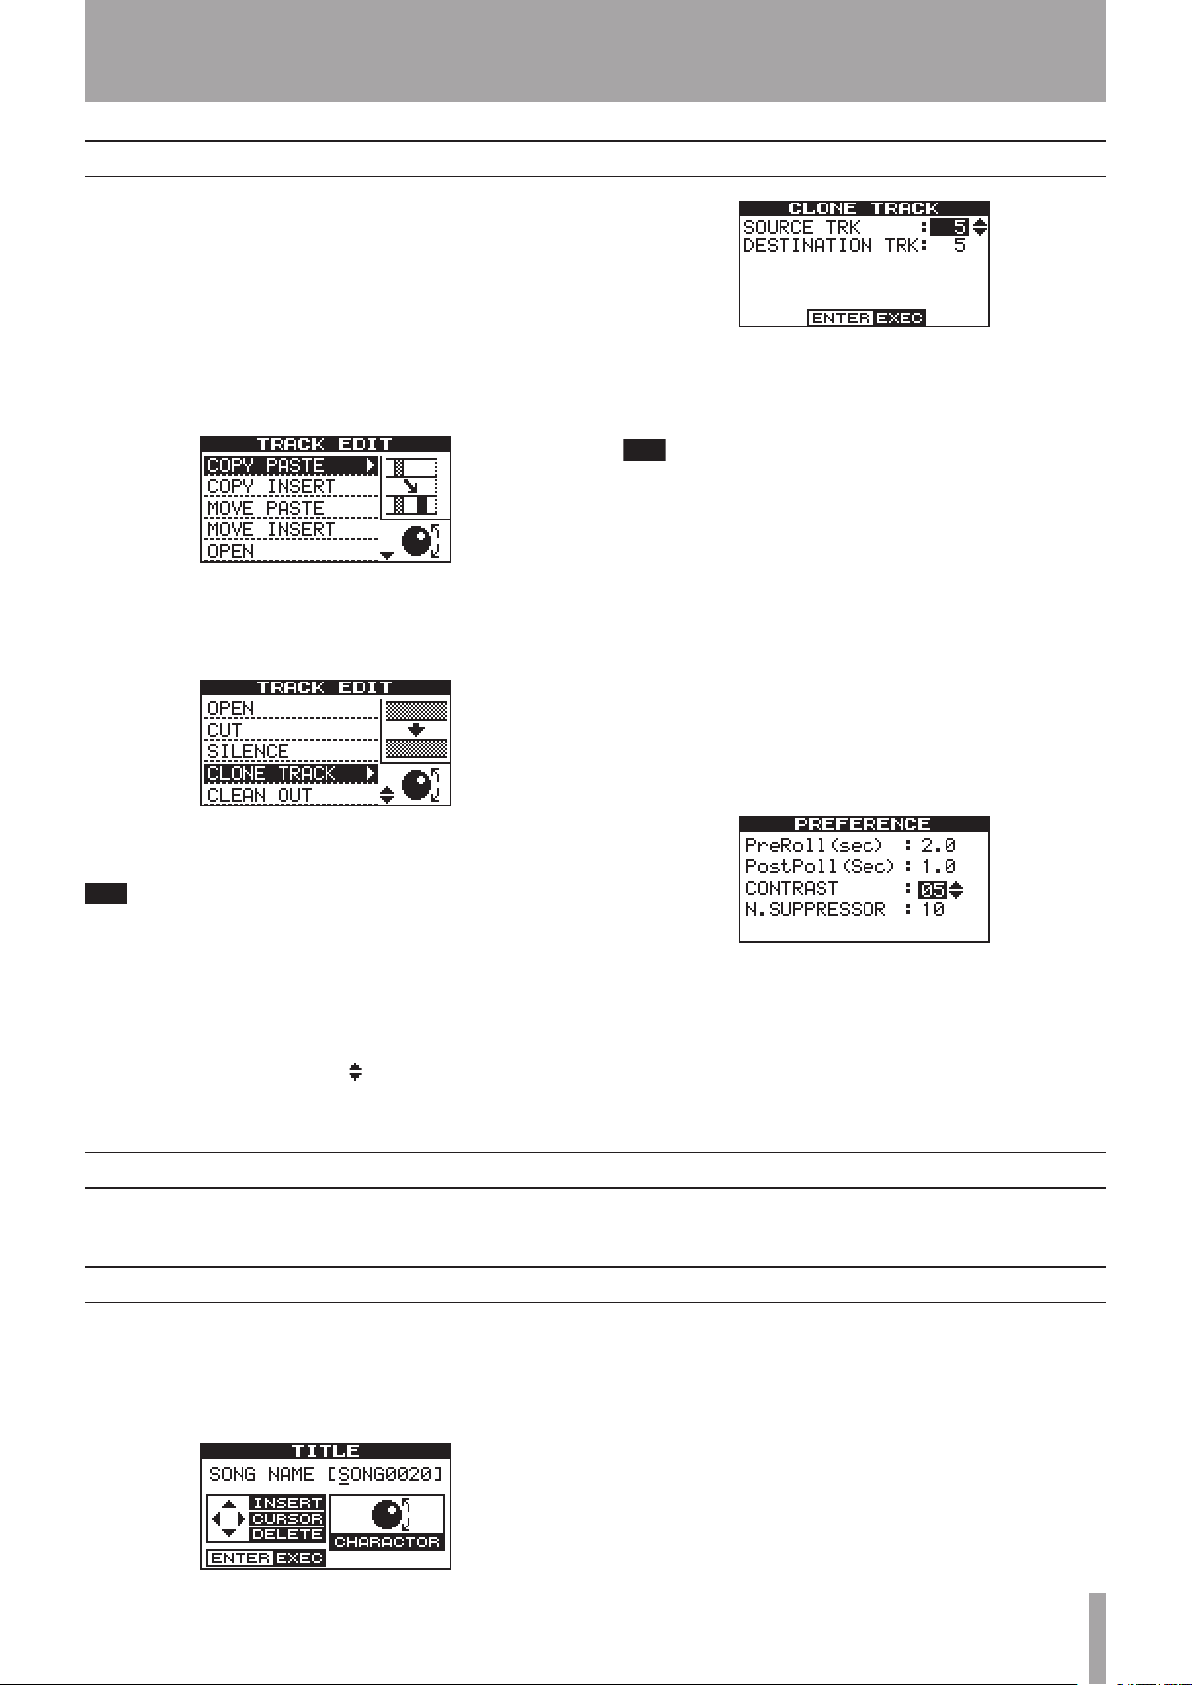
CLONE TRACK .............................................. 51
CLEAN OUT .................................................. 52
Troubleshooting ..............................53
Messages .........................................54
3 – Specifications ..................... 55
Specifications ..................................55
Analog specifications ........................................ 55
Digital specifications .........................................55
Audio performance...........................................55
Physical characteristics ......................................55
Dimensional drawings .................... 56
DP-02 ............................................................ 56
DP-02CF ........................................................ 56
Vocal settings (Vocal) ........................................59
Drum settings (drum) ........................................59
Reverb .............................................. 62
Turning the reverb on and off ...........................62
Using the reverb ...............................................62
Setting the reverb type ..................................... 62
Setting the reverb time .....................................62
About CD-R and CD-RW discs ......... 63
About finalizing .............................. 63
Handling of compact discs.......................... 64
Never use a stabilizer or printable discs.... 64
Media compatibility Table .............. 65
Inserting/Ejecting CDs ....................66
Audio CD performance ...................66
Playing back audio CDs ............................... 66
Making an audio CD ................................... 67
Writing by Disk At Once (DAO) .................. 67
Writing by Track At Once (TAO) .................68
Finalizing CDs .............................................. 68
Erasing a CD-RW .........................................69
Data CD performance ..................... 69
Importing and exporting tracks .... 69
Importing from a CD ................................... 69
Exporting to CD ........................................... 70
Backing up and restoring songs ....71
Backing up songs to CD .............................. 71
Restoring songs from a CD ......................... 72
CD-related Error Message ..............72
Pop-up Massages ............................73
5 – Commonly-used functions .. 75
How do I..? ....................................... 75
Block diagram (DP-02/DP-02CF) ...... 57
4 – DP-02 Appendix .................. 58
Tuning a guitar ................................58
Changing the tuning .................................... 58
Noise reduction ................................................ 58
Multi-effect .....................................59
Assigning the effect ......................................... 59
Selecting the effect type ................................... 59
Selecting the effect ..........................................59
Setting the parameter .......................................59
Setting the effect volume .................................59
Available multi-effect settings................... 60
Electric guitar settings (Elec.Guitar) ...................58
Acoustic guitar settings (Aco.Guitar) ................. 58
Bass guitar settings (Bass Guitar) .......................59
6 TASCAM DP-02/ DP-02C F
Page 7

T I P
NOTE
CAUT IO N
WARNING
1 – Starting out with your DP-02/DP-02CF
Thank you for your purchase of TASCAM’s latest 8-track
digital portastudio, the DP-02/DP-02CF.
The DP-02 and DP-02CF are designed to provide you with
great sound in an easy-to-use compact package, allowing
you to concentrate on the music, and not on the recording
process.
IMPORTANT SAFETY INSTRUCTIONS
Getting started
Read this section first. It contains important basic information about using your DP-02/DP-02CF effectively, and will
help you create exciting original musical projects. When
you have read this chapter (“Starting out with your DP-02/
DP-02CF” on page 7), you will be able to find your way
around the DP-02/DP-02CF, and to make and play back
recordings.
The DP-02/DP-02CF allows you to record many hours of
music, up to two tracks at a time, to a maximum of eight
tracks, and then mix them down to a pair of mastered
stereo tracks using the built-in mixing facilities.
DP-02 Line-up
There are two models, the DP-02 and DP-02CF. The
DP-02/DP-02CF is equipped with phantom-powered XLR
input jacks, and the DP-02 additionally is equipped with
internal effect processors. The DP-02 contains a large hard
disk and also an internal CD-R/RW drive. The DP-02CF
uses a Compact Flash Card (not included with the unit)
memory recorder (not provided with an internal CD-R/RW
drive).
The stereo mix can then be played back into a suitablyequipped CD recorder, etc., or into a computer’s audio
inputs for distribution over the Internet, etc. or transferred
using a fast USB 2.0 connection to a personal computer.
In addition, individual tracks can be imported and exported between your DP-02/DP-02CF and a personal computer,
and songs can be archived, backed up and restored using a
PC.
This manual refers to both models as “the unit”, as the
majority of the functions are common to both models.
Also, their hard disk and CF card are described as “recording media.” Any other exceptions are noted.
Chapter 4 of this manual, “DP-02 Appendix” on page 58,
deals with the features found on only the DP-02. If you
own a DP-02, please read the chapter.
Manual conventions
This first section gives you an idea of the basic operations of the DP-02/DP-02CF and will get you started with
recording. Further features are described in “Advanced
techniques” on page 29.
When we refer to features of the DP-02/DP-02CF such as
keys and connections, we display them like this: MENU.
We refer to features of other equipment like this: AUX IN.
When we show messages, etc., that appear on the screen,
we show them like this: SONG LOAD.
: We give hints and tips on using the DP-02/DP-02CF
when you see this icon.
: A note at the side of the main text provides addi-
tional explanations for special situations.
: A caution shows that you may lose data (your
recordings) if you don’t follow the instructions.
: Warnings should be taken seriously. They
describe situations which can cause injury, or damage to
the equipment if you do not follow the instructions,
This manual cannot begin to be a full guide to multitrack
recording techniques. However, if you visit the TASCAM
Web site (www.tascam.com), you can download various
documents on recording which may be of interest to you.
Troubleshooting The DP-02/DP-02CF was designed
to be easy to use, but sometimes you may need a little help.
See the section “Troubleshooting” on page 53 for a list of
questions you may have, and answers to help you. There’
s also a list of messages that may pop up, with an explanation of their meaning, and suggestions on what to do (see
“Messages” on page 54).
How to do it? At the back of this manual, there is
a chapter called “Commonly-used functions” on page
76. Refer to this section when you want to know how to
perform a particular operation.
TASCAM DP-02/ DP-02C F 7
Page 8

IMPORTANT SAFETY PRECAUTIONS
NOTE
WARNING
1 – Starting out with your DP-02/DP-02CF
Copyright
Windows, Windows XP, Windows 2000, and Windows
Vista are trademarks of Microsoft Corporation.
Macintosh, MacOS, and MacOS X are trademarks of
Apple Computer.
What’s in the box
When you unpack the box, you should find (as well as this
manual):
The unit itself (DP-02, or DP-02CF)
•
Power adaptor
•
Power cable suitable for your region
•
Warranty card
•
Precautions for placement and use
The DP-02/DP-02CF may be used in most areas, but to
maintain top performance, and prolong operating life,
observe the following notes, precautions and environmental conditions:
Avoid exposing it to extremes of temperature and
•
humidity and avoid mechanical shocks and vibration.
Keep the unit away from strong magnetic fields (TV
•
sets, computer monitors, large electric motors, etc.).
The nominal temperature should be between 5°C and
•
35°C (41°F and 95°F).
Relative humidity should be 30 to 90 percent.
•
Beware of condensation
If any of these items is missing, contact your TASCAM
supplier.
When using the unit, use only the power adaptor and
cable supplied with product. Do not use this power
adaptor and cable with any other product.
As the unit may become hot during operation, always
•
leave sufficient space above the unit for ventilation. Do
not install this unit in a confined space such as a bookcase, and do not put anything on top of the unit.
Avoid installing this unit on top of any heat-generating
•
electrical device such as a power amplifier.
Make sure that the unit is mounted in a level position for
•
correct operation.
The voltage supplied to the unit should match the volt-
•
age as printed on the rear panel. If you are in any doubt
regarding this matter, consult an electrician.
If the unit is moved from a cold to a warm place, or used
after a sudden temperature change, there is a danger of
condensation; vapor in the air could condense on the
internal mechanism, making correct operation impossible.
To prevent this, or if this occurs, let the player sit for one or
two hours at the new room temperature before using.
Media considerations (DP-02CF only)
The capacities and performance of your DP-02CF will
vary based on the speed and abilities of the Compact
Flash (CF) media used. Older and some cheaper Compact
Flash (CF) cards use slower memory components and
little internal buffering which results in poor recording
performance. Newer CF cards, not only perform reading
and writing faster, but also come in larger storage size.
A card more than 512 MB should be used on the
DP-02CF.
The DP-02CF supports only Type I Compact Flash media.
Type I cards are typically FLASH-ROM based and provide
higher performance and durability than hard disk cards.
A current list of stated CF cards and their capacities is
maintain and available for viewing on the TASCAM
website at www.tascam.com
8 TASCAM DP-02/ DP-02C F
Page 9
1 – Starting out with your DP-02/DP-02CF
CF
CAUT IO N
NOTE
CAUT IO N
T I P
NOTE
WARNING
IMPORTANT SAFETY INSTRUCTIONS
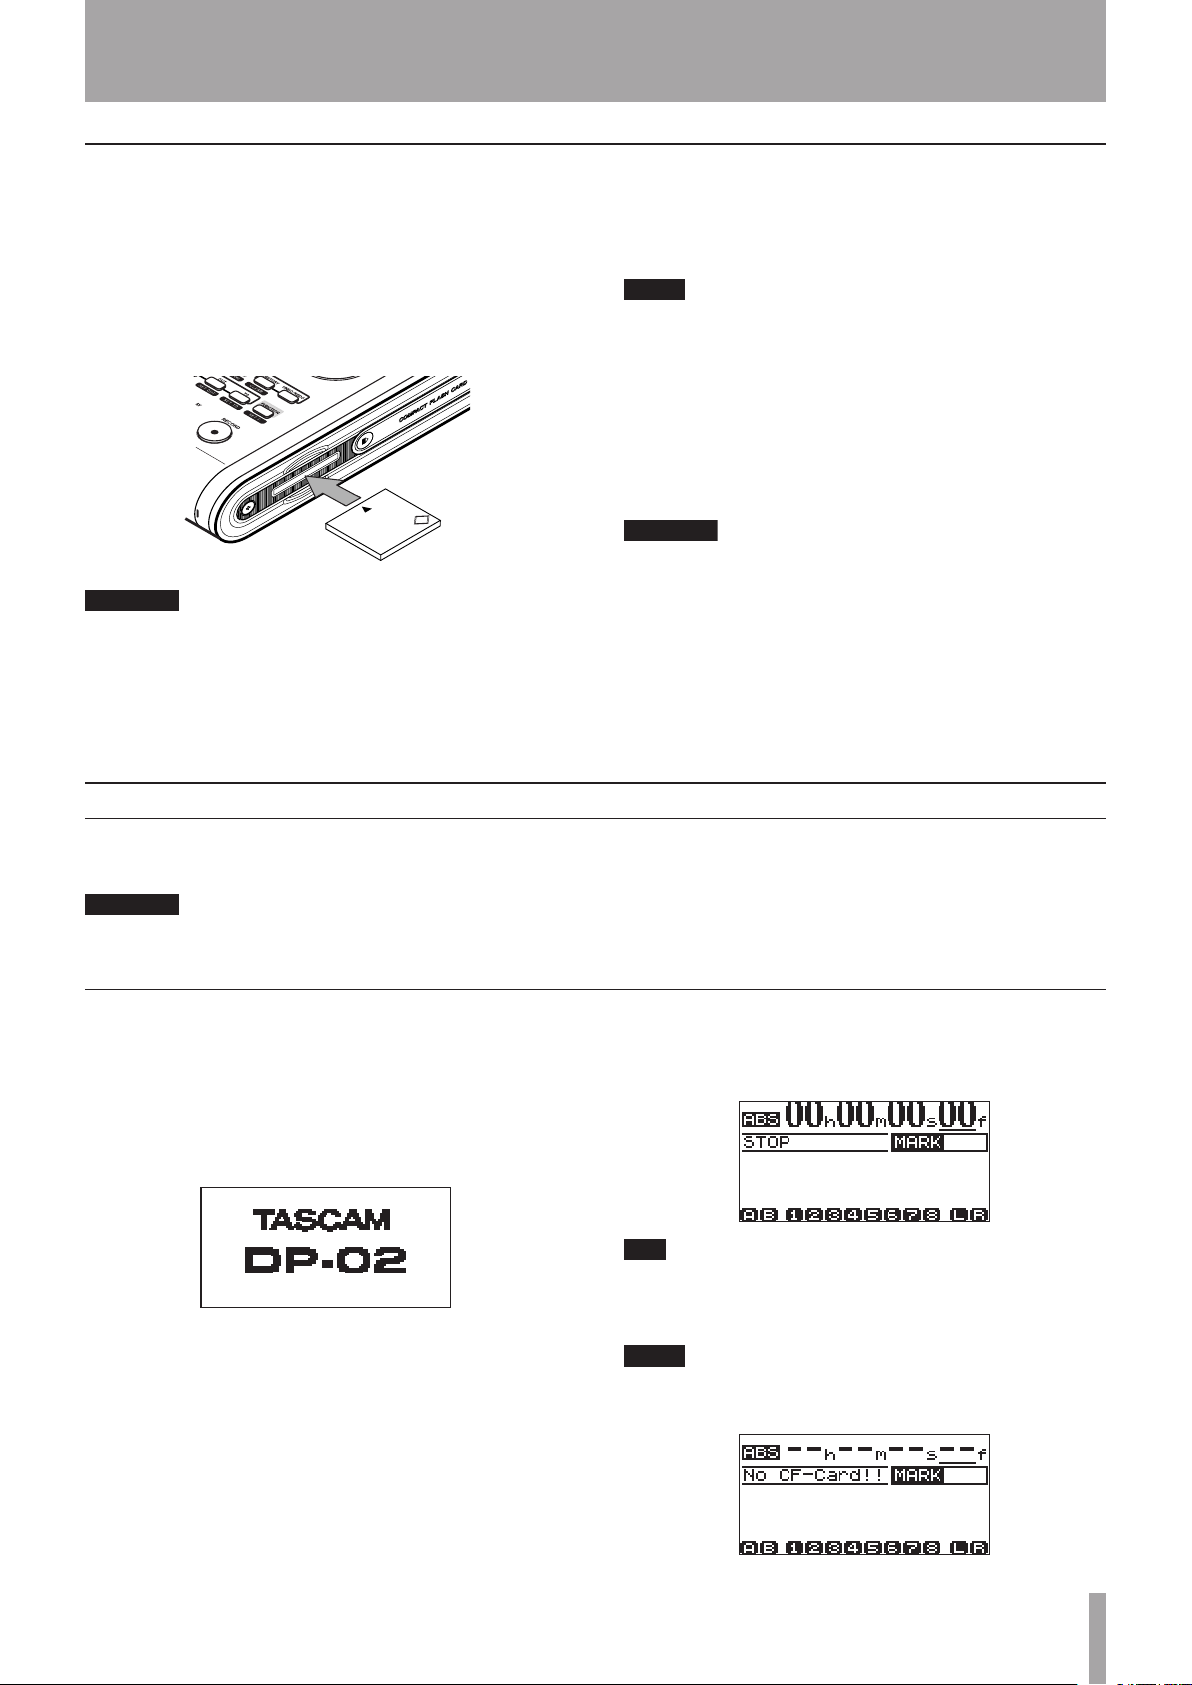
Loading the CF card into the unit (DP-02CF only)
On the DP-02CF, a CF card is used as a recording media
for recording and playback. The CF card should be loaded
into the unit before the power is turned on.
1. Slide the door to open the COMPACT FLASH CARD
slot on the side panel to the right, and gently insert a
card, label side up, into the unit’s slot.
If the card is the wrong way up, or backwards, when
inserted into the slot, applying excessive pressure may
damage the slot or the card. Do not force the card in
to avoid damage to the unit or the card, remove and
re-orient the card so that it slides in easily.
2. Close the slide door. With the door opened, the
DP-02CF cannot be used.
To use a new CF card, you need to format the card first
(see “Formatting a disk/card” on page 39).
Ejecting the card:
Turn off the power to the unit first, slide the door to open
and remove the card by hand (there is no eject lever on the
unit).
Do not remove the card when the unit is turned on.
Always turn the power off before you take the card
out from the unit.
Starttup & shutdown
Read this section to understand how to power up and
power down the unit.
When switching the unit on and off, we suggest that
you turn down the volume of any speakers or ampli-
Starting up the unit
Connect the power adaptor to the unit, the power cable
to the power adaptor, and the power cable to the power
supply.
Press the POWER switch on the top panel to turn on the
unit. The display shows a welcome message.
The system is loaded, and the last saved song is then loaded.
The ACCESS indicator f lashes to show the hard disk/CF
card is in use while the song is being loaded, and the display
shows the current operation.
fiers connected to the unit. Also, do not wear headphones connected to the unit when switching power
on or off. This will avoid damage to speakers, etc. and
possible damage to your hearing.
When the ACCESS light goes off, the display shows the
“home screen”:
You can reach this screen from most operations by
pressing HOME or repeatedly pressing the NO/EXIT
key.
When the power is turned on without a CF card loaded
into the unit, the home screen shows as follow:
TASCAM DP-02/ DP-02C F 9
Page 10
IMPORTANT SAFETY PRECAUTIONS
NOTE
CAUT IO N
T I P
WARNING
1 – Starting out with your DP-02/DP-02CF
Shutting down the unit
Pressing the POWER switch on the top panel shuts down
the unit automatically.
First, stop playback or recording, and press the POWER
switch for about seconds. While the unit is shutting down
(storing the song data to hard disk or CF card) you will see
the display shown here.
Once shut down starts, all key presses are ignored.
If you turn off the power accidently while the unit is
in operation, the unit cannot shut down properly so
all unsaved data will be lost. We recommend that you
save the data manually often.
There is a hook on the bottom of the unit to prevent
the adapter cable being pulled accidently.
The ACCESS light
This indicator shows that the hard disk, CF card, or the
CD-RW drive is in use. Although the unit is not exactly a
delicate piece of equipment, you should take care with it,
as with all electronic equipment, especially when the hard
disk or CF card is in operation or when CD-RW drive is
writing to CDs.
Do not move the DP-02/DP-02CF or turn it off or
disconnect the power or open the CF card door
(DP-02CF only) when the ACCESS indicator is lit, to
avoid damage to the recording media and possible loss
of data.
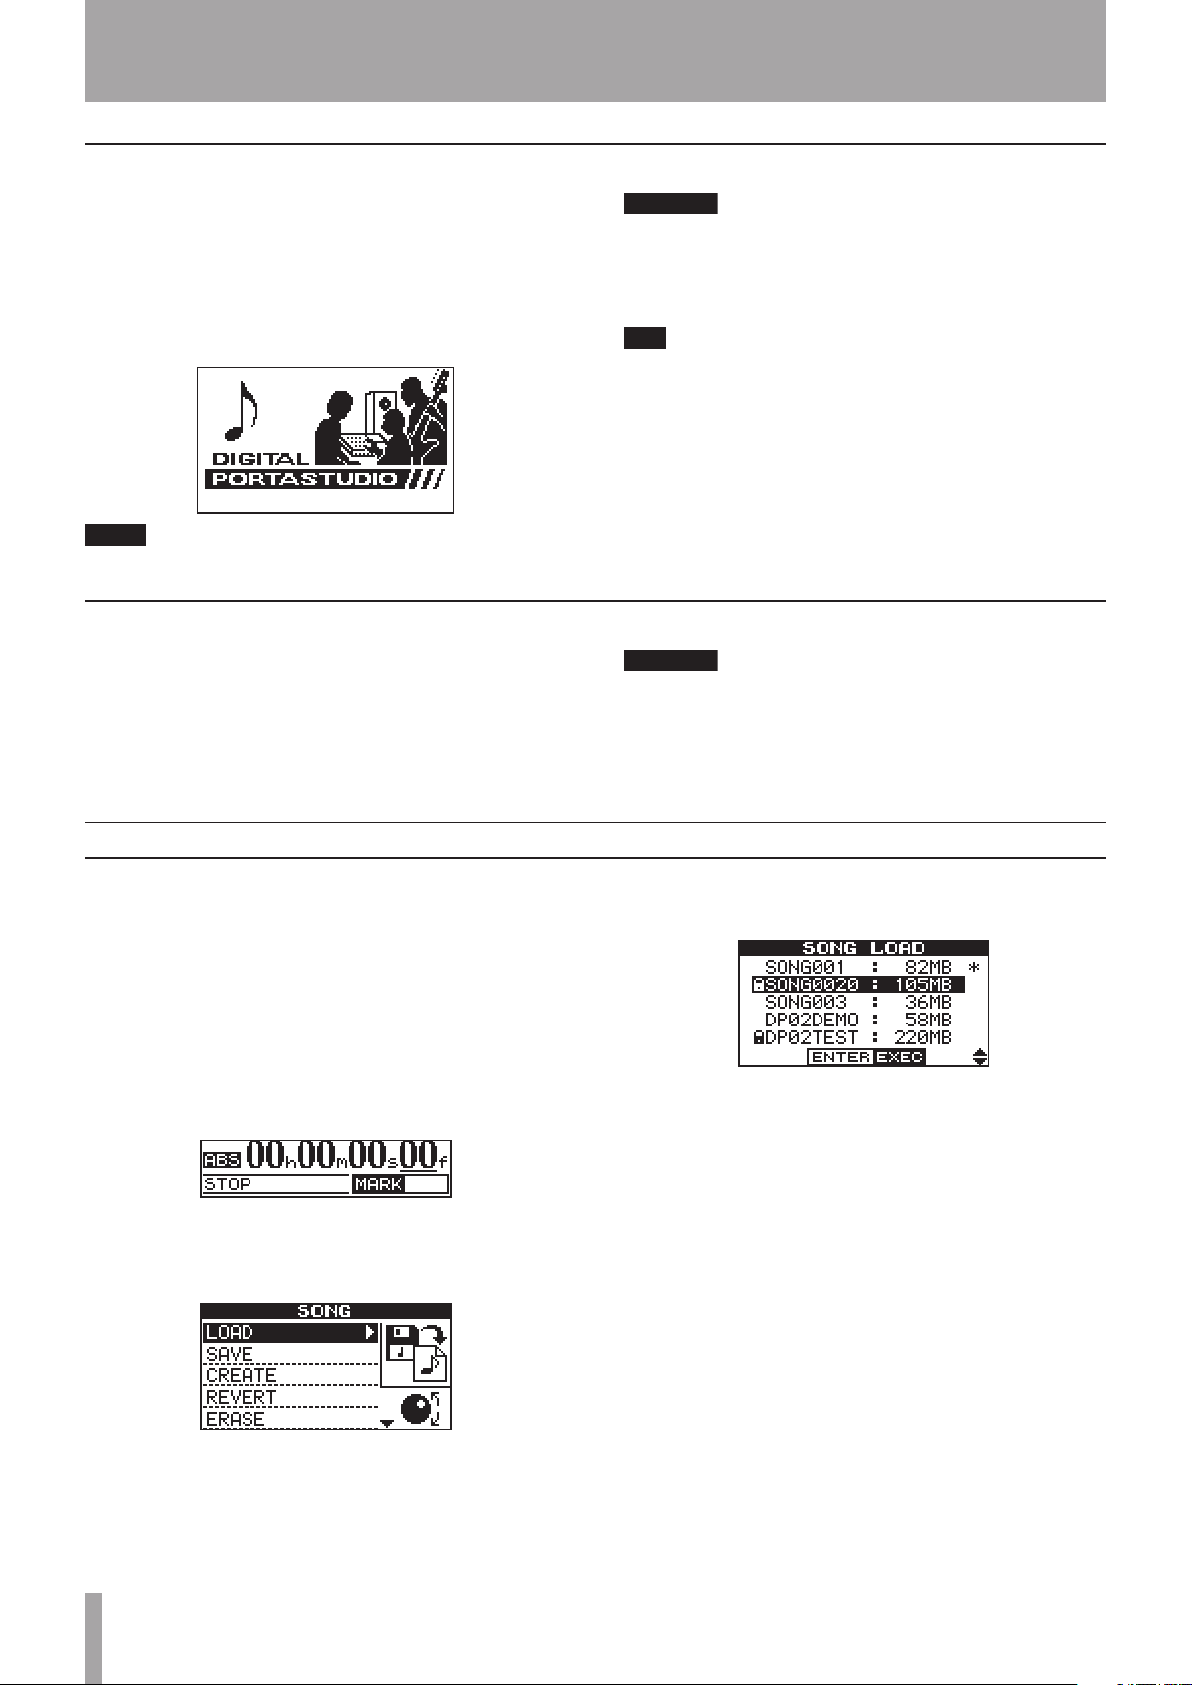
How to play back demo songs (DP-02 only)
Before the unit is shipped, demo songs are stored on its
hard disk. Follow the procedure below to play back these
demo songs.
1. Connect the LINE OUT connector on the unit to the
amplifier or monitor system. To listen on headphones, insert the headphone plug into the PHONES
jack on the left of the front panel.
2. Turn on the unit. When the unit has started up, the
display shows the home screen.
3. Press the SONG key. The SONG screen is displayed.
If the LOAD action is not selected, rotate the DATA
dial or use the cursor (¶/§) keys to highlight it.
4. Press the ¥ cursor or YES/ENTER key. The SONG
5. Use the cursor (¶/§) or DATA dial to select
A pop-up screen appears while loading.
When the demo is finished being loaded, the display
6. Press the NO/EXIT key or HOME key to return to
LOAD screen is displayed.
DP02DEMO and press the YES/ENTER key.
returns to the SONG screen.
the home screen.
7. Press the PLAY key to play back the demo songs.
Eight tracks of each demo song is available. Adjust
the fader, MASTER fader, PAN and other controls
for each channel.
To adjust the volume of the headphones, use the
PHONES knob on the top panel.
10 TASCAM DP-02/DP- 02CF
Page 11
1 – Starting out with your DP-02/DP-02CF
T I P
T I P
IMPORTANT SAFETY INSTRUCTIONS
Navigation
The unit uses 4 menu systems (MENU, SONG, TRACK
EDIT) (and also CD on the DP-02 only) which allow you to
make settings, and perform many operations. This section
explains how to use the menu system and to check and
make settings.
Here the TRACK EDIT system is explained as an example.
1. Press the TRACK EDIT key to bring up the opening
menu screen:
2. Use the DATA dial or the cursor (§/¶) keys to scroll
up and down through the list of top-level menus.
Here the CLONE TRACK action is highlighted.
An inverted triangle appears when the menu is
highlighted.
4. Use the cursor (§/¶) keys to highlight the value of
the item shown on the left.
Rotate the DATA dial to change the value.
To go up a level in the menu “tree”, press the NO/EXIT
key or the ˙ key.
Some screens show a number of lists to select, or confirm
the action. In these cases, you should use the cursor (§/¶
) keys or the DATA dial to highlight and select the item, or
use the YES/ENTER key to enter the action.
If you want to adjust the contrast of the display:
1. Press the MENU key and select the PREFERENCE
action using the cursor (¶/§) keys or the DATA dial.
2. Press the YES/ENTER or ¥ cursor key to bring up
the PREFERENCE screen.
The DATA dial icon is also shown right at the bottom
which indicating the dial can be used to select items.
At the bottom right of all menu screens is a symbol
showing whether there are more menus below the
current list (¶), above the current list (§), or above
and below the current list ( ).
3. Press the ¥ cursor key or YES/ENTER key to enter
the selected menu. The screen shows as below:
The SHIFT key
The SHIFT key modifies the behavior of a number of
different keys. When you press and hold it while pressing
Titling
You can give titles to your songs, exported tracks, etc.
Here’s how you do it:
Press and hold the SHIFT key and press the TITLE key to
bring up the screen like the one below:
3. Select the value shown to the right of the CONTRAST
preference using the cursor (¶/§) keys, and rotate
the DATA dial to adjust the value 1 to 10. The
contrast of the display changes equally as the value
is changing.
4. Press NO/EXIT to go back to the MENU screen.
another key, the other key takes on the function shown in
the label shown below the key (black-on-orange).
Use the DATA dial to change the letter above the under-
lined cursor. You can choose from common punctuation
marks, numbers, capital (UPPERCASE) letters, and small
(lowercase) letters.
Use the § cursor key to insert a blank space at the cursor
position, and use the ¶ cursor key to delete the character.
When you have finished entering the name, press YES/
ENTER. The song, with its new name, is stored to record-
ing media.
TASCAM DP-02/ DP-02C F 11
Page 12
IMPORTANT SAFETY PRECAUTIONS
Instruments to INPUT A and B
Microphones to INPUT Aand B
Drum machine
PHONES
Footswitch
MIDI OUT
STEREO MIX (L, R)
MIDI IN
SEND
RETURN (L, R)
External effects unit
LINE OUTPUT (L, R)
REC OUT/PLAY IN
Stereo amplifier
2-track recorder
Guitars and basses to
INPUT A
1 – Starting out with your DP-02/DP-02CF
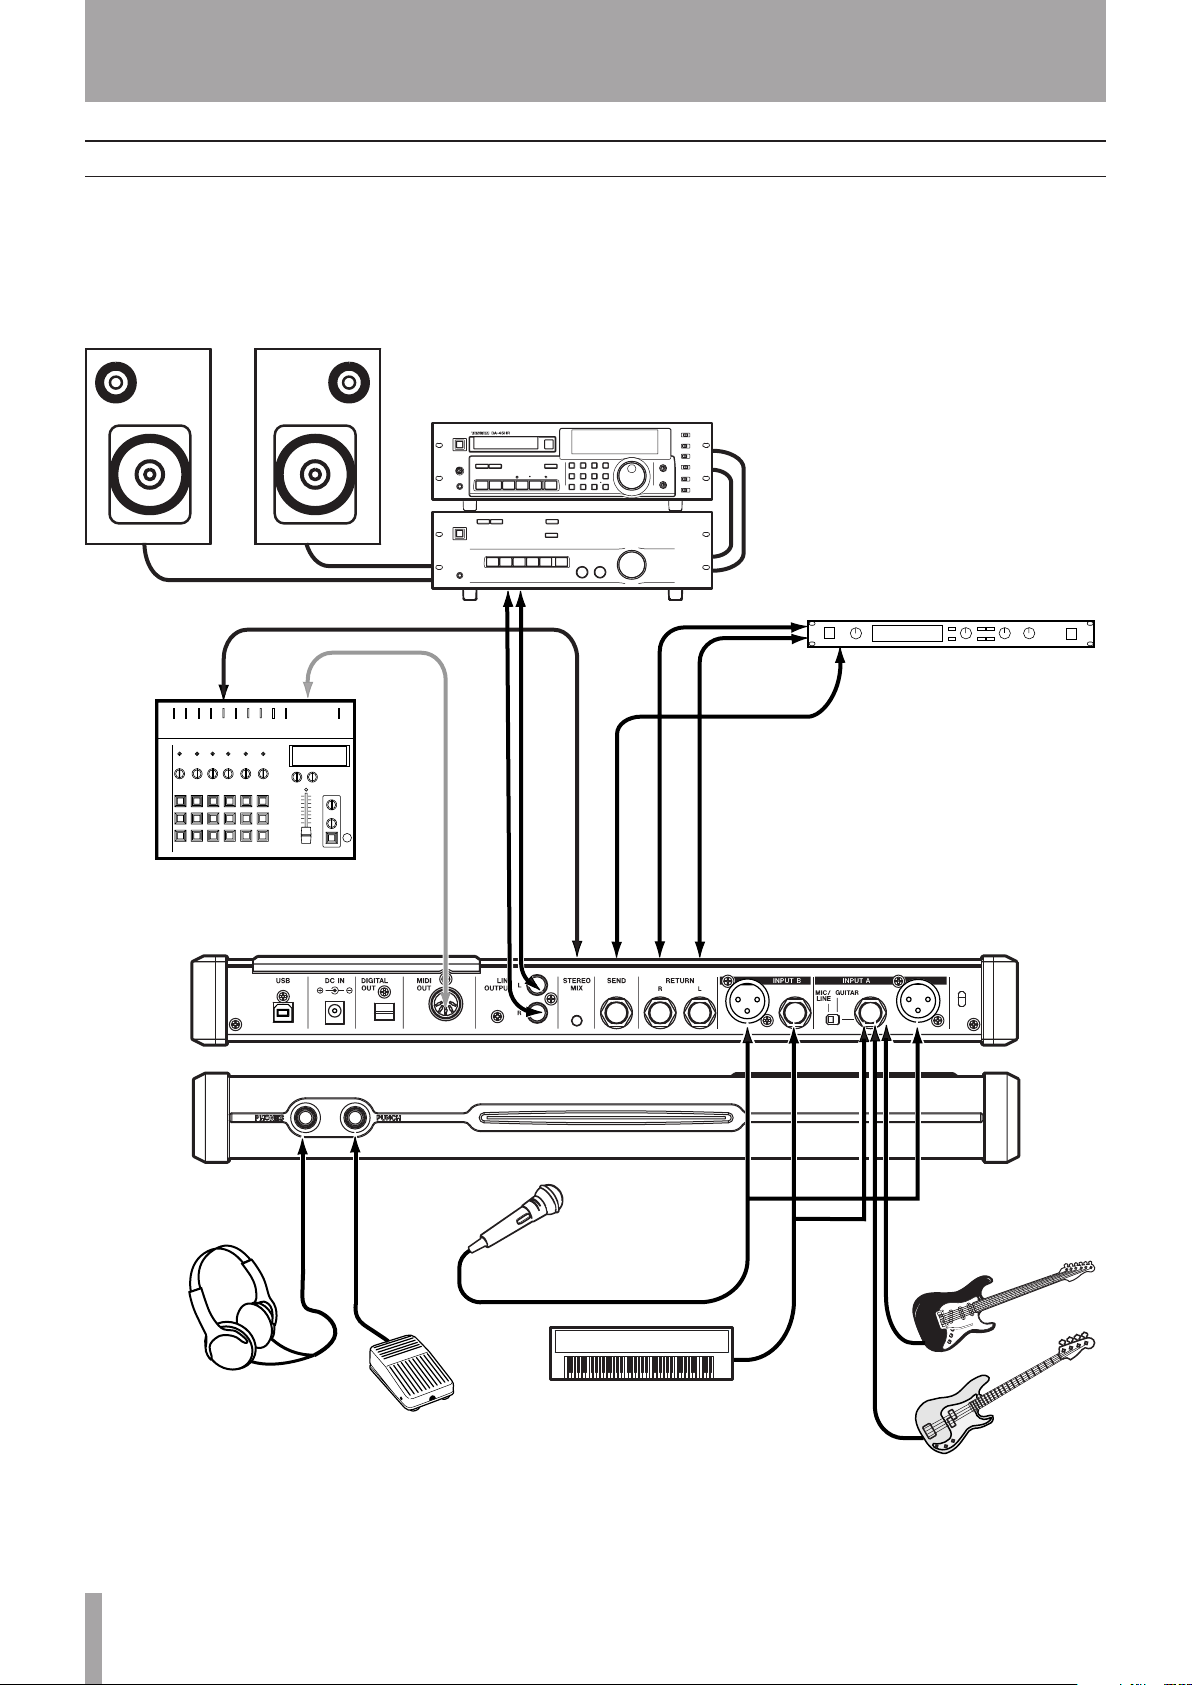
Connecting your unit to other equipment
Before you start recording with the unit, you will need to
make a few connections to other equipment. The following
picture shows how you can connect the unit to your existing audio setup.
12 TASCAM DP-02 /DP- 02CF
Page 13
DC input
To MIDI sequencer,
drum machine, etc.
From stereo effects
unit outputs
Synths, pre-amps etc.
fo here
Guitars, basses etc. go here
From submixer/MIDI tone
generator, etc.
To analog recorder,
monitoring system, etc.
To effects unit
To digital
recorder, etc.
Microphones go here
NOTE
WARNING
T I P
NOTE
NOTE
NOTE
1 – Starting out with your DP-02/DP-02CF
IMPORTANT SAFETY INSTRUCTIONS
Microphones are connected to the rear panel inputs.
Set the GUITAR switches to MIC/LINE. Turn the input
level controls so that the OL indicators light up only in the
loudest part of the recording.
The unit includes phantom-powered XLR microphone
input connectors. See “Balanced XLR inputs” on page
14 for details of using these connectors.
Synthesizers, etc. including drum machines, guitar
amplifier simulators, active basses, etc. as well as CD players, cassette decks, and so on can be connected to the rear
panel input jacks using standard 1/4” mono plugs (unbalanced). When you are recording a stereo source, make sure
the INPUT MODE key is set to STEREO (see “The INPUT
MODE key” below).
Set the GUITAR switch to MIC/LINE. Adjust the input level
controls and use the instrument’s output volume controls
to adjust the level so that the OL indicators light up only
during the very loudest passages.
NEVER plug the speaker outputs of a guitar amplifier
into the unit.
Guitars and basses (passive types) are connected to
the rear panel INPUT A using a standard 1/4” mono plug
(unbalanced).
Set the MIC/LINE switch to GUITAR. Turn the input level
control until the OL indicators barely light on the loudest
passages.
Use the built-in tuner (on the DP- 02 only) to tune the
guitar or bass (see “Tuning a guitar” on page 58).
The INPUT MODE key You will use this key when you
are recording from input A and input B at the same time.
This top panel key affects the way that you monitor the
input signals, both through the headphones and/or through
the LINE OUTPUT jacks. There are two positions:
INPUT MODE does not affect the recording at all—just
the monitoring process.
MONO x 2—The signals from input A and input B are
•
both sent to the center of the monitoring “stage”.
In the MONO X 2 mode, the A and B input signals are
added together in the center, and you may hear distortion in the monitoring system This does not affect the
recording, though.
STEREO—The signal from input A is sent to the left,
•
and the signal from input B is sent to the right of the
monitoring “stage” forming a stereo pair for use when
you are recording stereo instruments such as synthesizers, etc.
Monitoring and recording Use the rear panel LINE
OUTPUT RCA jacks to connect the unit to your monitoring
system (that is, an amplifier/ speaker setup). When you’re
ready to make your final stereo master, you can use these
jacks to connect to an analog recorder.
A typical setup would connect these jacks to the AUX IN
of a stereo system.
Use the stereo system’s selector switch to listen to the AUX
source when tracking, bouncing or mastering on the unit.
“Tracking” means recording tracks on the unit.
“Mastering” means taking these recording tracks and
mixing them down to stereo.
When you have mastered the stereo track and you want
to record it, set the stereo monitoring system so that the
recorder is set to the AUX source. Now you are monitoring
(or listening) through your stereo system.
Effect processor When you want to use an external effect processor with the unit, connect the rear panel
TASCAM DP-02/ DP-02C F 13
Page 14

IMPORTANT SAFETY PRECAUTIONS
NOTE
WARNING
NOTE
NOTE
1 – Starting out with your DP-02/DP-02CF
SEND of the unit to the mono input of the processor (1/4”
unbalanced jack).
The DP-02 owns internal reverb processors. However,
you can also use an external effect processor if you
prefer.
Connect the stereo output of the processor to the RETURN
jacks of tthe unit (1/4” unbalanced jack).
External stereo input The unit has a 1/8” stereo mini
jack on the rear panel marked STEREO MIX.
This can be used to connect an external stereo sub-mixer,
synthesizer, drum machine, CD player, etc.
This stereo signal is routed to the analog LINE OUTPUT
jacks. They can not be recorded on the unit, nor can you
adjust the signal level using the unit.
Balanced XLR inputs
These inputs enable you to connect condenser microphones
(the same type as those used in professional recording
studios).
Digital output Use a standard optical cable to connect
this to a suitable digital stereo input of monitoring system,
or stereo recorder.
You can connect a digital recorder (CD,MD) using the
digital connection, while using the LINE OUTPUT jacks
for monitoring.
This signals sent from this are the same as those sent from
the LINE OUTPUT jacks (although the STEREO MIX
signals are not output through the digital output).
MIDI output Use this (rear panel) to connect a sequencer, drum machine, etc. which can be started, stopped and
synchronized with the unit. See “Working with MIDI” on
page 37 for details.
Phantom power The PHANTOM switch can be turned
on or off to supply +48V phantom power to the XLR
connectors. Phantom power is not supplied to the 1/4”
jacks.
These XLR inputs are wired with these pin assignments: 1=ground, 2=hot, 3=cold.
The +48V phantom power supply allows you to power
condenser microphones. Without such phantom power,
many condenser microphones will not work. Some, however, use internal batteries.
Never connect or disconnect microphones to or from
the XLR connectors with the phantom power turned
on to avoid a loud pop noise.
Never turn the phantom power on when unbalanced dynamic microphones are plugged into the XLR
connectors to avoid any damage to the unit.
Consult any documentation that came with your microphones for full details of power requirements, etc.
Input level controls Use the input level controls the
same way you would microphones that use 1/4” jacks.
However, some microphones are more powerful than
others, and you may need to turn down the control to
prevent overloading.
14 TASCAM DP-02/ DP-02C F
Page 15
1 – Starting out with your DP-02/DP-02CF
IMPORTANT SAFETY INSTRUCTIONS
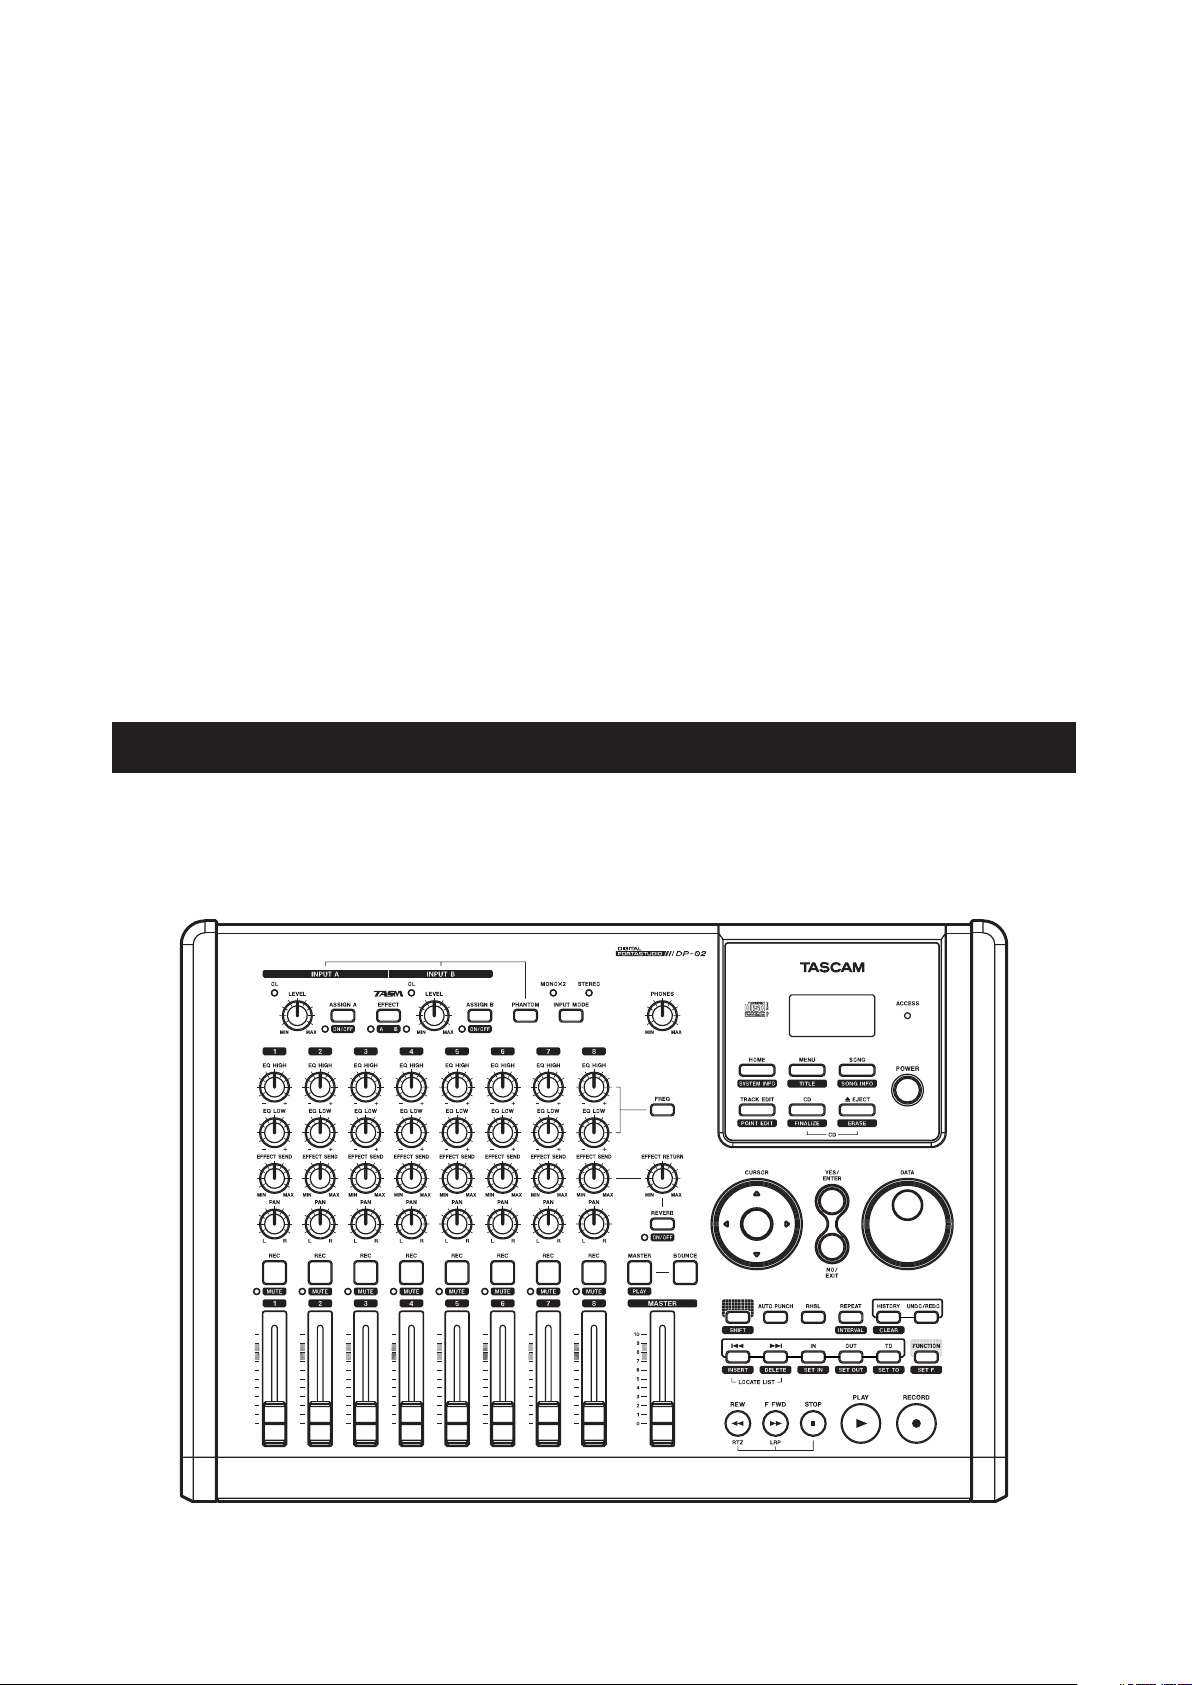
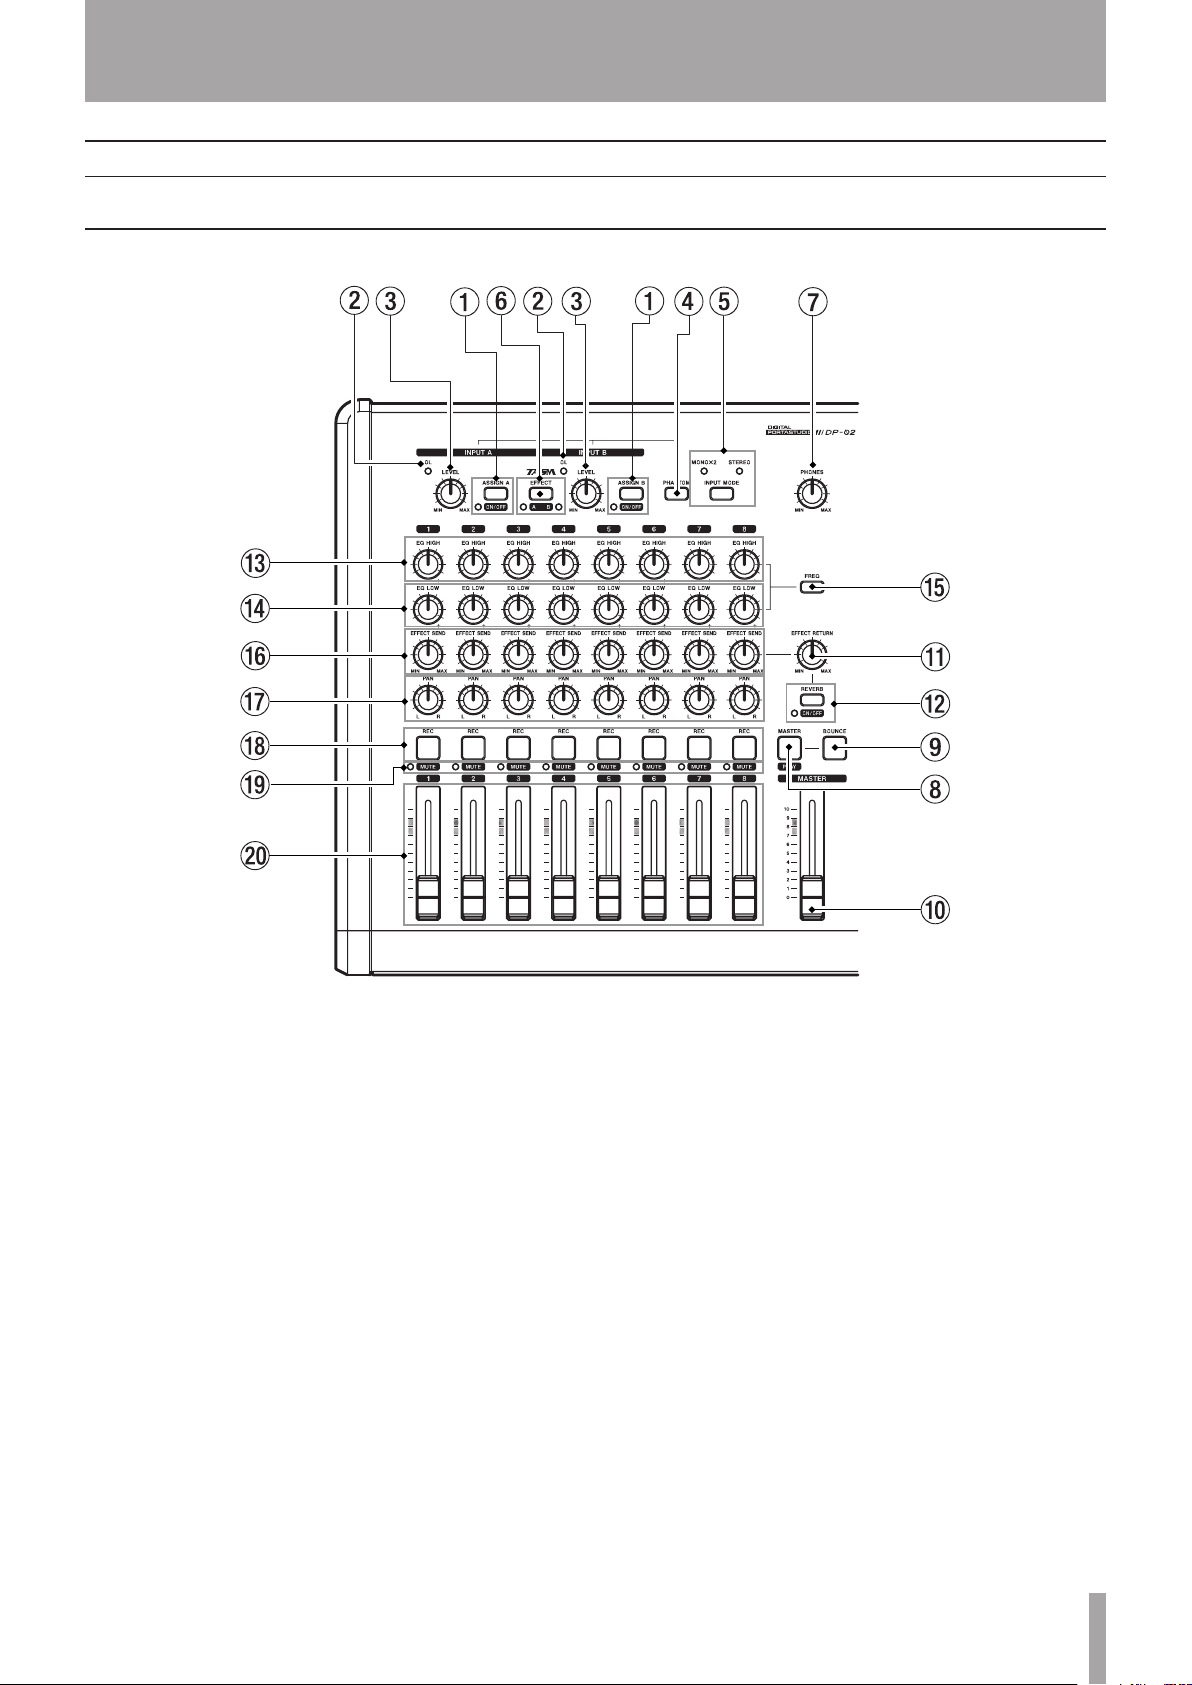
Features of the DP-02/DP-02CF
This section explains the features of the DP-02 and DP-02CF.
Top panel
1 ASSIGN (A,B) and ON/OFF keys
The ASSIGN (A,B) keys assign the input signals
through the INPUT A or B to the tracks (1 to 8). (See
“Assigning inputs” on page 23.)
The ON/OFF keys are used with the SHIFT key to turn
the INPUT (A,B) on or off. When the input is set to on,
the indicator next to the key lights up. When off, the
indicator is unlit.
2 OL indicators
The indicator lights when the input signal is too high.
3 LEVEL controls
Use this knob to adjust the INPUT (A,B) signal.
4 PHANTOM key
This key provides the phantom power (+48 V) to the
XLR input jacks (INPUT A,B). The phantom power is
not supplied to the 1/4 phone jacks.
5 INPUT MODE key and the indicators
Use this key to select the MONO X 2 or STEREO
modes (see “The INPUT MODE key” on page 13 for
details).
6EFFECT key / A B key (DP-02 only)
Pressing the EFFECT key brings up the MULTI
EFFECT screen.
The A B key is used with the SHIFT key to select the
input signal (INPUT A or B) which the internal multieffects is used with (see “Multi-effect” in chapter 4
“DP-02 Appendix” on page 59). When INPUT A is
selected, the indicator next to A letter lights up. When
INPUT B is selected, the indicator next to B letter lights
up. When both indicators are unlit, neither of the inputs
are not selected.
7 PHONES control
Adjusts the headphone volume.
8 MASTER / PLAY key
Pressing MASTER key alone turns the master recording
mode on or off. When on, this key flashes.
With the SHIFT key, PLAY (MASTER) key is used to
turn on or off the master playback mode. When on, this
key lights up (see “Mastering” on page 27).
9BOUNCE key
Turns Bounce mode on or off. When on, this key lights
up.
TASCAM DP-02/ DP-02C F 15
Page 16

IMPORTANT SAFETY PRECAUTIONS
1 – Starting out with your DP-02/DP-02CF
0 MASTER fader
Adjusts the stereo signal level output from the LINE
OUTPUT (L,R), PHONES, or DIGITAL OUT. Also, this
fader adjusts the recording level when performing a
track bounce or mix down.
q EFFECT RETURN control
On the DP-02, this knob adjusts the level of the internal effect return signals, or the external effect return
signals. (See “Block diagram” in the chapter 3 “specifications” on page 57.)
On the DP-02CF, this knob adjusts the level of the
return signals from the RETURN (L,R) jacks.
w REVERB key and ON/OFF key (DP-02 only)
The REVERB key brings up the REVERB screen to
adjust the internal reverb settings.
The ON/OFF key is used with the SHIFT key to turn the
reverb on or off. When on, the indicator lights up. (See
“Reverb” in chapter 4 “DP-02 Appendix” on page 62)
e EQ HIGH controls
Adjusts the level of the high frequencies for each track.
r EQ LOW controls
Adjusts the level of the low frequencies for each track.
t FREQ key
This key brings up the EQ FREQUENCY screen to
adjust the high and low frequencies (see “EQ settings
on page 31).
y EFFECT SEND controls
Adjust the level of each track’s signal sent to the SEND
jack.
On the DP-02, these controls also adjust the level of
each track sent to the internal reverb effects.
u PAN controls
Adjust the panning of the stereo mixed signal on each
track.
i REC keys
Press the REC key alone to put the track in recording
standby mode (only two tracks can be in recording
standby mode at a time), and the key flashes. Pressing
the key again cancels recording standby mode (see
“Recording” on page 24).
When used with the ASSIGN keys, the REC keys also
assign the input A or B to the tracks selected (1). (See
“Assigning inputs” on page 23).
o MUTE keys
These keys are used with the SHIFT key, and mute
the signal on each track when the signals are output.
The indicator on the left of the keys lights up (see
“Mixdown” on page 27).
p TRACK faders
Adjusts the play back level of each track.
16 TASCAM DP-02 /DP- 02CF
Page 17
1 – Starting out with your DP-02/DP-02CF
IMPORTANT SAFETY INSTRUCTIONS
a REW (∆) / RTZ key
When stopped, press the REW (∆) key to move the
playback position of the song being played back backwards. When the key is continuously held down, or
repeatedly pressed, the rewind speed jumps up to 10,
50, 100, 1000 times.
While playing back a song, pressing the REW (∆) key
moves the playback position backwards while the key is
held down.
While playing back a CD, pressing the REW (∆) key
skips the playback position of the track being played
back to the beginning.
The RTZ key locates the playback position to the zero
position and puts the unit in stop mode (Retrn To Zero
function: RTZ). Press and hold down the STOP key and
press the RTZ key.
s F FWD (˚) / LRP key
When stopped, press the F FWD (˚) key to move
the playback position of the song being played back
forwards. When the key is continuously held down, or
repeatedly pressed, the forward speed jumps up to 10,
50, 100, 1000 times.
While playing back a song , pressing the F FWD (˚)
key moves the playback position forwards while the key
is held down.
While playing back a CD, pressing the F FWD (˚) key
skips the playback position to the beginning of the next
track.
The LRP key locates the playback position to where
the last recording was ended, and puts the unit in stop
mode (Last Rec Point: LRP). Press and hold down the
STOP key and press the LRP key.
d STOP (ª) key
This key stops the operation of recording, playback,
forwards, backwards.
On the DP-02, this key also stops playback of a CD.
f PLAY (¥) key
When stopped, press this key to start playback.
With the RECORD key held down, press this key to
start recording.
The key lights up during playback or recording.
While recording, pressing this key stops recording
(punch out) and puts the unit in playback mode (see
“Punching recording” on page 25).
On the DP-02, this key starts playback of the CD.
g RECORD (–) key
When stopped, and when this key and the ¥ (PLAY)
key are pressed at same time, the unit starts recording
and the RECORD key lights up.
While the unit is in recording standby mode (this key
flashes), and when a song is being played back, pressing this key starts recording without stopping playback
(punch in) and this key lights up (see “Punching recording” on page 25).
h AUTO PUNCH key
This key turns Auto Punch mode on or off. When on,
the key lights up (see “Punch recording” on page 32).
j RHSL key
This key turns Rehearsal mode on or off. When on, the
key lights up (see “Rehearsal” on page 32).
k REPEAT / INTERVAL key
The REPEAT key turns Repeat mode on or off. When
on, the key lights up and the unit plays back between
TASCAM DP-02/ DP-02C F 17
Page 18

IMPORTANT SAFETY PRECAUTIONS
1 – Starting out with your DP-02/DP-02CF
IN and OUT point repeatedly (see “Repeat” on page 34).
With the SHIFT key pressed, the INTERVAL key is used
to bring up the REPEAT INTERVAL screen to adjust
the repeat interval time from 0.5 to 9.9 seconds (see
“Setting the repeat interval” on page 35).
l µ / INSERT key
Pressing the µ key skips to the previous location
mark in the song being played back.
With the SHIFT key pressed, the INSERT key is used to
mark a location point (see “Location marks” on page 29).
Pressing the µ and ≤ keys togather displays the
LOCATION MARK list screen.
On the DP-02, while playing back a CD, pressing the
µ key skips the playback position of the track being
played back to the beginning.
; ≤ / DELETE key
Pressing the ≤ key skips to the next location mark.
With the SHIFT key pressed, the DELETE key is used
to delete the location mark (see “Location marks” on
page 29).
Pressing the µ and ≤ key togather displays the
LOCATION MARK list screen.
On the DP-02, while playing back a CD, pressing the
≤ key skips the playback position to the beginning of
the next track.
z IN / SET IN, OUT / SET OUT, TO / SET TO key
Pressing the IN, OUT, or TO keys alone moves to IN,
OUT, or TO point.
b MENU / TITLE key
Press the MENU key to bring up the MENU screen.
With the SHIFT key pressed, the TITLE key is used to
bring up the TITLE screen (see “Titling” on page 11).
n SONG / SONG INFO key
Press the SONG key to bring up the SONG screen.
With the SHIFT key pressed, the SONG INFO key is
used to bring up the SONG INFORMATION screen to
show the information of the song currently loaded.
m TRACK EDIT / POINT EDIT key
Press the TRACK EDIT key to bring up the TRACK
EDIT screen.
With the SHIFT key pressed, the POINT EDIT key is
used to bring up the POINT EDIT screen.
, DATA dial
Use this dial for selection of menu or action, or adjustment of values.
. CURSOR (˙,¥,¶,§) keys
Use these keys to select a menu or action, or to enter
the selection.
The ˙ key can be used to return to the previous screen.
/ YES/ENTER key
Use this key to enter the selection or confirm the
action.
! NO/EXIT key
Use this key to exit from the current menu screen and
go back to the previous screen, or to cancel the selection or action.
With the SHIFT key pressed, the SET IN, SET OUT,
or SET TO keys are used to mark the current playback
position as IN, OUT, or TO points (see “ IN and OUT
marks” on page 30).
x CD / FINALIZE key on the DP-02
Press the CD key to bring up the CD screen.
With the SHIFT key pressed, the FINALIZE key is used
to bring up the FINALIZE screen.
CARD key on the DP-02CF
Pressing the CARD key brings up the CARD screen.
c ø EJECT / ERASE key on the DP-02
This key ejects the CD loaded into the unit.
With the SHIFT key pressed, the ERASE key is used to
bring up the CD-RW ERASE screen (see “Erasing CD-
RW” on page 69).
USB key on the DP-02CF
Press this key to bring up the USB screen (see “Open
and Close” on page 43).
v HOME / SYSTEM INFO key
Press the HOME key to display the home screen (on
some screens, this key does nothing).
With the SHIFT key pressed, the SYSTEM INFO key is
used to display the SYSTEM INFORMATION screen.
@ SHIFT key
This key is always used with another key, which takes
on the function shown in the label below that key
(black-on-orange).
# HISTORY / CLEAR key
Pressing the HISTORY key brings up the HISTORY
list screen. This screen is used to undo or redo many
actions at once (see “Undoing/Redoing actions at once”
on page 26).
With the SHIFT key, the CLEAR key is used to clear
the unused audio parts and histories (actions). (See
“Deleting unused data” on page 26.)
$ UNDO/REDO key
This key is used to undo or redo the action (see
“Undoing/Redoing an operation” on page 25).
% FUNCTION / SET.F key
The FUNCTION key can be used as a short cut key
when assigned to an action. After assigning, pressing
the key calls that action directory.
To assign the FUNCTION key, with the SHIFT key
pressed, press the SET.F key to bring up the SET
FUNCTION list screen. Select an action in the list
and press YES/ENTER to assign the action to the
FUNCTION key.
18 TASCAM DP-02 /DP- 02CF
Page 19
1 – Starting out with your DP-02/DP-02CF
T I P
IMPORTANT SAFETY INSTRUCTIONS
^ ACCESS indicator
On the DP-02, this indicator lights up or flashes while
the unit is writing or importing song data to the CD-R/
CD-RW drive or hard disk.
On the DP-02CF, this indicator lights or flashes while
the unit is writing or importing song data to the CF
card.
& POWER switch
Press the switch to turn the unit on or off. While the
unit is in operation, the POWER switch lights up.
To turn off the power, press this key until DIGITAL
PORTA STUDIO is shown (see “Shutting down the unit”
on page 10).
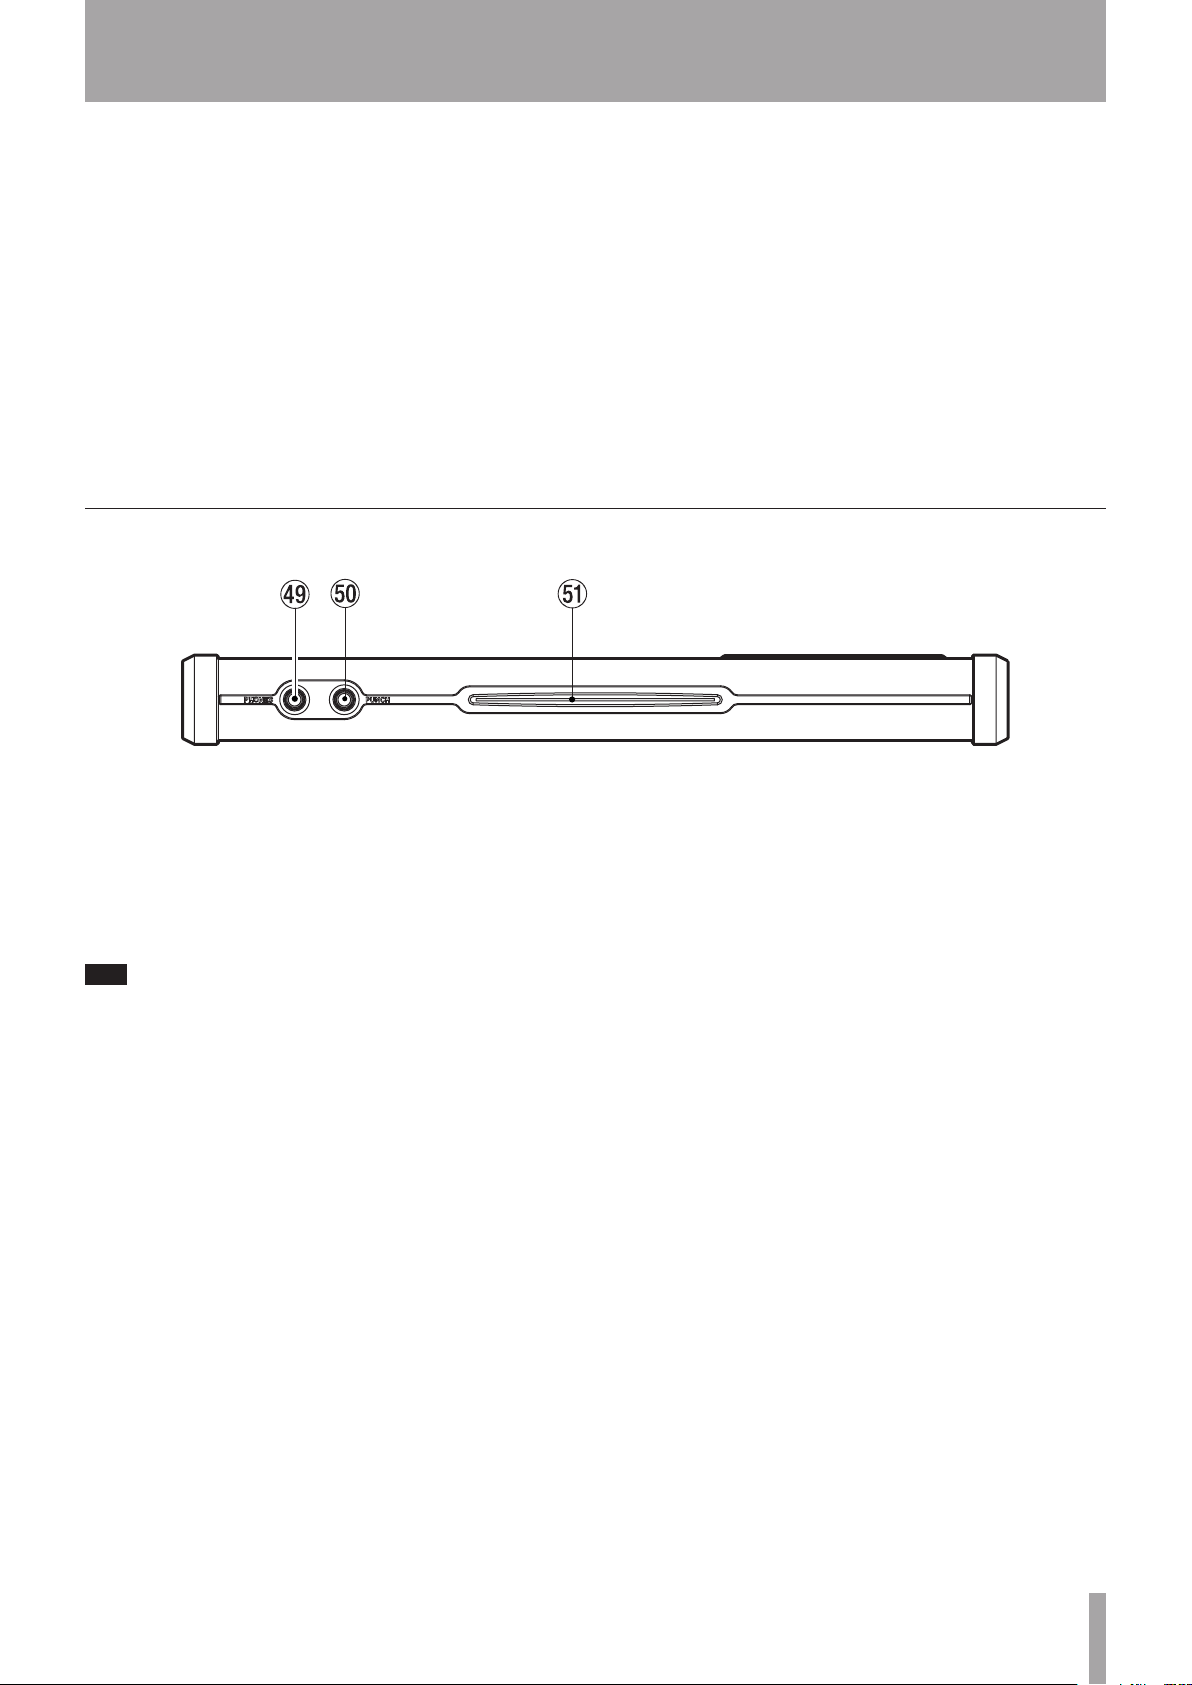
Front panel
* LCD display
Displays current status of the unit, as well as the
current menus or settings.
( PHONES jack (RCA)
Plug a pair of standard headphones into the 1/4” stereo
jack on the front panel. Adjust the volume with the
level control on the top panel.
) PUNCH jack (phone jack)
You can connect a standard “punch-in” foot pedal, such
as the TASCAM RC-30P.
The footpedal is useful if both hands are busy playing
a guitar, for example.
Use the pedal to punch in and out (that is, start and stop
recording on the fly).
Q Disc slot (on the DP-02)
Discs should be inserted label side upwards into this
slot.
TASCAM DP-02/ DP-02C F 19
Page 20
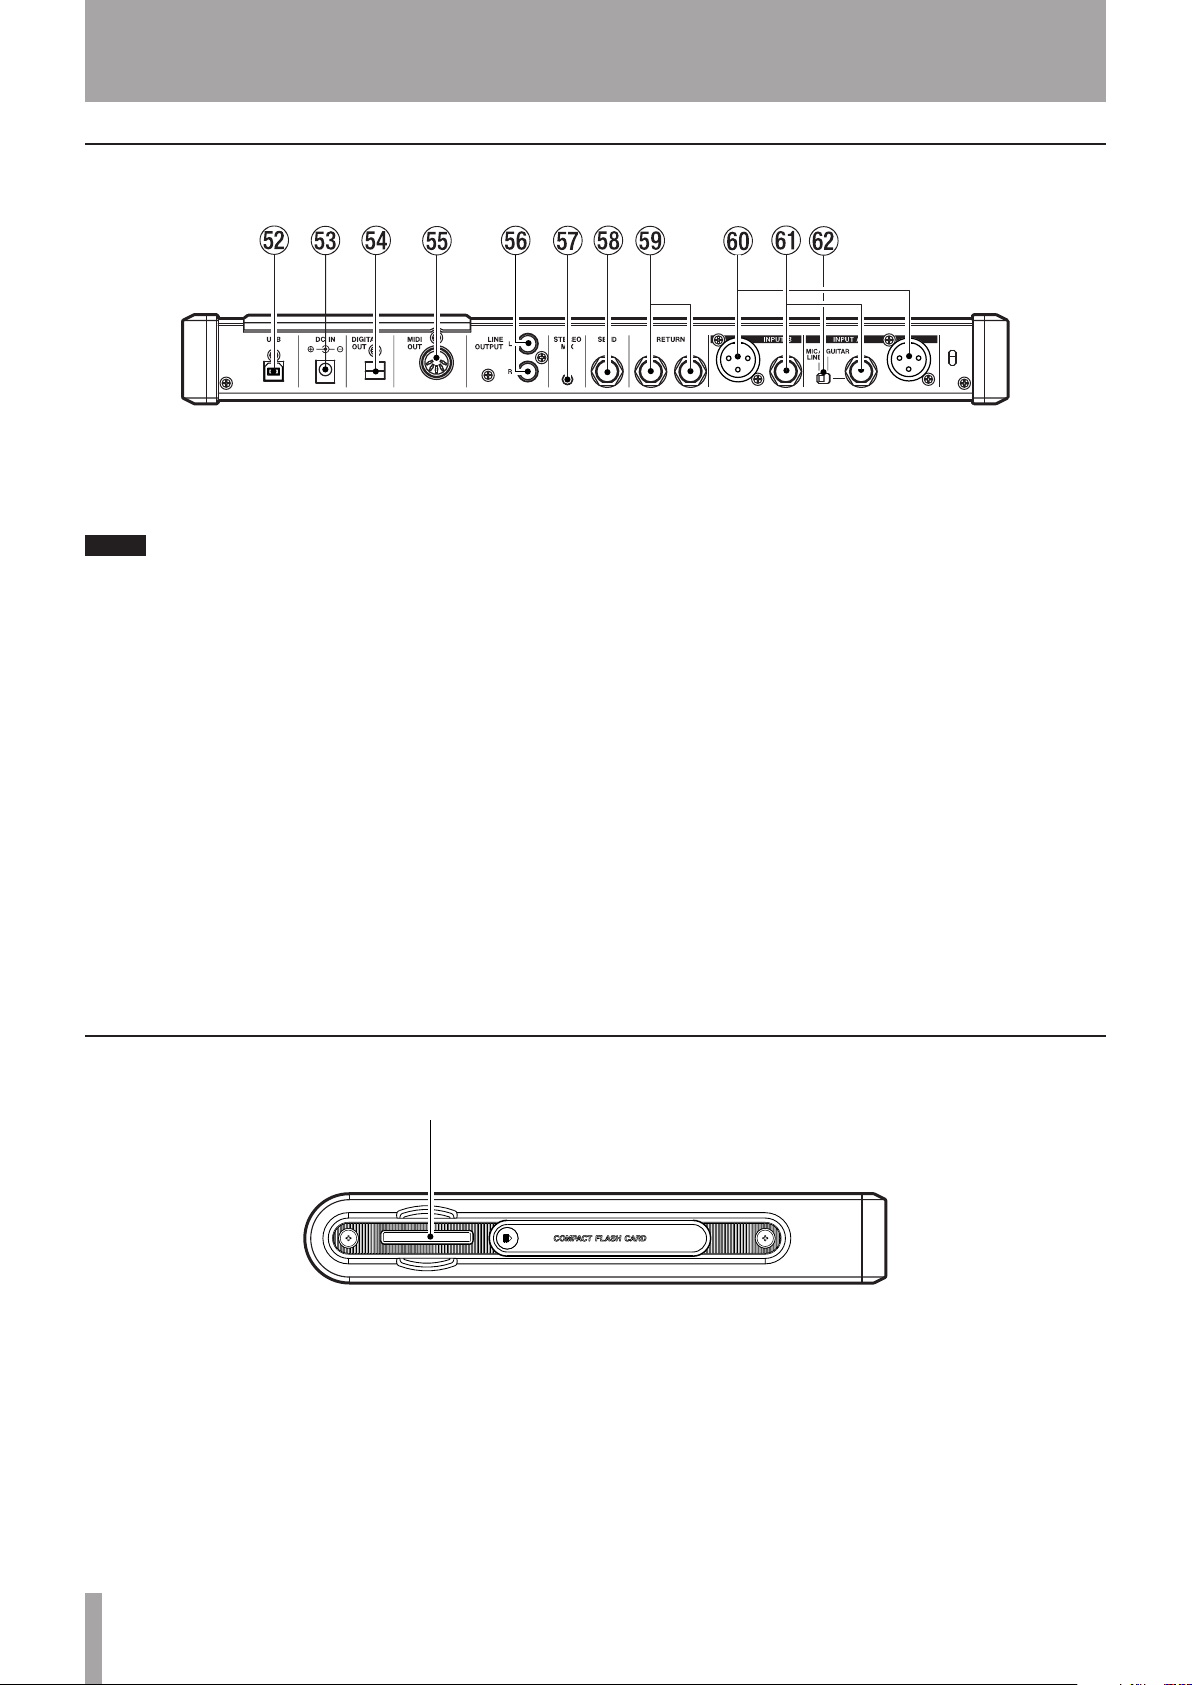
IMPORTANT SAFETY PRECAUTIONS
D
NOTE
1 – Starting out with your DP-02/DP-02CF
Rear panel
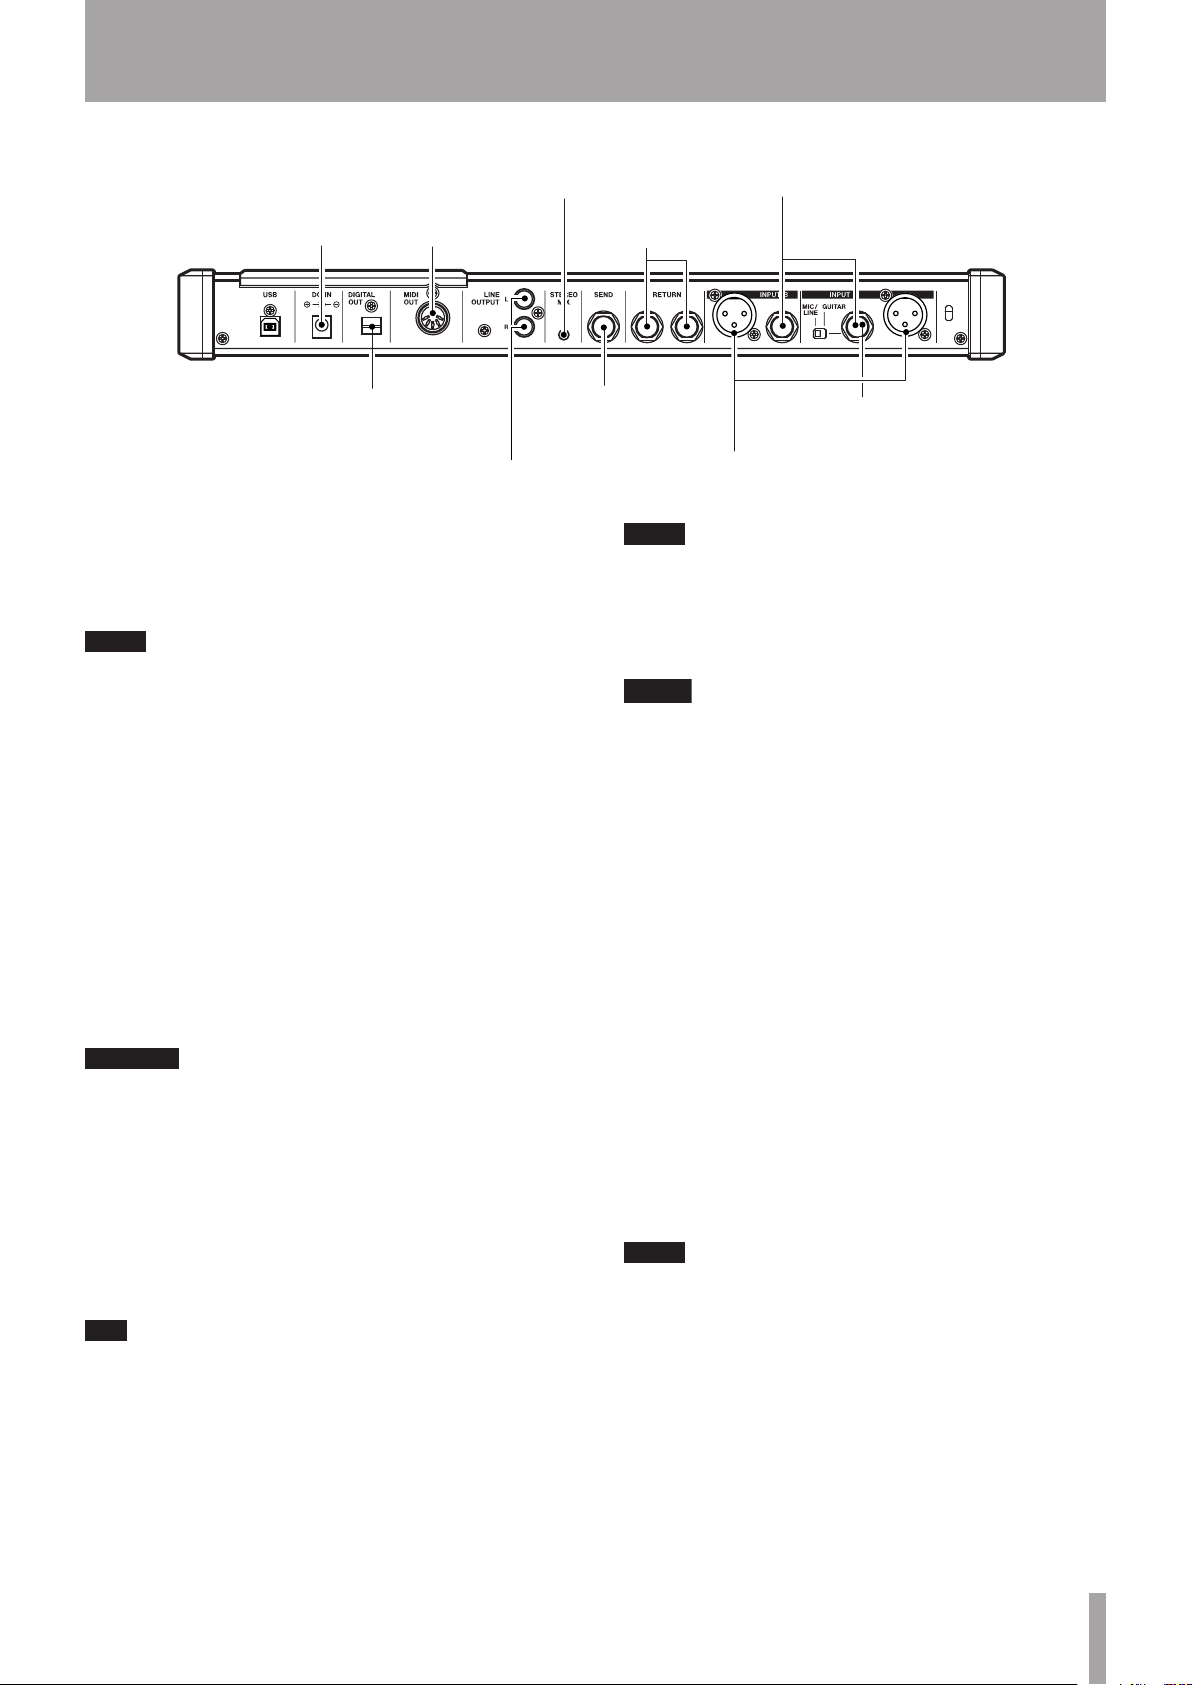
W USB jack
A USB cable is connected to a computer which allows
import or export of files between the unit and the
computer (see “Using the USB connection” on page 42).
When the unit is connected to a PC using this jack, the
FAT partition on the recording media is the only recognizable device.
E DC IN jack
The supplied AC adapter (PS-1225L) is connected here.
R DIGITAL OUT (OPTICAL) jack
The stereo mixed signals are output in S/PDIF format.
T MIDI OUT jack
MIDI signals such as MIDI Clock, MIDI Time Code,
and Song Position Pointer are output here.
Y LINE OUT (L,R) (RCA) jacks
The analog signals mixed in stereo are output.
U STEREO MIX jack
The signals input through this 1/8” stereo mini jack are
mixed in stereo and output from the LINE OUTPUT or
PHONES jacks.
I SEND jack (1/4 phone )
The EFFECT SEND signal is output.
O RETURN (1/4 phone) jack
The stereo signal output from the external effector is
inputted through this jack.
P INPUT A / INPUT B (XLR) jack
These XLR connectors are balanced analog inputs.
When PHANTOM is on, these connectors are supplied
with 48 V phantom power.
A INPUT A/INPUT B (1/4” phone) jack
These 1/4” connectors are unbalanced analog inputs.
The INPUT A jack can be connected to a guitar direc-
tory.
S GUITAR, MIC / LINE switch
Set to GUITAR or MIC / LINE to select which type of
input signal is connected to the INPUT A jack.
Side panel (DP-02CF only)
D CompactFlash card slot (on the DP-02CF)
Insert a CF card into this slot.
After inserting the card, make sure the door is closed.
With the door opened, the DP-02CF will not operate.
20 TASCAM DP-02/ DP-02CF
Page 21

1 – Starting out with your DP-02/DP-02CF
T I P
NOTE
NOTE
IMPORTANT SAFETY INSTRUCTIONS
Managing your songs
This section shows you how to create a new song, as well
as basic song management, such as renaming, deleting,
copying, etc. For more details on disk management, and
the other song management features of the unit, see “Disk/
CF card management” on page 38 and “Advanced song
management” on page 41.
Creating a new song
Any recording made on the unit is referred to as a
“song”, even though it may only consist of instrumental tracks or spoken word.
1. Press the SONG key to bring up the SONG menu.
If the CREATE action is not highlighted, use the
DATA dial or the cursor (§/¶) keys to highlight it.
2. Press the YES/ENTER or ¥ cursor key. The display
shows:
Storing songs
Since the unit does not automatically save the audio you
record as part of a song, you should get into the habit of
performing frequent manual saves.
3. Enter a title as described in “Titling” on page 11.
4. Press YES/ENTER to create the song. The current
song is stored even though the new song has not yet
been created.
You can re-title a song by pressing the SHIFTed TITLE
key to edit the title of the currently-loaded song.
When creating the song is finished, the screen returns to
the SONG screen.
2. Press the YES/ENTER or ¥ cursor key. The display
shows:
A “song” is not just the audio files you record—it also
includes editing, settings, etc.
1. Press the SONG key, use the DATA dial or the cursor
(§/¶) keys to highlight the SAVE action.
Reverting to last version
The REVERT action (which follows the SAVE action in the
SONG menu) allows you to undo all changes since the last
save.
When you select the REVERT, the title of the song is shown.
Press YES/ENTER to go back to the last saved version, or
NO/EXIT to keep the current song as it is.
3. Rename the file if you want to save it as another
name and press YES/ENTER, or simply press YES/
ENTER to save the file to disk or card.
The screen shows a message, Storing Song as the
song is saved.
TASCAM DP-02/ DP-02C F 21
Page 22
IMPORTANT SAFETY PRECAUTIONS
CAUT IO N
T I P
T I P
1 – Starting out with your DP-02/DP-02CF
Loading a saved song
Of course, saving songs is no use unless you can load them
again. This is how you do it.
1. Press the SONG key and use the DATA dial or cursor
(§/¶) keys to highlight the LOAD menu item.
Erasing a song(s)
Erase a song only if you are certain you don’t need it
any more—you can’t undo this operation! However,
you can use a USB connection to back up songs to a PC
before you erase them.
2. Press the YES/ENTER or ¥ cursor key.
3. Use the DATA dial or cursor (§/¶) keys to select the
song to load and press YES/ENTER.
If the * symbol appears next to the song, then that
song is currently loaded.
The current song is saved, and the selected song is
loaded.
Repeat steps 2 and 3 for multiple selection.
You can also use this method to perform other operations, such as copying.
If your disk is getting full, or you really don’t need a song
any more, you can erase it.
1. From the SONG menu, select the ERASE action:
2. Select a song that you want to erase using the cursor
(§/¶) keys or DATA dial.
3. When decided, rotate the DATA dial clockwise to
confirm the song to erase. The mark appears on
the check box.
When you want to cancel the selection, rotate the
DATA dial countercolckwise on the song highlighted.
The mark on the box disappears.
An arrow (up or down) appears to the right of the
highlighted song. A down-arrow indicates that you
can rotate the DATA dial clockwise to confirm the
selection. An up-arrow indicates that you can rotate
the dial counterclockwise to cancel the selection.
4. Press YES/ENTER. You are asked if you want to
erase the song (Are you sure?).
5. Press YES/ENTER to erase the song, or NO/EXIT to
cancel the operation.
If you erase the current song, the first song in the
list is automatically loaded.
You can erase all the songs shown, and a new song is automatically created. There is always at least one song on the
partition (for more information about partitions, see “Disk/
CF card management” on page 38).
22 TASCAM DP-02/ DP-02C F
Page 23
1 – Starting out with your DP-02/DP-02CF
ASSIGN keys
Eight REC keys
T I P
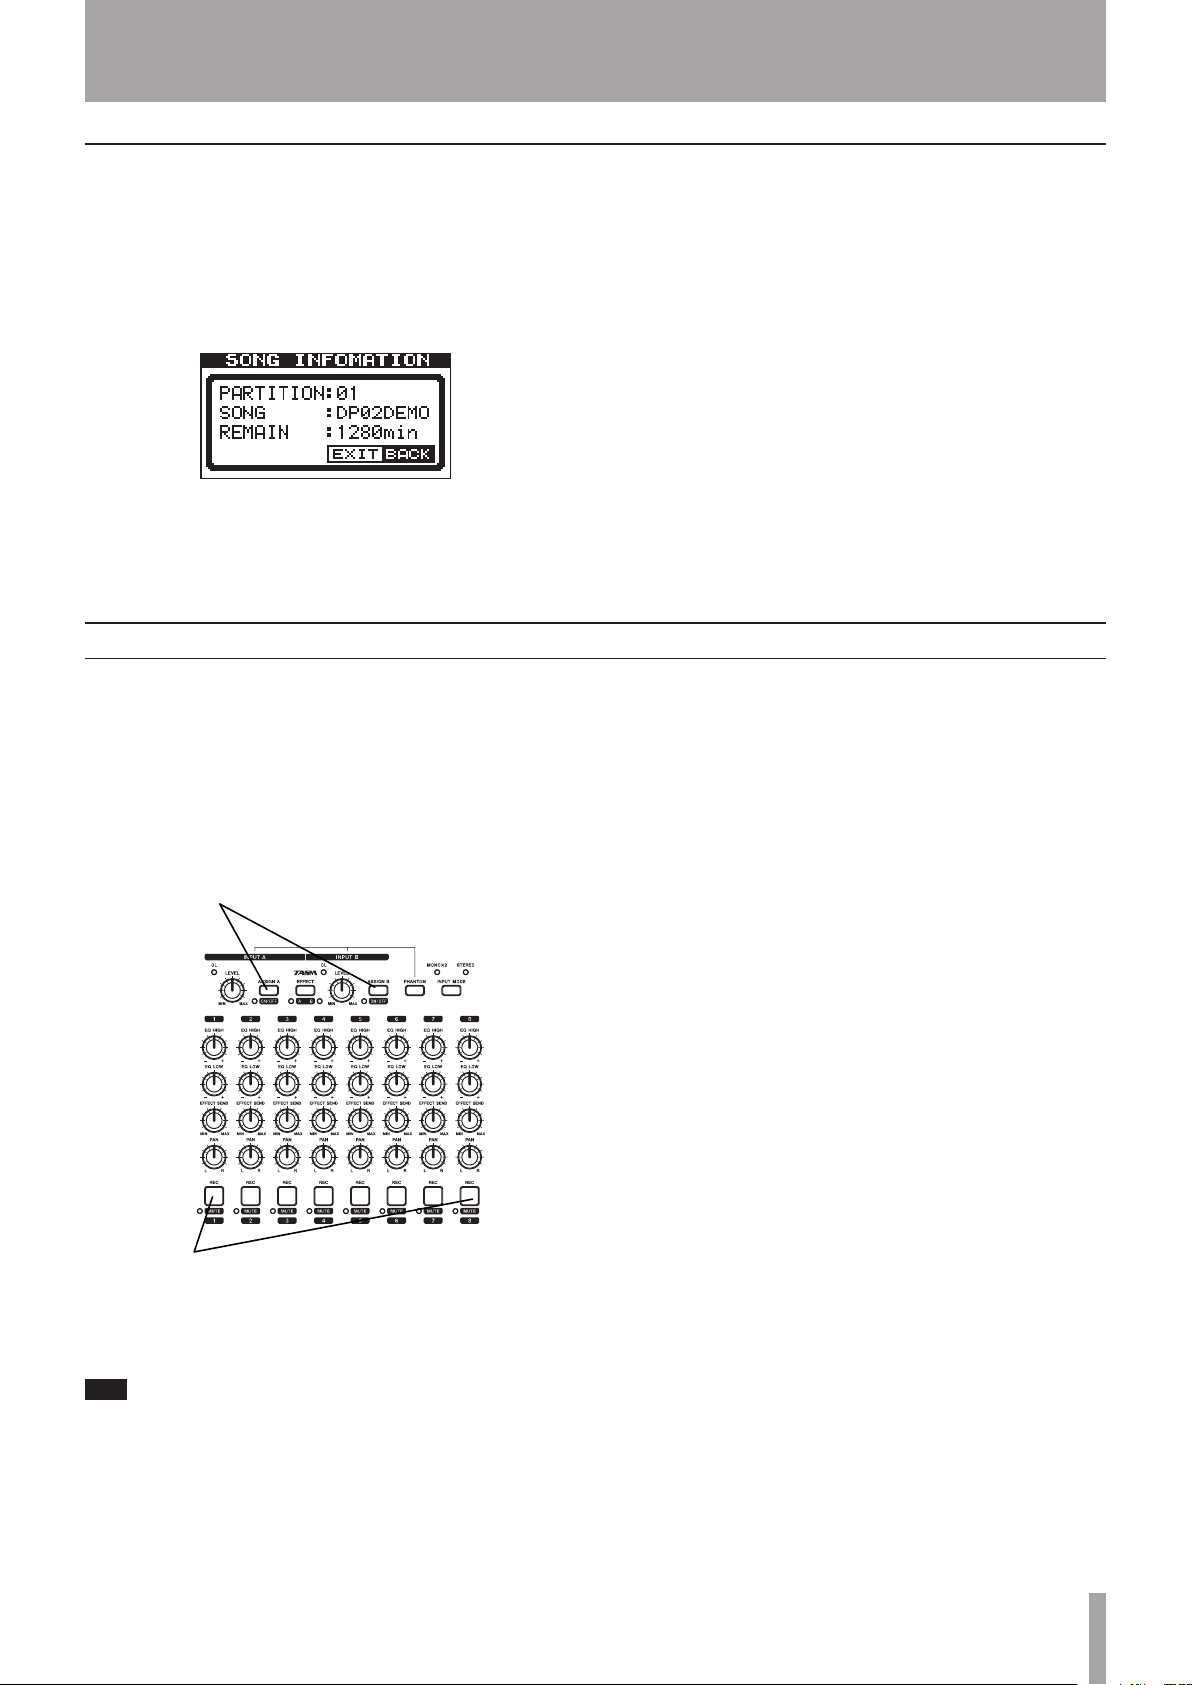
Song information
IMPORTANT SAFETY INSTRUCTIONS
You can view the title, working partition, and amount of
time left for recording from the “home screen”.
From the home screen, press and hold the SHIFT key and
press the SONG key.
The display shows:
the current partition (PARTITION), song title (SONG) and
amount of time left on the partition for recording (REMAIN)
in minutes.
Pressing the NO/EXIT key returns to the home screen.
Assigning inputs
When we talk about “assigning” inputs, we are talking
about routing the signals from the two inputs to the tracks.
You can record on up to two tracks at a time. This means
that the same input can be assigned to two tracks at the
same time (but you can’t then use the other input) or the
two inputs can be assigned to different tracks. You can’t
assign both inputs to the same track at the same time.
Additional song operations
Further song operations are described in “Advanced song
management” on page 41.
2. While holding down the
REC
key of the track to which you are assigning the
input. The
If you want to assign the input to another track, you must
first clear the current assignment (see below), and then
re-assign the input.
REC
key flashes rapidly.
ASSIGN
key, press the
1. Press and hold the ASSIGN key corresponding
to the input signal you are assigning (A or B).
Press and hold SHIFT and either of the ASSIGN keys
(A or B) to turn the inputs on or off as shown by the
indicator. You may want to turn off unused inputs to
reduce noise.
Note that the REC key of the first track to which you
assigned the input flashes when you hold down the
ASSIGN key.
Clearing an assignment
ª
Hold down the
then while holding the
ments by pressing a flashing
ASSIGN
key to check current assignments,
ASSIGN
key, clear current assign-
REC
key (which then stops
flashing).
TASCAM DP-02/ DP-02C F 23
Page 24
IMPORTANT SAFETY PRECAUTIONS
NOTE
T I P
1 – Starting out with your DP-02/DP-02CF
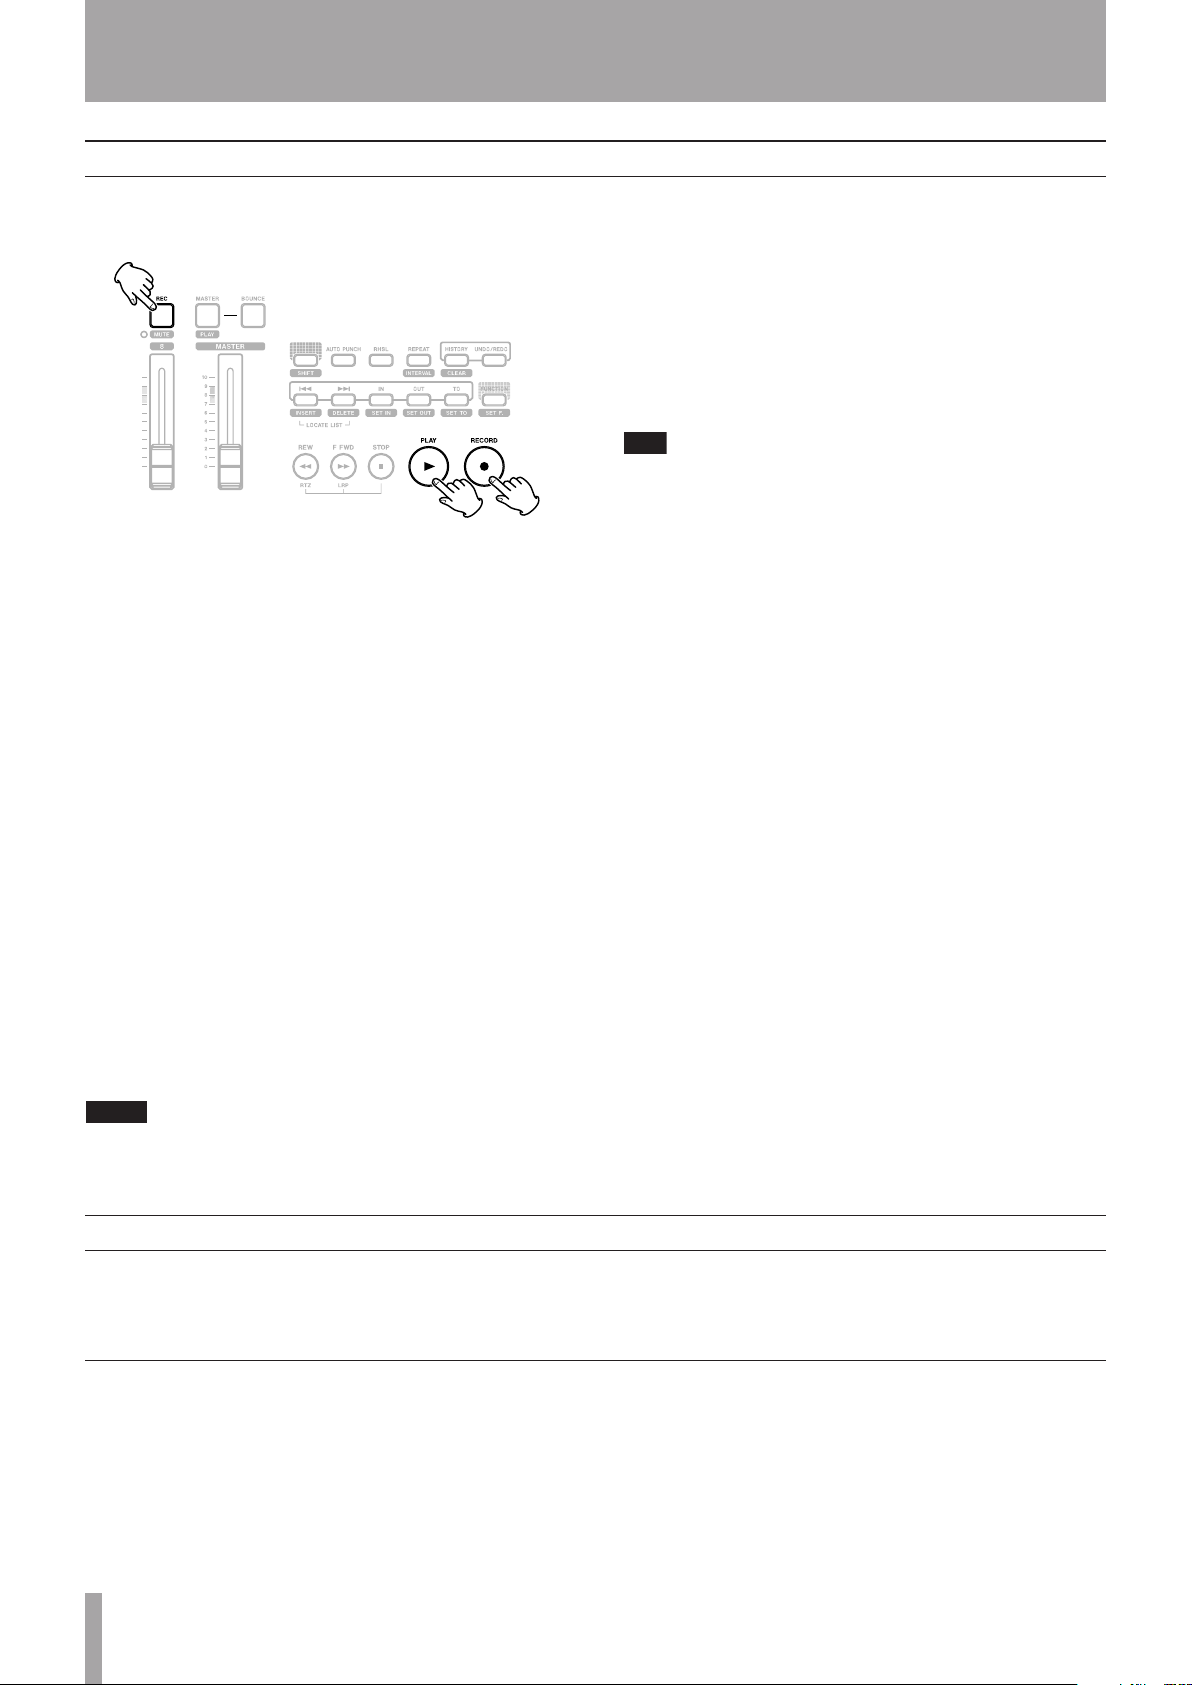
Recording
When you have connected a source, and assigned the
inputs to tracks, you are ready to start recording.
1. Press the REC key of the track(s) you’re going to
record on, which start to flash slowly (this process is
called “arming the track(s)”.
2. Press and hold the RECORD (–) key and press the
PLAY (¥) key.
The RECORD (–) key lights red, and the PLAY (¥)
lights green. The track REC keys stop flashing and
light steadily.
3. Press STOP when you’ve finished recording.
4. To return to the place where you started recording,
press and hold down the STOP key, and press the F
FWD (LRP = Last Recording Position) key.
The pan controls position the track in the stereo
“image” you hear in the left and right speakers (or
headphones). The center position is marked by a
“click” when you turn the knob.
The EQ HIGH and EQ LOW equalization controls
work in a similar way to the bass and treble tone
controls on a stereo system. The center “click” position of the knob means there’s no cut or boost for
that control.
You can change the EQ control point of the high and
low equalization controls. See ”EQ settings” on page
31 for details.
You can re-record the track if you’re not happy with it by
going back to the original point and repeating the process.
When you’re happy with your recording, you can un-arm
the track(s) (“safe” them) and arm and record on other
tracks. Remember to reassign the inputs as well as arming
the tracks.
Press the REW or F FWD keys for a short while and then
release them to move backwards or forwards through your
recording (like a tape recorder). Press and hold these keys
to increase the rewind or fast forward speed. Press STOP
to stop (again, like a tape recorder).
To return to the zero point, press and hold down
the STOP key and press the REW (RTZ = Return To
Zero) key.
5. Press PLAY (¥) to start playback of the recorded
tracks.
Use the track fader(s) and the red MASTER fader to
adjust the level of what you hear.
The faders and other mixer controls adjust the output
level of the recorded when playing back recorded
tracks.
More advanced features
The unit has many advanced features which you may want
to use later on. Though we will not go into full detail on all
of them now, you should be aware of a few of them now.
Using marks to locate positions
Although “Recording” on page 24 shows you some ways
of moving around in your song, the unit provides you with
ways to jump around the song using location marks, as
well as locating to locate directly to a position you set.
See “Location” on page 29 for details of how to set and use
these location marks.
24 TASCAM DP- 02/DP-02CF
Page 25

1 – Starting out with your DP-02/DP-02CF
NOTE
IMPORTANT SAFETY INSTRUCTIONS
Punching recording
When we talk about “punch recording”, we mean going
from play mode into record mode without stopping the
song (“punching in”) as well as going from recording to
playback without stopping the song (“punching out”).
The unit provides three ways to perform punching:
When at least one track is armed (the REC key is flashing),
and a song is being played back, press the RECORD (–)
transport key to punch in.
When recording, press the PLAY (¥) key to stop recording
(punch out).
Bouncing
The unit provides eight tracks for recording. But what
happens if you want to record more than eight instruments? You can take existing tracks, mix them, and record
them to unused tracks, freeing up the tracks you just mixed
for recording additional tracks. See “Bouncing” on page 34
for full details.
Track editing
Because the DP-02 is a hard disk and the DP-02CF is a
Compact Flash card recorder, there are many options available to you which would be extremely difficult, or even
impossible, with a tape-based recording system.
If you have a footswitch connected to the PUNCH jack,
you can press the footswitch to change between playback
and recording, as long as at least one track is armed for
recording.
You can automate the punch process by setting in and out
points. This is described in “IN and OUT marks” on page
30 and also in “Punching” on page 32.
See “About track editing” on page 47 for details of copy,
cut, and paste, etc. operations that you can perform on the
both unit.
Undoing/Redoing an operation
If you have made a mistake, very often you can undo it.
This includes the track editing operations described here,
as well as most other common operations you can perform
(including recording).
Also, if you make a mistake undoing an action, you can
undo the undo (that is, you redo the action).
You must have performed at least one undoable or
redoable action in order to use the function.
Undoing the last action and redoing the undo
ª
action
Use the UNDO/ REDO key to undo the last undoable
action.
1. Press UNDO/ REDO. A message pops up briefly, and
the key lights up.
2. Press UNDO/ REDO again to redo the last redoable
action. The lights goes off.
When UNDO/ REDO is lit, and the HISTORY key is
pressed, the HISTORY screen appears. The UNDO/ REDO
key becomes unlit and the HISTORY key lights up.
TASCAM DP-02/ DP-02C F 25
Page 26

IMPORTANT SAFETY PRECAUTIONS
CAUT IO N
NOTE
NOTE
CAUT IO N
1 – Starting out with your DP-02/DP-02CF
Undoing/Redoing actions at once
Undoing many actions at once (multi-undo) or redoing
many actions at once (multi-redo) is possible using the
HISTORY key.
1. Press HISTORY. The history list appears:
An asterisk (*) is shown to the right of the current
action.
When you undo an action (or event), you undo the
action highlighted, and all actions before it.
When you redo an action (or event), you redo the
action highlighted, and all actions after it.
Event numbering starts at -START UP- 0 at the
bottom of the history list (you can’t change this list).
The top line on the list is the most recent event.
3. Press YES/ENTER to do the multi-undo or multi-
redo.
The screen goes back to the home screen, and the
status of the unit changes to the status that it had
immediately after or before the highlighted operation in the list was performed.
The HISTORY key lights up.
To cancel the HISTORY function, select the most
recent event (the action on the top of the list) and
press YES/ENTER. The screen goes back to the
home screen and the HISTORY key becomes unlit.
After performing a multi-undo, and when a new menu
action is performed (copy, cut or etc.), all the redoable
actions are deleted and the new action becomes the most
recent action on the undo history list.
When the HISTORY key is lit, and when undo is performed
using the UNDO/REDO key, the UNDO/REDO key
also lights up. When two keys are lit, and when redo is
performed, the UNDO/REDO key becomes unlit. The
HISTORY key stays lit.
You cannot use the UNDO/REDO key when the UNDO
HISTORY screen is showing.
2. Use the DATA dial to scroll up and down through the
list until you come to the action you want to undo
or redo (together with all the actions that have been
performed since then).
Deleting unused data
Because a song is not just the parts you hear, but possibly
unused audio parts (see “About track editing” on page 47),
there may be operation history such as cut out, copy or etc.
that you want to delete so you don’t waste hard disk or a
CF card space.
This operation cannot be undone. Only do it if you are
sure you do not want the unused parts.
You can delete the unused data and all the operational
histories from the currently-loaded song.
1. Press and hold the SHIFT key and press the CLEAR
key. This action brings up the HISTORY screen as
below:
Of your operational history (actions), only the 500
most recent operations are stored when you shut
down the unit. Any history operation older than the
500th one is forgotten.
2. Press YES/ENTER to delete the unused data and the
operation history, or NO/EXIT to cancel the operation.
When YES/ENTER is pressed, the unit confirms
again if you are sure.
3. Press YES/ENTER to delete.
26 TASCAM DP-02/ DP-02C F
Page 27

1 – Starting out with your DP-02/DP-02CF
T I P
T I P
NOTE
T I P
NOTE
NOTE
NOTE
NOTE
IMPORTANT SAFETY INSTRUCTIONS
Mixdown and matering
This is the last stage in cresting a song, allowing you to
creat a file which you can play back into a stereo recorder,
and export to a WAV file for further processing, archiving,
recording, etc. on a personal computer (“Exporting the
mastered stereo tracks” on page 47).
Mixdown
This is the art of mixing the different tracks you have
recorded earlier so that the whole song sounds “right”–
everything is at the right volume, and the song sounds like
one piece of music.
The most important components of a mix are your
ears—if you think it sounds good, then it is.
Use the eight track faders to adjust the relative volume
of the tracks and the MASTER fader to adjust the overall level, and watch the L and R meters at the right of the
display to make sure that the mix is not too loud (if it’s too
loud, it will distort, and sound bad).
You don’t have to keep levels the same through the
whole song (try raising the level of a guitar during
solos, for example).
Use the EQ HIGH and EQ LOW (tone) controls to boost or
cut bass and treble from the individual tracks.
If you have an external effect processor connected through
the SEND and RETURN loop, adjust the EFFECT SEND
levels for each track. This is the amount of signal sent from
each track to the effect. You can use this to add effects
only to certain tracks. Use the EFFECT RETURN control
to adjust the amount of the effect returned to the mix.
On the DP-02, you can use the internal reverb unit
instead of an external effect processor (see “Reverb“
on page 62).
Use the PAN controls to adjust the left-right position of
each track in the stereo mix.
To cut out the sound of a track, use the SHIFT key and the
track’s REC key to mute (the orange MUTE indicator lights
for muted tracks) and un-mute the track.
If you have two tracks with different versions of the
same part, you can use the mute function to make
easy comparisons between the two.
The track meters show the level of the signal recorded
on the track, not the level sent from the track.
Mastering
This is where the actual stereo recording takes place, once
you’re happy with the mix you’ve created. You create a
mixed master stereo track, starting at 00:00:00:00 (the
“zero point”) and continuing to the OUT point.
The mixed stereo master is stored on disk as part of the song.
A song can only hold one stereo master mix.
Before starting the mastering procedure, you must set the
OUT point. This is where the mastering process stops. See
“IN and OUT marks” on page 30 for details.
While the unit is in the mastering mode, you will
notice that a number of playback functions are not
available. If you try to perform these operations, a
popup message tells you that you are in mastering
mode.
1. Press the MASTER key so that it flashes.
2. Press and hold the RECORD (–) key and press the
PLAY (¥) key. Recording starts on the stereo master
tracks (RECORD (–) and PLAY (¥) are lit).
Make the mix moves (faders, pan, etc.) that you
practiced earlier. These mix moves will affect the
sound of the final master stereo track. When the
playback point reaches the OUT point, recording
stops.
You can hear any signals received at the STEREO MIX
inputs, but they won’t be recorded on the master
track.
3. Press and hold the SHIFT key and press the PLAY
(MASTER) key so that it is lit steadily. Now when
you press PLAY (MASTER), you can hear the master
stereo mix you have just created. This mix is output
TASCAM DP-02/ DP-02C F 27
Page 28

IMPORTANT SAFETY PRECAUTIONS
NOTE
T I P
1 – Starting out with your DP-02/DP-02CF
through the analog and digital outputs, and you can
record it on a stereo recorder.
Note that while the PLAY (MASTER) key is lit steadily,
you cannot use the mixer controls, except for the
MASTER fader.
4. If you are happy with the mix, you can then exit the
mastering mode by pressing and holding the SHIFT
key and pressing the PLAY (MASTER) key until the
key is unlit.
If you want to do the mix again, press the MASTER
key until it flashes, and re-record. The new mix will
overwrite your previous mix.
If you want to save a mix from the unit as a file, you
can transfer it via USB to a computer (see “Exporting
the mastered stereo tracks” on page 47).
If a song has had a master stereo mix recorded and saved
with it, you can play back this master stereo mix whenever
the song is loaded, by pressing and holding the SHIFT key
and pressing the PLAY (MASTER) key until the key is lit
steadily and then pressing PLAY (¥).
To add the STEREO MIX inputs (through the analog
outputs only), you can play back the stereo master mix.
Any MIDI synchronization, etc. is output as the stereo
master mix is played back so that the output from a
sequencer, etc. can be added to the analog outputs, and
recorded on a stereo recorder (cassette, CD, MD or
computer audio program).
The stereo master mix can be “cloned” to a pair of stereo
tracks (see “CLONE TRACK” on page 51).
28 TASCAM DP-02/ DP-02CF
Page 29

IMPORTANT SAFETY INSTRUCTIONS
NOTE
NOTE
NOTE
T I P
The operations described here are ones that you may use
less often than the ones described earlier in this manual,
but you will find useful in your work with the unit.
Location
This section tells you how to jump around to different
parts of a song on the unit.
Direct location
2 – Advanced techniques
The unit displays the current position at the top of the
display as hours:minutes:seconds:frames. There are 30
frames in a second.
The unit can also display the current time in bars and
beats. See “Working in bars & beats” on page 35 for
details.
From the “home screen” when the unit is stopped, turn the
DATA dial, so that the top time display blinks.
Use the ˙ and ¥ cursor keys to move the underline cursor
between the different fields of the time shown at the top of
the screen. In this case, the frame field is selected.
Location marks
The unit can store up to 999 location marks per song! Use
these to mark the start of verses, vocal entry points, etc.
To set a location mark
ª
While stopped, recording or playing, press and hold the
SHIFT key and press the INSERT key at the point where
you want the new mark.
To change the value of the underlined field, use the DATA
dial. Fields “wrap round”, so going from 59 seconds to 0
seconds adds 1 to the minutes, etc. As you turn the DATA
dial, the frame field blinks. If you leave the DATA dial
untouched for a few seconds, or if you press YES/ENTER,
the display stops blinking.
If you want to edit another field, use the cursor keys to
move to that field and then use the DATA dial to get to the
time you’re looking for.
Press PLAY (¥) to start playback from the position whose
value has just been entered.
Alternatively, press and hold both LOCATE LIST keys
togather to show the location mark list:
Marks are shown on the display on the second line of the
“home” screen. The mark number you see is the one at or
immediately before the current position In the example
below, “M023” indicates the twenty-third mark in the
selected song.
Marks are numbered in the order you enter them, not
according to their position in the song. Mark 999 can
therefore appear in a song before mark 001.
To move to a location mark
ª
Press and release the µ or ≤ keys to move to the previous or next mark in the song. This works while playing
back, while stopped or “winding”, but not while recording.
Use the DATA dial or the cursor (§/¶) keys to choose a
mark (they’re listed in the order they appear in the song)
and press YES/ENTER to jump to that mark.
To delete a location mark
ª
Stop playback (or recording) and locate to the mark you
want to delete (or a little after). Press and hold the SHIFT
key and press the DELETE key.
You can’t undo this.
To edit a location mark
ª
If you made a mistake when you entered a location mark,
you can change the time of the mark.
This is sometimes called “trimming”.
TASCAM DP-02/ DP-02C F 29
Page 30

IMPORTANT SAFETY PRECAUTIONS
30 TASCAM DP-02/ DP-02CF
2 – Advanced techniques
NOTE
NOTE
T I P
1. Press and hold both LOCATE LIST keys togather to
show the location mark list.
2. Use the DATA dial to select a mark and press the ¥
cursor key to bring up the LOCATE TRIM screen.
The marks are shown in the order they appear in the
song, not by number.
IN and OUT marks
These marks are used for setting the points at which automated punch recording starts and ends and for repeat
playback, as well as for track editing. You can set these
marks while playing back, recording, or while playback is
stopped.
Set IN and OUT marks by pressing and holding the SHIFT
key and pressing SET IN or SET OUT keys at the appropriate points.
3. Use the dial to move the mark backwards and
forwards by 1/10 frame (the right most digit of the
number). You can’t move a mark forward past the
next mark in the list, or backwards to before the
previous mark in the list.
1/10 frame is 1/300 of a second about 3.3 milliseconds
4. When done, press YES/ENTER or NO/EXIT to
return to the LOCATE TRIM screen.
Fine-tune the position of the IN and OUT points by pressing and holding SHIFT and pressing POINT EDIT:
IN and OUT marks are also used (along with the TO
mark, which is set and used in the same way) when
performing track editing functions.
Locate to the IN and OUT points by simply pressing IN
and OUT.
Using the meters
Meters to let you know what’s going on with the audio in
the unit. Here are a few little hints and tips which may help
you.
As well as showing you the level of signals, the meters
can show you if the signals are actually getting to the unit.
Even if you can’t hear anything and the input meters are
showing a signal, it means that the connections from the
instrument to the unit are okay (and you should probably
check your monitoring equipment levels).
Edit the point, to 1/10 frame accuracy, using the cursor
keys and the DATA dial, in the same way as for direct loca-
tion (“Direct location” on page 29).
Press YES/ENTER when done.
Input meters
These meters (A and B) show the level of the signal coming
into the unit. Adjust the level with the front panel controls,
or the instrument volume control, if available.
Track meters
These meters (1 through 8) show the volume of the signal
recorded on the track (un-armed tracks) or entering the
track (armed tracks). Remember that the faders do not
control the level of signals sent to the track, and will never
affect the track meter readings.
Master meters
These meters (L and R) show the master level at all times.
The MASTER fader controls the level of these meters.
It’s important to remember that meters should never be
continuously at the top of the bar. If they are, it means the
level is too high, and you will probably experience distortion. Digital distortion is unpleasant (unlike, say, tube
guitar amp distortion), and you need to avoid it.
Page 31

EQ settings
T I P
IMPORTANT SAFETY INSTRUCTIONS
2 – Advanced techniques
On the unit, you can set the frequency at which the EQ
HIGH and EQ LOW controls work; individually for each
channel.
This can help you emphasize the particular frequency
ranges on a track.
1. Press the FREQ key. The display shows:
2. Use the cursor keys to highlight frequency you want
to change and the dial to set these parameters.
H (High) This is the high frequency control. Choose
from 1.7 to 18 kHz.
L (Low) This is the low frequency control. Choose
from 32 Hz to 1.6 kHz.
TASCAM DP-02/ DP-02C F 31
Page 32

IMPORTANT SAFETY PRECAUTIONS
32 TASCAM DP-02/ DP-02C F
2 – Advanced techniques
T I P
T I P
T I P
T I P
Post-roll
IN point
OUT point
What you hear
Playback from previously
recorded track starts at
pre-roll position, up to IN
Recorded signals are cut
flashes in rehearsal,
lights when recording)
Return to track playback
out) and playback stops
at post-roll point
You can always hear the input signal
Pre-roll
point (PLAY indicator lights).
(RECORD indicator
(RECORD indicator goes
Punching
As mentioned in “Punch recording” on page 25, the unit
provides two manual ways of changing between playback
and recording modes: using the PLAY (¥) and RECORD (
–) keys, and using the foot switch. There is also an auto-
mated punch mode, described here.
Rehearsal
The auto-punch mode allows you to rehearse your playing
before actually making a recording.
The RHSL key indicates you are in “rehearsal” mode, as
long as AUTO PUNCH is not lit. Your rehearsal take(s)
is not actually recorded.
1. First, set the IN and OUT points (“IN and OUT
marks” on page 30) so that they correspond to the
points where you want recording to start, and where
you want it to finish.
2. Assign an input or inputs to a track or tracks
(“Assigning inputs” on page 23), and arm those
track(s) for recording (press the track’s REC key so
that it flashes).
If you’re replacing a mistake, make sure that the sound
you are recording matches the sound you’re replacing
(same effect settings, etc.).
3. Press the AUTO PUNCH key so that it lights.
4. Press the RHSL (rehearsal) key so that it lights.
At the IN point, the playback of the armed track(s) stops.
The RECORD indicator starts to flash, indicating this
the point where recording would start were you actually
punching in.
If the IN and OUT points are not where they should be
for your punch recording operation, you can turn off
AUTO PUNCH and edit their position (See “IN and OUT
marks” on page 30).
At the OUT point, the signal you hear returns to what you
recorded earlier. The RECORD (–) indicator stops flash-
ing.
When playback reaches the post-roll point, it stops. When
you do your next rehearsal or punch, playback will start
from the pre-roll point.
6. Repeat the rehearsal as many times as you need
until you are happy with your performance.
You can rehearse by looping between the pre-roll and
post-roll points using the REPEAT key.
5. Press the PLAY (¥) key.
Playback starts from before the IN point (the PLAY
(¥) indicator is lit).
Page 33

Punch recording
NOTE
T I P
IMPORTANT SAFETY INSTRUCTIONS
2 – Advanced techniques
When you have rehearsed your punch-in, you can start
recording.
1. Press the RHSL key so that the indicator goes out
(but the AUTO PUNCH indicator is still lit).
2. Press PLAY (¥) so that playback starts. Use the
pre-roll time to get ready to record.
At the punch-in point, the unit goes into record mode (the
RECORD (–) indicator lights).
Pre-roll and post-roll time
The pre-roll and post-roll times can be set to suit your style
of playing.
1. Press MENU and scroll down to PREFERENCE and
press the ¥ cursor or YES/ENTER key.
The N.SUPPRESSOR setting os only available on the
DP-02. The DP-02CF will not show this option.
At the punch-out point, recording stops (the RECORD (–)
indicator goes out), and playback continues until the postroll point and then returns to the pre-roll point. The AUTO
PUNCH indicator is turned off (the track arming status
stays the same).
If you want to re-record the punch, turn AUTO PUNCH
back on before recording again.
2. Use the cursor keys to move the cursor to the Pre
(pre-roll time) item, and use the DATA dial to set the
value in seconds.
The pre-roll and post-roll times can be set between 1.0
seconds and 9.9 seconds in 0.1 second steps.
3. Use the cursor keys to move down to the Post (post-
roll time) item and use the DATA dial to change the
value.
4. Press NO/EXIT when you’re done, so that you can
start using these settings.
TASCAM DP-02/ DP-02C F 33
Page 34

IMPORTANT SAFETY PRECAUTIONS
34 TASCAM DP-02/ DP-02C F
2 – Advanced techniques
NOTE
T I P
1 Drums L
2 Drums R
3 Bass
4 Acoustic Guitar
5 E. Guitar 1
6 E. Guitar 2
7
8
1 Organ L
2 Organ R
3 Lead vox 1
4 Lead vox 2
5 Backing vox 1
6 Backing vox 2
7 Bounce mix L
8 Bounce mix R
B
O
U
N
C
E
MASTER(stereo)
T I P
T I P
Bouncing
“Bouncing” on the unit refers to the technique of mixing
recorded tracks through the MASTER fader to a pair of
unused tracks.
You might use a track bounce operation in the following
situation:
You can bounce to one track, if you want, but you will
probably want to bounce in stereo.
You’ve recorded the drums in stereo, the bass and two
rhythm guitars (one acoustic and one electric) and an electric guitar lead line. There are two tracks left. You’d like
some stereo organ added in, and there are two lead vocal
lines to record, as well as at least one set of backing vocals.
But there are only two tracks left!
Luckily, you can bounce everything through the stereo
tracks, and record them onto the two spare tracks.
1. “Un-arm” (safe) the existing tracks so that you don’
t accidentally record over them.
You may want to copy the song and give it another
name (see “Copying songs” on page 41) before starting the bounce, so that you can go back to the original
if necessary.
2. Press the BOUNCE key (above the MASTER fader)
so that it lights.
3. Arm the two tracks which you are mixing to.
Repeat
4. Use the faders and mixer controls of the tracks you’
re bouncing to create a stereo mix.
5. Adjust the overall level of the mix using the
MASTER fader. Watch the L and R meters on the
right side of the display so that the level is adjusted
to the optimum level. During this step, mute the
tracks at the bounce destination.
6. When you’re ready, use PLAY (¥) and RECORD (–
) to record the mix onto the two armed tracks from
start to end, with no stops. “Safe” the armed tracks.
You can now record over the original tracks you bounced,
playing along to the stereo pair created from the bounce.
You can also use auto punch recording (“Punching” on
page 32) to bounce only part of a song between the IN
and OUT points.
Repeat allows you to repeat the playback or auto-punched
rehearsal (see “Rehearsal” on page 32) between the IN and
OUT points.
First, set the IN and OUT points at the place where you
want the repeat loop to start and stop (see “IN and OUT
marks” on page 30).
You can’t set these points when the REPEAT key is lit.
Press the REPEAT key briefly so that the indicator lights.
Playback starts automatically from the IN point.
When the playback reaches the OUT point, playback
pauses for a short while (see “Setting the repeat interval”
on page 35) and the PLAY (¥) indicator flashes before
playback starts again, and the PLAY (¥) indicator lights
steadily.
Turn off the repeat function by pressing REPEAT so that
the indicator goes out.
Repeat auto-punch rehearsal, but not repeat auto-punch
recording, is also possible. If AUTO PUNCH, RHSL and
REPEAT are all lit, pressing RHSL to go from rehearsal to
auto punch recording mode will also turn off REPEAT.
Page 35

IMPORTANT SAFETY INSTRUCTIONS
T I P
T I P
T I P
2 – Advanced techniques
Setting the repeat interval
You can set the time between repeats up to 9.9 seconds.
Press and hold the SHIFT key, and press the INTERVAL
key. The screen shows:
Use the DATA dial to set the repeat interval from 0.5
seconds to 9.9 seconds in 0.1 second steps.
Working in bars & beats
Besides working in minutes and seconds (as explained in
detail in “Direct location” on page 29), the unit can work
in musical bars and beats. This is especially useful when
working with external MIDI devices (see “Working with
MIDI” on page 37).
This repeat interval allows you to reposition your
hands for a guitar lick, take a breath for a vocal phrase,
etc., when you are rehearsing.
Press NO/EXIT to exit the interval setting mode.
“Bars” are also sometimes referred to as “measures”.
Tempo setting
For the bars/beats function to be useful, you must set up a
tempo and time signature. These allow the unit to calculate
where the bar and beat divisions fall, based on the tempo of
your song.
1. With playback stopped, press MENU and select the
MIDI menu.
2. Select the TEMPO/T.SIG (tempo and time signature)
action and press the ¥ cursor or YES/ENTER key:
Selecting the time mode
Once the time signature and tempo are set, the unit can
map the bar and beat divisions to the time.
To display bars and beats: On the “home” screen,
move the cursor to the ABS field:
3. There are two parameters here, the tempo and the
time signature. Use the cursor and DATA dial to set
these.
The tempo is measured in beats per minute (bpm) and can
be set from 20 to 250.
The time signature can be set with the number of beats to
the bar (1 through 12) and the number of beats per whole
note (1, 2, 4, or 8).
Most rock and pop music is in 4/4 (with a few famous
exceptions). Some country and folk songs, as well as
waltzes, are in 3/4.
With the cursor at BAR, turn the DATA dial counterclock-
wise to return to the time-based display.
Location is performed in the same way as described in
“Location” on page 29, except that there are only two fields
now, bars and beats.
Turn the DATA dial clockwise. ABS changes to BAR and the
current position in bars and beats is shown, with the tempo
shown on the right of the screen:
Track editing is also performed in the same way as
described in “About track editing” on page 47, but because
the editing points are now set to a bars and beats-based
position, the editing can be more “musical”.
Location mark and Point editing Even when the
screen shows positions in bars and beats, location points are
edited in minutes and seconds (“To edit a location mark” on
page 29 and “IN, OUT and TO marks” on page 48 ), except
that the bars and beats equivalent is also shown.
TASCAM DP-02/ DP-02C F 35
Page 36

IMPORTANT SAFETY PRECAUTIONS
36 TASCAM DP-02/ DP-02CF
2 – Advanced techniques
NOTE
T I P
T I P
When both LOCATE LIST (µ/≤ ) keys are held down
together in “bars and beats” mode, the display looks something like this:
Use the cursor (¶,§) keys to select the mark to trim,
and press the ¥ cursor key to show the trim screen.
Selecting a point to edit shows the bars and beats below
the absolute time value. The bars and beats cannot be set
Metronome
To help you keep in time, the unit provides an internal
metronome function and a MIDI metronome function. The
internal metronome function allows you to listen to the
metronome on the unit, while the MIDI metronome function generates a metronome output on the MIDI interface.
1 Press MENU, use the DATA dial or cursor (¶,§
) keys to select the MIDI menu, and press the ¥
cursor or YES/ENTER key.
directly, but change, together with the absolute time value,
as the DATA dial is turned:
IN, OUT and TO points do not show the bars/beats
value when being edited.
When “MIDI” is selected at “Output” [MIDI
ª
metronome]
This setting generates a metronome output via the MIDI
interface. Generally, percussion type sounds are used as
the metronome. Any sound, of course, can be produced.
You can select MIDI channel, note/note on velocity of a
regular click, and note/note on velocity of an accent.
2 Select the METRONOME item, and press the ¥ cursor
or YES/ENTER key.
When “INTERNAL” is selected at “Output”
ª
[internal metronome]
The unit’s internal metronome (not an external sound source)
can be output to headphones and LINE OUTPUT L/R.
Mode Select from REC ONLY (only at recording) and
REC&PLAY (at recording and playback).
The internal metronome is not output in the following
instances:
• While the BOUNCE key is lit
• While the MASTER key is flashing
or is lit
Scroll the list to set the following parameters:
Mode Select from REC ONLY (only at recording) and
REC&PLAY (at recording and playback).
MIDI Ch The MIDI channel on which the metronome
signals are output.
Channel 10 is defined as the default drum channel for
all General MIDI devices.
AccNote The note played at the start of each bar. C3 is
equivalent to MIDI note 60.
AccVelo The velocity (which typically affects the
volume) of the note at the start of each bar.
NrmNote The note played at each beat, except at the
start of each bar. C3 is equivalent to MIDI note 60.
NrmVelo The velocity (which typically affects the volume)
of the note at each beat, except the start of each bar.
LEVEL Set the output level of the metronome within the
range 0 to 127. (The output level cannot be adjusted on the
MASTER fader.)
When “ OFF” is selected at “ Output”
The metronome function is disabled, and no items other
than Output are displayed.
Page 37

IMPORTANT SAFETY INSTRUCTIONS
NOTE
NOTE
Working With MIDI
2 – Advanced techniques
The unit is equipped with a MIDI OUT jack. This can
be used to drive a sequencer, drum machine, etc., either
synchronized to a time base, or a MIDI clock (see below
for an explanation of how this works). MIDI OUT is also
used to drive a MIDI instrument as a metronome (see
“Metronome” on page 36).
MIDI Clock, etc.
The MIDI song control messages put out by the unit from
the MIDI OUT port include tempo (MIDI Clock), bar and
beat information (Song Position Pointer), and Start/Stop/
Continue messages. This way of working is particularly
suitable for synchronizing with bar/ beat-based MIDI
devices such as drum machines and rhythm units.
You must set a tempo and time signature on the unit
(“Tempo setting” on page 35) to use this feature.
1. Press MENU and scroll down to MIDI and press
the key.
2. Select the GENERATOR action and press the ¥
cursor or YES/ENTER key:
A MIDI instrument can be connected to the A and B
inputs, or mixed with the recorded tracks from the analog
outputs if it is fed into the STEREO MIX inputs.
3. Use the DATA dial to change the OFF setting to CLK
(clock).
The unit now sends the messages described here from MIDI
OUT when playing back or recording. Connect the MIDI
OUT of the unit to the MIDI IN of your MIDI instrument.
Consult the documentation of the MIDI instrument for
details of how to synchronize to MIDI Clock, etc. messages as a slave.
MIDI timecode
MIDI Timecode sends out the current position in hours,
minutes, seconds and frames through the MIDI OUT port.
Typically, you will use the timecode function with devices
such as recorders and Digital Audio Workstations (DAWs)
that work to a time base, rather than a bars and beats base.
1. Press MENU and scroll down to MIDI and press the
¥ cursor or YES/ENTER key.
2. Select the GENERATOR action and press the ¥
cursor or YES/ENTER key. The display shows:
3. Use the DATA dial to change the OFF setting to MTC
(MIDI Timecode).
The unit’s MIDI Timecode is fixed at a frame rate of 30
fps and cannot be changed.
When “OFF” is selected at “Output”
ª
The metronome function is disabled, and no items other
than Output are displayed.
The unit now sends timecode from MIDI OUT when playing back or recording. Connect the MIDI OUT of the unit to
the MIDI IN of your MIDI device.
Consult the documentation of the MIDI device for details
of how to synchronize to MIDI Timecode as a slave.
TASCAM DP-02/ DP-02C F 37
Page 38

IMPORTANT SAFETY PRECAUTIONS
38 TASCAM DP-02/ DP-0 2CF
2 – Advanced techniques
CAUT IO N
NOTE
NOTE
NOTE
Disk/CF card management
The DP-02/DP-02CF allows you format and re-partition
their recording media (see “DP-02 Line-up” on page 7) to
suit your needs. The recording media on your unit can be
divided into partitions. Songs can be created on a partition
and moved to another one later for archive purposes, etc.,
or you can use different partitions for different types of
songs.
Formatting and re-partitioning are “destructive”
actions. You cannot undo them, and the changes are
permanent.
Selecting the active partition
Choose the active partition, from which you can load existing songs and on which you can create new songs, etc.
On the DP-02:
1. From the MENU screen, select and enter the DISK.
2. Highlight the PARTITION action and press the ¥
cursor or YES/ENTER key. The display shows:
In addition to the song partitions, there is also a
FAT-formatted partition. This is the part of the recording media that can be read by a personal computer when
the unit is connected using USB. Whenever you want to
archive or store a song on a computer, export a mix to a
computer, or import an audio file for inclusion in a song,
the data must be copied in two operations, copying first to
the FAT partition and then from there to your computer.
The FAT format (File Allocation Table) is a disk format
which can be read by all personal computers.
On the DP-02CF:
1. From the CARD screen, select the PARTITION
action and press YES/ENTER or ¥ cursor key. The
display shows the partition list as shown in the step
2 on the left column.
An asterisk (Ú) shows the active partition. The sizes
of the partitions are shown (not the available space).
2. Move the cursor (§/¶) keys or rotate the DATA dial
to the partition to make it active and press YES/
ENTER.
An asterisk (Ú) shows the active partition. The sizes
of the partitions are shown (not the available space).
You cannot select the FAT partition here.
3. Use the cursor (§/¶) keys or rotate the DATA dial to
select the partition to make it active and press YES/
ENTER. The display shows:
4. Press YES/ENTER to select, or NO/EXIT to cansel
the partition action.
The unit stores the current song, loads the current
song on the new partition and shows a series of
messages about the progress of the operation.
The display shows the message, Are you sure? as
shown in step 3 on the left column.
If a CF card under 5GB is used, just one partition
appears on the display, and that is the only partition
available as the current active partition, marked with
an asterisk.
3. Press YES/ENTER to select, or NO/EXIT to cancel
the partition action.
Page 39

IMPORTANT SAFETY INSTRUCTIONS
CAUT IO N
NOTE
WARNING
NOTE
NOTE
Formatting a disk/card
2 – Advanced techniques
As well as formatting the recording media, you can set the
size of the unit’s native partitions.
This destroys all data on the entire disk. You cannot
undo it. ONLY CARRY OUT THIS OPERATION IF YOU
ARE SURE THIS IS WHAT YOU REALLY WANT TO DO.
On the DP-02:
1. From the MENU screen, select and enter the DISK
2. Select the FORMAT action and press the ¥ cursor or
YES/ENTER.
The disk size shown on the display may vary from the
example given here.
3. Use the DATA dial to select the size of the partitions
(32, 16, 8 or 4 gigabytes—1 gigabyte is 1024 megabytes).
All partitions will be the same size, except the last
one, which will be the size of the remaining space.
On the DP-02CF:
1. From the CARD screen, select and enter the
FORMAT action. The display shows:
The card size shown on the display may vary from the
example given here.
2. Use the DATA dial to select the size of the partitions
(64, 32, 16, or 8 gigabytes—1 gigabyte is 512 megabytes).
All partitions will be the same size, except the last
one, which will be the size of the remaining space.
If a CF card less than 5GB is used, the partition size is
not selectable, so the partition size value is not highlighted.
3. Press YES/ENTER. A message reminds you that all
songs will be lost.
4. Press YES/ENTER.
A message reminds you that all songs will be lost.
It is most important that the power to the unit is not
turned off when the disk is being formatted. If this
happens, the unit may become unusable.
5. Press YES/ENTER again to format the disk with the
new partition sizes (or NO/EXIT to escape without
formatting).
TASCAM DP-02/ DP-02C F 39
Page 40

IMPORTANT SAFETY PRECAUTIONS
40 TASCAM DP-02/DP-02CF
2 – Advanced techniques
CAUT IO N
CAUT IO N
Formatting a partition
If you want to keep partition sizes the same, or you only
wish to clean out one partition of the recording media,
this is the way to do it. You use the REFORMAT screen to
format a partition.
You cannot undo this operation—all data on the
selected partition will be lost. ONLY CARRY OUT THIS
OPERATION IF YOU ARE SURE THIS IS WHAT YOU
REALLY WANT TO DO.
On the DP-02:
1. From the MENU screen, select and enter the DISK.
2. Select the REFORMAT action and press the ¥ cursor
or YES/ENTER key. The display shows:
An asterisk (Ú) shows the current active partition.
The sizes of the partitions are shown (not the available space).
3. Select the partition to be formatted and press YES/
ENTER. A popup message reminds you that all data
on the partition will be lost.
4. Press YES/ENTER to format the partition.
On the DP-02CF:
1. From the CARD screen, select and enter the
REFORMAT action. The display appears as shown in
step 2 on the left column (here, HDD is now CF).
An asterisk (Ú) shows the active partition. The sizes
of the partitions are shown (not the available space).
2. Select the partition to be formatted and press YES/
ENTER.
A popup message appears on the display as shown
in step 3 above.
3. Press YES/ENTER to format the partition.
Formatting the FAT partition
The FAT partition is used for transfer between the unit
and a personal computer. Its size is fixed by the unit, and
cannot be changed.
You cannot undo this operation—all data on the FAT
partition will be lost. ONLY CARRY OUT THIS OPERATION IF YOU ARE SURE THIS IS WHAT YOU REALLY
WANT TO DO.
On the DP-02:
1. From the MENU screen, select and enter the DISK.
2. Select the REFORMAT action and press ¥ cursor or
YES/ENTER.
3 Press YES/ENTER to reformat the FAT partition.
On DP-02CF:
1. From the CARD screen, select and enter the FAT
REFORMAT action. The display appears as shown in
step 2 on the left column.
2. Press YES/ENTER to reformat the FAT partition.
Page 41

IMPORTANT SAFETY INSTRUCTIONS
CAUT IO N
NOTE
T I P
2 – Advanced techniques
Automatic song creation
After formatting your recording media or a partition, a
new song is always created on any blank partition, in the
same way that one is created if the only song on a partition
is erased. You always have a song available to work with.
Initializing a Compact Flash card (the DP-02 only)
A CF card is initialized by formatting with FAT 32. This
will erase all data and format all areas on the card.
1. From the CARD screen, select and enter the CF
INITIALIZE action. The display appears:
Advanced song management
Coping songs
The recording media is divided into “partitions” (see
“Disk/CF card management” on page 38). You can use
different partitions for different purposes: old songs/new
songs, or instrumentals/vocal numbers, for example.
This function allows you to copy a song to another partition.
2. Press YES/ENTER to initialize the CF card.
You cannot undo this operation—all data on the card
will be lost. ONLY CARRY OUT THIS OPERATION IF YOU
ARE SURE THIS IS WHAT YOU REALLY WANT TO DO.
Automatic song creation cannot be performed when
initializing the CF card.
3. Press YES/ENTER. The display shows:
1. From the SONG menu, select the COPY action:
2. Use the cursor (§/¶) keys to highlight a song, and
rotate the DATA dial clockwise to confirm the song
to copy.
A “ ” appears in the check box.
To deselect the selection, rotate the dial counter-
clockwise. The check mark disappears.
By rotating the DATA dial, you can select the
“target” partition that the song will be copied to.
The available free space is shown on the display.
When the DP-02 leaves the factory, the disk has three
“native” partitions.
4. Press YES/ENTER to copy the song, or NO/EXIT to
cancel the operation.
The unit then provides you with a progress icon
as it carries out the copying operation. When it is
finished, you see the copy screen again.
TASCAM DP-02/ DP-02C F 41
Page 42

IMPORTANT SAFETY PRECAUTIONS
42 TASCAM DP-02/ DP-02C F
2 – Advanced techniques
NOTE
CAUT IO N
NOTE
NOTE
Protecting a song
When a song is protected, it cannot be edited, and further
recording is not possible. Of course, it cannot be erased,
either.
1. From the SONG menu, select the PROTECT action:
Using the USB connection
You can use a personal computer to read and write from
the FAT partition of the hard disk or CF card.
We use the term “PC” throughout this section to mean
either a Windows or Macintosh personal computer.
Data transfer between a personal computer and the unit is
always done through this FAT partition. You cannot access
“native” partitions from a computer, so performing data
transfer functions is a two-stage process.
Within the FAT partition, there are three directories (folders): BACKUP, WAVE and UTILITY, as explained below.
2. Use the dial to change protection from OFF to ON
and press YES/ENTER.
In lists of songs for copying, deletion, etc., a “key”
icon ( ) appears beside any protected song.
If you try to do an action which cannot be
performed on a protected song, a message appears
(Song Protected).
Unprotect a song by following the steps above, but
changing ON to OFF.
You can make the following transfers:
Whole songs—the unit calls this BACKUP (from the unit
to the BACKUP directory of the FAT partition to the PC)
and RESTORE (from the PC to the BACKUP directory of
the FAT partition of the unit).
Tracks in WAV format—tracks can be exported (one or
more at a time) as WAV files, or imported (one at a time)
from WAV files between the PC and the WAVE directory
of the FAT partition of the unit.
Mastered stereo mixes—export only, as stereo WAV files
to the WAVE directory of the FAT partition of the unit.
Do not rename or delete these directories—if you do,
you will lose the ability to carry out the operations
described here.
System requirements
The unit will work with the following Microsoft operating systems: Windows 2000, Windows XP, and Windows
Vista. It will also work with the following operating
systems from Apple Computer: Mac OS X 10.2 and above.
Data transfer between the unit and a PC takes place at
USB 2.0 speeds (maximum). If your computer has USB
1.1, but no USB 2.0, data transfer will still work, but
the USB 1.1 rate. We recommend that you always use
a high-quality USB 2.0 cable in order to maximize data
transfer speeds.
If the unit is connected to an Apple Mac running an
unsupported Mac OS (10.1 or older) using USB, it
may not be possible to use the software unmount, or
disconnect, function of that OS. In this case, you may
remove the USB cable from either the computer or the
unit to force a disconnect.
The UTILITY directory is used for DP- 02/DP-02CF
system updates, etc. Explanations of how this is used
are given with the update software.
your system. If you do not do this, there is a risk of data
corruption in the unit’s FAT partition.
Disconnecting from Windows 2000 / XP / Vista
ª
systems
With Windows 2000, Windows XP and Windows Vista the
procedure is a little more complex than simply unplugging
the unit.
In the system tray (typically at the bottom right of the
screen), you see an icon of a PC card and an arrow.
1. Left-click this icon to show a popup bar. Click this
popup bar to allow the unit to be removed from the
computer.
For all the above operating systems, no driver is required.
The unit simply appears as a mass storage device.
However, you should always follow your computer’s
instructions on how to disconnect a USB drive safely from
2. When the panel telling you it is safe to remove the
unit appears, press the YES/ENTER key on the unit
to “close” the system (see ““Open” and “Close”” on
page 43).
Page 43

IMPORTANT SAFETY INSTRUCTIONS
T I P
CAUT ION
2 – Advanced techniques
3. You can now unplug the USB cable.
If a panel telling you it is not safe to remove the unit
appears, do not “close” or unplug the unit. Close all
programs and windows that are accessing the files on the
unit and try again.
"Open" and "Close"
Before using the unit’s FAT partition, you must “open” the
system so that it can be read by the PC. While the system is
open, you cannot perform any recording, playback, etc., or
any operations involving the unit’s recording media.
Make sure that you have saved songs, copied all the
files you’re going to Transfer to the PC to the FAT
partition, etc., before you open the unit.
1. Connect the unit to the PC.
2. On the DP-02, press MENU and select USB.
On the DP-02CF, press the USB key on the top
panel.
Disconnecting from a Macintosh system
ª
When you are disconnecting the unit from a Macintosh
system (OS X), drag the disk icon to the Trash, or press
Command-E (OS X 10.3 also has a button in the Finder
which allows ejecting removable media). When the icon
has disappeared from your desktop, you can disconnect the
unit.
3. Press YES/ENTER again. The screen shows:
The unit is now locked until you press YES/ENTER.
Remove the unit from the computer (see “Using the
USB connection” on page 42) before pressing YES/
ENTER.
A popup message appears, asking if you are sure.
TASCAM DP-02/ DP-02C F 43
Page 44

IMPORTANT SAFETY PRECAUTIONS
44 TASCAM DP-02/ DP-02CF
2 – Advanced techniques
T I P
NOTE
Backing up and restoring songs
When you back up a song, you’re backing up the audio
tracks, as well as any editing, etc. Reverse the process
(computer hard disk to FAT partition on the recording
media in the unit) when you want to restore a song.
Backing up
Before you start, make sure that you’ve selected the
partition containing the song you’re going to back up (
“Selecting the active partition” on page 38).
1. From the MENU screen, select and enter the DATA
BACKUP action.
2. Select the SONG BACKUP action and press the ¥
cursor or YES/ENTER key.
The current song is shown with the Ú symbol beside
it.
3. Use the DATA dial to select the song to be backed up.
Press YES/ENTER.
5. Press YES/ENTER to back up the song to the FAT
partition. An error message appears if there is not
enough space.
The song is then copied as an archive from the
current partition to the FAT partition (with a .001
extension). An icon appears on the screen as the unit
goes through the process.
6. Connect the unit to the computer using the USB
cable, and “open” the recording media (““Open”
and “Close”” on page 43).
7. Use the PC operating system to copy or move the
song archive from the BACKUP directory of the unit
FAT partition to the PC.
Once the song archive is on the PC, you can “close”
the unit.
You should not rename the song archive on the PC as
this may “confuse” the unit when you come to restore it.
The song archive on the PC can then be backed up to
CD-R, etc. You can restore it later to the same unit or to
a friend’s unit, allowing you to complete the recording at
another location, or perform the final mix where there are
better speakers available, etc.
If you do not have enough space on the FAT partition
to back up a song, you must connect the unit to a PC
and manage the files from the PC.
4. You can now use the left and right cursor keys and
the dial to name the song archive (up to 8 characters) (see “Titling” on page 11) :
Page 45

NOTE
NOTE
NOTE
Restoring a song
IMPORTANT SAFETY INSTRUCTIONS
2 – Advanced techniques
This is basically the reverse of the backup process, allowing you to transfer a song archive from a PC to the unit.
1. Connect the unit to the PC using the USB cable, and
“open” the recording media (““Open” and “Close””
on page 43).
2. Use the PC operating system to copy the song
archive from the PC to the BACKUP directory of
the unit FAT partition.
3. “Close” the unit.
4. Press MENU and select the DATA BACKUP menu.
If there are no song archive files on the FAT partition,
a message is shown.
5. Select the SONG RESTORE action and press the ¥
cursor or YES/ENTER key key.
The display shows the song archive files on the FAT
partition
Although the unit displays shorter file names with
spaces at the end of the name, these spaces are not
part of the actual file name.
6. Select a song archive using the DATA dial and press
YES/ENTER. The current song is saved.
7. The “real” song name is extracted from the archive
and shown:
Importing and exporting tracks
You can import and export individual tracks to and from
a PC via the FAT partition. The files used for track import
and export are 16-bit 44.1kHz mono WAV format (and
Importing a track
Before you start, make sure that you have selected the
partition containing the song to which you want to import
the track, and that the song is loaded.
1. Connect the unit to the PC, and “open” the recording media (““Open” and “Close”” on page 43).
2. Use the PC operating system to copy the WAVE file
from the PC to the WAVE directory of the unit’s
FAT partition.
3. “Close” the unit.
4. Press MENU and select the WAVE menu.
8. Press YES/ENTER to load the archived song as the
current song. Appropriate messages are shown if
there is not enough disk space, etc.
must have the .WAV extension). Audio in other formats
intended for import must be converted before they can be
imported to the unit.
5. Select the IMPORT TRACK action and press the ¥
cursor or YES/ENTER key.
The display shows the song archive files on the FAT
partition:
Although shorter file names are shown with spaces on
the unit display, the actual file names on disk do not
contain these spaces.
TASCAM DP-02/ DP-02C F 45
Page 46

IMPORTANT SAFETY PRECAUTIONS
46 TASCAM DP-02/ DP-02CF
2 – Advanced techniques
NOTE
NOTE
6. Use the DATA dial to select the WAV file to be
imported and press YES/ENTER.
The display shows the amount of free space on the
current partition, and the size of the selected WAV
file.
Make sure the target track is an empty track. You
cannot import a track unless the target track is empty.
Exporting tracks
Any track can be exported as a mono, 16-bit 44.1kHz WAV
format file.
1. From the MENU screen, select and enter the WAVE
menu.
2. Select the EXPORT TRACK action and press the
YES/ENTER key.
7. Use the DATA dial to select the track into which the
WAV file will be imported. Press YES/ENTER.
Appropriate messages are shown if there is not
enough space, the file is in the wrong format, etc.
The unit reads the file from the FAT partition into the
track, with the start of the file at the “zero” position in the
song.
Once the file has been read into the track, it can be edited
(moved, copied, etc.) like any other recorded track. See
“About track editing” on page 47.
When the cursor is by a track, you can press SHIFT and
MENU to bring up a titling screen:
The display shows a list of suggested file names,
based on the song tracks which contain audio:
If a track does not contain audio, it does not appear in
this list.
3. Use the DATA dial or cursor (§,¶) keys to highlight
a track, and rotate the DATA dial clockwise to mark
it for export. A “ ” appears on the check box.
Edit the name, and press YES/ENTER when you’re
finished (“Titling” on page 11).
4. When all tracks for export have been selected, press
YES/ENTER.
The display shows the free space on the FAT parti-
tion (the destination of the exported tracks) and the
space which the exported tracks will occupy.
5. Press YES/ENTER to export the selected tracks.
The tracks are exported with the names you entered
(a .WAV extension is added). If you already have
exported a track file with the same name as one you
have chosen, a message appears asking you if you
want to overwrite the older file.
6. Connect the unit to the computer and “open” the
recording media (““Open” and “Close”” on page 43).
Repeat this action to select multiple tracks to export.
To deselect a track, use the cursor (§,¶) keys to
highlight and rotate the dial countercolckwise. The
check mark disappears.
7. Use the PC operating system to copy or move the
exported tracks from the WAVE directory of the unit
FAT partition to the PC.
Once the tracks are on the PC, you can “close” the unit.
The exported tracks on the PC can then be backed up to
CD-R, etc.
Page 47

IMPORTANT SAFETY INSTRUCTIONS
NOTE
NOTE
NOTE
2 – Advanced techniques
You can rename the exported tracks on the PC, but you
should remember to keep to the “8.3” standard and the
.WAV extension and remember to limit the character to
letters of the alphabet (no accented characters or “odd”
punctuation, etc.).
Exporting the mastered stereo tracks
When you have finished mastering (see “Mastering” on
page 27), you may want to save the mastered stereo mix,
otherwise it will be overwritten when you next perform a
mastering operation.
Before you start this operation, make sure you have loaded
the song whose mastered mix you will be exporting (and
that it does indeed contain a stereo mastered mix).
1. From the MENU screen, select and enter the WAVE
menu.
2. Select the EXPORT MASTER action and press the ¥
cursor or YES/ENTER key.
You can import these tracks later to the same unit or to a
friend’s unit.
3. Use the left and right cursor keys and the DATA dial
to name the exported mastered stereo mix (“Titling”
on page 11).
Press NO/EXIT if you want to cancel the export operation.
4. When you’re done, press YES/ENTER to export
the mastered stereo mix (as a single 16-bit 44.1kHz
stereo WAV file).
The file is exported with the name you just entered, and a
.WAV extension.
5. Connect the unit to the computer and “open” the
recording media (““Open” and “Close”” on page
43).
The display shows a default file name for you to edit:
If there is no mastered mix, the display will inform you.
About track editing
One of the most useful features of a disk or memory-based
recorder such as this unit is the ability to edit material easily. When working with a stereo tape recorder in the past,
editing was not an easy process, and was very difficult to
undo if there were any mistakes. Multitrack editing was
nearly impossible!
The unit allows you to edit songs, copying and moving
material from one part of a song to another. This editing
is known as non-destructive editing, meaning that the
operation does not actually destroy data, and you can undo
mistaken or unwanted editing operations easily.
6. Use the PC operating system to copy or move the
exported mastered mix file or files from the WAVE
directory of the unit FAT partition to the PC.
Once the file or files are on the PC, you can “close” the
unit.
If you have ever used a word-processor on a computer, you
will probably find most of the unit’s editing operations
pretty simple. If you have never used a computer, the unit’
s editing operations are nothing to be scared of–just read
through this section to see how it all works.
You can undo the editing operations described here
(see “Undoing/Redoing an operation” on page 25).
Even if you delete all the material on every track using
these functions, you can still get it back with only a
few key-presses.
TASCAM DP-02/ DP-02C F 47
Page 48

IMPORTANT SAFETY PRECAUTIONS
48 TASCAM DP-02/DP- 02CF
2 – Advanced techniques
OUTIN TO
OUTIN TO
IN, OUT and TO
We have previously seen how the IN and OUT points can
be used for punching and for location. They are also used
in these track editing operations, together with the TO
point.
The IN point marks the start of the part of the track
•
which is selected when editing a part of a track (rather
than a whole track).
Using edit mode
1. Make sure that the unit is stopped (not playing back
or recording).
2. Press the TRACK EDIT key on the top panel. The
displayshows:
Track editing function
The OUT point marks the end of the part of the track
•
which is selected when editing part of a track.
The TO point marks the final destination of a copy or a
•
move operation.
3. Use the DATA dial to move the cursor to the track
editing function you will be using and press the
YES/ENTER or ¥ cursor keys.
4. Select the appropriate values, as described for each
individual function.
5. Press YES/ENTER to perform the operation, or NO/
EXIT to exit without performing the operation.
Track editing functions
The track editing functions available on the unit are:
COPY->PASTE
•
COPY->INSERT
•
MOVE->PASTE
•
MOVE->INSERT
•
COPY ® PASTE
This function takes the section of a track or tracks marked
by the IN and OUT points, copies it, and pastes it at the TO
point on the chosen track or tracks.
The original source is left unchanged.
The copy operation overwrites anything which is already
recorded at the destination. The track is the same length as
it was before the operation.
You can copy the section more than once in one operation.
OPEN
•
CUT
•
SILENCE
•
CLONE TRACK
•
CLEAN OUT
•
You can change the following values:
SOURCE.TRK This sets the source track or tracks from
which the section is copied. Choose 1 through 8 to select
an individual track. Choose 1/2, 3/4, 5/6 or 7/8 to select a
pair of tracks. Choose 1-8 to select all tracks.
DESTINATION. TRK This sets the destination track or
tracks to which the selected section is pasted. What you
can select here depends on what you have selected for the
source track. If you have selected a single track, you can
select tracks 1 through 8 here. If you have selected a pair
of tracks (for instance, 1/2), you can only select track pairs
here. If you have selected all tracks (1-8), then 1-8 is the
only option available to you here.
COPY TIMES This is the number of times that the select-
ed section is pasted into the destination track or tracks.
You can set this value from 1 to 99.
Press YES/ENTER to perform the operation or NO/EXIT to
leave this screen.
Page 49

OUTIN TO
OUTIN TO
COPY ® INSERT
OUTIN TO
OUTIN TO
IMPORTANT SAFETY INSTRUCTIONS
2 – Advanced techniques
This function takes the section of a track or tracks marked
by the IN and OUT points, copies it, and inserts it on the
chosen track or tracks, as new material, starting at the TO
point.
The original source is left unchanged.
The insert operation adds the selected section as new material to the destination. Nothing is overwritten at the destination, as any existing material following the TO point is
moved to the end of the newly-inserted section. The track
is now longer than it was before the operation.
You can copy the section more than once in one operation
(for example, to repeat a verse/chorus section).
You can change the following values:
SOURCE.TRK This sets the source track or tracks from
which the section is copied. Choose 1 through 8 to select
an individual track. Choose 1/2, 3/4, 5/6 or 7/8 etc. to select
a pair of tracks. Choose 1-8 to select all tracks.
DESTINATION. TRK This sets the destination track or
tracks into which the selected section is inserted. What you
can select here depends on what you have selected for the
source track. If you have selected a single track, you can
select tracks 1 through 8 here. If you have selected a pair
of tracks (for instance, 1/2), you can only select track pairs
here. If you have selected all tracks (1-8), then 1-8 is the
only option available to you here.
COPY TIMES This is the number of times that the select-
ed section is inserted (end-to-end) in the destination track
or tracks. You can set this value from 1 to 99.
Press YES/ENTER to perform the operation or NO/EXIT to
leave this screen.
MOVE ® PASTE
This function takes the section of a track or tracks marked
by the IN and OUT points, and moves it to the chosen track
or tracks, starting at the TO point.
After the operation, the selected section of the source
between the IN and OUT points is replaced by silence.
This operation overwrites anything which is already
recorded at the destination. The track is therefore the same
length as it was before the operation.
You can change the following values:
SOURCE.TRK This sets the source track or tracks from
which the section is taken. Choose 1 through 8 to select an
individual track. Choose 1/2, 3/4, 5/6 or 7/8 to select a pair
of tracks. Choose 1-8 to select all tracks.
DESTINATION. TRK This sets the destination track or
tracks to which the selected section is moved. What you
can select here depends on what you have selected for the
source track. If you have selected a single track, you can
select tracks 1 through 8 here. If you have selected a pair
of tracks (for instance, 1/2), you can only select track pairs
here. If you have selected all tracks (1-8), then 1-8 is the
only option available to you here.
Press YES/ENTER to perform the operation or NO/EXIT to
leave this screen.
TASCAM DP-02/ DP-02C F 49
Page 50
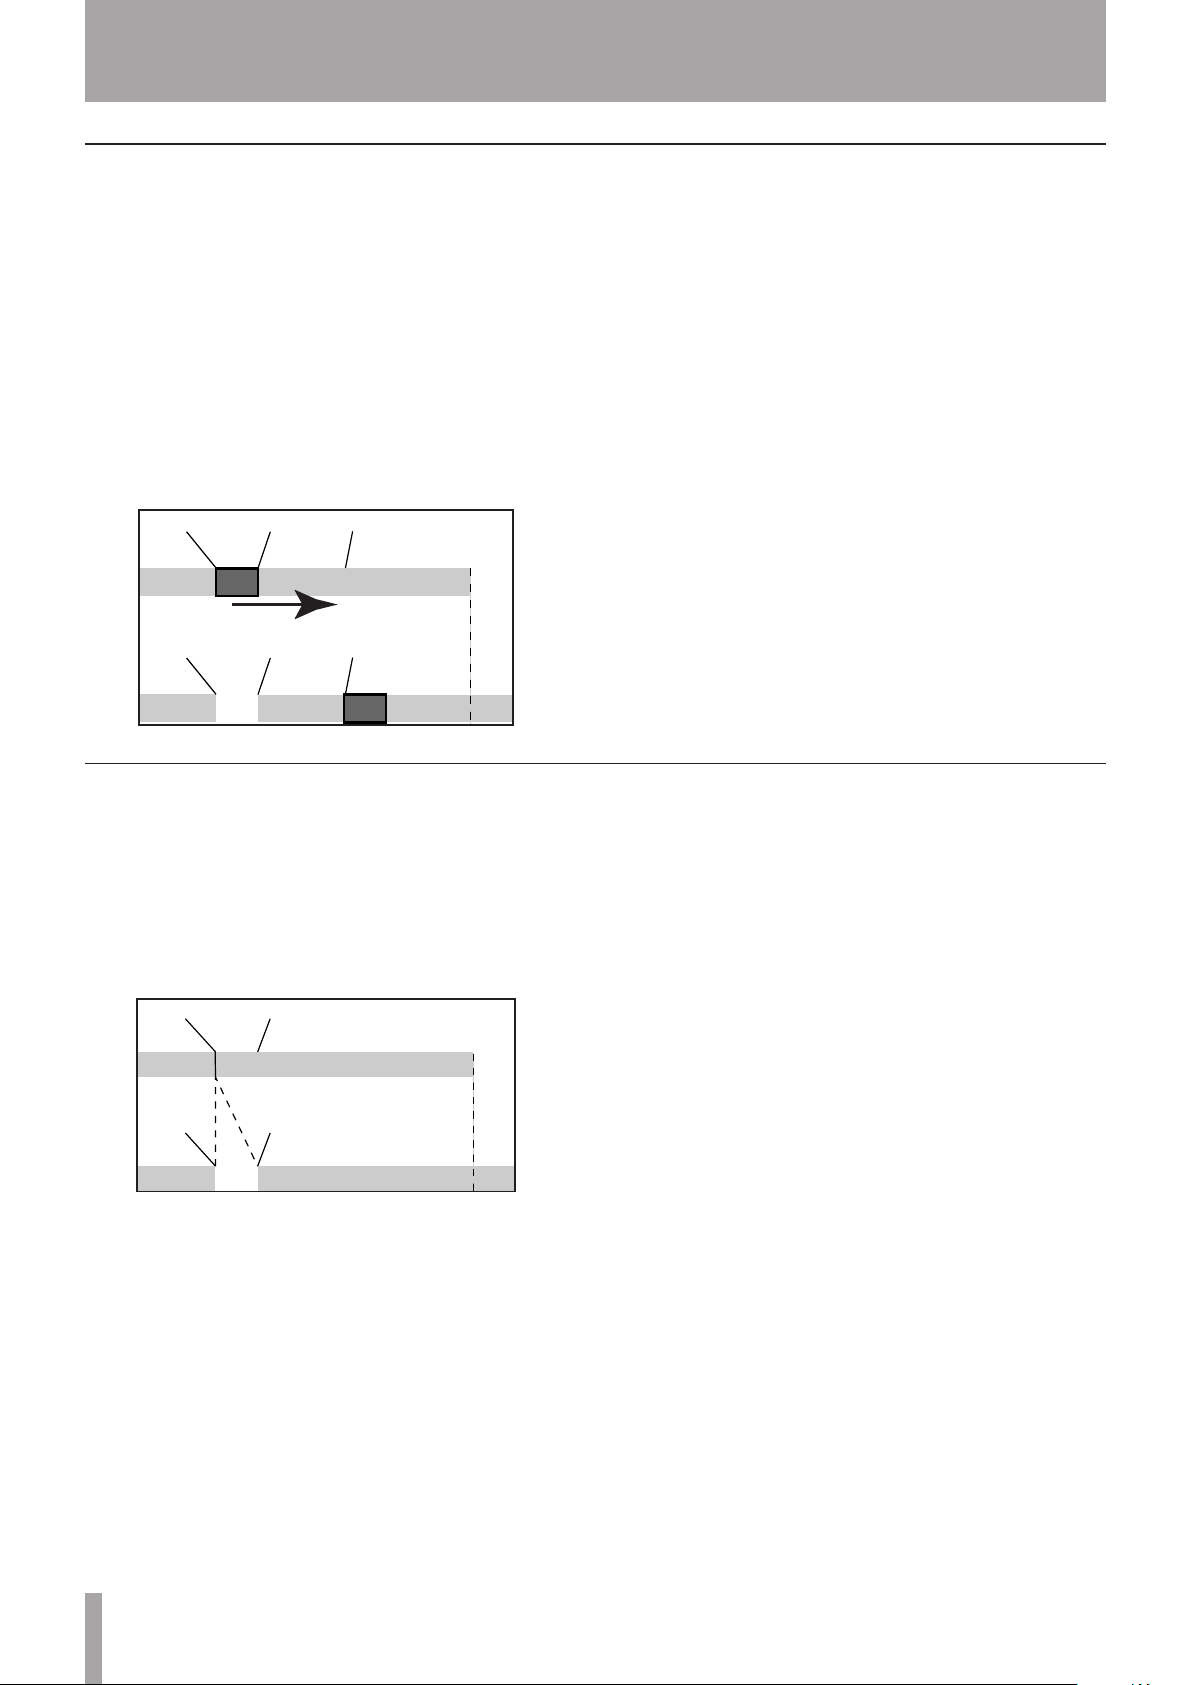
IMPORTANT SAFETY PRECAUTIONS
50 TASCAM DP-02/ DP-0 2CF
2 – Advanced techniques
OUTIN TO
OUTIN TO
OUTIN
OUTIN
MOVE ® INSERT
This function takes the section of a track or tracks marked
by the IN and OUT points, and moves it to the chosen track
or tracks, inserting it as new material, starting at the TO
point.
After the operation, the selected section of the source
between the IN and OUT points is replaced by silence.
The insert operation adds the selected section as new material to the destination. Nothing is overwritten on the destination, as any material following the TO point is moved to
the end of the newly-inserted section. The track is therefore
longer than it was before the operation.
OPEN
You can change the following values:
SOURCE.TRK This sets the source track or tracks from
which the section is taken. Choose 1 through 8 to select an
individual track. Choose 1/2, 3/4, 5/6, 7/8 to select a pair of
tracks. Choose 1-8 to select all tracks.
DESTINATION. TRK This sets the destination track or
tracks into which the selected section is inserted. What you
can select here depends on what you have selected for the
source track. If you have selected a single track, you can
select tracks 1 through 8 here. If you have selected a pair
of tracks (for instance, 1/2), you can only select track pairs
here. If you have selected all tracks (1-8), then this is the
only option available to you here.
Press YES/ENTER to perform the operation or NO/EXIT to
leave this screen.
This function “opens up” a silent gap between the IN and
OUT points on the chosen track or tracks.
The source and destination are the same, and after the
operation, the track is split at the IN point, with the material which followed the IN point now moved to follow the
OUT point. The result is therefore longer than the original.
There is only one value that you can change:
OPEN.TRK Select an individual track (1 through 8), a
pair of tracks (1/2, 3/4, 5/6, 7/8), all of the tracks (1-8) or all
tracks (ALL).
Press YES/ENTER to perform the operation or NO/EXIT to
leave this screen.
Page 51

NOTE
T I P
OUTIN
IN
CUT
OUT
OUT
IN
IN
IMPORTANT SAFETY INSTRUCTIONS
2 – Advanced techniques
This function deletes the material between the IN and OUT
points on the chosen track or tracks and “closes up” the
gap.
The source and destination are the same, and after the
operation, the material between the IN and OUT points is
deleted. The track is therefore shorter than the original.
SILENCE
This function is equivalent to recording silence between
the IN and
Material is deleted, but the length of the result is the same
as that of the original (the gap is not closed up, unlike with
the CUT function).
OUT
points on the chosen track or tracks.
There is only one value that you can change:
CUT.TRK Select an individual track (1 through 8), a pair
of tracks (1/2, 3/4, 5/6, 7/8), all of the tracks (1-8) or all
tracks (ALL).
Press YES/ENTER to perform the operation or NO/EXIT to
leave this screen.
There is only one value that you can change:
SILENCE.TRK
pair of tracks (1/2, 3/4, 5/6, 7/8), or all the tracks (1-8).
Press
YES/ENTER
leave this screen.
Select an individual track (1 through 8), a
to perform the operation or
NO/EXIT
to
CLONE TRACK
This copies a track or pair of tracks to another track or pair
of tracks.
There are no IN and OUT points when cloning.
There are two values that you can change:
SOURCE.TRK Select an individual track (1 through 8),
a pair of tracks (1/2, 3/4, 5/6, 7/8) or the MASTER stereo
track.
DESTINATION. TRK This sets the destination track or
tracks to which the source track is cloned. What you can
select here depends on what you have selected for the source
track. If you have selected a single track, you can select
tracks 1 through 8 here. If you have selected a pair of tracks
(for instance, 1/2), you can only select track pairs here.
Press YES/ENTER to perform the operation or NO/EXIT to
leave this screen.
If you try to select the same track as a destination that
you have selected as the source, when you press the
YES key, a message will appear.
Although you cannot mix the inputs of the STEREO MIX
to the mixed master track, you can add a drum machine
(say for instance) to the mix in the following way:
Mix down to the mix master track, using the EFFECT
•
SEND and EFFECT RETURN (“Mixdown and master-
ing” on page 27) to add reverb to your mix.
Clone the stereo mix to a pair of tracks.
•
TASCAM DP-02/ DP-02C F 51
Page 52

IMPORTANT SAFETY PRECAUTIONS
52 TASCAM DP-02/DP-02CF
2 – Advanced techniques
Disconnect the drum machine from the STEREO MIX
•
and connect it to the RETURN jacks. Make sure that the
drum machine is set up to be synchronized to the unit (
“Working with MIDI” on page 37).
Mix down again with only the two cloned tracks, using
•
the EFFECT RETURN control to add and adjust the
levels of the drum machine. You now have a mix including the drum machine as well as the effect added to the
main tracks.
CLEAN OUT
This deletes all the material in a track or tracks. There are
no IN and OUT points when performing the clean out function.
There is only one value that you can change:
CLEAN OUT.TRK Select an individual track (1 through
8), a pair of tracks (1/2, 3/4, 5/6, 7/8), or all the tracks (1-8).
Press YES/ENTER to perform the operation or NO/EXIT to
leave this screen.
Page 53

Troubleshooting
IMPORTANT SAFETY INSTRUCTIONS
2 – Advanced techniques
When working with any new piece of equipment like the
unit, it’s sometimes difficult to work out why something
isn’t happening the way you expect. The main thing is to
take your time—after all, you’re not paying hourly studio
rates! Stop and think. Ask yourself questions, like the ones
below, and you can usually find the answer.
Also, see the section on “Messages” on page 54 for the
meaning of messages that may pop up on the display.
Why can’t I hear any sound when I play back?
Are the faders of the tracks you’ve recorded at a reason-
•
able level?
Is the MASTER fader at a reasonable level?
•
Have you connected the LINE OUTPUT jacks to your
•
monitoring system properly, and is your monitoring
system set up correctly?
Is a track muted (MUTE indicator lit)? Press SHIFT and
•
the REC key to un-mute it.
If you’re monitoring through headphones, is the
•
PHONES control turned to a suitable level?
Why does the sound I’m recording sound distorted?
Is the input level control on the top panel of the unit set
•
appropriately for the input source?
If you’re recording an acoustic instrument, are you sure
•
you’re not sending it through an electric guitar effect?
(DP-02 only)
Are you listening at too high a volume? Is it your moni-
•
toring system that’s distorting?
Why can’t I record?
You must have at least one track armed (REC indicator
•
flashing) before you can use the RECORD (–) key.
Are inputs assigned to tracks (see “Assigning inputs” on
•
page 23)?
If you’re in a menu, etc., recording may not be possible.
•
Return to the “home” screen.
Why can’t my computer “see” the unit files?
Make sure the unit is connected to a USB port and
•
“open” (see ““Open” and “Close”” on page 43).
The computer can’t see files which are in the “native”
•
partitions. Back up or export songs, tracks and mixes to
the FAT partition (“Using the USB connection” on page
42) before “opening” the USB connection, so that the
files can be read on a computer.
Why can’t I hear the selected effect? (DP-02 only)
You must turn on the effect for the appropriate input
•
(EFFECT) or turn on the effect (REVERB).
For reverb, you must turn up at least one track’s
•
EFFECT SEND, together with the master EFFECT
RETURN.
The volume of a multi-effect may need adjusting or the
•
parameter is set so low that the effect is too subtle to be
noticed (“Multi-effect” on page 59).
TASCAM DP-02/ DP-02C F 53
Page 54

IMPORTANT SAFETY PRECAUTIONS
54 TASCAM DP-02/ DP-02CF
2 – Advanced techniques
Messages
The following popup messages alert you to conditions that
may arise while you are using the unit. Consult this table if
you see something you don’t understand:
Empty Export Track You’re trying to export a track (“Importing and exporting tracks” on page 45) which doesn’t have
anything recorded on it. Pick another track to export.
File Not Found You’re trying to restore a song when there are no backed-up songs on the partition (“Backing up
and restoring songs” on page 44)—maybe you hit the ¥ cursor key by mistake, or you may want
to change the partition (“Selecting the active partition” on page 38).
I/O Too Short You are trying to enter repeat mode, but the time between the IN and OUT points is too short.
Make the time longer.
Import File Not Found You’re trying to import a WAV file from the FAT partition when there aren’t any WAV files there
(“Importing a track” on page 45). Connect the unit to a PC and transfer some files to the FAT
partition for import.
Import File Too Big You’re trying to import a WAV file from the FAT partition that is too big for the remaining space
on the partition. Free up some space on the (native) partition and try again.
In Bounce Mode You tried to perform an action that cannot be done while in Bounce mode (“Bouncing” on page
34).
In Master Mode You tried to perform an action that cannot be done while in Master mode (“Mixdown and
mastering” on page 27).
In Punch Mode You tried to perform an action that cannot be done while in Punch mode (“Punching recording”
on page 25).
In Repeat Mode You tried to perform an action that cannot be done while in Repeat mode.
Mark Full You tried to store more than 999 location marks in a song (“Location marks” on page 29).
Delete some location marks and try again.
Master Track Not Found You’ve tried to export a mastered mix track (“Exporting the mastered stereo tracks” on page 47)
when the song doesn’t have one. Master the song and then export the mix.
Master Track Too Big You tried to export a master track which was too big for the remaining space on the FAT parti-
tion (“Exporting the mastered stereo tracks” on page 47). Connect the unit to a computer and
free up some space on the FAT partition.
No Armed Track You’re trying to set up auto-punching with no tracks armed (“Punching recording” on page 25).
Arm a track or tracks and try again.
No Disk Space You tried to create a song, but there’s not enough space on the partition to create a song (
“Creating a new song” on page 21). Free up some space and try again.
No Locate Mark You’re trying to edit the location mark list (“To edit a location mark” on page 29) when no loca-
tion marks have been set.
No Master Trk You’ve tried to use a non-existent master track as the source in a track cloning operation (
“CLONE TRACK” on page 51). Select another source or master the song and try again.
No Redo Histry There’s nothing for you to redo (nothing’s been undone). See “Undoing/Redoing an operation”
on page 25.
No Song You’re trying to load a song from a partition that has no songs on it (“Loading a saved song” on
page 22). Change partitions (“Selecting the active partition” on page 38).
No Undo Histry There are no actions to be undone. See “Undoing/Redoing an operation” on page 25.
Not Stopped The transport is moving (not stopped, but playing back, recording, etc.) and you’ve pressed a key
such as the BOUNCE key which cannot be used until you press STOP.
Now Recording You’re trying to perform an action which cannot be done while recording.
Same Track You can’t clone a track to itself. “CLONE TRACK” on page 51.
Song protected Song Protected The song is protected (“Protecting a song” on page 42) and you are trying to
change it (record or edit, etc.). Unprotect the song.
Too Many Songs You have 250 songs on one partition. You must delete some before you can create another song.
Track Full You’re trying to import a file from the FAT partition to a track that has already been recorded to
(“Importing a track” on page 45). You can only import to a blank track.
Trk too short You’re trying to master with the OUT point at the zero position (“Mixdown and mastering” on
page 27). Set the OUT point (“IN and OUT marks” on page 30) and try again.
Page 55

IMPORTANT SAFETY INSTRUCTIONS
3 – Specifications
Specifications
Analog specifications
INPUTs (A and B) 1/4” phone (unbalanced) XLR balanced
Input impedance >10 kΩ (max), or 1 MΩ (A only) with 2.4 kΩ
switch in GUITAR position
Nominal input level -4 dBV -8 dBu
Maximum input level +12 dBV +8 dBu
EFFECT RETURN 2 x 1/4” phone (unbalanced)
Input impedance 10 kΩ
Nominal input level –10 dBV
Maximum input level +6 dBV
STEREO MIX 1/8” stereo mini jack (unbalanced)
Input impedance 10 kΩ
Nominal input level –10 dBV
Maximum input level +6 dBV
LINE OUTPUT 2 x unbalanced RCA (pin) jacks
Output impedance 1 kΩ
Nominal output level –10 dBV
Maximum output level +6 dBV
EFFECT SEND 1 x 1/4” phone (unbalanced)
Output impedance 1 kΩ
Nominal output level –10 dBV
Maximum output level +6 dBV
PHONES 1/4” stereo jack
Maximum output 25 mW + 25 mW (into 30Ω)
Digital specifications
DIGITAL OUT Optical digital audio output (TOSLINK)
Data format S/PDIF 1
Audio performance
Frequency response 20 0Hz – 20 kHz, +1 dB/3 dB
Signal-to-noise ratio > 85 dB (A-weighting, 22 kHz LPF)
Total harmonic distortion < 0.02% (1 kHz, 10 dBV, 22 kHz LPF, MASTER fader at nominal)
Physical characteristics
External power adapter AC input 100 – 240 V AC, 50/60 Hz
External power adapter output 12V
External power adapter output current 2.5A
Power consumption DP-02: 11 W / DP-02CF: 8 W
Dimensions (w x h x d) DP-02/DP-02CF: 416 x 65.4 x 298.6 (mm) 16.4” x 2.6” x 11.8”
Weight DP-02: 4.5 kg (9.9 lb) / DP-02CF: 4.1 kg (9.0 lb)
TASCAM DP-02/ DP-02C F 55
Page 56

IMPORTANT SAFETY PRECAUTIONS
56 TASCAM DP-02/ DP-02CF
3 – Specifications
Dimensional drawings
DP-02
DP-02CF
Page 57

IMPORTANT SAFETY INSTRUCTIONS
STEREO BUS L
SEND BUS
METER
DIGITAL
INTERFACE
METER
STEREO MIX L
INPUT A
INPUT B
To MTR Input Assign
RETURN L
METER
METER
MUTE
MUTE
MUTE
On
On
On
FADER
PAN
EFFECT
SEND
EFFECT
RETURN
METER
METER
MASTER
FADER
PAN
PAN
EFFECT
SEND
EFFECT
SEND
FADER
FADER
METER, OL
On
METER, OL
On
Multi
Effector
OUTPUT
LEVEL
STEREO
MONOx2
STEREO
MONOx2
On
On
Off
Off
RETURN R
INPUT MODE
STEREO MIX R
To MTR Input Assign
(Bouncing, Mastering)
LINE OUTPUT L
LINE OUTPUT R
DIGITAL OUT
SEND (MONO)
MUTE
MUTE
INPUT-A L
INPUT-A R
INPUT-B R
INPUT-B L
STEREO L
STEREO R
NONE
NONE
MTR Input Assign
(Record Source Select)
REC
REC
REC
On
On
On
Off
Off
Off
Reverb
Guitar
Tuner
Multi Effect, Tuner, Reverb Algorithm (DP-02 Only)
INPUT-A L
INPUT-B L
INPUT-B R
INPUT-A R
STEREO L
STEREO R
HEADPHONE L
HEADPHONE R
TRACK
2
TRACK
8
TRACK
1
On
Off
On
Off
On
Off
METRONOME
On
Off
LEVEL
A/D
A/D
A/D
A/D
D/A
D/A
D/A
STEREO BUS R
EQ
LOW
EQ
HIGH
EQ
LOW
EQ
HIGH
EQ
LOW
EQ
HIGH
REVERB
MULTI (Multi Effect Assign)
DIGITAL
INTERFACE
STEREO MIX L
MASTER
FADER
STEREO MIX R
LINE OUTPUT L
LINE OUTPUT R
DIGITAL OUT
SEND (MONO)
HEADPHONE L
HEADPHONE R
METER
CD
Rch Data
Zero Data
D/A
D/A
D/A
Multi Track Recorder
Mixer
CD Player
CD
Lch Data
Block Diagram (MTR mode)
Block Diagram (CD player mode) [DP-02 only]
Block diagram (DP-02/DP-02CF)
3 – Specifications
TASCAM DP-02/ DP-02C F 57
Page 58

IMPORTANT SAFETY PRECAUTIONS
T I P
4 – DP-02 Appendix
Tuning a guitar
The built-in tuner allows you to tune a guitar or bass
connected to input A only.
Press the MENU key and select the TUNER action:
Play a single string. The unit makes its “best guess” at the
note, shows the value, and provides an indication of whether it’s sharp or flat.
The line of symbols on either side of the center square gets
shorter as the played note approaches the “target” and the
center square fills when the string is in tune:
Changing the tuning
ª
Most instruments are tuned to A=440Hz. If you are playing with another instrument that cannot be tuned, you may
want to change this value, that is, tune your guitar to the
other instrument.
Use the DATA dial to change the reference tuning away
from 440Hz if you need to do this.
Noise reduction
ª
When you are recording, the background noise of microphones, or the noise from guitar amplifiers, etc., may be
too loud. The unit allows you to “gate” this noise, and only
open the gate when the input signal goes over a certain
level. This only takes effect when the EFFECT is enabled.
1. From the MENU screen, select and enter the
PREFERENCE action.
2. Use the arrow keys to scroll to N.SUPPRESSOR :
Using a noise gate like this sometimes requires a little
work to make sure that you don’t accidentally cut off
quiet parts of a song. Before you make a recording
using the noise gate, it’s a good idea to rehearse the
whole part to make sure you’ve got the right gate
level.
3. Set the level at which the gate opens to a value of:
OFF (the gate is always open), or from 1 (the gate
will open easily, with very quiet sounds) to 60 (a lot
of force—a very loud sound—is needed to open the
gate).
58 TASCAM DP-02/ DP-02CF
Page 59

Multi-effect
IMPORTANT SAFETY INSTRUCTIONS
4 – DP-02 Appendix
The unit contains an input effector, which contains different types of effects, grouped by the type of input (electric
guitar, acoustic guitar, vocals, etc.) that they are suitable
for.
Assigning the effect
ª
Although there are two inputs, the multi-effect can only be
applied to one of them at a time.
The multi-effect produces a stereo output, so you can use it
on stereo pairs, and you can then assign the output to two
tracks (see “Assigning inputs” on page 23).
Press and hold the SHIFT key and press the EFFECT key
so that either the A or B indicator lights, showing the input
to which you want to apply the multi-effect.
There is a third setting in which neither indicator is lit,
showing that the multi-effect is not in use on either input.
Selecting the effect type
ª
Press the EFFECT key to bring up the multi-effect selection and editing screen:
Selecting the effect
ª
Use the cursor (§/¶) keys to highlight the PRESET value.
Turn the DATA dial to scroll through all available effects
(including those in other effect types). Effects available are
listed in “Available multi-effect settings” on page 60.
Setting the parameter
ª
Each multi-effect has one parameter (shown as PARAM).
Use the cursor (§/¶) keys to highlight the PARAM value.
Turn the DATA dial to set the value of the parameter (the
parameter is different for different types of effects).
Setting the effect volume
ª
Use the cursor (§/¶) keys to highlight the VOLUME value.
Set the volume of the effect from 0 to 127 by turning the
DATA dial.
Use the cursor (§/¶) keys to highlight the TYPE value.
Rotate the DATA dial to scroll through the different effect
types available:
Elec.Guitar Electric guitar
Aco.Guitar Acoustic guitar
Bass Guitar Bass guitar
Vocal Vocals
Drum Drums and percussion
The effect (second line of the display) also changes as you
change the type, and so does the parameter value (on the
third line).
TASCAM DP-02/ DP-02C F 59
Page 60

IMPORTANT SAFETY PRECAUTIONS
4 – DP-02 Appendix
Available multi-effect settings
This list is divided into the available effect types:
Electric guitar settings (Elec.Guitar)
TraDist Traditional distortion and doubling with a short delay
Tube OD Tube (valve) overdrive and vibrato
BlueDrv Blues overdrive with an auto-wah. Use short picking strokes with this setting
BlueSlid Blues with a right and left tremelo
R.Bottom 80’s heavy rock sound
ClsRock1 A classic 70’s British stack sound
ClsRock2 A deeper classic sound with a detuned chorus effect
MelSus Mellow sustain setting with longish sustain. Use this with a bridge humbucker for a sweet drive sound
SmthDist Smooth distortion for solos, combining echo with an overdrive sound
SpeeKing Single-coil pickup distortion
Heavy1 Distorted “tube”-type sound for heavy rock
Heavy2 Fuzz and flange for a heavy feel
Heavy3 Chorus and distortion
Metal Traditional metal sound (twin lead)
80sRock1 80’s metal with a cutting edge
80sRock2 Deeper echo and a high cut with distortion
90sRock Bright distortion and reverb; good for solo use
FstChor Good with single-coil pickups for chords and arpeggios. Similar to acoustic.
CompChr1 For single-coil pickups chorus with pre-delay expands the treble-emphasized sound
CompChr2 A good backing sound
Rhythm1 A backing sound with an edge to it
Rhythm2 Smooth backing sound, suitable for jazz
Rhythm3 A harder backing sound
Funk A “feather” effect for funk/fusion backing
Groove Flanger provides a rolling sound for backing, and arpeggio playing
Country Short echo and compression
Crying Very emotional — use at different volumes for a variety of effects
Weeping Overdrive with a “big heart”
Fusion1 Sweet sustained overdrive
Fusion2 Long delay and bright distortion
ClnSolo Long, sustained solos are possible with this sound
PwrDist1 A tube setting with echo
PwrDist2 A deep chorused distortion for an American rock sound
PwrDist3 A rough, metal distortion sound
PwrDist4 Doubled distortion with an edge
Texas1 The classic “black panel amp” sound
Texas2 A powerful overdriven sound
Texas3 A sharper overdrive sound
Texas4 Chorus and “stretched” overdrive
Swingy Mid-peaking warm sound
FatJazz1 Use on jazz pieces with breaks
FatJazz2 Compressed “fat” jazz setting
R&B High emphasis with a rough sound
ClnVerb Clear long sustained sound
CtyBlues Fat-sounding overdrive
LtlWing Bright crunch sound
CoolPick 3D sound with some “feathering” on the crunch
Fuzzy A fuzzy deep sound
Hazy No matter what color it is, it’s still hazy (use with a single-coil pickup)
BritCln The traditional British clean sound
60 TASCAM DP-02 /DP- 02CF
Page 61

IMPORTANT SAFETY INSTRUCTIONS
PowChord Distorted power chord setting for backing
BmLead A special lead sound with pitch shift of a seventh and distortion
FlngGtr Treble overdrive and a “jet” flanger
Oct.Dist One octave down split distortion
PhaseRev Phase and reverb for backing
Ensemble 3D chorus effect — good with single-coil pickups
Surf Suitable for West Coast surf
Violin Smooth attack — nice with a humbucker
BlkPanel A famous tube combo with spring reverb
UKStack Maybe the most famous stack in the world
Jimi Box There was only one Jimi and his distorted sound was something like this
MBoogie Famous combo sounds
HeartBrk Tube stack at low gain
GentWeep Chorus and distortion — great for a “crying” solo
Bfinger Distortion and retuned chorus. Good for finger-style playing
Tweed Tweed-covered amp sound — use with the front single-coil pickup (blues, for instance)
RSCrunch A warm “crunch” guitar setting for single-coil pickups
NightDrv A deeper shade of purple. Single-coil sounds good here
Ult.Funk Ultimate funky cutting sound
Axe Bom Heavy metal with a doubling edge
Doctor Wah-wah pedal halfway down
Sold No Simulated high-quality tube amp
Run Away Play a cutting sound using a pick
Remains Double-neck 12-string sound
Nostalgi Tube-based overdrive
RealDst1 Distortion only, influenced by a large stack
RealDst2 Distortion only, influenced by a famous small combo
RealDst3 Power tube distortion sound
RealDst4 Distortion only, influenced by echo on a smaller combo
4 – DP-02 Appendix
Acoustic guitar settings (Aco.Guitar)
Heaven Reverb with treble boost for a spacious feel
Stroke Echo and chorus — good for backing
Solo For acoustic solos
Blues For acoustic blues slide work
Arpeggio Acoustic picked arpeggios sound good with this setting
12String 12-string guitar sound (chorus and exciter)
Crystal A crystal-clear sound, emphasizing the treble, and making the best of a not-so-good guitar
Nashvill For that Nashville sound (“fat” acoustic)
Mellow A mellow acoustic setting — simulates nylon guitar on steel strings, using a treble cut
ChorVib A “thick” vibrato chorus sound
TremSolo A stereo tremolo solo sound
Bass guitar settings (Bass Guitar)
These sound best with bass instruments— other source
may not give such a good effect.
Miller Flanger — good for “chopper” bass
Singing A “singing” bass tone (chorus and distortion). Progressive sound
Fretless A fretless bass sound
Chopper Useful for slap-style playing
Heavy For heavy rock, etc. Distortion adds depth to the sound
Peculiar A warm bass sound
RockBass Distorted pick-bass setting with emphasized treble
TASCAM DP-02/ DP-02C F 61
Page 62

IMPORTANT SAFETY PRECAUTIONS
T I P
4 – DP-02 Appendix
Vocal settings (Vocal)
De-Esser Removes sibilance (ess sounds)
Chorist Choir sound using detuning
Emphasis Adds emphasis to vocals to make them stand out
Shout For loud distorted vocals
Moody Moody feeling for quieter smooth vocal lines
Response Echo vocal setting
Proclaim “Echo plus” — a distinctive sound
Quiverin A quavering voice with vibrato
Duet For two (male and female) singers and harmony groups
Lo-Fi Imitates low-fidelity equipment (high and low treated specially)
Megaphon For “megaphone”-type sound
Screamin Screaming sound using f langer
Panning A panned stereo vocal sound
Drum settings (Drum)
These sound good with rhythm machines, etc.
Groove A groove setting with flanger
Stepping Stepping beat — delay with a small amount of feedback
TrnAroun Stereo “bouncing” setting
GetSpace Drum reverb
CsBottom Classic “bass heavy” sound
Trem.Pad Another stereo bounce setting
PerfrmEQ Echo and pan
Lo-Fi Low fidelity for drums
Reverb Reverberation only
Comp. Compressor only
Vibrato A vibrato effect
Filter A creative low-pass filter effect
Reverb
The reverb effect is available as an alternative to the external SEND/ RETURN loop with an external effect processor
(see “Effect processor” on page 13). You cannot use both at
the same time.
“Reverb” is short for “reverberation” the sound produced
by many short echoes off the walls of rooms, etc.
Turning the reverb on and off
ª
Press and hold the SHIFT key and press the REVERB key
to turn the reverb on (the indicator lights) and off (the indicator is unlit).
Using the reverb
ª
When the reverb is on, the mixer EFFECT SEND controls
and the EFFECT RETURN control affect the amount of
signal sent to the internal reverb from the tracks, and
returned from the internal reverb unit to the stereo mix.
When the reverb is turned off, the mixer EFFECT SEND
controls and the EFFECT RETURN control affect the
amount of signal sent to the SEND jack from the tracks,
and returned to the stereo mix via the RETURN jacks.
Setting the reverb type
ª
Bring up the reverb screen by pressing the REVERB key:
Turn the DATA dial to select one of the different “f lavors”
of reverb: Hall, Room, Live or Studio. Each of these
settings has a different quality and character.
Setting the reverb time
ª
With the reverb screen displayed, use the cursor (§/¶)
keys to highlight the value below TIME.
Simply turn the DATA dial to change the time the reverb
sound takes to die away, from 0.1 seconds to 5.0 seconds in
0.1 second steps.
62 TASCAM DP-02/ DP-02CF
Page 63

IMPORTANT SAFETY INSTRUCTIONS
About CD-R and CD-RW discs
4 – DP-02 Appendix
CD-R discs can be recorded once only. Once they
have been used for recording, they cannot be erased or
re-recorded. However, if space is available on the disc,
additional material can be recorded. The pack-aging of
CD-R discs will include one of the following logos:
By contrast, a CD-RW disc can be used in much the same
way as a CD-R disc, but the last track or tracks recorded
can be erased before the disc has been “finalized”, and the
space on the disc can be re- used for other recordings. The
packaging of CD-RW discs will include the logo one of the
following logos:
However, you should note that an audio CD created using
a CD-RW disc may not play back satisfactorily on every
audio CD player. It will, naturally, be playable on the unit.
This is in no way a limitation of the unit itself, but of the
difference between the different types of media and the
methods used to read them.
CD-R and CD-RW discs are sensitive to the effects of
•
heat and ultraviolet rays. It is important that they are not
stored in a location where direct sunlight will fall on
them, and which is away from sources of heat such as
radiators or heat-generating electrical devices.
Always store CD-R and CD-RW discs in their cases to
•
avoid dirt and dust accumulating on their surfaces.
When labeling CD-R and CD-RW discs, always use a
•
soft oil-based felt-tipped pen to write the information.
Never use a ball-point or hard-tipped pen, as this may
cause damage to the recorded side.
Always keep the recording sides of the discs away from
•
grime and dust to avoid a reduction in sound quality.
To clean a disc, wipe gently with a soft dry cloth from
the center towards the outside edge. Do not use thinner,
gasoline, benzene or LP cleaning fluid, as these will
damage the disc and cause the disc unplayable.
Do not put labels or protective sheets on the discs and
•
do not use any protective coating spray.
If you are in any doubt as to the care and handling of a
•
CD-R and CD-RW discs, read the precautions supplied
with the disc, or contact the disc manufacturer directly.
There are precautions that you should take when handling
CD-R and CD-RW discs.
Avoid touching the recording (non-label) side of a disc on
•
which you will be recording. Recording on a disc requires
a cleaner surface than playing back, and fingerprints,
grease, etc. can cause errors in the recording process.
About finalizing
Although audio data may be written on a CD-R or CD-RW
disc, a standard CD player will not be able to read the data
(i.e. play back the audio) until a final *TOC has been written at the start of the disc.
*TOC:Table of contents*TOC:Table of contents
Information of recorded data, which contains titles, starting
and ending addresses, and etc..
The process of writing this table of contents is known as
“finalizing”. Once this has been done, no further data can
be written to the disc. See “Finalizing CDs” on page 68 for
details. In the case of a CD-RW disc which has been finalized, the whole of the disc may be erased, or the disc may
be “refreshed”, and the disc re-used.
In addition, a CD-RW disc that has been finalized may be
“unfinalized”, i.e. only the TOC is removed. This allows
further tracks to be recorded to the disc, provided that
there is space on the disc.
TASCAM DP-02/ DP-02C F 63
Page 64

IMPORTANT SAFETY PRECAUTIONS
NOTE
4 – DP-02 Appendix
Handling of compact discs
The CD-RW901SL has been designed for the playback
of CD-DA (standard audio) format discs and MP3 files
recorded on the discs using the ISO9660 format: In addition to ordinary 5-inch and 3-inch CDs, it can also play
properly recorded CD-R and CD-RW discs.
Always insert the compact discs into the unit with their
•
label facing upward.
To remove a disc from its case, press down on the center
•
of the disc holder, then lift the disc out, holding it carefully by the edges.
Avoid getting fingerprints on the signal side (the
•
non-label side). Grime and dust may cause skipping, so
keep discs clean and store them in their cases when not
being played. To clean the signal side of a disc, wipe
gently with a soft dry cloth from the center towards the
outside edge.
Discs should be returned to their cases after use to avoid
•
serious scratches that could cause the laser pickup to “skip.”
Keep discs away from direct sunlight, and places of
•
high heat and humidity. If left in such places, warping
could result.
Do not affix any labels or stickers to the label side of the
•
disc. Do not write on the disc with a ballpoint pen.
Do not insert discs that have adhesive remaining from
•
tape or stickers that have been removed. If they are
inserted into the player, they could stick to the internal
mechanism, requiring removal by a technician.
Do not use cracked discs.
•
Only use circular compact discs. Avoid using non-circu-
•
lar promotional, etc. discs.
The DP-02 cannot play unfinalized CD-R/RW discs.
•
Music discs with copy control, a copy-protection
•
system, have been released from several record companies in an attempt to protect the copyright. Since some
of these discs do not comply with the CD specifications,
they may not be playable on the DP-02.
Do not use any record spray, anti-static solutions,
•
benzene, paint thinner or other chemical agents to clean
CDs as they could damage the delicate playing surface.
It may cause CDs to become unplayable.
Never use a stabilizer or printable discs
Using commercially available CD stabilizers or printable
recordable discs with this player will damage the mechanism and cause it to malfunction.
Never use a disc that has had a stabilizer mounted to
it. The residual adhesive may cause the disc to stick to
the turntable of the DP-02. If it sticks to the turntable,
you will need a technician to get it out.
64 TASCAM DP-02/ DP-02CF
Page 65

IMPORTANT SAFETY INSTRUCTIONS
Media compatibility Table
4 – DP-02 Appendix
Writing of Audio CDs
Playback of Audio CDs
12cm CDDA standard format
Made on this CD-R/CD-RW player
12cm CDDA standard format
Commercially available CD
12cm CDDA standard format
Made on a CD player other than this CD-R/
CD-RW
player
12cm CDDA standard format
Made on this CD-R/CD-RW player
Non-finalized
12cm CDDA standard format
Made on a CD player other than this CD-R/
CD-RW
player
Non-finalized
8cm CDDA standard format
Commercially available CD
Format other than CDDA standard
Commercially available CD (protected CD,
DATA CD,
CD extra, etc.)
Format other than CDDA standard
CD-R/CD-RW
(DATA CD, CD extra, etc.)
12cm “Ultra Speed”
CD-RW media
12cm CD-R/CD-RW
Up to HIGH Speed
8cm CD-R/CD-RW N
Recorded CD-R/CD-RW
(CD-RW can be used by ERASE.)
12cm ISO 9660 Level1
CD-R/CD-RW
Backup on this CD player
12cm ISO 9660 Level1
CD-R/CD-RW
Made on a CD player other than this CD player
12cm ISO 9660 other than Level1
CD-R/CD-RW
12cm ISO 9660 Level1
CD-R/CD-RW
Addition of data other than data for this CD
player
A
A
B
A
N
N
B
B
N N N
Data Backup
Data Export
Data Restore
Data Import
A
N
A
A
N
B
A: Compatible; B: Operation not assured; N: Not compatible
TASCAM DP-02/ DP-02C F 65
Page 66

IMPORTANT SAFETY PRECAUTIONS
T I P
NOTE
4 – DP-02 Appendix
The DP-02 is a built-in CD-R/RW drive. The CD-R/RW
functions are described here.
In the menu instructions below, select menus by pressing the ¥ cursor or YES/ENTER key.
Inserting/Ejecting CDs
With the label side up, gently slide in a disc until the unit
pulls the disc in. When the disc has been loaded, the
following CD PLAYER display is shown:
Displays the track number currently being played.
Displays the time elapsed from
the start of the current track.
Current track number / Total
track number.
Level meter of audio (pre-fader)
Displays the track number and track length.
The list of tracks on an audio CD can be viewed by
turning the DATA dial or pressing the §/¶ cursor keys.
Press the EJECT key to eject the disc.
recorded to the CD. The stereo
output level can be adjusted
by the MASTER fader.
When the EJECT key does not work, turn off the power
and carefully push a small stick into the hole under the
CD slot a few times until the CD comes partially out,
and be removed manually.
If the power switch also does not work, disconnect
the power cable from the unit and attempt the same
operation. However, in this case, the unit cannot shut
down properly so that all the data unsaved on CD will
be lost (see “Shouting down the unit” on page 10).
Audio CD performance
Playing back audio CDs
1. Insert the audio CD into the slot.
2. Press the CD key to bring up the CD menu screen,
and select the CD PLAYER menu.
3. When entered, the display shows:
The CD mechanism in this device produces noises
when actions such as Inserting or Ejecting a CD are
performed. Depending on the positions of the LEVEL
controls, these noise may be recorded. Avoid using
the CD controls while recording to avoid such noises
appearing in your songs.
4. Press the PLAY (¥) key to playback the selected
track.
5. When the CD PLAYER menu is displayed, the CD
player can be controlled using the following keys:
STOP key: Stops the CD player.
•
PLAY (¥) key: Plays back the selected track.
•
F FWD/≤ keys: Skips the next track.
•
REW/µ keys : Skips the previous track.
•
DATA dial: Selects a track to playback from the
•
track list.
YES/ENTER key: Plays the selected track.
•
STOP+REW key: Stops playback and locates at
•
the start of the CD. (Press the REW key with the
STOP key held down.)
The currently selected track is highlighted.
The next track can be selected using the DATA dial
or the cursor (§/¶) keys.
66 TASCAM DP-02/DP-02CF
Page 67

IMPORTANT SAFETY INSTRUCTIONS
Making an audio CD
4 – DP-02 Appendix
On the DP-02, a song’s master stereo track can be written
to a CD-R or CD-RW (see “Mastering” on page 27), and
this master recording can be burned to CD for audio CD
playback.
There are two ways of making a CD:
Disk At Once (simply called “DAO” from here on)
Track At Once (simply called “TAO” from here on)
In the DAO recording, master stereo tracks recorded on the
DP-02 are written all at once.
DAO finalized the disc when it’s finished (see “Finalizing
CDs” on page 68), making the CD compatible with other
CD players immediately after writing by DAO has ended.
With DAO, additional tracks cannot be written to the CD
because it creates a finalized disc.
Writing by Disk At Once (DAO)
With DAO, the track order can be set when writing two or
more tracks.
A silent gap of any desired length can also be added
between tracks.
In the TAO recording, master stereo tracks recorded on the
DP-02 are written to the CD on a track-by-track basis.
If you want to write tracks to a CD over several sessions,
choose the TAO recording.
Since TAO does not finalize the CD, this CD cannot be
played back on a regular CD player (it can be played on the
DP-02).
After all of the desired master stereo tracks have been
written by TAO, finalize the disc (“Finalizing CDs” on
page 68).
Additional tracks cannot be written to the CD after finalization has ended.
In this screen, you can set the order in which the
master stereo tracks are to be written to the CD.
1. Insert a blank CD-R or an erased CD-RW into the
slot.
2. Press the CD key to bring up the MASTER WRITE
menu and enter.
3. A list of songs that have master tracks is displayed.
An asterisk (Ú) is displayed to the right of a song to
show the current song.
Use the cursor (§/¶) keys to select a song and rotate
the DATA dial clockwise to confirm the song to write
to the CD. A “ ” mark appears on the check box.
Repeat this action for multiple selection.
5. Select the song whose order is to be changed using
the §/¶ keys or DATA dial, and press the ˙ key to
bring up the following display:
Use the cursor (§/¶) keys or DATA dial to change
the order of the song. The selected song moves up or
down with the mark ( ) at the head of the song title.
When there are two or more songs whose order is to
be changed, repeat this operation.
When you have changed the song order, press the
YES/ENTER key. The display returns to the WRITE
SONG LIST.
6. In the WRITE SONG LIST screen, press the ¥
cursor key. The screen for setting the gap between
songs is displayed.
To deselect the selection, highlight the song and
rotate the DATA dial counterclockwise. The check
mark disappears.
4. When you have decided on the songs to write, press
the YES/ENTER key.
TASCAM DP-02/ DP-02C F 67
Page 68

IMPORTANT SAFETY PRECAUTIONS
T I P
4 – DP-02 Appendix
Use the cursor §/¶ keys to select, and set the length
of the gap to be made after each song by the DATA
dial.
You can set any gap within the range 0.0 to 9.9
seconds in 0.1 second increments.
To end setting of the gap, press the YES/ENTER key.
The display returns to the song list screen.
7. Press YES/ENTER to write to the CD. The following
write confirmation screen is displayed:
To return to the SONG ORDER screen, press the ˙
cursor key.
Writing by Track At Once (TAO)
With Track at Once, a silent gap of two seconds is automatically added at the end of each track.
8. After writing to the CD ends, the unit allows you to
make another copy of the same disc.
To write to another CD, press the YES/ENTER key.
To cancel writing to another CD, press NO/EXIT
key.
4. The following write confirmation screen is
displayed.
1. Press the CD key to bring up the MASTER WRITE
menu and press YES/ENTER.
2. A list of songs including the master track is
displayed. Use the cursor (§/¶) keys to select a
song to write to the CD, and press the YES/ENTER
key.
3. A menu screen for confirming whether or not to
finalize after writing ends is displayed. Use the dial
to select on or off and press YES/ENTER to finalize.
Finalizing CDs
If you are finished recording to a CD in TAO, you need to
finalize the CD so that it can be played on a regular CD
player.
1. Press and hold the SHIFT key and press the
FINALIZE key.
Press the YES/ENTER key to write the CD.
2. Press the YES/ENTER key to finalize the CD.
The following confirmation message is displayed.
68 TASCAM DP-02/DP- 02CF
Page 69

NOTE
Erasing a CD-RW
NOTE
IMPORTANT SAFETY INSTRUCTIONS
4 – DP-02 Appendix
To erase a CD-RW disc so that you can reuse it:
1. Press and hold the SHIFT key and press the ERASE
key.
The following confirmation message is displayed.
Data CD performance
Importing and exporting tracks
Between a CD and the DP-02’s song tracks, you can import
and export individual tracks to and from. The files used
for track import and export are 16-bit 44.1kHz mono WAV
format (and must have the .WAV extension).
Importing from a CD
You can read WAV-format files recorded on data CDs and
import these files to tracks of the currently-loaded song.
2. Press the YES/ENTER key to erase the CD-RW.
Only CD-RWs can be erased. A CD-R cannot be erased.
Audio in other formats intended for import must be
converted before the import operation.
3. Select a WAV file to import using the DATA dial and
press the YES/ENTER key.
1. Insert a CD containing WAV format files into the
slot.
2. Press the CD key to bring up the CD menu and select
the CD IMPORT action. The names of any WAV
format files on the CD are displayed:
Only 16-bit, 44.1 kHz monaural WAV format files can
be handled in import and export operations. (The filenames that are not in this format are not displayed.)
4. Select the import destination track of the WAV file
using the DATA dial and press the YES/ENTER key.
After the file is imported from the CD, the display
returns to the CD menu screen.
TASCAM DP-02/ DP-02C F 69
Page 70

IMPORTANT SAFETY PRECAUTIONS
4 – DP-02 Appendix
Exporting to CD
You can convert a track to WAV format files and write
them to CDs for editing in a computer.
1. Insert a CD-R that has not been written or an
erased CD-RW into the slot.
2. Press the CD key to bring up the CD menu and select
CD EXPORT action.
A list of the tracks you have recorded to in the
current song is displayed.
3. Highlight the tracks by turning the DATA dial or
pressing the cursor (§/¶) keys. Rotating the DATA
dial clockwise confirms the track to export. A “ ”
mark appears in the check box.
4. When you have selected the song track(s) to export,
press the YES/ENTER key. The available space on
the DATA CD and the total file size of the tracks to
export are displayed:
5. Press the YES/ENTER key. The following confirma-
tion screen is displayed:
6. Press the YES/ENTER key to begin exporting to CD.
7. After exporting ends, the display prompts to ask if
you want another copy.
To export to another CD, press the YES/ENTER key.
To cancel exporting to another CD, press NO/EXIT
key.
Repeat this step for multiple selection.
To deselect the selection, highlight the track and
rotate the DATA dial counterclockwise. The check
mark disappears.
To edit a track name:
Press and hold down the SHIFT key and press the TITLE
key.
The following screen is displayed, and you can rename of
the track at the cursor position.
Rename the track and press YES/ENTER key to set the
new name. (“Titling” on page 11)
70 TASCAM DP-02/DP-02CF
Page 71

IMPORTANT SAFETY INSTRUCTIONS
Backing up and restoring songs
When you back up a song, you’re backing up the audio
tracks, as well as any editing, etc. Reverse the process
(a CD to FAT partition to DP-02 disk) when you want to
restore a song.
Backing up songs to CD
4 – DP-02 Appendix
Back up your songs to a data CD so that you can restore
them later.
1. Insert a CD-R that has not been written or an
erased CD-RW into the slot.
2. Press the CD key to bring up the CD menu and select
the CD BACKUP action.
3. The song list is displayed when entered.
Select the songs to back up using the DATA dial or
cursor (§/¶) keys and the YES/ENTER key.
4. The screen displays the name of the file to write to
the data CD.
6. Press the YES/ENTER key again. The songs are
saved, and the number of CDs required for the
backup is displayed.
When you have prepared the required number of
CDs, press the YES/ENTER key to begin backing up.
7. After backup to the first CD ends, a message
prompting you to insert the second CD is displayed.
8. Insert a blank CD, or NO/EXIT to cancel.
If you insert a written CD-RW instead of a blank CD:
The following message is displayed.
Name the songs using up to eight letters by the
cursor (˙/¥) keys or the DATA dial. (“Titling” on
page 11)
5. Press the YES/ENTER key. The following confirma-
tion screen is displayed.
If you press the YES/ENTER key, the CD-RW will be
erased and the backup continues.
If you do not want to erase the CD-RW, press NO/EXIT. If
you hold the SHIFT key while pressing NO/EXIT, the unit
will eject your CD-RW so that you can insert a blank CD.
TASCAM DP-02/ DP-02C F 71
Page 72

IMPORTANT SAFETY PRECAUTIONS
4 – DP-02 Appendix
Restoring songs from a CD
Restore (reading) songs backed up to data CDs.
1. Insert a CD-R that has not been written or an
erased CD-RW into the slot.
2. Press the CD key to display the CD menu and select
the CD RESTORE action.
3. The names of the backup songs on the CD are
displayed.
CD-related Error Message
If you experience a problem while reading or writing a CD,
you may see one of the following error messages:
Backup Error
Press EXIT
CD Read Error
Press EXIT
CD Write Error
Press EXIT
Erase Error Press
EXIT
Export Error Press
EXIT
Finalize Error
Press EXIT
Import Error Press
EXIT
Media Error Press
EXIT
Restore Error
Press EXIT
Writing Failed
Press EXIT
An error occurred in the BACKUP execution process.
A CD read error occurred in the FINALIZE, BACKUP, RESTORE, IMPORT, EXPORT, and ERASE execution processes.
An error occurred in the FINALIZE, BACKUP, RESTORE, and ERASE execution processes.
An error occurred in the ERASE execution process.
An error occurred in the EXPORT execution process.
An error occurred in the FINALIZE execution process.
An error occurred in the IMPORT execution process.
An error occurred in the CD media in the CD player menu.
An error occurred in the RESTORE execution process.
An error occurred in the CD write process in the MASTER WRITE or CD EXPORT menu.
4. Press the YES/ENTER key. The following confirma-
tion screen is displayed.
Press the YES/ENTER key again. The song will be
restored from CD.
If the song is backed up to two or more CDs, a message
prompting you to insert the second backup CD will be
displayed. After the restore from the first CD ends, insert
the second CD.
When a popup message is displayed, press NO/EXIT key to
clear the display, check the state of the media, and retry the
operation.
72 TASCAM DP-02/ DP-02C F
Page 73

IMPORTANT SAFETY INSTRUCTIONS
4 – DP-02 Appendix
Pop-up Massages
The following shows a list of the popup messages. On the DP-02, popup messages are displayed according to the situation.
Refer to this list to learn the details of each of the messages and how to remedy the trouble.
Blank CD Insert
CD-RW
Blank CD Insert
Opened CD
Empty Export
Track
Finalized CD Insert
CD-RW
Finalized CD Insert
Opened CD
Import File Not
Found
Import File Too
Big
Invalid CD Insert
Backup CD
Invalid CD Insert
Blank CD
Invalid CD Insert
CD-RW
Invalid CD Insert
Import CD
Invalid CD Insert
Opened CD
Low Capacity
Insert Blank CD
No disk Insert
Backup CD
No disk Insert
Blank CD
“A blank CD has been inserted. Insert a CD-RW that is not blank”
An erased CD-RW or unwritten CD-R has been inserted in the CD-RW ERASE menu.
There is no need to erase the inserted CD.
“A blank CD has been inserted. Insert a non-finalized CD.”
An erased CD-RW or unwritten CD-R has been inserted in the FINALIZE menu.
Insert the CD to be finalized.
“There are no exportable tracks”
No audio data is recorded to tracks 1 to 8 in the CD EXPORT menu.
“A finalized CD has been inserted. Insert a CD-RW that is not blank.”
A finalized CD-R has been inserted in the CD-RW ERASE menu.
Only CD-RW disks can be erased.
“A finalized CD has been inserted. Insert a non-finalized CD.”
A finalized CD has been inserted in the finalize menu.
This CD does not need to be finalized.
“The import file cannot be found. Insert the import CD.”
There is no import file in the inserted CD in the CD IMPORT menu.
Insert a CD written with import data.
“The import file is too big.”
The size of the file to import equals or exceeds the free space on hard disk when executing an
import in the CD IMPORT menu.
Create more free space on hard disk by DEL/UNUSED, for example, to ensure sufficient free space
for reading the import file.
“An invalid CD has been inserted. Insert the backup CD.”
A CD not written with backup data has been inserted in the CD RESTORE menu.
Insert a CD written with backup data.
“An invalid CD has been inserted. Insert a blank CD.”
A CD other than a blank CD has been inserted when writing to CD by the MASTER, WRITE, CD
BACKUP or CD EXPORT menu. (This is also displayed when a finalized CD has been inserted when
writing by Track at Once.)
Insert a blank CD.
“An invalid CD has been inserted. Insert a CD-RW.”
A CD-R or other CD that cannot be erased has been inserted in the CD-RW ERASE menu.
Insert a CD-RW to be erased.
“An invalid CD has been inserted. Insert the import CD.”
An audio CD, blank CD or other invalid CD has been inserted in the CD IMPORT menu.
Insert a CD written with import data.
“An invalid CD has been inserted. Insert a non-finalized CD.”
A CD that cannot be finalized has been inserted in the finalize menu.
Insert a CD to be finalized.
“A CD with low capacity has been inserted. Insert a blank CD with adequate capacity.”
The capacity of the CD was less than the data to be written when an attempt was made to make
two or more CDs having the same content after ending MASTER WRITE (Disc at Once) to CD, CD
BACKUP or CD EXPORT. (This message is displayed, for example, when writing is executed with
the CD capacity at 700 MB and the data capacity at 700 MB at the initial write, and a 650 MB CD is
inserted after “Another CD?” is displayed after writing ends.)
Insert a blank CD having adequate capacity.
“A CD has not been inserted. Insert the backup CD.”
There is no CD in the CD tray in the CD RESTORE menu.
Insert a CD written with backup data.
“A CD has not been inserted. Insert a blank CD.”
• There is no CD in the CD tray when writing to a CD in the MASTER WRITE or CD EXPORT menus.
• The CD tray was opened after preparation for backup was completed in the CD BACKUP menu.
Insert a blank CD.
Insert a blank CD.
TASCAM DP-02/ DP-02C F 73
Page 74
IMPORTANT SAFETY PRECAUTIONS
4 – DP-02 Appendix
No disk Insert CD-RW “A CD has not been inserted. Insert a CD-RW that is not blank.”
There is no CD in the CD tray in the CD-RW ERASE menu.
Insert a CD-RW to be erased.
No disk Insert
Import CD
No disk Insert
Opened CD
No Room On CD
Press EXIT
No Room On HD
Press EXIT
Not Blank Insert
Blank CD
Track Full “No free tracks”
Wrong Order
Insert Backup CD
“A CD has not been inserted. Insert the CD to import from.”
There is no CD in the CD tray in the CD IMPORT menu.
Insert a CD written with the import data.
“A CD has not been inserted. Insert a non-finalized CD.”
There is no CD in the CD slot in the finalize menu.
“An attempt has been made to write data exceeding the capacity of the CD. Exit the menu.”
The total capacity of the specified master track exceeded the capacity of the inserted CD when writ-
ing to CD is started in the MASTER WRITE menu. Press NO/EXIT to exit the menu, and specify the
track to write to again.
“Not enough room on hard disk. Exit the menu.”
There is no free space to make the CD image file on hard disk when writing to CD is started in the
MASTER WRITE, CD BACKUP or CD EXPORT menus.
Create more free space on hard disk by CLEAR, for example, to ensure sufficient free space to make
the CD image file on the hard disk.
“A non-finalized CD has been inserted. Insert a blank CD.”
A CD written in the Track at Once is inserted when writing by Disc at Once in the MAS-TER WRITE menu.
Either insert a blank CD or write by Track at Once.
There are no more tracks to import (that is, all tracks are used) when you execute an import in the
CD IMPORT menu.
Either import after you have made empty tracks by CLEAN OUT, or import after making a new song.
“The CD order is wrong. Insert the backup CD.”
You have inserted the backup CD in the wrong order while you are restoring from two or more CDs
in the CD RESTORE menu.
Insert the correct backup CD.
.
74 TASCAM DP-02/ DP-02CF
Page 75

5 – Commonly-used functions
IMPORTANT SAFETY INSTRUCTIONS
How do I..?
This section gives you a brief guide to some operations on
the DP-02/DP-02CF which may not be immediately obvious from looking at the panel controls.
Key names are written like this: LOCATE. SHIFT +
CLEAR means “press and hold the SHIFT key and press
CLEAR.
You may find the same action listed more than once in
this alphabetical list. That’s because different people use
different words for the same things, so you may find both
“Delete” and “Erase”, for example.
The list of popup messages and their meaning (“Messages”
on page 54) may also be useful to you.
Menu items are written like this: MENU ® WAVE ®
IMPORT TRACK, meaning “press the MENU key, select
the WAVE menu, and then the IMPORT TRACK action.
How to Keys, etc. TO press Description
Assign inputs to tracks ASSIGN + REC See “Assigning inputs” on page 23.
Back up a song to a PC MENU ® DATA BACKUP ® SONG BACKUP See “Backing up and restoring
songs” on page 44.
Bounce tracks BOUNCE See “Bouncing” on page 34.
Change the display between minutes/
seconds and bar/beat
Change the EQ frequencies Press FREQ See “EQ settings” on page 31.
Choose another disk partition as the
active partition
Connect the unit to a PC MENU ® USB ® YES/ENTER (DP-02)
Copy a song SONG ® COPY See “Copying songs” on page 41.
Copy and insert parts of a track TRACK EDIT ® COPY INSERT See “COPY -> INSERT” on page 49.
Copy and paste parts of a track TRACK EDIT ® COPY PASTE See “COPY -> PASTE” on page 48.
Create a new song SONG ® CREATE See “Creating a new song” on page
Cut and close up part of a track TRACK EDIT CUT See “CUT” on page 51.
Delete a song SONG ® ERASE See “Erasing a song” on page 22.
Delete unused song data SHIFT + CLEAR See “Deleting unused data” on page
Display the current partition SHIFT + SONG INFO See “Song information” on page 23
Edit the IN and OUT and TO points SHIFT + POINT EDIT See “IN and OUT marks” on page 30.
Edit the location marks Press µ + ≤ at a time See “Location marks” on page 29.
Erase a song SONG ® ERASE See “Erasing a song(s)” on page 22.
Erase the whole of a track TRACK EDIT ® CLEAN OUT See “CLEAN OUT” on page 52.
Export a stereo mix to PC MENU ® WAVE ® EXPORT MASTER. See “Exporting the mastered stereo
Export a track's contents to PC MENU ® WAVE ® EXPORT TRACK See “Exporting tracks” on page 46.
Find out how much time is left for
recording
Format one partition MENU ® DISK ® REFORMAT (DP-02)
Format the disk MENU ® DISK ® FORMAT (DP-02)
Format the FAT partition MENU ® DISK ® FAT REFORMAT (DP-02)
Hands-free recording AUTO PUNCH, RHSL, etc See “Punching” on page 32.
Import a WAV file to a track MENU ® WAVE ® IMPORT TRACK See “Importing a track” on page 45.
Insert silence at a point in a track TRACK EDIT ® OPEN See “OPEN” on page 50.
Jump to a location mark Press µ or ≤
Jump to the IN and OUT and TO
points
Dial from “home screen” See “Working in bars & beats” on
page 35.
MENU ® DISK ® PARTITION (DP-02)
CARD ® PARTITION (DP-02CF)
USB ® YES/ENTER (DP-02CF)
SHIFT + SONG INFO “Song information” on page 23.
CARD ® REFORMAT (DP-02CF)
CARD ® FORMAT (DP-02CF)
CARD ® FAT REFORMAT (DP-02CF)
LOCATION LIST keys for the location mark list
Press IN, OUT or TO See “IN and OUT marks” on page 30.
See “Selecting the active partition” on
page 38.
See “Using the USB connection” on
page 42.
21.
26.
tracks” on page 47.
See “Formatting a partition” on page
40.
See “Formatting a disk/card” on
page 39.
See “Formatting the FAT partition” on
page 40.
See “Location marks” on page 29.
TASCAM DP-02/ DP-02C F 75
Page 76

IMPORTANT SAFETY PRECAUTIONS
5 – Commonly-used functions
How to Keys, etc. TO press Description
Load a song SONG ® LOAD See “Loading a saved song” on page
22.
Make an exact copy of (clone) a track TRACK EDIT ® CLONE TRACK See “CLONE TRACK” on page 51.
Metronome settings MENU ® MIDI ® METRONOME See “Metronome” on page 36.
Mix to a stereo master track MASTER See “Mixdown and mastering” on
page 27.
Move parts of a track and insert them
in another location
Move parts of a track to another location
Multi-effect setting (DP-02 only) EFFECT ® TYPE, PRESET, PARAM and LEVEL See “Multi-effect” on page 59.
Name a song Press SHIFT + MENU See “Titling” on page 11.
Ping-pong to other tracks BOUNCE See “Bouncing” on page 34.
Protect a song SONG ® PROTECT See “Protecting a song” on page 42.
Read a WAV file into a track MENU ® WAVE ® IMPORT TRACK See “Importing a track” on page 45.
Redo one operation Press UNDO/REDO briefly See “Undoing/Redoing a operation”
Redo several operations HISTORY See “Undoing/Redoing actions at
Remove a section of a track and
replace it with silence
Restore a song from a PC MENU ® DATA BACKUP ® SONG RESTORE See “Backing up and restoring
Reverb setting (DP-02 only) REVERB, ROOM TYPE and TIME See “Reverb” on page 62.
Revert to a previously saved version
of a song
Route inputs to tracks ASSIGN A or B and REC See “Assigning inputs” on page 23.
Save a song SONG ® SAVE See “Saving songs” on page 21.
Save a stereo mix to PC MENU ® WAVE ® EXPORT MASTER. See “Exporting the mastered stereo
Save a track's contents to PC MENU ® WAVE ® EXPORT TRACK See “Exporting tracks” on page 46.
Select the active disk partition MENU ® DISK ® PARTITION (DP-02)
Set a location mark Press SHIFT + INSERT See “Location marks” on page 29.
Set pre-roll and post-roll times MENU ® PREFERENCE ® Pre/Post See “Pre-roll and post-roll times” on
Set the IN and OUT and TO points Press SHIFT + IN or OUT or TO See “IN and OUT marks” on page 30.
Set the noise reduction (DP-02 only) (DP-02 only) MENU ® PREFERENCE ® N.SUPPRESSOR See “Noise reduction” on page 58.
Set the time signature and tempo for
MIDI clock
Show the song name Press SHIFT + SONG INFO See “Song information” on page 23
Synchronize another device using
MIDI Timecode or MIDI clock
Trim the IN and OUT and TO points SHIFT + POINT EDIT See “IN and OUT marks” on page 30.
Tune a guitar or bass (DP-02 only) MENU ® TUNER See “Tuning a guitar” on page 58.
Un-protect a song SONG ® PROTECT See “Protecting a song” on page 42.
Undo one operation Press UNDO/REDO briefly. See “Undoing/Redoing a operation”
Undo several operations at once HISTORY. See “Undoing/Redoing actions at
Use the MIDI metronome MENU ® MIDI ® METRONOME See “Metronome” on page 36.
Use the multi-effect (DP-02 only) EFFECT ® TYPE, PRESET, PARAM and
Use the reverb (DP-02 only) REVERB, ROOM TYPE and TIME See “Reverb” on page 62.
Use the USB connection MENU ® USB ® YES/ENTER (DP-02)
TRACK EDIT ® MOVE INSERT See “MOVE -> INSERT” on page 50.
TRACK EDIT ® MOVE PASTE See “MOVE -> PASTE” on page 49.
on page 25.
once” on page 26.
TRACK EDIT ® SILENCE See “SILENCE” on page 51.
songs” on page 44.
SONG ® REVERT See “Reverting to last version” on
page 21.
tracks” on page 47.
See “Selecting the active partition” on
CARD ® PARTITION (DP-02CF)
MENU ® MIDI ® TEMPO/T.SIG See “Tempo setting” on page 35.
MENU ® MIDI ® GENERATOR See “Working with MIDI” on page 37.
LEVEL
USB ® YES/ENTER (DP-02CF)
page 38.
page 33.
on page 25.
once” on page 26.
See “Multi-effect” on page 59.
See “Using the USB connection” on
page 42.
76 TASCAM DP-02/ DP-02CF
Page 77

For China
IMPORTANT SAFETY INSTRUCTIONS
Notes
TASCAM DP-02/ DP-02C F 77
Page 78

IMPORTANT SAFETY PRECAUTIONS
4 – DP-02 AppendixNotes
78 TASCAM DP-02/ DP-02CF
Page 79

Notes
TASCAM DP-02/ DP-02C F 79
Page 80

»
DP-02/DP-02CF
TEAC CORPORATION
Phone: +81-422-52-5082 www.tascam.com
3-7-3, Nakacho, Musashino-shi, Tokyo 180-8550, Japan
TEAC AMERICA, INC.
Phone: +1-323-726-0303 www.tascam.com
7733 Telegraph Road, Montebello, California 90640
TEAC CANADA LTD.
Phone: +1905-890-8008 www.tascam.com
5939 Wallace Street, Mississauga, Ontario L4Z 1Z8, Canada
TEAC MEXICO, S.A. De C.V
Phone: +52-555-581-5500 www.tascam.com
Campesinos No. 184, Colonia Granjes Esmeralda, Delegacion Iztapalapa CP 09810, Mexico DF
TEAC UK LIMITED
Phone: +44-8451-302511 www.tascam.co.uk
Unit 19 & 20, The Courtyards Hatters Lane, Watford, Hertfordshire. WD18 8TE, U.K.
TEAC EUROPE GmbH
Phone: +49-611-71580 www.tascam.de
Bahnstrasse 12, 65205 Wiesbaden-Erbenheim, Germany
Printed in China
 Loading...