

Tascam DP-01-FX Owners Manual
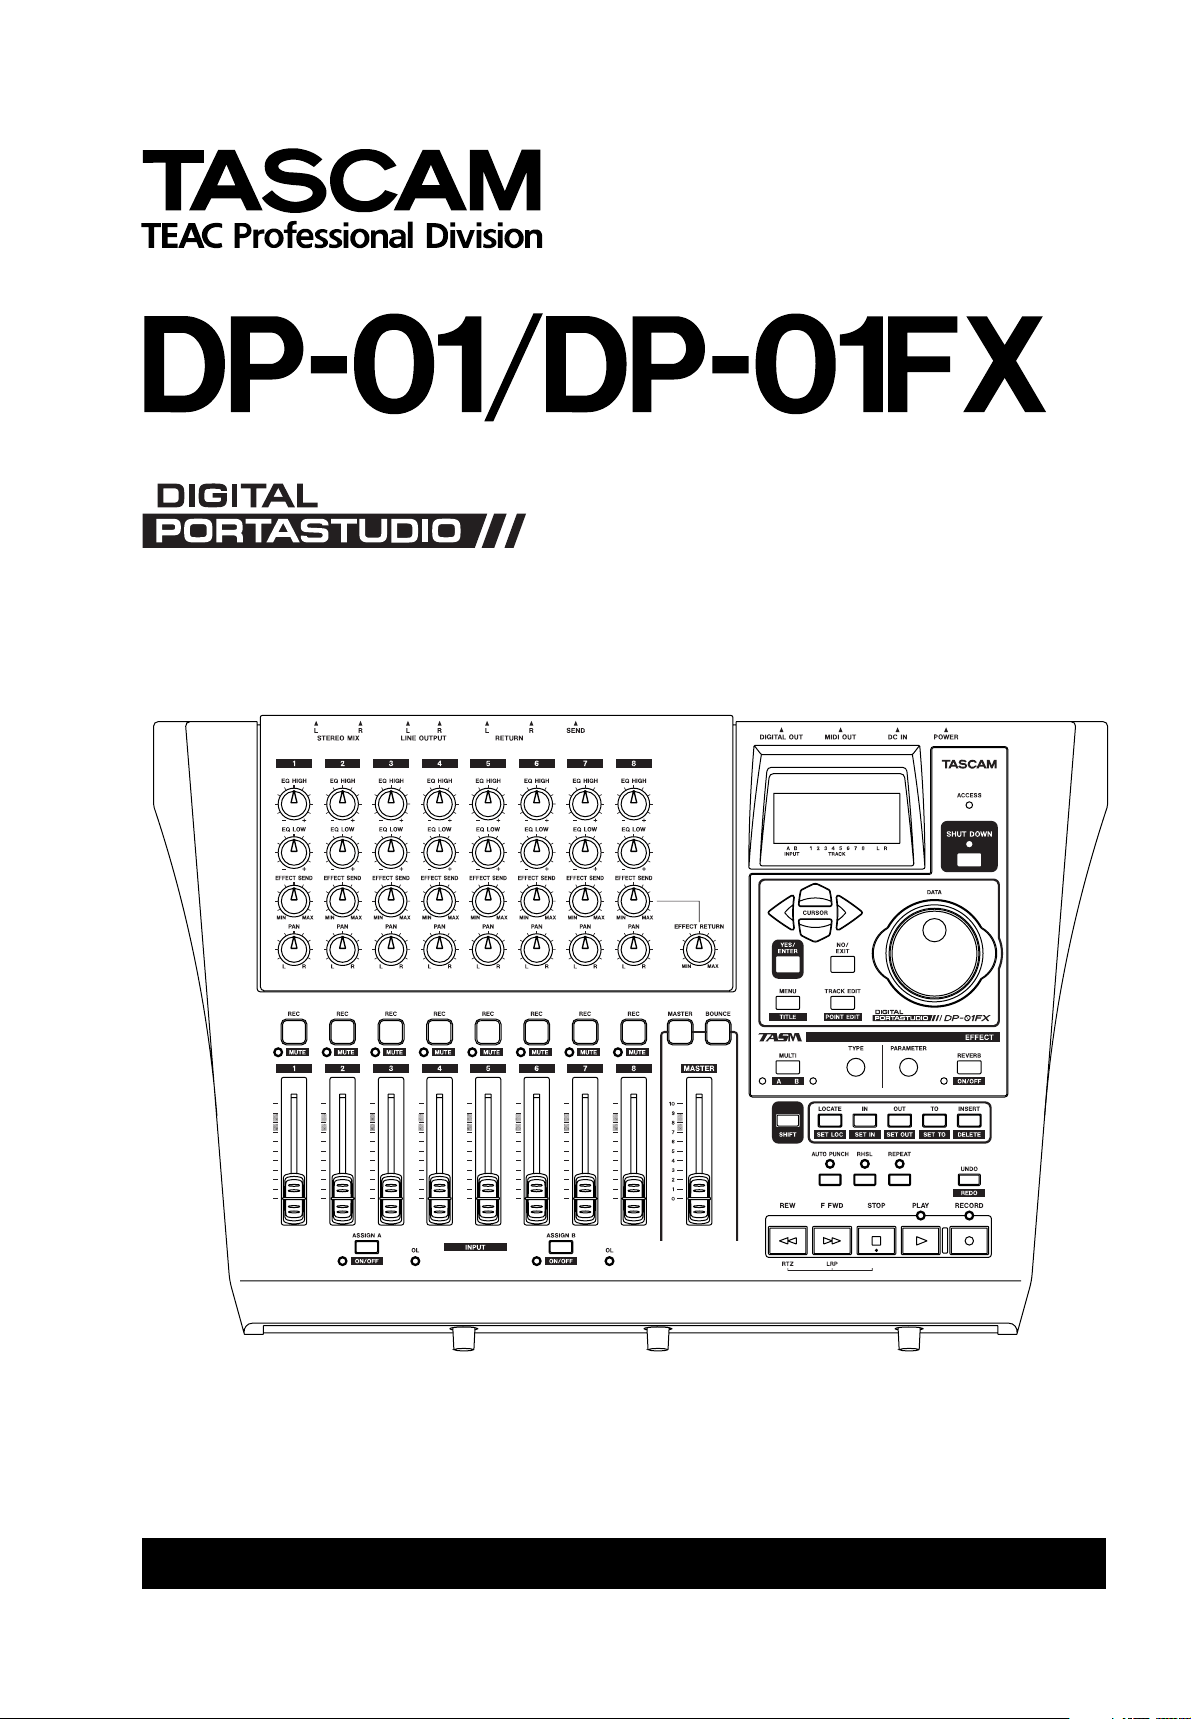
D00827620A
OWNER’S MANUAL

Important Safety Precautions
For the consumers in Europe
WARNING
This is a Class A product. In a domestic environment, this
product may cause radio interference in which case the user
may be required to take adequate measures.
Pour les utilisateurs en Europe
AVERTISSEMENT
Il s’agit d’un produit de Classe A. Dans un environnement
domestique, cet appareil peut provoquer des interférences
radio, dans ce cas l’utilisateur peut être amené à prendre
des mesures appropriées.
Für Kunden in Europa
Warnung
Dies ist eine Einrichtung, welche die Funk-Entstörung nach
Klasse A besitzt. Diese Einrichtung kann im Wohnbereich
Funkstörungen versursachen; in diesem Fall kann vom
Betrieber verlang werden, angemessene Maßnahmen
durchzuführen und dafür aufzukommen.
TO THE USER
This equipment has been tested and found to
comply with the limits for a Class B digital device,
pursuant to Part 15 of the FCC Rules. These limits
are designed to provide reasonable protection
against harmful interference in a residential
installation. This equipment generates, uses, and
can radiate radio frequency energy and, if not
installed and used in accordance with the
instruction manual, may cause harmful
interference to radio communications.
However, there is no guarantee that interference
will not occur in a particular installation. If this
equipment does cause harmful interference to
radio or television reception, which can be
determined by turning the equipment off and on,
the user is encouraged to try to correct the
interference by one or more of the following
measures.
CAUTION
Changes or modifications to this equipment not
expressly approved by TEAC CORPORATION for
compliance could void the user’s authority to
operate this equipment.
For U.S.A
a) Reorient or relocate the receiving antenna.
b) Increase the separation between the
equipment and receiver.
c) Connect the equipment into an outlet on a
circuit different from that to which the
receiver is connected.
d) Consult the dealer or an experienced radio/
TV technician for help.
Ü
The lightning flash with arrowhead symbol, within an equilateral triangle, is intended to alert the
ÿ
Ÿ
This appliance has a serial number
located on the rear panel. Please record
the model number and serial number
and retain them for your records.
Model number:__________________
Serial number: __________________
2 TASCAM DP-01 Owner’s Manual
user to the presence of uninsulated “dangerous voltage” within the product’s enclosure that
may be of sufficient magnitude to constitute a risk of electric shock to persons.
The exclamation point within an equilateral triangle is intended to alert the user to the presence
of important operating and maintenance (servicing) instructions in the literature accompanying the appliance.
CAUTION: TO REDUCE THE RISK OF ELECTRIC SHOCK, DO NOT REMOVE
COVER (OR BACK). NO USER-SERVICEABLE PARTS INSIDE. REFER
SERVICING TO QUALIFIED SERVICE PERSONNEL.
WARNING: TO PREVENT FIRE OR SHOCK
HAZARD, DO NOT EXPOSE THIS
APPLIANCE TO RAIN OR MOISTURE.

Important Safety Instructions
1 Read these instructions.
2 Keep these instructions.
3 Head all warnings.
4 Follow all instructions.
5 Do not use this apparatus near water.
6 Clean only with dry cloth.
7 Do not block any ventilation openings. Install in
accordance with the manufacturer’s instructions.
8 Do not install near any heat sources such as radia-
tors, heat registers, stoves, or other apparatus
(including amplifiers) that produce heat.
9 Do not defeat the safety purpose of the polarized
or grounding-type plug. A polarized plug has two
blades with one wider than the other. Grounding
type plug has two blades and a third grounding
prong. The wide blade or the third prong are provided for your safety. If the provided plug does not
fit into your outlet, consult an electrician for
replacement of the obsolete outlet.
10 Protect the power cord from being walked on or
pinched, particularly at plugs, convenience receptacles, and the point where they exit from the
apparatus.
11 Only use attachments/accessories specified by the
manufacturer.
12 Use only with the cart, stand, tripod, bracket, or
table specified by the manufacturer or sold with
the apparatus. When a cart is used, use caution
when moving the cart/apparatus combination to
avoid injury from tip-over.
13 Unplug this apparatus during lightning storms or
when unused for long periods of time.
14 Refer all serving to qualified service personnel. Ser-
vicing is required when the apparatus has been
damaged in any way, such as power-supply cord or
plug is damaged, liquid has been spilled or objects
have fallen into the apparatus, the apparatus has
been exposed to rain or moisture, does not operate
normally, or has been dropped.
• Do not expose this apparatus to drips or splashes.
• Do not place any objects filled with liquids, such
as vases, on the apparatus.
• Do not install this apparatus in a confined space
such as a book case or similar unit.
• The apparatus draws nominal non-operating
power from the AC outlet with its POWER switch
in the off position.
TASCAM DP-01 Owner’s Manual 3

Contents
1 : Starting out with your DP-01
Getting started
This manual .........................................................................................................................7
Copyright ............................................................................................................................8
About the DP-01 models ....................................................................................................8
What’s in the box ...............................................................................................................8
About the power adapter .................................................................................................................... 8
Startup & shutdown
Starting up the DP-01 .........................................................................................................9
Shutting down the DP-01 ................................................................................................10
The ACCESS light ..............................................................................................................10
Navigation
The SHIFT key ....................................................................................................................11
Titling ................................................................................................................................12
Connecting your DP-01 to other equipment
The INPUT MODE switch ..................................................................................................................... 15
Managing your songs
Creating a new song ........................................................................................................17
Storing songs ....................................................................................................................................... 17
Loading a saved song ......................................................................................................................... 18
Erasing a song ..................................................................................................................................... 18
Erasing many songs at one time ........................................................................................................ 19
Song information .............................................................................................................19
Other song operations ........................................................................................................................ 19
Assigning inputs
Recording
More advanced features ..................................................................................................22
Locating using marks, etc. .................................................................................................................. 22
Punch recording .................................................................................................................................. 22
Bouncing .............................................................................................................................................. 22
Track editing ........................................................................................................................................ 22
Undoing operations ............................................................................................................................22
Mixdown and mastering
Mastering ............................................................................................................................................. 24
2 : Advanced techniques
Location
Direct location ...................................................................................................................25
Location marks ..................................................................................................................25
IN and OUT marks .............................................................................................................26
Using the meters
Setting the meter type ....................................................................................................................... 27
EQ settings
Punching
Rehearsal ...........................................................................................................................29
Punch recording ................................................................................................................30
Pre-roll and post-roll times ..............................................................................................30
Bouncing
Repeat
Setting the repeat interval ..............................................................................................32
Working in bars & beats
Tempo setting ...................................................................................................................33
Selecting the time mode ..................................................................................................33
Metronome .......................................................................................................................34
Working with MIDI
MIDI Clock, etc. .................................................................................................................35
MIDI timecode ...................................................................................................................35
Disk management
Selecting the active partition ..........................................................................................36
Formatting a disk ..............................................................................................................36
4 TASCAM FW-1082 Owner’s Manual

Formatting a partition (Reform) ..................................................................................... 37
Formatting the FAT partition .......................................................................................... 37
Automatic song creation ................................................................................................. 37
Advanced song management
Copying songs ..................................................................................................................38
Deleting unused data ...................................................................................................... 38
Protecting a song ............................................................................................................. 39
Using the USB connection
System requirements ..........................................................................................................................40
“Open” and “Close” ......................................................................................................... 41
Backing up and restoring songs ...................................................................................... 41
Backing up ............................................................................................................................................41
Restoring a song ..................................................................................................................................42
Importing and exporting tracks ...................................................................................... 43
Importing a track .................................................................................................................................43
Exporting tracks ...................................................................................................................................43
Exporting the mastered stereo tracks ................................................................................................45
About track editing
IN, OUT and TO .................................................................................................................46
Using edit mode ..................................................................................................................................46
Track editing functions .................................................................................................... 47
COPY -> PASTE .....................................................................................................................................47
COPY -> INSERT ....................................................................................................................................47
MOVE -> PASTE ....................................................................................................................................48
MOVE -> INSERT ..................................................................................................................................48
OPEN .....................................................................................................................................................49
CUT .......................................................................................................................................................49
SILENCE .................................................................................................................................................49
CLONE TRACK ......................................................................................................................................50
CLEAN OUT ...........................................................................................................................................50
Undoing operations ......................................................................................................... 50
Troubleshooting
Messages .......................................................................................................................... 53
Specifications
Analog specifications ..........................................................................................................................55
Digital specifications ...........................................................................................................................55
Audio performance .............................................................................................................................55
Physical characteristics
Dimensional drawing ..........................................................................................................................56
Block diagram (DP-01FX) .....................................................................................................................57
..................................................................56
Contents
3 : DP-01FX Appendix
Balanced XLR inputs
Phantom power ...................................................................................................................................58
Input level controls ..............................................................................................................................58
Tuning a guitar ....................................................................................................................................58
Noise reduction ....................................................................................................................................59
Multi-effect
Assigning the effect ............................................................................................................................60
Selecting the effect type .....................................................................................................................60
Selecting the effect .............................................................................................................................60
Setting the parameter .........................................................................................................................60
Setting the effect volume ...................................................................................................................61
Available multi-effect settings ...........................................................................................................61
Reverb
Turning the reverb on and off ............................................................................................................64
Using the reverb ..................................................................................................................................64
Setting the reverb type .......................................................................................................................64
Setting the reverb time .......................................................................................................................64
4 : Commonly-used functions
How do I..?
TASCAM FW-1082 Owner’s Manual 5

Table of Figures
Figure 1.1: Power connections to the DP-01 ..............................................................9
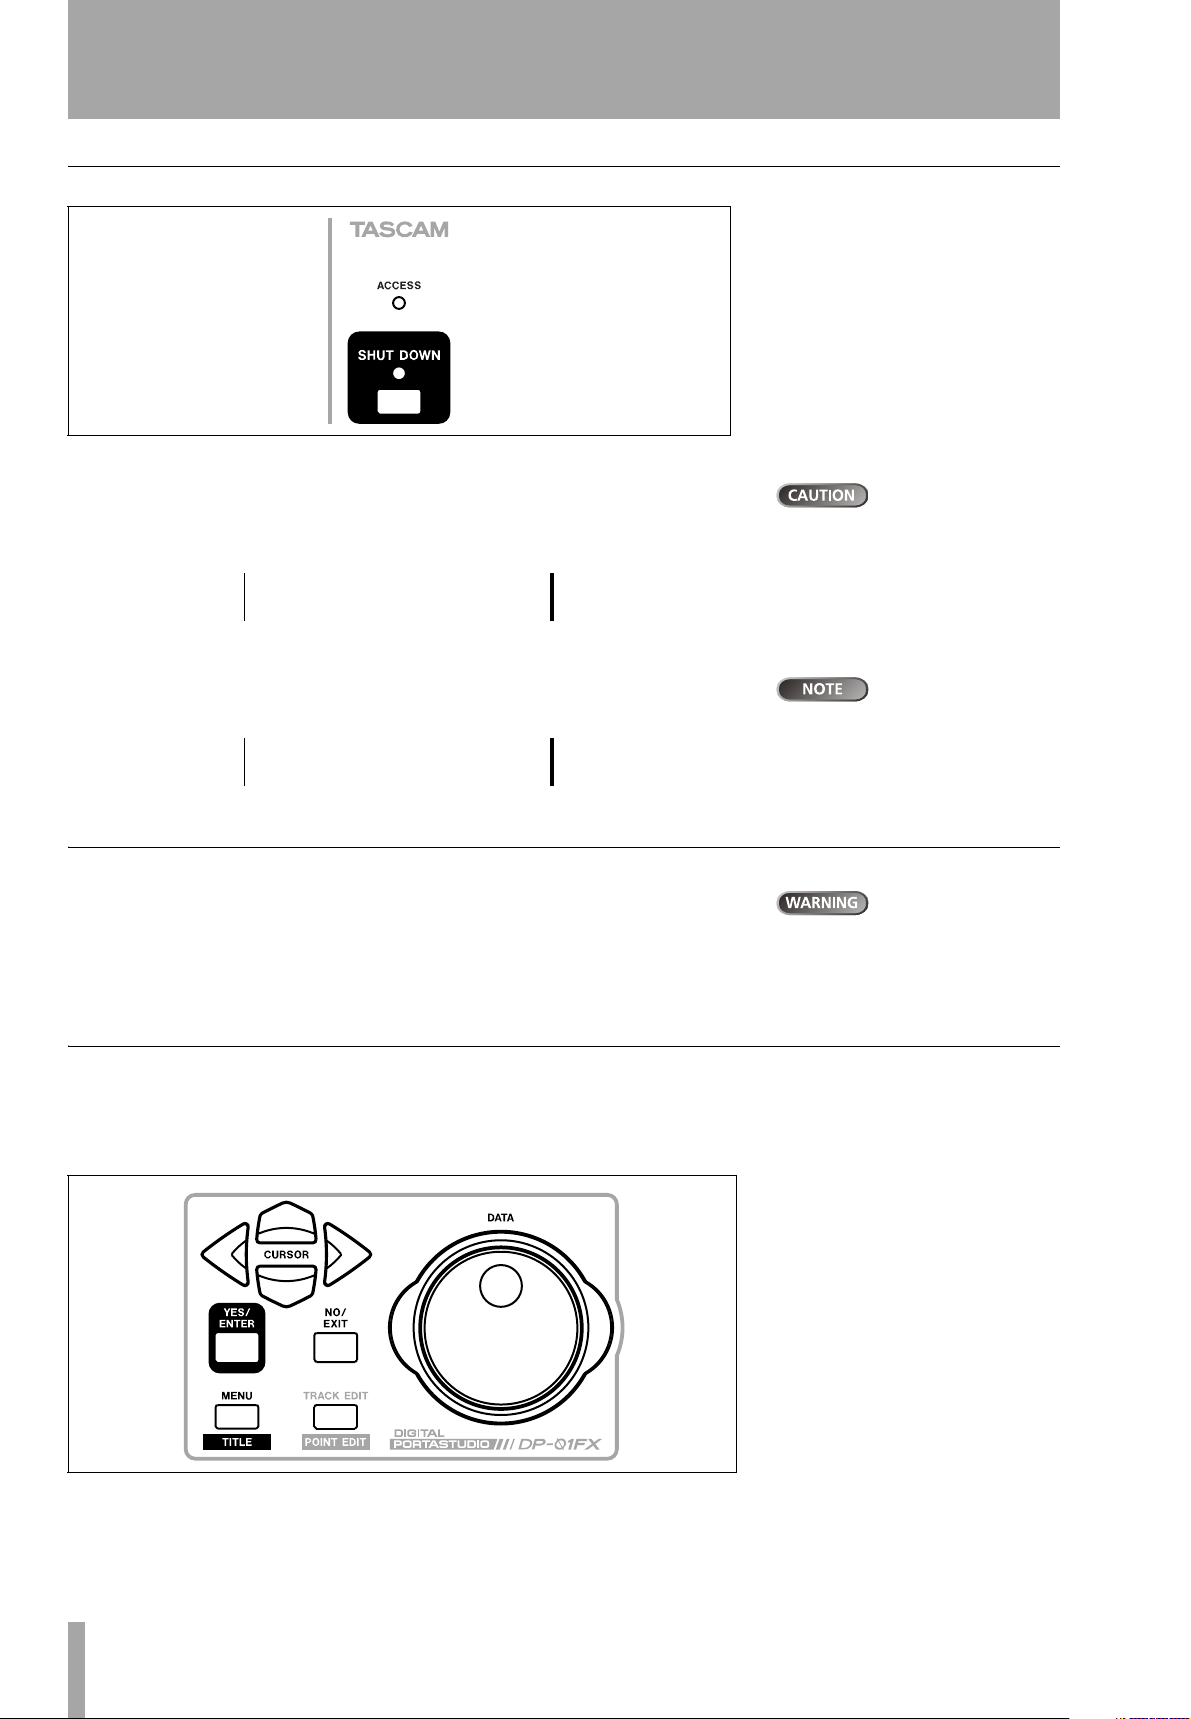
Figure 1.2: SHUT DOWN and ACCESS ......................................................................10
Figure 1.3: Menu controls .........................................................................................10
Figure 1.4: Connecting your DP-01 to other equipment .........................................13
Figure 1.5: DP-01FX front panel ................................................................................14
Figure 1.6: Rear panel connections ..........................................................................15
Figure 1.7: Assigning inputs to tracks ......................................................................20
Figure 1.8: Recording tracks ......................................................................................21
Figure 2.1: The DP-01 meters ....................................................................................27
Figure 2.2: Bouncing tracks .......................................................................................31
Figure 2.3: Disconnecting the DP-01 ........................................................................40
Figure 2.4: Copy and paste .......................................................................................47
Figure 2.5: Copy and insert .......................................................................................47
Figure 2.6: Move and paste ......................................................................................48
Figure 2.7: Move and insert ......................................................................................48
Figure 2.8: Opening a gap .........................................................................................49
Figure 2.9: Cutting material ......................................................................................49
Figure 2.10: Inserting silence ....................................................................................49
Figure 2.11: Cloning tracks ........................................................................................50
Figure 2.12: Cleaning out a track ..............................................................................50
Figure 2.13: Dimensions of the DP-01 ......................................................................56
Figure 2.14: Block diagram ........................................................................................57
Figure 3.1: Effect controls .........................................................................................60
6 TASCAM FW-1082 Owner’s Manual

1 : Starting out with your DP-01
Getting started
Read this section first. It contains important basic information about using
your DP-01 effectively, and helping you create exciting original musical
projects. When you have read this section (“Starting out with your DP-01” on
page 7), you will be able to find your way around the DP-01, and to make and
play back recordings.
Congratulations on your purchase of the TASCAM DP-01. This 8-track digital disk recorder is designed to provide you with great sound in an easy-to-use
compact package, allowing you to concentrate on the music, and not on the
recording process.
The DP-01 contains a large hard disk, allowing you to record many hours of
music, up to two tracks at a time, to a maximum of eight tracks, and then mix
them down to a pair of mastered stereo tracks using the built-in mixing facilities.
The stereo mix can then be played back into a suitably-equipped CD recorder,
etc. or into a computer’s audio inputs for distribution over the Internet, etc. or
transferred using a fast USB 2.0 connection to a personal computer.
In addition, individual tracks can be imported and exported between your
DP-01 and a personal computer, and songs can be archived, backed up and
restored using a PC.
This manual
Whether or not you have had experience of multitrack recording in the past,
you should read this manual in order to understand how to get the best out of
the DP-01. This first section gives you an idea of the basic operations of the DP01 and will get you started with your recordings. Further features are described
in “Advanced techniques” on page 25
Note that when we refer to features of the DP-01 such as keys and connectors,
we write them like this:
RETURN L and R.
We refer to features of other equipment like this: AUX IN.
When we show messages, etc. that appear on the screen, we show them like
this:
In Punch Mode.
Take special note of the extra information provided at the side of the main
text, especially the WARNING messages.
This manual cannot pretend to be a full guide to multitrack recording techniques. However, if you visit the TASCAM Web site, you can download various documents on recording which may be of interest to you.
Troubleshooting The DP-01 has been designed to be easy to use, but
sometimes you may need a little help. See the section “Troubleshooting” on
page 52 for a list of questions you may have, and answers to help you. There’s
also a list of messages that may pop up, with an explanation of their meaning,
and suggestions on what do to (“Messages” on page 53).
We give hints and
tips on using the
DP-01 in this way.
These warnings
should be taken
very seriously. They describe situations which can cause injury, or
damage to equipment if you
don’t follow the instructions.
These notes at the
side of the main
text provide additional explanations for special cases, etc.
Cautions show
that you may lose
data (your recordings) if you
don’t follow the instructions.
Getting started
How to do it? At the back of this manual, there’s a section called “Com-
monly-used functions” on page 65. Refer to this section when you want to
know how to perform a particular operation.
TASCAM DP-01 Owner’s Manual 7

Getting started
Copyright
Windows, Windows XP, and Windows 2000 are trademarks of Microsoft
Corporation.
Macintosh, MacOS, and MacOS X are trademarks of Apple Computer.
About the DP-01 models
There are two models of DP-01: the DP-01 and the DP-01FX. The latter
model is fitted with phantom-powered XLR input jacks, and internal effect
processors. This manual refers to both models as “DP-01”, as the majority of
the functions are common to both models. Any exceptions are noted.
The final section of this manual, “DP-01FX Appendix” on page 58, however,
deals only with those features of the DP-01FX which are different to those of
the DP-01. You only need to read this section if you own a DP-01FX.
What’s in the box
When you unpack the box, you should find (as well as this manual):
• The unit itself (DP-01 or DP-01FX)
• Power adapter (PS-1225)
• Power cable suitable for your region
• Warranty card
If any of these items is missing, contact your TASCAM dealer or distributor.
About the power adapter
When using the DP-01, only use the PS-1225 power adapter and
cable supplied. Do not use this power adapter and cable with
any other product.
Starting out with your DP-01
8 TASCAM DP-01 Owner’s Manual

Starting out with your DP-01
Startup & shutdown
Read this section to understand how to power up and power down the DP-01.
Starting up the DP-01
With the DP-01’s rear panel power switch OFF, connect the power adapter to
the DP-01, the power cable to the power adapter, and the power cable to the
power supply.
When switching
the DP-01 on and
off, we suggest that you turn
down the volume of any speakers
or amplifiers connected to the
unit. Also, do not wear headphones connected to the DP-01
when switching power on or off.
This will avoid damage to speakers, etc. and possible damage to
your hearing.
Figure 1.1: Power connections to the DP-01
… Switch on the DP-01 using the rear panel switch.
… The DP-01 display shows a welcome message.
TASCAM
DP-01
The system is loaded, and the last saved song is then loaded. The
ACCESS indicator lights to show the hard disk is in use while the song
is being loaded, and the display shows the current operation.
… When the ACCESS light goes off, the display shows the “home screen”:
ABS 00:00:00:00
You can reach this
screen from most
operations by repeated presses of
the
EXIT
key.
Startup & shutdown
TASCAM DP-01 Owner’s Manual 9
Navigation
Shutting down the DP-01
Figure 1.2: SHUT DOWN and ACCESS
1 First, stop playback or recording.
2 Press and hold the SHUT DOWN key for about a second. The screen
shows:
| SHUTDOWN |
|[ENTER] -> Exe|
3 Press ENTER to start the shut down process.
The display shows: Storing Song...
4 When the song data is stored to hard disk, the display shows:
| Complete |
| Now Sw Off |
If you don’t shut
down the DP-01 in
the way described here, you may
lose your recordings and settings.
Always shut down the DP-01 in
the way described here.
Pressing the
key cancels the
shutdown process.
EXIT
5 You can now use the rear panel switch to turn off the DP-01.
The ACCESS light
This red indicator shows that the disk is in use. Although the DP-01 is not a very
delicate piece of equipment, you should take care with it, as with all electronic
Starting out with your DP-01
equipment, especially when it is using its hard disk.
Navigation
The DP-01 uses a menu system which allows you to make settings, and perform
many operations. This section explains how to use the menu system and to
check and make settings.
Do not move the
DP-01 or turn it off
or disconnect the power when
the
ACCESS
avoid damage to the hard disk
and possible loss of data.
indicator is lit, to
Figure 1.3: Menu controls
10 TASCAM DP-01 Owner’s Manual

Starting out with your DP-01
… Press the MENU key to bring up the opening menu screen:
---- MENU ----
SONG .
DISK :
BACKUP : ;
… Use the wheel or the 6 and n keys to scroll up and down through the
list of top-level menus. Note how the : symbol changes to an inverted
triangle (
.) when the menu is highlighted.
At the bottom right of all menu screens is a symbol showing whether
there are more menus below the current list (
l), or above and below the current list (').
(
;), above the current list
… Press the y cursor key to enter the selected menu. The screen below
shows the
SONG menu:
-- SONG MENU --
CREATE .
SAVE :
REVERT : ;
… Use the wheel or the 6 and n keys to select the action from the menu
(here the
and below the current list):
ERASE option is selected—note that there are options above
-- SONG MENU -LOAD :
ERASE .
COPY : '
press the
To go up a level in
the menu “tree”,
EXIT
key.
… Press y to enter the menu action screen. In this case, the erase func-
tion presents you with a list of songs:
-- SONG ERASE --
/ NO BLUE← 67M
YOU WIN 426M
UPSTART 188M;
… Use the wheel (or the 6 and n keys) to move the cursor so that it is by
the song to be erased, and then press the
| SONG ERASE |
|Are you sure ?|
ENTER key.
… In cases like this, where the DP-01 asks you a question, the ENTER key
now becomes a
YES key, and the EXIT key becomes a NO key.
… Some screens allow a number of values to be filled in. In these cases,
you should use the 6 and n keys to move the cursor and the wheel to
set the value:
-- PREFERENCE -Pre / 2.0Sec
Post :1.0Sec
EQ LF:100 Hz '
The SHIFT key
The SHIFT key modifies the behavior of a number of different keys. When you
press and hold it while pressing another key, the other key takes on the function shown in the label (usually white-on-blue for the DP-01FX and whiteon-green for the DP-01) shown below the key.
The song names
and sizes shown
here will almost certainly be different on your DP-01.
Navigation
TASCAM DP-01 Owner’s Manual 11

Navigation
Titling
You can give titles to your songs, exported tracks, etc. Here’s how you do it:
When you see a screen like the one below:
- SONG CREATE Title [S
[ENTER] -> Exe
ONG001 ]
… Use the wheel to change the letter above the underlined cursor. You
can choose from common punctuation marks, numbers, capital
(UPPERCASE) letters, and small (lowercase) letters.
… Use the INSERT key to insert a blank space at the cursor position, and
use the
cursor.
SHIFTed INSERT key (DELETE) to delete the character at the
… When you have finished entering the name, press ENTER. The song,
with its new name, is stored to disk.
Starting out with your DP-01
12 TASCAM DP-01 Owner’s Manual
Starting out with your DP-01
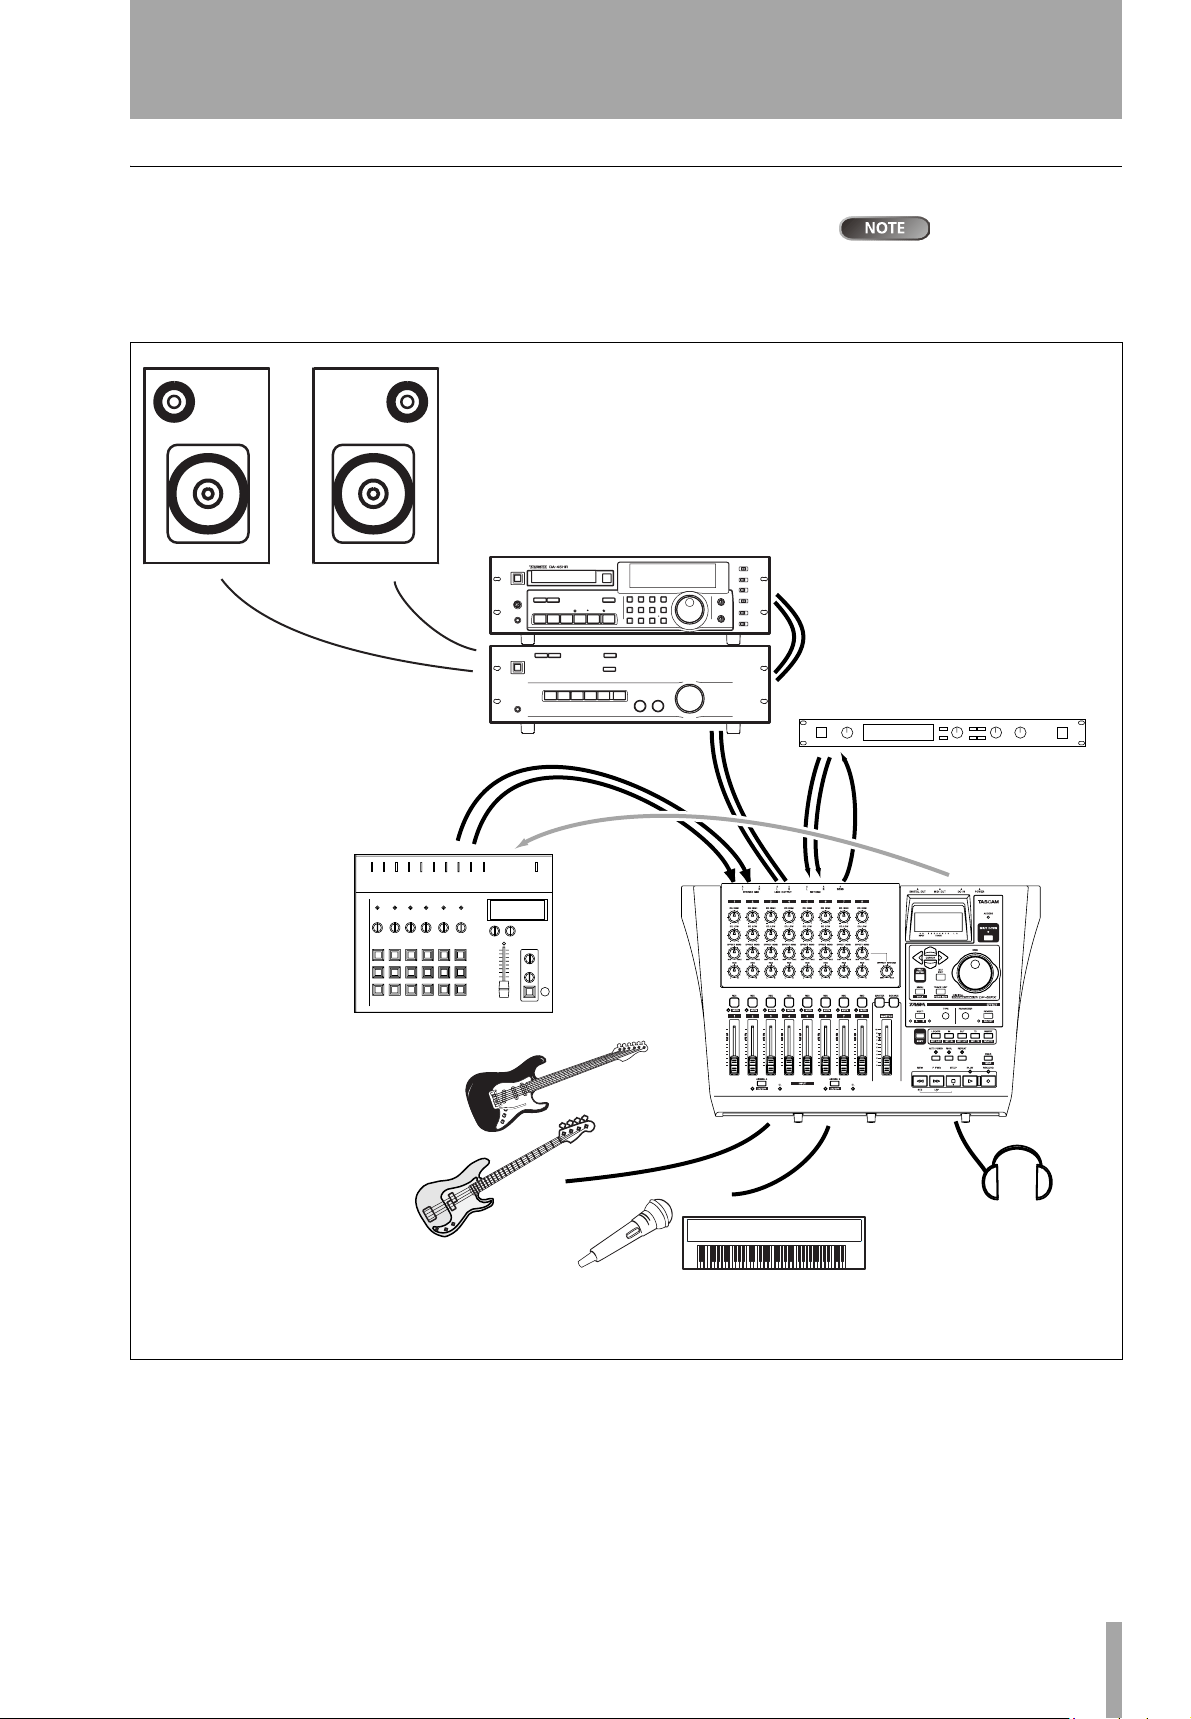
Connecting your DP-01 to other equipment
Before you start recording with the DP-01, you will need to make a few connections to other equipment. Figure 1.4 shows how you can connect your DP-01 to
your existing audio setup.
2-track
recorder
Stereo
amplifier
Figure 1.4 shows a
DP-01FX model.
The appearance of the DP-01 differs slightly, but the principles are
the same.
REC OUT/
PLAY IN
Drum machine
Guitars and basses
to INPUT A
MIDI IN
LINE OUTPUT
(L, R)
STEREO MIX
(L, R)
Instruments and
microphones to
INPUT A and B
RETURN
(L, R)
External effects unit
SEND
MIDI OUT
PHONES
Connecting your DP-01 to other equipment
Figure 1.4: Connecting your DP-01 to other equipment
TASCAM DP-01 Owner’s Manual 13
Connecting your DP-01 to other equipment
Turn on ONLY for
condenser microphones
Microphones go
here (DP-01FX)
(DP-01FX only)
Input level
controls
To headphones (and
level)
Guitars, basses
etc. go here
Synths, pre-amps etc. (&
microphones on DP-01)
go here
Select monitoring
mode (see text)
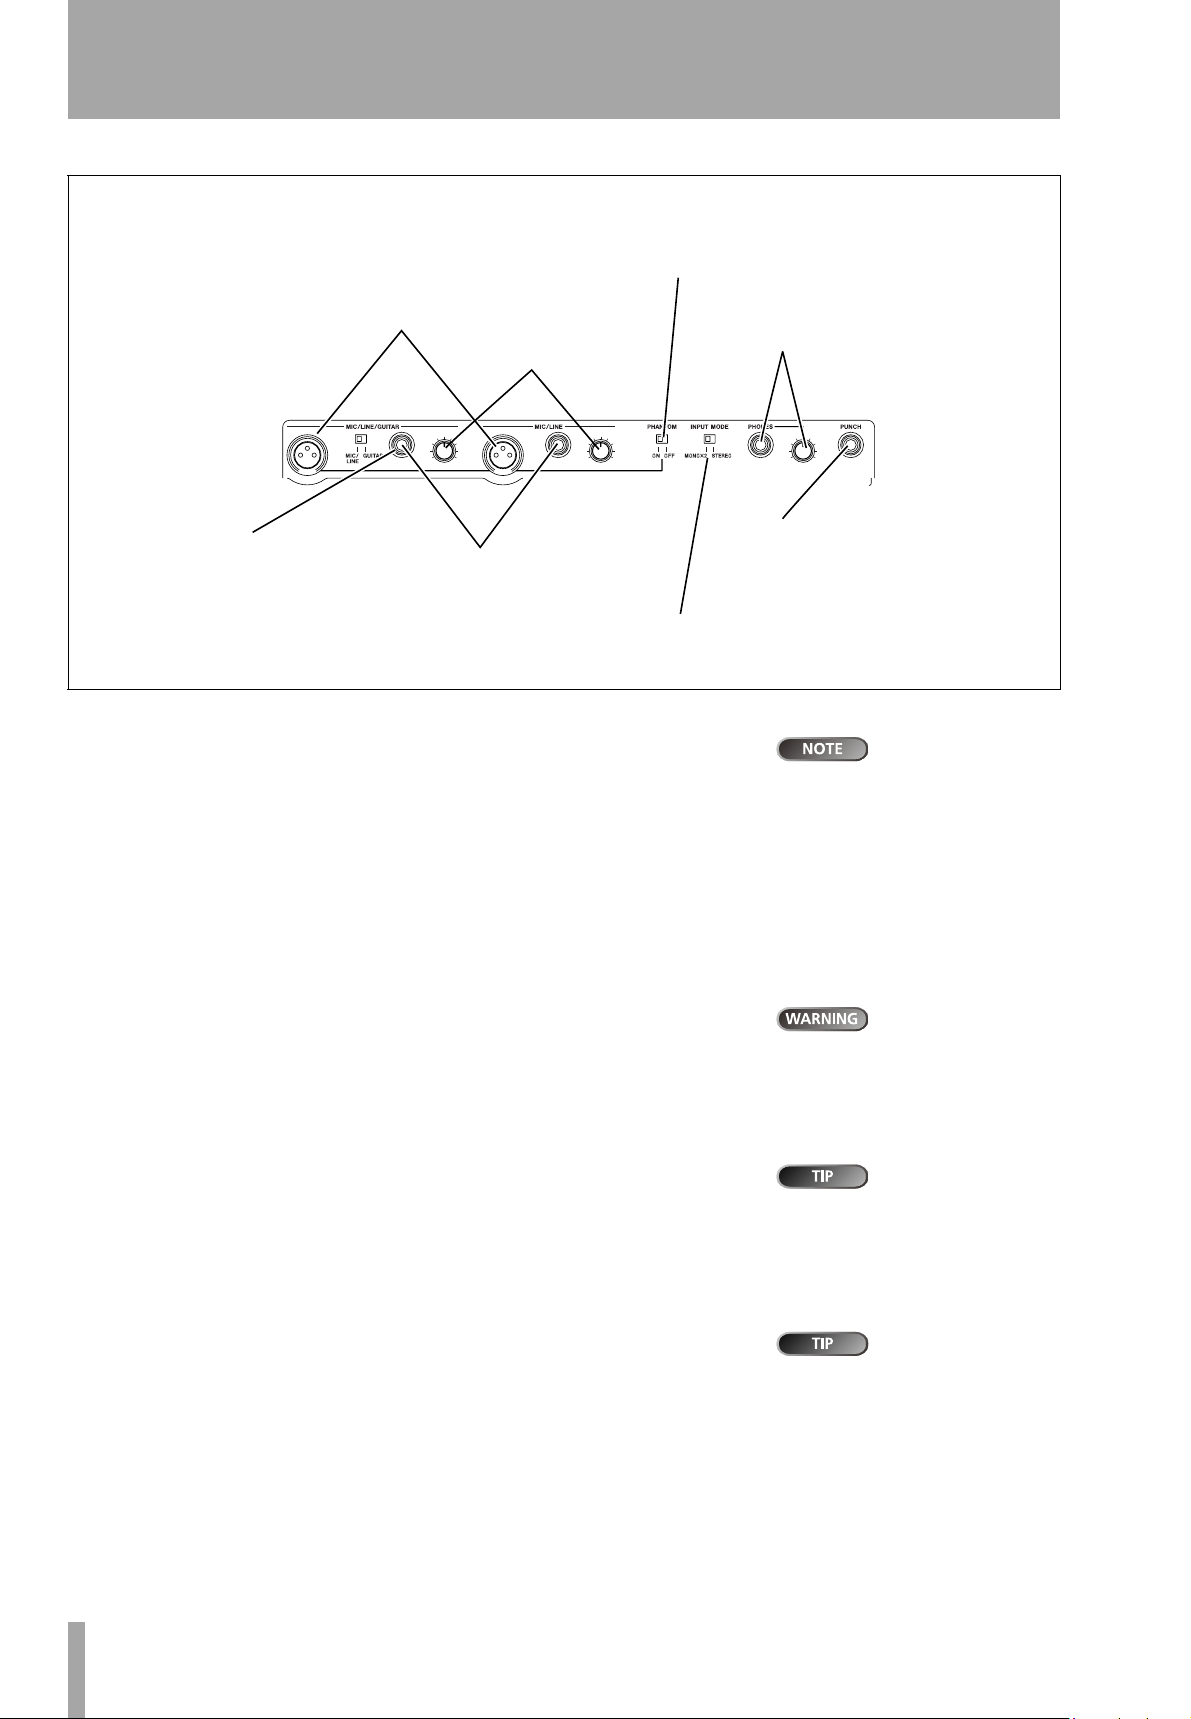
Figure 1.5: DP-01FX front panel
Microphones are connected to the front panel inputs.
Set the
the
GUITAR/LINE switches to LINE. Turn the input level controls so that
OL indicators only just light in the loudest part of the recording.
Synthesizers, etc. including drum machines, guitar amplifier simulators,
active basses, etc. as well as CD players, cassette decks, and so on can be connected to the front panel input jacks using standard 1/4" mono plugs (unbalanced). When you are recording a stereo source, you should consider the
Starting out with your DP-01
position of the
page 15).
Set the GUITAR/LINE switch to LINE. Adjust the input level controls and use
the instruments’ output volume controls to adjust the level so that the
indicators only just light on the very loudest passages.
INPUT MODE switch (see “The INPUT MODE switch” on
Guitars and basses (passive types) are connected to the front panel
A using a standard 1/4" mono plug (unbalanced).
input
OL
To
footswitch
The DP-01FX in-
cludes phantompowered XLR microphone input
connectors. See “DP-01FX Appendix” on page 58 for details of using these connectors.
NEVER plug the
speaker outputs of
a guitar amplifier into the DP-01.
Set the GUITAR/LINE switch to GUITAR. Turn the input level control until the
OL indicators barely light on the loudest passages.
Headphones Plug a pair of standard headphones into the 1/4" stereo jack
on the front panel.
Adjust the volume with the level control to the right of the jack.
Footswitch You can connect a standard “push-to-make” footswitch, such
as the TASCAM RC-30P to the front panel
Use the switch to punch in and out (that is, start and stop recording on the
fly).
PUNCH jack.
14 TASCAM DP-01 Owner’s Manual
Use the built-in
tuner (on the DP01FX only) to tune the guitar or
bass (see “Tuning a guitar” on
page 58).
The footswitch is
useful if both
hands are busy playing a guitar,
for example.
Starting out with your DP-01
The INPUT MODE switch
This switch is important when you are recording from input A and input B
together.
This front panel switch affects the way that you monitor the input signals,
both through the headphones and/or through the
are two positions:
LINE OUTPUT jacks. There
… MONO x 2—The signals from input A and input B are both sent to the
center of the monitoring “stage”.
… STEREO—The signal from input A is sent to the left, and that from
B is sent to the right of the monitoring “stage” forming a stereo
input
pair for use when you are recording stereo instruments such as synthesizers, etc.
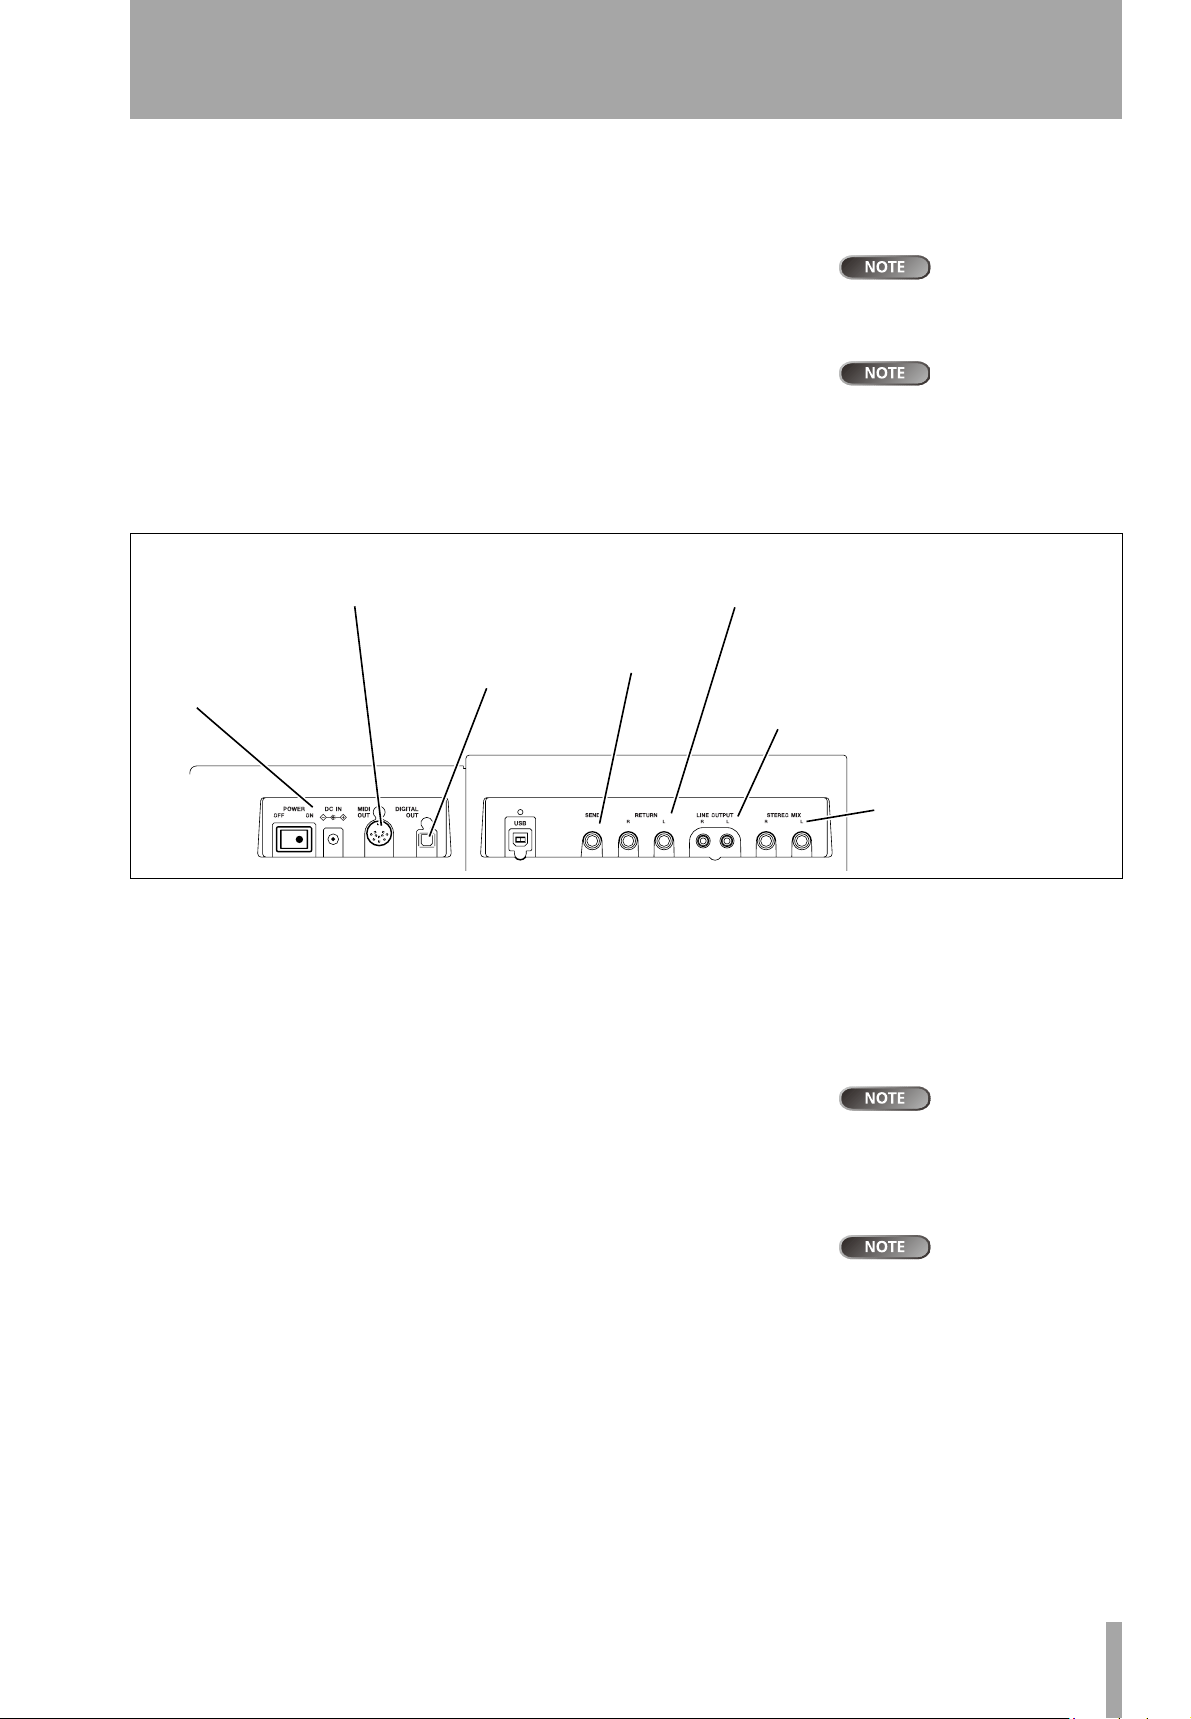
To MIDI sequencer,
drum machine, etc.
Power input and
switch
To digital
recorder, etc.
To effects
unit
From stereo effects
unit outputs
To analog recorder,
monitoring system,
etc.
INPUT MODE
not affect the recording at all—just the monitoring process.
In the
mode, the A and
input signals are added together
in the center, and you may hear
distortion in the monitoring system This does not affect the recording, though.
does
MONO X 2
B
From submixer/MIDI tone
generator, etc.
Figure 1.6: Rear panel connections
Monitoring and recording Use the rear panel LINE OUTPUT RCA
jacks to connect the DP-01 to your monitoring system (this is a fancy term for
an amplifier/speaker setup). When you come to make your final stereo recording, you can use these jacks to connect to an analog recorder.
A typical setup would connect these jacks to the AUX IN of a stereo system.
Use the stereo system’s selector switch to listen to the AUX source when track-
ing and bouncing, etc. on the DP-01 as well as when mastering.
When you have mastered the stereo track and you want to record it, set the
stereo monitoring system so that the recorder is set to record from the AUX
source, and you listen to the recorder, rather than the source.
Effect processor When you want to use an external effect processor with
the DP-01, connect the rear panel
the processor (1/4” unbalanced jack).
Connect the stereo outputs of the processor to the two
DP-01 (1/4" unbalanced jacks).
SEND of the DP-01 to the mono input of
RETURN jacks of the
“Tracking” means
recording tracks
on the DP-01. “Mastering” means
taking these recording tracks and
mixing them down to stereo.
The DP-01FX has
an internal reverb
processor. However, you can also
use an external effect processor if
you prefer.
Connecting your DP-01 to other equipment
TASCAM DP-01 Owner’s Manual 15

Connecting your DP-01 to other equipment
External stereo input The DP-01 has two 1/4"mono unbalanced jacks
on the rear panel marked
These can be used to connect an external stereo sub-mixer, synthesizer, drum
machine, CD player, etc.
STEREO MIX.
The signals input here go only to the analog
LINE OUTPUT jacks. They cannot
be recorded on the DP-01, and the signal level cannot be adjusted using the
DP-01.
Digital output Use a standard optical digital cable to connect this (rear
panel, close to the power switch) to a suitable digital stereo input of a monitoring system, or stereo recorder.
The signals sent from this mirror those sent from the
STEREO MIX signals are not output through the digital output).
the
LINE OUTPUT jacks (but
MIDI output Use this (rear panel) to connect a sequencer, drum machine,
etc. which can be started, stopped and synchronized with the DP-01. See
“Working with MIDI” on page 35 for details.
You can connect a
digital recorder
(CD, MD) using the digital connection, and keep using the
OUTPUT
jacks for monitoring.
LINE
Starting out with your DP-01
16 TASCAM DP-01 Owner’s Manual

Starting out with your DP-01
Managing your songs
This section tells you about how to make a new song, as well as basic song
management (renaming, deleting, and copying) features. For more details of
the disk management, and the other song management features of the DP-01,
see “Disk management” on page 36 and “Advanced song management” on
page 38.
Creating a new song
1 Press the MENU key, use the wheel to highlight the SONG menu item,
and press the y key.
== SONG MENU ==
CREATE .
SAVE :
REVERT : ;
2 If the CREATE option is not highlighted, use the wheel to highlight it
and press the y key.
- SONG CREATE Title [S
ONG001 ]
The DP-01, like
other audio equipment, always refers to a “song”,
even though you may be recording only instruments, or spoken
word.
[ENTER] -> Exe
3 Set the title as described in “Titling” on page 12.
4 Press ENTER to create the song. The current song is stored before the
new song is created.
Storing songs
Since the DP-01 does not automatically save the audio you record as part of a
song, you should get into the habit of performing frequent manual saves, and
always shutting down the DP-01 properly (“Shutting down the DP-01” on
page 10) to store all data.
1 Press the MENU key, use the wheel to highlight the SONG menu item,
and press the y key.
== SONG MENU ==
CREATE :
SAVE .
REVERT : ;
2 Highlight the SAVE option and press the y key:
-- SONG SAVE --Title [S
ONG001 ]
You can re-title a
song by pressing
the
SHIFT
ed
MENU
key to edit
the title of the currently-loaded
song.
A “song” is not
just the audio files
you record—it also includes editing, settings, etc.
Managing your songs
[ENTER] -> Exe
3
Rename the file if you want to save it as another name and press
ENTER, or simply press ENTER to save the file to disk.
The screen shows a message (
Saving Song) as the song is saved.
TASCAM DP-01 Owner’s Manual 17
Managing your songs
Reverting to last version The REVERT action (which follows the SAVE
action in the SONG menu) allows you to undo all changes since the last save.
… When you select the REVERT action, the title of the song is shown. Press
ENTER to go back to the last saved version, or EXIT to keep the current
song as it is.
Loading a saved song
Of course, saving songs is no use unless you can load them again. This is how
you do it.
1 Press the MENU key, use the wheel to highlight the SONG menu item,
and press the y key.
== SONG MENU ==
SAVE :
REVERT :
LOAD .'
2 Highlight the LOAD action, and press the y key:
-- SONG LOAD -/ MyBlues 118M
GoHome ←224M
3 Use the wheel to move the / cursor to the song to be loaded (the ←
symbol means that the song is currently loaded) and press
The current song is saved, and the selected song is loaded.
ENTER.
Erasing a song
If your disk is getting full, or you really don’t need a song any more, you can
erase it.
Starting out with your DP-01
1 From the SONG menu, select the ERASE action:
-- SONG ERASE -/ MyBlues 118M
GoHome ←224M
2 Highlight a song and press ENTER.
3 You are asked if you want to erase the song (Are you sure?).
Press
ENTER to erase the song, or EXIT to cancel the operation.
If you erase the current song, the first song in the list is automatically
loaded.
Only erase a song
if you are certain
you don’t need it any more (you
can’t undo this operation!). However, you can use a USB connection to back up songs to a PC
before you erase them.
18 TASCAM DP-01 Owner’s Manual

Erasing many songs at one time
You may want to select a number of songs for erasing.
Starting out with your DP-01
… Use the wheel to scroll up and down through the list of songs.
… Select a song for erasing using the INSERT key. A check mark (✔)
appears by the song title.
… De-select a song by using the SHIFTed INSERT (DELETE) key. The
check mark disappears.
… Press ENTER when you have selected all the songs to be erased. You are
asked if you are sure. Press
the process without erasing them.
You can erase all the songs shown, and a new song is automatically created. There is always at least one song on the partition.
Song information
It’s easy to see the title, working partition, and amount of time left for recording
from the “home screen”.
ENTER again to erase them, or EXIT to exit
… From the home screen, press and hold the EXIT key. While you hold
down the
EXIT key, the display shows:
-- Song Info. -Part : Part01
Song : MYBLUES
RecRem: 1269 min
This method of
working applies to
a few other operations (copying,
etc.) as well.
The current partition (
on the partition for recording (
Part), song title (Song) and amount of time left
RecRem) in minutes.
Other song operations
Other song operations are described in “Advanced song management” on
page 38.
Managing your songs
TASCAM DP-01 Owner’s Manual 19
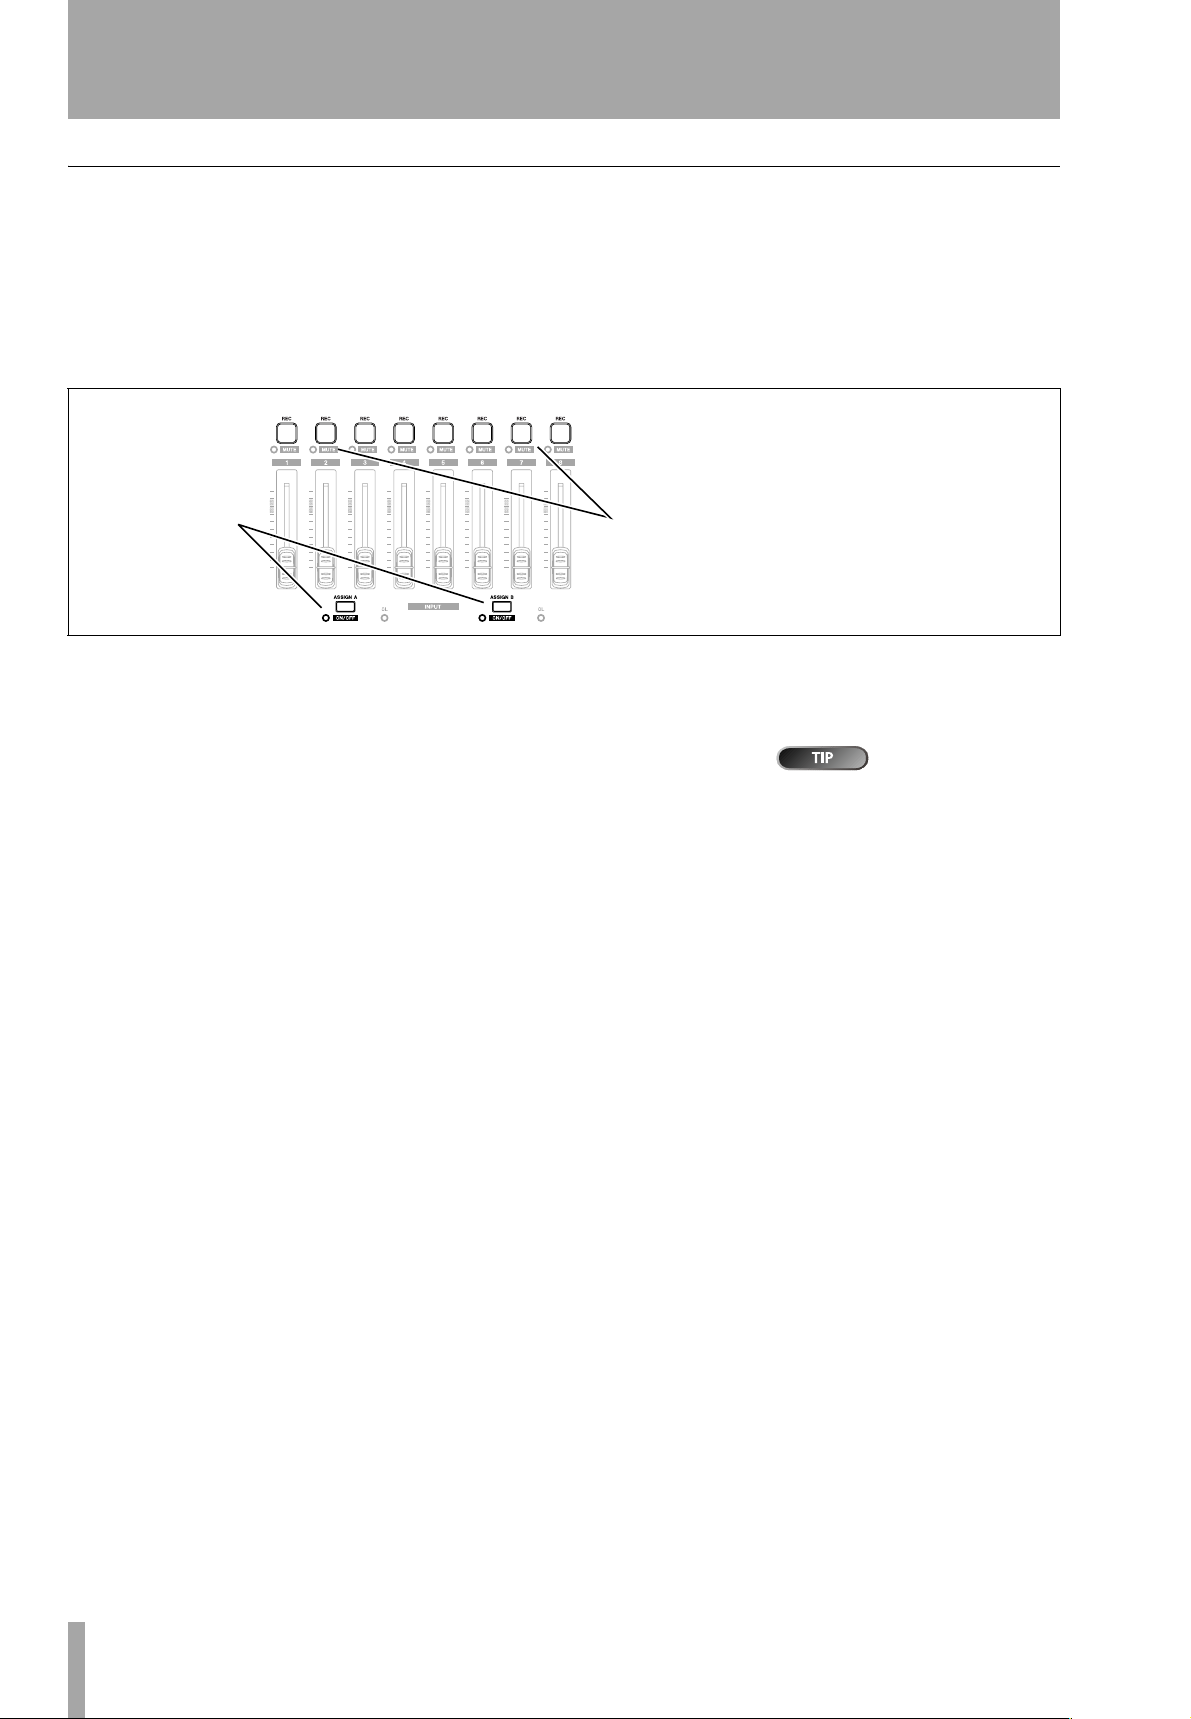
Assigning inputs
Assigning inputs
When we talk about “assigning” inputs, we are talking about linking the signals from the two inputs to the tracks.
You can record on up to two tracks at a time. This means that the same input
can be assigned to two tracks at the same time (you can’t then use the other
input) or the two inputs can be assigned to different tracks. You can’t assign
both inputs to the same track at the same time.
Press and hold
one of the
ASSIGN keys
Figure 1.7: Assigning inputs to tracks
And then press
one of the 8
REC keys
… Press and hold the ASSIGN key corresponding to the input signal you
are assigning (
A or B).
… While holding down the ASSIGN key, press the REC key of the track to
which you are assigning the input.
The
REC key flashes rapidly.
… If you want to assign the input to another track, you must first clear
the current assignment (see below), and then re-assign the input.
Note that the
Starting out with your DP-01
input flashes when you hold down the
Clearing an assignment Hold down the ASSIGN key to check current
assignments and while holding the
ments by pressing a flashing
REC key of the first track to which you assigned the
ASSIGN key.
ASSIGN key, clear current assign-
REC key (which then stops flashing).
Press and hold
SHIFT
and either
of the
turn the inputs on or off as
shown by the indicator. You may.
turn off unused inputs to reduce
noise.
ASSIGN
keys (A or B) to
20 TASCAM DP-01 Owner’s Manual
Starting out with your DP-01
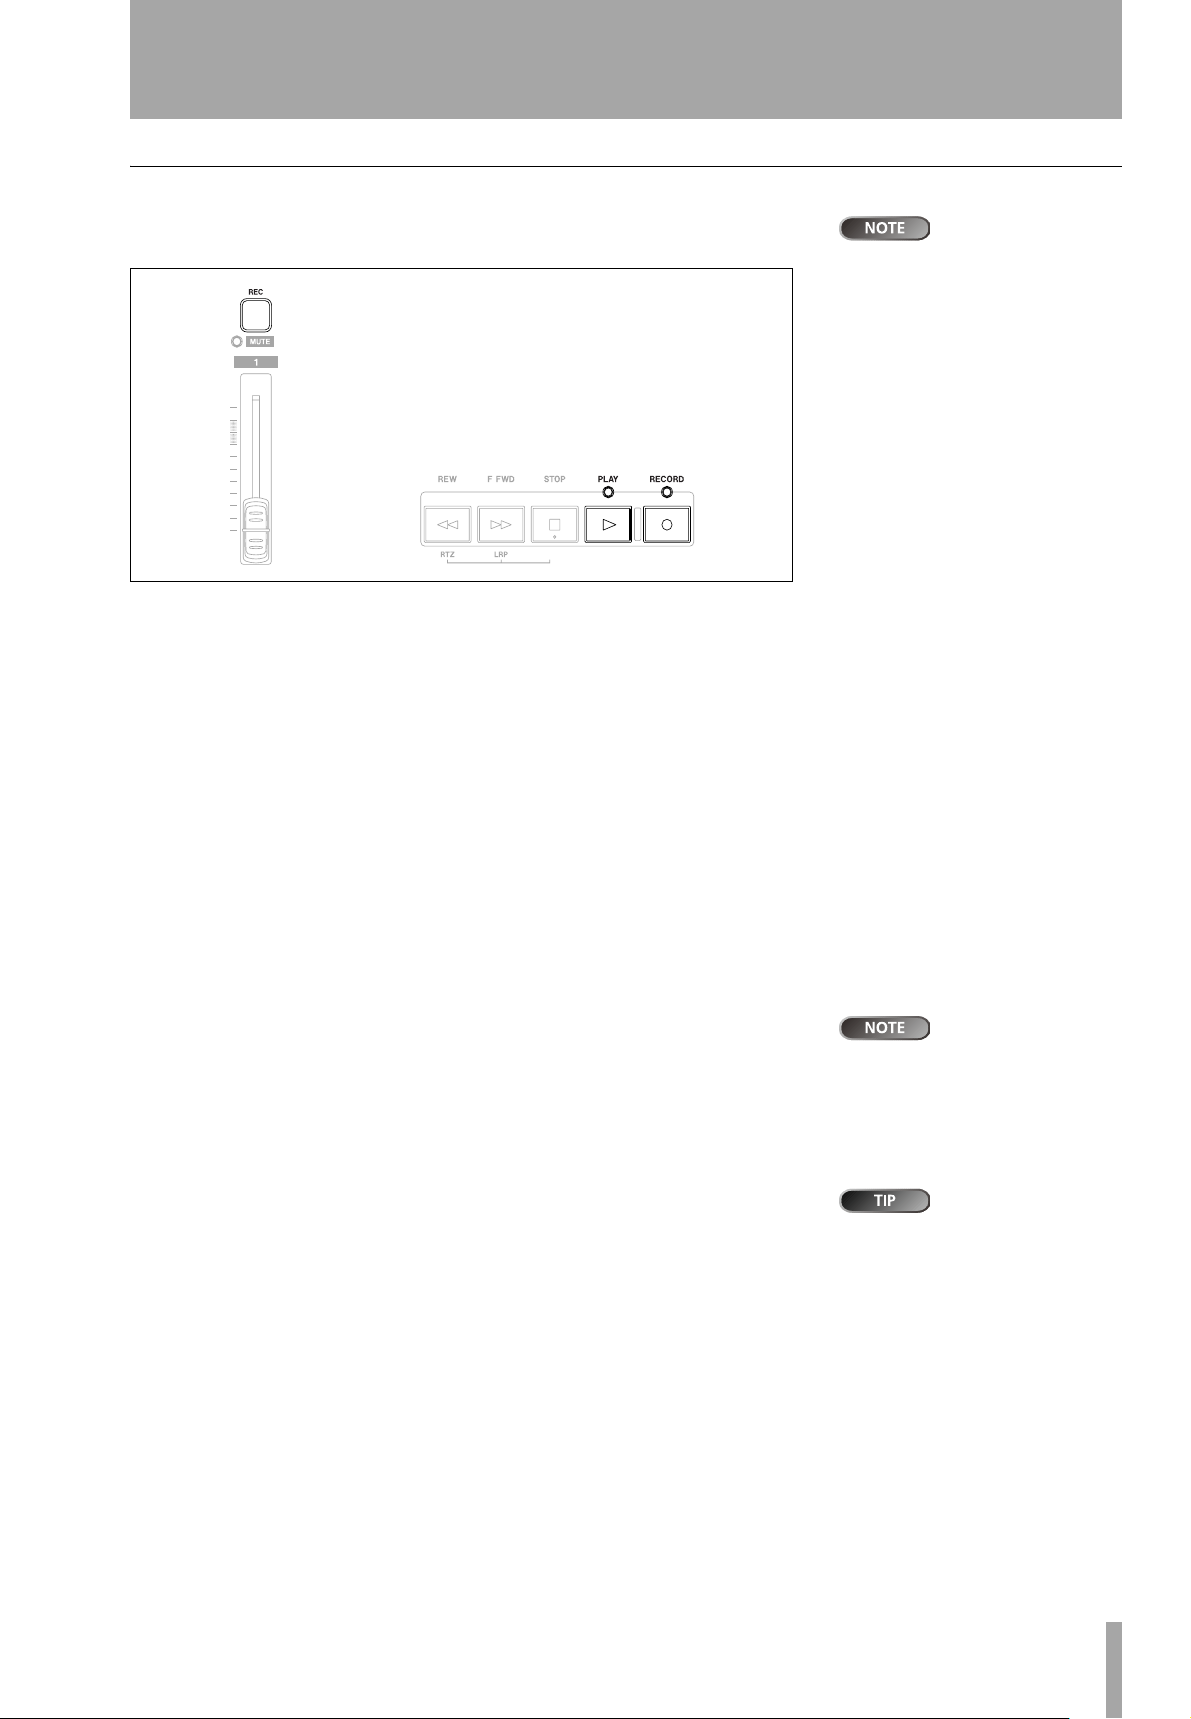
Recording
When you’ve connected the source, and made the assignments of inputs to
tracks, you’re ready to start recording.
Figure 1.8: Recording tracks
1 Press the REC key of the track(s) you’re going to record on, which start
to flash slowly (this is called “arming” the track(s).
The DP-01FX con-
tains an input effects processor (
01FX Appendix” on page 58 for
details.
MULTI
). See “DP-
2 Press and hold the RECORD key and press the PLAY key.
The
RECORD key indicator lights red, and the PLAY indicator lights
green. The track
REC indicators stop flashing and light steadily.
3 Press STOP when you’ve finished recording.
4 To return to the place where you started recording, press and hold
down the
tion) key.
To return to the zero point, press and hold down the
press the
STOP key, and press the F FWD (LRP = Last Recording Posi-
STOP key and
REW (RTZ = Return To Zero) key.
5 Press PLAY to start playback of the recorded tracks.
Use the track fader(s) and the red MASTER fader to adjust the level of
what you hear. Adjust the final volume with the headphones control
and the monitoring system’s volume control.
The pan controls position the track in the stereo “image” created by
the left and right speakers (or headphones). The center position is
marked by a “click” feel when you turn the knob.
The EQ HIGH and EQ LOW equalization controls work in a similar way
to the bass and treble tone controls on a stereo system. The center
“click” position of the knob means there’s no cut or boost for the
appropriate band.
… You can re-record the track if you’re not happy with it by going back to
the original point and repeating the process.
The faders and
other mixer controls adjust the output level of
the recorded tracks, not the input
signals.
You can change
the setting of the
high and low equalization controls. See “EQ settings” on
page 28 for details.
Recording
… When you’re happy with your recording, you can un-arm the track(s)
(“safe” them) and arm and record on other tracks. Remember to re-
assign the inputs as well as arming the tracks.
… Press the REW or F FWD keys for a short while and then release them
to wind backwards or forwards through your recording (like a tape
recorder). Press and hold these keys to increase the “wind” speed. Press
STOP to stop the fast winding (again, like a tape recorder).
TASCAM DP-01 Owner’s Manual 21
 Loading...