

Page 1
D01175220A
DP-006
Digital Multitrack Recorder
OWNER’S MANUAL
Page 2
IMPORTANT SAFETY PRECAUTIONS
8
For U.S.A
TO THE USER
This equipment has been tested and found to comply with the limits for a
Class B digital device, pursuant to Part 15 of the FCC Rules. These limits are
designed to provide reasonable protection against harmful interference in
a residential installation. This equipment generates, uses, and can radiate
radio frequency energy and, if not installed and used in accordance with the
instruction manual, may cause harmful interference to radio communications. However, there is no guarantee that interference will not occur in a
particular installation. If this equipment does cause harmful interference
to radio or television reception, which can be determined by turning the
equipment off and on, the user is encouraged to try to correct the interference by one or more of the following measures.
a) Reorient or relocate the receiving antenna.
b) Increase the separation between the equipment and receiver.
c) Connect the equipment into an outlet on a circuit different from that
to which the receiver is connected.
d) Consult the dealer or an experienced radio/TV technician for help.
CAUTION
Changes or modifications to this equipment not expressly approved by
TEAC CORPORATION for compliance could void the user's authority to
operate this equipment.
8
For Canada
THIS CLASS B DIGITAL APPARATUS COMPLIES WITH CANADIAN ICES-003.
CET APPAREIL NUMÉRIQUE DE LA CLASSE B EST CONFORME À LA NORME
NMB-003 DU CANADA.
Model Number : DP-006
Trade Name : TASCAM
Responsible party : TEAC AMERICA, INC.
Address : 7733 Telegraph Road, Montebello, California, U.S.A.
Telephone number : 1-323-726-0303
This device complies with Part 15 of the FCC Rules. Operation is subject to
the following two conditions: (1) this device may not cause harmful interference, and (2) this device must accept any interference received, including
interference that may cause undesired operation.
This appliance has a serial number located on the rear panel. Please record
the model number and serial number and retain them for your records.
Model number
Serial number
Declaration of Conformity
TASCAM DP-006
2
Page 3
IMPORTANT SAFETY INSTRUCTIONS
1 Read these instructions.
2 Keep these instructions.
3 Heed all warnings.
4 Follow all instructions.
5 Do not use this apparatus near water.
6 Clean only with dry cloth.
7 Do not block any ventilation openings. Install in accordance with the
manufacturer's instructions.
8 Do not install near any heat sources such as radiators, heat registers,
stoves, or other apparatus (including amplifiers) that produce heat.
9 Do not defeat the safety purpose of the polarized or grounding-type
plug. A polarized plug has two blades with one wider than the other. A
grounding type plug has two blades and a third grounding prong. The
wide blade or the third prong are provided for your safety. If the provided
plug does not fit into your outlet, consult an electrician for replacement
of the obsolete outlet.
10 Protect the power cord from being walked on or pinched particularly at
plugs, convenience receptacles, and the point where they exit from the
apparatus.
11 Only use attachments/accessories specified by the manufacturer.
12 Use only with the cart, stand, tripod, bracket, or table specified by the
manufacturer, or sold with the apparatus. When a cart is used, use
caution when moving the cart/apparatus combination to avoid injury
from tip-over.
13 Unplug this apparatus during lightning storms or when unused for long
periods of time.
14 Refer all servicing to qualified service personnel. Servicing is required
when the apparatus has been damaged in any way, such as power-supply
cord or plug is damaged, liquid has been spilled or objects have fallen
into the apparatus, the apparatus has been exposed to rain or moisture,
does not operate normally, or has been dropped.
The apparatus draws nominal non-operating power from the AC outlet
•
with its POWER or STANDBY/ON switch not in the ON position.
The mains plug is used as the disconnect device, the disconnect device
•
shall remain readily operable.
Caution should be taken when using earphones or headphones with the
•
product because excessive sound pressure (volume) from earphones or
headphones can cause hearing loss.
If you are experiencing problems with this product, contact TEAC for a
•
service referral. Do not use the product until it has been repaired.
CAUTION
Do not expose this apparatus to drips or splashes.
•
Do not place any objects filled with liquids, such as vases, on the
•
apparatus.
Do not install this apparatus in a confined space such as a book case or
•
similar unit.
The apparatus should be located close enough to the AC outlet so that
•
you can easily grasp the power cord plug at any time.
If the product uses batteries (including a battery pack or installed
•
batteries), they should not be exposed to sunshine, fire or excessive heat.
WARNING
Products with Class construction are equipped with a power supply cord
that has a grounding plug. The cord of such a product must be plugged into
an AC outlet that has a protective grounding connection.
TASCAM DP-006
3
Page 4
Safety Information
Pb, Hg, Cd
8
For European Customers
Disposal of electrical and electronic equipment
(a) All electrical and electronic equipment should be disposed of separately
from the municipal waste stream via designated collection facilities
appointed by the government or the local authorities.
(b) By disposing of the electrical and electronic equipment correctly, you will
help save valuable resources and prevent any potential negative effects
on human health and the environment.
(c) Improper disposal of waste equipment can have serious effects on the
environment and human health as a result of the presence of hazardous
substances in electrical and electronic equipment.
(d) The crossed out wheeled dust bin symbol indicates that electrical and
electronic equipment must be collected and disposed of separately from
household waste.
(e) The return and collection systems are available to the end users. For
more detailed information about disposal of old electrical and electronic
equipment, please contact your city office, waste disposal service or the
shop where you purchased the equipment.
Disposal of batteries and/or accumulators
(a) Waste batteries and/or accumulators should be disposed of separately
from the municipal waste stream via designated collection facilities
appointed by the government or the local authorities.
(b) By disposing of waste batteries and/or accumulators correctly, you will
help save valuable resources and prevent any potential negative effects
on human health and the environment.
(c) Improper disposal of waste batteries and/or accumulators can have
serious effects on the environment and human health as a result of the
presence of hazardous substances in batteries and/or accumulators.
(d) The crossed out wheeled dust bin symbol indicates that batteries and/
or accumulators must be collected and disposed of separately from
household waste.
If the battery or accumulator contains more than the specified values
of lead (Pb), mercury (Hg), and/or cadmium (Cd) defined in the Battery
Directive (2006/66/EC), then the chemical symbols for lead (Pb), mercury
(Hg) and/or cadmium (Cd) will be indicated beneath the crossed out
wheeled dust bin symbol.
(e) The return and collection systems are available to the end users. For more
detailed information about disposal of waste batteries and/or accumulators, please contact your city office, waste disposal service or the shop
where you purchased them.
TASCAM DP-006
4
Page 5
Safety Information
CAUTIONS ABOUT BATTERIES
This product uses batteries. Misuse of batteries could cause a leak, rupture
or other trouble. Always abide by the following precautions when using
batteries.
Never recharge non-rechargeable batteries. The batteries could rupture or
•
leak, causing fire or injury.
When installing batteries, pay attention to the polarity indications (plus/
•
minus (¥/^) orientation), and install them correctly in the battery
compartment as indicated. Putting them in backward could make the
batteries rupture or leak, causing fire, injury or stains around them.
When you store or dispose batteries, isolate their terminals with insulation
•
tape or something like that to prevent them from contacting other
batteries or metallic objects.
When throwing used batteries away, follow the disposal instructions
•
indicated on the batteries and the local disposal laws.
Do not use batteries other than those specified. Do not mix and use new
•
and old batteries or different types of batteries together. The batteries
could rupture or leak, causing fire, injury or stains around them.
8
For China
产品有毒有害物质或元素的名称及含量
机种 :DP-006 有毒有害物质或元素
品名
1 CHASSIS 部份 ○ ○ ○ ○ ○ ○
2 PCB Assy 部份 × ○ ○ ○ ○ ○
3 线材部份 ○ ○ ○ ○ ○ ○
4 附属品部份 × ○ ○ ○ ○ ○
5 SEAL 部份 ○ ○ ○ ○ ○ ○
6 包装部份 ○ ○ ○ ○ ○ ○
○ :表示该有毒有害物质在该部件所有均质材料中的含有量均在 SJ/T11363-2006 标准规定的限量要求以下。
× :表示该有毒有害物质至少在该部件的某一均质材料中的含量超出 SJ/T11363-2006 标准规定的限量要求。
(针对现在代替技术困难的电子部品及合金中的铅 )
铅
(Pb)
汞
(Hg)
Do not carry or store batteries together with small metal objects. The
•
batteries could short, causing leak, rupture or other trouble.
Do not heat or disassemble batteries. Do not put them in fire or water.
•
Batteries could rupture or leak, causing fire, injury or stains around them.
If the battery fluid leaks, wipe away any fluid on the battery case before
•
inserting new batteries. If the battery fluid gets in an eye, it could cause loss
of eyesight. If fluid does enter an eye, wash it out thoroughly with clean
water without rubbing the eye and then consult a doctor immediately. If
the fluid gets on a person’s body or clothing, it could cause skin injuries or
burns. If this should happen, wash it off with clean water and then consult
a doctor immediately.
The unit power should be off when you install and replace batteries.
•
Remove the batteries if you do not plan to use the unit for a long time.
•
Batteries could rupture or leak, causing fire, injury or stains around them.
If the battery fluid leaks, wipe away any fluid on the battery compartment
before inserting new batteries.
Do not disassemble a battery. The acid inside the battery could harm skin
•
or clothing.
镉
(Cd)
六价铬
(Cr6+)
多溴联苯
(PBB)
TASCAM DP-006
多溴二苯醚
(PBDE)
5
Page 6

Contents
1 – Introduction ................................................................. 9
Features ............................................................................................................................9
Included items ...............................................................................................................9
Conventions used in this manual ........................................................................ 10
Trademarks ................................................................................................................... 10
About SD cards ............................................................................................................11
Precautions for use ...........................................................................................11
Precautions for installation .....................................................................................11
Beware of condensation ..........................................................................................11
Cleaning the unit ........................................................................................................11
2–Quick Start Guides ...................................................... 12
Playback and mixing ................................................................................................ 12
Preparing ............................................................................................................. 12
Playing and mixing the demo song .......................................................... 13
Recording and mastering .......................................................................................15
Creating a new song ....................................................................................... 15
Setting the internal mics as input sources ............................................. 16
Setting the internal mics as the recording sources for TRACK 3 ... 17
Adjusting the input level and monitoring ............................................. 18
Using internal mics to record rhythm guitar to TR ACK 3 ................. 19
Listening to the recording ............................................................................ 20
Connecting an electric guitar ..................................................................... 20
Setting the guitar as an input source ....................................................... 21
Recording lead guitar to TRACK 2 ............................................................. 21
Recording vocals on TRACK 1 ..................................................................... 23
Creating a stereo master track .................................................................... 25
Checking the stereo master track ............................................................. 27
Transferring the stereo master track to a computer .................................... 28
Shutting down ............................................................................................................ 28
3 – Names and functions of parts .................................. 29
Top Pa nel ....................................................................................................................... 29
Front panel ................................................................................................................... 31
TASCAM DP-006
6
Rear panel ..................................................................................................................... 32
Left side panel ............................................................................................................. 32
Right side panel .......................................................................................................... 33
Bottom panel ...............................................................................................................33
Home Screen .............................................................................................................. 34
Menu structure ........................................................................................................... 36
Screen operations ..................................................................................................... 37
4 – Preparations ..............................................................39
Preparing the power and SD card ....................................................................... 39
Inserting an SD card ........................................................................................ 39
Removing an SD card ..................................................................................... 39
SD card write -protection switches ........................................................... 39
Preparing the power .......................................................................................40
Start-up & shutdown ................................................................................................ 41
Starting up the unit ......................................................................................... 41
Shutting down .................................................................................................. 41
Preparing SD cards for use ..................................................................................... 42
Recorder modes ......................................................................................................... 42
Connecting with other equipment .................................................................... 43
Rear panel connections ................................................................................. 43
Left side panel connections ........................................................................ 43
Right side panel connections ...................................................................... 44
Adjusting the contrast ............................................................................................. 44
5 – Song Management .................................................... 45
Partitions and songs .................................................................................................45
Selecting the active partition ............................................................................... 45
Editing names..............................................................................................................46
Loading a saved song ..............................................................................................46
Creating a new song ................................................................................................. 47
Saving a song ..............................................................................................................47
Viewing song information .....................................................................................48
Copying songs ............................................................................................................48
Page 7

Contents
Erasing songs ............................................................................................................... 49
Protecting songs ........................................................................................................ 50
6 – Basic Recording .........................................................51
Selecting the input source ..................................................................................... 51
Monitoring the input signal .................................................................................. 52
Setting the monitoring mode .....................................................................52
OL indicators and level meters ............................................................................. 53
Assigning inputs ........................................................................................................ 54
Setting the track t ype (Tracks 3 and 4 only) .......................................... 54
Assigning inputs to stereo tracks (Tracks 3 and 4 only) ................... 55
Assigning inputs to mono tracks ............................................................... 56
Making the first recording ..................................................................................... 56
Multitrack recording ................................................................................................. 57
Setting the recording tracks ........................................................................ 57
Setting TRACK PAN/BAL and LE VEL values ............................................ 57
Input selection and assignment ................................................................ 57
Setting input levels ......................................................................................... 58
Recording additional tracks......................................................................... 58
Undoing operations (undo) ................................................................................... 58
Undoing the last operation (single undo) ..............................................58
Undoing a previous operation (multi-undo) ........................................ 59
Erasing the operation history ..................................................................... 60
7 – Recorder Functions ................................................... 61
Punching in and out ................................................................................................. 61
Bouncing tracks .......................................................................................................... 61
Using the bounce function ..........................................................................62
Confirming the result ..................................................................................... 63
Locate and search func tions .................................................................................64
Direct locate function ....................................................................................64
Returning to the song beginning (RTZ function) or
the point where recording was last started (LRP func tion) ............64
Search backward/forward ............................................................................ 64
Repeat playback .........................................................................................................65
Setting IN and OUT points............................................................................ 65
Using repeat playback ................................................................................... 66
Setting the time between repetitions (repeat interval) ................... 66
8 – Editing Tracks ............................................................ 67
Overview of track editing ....................................................................................... 67
Editing points ................................................................................................... 67
Basic editing procedures .............................................................................. 67
Track editing function setting items ....................................................... 68
CLONE TRACK (track duplication) ........................................................................ 69
CLEAN OUT (track erase) ......................................................................................... 70
SILENCE (par t erase) ..................................................................................................70
CUT (remove par t) .....................................................................................................71
OPEN (insert silence)................................................................................................. 71
9 – Mixdown and mastering ...........................................72
Mixdown........................................................................................................................ 72
Level and balance ............................................................................................72
Stereo position (panning) ............................................................................. 72
Creating stereo master tracks ............................................................................... 72
Setting the star ting and ending points .................................................. 72
Creating a stereo master track .................................................................... 72
Checking stereo master track s .............................................................................74
10 – Miscellaneous Functions ........................................ 75
Metronome .................................................................................................................. 75
Tun er ............................................................................................................................... 76
Automatic power saving function ...................................................................... 77
Restoring preferences to default values .......................................................... 77
Viewing information................................................................................................. 78
11 – SD Card Management ............................................. 79
Overview of partitions ............................................................................................. 79
Formatting SD cards ................................................................................................. 79
TASCAM DP-006
7
Page 8

Contents
Reformatting MTR partitions ................................................................................ 81
Reformatting FAT partitions .................................................................................. 82
Initializing SD cards ...................................................................................................82
12 – Exchanging Data with a Computer ........................ 83
Supported operating systems ..............................................................................83
Connecting with a computer ................................................................................ 84
Disconnecting ...................................................................................................85
Song backup and restoration ............................................................................... 86
Backing-up songs ............................................................................................86
Restoring songs ................................................................................................87
Track import and export ......................................................................................... 88
Importing to track s .........................................................................................88
Exporting tracks ............................................................................................... 90
Expor ting stereo master tracks ............................................................................ 92
13 – Troubleshooting ...................................................... 93
14 – Message Lists ........................................................... 94
15 – Specifications .......................................................... 98
Media and f ile systems ............................................................................................ 98
Inputs and outputs ...................................................................................................98
Analog audio input and output .................................................................98
Data input and output ................................................................................... 98
Audio performance ...................................................................................................98
Operating requirements ......................................................................................... 99
General ........................................................................................................................... 99
Backup memory .......................................................................................................100
Dimensions ................................................................................................................10 0
Block diagram ...........................................................................................................101
16 – Commonly-used Functions .................................. 102
TASCAM DP-006
8
Page 9

1 – Introduction
Thank you for your purchase of the TASCAM DP-006 Digital Multitrack
Recorder.
Before connecting and using the unit, please take time to read this manual
thoroughly to ensure you understand how to properly set up and connect
the unit, as well as the operation of its many useful and convenient functions.
After you have finished reading this manual, please keep it in a safe place for
future reference.
You can also download the Owner’s Manual from the TASCAM web site (http://
tascam.com).
Features
Using this unit with an SD card, you can record two tracks simultaneously and
work with up to six tracks in a multitrack project. Moreover, using its mixer
functions, you can mix down a multitrack to create a stereo master track.
This stereo master track can then be transferred to a computer connected by
USB. In addition to copying individual and stereo master tracks from this unit
to a computer, song files can also be backed up to a computer.
•
Portable six-track multitrack recorder capable of two tracks of
simultaneous recording and six tracks of simultaneous playback
•
TRACK 3 and TRACK 4 can be set individually for use as either stereo or
mono tracks
•
CD-quality recording (16-bit, 44.1kHz)
•
Built-in omnidirectional stereo condenser mic suppresses pickup of
background noise (3 input gain level settings—Low, Mid, High)
•
2 mic/line inputs (INPUT A/B) with standard 6.3mm TS jacks
•
Guitars and basses can be connected directly to the INPUT A jack
(switchable mic/line input)
•
Independent LEVEL and PAN knobs allow direct control
•
Wheel allows rapid location to specific points (direct location function)
•
Set and use IN and OUT points as you like for repeat playback and editing
•
Separate stereo master track in addition to six independent tracks
•
Bounce function allows recording of more than six tracks
•
Punch in/out function allows parts to be re-recorded as necessary
•
Track editing functions include duplicating and deleting recorded tracks,
partial clearing and deletion and silence insertion
•
Recording and editing operations can be undone and redone
•
Chromatic tuner with meters provides visual feedback during tuning
•
Metronome
•
Transfer files to computers connected by USB 2.0
•
Backup and restore songs
•
Import and export stereo WAV files to stereo tracks
•
Export stereo masters as stereo WAV files
•
Operates on four AA batteries or a TASCAM PS-P520 AC adaptor (sold
separately)
•
2GB SD card included
•
Unit has built-in threads for tripod mounting
Included items
This product includes the following items.
Take care when opening the package not to damage the items. Keep the
packing materials for transportation in the future.
Please contact TASCAM if any of these items are missing or have been
damaged during transportation.
• Main unit .........................................................................................................................1
• SD Card (inside unit) ...................................................................................................1
• AA alkaline batteries ...................................................................................................4
• USB cable (80cm) .........................................................................................................1
• Warranty card ................................................................................................................1
• Owner’s Manual (this manual) ................................................................................1
TASCAM DP-006
9
Page 10

1 – Introduction
Conventions used in this manual
In this manual, we use the following conventions:
•
When we refer to buttons, connectors and other parts of this unit and
other equipment, we use a bold font like this: MENU button.
•
The 7 button is indicated as the Play (7) button, the 8 button as the
Stop (8) button and the 0 button as the Record (0) button.
•
Selectable items and messages shown on the display are indicated like
this:
MENU
•
The four buttons beneath the LCD display are called function buttons
and are referred to as F1, F2, F3 and F4 from left to right. Their functions
are shown above them at the bottom of the display and after the button
name in brackets in this manual.
Examples: F2 [EXEC] button, F4 [t] button
•
SD memory cards are called “SD cards”.
•
Words that appear on the computer display are shown in quotation marks
like this: “DP-006”
•
The currently selected MTR partition is called the “active partition”.
•
Additional information is provided as necessary as tips, notes and
cautions.
TIP
These are tips about how to use the unit.
NOTE
These provide additional explanations and describe special cases.
CAUTION
Failure to follow these instructions could result in injury, damage to
equipment or lost recording data, for example.
Trademarks
•
TASCAM is a registered trademark of TEAC Corporation.
•
Microsoft, Windows, Windows Vista, and Windows 7 are either registered
trademarks or trademarks of Microsoft Corporation in the United States
and/or other countries.
•
Apple, Macintosh, iMac, Mac OS and Mac OS X are trademarks of Apple
Inc.
•
Other company names, product names and logos in this document are
the trademarks or registered trademarks of their respective owners.
Any data, including, but not limited to information, described herein are
intended only as illustrations of such data and/or information and not
as the specifications for such data and/or information. TEAC Corporation
disclaims any warranty that any use of such data and/or information
shall be free from infringement of any third party’s intellectual property
rights or other proprietary rights, and further, assumes no liability of
whatsoever nature in the event of any such infringement, or arising from
or connected with or related to the use of such data and/or information.
This product is designed to help you record and reproduce sound works
to which you own the copyright, or where you have obtained permission
from the copyright holder or the rightful licensor. Unless you own
the copyright, or have obtained the appropriate permission from the
copyright holder or the rightful licensor, your unauthorized recording,
reproduction or distribution thereof may result in severe criminal
penalties under copyright laws and international copyright treaties. If
you are uncertain about your rights, contact your legal advisor. Under no
circumstances will TEAC Corporation be responsible for the consequences
of any illegal copying performed using the recorder.
TASCAM DP-006
10
Page 11

1 – Introduction
About SD cards
This unit uses SD cards for recording and playback.
SD cards that meet SD/SDHC standards and are at least 512 MB can be used
with this unit.
A list of SD cards that have been confirmed for use with this unit can be found
on the TASCAM website (http://tascam.com/). Please check this site or contact
TASCAM customer support.
Precautions for use
SD cards are delicate media. In order to avoid damaging a card or the card
slot, please take the following precautions when handling them.
•
Do not leave them in extremely hot or cold places.
•
Do not leave them in extremely humid places.
•
Do not let them get wet.
•
Do not put things on top of them or twist them.
•
Do not hit them.
Precautions for installation
•
The unit’s nominal operating temperature is from 5º to 35º C (41º–95º F).
•
Do not install in the following types of places. Doing so could degrade the
sound quality or cause malfunctions.
• Places with significant vibrations
• Near windows or other places exposed to direct sunlight
• Near heaters or other extremely hot places
• Extremely cold places
• Places with high humidity or bad ventilation
• Dusty places
• Places directly exposed to rain or other water
•
Do not place this unit on top of a power amplifier or other device that
generates heat.
Beware of condensation
If the unit is moved from a cold to a warm place, or used immediately after a
cold room has been heated or otherwise exposed to a sudden temperature
change, condensation could occur. Should this happen, leave the unit for one
or two hours before turning the unit on.
Cleaning the unit
To clean the unit, wipe it gently with a soft dry cloth. Do not wipe with
chemical cleaning cloths, paint thinner, ethyl alcohol or other chemical agents
to clean the unit as they could damage the surface.
TASCAM DP-006
11
Page 12
2–Quick Start Guides
indicator
Playback and mixing
First, we will play the demo song on the included SD card. When the unit is
purchased new, the SD card with the demo song is shipped already installed,
but we will start by explaining how to insert an SD card.
Preparing
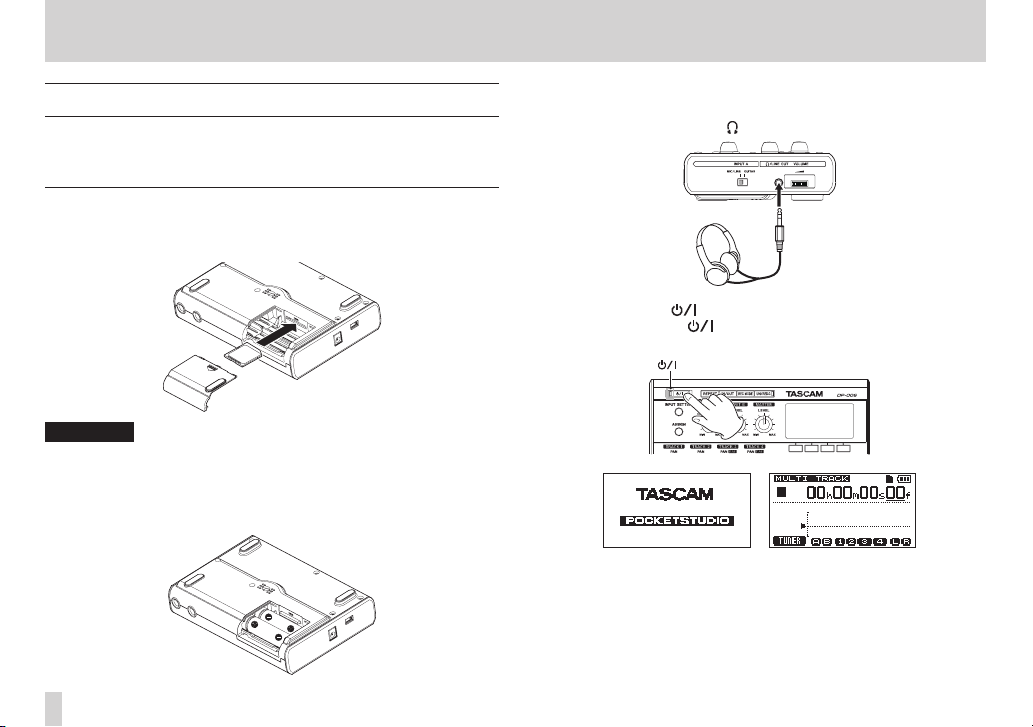
1. Open the battery compartment cover on the bottom of the unit and
insert the included SD card into the slot at the back.
CAUTION
Do not insert the card backwards or apply unnecessary force. This could
damage the slot or card.
2. Insert four AA batteries into the compartment, paying attention to their
¥/^ orientations as shown below. This unit can use alkaline or NiMH
batteries.
3. Close the battery compartment cover after installing the SD card and
batteries.
4. Connect headphones to the /LINE OUT jack on the left side of the unit.
Headphone
5. Press and hold the button on the top panel until “TASCAM” appears
on the display (or the button indicator lights green).
After the unit starts up, the Home Screen appears as shown below
Startup Screen Home Screen
TASCAM DP-006
12
Page 13
2 – Quick Start Guides
CAUTION
•
Do not remove or insert an SD card when the unit’s power is ON. Make sure
the unit power is OFF (in standby) before you remove or insert an SD card.
•
If you remove or insert an SD card when the unit’s power is ON, all data
and settings that have been changed since the last shutdown or song
saving operation will be lost. These data and settings cannot be recovered.
•
When the unit power is ON, do not remove the batteries, disconnect the
power cable or otherwise cut the power to the unit.
•
The included alkaline batteries are for confirming operation of the unit
and might only be usable for a short amount of time.
•
The volume dial on the left side panel does not have any indications.
Before turning the power ON or OFF (putting it into standby), minimize the
volume on any connected external monitoring system (powered monitor
speakers or an amplifier and speakers).
•
Do not wear headphones when turning the power ON or OFF (putting it
into standby) because noise at such times could harm your hearing.
TIPS
•
This unit can also be powered by a TASCAM PS-P520 power adaptor (sold
separately). (See “Using an AC adaptor (sold separately)” on page 40.)
•
By connecting an external monitoring system (powered monitor speakers
or an amplifier and speakers) to the /LINE OUT jack on the left side of
the unit, you can monitor recordings using speakers.
Playing and mixing the demo song
Before the unit is shipped, a demo song is stored on its SD card. We are now
going to use basic playback and mixing features with this demo song.
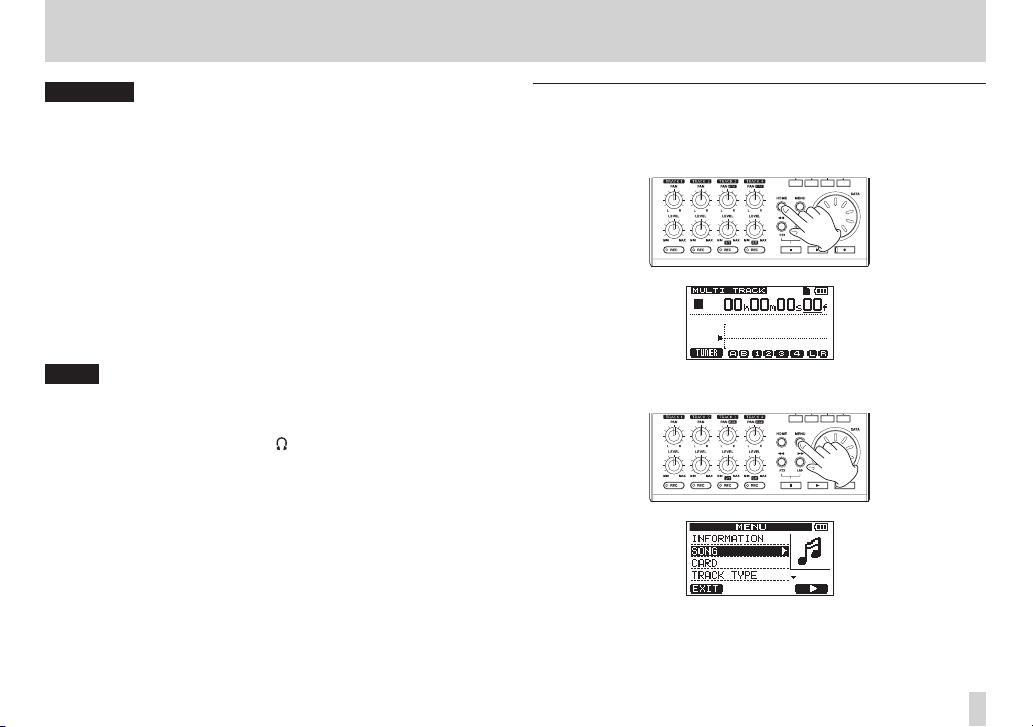
1. Press the HOME button to open the Home Screen.
2. When the recorder is stopped, press the MENU button to open the
MENU
screen.
TASCAM DP-006
13
Page 14

2 – Quick Start Guides
3. Use the DATA wheel to select (highlight) the
F4 [t] button to open the
4. Use the DATA wheel to select (highlight) the
F4 [t] button to open the
songs.
5. Use the DATA wheel to select (highlight)
[EXEC] button.
The demo song loads and the
6. Press the HOME button to reopen the Home Screen.
TASCAM DP-006
14
SONG
menu.
SONG LOAD
SONG
SONG
LOAD
screen, which shows a list of
DEMO_006
menu reopens.
item, and press the
item, and press the
and press the F2
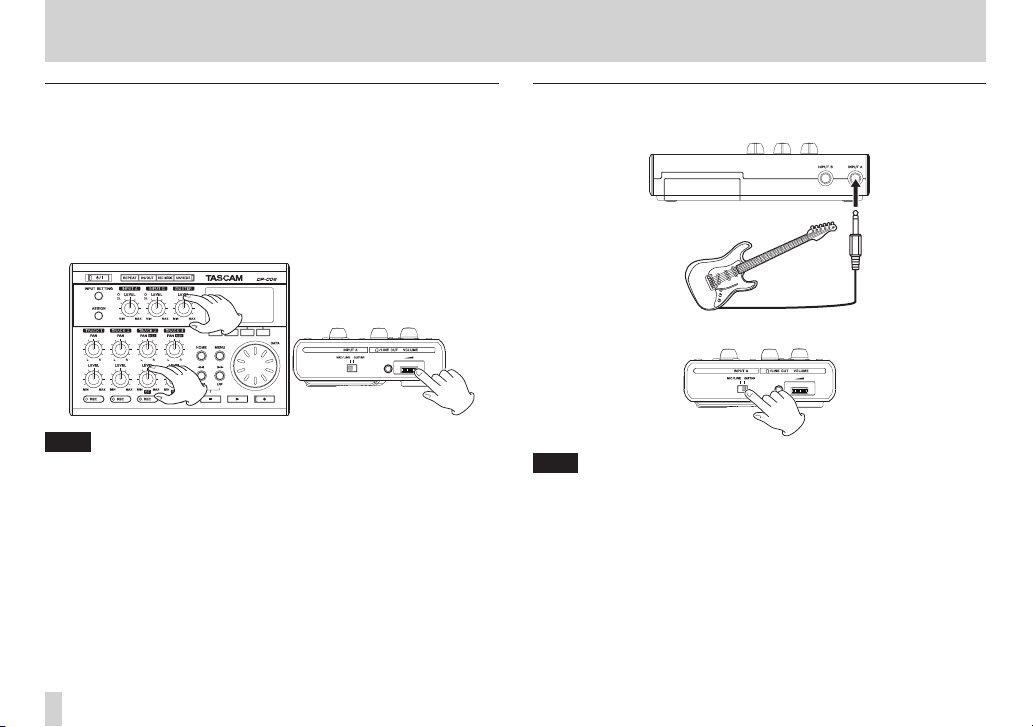
7. Press the play (7) button and turn up the TRACK 1–4 LEVEL knobs, the
MASTER LEVEL knob and the VOLUME dial on the left side of the unit so
you can hear the demo song.
The MASTER LEVEL knob adjusts the volume of tracks 1 to 4 at the same
time. The standard position of the MASTER LEVEL knob is around 2 or 3
o’clock.
Use the TRACK 1–4 LEVEL knobs to adjust the balance between the
tracks.
Use the VOLUME dial on the left side of the unit to adjust the final
monitoring level.
8. Use the TRACK 1–2 PAN knobs and TRACK 3–4 PAN (BAL) knobs to
adjust the stereo positions of each track.
TIPS
•
Press the m [RTZ] button while pressing and holding the Stop (8)
button to return to the beginning (00h00m00s00f) of the song. (Return To
Zero function)
•
If you push the wrong button when using a menu, press the HOME button
to return to the Home Screen.
Page 15
2 – Quick Start Guides
Recording and mastering
Here, we will try multitrack recording.
In the following example, we will first explain how to use the built-in mics to
record an acoustic guitar rhythm part on track 3 (by using the built-in stereo
microphone pair to record the acoustic guitar to a stereo track, we can capture
reverberations, including from the sound of the guitar body, that add a sense
of depth).
Next, we will use an electric guitar to record a lead guitar part on track 2. Then,
we will use the built-in mics to record singing on track 1. Finally, we will show
how to mix these tracks down to stereo.
We assume that you have followed the instructions in the previous section
“Playback and mixing” and already connected headphones to this unit, turned
it on and loaded an SD card.
TIP
This example uses the built-in mic for recording vocals, but you could also
connect an external mic to the INPUT A or INPUT B connector on the rear
panel and record it.
Creating a new song
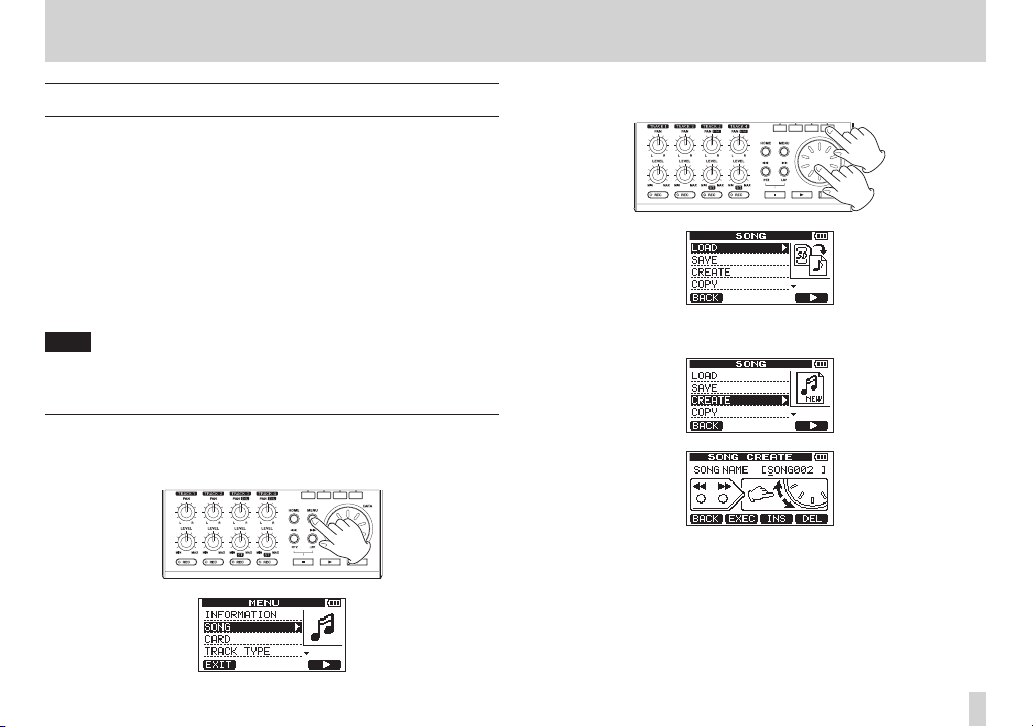
1. When the recorder is stopped, press the MENU button to open the
MENU
screen.
2. Use the DATA wheel to select (highlight) the
F4 [t] button to open the
3. Use the DATA wheel to select (highlight) the
the F4 [t] button to open the
When a song is created, it is given the name (title) “SONG***” (where ***
is a number).
4. Change the song name as necessary. (See “Editing names” on page 46.)
SONG
screen.
SONG CREATE
SONG
item, and press the
CREATE
item, and press
screen.
TASCAM DP-006
15
Page 16
2 – Quick Start Guides
5. Press the F2 [EXEC] button to save the currently loaded song and create
the new song.
6. Press the HOME button to reopen the Home Screen.
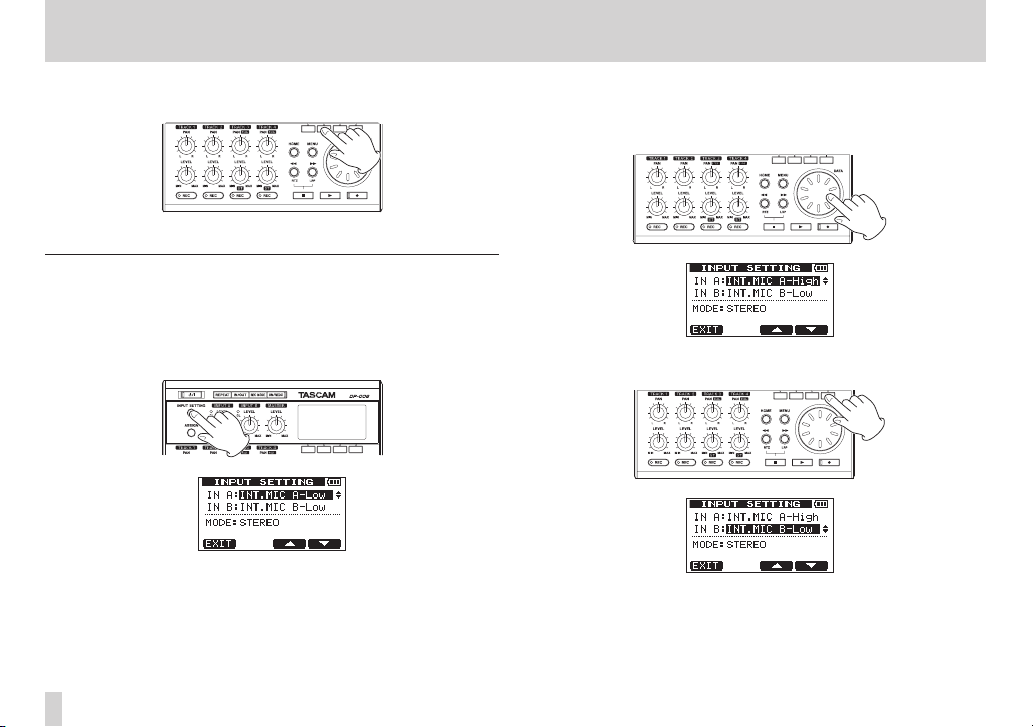
Setting the internal mics as input sources
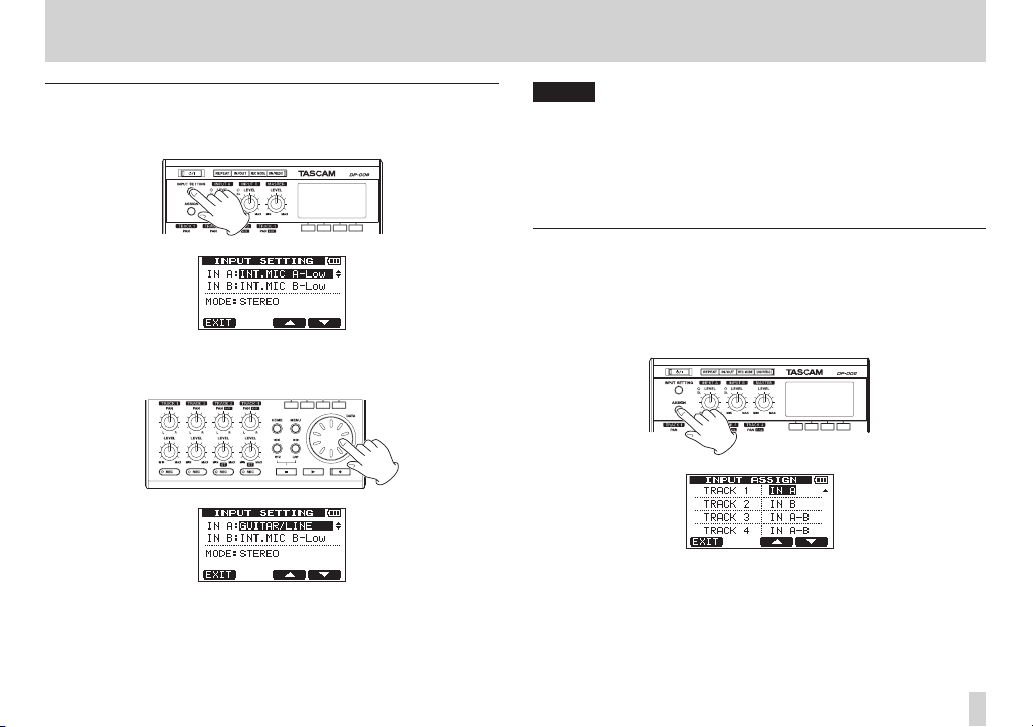
1. Press the INPUT SETTING button to open the
screen. On this screen, you can set the input source for both
A) and
IN B
At first, the current input source for
(highlighted).
(INPUT B).
IN A
INPUT SETTING
IN A
(INPUT A) is selected
(INPUT
2. In order to use the built-in MIC A to record the guitar to stereo TRACK 3,
use the DATA wheel to set the input source for
MIC A-L ow, INT MIC A -Mid
the input source” on page 51.)
3. Press the F4 [b] button to select (highlight) the current input source for
IN B
(INPUT B).
or
IN A
INT MIC A -High
(INPUT A) to
INT
. (See “Selecting
TASCAM DP-006
16
Page 17
2 – Quick Start Guides
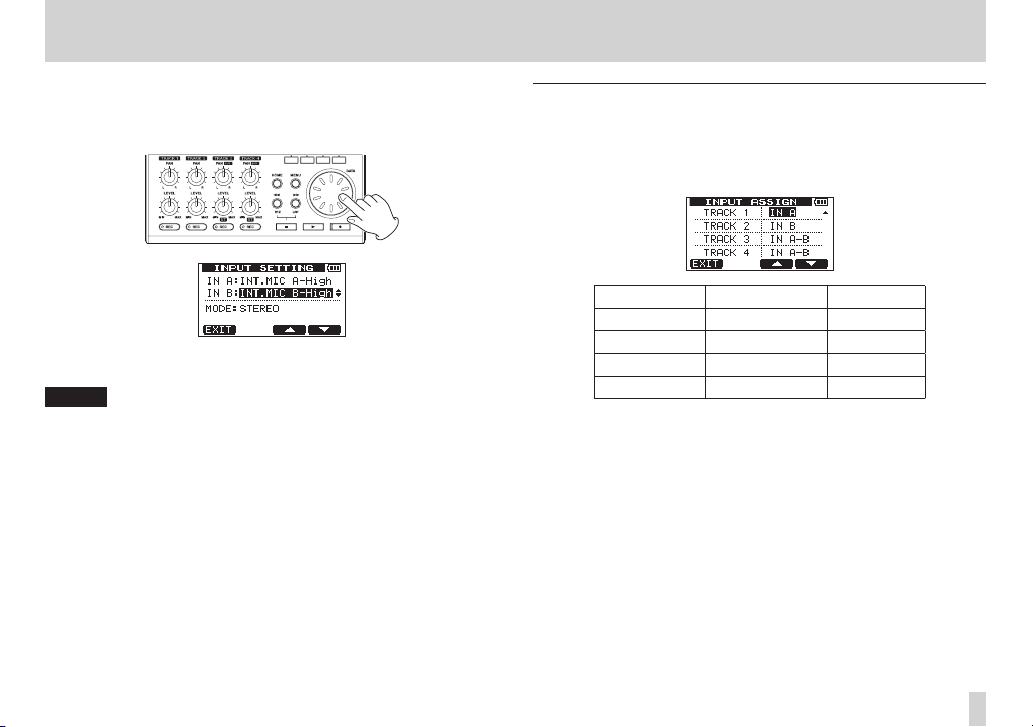
4. In order to use the built-in MIC B to record the guitar to stereo TRACK 3,
use the DATA wheel to set the input source for
MIC B-L ow, INT MIC B -Mid
the input source” on page 51.)
5. After completing the setting, press the HOME button to return to the
Home Screen.
NOTE
•
INT.MIC X-L ow, INT.MIC X-Mid
or B) settings change the sensitivity of the built-in mics. Set according to
the loudness of the subject being recorded.
If you are not sure which setting to use, choose
input level is still too low after adjusting it, return to
screen and change the setting to
still not high enough, change the setting to
•
Set the
MODE
signals. (See “Setting the monitoring mode” on page 52.)
item on the
or
INT.MIC X-Mid
INPUT SETTING
IN B
INT MIC B -High
and
INT.MIC X-High
(INPUT B) to
INT.MIC X-High (X
INT.MIC X-L ow
INPUT SETTING
. If the input level is
to monitor the input
INT
. (See “Selecting
is A
. If the
.
Setting the internal mics as the recording sources for TRACK 3
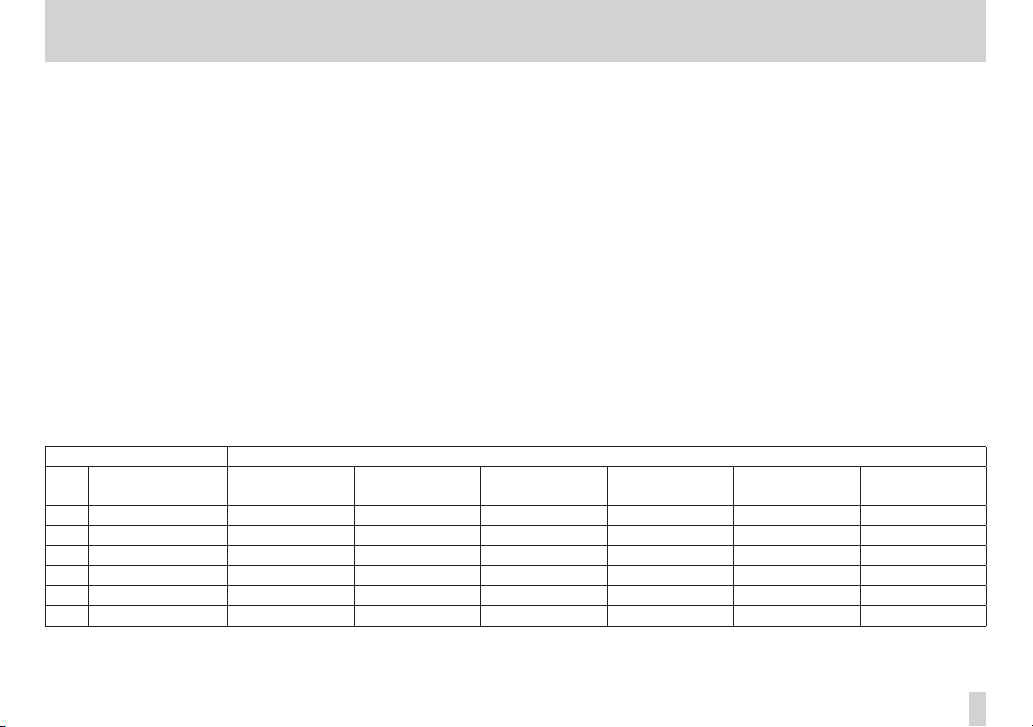
When the recorder is stopped, press the ASSIGN button to open the
ASSIGN
screen. By default the recording sources are assigned to the tracks as
shown below.
Recording track Recording source Default value
TRACK 1 INPUT A
TRACK 2 INPUT B
TRACK 3 INPUT A/B
TRACK 4 INPUT A/B
Since you set internal MIC A as the input source for INPUT A and internal MIC
B as the input source for INPUT B on the
previous “Setting the internal mics as input sources” section, signals from MIC
A and MIC B will be recorded to TRACK 3.
So, in this example, you do not need to change the input source assignment
settings to use the internal mics to record the rhythm guitar to TRACK 3.
INPUT SETTING
IN A
IN B
IN A- B
IN A- B
INPUT
screen in the
TASCAM DP-006
17
Page 18
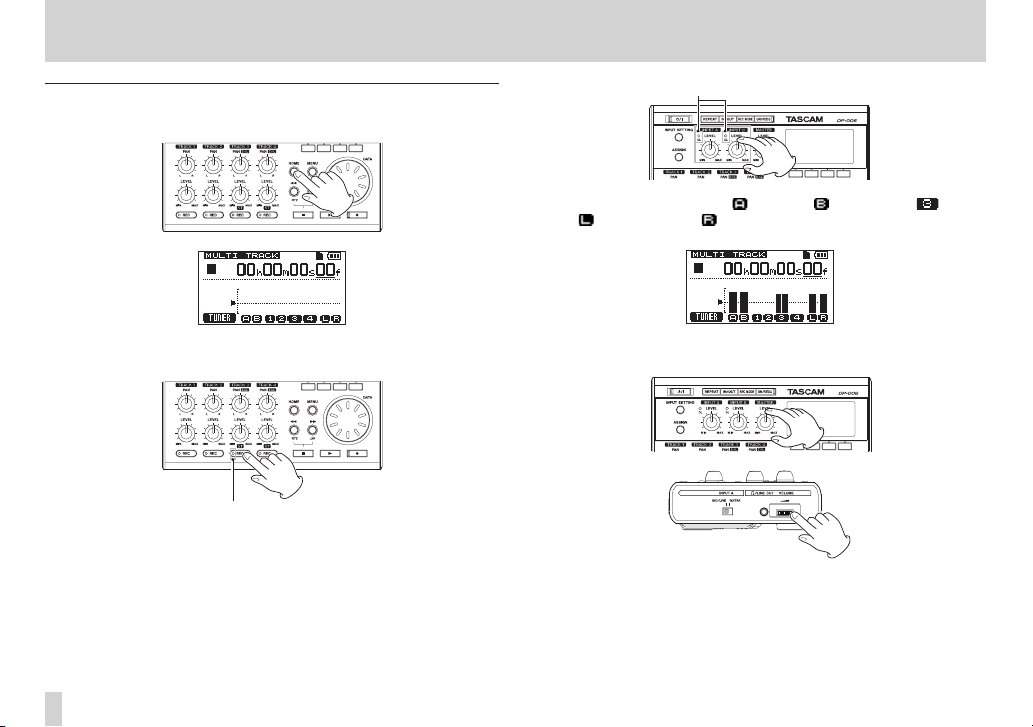
2 – Quick Start Guides
TRACK 3 REC indicator
OL indicator
Adjusting the input level and monitoring
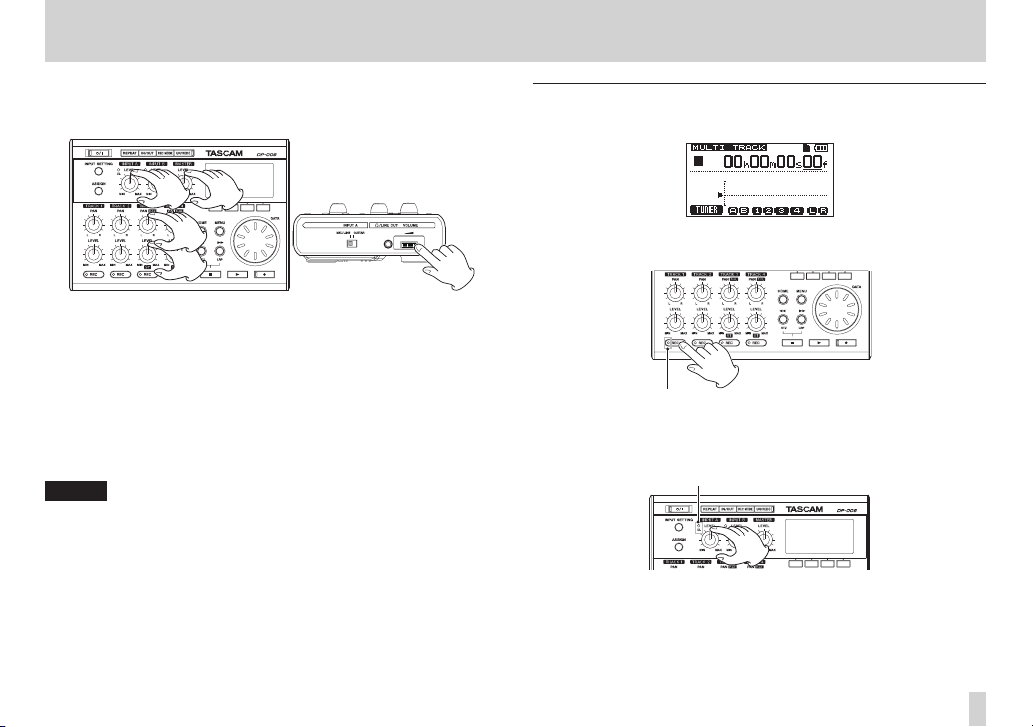
1. Press the HOME button to reopen the Home Screen.
When you play the guitar, the (INPUT A), (INPUT B) and (TRACK
3), (left channel) and (right channel) level meters on the display
move.
2. Press the TRACK 3 REC button to put the track into recording standby.
The REC indicator blinks when in standby.
3. Use the INPUT A and B LEVEL knobs to adjust the input levels of the
internal mics.
Set the LEVEL knobs so that the loudest sounds do not cause the INPUT
A and B OL indicators to light.
TASCAM DP-006
18
Turn up the MASTER LEVEL knob and the VOLUME dial on the left side
of the unit to hear the guitar sound through the headphones.
Page 19
2 – Quick Start Guides
TRACK 3 REC indicator
NOTE
•
If an OL indicator continues to light even when the LEVEL knob is turned
down, the mic signal itself is too loud. In this case, if the input source
setting is
INT.MIC X-High
MIC X-Lo w(X
set to
lower the volume at the sound source.
•
When an internal mic is an input source if the REC indicator is unlit for the
track with that mic as its recording source, you will not be able to hear that
input signal.
is A or B). If the OL indicator continues to light even when
INT.MIC X-L ow
, change it to
, move the sound source away from the mic or
INT.MIC X-Mid
or
I N T.
CAUTION
Always monitor through headphones when using a mic. If you monitor
through speakers, feedback could occur.
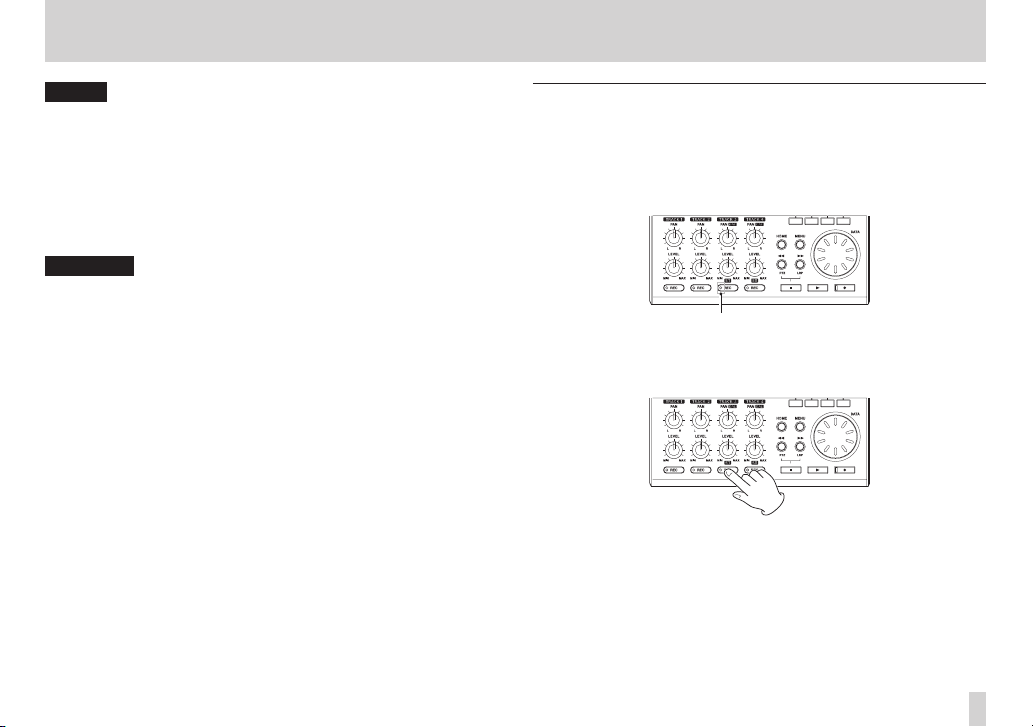
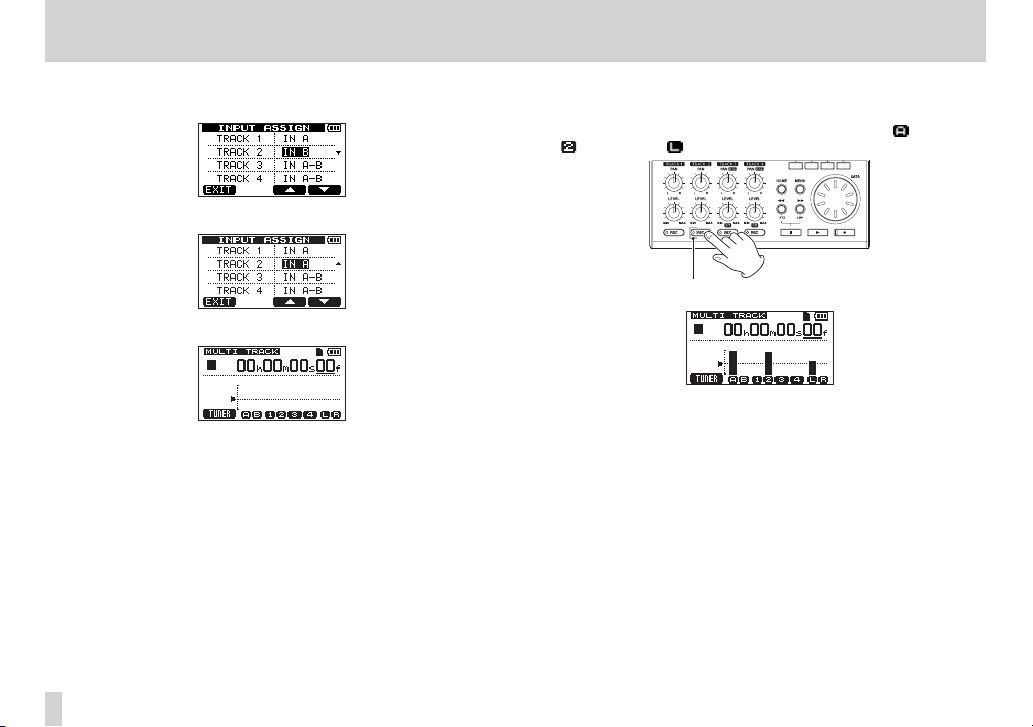
Using internal mics to record rhythm guitar to TRACK 3
1. Press the Play (7) button while pressing and holding the Record (0)
button to start recording and play the rhythm guitar part.
The Record (0) indicator lights, and the TRACK 3 REC indicator stops
blinking and stays lit.
2. When you are done playing, press the Stop (8) button to stop recording.
3. Press the TRACK 3 REC button to end recording standby. The REC
indicator becomes unlit.
TASCAM DP-006
19
Page 20
2 – Quick Start Guides
Listening to the recording
1. To go to the beginning of the song (00h00m00s00f) using the Return
To Zero (RTZ) function, press the m [RTZ] button while pressing and
holding the Stop (8) button.
2. Press the Play (7) button to play the recorded TRACK 3.
3. Use the TRACK 3 LEVEL knob and MASTER LEVEL knob to adjust the
monitoring level.
Use the VOLUME dial on the left side of the unit to adjust the final
monitoring volume.
TIP
Use the TRACK 3 PAN (BAL) knob to set the stereo position of the track
signal.
4. When you are done listening to the recording, press the Stop (8) button
to stop playback.
Connecting an electric guitar
1. Connect an electric guitar to the INPUT A connector on the rear panel.
Guitar
2. Set the MIC/LINE-GUITAR switch on the left side of the unit to GUITAR.
TIP
When connecting an electric-acoustic guitar with a built-in preamp or an
active electric guitar, as well as when connecting an electric guitar with
effect boxes between it and this unit, set the MIC/LINE-GUITAR switch to
MIC/LINE.
TASCAM DP-006
20
Page 21
2 – Quick Start Guides
Setting the guitar as an input source
1. Press the INPUT SETTING button to open the
screen.
2. In order to use the guitar/line input to record guitar to TRACK 2, use the
DATA wheel to set the input source for
LINE, GUIT AR/LIN E M
3. Press the HOME button to reopen the Home Screen.
or
GUIT AR/LIN E H
INPUT SETTING
IN A
(INPUT A) to
.
GUIT AR/
NOTE
GUIT AR/LIN E, GUIT AR/LIN E M
change the input gain. Set according to the level of the input.
If you are not sure which setting to use, choose
input level is still too low after adjusting it, return to
screen and change the setting to
If the input level is still not high enough, change the setting to
LINE H
.
and
GUIT AR/LIN E H
GUIT AR/LIN E
GUIT AR/LIN E M
settings
. If the
INPUT SETTING
.
GUIT AR/
Recording lead guitar to TRACK 2
Now, you will record lead guitar on TRACK 2 while listening to the rhythm
guitar on TRACK 3.
Follow these steps to change the recording source for TRACK 2.
1. When the recorder is stopped, press the ASSIGN button to open the
INPUT ASSIGN
screen.
TASCAM DP-006
21
Page 22
2 – Quick Start Guides
TRACK 2 REC indicator
2. Use the F4 [b] button to select (highlight) current recording source for
TRACK 2 (default value:
3. Use the D ATA wheel to select
4. Press the HOME button to reopen the Home Screen.
IN B
).
IN A
.
5. Press the TRACK 2 REC button to put the track into recording standby.
The REC indicator blinks when in standby.
When you play the guitar, the input level is shown by the (INPUT A),
(TRACK 2) and (left channel) level meters.
6. After returning to the beginning of the song (00h00m00s00f ), press the
Play (7) button to play back the recorded TRACK 3. Play the lead guitar
part along with the already recorded rhythm guitar. You can hear the
sound of the guitar being input along with the TRACK 3 playback sound
through the headphones.
TASCAM DP-006
22
Page 23
2 – Quick Start Guides
TRACK 1 REC indicator
OL indicator
7. As necessary, use the INPUT A LEVEL, TRACK 3 LEVEL and PAN [BAL]
knobs and MASTER LEVEL knob, along with the VOLUME dial on the left
side of the unit to adjust the monitoring levels and balance.
8. When you are done listening to the recording, press the Stop (8) button
to stop playback.
9. After returning to the start of the song (00h00m00s00f ), press the Play
(7) button while pressing and holding the Record (0) button to start
recording, and play the lead guitar part.
The Record (0) indicator lights and the TRACK 2 REC indicator stops
blinking and stays lit.
10. When you are done playing, press the Stop (8) button to stop recording.
11. Press the TRACK 2 REC button to end recording standby. The REC
indicator becomes unlit.
NOTE
If the OL indicator continues to light even when the LEVEL knob is turned
down, the guitar signal itself is too loud. In this case, if the input setting is
GUIT AR/LIN E H
If the input setting is
If the OL indicator continues to light even when set to
lower the guitar’s output volume.
, change it to
GUIT AR/LIN E M
GUIT AR/LIN E M
, change it to
or
GUIT AR/LIN E
GUIT AR/LIN E
GUIT AR/LIN E
Recording vocals on TRACK 1
1. Press the HOME button to reopen the Home Screen.
2. Press the TRACK 1 REC button to put the track into recording standby.
The REC indicator blinks when in standby.
3. Use the INPUT A LEVEL knob to adjust the input level of the internal mic.
Set the LEVEL knob so that the loudest sounds do not cause the INPUT
A OL indicator to light.
.
.
,
TASCAM DP-006
23
Page 24
2 – Quick Start Guides
When you sing into internal MIC A, the input level is shown by the
(INPUT A), (TRACK 1) and (left channel) level meters on the display.
Turn up the MASTER LEVEL knob and the VOLUME dial on the left side
of the unit to hear the mic signal through the headphones.
NOTE
•
If the OL indicator continues to light even when the LEVEL knob is turned
down, the mic signal itself is too loud. In this case, if the input source
setting is
INT.MIC A - High
MIC A-Low
MIC A-Low
MIC A-Low
volume at the sound source.
•
When the input source is a built-in mic, the signal from the built-in mic
cannot be monitored if the REC indicator of the track that it is assigned to
is not lit.
. If the input setting is
. If the OL indicator continues to light even when set to
, move the sound source away from the mic or lower the
, change it to
INT.MIC A - Mid
INT.MIC A - Mid
, change it to
or
I N T.
I N T.
I N T.
CAUTION
When using a microphone, always use headphones to monitor. Using
speakers to monitor could result in feedback.
4. After returning to the start of the song (00h00m00s00f ), press the Play
(7) button while pressing and holding the Record (0) button to start
recording, and sing along with the already recorded lead and rhythm
guitar parts.
You can hear singing and the recorded guitars playing back on TRACK 2
and TRACK 3.
5. As necessary, use the TRACK 2 and 3 LEVEL and PAN (PAN [BAL]) knobs,
the MASTER LEVEL knob and the VOLUME dial on the left side of the
unit to adjust the monitoring levels and balance.
6. When you are done listening to the recording, press the Stop (8) button
to stop playback.
7. After returning to the start of the song (00h00m00s00f ), press the Play
(7) button while pressing and holding the Record (0) button to start
recording, and sing the vocal part.
The Record (0) indicator lights red and the TRACK 1 REC indicator stops
blinking and stays lit.
8. When you are done singing, press the Stop (8) button to stop recording.
9. Press the TRACK 1 REC button to turn off the REC indicator (ending
recording standby).
TASCAM DP-006
24
Page 25
2 – Quick Start Guides
Creating a stereo master track
After you finish recording, the next step is to mix down the tracks and make a
stereo master track.
1. Use the TRACK 1–3 LEVEL knobs to adjust the levels of the tracks and
the balance between them. Use the MASTER LEVEL knob to adjust the
overall level.
2. Use the TRACK 1–2 PAN knobs and TRACK 3 PAN (BAL) knob to adjust
the stereo positioning of the tracks.
Watch the (left channel) and (right channel) meters on the display
as you make these adjustments.
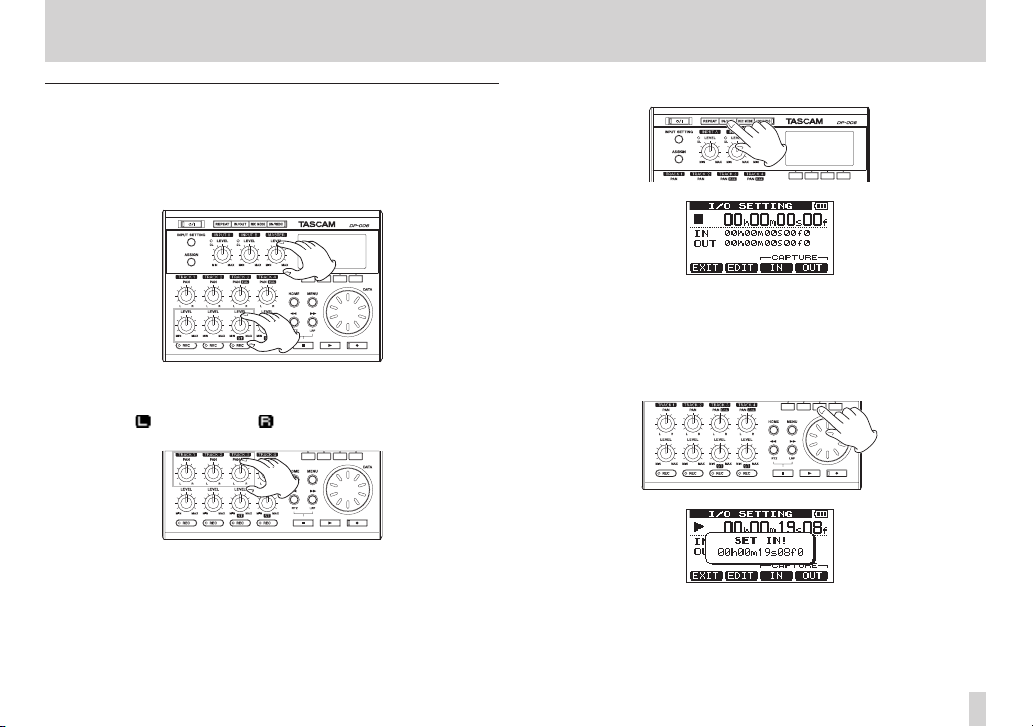
3. Press the IN/OUT button to open the
4. Set the IN point.
The time between the IN and OUT points will be included in the stereo
master track.
Press the Play (7) button to start playback, and press the F3 [IN] button
at the point where you want to start the stereo master track.
A
SET IN!
The point when you pressed the F3 [IN] button will be set as the IN point
and used as the starting point for making the stereo master track.
pop-up message appears.
I/O SETTING
screen.
TASCAM DP-006
25
Page 26
2 – Quick Start Guides
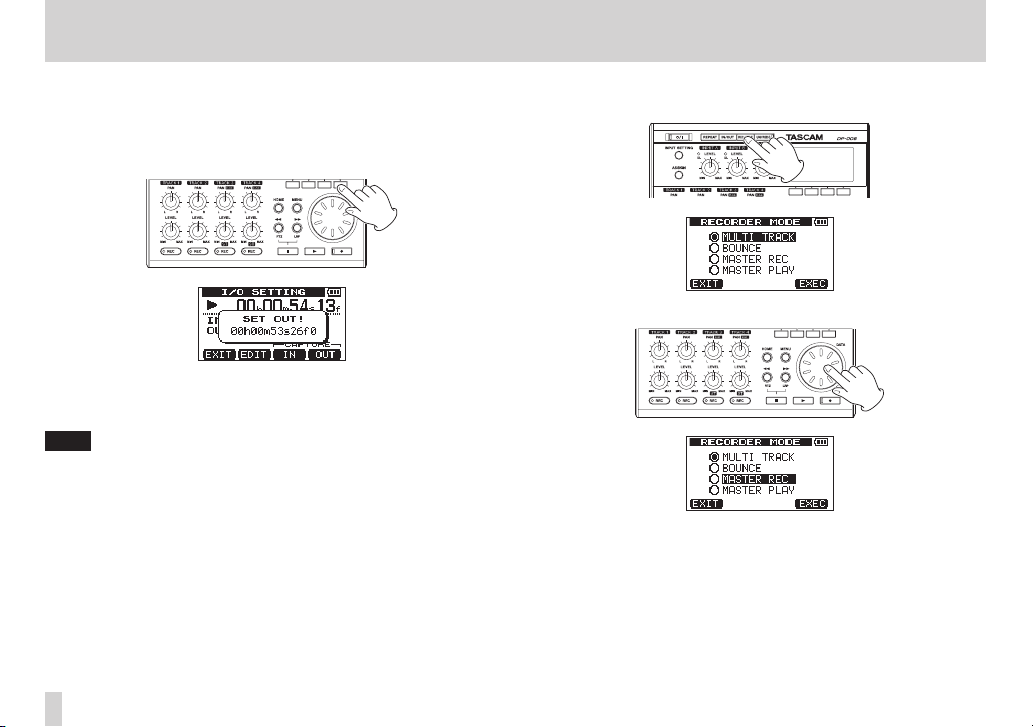
5. Set the OUT point.
Press the F4 [OUT] button at the point where you want to end the stereo
master track.
A
SET OUT!
The point when you pressed the F4 [OUT] button will be set as the OUT
point and used as the ending point for making the stereo master track.
pop-up message appears.
TIP
You can also use the F3 [IN] and F4 [OUT] buttons to set the IN and OUT
points when playback is stopped.
6. When you have completed setting the IN and OUT points, press the Stop
(8) button to stop playback of the song.
7. When the recorder is stopped, press the REC MODE button to open the
RECORDER MODE
8. Use the D ATA wheel to select (highlight)
screen.
MASTER REC
.
TASCAM DP-006
26
Page 27

2 – Quick Start Guides
9. Press the F4 [EXEC] button.
After a
Master Rec!
recording mode and the Home Screen reopens.
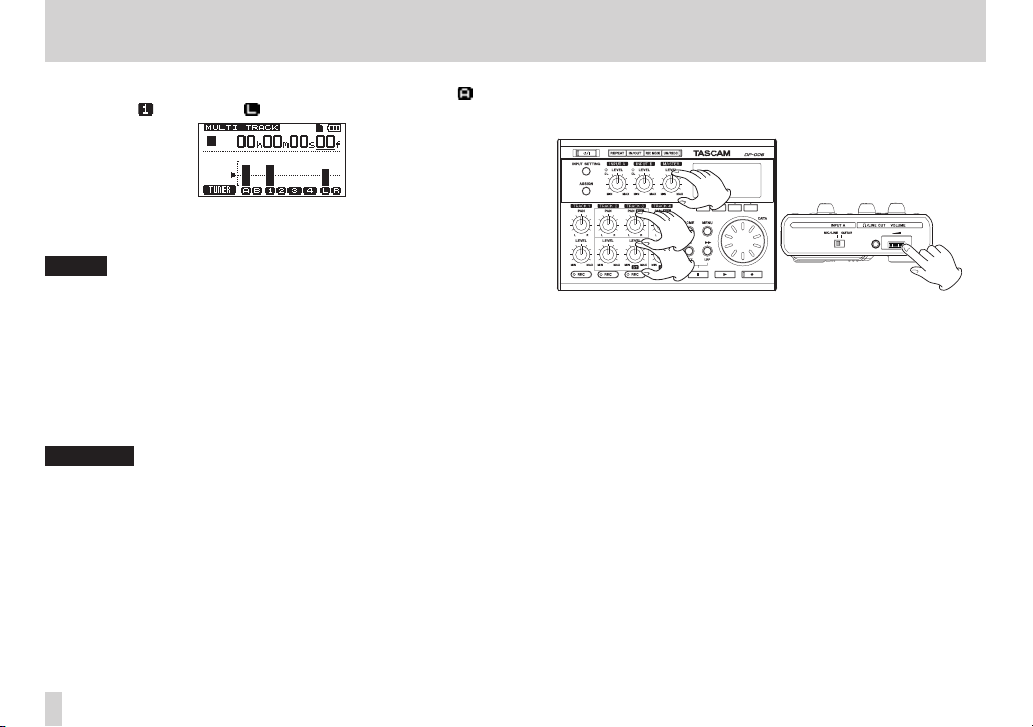
pop-up message appears, the unit enters master
NOTE
When in master recording mode,
the top left of the Home Screen.
10. Press the Play (7) button while pressing and holding the Record (0)
button to start recording the stereo master track from the IN point.
Recording automatically stops when the OUT point is reached.
NOTE
•
Set the IN and OUT points at least four seconds apart. If they are less than
four seconds apart, a
and you will not be able to change the unit to master recording mode.
•
You can use the LEVEL knobs to adjust the track and overall levels as you
record the master track.
Trk Too Sh or t
MASTER REC
appears highlighted at
pop-up message will appear
Checking the stereo master track
You can play back the stereo master track that you created to check it.
1. When the recorder is stopped, press the REC MODE button to open the
RECORDER MODE
2. Use the D ATA wheel to select (highlight)
screen.
MASTER PLAY
.
TASCAM DP-006
27
Page 28

2 – Quick Start Guides
3. Press the F4 [EXEC] button.
After a
•
•
4. In this state, you can press the Play (7) button to play back the stereo
Master Play!
master play mode and the Home Screen reopens.
pop-up message appears, the unit enters
NOTE
When in master play mode,
top left of the Home Screen.
If you have not made a stereo master track, you will not be able to put the
unit into
MASTER PLAY
master track.
MASTER PLAY
mode.
appears highlighted at the
Transferring the stereo master track to a computer
After creating a stereo master track following the procedures in “Creating
stereo master tracks” on page 72, you can transfer it to a computer
connected using the included USB cable. For instructions about how to
transfer the stereo master track to a computer, see “12 – Exchanging Data with
a Computer” on page 83.
Shutting down
When you are done using the unit, shut it down.
1. Press the HOME button to show the Home Screen.
2. Press and hold the button until
display.
The power turns OFF automatically after the unit completes its shutdown
process, including saving various information from your session.
Always follow the above procedures to shut down the unit properly.
CAUTION
Do not remove the batteries or disconnect the power cord, for example,
to turn the power OFF. If you do so, the unit cannot shut down properly
and all recording data and settings that had been made since the last
shutdown or song saving operation will be lost. Lost data and settings
cannot be restored.
POCKETSTUDIO
appears on the
TASCAM DP-006
28
Page 29
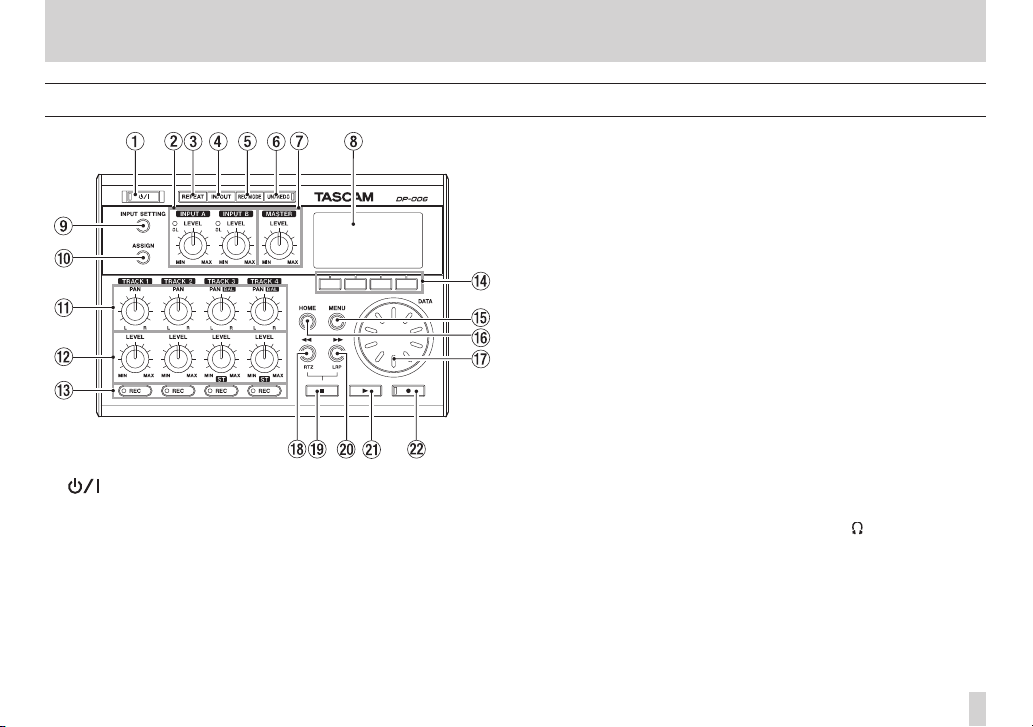
Top Panel
1 button / indicator
Press and hold this button to turn the unit ON and OFF. (See “Start-up &
shutdown” on page 41.)
The indicator lights when the power is on.
2 INPUT A/B LEVEL knobs and OL indicators
Use the LEVEL knobs to adjust the input levels for INPUT A/B. (See “Making
the first recording” on page 56.)
If an input source level is too high its OL (overload) indicator lights. If a
LEVEL knob is set too high (higher than 2–3 o’clock), the OL indicator
could light even if the volume of the input source signal is suitable.
3 – Names and functions of parts
3 REPEAT button
Turns the repeat playback mode ON and OFF. (See “Repeat playback” on
page 65.)
4 IN/OUT button
Press this button to open the
(starting) and OUT (ending) points for repeat playback and track editing.
(See “Setting IN and OUT points” on page 65.)
The IN and OUT points are also used as the starting and ending points
when creating stereo master tracks.
5 REC MODE button
Press this button to open the
set the recorder mode. (See “Recorder modes” on page 42.)
6 UN/REDO button / indicator
Press this button to undo the previous action or to redo the last undone
action. (See “Undoing operations (undo)” on page 58.)
Press this button while pressing and holding the Stop (8) button to open
the
HISTORY
tions at once.
This indicator lights when one or more operations that have been undone
can still be redone.
7 MASTER LEVEL knob
This adjusts the stereo signal level output from the /LINE OUT jack
This knob also adjusts the recording level when bouncing tracks, mixing
down and mastering.
8 Display
This shows various information.
9 INPUT SETTING button
Press this button to open the
set input sources. (See “Selecting the input source” on page 51.)
screen. Using this screen, you can undo multiple opera-
I/O SETTING
RECORDER MODE
INPUT SETTING
screen, and to set IN
screen where you can
screen where you can
TASCAM DP-006
29
Page 30

3 – Names and functions of parts
0 ASSIGN button
Use this to assign (set) the TRACK inputs (INPUT A/B). Press this button to
open the
INPUT ASSIGN
inputs become the recording sources. (See “Assigning inputs” on page
54.)
q PAN knobs (TRACK 1–TRACK 4)
TRACK 1 and TRACK 2
Use to adjust the stereo position of the track playback signal. (See “Stereo
position (panning)” on page 72.)
TRACK 3 and TRACK 4
If the track is stereo, use to adjust the left-right balance.
If the track is mono, use to adjust the stereo position of the track
playback signal in the same way as for TRACK 1 and TRACK 2. (See
“Stereo position (panning)” on page 72.)
w LEVEL knob ( TRACK 1–TRACK 4)
Use to adjust the level of the track. (See “Level and balance” on page 72.)
e REC buttons/indicators (TRACK 1–TRACK 4)
Use to turn the track record function ON (arm for recording) and OFF. To
monitor the input signals of the internal mics using headphones or an
external monitoring system (powered monitor speakers or an amplifier
and speakers), press the corresponding TRACK REC button. When a REC
button is ON, its REC indicator blinks when the recorder is stopped, and
lights when it is recording.
r Function buttons
The functions of these buttons depend on the current screen. The
functions currently assigned to these buttons are shown at the bottom of
the display screen.
screen on the display. Signals from assigned
NOTE
In this manual, the four function buttons are referred to as F1, F2, F3 and
F4 in order from the left.
t MENU button
Press to open the
TASCAM DP-006
30
MENU
screen. (See “Menu structure” on page 36.)
y HOME button
Press to open the the Home Screen. (See “Home Screen” on page 34.)
When the unit is stopped and the Home Screen is open, use this button
to move the cursor between time counter divisions. (See “Direct locate
function” on page 64.)
u DATA wheel
Use this to select items and change values on the setting screens.. When
the unit is stopped and the Home Screen is open, turn to change the
record/playback position. (See “Direct locate function” on page 64.)
i m [RTZ] button
Press when stopped or playing back to search backward. Press it again to
change the speed from 10x to 50x, again for 100x and 1000x.
Press while pressing and holding the Stop (8) button to locate to the
beginning of the song (00:00:00:00) using the Return To Zero function
(RTZ). (See “Returning to the song beginning (RTZ function) or the point
where recording was last started (LRP function)” on page 64.)
o Stop (8) button
Press to stop playback, recording and searching backward/forward. Press
together with the m [RTZ] button or the , [LRP] button to locate
to the beginning of the song (00h00m00s00f) or the last recording point
(LRP). (See “Returning to the song beginning (RTZ function) or the point
where recording was last started (LRP function)” on page 64.)
p , [LRP] button
Press when stopped or playing back to search forward. Press it again to
change the speed from 10x to 50x, again for 100x and 1000x.
Press while pressing and holding the Stop (8) button to locate to the
point when recording last started using the Last Recording Position (LRP)
function. (See “Returning to the song beginning (RTZ function) or the
point where recording was last started (LRP function)” on page 64.)
a Play (7) button
Press this button to start playback. While pressing the Record (0)
button, press this button to start recording. Press this button again when
recording to stop recording and start playback (punch out).
Page 31

3 – Names and functions of parts
s Record (0) button / indicator
Press the PLAY (7) button while pressing this button to start recording.
The indicator lights when recording. If you press this button when any
of the track REC indicators is lit, or during playback, recording will begin
(punch in). (See “Punching in and out” on page 61.)
Front panel
d MIC A
This built-in microphone is omnidirectional.
This internal mic can be set as the input source for INPUT A (INT.MIC
A-Low, INT.MIC A-Mid or INT.MIC A-High).
f MIC B
This built-in microphone is omnidirectional.
This internal mic can be set as the input source for INPUT B (INT.MIC
A-Low, INT.MIC A-Mid or INT.MIC A-High).
TASCAM DP-006
31
Page 32

3 – Names and functions of parts
Rear panel
g INPUT B ( standard jack)
Use this jack for a line level or mic signal (unbalanced connection).
Use this as an input source by setting
SETTING
Hig h
h INPUT A ( standard jack)
Use this jack for a guitar, line level or mic signal (unbalanced connection).
Use this as an input source by setting
SETTING
GUIT AR/LIN E M
Set the MIC/LINE-GUITAR switch on the left side of the unit according to
the input source.
screen for a line level input (
) or an external mic (MIC).
screen for a guitar or line level input (
or
GUIT AR/LIN E H
IN-B
(INPUT B) on the
LINE, LINE Mid
IN-A
(INPUT A) on the
GUIT AR/LIN E
) or an external mic (MIC).
or
LINE
INPUT
INPUT
Left side panel
j MIC/LINE-GUITAR switch
Set this switch to match the input signal to the INPUT A jack on the rear
panel. For mic or line signals, set it to MIC/LINE. For electric guitars and
basses that are connected directly, set it to GUITAR.
TIP
When connecting an electric-acoustic guitar with a built-in preamp or an
active electric guitar, as well as when connecting an electric guitar with
effect boxes between it and this unit, set the MIC/LINE-GUITAR switch to
,
MIC/LINE.
k /LINE OUT jack (stereo mini jack)
Connect headphones or an external monitoring system (powered monitor
speakers or an amplifier and speakers) here.
l The VOLUME dial
Use to adjust the volume output from the /LINE OUT jack.
CAUTION
The VOLUME dial does not have any indications. Before turning the power
ON, always turn it in the direction of the arrow until it stops to minimize
the volume. Sudden bursts of loud sounds can cause hearing damage and
speaker damage, for example.
TASCAM DP-006
32
Page 33

3 – Names and functions of parts
Right side panel
; USB connector
Connect the unit to a computer using the included USB cable. This allows
to sharing, importing and exporting files between the unit and the
computer, including backup of the song files. (See “Connecting with a
computer” on page 84.)
z DC IN 5V connector
Connect a dedicated power adaptor (PS-P520, sold separately).
Bottom panel
x Battery compartment cover
c Tripod screw thread (1/4-inch)
Use this to mount the unit on a tripod.
CAUTION
•
To prevent this unit from falling, thoroughly tighten the mounting and
adjustment screws of the tripod or mic stand.
•
When using this unit mounted on a tripod or mic stand, place the tripod or
mic stand on a level surface.
•
Depending on the tripod, the size of the screw might be different and
directly mounting the unit on it might not be possible. In such cases, use a
commercially-available adapter.
TASCAM DP-006
33
Page 34

3 – Names and functions of parts
v Battery compartment
The batteries (four AA) that power the unit are inserted here. The SD card
slot is in the back of the compartment.
b SD card slot
Insert SD cards into this slot.
Home Screen
1 Recorder mode
Shows the current recorder mode.
Indication Recoder mode
MULTI TRACK
BOUNCE
MASTER REC
MASTER PLAY
2 SD card write-protection indicator
If the SD card write-protection switch is set to “Lock”, the icon appears
here.
3 SD card insertion status
When an SD card is loaded in the unit, the icon appears here. (The
icon appears when no card is loaded in the unit.)
4 Battery status
A battery icon appears when the unit is being powered by batteries.
Multitrack recording mode
Bounce mode
Master recording mode
Master playback mode
TASCAM DP-006
34
Page 35

3 – Names and functions of parts
When a battery is being used, a battery icon shows the amount of power
remaining in bars ( , , ).
When the batteries are almost dead and the power will soon turn off, an
icon with no bars appears blinking.
When using the AC adapter (sold separately) appears.
5 Recorder transport state
One of the following icons appears depending on the status of the
recorder.
Indicator Meaning
Stopped
8
Playing back
t
Recording
0
Searching backward
m
Searching forward
,
6 Repeat playback mode indicator
When repeat playback is active appears.
7 Level meter guide
This guideline for adjusting input and output levels indicates –12 dB.
8 Recorder time counter
Shows the elapsed time from the start of the song.
9 Cursor that shows time increment being edited
When the unit is stopped press the HOME button to move the cursor
between time counter divisions.
Turn the DATA wheel to change the value of the underlined time
increment.
0 Shows the F1 button function
When that Home Screen is open, press the F1 [TUNER] button to open the
TUNER
screen.
q INPUT A and B Level meters
These show this input source signal levels of INPUT A ( ) and INPUT B ( ).
w TRACK 1-4 level meters
Shows the input level when recording and the playback signal level when
playing back.
Depending on the track type setting, the size of the level meter icons and
width of the level meters for TRACK 3 ( ) and TRACK 4 ( ) changes.
Track type Level meter icons
STEREO ,
MONO ,
e Level meter for stereo outputs (L, R)
Shows the output signal level from the /LINE OUT connector.
TASCAM DP-006
35
Page 36

3 – Names and functions of parts
Menu structure
Press the MENU button to open the
The menu items are as follows.
Menu item Function Reference
INFORMATION
SONG
CARD Format SD cards, etc. page 79
TRACK TYPE
TRACK EDIT Edit tracks. page 67
DATA BACKUP Back up and restore songs. page 86
IMPORT/EXPORT
METRONOME Make metronome settings. page 75
PREFERENCE
View information about files, SD cards
and the system.
Manage songs, including loading and
saving them and creating new ones.
Set the track type for TRACK 3 and
TRACK 4.
Import and export tracks and export
master tracks.
Adjust the contrast, repeat playback
interval, and auto power save settings
and initialize the backup memory, for
example.
MENU
screen.
page 78
page 45
page 54
page 88
page 44
page 66
page 77
Dedicated buttons can be used to directly access some setting screens as
follows.
Button Function Reference
INPUT SETTING Select the input source. page 51
ASSIGN
REPEAT
IN/OUT Set the IN and OUT points. page 65
REC MODE
UN/REDO
STOP (8) + UN/REDO
Assign INPUT A or B to a track as its
recording source.
Repeat playback between the set IN
and OUT points.
Create and adjust stereo master
tracks.
Undo the last action and redo the last
undo.
Show the undo/redo history and
select operations.
page 54
page 65
page 42
page 58
page 58
TASCAM DP-006
36
Page 37

3 – Names and functions of parts
Screen operations
After using the MENU button or a dedicated button to open a screen, use the
screen in the following manner.
This section describes the basic operation procedures. Depending on the
screen that is open the assignments of the function buttons might differ.
NOTE
During playback or recording, you cannot open screens that might access
the SD card. If you try to open one of these screens, a
recorder is not stopped) pop-up message will appear.
Function buttons
The currently assigned function of each button is shown above it at the
bottom of the screen. In this manual, for convenience, we refer to the function
buttons as F1, F2, F3 and F4 in order from the left.
BACK
appears above the F1 button, showing that this is the function
assigned to this button on the screen. In this manual, we write this as “F1
[BACK] button”.
In a similar manner the assignments for the F2, F3 and F4 buttons are
INS
and
DEL
in that order.
Not Stopped
EXEC
(the
0 Use the D ATA wheel to select (highlight) items you want to access.
This example shows the
On the screen, the
0 If there are more items above the top item in the list currently shown, an
5 icon appears. If there are more below the bottom item, an b icon
appears. (In the
least one more item below
0 If an item has a submenu (as on the
appears to its right, and pressing the F4 [t] button will open it.
0 In a submenu, you can press the F1 [BACK] button to return to the
previous screen.
,
MENU
SONG
MENU
screen.
item is selected (highlighted).
screen shown above, the b shows that there is at
TRACK TYPE
.)
MENU
screen, for example), an t
TASCAM DP-006
37
Page 38

3 – Names and functions of parts
0 To execute an operation, press the function button that has EXEC
assigned to it.
This example shows the
Press the F2 [EXEC] button to load the selected (highlighted) song.
0 When a setting value is selected (highlighted), use the D ATA wheel to
change the value.
To select (highlight) different item press the function button that has 5
or b assigned to it.
This example shows the
Use the D ATA wheel to change the
being copied) value.
Use the F3 [5] and F4 [b] buttons to move up and down to change the
selected (highlighted) item.
Press the F2 [EXEC] button to clone the track using the settings that you
made.
SONG LOAD
CLONE TRACK
screen.
SOURCE TRK
screen.
(the track that is
0 When moving left or right is possible, use the m [RTZ] and , [LRP]
buttons. When this operation is possible, an illustration on the screen
shows the assignment of the m and , buttons to cursor movement.
0 To continue to the next operation, press the F4 [NEXT] button.
0 To leave a screen that was accessed using a dedicated button, press the
F1 [EXIT] button.
0 To return to the Home Screen, press the HOME button.
TASCAM DP-006
38
Page 39

4 – Preparations
Preparing the power and SD card
Inserting an SD card
Insert the SD card into the SD card slot inside the battery compartment on the
bottom of the unit.
1. Open the cover of the battery compartment on the bottom of the unit.
If batteries are inside the compartment, confirm that the power is OFF
(standby mode) and remove the batteries.
2. Inser t the SD Card into the SD card slot inside the battery case in the
direction shown in the following illustration until it clicks into place.
3. Close the cover after inserting the SD card.
Replace the batteries if you are using them and close the cover.
Removing an SD card
Push a loaded SD card in further to eject it.
CAUTION
•
Always turn the power OFF (standby) before removing or inserting an
SD card. Failure to power off properly first will cause and recordings and
settings made since the last power off and song save to be lost. This data
cannot be recovered.
•
SD cards that meet SD/SDHC standards and are at least 512 MB can be
used with this unit.
•
A list of SD cards that have been confirmed for use with this unit can be
found on the TASCAM website (http://tascam.com/).
SD card write-protection switches
SD cards have write-protection switches.
Writing possible Write-protected
When a write-protection switch is set to the “LOCK” position, you will not be
able to write files to the card or edit files on it. To record on a card or erase files
on it, for example, disable its write-protection.
TASCAM DP-006
39
Page 40

4 – Preparations
AC wall socket
Preparing the power
This unit can be powered either by 4 AA batteries or using a TASCAM PS-P520
AC adaptor (sold separately).
Alkaline or NiMH AA batteries can be used with this unit.
8
Using batteries
Open the cover of the battery case on the bottom of the unit has described in
“Inserting an SD card” on the previous page. Insert 4 AA batteries in the box
according to the ¥ and ^ indications.
CAUTION
•
Manganese AA batteries cannot be used with this unit.
•
This unit cannot charge nickel-metal hydride batteries. Use a commercially-available recharger.
•
The included alkaline batteries are for confirming the operation of the unit
and might not last very long.
•
Remove the batteries if you do not plan to use the unit for some time.
Leaving the batteries in could cause them to be used gradually and lose
their charge or even to leak.
8
Using an AC adaptor (sold separately)
Connect a TASCAM PS-P520 AC adaptor (sold separately) to the DC IN 5V
connector as shown in the illustration.
TASCAM
PS-P520
(sold separately)
DC plug
CAUTION
•
Use only the PS-P520 AC adaptor (sold separately). Using any other AC
adaptor could cause malfunction, fire or electric shock.
•
This unit can be powered by batteries or an AC adaptor. Power cannot be
supplied to this unit over USB.
NOTE
The adapter powers the unit if the adapter is connected even if batteries
are installed.
TASCAM DP-006
40
Page 41

4 – Preparations
Start-up & shutdown
Starting up the unit
Press and hold the button on the top panel until “TASCAM” appears (or
the button indicator lights green).
After the start-up screen, the Home Screen appears.
Start-up screen Home Screen
This unit always starts up in
mode used last before shutting down.
CAUTION
•
Before turning the power ON or OFF (putting it into standby), minimize the
volume on any connected external monitoring system (powered monitor
speakers or an amplifier and speakers).
•
Do not wear headphones when turning the power ON or OFF (putting it
into standby) because noise at such times could harm your hearing.
MULTI TRACK
recorder mode regardless of the
Shutting down
Make the following preparations before shutting down the unit.
• Stop the recorder. (The unit cannot be shut down during recording,
playback, search forward, etc.)
• Return to the Home Screen.
• If the unit is connected to computer, disconnect the USB cable after
conducting the necessary procedures on the computer to unmount the
unit.
After making these preparations, press and hold the button until the
following screen appears (or the button indicator light begins to blink).
The power turns off after the unit completes its shutdown process, including
saving various information from your session.
CAUTION
•
Do not remove the batteries or disconnect the power cable accidently while
the unit is operating. If you do so, the unit cannot shut down properly and
all unsaved data will be lost. Lost data cannot be restored. We recommend
that you also save the data manually often.
•
When the power is turned OFF (put in standby mode), the operation
history of the currently loaded song will be completely erased. You will not
be able to undo or redo past song operations when you turn the power
back ON.
TASCAM DP-006
41
Page 42

4 – Preparations
Preparing SD cards for use
To use a new SD card with this unit, it is necessary to format it first. SD cards
formatted by the unit are divided into MTR partitions and FAT partitions. SD
cards with high capacities can be formatted with multiple partitions.
For more information about partitions see “9 – Mixdown and mastering” on
page 72.
NOTE
The included SD card is already formatted so formatting is not necessary.
If you format this card the demo song on it will be erased.
1. The first time you insert a new SD card in this unit, the following pop-up
message prompting you to format it appears.
NOTE
The pop-up message prompting you to format it also appears if you insert
an SD card that has been formatted by any device other than this unit.
CAUTION
If you format it, all data saved by the other device will be erased and you
will not be able to recover it.
2. Press the F3 [YES] button to format the SD card with the standard
number of partitions for the card capacity.
The Home Screen appears after the format completes correctly.
NOTE
•
To cancel formatting press the F4 [NO] button.
•
Depending on the SD card capacity, the partition setting can be changed
in some cases. To do so, set the partition size using the
the
CARD
menu before formatting. (See “9 – Mixdown and mastering” on
page 72.)
TASCAM DP-006
42
FORMAT
item in
Recorder modes
This unit has four recorder modes.
MULTI TRACK
Use the unit as a multitrack recorder.
BOUNCE
Use to bounce tracks. (See “Bouncing tracks” on page 61.)
MASTER REC
Use to create mixed stereo master tracks. (See “Mixdown” on page 72.),
(See “Creating stereo master tracks” on page 72.)
MASTER PLAY
Use to play created stereo master tracks. (See “Checking stereo master
tracks” on page 74.)
When the power is turned ON, the unit always starts in
mode.
When in recorder modes other than
operations are disabled.
In this Owner’s Manual, unless otherwise noted, the recorder mode explained
is assumed to be the
MULTI TRACK
MULTI TRACK
mode.
MULTI TRACK
mode, many screen
Page 43

4 – Preparations
Keyboard to INPUT A/
Headphone
Powered monitor speakers
Connecting with other equipment
This section shows examples of connections that can be made with this unit.
8
Precautions before making connections
• Turn the power OFF (or put in standby) for this unit and all other
equipment that you will connect to it.
• Set up all the equipment so that all units are powered from the same
line. When using a power strip, for example, use a thick cable with a high
current capacity to reduce fluctuation of the power voltage.
Rear panel connections
Mic to INPUT A/B
B
Guitar/bass to INPUT A
Left side panel connections
or amplier and speakers
NOTE
Before outputting sound, use the VOLUME dial of any external monitoring
system (powered monitor speakers or an amplifier and speakers)
connected to the unit. Failure to do so could cause loud noises that might
harm your hearing.
TASCAM DP-006
43
Page 44

4 – Preparations
AC wall socket
Right side panel connections
TASCAM
PS-P520
(sold separately)
DC plug
Mini-B USB plug
USB
NOTE
•
Recorder functions cannot be used when connected to a computer by USB.
•
This unit can only be connected to a computer by USB when the recorder
mode is set to
MULTI TRACK
.
Computer
Adjusting the contrast
You can adjust the contrast of the display.
Follow these steps to adjust the contrast.
1. When the recorder is stopped, press the MENU button to open the
MENU
2. Use the D ATA wheel to select (highlight) the
3. Use the F3 [5] and F4 [b] buttons to select the
The setting values are 1–10 (default value: 5).
Lower values make the display lighter while higher values make it darker.
The display appears different depending on the angle from which you
4. After completing the setting, press the HOME button to return to the
screen.
press the F4 [t] button to open the
use the DATA wheel to to adjust the display contrast.
view it, so adjust it while the unit is in the actual position that you plan to
use it in. Adjusting the contrast might make it easier to read.
Home Screen.
PREFERENCE
PREFERENCE
Contrast
item, and
screen.
item, and
TASCAM DP-006
44
Page 45

5 – Song Management
This unit manages data in units called “songs”. Ordinarily, each real song is one
“song” unit. The first step when using this recorder is to load the song that you
want. (You can load an existing song or create a new song.)
The recorded multitrack (TRACK 1–4) and stereo master track are saved in
each song.
This chapter, starts with an explanation of the two types of SD card partitions,
and then covers basic operations, including song loading and creation, as well
as various song management functions.
Partitions and songs
This unit uses SD cards to record songs. SD cards formatted by the unit are
divided into two (or more) partitions.
This unit uses an “MTR partition” to store song data and a “FAT partition” that
can be read by computers. SD cards with high capacities might be formatted
with multiple MTR partitions.
When you want to record, playback or edit a song, select an MTR partition to
make it the active partition and load a song on it or create a new song.
Selecting the active partition
If you want to use a file that is on a partition other than the currently active
partition in order to load an existing song or create a new song on it, you must
change the partition.
Follow these steps to select a partition on an SD card that has multiple MTR
partitions.
1. When the recorder is stopped, press the MENU button to open the
MENU
2. Use the D ATA wheel to select (highlight) the
screen.
F4 [t] button to open the
CARD
menu screen.
CARD
item, and press the
3. Use the D ATA wheel to select (highlight) the
press the F4 [t] button to open the
This screen shows a list of the MTR partitions.
The active partition is shown with an asterisk (*) on the right side. The
sizes of the MTR partitions are shown (not available space).
SD card with one MTR partition SD card with multiple MTR partitions
4. Use the D ATA wheel to select the desired partition, and press the F2
[EXEC] button.
Are yo u s ure?
5. Press the F3 [YES] button.
The unit saves the current song before changing partitions. It then loads
the last used song on that partition.
appears as a confirmation pop-up message.
PA RTITIO N
PA RTITIO N
item, and
screen.
TASCAM DP-006
45
Page 46

5 – Song Management
Editing names
You can edit names (titles) on the following screens.
When saving, creating or editing the name of a song
SONG SAVE, SONG CREATE
When backing up a song
SONG BACKUP
screen
When exporting WAV files
EXPORT MASTER
You can edit the name as follows.
• Use the m [RTZ] button and , [LRP] button to move the cursor
(underline) position. The cursor position is where editing occurs.
• Use the DATA wheel to change the underlined character.
On the
SONG SAVE, SONG CREATE
ordinary symbols, numerals and upper and lower case English letters
can be input.
On the
SONG BACKUP, EXPORT TRACK
screens, lower case English letters can be input.
• On the
• Press the F4 [DEL] button to delete the character at the cursor position.
SONG SAVE, SONG CREATE
press the F3 [INS] button to insert a blank at the cursor position.
On the
SONG BACKUP, EXPORT TRACK
screens, press the F3 [INS] button to insert the letter A at the cursor
position.
screen
and
NAME EDIT
NAME EDIT
screen
and
NAME EDIT
and
and
NAME EDIT
and
screens
screens,
EXPORT MASTER
screens,
EXPORT MASTER
• When finished inputting or editing a name (title), press the F2 [EXEC]
button to save it.
Loading a saved song
Follow these steps to load the song that you want from the active partition.
1. When the recorder is stopped, press the MENU button to open the
MENU
2. Use the D ATA wheel to select (highlight) the
3. Use the D ATA wheel to select (highlight) the LOAD item, and press the F4
A list of the songs on the active MTR partition is shown.
The currently loaded song is shown with an asterisk (*) to the right of the
4. Use the D ATA wheel to select (highlight) the desired song, and press the
The current song is saved, and the selected song is loaded.
5. Press the HOME button to open the Home Screen.
screen.
F4 [t] button to open the
[t] button to open the
song size. An icon appears on the left side of a protected song.
F2 [EXEC] button.
SONG
menu screen.
SONG LOAD
screen.
SONG
item, and press the
TASCAM DP-006
46
Page 47

5 – Song Management
Creating a new song
Follow these steps to create a new song in the active partition.
1. When the recorder is stopped, press the MENU button to open the
MENU
2. Use the D ATA wheel to select (highlight) the
3. Use the D ATA wheel to select (highlight) the
The default song name (title) given to new songs is “SONG***”.
4. Change the song name as necessary. (See “Editing names” on page 46.)
5. Press the F2 [EXEC] button to save the currently loaded song and create a
6. Press the HOME button to open the Home Screen.
screen.
F4 [t] button to open the
the F4 [t] button to open the
(The asterisks indicate a number. In the example above the name is
“SONG002”.)
SONG
menu screen.
SONG CREATE
SONG
item, and press the
CREATE
item, and press
screen.
TIP
You can rename a song later by selecting NAME EDIT item from the
menu screen. You can also edit the song name when saving it.
new song.
SONG
Saving a song
This unit automatically saves the current song when loading another song
and during shutdown (when it stores various information about operations
conducted to that point). You can also save a song at any time using the
following procedures.
1. When the recorder is stopped, press the MENU button to open the
MENU
2. Use the D ATA wheel to select (highlight) the
3. Use the D ATA wheel to select (highlight) the
4. Change the song name as necessary. (See “Editing names” on page 46.)
To save it as is, press the F2 [EXEC] button.
A
5. Press the HOME button to open the Home Screen.
screen.
F4 [t] button to open the
F4 [t] button to open the
Storing Song
saved. A
SONG Save Complete
done, and the
pop-up message appears while the song is being
SONG
menu screen reopens.
SONG
SAVE
screen.
item, and press the
item, and press the
SONG
menu screen.
SONG SAVE
pop-up message appears when it is
TASCAM DP-006
47
Page 48

5 – Song Management
Viewing song information
You can check the name (title), MTR partition and remaining recording time
of the currently loaded song on the
screen. (See “Viewing information” on page 78.)
1. When the recorder is stopped, press the MENU button to open the
MENU
2. Use the D ATA wheel to select (highlight) the
This opens the
screen.
press the F4 [t] button.
SONG
shows the name and remaining recording time of the current song.
NOTE
The
INFORMATION
(2/4),
SYSTEM
buttons to change the page. (See “Viewing information” on page 78.)
screen has four pages, including
(3/4) and
SONG
(1/4) page of the
INFORMATION
(1/4) page of the
F/ W
(4/4). Use the F3 [PREV] and F4 [NEXT ]
INFORMATION
INFORMATION
item, and
screen, which
SONG
(1/4),
CARD
Copying songs
Songs in the currently active partition can be copied to the same and different
MTR partitions. Multiple songs can also be copied at once.
1. When the recorder is stopped, press the MENU button to open the
MENU
2. Use the D ATA wheel to select (highlight) the
3. Use the D ATA wheel to select (highlight) the
A list of songs on the active partition is shown.
4. Use the D ATA wheel to select (highlight) the song you want copy, and
The song is selected as a copy source and a check appears in the
screen.
F4 [t] button to open the
F4 [t] button to open the
press the F4 [✔] button.
checkbox.
SONG
menu screen.
SONG COPY
SONG
COPY
screen.
item, and press the
item, and press the
TASCAM DP-006
48
Page 49

5 – Song Management
NOTE
To remove a ✔ from the checkbox, press the F4 [✔] button while the song
is selected.
5. To copy multiple songs, repeat step 4.
6. After selecting all the songs to copy (by putting ✔ marks in their checkboxes), press the F2 [NEXT] button.
The copy destination partition is shown.
In addition, the amount of open space on the selected MTR partition
(
Free
If the open space (
7. Use the D ATA wheel to select the copy destination MTR partition, and
When copying completes, the
) and the size of the song data (
possible. (If you try to execute it, a
appears to warn you that there is not enough free space in the partition.)
press the F4 [EXEC] button.
Free
) is less than the song data, copying is not
To t al
No Disk Space
SONG
menu screen reopens.
) are shown.
pop-up message
NOTE
To cancel song copying, press the F1 [BACK] button.
8. Press the HOME button to open the Home Screen.
Erasing songs
Songs can be erased. You can also erase multiple songs at once. You might
want to erase unneeded songs if the SD card starts to run out of open space.
1. When the recorder is stopped, press the MENU button to open the
MENU
2. Use the D ATA wheel to select (highlight) the
3. Use the D ATA wheel to select (highlight) the
A list of songs on the active partition is shown.
4. Use the D ATA wheel to select (highlight) the song you want to delete,
A check appears in the checkbox.
screen.
F4 [t] button to open the
F4 [t] button to open the
and press the F4 [✔] button.
SONG
menu screen.
SONG ERASE
SONG
item, and press the
ERASE
screen.
item, and press the
NOTE
To remove a ✔ from the checkbox, press the F4 [✔] button while the song
is selected.
TASCAM DP-006
49
Page 50

5 – Song Management
5. To erase multiple songs, repeat step 4.
6. After selecting all songs that you want to erase (adding ✔ to their checkboxes), press the F2 [EXEC] button.
A confirmation pop-up message appears.
7. Press the F3 [YES] button.
After the songs are erased, the
SONG
menu screen reopens.
NOTE
To cancel song erasing, press the F4 [NO] button.
8. Press the HOME button to open the Home Screen.
NOTE
Every MTR partition must always have at least one song, so if you erase all
the songs on a partition, a new song is created automatically.
Protecting songs
If you protect a song, editing, recording, and erasing of that song is prohibited.
1. When the recorder is stopped, press the MENU button to open the
MENU
2. Use the D ATA wheel to select (highlight) the
3. Use the D ATA wheel to select (highlight) the
4. Use the D ATA wheel to set the
After song protection is turned ON, the
screen.
F4 [t] button to open the
the F4 [t] button to open the
turn song protection ON and
[EXEC] button.
NOTE
•
When the song list is used to, for example, copy or erase, a icon appears
next to protected songs.
•
If you try to execute a prohibited operation (edit, record, erase) on a
protected song, pop-up message
operation is prevented.
•
To remove protection from a song, follow the above procedures but set
PROTECT
item to
OFF
SONG
menu screen.
SONG PROTECT
OFF
.
PROTECT
Song Protected
in step 4.
SONG
item, and press the
PROTECT
item to ON, and press the F2
SONG
item, and press
screen where you can
menu screen reopens.
appears and the
TASCAM DP-006
50
Page 51

6 – Basic Recording
Selecting the input source
This unit has two inputs (INPUT A/B) that can be selected separately as input
sources.
The built-in microphones (front panel MIC A/B) and external input signals
(input through the rear panel INPUT A/B jacks) can be selected as input
sources.
Mic, line and guitar signals can be input through the INPUT A standard jack.
Set the MIC/LINE-GUITAR switch on the left side of the unit to GUITAR.
1. When the recorder is stopped, press the INPUT SETTING button to open
the
INPUT SETTING
Use the
2. Use the F3 [5] and F4 [b] buttons to select (highlight) the
IN A
INPUT B.
B
setting value, and use the DATA wheel to set the input source.
and
screen.
IN B
items to set the input sources for INPUT A and
IN A
or
IN
IN A options
Option Description
OFF Input off
INT.MIC A-Low
(default value)
INT.MIC A-Mid Built-in mic A (medium input gain)
INT.MIC A-High Built-in mic A (high input gain)
GUITAR/LINE
GUITAR/LINE M
GUITAR/LINE H
MIC Mic through INPUT A jack
IN B options
Option Description
OFF Input off
INT.MIC B-Low
(default value)
INT.MIC B-Mid Built-in mic B (medium input gain)
INT.MIC B-High Built-in mic B (high input gain)
LINE Line through INPUT B jack (low input gain)
LINE Mid
LINE High Line through INPUT B jack (high input gain)
MIC Mic through INPUT B jack
3. After making the setting, press the HOME button to return to the Home
Screen.
Built-in mic A (low input gain)
Guitar or line through INPUT A jack
(low input gain)
Guitar or line through INPUT A jack
(medium input gain)
Guitar or line through INPUT A jack
(high input gain)
Built-in mic B (low input gain)
Line through INPUT B jack (medium input
gain)
TASCAM DP-006
51
Page 52

6 – Basic Recording
4. If a source that uses the INPUT A connector is selected as the INPUT A
input source in step 2 above, set the MIC/LINE-GUITAR switch on the left
side panel appropriately. Set it to GUITAR when connecting an electric
guitar or electric bass directly. Set it to MIC/LINE when inputting a mic or
line signal.
TIP
When connecting an electric-acoustic guitar with a built-in preamp or an
active electric guitar, as well as when connecting an electric guitar with
effect boxes between it and this unit, set the MIC/LINE-GUITAR switch to
MIC/LINE.
Monitoring the input signal
When an input source is set as the INPUT A or INPUT B connector on the rear
panel, regardless of the REC button setting, the input signal is always sent to
the stereo bus, so you can always monitor the input signal.
When an input source is set to a front panel built-in mic, the input signal is
sent to the stereo bus and can be monitored only when the REC indicator
light for the track that is set to record the built-in mic is blinking (during
record standby) or lit (while recording). You cannot monitor the built-in mic
input when the REC indicator is not lit.
NOTE
When an input source is set as the INPUT A or INPUT B connector, during
playback, the sounds of the playback signal and the input source are
mixed and can be heard through headphones or a monitoring system
connected to the /LINE OUT connector.
Setting the monitoring mode
The monitoring mode can be set for the INPUT A/B signals.
1. When the recorder is stopped, press the INPUT SETTING button to open
the
INPUT SETTING
2. Use the F3 [5] and F4 [b] buttons to select the
use the DATA wheel to select (highlight) the input signal monitor mode.
MONOx2: INPUT A/B signals are output as mono signals from left
and right channels.
STEREO: INPUT A/B signals are output as left and right channels.
3. After completing the setting, press the HOME button to return to the
Home Screen.
screen.
MODE
item value, and
TASCAM DP-006
52
Page 53

OL indicators and level meters
Ov
The audio levels of this unit can be checked using the INPUT A/B OL
indicators and the level meters on the display.
The level meters allow the signal levels to be checked, and they can also be
used to confirm whether signals are being input into the unit. For example,
if the and level meters are moving a signal is being input into the unit
even if you cannot hear anything when you are monitoring with headphones
or an external monitoring system (powered monitor speakers or an amplifier
and speakers). In this case, something other than this unit is probably the
reason that sound is not being output.
As shown below, if a “–” appears at the top of a level meter, the input is
overloading (these “–” indicators will automatically disappear after a while). In
this case, the sound might be distorted, so lower the level until the “–” stops
appearing.
If an OL indicator lights, the input source signal could be too loud or the
LEVEL knob set too high.
If the OL indicator lights even if the LEVEL knob is set to MIN, the input
source signal is too high, so lower the volume on the input source.
erload indicators
8
Input level meters (A/B)
The and level meters on the display show the input levels of this unit’s
INPUT A and INPUT B.
Use the INPUT A/B LEVEL knobs,
output volume controls of the input sound source to adjust the levels.
NOTE
If an INPUT A/B OL indicator lights even though the INPUT A/B level
meters shows a suitable level, the input signal is too strong and the sound
is distorted. Lower the output volume of the input sound source.
INPUT SETTING
screen settings and the
6 – Basic Recording
8
TRACK level meters (1–4)
These meters show either playback signal levels or the track input signal
levels, depending on the operation status, as shown below.
REC indicator Transport status
Unlit Playing back Track playback
Blinking
(recording standby)
Lit (recording) Recording Track input
Playing back Track playback
Stopped Track input
NOTE
When the playback signal is shown, the level of the recorded signal of the
track is shown, so the level shown by the meters cannot be changed. When
the input signal is being shown, the INPUT A/B LEVEL knobs can change
the levels shown by the level meters.
8
Stereo level meters (L/R)
These show the stereo bus output level of this unit. Adjust the output level
with the MASTER LEVEL knob.
NOTE
When an input source is a built-in mic, if the REC indicator is not lit on
a track that has the built-in mic as its recording source, the input sound
cannot be heard.
Signals shown
by level meters
TASCAM DP-006
53
Page 54

6 – Basic Recording
Assigning inputs
When using this unit, “assigning inputs” means setting the recording source
for each track using the
NOTE
•
The illustration above shows the default values.
•
Assignment settings are saved when songs are saved and when the power
is turned OFF (put into standby). Moreover, assignment settings are loaded
when songs are loaded.
This unit can simultaneously record a maximum of two tracks. You can also
record one input channel to two tracks simultaneously (in this case, you
cannot use the other input channel).
You cannot assign two inputs to the same track.
Setting the track type (Tracks 3 and 4 only)
Tracks 3 and 4 can each be used separately as stereo or mono tracks. Make this
setting on the
1. When the recorder is stopped, press the MENU button to open the
MENU
screen.
TASCAM DP-006
54
INPUT ASSIGN
TRACK TYPE
screen.
screen.
2. Use the D ATA wheel to select (highlight) the
press the F4 [t] button to open the
3. Use the F3 [5] and F4 [b] buttons to select (highlight) the track type
value of the track that you want to change, and use the DATA wheel to
change the value.
STEREO (default value): Use as a stereo track.
MONO: Use as a mono track.
4. Press the F2 [EXEC] button.
A confirmation pop-up message appears.
5. Press the F3 [YES] button to confirm the track type change.
6. After completing the setting,the
7. After completing the setting, press the HOME button to return to the
Home Screen.
MENU
TRACK TYPE
TRACK TYPE
screen reopens.
item, and
screen.
CAUTION
Changing the track type will clear all recordings on it, leaving silence.
However, undoing will restore the track type and the original recordings
on it. (See “Undoing operations (undo)” on page 58.)
Page 55

6 – Basic Recording
Assigning inputs to stereo tracks (Tracks 3 and 4 only)
1. On the
2. When the recorder is stopped, press the ASSIGN button to open the
3. Use the F3 [5] button and F4 [b] buttons to select (highlight) the
4. Use the D ATA wheel to set the input source of the
Setting values:
TRACK TYPE
STEREO
. (See “Setting the track type (Tracks 3 and 4 only)” on page 54.)
INPUT ASSIGN
setting value for
4
stereo track.
screen, set
screen.
TRACK 3
IN A- A, IN A- B
or
TRACK 4
TRACK 3
(default value),
and/or
.
TRACK 3
IN B- A, IN B- B
TRACK 4
or
to
TRACK
5. After making the setting, press the HOME button to return to the Home
Screen.
NOTE
Both left and right channels of stereo tracks (TRACK 3 and/or TRACK 4)
will be recorded to at the same time. Recording to just the left or just the
right channel is not possible.
TIP
You can record to track 1 and track 2 separately and then clone (copy)
them together as a stereo pair to the left and right channels of track 3 or
4. In this way, you can record their left and right channels separately. (See
“CLONE TRACK (track duplication)” on page 69.)
TASCAM DP-006
55
Page 56

6 – Basic Recording
Assigning inputs to mono tracks
1. On the
2. When the recorder is stopped, press the ASSIGN button to open the
3. Use the F3 [5] and F4 [b] buttons to select (highlight) the setting value
4. Use the D ATA wheel to set the input source of the mono track.
Setting values: IN A (default value for
5. After making the setting, press the HOME button to return to the Home
TRACK TYPE
MONO
. (See “Setting the track type (Tracks 3 and 4 only)” on page 54.)
INPUT ASSIGN
for the track you want to set.
(default value for
Screen.
screen, set
screen.
TRACK 3
and
TRACK 3
TRACK 1
TRACK 4
and/or
)
and
TRACK 4
TRACK 3
to
),
IN B
Making the first recording
Before beginning the following recording procedures, connect a recording
source (guitar, keyboard, etc.) to an input, assign that input as the recording
source for a track and connect headphones or an external monitoring system
(powered monitor speakers or an amplifier and speakers).
1. Press the REC button of a track to put it into recording standby.
Its REC indicator blinks.
A maximum of two tracks can be recorded simultaneously.
If you press a different REC button when the REC indicators of two tracks
are already blinking, the track that was put into record standby first will
become inactive and the REC indicator will turn off.
For example, if you press the REC buttons for TRACK 1, TRACK 2 and
TRACK 3 (stereo track) in that order, TRACK 1 and TRACK 2 will no
longer be in record standby, but stereo TRACK 3, which was pressed last,
will be in record standby. If TRACK 3 is set to mono, however, TRACK 1,
which was pressed first, will no longer be in record standby, but TRACK 2
and TRACK 3, which were pressed after, will be in record standby.
2. Set the recording level.
Use the INPUT A/B LEVEL knobs to adjust the input levels.
Watch the display and level meters and the OL indicators above
and to the left of the LEVEL knobs while setting their levels suitably.
At the same time, confirm that the sound you hear from the headphones
or an external monitoring system (powered monitor speakers or an
amplifier and speakers) is not distorted.
NOTE
The level meters of tracks with assigned input sources move in the same
way as the INPUT A/B level meters ( and ). The OL indicator lights if
the input is too loud. If the OL indicator stays lit even when you lower the
LEVEL knob, lower the output level on the signal source connected to the
input.
TASCAM DP-006
56
Page 57

6 – Basic Recording
3. While pressing and holding the Record (0) button, press the Play (7)
button.
The Record (0) button indicator lights red when recording starts, and
the TRACK REC indicators stop blinking and stay lit.
4. Press the Stop (8) button to end recording.
5. Use m [RTZ] button, for example, to locate to a point that you want to
check.
TIP
Use the RTZ and LRP Functions to easily locate to the beginning of the
song (00h00m00s00f) or the last point where recording started. For more
information about searching backward/forward and locating, see “Locate
and search functions” on page 64.
6. Press the Play (7) button to play the recorded track.
Use the track LEVEL knob and the MASTER LEVEL knob to adjust the
playback level.
Use the TRACK 1/2 PAN knobs and TRACK 3/4 PAN (BAL) knobs to set
the left and right stereo position (or balance) of each track.
Use the VOLUME dial on the left side of the unit or the volume control
of the external monitoring system (powered monitor speakers or an
amplifier and speakers) to set the final monitoring volume.
NOTE
•
The TRACK 1/2 PAN knobs, the TRACK 3/4 PAN [BAL] knobs and the
track LEVEL knobs control the playback output signal levels and stereo
positions of recorded tracks.
•
If you are not satisfied with the recorded sound, follow the procedures
above again from the beginning.
Multitrack recording
You can record new audio to different tracks while playing back already
recorded tracks.
Setting the recording tracks
• Press the TRACK REC buttons of already recorded tracks so that their
REC indicators become unlit.
• Press the TRACK REC buttons of tracks to be recorded to put them into
recording standby (REC indicators blink).
Setting TRACK PAN/BAL and LEVEL values
Use the LEVEL knobs and TRACK 1/2 PAN knobs and TRACK 3/4 PAN
(BAL) knobs to adjust their level and stereo positions for monitoring during
overdubbing.
NOTE
When the track type of track 3 or 4 is set to
knob functions as a balance knob.
Input selection and assignment
Use the procedures described earlier in this chapter to assign input sources to
tracks for recording.
STEREO
, that track’s PAN (BAL)
TASCAM DP-006
57
Page 58

6 – Basic Recording
UN/REDO indicator
Setting input levels
Just as though you were recording, you can monitor the sound of already
recorded tracks playing back and the input sources of the tracks for recording,
allowing you to check the monitoring balance and volume.
Recording additional tracks
While pressing and holding the Record (0) button, press the Play (7)
button.
While listening to the playback tracks, make new recordings on other tracks.
Undoing operations (undo)
This unit allows you to undo, for example, unwanted operations and
recordings that were unsuccessful. Undo can be used on many ordinary
operations, including editing and recording operations. This unit has two
types of undo functions. Single undo can be used with a simple button press,
while multi-undo allows you to return to and undo a specific past operation.
NOTE
The UN/REDO indicator lights when a single undo or multi-undo has been
conducted and there is an undone operation that can be redone.
Undoing the last operation (single undo)
Press the UN/REDO button to return to the state before the last operation was
conducted. After doing this, the UN/REDO indicator lights, showing that redo
(see below) is possible.
8
Cancelling an undo operation (redo)
Press the UN/REDO button when it is lit to return to the state of the last
operation. The UN/REDO indicator turns OFF.
NOTE
If single undo is used when multi-undo (described below) has already
been used to return the unit to a previous state, it will go one more step
backward. If you press the UN/REDO button again to redo the step, the
single undo operation is cancelled, and the previous multi-undo state
is restored. In this case, the unit is not restored to the most recently
conducted operation, so the UN/REDO indicator remains lit because
further redo operations are possible.
TASCAM DP-006
58
Page 59

6 – Basic Recording
Undoing a previous operation (multi-undo)
1. Press the UN/REDO button while pressing and holding the Stop (8)
button to open the
The
HISTORY
Each operation in the list is called an “event” .
The event list starts at the bottom with event number 0 (
The most recent event has an asterisk (*) to its right.
All events that occurred after a selected event can be undone at once.
This operation is called “multi-undo” because it allows you to undo
multiple events and return to an earlier state.
2. Use the D ATA wheel to select the event that you want to return to (all
events after the selected event will be undone).
3. Press the F2 (EXEC) button to execute the multi-undo and restore the
state just after the selected event was conducted.
In this state, the UN/REDO indicator lights.
The unit has been returned to a previous state, but the event information
undone through the above operation is not erased. On the
screen, a * appears to the right of current event after undoing.
If you make a new recording or new edits after using multi-undo (UN/
REDO indicator lit), the event history after the current event is cleared
and the last operation conducted becomes the most recent event.
NOTE
When the
HISTORY
function, so single undo and redo cannot be used.
CAUTION
•
When undo has been used and there are one or more undone operations,
the UN/REDO indicator lights.
HISTORY
screen shows the operation history as a list.
screen is open, the UN/REDO button does not
screen.
-START UP-
HISTORY
The UN/REDO indicator does not light if there are no undone operations
(the current state is that of the last operation).
When the UN/REDO indicator is lit (because there are undone operations),
if you make a new recording or edit, the last operation conducted becomes
the most recent event, and you will no longer be able to redo previously
undone operations.
•
When saving a song, a maximum of 500 items can be saved in the
operation history as song files. If the operation history exceeds 500 items,
the oldest events in the history are erased when the song is saved. Erased
events cannot be restored.
•
When the power is turned OFF (in standby) the operation history is
completely erased. The operation history is not restored when the power is
).
turned ON again.
TASCAM DP-006
59
Page 60

6 – Basic Recording
Erasing the operation history
When the power is turned OFF(in standby), the operation history of the
currently loaded song is erased (cleared). The operation history is not restored,
so past operations cannot be undone or redone when the power is turned ON
again.
You can also erase the operation history of the currently loaded song without
turning the power OFF by using the following procedures.
NOTE
Turning the power OFF (putting it in standby) does not erase the operation
history of songs that are not loaded.
1. While pressing and holding the Stop (8) button, press the UN/REDO
button to open the
2. Press the F4 [CLEAR] button.
A confirmation pop-up message appears.
3. Press the F3 [YES] button.
Another confirmation pop-up message appears.
HISTORY
screen.
4. Press the F3 [YES] button to erase the operation history and delete
unused data.
The Home Screen reopens when this operation completes.
NOTE
To cancel erasing the operation history, press the F4 [NO] button.
TIP
•
If you open the
history, the event (operation) that appears is 0 (
that the operation history has been cleared.
•
If you want to keep the operation history even when you power OFF(in
standby), turn song protect ON before turning the power OFF(in standby).
(See “Protecting songs” on page 50.)
HISTORY
screen immediately after erasing the operation
-START UP-
), showing
CAUTION
You cannot undo erasing the operation history! Only do it if you are certain
about it.
TASCAM DP-006
60
Page 61

7 – Recorder Functions
Guitar
Vocal
Punching in and out
Punching in/out is a technique to replace a part of an already recorded track.
Start playback and when you reach the part that you want to replace, switch
to record (punch in), then switch back to the Play (or stop) when you finish the
part that you want to replace (punch out).
1. Decide what part of the track you plan to replace and choose a point to
begin where the new recording can sit well with the existing recording.
2. Press the REC button of the TRACK that you plan to replace part of to
start record standby (REC indicator blinks).
3. Start playback before the part of the track that you want to replace.
4. Press the Record (0) button to start recording (punch in) when you
reach the part. Play or sing what you want to record.
5. Press the Play (7) button to switch to playback (punch out) when you
finish the replacement recording.
TIP
You can also press the Stop (8) button to punch out at the end of the
replacement recording.
Bouncing tracks
Use this unit’s bounce function to mix already recorded tracks (1–4) down to
one or two tracks.
Multitrack tape recorders can only bounce to an open track (in other words,
they can not record to a track that is also a source of the mix). For example,
tracks 1–3 could be bounced to track 4, but tracks 1–4 could not be bounced
to track 1. This unit, however, does not have this limitation.
You can mix down tracks 1–4 as a stereo mix to tracks 1 and 2 (stereo bounce),
or bounce tracks 1–4 as a mono mix to track 1 (mono bounce).
Track 1
Drum L
Source tracks are erased when they are bounce destinations. (In the illustration above the drum parts are overwritten by the stereo mix). However, you
can use the unit’s (undo) function to return to the previous state if you make a
mistake. (See “Undoing operations (undo)” on page 58.)
NOTE
Inside this unit, a mixdown is made to create a stereo master track that is
recorded to the designated tracks.
Track 2
Drum R
Tracks 1–4 are mixed down to stereo
and bounced to tracks 1–2
Track 1 and 2
Drums, Bass,
Guitar
Track 1 and 2
Drums, Bass,
Guitar
Track 3
Bass
Track 3
Bass
(can be
overwritten)
Track 3
Lead
Track 4
Guitar
Track 4
Guitar
(can be
overwritten)
New recordings can be
made to tracks 3–4
Track 4
Lead
TASCAM DP-006
61
Page 62

7 – Recorder Functions
Using the bounce function
1. When the recorder is stopped, press the REC MODE button to open the
RECORDER MODE
2. Use the D ATA wheel to select (highlight) the
3. Press the F4 [EXEC] button.
After a
Bounce!
BOUNCE
mode, and the Home Screen reopens.
NOTE
When the recorder is in
the upper left of the Home Screen.
screen.
BOUNCE
item.
pop-up message appears, the recorder enters
BOUNCE
mode,
BOUNCE
appears highlighted at
4. Press the TRACK REC buttons for the bounce destination tracks to light
their indicators.
For a stereo bounce, press two mono track REC buttons or one stereo
track REC button. (See “Setting the track type (Tracks 3 and 4 only)” on
page 54.)
Examples: Press the TRACK 1 and TRACK 2 REC buttons.
For a mono bounce (to a single track), press one mono track REC button
Examples: Press either the TRACK 1 or TRACK 2 REC button.
If the track type of TRACK 3 and TRACK 4 is set to
press the TRACK 3 and TRACK 4 REC buttons.
If the track type of TRACK 3 or TRACK 4 is set to
press either the TRACK 3 or TRACK 4 REC button.
If the track type of TRACK 3 and TRACK 4 is set to
press either the TRACK 3 or TRACK 4 REC button.
MONO
STEREO
MONO
NOTE
When the bounce destination track is mono,
regardless of the assignment settings.
IN A
(INPUT A) is recorded
TIP
You can record an additional performance to the bounce destination
track(s) while monitoring the mix that is being bounced to them. In other
words, you can overdub as you bounce.
,
,
,
TASCAM DP-006
62
Page 63

7 – Recorder Functions
5. Adjust the LEVEL and TRACK 1/2 PAN knobs and TRACK 3/4 PAN (BAL)
knobs for the bounce source tracks.
For a stereo bounce, adjust the bounce source tracks according to their
types as follows to maintain left and right channel separation.
Bounce source How to adjust
Turn the TRACK 1 PAN knob all
TRACK 1 and TRACK 2
TRACK 3 and TRACK 4 with track
type set to
TRACK 3 or TRACK 4 with track
type set to
If a bounce source track type is set to
(BAL)) knob all the way to the left (L) and the TRACK 2/4 PAN (PAN (BAL))
knob all the way to the right (R).
Use the MASTER LEVEL knob to adjust the overall level.
MONO
STEREO
the way to the left (L) and the
TRACK 2 PAN knob all the way to
the right (R).
Turn the TRACK 3 PAN (BAL) knob
all the way to the left (L) and the
TRACK 4 PAN (BAL) knob all the
way to the right (R).
Set the TRACK 3 or TRACK 4 PAN
(BAL) knob to the center.
MONO
, set the TRACK 1/3 PAN (PAN
NOTE
A mono bounce is not possible if a bounce source track type is set to
STEREO
. A stereo track cannot be converted to left and right mono tracks
to create a mono bounce.
6. After locating to the point where the bounce will start, while pressing
and holding the Record (0) button, press the Play (7) button, press the
Play (7) button to bounce the track.
Press the Stop (8) button at the point where you want to stop the
bounce.
Confirming the result
Raise the bounce destination TRACK LEVEL knob (turn other TRACK LEVEL
knobs all the way down) and the MASTER LEVEL knob, and start playback
from the beginning of the song. If you are not satisfied with the result
because, for example, the balance between instruments is poor, or the pan
settings are wrong, use the undo function. (See “Undoing operations (undo)”
on page 58.)
If you are satisfied with the result, when the recorder is stopped press the REC
MODE button to open the
TRACK
.
After bouncing tracks, you can record again on (overwrite) tracks other than
the bounce tracks.
TIP
If it is possible that you might need the original tracks at some later
time, back-up the track data to a computer or copy the song before
bouncing(See “Copying songs” on page 48.) (See “Connecting with a
computer” on page 84.)
RECORDER MODE
screen and select
MULTI
TASCAM DP-006
63
Page 64

7 – Recorder Functions
Locate and search functions
Direct locate function
The current recorder position is shown at the top of the Home Screen in “hours:
minutes: seconds: frames” (30 frames per second).
You can move the current recorder position to a specific time by inputting it
here.
1. On the Home Screen, use the HOME button to move the cursor
(underline) between time counter divisions.
You can edit the value at the cursor positions.
The seconds are selected in the following figure.
2. Use the D ATA wheel to change the value above the cursor (underlined).
When adjusting a value, it will carry over automatically when it reaches
the highest or lowest value in a field. For example, when using the DATA
wheel to increase the seconds value, if the number changes from 59 to 0,
the minutes value will increase by one.
NOTE
When the DATA wheel is being turned, the following pop-up message
appears.
3. Press the HOME button to move to a different time division and use the
DATA wheel to change the value.
4. After setting the desired time value, press the Play (7) button to start
playback from that position.
Returning to the song beginning (RTZ function) or the point where recording was last started (LRP function)
Use simple button operations to return to the beginning of a song (00:00:00:00)
or to locate to the position where recording last started.
RTZ is short for “Return To Zero,” and LRP is short for “Last Recording Position.”
Return To Zero (song beginning at 00:00:00:00)
Press them [RTZ] button while pressing and holding the Stop (8) button.
Last Recording Position (the position recording last started)
Press the [LRP] button while pressing and holding the Stop (8) button.
This function is useful when you want to record the same passage again.
Search backward/forward
When stopped, press the m [RTZ] button/, [LRP] button to search
backward/forward.
Each time you press one of these keys, the speed increases from 10x to 50x,
100x and 1000x.
During playback, press and hold the m [RTZ] button/, [LRP] button to
search backward/forward. During playback, the search backward/forward
speed is fixed at 10x.
TASCAM DP-006
64
Page 65

7 – Recorder Functions
Repeat playback
Use the repeat playback function to play the same part again and again. The
repeated passage is time between the IN and OUT points.
Setting IN and OUT points
In addition to using them for setting the repeat playback passage, the IN and
OUT points are also used for interval setting for track editing. Moreover, the
IN and OUT points are used as the start and end points when making stereo
master tracks.
You can set these points when recording, playing back and stopped.
NOTE
In the following cases, IN and OUT points cannot be captured or edited.
i During repeat playback
i When the recording mode is set to
PLAY
8
Capturing IN and OUT points
1. Press the IN/OUT button to open the
MASTER REC
I/O SETTING
or
MASTER
screen.
2. Press the F3 [IN] button or F4 [OUT] button at the desired position
(whether the unit is stopped, playing or recording) to set the IN/OUT
point.
SET IN!
pop-up message.
or
SET OUT!
SET IN SET OUT
and the captured time appear in a
NOTE
When the Home Screen is open, you can also use the F3 and F4 buttons to
set IN and OUT points even though these F3/F4 button assignments do not
appear.
The set times will be shown with a
above.
8
Editing IN/OUT points
1. When the
2. Edit the values of IN and OUT points using the following guidelines.
I/O SETTING
enable editing.
• Use the F3 [5] and F4 [b] buttons to move the cursor (underlined)
between the IN and OUT items.
• Use the m [RTZ] and, [LRP] buttons to move the cursor (underlined)
between time fields.
• Use the D ATA wheel to change the value at the cursor position
(underlined).
SET IN!
screen is open, press the F2 [EDIT] button to
or
SET OUT!
message as
TASCAM DP-006
65
Page 66

7 – Recorder Functions
Repeat icon
3. When finished editing, press the HOME button to return to the Home
Screen.
Using repeat playback
1. Set the starting (IN) and ending (OUT) points for the time that you want
to repeat, and then return to the Home Screen.
2. Press the REPEAT button to start repeat playback.
The icon appears on the Home Screen during repeat playback.
Playback starts from the IN point. When the OUT point is reached, after
the set repeat interval elapses, playback starts again from the IN point.
Playback continues to repeat between the IN and OUT points.
3. Press the REPEAT button again to stop repeat playback. The icon on
the Home Screen disappears.
The next section explains how to set the repeat interval that determines
the amount of time until playback starts again after the OUT point is
reached.
NOTE
If the time between the IN and OUT points is less than 2 frames, an
O Too S hort
button and repeat playback will not occur.
pop-up message appears when you press the REPEAT
I/
Setting the time between repetitions (repeat interval)
The time between repetitions (repeat interval) can be set from 0.5 to 9.9
seconds.
1. Press the MENU button to open the
2. Use the D ATA wheel to select (highlight) the
and press the F4 [t] button to open the
3. Use the F3 [5] and F4 [b] buttons to select (highlight) the
Int
item setting value, and use the DATA wheel to set the value
between
0.5sec
0.5sec
(default value) and
and
9.9sec
ments).
Use the F3 [5] and F4 [b] buttons to select (highlight) the
Int
item setting value, and use the DATA wheel to set the value
between
4. After making the setting, press the HOME button to return to the Home
Screen.
MENU
screen.
PREFERENCE
PREFERENCE
9.9sec
(in 0.1-second increments).
screen.
(in 0.1-second incre-
menu item,
Repeat
Repeat
TASCAM DP-006
66
Page 67

8 – Editing Tracks
Editing on a conventional tape recorder in the past required advanced
techniques, but with this unit editing tracks is easy and accurate. Moreover,
with a tape recorder, an editing error could not be undone, but this unit uses
nondestructive editing, allowing you to edit without altering the original data.
This means that the undo function can be used to correct an edit easily. (See
“Undoing operations (undo)” on page 58.)
Overview of track editing
This unit has the following track editing functions.
•
CLONE TRACK (duplicate a track)
•
CLEAN OUT (erase a track)
•
SILENCE (erase part of a track)
•
CUT (remove part of a track)
•
OPEN (insert a silent section)
Editing points
Among track editing functions, SILENCE, CUT and OPEN use the IN and OUT
points for editing. These are the same as the IN and OUT points used for repeat
playback.
For instructions about how to set IN and OUT points, see “Setting IN and OUT
points” on page 65.
Use the
I/O SETTING
and OUT points” on page 65.)
screen to edit IN and OUT points. (See “Setting IN
IN point
The IN point is the beginning of the part of the track that will be edited.
Press the IN/OUT button to open the
F3 [IN] button at the time where you want to set the IN point.
I/O SETTING
screen, and press the
OUT point
The OUT point is the end of the part of the track that will be edited.
Press the IN/OUT button to open the
F4 [OUT] button at the time where you want to set the OUT point.
I/O SETTING
screen, and press the
Basic editing procedures
1. When the recorder is stopped, press the MENU button to open the
MENU
2. Use the D ATA wheel to select (highlight) the
screen.
press the F4 [t] button to open the
TRACK EDIT
TRACK EDIT
item, and
screen.
TASCAM DP-006
67
Page 68

8 – Editing Tracks
3. Use the D ATA wheel to select (highlight) the desired track editing
function, and press the F4 [t] button to open that editing function’s
screen.
4. Select the setting item value.
When there are multiple setting items, use the F3 [5] and F4 [b]
buttons to select the items, and use the DATA wheel to set the values. For
details about the settings, see the explanations of the functions on the
following pages.
5. Press the F2 [EXEC] button to execute the function.
NOTE
Press the F1 [BACK] button to return to the
TRACK EDIT
screen.
Track editing function setting items
In this section, we explain the setting items that appear on the various track
editing function screens.
SOURCE TRK (copy source track )
CLEAN OUT TRK (track to be deleted)
SILENCE TRK (track partially silenced)
CUT TRK (track partially deleted)
OPEN TRK (track to have silence inserted)
These items are used to select the tracks to be edited.
The options depend on the editing function.
• 1, 2, 3, 4: Individual tracks
• 1/2: Track pair
• 3/4: Tracks 3 and 4 selected
• 1-4: All tracks
• MST: Stereo master track
• ALL: Tracks 1-4 and stereo master track
Example of
SOURCE TRK
item Example of
CLEAN OUT TRK
item
TASCAM DP-006
68
Page 69

8 – Editing Tracks
IN/OUT
These show the starting/ending points when it is necessary to define a part of
a recording for editing.
However, you cannot change the IN and OUT points when using a track
editing function. Set these points on the
can open by pressing the IN/OUT button. (“Setting IN and OUT points” on
page 65.)
Example of IN and OUT items
I/O SETTING
screen, which you
DESTINATION TRK (copy destination track)
Use this to set the track that will be the destination of a copy, insert or clone
edit.
If a mono track was set as the
item options will also be mono tracks.
If a stereo track was set as the
item options will be stereo tracks and
Example of
SOURCE TRK
SOURCE TRK
DESTINATION TRK
1/2
(track pair).
, the
, the
DESTINATION TRK
DESTINATION TRK
item
CLONE TRACK (track duplication)
Using
CLONE TRACK
a master track on a different track (or tracks).
This copies the entire track, so the IN and OUT points have no effect.
The parameters that can be set are as follows.
• SOURCE TRK (1, 2, 3, 4, 1/2, MST)
• DESTINATION TRK
NOTE
If you choose the same track for both the
DESTINATION TRK
Tra c k
pop-up message appears and the operation is cancelled.
you can create a copy of a single track, a track pair or
item and press the F2 [EXEC] button, a
SOURCE TRK
item and the
Sam e
TASCAM DP-006
69
Page 70

8 – Editing Tracks
IN OUT
CLEAN OUT (track erase)
This completely erases the selected track. This erases the entire track, so the IN
and OUT points have no effect.
The parameters that can be set are as follows.
• CLEAN OUT TRK (1, 2, 3, 4, 1/2, 3/4, 1-4)
SILENCE (part erase)
IN OUT
This erases the selected track between the IN and OUT points. This has the
same effect as recording a silent signal between the IN and OUT points. This
operation does not change the track length.
The parameters that can be set are as follows.
• SILENCE TRK (1, 2, 3, 4, 1/2, 3/4, 1-4)
TIP
This function can be used to remove short noises, for example.
TASCAM DP-006
70
Page 71

8 – Editing Tracks
IN OUT
IN OUT
CUT (remove part)
IN
The part of the track between the IN and OUT points on the selected track is
CUT (deleted), and the rest of the track after the OUT point is moved forward
to the IN point. As a result, the length of the track becomes shorter.
The parameters that can be set are as follows.
• CUT TRK (1, 2, 3, 4, 1/2, 3/4, 1-4, ALL)
OPEN (insert silence)
IN OUT
A silent passage is inserted between the IN and OUT points on the selected
track. This operation splits a track at the IN point and the beginning of the
part after the IN point is shifted to the OUT point. As a result, the length of the
track becomes longer.
The parameters that can be set are as follows.
• OPEN TRK (1, 2, 3, 4, 1/2, 3/4, 1-4, ALL)
TASCAM DP-006
71
Page 72
9 – Mixdown and mastering
Mixdown
Adjusting the volumes and stereo positions of the recorded tracks to create a
well-balance stereo mix is called mixdown.
Level and balance
Use the TRACK 1–4 LEVEL knobs to adjust the relative balance between
tracks. Then, use the MASTER LEVEL knob to adjust the overall level.
Watching the and level meters on the display, adjust the levels until
they are suitable. If the volume is too loud, the sound will be distorted.
NOTE
The track level meters on the display show the recorded signal levels on
the tracks. Therefore, these meters do not change even when the TRACK
LEVEL knobs are adjusted.
TIP
You do not need to keep the entire song at the same volume. For example,
you could gradually increase the volume during a guitar solo.
Stereo position (panning)
Use the PAN knob of TRACK 1 or 2 to adjust the left-right stereo position of
the track.
If TRACK 3 or TRACK 4 is a stereo track, use its PAN (BAL) knob to adjust the
balance of its left and right channels.
If TRACK 3 or TRACK 4 is a mono track, use its PAN (BAL) knob to adjust the
left-right stereo position of the track as with TRACK 1 and 2.
Creating stereo master tracks
When you are satisfied with the mix of your tracks, you can mix them down to
a stereo master track.
A stereo master recorded by this unit is saved as part of the song, and can be
recorded by an external stereo recorder. It can also be converted by the unit
into a WAV file and exported to a computer where the sound can be processed
further or combined with other recordings. (See “Exporting stereo master
tracks” on page 92.)
NOTE
Only one stereo master can be made in a song at a time.
Setting the starting and ending points
Before you start creating a stereo master track, you must set the starting and
ending points. The part of the song between the IN and OUT points will be
recorded as the stereo master track. Ordinarily, the beginning of the song is
set as the IN point and the end of the song is set as the OUT point.
Press the F3 [IN] button at the point where you want to start the stereo master
track to set the IN (starting) point and press the F4 [OUT] button at the point
where you want to end it to set the OUT (ending) point.
For details about adjusting IN and OUT points, see “Setting IN and OUT points”
on page 65.
Creating a stereo master track
After setting the IN and OUT points, you can make the stereo master track.
1. When the recorder is stopped, press the REC MODE button to open the
RECORDER MODE
screen.
TASCAM DP-006
72
Page 73

9 – Mixdown and mastering
2. Use the DATA wheel to select (highlight) the
3. Press the F4 [EXEC] button.
After a
At this point, if you start playback or recording, you will be able to hear
•
•
•
•
Master Rec!
to master recording mode and the Home Screen reopens.
the mixed track signals (including signals that will be recorded) through
headphones or an external monitoring system (powered monitor
speakers or an amplifier and speakers).
pop-up message appears, the recorder switches
NOTE
When in master recording mode,
the top left of the Home Screen.
If you try to switch to master recording mode when the length of the
interval between IN and OUT points is less than four seconds, a
Short
(track is too short) pop-up message appears and master recording
mode will not be activated.
You cannot change the IN and OUT points when in master recording mode.
Playback and some other functions do not work when the unit is in master
recording mode. If you try to use one of these functions, an
Mode
pop-up message appears.
MASTER REC
MASTER REC
appears highlighted at
item.
Trk Too
In Master
4. While pressing and holding the Record (0) button, press the Play (7)
button to start creating a stereo master track. The Record (0) indicator
lights.
Regardless of the recorder position, the part of the song between the IN
and OUT points will be recorded as the stereo master track.
As necessary, use the LEVEL and TRACK 1/2 PAN and TRACK 3/4 PAN
(BAL) knobs to adjust the mix. These adjustments will affect the recorded
stereo master track.
Creating a stereo master track automatically ends when the recorder
reaches the OUT point.
5. If you want to redo creation of the stereo master track, press the Play (7)
button again while pressing and holding the Record (0) button.
This will create a new stereo master track, overwriting and deleting the
previous one.
NOTE
•
After recording a stereo master track, you can play it back to check it. (See
“Checking stereo master tracks” on page 74.)
•
You can undo the creation of a stereo master track. So, after re-recording
the stereo master track several times, you can go back and choose one
that was previously recorded.
6. Press the REC MODE button to open the
and use the DATA wheel to return the recorder to
RECORDER MODE
MULTI TRACK
screen,
mode.
TASCAM DP-006
73
Page 74

9 – Mixdown and mastering
Checking stereo master tracks
After creating a stereo master track, you can listen to it by following these
procedures.
1. When the recorder is stopped, press the REC MODE button to open the
RECORDER MODE
2. Use the DATA wheel to select (highlight) the
3. Press the F4 [EXEC] button.
After a
•
•
Master Play!
switches to
NOTE
When the recorder is in
highlighted at the top left of the Home Screen.
If there is no stereo master track, a
will appear and the recorder mode will not change to
screen.
pop-up message appears, the recorder
MASTER PLAY
MASTER PLAY
MASTER PLAY
mode, and the Home Screen reopens.
mode,
MASTER PLAY
No Master Trk
item.
appears
pop-up message
MASTER PLAY
.
4. In this mode, press the Play (7) button to play the stereo master track.
The stereo master track signal is output from the /LINE OUT jack, so it
can also be dubbed to an external stereo recorder.
5. After you have created a stereo master track that you are satisfied with,
press the REC MODE button to open the
and use the DATA wheel to return the recorder to
mode.
If you are not satisfied with the stereo master track, you can create a new
one. A new stereo master track will overwrite the previous one.
RECORDER MODE
MULTI TRACK
screen,
NOTE
To listen to the recorded stereo master track of a saved song, load that
song, set the recorder mode to
(7) button to start playback.
TIP
•
When creating a stereo master track, you can play along with the mixdown
signal and record that sound through INPUT A/B to mix it with prerecorded tracks.
•
When this recorder is in
master mix created on this unit as a file that can be played back on a
computer. (See “Exporting stereo master tracks” on page 92.)
•
When this recorder is in
master track to TRACK 1 and TRACK 2 or stereo TRACK 3 or TRACK 4 by
cloning the track. (See “CLONE TRACK (track duplication)” on page 69.)
MASTER PLAY
MULTI TRACK
MULTI TRACK
and then press the Play
mode, you can transfer a stereo
mode, you can copy a stereo
TASCAM DP-006
74
Page 75

10 – Miscellaneous Functions
Metronome
This unit has a built-in metronome function that can be used when the
recorder is operating. You can set it to function during both playback and
recording or only during recording.
1. When the recorder is stopped, press the MENU button to open the
MENU
2. Use the D ATA wheel to select (highlight) the
3. Set the following items.
Use the F3 [5] and F4 [b] buttons to select (highlight) items, and use
Select one of the following modes.
Set the speed between 20 and 250 BPM (default value: 120).
screen.
press the F4 [t] button to open the
the DATA wheel to set their values.
MODE
Mode Meaning
OFF
(default value)
REC&PLAY
REC ON LY
metronome OFF, default value
Metronome functions during both
recording and playback
Metronome functions only during
recording
TEMPO
METRONOME
METRONOME
item, and
screen.
BEAT
Set the number of beats between 1 and 12 (default value: 4).
The accent falls on the first beat.
LEVEL
Set the metronome volume between 0 and 127 (default value: 100).
4. After completing the setting, press the HOME button to return to the
Home Screen.
The metronome will now function according to the MODE setting made
in step three.
Even if the metronome is active during recording, the its sound will not
be recorded directly.
NOTE
•
If you record using a mic while monitoring the metronome sound through
connected speakers, the metronome sound could be recorded.
•
When the metronome is operating, you can adjust the
other items on the
•
You can use the metronome to provide a click when making the first
recording of, for example, a rhythm guitar or bass part.
•
If you want to use the metronome when practicing, you can either play a
song that does not have any recordings or turn the TRACK LEVEL knobs
all the way down during playback.
METRONOME
screen cannot be changed.
LEVEL
item, but
TASCAM DP-006
75
Page 76

10 – Miscellaneous Functions
Tuner
Use the built-in chromatic tuner to tune guitars or wind instruments, for
example.
1. Connect a guitar or bass to INPUT A.
INPUT B cannot be used for tuning.
Use built-in MIC A to tune other instruments such as wind instruments.
2. On the
3. Press the HOME button to show the Home Screen.
4. When the recorder is stopped, press the F1 [TUNER] button to open the
The
5. Use the D ATA wheel to set the standard frequency of the A note between
INPUT SETTING
GUIT AR/ LIN E, GUIT AR/LIN E M
“Selecting the input source” on page 51.)
screen, set the
NOTE
When using the built-in mic, select
A-Mid
or
INT.MIC A - High
TUNER
screen.
Calibra tion
435 and 445 Hz. (default value: “440Hz”)
on the
(standard frequency) item is selected (highlighted).
IN A
input source to
or
GUIT AR/LIN E H
INT.MIC A-Low, INT.MIC
INPUT SETTING
. (See
screen.
6. Play the instrument and tune it.
The pitch name closest to the string appears above the meters. Tune the
string roughly until the sound name that you want appears. Then, fine
tune the string until the rectangle at the middle of the meter darkens,
showing that the string is in tune. If the pitch is too low, a bar extends
to the left of the middle and if it is too high it extends to the right. The
longer the bar is the more out of tune the string is.
The rectangle at the middle of the meter darkens when the string is in
tune.
7. When you are finished tuning, press the HOME button to open the Home
Screen.
NOTE
If you want to monitor the input signal, press the REC button of the track
that has
IN A
54.)
(INPUT A) assigned to it. (See “Assigning inputs” on page
TASCAM DP-006
76
Page 77

10 – Miscellaneous Functions
Automatic power saving function
You can set the amount of time until the unit automatically turns OFF (enters
standby) after its last activity or operation.
1. When the recorder is stopped, press the MENU button to open the
MENU
2. Use the D ATA wheel to select (highlight) the
3. Use the F3 [5] and F4 [b] buttons to select (highlight) the
Options: OFF (does not turn off automatically), 3min, 5min, 10min, 30min
4. After completing the setting, press the HOME button to return to the
screen.
press the F4 [t] button to open the
Pwr Save
of the following values.
(default value)
Home Screen.
item setting value, and use the DATA wheel to set it to one
PREFERENCE
PREFERENCE
screen.
item and
Auto
Restoring preferences to default values
You can restore
(See page 100.) to their initial values (values set when the unit was shipped
from the factory). This operation is called initialization.
1. When the recorder is stopped, press the MENU button to open the
MENU
2. Use the D ATA wheel to select (highlight) the
press the F4 [t] button to open the
3. Use the F3 [5] and F4 [b] buttons to select (highlight)
Initialize
4. When a confirmation pop-up message appears, press the F3 [YES]
button.
After initialization completes, the
NOTE
Press the F4 [NO] button to cancel initialization.
5. After completing initialization, press the HOME button to return to the
Home Screen.
PREFERENCE
screen.
, and press the F2 [EXEC] button.
screen settings and backup memory items
PREFERENCE
PREFERENCE
PREFERENCE
item and
screen.
Exec
next to
screen reopens.
TASCAM DP-006
77
Page 78

10 – Miscellaneous Functions
Viewing information
You can view information about the current song (currently loaded song), the
SD card, the system and the firmware.
1. When the recorder is stopped, press the MENU button to open the
MENU
2. Use the D ATA wheel to select (highlight) the
The
3. Use the F3 [PREV ] and F4 [NEXT] buttons to change the page.
The pages contain the following information.
screen.
press the F4 [t] button to open the
MA TION
screen.
INFORMATION
screen has four pages including this one.
INFORMATION
SONG
(1/4) page of the
INF OR -
SONG (1/4) page
For the MTR partition that holds the currently loaded song, the
partition number, the name (title) of that song and the remaining
recording time are shown
item, and
CARD (2/4) page
MTR partitions and capacities, FAT partition capacity
SYSTEM (3/4) page
Repeat playback interval, automatic power saving time and contrast
settings
F/W (4/4) page
system firmware version
TASCAM DP-006
78
Page 79

11 – SD Card Management
Size of entir
Overview of partitions
As described in “Partitions and songs” (page 45), SD cards formatted by this
unit are divided into partitions. MTR partitions are for recording data while the
FAT par tition can be accessed with a personal computer. High-capacity cards
can have multiple MTR partitions. In this case, you can use the MTR partitions
for different songs, for example, or copy songs to a different MTR partitions to
save their information. The FAT partition is FAT32 format and can be accessed
by a computer connected to this unit by USB. This FAT partition is used to save
songs and export stereo masters to computers, as well as to allow this unit
to import audio files into songs, for example. For this reason, two steps are
necessary to copy from a MTR partition and a computer. You can also format
an entire card or individual partition as well as change the divisions between
partitions (repartition) as necessary.
CAUTION
Formatting and repartition operations cannot be undone!
NOTE
•
The FAT (File Allocation Table) format is a disk format that can be read by a
computer.
•
SD cards that meet SD/SDHC standards and are at least 512 MB can be
used with this unit. A list of SD cards that have been confirmed for use with
this unit can be found on the TASCAM website (http://tascam.com/).
•
See “Selecting the active partition” on page 45 for how to change the
active partition.
Formatting SD cards
This operation formats the entire card and allows you set MTR partition sizes
for high-capacity cards.
CAUTION
This operation erases all the data on the card and cannot be undone!
Confirm that you will not lose important data before formatting a card.
1. When the recorder is stopped, press the MENU button to open the
MENU
2. Use the D ATA wheel to select (highlight) the
3. Use the D ATA wheel to select the
The following table shows the FAT and MTR partition sizes for different
screen.
F4 [t] button to open the
button to open the
FORMAT
CARD
screen.
screen.
FORMAT
CARD
item, and press the
item, and press the F4 [t]
MTR partition size
FAT partition size
e SD card
SD card capacities. The FAT partition size is set automatically according
to card capacity. The size of the MTR partition on cards 4 GB or smaller is
also fixed, but cards that are 8 GB or larger have multiple MTR partitions
and their sizes can be chosen. However, the last MTR partition is set to
fill the remaining space on the card automatically, so its size cannot be
chosen.
TASCAM DP-006
79
Page 80

11 – SD Card Management
SD card capacity and partition size
SD card capacity FAT partition size MTR partition size
32GB 4GB 2GB, 4GB, 8GB or 16GB
16GB 4GB 2GB, 4GB or 8GB
8GB 2GB 2GB or 4GB
4GB 2GB 2GB fixed
2GB 1GB 1GB fixed
1GB 512MB 512MB fixed
512MB 256MB 256MB fixed
NOTE
•
The unit can handle a maximum of 4 MTR partitions, no matter how small
you make them.
•
When you insert an unformatted SD card, the unit will ask you to format
it. At this time, however, you cannot choose the size of the MTR partitions.
If you want to change the sizes, follow the procedures above to format the
card.
4. If the capacity of the SD card is 8 GB or less, press the F2 [EXEC] button.
If the capacity of the SD card is more than 8 GB, use the DATA wheel to
set the size of the MTR partition, and press the F2 [EXEC] button.
A pop-up message warning that all songs will be erased appears.
5. Press the F3 [YES] button to format the SD card.
For example, if you format a 16 GB SD card with 4GB MTR partitions, 12
GB are left for MTR partitions after 4 GB is used for the FAT partition. Three
partitions are created. Two are 4 GB and the last one is 3 GB. (Since 1GB is
actually 1024 MB, the total size of the partitions does not always match
the SD card size.)
NOTE
•
When formatting finishes the
•
After formatting, one song is automatically created in each MTR partition.
•
To cancel formatting, press the F4 [NO] button.
CARD
menu screen reopens.
TASCAM DP-006
80
Page 81

11 – SD Card Management
Reformatting MTR partitions
You can reformat any MTR partition if you want. Use this function when you
just want to format a specific partition without changing its size.
CAUTION
You cannot undo this operation! All the data on the selected partition will
be erased, so be certain that you will not lose anything important when
reformatting.
1. When the recorder is stopped, press the MENU button to open the
MENU
2. Use the D ATA wheel to select (highlight) the
3. Use the D ATA wheel to select (highlight) the
A list of the MTR partitions and their sizes (not open capacities) appear.
The currently selected MTR partition has an asterisk (*) on its right.
screen.
F4 [t] button to open the
the F4 [t] button to open the
CARD
screen.
REFORMAT
CARD
item, and press the
REFORMAT
screen.
item, and press
4. Use the D ATA wheel to select (highlight) the MTR partition that you want
to reformat, and press the F2 [EXEC] button.
A pop-up message appears warning you that this will delete all the data
on the MTR partition.
5. Press the F3 [YES] button to reformat the MTR partition.
NOTE
•
When reformatting finishes the
•
After reformatting, one song is automatically created in the MTR partition.
•
To cancel reformatting, press the F4 [NO] button.
CARD
menu reopens.
TASCAM DP-006
81
Page 82

11 – SD Card Management
Reformatting FAT partitions
You can also reformat just the FAT partition. The size of the FAT partition
cannot be changed.
CAUTION
You cannot undo this operation! All data on the FAT partition will be
erased, so be certain that you will not lose anything important when reformatting.
1. When the recorder is stopped, press the MENU button to open the
MENU
2. Use the D ATA wheel to select (highlight) the
3. Use the D ATA wheel to select (highlight) the
A pop-up message warning that all data on the FAT partition will be
4. Press the F3 [YES] button to reformat the FAT partition.
screen.
F4 [t] button to open the
and press the F4 [t] button.
erased appears.
NOTE
•
When reformatting finishes the
•
To cancel reformatting, press the F4 [NO] button.
CARD
screen.
CARD
menu screen reopens.
CARD
item, and press the
FAT REFORMAT
item,
Initializing SD cards
If you want to use an SD card that was used with this unit, we recommend
that you initialize it.
When you initialize an SD card, the entire card is formatted as FAT32.
1. When the recorder is stopped, press the MENU button to open the
MENU
2. Use the D ATA wheel to select (highlight) the
3. Use the D ATA wheel to select (highlight) the
A pop-up message warning that all data on the card will be erased
4. Press the F3 [YES] button to initialize the entire SD card and format it in
screen.
F4 [t] button to open the
and press the F4 [t] button.
appears.
FAT32 format.
CARD
screen.
CARD
item, and press the
SD INITIALIZ E
NOTE
To cancel initialization, press the F4 [NO] button.
CAUTION
After initializing an SD card, it must be formatted again to be used with
this unit. (See “Formatting SD cards” on page 79.)
item,
TASCAM DP-006
82
Page 83

12 – Exchanging Data with a Computer
By connecting this unit with a computer using the included USB cable you
can backup song data on this unit’s SD card to the computer and restore
backed-up song data from the computer. Moreover, you can export track files
and stereo master files from a song to a computer and import audio files on
the computer to the unit.
Backed-up data can be restored to a different DP-006 unit than the one that
created it. In this way, files can be freely exchanged between DP-006 units,
making it easy to add additional recordings or mix existing recordings in a
different location.
CAUTION
Instead of using the USB connection, if you want to remove an SD card
from this unit and back-up its data by connecting it directly to a computer
(or using a card reader), always turn the unit’s power off (put in standby)
before removing the card.
NOTE
•
The MTR partitions where song files are stored cannot be directly accessed
from a computer.
•
In this chapter, “computer” refers to a Windows or Macintosh computer
connected to this unit. (See “Supported operating systems” on page 83.)
The following types of data can be transferred from this unit to a computer.
8
Entire songs
You can transfer the data for an entire song from the unit’s BACKUP
directory on the FAT partition to a computer. This operation is called
“backup.” In addition, data backed-up on a computer can be transferred
to the BACKUP directory on the FAT partition, and then restored as song
data. This operation is called “restore.”
8
WAV format tracks
You can convert tracks to WAV files and export them to a computer. You can
also import WAV files from a computer.
These WAV files are stored on the WAVE directory of this unit’s FAT partition.
8
Stereo master files
Stereo master files can be transferred as stereo WAV files from the WAVE
directory on the FAT partition of this unit to a computer.
Only export is possible.
Supported operating systems
You can connect this unit to computers with the following operating systems.
8
Windows
Windows XP, Windows Vista, Windows 7
8
Mac OS X
Mac OS X 10.2 or later
When this unit is connected to a computer, the computer recognizes it as a
removable disk. There is no need for a special driver.
NOTE
Data transfer between this unit and a computer occurs at USB 2.0 speed
(maximum). Data can still be transferred if the computer connection is
USB1.1, but it will be slower. In addition, to assure USB 2.0 speed, use the
included cable or a cable that meets USB 2.0 standards.
TASCAM DP-006
83
Page 84

12 – Exchanging Data with a Computer
Connecting with a computer
To use the FAT partition of this unit, the unit must be connected to a computer
by USB. When connected by USB, this unit’s record, playback and other
recorder operations cannot be used.
To connect with a computer, connect the USB port on the right side panel
of the unit with a USB port on the computer using the included USB cable. It
does not matter whether you turn the unit’s power ON before or after the USB
connection is made.
If the USB connection is made while the unit’s power is ON, the currently
loaded song is saved before the USB connection becomes effective.
If the USB connection is made while this unit’s power is ON, the currently
loaded song is saved before the USB connection becomes active and the
following screen appears on the display.
If you turn the unit’s power ON after making the USB connection, the screen
above appears right away.
The unit appears as an external drive named “DP-006” on the computer’s
display.
Click the “DP-006” drive on the computer to view the “BACKUP”, “WAVE “ and
“UTILITY” folders in the FAT partition of the DP-006.
CAUTION
•
This unit receives power from batteries or a TASCAM PS-P520 AC adaptor.
It cannot be powered over USB.
•
Do not make a USB connection when the remaining battery level is low. If
the power turns OFF during data transfer, all the data will be lost. This lost
data cannot be restored.
•
Do not change the names of the three folders in “DP-006”.
•
The total number of files and folders that this unit can recognize on a FAT
partition is 100. If the number exceeds 100, transfer them to a computer
hard drive, for example.
NOTE
•
This unit can only be connected to a computer by USB when the recorder
mode is set to
•
Before connecting the unit and the computer by USB, confirm that you
have exported or backed up to the FAT partition all the files that you want
to transfer to the computer.
•
The “UTILITY” folder is used to update the unit’s system software, for
example.
MULTI TRACK
.
TASCAM DP-006
84
Page 85

12 – Exchanging Data with a Computer
Disconnecting
Follow these steps to properly end the USB connection.
CAUTION
When transferring data, do not disconnect the unit or remove the USB
cable. Doing so could cause data on the computer or this unit to be
damaged.
NOTE
The procedure on the computer for disconnecting might be called “eject”
or “unmount”.
Disconnecting from Windows XP/Windows Vista/Windows 7
Follow the procedures below to disconnect computers that use Windows XP,
Windows Vista, or Windows 7 operating systems.
A PC card icon and arrow appear in the taskbar (usually at the bottom right of
the screen).
1. Left-click on this icon to open a pop-up bar. Click this pop-up bar to
disconnect this unit from the computer.
2. After a pop-up message appears on the computer display saying that the
unit can be disconnected, remove the USB cable.
The unit restarts automatically and the Home Screen opens on its display.
NOTE
Do not remove the USB cable if a pop-up message warning that the unit
cannot be disconnected safely appears on the computer display. Close
all the computer programs and windows that are accessing (reading or
writing) files on the unit, and then try the operation again.
Disconnecting from Mac OS X
1. Drag the “DP-006” icon that represents this unit to the Trash, or type
Command-E to disconnect the DP-006.
2. After the DP-006 icon disappears from the desktop, remove the USB
cable.
This unit restarts and the Home Screen appears on the display.
TIP
Depending on the OS version or OS settings, you might also be able to
disconnect the DP-006 by clicking an eject icon next to it in the Finder
window or by using a control key.
TASCAM DP-006
85
Page 86

12 – Exchanging Data with a Computer
Song backup and restoration
Song backup saves not only audio tracks, but also backs up editing data and
other song data. Song restoration is the reverse of this process. In short, song
files are transferred from the computer to the FAT partition of the unit and
then used to restore the song.
Backing-up songs
Before starting a backup, check that the MTR partition that has the song that
you want to backup is selected. (See “Selecting the active partition” on page
45.)
1. When the recorder is stopped, press the MENU button to open the
MENU
2. Use the D ATA wheel to select (highlight) the
3. Use the D ATA wheel to select (highlight) the
A list of songs in the currently selected MTR partition appears.
screen.
press the F4 [t] button to open the
press the F4 [t] button to open the
DATA BACKUP
DATA BACKUP
SONG BACKUP
SONG BACKUP
item, and
screen.
item, and
screen.
4. Use the D ATA wheel to select (highlight) the song you want to back up,
and press the F4 [NEXT] button.
A screen appears that allows you to edit the file name (title) of the song
selected on the
5. Edit the name (title) of the song being backed up as necessary. (See
“Editing names” on page 46.)
6. After setting the name (title), press the F2 [EXEC] button.
A backup copy of the song on the active partition is made on the FAT
partition (“.001” is added as an extension).
A
Writing File
backing up.
When the backup is complete, the
SONG BACKUP
pop-up message appears on the display while
screen.
DATA BACKUP
screen reopens.
NOTE
If the open space necessary to back up a song is not available on the FAT
partition, a
open space) pop-up message appears. In this case, connect this unit and a
computer, and erase unnecessary files on the partition using the computer
to make enough open space.
It's too Lar ge
(the file is larger than the available
TASCAM DP-006
86
Page 87

12 – Exchanging Data with a Computer
7. Connect this unit to a computer using the USB cable. (See “Connecting
with a computer” on page 84.)
8. Use the computer to copy backup files from the BACKUP directory on the
FAT par tition of the unit to the computer.
9. When done backing up, end the USB connection. (See “Disconnecting”
on page 85.)
CAUTION
•
If you use a computer to change the name of a song file that has been
backed up, use no more than eight ordinary English letters and numbers.
•
Do not change the file extension.
Restoring songs
Basically, restoring is the reverse of backing up. In short, transfer a backup file
on a computer to this unit to restore a song.
1. Connect this unit to a computer using the USB cable. (See “Connecting
with a computer” on page 84.)
2. Use the computer to copy backup files from the computer to the BACKUP
directory on the FAT partition of the unit.
3. When done copying, remove the USB cable using the proper procedures
and disconnect the unit from the computer. (See “Disconnecting” on
page 85.)
4. After this unit restarts automatically, press the MENU button to open the
MENU
5. Use the D ATA wheel to select (highlight) the
6. Use the D ATA wheel to select (highlight) the
This screen shows the backup files on the FAT partition.
screen.
press the F4 [t] button to open the
and press the F4 [t] button to open the
DATA BACKUP
DATA BACKUP
screen.
SONG RESTORE
SONG RESTORE
item, and
item,
screen.
TASCAM DP-006
87
Page 88

12 – Exchanging Data with a Computer
NOTE
A
File No t Fou nd
if there are no files on the FAT partition.
7. Use the D ATA wheel to select (highlight) the file that you want to restore,
and press the F2 [EXEC] button.
The actual song name and an
message appear.
(the file cannot be found) pop-up message appears
Are yo u s ure?
confirmation pop-up
NOTE
If the file name is short, spaces appear after the file name on the FAT
partition, but those spaces are not included in the actual file name.
8. Press the F3 [YES] button.
After the currently loaded song is saved, the song selected in step 7 is
restored and loaded.
NOTE
If there is not enough open space on the SD card, a
message appears.
9. Press the HOME button to reopen the Home Screen.
Ca rd Full
pop-up
Track import and export
You can import and export individual tracks between a computer and this
unit’s FAT partition.
Files that can be imported/exported as tracks must be in the WAV format (with
the “.WAV” extension).
You can import and export both mono and stereo files.
If you want to import an audio file that is of a different format, you must first
convert it to a 16-bit, 44.1kHz mono/stereo WAV file.
Importing to tracks
Before importing a track, first select the partition with the song that you want
to import it into as the active partition. Then, load the song that you want to
import tracks into. (See “Selecting the active partition” on page 45.)
1. Connect the unit to a computer using the included USB cable. (See
“Connecting with a computer” on page 84.)
2. Use the computer to copy WAV files on its drive to the WAVE directory in
this unit’s FAT partition.
NOTE
The files to be copied must have single-byte alphanumeric character
names(8 characters or less). If you try to copy a file with double-byte
characters, it cannot be imported because the file name will not appear on
the display in step 6 below.
3. After you have imported the track files from the computer, remove the
USB cable using the proper procedures and disconnect the unit from the
computer. (See “Disconnecting” on page 85.)
4. After this unit restarts automatically, press the MENU button to open the
MENU
screen.
TASCAM DP-006
88
Page 89

12 – Exchanging Data with a Computer
5. Use the D ATA wheel to select (highlight) the
and press the F4 [t] button to open the
IMPORT/EXPORT
6. Use the D ATA wheel to select (highlight) the
and press the F4 [t] button.
Song files on the FAT par tition are shown.
NOTE
•
This unit does not support WAV files with sampling frequencies other than
44.1 kHz. Such files are not displayed even if they have been imported. If
no files that can be imported are on the FAT partition, an
Not Found
•
If the file name is short, spaces appear after the file name on the FAT
partition, but those spaces are not included in the actual file name.
screen appears.
pop-up message appears.
IMPORT/EXPORT
IMPORT/EXPORT
IMPORT TRACK
Impo rt File
screen.
item,
item,
7. Use the D ATA wheel to select the WAV file that you want to import, and
press the F2 [NEXT] button.
The amount of open space on the MTR partition and the size of the
selected WAV file appear on the display.
If the WAV file is stereo, this unit automatically selects two mono tracks
(TRACK 1 and 2) or a stereo track (TRACK 3 or TRACK 4).
8. Use the D ATA wheel to select the track to which you want to import the
WAV file, and press the F4 [EXEC] button to start importing.
NOTE
•
If there is not enough open space, an
file to be imported is too large) warning pop-up message appears.
•
The track that is the destination for the import must be empty. This unit
reads the file from the FAT partition, and imports it to the designated track.
The beginning of the file is set at the start of the song (00h00m00s00f ).
In the same way as other recording tracks, you can edit the track that has
received the imported file. (See “8 – Editing Tracks” on page 67.)
•
When importing stereo WAV files, it is necessary to have an open pair of
tracks or a stereo track.
Impo rt File Too La rg e
(the
CAUTION
After importing a file to TRACK 3 or 4, if the track type has been changed
from stereo to mono or mono to stereo, any file that has been imported to
this track previously will be deleted. This operation can be undone.
9. When done importing, press the HOME button to return to the Home
Screen.
TASCAM DP-006
89
Page 90

12 – Exchanging Data with a Computer
Exporting tracks
You can export the tracks that you want as 16-bit, 44.1kHz mono and stereo
WAV files.
1. When the recorder is stopped, press the MENU button to open the
MENU
2. Use the D ATA wheel to select (highlight) the
3. Use the D ATA wheel to select (highlight) the
On this screen, song tracks that have audio files are shown in a list.
You can tell the original track number by the file name.
screen.
and press the F4 [t] button to open the
and press the F4 [t] button to open the
IMPORT/EXPORT
IMPORT/EXPORT
EXPORT TRACK
EXPORT TRACK
item,
screen.
item,
screen.
TIP
Press the F3 [NAME] button to open the
can edit the file name. (See “Editing names” on page 46.)
NAME EDIT
screen where you
NOTE
Song tracks that do not have audio files are not shown in the file list.
4. Use the D ATA wheel to select (highlight) a track to export, and press the
F4 [✔] button to put a ✔ in its checkbox.
By putting ✔ marks in multiple checkboxes, you can export multiple
tracks at the same time.
NOTE
To remove a ✔ from a checkbox select (highlight) that track and press the
F4 [✔] button.
TASCAM DP-006
90
Page 91

12 – Exchanging Data with a Computer
5. When you finish selecting (putting a ✔ next to) the tracks that you want
to export, press the F2 [NEXT] button.
The amount or open space on the FAT partition (which is the destination
for the exported tracks) and the total number of tracks to be exported is
shown.
6. Press the F4 [EXEC] button.
The selected track is exported to the FAT par tition with the edited file
name with the “.WAV” extension added as the track file name.
If you have previously exported a track file with the same name (title), a
Duplicate n am e A re you su re?
already exists. Are you sure that you want to overwrite it?) confirmation
pop-up message appears.
Press the F3 [YES] button to overwrite the old file.
Press the F4 [NO] button to cancel the export and return to the file list
screen.
7. Press the HOME button to reopen the Home Screen.
8. Connect this unit to a computer. (See “Connecting with a computer” on
page 84.)
9. Use the computer to copy track files from the WAVE folder on the FAT
partition to the computer.
(A file with the same name
10. After exporting track files to the computer, remove the USB cable using
the proper procedures and disconnect the unit from the computer. (See
“Disconnecting” on page 85.)
NOTE
•
You can change the name of an exported track file on the computer. If you
do so, use no more than 8 English letters and numbers for the name and
always follow them with the “.wav” extension. Furthermore, do not use
special symbols, for example.
•
Exported files are given names according to their source tracks in the
following manner.
TRACK 1: “TEX001.WAV”
TRACK 2: “TEX002.WAV”
TRACK 3 (mono): “TEX003.WAV”
TRACK 3 (stereo): “TEX003S.WAV”
TRACK 4 (mono): “TEX004.WAV”
TRACK 4 (stereo): “TEX004S.WAV”
TASCAM DP-006
91
Page 92

12 – Exchanging Data with a Computer
Exporting stereo master tracks
When you create a new stereo master track for a song, the existing stereo
master track is overwritten, so if you want to keep multiple different stereo
master tracks, you should save them to a computer.
Before starting the following export procedures, make sure that the song for
which you want to export a stereo master track is currently loaded and that
you have already created a stereo master track for it.
1. When the recorder is stopped, press the MENU button to open the
MENU
2. Use the D ATA wheel to select (highlight) the
3. Use the D ATA wheel to select (highlight) the
screen.
and press the F4 [t] button to open the
and press the F4 [t] button to open the
NOTE
A
Mast er Track No t Found
there is no stereo master track.
IMPORT/EXPORT
IMPORT/EXPORT
EXPORT MASTER
EXPORT MASTER
warning pop-up message appears if
item,
screen.
item,
screen.
4. Edit the name (title) of the stereo master file as necessary. (See “Editing
names” on page 46.)
5. When done editing the file name, press the F2 [EXEC] button to export a
stereo master track as a single 16-bit, 44.1kHz stereo WAV file to the FAT
partition.
The file name of the exported file is the name set in step 4 above plus the
“.WAV” extension.
If you have previously exported a stereo master track with the same
name (title), a
same name already exists. Are you sure that you want to overwrite it?)
confirmation pop-up message appears.
Press the F3 [YES] button to overwrite the old file.
Press the F4 [NO] button to cancel the export and return to the previous
screen where you can edit the name (title).
Duplicate n am e A re you su re?
(A file with the
NOTE
To cancel exporting, press the F1 [BACK] button.
6. Press the HOME button to reopen the Home Screen.
7. Connect this unit to a computer using a USB cable. (See “Connecting with
a computer” on page 84.)
8. Use the computer to copy the stereo master file from the WAVE directory
on the FAT par tition of the unit to the computer.
9. After copying finishes, remove the USB cable using the proper procedures and disconnect the unit from the computer. (See “Disconnecting”
on page 85.)
TASCAM DP-006
92
Page 93

13 – Troubleshooting
When working with any new piece of equipment like the unit, it’s sometimes difficult to work out whey something isn’t happening the way you expect. The main
thing is to take your time—after all, you’re not paying hourly studio rates! Stop and think. Ask yourself questions, like the ones below, and you can usually find the
answer.
Also, see the “Messages Lists” section on page 94 for the meaning of messages that may pop up on the display. Consult this table when a message appears
when an operation cannot be completed by the unit.
Why can’t I hear any sound when I play back?
• Are the LEVEL knobs of the tracks set to high enough?
• Is the MASTER LEVEL knob set to high enough?
• Have you properly connected the /LINE OUT jack to headphones
or an external monitoring system (powered monitor speakers or an
amplifier and speakers)?
Is the external monitoring system set up correctly?
• Has the VOLUME dial on the left side of the unit been raised to a
suitable level?
Why does the sound I'm recording sound distorted?
• Are the LEVEL knobs of the INPUT A or INPUT B on the top panel of
the unit set too high? Is the input source too loud?
• Is the monitoring level too high, causing distortion from the external
monitoring system (powered monitor speakers or an amplifier and
speakers)?
Why can’t I record?
• When you press the Play (7) button while pressing and holding the
Record (0) button to start recording, is at least one track in recording
standby (REC indicator lit)?
• Are inputs assigned to tracks? (See “Assigning inputs” on page 54.)
Why can’t my computer “see” the unit files?
• Is the unit connected to the computer via the USB terminal? (See
“Connecting with a computer” on page 84.)
• Before making the USB connection, songs, tracks, or stereo masters are
backed up or exported to the FAT partition?
Files on an MTR partition cannot be accessed directly from a computer.
When using the AC adaptor, noise occurs if I connect a passive
guitar or bass directly.
• Connecting another device to the unit’s /LINE OUT jack might
reduce the noise.
• This might be caused by interference noise from another device. If
there is a power amplifier or other device that uses a large transformer,
a fluorescent light or something similar nearby, you might be able to
reduce the noise by changing the distance and orientation of this unit
in relation to such equipment.
TASCAM DP-006
93
Page 94

14 – Message Lists
The following popup messages alert you to conditions that may arise while you are using the unit. Consult this table if you see something you do not understand.
Messages Meaning and remedy
Battery Empty
Battery Low
Card Full
Empty Export Track
File Not Found
I/O Too Short
Import File Not Found
Import File Too Large
In Bounce Mode
In Master Mode
The batteries have no remaining charge.
This appears when the batteries have no remaining charge.
Replace the batteries with new ones or use a TASCAM PS-P520 AC adapter (sold separately).
The batteries have little remaining charge.
This appears if you try to start recording when the batteries are low.
Replace the batteries with new ones or use a TASCAM PS-P520 AC adapter (sold separately).
The SD card is full during recording.
Export or delete unneeded data to make room on the card or use a different SD card.
There is no recorded data for the export track.
This appears if you tried to export a track from the song that does not have any recordings. (See “ Track import and export” on page 88.)
Export tracks from songs with recordings.
The file cannot be found.
This appears if you try to restore a song when the FAT Partition does not have any backed up songs. (See “Song backup and restoration”
on page 86.)
The IN and OUT points are too close together.
This appears if you try to activate repeat playback mode when the IN and OUT points are too close together. Make sure the IN and OUT
points are at least 2 frames apart. (See “Using repeat playback” on page 66.)
The file you are trying to import cannot be found.
You are trying to import a WAV file from the FAT partition when there are no WAV files there. (See “Importing to tracks” on page 88.)
Connect the unit to a PC and transfer some files to the FAT partition for import.
The file you are trying to import is too large.
You are trying to import a WAV file from the MTR partition that is too large for the remaining space on the partition. Free up some space
on the (native) partion and try again.
The unit is in
You tried to perform an action that cannot be done while in
The unit is in
You tried to perform an action that cannot be done while in
BOUNCE
mode.
MASTER REC
or
MASTER PLAY
mode.
BOUNCE
mode.
MASTER REC
or
MASTER PLAY
mode.
TASCAM DP-006
94
Page 95

Messages Meaning and remedy
In Repeat Mode
Invalid Card
It’s too Large
Master Track Not
Found
Master Track Too Large
No Disk Space
No Master Trk
No Song
The unit is in repeat playback mode.
You tried to perform an action that cannot be done while in Repeat mode.
The SD card installed in the card slot is in a format that cannot be used by this unit.
Insert another SD card after turning the unit OFF or format the card (put in standby) by opening the
selecting
FORMAT
The song file is too large.
You are trying to backup a song file that is larger than the open space available on the FAT partition. (See “Song backup and restoration”
on page 86.)
Format the FAT partition (see “Reformatting FAT partitions” on page 82) or connect the unit to a computer and make more space on
the partition by deleting unneeded files, for example.
The stereo master track cannot be found.
This appears if you try to export a stereo master track from a song that does not have one recorded. (See “Exporting stereo master
tracks” on page 92.)
Create a stereo master track and then export it.
The stereo master track is too large.
You tried to export a stereo master track that is larger than the open space available on the FAT partition. (See “Exporting stereo master
tracks” on page 92.)
Reformat the FAT partition (See “Reformatting FAT partitions” on page 82.) or connect the unit to a computer and delete unneeded
files, for example, to make more space available.
There is not enough space.
This appears if you try to create or copy a song when the MTR partition does not have enough space.
Delete songs (See “Erasing songs” on page 49.) or format the SD card (See “Formatting SD cards” on page 79.), for example, to make
more space available.
There is no master track.
This appears if you try to select a stereo master track that does not exist as the source track when cloning tracks. (See “CLONE TRACK (track
duplication)” on page 69.)
Create a stereo master track or select a different source track.
There is no song.
You are trying to load a song from a partition that has no songs on it. (See “Loading a saved song” on page 46.)
Change partitions. (See “Selecting the active partition” on page 45.)
.
14 – Message Lists
MENU
, selecting
CARD
and then
TASCAM DP-006
95
Page 96

14 – Message Lists
Messages Meaning and remedy
No Undo Histry
No SD Card
Not Stopped
Now Recording
Protected Card
Same Track
SD Size Error
Song Protected
Too Many songs
Track Full
Trk Edit Fail
Trk Too Shor t
There is no undo operation history.
There are no actions to be undone. (See “Erasing the operation history” on page 60.)
No SD card has been loaded.
Turn OFF the unit (put it in standby) and then insert an SD card.
The recorder is not stopped.
This appears when the recorder is not stopped and you push the UN/REDO button or any other button that only functions when the
recorder is stopped.
The unit is currently recording.
This appears when you try to perform a menu action while recording. There are also other operations that cannot be done while
recording.
The SD card installed in the unit is write-protected.
To record or edit, turn off (in standby) the unit and un-protect the SD card.
You have set the same track.
In the clone track settings you have set the same track for both
The capacity of the SD card installed in the unit is too small for this unit to use.
Use an SD card larger than 512 MB.
The song is protected.
This message appears when you try to record to, edit or otherwise change a protected song.
Remove protection from the song before trying to change it. (See “Protecting songs” on page 50.)
It is not possible to create any more songs.
You have 250 songs on one partition. You must delete some before you can create another song.
Tracks have already been recorded.
This appears if you try to import when all the tracks have been recorded. (See “Importing to tracks” on page 88.)
Track editing failed.
After saving the song, restart the unit’s power and conduct the edit again.
The track is too short.
This appears if you try to change the recorder to master recording mode when the IN and OUT points are less than four seconds apart.
Set the IN and OUT points at least four seconds apart. (See “Setting IN and OUT points” on page 65.)
SOURCE TRK
and
DESTINATION TRK
.
TASCAM DP-006
96
Page 97
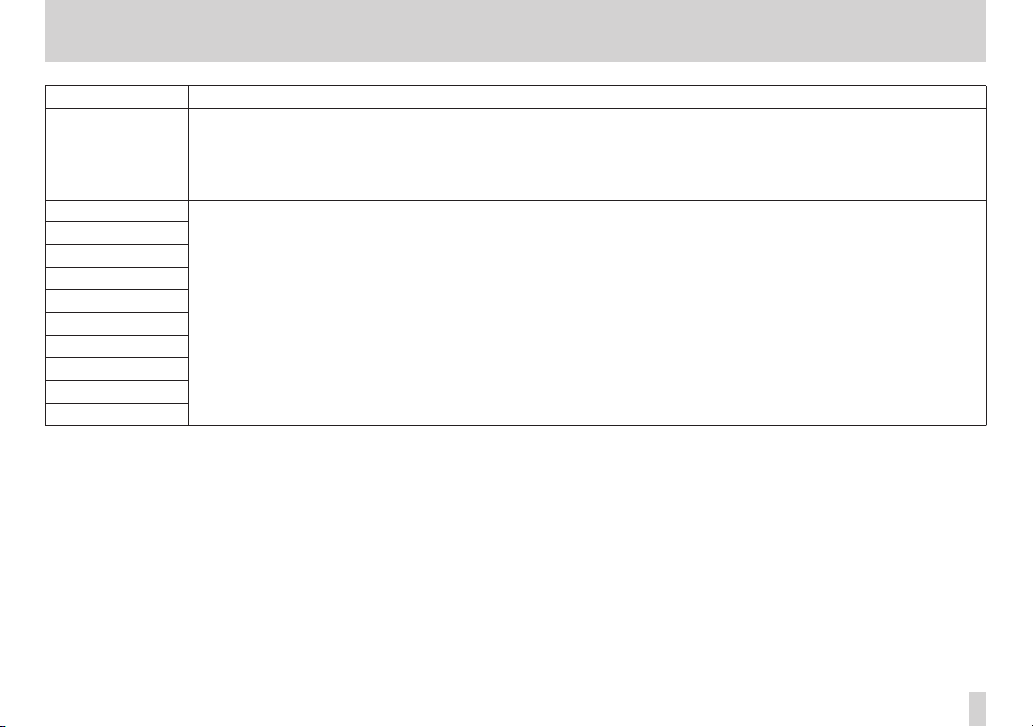
Messages Meaning and remedy
The virtual memory created for work on the SD card has become full.
Work Memory Full
Audio Rst Fail
Device Error
FileErr
I/F Error
Mount Error
SaveParam Fail
SD-Card Error!
SD Not Found
SD Read Busy
SD Write Busy
Even if the SD card has enough remaining memory space, this error may occur when you record a long song or edit a lot.
You may be able to continue the work if you clear the history which may increase the open work memory. (See “Erasing the operation
history” on page 60.)
You may also be able to continue work by turning the unit off and then on again,which may increas the open work memory.
If any of these errors occur, turn the the unit power OFF and restart it.
If these error message continue to appear, please contact the nearest retailer or TASCAM representative.
14 – Message Lists
TASCAM DP-006
97
Page 98

15 – Specifications
Media and file systems
Recording media
SD card (512 MB–2 GB)
SDHC card (4 GB–32 GB)
File system
MTR partition: TASCAM original
FAT partition: FAT32
Inputs and outputs
Analog audio input and output
INPUT A jack
Connector: 6.3mm (1/4”) TS standard jack
Input impedance:
10 kΩ or greater (when INPUT A switch set to MIC/LINE)
1 MΩ (when INPUT A switch set to GUITAR)
Standard input level: −10dBV
Maximum input level: +6dBV
Headroom: 16dB
INPUT B jack
Connector: 6.3mm (1/4”) TS standard jack
Input impedance: 10kΩ or greater
Standard input level: −10dBV
Maximum input level: +6dBV
Headroom: 16dB
Built-in microphones
Omnidirectional x2
/LINE OUT jack
Connector: 3.5mm (1/8”) stereo mini jack
• When line is connected
Standard output level: −16dBV
Maximum output level: 0dBV
• When headphone is connected
Standard output level: 15mW+15mW (THD+N 0.1% or less, 32Ω load)
Data input and output
USB jack
Connector: USB Mini-B 4-pin
Format: USB 2.0 HIGH SPEED mass storage class
Audio performance
Frequency response
INPUT(MIC/LINE) w LINE OUT: 20Hz–20kHz, +1dB/−3dB
Distortion
INPUT(LINE) w LINE OUT: Less than 0.05%
S/N ratio
INPUT(MIC/LINE) w LINE OUT: More than 81dB
TASCAM DP-006
98
Page 99

15 – Specifications
Operating requirements
For the latest information on compatible operating systems, check the
TASCAM website (http://tascam.com/).
Supported operating systems
Windows XP, Windows Vista and Windows 7
Mac OS X 10.4.6 and later
General
Power
Four AA batteries (alkaline or nickel-metal hydride) or
TASCAM PS-P520 AC adaptor (sold separately)
Power consumption
1W (maximum)
Continuous battery operation time (continuous use)
• When using alkaline batteries (EVOLTA)
Continuous operation Note
About 8.0 hours Using line input and recording
About 8.5 hours Using headphones and playing back
(JEITA standards used for recording and playback)
• When using nickel-metal hydride batteries (eneloop)
Continuous operation Note
About 9.0 hours Using line input and recording
About 9.5 hours Using headphones and playing back
(JEITA standards used for recording and playback)
Dimensions (W x H x D) (including protrusions)
155 x 41.5 x 107mm
8.70 x 1.63 x 4.98in.
Weight (w/o batteries)
360g / 0.79lbs
Operating temperature range
5–35°C
TASCAM DP-006
99
Page 100

15 – Specifications
Backup memory
This unit backs up the following settings and retains them even when OFF (in
standby).
The following
o Repeat Int
o Auto Pwr Save
o Contrast
PREFERENCE
screen items
Dimensions
107mm
155mm
•
Illustrations and other depictions may differ in part from the actual
product.
•
Specifications and external appearance may be changed without
notification to improve the product.
41.5mm
100
TASCAM DP-006
 Loading...