

Page 1
D00410300A
»
DA-45HR
Digital Audio Tape Deck
OWNER’S MANUAL
Ü
The lightning flash with arrowhead symbol, within an equilateral triangle, is intended to alert
ÿ
Ÿ
This appliance has a serial number
located on the rear panel. Please record
the model number and serial number
and retain them for your records.
Model number
Serial number
the user to the presence of uninsulated “dangerous voltage” within the product’s enclosure
that may be of sufficient magnitude to constitute a risk of electric shock to persons..
The exclamation point within an equilateral triangle is intended to alert the user to the presence of important operating and maintenance (servicing) instructions in the literature
accompanying the appliance.
CAUTION: TO REDUCE THE RISK OF ELECTRIC SHOCK, DO NOT
REMOVE COVER (OR BACK). NO USER-SERVICEABLE PARTS
INSIDE. REFER SERVICING TO QUALIFIED SERVICE PERSONNEL.
WARNING: TO PREVENT FIRE OR SHOCK
HAZARD, DO NOT EXPOSE THIS
APPLIANCE TO RAIN OR MOISTURE.
Page 2

Important Safety Precautions
IMPORTANT (for U.K. Customers)
DO NOT cut off the mains plug from this equipment.
If the plug fitted is not suitable for the power points in your
home or the cable is too short to reach a power point, then
obtain an appropriate safety approved extension lead or
consult your dealer.
If nonetheless the mains plug is cut off, remove the
fuse and dispose of the plug immediately, to avoid
a possible shock hazard by inadvertent connection to the
mains supply.
If this product is not provided with a mains plug, or one has
to be fitted, then follow the instructions given below:
IMPORTANT: The wires in this mains lead are coloured in
accordance with the following code:
GREEN-AND-YELLOW : EARTH
BLUE : NEUTRAL
BROWN : LIVE
TO THE USER
This equipment has been tested and found to comply
with the limits for a Class A digital device, pursuant to
Part 15 of the FCC Rules. These limits are designed
to provide reasonable protection against harmful
interference when the equipment is operated in a
commercial environment. This equipment generates,
uses, and can radiate radio frequency energy and, if
not installed and used in accordance with the
instruction manual, may cause harmful interference to
radio communications.
Operation of this equipment in a residental area is
likely to cause harmful interference in which case the
user will be required to correct the interference at his
own expense.
CAUTION
Changes or modifications to this equipment not
expressly approved by TEAC CORPORATION for
compliance could void the user’s authority to operate
this equipment.
WARNING: This apparatus must be earthed.
As the colours of the wires in the mains lead of this apparatus
may not correspond with the coloured markings identifying
the terminals in your plug proceed as follows:
The wire which is coloured GREEN-and-YELLOW must be
connected to the terminal in the plug which is marked by the
letter E or by the safety earth symbol ç or coloured GREEN
or GREEN-and-YELLOW.
The wire which is coloured BLUE must be connected to the
terminal which is marked with the letter N or coloured
BLACK.
The wire which is coloured BROWN must be connected to
the terminal which is marked with the letter L or coloured
RED.
When replacing the fuse only a correctly rated approved type
should be used and be sure to re-fit the fuse cover.
IF IN DOUBT — CONSULT A COMPETENT
ELECTRICIAN.
For the consumers in Europe
WARNING
This is a Class A product. In a domestic environment, this
product may cause radio interference in which case the user
may be required to take adequate measures.
Pour les utilisateurs en Europe
AVERTISSEMENT
Il s’agit d’un produit de Classe A. Dans un environnement
domestique, cet appareil peut provoquer des interférences
radio, dans ce cas l’utilisateur peut être amené à prendre
des mesures appropriées.
Für Kunden in Europa
Warnung
Dies is eine Einrichtung, welche die Funk-Entstörung nach
Klasse A besitzt. Diese Einrichtung kann im Wohnbereich
Funkstörungen versursachen ; in diesem Fall kann vom
Betrieber verlang werden, angemessene Maßnahmen
durchzuführen und dafür aufzukommen.
TASCAM DA-45HR
2
Page 3
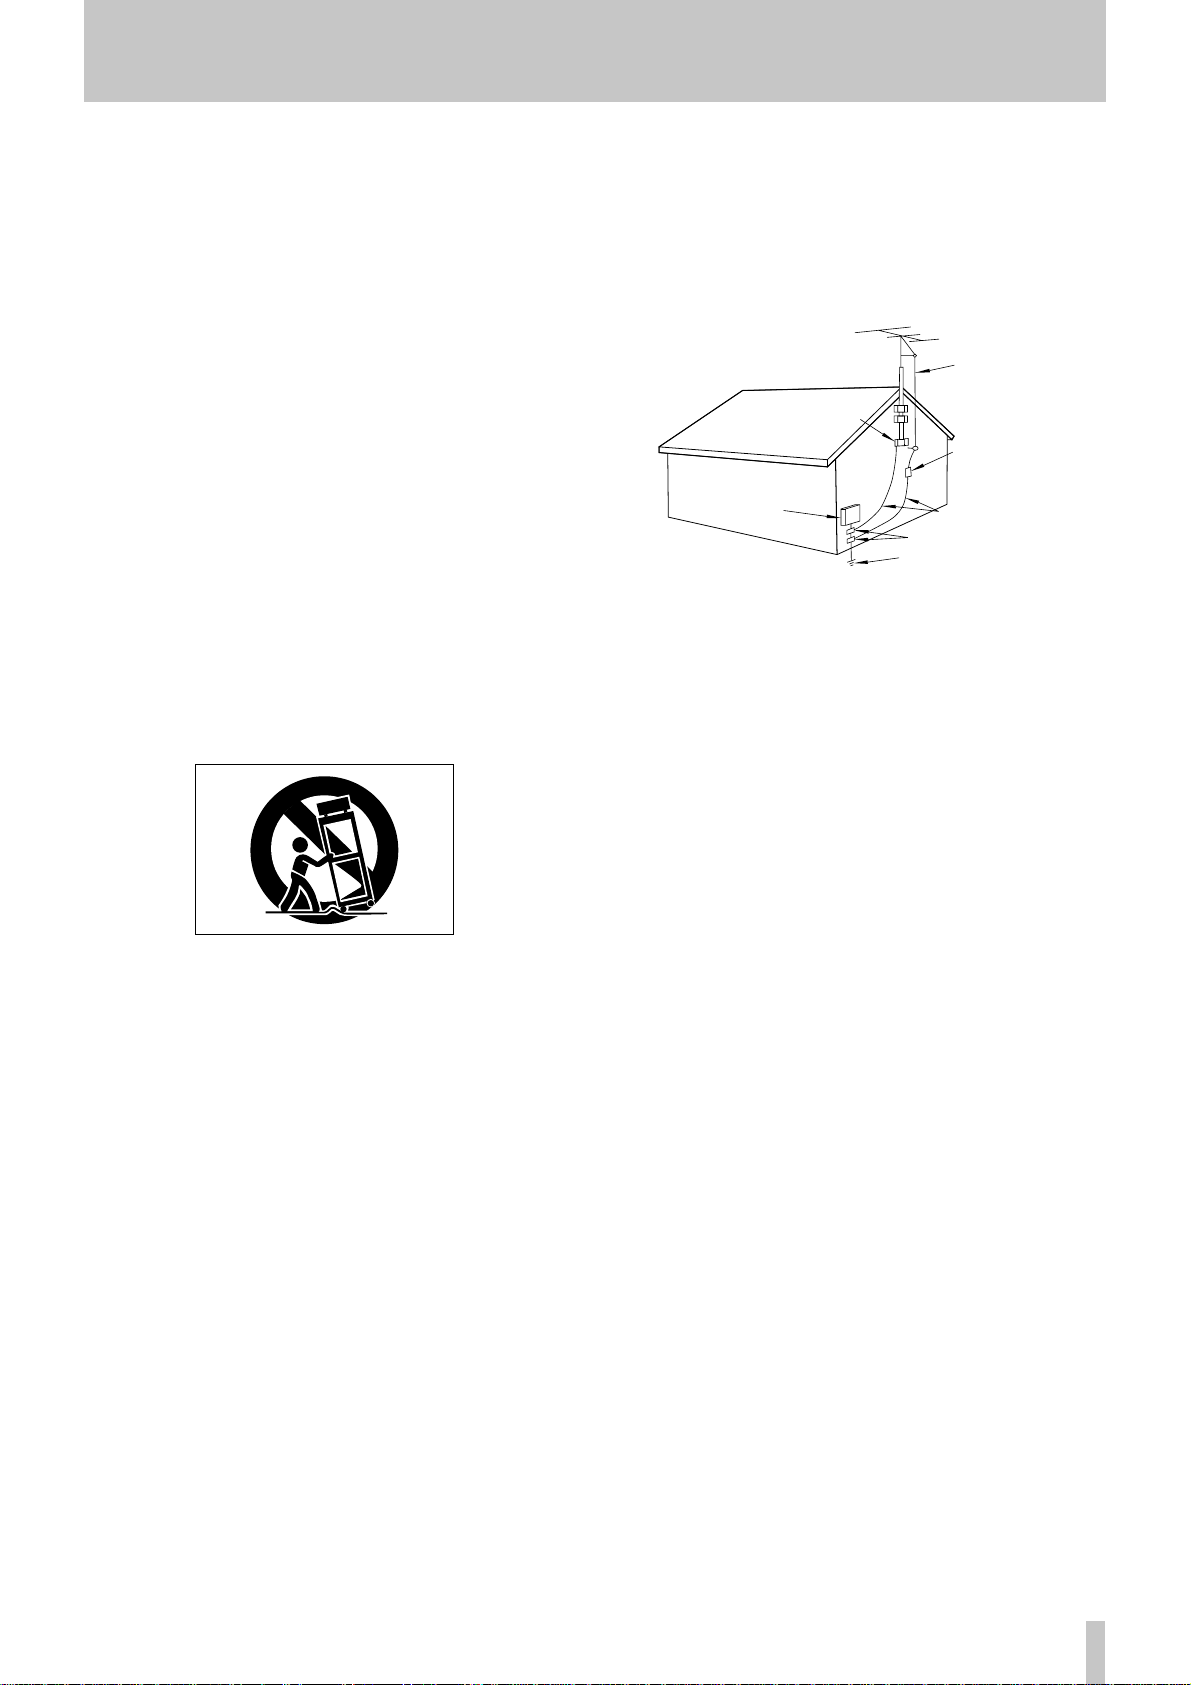
ANTENNA
LEAD IN
WIRE
ANTENNA
DISCHARGE UNIT
(NEC SECTION 810-20)
GROUNDING CONDUCTORS
(NEC SECTION 810-21)
GROUND CLAMPS
POWER SERVICE GROUNDING
ELECTRODE SYSTEM
(NEC ART 250. PART H)
NEC - NATIONAL ELECTRICAL CODE
ELECTRIC
SERVICE
EQUIPMENT
Example of Antenna Grounding as per
National Electrical Code, ANSI/NFPA 70
GROUND
CLAMP
IMPORTANT SAFETY INSTRUCTIONS
CAUTION:
Read all of these Instructions.
Save these Instructions for later use.
Follow all Warnings and Instructions marked on the audio
equipment.
1) Read Instructions — All the safety and operating instructions should
be read before the product is operated.
2) Retain Instructions — The safety and operating instructions should
be retained for future reference.
3) Heed Warnings — All warnings on the product and in the operating
instructions should be adhered to.
4) Follow Instructions — All operating and use instructions should be
followed.
5) Cleaning — Unplug this product from the wall outlet before cleaning.
Do not use liquid cleaners or aerosol cleaners. Use a damp cloth for cleaning.
6) Attachments — Do not use attachments not recommended by the
product manufacturer as they may cause hazards.
7) Water and Moisture — Do not use this product near water — for
example, near a bath tub, wash bowl, kitchen sink, or laundry tub; in a wet
basement; or near a swimming pool; and the like.
8) Accessories — Do not place this product on an unstable cart, stand,
tripod, bracket, or table. The product may fall, causing serious injury to a
child or adult, and serious damage to the product. Use only with a cart,
stand, tripod, bracket, or table recommended by the manufacturer, or sold
with the product. Any mounting of the product should follow the manufacturer’s instructions, and should use a mounting accessory recommended by
the manufacturer.
A product and cart combination should be moved with care. Quick stops,
excessive force, and uneven surfaces may cause the product and cart combination to overturn.
10) Ventilation — Slots and openings in the cabinet are provided for ven-
tilation and to ensure reliable operation of the product and to protect it
from overheating, and these openings must not be blocked or covered. The
openings should never be blocked by placing the product on a bed, sofa,
rug, or other similar surface. This product should not be placed in a built-in
installation such as a bookcase or rack unless proper ventilation is provided
or the manufacturer’s instructions have been adhered to.
11) Power Sources — This product should be operated only from the
type of power source indicated on the marking label. If you are not sure of
the type of power supply to your home, consult your product dealer or local
power company. For products intended to operate from battery power, or
other sources, refer to the operating instructions.
12) Grounding or Polarization — This product may be equipped with a
polarized alternating-current line plug (a plug having one blade wider than
the other). This plug will fit into the power outlet only one way. This is a
safety feature. If you are unable to insert the plug fully into the outlet, try
reversing the plug. If the plug should still fail to fit, contact your electrician
to replace your obsolete outlet. Do not defeat the safety purpose of the
polarized plug.
13) Power-Cord Protection — Power-supply cords should be routed so
that they are not likely to be walked on or pinched by items placed upon or
against them, paying particular attention to cords at plugs, convenience
receptacles, and the point where they exit from the product.
14) Outdoor Antenna Grounding — If an outside antenna or cable
system is connected to the product, be sure the antenna or cable system is
grounded so as to provide some protection against voltage surges and builtup static charges. Article 810 of the National Electrical Code, ANSI/NFPA
70, provides information with regard to proper grounding of the mast and
supporting structure, grounding of the lead-in wire to an antenna discharge
unit, size of grounding conductors, location of antenna-discharge unit, connection to grounding electrodes, and requirements for the grounding electrode.
"Note to CATV system installer:
…
…
…
9)
a)
b)
c)
d)
e)
This reminder is provided to call the CATV system installer’s attention to
Section 820-40 of the NEC which provides guidelines for proper grounding
and, in particular, specifies that the cable ground shall be connected to the
grounding system of the building, as close to the point of cable entry as
practical.
15) Lightning — For added protection for this product during a lightning
storm, or when it is left unattended and unused for long periods of time,
unplug it from the wall outlet and disconnect the antenna or cable system.
This will prevent damage to the product due to lightning and power-line
surges.
16) Power Lines — An outside antenna system should not be located in
the vicinity of overhead power lines or other electric light or power circuits,
or where it can fall into such power lines or circuits. When installing an
outside antenna system, extreme care should be taken to keep from touching such power lines or circuits as contact with them might be fatal.
17) Overloading — Do not overload wall outlets, extension cords, or
integral convenience receptacles as this can result in risk of fire or electric
shock.
18) Object and Liquid Entry — Never push objects of any kind into
this product through openings as they may touch dangerous voltage points
or short-out parts that could result in a fire or electric shock. Never spill
liquid of any kind on the product.
19) Servicing — Do not attempt to service this product yourself as open-
ing or removing covers may expose you to dangerous voltage or other
hazards. Refer all servicing to qualified service personnel.
20) Damage Requiring Service — Unplug this product from the wall
outlet and refer servicing to qualified service personnel under the following
conditions:
when the power-supply cord or plug is damaged.
if liquid has been spilled, or objects have fallen into the product.
if the product has been exposed to rain or water.
if the product does not operate normally by following the operating
instructions. Adjust only those controls that are covered by the operating
instructions as an improper adjustment of other controls may result in
damage and will often require extensive work by a qualified technician to
restore the product to its normal operation.
if the product has been dropped or damaged in any way.
f ) when the product exhibits a distinct change in performance – this
indicates a need for service.
21) Replacement Parts — When replacement parts are required, be
sure the service technician has used replacement parts specified by the
manufacturer or have the same characteristics as the original part.
Unauthorized substitutions may result in fire, electric shock, or other
hazards.
22) Safety Check — Upon completion of any service or repairs to this
product, ask the service technician to perform safety checks to determine
that the product is in proper operating condition.
23) Wall or Ceiling Mounting — The product should be mounted to a
wall or ceiling only as recommended by the manufacturer.
24) Heat — The product should be situated away from heat sources such
as radiators, heat registers, stoves, or other products (including amplifiers)
that produce heat.
TASCAM DA-45HR
3
Page 4

Table of Contents
Table of Contents
1 - Introduction to the DA-45HR
1.1 Features.............................................6
1.2 Unpacking and inspection...............6
1.3 Installation of the tape deck ............6
1.4 About DAT cassettes........................6
1.4.1 Head cleaning.................................... 7
1.5 Making connections .........................7
1.5.1 Making analog connections............. 7
1.5.2 Making digital audio connections ... 7
1.5.3 Making word synchronization
connections............................................. 7
1.5.4 Making control connections ............ 8
1.5.5 Power connections........................... 8
1.6 Block Diagram...................................8
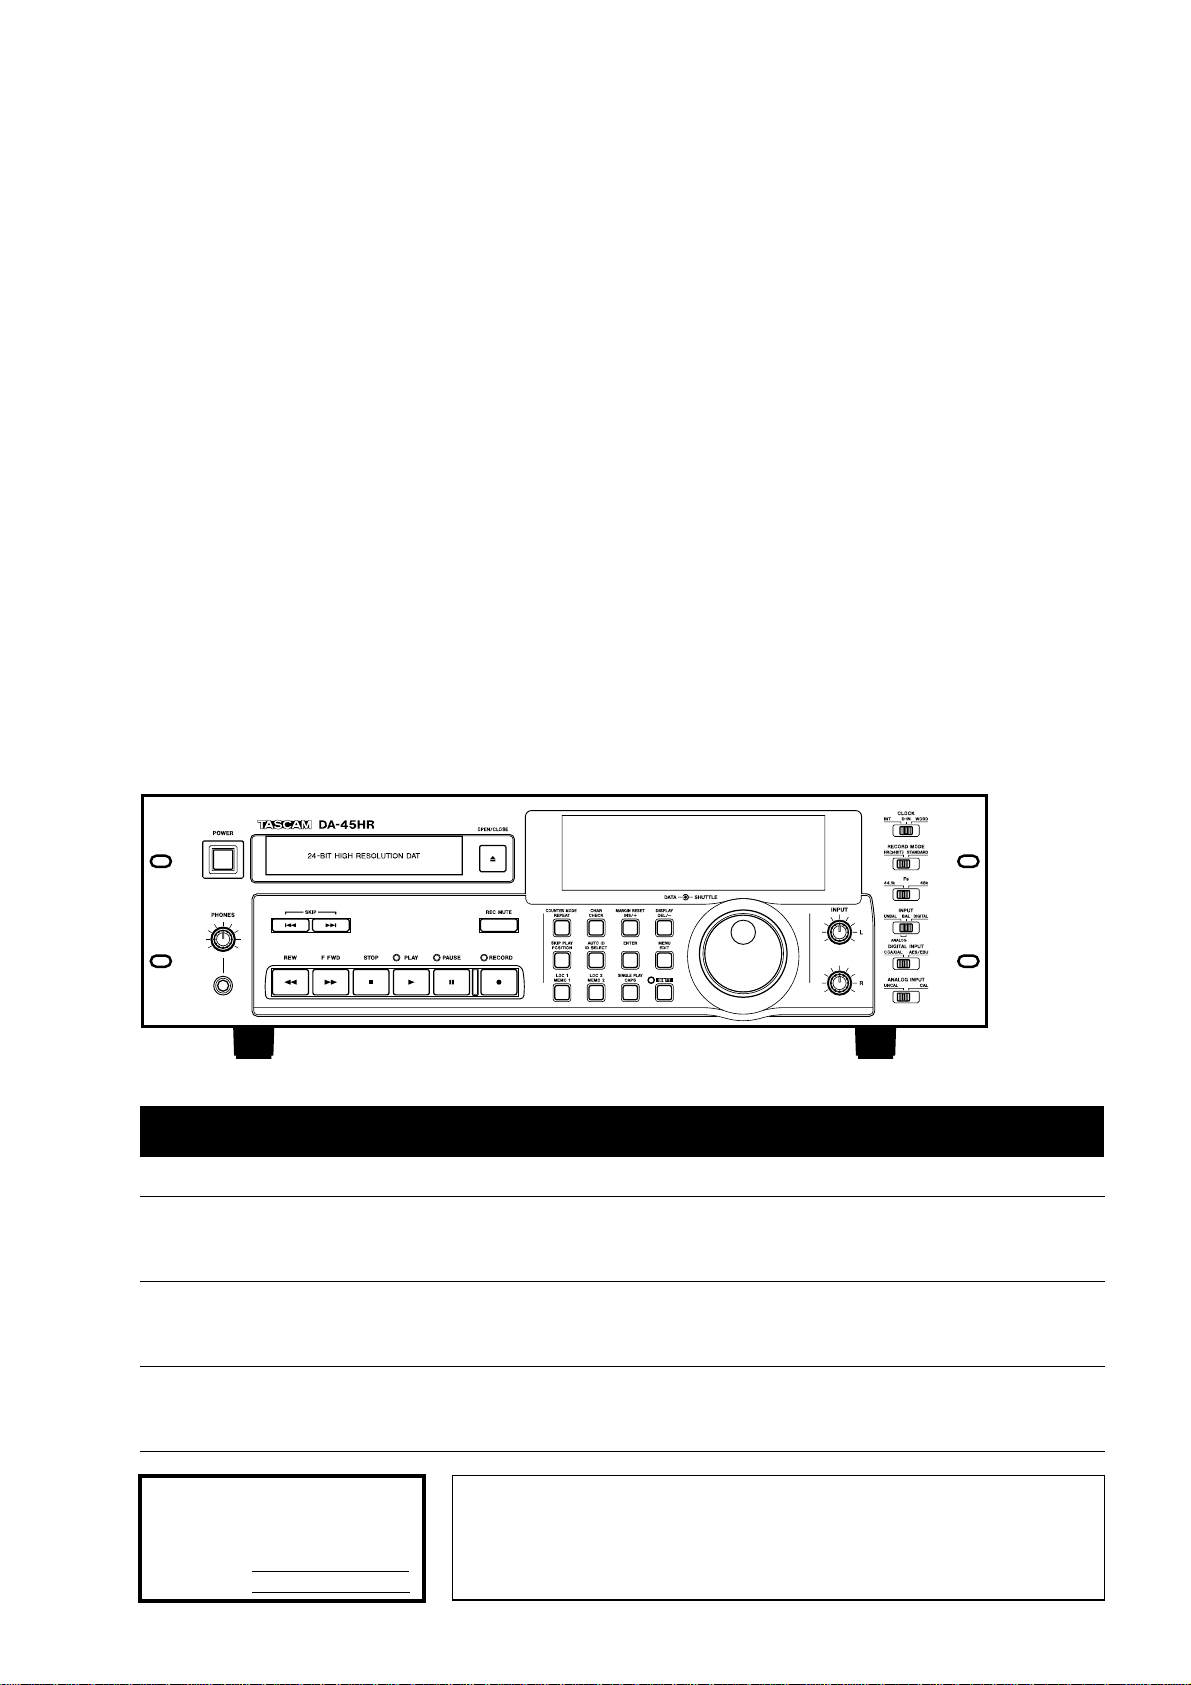
1.6 Front and Rear panels
2 - Parts of the tape deck
2.1 Power and display ............................10
[1] POWER switch...................................... 10
[2] Cassette tray and OPEN/CLOSE
button....................................................... 10
[3] Display window..................................... 10
2.2 Recording mode and source
switches, etc.........................................10
[4] CLOCK switch....................................... 10
[5] RECORD MODE switch........................ 11
[6] Fs switch ............................................... 11
[7] INPUT selector switch.......................... 11
[8] DIGITAL INPUT selector switch .......... 11
[9] ANALOG INPUT selector switch ......... 12
[10] INPUT level controls........................... 12
[11] PHONES control and jack.................. 12
2.3 Tape controls ....................................12
[12] SKIP keys ............................................ 12
[13] REW and F FWD keys ........................ 12
[14] STOP key............................................. 12
[15] PLAY key............................................. 13
[16] PAUSE key .......................................... 13
[17] RECORD key....................................... 13
[18] REC MUTE key.................................... 13
[19] SHUTTLE wheel.................................. 14
[20] DATA dial ............................................ 14
2.4 Command keys .................................14
[21] COUNTER MODE................................ 14
[22] CHAR ................................................... 15
[23] MARGIN RESET.................................. 15
[24] DISPLAY.............................................. 15
[25] SKIP PLAY........................................... 15
[26] AUTO ID............................................... 15
[27] ENTER ................................................. 15
[28] MENU................................................... 15
[29] LOC 1................................................... 16
[30] LOC 2................................................... 16
[31] SINGLE PLAY...................................... 16
[32] SHIFT ................................................... 16
2.5 Rear panel..........................................16
[33] DIGITAL (AES/EBU) INPUT/OUTPUT.16
[34] DIGITAL COAXIAL...............................16
[35] WORD IN and THRU (AUTO TERM)...16
[36] CONTROL I/O.......................................16
[37] REMOTE IN..........................................17
[38] ~ IN ......................................................17
[39] BALANCED ANALOG inputs..............17
[40] UNBALANCED ANALOG inputs ........17
[41] UNBALANCED ANALOG outputs......17
[42] BALANCED ANALOG outputs...........17
3 - Menu functions
3.1 Drum time (head time)......................18
3.2 Auto ID level ......................................18
3.3 Auto ID time.......................................18
3.4 Record mute time..............................18
3.5 Reference level..................................18
3.6 Digital output format.........................19
3.7 Digital out word length.....................19
3.8 Dither..................................................19
3.9 Copy prohibit.....................................19
3.10 End ID...............................................19
3.11 HR time display...............................20
3.12 Repeat mode....................................20
3.13 Pre-roll time.....................................20
3.14 End tally signal................................20
3.15 Auto rewind .....................................20
3.16 Fast forward mode..........................20
3.17 Parameter save................................21
3.18 Initializing settings..........................21
3.19 Viewing points at which block errors
have occurred.......................................21
4 - Advanced functions
4.1 REPEAT..............................................22
4.2 CHECK ...............................................22
4.3 INS/+ and DEL/- .................................22
4.4 ID markers (START, SKIP, END, CHAR
and renumbering).................................22
4.4.1 Selecting an ID mode........................23
4.4.2 Manually writing a START or
SKIP ID (i).................................................23
4.4.3 Writing a START or SKIP ID (ii)........23
4.4.4 Writing an END ID.............................. 24
4.4.5 Erasing a START or SKIP ID.............24
4.4.6 Erasing an END ID.............................24
4.4.7 Erasing titles......................................24
4.4.8 Renumbering START IDs.................. 24
4.5 The EDIT key......................................25
4.6 Location memories...........................25
4.6.1 Locating to location memories ........25
4.6.2 Setting location memories................25
4.6.3 Editing location memories................25
4.7 Program mode...................................26
4.8 Character editing (titling) .................26
4.8.1 Entering and editing titles ................26
4
TASCAM DA-45HR
Page 5

Table of Contents
4.8.2 Writing the title to tape......................27
4.8.3 Checking a title ..................................27
4.8.4 Deleting a title ....................................27
4.8.5 Copying and pasting a title...............27
5 - RC-D45 remote control unit (option)
[43] OPEN/CLOSE.......................................28
[44] CAPS.....................................................28
[45] CHECK..................................................28
[46] POSITION .............................................28
[47] ID SELECT............................................28
[48] AUTO ID................................................28
[49] INS/+ and DEL/-....................................28
[50] EDIT ......................................................28
[51] ENTER ..................................................28
[52] MENU....................................................28
[53] Numeric keys.......................................28
[54] Cursor keys..........................................28
[55] COUNTER MODE.................................28
[56] MARGIN RESET...................................28
[57] CHAR....................................................28
[58] DISPLAY...............................................28
[59] SKIP PLAY............................................28
[60] SINGLE PLAY...................................... 28
[61] REPEAT ...............................................28
5.1 Remote control transport keys .......28
[62] SKIP keys.............................................28
[63] MEMO 1 and MEMO 2 keys ................28
[64] SAMPLING MONITOR key.................. 28
[65] REW and F FWD..................................28
[66] LOC 1 and LOC 2 keys .......................29
[67] REC MUTE ...........................................29
[68] STOP....................................................29
[69] PLAY ....................................................29
[70] PAUSE..................................................29
[71] RECORD keys .....................................29
6 - Specifications
6.1 Audio specifications ........................30
6.2 I/O specifications..............................30
6.3 Physical specifications.................... 30
6.4 Dimensional drawing .......................31
6.5 Error messages ................................31
6.5.1 Warning messages............................31
6.5.2 Serious error messages ...................31
TASCAM DA-45HR
5
Page 6
1 - Introduction to the DA-45HR
The DA-45HR Digital Audio Tape (DAT) deck is
referred to throughout this manual as “the tape
deck”.
Please make a note of the different sections of this
manual to assist you in locating the function you
need. The index should also be of use in helping you
to find the correct section of the manual.
1.1 Features
The tape deck provides the following features:
• Superior quality digital-to-analog and analog-todigital conversion for maximum sonic fidelity
• 24-bit recording and playback for today’s digital
audio world
• Flexible word clock options for integration into
any digital audio system
1.3 Installation of the tape deck
The tape deck may be installed in most studio-type
environments, but to maintain optimum performance
and to maximize the life of the tape deck, the environment should meet the following specifications:
• the ambient temperature should be between 5˚ C
and 35˚ C (41˚ F to 95˚ F)
• the relative humidity should be between 30% and
60% (non-condensing)
• the tape deck should not be located near an y strong
magnetic fields (TV sets or monitors, speakers,
etc.)
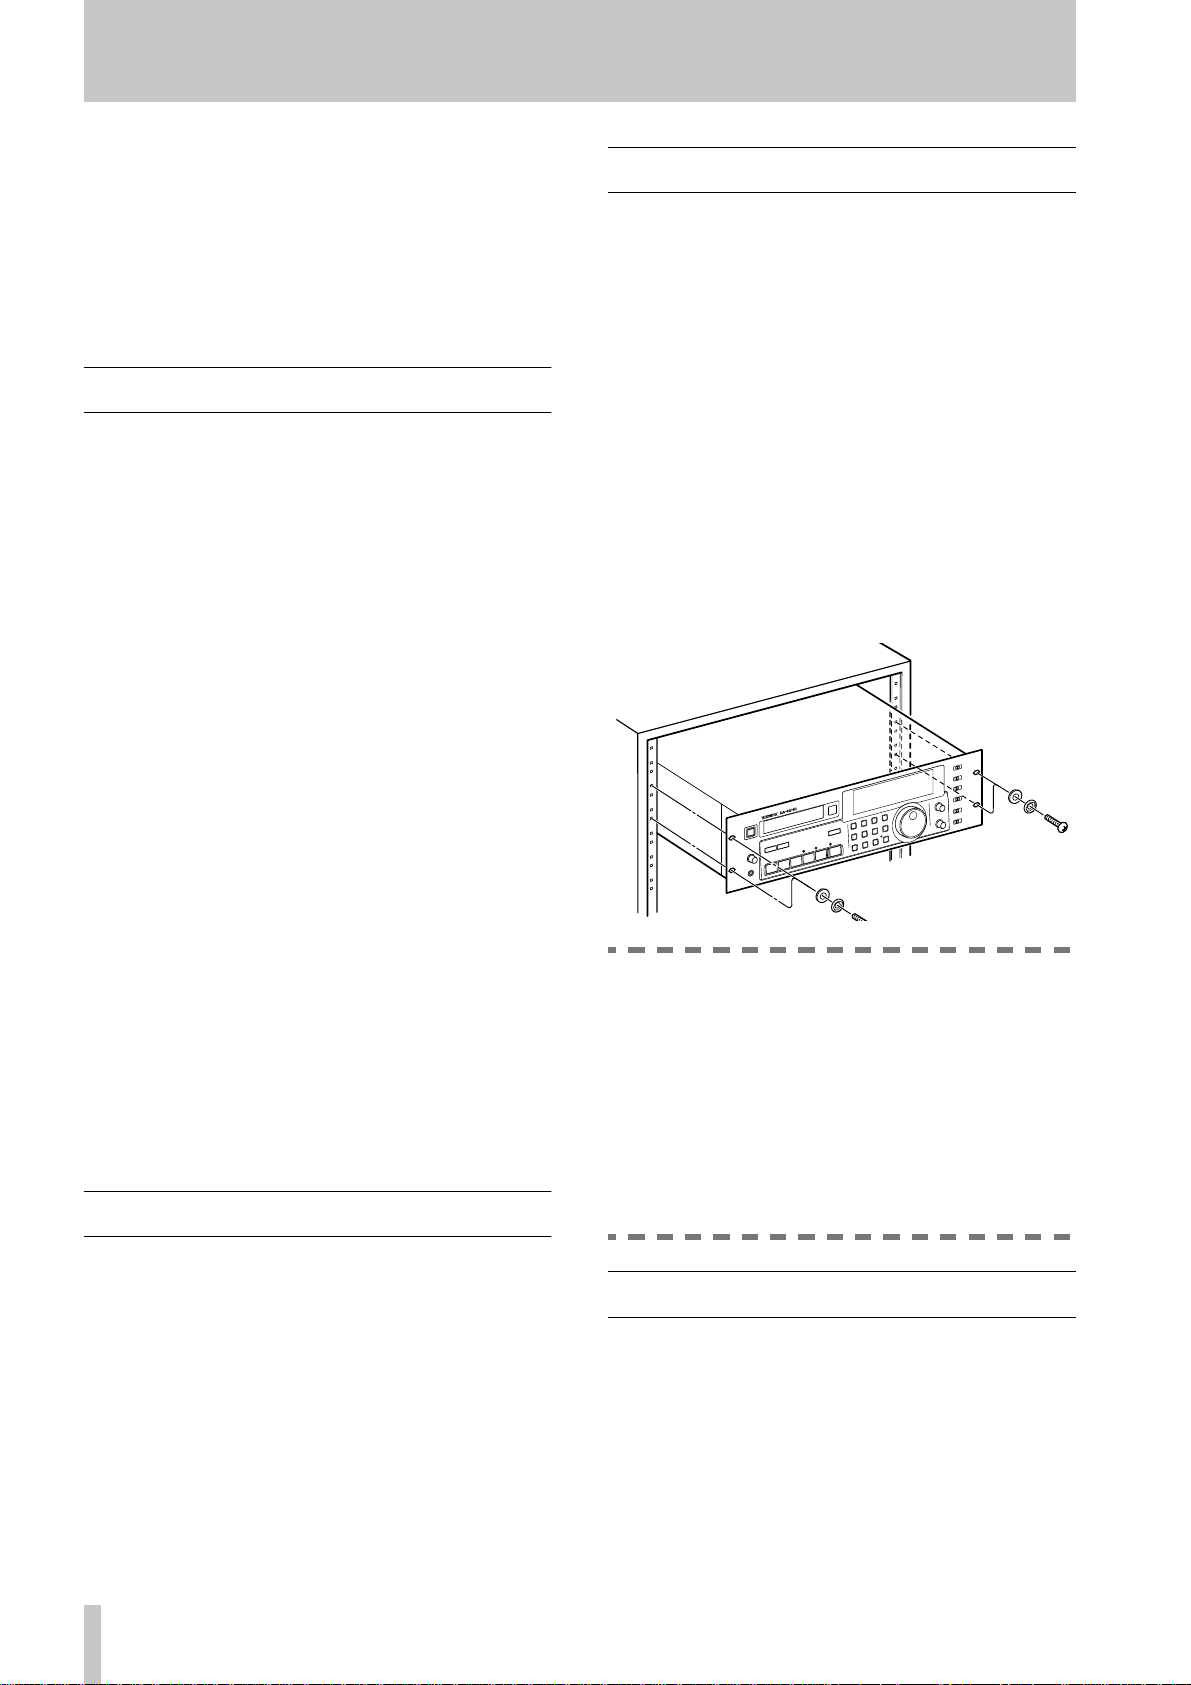
The tape deck may be mounted in a standard 19 inch
EIA rack using the supplied rack mounting screws.
Make sure that the rack is strong enough to take the
weight of the tape deck (over 8 kg— 17 lbs.).
• AES/EBU and SPDIF digital audio input and output formats for full flexibility
• Balanced (+4 dBu) and unbalanced (-10 dBV) analog inputs and outputs
• Comprehensive display options, showing elapsed
time, time remaining on the tape, etc.
• Character entry and editing, allowing tape and program titles to be displayed as the tape is played
• Optional wired remote control unit (RC-D45) for
control of all major functions
• Shuttle facilities, allowing precise positioning of
the tape using audio cues
• Location to frame accuracy to location memories
• Comprehensive menu options, allowing many
everyday function settings to be set up and
memorized
1.2 Unpacking and inspection
WARNING
If the tape deck is mounted in a mobile installation, and it is moved from a cold location to
a warm one, leave the tape deck turned on
with no tape inserted to allow the internal
temperature to stabilize before the tape deck
is used again (about one or two hours). This
will prevent any possible damage to the
heads, and other parts of the internal mechanism.
When you first receive the tape deck, be careful not
to damage it while unpacking it. Save the carton and
packing materials in case it must be transported later.
In addition to the tape deck itself, the carton should
contain a rack mount screw kit and a detachable 2 m
(6 ft) power cord.
If any items are missing or appear to have been damaged in transit, contact your TASCAM dealer at
once.
6
TASCAM DA-45HR
1.4 About DAT cassettes
If you have not used a DAT recorder before, here are
a few items of information about DAT cassettes and
their use with the tape deck which you may find
useful:
The cassette shell of a DAT cassette is designed to
prevent the tape from being touched by hand. Never
try to open the tape protection lid and touch the tape.
Page 7
1 - Introduction to the DA-45HR
Fingerprints on the tape may cause wear and damage
to the tape deck heads.
DAT cassettes can only be loaded and unloaded
when the tape deck is switched on. Do not leave cassettes in the deck when the deck is switched off.
Always store DAT cassettes in their plastic cases to
prevent dust damage. Keep them away from magnetic fields (TV sets and monitors, speakers, etc.)
Although 180-minute DAT cassettes are available,
we do not recommend their use, as the tape in these
cassettes is thin, and may cause winding problems,
and physical damage to the tape.
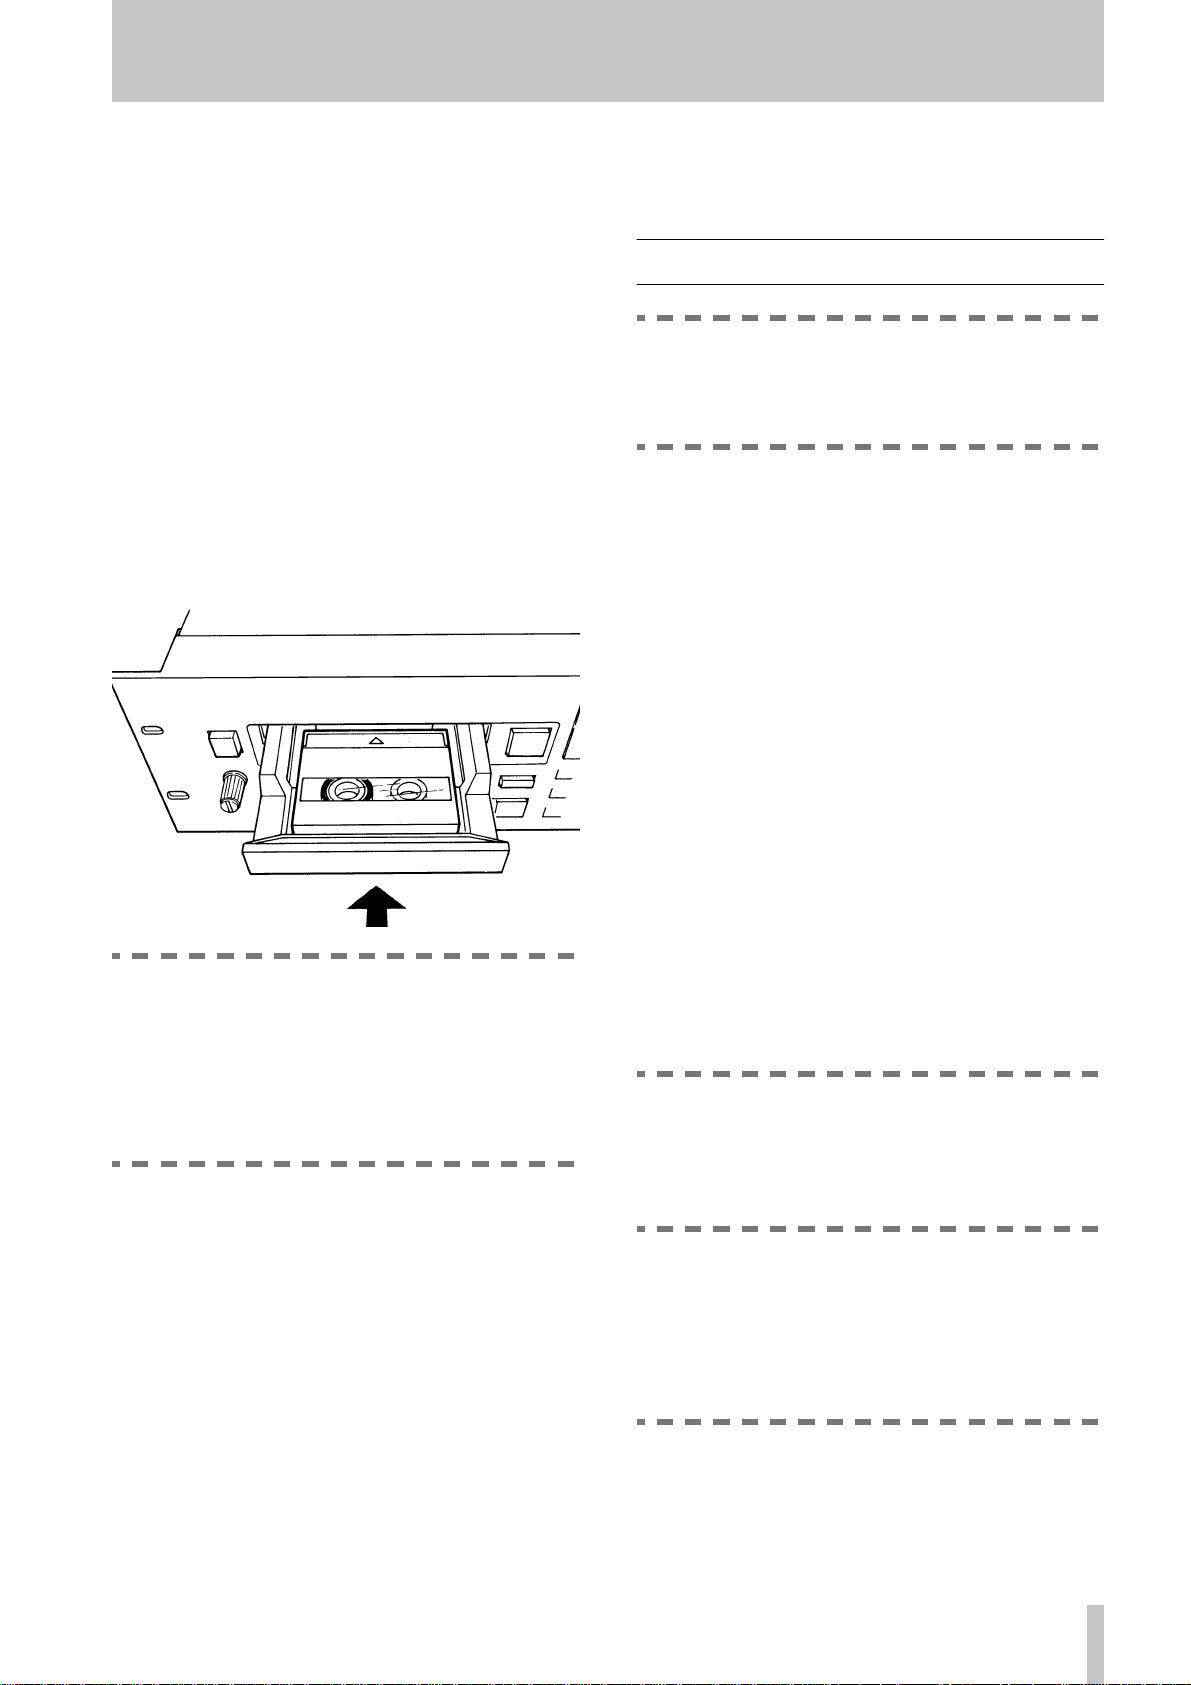
DAT cassettes play in one direction only. Always
load DAT cassettes with the tape window uppermost,
and the arrow on top of the cassette pointing into the
tape deck, as illustrated below:
tions using the
play menu (3.19, "Viewing points at which block
errors have occurred").
DISPLAY [24]
key or the error dis-
1.5 Making connections
NOTE
Before making any audio or word clock connections to the tape deck, make sure that all
equipment is turned off.
1.5.1Making analog connections
Use balanced cables to make connections between
the BALANCED INPUT
(male) XLR connectors of the tape deck, and the outputs and inputs of other audio equipment operating at
the professional +4 dBu level. The wiring standards
for the XLR connections are printed on the rear panel
of the tape deck (1 = ground, 2 = hot, 3 = cold)
Use unbalanced cables to make connections between
the unbalanced input and output RCA connectors of
the tape deck and the outputs and inputs of audio
equipment operating at other levels.
(female) and OUTPUT
NOTE
Start recording on a new blank tape from the
beginning of the tape. There is no need for a
lead-in section, and recording from the start
of the tape will record the subcode from the
start, allowing accurate positioning within the
tape.
Also note that DAT cassettes are fitted with a sliding
write-protect tab to prevent accidental recording. The
cassette is write-protected when the tab is closed.
1.4.1Head cleaning
Never attempt to clean the head of a DAT deck in the
same way that you clean the head of an analog tape
deck. Always use a special DAT head cleaning cassette. Follow the instructions on the cleaning cassette
for optimum performance.
The head may need to be cleaned if you hear errors
(noise) on playback or while recording. You can
make a visual check of the error rates and error loca-
1.5.2Making digital audio connections
Use cables wired in accordance with the AES/EBU
standard to connect the DIGITAL (AES/EBU)
INPUT
tors of the tape deck to other digital audio equipment.
Use unbalanced cables to connect the
(COAXIAL) INPUT
tors of the tape deck to other digital audio equipment.
(male) and
The use of analog cables is not recommended for digital audio use, and TASCAM
cannot guarantee reliable performance if such
cables are used for digital audio connections.
OUTPUT (female) XLR connec-
DIGITAL
and OUTPUT RCA connec-
NOTE
1.5.3Making word synchronization
connections
Use standard BNC-terminated cables to connect the
word in connector of the tape deck to the word clock
output of other device.
NOTE
There is no dedicated word output. Since both
the AES/EBU and SPDIF formats contain a
clock signal, if the tape deck is to be used as
TASCAM DA-45HR
7
Page 8
1 - Introduction to the DA-45HR
the word clock master for a digital audio
setup, any word clock slaves should receive
the clock through the digital audio signal.
1.5.4Making control connections
WARNING
Do not attempt to use the tape deck with any
remote control unit except one designed
especially for use with this tape deck.
The optional RC-D45 remote control unit may be
connected to the
(approximately 16 ft) cable of the RC-D45.
REMOTE IN
jack, using the 5 m
1.6 Block Diagram
The
CONTROL I/O connector is for use with suit-
ably-equipped control units (see
[36]
).
CONTROL I/O
1.5.5Power connections
Make sure that your AC voltage supply matches the
voltage requirements of the tape deck (as printed on
the rear panel).
8
TASCAM DA-45HR
Page 9
9
TASCAM DA-45HR
Page 10

2 - Parts of the tape deck
NOTES
As well as providing details of the settings
made with switches, etc., this section also
provides the information necessary for basic
operations of the tape deck. Although the
operation of the transport keys, etc. will be
familiar, there are some additional features of
this tape deck, and the operation of these features may differ slightly from the way in which
they are implemented on other units. Please
consult 2.3, "Tape controls" for full details of
such features and their operation.
The operation of the optional RC-D45 remote
control unit is explained in 5, "RC-D45 remote
control unit (option)".
The more commonly-used functions of the
function keys (below the display) which are
labeled in white above the keys are also
described in this section. The less commonlyused functions, labeled in blue above the
keys, are described in 4, "Advanced functions".
Above the tape counter in the display are two bargraph peak level meters which show either the level
of the input signals, or the level of the signals
recorded on tape, depending on the current status of
the transport.
Other indicators in the display provide information
on the current status of the tape deck and of the tape
(e.g. clock status, sampling frequency, repeat status,
and the various IDs encountered when a tape is being
replayed).
NOTE
In this manual, we use the term “program” to
describe part of a recording between two
START IDs. This is equivalent to the term
“track” on a CD or MD. Since the term “track”
is already established with another meaning
in analog tape recording technology, the term
“program” is used here instead.
2.2 Recording mode and source
switches, etc.
2.1 Power and display
[1] POWER switch
Push once to turn the power on, and again to turn the
power off.
[2] Cassette tray and OPEN/CLOSE
button
Always load DAT cassettes in the way illustrated on
page 7.
Press the open/close button to open the tray. If a cassette is already loaded, it will be unthreaded, and the
words
Tray Open!
After the tray is fully open, these words will be
shown (not flashing).
When the tray is open, and the open/close button is
pressed, the words
the display. If a tape is correctly inserted in the tray
when it is closed, the display will show a counter
value.
Tray Close
[3] Display window
The different modes available for display are
described more fully below ( COUNTER MODE
[21]
and DISPLAY [24] ).
will flash on the display.
will flash on
The following controls affect the recording mode,
and the selection of the signal source when making
recordings.
[4] CLOCK switch
Use this switch to select between INT (the tape
deck’s internal clock), D-IN
through the digital audio inputs— either AES/EBU
or
COAXIAL
through the BNC word synchronization connector, as
described in 1.5.3, "Making word synchronization
connections").
When making recordings using digital audio connections from the source (the
SWITCH [7]
set to D-IN
switch is set to INT
attempted, the display will show
no recording is possible.
There must be one, and only one, word clock
source in a digital audio system. If there is
more than one word clock, or if a digital audio
device is not properly synchronized, damage
may be caused to speakers, etc.
) or
WORD (the word clock received
is set to DIGITAL ), this switch must be
or WORD , as appropriate. If the CLOCK
when digital recording is being
WARNING
(the word clock received
INPUT SELECTOR
CLKINTX
, and
10
TASCAM DA-45HR
Page 11

2 - Parts of the tape deck
[5] RECORD MODE switch
Use this switch to choose between HR(24BIT) and
STANDARD
24 bits of resolution. The
record at 16 bits of resolution.
It is not possible to record a tape partly in
HR(24BIT) mode and partly in STANDARD
mode (an error message will appear (see
6.5.1, "Warning messages"). If a tape has
been recorded in one mode, and it is required
to re-record it in another mode, the tape must
be rewound to the start, and the new recording mode selected using this switch. The
RECORD key must be pressed and held, and
the PAUSE key pressed. Press and hold the
RECORD key once more, and press the
PAUSE key. The recording can now take
place in the selected mode.
Note that it is not possible to enter input mon-
itor mode (see RECORD KEY [17] ) if this
RECORD MODE switch is set to one record-
ing mode and the tape currently loaded in the
tape deck is has previously been recorded in
another. This helps to avoid the two modes
being mixed on one tape.
. The HR(24BIT) setting records with
STANDARD
Operating Tip
setting will
When the tape deck is in record ready mode, as mentioned above, turning the
selection of a program number other than
meaning that this recording will start at the selected
number, and subsequent programs will be written
with numbers automatically incremented from this
selected value.
Valid program numbers are from 01 to 99. If
the above procedure is used to select a progam number at the high end of the range, and
the automatic increment procedure takes the
number above 99, the number will “wrap” to
00. The number 00 can cause problems when
searching and locating, and this should be
remembered when setting program numbers.
DATA
NOTE
dial [20] allows the
01
,
[6] Fs switch
Use this switch to select the sampling frequency
(44.1 or 48 kHz) when making analog recordings.
When making digital recordings, the sampling frequency is automatically detected.
When playing back tapes that have already been
recorded, this switch has no effect. The sampling frequency of a recorded tape is fixed, and cannot be
changed.
NOTES
When recording with the switch set to the
HR(24BIT) position, the tape moves at twice
the normal speed. A tape which is labeled as
a 90-minute tape will therefore provide 45
minutes of recording time. The tape time that
is displayed in the
the ABS subcode, or actual elapsed time, as
set in 3.11, "HR time display".
If a tape has been recorded in
mode, it cannot be replayed on a DAT tape
deck that does not support this mode.
When recording digitally from a CD or other
material which contains fewer than 24 bits of
resolution and this switch is set to
the lower “extra” bits will be unused.
No setting is necessary to select the bit resolution for
playback— the tape deck recognizes the recording
mode in which the tape was recorded and adjusts
accordingly.
HR(24BIT)
mode is either
HR(24BIT)
HR(24BIT)
,
[7] INPUT selector switch
The left (UNBAL) and center (BAL) positions of
this switch allow the selection between the unbalanced RCA jacks or the balanced XLR jacks
respectively.
The right (DIGITAL) position allows the selection of
the digital input jacks.
[8] DIGITAL INPUT selector switch
When the INPUT switch [7] is set to the DIGITAL
position, this switch is used to choose between the
RCA COAXIAL and the XLR AES/EBU digital
audio input sources.
NOTE
Despite the name of the switch setting and
the connectors (AES/EBU), the XLR connectors are capable of receiving SPDIF format
input, and the RCA COAXIAL connectors are
capable of receiving AES/EBU format. The
tape deck will automatically detect the input
format and adjust itself accordingly.
TASCAM DA-45HR
11
Page 12

2 - Parts of the tape deck
[9] ANALOG INPUT selector switch
When the INPUT switch [7] is set to ANALOG, this
switch is used to select between UNCAL and CAL.
UNCAL means that the analog signal source works
at an uncalibrated nominal level which is neither
+4 dBu nor -10 dV, requiring the use of the input
level controls to adjust the recording level.
The CAL position is for use with analog sources
which are calibrated to use either the standard
+4 dBu or the -10 dBV level as a nominal level. The
input level controls are not used in this case.
NOTE
If this switch is set to the CAL position, make
sure that no parts of the program material will
cause clipping.
[10]INPUT level controls
When recording from analog sources with the
ANALOG INPUT switch [9] set to UNCAL, these
controls adjust the level of the input signal to the left
and right tape tracks.
They have no effect when the switch is set to the
CAL position, or when recording from a digital
audio source.
[11]PHONES control and jack
Repeated presses of these keys will move the tape
forwards or backwards by the appropriate number of
programs (pressing the skip forward key once will
move the tape to the beginning of the next program,
etc.).
While the tape is locating, the display will show
(flashing on the right) the number of programs which
must still be passed, and (on the left) the current program number:
ABS
00H12M46
S
PNO
08+02
In the above example, the tape is currently on program 8, and must move two programs forward before
the correct program (i.e. program 10) is reached.
When the start of the desired program is reached, the
tape deck will enter the play mode if the tape was
playing before the skip operation, otherwise it will
enter pause mode.
[13]REW and F FWD keys
Use these keys to wind backwards or forwards fast
through the tape.
If the tape is stopped or paused, and one of these
keys is pressed,
right of the display to indicate the direction of the
tape movement, if the margin is being displayed (see
DISPLAY [24]).
<< or >> will be shown on the
Any standard pair of stereo headphones may be
plugged into this π-inch jack, and the level adjusted
with the rotary control.
2.3 Tape controls
The following keys provide control of the tape transport, recording modes, etc. Please read this section
carefully if you are not sure of transport operations
using the tape deck.
[12]SKIP keys
These keys are used to move the tape forward or
backward by a certain number of programs.
NOTE
A “program” on a DAT cassette starts with a
START ID marker. The audio portion of the
data recorded on a DAT cassette is not used
to determine the division into tracks.
If normal mode has been selected (3.16, "Fast forward mode"), pressing either of these keys when the
tape is playing will start fast forward or rewind.
If the tape is playing when one of these keys is
pressed, and cue mode has been selected (3.16, "Fast
forward mode"), the tape enters a “cue” or “review”
mode, in which the tape is played forward or backward at either three times or five times normal speed
(if the tape has been recorded in HR(24BIT) mode)
or twice or four times normal speed (if the tape has
been recorded in standard mode). The cue/review
speed can be changed by pressing the REW or F
FWD key again, and is shown on the display as
>>3/>>5 (cue, HR(24BIT) mode), <<3/<<5
(review, HR(24BIT) mode),
dard mode),
<<2/<<4 (review, standard mode).
>>2/>>4 (cue, stan-
[14]STOP key
Use this key to stop the transport from whatever
mode is currently selected. This includes the “input
monitor” mode (see [17] below).
12 TASCAM DA-45HR
Page 13

2 - Parts of the tape deck
[15]PLAY key
Use this key to start playing when the tape is stopped
or paused, or to start recording when the tape is in
record pause mode (see below).
The indicator above the key will light when the tape
is playing back. In this case, the indicator will be the
only transport indicator lit.
The indicator may also be lit in combination with the
PAUSE indicator, showing that the unit will enter
playback mode almost instantly when the PLAY key
is pressed.
If the REC indicator is lit together with the PLAY
indicator, the unit is recording.
If the tape is locating as the result of a command to
search for the beginning of a program (skip or program play), and the unit was in play mode before this
search operation started, the PLAY indicator will
flash, showing that the unit is in “auto play” mode,
and playback will restart when the location is
reached.
[16]PAUSE key
Use this key to put the tape deck into pause mode, as
explained below.
If all clock connections are in order, the display will
show
ANALOG in, AES/EBU or
COAXIAL. The peak level meters will show the
signal levels received through the selected inputs.
In the case of the latter two digital options, the sam-
pling frequency (either
a digital input source is selected, and the sampling
frequency of the received signal is outside the allowable range (± 0.1%) the display will show the signal
source (
by a question mark. Input monitoring is possible, but
recording is not possible.
The signal source, followed by an
on the display if the source selected with the clock
switch [4] is not present or has no longer
synchronized.
From the input monitor mode, pressing and holding
the RECORD key and pressing the PLAY key will
start recording (the RECORD and PLAY indicators
will both light).
From the input monitor mode, pressing and holding
the RECORD key and pressing the PAUSE key will
put the tape deck into record ready mode (the
RECORD and PAUSE indicators will both light).
AES/EBU or COAXIAL), followed
44 or 48) will be shown. If
X, will be shown
If the tape is stopped or playing, pressing the
PAUSE key will put the tape deck into paused play
mode (the PLAY and PAUSE indicators will both
light).
If the tape deck is in “input monitor” mode (see [17]
below), pressing and holding down the RECORD
key and pressing the PAUSE key will put the tape
deck into record ready mode (the PAUSE and
RECORD indicators will both light).
From the record ready mode, pressing the PLAY key
will start recording (the PLAY and RECORD indicators will both light).
If the tape deck is left in pause mode for some time
(three minutes or so), it will drop back into stop
mode.
[17]RECORD key
Use this key for recording, as described here.
Press this key once to enter the “input monitor”
mode. In this mode, the display gives information
about the current status of the tape deck and the connections, ensuring that clock signals, digital audio
connections, etc. are properly made before recording
starts.
NOTES
If the tape deck is left in record ready mode
for three minutes or longer, it will automatically enter the input monitor mode (the head
drum will stop spinning).
It is possible to enter input monitor mode with
a write-protected cassette inserted, or with no
cassette inserted. However, if a cassette previously recorded in one mode (HR(24BIT) or
STANDARD) is inserted, and the RECORD
MODE switch is set to the other mode, input
monitoring is not possible. Correct this, by
replacing the cassette with another, or as
described in RECORD MODE SWITCH [5].
It is also possible to enter the record mode
directly from the stop mode by pressing and
holding the RECORD key and pressing the
PLAY key. It is also possible to enter the
record ready mode directly from the stop
mode (RECORD key and PAUSE key).
[18]REC MUTE key
Use this key to record a period of silence on the tape.
If the tape deck is recording, and this key is pressed,
TASCAM DA-45HR 13
Page 14

2 - Parts of the tape deck
the RECORD indicator will flash, and all input to
the tape will be muted. After a number of seconds
(defined in the menu
"Record mute time"), the tape deck will enter the
record ready mode (the record and pause indicators
will both be lit).
Pressing and holding the key for a few seconds will
mute the input, and will put the tape deck into record
ready mode as soon as the key is released.
[19]SHUTTLE wheel
Turn this wheel to move the tape backwards (counterclockwise) or forwards (clockwise). Turning the
wheel further from the center will make the tape
move faster in the appropriate direction.
The tape may be shuttled both forwards and backwards, from half-speed to eight times normal speed,
when the tape has been recorded in HR(24BIT)
mode, and from normal speed to twelve times normal
speed when the tape has been recorded in standard
mode.
When entering characters for program titles, and
editing memory locations, etc., this control acts as a
cursor control (counterclockwise to move the cursor
to the left, and clockwise to move it to the right).
[20]DATA dial
This dial is used for two major functions.
One is to change the value of data in menus and
parameter settings.
It can also be used, however, to select an absolute
program number at which playback should start
(compare this with the SKIP keys, which are used to
select a program number relative to the current
number).
While the tape is stopped or paused, and a menu or
edit function is not displayed, turn the data dial.
ABS
00H03M08
The program number following the
Program numbers can be from
turning the DATA dial past the limit will start at the
other end of the list.
Press the PLAY key within five seconds of turning
the DATA dial to locate to the start of the program
and start playing.
Press the PAUSE key within five seconds of turning
the DATA dial to locate to the start of the program
and put the tape deck into pause mode.
RecMut function—see 3.4,
PNO
02>04
S
> sign flashes.
01 through 99, and
NOTE
If the DATA dial is turned by mistake, either
leave the tape deck alone for five seconds to
cancel the operation, or press the STOP key.
2.4 Command keys
These command keys have two modes: the primary
mode, labeled in white above the key, is the most
common use for the key. The secondary, or shifted,
mode is labeled in blue above the key, and is only
operative when the SHIFT indicator [32] is lit (see 4,
"Advanced functions" for details of these secondary
modes).
[21]COUNTER MODE
Use this key to cycle through the different tape
counter modes available:
• ABS time— the absolute time as recorded on the
subcode of the tape. This is expressed in hours,
minutes and seconds. If the tape is at an unrecorded
location, the tape counter will show all dashes.
ABS
00H26M35
• PGM time— the elapsed time since the last
START ID which has been read from tape (the
beginning of the program). If, when the display is
in this mode, the tape is located to a point outside a
ST ART ID and playback restarts, the tape deck will
be unable to determine the time since the start of
the program and the display will show all dashes
instead of a time value..
PGM
03M17
• REMAIN time— the time remaining on the cur-
rently-loaded cassette; to minute accuracy. Cassettes from different manufacturers may vary
slightly in length, resulting in different values
being shown for tapes which are nominally the
same length.
REMAIN0
003
M
• Tape Counter mode— no indication is given on the
display of the mode, and a 4-digit number is used
to show the tape position. This v alue is relati v e to a
user-definable reference “zero” point (see
MARGIN RESET [23]).
01 26
PNO MARG
09 6.3
S
PNO MARG
09 6.3
S
PNO MARG
09 6.3
PNO MARG
08 6.3
dB
dB
dB
dB
14 TASCAM DA-45HR
Page 15

2 - Parts of the tape deck
[22]CHAR
If characters have been recorded on the tape as a tape
or program title, pressing this key will allow the tape
deck to display these characters, scrolling across the
display, as the START ID containing the title is
played back. They will be replaced by successive
title contents as they are read from tape. If characters
are read from a START ID, the CHAR indicator will
light in the display to indicate this. If no characters
have been recorded on the tape, pressing this key will
have no effect.
[23]MARGIN RESET
Pressing this key resets the margin (available headroom) to its lowest level of 40dB. Note that in some
display modes, there is no visible effect when this
key is pressed.
The margin is measured in 1 dB increments between
40 dB and 20 dB and in 0.1 dB increments between
19.9 dB and 0 dB.
If the time display is in the 4-digit tape counter
mode, pressing this key will reset the tape counter.
[24]DISPLAY
Regardless of the current counter mode set by [21],
this key is used to display other information. The
options available, which are accessed by repeated
presses of this key, are:
• Program number and Margin mode— where the
current program number and margin in decibels are
displayed:
ABS
00H23M08
S
• Frames mode— where frames are displayed as
well as hours, minutes, and seconds. The frames
used are “digital audio” frames, i.e. there are 100
frames in every three seconds; 33 in the first second, 33 in the next, and 34 in the third. The pattern
then repeats itself.
ABS
00H23M08
S
• Block Error Rate mode— the last digits of the
display show
E---- when out of play mode.
When playback starts, the error rate for either the A
or B track is displayed. The A or B track is selected
using the MENU key while the error rate display
mode is active.
ABS
00H23M08
S
PNO MARG
07 6.3
_32FP09
A0017
dB
• If titles have been recorded on the tape (see 4.8,
"Character editing (titling)"), CHAR is shown on
the display, and the characters comprising the title
are shown on the display (here, the word “TAS-
CAM” is used as the title):
ABS
00H23M08
TASCA.M
S
[25]SKIP PLAY
When skip mode is active, SKIP PLAY is shown on
the display . Skip mode means at that when a SKIP ID
is encountered on tape, the tape will fast forward
until the next START ID is encountered.
[26]AUTO ID
When AUTO ID mode is active, AUTO ID is shown
on the display (see 4.4, "ID markers (START, SKIP,
END, CHAR and renumbering)" if you are unsure
about ID marker types). This means that when
recording, a START ID will automatically be written
when a “trigger level” signal is detected after a
period of silence.
The number of the new START ID is one greater
than the last ID successfully read from tape. However, the automatic numbering of IDs will be out of
sequence if a START ID is added between existing
IDs, or if an ID is written before a valid previouslyrecorded ST ART ID has been read from tape. Use the
renumber function to restore the sequence (see 4.4,
"ID markers (START, SKIP, END, CHAR and
renumbering)".
The level which will trigger the automatic writing of
a START ID, and the length of the silence to precede
it may be set from the menu items (see 3.2, "Auto ID
level" and 3.3, "Auto ID time").
[27]ENTER
This key is used to confirm entries made in the menu
and EDIT settings.
It is also used, when in EDIT mode (see 4,
"Advanced functions"), to enter the EDIT functions).
When recording subcode (START, SKIP, END IDs
and CHAR title information), it is used to start the
writing of this information to tape.
[28]MENU
Repeated presses of this key (when the display is not
in Block Error mode) cycle through the different
options available in the menu. These options are
explained in detail in 3, "Menu functions".
TASCAM DA-45HR 15
Page 16

2 - Parts of the tape deck
[29]LOC 1
Pressing this key will locate the tape to the first memory location (set with this key in shifted mode). If the
tape is playing when this key is pressed, the tape will
resume playing when the location is reached, otherwise it will stop.
When the key is pressed, the value stored in the first
location memory will flash on the right side of the
display (frames, program numbers and margin will
disappear while the tape is locating, and be restored
once location is complete).
If a pre-roll time has been set in the menu, pressing
this key will locate to the memory location minus the
pre-roll time.
[30]LOC 2
This key functions in exactly the same way asLOC 1
[29] above, except that the second location memory
is used rather than the first.
[31]SINGLE PLAY
The single play mode, when active, will play only
one program , i.e. when the next START ID is
encountered, playback will stop. When single play
mode is active, the display will show SINGLE
PLAY.
[32]SHIFT
This key is a latching key. When active, the indicator
beside and above the key lights, and the command
keys take on their shifted functions, as indicated by
the blue captions above them.
See 4, "Advanced functions" for details of these
shifted functions.
the menu system (see 3.7, "Digital out word length").
The format of data received (AES/EBU or SPDIF) is
automatically detected.
[35]WORD IN and THRU (AUTO TERM)
These BNC connectors provide an input for an external word clock (selected using the CLOCK switch
[4] set to the WORD position) at the IN connector,
which is re-transmitted from the THRU connector.
There is no need to provide any termination for the
THRU connector if no connection is made to it.
[36]CONTROL I/O
This 15-pin ’D’-sub connector is used for connection
to a suitably-equipped controller.
As well as the mode described in the table below , this
connector can also be used as a serial connector.
Please contact your TASCAM distributor for details
of this facility.
The pinouts of this connector are given below:
Pin
number
1 STOP IN External com2 FWD PLAY IN
3 F.FWD IN
4 REW IN
5 PAUSE IN
6 REC PLAY IN
7 SERIAL IN
Signal
Function
Direction
mand reception;
active when low
(at ground potential for 30 ms or
more)
2.5 Rear panel
[33]DIGITAL (AES/EBU) INPUT/OUTPUT
These XLR connectors, wired in accordance with the
AES/EBU standard, provide digital audio input and
output facilities with the data being output in either
AES/EBU or SPDIF format (as selected in 3.6, "Digital output format"). The format of data received
(AES/EBU or SPDIF) is automatically detected.
[34]DIGITAL COAXIAL
These RCA connectors provide digital audio input
and output facilities with the data being output in
either AES/EB U or SPDIF format (as selected in 3.6,
"Digital output format"). The bit length is set using
16 TASCAM DA-45HR
8 Ground — —
9 FWD PLAY
TALLY
10 F.FWD T ALLY OUT
11 REW TALL Y OUT
12 STOP TALL Y OUT
13 REC/PLAY
TALLY
14 PAUSE T ALLY OUT
15 TAPE END
a
TALLY
a. See 3.14, "End tally signal"
OUT Transmit trans-
port status indication signals in
open collector
(maximum allowable voltage 15 V
and maximum
OUT
OUT
allowable current
80 mA)
Page 17

2 - Parts of the tape deck
[37]REMOTE IN
This 3.5 mm jack is used to connect the optional RCD45 remote control unit.
Do not use this jack to connect any remote control
unit other than one designed especially for use with
the tape deck.
[38]~ IN
Use this to connect the tape deck to the AC power
supply using the supplied cable.
Make sure that the power supply voltage matches the
voltage requirements of the tape deck as marked on
the rear panel. If there is any doubt, consult your
TASCAM dealer.
[39]BALANCED ANALOG inputs
These female XLR connectors provide balanced
inputs at a nominal +4 dBu level. The wiring of these
connectors is:1 = ground, 2 = hot, 3 = cold. The nominal impedance of these connectors is greater than
25 kΩ.
[40]UNBALANCED ANALOG inputs
These RCA connectors provide unbalanced inputs at
a nominal –10 dBV level. The nominal impedance of
these connectors is greater than 50 kΩ.
[41]UNBALANCED ANALOG outputs
These RCA connectors provide unbalanced outputs
at a nominal –10 dBV level. The nominal impedance
of these connectors is less than 700 Ω.
[42]BALANCED ANALOG outputs
These XLR connectors provide balanced outputs at a
nominal +4 dBu level. The nominal impedance of
these connectors is less than 27 Ω.
The trimmer beside each connector can be used to set
the output level precisely to match the le vel e xpected
by the equipment connected to the tape deck.
The “standard” setting (and the condition in which
the unit is shipped from the factory) is with these
trimmers set to maximum (fully clockwise).
TASCAM DA-45HR 17
Page 18

3 - Menu functions
The menu facilities on the tape deck allow common
settings to be made.
Repeated presses of MENU [28] will cycle through
the different menu items listed here in the order presented here.
Repeated presses of the DISPLAY [24] key when
the tape deck is in menu mode will display the different menu items in the opposite order to the one in
which they are presented here.
NOTE
When attempting to access the menus with
the MENU key, the display mode should not
be the Block Error rate display mode. In this
display mode, pressing the MENU key
changes between the A and B tracks.
When setting values from a menu, turn the DATA
dial [20] to change the displayed value. The new
value will be shown flashing on the display.
Press ENTER [27] to confirm the value.
3.3 Auto ID time
AtID-T
When the AUTO ID function is enabled (AUTO ID
[26]), signals which exceed the level set in 3.2,
"Auto ID level" will automatically start the recording
of a START ID, if the signal has remained below the
level for the period set in this parameter immediately
before exceeding the trigger level.
Since the tape deck does not read track numbers, etc.,
from digital audio sources, this function should be
used to divide CD tracks and assign new program
numbers at the start of each track. Set the “gap time”
as appropriate for the program material.
The times available are:
1.0 and 1.5 seconds.
The default value is
2.0sec
2.0, 2.5, 3.0, 0.5,
2.0 seconds.
3.4 Record mute time
If the DATA dial is turned, but no changes are to be
made to the displayed value, press the MENU key
again to return the display to the previous value.
To exit the menu mode, press either the COUNTER
MODE [21] or the MARGIN RESET [23] key.
3.1 Drum time (head time)
Drum-T
Reports the time (in hours) that the head drum has
been in use. Use this information to help schedule
head cleaning, following the interval between cleanings as recommended by the cleaning cassette.
0010H
3.2 Auto ID level
AtID-L
When the AUTO ID function is enabled (AUTO ID
[26]), signals which exceed this level, after a period
of relative silence (as set in 3.3, "Auto ID time") will
automatically start the recording of a START ID at
the point where the signal exceeds this level.
The options available are:
-57dB and -60dB.
The default value is
-48dB.
-48dB
-48dB, -54dB,
RecMut
2sec
Sets the length of the silent period when the REC
MUTE key [18] is pressed, the input signal to the
tape is muted, and a period of silence is recorded.
The values available are: 4, 5, 6, 7, 2 and 3
seconds.
The default value is
4 seconds.
3.5 Reference level
Ref-LV
Matches the input and output reference levels of analog audio equipment to the digital reference standard
in use for the recording project, meaning that when a
nominal level (either +4 dBu or –10 dBV) analog
signal is input, this will show as the selected reference level on the tape deck’s meters. The converse is
true when analog signals are output from the tape
deck (i.e. a signal at the selected reference level will
be output at the appropriate nominal analog level).
Three options are available:
-18dB (European), and -20dB (SMPTE).
The default value is
-16dB, and the symbol on
the display meters (between the 18 and
when this value is selected.
-16dB
-16dB (TASCAM),
14) will light
18 TASCAM DA-45HR
Page 19

3.6 Digital output format
3 - Menu functions
In the STANDARD mode, any dither settings made
are applied to the signal as it is recorded.
Format
AESEBU
Sets the format of the digital audio data output from
both digital audio outputs (the AES/EBU XLR connector and the COAXIAL RCA connector).
The options available are
format) and
The default is
Consmr (SPDIF format).
AESEBU.
AESEBU (AES/EBU
3.7 Digital out word length
DoutHR
When a tape has been recorded in HR(24BIT) mode,
it may be necessary to play back the material at 16bit resolution.
Note that the format of the digital audio data will
always be output in the format as selected above (3.6,
"Digital output format") from both connectors (AES/
EBU and COAXIAL).
The options available are
The default value is
24bit.
24bit
24bit and 16bit.
The triangular (
effectively than the rectangular (
Tri.) setting reduces noise more
Rect.)
2
, but
both reduce the signal-to-noise ratio compared to the
off setting, triangular more than rectangular.
There is no rule for using dither—different circumstances demand different settings.
The default setting here is
off.
3.9 Copy prohibit
Sets the level of copy protection for tapes recorded
using this tape deck.
CopyID
The menu items control the writing of the copy protection bit in the subcode of the recorded material.
The options available are:
tion is applied to the recorded material),
(one generation only of digital copying is possible
from tapes produced when this setting is made), and
Prohbt (no digital copying at all is possible).
The second option is equivalent to the SCMS system
implemented on consumer DAT recorders.
The default value here is
Free
Free (no copy protec-
1gen
Free.
3.8 Dither
Dither
Dithering is the technique used to improve resolution
at low levels, with resulting loss of quantization
1
noise
. It is particularly useful when playing back
audio recorded with higher number of bits than the
destination is capable of receiving.
When playing back a recording made in 24-bit HR
mode, dithering may be used if the internal D/A convertors are used. There is no effect if dithering is
selected, and 16-bit output word length is selected.
1. A full discussion of dither and other digital
audio techniques is outside the scope of this
manual. However, a good starting point for
learning about this, and other aspects of digital
audio, is John Watkinson’s The Art of Digital
Audio, pub Focal Press
off
3.10End ID
End-ID
Sets whether an END ID is automatically written
whenever recording stops.
The two options available are:
ID is written when recording stops) and
(an END ID is automatically written when recording
stops). When an END ID is written, the display
shows
WR-EE.
When playing back and an END ID is encountered,
EE is shown on the display , and playback stops. The
tape then either stops or rewinds, depending on the
setting made in 3.15, "Auto rewind".
The default value is No WR.
2. These names refer to the shape of the probability curve describing the noise applied to the
original signal as part of the dither process.
No WR
No WR (no END
AutoWR
TASCAM DA-45HR 19
Page 20

3 - Menu functions
3.11HR time display
HR-TM
When recording or playing back in the HR(24BIT)
mode, the tape moves at twice the normal speed. The
tape counter can use the subcode recorded on the
tape as its reference, meaning that the displayed time
passes twice as fast as real time, or it can display real
time.
The selected display mode is used in PGM Time
mode and REMAIN Time mode (see COUNTER
MODE [21]). A * symbol appears at the top of the
display when real time mode is selected.
The options available in this menu are:
(using the ABS time in the tape subcode), or
RealTM (using real time for the tape counter).
The default value is
TapeTM
TapeTM
TapeTM.
The values available are:
0, 1, 2, 3, 4 and 5
seconds.
The default value is
0 seconds.
3.14End tally signal
EndTLY
Controls the timing of the tape end tally signal transmitted through the CONTROL I/O [36] port. The
signal can either be transmitted at the end of the tape,
or at a fixed interval before the tape end.
The values available are:
will be transmitted at the end of the tape),
2min and 3min (the tally signal will be trans-
mitted before the end of the tape is reached).
The default value is
T-End.
T-End
T-End (the tally signal
1min,
3.15Auto rewind
NOTE
This menu item only applies to tapes
recorded in the HR mode; it has no relevance
to tapes recorded in standard mode.
3.12Repeat mode
Repeat
This menu item controls the number of times that the
playback will repeat when the repeat mode is set (see
4.1, "REPEAT").
The options available are:
will repeat 10 times) and
will repeat indefinitely until stopped).
The default value is
10TMS.
10TMS
10TMS (the playback
UnLimt (the playback
3.13Pre-roll time
PreRol
Sets a pre-roll time, so that the tape will locate to a
fixed point before either of the location memories
when the appropriate key (LOC 1 [29] or LOC 2
[30]) is pressed. The setting made here has no effect
on locating to the START IDs of programs using the
SKIP keys [12] or the DATA dial [20].
0sec
At-Rew
off
This menu item determines whether the tape will be
automatically rewound when the end of the tape or
an END ID is reached in play mode.
The two options available are:
off (the tape will
not be rewound when the end of the tape or an END
ID is reached) and
on (the tape will be automati-
cally rewound when the end of the tape or an END
ID is reached).
The default value is
off.
3.16Fast forward mode
FF-Key
This menu item determines whether the F FWD and
REW keys will act as cue and review keys, respectively, if they are pressed while the tape deck is in
play mode. The two settings are
unit will go from play mode to fast wind) and
(the unit will enter cue/review mode when the fast
wind keys are pressed).
The setting made here also applies to fast wind commands made through the CONTROL I/O [36] connector, and using the optional RC-D45 remote
control unit.
The default value is
Normal.
Normal
Normal (the
Cue
20 TASCAM DA-45HR
Page 21

3 - Menu functions
3.17Parameter save
P-Mode
Saves the following parameters so that they become
the default parameters when the tape deck is next
powered up:
• Single Play
• Skip Play
• Repeat Mode
When this menu item is first displayed, the right side
of the display shows:
----. To save the current
settings, turn the DATA dial [20], so that the display
shows
Save, and press ENTER [27].
----
3.18Initializing settings
*Data*
Resets all menu values to their default settings except
for the head time, (see 3.1, "Drum time (head
time)"), which cannot be reset.
To reset the values to default, turn the DATA dial
[20] so that the display shows
ENTER [27].
----
Init. and press
If the screen shows
dial again so that the display shows
Init.in error, turn the DATA
----.
3.19Viewing points at which block
errors have occurred
ABS
00H23M08
This display is shown if the MENU key is pressed
once more following the reset screen above.
This displays up to five points in ABS time format
where more than one block error has occurred within
a frame. T urn the DATA dial to view the five points at
which these errors have occurred. Turning the dial
clockwise after error #5 will show the total number
of such errors (up to a total of 99 errors).
While a block error time is shown on the display,
pressing the LOC 2 key will write the error location
to the second location memory and start locating the
tape to that point.
While any of the locations or the total number of the
tape errors menu is shown on the display, the information can be cleared by pressing the MARGIN
RESET key. Ejecting the tape will also clear this
data.
_32F#1
S
TASCAM DA-45HR 21
Page 22

4 - Advanced functions
The more advanced functions of the tape deck are
typically accessed by pressing SHIFT [32] so that
the indicator is lit.
While the indicator is lit, the command keys take on
their shifted function, labeled in blue above the key.
4.3 INS/+ and DEL/-
These keys may be used in addition to the data dial to
increment and decrement values in the menus (see 3,
"Menu functions").
4.1 REPEAT
Repeated presses of the REPEAT key [21] cycle
through the following:
• A-B repeat— the display shows REPEAT A-B—
playback is repeated between the two location
memory points (A refers to location memory point
1, and B refers to location memory point 2). The
points must first be set (see 4.6, "Location memories"), the tape located to a position between the
two location memory points, and playback started
from there.
• Single repeat— the display simply shows
REPEAT— a program will be repeated; use the
DATA dial or the INS/+ and DEL/- keys to select a
program number, and then press PLAY to start
repeated play of that program . While the program
is being played back, the word REPEAT will flash
in the display . If the REPEAT setting is being made
while the tape is playing back, the program which
starts with the next START ID encountered during
playback will be repeated.
NOTE
Remember that menus are unshifted functions. To use these keys as increment and
decrement keys in the menus , the SHIFT indicator must be lit, which means that the SHIFT
key must be pressed after the menu has been
entered.
They are also used or incrementing and decrementing numeric values in the edit screens (see 4,
"Advanced functions").
When these keys are used for editing values, pressing
and holding down these keys will repeat the increment or decrement operation.
When entering characters (see 4.8, "Character editing (titling)"), the INS/+ key inserts a blank space
into the character string immediately before the cursor position. The DEL/- key deletes the character at
the cursor position.
4.4 ID markers (START, SKIP, END ,
CHAR and renumbering)
• All repeat— the display shows ALL REPEAT—
the complete contents of the tape will be repeated
If the REPEAT setting is being made while the tape
is playing back, ALL REPEAT will start as soon as
an END ID or the end of the tape is encountered.
• No repeat— the display does not show any repeat
information
The number of times that the selected portion (A-B,
program or tape) is repeated is set by the repeat menu
option described in 3.12, "Repeat mode".
4.2 CHECK
This key [22] is used when entering characters for
tape or program titles. It allows the checking of titles
which are longer than the display allows, and scrolls
them across the display. See “Character editing
(titling)” on page 26
These ID markers are used to control tape operations
when they are read on playback. Briefly:
• START IDs are nine seconds in length. They are
used to mark the beginning of a program and are
usually in continuous sequence (from 01 to 99). If
they somehow get out of sequence, the renumber
facility is used to correct this.
• SKIP IDs are one second in length, and are used in
skip play mode (see SKIP PLA Y [25]) to skip past
unwanted sections of tape
• END IDs are nine seconds in length, and are used
to mark the “logical” end of a tape (even though
there may be tape remaining, playback will stop
when an END ID is encountered). There should,
naturally, only be one END ID on a tape.
The above three ID types are recognized by every
kind of DAT deck and player.
This tape deck also provides another kind of subcode
ID marker:
22 TASCAM DA-45HR
Page 23

4 - Advanced functions
• CHAR, which allows the writing of alphanumeric
characters (up to 60) which are associated with a
START ID on the tape, which will be shown on the
display when that part of the tape is replayed.
These can be used as tape (if written at the first
START ID) or program titles.
NOTE
All these IDs are written in the subcode of the
tape— they may be written and erased freely
without affecting the audio portion of the tape
in any way.
4.4.1Selecting an ID mode
Repeated presses of the ID SELECT key will cycle
through the following options:
• START WR T— a START ID will be written
• SKIP WRT— a SKIP ID will be written
• END WRT— an END ID will be written
• START ERASE— the START ID immediately
before the current location will be erased
• SKIP ERASE— the SKIP ID immediately before
the current location will be erased
• END ERASE— the tape will move forw ard to the
next END ID, which will be erased
• CHAR ERASE— the character information
immediately before the current location will be
erased
• RENUM— the tape will be rewound, and all
START IDs will be renumbered in sequence, starting at 1.
Protect
will appear in the display when
the ID SELECT key is pressed.
4.4.2Manually writing a START or SKIP
ID (i)
With the tape deck playing a tape where audio has
previously been recorded, or recording, select either
the ST ART WRT or SKIP WRT option as described
above.
When the tape reaches the point where an ID is to be
written, press ENTER [27].
The ID will be written at the point where the
ENTER key is pressed. While the ID is being written, ST ART WRT or SKIP WRT (as appropriate)
will flash on the display and output will be muted (if
the tape deck is in playback mode).
In playback mode, the display will also show
ST or WR-SK, and the playback will be restored
WR-
after the ID has been written.
The PLAY and RECORD indicators will both light
while the ID is being written.
NOTE
Do not press the STOP key while writing subcode IDs. This will cause the IDs to be of
indeterminate length, resulting in possible
future operational problems.
4.4.3Writing a START or SKIP ID (ii)
With the tape playing, press the POSITION key.
WARNING
When one of the above ID modes is shown in
the display, pressing ENTER may start the ID
writing or editing operation. When writing or
editing IDs is not required, therefore, press ID
SELECT repeatedly until none of the above
ID modes is shown on the display/
The ERASE and RENUM modes cannot be selected
while the tape deck is recording.
While IDs are being written, erased or renumbered,
all transport controls except STOP are disabled.
NOTE
If there is no cassette inserted, or if the cassette is write-protected, the message
Rec
The current tape location in ABS time will be displayed, together with the characters
Posit,
showing that the POSITION key has been pressed.
00H23M17
Posit
s
After two seconds, the time that which the
POSITION key was pressed will be shown to frame
accuracy, together with an offset value of
00 at the
right of the display.
00H23M17
_18F00
S
The PAUSE indicator will light, and the PLAY indi-
cator will start to flash.
Use the INS/+ and DEL/- keys or the DATA dial to
adjust the offset backwards or forwards by up to 50
frames in either direction.
TASCAM DA-45HR 23
Page 24

4 - Advanced functions
Press PLAY to preview the location of the ID point.
The tape will rewind to the position, with the offset
added or subtracted, and start playing back from the
previewed ID position. While playing back, the w ord
Posit will be shown on the display. When play-
back stops after a few seconds, the offset value will
replace the word
as described above.
Repeat the adjustment of the ID point and the preview of the point as many times as necessary.
Use the ID SELECT key to choose either a START
ID or a SKIP ID to write at the selected position, if
the display does not already show the desired ID
type.
When the ID point has been located satisfactorily,
press ENTER. The display will show
WR-SK, depending on whether a START or SKIP
ID is being written.
The edited point can also be used here as a location
memory (use the MEMO 1 or MEMO 2 key).
The writing of the ID can be canceled at any time
after POSITION has been pressed by pressing
STOP.
Posit, and may be re-adjusted
WR-ST or
After the ID has been erased, the deck will continue
playing the tape.
NOTE
If a START ID is erased, the program numbers will not be continuous. The renumbering
function may be used to restore the
sequence.
4.4.6Erasing an END ID
Select END ERASE as the ID mode (see 4.4.1,
"Selecting an ID mode").
Move the tape to a little after the END ID, and press
ENTER.
The tape will move back to the END ID and will
erase it (the RECORD and PLAY indicators will
both light). While the ID is being erased, the words
END ERASE will flash in the display.
4.4.7Erasing titles
If characters have been recorded on tape, the boxed
word CHAR will appear on the bottom of the display
(below the seconds digits).
4.4.4Writing an END ID
Writing an END ID will stop the tape. If an END ID
is written in the middle of recorded material, the
material following the END ID will be inaccessible
until the END ID is erased.
An END ID can be written from the record, or the
record pause mode.
Select the END WRT option as described in 4.4.1,
"Selecting an ID mode".
Press ENTER. The END ID will be written at the
point that ENTER is pressed.
4.4.5Erasing a START or SKIP ID
Select the ST AR T ERASE or SKIP ERASE option
as described in 4.4.1, "Selecting an ID mode".
Locate the tape to a little after the START or SKIP
ID to be erased.
Press ENTER. The tape will mo ve backwards to find
the first appropriate ID, and
as appropriate is shown in the display.
When the ID has been located, the ST AR T ERASE
or SKIP ERASE shown in the display will start
flashing, and the RECORD and PLAY indicators
will light.
ER-ST or ER-SK
To erase the characters which have been previously
recorded as program titles, select CHAR ERASE as
the ID mode (see 4.4.1, "Selecting an ID mode").
Move the tape to a little after the end of the START
ID containing the characters to be erased,
Press ENTER; the display will show
the tape will start moving back until the START ID
containing the characters is located on tape. The
character information will then be erased (the
RECORD and PLAY indicators will both light), but
the START ID containing the title characters and the
audio information will be retained. While the erase
operation is taking place, the words CHAR ERASE
will flash in the display.
ER-CH, and
4.4.8Renumbering START IDs
If START IDs have been written to a tape after audio
recording has taken place, or if START IDs have
been removed from a sequence, the program numbers will not form a continuous series.
T o renumber the programs, select RENUM as the ID
mode.
The right side of the display will show
ing), showing that the first START ID will be renumbered as 01.
#01 (flash-
24 TASCAM DA-45HR
Page 25

4 - Advanced functions
You can start the tape’s program numbers from a
value different from
01 by turning the DATA dial.
The program number selected with the DATA dial
will flash (the flashing will continue for five
seconds).
Confirm the flashing program number with the
ENTER key. If you press ENTER after the program
number has stopped flashing, renumbering will start
from 01.
The tape will rewind to the first START ID, and
rewrite the ID in the same location as previously, but
with the number selected above.
When this is done, the number at the right of the display will change to the number which is one greater
than the starting program number, and the tape will
move forward to the next START ID and renumber it
in the same way.
While a START ID is being rewritten, the word
RENUM will flash in the display, and the PLAY
and RECORD indicators will light.
If the current START ID already has a number, this
will be shown to the left of the
# mark on the
display:
PNO
00H23M17
02#03
s
If the current START ID is unnumbered, this is represented by a pair of dashes in the PNO location on the
display.
All program titles are retained during the renumbering process.
The renumbering process continues until the end of
the tape or an END ID is reached.
NOTE
• Editing of the first memory location
• Editing of the second memory location
• Editing of a programmed sequence of programs for
subsequent playback
• Editing of a string of characters to be used as a tape
or program title
• Writing a string of characters to tape
Repeated presses of EDIT will cycle through these
options.
To exit the EDIT mode, press
COUNTER MODE or
DISPLAY (as with all SHIFTed modes, pressing the
SHIFT key so that the SHIFT indicator goes out will
exit the SHIFT mode).
The ENTER key is used to select the operation.
4.6 Location memories
4.6.1Locating to location memories
Once a memory location has been set, as explained
below, use the LOC 1 and LOC 2 keys to locate to
the memory location points (as explained in LOC 1
[29]).
4.6.2Setting location memories
Press the MEMO 1 or MEMO 2 key. The current
location will be stored to frame accuracy, regardless
of whether or not the frame display mode is currently
in operation, in memory location 1 or 2 as
appropriate.
4.6.3Editing location memories
Press EDIT until the display shows either M1? or
M2? at the right, together with the location value
stored in that location memory.
Valid program numbers are from 01 to 99. If
the above procedure is used to select a progam number at the high end of the range, and
the renumbering increments a program number above 99, the number will “wrap” to 00.
The number 00 can cause problems when
searching and locating, and this should be
remembered when setting program numbers.
4.5 The EDIT key
The EDIT key (SHIFTed MENU [28]) allows the
following operations to the performed:
00H28M53
29 M1?
S
Press ENTER to start editing the location memory.
The word
Edit will appear at the right of the dis-
play, and the right digit of the frames field will start
to flash.
00H28M53
29Edit
S
Use the SHUTTLE wheel to move the cursor (flashing digits) between the frames, seconds, minutes and
hours fields.
Use the INS/+ and DEL/- keys and the DATA dial to
increment or decrement the flashing value field.
TASCAM DA-45HR 25
Page 26

4 - Advanced functions
4.7 Program mode
To play back a selection of programs in a defined
order, press EDIT until the following is sho wn on the
display:
Following this, if the PLAY key is pressed, the first
program step will be played, and the tape will locate
to the start of the next program step and enter pause
mode until the PLAY key is pressed again. The pro-
cess continues until all program steps have been
played back.
Edit
The program numbers for programmed playback are taken from the START IDs. If there
are no START IDs recorded on the tape, or if
they are out of sequence, programmed playback may not produce the expected results!
The RENUM function (4.4.8, "Renumbering
START IDs") should be used to restore the
sequence.
Press ENTER to start editing the program steps:
Step01
Use the DATA dial to choose a program number
(shown at the right of the display).
Use the SHUTTLE wheel to choose the program
step number. There may be up to 30 steps in a programmed playback sequence.
Enter the last program step with the program number
EE (end of tape) by pressing the DEL/- key.
When the program numbers have been entered into
the program steps, press PLAY. The word
PROGRAM appears in red at the bottom of the
display.
The tape will locate to the program number specified
in the first program step, and will then start paying
playing. When the START ID following the first program in the list is encountered, the tape will then
move to the next program number specified in the
program list.
This process continues until all steps in the program
have been played.
The PAUSE key can be used to play back a series of
program steps, one at a time, in the folloiwng way:
If the PAUSE key is pressed after the program steps
have been entered, the tape will locate to the start of
the program number specified in the first step, and
will enter pause mode.
PRGM ?
NOTE
Pno EE
Pressing either of the SKIP keys during programmed
playback will move the tape to the start of the current
or next (as appropriate) program step.
If playback is stopped in the middle of programmed
playback, the program will be canceled, and the word
PROGRAM will disappear from the display.
Programs cannot be stored for further reference.
4.8 Character editing (titling)
Using this feature, tape and program titles can be
added to the subcode of the tape, which are displayed
on the alphanumeric display of the tape deck.
These titles are written at a point that coincides with
START IDs. This allo ws them to be associated easily
with program names.
NOTE
This feature is not supported by every DAT
player and recorder. If titles are recorded on a
tape, they will be shown on TASCAM DA45HR machines, but not on other recorders.
However, recording titles will not affect the
audio quality or any other aspect of the tape
when it is used on other recorders.
4.8.1Entering and editing titles
Press EDIT until the display shows:
Edit
Press ENTER to start editing the character string. Up
to 60 characters can be entered.
The SHUTTLE wheel is used as a cursor to move
left and right through the string (the cursor position
is marked by a flashing character at the cursor position— if no character is visible at the cursor position,
the cursor changes to a flashing block).
The DATA dial is used to change the character. The
characters available are:
A through Z, a through z, 0 through 9 and the
following punctuation symbols:
Char ?
: ; < = > ? @ !
26 TASCAM DA-45HR
Page 27

4 - Advanced functions
"# $ % &' ( ) * + , - . / _ and the space
character.
To change between uppercase and lowercase alpha-
betical characters, use the CAPS key. The word
CAPS appears at the bottom left of the display when
the “caps lock” is on.
The INS/+ and DEL/- keys are used to insert a space
immediately following the cursor position, and to
delete the character at the cursor position,
respectively.
Since the title can be longer than the display can
show at one time, the first characters of the title are
shown, and the rest is then scrolled from right to left.
4.8.2Writing the title to tape
Locate the tape to a point following the end of the
ST ART ID which will be associated with the title that
has just been entered.
Press EDIT until the display shows:
Write
Press ENTER, and the tape will start moving back
until before the start of the previous START ID, and
then start recording the characters. The words
CHAR WRT will flash in the display while
recording is taking place.
Char ?
Use the CHAR key to display the last title which has
been read from tape. While the title is displayed, all
other tape counter numerals are replaced by the characters in the title. The title will scroll across the display if it is too long to fit in the display.
4.8.4Deleting a title
Locate the tape to a little past the point where the
title is recorded on tape.
Use the ID SELECT key to select the CHAR
ERASE mode (4.4.1, "Selecting an ID mode").
Press ENTER. The display will sho w
ER-CH, and
the tape will rewind to a little before the point where
the title has been recorded.
The title will then the erased. The words CHAR
ERASE will flash in the display while the title is
actually being erased.
4.8.5Copying and pasting a title
The title which was last been read from tape can be
copied and used as the basis for new titles. This can
be useful if you are producing a lot of programs with
similar titles (different mixes or takes of the same
piece, for instance).
Once the title which will be copied has been read
from tape (the CHAR indicator in the display must
be lit), press EDIT until the display shows:
4.8.3Checking a title
When replaying a tape on which titles have been
recorded, the boxed word CHAR appears under the
seconds field at the bottom of the display as soon as
the first title is read from tape.
Edit
Char ?
Press the MEMO 2 key to recall and paste the last
title into the editing area. The title may then be edited
and written to tape in the usual way.
TASCAM DA-45HR 27
Page 28

5 - RC-D45 remote control unit (option)
The optional RC-D45 remote control unit is plugged
into the REMOTE IN [37] jack at the rear of the tape
deck.
Most of the controls on the remote control unit duplicate the controls on the main tape deck. The explanation of the controls is given below:
[43]OPEN/CLOSE
Equivalent to [2] on the main unit.
[44]CAPS
Used to toggle between uppercase and lowercase
when entering titles (see 4.8.1, "Entering and editing
titles").
[45]CHECK
Equivalent to the shifted CHAR [22] on the main
unit.
[46]POSITION
Equivalent to the shifted SKIP PLAY [25] on the
main unit.
Repeated presses of a key will cycle through the
characters associated with the key. For instance, the
2 key, when pressed once, will enter
Pressing it again will enter
mode is active), pressing it one more time will enter
e and pressing it again will enter f. If it is pressed
one more time, it will enter
d (or D if the CAPS
2.
2 in the title.
[54]Cursor keys
These keys are used to move the cursor left and right
when entering and editing program titles.
[55]COUNTER MODE
Equivalent to the COUNTER MODE [21] on the
main unit.
[56]MARGIN RESET
Equivalent to the MARGIN RESET [23] on the
main unit.
[57]CHAR
Equivalent to the CHAR [22] on the main unit.
[47]ID SELECT
Equivalent to the shifted AUTO ID [26] on the main
unit.
[48]AUTO ID
Equivalent to the AUTO ID [26] on the main unit.
[49]INS/+ and DEL/-
Equivalent to the shifted MARGIN RESET [23]
and DISPLAY [24] on the main unit.
[50]EDIT
Equivalent to the shifted MENU [28] on the main
unit.
[51]ENTER
Equivalent to the ENTER [27] on the main unit.
[52]MENU
Equivalent to the MENU [28] on the main unit.
[53]Numeric keys
These keys may be used for a variety of purposes.
When playing back a tape, entering a program num-
ber using these keys, and pressing PLAY will locate
the tape to that program and start playing. If PAUSE
is pressed rather than PLAY, the tape will be located
to the start of the program and the deck will enter
pause mode.
[58]DISPLAY
Equivalent to the DISPLAY [24] on the main unit.
[59]SKIP PLAY
Equivalent to the SKIP PLAY [25] on the main unit.
[60]SINGLE PLAY
Equivalent to the SINGLE PLAY [31] on the main
unit.
[61]REPEAT
Equivalent to the shifted COUNTER MODE [21]
on the main unit.
5.1 Remote control transport keys
[62]SKIP keys
Equivalent to the SKIP keys [12] on the main unit.
[63]MEMO 1 and MEMO 2 keys
Equivalent to the shifted LOC 1 [29] and LOC 2
[30] on the main unit.
[64]SAMPLING MONITOR key
Equivalent to pressing the RECORD key on the
main unit once (see 17, "RECORD key").
[65]REW and F FWD
When editing and entering titles, these keys may be
used as a convenient way of entering characters.
28 TASCAM DA-45HR
Equivalent to the REW and F FWD keys [13] on the
main unit.
Page 29

5 - RC-D45 remote control unit (option)
[66]LOC 1 and LOC 2 keys
Equivalent to the LOC 1 [29] and LOC 2 [30] on
the main unit.
[67]REC MUTE
Equivalent to the REC MUTE key [18] on the main
unit.
[68]STOP
Equivalent to the STOP key [14] on the main unit.
[69]PLAY
Equivalent to the PLAY key [15] on the main unit.
[70]PAUSE
Equivalent to the PAUSE key [16] on the main unit.
[71]RECORD keys
To enter record ready, both of these keys must be
pressed simultaneously. It is not possible to enter
record mode directly, and this helps to prevent accidental recording.
TASCAM DA-45HR 29
Page 30

6 - Specifications
6.1 Audio specifications
Tape Speed 8.15 mm/s (SP mode)
16.3 mm/s (HR mode)
Recording time (with 120minute cassette)
Head drum speed 2,000 rpm (SP mode)
Fast wind time (forward
and rewind)
Sampling frequency 44.1 kHz, 48 kHz
Recording resolution 16-bit linear (SP mode)
Frequency response
±0.5 dB
S/N ratio >105 dB (SP mode)
120 minutes (SP mode)
60 minutes (HR mode)
4,000 rpm (HR mode)
60 seconds end-to-end with
120-minute tape
Rounded 24-bit AD conversion
24-bit linear (HR mode)
20 Hz to 20,000 Hz (SP mode)
20 Hz to 20,000 Hz (HR mode)
Analog outputs (balanced
XLR-3-32 type)
Analog outputs (unbalanced RCA)
Headphone π-inch stereo
jack
Digital output (balanced
XLR-3-32 type)
Digital output (unbalanced
a
RCA)
Digital input (balanced
XLR-3-31 type)
Digital input (unbalanced
RCA)
Nominal output level +4dBu
(FS=–16/–18/–20 )
Maximum output level +20/+22/
+24 dBu
All level measurements made
with trimmer set to maximum
value
Nominal impedance <27
Nominal output level –10 dBV
Maximum output level +6 dBV
(2 Vrms)
Nominal impedance <700
(2 x 50 mW into 32
IEC958 Type I (AES/EBU)
IEC958 Type II (SPDIF)
IEC958 Type I (AES/EBU)
IEC958 Type II (SPDIF)
IEC958 Type I (AES/EBU)
IEC958 Type II (SPDIF)
Ω
Ω
Ω)
>112 dB recording, >105 dB
overall (HR mode)
Dynamic range >100 dB (SP mode)
>113 dB recording, >105 dB
overall (HR mode)
Total harmonic distortion
(1 kHz @ FS – 0.1 dB)
Channel separation >95 dB (1kHz @ FS)
Wow and flutter Unmeasurable (<0.001%)
<0.005% (SP mode)
<0.002% recording, <0.004%
overall (HR mode)
a. If the DA-45HR’s DA convertors are used for
replay, conversion is carried out at a rounded 8
times oversampled 20 bits, with the option of
dithering.
6.2 I/O specifications
Analog inputs (balanced
XLR-3-31 type)
Analog inputs (unbalanced RCA)
Nominal input level +4dBu
(FS=–16/–18/–20 dBu)
Maximum input level +20/+22/
+24 dBu
Nominal impedance >10 k
Nominal input level –10dBV
Maximum input level +6 dBV
(2Vrms)
Nominal impedance >50 k
Ω
Ω
WORD SYNC IN
WORD SYNC THRU
Parallel I/O port 15-pin ’D’-sub connector
REMOTE CONTROL
3.5 mm mini-jack
BNC, 75
BNC, 75
For use with RC-D45 only
Ω
Ω
, auto-terminating
6.3 Physical specifications
Voltage requirements: USA/Canada 120 VAC ‘60 Hz
Europe/UK 230 VAC @ 50 Hz
Australia 240 VAC @ 50 Hz
Power consumption 40 W
Weight 8.3 kg (18.25 lbs)
Dimensions (w x h x d) 482 x 140.5 x 368 mm (19 x 5.5
x 14.5 in
Supplied accessories Power cord
Rack mounting kit
Optional accessories RC-D45 wired remote control
unit
Changes to specifications and features may be made
without notice or obligaiton.
30 TASCAM DA-45HR
Page 31

6.4 Dimensional drawing
482mm
456mm
432mm
6.5 Error messages
6 - Specifications
27mm 11mm
57mm
132mm
150.5mm
RecProtect—The cassette’s sliding write-pro-
tect tab is in the write-protect position.
330mm
There are two types of error message: warning (informational) and more serious messages.
6.5.1 Warning messages
These simply give an indication of a situation which is
easily resolved:
CLKINX—An attempt is being made to record digi-
tally , with the CLOCK switch set to INT. Set the
CLOCK switch to the appropriate setting (D-IN or
WORD)
AES/EBU X—The digital audio signal received at
the AES/EBU input has been selected as an input
source, but has become unsynchronized or is not present.
COAXIAL X—The digital audio signal received at
the COAXIAL unbalanced input has been selected as an
input source, but has become unsynchronized or is not
present.
AES/EBU ?—The digital audio signal received at
the AES/EBU balanced input is more than 0.1% outside
the standard sampling frequency and cannot be recorded
(though it can be monitored).
COAXIAL ?—The digital audio signal received at
the COAXIAL unbalanced input is more than 0.1% outside the standard sampling frequency and cannot be
recorded (though it can be monitored).
Tape Top & Tape End—The tape is at the
start or end, and an attempt has been made to move past
this point
End-ID—The presence of the END ID prevents the
attempted operation
A/D Error—The RECORD key has been
pressed and the analog input levels are too high for a
recording to be made successfully . Press the STOP key,
lower the analog input lev el, and press the RECORD
key again.
TapeMode HR, TapeMode NOR, —
An attempt is being made to record on a tape which has
previously been recorded using an incompatible mode
(HR or normal)
Tape Fs32k, Tape Fs32kLP—A tape
recorded at 32k or with the LP mode cannot be played
back using the DA-45HR
6.5.2 Serious error messages
Any of the following error messages indicates a serious
error, which you should ne ver see in normal operation. If
any of these appears, first try any countermeasures listed
here. If the message does not disappear after trying the
countermeasure, you should contact your TASCAM distributor for testing and repair of your tape deck.
DSP Com. Err.
Mecha. Com. Er.
Loading Err—Eject the tape, power do wn the
tape deck, power it up again, and reinsert the tape as
described in 1.4, "About DAT cassettes". If this fails, contact your TASCAM dealer.
Drum Error—Condensation may have occurred
on the head drum. Remove the cassette, and leav e the
tape deck switched on for one or two hours. See the
warning note in 1.3, "Installation of the tape deck"
Capstan Error
SVMemo.RDE
SVMemo.WRE
Tape Cut!—The tape has broken. You may be
able to remove the damaged cassette, but this is usually
best left to a qualified service technician, as the tape may
be wound in a complex path around delicate mechanical
parts of the tape deck.
Memo.Data Er—The memorized menu set-
tings (3.17, "Parameter save") are no longer stored in
memory . T ry re-making these settings. If the problem
persists, contact your TASCAM dealer.
TASCAM DA-45HR 31
Page 32

»
DA-45HR
TEAC CORPORATION
Phone: (0422) 52-5082 3-7-3, Nakacho, Musashino-shi, Tokyo 180-8550, Japan
TEAC AMERICA, INC.
Phone: (213) 726-0303 7733 Telegraph Road, Montebello, California 90640
TEAC CANADA LTD.
Phone: 905-890-8008 Facsimile: 905-890-9888 5939 Wallace Street, Mississauga, Ontario L4Z 1Z8, Canada
TEAC MEXICO, S.A. De C.V
Phone: 5-658-1943 Privada De Corina, No.18, Colonia Del Carmen Coyoacon, Mexico DF 04100
TEAC UK LIMITED
Phone: 01923-819699 5 Marlin House, Marlins Meadow, The Croxley Centre, Watford, Herts. WD1 8YA, U.K.
TEAC DEUTSCHLAND GmbH
Phone: 0611-71580 Bahnstrasse 12, 65205 Wiesbaden-Erbenheim, Germany
TEAC FRANCE S. A.
Phone: 01.42.37.01.02 17 Rue Alexis-de-Tocqueville, CE 005 92182 Antony Cedex, France
TEAC BELGIUM NV/SA
Phone: 0031-30-6048115 P.A. TEAC Nederland BV, Perkinsbaan 11a, 3439 ND Nieuwegein, Netherlands
TEAC NEDERLAND BV
Phone: 030-6030229 Perkinsbaan 11a, 3439 ND Nieuwegein, Netherlands
TEAC AUSTRALIA PTY.,LTD. A.C.N. 005 408 462
Phone: (03) 9644-2442 106 Bay Street, Port Melbourne, Victoria 3207, Australia
TEAC ITALIANA S.p.A.
Phone: 02-66010500 Via C. Cantù 11, 20092 Cinisello Balsamo, Milano, Italy
PRINTED IN JAPAN 0798U1 M-1394A
 Loading...