

Page 1
Quick Installation Guide
Guide d’installation rapide | Installationshinweise | Guía de instalación
rápida | Guida all'installazione rapida | クィック インストレーション
ガイド
Page 2

1
4
7
10
13
16
19
Quick Installation Steps
Procédure d’installation rapide
Installation im Überblick
Pasos de instalación rápida
Passi per l'installazione rapida
簡単な設置手順
Contact Information
Page 3
Quick Installation Steps
For more information and complete step-by-step instructions, see
Tandberg StorageLibrary
Caution
The Tandberg StorageLibrary
TM
T40 Installation and User Guide.
TM
T40 could be lifted
by one person if drives, power supply, and magazines
are removed. However, for absolute safety, it is
recommended that two people lift the Tandberg
StorageLibrary
TM
T40. Full library weight = 38 kg / 84 lbs
(2 FH drives). Empty library weight = 23.6 kg / 52 lbs
(does not include drives, magazines or power supply).
Caution
The transport locking screws must be removed before
the Tandberg StorageLibrary
TM
T40 can operate
normally.
When following the steps below, see corresponding numbers on the
illustrations.
1 If the library is a rack mount version, power on the unit to remove
the locking screws and install the rack mount ears. Install the
library in a rack. If the library is a tabletop version, keep the locking
screws mounted and install the tabletop kit. For instructions, see
Tandberg StorageLibrary
TM
T40 Installation and User Guide.
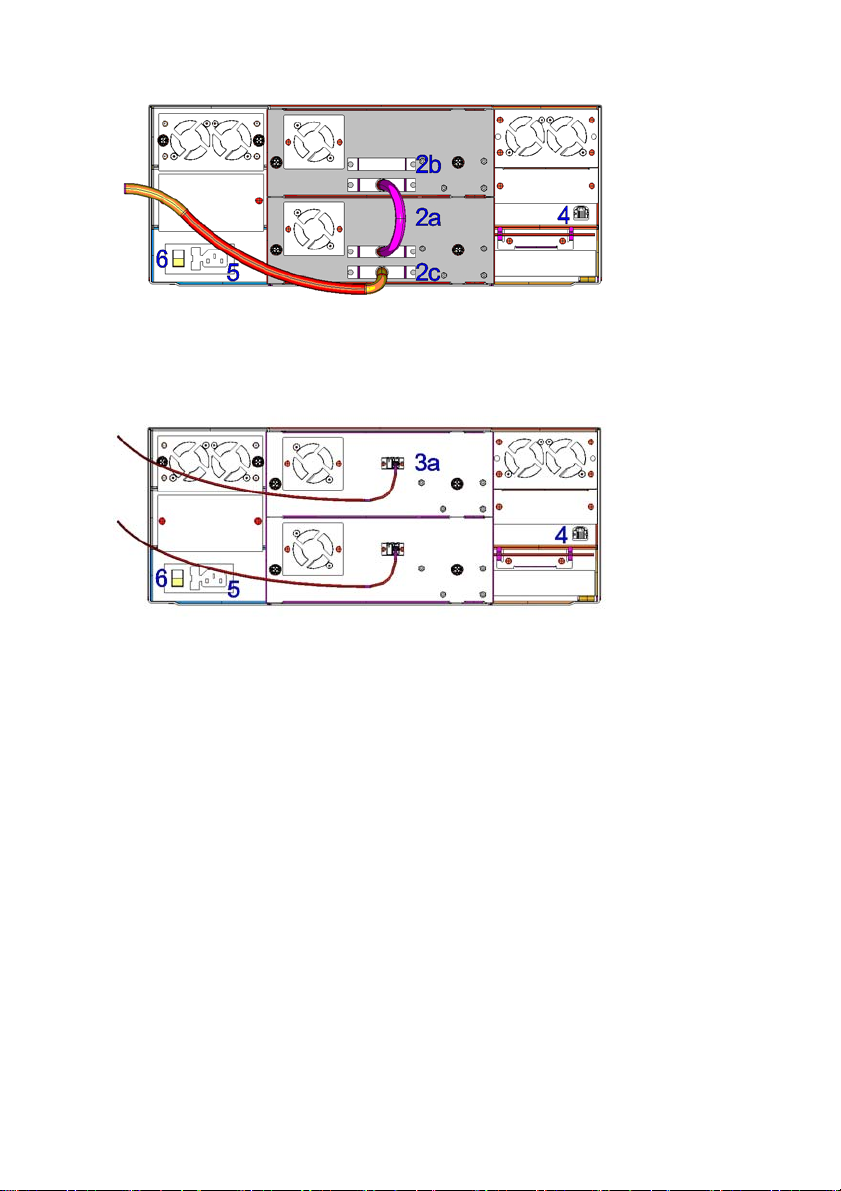
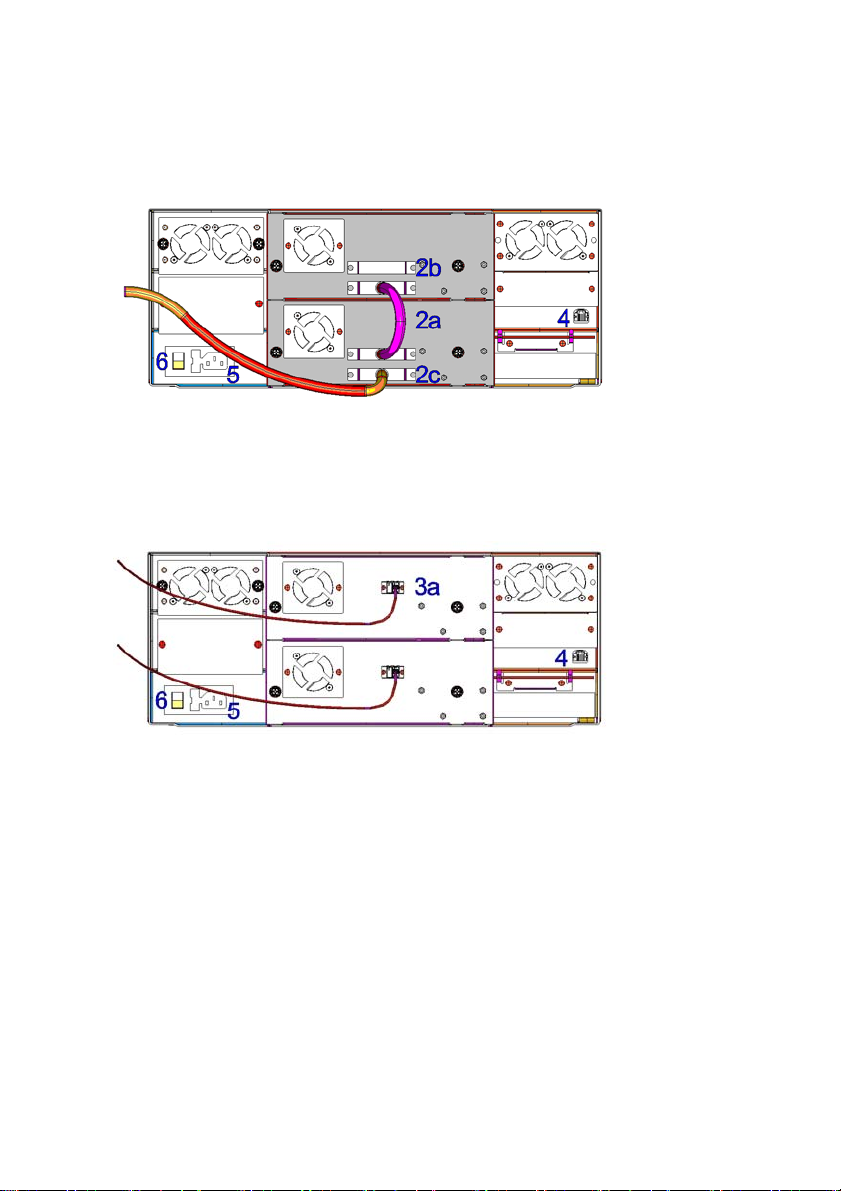
2 If your library includes SCSI tape drives connect the SCSI cables
to the connectors on the drive sled. See the Installation and User
Guide for installation requirements when using more than 2 SCSI
drives.
a. Connect a jumper cable between the top SCSI connector of
the bottom drive and the bottom SCSI connector of the drive
above it. Repeat this step for all drives on the SCSI bus.
Secure the cable with the thumbscrews on the connectors.
b. Terminate the last device on the SCSI bus with the appropriate
SCSI terminator.
c. Connect a cable between the first drive on the SCSI bus and
the host. Note that there are limitations to the length of the
SCSI cable. In a typical installation, the cable length should not
exceed 9 meters / 30 feet.
Quick Installation Guide 1
Page 4
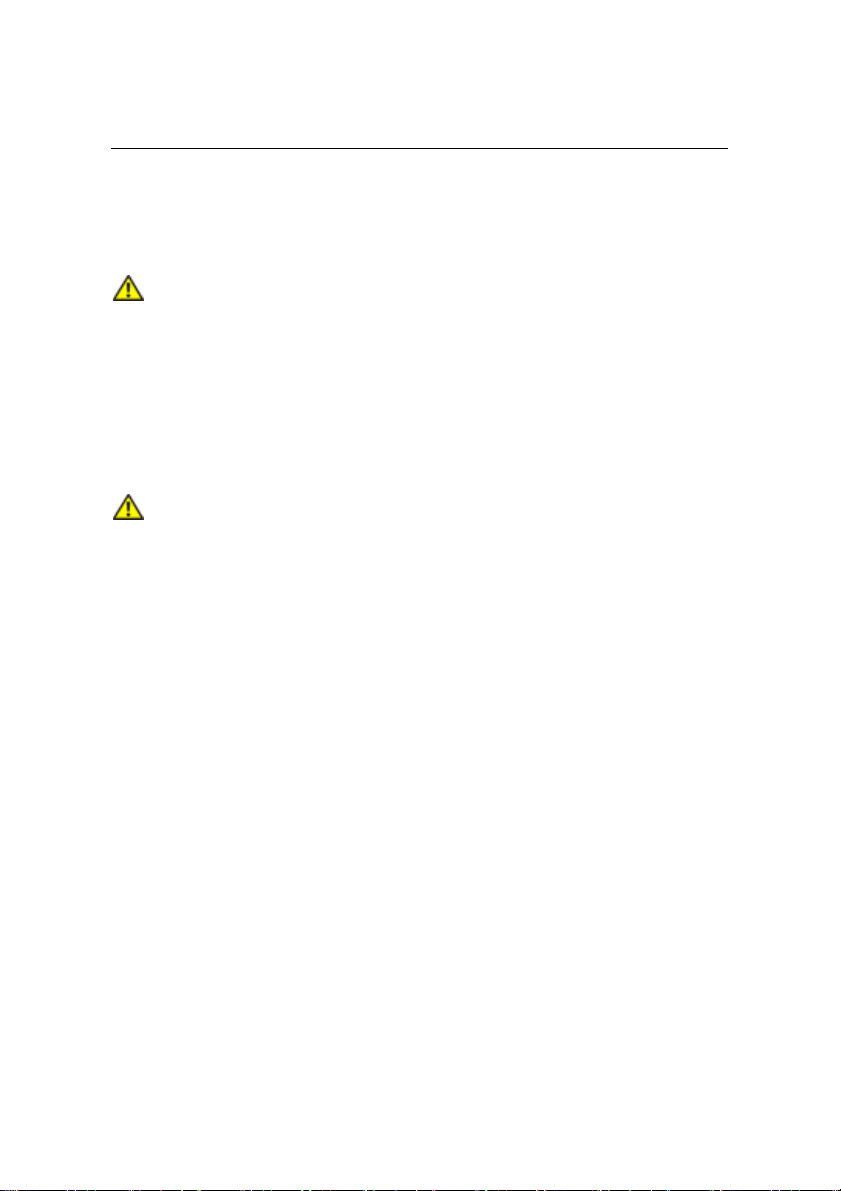
3 If your library includes fibre channel tape drives connect the fibre
cables to the tape drives:
a. Attach one end of the fibre cable to the fibre port on each drive.
Attach the other end of the cable to the host, switch or hub.
4 Connect your Ethernet cable to the Ethernet port on the rear of the
library. The Ethernet connection allows use of the Web Client.
5 Connect a power cord to the power connector on the rear of the
library. US and EU power cords are supplied with the library.
6 Power on the library by turning on the rear power switch.
7 If the library is a tabletop version, the library detects that the
locking screws are present. Follow the instructions on the front
panel display to remove the magazines to get access to the
screws. Remove the screws and reinsert the magazines. The
library will now continue its power-on sequence.
8 Power up the host system.
9 Verify that each host can communicate with the library’s tape
drives.
10 Configure your library using the library’s operator panel.
2 Quick Installation Guide
Page 5

Table: Power Requirements
Power Requirements Values
Input Voltage 100 – 240 VAC (1.2 – 0.5 A)
Input Frequency 50 – 60 Hz
Inrush Current (Cold Start)
Power Consumption Average 70 W
Power Consumption Peak* 120 W*
* Maximum peak length, less than 10ms.
Less than 15 A, 115 VAC
Less than 30 A, 230 VAC
Quick Installation Guide 3
Page 6
Procédure d’installation rapide
Pour plus d’informations sur l’installation ou pour connaître la procédure
détaillée, veuillez vous reporter au Guide d'installation et d'utilisation
Tandberg StorageLibrary
TM
T40 Installation and User Guide.
Attention
Si les lecteurs, le bloc d’alimentation et les magasins
ont été déposés, le Tandberg StorageLibrary
TM
T40
peut être soulevé par une seule personne. Toutefois,
par mesure de sécurité, il est préférable que le
Tandberg StorageLibrary
TM
T40 soit déplacé par deux
personnes. Poids total de la bibliothèque = 38 kg /
84 lbs (2 lecteurs FH). Poids de la bibliothèque à
vide = 23,6 kg / 52 lbs (sans les lecteurs, les magasins
et le bloc d’alimentation).
TM
Attention
Pour utiliser le Tandberg StorageLibrary
T40
normalement, vous devez retirer les vis de verrouillage.
Pour suivre la procédure ci-dessous, veuillez vous reporter aux
numéros correspondants dans les illustrations.
1 Si la bibliothèque doit être montée en rack, mettez l’unité sous
tension pour retirer les vis de verrouillage et installez les pattes
de fixation. Montez ensuite la bibliothèque. Si la bibliothèque est
de type boîtier, laissez les vis de verrouillage en place pendant
que vous installez le kit. Pour connaître la procédure, veuillez
vous reporter au Guide d'installation et d'utilisation Tandberg
StorageLibrary
TM
T40 Installation and User Guide.
2 Si la bibliothèque comporte des lecteurs de bandes SCSI,
branchez les câbles SCSI sur les connecteurs du traîneau de
lecteur. Si vous utilisez plus de 2 lecteurs SCSI, veuillez consulter
la procédure à respecter dans le Guide d’installation et d’utilisation.
a. Branchez un câble de liaison entre le connecteur SCSI
supérieur du lecteur inférieur et le connecteur SCSI inférieur
du lecteur installé au-dessus. Procédez de même pour tous
les lecteurs à rattacher au bus SCSI. Serrez les vis des
connecteurs pour fixer le câble.
b. Utilisez un bouchon SCSI adapté pour réaliser la terminaison
du dernier périphérique rattaché au bus SCSI.
4 Guide d’installation rapide
Page 7
c. Branchez un câble entre le premier lecteur rattaché au bus
SCSI et l’hôte. Notez que la longueur maximale du câble
SCSI doit être respectée : dans une installation normale,
le câble ne doit pas mesurer plus de 9 mètres (30 pieds).
3 Si la bibliothèque compte des lecteurs de bandes FC (Fibre
Channel), branchez les câbles FC sur ces derniers :
a. Branchez l’une des extrémités du câble FC sur le port FC de
chaque lecteur, et l’autre extrémité sur l’hôte, le switch ou le
concentrateur.
4 Branchez le câble Ethernet sur le port Ethernet, à l’arrière de
la bibliothèque. La connexion Ethernet autorise l’utilisation du
client Web.
5 Branchez un câble d’alimentation sur le connecteur d’alimentation,
à l’arrière de la bibliothèque. Deux câbles d’alimentation sont
fournis avec la bibliothèque : l’un pour les États-Unis, l’autre pour
l’Europe.
6 Mettez la bibliothèque sous tension à l’aide du bouton
d’alimentation situé à l’arrière.
7 Si la bibliothèque est de type boîtier, elle détecte la présence des
vis de verrouillage. Suivez les instructions affichées sur l’écran du
panneau avant pour déposer les magasins afin d’accéder à ces
vis. Retirez les vis et réinsérez les magasins. La bibliothèque peut
alors poursuivre sa séquence de mise sous tension.
Guide d’installation rapide 5
Page 8

8 Mettez le système hôte sous tension.
9 Vérifiez que la communication s’établit entre chaque hôte et les
lecteurs de bandes de la bibliothèque.
10 Configurez la bibliothèque à partir du panneau de commande.
Tableau : Alimentation
Alimentation Valeurs
Tension d’entrée 100 – 240 VCA (1,2 – 0,5 A)
Fréquence d’entrée 50 – 60 Hz
Courant d’appel (démarrage à froid)
Consommation moyenne 70 W
Pic de consommation* 120 W*
* Durée maximale du pic inférieure à 10 ms.
Inférieur à 15 A, 115 VCA
Inférieur à 30 A, 230 VCA
6 Guide d’installation rapide
Page 9

Installation im Überblick
Ausführliche Informationen und Anleitungen finden Sie in Tandberg
StorageLibrary
Achtung
TM
T40 Installation and User Guide.
Die Tandberg StorageLibrary
TM
T40 kann von einer
Person angehoben werden, wenn zuvor die Laufwerke,
das Netzteil und die Magazine entfernt wurden. Aus
Sicherheitsgründen wird aber empfohlen, die Tandberg
StorageLibrary
TM
T40 immer mit 2 Personen anzuheben.
Gewicht der Library in Vollausstattung = 38 kg (2 FHLaufwerke). Leergewicht: 23,6 kg (ohne Laufwerke,
Magazine und Netzteil).
TM
Achtung
Damit die Tandberg StorageLibrary
T40 benutzt
werden kann, müssen die Transportsicherungsschrauben
entfernt werden.
Beachten Sie beim Durchführen der folgenden Schritte die
entsprechenden Zahlen in den Abbildungen.
1 Wenn es sich bei der Library um die Version für den Rackeinbau
handelt, schalten Sie das Gerät ein, um die Sicherungsschrauben
zu entfernen und die Bügel für die Rackmontage anzubringen.
Installieren Sie die Library in einem Rack. Bei der Tischversion der
Library bleiben die Transportsicherungsschrauben zunächst im
System. Installieren Sie das Kit für die Tischversion. Anleitungen
enthält Tandberg StorageLibraryTM T40 Installation and User Guide.
2 Schließen Sie die SCSI-Kabel an die Anschlüsse am
Laufwerksschlitten an, wenn die Library SCSI-Bandlaufwerke
enthält. Informationen zur Installation bei Verwendung von mehr
als 2 SCSI-Laufwerken enthält Installation and User Guide.
a. Verbinden Sie den oberen SCSI-Anschluss des unteren
Laufwerks und den unteren SCSI-Anschluss des darüber
befindlichen Laufwerks mit einem Jumper-Kabel. Wiederholen
Sie diesen Schritt für alle Laufwerke am SCSI-Bus. Befestigen
Sie die Kabel mit den Rändelschrauben an den Steckern.
b. Terminieren Sie das letzte Gerät am SCSI-Bus mit einem
geeigneten SCSI-Abschlusswiderstand.
Installationshinweise 7
Page 10

c. Verbinden Sie das erste Laufwerk am SCSI-Bus und
den Host mit einem Kabel. Für SCSI-Kabel gelten
Längenbeschränkungen. In einer typischen Installation
darf die Kabellänge 9 m nicht überschreiten.
3 Enthält die Library Fibre-Channel-Bandlaufwerke, schließen Sie
die Fiberoptikkabel an die Bandlaufwerke an:
a. Stecken Sie ein Ende der Fiberoptikkabel in den
Fiberoptikanschluss jedes Laufwerks. Schließen Sie das
jeweils andere Ende des Kabels an den Host, Switch oder
Hub an.
4 Stecken Sie das Ethernet-Kabel in den Ethernet-Anschluss auf
der Rückseite der Library. Die Ethernet-Verbindung dient dem
Einsatz des Webclients.
5 Stecken Sie ein Netzkabel in den Stromanschluss auf der
Rückseite der Library. Die Library wird mit Netzkabeln für die
USA und für die EU ausgeliefert.
6 Schalten Sie die Library mit dem Stromschalter auf der
Rückseite ein.
8 Installationshinweise
Page 11

7 Wenn Sie die Tischversion der Library besitzen, erkennt das
System, dass die Sicherungsschrauben noch nicht entfernt
wurden. Befolgen Sie die Anweisungen auf dem Display und
entfernen Sie die Magazine, um an die Schrauben zu gelangen.
Entfernen Sie die Schrauben und setzen Sie die Magazine
wieder ein. Die Library setzt die Startsequenz fort.
8 Fahren Sie das Hostsystem hoch.
9 Stellen Sie sicher, dass jeder Host mit den Bandlaufwerken in
der Library kommunizieren kann.
10 Konfigurieren Sie die Library mit dem Bedienfeld auf der
Vorderseite.
Tabelle: Energieversorgung
Energieversorgung Werte
Eingangsspannung
100–240 V Wechselstrom
(1,2 – 0,5 A)
Eingangsfrequenz 50–60 Hz
Einschaltspannung (Kaltstart)
Weniger als 15 A, 115 V
Wechselstrom
Weniger als 30 A, 230 V
Wechselstrom
Durchschnittlicher Stromverbrauch 70 W
Stromverbrauchsspitze* 120 W*
* Maximale Dauer der Verbrauchsspitze liegt unter 10 ms.
Installationshinweise 9
Page 12

Pasos de instalación rápida
Para obtener más información e instrucciones completas paso a paso,
consulte Tandberg StorageLibrary
(guía de instalación y uso de la Tandberg StorageLibrary
Precaución
Una sola persona podría levantar la Tandberg
StorageLibrary
TM
T40 Installation and User Guide
TM
T40 si se extraen los lectores,
TM
).
la fuente de alimentación y los carruseles. Sin
embargo, para no correr ningún riesgo, es
recomendable levantarla entre dos personas. Peso
de la librería completa = 38 kg (2 lectores FH). Peso
de la librería vacía = 23,6 kg (no incluye lectores,
carruseles ni fuente de alimentación).
Precaución
Se deben extraer los tornillos de bloqueo de
transporte antes de poner en funcionamiento
la Tandberg StorageLibrary
TM
T40.
Al seguir los pasos detallados a continuación, consulte los números
correspondientes en las ilustraciones.
1 Si la librería es una versión de montaje en estante metálico,
encienda la unidad para extraer los tornillos de bloqueo e instale
las asas del montaje. Instale la librería en el estante metálico. Si
la librería es una versión de sobremesa, no extraiga los tornillos
de bloqueo e instale el kit de sobremesa. Para obtener más
instrucciones, consulte Tandberg StorageLibrary
Installation and User Guide (guía de instalación y uso de la
Tandberg StorageLibrary
TM
).
TM
T40
2 Si la librería incluye los lectores SCSI, conecte los cables SCSI a
los conectores de la guía del lector. Consulte la Guía de
instalación y uso para obtener información sobre los requisitos
de instalación cuando utilice más de 2 lectores SCSI.
a. Conecte un cable puente entre el conector SCSI superior del
lector inferior y el conector SCSI inferior del lector superior.
Repita este paso en todos los lectores del bus SCSI. Fije
el cable con los tornillos manuales de los conectores.
b. Termine el último dispositivo en el bus SCSI con el
terminador SCSI apropiado.
10 Guía de instalación rápida
Page 13

c. Conecte un cable entre el primer lector del bus SCSI bus y
el host. No olvide las limitaciones de longitud aplicables al
cable SCSI. En una instalación habitual, la longitud del cable
no podrá superar los 9 metros.
3 Si la librería incluye lectores con canales de fibra, conecte los
cables de fibra a los lectores:
a. Conecte un extremo del cable de fibra al puerto de fibra de
cada lector. Conecte el otro extremo del cable al host, al
conmutador o al concentrador.
4 Conecte el cable Ethernet al puerto Ethernet en la parte
trasera de la librería. La conexión Ethernet permite el uso
del Cliente Web.
5 Conecte un cable de alimentación al conector de alimentación
de la parte trasera de la librería. Los cables de alimentación de
la UE y de EE.UU. se proporcionan con la librería.
6 Para encender la librería, encienda el interruptor de alimentación
de la parte trasera.
7 Si la librería es una versión de sobremesa, detectará que los
tornillos de bloqueo no se han extraído. Siga las instrucciones
que se muestran en la pantalla del panel frontal para extraer los
carruseles y acceder a los tornillos. Extraiga los tornillos y vuelva
a insertar los carruseles. La librería ahora seguirá con su
secuencia de encendido.
Guía de instalación rápida 11
Page 14

8 Encienda el sistema host.
9 Compruebe que cada host se puede comunicar con los lectores
de la librería.
10 Configure la librería con la ayuda del panel de operador de la
librería.
Tabla: Requisitos de consumo
Requisitos de consumo Valores
Voltaje de entrada
100 – 240 VCA
(1,2 – 0,5 A)
Frecuencia de entrada 50 – 60 Hz
Corriente de entrada (arranque en frío)
Menos de 15 A, 115 VCA
Menos de 30 A, 230 VCA
Media de consumo de energía 70 W
Pico de consumo de energía* 120 W*
* Duración máxima de pico, menos de 10 m.
12 Guía de instalación rápida
Page 15

Passi per l'installazione rapida
Per ulteriori informazioni e istruzioni dettagliate, consultare il manuale
Tandberg StorageLibrary
Attenzione
La libreria Tandberg StorageLibrary
TM
T40 Installation and User Guide.
TM
T40 può
essere sollevata anche da una sola persona, se si
rimuovono unità, alimentatore e alloggiamenti. Per
maggiore sicurezza, tuttavia, è consigliabile che
venga sollevata da due persone. Peso della libreria
piena = 38 kg (2 unità FH). Peso della libreria vuota
= 23,6 kg (senza unità, alloggiamenti o
alimentatore).
Attenzione
Per un corretto funzionamento della Tandberg
StorageLibrary
TM
T40 è necessario rimuovere le
viti di bloccaggio utilizzate per il trasporto.
Vedere i numeri corrispondenti sulle illustrazioni mentre si segue la
procedura descritta di seguito.
1 Se la libreria è una versione in montaggio rack, accendere l'unità
per rimuovere le viti di bloccaggio e installare le alette per il
montaggio rack. Installare la libreria in un rack. Se la libreria è in
versione da tavolo, non rimuovere le viti di bloccaggio e installare
il kit sul tavolo. Per istruzioni, consultare il manuale Tandberg
StorageLibrary
TM
T40 Installation and User Guide.
2 Se la libreria include unità nastro SCSI, collegare i cavi SCSI ai
connettori sul supporto estraibile dell'unità. Consultare il manuale
d'uso per i requisiti di installazione quando si utilizzano più di
2 unità SCSI.
a. Collegare un cavo ponticello tra il connettore SCSI in alto
dell'unità inferiore e il connettore SCSI in basso dell'unità
superiore. Ripetere questo passaggio per tutte le unità sul
bus SCSI. Assicurare il cavo con le viti ad alette sui
connettori.
b. Terminare l'ultimo dispositivo sul bus SCSI con il terminatore
SCSI appropriato.
Guida all'installazione rapida 13
Page 16

c. Collegare un cavo tra la prima unità sul bus SCSI e l'host.
Esistono delle limitazioni alla lunghezza del cavo SCSI. In
una installazione tipica, tale lunghezza non deve superare
i 9 metri.
3 Se la libreria include unità nastro fibre channel, collegare i cavi in
fibra alle unità nastro:
a. Collegare un'estremità del cavo in fibra alla relativa porta su
ciascuna unità. Collegare l'altra estremità del cavo all'host,
switch o hub.
4 Collegare il cavo Ethernet alla porta Ethernet sul retro della
libreria. La connessione Ethernet consente di utilizzare il
client Web.
5 Collegare un cavo di alimentazione al connettore di
alimentazione sul retro della libreria. I cavi di alimentazione
US ed EU vengono forniti insieme alla libreria.
6 Accendere la libreria utilizzando l'interruttore posto sul retro.
7 Se la libreria è in versione da tavolo, vengono rilevate le viti di
bloccaggio presenti. Seguire le istruzioni sul display del pannello
frontale per rimuovere gli alloggiamenti e accedere alle viti.
Rimuovere le viti e reinserire gli alloggiamenti. La libreria
continuerà la sequenza di accensione.
8 Accendere il sistema host.
14 Guida all'installazione rapida
Page 17

9 Verificare che ciascun host possa comunicare con le unità nastro
della libreria.
10 Configurare la libreria tramite il pannello operatore.
Tabella: Requisiti di alimentazione
Requisiti di alimentazione Valori
Voltaggio di input 100 - 240 Vac (1,2 – 0,5 A)
Frequenza di input 50 - 60 Hz
Afflusso di corrente (avvio a freddo)
Consumo energetico medio 70 W
Consumo energetico max* 120 W*
* Lunghezza del picco massimo, inferiore a 10 ms.
Inferiore a 15 A, 115 Vac
Inferiore a 30 A, 230 Vac
Guida all'installazione rapida 15
Page 18

簡単な設置手順
設置方法の詳細と全操作手順については、『Tandberg StorageLibraryTM
T40 Installation and User Guide』を参照してください
要注意
要注意
以下の手順に従って作業する場合は、対応する番号のついた図を参
照してください。
1 ラックマウント型ライブラリの場合、装置の電源を入れ、固定
ネジを外してラックマウントイヤーを取り付け、ライブラリを
ラックに設置します。テーブルトップ型ライブラリの場合、固
定ネジを外さずにテーブルトップキットを取り付けます。手順
については、『Tandberg StorageLibrary
User Guide』を参照してください。
2 ライブラリにSCSIテープドライブがある場合、SCSIケーブルを
ドライブスレッドのコネクタに接続します。SCSIドライブを3
台以上使用する場合は、『Installation and User Guide』の設置
条件を参照してください。
a. 下のドライブの上部SCSIコネクタと、上のドライブの下部
b. SCSIバスの終端デバイスには、適切なSCSIターミネータを
Tandberg StorageLibraryTM T40にドライブ、電源装置、
マガジンが取り付けられていない場合、1人で持ち上げ
ることができます。ただし、絶対的な安全を考慮する場
合は 2人で持ち上げることをお勧めします。ライブラリ
の全重量は38kg (84ポンド)です(2FHドライブ)。空の
ライブラリの重量は23.6kg (52ポンド)です(ドライブ、
マガジン、電源装置を除く)。
Tandberg StorageLibraryTM T40が正常に動作するには、
輸送用の固定ネジを外しておく必要があります。
TM
T40 Installation and
SCSIコネクタをジャンパー線で接続します。SCSIバス上の
すべてのドライブに対してこの手順を繰り返します。ジャン
パー線はサムスクリューでコネクタに固定します。
装着します。
16 クィック インストレーション ガイド
Page 19

c. SCSIバスの最初のドライブとホストをケーブルで接続しま
す。SCSIケーブルの長さには制限があります。通常の設置
では、ケーブル長は9メートル(30フィート)を超えないよう
にしてください。
3 ライブラリにファイバーチャネルのテープドライブがある場合、
次の手順でファイバーケーブルをテープドライブに接続します。
a. ファイバーケーブルの片端を各ドライブのファイバーポート
に接続します。ケーブルの反対側をホスト、スイッチ、また
はハブに接続します。
4 Ethernetケーブルをライブラリ背面のEthernetポートに接続しま
す。Ethernet 接続により、Webクライアントを使用できます。
5 電源コードをライブラリ背面の電源コネクタに接続します。ラ
イブラリには米国用および欧州用の電源コードが同梱されてい
ます。
6 背面の電源スイッチをオンにして、ライブラリの電源を入れ
ます。
クィック インストレーション ガイド 17
Page 20

7 テーブルトップ型ライブラリでは、固定ネジが取り付けられて
いることが検出されます。正面パネルに表示される手順に従っ
てマガジンを取り外し、固定ネジを探し出します。ネジを取り
外し、マガジンを元に戻します。ライブラリで電源投入シーケ
ンスが続行されます。
8 ホストシステムの電源を入れます。
9 各ホストがライブラリのテープドライブと通信できることを確
認します。
10 ライブラリの操作パネルを使用して、ライブラリを設定します。
表:電源条件
電源条件 データ
入力電圧 100~240VAC (1.2~0.5A)
入力周波数 50~60Hz
突入電流(コールドスタート)
15A未満、115VAC
30A未満、230VAC
平均消費電力
70W
最大消費電力*
*最大消費電力の持続時間は10ミリ秒未満です。
120W*
18 クィック インストレーション ガイド
Page 21

International Headquarter
Tandberg Data ASA, Kjelsåsveien 161
P.O. Box 134 Kjelsås, N-0411 Oslo, Norway
Tel: +47 22 18 90 90, Fax: +47 22 18 95 50
www.tandberg.com
Worldwide Subsidiaries
Tandberg Data Corp., 12860 Danielson Court, Poway, U.S.A.
Tel: 858-726-1800. Fax: 858-726-1801
Tandberg Data GmbH, Feldstrasse 81, D-44141 Dortmund, Germany.
Tel: +49 231 5436 0. Fax: +49 231 5436 111
Tandberg Data S.A.S., 16/18 Ave. Morane-Saulnier, F-78941 Vélizy Cedex,
France.
Tel: +33 1 39 26 01 01/00800-82632374.
Fax: +33 1 34 65 02 89 (for technical support: 00800-07867243)
Tandberg Data (Asia) Pte. Ltd, 20 Bendemeer Road, #04-05 Cyberhub,
Singapore 339914, Tel: +65 6396 0786. Fax: +65 6396 0787
Tandberg Data (Japan) Inc., Eitaibashi Eco-Piazza Bldg. 8th floor 29-13,
Shinkawa 1-chome, Chuo-ku Tokyo 104-033, Japan
Tel: +81 3 5566 2871. Fax: +81 3 5566 2875
Tandberg Data Ltd., Bloxham Mill Business Centre, Barford Road, Bloxham,
Banbury, Oxfordshire, OX15 4FF, United Kingdom
Tel: +44 (0) 8450706916.
Specifications subject to change without notice. All trademarks are the
property of their respective owners.
©2006 Tandberg Data ASA. All rights reserved.
Part No. 433559-02, August 2006
Model 1040
19
 Loading...