


Español Français English
LC321SSX
LC320SSX
Owner’s Manual
Guide d’utilisation
Manual del Usuario
|
|
NEED |
HELP? |
|
? |
|
|
|||||||||||||||
|
|
|
D’AIDE |
|
|
|||||||||||||||||
|
BESOIN |
|
|
|
|
|
||||||||||||||||
|
|
|
AYUDA? |
|
||||||||||||||||||
|
¿NECESITA |
|
|
|
FREE! |
! |
||||||||||||||||
|
|
|
|
|
|
CALL |
TOLL |
|
|
|
|
|
|
|
||||||||
|
PLEASE |
|
|
GRATUIT |
||||||||||||||||||
|
|
|
|
NUMÉRO |
|
|
|
|
|
|
||||||||||||
|
|
NOTRE |
|
|
|
|
|
|
||||||||||||||
|
|
|
|
|
|
SINCOSTO! |
||||||||||||||||
APPELEZ |
|
POR |
FAVOR |
|
|
3927 |
||||||||||||||||
|
|
|
|
|
|
|
|
|
|
|
|
|||||||||||
|
|
|
|
|
|
|
|
|
|
|
|
|
|
|
||||||||
|
¡LLAME |
|
|
|
|
|
|
|
|
|
|
- |
|
|
|
|
|
|
|
|||
|
|
|
|
|
321 |
|
|
|
|
|
|
AT |
|
|||||||||
|
|
|
|
|
|
- |
|
|
|
|
|
|
|
|
|
|
|
|
|
|||
|
|
866 |
|
|
|
|
|
|
|
|
|
|
|
|
|
|
|
|
||||
|
- |
|
|
|
|
|
|
|
|
|
|
|
|
|
SITE |
|
|
|||||
|
1 |
|
|
|
|
|
OUR |
WEB |
L’ADRESSE |
|||||||||||||
|
|
VISIT |
|
|
|
À |
||||||||||||||||
|
|
OR |
|
|
WEB |
|||||||||||||||||
|
|
|
|
|
SITE |
|
EN |
|||||||||||||||
|
|
|
NOTRE |
|
WEB |
|||||||||||||||||
|
VISITEZ |
SITIO |
||||||||||||||||||||
OU |
|
|
|
|
.com |
|||||||||||||||||
|
NUESTRO |
|
|
|||||||||||||||||||
|
|
|
|
|
|
|
|
|
||||||||||||||
|
|
|
|
|
|
|
|
|
|
|||||||||||||
|
|
|
|
|
|
|
|
|
|
|
|
|
||||||||||
|
|
.sylvaniaconsumerelectronics |
||||||||||||||||||||
|
ÓVISITE |
|
|
|
|
|
|
|
|
|
|
|
|
|
|
|
|
|
|
|||
www |
|
|
|
|
|
|
|
|
|
|
|
|
|
|
|
|
|
|
|
|
||
MODEL NUMBER |
|
SERIAL NUMBER |
|
||
|
HIGH-DEFINITION TELEVISION
TO RECEIVE DIGITAL/ANALOG SIGNAL, YOU MUST CONNECT ANTENNA.
POUR RECEVOIR LE SIGNAL NUMÉRIQUE /ANALOGIQUE, VOUS DEVEZ CONNECTER L’ANTENNE.
PARA RECIBIR LA SEÑAL DIGITAL/ ANALÓGICA, DEBE CONECTAR LA ANTENA.
© 2009 Funai Electric Co., Ltd.

Need help connecting this LCD TV? Call us at 1-866-321-3927
Vous avez besoin d’aide pour connecter ce téléviseur LCD ? Appelez-nous au 1-866-321-3927 ¿Necesita ayuda para conectar esta TV LCD? Llame al número 1-866-321-3927
Before You Start |
Connection |
itial |
|
||||
Avant de Commencer |
Connexion |
Confi |
|
||||
Antes de Comenzar |
Conexiones |
alación |
|
||||
1 |
Plug in the AC power cord, then press |
. |
|||||
|
|
|
|
|
Branchez le cordon d’alimentation secteur, |
|
|
|
|
|
|
|
puis appuyez sur . |
|
|
|
|
|
|
|
Enchufe el cable alimentador de CA y presione . |
|
|
2 |
Select your language. |
|
|
||||
|
|
|
|
|
Sélectionnez votre langue. |
|
|
|
|
|
|
|
Seleccione su idioma. |
|
|
|
|
|
|
|
|
|
|
English
•“Autoscan” will begin.
La “Autoscan” commence.
Se inicia la función “Autoscan”.
Now the system is scanning for channels, please wait.
Autoscan will take up to 20 minutes to complete.
0%
ENTER
3Select “Antenna” or “Cable”.
Sélectionnez “Antenne” ou “Câble”. Seleccione “Antena” o “Cable”.
|
|
Make sure the antenna is connected to "ANT.IN" jack. |
|
|
|||||||
|
|
Select the destination of "ANT.IN" jack. |
|
|
|
|
|||||
|
|
|
|
|
|
|
|
|
|
|
|
|
|
|
|
|
|
|
|
|
|
|
|
|
|
|
Antenna |
|
Or |
|
|
|
|
||
|
|
|
Cable |
|
|
|
ANT.IN |
|
|||
|
|
|
|
|
|
|
|
|
|
|
|
|
|
|
|
|
|
|
|
BACK |
|
SETUP |
|
|
|
Select |
ENTER Enter |
|
|||||||
|
|
|
|||||||||
|
|
Back |
|
Skip |
|||||||
Before You Start |
Connection |
|
|
|
|
itial |
|||||
4Select “Retail” or “Home”.
Sélectionnez “Magasin” ou “Maison”. Seleccione “Tienda” o “Casa”.
Select “Retail” or “Home” for your location.
Select |
ENTER Enter |
Quick Start Guideuide
FR Guide de Démarrage Rapide
de Inicio Rápido
|
Connection |
Initial Setup |
ce |
Connexion |
Configuration Initiale |
|
Conexiones |
Instalación Inicial |
Attaching the Stand
Fixation du Support Fijación de la Base |
! |
|
1 |
2 |
|
3
Basic Operation
Opérations de Base
Operación Básica
Slide the stand onto the TV until the hook snaps.
Faites glisser le socle sur le téléviseur jusqu’à ce que les crochets s’enclenchent.
Deslice la base de soporte sobre el TV hasta que el gancho emboque.
Connecting the Antenna
Connexion de L’antenne Conexión de la Antena
What do I need in this procedure?
Avant de Commencer |
Connexion |
Confi g |
Antes de Comenzar |
Conexiones |
alación |
|
|
Channel Selection |
|
Volume Adjustment |
|
|
|
||
|
|
Sélection de Chaîne Selección de Canal |
|
Réglage du Volume Ajuste de Volumen |
|
|
|
Antenne VHF / UHF Antena VHF / UHF
VHF / UHF antenna
De quoi ai-je besoin pour réaliser cette procédure ? ¿Qué necesito para este procedimiento?
An RF coaxial cable (not included)
Câble RF coaxial (non fourni)
Un cable coaxial RF (no incluido)
TV
-When selecting analog channel 11.
Lorsque vous sélectionnez le canal analogique 11. Cuando seleccione el canal analógico 11.
DTV
- When selecting digital channel 11-1. Be sure to press
 before entering the subchannel number.
Lorsque vous sélectionnez le canal numérique 11-1. N’oubliez pas d’appuyer sur la toucher avant d’appuyer sur le numéro du sous-canal.
Cuando seleccione el canal digital 11-1 asegúrese de presionar  antes de indicar el número de subcanal.
Volume |
30 |
Switch the Input
Changer D’entrée Cambie la Entrada
Or ou o
HDMI1
e.g.) When selecting HDMI1. ex.) Lorsque vous sélectionnez HDMI1. p.ej.) Cuando seleccione HDMI1.
All of us at SYLVANIA wish you will be very pleased with your unit.
or ou o
cable TV company
Société de télévision par câble compañía de TV por cable
No Non No |
Do you have any AV device(s) to connect to this unit? |
YesYes UiUi SíSí |
Souhaitez-vous connecter d’autres appareils AV à ce téléviseur ? |
||
|
¿Tiene algún dispositivo AV para conectar a esta unidad? |
Go on the next page... |
|
|
Allez à la page suivante… |
|
|
Pase a la siguiente página… |
Printed in China
L’ensemble du personnel de SYLVANIA espère que vous serez satisfait de votre appareil. Todos en SYLVANIA deseamos que esté muy complacido(a) con su unidad.
1EMN24679 © 2009 Funai Electric Co., Ltd.
Connection Guide |
Vous avez besoin d’aide pour connecter ce téléviseur LCD ? Appelez-nous au 1-866-321-3927 |
|
|
|
Need help connecting this LCD TV? Call us at 1-866-321-3927 |
FR |
Guide de Connexion |
¿Necesita ayuda para conectar esta TV LCD? Llame al número 1-866-321-3927 |
ES |
Guía de Conexiones |
|
Before You Start |
Connection |
Initial Setup |
Basic Operation |
Avant de Commencer |
Connexion |
Configuration Initiale |
Opérations de Base |
Antes de Comenzar |
Conexiones |
Instalación Inicial |
Operación Básica |
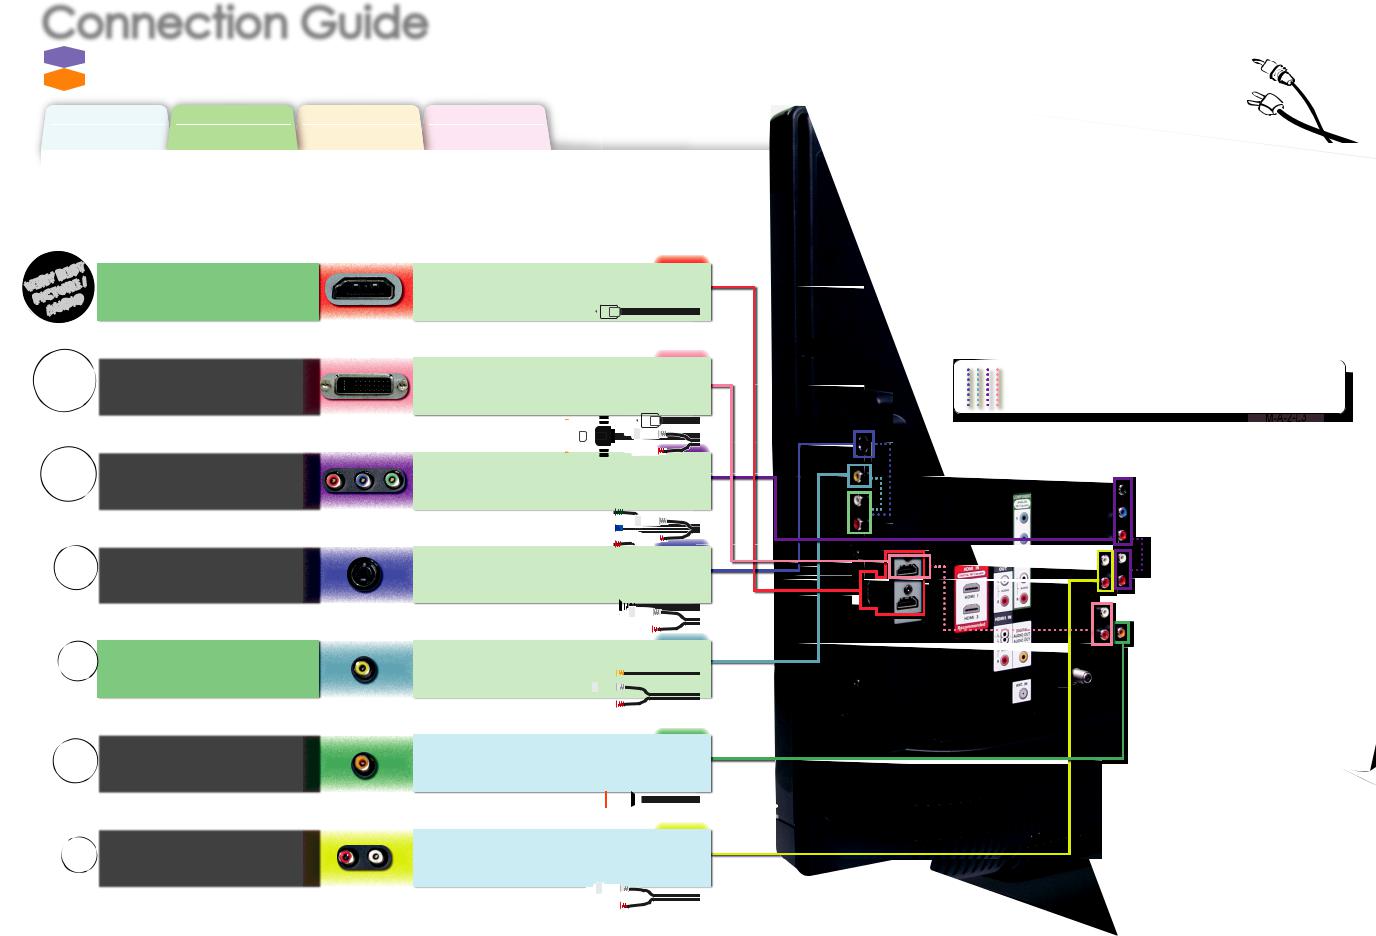
Optimize your HD TV experience by properly connecting your components.
Optimisez votre expérience de la télévision haute définition en connectant correctement vos composants. Optimice su experiencia en TV HD conectando correctamente los componentes.
|
your device has; |
|
votre appareil possède ; |
|
su dispositivo tiene; |
BEST |
HDMI OUT jack |
/ |
|
VERY |
prise de HDMI OUT |
PICTURE |
|
AUDIO |
toma de HDMI OUT |
Image/Audio de qualité optimale
Máximo imagen e audio
jack type is; necessary cable is; le type de prise est ; le câble nécessaire est ; el tipo de toma es; el cable necesario es;
HDMI cable
Câble HDMI
Cable HDMI
BEST |
DVI OUT jack (including PC) |
|
prise de DVI OUT (including PC) |
||
PICTURE |
||
|
toma de DVI OUT (including PC) |
|
|
|
Image d’excellente qualité
La mejor imagen
BETTER |
|
COMPONENTVIDEO OUT jack |
|
|
|
|
|
PICTURE |
prise de COMPONENT VIDEO OUT |
||
|
|
|
toma de COMPONENT VIDEO OUT |
Image de très bonne qualité |
|||
Mejor imagen |
|
||
|
|
|
|
OOO |
|
S-VIDEO OUT jack |
|
G |
D |
E |
|
|
R |
|
|
|
TU |
|
prise de S-VIDEO OUT |
PIC |
|
||
|
|
|
toma de S-VIDEO OUT |
Image de bonne qualité |
|||
Buena imagen |
|
||
STANDARD |
VIDEO OUT jack |
||
|
|||
PICTURE |
prise de VIDEO OUT |
||
|
|
|
|
toma de VIDEO OUT
Image de qualité standard
Imagen estándar
GOOD |
DIGITAL AUDIO IN jack |
|
prise de DIGITAL AUDIO IN |
||
AUDIO |
||
|
toma de DIGITAL AUDIO IN |
Audio de bonne qualité
Buen audio
STANDARD |
ANALOG AUDIO IN jack |
|
prise de ANALOG AUDIO IN |
||
AUDIO |
||
|
toma de ANALOG AUDIO IN |
|
|
|
DVI-HDMI conversion cable + audio cables
Câble de conversion DVI-HDMI + câbles audio Cable de conversión DVI HDMI + cables de audio
Component video cables + audio cables
Câbles vidéo composant + câbles audio
Cables de vídeo en componentes + cables de audio
S-Video cable + audio cables
Câble S-Vidéo + câbles audio
Cable de S-Video + cables de audio
Video cable + audio cables
Câble vidéo + câbles audio
Cable de vídeo + cables de audio
Coaxial Audio cable
Câble audio coaxial (audio numérique)
Cable coaxial de audio (Audio Digital)
Audio cables
Câbles audio (audio analogique)
Cables de audio (Audio Analógico)
Separate analog audio cable(s) is also required for this connection.
Vous aurez également besoin de câble audio analogiques pour effectuer ce branchement. Se requieren también cables separados de audio analógico para esta conexión.
Audio de qualité standard Audio estándar
The model and serial numbers of this unit may be found on the cabinet. |
Model No.: |
LC321SSX / LC320SSX |
You should record and retain those numbers for future reference. |
|
|
|
|
|
|
Serial No.: |
|
|
|
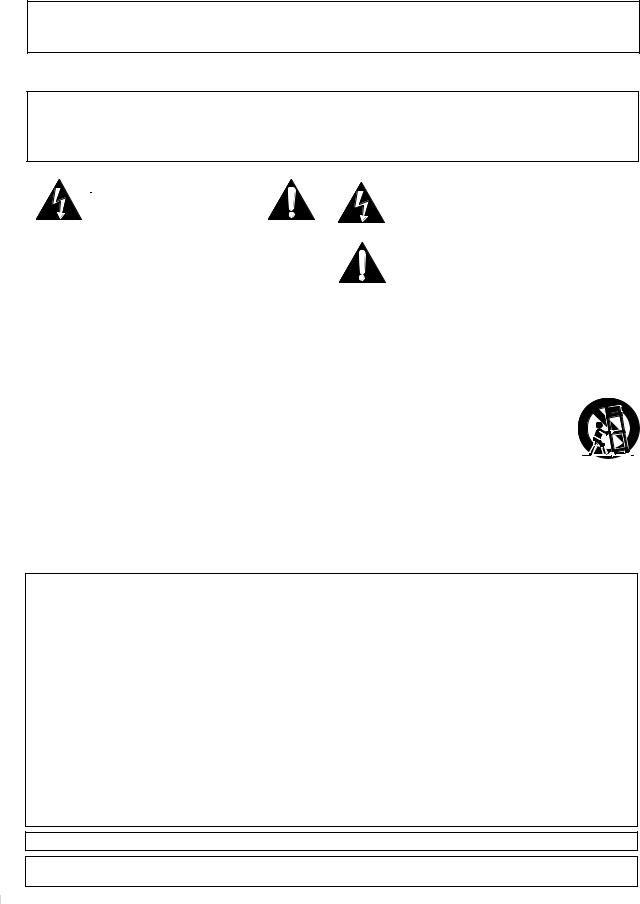
Precautions
WARNING: TO REDUCE THE RISK OF FIRE OR ELECTRIC SHOCK, DO NOT EXPOSE THIS APPARATUS TO RAIN OR MOISTURE.
APPARATUS SHALL NOT BE EXPOSED TO DRIPPING OR SPLASHING AND NO OBJECTS FILLED WITH LIQUIDS, SUCH AS VASES, SHALL BE PLACED ON THE APPARATUS.
|
|
|
|
|
|
|
CAUTION |
|
|
|
The lightning flash with arrowhead symbol, within an |
|
|
|
equilateral triangle, is intended to alert the user to the |
||
|
RISK OF ELECTRIC SHOCK |
|
|
|
|
|
|
|
|
||
|
|
|
presence of uninsulated“dangerous voltage” within the |
||
|
DO NOT OPEN |
|
|
apparatus’s enclosure that may be of sufficient magnitude |
|
|
|
|
|
|
to constitute a risk of electric shock to persons. |
CAUTION: TO REDUCE THE RISK OF ELECTRIC |
|
|
|||
|
|
The exclamation point within an equilateral triangle is |
|||
SHOCK, DO NOT REMOVE COVER (OR BACK). NO USER |
|
intended to alert the user to the presence of important |
|||
SERVICEABLE PARTS INSIDE. REFER SERVICING TO |
|
operating and maintenance (servicing) instructions in |
|||
QUALIFIED SERVICE PERSONNEL. |
|
the literature accompanying the apparatus. |
|||
|
|
|
|
|
|
The caution marking is located on the rear or bottom of the cabinet.
Important Safety Instructions
1.Read these instructions.
2.Keep these instructions.
3.Heed all warnings.
4.Follow all instructions.
5.Do not use this apparatus near water.
6.Clean only with dry cloth.
7.Do not block any ventilation openings. Install in accordance with the manufacture’s instructions.
8.Do not install near any heat sources such as radiators, heat registers, stoves, or other apparatus (including amplifiers) that produce heat.
9.Do not defeat the safety purpose of the polarized or grounding-type plug. A polarized plug has two blades with one wider than the other. A grounding type plug has two blades and a third grounding prong. The wide blade or the third prong are provided for your safety. If the provided plug does not fit into your outlet, consult an electrician for replacement of the obsolete outlet.
10.Protect the power cord from being walked on or pinched particularly at plugs, convenience receptacles, and the point where they exit from the apparatus.
11.Only use attachments/accessories specified by the manufacturer.
12. Use only with the cart, stand, tripod, bracket, or table specified by the manufacturer, or sold with the apparatus. When a cart is used, use caution when moving the cart/apparatus combination to avoid injury from tip-over.
13.Unplug this apparatus during lightning storms or when unused for long periods of time.
14.Refer all servicing to qualified service personnel. Servicing is required when the apparatus has been damaged in any way, such as power-supply cord or plug is damaged, liquid has been spilled or objects have fallen into the apparatus, the apparatus has been exposed to rain or moisture, does not operate normally, or has been dropped.
FCC WARNING
This apparatus may generate or use radio frequency energy. Changes or modifications to this apparatus may cause harmful interference unless the modifications are expressly approved in the manual. The user could lose the authority to operate this apparatus if an unauthorized change or modification is made.
RADIO-TV INTERFERENCE
This apparatus has been tested and found to comply with the limits for a Class B digital device, pursuant to Part 15 of the FCC Rules. These limits are designed to provide reasonable protection against harmful interference in a residential installation. This apparatus generates, uses, and can radiate radio frequency energy and, if not installed and used in accordance with the instructions, may cause harmful interference to radio communications. However, there is no guarantee that interference will not occur in a particular installation. If this apparatus does cause harmful interference to radio or television reception, which can be determined by turning the apparatus off and on, the user is encouraged to try to correct the interference by one or more of the following measures:
1)Reorient or relocate the receiving antenna.
2)Increase the separation between the apparatus and receiver.
3)Connect the apparatus into an outlet on a circuit different from that to which the receiver is connected.
4)Consult the dealer or an experienced radio/TV technician for help.
DECLARATION OF CONFORMITY |
|
|
|
Trade Name: |
SYLVANIA |
Responsible Party: |
FUNAI CORPORATION, INC. |
Model: |
LC321SSX / LC320SSX |
Address: |
201 Route 17 North Suite No. 903 Rutherford, New Jersey 07070 U.S.A. |
|
|
Telephone Number: |
201-727-4560 |
This Class B digital apparatus complies with Canadian ICES-003.
Do not place the unit on the furniture that is capable of being tilted by a child and an adult leaning, pulling, standing or climbing on it. A falling unit can cause serious injury or even death.
2
EN
Español Français English
This apparatus should not be placed in a built-in installation such as a bookcase or rack unless proper ventilation is provided. Make sure to leave a space of 3.2 inches (8cm) or more around this apparatus.
Disconnect the mains plug to shut off when find trouble or not in use. The mains plug shall remain readily operable.
CAUTION: Danger of explosion if battery is incorrectly replaced. Replace only with the same or equivalent type.
WARNING: Batteries (battery pack or battery installed) shall not be exposed to excessive heat such as sunshine, fire or the like.
 LAMP IN LCD CONTAINS MERCURY, DISPOSE ACCORDING TO LOCAL, STATE OR FEDERAL LAW.
WARNING: To prevent injury, this apparatus must be securely attached to the floor/wall in accordance with the instructions.
TO AVOID THE HAZARDS OF ELECTRICAL SHOCK AND FIRE
•Do not handle the AC power cord with wet hands.
•Do not remove this unit’s cabinet. Touching parts inside the cabinet could result in electric shock and/or damage to this unit. For service and adjustment inside the cabinet, call a qualified dealer or an authorized service center.
•Do not pull on the AC power cord when disconnecting it from an AC outlet. Grasp it by the plug.
•Do not put your fingers or objects into the unit.
LOCATION AND HANDLING
•The openings should not be blocked by placing the unit on a bed, sofa, carpet, rug, or other similar surface.
•Do not install the unit near or over a radiator or heat register.
•Do not install the unit in direct sunlight, near strong magnetic fields, or in a place subject to dust or strong vibration.
•Avoid a place with drastic temperature changes.
•Install the unit in a horizontal and stable position. Do not place anything directly on top or bottom of the unit. Depending on your external devices, noise or disturbance of the picture and/or sound may be generated if the unit is placed too close to them. In this case, please ensure enough space between the external devices and the unit.
•Depending on the environment, the temperature of this unit may increase slightly. This is not a malfunction.
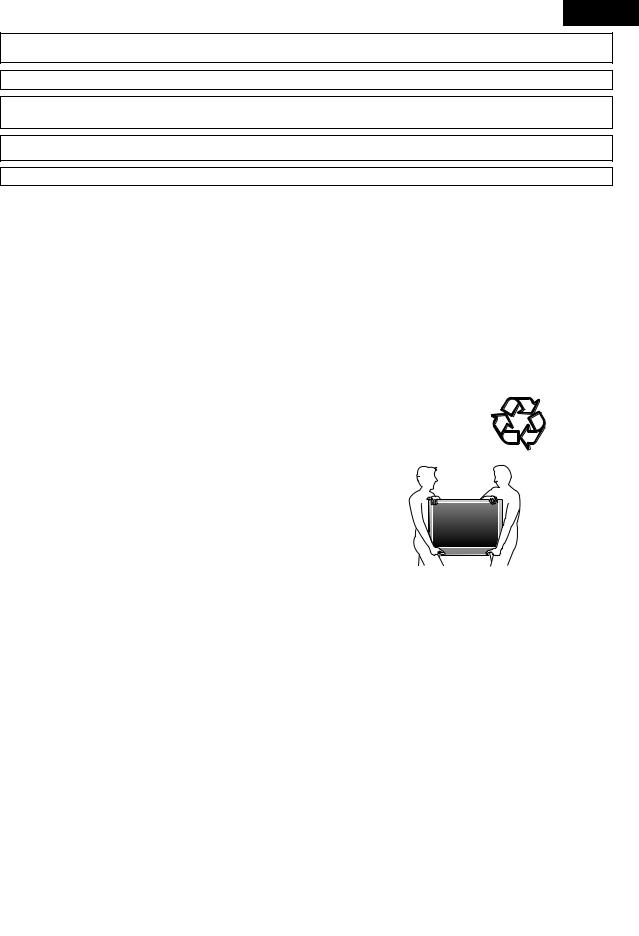
NOTE ABOUT RECYCLING
• This unit’s packaging materials are recyclable and can be reused.
Please dispose of any materials in accordance with your local recycling regulations.
•Batteries should never be thrown away or incinerated but disposed of in accordance with your local regulations concerning chemical wastes.
WHEN CARRYING THIS UNIT
•At least two people are required when carrying this unit.
•Make sure to hold the upper and bottom frames of the unit firmly as illustrated.
Trademark Information
•HDMI, the HDMI logo and High-Definition Multimedia Interface are trademarks or registered trademarks of HDMI Licensing LLC.
•Manufactured under license from Dolby Laboratories. “Dolby” and the double-D symbol are trademarks of Dolby Laboratories.
•Products that have earned ENERGY STAR® are designed to protect the environment through superior energy efficiency.
3
EN

INTRODUCTION
Supplied Accessories
owner’s manual |
quick start guide |
remote control |
registration card |
screw kit for attaching |
||||||
(1EMN24340B) |
(1EMN24679) |
(NF015UD) |
(1EMN24700) |
the stand |
||||||
|
|
|
|
|
|
|
|
|
|
(1ESA19881) |
|
|
|
|
|
|
|
|
|
|
|
|
|
|
|
|
|
|
|
|
|
|
|
|
|
|
|
|
|
|
|
|
|
|
|
|
|
|
|
|
|
|
|
|
|
|
|
|
|
|
|
|
|
|
|
batteries (AA x 2)
AA
 AA
AA
•If you need to replace these accessories, please refer to the part No. with the illustrations and call our toll free customer support line found on the cover of this manual.
Attaching the Stand
You must attach the stand to the unit to have it as a table top unit. Be sure the front and rear of the stand match the proper direction.
1 Spread a thick and soft cloth over a table as shown below.
Place the main unit face down onto it. Make sure not to damage the screen. At least two people are required at this step.
2 Align the 2 stand hooks with the two hooks under the bottom of the main unit (shown by arrow ), then slide the stand in the direction as shown by arrow until it stops and the 4 mounting holes are aligned.
Make sure not to put the AC power cord between the stand and the unit.
3 Drive Phillips pan screws in the 4 threaded holes at the bottom of the stand until they are tight.
screw holes


|
front |
side |


To remove the stand from this unit
Unscrew the Phillips pan screws indicated by above “ ” screw holes. After the screws are removed pull the stand up toward the rear of the unit. Be careful not to drop the stand when you remove it.
Note:
•When attaching the stand, ensure that all screws are tightly fastened. If the stand is not properly attached, it could cause the unit to fall, resulting in injuries as well as damage to the unit.
•Make sure to use a table which can support the weight of this unit and is larger than this unit.
•Make sure the table is in a stable location.
Symbols Used in this Manual
The following is the description for the symbols used in this manual. Description refers to:
TV : Analog TV operation DTV : Digital TV operation
• If neither symbol appears under the function heading, operation is applicable to both.
4
EN

Español Français English
Features
•DTV/TV/CATV
-You can use your remote control to select channels which are broadcast in digital format and conventional analog format. Also, cable subscribers can access their cable TV channels.
•Information Display (DTV only)
-You can display the title, contents and other information of the current DTV program on the TV screen.
•Autoscan
-This unit automatically scans and memorizes channels available in your area, eliminating difficult setup procedures.
•Child Lock
-This feature allows you to block children’s access to inappropriate programs.
•Closed Caption Decoder
-Built-in closed caption decoder displays text for closed caption supported programs.
•MTS/SAP Tuner
-Audio can be selected from the remote control.
•Auto Shut Off Function
-If there is no signal input from the antenna terminal and no operation for 15 minutes, the unit will turn off automatically.
•Sleep Timer
-This feature will automatically turn off the power of the unit at a specific time.
•Choices for On-screen Language
-Select your on-screen language: English, Spanish or French.
•Stereo Sound Function
•PLL Frequency Synthesized Tuning
-Provides free and easy channel selection and lets you tune directly to any channel using the number buttons on the remote control.
•Various Adjustment for Picture and Sound
-Customizes image quality to suitable for your room and sets the sound as your preference.
•HDMI Input
-When using HDMI1 Input, you can enjoy this unit as a PC monitor if your PC has DVI output terminal.
•Component video Input
•S-Video Input
•AV Input
•Digital audio Output
•Analog audio Output
© 2009 Funai Electric Co., Ltd.
Contents
Precautions . . . . . . . . . . . . . . . . . . . . . . . . . . . . . . . . . . . . . . . . . . . . . 2 Trademark Information. . . . . . . . . . . . . . . . . . . . . . . . . . . . . . . . . . 3
INTRODUCTION
Supplied Accessories. . . . . . . . . . . . . . . . . . . . . . . . . . . . . . . . . . . . 4 Attaching the Stand. . . . . . . . . . . . . . . . . . . . . . . . . . . . . . . . . . . . . 4 Symbols Used in this Manual . . . . . . . . . . . . . . . . . . . . . . . . . . . . 4 Features. . . . . . . . . . . . . . . . . . . . . . . . . . . . . . . . . . . . . . . . . . . . . . . . . 5 Control Panel . . . . . . . . . . . . . . . . . . . . . . . . . . . . . . . . . . . . . . . . . . . 6 Terminals . . . . . . . . . . . . . . . . . . . . . . . . . . . . . . . . . . . . . . . . . . . . . . . 6 Remote Control Function . . . . . . . . . . . . . . . . . . . . . . . . . . . . . . . 7 Installing the Batteries. . . . . . . . . . . . . . . . . . . . . . . . . . . . . . . . . . . 7
PREPARATION
Antenna Connection . . . . . . . . . . . . . . . . . . . . . . . . . . . . . . . . . . . . 8 Connection to Cable Receiver or Satellite Box . . . . . . . . . . . 8 External Device Connection . . . . . . . . . . . . . . . . . . . . . . . . . . . . . 9 Cable Management . . . . . . . . . . . . . . . . . . . . . . . . . . . . . . . . . . . .12 Plug In the AC Power Cord . . . . . . . . . . . . . . . . . . . . . . . . . . . . .12 Initial Setup . . . . . . . . . . . . . . . . . . . . . . . . . . . . . . . . . . . . . . . . . . . .13
WATCHING TV
Channel Selection. . . . . . . . . . . . . . . . . . . . . . . . . . . . . . . . . . . . . .14 Volume Adjustment. . . . . . . . . . . . . . . . . . . . . . . . . . . . . . . . . . . .14 Sleep Timer . . . . . . . . . . . . . . . . . . . . . . . . . . . . . . . . . . . . . . . . . . . .14 Still Mode . . . . . . . . . . . . . . . . . . . . . . . . . . . . . . . . . . . . . . . . . . . . . .15 Switching Each Input Mode . . . . . . . . . . . . . . . . . . . . . . . . . . . .15 Switching Audio Mode. . . . . . . . . . . . . . . . . . . . . . . . . . . . . . . . .15 TV Screen Information. . . . . . . . . . . . . . . . . . . . . . . . . . . . . . . . . .16 TV Screen Display Mode. . . . . . . . . . . . . . . . . . . . . . . . . . . . . . . .17
OPTIONAL SETTING
Main Menu. . . . . . . . . . . . . . . . . . . . . . . . . . . . . . . . . . . . . . . . . . . . .18 Autoscan. . . . . . . . . . . . . . . . . . . . . . . . . . . . . . . . . . . . . . . . . . . . . . .18 Channel List. . . . . . . . . . . . . . . . . . . . . . . . . . . . . . . . . . . . . . . . . . . .19 Manual Register. . . . . . . . . . . . . . . . . . . . . . . . . . . . . . . . . . . . . . . .19 Antenna Confirmation . . . . . . . . . . . . . . . . . . . . . . . . . . . . . . . . .20 Language Selection . . . . . . . . . . . . . . . . . . . . . . . . . . . . . . . . . . . .20 Picture Adjustment . . . . . . . . . . . . . . . . . . . . . . . . . . . . . . . . . . . .21 Sound Adjustment . . . . . . . . . . . . . . . . . . . . . . . . . . . . . . . . . . . . .22 Closed Caption. . . . . . . . . . . . . . . . . . . . . . . . . . . . . . . . . . . . . . . . .23 Child Lock. . . . . . . . . . . . . . . . . . . . . . . . . . . . . . . . . . . . . . . . . . . . . .26 PC Settings. . . . . . . . . . . . . . . . . . . . . . . . . . . . . . . . . . . . . . . . . . . . .30 Energy Saving Mode . . . . . . . . . . . . . . . . . . . . . . . . . . . . . . . . . . .31 Location . . . . . . . . . . . . . . . . . . . . . . . . . . . . . . . . . . . . . . . . . . . . . . .31 Current Software Info . . . . . . . . . . . . . . . . . . . . . . . . . . . . . . . . . .32
TROUBLESHOOTING
FAQ . . . . . . . . . . . . . . . . . . . . . . . . . . . . . . . . . . . . . . . . . . . . . . . . . . . .33 Troubleshooting Guide . . . . . . . . . . . . . . . . . . . . . . . . . . . . . . . .34
INFORMATION
Glossary. . . . . . . . . . . . . . . . . . . . . . . . . . . . . . . . . . . . . . . . . . . . . . . .36 Maintenance . . . . . . . . . . . . . . . . . . . . . . . . . . . . . . . . . . . . . . . . . . .36 Cable Channel Designations . . . . . . . . . . . . . . . . . . . . . . . . . . .37 General Specifications. . . . . . . . . . . . . . . . . . . . . . . . . . . . . . . . . .37 Electrical Specification . . . . . . . . . . . . . . . . . . . . . . . . . . . . . . . . .37 Other Specifications. . . . . . . . . . . . . . . . . . . . . . . . . . . . . . . . . . . .37
Limited Warranty. . . . . . . . . . . . . . . . . . . . . . . . . . . . . . . . . . . . . . .38
INFORMATION TROUBLESHOOTING SETTING OPTIONAL TV WATCHING PREPARATION INTRODUCTION
All rights reserved. No part of this manual may be reproduced, copied, transmitted, disseminated, transcribed, downloaded or stored in any storage medium, in any form or for any purpose without the express prior written consent of Funai.
Furthermore, any unauthorized commercial distribution of this manual or any revision hereto is strictly prohibited.
Information in this document is subject to change without notice. Funai reserves the right to change the content herein without the obligation to notify any person or organization of such changes.
|
with the |
design is a registered trademark of Funai Electric Co., Ltd and may not be used in any way without the express written |
|
|
|
||
consent of Funai. All other trademarks used herein remain the exclusive property of their respective owners. Nothing contained in this |
|
||
manual should be construed as granting, by implication or otherwise, any license or right to use any of the trademarks displayed herein. |
|
||
Misuse of any trademarks or any other content in this manual is strictly prohibited. Funai shall aggressively enforce its intellectual property |
5 |
||
rights to the fullest extent of the law. |
|||
EN
INTRODUCTION
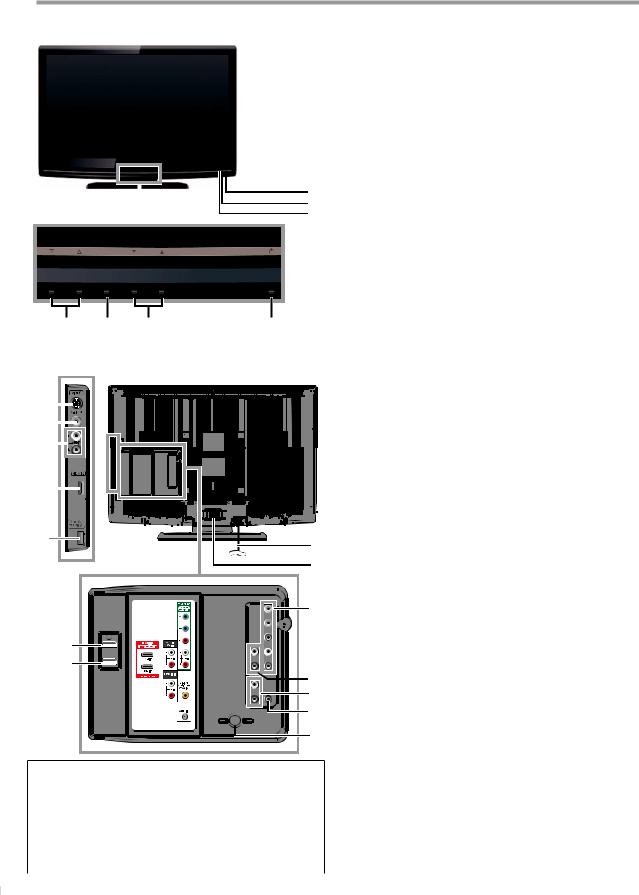
Control Panel |
1. |
y (power) (p. 13) |
|
|
|
||
|
|
2. |
Press to turn the unit on and off. |
|
|
CH K/L (p. 14 / p. 15) |
|
|
|
|
Press to select channels or move up (K) / down (L) |
|
|
|
through the main menu items. |
|
|
3. |
SETUP (p. 13) |
|
|
4. |
Press to display the main menu. |
|
|
VOL X/ Y (p. 14) |
|
|
|
|
Press to adjust the volume or move right (X) / left |
|
|
|
(Y) through the main menu items. |
|
|
5. |
Infrared sensor window |
|
5 |
|
Receives infrared rays transmitted from the remote |
|
|
||
|
|
control. |
|
|
6 |
|
|
|
6. |
POWER ON indicator |
|
|
7 |
||
|
|
|
Lights up green when power is on. |
|
|
|
|
|
|
7. |
STAND BY indicator |
|
|
|
Lights up red when power is off. |
4 |
3 |
|
|
|
2 |
|
|
|
1 |
|
||||||||||||
Terminals |
|
|
|
|
|
|
|
|
|
[Side Panel] |
||||||||||||
|
|
|
|
|
|
|
|
|
|
|
|
|
|
|
|
|
|
|
|
|
|
8. S-Video Input jack (p. 10) |
8 |
|
|
|
|
|
|
|
|
|
|
|
|
|
|
|
|
|
|
|
|
|
S-video cable connection from an external device. |
|
|
|
|
|
|
|
|
|
|
|
|
|
|
|
|
|
|
|
|
|
9. Video Input jack (p. 11) |
|
|
|
|
|
|
|
|
|
|
|
|
|
|
|
|
|
|
|
|
|
|
||
9 |
|
|
|
|
|
|
|
|
|
|
|
|
|
|
|
|
|
|
|
|
|
RCA video cable connection from an external device. |
|
|
|
|
|
|
|
|
|
|
|
|
|
|
|
|
|
|
|
|
|
||
10 |
|
|
|
|
|
|
|
|
|
|
|
|
|
|
|
|
|
|
|
|
|
10. Audio Input jack (p. 10 / p. 11) |
|
|
|
|
|
|
|
|
|
|
|
|
|
|
|
|
|
|
|
|
|
|
RCA audio cable connection from an external device. |
|
|
|
|
|
|
|
|
|
|
|
|
|
|
|
|
|
|
|
|
|
|
11. HDMI 2 Input jack (p. 8 / p. 9) |
|
|
|
|
|
|
|
|
|
|
|
|
|
|
|
|
|
|
|
|
|
|
|
11 |
|
|
|
|
|
|
|
|
|
|
|
|
|
|
|
|
|
|
|
|
|
HDMI connection from HDMI device. |
|
|
|
|
|
|
|
|
|
|
|
|
|
|
|
|
|
|
|
|
|
|
|
|
|
|
|
|
|
|
|
|
|
|
|
|
|
|
|
|
|
|
|
|
|
|
|
|
[Rear Panel] |
|
|
12. AC power cord (p. 12) |
* |
12 |
Connect to a standard AC outlet to supply power to |
this unit. |
||
|
13 |
13. Cable management (p. 12) |
|
|
Use this holder to bundle the cables. |
|
|
14. Component video and Audio Input jack (p. 8 / p. 10) |
|
14 |
RCA component video cable and RCA audio cable |
|
connection from an external device. |
|
|
|
|
|
|
15. Audio Output jack (p. 11) |
|
19 |
RCA audio cable connection for an external device. |
|
20 |
16. Audio Input jack for HDMI1 (p. 9 / p. 12) |
|
15 |
RCA audio cable connection from a DVI device. |
|
When you connect your PC that has a DVI terminal, |
|
|
16 |
|
|
use a stereo mini plug-RCA conversion cable as well. |
|
|
17 |
|
|
(For HDMI 1 Input jack only) |
|
|
18 |
17. Digital audio Output jack (p. 11) |
|
Coaxial digital cable connection for a decoder or an |
|
|
|
|
|
|
audio receiver. |
|
Note: |
18. Antenna Input jack (p. 8) |
|
service terminal (service use only) |
RF coaxial cable connection for your antenna or cable |
|
*• Use this terminal only when a software update is necessary. |
TV signal. |
|
• User should not connect any devices to the service terminal |
19. HDMI 1 Input jack (p. 8 / p. 9 / p. 12) |
|
such as digital camera, keyboard, mouse, etc. (because these |
HDMI connection for HDMI or DVI device. |
|
will not work). |
|
|
• The software update is, in most cases, handled by an |
When you connect your PC that has a DVI terminal, |
|
authorized service person or in some circumstances the user |
you can enjoy this unit as a PC monitor. |
|
may be asked to do the software upgrade themselves. |
20. HDMI 3 Input jack (p. 8 / p. 9) |
|
|
|
6 |
|
HDMI connection from HDMI device. |
EN

Remote Control Function
CH RETURN
1.POWER (p. 13)
Press to turn the unit on and off.
2.Number buttons (p. 14)
• Press to select channels.
- (hyphen)
• Press to shift the subchannel from the main channel.
3.SETUP (p. 13)
Press to display the main menu.
4.s / B / K / L (cursor) (p. 13)
Press to move left / right / up / down through the items.
5.ENTER (p. 13)
Press to decide the command of setting when the main menu is displayed.
|
Español |
Français |
English |
|
||||
6. |
BACK (p. 16) |
|
|
|
|
|
INTRODUCTION |
|
|
|
|
|
|
|
|||
|
Press to return to the previous menu operation. |
|
||||||
|
|
|||||||
7. |
CH RETURN (p. 14) |
|
|
|
|
PREPARATION |
||
|
Press to return to previously viewed channel. |
|
|
|
||||
|
|
|
|
|
||||
8. |
VOL. X/ Y (p. 14) |
|
|
|
|
|
|
|
|
Press to adjust the volume. |
|
|
|
|
|
||
9. |
MUTE (p. 14) |
|
|
|
|
|
|
|
|
Press to turn the sound on and off. |
|
|
|
|
|||
10. |
INPUT SELECT (p. 15) |
|
|
|
|
|
||
|
Press to access connected external devices |
|
|
|
|
|||
|
|
|
|
|
||||
|
like a BD/DVD recorder. |
|
|
|
|
WATCHING |
||
11. |
SLEEP (p. 14) |
|
|
|
|
|
||
|
|
|
|
|
|
|||
|
Press to activate the sleep timer. |
|
|
|
|
|||
12. |
AUDIO (p. 15) |
|
|
|
|
|
|
|
|
Digital mode (DTV) |
|
|
|
|
TV |
||
|
• Press to select the audio language. |
|
|
|
||||
|
Analog mode (TV) |
|
|
|
|
|
||
|
• Press to select the audio mode. |
|
|
|
|
|||
14. |
|
|
|
OPTIONAL |
||||
SCREEN MODE |
(p. 17) |
|
|
|
|
|||
13. |
STILL (p. 15) |
|
|
|
|
|
|
|
|
Press to pause screen image. |
|
|
|
|
|||
|
|
|
|
|
|
|
|
|
|
Press to select aspect ratio available for the TV screen. |
|
SETTING |
|||||
15. |
INFO (p. 16) |
|
|
|
|
|
||
|
|
|
|
|
|
|||
|
Digital mode (DTV) |
|
|
|
|
|
||
|
• Press to display the channel information, signal type |
|
|
|||||
|
|
|
||||||
|
and TV setting. |
|
|
|
|
|
TROUBLESHOOTING |
|
|
and TV setting. |
|
|
|
|
|
||
|
Analog mode (TV) |
|
|
|
|
|
||
|
• Press to display the channel number, signal type and |
|
||||||
|
TV setting. |
|
|
|
|
|
|
|
|
External input mode |
|
|
|
|
|
||
|
• Press to display the external input mode, signal type |
|
||||||
16. |
CH K/ L (p. 14 / p. 15) |
|
|
|
|
|
||
|
|
|
|
|
||||
|
Press to select channels and the external input mode. |
INFORMATION |
||||||
|
|
|
||||||
|
• Make sure the component code on your universal remote |
|
||||||
When using a universal remote control to operate |
|
|
||||||
this unit. |
|
|
|
|
|
|
||
|
control is set to our brand. |
|
|
|
|
|
||
|
Refer to the manual accompanying your remote control for |
|
|
|||||
|
more details. |
|
|
|
|
|
|
|
|
• We do not guarantee 100% interoperability with all universal |
|
|
|||||
|
remote controls. |
|
|
|
|
|
|
|
|
|
|
|
|
|
|
|
|
Installing the Batteries
Install the batteries (AA x 2) matching the polarity indicated inside battery compartment of the remote control.
Battery Precautions:
•Be sure to follow the correct polarity as indicated in the battery compartment. Reversed batteries may cause damage to the device.
•Do not mix different types of batteries together (e.g., Alkaline and Carbon-Zinc, or rechargeable batteries like ni-cad, ni-mh, etc) or old batteries with fresh ones.
•If the device is not to be used for a long period of time, remove the batteries to prevent damage or injury from possible battery leakage.
•Do not try to recharge batteries; they can overheat and rupture.
7
EN
PREPARATION
No supplied cables are used in this connection:
Please purchase the necessary cables at your local store.
High Speed HDMI cable (also known as HDMI category 2 cable) is recommended for the better compatibility.
Before you connect...
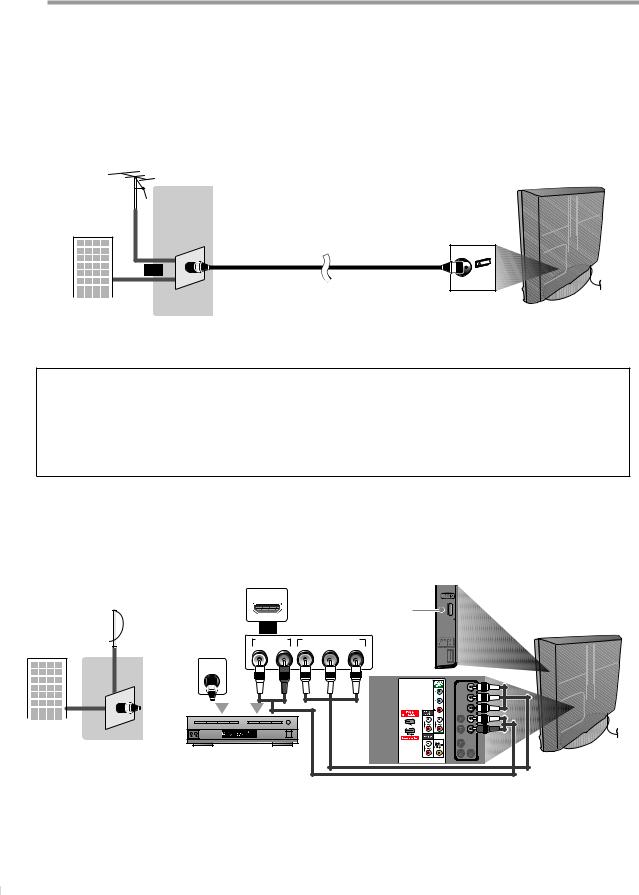
Be sure your antenna or other device is connected properly before plugging in the AC power cord.
Antenna Connection
Connect the RF coaxial cable on your home outlet to the antenna input jack of this unit.
rear of this unit
e.g.)
VHF / UHF antenna
RF coaxial cable
or
cable TV signal
*Once connections are completed, turn on the unit and begin initial setup. Channel scanning is necessary for the unit to memorize all available channels in your area. Refer to “Initial Setup” on page 13.
Note:
•If you have any question about the DTV’s antenna, visit www.antennaweb.org for further information.
•Depending on your antenna system, you may need different types of combiners (mixers) or separators (splitters). Contact your local electronics store for these items.
•For your safety and to avoid damage to this unit, please unplug the RF coaxial cable from the antenna input jack before moving the unit.
•If you use an antenna to receive analog TV, it should also work for DTV reception. Outdoor or attic antennas will be more effective than settop versions.
•To switch your reception source easily between antenna and cable, install an antenna selector.
•If you connect to the cable system directly, contact the CATV installer.
Connection to Cable Receiver or Satellite Box
Use an HDMI or an RCA component video cable to connect the HDMI or the Component video Input jack of the unit to the HDMI or the component video output jack of the cable receiver / satellite box.
If you connect to the unit’s Component video Input jack, connect RCA audio cables to the Audio L/R jacks below the Component video connector.
e.g.) |
HDMI OUT |
|
|
HDMI cable |
|
satellite dish |
or |
|
|
|
|
|
|
|
|
or |
|
|
AUDIO OUT |
COMPONENT VIDEO OUT |
|||
|
L |
R |
Y |
Pb/Cb Pr/Cr |
|
ANT IN
or
cable TV signal including PPV
RF coaxial |
(blue) |
(red) |
(green) |
|
cable |
(green) |
|||
|
|
|
(blue) |
|
|
|
|
|
|
|
|
|
|
(red) |
|
|
|
or |
|
|
STEREO |
|
|
|
|
PCM |
|
|
|
|
cable receiver / satellite box |
|
|
|
|
|
|
|
RCA component video cable |
|
|
|
|
and RCA audio cable |
side or
rear of this unit
*You can also connect this unit to the cable receiver or satellite box other than the HDMI or the component video output jack because they might have different output jacks.
*Required cables and connecting methods of the cable receiver / satellite box, or the availability channel for the clear QAM may differ depending on the cable / satellite provider. For more information, please contact your cable / satellite provider.
8
EN
Español Français
No supplied cables are used in this connection:
Please purchase the necessary cables at your local store.
High Speed HDMI cable (also known as HDMI category 2 cable) is recommended for the better compatibility.
English
INTRODUCTION
External Device Connection
[HDMI Connection]
HDMI connection offers the highest picture quality.
HDMI (High-Definition Multimedia Interface) transports high definition video and multi-channel digital audio through a single cable.
e.g.)
HDMI cable
HDMI OUT
TITLE 5
CHAPTER 15
REPEAT A-B
BD/DVD recorder |
|
|
or |
||
with the HDMI output jack |
||
|
side or
rear of this unit
or
Note:
•This unit accepts 480i / 480p / 720p / 1080i video signals, and 32kHz / 44.1kHz / 48kHz audio signals.
•This unit accepts only 2 channel audio signal (LPCM).
•You need to select “PCM” for the digital audio of the device you connected or check the HDMI audio setting. There may be no audio output if you select “Bitstream”, etc.
•This unit only accepts signals in compliance with EIA861.
[HDMI-DVI Connection]
Use an HDMI-DVI conversion cable to connect the unit to external video devices equipped with DVI output jack.
e.g.)
HDMI-DVI
DVI OUT |
conversion cable |
rear of this unit |
|
 INFORMATION TROUBLESHOOTING SETTING OPTIONAL TV WATCHING PREPARATION
STEREO
PCM
cable receiver or satellite box with the DVI output jack
AUDIO OUT
L R
To HDMI1 input jack only
RCA audio cable
Note:
•This unit accepts 480i / 480p / 720p / 1080i video signals.
•HDMI-DVI connection requires separate RCA audio connections as well.
•Audio signals are converted from digital to analog for this connection.
•DVI does not display 480i image that is not in compliance with EIA/CEA-861/861B.
9
EN
PREPARATION
No supplied cables are used in this connection:
Please purchase the necessary cables at your local store.
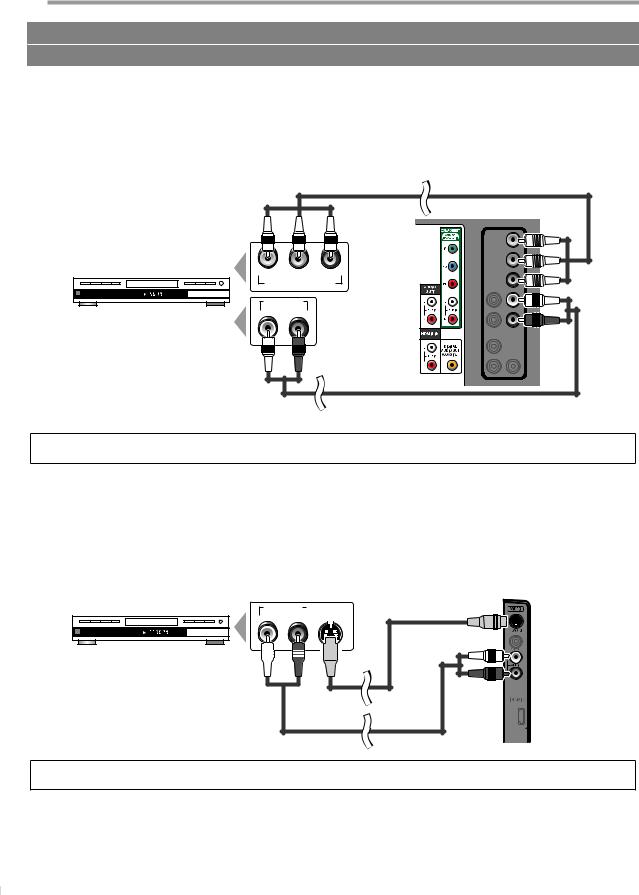
[Component video Connection]
RCA component video connection offers better picture quality for video devices connected to the unit.
If you connect to the unit’s Component video Input jack, connect RCA audio cables to the Audio L/R jacks below the Component video connector.
e.g.)
TITLE |
5 |
CHAPTER 15 |
|
REPEAT A-B |
|
BD/DVD recorder with
the component video output jack
|
RCA component video cable |
|
|
|
|
|
rear of this unit |
(green) |
(blue) |
(red) |
(green) |
|
|
|
|
|
|
|
(blue) |
Y |
Pb/Cb |
Pr/Cr |
(red) |
|
|||
COMPONENT VIDEO OUT |
|
||
AUDIO OUT |
|
|
|
L |
R |
|
|
RCA audio cable
Note:
• This unit accepts 480i / 480p / 720p / 1080i video signals.
[S-Video Connection]
S-Video connection offers good picture quality for video devices connected to the unit.
If you connect to the unit’s S-Video Input jack, connect RCA audio cables to the Audio L/R jacks below the Video connector.
e.g.)
TITLE |
5 |
CHAPTER 15 |
|
REPEAT A-B |
|
BD/DVD recorder with the S-Video output jack
|
AUDIO OUT |
|
S-VIDEO |
||||||
|
L |
|
R |
|
|
OUT |
|||
|
|
||||||||
|
|
|
|
|
|
|
|
|
|
|
|
|
|
|
|
|
|
|
|
|
|
|
|
|
|
|
|
|
|
|
|
|
|
|
|
|
|
|
|
|
|
|
|
|
|
|
|
|
|
|
|
|
|
|
|
|
|
|
|
|
|
|
|
|
|
|
|
|
|
|
|
|
|
|
|
|
|
|
|
side of this unit
S-Video cable
RCA audio cable
Note:
• If you connect to the S-Video Input jack and the Video Input jack at the same time, the S-Video connection will have priority.
10
EN
No supplied cables are used in this connection:
Please purchase the necessary cables at your local store.
Español |
Français |
English |
|
|
INTRODUCTION |
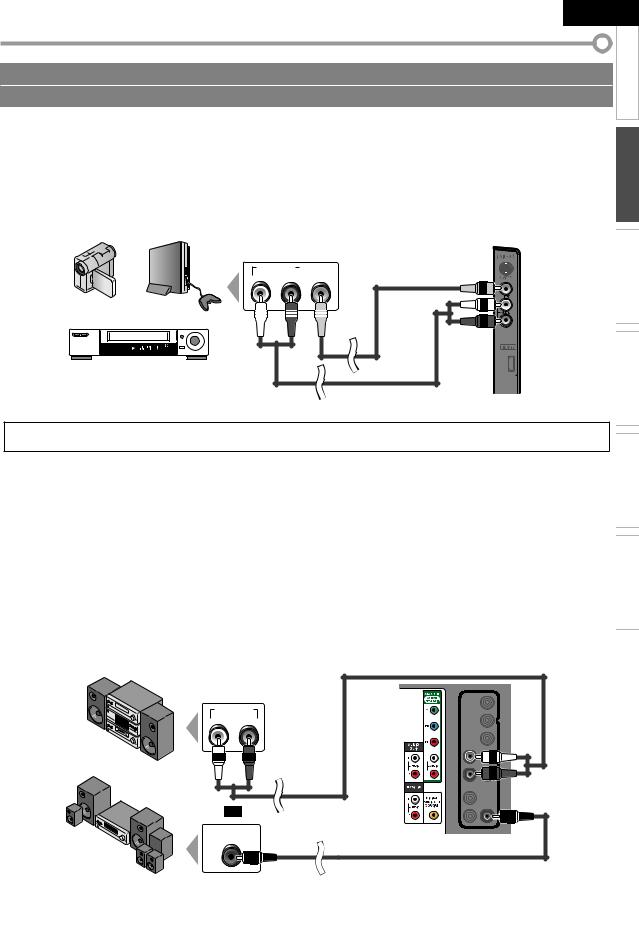
[Video Connection]
RCA video connection offers standard picture quality for video devices connected to the unit.
If you connect to the unit’s Video Input jack, connect RCA audio cables to the Audio L/R jacks below the Video connector.
When the audio jack of the video device is monaural, connect an RCA audio cable to the Audio L Input jack.
e.g.)
camcorder |
video game |
STAND-BY |
STEREO |
VCR
|
AUDIO OUT |
|
VIDEO |
|||||
|
|
|||||||
|
L |
|
R |
|
|
OUT |
||
|
|
|
|
|
|
|
|
|
|
|
|
|
|
|
|
|
|
|
|
|
|
|
|
|
|
|
|
|
|
|
|
|
|
|
|
|
|
|
|
|
|
|
|
|
side of this unit
RCA video cable
RCA audio cable
Note:
• If you connect to the S-Video Input jack and the Video Input jack at the same time, the S-Video connection will have priority.
[Audio Output Connection]
Digital (for digital broadcasting only)
If you connect this unit to an external digital audio device, you can enjoy multi-channel audio like 5.1ch digital broadcasting sound.
Use a digital audio coaxial cable to connect the unit to external digital audio devices.
Analog (for both analog and digital broadcasting)
If you connect this unit to an external analog audio device, you can enjoy stereo (2-channel) audio. Use an RCA audio cable to connect the unit to external analog audio devices.
 INFORMATION TROUBLESHOOTING SETTING OPTIONAL TV WATCHING PREPARATION
e.g.)
stereo system
Dolby Digital
decoder
|
AUDIO IN |
L |
R |
or |
RCA audio cable |
|
|
DIGITAL AUDIO |
|
COAXIAL IN |
rear of this unit |
|
|
|
digital audio coaxial cable |
11
EN
 Loading...