


STEINEL Vertrieb GmbH
Dieselstraße 80-84
33442 Herzebrock-Clarholz Tel: +49/5245/448-188 www.steinel.de
Contact www.steinel.de/contact
<![endif]>110070543 05/2019_A Technische Änderungen vorbehalten. / Subject to technical modification without notice.
Information
NightMatic 3000 Vario
<![endif]>CN BG RU LV LT EE HR SI RO PL SK CZ HU TR GR NO FI DK SE PT ES IT NL FR GB DE
DE Montageanleitung
Sehr geehrter Kunde, |
NightMatic 3000 Vario |
Montageanleitung vertraut. |
vielen Dank für das Ver- |
entgegengebracht haben. |
Wir wünschen Ihnen viel |
trauen, das Sie uns beim |
Bitte machen Sie sich vor |
Freude an diesem hoch- |
Kauf Ihres neuen STEINEL |
der Installation mit dieser |
wertigen Qualitätsprodukt. |
Das Prinzip
Der eingebaute Fotosensor |
angeschlossene Leuchte |
aus und falls gewünscht in |
registriert die Umgebungs- |
abends ein, bei Bedarf im |
den dunklen Morgenstun- |
helligkeit und schaltet die |
Nachtspar-Modus wieder |
den wieder ein. |
Installation
|
|
|
|
|
|
|
|
|
|
|
|
|
|
|
|
|
|
|
Bei der Montage darauf |
|
|
|
|
|
|
|
|
|
|
|
|
|
|
|
|
|
|
|
|
achten, dass die Leitungen |
|
|
|
|
|
|
|
|
|
|
|
|
|
|
|
|
|
|
|
|
möglichst immer von unten |
|
|
|
|
|
|
|
|
|
|
|
|
|
|
|
|
|
|
|
|
eingeführt werden. Vor |
|
|
|
|
|
|
|
|
|
|
|
|
|
|
|
|
|
|
|
|
dem Anschrauben des |
|
|
|
|
|
|
|
|
|
|
|
|
|
|
|
|
|
|
|
|
Gehäuses, die unten lie- |
|
|
|
|
|
|
|
|
|
|
|
|
|
|
|
|
|
|
|
(Phase) |
genden Kondenswasser- |
|
|
|
|
|
|
|
|
|
|
|
|
|
|
|
|
|
|
|
(Nullleiter) |
löcher durchstoßen. |
|
|
|
|
|
|
|
|
|
|
|
|
|
|
|
|
|
|
|
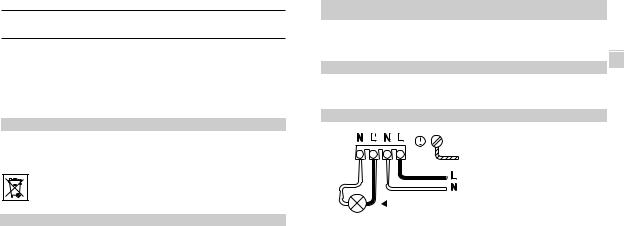
Anschluss |
||
|
|
|
|
|
|
|
|
|
|
|
|
|
|
|
|
|
|
|
||
|
|
|
|
|
|
|
Leuchte |
|
|
|
|
|
|
Das Gerät verfügt über |
||||||
|
|
|
|
|
|
|
|
|
|
|
|
|
folgende gekennzeichnete |
|||||||
|
|
|
|
|
|
|
|
|
|
|
|
|
|
|
|
|
|
|
||
|
|
|
|
|
|
|
|
|
|
|
|
|
|
|
|
|
|
|
Anschlüsse: |
|
Wandbefestigung |
Der NightMatic 3000 Vario |
|||||||||||||||||||
N = Nullleiteranschlüsse |
||||||||||||||||||||
Achtung: Die Montage |
kann auf Wunsch direkt |
|||||||||||||||||||
(2 x, meistens blau) |
||||||||||||||||||||
bedeutet Netzanschluss. |
neben der Leuchte mon- |
|||||||||||||||||||
L = Phasenanschluss |
||||||||||||||||||||
230 V heißt Lebensgefahr! |
tiert werden. Ein Micropro- |
|||||||||||||||||||
Daher als Erstes Strom ab- |
zessor trennt Umgebungs- |
(meistens schwarz, |
||||||||||||||||||
schalten und Spannungs- |
und Verbraucherlicht und |
braun oder grau) |
||||||||||||||||||
freiheit mit einem Span- |
sorgt so für konstante |
L' = Anschluss an die |
||||||||||||||||||
nungsprüfer überprüfen. |
Lichtmessungen. |
geschaltet Phase. Im Zwei- |
||||||||||||||||||
Bei der Installation des |
Für eine optimale Funktion |
fel müssen die Kabel mit |
||||||||||||||||||
Dämmerungsschalters |
wird ein schalterloser |
einem Spannungsprüfer |
||||||||||||||||||
handelt es sich um eine |
Betrieb empfohlen. |
identifiziert werden. |
||||||||||||||||||
Arbeit an der Netzspan- |
Mit einem Schraubendre- |
Die Netzleitung (L) und der |
||||||||||||||||||
nung; sie muss daher fach- |
her die vier Gehäuse- |
Nullleiter (N) werden an die |
||||||||||||||||||
gerecht nach VDE 100 aus- |
schrauben entgegen dem |
dafür vorgesehene Klem- |
||||||||||||||||||
geführt werden. |
Uhrzeigersinn lösen und |
men angeschlossen. Die |
||||||||||||||||||
Beachten Sie bitte, dass |
den Gehäusedeckel ab- |
Verbraucherzuleitung |
||||||||||||||||||
der Dämmerungsschalter |
nehmen. Das Elektronik- |
(Leuchte) wird am zweiten |
||||||||||||||||||
mit einem 10 A-Leitungs- |
gehäuse an die Wand hal- |
Nullleiteranschluss (N) und |
||||||||||||||||||
schutzschalter abgesichert |
ten und die Bohrlöcher an- |
Phase (L') angeschlossen. |
||||||||||||||||||
werden muss. Die Netzan- |
zeichnen; auf die Leitungs- |
Vorhandene grün/gelbe |
||||||||||||||||||
schlussleitung darf max. |
führung in der Wand ach- |
Schutzleiter müssen in |
||||||||||||||||||
einen Durchmesser von |
ten, Löcher bohren, Dübel |
der dafür vorgesehenen |
||||||||||||||||||
10 mm haben. |
setzen. |
Befestigung angeklemmt |
||||||||||||||||||
werden.
2
<![endif]>DE
Wichtig: Ein Vertauschen |
rungskasten zum Kurz- |
zelnen Kabel identifiziert |
der Anschlüsse führt im |
schluss. In diesem Fall |
und neu montiert werden. |
Gerät oder Ihrem Siche- |
müssen nochmals die ein- |
|
Inbetriebnahme/Funktion
Zum Testen Ihrer Installati- |
Sekunden die Linse ab. Die |
on, decken Sie für einige |
Verbraucher schalten ein. |
Einstellung für die Dämmerung:
Die werkseitige Dämme- rungs-Ansprechschwelle von ca. 1 Lux kann im Inneren des Gerätes wie folgt verändert werden: Bei gewünschter Einschalthelligkeit Taster (s. Skizze)
mit einem Kugel schrei ber o. ä. betätigen und gedrückt halten, bis die LEDAnzeige anund wieder aus geschaltet hat, Taster los assen,l danach wird für ca. 10 Sekunden das Um-
Danach wird die Lichtmessung aktiviert.
gebungslicht erfasst (falls erforderlich wird der angeschlossene Verbraucher ausgeschaltet). Die Leuchte wird fortan bei diesen Lichtverhältnissen eingeschaltet.
Einstellung des Nachtspar-Modus:
Die Leuchte kann in der Nacht automatisch ausgeschaltet werden, um zusätzlich Strom zu sparen. Zur stufenlosen Einstellung verwenden Sie bitte den Regler im Innern des Gerä-
tes. Im Auslieferzustand |
verhältnissen berechnet. |
schaltet die Leuchte um |
Jahreszeitliche Änderun- |
ca. 1:30 Uhr aus. Die Elek- |
gen der Lichtverhältnisse |
tronik beinhaltet keine Uhr. |
werden dabei automatisch |
Alle Zeitwerte werden vom |
berücksichtigt. |
Microprozessor entspre- |
|
chend den Dämmerungs- |
|
Beispiele Nachtspar-Modus: |
|
|
||
LED Taster |
|
LED Taster |
|
LED Taster |
Kein Nachtspar-Modus |
|
Mittlerer Nachtspar-Modus |
|
Langer Nachtspar-Modus |
|
|
|
|
|
|
|
|
|
|
Einstellung für die Morgenstunden: |
|
|
||
Der Nachtspar-Modus |
Diese Funktion kann wie |
4 x Blinken der LED- |
||
endet immer in den frühen |
folgt verändert werden: |
|
Anzeige = Leuchte wird |
|
Morgenstunden zwischen |
Taster kurz betätigen bis |
morgens eingeschaltet. |
||
ca. 4 und 5 Uhr. Danach |
die LED-Anzeige aufleuch- |
2 x Blinken der LED- |
||
wird die Leuchte bei Dun- |
tet, Taster loslassen, da- |
|
Anzeige = Leuchte bleibt |
|
kelheit wieder eingeschal- |
nach wird zwischen folgen- |
morgens aus. |
||
tet (Werkseinstellung). |
den Einstellmöglichkeiten |
|
|
|
|
gewechselt. |
|
|
|
|
3 |
|
|
|

Achtung:
Nach Inbetriebnahme und neuer Festlegung der Einstellung für die Dämmerung leuchtet die Leuchte in der ersten Nacht durchgehend bis zum Morgen, um die aktuellen Zeitwerte für die Dämmerungsverhältnisse zu ermitteln. Mit diesen
Werten arbeitet der Nacht- spar-Modus in den folgenden Nächten und passt sich dabei immer optimaler an. Lassen Sie daher der Elektronik nach nbetriebnahmeI sowie nach Änderungen der Ein stel unl gen immer einige Tage Zeit, um die neuen
Verhältnisse zu „erlernen“. Alle eingestellten Werte bleiben auch bei Stromausfall erhalten. Bitte dunkeln Sie den Lichtsensor nicht ab, um einen störungsfreien Betrieb zu gewährleisten.
Technische Daten
Abmessungen: |
(H x B x T) 99 x 74 x 37 mm |
||||||||||||
Netzanschluss: |
230/240 V, 50 Hz |
||||||||||||
Schaltleistung: |
Glühlampen, max. 1000 W bei 230 V AC |
||||||||||||
|
|
|
|
|
|
|
|
|
|
|
|
|
|
|
|
|
|
|
|
|
|
|
|
|
|
|
Leuchtstoffröhre, max. 500 W bei cos ϕ = 0,5, |
|
|
|
|
|
|
|
|
|
|
|
|
|
induktive Last bei 230 V AC |
|
|
|
|
|
|
|
|
|
|
|
|
|
|
|
|
|
|
|
|
|
|
|
|
|
|
|
4 x max. à 58 W, C ≤ 88 µF |
|
|
|
|
|
|
|
|
|
|
|
|
|
bei 230 V AC *1) |
Ansprechschwelle: |
einstellbar ca. 0,5–10 Lux |
||||||||||||
|
|
|
|
|
|
|
|
|
|
|
|
|
(Werkseinstellung 1 Lux) |
Nachtspar-Modus: |
variable Nachtabschaltung |
||||||||||||
|
|
|
|
|
|
|
|
|
|
|
|
|
(Werkseinstellung ca. 1:30 Uhr aus) |
Eigenverbrauch: |
< 0,8 W |
||||||||||||
Schutzklasse: |
IP 54 |
||||||||||||
*1) Leuchtstofflampen, Energiesparlampen, LED-Leuchten mit elektronischem Vorschaltgerät (Gesamtkapazität aller angeschlossenen Vorschaltgeräte unter dem angegebenen Wert).
Betriebsstörungen |
|
Störung |
Ursache |
NightMatic 3000 Vario |
ν Sicherung defekt, nicht |
ohne Spannung |
eingeschaltet, Leitung |
|
unterbrochen |
|
ν Kurzschluss |
Leuchte schaltet |
ν Verbraucher defekt |
nicht ein |
ν Keine Versorgungs- |
|
spannung |
|
ν Umgebung noch zu hell |
Leuchte schaltet nicht aus |
ν Umgebung noch nicht |
|
hell genug |
Leuchte schaltet morgens |
ν Funktion nicht richtig |
nicht ein |
aktiviert |
Leuchte schaltet zu unge- |
ν Umstellung Sommer-/ |
wohnter Zeit |
Winterzeit |
|
ν Schaltzeiten falsch |
|
berechnet |
Entsorgung
Elektrogeräte, Zubehör und Verpackungen sollen einer umweltgerechten Wiederverwertung zugeführt werden.
Werfen Sie Elektrogeräte nicht in den Hausmüll!
Nur für EU-Länder:
Gemäß der geltenden Europäischen Richtlinie über Elektround ElektronikAltgeräte und ihrer Umsetzung in nationales Recht müssen nicht mehr
<![endif]>DE
Abhilfe
νneue Sicherung, Netzschalter einschalten, Leitung überprüfen mit
νSpannungsprüfer Anschlüsse überprüfen
νVerbraucher austauschen
νsiehe „NightMatic 3000
νVario ohne Spannung“ Warten bis Einschalthelligkeit erreicht, evtl. neuen Einschaltwert (mit Taster) festlegen
νWarten bis hell genug, evtl. Einschalthelligkeit neu festlegen (abends)
νFunktion nach Kapitel „Einstellung für die Morgenstunden“ einstellen
νSchaltzeiten orientieren sich an Helligkeitswerten. Ggf. Einstellung
νändern Einschaltwert neu
festlegen (Schaltzeiten werden neu ermittelt)
gebrauchsfähige Elektrogeräte getrennt gesammelt und einer umweltgerechten Wiederverwertung zugeführt werden.
4 |
5 |

Herstellergarantie
Herstellergarantie
der STEINEL Vertrieb GmbH, Dieselstraße 80-84, 33442 Herzebrock-Clarholz
Wir beglückwünschen Sie zum Kauf Ihres STEINELProdukts, das höchste Qualitätsansprüche erfüllt. Aus diesem Grund leisten wir als Hersteller Ihnen als Endkunde gerne eine unentgeltliche Garantie gemäß den nachstehenden Bedingungen: Wir leisten Garantie durch kostenlose Behebung der Mängel (nach unserer Wahl: Reparatur, Austausch ggf. durch ein Nachfolgemodell oder Rückerstattung des Kaufpreises), die innerhalb der Garantiezeit auf einem Materialoder Herstellungsfehler beruhen. Die Garantiezeit für Ihr erworbenes STEINEL-Produkt beträgt
3 Jahre und beginnt mit dem Kaufdatum Ihres Produktes. Diese Herstellergarantie lässt gesetzliche Gewährleistungsansprüche, die Ihnen als Verbraucher gegenüber dem Verkäufer nach geltendem Recht einschließlich besonderer Schutzbestimmungen für Verbraucher zustehen können, unberührt. Die hier beschriebenen Leistungen gelten zusätzlich zu den gesetzlichen Gewährleistungsansprüchen und beschränken oder ersetzen diese nicht. Ausdrücklich ausgenommen von dieser Garantie sind alle auswechselbaren Leuchtmittel. Darüber hinaus ist die Garantie ausgeschlossen:
•bei einem gebrauchsbedingten oder sonstigen natürlichen Verschleiß von Produktteilen oder Mängeln am STEINEL-Produkt, die auf gebrauchsbedingtem oder sonstigem natürlichem Verschleiß zurückzuführen sind,
•bei nicht bestimmungsoder unsachgemäßem Gebrauch des Produkts oder Missachtung der Bedienungshinweise,
•wenn Anund Umbauten bzw. sonstige Modifikationen an dem Produkt eigenmächtig vorgenommen wurden oder Mängel auf die Verwendung von Zubehör-, Ergänzungsoder Ersatzteilen zurückzuführen sind, die keine STEINEL-Original- teile sind,
•wenn Wartung und Pflege der Produkte nicht entsprechend der Bedienungsanleitung erfolgt sind,
•wenn Anbau und Installation nicht gemäß den Installationsvorschriften von STEINEL ausgeführt wurden,
•bei Transportschäden oder -verlusten.
Die Garantie gilt für sämtliche STEINEL-Produkte, die in Deutschland gekauft und verwendet werden. Es gilt deutsches Recht unter Ausschluss des Übereinkommens der Vereinten Nationen über Verträge über den internationalen Warenkauf (CISG).
Geltendmachung
Wenn Sie Ihr Produkt reklamieren wollen, senden Sie es bitte vollständig und frachtfrei mit dem Original-Kaufbeleg, der die Angabe des Kaufdatums und der Produktbezeichnung enthalten muss, an Ihren Händler
oder direkt an uns, die STEINEL Vertrieb GmbH
– Reklamationsabteilung –, Dieselstraße 80-84,
33442 Herzebrock-Clarholz.
Wir empfehlen Ihnen daher, Ihren Kaufbeleg bis zum Ablauf der Garantiezeit sorgfältig aufzubewahren. Für Transportkosten und -risiken im Rahmen der Rücksendung übernehmen wir keine Haftung.
3HERSTELLER
GARANTIE
GB Installation Instructions
Dear Customer,
Many thanks for the trust that you have shown in purchasing your new
Principle
STEINEL NightMatic 3000 Vario. Please familiarise yourself with these instructions before attempting to
The built-in photosensor |
nected light ON in the |
registers the ambient light |
evening, OFF again in the |
level and switches the con- |
night economy mode |
install the unit. With hope this high-quality product brings you lasting satisfaction.
(when selected) and, if you wish, ON again in the early hours of the morning.
Installation
 (Phase)
 (Neutral conductor)
 Light
Light
Wall mounting Caution: Installation means making connec-
tions to the mains power supply.
230 V means danger to life! Therefore, switch off the power first and use a voltage tester to make sure the wiring is off circuit.
Installation of the photocell controller involves work on the mains power supply; this means it must be done properly in accordance with VDE 100.
Please note that the photocell controller must be protected by a 10 A circuit breaker. The mains supply lead must be no greater than 10 mm in diameter.
If you wish, the NightMatic 3000 Vario can be installed directly next to the light.
A microprocessor distinguishes between ambient and lamp light, ensuring constant light measurement.
For optimum performance it is recommended to operate the system without a switch.
Using a screwdriver, undo the four housing screws by turning them anti-clock- wise and remove the housing cover. Hold the electronic system's housing against the wall and mark where to drill the holes, paying attention to any wiring already existing in the wall, drill holes; insert wall plugs.
When installing, make sure the wires are fed in from below wherever possible. Before screwing on the housing, pierce through the condensation water holes at the bottom.
Power
The unit has the following marked terminals:
N = neutral conductor terminals (2 x, usually blue)
L = phase conductor terminal (usually black, brown or grey)
L' = terminal for the switched phase. If you are in any doubt, identify the conductors using a voltage tester.
Connect the live conductor (L) and the neutral conductor (N) to the terminals provided for this purpose. Connect the load supply conductor (light) to the second neutral conductor terminal (N) and phase (L').
Any green/yellow protective earth conductor must be connected to the terminal provided.
<![endif]>GB
6 |
7 |

Important: Getting the |
in the unit or in your fuse |
all cables and re-connect |
cable connections crossed |
box. In this case, you must |
them. |
will produce a short circuit |
check the identification of |
|
Operation/Function
To check that you have in- |
ly, cover the lens for a few |
switch ON. Light measure- |
stalled the product correct- |
seconds. The lamps will |
ment will now be activated. |
Twilight setting:
The factory-set twilight |
press the button (see |
ambient light level will be |
response threshold of |
drawing) with a ball-point |
sensed for approx. 10 sec. |
approx. 1 lux can be |
pen or similar object and |
(if necessary, the connect- |
changed as follows inside |
keep it pressed until the |
ed load will be switched |
the unit: At the ambient |
LED indicator switches |
'OFF). From now on, the |
light level you want the |
ON and OFF again. Now |
light will switch ON under |
light to come ON at, |
let the button go and the |
these light conditions. |
|
|
|
Night economy mode setting:
The light can be switched |
nitely varied. The unit |
microprocessor on the ba- |
'OFF' automatically at |
comes with a factory set- |
sis of light levels at twilight. |
night to save even more |
ting that switches the light |
Seasonal changes in light |
electricity. Please use the |
'OFF' at approx. 1.30 a.m. |
levels are identified auto- |
control dial inside the |
The electronic system |
matically and taken into |
housing for making the |
does not have a clock. All |
account. |
setting which can be infi- |
times are computed by the |
|
Examples of night economy mode: |
|
|
||
LED button |
|
LED button |
|
LED button |
No night economy mode |
|
Mid-range night economy mode |
|
'OFF' |
|
|
Long night economy mode |
||
|
|
|
|
|
|
|
|
|
|
Setting for morning hours: |
|
|
||
The night economy mode |
This function can be |
LED indicator flashes |
||
always ends in the early |
changed as follows: |
4 x = light switches ON |
||
hours of the morning |
Briefly press button until |
in the morning. |
||
between approx. 4 and |
the LED indicator lights up |
LED indicator flashes |
||
5 p.m. After then, the light |
and let button go. Now you |
2 x = light stays OFF in the |
||
switches 'ON' again auto- |
can choose between the |
morning. |
||
matically when it gets dark |
following settings: |
|
|
|
(factory setting). |
|
|
|
|
|
8 |
|
|
|
Note:
After putting the unit into operation and defining the twilight setting for the first time, the light stays ON all through the first night until the morning so that it can determine light levels at dusk and dawn. The night economy mode works with
these values in the nights that follow and constantly optimises its setting. So, after putting the unit into operation for the first time and after changing the settings, always give the electronic system a few days time to "learn" the new light levels.
All values set remain intact even in the event of a power failure. Please do not shade the light sensor to ensure trouble-free operation.
<![endif]>GB
Technical Specifications
Dimensions: |
(H x W x D) 99 x 74 x 37 mm |
||||||||||||
Mains voltage: |
230/240 V, 50 Hz |
||||||||||||
Switching capacity: |
Incandescent lamps, 1000 W max. at 230 V AC |
||||||||||||
|
|
|
|
|
|
|
|
|
|
|
|
|
|
|
|
|
|
|
|
|
|
|
|
|
|
|
Fluorescent lamp, 500 W max., at cos ϕ = 0.5, |
|
|
|
|
|
|
|
|
|
|
|
|
|
inductive load at 230 V AC |
|
|
|
|
|
|
|
|
|
|
|
|
|
|
|
|
|
|
|
|
|
|
|
|
|
|
|
4 x 58 W max., C ≤ 88 µF |
|
|
|
|
|
|
|
|
|
|
|
|
|
at 230 V AC *1) |
Response threshold: |
adjustable from approx. 0.5–10 lux |
||||||||||||
|
|
|
|
|
|
|
|
|
|
|
|
|
(factory setting 1 lux) |
Night economy mode: variable night 'OFF' time |
|||||||||||||
|
|
|
|
|
|
|
|
|
|
|
|
|
(factory setting: 'OFF' at approx. 1.30 a.m.) |
Intrinsic power |
|
||||||||||||
consumption: |
< 0.8 W |
||||||||||||
Protection class: |
IP 54 |
||||||||||||
*1) Fluorescent lamps, low-energy lamps, LED lights with electronic ballast |
|||||||||||||
|
(total capacity of all ballasts connected below the level stated). |
||||||||||||
Troubleshooting
Malfunction |
Cause |
Remedy |
NightMatic 3000 Vario |
ν Fuse has blown; not swit- |
ν New fuse, turn on power |
without power |
ched ON; break in wiring |
switch, check wiring with |
|
ν Short-circuit |
voltage tester |
|
ν Check connections |
|
Light does not switch ON |
ν Bulb faulty |
ν Change bulb |
|
ν No power supply |
ν See "NightMatic 3000 |
|
ν Surroundings still too |
Vario without power" |
|
ν Wait until ambient light |
|
|
bright |
reaches ON brightness; |
|
|
if necessary, define new |
|
|
switch-on value (using |
|
|
button) |
|
|
|
|
9 |
|
Malfunction |
Cause |
Remedy |
Light does not switch OFF |
ν Surroundings not yet |
ν Wait until it is light |
|
bright enough |
enough; if necessary, |
|
|
define a new light ON |
|
|
brightness (in the |
|
|
evening) |
Light does not switch ON |
ν Function not properly |
ν Set function as de- |
in the morning |
activated |
scribed in "Setting for |
|
|
morning hours" |
Light switches ON or OFF |
ν Change from summer to |
ν Switching times are |
at unusual times |
winter time or vice versa |
geared towards light |
|
|
levels. Change setting |
|
ν Switching times incor- |
if necessary |
|
ν Re-define switch-ON light |
|
|
rectly computed |
level (switching times will |
|
|
be re-computed) |
Disposal
Electrical and electronic |
|
Do not dispose of |
and Electronic Equipment |
equipment, accessories and |
|
electrical and elec- |
and its implementation in |
packaging must be recycled |
|
tronic equipment as |
national law, electrical and |
in an environmentally com- |
|
domestic waste. |
electronic equipment no |
|
|||
patible manner. |
|
|
longer suitable for use must |
|
EU countries only: |
be collected separately and |
|
|
Under the current European |
recycled in an environmen- |
|
|
Directive on Waste Electrical |
tally compatible manner. |
|
Manufacturer's warranty
This STEINEL product has |
damage to wearing parts, |
Repair service: |
|
been manufactured with |
damage or defects caused |
If defects occur outside the |
|
utmost care, tested for |
by improper treatment or |
warranty period or are not |
|
proper operation and safe- |
maintenance nor does it |
covered by warranty, ask |
|
ty and then subjected to |
cover breakage as a result |
your nearest service sta- |
|
random sample inspection. |
of the product being |
tion for the possibility of |
|
STEINEL guarantees that it |
dropped. Further conse- |
repair. |
|
is in perfect condition and |
quential damage to other |
|
|
proper working order. |
objects shall be excluded. |
|
|
The warranty period is 36 |
Claims under the guaran- |
|
|
months and starts on the |
tee shall only be accepted |
|
|
date of sale to the con- |
if the product is sent fully |
|
|
sumer. We will remedy |
assembled and well |
|
|
defacts caused by material |
packed complete with |
|
|
flaws or manufacturing |
sales slip or invoice (date |
|
|
faults. The warranty will be |
of purchase and dealer's |
|
|
met by repair or replace- |
stamp) to the appropriate |
Y E A R |
|
ment of defective parts at |
Service Centre or handed |
||
our own discretion. This |
in to the dealer within the |
MANUFACTURER'S |
|
guarantee does not cover |
first 6 months. |
||
3WARRANTY |
|||
|
10 |
FR Instructions de montage
Cher client, nous vous re- |
NightMatic 3000 Vario. |
mercions de la confiance |
Avant de installer, veuillez |
que vous avez témoignée à |
lire attentivement ces ins- |
STEINEL en achetant ce |
tructions de montage. |
Le principe
Nous espérons que ce produit de qualité exceptionnelle vous apportera entière satisfaction.
Le capteur photosensible |
lampe raccordée à la tom- |
nomique nocturne et la |
intégré détecte la lumino- |
bée de la nuit l’éteint si |
rallume le cas échéant à |
sité ambiante et allume la |
nécessaire en mode éco- |
l’aube. |
Installation
 (phase)
  (neutre)
 Lampe
Lampe
Montage mural Attention : le montage implique le raccordement au secteur.
La tension de 230 V peut être mortelle ! Il faut donc d'abord couper le courant et s'assurer de l'absence de courant à l'aide d'un testeur de tension.
L'installation de l'interrupteur crépusculaire implique une intervention sur le réseau électrique et doit donc être effectuée correctement et conformément à la norme VDE 100.
Veillez à ce que l'interrupteur crépusculaire soit protégé par un disjoncteur de protection de ligne 10 A. Le diamètre de la ligne secteur ne doit pas dépasser 10 mm.
Il est possible de monter le NightMatic 3000 Vario directement à côté de la lampe. Un microprocesseur fait la distinction entre la luminosité ambiante et la lumière émise par la lampe raccordée, assurant ainsi une mesure constante de la luminosité.
Pour un fonctionnement optimal, nous conseillons une utilisation sans interrupteur.
À l'aide d'un tournevis, desserrer les quatre vis du boîtier dans le sens inverse des aiguilles d'une montre, puis retirer le couvercle du boîtier. Maintenir le boîtier électronique contre le mur et marquer l'emplacement des trous en faisant attention à la position des câbles dans le mur, percer les trous et enfoncer les chevilles.
11
Lors du montage, introduire toujours – dans la mesure du possible – les câbles par le bas. Avant de visser le boîtier, percer les trous inférieurs d’évacuation de l’eau de condensation.
Branchement
L'appareil dispose des branchements signalés comme suit :
N = neutre (2 conducteurs généralement bleus)
L = phase (conducteur généralement noir, marron ou gris)
L' =Sortie 230V. En cas de doute, il faut identifier les câbles avec un testeur de tension.
Raccorder le câble secteur
(L) et le neutre (N) aux bornes prévues à cet effet. Brancher le câble de l’appareil à raccorder (lampe) au deuxième neutre (N) et à la phase (L’).
S’il existe un conducteur de mise à la terre vert/jaune, le brancher dans la fixation prévue à cet effet.
<![endif]>FR
Important : une inversion |
l'appareil ou dans le boî- |
identifier les câbles et les |
des branchements entraî- |
tier à fusibles. Dans ce |
raccorder en conséquen- |
ne un court-circuit dans |
cas, il faut à nouveau |
ce. |
Mise en service/Fonctionnement
Couvrir la lentille pendant |
tester votre installation. Les |
L'appareil active ensuite la |
quelques secondes afin de |
consommateurs s'allument. |
mesure de la luminosité. |
Réglage de la luminosité de déclenchement :
Le seuil de réaction (seuil de |
ge de la lampe, appuyer sur |
soir. L’appareil détermine |
luminosité de déclenche- |
le bouton-poussoir (cf. cro- |
ensuite pendant 10 s envi- |
ment) est réglé sur environ |
quis) avec un stylo à bille |
ron la luminosité ambiante |
1 lx et peut être modifié |
ou un autre objet pointu et |
(si nécessaire, il éteint la |
comme suit à l'intérieur de |
le maintenir enfoncé jus- |
lampe raccordée). L'appa- |
l'appareil : quand la lumino- |
qu’à ce que la DEL témoin |
reil allumera désormais la |
sité ambiante a atteint la va- |
s’allume puis s’éteigne. |
lampe dès que cette lumi- |
leur souhaitée pour l’alluma- |
Relâcher le bouton-pous- |
nosité est atteinte. |
|
|
|
Réglage du mode économique nocturne :
La nuit, l'appareil peut |
réglage en continu. À sa |
ge et d'extinction en fonc- |
éteindre automatiquement |
sortie d'usine, la lampe |
tion des conditions de lu- |
la lampe afin de faire de |
s'éteint à env. 1h30. Le |
minosité de déclenche- |
plus grandes économies |
système électronique n'a |
ment. Il tient automatique- |
d'électricité. Utiliser la vis |
pas d'horloge. C'est le mi- |
ment compte des change- |
de réglage située dans |
croprocesseur qui calcule |
ments saisonniers de lumi- |
l'appareil pour effectuer le |
tous les horaires d'alluma- |
nosité. |
Exemples pour le mode économique nocturne : |
||||
DEL Bouton-poussoir |
|
DEL Bouton-poussoir |
|
DEL Bouton-poussoir |
|
|
|
|
Arrêt |
Sans mode économique nocturne |
|
Mode économique nocturne moyen |
|
Mode économique nocturne long |
|
|
|
|
|
|
|
|
|
|
Réglage pour l'aube : |
On peut modifier cette fonc- |
La DEL témoin clignote |
||
Le mode économique noc- |
tion de la façon suivante : |
quatre fois = l’appareil allu- |
||
turne se termine toujours |
appuyer brièvement sur le |
me la lampe le matin. |
||
au petit matin entre 4 et |
bouton-poussoir jusqu’à ce |
La DEL témoin clignote |
||
5 heures environ. L'appa- |
que la DEL s’allume, le relâ- |
deux fois = la lampe reste |
||
reil allume alors de nou- |
cher. Il est ensuite possible |
éteinte le matin. |
||
veau la lampe (réglage ef- |
de commuter entre les deux |
|
|
|
fectué en usine). |
réglages suivants : |
|
12 |
Attention : Après la mise en service et la détermination du nouveau réglage de la luminosité de déclenchement, la lampe reste allumée toute la première nuit jusqu’au matin afin de saisir les données actuelles des conditions de luminosité de déclenche-
ment. Le mode économique nocturne fonctionne avec ces valeurs pendant les nuits suivantes et s’adapte de plus en plus précisément. Après la mise en service ou des modifications du réglage, laissez quelque temps au système électronique pour lui per-
Caractéristiques techniques
mettre d'« apprendre » les nouvelles conditions de fonctionnement. Tous les réglages sont conservés en cas de coupure de courant. Pour garantir un fonctionnement impeccable de l'appareil, ne jamais obstruer le détecteur de lumière.
<![endif]>FR
Dimensions (H x l x P) : |
99 x 74 x 37 mm |
||||||||||||||
Alimentation : |
230/240 V, 50 Hz |
||||||||||||||
Puissance de commutation : |
lampes à incandescence, 1000 W max. pour 230 V CA |
||||||||||||||
|
|
|
|
|
|
|
|
|
|
|
|
|
|
|
|
|
|
|
|
|
|
|
|
|
|
|
|
|
|
|
tube fluorescent, max. 500 W pour cos ϕ = 0,5, |
|
|
|
|
|
|
|
|
|
|
|
|
|
|
|
charge inductive pour 230 V CA |
|
|
|
|
|
|
|
|
|
|
|
|
|
|
|
4 x max. à 58 W, C ≤ 88 µF pour 230 V CA *1) |
Seuil de réaction : |
réglable à env. 0,5 à 10 lx (réglage effectué en usine 1 lx) |
||||||||||||||
Mode économique nocturne : coupure nocturne variable |
|||||||||||||||
|
|
|
|
|
|
|
|
|
|
|
|
|
|
|
(réglage effectué en usine: extinction vers 1h30) |
Autoconsommation : |
< 0,8 W |
||||||||||||||
Indice de protection : |
IP 54 |
||||||||||||||
*1) Tubes fluorescents, lampes à économie d'énergie, lampes DEL avec ballast électronique (capacité totale de tous les ballasts raccordés inférieure à la valeur indiquée).
Dysfonctionnements
Problème |
Cause |
Solution |
Le NightMatic 3000 Vario |
ν Fusible défectueux, appa- |
ν Changer le fusible défec- |
n'est pas sous tension |
reil hors circuit, câble |
tueux, mettre l'interrupteur |
|
coupé |
en circuit, vérifier le câble à |
|
|
l'aide d'un testeur de ten- |
|
ν Court-circuit |
sion |
|
ν Vérifier le branchement |
|
La lampe ne s’allume pas |
ν Consommateur défectueux |
ν Remplacer le consomma- |
|
ν Absence d’alimentation |
teur |
|
ν cf. point « Le NightMatic |
|
|
électrique |
3000 n’est pas sous |
|
ν Luminosité ambiante |
tension » |
|
ν Attendre que la luminosité |
|
|
encore trop forte |
de consigne soit atteinte, |
|
|
éventuellement régler une |
|
|
nouvelle luminosité d’allu- |
|
|
mage (avec le bouton- |
|
|
poussoir) |
|
13 |
|

Problème |
Cause |
Solution |
La lampe ne s'éteint pas |
ν Luminosité ambiante |
ν Attendre que la luminosité |
|
encore trop faible |
soit suffisante, éventuelle- |
|
|
ment régler une nouvelle |
|
|
luminosité d’allumage (le |
|
|
soir) |
La lampe ne s'allume pas le |
ν La fonction n'est pas |
ν Régler la fonction comme |
matin |
correctement activée |
indiqué à la section |
|
|
« Réglage » pour le matin |
La lampe s'allume à un |
ν Réglage heure d'été/heure |
ν Les heures de commuta- |
moment inhabituel |
d'hiver |
tion dépendent de la lumi- |
|
|
nosité. Le cas échéant, |
|
ν Calcul incorrect des |
modifier le réglage |
|
ν Régler de nouveau la va- |
|
|
heures de commutation |
leur d’allumage (nouveau |
|
|
calcul des heures de com- |
|
|
mutation) |
Recyclage
Les appareils électriques, |
Uniquement pour les pays |
qui ne fonctionnent plus |
|
les accessoires et les em- |
de l’UE : |
doivent être collectés sé- |
|
ballages doivent être sou- |
Conformément à la directi- |
parément des ordures mé- |
|
mis à un recyclage respec- |
ve européenne en vigueur |
nagères et doivent faire |
|
tueux de l’environnement. |
relative aux appareils élec- |
l’objet d’un recyclage éco- |
|
|
Ne jetez pas les |
triques et électroniques |
logique. |
|
appareils élec- |
usagés et à son applica- |
|
|
triques avec les or- |
tion dans le droit national, |
|
|
dures ménagères ! |
les appareils électriques |
|
|
|
||
Garantie du fabricant
Ce produit STEINEL a été |
paration ou échange des |
tant la date d'achat et le |
fabriqué avec le plus |
pièces défectueuses. |
cachet du vendeur ou s'il |
grand soin. Son fonction- |
La garantie ne s'applique ni |
est remis au vendeur dans |
nement et sa sécurité ont |
aux pièces d'usure, ni aux |
les 6 premiers mois de la |
été contrôlés suivant des |
dommages et défauts dus |
garantie. |
procédures fiables et il a |
à une utilisation ou mainte- |
|
été soumis à un contrôle |
nance incorrectes, ni aux |
Service de réparation : |
final par sondage. |
bris de pièces consécutifs |
Le service après-vente de |
STEINEL garantit un état |
à une chute. Les dom- |
notre usine effectue égale- |
et un fonctionnement irré- |
mages consécutifs causés |
ment les réparations non |
prochables. |
à d’autres objets sont ex- |
couvertes par la garantie |
La durée de garantie est |
clus de la garantie. |
ou survenant après l’expi- |
de 36 mois et débute au |
La garantie ne s'applique |
ration de celle-ci. |
jour de la vente au |
que si l'appareil non dé- |
|
consommateur. Nous re- |
monté est retourné à la sta- |
|
médions aux défauts pro- |
tion de service après-vente |
A N S |
venant d'un vice de ma- |
la plus proche, dans un |
|
tière ou de construction. |
emballage adéquat, ac- |
|
La garantie sera assurée |
compagné d'une facture ou |
DE GARANTIE |
à notre discrétion par ré- |
d'un ticket de caisse por- |
3FABRICANT |
|
14 |
|
NL Gebruiksaanwijzing
Geachte klant, Hartelijk dank voor het vertrouwen, dat u met de aanschaf van uw nieuwe NightMatic 3000
Het principe
De ingebouwde fotosensor registreert de omgevingslichtsterkte en schakelt de
Vario van STEINEL in ons stelt. Lees voor de installatie deze gebruiksaanwijzing nauwkeurig door. Wij
aangesloten lamp' s avonds in, bij behoefte in de nachtspaarstand weer
wensen u veel plezier met dit hoogwaardige kwaliteitsproduct.
uit en indien gewenst in de donkere ochtenduren weer in.
Installatie
 (fase)
  (nuldraad)
 Lamp
Lamp
Wandbevestiging Opgelet: montage betekent netaansluiting.
230 V is levensgevaarlijk! Daarom eerst de stroom uitschakelen en op spanningsloosheid testen met een spanningstester.
Bij het installeren van de schemerschakelaar werkt u met netspanning. De installatie moet daarom vakkundig conform VDE 100 worden uitgevoerd.
Houd er rekening mee, dat de schemerschakelaar met een veiligheidsschakelaar voor een 10 A-leiding moet worden beveiligd. De stroomtoevoerkabel mag een max. diameter van
10 mm hebben.
De NightMatic 3000 Vario kan indien gewenst direct naast de lamp worden gemonteerd. Een microprocessor scheidt het omgevingsen verbruikerlicht en zorgt hierdoor voor constante lichtmetingen.
Voor een optimaal functioneren adviseren wij geen schalkelaars te monteren.
Draai de vier schroeven van de behuizing met een schroevendraaier tegen de wijzers van de klok in en neem het deksel van de behuizing. De elektronische behuizing tegen de wand houden en de boorgaten aftekenen (let op de stroomleiding in de wand!), gaten boren en pluggen plaatsen.
15
Probeer bij de montage de leidingen van onderaf in te voeren. Voor het opschroeven van de behuizing de onderaan liggende condenswatergaten doorstoten.
Aansluiting
Het apparaat beschikt over de volgende gemarkeerde aansluitingen:
N = nuldraad (2x, meestal blauw)
L = fase (in Nederland meetal bruin in Belgie meestal zwart)
L' = aansluiting op de geschakelde fase. In geval van twijfel moeten de draden met een spanningstester worden geïdentificeerd.
De stroomtoevoer (L) en de nuldraad (N) worden aan de hiervoor bedoelde klemmen aangesloten. De stroomtoevoer naar de verbruiker (lamp) wordt
op de tweede nuldraad (N) en fase (L') aangesloten.
Bestaande groen/gele aarddraden moeten in de hiervoor bedoelde bevestiging worden geklemd.
<![endif]>NL
Belangrijk: verwisseling |
zekeringenkast tot kortslui- |
maals geïdentificeerd en |
van de aansluitingen leidt |
ting. In dit geval moeten de |
opnieuw gemonteerd wor- |
in het apparaat of in uw |
afzonderlijke kabels nog- |
den. |
Ingebruikname/werking
Om de installatie te testen, |
afdekken. De verbruikers |
Daarna wordt de lichtme- |
de lens enkele seconden |
worden ingeschakeld. |
ting geactiveerd. |
Instelling voor de schemering:
De af fabriek ingestelde in- |
(zie tekening) drukken en |
gemeten (indien nodig |
schakelwaarde van ca. 1 |
ingedrukt houden tot de |
wordt de aangesloten |
lux kan binnenin de lamp |
led-weergave inen weer |
verbruiker uitgeschakeld). |
als volgt worden gewijzigd: |
uitgeschakeld is, daarna |
De lamp wordt voortaan |
Bij de gewenste inschakel- |
de knop loslaten. Vervol- |
bij deze lichtwaarden |
lichtsterkte met een pen of |
gens wordt de omgevings- |
ingeschakeld. |
iets dergelijks op de knop |
lichtsterkte ca. 10 sec. |
|
|
|
|
Instelling van de nachtspaarstand:
De lamp kan 's nachts au- |
de lamp ingesteld op een |
tomatisch worden uitge- |
uitschakeling om ca. |
schakeld om extra energie |
1:30 uur. In de elektronica |
te besparen. Gebruik voor |
zit geen klok. Alle tijdwaar- |
de traploze instelling a.u.b. |
den worden door de mi- |
de regelaar binnenin het |
croprocessor berekend al |
apparaat. Bij de levering is |
naar gelang de schemer- |
Voorbeelden nachtspaarstand: |
|
led knop |
led knop |
Geen nachtspaarstand |
Gemiddelde nachtspaarstand |
waarden. Met veranderingen in de lichtomstandigheden afhankelijk van het jaargetijde wordt automatisch rekening gehouden.
led knop

 uit
uit
Lange nachtspaarstand
Instelling voor de ochtenduren:
De nachtspaarstand ein- |
Deze functie kan als volgt |
4x knipperen van de led- |
digt altijd in de vroege och- |
worden veranderd: |
weergave = de lamp wordt |
tenduren tussen ca. 4 en |
De knop kort indrukken tot |
's morgens ingeschakeld. |
5 uur. Daarna wordt de |
de led-weergave knippert, |
2x knipperen van de led- |
lamp bij duisternis weer |
knop loslaten, vervolgens |
weergave = de lamp blijft |
ingeschakeld (fabrieksin- |
wordt tussen de volgende |
's morgens uit. |
stelling). |
instelmogelijkheden gewis- |
|
|
seld. |
|
|
16 |
|
Opgelet:
Na de ingebruikneming en hernieuwde instelling voor de schemering brandt de lamp in de eerste nacht continu tot de ochtend om de actuele tijdwaarden voor de schemeromstandigheden te registreren.
Technische gegevens
Met deze waarden werkt |
nieuwe omstandigheden te |
de nachtspaarstand in de |
'leren'. Alle ingestelde |
volgende nachten en past |
waarden blijven ook in ge- |
zich hierbij steeds optima- |
val van stroomuitval be- |
ler aan. Geef de elektroni- |
waard. Voor een storings- |
ca daarom na de inge- |
vrije functie mag de licht- |
bruikneming en na wijzigin- |
sensor nooit worden afge- |
gen bij de instellingen altijd |
schermd. |
enkele dagen tijd om de |
|
<![endif]>NL
Afmetingen: |
(H x B x D) 99 x 74 x 37 mm |
||||||||||||
Stroomtoevoer: |
230/240 V, 50 Hz |
||||||||||||
Schakelvermogen: |
gloeilampen, max. 1000 W bij 230 V AC |
||||||||||||
|
|
|
|
|
|
|
|
|
|
|
|
|
|
|
|
|
|
|
|
|
|
|
|
|
|
|
tl-buis, max. 500 W bij cos ϕ = 0,5, |
|
|
|
|
|
|
|
|
|
|
|
|
|
inductieve belasting bij 230 V AC |
|
|
|
|
|
|
|
|
|
|
|
|
|
|
|
|
|
|
|
|
|
|
|
|
|
|
|
4 x max. à 58 W, C ≤ 88 µF |
|
|
|
|
|
|
|
|
|
|
|
|
|
bij 230 V AC *1) |
Inschakelniveau: |
instelbaar ca. 0,5–10 lux (instelling af fabriek 1 lux) |
||||||||||||
Nachtspaarstand: |
variabele nachtuitschakeling (instelling af fabriek ca. 1:30 uur uit) |
||||||||||||
Eigen verbruik: |
< 0,8 W |
||||||||||||
Beschermingsklasse: |
IP 54 |
||||||||||||
*1) TL-lampen, spaarlampen, led-lampen met elektronisch voorschakelapparaat (totale capaciteit van alle aangesloten voorschakelapparaten onder de aangegeven waarde).
Bedrijfsstoringen
Storing |
Oorzaak |
Oplossing |
NightMatic 3000 Vario zon- |
ν zekering defect, niet inge- |
ν nieuwe zekering, net- |
der netspanning |
schakeld, kabel onder- |
schakelaar inschakelen, |
|
broken |
kabel met spanningzoe- |
|
ν kortsluiting |
ker controleren |
|
ν aansluitingen controleren |
|
Lamp schakelt niet in |
ν verbruiker defect |
ν verbruiker vervangen |
|
ν geen voedingsspanning |
ν zie 'NightMatic 3000 Vario |
|
ν omgeving nog te licht |
zonder netspanning' |
|
ν wachten tot de inschakel- |
|
|
|
lichtsterkte is bereikt of |
|
|
evt. nieuwe inschakel- |
|
|
waarde (met schakelaar) |
|
|
vastleggen |
Lamp schakelt niet uit |
ν omgeving nog niet licht |
ν wachten tot er voldoende |
|
genoeg |
licht is of evt. de inscha- |
|
|
kellichtsterkte opnieuw |
|
|
instellen ('s avonds) |
|
17 |
|
Storing |
Oorzaak |
Oplossing |
Lamp schakelt 's morgens |
ν functie niet correct ge- |
ν de functie volgens 'In- |
niet in |
activeerd |
stelling voor de ochten- |
|
|
duren' instellen |
De lamp schakelt op een |
ν omschakeling / auf vori- |
ν schakeltijden richten |
ongewone tijd |
ge Zeile |
zich op de lichtsterkte- |
|
|
waarden. De instelling |
|
ν schakeltijden verkeerd |
evt. veranderen |
|
ν inschakelwaarde op- |
|
|
berekend |
nieuw vastleggen (de |
|
|
schakeltijden worden |
|
|
opnieuw berekend) |
|
|
|
Verwijderen
Elektrische apparaten, toebehoren en verpakkingen dienen milieuvriendelijk gerecycled te worden.
Doe elektrische apparaten niet bij het huisvuil!
Alleen voor EU-landen: Conform de geldende Europese richtlijn voor gebruikte elektrische en elektronische apparatuur en hun implementatie in het nationaal recht, dienen niet langer bruikbare elek-
trische apparaten gescheiden ingezameld en milieuvriendelijk gerecycled te worden.
Fabrieksgarantie
Dit STEINEL-product is |
Garantie vervalt bij schade |
met grote zorgvuldigheid |
aan onderdelen, die aan |
gefabriceerd, getest op |
slijtage onderhevig zijn, bij |
goede werking en veilig- |
schade of gebreken, die |
heid volgens de geldende |
door ondeskundig gebruik |
voorschriften, en vervol- |
of onderhoud ontstaan, |
gens steekproefsgewijs |
alsmede bij breuk door val- |
gecontroleerd. STEINEL |
len. Schade aan andere |
verleent garantie op de |
voorwerpen is uitgesloten |
storingvrije werking. |
van garantie. |
De garantietermijn be- |
De garantie wordt alleen |
draagt 36 maanden en |
verleend, als het niet-gede- |
gaat in op de datum van |
monteerde apparaat met |
aanschaf door de klant. |
kassabon of rekening (met |
Alle klachten die berusten |
aankoopdatum en winke- |
op materiaalof fabricage- |
lierstempel), goed verpakt, |
fouten, worden door ons |
aan het betreffende servi- |
opgelost. De garantie be- |
ceadres wordt opgestuurd |
staat uit reparatie of ver- |
of binnen de eerste |
nieuwen van de defecte |
6 maanden naar de winke- |
onderdelen, door ons te |
lier wordt teruggebracht. |
beoordelen. |
|
Reparatieservice:
Na afloop van de garantieduur of bij gebreken die niet onder de garantie vallen, kunt u het dichtstbijzijnde serviceadres naar de mogelijkheden van een reparatie vragen.
3J A A R
F A B R I E K S
GARANTIE
18
|
|
|
|
|
|
|
|
|
|
|
|
|
|
|
|
|
|
|
|
|
|
|
|
|
|
|
|
|
|
|
|
|
|
|
|
|
|
|
|
|
|
|
|
|
|
|
|
|
|
|
|
|
|
|
|
|
|
|
|
|
|
|
|
|
|
|
|
|
|
|
|
|
|
|
|
|
|
|
|
|
|
|
|
|
|
|
|
|
|
|
|
|
|
|
|
|
|
|
|
|
|
|
|
|
|
|
|
|
|
|
|
|
|
|
|
|
|
|
|
|
|
|
|
|
|
|
|
|
|
|
|
|
|
|
|
|
|
|
|
Montaggio a muro |
|
Il NightMatic 3000 Vario, su |
|||||||||||||||||
Attenzione: montaggio si- |
|
richiesta, può venire monta- |
|||||||||||||||||
gnifica collegamento alla |
|
to anche direttamente ac- |
|||||||||||||||||
tensione di rete. |
|
canto alla lampada. Un mi- |
|||||||||||||||||
230 V equivale a pericolo di |
|
croprocessore separa la lu- |
|||||||||||||||||
|
ce ambiente da quella del- |
||||||||||||||||||
morte! Prima del lavoro, oc- |
|
||||||||||||||||||
|
l'utenza garantendo in tal |
||||||||||||||||||
corre pertanto togliere la |
|
||||||||||||||||||
|
modo misurazioni costanti |
||||||||||||||||||
tensione e accertarne l'as- |
|
||||||||||||||||||
|
della luce. |
||||||||||||||||||
senza della stessa mediante |
|
||||||||||||||||||
uno strumento di misurazio- |
|
Per un funzionamento otti- |
|||||||||||||||||
ne della tensione. |
|
male si consiglia un utilizzo |
|||||||||||||||||
L'installazione dell'interrutto- |
|
senza interruttori. |
|||||||||||||||||
re crepuscolare è un lavoro |
|
Con l'ausilio di un caccia- |
|||||||||||||||||
che richiede un intervento |
|
vite svitate le quattro viti |
|||||||||||||||||
sulla tensione di rete; per |
|
dell'involucro ruotando in |
|||||||||||||||||
questo motivo l'installazione |
|
senso antiorario e rimuo- |
|||||||||||||||||
deve venire eseguita a rego- |
|
vete il coperchio dell'invo- |
|||||||||||||||||
la d'arte in ottemperanza |
|
lucro. Tenete bloccato alla |
|||||||||||||||||
della norma VDE 100. |
|
parete l'involucro dei com- |
|||||||||||||||||
Ricordate che l'interruttore |
|
ponenti elettronici e segna- |
|||||||||||||||||
crepuscolare deve venire |
|
te i punti dove devono ve- |
|||||||||||||||||
protetto con un interruttore di |
|
nire effettuati i fori; fate at- |
|||||||||||||||||
potenza automatico da 10 A. |
|
tenzione al percorso dei |
|||||||||||||||||
La linea di alimentazione col- |
|
conduttori nella parete, ef- |
|||||||||||||||||
legata alla rete può avere un |
|
fettuate i fori, inserite i tas- |
|||||||||||||||||
diametro massimo di 10 mm. |
|
selli. |
|||||||||||||||||
|
|
|
|
|
|
|
|
|
|
|
|
19 |
|||||||
Vi auguriamo di essere pienamente soddisfatti
di questo pregiato prodotto di qualità.
<![if ! IE]><![endif]>IT
cenderla nuovamente, se lo si desidera, nelle prime ore del mattino in cui è ancora buio.
Nel montaggio badate che i conduttori vengano possibilmente introdotti dal basso. Prima di riavvitare l'involucro, perforate i fori per l'acqua di condensa che si trovano in basso.
Allacciamento
L'apparecchio dispone dei seguenti allacciamenti contrassegnati:
N = allacciamenti filo di neutro (2 x, di norma blu)
L = allacciamento fase (di norma nero, marrone o grigio)
L' = allacciamento alla fase collegata. Se avete dei dubbi controllate i cavi con un indicatore di tensione.
Il conduttore di rete (L) e il filo di neutro (N) vengono allacciati ai morsetti predisposti. La linea di allacciamento all'utenza (lampada) viene allacciata al secondo allacciamento del filo di neutro (N) e alla fase (L').
I conduttori di protezione di colore verde/giallo presenti devono venire bloccati nel- l'apposito fissaggio.
Importante: lo scambio di |
o nella sua valvoliera. In |
e quindi rimontati. |
collegamenti causa un cor- |
questo caso i singoli cavi |
|
to circuito nell'apparecchio |
devono venire reidentificati |
|
Messa in esercizio/Funzionamento
Per provare la Vostra in- |
per alcuni secondi. Le |
Dopo di ciò viene attivata |
stallazione, coprite la lente |
utenze si accendono. |
la misurazione della luce. |
Impostazione crepuscolare:
La soglia d'intervento cre- |
derata azionate il tasto (vedi |
punto viene rilevata per ca. |
puscolare impostata dal co- |
disegno) con una penna a |
10 sec la luce dell'ambiente |
struttore è di ca. 1 Lux; è |
sfera o altro oggetto appun- |
(se necessario, l'utenza al- |
possibile cambiarla all'inter- |
tito, tenendolo premuto fin- |
lacciata viene spenta). Da |
no dell'apparecchio proce- |
ché la spia LED non si è ac- |
ora in poi la lampada si ac- |
dendo come segue: alla lu- |
cesa e rispenta, dopodiché |
cende in presenza di queste |
minosità d'intervento desi- |
rilasciate il tasto; a questo |
condizioni di luminosità. |
Impostazione della modalità di risparmio durante la notte:
Per risparmiare ulteriormen- |
terno dell'apparecchio. Al |
vengono calcolati dal micro- |
te corrente, si può imposta- |
momento della fornitura la |
processore in base alle con- |
re lo spegnimento automati- |
lampada è impostata in mo- |
dizioni crepuscolari. I cam- |
co della lampada di notte. |
do tale da spegnersi alle ore |
biamenti stagionali della lu- |
Per la regolazione in conti- |
1.30 circa. Il sistema elettro- |
minosità esterna vengono |
nuo siete pregati di utilizzare |
nico non contiene un orolo- |
tenuti in considerazione au- |
il regolatore presente all'in- |
gio. Tutti i valori temporali |
tomaticamente. |
Esempi della modalità di risparmio durante la notte:
LED Tasto |
|
LED Tasto |
|
LED Tasto |
|
|
|
|
off |
Modalità di risparmio durante la |
|
Modalità di risparmio durante la |
|
Modalità di risparmio durante la |
notte disattiva |
|
notte di media durata |
|
notte di lunga durata |
|
|
|
|
|
Impostazione per le ore del mattino: |
|
|
||
La modalità di risparmio |
Questa funzione può venire |
4 x lampeggio della spia |
||
durante la notte termina |
modificata come segue: |
LED = la lampada si ac- |
||
sempre nelle prime ore del |
azionare brevemente il ta- |
cende al mattino. 2 x lam- |
||
mattino tra le 4 e le 5 circa. |
sto finché la spia LED non |
peggio della spia LED = la |
||
Dopo di ciò la lampada in |
si accende; rilasciare il ta- |
lampada rimane spenta al |
||
caso di oscurità si riaccen- |
sto; dopo di ciò si può |
mattino. |
||
de (impostazione da parte |
passare a una delle se- |
|
|
|
del costruttore). |
guenti impostazioni. |
|
|
|
|
|
20 |
|
|
Attenzione: |
|
sive la modalità di risparmio |
tempo affinché possa "ap- |
|
|||||||||||||
Dopo la messa in esercizio e |
durante la notte lavora con |
prendere" le nuove condizio- |
|
||||||||||||||
la ridefinizione dell'imposta- |
questi valori adattandosi di |
ni. Tutti i valori impostati |
|
||||||||||||||
zione crepuscolare, la lam- |
volta in volta in modo sem- |
vengono mantenuti anche in |
|
||||||||||||||
pada nella prima notte rima- |
pre più ottimale. Si consigia |
caso di mancanza di corren- |
|
||||||||||||||
ne permanentemente acce- |
pertanto, dopo la messa in |
te. Ai fini di garantire un fun- |
|
||||||||||||||
sa fino al mattino allo scopo |
esercizio o l'esecuzione di |
zionamento privo di guasti, si |
|
||||||||||||||
di rilevare i valori temporali |
modifiche alle impostazioni, |
prega di non oscurare il sen- |
<![if ! IE]> <![endif]>IT |
||||||||||||||
attuali per le condizioni cre- |
di lasciare al sistema elettro- |
sore ottico. |
|
||||||||||||||
puscolari. Nelle notti succes- |
nico sempre alcuni giorni di |
|
|
|
|||||||||||||
|
|
|
|
|
|
|
|
|
|
|
|
|
|
|
|
|
|
|
Dati tecnici |
|
|
|
|
|
|||||||||||
|
|
|
|
|
|
|
|
|
|
|
|
|
|
|
|
|
|
Dimensioni: |
(A x L x P) 99 x 74 x 37 mm |
|
|
|
|||||||||||||
Allacciamento alla rete: 230/240 V, 50 Hz |
|
|
|
||||||||||||||
Potere di rottura: |
lampadine a incandescenza, max. 1000 W a 230 V AC |
|
|||||||||||||||
|
|
|
|
|
|
|
|
|
|
|
|
|
|
||||
|
|
|
|
|
|
|
|
|
|
|
|
|
tubo fluorescente, max. 500 W a cos ϕ = 0,5, |
|
|||
|
|
|
|
|
|
|
|
|
|
|
|
|
carico induttivo a 230 V AC |
|
|
|
|
|
|
|
|
|
|
|
|
|
|
|
|
|
|
|
|
||
|
|
|
|
|
|
|
|
|
|
|
|
|
4 x max. da 58 W cad., C ≤ 88 µF |
|
|
|
|
|
|
|
|
|
|
|
|
|
|
|
|
|
a 230 V AC *1) |
|
|
|
|
Soglia d'intervento: |
regolabile tra ca. 0,5 e 10 Lux (impostazione da parte del |
|
|||||||||||||||
|
|
|
|
|
|
|
|
|
|
|
|
|
costruttore: 1 Lux) |
|
|
|
|
Modalità di risparmio |
spegnimento notturno variabile (impostazione da parte del |
|
|||||||||||||||
durante la notte: |
costruttore: spegnimento alle ore 1.30 ca.) |
|
|||||||||||||||
Consumo proprio |
< 0,8 W |
|
|
|
|||||||||||||
Grado di protezione: IP 54
*1) Lampade fluorescenti, lampadine a basso consumo energetico, lampade LED con ballast elettronico (capacità totale di tutti i ballast elettronici allacciati al di sotto del valore indicato)
Disturbi di funzionamento
Guasto |
Causa |
Rimedio |
NightMatic 3000 Vario fuori |
ν Fusibile difettoso, lampa- |
ν Sostituite il fusibile, accen- |
tensione |
da non accesa, punto di |
dete l'interruttore, control- |
|
interruzione nel cavo |
late la linea di alimentazio- |
|
ν Corto circuito |
ne con un voltmetro |
|
ν Controllate gli allacciamenti |
|
La lampada non si accende |
ν Utenza difettosa |
ν Sostituite l'utenza |
|
ν Assenza di corrente elet- |
ν Vedi „NightMatic 3000 |
|
trica |
Vario fuori tensione“ |
|
ν Ambiente ancora troppo |
ν Attendete fino a quando |
|
chiaro |
non viene raggiunta la lu- |
|
|
minosità di accensione, |
|
|
eventualmente impostate |
|
|
un nuovo valore di accen- |
|
|
sione (con l'ausilio del- |
|
|
l'apposito tasto) |
|
|
|
|
21 |
|

La lampada non si spegne |
ν L'ambiente non è ancora |
ν Aspettate finché esso è |
|
sufficientemente chiaro |
sufficientemente chiaro, |
|
|
eventualmente imposta- |
|
|
te un nuovo valore di lu- |
|
|
minosità di accensione |
|
|
(alla sera) |
La lampada non si accen- |
ν La funzione non è stata |
ν Impostate la funzione |
de al mattino |
correttamente attivata |
seguendo le istruzioni al |
|
|
capitolo "Impostazione |
|
|
per le ore del mattino" |
La lampada si accende a |
ν Passaggio ora legale/ora |
ν L'ora di accensione e |
ore inconsuete |
solare |
spegnimento si orienta ai |
|
|
valori di luminosità. Al- |
|
|
l'occorrenza modificate |
|
ν L'ora di accensione e |
l'impostazione |
|
ν Ridefinite il valore di ac- |
|
|
spegnimento è stata cal- |
censione (l'ora di accen- |
|
colata in modo errato |
sione e spegnimento |
|
|
viene ricalcolata) |
Smaltimento
Apparecchi elettrici, acces- |
Solo per paesi UE: |
idonei all’uso devono essere |
|
sori e materiali d’imballaggio |
Conformemente alla Diretti- |
separati dagli altri rifiuti e |
|
devono essere consegnati |
va Europea vigente in mate- |
consegnati a un centro di ri- |
|
agli appositi centri di raccol- |
ria di rifiuti di apparecchi |
ciclaggio riconosciuto. |
|
ta e smaltimento. |
elettrici ed elettronici e alla |
|
|
|
Non gettare gli ap- |
sua attuazione nel diritto na- |
|
|
|
||
|
parecchi elettrici |
zionale, gli apparecchi elet- |
|
|
nei rifiuti domestici! |
trici ed elettronici non più |
|
Garanzia del produttore
Questo prodotto STEINEL |
nella riparazione o nella sosti- |
non smontato, ben confezio- |
viene costruito con la massi- |
tuzione dei pezzi difettosi. |
nato e munito di scontrino di |
ma cura, con controlli di fun- |
Non sussiste nessun diritto di |
cassa o di fattura (con indi- |
zionamento e del grado di si- |
garanzia in caso di difetti sui |
cazione della data dell'acqui- |
curezza in conformità alle |
pezzi soggetti ad usura e in |
sto e timbro del rivenditore). |
norme vigenti in materia; |
caso di guasti o difetti insorti |
Centro assistenza riparazioni: |
vengono poi effettuati collau- |
in seguito a trattamento o |
dopo la scadenza del perio- |
di con prove a campione. |
manutenzione impropri, co- |
do di garanzia o in caso di di- |
STEINEL garantisce la per- |
me danni da caduta. Sono |
fetti per i quali non si ha dirit- |
fetta qualità e il funzionamen- |
esclusi dal diritto di garanzia |
to alla prestazione di garan- |
to. La garanzia si estende a |
gli ulteriori danni conseguenti |
zia, siete pregati di rivolgerVi |
36 mesi ed inizia il giorno |
che si verificano su oggetti |
al centro di assistenza più vi- |
d'acquisto da parte dell'utiliz- |
estranei. |
cino per informarVi sulla pos- |
zatore finale. Noi eliminiamo |
La garanzia viene prestata |
sibilità di riparazione. |
difetti riconducibili al materia- |
solo se l'apparecchio viene |
A N N I |
le o alla fabbricazione; la pre- |
riconsegnato al centro di as- |
|
stazione della garanzia con- |
sistenza responsabile o, nei |
DI GARANZIA |
siste a nostra discrezione |
primi 6 mesi, al rivenditore, |
3DEL PRODUTTORE |
|
22 |
ES Instrucciones de montaje
Apreciado cliente: Muchas |
STEINEL NightMatic 3000 |
gracias por la confianza que |
Vario. Le rogamos se fami- |
nos ha dispensado al com- |
liarice con estas instruccio- |
prar este nuevo dispositivo |
nes de montaje antes de |
instalarlo. Le deseamos que pueda sacar buen provecho de este producto de alta calidad.
El concepto |
|
<![if ! IE]> <![endif]>ES |
El fotosensor integrado re- |
la apaga, opcionalmente, |
en las horas de penumbra |
gistra la luminosidad am- |
en el modo de consumo re- |
matutina. |
biental y enciende de no- |
ducido, para volver a en- |
|
che la lámpara conectada; |
cenderla, en caso deseado, |
|
Instalación |
|
|
|
|
|
|
|
|
|
|
|
|
|
|
|
|
|
|
|
|
|
(fase) |
|
|
|
|
|
|
|
|
|
|
|
|
|
|
|
|
|
|
|
|
|
|
|
|
|
|
|
|
|
|
|
|
|
|
|
|
|
|
|
|
|
|
|
|
|
|
|
|
|
|
|
|
|
|
|
|
|
|
|
|
|
|
|
|
|
|
|
|
|
|
|
|
|
|
|
|
|
|
|
|
|
|
|
|
|
|
|
|
|
|
|
|
|
|
|
|
|
|
|
|
|
|
|
|
|
|
|
|
|
|
|
|
|
|
|
|
|
|
|
|
|
|
|
|
|
|
|
|
|
|
|
|
|
|
|
|
|
|
|
(neutro) |
|
|
|
|
|
|
|
Lámpara |
||||||||||||
|
|
|
|
|
|
|
|
|
|
|
|
|
|
|
|
|
|
|
|
Montaje en la pared |
|
El NightMatic 3000 Vario |
|||||||||||||||||
Atención: El montaje sig- |
|
puede montarse, si es de- |
|||||||||||||||||
nifica conexión a la red |
|
seado, directamente al la- |
|||||||||||||||||
eléctrica. |
|
do de la lámpara. Un mi- |
|||||||||||||||||
¡230 V significan peligro de |
|
croprocesor separa la luz |
|||||||||||||||||
muerte! Por eso, desco- |
|
ambiental de la del consu- |
|||||||||||||||||
|
midor, garantizando así |
||||||||||||||||||
necte primero la corriente |
|
||||||||||||||||||
|
una fotometría de lo más |
||||||||||||||||||
y compruebe la ausencia |
|
||||||||||||||||||
|
constante. |
||||||||||||||||||
de tensión con un compro- |
|
||||||||||||||||||
bador de tensión. |
|
Para una función óptima, |
|||||||||||||||||
La instalación del interrup- |
|
se recomienda un servicio |
|||||||||||||||||
tor crepuscular supone un |
|
sin conmutador. |
|||||||||||||||||
trabajo en la red eléctrica; |
|
Soltar los cuatro tornillos |
|||||||||||||||||
tendrá que ejecutarse, por |
|
de la carcasa con un des- |
|||||||||||||||||
consecuencia, profesional- |
|
||||||||||||||||||
|
tornillador girando en sen- |
||||||||||||||||||
mente conforme a la nor- |
|
||||||||||||||||||
|
tido antihorario y retirar la |
||||||||||||||||||
mativa VDE 100. |
|
||||||||||||||||||
|
tapa. Apretar la carcasa |
||||||||||||||||||
Tenga en cuenta que hay |
|
contra la pared y dibujar |
|||||||||||||||||
que proteger el interruptor |
|
los agujeros, tener en |
|||||||||||||||||
crepuscular con un inte- |
|
cuenta por donde pasa el |
|||||||||||||||||
rruptor automático de 10 |
|
cableado, hacer los aguje- |
|||||||||||||||||
A. El cable de alimentación |
|
ros, introducir los tacos. |
|||||||||||||||||
eléctrica deberá tener un |
|
|
|
|
|
|
|
|
|||||||||||
diámetro máx. de 10 mm. |
23 |
||||||||||||||||||
|
|
|
|
|
|
|
|
|
|
|
|
||||||||
Para el montaje, procurar introducir los cables siempre por abajo. Antes de atornillar la carcasa, perforar los orificios de salida del agua de condensación.
Conexión
El dispositivo dispone de las siguientes conexiones identificadas:
N = conexiones del neutro (2 x, generalmente azul).
L = conexión de la fase (generalmente negro, marrón o gris).
L' = conexión a la fase activada. En caso de dudas, hay que identificar los conductores con un comprobador de tensión.
El cable de la red eléctrica (L), y el neutro (N) se conectan a la regleta prevista. El cable de alimentación del aparato conectado (lámpara) se conecta a la segunda toma de neutro
(N) y a la fase (L').
Los hilos de tierra verdes/amarillos existentes han de fijarse al contacto para ello previsto.
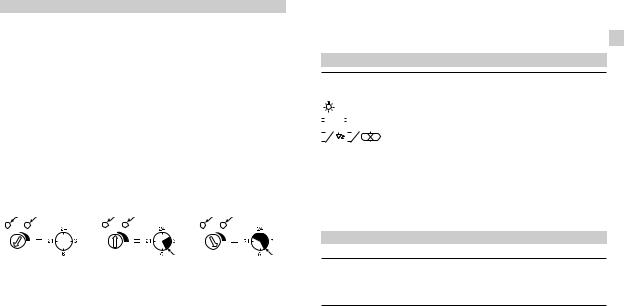
Importante: Una distribu- |
circuito en el aparato o en |
identificar cada uno de los |
ción errónea de las cone- |
la caja de fusibles. En tal |
conductores y montarlos |
xiones producirá un corto- |
caso habrá que volver a |
de nuevo. |
Puesta en servicio/funcionamiento
Para probar su instalación |
nos segundos. Los consu- |
A continuación, se activa la |
tape el lente durante algu- |
midores se conectan. |
fotometría |
Regulación para el crepúsculo
El umbral de respuesta cre- |
conmutador (vse. dibujo) |
la luz ambiental durante |
puscular a salida de fábrica |
con un bolígrafo o similar y |
unos 10 seg. (en caso ne- |
de aprox. 1 lux puede mo- |
manténgase apretado hasta |
cesario, se apagará el con- |
dificarse en el interior del |
que el indicador LED se en- |
sumidor conectado). A par- |
aparato como sigue: Al al- |
cienda y vuelva a apagar, |
tir de ahora, la lámpara se |
canzarse el nivel de lumino- |
soltar el conmutador, a |
encenderá siempre con es- |
sidad deseado, actívese el |
continuación, se registrará |
tas condiciones lumínicas. |
|
|
|
Configuración del modo de consumo nocturno reducido:
La lámpara puede desco- |
tado de suministro, la lám- |
las condiciones crepuscu- |
nectarse automáticamente |
para se apaga a las 1:30 |
lares. Los cambios esta- |
por la noche para ahorrar |
horas aprox. La electrónica |
cionales en las condicio- |
todavía más energía. Para |
no comprende ningún re- |
nes de luz se tienen en |
la regulación sin etapas |
loj. Los valores de tempori- |
cuenta automáticamente. |
utilice el regulador en el in- |
zación los calcula el micro- |
|
terior del aparato. En el es- |
procesador en función de |
|
Ejemplos modo de consumo reducido: |
|
|
||
LED conmutador |
|
LED conmutador |
|
LED conmutador |
|
|
|
|
OFF |
Sin modo de consumo reducido |
|
Modo de consumo reducido mediano |
|
Modo de consumo reducido largo |
|
|
|
|
|
|
|
|
|
|
Regulación para el amanecer: |
|
|
||
El modo de consumo redu- |
Esta función puede modifi- |
Indicador LED centellea |
||
cido acaba siempre al |
carse como sigue: |
cuatro veces = lámpara se |
||
amanecer, entre las 4 y las |
Activar el conmutador has- |
enciende por la mañana. |
||
5 horas. Después, la lám- |
ta que el indicador LED se |
Indicador LED centellea |
||
para se enciende de nuevo |
encienda, soltar el conmu- |
dos veces = lámpara queda |
||
al oscurecer (configuración |
tador, ahora se cambia en- |
apagada por la mañana. |
||
de fábrica). |
tre las siguientes opciones |
|
|
|
|
|
de configuración. |
|
|
|
|
24 |
|
|
Atención:
Una vez puesta en servicio |
res. Con estos valores, el |
configuración, para que la |
y reconfigurada la función |
modo de consumo reduci- |
electrónica pueda „apren- |
crepuscular, la lámpara se |
do opera en las siguientes |
der“ las nuevas circunstan- |
queda encendida la primera |
noches, adaptándose cada |
cias. Los valores definidos |
noche durante todo el tiem- |
vez mejor. Deje pasar, por |
se conservan incluso con |
po hasta el amanecer para |
tal razón, algunos días des- |
un apagón. Por favor, no ta- |
calcular los valores de tem- |
pués de cada puesta en |
pe el sensor de la luz para |
porización actuales de las |
servicio, así como después |
garantizar un perfecto fun- |
circunstancias crepuscula- |
de cualquier cambio de la |
cionamiento. |
Datos técnicos
Dimensiones: |
(alt. x anch. x prof.) 99 x 74 x 37 mm |
||||||||||||
Tensión de alimentación: |
230/240 V, 50 Hz |
||||||||||||
Potencia de ruptura: |
Bombillas incandescentes, máx. 1000 W con 230 V AC |
||||||||||||
|
|
|
|
|
|
|
|
|
|
|
|
|
|
|
|
|
|
|
|
|
|
|
|
|
|
|
Lámpara fluorescente, máx. 500 W con cos ϕ = 0,5, |
|
|
|
|
|
|
|
|
|
|
|
|
|
carga inductiva con 230 V AC |
|
|
|
|
|
|
|
|
|
|
|
|
|
|
|
|
|
|
|
|
|
|
|
|
|
|
|
4 x máx. 58 W, C ≤ 88 µF |
|
|
|
|
|
|
|
|
|
|
|
|
|
con 230 V AC *1) |
Umbral de respuesta: |
ajustable aprox. entre 0,5–10 lux (configuración |
||||||||||||
|
|
|
|
|
|
|
|
|
|
|
|
|
de fábrica 1 lux) |
Modo de consumo reducido: |
desconexión nocturna variable (configuración de fá |
||||||||||||
|
|
|
|
|
|
|
|
|
|
|
|
|
brica apagado aprox. a las 1:30 h) |
Consumo característico: |
< 0,8 W |
||||||||||||
Clase de protección: |
IP 54 |
||||||||||||
*1) Lámparas fluorescentes, bombillas de bajo consumo, lámparas LED con balastro electrónico (capacidad total de todos los balastros conectados por debajo del valor indicado).
Fallos de funcionamiento
Fallo |
Causa |
Solución |
NightMatic 3000 Vario sin |
ν fusible defectuoso, inte- |
ν cambiar fusible, poner in- |
tensión |
rruptor en OFF, línea inte- |
terruptor en ON, compro- |
|
rrumpida |
bar la línea de alimenta- |
|
|
ción con un comprobador |
|
ν cortocircuito |
de tensión |
|
ν comprobar conexiones |
|
La lámpara no se enciende |
ν aparato defectuoso |
ν cambiar el aparato |
|
ν no hay tensión de alimen- |
ν véase „NightMatic 3000 |
|
tación |
Vario sin tensión“ |
|
ν entorno todavía demasia- |
ν esperar hasta alcanzar la |
|
do claro |
luminosidad de conexión, |
|
|
si procede, especificar un |
|
|
nuevo valor de conexión |
|
|
(con conmutador) |
|
|
|
|
25 |
|
<![endif]>ES

Fallo |
Causa |
Solución |
La lámpara no se apaga |
ν luminosidad de entorno |
ν esperar a que haya sufi- |
|
todavía insuficiente |
ciente luminosidad, si |
|
|
procede, especificar de |
|
|
nuevo la luminosidad de |
|
|
conexión (noche) |
La lámpara no se enciende |
ν función no activada |
ν configurar la función se- |
por la mañana |
correctamente |
gún el capítulo "Configu- |
|
|
ración para las horas |
|
|
matutinas“ |
La lámpara se enciende a |
ν cambio horario de |
ν los tiempos de conmuta- |
una hora inusual |
verano/invierno |
ción se basan en los va- |
|
|
lores de luminosidad. |
|
|
modificar ajuste si pro- |
|
ν tiempos de conmutación |
cede |
|
ν especificar de nuevo |
|
|
incorrectos |
el valor de conexión |
|
|
(se calculan de nuevo |
|
|
los tiempos de conmuta- |
|
|
ción) |
Eliminación
Aparatos eléctricos y embalajes han de someterse a un reciclamiento respetuoso con el medio ambiente.  ¡No eche los apara-
tos eléctricos a la basura doméstica!
Solo para países de la UE: Según la Directiva europea vigente sobre residuos de aparatos eléctricos y electrónicos y su transposición al derecho nacional, aparatos eléctricos fuera de uso
han de ser recogidos por separado y sometidos a un reciclamiento respetuoso con el medio ambiente.
Garantía de funcionamiento
Este producto STEINEL ha |
bio de piezas defectuosas, |
sido elaborado con el má- |
según nuestro criterio. La |
ximo esmero, habiendo |
prestación de garantía no |
pasado los controles de |
será aplicable a daños pro- |
funcionamiento y seguri- |
ducidos en piezas de des- |
dad previstos por las dis- |
gaste, daños y defectos |
posiciones vigentes, así |
originados por un uso o |
como un control adicional |
mantenimiento inadecua- |
de muestreo al azar. |
dos y los causados por ro- |
STEINEL garantiza el per- |
tura en caso de caídas. |
fecto estado y funciona- |
Quedan excluidos de la |
miento. El período de |
garantía los daños conse- |
garantía es de 36 meses, |
cutivos causados en obje- |
comenzando el día de la |
tos ajenos.La garantía sólo |
venta al consumidor. Re- |
se aplicará enviando el |
paramos defectos de ma- |
aparato entero no des- |
terial o de fabricación, la |
montado junto con el tí- |
garantía se aplicará a base |
quet de compra o la factu- |
de la reparación o el cam- |
ra (fecha de compra y sello |
|
26 |
del vendedor), bien empaquetado, a la correspondiente estación de servicio o bien entregándoselo, en los primeros 6 meses, al vendedor.
Servicio de reparación: Una vez transcurrido el período de garantía o en caso de defectos sin derecho de garantía, consulte su centro de reparación más próximo para averiguar una posible reparación.
3A Ñ O S
DE GARANTÍA
DE FABRICANTE
PT Instruções de montagem
Estimado cliente. Agrade- |
3000 Vario da STEINEL. |
votos que tenha prazer ao |
cemos-lhe a confiança de- |
Antes de proceder à insta- |
trabalhar com este produto |
positada em nós ao com- |
lação, familiarize-se com |
de elevada qualidade. |
prar o seu novo NightMatic |
estas instruções. Fazemos |
|
O princípio
O foto-sensor integrado re- |
|
desligá-lo no modo notur- |
durante as horas que ainda |
|||||||||||||||||
gista a luminosidade am- |
|
no economizador, se ne- |
está muito escuro. |
|||||||||||||||||
biental e liga o candeeiro |
|
cessário, e, se o desejar, |
|
|||||||||||||||||
conectado à noite, volta a |
|
volta a ligá-lo de manhã, |
|
|||||||||||||||||
Instalação |
|
|
|
|
|
|
|
|
|
|||||||||||
|
|
|
|
|
|
|
|
|
|
|
|
|
|
|
|
|
|
|
|
Ao proceder à montagem, |
|
|
|
|
|
|
|
|
|
|
|
|
|
|
|
|
|
|
|
|
|
|
|
|
|
|
|
|
|
|
|
|
|
|
|
|
|
|
|
|
|
prestar atenção para que |
|
|
|
|
|
|
|
|
|
|
|
|
|
|
|
|
|
|
|
|
os cabos sejam introduzi- |
|
|
|
|
|
|
|
|
|
|
|
|
|
|
|
|
|
|
|
|
|
|
|
|
|
|
|
|
|
|
|
|
|
|
|
|
|
|
|
|
|
dos sempre pelo lado de |
|
|
|
|
|
|
|
|
|
|
|
|
|
|
|
|
|
|
|
|
baixo, se possível. Antes |
|
|
|
|
|
|
|
|
|
|
|
|
|
|
|
|
|
|
|
|
de aparafusar a carcaça, |
|
|
|
|
|
|
|
|
|
|
|
|
|
|
|
|
|
|
|
(Fase) |
perfurar os furos para es- |
|
|
|
|
|
|
|
|
|
|
|
|
|
|
|
|
|
|
|
(Neutro) |
coamento da água con- |
|
|
|
|
|
|
|
|
|
|
|
|
|
|
|
|
|
|
|
densada em baixo. |
|
|
|
|
|
|
|
|
|
|
|
|
|
|
|
|
|
|
|
|
|
|
|
|
|
|
|
|
|
Candeeiro |
Ligação |
||||||||||||
|
|
|
|
|
|
|
O aparelho dispõe das |
|||||||||||||
|
|
|
|
|
|
|
|
|
|
|
|
|
|
|
|
|
|
|
|
|
|
|
|
|
|
|
|
|
|
|
|
|
|
|
|
|
|
|
|
|
seguintes ligações identifi- |
Fixação à parede |
|
Se o desejar, poderá mon- |
||||||||||||||||||
|
cadas: |
|||||||||||||||||||
Atenção: a montagem re- |
|
tar o NightMatic 3000 Vario |
N = ligações de neutro |
|||||||||||||||||
quer o estabelecimento de |
|
diretamente ao lado do |
||||||||||||||||||
|
(2 x, geralmente azul) |
|||||||||||||||||||
uma ligação à rede elétrica. |
|
candeeiro. Um micropro- |
||||||||||||||||||
230 V representam perigo |
|
cessador separa a luz do |
L = ligação de fase (geral- |
|||||||||||||||||
de morte! Para tal, desligue |
|
ambiente da luz do consu- |
mente preto, castanho |
|||||||||||||||||
primeiro a corrente e verifi- |
|
midor, conseguindo assim |
ou cinzento) |
|||||||||||||||||
que se não há tensão, |
|
realizar medições de luz |
L' = ligação à fase comuta- |
|||||||||||||||||
usando um busca-polos. |
|
constantes. |
da. Em caso de dúvi- |
|||||||||||||||||
A instalação do temporiza- |
|
Para o funcionamento |
da, é necessário identi- |
|||||||||||||||||
dor crepuscular consiste |
|
ideal, é recomendável op- |
ficar os cabos com um |
|||||||||||||||||
essencialmente em lidar |
|
tar pela operação sem in- |
busca-polos. |
|||||||||||||||||
com tensão de rede e re- |
|
terruptores. |
O cabo de rede (L) e o con- |
|||||||||||||||||
quer obrigatoriamente um |
|
Desaparafusar os quatro |
||||||||||||||||||
|
dutor neutro (N) são liga- |
|||||||||||||||||||
trabalho profissional em |
|
parafusos da carcaça no |
dos às respetivas barras |
|||||||||||||||||
conformidade com a nor- |
|
sentido anti-horário, usan- |
de junção. O cabo de ali- |
|||||||||||||||||
ma VDE 100. |
|
do uma chave de fendas, e |
mentação do consumidor |
|||||||||||||||||
Tenha em atenção que o |
|
retirar a tampa da carcaça. |
(candeeiro) é ligado à se- |
|||||||||||||||||
temporizador crepuscular |
|
Encostar a caixa do siste- |
gunda ligação de neutro |
|||||||||||||||||
tem de ser protegido com |
|
ma eletrónico na parede e |
(N) e à fase (L'). |
|||||||||||||||||
um disjuntor de proteção |
|
marcar os furos; prestar |
Condutores de ligação à |
|||||||||||||||||
de condutores de 10 A. |
|
atenção a cabos integra- |
||||||||||||||||||
|
terra verdes/amarelos de- |
|||||||||||||||||||
O diâmetro máximo do ca- |
|
dos na parede, fazer os fu- |
||||||||||||||||||
|
vem ser fixados nos res- |
|||||||||||||||||||
bo de rede não pode ser |
|
ros e colocar as buchas. |
||||||||||||||||||
|
pectivos terminais previs- |
|||||||||||||||||||
superior a 10 mm. |
|
|
|
|
|
|
|
|
||||||||||||
|
|
|
|
|
|
|
|
tos para esse fim. |
||||||||||||
|
|
|
|
|
|
|
|
|
|
|
|
27 |
||||||||
|
|
|
|
|
|
|
|
|
|
|
|
|
||||||||
<![endif]>PT

Importante: se as ligações |
to-circuito no aparelho ou |
rão de ser identificados e |
forem trocadas, poderá |
na caixa de fusíveis. Nesse |
montados de novo. |
ocorrer mais tarde um cur- |
caso, os diversos fios te- |
|
Colocação em funcionamento/Funções
Para testar a sua instala- |
alguns segundos. Os pon- |
A seguir, a medição da luz |
ção, cubra a lente por |
tos de consumo ligam-se. |
é ativada. |
Ajuste para o crepúsculo:
O limiar de resposta cre- |
acionar o botão (ver es- |
minosidade do ambiente |
puscular de aprox. 1 lux, |
quema) com uma esfero- |
durante aprox. 10 s (se for |
definido de fábrica, pode |
gráfica, ou outro objeto pa- |
necessário, o consumidor |
ser alterado no interior do |
recido, e mantê-lo premido |
que está conectado será |
aparelho, procedendo da |
até o indicador de LED se |
desligado). A partir daí, o |
seguinte forma: Assim que |
acender e voltar a apagar- |
candeeiro passará a ser li- |
se verificar a luminosidade |
se, largar o botão; depois, |
gado precisamente nessas |
desejada para a ativação, |
será medida de novo a lu- |
condições de luz. |
|
|
|
Regulação do modo noturno economizador:
Existe a possibilidade de |
relho. No estado de entre- |
base nas situações de luz |
desligar o candeeiro auto- |
ga, o candeeiro será desli- |
durante o crepúsculo. |
maticamente durante a |
gado à 1h30. O sistema |
Assim, quaisquer altera- |
noite, para poupar ainda |
eletrónico não contém re- |
ções das condições de luz |
mais energia. Para a regu- |
lógio. Todas as horas defi- |
em função da época do |
lação progressiva use o re- |
nidas são calculadas pelo |
ano serão ponderadas |
gulador no interior do apa- |
microprocessador com |
automaticamente. |
Exemplos para o modo noturno economizador: |
|
|||
LED Botão |
|
LED Botão |
|
LED Botão |
|
|
|
|
desligado |
Sem modo noturno economizador |
|
Modo noturno economizador médio |
|
Modo noturno economizador longo |
|
|
|
|
|
|
|
|
|
|
Definição para o romper do dia: |
|
|||
O modo noturno economi- |
Esta função pode ser alte- |
Indicador LED pisca 4 ve- |
||
zador termina sempre ao |
rada da seguinte forma: |
zes = o candeeiro será li- |
||
romper do dia, aprox. entre |
Premir brevemente o botão |
gado de manhã. Indicador |
||
as 4 e as 5 horas da ma- |
até o indicador LED se |
LED pisca 2 vezes = o can- |
||
nhã. Depois, o candeeiro |
acender, depois existem |
deeiro não se acende de |
||
volta a ligar-se quando |
as diversas opções de re- |
manhã. |
||
escurecer (regulação de |
gulação indicadas a seguir. |
|
||
fábrica). |
|
|
|
|
|
|
28 |
|
|
Atenção:
Depois da colocação em |
usados como definição pa- |
dias para que o sistema ele- |
funcionamento e da defini- |
ra o modo noturno econo- |
trónico "aprenda" as novas |
ção renovada para o cre- |
mizador nas noites subse- |
condições do seu ambien- |
púsculo, na primeira noite o |
quentes, o que significa que |
te. Estes valores definidos |
candeeiro ficará aceso, sem |
se adapta cada vez mais às |
serão preservados, mesmo |
interrupção, até ao romper |
condições reais. Por esse |
no caso da falta de eletrici- |
do dia, para assim determi- |
motivo, depois da coloca- |
dade. Não cubra o sensor |
nar as condições crepuscu- |
ção em funcionamento e |
de luz, para assegurar o seu |
lares existentes. Os valores |
sempre que altere as defini- |
funcionamento perfeito. |
obtidos desta forma são |
ções, espere sempre alguns |
|
Dados técnicos
Dimensões: |
(a x l x p) 99 x 74 x 37 mm |
|||||||||||||
Ligação à rede: |
230/240 volts, 50 Hz |
|
||||||||||||
Potência: |
Lâmpadas incandescentes, máx. 1000 W a 230 V de CA |
|||||||||||||
|
|
|
|
|
|
|
|
|
|
|
|
|
||
|
|
|
|
|
|
|
|
|
|
|
|
|
Lâmpada fluorescente, máx. 500 W com cos ϕ = 0,5, |
|
|
|
|
|
|
|
|
|
|
|
|
|
|
carga indutiva com 230 V CA |
|
|
|
|
|
|
|
|
|
|
|
|
|
|
||
|
|
|
|
|
|
|
|
|
|
|
|
|
no máx. 4 a 58 W cada, C ≤ 88 µF |
|
|
|
|
|
|
|
|
|
|
|
|
|
|
a 230 V de CA *1) |
|
Limiar de resposta: |
regulável de aprox. 0,5 - 10 lux |
|||||||||||||
|
|
|
|
|
|
|
|
|
|
|
|
|
(regulação de fábrica: 1 lux) |
|
Modo noturno economizador: |
Desligamento variável noturno |
|||||||||||||
|
|
|
|
|
|
|
|
|
|
|
|
|
(regulação de fábrica: desligar aprox. à 1h30) |
|
Consumo próprio: |
< 0,8 W |
|
||||||||||||
Classe de proteção: |
IP 54 |
|
||||||||||||
*1) lâmpadas fluorescentes, lâmpadas economizadoras, candeeiros LED com balastro eletrónico (capacidade total de todos os balastros ligados inferior ao valor especificado).
Falhas de funcionamento
Falha |
Causa |
Solução |
NightMatic 3000 Vario não |
ν Fusível queimado ou não |
ν Fusível novo, ligar o inter- |
tem tensão |
ligado, ligação interrom- |
ruptor de rede, verificar o |
|
pida |
condutor com medidor de |
|
ν Curto-circuito |
tensão |
|
ν Verificar as ligações |
|
O candeeiro não se acende |
ν Consumidor com defeito |
ν Substituir o consumidor |
|
ν Falta tensão de alimenta- |
ν Vide "NightMatic 3000 |
|
ção |
Vario não tem tensão" |
|
ν Ambiente ainda está claro |
ν Esperar até ser alcançada |
|
demais |
a claridade de ativação, |
|
|
redefinir eventualmente |
|
|
o valor de ativação (com |
|
|
a tecla) |
|
|
|
|
29 |
|
<![endif]>PT

Falha |
Causa |
Solução |
O candeeiro não se desliga |
ν A claridade ambiental |
ν Esperar até ficar mais |
|
ainda não é suficiente |
claro, redefinir eventual- |
|
|
mente a claridade de ati- |
|
|
vação (à noite) |
O candeeiro não se acen- |
ν A função não foi ativada |
ν Definir a função seguin- |
de de manhã |
corretamente |
do as indicações no ca- |
|
|
pítulo "Definição para o |
|
|
romper do dia" |
O candeeiro acende-se à |
ν Mudança de horário de |
ν As horas de comutação |
hora errada |
verão/inverno |
regem-se pelos valores |
|
|
de luminosidade. Even- |
|
ν As horas de comutação |
tualmente, alterar a defi- |
|
nição |
|
|
foram mal calculadas |
ν Redefinir o valor de |
|
|
ativação (as horas de |
|
|
comutação serão |
|
|
recalculadas) |
Reciclagem
Equipamentos elétricos, acessórios e embalagens devem ser entregues num posto de reciclagem ecológica.
Nunca deite equipamentos elétricos para o lixo doméstico!
Apenas para estados membros da U.E.: Segundo a diretiva europeia relativa aos resíduos de equipamentos elétricos e eletrónicos, e a respetiva transposição para o direito nacional, todos os equipamentos elétricos e eletróni-
cos em fim de vida útil devem ser recolhidos separadamente e entregues nos pontos de recolha previstos para fins de reutilização ecológica.
Garantia do fabricante
Este produto STEINEL foi |
critério, estando excluídas |
fabricado com todo o zelo |
as peças sujeitas a des- |
e o seu funcionamento e |
gaste, os danos e as falhas |
segurança verificados, de |
originados por uma utiliza- |
acordo com as normas em |
ção ou manutenção incor- |
vigor, e sujeito a um con- |
reta, bem como por rutura |
trolo por amostragem alea- |
em função de uma queda. |
tória. A STEINEL garante o |
Excluem-se igualmente os |
bom estado e o bom fun- |
danos provocados noutros |
cionamento do aparelho. |
objetos estranhos ao apa- |
O prazo de garantia é de |
relho. |
36 meses a contar da data |
Os serviços previstos na |
de compra. Eliminamos fa- |
garantia só serão presta- |
lhas relacionadas com de- |
dos caso o aparelho seja |
feitos de material ou de fa- |
apresentado bem embala- |
brico. A garantia inclui a |
do no respetivo serviço de |
reparação ou a substitui- |
assistência técnica ou, nos |
ção das peças com defei- |
primeiros 6 meses, junto |
to, de acordo com o nosso |
do revendedor, devida- |
mente montado e acompanhado do talão da caixa ou da fatura (data da compra e carimbo do revendedor).
Serviço de reparação: Assistência: depois de expirado o prazo de garantia ou em caso de falha não abrangida pela garantia, contacte o serviço de assistência técnica mais perto de si para saber quais são as possibilidades de reparação.
3ANOS
GARANTIA
DOFABRICANTE
SE Montageanvisning
Bäste Kund ! Tack för det |
Vario. Vi ber dig noga läsa |
mycken glädje med denna |
förtroende du har visat oss |
igenom denna bruksanvis- |
kvalitetsprodukt. |
genom att köpa din nya |
ning innan du installerar |
|
Steinel NightMatic 3000 |
apparaten. Vi önskar Dig |
|
Principen
Fotocellen registrerar |
försedd med en nattspar- |
eller återigen när det mörk- |
omgiv ningens ljusnivå och |
funktion som kan släcka |
nar, beroende på vilken |
styr reläet som tänder lam- |
lamporna under natten. |
funktion du har valt. |
porna när det blir mörkt. |
Därefter tänds lamporna |
|
NightMatic 3000 är också |
under morgontimmarna |
|
Installation
|
|
|
|
|
|
|
|
|
|
|
|
|
|
|
|
|
|
|
|
Anslut alltid ledningarna |
|
|
|
|
|
|
|
|
|
|
|
|
|
|
|
|
|
|
|
|
från undersidan. Före |
|
|
|
|
|
|
|
|
|
|
|
|
|
|
|
|
|
|
|
|
montering på vägg skall |
|
|
|
|
|
|
|
|
|
|
|
|
|
|
|
|
|
|
|
|
|
|
|
|
|
|
|
|
|
|
|
|
|
|
|
|
|
|
|
|
|
dräneringshålen (vardera |
|
|
|
|
|
|
|
|
|
|
|
|
|
|
|
|
|
|
|
|
nedre hörnen) för konden- |
|
|
|
|
|
|
|
|
|
|
|
|
|
|
|
|
|
|
|
|
svatten öppnas med en syl |
|
|
|
|
|
|
|
|
|
|
|
|
|
|
|
|
|
|
|
(fas) |
e. d. |
|
|
|
|
|
|
|
|
|
|
|
|
|
|
|
|
|
|
|
(nolledare) |
Inkoppling |
|
|
|
|
|
|
|
|
|
|
|
|
|
|
|
|
|
|
|
|
Skymningsreläet har följan- |
|
|
|
|
|
|
|
Lampa |
|
|
|
|
|
|
|
|
de plintmärkning: |
||||
|
|
|
|
|
|
|
|
|
|
|
|
|
|
|
|
|
|
|
|
N = 2 st. plintar för nolle- |
Montering på vägg |
|
NightMatic 3000 Vario kan |
dare |
|||||||||||||||||
Varning! Inkoppling av |
|
placeras nära en lampa. |
L = Plint förfas |
|||||||||||||||||
nätspänning 230 V betyder |
|
Mikroprocessorn skiljer |
L' = Plint för utgående fas |
|||||||||||||||||
livsfara! |
|
mellan dagsljus och ljuset |
||||||||||||||||||
|
till armatur |
|||||||||||||||||||
Vid installation av Night- |
|
från armaturer och sörjer |
||||||||||||||||||
|
Vid minsta tveksamhet |
|||||||||||||||||||
|
kan därför tända belysing- |
|||||||||||||||||||
Matic 3000 Vario sker in- |
|
|||||||||||||||||||
|
en vid korrekt tid trots att |
måste parterna identifieras |
||||||||||||||||||
kopplingen till elnätet. Där- |
|
|||||||||||||||||||
|
annan belysning är tänd. |
med en spänningsprovare. |
||||||||||||||||||
för måste detta utföras på |
|
|||||||||||||||||||
|
Alltför kraftigt ljus mot ljus- |
|
||||||||||||||||||
fackmannamässigt sätt |
|
Nätkabelns parter fas (L) |
||||||||||||||||||
|
sensorn kan dock förblinda |
|||||||||||||||||||
och enligt rådande be- |
|
och nolledare (N) ansluts |
||||||||||||||||||
|
skymningsreläet. |
|||||||||||||||||||
stämmelser. |
|
till avsedda plintar, märkta |
||||||||||||||||||
Innan inkoppling påbörjas |
|
Kapslingen öppnas genom |
N och L. Utgående fas |
|||||||||||||||||
måste spänningen kopplas |
|
att lossa de fyra skruvarna |
(tändtråden) till belastning- |
|||||||||||||||||
ur. Detta kontrolleras med |
|
varvid locket tas av. |
en (lamporna) ansluts till |
|||||||||||||||||
en spänningsprovare. |
|
Håll lådan mot väggen och |
plint märkt med L' och |
|||||||||||||||||
|
önskas nolla till lamporna |
|||||||||||||||||||
Avsäkra skymningsreläet |
|
märk för ev. borrhål. Vid |
||||||||||||||||||
|
från skymningsreläet kan |
|||||||||||||||||||
med 10 A. Max diameter |
|
behov borra och tryck |
den anslutas till den andra |
|||||||||||||||||
på anslutningskabeln är |
|
in pluggarna. Akta ledning- |
nollplinten N. |
|||||||||||||||||
10 mm. |
|
arna! |
|
|||||||||||||||||
<![endif]>SE
30 |
31 |

VIKTIGT! En felaktig |
ler säkringsskåpet. |
att kabelparterna har iden- |
inkoppling kan orsaka |
I detta fall måste en |
tifierats. |
kortslutning i apparaten el- |
omkoppling ske efter |
|
Idrifttagning/funktion
Täck över linsen några |
Förbrukarna tänds. |
sekunder för att testa |
Därefter är NightMatic |
installeringen. |
aktiverad. |
Inställning av skymningsnivå
Vid leverans är skymnings- |
som man önskar att lam- |
LED (dioden) har slock- |
nivån inställd på |
porna ska tändas vid; |
nat och om givningens |
cirka 1 lux. Nivån kan en- |
Håll ner tryckknappen |
ljusnivå kommer att regi- |
kelt justeras med en tryck- |
med t.ex. spetsen på |
streras av mikro - |
knapp som finns |
en kulspetspenna tills |
processorn. Lamporna |
inuti NightMatic. För att re- |
LED (dioden) tänds. |
tänds sedan vid den regi- |
gistrera annan ljusnivå |
Släpp tryckknappen när |
strerade ljusnivån. |
Inställning av nattsparfunktionen
Lamporna kan om man så |
meter. Vid leverans är |
önskar automatiskt kopp- |
NightMatic inställd så att |
las bort under en del av |
ljuset slocknar cirka kl. |
natten. Inställningen av när |
01.30. Elektroniken inne- |
lamporna ska släckas sker |
håller ingen klocka. Alla |
steglöst med en potentio- |
tidvärden Nattspar-funk- |
tion och skymninsvärde lagras av mikroprocessorn som även tar hänsyn till årstidernas olika ljusförhållanden.
Exempel på nattsparfunktion |
|
|
LED Tryck-knapp |
LED Tryck-knapp |
LED Tryck-knapp |
Ingen besparing |
Svart fält= |
Svart fält= |
Medelbesparing lampor släckta |
Max besparing lampor släckta |
|
Inställning av morgontimmarna
Om man önskar kan lamporna kopplas in under morgontimmarna eller så kan de vara släckta tills det ljusnar.
1)Lamporna är släckta under morgontimmarna (leveransinställning).
2)Lamporna tänds under morgontimmarna.
Valet görs enligt följande: Håll ner tryckknappen tills LED dioden)( tänds. Släpp tryckknappen när LED (dioden) är tänd. LED kommer antingen blinka 2 eller 4 gånger.
2 blinkningar = lamporna förblir släckta under morgontimmarna. 4 blinkningar = lamporna tänds under
32
morgontimmarna mellan kl. 4 och 5 och är tända tills det ljusnar.
Nästa gång tryckknappen hålls ner och släpps upp kommer den att blinka omvänt mot föregående scenario dvs. varannan gång 2 blinkningar och varannan gång 4 blinkningar.
Observera:
Efter driftsättning och ny in- |
de nätter justeras tiden ge- |
hålls efter spänningsbortfall. |
ställning av skymningsvär- |
nom nya mätningar. Låt |
Lagrad inställning ändrar |
det lyser lamporna hela nat- |
därför elektroniken få tid |
sig först när en ny genom- |
ten ända till morgonen för |
några dygn för att anpassa |
förs. Täck inte ljussensorn |
under tiden NightMatic lä- |
sig till ändrade förhållande. |
om du vill ha en störningsfri |
ser in nattens längd. Följan- |
Alla nställdai värden bibe- |
drift. |
Teknisk data
Mått: |
(H x B x D) 99 x 74 x 37 mm |
|
||||||||
Spänning: |
230/240 V, 50 Hz |
|||||||||
Belastning: |
|
<![if ! IE]> <![endif]>SE |
||||||||
|
|
|
|
|
|
|
|
|
- Glödlampor, max. 1000 W vid 230 V AC |
|
|
|
|
|
|
|
|
|
|
- lysrör/LED: max driftdon, HF-don, |
|
|
|
|
|
|
|
|
|
|
- energisparlampor, LED-lampor |
|
|
|
|
|
|
|
|
|
|
4x max. á 58 W, C ≤ 88 μF. |
|
|
|
|
|
|
|
|
|
|
||
|
|
|
|
|
|
|
|
|
|
|
Skymningsinställning: |
cirka 0,5–10 lux |
|
||||||||
Nattsparfunktion: |
variabel släcktid |
|
||||||||
Egen förbrukning: |
< 0,8 W |
|
||||||||
Skyddsklass: |
IP 54 |
|
||||||||
Driftstörningar
Fel |
Orsak |
Åtgärd |
NightMatic 3000 Vario utan |
ν Defekt säkring, kabel- |
ν Byt säkring. Slut brytaren, |
spänning |
brott |
testa med spännings- |
|
ν Kortslutning |
provare |
|
ν Kontrollera ledningar och |
|
|
|
belastning |
|
|
|
Lamporna tänds inte |
ν Ljuskälla trasig |
ν Byt ljuskälla |
|
ν Ingen matningsspänning |
ν Se ovan |
|
ν Fortfarande för ljust ute |
ν Vänta tills det blir mörkt. |
|
|
Ställ ev in ny ljusnivå |
|
|
|
Lamporna slocknar inte |
ν Ej tillräckligt ljust ute |
ν Vänta tills det blir ljust. |
|
|
Ställ ev om ljusnivån |
Lamporna tänds ej på |
ν Funktionen ej rätt |
ν Ställ in enligt kapitlet om |
morgonen |
aktiverad |
”Inställning morgontim- |
|
|
mar” |
Lamporna tänds vid |
ν Omställning till sommar/ |
ν Kopplingstiderna är ori- |
ovanligt tidpunkt |
orienterade till ljusvärden |
enterade till ljusvärden. |
|
ν Tider felaktigt beräknade |
Ev ändra inställning |
|
ν Ändra inkopplingsvärden |
|
|
|
(nya inkopplingstider) |
|
|
|
|
33 |
|
 Loading...