

Page 1
New Features in 3.1
Page 2

Manual by C. Bachmann, H. Bischoff, S. Pfeifer, C. Schomburg
The information in this document is subject to change without notice and does not represent a commitment on the part of Steinberg Media Technologies GmbH. The software described by this document is subject to a License Agreement and may not be
copied to other media except as specifically allowed in the License Agreement. No part
of this publication may be copied, reproduced or otherwise transmitted or recorded, for
any purpose, without prior written permission by Steinberg Media Technologies GmbH.
All product and company names are ™ or ® trademarks of their respective owners.
Windows XP is a trademark of Microsoft Corporation. The Mac logo is a trademark
used under license. Macintosh and Power Macintosh are registered trademarks.
© Steinberg Media Technologies GmbH, 2005.
All rights reserved.
Page 3

Table of Contents
Page 4

7 Introduction
8 Working with the new features
11 Working with the new features
12 Editing – General
12 New Preferences options
20 Key Commands
21 Track Folding
23 Gluing events/parts together
26 Metronome settings
27 Synchronization settings
28 Duplicating tracks
28 Exporting selected tracks (Cubase SX only)
28 Importing Track Archives (Cubase SX only)
31 The Stereo Pan Law modes
31 Resizing tracks in the Track list
32 Inspector sub panels
33 Editing – MIDI
33 Freezing track parameters
34 Dissolving parts
34 The Legato dialog
35 Selecting notes of equal pitch (Edit menu)
36 Extracting MIDI automation
37 External instruments/effects (Cubase SX only)
46 Mixer operations
46 The context menu functions
48 Copying channel settings to/from several tracks in one go
48 Mixer key commands
49 Panning Bypass
50 The Tempo Track (Cubase SX only)
52 Pool Operations
52 The extended search functionality in the Pool (Cubase SX only)
54 Pool key commands
54 Video
57 Score editor operations
59 Remote Control
59 Accessing user panel parameters via remote control devices
(Cubase SX only)
CUBASE SX/SL
4 Table of Contents
Page 5

60 General improvements
60 Recovery of audio recordings after system failure
61 About the Dolby Digital and DTS Encoders (Cubase SX only)
63 Index
Table of Contents 5
CUBASE SX/SL
Page 6

CUBASE SX/SL
6 Table of Contents
Page 7

Introduction
Page 8

Working with the new features
Welcome to Cubase SX/SL 3.1! This document lists and describes
all features that have been added to or modified in the program since
the original 3.0 version. To read more about a feature listed below,
please click the respective green link.
Some of the new features described in this document only apply to
the Cubase SX version. Whenever this is the case, this will be clearly
stated in the heading of the related subject.
Editing – General
•
New Preferences options. See page 12.
•
Key Commands. See page 20.
•
Track folding. See page 21.
•
Gluing events/parts together. See page 23.
•
Metronome settings. See page 26.
•
Synchronization settings. See page 27.
•
Duplicating tracks. See page 28.
•
Exporting Selected Tracks (Cubase SX only). See page 28.
•
Importing Track Archives (Cubase SX only). See page 28.
•
Stereo Pan Law modes. See page 31.
•
Resizing tracks in the Track list. See page 31.
•
Inspector sub panels. See page 32.
CUBASE SX/SL
8 Introduction
Page 9

Editing – MIDI
•
Freezing track parameters. See page 33.
•
Dissolving parts. See page 34.
•
The Legato dialog. See page 34.
•
Selecting notes of equal pitch. See page 35.
•
Extracting MIDI automation. See page 36.
External instruments and effects
•
Working with external instruments and effects (Cubase SX only).
See page 37.
•
About the Favorites. See page 43.
•
Freezing external effects/instruments. See page 45.
Mixer operations
•
The context menu functions. See page 46.
•
Copying channel settings. See page 48.
•
Mixer key commands. See page 48.
•
Panning Bypass. See page 49.
The Tempo Track
•
The Process Bars dialog. See page 50.
Pool operations
•
The extended search functionality in the Pool. See page 52.
•
Pool key commands. See page 54.
Introduction 9
CUBASE SX/SL
Page 10

Video
•
Generating thumbnail cache files during video import. See page 54.
•
Generating thumbnail cache files manually from within the Pool .
See page 55.
•
Thumbnail cache usage. See page 56.
Score editor operations
•
The selection indicators. See page 57.
•
Showing/Hiding the custom colors. See page 57.
•
The Set Note Info dialog. See page 58.
Remote Control
•
Accessing user panel parameters via remote control devices.
See page 59.
General improvements
•
Recovery of audio recordings after system failure. See page 60.
•
About the Dolby Digital and DTS Encoders (Cubase SX only).
See page 61.
CUBASE SX/SL
10 Introduction
Page 11

Working with the new features
Page 12
Editing – General
New Preferences options
For Cubase SX/SL 3.1 several changes have been made to the Preferences dialog. The Appearance page has been completely modified
(Cubase SX only), a new subpage “Project & Mixer” has been added
to the Editing page, the VST page has been further subdivided, etc. In
the following sections, the changes are described separately for the
different pages of the dialog.
CUBASE SX/SL
12 Working with the new features
Page 13

Appearance (Cubase SX only)
The Appearance page in the Preferences dialog now contains three
subpages, on which you can adjust the look of the program in the following way:
Appearance–General
The three controls on the General subpage affect the appearance of
the work area backgrounds in Cubase SX.
•
Saturation determines how rich the background colors are, from grey
to blue.
•
Contrast determines how bright or dark the background is in relation
to controls and displays.
•
Brightness lightens or darkens the background.
CUBASE SX/SL
Working with the new features 13
Page 14
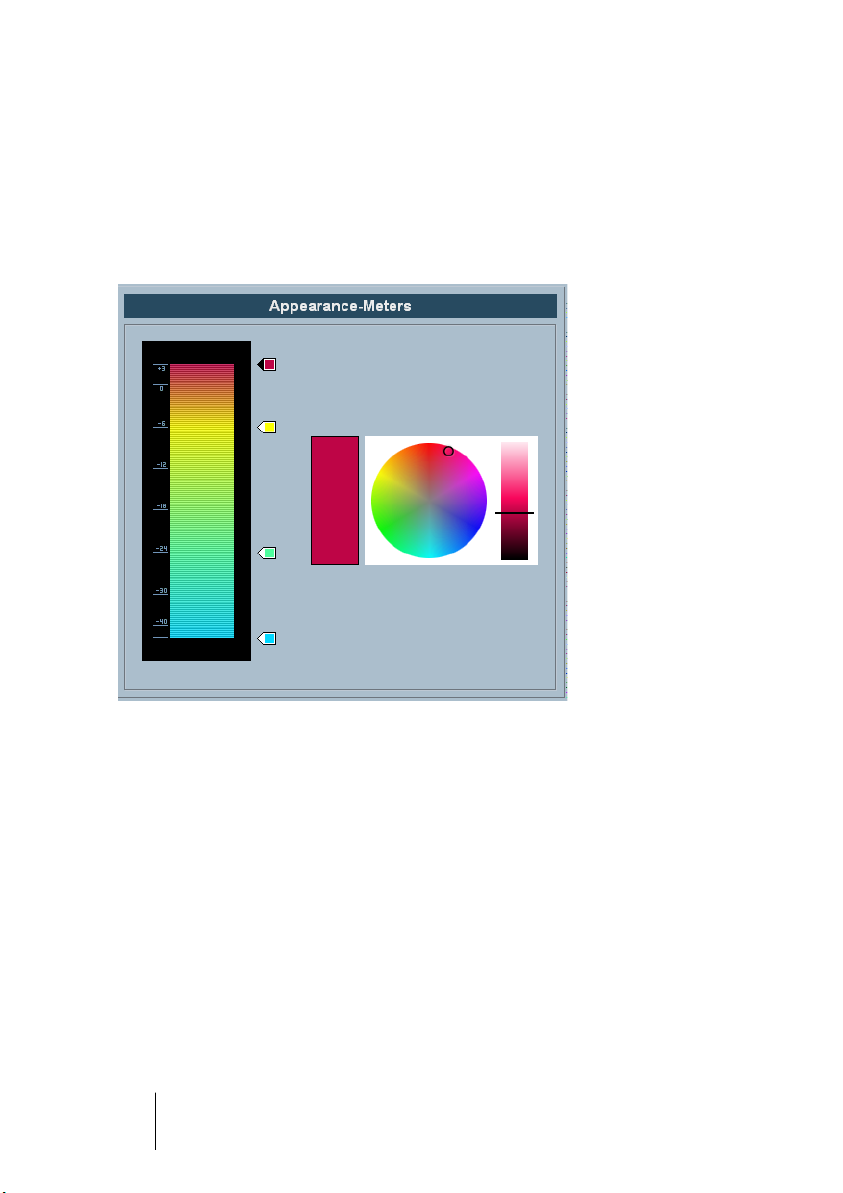
Appearance–Meters
The coloring of meters in Cubase SX can be controlled in sophisticated
ways. Multiple colors can help to visually indicate what levels are being
reached, e.g. in a channel of the Mixer. To do this, the meter on the Appearance–Meters page has color handles that allow you to define what
color the meter will have at a given signal level.
The Appearance–Meters page.
•
The default setting has four color handles. Each color handle has a
unique color that gradually shifts as the meter moves towards the next
color handle.
You can click on any color handle and move its position in the meter scale. If you hold
down [Shift] while moving the handle with the mouse, it will move ten times slower for
more precise positioning. You can also nudge the color handle’s position with the arrow
up/down keys. Holding Shift while nudging will move the color handle ten times faster.
•
You can add color handles by [Alt]/[Option]-clicking anywhere along
the side of the meter scale. [Ctrl]/[Command]-clicking on a handle removes it from the meter scale.
By adding more color handles to the meter scale, you can define colors for more specific signal levels. Try adding two color handles very close to one another. This way,
you can make the meter color change more rapidly at a specific signal level.
CUBASE SX/SL
14 Working with the new features
Page 15

•
To change the color of a handle, click on the handle to select it. You
can also use the [Tab] key to select the next handle. (To select the previous handle, hold down [Shift] and press the [Tab] key.) Use the hue
and brightness controls on the right to alter the handle’s color.
The currently selected color handle is indicated by a black triangle.
Appearance–Work Area
“Work areas” in this context refers to those places where the actual
data is displayed, such as the Project window event display. In these
areas, there are items such as vertical and horizontal grid lines which
can be altered in intensity by the controls found on this subpage.
Editing
On the main Editing page, the following options have been added:
•
Use Up/Down Navigation Commands for selecting Tracks only
By default, tracks are selected with the up/down arrow keys on the
computer keyboard. These are however also used for selecting events
which can lead to confusing results in some cases. Since track selection is a most vital operation in both editing and mixing, you now have
the opportunity to use the navigation controls for track selection only.
The following applies:
• When this option is deactivated and no event/part is selected in the Project
window, the up/down arrow keys on the computer keyboard are used to step
through the tracks in the Track list – just as you would expect this to work.
• When this option is deactivated and an event/part is selected in the Project
window however, the up/down arrow keys still step through the tracks in the
Track list – but on the currently selected track, the first event/part will automatically be selected as well. If this is not the desired behavior, you have to
activate “Use Up/Down Navigation Commands for selecting Tracks only”.
• When this option is activated, the up/down arrow keys are only used to
change the track selection – the current event/part selection in the Project
window will not be altered.
•
Default Track Time Type (Cubase SX only)
This allows you to specify the default track time type for new tracks
(Audio, Group/FX, MIDI and Marker tracks). When you change this
setting, all new tracks will use the selected time type. You can choose
CUBASE SX/SL
Working with the new features 15
Page 16

between “Musical”, “Time Linear” and “Follow Transport Main Display”.
Selecting “Musical” will cause all added tracks to be set to musical
time type (the respective button shows a note symbol). When you select “Time Linear”, all new tracks will use linear time base (i.e. the button shows a clock symbol). The third option uses the primary time format setting on the Transport panel. When this is set to “Bars+Beats”,
tracks with musical time base will be added. When this is set to any of
the other options (Seconds, Timecode, Samples, etc.), all new tracks
will use linear time base.
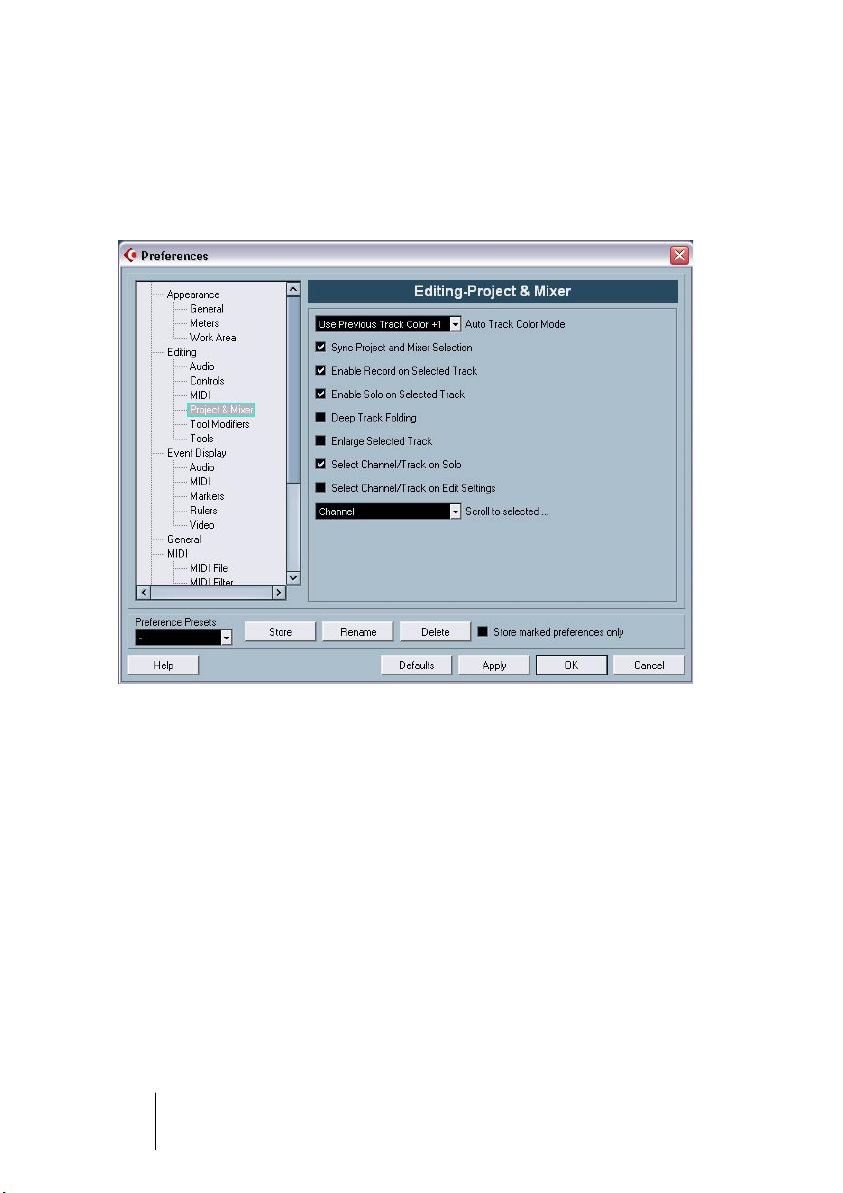
Editing–Project & Mixer
This is a new subpage of the Preferences dialog with the following
new options:
•
Auto Track Color Mode
This offers you several options for automatically assigning colors to tracks that are
added to the project.
•
Sync Project and Mixer Selection
This is not a new feature, rather an old one with a new name. In previous versions, this
was called “Mixer Selection follows Project”. It has been renamed because the function really works both ways. For a description of the functionality (with the “old” name
“Mixer Selection follows Project”), see the dialog help for the Preferences dialog or the
chapter “The Mixer” in the Operation Manual.
•
Deep Track Folding
When you activate this option, any folding settings you make (on the Project menu –
Track Folding submenu) also affect the sub elements of the tracks, i.e. if you fold in a
folder track which contains 10 audio tracks 5 of which have several automation subtracks open, all these audio tracks within the folder track will be folded in as well.
•
Enlarge Selected Track
Activate this option to enter a mode where the selected track in the Project window
will be enlarged. (You can adjust the size directly in the Track list if the default enlargement factor does not suit you.) When this option is activated and you select another
track in the Track list, this is automatically enlarged and the previously selected track is
displayed in its previous size again.
Please note that Enlarge Selected Track is also available on the Edit menu.
CUBASE SX/SL
16 Working with the new features
Page 17

•
Select Channel/Track on Solo
When you activate this option, a track in the Track list or a channel in the mixer automatically gets selected when the Solo button is activated.
Deactivating this option always keeps the current selection status, regardless of the
Solo setting for the tracks.
•
Select Channel/Track on Edit Setting
When you activate this option, a track in the Track list or a channel in the mixer automatically gets selected when you click the respective Edit button (e).
Deactivating this option always keeps the current track/channel selection.
•
The “Scroll to selected…” pop-up menu
The options in this pop-up menu work as follows:
• When you select “Track”, the Track list display follows the display in the Mixer,
i.e. when you select a channel in the mixer, the respective track is automatically displayed in the Track list as well. (However, this does not work the other
way around in this mode.)
• When you select “Channel”, selecting a track in the Track list automatically
scrolls the mixer to display the respective channel strip. (Here too, this does
not work vice versa.)
• When you select “Channel and Track”, both Track list and Mixer are automatically scrolled to display the track or channel selected in the other.
• Selecting “Disabled” deactivates this scrolling behavior.
Editing–Tools
•
Cross Hair Cursor options:
This allows you to display a cross hair cursor when working in the
Project window and editors, facilitating navigation and editing, especially when arranging in large projects. You can set up the colors for
the line and the mask of the cross hair cursor, and define its width.
The cross hair cursor works slightly differently for the different tools.
• When the Selection tool (or one of its subtools) is selected, the cross hair
cursor appears when you start moving/copying a part/event or using the
event trim handles.
• When the Scissors tool is selected, the cross hair cursor appears as soon as
you move the mouse over the event display.
• For the other tools, the cross hair cursor is not used.
CUBASE SX/SL
Working with the new features 17
Page 18

General
On the General page, there is one new option:
•
Maximum Backup Files
This allows you to specify how many backup files will be created with the Autosave
function. When the maximum number of backup files is reached, the existing files will
be overwritten (starting with the oldest file).
MIDI
On the main MIDI page, the following options have been added:
•
Insert Reset Events after Record
This is a very handy function for MIDI recording. At the end of each recorded part, a Reset event will be inserted, resetting controller data
such as Sustain, Aftertouch, Pitchbend, Modulation, Breath Control,
etc. This is useful if a MIDI part is recorded and e.g. the Sustain pedal
is still held after stopping recording. Usually, this would cause all following parts to be played with Sustain, as the Pedal Off command
was not recorded. This can be prevented by activating “Insert Reset
Events after Record”.
•
Chase Events – Chase not limited to Part Boundaries
In previous program versions, Chase was only performed on parts
“touched” by the position cursor.
When you activate this option, MIDI controllers are also chased outside the part boundaries, i.e. the Chase will be performed on the part
touched by the cursor as well as on all the parts to the left of it. Please
note that this option should be deactivated for very large projects, as
it considerably slows down e.g. positioning and soloing.
When you deactivate this option, the MIDI controllers are only chased
within the parts under the position cursor.
CUBASE SX/SL
18 Working with the new features
Page 19

VST
The main VST page now has three further subpages. On the main
VST page, the following options have been added:
•
Default Stereo Panner Mode
This allows you to specify the default pan mode for inserted audio
tracks (Stereo Balance Panner, Stereo Dual Panner or Stereo Combined Panner). For a description of these modes, see the chapter
“The Mixer” in the Operation Manual.
•
Activate dialog “Export Warnings as text file”
When you open a project which contains e.g. missing plug-ins, a dialog
opens listing these. When this dialog is closed, a message appears,
asking whether you want to export these warnings as text file. This message can be deactivated, i.e. if you activate the “Do not show this message again” checkbox, it will not be displayed in the future (when opening other projects with missing plug-ins etc.). To display this message
again, and thus be able to export important warnings as text files, activate the option “Activate dialog ‘Export Warnings as text file’”.
•
Warn on Processing Overloads
When you activate this option, a warning message will be displayed
as soon as the CPU clip indicator (on the Transport panel) lights up
during recording.
VST–Metering
•
Map Input Bus Metering to Audio Track (in Direct Monitoring)
When Direct Monitoring is activated in the Device Setup dialog, this
option allows you to map the input bus metering to monitor-enabled
audio tracks. This gives you the opportunity to watch the input levels
of your audio tracks when working in the Project window.
When Direct Monitoring is activated in the Device Setup dialog, this
function works as follows:
CUBASE SX/SL
Working with the new features 19
Page 20

• When “Map Input Bus Metering to Audio Track (in Direct Monitoring)” is activated, audio tracks show the metering signal from the input bus they are
routed to as soon as the track is record enabled.
Note that the tracks are mirroring the input bus signal, i.e. you will see the
same signal in both places. When using mapped metering, any functions (e.g.
trimming) you apply to the audio track are not reflected in its meters.
• When “Map Input Bus Metering to Audio Track (in Direct Monitoring)” is not
activated, metering works as usual (see the Operation Manual for details).
VST–Scrub
•
CPU Saving Scrub Mode
When you activate this option, scrubbing will be less demanding on the
processor. This can be very useful when scrubbing in a large project,
where the “normal” scrub behavior leads to processing overloads.
When “CPU Saving Scrub Mode” is activated, the effects are disabled
for scrubbing and the resampling quality is lower.
Key Commands
A wide range of new key commands has been added for various areas
of the program. These can be assigned or modified as usual in the Key
Commands dialog (this is described in detail in the Key Commands
chapter in the Operation Manual).
There is now a separate Mixer section in the Key Commands dialog
(see also page 48), allowing you to e.g. hide the different channel
types, to save or load the Mixer settings, etc. In the Edit category, you
can now define a key command for opening the Device panel for the
selected track. Also, please note that the key command that was used
to open the Pool window can now be used to close the Pool as well.
CUBASE SX/SL
20 Working with the new features
Page 21

Track Folding
On the Project menu, the Track Folding submenu has been added,
allowing you to quickly show, hide or invert what is displayed in the
Project window event display. This allows e.g. for dividing the project
into several parts (by creating several folder tracks for the different
project elements) and showing/hiding their contents by selecting a
menu function (or using a key command). The following options are
available:
• Toggle Selected Track
When you select this menu option, the fold state of the selected track is reversed, i.e.
if the track was folded in (its elements (subtracks) were hidden), it is now unfolded (all
subtracks displayed) and vice versa.
• Fold Tracks
Select this menu option to fold in all open folder tracks in the Project window. Please
note that the exact behavior of this function depends on the “Deep Track Folding” setting in the Preferences dialog, see page 16.
• Unfold Tracks
Select this menu option to unfold all folder tracks in the Project window. Please note
that the exact behavior of this function depends on the “Deep Track Folding” setting in
the Preferences dialog, see page 16.
CUBASE SX/SL
Working with the new features 21
Page 22

• Flip Fold States
Select this menu option to flip the fold states of the tracks in the Project window. This
means that all tracks that were folded in will be unfolded and all unfolded tracks will be
folded in, respectively.
• You can assign key commands for these menu options in the Key Commands dialog (Project category).
• Note that there is a separate Deep Track Folding setting in the Preferences dialog (Editing – Project & Mixer page), which affects some of
these menu items (see page 16).
CUBASE SX/SL
22 Working with the new features
Page 23

Gluing events/parts together
In version 3.1 of the program, the behavior of the Glue Tube tool has
been modified. Below, you will find descriptions of what you can do
with this tool.
Working with the Glue Tube tool
By using the Glue Tube tool, you can combine several audio or MIDI
events/parts or even controller events in the Project window, the InPlace-Editor, the MIDI editors, etc. in the following ways:
Gluing one audio event/part to the next
Clicking on an audio event or part with the Glue Tube tool glues it to
the next audio event on the track. The events do not have to touch one
another. The result is a part containing the two events. The resulting
part will get the name of the track:
If you click on the “bass” event to glue it to the “guitar” event…
…a part with the name of the audio track will be created, containing the two events.
• If you first split an event and then glue the two sections together again
(without moving or editing them first), they become a single event again.
Each audio event in the part will keep its own properties (event name,
mute status, etc.).
CUBASE SX/SL
Working with the new features 23
Page 24

Gluing one MIDI event/part to the next
Clicking on a MIDI part with the Glue Tube tool glues it to the next
part on the track. The parts do not have to touch one another. The
resulting part will get the name of the first part:
If the Parts overlap, they are merged in the overlapping area, i.e. no
events are lost.
The resulting long part will get the properties of the first part (the one on
which you clicked). This includes part name, part mute status, etc.
• You can also glue events within folders this way.
Gluing several events in one go
You can also glue several selected events on one or on several tracks
in one go. This means that you can select several pairs of events on
different tracks, and click with the glue tool on one of them. All selected
events on the same track will be glued together.
Click on one of the selected events with the Glue Tube tool…
…to glue the events on the same track together.
CUBASE SX/SL
24 Working with the new features
Page 25

Gluing an event to all following events of a track in one go
If you hold down [Alt]/[Option] and click on an event with the Glue
Tube tool, this and all following events on that track will be glued together. You can also change the default key command for this in the
Preferences dialog (Editing–Tool Modifiers page).
CUBASE SX/SL
Working with the new features 25
Page 26

Metronome settings
There is a new option called Use Time Signature at Record Start Time
in the Precount Options section of the Metronome Setup dialog
(which is accessed via the Transport menu).
In the Precount Options section you can specify how long (i.e. for how
many bars) a precount click should be audible before recording starts
and which time signature this precount click should use.
There are three options regarding the time signature of the precount:
• When you select Use Time Signature at Project Time, the time signature of the Tempo track including all tempo changes is used.
• When you select Use Signature, you can set a separate time signature that is independent of the Tempo track.
• When you select Use Time Signature at Record Start Time, the precount will automatically use the time signature and tempo set at the
position where recording will start.
CUBASE SX/SL
26 Working with the new features
Page 27

Synchronization settings
There is a new option called “MIDI Clock Follows Project Position” in
the MIDI Clock Destinations section of the Synchronization Setup dialog (which is accessed via the Transport menu).
The MIDI Clock Destinations section in the Synchronization Setup dialog.
This option is similar to the “MIDI Timecode Follows Project Time” option in the MIDI Timecode Destinations section in the same dialog (see
the Synchronization chapter in the Operation Manual), only that this is
applicable for devices synchronized to MIDI Clock signals instead of
MIDI Timecode signals.
• Activate “MIDI Clock Follows Project Position” if you want the other
device to follow when you loop, jump and locate during playback.
When this is activated, the sent MIDI Clock signals will follow the sequencer time and
tempo position at all times.
Please note that some external devices may not react smoothly to these
repositioning messages. Especially when working with some older devices, it may take some time for them to synchronize accurately to the
project time.
CUBASE SX/SL
Working with the new features 27
Page 28

Duplicating tracks
On the Project menu, you will find the new “Duplicate track” command.
When you select a track in the track list and choose this option, a copy
of the selected track is created and inserted below the original track.
You can also define a key command for this function.
Exporting selected tracks (Cubase SX only)
Cubase SX allows you to select individual tracks of a project and to export these as a track archive. When exporting, you now have the option
to exclude the media files referenced by these tracks from the export,
i.e. only file references and other track specific data are exported.
Importing Track Archives (Cubase SX only)
Selecting individual tracks in an archive
When importing a track archive, you can select which of the tracks
contained in this archive you wish to import. Proceed as follows:
1. Pull down the File menu and open the Import submenu.
2. On the submenu, select Track Archive.
CUBASE SX/SL
28 Working with the new features
Page 29

3. In the file dialog that appears, locate the archive’s xml file, select it and
click “Open”.
The Import Options dialog opens.
4. In the Import Options dialog, click in the Import column to the left to
select the desired track(s).
A check mark is shown for all selected tracks.
CUBASE SX/SL
Working with the new features 29
Page 30

Sample rate conversion when importing tracks
A track archive may contain media files with a sample rate that is different from the sample rate of your currently active project. When importing such a track archive, the Import Options dialog will show the
different sample rates and an additional option in the Media Options
section:
“Perform Sample Rate Conversion” is available in the Import Options dialog.
In the Media Options section of the Import Options dialog, select
which operation to perform when importing the track(s):
• Select “Use Media Files From Archive” if you want to import the track
without copying the media files into your project folder.
• Select “Copy Media To Project Folder” if you want to import the media files into your project folder.
• When “Copy Media To Project Folder” is selected, the “Perform Sample Rate Conversion” option becomes available, allowing you to convert
the imported media files to the sample rate used in the active project.
CUBASE SX/SL
30 Working with the new features
Page 31

The Stereo Pan Law modes
In the Project Setup dialog there is a pop-up menu named “Stereo Pan
Law”, on which you can select a pan mode. These different pan modes
provide gain compensation. This is necessary because without compensation, the gain of the sum of the left and right side will be higher
(louder) if a channel is panned center than if it’s panned left or right.
This is described in the chapter “The mixer” in the Operation Manual.
• You can now also select “Equal Power” on this pop-up menu, which
means that the power of the signal will remain the same regardless of
the pan setting.
Resizing tracks in the Track list
With the introduction of version 3.1 of the program, you have now the
possibility to resize a track in the Track list without automatically selecting it. This is a handy feature when “Enlarge Selected Track” is activated (see page 16).
Normally, a track automatically gets selected when it is being resized
in the Track list. With Enlarge Selected Track activated, it is therefore
impossible to change the track size for a track permanently. As soon
as you try to resize it, it gets selected and is automatically enlarged.
However, there might be situations where you want to change the size
of one of the tracks permanently. If this is the case, proceed as follows:
1. Move the mouse pointer over the lower border of the (unselected)
track you want to resize.
The mouse pointer turns into a divider symbol.
2. Hold down [Alt]/[Option] and drag the lower border of the track until it
reaches the desired height.
• The track height is adjusted, but the track is not automatically selected.
This way you can change the “original” size of the track. When this
track is selected (and Enlarge Selected Track is activated), it will be
enlarged and when another track gets selected, the track will revert to
the size you specified.
CUBASE SX/SL
Working with the new features 31
Page 32

Inspector sub panels
Normally, when a MIDI track is routed to a VST instrument, a new sub
panel (with the name of the instrument) is added to the inspector for
the selected track.
This is now also the case in the following situations:
• When a MIDI track is routed to an external instrument or effect that has an associated MIDI Device. In this case, the new sub panel gets the name of the
device.
• When a MIDI track is routed to an effect plug-in that also receives audio data,
i.e. that is used as an insert effect for an audio track (e.g. MIDI Gate), a sub
panel for this audio track appears in the MIDI track inspector.
• If a MIDI track is routed to an effect-plug-in assigned to a FX Channel track, a
respective FX sub panel is added to the Inspector.
A MIDI track routed to an effect plug-in used as an insert effect on an audio track.
CUBASE SX/SL
32 Working with the new features
Page 33

Editing – MIDI
Freezing track parameters
This function affects the following settings for MIDI tracks:
• Several settings on the main tab of the Inspector (program and bank selection
and the Delay parameter).
• The settings on the Track Parameters tab (i.e. Transpose, Velocity Shift, Velocity Compression and Length Compression).
• The settings on the Inserts tab. (If you are using an arpeggiator for example
and want to convert the added notes into real events.)
The following settings for MIDI parts are taken into account as well:
• The Transpose and Velocity settings for parts displayed on the info line –
please note that the Volume setting is not taken into account.
Those settings usually do not change the MIDI events themselves, but
rather work like a “filter”, affecting the music on playback. However
sometimes you may want to make these settings permanent, i.e. convert them to “real” MIDI events. For this, you can use the Freeze Track
Parameter command on the MIDI menu. This works as follows:
1. Select the tracks whose settings should become permanent.
2. Pull down the MIDI menu and select “Freeze Track Parameter”.
The Inspector settings will be converted to MIDI events and inserted at the beginning
of the part(s). All notes of the part(s) will be modified accordingly and the Inspector
settings will be reset.
CUBASE SX/SL
Working with the new features 33
Page 34

Dissolving parts
The option “Optimized Display” has been added to the Dissolve Part
dialog. The Dissolve Part function still splits parts into separate channels or pitches (depending on your settings), but you can now automatically remove the silent (empty) areas of the resulting parts by
activating the “Optimized Display” checkbox.
The Legato dialog
One new feature has been added to the Legato dialog. Previously,
when the Legato function was applied, it lengthened the selected note
so that it reached the following note (for a detailed description of this
function, see the Operation Manual chapter “MIDI processing and
quantizing”). In version 3.1 of the program, the Legato Options dialog
contains the checkbox “Selected Only”. When you activate this option, the length of the note will be adjusted so that it reaches the next
selected note, allowing you e.g. to only apply Legato to your bass line
(when playing on a keyboard).
CUBASE SX/SL
34 Working with the new features
Page 35

Selecting notes of equal pitch (Edit menu)
On the Edit menu–Select submenu, you will find the options “Equal
Pitch – all Octaves” and “Equal Pitch – same Octave”. These are not
new in this program version, but the functionality has been modified. Up
until now, selecting one of these menu items selected all following
notes of the same pitch, on all octaves or on the same octave, respectively. In version 3.1 of the program, this has changed. Now all notes in
the part that have the same pitch as the selected note will be selected.
This makes editing in the Key Editor (or in-place editing) much easier,
as you do not have to scroll to the first note of the part with the desired
pitch. Now, all notes of the same pitch on all positions within the part
get selected, which is generally what you want when using this function.
To select all notes (of the same pitch) following the selected note, you can
define an action in the Locical Editor. (For a description of the Logical Editor,
please refer to the chapter “The Logical Editor, Transformer and Input Transformer” in the pdf document “MIDI Devices and Features”).
CUBASE SX/SL
Working with the new features 35
Page 36

Extracting MIDI automation
On the MIDI menu–Functions submenu, the command “Extract MIDI
Automation” has been added. This allows you to automatically convert
continuous controller data of a MIDI part into MIDI track automation
data.
Proceed as follows:
1. Select the desired MIDI part containing the continuous controller data.
2. From the Functions submenu on the MIDI menu, select “Extract MIDI
Automation”. (This command is also available on the Key editor context menu.)
The controller data will automatically be removed from the controller lane in the editor.
3. In the Project window, open the automation track(s) for the respective
MIDI track (by clicking on the plus signs or by selecting “Show used
Automation” from the context menu). You will find that an automation
track has been created for each of the continuous controllers in the part.
• Please note that this function can only be used for continuous controllers.
Data such as e.g. Aftertouch, Pitchbend or Sysex cannot be converted to
MIDI track automation data.
This is an extremely useful function as it allows you to quickly and easily
convert the continuous controllers of your recorded MIDI parts into MIDI
track automation data, making them available for editing in the Project
window.
• Note that to be able to hear the automation data, you have to activate
the Read button for the respective automation track(s).
CUBASE SX/SL
36 Working with the new features
Page 37

External instruments/effects (Cubase SX only)
Since the release of version 3 of Cubase SX, the program supports the
integration of external effect devices into the sequencer signal flow.
With Cubase SX 3.1, you can also integrate external instruments, e.g.
hardware synthesizers. You can use the External Instrument tab in the
VST Connections window to define the necessary return ports and
access the instruments through the VST Instruments window.
You may have projects created in Cubase SX 3.0 that use an external effect as defined in the VST Connections dialog. When you open such a
project in version Cubase SX 3.1 for the first time, a message warning
about a missing plug-in will be displayed. This is because the handling of
external devices has been changed. See page 44.
Requirements
• To use external effects, you need audio hardware with multiple inputs
and outputs. To use external instruments, a MIDI interface must be
connected to your computer.
An external effect will require at least one input and one output (or input/output pairs
for stereo effects) – in addition to the input/output ports you use for recording and
monitoring.
• As always, audio hardware with low-latency drivers is a good thing to
have.
Cubase SX will compensate for the input/output latency and ensure that the audio
processed through external effects isn’t shifted in time. However, this automatic delay
compensation results in added latency – if your audio hardware has a high latency to
start with, this could be a problem.
CUBASE SX/SL
Working with the new features 37
Page 38

Connecting the external effect/instrument
To set up an external effect or instrument, proceed as follows:
1. Connect an unused output pair on your audio hardware to the input
pair on your external hardware device.
In this example, we assume that the hardware device has stereo inputs and outputs.
2. Connect an unused input pair on your audio hardware to the output
pair on your hardware device.
Once the external device is connected to the audio hardware of your
computer, you must set up the input/output busses in Cubase SX:
Setting up external effects
1. Open the VST Connections window from the Devices menu.
2. Open the External FX tab and click “Add External FX”.
3. In the dialog that appears, enter a name for the external effect and
specify the Send and Return configurations. If you want to set up a
MIDI device corresponding to the external effect, click the Associate
MIDI Device button.
Depending on the type of effect, you can specify mono, stereo or surround configurations. When clicking Associate MIDI Device, you can use the MIDI Device Manager
functions to create a new MIDI device for the effect. Note that delay compensation will
only be applied for the effect when you use MIDI devices. For information about the
MIDI Device Manager and user device panels see the chapter “MIDI devices” in the
pdf document “MIDI Devices and Features”.
CUBASE SX/SL
38 Working with the new features
Page 39

4. Click OK. This adds a new External FX bus.
5. Click in the Device Port column for the Send Bus “Left” and “Right”
ports and select the outputs on your audio hardware that you connected in step 1 in the section “Connecting the external effect/instrument”.
6. Click in the Device Port column for the Return Bus “Left” and “Right”
ports and select the inputs on your audio hardware that you connected in step 2 in the section “Connecting the external effect/instrument”.
7. If you like, make additional settings for the bus.
These are found in the columns to the right. Note however that you can adjust these
while actually using the external effect – which may be easier as you can hear the result.
Setting Description
Delay If your hardware effect device has an inherent delay (latency), you
should enter this value here, as it allows Cubase SX to compensate
for that delay during playback. You can also let the delay value be determined by the program by right-clicking (Win)/[Ctrl]-clicking (Mac)
in the Delay column for the effect and selecting “Check User Delay”.
Note that you don’t have to take the latency of the audio hardware into
account – this is handled automatically by the program.
Send Gain Allows you to adjust the level of the signal being sent to the external
effect.
Return Gain Allows you to adjust the level of the signal coming in from the exter-
nal effect.
Note however that excessive output levels from an external effect device may cause clipping in the audio hardware. The Return gain setting cannot be used to compensate for this – you have to lower the
output level on the effect device instead.
MIDI Device When you click in this column, a pop-up menu opens where you can
either disconnect the effect from the associated MIDI device, select
a MIDI device, create a new device or open the MIDI Device Manager in Cubase SX to edit the MIDI device. When Studio Manager 2
is installed, you may also select an OPT editor to access your external effect.
Used Whenever you insert an external effect into an audio track, this column
shows a check mark (“x”) to indicate that the effect is being used.
8. When you are done, close the VST Connections window.
Working with the new features 39
CUBASE SX/SL
Page 40

How to use the external effect
If you now click an insert effect slot for any channel and look at the effect pop-up menu, you will find the new external FX bus listed on the
“External Plugins” submenu.
When you select it, the following happens:
• The external FX bus is loaded into the effect slot just like a regular effect plug-in.
• The audio signal from the channel will be sent to the outputs on the audio
hardware, through your external effect device and back to the program via the
inputs on the audio hardware.
• A parameter window appears, showing the Delay, Send Gain and Return Gain
settings for the external FX bus. You can adjust these as necessary while playing back. The parameter window also provides the “Measure Effect’s Loop Delay for Delay Compensation” button. This is the same function as the “Check
User Delay” option in the VST Connections window. It provides Cubase SX
with a Delay value to be used for delay compensation. When you have defined
a MIDI device for the effect, the corresponding Device window will be opened.
When Studio Manager 2 is installed, and you have set up a corresponding
OPT editor, this OPT editor will be displayed.
The default parameter window for an external effect
Like any effect, you can use the external FX bus as an insert effect or
as a send effect (an insert effect on an FX channel track). You can deactivate or bypass the external effect with the usual controls.
CUBASE SX/SL
40 Working with the new features
Page 41

Setting up external instruments
1. Open the VST Connections window from the Devices menu.
2. Open the External Instrument tab and click “Add External Instrument”.
3. In the dialog that appears, enter a name for the external instrument
and specify the number of required mono and/or stereo returns. If you
want to set up a MIDI device corresponding to the external instrument,
click the Associate MIDI Device button.
Depending on the type of instrument, a specific number of mono and/or stereo return
channels is required. When clicking Associate MIDI Device, you can use the MIDI Device Manager functions to create a new MIDI device. For information about the MIDI
Device Manager and user device panels see the chapter “MIDI devices” in the pdf
document “MIDI Devices and Features”.
4. Click OK. This adds a new external instrument bus.
5. Click in the Device Port column for the Return Bus “Left” and “Right”
ports and select the inputs on your audio hardware to which you connected the external instrument.
6. If you like, make additional settings for the bus.
These are found in the columns to the right. Note however that you can adjust these while
actually using the external instrument – which may be easier as you can hear the result.
Setting Description
Delay If your hardware device has an inherent delay (latency), you should
enter this value here. This allows Cubase SX to compensate for
that delay during playback. Note that you don’t have to take the latency of the audio hardware into account – this is handled automatically by the program.
CUBASE SX/SL
Working with the new features 41
Page 42

Setting Description
Return Gain Allows you to adjust the level of the signal coming in from the ex-
ternal instrument.
Note however that excessive output levels from an external device
may cause clipping in the audio hardware. The Return gain setting
cannot be used to compensate for this – you have to lower the
output level on the device instead.
MIDI Device When you click in this column, a pop-up menu opens where you
can either disconnect the instrument from the associated MIDI device, select a MIDI device, create a new device or open the MIDI
Device Manager in Cubase SX to edit the MIDI device. When Studio Manager 2 is installed, you may also select an OPT editor to
access your external instrument.
Used Whenever you insert the external instrument into a VST Instrument
slot, this column shows a chicanery (“x”) to indicate that the instrument is being used.
7. When you are done, close the VST Connections window.
How to use the external instrument
Once you have set up the external instrument in the VST Connections
window, you can use it as a VST Instrument. Open the VST Instruments
window and click on an empty instrument slot. In the instrument pop-up
menu, your external instrument is listed on the External Instruments
submenu:
CUBASE SX/SL
42 Working with the new features
Page 43

When you select the external instrument in the VST Instruments window, the following happens:
• A parameter window for the external device is opened automatically. This may
either be the Device window, allowing you to create a generic device panel,
an OPT editor window or a default editor. For information about the Device
window, the MIDI Device Manager and User device panels, see the chapter
“MIDI devices” in the pdf document “MIDI Devices and Features”.
• To send MIDI notes to the external instrument, open the output pop-up menu in
the Inspector for the corresponding MIDI track and select the MIDI device to
which the external instrument is connected. This ensures use of delay compensation. The instrument will now play any MIDI notes it receives from this track
and return them to Cubase SX through the return channel(s) you have set up.
The external instrument will behave like any other VST Instrument in
Cubase SX.
About the Favorites buttons
In the VST Connections window, both the External FX tab and the
External Instrument tab feature a Favorites button.
The Favorites button on the External FX tab
Favorites are device configurations that you can recall at any time, like
a library of external devices that are not constantly connected to your
computer. They also allow you to save different configurations for the
same device, e.g. a multi-effect board or an effect that provides both a
mono and a stereo mode.
To save a device configuration as a favorite, proceed as follows:
• When you have added a new device in the VST Connections window,
select it in the Bus Name column and click the Favorites button.
A context menu is displayed showing an option to add the selected effect or instrument
to the Favorites.
• You can recall the stored configuration at any time by clicking the
Favorites button and selecting the device name from the context menu.
CUBASE SX/SL
Working with the new features 43
Page 44

About the “plug-in could not be found” message
When you open a project that uses an external effect/instrument, you
may get a “plug-in could not be found” message. This will happen
whenever you remove an external device from the VST Connections
window although it is used in a saved project, or when transferring a
project to another computer on which the external device is not defined. You may also see this message when opening a project last
saved with version 3.0 of Cubase SX.
In the VST Connections window, the broken connection to the external device is indicated by an icon in the Bus Name column:
To reestablish the broken connection to the external device, simply
right-click (Win) or [Ctrl]-click (Mac) the entry for the device in the
Bus Name column and select “Connect External Effect”. The icon is
removed, and you can use the external device within your project as
before.
Note that busses set up for external effects or external instruments are
saved not with the current project, but “globally”, i.e. for your particular
computer setup.
CUBASE SX/SL
44 Working with the new features
Page 45

Freezing external effects/instruments
Just as when working with regular VST instruments and effects, you
can also choose to freeze external effects and instruments. The general procedure is described in detail in the Operation Manual chapters
“Audio effects” and “VST Instruments”.
When freezing external instruments or effects, you can adjust the respective tail value in the Freeze Channel Options dialog:
• Use the arrow buttons next to the Maximum Tail value field to set the desired
Tail length, i.e. the range after the part boundary that should also be included
for the freeze. You can also click directly in the value field and enter the desired
value manually (the maximum value being 60 s).
• When Maximum Tail is set to 0s (default), the freezing will only take into
account the data within the Part boundaries.
CUBASE SX/SL
Working with the new features 45
Page 46

Mixer operations
Several changes have been made to the mixer, to facilitate editing,
navigating, etc. A whole new Mixer category has been added in the
Key Commands dialog for example, allowing you to create keyboard
shortcuts for the mixer functions you often work with. Several new
functions have been added to the mixer context menu, allowing you
e.g. to specify which channels functions should be applied to. These
new functions are described in the following sections.
The context menu functions
The context menu contains two new submenus:
CUBASE SX/SL
46 Working with the new features
Page 47

The Window submenu
This submenu is handy for quickly switching to another open mixer
window, showing/hiding the different mixer panes etc. It contains the
following options:
• Show Routing View
Allows you to show/hide the topmost section of the mixer which contains the input/
output routing settings.
• Show Extended View (Cubase SX only)
Allows you to show/hide the middle section of the mixer, where you can display different settings for the channels (EQs, Send effects, etc.).
• Next Mixer
This displays the next mixer window (if you have several mixer windows open).
The Command Target submenu
This submenu lets you specify which channels should be affected by
the “commands” (basically all the functions that can be assigned key
commands), e.g. what to display in the extended mixer pane (Cubase
SX only), the width setting of the channel strips, etc. It contains the
following options:
• All Channels
Select this if you want your commands to affect all channels.
• Selected Only
Select this option if you want your commands to affect the selected channels only.
• Exclude Inputs
Select this if you do not want your commands to affect the input channels.
• Exclude Outputs
Select this if you do not want your commands to affect the output channels.
CUBASE SX/SL
Working with the new features 47
Page 48

Copying channel settings to/from several tracks in one go
In the previous program version, the channel settings could be copied
for one channel and pasted into another channel. This behavior was a
bit cumbersome if the same settings had to be applied to several channels, as they had to be applied to each channel separately. In version
3.1 of the program, it is now possible to apply the settings of one channel on several other channels in the mixer, or even to select several
channels, copy their settings and apply them to the same number of
other channels in one go.
Mixer key commands
The Key Commands dialog now contains a dedicated Mixer category,
allowing you to create keyboard shortcuts for the mixer functions. For
a detailed description of setting up and working with key commands,
see the Key Commands chapter in the Operation Manual.
CUBASE SX/SL
48 Working with the new features
Page 49

Panning Bypass
In version 3.1 of the program, it is now possible to bypass the panning
for all track types except MIDI tracks. To do this, keep [Shift] and [Alt]/
[Option] pressed and click on the pan setting for the respective channel in the mixer (on the fader panel or in the extended mixer view –
Cubase SX only). The Panning Bypass state is reflected in all the different pan setting sections, e.g. if you bypass a channel in the mixer,
this is automatically reflected in the Inspector for the respective track.
When panning is bypassed for a channel, the following happens:
• Mono channels will be panned center.
• Stereo channels will be panned left and right.
• Surround channels will be panned center.
• To deactivate Panning Bypass, simply [Shift]+[Alt]/[Option]-click again.
CUBASE SX/SL
Working with the new features 49
Page 50

The Tempo Track (Cubase SX only)
A very handy new feature can be found in the Tempo Track window:
the Process Bars dialog. This dialog uses the global “Insert Silence”
and “Delete Time” functions from the Edit menu – Range submenu,
but uses a musical “bars+beats-based” environment for calculating
the necessary ranges (or parameters). It also ensures that the time
signatures stay “in sync” after these operations. This allows for a
much more intuitive approach when inserting, deleting or replacing
“time” while working with a project set to the Bars+Beats time type.
The Process Bars dialog
The Process Bars dialog is opened by clicking on the respective button on the Tempo Track toolbar (next to the Process Tempo button).
Click this button on the Tempo Track toolbar…
… to open the Process Bars dialog.
The dialog contains the following elements:
Option Description
Bar Range The Bar Range display gives you a graphical overview of the
CUBASE SX/SL
50 Working with the new features
position of the bar range within the project as well as its
length. You can change the setting here by dragging the
green rectangle, however this is accomplished much easier
by using the Start and Length value fields (see below).
The small arrow pair in this section mark the length of the
current project. The area to the right marks the bar range that
can be added (500 bars max.).
Page 51

Option Description
Bar Range – Start This is where you specify the desired start position for the
bar range. Click on the small arrows to raise/lower the value
by one step or click directly in the value field and enter the
desired number manually.
Bar Range – Length This is where you specify the desired length of the bar range.
Click on the small arrows to raise/lower the value by one
step or click directly in the value field and enter the desired
number manually.
Action – Insert Bars When you select this action, clicking the Process button will
insert the specified number of empty bars with the set time
signature at the desired start position in the project.
Action – Delete Bars When you select this action, clicking the Process button will
delete the specified number of bars beginning at the set start
position.
Action –
Reinterpret Bars
Action – Replace Bars When you select this action, clicking the Process button will
Action – Signature This lets you specify the desired time signature for the action
When you select this action, clicking the Process button will
reinterpret the bar range to fit the specified time signature.
This is very special in the sense that both bars+beats positions of the notes and the tempo are being changed to fit the
new time signature, but the playback of the notes will stay just
the same.
If you want to reinterpret e.g. a bar with the time signature 3/4
so that it gets the time signature 4/4, quarter notes will become half note triplets. If you reinterpret a bar with the time
signature 4/4 to attain 3/4, you will get quadruplets.
cause the time signature of the specified bar range to be replaced by the one you specify in this dialog.
you select in the Action pop-up menu (except for the Delete
Bars action).
Process Click this button to apply your changes to the desired bar
range.
Close Clicking this button closes the Process Bars dialog. Please
note that you have to click the Process button first to apply
your settings. Clicking this button without clicking on “Process” first will close the dialog without applying your settings.
CUBASE SX/SL
Working with the new features 51
Page 52

Pool Operations
The extended search functionality in the Pool (Cubase SX only)
A number of new features have been added to the Search pane in the
Pool window. When you click the Search button in the Pool toolbar, a
lower Pool pane is displayed, allowing you to search for files on your
hard disk or other media. This is described in detail in the chapter “The
Pool” in the Operation Manual. The new program version allows for a
more extensive search, including a range of additional search filters.
This works as follows:
1. Click the Search button on the toolbar.
The Search pane is displayed in the lower part of the Pool window.
• By default, the search parameters available in the lower Pool pane are
“Name” and “Location”.
When you move the mouse pointer over the “Name” text to the right of the name field,
an arrow is displayed to the right. Click on it to open a pop-up menu.
Move the mouse pointer over the “Name” text to the right of the name field…
… to show the Extended Search pop-up menu.
CUBASE SX/SL
52 Working with the new features
Page 53

2. When you click on “Name”, the Extended Search pop-up menu opens.
This contains six options determining which settings will be displayed above the Location parameter (Name, Size, Bitsize, Channels, Sample Rate or Date) and the Add Filter and Presets submenus.
The pop-up menu with the extended search options.
3. Select one of the topmost 6 options in the pop-up menu to change
the search option above the Location pop-up menu.
This way, you can choose e.g. to display the Size or Sample Rate parameter instead of
the Name field.
4. If you want to display more search options, select the desired element
from the Add filter submenu.
This allows you e.g. to add the Size or the Sample Rate parameters to the already displayed Name and Location parameters.
This allows for a very detailed search, helping you to master even the
largest, most chaotic sound database.
CUBASE SX/SL
Working with the new features 53
Page 54

Pool key commands
• It is now possible not only to open, but also to close the Pool window
using a key command. By default, this is [Ctrl]/[Command]+[P], but you
can change this as usual in the Key Commands dialog (Project page).
Video
When working with video in Cubase SX/SL, video files are displayed
as events/clips on the video track, with thumbnails representing the
frames in the film (if the option “Show Video Thumbnails” is activated
in the Preferences dialog). In the previous program versions, these
were calculated in real time and had to be redrawn during e.g. scrolling or moving. As this does consume quite a lot of processor power,
the reaction sometimes seemed sluggish. To remedy this, you now
have the possibility to generate a thumbnail cache file which will be
used in situations requiring a lot of processor power. This is a very
handy new feature, allowing you to economize system performance
during CPU intensive tasks.
Generating thumbnail cache files during video import
When you import a video file into Cubase SX/SL 3.1, you will find that
the additional option “Generate Thumbnail Cache” is available on the
Import dialog.
The Generate Thumbnail Cache option activated in the Import Video dialog.
CUBASE SX/SL
54 Working with the new features
Page 55

When you activate “Generate Thumbnail Cache” in the Import video
dialog and click “Open”, a thumbnail cache file will be created before
the file is inserted in the Project window. A window will be displayed
showing you the progress and the estimated time for the process.
The thumbnail cache file is created.
After the cache file is created, the window will be closed and the
video clip is inserted as usual. When you now start video playback
and perform processor consuming operations, the thumbnail file is
used to display the video frames in the Project window. When enough
processor power is available, the “real” calculated thumbnail frames
are displayed again.
• The generated thumbnail cache file will be stored in the same folder as
the video file and will get the name of the file with the suffix “.videocache”.
Generating thumbnail cache files from within the Pool
When you have video files without thumbnail cache files (e.g. if you did
not create a thumbnail cache file during import, if you imported the file
by drag & drop or if you are working with an older project), you always
have the possibility to generate the thumbnail cache file at a later stage.
This is done from within the Pool.
Proceed as follows:
1. Open the Pool window and locate the video file you want to create a
thumbnail cache file for.
2. Right-click (Win) or [Ctrl]-click (Mac) on the file to open the context
menu and select “Generate Thumbnail Cache”.
Just as when creating the file during import, the status window opens (see above).
After the file is created, the window will be closed and the thumbnail
cache file is used when necessary (see below).
CUBASE SX/SL
Working with the new features 55
Page 56

Please note that the cache file will not be automatically updated if a
video file is edited. Whenever you change a video file (e.g. in a video editing application), you need to create a new thumbnail cache file manually, as described above.
When exactly is the cache file used?
The cache file is used in situations where the processor load is very
high and the correct redrawing or real-time calculation might use system resources necessary for editing or processing. When the cache
file is used and you zoom in on the thumbnails, you will see that they
are in a lower resolution, i.e. the pictures are not as clean as when they
are calculated. When the processes that rely heavily on the computer
CPU are finished, the frames will automatically be calculated again, i.e.
the program switches automatically between real-time calculation of
the pictures and the usage of the cache file.
The above paragraphs apply only if “Show Video Thumbnails” is activated in the Preferences dialog, i.e. if thumbnails are displayed in the
Project window.
CUBASE SX/SL
56 Working with the new features
Page 57

Score editor operations
About the selection indicators
With version 3.1 of the program, the display of selected elements in
the Score editor has changed. The following applies:
• Selected events are displayed in red.
• The active staff has blue lines and a blue rectangle to the left.
Please note that you can use this blue rectangle to select, move or edit the active staff.
• A selected system (grand staff) is indicated by a red line regrouping
the staves.
• The active staff in a selected system has violet lines.
Showing/Hiding the custom colors
If you have specified colors for notes (or other elements) in the score
(see the separate pdf document “Score Layout and Printing”), the score
coloring may become confusing as you might e.g. mistake colored
notes for selected notes and vice versa. Therefore, you have now the
possibility to hide (ignore) all color settings you specified for the score:
To hide the color settings you specified, simply click the “Hide Colors”
button on the Score editor toolbar.
Click the “Hide Colors” button to hide all your color settings.
• If the custom colors are hidden in the Score editor, only the selection
indicator colors are used, as described above.
• To display your color settings again, simply click the button again.
CUBASE SX/SL
Working with the new features 57
Page 58

The Set Note Info dialog
The Set Note Info dialog now contains an option called “No Flag/
Beam”. Activate this to hide the flags or beams of the selected note(s).
The No Flag/Beam option in the Set Note Info dialog.
CUBASE SX/SL
58 Working with the new features
Page 59

Remote Control
Accessing user panel parameters via remote control devices (Cubase SX only)
Cubase SX allows you to control external MIDI devices through user
device panels. When you have assigned project parameters to a device panel to be displayed in the Mixer (i.e. when creating the panel,
you must select the Channel Strip Size option in the Add Panel dialog), you can now access these parameters through some of the remote control devices supported by Cubase SX.
This feature is supported for the following devices:
• Steinberg Houston
• Mackie Control
• Mackie HUI
• Yamaha DM 2000
• CM Motormix
• SAC2K
For these remote control devices, an extra display page has been
added in the Inserts section for the selected channel.
This page is called User and is displayed as the 9th insert page for
audio channels and as the 5th insert page for MIDI channels. It allows
you to control the parameters assigned to your user device panel from
your remote control device.
CUBASE SX/SL
Working with the new features 59
Page 60

General improvements
Recovery of audio recordings after system failure
Stability and reliability of Cubase SX/SL have further improved with
the release of version 3.1.
Normally, when a computer crashes, all changes made to your current
project since you last saved it will be lost. Usually, there is no quick
and easy way to recover your work.
With Cubase SX/SL 3.1, when your system crashes while you are recording (because of a power cut or other mishap), you will find that
your recording is still available, from the moment when you started recording to the time when your computer crashed.
When you experience a computer crash during a recording, simply relaunch the system and check the project record folder (by default this
is the Audio subfolder inside the project folder). It should contain the
audio file you were recording at the time of the crash.
Please note: This new feature does not constitute an “overall” guarantee
by Steinberg. While the program itself was improved in such a way that
audio recordings can be recovered after a system failure, it is always
possible that a computer crash, power cut, etc. might have damaged
any other component of the computer, making it impossible to save or
recover any of the data.
Warning: Please do not try to actively bring about such a situation to test
this new feature. Although the internal program processes have been
improved to cope with such situations, Steinberg cannot guarantee that
other parts of the computer may not be damaged as a consequence.
CUBASE SX/SL
60 Working with the new features
Page 61

About the Dolby Digital and DTS Encoders (Cubase SX only)
With version 3.1 of the program, Steinberg now provides support for
the Dolby Digital and DTS encoders not only for Nuendo, but also for
Cubase SX, allowing you to e.g. export a surround mix to a Dolby Digital AC3 file or a DTS file (provided you have purchased the Steinberg
Dolby Digital Encoder or the Steinberg DTS Encoder). For details,
please go to www.steinberg.net.
CUBASE SX/SL
Working with the new features 61
Page 62

CUBASE SX/SL
62 Working with the new features
Page 63

Index
Page 64

C
Converting MIDI to CC track
automation 36
I
Inspector
Sub panels 32
D
Dolby Digital Encoder (Cubase SX)
About 61
DTS Encoder (Cubase SX)
About 61
Duplicate track 28
E
Exporting Selected Tracks 28
External effects
About 37
Favorites 43
Freezing 45
Missing plug-ins 37, 44
Setting up 38
External instruments
About 37
Favorites 43
Freezing 45
Missing plug-ins 37, 44
Setting up 41
Extracting MIDI Automation 36
F
Folding
Track Folding options 21
G
Glue Tube tool 23
Gluing all events of a track 25
Gluing one event to the next 23
Gluing selected events 24
Gluing several events in
one go 24
Using modifiers 25
K
Key commands
Mixer 48
Pool 54
L
Legato dialog 34
M
Metronome Settings 26
Metronome Setup
Use Time Signature at Record
Start Time 26
MIDI
Dissolving Parts 34
Freezing Track Parameters 33
Legato Options 34
Preferences 18
Selecting notes of equal pitch
(same or all octaves) 35
MIDI Handling 33
Mixer 46
Context menu functions 46
Copying channel settings 48
Mixer key commands 48
P
Panning Bypass 49
Pool
Search Filters 53
Search Functionality 52
Pool key commands 54
CUBASE SX/SL
64 Index
Page 65

Preferences 12
Appearance 13
Editing 15
General page 18
MIDI 18
VST 19
Process Bars dialog 50
R
Recovering recordings 60
Remote Control
Accessing user panels via re-
mote control devices 59
Resizing tracks in the Track list 31
S
Score editor
Colors 57
No Flag/Beam 58
Selection indicators 57
Showing/Hiding the custom
colors 57
Search Functionality in Pool 52
Stereo Pan Law
Equal Power 31
V
Video
Thumbnail cache files 54
T
Tempo Track
Process Bars dialog 50
Thumbnail cache files
Generating 54
Track archive
Exporting 28
Sample rate conversion 30
Selecting individual tracks 28
Track Folding 21
Track Selection 31
CUBASE SX/SL
Index 65
 Loading...