

Page 1
Cubase 5 Effect Plug-ins
Page 2

Operation Manual by Ludvig Carlson, Anders Nordmark, Roger Wiklander
Quality Control: C.Bachmann, H. Bischoff, S. Pfeifer, C. Schomburg
The information in this document is subject to change without notice and does not represent a commitment on the part of Steinberg Media Technologies AG. The software
described by this document is subject to a License Agreement and may not be copied
to other media except as specifically allowed in the License Agreement. No part of this
publication may be copied, reproduced or otherwise transmitted or recorded, for any
purpose, without prior written permission by Steinberg Media Technologies AG.
All product and company names are ™ or ® trademarks of their respective owners.
Windows 2000 and Windows XP are trademarks of Microsoft Corporation. The Mac
logo is a trademark used under license. Macintosh and Power Macintosh are registered trademarks.
© Steinberg Media Technologies AG, 2002.
All rights reserved.
Page 3

Introduction
This document contains descriptions of the effects from version 5 of
Cubase. These can be found on the “Cubase 5 Plug-ins” submenu on
the effect pop-up menus in the program, if you chose to install them during the Cubase SX/SL installation. Note that some of these plug-ins are
duplicates of the standard Cubase SX/SL plug-ins.
Mac OS X disclaimer
Mac users should be aware of the fact that although these older effects have been updated to function under OS X, they have not been
thoroughly tested in this environment. These effects could be viewed
as a “bonus” part of the package, and should be used at one’s own
risk. Steinberg will not officially offer support for these older plug-ins
under OS X.
CUBASE SX/SL
– 3
Page 4

Table of Contents
•
Autopole – see page 5.
•
Chopper2 – see page 29.
•
Distortion – see page 28.
•
Karlette – see page 37.
•
Metalizer2 – see page 33.
•
MIDI Comb – see page 9.
•
MIDI Gate – see page 13.
•
Mysterizer – see page 16.
•
Phatsync – see page 19.
•
Reverb – see page 31.
•
Reverb 32 – see page 32.
•
Ring Modulator – see page 23.
•
subBASS – see page 26.
•
Tranceformer2 – see page 35.
CUBASE SX/SL
– 4
Page 5
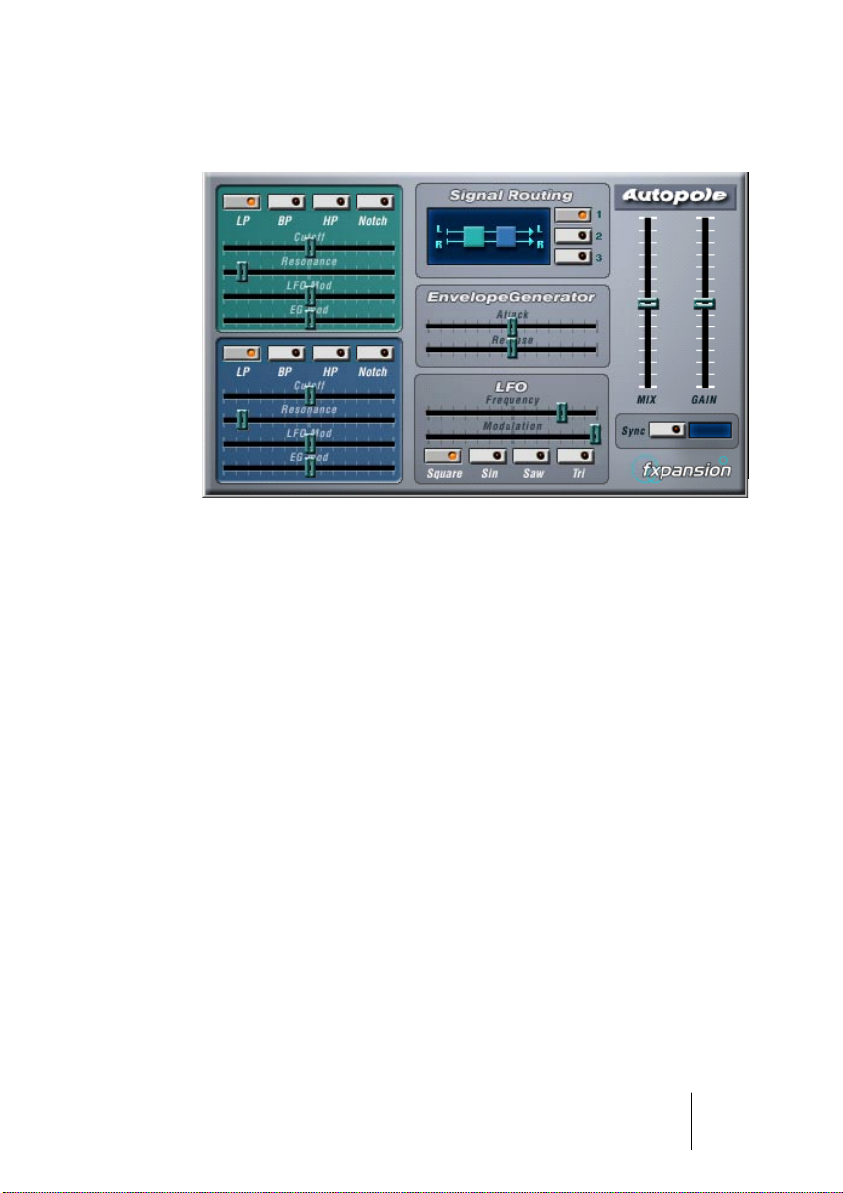
Autopole
The Autopole is a filter effect containing two separate filters capable
of operating in four different modes, an Envelope Generator and an
LFO with four different waveforms. It also lets you choose between
three different signal routing modes to control how an incoming signal
should be sent through the filters.
The Autopole should be used as an insert effect. If you wish to apply it
on several channels at once, you can use it as an insert effect on a group
channel and then route the desired channels to the group channel.
The parameters for the different “sections” of the Autopole are the
following:
CUBASE SX/SL
– 5
Page 6

The Filters
Parameter Description
Filter Mode buttons
(LP, BP, HP, Notch)
Cutoff This is used for setting the Cutoff frequency, i.e. the threshold
Resonance This affects the resonance of the filter. Increasing the reso-
LFO Mod These sliders govern how the filter cut-off frequencies are af-
EG Mod These sliders work in conjunction with the Envelope Genera-
These buttons let you decide in which mode the Filter should
operate:
LP: This is a Low-Pass Filter that “filters out” the high frequency content of the incoming signal, according to a certain
set threshold level. Only signals below the threshold will pass
through.
BP: This is a Band-Pass filter that only lets signals around the
set frequency through, filtering out all other content.
HP: This is a High-Pass Filter that “filters out” the low frequency content of the incoming signal, according to a certain
set threshold level. Only signals above the threshold will pass
through.
Notch: This is a filter that cuts off the signals around the set
frequency, leaving all other content unaffected.
at which the filter should “kick in”. The farther to the right you
drag the sliders, the higher the frequency.
nance gives a more pronounced, lively filter sound. Be wary
of extremely high levels of resonance since they might induce
unpleasant distortion.
fected by the LFO (see below). The sliders are “zero-centered”,
meaning that in the middle position (zero), no LFO modulation
will be applied. By dragging the sliders to the left or right, you
cause an increasing amount of modulation to the cut-off frequency. The difference is that if you drag the sliders to the left,
the waveform of the LFO is inverted, creating a different effect.
tor settings (see below). They control to which extent the cutoff frequencies of the filters should be affected by the Envelope Generator. Drag the sliders to the right if you want to
raise the cut-off frequencies and if you want to lower the frequencies, drag the sliders to the left. Leave the sliders in the
middle position if you don’t want Envelope data to affect the
cut-off frequencies.
CUBASE SX/SL
– 6
Page 7

Signal Routing
By clicking one of the three buttons, you choose how an input
stereo
signal will pass though the filters. The signal flow chart to the left of
the buttons indicates the path:
•
Option # 1 will have the signal from each channel pass through both
of the filters in series (one after the other).
•
With option # 2, the signal from each channel will pass through both
of the filters in parallel, and then be mixed at the output.
•
Finally, option # 3 causes the signals from both channels to each
pass through a separate filter. I.e. the left signal only passes through
Filter A, and the right signal only passes through Filter B.
❐
When using the Autopole with mono material, options 1 and 2 are the
best choices (sending the signal through the filters in series or in parallel,
respectively).
Envelope Generator
This section controls how the input signal is converted into Envelope
data. This, in its turn, affects the EG Mod sliders in the Filter sections
and the Modulation slider in the LFO section:
Parameter Description
Attack This regulates how fast the Envelope Generator will respond to
an input signal as it rises in sound level. The farther to the left you
drag the slider, the faster the response will be.
Release This governs how fast the Envelope Generator will respond to an
input signal as it drops in sound level. The farther to the left you
drag the slider, the faster the response will be.
CUBASE SX/SL
– 7
Page 8

LFO
These are the controls for the Low Frequency Oscillator, used for
adding continuous filter movement, wah-wah effects, etc:
Parameter Description
Frequency This slider controls the speed of the LFO. The farther to the right
you drag the slider, the faster the oscillation will be.
Modulation Use this slider to control how the speed of the LFO should be mod-
ulated by the Envelope Generator (and thus by the level of the input
signal). If you drag the slider to the left, a loud input signal will cause
the LFO to slow down and if you drag to the right, the LFO will
speed up. In the middle position, the speed of the LFO is unaffected.
Waveform Buttons These buttons are used for choosing a waveform for the LFO. You
can choose between Square, Sine, Saw and Triangle.
Output Controls
Parameter Description
Mix This controls the balance between the output from the Autopole
and the input signal. In the middle position, both signals are
equally mixed. The higher you drag the slider, the more dominant
the effect will be. Conversely, with lower settings the unaffected
original signal will be more pronounced.
Gain This slider regulates the output level from the Autopole. The
higher you drag the slider, the higher the level.
Sync When this is activated, the LFO will restart in intervals according
to the current Song tempo, which is useful for tempo sync and
special effects. Click the button to activate sync, and then click
in the small display to the right to select at which note values the
LFO should be restarted: 1/1, 1/2, 1/4, 1/8 or 1/16.
For example, setting this to 1/4 will make the LFO restart on
each beat (quarter note) according to the current tempo.
CUBASE SX/SL
– 8
Page 9

MIDI Comb
This is a comb filter, which can be described as one or several very
short delays with high feedback, causing resonating peaks at certain
frequencies. While the MIDI Comb is used as an insert effect on an
audio channel, the signals that actually trigger it are the ones sent
from a MIDI track.
CUBASE SX/SL
– 9
Page 10

Setting Up
The MIDI Comb requires both an audio signal and a MIDI input to
function.
To set it up, proceed as follows:
1.
Select the audio to be affected by the MIDI Comb.
This can be audio material from any audio track, or even a live audio input routed to a
audio track (provided you have a low latency audio card). If a live audio input is used,
the track has to be record enabled or in Monitor mode.
2.
Select the MIDI Comb as an Insert effect for the audio channel.
3.
Select a MIDI track.
This can be an empty MIDI track, or a MIDI track containing data, it doesn’t matter.
However, if you wish to play the MIDI Comb in real-time – as opposed to having a recorded part playing it – the track has to be record enabled or in Monitor mode for the
effect to receive the MIDI output.
4.
Open the Output pop-up for the MIDI Track.
The MIDI Comb is now added to the list.
5.
Select the MIDI Comb from the Output pop-up menu.
The MIDI Output from the Track is now routed to the MIDI Comb.
What to do next depends on whether you are using live or recorded
audio and whether you are using real-time or recorded MIDI. We will
assume for the purposes of this manual that you are using recorded
audio, and play the MIDI in real-time.
Make sure the MIDI Track is selected and start playback.
6.
Now play a few notes on your MIDI keyboard.
As you can hear, the audio track material is affected by what you play on your MIDI keyboard.
❐
The MIDI Comb is polyphonic with up to 8 voices, i.e. you can play up to 8
MIDI notes at once and each note will produce a separate resonating tone.
CUBASE SX/SL
– 10
Page 11

You can now make settings for the MIDI Comb using the following
parameters:
Amp e.g.
Parameter Description
Atk Use this slider to set the attack time of the resonant tones created
by the comb filter – i.e how soon they will start to resonate after
being triggered by MIDI notes. The farther down you drag the
slider, the shorter the attack.
Rel This controls the release time of the resonant tones created by
the comb filter – i.e. how soon the sound will be cut off. The farther up you drag the slider, the longer the sound will resonate.
Key Velocity Modifiers
Parameter Description
Level This determines how the filter responds to MIDI notes with differ-
ent velocity values. At the middle setting, all tones produced by the
filter will sound at an equal level regardless of the velocity values of
the MIDI notes that trigger them. If you move the slider upwards,
MIDI notes with higher velocity values will produce louder comb filter tones. Conversely, moving the slider downwards causes the
level of the filter tones to increase with lower MIDI note velocities.
Res This affects the resonance (feedback) of the produced tones de-
pending on the velocity value of the MIDI notes that trigger them.
In the middle position, the resonance is unaffected regardless of
velocity. By dragging the slider upwards, tones triggered by MIDI
notes with a high velocity value will get increased resonance. By
dragging the slider downwards, tones triggered by MIDI notes
with a low velocity value will become more resonant.
HPF & LPF The MIDI Comb features both a High-Pass filter and a Low-Pass
filter (see “Filters” below) that can be used for “filtering out” certain frequencies of the resonating tones according to a certain set
filter cutoff frequency. These two sliders determine how much the
High-Pass and Low-Pass filters should be affected by the MIDI
note velocity values. Positive values cause higher velocities to increase the effect of the filters, negative values cause higher velocities to decrease the effect.
CUBASE SX/SL
– 11
Page 12

Feedback
Parameter Description
Feedback This slider governs the amount of effect output from the MIDI
Comb that is fed back in again. The more effect feedback, the more
complex the sound. Drag the slider upwards to increase feedback.
Filters
Parameter Description
LP Cut-off Use this to set the frequency threshold of the Low-Pass Filter.
This filter cuts off all of the high frequencies relative to the set
threshold. The farther up you drag the slider, the more of the high
frequencies will be allowed to pass through.
HP Cut-off Use this to set the frequency threshold of the High-Pass Filter.
This filter cuts off all of the low frequencies relative to the set
threshold. The farther down you drag the slider, the more of the
low frequencies will be allowed to pass through.
Output
Parameter Description
Mix Use this to set the balance between the original, unprocessed
signal and the signal affected by the MIDI Comb. In the middle position, they are equally mixed. Drag the slider upwards for a more
dominant effect sound and vice versa.
Gain This controls the output level from the MIDI Comb. Drag the slider
upwards to increase the level.
CUBASE SX/SL
– 12
Page 13

MIDI Gate
Gating, in its fundamental form, silences audio signals below a certain
set threshold level. I.e. when a signal rises above the set level, the
Gate opens to let the signal through while signals below the set level
are cut off. MIDI Gate however, is a Gate effect that is not triggered by
threshold levels, but instead by MIDI notes. Hence it needs both audio
and MIDI data to function.
CUBASE SX/SL
– 13
Page 14

Setting Up
The MIDI Gate requires both an audio signal and a MIDI input to function.
To set it up, proceed as follows:
1.
Select the audio to be affected by the MIDI Gate.
This can be audio material from any VST Audio Track, or even a live audio input routed
to a VST Audio Track (provided you have a low latency audio card). If a live audio input
is used, monitoring must be activated.
2.
Select the MIDI Gate as an Insert effect for the Audio channel.
3.
Select a MIDI Track to control the MIDI Gate.
This can be an empty MIDI Track, or a MIDI Track containing data, it doesn’t matter.
However, if you wish to play the MIDI Gate in real-time – as opposed to having a recorded Part playing it – the Track has to be selected for the effect to receive the MIDI
output.
4.
Select the MIDI Gate from the Output pop-up menu.
The MIDI Output from the Track is now routed to the MIDI Gate.
What to do next depends on whether you are using live or recorded
audio and whether you are using real-time or recorded MIDI. We will
assume for the purposes of this manual that you are using recorded
audio, and play the MIDI in real-time.
Make sure the MIDI Track is selected and start playback.
5.
Now play a few notes on your MIDI keyboard.
As you can hear, the audio track material is affected by what you play on your MIDI keyboard.
CUBASE SX/SL
– 14
Page 15

You can now make settings for the MIDI Gate using the following parameters:
Parameter Values Description
Attack 0 - 500 This is used for determining how long it should take for the
Gate to open after receiving a signal that triggers it.
Hold 0 - 3.000 Regulates how long the Gate remains open after a Note On
or Note Off message (see Hold Mode below).
Release 0 - 3.000 This determines how long it takes for the Gate to close (in
addition to the value set with the Hold-parameter).
Note To
Attack
Note To
Release
Velocity To
VCA
Hold Mode Note-On/
0 - 127 The value you specify here determines how and to which ex-
tent the pitch of the MIDI notes should affect the Attack. If
this is set to a positive value, the Attack time will increase
with higher note velocities. Negative values will give shorter
Attack times with higher velocities. If you do not wish to use
this parameter, set it to 0.
0 - 127 The value you specify here determines how and to which ex-
tent the pitch of the MIDI notes should affect the Release.
Positive values will increase the Release time and negative
values will decrease the Release time. If you do not wish to
use this parameter, set it to 0.
0 - 127 This controls to which extent the velocity values of the MIDI
notes determine the output volume. A value of 127 means
that the volume is controlled entirely by the velocity values,
while a value of 0 means that velocities will have no effect on
the volume.
Use this switch to set the Hold Mode. In Note-On mode, the
Note-Off
Gate will only remain open for the time set with the Hold and
Release parameters, regardless of the length of the MIDI
note that triggered the Gate. In Note-Off mode on the other
hand, the Gate will remain open for as long as the MIDI note
plays, and then apply the Release parameter. In this case, the
Hold parameter has no effect.
CUBASE SX/SL
– 15
Page 16

Mysterizer
The Mysterizer is a multi-effect plug-in with a unique hands-on user interface. It can be used as an insert effect or a send effect, and allows
you to choose between eight different effects. For each effect, you
can control two parameters by clicking and dragging in the display, allowing for continuous real-time effect manipulation, subtle sweeping
changes or weird, wild mutations.
CUBASE SX/SL
– 16
Page 17

Here’s how to use the Mysterizer:
1.
Play back some audio and route the audio channel through the Mysterizer (either as an insert or a send effect).
2.
Open the Mysterizer effect control panel and click the Prog Select
field to the right to select the desired effect.
Each time you click, the next effect is selected. For a list of the effects, see below.
3.
When you have selected an effect you want to use, the two text fields
to the left show you which parameters are controlled on the X-axis and
Y-axis respectively.
In the figure above, the Ring Mod effect is selected, with Amount controlled on the Xaxis and Frequency on the Y-axis.
4.
Click in the display and drag the hair cursor to change the parameter
settings.
The X-axis goes from left to right and the Y-axis goes from top to bottom, which means
that the “zero setting” for both axes is in the upper left corner of the display.
5.
Experiment!
The Rate and Overshoot knobs
When you move the hair cursor, you will see how the small white dot
moves to follow your adjustments. This represents the actual parameter settings. The Rate and Overshoot controls at the bottom of the
window control how quickly and accurately the white dot follows your
movements – in other words how your mouse movements are “interpreted” by the effect.
•
The Rate knobs determine how fast the Mysterizer will respond when
you move the hair cursor to a new position.
You can make independent settings for the X- and Y-axis.
•
The Overshoot knobs determine how far from the “target position” the
white dot will be allowed to stray along the corresponding axis when
moving the hair cursor.
Moderate settings can give a more natural feel when a parameter is changed. Maximum Overshoot settings (turning the knob all the way to the right) will cause constant
movement back and forth along the corresponding axis relative to the target position,
because the white dot will never “reach the target” and come to rest. This can create
an undulating, LFO-like special effect, the speed and range of which can be controlled
with the corresponding Rate knob.
CUBASE SX/SL
– 17
Page 18

The Effects
The following effects are available:
Effect Description X-axis
param.
Ring Modulator An effect with which the in-
coming audio is ring modulated by an internal, variable
frequency oscillator, thereby
producing new harmonics.
Comb Delay A delay with high feedback,
causing resonating peaks at
certain frequencies.
Mono Delay A monaural delay. Delay feed-
Stereo Delay A stereo delay with which the
repeats are heard in both the
left and right channels.
Low-Pass Filter (LP) A filter that cuts off high fre-
quencies according to a set
frequency threshold. Only
signals below the cut-off frequency will be heard.
High-Pass Filter (HP) A filter that cuts off low fre-
quencies according to a set
frequency threshold. Only
signals above the cut-off frequency will be heard.
Band-Pass Filter (BP) A filter that cuts off all fre-
quencies except those around
the set cut-off frequency.
Distortion A standard distortion effect. Drive amount Tone control
Amount of
effect
Feedback
amount
back
Delay feedback
Filter resonance
Filter resonance
Filter resonance
Y-axis param.
Frequency of the
built-in oscillator
Manual delay time
(pitch) adjustment
Delay time
Delay time
Filter cutoff
frequency
Filter cutoff
frequency
Filter cutoff
frequency
CUBASE SX/SL
– 18
Page 19

Phatsync
Phatsync is a pattern-controlled multimode filter that can create rhythmic, pulsating filter effects.
General Operation
Phatsync can produce two simultaneous 16-step patterns for the filter
cutoff and resonance parameters, synchronized to the sequencer
tempo.
CUBASE SX/SL
– 19
Page 20

Setting Step Values
•
Setting step values is done by clicking in the pattern grid windows.
Individual step entries can be freely dragged up or down the vertical axis, or directly set
by clicking in an empty grid box. By click-dragging left or right consecutive step entries
will be set to the pointer position.
Setting filter cutoff values in the grid window.
•
The horizontal axis shows the pattern steps 1-16 from left to right, and
the vertical axis determines the (relative) filter cutoff frequency and
resonance setting.
The higher up on the vertical axis a step value is entered, the higher the relative filter
cutoff frequency or filter resonance setting.
•
By starting playback and editing the patterns for the cutoff and resonance parameters, you can hear how your filter patterns affect the
sound source connected to Phatsync directly.
CUBASE SX/SL
– 20
Page 21

Selecting New Patterns
•
Created patterns are saved with the song, and up to 8 different Cutoff
and Resonance patterns can be saved internally.
Both the Cutoff and Resonance patterns are saved together in the 8 Pattern memories.
•
To select new patterns you use the Pattern Selector.
New patterns are all set to the same step value by default.
Pattern Selector.
Using Pattern Copy and Paste to create variations
You can use the Copy and Paste buttons below the Pattern selector
to copy a pattern to another Pattern memory location, which is useful
for creating variations on a pattern.
• Click the Copy button with the pattern you wish to copy selected,
then select another Pattern memory location, and click Paste.
The pattern is copied to the new location, and can now be edited to create variations
using the original pattern as a starting point.
CUBASE SX/SL
– 21
Page 22

Phatsync Parameters:
Parameter/Value Description
Base Cutoff This sets the base filter cutoff frequency. Cutoff values
set in the Cutoff Grid windows are values relative to the
Base Cutoff value.
Base Resonance This sets the base filter resonance. Resonance values
set in the Resonance Grid windows are values relative
to the Base Resonance value. Note that very high Base
Resonance settings can produce loud ringing effects at
certain frequencies.
Glide This will apply glide between the pattern step values,
causing values to change more smoothly.
Filter Mode (LP, BP, HP) This selects between low-pass (LP), bandpass (BP) or
high-pass (HP) filter modes.
Sync (1/32, 1/16, 1/8, 1/4) This sets the pattern beat resolution, i.e. what note val-
ues the pattern will play in relation to the tempo.
Mix Adjusts the mix between dry and processed signal.
Gain Sets the overall volume.
CUBASE SX/SL
– 22
Page 23

Ring Modulator
The Ring Modulator can produce complex, bell-like enharmonic sounds.
Ring Modulators work by multiplying two audio signals together. The
ring modulated output contains added frequencies generated by the
sum of, and the difference between, the frequencies of the two signals.
The Ring Modulator has a built-in oscillator that is multiplied with the
input signal to produce the effect.
CUBASE SX/SL
– 23
Page 24

Parameters:
Parameter Description
Oscillator LFO Mod LFO Mod controls how much the oscillator frequency is af-
fected by the LFO.
Oscillator EG Mod EG Mod controls how much the oscillator frequency is af-
fected by the Envelope (which is triggered by the input signal). Positive and negative values can be set, with center
position representing no modulation. Left of center, a loud input signal will decrease the oscillator pitch, whereas right of
center the oscillator pitch will increase when fed a loud input.
Oscillator Wave Selects the oscillator waveform; square, sine, saw or triangle.
Oscillator Range Determines the frequency range of the oscillator in Hz.
Freq Sets the oscillator frequency +/- 2 octaves within the
selected range.
Roll-Off Cuts high frequencies in the oscillator waveform, to soften
the overall sound. This is best used when harmonically rich
waveforms are selected (e.g. square or saw).
Stereo Phase Invert Flips the phase of the oscillator waveform on the right chan-
nel.
LFO Waveform Selects the LFO waveform: square, sine, saw or triangle.
LFO Freq Sets the LFO Speed.
EG Mod Controls how much the input signal level – via the Envelope
Generator – affects the LFO Speed. Positive and negative
values can be set, with center position representing no
modulation. Left of center, a loud input signal will slow
down the LFO, whereas right of center a loud input signal
will speed it up.
Stereo Invert This inverts the LFO waveform for the right channel of the
oscillator, which produces a wider stereo perspective for
the modulation.
Retrig Causes the LFO cycle to reset itself at the start of each bar
during playback, which can be used for certain LFO effects
synchronized to the tempo.
CUBASE SX/SL
– 24
Page 25

Parameter Description
Envelope Generator The Envelope Generator section controls how the input sig-
nal is converted to envelope data, which can then be used
to control oscillator pitch and LFO speed. It has two main
controls:
Attack sets how fast the EG output level rises in response
to a rising input signal.
Decay controls how fast the EG output level falls in response to a falling input signal.
Lock L<R When this switch is enabled, the L and R input signals are
merged, and produce the same EG output level for both oscillator channels. When disabled, each channel has its own
EG, which affect the two channels of the oscillator independently.
Mix Adjusts the mix between dry and processed signal.
Gain Sets the overall volume.
CUBASE SX/SL
– 25
Page 26

subBASS
The subBASS is a bass synthesizer, that can generate low frequency
content and track the pitch from the audio material for deep, subsonic bass effects.
CUBASE SX/SL
– 26
Page 27

The parameters are as follows:
Parameter Values Description
Mode Boost/Divide/
Trigger
Tune 20-500Hz This sets the maximum frequency to be affected. Set
Drive 0-100 In Boost mode, raising the Drive parameter adds
Tone 0-100 This is a low-pass filter that can be used to change the
Threshold -80dB to 0dB This sets the threshold for the effect. Increase to “gate”
Dry Level 0-100 Sets the level of the original, unprocessed signal.
FX Level 0-100 Sets the level of the processed signal.
Boost produces a warm bass boost to the signal.
Divide generates a pitch tracking signal an octave
below the input signal.
Trigger adds a decaying “boom” produced by an oscillator, typically triggered by a kick drum.
as low as possible to avoid unwanted distortion. In
“Trigger” mode this sets the oscillator frequency.
“crunch” to the effect.
In Divide mode, increasing Drive to 50% overdrives the
sub-octave signal producing a square wave, and increasing Drive to 100% produces a square wave one
octave above (i.e. at the original input frequency).
In Trigger mode this changes the tone of the oscillator,
with higher settings producing a thinner sound.
brightness of the signal. In “Trigger” mode this sets the
decay time of the generated oscillator boom.
the effect and to cut out unwanted background rumble.
CUBASE SX/SL
– 27
Page 28

Distortion
The Distortion effect plug-in is capable of producing anything from a
soft “crunch” to all-out distortion. There is a selection of factory presets
available. Note that these presets are not stored parameter settings,
but different basic distortion algorithms. The basic characters of the
distortion preset “models” are indicated by their names. The parameters are as follows:
Parameter Values Description
Input -24dB to 0dB Sets the Input level.
Output -24dB to 0dB Sets the Output level. As distortion generates har-
monics, it increases the level of the processed signal. You can use the Output fader to compensate
for the level increase.
Shapes Linear,
Contour 0-100% This is a selective low-pass filter, altering the tonal
Drive 0-100% Governs the amount of distortion.
Factory Presets Soft, Crunchy,
CUBASE SX/SL
– 28
Non-linear 1,
Non-linear 2
Dirty, Wracky, Evil
The Shape parameter determines how much the input signal is affected by the distortion effect. Nonlinear 2 will produce the strongest distortion.
quality of the distortion.
Select one of five presets, which can be used as
they are, or as a basis for further “tweaking”.
Page 29

Chopper2
Chopper2 is a combined tremolo and autopan effect. It can use different
waveforms to modulate the level (tremolo) or left-right stereo position
(pan), either using Tempo Sync or manual modulation speed settings.
CUBASE SX/SL
– 29
Page 30

The parameters are as follows:
Parameter Values Description
Input 0-100% Sets the Input level.
Output 0-100% Sets the Output level.
Mix 0-100% Sets the level balance between the dry
signal and the effect. If Chopper is used
as a send effect, this should be set to
maximum as you can instead control the
dry/effect balance with the send.
Tempo Sync pop-upNo sync, 1/1 to 1/32, 1/1
to 1/32 Triplet,
1/1 to 1/32 Dotted
Speed 0-50Hz When tempo sync is activated (the
Sync button On/Off Turns Tempo Sync on or off.
Stereo/Mono
button
Waveform
buttons
Depth 0-100% Sets the depth of the Chopper effect.
Stereo/Mono Determines whether the Chopper will work
Sine, Square, Saw,
reverse Saw, Triangle
When tempo sync is activated (the “Sync”
button is lit) clicking the field above the
Speed knob opens a pop-up menu, on
which you select a note value for temposyncing the effect. Note that there is no
note value modifier for this effect.
“Sync” button is lit), this knob selects note
values (the same as selecting from the
pop-up menu). When tempo sync is deactivated (the “Sync” button is dark), this
sets the tremolo/auto-pan speed freely.
as an auto-panner (button set to “Stereo”)
or a tremolo effect (button set to “Mono”).
Sets the modulation waveform.
CUBASE SX/SL
– 30
Page 31

Reverb
Reverb is used to add ambience and “space” to recordings. The reverb effect features the following parameters:
Parameter Values Description
Mix 0-100% Sets the level balance between the dry signal and the
effect. If Reverb is used as a send effect, this should
be set to maximum as you can instead control the
dry/effect balance with the send.
Room Size 0-100% Governs the “size” of the simulated room environment.
Pre-delay 0-100% This parameter sets a delay between the direct sound
and the reverb effect output. A short predelay before
the reverb reduces reverb “clutter” which blurs the
sound, and makes the reverb effect more naturalsounding.
Reverb Time 0-100% This parameter sets the length of the reverb effect.
Damp 0-100% This parameter “dampens” the higher frequencies,
producing a rounder and smoother sounding reverb.
CUBASE SX/SL
– 31
Page 32

Reverb 32
Reverb 32 is a reverb plug-in which provides smooth, dense reverb effects. Reverb 32 has the following parameters:
Parameter Values Description
Mix Dry/Wet Sets the level balance between the dry signal and
the effect (wet). If Reverb 32 is used as a send effect, this should be set to maximum wet, as you
can instead control the dry/wet balance with the
send.
Room Size 20-100 This setting determines the “size” of the simulated
room environment.
Predelay 0-100ms This parameter sets a delay between the direct
sound and the reverb effect output. A short predelay before the reverb reduces reverb “clutter”
which blurs the sound, and makes the reverb effect more natural-sounding.
Reverb Time 0,2s - forever This parameter sets the length of the reverb time.
Filter Hi Cut -15 to 0dB This filters out high frequencies for the reverb,
which can make the reverb sound softer.
Filter Lo Cut -15 to 0dB This filters out the lower frequencies for the reverb.
It can be used to reduce low frequency “rumble”.
CUBASE SX/SL
– 32
Page 33

Metalizer2
The Metalizer feeds the audio signal through a variable frequency
filter, with Tempo sync or time modulation and feedback control.
CUBASE SX/SL
– 33
Page 34

The parameters are as follows:
Parameter Values Description
Tempo Sync pop-upNo sync, 1/1 to 1/32, 1/1
to 1/32 Triplet,
1/1 to 1/32 Dotted
Speed 0-10Hz When tempo sync is activated (the
On button On/Off Turns on and off the filter modulation.
Sync button On/Off Turns tempo sync of the modulation on
Stereo/Mono button
Sharpness 0-100% Governs the character of the filter effect.
Tone 0-100% Governs the feedback frequency. The
Feedback 0-100% Sets the amount of feedback. Higher val-
Stereo/Mono Determines whether the output of the
When tempo sync is activated (the
“Sync” button is lit) clicking the field
above the Speed knob opens a pop-up
menu, on which you select a note value
for tempo-syncronizing the effect. There
is no note value modifier for this effect.
“Sync” button is lit), this knob selects
note values (the same as selecting from
the pop-up menu). When tempo sync is
deactivated (the “Sync” button is dark),
this sets the modulation speed freely.
When turned off, the Metalizer will work
as a static filter.
or off.
Metalizer will be in stereo or mono.
The higher the value, the narrower the affected frequency area, producing sharper
sound and a more pronounced effect.
effect of this will be more noticeable with
high Feedback settings.
ues produce a more “metallic” sound.
CUBASE SX/SL
– 34
Page 35

Tranceformer2
Tranceformer2 is a ring modulator effect, in which the incoming audio
is ring modulated by an internal, variable frequency oscillator, producing new harmonics. A second oscillator can be used to modulate the
frequency of the first oscillator, synchronized to the Song tempo if you
wish.
CUBASE SX/SL
– 35
Page 36

The parameters are as follows:
Parameter Values Description
Input 0-100% Sets the Input level.
Output 0-100% Sets the Output level.
Mix 0-100% Sets the level balance between the dry
signal and the effect.
Pitch 1 - 5000Hz Governs the frequency (pitch) of the mod-
ulating oscillator.
Tempo Sync pop-upNo sync, 1/1 to 1/32,
1/1 to 1/32 Triplet,
1/1 to 1/32 Dotted
Speed 0-10Hz When tempo sync is activated (the “Sync”
On button On/Off Turns modulation of the Pitch parameter
Stereo/Mono button
Sync button On/Off Turns tempo sync of the modulation on or
Depth 0-100% Governs the depth of the pitch modulation.
Waveform buttonsSine, Square, Saw,
Stereo/Mono Governs whether the effect output will be
reverse Saw, Triangle
When tempo sync is activated (the “Sync”
button is lit) clicking the field above the
Speed knob opens a pop-up menu, on
which you select a note value for temposyncing the effect. There is no note value
modifier for this effect.
button is lit), this knob selects note values
(the same as selecting from the pop-up
menu). When tempo sync is deactivated
(the “Sync” button is dark), this sets the
modulation speed freely.
on or off.
stereo or mono.
off.
Sets the pitch modulation waveform.
CUBASE SX/SL
– 36
Page 37

Karlette
The Karlette is a four-channel delay, that emulates a “tape-loop” echo.
The four “tape-heads” can be set to a certain note value, or a certain
time, depending on whether Tempo Sync is activated or not.
CUBASE SX/SL
– 37
Page 38

For each of the four “tape-heads”, you can set the following parameters:
Parameter Values Description
Delay 1/32, 1/16, 1/16*, 1/8,
1/4T, 1/8*, 1/4, 1/2T,
1/4*, 1/2, 3/4, 1/1
Sync Off: 0 - 2 sec.
Volume Off to OdB The amplitude of the delay. With the knob
Damp 0.000 to 1.000 The higher the value, the more the delay is
Pan L64/< C >/R64 Sets the stereo position for the delay.
Feedback 0.000 to 1.000 Sets the number of delay repeats.
With the sync button activated, the delay can
be set to a note value synchronized to the
Cubase SX/SL tempo. If the sync button is
deactivated, the delay can be freely set to a
time value.
turned all the way to the left, the delay is
muted.
dampened (the high frequencies are attenuated) to produce a more subtle effect.
In addition, the following global parameters are available:
Dry/Wet 0-100% Sets the level balance between the dry
signal and the effect. If Karlette is used as
a send effect, this should be set to maximum as you can instead control the dry/effect balance with the send.
Sync On/Off Turns Tempo Sync on or off.
CUBASE SX/SL
– 38
 Loading...