

Page 1
Getting Started
Einführung
Prise en Main
Page 2

Tutorials by Steve Kostrey
Revision and Quality Control:
Cristina Bachmann, Heiko Bischoff, Marion Bröer, Sabine Pfeifer
Thanks to: Georg Bruns
The information in this document is subject to change without notice and does not represent a commitment on the part
of Steinberg Media Technologies GmbH. The software described by this document is subject to a License Agreement
and may not be copied to other media except as specifically allowed in the License Agreement. No part of this publication may be copied, reproduced or otherwise transmitted or recorded, for any purpose, without prior written permission
by Steinberg Media Technologies GmbH.
All product and company names are ™ or ® trademarks of their respective owners. Windows XP is a trademark of
Microsoft Corporation. Windows Vista is either a registered trademark or trademark of Microsoft Corporation in the
United States and/or other countries. The Mac logo is a trademark used under license. Macintosh and Power Macintosh
are registered trademarks.
Release Date: April 02, 2008
© Steinberg Media Technologies GmbH, 2008.
All rights reserved.
Page 3

Table of Contents
Page 4

5 Introduction
6 Welcome
6 About the manuals and the help
7 About the program versions
7 Key command conventions
7 How you can reach us
8 System requirements and installation
9 About this chapter
9 Minimum requirements
10 Hardware installation
12 Installing Cubasew
12 Defragmenting the hard disk (Windows only)
12 Register your software
51 Tutorial 4: Working with loops
52 Loop Browser
52 Adding loops
53 Making copies
53 Insert into Project
54 Tutorial 5: External MIDI instruments
55 Introduction
55 Setting up MIDI devices
55 Setting up VST connections for external
instruments (Cubase only)
56 Monitoring external MIDI instruments (Cubase only)
57 Recording MIDI and external instruments
(Cubase only)
13 Setting up your system
14 Setting up audio
18 Setting up MIDI
20 Connecting a synchronizer
20 Setting up video
21 Optimizing audio performance
23 Tutorial 1: Recording audio
24 Creating a new project
25 Setting up the VST Connections
26 Level settings and recording
29 Playback
30 Recording modes with cycle off
30 Cycle recording
31 Stacked recording
33 Tutorial 2: Editing audio
34 Event operations
39 Event envelopes
40 Processing audio
42 Tutorial 3: Recording and editing MIDI
43 Introduction
43 Creating an Instrument Track
44 Browsing sounds
45 MIDI recording
46 MIDI playback
46 Recording modes with cycle off
47 Cycle recording
48 The Key Editor
50 The Controller lane
58 Tutorial 6: Mixing and effects
59 Introduction
59 Setting levels
60 Setting pan
60 Mute and solo
61 Adding EQ
63 Audio effects
64 About automation
65 Exporting
68 Tutorial 7: Surround production
(Cubase only)
69 Surround busses
71 Setting up a surround mix
72 Recording in surround
73 Exporting a surround file
75 Tutorial 8: Editing audio II - tempo and
groove
76 Background
76 Example 1: Drum loop, tempo known
77 Example 2: Drum loop, Auto Adjust
78 Example 3: Drum loop, Manual Adjust
80 Example 4: Working with selections
81 Tutorial 9: Media management
82 Background
82 MediaBay, Loop Browser and Sound Browser
84 Scanning with the browser
86 Searching for media
87 Auditioning media with the Scope
88 Tagging
89 Index
4
Table of Contents
Page 5

1
Introduction
Page 6

Welcome
Congratulations and thank you for your purchase of Steinberg Cubase. You have now become a member of the
world's largest community of music production software users. Looking back at more than 20 years of innovation in
computer-based music production, Steinberg has always
been the driving force behind software technology and Cubase is the benchmark for this development. With Version
4, Cubase is taking the next evolutionary step towards a totally integrated software and hardware system.
As a composer, musician or producer, you want to be working with sounds instead of isolated instruments or effects.
In Cubase and Cubase Studio, this is accommodated with
the introduction of VST Sound, a unique combination of a
database, track presets and an integrated synth engine.
From now on, you will be able to manage all your sounds
from all your instruments (software or hardware) within a
single environment. You can create, manage and access
your sounds faster and more intuitively than ever. If your music is heavily based on loops or prefabricated audio clips,
you can use the new MediaBay database in a similar fashion to browse and preview your loops. A brand-new effects
plug-in set and a powerful synth engine provide you with
thousands of new instruments, sounds and effects. Cubase
and Cubase Studio also introduce Steinberg's latest-generation plug-in technology, VST3. It makes plug-ins more
flexible, more efficient and easier to use.
As a professional producer, you will enjoy the flexibility of
Cubase's new control room section. If your are a composer
or songwriter, you will be impressed with Cubase Studio's
powerful yet easy-to-use new score layout and printing features. Combine this with unique Cubase features such as
the Arranger Track for pattern-based arranging or the powerful and now enhanced AudioWarp technology, which
frees your static audio files from being locked to time or
pitch. All this has been designed to make your life easier, no
matter if you make music for a living or as a hobby.
Take some time to find your way around in this new version of Cubase. If you are a first-time user, you will find a
lot of help in the tutorial section, which is included in this
manual. It comes with matching Cubase project files and
even short training videos, which you will find on your pro-
gram DVD. Even if you are already familiar with Cubase, it
makes sense to study these tutorials in order to learn
about some of the new features in Cubase and Cubase
Studio, and how they are integrated.
Last but not least, we strongly recommend to register your
software! It gives you access to special offers from Steinberg and ensures that you are always up-to-date on the latest news about tips and tricks, updates or special events.
Finally, you are also invited to join our Cubase user forum at
www.steinberg.net, which is the best way to communicate
directly with us and other Cubase users around the world.
See you around!
The Steinberg Cubase Team
About the manuals and the help
The Cubase documentation is divided into several sections, as listed below. Some of the documents are in
Adobe Acrobat format (extension “.pdf”) – these can be
accessed in the following ways:
• You can open the pdf documents from the Documentation
submenu on the Help menu in the program.
• Under Windows you can also open these documents from the
Cubase Documentation subfolder on the Windows Start menu.
• Under Mac OS X the pdf documents are located in the folder
“/Library/Documentation/Steinberg/Cubase 4”.
Ö To read the pdf documents, you need to have a suitable pdf reader application installed on your computer.
An installer for Adobe Reader is provided on the program DVD.
The Getting Started book
This is the book you are reading now. The Getting Started
book covers the following areas:
• Computer requirements.
• Installation issues.
• Setting up your system for audio, MIDI and/or video work.
• Tutorials describing the most common procedures for record-
ing, playing back, mixing and editing in Cubase.
In other words, this book does not go into detail on any
Cubase windows, functions or procedures.
6
Introduction
Page 7

The Operation Manual
The Operation Manual is the main Cubase reference documentation, with detailed descriptions of Cubase operations,
parameters, functions and techniques. It also includes detailed information about the Score Editor. You should be familiar with the concepts and methods described in the
Getting Started book before moving on to the Operation
Manual.
Similarly, some features and settings are specific to one of
the platforms, Windows or Mac OS X. This is clearly
stated in the applicable cases. In other words:
Ö If nothing else is said, all descriptions and procedures
in the documentation are valid for both Cubase and Cubase Studio, under Windows and Mac OS X.
The screenshots are taken from the Windows version of Cubase.
MIDI Devices
This pdf document contains descriptions of how to manage MIDI Devices and device panels.
Plug-in Reference
This manual describes the features and parameters of the
included VST plug-ins, real-time audio effects and VST Instruments and the MIDI effects.
Remote Control Devices
This pdf document lists the supported MIDI remote control
devices and describes how to set them up and use them
with Cubase.
Mackie Control
This pdf document describes the supported features for
the Mackie Control remote device.
Menu Reference
This pdf document provides a list of all menus and their
options with a brief description, for quick reference.
The dialog help
To get information about the active dialog, click its Help
button.
About the program versions
The documentation covers two program versions; Cubase
and Cubase Studio, for two different operating systems or
“platforms”; Windows and Mac OS X.
Some features described in the documentation are only
applicable to the Cubase version. Whenever this is the
case this will be clearly indicated in the heading of the related subject.
Key command conventions
Many of the default key commands in Cubase use modifier
keys, some of which are different depending on the operating system. For example, the default key command for
Undo is [Ctrl]+[Z] under Windows and [Command]+[Z]
under Mac OS X.
When key commands with modifier keys are described in
this manual, they are shown with the Windows modifier
key first, in the following way:
[Win modifier key]/[Mac modifier key]+[key]
For example, [Ctrl]/[Command]+[Z] means “press [Ctrl] un-
der Windows or [Command] under Mac OS X, then press
[Z]”. Similarly, [Alt]/[Option]+[X] means “press [Alt] under
Windows or [Option] under Mac OS X, then press [X]”.
Ö Please note that this manual often refers to “rightclicking”, e.g. to open context menus, etc. If you are using
a Macintosh computer with a single-button mouse, hold
down [Ctrl] and click.
How you can reach us
On the Help menu in Cubase you will find items for getting
additional information and help:
• On the “Steinberg on the Web” submenu, you can find
links to various Steinberg web sites. Selecting one will automatically launch your browser application and open the
page.
You can find support and compatibility information, answers to frequently
asked questions, links for downloading new drivers, etc. This requires
that you have a web browser application installed on your computer, and
a working Internet connection.
7
Introduction
Page 8

2
System requirements and installation
Page 9

About this chapter
!
General notes on how to set up your system
This chapter describes the requirements and installation
procedures for the Windows version and the Mac version
of Cubase.
Minimum requirements
To use Cubase, your computer must meet the following
minimum requirements:
Windows
• Windows XP (Home or Professional),
or Windows Vista (32-bit and 64-bit – see below)
• Intel Pentium or AMD Athlon 1.4 GHz processor
•512 MB RAM
• Windows DirectX compatible audio hardware;
ASIO compatible audio hardware recommended for low
latency performance.
• Display resolution of 1024x768 pixels
• Steinberg Key and USB component connector
• DVD ROM drive required for installation
• Internet connection required for license activation
Macintosh
• Mac OS X 10.4
• Power Mac G4 1 GHz or Core Solo 1.5 GHz
•512 MB RAM
• Display resolution of 1024x768 pixels
• CoreAudio compatible audio hardware
• Steinberg Key and USB component connector
• DVD ROM drive required for installation
• Internet connection required for license activation
Ö If you want to install the 64-bit version of Cubase,
make sure you read the ReadMe document on this topic
before proceeding.
You will find this document, called “Windows_Vista_64bit_[language].rtf”, on the installation DVD, in the ReadMe Files folder.
On the Steinberg web site, under “Support–DAW
Components”, you can find detailed information on
what to consider when setting up a computer system
dedicated to audio work.
• RAM – There is a direct relation between the amount of
available RAM and the number of audio channels that you
can have running.
The amount of RAM specified above is the minimum requirement, but as
a general rule “the more the better” applies.
• Hard disk size – The size of the hard disk determines
how many minutes of audio you will be able to record.
Recording one minute of stereo CD quality audio requires 10 MB of hard
disk space. That is, eight stereo tracks in Cubase use up at least 80 MB
of disk space per recording minute.
• Hard disk speed – The speed of the hard drive also determines the number of audio tracks you can run.
That is the quantity of information that the disk can read, usually expressed
as “sustained transfer rate”. Again, “the more the better” applies.
• Wheel mouse – Although a regular mouse will work fine
with Cubase, we recommend that you use a wheel mouse.
This will speed up value editing and scrolling considerably.
MIDI requirements
If you intend to use the MIDI features of Cubase, you need
the following:
• A MIDI interface to connect external MIDI equipment to your
computer.
•A MIDI instrument.
• Any audio equipment required to listen to the sound from your
MIDI devices.
Audio hardware
Cubase will run with audio hardware that meets the following specifications:
•Stereo.
•16 bit.
• Support of at least the 44.1kHz sampling rate.
• Windows – The audio hardware must be supplied with a special ASIO driver, or a DirectX compatible driver, see below.
• Mac – The audio hardware must be supplied with Mac OS Xcompatible drivers (CoreAudio or ASIO).
9
System requirements and installation
Page 10
Using the built-in audio hardware of the Macintosh
!
!
!
(Mac only)
Although Cubase is designed with multi-channel input
and output in mind, it’s of course possible to use the program with “basic” stereo inputs and outputs. As of this
writing, all current Macintosh models provide at least builtin 16 bit stereo audio hardware. For detailed information,
refer to the documentation describing your computer.
Depending on your preferences and requirements, using
the built-in audio hardware may be sufficient for use with
Cubase. It is always available for selection in Cubase –
you don’t need to install any additional drivers.
Some Macintosh models have audio outputs but no
inputs. This means that you can only play back audio
– recording is not possible without additional audio
hardware.
About drivers
A driver is a piece of software that allows a program to
communicate with a certain piece of hardware. In this
case, the driver allows Cubase to use the audio hardware.
For audio hardware, there are two different cases, requiring different driver configurations:
If the audio hardware has a specific ASIO driver
Professional audio cards often come with an ASIO driver
written especially for the card. This allows for communication directly between Cubase and the audio card. As a result, audio cards with specific ASIO drivers can provide
lower latency (input-output delay), which is crucial when
monitoring audio via Cubase or using VST Instruments.
The ASIO driver may also provide special support for multiple inputs and outputs, routing, synchronization, etc.
Audio card-specific ASIO drivers are provided by the card
manufacturers. Make sure to check the manufacturer’s
web site for the latest driver versions.
If your audio hardware comes with a specific ASIO
driver we strongly recommend that you use this.
If the audio card communicates via DirectX (Windows
only)
DirectX is a Microsoft “package” for handling various
types of multimedia data under Windows. Cubase supports DirectX, or to be more precise, DirectSound, which
is a part of DirectX used for playing back and recording
audio. This requires two types of drivers:
• A DirectX driver for the audio card, allowing it to communicate
with DirectX. If the audio card supports DirectX, this driver
should be supplied by the audio card manufacturer. If it isn’t
installed with the audio card, please check the manufacturer’s
web site for more information.
• The ASIO DirectX Full Duplex driver, allowing Cubase to communicate with DirectX. This driver is included with Cubase,
and does not require any special installation.
Hardware installation
The Steinberg Key
Please read the following section before installing
the Cubase software.
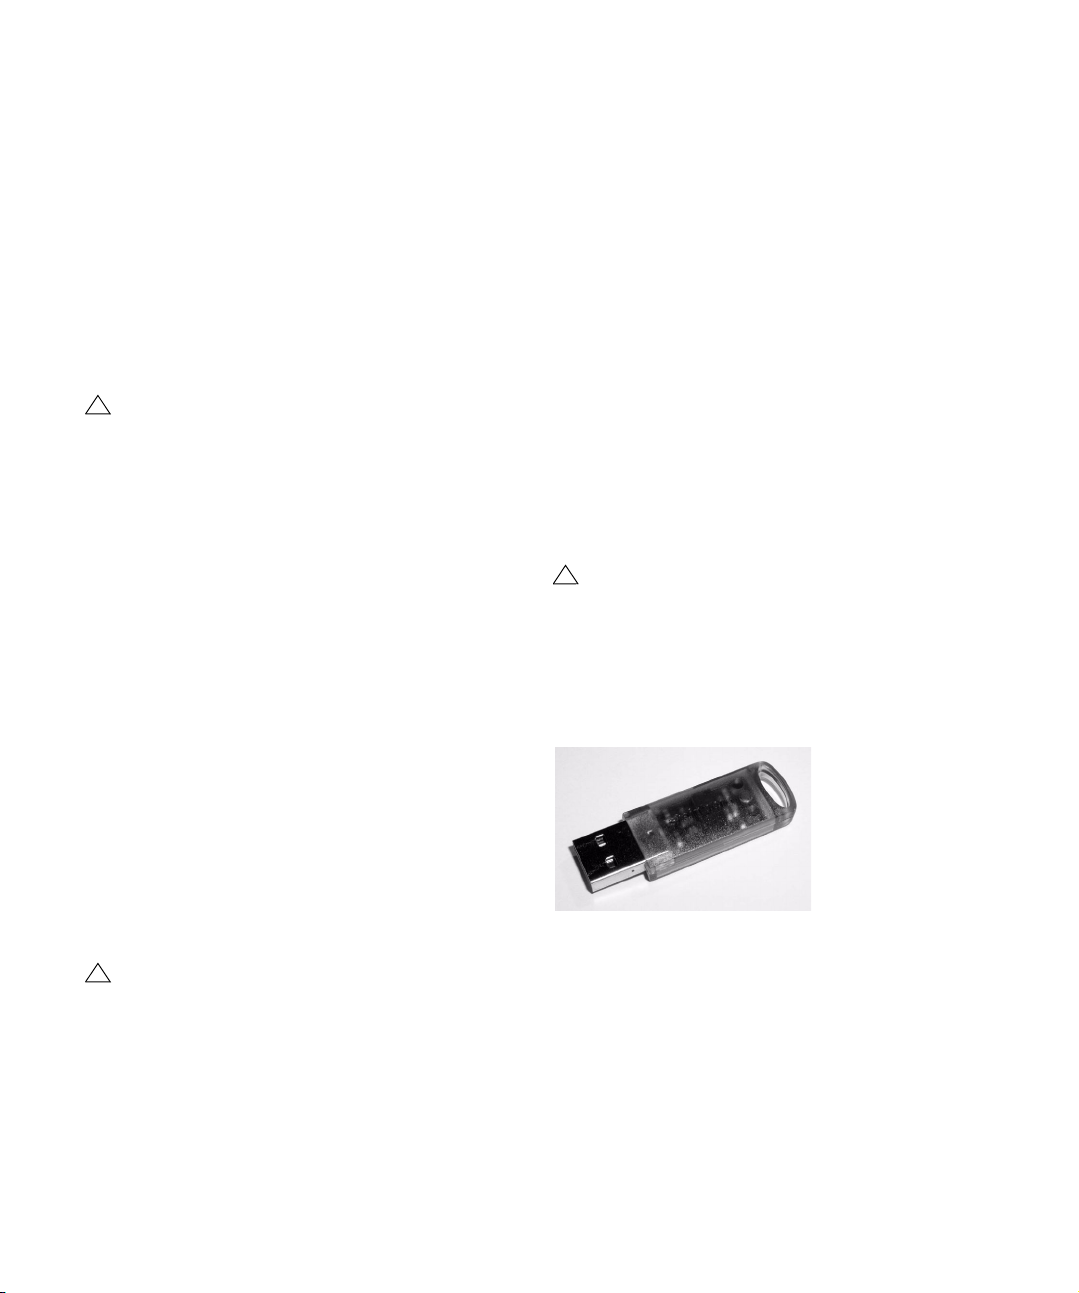
Included with the Cubase package, you will find the Steinberg Key (also referred to as a “dongle” or “eLicenser”), a
hardware copy protection device that is part of the Cubase copy protection scheme. Cubase will not run if there
is no Steinberg Key.
The Steinberg Key
The Steinberg Key is, in fact, a little computer on which
your Steinberg software licenses are stored. All hardwareprotected Steinberg products use the same type of key,
and you can store more than one license on one key. Also,
licenses can (within certain limits) be transferred between
keys – which is helpful, e.g. if you want to sell a piece of
software.
10
System requirements and installation
Page 11

The Syncrosoft License Control Center (which can be
found in the Start/Programs menu under Windows or the
Applications folder on a Mac) is the place where you can
check the licenses installed on your Steinberg Key.
• If you are using other copy-protected Steinberg products, you may want to transfer all licenses for your applications to only one Steinberg Key, thus using only one USB
port of your computer. To transfer licenses between keys,
launch the License Transfer wizard of the Syncrosoft License Control Center and follow the instructions.
• Steinberg software products always come with a license
activation code, but not always with a Steinberg Key – if
you want to activate a license for such a Steinberg software
(e.g. a VSTi) on the Steinberg Key you received with Cubase, launch the License Download wizard of the Syncrosoft License Control Center and follow the instructions.
More information on the transfer or activation of licenses
can be found in the help for the Syncrosoft License Control Center.
Installing the audio hardware and its driver
1. Install the audio card and related equipment in the
computer, as described in the card’s documentation.
2. Install the driver for the card.
Depending on the operating system of your computer, there are different
types of drivers that could apply: card-specific ASIO drivers, DirectX
drivers (Windows) or Mac OS X (Mac) drivers:
Specific ASIO driver
If your audio card has a specific ASIO driver, it may be included with the audio card, but you should always make
sure to check the audio card manufacturer’s web site for
the most recent drivers. For details on how to install the
driver, refer to the manufacturer’s instructions.
Mac OS X drivers (Mac only)
If you are using a Macintosh computer, make sure you are
using the latest Mac OS X drivers for your audio hardware. Follow the manufacturer’s instructions to install the
driver.
Testing the card
To make sure the audio card will work as expected, perform
the following two tests:
• Use any software included with the audio card to make
sure you can record and play back audio without problems.
• If the card is accessed via a standard operating system
driver, try playing back audio using the computer’s standard
audio application (e.g. Windows Media Player or Apple
iTunes).
Installing a MIDI interface/synthesizer card
Installation instructions for a MIDI interface should be included with the product. However, here’s an outline of the
necessary steps:
1. Install the interface (or MIDI synthesizer card) inside
your computer or connect it to a “port” (connector) on the
computer.
Which is right for you depends on which type of interface you have.
2. If the interface has a power supply and/or a power
switch, turn it on.
3. Install the driver for the interface, as described in the
documentation that comes with the interface.
You should also make sure to check the manufacturer’s web site for the
latest driver updates.
DirectX driver (Windows only)
If your audio card is DirectX compatible, its DirectX drivers
will most likely be installed when you install the card. If you
have downloaded special DirectX drivers for the audio
card, you should follow the manufacturer’s installation instructions.
System requirements and installation
11
Page 12

Installing Cubasew
!
Register your software
The installation procedure puts all files in the right places,
automatically.
Windows
1. Double-click the file called “Cubase4.msi” or
“CubaseStudio4.msi”.
2. Follow the instructions on screen.
Macintosh
1. Double-click the file called “Cubase4.mpkg” or “Cubase Studio 4.mpkg”.
2. Follow the instructions on screen.
About the tutorials
The program DVD also contains several tutorial project
files and videos. These are not installed during the installation, but can be added manually from the DVD.
The tutorial chapters in this manual all refer to these tutorial projects. So, to be able to follow the instructions in this
manual, you have to drag the files to your computer.
You find the Tutorial Projects in the folder “Additional
Content”.
Defragmenting the hard disk (Windows only)
We encourage you to register your software! By doing so
you are entitled to technical support and kept aware of updates and other news regarding Cubase.
There are two ways to register:
• In Cubase, open the Help menu and select the Regis-
tration option.
This option is an Internet link that will open the Registration page of the
Steinberg web site. To register, simply follow the instructions on screen.
When you launch Cubase, you will also be prompted to launch the registration process.
• Included on the Cubase installation DVD, you can find a
registration form in pdf format. To register, print out the
form, enter all required information and send it to Steinberg.
If you plan to record audio on a hard disk where you have
already stored other files, now is the time to defragment it.
Defragmentation reorganizes the physical allocation of
space on the hard disk in order to optimize its performance. It is done with a special defragmentation program.
It is crucial to the audio recording performance that
your hard disk is optimized (defragmented). You
should make sure to defragment regularly.
12
System requirements and installation
Page 13

3
Setting up your system
Page 14
Setting up audio
!
Make sure that all equipment is turned off before
making any connections!
Connecting audio
Exactly how to set up your system depends on many different factors, e.g. the kind of project you wish to create,
the external equipment you want to use, the computer
hardware available to you, etc. Therefore, the following
sections can only serve as examples.
How you connect your equipment, i.e. whether you use
digital or analog connections, also depends on your individual setup.
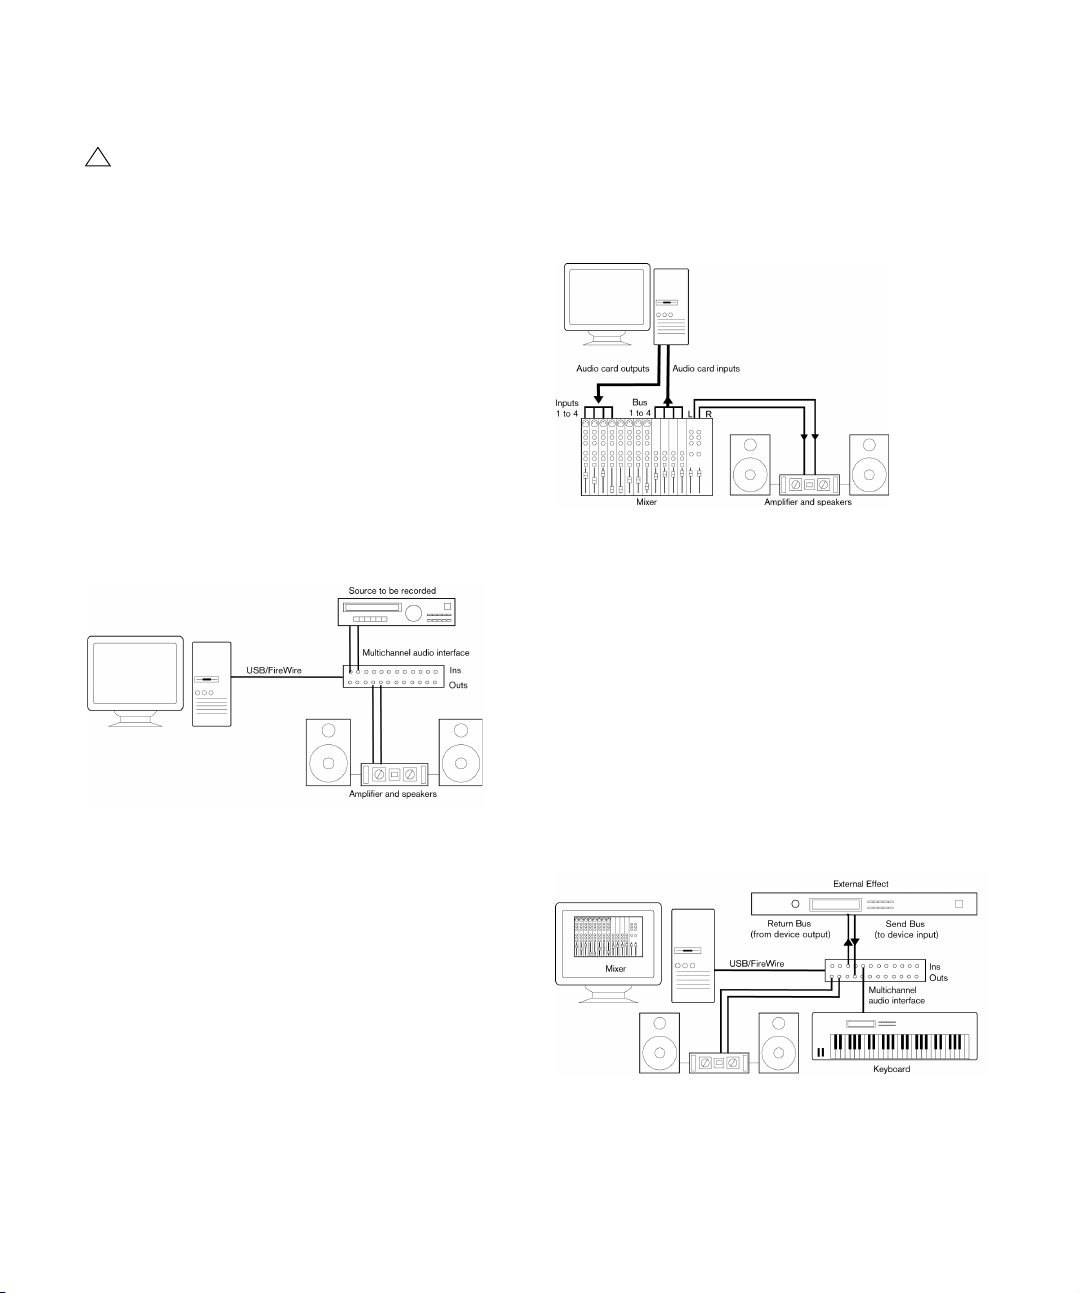
Stereo input and output – the simplest connection
If you only use a stereo input and output from Cubase, you
can connect your audio hardware, e.g. the inputs of your
audio card or your audio interface, directly to the input
source and the outputs to a power amplifier and speaker.
A simple stereo audio setup.
This is probably the simplest of all setups – once you have
set up the internal input and output busses, you can connect your audio source, e.g. a microphone, to your audio
interface and start recording.
• External mixing means having a hardware mixing device
with a group or bus system that can be used for feeding
inputs on your audio hardware.
In the example below, four busses are used for feeding signals to the audio hardware’s inputs. The four outputs are connected back to the mixer
for monitoring and playback. Remaining mixer inputs can be used for
connecting audio sources like microphones, instruments, etc.
A multi-channel audio setup using an external mixer.
Ö When connecting an input source (like a mixer) to the
audio hardware, you should use output busses, sends or
similar that are separate from the mixer’s master output to
avoid recording what you are playing back. You may also
have mixing hardware that can be connected via FireWire.
• When using the Mixer inside Cubase, you can use the
inputs on your audio hardware to connect microphones
and/or external devices. Use the outputs to connect your
monitoring equipment.
Cubase only: You can create very complex setups using external instruments and external effects, and integrate Cubase seamlessly with all
your external equipment using the Control Room feature (see the chapters “VST Connections: setting up input and output busses” and “The
Control Room” in the Operation Manual for details).
Multi-channel input and output
Most likely however, you will have other audio equipment
that you want to integrate with Cubase, using several input and output channels. Depending on the equipment
available to you, there are two ways to go: either mixing
using an external mixing desk, or mixing using the mixer inside Cubase.
Setting up your system
Mixing inside Cubase
14
Page 15
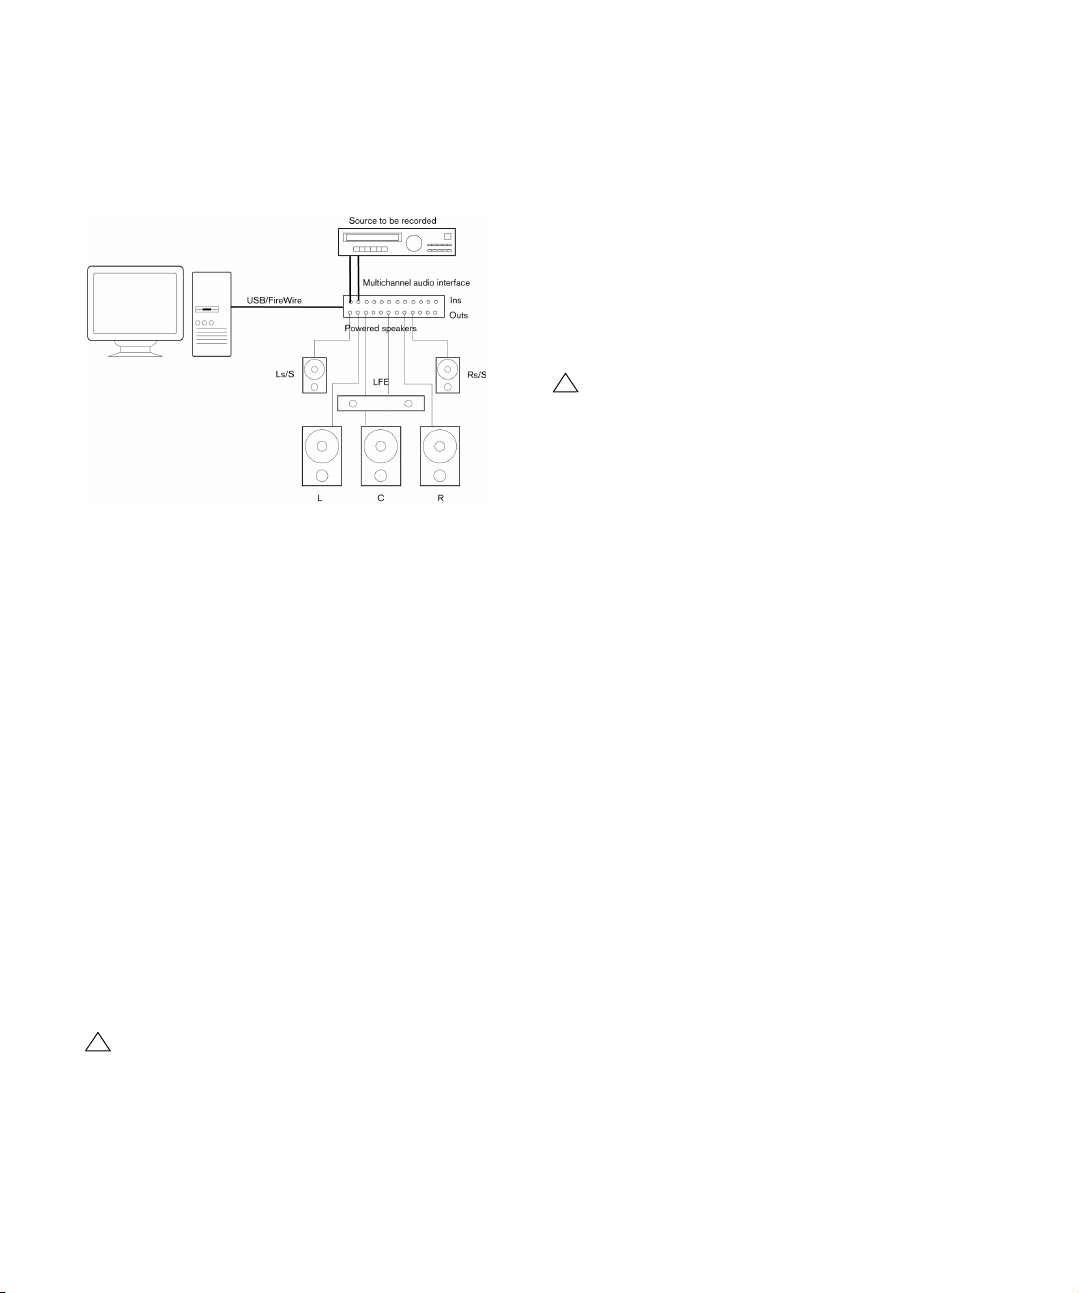
Connecting for surround sound (Cubase only)
!
!
If you plan to mix for surround sound, you can connect the
audio outputs to a multi-channel power amplifier, driving a
set of surround channels.
A surround sound playback configuration.
Cubase supports surround formats with up to 6 speaker
channels. The figure above shows a 5.1 surround setup.
Recording from a CD player
Most computers come with a CD-ROM drive that can also
be used as a regular CD player. In some cases the CD
player is internally connected to the audio hardware so
that you can record the output of the CD player directly
into Cubase (consult the audio hardware documentation if
you are uncertain).
• All routing and level adjustments for recording from a CD (if
available) are done in the audio hardware setup application
(see “Making settings for the audio hardware” on page 15).
• You can also grab audio tracks directly from a CD in Cubase
(see the chapter “File Handling” in the Operation Manual).
Word Clock connections
If you are using a digital audio connection, you may also
need a word clock connection between the audio hardware and external devices. Please refer to the documentation that came with the audio hardware for details.
About recording levels and inputs
When you connect your equipment, you should make sure
that the impedance and levels of the audio sources and inputs are matched. Typically, different inputs may be designed for use with microphones, consumer line level
(-10dBV) or professional line level (+4dBV), or you may be
able to adjust input characteristics on the audio interface or
in its control panel. Please check the audio hardware documentation for details.
Using the correct types of input is important to avoid distortion or noisy recordings.
Cubase does not provide any input level adjustments
for the signals coming in to your audio hardware,
since these are handled differently for each card. Adjusting input levels is either done in a special application included with the hardware or from its control
panel (see below).
Making settings for the audio hardware
Most audio cards come with one or more small applications that allow you to configure the inputs of the hardware to your liking.
This includes:
• Selecting which inputs/outputs are active.
• Setting up word clock synchronization (if available).
• Turning monitoring via the hardware on/off (see “About moni-
toring” on page 18).
• Setting levels for each input. This is very important!
• Setting levels for the outputs, so that they match the equipment you use for monitoring.
• Selecting digital input and output formats.
• Making settings for the audio buffers.
In many cases all available settings for the audio hardware
are gathered in a control panel, which can be opened from
within Cubase as described below (or opened separately,
when Cubase isn’t running). In some cases, there may be
several different applications and panels – please refer to
the audio hardware documentation for details.
It is very important that word clock synchronization is
done correctly or there might be clicks and crackles
in recordings that you make!
15
Setting up your system
Page 16
Selecting a driver and making audio settings
!
in Cubase
The first thing you need to do is select the correct driver in
Cubase to make sure that the program can communicate
with the audio hardware:
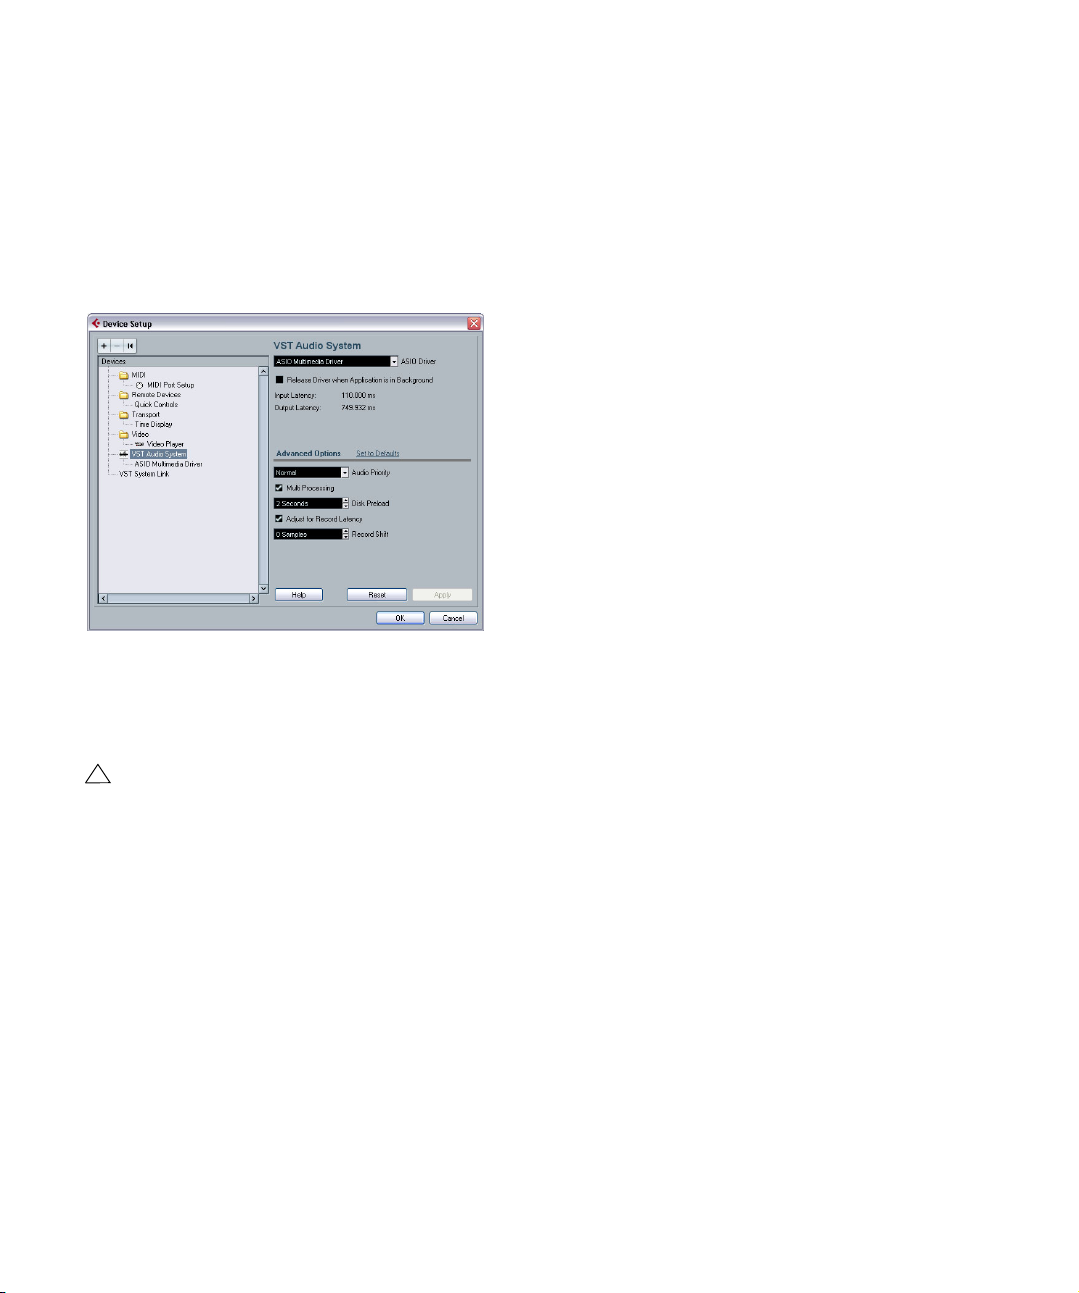
1. Launch Cubase, select Device Setup from the Devices
menu and click on VST Audio System in the Devices list to
the left.
The VST Audio System page in the Device Setup dialog.
2. Select your audio hardware driver from the ASIO
Driver menu.
There may be several options here that all refer to the same audio hardware. When you have selected a driver, it is added to the Devices list.
Under Windows, we strongly recommend that you
access your hardware via an ASIO driver written
specifically for the hardware, if available. If no ASIO
driver is installed, we recommend that you check
with your audio hardware manufacturer if they have
an ASIO driver available, for example for download
via the Internet.
3. Select the driver in the Devices list to open the Driver
settings for your audio hardware.
4. Bring up the control panel for the audio hardware and
adjust the settings as recommended by the audio hardware manufacturer.
• Under Windows, you open the control panel by clicking
the Control Panel button.
The control panel that appears when you click this button is provided by
the audio hardware manufacturer and not Cubase (unless you use DirectX, see below). Hence it will be different for each audio card brand
and model.
The Control panel for the ASIO DirectX driver is an exception, as it is
provided by Steinberg, and is described in the dialog help, opened by
clicking the Help button in the dialog. See also the notes below.
• Under Mac OS X, you will find the control panel for your
audio hardware in the System Preferences (“Other” section), opened from the Apple menu or from the Dock.
If you are using the built-in audio hardware of the Macintosh, you use the
“Sound” control panel in the System Preferences to set levels, balance, etc.
If you are using ASIO audio hardware, you can click the Control Panel button to bring up its panel.
5. If you plan to use several audio applications simulta-
neously, you may want to activate the option “Release
Driver when Application is in Background” on the VST
Audio System page. This will allow another application to
play back via your audio hardware even though Cubase is
running.
The application that is currently active (i.e. the “top window” on the desktop) will get access to the audio hardware. Make sure that any other audio application accessing the audio hardware is also set to release the
ASIO (or Mac OS X) driver so Cubase can use it when it becomes the
active application again.
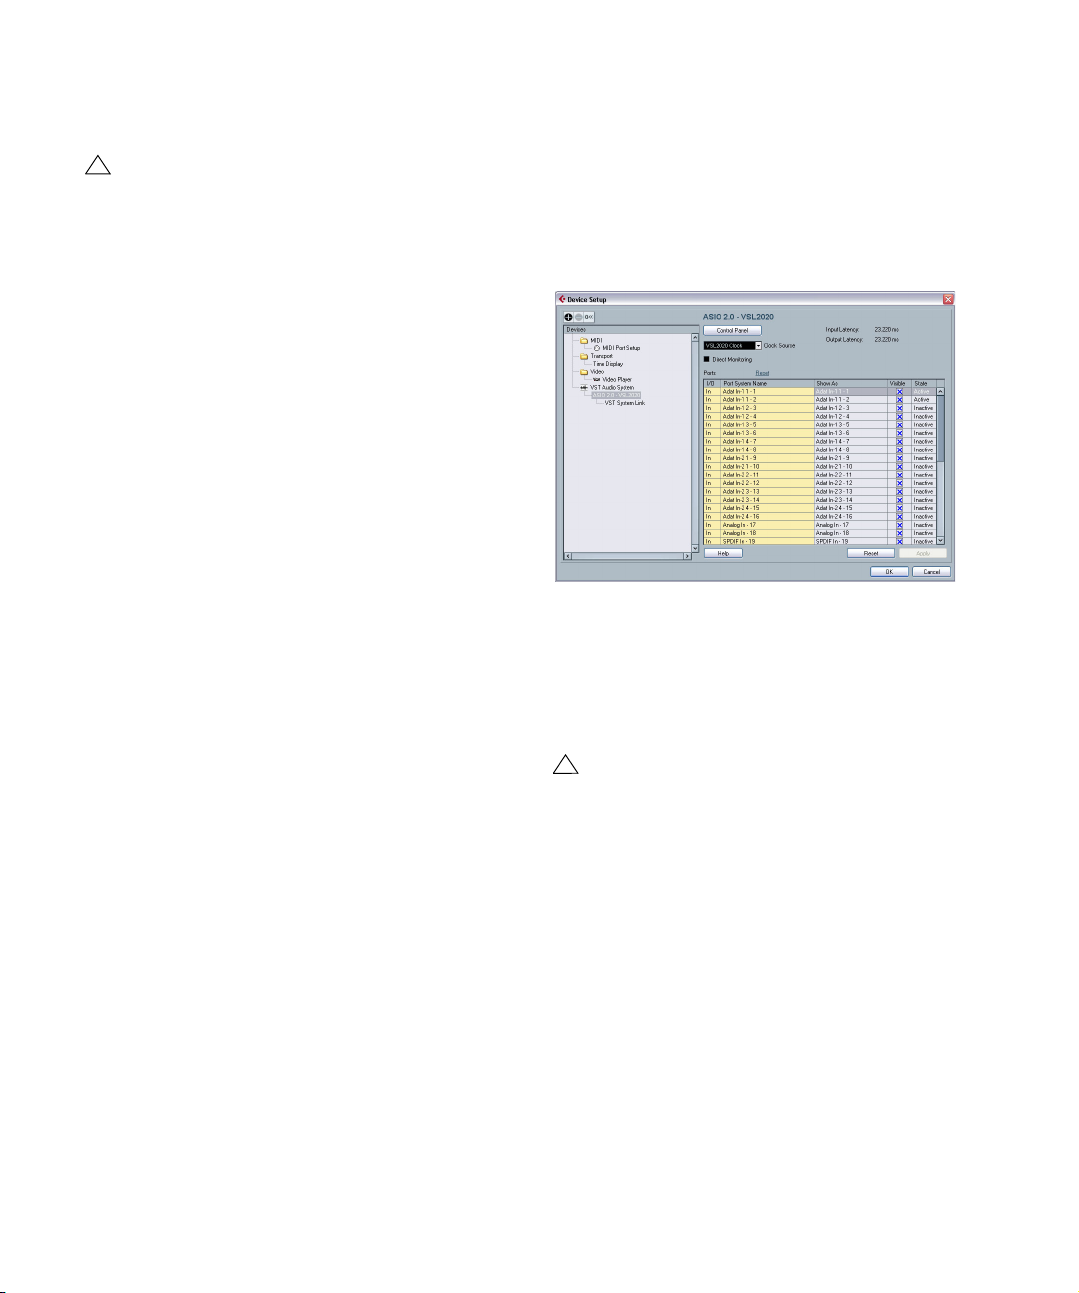
6. If your audio hardware and its driver support ASIO Di-
rect Monitoring, you may want to activate the Direct Monitoring checkbox on the page for the driver.
Read more about monitoring later in this chapter and in the chapter “Recording” in the Operation Manual.
7. Click Apply and then OK to close the dialog.
16
Setting up your system
Page 17
If you are using audio hardware with a DirectX driver
!
!
(Windows only)
If your Windows audio hardware does not have a
specific ASIO driver, a DirectX driver is the next best
option.
Cubase comes with a driver called ASIO DirectX Full Duplex, available for selection on the ASIO Driver pop-up
menu (VST Audio System page).
Ö To be able to take full advantage of DirectX Full Duplex, the audio hardware must support WDM (Windows
Driver Model) in combination with DirectX version 8.1 or
higher.
In all other cases, the audio inputs will be emulated by DirectX (see the
dialog help for the ASIO DirectX Full Duplex Setup dialog for details
about how this is reported).
Ö During the installation of Cubase, the latest DirectX
will be installed on your computer.
When the ASIO DirectX Full Duplex driver is selected in
the Device Setup dialog, you can open the ASIO Control
Panel and adjust the following settings (for more details,
click the Help button in the control panel):
• Direct Sound Output and Input Ports
In the list to the left in the window, all available Direct Sound output and
input ports are listed. In many cases, there will be only one port in each
list. To activate or deactivate a port in the list, click the checkbox in the
left column. If the checkbox is ticked, the port is activated.
• You can edit the Buffer Size and Offset settings in this
list if necessary, by double-clicking on the value and typing in a new value.
In most cases, the default settings will work fine. Audio buffers are used
when audio data is transferred between Cubase and the audio card.
While larger buffers ensure that playback will occur without glitches, the
latency (the time between the moment Cubase sends out the data and
when it actually reaches the output) will be higher.
• Offset
If a constant offset is audible during playback of Audio and MIDI recordings, you can adjust the output or input latency time using this value.
Setting up the input and output ports
Once you have selected the driver and made the settings
as described above, you need to specify which inputs and
outputs should be used and name these:
1. In the Device Setup dialog, select your driver in the De-
vices list on the left to display the Driver settings for your
audio hardware.
All input and output ports on the audio hardware are listed.
2. To hide a port, click in the “Visible” column for the port
(deselecting the checkbox).
Ports that aren’t visible cannot be selected in the VST Connections window where you set up your input and output busses – see “Setting up
the VST Connections” on page 25 and the chapter “VST Connections:
setting up input and output busses” in the Operation Manual.
If you attempt to hide a port that is already used by a
bus you will be asked whether this is really what you
want – note that this will disable the port!
3. To rename a port, click on its name in the “Show as”
column and type in a new name.
Ö It is a good idea to give your ports names that are related to the channel configuration (rather than to the actual hardware model)!
For example, if you are using a 5.1 surround audio setup (Cubase only),
you could name the six ports Left, Right, Center, Lfe, Left Surround and
Right Surround. This makes it easier to transfer your projects between
different computers, e.g. in different studios – if the same port names are
used on both computers, Cubase will automatically handle the bus connections properly when you open the project on the other computer.
4. Click OK to close the Device Setup dialog and apply
your changes.
17
Setting up your system
Page 18
About monitoring
!
In Cubase, monitoring means listening to the input signal
while preparing to record or while recording. There are
three ways to monitor:
External monitoring
External monitoring (listening to the input signal before it
goes into Cubase) requires an external mixer for mixing the
audio playback with the input signal. This can be a classic
mixing desk or a mixer application for your audio hardware,
if this has a mode in which the input audio is sent back out
again (usually called “Thru”, “Direct Thru” or similar).
Via Cubase
In this case, the audio passes from the input into Cubase,
possibly through Cubase effects and EQ and then back to
the output. You control monitoring via settings in Cubase.
This allows you to control the monitoring level from Cubase and add effects to the monitored signal only.
ASIO Direct Monitoring
If your audio hardware is ASIO 2.0 compatible, it may support ASIO Direct Monitoring (this feature may also be available for audio hardware with Mac OS X drivers). In this
mode, the actual monitoring is done in the audio hardware,
by sending the input signal back out again. However, monitoring is controlled from Cubase. This means that the audio
hardware’s direct monitoring feature can be turned on or off
automatically by Cubase.
Monitoring is described in detail in the chapter “Recording” in the Operation Manual. However, when setting up,
there’s one thing to note:
• If you want to use the external monitoring via your audio
hardware, make sure the corresponding functions are activated in the card’s mixer application.
Ö If you are using RME Audio Hammerfall DSP audio
hardware, make sure that the pan law is set to -3dB in the
card’s preferences.
Setting up MIDI
Make sure that all equipment is turned off before
making any connections!
This section describes how to connect and set up MIDI
equipment. If you have no MIDI equipment, you can skip
this section. Note that this is only an example – you might
need or want to hook things up differently!
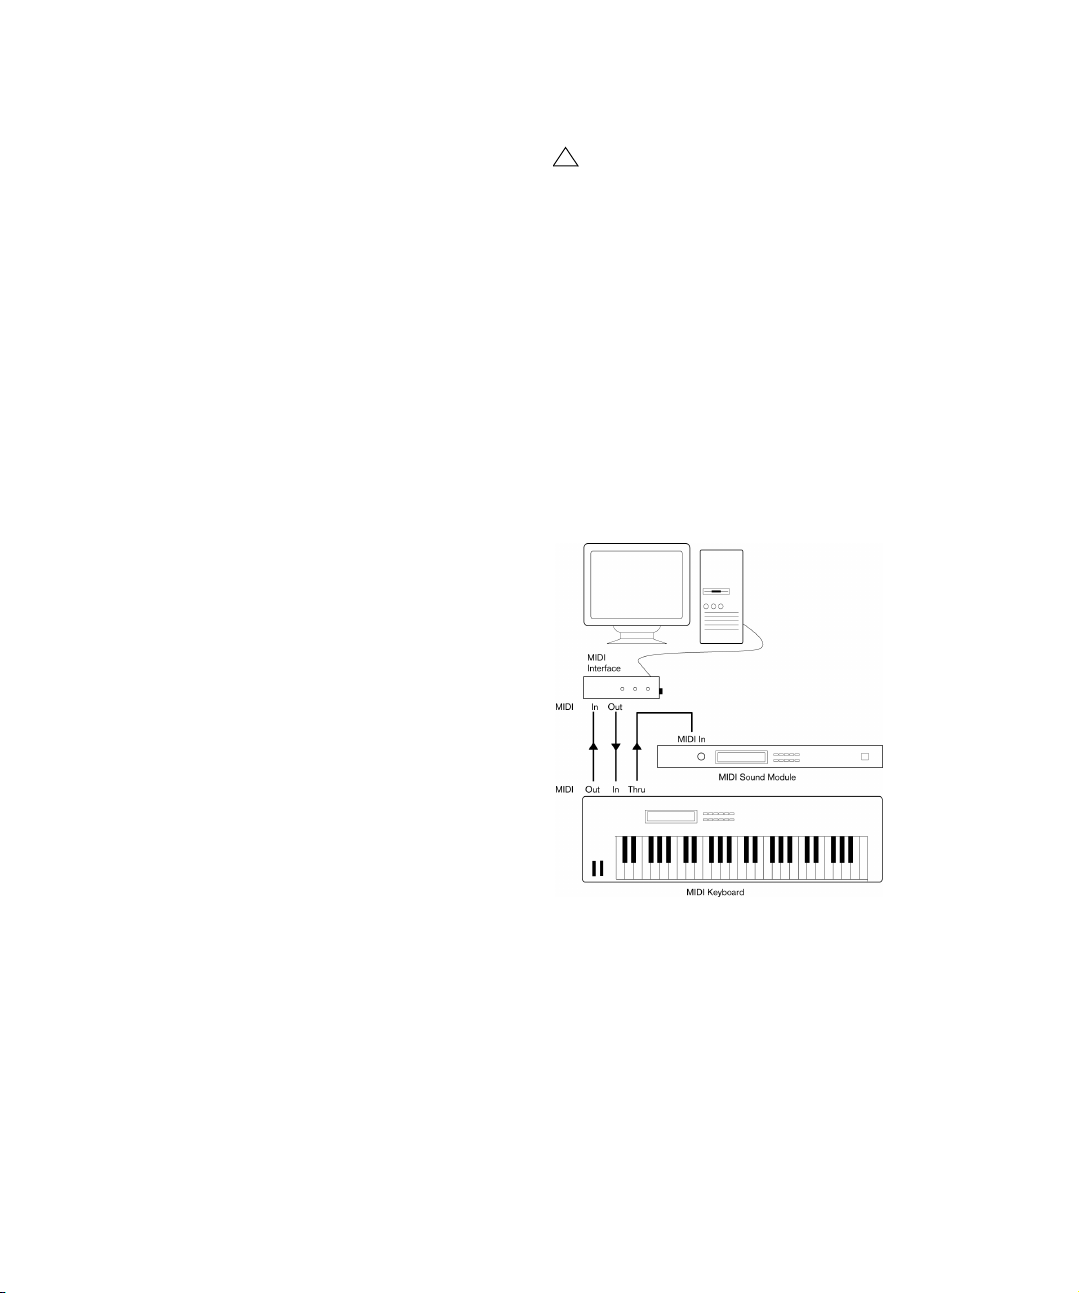
Connecting the MIDI equipment
In this example we assume that you have a MIDI keyboard
and an external MIDI sound module. The keyboard is used
both for feeding the computer with MIDI messages for recording and for playing back MIDI tracks. The sound module is used for playback only. Using Cubase’s MIDI Thru
feature (described later) you will be able to hear the correct sound from the sound module while playing the keyboard or recording.
A typical MIDI Setup.
18
Setting up your system
Page 19
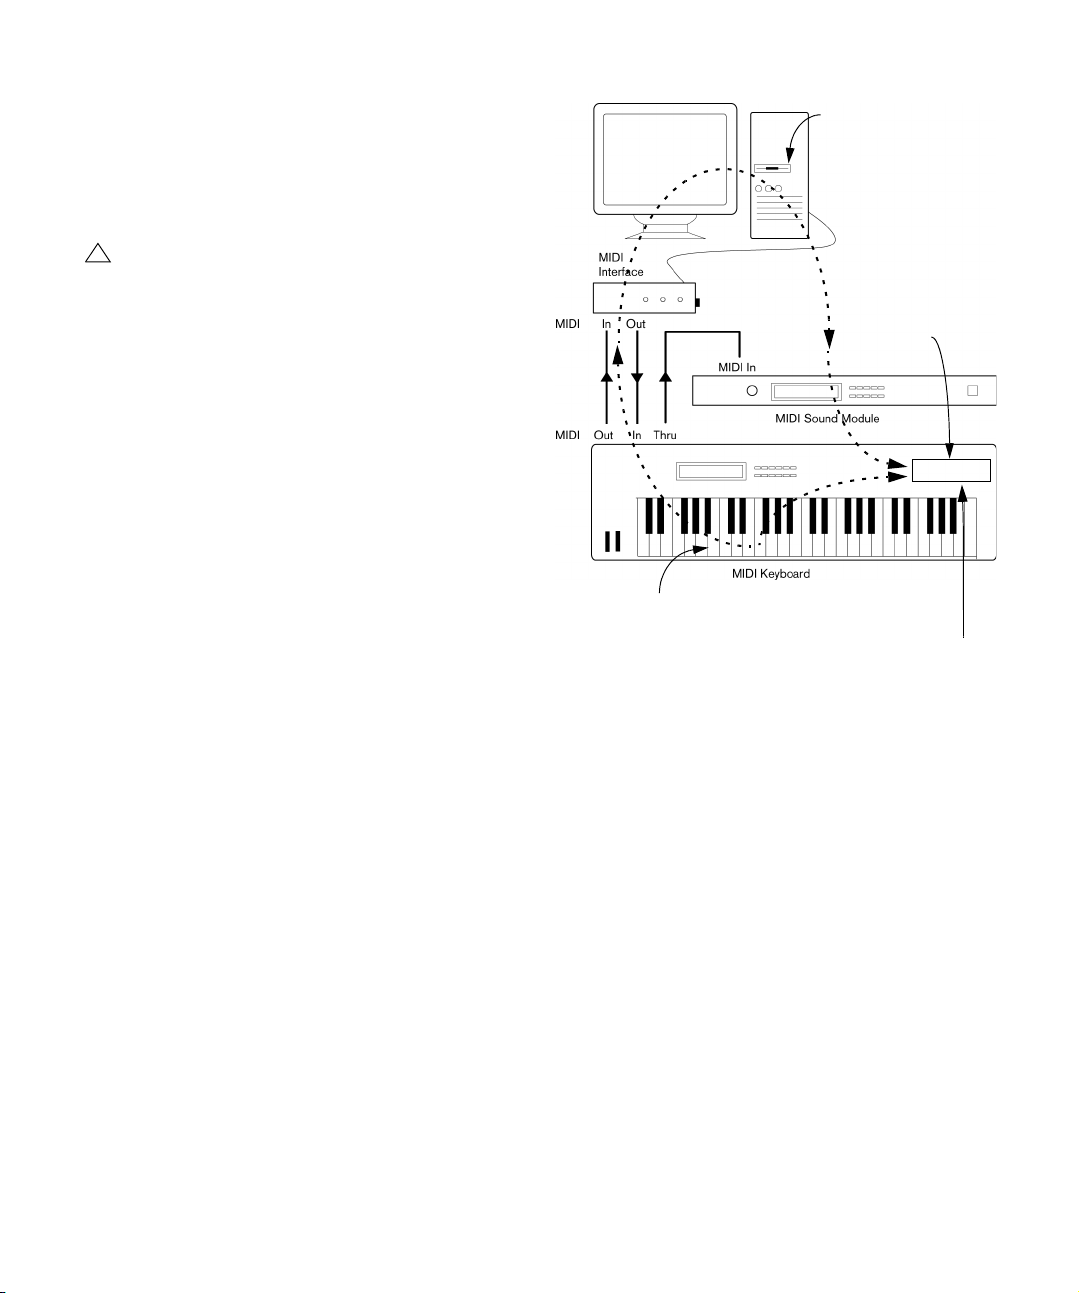
You might want to use even more instruments for playback.
!
When “MIDI Thru” is active
in Cubase, MIDI data received is immediately
“echoed” back out.
When you press a key, it is sent
out via MIDI to Cubase.
MIDI data coming in to
the instrument is played
by the “Synth” inside it.
When Local Control is turned on in the instrument, the keys
you press will be played by the “Synth” inside the Instrument.
When Local Control is turned off, this connection is cut off.
MIDI data coming in to
the instrument is played
by the “Synth” inside it.
“Synth”
If you do, simply connect MIDI Thru on the sound module to
MIDI In on the next instrument, and so on. In this hook-up,
you will always play the first keyboard when recording. But
you can still use all your devices for providing sounds on
playback.
If you plan to use more than three sound sources, we
recommend that you either use an interface with
more than one output, or a separate MIDI Thru box
instead of the Thru jacks on each unit.
Setting MIDI Thru and Local On/Off
In the “MIDI” section in the Preferences dialog (located on
the File menu under Windows and on the Cubase menu
under Mac OS X), you will find a setting called “MIDI Thru
Active”. This is related to a setting in your instrument
called “Local On/Off” or “Local Control On/Off”.
• If you use a MIDI keyboard instrument, as described earlier in
this chapter, MIDI Thru should be activated and that instrument should be set to Local Off (sometimes called Local Control Off – see the instrument’s operation manual for details).
The MIDI signal from the keyboard will be recorded in Cubase
and at the same time be re-routed back to the instrument so
that you hear what you are playing, without the keyboard “triggering” its own sounds.
• If you use a separate MIDI keyboard – one that does not produce any sounds itself – MIDI Thru in Cubase should also be
activated, but you don’t need to look for any Local On/Off setting in your instruments.
• The only case where MIDI Thru should be deactivated is if you
use Cubase with only one keyboard instrument and that instrument cannot be set to Local Off mode.
• Note that MIDI Thru will be active only for those MIDI tracks
that are record enabled and/or have the Monitor button activated. See the chapter “Recording” in the Operation Manual
for more information.
19
Setting up your system
Page 20

Setting up MIDI ports in Cubase
!
!
The Device Setup dialog lets you set up your MIDI system
in the following ways:
Ö Note: When you change MIDI port settings in the Device Setup dialog, these are automatically applied in the
program.
Showing or hiding MIDI Ports
The MIDI ports are listed in the Device Setup dialog on the
MIDI Port Setup page. By clicking in the “Visible” column
for a MIDI input or output, you can specify whether or not it
should be listed on the MIDI pop-up menus in the program.
If you are trying to hide a MIDI port which is already selected for a track or a MIDI device, a warning message will
appear, allowing you to hide – and disconnect – the port
or to cancel the operation and keep the MIDI port visible.
Setting up the “All MIDI Inputs” option
When you record MIDI in Cubase, you can specify which
MIDI input each recording MIDI track should use. However, you can also select the “In All Inputs” option for an
input port, which causes any MIDI data from any MIDI input to be recorded.
The “In All Inputs” option on the MIDI Port Setup page allows you to specify which inputs should be included when
you select All MIDI Inputs for a MIDI track. This can be especially useful if your system provides several instances of
the same physical MIDI input – by deactivating the duplicates you make sure only the desired MIDI data is recorded.
Ö If you have a MIDI remote control unit connected, you
should also make sure to deactivate the “In All Inputs” option for that MIDI input.
This will avoid accidentally recording the data from the remote control
when the “All MIDI Inputs” option is selected as input for a MIDI track.
Connecting a synchronizer
Make sure that all equipment is turned off before
making any connections!
When using Cubase with external tape transports, you will
most likely need to add a synchronizer to your system. All
connections and setup procedures for synchronization are
chapter
described in the
“Synchronization” in the Opera-
tion Manual.
Setting up video
Always make all connections with all equipment
turned off!
Cubase plays back video films in AVI, Quicktime or MPEG
formats. Under Windows, video can be played back using
one of the following playback engines: Video for Windows, DirectShow or Quicktime. This ensures compatibility with as wide a range of video files as possible. Under
Mac OS X, Quicktime is always used as playback engine.
Generally there are two ways to play back video:
• Without any special hardware at all, using the computer
CPU.
In this case, the “codec” is in software. While this will be fine in many situations it does put a limit on the size of the video window as well as the
quality of the image.
• Using video hardware that for example connects to an
external monitor.
Mac OS X: Using a FireWire port, you can play back video on an external
monitor using a DV-to-analog converter or a DV camera (see also the
chapter “Video” in the Operation Manual).
This is valid for DV video and QuickTime is used for playback.
Windows: Multi-head graphics cards which support overlay functionality
can be used to display the video picture on an external monitor. The following manufacturers have working (and tested) solutions available:
nVIDIA and Matrox.
If you plan to use special video hardware, install it and set
it up as recommended by the manufacturer.
Before you use the video hardware with Cubase, we recommend that you test the hardware installation with the
utility applications that came with the hardware and/or the
Windows Media Player or Quicktime Player (Mac OS X)
applications.
20
Setting up your system
Page 21

Optimizing audio performance
!
This section gives you some hints and tips on how to get
the most out of your Cubase system, performance-wise.
Some of this text refers to hardware properties and can be
used as a guide when upgrading your system. This text is
very brief. Look for details and current information on the
Cubase web site (see “How you can reach us” on page 7)!
Two aspects of performance
There are two distinct aspects of performance in respect
to Cubase:
Tracks and effects
Simply put: the faster your computer, the more tracks, effects and EQ you will be able to play. Exactly what constitutes a “fast computer” is almost a science in itself, but
some hints are given below.
Short response times (latency)
Another aspect of performance is response time. The term
“latency” refers to the “buffering”, i.e. the temporary storing, of small chunks of audio data during various steps of
the recording and playback process on a computer. The
more and larger those chunks, the higher the latency.
High latency is most irritating when playing VST Instruments and when monitoring through the computer, i.e.
when listening to a live audio source via the Cubase mixer
and effects. However, very long latency times (several
hundred milliseconds) can also affect other processes like
mixing, e.g. when the effect of a fader movement is heard
only after a noticeable delay.
While Direct Monitoring and other techniques reduce the
problems associated with very long latency times, a system that responds fast will always be more convenient to
work with.
• Depending on your audio hardware, it may be possible
to “trim” your latency times, usually by lowering the size
and the number of buffers.
For details, refer to the audio hardware documentation, or, if you are using a DirectX driver under Windows, the dialog help.
System factors that affect performance
CPU and processor cache
It goes without saying that the faster the computer processor, the better. But there are a number of factors that
affect the apparent speed of a computer: the bus speed
and type (PCI is strongly recommended), the processor
cache size and of course, the processor type and brand.
Cubase relies heavily on floating point calculations. When
shopping for a processor, please make sure you get one
that is powerful in calculating floating point arithmetics.
Note also that Cubase features full support for multi-processor systems. So, if you own a computer system with
more than one processor, Cubase can take advantage of
the total capacity and evenly distribute the processing load
to all available processors. See “The advanced options” on
page 22.
Hard disk and controller
The number of hard disk tracks you can record and play
back at the same time also depends on the speed of your
hard disk and hard disk controller. If you use E-IDE disks
and controllers, make sure that the transfer mode is DMA
Busmaster. Under Windows, you can check the current
mode by launching the Windows Device Manager and
looking for properties of the IDE ATA/ATAPI Controller’s
primary and secondary channel. DMA transfer mode is enabled by default, but may be turned off by the system
should hardware problems occur.
Audio hardware and driver
The hardware and its driver can have some effect on regular performance. A badly written driver can reduce the
performance of your computer. But where the hardware
driver design makes the most difference is with latency.
Again, we strongly recommend that you use audio
hardware for which there is a specific ASIO driver!
This is especially true when using Cubase for Windows:
• Under Windows, ASIO drivers written specifically for
the hardware are more efficient than a DirectX driver and
produce shorter latency times.
21
Setting up your system
Page 22

• Under Mac OS X, audio hardware with properly written
Mac OS X (Core Audio) drivers can be very efficient and
produce very low latency times.
However, there are additional features currently only available with ASIO
drivers, such as the ASIO Positioning Protocol.
Making settings that affect performance
Choosing a driver for your audio hardware
As described in the section “Selecting a driver and making
audio settings in Cubase” on page 16, it is recommended
to install and use a standard ASIO driver if available for your
specific hardware. Check the manufacturer’s web site for
the latest drivers, etc.
Making audio buffer settings
Audio buffers affect how audio is sent to and from the audio
hardware. The size of the audio buffers affects both the latency and the audio performance. Generally, the smaller the
buffer size, the lower the latency. On the other hand, working with small buffers can be demanding for the computer.
If the audio buffers are too small, you may get clicks, pops
or other audio playback problems.
• Under Mac OS X, you can adjust the size of the buffers
on the VST Audio System page in the Device Setup dialog.
You may also find buffer settings in the control panel for the audio hardware.
• Under Windows, you adjust the buffer size settings in
the control panel for the audio hardware (opened by clicking the Control Panel button on the driver page in the Device Setup dialog).
Optimizing processor scheduling (Windows
only)
To get the lowest possible latencies when using ASIO under Windows XP (on a single-CPU system), the “system
performance” has to be optimized for background tasks:
1. Open the Windows Control Panel from the Start menu
and select System.
2. Select the Advanced tab and click the Settings button
in the Performance section.
The Performance Options dialog appears.
3. Select the Advanced tab.
4. In the Processor Scheduling section, select “Adjust
for best performance of: Background services”.
5. Click OK to close the dialogs.
The advanced options
On the VST Audio System page you will find the “Advanced
options” section. Here you find advanced settings for the
VST Engine, including a Multi Processing option. When this
is activated (default setting if you have a hyper-threading or
multiple-CPU system) and there is more than one CPU in
your system, the processing load is distributed evenly to all
available CPUs, allowing Cubase to make full use of the
combined power of the multiple processors. See the dialog
help for details.
Activating the “Lower Latency” option will basically disable
the CPU overload protection, but allow for lower latencies.
See the dialog help for details.
Setting up your system
22
Page 23

4
Tutorial 1: Recording audio
Page 24
Creating a new project
!
The name of the project
In this section we are going to explain how to create a new
project, save a project and open a saved project.
When you first open Cubase an empty screen appears
before you. You need to either create a new project or
open an existing one.
To create a new project
1. Let’s create a new project by selecting “New Project”
from the “File” Menu.
2. The Templates dialog box will open up.
Templates are discussed in the “File Handling” section of the Operation
Manual.
3. Choose “Empty”.
This will create a new project with nothing in it.
4. Click “OK”.
5. Cubase now wants to create a folder on the hard drive
so that your Cubase project file and all of its related files
are stored in one safe place.
It is important that every project gets stored in its own folder. Having many
different projects stored in the same folder only leads to confusion later on.
6. Navigate to where you would like this project to be
created.
NOTE: You are not saving the project at this point! You are creating a
folder on the hard drive that your project will get saved into later. This will
be explained very shortly.
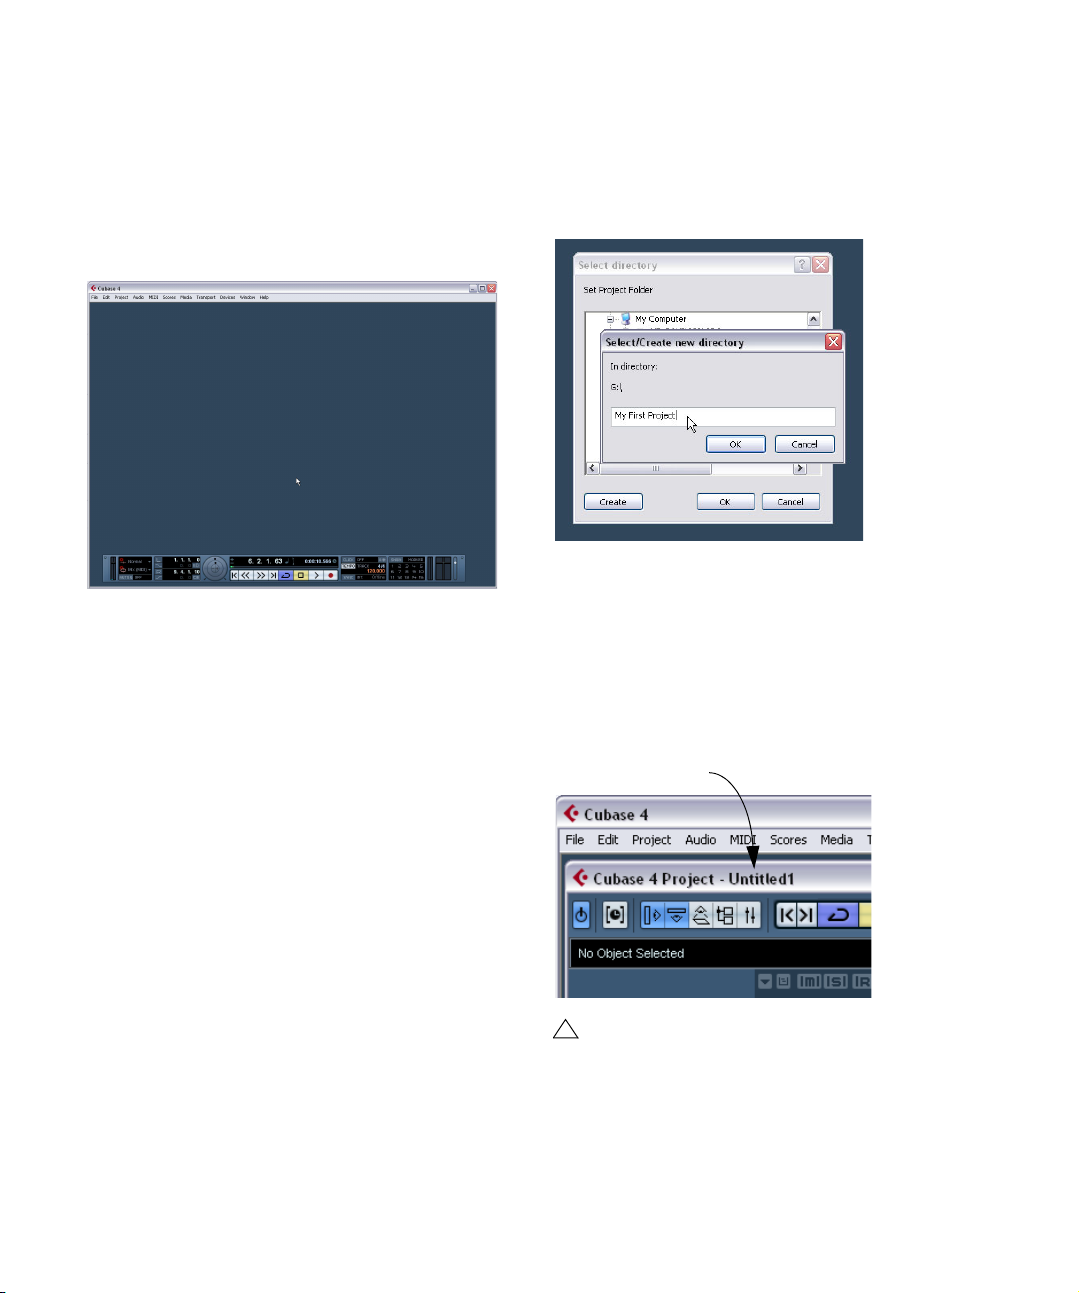
7. Click “Create” on the PC or “New Folder” on the Mac
to create a new folder for your project.
8. Give your new folder a name.
If your are going to name your project “My First Project” then you could
call this folder “My First Project” or “First Project”. What’s important here
is that you are creating a folder on the hard drive to store your project
into it. This folder should have a unique name that is different than any
other Cubase project you have created before.
9. Click “OK” on the PC or “Create” on the Mac.
Your project folder is now created on the hard drive!
10. Now click “OK” on the PC or “Choose” on the Mac.
11. You should be looking at your very first project in Cu-
base now, Congratulations!
If you look at the top of the window in Cubase (called the Project window)
you’ll see the name of this project is “Untitled1”. Proceed further to learn
how to save your first project.
You’re not done yet!
So far we’ve created a blank Cubase project. We
have a folder sitting on the hard drive but we haven’t
saved the actual Cubase project yet.
24
Tutorial 1: Recording audio
Page 25
To save a project
!
1. Select “Save As…” from the File menu.
The difference between Save and Save As are discussed in the chapter
“File Handling” in the Operation Manual.
2. You will notice that Cubase is in the “My First Project”
folder that you created earlier. This is where you want to
save your project. Type in a name for your Project – you
can use “My First Cubase Project” for example.
3. Click “Save” – and that’s it!
To close a project
1. Make sure the Project window is selected.
The Project window is the main window that you work in. See the chapter “The Project window” in the Operation Manual.
2. Select “Close” from the “File” Menu.
If you have made any changes to the project since you last saved it, you
will be prompted to “Save”, “Don’t Save” or “Cancel”. Click “Save” if you
want your changes saved.
To open a project
Now that we have saved and closed your project, let’s
show you how to open it.
Open a project using the “Open” command
1. Select “Open” from the “File” Menu.
Here you can navigate to the folder that has the project you wish to open.
2. Once you have found the project click “Open” and the
project will load.
Open a project using the “Recent Projects” submenu
Cubase remembers recently open projects and lists them
in the “Recent Projects” submenu under the “File” menu.
1. Select “Recent Projects” from the “File” Menu.
2. Choose the project you wish to open by clicking once
on it.
Setting up the VST Connections
The VST Connections window allows you to set up the input and output signals of Cubase to your audio card. Cubase calls these “busses”. This section will show you how
to set the busses up so that you can get playback and recording working.
Make sure you read the chapters “System requirements
and installation” on page 8 and “Setting up your system”
on page 13, so that your audio hardware is properly setup
before proceeding.
Load the project called “VST Connections” found in
the “Tutorial 1” folder.
Ö Note that the Tutorial projects are not installed by default during the installation of Cubase. You will find the Tutorial Projects on the program DVD, in the folder “Additional
Content”.
Adding outputs
1. Open the “Devices” menu and choose “VST Connec-
tions”.
The default key command for this is [F4].
• You’ll see several tabs at the top of the window. We’re
only going to cover Input and Output right now. See the
chapter “VST Connections” in the Operation Manual for
more details.
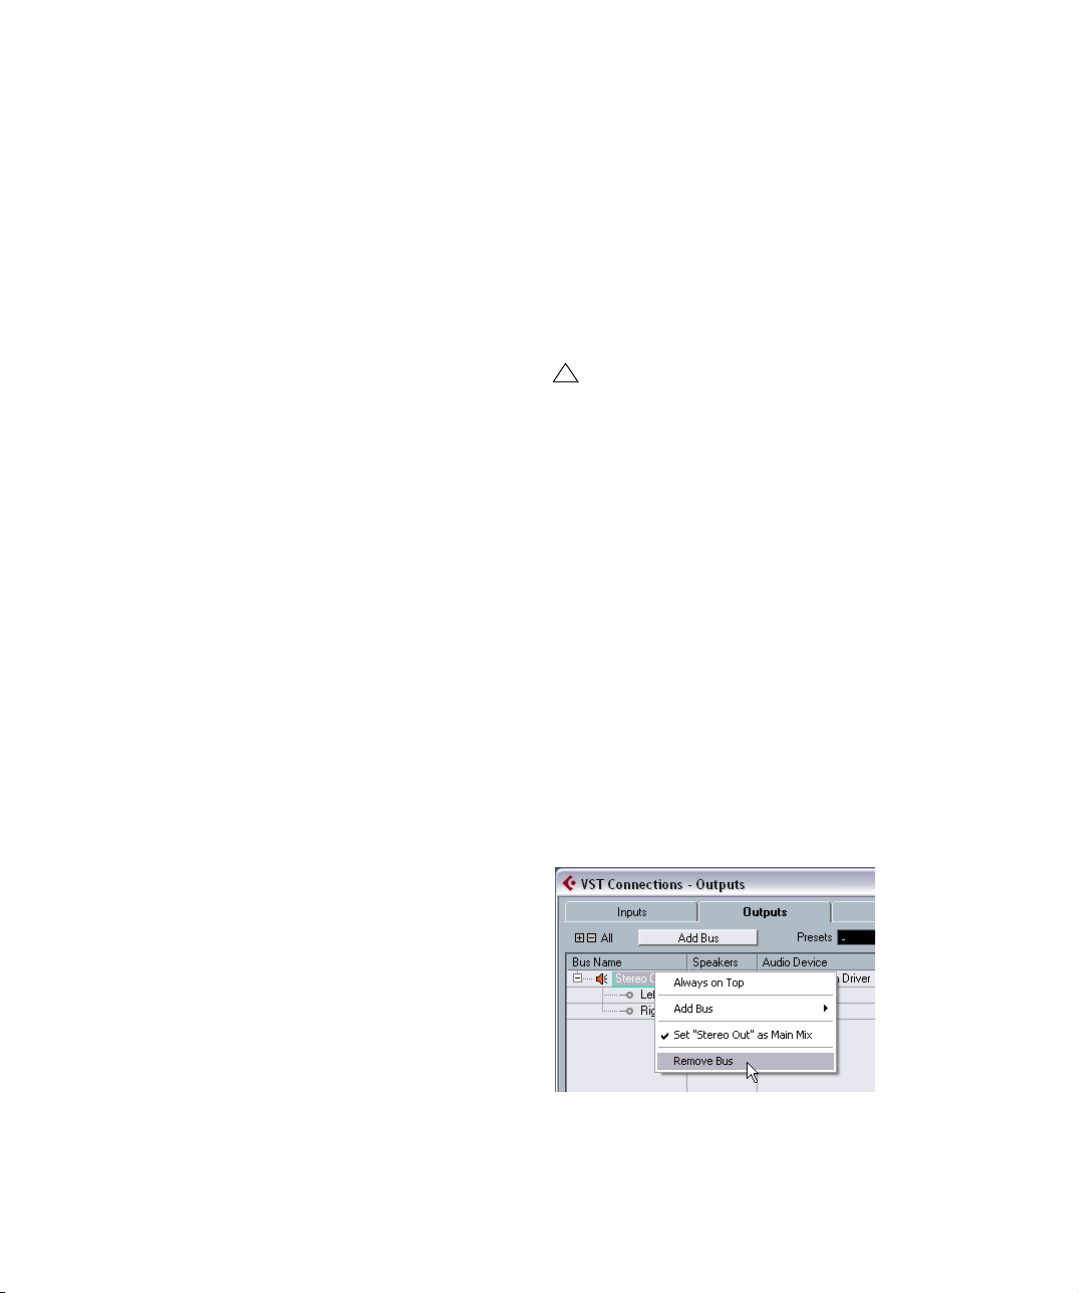
2. Let’s choose “Output” first. We want to start from
scratch and remove anything that is currently there, just in
case it’s set up incorrectly. If you see anything in the “Bus
Name” column, right-click with the mouse and choose
“Remove Bus”.
25
Tutorial 1: Recording audio
Page 26
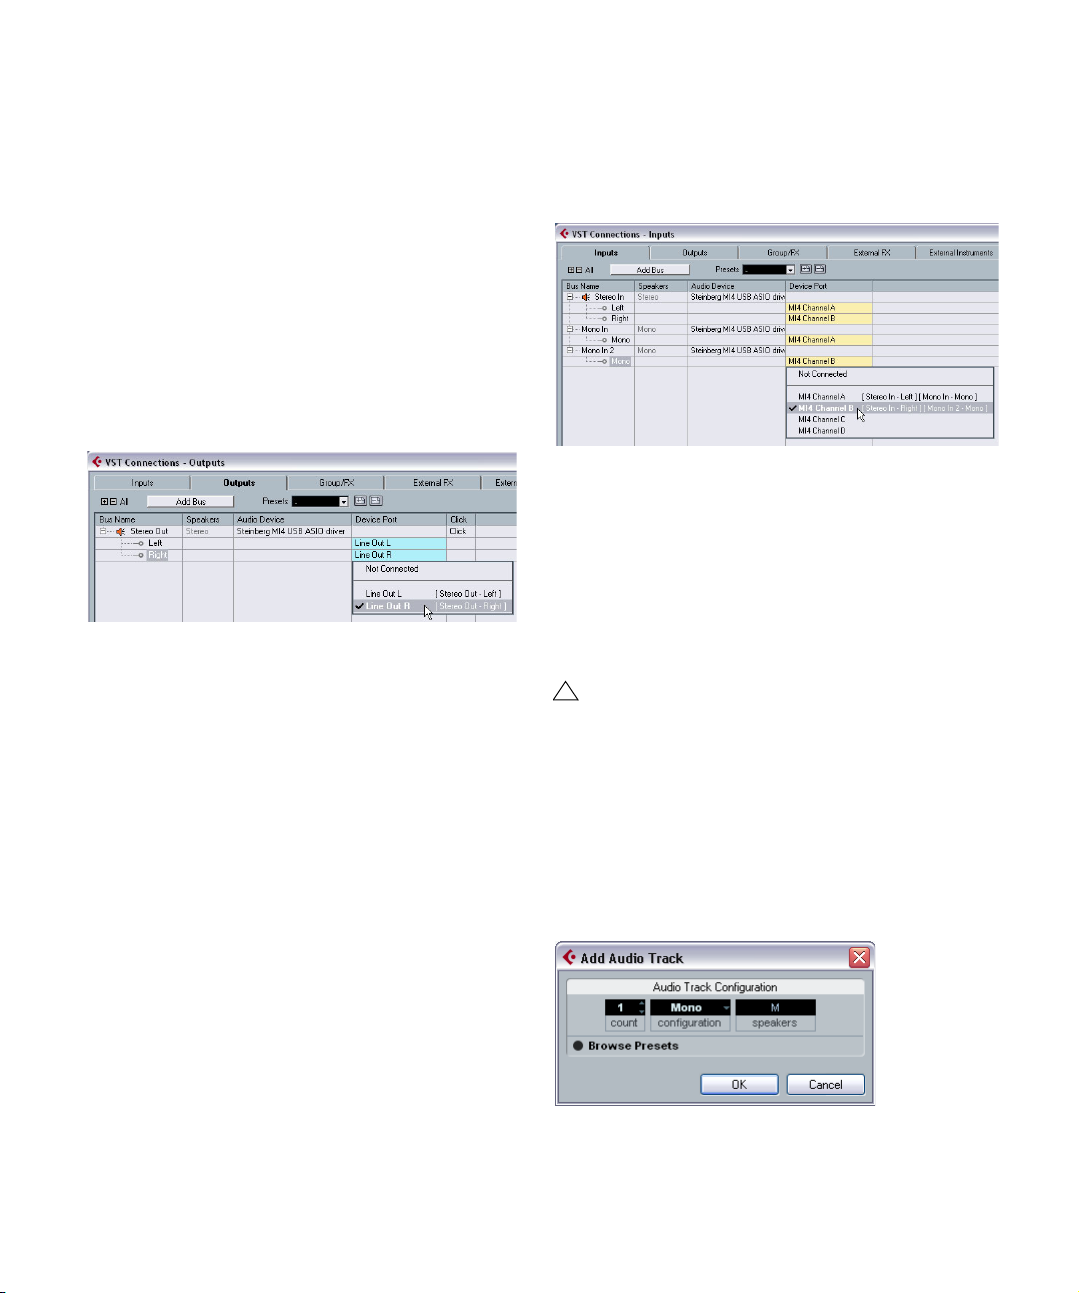
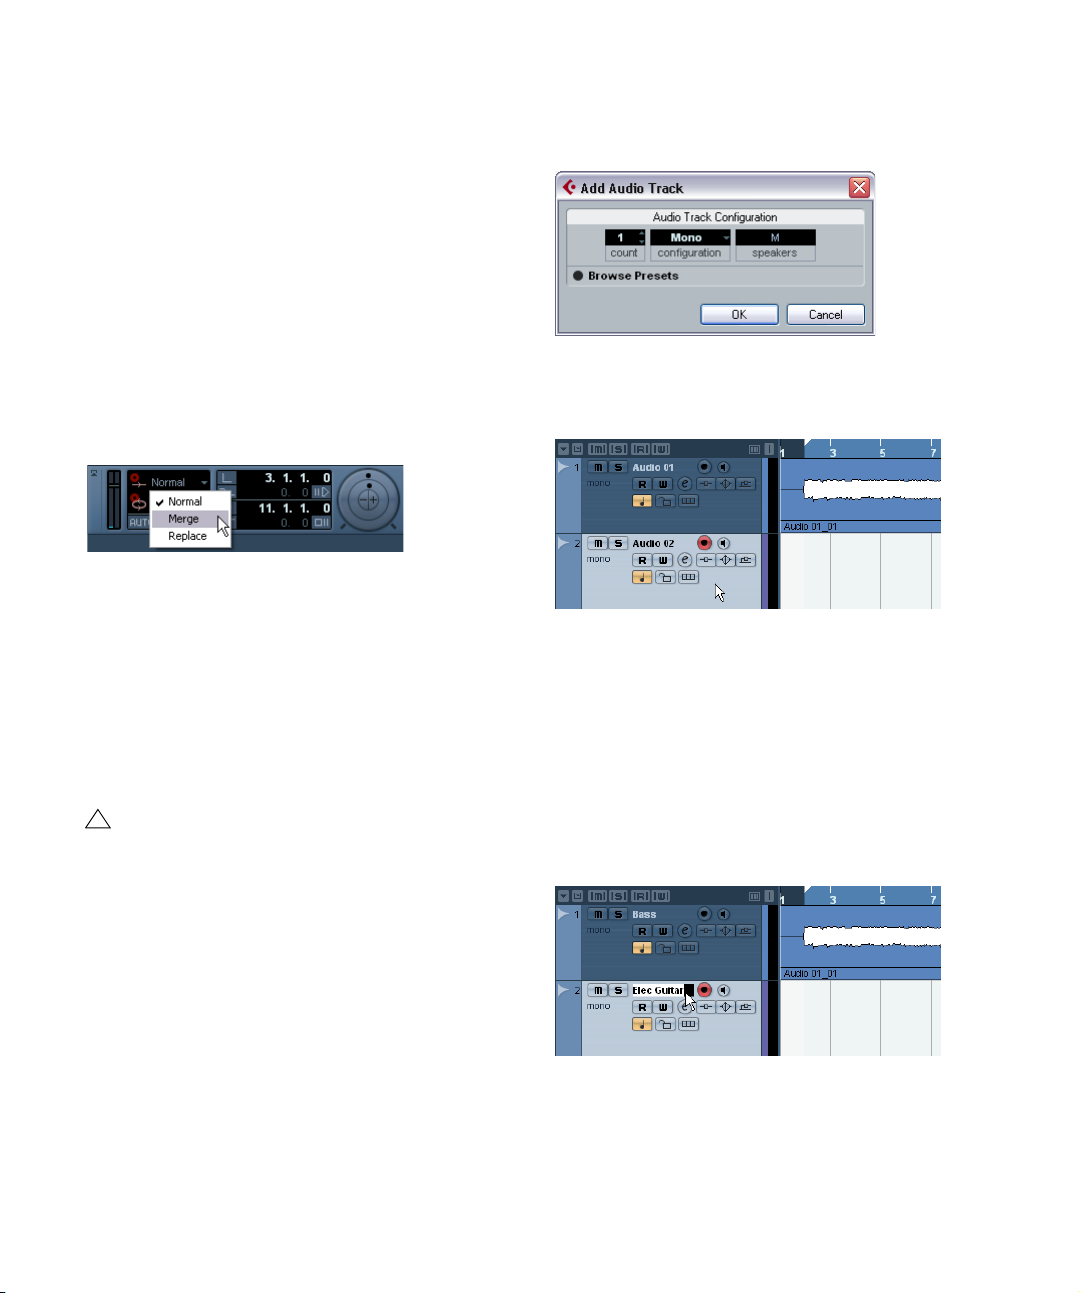
3. Now click the “Add Bus” button. Choose “Stereo” for
!
configuration and “1” for count and click OK.
This has now added a new stereo bus (Left and Right) allowing us to
have audio in Cubase route to our audio hardware.
4. Since we mainly listen to our music as a stereo mix, all
we need is a stereo output.
We can listen to our music with more than 2 channels. If we for example
had a surround sound setup.
5. Depending on your audio hardware, your outputs
should be setup now. You can however select the outputs
of your choice from the “Device Port” pull down menu.
Normally you’ll want to choose “Out 1” and “Out 2” or “Left 1” and “Right
2” as these are the main stereo outputs of your audio card. More sophisticated setups may require you to choose different outputs and even add
more busses.
Adding Inputs
Now let’s open the “Input” tab and set up the inputs we
are going to use for recording into Cubase.
1. Do the same as mentioned above for the outputs.
Right-click and select “Remove Bus”.
2. Click the “Add Bus” button. Choose “Stereo” for configuration and “1” for count and click “OK”.
This has now added a new stereo bus (Left and Right) allowing us to
have audio from our audio card’s input route to Cubase for recording.
• Having a stereo input is useful for recording audio with
two channels. An example of this is recording a keyboard
with a left and right audio channel. If we wanted to record
in mono or with one channel we can make separate busses. Let’s do this now.
1. Click the “Add Bus” button. Choose “Mono” for configuration and “2” for count and click “OK”.
This has now added two new mono busses allowing us to have audio
from our audio card’s input route to Cubase for recording.
2. Next, click in the “Device Port” column to select the
audio inputs of your audio card for the stereo and mono
inputs.
In our case we have the MI4 interface so we are selecting “MI4 Channel
A” and “MI4 Channel B” for our inputs.
That’s it! You should now be ready to record audio in Cubase and then play it back.
Level settings and recording
For this section, we are going to record a bass guitar in
mono from the input “Mono In”. Make sure you have your
audio card set up and you have read through the section
“Setting up the VST Connections” on page 25.
Load the project called “Recording” found in the
“Tutorial 1” folder.
Adding a mono track
1. Now let’s add an audio track to record to. Open the
Project menu and choose “Audio” from the “Add Track”
submenu.
2. Choose “Mono” for Configuration and “1” for Count.
Click “OK”.
This adds a mono audio track to our Project window.
26
Tutorial 1: Recording audio
Page 27
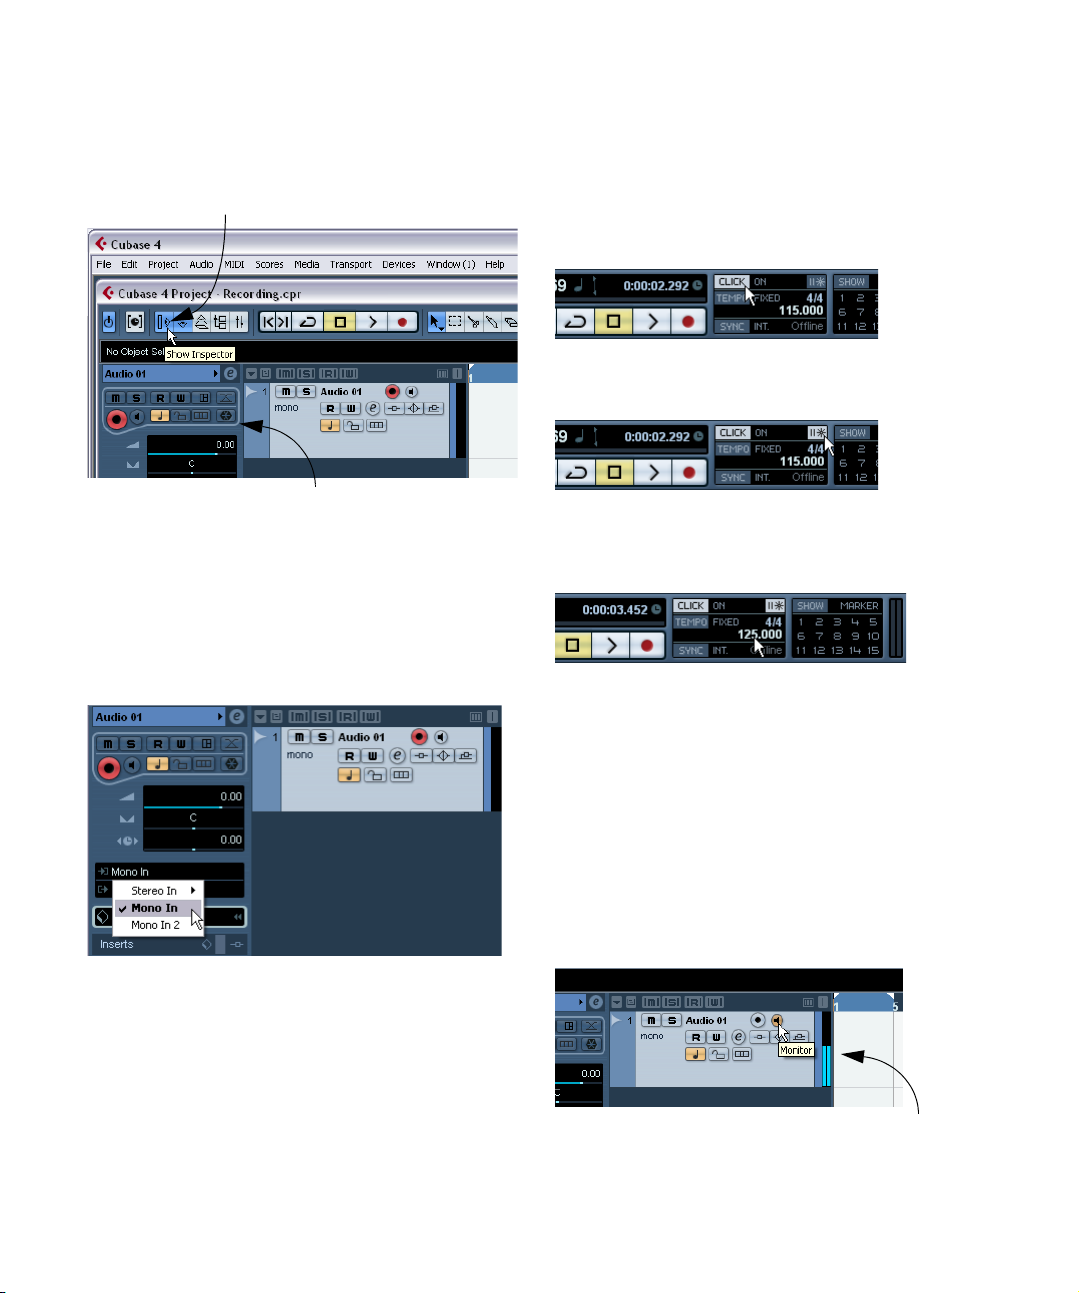
3. Click on the new track you’ve created and make sure
The Inspector
Click to open the Inspector
Audio coming into this track
the Inspector is shown.
The Inspector allows us to see and manipulate a lot of information for the
selected track.
Turning on the metronome click
We’ll want to have a click or metronome play in the background as we record the bass guitar so that what we
record aligns with the bars and beats in Cubase.
1. Activate the “Metronome/Click” button on the Trans-
port panel.
2. If you would like a two bar count in before you record,
also activate the “Precount/Click” button.
4. Make sure that “Mono In” is selected for the audio
track’s input and that “Stereo Out” is selected for the audio tracks output.
You may have different inputs and outputs based on your audio hardware.
See the chapter “VST Connections” in the Operation Manual for more detailed information. By setting “Mono In”, we will be able to record the audio
from the left input of our audio card into a track in Cubase. Setting the output to “Stereo Out” allows us to hear what we are recording.
3. We now need to set the speed or the tempo of our
project. This will directly affect how fast the click plays.
You can set the tempo just below the click.
In this picture, we have a setting of 125, which means 125bpm (beats
per minute).
Setting levels
We have a bass guitar playing through an amplifier with a
microphone in front of the amplifier’s speaker. This microphone is plugged directly into the Steinberg MI|4 microphone input. We have set the level on the MI|4 so that we
have enough volume without clipping.
1. Clicking the Monitor button will allow us to hear the
bass guitar.
You should see and hear the audio coming in to the right of the track.
27
Tutorial 1: Recording audio
Page 28
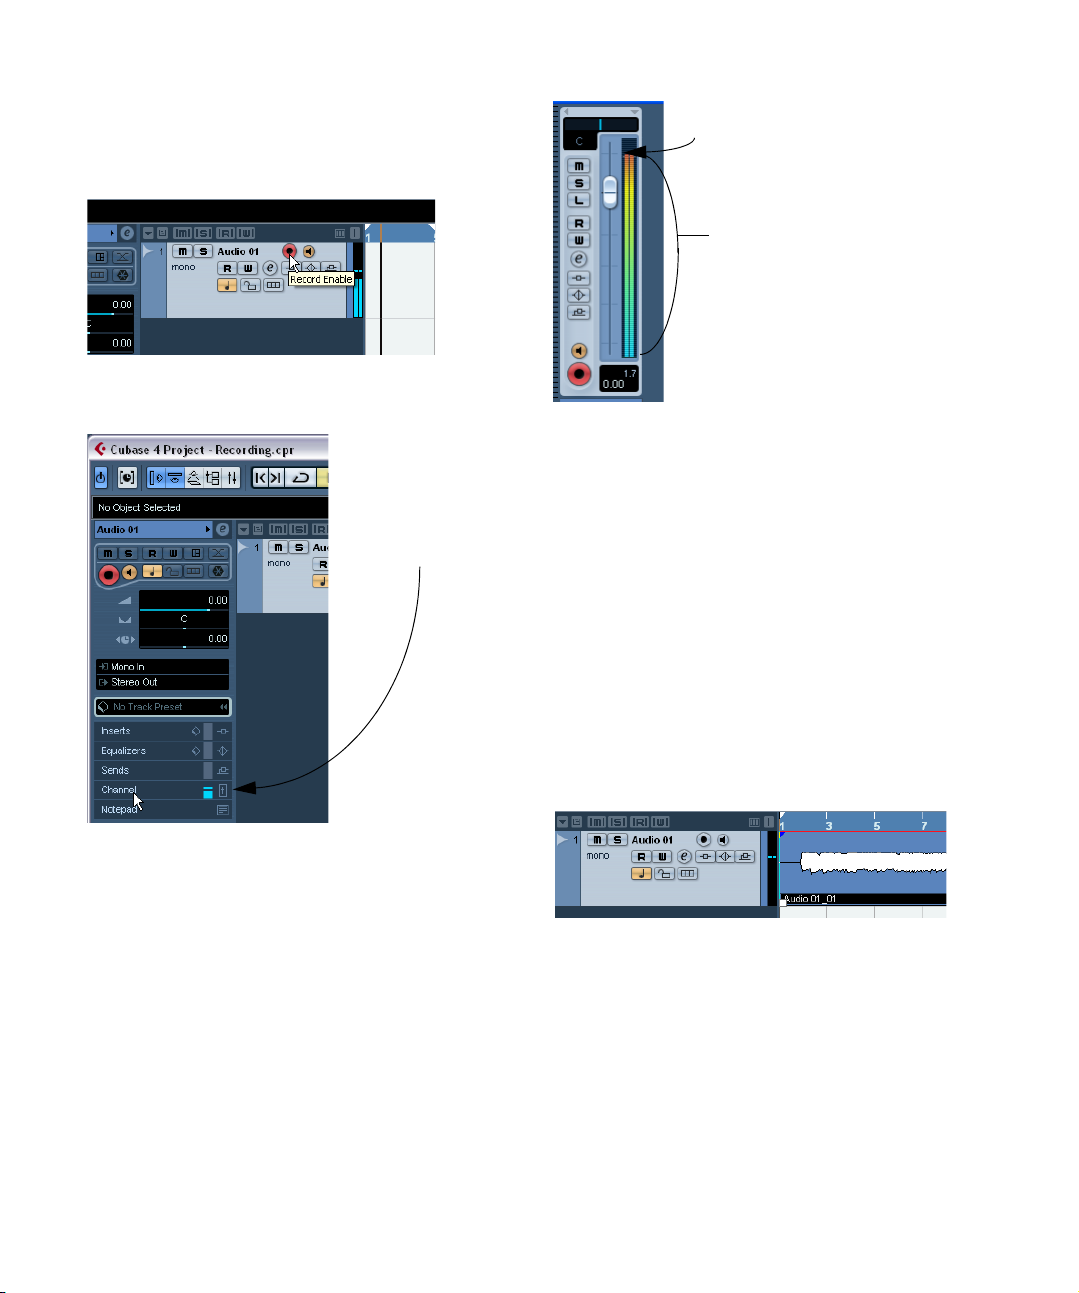
2. Now click the “Record Enable” button on the track.
Click here to display
the channel fader.
Do not allow the audio
level to go past this line!
This is the safe area
for recording
Setting the track to Record Enable lets Cubase know that you want to
record on this track and no other one. You can have many tracks Record
Enabled at a time.
3. In the Inspector, open the “Channel” tab.
This will display the channel fader for the selected track.
• Once the level is set, you are ready to record!
Recording bass guitar
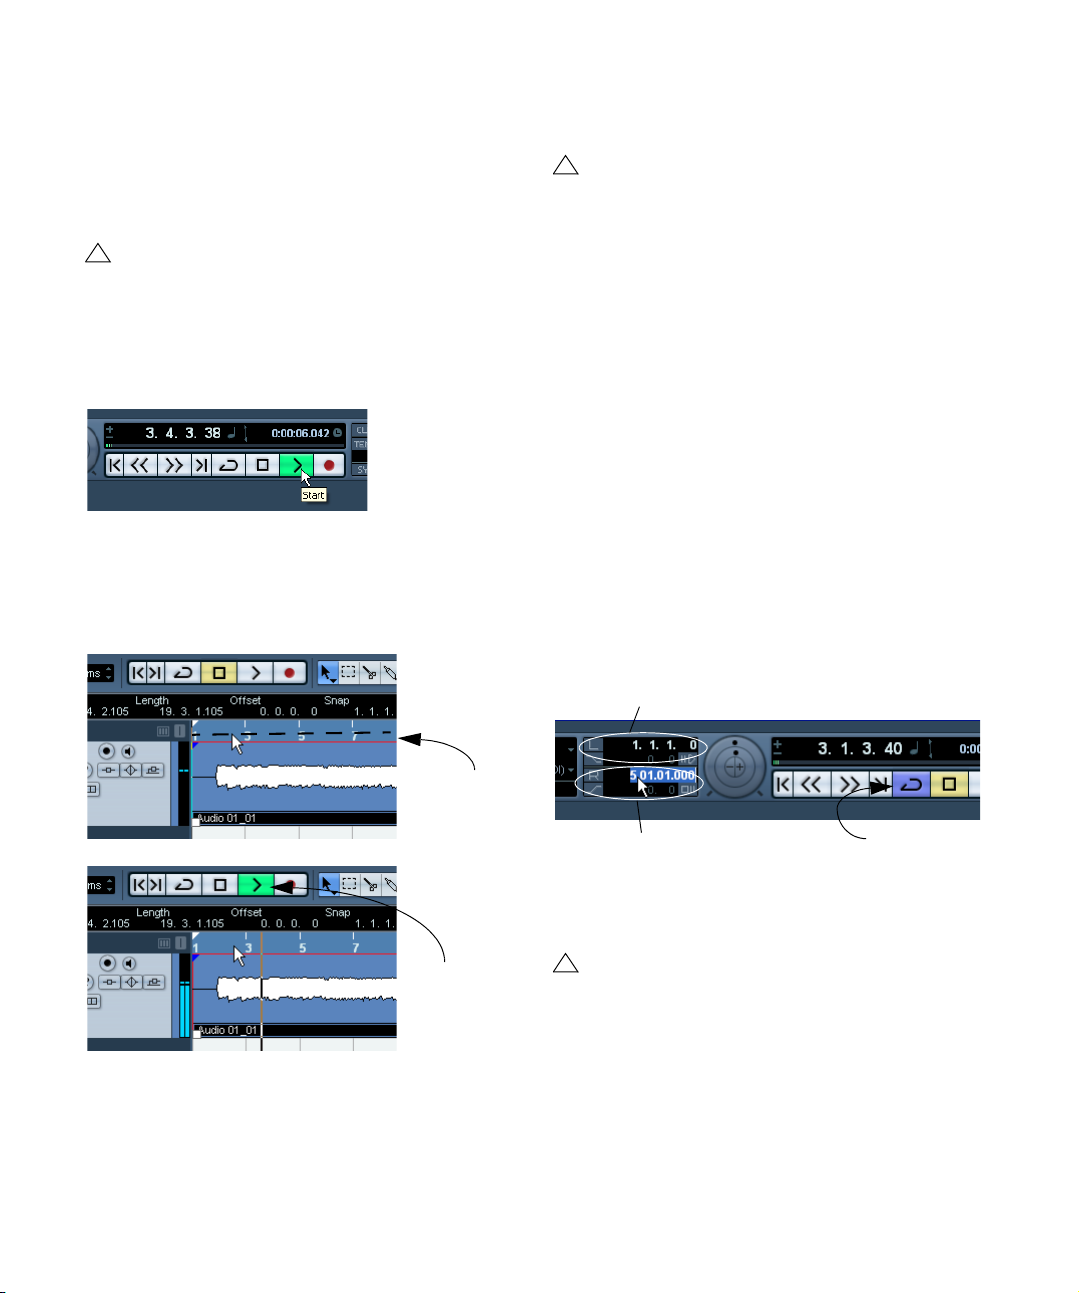
1. Position the cursor at the beginning of the project.
This will make sure we start recording on bar 1.
2. Click the Record button to record the bass guitar.
Since the “Precount/Click” button is activated, we’ll hear two bars of
click before recording begins.
3. Click “Stop” when you are finished.
4. Turn off the Monitor and Record Enable buttons on the
track so that we don’t hear the input or record on the track
any more.
Congratulations! You have just recorded your first piece of
audio in Cubase. Move ahead to the next section to learn
how to play back audio.
• Do the best you can to send the maximum amount of
volume to the audio inputs of your audio card before you
hear any distortion. Most audio cards show some kind of
level or volume indication. If yours doesn’t, don’t worry, we
can change the amount here.
4. Move the fader up or down so that the volume is loud
enough without going into the red on the channel meter. If
you go into the red you may cause clipping or distortion.
You will see a line near the top of the channel meter –
make sure the level does not go over this line!
Tutorial 1: Recording audio
28
Page 29
Playback
!
Double-click in
the lower half of
the ruler…
… to start
playback
!
!
The left locator set to “1”.
The right locator set to “5”. Cycle activated.
We are going to learn how to play back audio in Cubase.
You might think this is very simple – just hit “Play”. It is actually this simple but there are a few tricks to learn so that
you’ll be playing back what you want with precision.
Load the project called “Playback” found in the
“Tutorial 1” folder.
To start playback
There are a few ways you can play back in Cubase.
• Click the “Start” button on the Transport panel.
• Press the space bar on your computer keyboard.
This toggles between start and stop.
• Press the [Enter] key of the numerical computer keypad.
• Double-click in the lower half of the ruler.
• Select the audio event called “Audio 01_01” and
choose “Loop Selection” from the Transport menu.
The default key command for this is [Shift]+[G]. This
is the quickest way to loop an audio event and start
playback!
To stop playback
• Click the “Stop” button on the Transport panel.
• Clicking the “Stop” button twice moves the cursor to
the position in the project where you started playback.
• Press the space bar on your computer keyboard.
This toggles between stop and start.
• Press the “0” key of the numerical computer keypad.
Cycle playback
Cubase has the ability to loop or cycle a section of your
project. To set the cycle location you need to use the left
and right locator.
1. On the Transport panel, set the left locator to “1” and
the right locator to “5”.
This tells Cubase that we want to loop or cycle between bars 1 and 5.
Meaning we will have a 4 bar loop since the end of bar 4 is the beginning
of bar 5.
2. Make sure that the “Cycle” button is activated.
3. Click the Start button on the Transport panel and Cu-
base will play looping over and over until you click “Stop”.
Don’t forget – you can set the locators to encompass the selected event, turn on “Cycle” and begin
playback all by the key command [Shift]+[G].
29
Tutorial 1: Recording audio
Page 30
Recording modes with cycle off
!
There are three different modes for recording when the
cycle is turned off. This is called linear recording. The
three modes are:
• Normal
• Merge
• Replace
When recording audio, “Normal” and “Merge” are the
same. Selecting either of these will allow you to record
over the top of another audio event and it will appear as an
overlap. You can then select between the overlapping
events and determine which one will play. This is discussed in the section “Cycle recording” on page 30.
“Replace” mode when used will not overlap the audio if
there is already some on the track. It will split or cut the
audio where the recording takes place replacing what was
there previously. Keep in mind though that the audio being
replaced is not permanently deleted. It is only cut or
trimmed away allowing you to recover it later.
Cycle recording
You can record audio while “cycle” is on.
Load the project called “Cycle Recording” found in
the “Tutorial 1” folder.
So far we’ve shown you how to add tracks, record and
playback. Now we are going to add an electric guitar to
our bass guitar using cycle recording. Recording with cycle on allows us to make multiple passes of our recording
and then pick the best take.
If you haven’t reviewed the previous sections in this tutorial, please do as we are going to move a little faster now.
Recording electric guitar
1. Let’s add another “Mono” audio track.
2. You can see now that we have a track called “Audio
01” and “Audio 02”. Up to now we haven’t been concerned about naming the tracks but let’s do this now.
3. Double-click on “Audio 01” and re-name it “Bass”.
4. Double-click on “Audio 02” and re-name it “Elec Gui-
tar”. That looks a lot better now.
• It’s always good to name your tracks before you start to
record. This way the audio event will take the name of the
track. Since “Audio 01” was the name of our first track the
audio event is named “Audio 01_01”. The suffix “_01” being the first event recorded on the “Audio 01” track. We’ll
show you how to re-name your audio files in the chapter
“Tutorial 2: Editing audio” on page 33.
30
Tutorial 1: Recording audio
Page 31
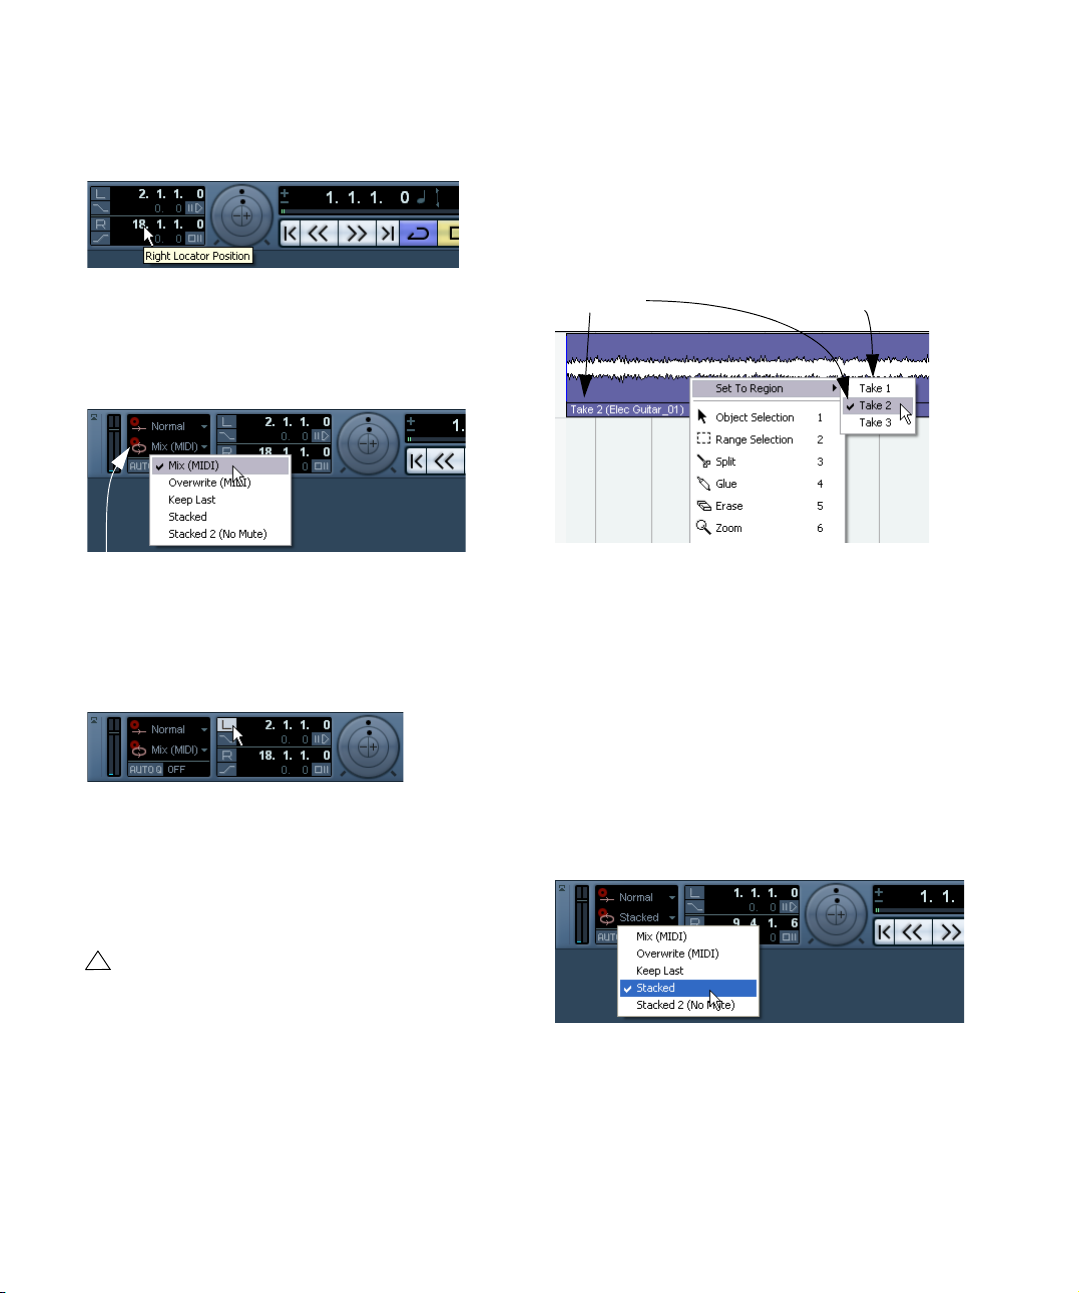
5. Make sure “Cycle” is activated, set the left locator to 2
!
Cycle Record Mode
Current take Available takes
and the right locator to 18.
This will loop or cycle between bars 2 and 18.
6. On the Transport panel, make sure “Mix (MIDI)” is selected for the “Cycle Record Mode”.
This will allow us to record the electric guitar, and as each cycle repeats
a new take will be created. We will then choose the best take to keep as
our guitar line.
7. Activate the Record Enable and Monitor buttons on
the “Elec Guitar” track.
8. Click the “L” button on the Transport panel once.
This will make sure we start recording at the left locator.
9. Click the “Record” button on the Transport panel.
As you record the guitar, let the cycle repeat three times so we have
three different guitar takes.
10. Click “Stop” when you’re finished. We’ve just recorded three different guitar takes. Now let’s figure out
how to select the best sounding one.
Selecting different takes
1. Right-click on the new guitar audio event that we just
recorded and choose a take from the “Set to Region” submenu.
Cubase has recorded all of the passes we made when we were recording in loop mode (Cycle Recording). These passes are called “Takes”. In
our example we have three different guitar takes. We can pick between
them and choose which one sounds best.
2. Listen to the different takes and when you are done,
choose “Take 1”.
Stacked recording
Stacked recording is very similar to cycle recording but with
one difference – you can see the “Takes” that you record all
the time instead of them being hidden underneath.
1. Create a new “Mono” track.
2. Re-name the track “Guitar 2”.
3. On the Transport panel, select the Cycle Record
Mode “Stacked”.
Load the tutorial called “Cycle Recording 2” found in
the “Tutorial 1” folder.
The Cycle Record Mode pop-up menu.
4. Activate the Record Enable and Monitor buttons on
the track “Guitar 2”.
5. Click the Record button on the Transport panel.
31
Tutorial 1: Recording audio
Page 32

6. When you are done recording, click “Stop”.
!
You should see the recorded audio events appearing below each other
as separate takes.
7. Click the lower border of the “Guitar 2” track and drag
downwards to resize it larger.
This allows you to see the audio takes much better.
8. Deactivate the Record Enable and Monitor buttons.
Load the tutorial called “Stacked Recording” found
in the “Tutorial 1” folder.
9. Open the Preferences dialog (Editing–Audio page)
and make sure that the option “Treat Muted Audio Events
like Deleted” is activated.
10. On the toolbar, select the Mute tool.
This will allow us to switch between our stacked recorded takes.
11. You will see three takes. The bottom two are muted
and the top one that is green colored (Take 1) is the one
that will currently play.
12. Mute “Take 1” and un-mute “Take 2”.
This allows “Take 2” to be heard. Notice that “Take” 2 is now colored
green.
13. You can do the same for “Take 3”.
Continue to the following chapter, as we will show you
how to edit what we’ve recorded using some of the tools.
32
Tutorial 1: Recording audio
Page 33

5
Tutorial 2: Editing audio
Page 34

Event operations
!
The name has changed from “Audio 01_01” to “Bass”.
There is extra space on either side of the Bass audio
event that we don’t want.
White squares appear on
the bottom left and bottom
right of the event. Resize
the event with these.
In this section we’ll learn how to edit events or parts. This
includes rename, resize, split, glue, move, copy, repeat,
mute, erase and adding a fade.
Load the project called “Event Operations” found in
the “Tutorial 2” folder.
Renaming
If we look at the audio events that we recorded earlier, we
notice that the bass track has an audio event on it called
“Audio 01_01”. This is because the name of the track was
originally “Audio 01” and the suffix “_01” means that it is
the 1st audio file to be recorded on the track. The second
audio file would be called “Audio 01_02”.
Naming your audio files keeps your project clean and easy
to understand. Let’s rename “Audio 01_01” to “Bass”:
1. Choose the Object Selection tool.
2. Click on the event “Audio 01_01”.
3. Make sure “Show Event Infoline” is activated on the
toolbar.
5. Notice that our audio event now says “Bass”.
Resizing
You resize an event by adjusting the start and/or end of
the event. Used in combination with the split tool this is
usually all the editing you’ll need.
1. Choose the Object Selection tool.
2. Click on the event you wish to resize.
In our case let’s change the “Bass” event.
• The “Event Infoline” gives us detailed information about
an object or objects that are currently selected in the
event display.
4. Change “Audio 01_01” to “Bass” underneath the
word “File”.
This changes the audio file’s name directly on the hard drive – easy!
3. Position the cursor over one of the squares at the bot-
tom right or bottom left of the event. Click and adjust the
“Bass” event so that it lines up with “Elec Guitar_01”.
34
Tutorial 2: Editing audio
Page 35

Splitting
Here are the splits that were made to the Bass event.
There is more to see but your screen resolution may prevent you from seeing everything.
Right-click in
the toolbar.
Splitting is used to cut events. You can split or cut an event
wherever you want or split them evenly to bars and beats.
Splitting with “Snap” off
Splitting with “Snap” off allows you to cut anywhere without locking to any kind of reference like bars and beats.
1. Choose the Split tool.
2. Make sure “Snap” is off (not highlighted).
Snap allows you to edit to various time frames. The most common one is
bars and beats. Meaning you can cut exactly to the bar with “Snap”
turned on. With it turned off you can cut anywhere. See more about
“Snap” in the chapter “The Project window” in the Operation Manual.
3. You can now split or cut the audio anywhere by clicking on the event.
Splitting with “Snap” on
Having “Snap” on allows you to split or cut to a time reference. For example, if you want to cut the “Elec Guitar”
track to bars or beats.
1. Choose the Split tool.
2. Make sure “Snap” is on.
Snap allows you to edit to various time frames. The most common one is
bars and beats. Meaning you can cut exactly to the bar with “Snap”
turned on. With it turned off you can cut anywhere. See more about
“Snap” in the chapter “The Project window” in the Operation Manual.
3. If you are having trouble seeing anything beyond the
“Tool Buttons”, right-click in the toolbar (the top bar that
the “Tool Buttons” are on).
This allows you to change what you see at the top of the Project window.
Customization is in the heart of Cubase.
4. Undo your actions by choosing “Undo Split” from the
Edit menu as many times as you used the Split tool.
Make sure there are no splits in the “Bass” event any more.
4. Choose “Default” so that if you changed anything it
will return to the default settings.
35
Tutorial 2: Editing audio
Page 36

5. Next, right click again and choose “Automation Mode”
so that the automation tools are hidden from view.
Now we can see enough for us to continue on with the Split tool.
6. With most of the snap features in view, choose “Grid”
from the Snap mode pop-up menu to the right of the Snap
button.
Splitting with [Alt]/[Option]
1. Choose the Split tool.
2. Hold down [Alt]/[Option] and click on the bass event
at bar 3 and the length of the split will be repeated until
the end of the event.
You can try this with “Snap” on or off.
3. Select “Undo Split” from the Edit menu and return the
bass to the way it was.
This means we’ll be snapping to a grid.
7. Next choose “Bar” as the “Grid Type”.
This means you will split to bars.
8. You can now split the “Elec Guitar_01” event precisely to the bar. Cut on bars 6, 10 and 14.
Gluing or joining events
Using the Glue tool allows you to join events together that
have been cut using the Split tool.
1. Choose the Glue tool.
2. Glue together the split events in the “Elec Guitar”
track by clicking just before each split.
Let’s make sure we glue all of them.
36
Tutorial 2: Editing audio
Page 37

Moving events
1. Choose the Object Selection tool.
2. Move all the events in the Project window from bar 2
to bar 1. Click and hold the mouse on an empty area of the
Project window. Drag to create a selection of all the
events. When you release the mouse button, all the events
will be selected.
3. With all the events selected, click and drag them to
bar 1.
Copying events
Copying can be used to copy an event to another area in
the Project window. If you want to make several copies in
one go, see “Repeating” on page 38.
Using Copy and Paste
1. To copy an audio event, click on the desired event and
choose “Copy” from the Edit menu.
In our case let’s choose the “Elec Guitar_01” event.
2. Position the cursor at the point in the project that you
wish the copy to be made.
We’ll put our cursor at bar 17.
3. Make sure you click on the track that you want the
copied event to be copied to. Choose “Paste” from the
Edit menu.
It is possible that you may have another track selected. If so the “Paste”
command would paste it to a different track. Always note the track you
have selected before choosing “Paste”.
4. Click on an empty area of the Project window so that
no event is selected.
Tutorial 2: Editing audio
4. Now we have two guitar events. Note that we also
copied the takes that were on the guitar track. We can use
these later.
Using the [Alt]/[Option] key
1. Choose the Object Selection tool and hold down [Alt]/
[Option].
2. We are going to copy the “Guitar 2” events. Remem-
ber that there are three events since we used stacked recording to record them. Select all of the “Guitar 2” events
by clicking and dragging as described above.
37
Page 38

3. Click and hold the selected events and drag to the position you wish the copy to be made. Then release the
mouse button.
Don’t worry about the “Scissor” icon that appears. As soon as you click
and hold on the event you are copying it switches to an arrow with a “+”
sign indicating that you are copying.
Repeating
Repeats are great for repeating something over and over
directly after the event you want to repeat.
1. Click the bass event with the Object Selection tool.
2. Choose “Repeat” from the Edit menu.
3. In the dialog that opens, choose how many copies you
wish to make by increasing the “Count” field.
• You can choose to select “Shared Copies” if you want.
Shared copies allow you to make aliases to the original
event. This means that if you make changes to the original
event (such as processing or editing), the copies will reflect those changes. This is a big time saver!
4. Click “OK” and the repeat will be placed directly after
the Bass event.
Muting
Muting an event stops you from hearing just that event.
You may want to mute events on a track so that the track
continues to play except for the events you mute. Note
that this is different from muting a track.
1. Choose the Mute tool.
2. Click on the event you wish to mute.
38
Tutorial 2: Editing audio
Page 39

3. To un-mute an event, click on the muted event with the
Notice the blue triangles that appear at the top left and top
right of the event.
Double-click here to open the fade dialog.
Mute tool again and it returns to normal.
• If you drag with the Mute tool you can mute a number of
events at a time. Equally this will un-mute events that are
muted.
Erasing
1. Choose the Erase tool.
2. Click on the events you wish to erase.
3. Click on one of the blue triangles and move it so that a
fade appears.
Adding a fade
You can add a fade to an event to give the effect that the
event is fading in or fading out.
1. Choose the Object Selection tool.
2. Click on the event you wish to add a fade to.
4. For more advanced fades you can double-click on the
fade area to open up the fade dialog. See the chapter
“Fades and Crossfades” in the Operation Manual for more
information.
Event envelopes
An envelope is a volume curve for an audio event. This allows you to adjust the volume of the event over time.
1. Select the Pencil tool.
When you move the Pencil tool over an audio event, a small volume curve
symbol is shown next to the tool.
2. Click on the “Elec Guitar_01” event and notice that an
envelope point appears.
Clicking either high or low on the event will change the event volume to
either loud of soft.
39
Tutorial 2: Editing audio
Page 40

3. Clicking further on will create more points.
!
!
As you create more and more envelope points, you are adjusting the volume of the event over time. The waveform reflects the changes you make.
Load the project called “Event Operations 2” found
in the “Tutorial 2” folder. This project has all the event
operation changes you’ve learned so far.
Processing audio
Cubase has the ability to make changes to the audio in
more ways than splitting and resizing. You can normalize,
reverse, pitch shift and time stretch, to name a few. For a
full explanation on processing audio, see the chapter “Audio processing and Functions” in the Operation Manual.
Load the project called “Processing Audio” found in
the “Tutorial 2” folder.
You can process the whole audio event or use the Range
Selection tool and select just the section of audio you want.
1. With the Object Selection tool, click on the audio
event you wish to change.
You can also use the Range Selection tool and select the section of audio you want.
2. On the Audio menu–Process submenu, select “Nor-
malize”.
3. Adjust the slider to the amount you desire. A setting of
Let’s show you how to Normalize and Reverse an audio
“0” db or “-1” db is common.
event.
Normalize
Normalize raises the volume of the audio to the desired
amount. Usually you adjust the slider to “0” dB or “-1” dB
so that you get the maximum volume without clipping your
audio. A common use for Normalizing is to raise the level
of audio that was recorded at too low an input level.
Ö Please note that in some situations, this function may
lead to distortion. Therefore, you should use it carefully
and listen to the audio material afterwards, to make sure it
sounds as intended.
Tutorial 2: Editing audio
4. Click the Process button and your audio is now nor-
malized.
For a description of the “More” and “Preview” buttons, see the chapter
“Audio Processing and Functions” in the Operation Manual.
40
Page 41

Reverse
!
The “Reverse” command reverses the audio selection.
This will sound as if you were playing a tape backwards.
1. With the Object Selection tool, click on the audio
event you wish to change. In our case, let’s pick the bass
audio event.
You can also use the “Range Selection” tool and select the section of
audio you want.
2. On the Audio menu–Process submenu, select “Reverse”.
3. If you have copied events in the Project window, this dialog box will open. It asks if you want all the copied events
changed (Continue) or if a new version is to be created so
that only your selection is affected (New Version).
4. Clicking either “Continue” or “New Version” will reverse your audio.
Audio processing in Cubase is “non-destructive”, in
the sense that you can always undo changes or revert to the original versions. See the chapter “Audio
Processing and Functions” in the Operation Manual.
41
Tutorial 2: Editing audio
Page 42

6
Tutorial 3: Recording and editing MIDI
Page 43

Introduction
!
In this chapter, we are going to add some more instruments to our song. In the previous tutorials, we have recorded audio. Now we are going to record using MIDI.
There are two ways in which we can have MIDI sounds
appear in Cubase: via virtual instruments, that is a synthesizer inside your computer or through the use of a traditional hardware keyboard.
This tutorial will focus on virtual instruments, while the chapter “Tutorial 5: External MIDI instruments” on page 54 will
show you how to record via a hardware synthesizer.
Creating an Instrument Track
Load the project called “Recording MIDI 1” found in
the “Tutorial 3” folder.
1. Let’s start by adding a string part to our song. From the
Project menu–Add Track submenu, select “Instrument”.
In previous versions of Cubase, you needed a MIDI track routed to a virtual instrument found in the “VST Instruments” window. You can still use
this method but instrument tracks are far more convenient.
2. From the “Instrument” pop-up menu, choose “HALion-
One”, then click “OK”.
An instrument track is created below the selected track in the Project
window.
3. Make sure the “Inspector” is shown.
4. Click in the name field of the instrument track. It should
be the only instrument track you created, so the name
should be “HALionOne 01”. We can double-click on this
and change it to “Strings”.
43
Tutorial 3: Recording and editing MIDI
Page 44

5. Click on the “Edit Instrument” button to open the con-
Right-click here to select “Always on Top”.
!
Category Sub Category
Filtered List
trol panel for “HALionOne”.
Browsing sounds
We are now going to load sounds into our virtual instrument
“HALionOne”.
Load the project called “Recording MIDI 2” found in
the “Tutorial 3” folder.
1. Click the “Preset” button in “HALionOne” and choose
“Load Preset” from the pop-up menu.
6. If you want “HALionOne” to stay always on top while
you are working you can right click on the bar near the top
of the instrument and select “Always on Top”.
2. In the “Category” section, make sure only “Strings” is
selected by deselecting anything else and clicking on
“Strings”. In the “Sub Category” click on “Synth”. You
have filtered the list to only show synth strings. Choose a
string sound from the list on the right. Then click “OK”.
44
Tutorial 3: Recording and editing MIDI
Page 45

MIDI recording
The MIDI input routing
pop-up menu.
Record Enable
Monitor
Now that we have our sound, let’s record something. Recording MIDI is very similar to recording audio, see the
chapter “Tutorial 1: Recording audio” on page 23.
Setting MIDI input
1. Make sure you have a MIDI keyboard connected to your
computer either directly through USB or a MIDI interface.
See the chapter “Setting up your system” on page 13 for information on
setting up MIDI in your computer.
2. We want to have our MIDI keyboard routed to this
track and play “HALionOne”. Make sure the “Inspector” is
shown so we can see our MIDI input and output routing.
3. Next, on the input routing pop-up menu, choose the
MIDI input you wish to use. Most people leave this on “All
MIDI Inputs” since you don’t have to worry about which input is which. “All MIDI Inputs” takes the MIDI signal from
all your inputs and routes it to this track. There are some
cases where you wouldn’t want this but for 99% of the
time you’ll be safe with this option selected.
5. Activate the Record Enable and Monitor buttons on
the track and play some notes on your MIDI keyboard.
You should see and hear the MIDI signals coming in to the right of the
track.
Setting the track to Record Enable lets Cubase know that you want to
record on this track. You can have many tracks Record Enabled at a time.
6. Set the left locator to bar “1” and the right locator to
bar “57”.
7. Make sure Cycle is turned off.
We are going to record without looping. We’ll cover MIDI cycle recording
in the section “Cycle recording” on page 47.
8. Press [1] on the numeric keypad of your computer
keyboard.
This will move the cursor to the left locator.
9. Click the Record button and record a few bars of mu-
sic.
10. Click the Stop button when you are finished.
11. Turn off the Monitor and Record Enable buttons on the
track so that we don’t hear the input or record on the track
any more.
4. Below the MIDI input routing pop-up menu, you can
set the MIDI output. This is set to our virtual instrument
“HALionOne”. If for any reason you need to change this to
another instrument you can do this here.
Tutorial 3: Recording and editing MIDI
Congratulations! You have just created your first MIDI recording in Cubase. Move ahead to the next section to
learn how to play back MIDI.
45
Page 46

MIDI playback
!
!
The left locator set to “1”.
The right locator set to “5”.
Cycle activated
We are now going to learn how to play back MIDI in Cubase. You might think this is very simple – just hit “Play”. It
is actually this simple, but there are a few tricks to learn so
that you’ll be playing back what you want with precision.
For this section, make sure you load the project
“MIDI Playback” found in the “Tutorial 3” folder.
To start playback
• Click the Start button on the Transport panel.
Cycle playback
Cubase has the ability to loop or cycle a section of your
project. To set the cycle location you need to use the left
and right locator.
1. On the Transport panel, set the left locator to “1” and
the right locator to “5”.
This tells Cubase that we want to loop or cycle between bars 1 and 5.
Meaning we will have a 4 bar loop since the end of bar 4 is the beginning
of bar 5.
• Press the space bar on your computer keyboard.
This toggles between start and stop.
• Press the [Enter] key of the numerical computer keypad.
• Double-click in the lower half of the ruler.
• Select the MIDI event called “Strings” and choose
“Loop Selection” from the Transport menu.
The default key command for this is [Shift]+[G]. This
is the quickest way to loop the selected MIDI event
and start playback!
To stop playback
• Click the Stop button on the Transport panel.
• Clicking the Stop button twice moves the cursor to the
position in the project, where you started playback.
• Press the space bar on your computer keyboard.
This toggles between stop and start.
• Press the “0” key of the numerical computer keypad.
2. Make sure that the Cycle button is activated.
3. Click the Start button on the Transport panel and Cu-
base will play looping over and over until you click Stop.
Recording modes with cycle off
There are three different modes for recording when the
cycle is turned off. This is called linear recording.
• Normal
“Normal” allows you to record on top of previously recorded MIDI. You
will be able to see both MIDI parts on the screen overlapping each other.
• Merge
“Merge” joins or merges any MIDI data previously recorded on the track.
An example of this is when recording drums – adding the kick drum on
one pass and then the snare drum on another pass. The MIDI data is
then joined together as one MIDI part.
• Replace
“Replace” mode will replace or overwrite any previous MIDI recording
that was on the track.
46
Tutorial 3: Recording and editing MIDI
Page 47

Cycle recording
!
Cycle Record Mode
You can record MIDI while the Cycle is activated.
Load the project called “Cycle Recording MIDI”
found in the “Tutorial 3” folder.
Recording MIDI drums
1. Let’s add another “Instrument” track and choose
“HALionOne” as our instrument.
2. Click in the program field in the Inspector and load a
drum sound of your choice found under the category
“Drums&Perc”, sub-category “Drumset”.
3. Rename this new track to “Drums”.
4. Make sure the Cycle button is activated and set the
left locator to “9” and the right locator to “13”.
This will loop or cycle between bars 9 and 13.
5. On the Transport panel, make sure “Mix (MIDI)” is selected for the “Cycle Record Mode”.
This will allow us to record the drums, and as each cycle repeats, the MIDI
will mix together into one part. This makes it easy to create complex drum
rhythms.
6. Activate the “AUTO Q” button. This is the automatic
quantize function which will lock our MIDI to the beat as
we record it. Great if we play off time a bit.
7. Next we have to set the value of our quantize. This is
so Cubase knows what to lock our MIDI notes to. Choose
“1/8” notes from the “Quantize Type” pop-up menu.
8. Activate the Record Enable and Monitor buttons on
the “Drums” track.
9. Click the “L” button on the Transport panel once.
This will make sure we start recording at the left locator.
10. Activate the Record button on the Transport panel and
let’s record hi-hat on the first pass, kick on the second
pass and then finally snare on the third.
11. Hit “Stop” when you’re finished.
47
Tutorial 3: Recording and editing MIDI
Page 48

12. Now move and copy this drum part so that the rest of
!
The Drum MIDI notesThe Drum MIDI velocities
Keyboard notes
Time ruler
the song has a drum beat.
Move and copy were discussed in the chapter “Tutorial 2: Editing audio”
on page 33.
13. Glue all the parts together as one.
The Glue tool was discussed in the chapter “Tutorial 2: Editing audio” on
page 33.
The Key Editor
Erasing MIDI notes
1. Double-click on the “Drums” part so that the Key Editor
opens.
Here we can see our drum notes lined up with a keyboard on the left. At
the bottom we have the velocity of each of the MIDI notes and at the top
we can see the time ruler.
The Key Editor is where we can make changes to our MIDI
data.
Load the project called “Key Editor” found in the
“Tutorial 3” folder.
Tutorial 3: Recording and editing MIDI
2. We want the song to start off with hi-hat and kick
drum. Erase the snare by clicking once and holding the
mouse while dragging a selection over the snare drum.
Make your selection from bars 1 through 8.
A common term for this is to “lasso” the notes.
3. Press the [Delete] key to delete the snare notes.
4. Zoom in on the bar 1 and delete all the hit-hat notes
with the Erase tool of the Key Editor so that you only hear
1/4 notes.
48
Page 49

5. Now erase all the other hi-hat notes from bar 2
Click and drag with the Pencil tool
through 8 using any method you like.
Copying MIDI notes
Let’s copy the MIDI notes in bar 1 to bars 2 through 8.
1. Lasso the hi-hat notes in bar 1. Hold down [Alt]/[Option]
and drag the notes in bar 1 to bar 2. This copies them.
Creating or drawing in MIDI notes
Now we need to draw in a cymbal crash in bar 25.
1. Scroll over to bar 25 and click on the piano roll on the
left hand side of the Key Editor. Click on the notes until you
hear a crash cymbal that you like. There is a good one at
C#2.
2. Select the Pencil tool of the Key Editor and draw in the
crash cymbal note at bar 25 by clicking and dragging for a
full bar.
2. Continue copying until bar 9.
49
Tutorial 3: Recording and editing MIDI
Page 50

The Controller lane
Pick one from the list or choose setup for more controllers.
The “Controller Lane” allows us to add in or modify MIDI
data such as velocity and controller information. The most
common use for this is to edit velocity, pitch bend and
controller numbers for things like filter etc.
If you find that the MIDI velocity is too loud or quiet on certain notes, you can view and edit them at the bottom of the
Key Editor.
1. Make sure you can see the Controller Lane by clicking
on the “Controller Lane Presets” button at the bottom left
of the Key Editor.
2. Choose “Velocity Only” to view the velocity.
3. You can choose the MIDI information you wish view or
change from the pop-up menu.
4. You can also select “Setup” to view more controllers.
5. Use the Pencil tool of the Key Editor to draw in new
velocities for the notes. You can even draw in curves and
ramps.
50
Tutorial 3: Recording and editing MIDI
Page 51

7
Tutorial 4: Working with loops
Page 52

Loop Browser
!
Search for sounds here
Your Loops
Audition loops
Audition controls (Start, Stop, Pause, Cycle and level slider)
Play in Project context button
Auto Play – this automatically starts playback for the selected file.
Drag from the
Loop Browser
into your project
The “Loop Browser” allows you to have a single window
that gives you quick and easy access to all your loops. In
the “Loop Browser” you can search for audio files, use
tags to categorize, audition the audio in the open project’s
tempo and a whole lot more.
Load the project called “Loops” found in the
“Tutorial 4” folder.
Adding loops
1. Select “Open Loop Browser” from the Media menu.
4. Click the Start button to listen to the loop. The “Play in
Project context” option allows you to audition the loop in
the project’s tempo. This is handy if the loop you are auditioning has a tempo that is different from the one you are
using in your project.
5. If you have many loops you can search for them using
the Filter options at the top of the Viewer section.
6. Once you have found the loop you like, drag and drop
it into your project. If you haven’t made an extra audio track
for the loop, one will be created automatically for you.
2. Once the Loop Browser has finished scanning your
hard disk(s) for loop files, they will be displayed in the
Viewer section.
3. Selecting a loop file in the Viewer section will display it
graphically below in the Scope section.
7. Rename the new track to “Loop 1”.
52
Tutorial 4: Working with loops
Page 53

Making copies
Now that we have our loop let’s copy it using the “Repeat”
function.
1. Click on the loop event in the Project window to select it.
2. Choose “Repeat” from the Edit menu.
3. In the dialog that opens, set the “Count” field to “13”.
4. Click “OK”. The loop will be copied 13 times and all
repeats will be placed one after the other.
Insert into Project
5. Use the “Repeat” command to repeat the loop out un-
til the end of the project.
Make sure you read up on the “Loop Browser” in the
chapter “The MediaBay” in the Operation Manual.
We are now going to add one more loop. This time we’ll
use the “Insert into Project” command.
1. Create a new stereo audio track.
2. Rename the track to “Loop 2” and make sure it is se-
lected, as “Insert into Project” works using a selected track.
3. Position your cursor where you would like the loop to
be inserted. In our case, let’s choose bar 9.
4. In the “Loop Browser” right-click on the loop you want
and choose “Insert into Project at cursor”. This will drop the
loop into the Project window at bar 9 on the “Loop 2” track.
Tutorial 4: Working with loops
53
Page 54

8
Tutorial 5: External MIDI instruments
Page 55

Introduction
!
!
In this tutorial we are going to show you how to set up
your MIDI devices and how to record them into Cubase.
You may have a MIDI keyboard that is playing back MIDI
data from Cubase and you want the data recorded as audio for further processing for the final mix. Learning to use
the right tools will make these steps easy.
By adding External instruments (Cubase only) you can
have a MIDI keyboard’s audio outputs plugged directly
into your audio card’s inputs so that Cubase can monitor
and record the signal in realtime.
Setting up MIDI devices
3. We can then add a MIDI output to the “K2000”. Se-
lect it in the “Output” pop-up menu.
This will make things very handy later on!
First let’s set up the MIDI devices that you have connected
to your computer. Please note that every setup is different
and that you’ll have to do some further reading in the Operation Manual to get everything 100% the way you want
it. This tutorial covers a basic setup with the Steinberg
MI4 interface and the Kurzweil K2000 keyboard.
Load the project called “External MIDI 1” found in the
“Tutorial 5” folder.
1. Start off by first opening the “MIDI Device Manager”
from the Devices menu.
2. Next click the “Install Device” button, so we can add
the K2000. Select it in the list and then click “OK”.
You may have another keyboard other than the Kurzweil K2000 in this
list. Feel free to select it now.
4. Close the MIDI Device Manager when you are done.
• MIDI devices contain all the necessary information to
select patches on the MIDI device that you are using. If
your device is in the list, make sure you have it set up. If
your MIDI device is not in the list, you can choose “Define
New…” to create it. Make sure you read the separate pdf
document “MIDI Devices” for more detailed information.
Setting up VST connections for external instruments (Cubase only)
Now we have our MIDI device all set up. We are now going to set up our inputs so that we can listen to the audio
output of our keyboard play into the Steinberg MI4’s audio
inputs. This is what is meant by “external instruments”:
having your external MIDI instruments play into Cubase.
Load the project called “External MIDI 2” found in the
“Tutorial 5” folder.
1. On the Devices menu, choose “VST Connections”.
The default key command for this is [F4].
2. Open the “External Instruments” tab.
3. Click on the “Add External Instrument” button and type
in “K2000” into the “Name” field.
You can use any name you choose if you have a different setup than what
we are using in this tutorial.
55
Tutorial 5: External MIDI instruments
Page 56

4. We want the audio from the K2000 to be in stereo.
!
K2000’s audio playing through Cubase
MIDI in and MIDI out indicators
This means we are going to physically plug audio cables
from the K2000’s output into the MI4 input. Since the MI4
has 4 inputs we are going to plug them into the Line In 3
and 4. Choose “1” for “Stereo Return(s)” since the K2000
has a left and right output.
5. We created a MIDI device earlier, so let’s click on “Associate MIDI Device” and choose the “K2000”.
To create a new MIDI Device (e.g. if you didn’t find yours on the list),
select “Create Device”.
6. Click “OK” to close the dialog.
7. Make sure you set the correct inputs and outputs for
your new external instrument bus in the Device Port column.
This is what our external instrument bus should look like.
10. For “instrument”, choose the external instrument that
we created. In our case it’s the “K2000”. For “count”
choose “1”.
11. Click “OK” to close the dialog.
Now let’s go to the next section and monitor our external
instrument. We’ll also choose a sound and record some
MIDI.
Monitoring external MIDI instruments (Cubase only)
Load the project called “External MIDI 3” found in the
“Tutorial 5” folder.
1. Activate the Record Enable and Monitor buttons on the
“K2000” track.
2. Play some notes on the actual K2000 keyboard. You’ll
see the MIDI indicators on the Transport panel light up and
you’ll be able to hear the K2000 playing through Cubase.
Play whichever keyboard you have created in the MIDI Device Manager
for this tutorial.
8. Close the “VST Connections” window and select the
“Loop 2” track.
We are going to add a new track. By selecting the “Loop 2” track, the
new track will be added below this.
9. Open the Project menu and, on the “Add Track” submenu, select “Instrument”.
3. Let’s rename the track “K2000” to “Piano” since it’s
piano that we’ll be recording on this track.
This doesn’t rename the external instrument name in the “VST Connections” window, but only in the Project window.
56
Tutorial 5: External MIDI instruments
Page 57

4. Remember that we created a MIDI device in the MIDI
Click the “Programs”
button to select a piano sound.
!
!
Device Manager. MIDI Devices contain valuable information about patch names, bank selections and a few other
things. This helps us in that we already have all the program names for the K2000 at our disposal. Click on the
“Programs” button in the inspector and choose the “Stereo Grand” piano sound.
If your MIDI device is different from the one in this tutorial choose a piano
sound from your device.
Recording MIDI and external instruments (Cubase only)
Load the project called “External MIDI 4” found in the
“Tutorial 5” folder.
Now let’s record some MIDI on our instrument track.
1. Activate the Record Enable and Monitor buttons on the
Piano track if they aren’t already on.
2. If you find the levels low, you can click on the “Edit In-
strument” button and move the “Return Gain” slider so
that you hear more of the external instrument.
That’s it. We are now monitoring and playing our external
instrument. You can add effects and EQ to the external instrument just like a virtual instrument or an audio track. We’ll
do this in the next tutorial. For now let’s record some MIDI.
3. Click the Record button on the Transport panel and
record a piano line.
4. Click the Stop button when you are finished.
5. Turn off the “Record Enable” and “Monitor” buttons on
the “Piano” track so that you don’t hear the input any more
and that you won’t accidentally record on it.
Congratulations! You’ve just recorded your first external
MIDI instrument. Move on to the next tutorial as we will
discuss mixing, EQs, effects, automation and exporting.
Load the project called “External MIDI 5” found in the
“Tutorial 5” folder to hear all the changes we’ve
made so far.
57
Tutorial 5: External MIDI instruments
Page 58

9
Tutorial 6: Mixing and effects
Page 59

Introduction
!
Channel meters
Channel fader
Channel Level
Peak Meter Value
In this section we’ll draw from the last 5 tutorials and finally
get a mix ready with proper levels, EQs and effects. Automation will be added and then we’ll export the audio.
Load the project called “Mixing 1” found in the “Tutorial 6” folder.
Setting levels
The first thing we want to do is to set the levels for our
project. This helps us get a preliminary balance of the mix
so we can add EQ and effects later.
1. Select the Mixer from the Devices menu.
The default key command for this is [F3].
2. Cubase only: Hide the input channels from view (we
won’t be using them any more), by clicking the “Hide Input
Channels” button in the common panel to the left of the
Mixer.
4. Move the faders for each track so that you can hear all
of the mix the way you like it.
5. If for any reason you need to get the fader back to 0dB
(the default setting), you can [Ctrl]/[Command]-click directly in the fader area.
6. You can also change the fader by double-clicking in
the “Channel Level” area and entering the level manually.
7. Be careful when it comes to how loud you raise the
faders. Make sure you keep levels at a good volume so
that they are as loud as possible without clipping. You will
always know when you are clipping: when the “CLIP” indicator lights up on the output channel. If it does, lower your
3. Click the Start button on the Transport panel and lis-
levels and click on “CLIP”. This will reset the warning light.
ten to your mix.
• That’s it for setting the levels. Let’s look at pan next.
Tutorial 6: Mixing and effects
59
Page 60

Setting pan
!
Panner
Pan amount
Right click the pan area to open the pan mode pop-up menu.
!
Solo
Mute
Load the project called “Mixing 2” found in the “Tutorial 6” folder.
1. Setting the pan for each track moves its position in the
stereo mix. It will either keep the signal balanced in the
middle of the left and right speaker, lean to the left or lean
to the right or be completely in the left or right speaker.
4. Keep the “Drums” track in the middle but let’s move
“Loop 1” a bit to the left and “Loop 2” a bit to the right.
This will give our rhythm section a larger, more spacious sound.
2. Right-clicking in the panner for certain track types presents you with three different types of pan options.
The different pan options are described in detail in the chapter “The
Mixer” in the Operation Manual.
• To get the panner back to the middle (the default position), [Ctrl]/[Command]-click anywhere in the panner area.
3. Let’s pan our two guitars slightly left and slightly right.
This will spread them out a bit.
That’s it for pan, let’s move on to Mute and Solo.
Mute and solo
Load the project called “Mixing 3” found in the “Tutorial 6” folder.
• For each track there is an “M” for mute and “S” for solo
button. Mute will prevent you from hearing the track and
solo will only play that track or tracks which have “S” highlighted.
• You can have several tracks muted or soloed at a time.
• When you solo a track, the other tracks become muted.
60
Tutorial 6: Mixing and effects
Page 61

• If you want to clear or deactivate all the mutes or solos,
!
“Deactivate all Mute”
“Deactivate all Solo”
Click the “EQ Band Active” button to turn on an EQ.
Click in the EQ curve area to turn on an EQ.
click on the “Deactivate all Mute” or “Deactivate all Solo”
buttons in the common panel to the left of the Mixer.
• There may be times when you want certain tracks to always play even if another track has solo active. If you [Alt]/
[Option]-click on the “S” button, this will place the track in
“Solo Defeat” mode. This allows the track to always play
even if you solo another track.
• To take a track out of “Solo Defeat” mode simply [Alt]/
[Option]-click it again.
That’s it for mute and solo, let’s move on to adding EQ.
1. Solo the Drums track and click the “Edit Instrument
Channel Settings” button.
2. This will open the Channel settings window, where
you can e.g. make EQ settings. Make sure you have a
section of music looping so that you can hear the EQ
changes you are making.
• There are four bands of EQ on each track.
3. Click the “EQ Band Active” button for each of the EQs
to turn them on. You can also click in the EQ curve area to
turn on an EQ.
Adding EQ
Load the project called “Mixing 4” found in the “Tutorial 6” folder.
EQ or equalization amplifies or attenuates frequencies so
that we can place each instrument correctly in the mix. EQ
is subjective and can be influenced greatly by the style of
music that you are mixing.
We’re going to run through the EQ features that Cubase
has to offer, but feel free to experiment and try out the different presets on your mix.
61
Tutorial 6: Mixing and effects
Page 62

4. Click and move the EQ point up, down, right or left.
Move the EQ up or down to
raise or lower the gain.
“EQ Band Gain” amount
“EQ Band Freq” amount
Move the EQ left or right to
change the frequency
“EQ Band Q” amount
Moving the EQ up or down while holding down [Shift] changes the Q
Moving the EQ point up or down raises or lowers the gain
of the EQ. The gain makes that particular EQ louder or
softer. The “EQ Band Gain” at the bottom of the EQ window gives you the value of gain.
If you hold down [Ctrl]/[Command], you can restrict the movement of the
EQ to just up and down.
5. Moving the EQ point right or left changes the frequency
of the EQ. The “EQ Band Freq” setting at the bottom of the
EQ window gives you the value of the frequency.
If you hold down [Alt]/[Option], you can restrict the movement of the EQ
to just right or left.
6. Holding down [Shift] while moving the EQ point up or
down changes the quality of the EQ. Many people refer to
this as the width of the EQ. The “EQ Band Q” setting at the
bottom of the EQ window gives you the value of the quality.
7. The “Preset Management” button allows you to recall
and store presets. Choose from the list to get a sound
that’s close to what you want and then adjust it slightly.
You can then store it as a new preset.
62
Tutorial 6: Mixing and effects
Page 63

8. You can bypass the EQs by clicking on the “Bypass
!
!
Equalizers” button. If you [Alt]/[Option]-click, you can reset
the EQ. A dialog window will open to confirm if you are sure
you want to reset the EQs. If you are sure, click “Yes”.
Experiment with the EQs on all your tracks in this tutorial.
A good tip when using EQ is that it’s usually better to take
away EQ (lower the gain) than to add it.
We’ve made a whole bunch of EQ changes to this
tutorial. Listen and see the changes by loading the
project “Mixing 5” found in the “Tutorial 6” folder.
Now let’s move on to effects.
Audio effects
Load the project called “Mixing 6” found in the “Tutorial 6” folder.
Now let’s start using some effects. We can add effects by
inserting the effect directly on a track or we can create an
FX channel and use the auxiliary sends of each track to
send to that FX channel.
4. Let’s add compression to the Bass track to smooth it
out. Click on the “Select Insert Type 1” slot and choose
“Compressor” from the Dynamics submenu.
5. Make changes to the compression. At the end of this
section, you can load the next tutorial that will contain all of
the changes we have made.
Insert effects
1. Make sure the Mixer is open.
You can open the Mixer from the Devices menu or by pressing [F3].
2. Begin playback and loop or cycle a section of music
so that you can hear everything.
The tutorial project has its locators and cycle already set for this. Feel
free to change this if you like.
3. Click on the “Edit Audio Channels Settings” button on
the Bass track to open the VST Audio Channel Settings
window.
Tutorial 6: Mixing and effects
FX channels
Now let’s show you how to create and use FX channels.
1. Close the Mixer and choose “FX Channel” from the
Add Track submenu of the Project menu.
63
Page 64

2. Choose “Stereo” for “Configuration”, select the “Ste-
!
reoDelay” effect and click OK.
3. We are going to put delay on the “Elec Guitar” track.
Let’s set the delay so that the left side and right side have
different delay settings and make sure the “Mix” is set to
“100.0”.
Giving the stereo delay different left and right settings creates a more dynamic effect.
4. With the delay set, click the “Edit Channels Settings”
button of the “Elec Guitar” track.
5. Select “FX 1-StereoDelay” from the “Select Send
Destination” pop-up menu.
7. Move the slider to the right to raise the level of the
send to the “StereoDelay” effect. You will begin to hear
the guitar being delayed. Clicking the “S” (solo) button on
the track will allow you to hear this more clearly.
8. The great thing about FX Channels is that the channel
looks and feels just like a regular audio channel. When you
set an EQ for an FX Channel, only this effect will be
changed by the EQ. In our case changing the EQ on the
“FX 1 – StereoDelay” FX channel will only change the EQ
of the delay.
About automation
Automation allows us to make objects such as faders and
knobs move by themselves. This is very handy in that we
can tell Cubase to make changes over a period of time
6. Click the “Activate Send 1” button to turn on the send.
This will allow you to send the guitar to the “StereoDelay”.
Tutorial 6: Mixing and effects
and those changes will be remembered and will occur
again without our attention.
Load the project called “Mixing 7” found in the “Tutorial 6” folder.
64
Page 65

1. We created a fade in on the “Elec Guitar” track earlier.
!
Let’s remove the fade on this audio event and create some
automation instead. Zoom in so that you can see the first
audio event more clearly.
2. Select the event and choose “Remove Fades” from
the Audio menu.
3. Click the “Show/Hide Automation” button at the far
left of the track.
You may need to hover your mouse over the far left bottom area until you
see the button appear as this is only shown when you need it.
6. You can also use the “Line” tool to draw in automation
in a straight line. Perfect for fade in automation.
7. Listen to the fade in automation we created.
• You may have noticed that when we used the Pencil
tool to place in automation, the “R” button (Read Enable)
for the track became highlighted. This means that the automation on this track is being read or played back. You
can turn this off and the automation will not be read. In our
case we drew in volume automation, and so in turning it off
the volume will not fade in but stay at one level.
There are so many examples to show when it comes to au-
4. Select the Pencil tool.
5. In the subtrack that appears below the audio event use
the “Draw” tool to draw in automation so that it resembles a
fade in.
tomation. For example we could have automated our effects
or our send levels. We could have even automated objects
while Cubase was playing back. The automation can be
placed into write mode and moving almost any thing will
create automation that we can edit for fine tuning later!
Make sure you read the chapter “Automation” in the Operation Manual to fully realize how exciting automation can be.
Exporting
Now that we have our project mixed we will want to export
it so that we can import it into another program such as a
CD burning application like WaveLab.
Load the project “Mixing 8” found in the “Tutorial 6”
folder.
• Before we can export our mix we need to tell Cubase
how many bars to export. We accomplish this by setting
the locators.
65
Tutorial 6: Mixing and effects
Page 66

1. Set the left locator to bar 1 and the right locator to bar
!
65 on the Transport panel. This will make sure we have all
the music for export.
2. On the File menu–Export submenu, select “Audio Mixdown…”.
3. The “Export Audio Mixdown” dialog opens.
This dialog is described in detail in the chapter “Export Audio Mixdown” in
the “Operation Manual”. Please refer to this for more complete information.
4. “File Name” is for naming the file for export. Let’s name
our’s “Mixing Mixdown”.
5. The “Path” is where you wish to save the exported file
on your computer. Use the “Choose” button to navigate to
the folder you wish to save to. For convenience there is
the option “Use Project Audio Folder” which will store the
exported file in your project’s audio folder. This is one of
the best places to keep it so it won’t accidentally become
erased or lost. Make sure “Use Project Audio Folder” is
activated for this export.
6. Normally you’ll want to save your exported file as a
“Wave File” under “File Format”. This of course chiefly depends on what file format the other application such as a
CD burning program requires.
7. You can choose whether you want the main stereo
outputs “Stereo Out (Stereo)” to be exported. This means
the exported file will be generated through the main stereo
outputs that we see in the Mixer. You can also choose the
individual outs of each audio channel for flexibility in your
export. Let’s choose “Stereo Out (Stereo)”.
8. Choose the “Sample Rate” and “Bit Depth” that will
be required for your export. 44.100 kHz and 16 bit are
common for CD burning.
9. Activate the three options at the bottom of the dialog,
as these will import the audio back into Cubase after you
export it and automatically create an audio track. The “Export Audio Mixdown” window will also close after export.
Important Feature – “Real-Time Export”!
10. Before we finish, there is one very important feature that
we must select. This is “Real-Time Export”. Since we have
an external MIDI instrument that is playing a physical keyboard and its audio is coming back into Cubase, we need
the audio mixdown to happen in real-time. This ensures that
the MIDI data is properly sent to the external MIDI instrument and recorded back in. Don’t forget this step!
66
Tutorial 6: Mixing and effects
Page 67

11. When you are done making all the settings, click the
!
Export button.
12. You will now see the exported stereo mix on a new
stereo track.
13. You can check to see if the audio mixdown sounds the
way you want it by soloing the mixdown track
Load the project called “Mixing 9” found in the “Tutorial 6” folder to see the results of this export.
67
Tutorial 6: Mixing and effects
Page 68

10
Tutorial 7: Surround production
(Cubase only)
Page 69

Surround busses
!
Using surround sound in Cubase is effortless. Surround
becomes an extension of what we’ve already learned - just
with a few more channels added. Let’s set up our inputs
and outputs so that we are surround-ready.
To fully use surround sound on your computer, you will
need an audio card that has 6 or more inputs and outputs.
If your audio card only has between 2-5 inputs or outputs,
there may be sections of this tutorial that will not apply to
your configuration.
To learn more about surround beyond this tutorial, consult
the chapter “Surround Sound” in the Operation Manual.
Load the project called “Surround 1” found in the
“Tutorial 7” folder.
Setting up surround outputs
1. Go to the Devices menu and choose “VST Connections”.
The default key command for this is [F4].
2. Let’s choose the “Output” tab first. We want to start
from scratch and remove anything that is currently there,
just in case it’s set up incorrectly. If you see anything in the
“Bus Name” column, right-click with the mouse and
choose “Remove Bus”.
4. Click in the Device Port column for the channels in the
bus and select the desired outputs (those connected to
your speakers) from the context menu.
Since 5.1 surround requires 6 speakers (or 6 individual outputs), make
sure you select 6 separate outputs in the Device Port column.
Setting up surround inputs
Now let’s open the “Input” tab and set up the inputs we are
going to use for recording surround sound into Cubase.
1. Do the same as mentioned above for the outputs.
Right-click and select “Remove Bus”.
2. Now click the “Add Bus” button. Choose “5.1” for
configuration and “1” for count and click “OK”.
This has now added a new surround sound 5.1 bus (Left, Right, Center,
LFE, Left Surround and Right Surround), allowing us to record audio into
Cubase in 5.1 surround.
3. Click the “Add Bus” button. Choose “5.1” for configuration and “1” for count and click “OK”.
This will add a new surround sound 5.1 bus (Left, Right, Center, LFE,
Left Surround and Right Surround) allowing us to have audio in Cubase
route to our audio hardware.
Tutorial 7: Surround production (Cubase only)
3. Click in the Device Port column for the channels in the
bus and select the desired inputs on your audio card from
the context menu.
Since 5.1 surround requires 6 individual inputs, make sure you select 6
separate inputs in the Device Port column.
69
Page 70

Recording with a 5.1 input bus
Having a 5.1 bus allows you to record surround as one
multi-channel audio file on one audio track. This is very convenient and keeps the files aligned so they don’t go out of
phase. Below is an example of recording with a 5.1 bus.
Recording with 6 mono input busses
You can however create separate mono busses for your
5.1 inputs. This allows for greater flexibility in terms of
routing, EQ, effects, etc. Below is an example of recording
with 6 separate mono busses.
2. Click the “Add Bus” button. Choose “Mono” for con-
figuration and “6” for count and click “OK”.
This will add 6 separate mono busses that we will configure as a surround input setup.
3. Click in the Device Port column for the busses and se-
lect the desired inputs on your audio card from the context
menu.
Since 5.1 surround requires 6 individual inputs, make sure you select 6
separate inputs in the Device Port column.
Let’s show you how to record in surround sound using
separate mono busses.
1. Right-click on our “5.1 In” bus and select “Remove
Bus”.
Tutorial 7: Surround production (Cubase only)
4. Rename the inputs “Left”, “Right”, “Center”, “LFE”,
“Left Surround” and “Right Surround”.
That’s it for the “VST Connections” window. You are now
ready to set up your tracks.
70
Page 71

Setting up a surround mix
!
!
Step 1 - Select the track.
Step 2 - Open the “Input Routing” pop-up menu and
select the input for the track.
Step 1 - Select the track.
Step 2 - Open the “Output Routing” pop-up
menu and select the output for the track.
We have our inputs and outputs set up in the “VST Connections” window, now we need to set up the tracks in Cubase so that they’ll be properly named, have the right inputs
and will output the audio correctly to our audio card.
Load the project called “Surround 2” found in the
“Tutorial 7” folder.
Setting up the track inputs
1. Close the “VST Connections” window and create 6
mono audio tracks.
2. Rename the tracks “Left”, “Right”, “Center”, “LFE”,
“Left Surround” and “Right Surround”.
Remember that naming your tracks before you record is the recommended way of recording. This allows your audio files to have proper
names like “Left Surround_01” and “LFE_01” instead of “Audio 07_09”
which can lead to confusion.
At this point we’ve made a lot of changes to our tracks.
Feel free to load the project called “Surround 3” found in
the “Tutorial 7” folder. This will make sure your project
corresponds to this tutorial.
Setting up the track outputs
Load the project called “Surround 3” found in the
“Tutorial 7” folder.
1. Open the “Output Routing” pop-up menu for each of
the tracks and assign them to their corresponding outputs.
“Left” to the “Left” output, “Right” to the “Right” output, etc.
3. We now need to give each track its proper input. Set
the track named “Left” to the “Left” input on the “Input
Routing” pop-up menu. Set the track “Right” to the
“Right” input and so on.
71
Tutorial 7: Surround production (Cubase only)
Page 72

• Alternatively you can select the “5.1” output for each of
!
Record Enable
Monitor
the tracks.
• In this case you could have a surround panner for each
track.
Make sure you look up the chapter “Surround Sound” in the Operation
Manual for more detailed information on the surround panner.
Recording in surround
We are now ready to record in surround sound. This
means we are going to record 6 channels at a time. These
channels are routed to the 5.1 output we’ve set up in the
“VST Connections” window. We have 6 mono inputs as
the inputs. We could have used one audio track that is
configured as a 5.1 track as discussed previously, but using 6 mono tracks allows us flexibility for future changes
and edits.
Load the project called “Surround 4” found in the
“Tutorial 7” folder.
• The basic recording procedures are described in the
chapter “Tutorial 1: Recording audio” on page 23. For
more detailed information see the “Recording” chapter
in the Operation Manual.
Behind the scenes we have 6 channels of audio (a surround sound mix) coming in our 6 mono inputs. You’ll be
able to hear this once you load the next project.
1. Activate the “Record Enable” and “Monitor” buttons for
the tracks.
We now have all the inputs and outputs set up. Move on
to the next section for information on surround recording.
72
Tutorial 7: Surround production (Cubase only)
Page 73

2. Make sure “Cycle” is turned off (not highlighted) and
!
Left Locator
Right Locator
that you are starting recording at bar 1.
3. Click the “Record” button to record.
4. Click the “Stop” button when you are finished record-
ing.
5. Turn off the “Record Enable” and “Monitor” buttons for
all the tracks so that we don’t hear the inputs or record on
the tracks any more.
Congratulations! You have just recorded a 5.1 mix in Cubase. Move ahead to the next section to learn how to export a surround file.
1. Set the left locator to bar 1 and the right locator to bar
26 on the Transport panel. This will make sure we have all
the music for export.
2. Next, open the File menu, and on the Export submenu,
select “Audio Mixdown…”.
Exporting a surround file
Now that we have a surround mix recorded, we will want
to export it so that we can import it into another program
such as a DVD authoring application.
Load the project called “Surround 5” found in the
“Tutorial 7” folder.
• Before we can export the surround mix to another program, we need to tell Cubase how many bars to export.
We accomplish this by setting the locators.
73
Tutorial 7: Surround production (Cubase only)
Page 74

3. The “Export Audio Mixdown” dialog opens.
!
Individual audio channel export
5.1 main output export
This is described in detail in the chapter “Export Audio Mixdown” in the
“Operation Manual”. Please refer to this for more complete information.
4. “File Name” is for naming the file for export. Let’s name
ours “Surround Tutorial Export”.
5. The “Path” is where you wish to save the exported file
on your computer. Use the “Choose” button to navigate to
the folder you wish to save to. For convenience, there is
the option “Use Project Audio Folder” which stores the
exported file in your project’s audio folder. This is one of
the best places to keep it, so it won’t accidentally become
erased or lost. Make sure “Use Project Audio Folder” is
activated for this export.
6. Normally you’ll want to save your exported file as a
“Wave File” under “File Format”. This of course chiefly depends on what file format the other application such as a
DVD authoring program requires.
7. You can choose whether you want a complete 5.1 ex-
ported mix by selecting “5.1 Out (5.1)”. This means the
exported file will be generated through the main 5.1 outputs that we see in the Mixer. You can also choose the individual outs of each audio channel for flexibility in your
export. Let’s choose “5.1 Out (5.1)”.
8. Choose the “Sample Rate” and “Bit Depth” that will
be required for your export.
9. Select the three options in the bottom left corner as
these will import the audio back into Cubase after you export it and automatically create an audio track. The “Export
Audio Mixdown” window will also close after export.
10. When you are done making all your settings, click the
“Export” button.
11. You will now see your newly exported surround mix on
one audio track as a 5.1 multiple channel audio file.
74
Tutorial 7: Surround production (Cubase only)
Load the project called “Surround 6” found in the
“Tutorial 7” folder to see the results of this export.
Page 75

11
Tutorial 8: Editing audio II - tempo and
groove
Page 76

Background
!
120bpm
Definition tab
Enter the
tempo of the
drum loop
Number of bars
In this section we’ll walk you through various examples of
audio files that have no tempo information and will show
you how they can follow the project tempo of Cubase in a
few simple steps.
Load the project called “Tempo and Groove 1” found
in the “Tutorial 8” folder.
Example 1: Drum loop, tempo known
In this example we have imported a drum loop and we
know its tempo. This is one of the quickest ways to match
the tempo of the drum loop with the project tempo.
Here we have a drum loop and we know its tempo, 100
beats per minute.
2. Activate Stop on the Transport panel and deactivate
the Click.
3. Double-click on the drum loop and the Sample Editor
will open.
4. Click on the Definition tab, and in the tempo field,
enter 100.
This way Cubase knows that the tempo of this audio file is 100 bpm.
With this information Cubase can then time stretch the audio properly. In
addition to typing in the tempo, you can type in the number of bars whatever is known. In both cases, the audio will be stretched properly.
The project tempo of Cubase is 120bpm, different from
the drum loop.
We are going to set the tempo of the drum loop to match
the project tempo.
1. Activate Start on the Transport panel.
You will hear that the drum loop is off time with the click.
Tutorial 8: Editing audio II - tempo and groove
76
Page 77

5. Activate Preview.
Activate Preview
!
Definition tab
Activate Preview
Zoom slider
1-8 9-16 17-18
The drum loop is now matched to the tempo of the project.
6. Close the Sample Editor.
7. Select the drum loop in the project window and select
Loop Selection from the Transport menu.
You can also use the corresponding key command [Shift]+[G].
Example 2: Drum loop, Auto Adjust
Load the project called “Tempo and Groove 2” found
in the “Tutorial 8” folder.
In this example we have imported a drum loop and we do
not know the tempo. This is one of the quickest ways to
match the tempo of the drum loop with the project tempo.
1. Activate Start on the Transport panel.
You will hear that the drum loop is off time with the click.
2. Activate Stop and deactivate the Click.
3. Double-click on the drum loop.
The Sample Editor will open.
4. Click on the Definition tab and activate Preview.
Activating Preview allows you to hear any tempo changes directly.
You can now hear that the drum loop is in perfect time
with the project tempo. Feel free to change the tempo on
the Transport panel by deactivating the Tempo Track. The
drum loop will follow.
5. Zoom in on the first bar.
You can use the zoom slider on the bottom right. Zoom in so that you can
see about 18 waveform shaker hits.
77
Tutorial 8: Editing audio II - tempo and groove
Page 78

6. Select the first bar of the loop (the first 16 hits, up to
Audition Loop
Audition
Auto Adjust
!
Activate Preview
the 17th). Activate Audition Loop and click the Audition
button.
7. As you listen back you may need to tweak the end of
the loop to get it to loop smoothly.
Example 3: Drum loop, Manual Adjust
Load the project called “Tempo and Groove 3” found
in the “Tutorial 8” folder.
This builds on what we have learned already in the previous examples. In this example we have a drum loop of unknown tempo and with timing issues that need to be
corrected. You will learn how to manually correct this by
adjusting the Timing Grid in the Sample Editor.
1. Activate Start on the Transport panel.
You will hear that the drum loop is off time with the click.
2. Activate Stop.
3. Double-click on the drum loop.
The Sample Editor will open.
4. Open the Definition tab and activate Preview.
Activating Preview allows you to hear any tempo changes directly.
8. Zoom out and click Auto Adjust on the Definition tab.
5. Enter the number of bars the drum loop’s length
equals. In our case it’s 4.
The drum loop is now matched to the project tempo.
6. Activate Playback on the Transport panel.
You will hear that the drum loop doesn’t exactly match with the Click. It’s
close, but not exact. This is because the loop has timing variations. Let’s
9. Close the Sample Editor and listen to the loop play in
time!
Tutorial 8: Editing audio II - tempo and groove
correct them.
78
Page 79

7. Activate Manual Adjust.
Manual Adjust
!
!
This allows us to manually adjust the Timing Grid to correct any timing
variations.
8. Zoom in to the bars of the drum loop. In our case it will
be bars 2, 3 and 4.
9. Hold down [Alt]/[Option] and move the bar Grid lines
close to the beginning of the attacks of the waveform display. Make sure you are only moving the Grid lines that are
on Bars 2, 3 and 4. You should see the flag “Stretch Previous - Move Next” appear.
Holding down [Alt]/[Option] and moving the Grid lines at bar positions
allows us to change the tempo of the previous bar while the following
bars will be moved.
Load the project called “Tempo and Groove 4” found
in the “Tutorial 8” folder to see the bar grid line adjustments.
Click on the Definition Tab in the Sample Editor and
activate Manual Adjust.
10. Now hold down [Ctrl]/[Command] to move the beat
grid lines close to the beginning of the attacks of the
waveform display.
Zoom in to line up the beat grid lines exactly. Do this for the entire drum
loop in all the locations that appear to be off time.
Load the project called “Tempo and Groove 5” found
in the “Tutorial 8” folder to see the beat grid line adjustments.
Click on the Definition Tab in the Sample Editor and
activate Manual Adjust.
11. Close the Sample Editor.
79
Tutorial 8: Editing audio II - tempo and groove
Page 80

12. Click on the drum loop and select Loop Selection from
!
Range Selection tool
Range tab
Hitpoints tab
Slice & Close
the Transport menu.
You can now hear that the drum loop is in perfect time
with the project’s tempo. Feel free to change the tempo
on the Transport by first deactivating the Tempo Track and
notice that the drum loop will follow.
Example 4: Working with selections
Load the project called “Tempo and Groove 6” found
in the “Tutorial 8” folder.
In this example we have an audio file with unknown tempo.
We only want to use a small section of the audio file to
create a drum loop.
1. Activate Start on the Transport panel and hear that the
drum loop is off time with the click.
2. Activate Stop and deactivate the Click.
3. Double-click on the drum loop.
The Sample Editor will open.
4. We are going to create a 2-bar loop from this audio
file. Make sure the Range Selection tool is selected. Click
and drag to make a selection to a portion of the audio file
that you will use as a drum loop. Somewhere just after bar
5 and just after bar 7.
To get the selection to match our example click on the
Range tab and enter 411427 in the Start field and
616843 in the End Field.
5. Click on the Hitpoints tab and choose Slice & Close.
You now have a loop that is cut to the selection you made and can now
loop to the project tempo. The Sample Editor will close and you will be
returned to the Project window.
6. Click on the drum loop and select Loop Selection from
the Transport menu.
You can now hear that the drum loop is in perfect time
with the project’s tempo. Feel free to change the tempo
on the Transport by first deactivating the Tempo Track and
notice that the drum loop will follow.
80
Tutorial 8: Editing audio II - tempo and groove
Page 81

12
Tutorial 9: Media management
Page 82

Background
!
MediaBay,
Loop Browser,
Sound Browser
The MediaBay is an area in Cubase that helps to find,
identify, tag and organize your sounds (VST 3 Presets and
track presets), audio/MIDI loops, video and project files.
You’ll hear and read about two different terms associated
with the MediaBay: VST Sound and MediaBay.
VST Sound is the overall concept of managing the evergrowing number of plug-ins, instruments, presets, etc. The
tool that links all of the plug-ins, instruments and presets
together is the MediaBay.
Why is the MediaBay important to me?
The MediaBay:
• Provides different views allowing you to find and tag media
files, quickly import media files into projects. Media files include: audio files, MIDI files, MIDI loops and video.
• Allows you to find sounds easily so that you can begin working
on your music quickly without endlessly searching for the
‘right’ instrument.
• Allows you to find and apply audio, MIDI and instrument presets quickly to your tracks.
• Shows you all of the Cubase project files that are on your
computer to quickly load them.
• MediaBay frees you from thinking in a folder structure or by instrument. Just think about the sound you are looking for and
find it across your entire library.
MediaBay, Loop Browser and Sound Browser
There are three menu options on the Media menu that allow you to call up the various MediaBay views.
It really doesn’t matter which one you pick as they all provide the same functionality. The reason you would pick
one from the other is that they have various buttons and
features turned on or off so that you can easily find what
you are looking for.
For example, if you are looking for loops you would select
the Loop Browser as this has been pre-configured for
searching specifically for loops. Or if you were looking for
Track Presets or VST Plug-in Presets, the Sound Browser
would suit you best.
Load the project “Media Management” found in the
“Tutorial 9” folder.
To open the MediaBay
We are going to use the MediaBay view as this view has
been pre-configured to allow all of the controls by default
to be visible. Everything we learn in the MediaBay can be
applied to the Loop or Sound Browser.
82
Tutorial 9: Media management
Page 83

1. On the Media menu, select “Open MediaBay” and
Category tab
Browser, Scope and Tag Editor
Viewer display
Filter section
Browser section
Click here to show/hide the Browser section
click on the Category tab or press [F5] on your computer
keyboard.
The MediaBay by default opens with the Details tab activated. For the
purpose of this tutorial, the Category tab will be needed.
Making visible the different sections of the
MediaBay
At the bottom left hand side of the MediaBay window
there are 3 buttons allowing you to show/hide the different
MediaBay sections. These are:
•Browser
•Scope
•Tag Editor
1. Hide the Browser, Scope and Tag Editor sections.
We are left with the Viewer display and Filter section. These two sections
allow us to view and find files.
2. Show the Browser section.
This is where you can specify locations on your computer so that the
MediaBay can find all of your media files.
83
Tutorial 9: Media management
Page 84

3. Show the Scope section.
Click here to show/hide the Scope section
Scope section
Tag Editor section
The Scope section allows you to view and play back files selected in the
Viewer section.
4. Show the Tag Editor section (Cubase only).
When a file is selected in the Viewer section, you can view and/or assign
tags to the file to make organizing and searching for the file easier.
Physical and virtual scanning locations
There are 2 different locations that you can scan for media
files on your computer. The File system location and the
VST Sound location.
File System
The File system locations are the physical or actual locations on your computer. These locations include local and
removable disks such as hard drives, external drives, CD
or DVD-ROM drives, etc.
By default File system is checked, however, it contains
many locations you would not want scanned. Be sure to
check which areas/folders you want MediaBay to manage.
The areas/folders that you pick will automatically be
scanned and the result of that scan can be seen in the
Viewer section.
VST Sound
The VST Sound locations are the virtual locations on your
computer to any factory content or user presets created
for plug-ins, instruments or MIDI-loops. Make sure that
this is not turned off.
Scanning with the browser
When you open the MediaBay, the Loop Browser or the
Sound Browser, a scan for the media files is performed.
Specify which folders or directories should be included in
the scan by activating their check boxes to the left of the
name. The result of the scan is saved in the MediaBay database.
Tutorial 9: Media management
Choosing scanning locations
Generally you’ll want to make sure that VST Sound is always checked since this is the factory content or content
that either came with Cubase or other compatible product
such as Steinberg’s Sequel. This is also the location of
any user presets that were created.
84
Page 85

1. Click the plus symbol on File system to reveal its scan-
Deep Results
ning locations.
These are the physical locations on your computer that you can specify
so that MediaBay will search for media content. Be sure to check the areas/folders that you want the MediaBay to scan.
2. Click the plus symbol on VST Sound to reveal the
scanning locations found there.
Deep Results
Before we begin the scan of all our media on the computer, make sure the “Deep Results” button is activated.
Activating “Deep Results” will show any files inside the
currently selected folder, as well as any sub folder in a
“flat” view - as if they were inside the same folder. This allows you to look at your media files sorted by attributes,
even if they reside in a complex folder structure.
There are many locations that do not need to be checked.
Spend the time un-checking the locations you feel do not
need to be searched. By doing this the MediaBay is kept
clean of any useless information which speeds up
searches and general handling.
If you are in doubt about any of the locations, don’t worry
– just leave them checked.
Selecting a location (folder) automatically initiates a scan
and updates the database.
Tutorial 9: Media management
1. Right-click on Media and select “Refresh” from the
context menu to begin scanning.
This starts the scanning process and now the MediaBay is looking for
media on your computer within the locations you have specified.
85
Page 86

Scanning indicator and status
!
Scanning indicator
Viewer display
Filter section
When the MediaBay is scanning for media on your computer, a visual indicator in the upper right hand corner of
the Viewer section will be displayed.
The scanning status for the individual folders in the
Browser section is indicated by the color of the icons:
• A red icon means that this folder is currently being scanned.
• A light blue icon means this folder has been scanned.
• Orange folder icons are displayed when a scanning process
was interrupted.
• Yellow icons are displayed for folders that have not been
scanned.
We are now going to shift our attention to the Viewer section. The Viewer section consists of two panes: the filter
section at the top and below it, the Viewer display.
Searching for media
Now that we have selected the folders on our computer
and scanned for media we can now search for an audio
file and drop it into our project.
You should still have the project called “Media Management” loaded for this tutorial.
Tutorial 9: Media management
1. Choose a main category from the filter section (like
“Drum/Perc”).
This will show us any files that have been tagged with the category Drum
& Perc. See “Tagging” on page 88.
86
Page 87

2. Choose a sub category if appropriate (like “Beats”).
Text Search field
Click here to show/hide the Scope section.
The Scope section displaying an audio file.
Preview level (Volume)
Start, stop, pause and cycle
Play in Project context
Auto Play
This allows us to narrow down our search even more.
There is a list of drum loops that are now available to us in
the Viewer display with our filter criteria. We can simply
drag and drop any of these audio files into our project. Alternatively we could use the Text Search field and search
for a media file by name.
Auditioning media with the Scope
We have narrowed down our search to just drum beats
and now we want to audition our results before we drop it
into our project.
1. Show the Scope section and select an audio file from
the Viewer display.
You will see the Scope display the audio file as a waveform.
You can start, stop, pause and cycle the audio file to hear
what it sounds like. You can also set the preview level.
It’s a good idea to hear our project playing while we audition our audio loop.
2. Activate Play in Project context.
The loop will now play along with our project in the project tempo.
3. Activate Auto Play.
With Auto Play activated we can click on many different audio files in the
Viewer display and audition them quickly.
4. Click Start on the Transport panel.
The project will begin to play and the audio files you have selected in the
Viewer display will play along in time with the project.
5. Click on different audio files to find the one that works
best with the project.
You can use the up and down arrow keys on your computer keyboard to
quickly audition many files.
6. When you have selected the file you wish to use, drag
and drop it right into the project.
You don’t have to click Stop, the project will continue to play and the MediaBay will stop auditioning the file automatically.
87
Tutorial 9: Media management
Page 88

Tagging
Click here to show/hide the Tag Editor section.
Attribute name
Select the Managed tab
Click here to open the Manage Tags window.
You are able to add musical tags to your media files so
that you are able to quickly organize and find your media
files for later use. Tagging also helps you to group large
amounts of media into a more usable and searchable format.
1. Show the Tag Editor section and select one or multiple
files in the Viewer section.
For even greater search capabilities and organization you
can open the Manage Tags window and define even more
tags for your media files.
2. Select the Managed tab.
You can apply tags by clicking (double-clicking for Character) in the field next to the attribute name.
The next time you search for media using the search filters
(category, sub category, style, etc.) you’ll see the media
you have tagged appear in the viewer section along with
the other similar tagged media.
For further details refer to the MediaBay chapter in the
Operation manual.
88
Tutorial 9: Media management
Page 89

Index
Page 90

A
Adding
EQ 61
Loops 52
Mono Track 26
Adding a fade 39
Advanced settings 22
All MIDI Inputs 20
ASIO 2.0 18
ASIO Direct Monitoring 18
ASIO driver
About 10
DirectX 10
DirectX Setup 10, 17
Installing 11
Audio
Editing 33
Processing 40
Recording 23
Audio buffer size 22
Audio hardware
Connections 14
Setup application 15
Automation
About 64
B
Browser
Scanning 84
Bus
Surround 69
C
Click
Activating 27
Close
Project 25
Connecting
Audio 14
MIDI 18
Controller lane 50
Copying 37
Events 53
MIDI notes 49
Cycle
Playback 29
Recording 30
Recording (MIDI) 47
D
Defragmenting
Windows 12
E
Editing
Adding a fade 39
Audio 33
Copying 37
Erasing 39
Gluing 36
MIDI 42
Moving 37
Mute 38
Renaming 34
Repeating 38
Resizing 34
Splitting 35
Effects 63
About 58
FX channels 63
Insert 63
EQ 61
Equalization 61
Erasing 39
Event envelopes 39
Event operations
About 34
Adding a fade 39
Copying 37
Erasing 39
Gluing 36
Moving 37
Muting 38
Renaming 34
Repeating 38
Resizing 34
Splitting 35
Volume changes 39
Export 73
Mixdown 65
Surround 73
External instruments
About 54
Monitoring 56
Recording 57
Setting up 55
F
FX channels 63
G
Gluing 36
H
Hard disk
Considerations 21
I
Input
Adding 26
Level 15
Ports 17
Setup Surround 69
Insert effects 63
Instrument Track
Creating 43
J
Joining 36
K
Key command conventions 7
Key Editor
About 48
L
Latency 21
Levels 59
Setting 26, 27
Loading Sounds 44
Local On/Off 19
Loop Browser 82
About 52
Insert into Project 53
Loops
Adding 52
Working with 51
90
Index
Page 91

M
Media Management
Background 82
MediaBay 82
Auditioning media 87
Open 82
Physical and virtual scanning
locations 84
Scanning 84
Searching for media 86
Tagging 88
Metronome click
Activating 27
MIDI
Copying notes 49
Cycle Playback 46
Cycle recording 47
Editing 42
Erasing notes 48
External Instruments 54
Playback 46
Quantizing 47
Recording 42, 45
Recording modes (cycle off) 46
MIDI Devices
Setting up 55
MIDI Input
Setting 45
MIDI Interface
Connecting 18
Installing 11
MIDI notes
Creating 49
Drawing 49
MIDI ports
Setting up 20
MIDI Thru Active 19
Mixing
About 58
Modifier keys 7
Monitoring
About 18
Moving 37
Mute 38, 60
N
New Project
Create 24
Save 25
Normalize 40
O
Open
Project 25
Recent Projects 25
Optimizing the Hard Disk
Windows 12
Output
Adding 25
Ports 17
Setup Surround 69
P
Pan
Setting 60
Playback
About 29
Cycle 29
MIDI 46
Start 29
Processing
Audio 40
Normalize 40
Reverse 41
Project
Close 25
Open 25
Q
Quantizing 47
R
Recent Projects 25
Recording 70
Audio 23
Cycle 30
External Instruments 57
Level Settings 26
MIDI 42, 45
Modes 30
Stacked 31
Surround 72
Recording levels 15
Release Driver when Application is in
Background 16
Rename 34
Repeating 38
Resizing 34
Reverse 41
S
Save
New Project 25
Setting 59
Setting levels 27, 59
Setting Pan 60
Setup
MIDI Devices 55
Surround Inputs 69
Surround Mix 71
Surround Outputs 69
VST connections for external
instruments 55
Solo 60
Sound Browser 82
Splitting 35
Stacked recording 31
Steinberg Key
About 10
License Activation 11
License Transfer 11
Surround 70, 73
Busses 69
Inputs 69
Outputs 69
Recording 70, 72
Setup 15
Setup a Mix 71
Syncrosoft LCC 11
T
Track
Adding 26
V
VST Audio System 16
VST Connections 25
VST input ports 17
VST output ports 17
91
Index
Page 92

Cubase 4 – Einführung
Page 93

Lehrgänge von Steve Kostrey
Überarbeitung, Qualitätssicherung und Übersetzung:
Cristina Bachmann, Heiko Bischoff, Marion Bröer, Sabine Pfeifer
Dank an: Georg Bruns
Die in diesem Dokument enthaltenen Informationen können ohne Vorankündigung geändert werden und stellen keine
Verpflichtung seitens der Steinberg Media Technologies GmbH dar. Die Software, die in diesem Dokument beschrieben
ist, wird unter einer Lizenzvereinbarung zur Verfügung gestellt und darf ausschließlich nach Maßgabe der Bedingungen
der Vereinbarung (Sicherheitskopie) kopiert werden. Ohne ausdrückliche schriftliche Erlaubnis durch die Steinberg Media Technologies GmbH darf kein Teil dieses Handbuchs für irgendwelche Zwecke oder in irgendeiner Form mit irgendwelchen Mitteln reproduziert oder übertragen werden.
Alle Produkt- und Firmennamen sind ™ oder ® Warenzeichen oder Kennzeichnungen der entsprechenden Firmen. Windows XP ist ein Warenzeichen der Microsoft Corporation. Windows Vista ist ein eingetragenes Warenzeichen oder ein
Warenzeichen der Microsoft Corporation in den USA und/oder anderen Staaten. Das Mac-Logo ist eine Marke, die in Lizenz verwendet wird. Macintosh ist ein eingetragenes Warenzeichen. Power Macintosh ist eine eingetragene Marke.
Stand: 02.04.2008
© Steinberg Media Technologies GmbH, 2008.
Alle Rechte vorbehalten.
Page 94

Inhaltsverzeichnis
Page 95

97 Einleitung
98 Willkommen
98 Die Handbücher und die Hilfe
99 Die Programmversionen
99 Die Tastaturbefehle
100 So können Sie uns erreichen
101 Systemanforderungen und Installation
102 Einleitung
102 Systemanforderungen
104 Installieren der Hardware
105 Installieren von Cubase
105 Defragmentieren der Festplatte
(nur Windows)
106 Registrieren Sie Ihre Software!
107 Einrichten des Systems
108 Vorbereitungen für Audioaufnahmen
113 Vorbereitungen für MIDI-Aufnahmen
115 Anschließen eines Synchronisierers
115 Vorbereitungen für Videoaufnahmen
115 Optimieren der Audioleistung
118 Lehrgang 1: Aufnehmen von
Audiomaterial
119 Erstellen eines neuen Projekts
120 Einrichten der VST-Verbindungen
122 Einstellen der Pegel und Aufnahme
124 Wiedergabe
125 Aufnehmen ohne Cycle-Modus
125 Aufnehmen im Cycle-Modus
127 Aufnahme im Stacked-Modus
128 Lehrgang 2: Bearbeiten von
Audiomaterial
129 Arbeiten mit Events
135 Event-Hüllkurven
135 Audiobearbeitung und -funktionen
137 Lehrgang 3: Aufnehmen und
Bearbeiten von MIDI
138 Einleitung
138 Einfügen einer Instrumentenspur
139 Einstellen des Instrumentensounds
139 Aufnehmen von MIDI
140 Wiedergeben von MIDI
141 Aufnahmemodi (ohne Cycle)
141 Cycle-Aufnahmen
143 Der Key-Editor
144 Die Controller-Spur
145 Lehrgang 4: Arbeiten mit Loops
146 Der Loop-Browser
146 Hinzufügen von Loops
147 Erstellen von Kopien
147 Einfügen von Loops in das Projekt
148 Lehrgang 5: Externe MIDI-Instrumente
149 Einleitung
149 Einrichten von MIDI-Geräten
149 Einrichten der VST-Verbindungen für externe
Instrumente (nur Cubase)
150 Abhören von externen MIDI-Instrumenten
(nur Cubase)
151 MIDI-Aufnahmen von externen Instrumenten
(nur Cubase)
152 Lehrgang 6: Anwenden von Effekten
und Erstellen eines Mixdowns
153 Einleitung
153 Einstellen der Pegel
154 Panoramaeinstellungen
155 Stummschalten und Solo
155 Vornehmen von EQ-Einstellungen
157 Audio-Effekte
159 Automation
160 Exportieren
162 Lehrgang 7: Surround-Sound
163 Surround-Busse
165 Einrichten eines Surround-Mix
166 Surround-Aufnahmen
167 Exportieren einer Surround-Datei
95
Inhaltsverzeichnis
(nur Cubase)
Page 96

170 Lehrgang 8: Bearbeiten von
Audiomaterial II – Tempo und Groove
171 Einleitung
171 Beispiel 1: Schlagzeug-Loop, Tempo bekannt
172 Beispiel 2: Schlagzeug-Loop, Auto-Anpassen
173 Beispiel 3: Schlagzeug-Loop, manuelle Anpassung
176 Beispiel 4: Schlagzeug-Loop aus Auswahlbereich
177 Lehrgang 9: Medienverwaltung
178 Einleitung
178 MediaBay, Loop-Browser und Sound-Browser
180 Mediensuche mit dem Browser
182 Mediensuche
183 Medienwiedergabe im Scope-Bereich
184 Tags
185 Stichwortverzeichnis
96
Inhaltsverzeichnis
Page 97

1
Einleitung
Page 98

Willkommen
Herzlichen Glückwunsch und vielen Dank, dass Sie sich für
Cubase/Cubase Studio von Steinberg entschieden haben.
Sie sind damit Teil der weltweit größten Gemeinschaft von
Musik-Software-Benutzern geworden. Blickt man auf die
letzten 20 Jahre computergestütze Musikproduktion zurück,
dann war Steinberg immer die treibende Kraft hinter der
Software-Technologie – Cubase ist das Markenzeichen
dieser Entwicklung. Mit Version 4 macht Cubase den
nächsten logischen Schritt in Richtung eines vollständig integrierten Soft- und Hardwaresystems.
Als Komponist, Musiker oder Produzent arbeiten Sie lieber mit Sounds als mit einzelnen Instrumenten oder Effekten. In Cubase und Cubase Studio ist dies dank der
Einführung von VST Sound, einer einzigartigen Kombination aus Datenbank, Spur-Presets und einer integrierten
Synth-Engine möglich. Von nun an können Sie die
Sounds all Ihrer Instrumente (Soft- oder Hardware) aus einer einzigen Arbeitsumgebung heraus verwalten und so
Ihre Sounds schneller und intuitiver erstellen, verwalten
und verwenden. Basiert Ihre Musik hauptsächlich auf
Loops oder fertigen Audio-Clips, sollten Sie die neue MediaBay-Datenbank zum Durchsuchen und Vorhören nutzen. Ein völlig neues PlugIn-Set und eine leistungsstarke
Synth-Engine stellen Ihnen tausende von neuen Instrumenten, Sounds und Effekten zur Verfügung. Cubase und
Cubase Studio führen mit VST 3 Steinbergs neueste PlugIn-Technologie ein, mit der Sie PlugIns flexibler, effizienter und leichter benutzen können.
Als professioneller Produzent werden Sie die Vielseitigkeit
des neuen Control Room in Cubase zu schätzen wissen.
Wenn Sie ein Komponist oder Songschreiber sind, werden Sie von den neuen leistungsfähigen und einfach zu
verwendenden Funktionen des Noten-Editors in Cubase
Studio begeistert sein. Nicht zu vergessen die einzigartigen Cubase-Funktionen wie die Arranger-Spur für das
Pattern-basierte Arrangieren oder die leistungsfähige und
verbesserte AudioWarp-Technologie, mit der statische
Audiodateien nicht mehr an Zeit oder Tonhöhe gebunden
sind. All diese neuen Funktionen wurden eingeführt, um
Ihnen das Musikmachen zu erleichtern, egal ob Sie mit
Musik Ihren Lebensunterhalt verdienen oder sie eher als
Hobby sehen.
Nehmen Sie sich die Zeit, sich in diese neue Version von
Cubase einzuarbeiten. Wenn Sie ein Neuling sind, werden
die in diesem Handbuch enthaltenen Lehrgänge Ihnen weiterhelfen. Diese bauen auf entsprechenden Cubase-Projektdateien auf und werden sogar in kurzen TrainingsVideos gezeigt, die Sie auf der Programm-DVD finden.
Selbst wenn Sie schon ein erfahrener Cubase-Benutzer
sind sollten Sie die Lehrgänge einmal durchgehen. So können Sie die neuen Funktionen und ihre Einbindung in Cubase und Cubase Studio schnell kennenlernen.
Zu guter Letzt möchten wir Ihnen empfehlen, Ihre Software zu registrieren! Sie erhalten dadurch Zugang zu Angeboten von Steinberg und stellen sicher, dass Sie immer
auf dem letzten Stand sind, was Tipps und Tricks, Updates oder Veranstaltungen angeht. Schließlich sind Sie
auch herzlich dazu eingeladen an unserem Cubase-Benutzerforum unter www.steinberg.net teilzuhaben. Hier
können Sie direkt mit uns und anderen Cubase-Benutzern
in aller Welt kommunizieren.
Wir freuen uns auf Sie!
Ihr Steinberg Cubase-Team
Die Handbücher und die Hilfe
Die verschiedenen Bestandteile der Dokumentation von
Cubase sind im Folgenden aufgelistet. Die meisten dieser
Dokumente liegen als Adobe Acrobat-Dateien (mit der
Dateinamenerweiterung ».pdf«) vor. Sie können auf diese
Informationen folgendermaßen zugreifen:
• Im Programm können Sie alle PDF-Dokumente über das HilfeMenü öffnen.
• Unter Windows können Sie diese Dokumente auch über das
Start-Menü öffnen. Wählen Sie unter »Steinberg Cubase« den
Dokumentation-Eintrag.
• Unter Mac OS X befinden sich die PDF-Dokumente im Ordner
“/Library/Documentation/Steinberg/Cubase 4”.
Ö Damit Sie die PDF-Dokumente lesen können, muss
ein PDF-Reader auf Ihrem Computer installiert sein.
Den Reader-Installer finden Sie auf der Programm-DVD.
98
Einleitung
Page 99

Das Einführung-Handbuch
Das Buch, das Sie vor sich haben, deckt die folgenden
Bereiche ab:
• Systemanforderungen
• Fragen zur Installation
• Einrichten des Systems für die Audio-, MIDI- und/oder Videobearbeitung
• Lehrgänge (Tutorials), in denen die wichtigsten Verfahren zum
Aufnehmen, Wiedergeben, Mischen und Bearbeiten in Cubase beschrieben werden.
Sie erhalten hier also keine detaillierten Informationen zu
den Fenstern, Funktionen und Verfahren von Cubase.
Das Benutzerhandbuch
Das Benutzerhandbuch ist die wichtigste Informationsquelle mit ausführlichen Beschreibungen aller Verfahren,
Parameter und Funktionen. Es beinhaltet auch ausführliche Informationen über den Noten-Editor. Die Inhalte des
Einführung-Handbuchs sollten Ihnen vertraut sein, bevor
Sie mit dem Lesen des Benutzerhandbuchs beginnen.
MIDI-Geräte
Dieses Dokument enthält Informationen zum Verwalten
von MIDI-Geräten und Bedienfeldern.
PlugIn-Referenz
Dieses Dokument beschreibt die Funktionen und Parameter der mitgelieferten VST-PlugIns (Echtzeit-Audioeffekte
und VST-Instrumente) und MIDI-Effekte.
Fernbedienungsgeräte
Hier wird das Einrichten und Verwenden der unterstützten
MIDI-Fernbedienungsgeräte für die Arbeit mit Cubase beschrieben.
Mackie Control
Dieses Dokument beschreibt die Verwendung des Fernbedienungsgerätes Mackie Control zusammen mit Cubase.
Menübeschreibungen
In diesem Dokument sind alle Menüs und Optionen mit einer kurzen Beschreibung aufgeführt.
Die Dialog-Hilfe
Wenn Sie Informationen über den aktiven Dialog erhalten
möchten, klicken Sie auf den Hilfe-Schalter.
Die Programmversionen
Die Dokumentation beschreibt die Programmversionen
Cubase und Cubase Studio für die Betriebssysteme Windows und Mac OS X.
Einige Funktionen und Einstellungen gelten nur für Cubase. Darauf wird in der Überschrift deutlich hingewiesen.
Einige Funktionen und Einstellungen gelten nur für eines
der Betriebssysteme Windows oder Mac OS X. Darauf
wird an den entsprechenden Stellen deutlich hingewiesen. Mit anderen Worten:
Ö Wenn nichts anderes erwähnt wird, gelten alle Beschreibungen und Einstellungen für Cubase und Cubase
Studio, sowohl unter Windows als auch unter Mac OS X.
Die Abbildungen der Programmoberfläche wurden mit Cubase unter
Windows aufgenommen.
Die Tastaturbefehle
Für viele Standardtastaturbefehle in Cubase werden Sondertasten verwendet, die sich je nach Betriebssystem unterscheiden. Der Standardtastaturbefehl für »Rückgängig«
ist z.B. unter Windows [Strg]+[Z] und unter Mac OS X
[Befehlstaste]+[Z].
Wenn in diesem Handbuch Tastaturbefehle mit Sondertasten beschrieben werden, stehen die Windows-Sondertasten an erster Stelle:
[Windows-Sondertaste]/[Mac-Sondertaste]+[Taste]
So bedeutet z.B. [Strg]-Taste/[Befehlstaste]-[Z]: »Drücken
Sie die [Strg]+Taste unter Windows bzw. die [Befehlstaste] unter Mac OS X und dann die Taste [Z]«.
Ö Sie werden in diesem Handbuch oft dazu aufgefordert,
mit der rechten Maustaste zu klicken, um beispielsweise ein
Kontextmenü zu öffnen. Wenn Sie auf dem Macintosh mit
einer Eintastenmaus arbeiten, müssen Sie dafür beim Klicken die [Ctrl]-Taste gedrückt halten.
99
Einleitung
Page 100

So können Sie uns erreichen
Im Hilfe-Menü von Cubase finden Sie Optionen, über die
Sie weitere Informationen und Hilfe erhalten können:
• Im Untermenü »Steinberg im Internet« finden Sie eine
Reihe von Links auf verschiedene Web-Seiten von Steinberg. Wenn Sie eine dieser Optionen auswählen, wird Ihr
Internet-Browser gestartet und die entsprechende WebSeite geöffnet.
Hier erhalten Sie technische Unterstützung und Informationen zur Kompatibilität, Antworten auf häufig gestellte Fragen, Adressen zum Herunterladen neuer Treiber aus dem Internet usw. Dazu muss auf Ihrem Computer
ein Web-Browser installiert und eine Verbindung zum Internet hergestellt
sein.
100
Einleitung
 Loading...