

Page 1
Score Layout and Printing
Page 2

Manual by Ludvig Carlson, Anders Nordmark, Roger Wiklander
Quality Control: C. Bachmann, H. Bischoff, S. Pfeifer, C. Schomburg
The information in this document is subject to change without notice and does not represent a commitment on the part of Steinberg Media Technologies GmbH. The software
described by this document is subject to a License Agreement and may not be copied
to other media except as specifically allowed in the License Agreement. No part of this
publication may be copied, reproduced or otherwise transmitted or recorded, for any
purpose, without prior written permission by Steinberg Media Technologies GmbH.
All product and company names are ™ or ® trademarks of their respective owners.
Windows 2000 and Windows XP are trademarks of Microsoft Corporation. The Mac
logo is a trademark used under license. Macintosh and Power Macintosh are registered
trademarks.
© Steinberg Media Technologies GmbH, 2003.
All rights reserved.
Page 3

Table of Contents
Page 4

7 How the Score Editor
works
8 In this chapter you will learn:
8 Welcome!
9 How the Score Editor
operates
10 MIDI notes vs. score notes
11 Display quantize
16 Entering notes by hand vs.
recording notes
17 The basics
18 In this chapter you will learn:
18 Preparations
18 Opening the Score Editor
19 The project cursor
20 Page Mode
22 Changing the Zoom factor
23 The active staff
24 Making page setup settings
24 Designing your work space
29 About dialogs in the Score
Editor
29 Setting key, clef and time
signature
36 Working with transposing
instruments
37 Working order
38 Force update
39 Transcribing MIDI
recordings
40 In this chapter you will learn:
40 About transcription
40 Getting the parts ready
41 Strategies: Preparing parts
for score printout
42 Staff settings
51 Situations which require
additional techniques
53 Inserting display quantize
changes
54 Strategies: Adding display
quantize changes
55 The Explode function
57 Using “Scores Notes To
MIDI”
59 Entering and editing
notes using the
mouse
60 In this chapter you will learn:
60 Staff settings
63 Note values and positions
66 Adding and editing notes
70 Selecting notes
72 Deleting notes
73 Moving notes
76 Duplicating notes
76 Moving using the bar
handles
77 Cut, copy and paste
78 Editing pitches of individual
notes
80 Changing the length of
notes
82 Splitting a note in two
82 Working with the Display
Quantize tool
83 Split (piano) staves
85 Strategies: Multiple staves
86 Inserting and editing clefs,
keys or time signatures
CUBASE SX
4 Table of Contents
Page 5
89 Staff settings
90 In this chapter you will learn:
90 Staff settings
91 Making settings
92 Working with staff presets
93 Staff names
93 Key and clef
94 Display quantize and inter-
pretation flags
95 Display transpose
96 The Options tab
98 The Polyphonic and Tabla-
ture tabs
99 Polyphonic voicing
100 In this chapter you will learn:
100 Background: Polyphonic
voicing
103 Setting up the voices
107 Strategies: How many
voices do I need?
108 Entering notes into voices
109 Checking which voice a
note belongs to
109 Moving notes between
voices
112 Handling rests
113 Voices and display quantize
115 Creating crossed voicings
117 Automatic polyphonic
voicing – Merge All Staves
118 Converting voices to tracks
– Extract Voices
119 Additional note and
rest formatting
124 Stem length
125 Accidentals and enharmonic
shift
127 Changing the note head
shape
128 Other note details
131 Copying settings between
notes
132 Handling beaming
142 About tied notes
145 Graphic moving of notes
146 Cue notes
148 Grace notes
150 Tuplets
155 Working with symbols
156 In this chapter you will learn:
156 Background: The different
layers
159 The symbol palettes
165 Important! – Symbols,
staves and voices
166 Adding symbols to the
score
179 Selecting symbols
182 Moving and duplicating
symbols
189 Changing length and shape
190 Double clicking symbols
191 Deleting symbols
191 Copy and paste
192 Alignment
193 Symbol details
201 Working with chords
202 Chord symbols
120 In this chapter you will learn:
120 Background: Note stems
121 Setting stem direction
CUBASE SX
Table of Contents 5
Page 6
209 Working with text
210 In this chapter you will learn:
210 Adding and editing text
symbols
215 Different Types of text
222 Text functions
272 Setting up a staff for drum
scoring
273 Entering and editing notes
273 Using “Single Line Drum
Staff”
275 Creating tablature
229 Working with layouts
230 In this chapter you will learn:
230 Background: Layouts
231 Creating a layout
232 The Layout List
233 Using layouts – an example
234 Marker Track to Form
235 Designing your score –
additional techniques
236 In this chapter you will learn:
236 Layout settings
239 Staff size
240 Hiding/showing items
242 Coloring notes
243 Multiple rests
245 Adding and editing bar lines
246 Creating upbeats
249 Setting the number of bars
across the page
251 Moving bar lines
253 Dragging staves
256 Adding brackets and braces
257 Auto Layout
261 Clean Up Layout
262 Breaking bar lines
276 In this chapter you will learn:
276 Automatic creation
279 Manual creation
280 Tablature number
appearance
281 Editing
282 Note head shape
283 The score and MIDI
playback
284 In this chapter you will learn:
284 The MIDI Meaning function
286 Dynamic crescendo
symbols
289 Printing and exporting
pages
290 Printing
290 Exporting pages as image
files
293 Troubleshooting
294 In this chapter you will learn:
294 How to use this chapter
294 Adding and editing notes
297 Symbols and layout
265 Scoring for drums
266 In this chapter you will learn:
266 Background: Drum maps in
the Score Editor
269 Setting up the drum map
CUBASE SX
6 Table of Contents
299 Tips and Tricks
300 In this chapter you will learn:
305 Index
Page 7

1
How the Score Editor works
Page 8

In this chapter you will learn:
• How the Score Editor and MIDI data relate.
• What display quantize is and how it works.
Welcome!
Welcome to scoring in Cubase SX! The Score Editor has been created to allow you to get any possible piece of music displayed as a
score, complete with all the necessary symbols and formatting. It allows you to extract parts out of a full orchestra score, to add lyrics and
comments, create lead sheets, score for drums, create tablature, etc.
In other words: just about any type of notation you could ever desire!
There are a few basic principles to how the Score Editor works, which
you just have to understand to make full use of it. So please bear with
us during this chapter, we’ll try to be as concise as possible.
CUBASE SX
1 – 8 How the Score Editor works
Page 9
How the Score Editor operates
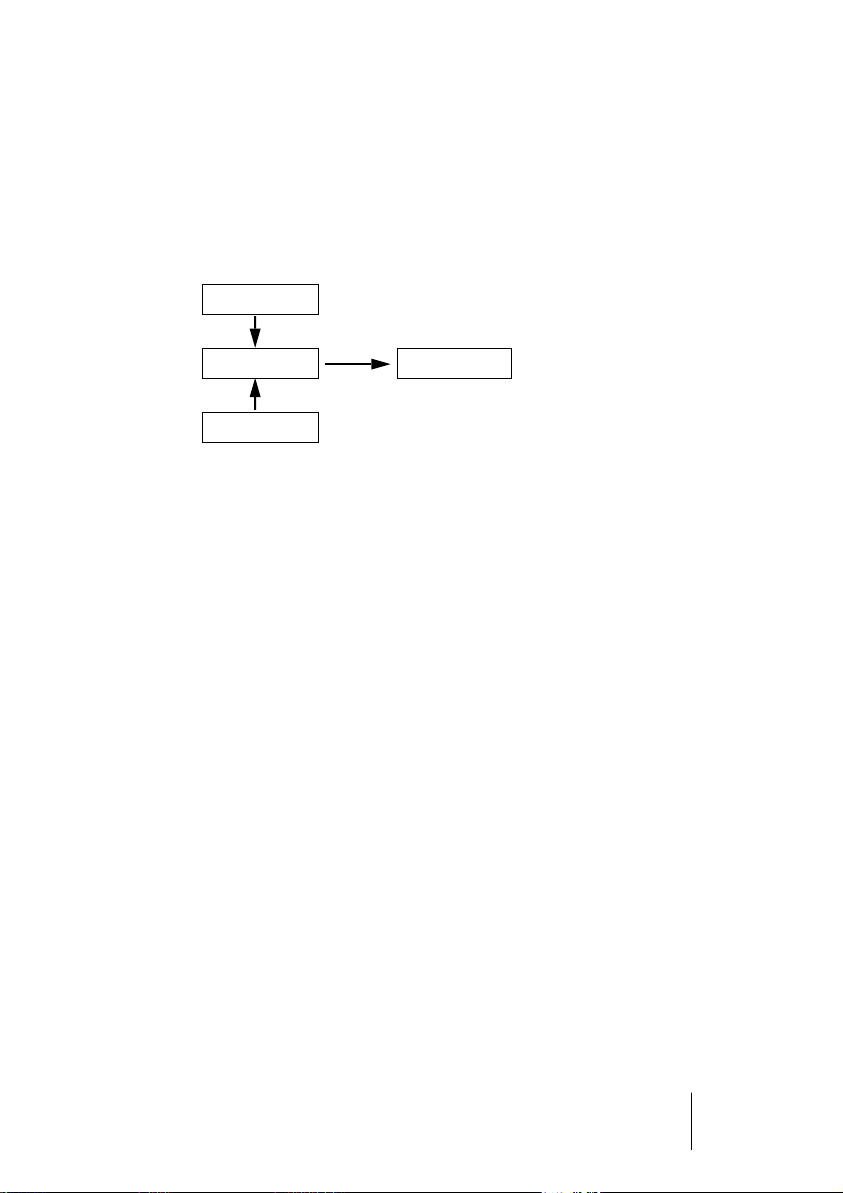
The Score Editor basically does the following:
• Reads the MIDI notes in the MIDI parts.
• Looks at the settings you have made.
• Decides how the MIDI notes should be displayed according to the settings.
MIDI data
Score Editor Score display
Score settings
The Score Editor takes MIDI data and settings as input and produces a score as
output.
The Score Editor does all this in real time. If you change some of the
MIDI data (for example by moving or shortening a note) this is immediately reflected in the score. If you change some of the settings (for example the time signature or key signature) this is also immediately
apparent.
You should not think of the Score Editor as a drawing program, but
rather as an “interpreter” of MIDI data.
CUBASE SX
How the Score Editor works 1 – 9
Page 10
MIDI notes vs. score notes
MIDI tracks in Cubase SX hold MIDI notes and other MIDI data. As
you may know, a MIDI note in Cubase SX is only defined by its position, length, pitch and velocity. This is not nearly enough information to
decide how the note should be displayed in a score. The program
needs to know more: What type of instrument are we talking about,
Drums? Piano? What key is the piece in? What is the basic rhythm?
How should the notes be grouped under beams? etc. You provide
this information by making settings and working with the tools available in the Score Editor.
An example of the MIDI/score relationship
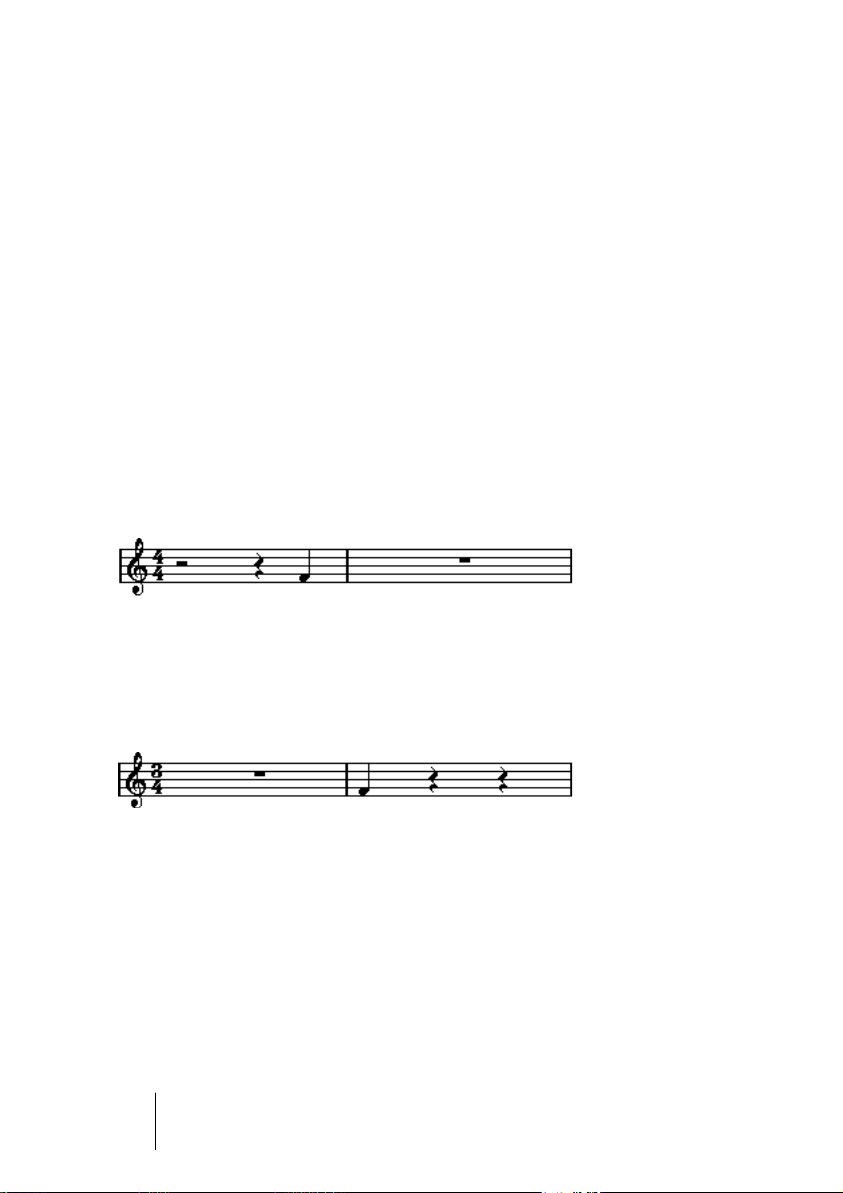
When Cubase SX stores a MIDI note’s position it makes the measurement in an absolute value, called ticks. There are 480 ticks to a quarter note. Have a look at the example below.
A quarter note at the end of a 4/4 measure.
The note is on the fourth beat of the measure. Now, let’s say you
change the time signature to 3/4. This shortens the length of a “measure” to only three quarter notes – 1440 ticks. Suddenly our quarter
note is in the next measure:
The same note in 3/4.
Why? Since by changing the time signature you are not changing the
MIDI data in the track/part (that would ruin your recording!), the note
is still at the same absolute position. It’s just that now each “measure”
is shorter, which effectively moves the note in the score.
What we are trying to get across here is that Score Editor is an “interpreter” of the MIDI data. It follows rules that you set up by making settings in dialogs, on menus, etc. And this interpretation is “dynamic”, or
in other words, it is constantly updated whenever the data (the MIDI
notes) or the rules (the score settings) change.
CUBASE SX
1 – 10 How the Score Editor works
Page 11
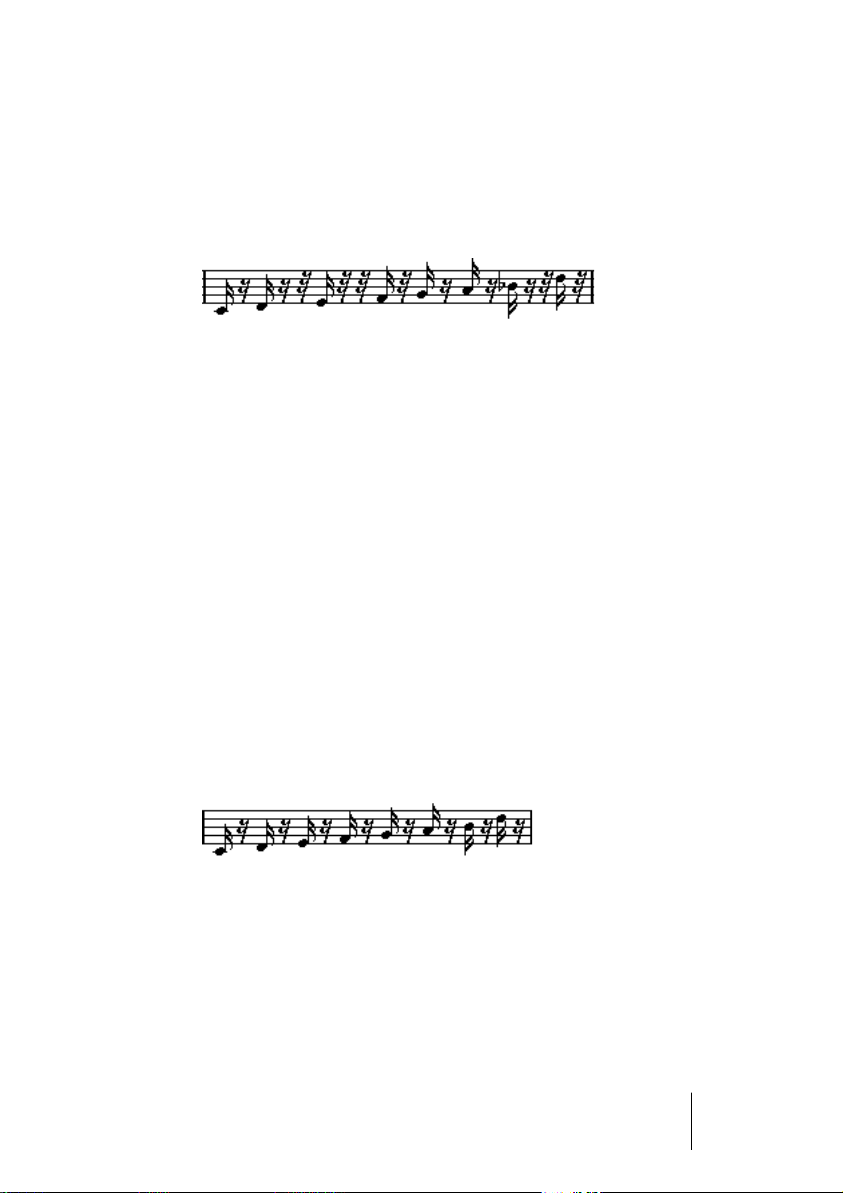
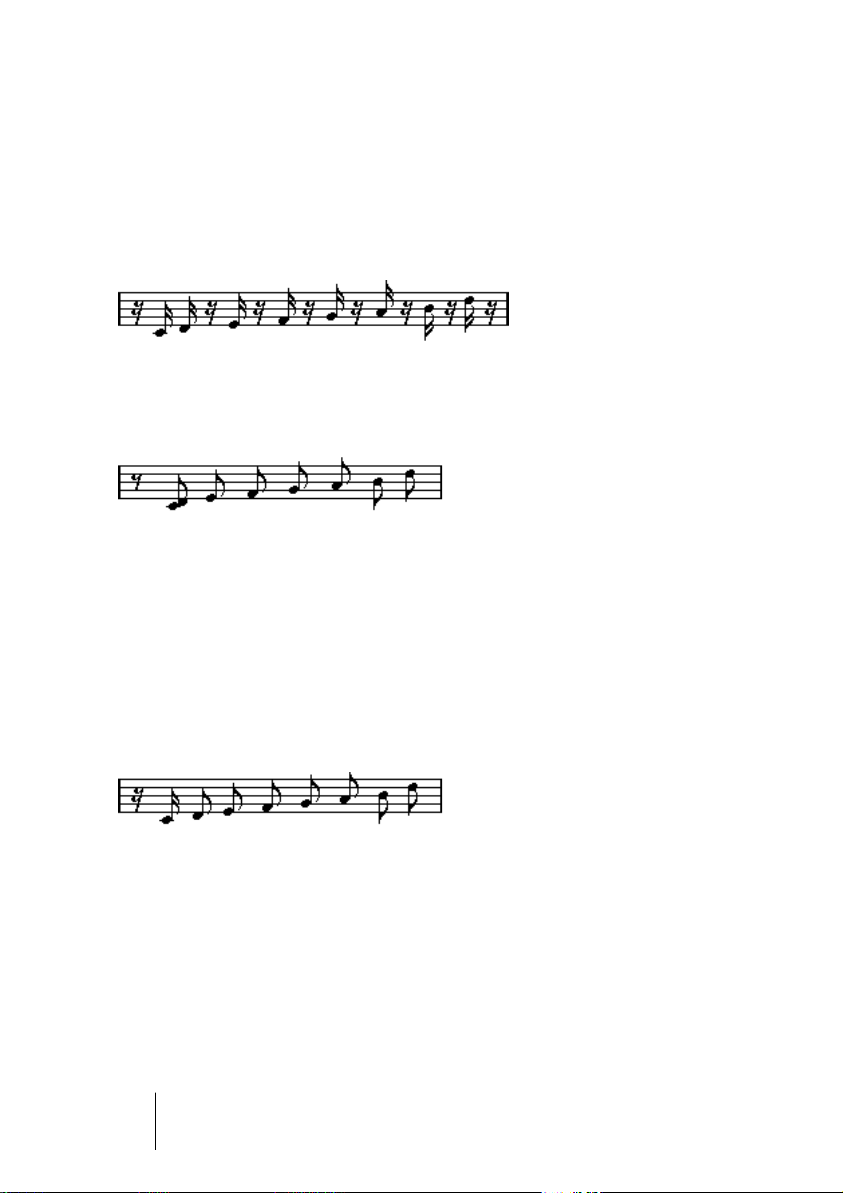
Display quantize
Let’s say you used the project window to record a figure with some
staccato eighth notes. When you open the Score Editor it displays it
like this:
This doesn’t look anything like what you intended. Let’s start with the
timing – obviously, you were off at a couple of places (the third, fourth
and last note all seem to be a 32nd note late). You can solve this by
quantizing the figure, but this would make the passage sound too
“stiff”, and not fit in the musical context. To resolve this problem the
Score Editor employs something called “display quantize”.
Display quantize is a setting which is used to tell the program two
things:
•
How precise the Score Editor should be when displaying the note
positions.
•
The smallest note values (lengths) you want displayed in the score.
In the example above, the display quantize value seems to be set to
32nd notes (or a smaller note value). When reading the following
chapters you will find out how to set the display quantize value yourself.
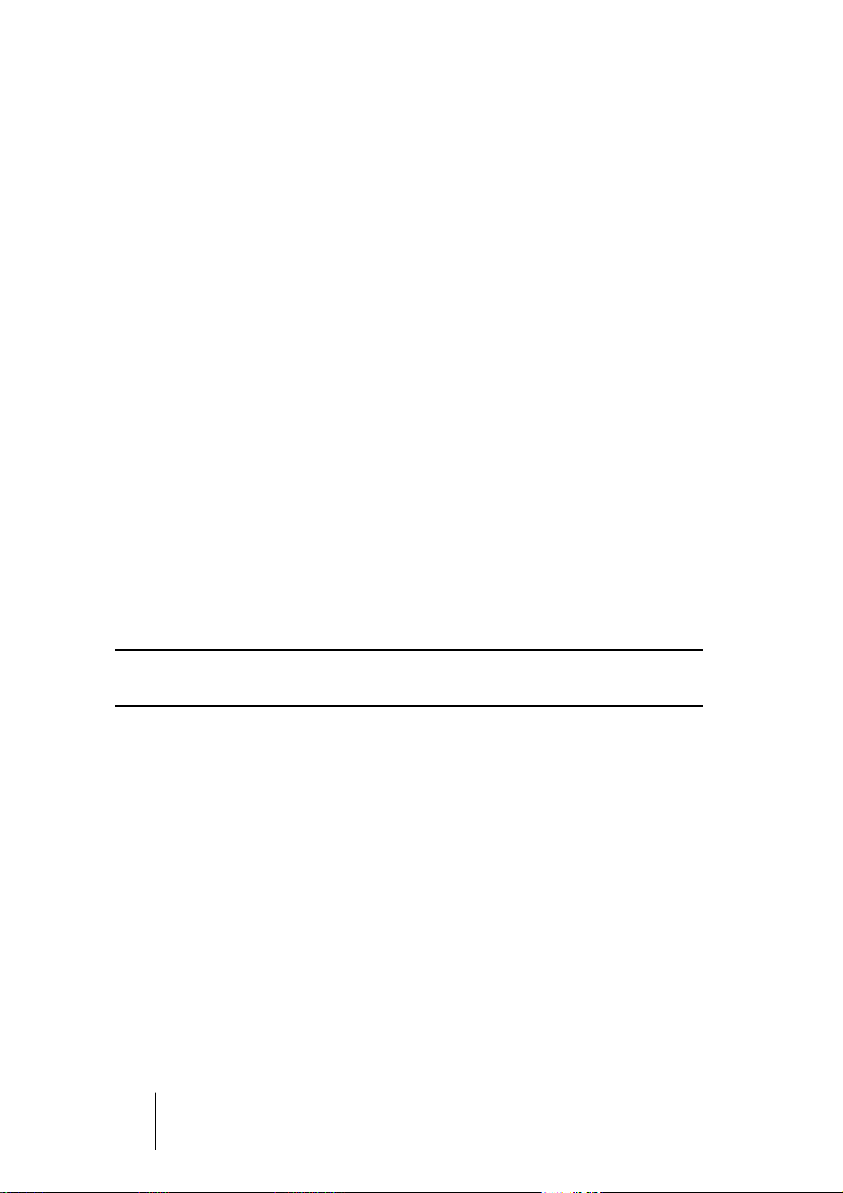
Let’s say we change the display quantize value to sixteenth notes in
the example:
With display quantize set to sixteenth notes.
CUBASE SX
How the Score Editor works 1 – 11
Page 12
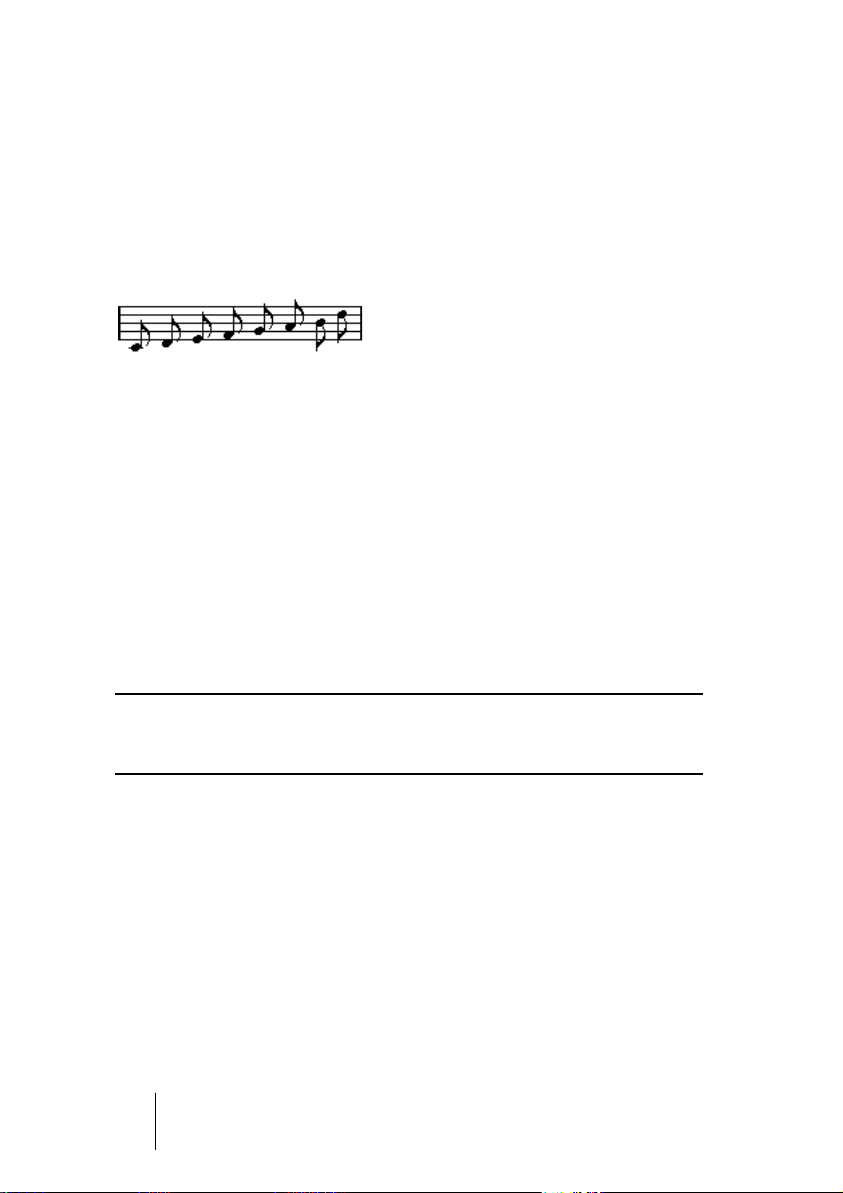
OK, now the timing looks right, but the notes still don’t look like what
you intended. Maybe you can understand that from a computer’s point
of view, you did play sixteenth notes, which is why there is a lot of
pauses. But that’s not how you meant it. You still want the track to
play back short notes, because it is a staccato part, but you want
something else “displayed”. Try setting the display quantize value to
eighth notes instead:
With display quantize set to eighth notes.
Now we have eighth notes, as we wanted. All we have to do now is to
add staccato articulation which can be done with one simple mouse
click using the Pencil tool (you will find out about this in “Working with
symbols”).
How did this work? By setting the display quantize value to eighth
notes you give the program two instructions, that would sound something like this in English: “Please, display all notes as if they were on
exact eighth note positions, regardless of their actual positions” and
“Please, don’t display any notes smaller than eighth notes, regardless
of how short they are”. Please note that we used the word display,
which leads us to one of the most important messages of this chapter:
❐
Setting a display quantize value does not alter the MIDI notes of your recording in any way, as regular quantizing does. It only affects how the
notes are displayed in the Score Editor (and nowhere else)!
CUBASE SX
1 – 12 How the Score Editor works
Page 13
Choose your display quantize values with care
As explained above, the display quantize value for notes puts a restriction on the “smallest” note value that can be displayed. Let’s for a second look what happens if we set it to quarter notes:
With display quantize set to quarter notes.
Oops, this doesn’t look too good. Well of course it doesn’t! We have
now instructed the program that the “smallest” note that occurs in the
piece is a quarter note. We have explicitly told it that there are no eighth
notes, no sixteenths, etc. So when the program draws the score on
screen (and on paper) it quantizes the display of all our eighth notes to
quarter note positions, which makes it look like above. But again, please
note that when you hit Play, the passage will still play as it originally did.
The display quantize setting only affects the score image of the recording. One last important note:
❐
Even if you enter notes using the mouse and input perfect note values, it
is very important that you have your display quantize settings right!
These values are not just used for MIDI recordings! If you for example set
the display quantize value for notes to quarter notes and start clicking in
eighth notes, you will get eighth notes in the track (as MIDI data), but still
only quarter notes in the display!
CUBASE SX
How the Score Editor works 1 – 13
Page 14
Using Rests display quantize
Above we used display quantize for notes. There is a similar setting
called “Rests” display quantize which is used to set the smallest rest
to be displayed. Often, this setting is very effective:
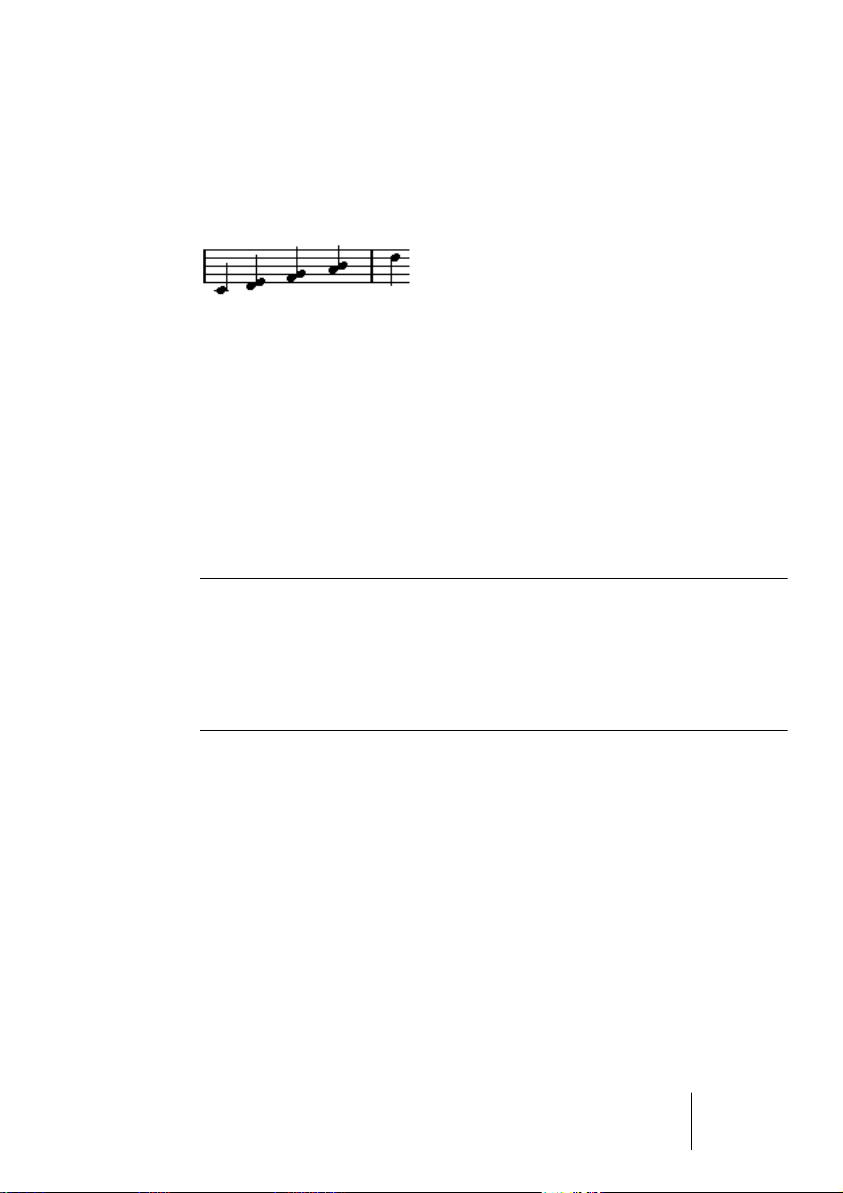
What if the original note example looked like this:
As you see, the first note is moved and appears one sixteenth note
later. If we change the display quantize value for notes to eighth notes,
the score will be displayed like this:
With Notes display quantize set to eighth notes.
Unfortunately, this moves the first note to the same position as the
second, since sixteenth note positions aren’t allowed. We can solve
this by inserting extra display quantize values within the bar with the
Display Quantize tool (“Q”), but there is a much easier way: Change
the display quantize value for notes back to sixteenths, but set the display quantize value for
to display any rests smaller than eighth notes,
sary
. The result looks like this:
rests
to eighth notes! This tells the program not
except when neces-
With Notes display quantize set to sixteenth notes, but Rests display quantize set to
eighth notes.
How did this work? Well, you instructed the program not to display
any rests smaller than eighth notes, except when “necessary”. Since
the first note appeared on the second sixteenth note position, it was
necessary to put a sixteenth rest at the beginning of the figure. All
other rests, however, can be hidden by displaying the notes as eighth
notes, and were therefore not “necessary”.
CUBASE SX
1 – 14 How the Score Editor works
Page 15

This leads us to the following general guidelines:
• Set the Notes display quantize value according to the “smallest note position” you want to be shown in the score.
For example, if you have notes on odd sixteenth note positions, the Notes display quantize value should be set to sixteenth notes.
• Set the Rests display quantize value according to the smallest note value
(length) you want to be displayed for a single note, positioned on a beat.
A common setting would be to have Notes display quantize set to 16
(sixteenth notes) and Rests display quantize set to 4 (quarter notes).
Handling exceptions
Unfortunately, the guidelines above won’t work perfectly in every situation. You may for example have a mix of straight notes and tuplets of different types, or you may wish to display equally long notes with different
note values depending on the context. There are several methods you
can try:
Automatic display quantize
If your score contains both straight notes and triplets, you can use automatic display quantize. When this is activated, Cubase SX tries to
“understand” whether the notes should be display quantized to
straight notes or triplets. See page 45.
Using the Display Quantize tool
With the “Q” tool, you can insert new display quantize values anywhere in the score. Inserted display quantize values affect the staff
from the insertion point onwards. See page 53.
Permanent alteration of MIDI data
As a last resort, you can resize, quantize or move the actual note
events. However, this would result in the music not playing back like it
originally did. Often it is possible to get the score to look like what you
want without altering any MIDI data.
CUBASE SX
How the Score Editor works 1 – 15
Page 16
Summary
This closes our discussion on the basic concept of display quantizing.
There are a number of other special situations which require more advanced techniques, which you will find out about in the next chapters.
You will also read about other settings which work along the same
lines as display quantize but each with its own application. These are
called “interpretation flags”.
Entering notes by hand vs. recording notes
Sometimes you will enter and edit notes by hand (or rather using the
mouse and computer keyboard) and at other times you will record them
from a MIDI keyboard. Most of the time, you will do a combination of
both. In “Transcribing MIDI recordings” you will find out how to make a
recorded score as legible as possible without performing any permanent changes to the MIDI data. “Entering and editing notes using the
mouse” shows you how to enter and edit notes using the mouse. In real
life, even if you have recorded the piece perfectly, you will often have to
do some permanent editing to your recording before printing. Which
leads to this conclusion:
❐
You will have to read both chapters in order to understand how to produce legible scores!
CUBASE SX
1 – 16 How the Score Editor works
Page 17

2
The basics
Page 18

In this chapter you will learn:
• How to open the Score Editor.
• How to set up the page size and margins.
• How to switch between Page Mode and Edit Mode.
• How to hide and show the symbol palettes, the toolbar and extended toolbar.
• How to set up the ruler.
• How to set a zoom factor.
Preparations
1.
In the project window, create a MIDI track for each instrument.
Please note that you can prepare a piano (split) staff from a single track, there’s no
need to create one track for the bass clef and one for the treble clef.
2.
If you like, name each track after the instrument.
This name can later be used in the score if you like.
3.
Record into the tracks or create empty parts on all tracks.
You can make very long parts that cover the entire piece, or you can start out with
shorter parts to begin with. If you choose the latter option, you can always go back
later and add new parts or copy existing parts.
Opening the Score Editor
Editing one or several parts
To open one or several parts in the Score Editor, select the parts (on
the same or different tracks) and select “Open Score Editor” from the
MIDI menu or “Open Selection” from the Scores menu. The default
key command for this is [Ctrl]/[Command]-[R].
•
You can also select the Score Editor as your default editor, allowing
you to open it by double clicking parts.
This is done with the Default Edit Action pop-up menu in the Preferences dialog (event
Display – MIDI page).
CUBASE SX
2 – 18 The basics
Page 19

Editing whole tracks
When you are preparing a score for printing, you probably want to
open the whole MIDI tracks in the Score Editor. To do this, select the
track(s) in the track list and make sure no parts are selected – then
open the Score Editor as usual.
About editing parts on different tracks
If you have selected parts on two or more tracks (or several whole
tracks – no parts) and open the Score Editor, you will get one staff for
each track (although you can split a staff in two, e.g. when scoring for
piano). Think of the project windows as an overview of your entire
score and the tracks as representing one instrument each.
Editing predefined combinations of tracks
On page 232 you will find out how to open the Score Editor with a
certain combination of tracks that you edited before.
The project cursor
The project cursor appears as a vertical line across the staff. When
you open the Score Editor, the view is automatically scrolled so that
the project cursor is visible in the window. This means you don’t always see the beginning of the edited part when you first open the
Score Editor.
•
Hold down [Alt]/[Option] and [Shift] and click anywhere in the score
to move the project cursor there.
This is handy if the project cursor pointer isn’t visible.
CUBASE SX
The basics 2 – 19
Page 20

Page Mode
When you are preparing a score for printout, you should set the Score
Editor to Page Mode. This is done by selecting Page Mode from the
Scores menu (if the menu item is called “Edit Mode”, you are already
in Page Mode).
Selecting Page Mode.
When you do this, the window switches to show you one page at a
time, as it will appear on printout.
Page Mode vs. Edit Mode
All you can do in Edit Mode, you can also do in Page Mode. But Page
Mode offers lots of additional features that are not available in Edit
Mode, typically because they are directly related to how the score is
displayed and printed.
❐
This section of the manual assumes you are in Page Mode. It will be mentioned explicitly if something in this text specifically relates to Edit Mode.
Using the scroll bars in Page Mode
In Page Mode, the scroll bars are used to scroll the image of the page
inside the window.
CUBASE SX
2 – 20 The basics
Page 21
Moving between pages in Page Mode
If your score takes up more than one page, you can skip between the
pages in two ways:
•
By using the page number indicator in the lower right corner.
The number can be adjusted using the standard value editing techniques.
The Page Number indicator – adjust it to move to another page.
•
By assigning key commands to the functions “Move to Next Page”
and “Move to Previous Page” in the Key Commands dialog in the
Scores category.
Also, if Autoscroll is activated on the toolbar, the score display will follow the project cursor position. This way you can scroll the score by
using fast forward or rewind.
Playing back and recording
You can play back and record MIDI in the Score Editor using the standard transport commands, just like in the other MIDI editors. See the
Operation Manual for details.
CUBASE SX
The basics 2 – 21
Page 22
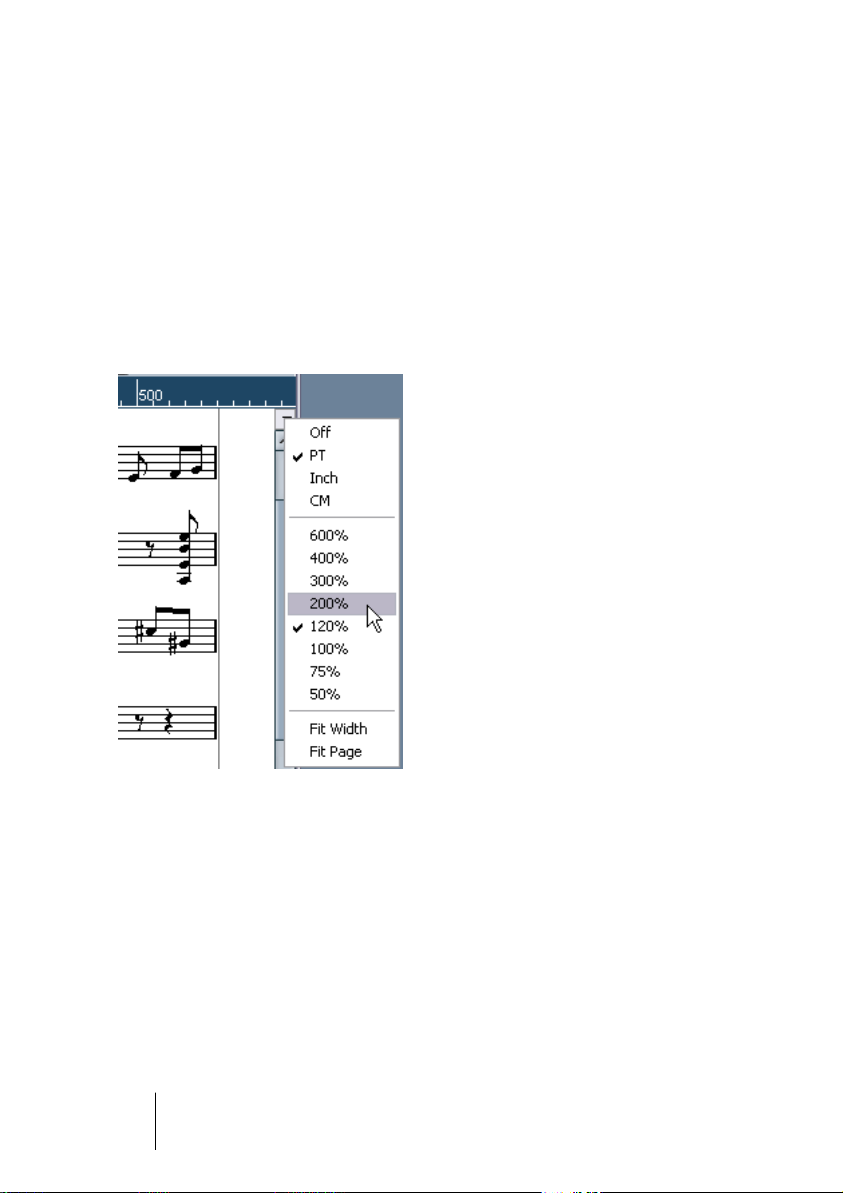
Changing the Zoom factor
There are two general ways to change the zoom in Page Mode: by
setting a zoom factor on the zoom pop-up menu or by using the Zoom
tool (magnifying glass).
Using the zoom pop-up menu
Above the vertical scrollbar to the right you will find a pop-up allowing
you to set the zoom factor.
The zoom pop-up.
By zooming in you will be able to make detailed adjustments to symbols etc. By zooming out you will get a better overview.
• If you select “Fit Page”, the zoom factor will be adjusted according to
the window size so the whole page is visible.
• If you select “Fit Width”, the zoom factor will be adjusted according to
the window width so the full width of the page is visible.
This pop-up menu can also be opened by right-clicking (Win) or
[Ctrl]-clicking (Mac) in the ruler.
CUBASE SX
2 – 22 The basics
Page 23

Using the Zoom tool
The Zoom tool in the Score Editor works much like in the project
window:
• Click once with the Zoom tool to zoom in one step.
• Hold down [Alt]/[Option] and click once with the Zoom tool to zoom
out one step.
• Drag a rectangle with the Zoom tool to set a custom zoom factor.
The section encompassed by the rectangle is zoomed to fill the window.
The active staff
One thing to note when you are working with multiple staves is the
“active” staff. Only one staff at a time can be active, and is indicated
by a black rectangle to the left of the clef symbol.
This staff is active.
Later on you will find out how to make settings that apply specifically
to the active staff.
• To make a staff active, click anywhere in it.
By default, you can also use the up and down arrow keys on the computer keyboard to
step between staves.
CUBASE SX
The basics 2 – 23
Page 24
Making page setup settings
Before you start preparing the score for printout, you have to make
some page settings for your project. You don’t have to do this as the
first thing you do, but it’s a good working habit, because it affects how
the score is displayed on screen, too.
1. Select Page Setup from the File menu.
The Page Setup dialog appears. This is the regular operation system Page Setup dialog, described in detail in your system’s documentation. The only things that Cubase SX
adds to this are the margin settings.
2. Select the preferred printer, paper size, orientation, etc.
3. If you need to, change the margins by setting the left, right, top and
bottom settings.
• To make the settings permanent, save the project.
If you want new projects to always start with certain page setup settings, you can make
project templates with these or create a default project. See the Operation Manual.
Designing your work space
Some of the areas in the window can be hidden or displayed. Exactly
which areas you wish to see depends on what kind of work you are
doing, and how big a monitor you have.
Info line
Extended toolbar
Display filter bar
Ruler
These areas can be hidden or displayed.
CUBASE SX
2 – 24 The basics
Page 25
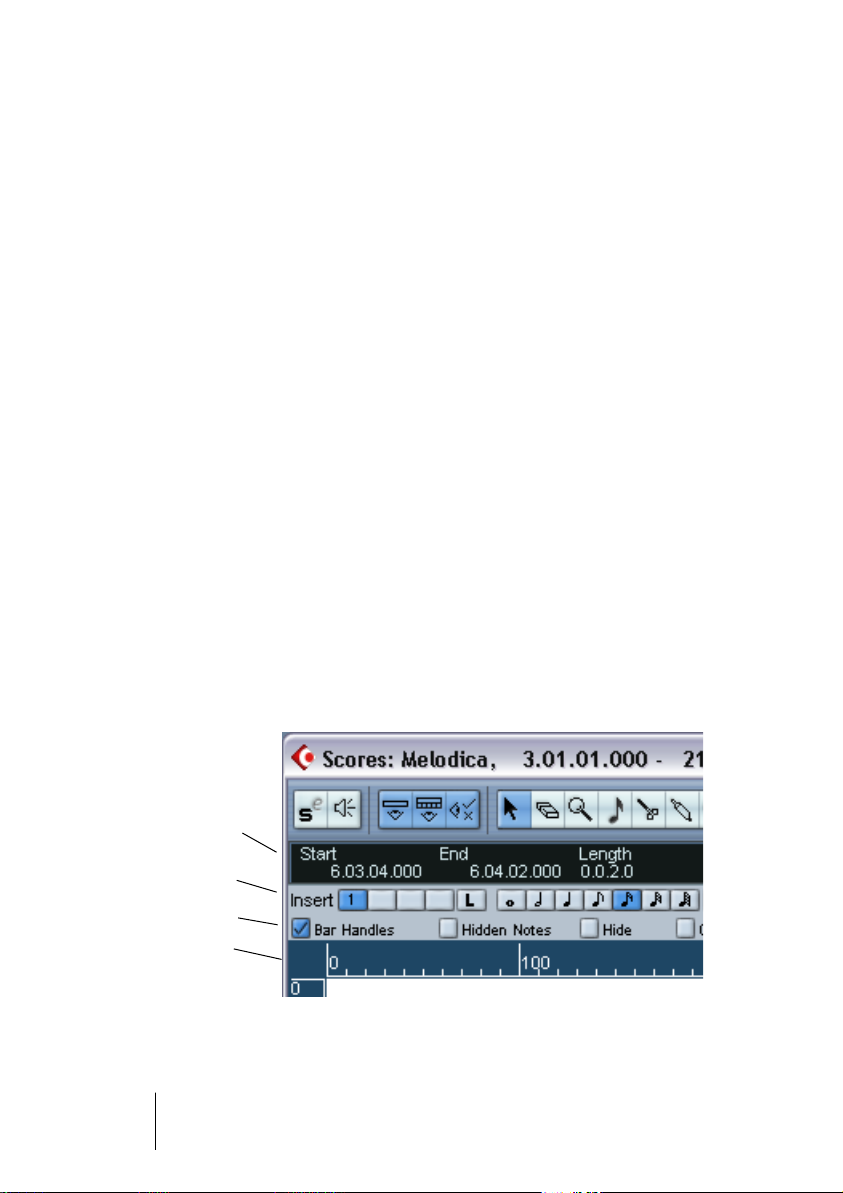
The info line
The info line displays information about the currently selected note. It
can be hidden/displayed by clicking the Show Info button on the toolbar, or by using the key command for “Show/Hide Infoview” (in the Key
Commands dialog–Editors category; by default [Ctrl]/[Command]-[I]).
The extended toolbar
The extended toolbar can be displayed/hidden by clicking the Show
Tool Strip button on the main toolbar.
The display filter bar
This area contains checkboxes for determining which indicators, handles and other non-printed elements should be shown in the score. You
hide and show the filter bar by clicking the “Show Filter View” button on
the toolbar.
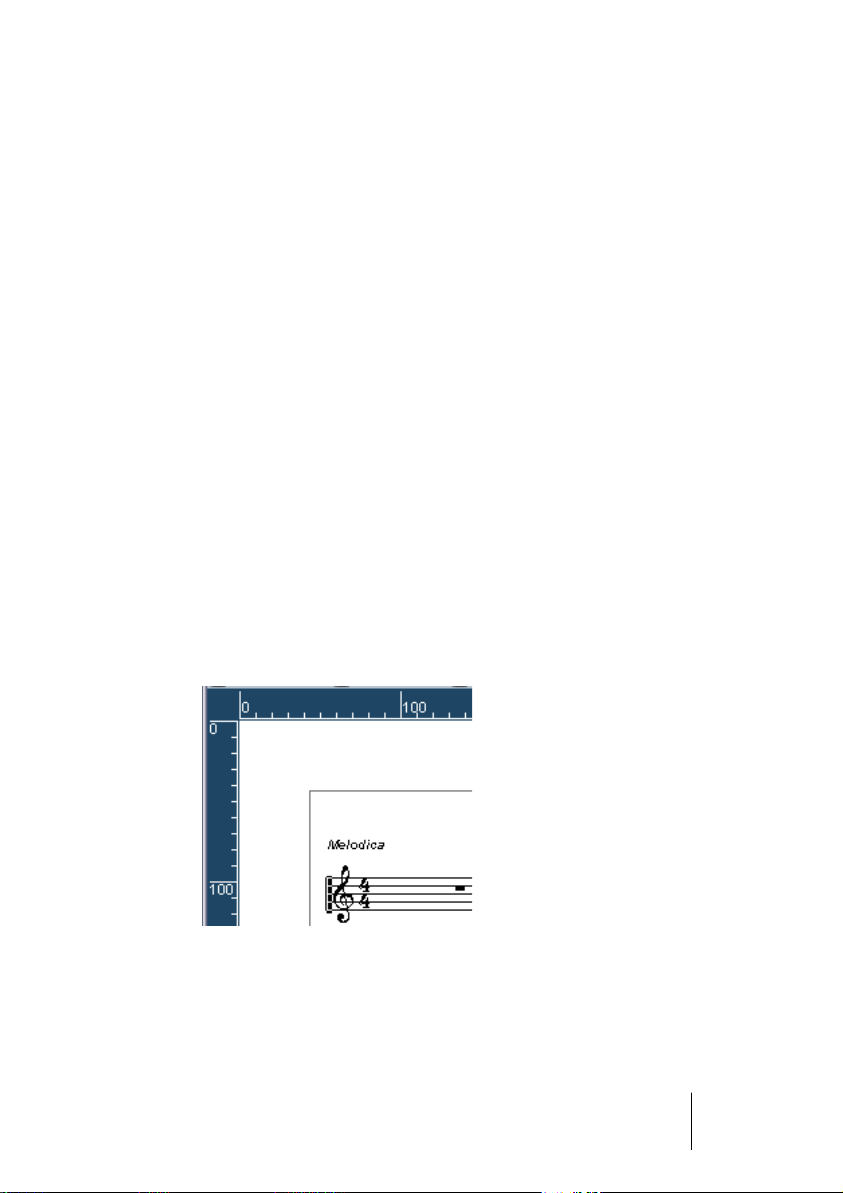
The ruler
In the Score Editor there are no meter/time position rulers as in the
other editors. Instead, there are horizontal and vertical “graphic rulers”
in Page Mode. These help you to position symbols and graphical objects in the scores.
CUBASE SX
The basics 2 – 25
Page 26
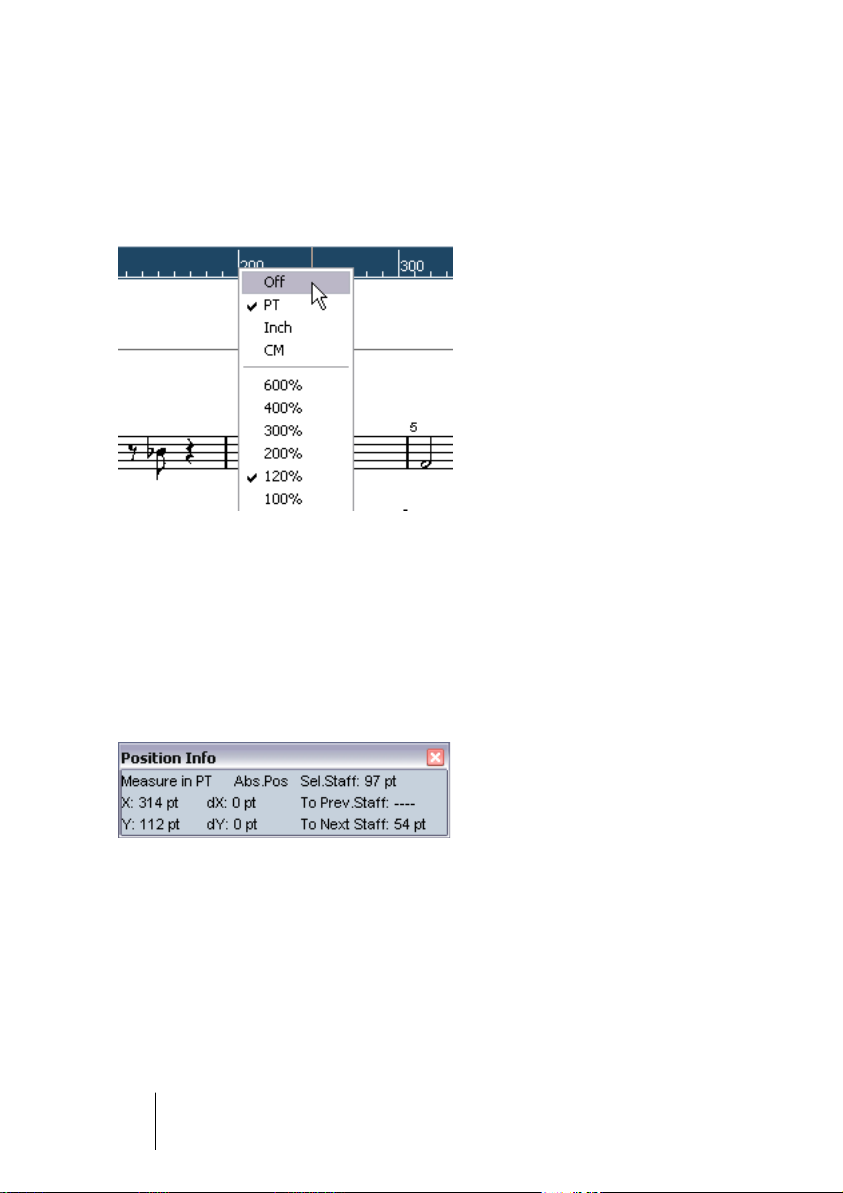
• To set which units should be used on the rulers, open the Zoom pop-
up menu above the vertical scrollbar to the right, and select one of the
options.
Choose between points, inches or centimeters. You can also bring up this pop-up
menu by right-clicking (Win) or [Ctrl]-clicking (Mac) in the ruler.
• To hide the rulers, select “Off” from the pop-up menu.
The Position Info window
To help you further when positioning objects in the scores, Page
Mode has a special Position Info window, in which you can view and
adjust object positions numerically, in the unit selected for the rulers.
To display the Position Info window, click in the ruler.
CUBASE SX
2 – 26 The basics
Page 27
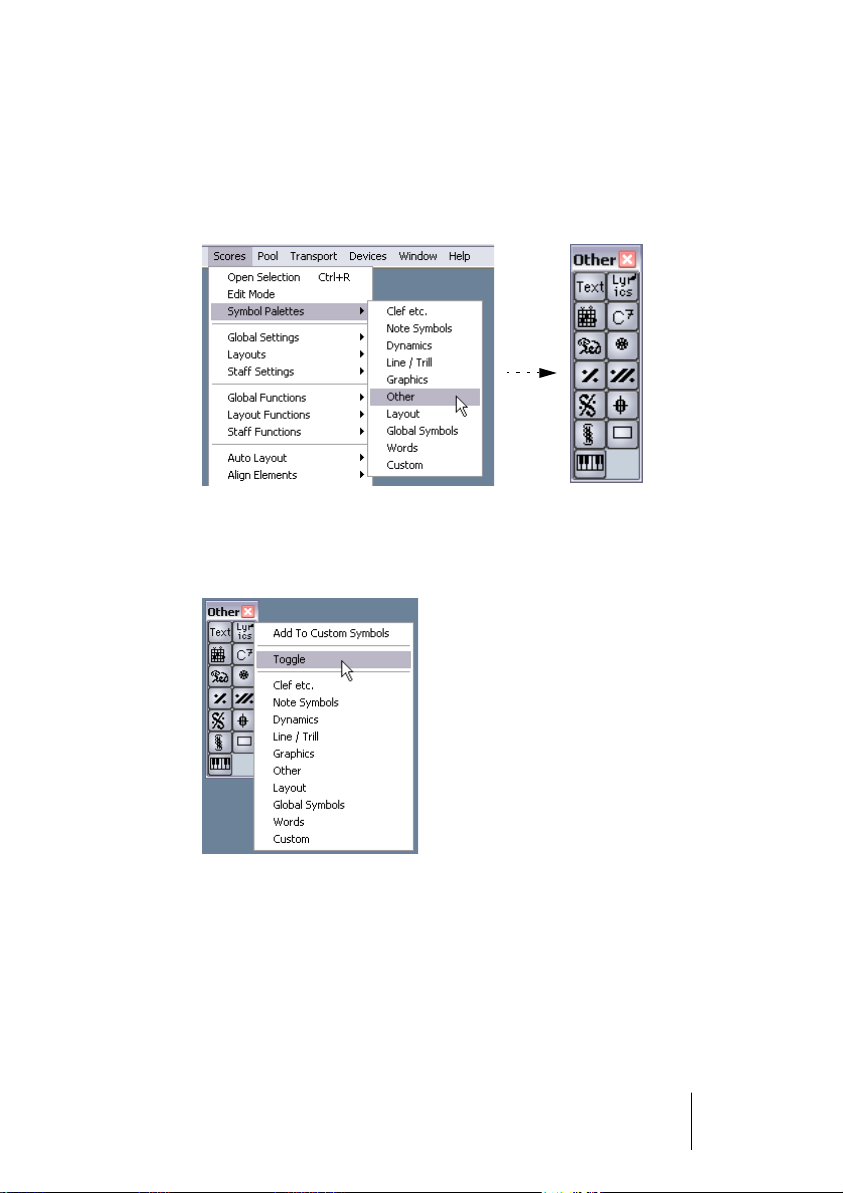
The symbol palettes
The symbol palettes, which are used to add symbols to the score, can
be displayed by selecting an option in the “Symbol Palettes” submenu
from the Scores menu.
You can move symbol palettes around on the screen by clicking and
dragging their title bars. Right-clicking (Win) or [Ctrl]-clicking (Mac) in
a symbol palette brings up a pop-up menu with the following options:
• Select “Toggle” to switch between a vertical or a horizontal palette.
• Selecting one of the symbol palettes on the pop-up menu brings up that palette, replacing the current.
• If you hold down [Ctrl]/[Command] and select a palette from the pop-up
menu, the selected palette will open in a new window (without replacing the
existing one).
To close a symbol palette, click its close button as usual.
CUBASE SX
The basics 2 – 27
Page 28
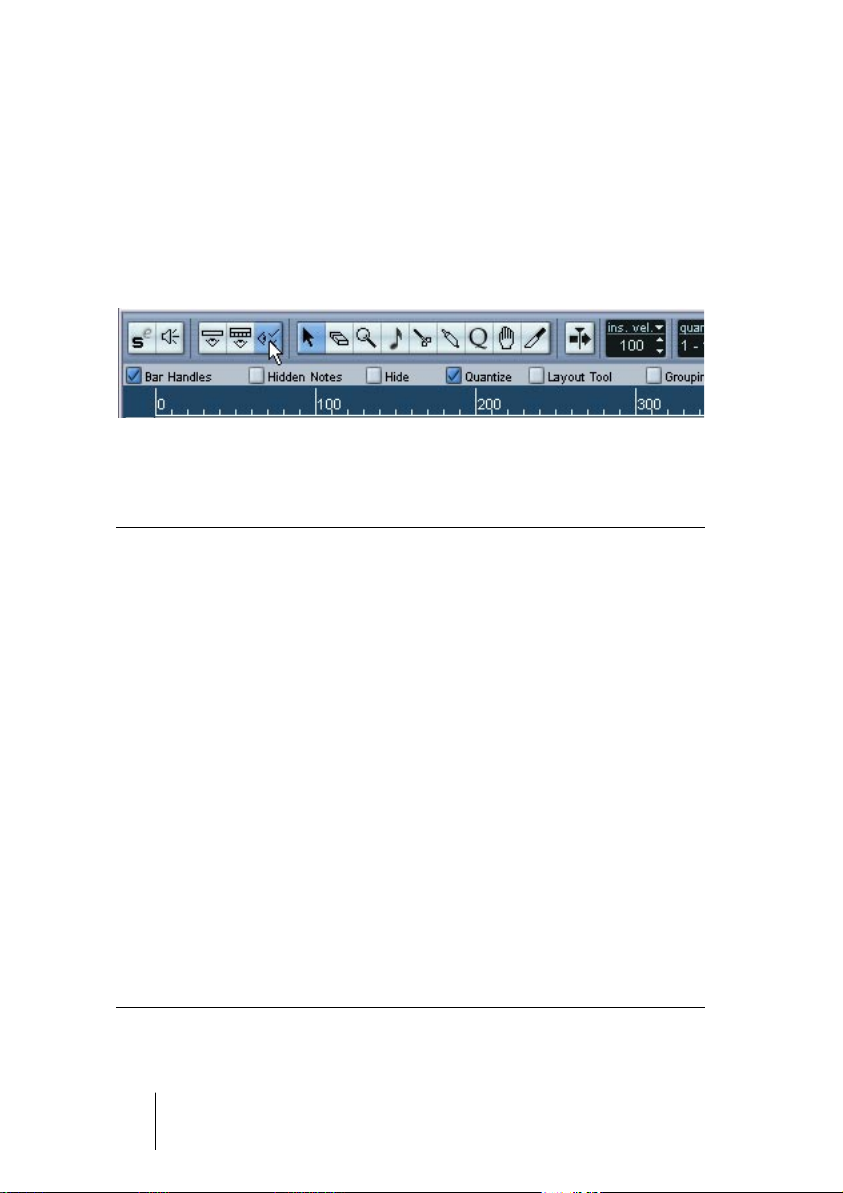
Showing and hiding “invisible” elements
Some of the elements in the score will not be printed, but rather serve
as indicators for layout changes, handles, etc. These elements can be
hidden or shown in any combination by using the display filter bar.
• If the filter bar isn’t shown, click the Show Filter View button on the
toolbar.
The checkboxes on the filter bar determine whether an element
should be visible (checkbox ticked) or not. The following options are
available:
Option Description
Bar Handles Displays the bar handles, used for copying bars (see page 185).
Hidden Notes Displays any notes you might have hidden (see page 240).
Hide Displays markers in the score for each hidden element (notes ex-
cepted). See page 240.
Quantize Displays markers in the score where you have made display quan-
tize “exceptions” (see page 53).
Layout tool Displays markers in the score where you have made adjustments
with the Graphic Move tool (see page 145).
Grouping Displays markers in the score where you have made beam group-
ings (see page 132).
Cutflag Displays markers in the score where you have inserted cutflag
events (see page 143).
Split Rests Displays markers in the score wherever you have split multiple rests
(see page 243).
Stems/Beams Displays markers in the score where you have made any stem or
beam adjustments (see page 121 and page 140).
CUBASE SX
2 – 28 The basics
Page 29

About dialogs in the Score Editor
There are two basic types of dialogs available in the Score Editor:
• Non-modal dialogs can remain open while you continue working in the score.
In a non-modal dialog, you click the Apply button to apply the settings in the dialog to
the selected objects in the score. This means you can select different elements in the
score and change their settings, without having to close the dialog in between.
The dialog is closed by clicking the standard close button in the window title bar. The
Staff Settings dialog is an example for a non-modal dialog.
• Regular dialogs have an OK button instead of an Apply button.
Clicking OK applies the settings you’ve made and closes the dialog. You cannot continue working in the score (or select other objects) until you close the dialog.
• If the option “Apply closes Property Windows” is activated in the Preferences (Scores page), clicking the Apply button in a non-modal dialog
closes the dialog.
In other words, this makes a non-modal dialog work a bit more like a regular dialog.
Setting key, clef and time signature
When preparing for entering notes into a score, you will probably
want to start out by setting the desired key, clef and time signature for
the staff. The text below assumes you are working on one track only. If
you have multiple staves, you either make this setting independently
for each staff or for all staves at once. See page 42 for details.
Normally, all these symbols appear at the beginning of each staff.
However, you can control this by using the Real Book option (see
page 237) and by hiding (see page 240).
CUBASE SX
The basics 2 – 29
Page 30
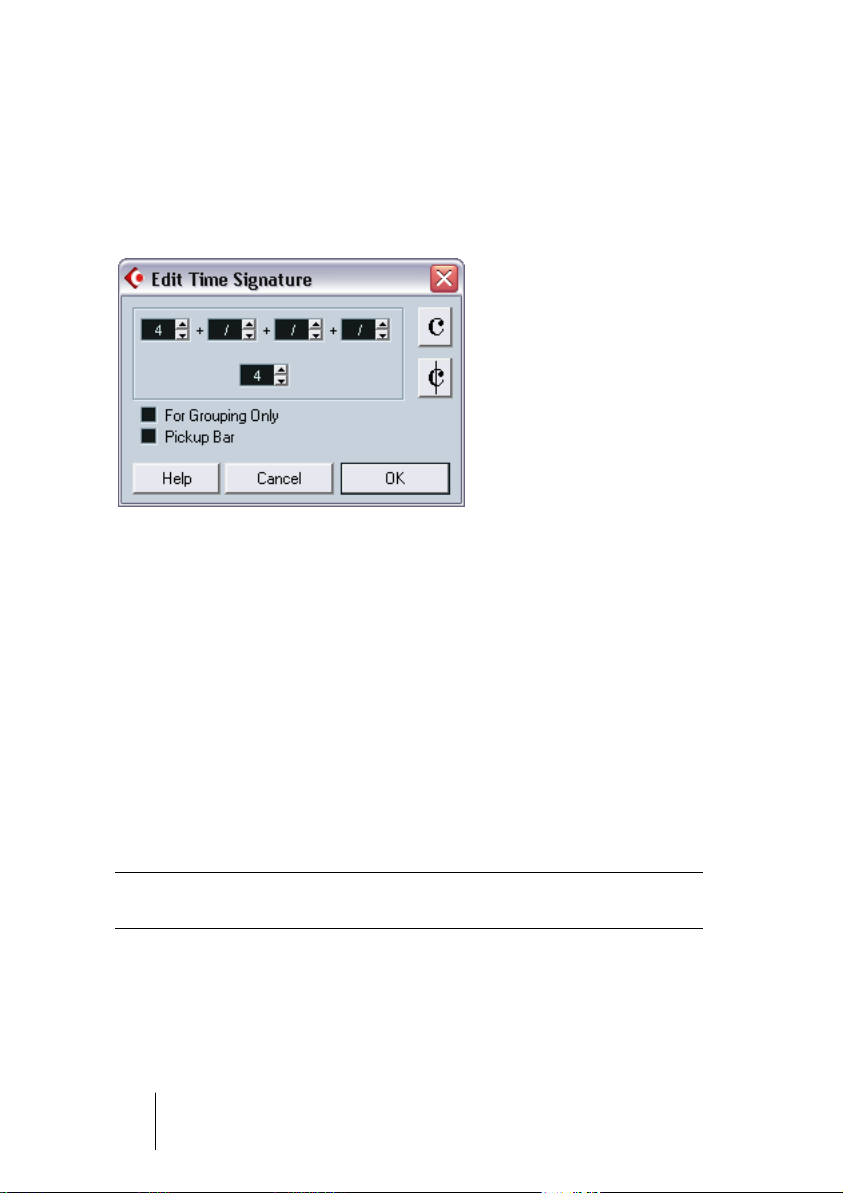
Setting the initial time signature
From within the score
1. Double click on the time signature symbol at the beginning of the staff.
A dialog opens.
The time signature dialog with a 4/4 signature.
2. If the piece is in 4/4 or 2/2, you can select common time/cut time di-
rectly by clicking one of the two symbols on the right.
This will set the time signature to 4/4 or 2/2, respectively, but also give you a common/
cut time symbol on the staff.
3. If the piece is in any other time, set the numerator and denominator
above and below the line, respectively.
The numerator can consist of several numbers for composite time signatures. However, if the piece is in a simple time signature you only need to fill in the first number
above the line. The more advanced options are described below.
• The “Pickup Bar” option is described on page 246.
4. Click OK or press [Return].
❐
All tracks share the time signature! In other words, when you set the time
signature, you do this for all tracks in the project.
If you need to enter half a bar somewhere (for example) you have to make
a time signature change (for example from 4/4 to 2/4 and back again).
On page 86 you will find out how to input time signature changes.
CUBASE SX
2 – 30 The basics
Page 31

Composite time signatures and the For Grouping Only option
For composite signatures, the numerator can be made up of up to four
groups. For example, ”4+4+3+/” on the upper line and 8 on the lower
means the time signature is 11/8.
The reason for dividing the numerator into several numbers is to get
beaming and tied notes displayed correctly automatically. This does
not affect the metronome or anything else, only beams and ties. For
more information on beaming, see page 132.
If “For Grouping Only” is not activated, the numerator will show all the
numbers entered. If it is activated, it will show the sum of the numbers
entered, as for “simple” time signatures.
“For Grouping Only” off and on.
Note that Cubase SX tries to preserve the denominator when you insert a composite signature with “For Grouping Only” activated. This
means that if you have a 4/4 time signature, and change it to a composite value (3+3+2 eighths for example), the time signature will still
be displayed as 4/4 instead of 8/8.
Setting the time signature from the Transport panel
The time signature on the Transport panel.
You can also set the time signature directly on the Transport panel, as
described in the Operation Manual. Please note the following:
• The time signature box on the Transport panel always displays the first time
signature event on the tempo track. When you change this value you are in
fact editing the first time signature event on the tempo track.
• You can not create composite time signatures from the Transport panel.
CUBASE SX
The basics 2 – 31
Page 32

Setting the time signature by editing the tempo track
You can also add, edit and delete time signatures by editing the tempo
track (this is described in the Operation Manual). Please note:
• The score always shows the time signature events on the tempo track, regardless of whether or not the Master button is activated. Likewise, any time signatures you create in the Score Editor will be shown in the tempo track.
• You can not create composite time signatures from the tempo track.
Setting the initial clef
Directly in the score
1. Double click on the current clef.
A dialog appears.
Double clicking on a clef brings up the clef dialog.
2. Use the scroll bar to select one clef.
❐
This does not work if Auto Clef is activated in the Staff Settings dialog,
see below.
3. Repeat the steps above for all staves in the system.
CUBASE SX
2 – 32 The basics
Page 33

In the Staff Settings dialog
1. Click in the staff to make it the active staff.
2. Double click just to the left of the staff, or select Setup from the Staff
Settings submenu on the Scores menu.
The Staff Settings dialog appears, showing the current settings for the active staff.
3. Locate the Key/Clef section.
4. Use the left scroll bar to select one of the available clefs.
You will find out how to insert clef changes on page 86.
5. Click Apply.
• You can select another staff in the score and make settings for it with-
out having to close the Staff Settings dialog first.
In a split system
If you have a split system (see page 83 and page 107) you can of
course set different clefs for the upper and lower staff.
1. Open the Staff Settings dialog.
2. Select a clef for the upper staff.
3. Activate the “Lower Staff” check box.
4. Set a clef for the lower staff.
The basics 2 – 33
CUBASE SX
Page 34

Using Auto Clef
Auto Clef activated in
the Staff Settings dialog
.
In the Staff Settings dialog you will also find an option called Auto
Clef. If this is activated, the program will automatically select a treble
clef or a bass clef for the staff, depending on in which range the notes
in the part fall.
Setting the initial key
In the Staff Settings dialog
1. Make sure the desired staff is the active staff and bring up the Staff
Settings dialog from the Scores menu.
Or, you can double click just to the left of the staff – this makes the staff active and
brings up the Staff Settings dialog in one go.
The Key/Clef section of the Staff Settings dialog.
2. Use the right scroll bar in the Key/Clef section of the dialog to select
one of the keys.
3. Click Apply.
• You can select other staves in the score and make settings for these,
without having to close the Staff Settings dialog first.
CUBASE SX
2 – 34 The basics
Page 35

Setting the key for a split system
You might have a split system (see page 83 and page 107) with two
staves.
1. Click in the system to make one of its staves the active staff.
2. Open the Staff Settings dialog.
3. Set a key for the upper staff.
This will automatically set the lower staff to the same key.
4. If you need to set a different key for the lower staff, activate the “Lower
Staff” check box and set a key for this.
The Lower Staff check box
Directly in the score
If the current key is anything but C major/A minor (no accidentals) you
can set the key directly in the score:
1. Double click on the accidentals at the beginning of a staff.
Double click in this area
A dialog appears
2. Use the scroll bar to select a key and click OK.
• If you wish, you can set a display transpose value in the Staff Settings
dialog.
3. Repeat for all staves.
You will find out how to insert key changes on page 86.
CUBASE SX
The basics 2 – 35
Page 36

Working with transposing instruments
Scores for some instruments, for example a lot of brass instruments,
are written transposed. Therefore, the Score Editor provides a “display
transpose” function. With this function notes are transposed in the
score, without affecting the way they are played back. This allows you
to record and play back a multi staff arrangement, and still score each
instrument according to its own transposition.
Setting display transpose
1. Make the desired staff active and open the Staff Settings dialog.
2. Select your instrument from the transpose pop-up or adjust the value
directly in the Semitones field.
The Display Transpose section in the Staff Settings dialog.
3. Click Apply.
❐
Display transpose does not affect MIDI playback!
Display transpose in the Edit Key/Clef dialog
If you want to change the display transpose setting in the middle of
the score, you can do this by inserting a key change (see page 86). In
the Edit Key/Clef dialog you will find a Transpose field, in which you
can enter a transposition value in semitones. This is useful if you are
writing a saxophone part and want the player to switch from alto to
tenor saxophone, for example.
• Note that you should enter the absolute display transpose value that
should be used from this point on.
In other words, this setting is not relative to any display transpose settings you made in
the Staff Settings dialog.
CUBASE SX
2 – 36 The basics
Page 37

Working order
When you prepare a score we suggest you do things in the following
order, since this will minimize the time needed if you make a mistake
somewhere and need to redo a step. Try our suggestion first, and if
you think another method suits your particular working situation better, go ahead and do it!
• Preferably work on copies of recorded tracks.
If the parts are fairly complex you might have to change them permanently after which
they don’t play back as they originally did.
• If memory is short, break the score up into segments.
You might for example use Split Loop to split the parts across all tracks.
• Put the tracks in the project window in the order you want them in the score.
You can not rearrange the order of systems in the Score Editor. However, you can go
back and change the order in the project window at any time.
• When opening the Score Editor, begin with the adjustments described above.
You should always begin by setting page margins, etc.
• If you have recorded music into tracks already, try adjusting the score “picture”
as much as possible without permanently editing the notes.
Use the staff settings, display quantize, grouping etc.
• If the tracks are empty, make basic staff settings, enter the notes and then
make detailed adjustments, add display quantize etc.
• If needed, use polyphonic voicing to resolve overlapping notes, to create piano systems, to handle crossing voices etc.
• When all this is done, decide if you need to perform “destructive” editing.
You might for example have to permanently alter the length or position of some of the
recorded notes.
• Hide unwanted objects and add note dependant and note related symbols.
This includes accents, dynamic symbols, crescendo, slurs, lyrics, “graphic rests” etc.
• Work through the score and adjust the number of bars across the page.
• Adjust the vertical spacing between staves and grand staves.
The last two steps can be performed automatically by the program using the Auto Layout features.
• Add layout symbols like endings, page text, etc.
• Print.
• Go back and create alternative layouts to extract voices etc.
CUBASE SX
The basics 2 – 37
Page 38

Force update
If for some reason the screen isn’t redrawn properly (as a result of the
computer’s recalculation of the page’s appearance), you can select
“Force Update” from the Global Functions submenu on the Scores
menu or click the Update button on the toolbar. This forces a total redraw of the whole page.
The Update button
CUBASE SX
2 – 38 The basics
Page 39

3
Transcribing MIDI recordings
Page 40

In this chapter you will learn:
• How to make initial staff settings to make a score as legible as possible.
• How to use the Display Quantize tool to handle “exceptions” in the score.
• How to resolve parts that contain mixed notes and triplets.
About transcription
This chapter assumes you have a MIDI recording that you want to
transform into a printable score. However, if the parts are fairly complicated, you will probably need to perform some manual editing of the
notes. Hence you will need to read the next chapter, too!
❐
Before starting, make sure you understand the basic principles behind
the score notes/MIDI notes relationship and also what display quantize
is, as described in the chapter “How the Score Editor works”.
Getting the parts ready
1. Record the music.
You must definitely play in time with the click.
2. Play back to check that the music was recorded as intended.
If not, you might need to re-record or perform some editing.
3. Decide how much permanent alteration to the recording you can ac-
cept to make the score look good.
If the answer is “none”, you should prepare your score from a copy of the track. See
the next section below.
4. Select all parts (on all tracks) that you wish to work on.
5. Select Open Score Editor from the MIDI menu.
6. Switch to Page Mode.
CUBASE SX
3 – 40 Transcribing MIDI recordings
Page 41

Strategies: Preparing parts for score printout
Below follow a few tips that you might want to refer to when preparing
a piece for printout:
• If a part is complex, you may have to do some “manual” editing of notes, like
moving them or changing their lengths (see next chapter). This means that the
recording will not play back exactly as it originally did. If this is a problem, we
suggest you work on a copy of the recording. Use the Duplicate Track function on the Track list’s Quick menu to create a version of the track for scoring.
Rename the track and mute the original track while you are preparing the
score. You could of course also work on a copy of the entire project file.
• For reasons described in the previous chapter, quantizing the track might be a
good idea. This will reduce the amount of detailed adjustments needed in the
Score Editor. Remember that you can always prepare the score from copies
of the original tracks, as described above.
• If you need to quantize, always play back your tracks afterwards to make sure
timing wasn’t disrupted due to inappropriate quantize settings. You might
have to quantize some sections with one value and others with another.
• If the piece contains many repetitions, it might be quicker to initially just record
one instance of each of them. If you then finish the score work on each section, you can assemble the entire piece by working with parts in the project
window. This might save you some time since you may have to perform detailed adjustments to each section only once.
• A similar approach can also be used when you are creating sections where
several instruments play the same rhythm (a horn section, for example):
Record the first instrument and make adjustments so that it looks like it should
in the Score Editor. Then copy the part to the other tracks, and change the
pitches of the notes using MIDI input. Finally, go through the copied parts and
make fine adjustments, change display transpose settings, etc. This can be a
very fast way to create polyphonic parts with complicated rhythms.
• There may also be situations when the quickest way to record a part for several
instruments is to simply record it in one go, by playing the chords on your MIDI
instrument. If you later want to split the recording into separate tracks or polyphonic voices, you can use the Explode function, as described on page 55.
CUBASE SX
Transcribing MIDI recordings 3 – 41
Page 42

Staff settings
The first thing to do after opening the Score Editor is to make initial
staff settings. There are three ways to open the Staff Settings dialog:
• Make the staff active, pull down the Scores menu and select “Setup”
from the Staff Settings submenu.
• Double click to the left of the staff.
• Make the staff active and click the “i” button on the extended toolbar.
For this to work, make sure no notes or symbols are selected – otherwise, clicking the
“i” button may open a dialog with settings for the selected object instead.
Either way, the Staff Settings dialog appears and shows the current
settings for the staff:
The Main tab in the Staff Settings dialog for a track called “Congas”.
CUBASE SX
3 – 42 Transcribing MIDI recordings
Page 43

Applying settings and selecting other staves
The Staff Settings dialog is non-modal (see page 29). This means you
click Apply to apply the settings you’ve made to the active staff.
To make settings for another staff, simply make it active in the score
(by clicking anywhere in the staff or by using the up/down arrow keys
on the computer keyboard). However, please note:
• Remember to click Apply before making another staff active – otherwise
your settings will be lost!
Staff presets
When you know you will reuse settings made for one track in other
tracks, you will save some time by creating a staff preset. This is described on page 92.
• There are a number of staff presets available, set up to suit various instruments, etc.
The presets are accessed from the Presets pop-up menu in the Staff Settings dialog,
or from the Staff Settings submenu on the Scores menu. Use them as they are, or as
starting points for your own settings.
Names
Allows you to specify a “long” and a “short” name for the staff. The
long name is shown for the very first system for the staff in the score
(at the start of the song), while the short name is shown for the remaining systems.
• Whether the names should be shown at all is set in the Layout Settings dialog
(see page 225).
There, you can also opt to use the names of the edited MIDI tracks instead.
• If you only want the “long name” to be shown (i.e. if you don’t want a name
shown for each system in the score), simply delete the short name.
Key/Clef
The basic key and clef track staff settings are described in detail on
page 29. There is also a Lower Staff check box which is only used in
conjunction with piano (split) staves and polyphonic voicing. This is
described on page 33.
CUBASE SX
Transcribing MIDI recordings 3 – 43
Page 44

Display quantize
The display quantize settings.
This is where you give the program basic information about how to interpret your playing. There are “fixed” display quantize values plus an
“Auto” option which should only be used when your music contains
mixed straight notes and triplets. For background information about
display quantize, see page 11.
If your music only contains “straight” notes or triplets:
1. Set the Notes display quantize value according to the “smallest note
position” you want to be shown in the score.
For example, if you have notes on odd sixteenth note positions, the Notes display quantize value should be set to 16 (sixteenth notes). The “T” values on the pop-up are for
triplets.
2. Set the Rests display quantize value according to the smallest note
value (length) you want to be displayed for a single note, positioned
on a beat.
For example, if you want a single short note on a beat (quarter note position) to be displayed as a quarter note, set the Rests display quantize value to 4 (quarter notes).
3. Deactivate the Auto Quantize option.
4. Set all the interpretation flags.
These are described in detail below.
5. Examine the score.
6. If necessary, use the Display Quantize tool to insert “exceptions” to
the staff settings.
See page 53.
CUBASE SX
3 – 44 Transcribing MIDI recordings
Page 45

If your music contains mixed straight notes and triplets
1. Examine the score and decide if it mainly contains triplets or mainly
“straight” notes.
2. Set the Notes display quantize value accordingly.
If the score is mainly triplets, select the smallest triplet note position used in the score.
If it is mainly straight notes, select the smallest “ordinary” note position.
3. Set the Rests display quantize value.
This is done according to the same rules as above.
4. Activate the Auto Quantize option.
5. Turn on the Deviation (”Dev.”) and Adapt flags if you need them.
When Deviation is activated, triplets/straight notes will be detected even if they are not
exactly “on the beat”. However, if you know your triplets/straight notes are perfectly recorded (quantized or entered by hand), turn this off.
When Adapt is activated, the program “guesses” that when one triplet is found, there
are probably more triplets surrounding it. Turn this on if not all of your triplets are detected.
Interpretation flags
The Interpretation flags.
Clean Lengths
When this is turned on, the program interprets the length of your
notes differently. A note’s length (in the display only) might be extended to the beginning of the next note or to the next Rests display
quantize “position”. An example:
• If a note is too short, you may get a rest just after it.
• When Clean Lengths is turned on, the rest will disappear.
CUBASE SX
Transcribing MIDI recordings 3 – 45
Page 46

A slightly short eighth note with Clean Lengths off and on.
If using Clean Lengths doesn’t help in a particular situation, you will
have to manually resize the offending note(s) or use the Display Quantize tool (see page 53).
No Overlap
When notes starting at the same position have different lengths, the
program tends to add more ties than you may want. This can be
avoided by using No Overlap.
This recording in the Key Editor…
…will be displayed like this when No Overlap is off…
…and like this when No Overlap is on.
You can insert “exceptions” to the No Overlap setting in the Staff Settings dialog, by using the Display Quantize tool.
❐
Please note that probably there will be situations when neither of these
alternatives is ideal. If you run into such a situation, it can probably be resolved by using polyphonic voices, see page 99.
CUBASE SX
3 – 46 Transcribing MIDI recordings
Page 47

Syncopation
When Syncopation is off, the program generally adds ties to long
notes crossing beats. There are a few exceptions to this. For example,
a half note starting at “2” in 4/4 is always displayed as a half note,
never as two tied quarter notes.
For a “modern” notation of syncopated notes, activate Syncopation.
Syncopation off, and on.
Again, Syncopation off, and on.
Please note that you can insert “exceptions” to the Syncopation setting in the Staff Settings dialog, by using the Display Quantize tool.
You can also create tied notes in various combinations by using the
Cut Notes tool.
Shuffle
In jazz it is very common to score a shuffled beat as straight notes,
simply to make it more legible.
When the Shuffle flag is turned on, the program searches for eighth
note or sixteenth note pairs where the second note is played late (with
a “swing feel” or as the third note in a triplet). Such pairs are displayed
as regular eighth or sixteenth notes instead of triplet-based figures.
Shuffle off and on.
CUBASE SX
Transcribing MIDI recordings 3 – 47
Page 48

Display transpose
This is used when preparing parts for instruments that are not scored
at the actual concert key. For example, if you want the note C3 to be
played by an alto sax, you have to score it as an A3 – nine semitones
up. Luckily, the display transpose setting takes care of this for you:
• Use the pop-up menu to select the instrument for which you’re scoring.
• If the pop-up menu doesn’t list the needed instrument, you can set the desired
transposition with the Semitones value field.
• The display transpose setting doesn’t affect playback or the actual pitch
of the notes – it only changes how they are displayed and printed.
More details on page 36.
The Options tab
The Options tab selected in the Staff Settings dialog.
The Options tab contains additional settings for the staff. Below follows a brief description of these, with references to more detailed explanations.
CUBASE SX
3 – 48 Transcribing MIDI recordings
Page 49

Switches
Option Description
Flat Beams Activate this when you want the beams over notes to be flat (as
opposed to slanted). See page 139.
No Beams Activate this when you don’t want any beaming at all on the staff
(for example for vocal scoring). See page 132.
Beam Subgroups Use this when you want sixteenth notes displayed under a
beam to be divided into groups of four notes. See page 138.
Beam Subgroups off and on
16th Subgroups Use this when you want even smaller subgroups of sixteenth
notes. This setting has no effect if Beam Subgroups is turned off.
As above, but with 16th Subgroups activated.
Consolidate Rests Activate this when you want small consecutive rests joined into
one (an eight note rest and a sixteenth note rest joined to a dotted eighth note rest for example).
Consolidate Rests off and on.
Transcribing MIDI recordings 3 – 49
CUBASE SX
Page 50

Score Drum Map
These settings are all described in the chapter “Scoring for drums”.
System Sizes
This section allows you to set the number of system lines and to control spacing between the lines. See page 279 for an example of how
this can be used with tablature.
Fixed Stems
Activate this if you want all note stems to end at the same vertical position. The Up and Down fields let you specify the desired positions
for stems in the respective direction, using the graphic figure to the
right as a guideline.
The Polyphonic tab
This is where you activate and set up split (piano) systems or polyphonic voices (several independent score lines in the same staves).
See page 100.
The Tablature tab
This contains settings for creating tablature scores. See “Creating ta-
blature”.
CUBASE SX
3 – 50 Transcribing MIDI recordings
Page 51

Situations which require additional techniques
The notes may not always appear in the score as you expect them to,
initially. This is because there are a number of situations which require
special techniques and settings. Below follows a list of some of these
and where to find more information about handling them:
• Notes at the same position are considered parts of a chord. To get independent voicing (e.g. notes with different stem directions), such as for vocal material, you need to use the polyphonic voicing feature described on page 99.
Without and with polyphonic voicing.
• If two notes beginning at the same position have different lengths, the longer
one will be displayed as a number of tied notes. To avoid this, you will either
have to use the No Overlap feature (see page 46) or polyphonic voicing (see
page 99).
• One note will often be displayed as two notes with a tie. This is only how the
program displays the note, there is still only a single note “stored”.
This single note in the Key Editor is displayed as two tied notes in the Score Editor.
• Generally the program adds ties where necessary (if a note stretches over a
beat), but not always. For a “modern” notation of syncopated notes (less ties),
you will need to use the Syncopation feature described on page 47.
The same note, without and with syncopation.
• If you find that you want a long note to be displayed as two or more tied notes,
you can achieve this with the Cut Notes tool. See page 143.
• If two notes on the same position are too close to each other or if you want
their order in the part reversed, you can do this without affecting playback.
See page 145.
CUBASE SX
Transcribing MIDI recordings 3 – 51
Page 52

• If a note has the wrong accidental, this can be changed. See page 125.
• Stem direction and length are automatic, but you can change them manually if
you wish. See page 120.
• If you are scoring for piano and therefore (or for other reasons) need a split
staff, there are special techniques for this – see page 83 and page 99.
If you run into trouble
Below follow a few simple troubleshooting steps that will help you pinpoint other common problems:
• The note I recorded is displayed with the wrong length. For example, I
recorded a sixteenth and got a quarter note.
You probably have the wrong display quantize value set, see page 44 for details. If you
feel uncertain about what display quantize is, and how it works, please read “How the
Score Editor works”. Also, you may want to check the No Overlap setting.
• There is a pause after a note that I don’t want.
The note is probably too short. This can be adjusted in two ways, by using Clean
Lengths (see page 45) or by manually lengthening it (see page 80). If this problem occurs a lot in your score, try selecting a larger Rests display quantize value (see page 14).
• There is no pause after the note although there should be one.
Either the note is too long (use Clean Lengths or change the current note’s length). Or,
your Rests display quantize value is set too high. Open the Staff Settings dialog and
lower it.
• The note has an accidental when it shouldn’t, or it doesn’t when it
should.
Enharmonic shifting is discussed on page 125.
• Notes are not grouped under beams the way I want it.
Normally the program groups eighth notes, sixteenths etc. under beams. This can be
turned off. There is also detailed control of which notes are grouped under a beam.
This is all described on page 132.
CUBASE SX
3 – 52 Transcribing MIDI recordings
Page 53

Inserting display quantize changes
There are instances when you will want different staff settings on different sections of the track. The staff settings are valid for the entire
track, but you can insert changes wherever you like:
1. Select the Display Quantize tool from the toolbar or Quick menu.
The Display Quantize tool on the toolbar.
2. When you select the tool, the Display Quantize dialog appears.
3. Activate the flags you need and set the quantize values as desired.
Details are found on page 44 and page 45. Additional hints below.
4. If you want to restore the settings to the ones used in the Staff Set-
tings dialog, click on Restore To Staff.
5. Move the mouse over the staff where you want to insert a new display
quantize value.
Use the mouse position box to find the exact location. The vertical position is of no relevance as long as you click somewhere in the staff.
CUBASE SX
Transcribing MIDI recordings 3 – 53
Page 54

6. Click the mouse button to insert a display quantize event.
The new quantize settings are now inserted into the staff at the position where you
clicked. The settings are valid until a new change is inserted.
• If you are using polyphonic voices (see page 99), you can insert a dis-
play quantize event for all voices by pressing [Alt]/[Option] and clicking with the tool.
If the option “Display Quantize Tool affects all Voices” is activated in the Notation
Style–Switches dialog (Scores–Global Settings submenu), display quantize events
will always be inserted for all voices.
Viewing and editing display quantize changes
If you activate the “Quantize” checkbox on the display filter bar (see
page 28), a marker will be shown under the staff for each display
quantize setting you have entered with the tool.
This allows you to edit your settings in the following ways:
• To edit a display quantize change event, double click on its marker.
This opens the Display Quantize dialog again – adjust the settings and click Apply.
• If the Display Quantize dialog is already open, you can select any display quantize change event, adjust its settings in the dialog and click
Apply.
• To remove a display quantize change, either click its marker to select
it and press [Backspace] or [Delete], or click on it with the Erase tool.
Strategies: Adding display quantize changes
Very often, the score will be fine except for a few bars somewhere. To
remedy the problem, insert two display quantize changes with the tool
(one at the beginning of the section, one after it to restore to the current staff settings).
If you have mixed triplets and straight notes, it can be tempting to insert many display quantize changes. Before you do so, try the Auto
Quantize options and their additional settings. See page 45.
CUBASE SX
3 – 54 Transcribing MIDI recordings
Page 55

The Explode function
This function allows you to “split” the notes on a staff into separate
tracks. It is also possible to use this function to convert a polyphonic
staff into polyphonic voices – this is described on page 110.
❐
You may want to create a copy of the original track first, since this will be
changed by the operation.
1. Pull down the Scores menu and select “Explode…” from the Global
Functions submenu.
The Explode dialog, set to create tracks.
2. Make sure “To New tracks” is selected at the top of the dialog.
3. Enter the desired number of new tracks.
Note that this is the number of new tracks to be created! For example, if you have a
three-part polyphonic section and want to split this into three separate tracks, you
must specify 2 new tracks, since the original track will hold one of the parts.
CUBASE SX
Transcribing MIDI recordings 3 – 55
Page 56

4. Use the options in the bottom section to set up the criteria for the split.
Choose from the following options:
Option Description
Split Note Use this to move all notes below a certain pitch to another track.
When this is selected, it is pointless to specify more than 1 new
track.
Lines To tracks Use this when you want all musical “lines” to be put on one track
each. The notes with the highest pitch will remain on the original
track, the notes with the second highest pitch will be put on the first
new track, and so on.
Bass To Lowest
Voice
When this is activated, the lowest notes will always end up on the
lowest track.
5. Click OK.
A number of new tracks are now added to the score and the project window.
CUBASE SX
3 – 56 Transcribing MIDI recordings
Page 57

Using “Scores Notes To MIDI”
For very complicated scores, there may be situations where you have
tweaked the parameters for display quantize and interpretation best
you can, and you still can’t get the score exactly as you want it. Perhaps one setting works fine in one section of the track and another is
needed for another section.
In this case, “Scores Notes To MIDI” will help you out. It changes the
lengths and position of some or all the MIDI notes in the edited parts
so that they have exactly the values currently shown on screen.
1. For safety, go back to the project window and make a copy of the
track.
2. Open the part(s) again in the Score Editor.
If you only want some sections of your score to be “converted”, make sure to only open
those parts.
3. Make sure the notes you want to affect are not hidden (see page 240).
4. Select “Scores Notes To MIDI” from the Global Functions submenu
on the Scores menu.
The notes are now “converted”.
5. Make whatever adjustments are needed to make the score read as
intended.
Now that the notes have the exact lengths and positions that were previously only displayed, you can probably turn off many of the options in
the Staff Settings dialog and delete display quantize settings etc.
If you find the operation didn’t give you the result you were after, you
can undo your settings or go back to the original track, make a copy of
that, and start over.
CUBASE SX
Transcribing MIDI recordings 3 – 57
Page 58

CUBASE SX
3 – 58 Transcribing MIDI recordings
Page 59

4
Entering and editing notes using
the mouse
Page 60

In this chapter you will learn:
• How to make various settings for how notes are displayed.
• How to enter notes by using the mouse.
• How to use tools and settings to make the score as legible as possible.
• How to set up a split (piano) staff.
• How to work with multiple staves.
Staff settings
Before you start entering notes, you need to make some initial staff
settings in addition to those described in the chapter “The basics”. In
order for you to understand why, and how these settings and the note
data in the score interact, please read the chapter “How the Score
Editor works”.
There are three ways to open the Staff Settings dialog:
• Make the staff active, pull down the Scores menu and select “Setup”
from the Staff Settings submenu.
• Double click to the left of the staff.
• Make the staff active and click the “i” button on the extended toolbar.
For this to work, make sure no notes or symbols are selected – otherwise, clicking the
“i” button may open a dialog with settings for the selected object instead.
Either way, the Staff Settings dialog appears and shows the current
settings for the staff.
CUBASE SX
4 – 60 Entering and editing notes using the mouse
Page 61

Applying settings and selecting other staves
The Staff Settings dialog is non-modal (see page 29). This means you
click Apply to apply the settings you’ve made to the active staff.
To make settings for another staff, simply make it active in the score
(by clicking anywhere in the staff or by using the up/down arrow keys
on the computer keyboard). However, please note:
• Remember to click Apply before making another staff active – otherwise
your settings will be lost!
Staff presets
When you want to reuse settings made for one track in other tracks,
you will save some time by creating a staff preset. This is described on
page 92.
• There are a number of staff presets available, set up to suit various instruments, etc.
The presets are accessed via the Presets pop-up menu in the Staff Settings dialog, or
from the Staff Settings submenu on the Scores menu. Use them as they are, or as
starting points for your own settings.
CUBASE SX
Entering and editing notes using the mouse 4 – 61
Page 62

Suggested initial settings
When you start out entering notes using the mouse, your staff settings
should make your score display the notes as entered. We suggest the
following:
Option Description
Names As desired.
Display Quantize: Notes 64
Display Quantize: Rests 64
Auto Quantize Activated.
Clean Lengths Off.
No Overlap Off.
Syncopation Off.
Shuffle Off.
Key As desired.
Clef As desired.
Auto Clef Activate this if you want the program to select a treble or
bass clef automatically.
Display Transpose 0
Options tab settings As is.
Polyphonic tab settings Staff Mode: Single (for split staves, see page 83).
Tablature tab settings Tablature Mode deactivated.
You will find out later how to adapt these settings in detail to make the
score read as you want it to.
• It is very important that you understand how the display quantize values
for notes and rests interact with the score. If you select too large a
notes/rests value, the notes you “click in” may not appear as intended.
Please read the chapter “How the Score Editor works”. If you have mixed triplets and
straight notes, please refer to page 44.
CUBASE SX
4 – 62 Entering and editing notes using the mouse
Page 63

Note values and positions
Two of the most important settings for entering notes (and the ones
you will change most often) are the length of the note (the note value)
and the minimum spacing between notes (the quantize value).
Selecting a note value for input
This can be done in one of three ways:
• By clicking the note symbols on the extended toolbar.
You can select any note value from 1/1 to 1/64th and turn on and off the dotted and
triplet options by clicking the two buttons to the right. The selected note value is displayed in the Length value field on the toolbar and in the Insert Note tool cursor shape.
The note value is reflected in the extended toolbar, the Length value field and the
Insert Note tool shape.
• By selecting an option from the Length pop-up menu on the toolbar.
• By assigning key commands to the different length values.
This is done in the Key Commands dialog on the File menu, under the category “Set
Insert Length”.
About unusual note values
Not all note values can be selected directly, for example double dotted notes. Such notes are created by changing the length of the note
after you have put it in (see page 80), by gluing notes together (see
page 81) or by using the Display Length feature.
CUBASE SX
Entering and editing notes using the mouse 4 – 63
Page 64

Selecting a display quantize value
When you move the mouse pointer over the score, you will see that
the position box on the toolbar tracks your movement and shows the
current position in bars, beats, sixteenth notes and ticks.
Positioning on screen is controlled by the current quantize value. If
you for example set this to “1/8 Note” you can only insert and move
notes to eighth note positions, at quarter notes, at half bars or at bar
positions. It is a good strategy to set the quantize value to the smallest
note value in the piece. This doesn’t stop you from inputting notes at
“coarser” positions. However, if you set the quantize value to too small
a note value, it is easier to make mistakes.
With the quantize value set to “1/8 Note”, you
can only input notes at eighth note positions.
The quantize value is set on the toolbar in the Quantize pop-up menu:
• You can also assign key commands to the different quantize values.
This is done in the Key Commands dialog on the File menu, under the category “MIDI
Quantize”.
• Just like in the other MIDI editors, you can use the Quantize Setup dialog to create other quantize values, irregular grids, etc.
However, this is not often used when inputting score notes.
CUBASE SX
4 – 64 Entering and editing notes using the mouse
Page 65

The “mouse position box”
While you will most often use the graphical position in the actual score
to determine where the notes go, there are instances when you will
want to verify the position numerically using the mouse position box:
The upper field shows the pitch according to the vertical position of
the pointer in a staff. The lower field shows the “musical position” in
bars, beats, sixteenth notes and ticks:
• The relation between beats and bars depends on the time signature: In 4/4
there are 4 beats to a bar. In 8/8 there are eight, in 6/8 there are six, etc.
• The third number is the sixteenth note within the beat. Again, the time signature determines the number of sixteenth notes to each beat. In a quarter note
based time signature (4/4, 2/4, etc.) there are four sixteenth notes to each
beat, in an eighth note based time signature (3/8, 4/8, etc.), there are two sixteenth notes, etc.
• The last value is in ticks, with 480 ticks per quarter note (and thus 120 ticks
per sixteenth note).
The figures below show some note positions and their corresponding position values:
2/2
4/4
8/8
Eighth note positions.
2/2
4/4
8/8
Eighth note triplet positions.
2/2
4/4
8/8
Sixteenth note positions.
1.1.3.0 1.2.1.0 1.2.3.0
1.1.1.0
1.2.1.0 1.3.1.0 1.4.1.0
1.1.1.0
1.1.1.0 1.1.2.40 1.1.3.80 1.1.5.0
1.1.1.0 1.1.2.40 1.1.3.80 1.2.1.0
1.1.1.0 1.1.2.40 1.2.1.80 1.3.1.0
1.1.1.0
1.1.2.0 1.1.3.0 1.1.4.0
1.1.2.0 1.1.3.0 1.1.4.0
1.1.1.0
1.1.1.0 1.1.2.0 1.2.1.0 1.2.2.0
Entering and editing notes using the mouse 4 – 65
1.1.3.0 1.1.5.0 1.1.7.0
1.1.1.0
1.2.1.0
1.3.1.0
1.5.1.0
1.1.5.0
1.2.1.0
1.3.1.0 1.3.2.0 1.4.1.0 1.4.2.0
1.2.3.0 1.2.5.0 1.2.7.0
1.3.3.0 1.4.1.0 1.4.3.0
1.6.1.0 1.7.1.0 1.8.1.0
1.1.6.40 1.1.7.80
1.2.2.40 1.2.3.80
1.3.2.40 1.4.1.80
1.1.6.0 1.1.7.0 1.1.8.0
1.2.2.0 1.2.3.0 1.2.4.0
CUBASE SX
Page 66

Adding and editing notes
Entering one note by dragging
To add a note to the score, proceed as follows:
1. Make the staff active.
Notes are always put in on the active staff. See page 23 for details.
2. Select the type of note by selecting a note value.
This is described in detail above.
3. If you selected the note value by clicking on a symbol on the extended
toolbar, the Insert Note tool was automatically selected – otherwise
select the Insert Note tool from the toolbar or Quick menu.
4. Select a quantize value.
Described above. The quantize value will determine the spacing between notes. If you
set quantize to “1/1 Note” you will only be able to add notes at downbeats. If you set
quantize to “1/8 Note” you will be able to add notes at all eighth note positions etc.
5. Click in the staff and keep the mouse button pressed.
A note appears under the mouse pointer.
6. Move the mouse horizontally to find the correct position.
Check the mouse position box – the position is “magnetically” attracted to the grid defined by the current quantize value. This allows you to easily find the correct position.
7. Move the mouse vertically to find the correct pitch.
The pitch is shown here.
• If the option “Show Note Info by the Mouse” is activated in the Preferences–Scores dialog, the position and pitch of the note will also be
shown in a “tool tip” next to the pointer while you’re dragging.
If you find that screen redraws are too sluggish, you may want to deactivate this option.
8. Release the mouse button.
The note appears in the score.
CUBASE SX
4 – 66 Entering and editing notes using the mouse
Page 67

Clicking directly
When you get better acquainted with the Score Editor and find it easy
to aim at the right position directly, you don’t need to drag the note
around as described above. Simply aim at the correct position and
click once.
If you have problems getting the pitch right
• Normally, you are allowed to “draw” notes with any pitch. But if the op-
tion “Keep moved notes within key” is activated in the Preferences–
Scores dialog, the pitches are restricted to inside the current key only.
• When you drag the mouse up and down before releasing the button,
accidentals are shown beside the note to indicate the current pitch.
This helps you verify the vertical position before releasing the mouse button.
Adding more notes
1. If the next note is of another note value, select a new note value.
2. If you need finer positioning, or if the current value is too fine, change
the quantize value.
3. Move the mouse to input the new note, and click.
Notes input at the same position are automatically interpreted as chords, see below.
About the interpretation
The notes may not always appear in the score as you expect them to,
initially. This is because there are a number of situations which require
special techniques and settings. Below follows a list of some of these
and where to find more information about handling them:
• Notes at the same position are considered parts of a chord. To get independent voicing (for example notes with different stem directions), such as for vocal material, you need to use polyphonic voicing – see page 99.
Without and with polyphonic voicing
CUBASE SX
Entering and editing notes using the mouse 4 – 67
Page 68

• If two notes beginning at the same position have different lengths, the longer
will be displayed as a number of tied notes. To avoid this, you will either have
to use the “No Overlap” feature (see page 46) or polyphonic voicing (see
page 99).
• One note will often be displayed as two notes with a tie. This is only how the
program displays the note, there is still only a single note “stored”.
This single note in the Key Editor is displayed as two tied notes in the Score Editor.
• Generally the program adds ties where necessary (if a note stretches over a
beat), but not always. For more “modern” notation of syncopated notes (less
ties), you will need to use the syncopation feature described on page 47.
The same note, without and with Syncopation.
• If you specifically want a long note to be displayed as two (or more) tied notes,
you can use the Cut Notes tool for this.
• If a note has the wrong accidental, this can be changed. See page 125.
• If two notes on the same position are too close to each other or if you want
their “graphical order” in the score reversed, you can do this without affecting
playback. See page 145.
• Stem direction and length is normally automatic, but you can set it yourself.
See page 120.
• If you are scoring for piano and therefore (or for other reasons) need a split staff,
there are special techniques for this, described on page 83 and page 99.
CUBASE SX
4 – 68 Entering and editing notes using the mouse
Page 69

If you run into trouble
Below follow a few simple troubleshooting steps that will help you pinpoint some common mistakes:
• The note I put in has the wrong length. For example, I added a sixteenth
and got a quarter note.
You probably have the wrong display quantize value set. Open the Staff Settings dialog.
If Auto Quantize is on, turn it off, unless you have mixed triplets and regular notes. Also
check the Notes and Rests display quantize values. If the settings are too “coarse”,
change them to a smaller note value. If you for example need the program to display an
eighth note rest, Rests display quantize must be set to “8” or a smaller value (please refer to “How the Score Editor works”). If No Overlap is on, you might want to turn it off.
• There is a pause after a note that I don’t want.
You probably added a note with the wrong note value. Either lengthen the note (physically or graphically – see page 80) or delete the one you have (see page 72) and add
a new one with the correct note value.
• There is no pause after the note although there should be one.
Either the note is too long (delete and enter a new one or change the current note’s
length, physically or graphically). Or, your Rests display quantize is set to too large a
note value. Open the Staff Settings dialog and lower it.
• The note has an accidental when it shouldn’t, or it doesn’t when it
should.
Maybe the note is simply of the wrong pitch? Click on it (using the Object Selection
tool) and look at the info line (if this is shown, see page 25). Move it to the correct pitch
(see page 78). If this is not the reason, maybe you have the wrong key set? And last,
enharmonic shifting is described on page 125.
• Notes are not grouped under beams the way I want it.
Normally the program groups eighth notes, sixteenths etc. under beams. This can be
turned off. There is also detailed control of which notes are grouped under a beam.
This is all described on page 132.
CUBASE SX
Entering and editing notes using the mouse 4 – 69
Page 70

Selecting notes
In the operations described in the rest of this chapter, you will often
work on selected notes. The text below describes how to select notes
in various ways:
By clicking
To select a note, click on its note head with the Object Selection tool.
The note head is inverted to indicate that it is selected.
• To select more notes, hold down [Shift] and click on them.
Selected notes
• To deselect notes, hold down [Shift] and click on them again.
• If you hold down [Shift] and double click on a note, this note and all
the following notes in the same staff are selected.
Using a selection rectangle
1. Press the mouse button with the Object Selection tool in an empty
area in the score.
2. Drag the mouse pointer.
A selection rectangle appears. You can drag to select voices on several voices or
staves if you wish.
3. Release the mouse button.
All notes with their note heads inside the rectangle are selected.
If you want to deselect one or more of the notes, hold down [Shift]
and click as described above.
CUBASE SX
4 – 70 Entering and editing notes using the mouse
Page 71

Using the keyboard
By default, you can step through the notes in the staff using the left
and right arrow keys. If you press [Shift], you will select the notes as
you step through them.
• If you are working with polyphonic voices, you will only step through
the notes in the current voice.
• If you want to use other keys for selecting notes, you can customize the
settings in the Key Commands dialog on the File menu (in the Navigate
category).
Selecting tied notes
Longer notes are often displayed in the score as one note with a tie.
When you intend to select the entire note for deleting etc., you should
select the first note, not the tied note.
❐
There is a preference for this in the Preferences–Scores dialog: If you
activate “Tied notes selected as Single Units”, the whole note will be selected, even if you just click on one of the tied notes.
Deselecting everything
To deselect everything, simply click with the Object Selection tool in
an empty area in the score.
CUBASE SX
Entering and editing notes using the mouse 4 – 71
Page 72

Deleting notes
Notes can be deleted in two ways:
Using the Erase tool
1. Select the Erase tool from the toolbar or Quick menu.
The Erase tool on the Quick menu.
2. Click on the note(s) you want to erase, one at a time or drag over them
with the mouse button pressed.
Using the keyboard or delete menu item
1. Select the notes you want to delete.
2. Select Delete from the Edit menu, or press [Delete] or [Backspace]
on the computer keyboard.
CUBASE SX
4 – 72 Entering and editing notes using the mouse
Page 73

Moving notes
About the lock layers
When you are moving and editing notes in the score, you might accidentally move other objects nearby. To avoid this, assign different types
of objects to different “lock layers” (up to three) and instruct Cubase SX
to “lock” one or two of these layers, making them unmovable.
There are two ways to set up which type of object should belong to
which lock layer:
• Open the Preferences dialog from the File menu and select the Scores–Event
Layer page.
This page lets you adjust the layer setting for each object type.
• Right-click (Win) or [Ctrl]-click (Mac) on one of the layer buttons (1-2-3) in the
extended toolbar to bring up a pop-up menu, showing which object types are
associated with that layer.
A checkmark for an object type means it belongs to that layer. If no checkmark is
shown, you can select the object type on the menu to move it to that layer.
To lock a layer, click on its number on the Lock layer button, so that it
goes dark. You can only select or move objects whose layer number is
lit. For more detailed information, see page 180.
• There are also “L” and “G” layer buttons, for the layout and global layer,
respectively.
Clicking these buttons allow you to lock the layout layer and global layer in the same
way. See page 156.
CUBASE SX
Entering and editing notes using the mouse 4 – 73
Page 74

Activating auditioning
Auditioning activated
If you want to hear the pitch of the note while moving, activate the
speaker icon on the toolbar. When it is on, you will hear the current
pitch of the “dragged” note, as described below.
Moving by dragging
1. Set the quantize value.
The quantize value will restrict your movement in time. You can not place the notes on
positions smaller than the quantize value. If Quantize for example is set to “1/8 Note”,
you will not be able to move the notes to a sixteenth note position. However, you will
be able to put them on any eighth note, quarter note, half note or whole note position.
2. Select the note(s) you plan to move.
You can select across several staves if you wish.
3. Click one of the selected notes and drag it to a new position.
The horizontal movement of the note is “magnetically attracted” to the current quantize
value. The position boxes on the toolbar show what the new position and pitch for the
dragged note will be.
• If the option “Show Note Info by the Mouse” is activated in the Preferences–Scores dialog, the position and pitch of the note will also be
shown in a “tool tip” next to the pointer while you’re dragging.
If you find that screen redraws are too sluggish, you may want to deactivate this option.
4. Release the mouse button.
The notes appear at their new position.
• If you press [Ctrl]/[Command] and drag, movement is restricted to
vertical or horizontal only (depending on in which direction you drag).
• If you move notes vertically and the option “Keep moved notes within
key” is activated in the Preferences–Scores dialog, the notes will be
transposed within the current key only.
CUBASE SX
4 – 74 Entering and editing notes using the mouse
Page 75

Moving by using key commands
Instead of dragging the note with the mouse, you can assign key commands for this:
• The commands for which you should assign keys are found in the
Nudge category in the Key Commands dialog.
The commands are listed as “Left”, “Right”, “Top” and “Bottom”.
• When moving notes to the left or right using key commands, the notes
will be moved in steps according to the current quantize value.
The keys assigned for up/down nudging will transpose notes in semitone steps.
Moving across staves – the Lock button
If you are editing several tracks, you may want to move notes from one
staff to another. Proceed as follows:
1. Set Quantize and select the notes as described above.
You may select notes from several staves, but only the ones on the staff from which
you actually dragged will be moved, so this is probably best avoided.
2. Make sure the “L” (Lock) button on the extended toolbar is deacti-
vated.
The “L” (Lock) button is deactivated.
When this button is activated, you cannot move notes and other objects from one staff
to another, which is handy if you for example need to transpose a note very high or low.
3. Click on one of the notes and drag them to the new system.
The active staff rectangle indicates on which staff the dragged note(s) will appear.
CUBASE SX
Entering and editing notes using the mouse 4 – 75
Page 76

Duplicating notes
1. Set the quantize value and select the notes, as for moving.
You can duplicate any block of notes, even on several systems at the same time.
2. Press [Alt]/[Option] and drag the notes to their new position.
• If you want to restrict movements to one direction only, press [Ctrl]/
[Command].
This works just as for moving, as described above.
• If you want to restrict the pitch to inside the current key only, make
sure the option “Keep moved notes within key” is activated in the Preferences–Scores dialog.
• [Alt]/[Option] is the default modifier key for copying/duplicating. If you
like, you can change this in the Preferences dialog (Editing–Tool Modifiers page).
The entry for this is found in the Drag & Drop category (“Copy”).
Moving using the bar handles
You can move or copy whole bars by dragging the bar handles. This is
described on page 185.
CUBASE SX
4 – 76 Entering and editing notes using the mouse
Page 77

Cut, copy and paste
• To cut notes, select them and select Cut from the Edit menu (or use a
key command, by default [Ctrl]/[Command]-[X]).
The notes are now removed from the score and put on the clipboard. Below we describe how to insert notes from the clipboard into the score.
• To copy notes, select them and select Copy from the Edit menu (or
use a key command, by default [Ctrl]/[Command]-[C]).
A copy of the notes is made, and put on the clipboard. The original notes remain where
they were.
❐
The clipboard can only hold one set of notes. If you cut or copy and then
cut or copy again, the notes that first were on the clipboard will be lost.
Notes that you have put on the clipboard by cutting or copying can be
inserted into the score again, in the following way:
1. Make one staff active.
2. Move the project cursor to the position where you want the first note
to appear.
3. Select Paste from the Edit menu (or use a key command, by default
[Ctrl]/[Command]-[V]).
The notes are pasted in, beginning at the project cursor. If the cut or copied notes
come from different staves, they will be pasted into their original staves. Otherwise, the
notes are put in on the active staff. They keep the pitch and relative positions they had
when you cut or copied them.
CUBASE SX
Entering and editing notes using the mouse 4 – 77
Page 78

Editing pitches of individual notes
By dragging
The most basic way to edit the pitch of a note would probably be to
drag it up or down. Remember to hold down [Ctrl]/[Command] to
avoid moving the note sideways as well.
• If the option “Keep moved notes within key” is activated in the Preferences–Scores dialog, notes will be transposed within the current key
only.
• To avoid accidentally moving the note into another staff, activate the
Lock button as described on page 75.
Using key commands
Instead of transposing the note with the mouse, you can assign key
commands for this.
• The commands for which you should assign keys are found in the
Nudge category in the Key Commands dialog.
The commands are listed as “Top” (transpose one semitone up) and “Bottom” (transpose one semitone down).
Using the info line
You can use the info line to change the pitches (and other properties) of
one or several notes numerically, as described in the Operation Manual.
• If you have several notes selected and change the pitch on the info
line, the changes will be relative.
That is, all selected notes will be transposed by an equal amount.
• If you have several notes selected, hold down [Ctrl]/[Command] and
change the pitch on the info line, the changes will be absolute.
That is, all selected notes will be set to the same pitch.
CUBASE SX
4 – 78 Entering and editing notes using the mouse
Page 79

Via MIDI
1. On the toolbar, activate the MIDI Input button and the Record Pitch
button to the right.
If you also want to change the note-on and/or note-off velocity of the notes via MIDI,
this can be done by also activating the corresponding velocity buttons, as described in
the chapter about MIDI editing in the Operation Manual.
To edit notes via MIDI (pitches only), set up the buttons like this.
2. Select the first note you want to edit.
3. Press a key on your MIDI keyboard.
The note takes on the pitch of the key you pressed. The program then selects the next
note.
4. To change the pitch of the next selected note, simply press the de-
sired key.
In this manner you can change the pitches of as many notes as you wish, by simply
pressing the relevant keys. You can also use key commands (by default the left and
right arrow key) to step around among the notes. For example, if you make a mistake,
you can step back to the previous note by pressing the left arrow key.
CUBASE SX
Entering and editing notes using the mouse 4 – 79
Page 80

Changing the length of notes
When it comes to note lengths, the Score Editor is special in that it
doesn’t necessarily display the notes with their actual length. Depending on the situation, you may want to change the “physical length” of
the notes or the “display length”.
Changing the “physical” length
This will change the actual length of the notes. The change will be reflected when you play back the music.
❐
Remember that the appearance of notes and rests in the score is determined by the display quantize settings in the Staff Settings dialog. Depending on the display quantize “Notes” and “Rests” values, notes may
be displayed as if they were longer than they really are (see page 11).
By using the Insert Note tool
1. Select a note value that you wish to apply to the note.
This can be done by clicking a note value icon in the extended toolbar, by selecting a
new length value or by pressing keys on the computer keyboard.
2. Select the Insert Note tool if it isn’t already selected.
3. Hold down [Alt]/[Option] and click on the notes you wish to set to this
length.
By using the extended toolbar
Using the extended toolbar is another quick way to set a number of
notes to the same length:
1. Select the notes you want to change.
2. Hold down [Ctrl]/[Command] and click on one of the note icons on
the extended toolbar.
All the selected notes are now given the length of the clicked note.
CUBASE SX
4 – 80 Entering and editing notes using the mouse
Page 81

By using the info line
You can also edit length values numerically on the info line. The same
rules apply as when changing the pitch of notes (see page 78).
Lengthening a note by gluing two notes together
You can create unusual note length values by gluing notes of the
same pitch together.
1. Insert the notes you want to glue together (if they don’t already exist).
2. Select the Glue tool from the toolbar or Quick menu.
The Glue tool on the Quick menu.
3. Click on the first note.
This note will now be tied to the first note after it that has the same pitch.
❐
Make sure you have display quantize values for notes and rests that allow you to display notes of the created note value.
4. If you want to glue more notes, click again.
By gluing together a quarter note, an eighth note and a sixteenth note…
…you get a double dotted quarter note.
CUBASE SX
Entering and editing notes using the mouse 4 – 81
Page 82

Changing the display length
If you want to change the displayed length of notes without affecting
how they play back, the first thing to try is to adjust the display quantize,
either for the whole staff or for a separate section, using the Display
Quantize tool (see page 53). But you can also make length adjustments
to individual notes in the Set Note Info dialog:
1. Double click on the head of the note.
The Set Note Info dialog opens.
2. Locate the “Displ. Length” setting.
By default, this is set to “Auto”, meaning that the note will be displayed according to its
actual length (and the display quantize settings).
3. Set a new length value (displayed in bars, beats, sixteenth notes and
ticks).
To set the display length to “Auto” again, scroll the value down to zero.
4. Click Apply to close the dialog.
The note will now be displayed according to its display length setting. However, the
display quantize settings still apply!
Splitting a note in two
If you have two notes strung together by a tie, and click on the “tied”
note head with the Split tool, the note will be divided into two, with the
respective length of the “main” and the tied note.
Before and after splitting a tied note.
Working with the Display Quantize tool
There are instances when you will want different staff settings on different sections of the track. The settings in the Staff Settings dialog
are valid for the entire track, but by using the Display Quantize tool
you are able to insert changes and exceptions wherever you like. This
is described in detail on page 53.
CUBASE SX
4 – 82 Entering and editing notes using the mouse
Page 83

Split (piano) staves
Setting up the split staff
1. Make a staff active.
2. Open the Staff Settings dialog for the staff and select the Polyphonic
tab.
3. From the Staff Mode pop-up, select Split.
4. Set the Splitpoint value to a suitable note.
All notes below this will be put on the lower clef, all above will be put on the upper clef.
Split mode selected.
5. Open the Main tab and select a clef and key.
When you set a key for the upper staff, this setting is automatically copied to the lower
staff. To set a separate key for the lower staff, activate “Lower staff” and then change
the key.
6. Make whatever additional staff settings you need.
These will apply to both the upper and lower clefs.
7. Click Apply.
Before and after setting a split at C3.
Entering and editing notes using the mouse 4 – 83
CUBASE SX
Page 84

Adding notes
This is done just as on a single system, see page 66. Please note the
following:
• When you enter a note, use the pitch box (on the toolbar) to determine the
pitch. Whether it ends up on the upper or lower staff has nothing to do with
where you aim with the mouse. The splitpoint setting always decides if a note
goes on the upper or lower clef. If you change the split point, this will affect
existing notes, see below.
• Sometimes a fixed split point isn’t good enough. You might want to put two
notes with the same pitch on different staves in different parts of the piece. To
achieve this you need to use polyphonic voicing, see page 99.
Changing the split point
1. Open the Staff Settings dialog for the system you are working on.
2. Select the Polyphonic tab.
3. Change the Splitpoint value.
4. Click Apply.
Now, some notes that were previously on the lower staff will be on the
upper, or vice versa.
CUBASE SX
4 – 84 Entering and editing notes using the mouse
Page 85

Strategies: Multiple staves
As described above, when you have parts on several tracks selected
in the project window, these will be put on one staff each, when you
open the Score Editor. This allows you to work on several staves in
parallel.
Working with several staves is not much different from working with
one. Below follow some guidelines that apply specifically to working
with multiple staves.
Staff settings
• As described above, the settings in the Staff Settings dialog are local to each
staff. You can have the Staff Settings dialog open and select each staff in turn
to make settings – just remember to click Apply before selecting another staff,
otherwise your changes will be lost.
• If several staves share settings, you will save some time by using staff presets.
Set up the staff settings for the first staff, then make those settings a preset.
This preset can then be applied to any of the other staves, one at a time. See
page 92 for details.
Selecting notes
• You can select notes from one or several staves at the same time, using any
method of selection, as described on page 70.
Adding notes
• You can add notes to any staff by just clicking inside it. The active staff rectangle will move to the staff where you input the note.
• If you need to put in a note with a very high or low pitch, which makes it wind
up on the wrong staff when you click, first enter a note with the wrong pitch,
and then edit its pitch as described on page 78.
CUBASE SX
Entering and editing notes using the mouse 4 – 85
Page 86

Inserting and editing clefs, keys or time signatures
It is possible to insert a change of key signature, clef, or time signature
anywhere in the score:
Inserting a symbol on one staff
1. Select “Clef etc.” from the “Symbol Palettes” menu on the Scores
menu.
This opens the “Clef etc.” palette, which contains clef, key and time signature symbols.
The Symbol Palettes submenu and the “Clef etc.” palette.
2. Click in the palette to select the symbol you wish to insert.
The Pencil tool is automatically selected (see also page 166).
3. Move the mouse over the staff where you want to insert a new symbol.
Use the mouse position box to find the exact location. The vertical position is of no relevance as long as you click somewhere in the staff. Time signature changes can only be
inserted at the beginning of a bar.
4. Click the mouse button.
A dialog appears, allowing you to select the desired clef, key or time signature. For details on the Edit Time Signature dialog, please see page 29.
CUBASE SX
4 – 86 Entering and editing notes using the mouse
Page 87

5. Select an option from the dialog and click OK.
The symbol appears. If there is room for it in the bar, the notes are moved to make
room for it. If not, you will have to use Auto Layout or make manual adjustments (see
“Moving clefs” below).
❐
Inserting a symbol at position 1.1.1.0 is the same as changing the staff
settings which are stored in the track. Inserting anywhere else adds the
change to the part.
Inserting a symbol on all staves
If you hold down [Alt]/[Option] when you click with the Pencil tool to
insert a symbol, it will be inserted at this position on all staves currently being edited in the Score Editor. Note:
• Time signature changes are always inserted on all tracks in the score.
Or rather, they are inserted on the tempo track, which affects all tracks.
• For key changes, display transpose is taken into account.
This allows you to set all staves to a new key and the staves set to display transpose
will still show the correct key after the key change.
• If some of the staves are bracketed (straight brackets only, as set up in
the Layout Settings dialog – see page 256), inserting a symbol for one of
these staves will insert it for all other staves within the bracket.
Staves outside the bracket will not be affected.
Editing keys, clefs and time signatures
If you double click on a symbol, the same dialog appears as when you
inserted it. This allows you to change the settings for it.
If you hold down [Alt]/[Option] when double clicking, all symbols at
the same position are changed accordingly. With key signatures, the
display transpose value is taken into account as described above.
• You will find several options for how key, clef and time signature
changes should be displayed in the Notation Style–Switches dialog
on the Scores–Global Settings menu.
You can also adjust the automatic spacing between these symbols in the Spacings
dialog on the same menu. See the dialog help for details.
CUBASE SX
Entering and editing notes using the mouse 4 – 87
Page 88

Moving clefs
Clefs inserted into the score have an effect on how notes are displayed. If you for example insert a bass clef in the middle of a treble
staff, the staff switches to show bass pitches. Therefore it is very important where you insert the clef.
However, you might want to move the clef graphically, without disturbing this relation between the clef and the notes. Proceed as follows:
1. Select the Graphic Move tool.
This is available in Page Mode only.
2. Click and move the clef just as with the normal Object Selection tool.
Now the clef is moved, but the score is still interpreted as if it remained in its original
position.
CUBASE SX
4 – 88 Entering and editing notes using the mouse
Page 89

5
Staff settings
Page 90

In this chapter you will learn:
• How to make staff settings.
• How to work with staff presets.
Staff settings
Below follows a run-through of all staff settings, more detailed information about the ones already described and references to other
places in the manual for some options.
This is where you enter
the name for the staff.
Normally, the long
name is shown at the
beginning of the score,
while the short name is
shown for the remaining systems.
Use this section to set
up how the display
should be quantized –
the displayed spacing
and length of notes.
The dialog has four tabs –
here, the Main tab is selected.
This section contains
additonal settings for
how the notes are displayed.
Use this section to select and apply presets,
or turn the current settings into a preset.
Use this section to select keys
and clefs
This is where you specify the display
transpose for instruments that are not
scored in concert key.
CUBASE SX
5 – 90 Staff settings
Page 91

Making settings
1. Open the Staff Settings dialog.
2. With the Staff Settings dialog open, make the desired staff active.
Click anywhere in a staff to make it active, or use the up and down arrow keys to step
from staff to staff.
3. Select the desired tab in the dialog and make whatever settings you
need to do.
The settings for regular staves are found on the Main and Options tab, the Polyphonic
tab contains settings for split systems and polyphonic voices while the Tablature tab
lets you set up tablature scores.
4. When you have made the desired settings, click Apply.
The settings are applied to the active staff.
• If the option “Apply closes Property Windows” is activated in the Preferences dialog (Scores page), clicking Apply will also close the dialog.
5. Select another staff, make settings for this and click Apply.
Repeat this until all staves have the right settings.
6. If you want to close the dialog, click its close box as usual.
CUBASE SX
Staff settings 5 – 91
Page 92

Working with staff presets
You will spend some time making staff settings for your scores. Staff
presets allow you to reuse those settings whenever you work with a
staff similar to one you have worked on before. A staff preset contains
all the settings in the Staff Settings dialog except the key.
• To store the current settings (including the settings on the Options tab,
see below) click the Store button in the Presets section of the dialog.
Enter a name for the preset in the name dialog that appears, and click OK. The preset
will now be available on the Presets pop-up menu (in all projects).
• To load a preset, select it on the Presets pop-up menu.
Note that this loads the settings in the preset into the dialog – to apply these to a staff
you must click the Apply button as usual. You can also apply staff presets directly in
the score – see below.
• To remove a preset, select it from the pop-up menu and click the Re-
move button.
Applying a preset directly in the score
If you right-click (Win) or [Ctrl]-click (Mac) directly to the left of a staff,
a pop-up menu will appear, listing all available presets. Select one to
apply it to the staff.
How staff presets are stored
The staff presets are stored as individual files in the Presets–Staff
Settings folder within the Cubase SX program folder. The presets are
available for selection in any project you create or edit.
CUBASE SX
5 – 92 Staff settings
Page 93

Staff names
These fields allow you to specify a “long” and a “short” name for the
staff. The long name is shown for the very first system for this staff in
the score (at the start of the song), while the short name is shown for
the remaining systems.
• Whether the names should be shown at all is set in the Layout Settings dialog (see page 225).
Here, you can also opt to use the names of the edited MIDI tracks instead.
• If you only want the “long name” to be shown (i.e. if you don’t want a
name shown for each system in the score), simply delete the short
name.
• If the option “Show Long Track Names on new Pages” is activated in
the Notation Style dialog (Scores–Global Settings menu), the long
name will be shown at the beginning of each new page.
Key and clef
The basic key and clef settings are described in detail on page 29.
There is also a Lower Staff check box which is only used in conjunction with split (piano) staves and polyphonic voicing. This is described
on page 33.
Staff settings 5 – 93
CUBASE SX
Page 94

Display quantize and interpretation flags
These two sections of the dialog contain a number of settings used to
determine how the notes should be interpreted. While these settings
are more critical to making MIDI recorded music appear as legible as
possible it is still important to have them set correctly when entering
notes using the mouse. Below you will find a brief summary of the settings – for more details, see page 44.
Notes and Rests display quantize values
• Generally, the Notes display quantize value should be set to a value equal to,
or smaller than, the “smallest note position” you want to be shown in the score.
• The Rests display quantize value should be set to a value equal to, or smaller
than, the smallest note value (length) you want to be displayed for a single
note, positioned on a beat.
• If the score contains only triplets, or mostly triplets, select one of the Triplet
options.
Auto Quantize
• If the piece contains no triplets or only triplets, deactivate this option.
• If the piece contains mixed triplets and straight notes, activate this option (the
additional options are described in detail on page 45).
CUBASE SX
5 – 94 Staff settings
Page 95

Interpretation flags
Option Description
Clean Lengths Activate this when you find the program generally interprets your
notes as shorter than you expect. See page 45.
No Overlap Activate this when notes starting at the same position, but having
different lengths, give you more ties than you want. See page 46.
Syncopation Activate this when the program adds more ties to notes crossing
beats and bar lines than you prefer. See page 47.
Shuffle Activate this when you have played a shuffle beat and want it dis-
played as straight notes (no triplets). For details see page 47.
Display transpose
This is used when preparing parts for instruments that are not scored
at the actual concert key. For example, if you want the note C3 to be
played by an alto sax, you have to score it as an A3 – nine semitones
up. Luckily, the display transpose setting takes care of this for you:
• Use the pop-up menu to select the instrument for which you’re scoring.
• If the pop-up menu doesn’t list the desired instrument, you can set the
desired transposition with the Semitones value field.
• The display transpose setting doesn’t affect playback or the actual pitch
of the notes – it only changes how they are displayed and printed.
You can also insert display transpose changes anywhere in the score,
by inserting a key change symbol and using the Transpose setting in
the Edit Key/Clef dialog (see page 36).
CUBASE SX
Staff settings 5 – 95
Page 96

The Options tab
Clicking the Options tab in the dialog brings up another page with additional settings (which can be made part of a staff preset just like the
other settings). Below follows a brief description of these, with references to more detailed explanations.
CUBASE SX
5 – 96 Staff settings
Page 97

Switches
Option Description
Flat Beams Activate this when you want the beams over notes to be flat (as
opposed to slanted). See page 139.
No Beams Activate this when you don’t want any beaming at all on the staff
(for example for vocal scoring). See page 132.
Beam Subgroups Activate this when you want sixteenth notes displayed under a
beam to be divided into two groups of eight notes. See page 138.
16th Subgroups Use this when you want even smaller subgroups of sixteenth
notes. This setting has no effect if Beam Subgroups is turned off.
Consolidate Rests Activate this when you want two rests joined to one (for example
an eighth note and a sixteenth note rest displayed as a dotted
eighth note rest). See page 49 for an example.
System Sizes
This section allows you to set the number of system lines and to control spacing between the lines:
Option Description
System Lines The number of lines in a system. For regular scoring, this should
be set to 5.
Add Space Allows you to increase or decrease the space between the lines
in a system.
Size Allows you to set a size for the systems, as a percentage (with
100% being the default value). In effect, this setting scales the
score vertically.
See page 279 for an example of how this can be used with tablature.
Score Drum Map
These settings are all described in the chapter “Scoring for drums”.
CUBASE SX
Staff settings 5 – 97
Page 98

Fixed Stems
If you activate this checkbox, the stems of all notes will end at the
same vertical position. This feature is perhaps most often used when
scoring for drums (see page 272).
A drum pattern with Fixed Stem length activated.
The Up and Down parameters determine which position (relative to
the top of the staff) should be used for up and down stems, respectively. The graphical display helps you get your settings right.
The Polyphonic and Tablature tabs
These are described in the chapters “Polyphonic voicing” and “Creat-
ing tablature”, respectively. For now, just note that the Polyphonic tab
contains the Staff Mode pop-up, which determines whether the staff
should be a single system, a split (piano) staff or use polyphonic voices.
CUBASE SX
5 – 98 Staff settings
Page 99

6
Polyphonic voicing
Page 100

In this chapter you will learn:
• How to decide when to use polyphonic voicing.
• How to set up voices.
• How to automatically convert your score to polyphonic voicing.
• How to enter and move notes into voices.
Background: Polyphonic voicing
Polyphonic voicing allows you to resolve a number of situations impossible to score properly otherwise:
• Notes starting at the same position, but with different lengths. Without polyphonic voicing you get unnecessary amounts of ties.
Without and with polyphonic voicing.
• Vocal scoring and similar. Without polyphonic voicing, all notes starting at the
same position are considered parts of a chord. With polyphonic voicing you
can give each voice a stem direction, you can have individual rest handling for
each voice etc.
Without and with polyphonic voicing.
• Complicated piano systems. Without polyphonic voicing you have to resort to
a fixed split note setting to decide which notes go on which clef. With polyphonic voicing the split point can be “floating”. The program can even automatically put a bass line on the lower clef for you!
With a split system and with polyphonic voicing.
CUBASE SX
6 – 100 Polyphonic voicing
 Loading...