


MixPre II Series
Multichannel Recorders | Mixers | USB Audio Interfaces
User Guide
Legal Notices
Product specifications and features are subject to change without prior notification.
Copyright© 2019 Sound Devices, LLC. All rights reserved. This product is subject to the terms and conditions of a software license agreement provided with the product, and may be used in accordance with the license agreement.
This document is protected under copyright law. An authorized licensee of this product may reproduce this publication for the licensee’s own personal use. This document may not be reproduced or distributed, in whole or in part, for commercial purposes, such as selling copies or providing educational services or support.
This document is supplied as a technical guide. Special care has been taken in preparing the information for publication; however, since product specifications are subject to change, this document might contain omissions and technical or typographical inaccuracies. Sound Devices, LLC does not accept responsibility for any losses due to the user of this guide.
Trademarks
The “wave” logo is a registered trademark and
Kashmir is a trademark of Sound Devices, LLC. iPad, iPhone, Mac and OS X are trademarks of Apple Inc., registered in the U.S. and other countries. Windows is a registered trademark of Microsoft Corporation in the U.S. and other countries. Bluetooth Smart is a registered trademark of Bluetooth SIG, Inc. ASIO is a registered trademark of Steinberg Media Technologies. All other trademarks herein are the property of their respective owners.
WEEE Statement
If you wish to discard a Sound Devices product in Europe, contact Sound Devices UK Service Center: +44 (0)1494 511711 for further information.
Warning! This device can drive headphones to potentially dangerous levels. Do not listen at high volume levels for long periods.
Read and fully understand this manual before operation.
Manual Conventions
SYMBOL DESCRIPTION
This symbol is used to show the order in which you select menu
>commands and sub-options, such as: Main Menu > Outputs indicates you press the Menu button for the Main Menu, then scroll to and select Outputs by pushing the Encoder.
[ ] |
This symbol is used to convey selectable menu items. |
*This symbol is used to convey factory default settings.
A plus sign is used to show button or keystroke combinations. For instance, Ctrl+V means to hold the Control key down and press the V key simultaneously. This also applies to other controls, such
+as switches and encoders. For instance, MIC+HP turn means to slide and hold the MIC/TONE switch left while turning the Headphone (HP) encoder. METERS+SELECT means to hold the METERS button down as you press the SELECT encoder.
A note provides recommendations and important related Note information. The text for notes appears italicized.
A cautionary warning about a specific action that could cause harm to you, the device, or cause you to lose data. Follow the
*guidelines in this document or on the unit itself when handling electrical equipment. The text for cautionary notes also appears italicized and bold in a different color.
MixPre II User Guide | Rev 4-A | 06/20
This document is distributed by Sound Devices, LLC in online electronic (PDF) format only. Published in the USA.
This table provides the revision history and cross-reference links to “what’s new” in this guide.
REV # |
DATE |
VERSION |
DESCRIPTION |
1-A |
08/19 |
A |
v4.00 Initial release |
2-A |
11/19 |
A |
v5.00. MixAssist, USB hub support, |
|
|
|
USB routing matrix. |
3-A |
1/20 |
A |
v6.00 32-bit float USB Audio Interface |
|
|
|
|
4-A |
6/20 |
A |
v7.00 Support for NoiseAssist, output |
|
|
|
delay, support for P.I. Engineering |
X-Keys
Post Office Box 576 |
+1 |
608.524.0625 main |
E7556 State Rd. 23 and 33 |
+1 |
608.524.0655 fax |
Reedsburg, Wisconsin 53959 USA |
|
800.505.0625 toll free |
www.sounddevices.com |
|
support@sounddevices.com |

Welcome to the MixPre II
VERSATILE. DURABLE. HIGH-PERFORMANCE.
If you record field audio, sound effects, audio for film, podcasts, voice-overs, music, or are just starting your audio journey, the MixPre II Series is for you! Lightweight, durable, and small, this powerhouse audio recorder and USB interface will help you capture audio for any application.
With Sound Devices’ hand-crafted, crystal-clear, ultra low-noise Kashmir preamps, you’ll record audio in superior quality - all the way up to a 32-bit float bit depth and a 192 kHz sample rate. This newest generation of Sound Devices’ award-winning MixPre Series has been redesigned for increased performance and an astounding 142 dB of dynamic range.
The MixPre II is highly customizable to your needs. Record internally to a compatible SD card on set or stream your podcast over USB to your computer at home. Power with your computer, wall power, or record in the middle of nowhere with AA or Sony L-mount batteries. Adjust limiters, bit depth, sample rates, gain, pan, low-cut, phase inversion and phantom power to your liking. Use the MixPre’s high-precision internal timecode generator to trigger the camera, or feed timecode in. The choice is yours!
Professionals love the flexibility of the MixPre Series. Don’t need all those options? Basic mode has you covered.
All models are rugged, lightweight, and small, so you can throw it in a bag or mount it to a tripod or camera - or get situated on set with our Wingman App and one of our four supported USB control surfaces.
With the superior sound and build quality that you can expect from the industry leader in production audio recording, your MixPre II can capture audio for any application. Our friendly and knowledgeable support team, based in the USA and Germany, is here for all your questions and comments. Our job is to make your job easier.
CUSTOMIZE WITH PLUGINS
Are you a songwriter or musician? Buy the Musician Plugin to easily create a song using your MixPre II as a standalone recorder or USB interface. Use onboard features like overdub, bounce, reverb, and tracking to a metronome. Create Music Projects to lay down backing tracks and use them live or at home for writing or practicing. Capturing your song ideas has never been easier!
Download the Ambisonics Plugin to record in 360° audio and monitor binaurally with an ambisonic microphone like the Sennheiser AMBEO and a MixPre-6 II or MixPre-10 II.
Using multiple microphones with your MixPre II?
Download the MixAssist Plugin to reduce unwanted room noise, feedback, or comb filter artifacts while recording.
Suppress background noise instantly on-location with the NoiseAssist Plugin for MixPre II Series. NoiseAssist is an advanced signal processing algorithm that reduces background noises such as traffic, generators, HVAC noise, and more. One instance of NoiseAssist can run on any channel, bus L, or bus R.
All plugins may be downloaded from the Sound Devices Store. |
|
We are honored to be part of your kit. |
|
Sincerely, |
|
Sound Devices |
|
MixPre II User Guide |
1 |

Table of Contents
PANEL VIEWS |
|
MIXPRE-3 II |
3 |
MIXPRE-6 II |
4 |
MIXPRE-10 II |
5 |
POWERING |
6 |
TOUCHSCREEN |
7 |
TRANSPORT CONTROL |
8 |
NAVIGATING MENUS |
9 |
CHOOSING YOUR MODE |
10 |
CHANNEL SCREEN |
17 |
LINKING CHANNELS |
19 |
INPUTS |
20 |
METERING |
22 |
LIMITERS |
23 |
OUTPUTS |
24 |
HEADPHONE OUTPUT |
26 |
USING THE MIXPRE II AS A USB AUDIO INTERFACE |
27 |
USB OUTPUT ROUTING |
29 |
FORMATTING MEDIA |
31 |
RECORD |
32 |
TIMECODE |
34 |
TIMECODE MODES |
35 |
PRESETS & PROJECTS |
36 |
FILE LIST |
37 |
CUE MARKS |
39 |
STAR SHORTCUTS |
40 |
SYSTEM |
34 |
WINGMAN |
41 |
USB HUB |
43 |
USB KEYBOARD |
44 |
USB CONTROLLERS |
45 |
MOUNTING TO A CAMERA OR TRIPOD |
50 |
SPECIFICATIONS |
|
MIXPRE-3 II |
51 |
MIXPRE-6 II |
52 |
MIXPRE-10 II |
53 |
MixPre II User Guide |
2 |
Panel Views
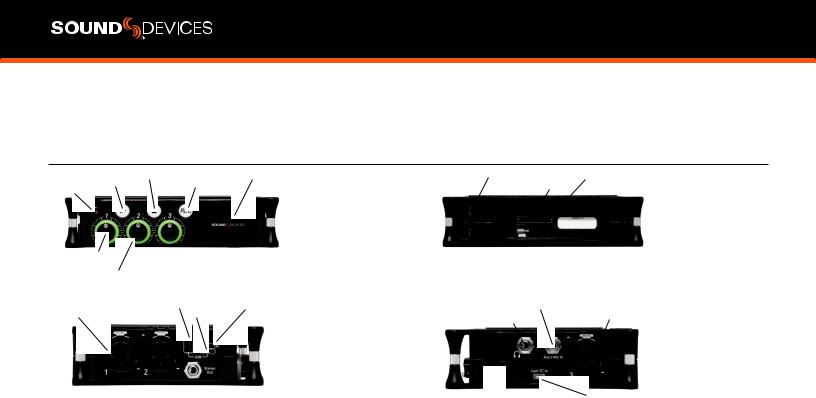
MIXPRE-3 II
|
Play |
Button |
Stop |
Button |
Touchscreen |
|
Power LED |
|
Record |
Button |
|
||
|
|
|
|
|||
Channel Knobs |
FRONT |
|
|
|
|
Channel Ring LED |
|
|
XLR Inputs |
USB-A Port |
Power Switch |
USB-C Port |
||
LEFT  Stereo or Timecode
Output
POWER LED Glows when the MixPre II is powered on.
CHANNEL KNOBS Sets the input gain for the channel. Press in on knob to access channel screen.
CHANNEL LED RING Provides visual indication of channel signal condition, solo and mute.
PLAY BUTTON Press to begin playback. While in playback the button glows green. See Transport.
STOP BUTTON Press to stop recording or playback. While stopped the button glows orange. See Transport.
RECORD BUTTON Press to begin a recording. While recording the button glows red. While copying in idle, the button flashes red. See Transport.
TOUCH SCREEN The sunlight-viewable, high-resolution, touchscreen is used to navigate the MixPre II user interface.
BATTERY CONTACTS Accepts power sled accessories designed for MixPre II. Allows powering from AA or Sony L-Mount batteries, such as the included MX-4AA.
SD CARD SLOT Insert SD card for recording.
ALLEN WRENCH & ANTI-ROTATIONAL PIN Magnetically attaches to the MixPre II for safe keeping. Used to attach MixPre II to cameras and tripods via ¼-inch-20-thread captive screw on MixPre II top panel.
INPUTS 1-3 FEMALE XLR JACKS Active-balanced analog microphone or line-level inputs. Inputs 1-2 on left panel, input 3 on the right. [pin-1 = ground, pin-2 = hot (+), and pin-3 = cold (-)]
Battery |
Contacts |
|
Allen Wrench and |
||
|
|
|
|
||
|
|
|
SD Card Slot |
|
Anti-Rotational Pin |
|
|
|
|
|
Storage |
|
|
|
|
|
|
|
|
|
|
|
|
REAR
Aux/Mic/Timecode |
Input |
XLR |
Input |
||
Headphone Output |
|
|
|
||
|
|
|
|
||
|
|
|
|
|
|
|
|
|
|
|
|
|
|
|
|
|
|
Headphone Knob |
RIGHT HDMI TC Input |
|
USB-A PORT
1.USB keyboard.
2.Auto-copy to USB drives.
3.USB to approved 3rd party control surfaces.
4.USB hubs to support multiple devices.
USB-C PORT
1.Provides power to the unit.
2.Connects to computer as a USB Audio Interface.
3.Connects to computer for transferring files from the SD card.
STEREO OR TIMECODE OUTPUT Unbalanced stereo 3.5 mm female connector. Routing determined in the Outputs menu. [Sleeve = ground, tip = X1, ring = X2].
POWER SWITCH Turns the power on and off.
HEADPHONE OUTPUT 3.5 mm TRS headphone output. Warning! This output can drive headphones to potentially dangerous levels. [Sleeve = ground, tip = left, ring = right]
HEADPHONE KNOB
1.Rotate to control headphone volume.
2.Rotate to navigate some menus and the virtual keyboard. Press in to select items.
AUX/MIC/TIMECODE INPUT Menu-selectable input. Accepts unbalanced stereo audio signal, Plug in Power microphones, or LTC timecode.
HDMI TC INPUT Connect to select cameras to receive HDMI timecode and record start/stop flags.
MixPre II User Guide |
3 |
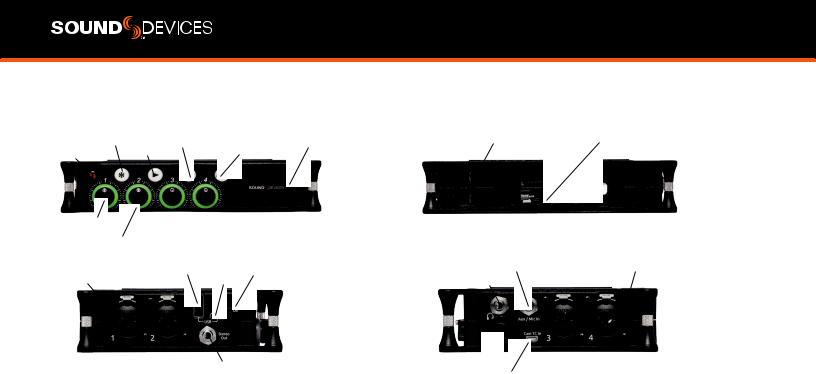
MIXPRE-6 II
|
|
Star |
Button |
Stop |
Button |
|
|
Touchscreen |
Battery Contacts |
|
|
Allen Wrench and |
|||||
|
|
Record |
Button |
|
|
|
SD Card Slot |
Anti-Rotational Pin |
|||||||||
|
|
|
Play |
Button |
|
|
|
||||||||||
Power LED |
|
|
|
|
|
|
|
Storage |
|||||||||
|
|
|
|
|
|
|
|
|
|||||||||
|
|
|
|
|
|
|
|
|
|||||||||
|
|
|
|
|
|
|
|
|
|
|
|
|
|
|
|
|
|
|
|
|
|
|
|
|
|
|
|
|
|
|
|
|
|
|
|
|
|
|
|
|
|
|
|
|
|
|
|
|
|
|
|
|
|
|
|
|
|
|
|
|
|
|
|
|
|
|
|
|
|
|
|
|
|
|
|
|
|
|
|
|
|
|
|
|
|
|
|
|
|
Channel |
Knobs |
|
FRONT |
|
|
|
|
|
|
|
REAR |
|
|
|
||||
|
|
|
|
|
|
|
|
|
|
|
|
|
|
|||||
Channel Ring LED |
|
USB- |
A Port |
|
|
Power |
Switch |
Aux/Mic/Timecode |
Input |
XLR / 1/4-inch |
TRS |
Inputs |
||||||
XLR / 1/4-inch TRS Inputs |
|
|
||||||||||||||||
|
|
|
||||||||||||||||
|
|
|
|
|
|
|
|
|
||||||||||
|
|
|
|
|
|
|
|
|
|
|||||||||
|
|
USB-C |
Port |
|
Headphone Output |
|
|
|
|
|
|
|||||||
|
|
|
|
|
|
|
|
|
|
|||||||||
|
|
|
|
|
|
|
|
|
|
|
|
|||||||
|
|
|
|
|
|
|
|
|
|
|
|
|
|
|
|
|
|
|
|
|
|
|
|
|
|
|
|
|
|
|
|
|
|
|
|
|
|
|
|
|
|
|
|
|
|
|
|
|
|
|
|
|
|
|
|
|
LEFT |
|
Stereo or Timecode |
Headphon |
e Knob |
RIGHT |
|
|||||
Output |
|
|
|||
HDMI TC Input
POWER LED Glows when the MixPre II is powered on.
CHANNEL KNOBS Sets the input gain for the channel. Press in on knob to access channel screen.
CHANNEL LED RING Provides visual indication of channel signal condition, solo and mute.
STAR (* & **) BUTTON Provides a user-assignable hardware button to frequently used functions. See Shortcuts.
PLAY BUTTON Press to begin playback. While in playback the button glows green. See Transport.
STOP BUTTON Press to stop recording or playback. While stopped the button glows orange. While copying in idle, the button flashes red. See Transport.
RECORD BUTTON Press to begin a recording. While recording the button glows red. While copying in idle, the button flashes red. See Transport.
TOUCH SCREEN The sunlight-viewable, high-resolution, touchscreen is used to navigate the MixPre II user interface.
BATTERY CONTACTS Accepts power sled accessories designed for MixPre II. Allows powering from AA or Sony L-Mount batteries, such as the included MX-4AA.
SD CARD SLOT Insert SD card for recording.
ALLEN WRENCH & ANTI-ROTATIONAL PIN Magnetically attaches to the MixPre II for safe keeping. Used to attach MixPre II to cameras and tripods via ¼-inch-20-thread captive screw on MixPre II top panel.
INPUTS 1-4 FEMALE XLR / 1/4” TRS COMBO JACKS Active-bal- anced analog microphone or line-level inputs. Inputs 1-2 on left panel, inputs 3-4 on the right. [pin-1 = ground, pin-2 = hot (+), and pin-3 = cold (-)]
USB-A PORT
1.USB keyboard.
2.Auto-copy to USB drives.
3.USB to approved 3rd party control surfaces.
4.USB hubs to support multiple devices.
USB-C PORT
1.Provides power to the unit.
2.Connects to computer as a USB Audio Interface.
3.Connects to computer for transferring files from the SD card.
STEREO OR TIMECODE OUTPUT Unbalanced stereo 3.5 mm female connector. Routing determined in the Outputs menu. [Sleeve = ground, tip = X1, ring = X2].
POWER SWITCH Turns the power on and off.
HEADPHONE OUTPUT 3.5 mm TRS headphone output. Warning! This output can drive headphones to potentially dangerous levels. [Sleeve = ground, tip = left, ring = right]
HEADPHONE KNOB
1.Rotate to control headphone volume.
2.Rotate to navigate some menus and the virtual keyboard. Press in to select items.
AUX/MIC/TIMECODE INPUT Menu-selectable input. Accepts unbalanced stereo audio signal, Plug in Power microphones, or LTC timecode.
HDMI TC INPUT Connect to select cameras to receive HDMI timecode and record start/stop flags.
MixPre II User Guide |
4 |
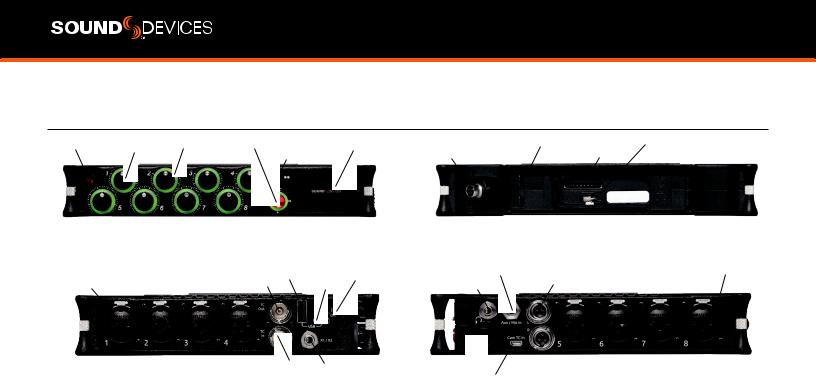
MIXPRE-10 II
Power LED |
Channel |
LED Ring Transport Controls |
Touchscreen |
|
|
|
Battery Contacts |
|
|
|
Allen Wrench and |
|||||||
|
|
|
|
|
|
|
|
Anti-Rotational Pin |
||||||||||
|
|
Channel |
Knobs |
|
|
|
Star Switch |
4-Pin Hirose DC Input |
|
|
SD |
Card Slot |
||||||
|
|
|
|
|
|
|
|
|
|
|
|
|
|
|||||
|
|
|
|
|
|
|
|
|
|
|
|
|
|
|
|
|
||
|
|
|
|
|
|
|
|
|
|
|
|
|
|
|
|
|
|
|
|
|
|
|
|
|
|
|
|
|
|
|
|
|
|
|
|
|
|
|
|
|
|
|
|
|
|
|
|
|
|
|
|
|
|
|
|
|
|
|
|
|
|
|
|
|
|
|
|
|
|
|
|
|
|
|
|
|
|
|
|
|
|
|
|
|
|
|
|
|
|
|
|
|
|
|
|
|
|
FRONT |
|
|
|
|
|
|
|
|
|
REAR |
|||||
|
|
|
BNC Timecode/ USB-A |
Port |
|
|
Power |
Switch |
Aux/Mic/Timecode |
Input |
|
XLR / 1/4-inch |
TRS |
Inputs |
||||
|
XLR / 1/4- |
inch TRS Inputs |
|
|
|
|
|
|
Left and Right TA3 Outputs |
|
|
|||||||
|
|
Headphone Output |
|
|
|
|||||||||||||
|
Word Clock Output |
|
|
|
USB-C |
Port |
|
|
|
|
|
|
|
|
||||
|
|
|
|
|
|
|
|
|
|
|
|
|||||||
|
|
|
|
|
||||||||||||||
|
|
|
|
|
|
|
|
|
|
|
||||||||
|
|
|
|
|
|
|
|
|
|
|
|
|
|
|
|
|
|
|
|
|
|
|
|
|
|
|
|
|
|
|
|
|
|
|
|
|
|
|
|
|
|
|
|
|
|
|
|
|
|
|
|
|
|
|
|
|
|
|
|
|
|
|
|
|
|
|
|
|
|
|
|
|
|
|
|
LEFT |
BNC Timecode/ |
|
|
X1 and X2 Output |
Headphon |
e Knob |
|
|
|
|
|
|
|||||
|
|
|
|
|||||
Word Clock Input |
|
|
|
HDMI |
|
|
||
|
|
|
|
|
|
TC Input |
||
RIGHT
POWER LED Glows when the MixPre II is powered on.
CHANNEL KNOBS Sets the input gain for the channel. Press in on knob to access channel screen.
CHANNEL LED RING Provides visual indication of channel signal condition, solo and mute.
TRANSPORT CONTROLS A joystick (with its illuminated LED ring) on the front panel is used to perform various transport control functions. (see Transport).
STAR (* & **) SWITCH Provides a user-assignable hardware switch to frequently used functions. See Shortcuts.
TOUCH SCREEN The sunlight-viewable, high-resolution, touchscreen is used to navigate the MixPre II user interface.
4-PIN HIROSE DC INPUT Accepts DC voltages from 10–17 V for powering. [pin-4=+, pin-1=-] Works with included XL-WPH3.
BATTERY CONTACTS Accepts power sled accessories designed for MixPre II. Allows powering from AA or Sony L-Mount batteries, such as the included MX-8AA.
ALLEN WRENCH & ANTI-ROTATIONAL PIN Magnetically attaches to the MixPre II for safe keeping. Used to attach MixPre II to cameras and tripods via ¼-inch-20-thread captive screw on MixPre II top panel.
SD CARD SLOT Insert SD card for recording.
INPUTS 1-8 FEMALE XLR / 1/4” TRS COMBO JACKS Active-bal- anced analog microphone or line-level inputs. Inputs 1-4 on left panel, inputs 5-8 on the right. [pin-1 = ground, pin-2 = hot (+), and pin-3 = cold (-).
BNC TIMECODE OR WORD CLOCK OUTPUT Menu-selectable between timecode or word clock functionality. Set to timecode to send LTC timecode to cameras, digi-slates or other timecode-enabled equipment. Set to word clock to use the MixPre-10 II as a master precision clock source for external equipment.
BNC TIMECODE OR WORD CLOCK INPUT Menu-selectable between timecode or word clock functionality. Set to timecode to receive LTC timecode from a camera or timecode generator. Set to word clock to slave to an external clock source.
USB-A PORT
1.USB keyboard.
2.Auto-copy to USB drives.
3.USB to approved 3rd party control surfaces.
4.USB hubs to support multiple devices.
USB-C PORT Used to connect to a computer for USB audio or transferring files from the SD card.
X1/X2 OUTPUT Unbalanced stereo 3.5 mm female connector. Routing determined in the Outputs menu. [Sleeve = ground, tip = X1, ring = X2].
POWER SWITCH Turns the power on and off.
HEADPHONE OUTPUT 3.5 mm TRS headphone output. Warning! This output can drive headphones to potentially dangerous levels. [Sleeve = ground, tip = left, ring = right]
AUX/MIC/TIMECODE INPUT Menu-selectable input. Accepts unbalanced stereo audio signal, Plug in Power microphones, or LTC timecode.
HEADPHONE KNOB
1.Rotate to control headphone volume.
2.Rotate to navigate some menus and the virtual keyboard. Press in to select items.
HDMI TC INPUT Connect to select cameras to receive HDMI timecode and record start/stop flags.
LEFT & RIGHT TA3 OUTPUTS +18 dBu line level outputs. Routing determined in the Outputs menu. [pin-1 = Ground, pin-2 = hot (+), pin- 3 = cold (-). Float pin-3 to unbalance]
MixPre II User Guide |
5 |

Powering the MixPre II
Apply your choice of power source. Turn the master power switch located in the upper right corner of the left side panel to the On position. To ensure the battery/power status indicator displayed on the touchscreen shows accurate level and status, select your battery/ power type in the Power menu.
When using AA batteries to power the MixPre II, we recommend Energizer Ultimate Lithium (not alkaline batteries). The high internal resistance of alkaline batteries makes them only suited to devices requiring low current (less than 25 mA), not higher power electronic devices such as the MixPre II.
Incorrect use of batteries poses a danger of explosion. Replace only with the same or equivalent type. Properly recycle batteries. Do not crush, disassemble, incinerate, dispose in a fire or expose batteries to high temperatures.
Save power by turning off unused channels.
With multiple options for powering, your MixPre II can operate in a wide array of applications and environments.
MIXPRE-3 II AND MIXPRE-6 II POWER OPTIONS
1.Included MX-PSU AC wall adapter to USB-C power supply.
2.Four AA batteries installed in the included MX-4AA Battery Sled.
3.Eight AA batteries installed in the optional MX-8AA Battery Sled accessory.
4.One or two Sony-type L-Mount batteries installed in the optional MX-LMount battery sled accessory.
5.USB-C to USB-C cable (included) connected to a USB-C host computer or AC wall adapter.
6.USB-A to USB-C cable connected to a USB-A host computer or AC wall adapter. The unit will enter a low power state and some functionality will be limited with this power option.
7.MX-USBY Dual USB-A to USB-C optional accessory cable connected to a USB-A host computer. Use this cable option if your computer is unable to provide adequate power with only one USB-A port.
MIXPRE-10 II POWER OPTIONS
1.Included XL-WPH3 AC to DC 12 V Power supply with 4-pin Hirose.
2.Eight AA batteries installed in the included MX-8AA Battery Sled.
3.One or two Sony-type L-Mount batteries installed in the optional MX-LMount battery sled accessory.
Power Switchover and Priority
MIXPRE-3 II AND MIXPRE-6 II
To preserve battery power, USB-C power sources take priority over batteries if both are connected with one exception - if the USB-C power source does not meet the full power requirements of the MixPre II, you can choose to power from battery or continue to power from USB-C. An underpowered MixPre II will be able to use two of the three or four channels with 48 V phantom mics. Other channels can still be used with dynamic mics and line level, Aux, or USB sources. In a low power state, the MixPre II automatically:
1.Dims LCD and LED Brightness.
2.Disables USB-A port.
3.Disables HDMI TC port.
For protection against accidental loss of power, the MixPre II incorporates circuitry to automatically switch over from USB-C to batteries.
MIXPRE-10 II
For preservation of battery power, 4-pin Hirose power sources take priority over batteries if both are connected. For protection against accidental loss of power, the MixPre-10 II incorporates circuitry to automatically switch power sources.
MixPre II User Guide |
6 |
Touchscreen
The MixPre II has a sunlight-viewable, high-resolution, touch-screen-based user interface, which consists of the Home screen, Main Menu screen, and Channel screen views. There are several touch zones on the touch screen for controls. As you become familiar with the user interface, changing settings for inputs, outputs, recording and metering will become fast and intuitive.
HOME SCREEN
The Home screen view appears on the touchscreen when the device is powered up.
|
|
Current File |
Cue Marker |
Power Status |
||||||
File List Icon |
|
Name |
|
|
Icon |
|
Icon |
Menu Icon |
||
|
|
|
|
|
|
|
|
|||
|
|
|
|
|
|
|
|
|
|
|
|
|
|
|
|
|
|
|
|
|
|
|
|
|
|
|
|
|
|
|
|
|
Time Counter
 Meter View
Status Bar
FILE LIST ICON Touch to enter the File List. CURRENT FILE NAME Displays the current file name.
TIME COUNTER Displays current timecode value. If timecode is Off, displays time counter of recording file.
CUE MARKER ICON Touch to lay a cue marker during record or playback. Displays current cue mark point.
POWER STATUS ICON Displays the status of the active power source. See tables opposite for further details.
MENU ICON Touch to enter the setup menu.
METER VIEW Displays audio activity. Touch to toggle through available meter views:.
1.Left and Right mix tracks.
2.Left and Right mix tracks with isolated tracks.
3.Left and Right mix tracks, USB inputs 1 and 2, and 2 camera returns (when Aux inputs are set to camera).
STATUS BAR Touch to toggle information displayed:
1.SD card status: card/drive activity, available recording time, file duration, elapsed time, and headphone preset.
2.USB drive status: remaining space on drive, sample rate, bit depth.
3.Sync Source (if external), sample rate, and bit depth.
4.Date and time.
While auto-copying, copy status is displayed on all status bars. Copy status will alternate with default info.
MIXPRE-3 II AND MIXPRE-6 II
Power Status Icon |
|
Description |
|
|
|
|
|
USB power source is ideal. |
(Green USB) |
|
|
|
|
USB power source low. Brightness |
(Orange USB) |
|
dimmed, HDMI & USB-A ports disabled, |
|
48 V phantom on 2 channels only. |
|
|
|
Healthy battery. Plan to change batteries |
(Green Battery) |
|
when green level drops to about ¼ full. |
|
|
|
|
|
Battery power is critically low. Change |
(Flashing Red Battery) |
|
batteries. |
|
|
|
MIXPRE-10 II |
|
|
|
|
|
Power Status Icon |
|
Description |
|
|
|
|
|
Healthy battery. Plan to change batteries |
(Green Battery) |
|
when green level drops to about ¼ full. |
|
|
|
|
|
Battery power is critically low. Change |
(Flashing Red Battery) |
|
batteries. |
|
|
MixPre II User Guide |
7 |
Transport Controls
MIXPRE-3 II AND MIXPRE-6 II
The three Transport controls (illuminated buttons) on the front panel are used to perform recording and playback functions.
FUNCTION |
CONTROL |
ACTION |
|
|
|
|
|
Press to begin recording a new file. The button illuminates red while recording is in |
Record |
|
underway. In Stop mode the record button flashes red while auto-copying to a USB |
|
thumbdrive. |
|
|
|
|
|
|
While recording, press once to stop recording. While in playback, press once to stop |
Stop |
|
playback. While in standby, press and hold to display next name. While in Standby |
|
and auto-copying is in progress, press Stop to optionally suspend auto-copying. |
|
|
|
|
|
|
|
|
|
Press to begin playback of the last file recorded or file currently loaded. The button |
Play / Pause |
|
illuminates green during playback. While in playback, press once to pause, and press |
|
again to resume playback. Whenever playback is paused, the button and the current |
|
|
|
|
|
|
file name will flash green. |
|
|
|
|
|
While playing or paused, press and hold the headphone encoder to enter Scrub |
Scrub |
|
mode. Then rotate clockwise for fast forward or counter-clockwise for rewind at |
|
speeds of 0x, 1/8x, 1/4x, 1/2x, 1x, 2x, 4x, 8x and 16x. The audio is heard in Scrub |
|
|
|
|
|
|
mode up to 2x speed. |
MIXPRE-10 II
A joystick (with its illuminated LED ring) on the front panel is used to perform various transport control functions.
FUNCTION |
CONTROL |
ACTION |
|
|
Push up the Transport control to begin recording a new file. The LED ring illuminates |
|
|
red while recording is underway. |
Record
|
Press in the Transport control to stop recording or playback.While in standby, press |
|
Stop |
and hold to display next take name. The LED flashes red while auto-copying to a USB |
|
thumbdrive.While in Standby and auto-copying is in progress, press Stop to bring up |
||
|
||
|
a dialogue box which gives the option to suspend auto-copying. |
|
|
Push down the Transport control to begin playback of the last file recorded or file |
|
|
currently loaded. While in playback, push down again to pause playback. The LED |
|
Play |
ring as well as the active file in the display will flash to indicate that Pause is active. |
|
Push down again to continue playback. |
||
|
||
|
While in standby, push left to load the previous take. While in playback, push and |
|
Rewind / Load |
hold left to rewind. |
|
previous take |
When the MixPre is playing back or paused, moving the joystick to the left (<<) |
|
|
rewinds at 2x speed, then after holding for 5 seconds, it increases to 16x speed. |
|
|
While in standby, push right to load the next take. While in playback, push and hold |
|
Fast forward / Load |
right to fast forward. |
|
next take |
When the MixPre is playing back or paused, moving the joystick to the right (>>) fast- |
|
|
forwards at 2x speed, then after holding for 5 seconds, it increases to 16x speed. |
|
|
While playing or paused, press and hold the headphone encoder to enter Scrub |
|
|
mode. Then rotate clockwise for fast forward or counter-clockwise for rewind at |
|
Scrub |
speeds of 0x, 1/8x, 1/4x, 1/2x, 1x, 2x, 4x, 8x and 16x. The audio may be heard in |
|
|
Scrub mode up to 2x speed. |
MixPre II User Guide |
8 |
Navigating Menus
Most features and functions are selected and set up in the Menu.
ICON |
FUNCTION |
|
|
|
Touch the Menu icon from the Home |
|
Screen to enter the Menu. |
|
|
|
Touch the Page (dots) icon to view |
|
the next page of options. |
|
|
|
Touch the Back icon to return to the |
|
main Menu from any submenu. |
|
|
|
Touch the Home icon to immediately |
|
return the the Home Screen. |
|
|
|
Touch the Headphone icon to enter |
|
the Headphone menu. |
|
|
MAIN MENU SCREEN
Touch any menu item to enter the submenu. The menus available depend on model and Mode. See Choosing Your Mode for more information.
MixPre II User Guide |
9 |

Choosing your Mode
The MixPre II has three different modes of operation to suit you and your application: Basic, Advanced, and Custom. Basic mode is intended for simple, hassle-free, plug-and-play use and beginners. Advanced mode is for professionals and anyone who wants to have every available setting and option at their disposal. Custom mode allows you to select your own mixture of basic and advanced operation.
The MixPre-3 II and MixPre-6 II default to Basic mode. The MixPre-10 II defaults to Advanced mode. To change mode, go to Menu>System>Mode.
MIXPRE-3 II BASIC VS ADVANCED
|
FEATURE |
BASIC |
ADVANCED |
|
|
|
|
|
|
|
Gain |
Channel knob controls all gain for a |
Dual gain stage. Input gain is set in the Channel Screen. Channel |
|
|
|
channel. |
knob controls post-fade levels to mix bus. |
|
|
Channel Screen Options |
Pan (Left, Center, Right) |
Solo |
|
|
|
Input |
Mute |
|
|
|
Phantom |
Track Arm (Iso Tracks) |
|
|
|
Low Cut (On or Off) |
Gain |
|
|
|
|
Pan (Variable) |
|
|
|
|
Input |
|
|
|
|
Phantom |
|
|
|
|
Low Cut (On or Off) |
|
|
|
|
Phase |
|
|
|
|
Delay |
|
|
|
|
NoiseAssist (requires NoiseAssist plugin) |
|
|
|
|
Stereo and MS Linking |
|
|
Headphone Options |
LR Stereo |
LR Stereo |
|
|
|
USB 1,2 |
LR Mono |
|
|
|
|
USB 1,2 |
|
|
|
|
Presets 1-4 |
|
|
|
|
Edit Presets |
|
|
|
|
Camera Stereo |
|
|
|
|
Camera Mono |
|
|
|
|
HP Solo mode (Multiple or Individual) |
|
|
Outputs |
Fixed routing of LR mix |
Stereo Output flexible routing |
|
|
|
|
Stereo Output gain |
|
|
|
|
Stereo Out Mode (LTC or Audio) |
|
|
|
|
Stereo Out Mute |
|
|
|
|
L,R Delay |
|
|
|
|
USB Output 1-6 |
|
|
File List Options |
Name |
Undo Recording |
|
|
|
Number |
Name |
|
|
|
Trash File |
Number |
|
|
|
Cue Move |
Notes |
|
|
|
Cue Name |
Track Names |
|
|
|
Cue Delete |
Trash File |
|
|
|
|
Cue Move |
|
|
|
|
Cue Name |
|
|
|
|
Cue Delete |
|
|
Aux In Options |
Mic |
Mic |
|
|
|
Line |
Line |
|
|
|
Timecode |
Timecode |
|
|
|
Off |
Camera Return |
|
|
|
|
Off |
|
|
MixAssist |
Not Available |
Requires Plugin |
|
|
|
|
|
|
|
NoiseAssist |
Not Available |
Requires Plugin |
|
|
|
|
|
|
|
Record Options |
Sample Rate fixed at 48 kHZ |
Sample Rate Options 44.1 - 192 kHz |
|
|
|
Bit Depth fixed at 24 bit |
Bit Depth options 16, 24, 32 (float) |
|
|
|
Records only the Left/Right mix |
Record Isolated channels and mix tracks |
|
|
|
Pre-roll |
Individual control of Left and Right gain |
|
|
|
Record Triggers |
Individual control of Left and Right record arming |
|
|
|
Record Bells |
Pre-roll |
|
|
|
|
Record Triggers |
|
|
|
|
Record Bells |
|
|
|
|
Remix & Rerecord |
|
|
|
|
NoiseAssist, Left and Right (requires plugin) |
|
MixPre II User Guide |
|
10 |
||

|
|
|
|
|
|
|
|
|
|
|
Limiters |
Always On |
Limiters (Off, Factory, Custom) |
|
|
|
|
Custom Limiter options (Ratio, Threshold, Release) |
|
MixPre II User Guide |
11 |

MIXPRE-6 II BASIC VS ADVANCED
|
FEATURE |
BASIC |
ADVANCED |
|
|
|
|
|
|
|
Gain |
Channel knob controls all gain for a |
Dual gain stage. Input gain is set in the Channel Screen. Channel |
|
|
|
channel. |
knob controls post-fade levels to mix bus. |
|
|
Channel Screen Options |
Pan (Left, Center, Right) |
Solo |
|
|
|
Input |
Mute |
|
|
|
Phantom |
Track Arm (Iso Tracks) |
|
|
|
Low Cut (On or Off) |
Gain |
|
|
|
|
Pan (Variable) |
|
|
|
|
Input |
|
|
|
|
Phantom |
|
|
|
|
Low Cut (On or Off) |
|
|
|
|
Phase |
|
|
|
|
Delay |
|
|
|
|
NoiseAssist (requires NoiseAssist plugin) |
|
|
|
|
Linking |
|
|
Headphone Options |
LR Stereo |
LR Stereo |
|
|
|
USB 1,2 |
LR Mono |
|
|
|
USB 3,4 |
USB 1,2 |
|
|
|
|
USB 3,4 |
|
|
|
|
Presets 1-4 |
|
|
|
|
Edit Presets |
|
|
|
|
Camera Stereo |
|
|
|
|
Camera Mono |
|
|
|
|
HP Solo mode (Multiple or Individual) |
|
|
Outputs |
Fixed routing of LR mix |
Stereo Output flexible routing |
|
|
|
|
Stereo Output gain |
|
|
|
|
Stereo Out Mode (LTC or Audio) |
|
|
|
|
Stereo Out Mute |
|
|
|
|
L,R Delay |
|
|
|
|
USB Outputs 1-8 |
|
|
File List Options |
Name |
Undo Recording |
|
|
|
Number |
Name |
|
|
|
Trash File |
Number |
|
|
|
Cue Move |
Notes |
|
|
|
Cue Name |
Track Names |
|
|
|
Cue Delete |
Trash File |
|
|
|
|
Cue Move |
|
|
|
|
Cue Name |
|
|
|
|
Cue Delete |
|
|
Aux In Options |
Mic |
Mic |
|
|
|
Line |
Line |
|
|
|
Timecode |
Timecode |
|
|
|
Off |
Camera Return |
|
|
|
|
Off |
|
|
Ambisonics |
Not Available |
Requires Plugin |
|
|
|
|
|
|
|
MixAssist |
Not Available |
Requries Plugin |
|
|
|
|
|
|
|
NoiseAssist |
Not Available |
Requires Plugin |
|
|
|
|
|
|
|
Record Options |
Sample Rate fixed at 48 kHZ |
Sample Rate Options 44.1 - 192 kHz |
|
|
|
Bit Depth fixed at 24 bit |
Bit Depth options 16, 24, 32 (float) |
|
|
|
Records only the Left/Right mix |
Record Isolated channels and mix tracks |
|
|
|
Pre-roll |
Individual control of Left and Right gain |
|
|
|
Record Triggers |
Individual control of Left and Right record arming |
|
|
|
Record Bells |
Pre-roll |
|
|
|
|
Record Triggers |
|
|
|
|
Record Bells |
|
|
|
|
Remix & Rerecord |
|
|
|
|
NoiseAssist, Left and Right (requires plugin) |
|
|
Tone Menu |
On or Off |
On or Off |
|
|
|
|
L Ident Tone |
|
|
|
|
Tone Level |
|
MixPre II User Guide |
|
12 |
||

|
|
|
|
|
|
|
|
|
|
|
FEATURE |
BASIC |
ADVANCED |
|
|
|
|
|
|
|
Limiters |
Always On |
Limiters (Off, Factory, Custom) |
|
|
|
|
Custom Limiter options (Ratio, Threshold, Release) |
|
MixPre II User Guide |
13 |

MIXPRE-10 II BASIC VS ADVANCED
FEATURE |
BASIC |
ADVANCED |
|
|
|
Gain |
Channel knob controls all gain for a |
Dual gain stage. Input gain is set in the Channel Screen. Channel |
|
channel. |
knob controls post-fade levels to mix bus. |
Channel Screen Options |
Pan (Left, Center, Right) |
Solo |
|
Input |
Mute |
|
Phantom |
Track Arm (Iso Tracks) |
|
Low Cut (On or Off) |
Gain |
|
|
Pan (Variable) |
|
|
Input |
|
|
Phantom |
|
|
Low Cut (On or Off) |
|
|
Phase |
|
|
Delay |
|
|
NoiseAssist (plugin required) |
|
|
Stereo and MS Linking |
Headphone Options |
LR Stereo |
LR Stereo |
|
X1X2 Stereo |
LR Mono |
|
USB 1,2 |
X1X2 Stereo |
|
USB 3,4 |
USB 1,2 |
|
|
USB 3,4 |
|
|
Presets 1-4 |
|
|
Edit Presets |
|
|
Camera Stereo |
|
|
Camera Mono |
|
|
HP Solo mode (Multiple or Individual) |
Outputs |
Fixed routing of LR mix |
L,R and X1,X2 flexible routing |
|
|
L,R and X1,X2 gain |
|
|
L,R and X1,X2 Out Mute |
|
|
L,R and X1,X2 Delay |
|
|
USB Outputs 1-12 |
File List Options |
Name |
Undo Recording |
|
Number |
Name |
|
Trash File |
Number |
|
Cue Move |
Notes |
|
Cue Name |
Track Names |
|
Cue Delete |
Trash File |
|
|
Cue Move |
|
|
Cue Name |
|
|
Cue Delete |
Aux In Options |
Mic |
Mic |
|
Line |
Line |
|
Timecode |
Timecode |
|
Off |
Camera Return |
|
|
Off |
Ambisonics |
Not Available |
Requires Plugin |
|
|
|
MixAssist |
Not Available |
Requires Plugin |
|
|
|
NoiseAssist |
Not Available |
Requires Plugin |
|
|
|
Record Options |
Sample Rate fixed at 48 kHZ |
Sample Rate options 44.1 - 192 kHz |
|
Bit Depth fixed at 24 bit |
Bit Depth options 16, 24, 32 (float) |
|
Records only the Left/Right mix |
Record Isolated channels and mix tracks |
|
Pre-roll |
Individual control of Left and Right gain |
|
Record Triggers |
Individual control of Left and Right record arming |
|
Record Bells |
Pre-roll |
|
|
Record Triggers |
|
|
Record Bells |
|
|
Remix & Rerecord |
|
|
NoiseAssist, Left and Right (requires plugin) |
MixPre II User Guide |
14 |

|
|
|
|
|
|
|
|
|
|
|
FEATURE |
BASIC |
ADVANCED |
|
|
|
|
|
|
|
Tone |
On or Off |
Flexible Tone Routing |
|
|
|
|
Tone Level |
|
|
|
|
L Ident Tone |
|
|
|
|
Tone Level |
|
|
Limiters |
Always On |
Limiters (Off, Factory, Custom) |
|
|
|
|
Custom Limiter options (Ratio, Threshold, Release) |
|
MixPre II User Guide |
15 |
 Loading...