


8 3 3
PORTABLE COMPACT MIXER-RECORDER
Legal Notices
Product specifications and features are subject to change without prior notification.
Copyright© 2019 Sound Devices, LLC. All rights reserved. This product is subject to the terms and conditions of a software license agreement provided with the product, and may be used in accordance with the license agreement.
This document is protected under copyright law. An authorized licensee of this product may reproduce this publication for the licensee’s own personal use. This document may not be reproduced or distributed, in whole or in part, for commercial purposes, such as selling copies or providing educational services or support.
This document is supplied as a technical guide. Special care has been taken in preparing the information for publication; however, since product specifications are subject to change, this document might contain omissions and technical or typographical inaccuracies. Sound Devices, LLC does not accept responsibility for any losses due to the user of this guide.
Trademarks
The “wave” logo is a registered trademarks; Wave Agent ia a trademark of Sound Devices, LLC. Windows and Microsoft Excel are registered trademarks of Microsoft Corporation in the U.S. and other countries. All other trademarks herein are the property of their respective owners.
WEEE Statement
If you wish to discard a Sound Devices product in Europe, contact Sound Devices (Germany) for further information.
Warning! This device can drive headphones to potentially dangerous levels. Do not listen at high volume levels for long periods.
Read and fully understand this manual before operation.
Manual Conventions
SYMBOL DESCRIPTION
This symbol is used to show the order in which you select menu
>commands and sub-options, such as: Main Menu > Outputs indicates you press the Menu button for the Main Menu, then scroll to and select Outputs by pushing the Knob.
[ ] |
This symbol is used to convey selectable menu items. |
*This symbol is used to convey factory default settings.
A plus sign is used to show button or keystroke combinations. For instance, Ctrl+V means to hold the Control key down and press the V key simultaneously. This also applies to other controls,
+such as switches and knobs. For instance, MIC+HP turn means to slide and hold the MIC/TONE switch left while turning the Headphone (HP) knob. METERS+SELECT means to hold the METERS button down as you press the SELECT knob.
A note provides recommendations and important related
*information. The text for notes appears italicized.
A cautionary warning about a specific action that could cause harm to you, the device, or cause you to lose data. Follow the
*guidelines in this document or on the unit itself when handling electrical equipment. The text for cautionary notes also appears italicized and bold in a different color.
833 User Guide | Rev 2-A | 10/16/19
This document is distributed by Sound Devices, LLC in online electronic (PDF) format only. Published in the USA.
This table provides the revision history and cross-reference links to “what’s new” in this guide.
REV # |
DATE |
VERSION |
DESCRIPTION |
1-A |
09/19 |
A |
v2.10 Initial Release |
2-A |
10/19 |
A |
v3.00 MixAssit, CL-12 Support, |
|
|
|
Timecode stamped AAC file recording, |
Smart Battery telemetry.
Included Accessories
PART NUMBER |
DESCRIPTION |
2479.000 |
Cordset 6’ AC cable |
|
|
9623.001 |
XL-WPTA4 power supply TA4 Connector |
|
|
9244.003 |
LCD cover |
|
|
9772.000 |
Antenna, SMA connector |
|
|
5529.000 |
Promo Sticker (white) |
|
|
5537.000 |
Promo sticker (black) |
1312.000 |
Dot: Red, Yellow, Blue,Green, Purple, White (8 each) |
Post Office Box 576 |
+1 |
608.524.0625 main |
E7556 State Rd. 23 and 33 |
+1 |
608.524.0655 fax |
Reedsburg, Wisconsin 53959 USA |
|
800.505.0625 toll free |
www.sounddevices.com |
|
support@sounddevices.com |

Welcome to the 833
FULLY ROUTABLE. ULTRA-PORTABLE.
The 833 is the professional’s tool for mobile and small productions. Like the popular Sound Devices 633, the 833 is small, lightweight, and compact. A tactile interface with dedicated faders, trim knobs, and PFL switches makes this mixer-recorder ideal for run-and-gun bag use.
The 833 has 6 mic/line preamplifiers, 8 channels, 12 tracks, 6 analog outputs, and ultra-accurate timecode. Many features have carried over from the premium Sound Devices’ Scorpio, such as Sound Devices’ new preamplifier design, 2 SD card slots, dual L-Mount battery charging and powering, and an internal 256 GB SSD.
Additionally, the 833 shares the same processing architecture and multiple FPGAs as the Scorpio. This enables the 833 to be fully routable, and any physical input can be routed to any track. The 833 features both digital and analog inputs and outputs, and has multiple powering options, so it will fit effortlessly into your existing kit.
A built-in three band EQ may be set to either preor post-fade for each channel to tackle any problems directly on-set. Enable Dugan Automixing to automatically attenuate unused microphones in multi-microphone applications. Up to 8 channels can be automixed at a time, and two separate groups can be mixed simultaneously.
Dedicated coms and slate allows for professional bi-directional communication with other crew members. Send customized mixes to the camera or crew with multiple mix buses. With the ability to record to three media simultaneously, you can turn over SD cards to production at the end of the day while keeping a backup on the internal 256 GB SSD.
The 833 may be controlled via the companion Android app, SD-Remote, which features transport controls, metering, and sound reports. For an instant mobile workstation, choose from one of several supported USB control surfaces for remote fader and transport control.
We are honored to be part of your kit.
Sincerely,
Sound Devices
833 User Guide |
1 |

Table of Contents
PANEL VIEWS |
3 |
FRONT PANEL |
3 |
LEFT SIDE PANEL |
4 |
RIGHT SIDE PANEL |
5 |
REAR PANEL |
6 |
TOP PANEL |
6 |
HOME SCREEN |
7 |
CHANNEL SCREEN |
8 |
VIRTUAL KEYBOARD |
9 |
PHRASE MANAGER |
10 |
CHANNEL EQ |
11 |
MENUS |
12 |
POWER MENU |
13 |
CHANNEL SETUP |
13 |
BUS MENU |
14 |
OUTPUT MENU |
15 |
LIMITERS |
16 |
AUTOMIXER |
17 |
DUGAN AUTOMIXER |
17 |
MIXASSIST |
18 |
METERS |
19 |
TIMECODE |
20 |
RECORD/PLAY |
21 |
FILES |
22 |
SLATE/COMS/RETURNS |
25 |
SYSTEM |
26 |
CONTROLLERS |
27 |
FRONT PANEL SHORTCUTS |
31 |
TOGGLE SWITCH SHORTCUTS |
31 |
USB KEYBOARD |
32 |
SD REMOTE |
33 |
QUICK SETUP |
35 |
SPECIFICATIONS |
37 |
GLOSSARY |
41 |
833 User Guide |
2 |

Panel Views
FRONT PANEL
|
|
|
|
|
|
Channel Fader |
Transport Control |
||
Channel Trim |
PFL Switch |
|
|
LCD Display |
|||||
|
|
Channel Ring LED |
Meter |
|
Power Switch/LED Indicator |
||||
|
|
|
|
||||||
|
|
|
|
|
|
|
|
|
|
|
|
|
|
|
|
|
|
|
|
Menu Button
 Headphone Knob
|
|
|
Switch |
Select Knob |
*/** |
||
|
|
Rtn/Fav Switch |
|
|
Mic/Tone Switch |
||
CHANNEL TRIM Turns the channel on/off and sets the input gain for the channel. To conserve power, turn off unused channels by rotating channel trim fully counter-clockwise.
CHANNEL LED RING Provides visual indication of channel signal condition, solo and mute, and whether a channel is on or off.
CHANNEL FADER Controls the audio level of the channel as it contributes to the L/R mix and any destinations selected in routing as “Post”.
PFL SWITCH Pre/Post Fade Listen selects the channel in the headphones for Pre/Post Fade Listen while simultaneously entering the channel screen. Also used for accessing virtual keyboard for channel naming and various shortcuts.
TRANSPORT CONTROLS A joystick (with its illuminated LED ring) on the front panel is used to perform various transport control
functions. (see table below). The ring LED will flash orange indicating post roll while writing to media.
Function |
Action |
|
|
Record |
Push up the Transport control to begin recording a new file. |
|
The LED ring illuminates red while recording is underway. |
Stop |
Press in the Transport control to stop recording or playback. |
|
While in standby, press and hold to display next take name. |
Play |
Push down on the Transport control to begin playback of the |
|
last file recorded or file currently loaded. While in playback, |
|
push down again to pause playback. The LED ring as well as |
|
the active file in the display will flash to indicate that Pause |
|
is active. Push down again to continue playback. |
Rewind / Load |
While in standby, push left to load the previous take. While |
Previous Take |
in playback, push and hold left to rewind. |
|
When the 833 is playing back or paused, moving the joystick |
|
to the left (<<) rewinds at 2x speed, then after holding for 5 |
|
seconds, it increases to 16x speed. |
Fast Forward |
While in standby, push right to load the next take. While in |
/ Load Next |
playback, push and hold right to rewind. |
Take |
When the 833 is playing back or paused, moving the joystick |
|
to the right (>>) fast forwards at 2x speed, then after holding |
|
for 5 seconds, it increases to 16x speed. |
Scrub |
While playing or paused, press the headphone knob to |
|
enter Scrub mode. Then rotate clockwise for fast forward or |
|
counter-clockwise for rewind speeds of 0x, 1/8x, 1/4x, 1/2x, |
|
1x, 2x, 4x, 8x, and 16x. The audio may be heard in scrub |
|
mode up to 2x speed. |
METER BUTTON Push to view and select various metering presets. Used with Select knob. Push again to return to Home Screen.
SELECT KNOB
1.Push to view Outputs list, rotate and push to Select Output Screen. Push Meter Button to return to Home Screen.
2.Rotate to select track in display, push both Meter and Select at the same time to arm/disarm track. While holding the Meter Button, multiple consecutive tracks may be armed by holding in the Select knob and rotating.
3.Use with Meter Button to scroll through meter views then push to Select.
4.Push with Channel Select switches 1-6 for shortcut to Bus 1-4, L,R routing.
5.Menu navigation and push to Select.
MIC/TONE SWITCH Toggle slate mic and tone generator. Soft button for menus.
*/** SWITCH User-programmable shortcut toggles.
POWER SWITCH/LED INDICATOR Turns the power on and off. Switch LED ring indicates the following:
1.Power condition: green = good, yellow = warning, red = shutdown imminent.
2.Flashing blue = power is off and holding timecode.
3.Continuous blue = booting up.
4.Flashing yellow = unit is off and charging L-mount batteries.
5.Continuous yellow = unit is off and both L-mount batteries are fully charged.
MENU BUTTON Push to enter the Main menu. Also used to exit menus. The Menu button will flash red to indicate clipping on the headphones. Press with Channel Select switches 1-6 for shortcuts to Menu Favorites 1-6.
HEADPHONE KNOB
1.Rotate to control headphone volume.
2.Press to open headphone preset menu and select.
3.Menu navigation and push to select.
4.Press Menu and HP knob to enter Take List.
5.Press > 0.5s during playback to enter audio scrub mode.
833 User Guide |
3 |
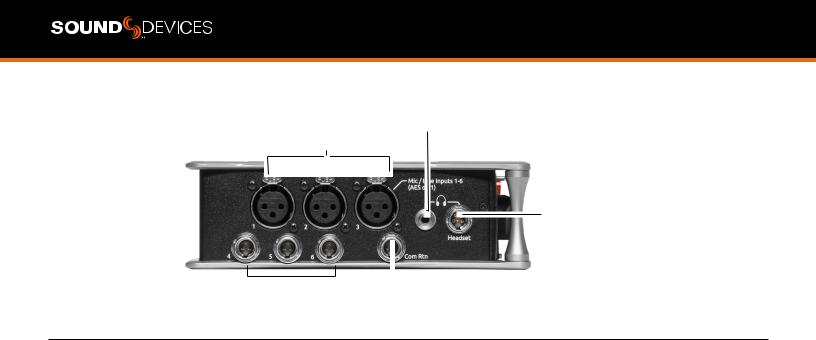
LEFT SIDE PANEL
Headphone 3.5mm jack
Mic/Line Inputs 1-3 female XLR jacks
AES3/AES42 on XLR Input 1
Headphone/
Headset/External Slate
Mic TA5 jack
|
|
|
|
|
|
|
|
|
|
|
|
|
|
Mic/Line |
|
|
|
Inputs 4-6 |
Com Rtn TA3 jack |
|
|
|
|
||||
TA3 jacks |
|
|
||||
INPUTS 1-3 FEMALE XLR JACKS Active-balanced analog microphone or line-level inputs. Input 1 can also accept AES3 or AES42 signal. [pin-1 = ground, pin-2 = hot (+), and pin-3 = cold (-)].
MIC/LINE INPUTS 4-6 TA3 JACKS Active-balanced analog microphone or line-level inputs. [pin-1 = ground, pin-2 = hot (+), pin 3 = cold (-)].
COM RTN TA3 JACK Balanced connection for Com Return audio input. [pin-1 = Ground, pin-2 = hot (+), pin-3 = cold (-)].
HEADPHONE 3.5 MM JACK Unbalanced output and TRS headphone output. Warning! This output can drive headphones to potentially dangerous levels. Routing determined in the Outputs menu. [Sleeve = ground, tip = left, ring = right].
HEADPHONE/HEADSET TA5 JACK Headphone and slate microphone connections [pin-1 = HP right, pin-2 = HP left, pin-3 = ground, pin-4 = mic -, pin-5 = mic+].
833 User Guide |
4 |
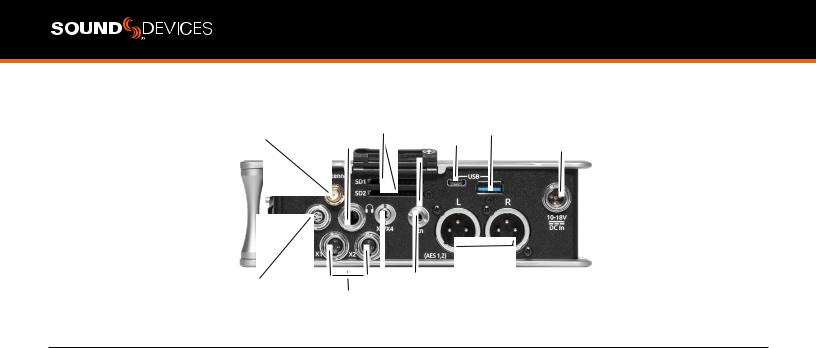
RIGHT SIDE PANEL
Antenna RP-SMA |
|
SD Card slots 1 |
& 2 |
USB A port |
|
connector |
|
|
|||
1/4” |
headphone jack |
|
USB C port |
10-18 V DC TA4 jack |
|
|
|
||||
|
|
|
|
|
LTC/Wordclock/5-pin LEMO jack
|
|
Aux In 3.5 mm jack |
|
|
|
|
|
|
|
|
|
|
|
||
|
|
|
|
|
|
||
|
|
|
Main Outputs |
L (AES |
1,2), |
||
X1/X2 |
X3/X4 |
R (AES 3,4) Male XLR jacks |
|||||
TA3 jacks |
3.5 mm jack |
|
|
|
|
|
|
ANTENNA RP-SMA-MALE CONNECTOR Connects to included external antenna for Bluetooth LE.
SD 1 AND 2 CARD SLOTS Insert SD card media for recording. Insert label side down.
USB C PORT
File transfer.
USB A PORT
1.USB keyboard.
2.USB to SD-Remote Android app.
3.USB to the CL-12 and other approved 3rd party fader controllers.
4.Supports USB hubs.
10-18V DC TA4 JACK Accepts DC voltages from 10–18 V for powering. [pin-1- GND, pin-2- Smart Battery DATA, pin-3- Smart Battery CLOCK, pin-4- +10-18 VDC].
LTC/WORDCLOCK/5-PIN LEMO JACK Timecode I/O, Wordclock. [pin-1- GND, pin-2- LTC or WORDCLOCK IN, pin-5- LTC or WORDCLOCK OUT (Pins 2 and 5 are software selectable)].
¼” HEADPHONE JACK 1/4-inch TRS headphone output. Warning! This output can drive headphones to potentially dangerous levels. [Sleeve = ground, tip = left, ring = right].
X3/X4 3.5MM JACK Unbalanced stereo 3.5 mm female connector. Routing determined in the Outputs menu. [Sleeve = ground, tip = X3, ring = X4].
X1/X2 TA3 JACKS Line, -10, or Mic level selected in Main menu OUTPUTS section. Routing determined in the Outputs menu. [pin-1 = Ground, pin-2 = hot (+), pin-3 = cold (-). Float pin-3 to un-balance].
AUX IN 3.5 MM JACK Auxilary input used for extra inputs or camera return [Sleeve = ground, tip = left, ring = right].
MAIN OUTPUTS L (AES 1,2), R (AES 3,4) XLR JACKS Analog outputs on standard 3-pin XLR-3M connectors. Analog Output levels are selected between Line, -10, and Mic levels in Main menu > OUTPUTS. Can be set to send AES3 digital signals (1,2 and 3,4 on L and R respectively) in Main menu > OUTPUTS. Routing determined in the Outputs menu. [pin-1 = Ground; pin-2 = hot (+); pin-3 = cold (-). Unbalance by floating pin-3].
833 User Guide |
5 |

REAR PANEL
Battery 1, Battery 2 Docking
BATTERY 1, BATTERY 2 DOCKING Sony L-Mount type batteries may be used. When connected to an external DC source via DC the L-Mount batteries can be charged if enabled in the Power menu.
TOP PANEL
Test connector for manufacturing
TEST CONNECTOR Used during manufacturing.
833 User Guide |
6 |
Screen Views
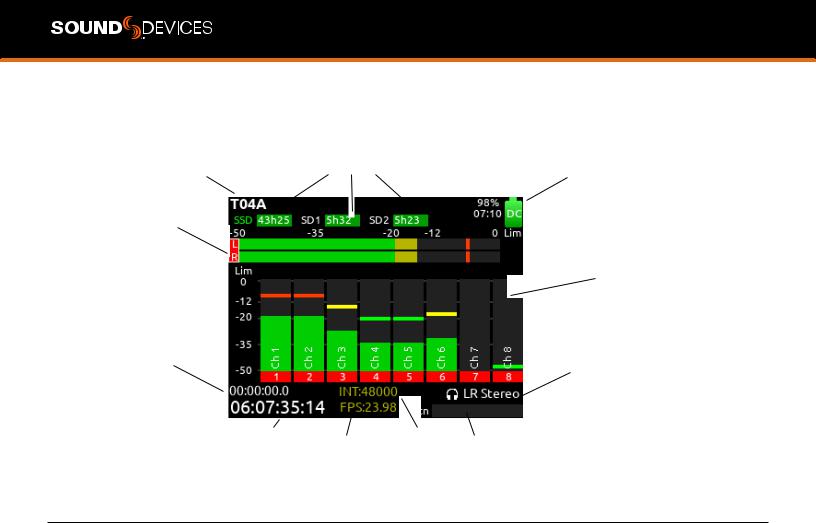
HOME SCREEN
|
|
Media space |
Smart Battery telemetry |
||
Current take name |
remaining indicators |
|
Power icon |
||
|
|
|
|
||
|
|
|
|
|
|
|
|
|
|
|
|
LR mix bus meters
Individual channel meters
File elapsed time |
Selected |
|
|
headphone preset |
|
|
|
|
|
|
|
|
|
Current sample rate |
|
|
|
|
|
|
|
|
|
|
Timecode |
Current |
|
|
|
|
||
|
|
|
|
Return |
meter |
||
|
|
frame rate |
|||||
CURRENT TAKE NAME Shows the filename of the currentlyselected take.
SSD, SD1, SD2 Indicates the amount of recording time available based on current track count, sample rate, and media routing. The internal SSD drive has a capacity of 256 GB.
POWER ICON Indicates approximate voltage condition and current power source being used.
LR MIX BUS METERS WITH ARM/DISARM INDICATION
Indicates the peak and VU audio levels of the L/R mix. The L and R indicators turn red to indicate that the tracks are armed for record.
INDIVIDUAL CHANNEL METERS WITH ARM/DISARM INDICATION
Indicates the peak and VU audio levels of the individual channel. May be Preor Postfade depending on Channel to Iso routing. The isolated track indicators turn red to indicate that the tracks are armed for record.
FILE ELAPSED/ REMAINING TIME Indicates in Hours:Minutes:Seconds:1/10ths the elapsed time of the current file. During playback, displays the elapsed and remaining time in hours, minutes and seconds.
TIMECODE Indicates current SMPTE timecode value in HH:MM:SS:FF.
SAMPLE RATE / FRAME RATE/ TEMPORARY LEVEL DISPLAY
1.Indicates current sample rate.
2.Indicates current frame rate.
3.Temporarily indicates fader level of last moved fader (red text box).
4.Temporarily indicates trim level of last moved trim (green text box).
5.Temporarily indicates bus level of last adjusted bus fader (light blue text box).
6.Temporarily indicates output level of last adjusted out gain (white text box).
7.Temporarily indicates EQ freq and gain of last adjusted EQ (blue text box when EQ is On, orange text box when EQ is off or band is bypassed).
SMART BATTERY TELEMETRY Indicates time remaining and percent remaining of Smart Battery life. Other power sources will show voltage.
SELECTED HEADPHONE PRESET Indicates the currently-selected headphone preset.
RETURN METER Indicates audio level for the return.
833 User Guide |
7 |
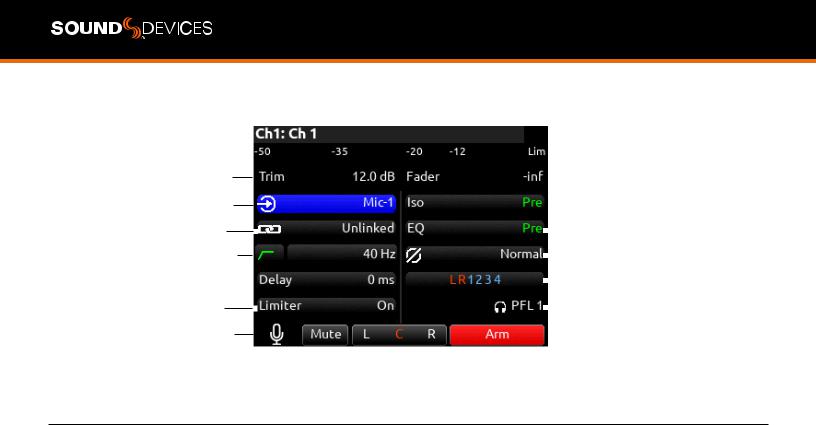
CHANNEL SCREEN
Channel desgination and user-defined name 
Channel Meter view
Channel Trim value |
|
|
|
|
|
|
|
|
|
|
|
|
|
|
|
|
|
|
|
|
Channel Fader Value |
|||||
|
|
|
|
|
|
|
|
|
|
|
|
|
|
|
|
|
|
|
|
|
|
|||||
|
|
|
|
|
|
|
|
|
|
|
|
|
|
|
|
|
|
|
|
|
|
|||||
|
|
|
|
|
|
|
|
|
|
|
|
|
|
|
|
|
|
|
|
|
Channel to ISO routing |
|||||
Channel Input selection |
|
|
|
|
|
|
|
|
|
|
|
|
|
|
|
|||||||||||
|
|
|
|
|
|
|
|
|
|
|
|
|
|
|
||||||||||||
|
|
|
|
|
|
|
|
|
|
|
||||||||||||||||
|
|
|
|
|
|
|
|
|
|
|
|
|
||||||||||||||
|
|
|
|
|
|
|
|
|
|
|
||||||||||||||||
|
|
|
|
|
|
|
|
|
|
|
|
|
|
|
|
|
|
Channel EQ |
||||||||
Channel Linking |
|
|
|
|
|
|
|
|
|
|
|
|
|
|||||||||||||
|
|
|
|
|
|
|
|
|
|
|
|
|
||||||||||||||
HPF (High Pass Filter) |
|
|
|
|
|
|
|
|
|
|
|
|
|
|
|
|
|
|
|
|
|
Polarity |
||||
|
|
|
|
|
|
|||||||||||||||||||||
|
|
|
|
|
|
|
|
|
|
|
|
|
|
|
|
|
|
|
|
|
||||||
Channel delay |
|
|
|
|
|
|
|
|
|
|
|
|
|
|
|
|
|
|
|
|
|
|
|
|
|
Channel to L, R, 1-4 |
|
|
|
|
|
|
|
|
|
|
|
|
|
|
|
|
|
|
|
|
|
|
|
|
|||
|
|
|
|
|
|
|
|
|
|
|
|
|
||||||||||||||
|
|
|
|
|
|
|
|
|
|
|
|
|
|
|
|
|
||||||||||
Limiter |
|
|
|
|
|
|
|
|
|
|
|
|
|
HP Preset |
||||||||||||
|
|
|
|
|
|
|
|
|
|
|
|
|
||||||||||||||
Slate Mic |
|
|
|
|
|
|
|
|
|
|
|
|
|
|
|
|
||||||||||
|
|
|
|
|
|
|
|
|
|
|
|
|
|
|
||||||||||||
|
|
|
|
|
|
|
|
|
Channel |
|
|
|
|
|
|
|
|
|
|
|
|
|
|
|
|
|
|
|
|
|
|
|
|
|
|
|
|
|
|
|
|
|
|
|
|
|
|
|
|
|
|||
|
|
|
|
|
|
|
|
|
|
|
|
|
|
|
|
|
|
|
|
|
|
|
|
|
|
|
|
|
|
|
|
|
|
|
|
|
|
|
|
|
|
|
|
|
|
|
|
|
|
|
|||
|
|
|
|
|
|
|
Mute |
|||||||||||||||||||
|
|
|
|
|
|
|
|
|
|
select |
Channel Arm |
|||||||||||||||
|
|
|
|
|
|
|
L C R pan |
|||||||||||||||||||
CHANNEL DESIGNATION AND USER-DEFINED NAME Indicates mixer channel and user-defined name. Both are overlaid onto the channel audio meter. When in a Channel Screen, hold the PFL Switch for about 0.5 s to enter the virtual keyboard and enter a user-defined name for the channel.
CHANNEL METER VIEW Indicates the audio level of the channel. Metering follows ISO Routing selection, Preor Post-fade.
CHANNEL TRIM VALUE Indicates the gain of the channel trim control. The gain range depends on the type of input selected.
Mic: +12 to +76 dB Line: -14 to +50 dB AES3: -10 to +20 dB AES42: 0 to +70 dB Returns: -20 to +30 dB
Channels 1-6 trim is adjustable using the front panel trim controls. Channels 7 & 8 trims are adjustable in the channel screen using the Select knob.
CHANNEL FADER VALUE Indicates the level of the channel fader control, continuously-variable from Off to +16dB.
Channels 1-6 fader is adjustable using the front panel fader controls. Channels 7 & 8 faders are adjustable in the channel screen using the Select knob.
CHANNEL INPUT SELECTION Indicates which physical audio input is feeding the channel.
ISO (CHANNEL->ISO) ROUTING Indicates where the isolated track’s audio is tapped from in the audio chain. Preor Post-fade.
CHANNEL LINKING Indicates the current linking status. The linking options are Unlinked, adjacent channels (eg. 1,2) and adjacent channels Mid Side (eg. 1-2MS). Linked parameters are: trims, faders, HPF, delay, limiter, mute, ISO, Bus Send 1 and Bus Send 2. Stereo panning is odd to L and even to R. For MS linking, the pan becomes a balance control between M and S.
CHANNEL EQ Indicates the EQ position in the audio chain. Preor Post-fade. Select to enter Channel EQ screen.
HPF (HIGH PASS FILTER) Indicates on/off status where green icon and white value = ”On” and grey icon and value = “Off”. The HPF frequency is variable in 10 Hz steps from 10 Hz to 320 Hz.
POLARITY REVERSE Indicates polarity status. Green icon = polarity reversed, white icon = polarity normal.
CHANNEL INPUT DELAY Indicates input delay time. The input delay is continuously-variable in milliseconds from 0-50 ms.
CHANNEL TO BUS ROUTING Determines the bus or buses channel audio will be sent. When a channel is routed to a bus as a Send (bus box highlighted blue), the Send Gain value is used. When a channel is sent Pre-fade (green) or Post-fade (orange), the Send Gain value is ignored.
CHANNEL LIMITER Indicates on/off status of channel limiter.
MUTE Indicates mute status of channel. Blue icon = muted. Toggle mute on/off with the “Tone” switch.
L C R SELECT Indicates the stereo pan position of the channel’s contribution to the L/R mix. Orange = selected. Use the */** switch to select. Hold */** switch and rotate Select knob for continuous panning positioning. Alternatively, press and hold Select knob, then use */** switch to pan continuously.
ARM Toggle the Rtn/Fav switch to arm or disarm isolated track for recording.
HP PRESET Pressing in the HP knob toggles between HP preset and PFL.
833 User Guide |
8 |
Virtual Keyboard
Action |
Function |
Rotate HP |
Scrolls orange highlight through the keyboard |
|
characters. |
Press HP |
Inserts the highlighted character in text field. |
‘abc’ switch |
Quick flick toggles between A-Z and a-z in keyboard. |
Hold ‘abc’ |
Momentary selection of other case. |
switch |
|
|
|
Delete |
Deletes character to the left of flashing cursor. |
Hold Delete |
Repeatedly deletes characters to the left of flashing |
|
cursor. |
Space |
Inserts space at the flashing cursor position. |
Hold Space |
Repeatedly inserts spaces. |
Save switch |
Saves text and exits screen. |
|
|
Rotate |
Moves the cursor to the left or right in the text field. |
Select |
|
Quick Press |
Switches to the Shifted functions: Clear, End, Home, |
Select |
Exit. When shifted functions are active, their text |
|
changes to white and the non-shifted functions |
|
change to gray. |
Clear |
Clears text from the text edit field. |
End/Home |
Moves cursor to end/start of text. |
Exit |
Exits screen without saving text edits. |
833 User Guide |
9 |

Phrase Manager
CLEAR Clears all phrases DELETE Deletes selected phrases NEW Create new phrase
EDIT Edit selected phrase
INSERT Inserts selected phrase into text
REPLACE Replaces text with current selected phrase
833 User Guide |
10 |

Channel EQ
1.EQ Selects channel EQ state. [Off*, On].
2.LOW FREQ Selects low frequency EQ filter parameters.
a.TypeIndicates Shelf or Peaking filter [Shelf, Peak].
b.FreqIndicates frequency of the filter, continuously-variable from
20Hz to 20 kHz (100 Hz*).
c. GainIndicates gain of the filter, continuously-variable from -15 dB to +15 dB in 1 dB increments (0 dB*).
d.Q- Indicates “Q” or bandwidth of the filter, continuously-variable from .5 - 10 in .1 increments (1.0*).
e.BypassIndicates state of the filter [Bypass (orange fill)]*.
3.MID FREQ Selects mid frequency EQ filter parameters.
a.FreqIndicates frequency of the filter, continuously-variable from 200-20 kHz in 10 Hz increments (5000 Hz*).
b.GainIndicates gain of the filter, continuously-variable from -15 dB to +15 dB in 1 dB increments (0 dB*).
c.Q- Indicates “Q” or bandwidth of the filter, continuously-variable from .5-10 in .1 increments (1.0*).
d.BypassIndicates state of the filter [Bypass(orange fill)]*.
4.HI FREQ Selects high frequency EQ filter parameters. a. TypeIndicates Shelf or Peaking filter [Peak, Shelf].
b. FreqIndicates frequency of the filter, continuously-variable from
20Hz to 20 kHz. (100 Hz*).
c. GainIndicates gain of the filter, continuously-variable from -15 dB to +15 dB in 1 dB increments (0 dB*).
d. Q- Indicates “Q” or bandwidth of the filter, continuously-variable from .5 - 10 in .1 increments (1.0*).
e. BypassIndicates state of the filter. [Bypass (orange fill)]*
5.PRE/POST-FADER Indicates where the EQ is inserted into the audio chain. Pre-fade or Post-fade [Pre*, Post]
Note: EQ will apply to bus sends when applied Pre-fade only.
833 User Guide |
11 |
Menus
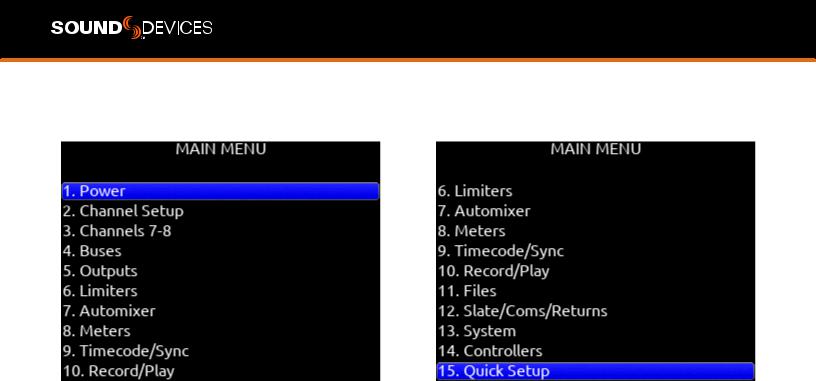
MAIN MENU
833 User Guide |
12 |
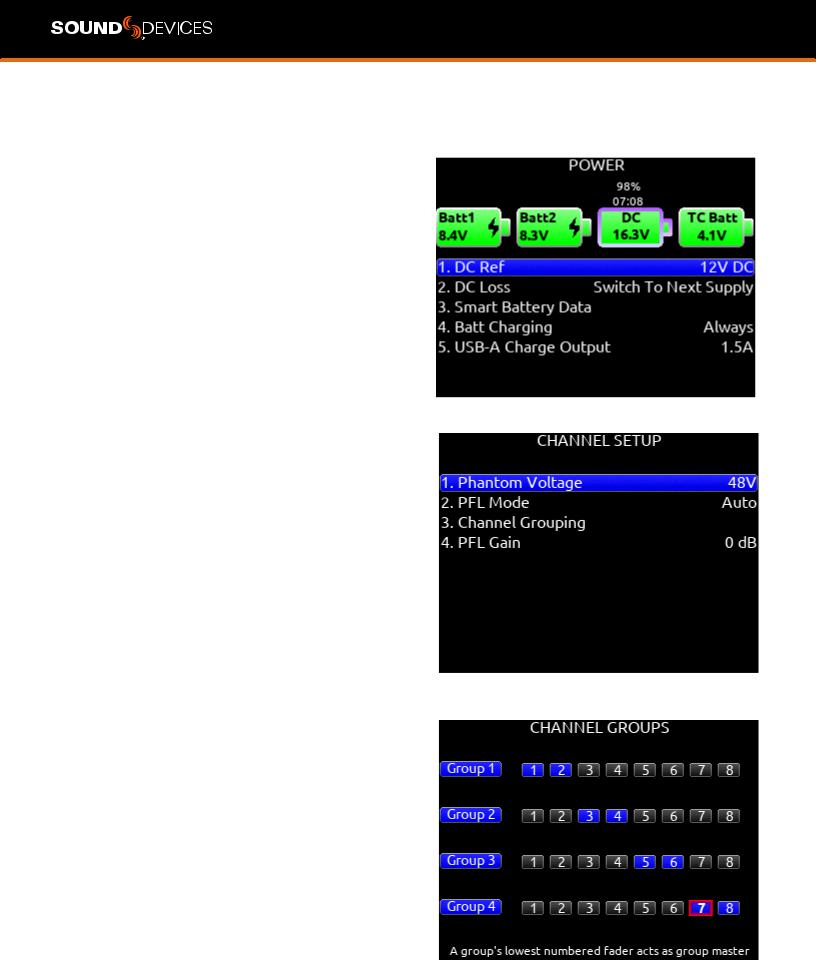
Power
Allows configuration of various power settings.
POWER SOURCE ICONS (Batt1, Batt2, DC, TC Batt,) Indicates the power condition of each power source. [Green = normal, yellow = below normal, red = warning]
1.DC REF Allows proper power level indicator calibration based upon the type of DC power source used. [12V DC*, 14 V Li-Ion, 12 V Lead Acid, Full Range (10-18 V), Smart Battery].
2.DC LOSS Selects how the unit should operate when DC power is lost. [Switch to Next Supply*, Turn Off].
3.SMART BATTERY DATA Displays Time Remaining, Percent Remaining, Cycle Count, and Temperature of Smart Battery.
Note: This menu is only displayed when a smart battery is connected.
4.BATT CHARGING Selects battery charging mode when connected to an external DC source. [Disabled, When Power Off, When Power On, Always*].
5.USB-A CHARGE PORT Allows charging of compatible external USB devices such as Android tablets [500 mA or 1.5 A*].
Channel Setup
1.PHANTOM VOLTAGE Selects phantom power voltage for all inputs. [12 V, 48 V*].
2.PFL MODE Selects the source of the PFL feed. [Auto* Pre-fade, Post-fade] Auto = pre-fade if channel is routed to ISO track pre-fade, post-fade if channel is routed to the ISO track post-fade.
3.CHANNEL GROUPING Selects grouping of faders, record arming, and mutes across channels. The lowest channel number in the group controls the other channels grouped. Two channel groups are possible, channels grouped can only be assigned to one group.
a. Group 1 [1-8] b. Group 2 [1-8] c. Group 3 [1-8] d. Group 4 [1-8]
4.PFL GAIN A preset amount of gain that is applied to any channel(s) with active PFL.
Channel Groups
CHANNEL GROUPS ENABLE/DISABLE
Provides global enable/disable for each of the four groups in the channel grouping menu. Scroll to Group 1-4 using either knob, then press the knob to enable or disable the group.
833 User Guide |
13 |
 Loading...